 Here’s a copycat recipe for Australia’s (current) favourite confectionary – Golden Gaytime Popcorn! Caramel popcorn drizzled with chocolate and sprinkled with biscuits crumbs, it’s ridiculously addictive but rather expensive. Save a fortune by making it yourself! Golden Gaytime Popcorn Popcorn and candy lovers alike were in a tizzy of excitement with Golden Gaytime Popcorn was... Get the Recipe
The post Golden Gaytime popcorn (copycat) appeared first on RecipeTin Eats.
]]>Here’s a copycat recipe for Australia’s (current) favourite confectionary – Golden Gaytime Popcorn! Caramel popcorn drizzled with chocolate and sprinkled with biscuits crumbs, it’s ridiculously addictive but rather expensive. Save a fortune by making it yourself!
Golden Gaytime Popcorn
Popcorn and candy lovers alike were in a tizzy of excitement with Golden Gaytime Popcorn was first released. Yours truly included. The chatter between closet popcorn-loving friends, however, quickly moved from “Far out, this is crazy good!” to “OMG can you believe it’s so expensive”??
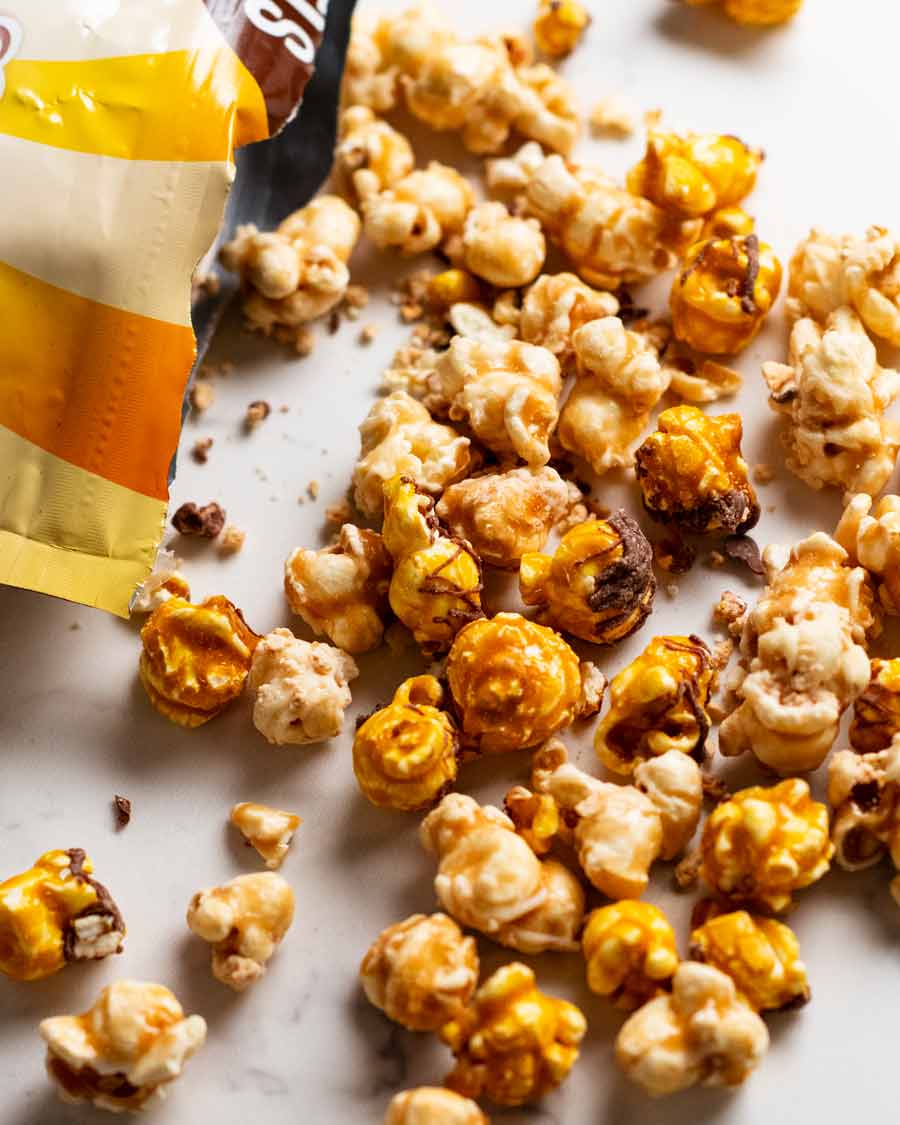
Named as such because it’s a popcorn version of a beloved Australian’s ice cream called Golden Gaytime, one packet of the Gaytime popcorn is $5.75 for 100g (3.5 oz). A small bag with just 2 cups of Gaytime popcorn. I can’t afford to feed my addiction!!
Which, of course, lead to what was affectionately dubbed The Gaytime Popcorn Project – a homemade version I was confident I could create for 80% cheaper. How’d I do? My report card is at the bottom of the post!
Store-bought Golden Gaytime popcorn

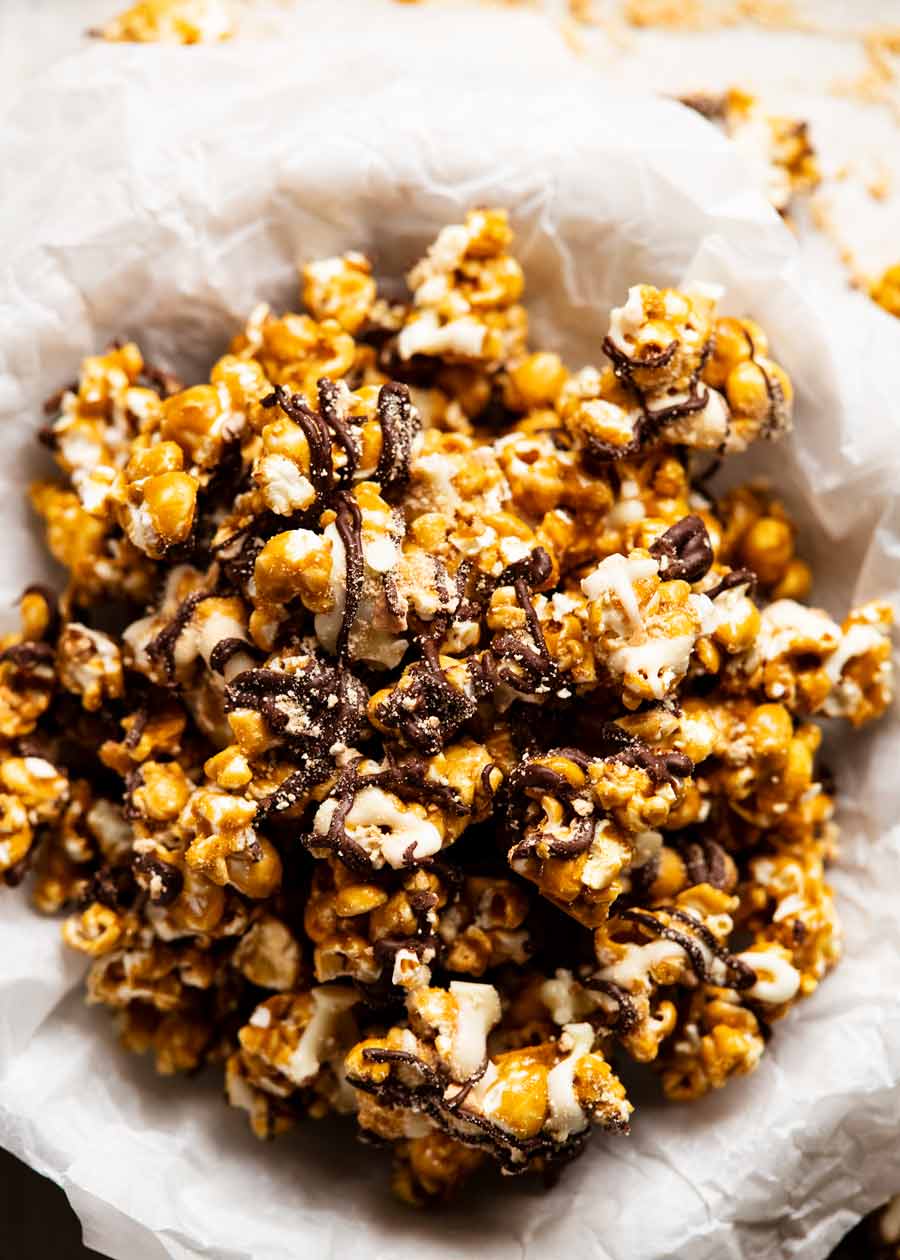
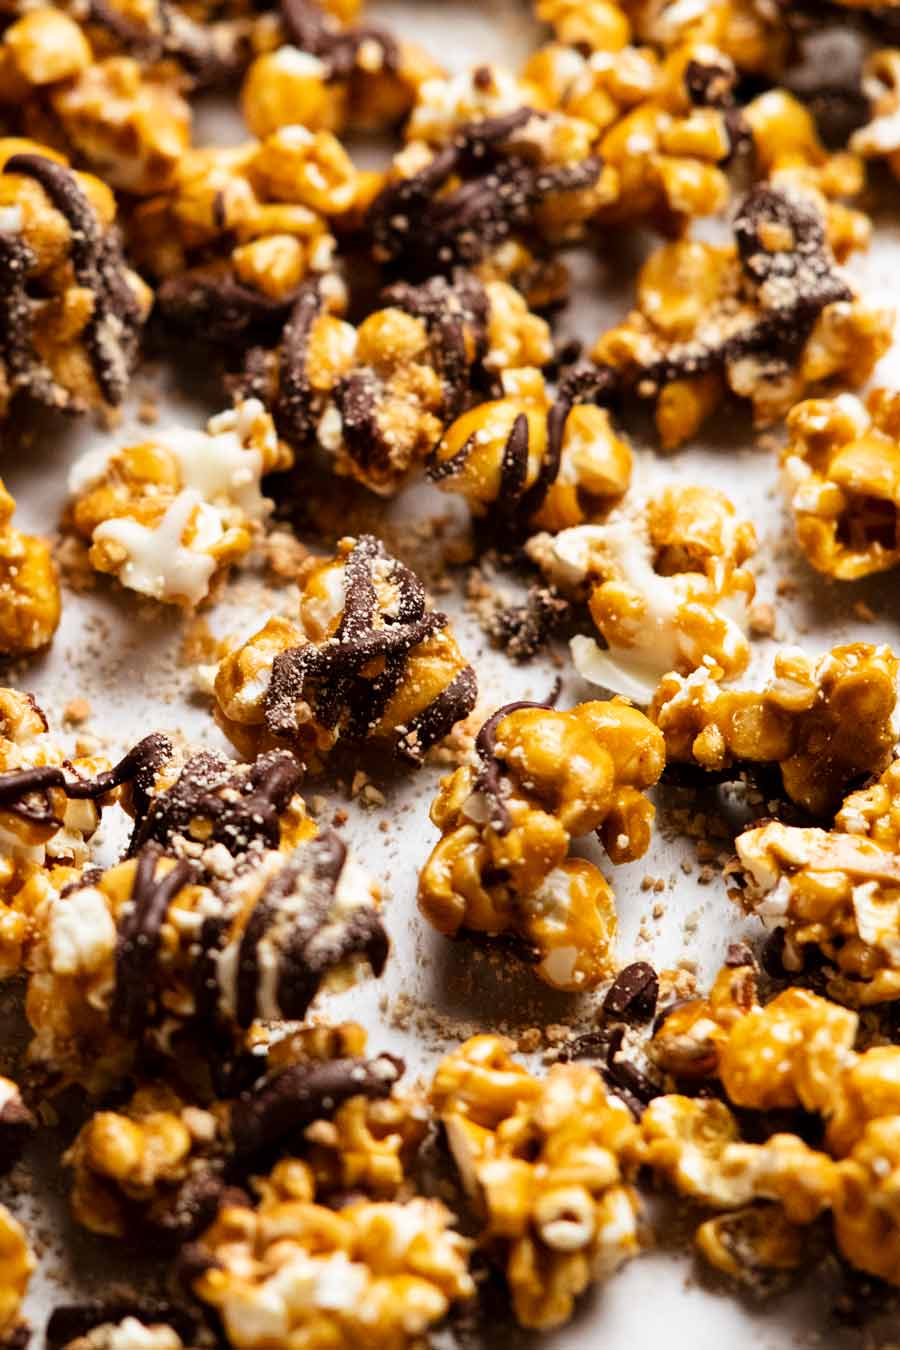
A quick inspection of the ingredients label was all I needed to come up with a copycat recipe. It’s really just caramel popcorn with a drizzle of chocolate and sprinkling of biscuit crumbs.
However, my homemade Gaytime Popcorn is far more generous on the chocolate drizzling (oh, why not? 😇). And you won’t break the bank!
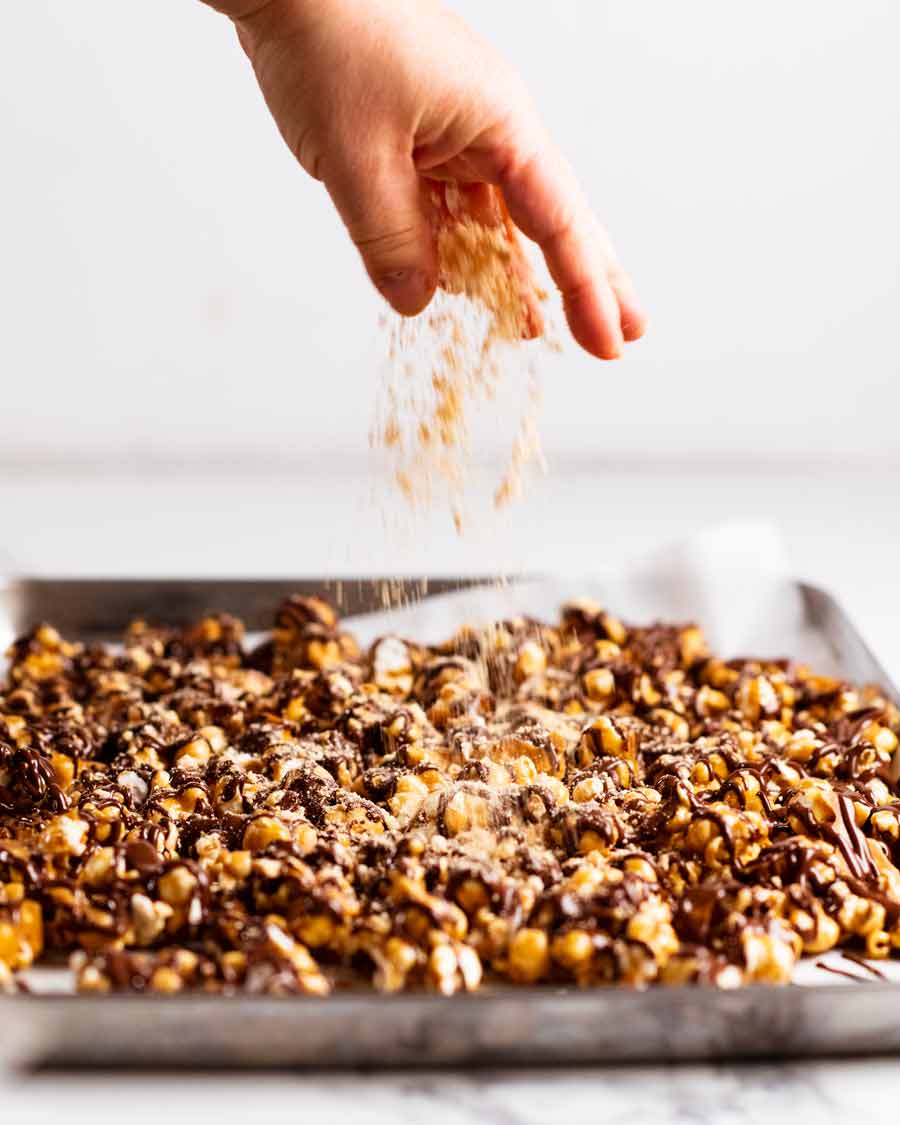
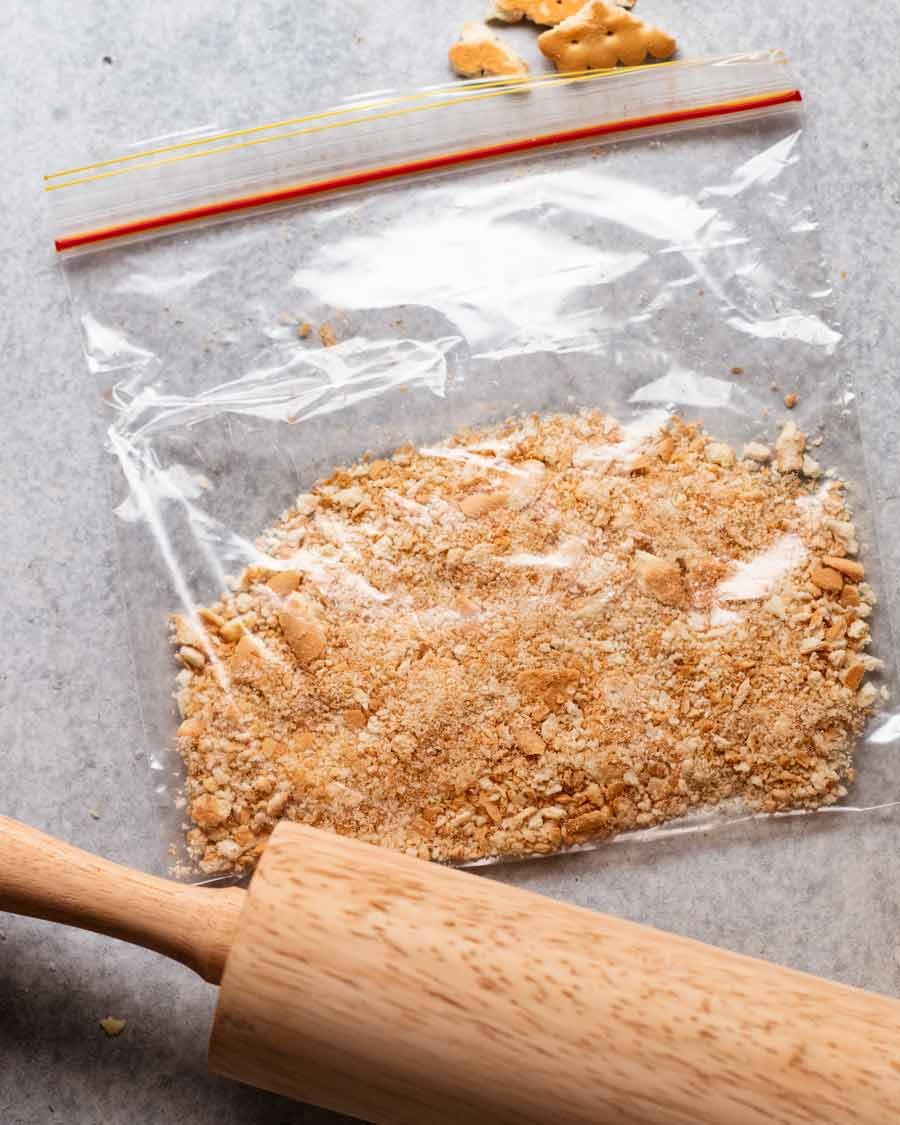
Hmm, I did a “sprinkling of biscuit crumbs”, didn’t I. But it looks more like I’m assertively throwing biscuit crumbs in the photo below. You want biscuit crumbs? Here’s your biscuit crumbs!!! 😂
Ingredients you need
Here’s what you need to make this. The first part covers the caramel popcorn, then the second part covers the chocolate drizzle and biscuit crumbs.
Caramel popcorn ingredients
Here’s what you need for the caramel popcorn:
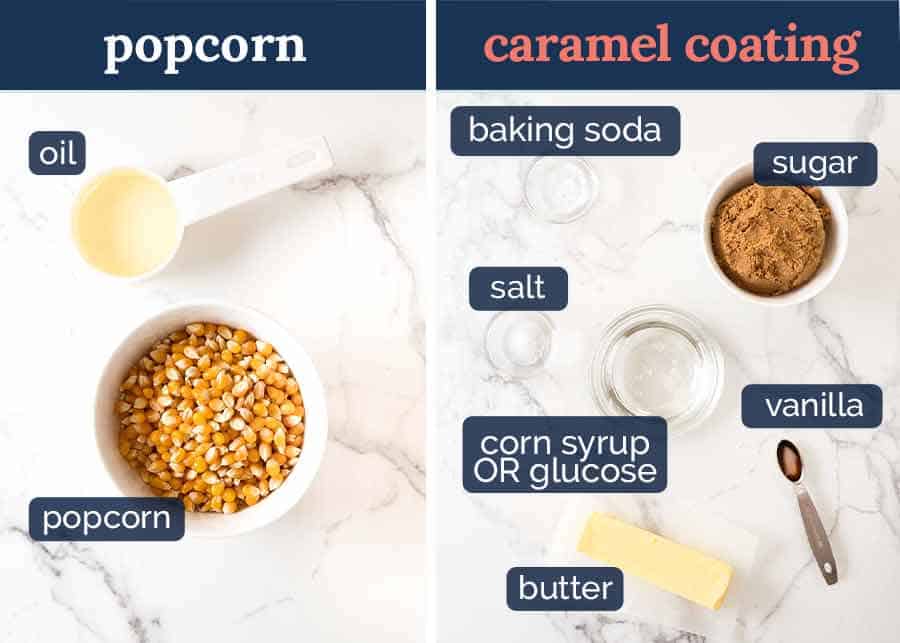
Corn syrup – This stabilises the caramel to ensure sugar crystallisation doesn’t occur, gives the caramel a nice shiny finish that’s crisp rather than sticky. Common grocery item in the US and Canada ! It can be purchased online in Australia from USAFoods.com.au and Amazon.
Glucose is a perfect substitute for corn syrup which is available in Australian supermarkets (baking aisle, clear thick syrup with honey consistency). Just a little harder to measure out because it’s so thick. However, the popcorn needs to be baked for 15 minutes longer to make sure the caramel coating dries out and becomes crisp. This is because glucose has slightly higher water content.
Baking soda / bi-carb – This makes the caramel coating become sort of foamy and increase in volume when you whisk it in. It helps get even coverage of caramel on the popcorn. Without the baking soda, you end up with big globs of caramel. It can’t be substituted with baking powder.
Toffee, caramel or vanilla essence – Store-bought Gaytime popcorn has a stronger albeit more artificial caramel flavour than homemade. To replicate this, use a caramel or toffee essence. Otherwise, just stick with vanilla like normal caramel popcorn. It’s honestly not a big deal, the popcorn still has a lovely caramel-y flavour.
Brown sugar rather than white sugar, for better caramel flavour.
Butter – For flavour. Not margarine or other alternatives. I can’t predict what that will do to the crispness of the caramel coating.
Oil – Anything neutral flavoured like vegetable, canola or peanut oil. This is for cooking the popcorn. It doesn’t work as well with butter (because butter is ~15% water and dairy, not just fat).
Popping corn! It’s usually sold in the potato crisps aisle in grocery stores here in Australia.
Chocolate drizzle and biscuit crumbs
For the chocolate drizzle and biscuit crumbs, you just need chocolate suitable for melting and some plain biscuits to crush up then sprinkle on the popcorn.
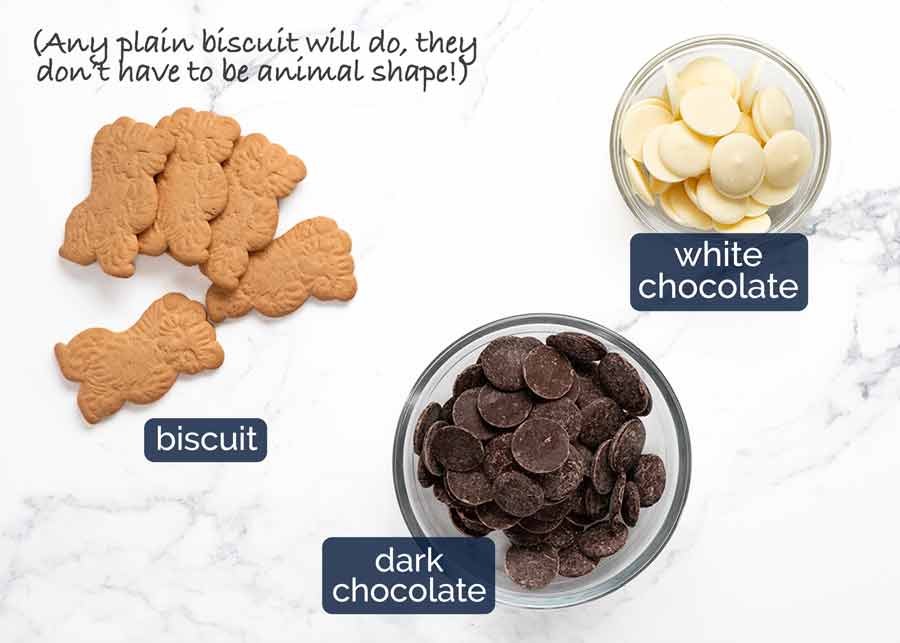
Chocolate -You can use a combination of dark and white chocolate, as I have done (like the store-bought Gaytime popcorn mix), or just one or the other.
Use a chocolate purchased from the baking aisle rather than eating chocolate. Baking chocolate is purpose-made for melting and cooking with, whereas eating chocolate is actually often designed specifically so it doesn’t melt when warm! I typically use “melts” for melting and chocolate chips for things like chocolate chip cookies as they are designed to hold their shape when cookies are baked.
For those of you in the US, semi-sweet chocolate chips is perfect.
Plain biscuits – A signature part of Golden Gaytime Popcorn is the sprinkling of crushed biscuits on the popcorn. The ingredients label specifies that it’s vanilla biscuits. Honestly though, any plain sweet biscuits will work just fine!

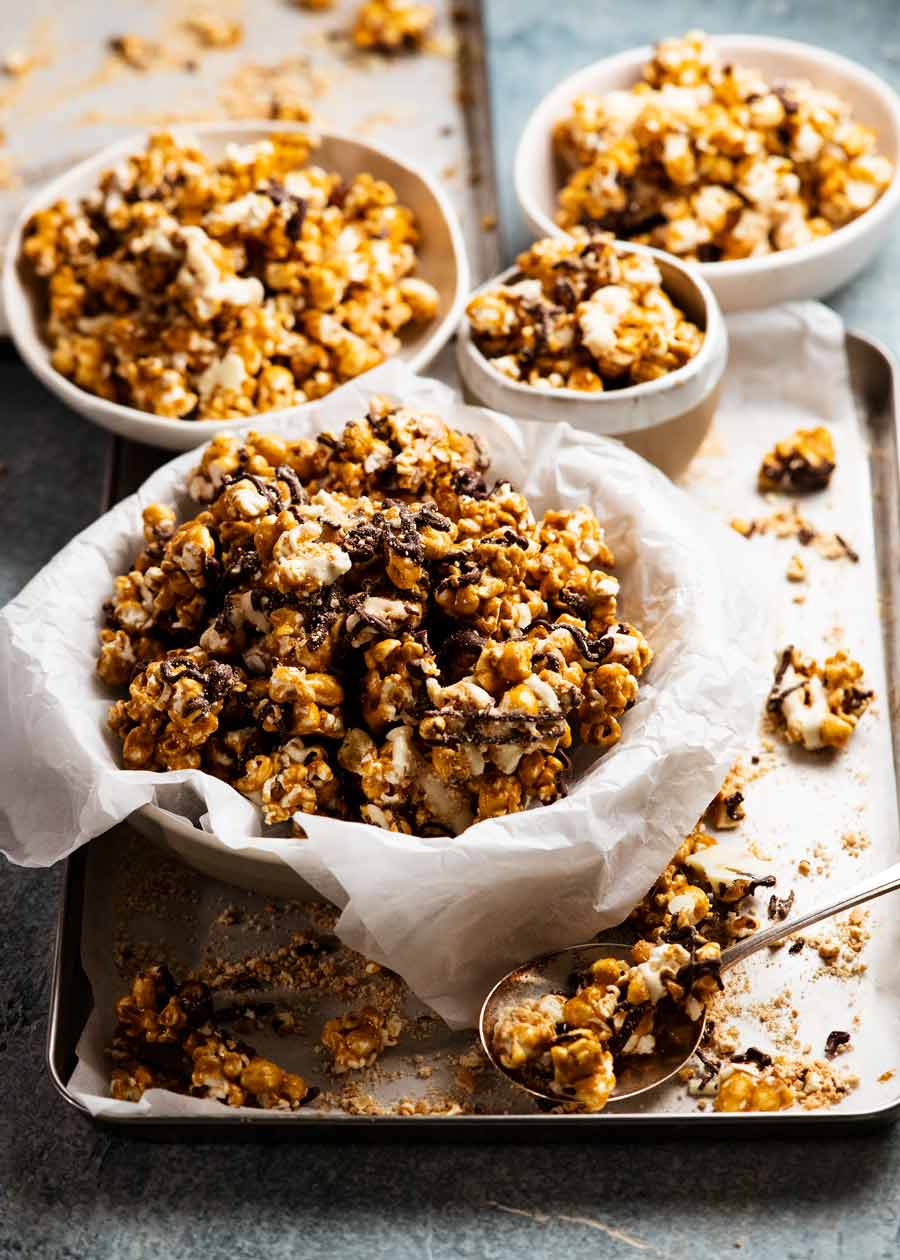
How to make Golden Gaytime Popcorn
Simply make caramel popcorn then finish with a drizzle of chocolate and sprinkle of biscuit crumbs. It will stay crisp and fresh for at least a week – I’m sure it will last for longer (caramel popcorn lasts for weeks). But every test batch I made mysteriously disappeared before I could finish testing the shelf life!!
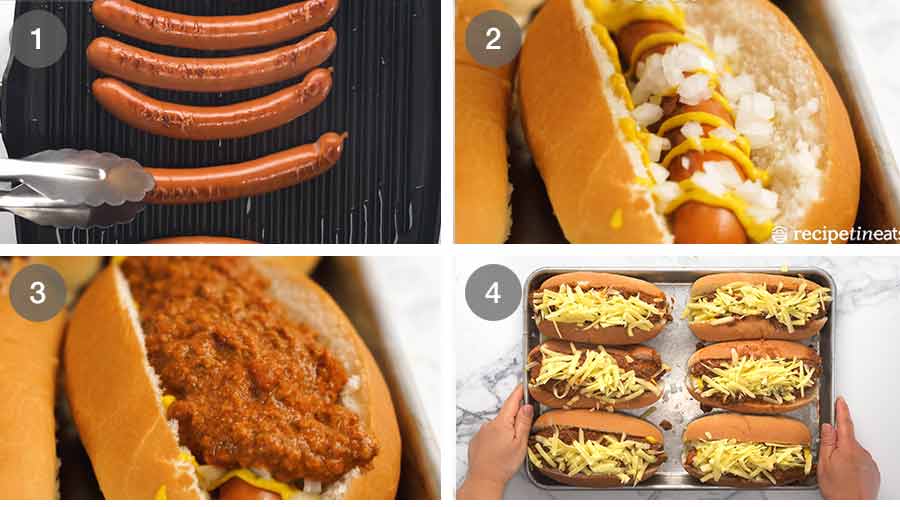
1. Pop popcorn
Pop your popcorn kernels using your method of choice – stove or popcorn maker, if you have one (I do, but for some reason digging it out of the back of the cupboard seems like more effort than cooking the popcorn on the stove).
Here’s how to cook popcorn on the stove.
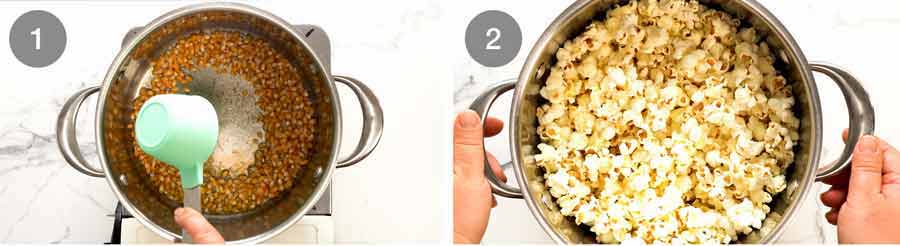
Test kernels – Heat oil in a large pot over medium heat. Add a few pieces of popcorn and wait until it pops, then quickly remove.
Add remaining popcorn, elevate off stove to shake and spread corn out evenly. Cover with a lid.
Shake! Once the popcorn starts popping in earnest, shake the pot gently once. Remove from heat when the popping stops (when you can count to 3 between pops) and transfer to a (very!) large bowl.
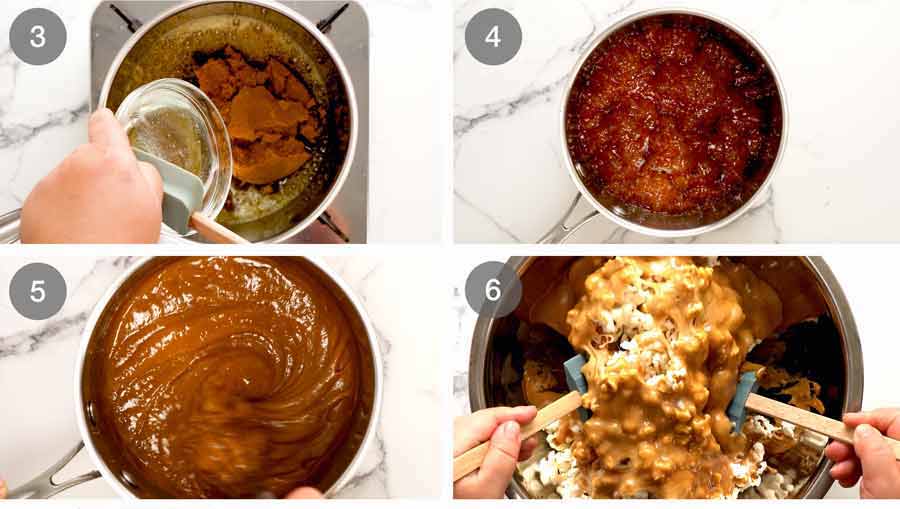
To make the caramel melt butter in a saucepan over medium heat. Add sugar, corn syrup and salt. Stir until just combined.
Simmer – When it starts to bubble, simmer for 4 minutes – DO NOT STIR! This may cause the sugar to crystallise so you won’t end up with a smooth caramel.
Baking soda “foamy” – Remove from heat then quickly whisk in caramel (toffee or vanilla) and baking soda. When you stop whisking, the caramel will foam and increase in volume. This is what makes the caramel coat the popcorn evenly. Without the baking soda, you end up with thick heavy globs of caramel on the popcorn and it’s impossible to toss.
Coat popcorn – Quickly pour the foamy caramel straight over the popcorn and toss to coat the popcorn as best you can until the caramel cools and starts to harden.
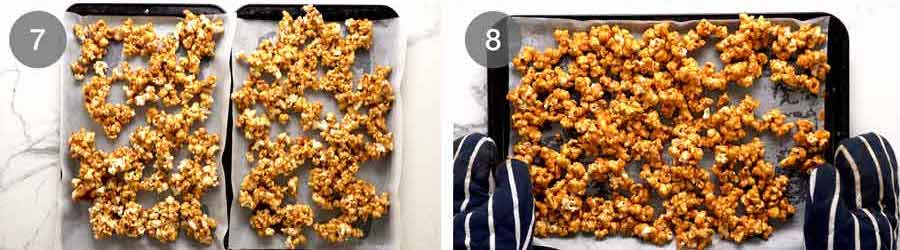
Bake for 45 minutes, tossing every 10 minutes or so. The caramel will remelt for the first 2-3 tosses so it coats the popcorn more evenly.
REMINDER: If using glucose instead of corn syrup, bake for an extra 15 minutes.
Cool – Remove from oven, leave to cool on the tray for 20 minutes so the caramel hardens. Then break up the popcorn – no need to be too pedantic, clumps are great!
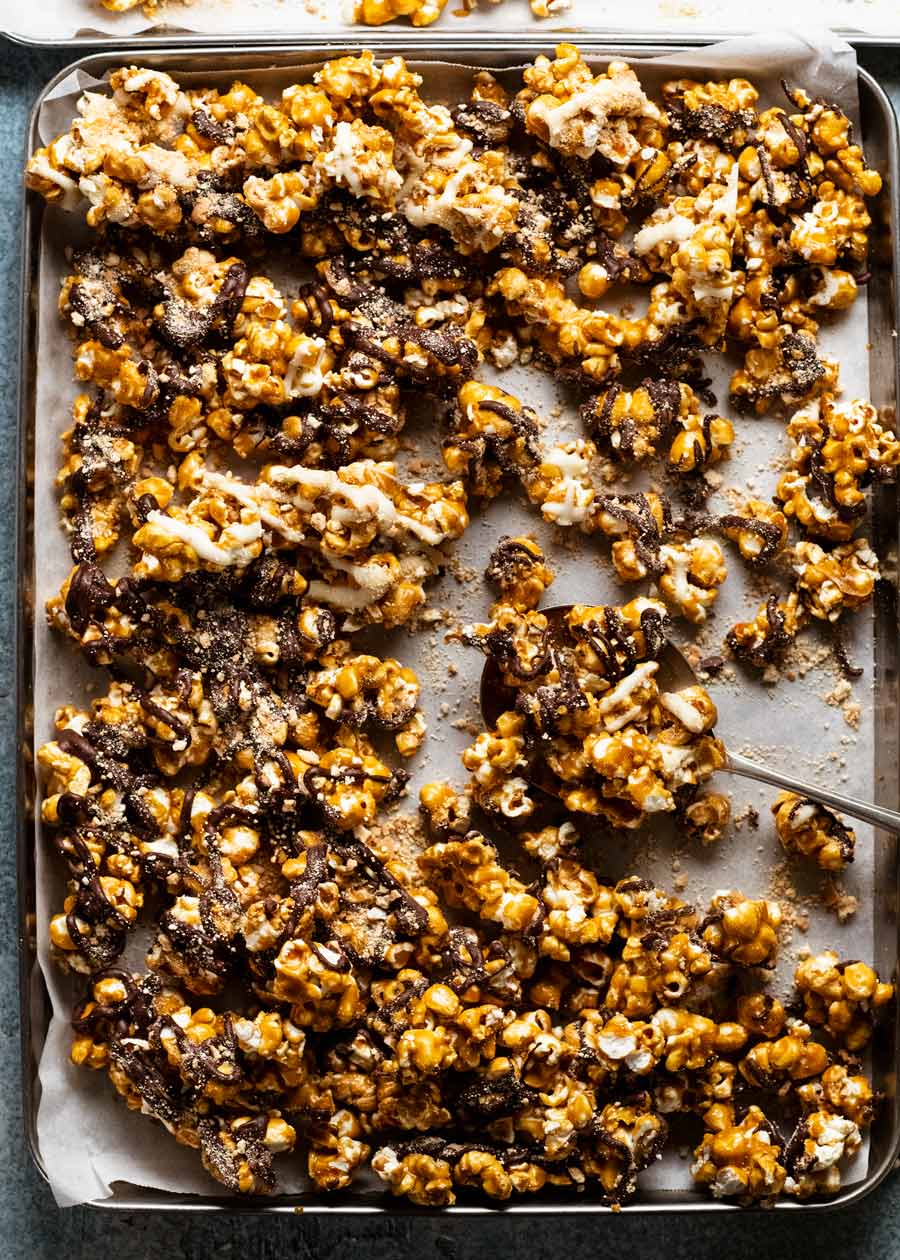
Gaytime the popcorn!
OK, so time to transform our caramel popcorn into Gaytime Popcorn! Here’s how:
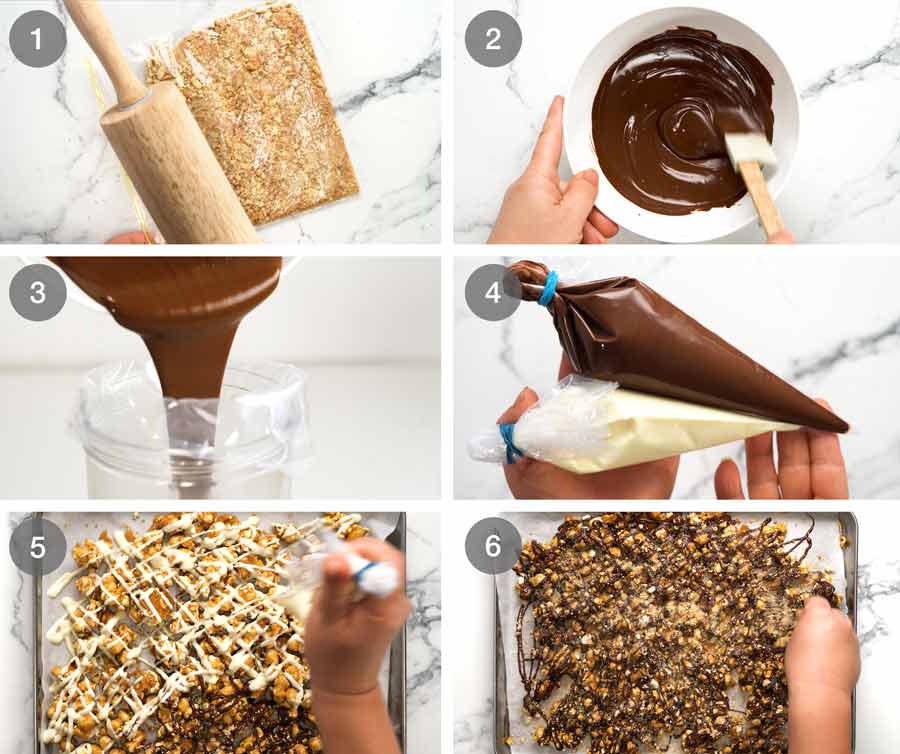
Bash the biscuits into crumbs either in a ziplock bag or using a mortar and pestle.
Melt the chocolate in the microwave (I use this) or bain-marie (bowl set over simmering water).
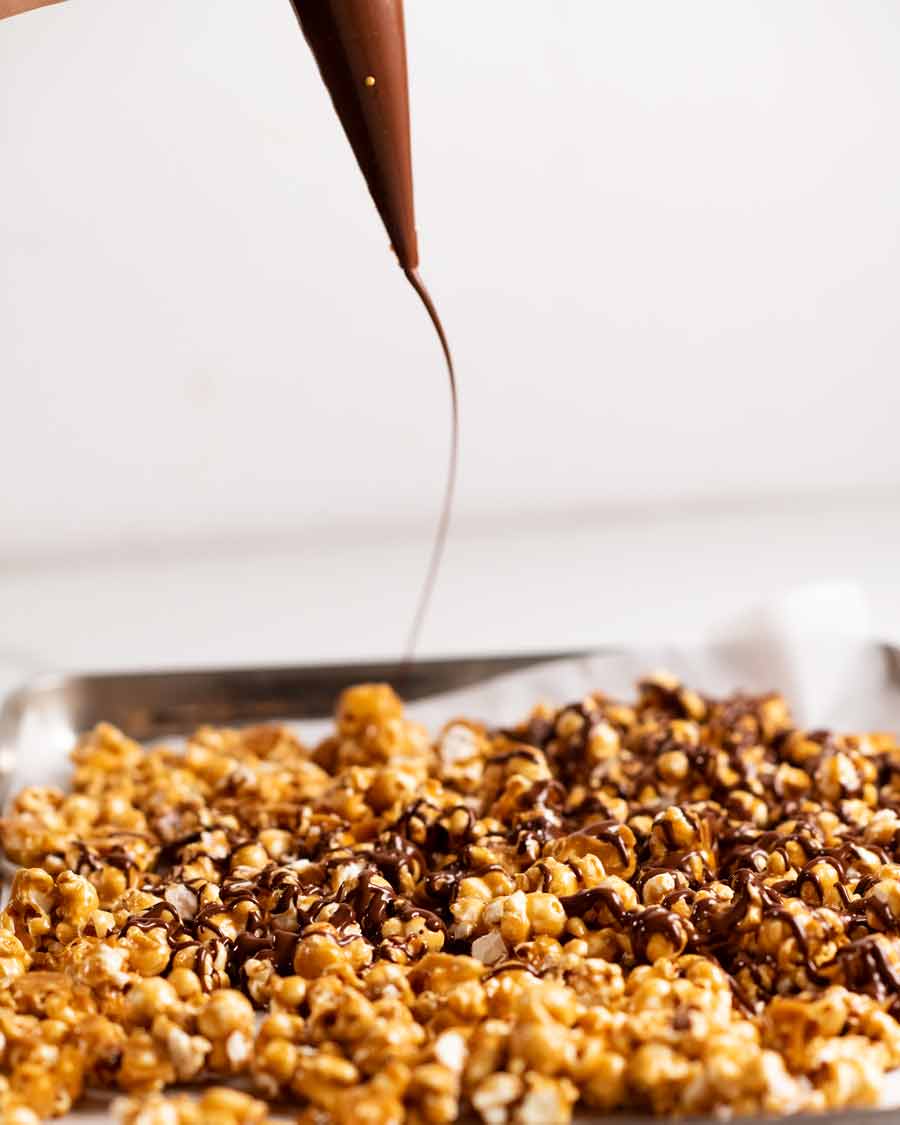
Transfer the melted chocolate into a piping bag. This makes it easier to get even coverage and zig-zag chocolate drizzles like you get with the store bought Gaytime popcorn. But if you prefer, you can just use a spoon for drizzling.
Ready for drizzling!
Drizzle the chocolate all over the popcorn in whatever pattern you prefer. There are no rules! Except – aim for even coverage. Nobody wants to be the unlucky person who gets a handful of chocolate-less popcorn!
Sprinkle the popcorn with the biscuit crumbs while the chocolate is still wet. The biscuits will stick to the chocolate part only, and it kind of sticks in concentrated (albeit small) patches so you can taste it a little better. I preferred this method rather than sprinkling it on the caramel popcorn whilst in the oven (the crumbs kind of got lost).
Once the chocolate sets – I speed things up by popping the trays in the fridge for 15 minutes – it’s ready to dive in!!
Storage
In theory, Gaytime Popcorn should stay fresh and crisp as long as Caramel Popcorn which has an excellent shelf life of several weeks.
Test batches made it to around the 1 week mark successfully before mysteriously disappearing. So I can’t say for sure, but I’m confident it should last for at least 2 weeks. Just make sure it is stored in an airtight container in a cool and dry place. If moisture gets in and/or it’s hot and humid, the caramel coating will get sticky and chewy so it gets stuck in your teeth.
This was a jar intended for gifting. It never got gifted. 🤭

REPORT CARD: Homemade is 68% cheaper!!
I boldly stated when I started on the Gaytime Popcorn Project that I believed I could make it for 80% less than store-bought.
We’ve run the numbers and the results are in.
One batch costs $8.96 to make which equates to 5 packets of store bought Gaytime Popcorn which costs $28.75 ($5.75 per packet). That’s a 68% saving!
So, I was 12% off. But still. I would never spend $28.75 for 5 packets of Gaytime. But I would spend $8.96 to make a batch of this any day of the week – and twice for movie night! – Nagi x
Watch how to make it
Golden Gaytime Popcorn – copycat recipe!
Ingredients
For the popcorn
- 1/4 cup vegetable oil (not required if air popping with a popcorn maker)
- 1/2 cup popping corn
For the caramel
- 100g / 7 tbsp unsalted butter
- 1 cup brown sugar , tightly packed cup
- 1/2 cup light corn syrup (sub glucose, Note 1)
- 1/2 tsp cooking/ kosher salt
- 2 tsp toffee or caramel essence OR 1 tsp vanilla (substitute) (Note 2)
- 1/2 tsp baking soda (bi-carb) (Note 3)
Golden Gaytime Finishes
- 1 1/4 cups dark or white chocolate melts or chips (US: semi-sweet chips), I used ~25% white and 75% dark (Note 4)
- 4 plain sweet biscuits (like Marie Crackers) (Note 5)
Instructions
Popcorn
- Test oil – Heat oil in a large pot over medium heat. Add a few pieces of popcorn and wait until it pops, then quickly remove.
- Pop – Add remaining popcorn, elevate off stove to shake and spread corn out evenly. Cover with a lid. Once the popcorn starts popping in earnest, shake the pot gently once. Then crack the lid a tiny bit – let's steam escape for crisper popcorn.
- Remove from heat when the popping stops (when you can count to 3 between pops) and transfer to a (very!) large bowl.
Caramel:
- Preheat oven to 110°C/230°F (both fan and standard ovens).
- Combine – Melt butter in a saucepan over medium heat. Add sugar, corn syrup and salt. Stir until just combined.
- Simmer – When it starts to bubble, simmer for 4 minutes – DO NOT STIR!
- Baking soda "foamy" – Remove from heat then quickly whisk in caramel (toffee or vanilla) and baking soda. When you stop whisking, the caramel will foam and increase in volume.
- Coat popcorn – Quickly pour straight over popcorn, toss until caramel cools and starts to harden.
Baking to crisp caramel coating:
- Spread popcorn on 2 large paper lined baking trays.
- Bake for 45 minutes, tossing every 10 minutes or so. Caramel will remelt for the first 2-3 tosses – tossing coats popcorn more evenly with caramel. (If using glucose, bake further 15 minutes).
- Cool – Remove from oven, leave to cool on the tray for 20 minutes. Then break up the popcorn – no need to be too pedantic, clumps are great!
Drizzle and crumbs
- Crumbs – Place biscuits in a ziplock bag and bash into crumbs.
- Melt chocolate – Place chocolate in a heatproof bowl and microwave in 30 second increments on high, stirring in between, until melted and smooth – about 1 1/2 minutes. (If doing a small amount of white chocolate, reduce to 20 second increments).
- Piping bags – Transfer chocolate into a piping bag. Use scissors to snip a small opening at the tip. (Alternative: just drizzle with a spoon).
- Drizzle & crumb – Push the popcorn together but in a single layer. Drizzle criss-cross (or any pattern!) all over the popcorn. Sprinkle with biscuits crumbs while the chocolate is wet so it sticks.
- Fridge – Refrigerate for 15 minutes until the chocolate is firm. Gently break popcorn into pieces. EAT!
- Store in an airtight container in a cool place. Stays crisp for at least a week. Our test batches never lasted any longer!
Notes
Nutrition
Life of Dozer
I promise Dozer, there is nothing going on in here that would be of interest to you…..😂

The post Golden Gaytime popcorn (copycat) appeared first on RecipeTin Eats.
]]>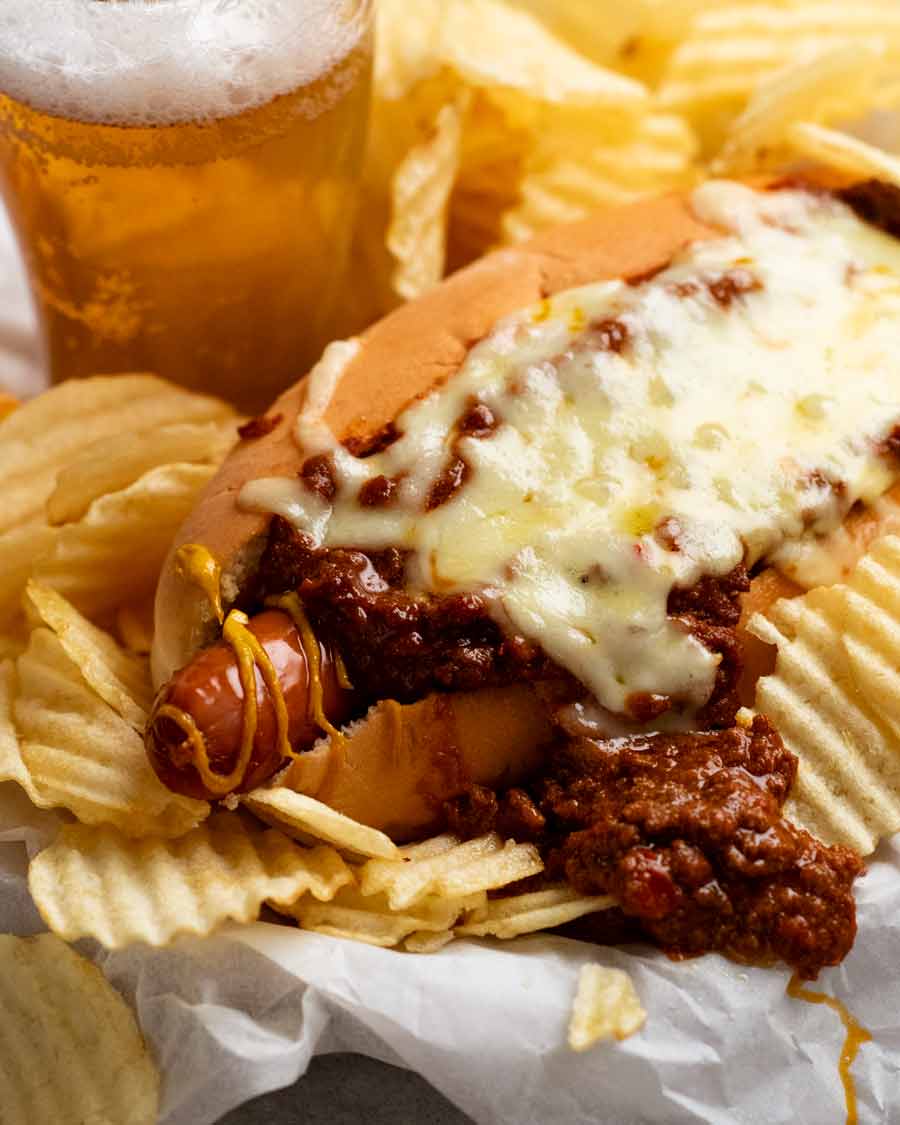 Welcome to the chili dog of my dreams! A thick, molten beef chili sauce, slow cooked for hours, designed to function more like a sauce so it smothers rather than running everywhere. As for the grilled hot dog? Skip the cheap footy franks. Smoked sausages are the way to go. Think – kranksy, bratwurst, half-smokes!... Get the Recipe
The post Chili dogs appeared first on RecipeTin Eats.
]]>Welcome to the chili dog of my dreams! A thick, molten beef chili sauce, slow cooked for hours, designed to function more like a sauce so it smothers rather than running everywhere. As for the grilled hot dog? Skip the cheap footy franks. Smoked sausages are the way to go. Think – kranksy, bratwurst, half-smokes!
A cracking recipe for summer BBQ’s, game-day, and just when you need something seriously moreish.

THE chili sauce for hot dogs….
This is a chili dog that is inspired by the famous Half-Smoke Chili Dogs at Ben’s Chili Bowl in Washington DC. It’s an institution famous for their chili which is served in various formats – in a bowl, burgers, and chili dogs.
The chili sauce used for the hot dogs is different to the chili served in bowls. It’s noticeably thicker and smoother, and doesn’t have beans in it. Essentially, it’s like a thick sauce that stays on the hot dog better than regular chili so you can eat it with your hands.
I’ve always wanted to replicate the Ben’s chili sauce. I’ve had a few attempts over the years – surely I just need to slow cook for longer, longer! Nope, it just didn’t have that same “molten” texture.
The answer came to me when I was making lentil soup: a partial blitz. Releases flavour, thickens the sauce, and makes it smoother too. This changed my chili-dog-game forever. Will it change yours too??

Chili = American vs chilli = Australian/UK: Ordinarily, I write in Australian-English rather than Americanised English, because I live in Australia. However, given that chili dogs is very much a beloved dish of the States, I’ve decided to respect the origins and use “chili” with one “l” throughout this post!
Ingredients in chili dog
Alrighty, first up, what you need to make the chili sauce for hot dogs!
Ingredients in chili sauce
The ingredients are no different to my classic chili con carne except the ratios of the spices are a little different (more!). And there are no beans in this chili sauce so it’s smoother and sits in/on the hot dog better.
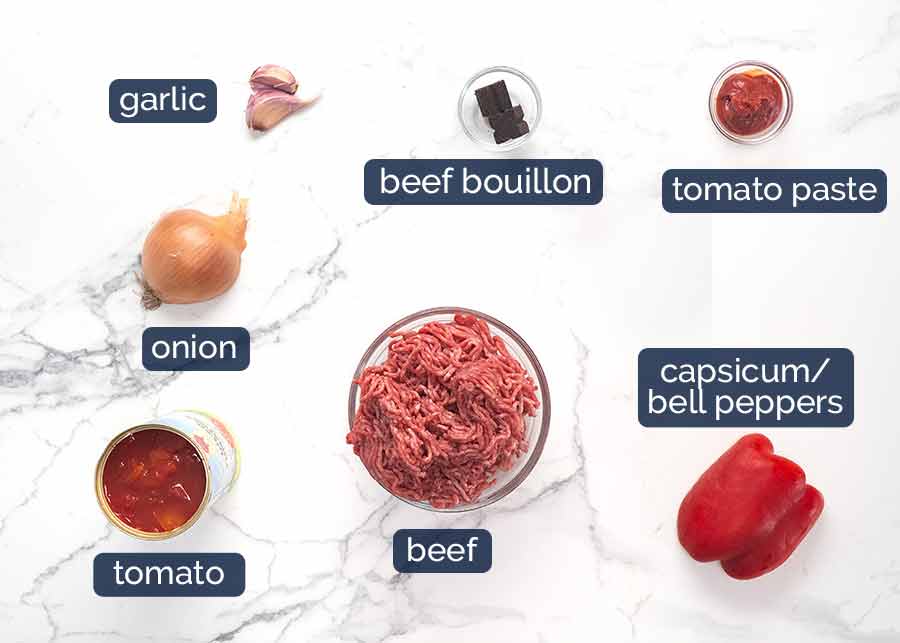
Beef mince / ground beef – While this recipe will work with lean beef, it will not have as much beefy flavour. Because most of the good beefy flavour we love is in the fat!
Beef bouillon cube (stock cube) – Better than salt! Adds more flavour.
Onion & garlic – Essential flavour bases.
Tomato paste and crushed tomato – For thickening and flavour of the sauce. By the time all the spices are added in and it’s been slow cooked, you don’t really taste the tomato at all.
Capsicum/bell pepper – A traditional inclusion in chili.
Homemade chili powder for sauce
There’s no store-bought chili powder mix in my chili sauce. I prefer to make my own from scratch because the flavour of chili powder varies from brand to brand. Making your own ensures consistency of flavour for everyone!
Plus, chili powder spice mix, while common in the US, is not easily found in Australia.
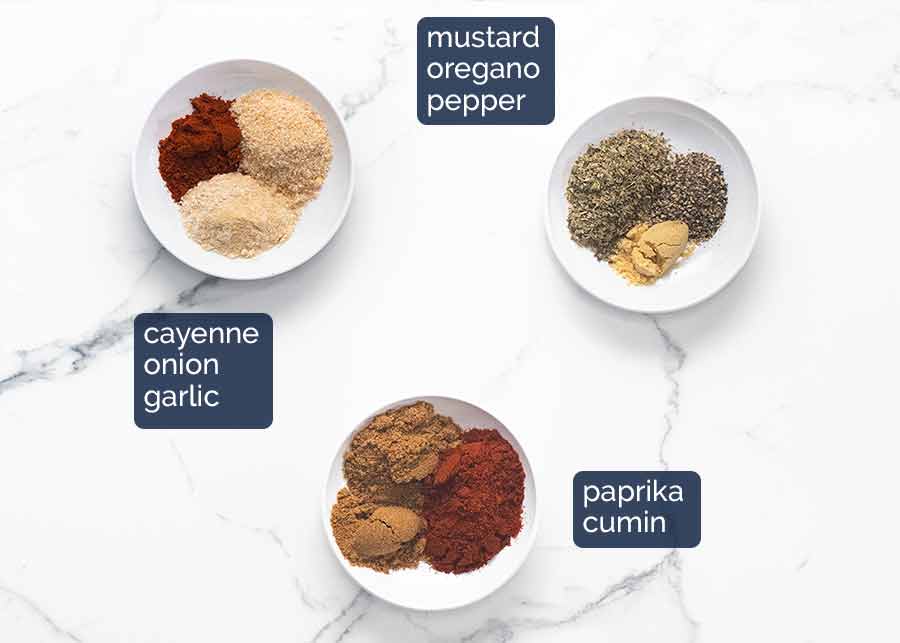
No unusual players here. All pantry essentials (here’s my essential spices list, in case you missed it!), the same spices I use in my chilli con carne. However, I use slightly more spices to give the sauce a stronger flavour because less sauce has to go further when it’s used in a hot dog bun compared to serving a big bowl of chili. Am I making sense?? Not sure I’m explaining that well!
Spiciness – There’s a decent amount of cayenne pepper in this to give the chili sauce a spicy kick, as is traditional. Feel free to dial it back. You can just add it right at the end, bit by bit, tasting as you go.
Chili dog
For the best hot dog of your life, skip the everyday cheap hot dogs and go for a good German or other European smoked sausage (Austrian, Polish). You’re welcome!

Smoked sausages – better than hot dogs! Chili dogs are typically made with economical thin hot dogs. Think – uniform pink colour that are 30 – 40% fillers. Tasty enough, when smothered in a homemade chili sauce. But you can really dial-up your hot dog game by using good European smoked sausages – like kranksy’s, bockwurst, bratwurst, “continental franks”. Just ask Ben’s Chili Bowl. Their famous chili dogs use sausages called “half-smokes” which are a type of smoked sausage.
Why European smoked sausages are better – More meat, less fillers, they’re seasoned with flavour, and fatter so you get more sausage! They are smoked so they are technically cooked but most are usually grilled or pan fried before serving. Makes them even tastier.
Find them easily these days:
Kranksy’s – a deli staple at large supermarkets (Coles, Woolies – see here online, Harris Farms). Get the smoked ones, if you can, but even un-smoked are 20x better than the “footy franks”
Sausages in packets labelled “Continental Franks” or “Weiners”.
German deli – If you are lucky enough to have a German deli in your area, it’s worth a visit because you’ll have an even better selection – and it’s hard to go wrong! Also, other European delis. The Polish and Austrians do wickedly good smoked sausages too.
Where I go – Brot & Wurst in Narrabeen, Sydney, which is near my home. My favourite for chili dogs are Bockwurst (pictured above). But all the smoked sausages of theirs I’ve tried (probably most) are great!

Hot dog buns – Look for soft, pillowy buns for the hot dogs to nestle in.
Yellow mustard – Optional, I guess! For me, a chili dog isn’t a chili dog without a squirt of mustard. I use American mustard – 100% artificial yellow colour, 100% hot dog authentic.
White onion – Optional! This is a direct copycat of the way the chili dogs are served at Ben’s Chili Bowl. A little sprinkle of finely chopped white onion brings a hint of freshness in amongst all that moorish, spicy, saucy goodness. I like to use white onion because it’s not as sharp as brown onion. Red onion will also work from a flavour perspective.
Cheese – A sprinkle of shredded cheese on a chili dog is fairly common practice but melting is not. But, like good ole’ crispy shell beef tacos, melted cheese wins over un-melted cheese any day. So if you have the option to melt, why would you not?? (Bonus: Cheese melting oven time warms up the bun so you don’t have to do it beforehand plus gives all the flavours a chance to meld together into one cohesive chili-dog-of-your-dreams!)
How to make chili dogs
As I mentioned earlier, the one thing that’s a little unique about the chili sauce I make for chili dogs is that it’s thicker, smoother and more “molten” than the usual recipes you see which have larger, chunkier beef bits in a runnier sauce. This is because mine is designed to be like the famous Ben’s Chili Bowl chili sauce which is like a thick sauce that stays in the hot dog rather than slopping out everywhere when I take a (big!) bite!
The trick to achieve this? A little blitz. Releases flavour and thickens the sauce.
1. The chili sauce
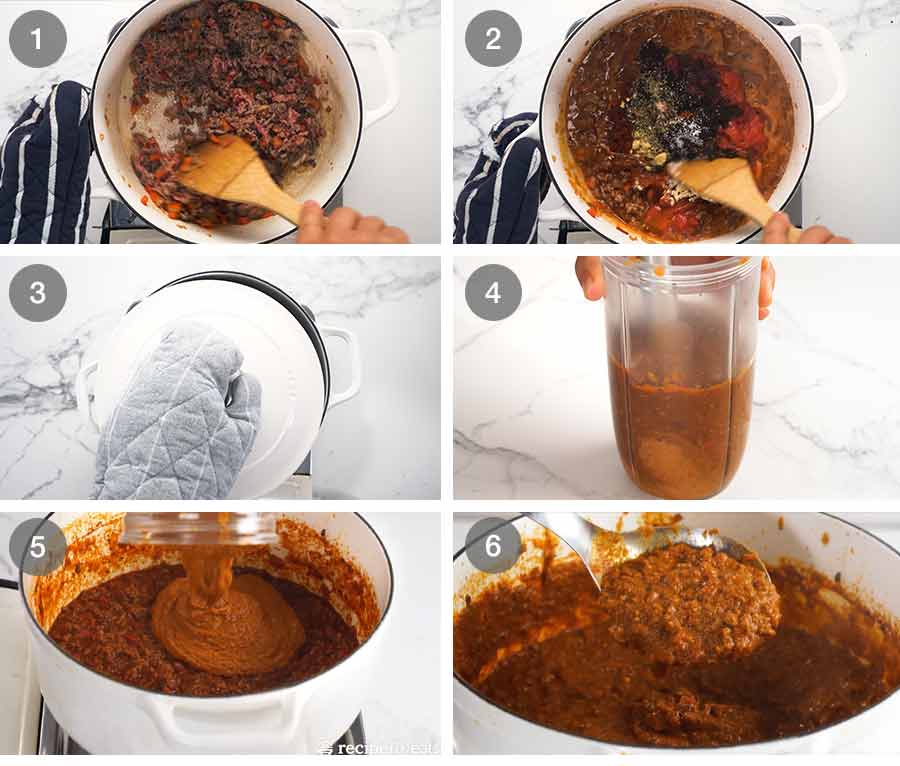
Cook chili sauce – The chili sauce starts off like your everyday chili con carne. Sauté onion, garlic and capsicum. Cook the beef until it’s browned, then stir the tomato paste for a minute to cook out the sour raw flavour.
Add everything else – Add all the spices, canned tomato, beef stock cubes (bouillon cubes), salt and water and give it a good stir then bring it to a simmer.
Slow cook 3 hours – Simmer on a really low heat with the lid partially on. A cracked lid allows the sauce to reduce and thicken. Make sure the heat is really low and give it a stir every now and then to ensure the base doesn’t catch. Remember – we’re making a sauce that is thicker than typical chili con carne.
It can also be cooked in the oven (160°C / 325°F for 3 hours) or slow cooker (low for 6 to 8 hours) – directions included in the recipe.
After 3 hours of slow cooking, the beef should be very tender. Yep, you’ll need to have a spoonful to check!
Blitz to thicken and smooth – Remove 1 1/2 cups of the chili into a container so the head of a stick blender will be submerged under the chili. Then blitz until smooth – it should only take around 15 seconds on high. This will release flavour and also thicken the sauce.
Stir in – Return the pureed chili sauce into the pot and stir well. As you stir, you should find that the slow-cooked beef bits start to fall-apart into really fine pieces of beef to make a smooth-ish, almost molten-like sauce.
If your beef doesn’t do this, it will just need a bit of help from a potato masher. Just mash the beef straight in the pot until it becomes a fairly fine texture, like pictured.
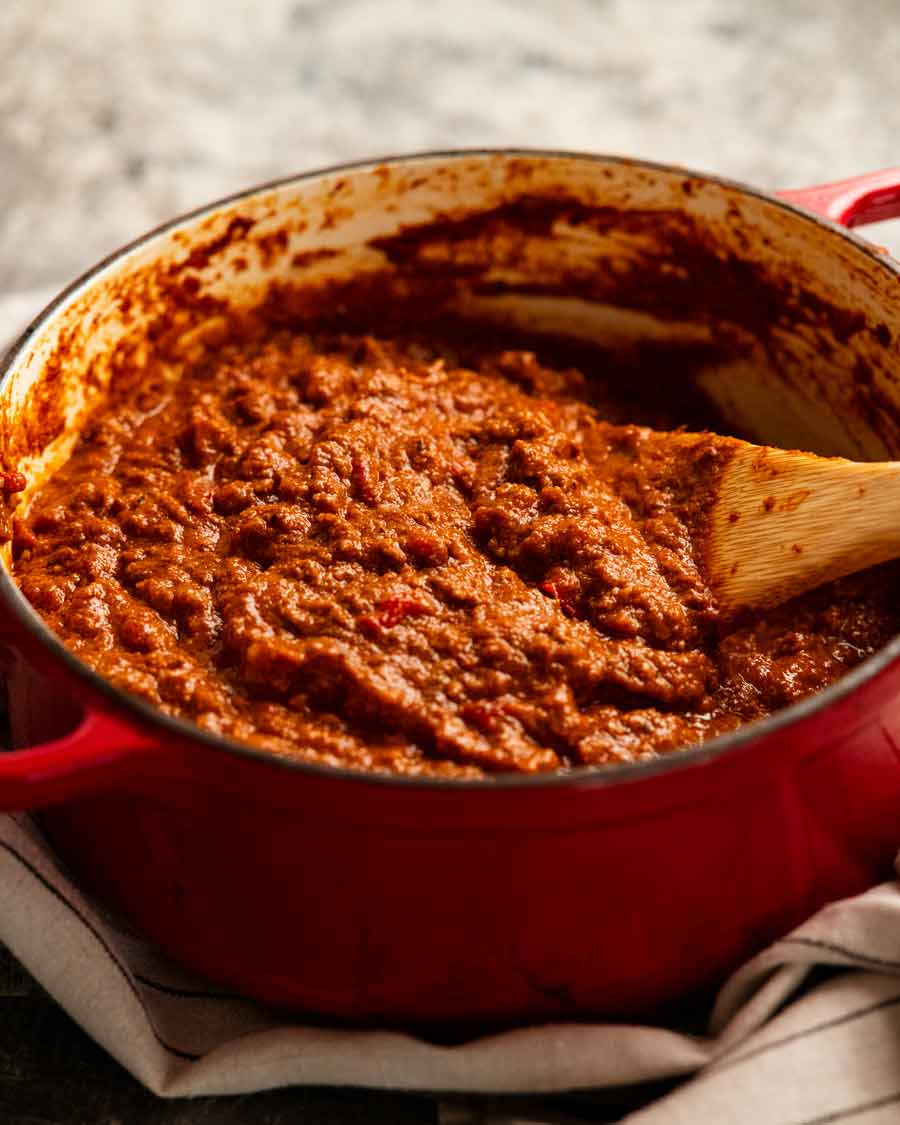
Thick sauce – This is what your sauce should look like! Dollop-able but it mounds. Now you get to heap it on your hot dog!
2. Assembling chili dogs
Grill, stuff, smother, bake!
Pan fry or grill your hot dogs / smoked sausages until browned and warmed through. Don’t worry if the skin splits! Visually it doesn’t matter because it will be completely hidden by sauce.
Mustard & onion – Add a squiggle of mustard then sprinkle with onion.
Chili sauce – Smother with a good amount of chili sauce. Appreciate how it’s thick and stays on/in the hot dog instead of running everywhere!
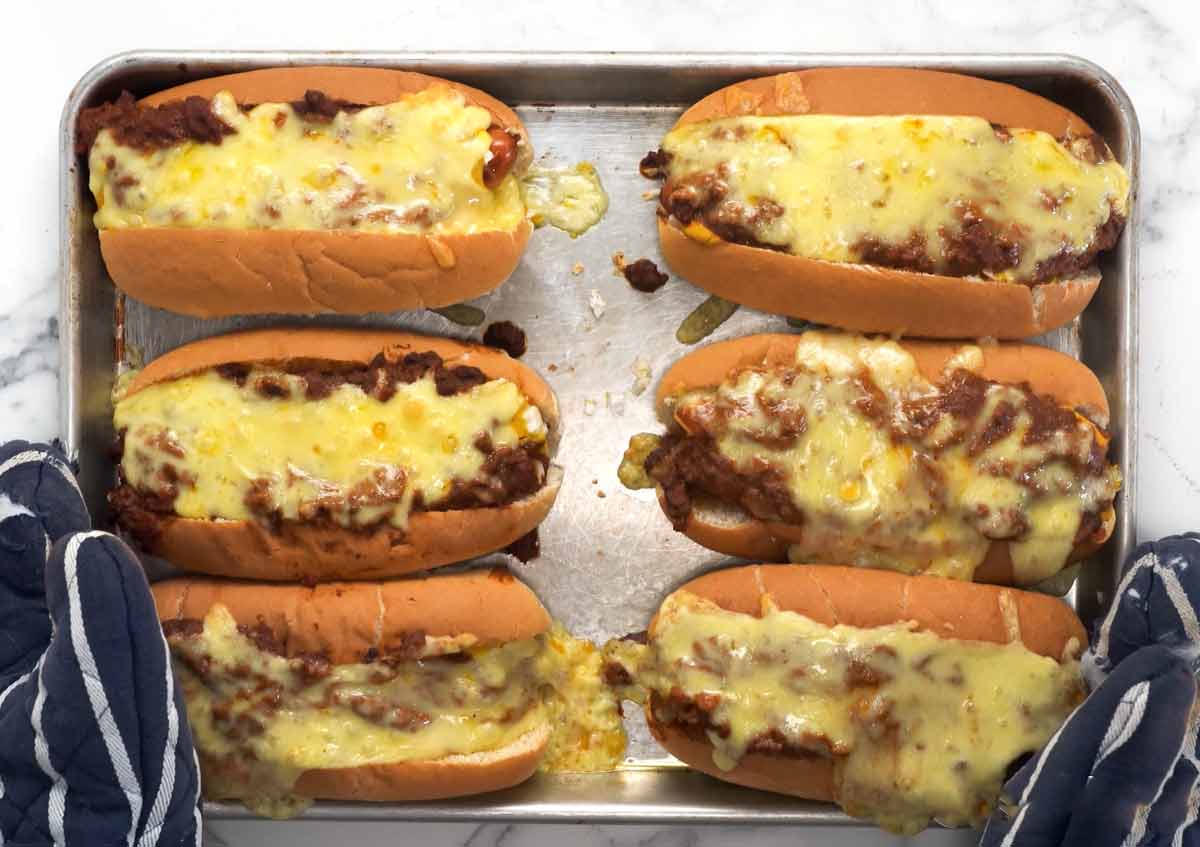
Bake for 10 minutes – Top with cheese then bake for 10 minutes just to melt the cheese. Pull out of oven and start getting excited about sinking your teeth into these chili dogs!!!

When to make chili dogs
A backyard grill out, a gathering with friends. Game day, dinner tonight, and, well, just anytime because you can’t get darn-good chili dogs in your area. That would be ME!!
In all seriousness though. A good smoked sausage, pan fried or grilled then tucked into a soft bun is delicious as is.
Smother it with a thick layer of big-flavoured beef chili sauce, and you’re well on your way to food heaven.
Add a blanket of molten, gooey cheese and that, my friends, THAT is what food dreams are made of.
I really hope you try these chili dogs one day. For us Aussies, chili dogs are hard to come by and when we do find them, all too often they are terribly disappointing. I promise this won’t disappoint! – Nagi x
PS As long as you give the cheap footy franks a miss!
Watch how to make it

Chili dogs
Ingredients
Homemade chili powder (Note 1):
- 3 tsp smoked paprika (sub plain paprika)
- 3 tsp cumin powder
- 1 tsp cayenne pepper , adjust to taste
- 1 1/2 tsp garlic powder
- 1 1/2 tsp onion powder
- 1 1/2 tsp oregano
- 1/2 tsp mustard powder
- 1/2 tsp black pepper
Chili sauce:
- 1 tbsp olive oil
- 2 garlic cloves , finely minced
- 1/2 onion , finely chopped
- 1/2 red capsicum / bell pepper , finely chopped
- 500 g/1 lb ground beef / beef mince
- 1 tbsp tomato paste
- 400g / 14 oz canned crushed tomato
- 2 beef cubes (I like Oxo, easy to crumble, Note 2)
- 1 1/2 cups water
- 3/4 tsp cooking/kosher salt , plus more to taste
Chili dogs:
- 6 good smoked sausages (kransky, bratwurst, half-smoke) or hot dogs of choice (Note 3)
- 6 hot dog buns
- 1/2 white onion , finely chopped
- Yellow mustard (I use Heinz American mustard)
- 2 cups Colby or Monterey Jack , shredded (or other cheese of choice)
- Plain crinkle cut potato chips , optional side for serving (traditional!)
Instructions
Chili sauce:
- Sauté aromatics – Heat oil over medium high in a heavy based pot. Cook the onion, garlic and capsicum for 3 minutes.
- Brown beef – Add beef and cook, breaking it up as you go, until you no longer see raw meat. Add tomato paste and stir for 1 minute.
- Sauce – Add the spices, tomato, water, crumbled beef cube and salt. Stir well.
- Slow cook 3 hours – Bring the chili to a simmer then turn down to low, on a small burner. Put the lid partially on (to allow for sauce reduction). Simmer for 3 hours on low (goal: small bubble every now and then), stirring just to ensure the base doesn’t catch. OR put it in a 160°C/325°F oven for 3 hours (lid partially cracked).
- Slow cooker (Note 4) – Reduce water to 3/4 cup. After chili comes to a simmer on the stove, transfer everything to a slow cooker then cook on low for 6 to 8 hours on low.
- Thicken sauce – Remove 1 1/2 cups of the chili into a container so the head of a stick blender will be submerged under the chili. Then blitz until smooth (~ 15 seconds). Add the pureed sauce back in the pot and stir well.
- Sauce goal – As you stir, the remaining beef bits should become quite fine (rather than bolognese type chunks) because the beef is so tender. If the beef bits are not as small as desired, use a potato masher in the pot – it won't take long. The chili sauce should be a thick sauce that mounds up a bit when you scoop it, not runny. (Note 5) Keep sauce warm.
- Optional rest overnight – Allow the sauce to cool then refrigerate overnight. As with most slow-cooked stewy things, the flavour improves! Reheat on the stove before proceeding.
Chili dogs:
- Preheat oven to 180°C/350°F (160°C fan).
- Grill/pan-fry – Preheat a pan with 1/2 tbsp oil (or the BBQ) on medium / medium high. Brown the stages all over until they are heated through (they are already cooked inside, it's just about heating/colour).
- Assemble – Place hot dog buns on a tray. Stuff with a sausage, top with a squiggle of mustard and a sprinkle of onion. Spoon over a generous amount of warm chili sauce, top with cheese.
- Bake for 7 to 10 minutes or until the cheese is melted. Serve immediately. Traditionally with a mound of plain crinkle cut potato chips and an ice cold beer!
Notes
1. Spice notes:
- This blend of spices includes a homemade chili powder which I prefer to do because the flavour of store-bought chili powder mixes (in the US) vary from brand to brand.
- Garlic powder and onion powder can be substituted with more of the other.
- Cayenne pepper provides the spiciness (chili sauce is SUPPOSED to be a bit spicy!). This amount won’t blow your head off but if you’re concerned, hold some (or all) of it back and add right at the end, little by little.
- Mustard powder – sub 1 tsp dijon mustard
Nutrition
Life of Dozer
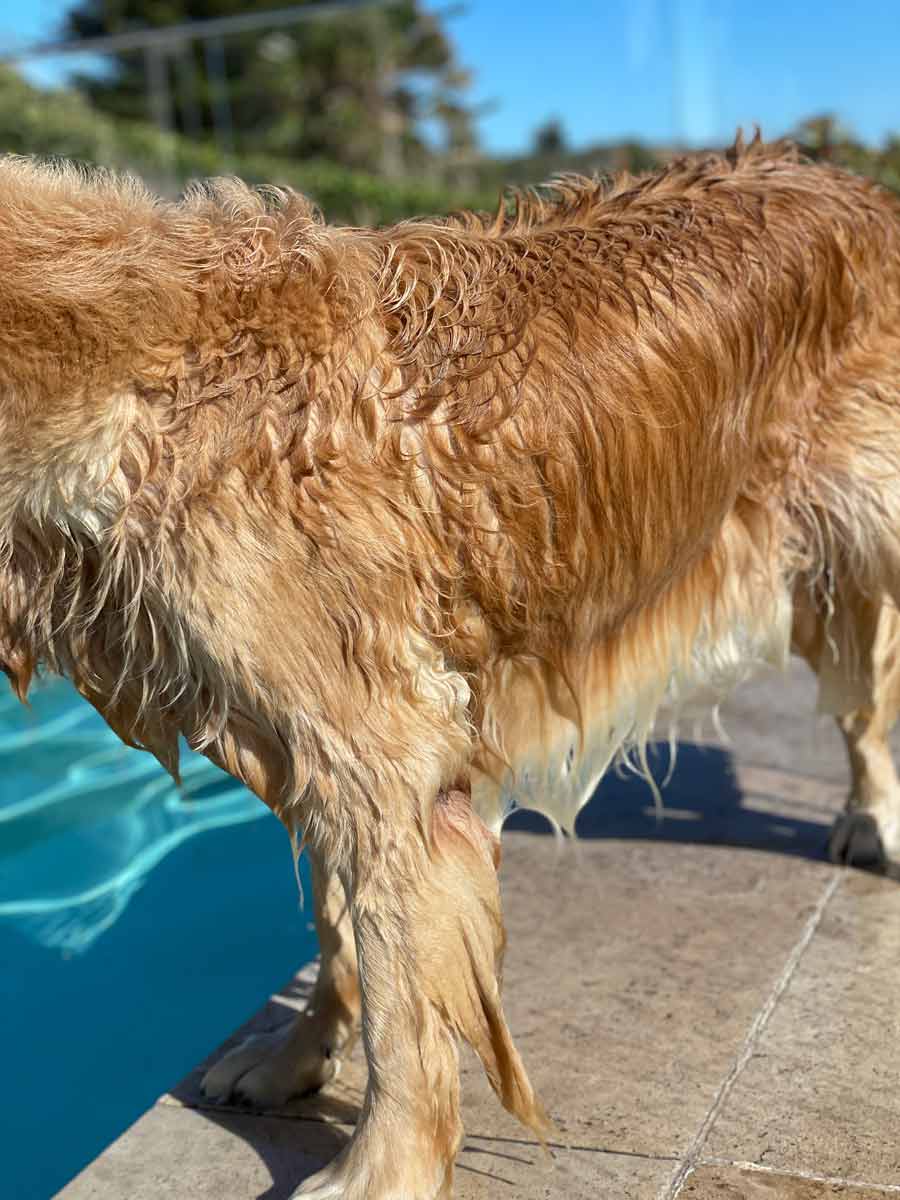
I find it quite amusing that he can spend hours in the pool or at the beach and his furry golden head remains fluffy and dry while the rest of him is saturated.
Then I realised I do the same thing. Sometimes a girl just doesn’t want to ruin her hair, y’a know? 😂

The post Chili dogs appeared first on RecipeTin Eats.
]]> No false promises here – these are seriously crispy Baked Buffalo Wings that are made entirely in the oven! Using a now-world-famous Cooks’ Illustrated technique, the skin is so shatteringly crispy it’s hard to believe they aren’t fried. Don’t believe me? I don’t blame you! See and hear it for yourself in the recipe video……... Get the Recipe
The post Baked Buffalo Wings – ULTRA CRISPY!! appeared first on RecipeTin Eats.
]]>No false promises here – these are seriously crispy Baked Buffalo Wings that are made entirely in the oven! Using a now-world-famous Cooks’ Illustrated technique, the skin is so shatteringly crispy it’s hard to believe they aren’t fried.
Don’t believe me? I don’t blame you! See and hear it for yourself in the recipe video……
Super Crispy BAKED Buffalo Wings!
The great thing about the internet is that there are loads of options for any recipe your heart desires.
The bad thing about the internet is sifting through all those Google search results to find a recipe that actually works as promised and is exactly what you are after.
So here is what I promise you: If you love perfectly seasoned crispy buffalo wings, tossed in a classic spicy, buttery Buffalo Sauce with a tinge of sweetness, and you prefer to avoid the mess and calories of deep frying, this is The One.
These aren’t just “quite crispy but still not like they’ve been deep fried”. These wings are seriously crispy. Read hundreds of testimonials from people who have tried it!

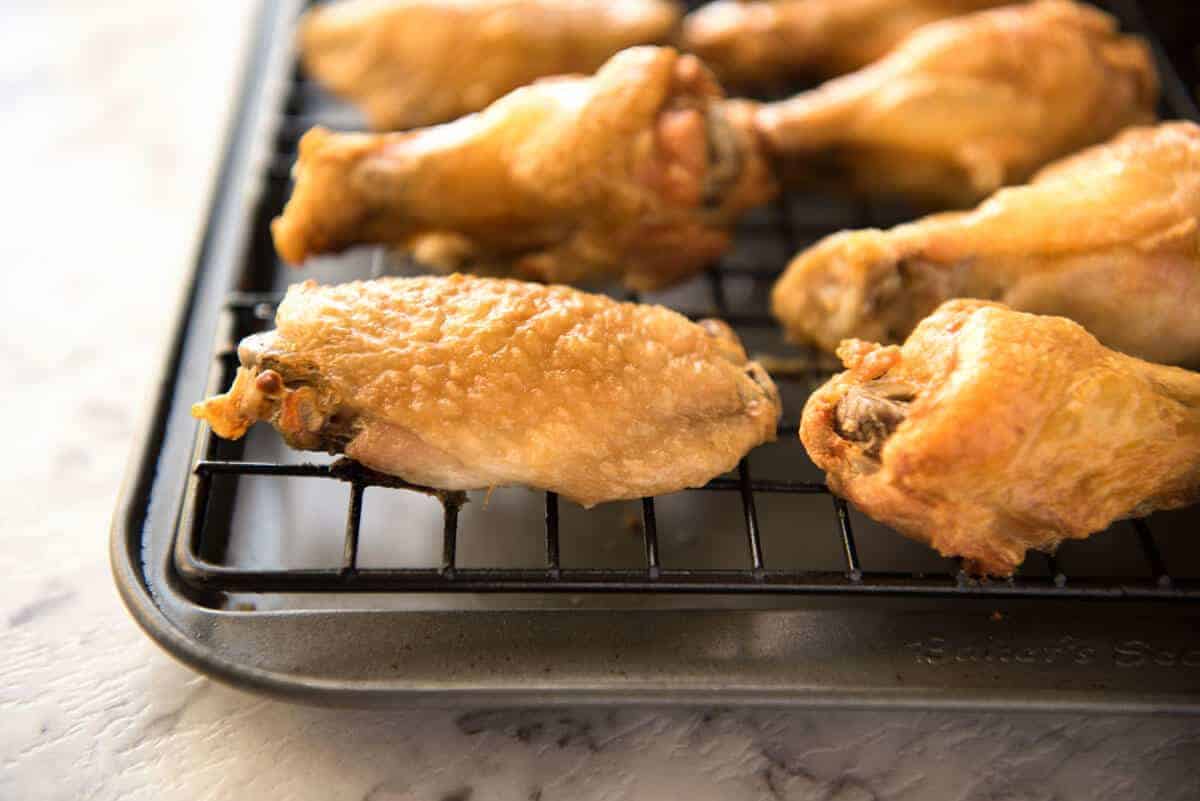
You can’t see how crispy the skin is when I’ve smothered them in that glorious Buffalo Sauce so here’s a photo of them plain, straight out of the oven. And if you have 90 seconds, watch the recipe video below the recipe so you can hear how crispy they are!
The recipe is ridiculously simple, and it’s a genius discovery by the amazing folk over at Cook’s Illustrated who used science to figure out how to make truly crispy wings in the oven.
How to make Ultra Crispy Buffalo Wings in the Oven
The 2 unique steps in this recipe that make all the difference are:
1. baking powder (secret ingredient!) – tossing the wings in baking powder which draws moisture to the surface of the skin and helps make it crispy. Rest assured you can’t taste the baking powder at all; and
2. bake on low then high – usually, the fat under the skin is part of the reason why baked wings don’t get really crispy. In this recipe, we start at a low temp first which melts the fat under the skin, then we crank up the oven which makes the skin super crispy!
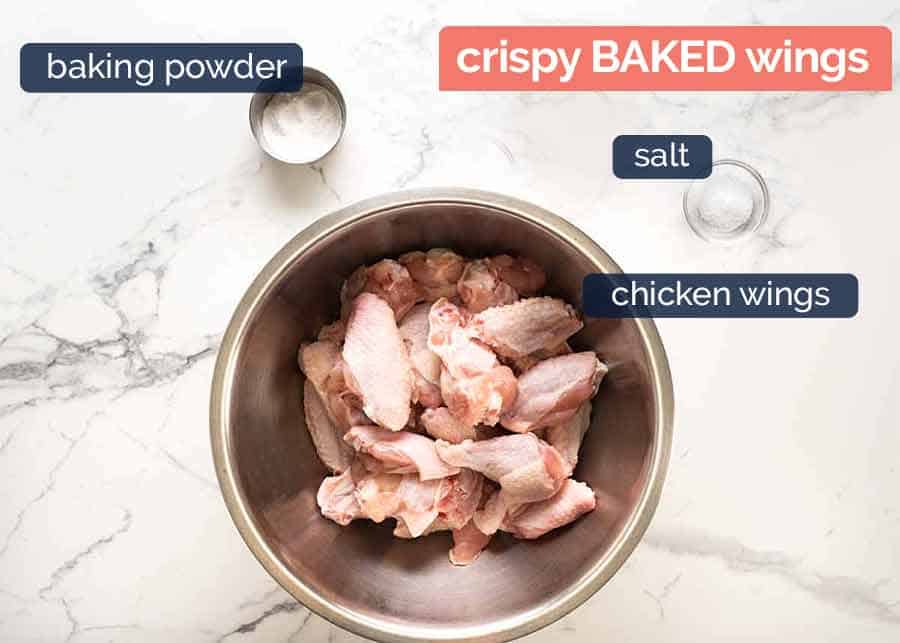
What you need for Crispy Baked Buffalo Wings
And here’s a visual for what you need.
1. The crispy baked wings
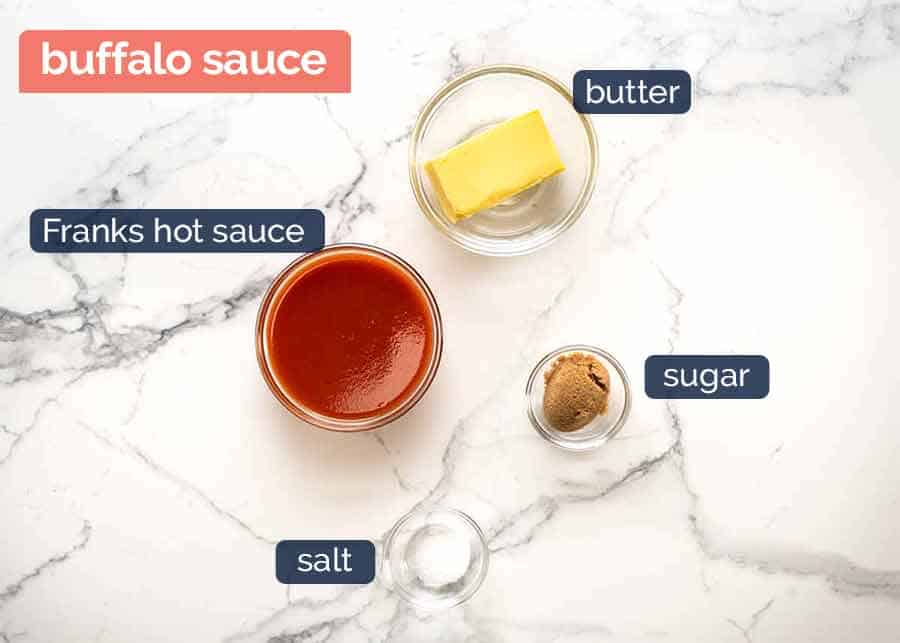
2. The Buffalo Sauce
That perfect combination of spiciness from Franks hot sauce, buttery goodness and and hint of sweet.

3. Blue Cheese Dip
I know some people aren’t a fan of blue cheese dip – but I’m all in!! In fact, I love blue cheese dip so much, I like to keep mine a bit lumpy so I get little pops of blue cheese. But usually, restaurants serve it completely smooth. Go with what rocks your boat!
Celery?? YES!
Crispy wings + spicy, buttery Buffalo Sauce + earthy, creamy blue cheese dip + fresh, crunchy celery = MAGICAL COMBINATION
I don’t know who discovered it, but they deserve a Nobel Prize. I remember the first time I tried it, I squinted at the celery sticks and thought, “who would bother with them?”. But they work! It’s like the perfect way to reboot your taste buds in between each wing!!

You’ll make a total mess of yourself eating them. It’s just not possible to eat wings elegantly. You’ll get Buffalo Sauce smeared all around your mouth. You’re doing well if your shirt stays clean.
But that’s all part of the Buffalo Wings experience, right?? The dramatic clatter as you toss the naked bones into a bowl. Smack you lips. Suck each finger clean.
Dive in for another.
YES PLEASE. – Nagi x
Crispy Baked Buffalo Wings
Watch how to make it
PUMP UP THE VOLUME so you can hear how crispy they are!!

Truly Crispy Oven Baked Buffalo Wings
Ingredients
Crispy Baked Wings
- 4 lb / 2kg chicken wings, wingettes & drumettes (Note 1)
- 5 teaspoons baking powder (NOT baking soda / bi-carb soda) (Note 2)
- 3/4 teaspoons kosher salt / cooking salt (not table salt, too fine)
Sauce
- 4 tbsp (60g) unsalted butter, melted
- 1/2 cup Frank’s Original Red Hot Sauce (Note 3)
- 1 tbsp brown sugar
- 1/4 tsp kosher salt / cooking salt
Blue Cheese Dip
- 1/2 cup crumbled blue cheese, softened (I use gorgonzola)
- 1/2 cup sour cream
- 1/4 cup mayonnaise , preferably whole-egg
- 1 clove small garlic , minced
- 1 – 3 tbsp milk
- 2 tbsp lemon juice
- 1/2 tsp kosher salt / cooking salt
- Black pepper
To Serve
- Celery sticks
- Lots of beer!
Instructions
Crispy Baked Wings
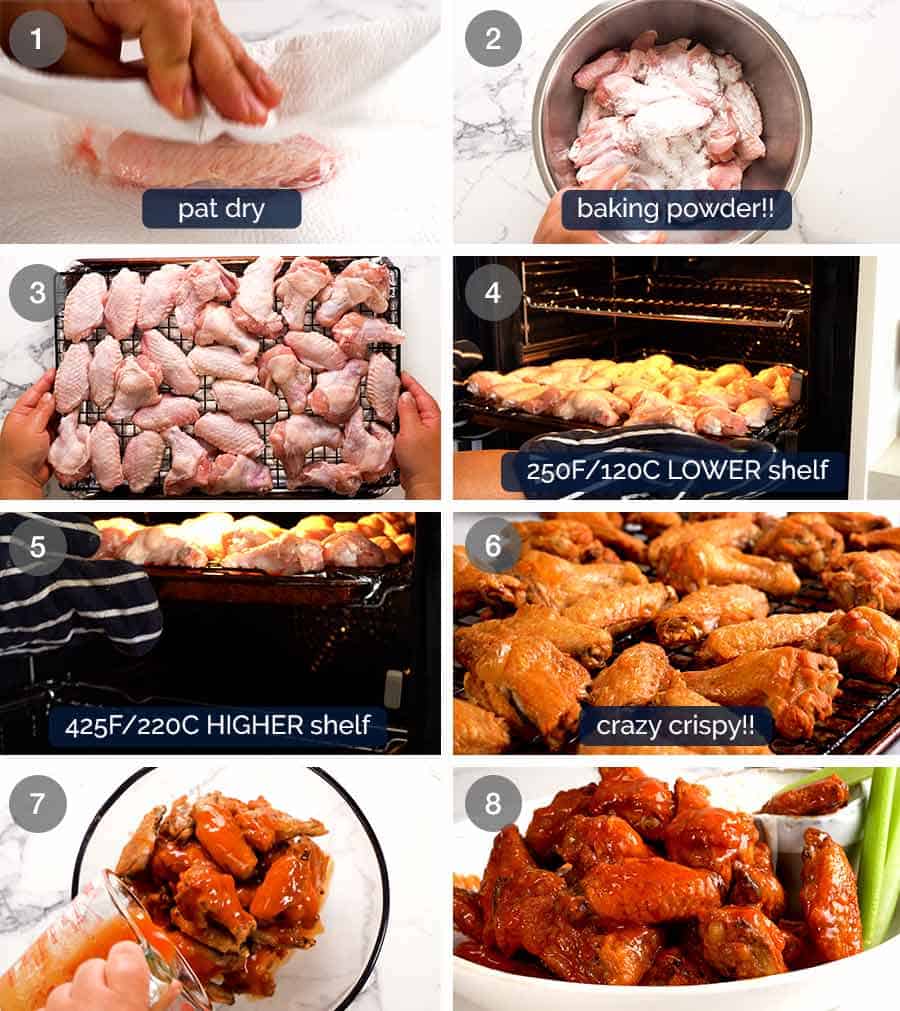
- Dry overnight (optional) – If you plan ahead, lay the wings on a rack on a rimmed baking tray and let them dry uncovered in the fridge overnight. Alternatively, pat them dry with paper towels.
- Preheat the oven to 250°F/120°C (all oven types). Put one oven shelf in the lower quarter of the oven and one in the top quarter.
- Line the tray with foil. Put a rack on the tray then spray the rack with oil.
- Toss wings – Place the wings in a large bowl. Sprinkle over baking powder and salt. Use hands to toss well (or shake in ziplock bag) to coat wings evenly.
- Bake 30 minutes on low temp – Place the wings skin side up on the rack (ok if snug, they shrink). Bake on the lower shelf in the oven for 30 minutes.
- Bake 40 minutes on high – Move the tray up to the higher shelf and turn the oven up to 425°F / 220°C (all oven types). Bake for a further 40 to 50 minutes, rotating the tray halfway through. The wings do not need to be turned over. They are ready when dark golden brown and the skin is very crispy.
- Toss in sauce – Transfer the wings into a large bowl. Pour over sauce and toss to coat. (Alternatively, serve wings plain with Buffalo Sauce for dipping).
- Serve immediately with Blue Cheese Dip (for both wings and celery sticks dunking)!
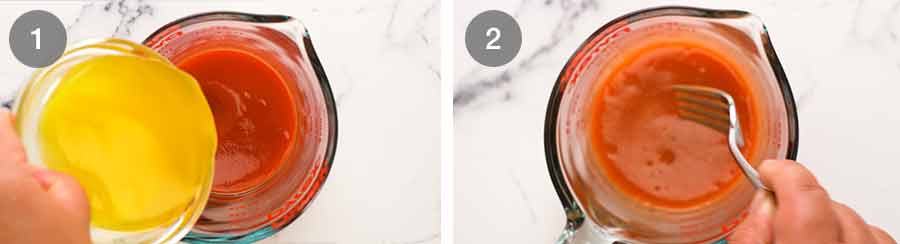
Buffalo Sauce
- Whisk together the Sauce ingredients until the sugar is melted. Keep warm or reheat just prior to using.
Blue Cheese Dip
- Mash the blue cheese with sour cream until smooth (or to your taste).
- Add remaining ingredients and mix well until combined, using milk to get it to the consistency you want. Store in the fridge until required. Remove from the fridge 15 minutes before serving.
Notes
* Salt – only a small amount is required, it’s a phenomenon I can’t explain but this small amount perfectly seasons 2kg/4lb of wings using this baking method.
* These shrink when baked because the fat under the skin renders out (melts) which is how these become super crisp. So they can be snug on the rack.
* They are JUICY not dry, despite the long cook time. This is because the first bake at the lower temp barely cooks them, it only melts the fat.
* These bake to a golden brown, not a deep golden brown. You will know they are done because the skin will be lovely and crispy. 5. Source: The recipe for the wings is from Cook’s Illustrated “Meats Book” cookbook. The sauce recipe is my own. 6. To reheat: Allow wings (not tossed in sauce) to cool, then cover and refrigerate. The skin will wrinkle and soften. Preheat oven to 200°C/390°F. Spread wings out on tray, skin side up, and bake for 5 to 8 minutes or until the skin puffs up so the wrinkles smooth out and becomes crisp again. Works 100% perfectly! 7. Make Ahead: These stay crispy for as long as the wings are warm, so around 20 – 30 minutes. The skin stays crispy for around 10 – 15 minutes after tossing in the sauce, then after that they start to soften but not go soggy, up to around 30 minutes. If you reheat after tossing in sauce, they go soggy. 8. Comprehensive FAQ is available in the original Truly Crispy Oven Baked Wings. 9. Nutrition for just plain crispy wings (419 cal) and including the hot sauce (476 cal), both assuming 8 servings. Note that the wings have been adjusted to reflect the amount of fat that is rendered out (I measured the fat I poured off the tray
 ).
). Nutrition
Originally posted June 2015. Republished February 2020 with improved video and photos, then updated with tidy ups in 2023. NO CHANGE TO RECIPE. I wouldn’t dare – it’s perfect as is!
Life of Dozer
This is what a Food Coma looks like.

The post Baked Buffalo Wings – ULTRA CRISPY!! appeared first on RecipeTin Eats.
]]> Blinis are mini pancakes that make perfect finger food for passing around at a party. Top with dill crème fraîche and smoked salmon for a timeless, elegant canapé that never fails to impress! Blini with smoked salmon If there is ever a time to get a little fancy, New Years’ Eve would be it. Break... Get the Recipe
The post Blinis with smoked salmon appeared first on RecipeTin Eats.
]]>Blinis are mini pancakes that make perfect finger food for passing around at a party. Top with dill crème fraîche and smoked salmon for a timeless, elegant canapé that never fails to impress!
Blini with smoked salmon
If there is ever a time to get a little fancy, New Years’ Eve would be it. Break open the bubbles, toast the new year in…….. and let’s make a canapé that will impress the pants off your friends: BLINIS!
Blinis with smoked salmon are a hors d’oeuvre that often appears on the menu of caterers and function venues a-like. And the reason is simple: it’s a classic that everybody loves. It’s elegant. It’s easy to make in large volume.
And it isn’t hard to make at all. They’re just mini pancakes with a smear of crème fraîche and a bit of smoked salmon plonked on top. No big deal!

What’s the difference between a pancake and blini, actually?
OK, time to clarify that blinis are more than just a mini form of your favourite breakfast pancake. And blinis are not a breakfast item, they are used to make canapés / hors d’oeuvres. They make great finger food because of their size. One bite wonders!
Unlike regular pancakes, blinis are made with yeast rather than baking powder so they are softer and more delicate. And blinis are made with buckwheat flour which gives it the signature slightly nutty flavour.
Though I think buckwheat flour is essential for blinis – for flavour – you can still make great blinis using baking powder instead of yeast. Read on to find out how!
Ingredients in blini
Here’s what you need to make traditional blini.
Want a no-yeast version? See the information box below!

Dry yeast (aka active dry yeast) – This is the yeast that comes in small foil packets, as pictured below. I’ve also included an information box below with some extra information on dry yeast vs instant yeast (comes in tubes, yes you can use it), how to make blini with baking powder instead of yeast!
Buckwheat flour – This is what makes blini a blini instead of just a mini pancake! It’s actually gluten-free and gives the blinis a distinctive nutty flavour. If you skip it, your blinis will be pretty bland. So – don’t!
Find it in the baking aisle or health food aisle of grocery stores.Plain flour (all-purpose flour) – Just our everyday flour. Buckwheat provides the flavour. Normal flour is needed so the blini has the desired texture and fluffiness without resorting to xanthum gum and other ingredients you ordinarily need when making breads with gluten-free products like buckwheat flour.
Milk – Full fat ordinary cow milk. I don’t see why it wouldn’t work with low fat milk but I am not sure it will work using non-cow milk (like almond milk).
Sugar – Required for both a touch of sweetness in the blini as well as activated the yeast to make it foamy (it feeds the yeast to wake it up to make it foamy!).
Butter – Just a small amount to add a touch of fat and flavour into the blini.
Egg – This is what binds the blini together. Make sure it’s at room temperature so it combines easily with the other ingredients.
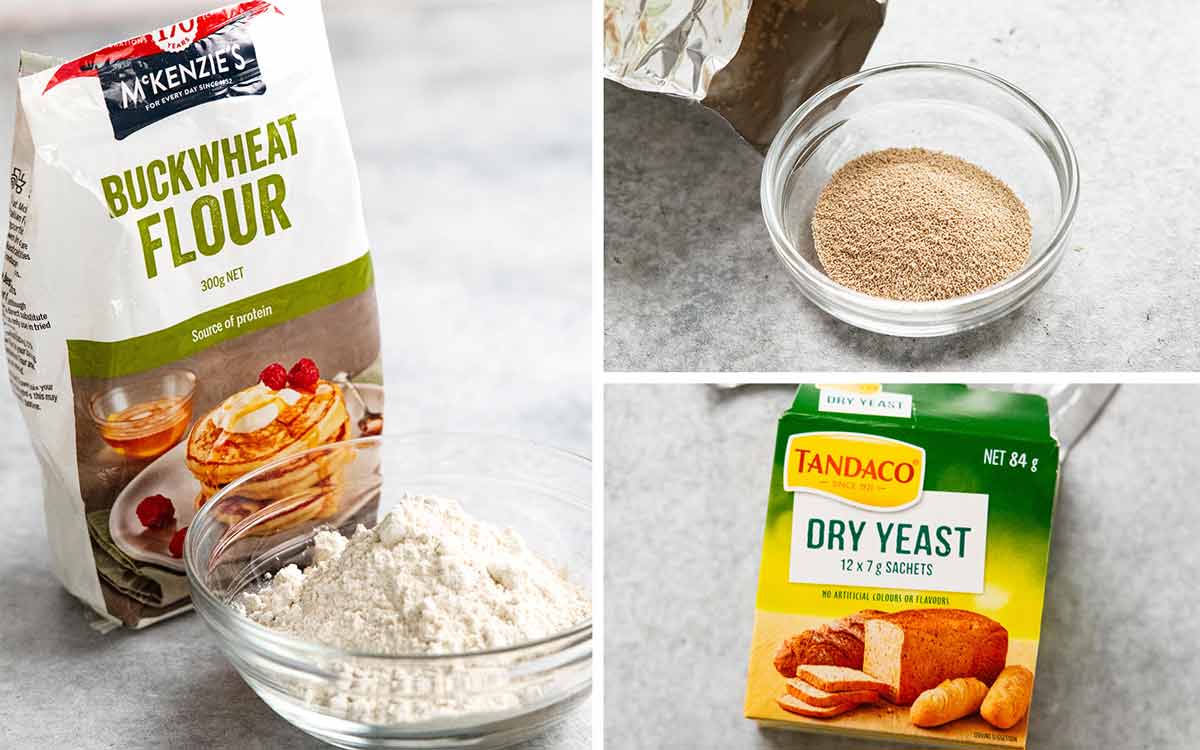
Best type of yeast for blini
Blini is made with active dry yeast, pictured above, which comes in foil packets. This is the type of yeast that needs to be activated by foaming it up in warm water before mixing it into flour and other ingredients.
Active dry yeast is different to instant yeast (also known as rapid yeast) which is sold in canisters. This is the type of yeast I use more regularly in my recipes because of convenience as it gets mixed straight into the flour etc. without having to foam it up beforehand. Examples – infamous No-Knead Crusty Artisan Bread, Focaccia and Brioche.
Why use active dry yeast for blini? Because it’s not as strong as instant yeast, so the batter doesn’t foam up as much which makes it a bit easier to handle to pour neat rounds of batter into the pan. Plus, the blini ends up the right thickness and texture. Not too puffy. Not crepe-like!
Can I use instant yeast? Yes you can! The blini does end up a touch puffier but only people who really “know” blinis would notice. The steps are more streamlined so I’ve included directions in the recipe notes.
Can I make blini without yeast?
Yes, you can! Well, it obviously won’t be traditional blini but it’s still very tasty, 85% similar to the real deal. The big upside is that it’s speedier to make because there’s no batter rising time!
To make blini without yeast, just make my pikelets recipe which uses baking powder instead of yeast as the rising agent. However, use 50/50 plain flour and buckwheat flour instead of just plain flour.
You will likely need to thin the batter a tiny bit so it spreads into the blini rounds in the pan (because buckwheat flour is slightly more absorbent than plain flour). The blini is also not quite as soft due to using baking powder rather than yeast. But the flavour is remarkably similar!
Ingredients for blini topping
As you can imagine, there’s all sorts of topping possibilities for blinis. But today, we’re going with a firm favourite – smoked salmon with dill crème fraîche!
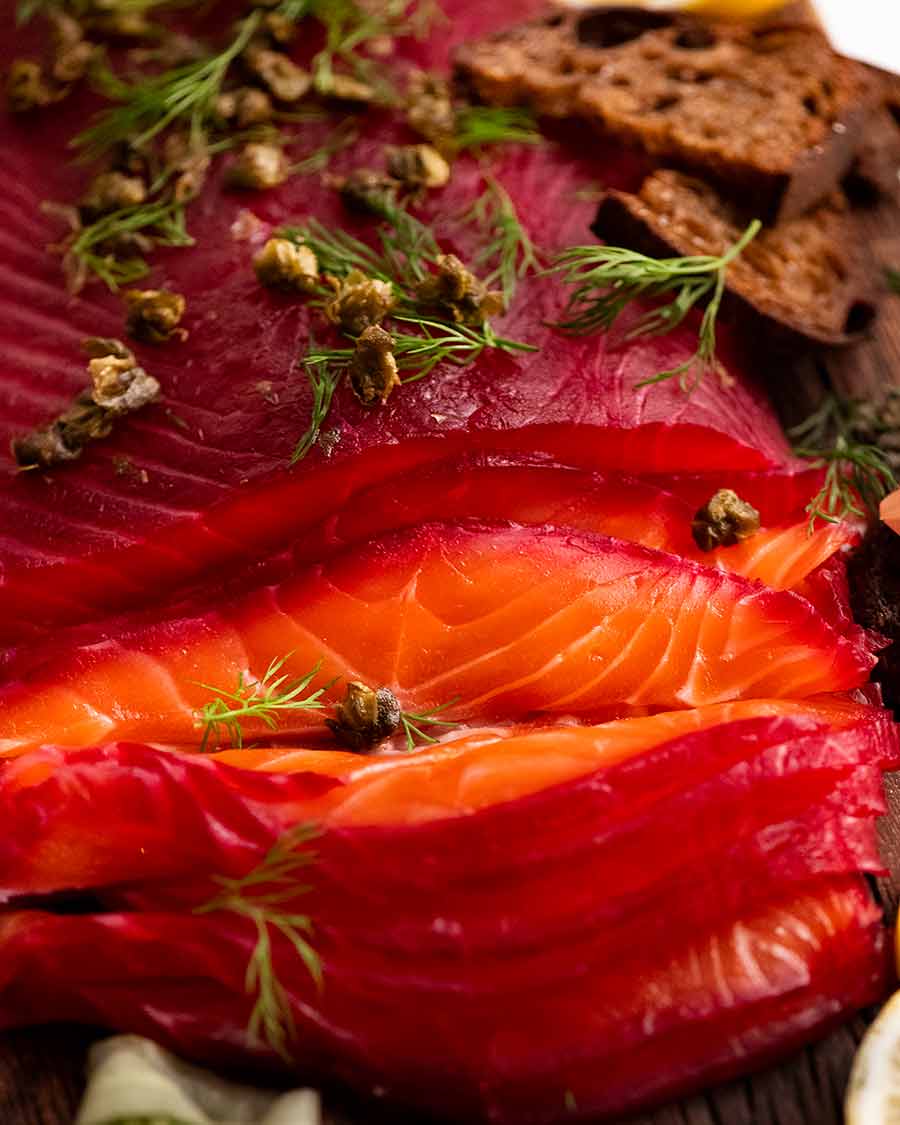
Smoked salmon
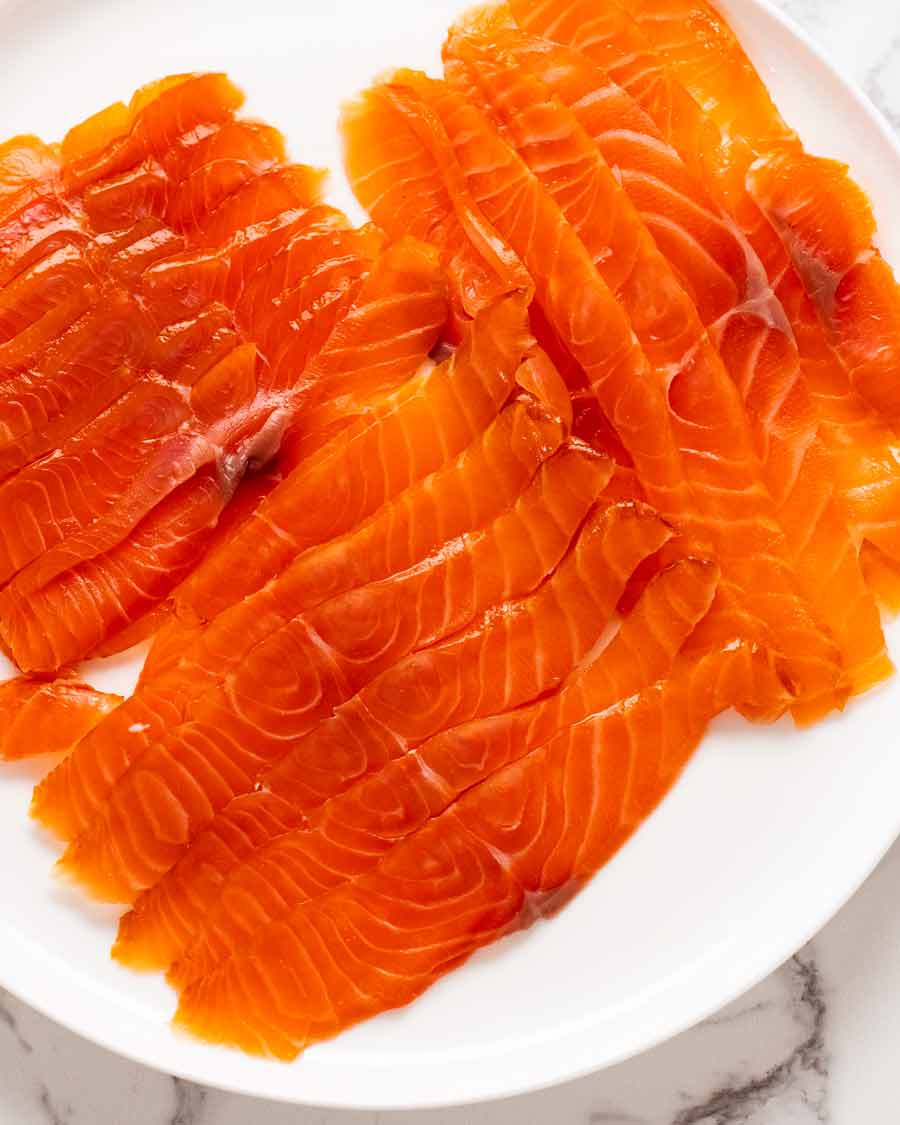
Smoked salmon is sold in packets pre-sliced into thin slices. Smoked trout is also perfect to use here.
Homemade beetroot cured salmon or salmon gravlax would also be ideal! They taste different to smoked salmon because they are not smoked. And they have fresher flavours from the respective flavourings used. But they have the same texture as smoked salmon – and are cheaper to make too, with fresh flavour you cannot buy!

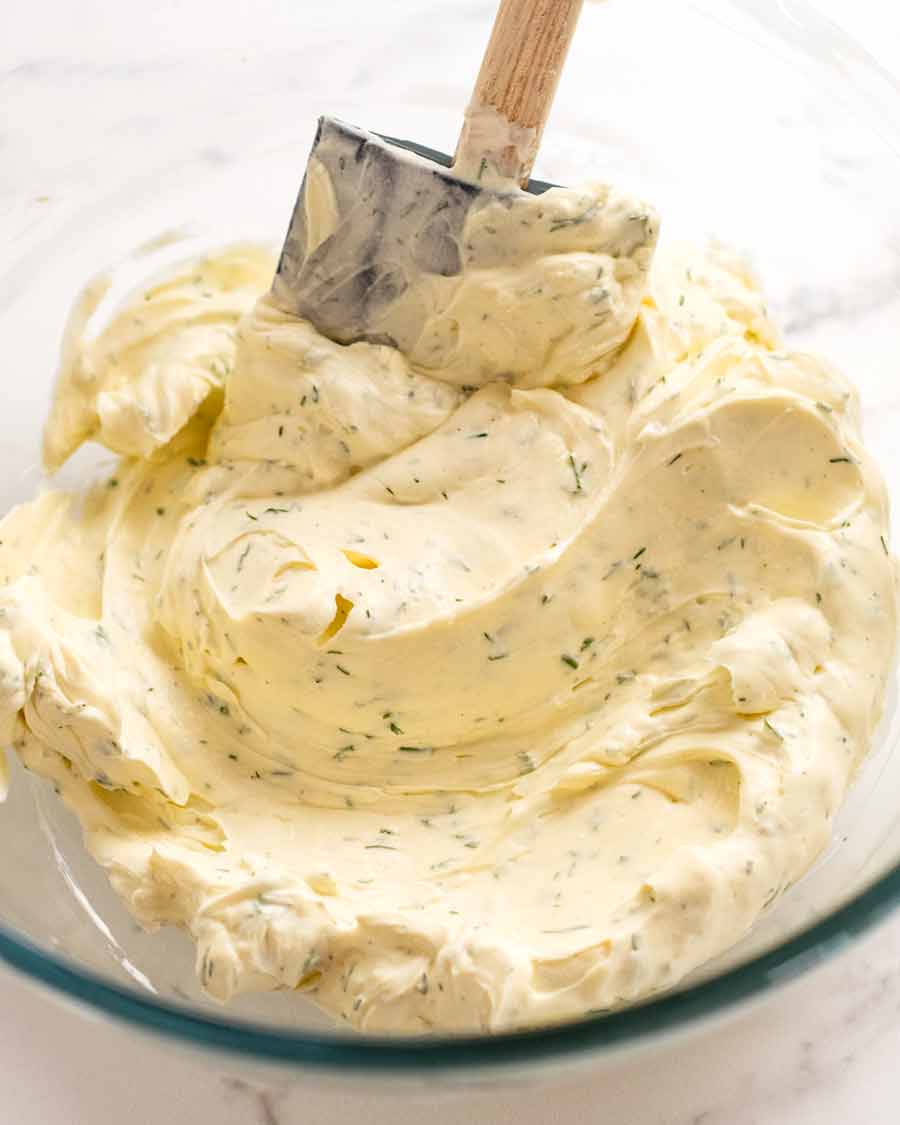
Dill crème fraîche
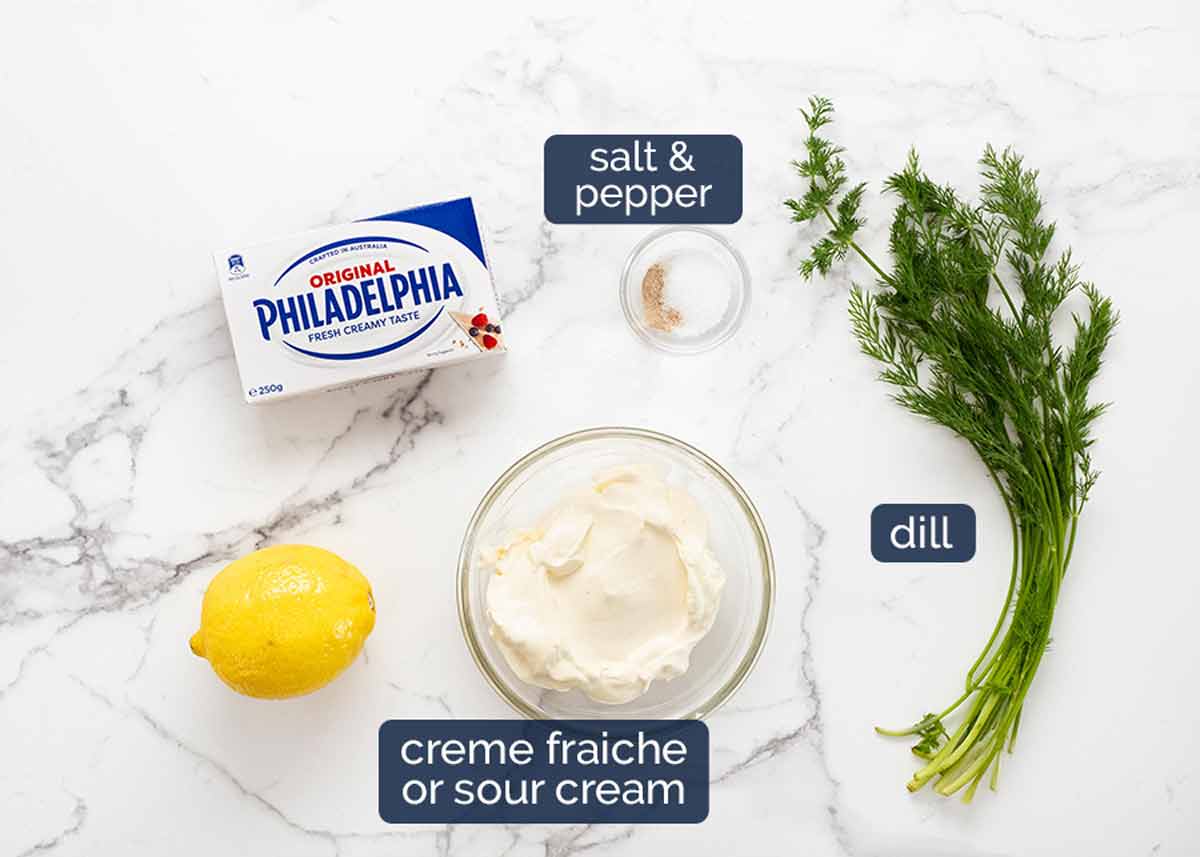
Crème fraîche – Think of this as a slightly richer sour cream, because that’s exactly what it tastes like. Which means, yes, sour cream is a near perfect substitute and it’s more economical. Sour cream just has a slightly less rich mouthfeel (because it has less fat). To be 100% honest, I don’t think most people could tell the difference.
Cream cheese – This is a little thicker than crème fraîche so it prevents the mixture from becoming too runny. We want it to be spreadable, like softened butter.
Dill – Not a primary ingredient here, we just use 2 teaspoons of finely chopped dill. So it’s not a deal killer if you can’t find it. Just leave it out, or substitute with chives or parsley.
Lemon juice – For a touch of tang, we only use 1 teaspoon. So like the dill, not a deal killer if you don’t have fresh lemon. Just use a vinegar instead.
How to make blinis
We’re really just making mini pancakes here. No big deal! The trickiest part is pouring neat rounds. But if yours come out wonky, who cares? Once you pile on the toppings, no one will notice! And it certainly doesn’t affect the delicious-factor.🤷🏻♀️
1. Activate yeast (ie foam it up)
First up, we need to activate the yeast. This just means waking it up by mixing it with warm water.
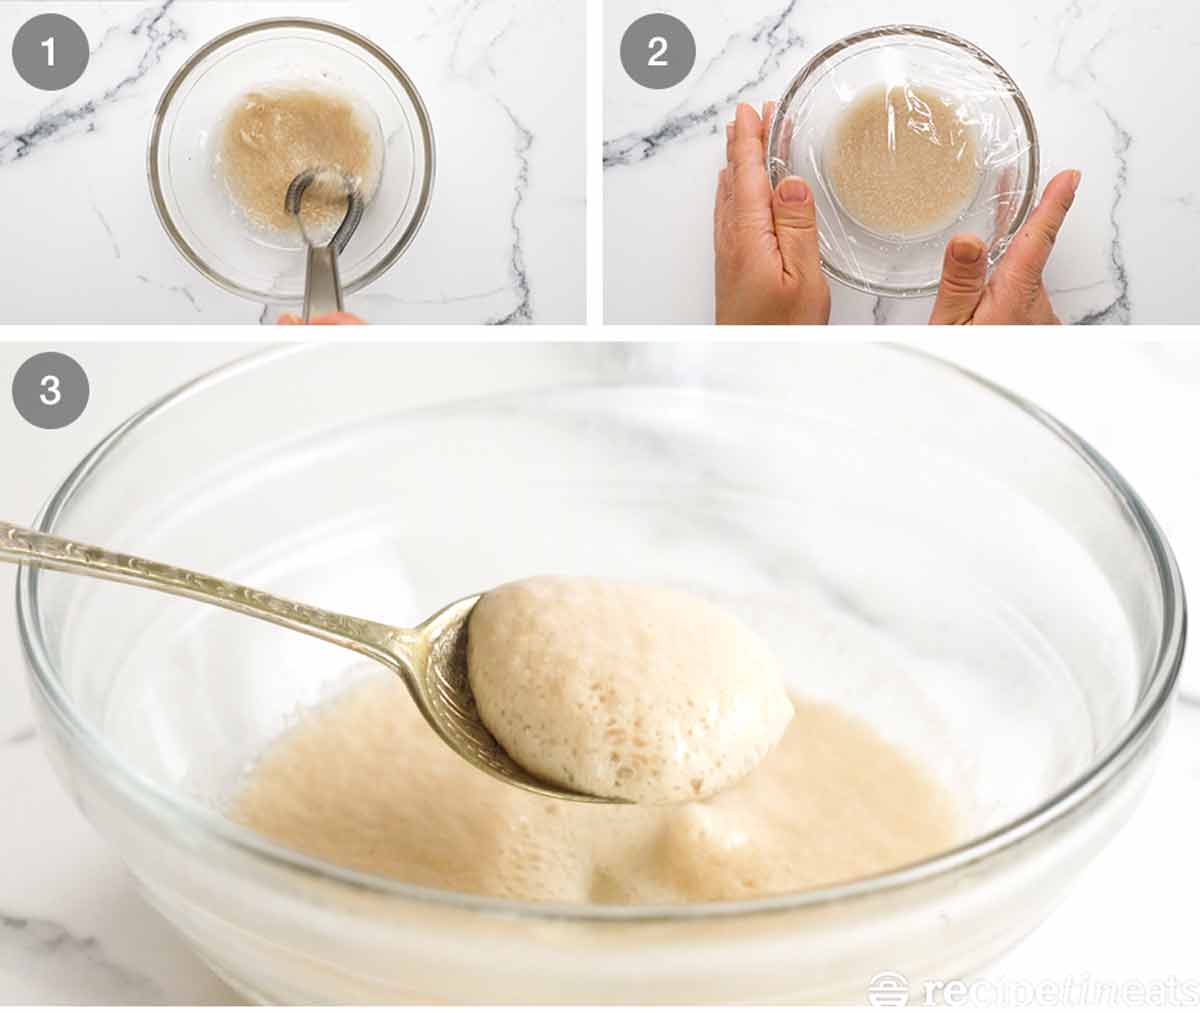
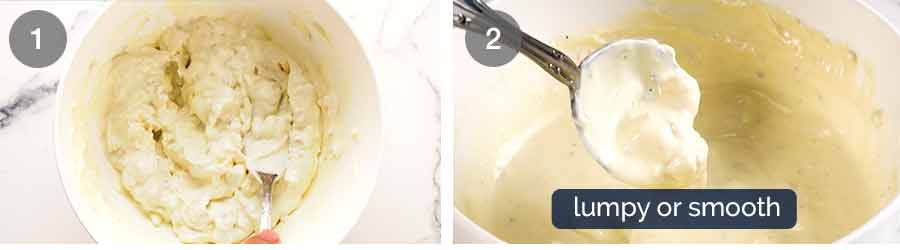
Mix yeast with warm water and sugar until mostly dissolved. Some lumps floating on the surface is fine, it will self-dissolve.
WINTER tip – If you’re in a cold environment, warm up the bowl before use by running it under hot water then wiping dry, or popping it in the microwave for a minute. This will help keep the mixture warm so the yeast becomes foamy. We’re only using a small amount of water here which will cool quickly if your kitchen is cold, and the yeast may not foam up.
Foam it! Cover with cling wrap then leave it in a warm place for 10 minute or until the surface becomes foamy. Meanwhile, prepare the other blini ingredients and topping!
No foam appearing? Move it to a warmer place. Still not foaming? Sorry, but it sounds like your yeast is dead! Have another go, but if it still doesn’t become foamy, it’s time to replace your yeast!
Foamy! This is what it looks like once the yeast is activated and makes the water foamy.
2. Make and proof blini batter
Once the yeast is activated, we can move on to make the blini batter.
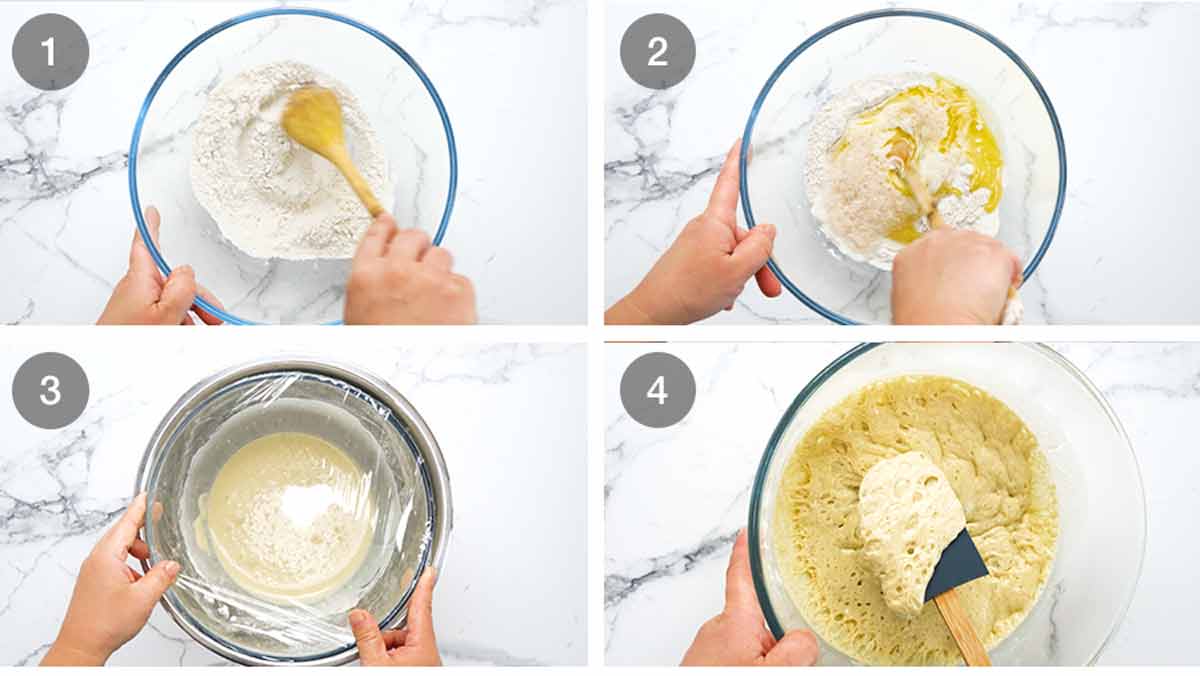
Dry ingredients – Mix the buckwheat flour, plain flour, salt and remaining sugar in a bowl.
Wet ingredients & foamy yeast – Add the milk, butter, egg and the foamy yeast then mix until combined.
Rise 1.5 hours – Cover the bowl in cling wrap then place it in a larger bowl filled with 3 cm / 1.2″ of warm water. This helps keep the batter in a warm cosy environment to make it rise.
Foamy – Then put the bowls in a warm place for 1 1/2 hours or until it doubles in volume and the surface is bubbly and foamy. This is what it will look like.
And yes, excessive use of the word “foamy” in today’s post has been noted! Let’s hope this is the end of it. 😂
3. Cook blini
We’ve got 35 of these little pancakes to cook. But the good news is, they only take 1 1/2 minutes per batch!
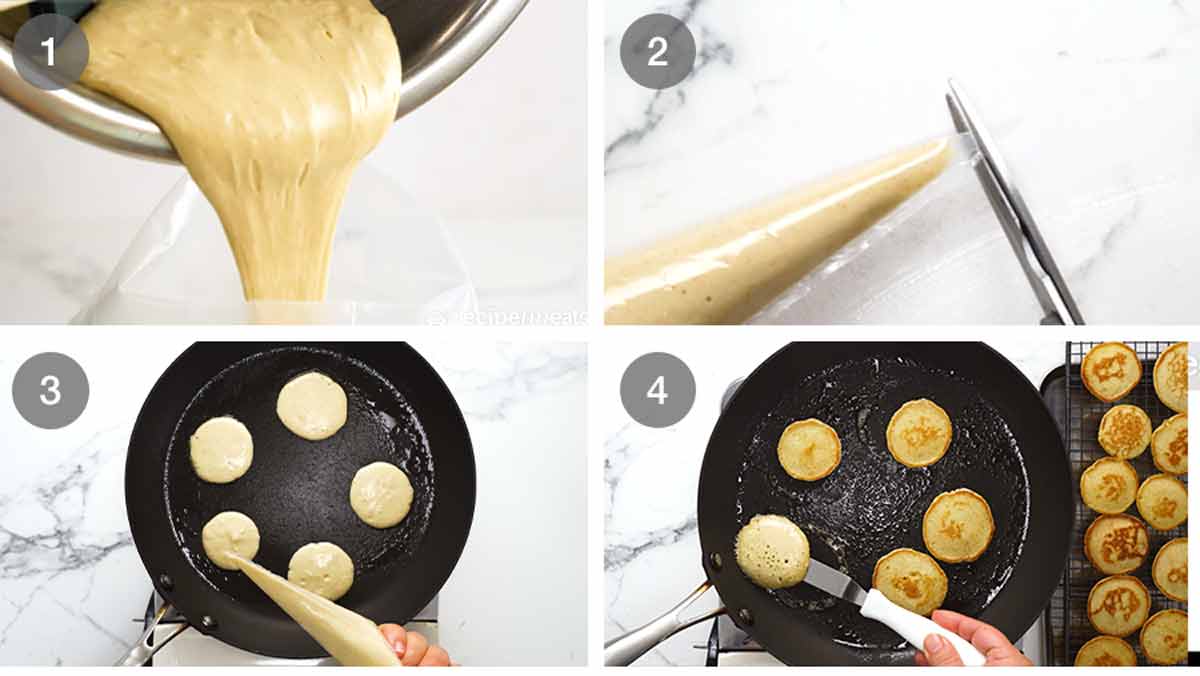
Piping bag or jug – Mix the batter to deflate and make it smooth. Then pour into a piping bag fitted with a 4mm (1/6″) round piping tip, or snip a 6 mm / 1/4″ hole in the end once filled (this is what I do).
The alternative to a piping bag is to use a pouring jug. However, I find it easier to use a piping bag to make neat rounds.
Snip end (if no nozzle) – As referred to above, if you don’t have the right size piping tip, snip a 6 mm / 1/4″ hole once filled. This will form a round opening that is 4 mm (1/6″) wide.
Cook 1 1/2 minutes – Place a large non stick pan over medium high heat. Once hot, remove pan from stove, spray lightly with oil then return to stove.
⚠️ SAFETY WARNING: Do not spray a pan with oil while it is set on a turned on stove else you risk a fire blaster situation! REMOVE the pan away from the fire, spray, then safely return to the stove.
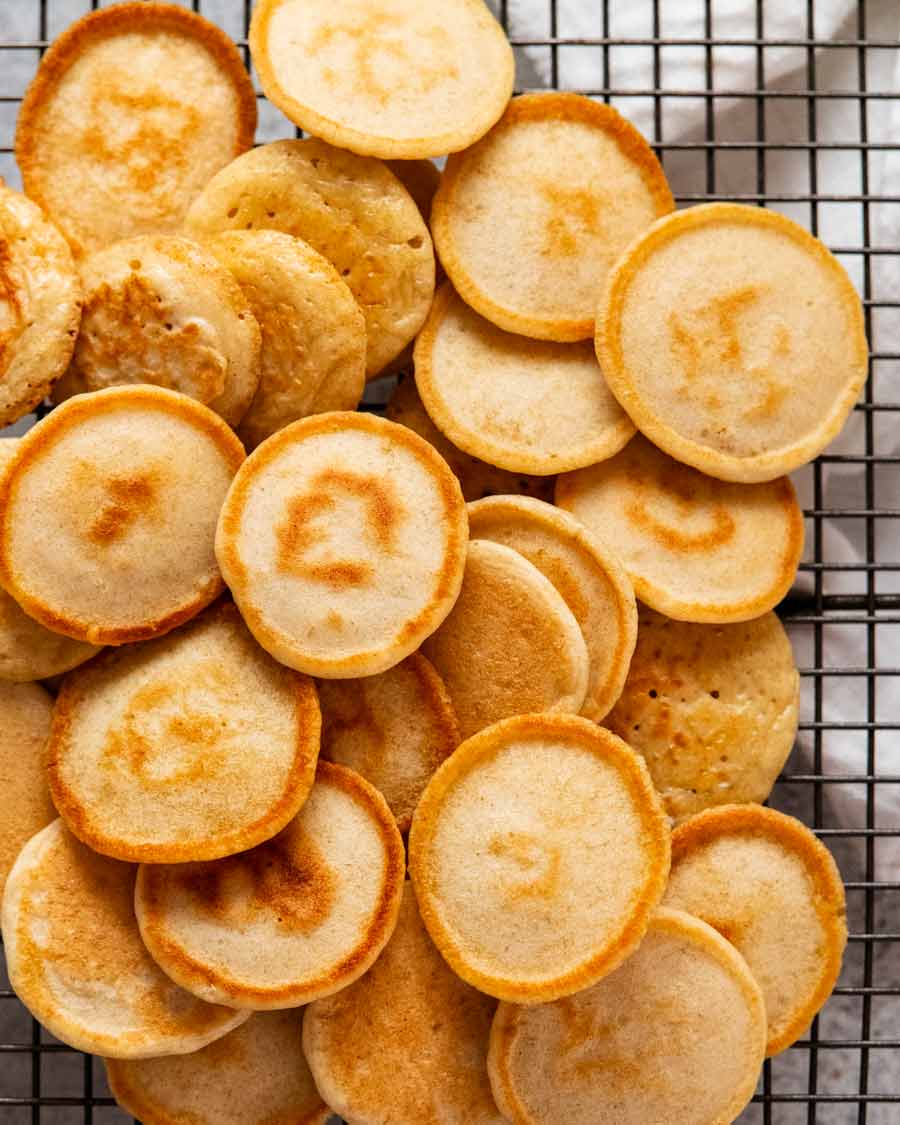
Pipe 2.5 cm / 1″ rounds so they spread to 4cm / 1.7″. Cook the first side 45 seconds to 1 minute or until it has golden spots in the middle and has the signature gold Blini “ring” around it. Flip and cook the other side for 30 seconds.
Cool – Transfer to a rack. Wipe the pan clean with a paper towel (so the next batch won’t be too brown). Spray lightly with oil again, set over the stove then continue cooking blinis.
Storing: Blinis are best made on the day of serving (make in morning then serving that evening is fine). We tried keeping them in the pantry, fridge and freezer overnight but they were all a little less fresh than ideal the next day.
To get ahead, you can make the blini batter the day before then refrigerate overnight and cook the blini on the day-of which is pretty quick given they only take 90 seconds a batch! I’ve included directions for making the batter the day before in the recipe notes.
4. Assemble blini
We are so tantalisingly close to finishing these delicious little morsels!
I know you’re impatient (oh wait, is that just me??!), but please ensure your blinis are fully cool before assembling. Otherwise the creamy dill spread will melt!
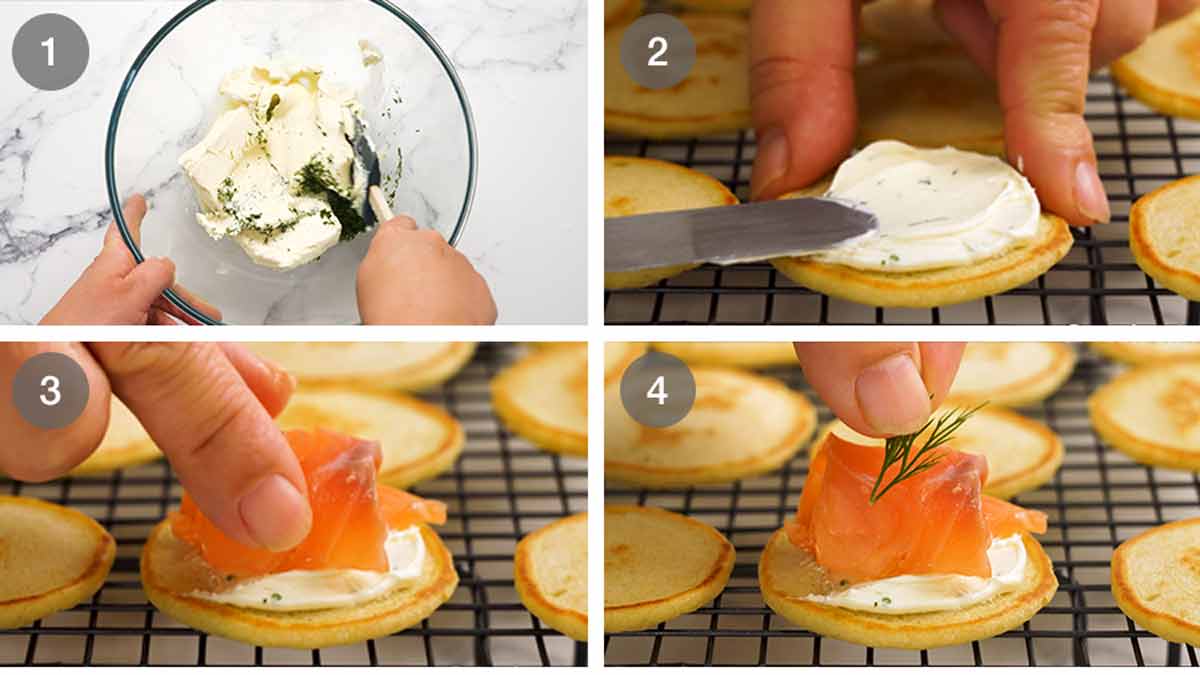
Dill crème fraîche – Mix all the ingredients in a bowl until smooth. This can be done ahead of time, even the day before. Just refrigerate until required, then mix before use to make it smooth, like softened butter, so it spreads easily onto the blini.
Spread a little of the dill crème fraîche on a blini.
Smoked salmon – Top with a small slice of smoked salmon, slightly coiled so it sits up prettily.
Dill sprig – Then, given we’ve come this far, we may as well finish it off with a little sprig of dill for a touch of fresh green colour!
Transfer your beautiful little blinis onto a platter, litter with some extra dill and lemon wedges for garnishes, pop open that bubbly and enjoy!


It is worrying how many of these I managed to inhale on one sitting when I filmed them. Oh, and also when I photographed them (yes, a different batch). Ummm, and yes, memories of all those test batches we did (instant yeast, active dry yeast, making the batter the day before, the blini-pikelet version, no buckwheat, no plain flour)…..
Yes, I’ve certainly had more than my fair share of blini in the past few weeks. Face is, anything you can eat with one hand while clutching a wine glass with the other rates very highly in my world.
That these are so elegant and make me feel a little classy is an added bonus. It’s not often I share a canapé like this. So let me have this one! 😂 – Nagi x
Watch how to make it

Blini with smoked salmon
Top with smoked salmon and dill crème fraîche (or sour cream) for an elegant, timeless canapé that never fails to impress. (Makes 35 though depends on number of test blinis, there are usually casualties)Ingredients
Blini:
- 3 tbsp warm water
- 1/2 tsp dry yeast (Note 1 re: instant yeast)
- 3/4 tsp white sugar
- 1/3 cup plain flour (all-purpose flour)
- 1/3 cup buckwheat flour (Note 2)
- 1/8 tsp cooking/kosher salt
- 1/3 cup milk , full-fat, warm
- 30g / 2 tbsp unsalted butter , melted and cooled
- 1 large egg at room temperature, lightly beaten (Note 3)
- Canola spray , for cooking
Dill crème fraiche:
- 125 g / 4 oz cream cheese , softened
- 3/4 cup crème fraîche (or sour cream) (Note 4)
- 2 tsp fresh dill , finely chopped (sub chives, parsley)
- 1 tsp lemon juice or apple cider vinegar
- 1/4 tsp cooking/kosher salt
- 1 pinch white pepper (sub black pepper)
Topping:
- 300 g / 10 oz smoked salmon (or trout) slices (Note 5)
- Extra fresh dill , for garnish
Instructions
Blini batter:
- Foamy yeast 10 min – Warm a small bowl by running under warm water, then wipe dry. (Note 6). Mix the warm water, yeast and 1/4 tsp of the sugar in the bowl until yeast is mostly dissolved (some small floating lumps ok). Cover with cling wrap and leave in a warm place for 10 minutes until the surface is foamy.
- Mix dry – With a wooden spoon, mix both flours, salt and the rest of the sugar in a separate medium bowl.
- Add wet – Stir in milk, butter, egg and all the foamy yeast mixture. Mix well until incorporated. It will be runny like pancake batter.
- Rise 1 1/2 hours – Cover with cling wrap and set in another larger bowl filled with 3cm/1" of warm water (to create a cosy, warm environment for batter rising). Let the batter rise in a warm place for 1 1/2 to 2 hours until it doubles in volume and has bubbles breaking the surface.
Cook blini:
- Piping bag – Stir batter before using. Transfer to a piping bag fitted with 4mm (1/6") round piping tip (or snip a 6 mm / 1/4" hole in the end). Tie off the piping bag end with a rubber band (loosely, as batter keeps expanding).
- Spray pan with oil – Place a large non stick pan over medium high heat. Once hot, remove pan from stove, spray lightly with oil then return to stove (⚠️Note 7)
- Cook – Pipe 2.5cm / 1" rounds that spread to 4cm / 1.7" in the pan. Cook the first side 45 seconds to 1 minute or until it has golden spots in the middle and has the signature gold Blini "ring" around it. Flip and cook the other side for 30 seconds.
- Cool – Transfer to a cooling rack. Wipe pan briefly with a paper towel, spray with oil and heat again. Continue cooking blinis, taking care to keep the pan at the right temperature.
Assembling blini:
- Cool blini before assembling.
- Dill crème fraîche – Mix ingredients until smooth. Refrigerate until required.
- Smoked salmon – Cut into 4 x 5 cm pieces (1.5 x 2")
- Assemble – Spread 3/4 teaspoon of dill crème fraîche on a blini. Coil on a piece of salmon, top with dill. Transfer to a larger platter. Use lemon wedges and extra dill as platter garnishes, if desired. Serve with bubbles and wine!
Notes
- Switch half the plain flour with buckwheat flour for the signature nutty flavour of blini
- Leave out the sugar
- Cook one test blini. If batter is too thick (which is likely), thin with a touch of milk.
Life of Dozer
He only got this one cause I dropped it on the floor. No blini for Dozer! Too precious! 😂

The post Blinis with smoked salmon appeared first on RecipeTin Eats.
]]>