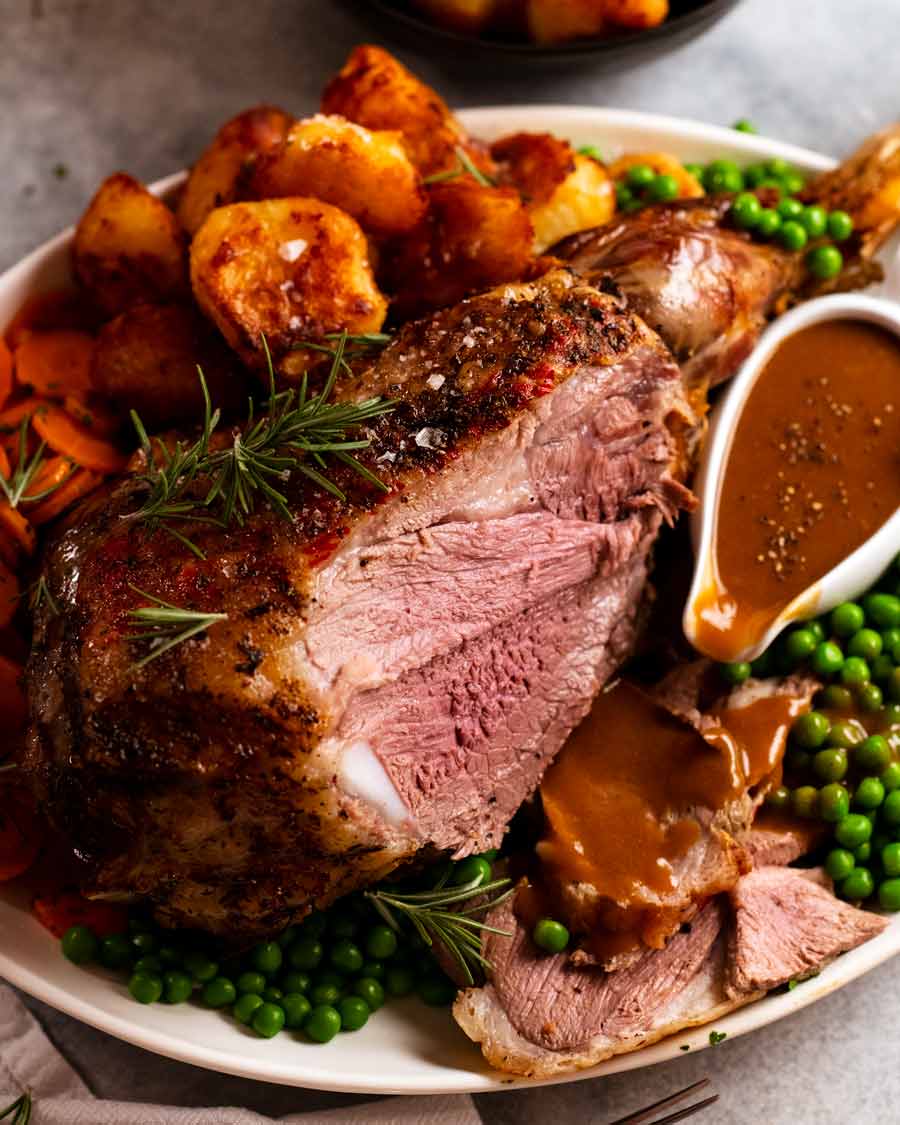
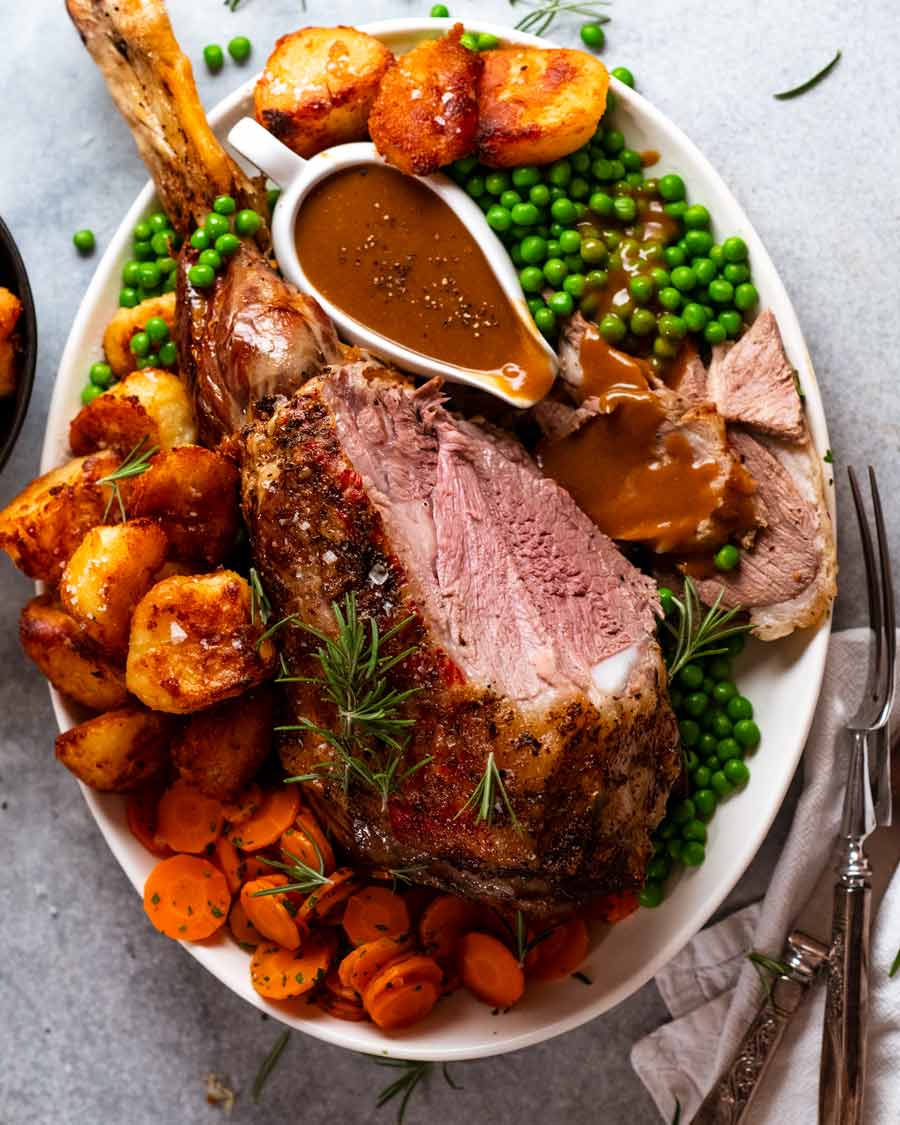
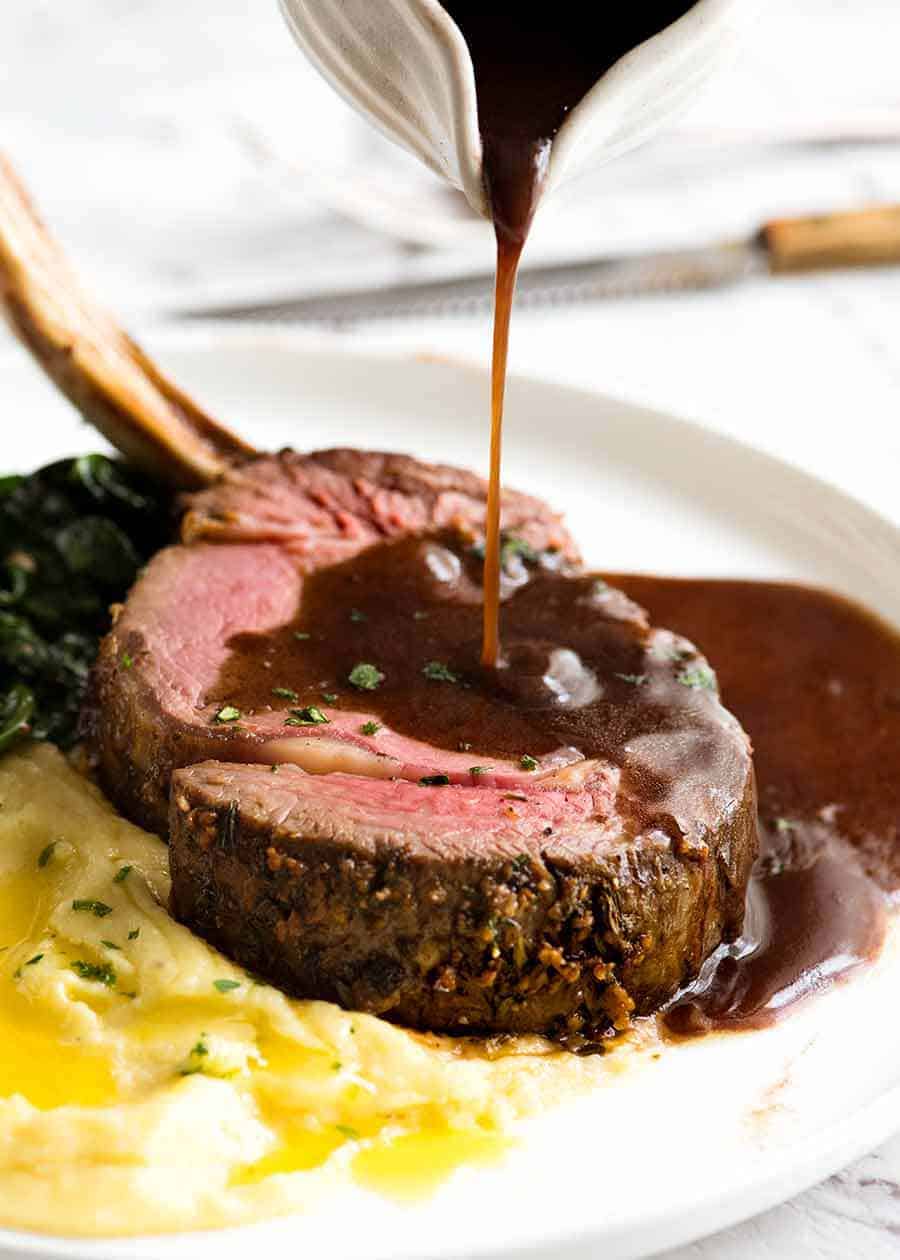
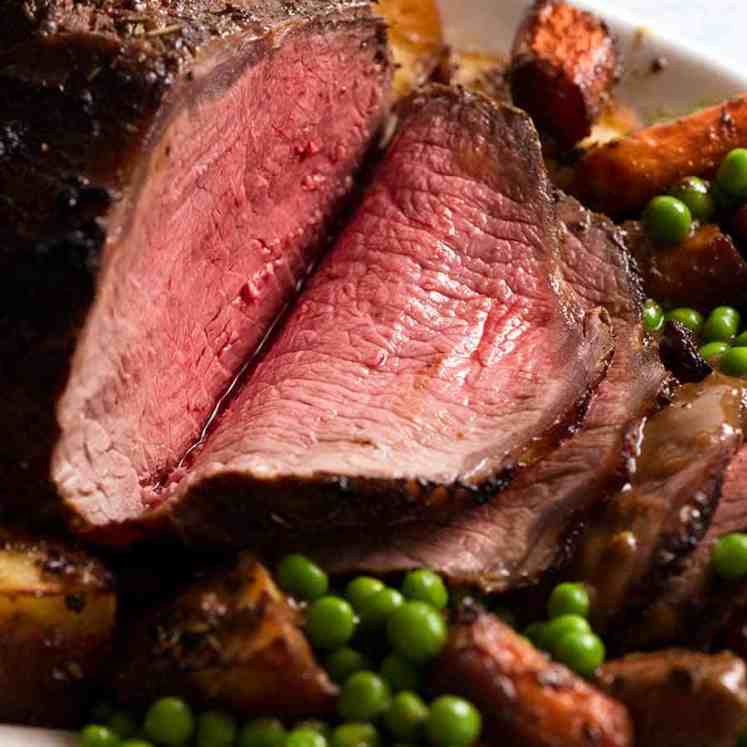
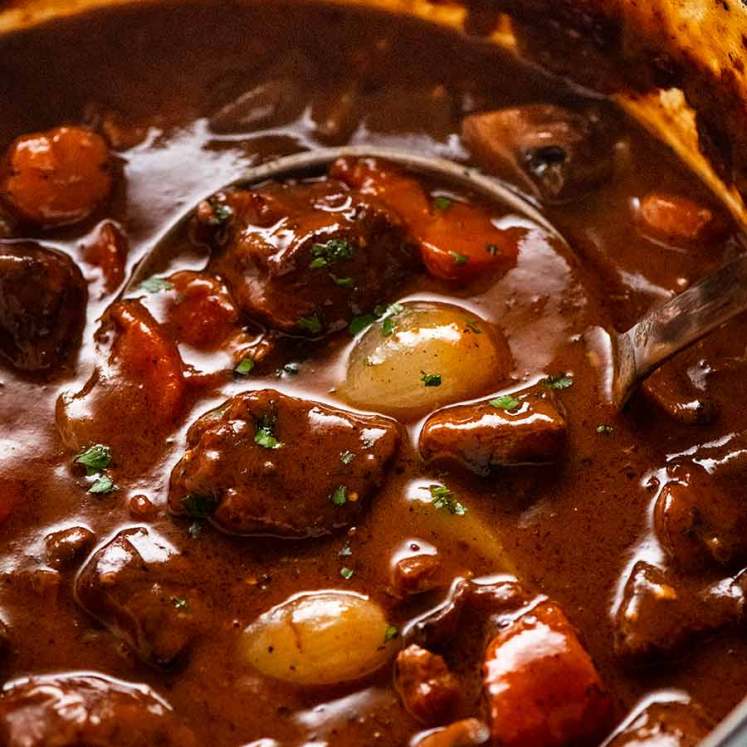
 I love a good roast lamb (proof). Here’s my classic recipe for lamb leg, rubbed with garlic and rosemary, served with gravy, peas, carrots and crispy roast potatoes (duck fat or classic). I hope you love it as much as I do! The only thing you need to know for perfect roast lamb leg I... Get the Recipe
The post Roast Lamb Leg with Gravy appeared first on RecipeTin Eats.
]]>I love a good roast lamb (proof). Here’s my classic recipe for lamb leg, rubbed with garlic and rosemary, served with gravy, peas, carrots and crispy roast potatoes (duck fat or classic). I hope you love it as much as I do!
The only thing you need to know for perfect roast lamb leg
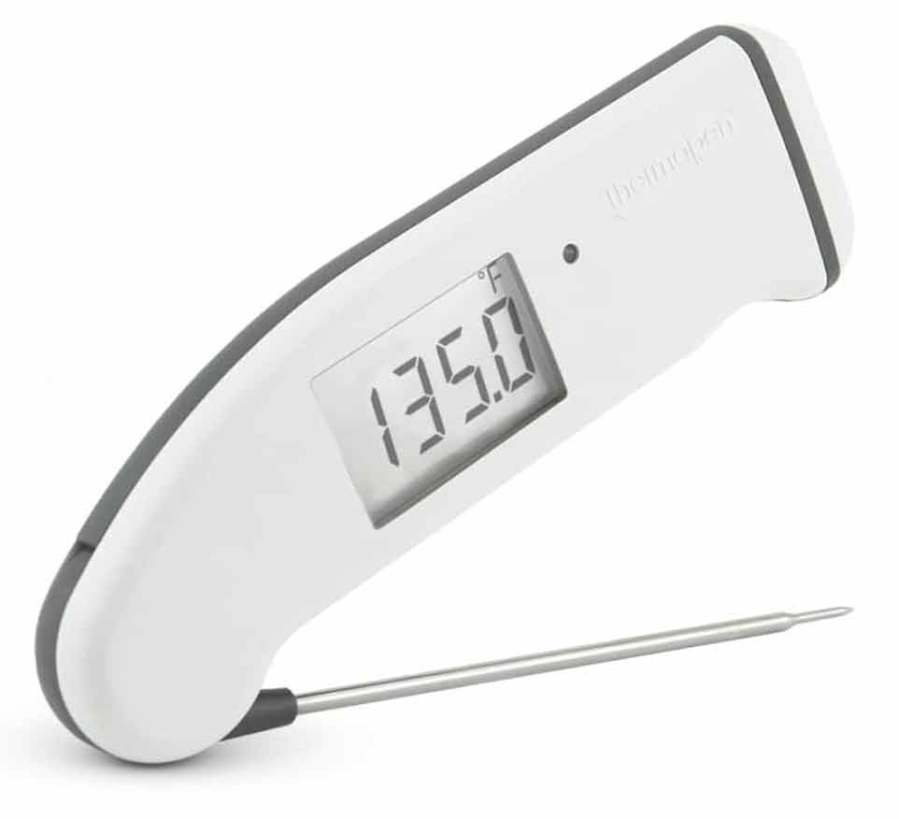
I have a lot to say about roasting any kind of meat. Especially Australia’s favourite roast – the great lamb leg. But there’s really only one thing you need to know to make perfect roast lamb leg, every single time:
GET A MEAT THERMOMETER!!
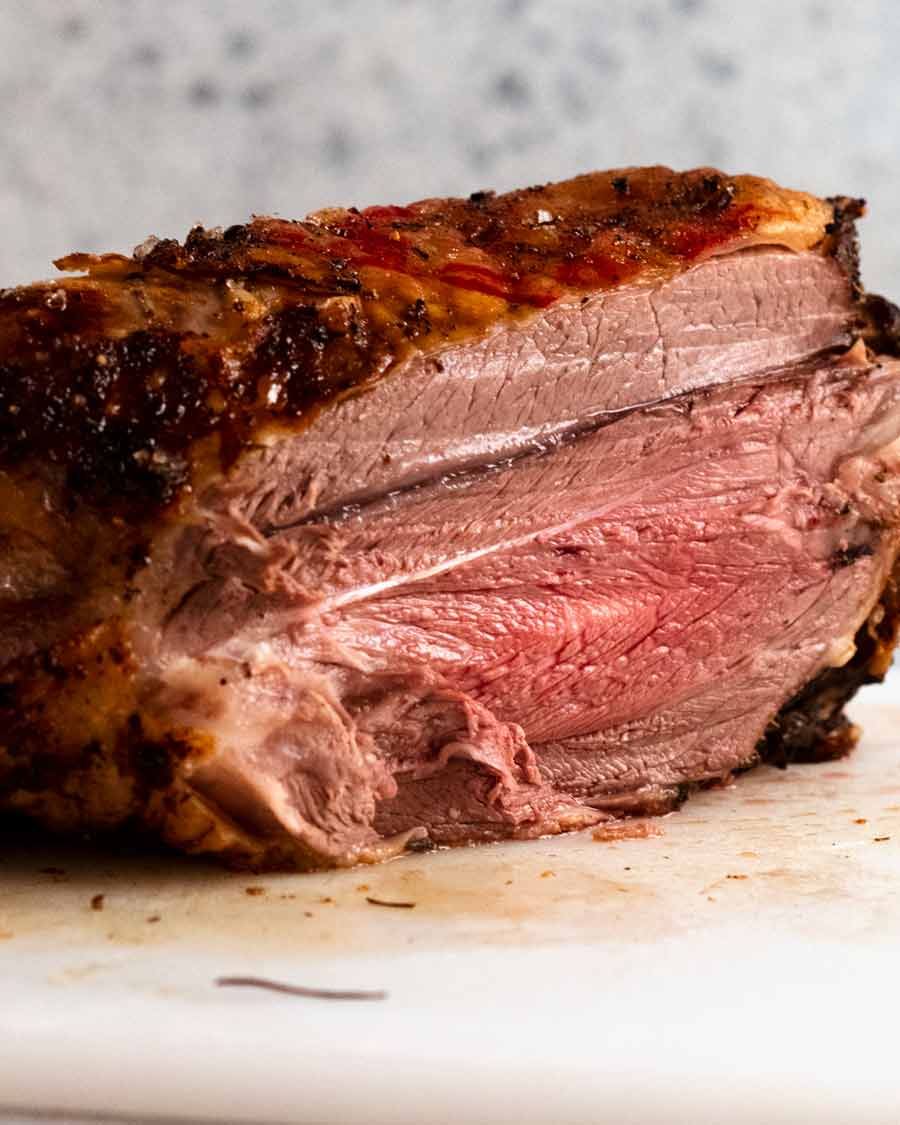
It’s the only way you can take the guesswork out of cooking lamb leg so it’s perfect blushing pink and ridiculously juicy inside. Because – and here’s something Aussies don’t like to talk about – lamb leg is actually very lean so if it’s not pink, it’s dry. Full stop, end of story!
My meat thermometer – For most of my adult life, I was using a $5 thermometer I got on Ebay which never failed me. A few years ago I finally decided it was time to invest in a real one so I got a Thermapen which is pretty well regarded as the best (my thoughts here). Even if you can’t invest in a Thermapen – it’s the 21st century, and even cheap tech isn’t so bad. Invest in a $5 meat thermometer. That’s a lot cheaper than a wasted, overcooked lamb leg!
OK, I do have a few more “how to make the perfect roast lamb leg” tips!
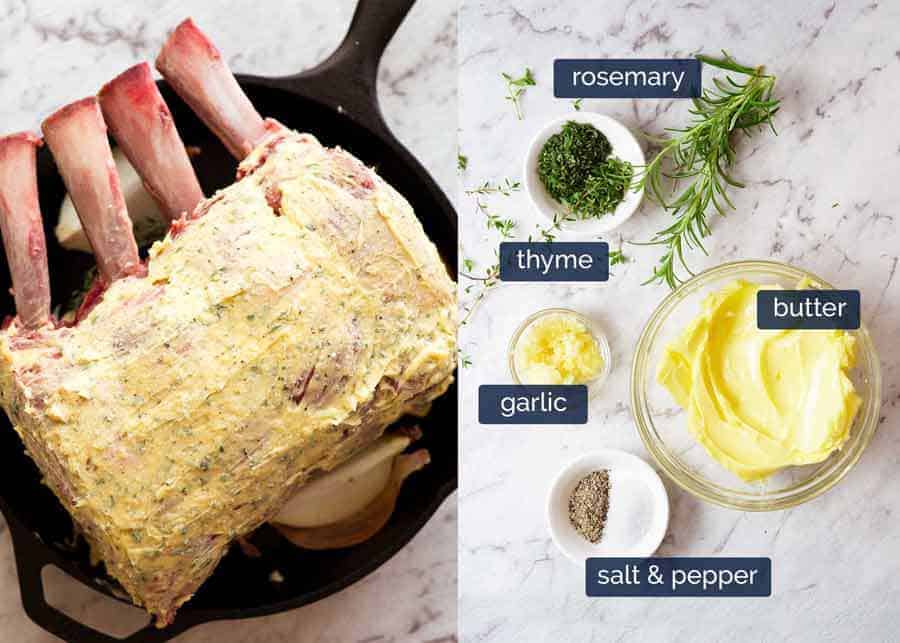
Garlic rosemary rub – classic lamb flavours.
Start on high to get the colour going then lower heat.
Roast on a bed of garlic (or onion).
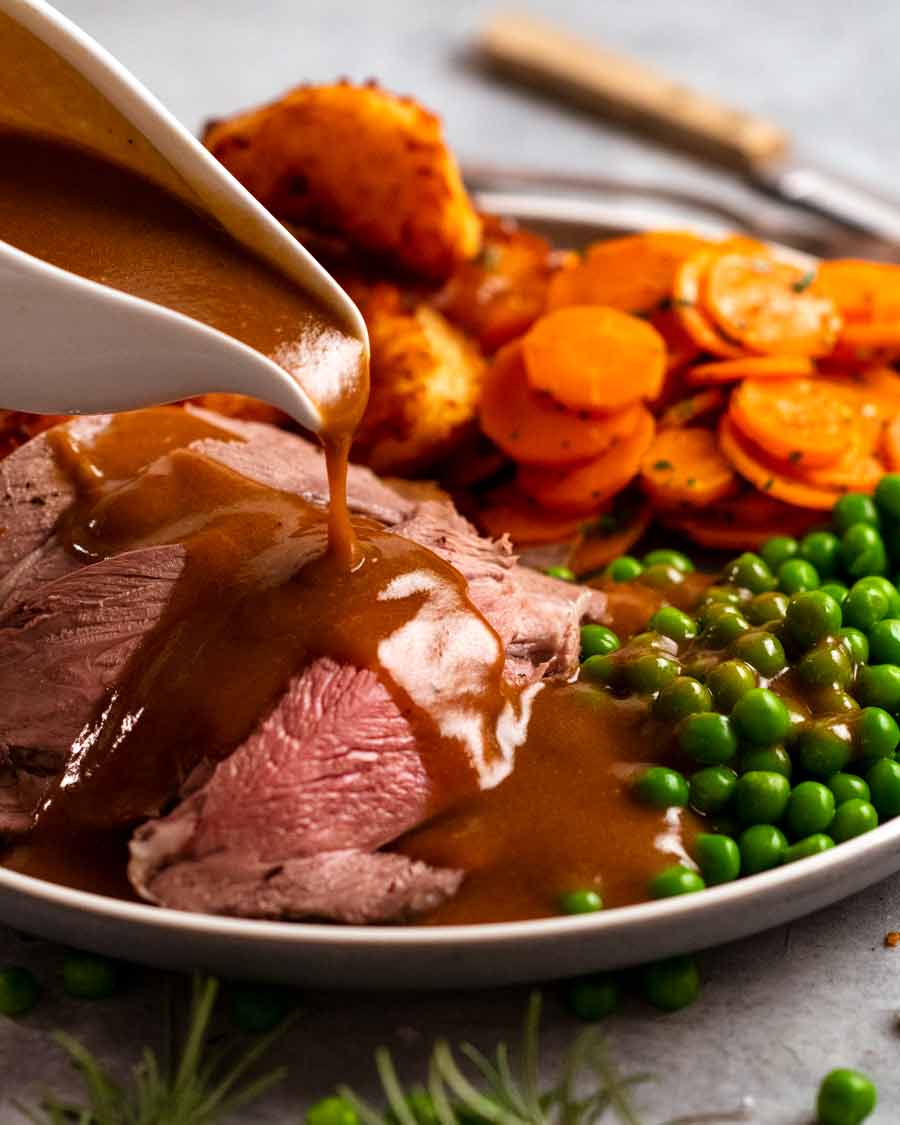
Make the gravy using the pan drippings. Roast lamb gravy is better than every other cut of meat – beef, chicken, pork, none of them compare!

What you need for roast lamb leg
Starting with the hero ingredient – the lamb leg! Get the best you can afford – yes, meat is like wine, the more you pay, the better the quality. Quality of life of the animal also comes into play there.
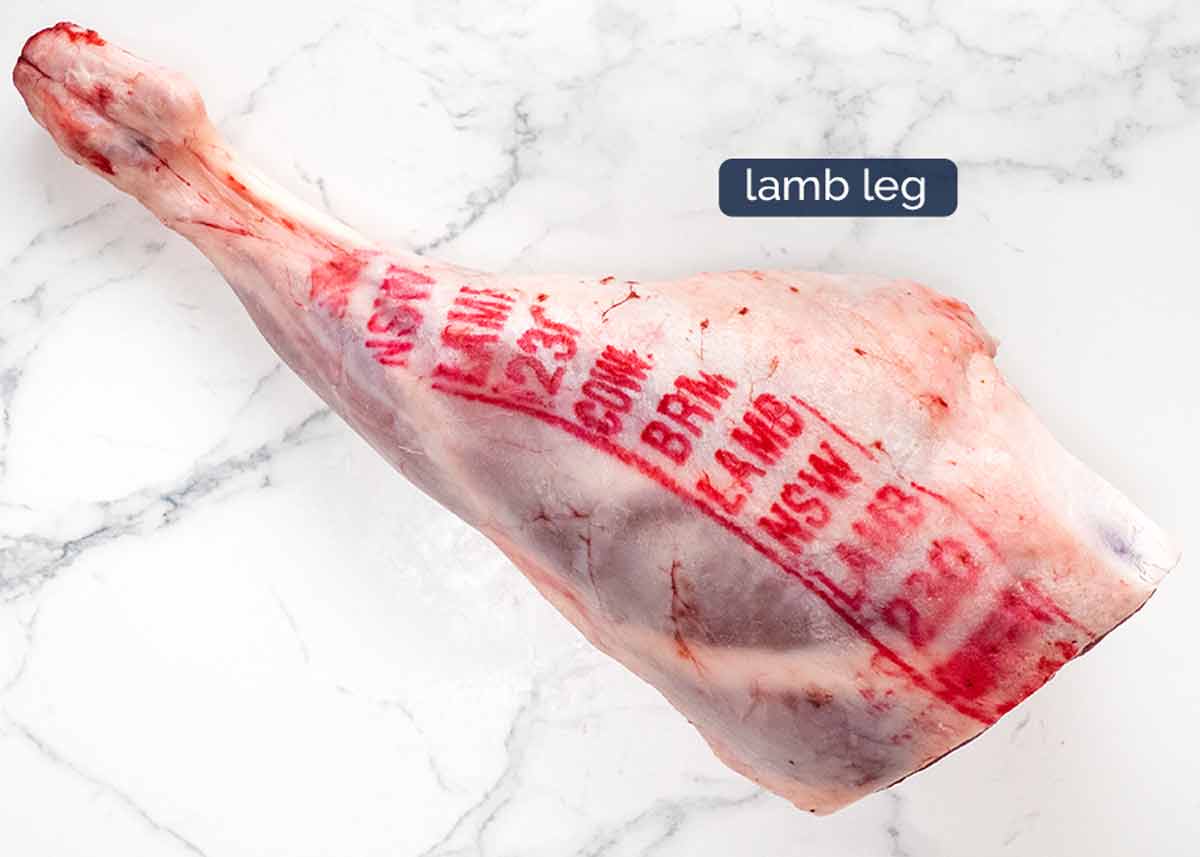
All that red ink you see is perfectly safe to eat and actually, you only see it on better quality lamb. You don’t typically see it on supermarket lamb.
Cut bone – Some (most?) butchers and almost all supermarkets sell lamb leg with the shank (bone) cut. Either fully cut off or partially cut so it folds. This is simply for practical reasons – shelf storage and packing space. For grandness, I like the bone in tact. But it doesn’t matter ,it’s purely a visual decision!
Rub for roast lamb leg
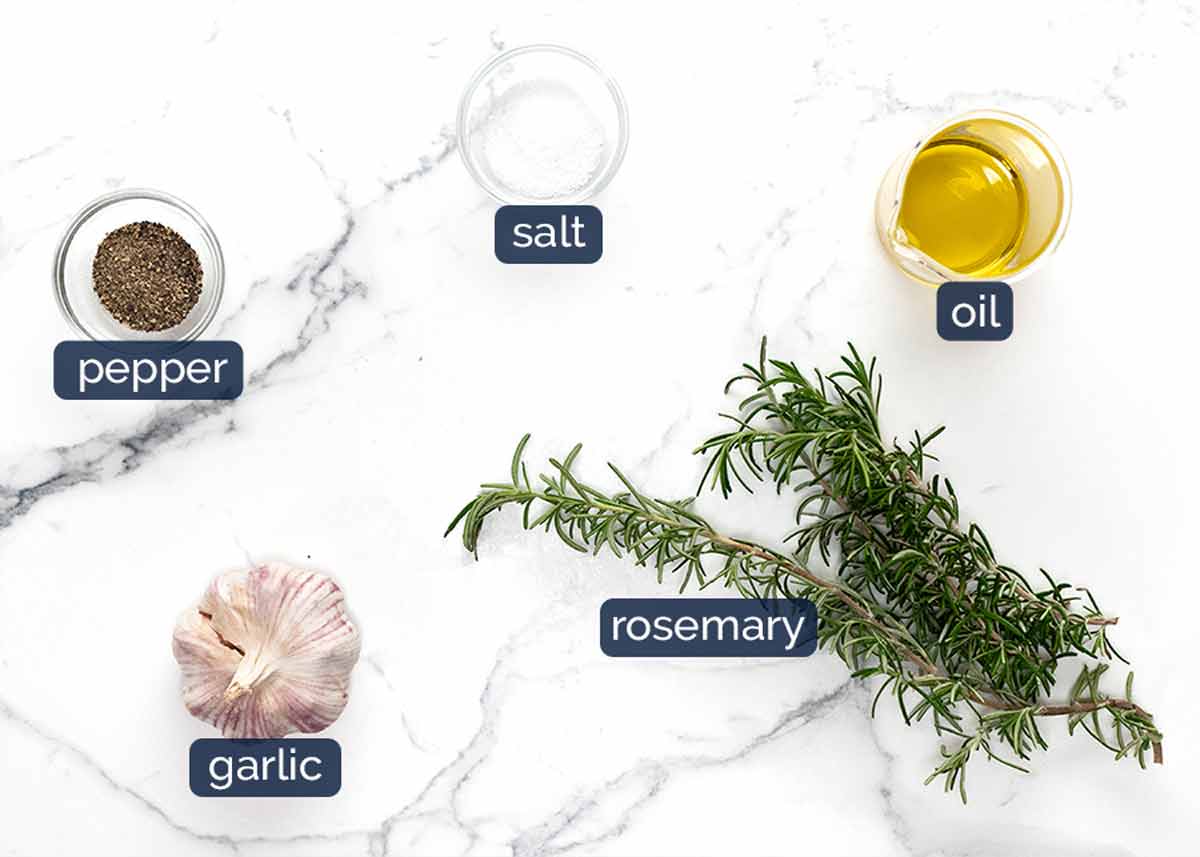
Here’s what you need for the rub: rosemary, garlic, olive oil, salt and pepper. Use fresh rosemary – dried is not the same!
Roast lamb gravy
All you need for gravy is flour for thickening and beef stock/broth for the liquid. You shouldn’t need extra salt for the gravy. I find the salt on the lamb that ends up in the pan drippings plus the salt in the beef stock is enough. But taste and add more if you want!
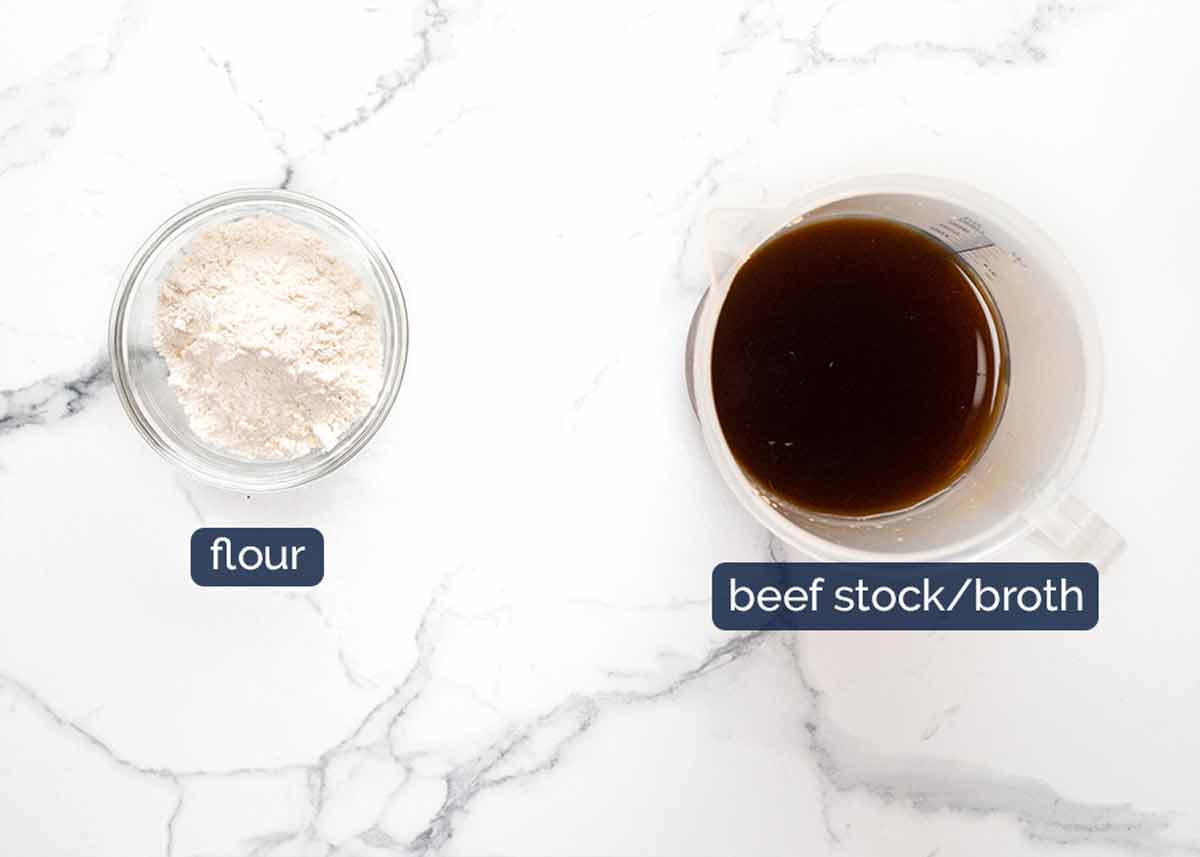
Why beef rather than lamb stock? Well, there’s a reason lamb stock is not typically sold at grocery stores! It’s just very…lamby.  Beef has a cleaner flavour. It doesn’t make the gravy taste beefy at all because there is so much lamb flavour from the drippings.
Why not chicken stock? It works fine but the gravy colour is paler. I like my gravy for roast lamb leg to be a really deep brown colour!
How to make roast lamb leg
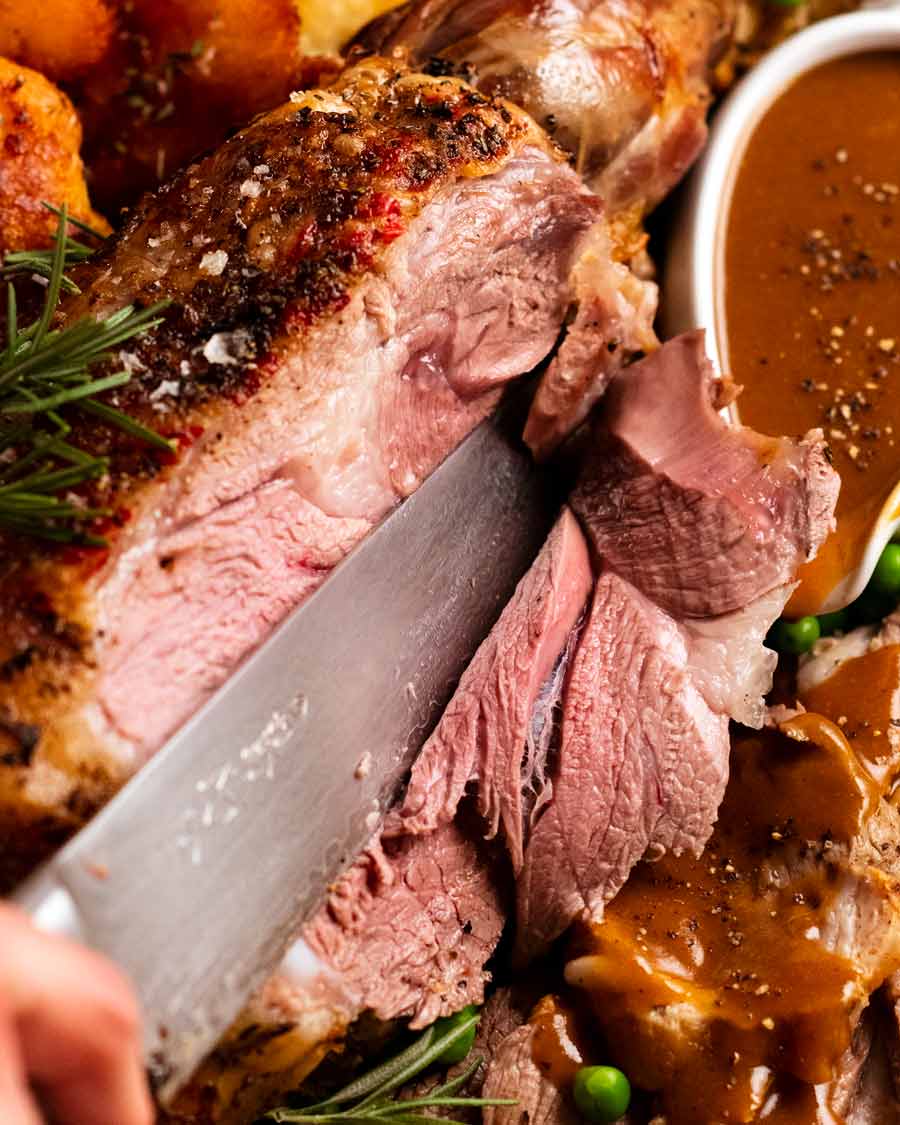
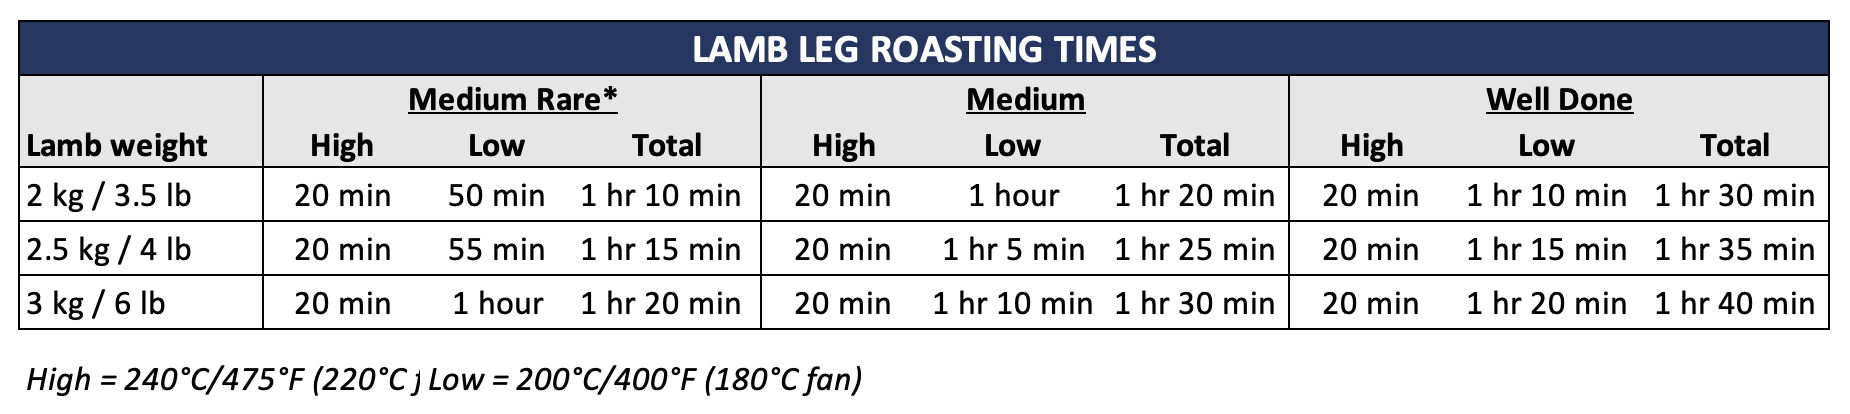
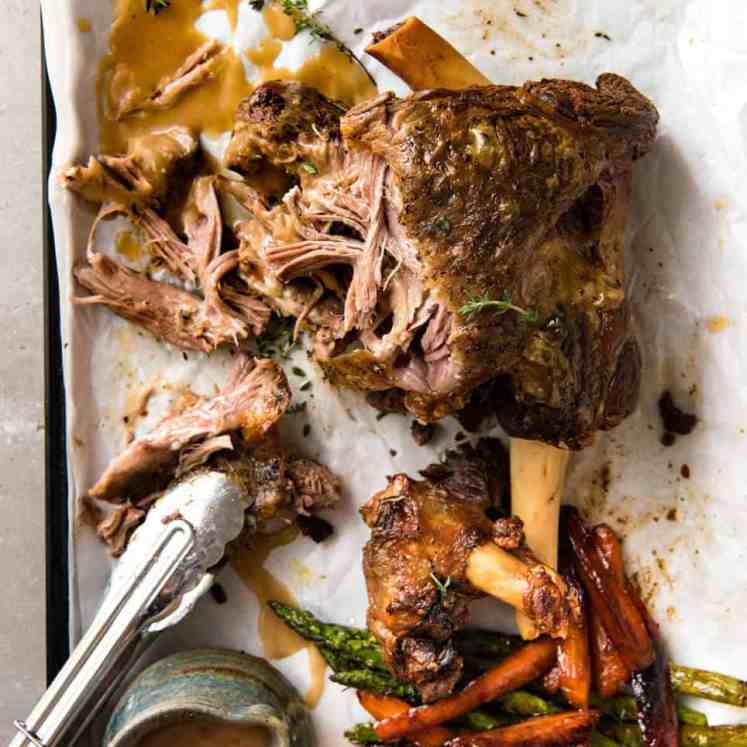
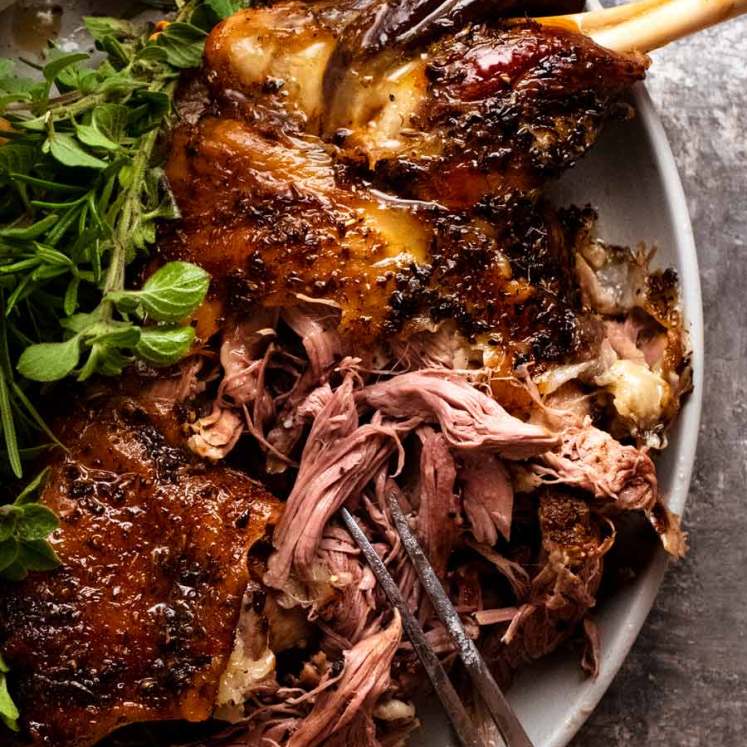
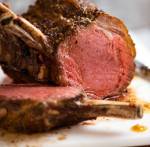
Rub with rosemary and garlic, roast in a hot oven to get the colour going then continue at a lower temperature for 1 hour or until the internal temperature is 53°C/127°F (for blushing pink perfection). Rest for 20 minutes before carving. It will still be very warm even after 1 hour – enough time to make duck fat potatoes!
The lamb leg pictured is a 2.75 kg lamb leg which is about the average size you get from good butchers. Supermarket lamb legs tend to be a little larger from slightly older animals which makes the meat a little less tender and a little stronger “lamby” flavour. Albeit, as you’d expect, cheaper than from butchers.
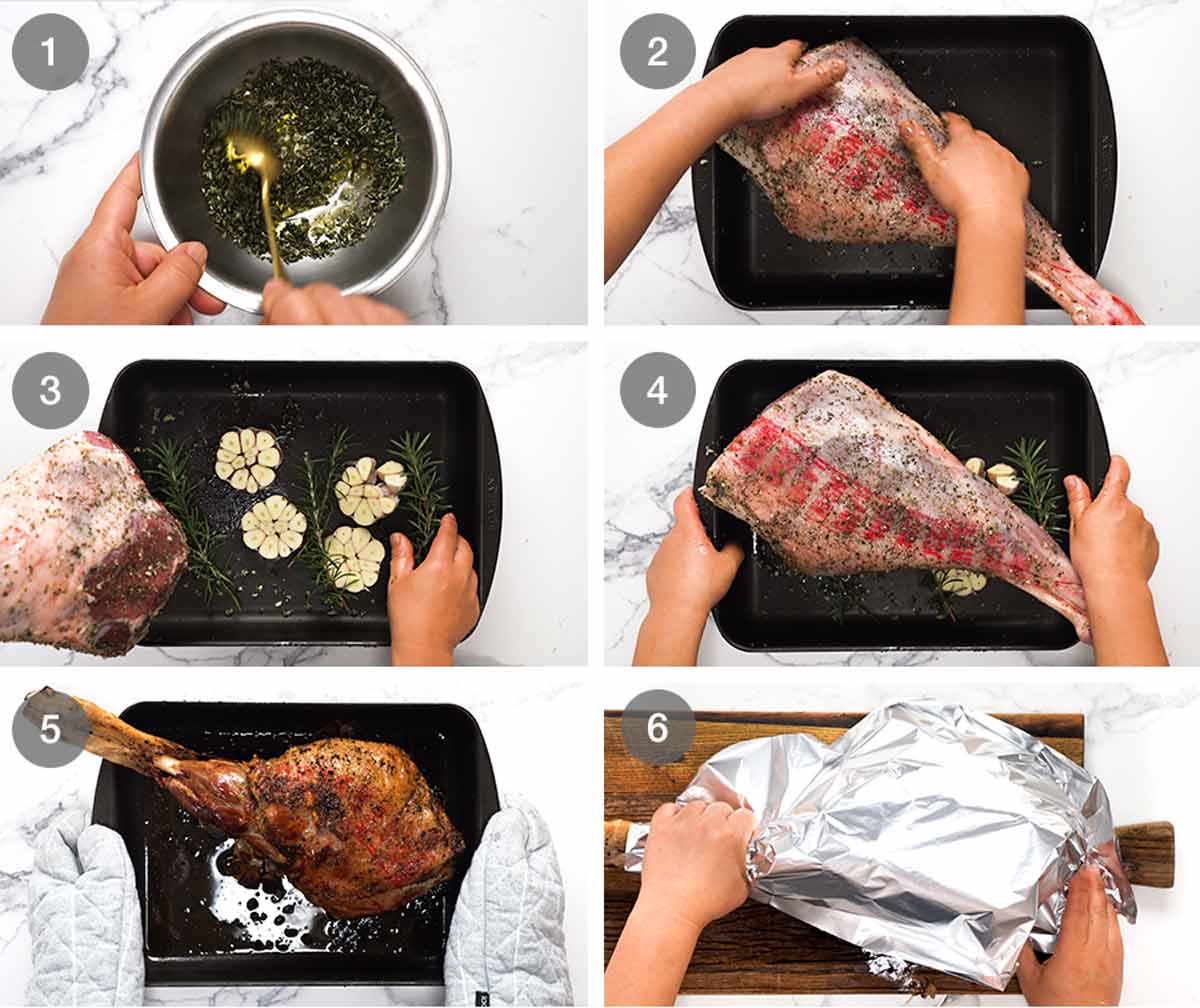
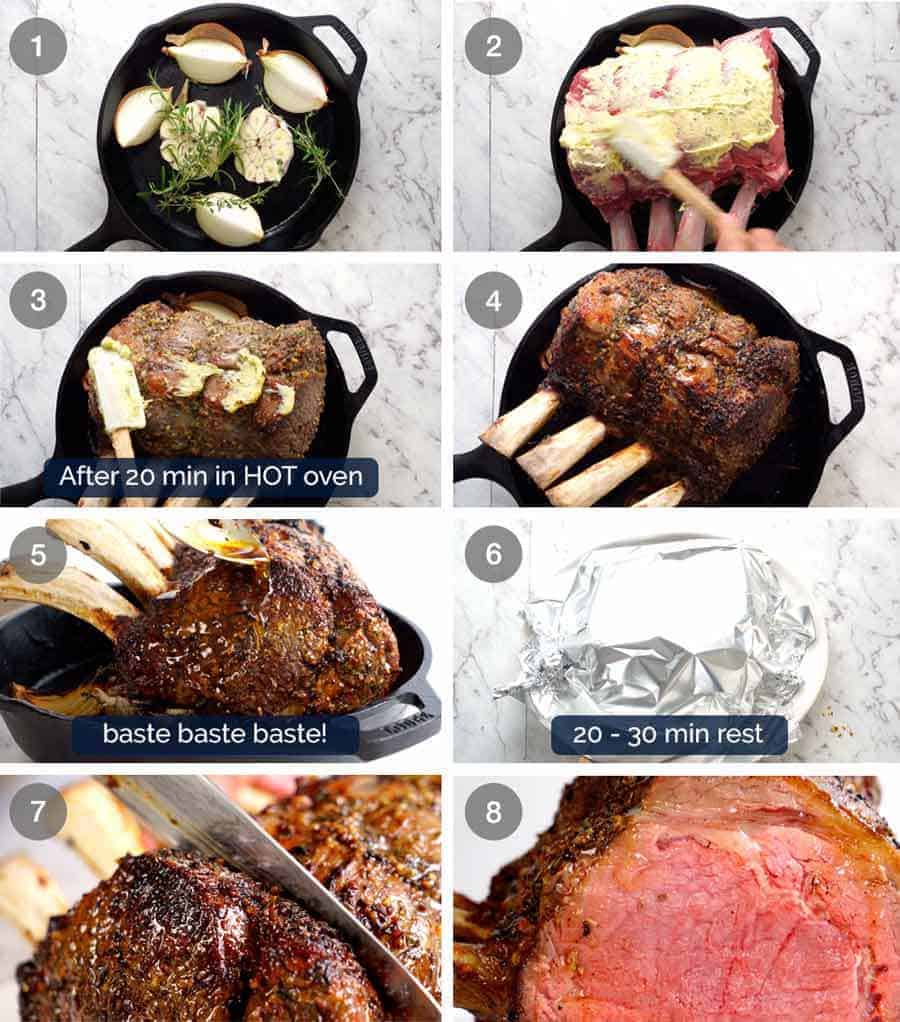
Make rub – Mix oil, garlic and rosemary in a bowl.
Rub then sprinkle – Slather the rub all over the lamb, then sprinkle the salt and pepper all over. It’s better to do it this way for more even dispersion of salt – if you put it in the oil, it doesn’t spread quite as evenly because it pools in the bottom of the bowl.
I do this rubbing step in the roasting pan – why dirty a cutting board??
Garlic bed – Place cut garlic and rosemary under the lamb.
Hot oven 20 minutes – Roast for 20 minutes in a hot 240°C/475°F (220°C fan) oven. This will get the colour going on the lamb. It’s tempting to go longer to get even more colour on it but I find if you go beyond 20 minutes you end up with too much overcooked meat “ring” on the outer edges of the lamb.
1 hour lower oven – Reduce heat to 200°C / 400°F (180°C fan) and roast for a further 1 hour or until the internal temperature of the lamb is 53°C/127°F for blushing pink perfection.
Check the internal temperature at the 45 minute mark. Never rely on a recipe cook time for roast meat, use your thermometer! So many variables can affect the exact roasting time, from oven strength to pan heat distribution, the shape of the lamb leg and how cold the meat is right in the middle.
See below for more information on lamb doneness and different size lambs.
Rest 20 minutes – Rest the lamb for 20 minutes before carving. During this resting stage, the lamb finishes cooking and the internal temperature will rise to 62°C/144°F which is perfect medium rare for lamb.
Also during resting, the lamb juices get re-absorbed by the meat fibres so when you cut into the meat, the juices remain in the meat and eventually end up in your mouth. If you do not rest the meat then the meat juices leak out everywhere when you start carving the lamb.
Internal temperature of roast lamb leg
No credible restaurant would ever serve lamb leg at anything over than medium rare! But I do know some people like their lamb done a little more, so here are the internal temperatures for lamb leg at different levels of doneness.
Take the lamb out when it hits the “temperature out of oven”. After resting for 20 minutes it will rise to your target level of doneness.
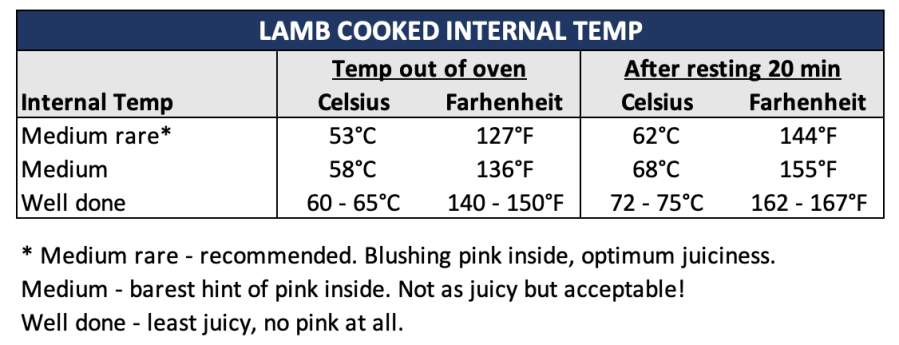
TIP: Take the lamb out early!!!
This is one of the most common mistakes people make when roasting lamb. If you want medium rare lamb and you take the lamb leg out of the oven when it hits 62°C/144°F (which is the medium rare target temperature), it will rise to 73°C/163°F once rested which is well done – no hint of pink at all! This occurs because the lamb continues to cook after you take it out of the oven due to residual heat. It’s called carry-over cooking.
So if you want medium rare, perfectly pink lamb leg, you need to take it out of the oven once the internal temperature reaches 53°C/127°F. At this temperature, the lamb is rare.
But when you rest the lamb for 20 minutes, it will continue to cook and the internal temperature will rise by 9°C/17°F to 62°C/144°F. This temperature is medium rare, the optimum doneness for lamb leg so it’s beautifully juicy. Any more and the lamb meat is drier than ideal, because lamb leg is a lean meat.
How to make gravy for roast lamb leg
Gravy for lamb leg is made using the pan drippings after roasting the lamb. “Drippings” simply refers to the fat and meat juices left in the roasting pan after roasting the meat and it’s our express, free path to a killer gravy.

Heat drippings & cook flour – Once you take the lamb out of the roasting pan, put it straight on the stove to heat the fat. Add flour and stir it for 1 minute to cook it off – it will kind of be like a paste.
Pour in the beef stock, stirring as you go to help dissolve the flour.
Smush the garlic with a potato masher or even a smooth to help release the beautiful caramelised garlic flesh into the gravy.
Strain – Then just simmer for a few minutes until the gravy thickens to your taste then strain into a bowl, pressing the gravy liquid out of the garlic heads. Then pour into a jug to serve!
And that, my friends, is everything you need to know to be the king (or queen) of roast lamb leg from this day forth. The precision by which you roast your lamb to blushing pink perfection will be admired. Your gravy will be whispered about in your circles – the flavour!!! It’s incredible!
Just smile sedately, sit back and bask in the praise. There is no need to reveal your recipe source. 😎
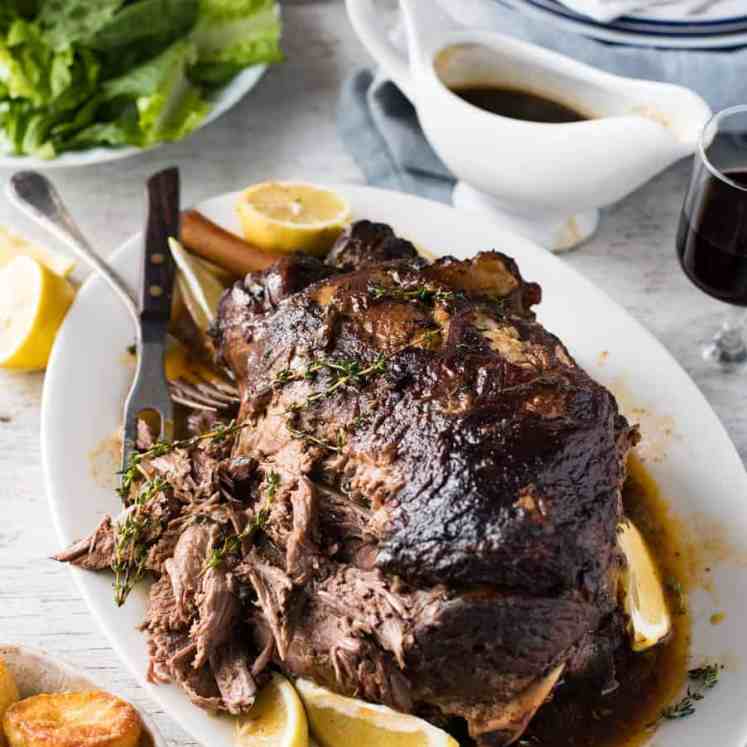
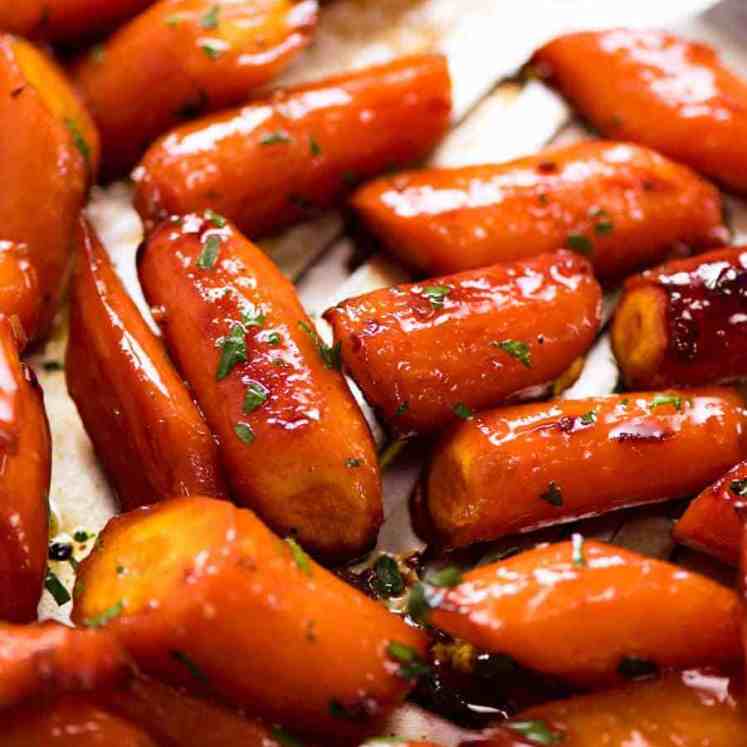
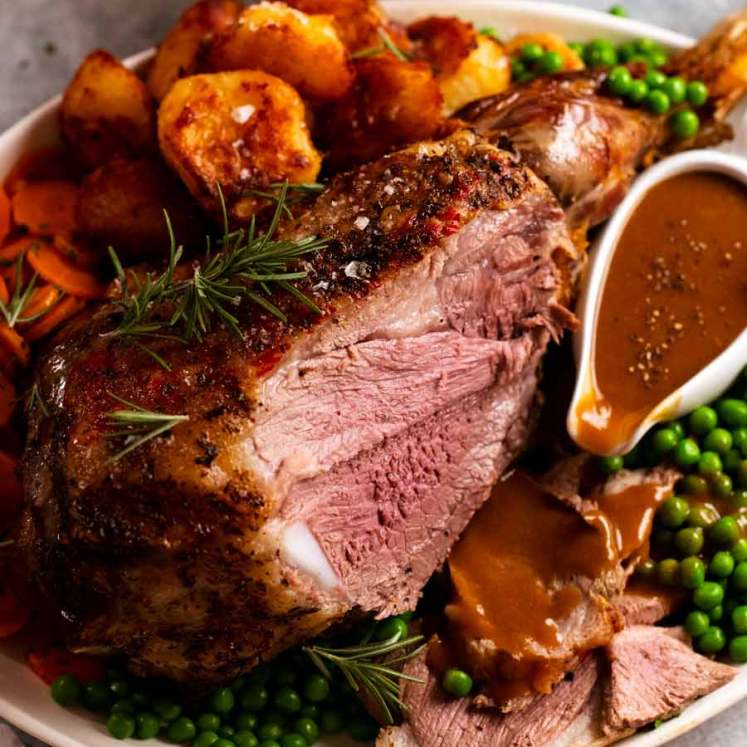
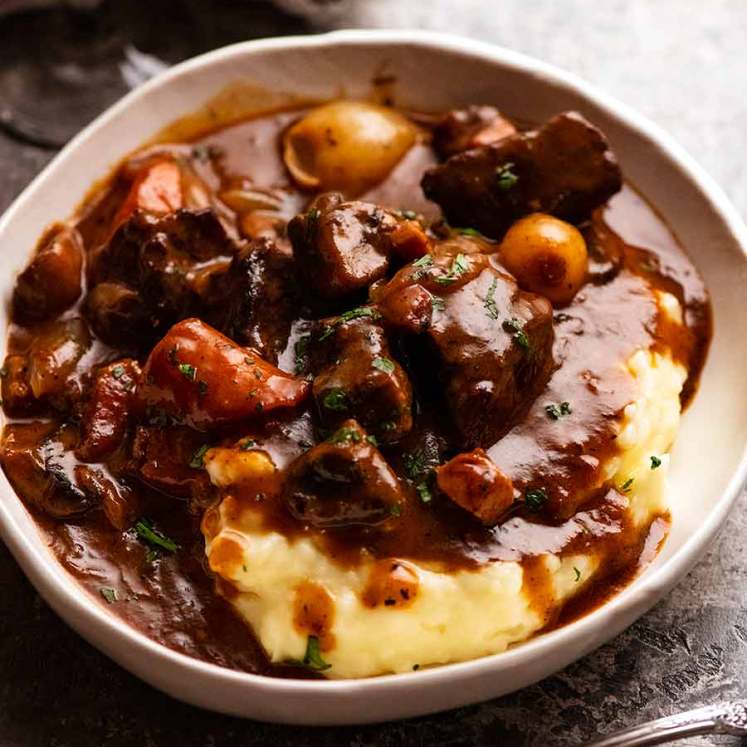
The lamb leg in this post is pictured with duck fat potatoes (the best crispy potatoes in the world!) with peas and steamed carrots tossed with a little butter and parsley. If you don’t have duck fat, make my classic crunchy roast potatoes instead. They are still way crunchier than your usual way of making them.
Go forth and enjoy your new lamb-alicious world! If you’ve got your own lamb leg secrets, sharing in the comments below – readers love hearing what you have to say. – Nagi x
Watch how to make it
Roast Lamb Leg with Gravy
Ingredients
- 2.75 – 3 kg / 5.5 – 6 lb lamb leg , bone-in (Note 1)
- 1 1/2 tsp cooking salt
- 1/2 tsp black pepper
Rub
- 1 1/2 tbsp fresh rosemary leaves , finely chopped
- 3 garlic cloves , finely minced
- 2 tbsp olive oil
Base
- 2 whole heads of garlic , halved horizontally (Note 2)
- Few sprigs rosemary (optional)
Gravy
- 4 tbsp flour , plain/all purpose
- 2 1/2 cups beef broth / stock , low sodium (Note 3)
Instructions
- Take lamb out of fridge at least 1 hour before roasting. (Note 4)
- Preheat oven to 240°C/475°F (220°C fan) with oven shelf in the middle.
- Rub – Mix rosemary, garlic and olive oil.
- Prepare lamb – Place lamb leg in a roasting pan. Coat with the rub using your hands, the sprinkle with the salt and pepper. Place garlic and rosemary sprigs underneath the lamb, garlic cut face up.
- Roast lamb leg for 20 minutes. Turn the oven down to 200°C/400°F (180°C fan) and roast for a further 1 hour or until the internal temperature reaches 53°C/127°F for medium rare (Note 5 other doneness). Check first at 45 minutes – everyone's oven is different!
- Rest – Remove lamb from oven. Transfer lamb to plate, loosely cover with foil and rest for 20 minutes to 1 hour (it will still be warm enough for serving!). The internal temperature will rise to 62°C/144°F (medium rare). Make gravy while lamb is resting – below.
- Serve lamb with gravy, duck fat or classic crunchy roast potatoes, peas and steamed carrots tossed with butter and parsley.
Gravy for roast lamb leg
- Drippings in pan – Discard rosemary sprigs. You should have around 4 – 5 tbsp of fat (drippings). If less, add butter. If much more, discard a bit.
- Add flour – Place roasting pan on stove over medium heat. When the fat starts to bubble, then add flour. Mix flour in and cook for 1 minute.
- Stock – Pour in half the beef stock and mix to dissolve sludge in, then add remaining beef stock and mix.
- Garlic squidging – Use a potato masher (if you're really keen like me) to mush the garlic to squeeze out the flavour (also helps flour caught in garlic to dissolve).
- Taste – Check salt and pepper (I don't add more).
- Thicken – Simmer for a couple of minutes, stirring, until it starts to thicken. Take it off the stove BEFORE the gravy is the thickness you want because it will keep thickening.
- Strain into a bowl, mushing garlic to squeeze all the liquid out. Then pour into gravy jug and serve with lamb!
Notes
 1. Lamb leg – Recipe is based on a whole lamb leg. See roasting time table above for different lamb sizes. Sometimes the bone sticking out is removed, sometimes it is partially cut so it folds inwards. It doesn’t matter either way, but just ensure the bone inside the meat is not removed. (If it is, you have a butterflied lamb leg – use this recipe instead).
Boneless lamb – I love making Greek butterflied lamb leg. If yours is rolled and tied, you could make this recipe but the meat is not quite as juicy because it’s been cut to remove the bone so there’s more escape roots for meat juices! If you can, unroll the lamb to do the rub then roll it back up and tie again (excellent flavour infusion!). Also, cook time likely a bit shorter. I’d do the 20 minute high temp blast, lower oven then check at 40 minute mark.
2. Garlic base – Elevates the lamb slightly so it cooks more evenly and allows the fat to drip over the garlic so the flavour infuses into the drippings that then forms the base of the gravy. Place garlic cut side up so the flavour infuses into the flesh of the lamb.
It is not garlicky at all because when garlic roasts, it becomes sweet and caramelised. It is my big secret for making a killer gravy for roast lamb! You can use 1 onion, quarters (skin on) instead of or in addition to garlic.
3. Gravy for lamb is best made with beef stock/broth because it has a deeper flavour and makes the gravy a beautiful dark brown colour. Store bought is fine, though homemade makes it ultra restaurant-worthy! If you cannot consume beef for religious or health reasons, then chicken broth can be substituted.
4. De-chilling lamb will make it cook more evenly. Cold lamb leg = overcooked on the outside by the time the inside is cooked.
5. Internal temperature of cooked lamb leg:
1. Lamb leg – Recipe is based on a whole lamb leg. See roasting time table above for different lamb sizes. Sometimes the bone sticking out is removed, sometimes it is partially cut so it folds inwards. It doesn’t matter either way, but just ensure the bone inside the meat is not removed. (If it is, you have a butterflied lamb leg – use this recipe instead).
Boneless lamb – I love making Greek butterflied lamb leg. If yours is rolled and tied, you could make this recipe but the meat is not quite as juicy because it’s been cut to remove the bone so there’s more escape roots for meat juices! If you can, unroll the lamb to do the rub then roll it back up and tie again (excellent flavour infusion!). Also, cook time likely a bit shorter. I’d do the 20 minute high temp blast, lower oven then check at 40 minute mark.
2. Garlic base – Elevates the lamb slightly so it cooks more evenly and allows the fat to drip over the garlic so the flavour infuses into the drippings that then forms the base of the gravy. Place garlic cut side up so the flavour infuses into the flesh of the lamb.
It is not garlicky at all because when garlic roasts, it becomes sweet and caramelised. It is my big secret for making a killer gravy for roast lamb! You can use 1 onion, quarters (skin on) instead of or in addition to garlic.
3. Gravy for lamb is best made with beef stock/broth because it has a deeper flavour and makes the gravy a beautiful dark brown colour. Store bought is fine, though homemade makes it ultra restaurant-worthy! If you cannot consume beef for religious or health reasons, then chicken broth can be substituted.
4. De-chilling lamb will make it cook more evenly. Cold lamb leg = overcooked on the outside by the time the inside is cooked.
5. Internal temperature of cooked lamb leg: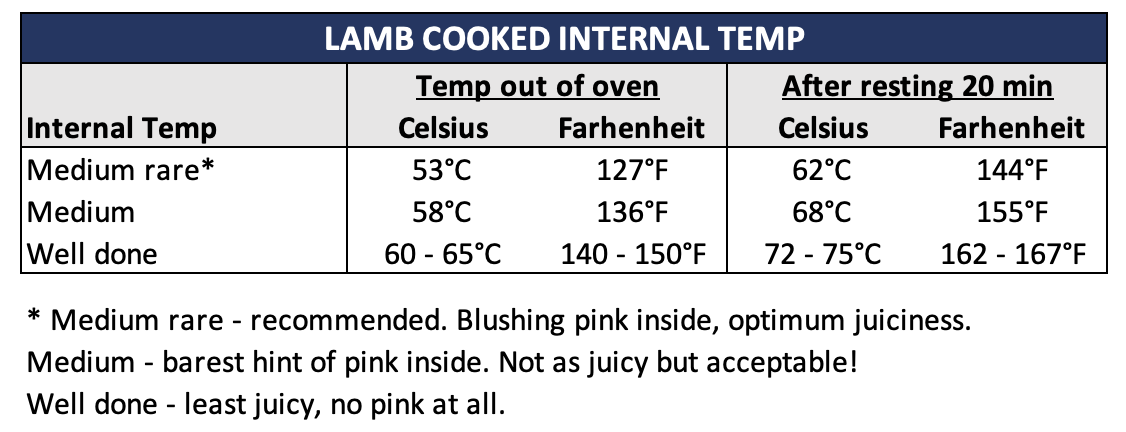 I highly recommend getting a meat thermometer for accuracy – only guaranteed way to get juicy lamb every time!
6. Holding – The lamb leg will stay warm for up to 1 hour, enough time to make duck fat or classic crunchy roast potatoes! The inside of the lamb is still warm even after 3 hours.
7. Servings: A 2.5 kg/5 lb lamb serves 6 very generously and 8 comfortably. After taking into account the bone (500g/1lb) and meat juices lost during roasting, you should end up with around 1.7kg meat after cooking which is around 280g for 6 people (generous!) or 200g for 8 people. If you slice lamb thinly it will go further!
8. Nutrition per serving, assuming 8 servings and that all the gravy is consumed.
I highly recommend getting a meat thermometer for accuracy – only guaranteed way to get juicy lamb every time!
6. Holding – The lamb leg will stay warm for up to 1 hour, enough time to make duck fat or classic crunchy roast potatoes! The inside of the lamb is still warm even after 3 hours.
7. Servings: A 2.5 kg/5 lb lamb serves 6 very generously and 8 comfortably. After taking into account the bone (500g/1lb) and meat juices lost during roasting, you should end up with around 1.7kg meat after cooking which is around 280g for 6 people (generous!) or 200g for 8 people. If you slice lamb thinly it will go further!
8. Nutrition per serving, assuming 8 servings and that all the gravy is consumed.Nutrition
Originally published October 2016. I have been very neglectful not updating one of my favourite recipes with sparkling new photos and a recipe video!
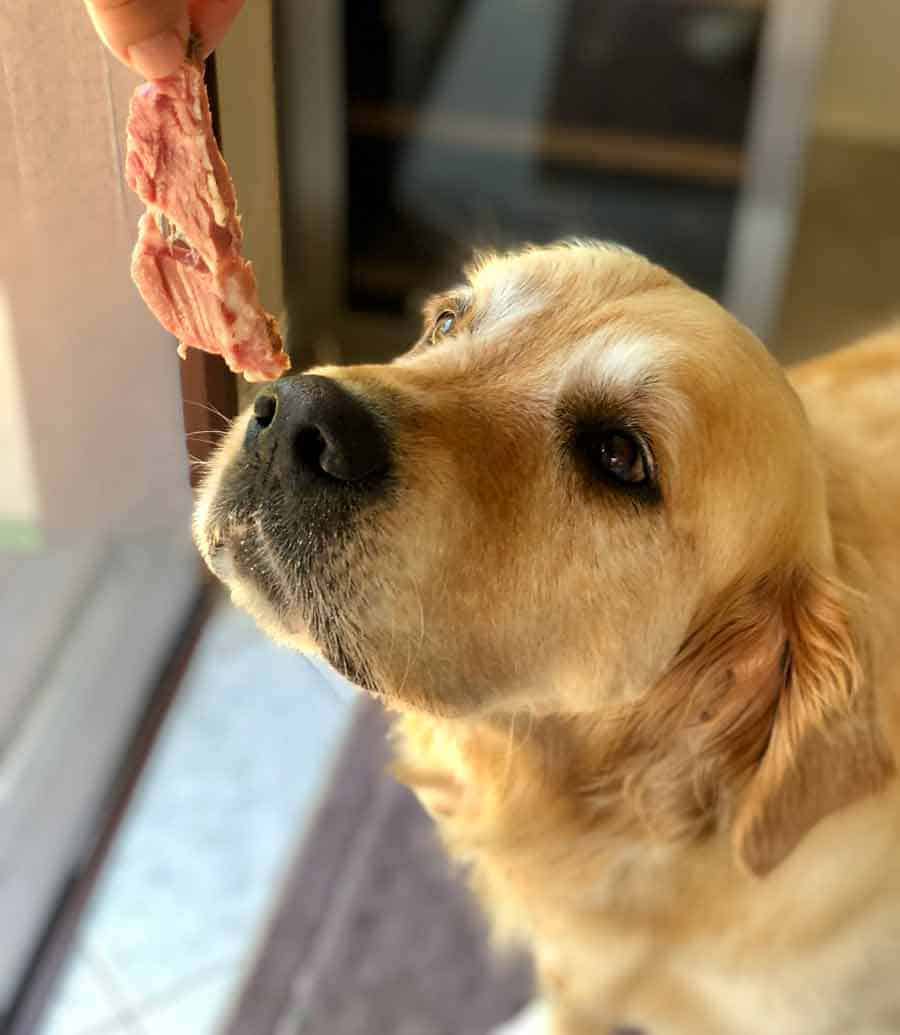
I told you – I LOVE roast lamb! See?
Life of Dozer
Original photo from when I first published this recipe in 2016 still holds true, so no need to update:
DOZER. Don’t breathe your stinky dog breath over my friends while they eat!

The post Roast Lamb Leg with Gravy appeared first on RecipeTin Eats.
]]> Standing Rib Roast is considered by many to be the best roast beef in the world. Also known as Prime Rib, it’s a beef cut that’s incredibly succulent with superior taste. This recipe uses a safe, simple but highly effective roasting method so the beef is blushing pink all the way through. Top tip? Pull the beef out... Get the Recipe
The post Standing Rib Roast (Prime Rib) appeared first on RecipeTin Eats.
]]>Standing Rib Roast is considered by many to be the best roast beef in the world. Also known as Prime Rib, it’s a beef cut that’s incredibly succulent with superior taste. This recipe uses a safe, simple but highly effective roasting method so the beef is blushing pink all the way through.
Top tip? Pull the beef out before the target internal temperature as the meat continues to cook as it rests, taking medium rare beef to medium. Otherwise, it overcooks while resting!
Standing Rib Roast – don’t make this mistake!
The biggest mistake people make with prime rib is not factoring in that beef continues to cook as it rests. So if you pull it out of the oven at 52°C / 125°F, the target temperature for medium rare, it will rise to 55°C / 130°F or more once rested which is medium. Ie not much blushing pink left!
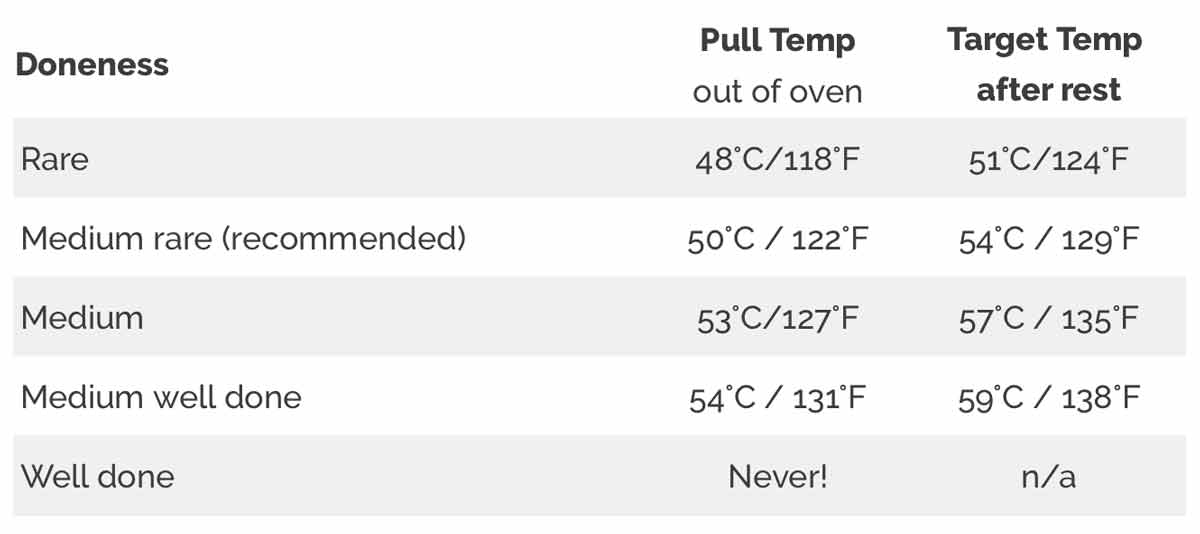
So you must pull the beef out of the oven before your Target Temperature. Here is a table of the internal temperature of Prime Rib for varying levels of doneness.
Internal temperature of cooked prime rib
The internal temperature of prime rib will rise by around 4°C / 5 – 7°F while resting, so it needs to be pulled out of the oven before reaching the Target Internal Temperature for your desired level of doneness.
| Doneness | Pull temperature | Target Temp after rest |
|---|---|---|
| Rare | 48°C/118°F | 51°C/124°F |
| Medium rare (recommended) | 50°C / 122°F | 54°C / 129°F |
| Medium | 53°C/127°F | 57°C / 135°F |
| Medium well done | 55°C/131°F | 59°C/138°F |
| Well done | Never! | n/a |
Target Temperature after resting – this is the internal temperature for each level of doneness, after resting.
Pull Temperature – this is the target internal temperature when you take it out of the oven, and it is lower than the Target Temperature to achieve the level of doneness you desire. The temperature rises when the beef is resting. If you take the beef out of the oven at the Target Temp, then by the time the beef has rested it will be beyond what you wanted.
Prime Rib – simply the best
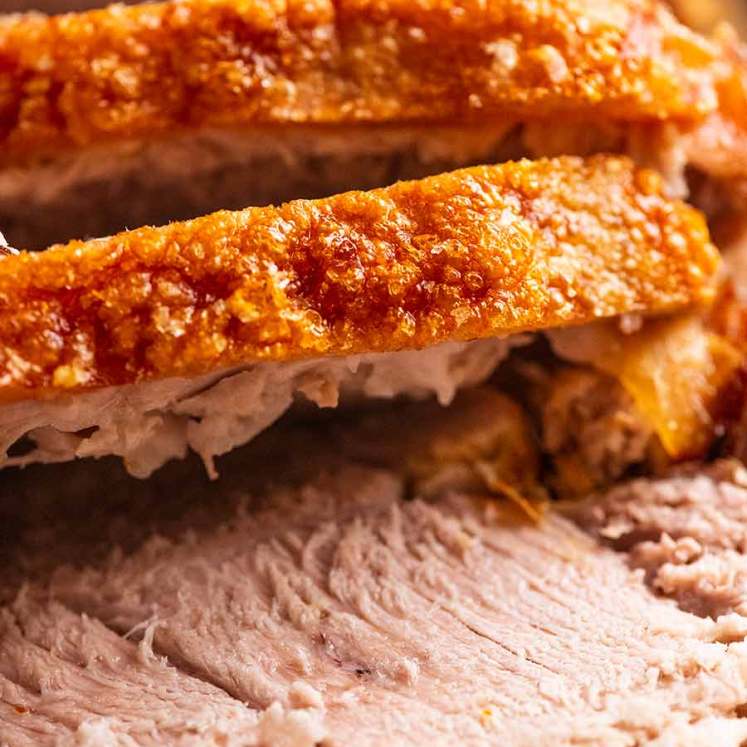
There’s no question – the Standing Rib Roast is the creme de la creme of roasts. Also known as Prime Rib, this is THE roast beef with superior flavour, texture and juiciness above all other cuts of beef.
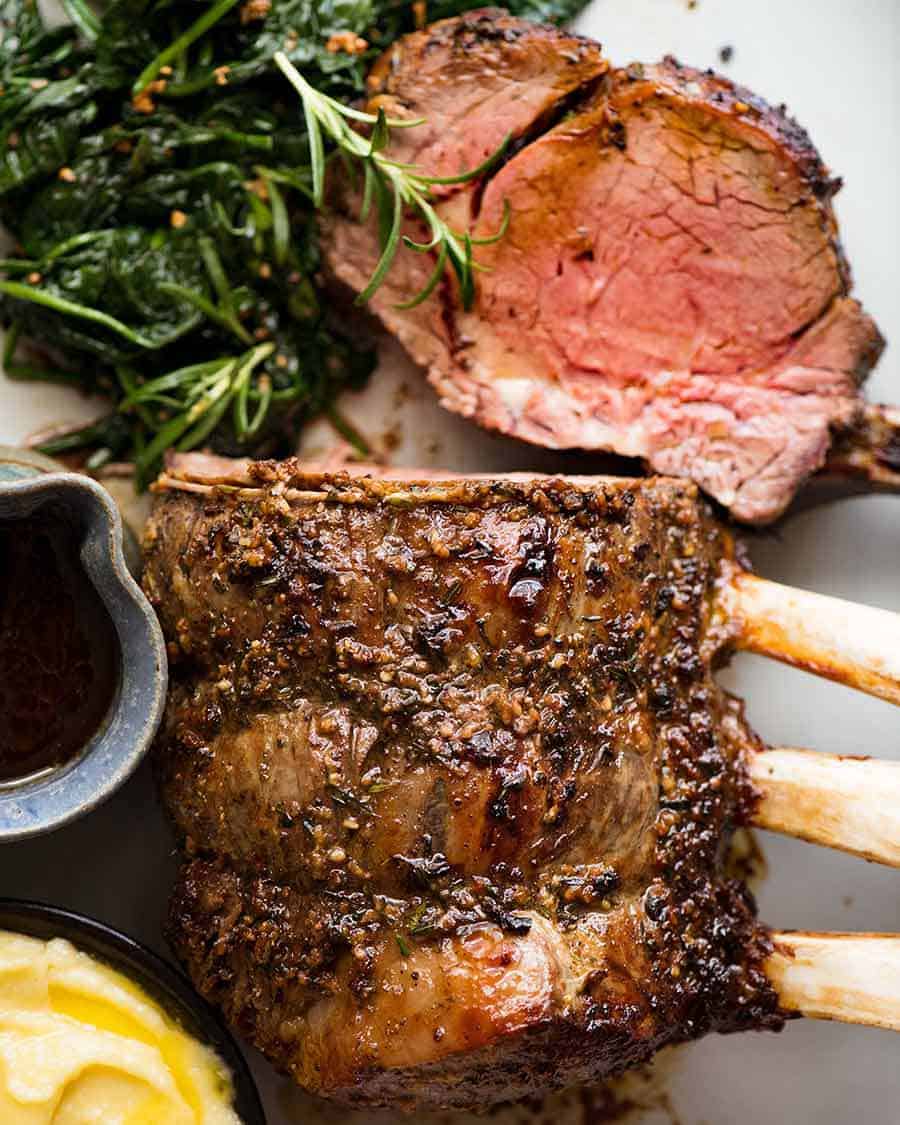
It’s certainly not an economical cut. It’s an investment worthy of special occasions when gathering with like minded people who will appreciate that moment when you slice through the deep golden, garlic studded crust, those people in your life who will clap their hands with glee at the sight of the rose pink flesh, knowing that it’s going to taste as incredibly juicy as it looks…..
Prepare yourself for the ultimate roast beef experience – complete with a gorgeous Red Wine Sauce, a side of Parish Mash and Garlic Sautéed Spinach!!
Safe, highly effective cooking method
A quick blast in a hot oven for 20 minutes, then 1.5 hours at a lower temperature. This yields a roast that’s evenly cooked all throughout to the doneness of your choice (medium rare for me!), with a deep golden crust.
This method is safe and highly effective, with the benefits of a long slow cook but far quicker to make.
Roasting at a lower temperature is better than a Hard & Fast quick roast because it cooks more evenly throughout (no overcooked outer ring!), there’s less risk of overcooking and the fat will melt to make the meat even juicier.
How to choose the best standing rib roast
I know I’m stating the obvious here, but the better the beef, the better the eating experience.
TIP: If your budget doesn’t stretch to Prime Rib, use my Roast Beef Marinade to make the most of economical roast beef cuts!

America – If you’re in the States, the USDA has made it easy for you by grading prime rib: Prime (the best), followed by Choice then Select. The grading is largely based on the fat marbling and taste.
Here in Australia, we don’t have a consistent grading system. But what I can say for sure is that if you want a good quality standing rib roast, skip the supermarket and head to your local butcher. Grass fed or grain fed comes down to personal choice.
Grain fed typically has better marbling and therefore a richer, fattier flavour. Grass fed is usually less fatty but people (me included!) believe the flavour of the beef to be richer, more full of flavour and the meat to be more tender.
If you want top shelf, opt for dry aged beef. You’ll pay serious dollars for it – but it’s worth it!
The standing rib roast pictured above and below and used in the recipe video has been prepared the standard way we do it here in Australia: the fat cap trimmed and the bones scraped clean for presentation.
The foil: Some butchers will sell the standing rib roast with foil wrapped around the bones. It’s to stop the bones from browning, for presentation purposes only. It looks striking to have a dark brown crust, the pink meat and a white bone. If the beef comes with it, I leave it on. But I don’t do it myself.
How the beef is cut – Bone in / off / tied back on
This recipe will work fine whether bone in or out, or tied back on. But I’m a firm believer that anything cooked with the bone is juicier, so the thought of roasting a prime rib without the bone never crossed my mind.
Plus – I just think it looks grand with the bone in! And isn’t chewing the meat off the bone the best bit?? 😉
In the States, you’ll find some butchers remove the bone then tie it back on. Here in Australia, you’d have to ask for a special order to have the bone cut out.
The meat itself is so incredibly juicy (with the added bonus of the garlic herb butter!), I really doubt you’d notice a difference. So use what you can get, or whatever your personal preference is!
Ingredients you need
When you invest in a good piece of beef, you don’t need to do much to it.
But then again, a good slathering of Herb and Garlic Butter certainly doesn’t do any harm! 😂
Using softened rather than melted butter works much better because the garlic and herb bits stick to the skin, creating a terrific golden herb and garlic crust!
Feel free to switch the herbs to what you have / prefer. Also, dried herbs work too!
How to make standing rib roast
After slathering the beef with butter, blast it for 20 minutes in a hot oven to get the crust going, then roast in a relatively low oven of 120°C/250°F for a further 1.5 hours before resting for 20 to 30 minutes.
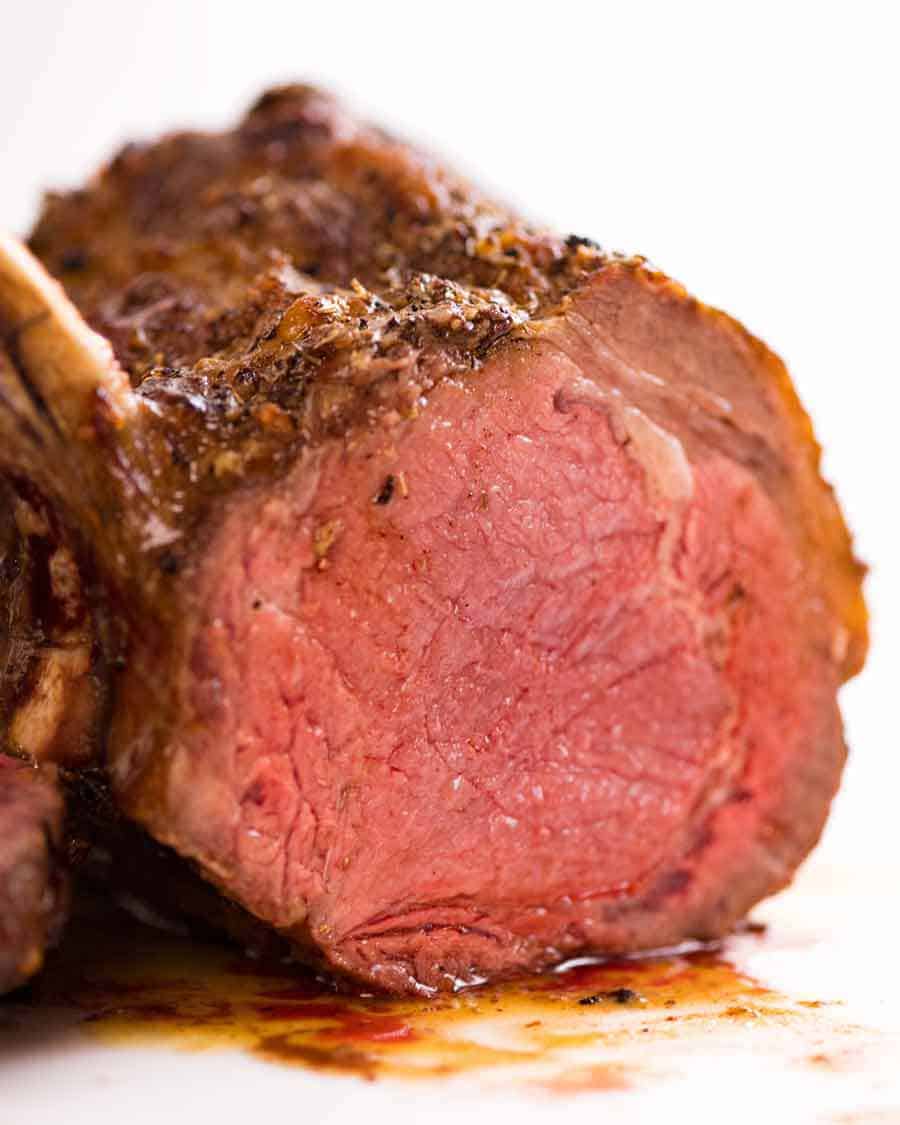
With this method, the high temperature creates a crust quickly, sealing the juices in. Then we turn the temperature down to roast it slowly and evenly so it’s blushing pink all the way through, rather than ending up with a thick overcooked band around the outside of the beef.
Target an internal temperature of 50°C/122°F when taking it out of the oven (medium rare, recommended) which will rise to 54°C/129°F after resting for perfect medium rare. See chart below for other doneness.
There are recipes “out there” that opt to use an even lower temperature and roast for up to 10 hours. This method cooks the prime rib so slowly that it’s evenly pink from edge to edge, then seared at the end to form a thin dark crust.
We actually prefer to have the textural contrast of a thin layer of cooked beef on the outer edge of the beef. It’s still 90% pink and cooked to medium rare throughout!
Never skip the 20 minute rest, essential to let the meat juices redistribute. If you don’t rest, the meat juice will run everywhere when you slice it = not as juicy.
Target internal temperature
Remember, as I explained at the very top, pull the beef out of the oven before your final Target Temperature as the internal temperature will continue to rise at it rests for 20 minutes. If you pull the beef out of the oven when it is already medium rare (52°C / 125°F), it will be medium after it rests – barely any blushing pink left!
| Doneness | Pull Temp out of oven | Target Temp after rest |
|---|---|---|
| Rare | 48°C/118°F | 51°C/124°F |
| Medium rare (recommended) | 50°C / 122°F | 54°C / 129°F |
| Medium | 53°C/127°F | 57°C / 135°F |
| Medium well done | 54°C / 131°F | 59°C / 138°F |
| Well done | Never! | n/a |
Why I roast on a bed of onion, garlic & herbs
I like to roast my standing rib on a bed of onion, garlic and herbs which serves three purposes:
Elevates the beef off the base to encourage more even cooking;
Stops the drippings from burning (smokes out oven + can’t make a sauce from drippings); and
Adds more flavour to the drippings that is then used to make a sauce for the prime rib.
Key tip: take out of fridge 2 hours prior
A standing rib roast is a formidable hunk of meat so to encourage even cooking, I like to take it out of the fridge 2 or even 3 hours prior to cooking.
By reducing the chill in the beef, this prevents the beef from cooking such that you end up with a very thick layer of overcooked beef on the outside and a small circle of pink perfect cooked beef in the middle.
Sauce for Prime Rib – Red Wine Sauce
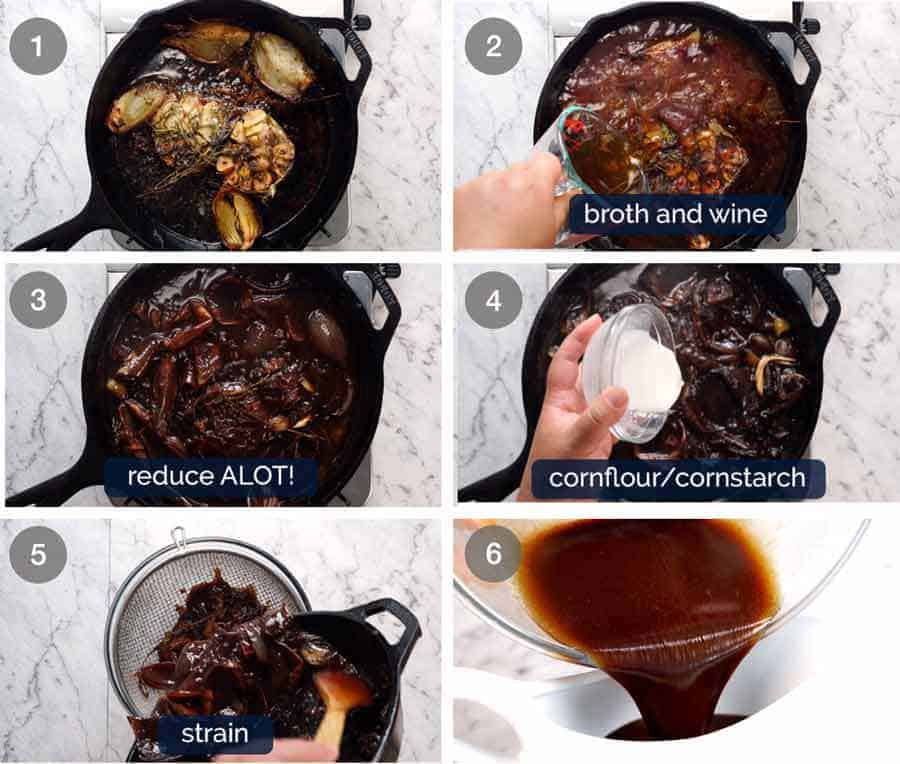
The drippings from the beef left in the pan are loaded with flavour and begging to be used for a sauce!
Red wine and beef is a classic flavour combination so that’s what I’ve gone with here. Essentially, we’re making a red wine jus by rapidly simmering beef broth and red wine in the same skillet the beef was roasted in until it reduces down into an intense flavoured, highly savoury sauce.
I like my sauces to have a syrupy consistency so I add a bit of cornflour (cornstarch) to thicken it. But this is optional – most red wine jus are not thickened, they are quite runny sauces.
What to serve with Prime Rib
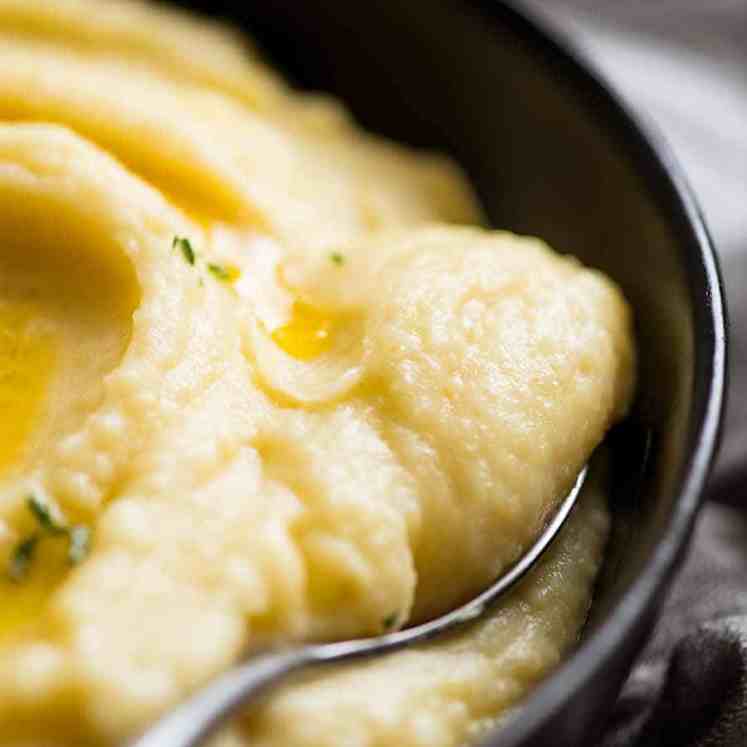
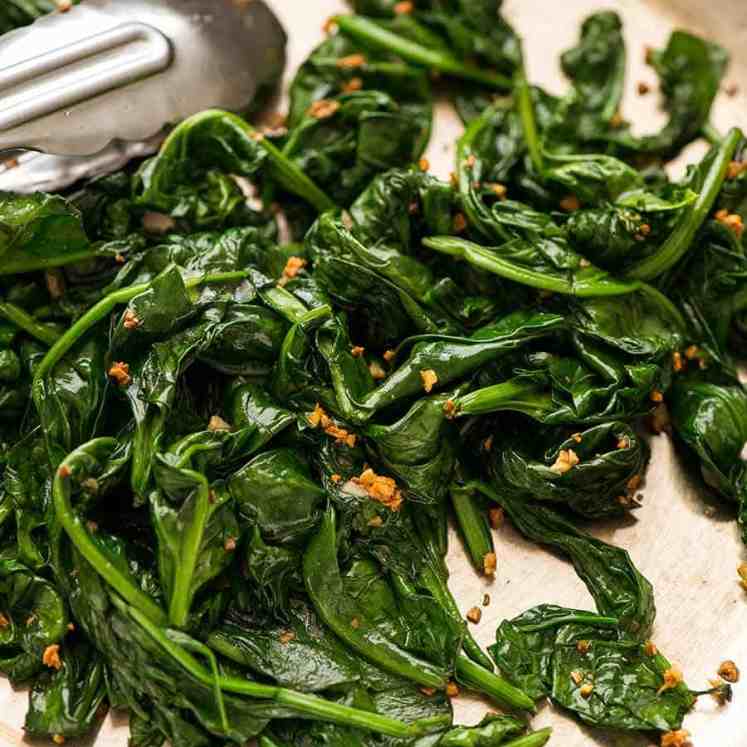
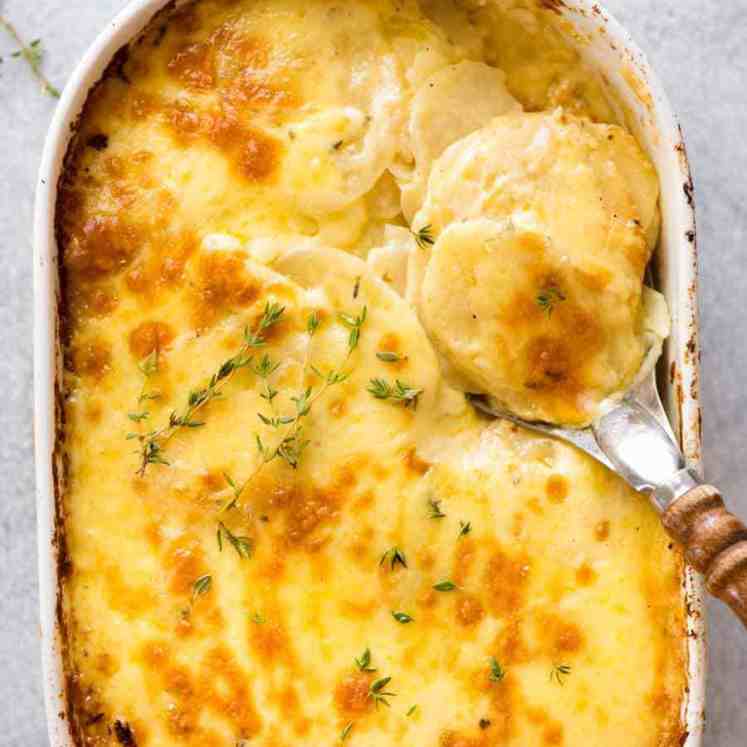
For a high-end restaurant experience, you can’t go past Paris Mash(pictured below) – ultra rich and creamy mashed potato! Potatoes au gratin is an elegant French potato side option that’s ideal for making ahead. Otherwise, rich and creamy Cauliflower Cheese is a British roast dinner classic! For greens, Garlic Sautéed Spinach pairs exceptionally well with Prime Rib and is a Classic Steakhouse side!
Here are a few more options:
Classic Side Dishes for Standing Rib Roast
Just imagine that moment, when you carve up thick slices of this Standing Rib Roast that’s almost impossibly juicy, blushing pink on the inside with that salty, buttery, herb and garlic crust….
It’s so unbelievably tender, and it’s so perfect you know you could eat the whole thing plain…. But THEN, you add a drizzle of that incredible Red Wine Sauce…..
There. Are. No. Words. It’s almost as perfect as a meal gets. – Nagi x
Watch how to make it
Beef Standing Rib Roast (Prime Rib)
Ingredients
- 2.5 kg / 5 lb standing rib roast / prime rib , bone in (Note 1)
- 1 onion , unpeeled, quartered (brown, yellow, white)
- 1 head of garlic , unpeeled, halved horizontally
- 5 sprigs thyme
- 3 sprigs rosemary
Garlic Herb Butter:
- 150g/ 10 tbsp unsalted butter , softened
- 5 garlic cloves , minced
- 2 tsp finely chopped fresh rosemary (or 1 tsp dried)
- 2 tsp finely chopped fresh thyme (or 1 tsp dried)
- 2 tsp salt
- 1 tsp black pepper
Red Wine Sauce:
- 1 1/2 cups beef broth/stock , low salt
- 2 1/2 cups dry red wine (Note 2)
- 1 tbsp cornflour/cornstarch (optional, Note 3)
Instructions
Prepare Beef
- Bring Beef to room temp: Take beef out of the fridge 2 – 3 hours before cooking to bring to room temp (key tip for even cooking). Pat dry with paper towel.
- Preheat oven to 240°C/460°F (220°C fan). Adjust shelf so beef will be sitting in the middle of the oven.
- Garlic Herb Butter: Mix together.
- Roasting bed: Place onion, garlic and herbs in a heavy based oven proof skillet (or use a roasting pan).
- Slather 1: Spread a thin layer of butter on the underside of the beef (ie the bone side). Place beef on onion etc, butter side down. Spread about 2/3 of the butter on the top and sides (reserve some for Slather 2).
- Hot oven: Roast 20 minutes.
- Slather 2: Remove, spread over remaining butter. Turn oven down to 120°C/250°F (100°C fan).
- Slow roast: Roast for a further 1 1/2 hours, basting every 30 minutes with the juices in the pan, until the internal temperature is 50°C/122°F in the centre (for medium rare, Note 4). Start checking the internal temp early.
- Rest: Transfer beef to plate. Cover loosely with foil and rest for 20 – 30 minutes. Internal temperature will rise to 54°C/129°F (which is medium rare).
- Slice beef and serve with Sauce! For a classic high-end Steakhouse experience, serve with Paris Mash and Garlic Sautéed Spinach.
Red Wine Sauce:
- Place skillet with onion and garlic left in it on the stove over high heat. Add wine and beef stock, rapidly simmer for 10 minutes until it reduces by 2/3 or so, down to 1 1/2 cups or liquid.
- Lower heat to medium. Mix cornflour with 2 tbsp water. Drizzle in half and stir. Sauce will thicken in 1 minute or so. Add more cornflour water mixture if you want it thicker.
- Strain into bowl, pour into sauce jug.
Notes
- Pull temp is the temperature at which it should be removed from the oven;
- Target temp is the final temperature of the beef for each level of doneness, to which the beef will rise after resting for 20 minutes.
Nutrition
Originally published 30 November 2018. Post reviewed regularly and updated if necessary. Last updated December 2021. No change to recipe – this is a master recipe loved by many so I wouldn’t dare!
Best of Sunday Supper Roasts
For fellow roast lovers….

Life of Dozer
Is it juicy Dozer??? Is it???
The post Standing Rib Roast (Prime Rib) appeared first on RecipeTin Eats.
]]> Pot-roasting is hands-down the best way to roast a chicken. A sealed vessel keeps all the moisture locked in. I also rest the chicken flipped so the juices settle into the breast meat. Result: Juices running everywhere with every bite. It will blow your mind! Find the recipe on page 270 of Dinner.
The post Juiciest, Easiest Roast Chicken Ever appeared first on RecipeTin Eats.
]]>Pot-roasting is hands-down the best way to roast a chicken. A sealed vessel keeps all the moisture locked in. I also rest the chicken flipped so the juices settle into the breast meat. Result: Juices running everywhere with every bite. It will blow your mind!
Find the recipe on page 270 of Dinner.
This is a cookbook exclusive recipe!
This recipe is exclusive to my debut cookbook Dinner which includes a how-to video for every recipe. Just scan the QR code!
Just to explain….
I know, it’s confusing! You’re so used to getting recipes on my website – there’s over 1,200 of them, after all. And here you are looking at a tasty recipe video and I haven’t provided the recipe. 🙀
I’m not just doing this to torture you, I promise.
This page exists to display the how-to video for this recipe which I exclusively created for my debut cookbook, Dinner. Every recipe in the cookbook has a tutorial video. To watch it, you simply scan the QR code with your phone or tablet and it will take you straight to the recipe video like the one shown above!
Curious about my cookbook?
Read the cookbook overview
Browse all cookbook exclusive recipes here
Read the Cookbook Tales. Spoiler alert: there’s A LOT of dirty dishes!! And quite a lot of Dozer. 😂
Stay tuned for more on this page! Some cookbook exclusive recipes will have extra information added as well as extra tips. I am also looking at enabling comments for selected recipes so I can answer reader questions about cookbook recipes. I’m just a little snowed under during this launch period – book tours, getting 131 recipe videos out, launching the book overseas. Please bear with me! – Nagi x (10 October 2022)
The post Juiciest, Easiest Roast Chicken Ever appeared first on RecipeTin Eats.
]]> Duck Confit is an adored, age-old French preparation for duck. Called Confit de Canard in French, duck legs are slow-cooked in duck fat until the meat is meltingly tender, then the skin crisped to golden perfection. This is a traditional Duck Confit recipe that’s low-effort and DOESN’T require buckets of duck fat! 🇫🇷Welcome back to... Get the Recipe
The post Duck Confit (French slow-cooked duck) appeared first on RecipeTin Eats.
]]>Duck Confit is an adored, age-old French preparation for duck. Called Confit de Canard in French, duck legs are slow-cooked in duck fat until the meat is meltingly tender, then the skin crisped to golden perfection. This is a traditional Duck Confit recipe that’s low-effort and DOESN’T require buckets of duck fat!
🇫🇷Welcome back to French Bistro Week!🇫🇷
From time to time, I like to dedicate a week of recipes to a theme. This week, it’s French Bistro Week!!
Following Monday’s French Goat’s Cheese Salad starter, I present today’s Duck Confit as the scrumptious main. As for Friday? Lemon Tart – the perfect French dessert ending to this menu! We’ll round out the week with an incredible French dessert, of course!!
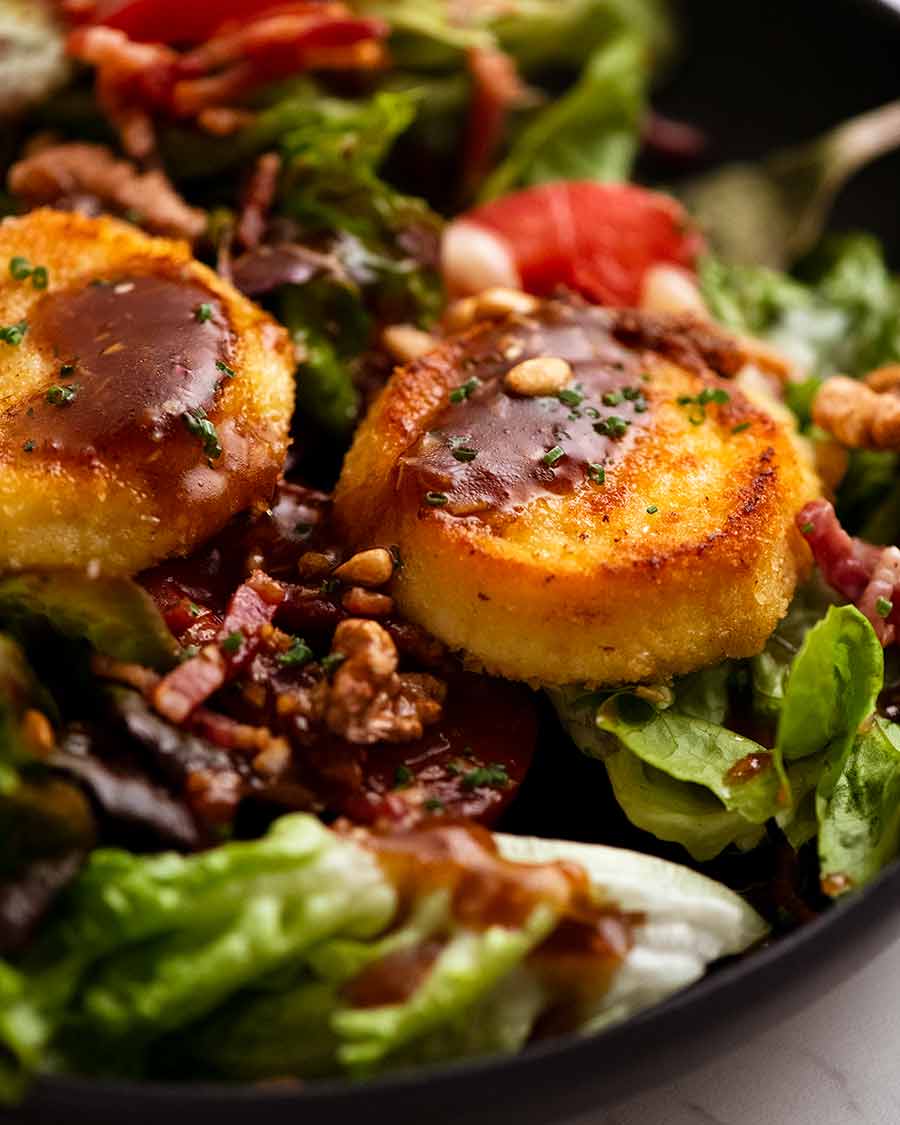
Goat’s Cheese Salad – French bistro starter 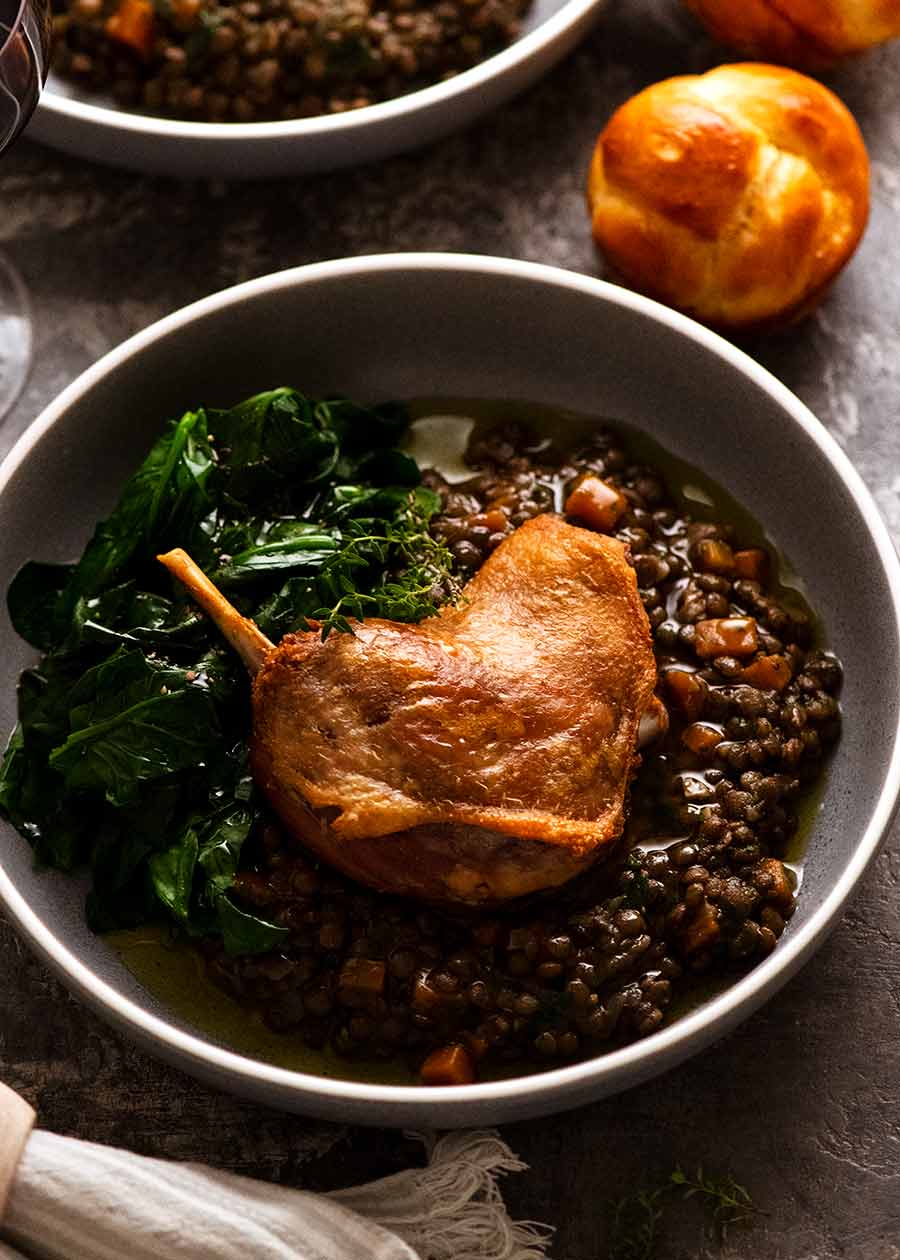
Today’s Duck Confit for the main with Lentil Ragout 
Lemon Tart for dessert
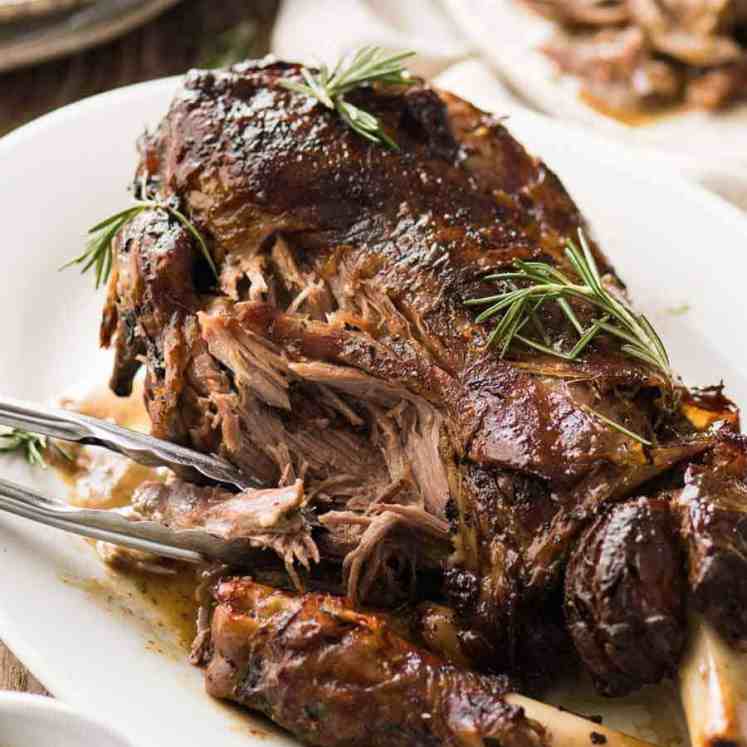
Duck Confit
Called Confit de Canard in French, Duck Confit is an elegant and classic French bistro dish. Confit (pronounced kon-FEE) here refers to the method of slow-cooking the duck in its fat, yielding gorgeously tender meat. The legs are then briefly sizzled in a hot pan or oven until the paper-thin skin is wonderfully crisp.
Confit traditionally was done for preservation purposes, allowing the duck to be stored for long periods. This still has benefits today because it means we can easily make Duck Confit ahead of time and keep it for use whenever the fancy takes us!
This recipe for Duck Confit comes to you by way of a stellar French chef I work with, Jean-Baptiste Alexandre. And for me it’s a game-changer. Why? For one, the method is incredibly simple. It’s more forgiving and less messy than even a roast chicken, and far less graft than, say, fried chicken!
But the real clincher is this: Unlike most Duck Confit recipes, this one DOESN’T require litres of duck fat! By arranging the legs snugly for cooking, you need far less fat than you think – at most a few cups – which can be re-used or stored for months.
Easy and delicious. Efficient and ideal for making ahead. Indulgent and classy. I’m running out of boxes to tick here! If you’ve always wanted to try your hand at Duck Confit, now is the time!
What Duck Confit tastes like
An initial overnight cure ensures our duck legs are seasoned with all the way through, the meat delicately perfumed with the herbs, spices and garlic.
Next, slow-cooking the legs under duck fat softens the meat until it is tender, silky, and just melting in the mouth. Residual melted duck fat clinging to the meat reinforces the rich duck flavour, while setting things up for the last step.
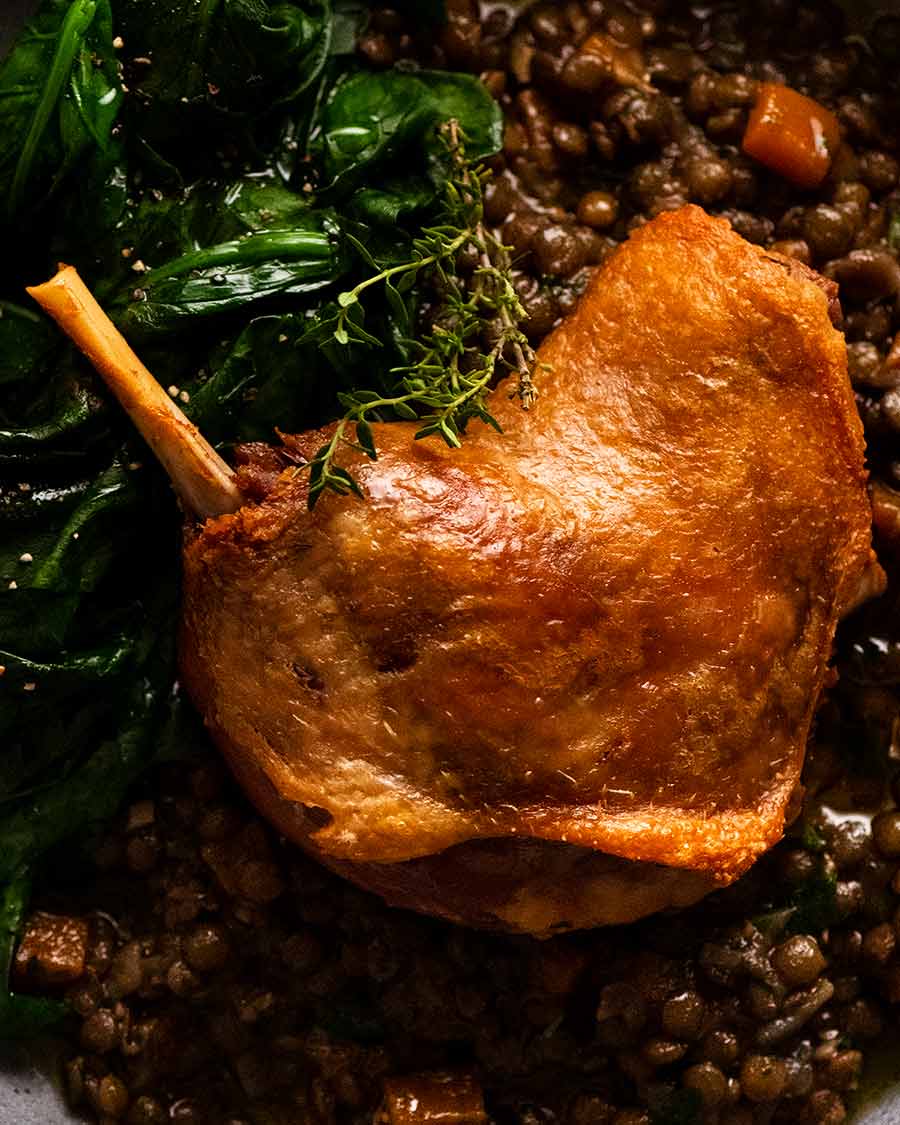
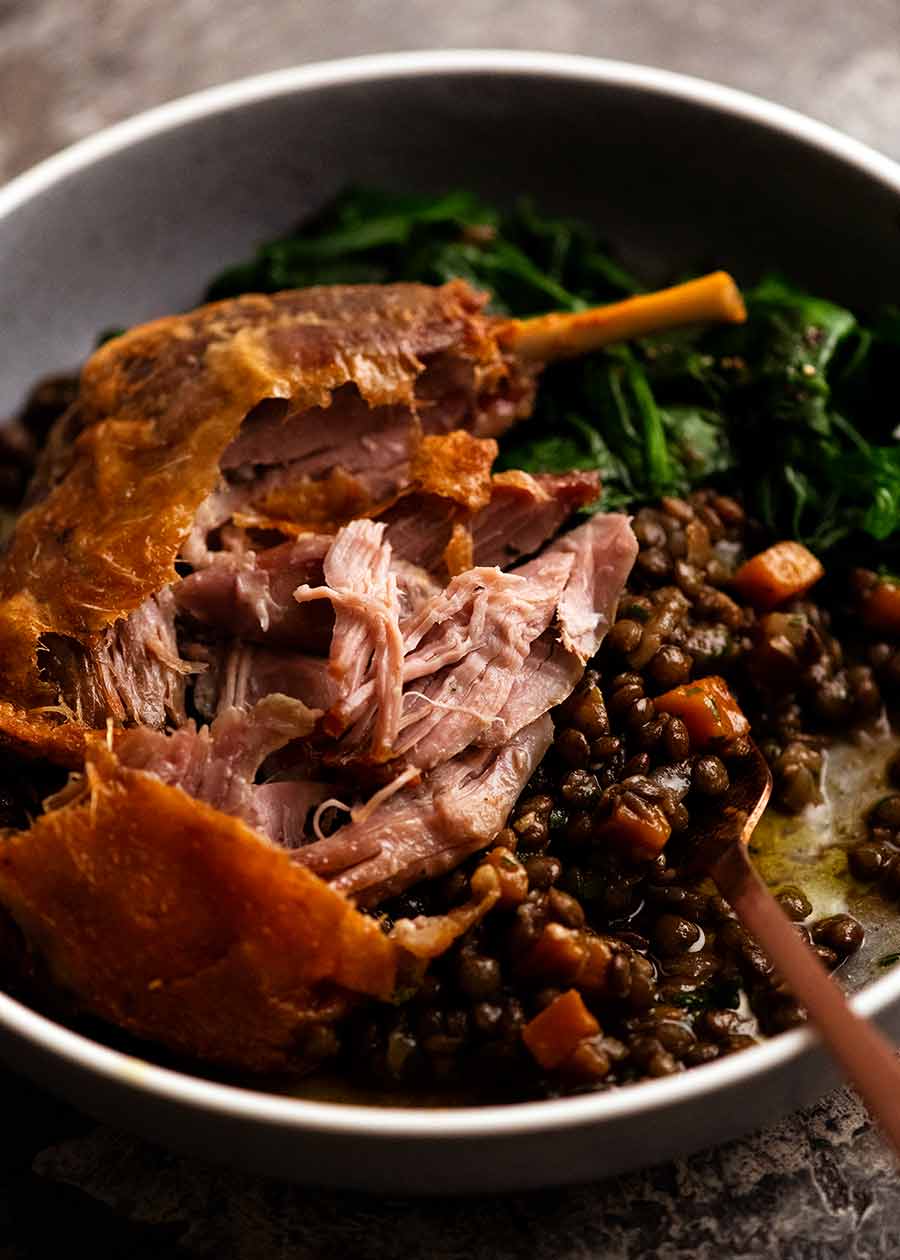
A final blast in the oven is all that’s needed for that excess cooking fat to sizzle and crisp up the skin. Result? Delicious, paper-thin duck skin that crackles as you cut through it with a knife into the dark, velvety flesh beneath … oh my!! 🤤
What does confit mean?
The word “confit” in French means “to preserve”. It can apply to different foods, including fruit and vegetables.
In the case of meat it refers to the technique of first curing then slow-cooking meat under fat at a low temperature. The meat can then be stored under the cooking fat for long periods, free from spoilage. It just so happens that this technique also yields impossibly tender, delicious and flavourful meat that gets better the longer it’s stored! Those clever French …
Historically, this preservation technique was a necessity to survive times of scarcity. Today, it means we can enjoy produce at its best (even when out of season) and have luxurious preserved foods at our disposal.
Duck Confit, originating from the south-western region of France, is one of the most classic and well-known confit foods.
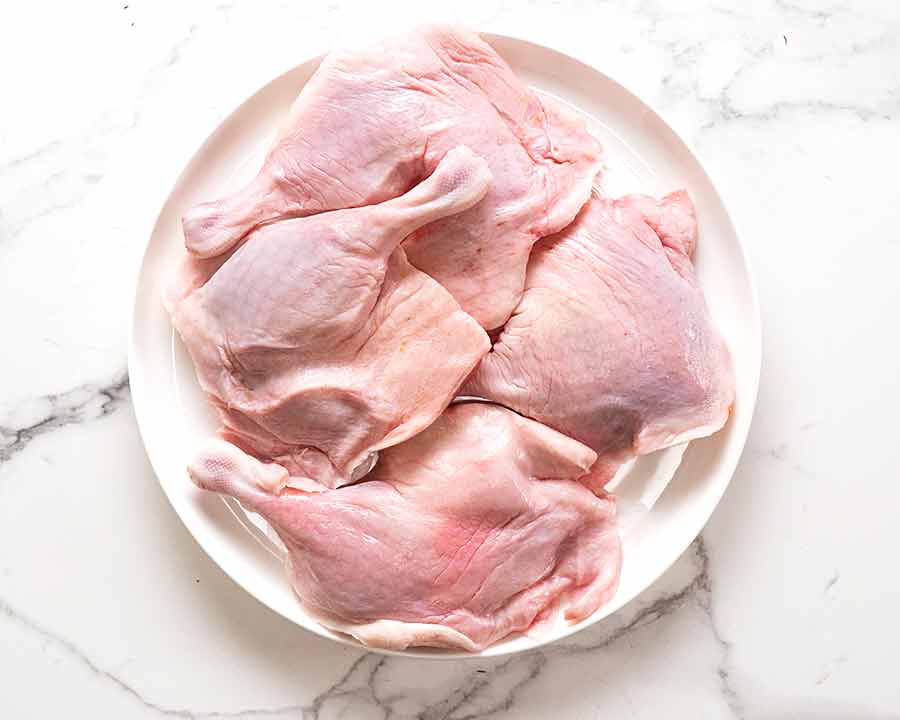
Duck cut used for Duck Confit
The cut of duck used for Duck Confit are duck legs. It is the lower leg plus the thigh attached, a poultry cut known as a maryland here in Australia.
It must be bone-in and with the skin on. Because it ain’t Duck Confit without crispy skin!
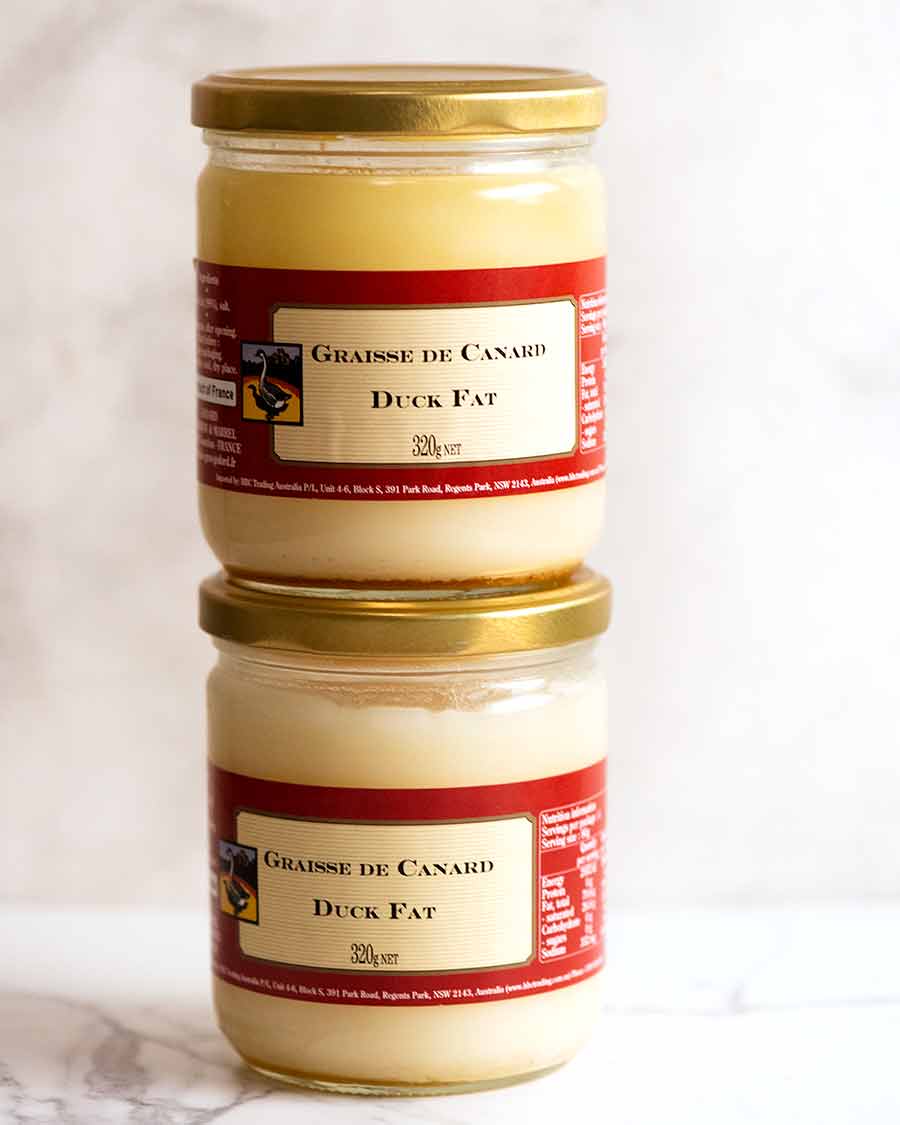
Duck fat to cook Duck Confit
To confit meat means to slow cook in fat, usually the meat’s own fat. So for Duck Confit we use duck fat. These days, you’ll find duck fat sold in jars in the pantry aisle of grocery stores alongside other oils. While these products were considered very “gourmet” 10 years ago with hefty price tags to match, these days they are much better value and easier to find. The fat can be re-used multiple times and will keep sealed in the freezer for 6 months or longer.
Technically any fat or oil can be used to confit a meat. However in traditional French cuisine it’s most typical to use the same animal fat as from the meat you’re cooking. The reason is partly historical: if you’re a farmer who has just harvested a bunch of ducks and plan to preserve some, you’ll likely have plenty of duck fat lying around too. The other reason is the flavours are more naturally more harmonious.
Here’s one brand of duck fat that’s sold at grocery stores in Australia:
How much duck fat you need
You will need between 600 – 800g / 21 – 28 oz of duck fat. You need enough fat to cover the legs so they are fully submerged for slow roasting (see photos in post / video). So the exact amount you need depends on the size of the duck legs and your roasting pan.
We minimise the amount of duck fat required by using a small roasting pan that the duck fits in snugly. While you can count on some fat being released by the duck itself during the slow roasting time, it doesn’t actually raise the fat levels.
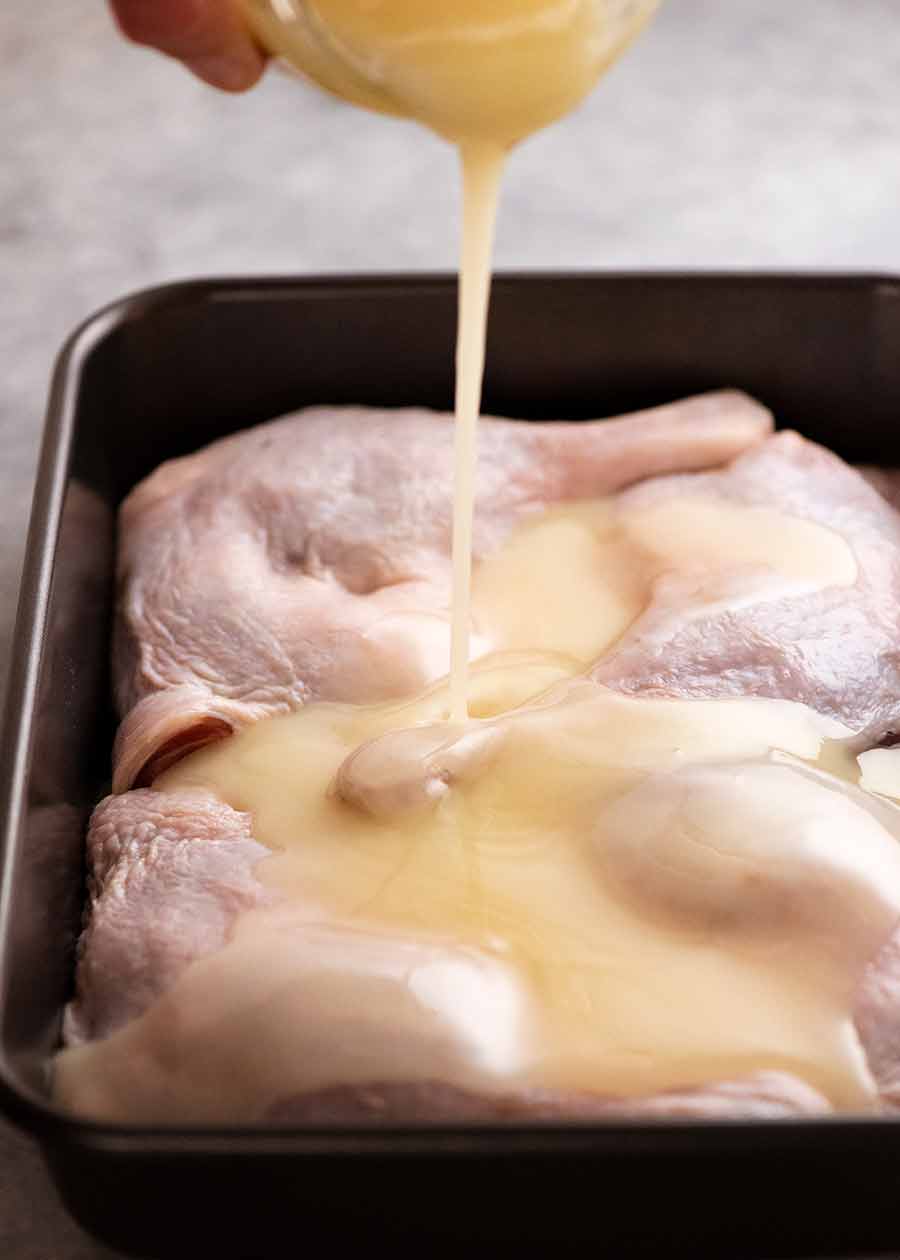
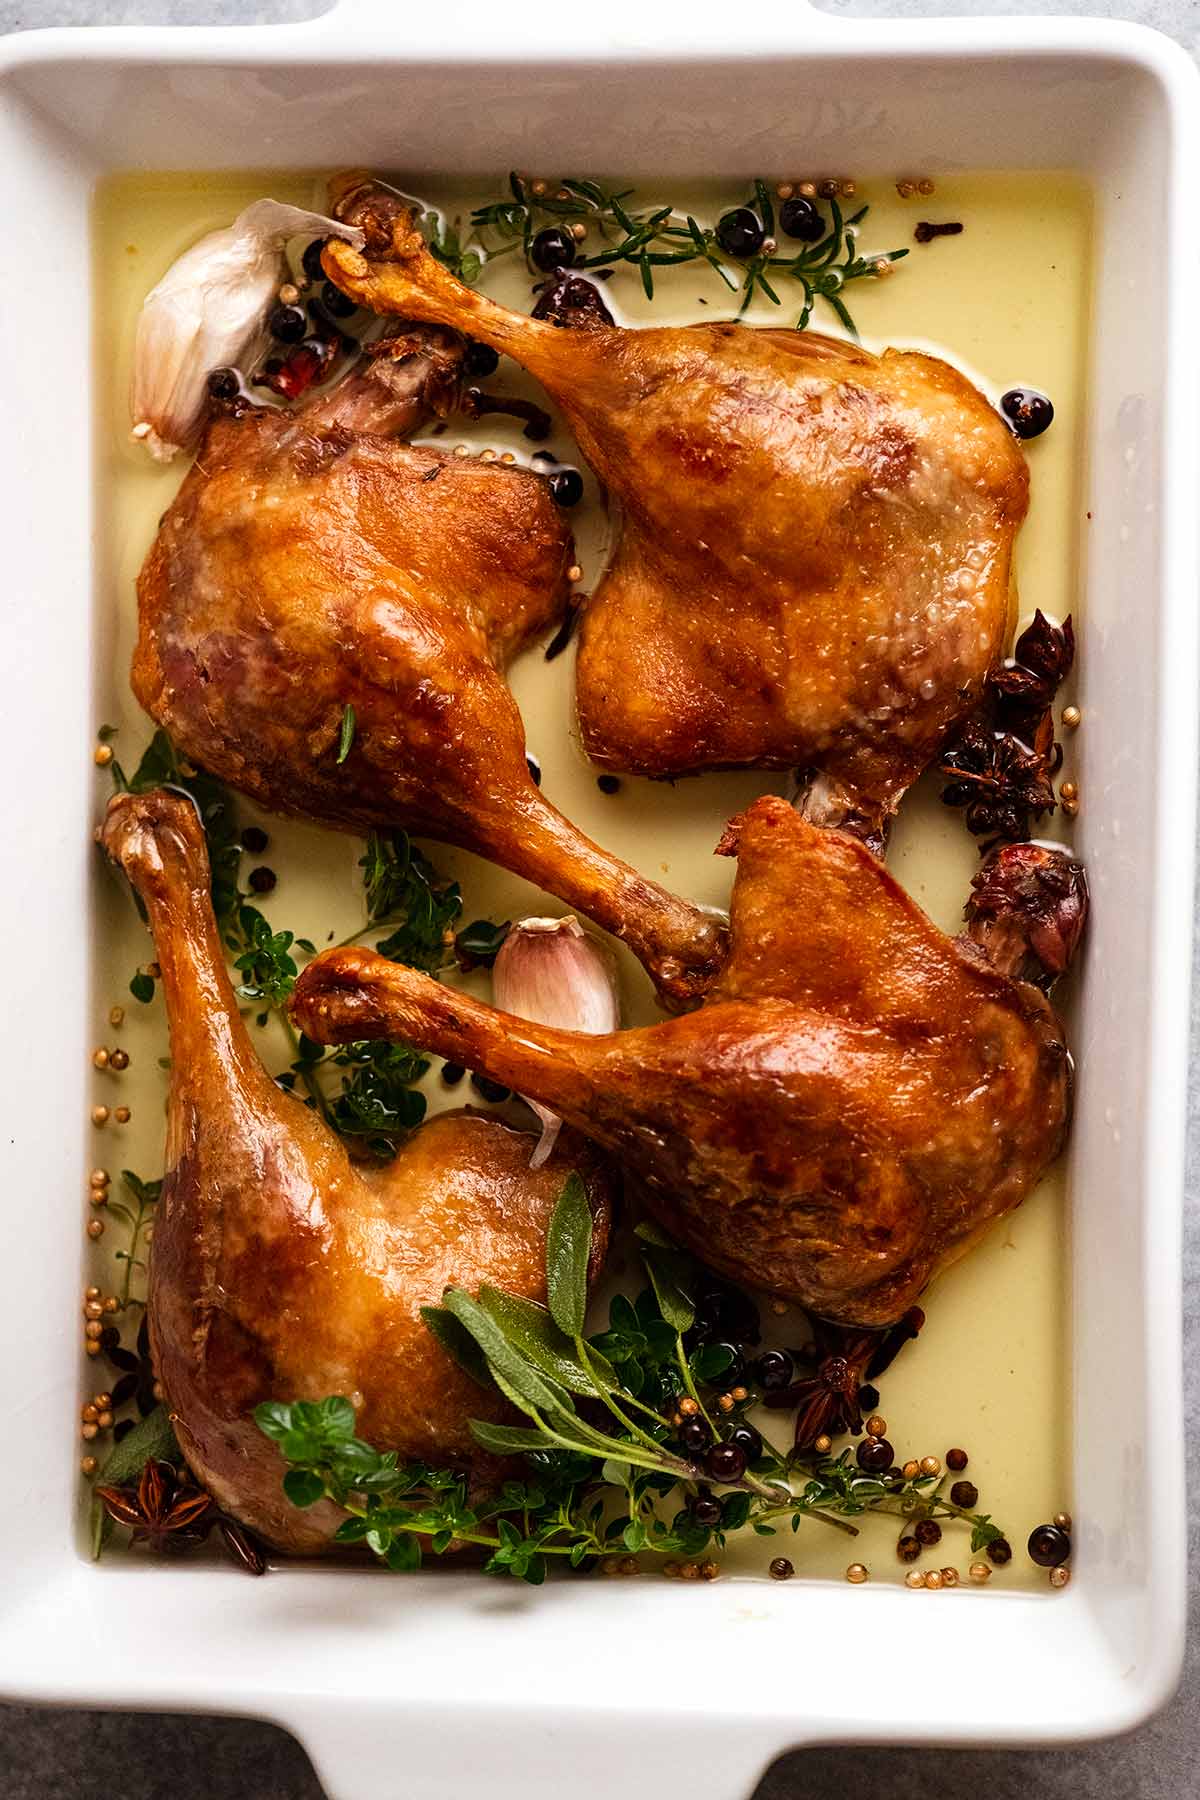
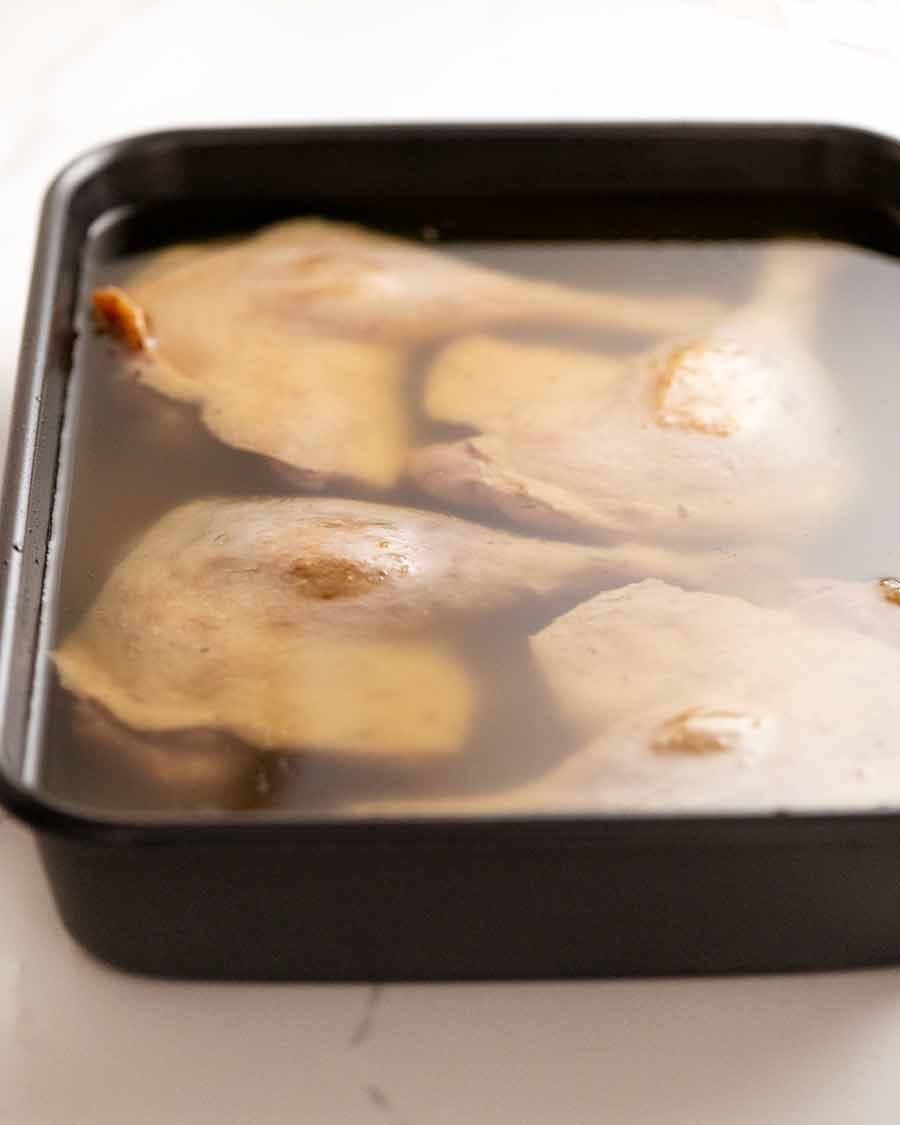
Pouring duck fat over duck legs for Duck Confit 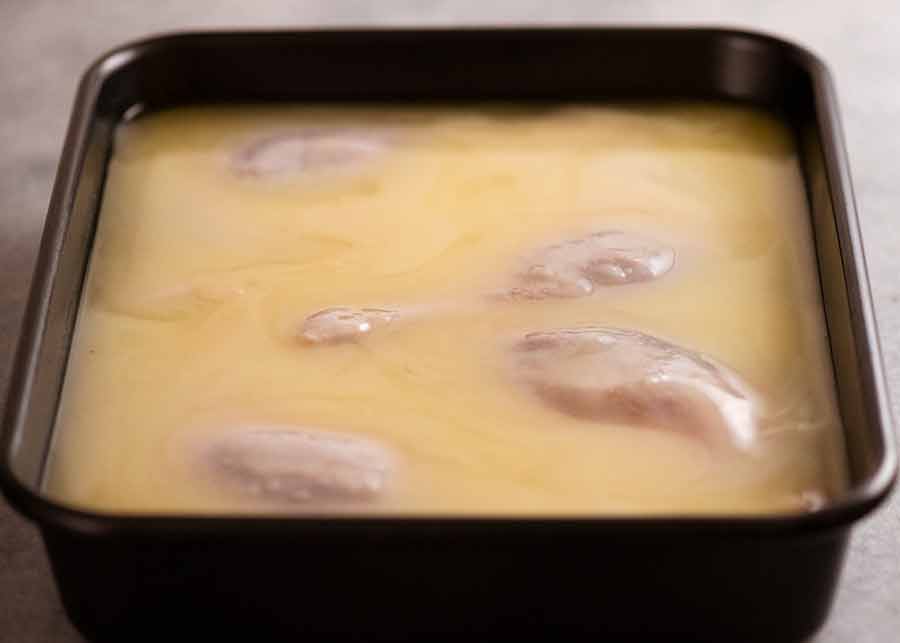
The duck legs need to be virtually completely submerged
Dry cure for Duck Confit
One of the key characteristics of Duck Confit is the incredible, subtle but complex perfume of herbs and spices that is infused all the way through the duck. We use a lot of the stuff. A lot!!
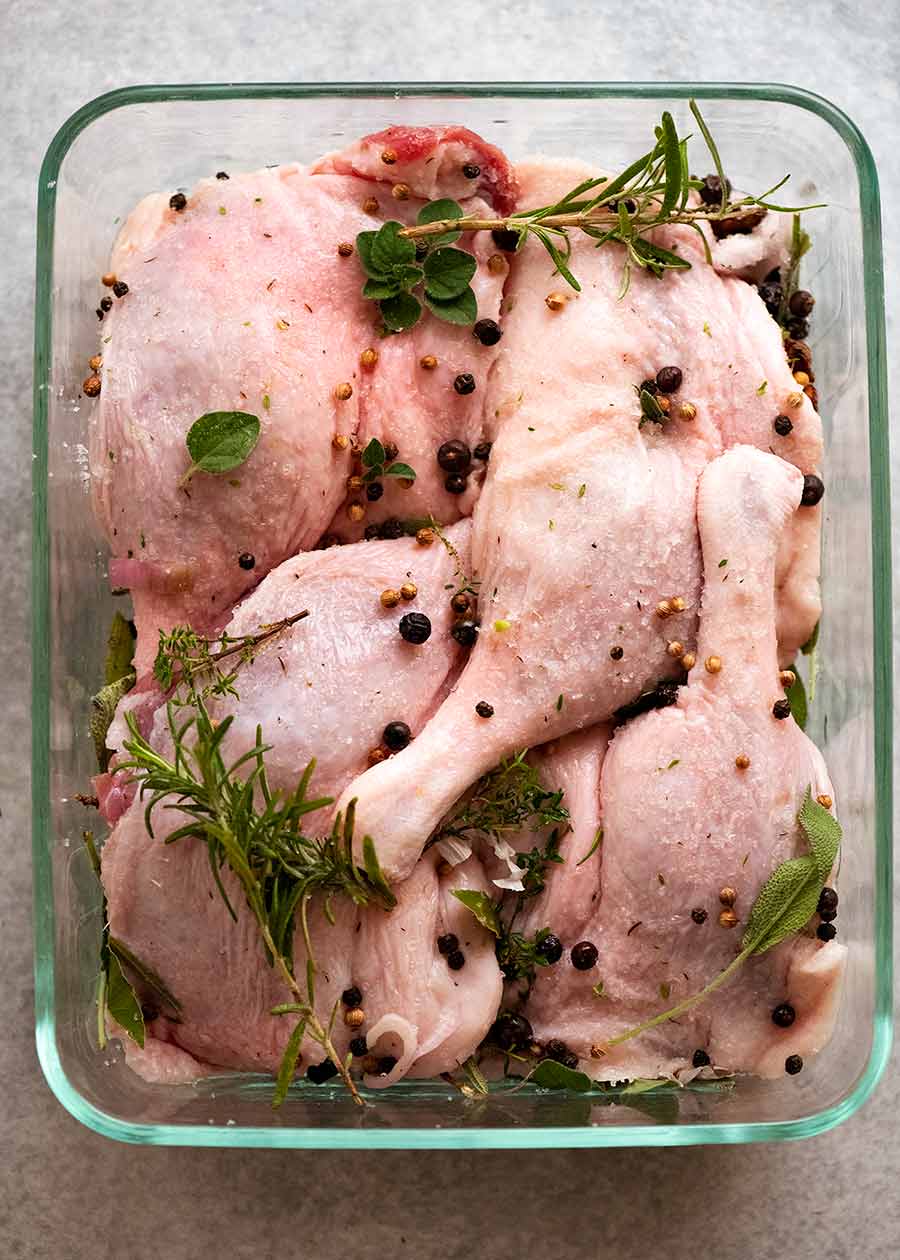
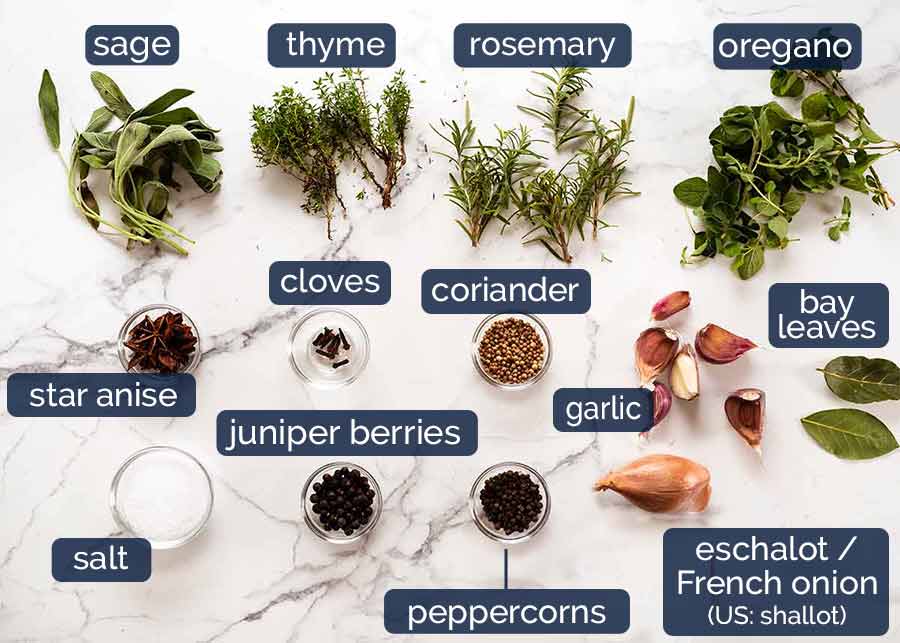
Fresh herbs – Thyme, sage, rosemary, oregano and bay leaves. Do not underestimate the power of these fresh herbs!
Dried herb substitute: If you are missing one of these herbs, use about 1 tsp of the dried herb equivalent. Try to avoid substituting more than one of the fresh herbs with dried because it’s not quite the same. However, in and emergency, yes I would use dried herbs for all and yes it will still be fabulous!
Garlic – Smash the garlic clove with the side of a knife to make the clove burst open but still mostly remain in one piece. This releases the flavour of the garlic to subtly infuse the duck with garlic whilst making it easy to pick out later;
Eschalots – Also known as French onions, these are called “shallots” in the US. They look like baby onions, but have purple-skinned flesh, are finer and sweeter. Not to be confused with what some people in Australia call “shallots” ie the long green onions; and
Spices – Whole black peppercorns, coriander seeds, star anise, juniper berries and cloves (whole).
How to make Duck Confit
Are you ready to be shocked how incredibly easy it is to make Duck Confit? Oui? Here we go!
Overview
Here’s an overview of the steps. I’m providing more visuals than usual because I suspect this is not an everyday recipe for most people. But I promise it’s straightforward!
Cure duck for 12 – 24 hours in a dry cure of salt, herbs and spices;
Submerge in duck fat, cook in oven for 8 hours at a very low temperature. We use a small pan to minimise the amount of duck fat required, and I usually slow cook overnight;
Crisp skin in a hot oven, using a rack set over a pan of boiling water to keep the flesh on the underside moist. This is a far more effective and easier method than the usual pan-frying or broiling/grilling called for in most recipes.
Part 1: Dry-cure duck
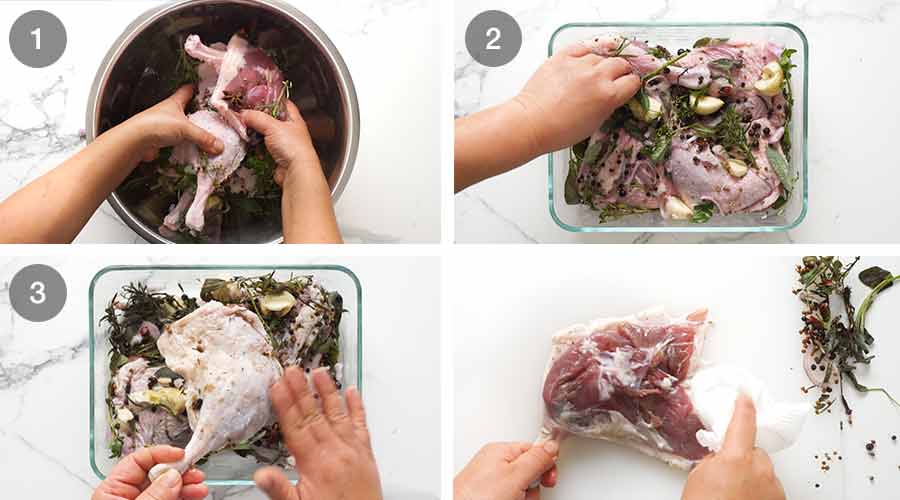
Coat duck with salt, herbs and spices: Place duck legs and all the curing ingredients in a large bowl and toss well with your hands.
Cure 12 -24 hrs: Transfer to a ceramic or glass dish large enough so the duck legs fit in a single layer but snugly, so they are cosied up with all those herbs and spices. Cover and refrigerate for 12 – 24 hours (no longer is necessary).
Rinse: Brush off the cure. Rinse duck under tap water to clean them, removing all salt and other bits. Pat dry with paper towels.
Part 2: Prepare for cooking
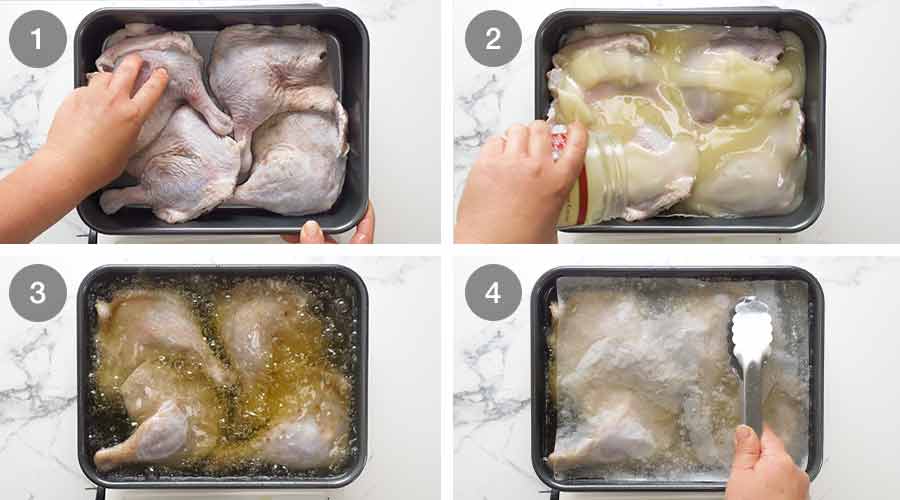
Place duck in a snug roasting pan: Place duck in a small metal roasting pan with high sides in which they fit snugly, touching each other, but in a single layer. The pan I use is 27cm x 21cm (10.5″ x 8″);
You need a pan with high sides so hot duck fat doesn’t slosh out when you handle it – hot fat and hands don’t mix! It’s best if it’s a metal roasting pan so you can put it straight on the stove to kickstart the fat heating step (step 3 below);
Cover with duck fat: Pour fat over duck legs. You need enough so they are virtually fully submerged. A little bit of the skin or bone above the surface is fine because the duck will shrink under as it cooks. The main aim here is to ensure the flesh is fully submerged;
Heat fat: Place the pan directly on the stove over medium-high heat until the fat is bubbling energetically across the whole surface (ie not just around the edges);
Cover with paper: Turn the stove off. Cover the duck with baking/parchment paper cut to size so it sits flat on the oil surface. Press it gently down to remove air bubbles.
This paper lid is a cooking technique similar to a cartouche which is used to trap heat and keep foods submerged during braising or confit like this.
Cover the pan tightly with a double layer of foil. Now you’re ready for slow roasting!
Part 3: Slow-cooking (confit)
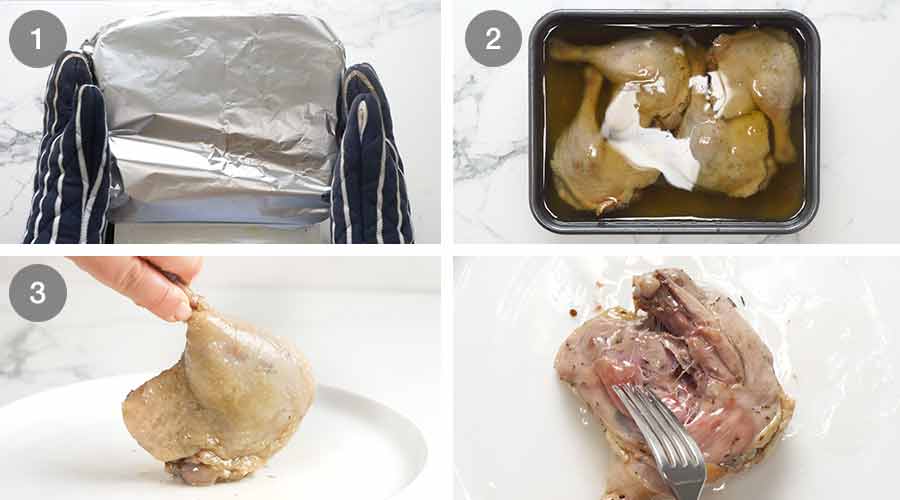
Slow-cook: Carefully transfer to the oven. (Be very careful! Hot duck fat is dangerous!) Slow-cook for 8 hours at 100°C / 210°F (80°C fan). I typically do this overnight. In an oven this low, I feel perfectly safe snoozing away!
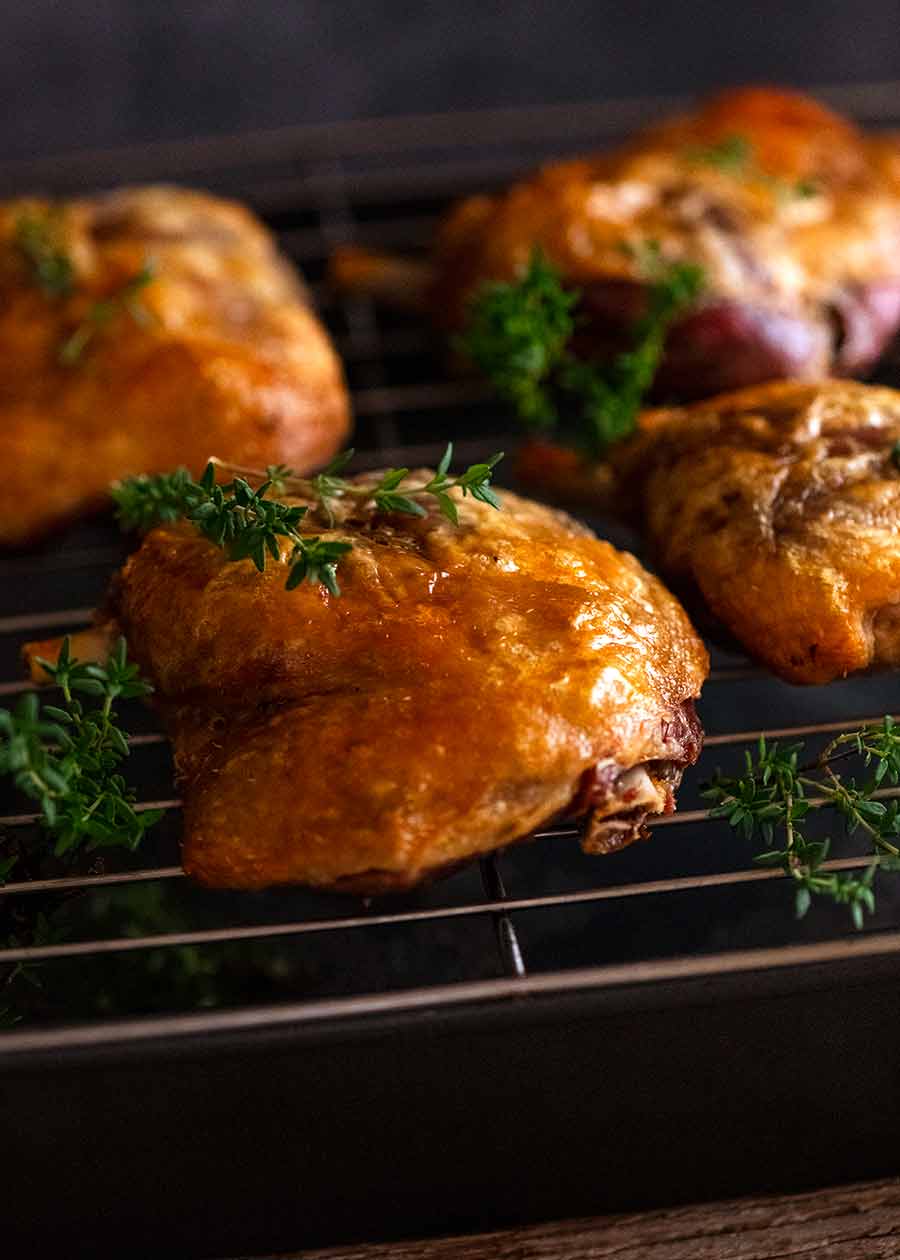
Remove from oven: This is what it looks like when it comes out of the oven. It will look totally unimpressive with pale and flabby skin. But just wait! The best is yet to come!
Check flesh is cooked: By this stage, the duck flesh should be ultra-tender and “fall apart at a touch” but still attached to the bone. There’s two ways to check:
Method 1 – Turn the leg over to check the exposed flesh side. Use a fork to check if the flesh flakes easily (it’s tempting to remove a chunk and pop it in your mouth, I know – resist!);
Method 2 – Bend the duck leg gently on a plate. It should bend easily when pressure is applied on the joint (see video).
Meat done, at this stage the duck can either be crisped up in the oven to serve straight away, or stored in the fridge / freezer still submerged in fat. Therein lies the beauty of Duck Confit – you can have this amazing dish sitting around ready to impress the pants off some lucky person at the drop of a hat!
Part 4: Long term storage (optional)
Here’s how to store the duck in the fridge (5 days) or freezer (3 months or more) if you are planning to keep it to serve at a later date.
Those of you familiar with Duck Confit might be thinking, “But isn’t the whole point of confit that you can keep the meat sealed under fat just the fridge for weeks or even months, and it will be good to eat?” The answer is yes, traditionally Duck Confit would be stored long-term in just a cool place. In 99.99% of cases it will keep perfectly like this. If you’re comfortable doing this, you can. However out of an (over) abundance of caution I recommend keeping in the fridge no longer than regular food, and freezer for any duration past this.
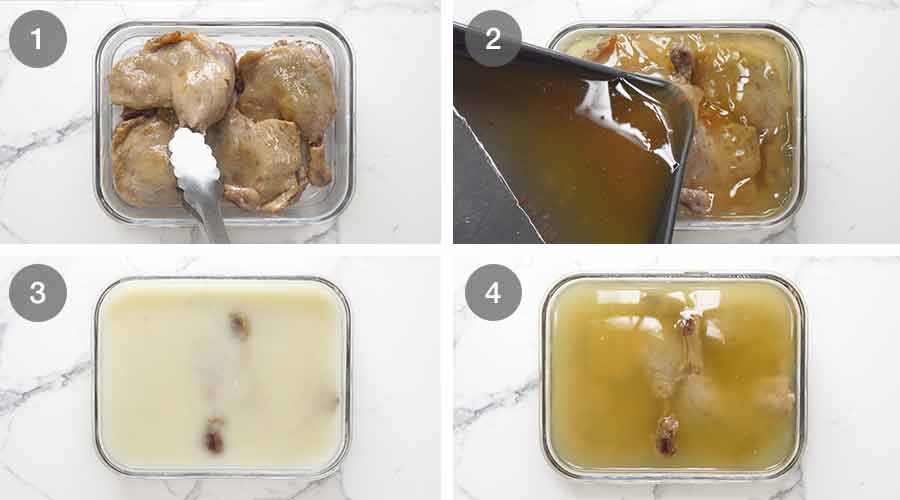
Cover with duck fat: While the duck is still warm, remove from the roasting pan into a non-reactive container in which they fit snugly. They can be stacked or in a single layer, just as long as the duck fat covers the duck completely. Do this while the duck is still warm as they are pliable so you can arrange them in the most space-efficient manner.
Strain duck fat: Strain the duck fat into a jug, then leave it for a bit to let the duck juices settle at the bottom. Then pour the duck fat over the duck legs, leaving behind most of the duck juice;
Cover and freeze: Once fully cool, cover with a lid and place in fridge (5 days) or freezer (3 months). The fat will solidify and turn white. If you are comfortable, you can keep just in the fridge for at least several months, as is traditional!;
To cook: If the duck was frozen, thaw it overnight in the fridge. Then heat duck gently in the microwave to melt the fat so the duck can be removed. Proceed with the recipe to crisp up the skin and reheat the duck.
Part 5: Crisping skin and finishing the Duck Confit
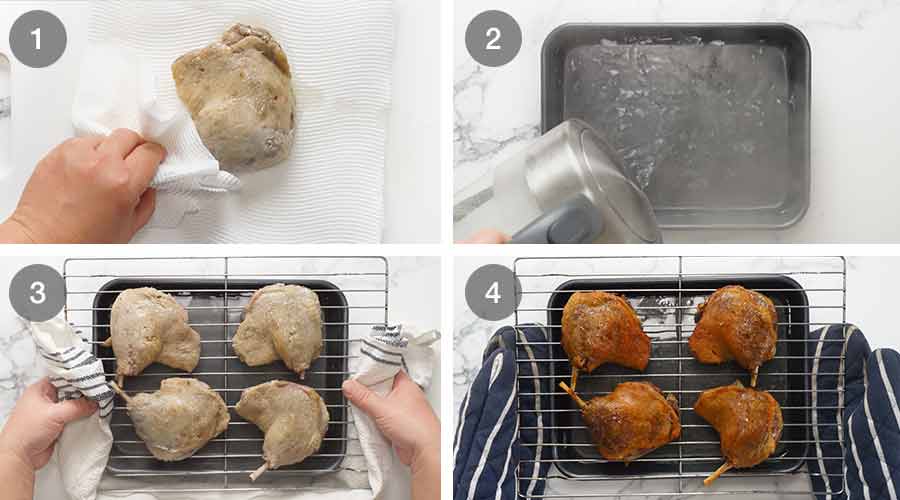
Prepare for roasting: Remove duck from fat, allowing excess to drip off. Dab excess fat off with paper towels;
Skin crisping: Pour 2.5cm / 1″ boiling water water into a roasting pan, then set a rack over the pan. Place the duck on the rack, skin side up.
The water keeps the flesh of the duck ultra moist whilst allowing the skin to crisp up beautifully. This method of crisping up the skin works far better than the stove-searing methods that other recipes use. It gives the most even colour and, more importantly, crispy skin all over! In contrast, although faster, pan searing will only crisp the skin where the skin is in contact with the pan;
Crisp skin: Roast duck for 40 minutes in a hot oven (240°C / 465°F (220°C fan)) until the skin is a deep golden colour and crispy. Rotate the pan as needed to make the colour even all over. You won’t have problems with smoke because the fat will drip down into the water; and
Serve straight away while the skin is at it’s crispiest best! There is no need to rest duck because the meat is already cooked. In fact, the skin loses crispiness if it’s sitting around.
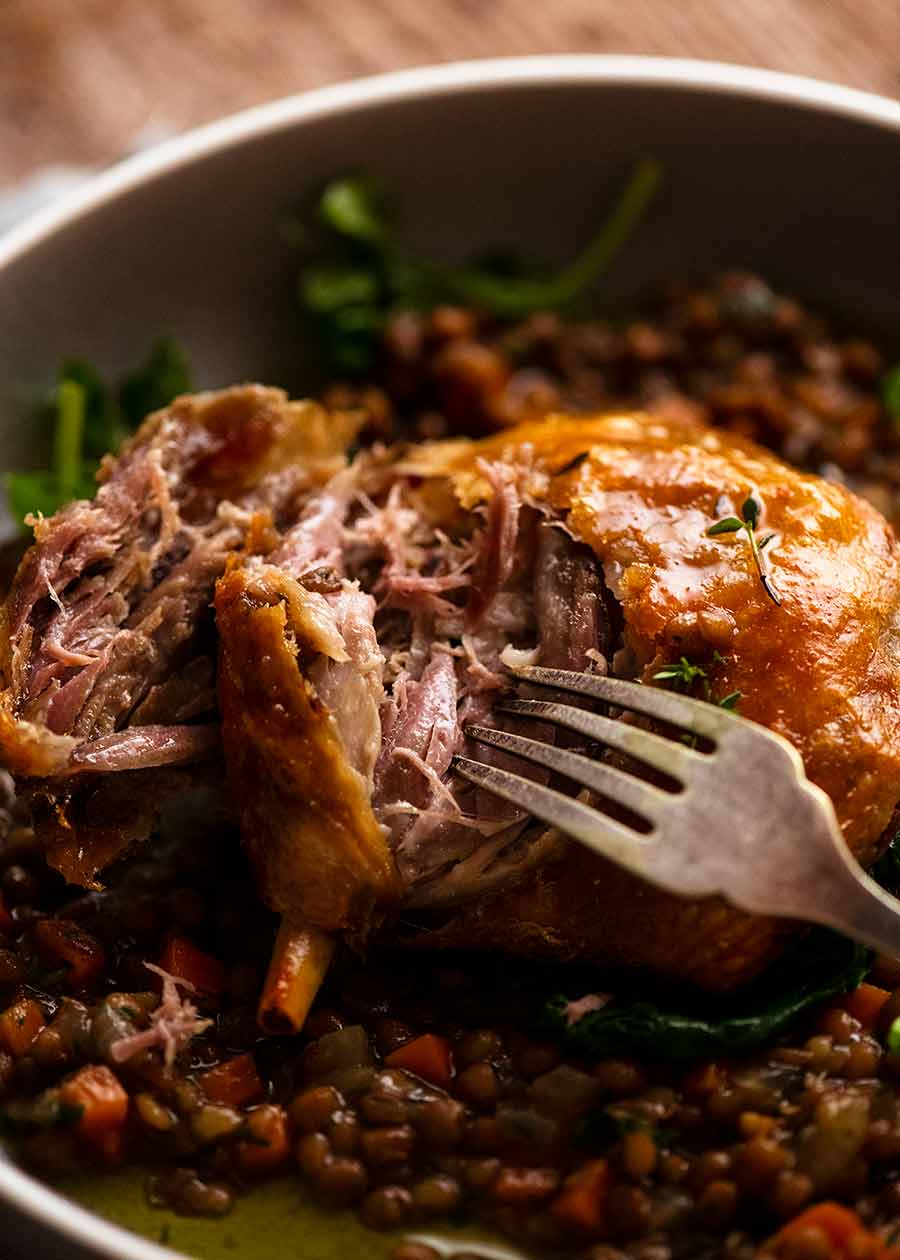
Crispy skin…..

… and tender, flavour-infused flesh. It’s that magical combination hits my carnivore sweet spot every single time! 😉
How to serve Duck Confit
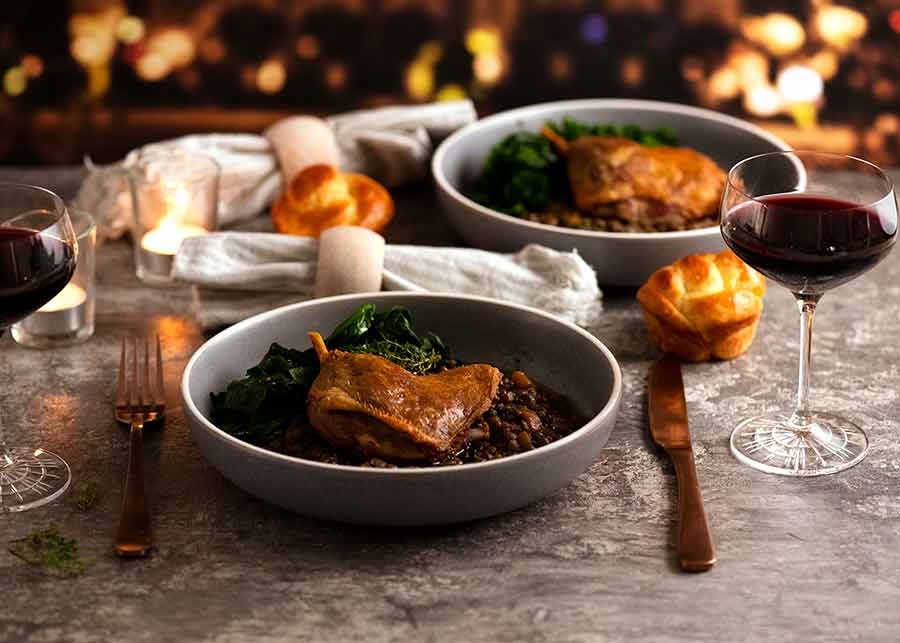
The most traditional way Duck Confit is served in France is on a bed of lentils. The earthy lentils are a perfect match for the rich and gamey duck. This is a French Lentil Ragout – yes that’s right, I said a ragout! It’s mouthwateringly good, and a worthy serving companion to Duck Confit.
Add a bowl of leafy greens tossed lightly with a French Dressing, and voila! You’ll feel just like you’re in a cosy bistro or a bustling brasserie tucked in the back streets of Paris! – Nagi x
PS. Dessert is coming on Friday. 😇
Watch how to make it
Duck Confit – French slow roasted duck legs
Ingredients
Duck:
- 4 x 250g / 8oz duck legs , skin on, bone in (aka maryland); (Note 1)
- 750 ml / 25 oz duck fat (Note 2)
Dry cure (Note 3):
- 4 tsp cooking/kosher salt (Note 4)
- 1/3 cup thyme sprigs , lightly packed
- 1/3 cup sage sprigs , lightly packed
- 1/3 cup rosemary sprigs , lightly packed
- 1/3 cup oregano sprigs , lightly packed
- 6 cloves garlic , smashed with skin on
- 1 eschalot (US: shallot), peeled and sliced 0.7cm (1/3") thick
- 1 tbsp black peppercorns
- 1 tbsp coriander seeds
- 8 star anise
- 2 bay leaves
- 2 tbsp juniper berries
- 8 cloves
Instructions
Cure duck:
- Coat duck with dry cure: Place duck legs and all the Dry Cure ingredients in a large bowl. Toss well with your hands.
- Cure 12 – 24 hrs: Transfer to a ceramic or glass dish large enough so the duck fits in a single layer but snugly. Cover and refrigerate for 12 – 24 hours (no longer is necessary).
- Rinse: Brush off cure and rinse duck under tap water to clean them (remove all salt and black bits). Pat dry with paper towels.
Slow cooking (confit):
- Preheat oven to 100°C/210°F (80°C fan) with a shelf positioned in the middle of the oven.
- Roasting pan: Place duck in a small metal roasting pan with high sides. They should fit snugly, touching each other, but in a single layer. (Note 5)
- Cover with duck fat: Pour fat over duck. It should pretty much cover the legs. (Note 6)
- Heat fat in pan: Place pan on the stove over medium-high heat. Heat fat until bubbling energetically all across the surface (ie not just around the edges).
- Cover with paper: Turn off stove. Cover surface with baking / parchment paper, cut to size so it sits on the surface of the fat over the duck. Gently push down to remove air bubbles. Cover pan tightly with a double layer of foil.
- Slow cook: Carefully transfer to the oven. Cook for 8 hours.
- Check flesh: Remove one duck leg (gently). Turn over to check the flesh side – meat should be fall-apart tender. Leg should also give easily when pressure is applied to the joint (see video).
Storing cooked Duck Confit (optional):
- Duck can be stored submerged in fat at this stage. The meat juice should be strained off first.
- Remove duck to a non-reactive container in which they fit snugly. (Note 7) Pour over cooled duck fat, leaving juice sediment behind. Ensure it fully covers the duck (push duck under while warm and pliable as needed, using tongs).
- Once fully cool, cover with lid and place in fridge (5 days) or freezer (3 months). Fat will solidify.
- To cook, heat duck gently in a container in microwave to melt the fat. Proceed with recipe.
Crisping skin and finishing Duck:
- Preheat oven to 240°C/465°F (220°C fan). Place a rack over a deep roasting pan.
- Remove duck from fat: Remove duck from fat, allowing excess oil to drip off. Pat excess oil off with paper towels.
- Prepare for roasting: Pour 2.5cm / 1" of boiling water water into the roasting pan (steam keeps flesh moist). Place duck on rack, skin side up.
- Crisp skin: Roast duck for 40 minutes until the skin is a deep golden and crispy. Rotate pan as needed for even colour. (You won't have problems with fat smoking as it drips into the water)
- Serve: Rest briefly to cool, and serve! A classic French side dish for Duck Confit is Lentil Ragout. (pictured in post)
Notes
- Fresh herbs measurement – Use sprigs and lightly pack them into cup measures. Use ingredient photos in post and the recipe video for visual guide, or weights provided in recipe.
- Smashed garlic – Place side of large knife on garlic then use the heel of your hand to bash the side of the knife once, making the garlic burst open but mostly hold together.
- Eschalots –Also known as French onions, and called “shallots” in the US. They look like baby onions, but have purple-skinned flesh, are finer and sweeter. Not to be confused with what some people in Australia call “shallots” ie the long green onions.
Alternatively, strain the fat into a jug and let it solidify in the fridge. Then scrape the fat off, leaving behind the juice (which will firm into a jelly). You’ll need to reheat the fat to pour into a container. 9. Source – This recipe was created in collaboration with Jean-Baptiste Alexandre, a French chef residing in Sydney who works with me on some of the more iconic recipes of the world. If there’s anyone who will know Duck Confit, if it’s a French chef!
Nutrition
More fancy French food!
Life of Dozer
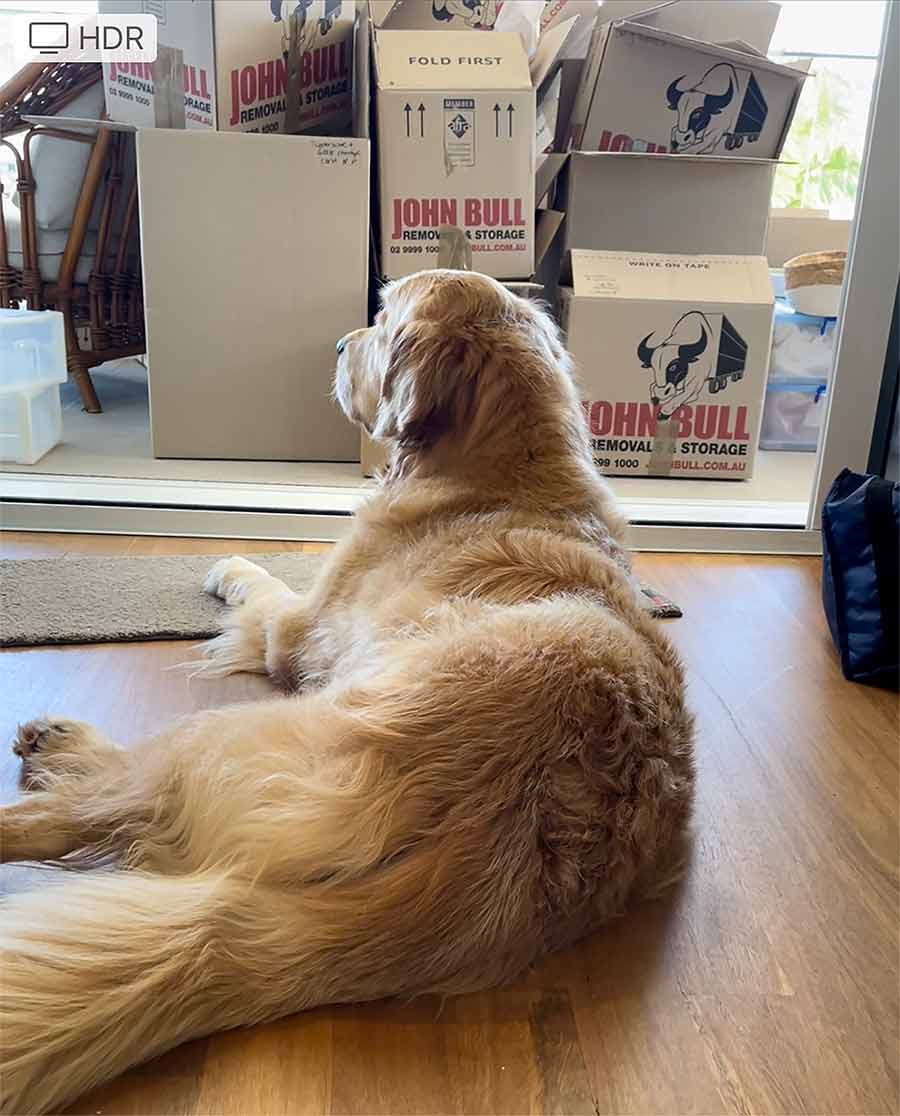
Moving into a temporary rental while my house is undergoing renovations!! It’s a short term furnished rental luckily, so I just had to move personals in….and all my kitchen gear, of course!
This is pretty much what Dozer spent the whole moving day doing. (ie Bugger all)
The post Duck Confit (French slow-cooked duck) appeared first on RecipeTin Eats.
]]>