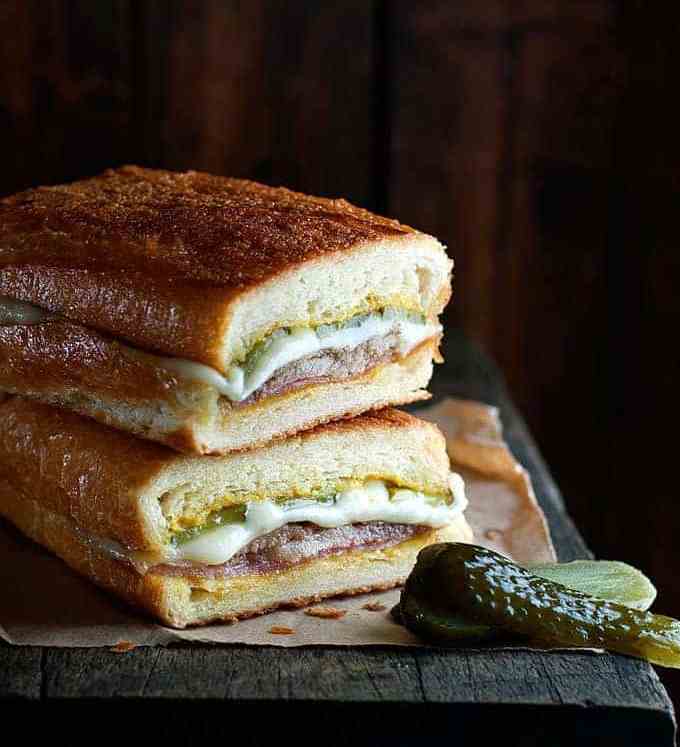
 A grilled cheese sandwich is not diet food. So when I have one, it has to be great! Crispy, salty, buttery exterior and oozy, molten cheese inside. Are you ready to meet the ultimate cheese toastie?? My two golden rules for a great Grilled Cheese I realise it might seem strange to share a recipe... Get the Recipe
The post My Best Grilled Cheese Sandwich appeared first on RecipeTin Eats.
]]>A grilled cheese sandwich is not diet food. So when I have one, it has to be great! Crispy, salty, buttery exterior and oozy, molten cheese inside. Are you ready to meet the ultimate cheese toastie??
My two golden rules for a great Grilled Cheese
I realise it might seem strange to share a recipe for what is fundamentally just melted cheese between bread. And really, is there even such a thing as a bad grilled cheese? Perhaps not.
But there is such a thing as a GREAT grilled cheese sandwich!
So here are my two golden rules for my very best grilled cheese:
Use TWO types of cheese – mozzarella for stretch and another for flavour (gruyere and vintage cheddar are my favourites)
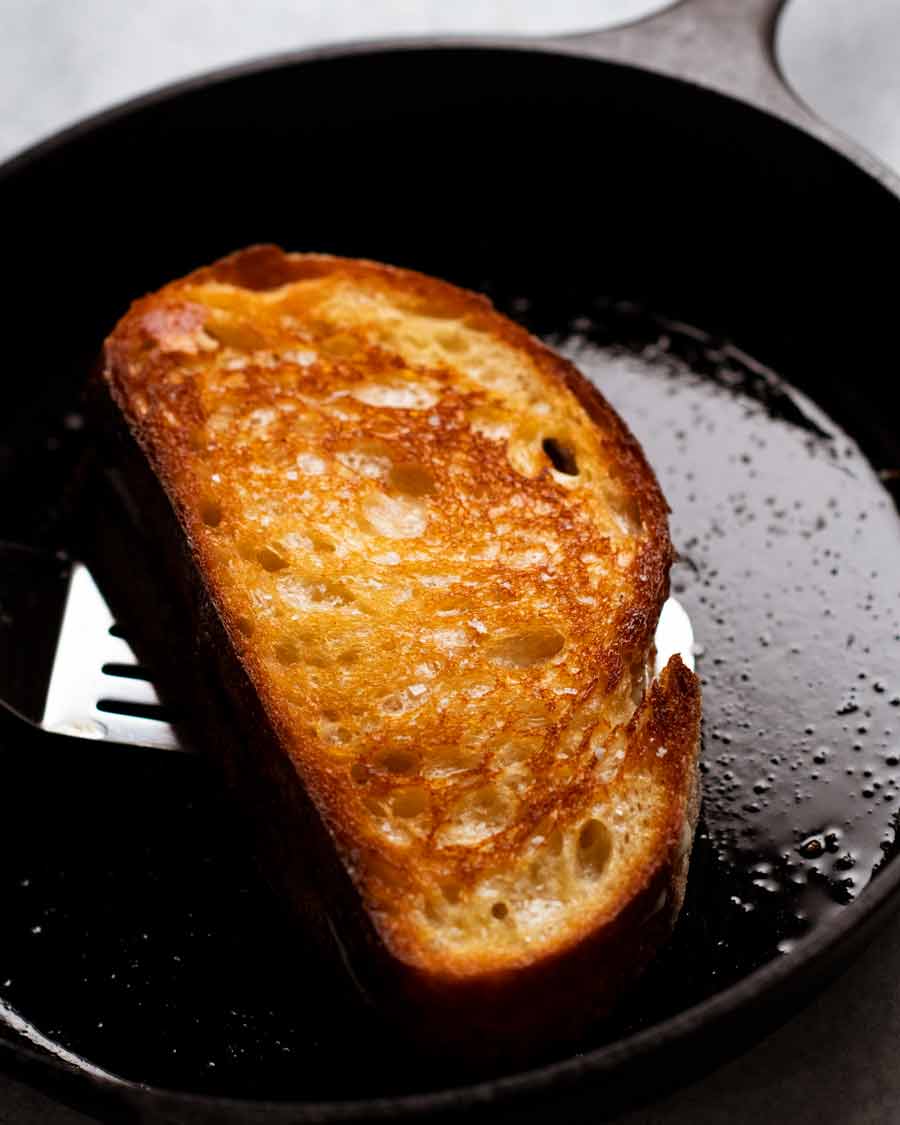
Give your sandwich press a miss. Use a pan on your stove! Just look at the superior golden buttery crust you get to bite into! ↓↓↓
Then to take it from excellent to new heights of greatness….
Use sourdough bread instead of ordinary sandwich bread;
Use freshly grated cheese instead of sliced or pre-shredded;
Butter both sides of each slice of bread; and
Be sure to use salted butter!
Grilled cheese vs cheese toastie – Fundamentally they are both toasted bread with melted cheese sandwiched between them. But toasties are made using a sandwich press or toastie maker, while grilled cheese is made on the stove in a skillet, griddle or pan.
Which is better? While it comes down to personal taste and convenience / speed, for me the grilled cheese wins hands down. The bread gets too squished in toasties and sandwich makers – even the ones that have a “thick set” option. The weight of the lid presses down on the bread too much. This also causes cheese to ooze out, limiting the amount you can put in the sandwich to not-enough. Travesty!!
And a quick note on other cooking methods…..
Broiler/grill – This method works fine and is a good alternative for batch cheese toastie making but you can’t achieve that same awesome melding of buttery-bread-molten-cheese like you do in a pan. Nor will you get the same golden buttery crust! However, useful method to use for batch cheese-toastie making (my method: toast bread, place on rack, butter, cheese, grill, eat open face or sandwich together)
Jaffle maker –The sealed edges and squished bread are the cons here. Though, still perfectly acceptable to scratch your cheese-toasties itch!
Microwave – No, you haven’t, have you??? *YES I HAVE!* 🙈
What you need for a grilled cheese sandwich
Here’s what you need to make my idea of the perfect grilled cheese. However, rest assured there’s flexibility and options! It’s more about technique. 
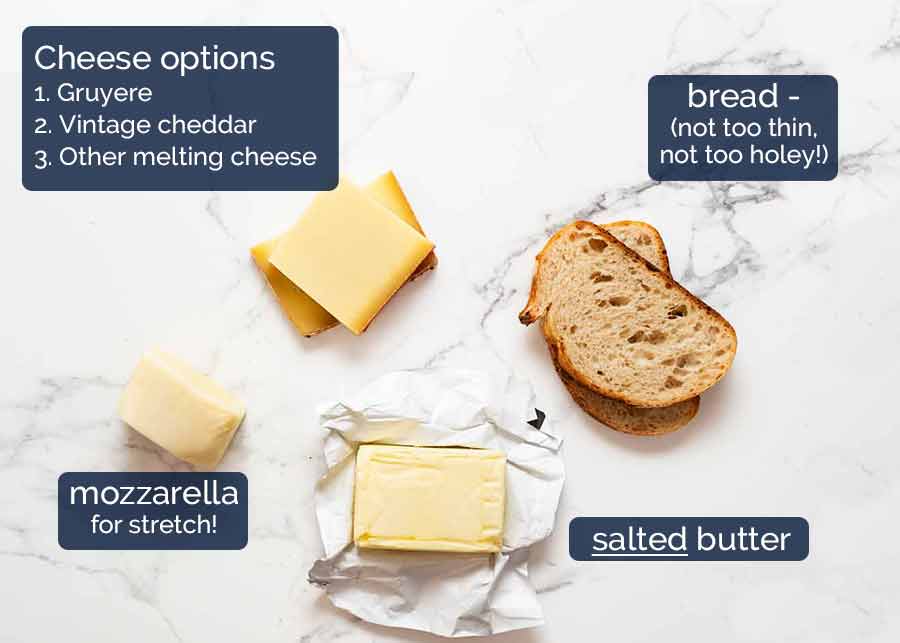
Bread – This recipe will work fine with any sliced bread (sandwich, loaf etc) though you want to ensure the slices are not too thick (cheese might not melt), too thin or too soft (will get squished by the cheese) or too holey (cheese-escape-routes).
My favourite is a nice sourdough but not those super fancy ones that come with a crazy thick, tough teeth-breaking crust. Just a normal, good sourdough is all you need!
Cheese options – For the best grilled cheese, you want to use a combination of mozzarella (for its cheese pull and non-greasy melting qualities) with a flavoured cheese – because mozzarella actually has a very mild flavour. A good vintage cheddar or gruyere are my absolute favourites.
Otherwise, I’ll use anything and everything – tasty, Monterey Jack, colby, swiss, cheddar. Just give me my grilled cheese!!!
Grate your own cheese for the ultimate grilled cheese! The melt is superior – smoother, more even, and “softer”. Store bought pre-grated cheese is coated with anti-caking agents that prevents it from melting well, so it can end up kind of gloopy and rubbery. Cheese slices are better than using packet shredded cheese.
Salted butter – Just your everyday butter that you use to spread on bread and crackers. Else, use unsalted and add a light sprinkle of salt. Trust me – you really want the salt!
How to make the best grilled cheese sandwich (in my world)
I added “(my world)” to the end because I realise that some people might not agree or have different tastes etc. and that’s totally ok! I’m just here today to share what I think is the very best grilled cheese in the world. (I mean, MY world 😂)
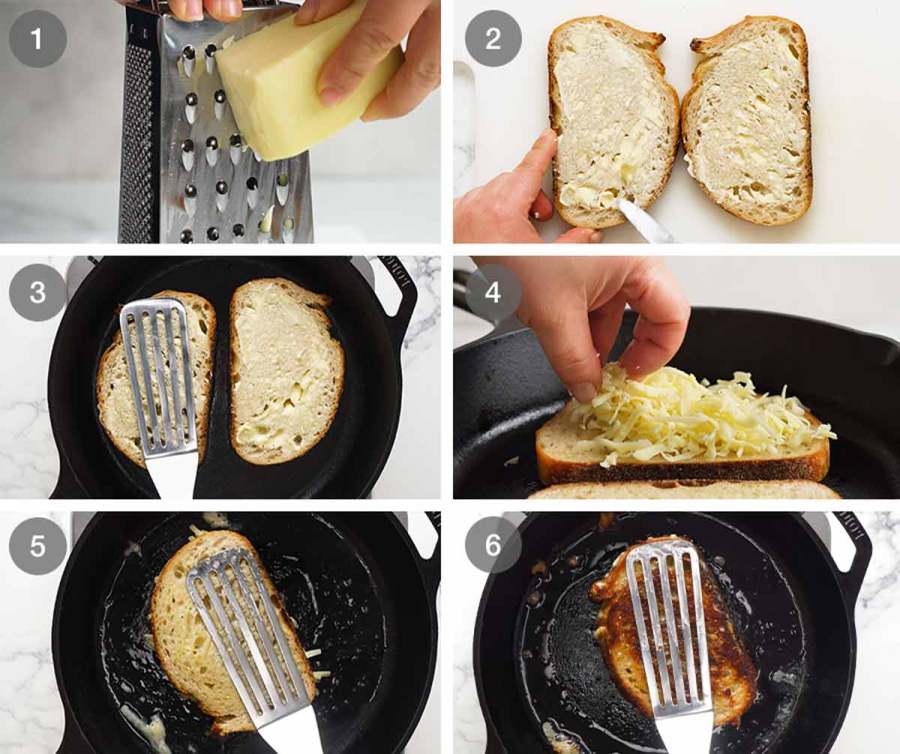
Grate cheese – If not using store bought pre-sliced cheese, grate the cheese using a standard box grater. As noted above, store bought pre-shredded cheese is coated with anti-caking agents which prevents it from melting properly.
Butter both sides of each bread. Yes that’s right, all four sides. Trust me on this!
Head start fry – Place the bread in a pre-heated heavy based skillet or non-stick fry pan over medium low heat. Let it lightly toast just for 1 minute. This will give this side of the bread a little extra toasty flavour as well as giving the cheese melting a head start – because we are going to flip the bread before piling the cheese on.
Flip bread & cheese it! Turn one slice of bread then pile the cheese on top (any order). Place the other piece of bread on top with the hot toasted side in contact with the cheese.
3 minutes – Press down lightly and cook for 3 minutes until the underside is a deep, even golden brown colour. If it is browning too quickly, remove the pan from the stove, let it cool slightly and lower the heat.
Turn, 3 minutes – Carefully turn the sandwich. Cook the other side for another 3 minutes until golden and crisp, and (most importantly!) the cheese is melted. Take a quick peek if you are unsure.

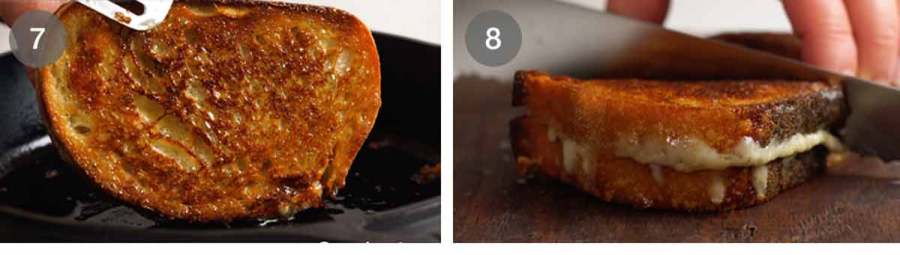
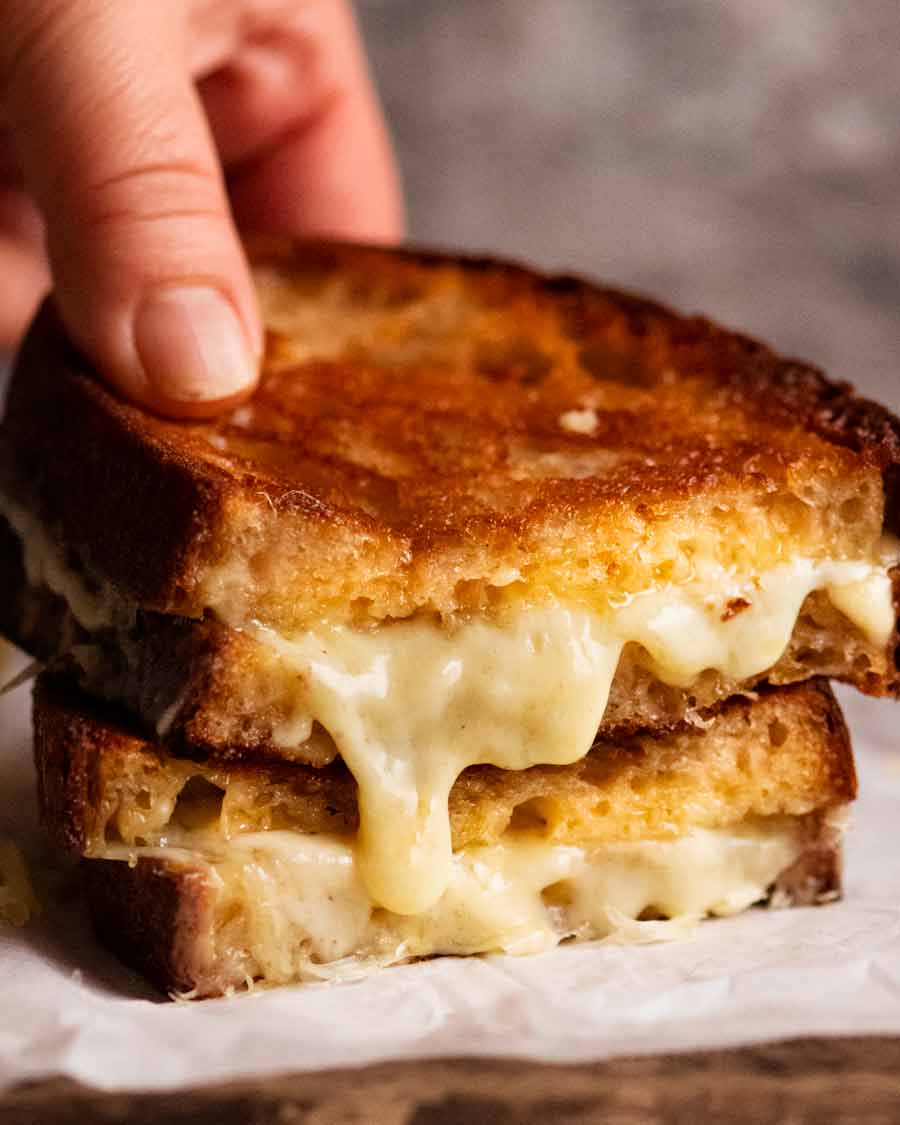
Golden brown – This is what your bread should look like from edge to edge! A deep golden brown, even coloured, crisp. You know this is going to be good!
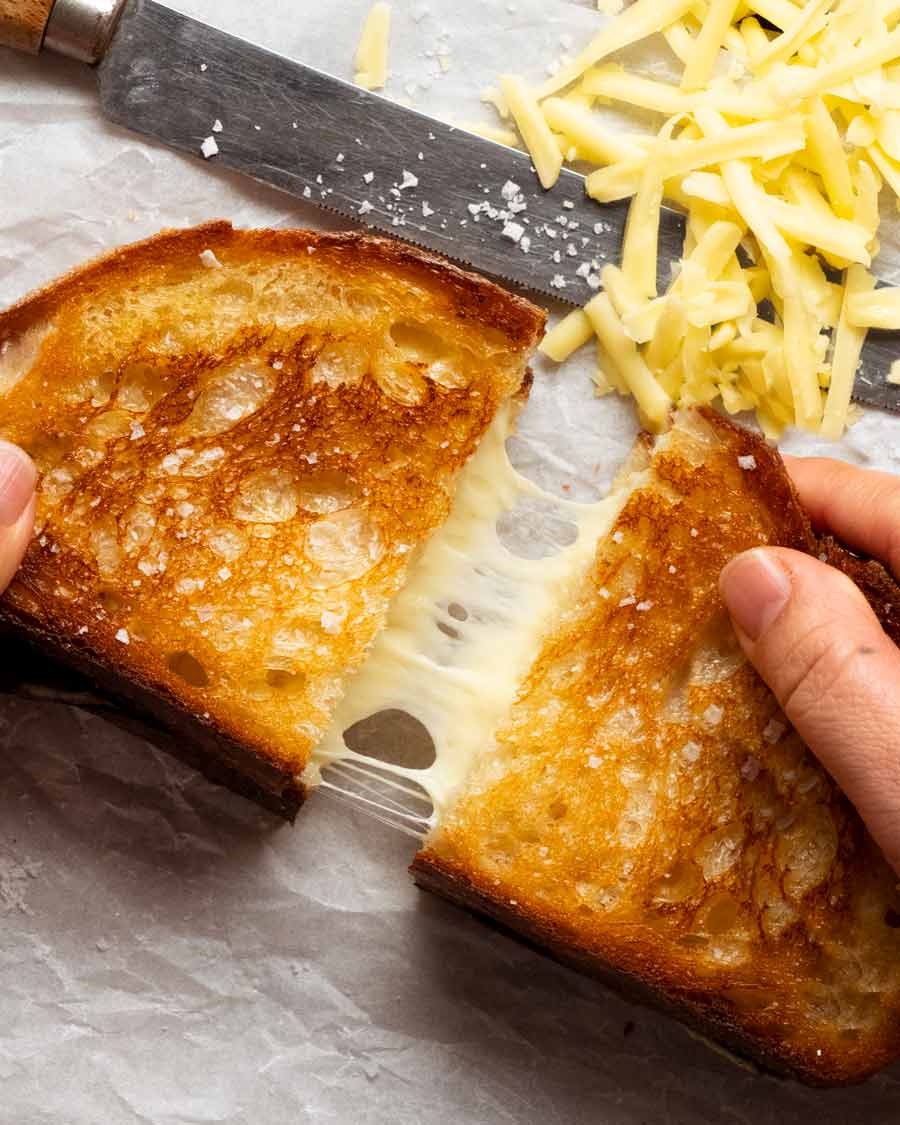
Cut – Transfer to a cutting board and cut in half, decisively and with intention. And then….wait for it…. THE CHEESE PULL!
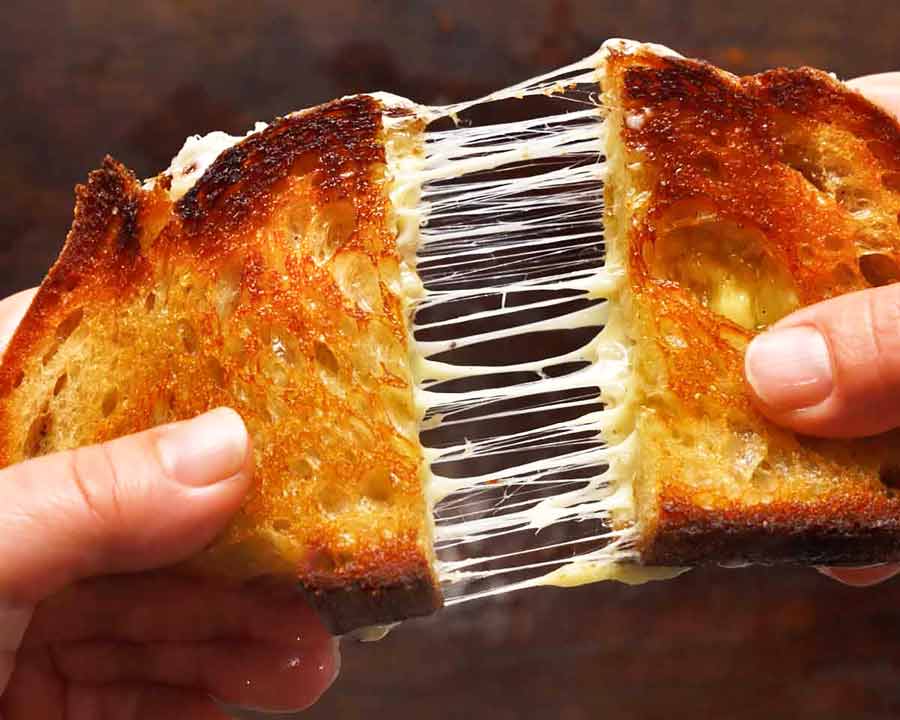
Yup, that piece has my name all over it. JUST LOOK AT IT.
That golden, salty, buttery crust.
The molten cheese, the perfect combination of the beautiful melting qualities of mozzarella mixed with the flavour of gruyere or cheddar….
The first bite is EVERYTHING!
I really hope you give this recipe a go, even if you only make it once, just so you can experience the greatness of a really, really good grilled cheese sandwich!! – Nagi x
PS Reading back over this post, I find my extreme enthusiasm for butter-cheese-bread somewhat worrying. I hope that one day, my salad recipes read with the same level of energy.
Watch how to make it

My best Grilled Cheese Sandwich
Ingredients
- 2 slices sourdough bread , sliced 1.3–1.5cm thick (0.5 – 0.6″) – Note 1
- 30g/ 2 tbsp SALTED butter , for spreading on bread (or unsalted + pinch of salt)
- 1/3 cup (heaped) vintage cheddar cheese or gruyere, freshly grated (or other melting cheese of choice) – Note 2
- 30g/ 1/3 cup mozzarella, freshly grated – Note 2
Instructions
- Butter bread – Slather both sides of each piece of bread with the butter (yes, all 4 sides!).
- Light toast – Heat a heavy-based skillet or frying pan over medium low heat (no oil or butter). Place both pieces of bread in the skillet and lightly toast for 1 minute to warm it through and create a light crust. (When we flip, this gives the cheese a head start).
- Pile on cheese – Flip one slice of bread, then pile on the cheddar cheese followed by the mozzarella. Place the other slice of bread on top, with the hot toasted side in contact with the cheese.
- Cook 3 minutes – Cook for 3 minutes or until the bread is evenly golden and crisp, pressing down lightly with a spatula every now and then. If it's browning too quickly, remove remove from the stove to cool down a bit and lower heat.
- Flip, 3 minutes – Turn the sandwich over, and cook the other side for 3 minutes or until the bread is golden and the cheese is melted.
- Devour – Transfer to cutting board. Cut in half in one swift motion. Admire cheese pull. Devour.
Notes
1. Bread – This recipe will work fine with any bread though you want to ensure it’s not too thick (cheese might not melt), too thin or too soft (will get squished by the cheese), too holey (cheese-escape-routes). My favourite is a nice sourdough but not those super fancy ones that come with a crazy thick, tough teeth-breaking crust. Just a normal, good sourdough is all you need!
2. Cheese options – For the best grilled cheese, you want to use a combination of mozzarella (for its cheese pull and non-greasy melting qualities) with a flavoured cheese – because mozzarella actually has a very mild flavour. A good vintage cheddar or gruyere are my absolute favourites.
Otherwise, I’ll use anything and everything – tasty, Monterey Jack, colby, swiss, cheddar. Just give me my grilled cheese!!!
Cheese slices work fine but honestly, you get a better melt using shredded. I promise. (I’ve had a lot of experience with both!). Please grate your own – packet shredded has anti caking agents, never melts as well.Nutrition
Life of Dozer
Post trip re-uniting treat, for both of us! He’s not usually allowed up on the couch without a full-towel-coverage situation. The fur…SO MUCH FUR. I’ll be vacuuming that couch tomorrow!

The post My Best Grilled Cheese Sandwich appeared first on RecipeTin Eats.
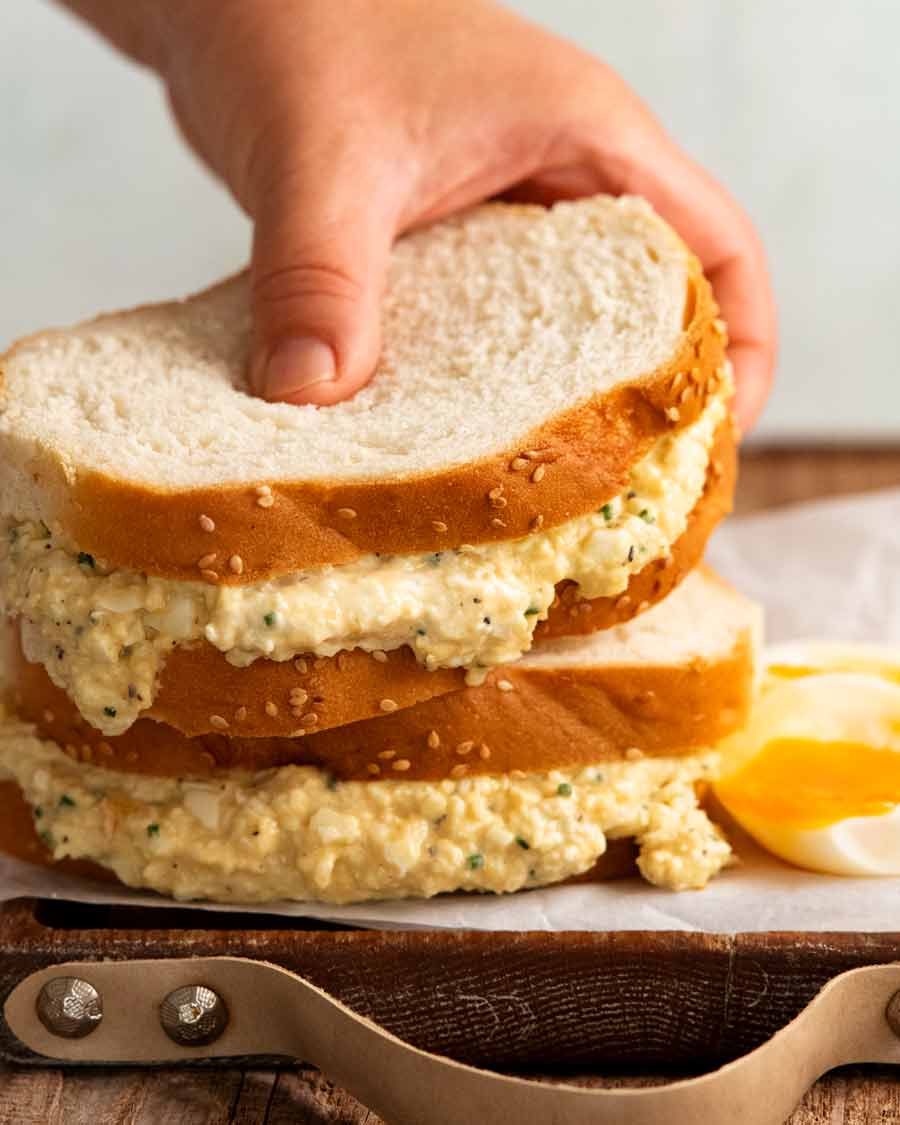
]]> At the heart of a great egg sandwich is a creamy egg filling and essential to this are soft boiled, not hard boiled eggs! The creamy yolks practically makes its own mayonnaise sauce and the soft-set egg whites almost melt in your mouth. Egg sandwich thoughts You wouldn’t think that someone would have so many... Get the Recipe
The post Egg sandwich appeared first on RecipeTin Eats.
]]>At the heart of a great egg sandwich is a creamy egg filling and essential to this are soft boiled, not hard boiled eggs! The creamy yolks practically makes its own mayonnaise sauce and the soft-set egg whites almost melt in your mouth.
Egg sandwich thoughts
You wouldn’t think that someone would have so many opinions about a simple egg sandwich, but as I sat down to write this recipe, it turns out I do! Here’s my egg sandwich thought-dump, roughly in care-factor order:
No rubbery bits of whites – I don’t like little firm bits of egg whites in what should be a creamy egg filling. So I use soft boiled eggs with soft just-set egg whites, rather than hard boiled eggs which is more common in standard egg sandwiches.
Semi homemade mayo – Soft boiled eggs = creamy yolk = practically makes its own semi-homemade mayonnaise. It’s so good! Better flavour and more luxurious with less mayonnaise required.
No celery. I know that might be an unpopular opinion but crunchy bits in a creamy egg filling, no matter how small or finely sliced, just don’t appeal to me. Goes in the same bucket as #1.
Soft bread is best. Too much filling oozes out when you bite the sandwich if you use chewy, crusty artisan bread like sourdough.
So, if all that sounds good to you, then let me introduce to the egg sandwich of your dreams!
Creamy egg sandwich filling
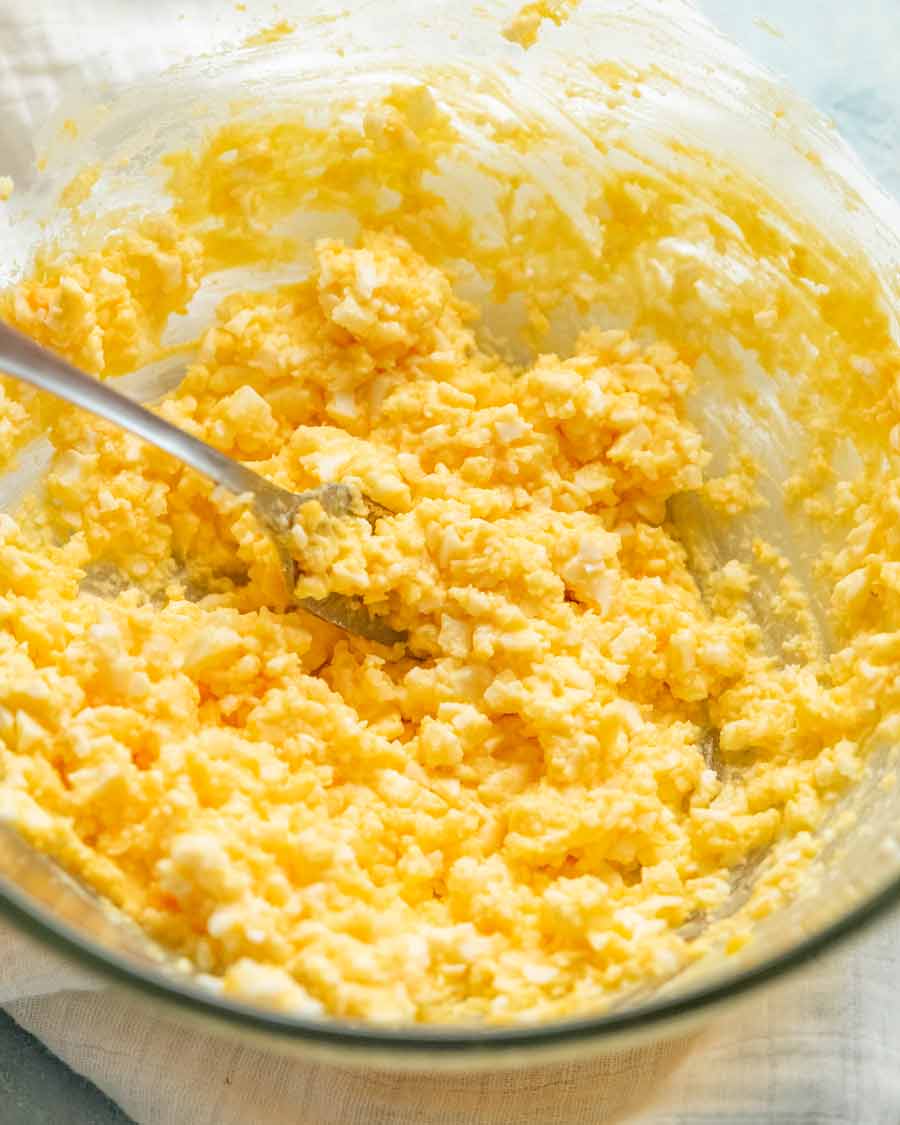
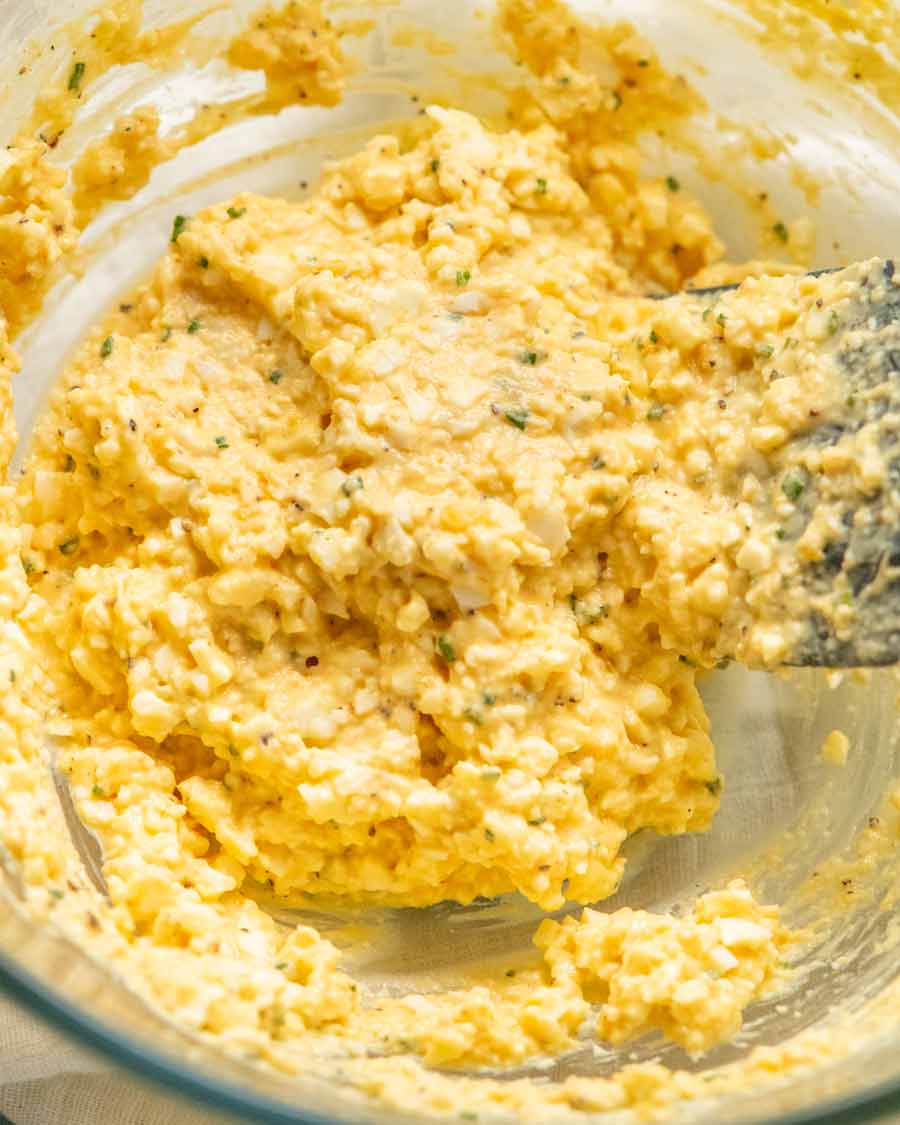
Here’s an up-close-and-personal look at the filling. The left photo is just soft boiled eggs mashed up. You can see that it’s already pretty creamy, even before adding the mayonnaise! Then the photo on the right is the finished filling after adding the mayonnaise and mustard.
What you need for my egg sandwich
As already emphasised a number of times (reeks of passion, right??!), the key ingredient here is soft boiled rather than hard boiled eggs! With creamy yolks, you only need a mere dab of mayonnaise and smidge of mustard for a creamy, luxurious filling.
If you don’t have chives, substitute with finely minced green onion.

Soft boiled eggs – The creamy yolk gives you a head start on the creamy sauce so we only need 1 tablespoon of mayonnaise for 6 eggs (4 sandwiches). So we’re sort of making a semi-homemade mayonnaise here!
Mayonnaise – Whole egg mayo is creamier and less tangy than normal mayo. My favourite brand is S&W (Australia), followed by Hellman’s and Kewpie (equal second).
Dijon mustard – For flavour and a touch of tang.
Chives – For freshness and nice green bits in our filling.
Salt – Just 1/8 teaspoon! Trust me on this. Egg is weirdly salt adverse. The opposite of potatoes which can take loads of salt!
Best bread for egg sandwiches
As for the bread, you can really use anything you want though for traditional tea-type sandwiches (like pictured), soft white sandwich bread is the go. My only tip is to avoid crusty, chewy artisan bread (like sourdough). Filling ooze issues. Stick with soft bread!
How to make egg sandwiches
And the making part:
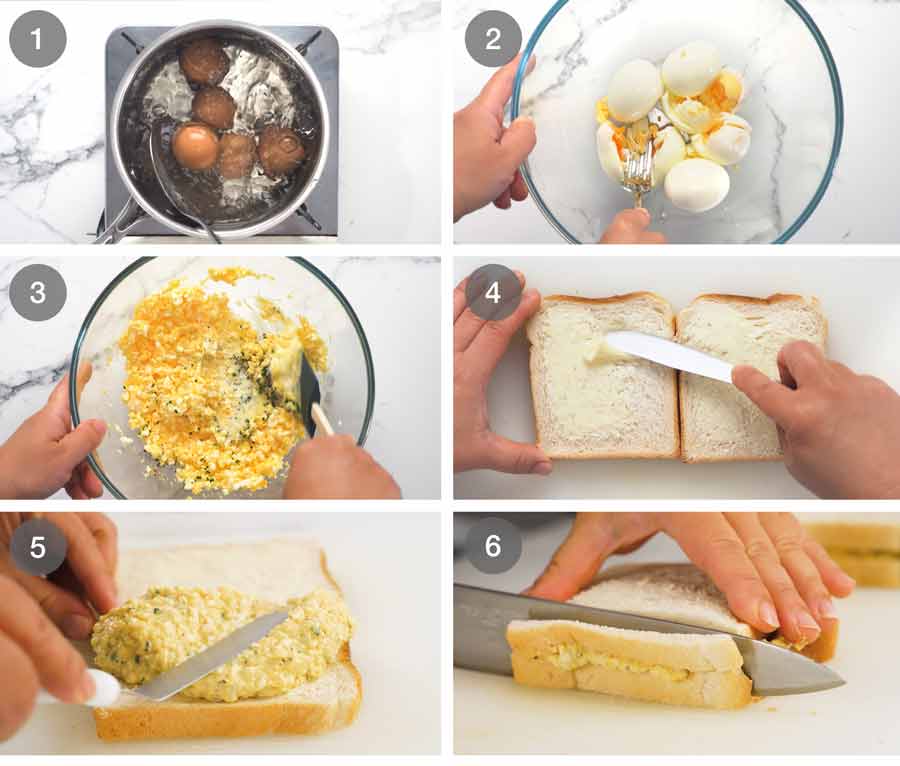
Cook soft boiled eggs and peel (8 minutes in boiling water). For full directions see my boiled eggs recipe, but I’ve included abbreviated directions in the recipe card below.
Mash the eggs using a fork to get it started, then a potato masher. The finer you mash, the creamier your filling! Once well mashed, you’ll see your filling is already semi-creamy.
Filling – Stir in the mayo, mustard, chives, salt and pepper.
Spread butter on the bread.
Spread filling on bread, from edge to edge!
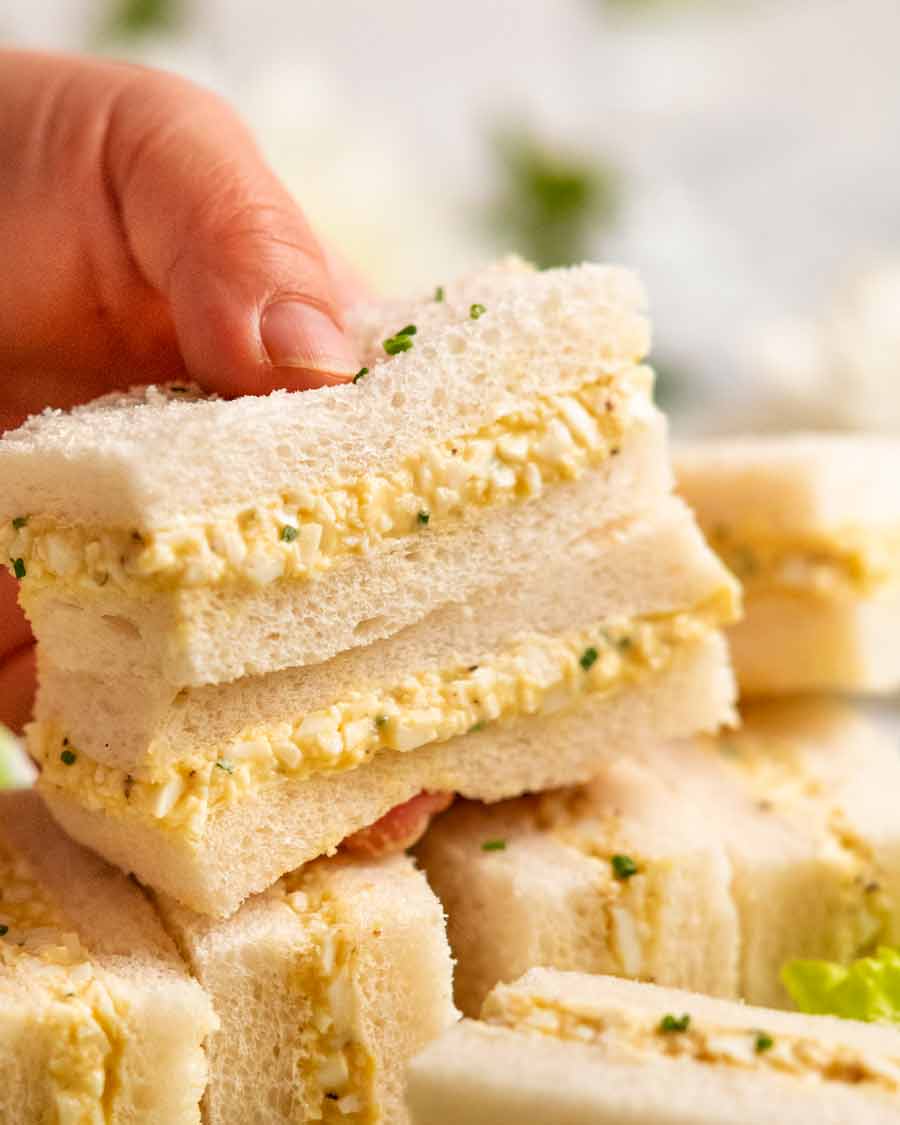
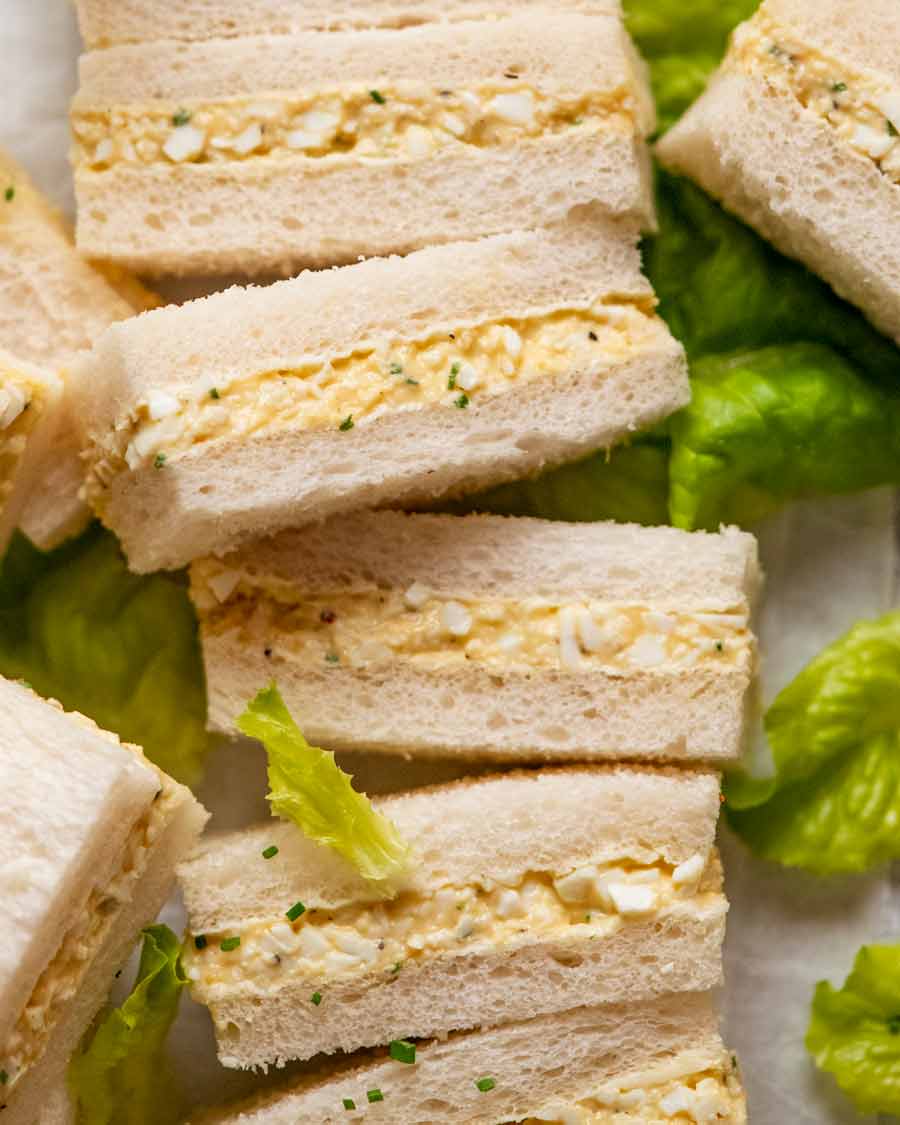
Crusts – If you’re going for quaint English tea sandwiches, trim the crusts off then cut to your desired shape. The sandwiches pictured in post have been cut into 3 rectangles (4 sandwiches cut into a total of 12 finger sandwiches).
TIP: For extra neat edges, refrigerate the sandwiches for 1 hour before cutting. This will set the filling so you can cut more neatly. But be sure to serve at room temperature!
And there you have it! My egg sandwich. I know there are recipes out there with more bells and whistles, using fancier ingredients like creme fraiche, perhaps a smidge of curry powder, and other add-ins.
But to me, all that is unnecessary if you use soft boiled eggs. This is one of those recipes where the end result is so much more than the sum of its parts. I hope you give it a go! Let me know what you think if you do. And also, you know I always love hearing your thoughts on my thoughts on matters of food. Do you disagree with my position on soft boiled eggs? Do you think celery is mandatory? Fancier bread? Bring on the egg sandwich debate! 😂 – Nagi x
Watch how to make it
Egg sandwich
Ingredients
Egg sandwich filling:
- 6 soft boiled eggs , at room temperature (Note 1)
- 1 tbsp whole egg mayonnaise (S&W brand best, Note 2)
- 2 tsp dijon mustard
- 2 tsp finely chopped chives (sub green onion)
- 1/2 tsp black pepper
- 1/8 tsp cooking/kosher salt (yes really, that's all!)
Sandwich:
- 8 slices soft white sandwich bread (Note 3)
- Soft salted butter , for spreading on bread
Instructions
- Mash egg: Place the eggs in a bowl and crush with a fork. Once mostly broken up, use a potato masher to mash them up really well. Smaller egg white bits = creamier filling.
- Filling: Add remaining filling ingredients and gently stir to combine. Taste and add more salt if desired, but add with caution because it's bizarre how little salt eggs can take!
- Make sandwich: Butter the bread. Divide filling between 4 pieces of bread, spread evenly edge to edge. Trim crusts (optional), then cut as you wish. (Note 4 tips)
- Serve: Always serve at room temperature, for best flavour!
Notes
Nutrition
Life’s too short for bland sandwiches!

Life of Dozer
No egg sandwiches for Dozer! 💨💨

The post Egg sandwich appeared first on RecipeTin Eats.
]]> Welcome to the chili dog of my dreams! A thick, molten beef chili sauce, slow cooked for hours, designed to function more like a sauce so it smothers rather than running everywhere. As for the grilled hot dog? Skip the cheap footy franks. Smoked sausages are the way to go. Think – kranksy, bratwurst, half-smokes!... Get the Recipe
The post Chili dogs appeared first on RecipeTin Eats.
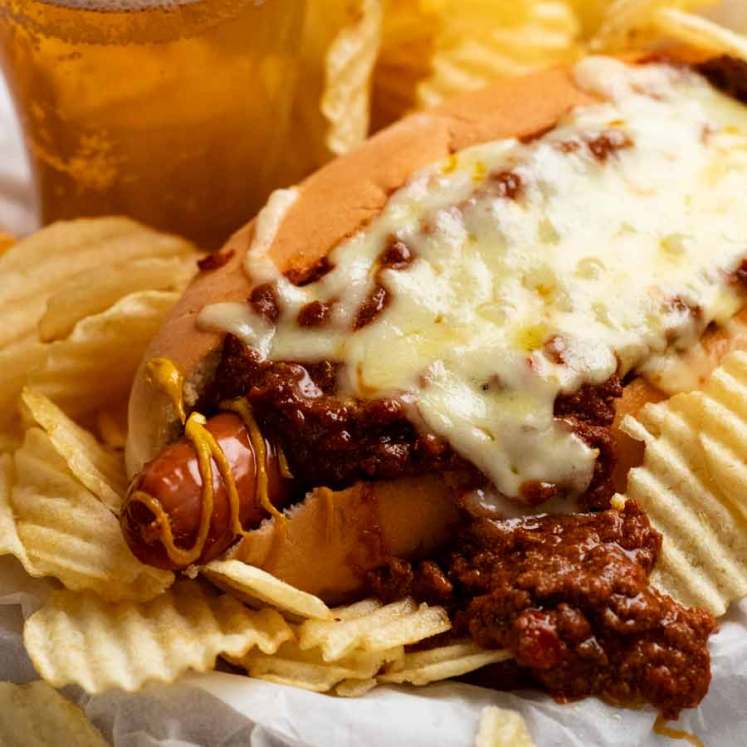
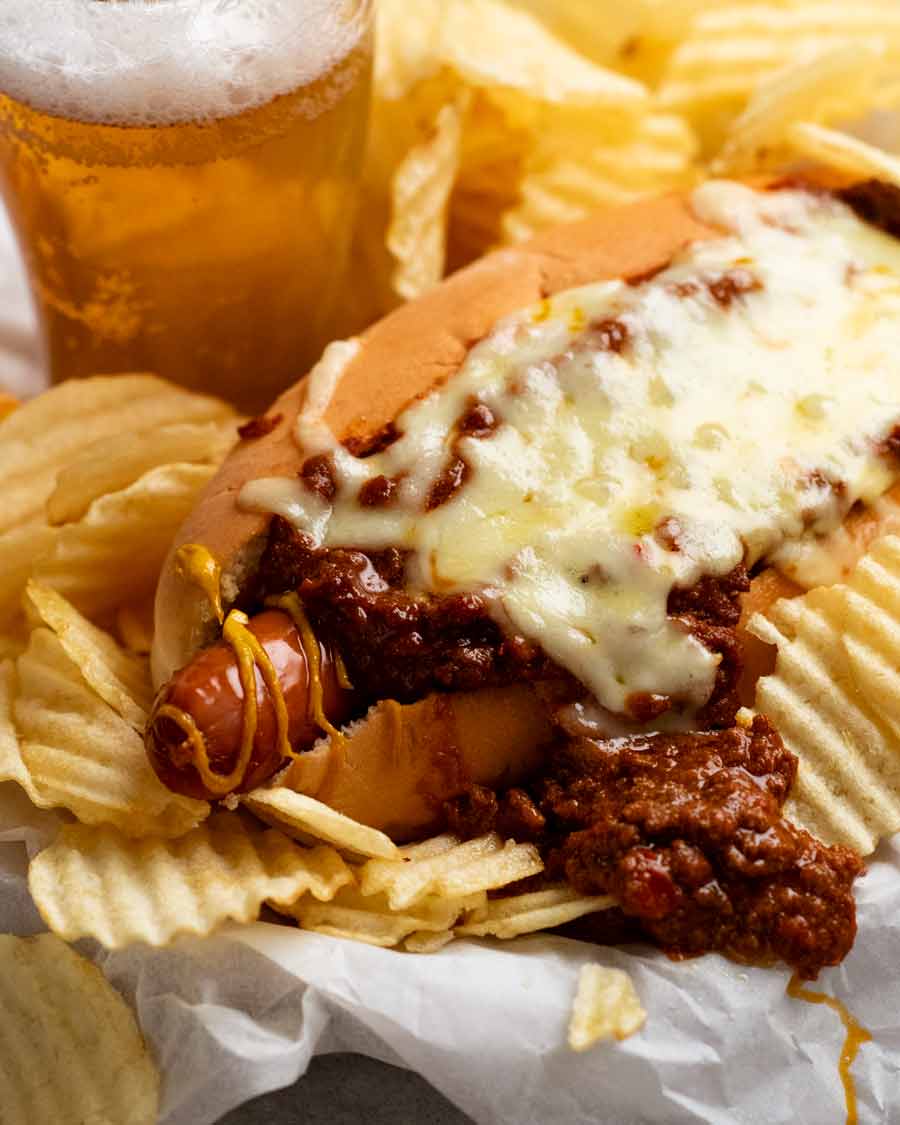
]]>Welcome to the chili dog of my dreams! A thick, molten beef chili sauce, slow cooked for hours, designed to function more like a sauce so it smothers rather than running everywhere. As for the grilled hot dog? Skip the cheap footy franks. Smoked sausages are the way to go. Think – kranksy, bratwurst, half-smokes!
A cracking recipe for summer BBQ’s, game-day, and just when you need something seriously moreish.

THE chili sauce for hot dogs….
This is a chili dog that is inspired by the famous Half-Smoke Chili Dogs at Ben’s Chili Bowl in Washington DC. It’s an institution famous for their chili which is served in various formats – in a bowl, burgers, and chili dogs.
The chili sauce used for the hot dogs is different to the chili served in bowls. It’s noticeably thicker and smoother, and doesn’t have beans in it. Essentially, it’s like a thick sauce that stays on the hot dog better than regular chili so you can eat it with your hands.
I’ve always wanted to replicate the Ben’s chili sauce. I’ve had a few attempts over the years – surely I just need to slow cook for longer, longer! Nope, it just didn’t have that same “molten” texture.
The answer came to me when I was making lentil soup: a partial blitz. Releases flavour, thickens the sauce, and makes it smoother too. This changed my chili-dog-game forever. Will it change yours too??
Chili = American vs chilli = Australian/UK: Ordinarily, I write in Australian-English rather than Americanised English, because I live in Australia. However, given that chili dogs is very much a beloved dish of the States, I’ve decided to respect the origins and use “chili” with one “l” throughout this post!
Ingredients in chili dog
Alrighty, first up, what you need to make the chili sauce for hot dogs!
Ingredients in chili sauce
The ingredients are no different to my classic chili con carne except the ratios of the spices are a little different (more!). And there are no beans in this chili sauce so it’s smoother and sits in/on the hot dog better.
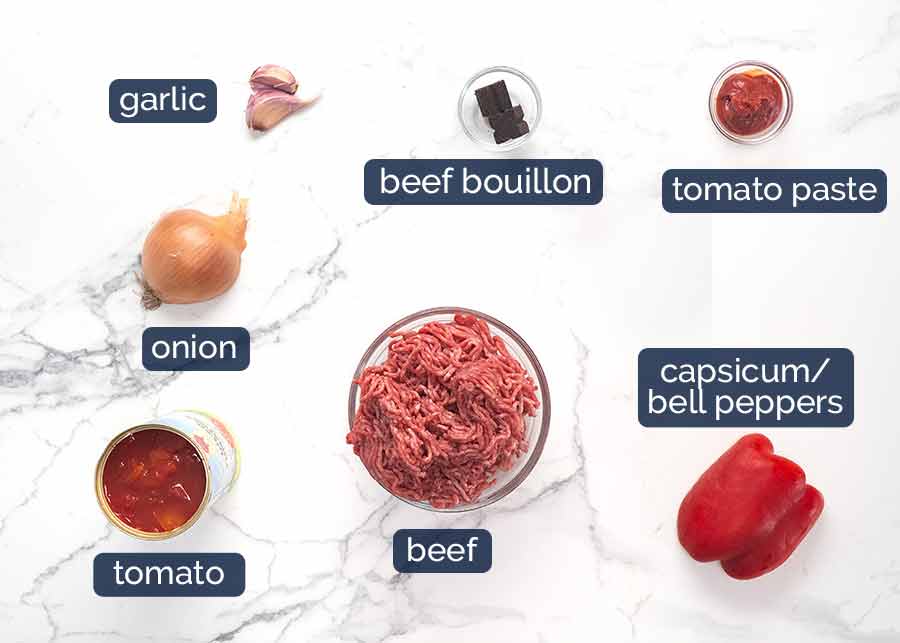
Beef mince / ground beef – While this recipe will work with lean beef, it will not have as much beefy flavour. Because most of the good beefy flavour we love is in the fat!
Beef bouillon cube (stock cube) – Better than salt! Adds more flavour.
Onion & garlic – Essential flavour bases.
Tomato paste and crushed tomato – For thickening and flavour of the sauce. By the time all the spices are added in and it’s been slow cooked, you don’t really taste the tomato at all.
Capsicum/bell pepper – A traditional inclusion in chili.
Homemade chili powder for sauce
There’s no store-bought chili powder mix in my chili sauce. I prefer to make my own from scratch because the flavour of chili powder varies from brand to brand. Making your own ensures consistency of flavour for everyone!
Plus, chili powder spice mix, while common in the US, is not easily found in Australia.
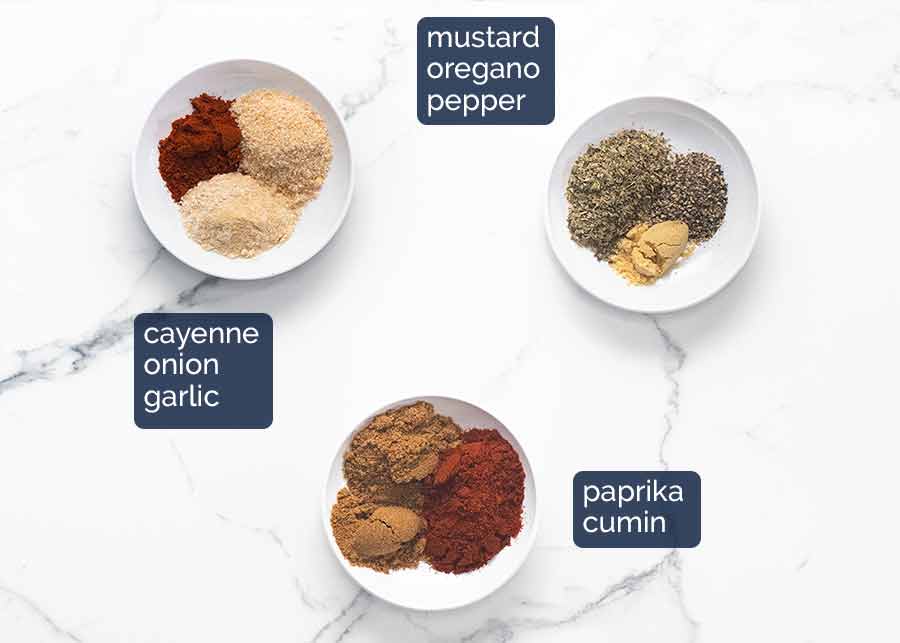
No unusual players here. All pantry essentials (here’s my essential spices list, in case you missed it!), the same spices I use in my chilli con carne. However, I use slightly more spices to give the sauce a stronger flavour because less sauce has to go further when it’s used in a hot dog bun compared to serving a big bowl of chili. Am I making sense?? Not sure I’m explaining that well!
Spiciness – There’s a decent amount of cayenne pepper in this to give the chili sauce a spicy kick, as is traditional. Feel free to dial it back. You can just add it right at the end, bit by bit, tasting as you go.
Chili dog
For the best hot dog of your life, skip the everyday cheap hot dogs and go for a good German or other European smoked sausage (Austrian, Polish). You’re welcome!

Smoked sausages – better than hot dogs! Chili dogs are typically made with economical thin hot dogs. Think – uniform pink colour that are 30 – 40% fillers. Tasty enough, when smothered in a homemade chili sauce. But you can really dial-up your hot dog game by using good European smoked sausages – like kranksy’s, bockwurst, bratwurst, “continental franks”. Just ask Ben’s Chili Bowl. Their famous chili dogs use sausages called “half-smokes” which are a type of smoked sausage.
Why European smoked sausages are better – More meat, less fillers, they’re seasoned with flavour, and fatter so you get more sausage! They are smoked so they are technically cooked but most are usually grilled or pan fried before serving. Makes them even tastier.
Find them easily these days:
Kranksy’s – a deli staple at large supermarkets (Coles, Woolies – see here online, Harris Farms). Get the smoked ones, if you can, but even un-smoked are 20x better than the “footy franks”
Sausages in packets labelled “Continental Franks” or “Weiners”.
German deli – If you are lucky enough to have a German deli in your area, it’s worth a visit because you’ll have an even better selection – and it’s hard to go wrong! Also, other European delis. The Polish and Austrians do wickedly good smoked sausages too.
Where I go – Brot & Wurst in Narrabeen, Sydney, which is near my home. My favourite for chili dogs are Bockwurst (pictured above). But all the smoked sausages of theirs I’ve tried (probably most) are great!
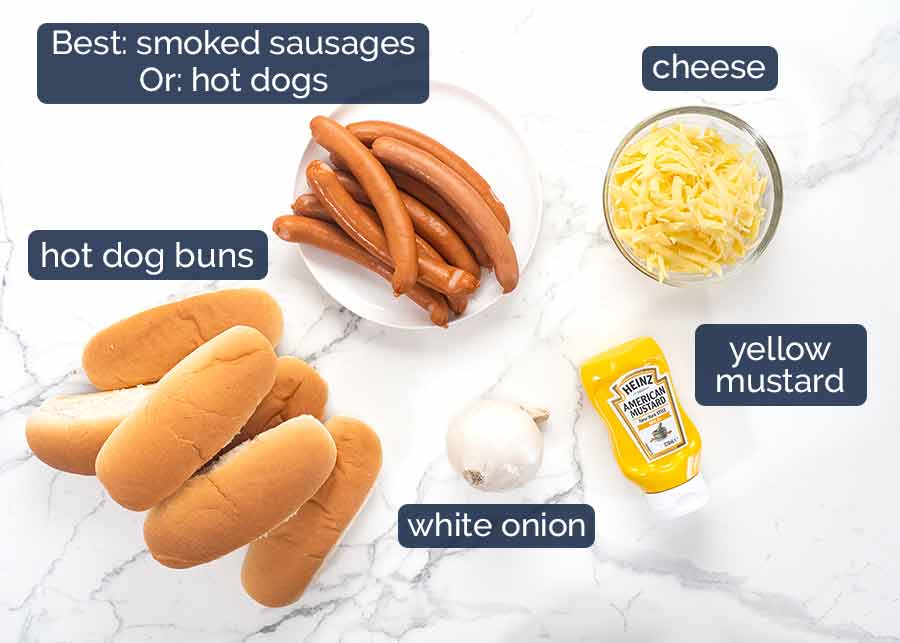
Hot dog buns – Look for soft, pillowy buns for the hot dogs to nestle in.
Yellow mustard – Optional, I guess! For me, a chili dog isn’t a chili dog without a squirt of mustard. I use American mustard – 100% artificial yellow colour, 100% hot dog authentic.
White onion – Optional! This is a direct copycat of the way the chili dogs are served at Ben’s Chili Bowl. A little sprinkle of finely chopped white onion brings a hint of freshness in amongst all that moorish, spicy, saucy goodness. I like to use white onion because it’s not as sharp as brown onion. Red onion will also work from a flavour perspective.
Cheese – A sprinkle of shredded cheese on a chili dog is fairly common practice but melting is not. But, like good ole’ crispy shell beef tacos, melted cheese wins over un-melted cheese any day. So if you have the option to melt, why would you not?? (Bonus: Cheese melting oven time warms up the bun so you don’t have to do it beforehand plus gives all the flavours a chance to meld together into one cohesive chili-dog-of-your-dreams!)
How to make chili dogs
As I mentioned earlier, the one thing that’s a little unique about the chili sauce I make for chili dogs is that it’s thicker, smoother and more “molten” than the usual recipes you see which have larger, chunkier beef bits in a runnier sauce. This is because mine is designed to be like the famous Ben’s Chili Bowl chili sauce which is like a thick sauce that stays in the hot dog rather than slopping out everywhere when I take a (big!) bite!
The trick to achieve this? A little blitz. Releases flavour and thickens the sauce.
1. The chili sauce
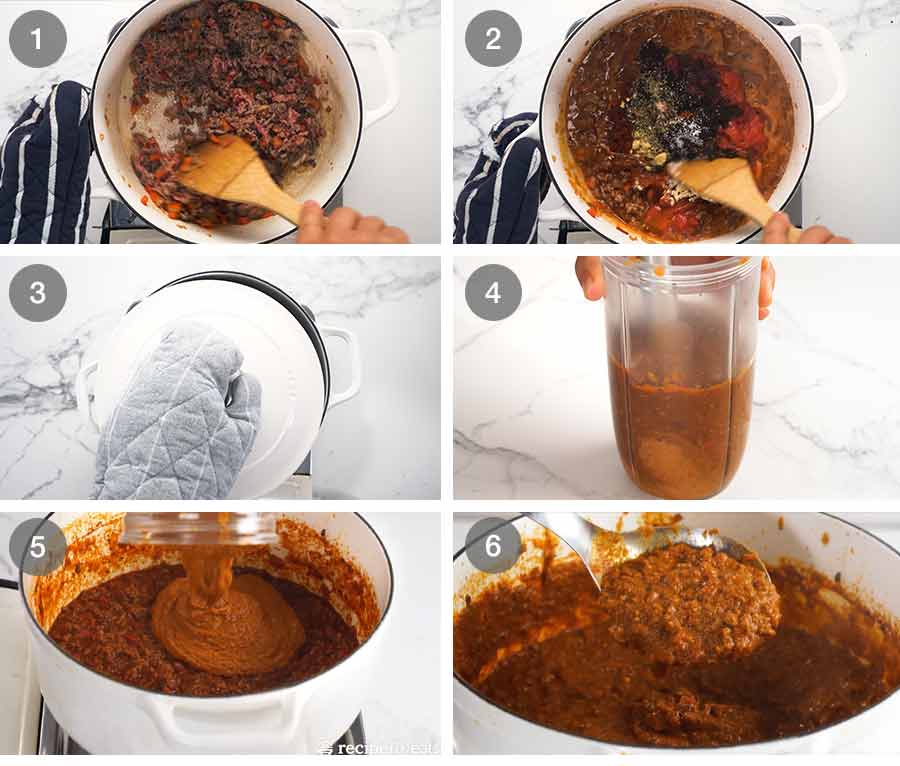
Cook chili sauce – The chili sauce starts off like your everyday chili con carne. Sauté onion, garlic and capsicum. Cook the beef until it’s browned, then stir the tomato paste for a minute to cook out the sour raw flavour.
Add everything else – Add all the spices, canned tomato, beef stock cubes (bouillon cubes), salt and water and give it a good stir then bring it to a simmer.
Slow cook 3 hours – Simmer on a really low heat with the lid partially on. A cracked lid allows the sauce to reduce and thicken. Make sure the heat is really low and give it a stir every now and then to ensure the base doesn’t catch. Remember – we’re making a sauce that is thicker than typical chili con carne.
It can also be cooked in the oven (160°C / 325°F for 3 hours) or slow cooker (low for 6 to 8 hours) – directions included in the recipe.
After 3 hours of slow cooking, the beef should be very tender. Yep, you’ll need to have a spoonful to check!
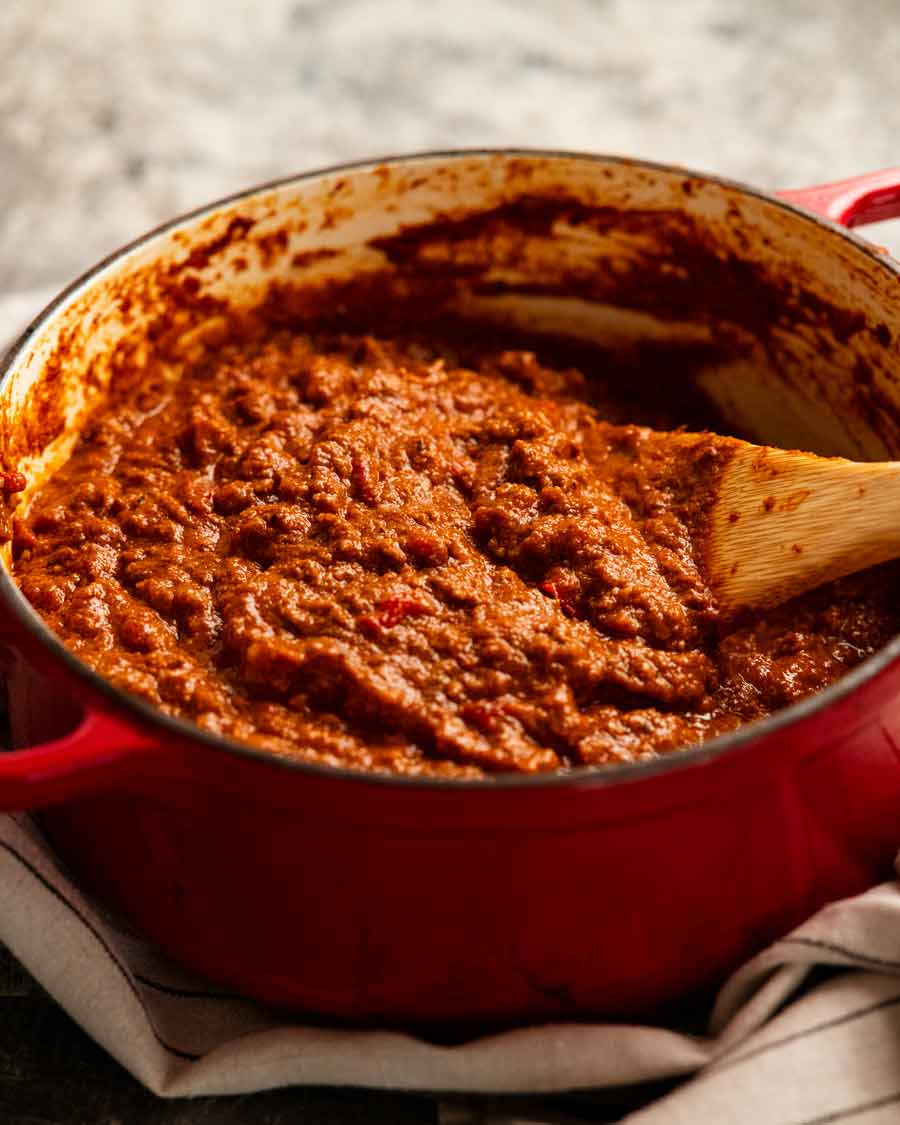
Blitz to thicken and smooth – Remove 1 1/2 cups of the chili into a container so the head of a stick blender will be submerged under the chili. Then blitz until smooth – it should only take around 15 seconds on high. This will release flavour and also thicken the sauce.
Stir in – Return the pureed chili sauce into the pot and stir well. As you stir, you should find that the slow-cooked beef bits start to fall-apart into really fine pieces of beef to make a smooth-ish, almost molten-like sauce.
If your beef doesn’t do this, it will just need a bit of help from a potato masher. Just mash the beef straight in the pot until it becomes a fairly fine texture, like pictured.
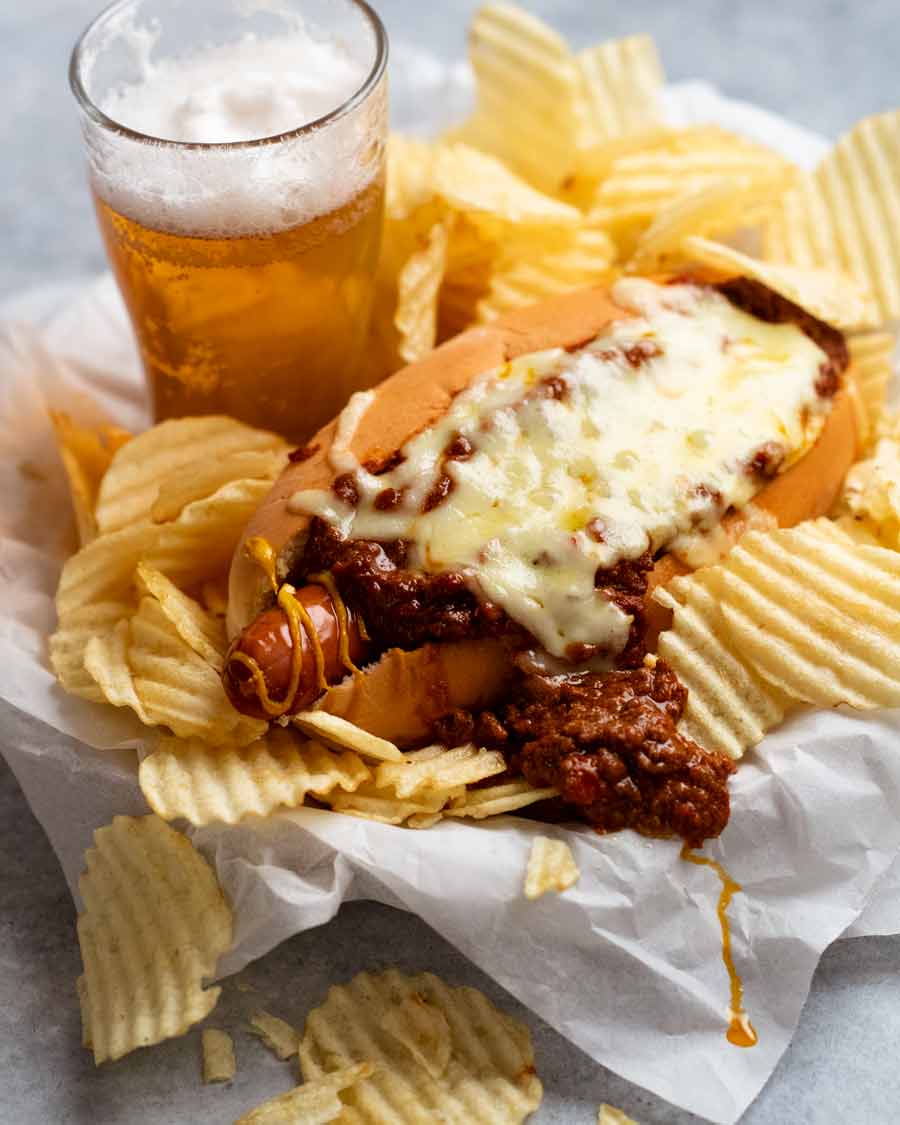
Thick sauce – This is what your sauce should look like! Dollop-able but it mounds. Now you get to heap it on your hot dog!
2. Assembling chili dogs
Grill, stuff, smother, bake!
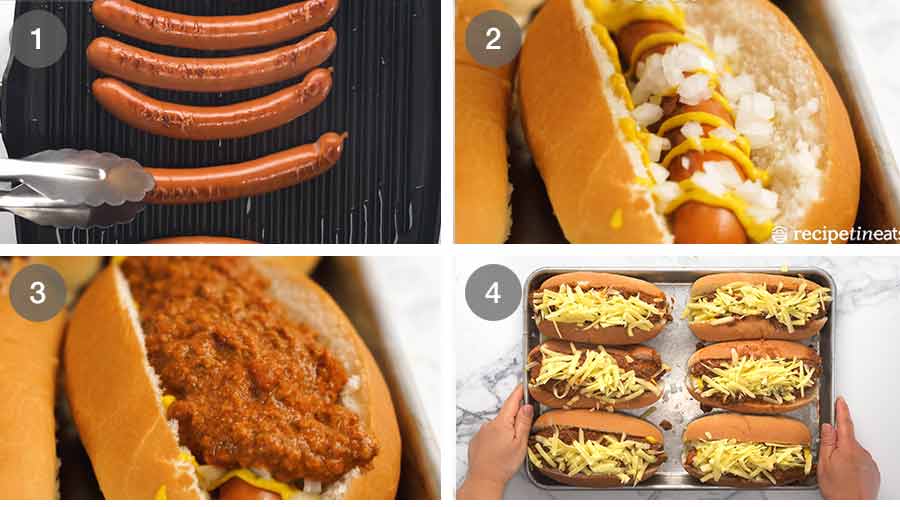
Pan fry or grill your hot dogs / smoked sausages until browned and warmed through. Don’t worry if the skin splits! Visually it doesn’t matter because it will be completely hidden by sauce.
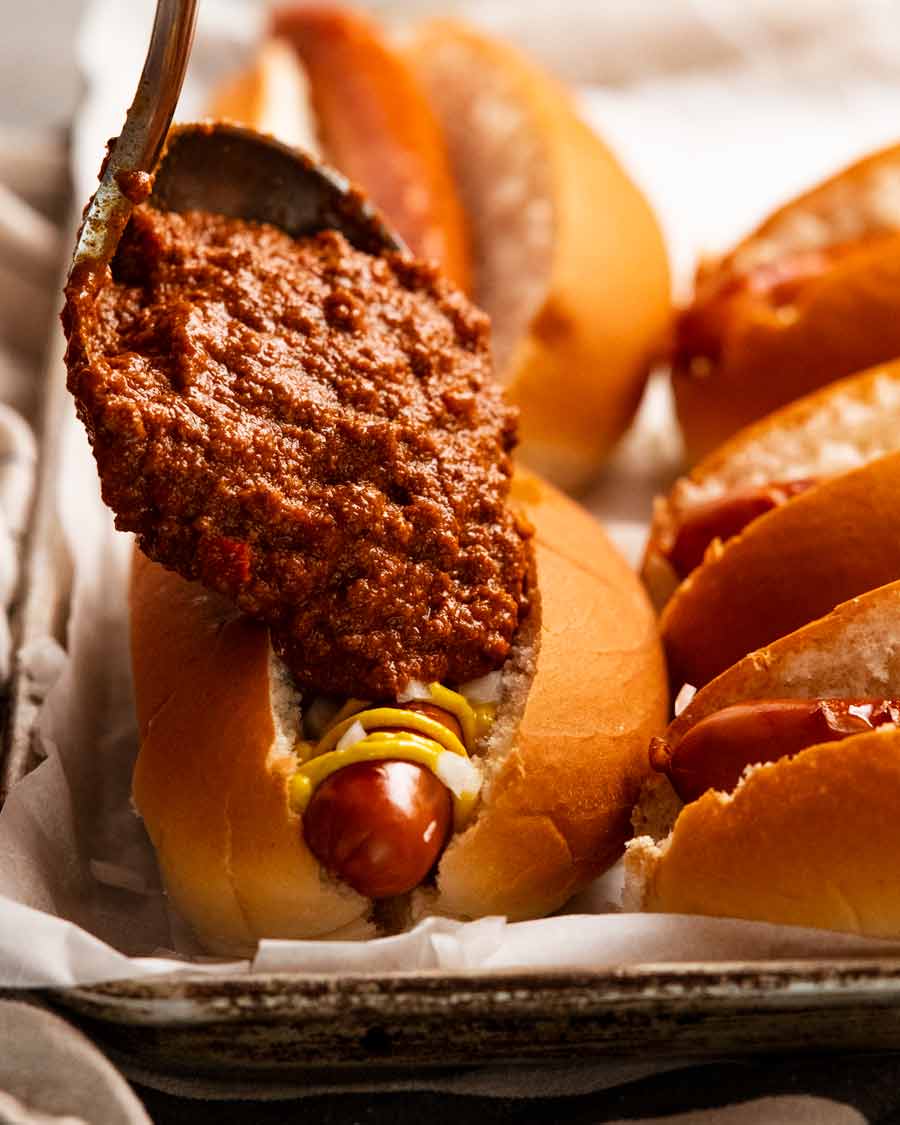
Mustard & onion – Add a squiggle of mustard then sprinkle with onion.
Chili sauce – Smother with a good amount of chili sauce. Appreciate how it’s thick and stays on/in the hot dog instead of running everywhere!
Bake for 10 minutes – Top with cheese then bake for 10 minutes just to melt the cheese. Pull out of oven and start getting excited about sinking your teeth into these chili dogs!!!
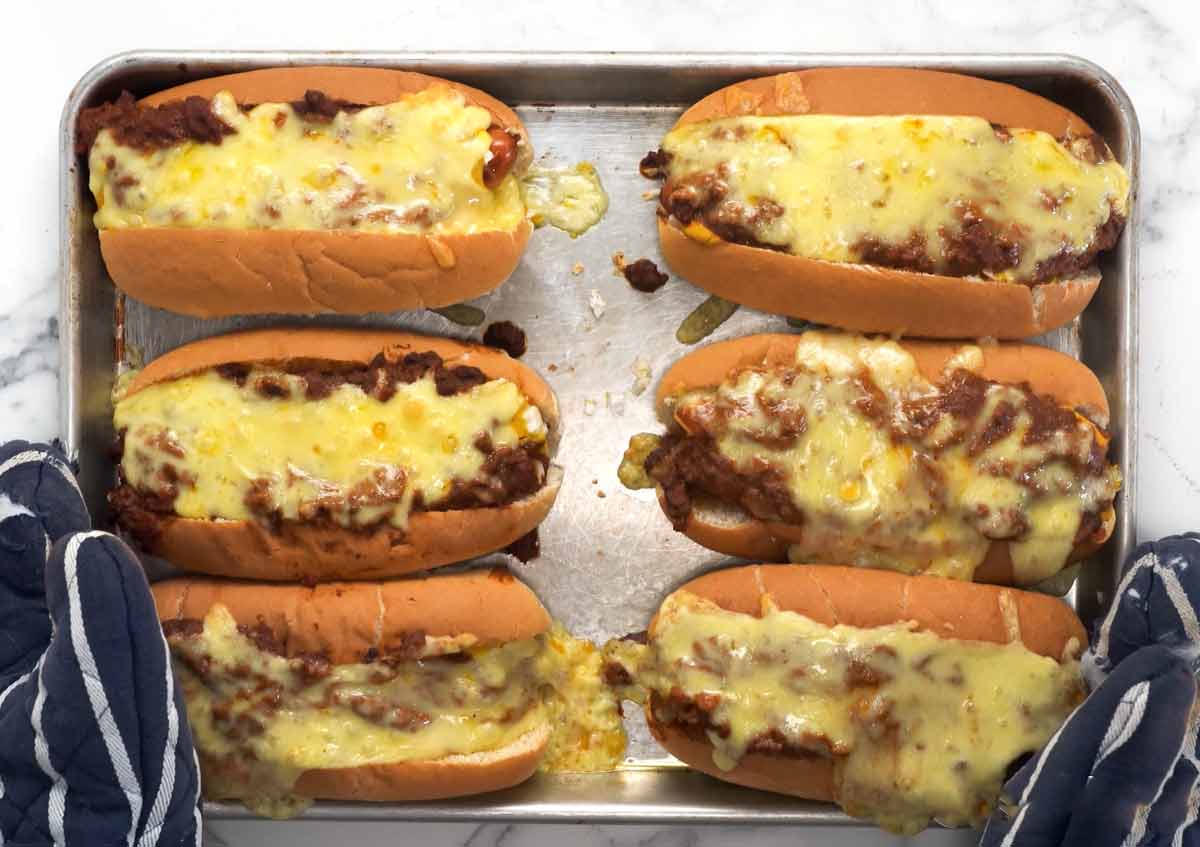
When to make chili dogs
A backyard grill out, a gathering with friends. Game day, dinner tonight, and, well, just anytime because you can’t get darn-good chili dogs in your area. That would be ME!!
In all seriousness though. A good smoked sausage, pan fried or grilled then tucked into a soft bun is delicious as is.
Smother it with a thick layer of big-flavoured beef chili sauce, and you’re well on your way to food heaven.
Add a blanket of molten, gooey cheese and that, my friends, THAT is what food dreams are made of.
I really hope you try these chili dogs one day. For us Aussies, chili dogs are hard to come by and when we do find them, all too often they are terribly disappointing. I promise this won’t disappoint! – Nagi x
PS As long as you give the cheap footy franks a miss!
Watch how to make it
Chili dogs
Ingredients
Homemade chili powder (Note 1):
- 3 tsp smoked paprika (sub plain paprika)
- 3 tsp cumin powder
- 1 tsp cayenne pepper , adjust to taste
- 1 1/2 tsp garlic powder
- 1 1/2 tsp onion powder
- 1 1/2 tsp oregano
- 1/2 tsp mustard powder
- 1/2 tsp black pepper
Chili sauce:
- 1 tbsp olive oil
- 2 garlic cloves , finely minced
- 1/2 onion , finely chopped
- 1/2 red capsicum / bell pepper , finely chopped
- 500 g/1 lb ground beef / beef mince
- 1 tbsp tomato paste
- 400g / 14 oz canned crushed tomato
- 2 beef cubes (I like Oxo, easy to crumble, Note 2)
- 1 1/2 cups water
- 3/4 tsp cooking/kosher salt , plus more to taste
Chili dogs:
- 6 good smoked sausages (kransky, bratwurst, half-smoke) or hot dogs of choice (Note 3)
- 6 hot dog buns
- 1/2 white onion , finely chopped
- Yellow mustard (I use Heinz American mustard)
- 2 cups Colby or Monterey Jack , shredded (or other cheese of choice)
- Plain crinkle cut potato chips , optional side for serving (traditional!)
Instructions
Chili sauce:
- Sauté aromatics – Heat oil over medium high in a heavy based pot. Cook the onion, garlic and capsicum for 3 minutes.
- Brown beef – Add beef and cook, breaking it up as you go, until you no longer see raw meat. Add tomato paste and stir for 1 minute.
- Sauce – Add the spices, tomato, water, crumbled beef cube and salt. Stir well.
- Slow cook 3 hours – Bring the chili to a simmer then turn down to low, on a small burner. Put the lid partially on (to allow for sauce reduction). Simmer for 3 hours on low (goal: small bubble every now and then), stirring just to ensure the base doesn’t catch. OR put it in a 160°C/325°F oven for 3 hours (lid partially cracked).
- Slow cooker (Note 4) – Reduce water to 3/4 cup. After chili comes to a simmer on the stove, transfer everything to a slow cooker then cook on low for 6 to 8 hours on low.
- Thicken sauce – Remove 1 1/2 cups of the chili into a container so the head of a stick blender will be submerged under the chili. Then blitz until smooth (~ 15 seconds). Add the pureed sauce back in the pot and stir well.
- Sauce goal – As you stir, the remaining beef bits should become quite fine (rather than bolognese type chunks) because the beef is so tender. If the beef bits are not as small as desired, use a potato masher in the pot – it won't take long. The chili sauce should be a thick sauce that mounds up a bit when you scoop it, not runny. (Note 5) Keep sauce warm.
- Optional rest overnight – Allow the sauce to cool then refrigerate overnight. As with most slow-cooked stewy things, the flavour improves! Reheat on the stove before proceeding.
Chili dogs:
- Preheat oven to 180°C/350°F (160°C fan).
- Grill/pan-fry – Preheat a pan with 1/2 tbsp oil (or the BBQ) on medium / medium high. Brown the stages all over until they are heated through (they are already cooked inside, it's just about heating/colour).
- Assemble – Place hot dog buns on a tray. Stuff with a sausage, top with a squiggle of mustard and a sprinkle of onion. Spoon over a generous amount of warm chili sauce, top with cheese.
- Bake for 7 to 10 minutes or until the cheese is melted. Serve immediately. Traditionally with a mound of plain crinkle cut potato chips and an ice cold beer!
Notes
1. Spice notes:
- This blend of spices includes a homemade chili powder which I prefer to do because the flavour of store-bought chili powder mixes (in the US) vary from brand to brand.
- Garlic powder and onion powder can be substituted with more of the other.
- Cayenne pepper provides the spiciness (chili sauce is SUPPOSED to be a bit spicy!). This amount won’t blow your head off but if you’re concerned, hold some (or all) of it back and add right at the end, little by little.
- Mustard powder – sub 1 tsp dijon mustard
Nutrition
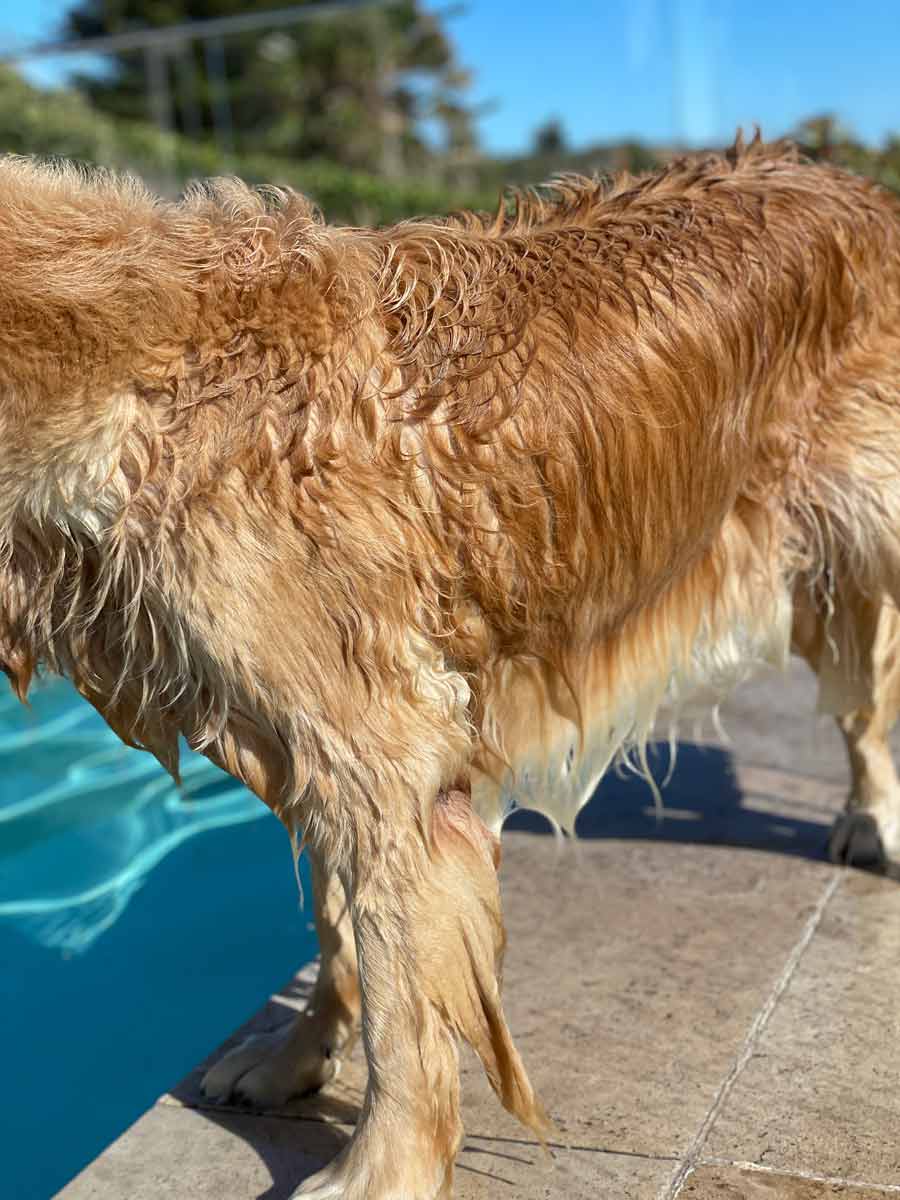
Life of Dozer
I find it quite amusing that he can spend hours in the pool or at the beach and his furry golden head remains fluffy and dry while the rest of him is saturated.
Then I realised I do the same thing. Sometimes a girl just doesn’t want to ruin her hair, y’a know? 😂

The post Chili dogs appeared first on RecipeTin Eats.
]]> Chicken Banh Mi is the much-loved chicken variety of the classic Vietnamese Banh Mi sandwich. It has all the familiar flavours of Banh Mi – pate, mayo, fresh herbs and pickled vegetables – but instead of mystery pink meat slices, it’s made with chicken! Fabulously effortless. Chicken Banh Mi Banh Mi is a meat filled... Get the Recipe
The post Chicken Banh Mi (Vietnamese sandwich) appeared first on RecipeTin Eats.
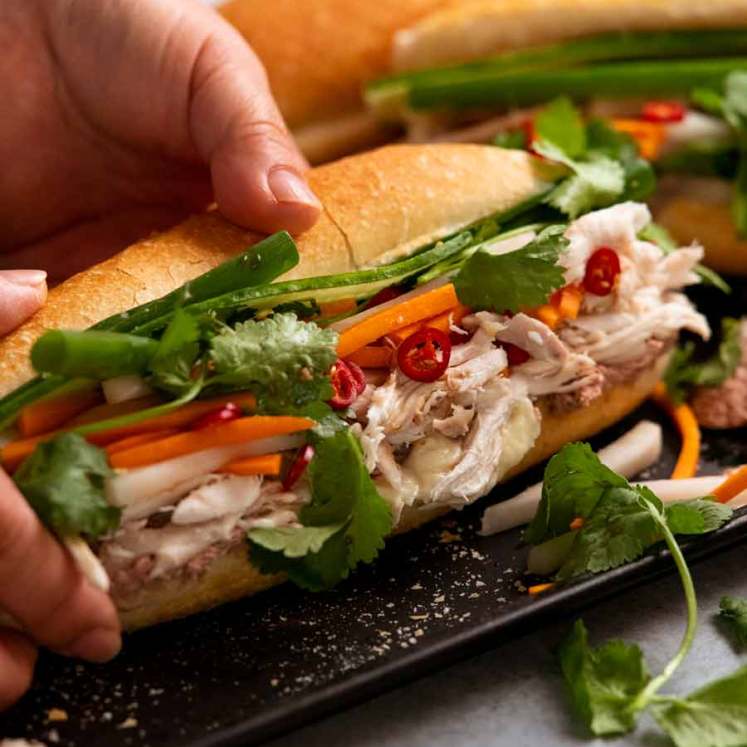
]]>Chicken Banh Mi is the much-loved chicken variety of the classic Vietnamese Banh Mi sandwich. It has all the familiar flavours of Banh Mi – pate, mayo, fresh herbs and pickled vegetables – but instead of mystery pink meat slices, it’s made with chicken! Fabulously effortless.
Chicken Banh Mi
Banh Mi is a meat filled French baguette sandwich stuffed with Asian flavours. Born from the time of France’s occupation of Vietnam, I imagine the French just couldn’t cope without crusty bread so they introduced baguettes to the Vietnamese and the Vietnamese filled it with their meats and herbs and voila! The now-world-famous Banh Mi was born.
While Vietnamese locals love the classic mystery-meat-pork-cold-cuts version, there are all sorts of other varieties across Vietnam and around the world these days. Grilled meats, beef, chicken, meatballs, egg, sausage, BBQ pork, fish, egg, to name a few.
Today, I’m sharing a shredded chicken version which is very popular among Sydney locals who remain suspicious of the mystery pink cold-cut slices!!
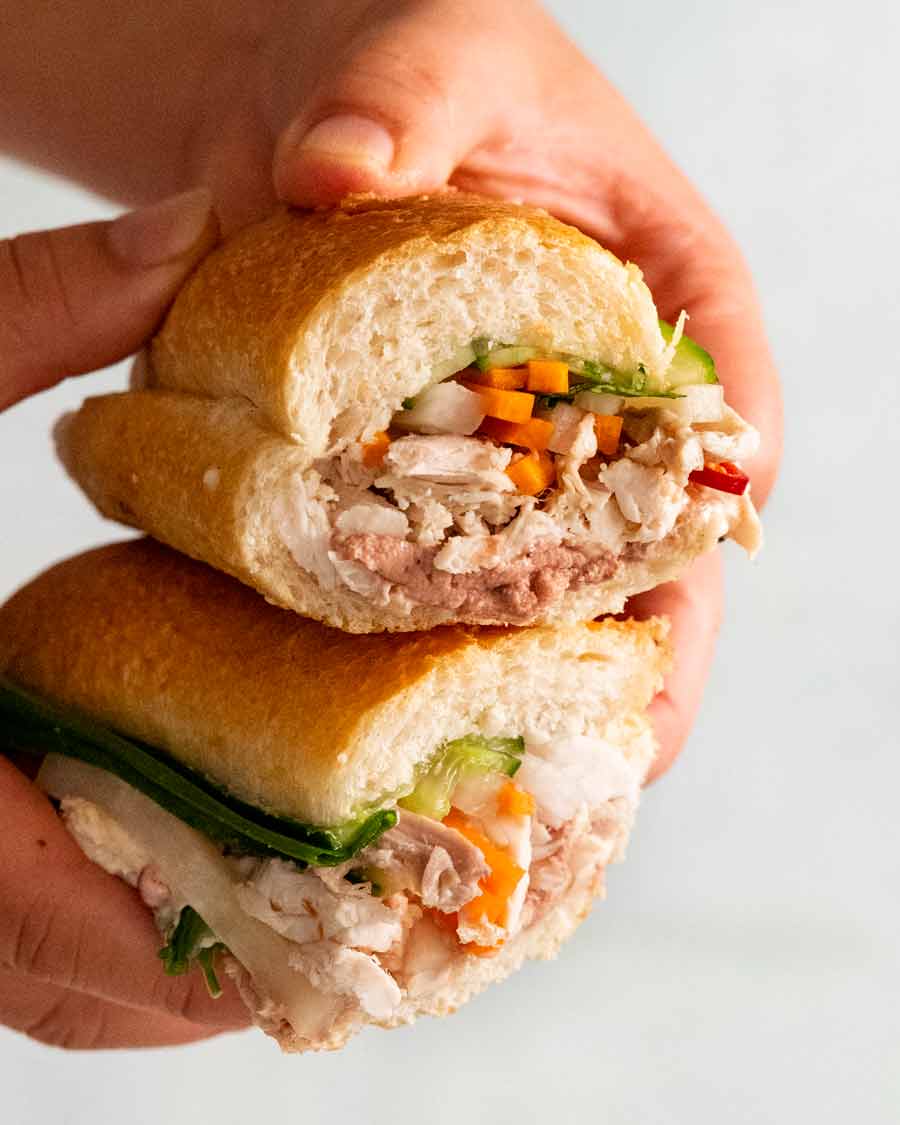
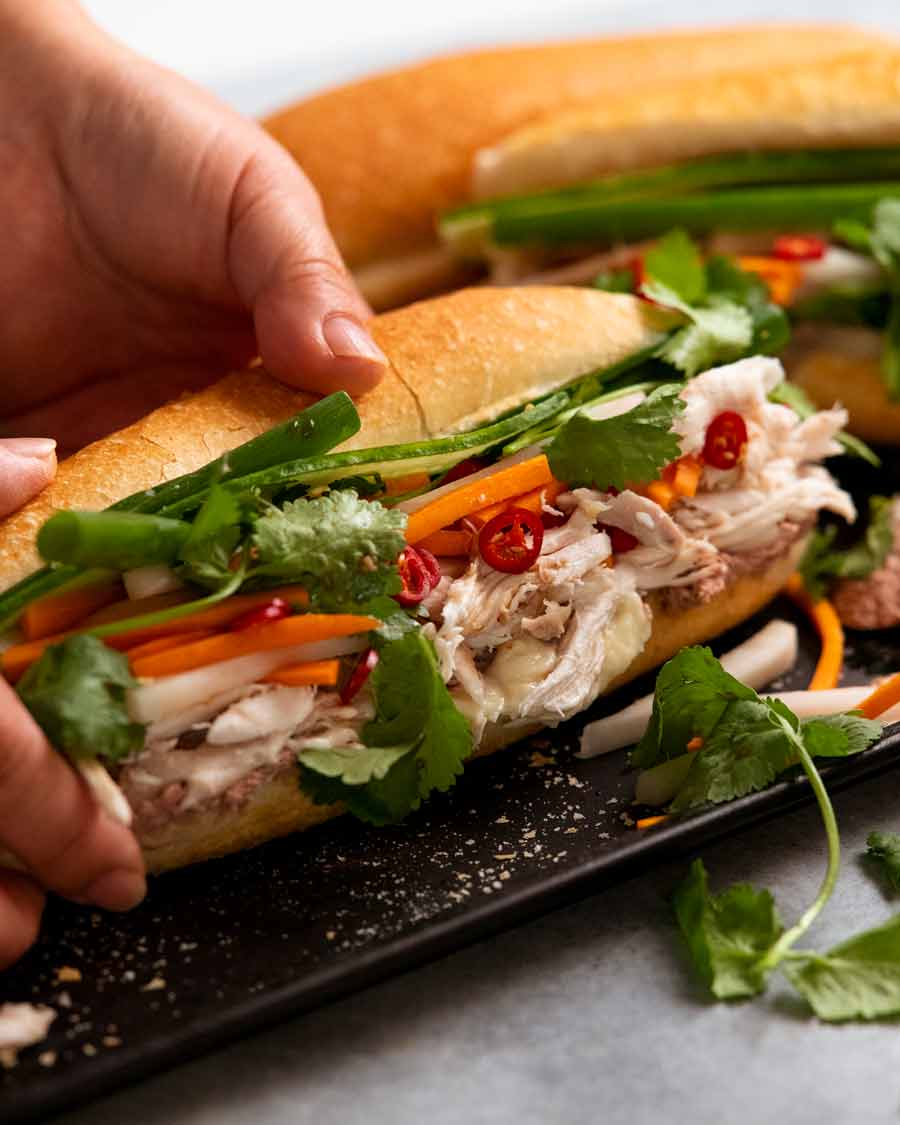
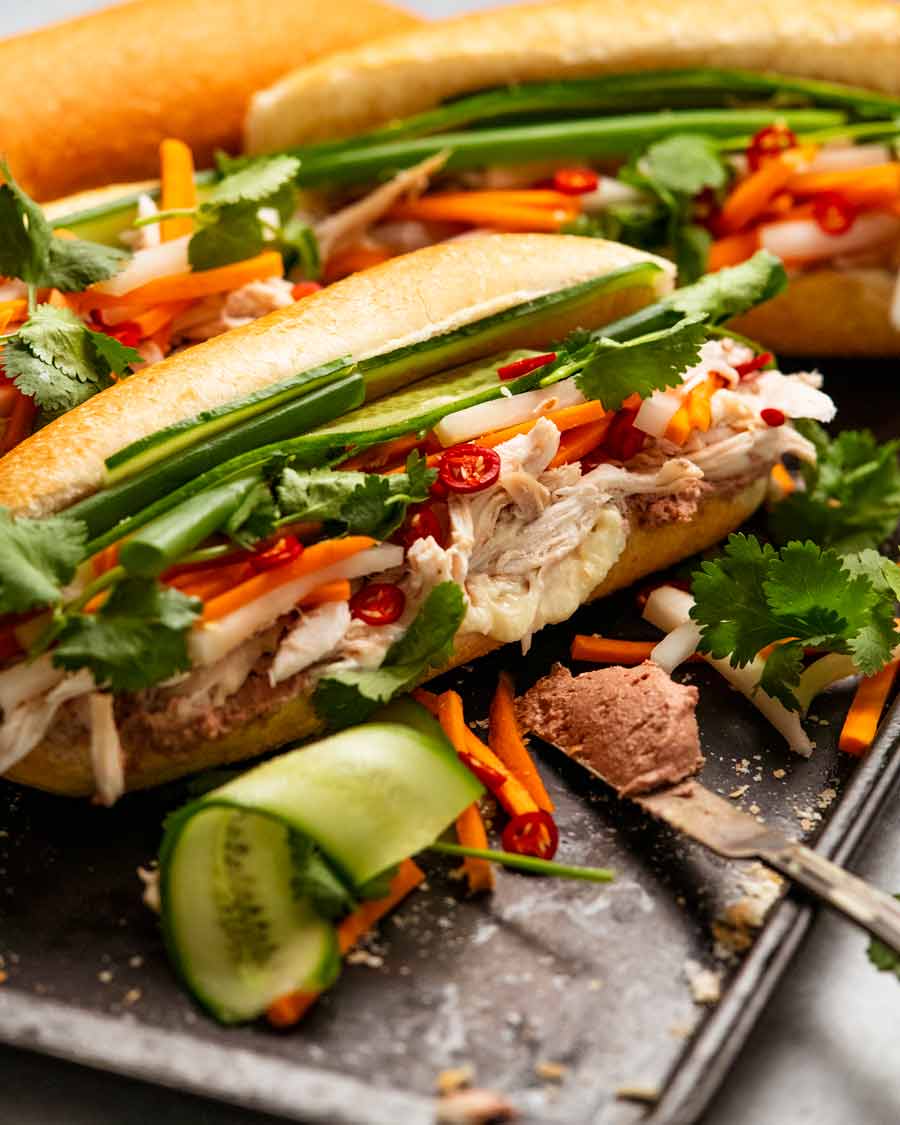
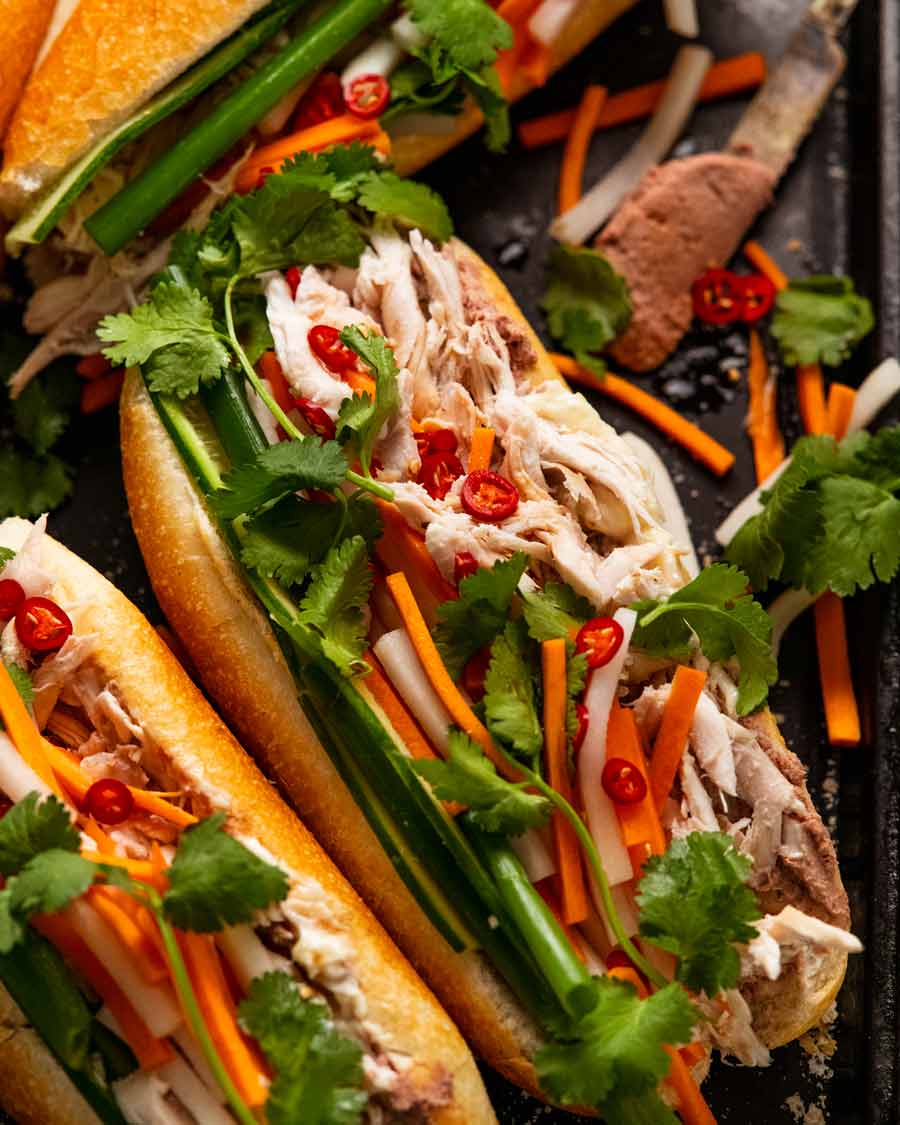
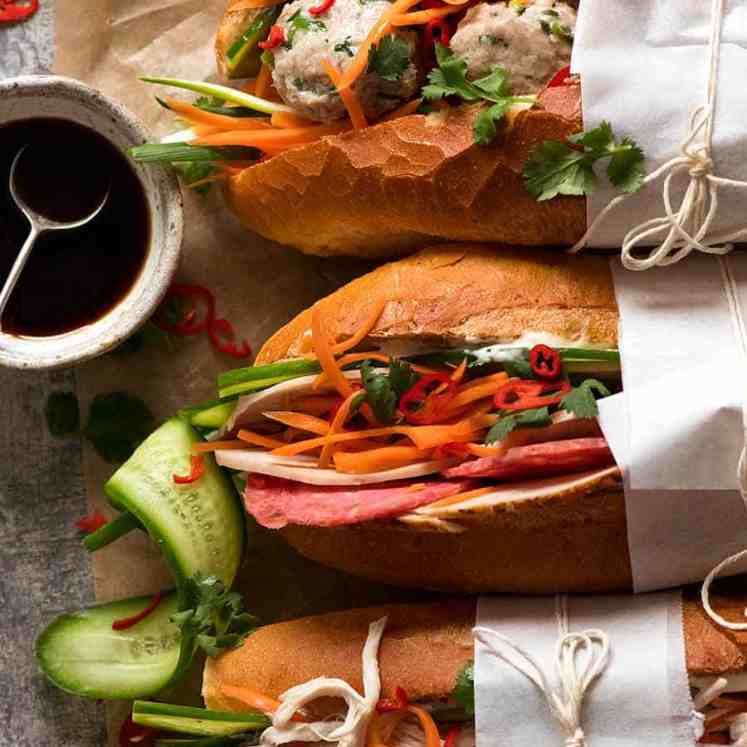
One tip: Stuff generously. The photo is above is how it looks when squished. Look how full it is before I picked it up. ⬇️ The motto here – don’t skimp on fillings!!!
Ingredients in chicken banh mi
Any sandwich is the sum of its parts, and it holds extra true for Banh Mi. Each ingredient in isolation is not extraordinary. The combination sounds odd, for for Banh Mi first timers. But one bite is all it will take to get you jumping onto the Banh Mi train!
The baguette
Use a standard crusty white baguette, not a fancy artisan one like sourdough as they are too chewy. The best baguettes used by the most popular Banh Mi vendors in Vietnam have delicate crispy crusts and fluffy soft insides.
If your baguette is not as crusty as you’d like, just pop it in the oven for a few minutes to crisp up. (I do this because it’s just not a proper Banh Mi unless the crust is crispy!)
Stuff inside
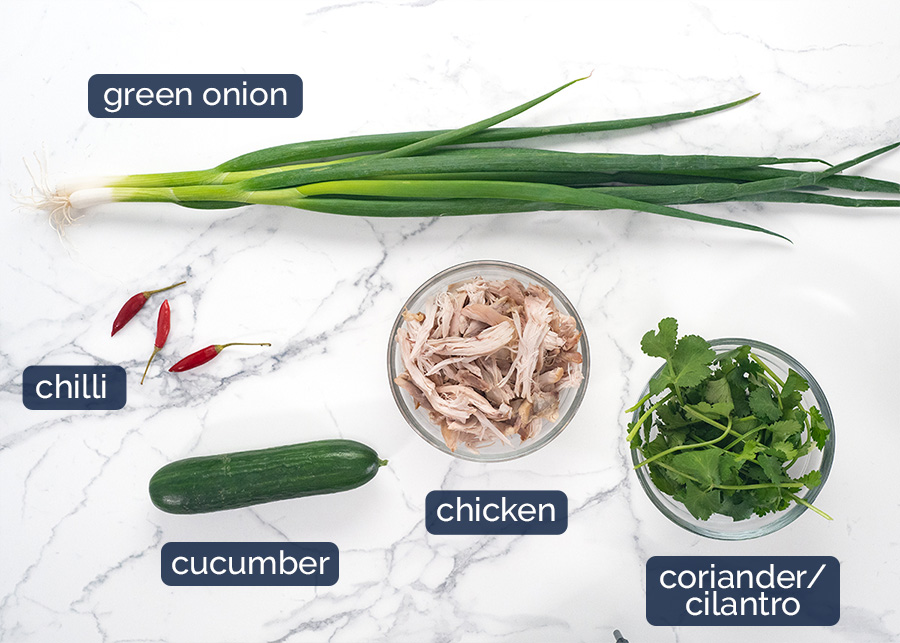
Chicken – I just use a store bought roast chicken for convenience. You could also make your own. Either use a plain brined roast chicken (so the flesh will be seasoned) or poach chicken breast then use a bit of extra Maggi Seasoning.
The amount of chicken you use will depend on the size of your baguette. You can really be as generous as you want. I’m pretty generous!
Grilled lemongrass chicken – There’s also varieties of chicken Banh Mi made with grilled marinated chicken. If that’s what you’re after, use the chicken in this Lemongrass chicken recipe, cut it into slices and use in place of the shredded chicken. Skip the Maggi seasoning, you won’t need it.
Green onion – You need 2 to 3 pieces that are about as long as your bread roll for each Banh Mi.
Cucumber – You will need 2 thin slices (cut lengthwise) for each Banh Mi. 1 cucumber should be enough.
Fresh chilli – Either birds eye chilli (popular ones here in Australia) or Thai red chilli. Anything red and fiery. It’s all part of a great Banh Mi!
Quick pickled vegetables
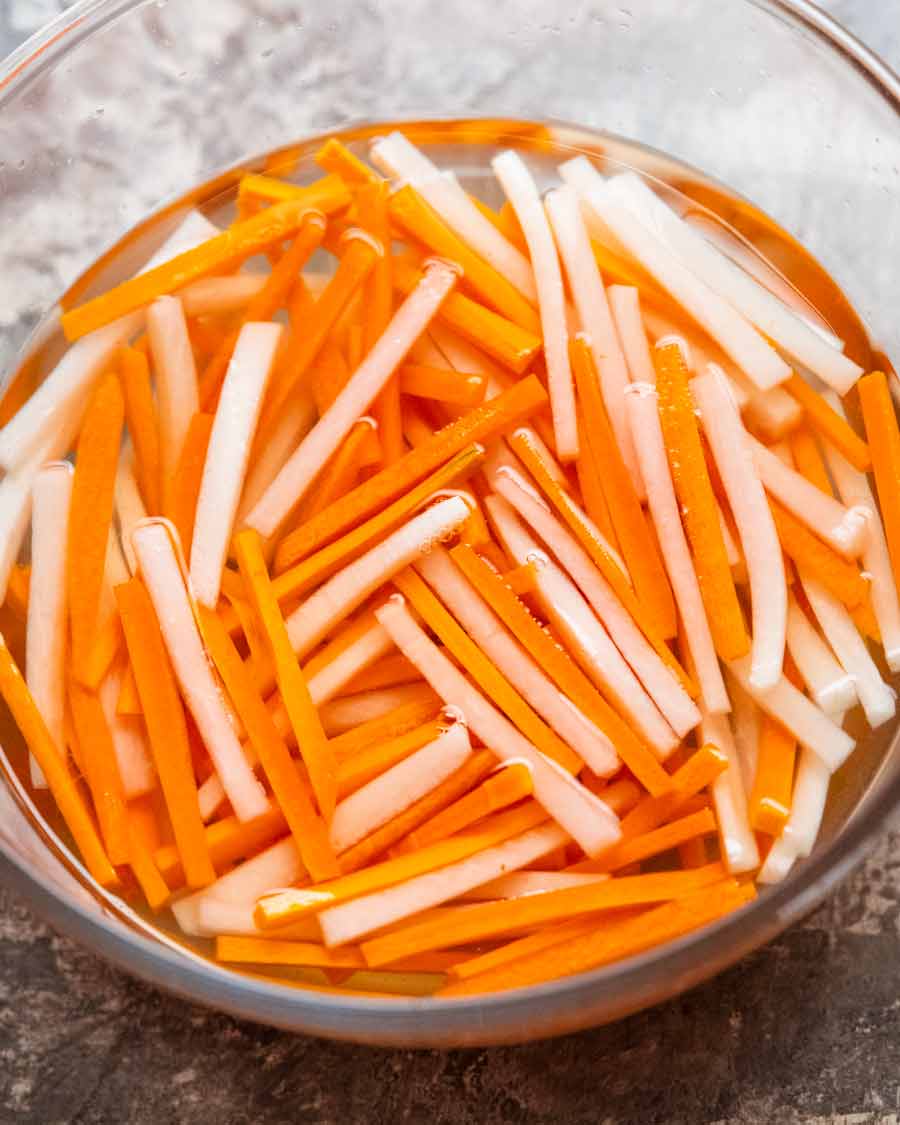
This is one of the things that makes Banh Mi so special – the crunch of pickled carrot and daikon. It’s so good!! Don’t even think about skipping this. If you can’t find daikon (white radish), just double up on carrot.
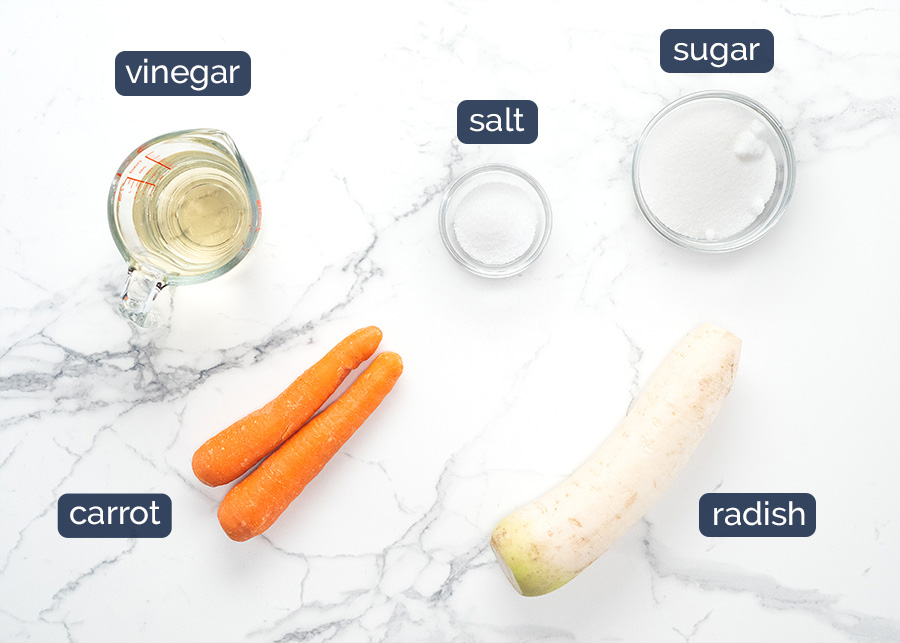
Carrot and daikon (white radish) – These are the two pickled vegetables most commonly used in Banh Mi. They are cut into thin batons so you get a terrific crunch (albeit pickled-softened-crunch!) when you bite in them.
Don’t be tempted to shortcut cutting the vegetables by using a box grater. I tried (the lazy cook in me couldn’t resist) – and it just wasn’t the same. A big vinegary pile of coleslaw-like mush. I missed the crunch!
Rice wine vinegar – This is the vinegar used for the pickled vegetables, an Asian vinegar made from rice. Substitute with apple cider vinegar.
Salt and sugar – For pickling. These pickled vegetables are a bit sweet and bit salty, nice balance between the two.
Spreads and sauces
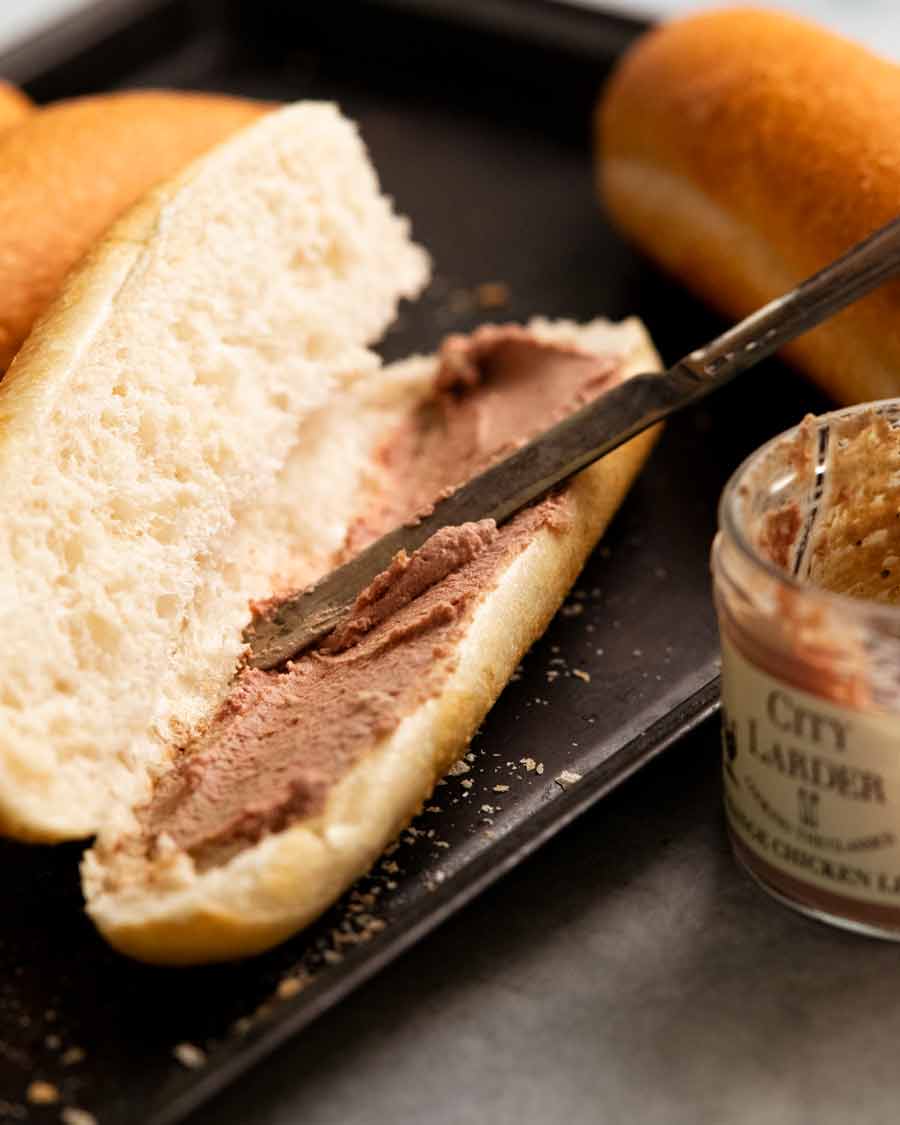
“It’s not a Banh Mi without pate!” she declares vehemently.
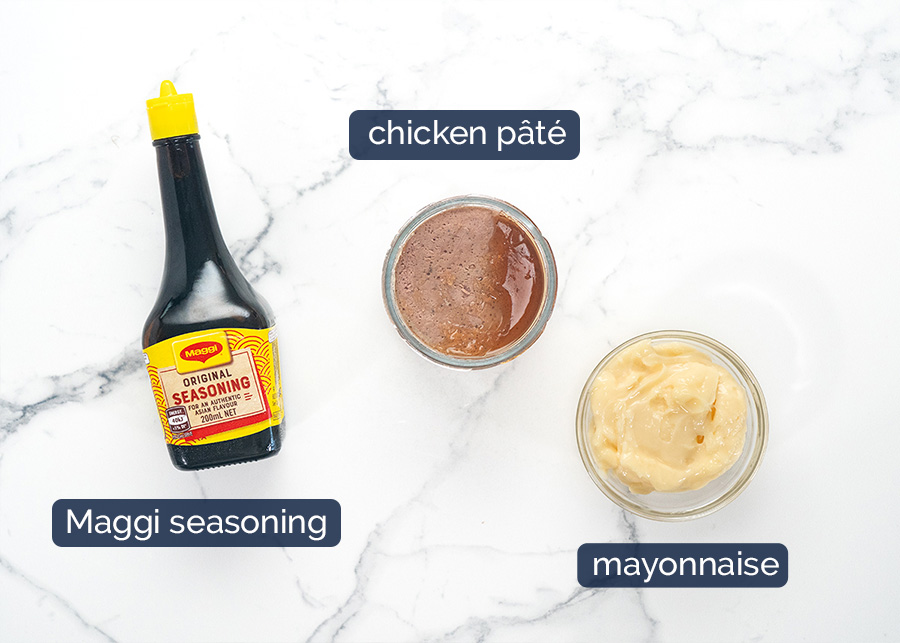
Maggi Seasoning – This is basically like a soy sauce but with more flavour. No, not MSG!
While some Banh Mi vendors make their own secret sauce, this is the most common sauce used straight out of the bottle. Find it in the Asian or sauce aisle at large grocery stores here in Australia.
Pate – Chicken pate is on theme here though you can use any pate you want. While you’re most welcome to go ahead and indulge in expensive pate, there’s actually no need. With so much other stuff going on in this sandwich, no one’s going to know if you used a budget pate or a premium one!
Mayonnaise – Whole egg mayonnaise or Japanese Kewpie mayonnaise please. I don’t use other types of mayonnaise (too vinegary or too sweet).
How to make a chicken banh mi
Making any type of Banh Mi is just about the order in which you layer. Rich and creamy on the bottom, topped with meaty then finished with fresh.

Split the baguette in half but don’t cut it all the way through.
Butter – Spread butter on the lid of the baguette.
Pate and mayo – Spread pate then mayonnaise on the base of the baguette. Don’t skimp – the most popular Banh Mi joints in Vietnam are always the ones that are most generous with the pate!!
Chicken and sauce – Top with shredded chicken then drizzle with Maggi Seasoning, the secret Banh Mi sauce!
Vegetables & herbs – Stuff in a generous amount of pickled carrot and daikon, layer 2 slices of cucumber then stuff with 2 to 3 green onion stems and a few sprigs of coriander.
Chilli – Lastly, sprinkle with as much fresh chilli as you dare, then devour!
Go hard with the chilli! Little pops of fresh chilli buried amongst the freshness of pickled vegetables is a signature characteristic of Banh Mi so don’t be shy with the chilli! In fact, try it the other way. Be brave, go hard, then if it’s too much for you, just pick ’em out!!
And there you have it. The chicken version of the infamous Banh Mi, filled with flavours like you’ll never experience in a Western sandwich! That combination of the fresh herbs and pickled vegetables with the smear of rich creamy pate and mayonnaise is stellar. It works with many proteins, but using chicken is an easy option if you just use a store bought roast chicken like I do.
If you’re new the world of Banh Mi, this is a good one to start with. Hope you give it a go! – Nagi x
Watch how to make it

Chicken banh mi (Vietnamese sandwich)
Don't skip the pickled vegetables. They totally make it.For lemongrass grilled chicken, use the chicken in this recipe in place of the shredded chicken, and skip the Maggi seasoning.Ingredients
Pickled vegetables:
- 2 medium carrots , peeled cut into 2-3mm / 1/10″ batons (Note 1)
- 1/2 large white radish (daikon), peeled, cut the same as carrots (Note 1)
- 1 1/2 cups boiling water
- 1/2 cup white sugar
- 4 tsp cooking / kosher salt
- 3/4 cup rice wine vinegar (sub apple cider vinegar)
Banh Mi:
- 4 crusty white rolls ~ 20cm/8" (Note 2)
- 2 – 3 tbsp salted butter
- 120g/ 4 oz chicken pate (or other pate of choice)
- 4 tbsp whole egg mayonnaise or Kewpie
- 4 cups (400g/ 14oz) shredded chicken (1 small store bought or homemade brined roast chicken, or poached breast)
- 2 – 3 green onion stems , cut to bread roll length (3 pieces per Banh Mi)
- 1 cucumber , thinly sliced lengthwise (2 slices per Banh Mi)
- 1 1/2 cups (lightly packed) coriander/cilantro sprigs
- 1/4 tsp Maggi seasoning per Banh Mi (Note 3)
- 2 – 3 birds eye or Thai red chilli , finely sliced
Instructions
Pickled vegetables:
- Pickle – In a large bowl, dissolve the salt and sugar in the hot water. Stir in vinegar. Add carrots and daikon – they should just about be covered.
- 2 hours – Leave for 2 hours until slightly floppy. Drain well then use per recipe.
Banh Mi:
- Split the bread roll in half but don't cut all the way through.
- Butter – Spread the lid with butter.
- Pate then mayo – Spread the base with 1 to 2 tablespoons pate (be generous!), then 1 1/2 tbsp mayonnaise.
- Chicken & Maggi – Pile on shredded chicken, drizzle with 1/4 tsp Maggi seasoning (you can always add more later).
- Fresh stuff! Stuff with pickled vegetables, 2 slices of cucumber, 3 slices of green onion and coriander. Finally, sprinkle with as much chilli as you dare. Jam the lid down and devour!
Notes
Nutrition
I love a good sandwich.
And there’s more coming soon!
Life of Dozer
He was squinting in the sun….

Now I’m squinting in the sun….

The post Chicken Banh Mi (Vietnamese sandwich) appeared first on RecipeTin Eats.
]]>