 Here’s a copycat recipe for Australia’s (current) favourite confectionary – Golden Gaytime Popcorn! Caramel popcorn drizzled with chocolate and sprinkled with biscuits crumbs, it’s ridiculously addictive but rather expensive. Save a fortune by making it yourself! Golden Gaytime Popcorn Popcorn and candy lovers alike were in a tizzy of excitement with Golden Gaytime Popcorn was... Get the Recipe
The post Golden Gaytime popcorn (copycat) appeared first on RecipeTin Eats.
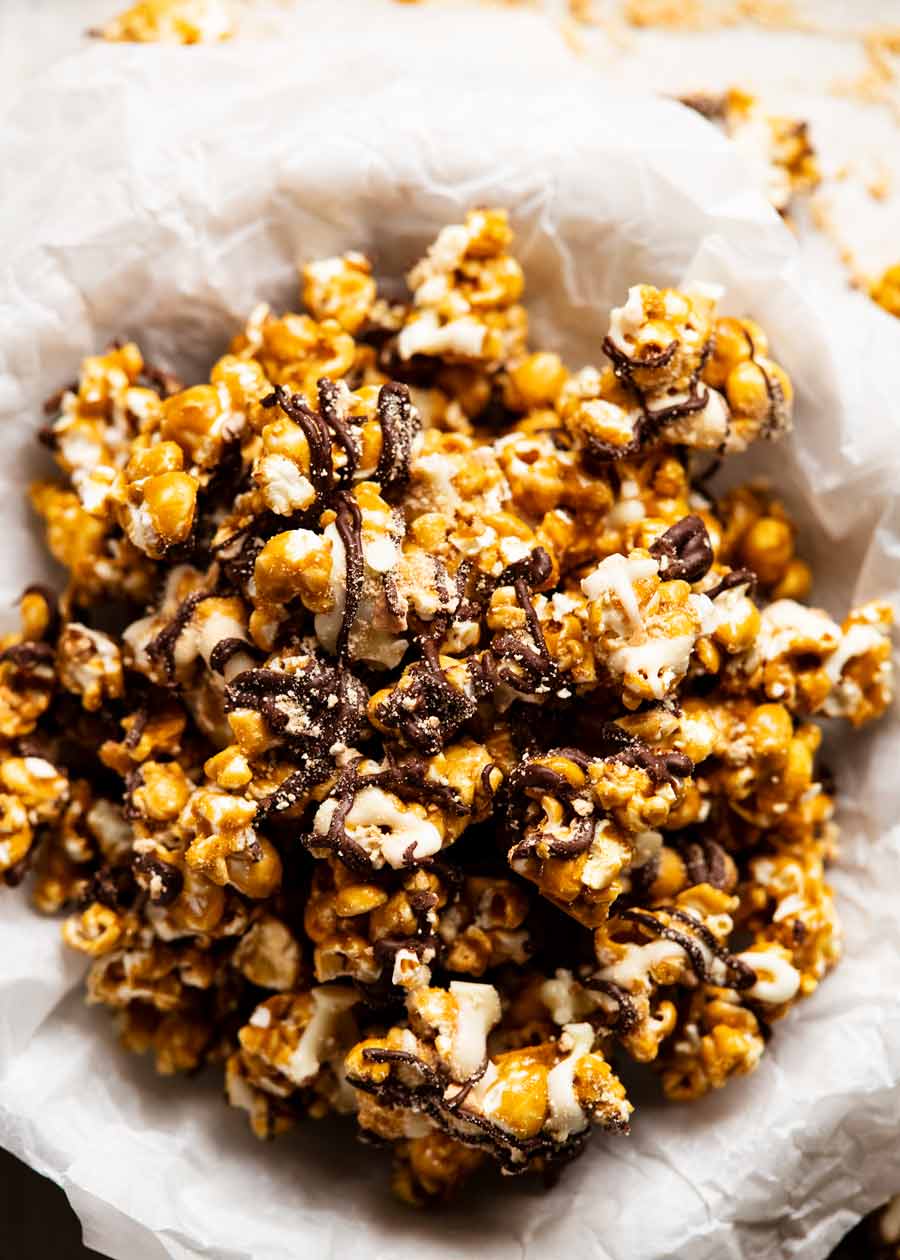
]]>Here’s a copycat recipe for Australia’s (current) favourite confectionary – Golden Gaytime Popcorn! Caramel popcorn drizzled with chocolate and sprinkled with biscuits crumbs, it’s ridiculously addictive but rather expensive. Save a fortune by making it yourself!
Golden Gaytime Popcorn
Popcorn and candy lovers alike were in a tizzy of excitement with Golden Gaytime Popcorn was first released. Yours truly included. The chatter between closet popcorn-loving friends, however, quickly moved from “Far out, this is crazy good!” to “OMG can you believe it’s so expensive”??
Named as such because it’s a popcorn version of a beloved Australian’s ice cream called Golden Gaytime, one packet of the Gaytime popcorn is $5.75 for 100g (3.5 oz). A small bag with just 2 cups of Gaytime popcorn. I can’t afford to feed my addiction!!
Which, of course, lead to what was affectionately dubbed The Gaytime Popcorn Project – a homemade version I was confident I could create for 80% cheaper. How’d I do? My report card is at the bottom of the post!
Store-bought Golden Gaytime popcorn

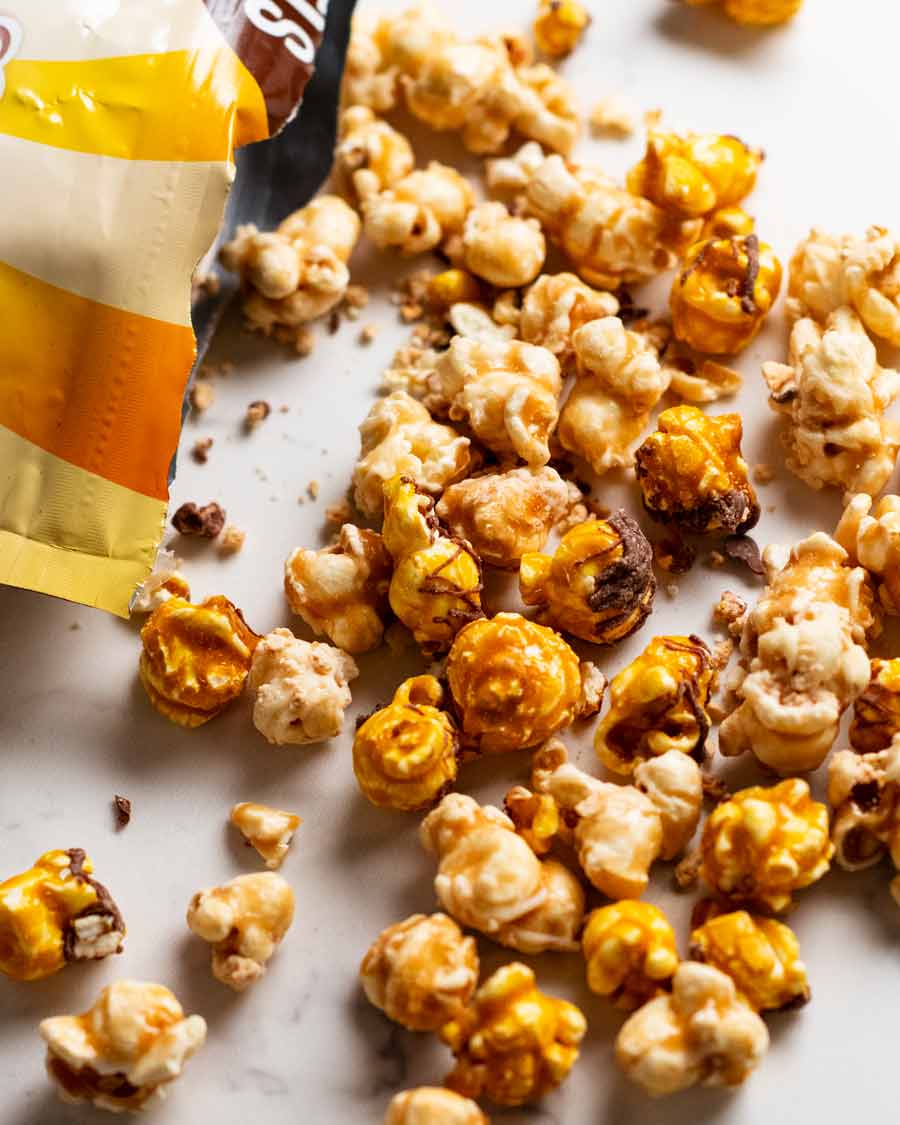
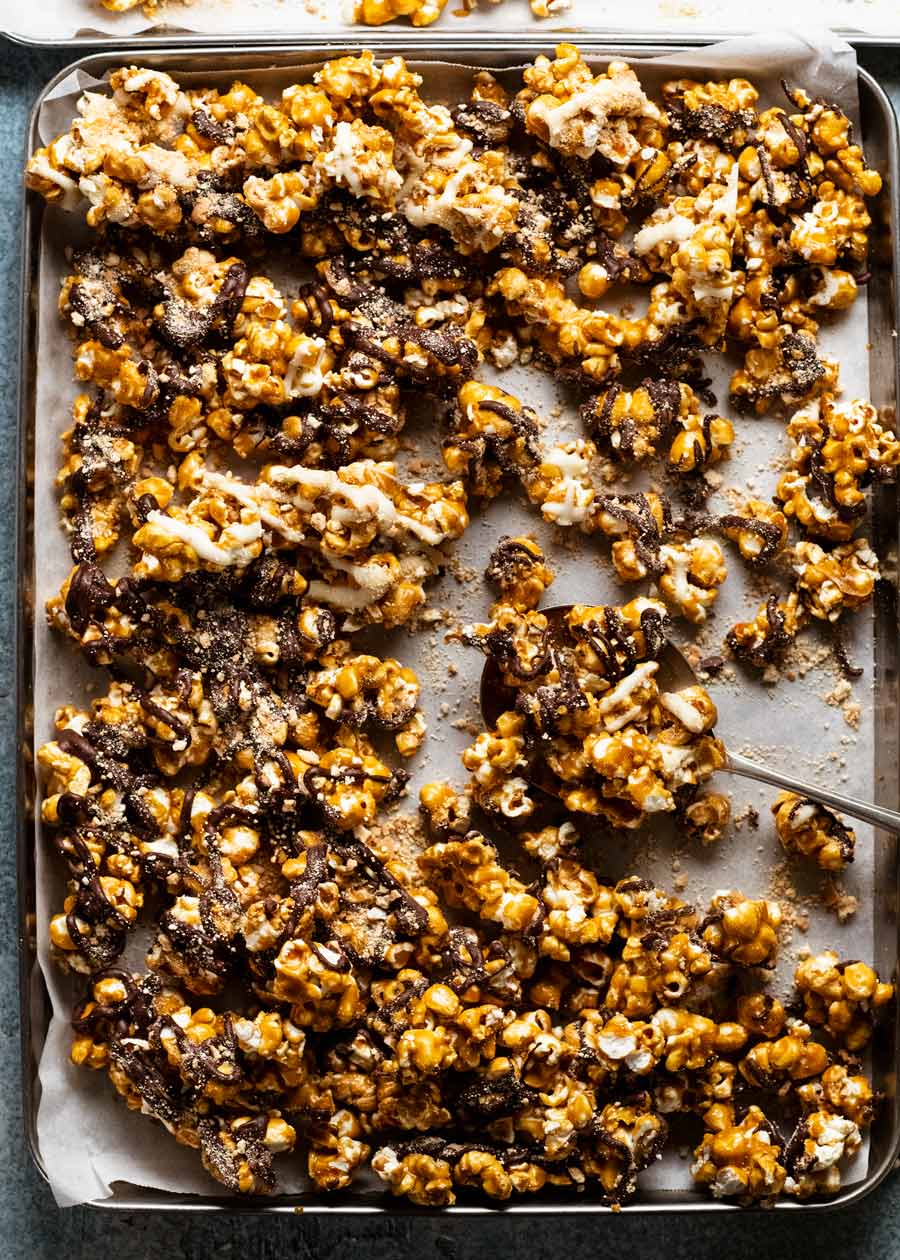
A quick inspection of the ingredients label was all I needed to come up with a copycat recipe. It’s really just caramel popcorn with a drizzle of chocolate and sprinkling of biscuit crumbs.
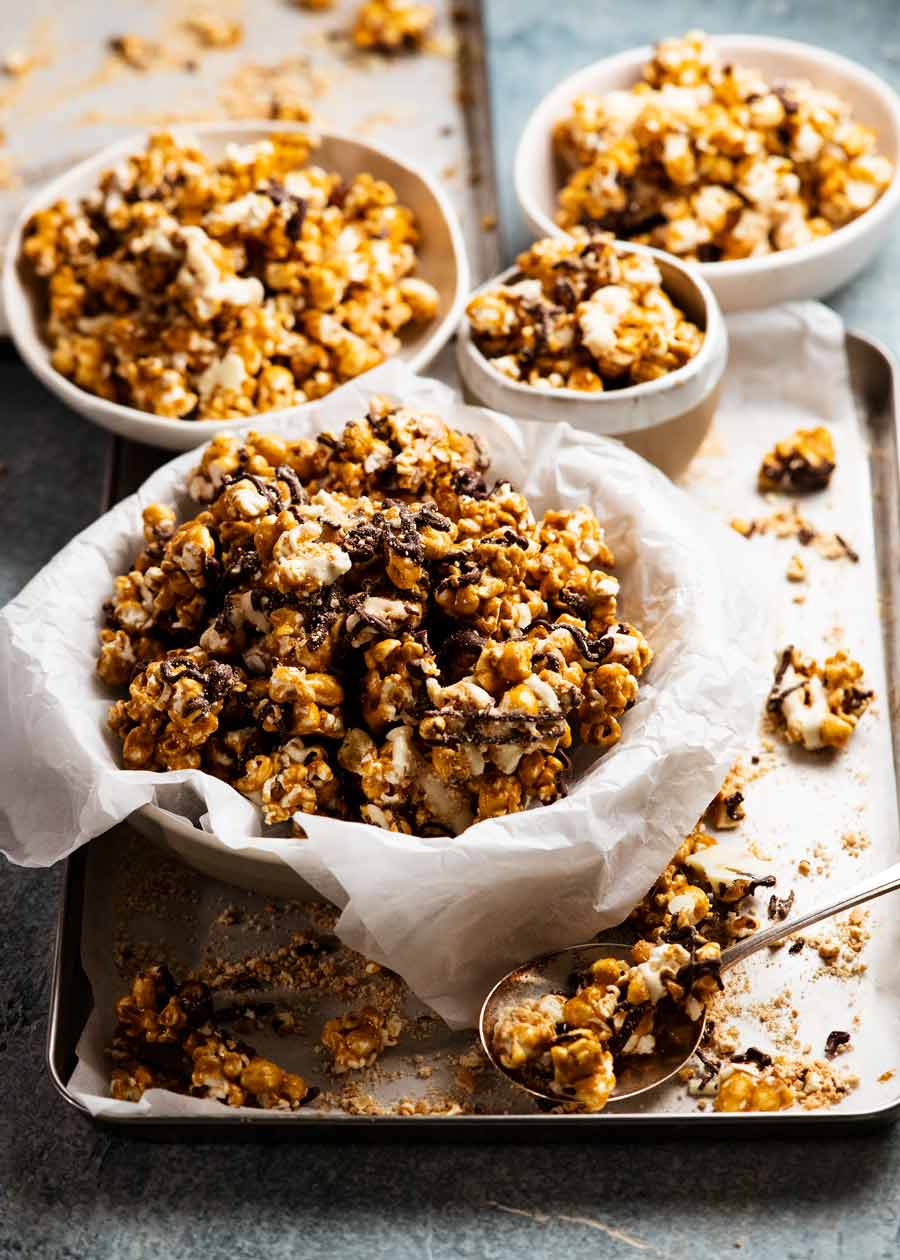
However, my homemade Gaytime Popcorn is far more generous on the chocolate drizzling (oh, why not? 😇). And you won’t break the bank!
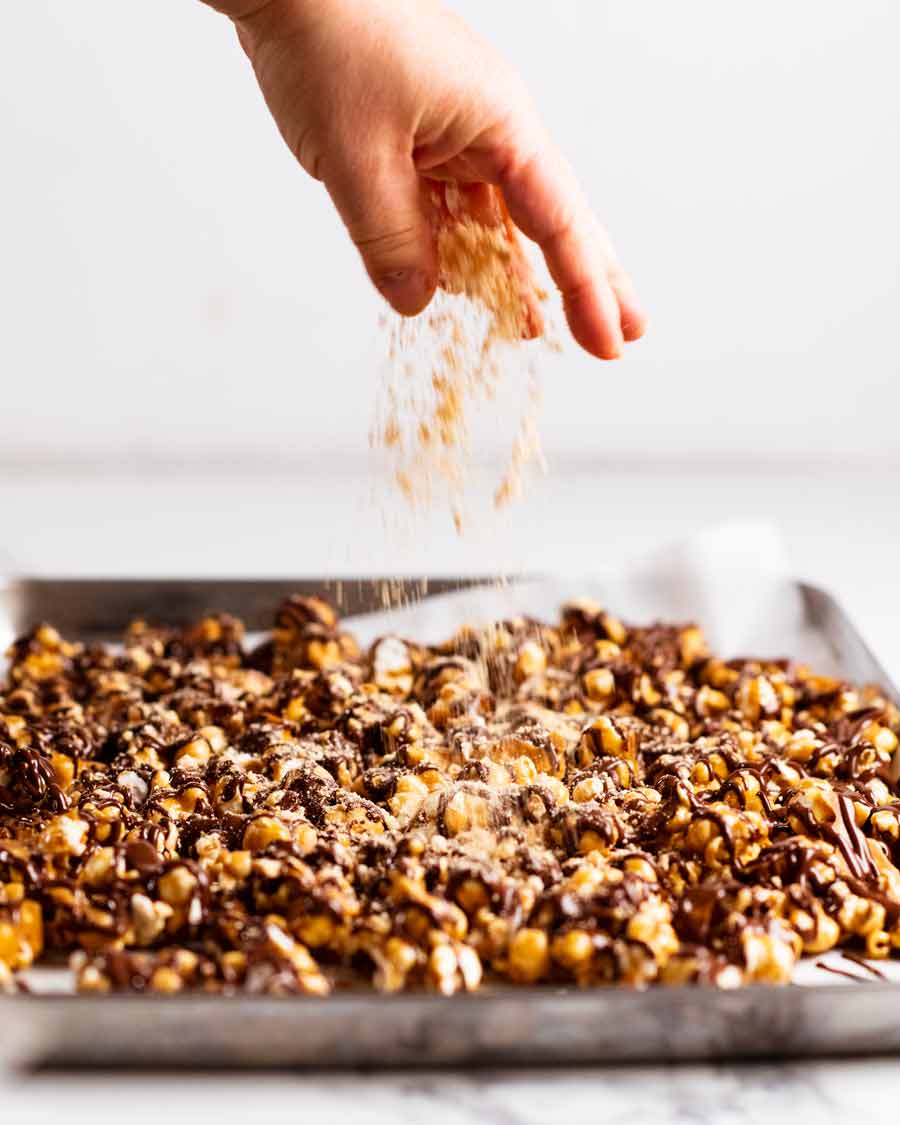
Hmm, I did a “sprinkling of biscuit crumbs”, didn’t I. But it looks more like I’m assertively throwing biscuit crumbs in the photo below. You want biscuit crumbs? Here’s your biscuit crumbs!!! 😂
Ingredients you need
Here’s what you need to make this. The first part covers the caramel popcorn, then the second part covers the chocolate drizzle and biscuit crumbs.
Caramel popcorn ingredients
Here’s what you need for the caramel popcorn:
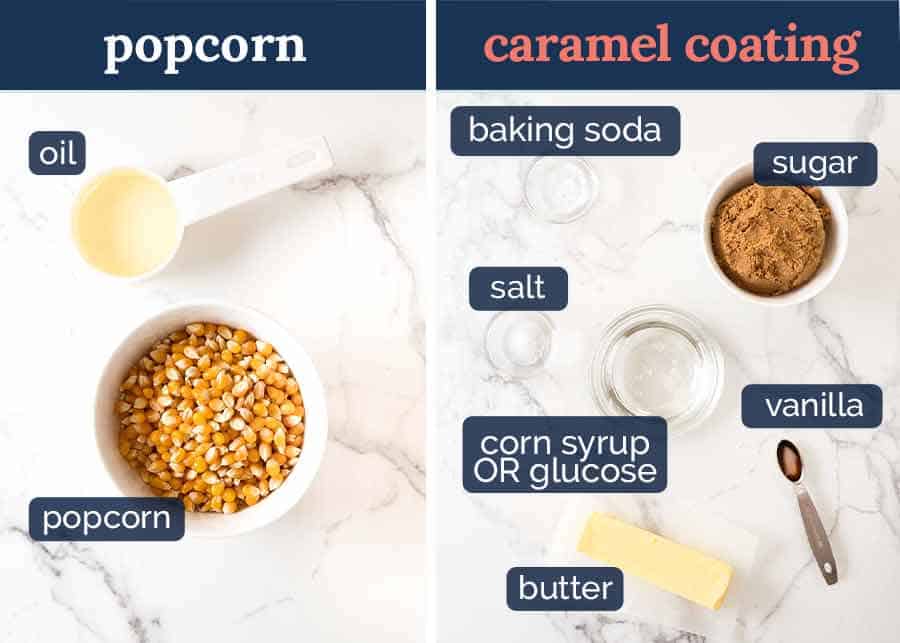
Corn syrup – This stabilises the caramel to ensure sugar crystallisation doesn’t occur, gives the caramel a nice shiny finish that’s crisp rather than sticky. Common grocery item in the US and Canada ! It can be purchased online in Australia from USAFoods.com.au and Amazon.
Glucose is a perfect substitute for corn syrup which is available in Australian supermarkets (baking aisle, clear thick syrup with honey consistency). Just a little harder to measure out because it’s so thick. However, the popcorn needs to be baked for 15 minutes longer to make sure the caramel coating dries out and becomes crisp. This is because glucose has slightly higher water content.
Baking soda / bi-carb – This makes the caramel coating become sort of foamy and increase in volume when you whisk it in. It helps get even coverage of caramel on the popcorn. Without the baking soda, you end up with big globs of caramel. It can’t be substituted with baking powder.
Toffee, caramel or vanilla essence – Store-bought Gaytime popcorn has a stronger albeit more artificial caramel flavour than homemade. To replicate this, use a caramel or toffee essence. Otherwise, just stick with vanilla like normal caramel popcorn. It’s honestly not a big deal, the popcorn still has a lovely caramel-y flavour.
Brown sugar rather than white sugar, for better caramel flavour.
Butter – For flavour. Not margarine or other alternatives. I can’t predict what that will do to the crispness of the caramel coating.
Oil – Anything neutral flavoured like vegetable, canola or peanut oil. This is for cooking the popcorn. It doesn’t work as well with butter (because butter is ~15% water and dairy, not just fat).
Popping corn! It’s usually sold in the potato crisps aisle in grocery stores here in Australia.
Chocolate drizzle and biscuit crumbs
For the chocolate drizzle and biscuit crumbs, you just need chocolate suitable for melting and some plain biscuits to crush up then sprinkle on the popcorn.
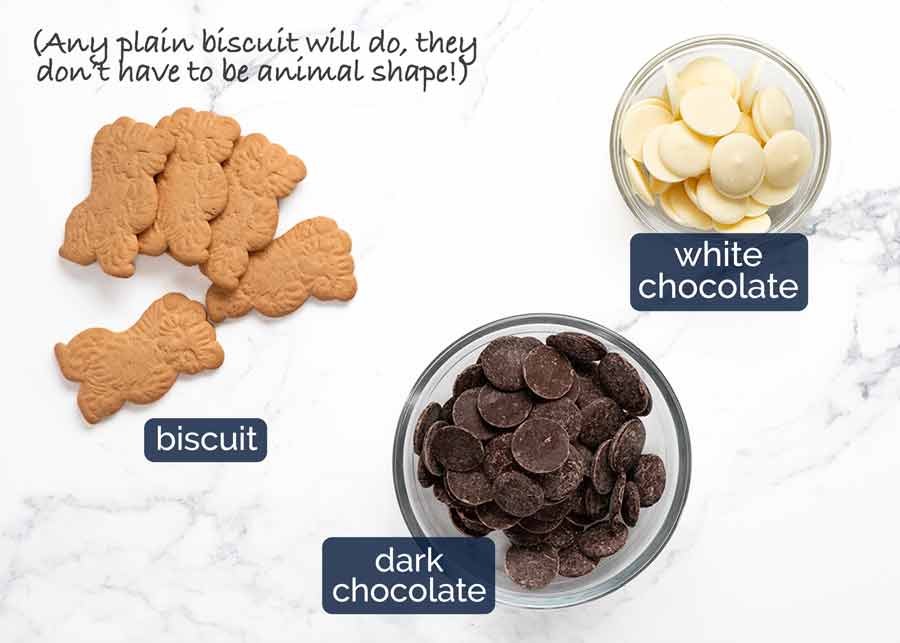
Chocolate -You can use a combination of dark and white chocolate, as I have done (like the store-bought Gaytime popcorn mix), or just one or the other.
Use a chocolate purchased from the baking aisle rather than eating chocolate. Baking chocolate is purpose-made for melting and cooking with, whereas eating chocolate is actually often designed specifically so it doesn’t melt when warm! I typically use “melts” for melting and chocolate chips for things like chocolate chip cookies as they are designed to hold their shape when cookies are baked.
For those of you in the US, semi-sweet chocolate chips is perfect.
Plain biscuits – A signature part of Golden Gaytime Popcorn is the sprinkling of crushed biscuits on the popcorn. The ingredients label specifies that it’s vanilla biscuits. Honestly though, any plain sweet biscuits will work just fine!

How to make Golden Gaytime Popcorn
Simply make caramel popcorn then finish with a drizzle of chocolate and sprinkle of biscuit crumbs. It will stay crisp and fresh for at least a week – I’m sure it will last for longer (caramel popcorn lasts for weeks). But every test batch I made mysteriously disappeared before I could finish testing the shelf life!!
1. Pop popcorn
Pop your popcorn kernels using your method of choice – stove or popcorn maker, if you have one (I do, but for some reason digging it out of the back of the cupboard seems like more effort than cooking the popcorn on the stove).
Here’s how to cook popcorn on the stove.
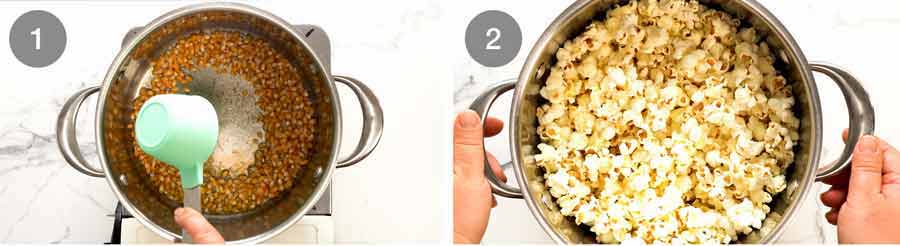
Test kernels – Heat oil in a large pot over medium heat. Add a few pieces of popcorn and wait until it pops, then quickly remove.
Add remaining popcorn, elevate off stove to shake and spread corn out evenly. Cover with a lid.
Shake! Once the popcorn starts popping in earnest, shake the pot gently once. Remove from heat when the popping stops (when you can count to 3 between pops) and transfer to a (very!) large bowl.
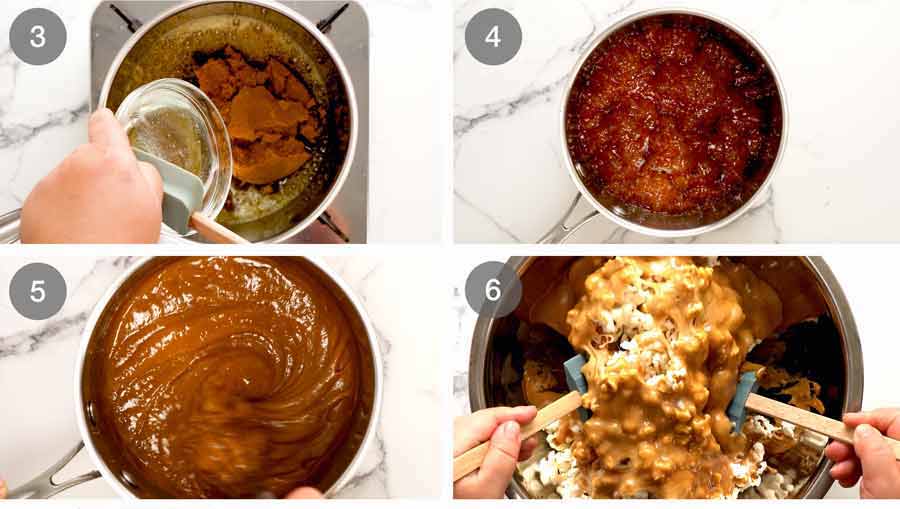
To make the caramel melt butter in a saucepan over medium heat. Add sugar, corn syrup and salt. Stir until just combined.
Simmer – When it starts to bubble, simmer for 4 minutes – DO NOT STIR! This may cause the sugar to crystallise so you won’t end up with a smooth caramel.
Baking soda “foamy” – Remove from heat then quickly whisk in caramel (toffee or vanilla) and baking soda. When you stop whisking, the caramel will foam and increase in volume. This is what makes the caramel coat the popcorn evenly. Without the baking soda, you end up with thick heavy globs of caramel on the popcorn and it’s impossible to toss.
Coat popcorn – Quickly pour the foamy caramel straight over the popcorn and toss to coat the popcorn as best you can until the caramel cools and starts to harden.
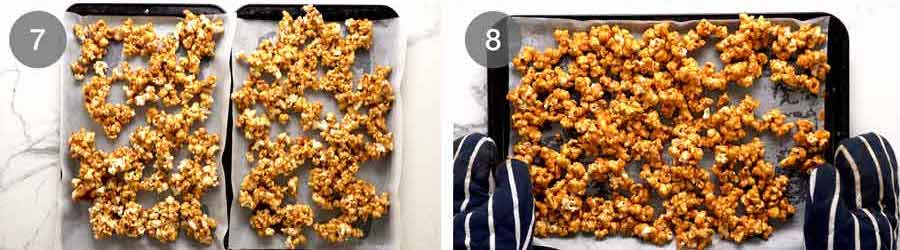
Bake for 45 minutes, tossing every 10 minutes or so. The caramel will remelt for the first 2-3 tosses so it coats the popcorn more evenly.
REMINDER: If using glucose instead of corn syrup, bake for an extra 15 minutes.
Cool – Remove from oven, leave to cool on the tray for 20 minutes so the caramel hardens. Then break up the popcorn – no need to be too pedantic, clumps are great!
Gaytime the popcorn!
OK, so time to transform our caramel popcorn into Gaytime Popcorn! Here’s how:
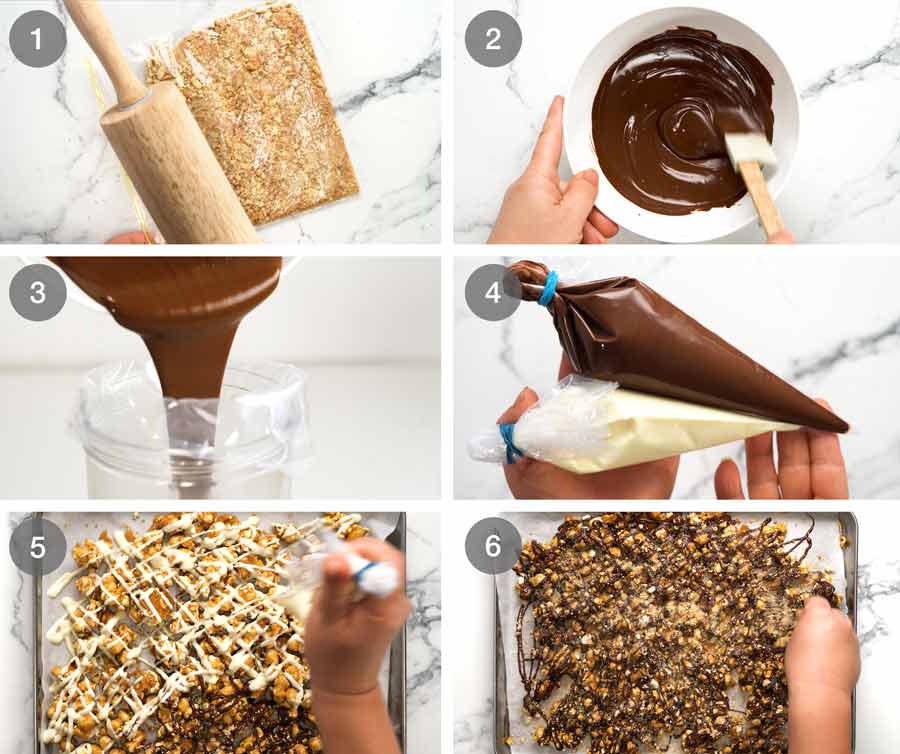
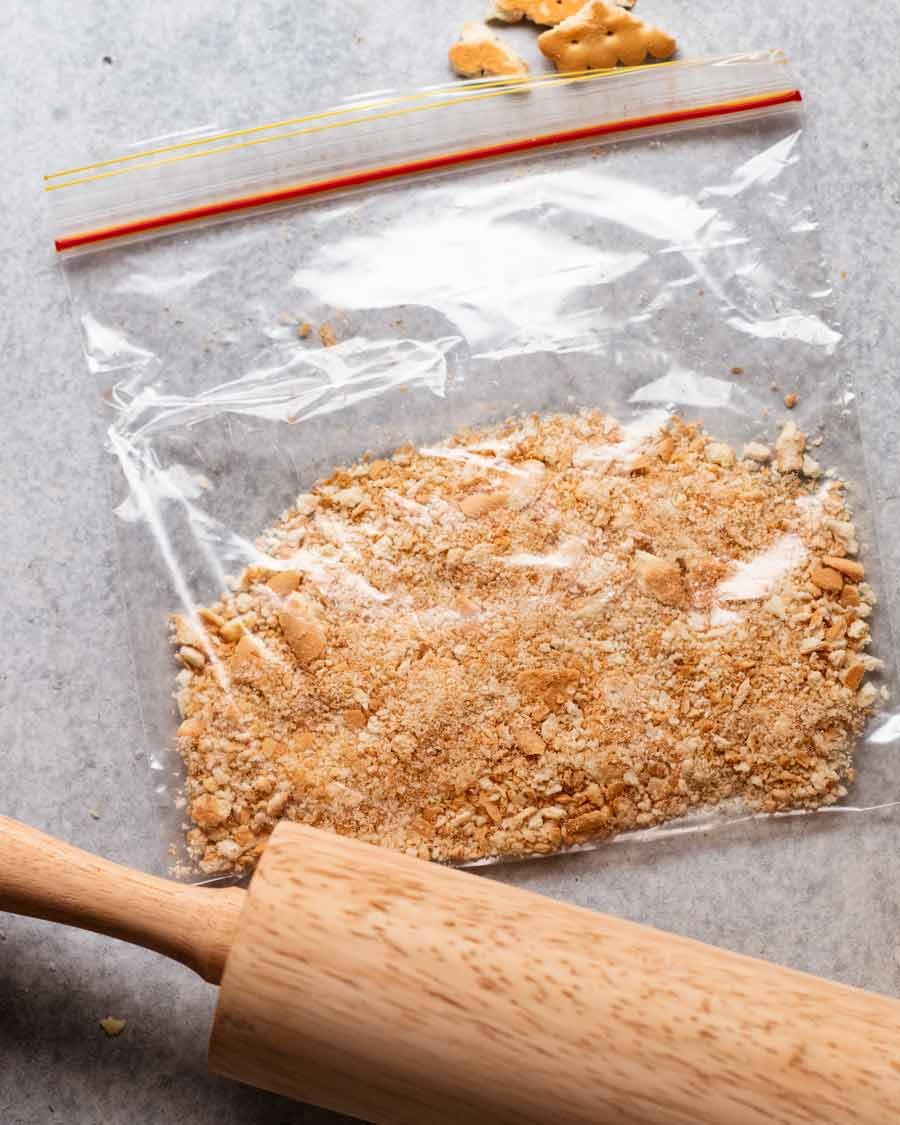
Bash the biscuits into crumbs either in a ziplock bag or using a mortar and pestle.
Melt the chocolate in the microwave (I use this) or bain-marie (bowl set over simmering water).
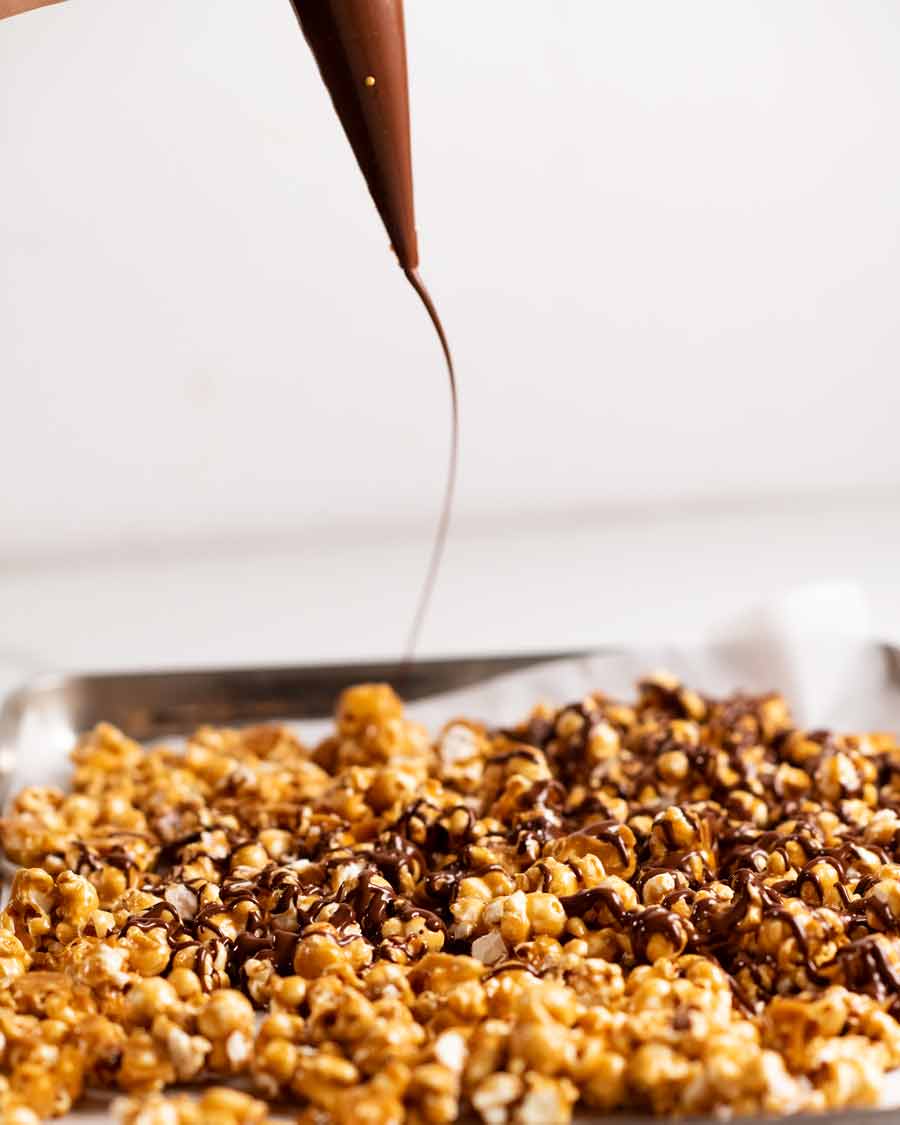
Transfer the melted chocolate into a piping bag. This makes it easier to get even coverage and zig-zag chocolate drizzles like you get with the store bought Gaytime popcorn. But if you prefer, you can just use a spoon for drizzling.
Ready for drizzling!
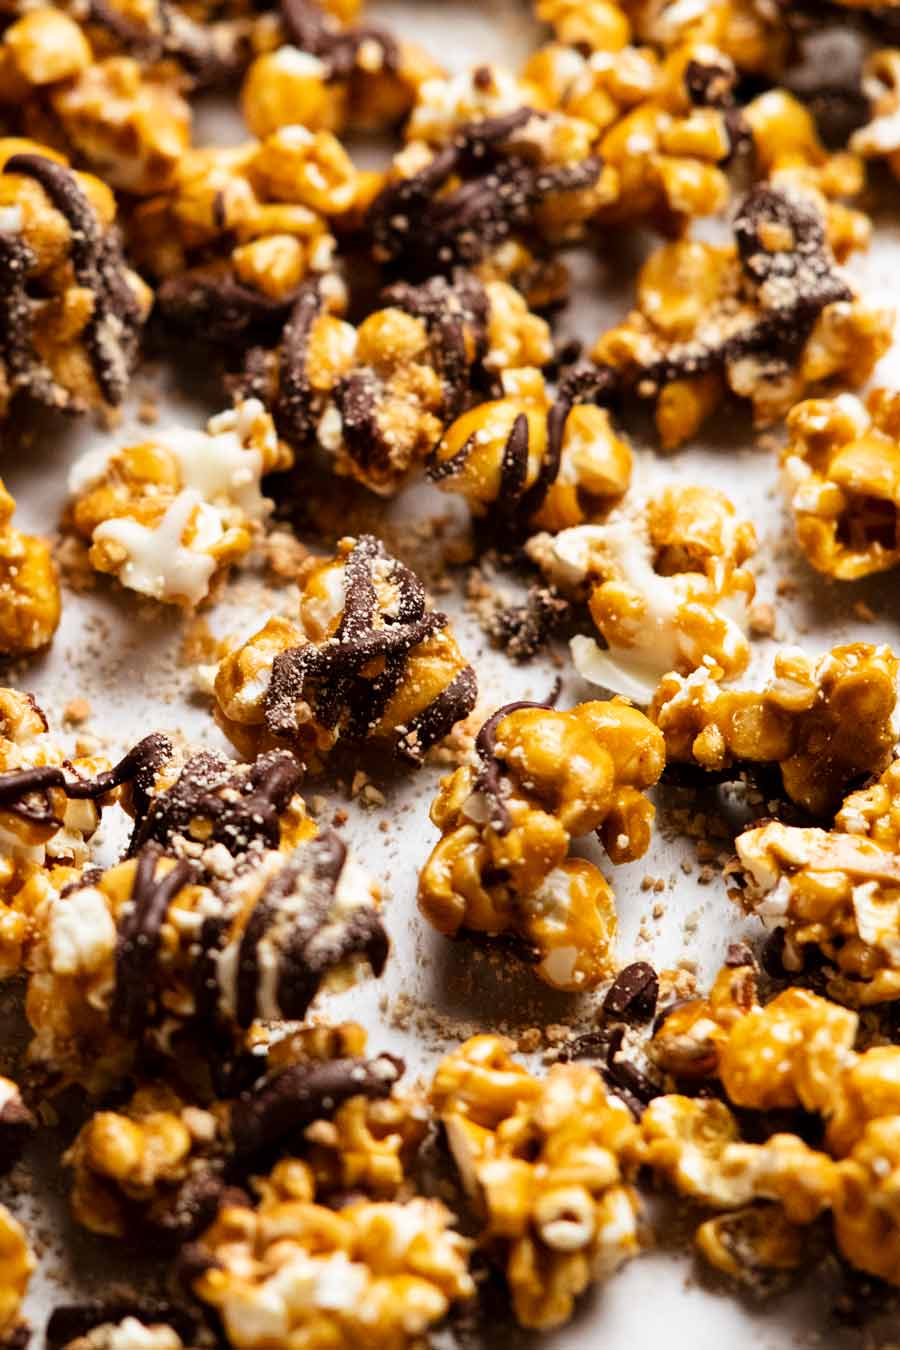
Drizzle the chocolate all over the popcorn in whatever pattern you prefer. There are no rules! Except – aim for even coverage. Nobody wants to be the unlucky person who gets a handful of chocolate-less popcorn!
Sprinkle the popcorn with the biscuit crumbs while the chocolate is still wet. The biscuits will stick to the chocolate part only, and it kind of sticks in concentrated (albeit small) patches so you can taste it a little better. I preferred this method rather than sprinkling it on the caramel popcorn whilst in the oven (the crumbs kind of got lost).
Once the chocolate sets – I speed things up by popping the trays in the fridge for 15 minutes – it’s ready to dive in!!
Storage
In theory, Gaytime Popcorn should stay fresh and crisp as long as Caramel Popcorn which has an excellent shelf life of several weeks.
Test batches made it to around the 1 week mark successfully before mysteriously disappearing. So I can’t say for sure, but I’m confident it should last for at least 2 weeks. Just make sure it is stored in an airtight container in a cool and dry place. If moisture gets in and/or it’s hot and humid, the caramel coating will get sticky and chewy so it gets stuck in your teeth.
This was a jar intended for gifting. It never got gifted. 🤭

REPORT CARD: Homemade is 68% cheaper!!
I boldly stated when I started on the Gaytime Popcorn Project that I believed I could make it for 80% less than store-bought.
We’ve run the numbers and the results are in.
One batch costs $8.96 to make which equates to 5 packets of store bought Gaytime Popcorn which costs $28.75 ($5.75 per packet). That’s a 68% saving!
So, I was 12% off. But still. I would never spend $28.75 for 5 packets of Gaytime. But I would spend $8.96 to make a batch of this any day of the week – and twice for movie night! – Nagi x
Watch how to make it

Golden Gaytime Popcorn – copycat recipe!
Ingredients
For the popcorn
- 1/4 cup vegetable oil (not required if air popping with a popcorn maker)
- 1/2 cup popping corn
For the caramel
- 100g / 7 tbsp unsalted butter
- 1 cup brown sugar , tightly packed cup
- 1/2 cup light corn syrup (sub glucose, Note 1)
- 1/2 tsp cooking/ kosher salt
- 2 tsp toffee or caramel essence OR 1 tsp vanilla (substitute) (Note 2)
- 1/2 tsp baking soda (bi-carb) (Note 3)
Golden Gaytime Finishes
- 1 1/4 cups dark or white chocolate melts or chips (US: semi-sweet chips), I used ~25% white and 75% dark (Note 4)
- 4 plain sweet biscuits (like Marie Crackers) (Note 5)
Instructions
Popcorn
- Test oil – Heat oil in a large pot over medium heat. Add a few pieces of popcorn and wait until it pops, then quickly remove.
- Pop – Add remaining popcorn, elevate off stove to shake and spread corn out evenly. Cover with a lid. Once the popcorn starts popping in earnest, shake the pot gently once. Then crack the lid a tiny bit – let's steam escape for crisper popcorn.
- Remove from heat when the popping stops (when you can count to 3 between pops) and transfer to a (very!) large bowl.
Caramel:
- Preheat oven to 110°C/230°F (both fan and standard ovens).
- Combine – Melt butter in a saucepan over medium heat. Add sugar, corn syrup and salt. Stir until just combined.
- Simmer – When it starts to bubble, simmer for 4 minutes – DO NOT STIR!
- Baking soda "foamy" – Remove from heat then quickly whisk in caramel (toffee or vanilla) and baking soda. When you stop whisking, the caramel will foam and increase in volume.
- Coat popcorn – Quickly pour straight over popcorn, toss until caramel cools and starts to harden.
Baking to crisp caramel coating:
- Spread popcorn on 2 large paper lined baking trays.
- Bake for 45 minutes, tossing every 10 minutes or so. Caramel will remelt for the first 2-3 tosses – tossing coats popcorn more evenly with caramel. (If using glucose, bake further 15 minutes).
- Cool – Remove from oven, leave to cool on the tray for 20 minutes. Then break up the popcorn – no need to be too pedantic, clumps are great!
Drizzle and crumbs
- Crumbs – Place biscuits in a ziplock bag and bash into crumbs.
- Melt chocolate – Place chocolate in a heatproof bowl and microwave in 30 second increments on high, stirring in between, until melted and smooth – about 1 1/2 minutes. (If doing a small amount of white chocolate, reduce to 20 second increments).
- Piping bags – Transfer chocolate into a piping bag. Use scissors to snip a small opening at the tip. (Alternative: just drizzle with a spoon).
- Drizzle & crumb – Push the popcorn together but in a single layer. Drizzle criss-cross (or any pattern!) all over the popcorn. Sprinkle with biscuits crumbs while the chocolate is wet so it sticks.
- Fridge – Refrigerate for 15 minutes until the chocolate is firm. Gently break popcorn into pieces. EAT!
- Store in an airtight container in a cool place. Stays crisp for at least a week. Our test batches never lasted any longer!
Notes
Nutrition
Life of Dozer
I promise Dozer, there is nothing going on in here that would be of interest to you…..😂

The post Golden Gaytime popcorn (copycat) appeared first on RecipeTin Eats.
]]> Hot Chocolate Fudge Cake – think of this as a sliceable version of Chocolate Self Saucing Pudding – with a LOT more chocolate fudge sauce! The perfect cosy dessert for cool winter days that’s easy to make. The chocolate cake of your dreams… I know this is a great dessert for sweater weather. But holy... Get the Recipe
The post Hot chocolate fudge cake appeared first on RecipeTin Eats.
]]>Hot Chocolate Fudge Cake – think of this as a sliceable version of Chocolate Self Saucing Pudding – with a LOT more chocolate fudge sauce! The perfect cosy dessert for cool winter days that’s easy to make.
The chocolate cake of your dreams…
I know this is a great dessert for sweater weather. But holy moly. It’s so good, I’ll wager that after you’ve made it once, you’ll make it over and over again regardless of the weather.
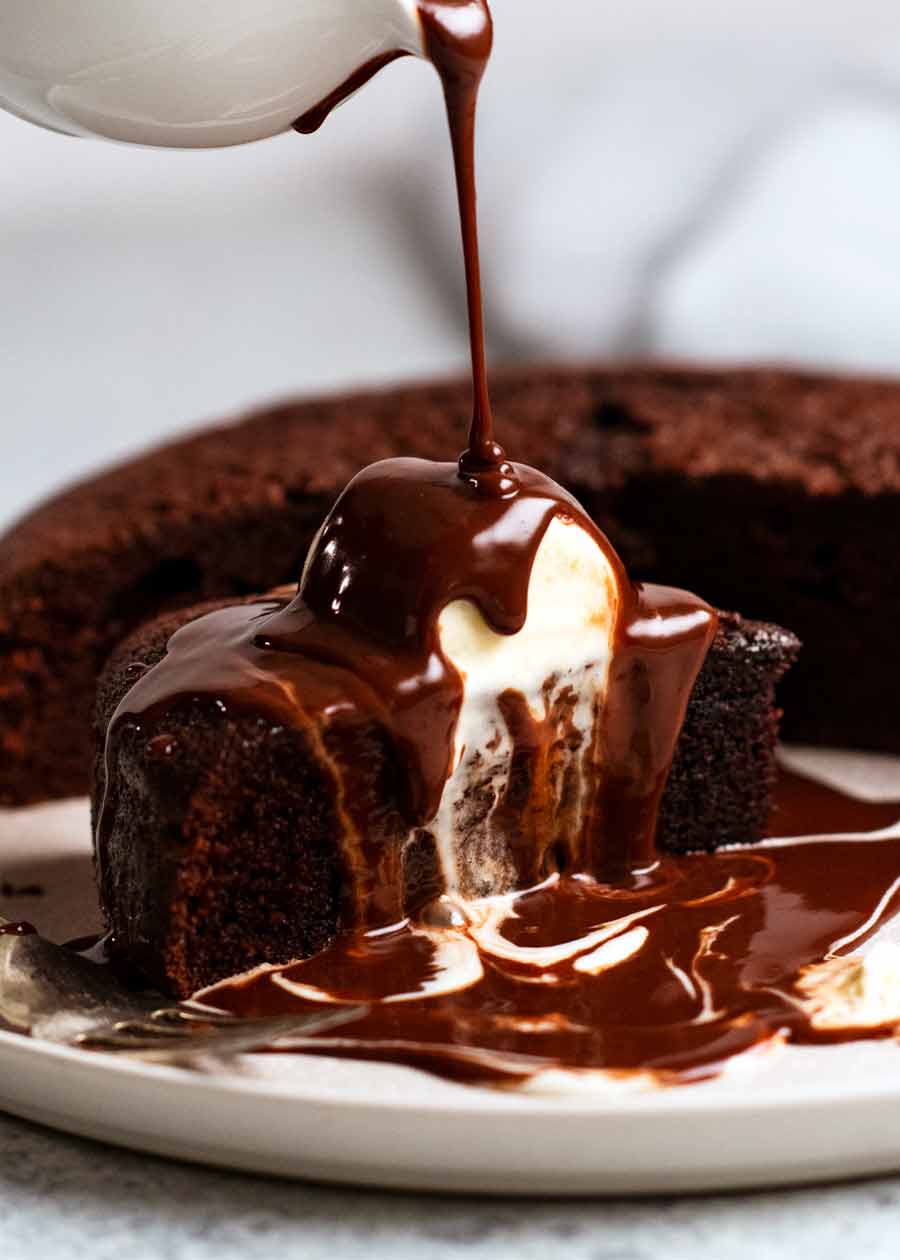
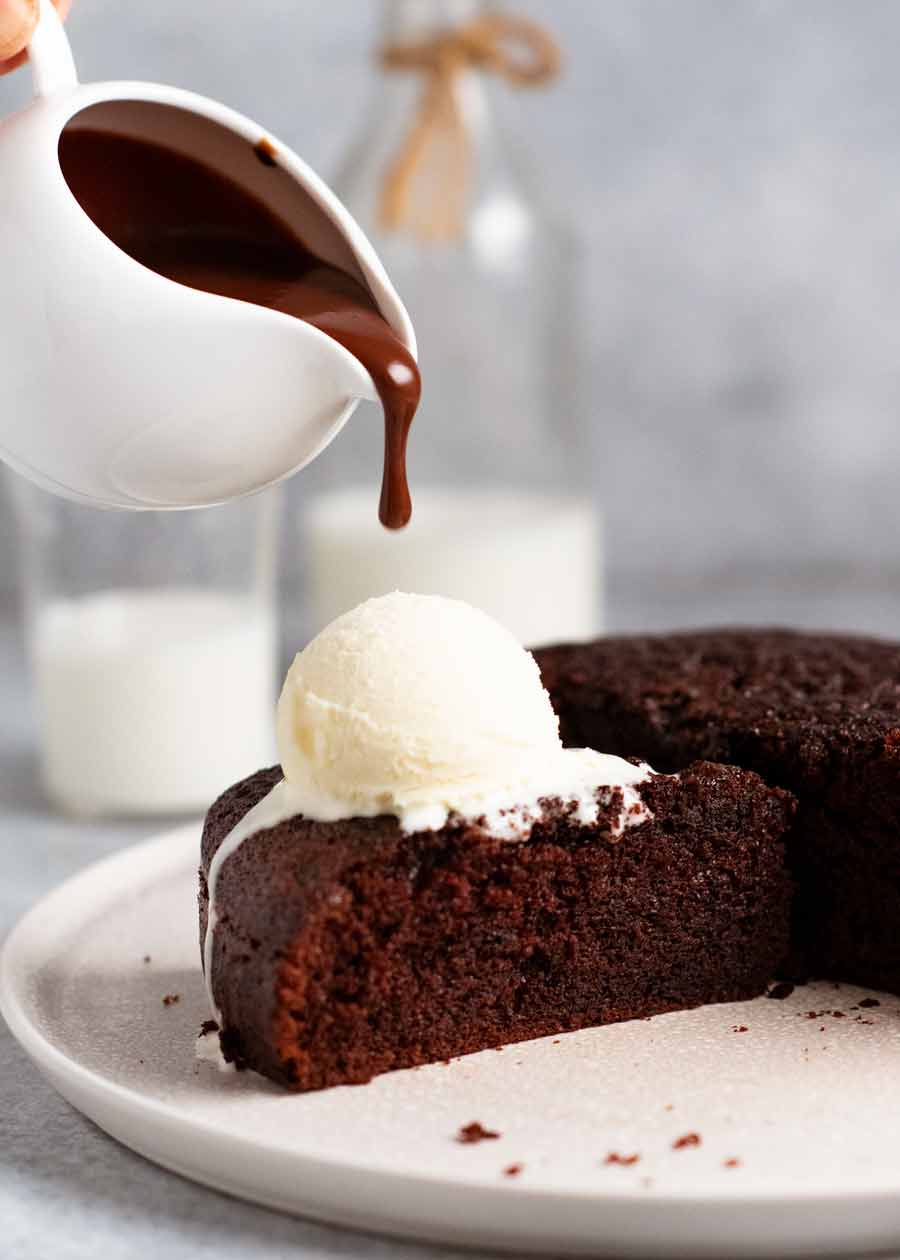
Let me paint the picture for you. A warm slice of soft chocolate cake, moist in a way that cakes can only be when warm. A scoop of melty vanilla ice cream on top.
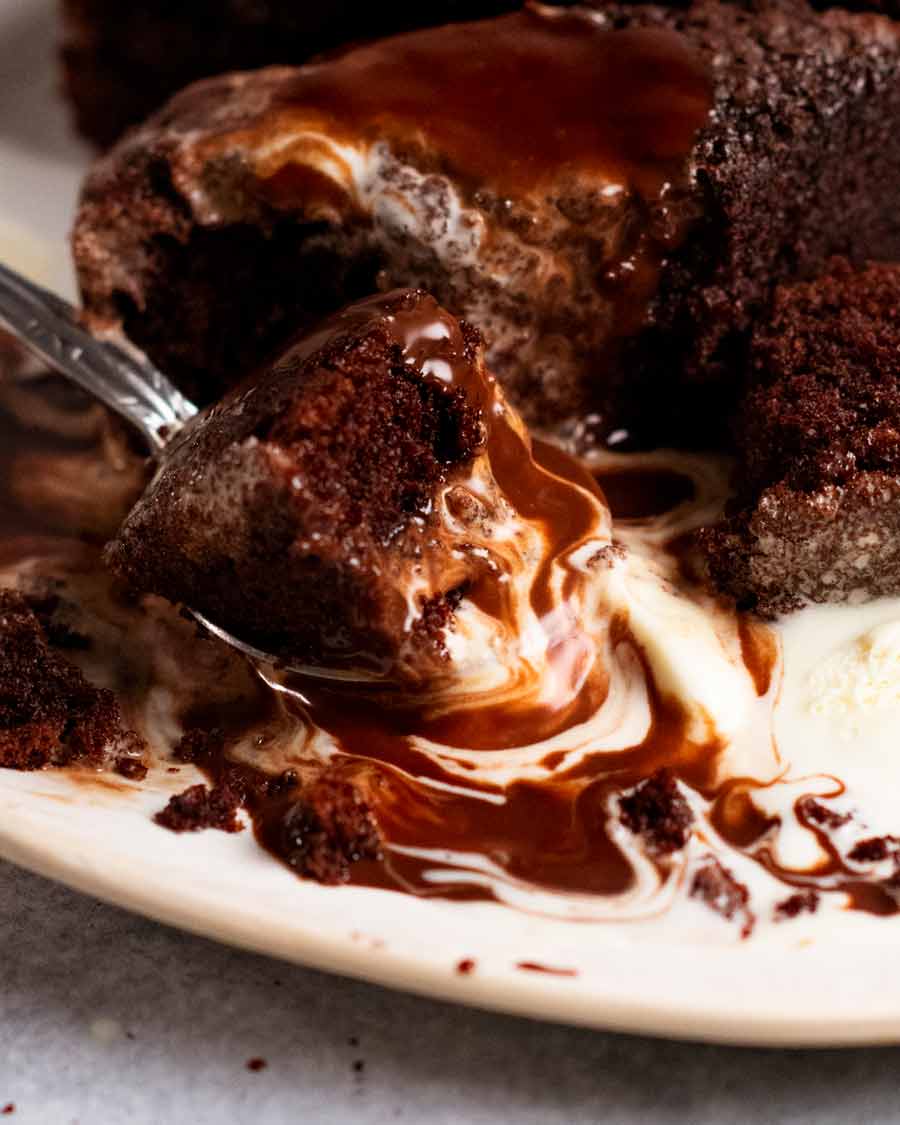
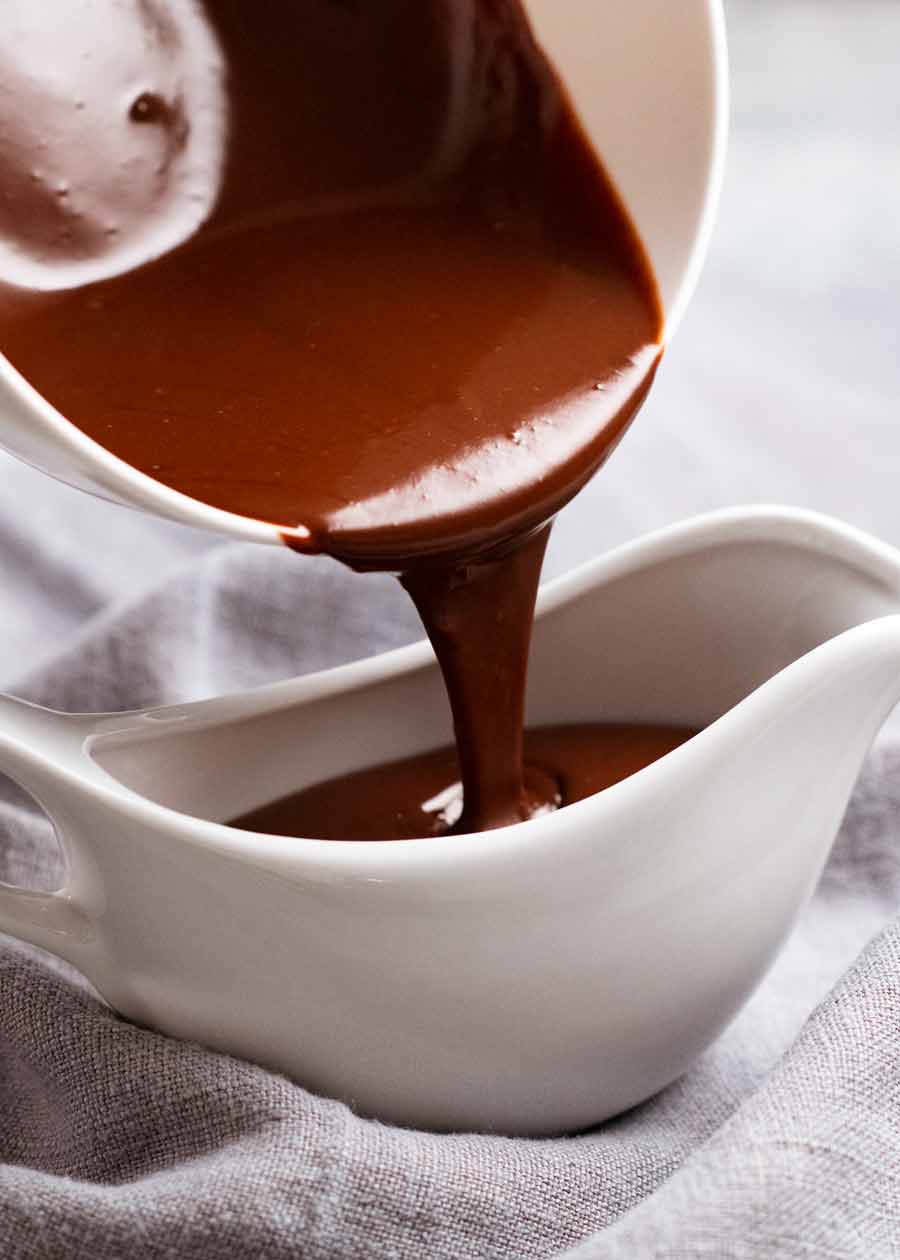
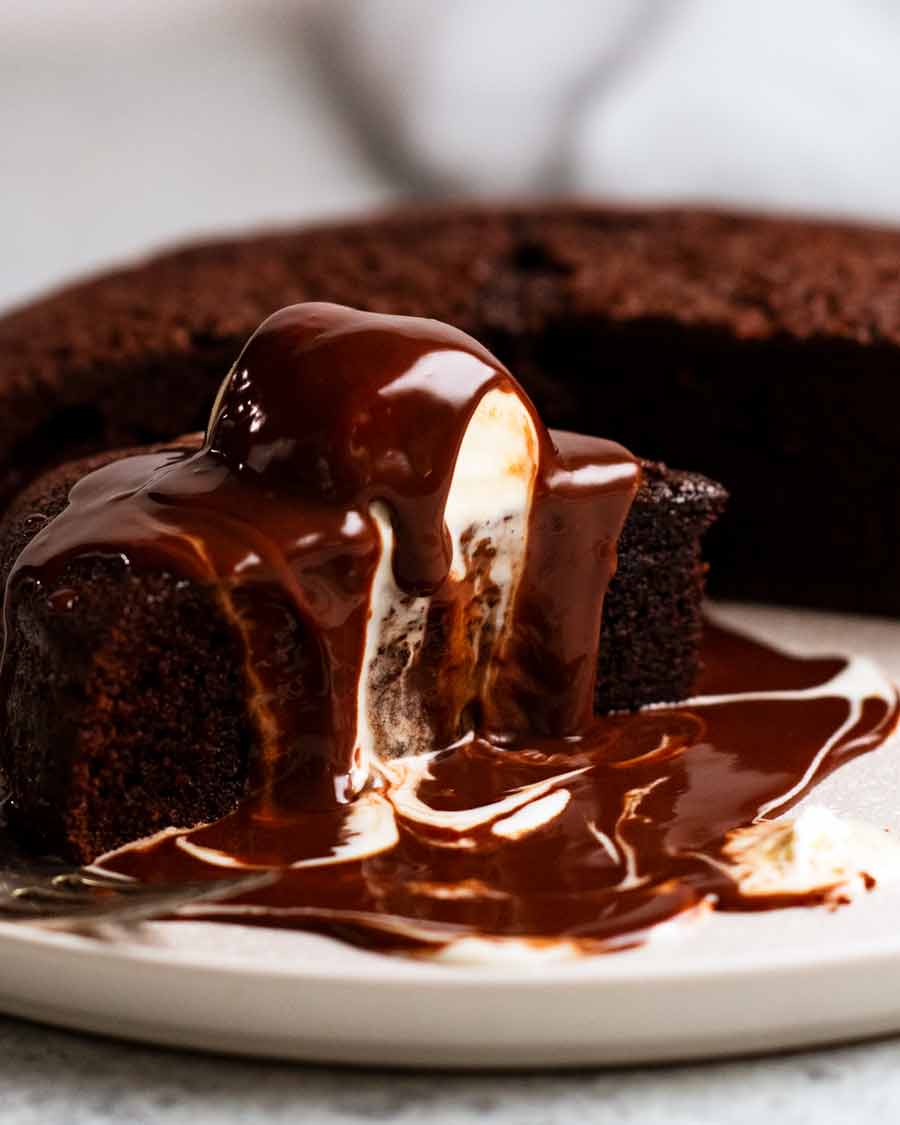
Then you douse – douse, my friends! – with hot chocolate fudge sauce. The ice cream starts to melt, and you get beautiful swirls of chocolate with white streaks pooling around your cake. You dig in with a spoon, getting a big scoop of cake soaked with the chocolate sauce and melted ice cream, and that first bite, that first glorious bite…..
Knees. WEAK.
Did I mention how easy this Hot Chocolate Fudge Cake is to me? The batter is made in a single bowl with a wooden spoon. And that fudge sauce is 2 ingredients – just cream and chocolate.
Ingredients in Hot Chocolate Fudge Cake
Here’s what you need to make this winter dessert. The recipe is based on my classic Chocolate Cake, with some minor adjustments to make it suitable for serving hot as a single layer, unfrosted cake.
Dry ingredients for the warm chocolate cake
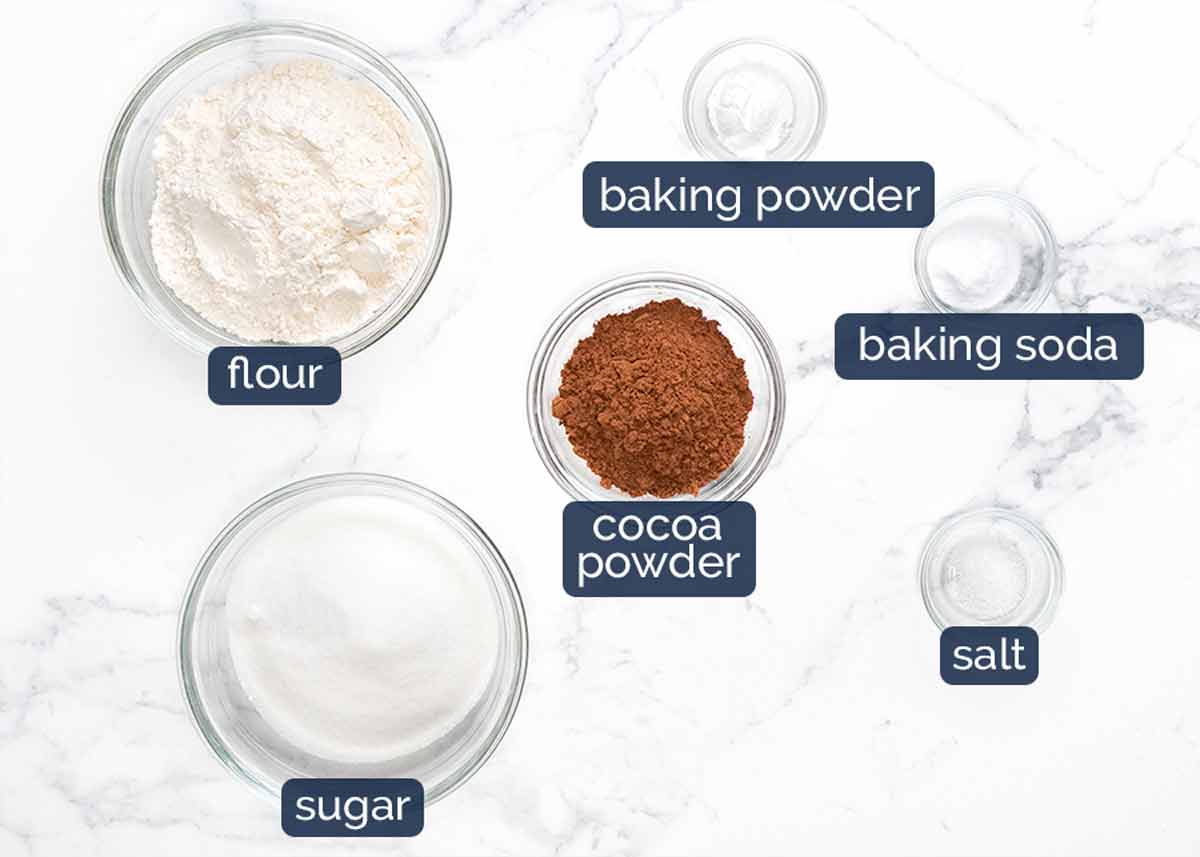
Flour – Just plain / all-purpose flour. Self raising flour will also work but the cake crumb is not as soft. (Skip the baking soda and baking powder if you use self-raising flour).
Baking soda (bi-carb) and baking powder, or use more of either – Both of these makes cakes, muffins etc rise but work differently depending on what you’re making. Baking soda is also ~3x stronger than baking powder. I like using a combination of the two for this cake for a lovely tender crumb and nice shape to the surface of the cake. However, if you only have one or the other, you can use more of what you have. See recipe notes for quantities.
Cocoa powder – Just plain cocoa powder, unsweetened. Not dutch processed – though you can use it if you’ve got this more expensive, more intense type.
White sugar – Use caster sugar / superfine sugar if you’ve got it, because it’s finer so you can be confident it dissolves easily. Else ordinary white sugar / granulated sugar works ok too.
Salt – Just a pinch brings out the flavours in this cake, especially the chocolate. Fairly standard baking practice for me these days, adding a touch of salt for this purpose!
Wet ingredients
And here are the wet ingredients in this cake:

Melted butter AND oil – Butter adds flavour into this cake while oil keeps the crumb fresh and moist for longer. Using both gives us the best of both worlds!
Egg – 1 large egg which means an egg that is sold in cartons labelled “large eggs” which is an industry standard. It is also best to be at room temperature – see this post for a quick way to do this.
Vanilla – For flavour, which compliments the chocolate.
Boiling water – Using hot rather than cold water makes the cocoa flavour “bloom” so the cake tastes more chocolatey. You’ll smell the chocolate the moment the hot water mixes into the batter!
No coffee? Some chocolate cakes include a touch of coffee which brings out the chocolate flavour. I tried it but it didn’t add anything to this cake because you get so much chocolate flavour from the hot fudge sauce!
Hot chocolate fudge sauce
Fudge sauce comes in many forms – some made with cocoa powder and evaporated milk, some with melted chocolate, some a combination of the two. The hot fudge sauce for this cake is the most luxurious of its kind – pourable chocolate ganache that’s made with just chocolate and cream.
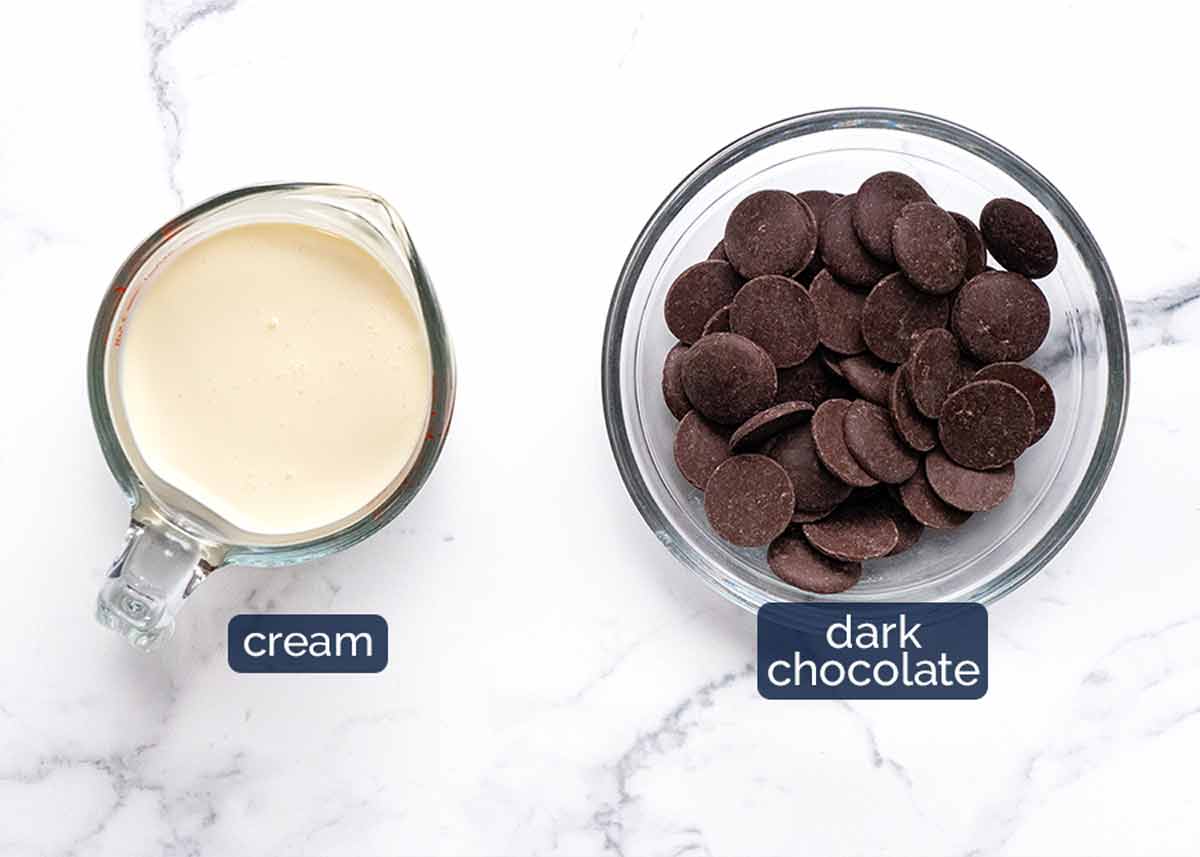
The ratio of chocolate to cream is 1:1 for ganache. However, as I want the sauce to be slightly thicker when warm, I’ve increased the chocolate slightly so it’s 1/ 1/4 cups of chocolate (200g) to 1 cup / 250ml of cream.
Dark chocolate – I use standard baking dark chocolate melts or chips (US: semi-sweet chocolate chips). You can also use chopped 50 – 70% dark chocolate (Lindt is my favourite).
Chocolate melts are just a type of chocolate chips that is available here in Australia. It comes in a disc shape and is designed to melt easily and smoothly. Whereas chocolate chips, while they can also be used for melting, are designed specifically to hold their shape for your favourite chocolate chip cookies rather than melting into puddles.
Milk and white chocolate – These will work but you will need to reduce the amount of cream slightly else the fudge sauce will be too runny. This is because they are softer than dark chocolate. Fellow baking nerds can read more about this in my Chocolate Ganache recipe!
Cream – Either heavy / thickened cream or pure cream will work here. Full fat essential. Reduced fat doesn’t always mix properly into the chocolate and also the sauce will be too thin.
How to make Hot Chocolate Fudge Cake
Get the cake in the oven first. Then make the chocolate fudge sauce – it will need 20 to 30 minutes to cool a bit to allow it to thicken slightly before using.
1. Making the hot fudge cake
Just mixed up in one bowl with a whisk. No stand-mixer or electric beater required. This is a very forgiving cake. Just be sure to get it in the oven as soon as you mix the batter, don’t leave it lying around.
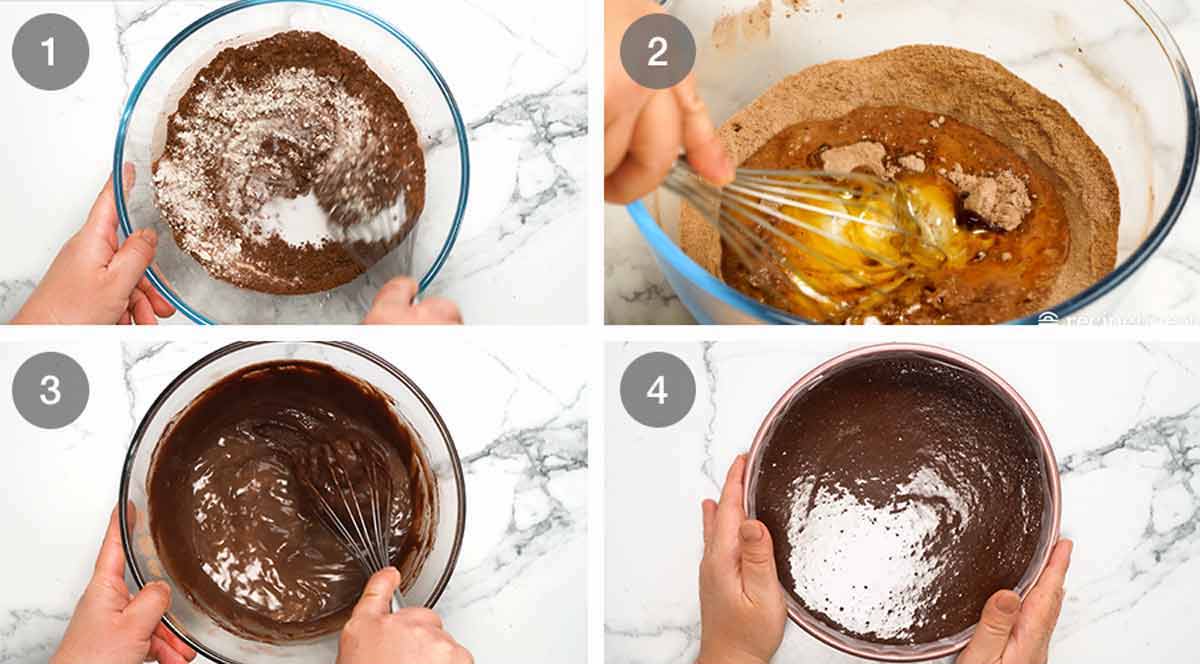
Mix Dry – Whisk the Dry ingredients in a large bowl.
Add Wet – Add the Wet ingredients, except the boiling water, into the same bowl.
Whisk until combined. Then whisk the boiling water in. The batter will be pretty thin – not as thin as the Chocolate Cake on which this recipe is based, but still pretty thin.
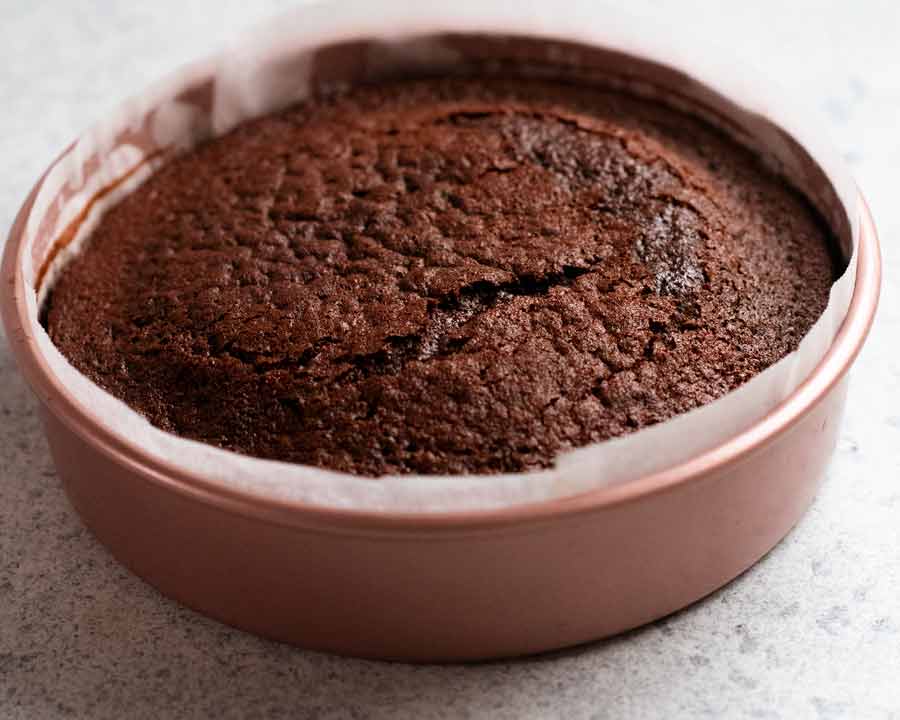
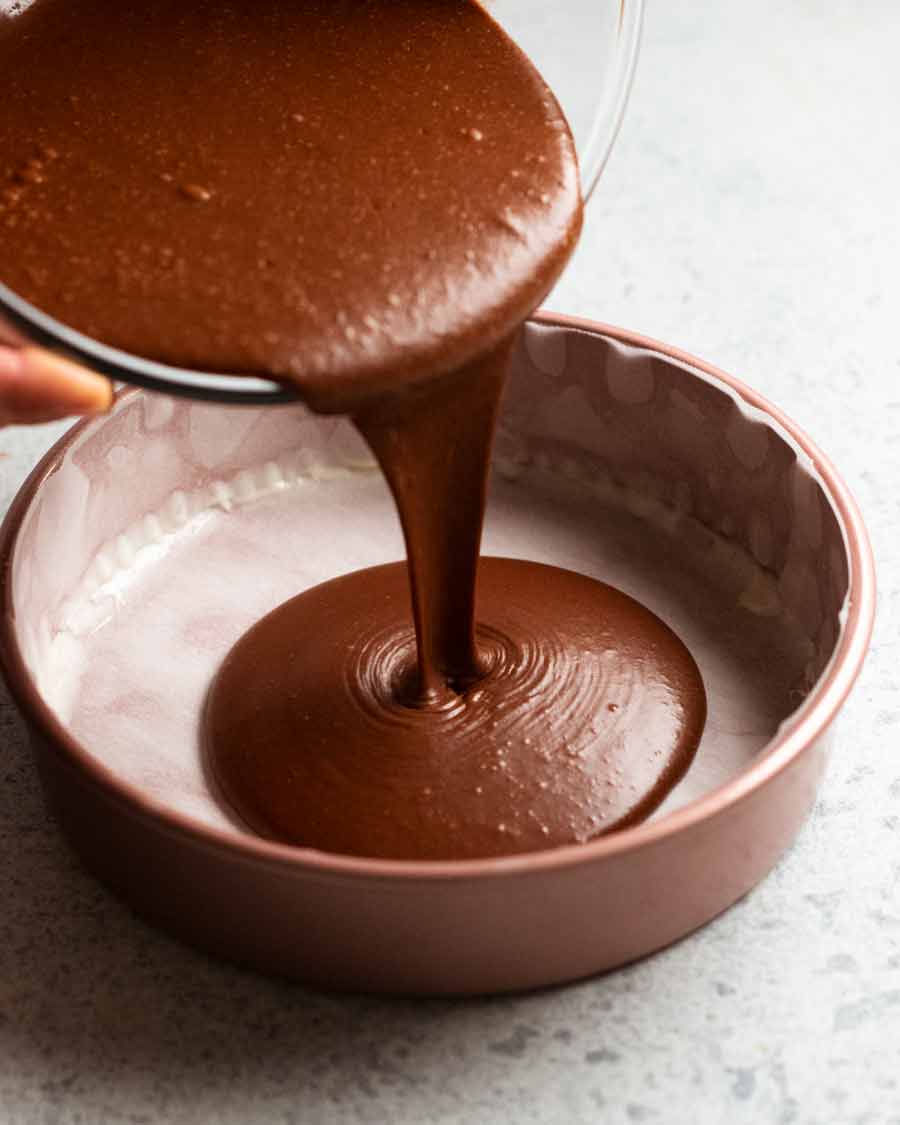
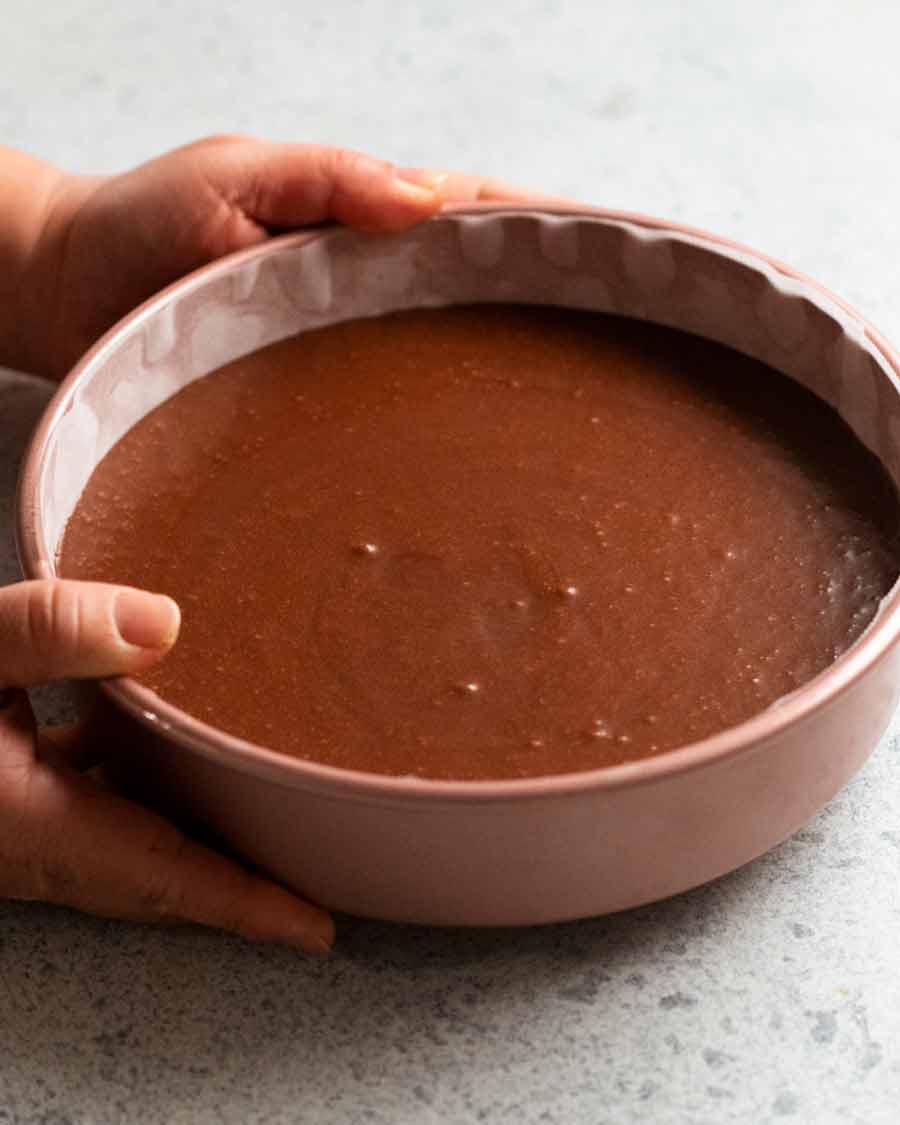
Pour the batter into a lined 20cm/8″ pan. It’s best not to use a springform pan to avoid any chance of batter leakage – because as noted above, the batter is fairly thin.
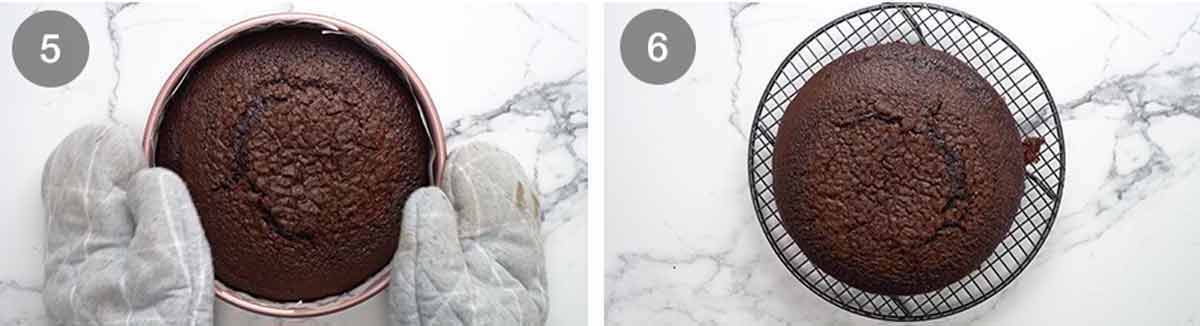
Bake for 40 minutes at 180°C/350°F (160°C fan) or until a toothpick inserted into the centre comes out clean or nearly clean. Remember, we’re making a hot fudge cake here, so it’s fine if the centre is slightly damp!

Cool in the pan for 10 minutes. Then turn it out and let it cool for just another 10 minutes before slicing to serve. Don’t worry, the cake will still be lovely and warm! We just want to rest the cake a bit before slicing. Hot cake is very delicate!
2. Making the hot fudge sauce
While it’s tempting to just put both cold cream and chocolate in a bowl and microwave to melt, this can lead to the chocolate seizing so you end up with a lumpy mess in your hands. Yep, speaking from first hand experience here! Make ganache properly – by pouring hot cream over the chocolate and leaving it to melt before mixing to combine.

Pour hot cream over chocolate – Heat the cream until steamy and hot using whatever method you choose: saucepan or microwave. Then pour it over the chocolate in a bowl.
Full coverage! Shake the bowl / poke as needed to ensure all the chocolate is submerged.
5 minutes – Cover with a plate and leave for 5 minutes so the cream melts the chocolate.
Mix until the cream and chocolate combine into a glossy chocolate sauce. Be patient – it will happen! If you have little chocolate lumps at the end, just pop it in the microwave for 20 seconds for a heat boost, then mix again.
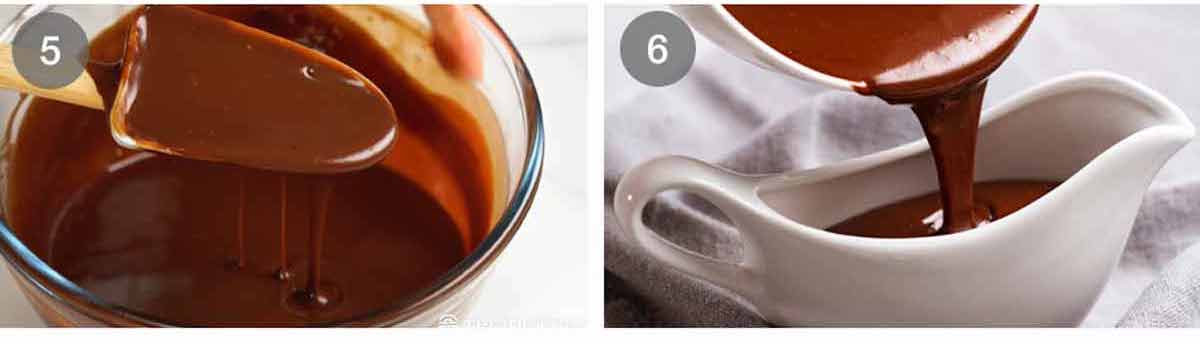
Cool for 20 minutes to let the sauce thicken slightly. Just leave it in the bowl.
Serving – Give it a mix to make it smooth again. Then pour into serving jugs to let everyone help themselves. (Or, if you’re concerned about portion control, you can serve it!).
Reheating and storage – The chocolate sauce will firm up to a peanut butter consistency when refrigerated but can simply be reheated in the microwave back to perfect pourable consistency. It will keep for at least a week – just bear in mind the shelf life of the cream.
3. Serving the hot fudge cake
To serve this gloriously cosy, decadent hot chocolate cake, cut slices of cake as generous as you want. Put on a plate – or a shallow bowl (for easy chocolate-sauce-melted-ice-cream scooping). Top with a scoop of vanilla ice cream then douse with warm chocolate fudge sauce. Dive in and swoon!!
And 10 seconds later…..
Matters of storage
The cake has an excellent shelf life of 5 to 7 days in the fridge. It won’t go stale thanks to the smidge of oil we’re using, and also because it is intended to serve hot. Any baked good heated up wipes out any trace of staleness!
The fudge sauce can also be kept for at least 7 days, limited only by the shelf life of the cream. Keep it in the fridge – it will firm up to a peanut butter like consistency. Scoop out what you need, then just microwave to re-melt.
And PS, in case you’re concerned, there’s plenty of hot fudge sauce for serving. 2 whole cups, that’s 500 ml. Imagine running out of chocolate sauce! Devastating. – Nagi x
Watch how to make it
Hot Chocolate Fudge Cake
Ingredients
Dry:
- 1 cup plain/all-purpose flour (Note 2)
- 1/3 cup cocoa powder (unsweetened), sifted (Note 1)30g
- 3/4 tsp baking powder (Note 2)
- 3/4 tsp baking soda/bi-carb (sifted if lumpy) (Note 2)
- 1 cup caster/superfine sugar (sub ordinary white sugar)
- 1/4 tsp salt
Wet:
- 1 large egg , at room temperature
- 1/2 cup milk , full fat, at room temperature
- 75g / 5 tbsp unsalted butter , melted and cooled slightly
- 1 tbsp oil (canola, veg or other neutral oil) – keeps cake moist for days
- 1 tsp vanilla extract
- 1/2 cup boiling water
Chocolate fudge sauce:
- 1 cup thickened / heavy cream, or pure cream (not low fat, too thin)
- 1 1/4 cups dark chocolate melts or chips (US: semi-sweet chips) – or finely chopped 60 – 70% cocoa chocolate block (Note 3)
Serving:
- Vanilla ice cream
Instructions
- Preheat oven to 180°C/350°F (160°C fan). Grease a 20cm/8" cake pan with butter then line with paper.
- Whisk Dry ingredients in a large bowl.
- Add Wet – Then add all the Wet ingredients EXCEPT the boiling water. Whisk until combined. Then add the boiling water and whisk until smooth. The batter will be pretty thin.
- Bake 40 min – Pour into the pan. Bake for 40 minutes or until a skewer inserted into the centre comes out mostly clean – a faint smear of batter isn't a bad thing, we're making a fudge cake here!
- Cool in the pan for 10 minutes. Invert onto a plate, then onto a cooling rack or plate right side up. Cool for a further 10 minutes – the cake will still be warm for serving.
- Serving – Cut slices of the warm cake. Top with a scoop of ice cream. Douse with fudge sauce – just shy of 1/4 cup per slice (10 slices). Eat and swoon!
Chocolate fudge sauce (makes 2 cups):
- Heat cream until hot, just before boiling point, using your method of choice – saucepan or microwave.
- Stand 5 min – Put chocolate in bowl. Pour over hot cream. Ensure all chocolate is submerged, then cover with a plate. Leave for 5 minutes.
- Mix – Using a whisk or rubber spatula, mix vigorously until the cream and chocolate combine into a silky chocolate sauce.
- Cool to thicken for 20 minutes. Give it a stir then pour into a jug for serving!
Notes
– Just baking soda: use 1 teaspoon in total Self raising flour – Skip both the baking soda and baking powder, switch the plain flour with self raising flour. The crumb won’t rise quite as much but still fluffy and lovely! 3. Chocolate – Use chocolate intended for baking sold in the baking aisle, not eating chocolate (Lindt 70% is the exception). If using a block, chop it finely. Don’t use ordinary eating chocolate – it’s hit and miss. Some will melt fine, others do not. AUSTRALIA: “Melts” are intended for melting so are safest to use. However, chips will melt fine too. US: Semi-sweet chips are perfect for this. 4. Storage – Cake will keep for 5 – 7 days in the fridge (stays moist thanks to a touch of oil). Warm to serve. Fudge sauce will keep for at least a week – factor in the cream shelf life. Firms up in the fridge, just warm to melt. Both the cake and sauce can also be frozen for up to 3 months. Nutrition per serving, assuming 10 servings and all the sauce is consumed. Excludes ice cream.
Nutrition
Life of Dozer
Busted, helping himself to the bin. He’s so gross! 😝 Probably rebelling because he was deprived of chocolate cake. No chocolate for dogs!

The post Hot chocolate fudge cake appeared first on RecipeTin Eats.
]]> Here’s a great beef mince recipe for you that’s quick to make, economical and full of hidden vegetables so it’s a complete meal – Beef Chow Mein! It’s the beef version of everybody’s favourite Chicken Chow Mein, made with the convenience of ground beef. Beef chow mein Here’s something new to try with that packet of... Get the Recipe
The post Beef chow mein – great mince/ground beef recipe! appeared first on RecipeTin Eats.
]]>Here’s a great beef mince recipe for you that’s quick to make, economical and full of hidden vegetables so it’s a complete meal – Beef Chow Mein! It’s the beef version of everybody’s favourite Chicken Chow Mein, made with the convenience of ground beef.
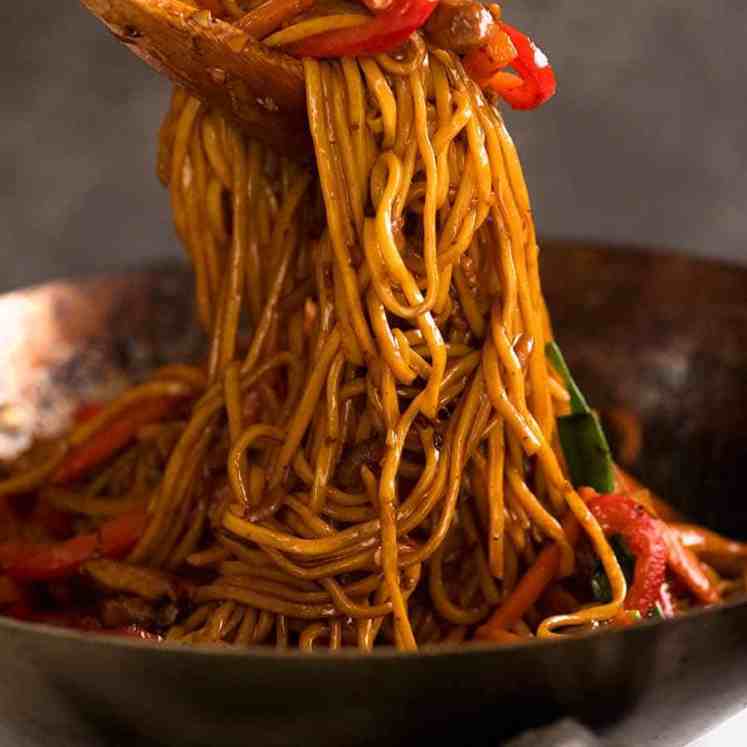
Beef chow mein
Here’s something new to try with that packet of beef mince you throw into your shopping cart every week! The beef is stir fried with chow mein sauce until it’s beautifully caramelised then tossed in a tangle of noodles and vegetables.
A neat trick in today’s recipe is to scramble up an egg with the beef. It makes the beef bits stick to the noodles better, with the added bonus of upping the protein.
Another bonus: chow mein actually has a vast amount of noodle-shaped vegetables hidden in the noodles. A carrot, 2 heaped cups of cabbage and a heaped cup of bean sprouts. That’s a good veg serving for a meal!

What you need
Here’s what you need to make this:
Noodles & add-ins
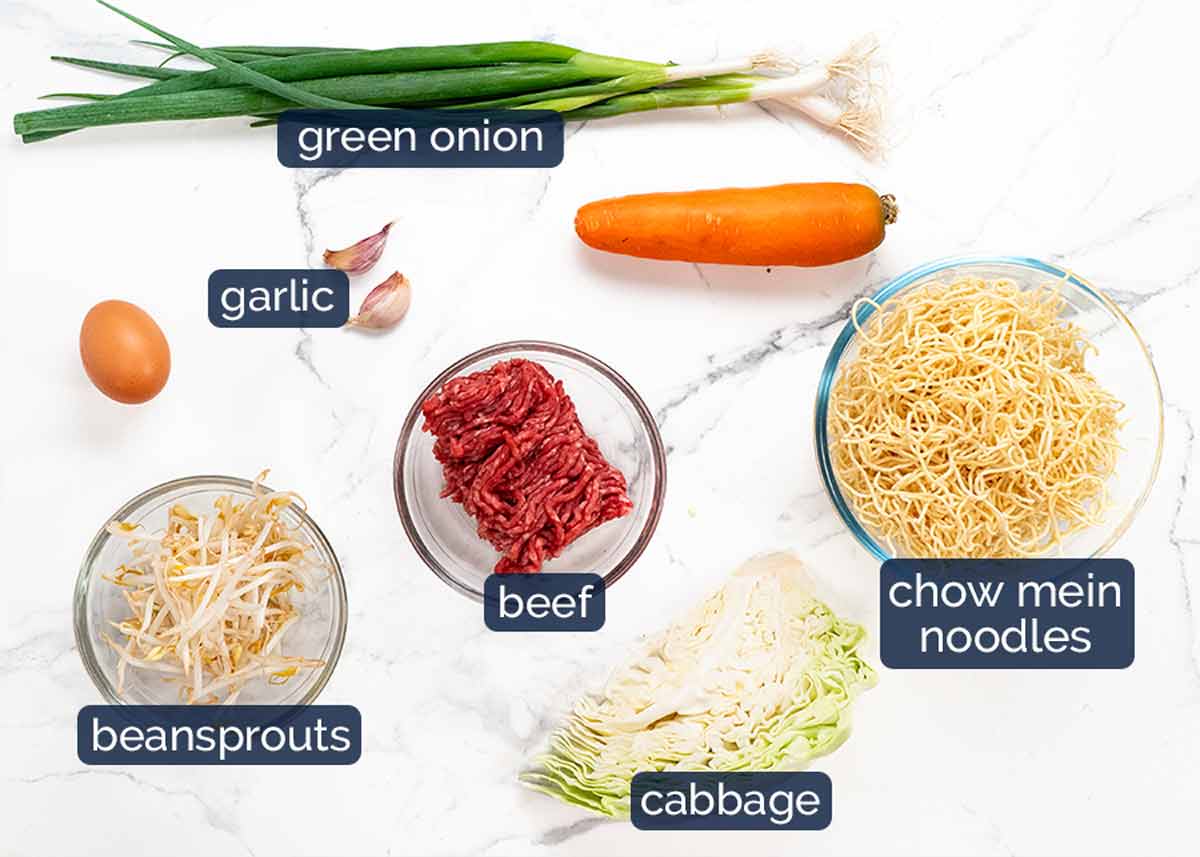
Noodles – Chow mein noodles are sort of dry and crinkly, rather than oily and straight like hokkien noodles, lo mein noodles. But this dish can really be made with any noodles – or even spaghetti (yes really, who’s going to know once tossed in chow mein sauce??). Use the same weight.
Garlic – Rarely do Asian stir fries happen without garlic, and this one is no exception!
Beef mince – That’s ground beef to Americans. Any fat % is fine here though lean beef won’t caramelise quite as well.
Other proteins – Any other mince will work just fine here. Chicken, pork, turkey, even lamb! Though bear in mind the sauce is quite intense flavoured to suit the beefy flavour of beef, so you won’t taste the flavour of white meats through the sauce.
Egg – We use this to scramble into the beef. Neat trick to make the beef stick to the noodles better with the added bonus of a free protein boost!
Green cabbage – Or Chinese cabbage. Finely sliced so it disappears into the tangle of noodles.
Bean sprouts – Excellent grab-and-throw-in vegetable option! STORAGE TIP: Keep bean sprouts in water in an airtight container. Change the water every couple of days. This will increase the shelf life of beansprouts 3x.
Carrot – Cut into thin batons. More noodle shaped vegetables so it all jumbles up together!
Green onion – We use 3 whole stems here. They are the onion in this dish, as well as some fresh green colour.
Chow Mein Sauce
The combination of sauces used in Chow Mein is common in Chinese dishes.
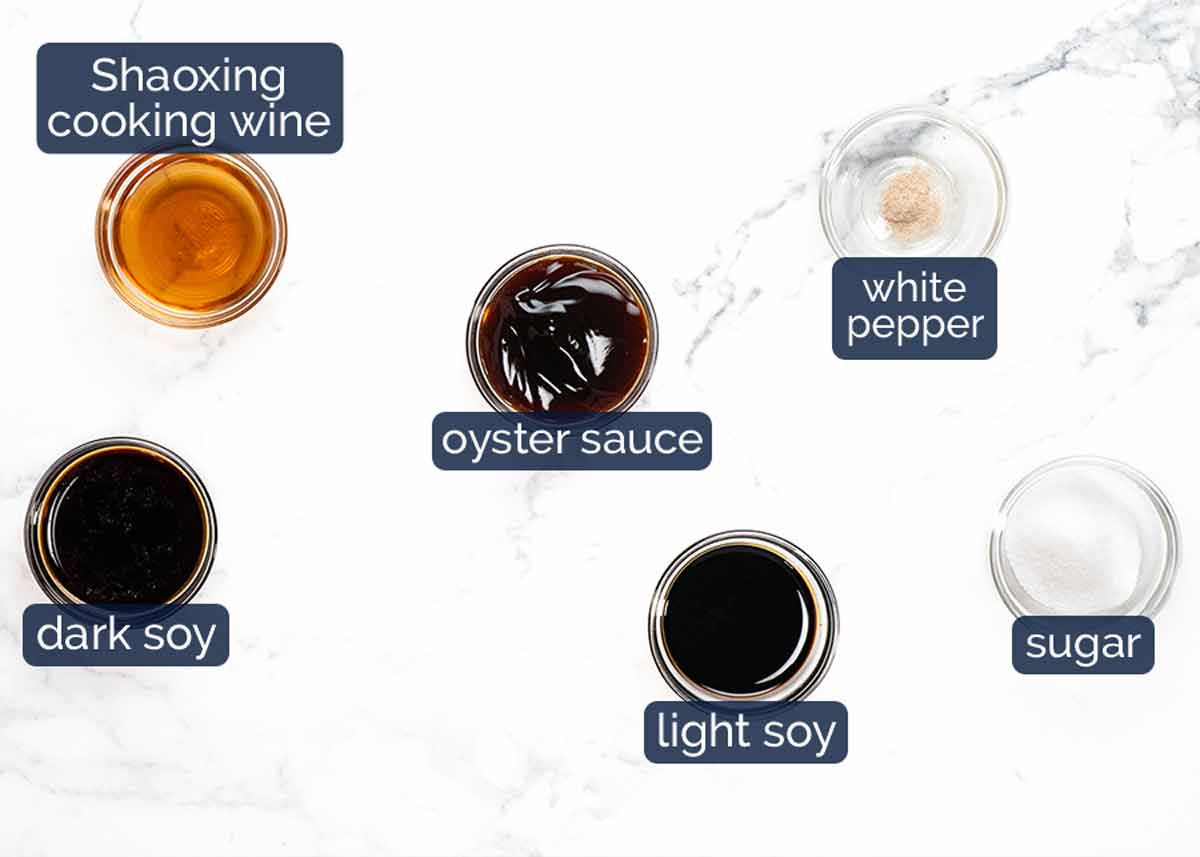
Soy sauces – We’re using both light and dark soy sauce in this recipe. What’s the difference? Dark soy stains the noodles a lovely warm mahogany colour as well as adding soy flavour. Light soy sauce provides the salt without overwhelming with soy flavour, and does not stain the rice.
Substitutions -You can use only light soy sauce or just an all-purpose soy sauce (ie bottle just labelled “soy sauce” without “light” or “dark” in front of it) instead of dark soy sauce. But you cannot use only dark soy sauce as the flavour is too strong! More on different types of soy sauces here.
Oyster sauce – A load of flavour, all in one sauce! It’s sweet and savoury and adds a neat flavour shortcut in dishes. Makes a regular appearance in Asian dishes, from Pad See Ew to Asian Glazed Salmon to Honey Pepper Beef to Supreme Soy Noodles. And Steamed Asian Greens with Oyster Sauce!
Vegetarian oyster sauce is available these days, at Asian stores and some large grocery stores (Australia – there’s Ayam vegetarian oyster sauce at Woolies). Otherwise, hoisin is a good alternative. Slightly different flavour profile (hint of Chinese five spice) but similar savoury / sweetness.
Chinese cooking wine (Shaoxing wine) is an essential ingredient for making truly “restaurant tasting” Chinese dishes. Without it, the dish will be lacking something. Substitute with Mirin, cooking sake or dry sherry.
Non alcoholic sub – sub both the cooking wine and water with low sodium chicken broth/stock.
Cornflour / cornstarch (left out of photo – oops!) – For thickening the sauce so it clings to the noodles. It also makes the sauce lovely and glossy.
White pepper and sugar – For seasoning.
How to make Beef Chow Mein
Be sure to cook the beef well once you add the sauce to get it really nicely caramelised, for a free flavour boost!
1. Sauce & thickener
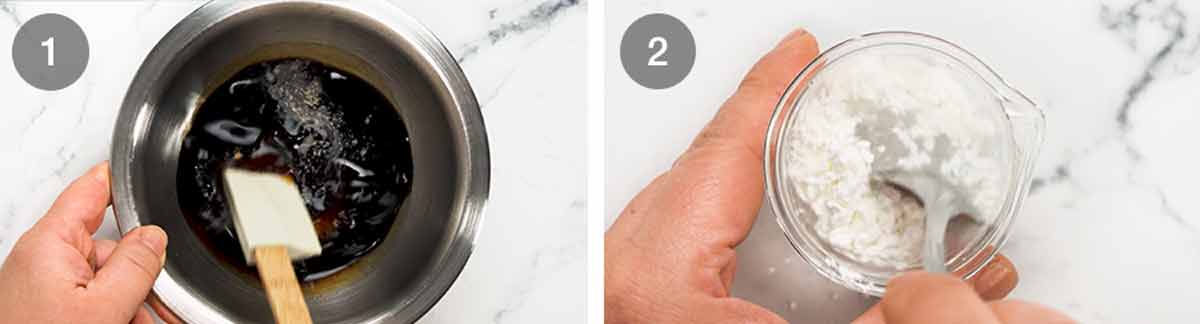
Sauce – Mix the soy sauces, oyster sauce, Chinese cooking wine, sugar and pepper in a small bowl. We’re going to use some to flavour the beef, then we will mix the rest with the sauce thickener (next step) to make the noodle sauce.
Sauce thickener (cornflour slurry) – Mix the cornflour / cornstarch and water in a separate small bowl. This is what thickens the sauce so it coats the noodles, as well as making it shiny and glossy.
2. Making the stir fried noodles

Prepare the noodles per the packet directions then drain. I usually get the water boiling while I’m prepping the vegetables then cook the noodles when I start cooking. The chow mein noodles I get just call for soaking in hot water for 3 minutes. Some brands need to be boiled.
Caramelise beef – Using a large non-stick pan, cook the garlic first to flavour the oil. Then cook the beef, breaking it up as you go, until you can no longer see raw beef.
Then add the white part of the green onions and 1 1/2 tablespoons of the Sauce. We add the white part of the green onions first as it takes longer than the green part. Cook for another 2 minutes to get the beef nicely caramelised.
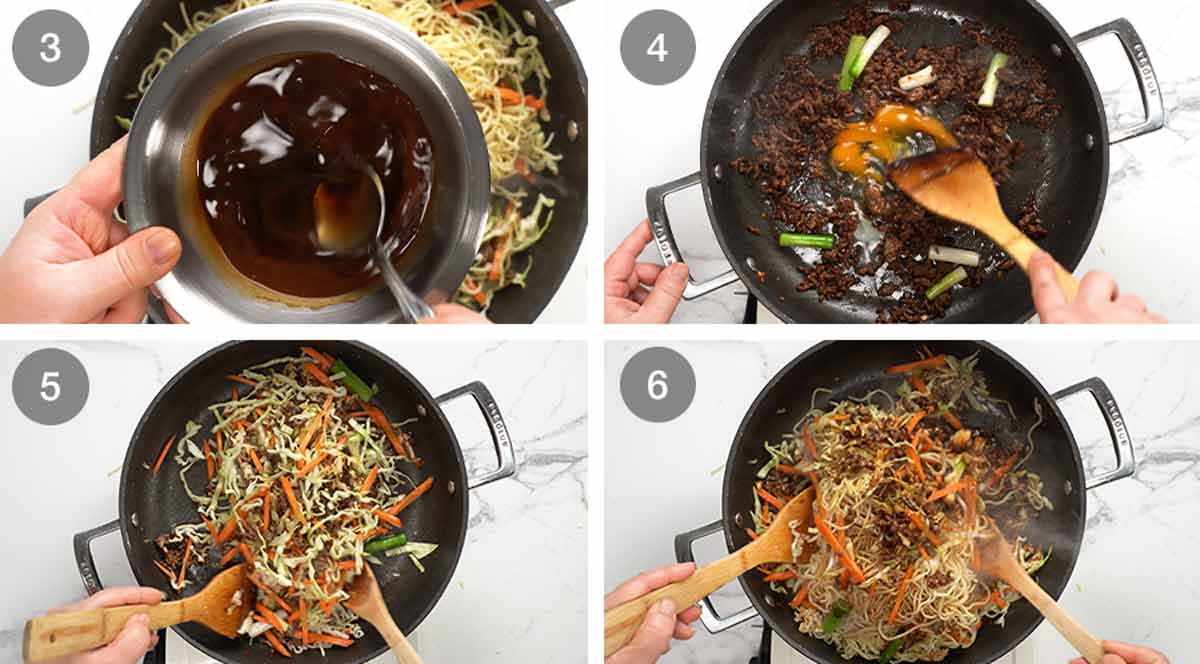
Finish sauce – Meanwhile, mix the cornflour slurry into the remaining sauce.
Scramble egg – Add the egg into the pan then mix it through the beef, it will sort of scramble into the mixture. This is what makes beef stick to the noodles better!
Keep cooking! – When the egg is mostly cooked, add the carrot and cabbage. Cook for 1 minute until cabbage starts to wilt.
Sauce & noodles – Give the sauce a quick mix. Add the bean sprouts, noodles and sauce into the pan. Toss well for 1 minute or until sauce is dispersed through the noodles. Add green part of green onions. Toss for another 1 minute, then serve!

So there you go! Stir fried noodles for dinner, relatively low effort and quick to make. Great way to get a noodle fix, very economical, and highly versatile – switch out the vegetables and proteins with what you’ve got or what you love.
Enjoy! – Nagi x
Watch how to make it

Beef Chow Mein – great beef mince noodle recipe!
Ingredients
Chow Mein:
- 200g/ 7 oz chow mein noodles , or other thin yellow egg noodles or 3 ramen cakes (Note 1)
- 1 1/2 tbsp canola oil
- 2 garlic cloves , finely minced
- 200g/ 7 oz beef mince / ground beef (any fat %)
- 3 green onion stems , cut into 5cm/2″ lengths, white and green parts separated
- 1 egg
- 2 cups green cabbage , finely sliced (or Chinese cabbage)
- 1 carrot , peeled, cut into thin batons
- 1 heaped cups bean sprouts (~ 75g / 2 1/2 oz) (Note 5 – storage tip)
Chow Mein Sauce:
- 1 1/2 tbsp light soy sauce or all-purpose soy sauce (Note 2)
- 1 1/2 tsp dark soy sauce (Note 2)
- 1 1/2 tbsp oyster sauce (Note 3)
- 1 1/2 tbsp Chinese cooking wine (Shaoxing) (Note 4)
- 1 1/2 tsp white sugar
- Pinch white pepper
Sauce thickener:
- 1 1/2 tsp cornflour / cornstarch
- 3 tbsp water
Instructions
- Sauce – Mix ingredients in a small bowl then set aside. Some is used to flavour the beef, then the rest for the noodles.
- Sauce thickener (cornflour slurry) – Mix the cornflour / cornstarch and water in a separate small bowl.
- Prepare noodles per packet directions then drain.
- Cook beef – Heat the oil in a large non-stick pan over high heat. Cook garlic for 10 seconds, then add the beef and cook until you can no longer see pink. Add 1 1/2 tablespoons of the Sauce and the white part of the green onions. Cook for another 2 minutes to get the beef nicely caramelised.
- Finish sauce – Mix the cornflour slurry into the remaining sauce.
- Egg – Add the egg into the pan then mix it through the beef, it will sort of scramble. Egg makes the beef stick to the noodles better!
- Cabbage & carrot – When the egg is mostly cooked, add the carrot and cabbage. Cook for 1 minute until cabbage starts to wilt.
- Sauce & noodles – Give the sauce a quick mix. Add the bean sprouts, noodles and sauce into the pan. Toss well for 1 minute or until sauce is dispersed through the noodles. Add green part of green onions. Toss for another 1 minute.
- Serve – Divide between bowls and serve!
Notes
Nutrition
My noodle life


Life of Dozer
Visited our old stomping ground on the weekend – Bayview dog beach! Plenty of Dozer smiles that morning. 🥰

The post Beef chow mein – great mince/ground beef recipe! appeared first on RecipeTin Eats.
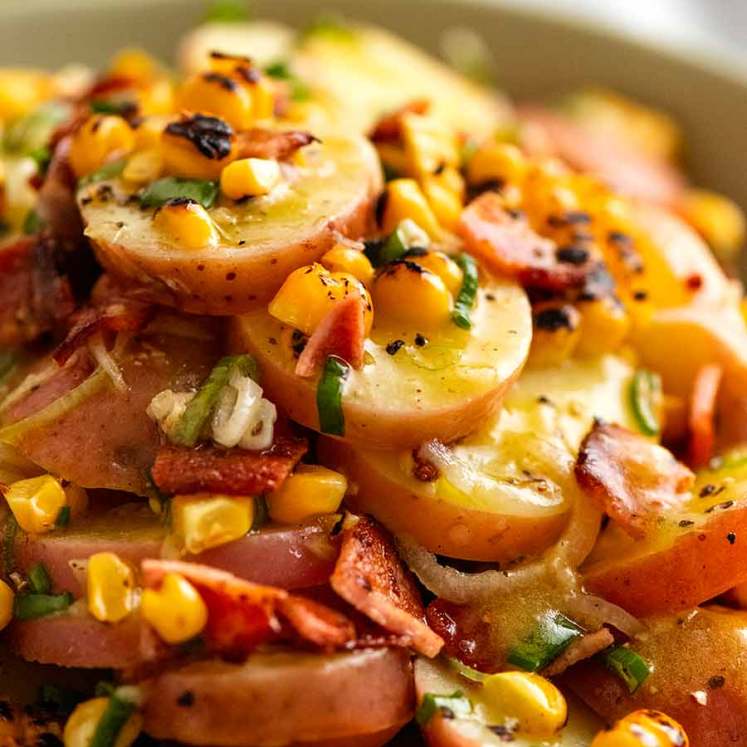
]]> The best potato salad is made by dousing hot potatoes with French Dressing so they take in the flavour before tossing in a creamy dressing. Complete with essential add-ins: bacon, cucumber and celery. Every bite is perfection! Prefer no mayo? Try German Potato Salad, Red Potato Salad with Charred Corn, Lemon Potato Salad and Wickedly... Get the Recipe
The post The Best Potato Salad appeared first on RecipeTin Eats.
]]>The best potato salad is made by dousing hot potatoes with French Dressing so they take in the flavour before tossing in a creamy dressing. Complete with essential add-ins: bacon, cucumber and celery. Every bite is perfection!
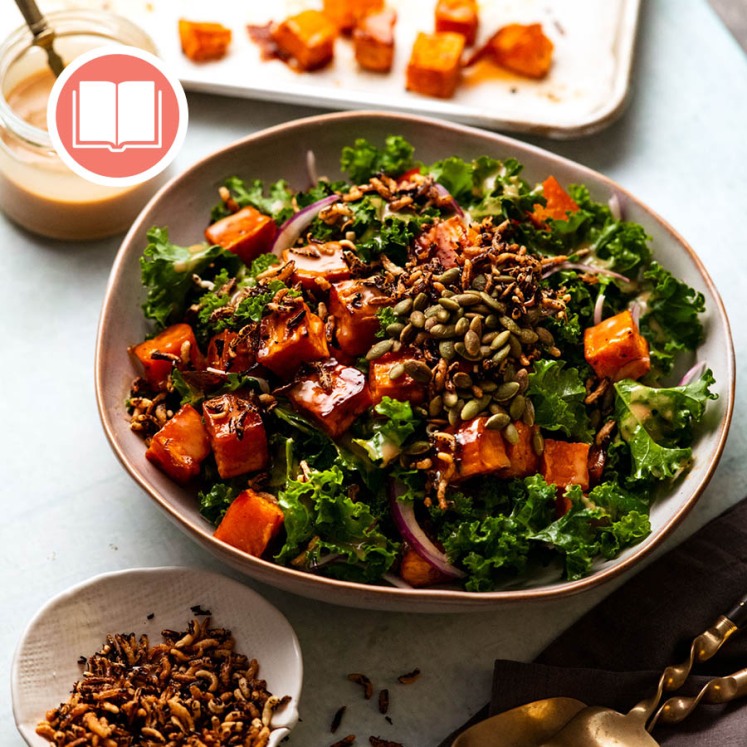
Prefer no mayo? Try German Potato Salad, Red Potato Salad with Charred Corn, Lemon Potato Salad and Wickedly Delish Sweet Potato Salad.
A Potato Salad you’ll make again and again…
This is a potato salad recipe given to me by the mother of a friend. To respect her privacy, let’s call her Mrs B.
The very first time I heard how Mrs B makes her potato salad, I instantly knew that this was one that would stand out from the crowd of thousands – millions – of potato salad recipes “out there” in the world wide web.
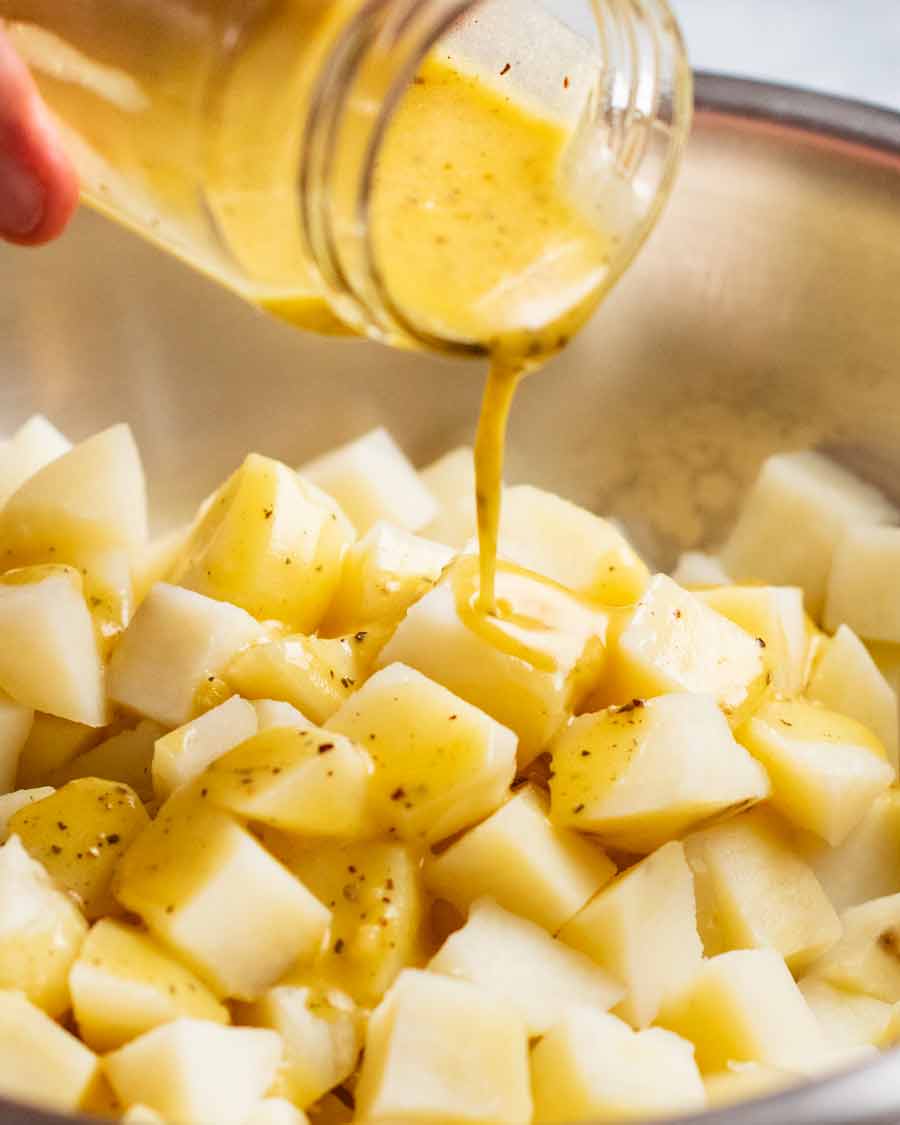
The thing that makes it so special is pouring French Salad Dressing over the hot boiled potatoes. By dressing while hot, they absorb the French Salad Dressing flavour rather than just coating them. Which means, flavour inside the potatoes not just on the outside.
Combined with the creamy sour cream-mayonnaise dressing, salty bacon, and fresh bursts of celery, cucumber and onion, every mouthful is the perfect bite!

Plenty of dressing….but not overly greasy
The other thing I really like about this potato salad is the dressing. While I love a creamy dressing, I find using only mayonnaise too greasy. But I also don’t want to skimp on dressing. There’s nothing worse than a dry potato salad!
The solution: break up the richness of mayonnaise by combining with sour cream. I use a 50/50 ratio.
The addition of tang and hint of zing from a dab of Horseradish Cream also helps to cut through the richness. It’s optional but adds an extra little something-something to it.
And don’t forget, all this mingles together with the French Dressing the potatoes are soaked in!
After a creamy no-mayo version? Try this Creamy Yogurt Potato Salad Dressing – it’s terrific!

Ingredients for the Best Potato Salad
Here’s what you need to make the best potato salad on the block!
The potatoes and add-ins
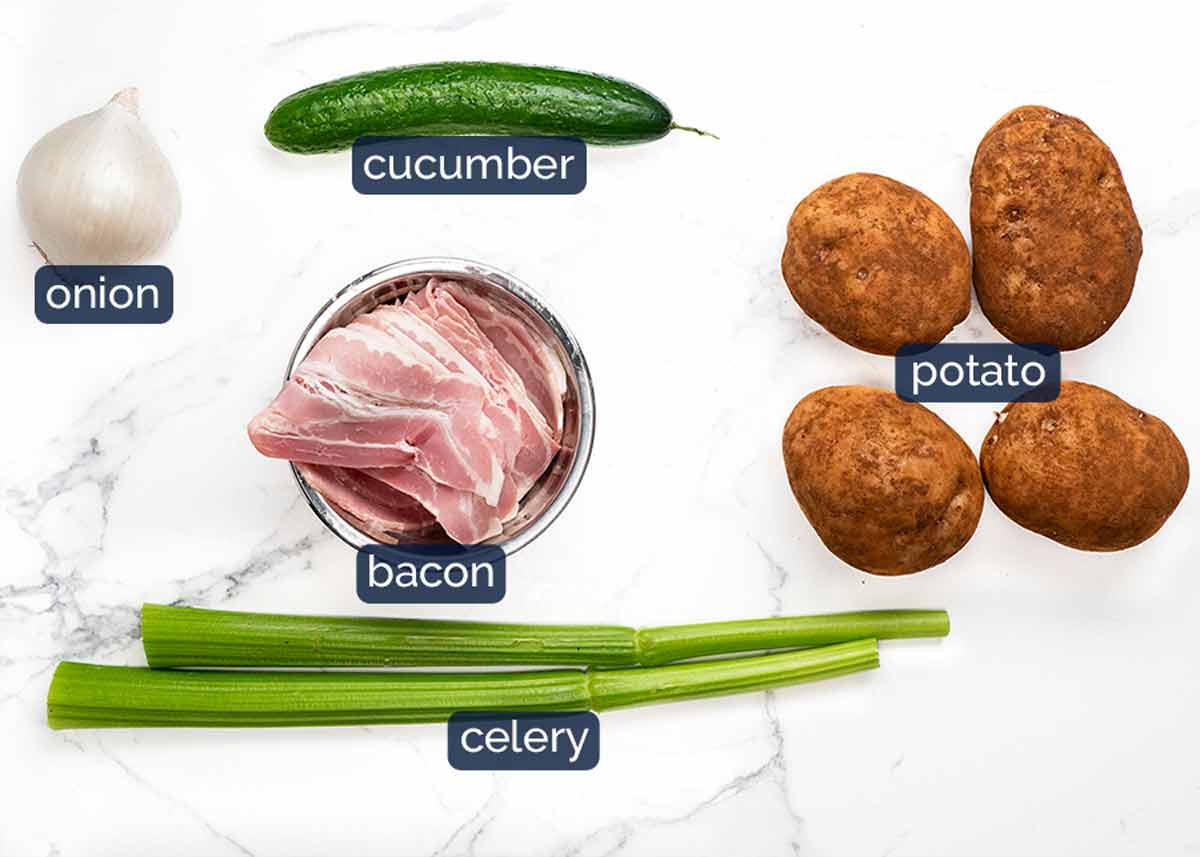
Potatoes – Potatoes vary widely in texture when cooked. For potato salad, I like to use starchy (floury) and all-rounder potatoes which become soft and fluffy when cooked and are a sponge to absorb the French dressing. The edges of the potato cubes mash up a bit when tossed with the dressing (nobody wants sharp-edged cubes in their potato salad!) and the surface becomes a little ragged so the creamy dressing clings to every surface
Starchy/all-rounder potato types:
– Australia: Sebago (dirt-brushed common potatoes), Coliban (white skin potatoes common at supermarkets)
– US: Russet, Idaho and Yukon gold
– UK: Maris Piper, King Edward, and RussetWaxy potatoes, on the other hand, do not absorb flavour nearly as well and have a firmer texture when cooked. While the potato cubes will hold their shape more perfectly when cooked with sharp cut edges, the surface is slippery so the dressing doesn’t adhere to it as well.
Celery and cucumber – Welcome freshness! The celery is sliced finely so you get soft crunch but it becomes floppy rather than stiff sprigs sticking out. And the cucumber is finely diced rather than the typical slicing so you get great soft juicy little crunchy pops. Love!
Raw onion (finely minced) – This cuts through the creaminess of the dressing and adds great subtle fresh flavour into the whole salad. The fact that it’s finely minced rather than just chopped or sliced helps – better dispersion throughout the whole salad plus you get the juiciness too. It kind of takes the place of garlic which I put in “everything” but is a little harsh in this particular potato salad.
Bacon – Essential for a classic potato salad!
Dressing 1: The French Dressing
This is the dressing the hot potatoes soak up! The original recipe shared with me by Mrs B used store bought French Dressing which is an option. However, I just make my own – here’s all you need:

White wine vinegar – The classic vinegar used for French dressing but can be substituted with apple cider vinegar, sherry or champagne vinegar (last resort: plain white vinegar).
Olive oil is the oil of choice. The better the quality, the better the flavour!
Dijon mustard – For flavour and thickening.
Water – Missing from the photo!
I use just 1 tablespoon of water to stretch out the dressing, rather than more oil (simply for health reasons).Garlic – flavour!
Sugar – Just a touch, which takes the edge off the tang a bit too.
Dressing 2: The creamy dressing!
As noted right up front, I like my potato salad nice and creamy but I find just using mayonnaise is overly heavy. So I use a 50/50 sour cream/mayo combination.
(Reminder – mayo free version here!)
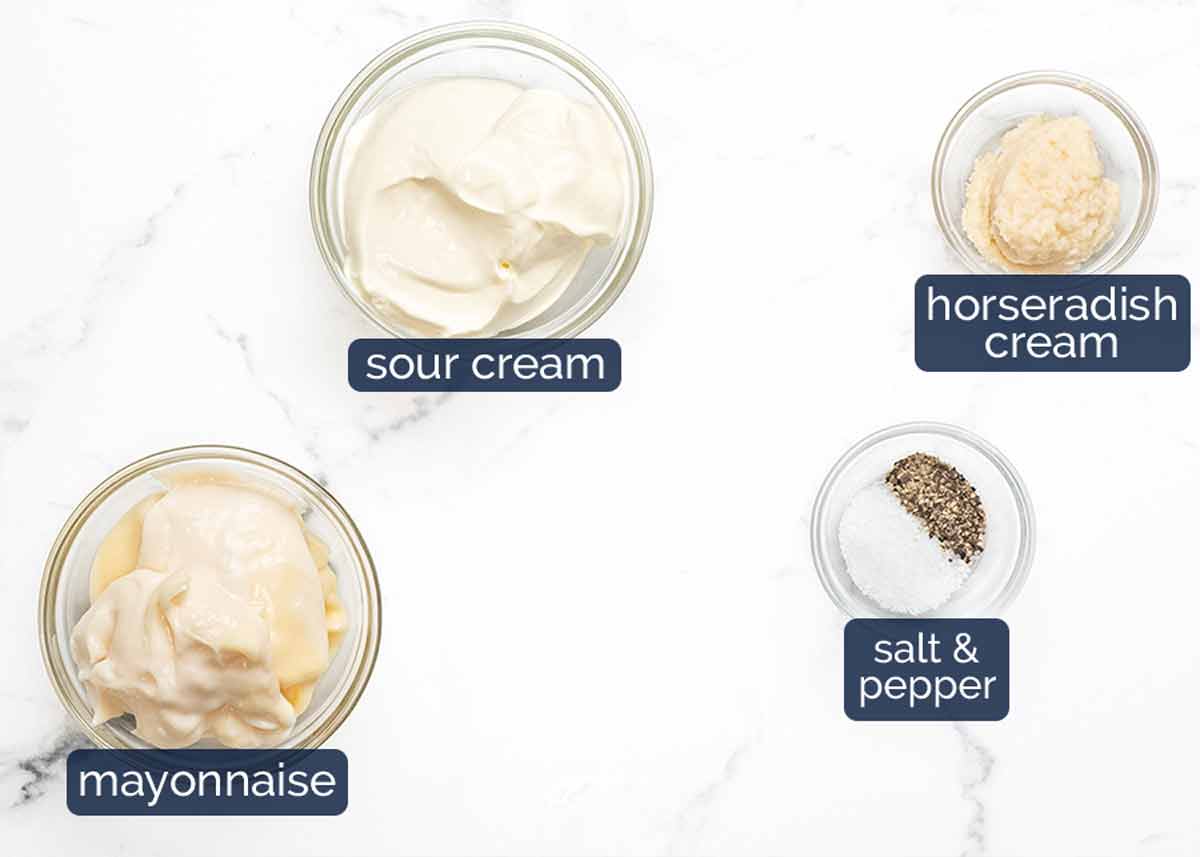
Mayonnaise – Whole egg mayo is best as it is creamier and less tangy than ordinary mayonnaise. Readily available these days in grocery stores (it will say “whole egg mayo” on the label).
Sour cream – Full fat please! Yogurt can be used as a substitute but sour cream does have a creamier mouthfeel.
Horseradish cream – This is pickled fresh horseradish which has a zingy spiciness like wasabi. Because it’s pickled, it is vinegary. So this adds both a hint of spicy warmth and tang to the dressing.
If you’re lucky enough to have fresh horseradish, use half the amount and add a couple of teaspoons of vinegar.
How to make potato salad
IMPORTANT! Creamy potato salads really are better made with starchy potatoes for texture and flavour, but you really need to take care not to overcook else they will crumble too much when tossing. Waxy potatoes would be easier to use because they hold their shape….but the eating part is not as good! I’ve done a lot of potato salad eating in my time to arrive at this conclusion.
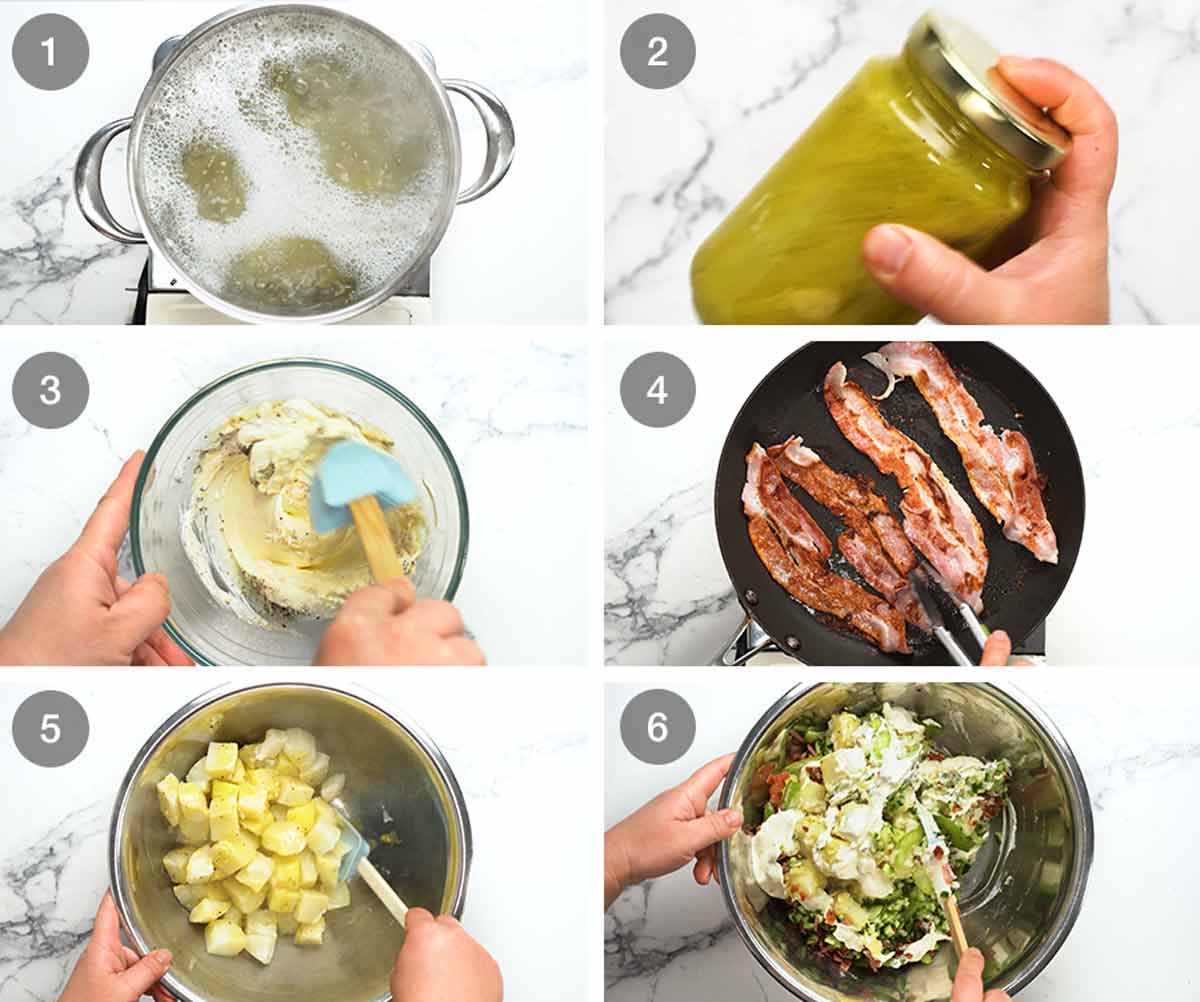
Start in cold water – Cook cut potatoes starting in cold water. Never start potatoes in boiling water else they will cook too much on the outside before the inside cooks and crumble when tossed!
Check frequently – Once the water comes up to the boil, start checking at 4 minutes and every 30 seconds thereafter. As soon as you can pierce a potato with almost no resistance, drain immediately. They will continue cooking with the residual heat.
French Dressing – Shake French Dressing ingredients in a jar until combined.
Creamy Dressing – Mix the ingredients in a bowl until smooth.
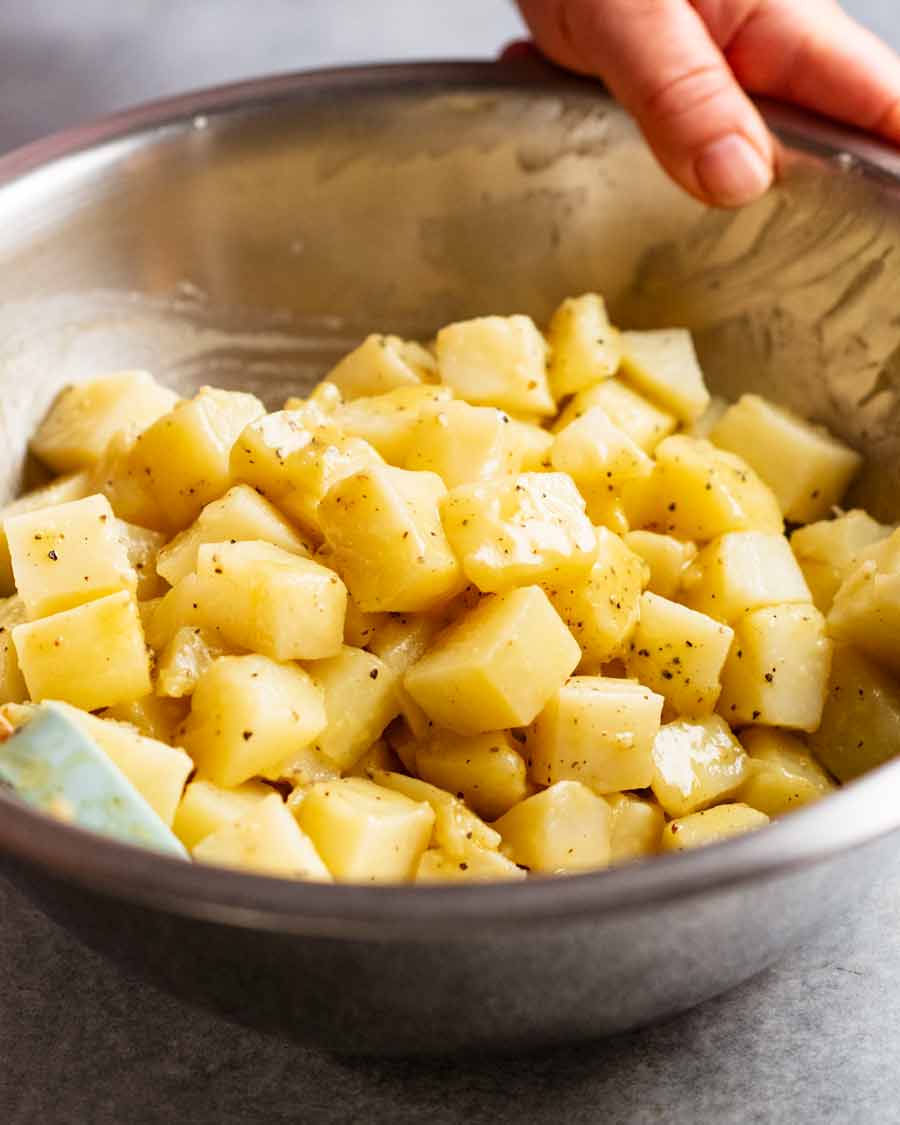
Soak hot potatoes – Gently transfer the potatoes in a bowl and pour over the French Dressing. Toss very gently using a rubber spatula. Minimum tosses just to coat, then set aside for at least 2 hours for the potatoes to cool and absorb the dressing. We are essentially marinating the potatoes here. You know this is going to be good!
The cooled potatoes are also less fragile less susceptible to breaking when we mix with the remaining ingredients.
Add-ins – Add the cucumber, celery, onion, most of the bacon and all the creamy dressing. Toss gently until mixed through. If time permits, set aside for a few hours or better yet overnight, to let the flavours meld together. But honestly, even if you serve it straight away, it will still be the best potato salad of your life!

Proof of excellence
This potato salad will last 4 to 5 days in the fridge, and it just gets better with time. Make it once, and it will be a staple at all gatherings for years to come. I have never strayed from this recipe since the moment I tried it!
And as final proof of how great this potato salad is, even my mother who is a die-hard Japanese Potato Salad devotee couldn’t stop eating this. That’s just about the highest praise you can get.
Thank you Mrs B! – Nagi x
Watch how to make it

The best Potato Salad
Ingredients
Potato Salad
- 1 kg / 2 lb potatoes peeled and cut into 2cm/ 3/4" cubes (Aus – Sebago, Colban; US – Russet, Idaho Yukon; UK – Maris Piper, King Edward) (Note 1)
- 2 tsp cooking / kosher salt , for cooking potatoes
- 250g / 8oz streaky bacon
- 1/2 cup French Dressing – homemade (below) or store bought (Note 2)
- 3/4 cup cucumber, finely diced (1 x 15cm/6" cucumber, cut lengthwise and remove watery seeds first)
- 1 cups celery, finely sliced diagonally (~ 2 ribs)
- 1/4 cup white onion, finely minced , ~ 1/2 onion (Note 3)
Potato Salad Dressing
- 1/3 cup mayonnaise , preferably whole-egg
- 1/3 cup sour cream , full fat (sub yogurt)
- 1 tbsp horseradish cream (or horseradish relish) (Note 4)
- 1/2 tsp cooking / kosher salt
- 1/4 tsp black pepper
French Dressing (essential! Note 2)
- 1 tbsp dijon mustard
- 2 tbsp white wine vinegar (sub apple cider vinegar)
- 1/4 cup extra virgin olive oil
- 1 tbsp water (for volume, rather than more oil)
- 1/2 tsp white sugar
- 1/2 garlic clove , finely grated or minced
- 1/2 tsp salt
- 1/4 tsp black pepper
Instructions
- French Dressing – Shake ingredients in a jar until well combined.
- Cook potatoes (CAREFUL! Note 5) – Put potatoes and 2 teaspoon salt in a large pot of cold water. Turn the stove on. Once the water is simmering, cook for 4 minutes or until the potatoes are JUST cooked (still bit firm in the middle) – they will keep cooking with residual heat. Drain immediately (gently!).
- Douse hot potatoes! Carefully transfer potatoes into a large bowl and pour over French Dressing. Gently toss to coat then set aside for 2 hours so potatoes absorb the dressing and cool (less fragile).
- Crispy bacon – Lay half the bacon in a cold non-stick pan. Turn onto medium high and cook until golden (the fat will melt as the pan warms up so it cooks in its own fat). Turn and cook the other side until golden. Drain paper towels, repeat with remaining bacon. Once cool and crisp, chop into small pieces.
- Creamy Dressing – Mix ingredients in a bowl until combined.
- Toss – Add creamy dressing, celery, cucumber, onion, and most of the bacon. Toss gently to combine.
- Serving – Serve garnished with remaining bacon. If time permits, I recommend setting aside for a few hours, or even better, overnight, to give the flavours a chance to meld. But still amazing served straight away! Always serve at room temperature, not fridge cold.
Notes
Nutrition
Originally published August 2014. This is such a staple recipe in my life, I had to re-publish it with a video, sparkling new photos and of course add a Life of Dozer section!!
The potato salad family


Summer salads I love


Life of Dozer
I was at the Good Food & Wine Show in Sydney on the weekend! JB and I were doing a cooking show on stage and book signings/meet ‘n greets.
The Fun Police (council) wouldn’t let Dozer into a food show. So I took the next best thing – a life size cardboard cut out. We’re getting a lot of mileage out of 2D Dozer! 😂


The post The Best Potato Salad appeared first on RecipeTin Eats.
]]>