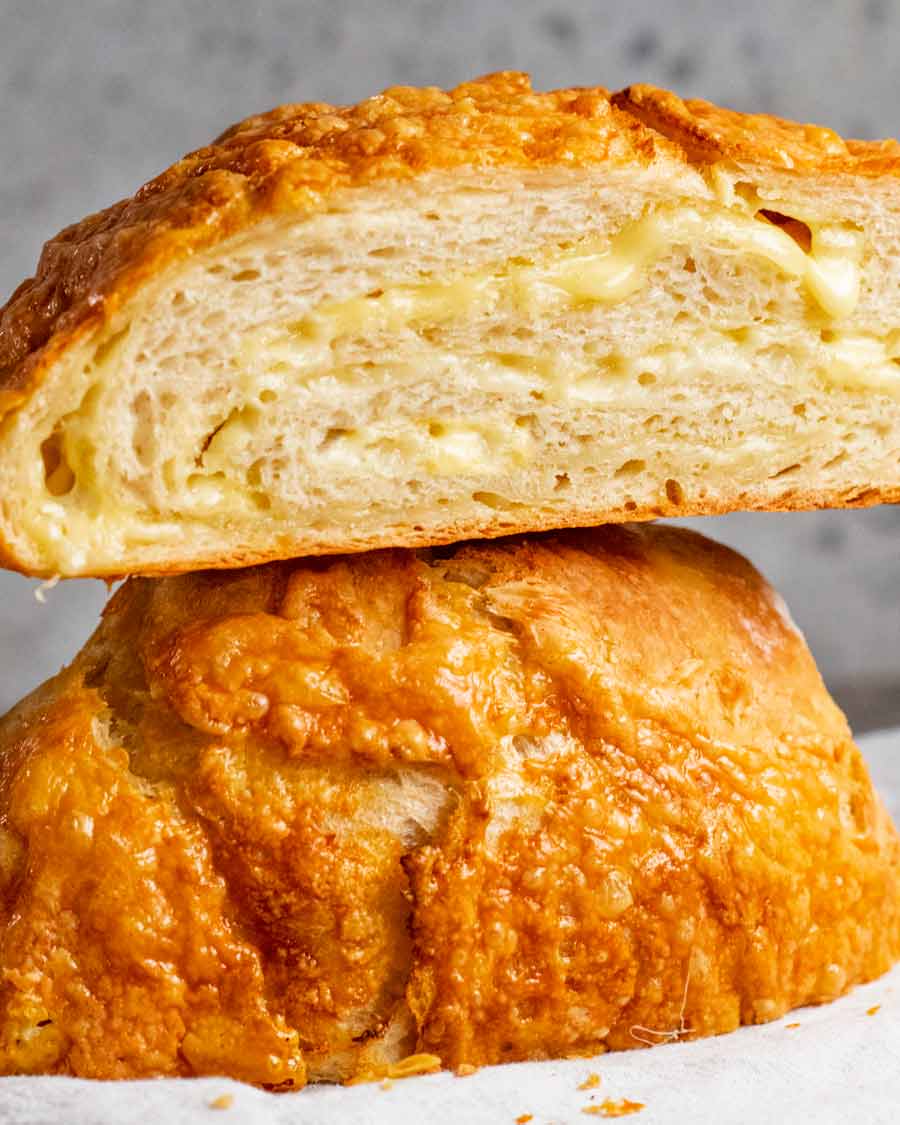
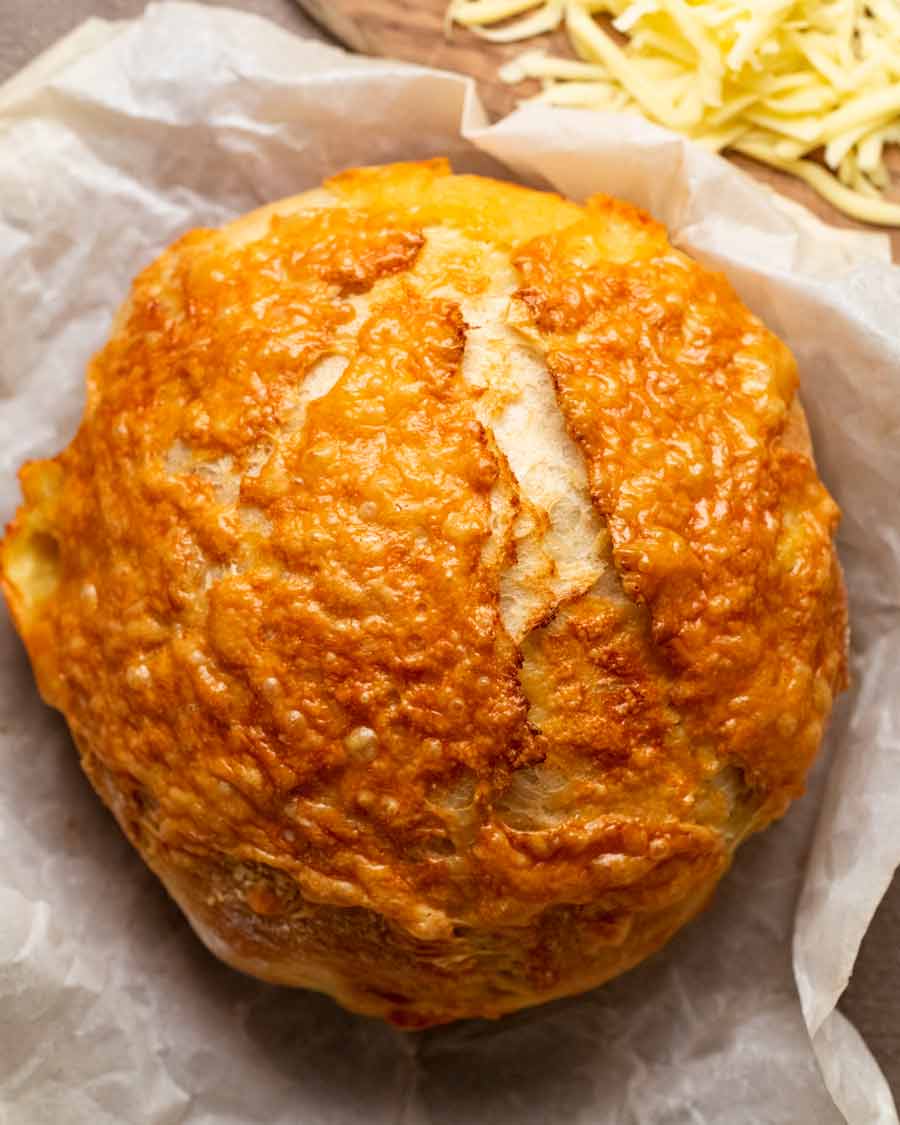
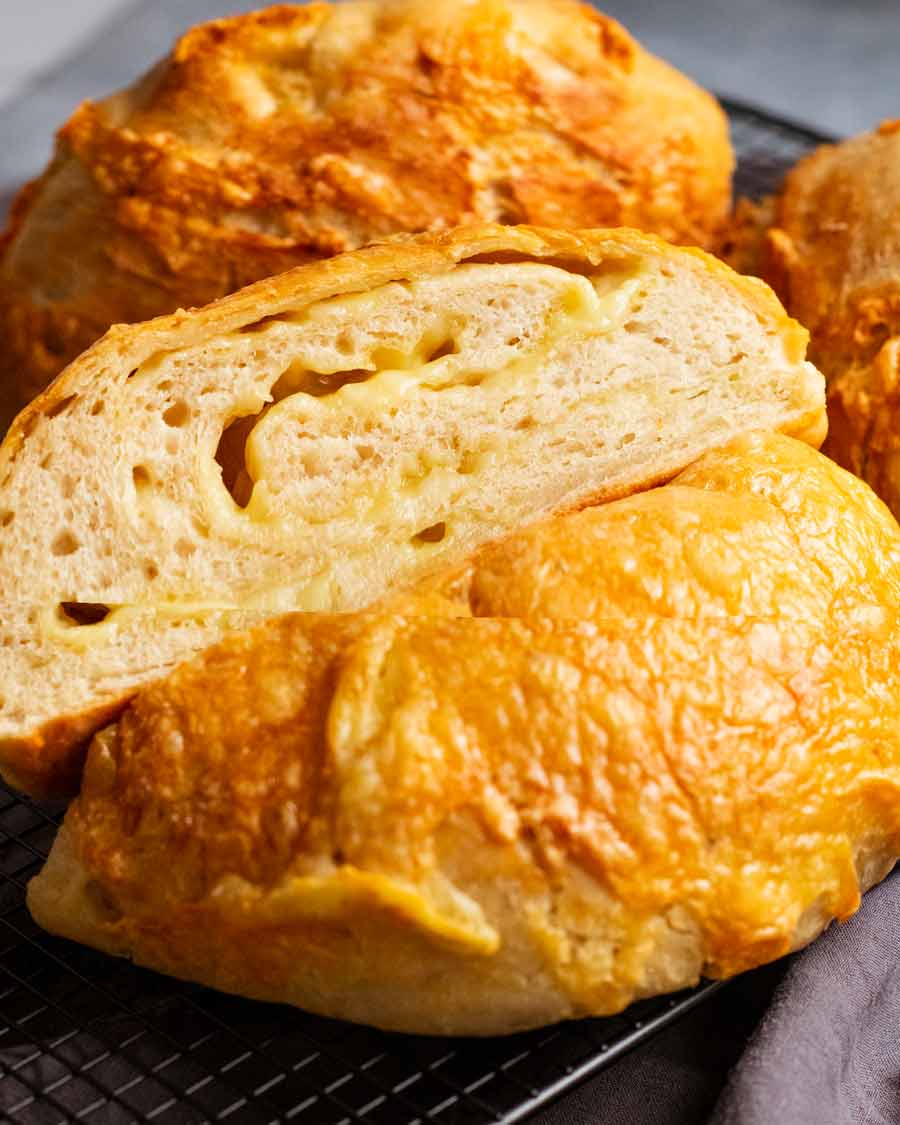
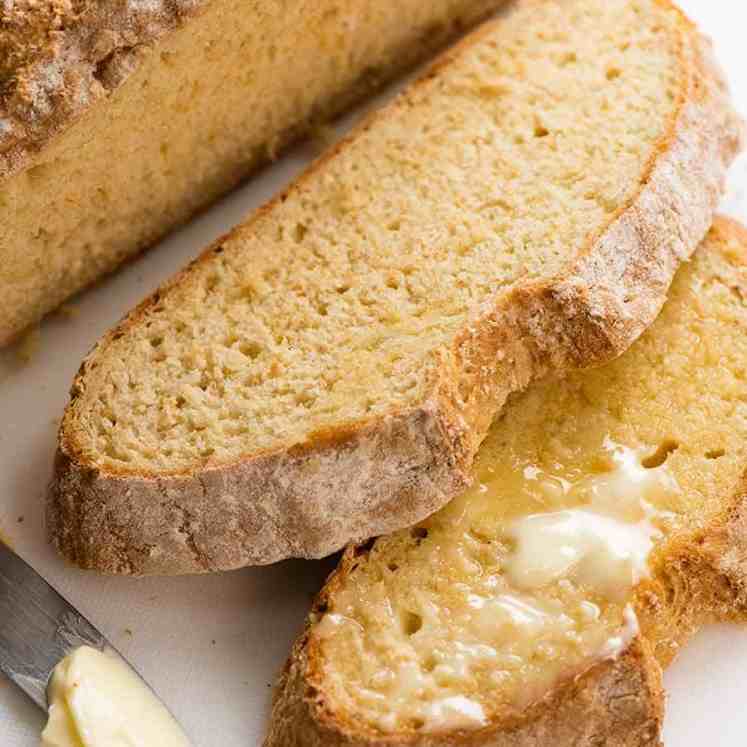
 Swirls of cheese, an insanely golden crispy cheese crust, and soft fluffy crumb. This cheese bread is every cheese-loving carb-monsters’ dream come true! A very easy, no-knead bread recipe based on the beloved No-Knead Crusty Artisan Bread – are you ready for this??! Cheese Bread This is a bread you’d struggle to buy. Because I... Get the Recipe
The post Cheese Bread (no knead!) appeared first on RecipeTin Eats.
]]>Swirls of cheese, an insanely golden crispy cheese crust, and soft fluffy crumb. This cheese bread is every cheese-loving carb-monsters’ dream come true! A very easy, no-knead bread recipe based on the beloved No-Knead Crusty Artisan Bread – are you ready for this??!
Cheese Bread
This is a bread you’d struggle to buy. Because I just can’t see any bakery cramming in as much cheese as I do. 250g – that’s half a pound! For un-missable cheese flavour.
Indulgent? Excessive? Perhaps.
But if I’m going to make a cheese bread, I want to do it right! None of this wimpy barely-there sprinkle of cheese on just the surface. I’d rather just make a plain loaf of bread and make a cheese toastie!
About this no-knead bread business
This gorgeous loaf is made using a no-knead bread dough that has been read over 7 million times since I published it in 2020. It’s tried and tested miracle recipe (thank you New York Times!) that’s easy enough for beginners yet seasoned bread enthusiasts appreciate its Artisan qualities.
Here’s how it goes down:
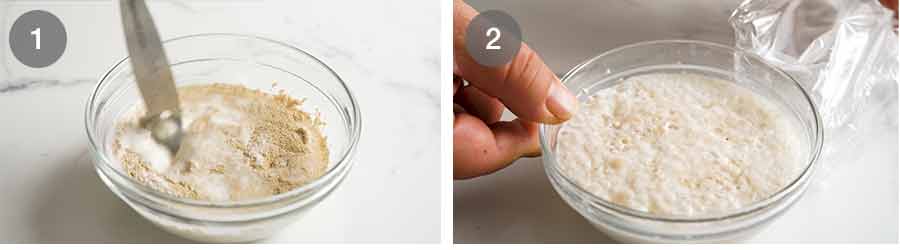
Mix flour, yeast, salt and water with a wooden spoon (10 seconds).
Leave to double in volume (1 to 3 hours).
Fold in cheese, shape in a round (5 minutes).
Bake (40 minutes). Eat (30 seconds).
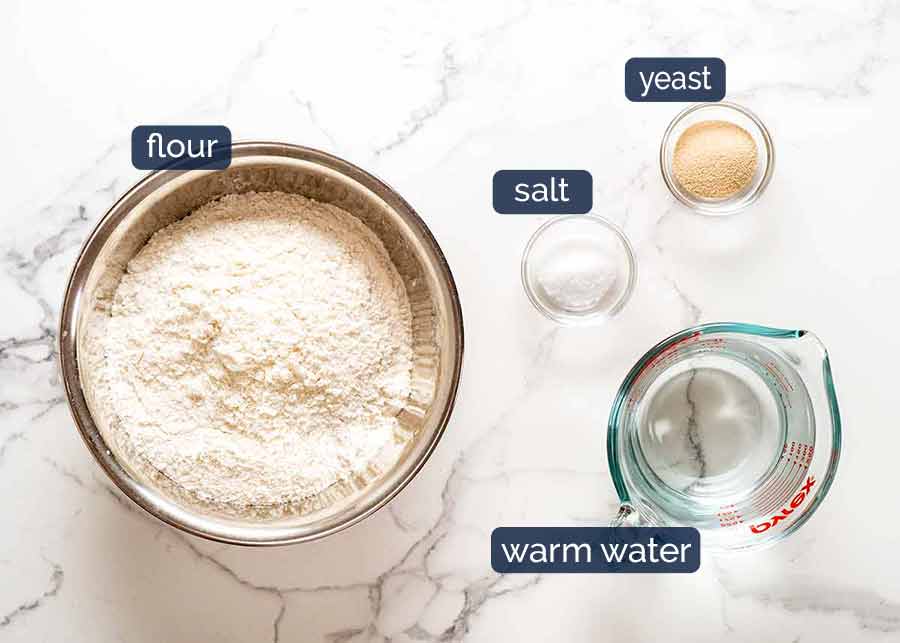
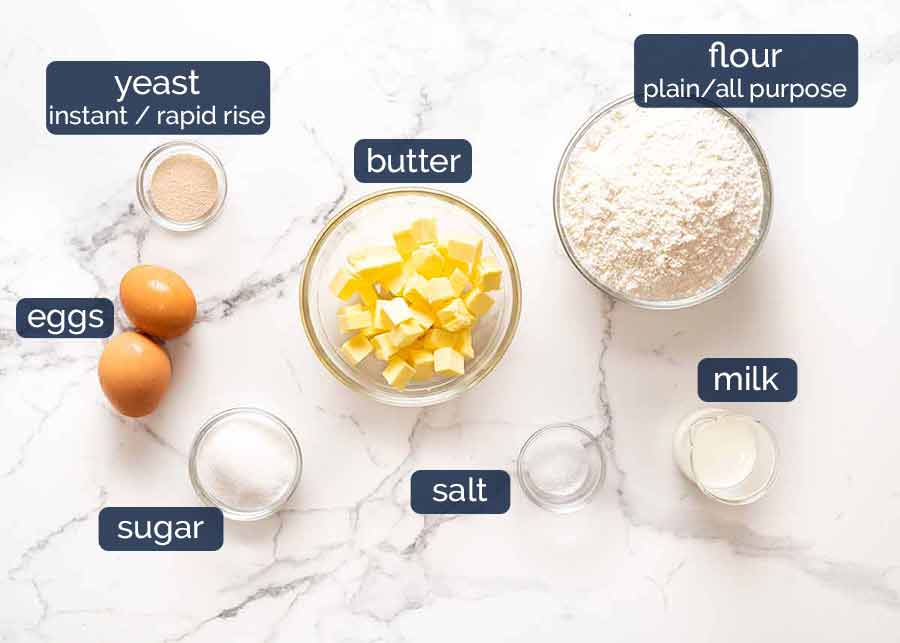
Ingredients
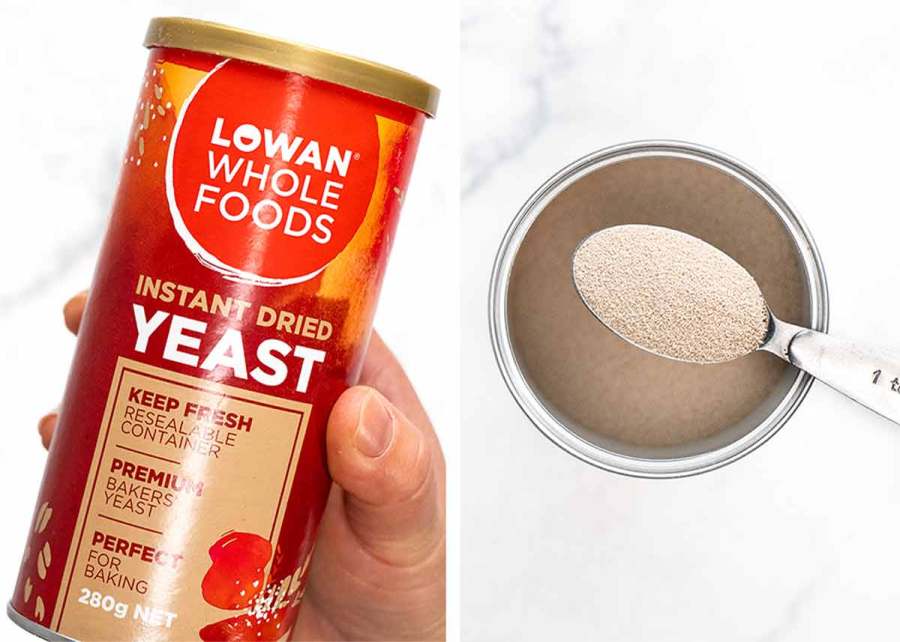
Here’s what you need to make this – yeast, flour, salt, water and cheese. Yep, really, that’s it!
For the bread dough
Bread flour is best, if you can – Use bread flour if you can. Bread flour has more protein in it than normal flour which means more gluten, and this makes the dough more elastic and yields a more fluffy yet chewy texture inside the bread, just like the (pricey!) artisan bread you get from your favourite bakery.
However, this bread is still fantastic made with plain/all-purpose flour. Put it this way – I wouldn’t make a special trip just to get bread flour if I have a hankering for this right now. But I would go and get it if I was making this for company!
Instant yeast – The base recipe calls for Instant Yeast (aka Rapid Rise yeast) which does not need to be dissolved in water and left to foam. You can also use normal yeast (“Active Dry Yeast” or just “dry yeast”) – you just need to change the order of the steps and dissolve the yeast in water first. The bread will come out the same!
The cheese
I use Colby but you can use (almost) any meltable cheese you want (thoughts below). But I really urge you to:
Don’t skimp on quantity. I use a whole 250g/8oz (2 1/2 packed cups) in this bread. The early versions started with 1 cup, then just creeping up and up. For full-on unmissable OMG cheese flavour, 250g/8z is the amount to use! (In case you’re curious, I did creep up a little more but it started to weight the bread down. Cheese greediness backfired!)
Shred your own cheese. Store bought cheese is chunkier (so it weighs the bread down and won’t rise as well) and doesn’t melt because it is coated with anti-caking agents. For the best cheese ribbons and best cheese crust, grate your own! (But, in the event of a Cheese Bread emergency – and it can happen – packet shredded cheese will do).
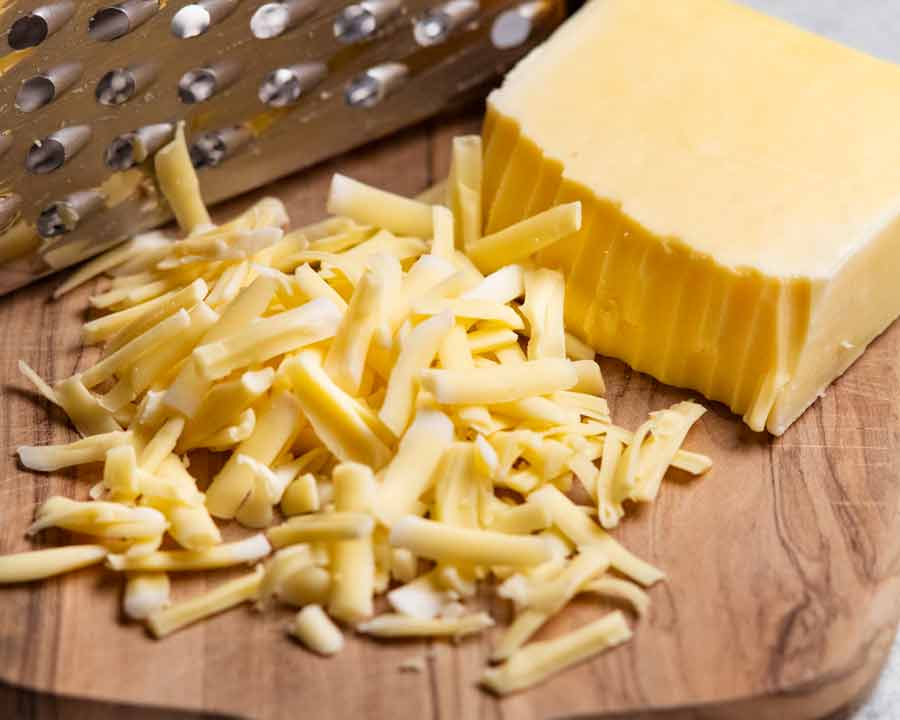
I use Colby – I like using Colby because it melts “softly” so it kind of melds into the bread crumb beautifully without weighing it down or bleeding oil. It also bakes up beautifully golden on the crust. For a premium version, I use gruyere. But it makes this considerably pricier!
Other cheese – Any cheese (other than mozzarella) that melts well will work great here, like cheddar, tasty, Monterey Jack, gruyere. I like Colby for it’s melting qualities and it doesn’t weigh the bread down as it rises in the oven, and it’s not greasy (like Tasty cheese). Re: mozzarella – it will work fine but it doesn’t have enough flavour in it compared to other cheeses.
How to make this No-Knead Cheese Bread
Heads up – There’s a lot of detailed information in this section to give bread first timers the confidence to make this. For experienced bread makers, this recipe is a cinch so I suggest you skip straight to the recipe or recipe video. 
For those familiar with the beloved no-knead Crusty Artisan Bread – the method is the same except with cheese folded in and piled on top!
1. The no-knead bread dough
Dump everything in a bowl and mix. No kneading!
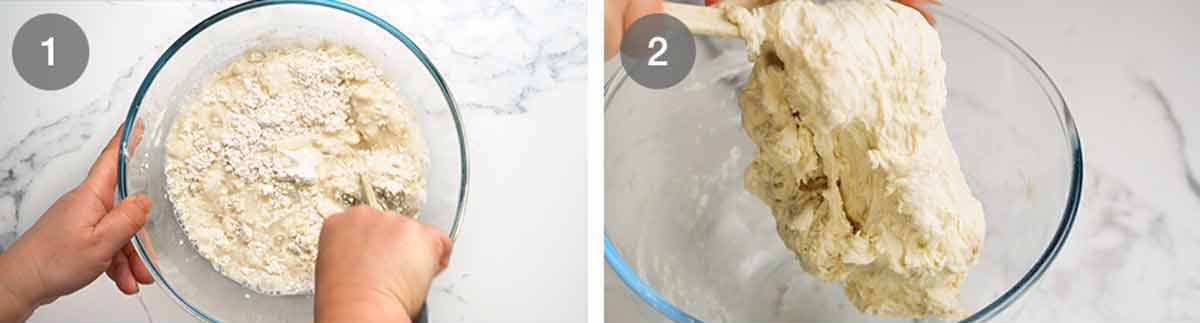
Shaggy dough – Using a rubber spatula, mix flour, salt and yeast in a large bowl. Add water, then mix using the handle of the spatula until you can no longer see flour.
Why the handle of the rubber spatula? Kind of mimics the dough hook of stand mixers. Less surface area to wipe gummy dough off.
Dough consistency – It should be too sticky to knead by hand, but not pourable like cake batter (see video at X seconds).
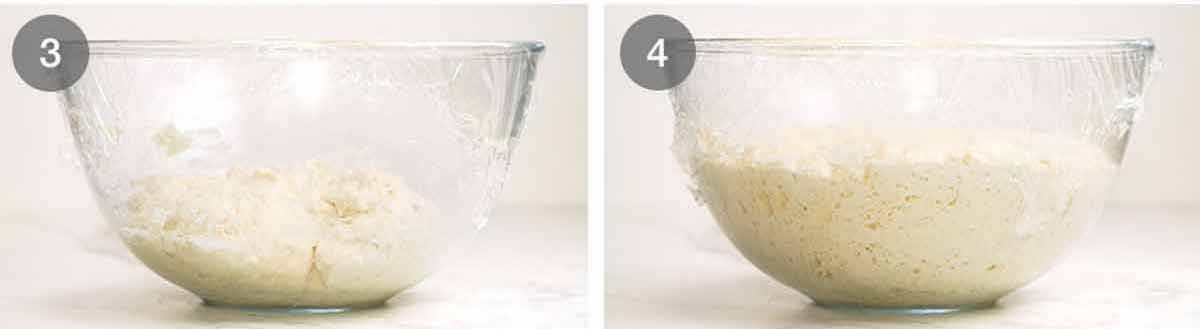
Rise – Cover with cling wrap and leave to rise in a warm place for 1 to 2 hours until the dough doubles in volume. The surface should be bubbly, and the mixture should jiggle when you shake the bowl.
What’s a warm place? 25°C/77°F+. Warmer = faster rise. Avoid direct sunlight, it dries out the surface of the dough. In winter, I sit the bowl next to a heater. In summer, anywhere in the house! TIP – your dryer Run it (empty) for a few minutes. Put bowl in, shut door. Nice and warm inside = perfect draught free dough rising location!
The proofed dough (ie rising the dough) – Aim for around double for the best bread rising. If it rises too much (eg triple) or not enough, then the bread will not rise enough or will collapse.
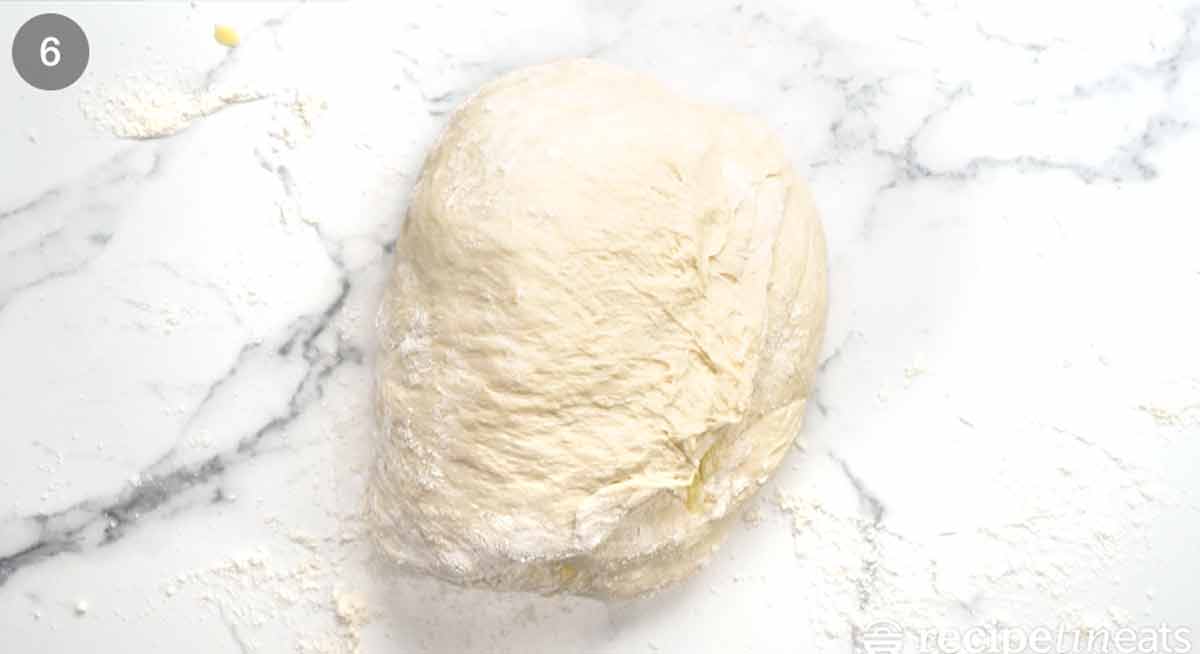
Dough, done – and you didn’t even get your hands dirty! Onto shaping, cheesing and baking.
2. Shaping and cheesing
This section is wordy. But in practice, it’s straight forward. You’ll see in the recipe video!
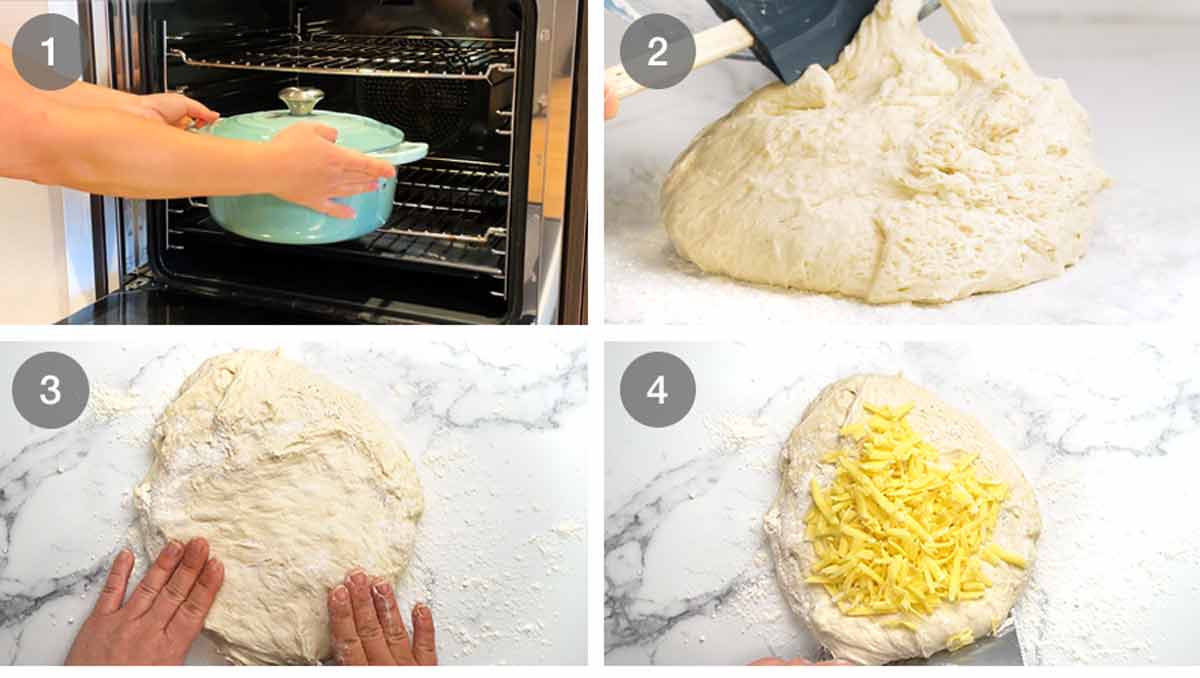
Pre-heat pot – 30 minutes before the dough is ready, put a 24-28cm / 4.5-8 quart heavy based pot with a lid in the oven. Then preheat the oven to preheat to 240°C/450°F (220°C fan-forced). We want that pot hot!
Curious why a hot pot? Read the Q&A in the No-Knead Crusty Artisan Bread. No dutch oven? That’s ok! Use a pan of water in the oven instead. Instructions in recipe notes.
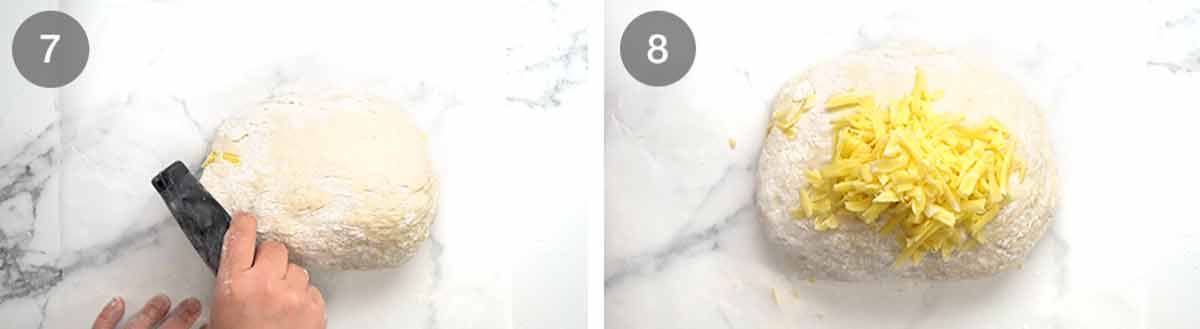
Scrape dough out – Sprinkle a 30cm/12″ area with ~1 tablespoon flour. Scrape the dough out onto the flour using the rubber spatula.
Shape into disc – Sprinkle the surface with 1 teaspoon flour so you can pat it down into an approximate 20cm/8″ disc without the dough getting stuck all over your hands. No need to be meticulous about a perfect shape or size, just approximate is fine.
Cheese it – Set aside 1/3 of the cheese for topping. Cover surface with half the remaining cheese, leaving a 2cm/3/4″ border.
Folding the cheese inside the loaf
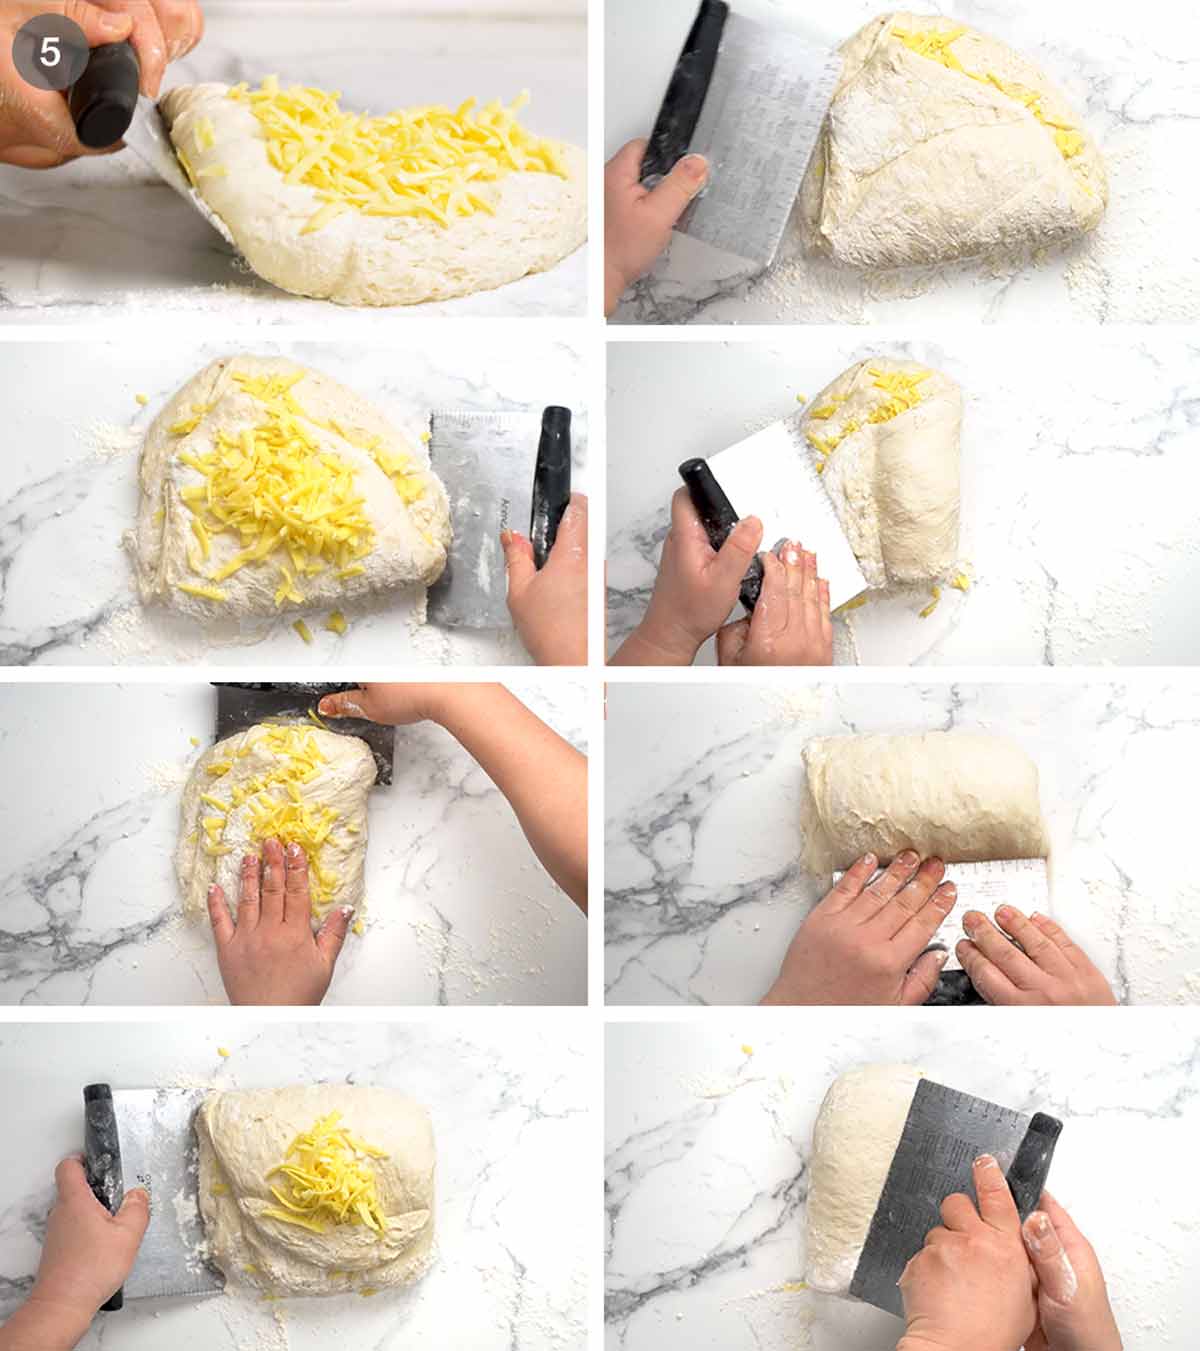
Fold inwards – Using a dough scraper or anything of similar shape (cake server, large knife, spatula), fold the sides inwards 4 times to roughly form a roundish shape. Sprinkle the scraper as needed to stop the dough from sticking to it.
Cheese each layer – After each fold, top the naked dough with some of the remaining cheese, but keep the final layer cheese-free as this will be the base of the bread.
Wonky is fine! Don’t worry about the shape at this stage. The purpose of the folding steps is to deflate the air bubbles in the dough and bury the cheese inside the bread.
Paper transfer – Place a 40cm/16″ sheet of baking/parchment paper next to the dough then flip it onto the paper so the seamside is (mostly) facedown.
Tidy the shape roughly, using the dough scraper, into an even round or oval shape. Don’t bother being too fastidious here because no matter what shape the dough is, it always expands and rises into a perfect round shape, as dictated by the pot.
Cheese crown – Pile the reserved cheese on. It piles up high. Such a satisfying vision!
Baking time!
3. Baking (& eating)
Unlike the bread shaping, this part is delightfully short to explain in words!
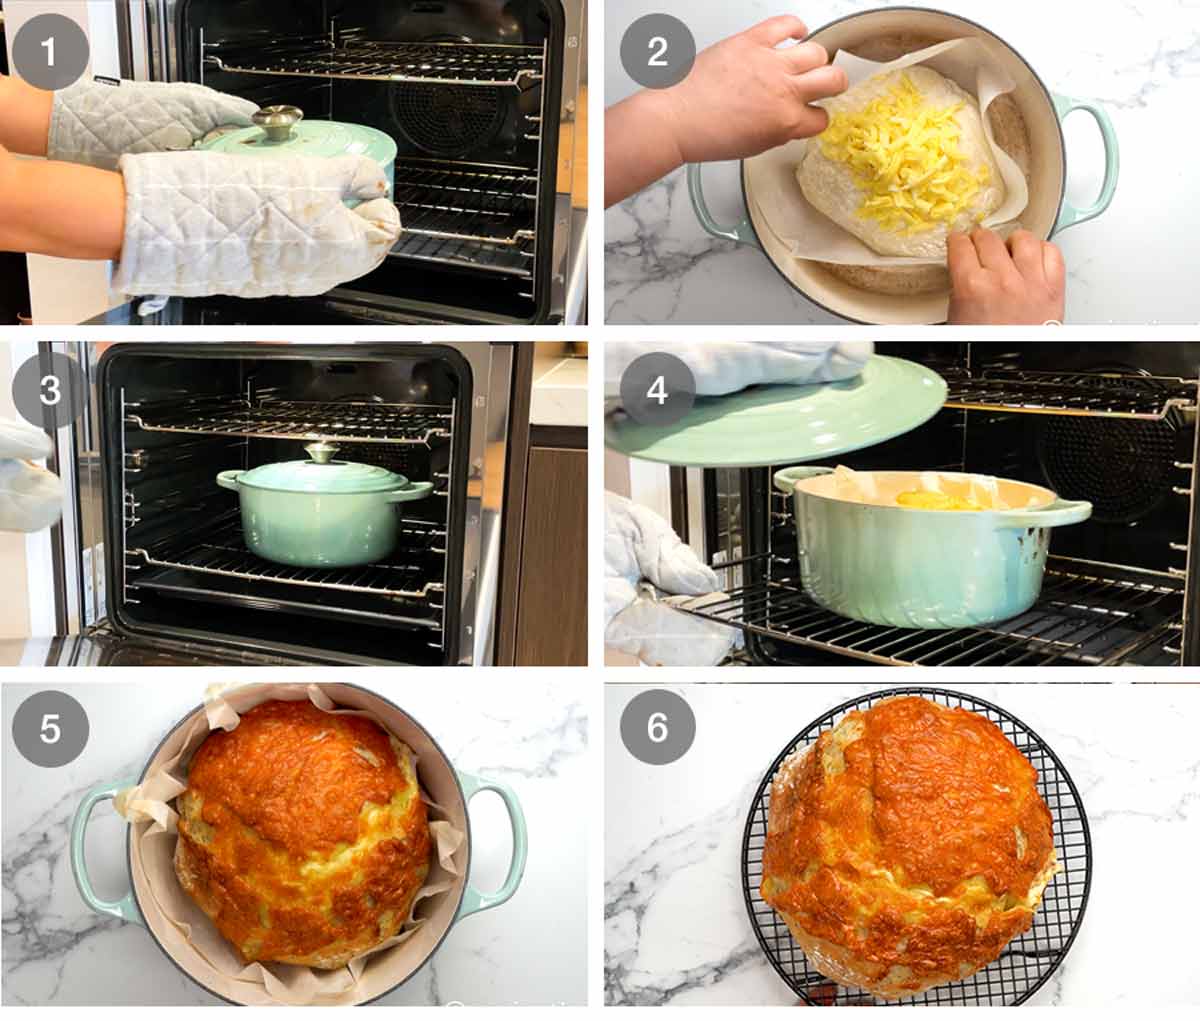
Take out hot pot – Remove hot pot from the oven.
Transfer dough – Hold the paper to transfer dough into the pot, keeping it on the paper. Put lid on.
35 minutes covered – Bake 35 minutes with the lid on.
10 minutes uncovered – Remove lid. Bake uncovered for 10 minutes to colour the surface.
Transfer to cooling rack – Remove pot from oven. Use paper overhang to transfer bread onto a cooling rack. Slide paper out from underneath.
Rest for at least 10 minutes before slicing. Resting is important for breads! In this step, the inside finishes cooking and dries out. If you’re impatient and cut bread straight out of the inside, the inside will smear like it’s uncooked dough – even if it’s not. Yep, been there, done that. Patience is not my virtue – and I get punished for it!
Now, it’s time to EAT!
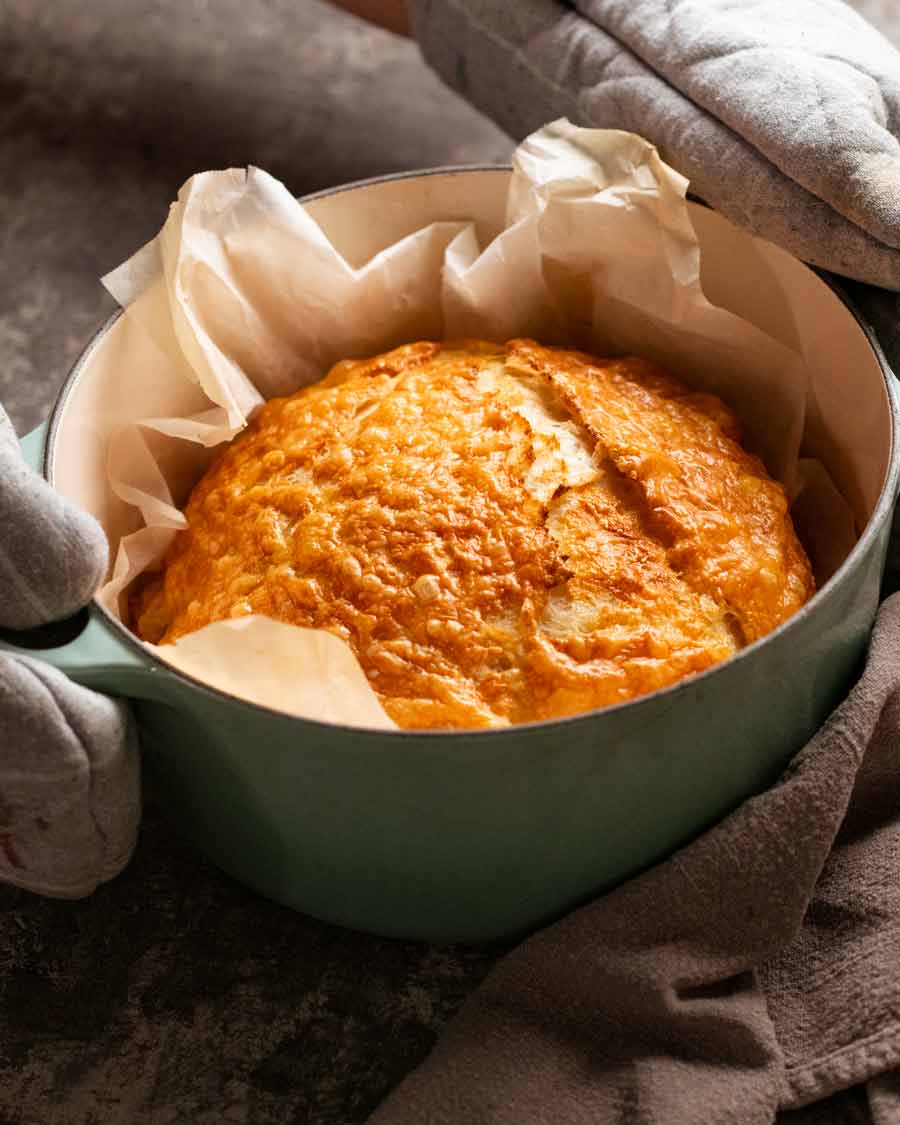
Note: The artwork of the cheese ribboned throughout is different every time. It’s like a surprise-inside!

Matters of serving and keeping cheese bread
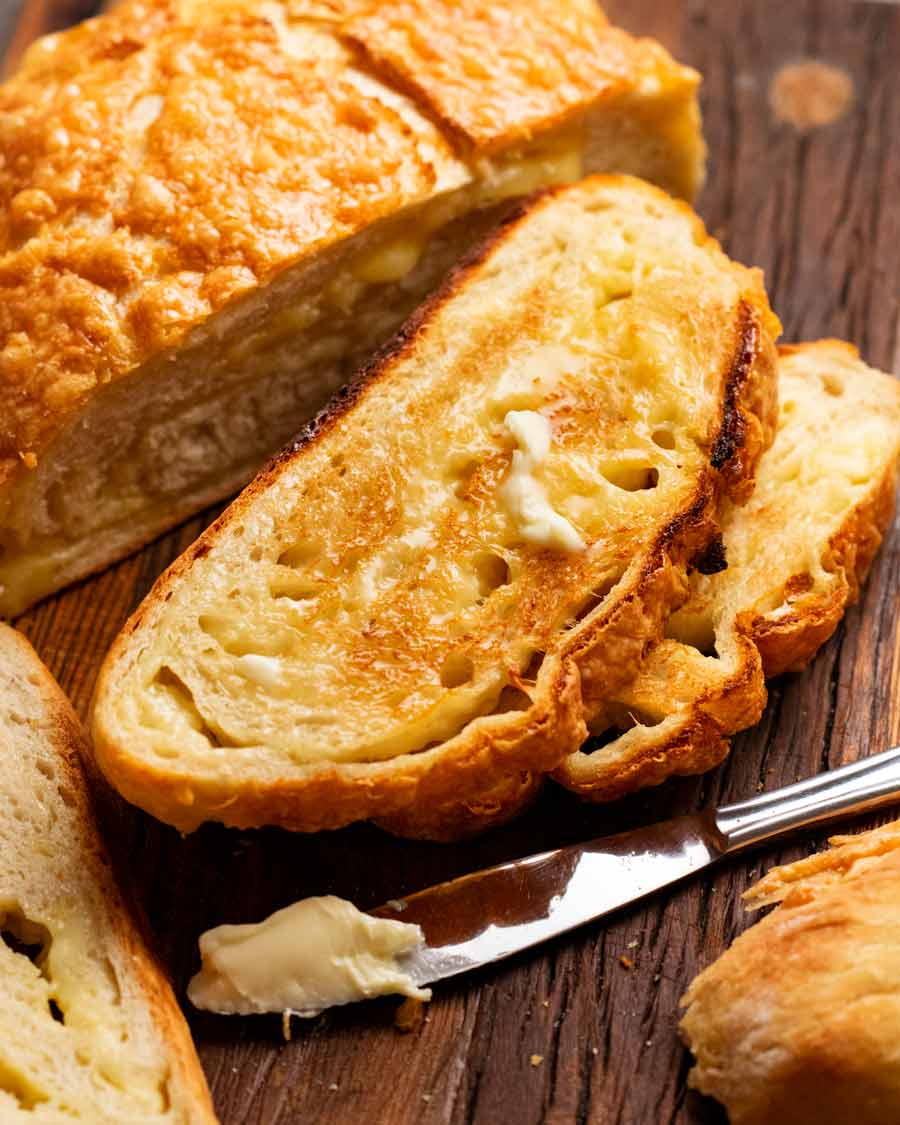
This bread, when hot and fresh, needs nothing to accompany it to be enjoyed. The cheese is molten, the bread is soft, the crust is salty and crispy.
However, you and I both know that a slathering of butter would only elevate the eating experience!
It stays fresh enough to eat un-toasted for around 24 to 36 hours. After this, just give them a quick toast in your toaster then slather with butter. The cheese on the surface of each slice goes golden and crusty, and you also get molten bits. It’s so good, you will forever hope for more cheese bread leftovers. – Nagi x
Watch how to make it

Cheese bread (no knead!)
Ingredients
- 3 cups bread flour (Note 1 re: plain/all-purpose flour)
- 2 tsp instant yeast aka rapid rise (Note 2)
- 1 1/2 tsp cooking/kosher salt
- 1 1/2 cups very warm tap water (Note 3)
- 2 1/2 cups (tightly packed) Colby cheese , freshly shredded (or other cheese of choice – Note 4)
Instructions
SHORTHAND RECIPE – for experts
- Mix dry ingredients, mix in water. Rise 2 – 3 hrs until doubled.
- Preheat pot 240°C/450°F (220°C fan). Turn dough out. Reserve 1/3 cheese for topping. Fold inwards 4 times, stuffed/layered with remaining cheese. Flip onto parchment paper. Pile reserved cheese on top.
- Bake 35 minutes covered, 10 minutes uncovered. Rest 10 minutes. Eat!
FULL RECIPE
Magic no-knead dough:
- Shaggy dough – Using a rubber spatula, mix flour, salt and yeast in a large bowl. Add water, then mix using the handle of the spatula until you can no longer see flour. The dough should be too sticky to knead by hand, but not pourable like cake batter (see video at X seconds).
- Rise – Cover with cling wrap and leave to rise in a warm place for 2 to 3 hours until the dough doubles in volume (Note 5). The surface should be bubbly, and the mixture should jiggle when you shake the bowl.
- Preheat pot – Half an hour before the dough is ready, put a 24-28cm / 4.5-8 quart heavy based pot with a lid in the oven to preheat to 240°C/450°F (220°C fan-forced). Note 7 for no dutch oven method.
Shape loaf:
- Pat into disc – Sprinkle work surface with 1 tbsp flour. Scrape dough out, sprinkle surface with flour, pat into a ~20cm/8" disc.
- Cheese it – Set aside 1/3 of the cheese for topping. Cover surface with half the remaining cheese.
- Fold inwards stuffed with cheese – Using a dough scraper or anything of similar shape (cake server, large knife, spatula), fold the sides inwards 4 times to roughly form a roundish shape, topping each layer of with the remaining cheese (but keep the final layer cheese free, it will be the base of the bread). (Note 6 for tips)
- Paper transfer – Flip the dough onto a sheet of parchment/baking paper so the seamside is (mostly) facedown. Tidy the shape if desired. (Note 6)
- Cheese crown – Pile the reserved cheese on.
Bake
- Hot pot transfer – Remove hot pot from the oven. Use paper to transfer dough into the pot, keeping it on the paper. Put lid on.
- Bake 35 minutes. Remove lid. Bake 10 minutes to colour the surface.
- Cool – Remove pot from oven. Use paper to transfer bread onto a cooling rack. Remove paper. Cool at least 10 minutes before slicing! (Note 8)
Notes
Nutrition
Life of Dozer
Freshly laundered bucket of Dozer toys. Let’s see how full that bucket is by the end of tomorrow.

The post Cheese Bread (no knead!) appeared first on RecipeTin Eats.
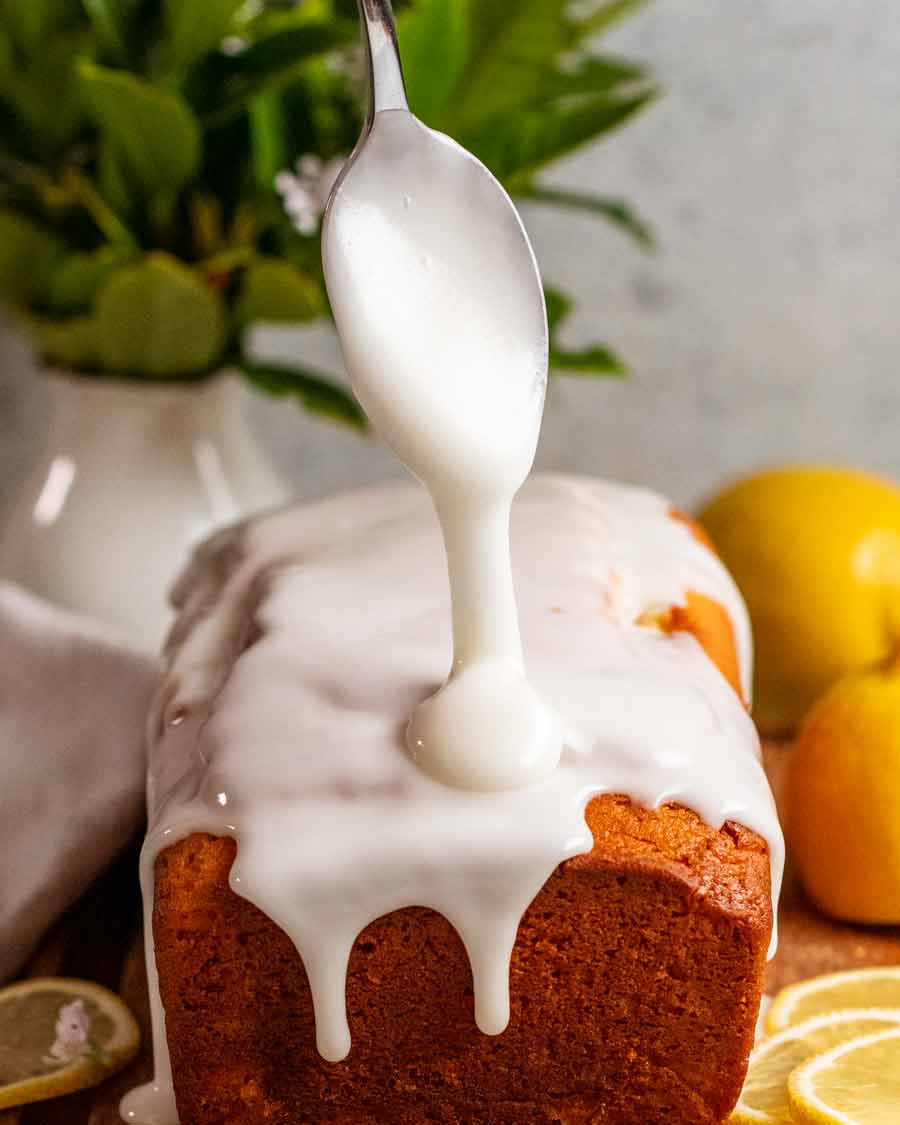
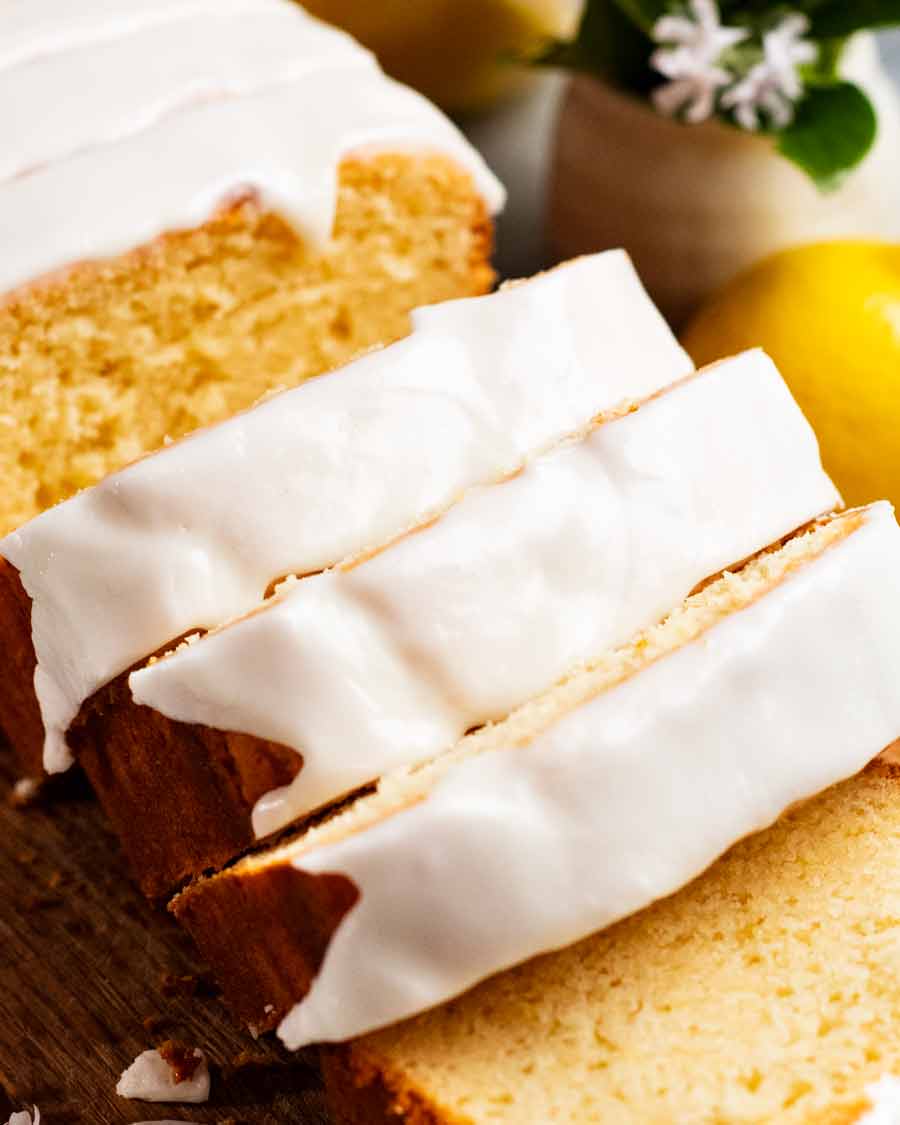
]]> Glazed lemon loaf is what you make when you’re after something not too sweet that’s fuss-free to make. Lovely bright lemon flavour with buttery undertones, it’s a quick bread which means no yeast and easy to make. Excellent shelf life of 5 days! Glazed lemon loaf Quick breads are a great option for those times... Get the Recipe
The post Glazed lemon loaf appeared first on RecipeTin Eats.
]]>Glazed lemon loaf is what you make when you’re after something not too sweet that’s fuss-free to make. Lovely bright lemon flavour with buttery undertones, it’s a quick bread which means no yeast and easy to make. Excellent shelf life of 5 days!
Glazed lemon loaf
Quick breads are a great option for those times when you have the urge or need to bake, but don’t have the time for more involved recipes. They’re also convenient – easy to transport and easy to serve. Slice like bread and eat on a napkin!
As for today’s lemon glazed loaf, it’s here after I responded to a question on Facebook for how to convert my simple Lemon Yogurt Cake into a loaf. “Use the recipe as is but I’d switch half the oil with melted butter to get buttery flavour into it, because it’ll be taller than the cake so there’s less frosting-to-cake ratio so you’ll want the cake to have more flavour. I’d probably dial up the lemon flavour for the same reason. And it will take longer to bake – just keep testing with a skewer!”
By the time I got to the end of the response, the “just do this” suddenly seemed a little less simple. So I decided to create and properly test it, write it up and publish it! 😂

Ingredients in Glazed Lemon Loaf
Here’s what you need to make this. Note: Lemon extract is recommended for really good lemon flavour, but you can get away with doubling the zest instead!
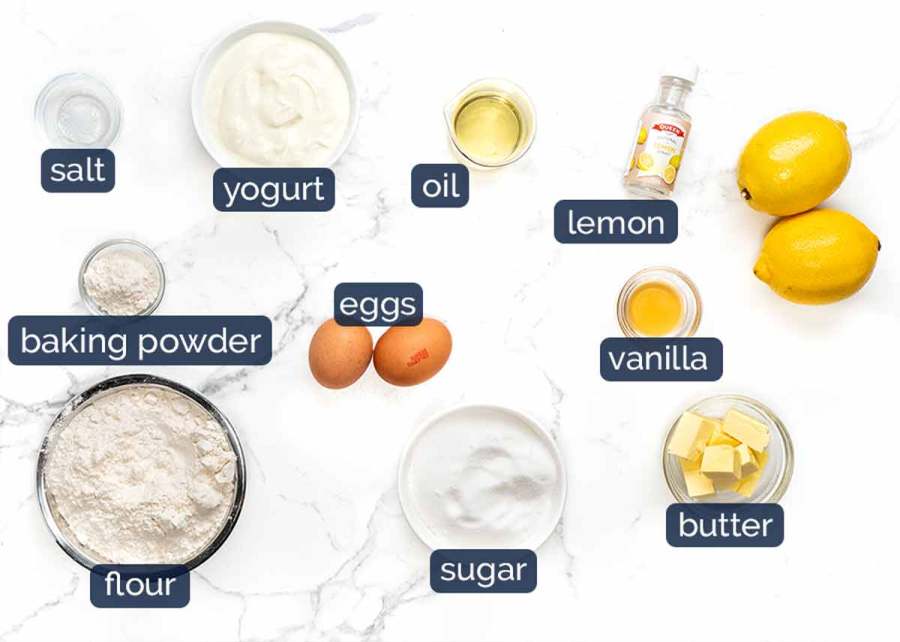
Yogurt – A “secret ingredient” in baking to make batters that bake up into lovely moist cakes, muffins etc. Any plain, unsweetened yogurt is fine here. I typically use Greek Yogurt. Substitute with sour cream (full fat).
Flour – Just plain / all purpose flour. Self-rising flour can be used in place of flour and baking powder, however, the loaf won’t be quite as soft or rise as well. Baking powder + flour is just more effective.
Gluten-free – I have not tried myself but reader Julie reported great success using gluten free flour! See her comment on this recipe dated 12 June 2023.
Baking powder – This makes this loaf rise.
Butter AND oil – Butter adds lovely buttery flavour into baked goods while oil makes the crumb moist. In this particular loaf, I wanted the best of both worlds so we’re using both.
In most recipes, I use one or the other – or I use butter plus another technique to keep the crumb moist (like the more involved technique for the reader-favourite plush Vanilla Cake).
Oil types – Vegetable or canola oil, or any other plain flavoured oil (such as sunflower, grapeseed oil) can be used. For the butter, use unsalted.
Fresh lemon – Fresh please! We need the zest and juice. Zest is where all the lemon flavour is! Juice provides mostly tang, not much lemon flavour.
Lemon extract (natural) – To make the lemon flavour in this un-missable. It really does enhance the lemon flavour in a way that you can’t achieve using just fresh lemons. But if you’ve got a stack of fresh lemons, feel free to skip this and double up on zest instead.
Vanilla – For flavour. I use vanilla extract here which is real vanilla flavour. Vanilla essence is artificial so the flavour is not as good. I typically only use pricier vanilla bean paste or vanilla beans for more refined dessert recipes, such as Creme Brûlée and Flan Pâtissier (the world’s greatest Custard Tart!)
Sugar – Just 1 cup which makes this loaf on the less-sweet side.
Eggs – At room temperature, so they incorporate easily into the batter. I use large eggs which are ~55g / 2 oz each, an industry standard so the eggs will be labelled “large eggs” on the carton.
Salt – Just a touch, to bring out the flavours. This is good general practice for all (well, most!) sweet baking recipes.
Lemon glaze
For the glaze, you just need soft icing sugar / powdered sugar and lemon juice. Australia – be sure to use soft icing sugar, not pure icing sugar which will set into a hard icing, like royal icing.

How to make this lemon loaf
Mix dry ingredients. Mix wet ingredients. Mix wet into dry. Bake! How easy it that!
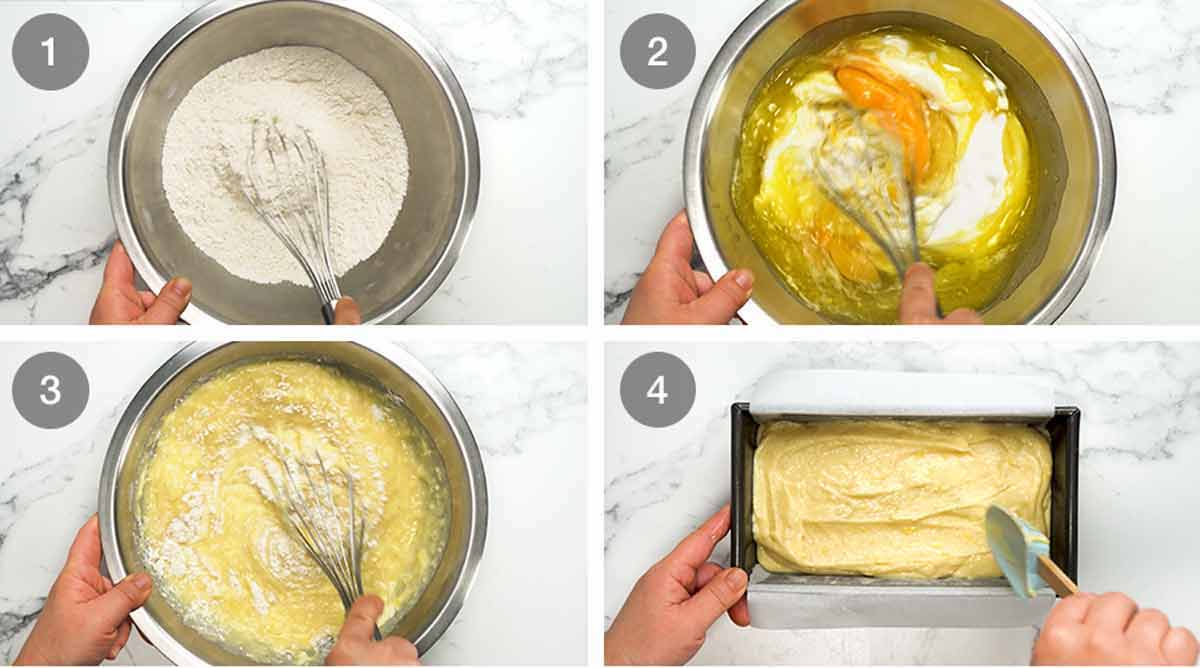
Whisk the dry ingredients in a large bowl.
Whisk the wet ingredients in a separate bowl until combined.
Pour the wet into the dry ingredients then whisk just until combined and lump free. Don’t keep whisking as this will cause your cake to come out hard!
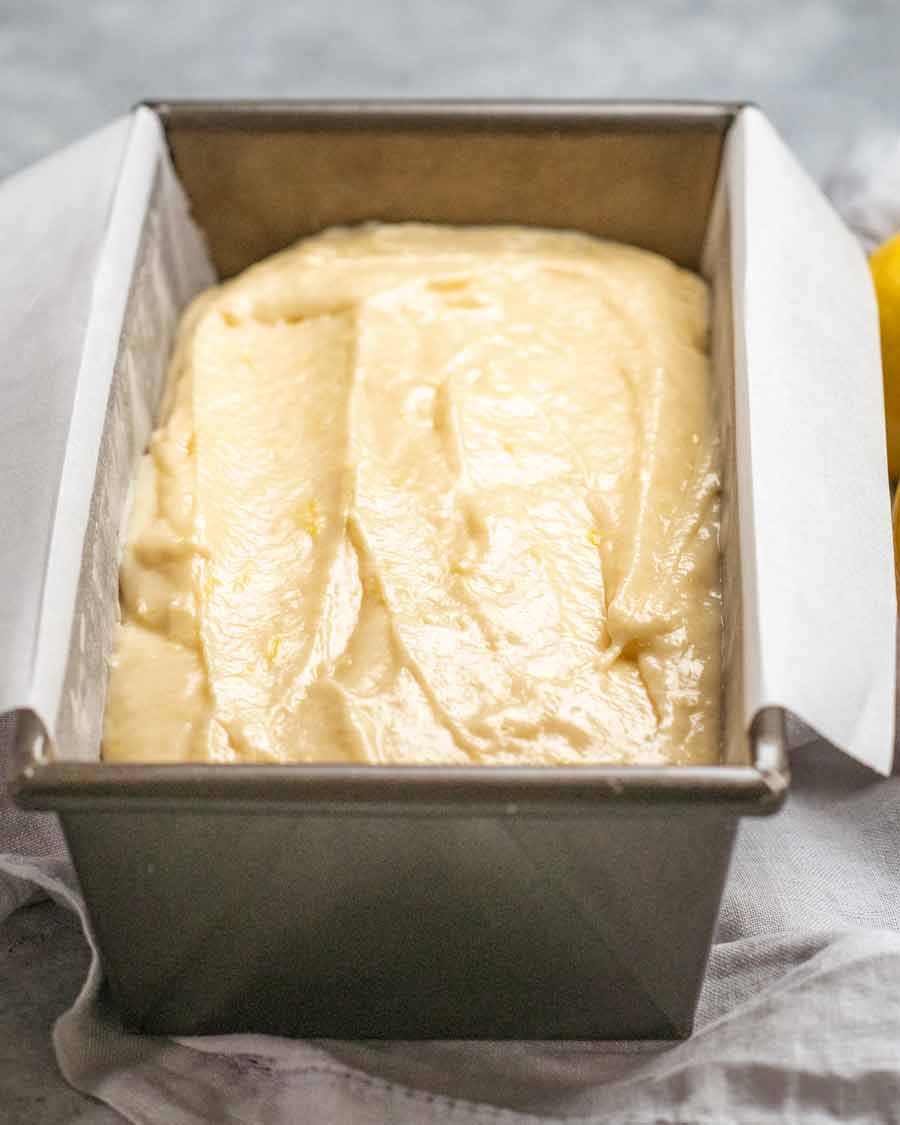
Pour / scrape the batter into a lined pan. (Note – when I say “lined pan”, I use a single sheet of baking / parchment paper to line the long sides and base. I don’t bother with the short side – no sticking problems if you grease it).
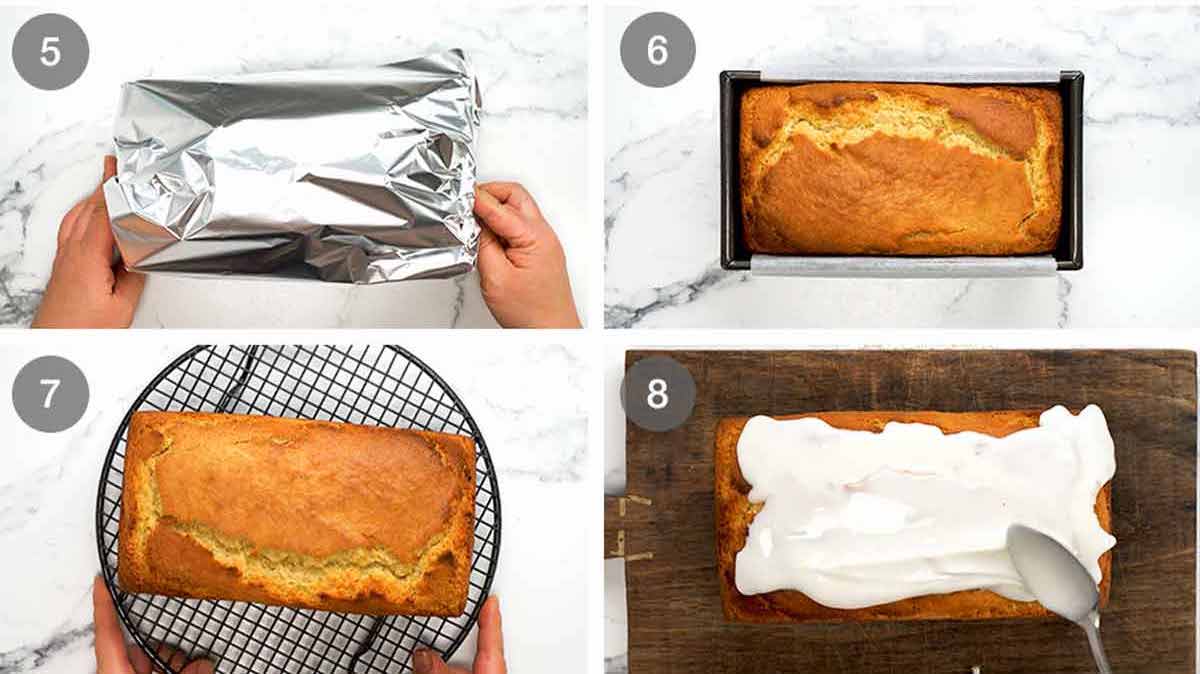
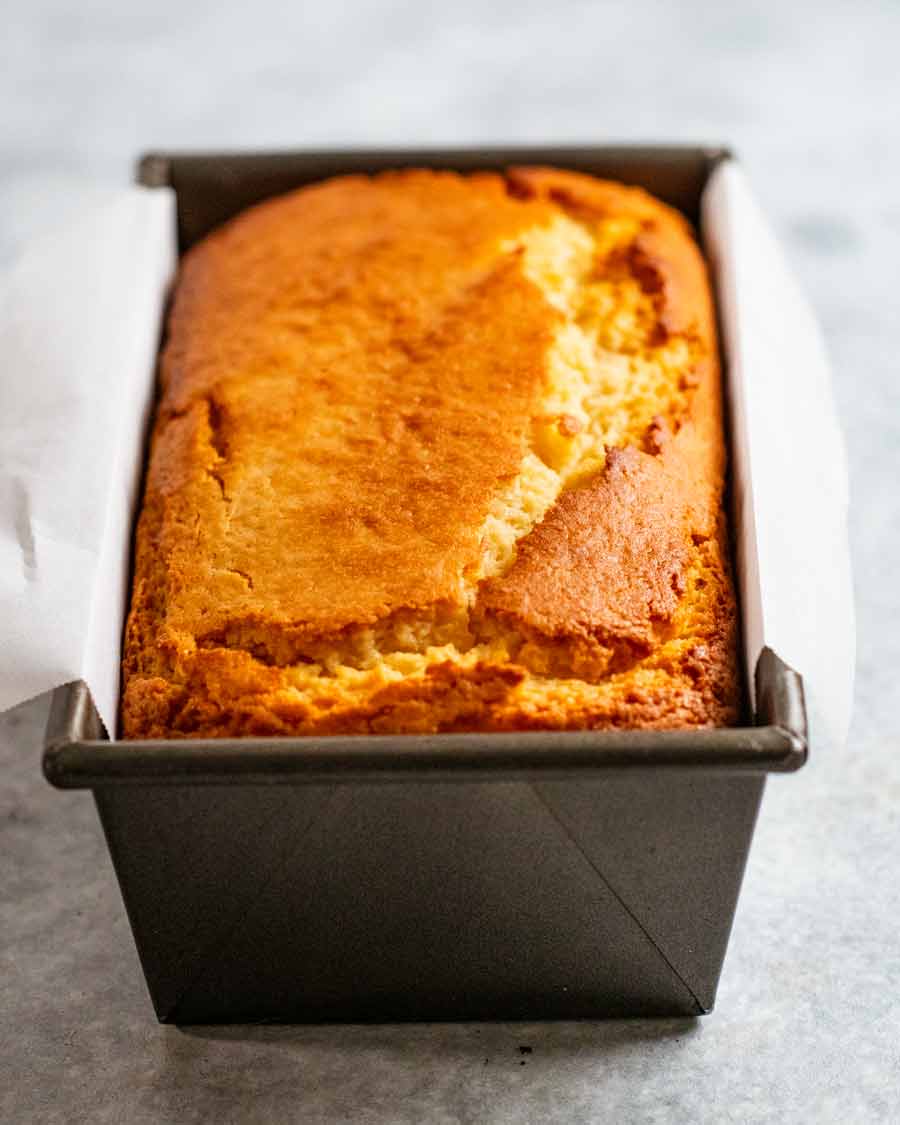
Bake 45 minutes uncovered, then loosely cover with foil and bake for a further 20 minutes or until a skewer inserted into the centre comes out clean.
Rest 10 minutes – Let it rest in the pan for 10 minutes (all cakes are very fragile when fresh out of the oven) before transferring it onto a cooling rack.
Cool – Use the paper overhang to lift it out onto a cooling rack, then cool completely for 3+ hours before glazing!
Glaze – To make the glaze, just mix the icing sugar (powdered sugar) and lemon juice together. Then spoon / spread it onto the surface, coaxing drips down the side.
⚠️ GLAZE THICKNESS CAUTIONARY NOTE!
I find glazes will go from seemingly too thick to way too thin with just even the barest smidge of extra liquid. So take care and be patient when mixing the glaze! I only use 3 1/2 teaspoons of lemon juice for 1 cup of icing sugar. At first it will seem like there’s nowhere near enough liquid, but be patient, keep mixing! It will turn into a thick glaze that will drape over your lemon loaf rather than spreading into a thin, transparent (unsatisfying) glaze.
The no-glaze option
“Everybody” loves the glaze but actually, there’s a good case for a no-glaze version too. No glaze means you can toast it like bread – literally, in a toaster. Then slather with butter and for a really great finishing touch, drizzle with honey.

You can just imagine the flavour combo here, right?? Not-too-sweet lemony cake soaked with lightly salted melted butter and sweet honey. It’s so good I almost published this recipe without the glaze!!
Whichever way you go, glaze or no glaze, you can’t go wrong with this lemon loaf. It’s also one of those recipes that’s quite forgiving, so it’s a good one for those new to baking or if you have little helpers keen to get involved.

Stays fresh 5 days
And finally – this lemon loaf has an excellent shelf life. Regular readers know that I am notorious for extending the shelf life of baked goods! It used to drive me mad that people would just accept that homemade muffins would go stale overnight, and that cakes are best made on the day of serving as they lose freshness within 24 hours. Who has the time to bake fresh on the day, not to mention the disappointment of not being able to enjoy cakes for days afterwards? The reader-favourite Vanilla Cake and Cupcakes are probably the most famous examples around here – they stay fresh for 4 to 5 days which is unheard of!
As for this lemon loaf – it’s perfect for 3 days, still great 5 days later. Keep it in the fridge if it’s warm where you are, but if not, the pantry is fine.
Enjoy! – Nagi x
Watch how to make it

Glazed lemon loaf
Ingredients
Dry ingredients:
- 2 cups plain flour / all-purpose flour (Note 1 for GF)
- 4 tsp baking powder (make sure yours is alive!)
- 1/8 tsp salt
Wet ingredients (Note 2 – room temp):
- 1 cup plain yogurt , at room temperature
- 2 large eggs (~55g/2oz each), at room temperature
- 75g / 5 tbsp unsalted butter , melted and cooled
- 1/4 cup vegetable or canola oil (or other neutral flavoured oil)
- 2 tbsp lemon zest (~2 large lemons)
- 1/4 cup lemon juice
- 1 1/4 cups caster sugar / superfine sugar (sub normal/granulated sugar)
- 1/2 tsp vanilla extract
- 1 1/2 tsp lemon extract – sub 1 tbsp extra zest (Note 3)
Glaze (optional):
- 1 cup soft icing sugar/powdered sugar , sifted
- 3 – 3 1/2 tsp+ lemon juice
Instructions
- Preheat oven to 180°C/350°F (160°C fan-forced). Grease then line a 21 x 11 x 7 cm (8.5 x 4.5 x 2.75") with baking / parchment paper. (Note 4)
- Batter – Whisk Dry ingredients in a large bowl. Whisk Wet ingredients in a separate bowl. Pour Wet ingredients into the Dry ingredients. Whisk just until lump free. Pour into the prepared loaf pan then smooth the surface.
- Bake 45 minutes uncovered. Loosely cover with foil then bake a further 20 minutes or until a skewer inserted comes out clean.
- Cool & glaze – Stand 10 min in pan then turn out onto a cooling rack. Fully cool before glazing (~3 hours). Use a spoon to spread and coax lovely glaze drips down the side! Cut thick slices and serve.
- Glaze – Whisk ingredients until combined and smooth, a thick smooth frosting that will drip thickly, not be transparent. Start with 3 1/2 teaspoons lemon juice, and add 1/2 tsp extra, as needed. (Note 5 on thickness)
Notes
Nutrition
Life of Dozer
Dunno why I look so happy when Dozer looks so tortured, waiting to taste that bit of lemon cake!

The post Glazed lemon loaf appeared first on RecipeTin Eats.
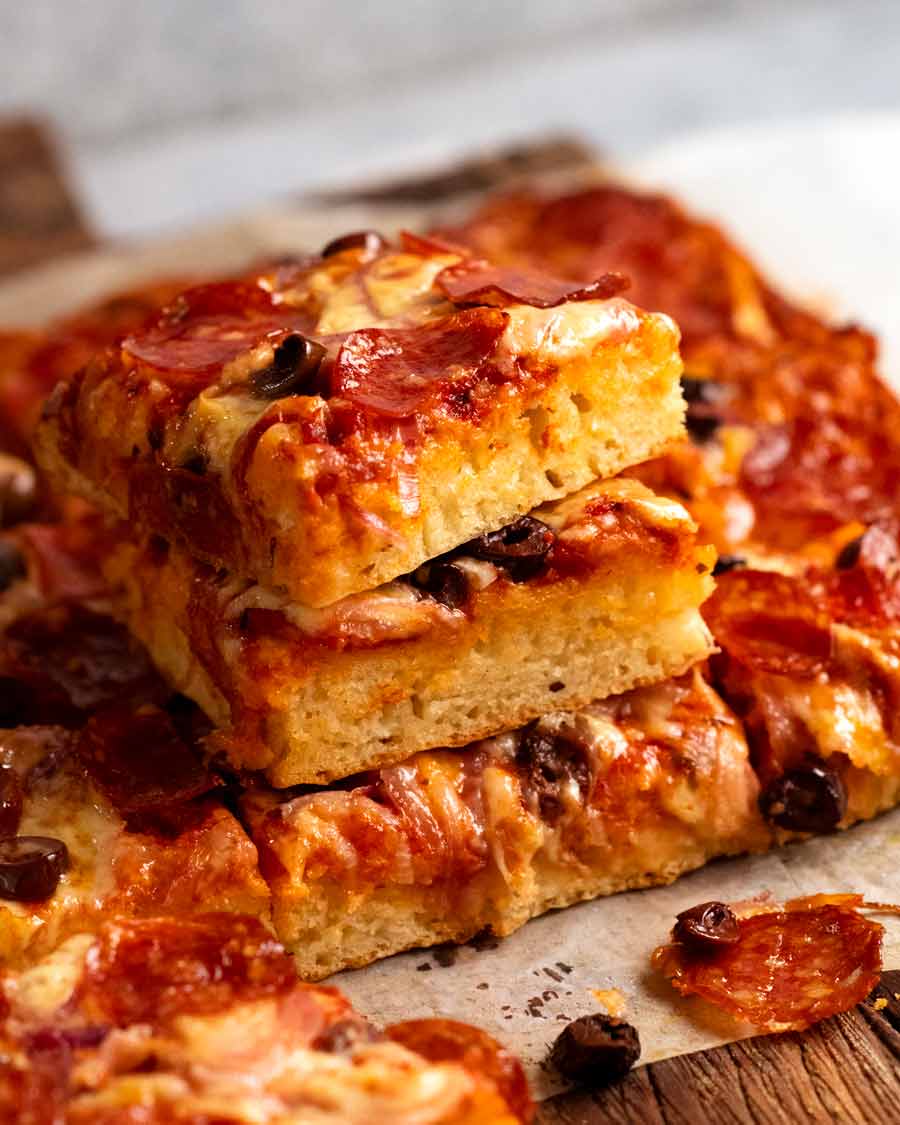
]]> An economical, easy copycat of the fan favourite Bakers’ Delight pizza bread, a much loved lunch-on-the-run! Named as such as it’s designed to be tucked into lunchboxes and eaten at room temp rather than piping hot like normal pizza. Think: morning tea, picnics, hungry teenagers, freezer stash! A homemade pizza bread There’s a popular bakery chain... Get the Recipe
The post Lunchbox Pizza Bread (easy) appeared first on RecipeTin Eats.
]]>An economical, easy copycat of the fan favourite Bakers’ Delight pizza bread, a much loved lunch-on-the-run! Named as such as it’s designed to be tucked into lunchboxes and eaten at room temp rather than piping hot like normal pizza. Think: morning tea, picnics, hungry teenagers, freezer stash!

A homemade pizza bread
There’s a popular bakery chain here in Australia called Bakers’ Delight which sells a myriad of baked goods, ranging from sweet cinnamon buns to savoury bread rolls that are a convenient “lunch on the run”.
I’ve always wanted to recreate the fan favourite pizza breads. And noticing that the RRP has crept up to $4.90 (inflation!) was just the kick I needed to get moving on it.
Rather than making individual pizzas, I decided to take the easier option of making a large pizza slab then cutting it into portions. I then went one step further and decided to use a simple cheesy muffin batter rather than yeast-based proper pizza dough which needs hours to rise.
So here it is today – my pizza bread. It’s a great one for lunch boxes or taking to places, like morning tea at work because it’s designed to be eaten at room temperature.
Ingredients in pizza bread
This is a quick pizza bread that’s based on a savoury muffin batter. Which means – no yeast, no kneading, no rise time. Mix and bake!
The batter
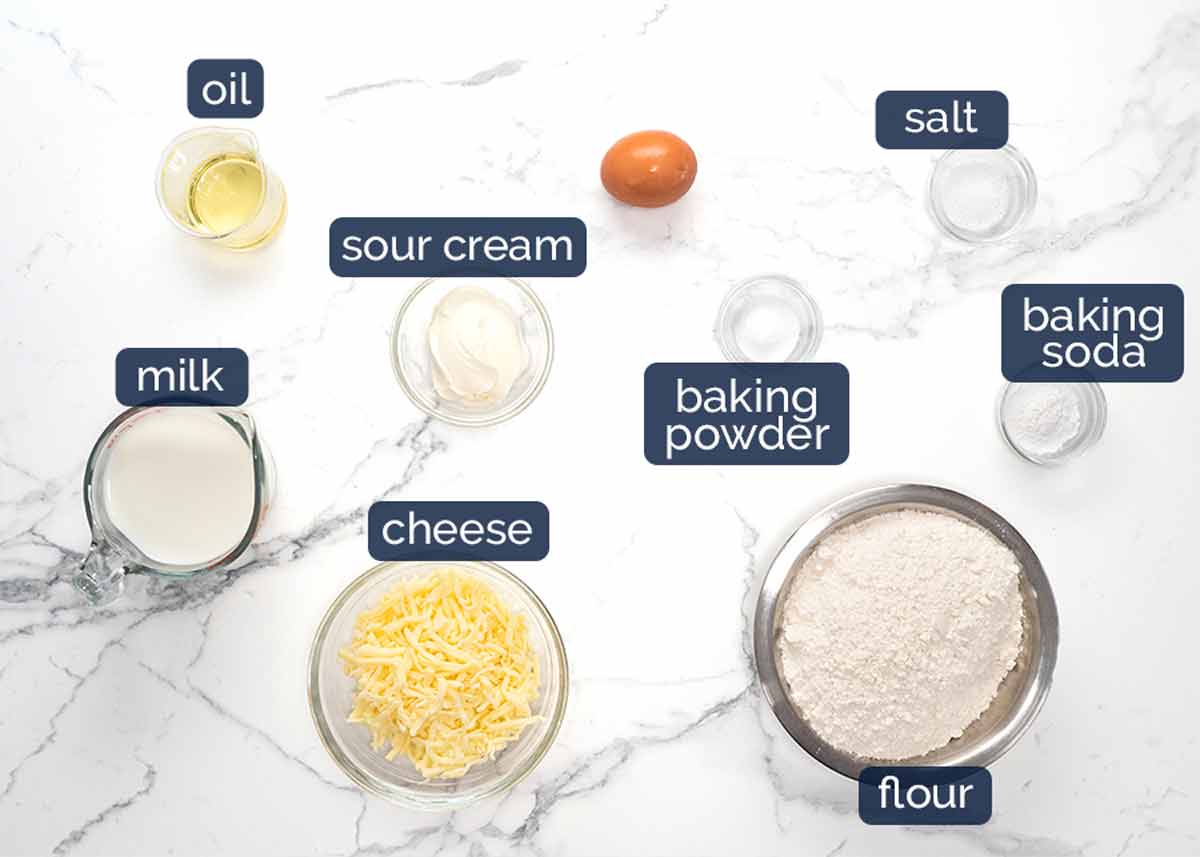
Flour – Just plain / all purpose flour. Self raising flour will work in place of the flour + baking powder + baking soda but the crumb is not as soft or springy, and will not stay fresh for as long.
Baking powder + baking soda (bi-carb) – I know, it’s soooo irritating when I ask you to use both instead of one or the other! I wouldn’t ask it of you unless it matters – and in this case it really does make a noticeable difference.
Basically, both make muffins, cakes etc rise. But baking soda is like triple strength baking powder, and they have different rising qualities depending on what other ingredients are used. For this recipe, only baking powder = crumb not as soft or moist. Only baking soda = mound rather than flat surface. Combo of both = perfect!
Shredded cheese – Used to flavour the crumb and top the bread. Use your favourite shredded cheese (or cheese blend) that melts except mozzarella which doesn’t have much flavour. I use Devondale 3 cheese blend (mozzarella, colby, parmesan) which is my favourite store bought shredded cheese for both melting qualities and flavour (I’m in Australia).
If mozzarella is all you’ve got, just add an extra 1/2 teaspoon salt in the batter.
Pre-shredded ok! Usually I recommend shredding your own but in this case pre-shredded is fine, in the spirit of this quick & easy recipe!
Milk & sour cream (or yogurt) – These are the liquids for this batter. The sour cream keeps the pizza bread stay moist for several days rather than going stale the next day which is what happens to most muffins. For baking enthusiasts: the reason for this is because sour cream is thicker than milk so you don’t need as much flour in the batter to get it to the right consistency. Less flour = more moist crumb.
Olive oil – This too helps keep the crumb moist. This is because butter, the other most common fat used in baking, adds lovely buttery flavour but it firms up at room temperature = drier crumb. Oil, on the other hand, remains in liquid form which means the crumb is more moist.
Egg – This is the binding agent in the batter. We only use 1 egg and this is another reason the shelf life of this bread is so great: because more egg in batters = drier crumb.
Salt – For seasoning.
Toppings
I’m going for quick ‘n easy today, so I’ve used a store bought pizza sauce. However, if you’re a better person than me, please feel free to make your own (any of the 3 options are great).
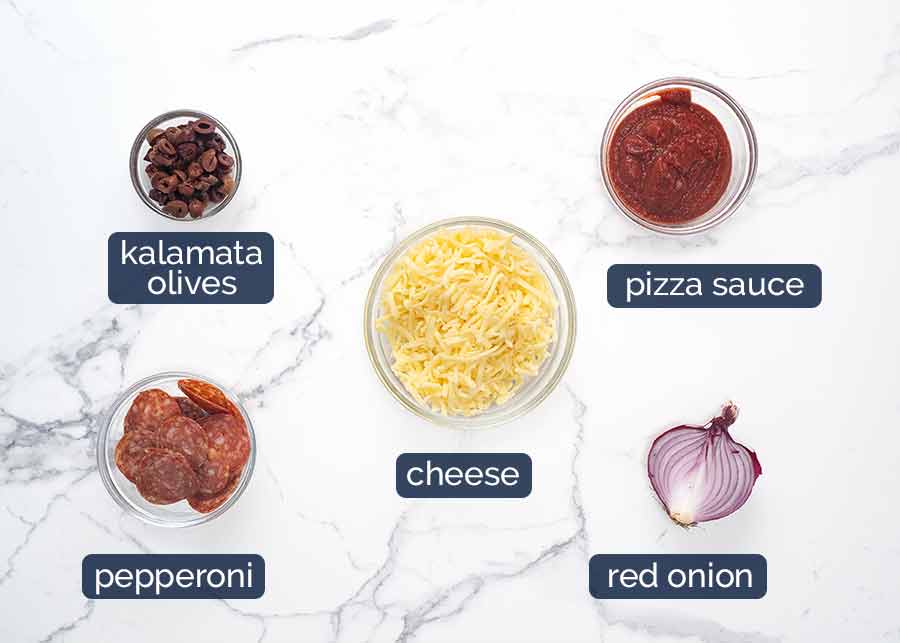
Pizza sauce – As noted above, this is just store bought. Use any flavour your heart desires!
Toppings – Pepperoni, sliced olives, onion and green capsicum / bell peppers (yup, missing from photo above and half the pizza photos!). Feel free to use whatever you want.
Shredded cheese – I just use the same cheese as noted above in the batter.
How to make my easy pizza bread
You’re going to LOVE how easy this is! Ready?
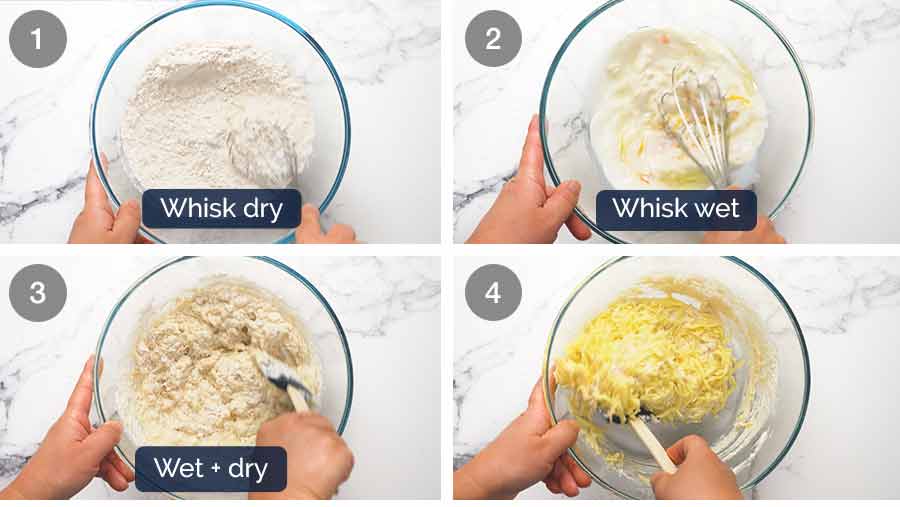
Whisk Dry ingredients in a bowl. I whisk the dry first so the whisk stays clean to use for the wet ingredients!
Whisk Wet ingredients in a separate bowl.
Combine – Pour the Wet ingredients into the Dry ingredients then mix with a rubber spatula until the flour is mostly mixed in but you can still see a bit. It will still be lumpy – that’s ok!
Add cheese then mix until you can no longer see flour. If the batter still has some small flour lumps, that’s fine as they will bake out. What you do not want to do is mix too much because this will activate the gluten in the flour and make the crumb hard and dense.
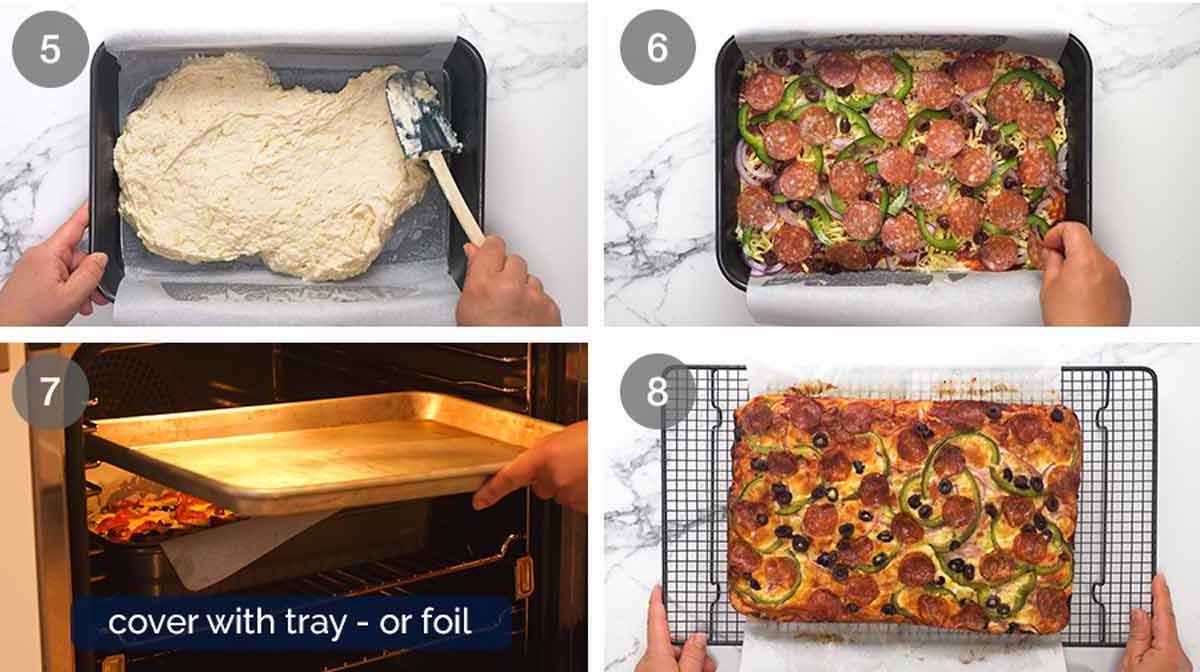
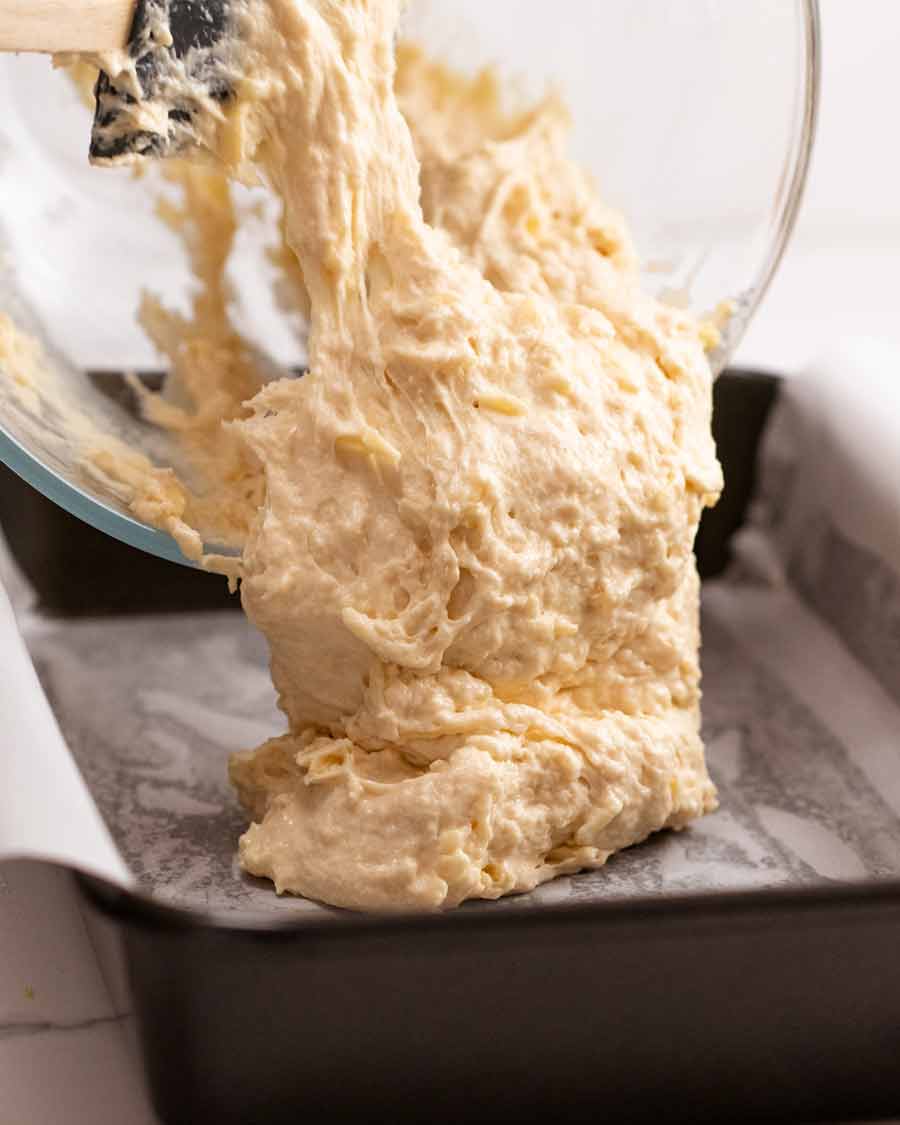
Spread the batter into a 23 x 33 cm (9 x 13″) lined metal pan. I spray with oil then line the base and long sides with a single large sheet of paper, with overhang to make it easy to lift out later. There’s no need to line the short sides if you spray with oil.
Ceramic and glass pans will also work but the bread will rise a smidge less and I would add an extra 3 minutes to the bake time. This is because glass takes a little longer to heat up.
Toppings – Spread with pizza sauce, then top with cheese, onion, capsicum (which I forgot in half the photos!), olives and pepperoni (in that order).
Bake 40 minutes – Bake uncovered for 25 minutes. Then pop a baking tray on top and bake for a further 15 minutes. This will stop the cheese from getting a little too golden.
Cool for 10 minutes in the pan, then 10 minutes on a cooling rack before slicing to serve.
It’s important to follow recipe directions for cooling baked goods because they finish cooking inside. If you slice this bread when it’s piping hot, straight out of the oven, then the inside will taste a bit “doughy” and undercooked.
This bread will still be warm after 20 minutes resting time. But it’s also specifically designed to be tasty at room temperature, for popping into lunch boxes! And it will stay fresh for 3 to 4 days.


How to serve Lunchbox Pizza Bread
As mentioned at the top, this pizza bread is designed to be eaten at room temperature like a savoury muffin rather than piping-hot-straight-out-of-the-oven like pizza, easy to make in bulk (do 2 pans at once!) and freezes perfectly.
Which means it’s:
great to pop into lunch boxes – the original idea I had when I decided I set out to create this recipe, hence the name! Pictured in post (top) with a homemade muesli bar.
ideal to take into work for a shared morning tea
a handy breakfast on the run
useful to feed permanently hungry teenagers
It’s about 70% cheaper than buying pizza rolls from Bakers Delight. And finally, my last effort to convince you to try this? There’s nothing like homemade. Right? – Nagi x
Watch how to make it

Lunchbox pizza bread (quick)
Ingredients
DRY INGREDIENTS:
- 2 cups plain flour (all-purpose flour)
- 1 1/2 tsp baking powder
- 1/2 tsp baking soda / bi-carb soda , sifted (Note 1)
- 1/2 tsp cooking/kosher salt
WET:
- 1 large egg (60g / 2 oz)
- 1 cup milk (full or low fat)
- 1/4 cup sour cream , or plain yogurt
- 3 tbsp olive oil
CHEESE FOR BATTER:
- 1 cup shredded cheese (colby, cheddar, Monterey Jack, Devondale "3 cheese blend") (Note 2)
PIZZA TOPPINGS:
- 1 1/2 cups shredded cheese, same as above (Note 2)
- 1/2 cup pizza sauce , store bought or homemade (any of them)
- 1/4 red onion , finely sliced
- 1/2 green capsicum / bell pepper , finely sliced
- 1/4 cup sliced kalamata olives
- 50g/ 2 oz pepperoni slices (about 1/2 cup)
Instructions
- Preheat oven to 180°C/350°F (160°C fan). Oil spray a 23 x 33 cm (9 x 13") metal pan then line with baking / parchment paper (Note 3).
- Whisk Dry ingredients in a large bowl.
- Whisk Wet ingredients in a separate bowl until combined.
- Combine Wet & Dry – Pour Wet into the Dry ingredients. Mix with a rubber spatula until the flour is mostly mixed in but you can still see a bit of flour. Add cheese then stir until you can no longer see flour. Some small lumps is fine, they will bake out.
- Assemble – Scrape into the baking pan and evenly spread – it's not that thick, remember it rises! Spread the surface with pizza sauce. Sprinkle with cheese, then (in this order) onion, capsicum, olives then pepperoni.
- Bake 40 min – Bake 25 minutes uncovered. Cover with a baking tray (or foil) then bake for a further 15 minutes.
- Cool 10 minutes in the pan then use the paper overhang to lift or slide out onto a cooling rack. Cool for a further 10 minutes before slicing to serve.
- Serving – Great at room temp though for VIP's, sometimes I warm it in the oven, drizzle with a swish of olive oil and sprinkle with a pinch of oregano.
Notes
Nutrition
Life of Dozer
Raise your hand if you think I said “yes Dozer, go ahead and have a swim in that stinky golf dam filled with decaying aquatic plants. I really love how you smell afterwards!”. 😖

The post Lunchbox Pizza Bread (easy) appeared first on RecipeTin Eats.
]]> Rich and buttery, yet amazingly light and elegant, Brioche is one of the crowning glories of traditional French baking. Making delicious, boulangerie-quality brioche at home is actually far easier than you’d think. With this Brioche recipe, you’ll never have to settle again for the pricey and poor imitations from the shops! Brioche recipe If you’ve ever... Get the Recipe
The post Brioche appeared first on RecipeTin Eats.
]]>Rich and buttery, yet amazingly light and elegant, Brioche is one of the crowning glories of traditional French baking. Making delicious, boulangerie-quality brioche at home is actually far easier than you’d think. With this Brioche recipe, you’ll never have to settle again for the pricey and poor imitations from the shops!
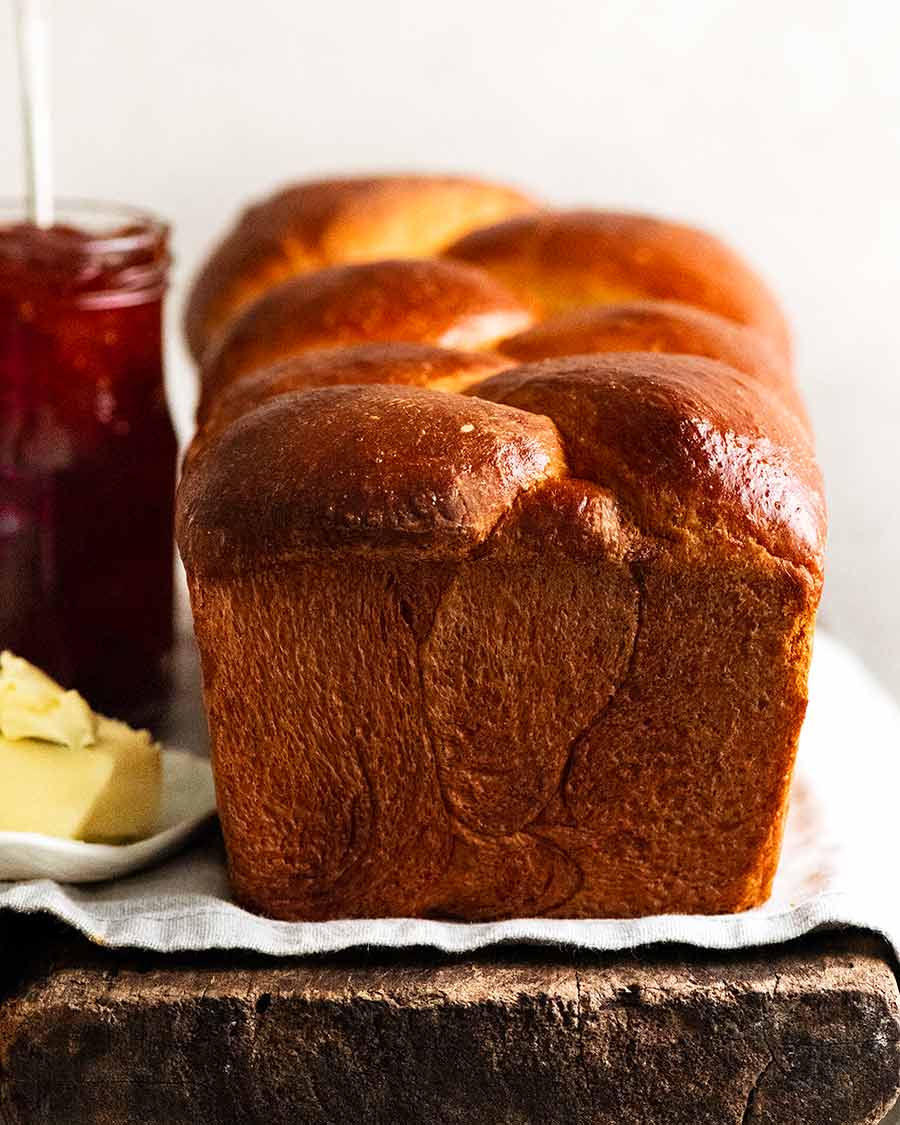
Brioche recipe
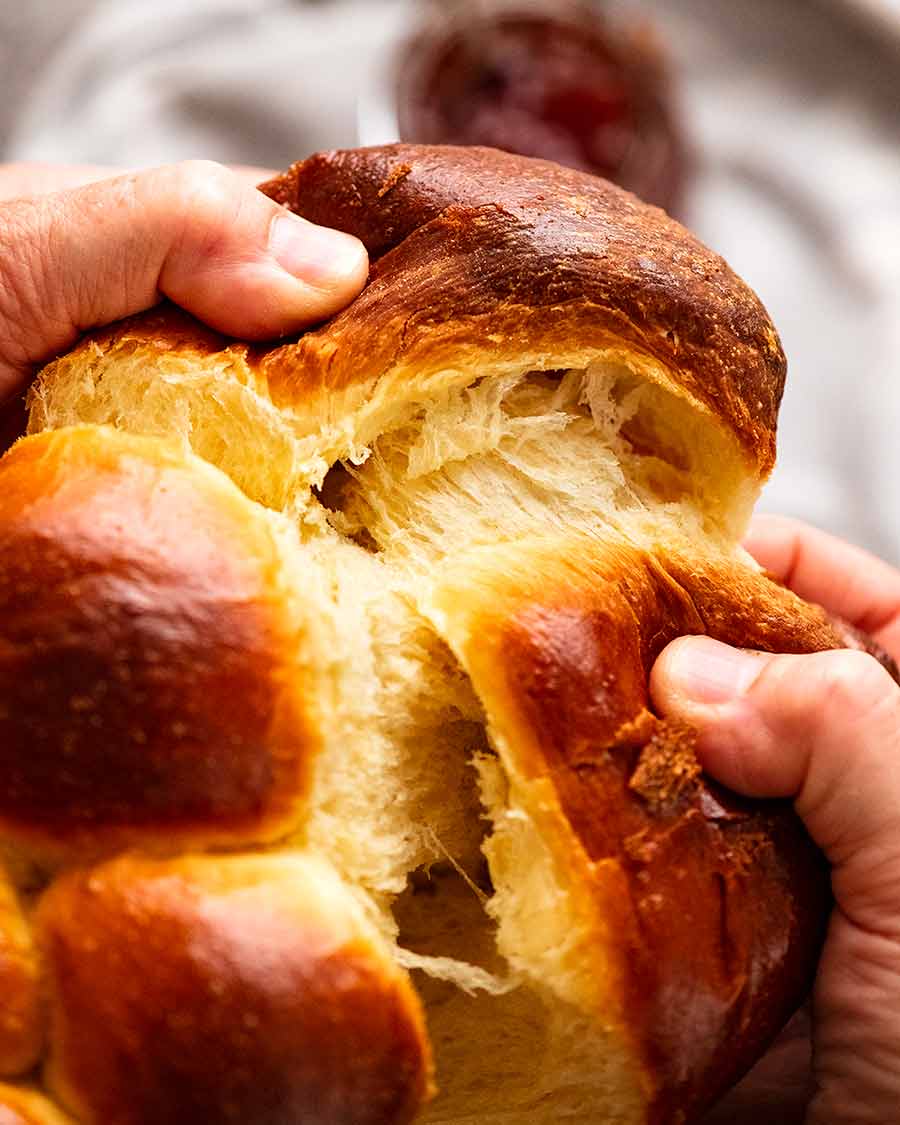
If you’ve ever wondered what makes Brioche different from most other breads, the answer is butter. Unsurprising really, given the French origins of this delicious bread!
Enrichening bread with butter and eggs is what gives Brioche its croissant-like flavour, its uniquely soft crumb and its signature crust that’s paper-thin and a beautiful, burnished mahogany.
Store-bought Brioche is more often than not a pale example of what a great brioche should be like.

Store-bought Brioche is not only expensive but more often than not a pale example of what a great brioche should be like. Mass-produced Brioche often skimps on butter for cost reasons for one. It’s also produced without the care needed to bake a truly great brioche.
Making your own Brioche on the other hand is not nearly as hard as it sounds and infinitely rewarding. Incomparable taste aside, when you bake your own Brioche, the smells wafting through your house are truly intoxicating. The sweet scent of butter, sugar and toasty bread will instantly teleport you to a cosy bakery in a quaint village with cobblestone streets, somewhere in the French countryside. It’s …. just … magical!
So, are you ready to bake the most amazing bread of your life?? Oui? Then let’s do this!!
Source of this Brioche Recipe
For a recipe this iconic I wanted to ensure I did it justice, making it the traditional, real-deal French way. So this homemade Brioche recipe is one I created together with a classically-trained French chef residing right here in Sydney, Jean-Baptiste Alexandre.
We created this recipe with wisdom we gleaned from well-respected French cookbooks to arrive at what we think is the best possible Brioche a home cook can make. The notable books we used are:
Larousse Gastronomique;
Escoffier’s Le Guide Culinaire; and
French Patisserie Master Recipes and Techniques from the Ferrandi School of Culinary Arts.
Brioche is an all-day project and worth every second
Let me be upfront: Brioche is not a 30-minute shake-n’-bake job you can whip up after work. Brioche is a project for one of those homebody days when you plan to potter around the house all day doing chores or relaxing. This is because it takes 8 1/2 hours from start to finish:
Making dough: 35 minutes mixing + 10 minutes prep = 45 minutes
Rise #1: 2 hours
Refrigeration: 1.5 hours
Rise #2: 3 hours
Baking: 35 minutes
Cooling: 45 minutes
TOTAL = ~8.5 hours
The vast majority of this time as you can see is in fact completely passive, ie. waiting around – for the dough to mix, proof, rest, bake, cool etc. The active time is actually a tiny proportion of the overall process. And I promise you the end result makes it more than worth the time investment. Brioche truly is the most extraordinary homemade bread I’ve ever made. But make no mistake, it does require commitment!
What you need to make Brioche
Other than the fact that there’s a considerable amount of butter called for – unsurprising given the beautiful buttery flavour of this bread – there’s no unusual ingredients at all in brioche. The unique part is in the making!
Plain / all-purpose flour – An interesting fact is that Brioche is fluffier, rises better (about 15% taller) and has a softer crumb when made with plain / all-purpose flour rather than bread flour (ie. high protein flour). The latter typically yields a better result for most breads such as Artisan bread, Naan and Pide, to name a few. Yet not for Brioche. We know because we tested bread flour vs plain flour versions of Brioche side-by-side!
Only got bread flour? Brioche is still absolutely worth making. It’s just even better with good old plain flour!
Instant / rapid-rise yeast – Instant / rapid-rise yeast is called for in this recipe. The recipe also works with standard active / dry yeast, but the brioche does not rise quite as much and the crumb is not quite as tender.
Butter – Lots of it … The amount of butter is significantly more than most breads, and is what gives Brioche its signature intense, buttery flavour. 150g / 10.5 tablespoons of butter to 300g / 2 cups of flour here, which is at least 5 times as much as an average white bread recipe! (High five! 🙌🏼 😂)
Softened / room temperature butter is needed. The butter must be softened and not fridge-cold, so it incorporates more easily into the dough. Target a temperature of 20 – 22°C / 68-71.5°F (if you have a thermometer).
However the butter must not be so soft that it is melting, otherwise the dough will end up greasy. It should be firm enough so you can pick it up with your fingers but soft enough that you can only just do so, and can squish it fairly easily;
Sugar – Brioche is technically a Viennoiserie, a class of rich, sweet breads and pastries that includes Danishes and croissants. The extent of sweetness you encounter in Brioche can vary. For me, I like it on the less sweet side, straddling the line between sweet and savoury. I feel this way it’s not too sweet when spread with say, jam (a traditional French accompaniment for brioche), and still also suitable for savoury foods (eg. for burgers, sliders, breakfast rolls etc);
1/2 cup (125 ml) eggs, at room temperature – This recipe very specifically calls for 1/2 cup (125 ml) of eggs which is approximately 2 1/2 eggs. I tried rounding up to 3 (it was too eggy and it dried out the crumb) and rounding down to 2 (the crumb was too loose).
So, sorry folks! 2 1/2 eggs it is!
A few pointers:
– How to measure the eggs out: Just crack 3 eggs into a bowl, whisk, then measure out 1/2 cup (125 ml). We will use the remaining egg for the egg wash, don’t worry!
– Use at room temperature: Eggs need to be at room temperature and not fridge-cold, so they incorporate better into the dough.
– A quick way to warm up fridge-cold eggs: Place eggs in a large bowl, cover with warm tap water (just warm, not hot) and leave for 5 minutes. Wipe dry (to avoid residual water dripping into bowl), then use per recipe.
How to make Brioche
To make brioche properly, you will need a stand mixer because the recipe calls for 35 minutes of kneading which is what makes brioche rich and buttery, yet an incredibly tender crumb. (Theoretically I suppose kneading by hands is possible, but I can’t begin to imagine how long it will take! You would need to be either a masochist or an Olympic rower … )
Don’t have a stand mixer? Don’t worry! This can be made using a food processor in 5 minutes flat. It rises about 10% less but the results are still exceptional!
Part 1: Bloom yeast
Mix instant yeast with warm milk and sugar: Once mixed, leave it for 10 minutes to bloom, ie. become foamy. This is not a typical step you see in bread-making when using instant yeast. Usually the whole point of instant yeast is that you can add it straight into dough without mixing with warm water or milk and letting it foam first.
But when creating the Naan recipe and also Pide, we found that blooming instant yeast in a warm water and sugar solution first makes flatbreads fluffier and softer. The same also applies to brioche.
Blooming the yeast first is also a valuable insurance policy to confirm the yeast is alive and well before baking. Imagine setting aside your day to make this Brioche only to find it hasn’t risen because the yeast is dead! 😱 Don’t even go there … !
Foam test: So we do our yeast foam test to avoid all this potential heartbreak. This is what it looks like after 10 minutes. Foamy? Good!
Part 2: Make the dough (it’s super soft!)
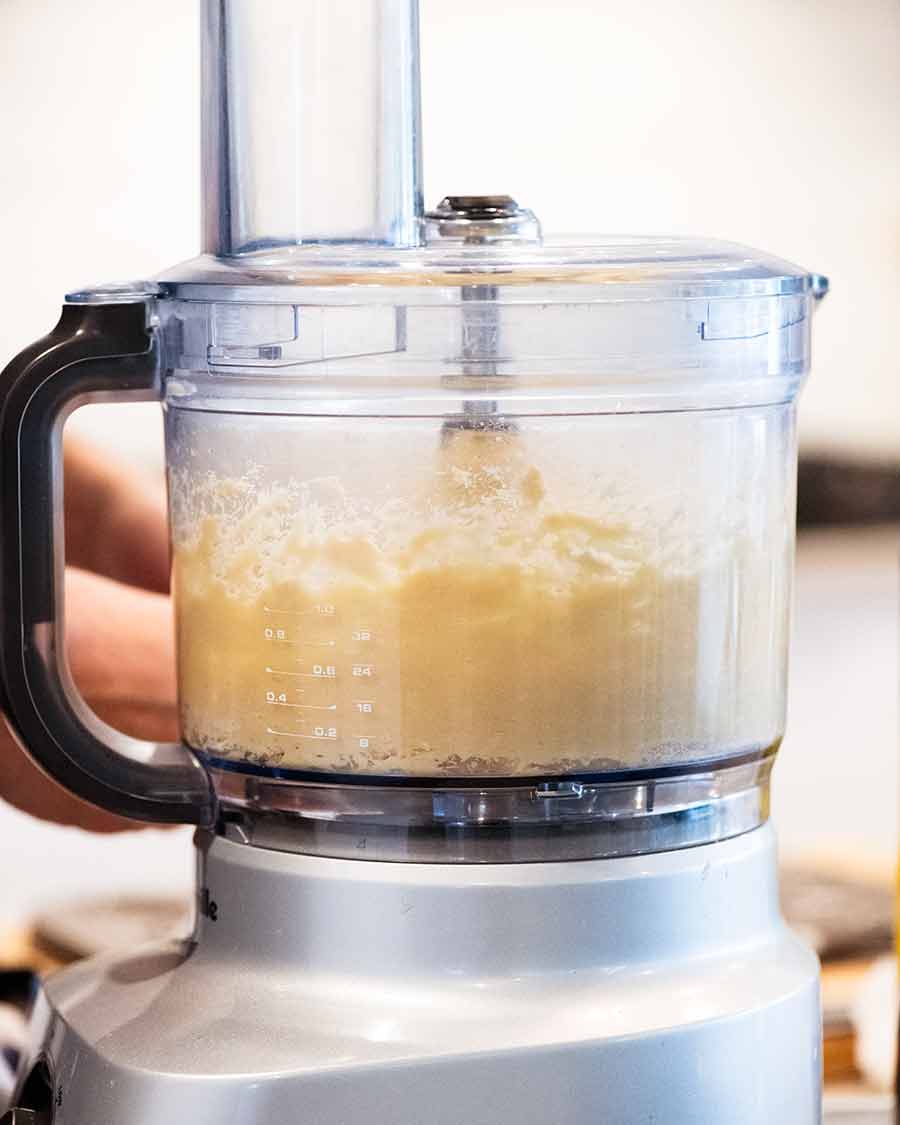
Heads up: Yes really, the dough takes 35 minutes to mix using a stand mixer. It will look like a sticky, unusable paste for the first 25 minutes, and even once ready it will still be a very, very soft dough. Click here to jump to the section explaining why the dough is soft.
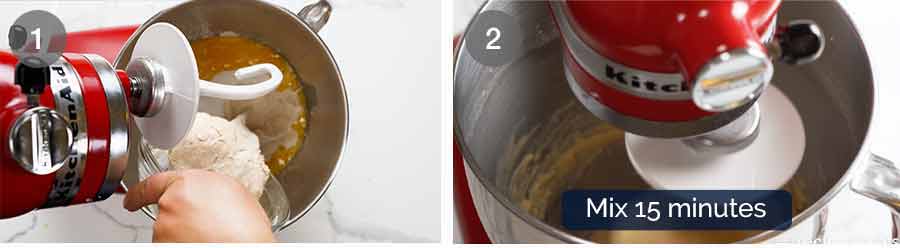
Make dough: In the bowl of a stand mixer fitted with a dough hook, add the flour, eggs, salt, rest of the sugar and the foamy yeast. Mix on Speed 1 just until ingredients are combined;
Mixing – Part 1 (15 minutes): After the ingredients are combined, then mix on Speed 1 for 5 minutes then on Speed 2 for 10 minutes. Yes really, for 15 minutes!
(Click here to read about why it takes this long. In short, it’s because the high amount of butter in this dough inhibits the formation of gluten that occurs when we knead dough which makes breads rise. So we have to knead for much longer than typical breads for the the gluten to form.)
What should the dough look like at this stage? Super sticky and pasty, and totally un-dough-like. No way could you knead it with your hands. You’re on the right track!

Brioche dough in the early stages go mixing – very sticky! 
Brioche dough initially – very sticky and pasty
Next, we add butter:

Slowly add butter: With the stand mixer still on Speed 2, drop butter cubes in gradually. Do this over about 90 seconds to 2 minutes, giving the dough a chance to mix most of the butter in. Don’t dump all the butter in one go as it will take much longer for the butter to incorporate;
Incorporate butter: Keep mixing until the butter is fully incorporated – about 1 minute. At first the butter will be pushed around the sides but eventually it will mix in.
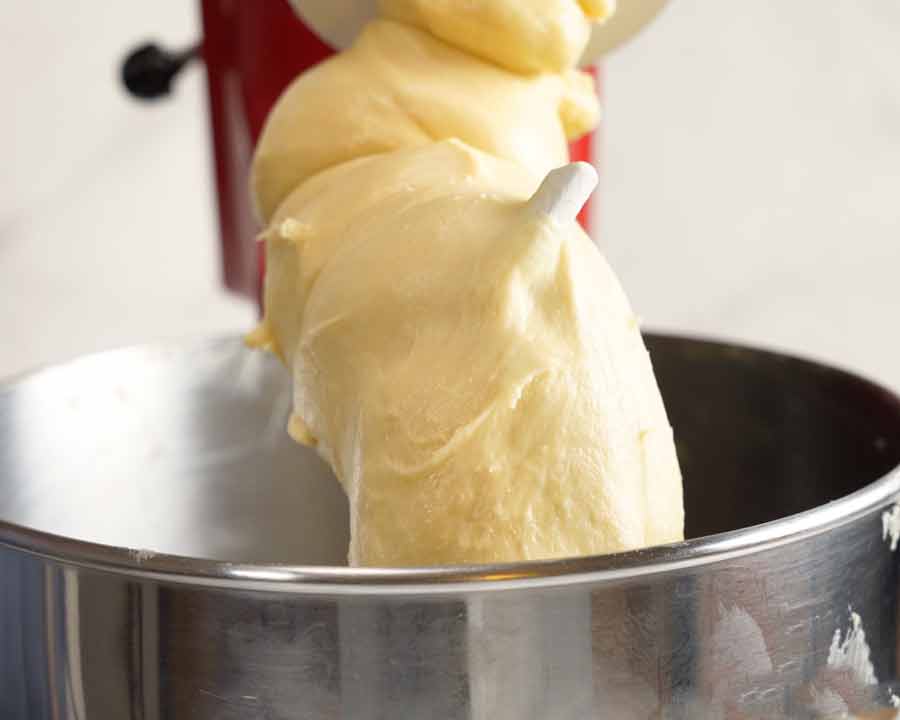
What should the dough look like at this stage? Even stickier and pastier! You may start to doubt me … but have faith! The dough will firm up later to the point we can just handle it after kneading with the stand mixer (see next step).

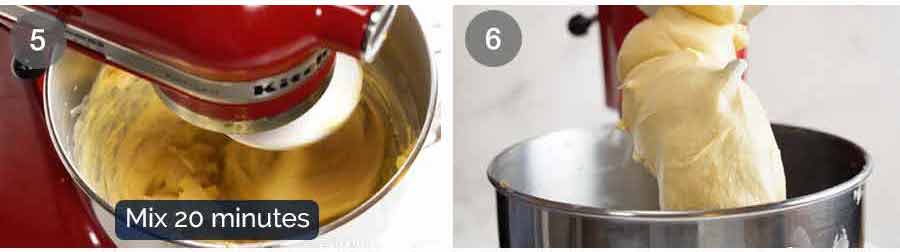
Mixing – Part 2 (20 minutes): After you can no longer see lumps of dough, mix on Speed 2 for 20 minutes. Yes, a whole 20 minutes! Click here to read about why it takes this long.
Scrape down the sides of the bowl every now and then, as needed. I do it about 3 times at the beginning of the mixing when the mixture is stuck all over the side of the bowl. Towards the end of the mixing time, the dough will come together and the sides of the bowl will be clean;
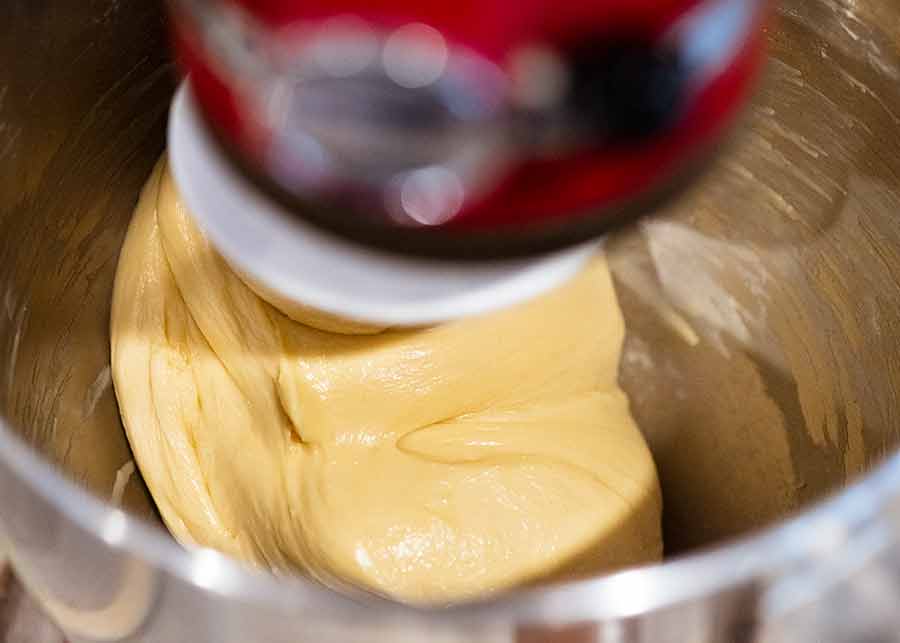
What should the dough look like at this stage (finished)? We want the dough as soft as possible but just firm enough and un-sticky enough to handle. Soft dough = soft brioche! The following photos show what the dough looks like before and after mixing.
Brioche dough at the beginning (left) and end (right) of mixing:
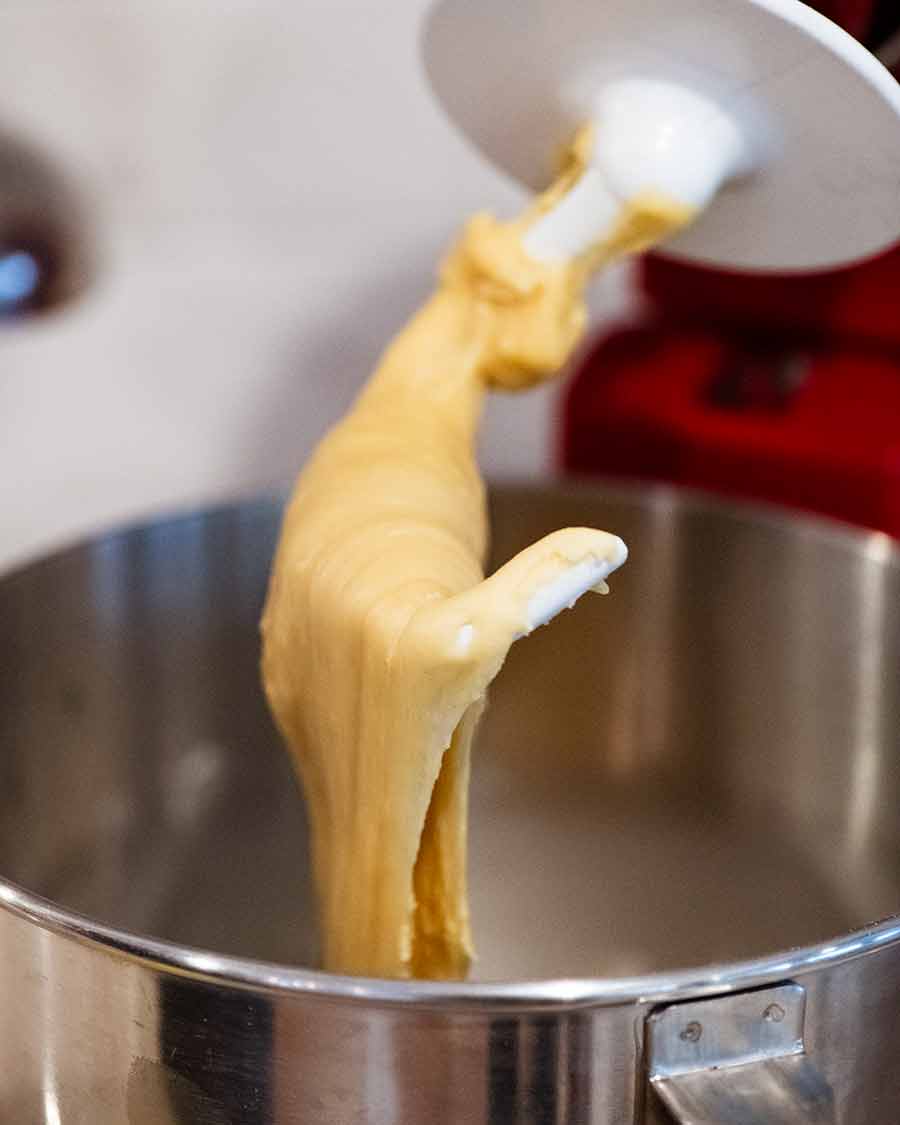
Brioche dough at start of mixing – thin and super sticky 
After 35 minutes of mixing – firm enough to shape.
And here’s another photo towards the end of the mixing time. You can see how the dough has come together and come away from the side of the bowl (ie the dough isn’t so pasty it’s stuck all on the bowl).
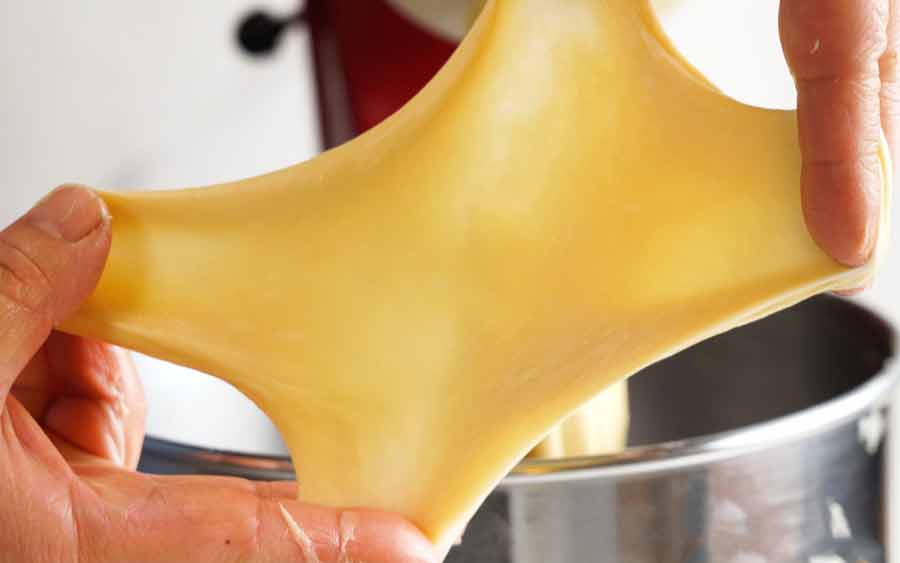
The “window pane test”: The “window pane” test will tell you if your dough is also sufficiently elastic which means it has been kneaded enough. Take a walnut size piece of dough and stretch out into a thin film using your fingers. If you can see light through it and do this without the dough breaking, then it has been kneaded enough. If not, keep kneading!
Sometimes it takes longer to knead the dough, depending on the warmth and humidity of the kitchen. I haven’t pinpointed exact temperatures yet, but generally the hotter a kitchen, the longer the dough takes to knead until ready. 20 minutes is the time it has consistently taken me in a ~21 – 23°C (70 – 73.5°F) kitchen.
Hot weather and melting butter
If it’s very warm (say 28°C/ 82°F or more) then the butter may melt as the dough is being mixed. This will cause the dough to become excessively greasy. You can tell if this happens because the dough will be shiny and slippery with oil, rather than the butter being incorporated into the dough.
If this happens, just pop the bowl with the dough in it in the fridge for 15 minutes to chill the butter slightly. Then continue mixing.
The same can happen if you take a little too long to braid the dough before baking (warm weather, warm hands = melting butter!) Just pop the dough back in the fridge to let the butter firm up a bit, then continue with the recipe.
Part 3: Rising and shaping the loaf
Dough made, it’s now time to let it rise and to form the loaf.
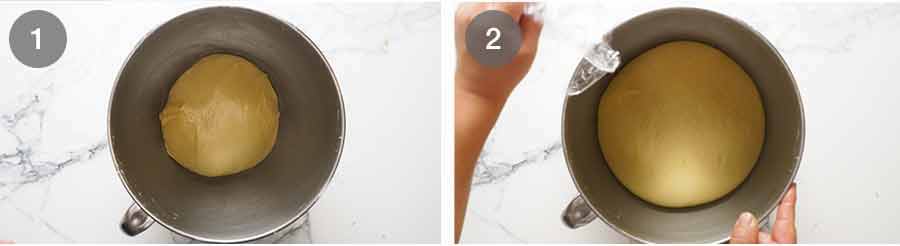
Rise #1 (2 hours): Shape the dough into a ball, put it back into the stand mixer bowl. Cover with cling wrap and put it in a warm place for 2 hours until it has doubled in size.
When seeking a warm place to let the dough rise, remember that the warmer it is, the faster it will rise. Do not put it in direct sunlight. The heat is too strong and will dry out the dough.
CHEEKY TIP: Use your dryer! Run it for a few minutes to warm it up, then place the dough in and close the door. It’s a draught-free, warm and cosy environment your dough will love!
How the dough looks after Rise #1: It has doubled in size.

How to tell dough is proofed enough
You can determine if the dough has proofed just enough, not enough or too much by looking and touching.
Correctly proofed
Visual: Dough has increased in volume according to the description given in the recipe directions. For this recipe, we are looking for doubling in size for Rise #1, and just over double in size for Rise #2.
Touch: Gently poke the dough. If the indentation slowly springs back halfway, then it’s proofed and ready for the next step per the recipe.Over-proofed
Visual: The dough has risen over the top of the pan and is spilling out over the sides
Touch: Will be balloon-like and inflated. If the indentation remains OR touching the dough causes the dough to deflate, then it’s over proofed.Under-proofed
Visual: The dough has not increased to the described volume given in the recipe direction.
Touch: If the indentation springs back immediately, the dough is under-proofed.
It’s critical to aim for the correct level of proofing for the best result. Over-proofed dough will likely collapse during or after baking, and the crumb will be too loose and crumbly. Under-proofed dough will not rise enough during the bake and the bread will be denser than it should be.
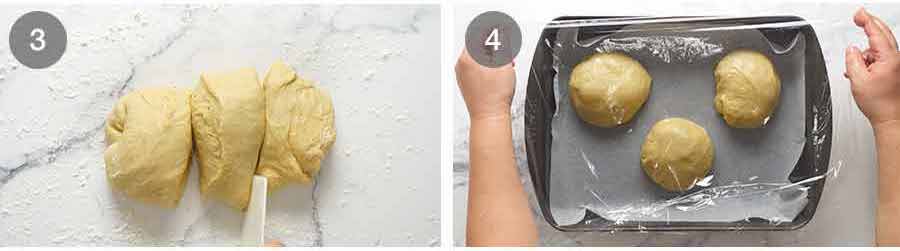
Divide the dough into 3: Punch the dough dough to release all the air. Scrape out onto a lightly floured work surface. Fold the outside of the dough in 6 times. Shape into a log then cut into 3 equal portions and shape into a ball (~225g / 7.9oz per piece);
Optional: Place in fridge (1.5 hours): Line a deep container or roasting pan with baking/parchment paper that’s been lightly sprayed with oil. Place dough on paper, cover with cling wrap or a lid, lightly sprayed with oil. Refrigerate for 1.5 hours.
This step makes the butter in the dough harden which in turn makes the dough firmer and easier to handle. This makes it easier to shape into a braid and makes the surface of the brioche smoother.
It’s an optional step because you can proceed straight onto forming the loaf and Rise #2. If you skip it the inside of the brioche will come out exactly the same, but the surface of the brioche will be slightly more streaky (like the crust of croissants). It’s also a little harder to handle because the dough is very soft.
To be honest, I love the crust of brioche that hasn’t been refrigerated because it flakes like croissants. But in pursuit of perfection, I’ve included the refrigeration step!
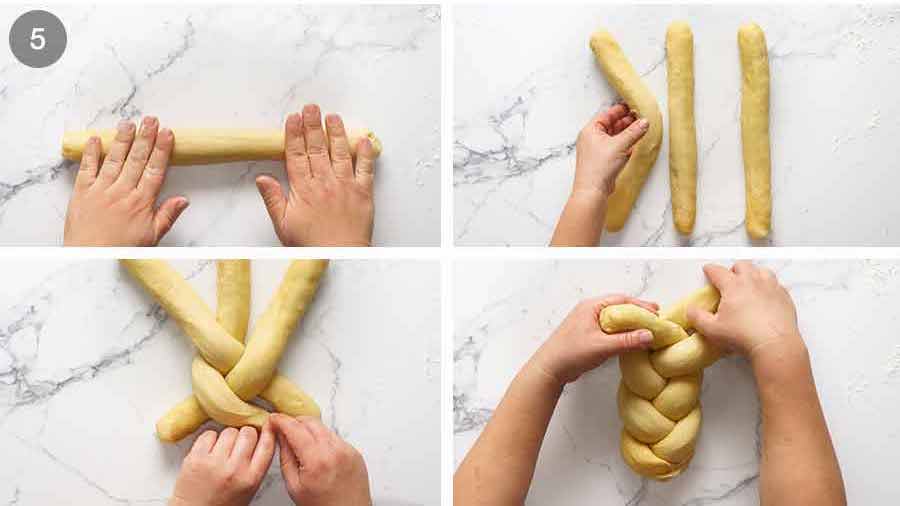
Braid the dough: Remove dough from fridge. Place on a lightly floured work surface and roll each piece into a 35cm/14″ logs. Braid the logs, and tuck the ends under to make them tidy. See video for my braiding technique.
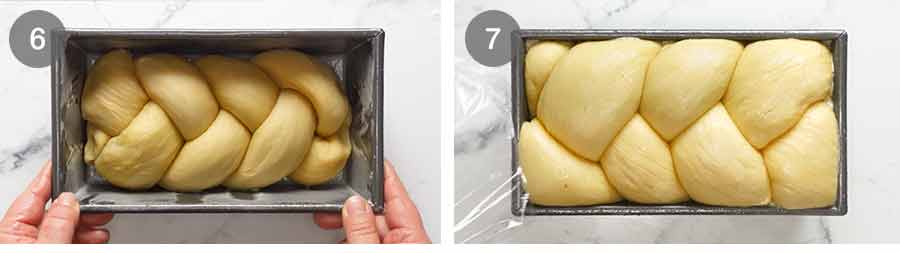
Place in loaf pan: Spray a 21.5 x11cm (8.5 x 4.3″) loaf pan well-coated with oil spray (this works better than butter to ensure it doesn’t stick), then place the dough in.
Lightly spray cling wrap with oil, then cover the dough. (Oiling the cling wrap stops the dough from sticking to the cling wrap. If it sticks, it will causes the dough to deflate when you remove the cling wrap.)
Different size loaf pans are fine to use, but it will affect the shape/height of the brioche. You can also bake it freeform (ie. just on a tray) but bear in mind it will spread out more so it will be wider than it is tall;
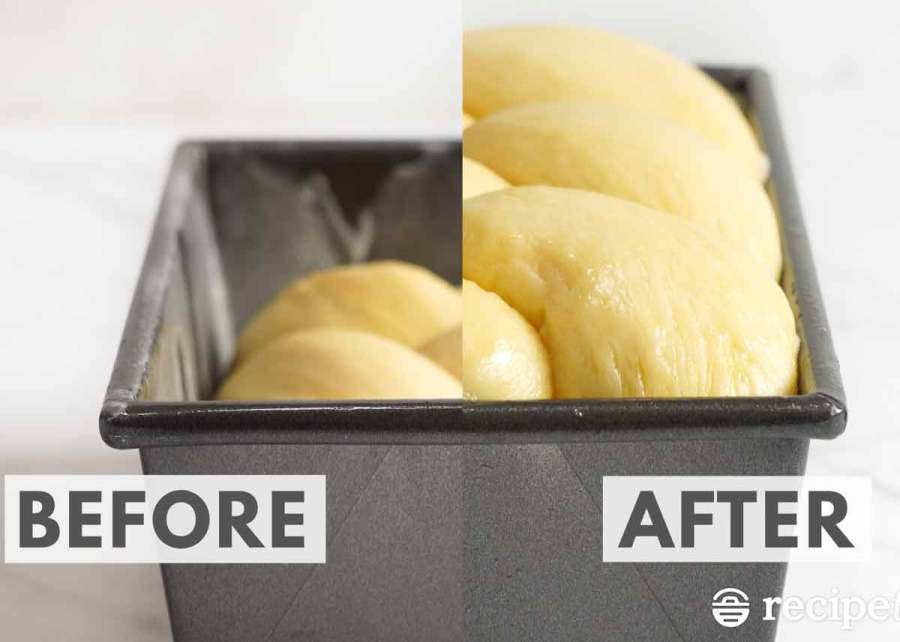
Rise #2 (3 hours): Rise in a warm place for 3 hours or until it is just over double in size. In my loaf pan, the dough rises to 1cm / 0.2″ above rim at highest point of the dough.
This rise takes longer than you might expect because the dough first needs to come to room temperature (ie remove fridge chill) before it starts to warm up and actually rise.
Here’s a comparison of before and after rising in the loaf pan:
Now, we’re ready to bake!
Part 4: Baking
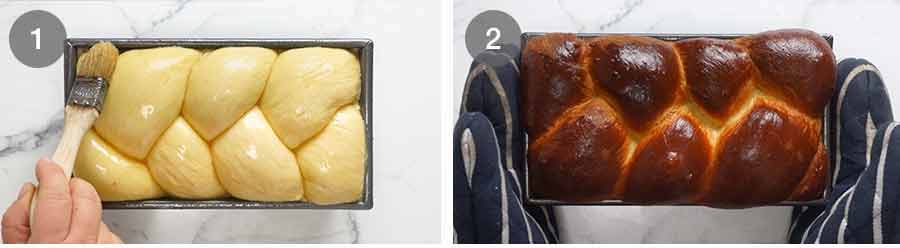
Egg wash: Brush the brioche gently with leftover egg. This is what gives the brioche the signature deep golden colour and shiny finish;
Bake uncovered 15 minutes: Position a shelf so the brioche will sit in the lowest 1/3 of the oven. If it sits higher, the top goes a little too golden too quickly.
Bake uncovered for 15 minutes at 200°C/390°F (180°C fan). The brioche should be a bronzed, mahogany colour.
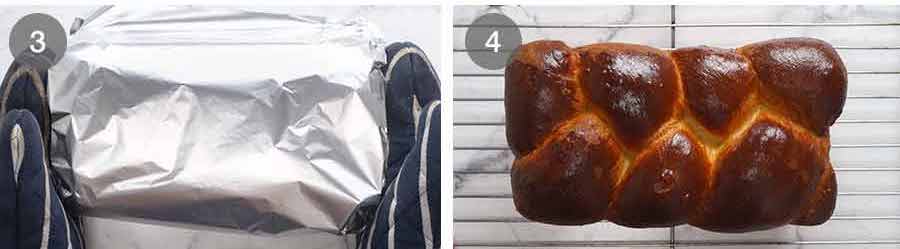
Bake covered 20 minutes more: Remove the brioche from the oven and cover loosely with foil. Bake for a further 20 minutes (thus 35 minutes in total).
Cooked internal temperature – The internal temperature of cooked brioche is 88°C/190°F. This is slightly lower than the target temperature of 93-96°C /200-205°F of most breads because it is an enriched dough (ie. high in fat). Lower fat breads have a higher cooked internal temperature.
In actual fact, brioche is cooked (done) at 82°C / 180°F but I tend to take it higher as a precaution, having experienced a few too many undercooked brioches when creating this recipe! This internal temperature is still well within the limits that yield moist, tender bread (as you will see in the video);
Rest baked brioche: Immediately turn finished brioche out onto a rack. Don’t leave it sitting in the loaf pan as it will overcook and the crust will also go soggy.
Leave the brioche to cool for at least 45 minutes before slicing (or tearing!) to serve. This is a key step for any bread to allow it to finish cooking inside and settle. If you cut bread as soon as it comes out of the oven, the inside is still doughy and wet.
And now for the best part – EATING IT!!!

Before we start fawning over our amazing finished brioche though, my work is not done yet. Allow me to geek out a little bit on you on the finer details of this Brioche. If you’re not interested, skip down to the recipe, recipe tutorial video, or … to Dozer!
Brioche recipe: The details
Brioche is a unique bread, and with it comes a unique production process. So in this section, I’m sharing some extra background information pointing out some of the quirks and features of brioche generally as well this recipe specifically. I hope it may interest those of you interested in the why when it comes to baking.
1. This is a traditional French Brioche recipe – with one exception
This Brioche recipe is a traditional French brioche recipe with the exception of one thing: the yeast. Professional French patisseries and bakeries traditionally make brioche with fresh yeast, which is not readily available to all home cooks. Also, working with fresh yeast calls for capable baking experience.
So I’ve chosen to create a brioche recipe made with dry yeast to make this more accessible to home cooks.
2. Butter in brioche: Go big or go home
One thing that puts this brioche recipe firmly in the “authentic French” camp as opposed to most recipes you’ll find on the internet is the quantity of butter used. This recipe calls for 150g / 10.5 tablespoons of butter per 300g / 2 cups of flour which is a ratio of 1:2.
Many recipes will call for only around half the butter this recipe uses (1:4 butter to flour) which makes the dough easier to work with (because it’s not as soft as it is in this recipe). On the flip side however, it significantly reduces the richness and buttery flavour of the end result.
Butter is the heart and soul of a great brioche. In my humble opinion, if we’re going to all the effort to bake a brioche, let’s do it right!
3. Why does brioche dough have to be kneaded for so long?
Brioche dough takes 35 minutes to form using a stand mixer because of the amount of fat in the dough from the butter and eggs. This means it requires far longer for the gluten to form through the kneading process than regular bread.
Brioche dough is called an enriched dough which has higher amounts of fat (butter), sugar and dairy than typical breads. Brioche has around 5 times as much butter as an average white bread recipe!
Fat inhibits the formation of gluten which is formed when we knead dough which is required to make breads rise so they’re soft and fluffy. So brioche dough is required to be kneaded for longer than usual to develop the gluten.
4. No standmixer? No worries.
If you don’t have a stand mixer you can use a food processor instead! It’s also much quicker, taking just 5 minutes flat. Directions in the recipe.
The Brioche rises slightly less, but it tastes exactly the same. Below is a visual comparison of the results.
Comparison: Food processor (5 minutes kneading) vs stand mixer (35 minutes kneading)
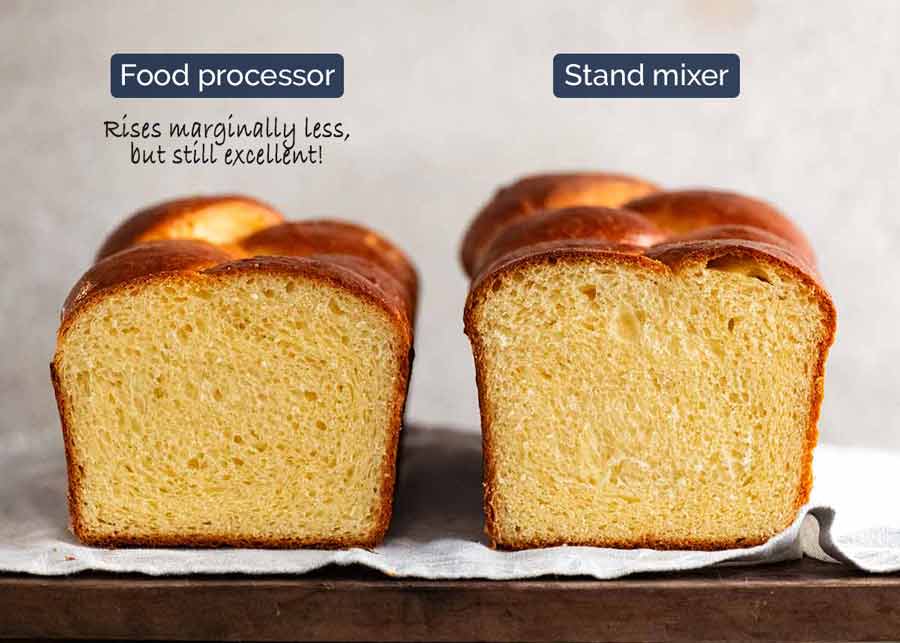
So why I didn’t share the food processor version as the base recipe if it’s so good? A good question and my answer is this:
Brioche is an iconic recipe, one of the great breads in the world. I wanted to show you how it’s made properly and traditionally. The fact remains that the food processor version is not quite as good as making it with a stand mixer because it doesn’t rise quite as well. But the difference is marginal. So given how much time you save, not to mention being an excellent alternative to those of you who don’t have a stand mixer, I fully endorse the food processor method as a perfectly acceptable compromise!
5. “Help! My dough looks too soft! Is this normal?”
Relax. The dough for brioche is much softer than typical bread doughs and this is the secret to the extraordinarily soft crumb of real brioche.
In fact, the dough is so soft that for most of the time the dough is being worked in the stand mixer it will have a paste-like consistency. It will be so wet and sticky that it’s impossible to handle because it would just stick to your hands.
As you continue to knead the dough in the stand mixer though, the dough firms up. It will come to a point where it can now be handled. It will be smooth and still very soft – much softer than typical bread doughs – but shouldn’t stick to your hands.
The dough is also refrigerated partway through the making of the Brioche to aid in shaping by hand before placing into the loaf time, so we get a nice smooth crust.
You’ll find “easy” brioche recipes on the internet that have firmer doughs that are easier to work with. But you’ll also find the crumb of those breads isn’t as soft as a real brioche. Yes, we made a LOT of brioche in recent months!!
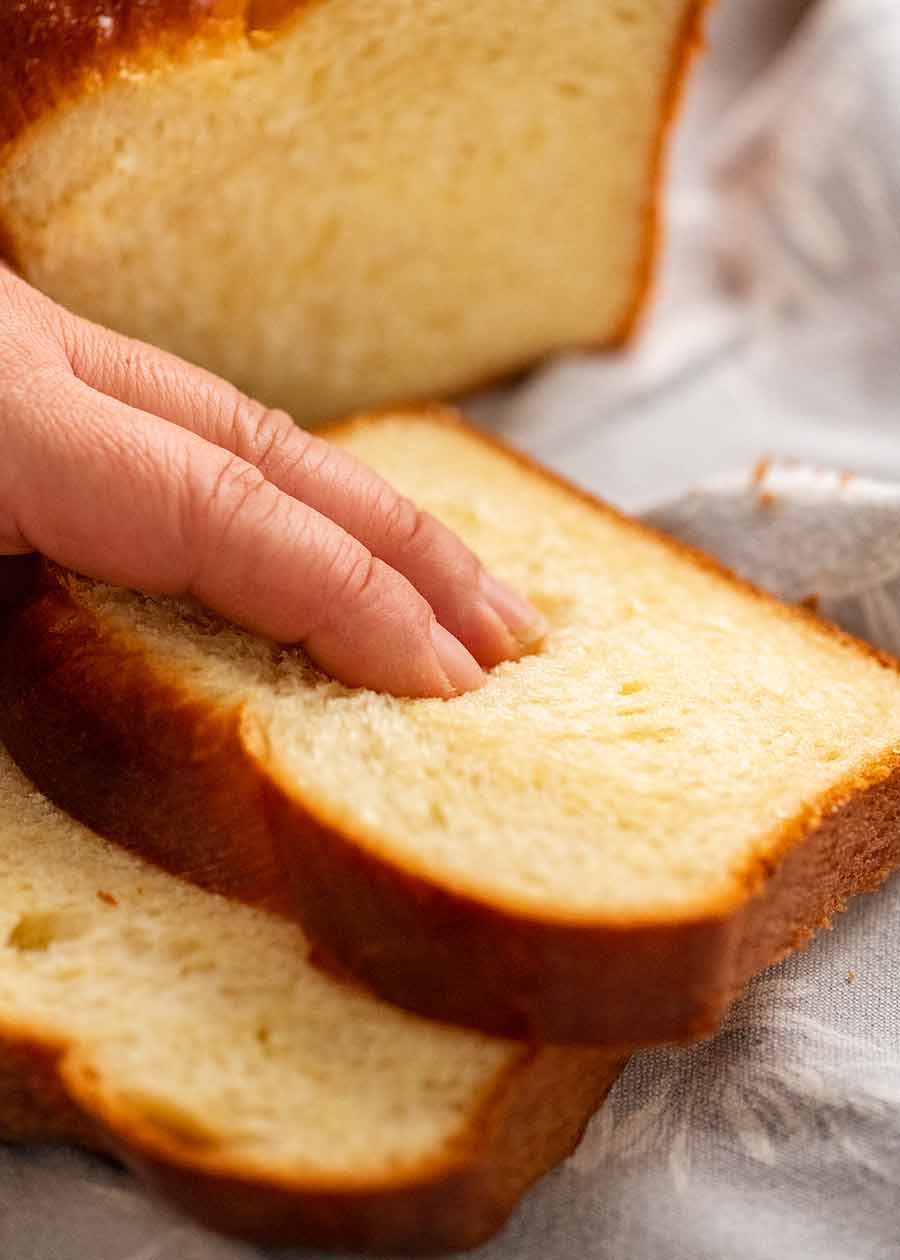
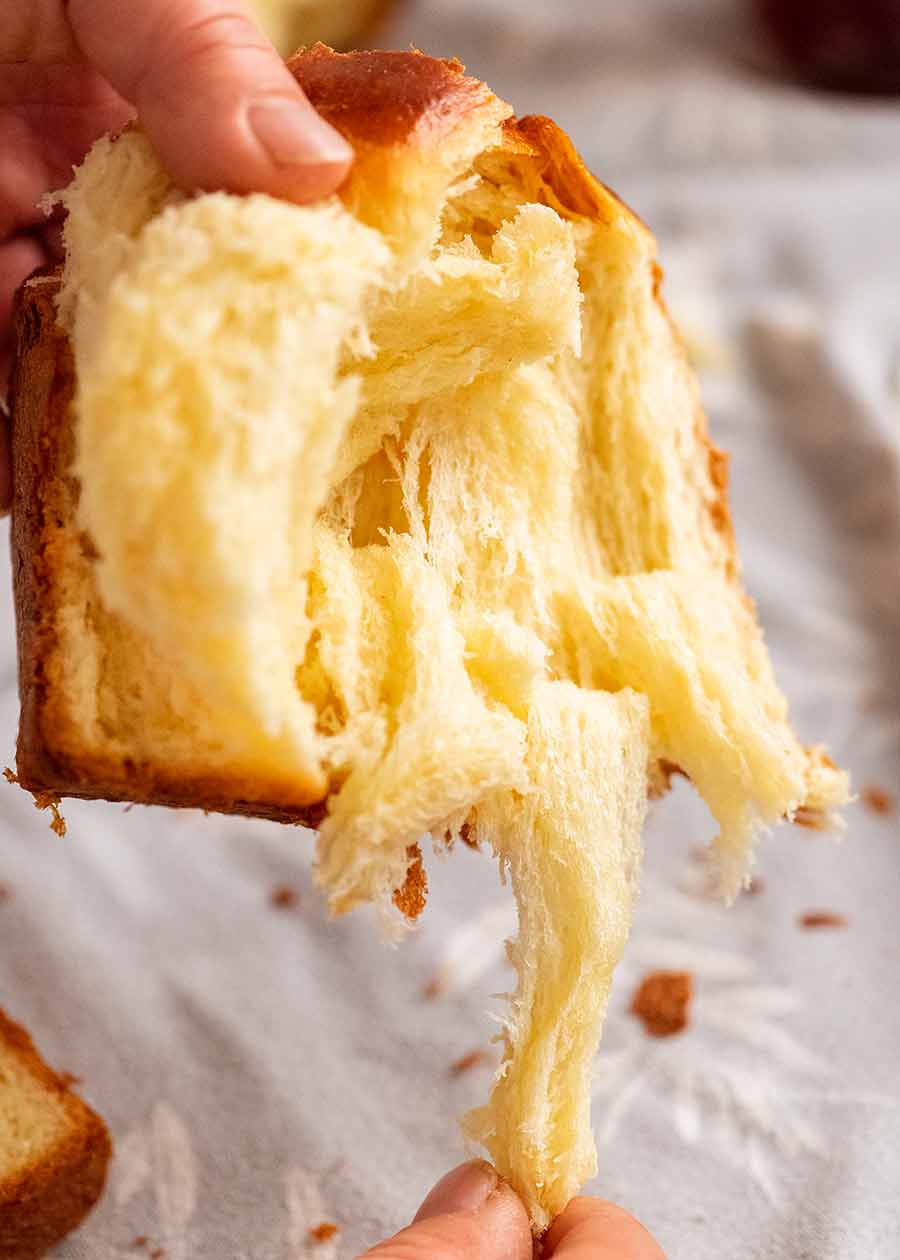
6. Inside a perfect brioche: “Cotton candy” strands
One of the unique qualities of brioche is the texture of the crumb. It has an elasticity similar to soft breads (as you will see in the video when I tear it!), it looks like bread and it slices like bread without crumbling. It is for all intents and purposes, bread.
However rather than being chewy, the crumb is soft and giving like cake. Even more enticing is the distinct cotton candy-like strands of the interior that peel away when you tug at them. These strands are truly mesmerising, to both play with and eat! To me, it’s one of the features that makes brioche so special and totally unlike any other bread. Perhaps like popping bubble wrap, it appeals to the inner child within me – I find those strands irresistible!

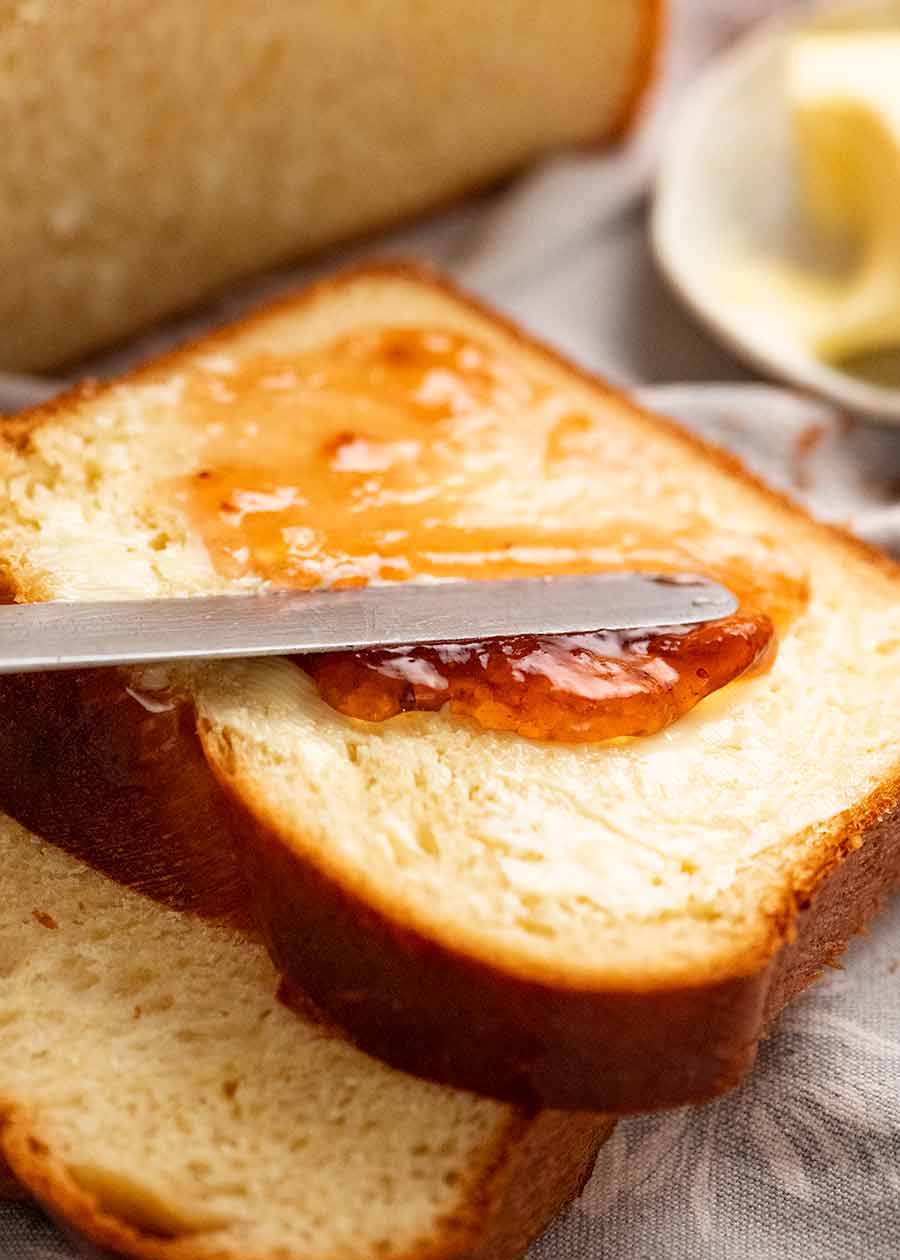
How to serve Brioche
In France, brioche is typically served for breakfast and afternoon tea. Think warm slices of brioche with butter (because, well, you know, there’s just not enough butter in brioche as it is! 😂) and a good smear of homemade jam.
Traditional that may be, but in my world the applications of brioche are much broader! Here’s how else I love to use brioche:
Breakfast, morning tea, afternoon tea, and all snacking times in between – Either slices of a warm loaf or toasted and spread with butter and quality jam. I personally find honey too sweet with brioche, but that’s just me …
Bread on the side of meals – Apparently this is “not done” in France, I presume because it’s all a bit much. “A bit much” never stopped me though, and nor should it you! Imagine mopping up the garlic butter on a plate of Garlic Prawns or Baked Fish with brioche … Yerrrrrsss!!
For sandwiches, sliders, burgers – Brioche buns are all the rage at trendy bistros!
Eggs – Topped with scrambled or poached eggs (try it with Eggs Benedict!);
The ultimate Bread and Butter Pudding; or
The most incredible French Toast of your life.
Serve with chicken liver parfait or smoked fish pâté – a trend you see at nouveau French restaurants these days, instead of crackers or toast.
Basically, anything you will eat with bread will be better if you replace it with brioche! You just can’t go wrong. – Nagi x
Watch how to make it
Brioche
Ingredients
- 2 1/2 tsp instant/rapid rise dried yeast (other yeasts see Note 1)
- 4 tbsp milk , warm, full fat (Note 2)
- 2 cups plain/all purpose flour (not bread flour, Note 3)
- 3 1/2 tbsp caster/superfine sugar (Note 4)
- 1/2 cup eggs (2 1/2 eggs) , lightly whisked, at room temperature (Note 5)
- 1 tsp salt (cooking/kosher salt, not table salt Note 6)
- 150g / 10.5 tbsp unsalted butter , cut into 1.25 / 1/2" pieces, softened (but not melting, Note 7)
Other:
- Oil spray , anything neutral flavoured (canola, vegetable, not olive oil)
- 1/2 leftover egg , lighter whisked (Egg Wash, use leftover egg from above)
Instructions
Dough:
- Bloom yeast (Note 1): In a small bowl, mix 1 tsp sugar, yeast and milk together. Cover with cling wrap and set aside in a warm place for 10 minutes until foamy.
- Dough making methods: Base recipe method uses a Stand Mixer. See Note 5 for faster food processor method.
- Make dough: In the bowl of a stand mixer fitted with a dough hook, add the flour, eggs, salt, rest of the sugar and the foamy yeast. Mix on Speed 1 until ingredients are combined.
- Mixing Part 1: After the ingredients are combined, then mix on Speed 1 for 5 minutes then on Speed 2 for 10 minutes, (Yes really, 15 minutes, see Note 8!)
- Slow add butter: With the stand mixer still on Speed 2, drop butter cubes in gradually, over about 90 seconds to 2 minutes, giving the dough a chance to mix most of the butter in. (Note 9)
- Incorporate butter: Keep mixing until the butter is fully incorporated- about 1 minute. Dough will be pasty and sticky!
- Mixing Part 2: Then mix on Speed 2 for 20 minutes, scraping down the sides of the bowl every now and then.
- Dough goals (Note 8): At first the mixture it will be very pasty and stuck to the sides of the bowl. By the end, the dough should come together, caught up in the dough hook, and not be stuck on the sides of the bowl. Very soft, but able to pick it up. You should be able to do the "window pane" test using a walnut size piece (Note 10). If not, keep kneading! (Note 11 trouble shooting)
Rising, Fridge & Shaping:
- Rise #1 (2 hrs): Shape the dough into a ball, put it back into the stand mixer bowl. Cover with cling wrap and put it in a warm place for 2 hours until it has doubled in size.
- Cut into 3: Punch the dough dough to release all the air. Scrape out onto a lightly floured work surface. Fold the outside of the dough in 6 times. Shape into a log then cut into 3 equal portions and shape into a ball (~225g/7.9oz per piece).
- Fridge (1.5 hrs): Line a deep container or roasting pan with baking/parchment paper lightly sprayed with oil. Place dough on paper, cover with cling wrap/lid and refrigerate for 1.5 hours (Note 12).
- Braid: Remove dough from fridge. Place on a lightly floured work surface and roll each piece into a 35cm/14" logs. Braid the logs, and tuck the ends under to make them tidy.
- Loaf pan: Spray a 21.5 x11cm (8.5 x 4.3") loaf pan well coated with oil spray, then place the dough in. Lightly spray cling wrap with oil, then cover the dough.
- Rise #2 (3 hrs): Rise in a warm place for 3 hours or until it is just over double in size. (Note 13)
Baking:
- Preheat oven: Preheat oven to 200°C/390°F (180°C fan) when dough is almost ready.
- Shelf position: Position shelf so loaf will sit in the lowest 1/3 of the oven.
- Egg wash: Brush the brioche surface very gently with whisked egg.
- Bake uncovered 15 min: Bake brioche for 15 minutes, uncovered, until a beautiful deep golden.
- Bake covered 20 min: Remove from oven. Loosely cover with foil. Bake for a further 20 minutes or until the internal temperature is 88°C/190°F. (Note 14)
- Turn out and cool: Immediately turn brioche out onto a rack. Cool for at least 45 minutes before slicing (or tearing!) to serve (still warm).
- Serving: Best served warm, with butter and lovely jams, the French way! Either slice warm loaf, or toast slices. (Note 16) See in post for more serving ideas – savoury, sweet, breakfast, lunch, dessert!
What the finished brioche should be like:
- The crust will be delicately crusty and flake gently when you slice it. It will be ultra soft inside, much softer than usual breads, with a pale yellow colour from the butter and eggs. Though traditionally sliced to serve, a unique characteristic is that if you tear the bread, it shreds like cotton candy. This is the sign off a well made traditional French brioche that you will not find in run-of-the-mill grocery store cheap brioche! Subtly sweet with a beautiful butter flavour (another thing store bought lacks!).
Notes
- Too sticky – If at 20 minutes the dough is still really pasty, add 1 tablespoon of flour at a time until the dough is still very soft but just firm enough to handle without it sticking all over your hands.
- Too crumbly – If your dough is too crumbly at the beginning and never becomes pasty, likely you mis-measured something. This is tough to salvage (having made that mistake myself!). You can try adding warm milk, a bit at a time until you reach the dough consistency pictured in the photos/video. But actually, I would suggest starting over.
- Greasy (melting butter) – if it’s very warm in your kitchen, the butter in the dough may melt during the mixing stage, causing the dough to become very greasy (you will see oil on the surface). If this happens, refrigerate the dough in the bowl for 15 minutes to firm up the butter slightly, then keep mixing.
Nutrition
Classic breads you can make at home


Life of Dozer
Demolition Darby Dozer… in what used to be my house!!

The post Brioche appeared first on RecipeTin Eats.
]]>