 Hot Chocolate Fudge Cake – think of this as a sliceable version of Chocolate Self Saucing Pudding – with a LOT more chocolate fudge sauce! The perfect cosy dessert for cool winter days that’s easy to make. The chocolate cake of your dreams… I know this is a great dessert for sweater weather. But holy... Get the Recipe
The post Hot chocolate fudge cake appeared first on RecipeTin Eats.
]]>Hot Chocolate Fudge Cake – think of this as a sliceable version of Chocolate Self Saucing Pudding – with a LOT more chocolate fudge sauce! The perfect cosy dessert for cool winter days that’s easy to make.
The chocolate cake of your dreams…
I know this is a great dessert for sweater weather. But holy moly. It’s so good, I’ll wager that after you’ve made it once, you’ll make it over and over again regardless of the weather.
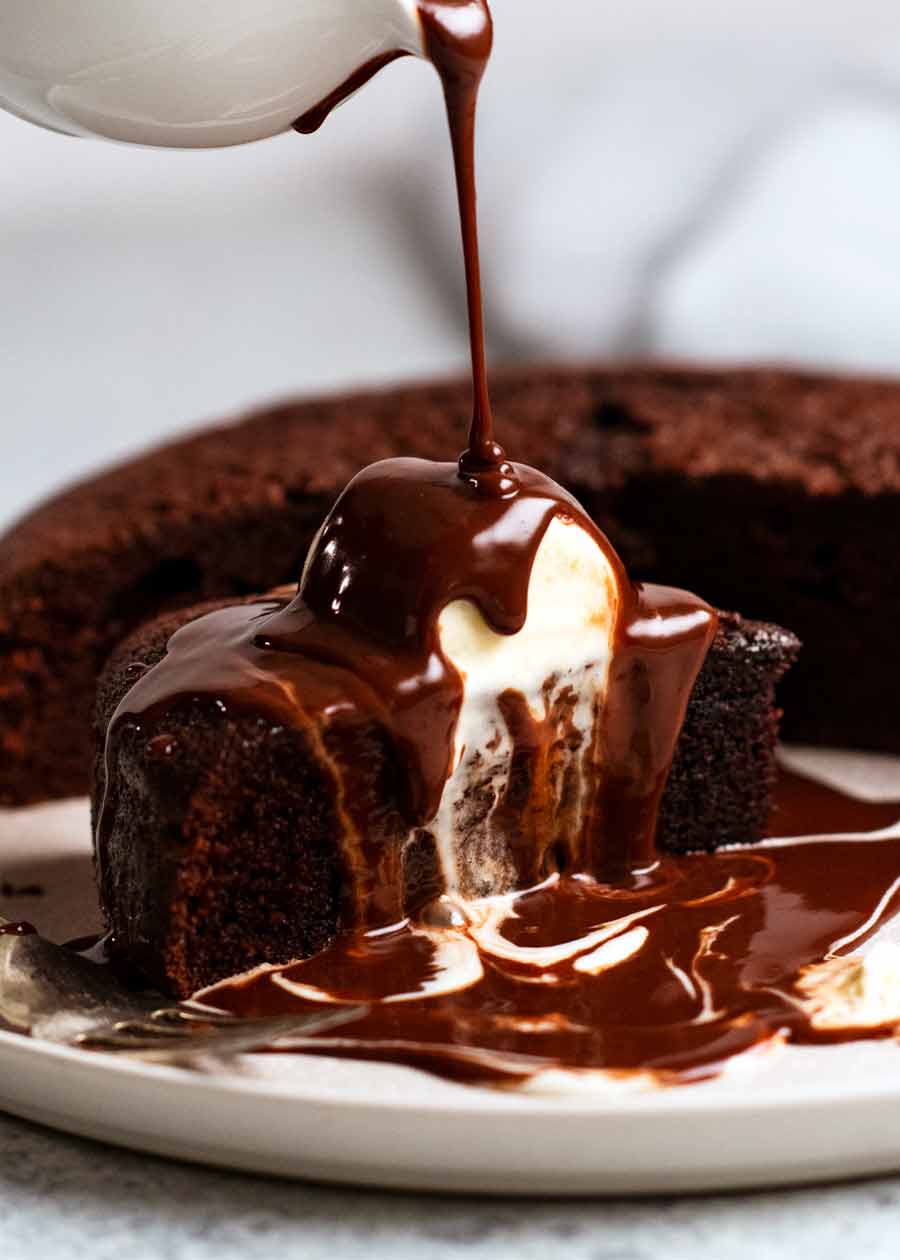
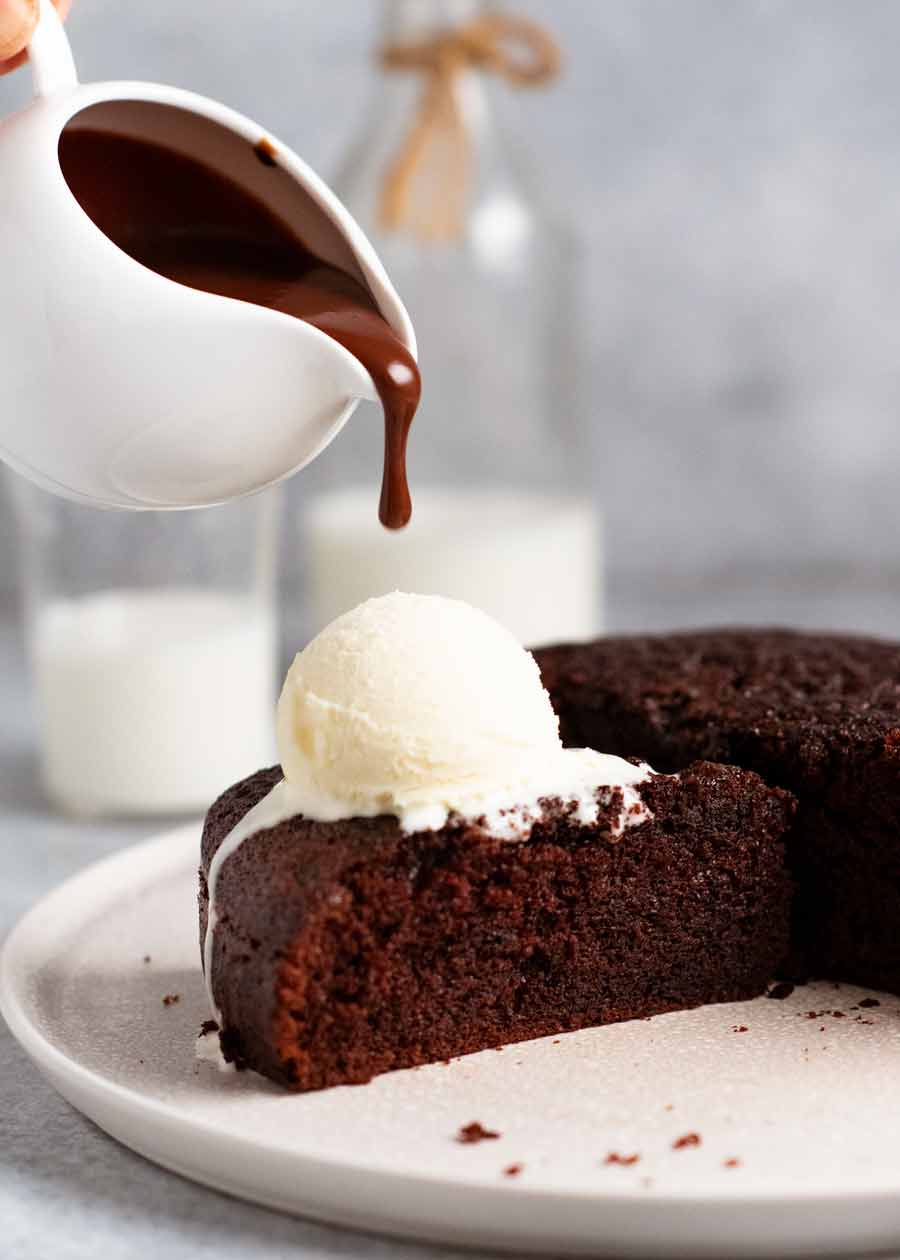
Let me paint the picture for you. A warm slice of soft chocolate cake, moist in a way that cakes can only be when warm. A scoop of melty vanilla ice cream on top.
Then you douse – douse, my friends! – with hot chocolate fudge sauce. The ice cream starts to melt, and you get beautiful swirls of chocolate with white streaks pooling around your cake. You dig in with a spoon, getting a big scoop of cake soaked with the chocolate sauce and melted ice cream, and that first bite, that first glorious bite…..
Knees. WEAK.

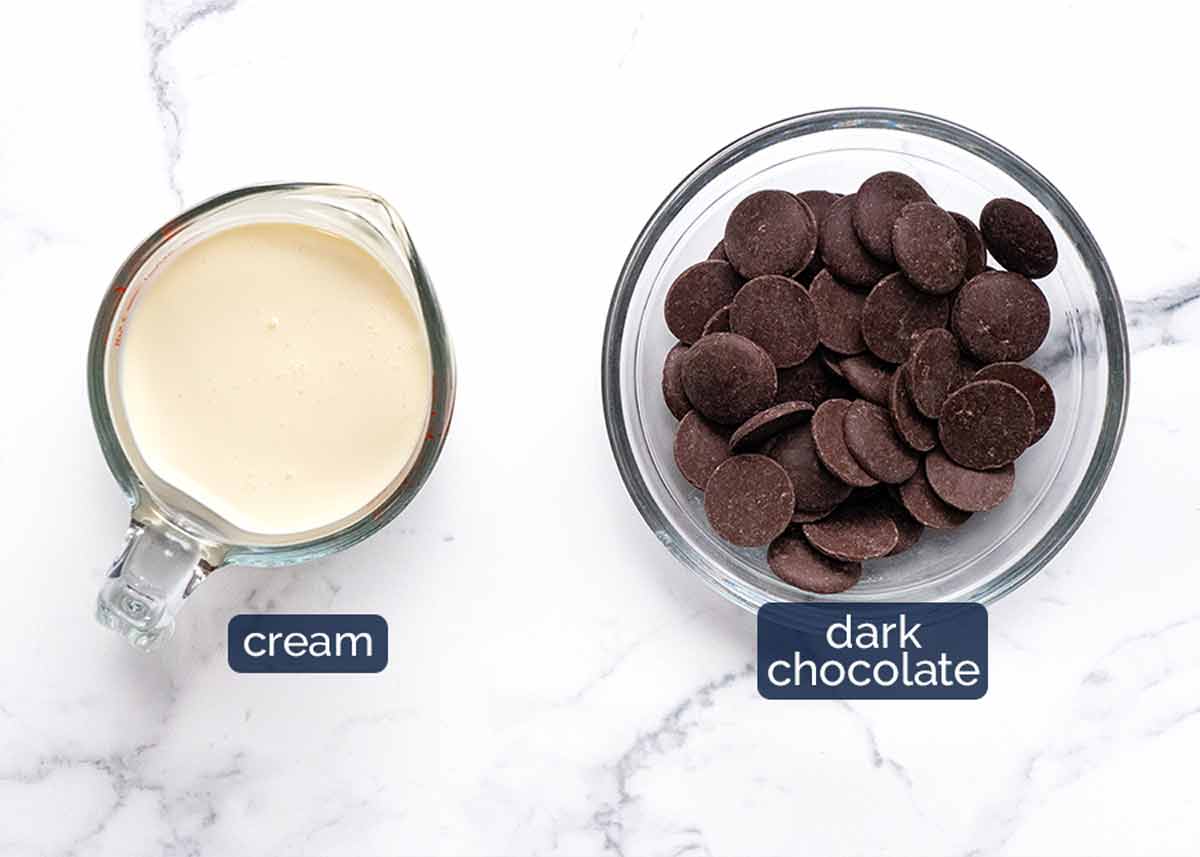
Did I mention how easy this Hot Chocolate Fudge Cake is to me? The batter is made in a single bowl with a wooden spoon. And that fudge sauce is 2 ingredients – just cream and chocolate.
Ingredients in Hot Chocolate Fudge Cake
Here’s what you need to make this winter dessert. The recipe is based on my classic Chocolate Cake, with some minor adjustments to make it suitable for serving hot as a single layer, unfrosted cake.
Dry ingredients for the warm chocolate cake
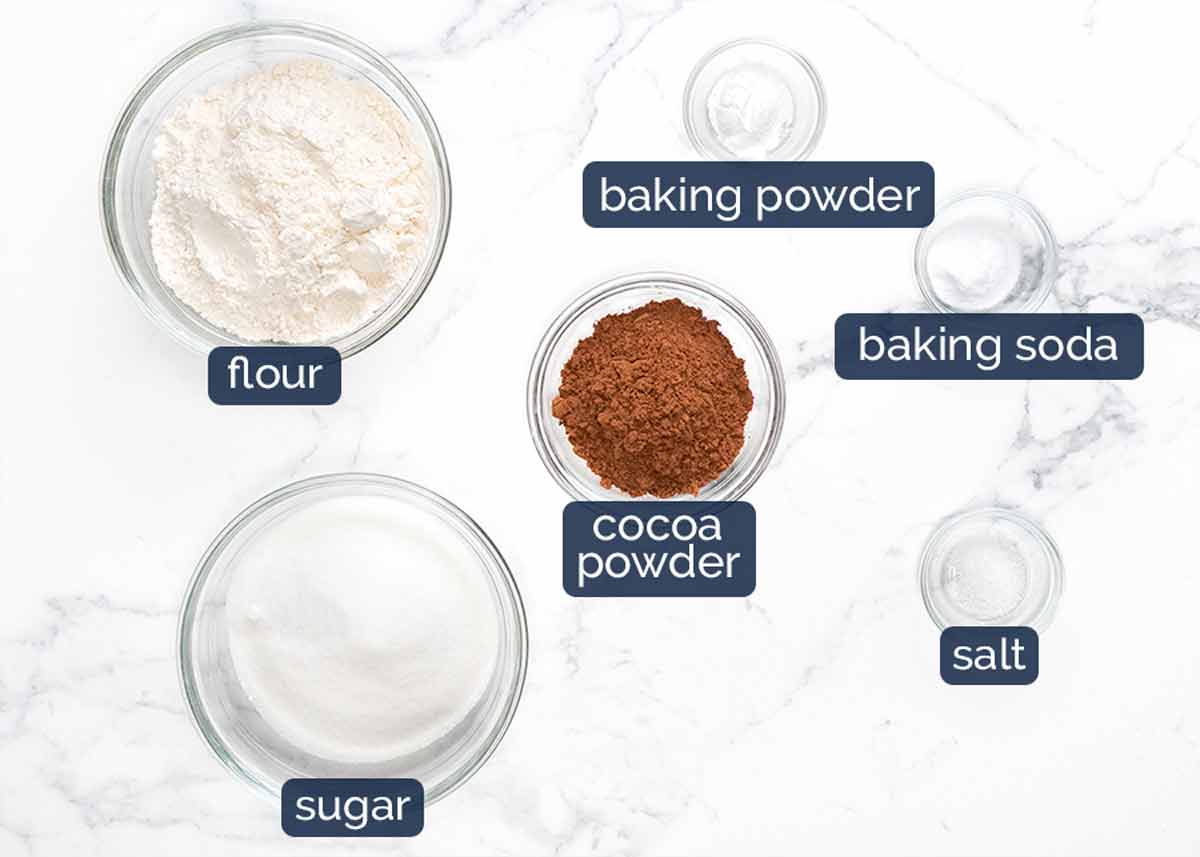
Flour – Just plain / all-purpose flour. Self raising flour will also work but the cake crumb is not as soft. (Skip the baking soda and baking powder if you use self-raising flour).
Baking soda (bi-carb) and baking powder, or use more of either – Both of these makes cakes, muffins etc rise but work differently depending on what you’re making. Baking soda is also ~3x stronger than baking powder. I like using a combination of the two for this cake for a lovely tender crumb and nice shape to the surface of the cake. However, if you only have one or the other, you can use more of what you have. See recipe notes for quantities.
Cocoa powder – Just plain cocoa powder, unsweetened. Not dutch processed – though you can use it if you’ve got this more expensive, more intense type.
White sugar – Use caster sugar / superfine sugar if you’ve got it, because it’s finer so you can be confident it dissolves easily. Else ordinary white sugar / granulated sugar works ok too.
Salt – Just a pinch brings out the flavours in this cake, especially the chocolate. Fairly standard baking practice for me these days, adding a touch of salt for this purpose!
Wet ingredients
And here are the wet ingredients in this cake:

Melted butter AND oil – Butter adds flavour into this cake while oil keeps the crumb fresh and moist for longer. Using both gives us the best of both worlds!
Egg – 1 large egg which means an egg that is sold in cartons labelled “large eggs” which is an industry standard. It is also best to be at room temperature – see this post for a quick way to do this.
Vanilla – For flavour, which compliments the chocolate.
Boiling water – Using hot rather than cold water makes the cocoa flavour “bloom” so the cake tastes more chocolatey. You’ll smell the chocolate the moment the hot water mixes into the batter!
No coffee? Some chocolate cakes include a touch of coffee which brings out the chocolate flavour. I tried it but it didn’t add anything to this cake because you get so much chocolate flavour from the hot fudge sauce!
Hot chocolate fudge sauce
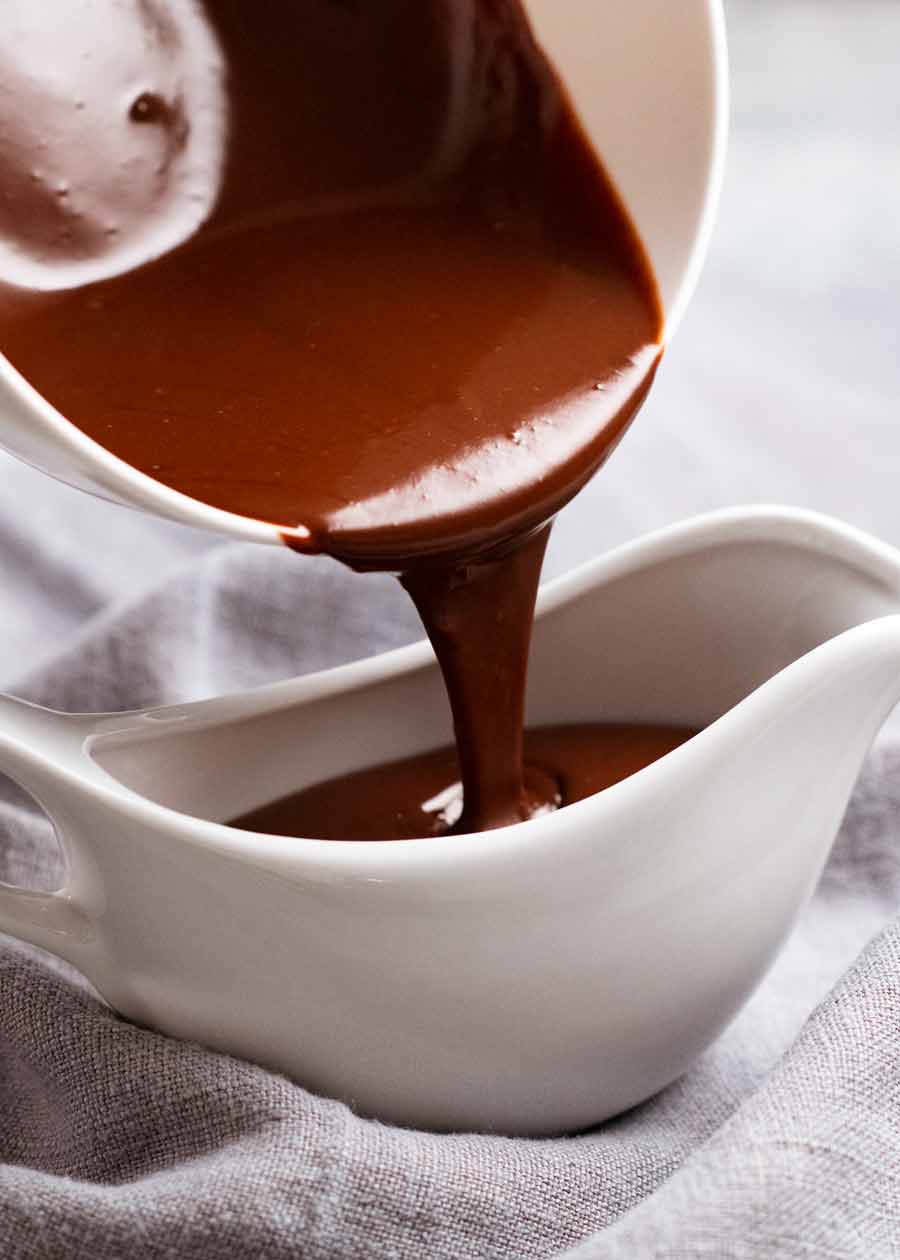
Fudge sauce comes in many forms – some made with cocoa powder and evaporated milk, some with melted chocolate, some a combination of the two. The hot fudge sauce for this cake is the most luxurious of its kind – pourable chocolate ganache that’s made with just chocolate and cream.
The ratio of chocolate to cream is 1:1 for ganache. However, as I want the sauce to be slightly thicker when warm, I’ve increased the chocolate slightly so it’s 1/ 1/4 cups of chocolate (200g) to 1 cup / 250ml of cream.
Dark chocolate – I use standard baking dark chocolate melts or chips (US: semi-sweet chocolate chips). You can also use chopped 50 – 70% dark chocolate (Lindt is my favourite).
Chocolate melts are just a type of chocolate chips that is available here in Australia. It comes in a disc shape and is designed to melt easily and smoothly. Whereas chocolate chips, while they can also be used for melting, are designed specifically to hold their shape for your favourite chocolate chip cookies rather than melting into puddles.
Milk and white chocolate – These will work but you will need to reduce the amount of cream slightly else the fudge sauce will be too runny. This is because they are softer than dark chocolate. Fellow baking nerds can read more about this in my Chocolate Ganache recipe!
Cream – Either heavy / thickened cream or pure cream will work here. Full fat essential. Reduced fat doesn’t always mix properly into the chocolate and also the sauce will be too thin.
How to make Hot Chocolate Fudge Cake
Get the cake in the oven first. Then make the chocolate fudge sauce – it will need 20 to 30 minutes to cool a bit to allow it to thicken slightly before using.
1. Making the hot fudge cake
Just mixed up in one bowl with a whisk. No stand-mixer or electric beater required. This is a very forgiving cake. Just be sure to get it in the oven as soon as you mix the batter, don’t leave it lying around.
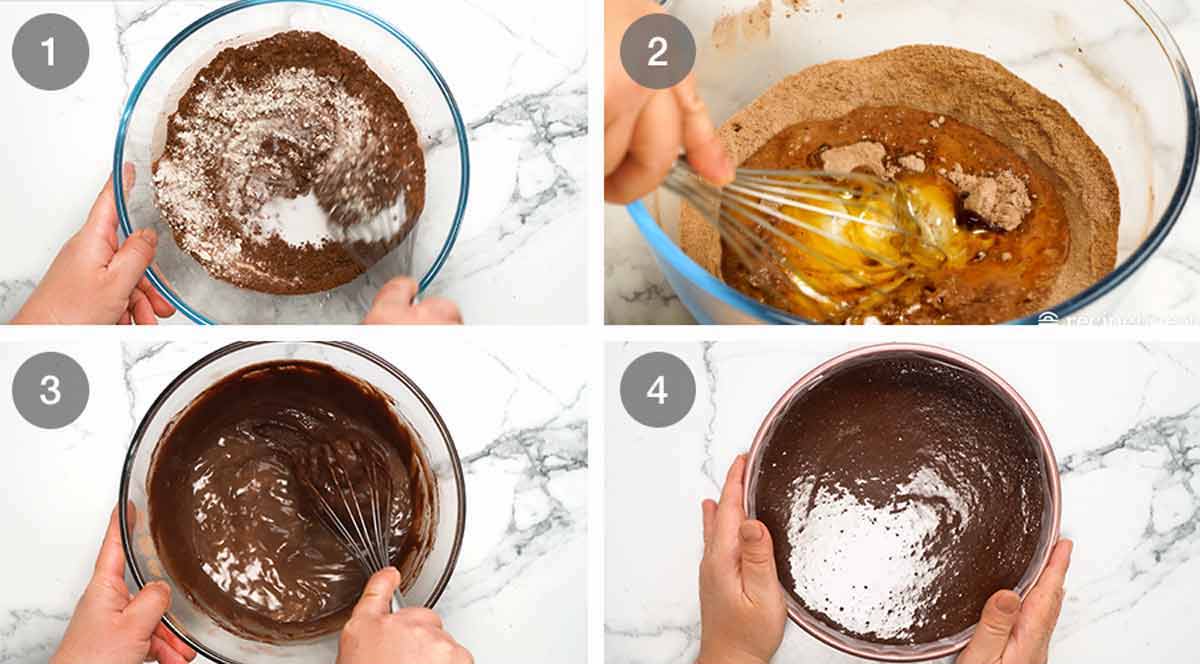
Mix Dry – Whisk the Dry ingredients in a large bowl.
Add Wet – Add the Wet ingredients, except the boiling water, into the same bowl.
Whisk until combined. Then whisk the boiling water in. The batter will be pretty thin – not as thin as the Chocolate Cake on which this recipe is based, but still pretty thin.
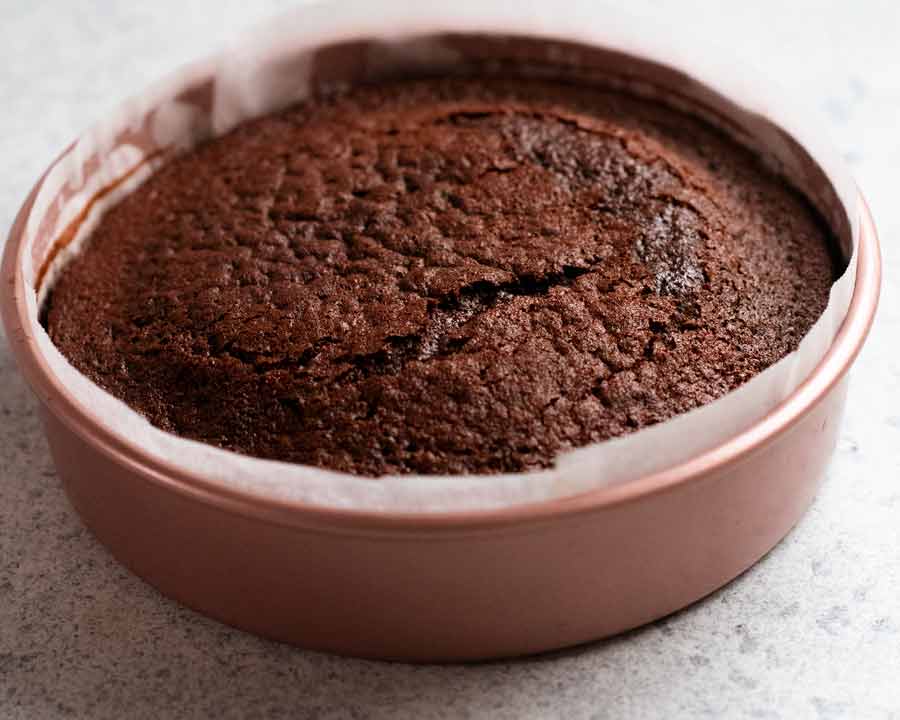
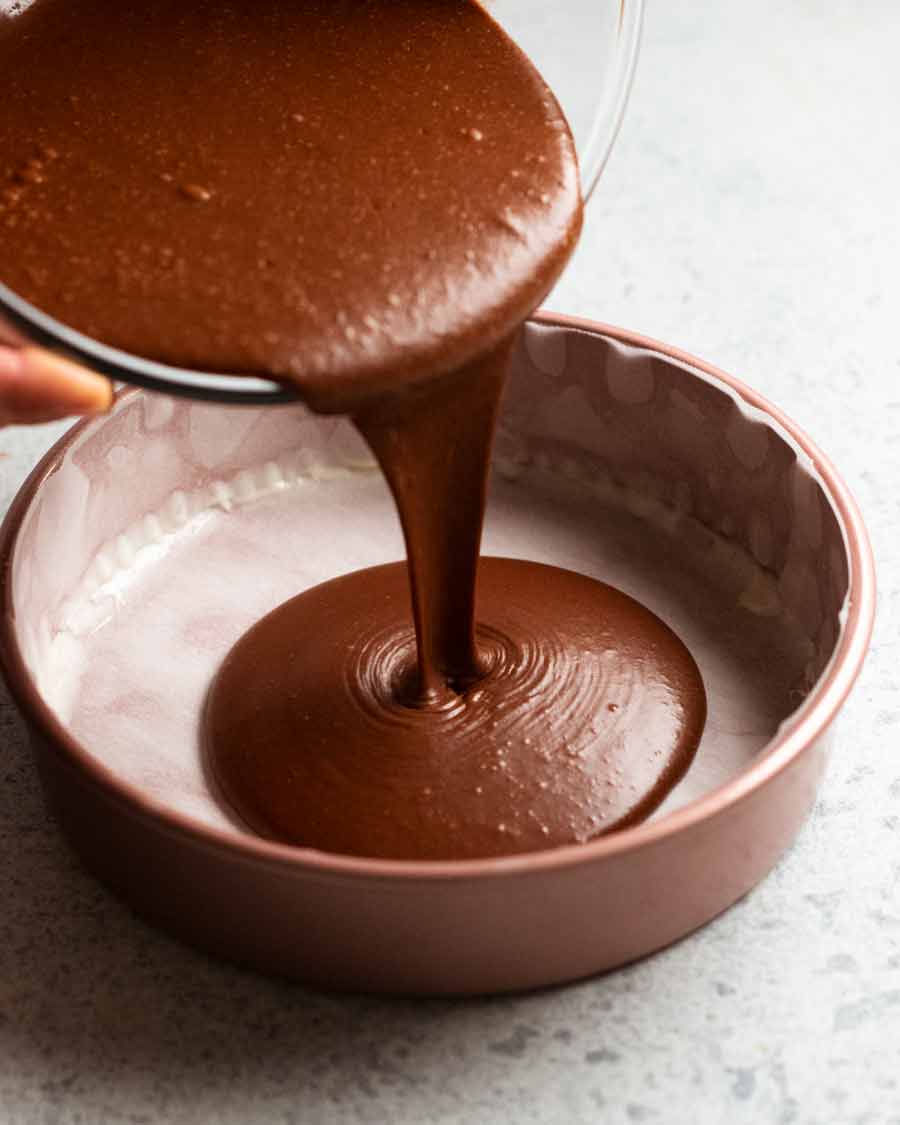
Pour the batter into a lined 20cm/8″ pan. It’s best not to use a springform pan to avoid any chance of batter leakage – because as noted above, the batter is fairly thin.
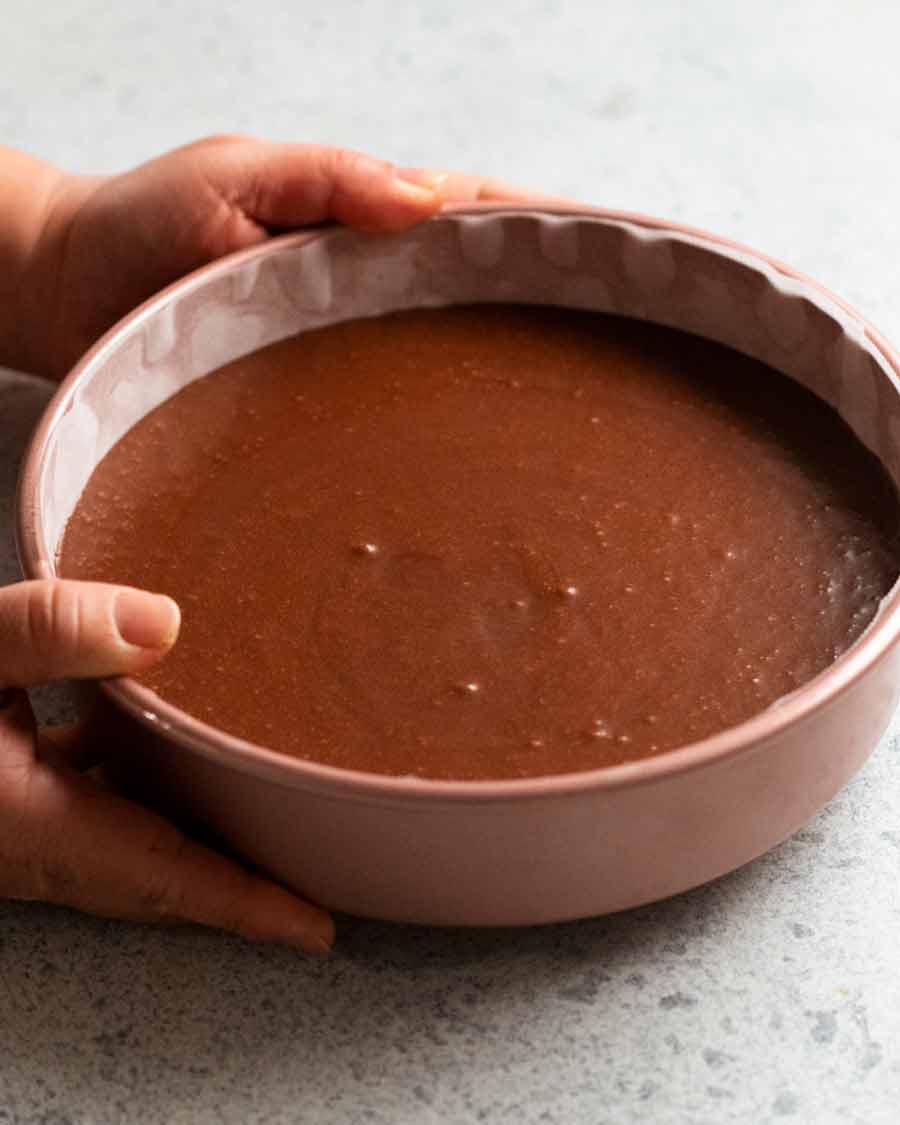
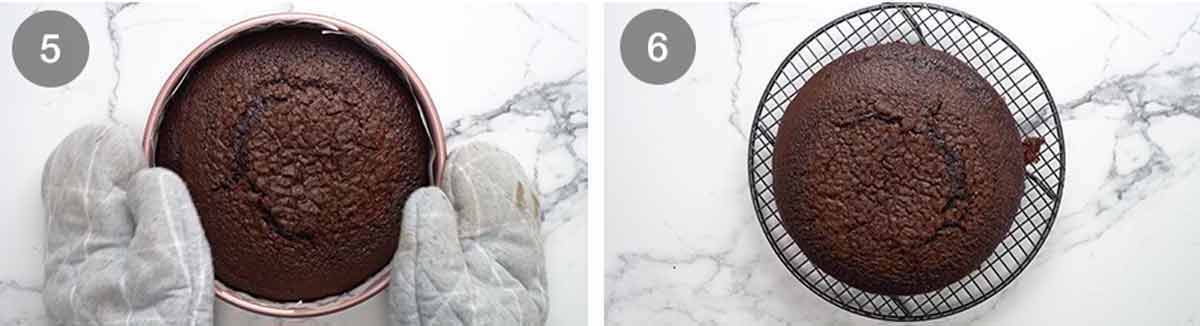
Bake for 40 minutes at 180°C/350°F (160°C fan) or until a toothpick inserted into the centre comes out clean or nearly clean. Remember, we’re making a hot fudge cake here, so it’s fine if the centre is slightly damp!

Cool in the pan for 10 minutes. Then turn it out and let it cool for just another 10 minutes before slicing to serve. Don’t worry, the cake will still be lovely and warm! We just want to rest the cake a bit before slicing. Hot cake is very delicate!
2. Making the hot fudge sauce
While it’s tempting to just put both cold cream and chocolate in a bowl and microwave to melt, this can lead to the chocolate seizing so you end up with a lumpy mess in your hands. Yep, speaking from first hand experience here! Make ganache properly – by pouring hot cream over the chocolate and leaving it to melt before mixing to combine.

Pour hot cream over chocolate – Heat the cream until steamy and hot using whatever method you choose: saucepan or microwave. Then pour it over the chocolate in a bowl.
Full coverage! Shake the bowl / poke as needed to ensure all the chocolate is submerged.
5 minutes – Cover with a plate and leave for 5 minutes so the cream melts the chocolate.
Mix until the cream and chocolate combine into a glossy chocolate sauce. Be patient – it will happen! If you have little chocolate lumps at the end, just pop it in the microwave for 20 seconds for a heat boost, then mix again.
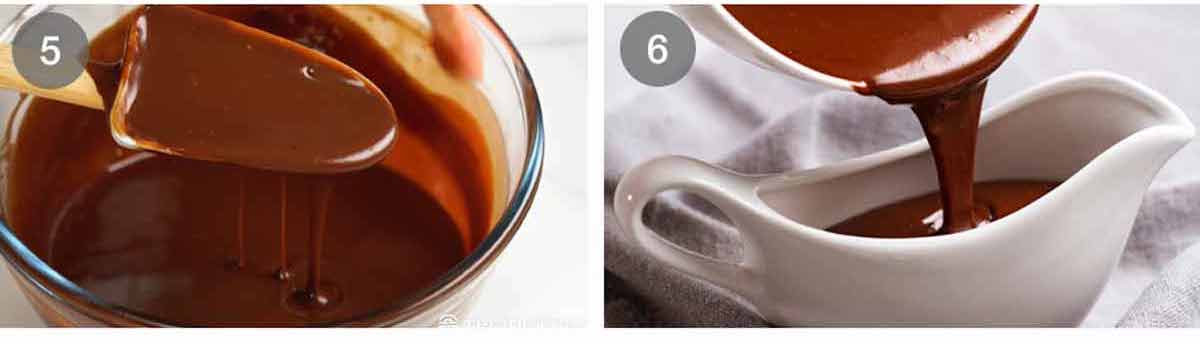
Cool for 20 minutes to let the sauce thicken slightly. Just leave it in the bowl.
Serving – Give it a mix to make it smooth again. Then pour into serving jugs to let everyone help themselves. (Or, if you’re concerned about portion control, you can serve it!).
Reheating and storage – The chocolate sauce will firm up to a peanut butter consistency when refrigerated but can simply be reheated in the microwave back to perfect pourable consistency. It will keep for at least a week – just bear in mind the shelf life of the cream.
3. Serving the hot fudge cake
To serve this gloriously cosy, decadent hot chocolate cake, cut slices of cake as generous as you want. Put on a plate – or a shallow bowl (for easy chocolate-sauce-melted-ice-cream scooping). Top with a scoop of vanilla ice cream then douse with warm chocolate fudge sauce. Dive in and swoon!!
And 10 seconds later…..

Matters of storage
The cake has an excellent shelf life of 5 to 7 days in the fridge. It won’t go stale thanks to the smidge of oil we’re using, and also because it is intended to serve hot. Any baked good heated up wipes out any trace of staleness!
The fudge sauce can also be kept for at least 7 days, limited only by the shelf life of the cream. Keep it in the fridge – it will firm up to a peanut butter like consistency. Scoop out what you need, then just microwave to re-melt.
And PS, in case you’re concerned, there’s plenty of hot fudge sauce for serving. 2 whole cups, that’s 500 ml. Imagine running out of chocolate sauce! Devastating. – Nagi x
Watch how to make it

Hot Chocolate Fudge Cake
Ingredients
Dry:
- 1 cup plain/all-purpose flour (Note 2)
- 1/3 cup cocoa powder (unsweetened), sifted (Note 1)30g
- 3/4 tsp baking powder (Note 2)
- 3/4 tsp baking soda/bi-carb (sifted if lumpy) (Note 2)
- 1 cup caster/superfine sugar (sub ordinary white sugar)
- 1/4 tsp salt
Wet:
- 1 large egg , at room temperature
- 1/2 cup milk , full fat, at room temperature
- 75g / 5 tbsp unsalted butter , melted and cooled slightly
- 1 tbsp oil (canola, veg or other neutral oil) – keeps cake moist for days
- 1 tsp vanilla extract
- 1/2 cup boiling water
Chocolate fudge sauce:
- 1 cup thickened / heavy cream, or pure cream (not low fat, too thin)
- 1 1/4 cups dark chocolate melts or chips (US: semi-sweet chips) – or finely chopped 60 – 70% cocoa chocolate block (Note 3)
Serving:
- Vanilla ice cream
Instructions
- Preheat oven to 180°C/350°F (160°C fan). Grease a 20cm/8" cake pan with butter then line with paper.
- Whisk Dry ingredients in a large bowl.
- Add Wet – Then add all the Wet ingredients EXCEPT the boiling water. Whisk until combined. Then add the boiling water and whisk until smooth. The batter will be pretty thin.
- Bake 40 min – Pour into the pan. Bake for 40 minutes or until a skewer inserted into the centre comes out mostly clean – a faint smear of batter isn't a bad thing, we're making a fudge cake here!
- Cool in the pan for 10 minutes. Invert onto a plate, then onto a cooling rack or plate right side up. Cool for a further 10 minutes – the cake will still be warm for serving.
- Serving – Cut slices of the warm cake. Top with a scoop of ice cream. Douse with fudge sauce – just shy of 1/4 cup per slice (10 slices). Eat and swoon!
Chocolate fudge sauce (makes 2 cups):
- Heat cream until hot, just before boiling point, using your method of choice – saucepan or microwave.
- Stand 5 min – Put chocolate in bowl. Pour over hot cream. Ensure all chocolate is submerged, then cover with a plate. Leave for 5 minutes.
- Mix – Using a whisk or rubber spatula, mix vigorously until the cream and chocolate combine into a silky chocolate sauce.
- Cool to thicken for 20 minutes. Give it a stir then pour into a jug for serving!
Notes
– Just baking soda: use 1 teaspoon in total Self raising flour – Skip both the baking soda and baking powder, switch the plain flour with self raising flour. The crumb won’t rise quite as much but still fluffy and lovely! 3. Chocolate – Use chocolate intended for baking sold in the baking aisle, not eating chocolate (Lindt 70% is the exception). If using a block, chop it finely. Don’t use ordinary eating chocolate – it’s hit and miss. Some will melt fine, others do not. AUSTRALIA: “Melts” are intended for melting so are safest to use. However, chips will melt fine too. US: Semi-sweet chips are perfect for this. 4. Storage – Cake will keep for 5 – 7 days in the fridge (stays moist thanks to a touch of oil). Warm to serve. Fudge sauce will keep for at least a week – factor in the cream shelf life. Firms up in the fridge, just warm to melt. Both the cake and sauce can also be frozen for up to 3 months. Nutrition per serving, assuming 10 servings and all the sauce is consumed. Excludes ice cream.
Nutrition
Life of Dozer
Busted, helping himself to the bin. He’s so gross! 😝 Probably rebelling because he was deprived of chocolate cake. No chocolate for dogs!

The post Hot chocolate fudge cake appeared first on RecipeTin Eats.
]]> Mexican Chipotle Pork and Beans is a big pot of saucy, shreddable meat in a rich, spicy, chipotle sauce. Pork shoulder is slow cooked into fall-apart submission with meaty lima beans that absorbs the bold flavoured sauce. Stuff in tacos, serve over red rice, or eat like stew! Mexican Chipotle Pork and Beans This food... Get the Recipe
The post Mexican Chipotle Pork & Beans appeared first on RecipeTin Eats.
]]>Mexican Chipotle Pork and Beans is a big pot of saucy, shreddable meat in a rich, spicy, chipotle sauce. Pork shoulder is slow cooked into fall-apart submission with meaty lima beans that absorbs the bold flavoured sauce. Stuff in tacos, serve over red rice, or eat like stew!
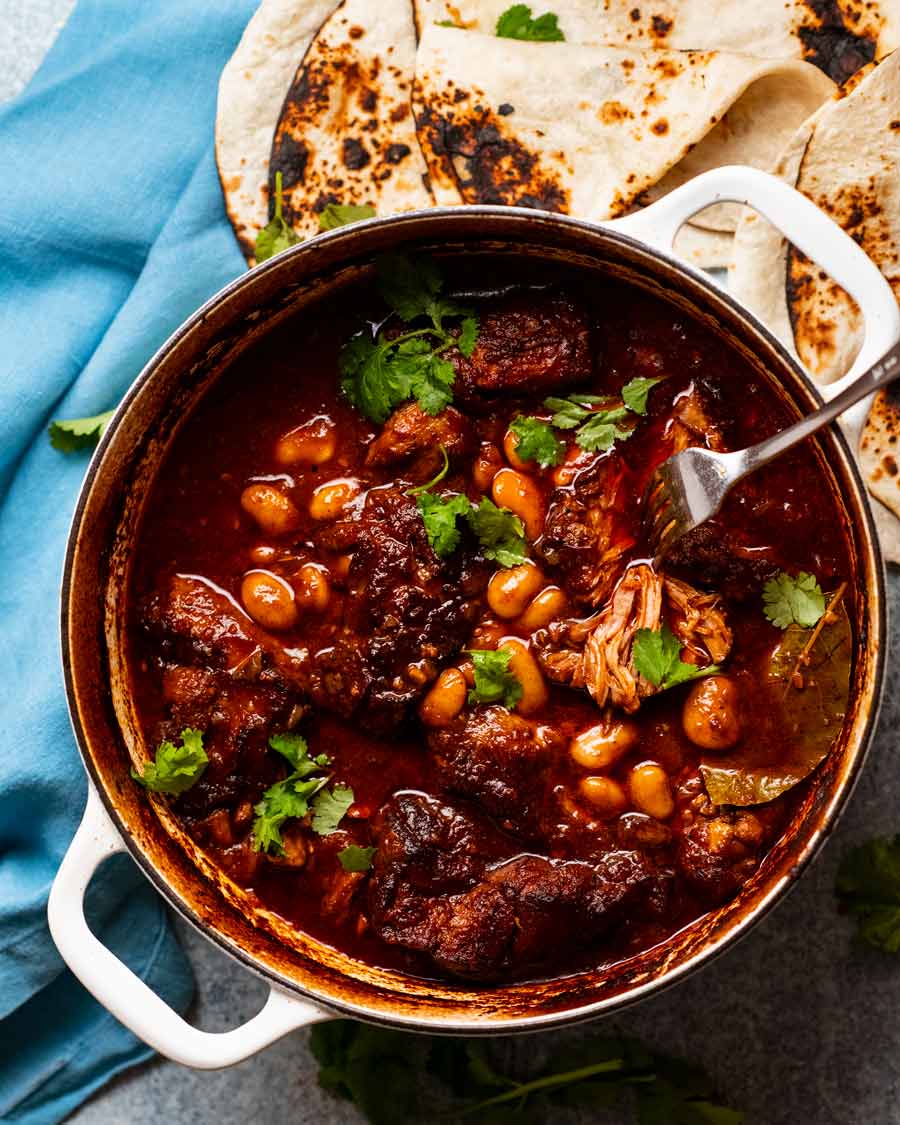
Mexican Chipotle Pork and Beans
This food is me on a plate.
Well, in a pot.
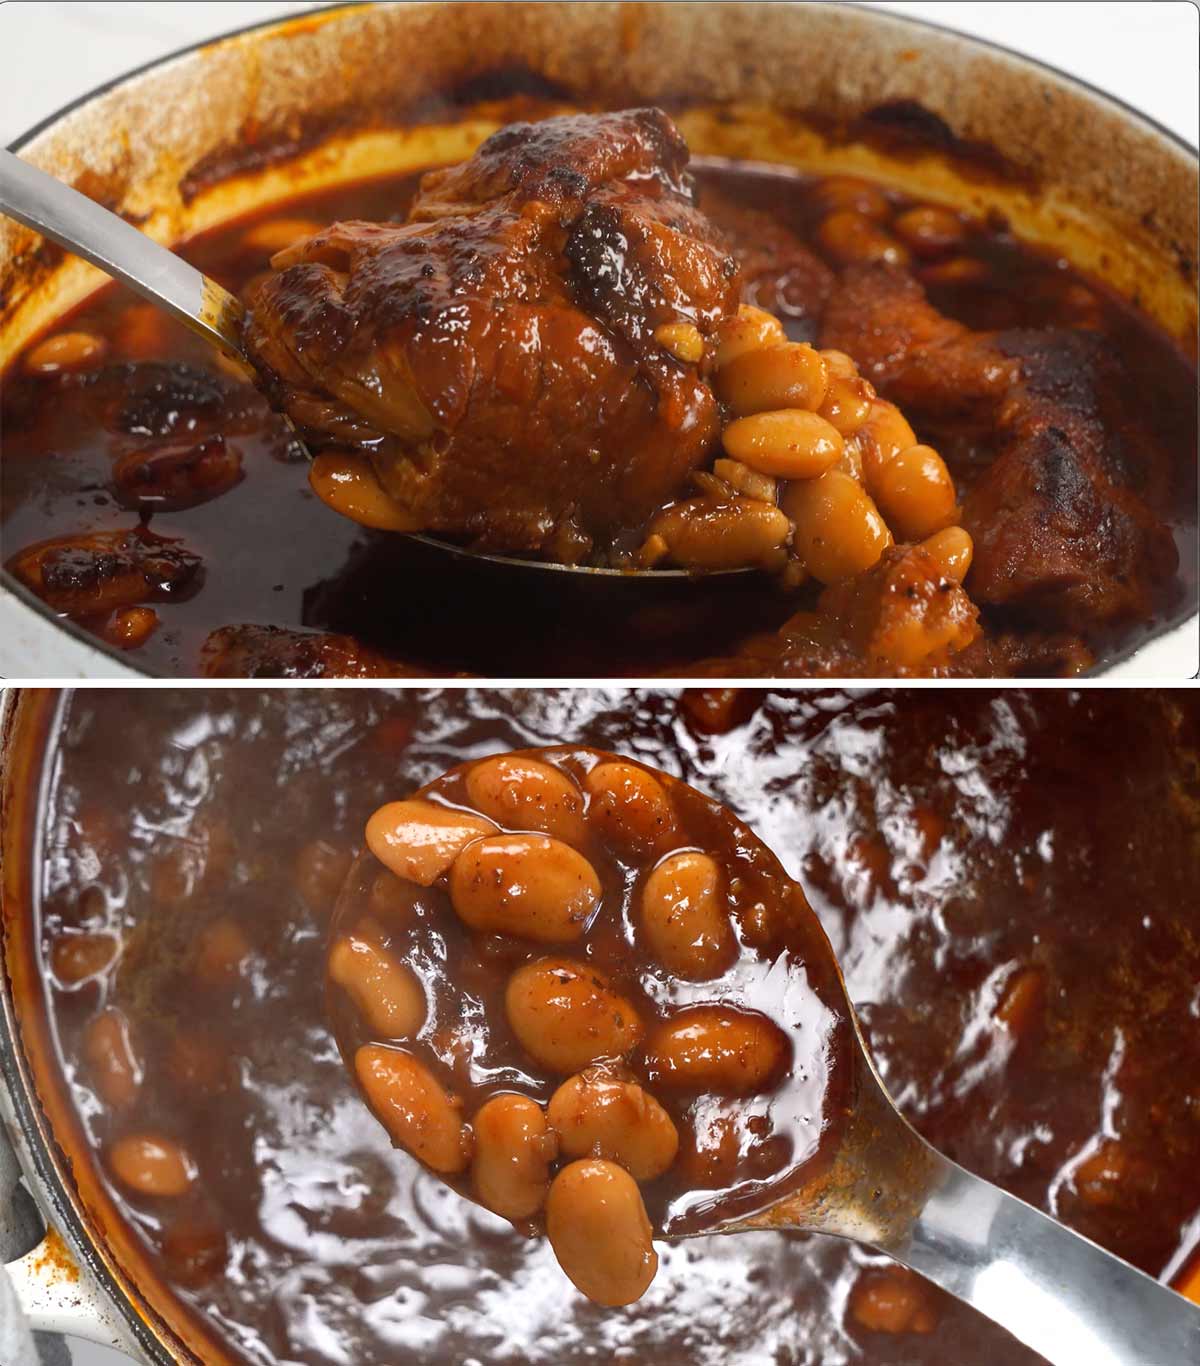
Hunks of juicy meat that’s so tender, it’s barely holding together when you scoop it out. A bold sauce that’s spicy, tangy and deeply savoury. Big creamy beans littered throughout that’s absorbed the flavour of the sauce, making beans tastier and dreamier than you ever imagined possible.
That it’s straightforward to make is a (big) bonus. It’s just like making a stew. In fact, that’s my favourite way to serve this – ladled into bowls like stew, except with tortillas on the side for dunking instead of serving it over the usual mash!
Ingredients in Mexican Chipotle Pork and Bean
Here’s what you need to make big pot of Mexican deliciousness!
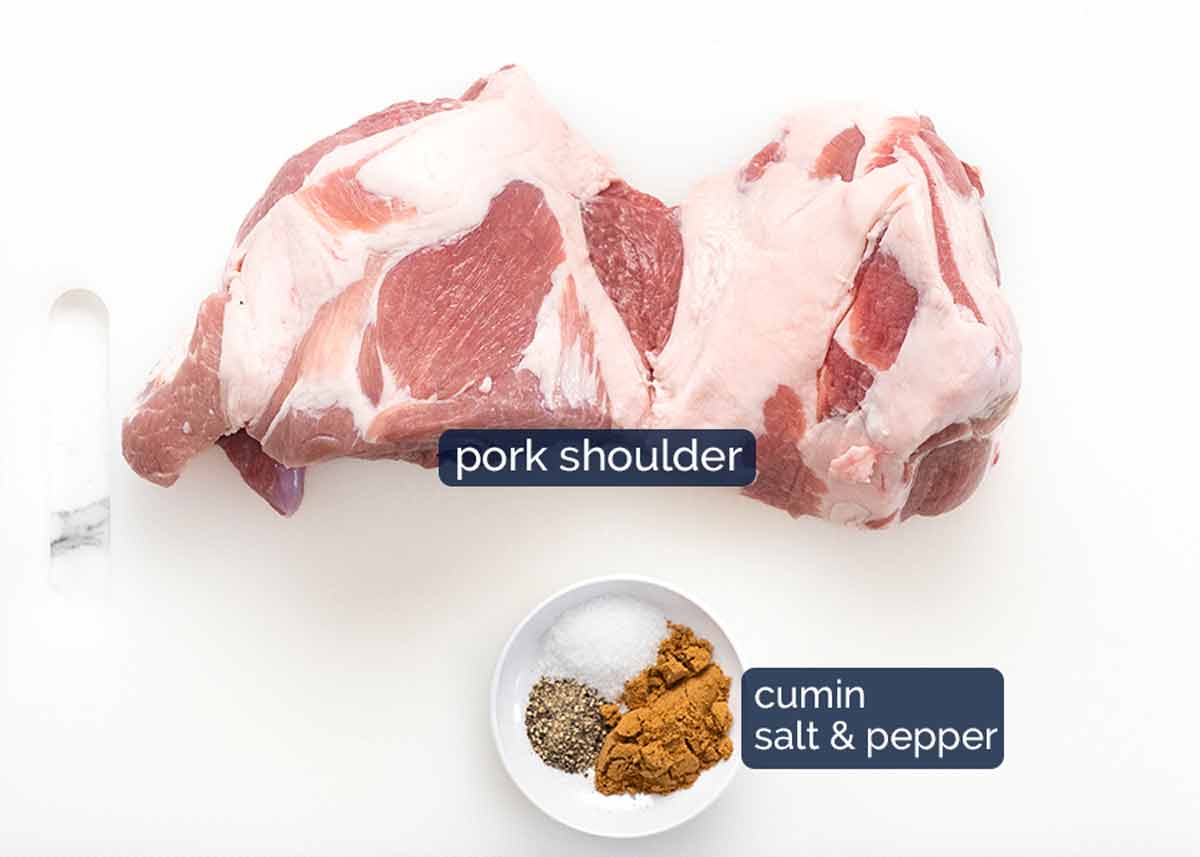
Seasoned pork
This dish is made with pork shoulder which is an economical tough cut of meat that needs to be slow cooked to fall-apart tenderness. I just use cumin to flavour it before searing because the pork absorbs so much flavour while it’s slow cooking, it really doesn’t need much on the surface!
The chipotle sauce (and beans!)
And here’s what you need to make the rich chipotle sauce that the pork is braised in. Flavour to the max!!
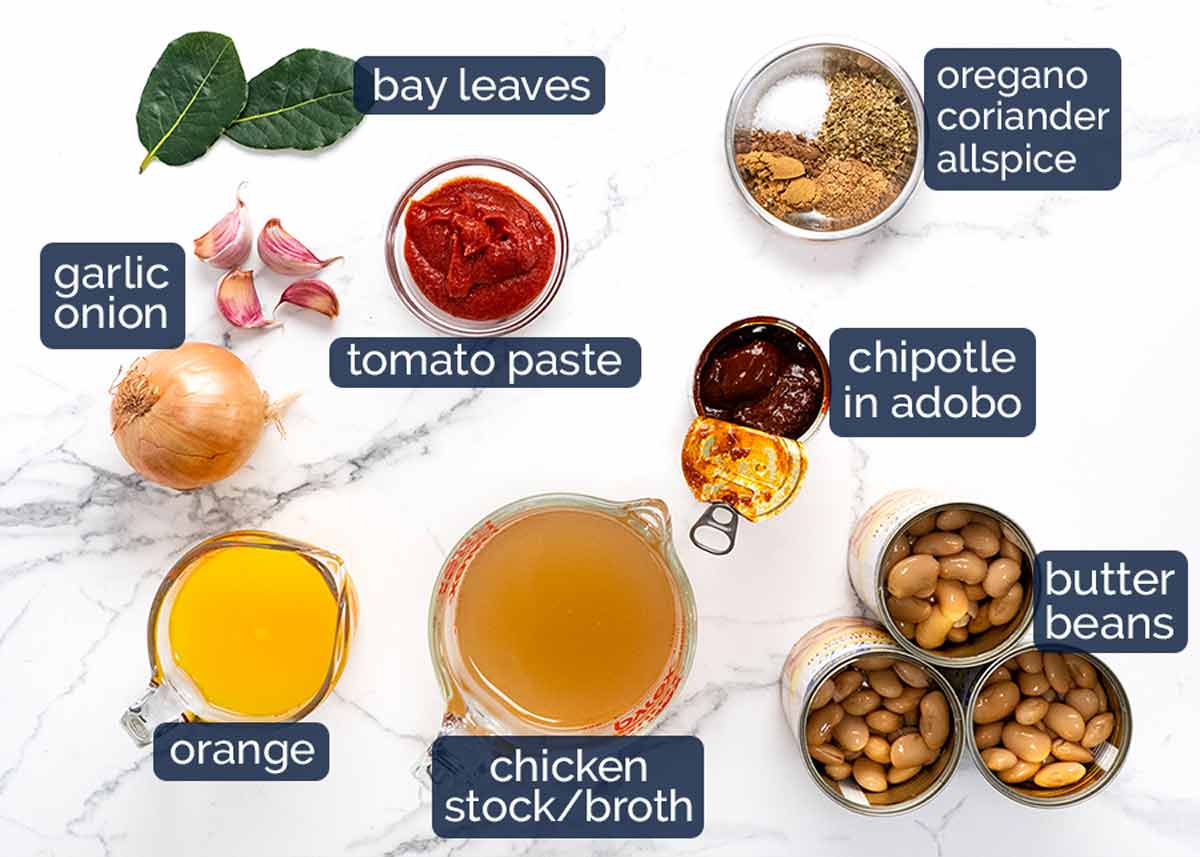
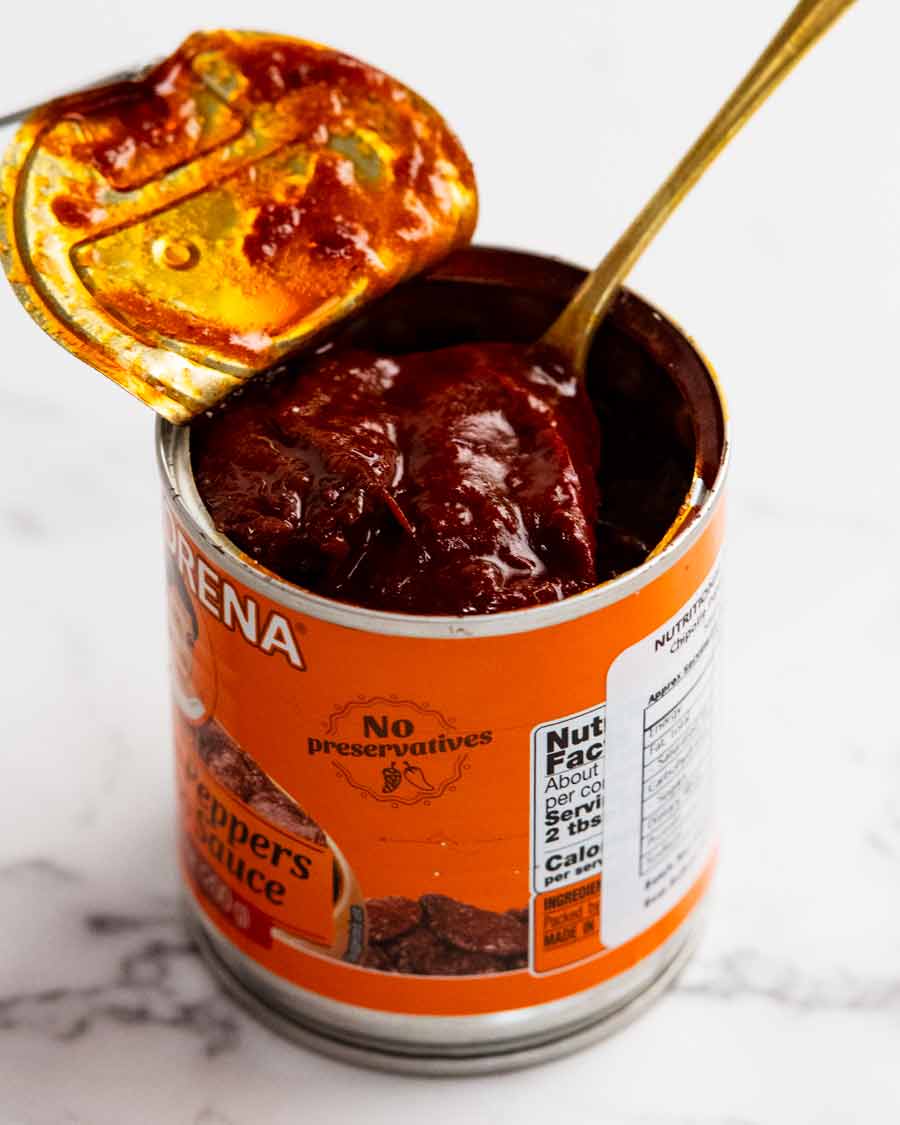
Chipotle in adobo (photo below) – The hero ingredient, I adore this Mexican sauce! It’s made with chipotles which are rehydrated and canned in a tangy, spicy red sauce that packs a load of flavour. (Chipotles are smoked, dried jalapeños).
In this recipe, we’re using both the chipotles and sauce (some recipes only use one or the other) and pureeing the chipotles for maximum flavour release and to make a smooth sauce.
Where to find it – Those of you in the States are lucky enough to find chipotle in adobo virtually “everywhere”! In Australia – find it in the Mexican aisle of large grocery stores (Coles, Woolies), Harris Farms, as well as independent grocers. I use La Morena which I buy from Harris Farms – $3.29 for 200g/7 oz (we use the whole can).
Butter beans (aka lima beans) – The big, fat, meaty beans you always see at the store that you wonder what to do with. Well, now you know! 😂 Feel free to substitute with other beans, though I do think creamy beans work better than smaller, firm ones like black beans, chickpeas etc.
Why canned instead of dried beans? I find that the cook time for dried beans (especially large ones like butter beans) can vary quite drastically depending on the age, size and quality of the beans. Which means for dishes like this, sometimes the beans are done before the pork is, sometimes they are still hard when the pork is done. It’s not too bad pulling the pork out and leaving the beans to cook for longer. But it is a pain to take the beans out to continue cooking the pork! So, canned is my preference here.
Orange juice – Yes! A secret ingredient used in Mexican cooking to add sweetness and more flavour than just adding sugar into things (eg carnitas, fajitas). Doesn’t make it taste orangey because once it’s slow cooked, the flavour completely transforms.
Chicken stock – For the braising liquid. Low sodium please, otherwise your dish might end up too salty.
Tomato paste – For flavour and thickening. It’s sautéed to cook out the raw, sour flavour before mixing into the braising liquid.
Herbs and spices – Nothing unusual here! Oregano, coriander, allspice, bay leaves.
Onion and garlic – Flavour base.
How to make Chipotle pork and beans
This recipe starts off by searing the pork on the stove before transferring to the oven to braise until the pork is fall-apart tender, giving the sauce time to develop fabulous deep, savoury flavour.
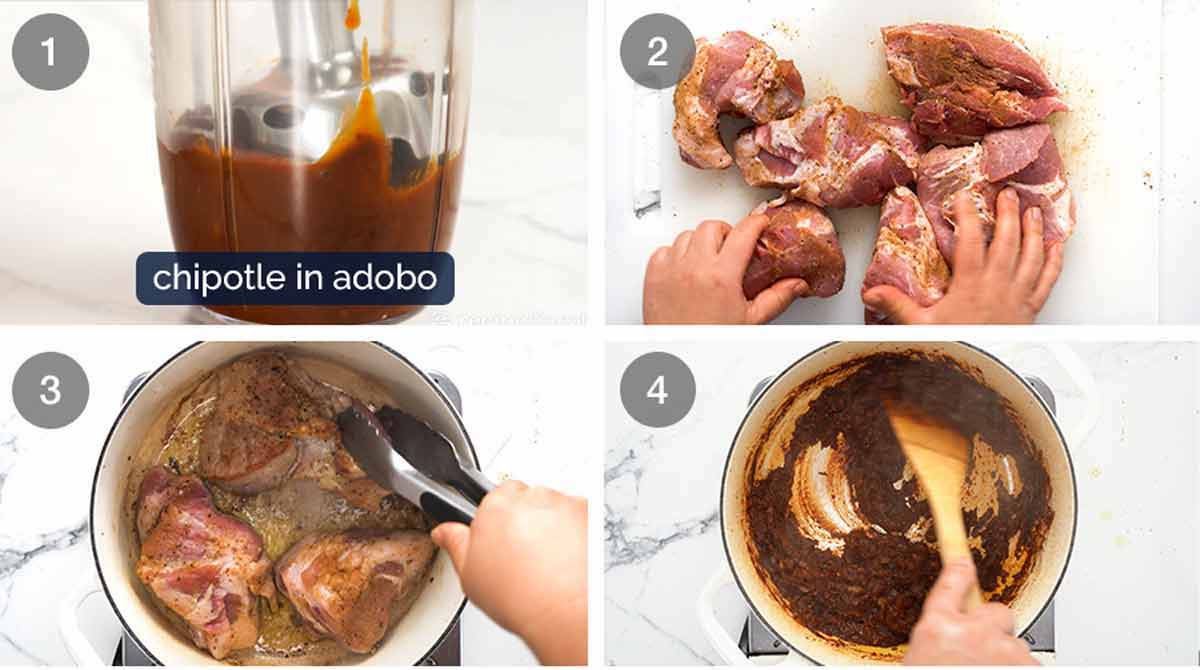
Puree the chipotle in adobo using a stick blender. The chipotle is really soft so it literally takes seconds.
Season pork – Cut the pork into 6 equal pieces, for ease of handling to sear, more surface area for browning and so they cook faster than a whole pork shoulder. Then sprinkle with the cumin, salt and pepper.
Brown the pork in two batches, using a heavy based oven-proof pot. Rotate the pork to brown all over. Remember, colour = flavour! Once done, remove the pork onto a plate.
Sauté sauce flavour base – Using the same pot, sauté the garlic, onion, dried herbs and spices. Sautéing dried herbs and spices is a neat trick for getting extra flavour out of them – it makes them “bloom”.
Next, cook off the tomato paste followed by the pureed chipotle in adobo. Cooking off pastes is a great flavour trick as it intensifies flavour as well as taking off the raw, sour edge. It also depends the savoury flavour so you get more out of less!
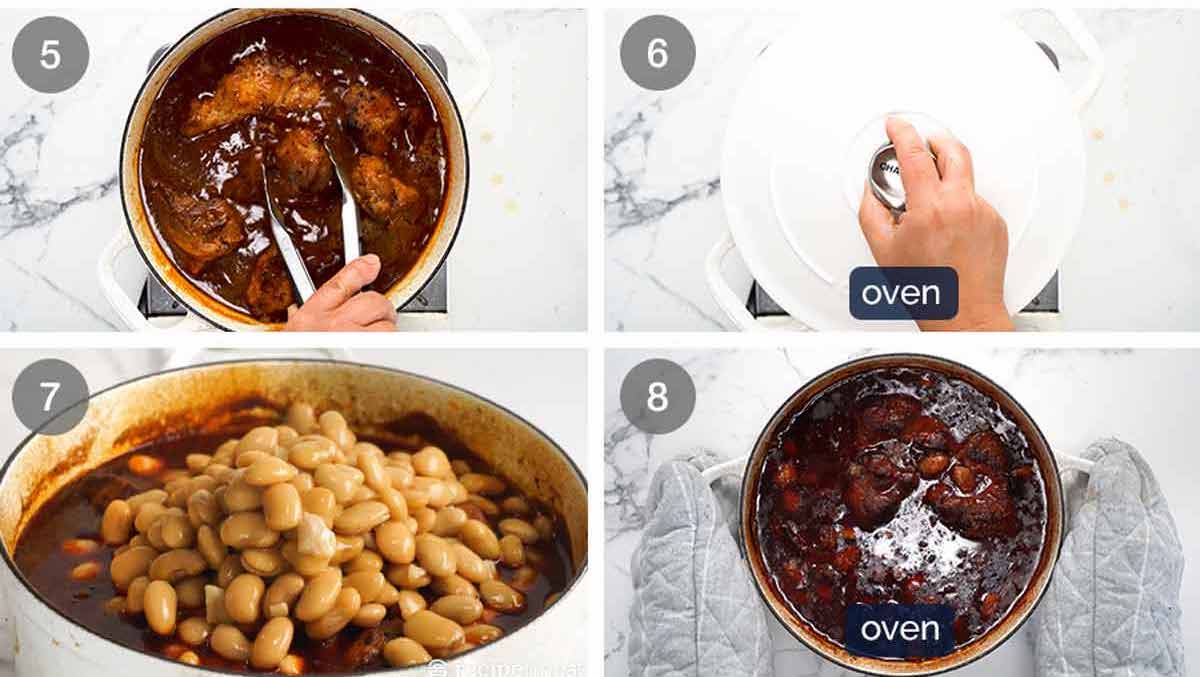
Braising liquid – Add all the remaining ingredients except the beans into the sauce – the orange juice, stock, spices and bay leaves. The beans are added later else they will overcook and become too mushy.
Give it all a good mix then place the pork in, along with any juices pooled on the plate (never waste free flavour!). Arrange the pork as best you can so they are submerged under the liquid. But don’t worry if there’s some of the surface poking above because it will steam-cook and also the pork will shrink as it cooks so it will eventually sink below the surface.
Slow cook – Put the lid on and transfer to the oven to slow cook for 2 hours at 180°C/350°F (160°C fan). This temperature might sound high for slow cooking but it equates to a gentle simmer on the stove, which is suitable for slow cooking meats.
Other cook methods – 6 hours in a slow cooker on low or 2 hours on the stove.
Beans – Remove the pot from the oven. The pork should be pretty much fork tender by this stage. Add the beans and push them in as best you can under the liquid.
Bake uncovered – Return the pot to the oven to bake uncovered for 30 minutes to caramelise the surface which adds extra flavour. Also by this stage, the pork should be tender enough so you can pry it apart using two forks without any effort at all.
If you used your slow cooker or the stove, I do recommend doing this final step in the oven because the caramelising of the surface does add extra flavour!
And that’s it! To serve, just scoop up pieces of pork and beans, and ladle into bowls or onto a plate for serving. See below for ways to eat this pot of fall-apart-spicy-meaty-beany deliciousness!
How to serve Chipotle Pork and Beans
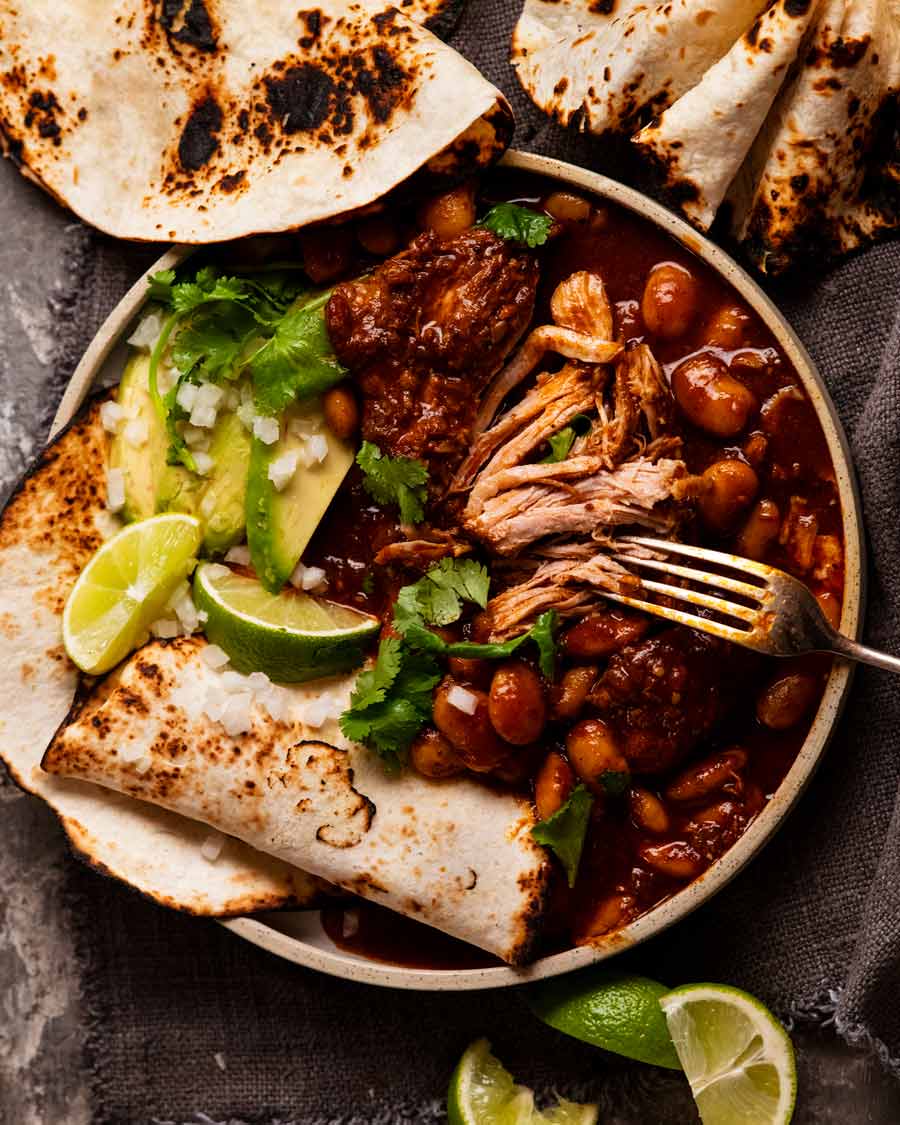
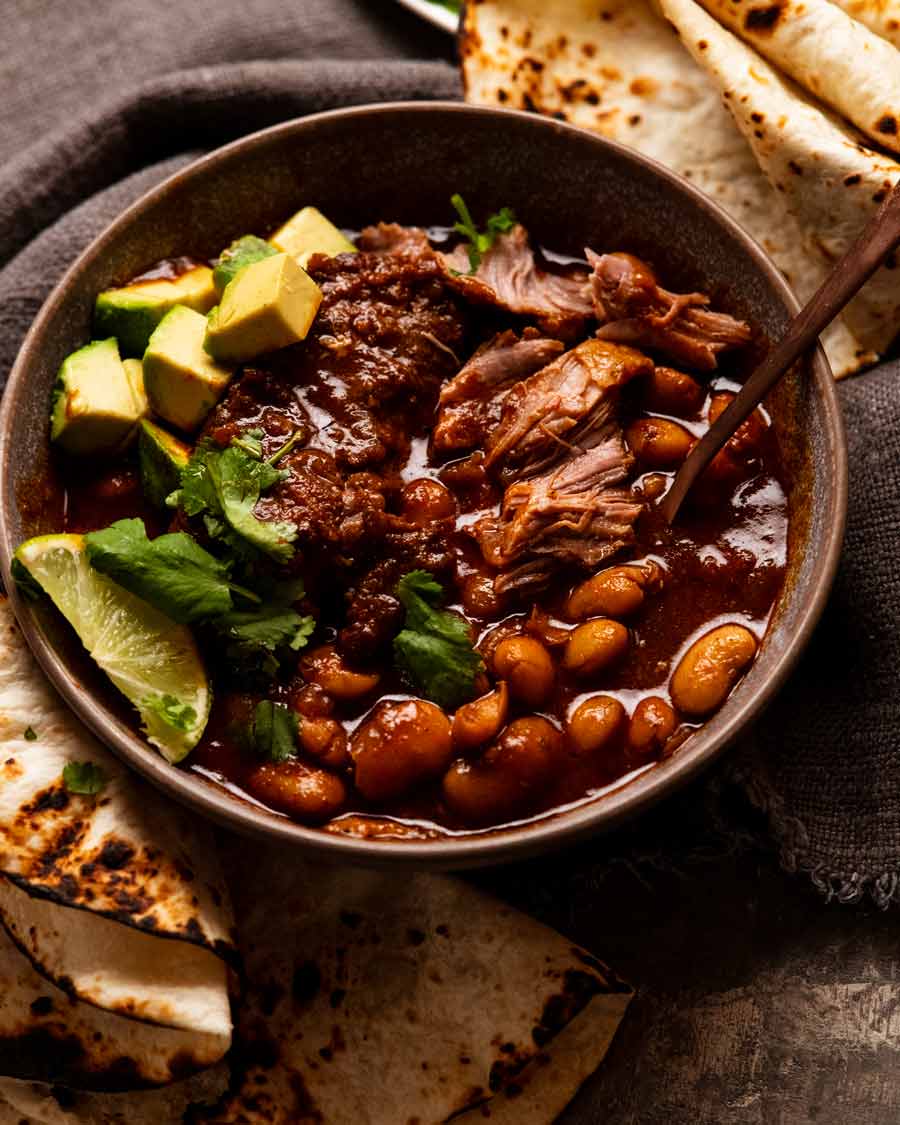
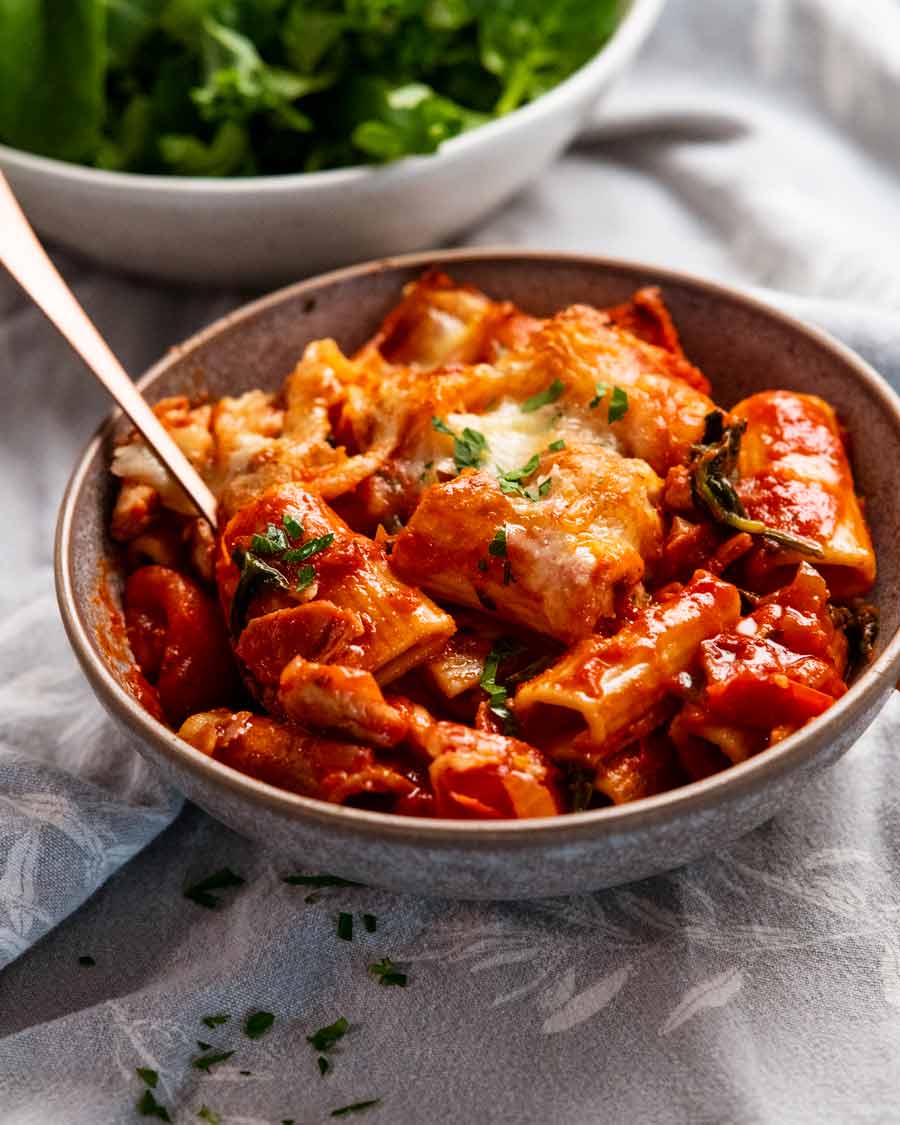
As I mentioned at the beginning, my favourite way. to serve Chipotle Pork and Beans is in a bowl like stew. Just use a spoon or fork to cut off bits of pork (which takes barely a touch!) then get a big scoop with beans and plenty of sauce.
I like to add a bit of avocado and sprinkle of coriander/cilantro for freshness, and tortillas for dunking / bowl mopping is essential in my world.
Having said that, here are some other options – all dish worthy!
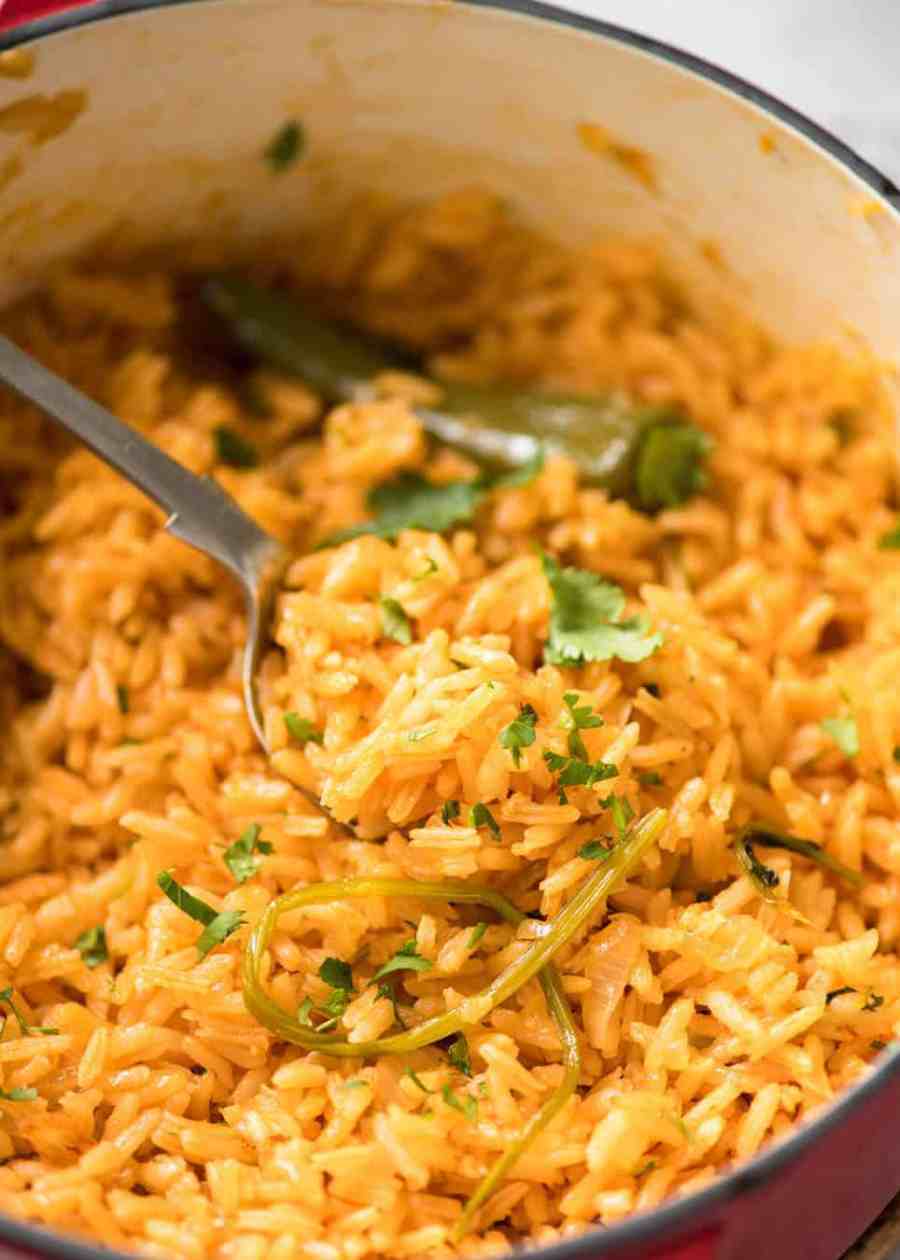
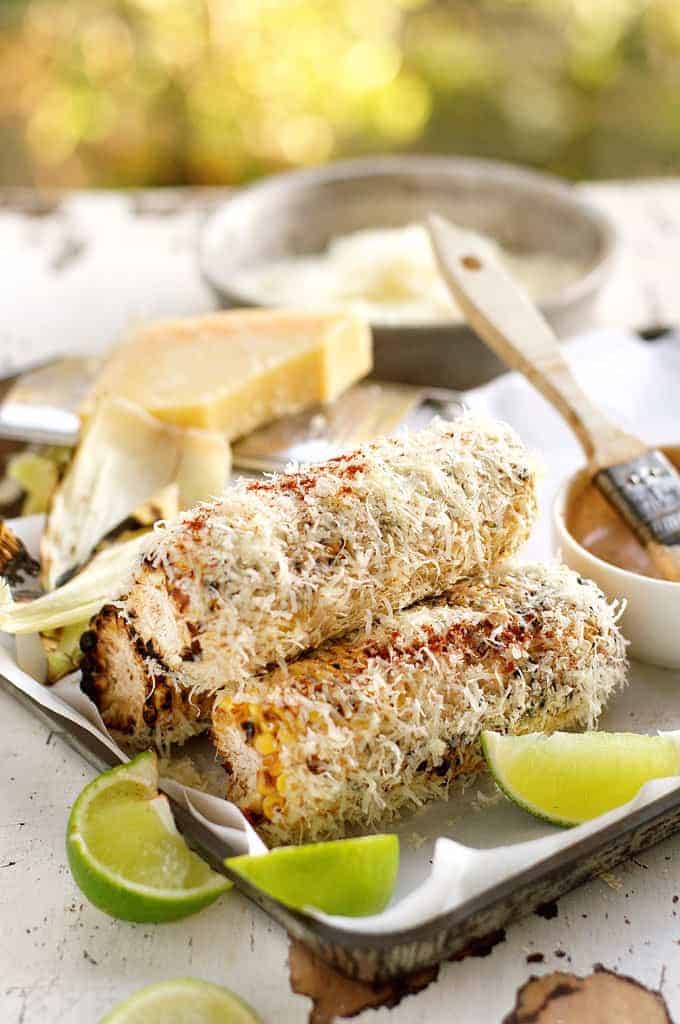
Served over Mexican red rice – or put a big Mexican plate together with Mexican corn cobs (pictured above).
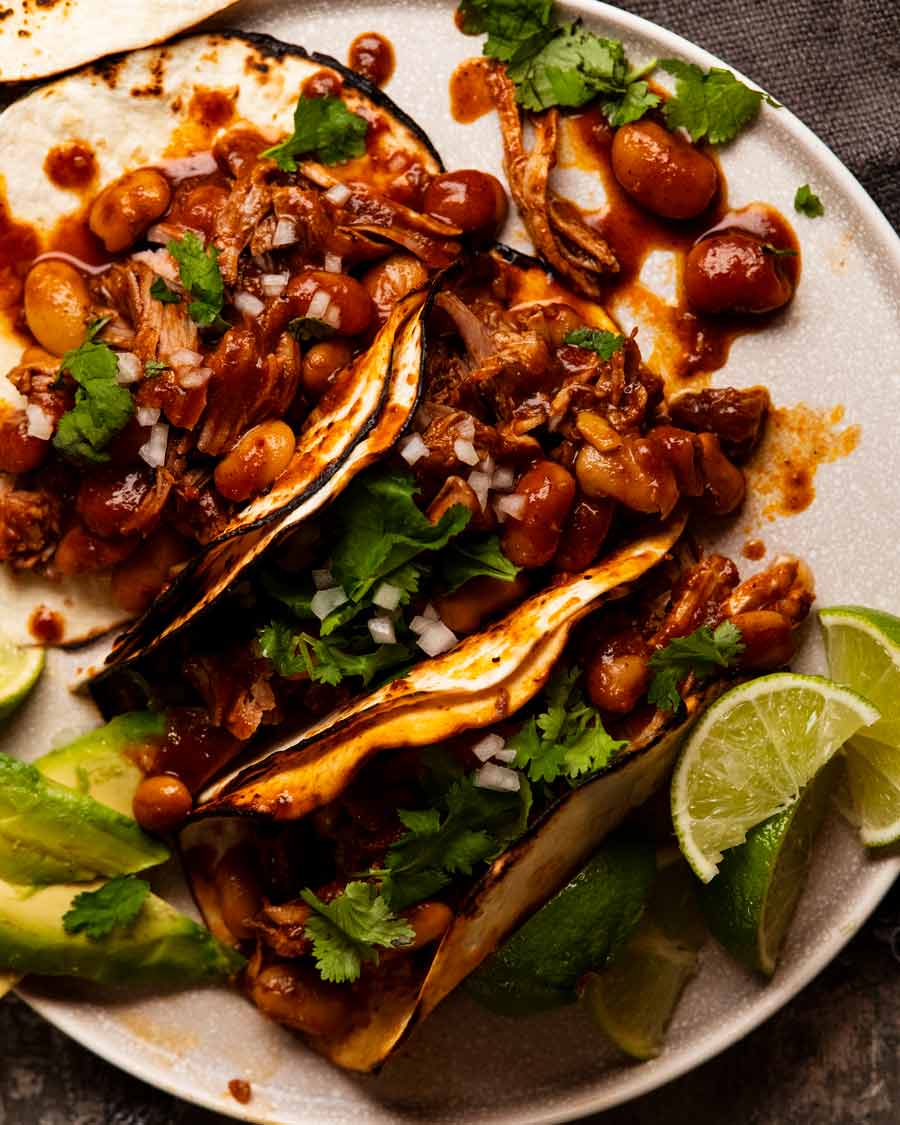
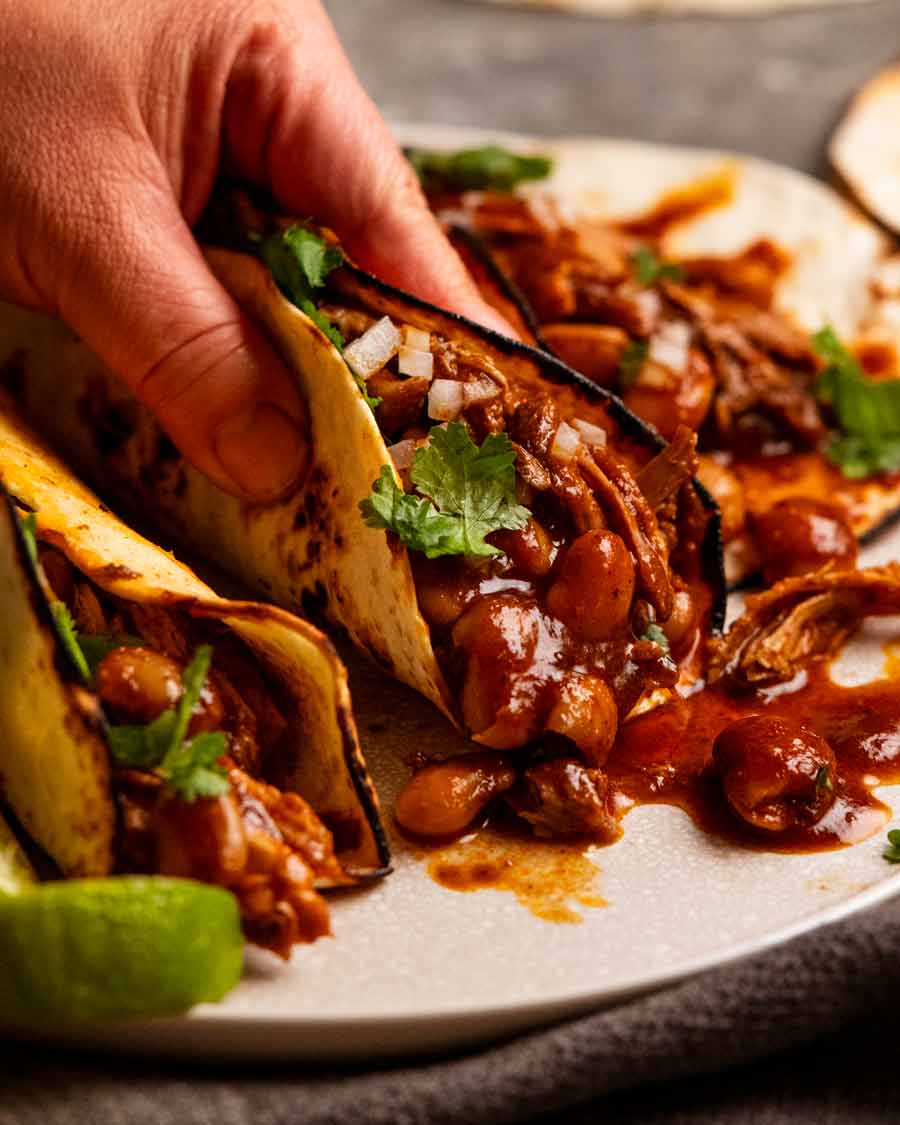
As a taco filling with your toppings of choice! It’s pictured above with avocado slices, finely chopped white onion, fresh coriander/cilantro leaves and lime wedges. There’s no need for a separate sauce – this is saucy enough as is!
Burritos to die for! Switch the chicken in this burrito recipe.
Shred up the pork and mix it up into the sauce with the beans. Then use it to make a giant nachos (switch out the chicken in this nachos recipe), as an enchilada filling, make tostada or simply scoop up with corn chips.
Turn it into a hearty soup – Add extra chicken stock/broth to thin the sauce and make it less intense, so it becomes suitable to be a soup broth. Then serve it as soup!
So many possibilities! What do you think? Which serving option appeals to you? – Nagi x
Watch how to make it

Mexican Chipotle Pork and Beans
Ingredients
Pork:
- 1.5kg / 3lb pork shoulder (skinless, boneless), cut into 6 equal pieces (Note 1)
- 1 tsp cooking/kosher salt
- 1/2 tsp black pepper
- 2 tsp cumin powder
Sauce:
- 200g / 7 oz chipotle in adobo – the chillis + sauce (Note 2)
- 2 tbsp olive oil
- 1 onion , finely chopped
- 4 garlic cloves , finely minced
- 1/4 cup tomato paste
- 1 cup orange juice (real, not reconstituted sweetened stuff – Note 3)
- 2 cups chicken stock/broth , low sodium
- 2 bay leaves (fresh, else dried)
- 1 tsp cooking/kosher salt
- 3 x 420g / 16 oz canned butter beans / lima beans , or other of choice (Note 4)
Dried herbs & spices
- 1 tbsp dried oregano
- 1 tsp cumin powder
- 1 tsp coriander powder
- 1/2 tsp allspice powder
Instructions
- Preheat oven to 180°C/350°F (160°C fan).
- SPICINESS – Read note above about spiciness!
- Puree chipotle in adobo until smooth using a stick blender or similar.
- Sprinkle pork all over with salt, pepper and cumin.
- Brown pork – Heat all the oil in a large oven-proof pot over high heat. Brown the pork all over in 2 batches, the remove onto a plate (~ 1 minute each side).
- Sauté – Cool the pot slightly then return to medium heat. If the pot looks dry, add 1 tbsp oil. Sauté onion, garlic, the herbs & spices for 3 minutes.
- Cook off tomato & chipotle – Add tomato paste and cook it off for 2 minutes. Add chipotle puree and cook for 2 minutes.
- Slow cook 2 hours – Add remaining ingredients EXCEPT beans. Stir, then bring to simmer. Place pork in – arrange so its submerged as best as possible. Cover with lid. Place in oven for 2 hours. (Note 6 other cook methods)
- Add beans, cook 30 min – Remove lid, add beans. Return to oven for 30 minutes without lid to caramelise the surface. The pork will be fork-tender!
- Serve like stew over Mexican red rice or with tortillas for dunking. Or make wickedly food tacos with finely chopped white onion, fresh coriander/cilantro, avocado slices and a squeeze of lime. More serving options above the recipe video.
Notes
Nutrition
Life of Dozer
The Coronation of Prince Edward Dozer Maehashi the first.

The post Mexican Chipotle Pork & Beans appeared first on RecipeTin Eats.
]]> A nice change from the usual creamy versions, this chicken pasta bake is made with a tomato pasta sauce. Filled with bacon, sizzling seasoned chicken and generous on the cheese, it’s cosy and hearty and thrifty and just so, so delicious! Excellent complete meal for making ahead and freezing. Chicken pasta bake If you can... Get the Recipe
The post Chicken pasta bake appeared first on RecipeTin Eats.
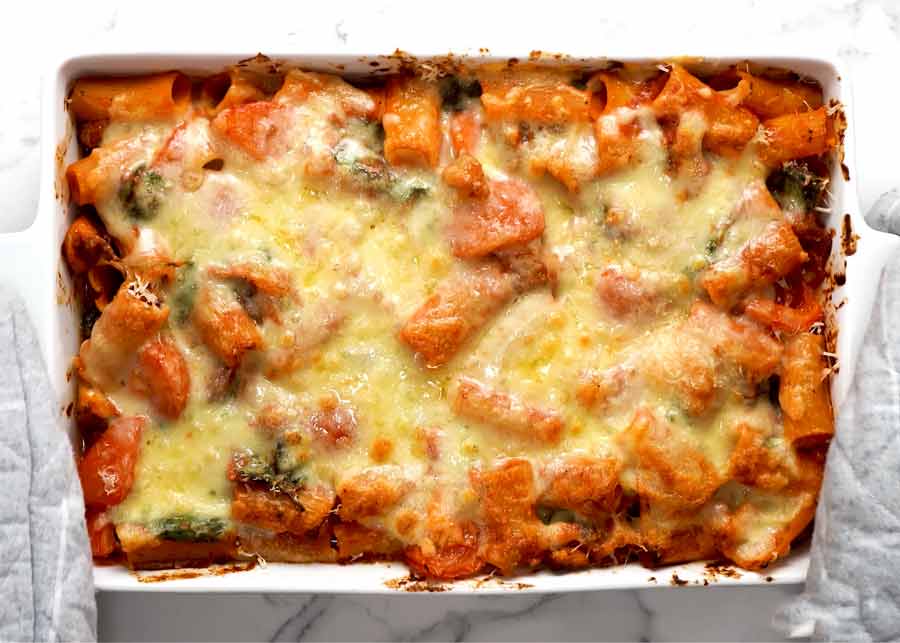
]]>A nice change from the usual creamy versions, this chicken pasta bake is made with a tomato pasta sauce. Filled with bacon, sizzling seasoned chicken and generous on the cheese, it’s cosy and hearty and thrifty and just so, so delicious! Excellent complete meal for making ahead and freezing.
Chicken pasta bake
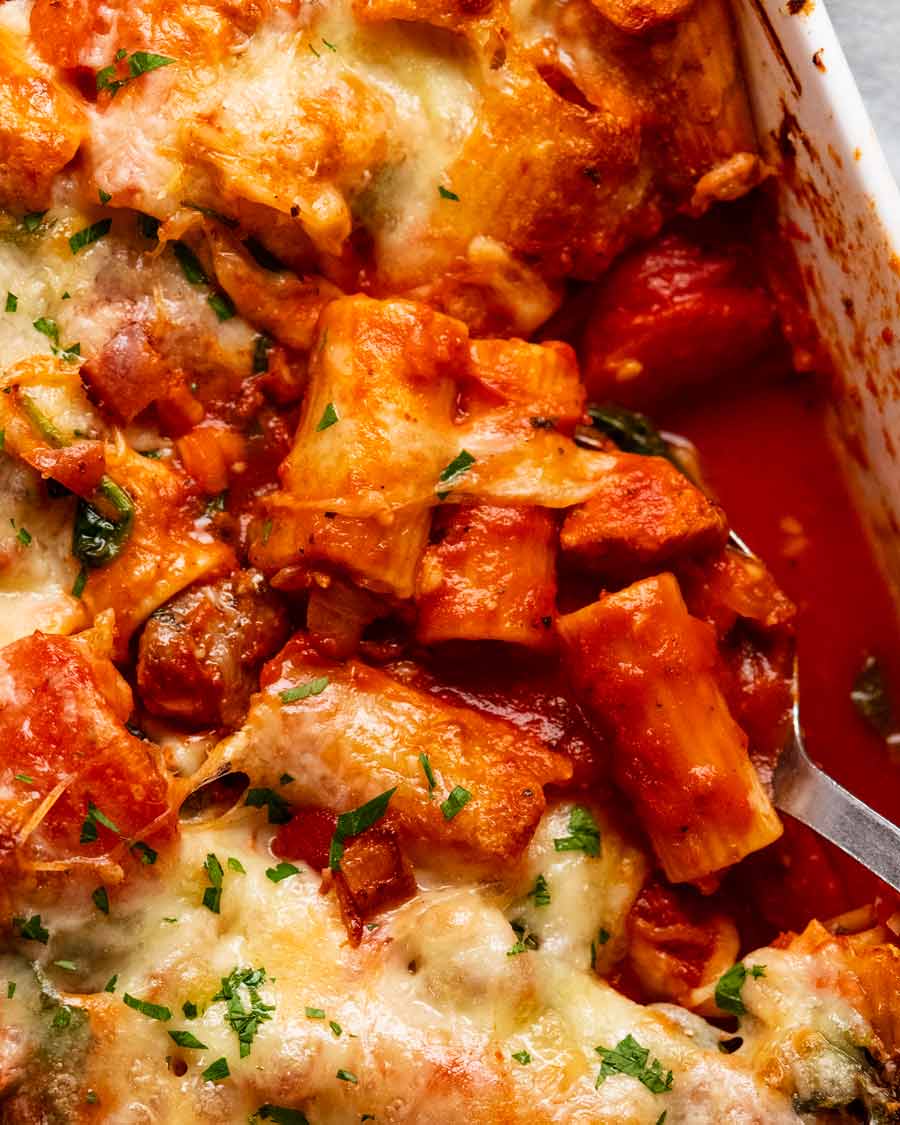
If you can cut a pasta bake like cake – I’m talking straight vertical walls with sharp edges – that is not a good thing. It just screams dry pasta bake!
Nope. Not in my world. Pasta bakes should be saucy and juicy, molten and oozy! Generously loaded with add-ins, if you’re going for a dinner pasta bake (as opposed to a side dish like Mac and Cheese).
This one ticks all those boxes. Proof by picture – juicy / saucy:
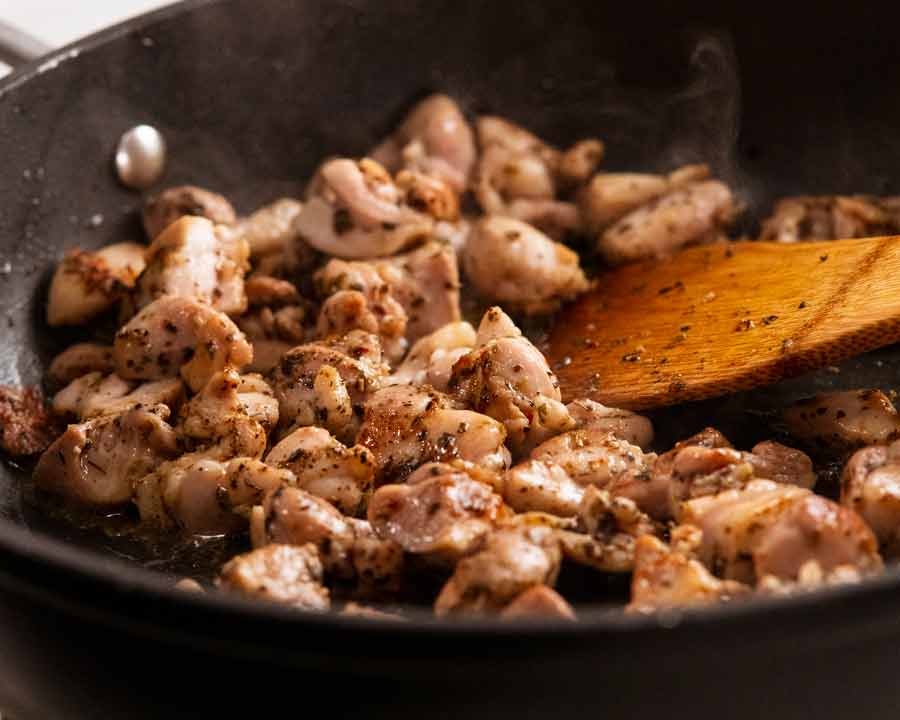
Tasty add-ins – sizzling seasoned chicken! Love the smell when the chicken hits the pan.
So if that sounds good to you, read on so you can see how to make your new favourite chicken pasta bake!
Ingredients in chicken pasta bake
You’ll be able to get everything from your local grocery store. Nothing pricey on the list!
Sizzling seasoned chicken
The pasta bake starts with sizzling chicken that’s been tossed in a simple, tasty seasoning. Here’s what you need:

Chicken – I like using chicken thighs as they stay juicier in dishes like pasta bakes where they are twice cooked (ie before adding into sauce then in the oven with the pasta).
Seasoning – Using a store bought Italian herb mix is a great shortcut here. I always like to add an extra spice, garlic in this paste, for extra flavour oomph.
Tomato pasta sauce for the pasta bake
A good tomato-based pasta bake needs a good tomato pasta sauce! No shortcuts here – I tried and just found it too bland. So here’s what we need:

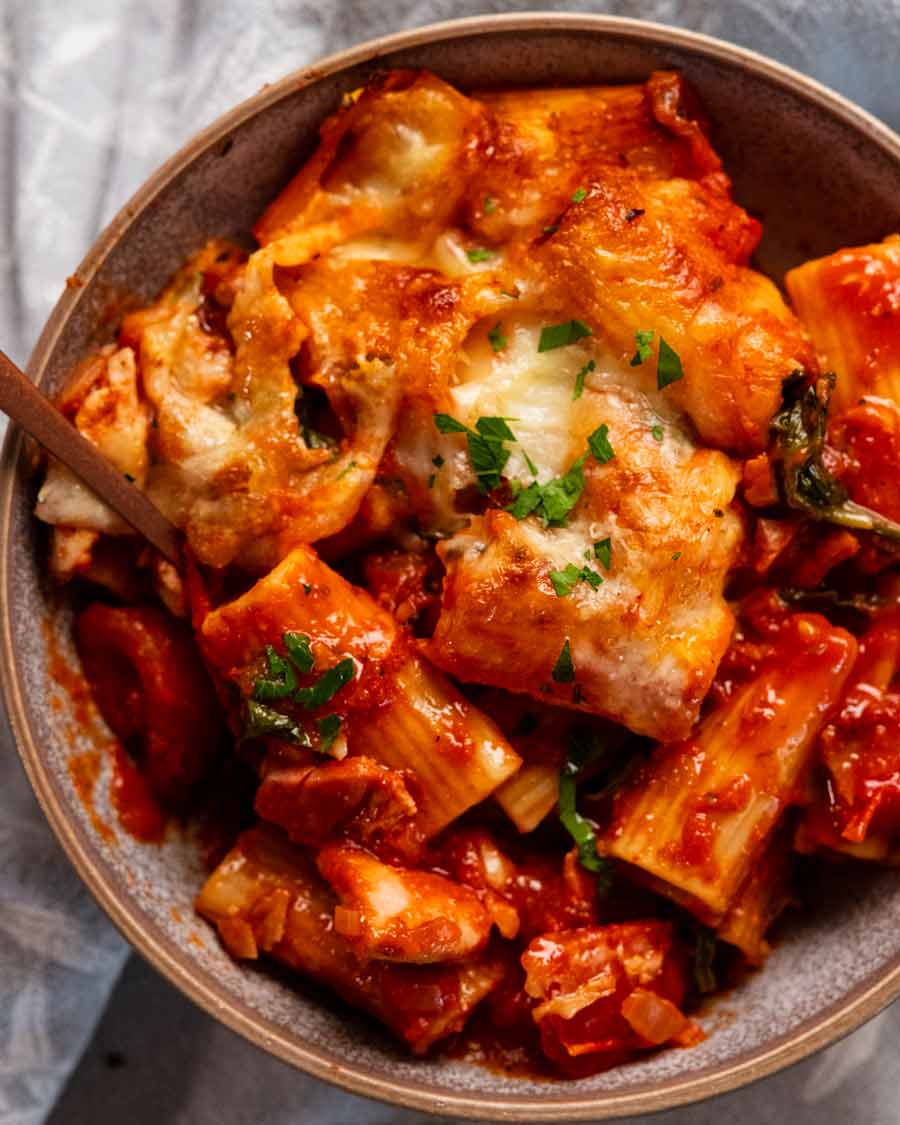
Pasta type – I like the substantialness of rigatoni, there’s something extra cosy and satisfying about it in pasta bakes. However, feel free to use other short pastas like macaroni, penne, ziti, shells etc.
Tomato passata – for a thick, smooth sauce with better tomato flavour and red colour, use passata instead of crushed or diced tomato. It’s just pureed plain tomato! Readily available here in Australia in the pasta or canned tomato aisle and costs around the same as canned tomato. More on passata here.
Tomato paste – for sauce thickening and extra tomato flavour.
Garlic and onion – essential flavour base!
Oregano – for earthy flavour.
Chilli flakes / red pepper flakes – for a hum of warmth!
Wine – secret ingredient! Simmered rapidly to reduce and cook out the alcohol and winey flavour, just leaving behind tasty flavour. My favourite white wine for cooking is chardonnay which adds superior flavour compared to more neutral whites like sauvignon blanc. Substitute with low sodium chicken stock/broth.
Chicken pasta bake add-ins & topping
Lots of add-in options, but here’s what I’ve gone with!
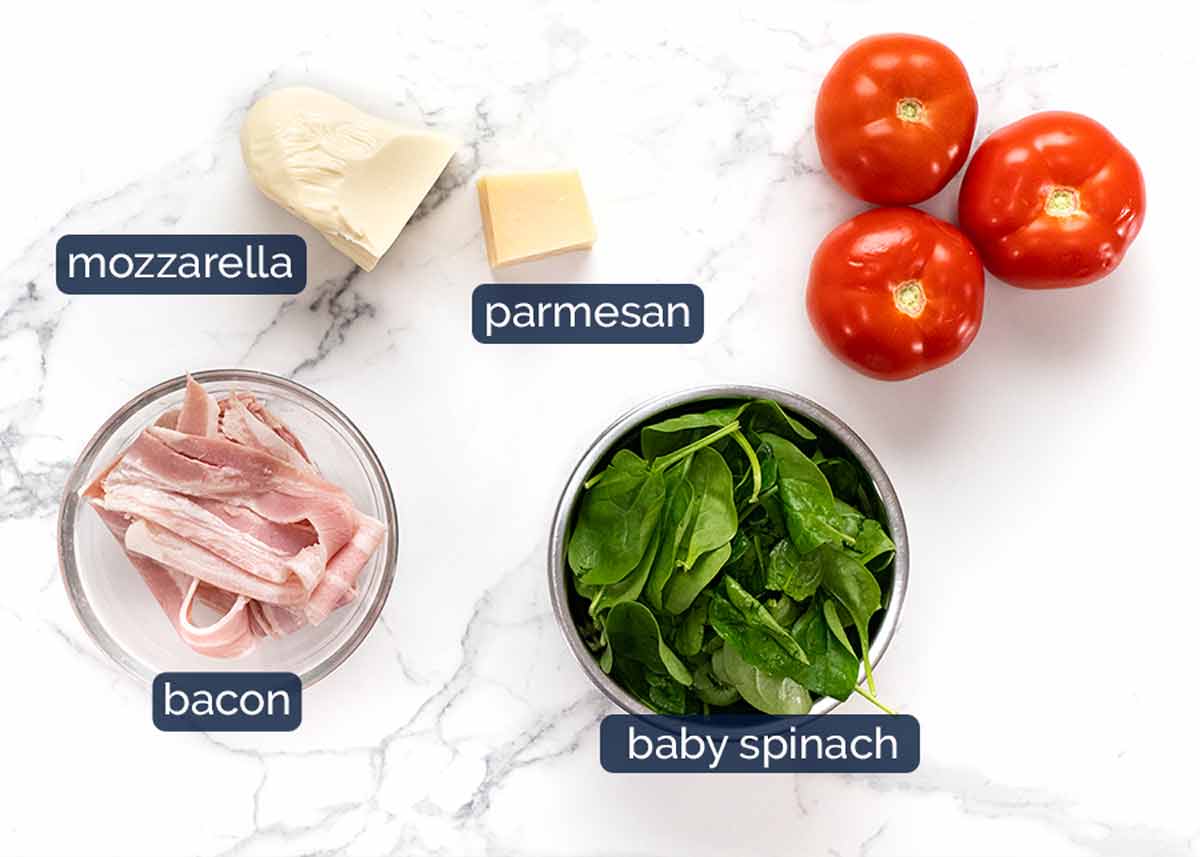
Bacon – cooked first until crisp, chopped, and tossed through the pasta bake. Then we use the bacon fat left in the pan to cooke the chicken. Free flavour not to be wasted! Substitute with ham bits or chopped ham.
Tomato – adds lovely juicy chunks of tomato in the pasta bake as well as filling it out and increasing the vegetable quota.
Baby spinach – for more hidden greens as well as adding nice streaks of green into the pasta bake.
Cheese – mozzarella for stretch and melting qualities, parmesan for flavour! (Because mozzarella actually does not have much flavour).
Feel free to substitute the tomato and baby spinach with other add-ins of choice.
How to make chicken pasta bake
There’s a time and a place for quick, low-effort one-pot pasta bakes. Then there’s all those times when you want a really good pasta bake so you’ll do it properly. Crisp the bacon, sear the chicken, simmer the sauce, then bring it all together into one big bubbling pasta bake.
Today is one of those days!
1. Crisp bacon (no oil)
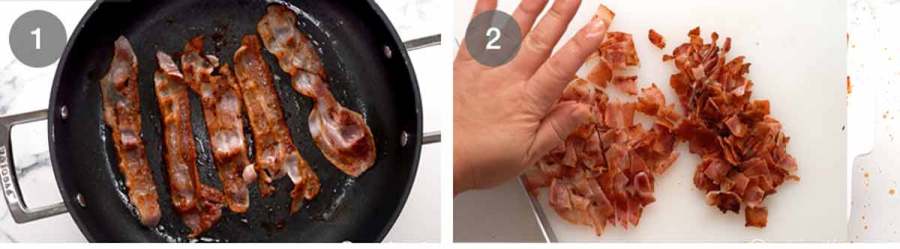
First, cook the bacon in a non-stick pan until golden and crisp. You won’t need any oil to do this as the fat in the bacon will melt and release fat into the pan. So it cooks in its own fat!
Drain on paper towels, leaving the fat in the pan (we will use this to cook the chicken). The bacon will go crispy when it cools, then chop into pieces.
2. Making the pasta bake
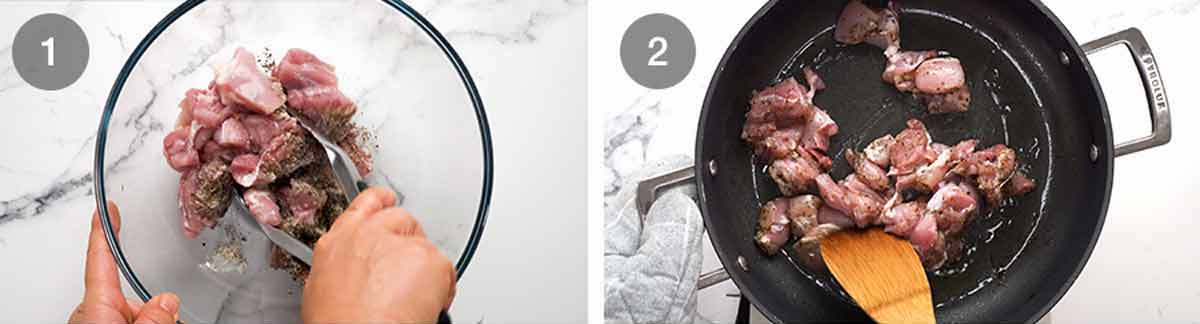
Toss the chicken in the Italian herbs, garlic powder, salt and pepper.
Sear – Using a very big pan or a large pot (because we’re mixing the sauce with pasta in this pan), sear the chicken until light golden in the reserved bacon fat.
Don’t worry whether it’s cooked through inside, it will finish cooking in the sauce and oven. Remove chicken with a slotted spoon and set aside in a bowl, leaving the tasty chicken/bacon fat in the pan (you see all this flavour building going on, right??!)
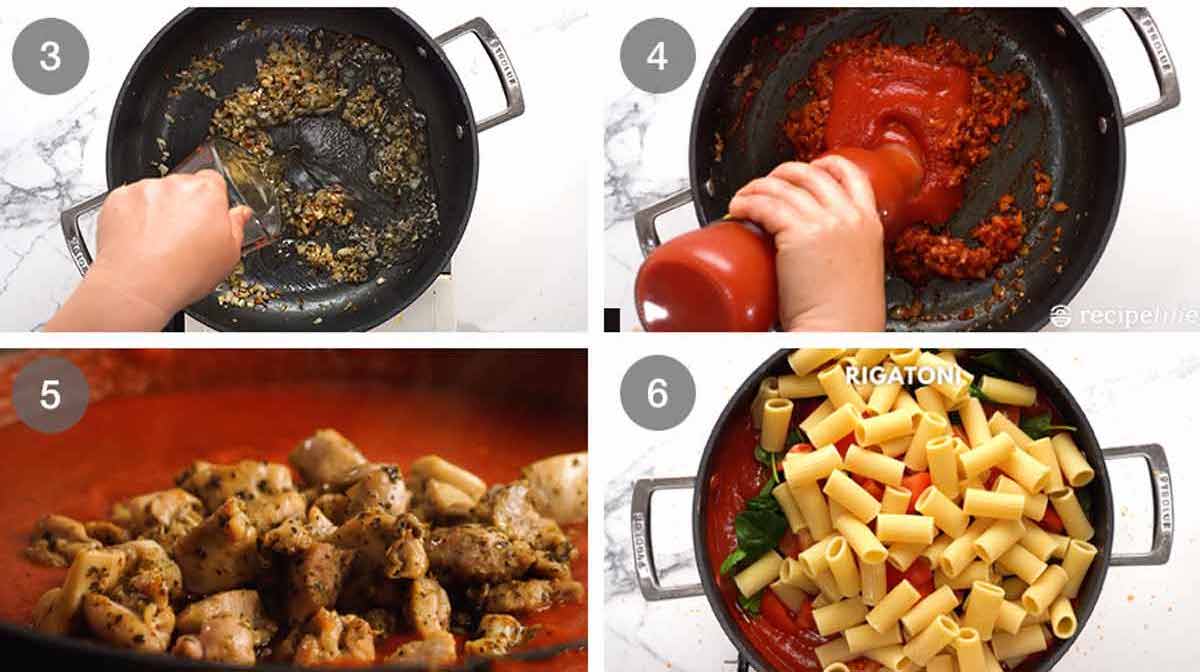
Sauté the onion and garlic with the chilli flakes and dried oregano – good trick for bringing out extra flavour from dried herbs! Then add the wine and simmer rapidly to mostly reduce – this cooks out the alcohol and removes the winey flavour, just leaving behind tasty flavour which adds a little something-something into the sauce.
Sauce – Next, cook off the tomato paste. Similar to toasting the herbs, this improves the flavour of tomato paste, taking off the sour edge, intensifying the tomato flavour and sweetening it. Good Cheffy tip!
Then we add all the liquids – the tomato passata, water (use it to rinse out the bottle) – salt and pepper for seasoning.
Simmer – Then stir in the chicken – don’t forget to add all the juices pooled in the bowl! Simmer for 5 minutes to bring the flavours together – this is when the magic happens so don’t skip or shortcut this step. I tried – to speed things up – but the sauce just lacked flavour.
Add-ins – Add the baby spinach, tomato, cooked pasta and bacon in that order, so the heavier add-ins weigh down the considerable volume of baby spinach.
Oh! If you remember, you can hold back a bit of bacon for sprinkling on at the end. But to be honest, I usually forget.

Mix well – Give it all a good stir to mix it all together. You DID use a big pan, right?? 🙂 If you didn’t, this is the part where you’ll start crying or cursing – been there, done that!
Baking pan – Transfer to a 23 x 33cm / 9 x 13″ pan and level the surface.
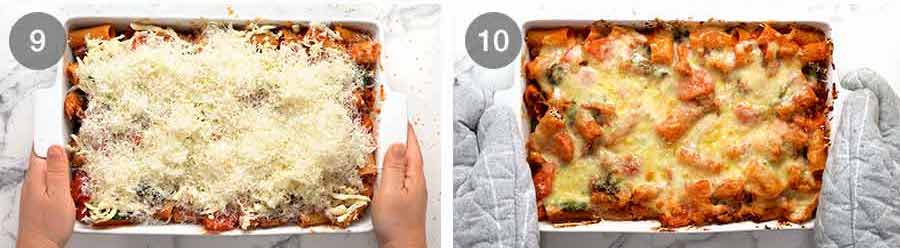
Cheese it! Top with mozzarella then parmesan cheese. Doing it in this order gives the surface a lovely golden crust thanks to the parmesan, but it’s not the end of the world if you do it the other way.
Bake for just 25 minutes until the cheese is melted with some lovely golden spots. Rest for 5 minutes, just to let it settle so the sauce clings to the pasta a bit better. Then serve!
Make-ahead / freezing tip
Most pasta bakes are terrific make-ahead-bake-later options, and this chicken pasta bake is no exception!
The best way to make ahead is to cook the sauce and pasta separately, allow both to cool completely. Then toss together and assemble the pasta bake – including topping with cheese. Cover well with cling wrap and refrigerate 3 days or freeze up to 3 months (thaw thoroughly). Then bake covered for 20 minutes then uncovered for 20 minutes. It will take longer for the centre to get hot if you’re baking from fridge-cold but the cheese will get too brown if you leave it uncovered for this full baking time.
Complete meal – veg, starch, protein!
It is not often I get to tell you that a pasta dish is a complete meal, so let me enjoy the moment. This one’s got it all! Starch, protein and plenty of vegetables – the tomato passata (yes it’s a vegetable!), chunks of fresh tomato and a good amount of baby spinach too.
Which means – unlike most of my creamy pasta bakes – no need to make a salad for the side to round out the meal. Always a bonus when it comes to choosing what to make for dinner tonight, right?? – Nagi x
PS Having just made that statement, I just realised the photo above has a side salad in it. 😂 It’s the rocket salad (arugula) with balsamic dressing minus the parmesan shavings (because I figured there was enough cheese in the pasta bake!). It was already made for another recipe I was shooting so I just grabbed it as a background prop for the photo!
PPS Despite saying this is a complete meal, a side of garlic bread would certainly take dinner to another level!
Watch how to make it

Chicken pasta bake
Ingredients
Seasoned Chicken
- 500g / 1 lb chicken thighs , cut into small bite size pieces (Note 1)
- 1/2 tsp cooking/kosher salt
- 1/4 tsp black pepper
- 1/2 tsp garlic powder
- 2 tsp Italian herb mix , any store bought type
Pasta bake
- 300g/10oz rigatoni (or penne, elbow macaroni, shells or similar)
- 2 tsp salt , for cooking pasta
- 5 slices streaky bacon
- 1/2 onion , finely chopped
- 2 garlic cloves , minced
- 1 1/2 tsp dried oregano
- 1/2 tsp chilli flakes / red pepper flakes
- 1/2 cup chardonnay or other dry white wine (Note 2)
- 2 tbsp tomato paste
- 700g / 24oz tomato passata (Note 3)
- 1/2 cup water
- 1 tsp cooking/kosher salt
- 1/2 tsp black pepper
- 3 tomatoes , cut into 8 wedges then halved
- 2 big handfuls baby spinach (or bite size kale)
- 2 cups mozzarella, shredded
- 1/2 cup (tightly packed) parmesan, finely shredded
Instructions
- Preheat oven to 180°C/350°F (160°C fan).
- Cook pasta per packet directions, using boiling water seasoned with the 2 teaspoons of salt. Drain, rinse briefly under tap water, then set aside to cool while making the sauce.
- Season chicken – Toss together Seasoned Chicken ingredients in a bowl.
- Crisp bacon – Put bacon in an unheated very large non-stick pan (Note 2). Turn stove on medium high. The fat will melt so the bacon cooks in its own fat. Cook until light golden, remove onto paper towels, leaving fat in the pan. Once cool, cut into 1cm / 1/3" pieces.
- Sizzle chicken – Top up bacon fat with olive oil if you don’t have at least 1 tbsp. Increase heat to high. Cook chicken for 3 minutes until light golden on the outside but still raw inside. Remove into a bowl with a slotted spoon.
- Sauce – In the same pan, cook garlic and onion for 1 minute, then add chilli flakes and oregano. Cook for 2 minutes until onion is translucent. Add wine and rapidly simmer for 1 to 2 minutes until mostly evaporated. Add tomato paste and cook for 1 minute to concentrate and improve flavour. Add passata, then use the water to rinse out the bottle. Add salt, pepper, chicken (including all juices on the plate). Mix, then simmer for 5 minutes on medium.
- Toss – Add baby spinach, tomato, pasta and bacon. Toss well.
- Assemble – Transfer to 23 x 33cm/9 x 13" pan. Top with mozzarella then parmesan. Bake 25 minutes until melted with some golden spots.
- Serve – Stand for 5 minutes then serve!
Notes
Nutrition
Life of Dozer
Sunset walk. Such a beautiful part of Sydney! (It’s Bayview dog park in Sydney’s northern beaches).

The post Chicken pasta bake appeared first on RecipeTin Eats.
]]> I really did mean to post a classic pot roast chicken. But this Thai red curry version is SO MUCH MORE EXCITING!! To-die-for red curry sauce with outrageously juicy chicken, you’ll have this in the oven in 10 minutes. Effortless recipes with incredible results, this is my kind of food! Thai red curry pot roast... Get the Recipe
The post Thai red curry pot roast chicken appeared first on RecipeTin Eats.
]]>I really did mean to post a classic pot roast chicken. But this Thai red curry version is SO MUCH MORE EXCITING!! To-die-for red curry sauce with outrageously juicy chicken, you’ll have this in the oven in 10 minutes. Effortless recipes with incredible results, this is my kind of food!
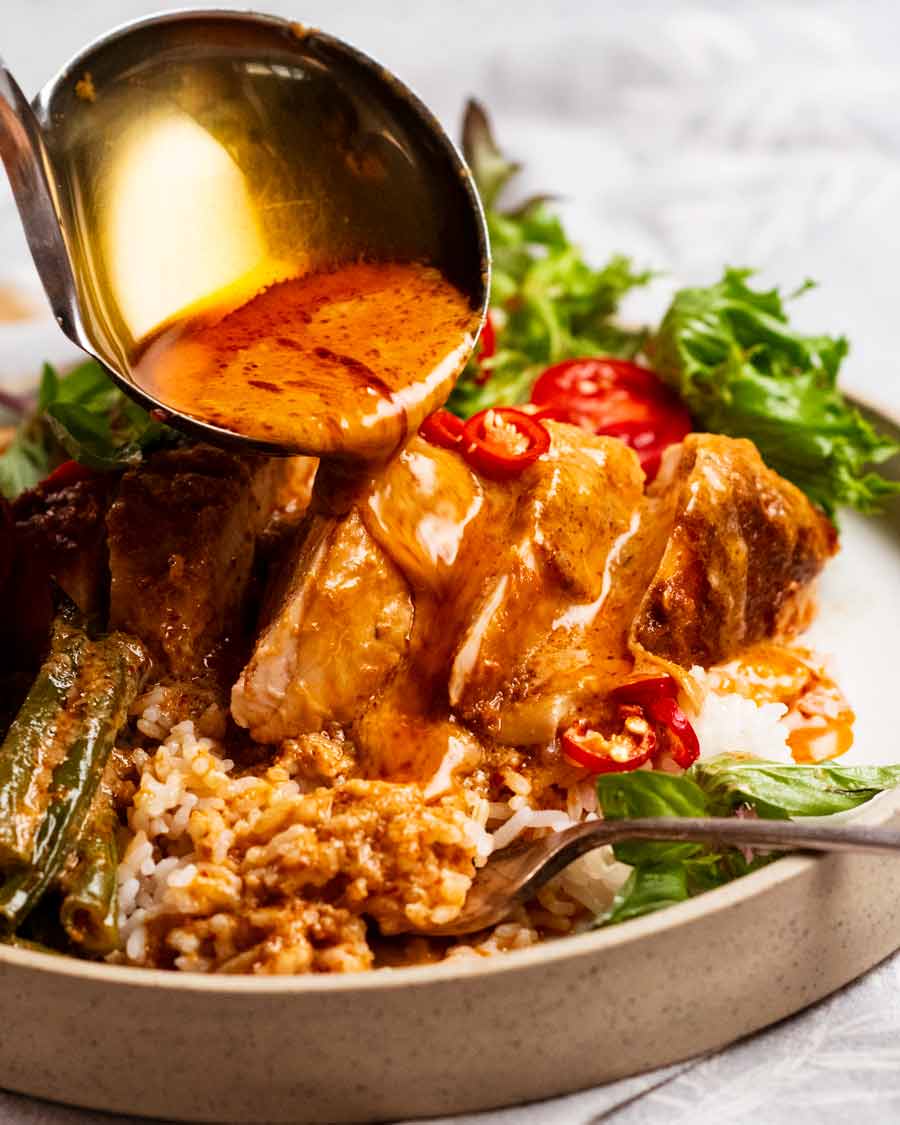
Thai red curry pot roast chicken
Consider this to be the roast chicken version of Lamb Shanks Massaman Curry, and beloved fan-favourite where you just put everything in a pan, pop it in the oven, then out comes fall-apart bronzed lamb shanks smothered in a rich massaman curry sauce.
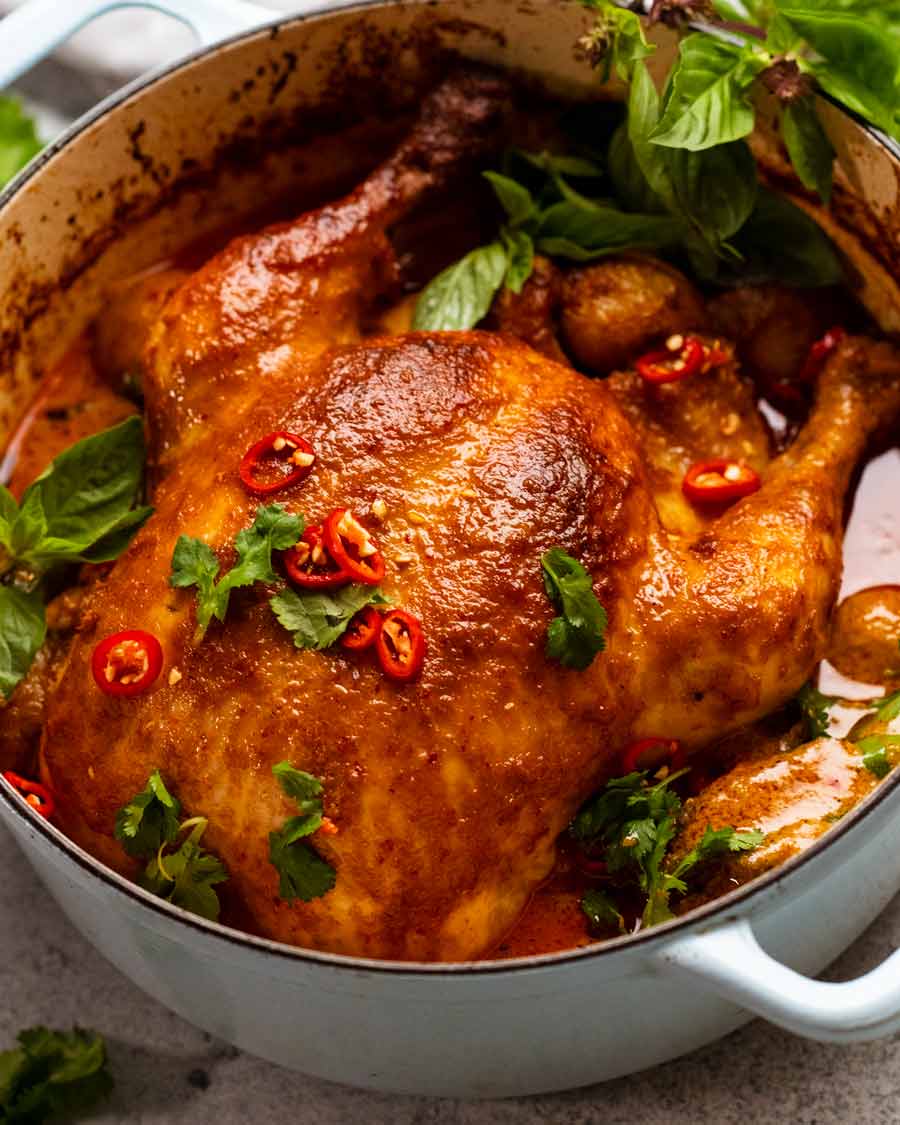
Admittedly, this roast chicken red curry version does call for one extra step – sautéing the curry paste with aromatics (garlic, ginger, lemongrass) – before adding everything else and transferring it into the oven. Well worth a whole 2 minutes of effort for the extra depth of flavour you get in the Thai red curry sauce. And LOOK at the sauce!!
Speaking of sauce – did I mention we’re using store bought instead of homemade red curry paste today? For ease. Which brings me to an important topic:
My favourite red curry paste – Maesri
The best and cheapest. Full stop, end of story!

There is just no other than compares in mainstream grocery stores and Asian stores here in Australia. For authentic flavour – fresh, real, and not too sweet (why-oh-why are all the “western” red curry pastes so darn sweet??!!). Given the tick of approval by Thai nationals and it happens to be the cheapest curry paste clocking in at $2.10 a can.
While I highly recommend Maesri, this recipe does work with other red curry paste brands too. But the sauce will only be as good as the curry paste you use!
Where to find Maesri red curry paste
Asian grocery stores (it’s very common here in Australia)
Australia – Woolworths, Harris Farms, Amazon, asianpantry.com.au
Other countries – Amazon US, Amazon UK, Amazon CA (strangely pricey in Canada??)
Ingredients in Thai red curry pot roast chicken
Here’s what you need to make today’s recipe.
The red curry sauce
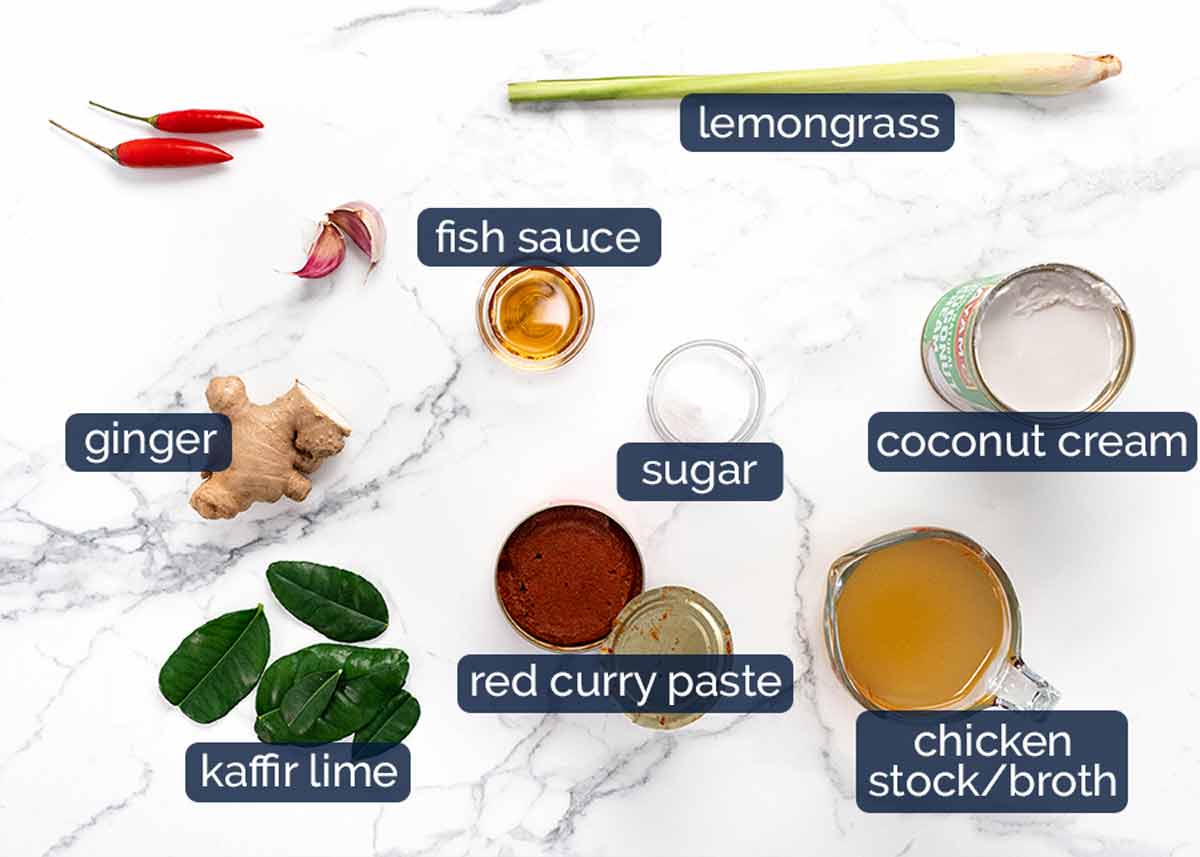
Red curry paste – As per section above, Maesri is my preferred! Cheapest and most authentic flavour.
Lemongrass, garlic and ginger – Adding these gives the store bought curry paste a flavour boost that makes it virtually like homemade red curry paste. It really makes a different!
Lemongrass – Substitute with 1 tablespoon of lemongrass paste. But one day, I hope you can make this with fresh lemongrass because it really is better!
Coconut cream – Not all coconut cream is created equal! Good ones are 100% coconut and have better flavour. Economical ones use water + thickener.
Coconut milk will also work but coconut flavour is not as intense (the sauce gets a ton of juices from chicken which dilutes the coconut flavour which is why coconut cream works better than milk).
Kaffir lime leaves – For authentic Thai curry flavour! Fairly accessible these days at large grocery stores and Asian stores. They freeze 100% perfectly which is handy.
Use leftover kaffire lime leaves in Thai red curry, Tom Yum soup, Thai meatballs, beef rendang, Malaysian chicken satay curry, green curry, golden turmeric baked fish and everybody’s favourite Asian coconut rice!
Fish sauce – This is used as the salt in red curry. More flavour than plain salt!
Sugar – For the right touch of sweetness you find in red curry sauce.
Red chilli – For optional garnish.
Vegetables and herbs
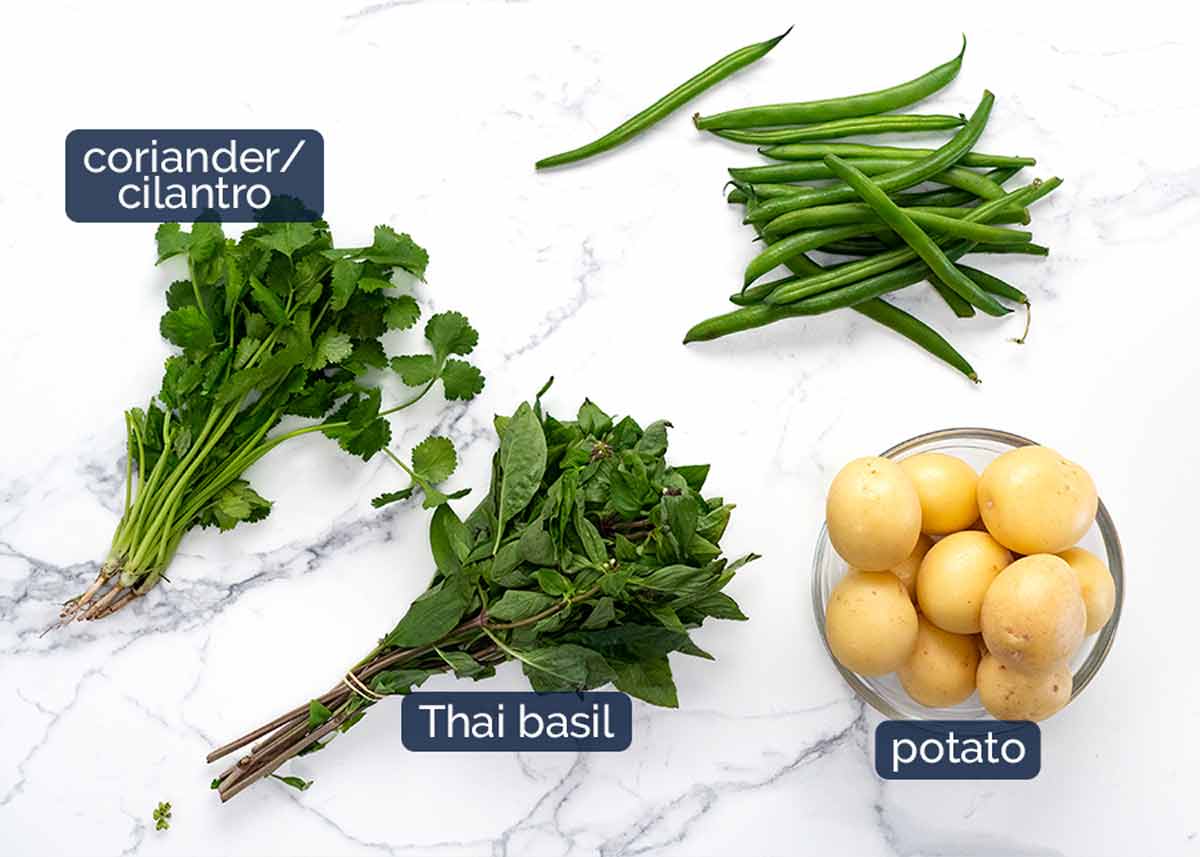
Potatoes – Small, skin on whole potatoes are best as the skin holds them together while they cook up beautifully creamy inside. If using cut pieces, add them partway through cooking else they will disintegrate.
Green beans – Just to add some vegetables into the sauce, plus a sprinkle of green. Feel free to add other vegetables!
Thai Basil has a slight aniseed flavour. Italian basil can be used in a pinch! Really adds a special touch to the finished dish so try not to skip it. But if this is the only thing you’re missing, still worth making!
Coriander/cilantro (optional) – This is mainly for garnish, though if you don’t have Thai Basil this makes a good alternative as a fresh herb addition to the dish.
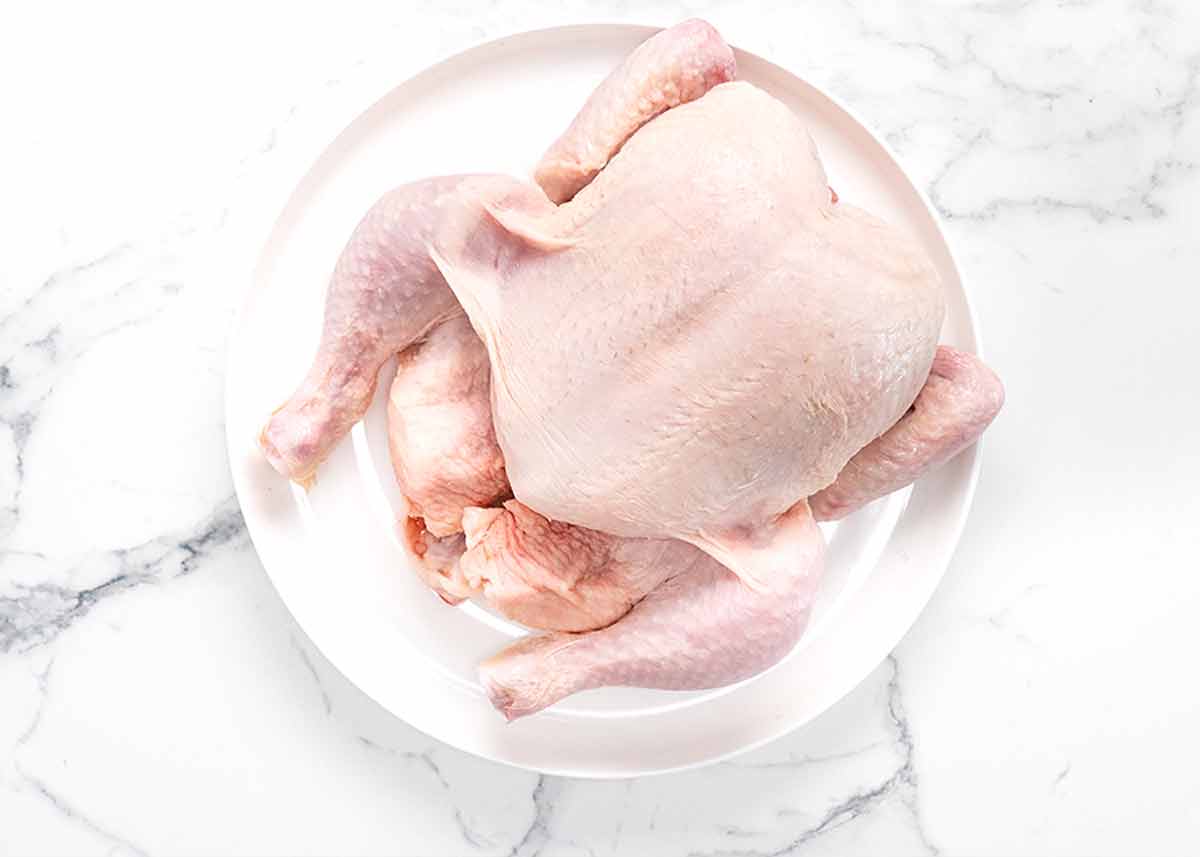
Whole chicken
Oh yes, and you will need a whole chicken. Let’s not make today’s recipe like that time I forgot to include pork in a roast pork recipe!! 😂
I use a 1.8kg/3.6lb chicken. It’s fine to use one a little larger or smaller as the pot-roasting method of cooking we’re using today is very forgiving. It will keep chicken juicy even if you take it over (small chickens) and cooks evenly and fast so larger chickens will cook through.
How to make Thai red curry pot roast chicken
This all gets made in one pot, and you’ll have it in the oven in 10 minutes!
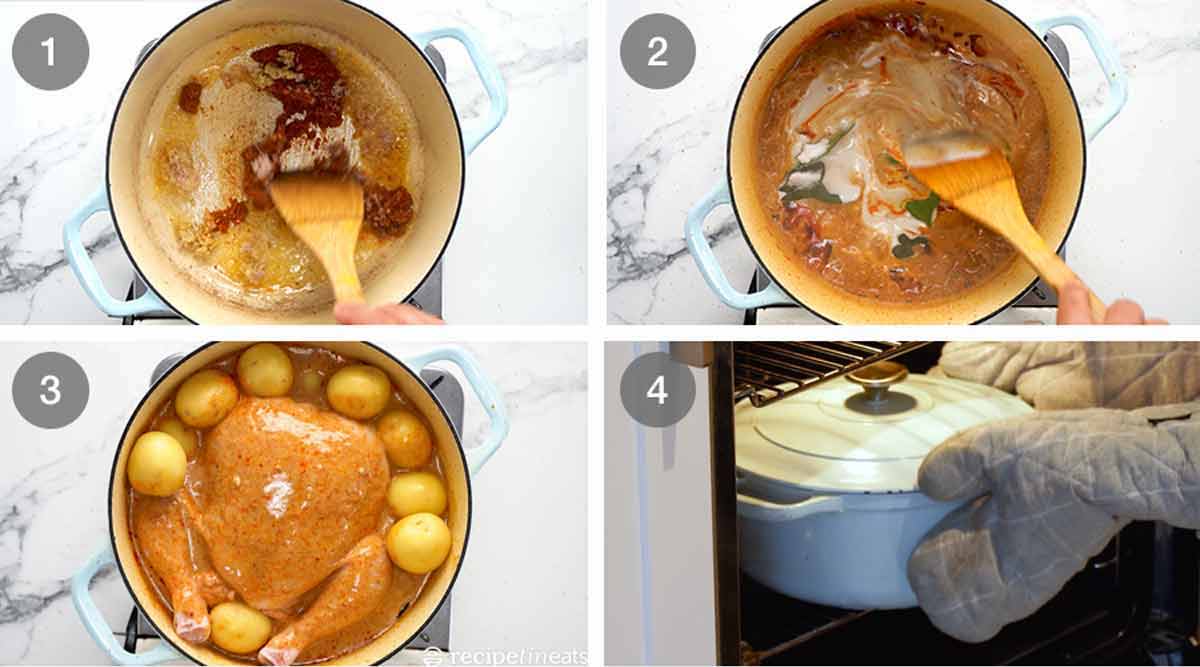
Cook off curry paste – Sauté the curry paste with lemongrass, ginger and garlic for a couple of minutes. The curry paste will dry out and caramelise which intensifies and improves the flavour. An essential step when using any store bought curry paste!
Sauce – Add the chicken stock then reduce it by half to concentrate the flavour. Add the remaining sauce ingredients – coconut cream, fish sauce, sugar, kaffir lime leaves – and stir to combine.
Put the chicken into the sauce and spoon sauce over. Then place the potatoes around it.
Bake covered for 40 minutes.
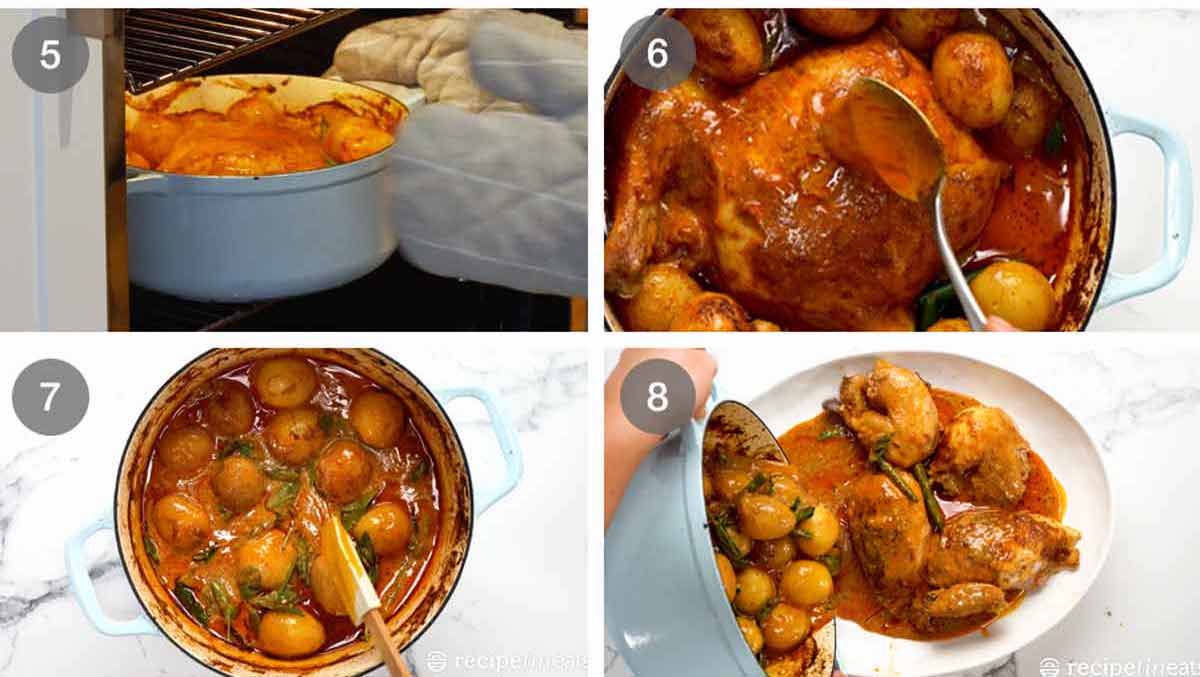
Brown the chicken – After 40 minutes, remove the lid and bake for a further 30 minutes, basting every 10 minutes. Oh, and push the beans into the sauce for the last 10 minutes! Any earlier and they’ll overcook far too much.
Just use a spoon to baste the chicken (which simple means spooning the sauce over) though if you have a turkey baster, it will make your life even easier.
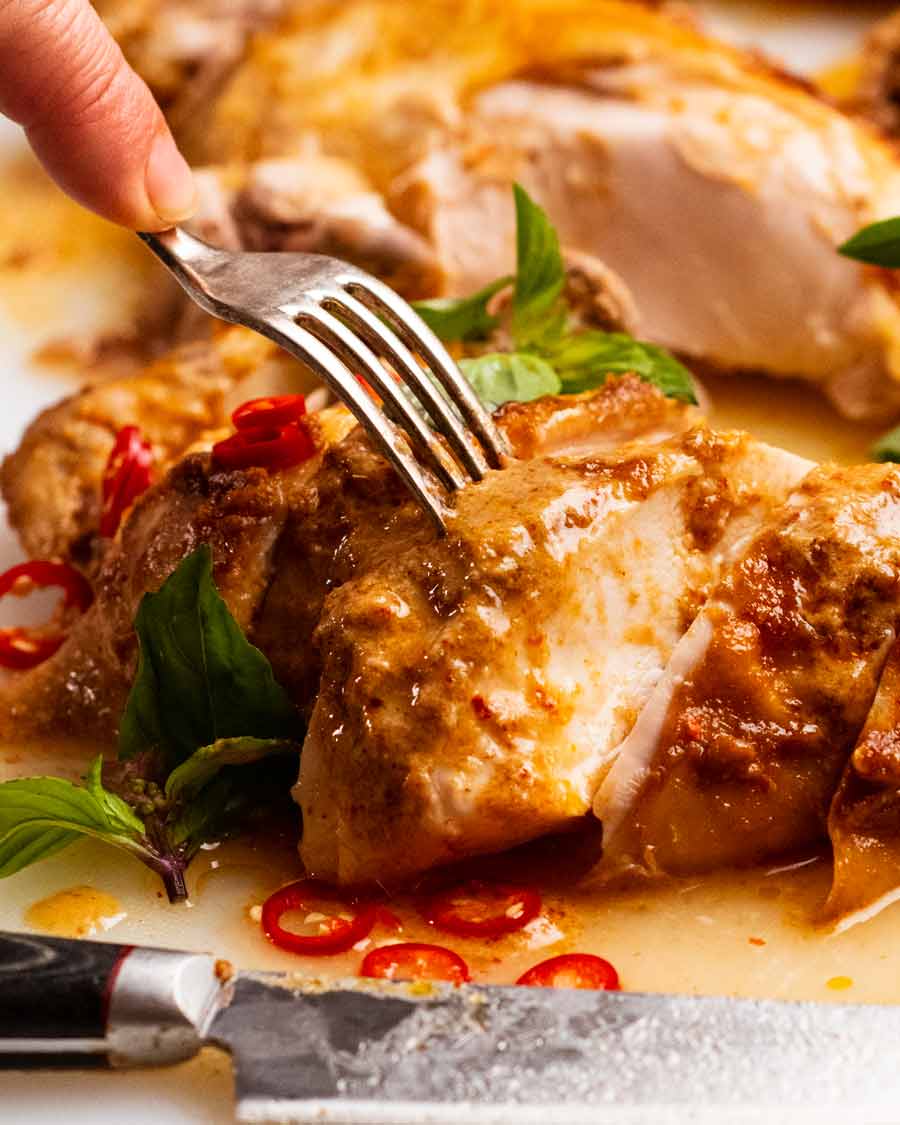
Final baste – Give the chicken a final baste then transfer it to a plate to rest for 10 minutes before cutting it into pieces.
Thai Basil leaves – Stir the basil leaves into the sauce just before plating up, so as to retain the freshness of the flavour.
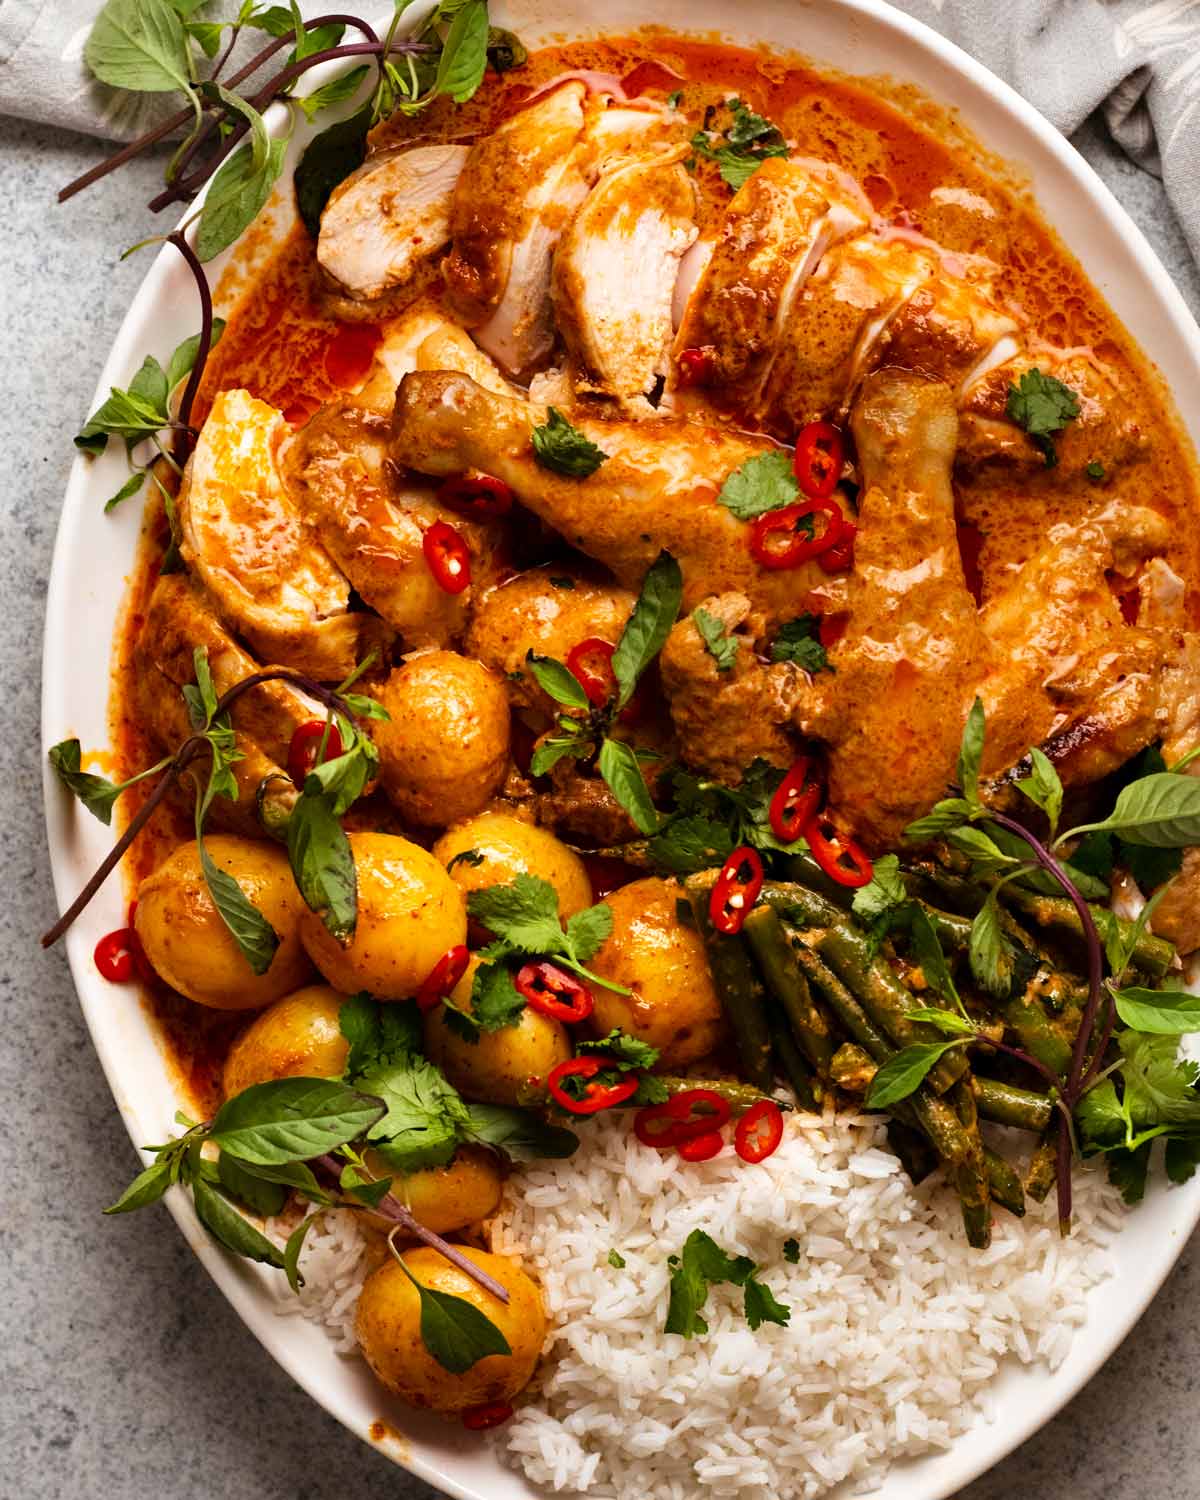
To serve – Place the chicken pieces on a platter then pour over the sauce, potatoes and beans. Garnish with extra chilli and fresh coriander if desired, then take it to the table!
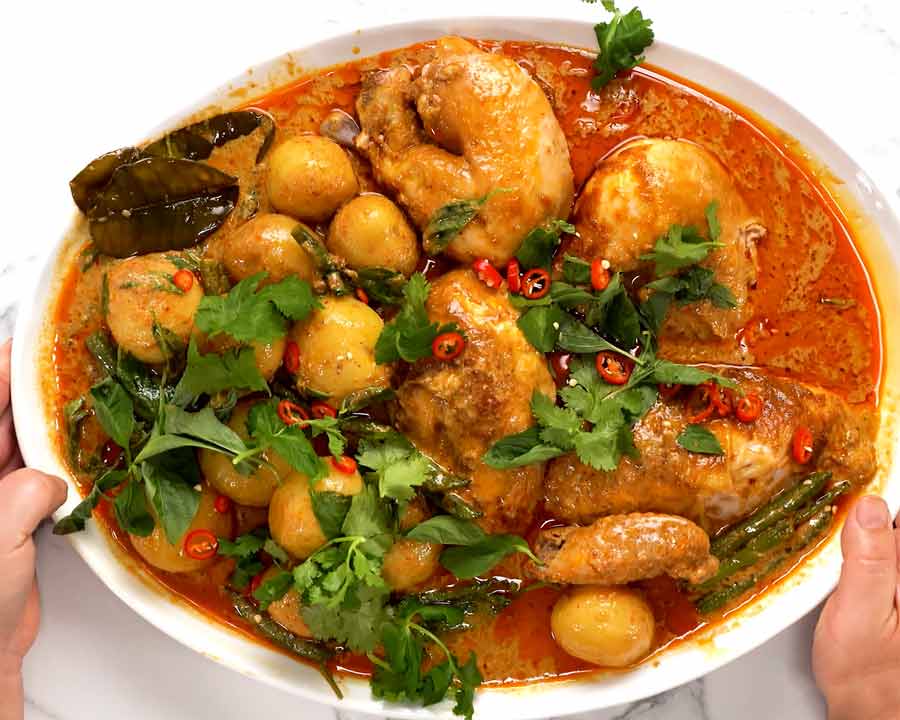
I know I’ve been going on and on about the sauce – and it really is worthy of the talk, I promise – but I shouldn’t undersell how juicy the chicken is, thanks to the pot roasting method of cooking! So much more forgiving than traditional roast chicken – which we all love, but does require more accuracy to ensure you don’t end up with a dry breast.
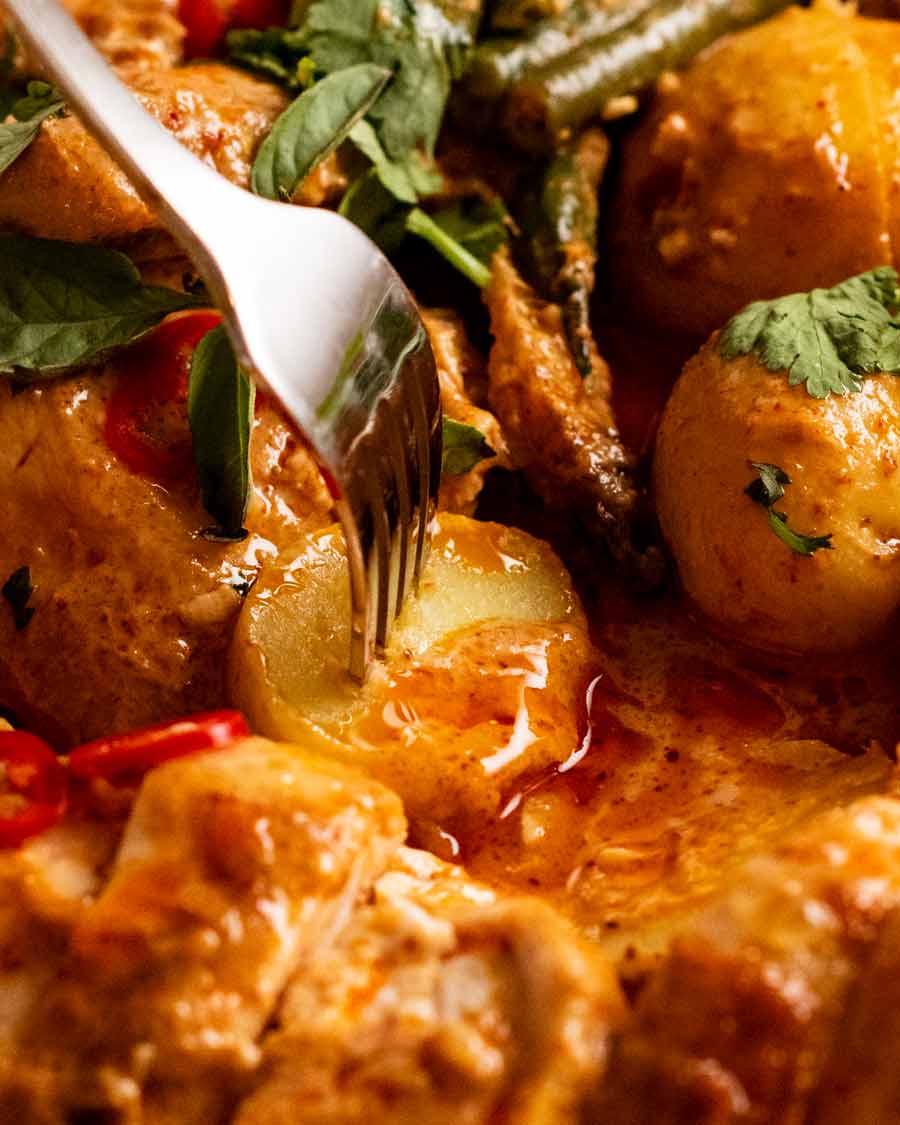
Ah, also, the potatoes!! Using whole small baby potatoes means we can cook them until they are really soft and creamy inside without disintegrating. If you only have large potatoes, cut them into 1.5cm / 0.6″ chunks and add them about halfway through the cook time, otherwise they will over-cook and turn into mush.
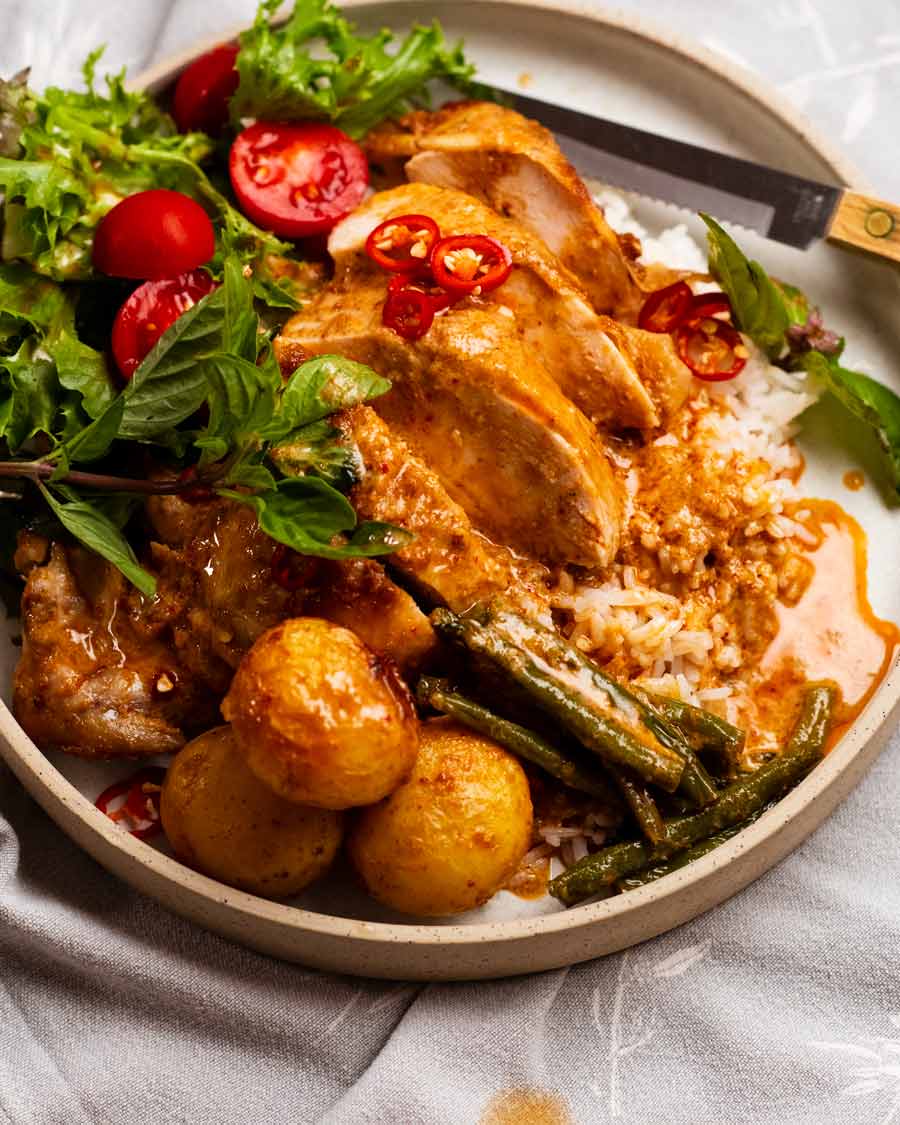
Serve over jasmine rice, to soak up all that beautiful curry sauce, and a perky side salad for something fresh. Pictured above is my Asian side salad but if I had a choice, I probably would’ve opted for smashed cucumbers or my favourite Chang’s Crispy Noodle Cabbage Salad.
I really hope you try this recipe one of these days! Something a little different but very straight forward to make that’s forgiving, with knock-your-socks-off results. It’s Amazing – with a capital A. Everybody knows when I use capitals, I really mean it! 😂 – Nagi x
Watch how to make it

Thai red curry pot roast chicken
Ingredients
- 1.8 kg/ 3.6 lb whole chicken
- 1 tsp cooking/kosher salt
- 3 tbsp vegetable oil
- 115g/ 4 oz (1/2 cup) Thai red curry paste (Maesri recommended, Note 1)
- 2 large garlic cloves , finely grated (Note 2)
- 2 tsp fresh ginger , finely grated (Note 2)
- 2 tsp fresh lemongrass , finely grated, white / pale green part only (Note 2)
- 1 cup chicken stock/broth , low sodium
- 400 ml/ 14 oz coconut cream (Note 3)
- 6 kaffir lime leaves , crushed in hand (Note 4)
- 1 tbsp white sugar
- 2 tsp fish sauce
- 600g/ 1.2lb small potatoes (12 or so), skin on (Note 5)
- 120g/ 4oz green beans , trimmed and cut in half
- 15 Thai basil leaves , or more! (sub ordinary Italian basil, Note 6)
Serving + optional garnishes:
- Jasmine rice
- Red chilli , finely sliced
- Coriander / cilantro leaves
Instructions
- De-chill & salt chicken – Take the chicken out of the fridge 1 hour prior. Pat dry then sprinkle with the salt.
- Preheat oven to 200°C/400°F (180°C fan).
- Sauté curry paste – Use a large, oven-proof pot with a lid. Heat oil on medium high heat. Cook curry paste, garlic, ginger and lemongrass for 2 minutes. This step substantially improves the flavour of store bought curry paste.
- Sauce – Add chicken stock, stir, then simmer rapidly for 3 minutes to reduce by half. Stir in coconut cream, hand-crushed kaffir lime leaves, sugar and fish sauce.
- Place chicken into the sauce. Spoon over sauce. Surround with potatoes.
- Bake 1 hour – Place the lid on and bake for 40 minutes. Remove lid spoon sauce over chicken (ie. baste). Turn the oven up to 220°C/425°F (200°C fan). Bake uncovered for 10 minutes, baste, bake another 10 minutes.
- Beans, then bake 10 minutes – Push beans into the sauce (wherever they fit!). Baste again then bake for a final 10 minutes (no lid).
- Rest 10 minutes – Remove chicken onto a plate (Note 7). Rest 10 minutes. Put lid on pot to keep sauce warm.
- Serving – Carve chicken, place on platter. Stir basil leaves into sauce. Pour/spoon sauce, potatoes and beans over chicken. Garnish with chilli and coriander, if desired. Serve with jasmine rice!
Notes
Nutrition
Life of Dozer
Typical.

The post Thai red curry pot roast chicken appeared first on RecipeTin Eats.
]]>