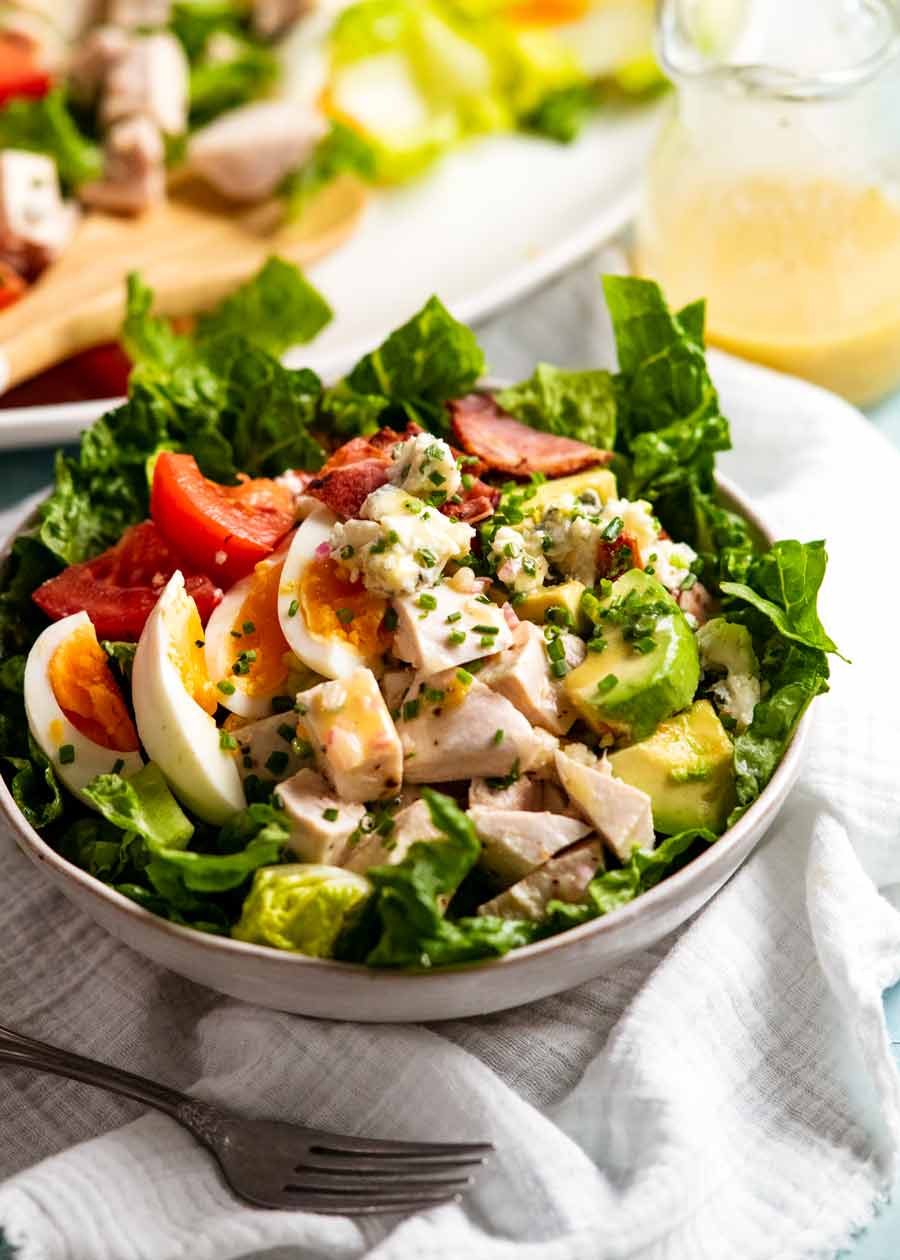
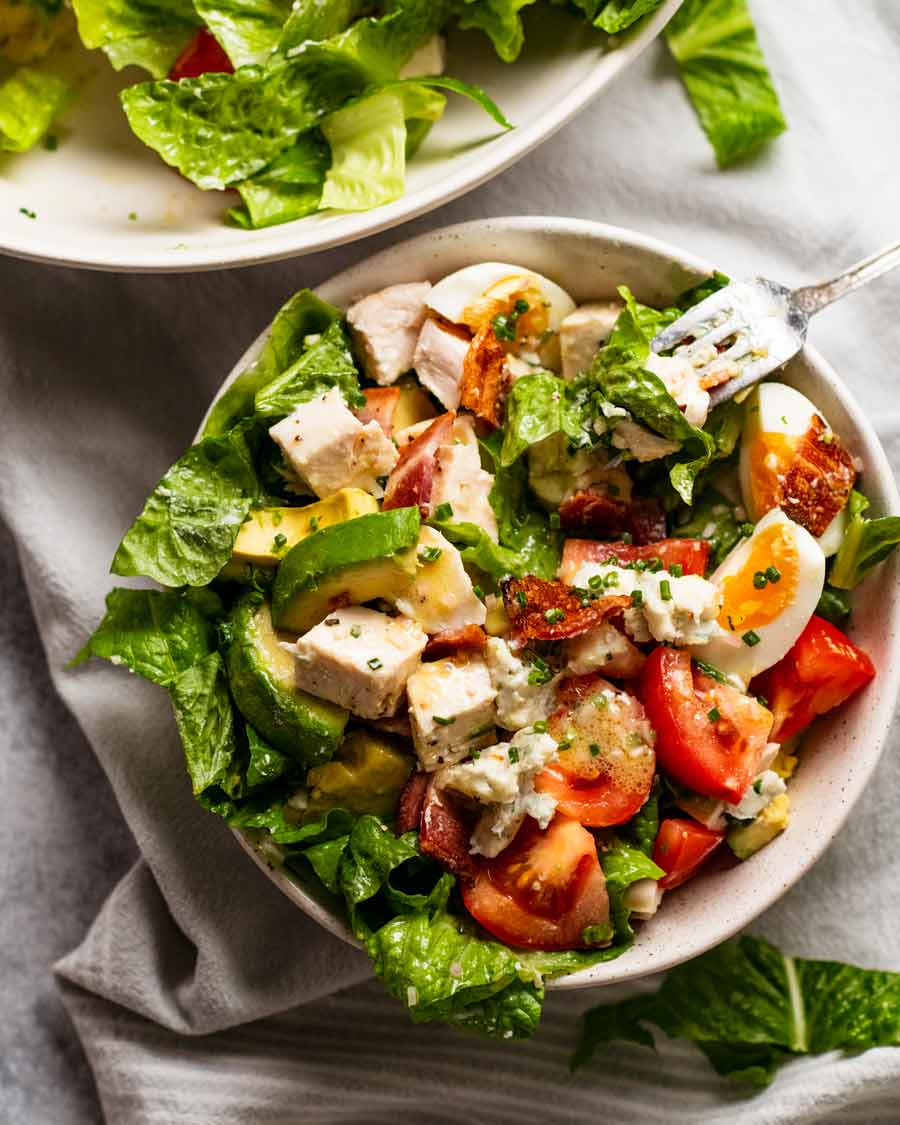
 The mighty Cobb Salad has arrived! All the essential players present – juicy bites of chicken, crispy lettuce, chunks of tomato, creamy avocado, salty bacon and creamy blue cheese, arranged in the signature rows. Served with a homemade Cobb Salad dressing. Salad was never so delicious! Cobb Salad I feel like I’ve done endless iterations... Get the Recipe
The post The mighty Cobb Salad appeared first on RecipeTin Eats.
]]>The mighty Cobb Salad has arrived! All the essential players present – juicy bites of chicken, crispy lettuce, chunks of tomato, creamy avocado, salty bacon and creamy blue cheese, arranged in the signature rows. Served with a homemade Cobb Salad dressing. Salad was never so delicious!
Cobb Salad
I feel like I’ve done endless iterations of chicken salad, from Chinese to Vietnamese, Mexican to Thai, not to mention all the various non-Asian ones from the Avocado Ranch pasta one to Lemon Chicken to that one I copied from a trendy San Francisco bistro (<- This was is super good!).
So I was a little surprised that I hadn’t done what is probably the most classic of all chicken salads – the great Cobb Salad! Though actually, it was traditionally made with turkey rather than chicken. But these days chicken is more common, especially for homemade versions.
Though there are various tales about the origins of Cobb Salad, one thing everybody agrees on is that the ingredients should be presented in neat rows on a large bed of lettuce. The presence of blue cheese is also essential – otherwise, it’s just another chicken salad! 
Cobb Salad Dressing – sharper than most
Another thing worth mentioning is that Cobb Salad Dressing is a little sharper than standard dressings, with a 50/50 oil to vinegar ratio compared to the usual 1 part vinegar to 3 or 4 parts oil. The slightly tangier dressing works really well here because it offsets the richness of the blue cheese, with the added benefit of lower calories!

Ingredients in Cobb Salad
Feel free to cut the vegetables as you wish. Some like them more chunky, to give the salad a sense of heft. Others prefer them chopped into smaller pieces. It’s entirely up to you!
Cobb Salad Vegetables
Here are the vegetables in a classic Cobb Salad.
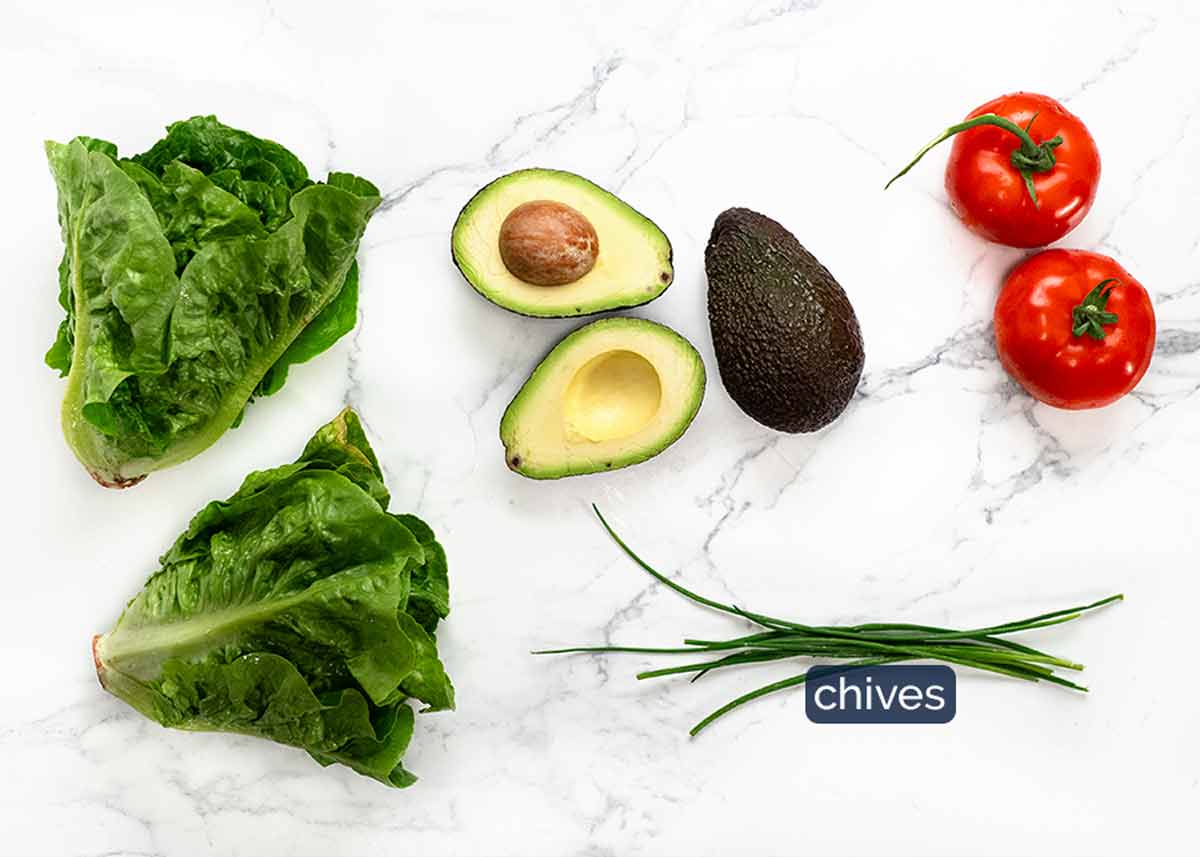
Cos / romaine lettuce – Either 1 large or 2 small ones (“hearts”), chopped into large bite size pieces. You want around 12 cups, lightly packed, slightly heaped. I know, it’s hard to measure! It’s flexible. The recipe has plenty of dressing!
Tomatoes – Either 2 large ones cut into chunks (I prefer this) or 250g/8oz cherry tomatoes, halved.
Avocados – Two medium avocados or one really large on.
Chives – This is an optional garnish. Finely chop then sprinkled on at the end.
Cobb Salad Proteins & Blue Cheese
Not a fan of blue cheese? You’re missing out! 😂

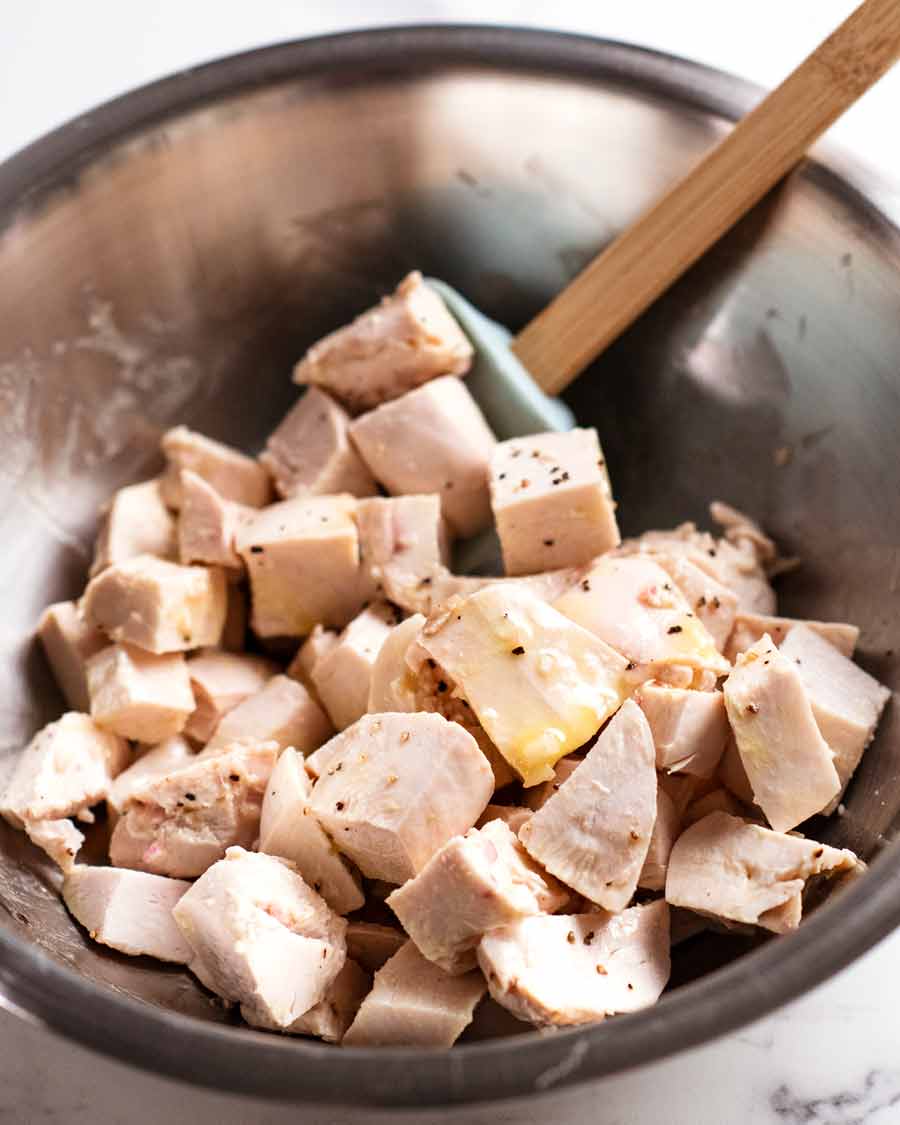
Chicken – You can either poach your own (you will love my foolproof entirely hands-off method) or use store bought roast chicken. Though not standard, I like to toss my cooked chicken in a little salt, pepper and dressing. Just – more flavour.
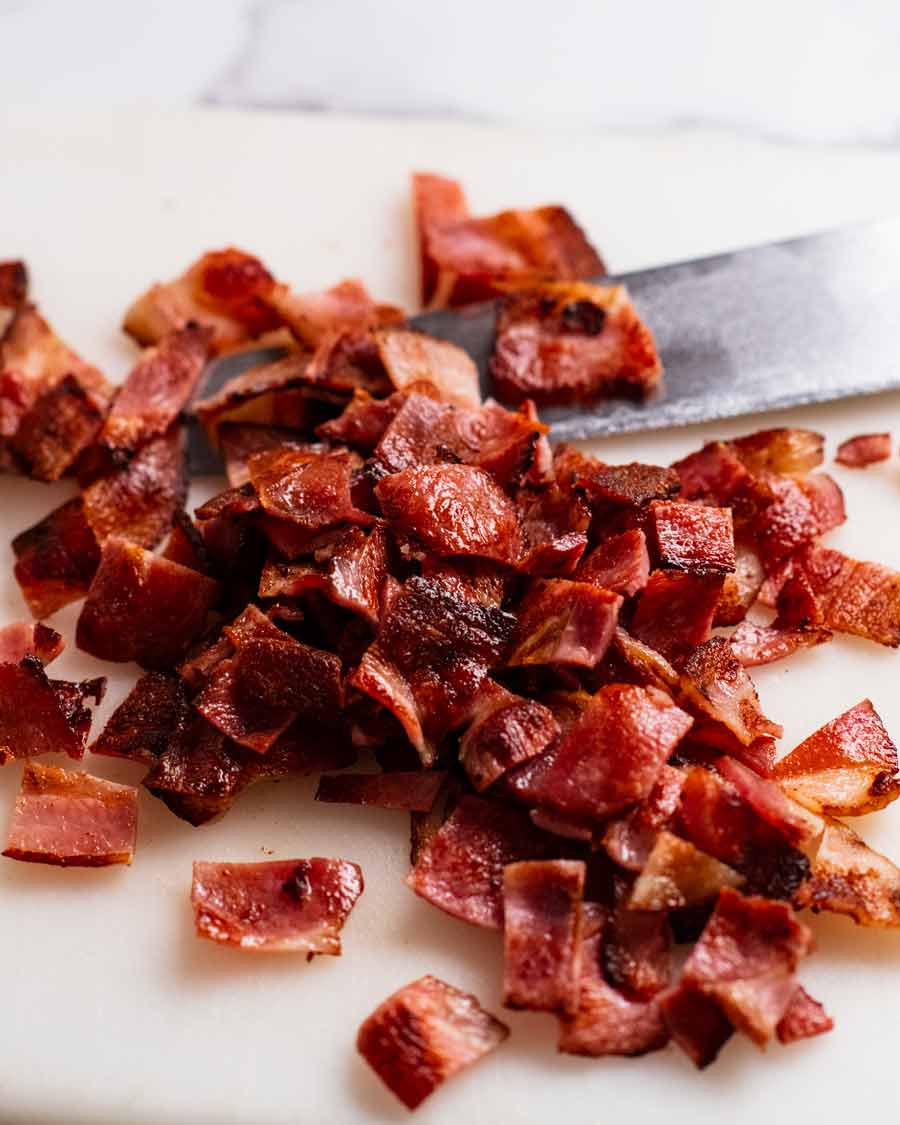
Bacon – These days I tend to cook the strips whole then chop afterwards because it’s less effort. So much easier to cut crispy bacon than raw, and less effort to cook strips than a pan full of lots of tiny pieces that keep popping in my face!
Blue cheese – There might not be full consensus on exactly what type of blue cheese is the classic to use in a Cobb Salad. But for me, there’s no question: creamy is better than crumbly/drier. Creamy blue cheese smears and gets on “everything”, and everything it touches is tastier!!
My favourite blue cheese for salads is gorgonzola. Gorgonzola Dolce is my preference for a creamier, rounder blue cheese flavour – this is the more common type of Gorgonzola. Though if you like your blue cheese really sharp, then go for Gorgonzola Picante!
New to blue cheese? Try Blue Castello. It’s probably the most mild out of all the blue cheese, plus it’s better value.
Boiled eggs – I like mine soft boiled so the yolks are slightly jammy but not runny. 9 minutes in boiling water – boil the water first, lower eggs in then set the timer! (Boiled egg directions here).
Cobb Salad Dressing ingredients
As noted above, Cobb Salad Dressing is tangier than typical vinaigrettes. To help with thickening (because less oil = thinner dressing), a touch of Dijon mustard is used.
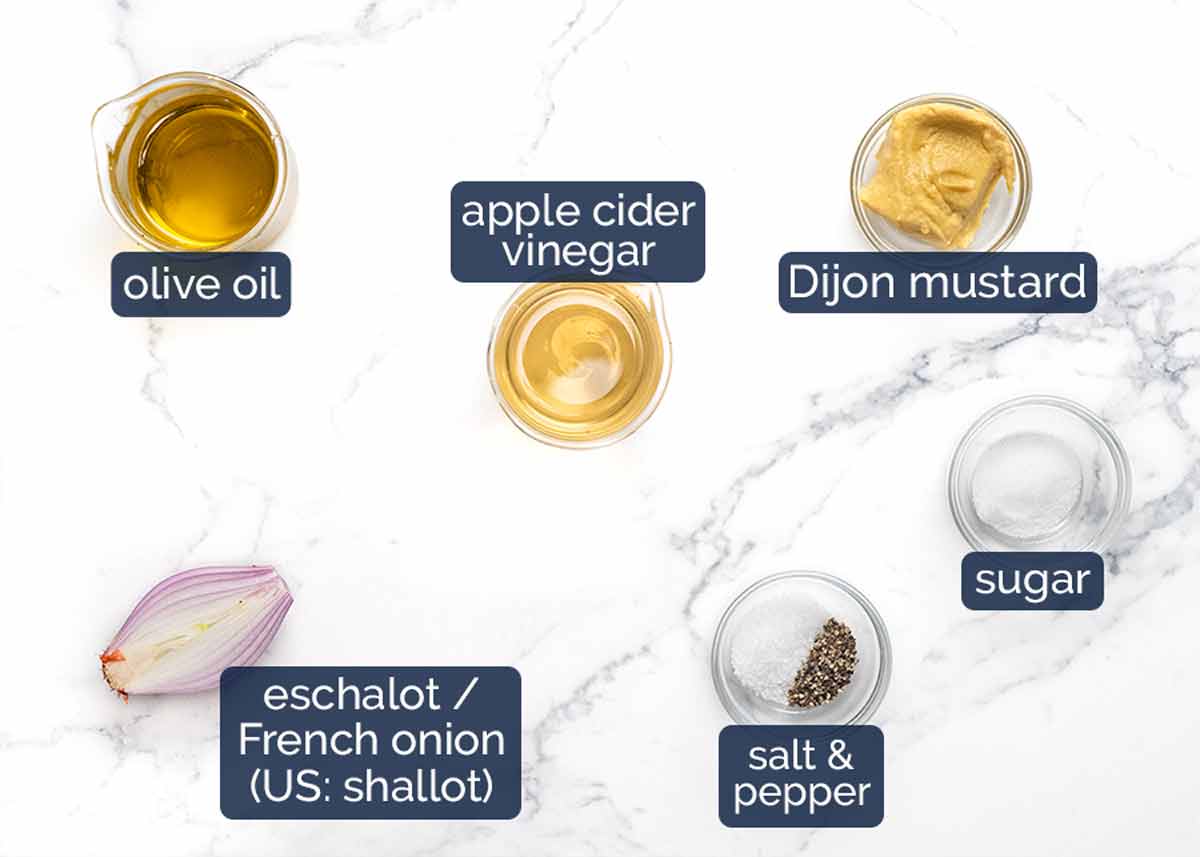
Extra virgin olive oil – Use the best you can afford! The better the olive oil, the tastier your dressings.
Apple cider vinegar – Good all rounder vinegar for dressings that’s not as sharp as white vinegar. Substitute with white wine or red wine vinegar.
Dijon mustard – Adds flavour as well as thickening the dressing which is particularly important here because this dressing uses less oil. So the dressing would be very watery without the dijon.
Eschallot (US: shallot) – The small onions which are finer than ordinary onions so the minced pieces blend into the dressing better, rather than having lots of big chunks. Also, the flavour is not as sharp as ordinary onions. This adds good value into the dressing so don’t skip it! Substitute with 1 tablespoon finely grated red onion.
Sugar – Just 1/2 a teaspoon takes a bit of the tangy edge off this dressing.
I’m using a classic Cobb Salad dressing today so there’s no garlic in it. But a finely grated garlic clove certainly wouldn’t go astray here!
How to make Cobb Salad
The presentation of Cobb Salad is one of its defining features. Traditionally, it’s served on a large platter with the ingredients artfully arranged in neat rows. I see no reason to stray from tradition when it looks so good!
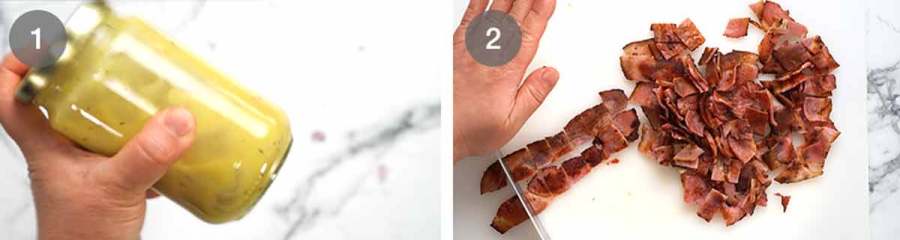
Dressing – Shake everything up in a jar. It really is a quick and easy way to properly mix dressings so they become thick and creamy as they should be.
Cook bacon strips until crisp then chop. (See comment in the ingredients section about my preference to cook first then chop later these days).

Poach chicken breast using my foolproof poached chicken recipe. (plonk in boiling water, turn stove off, leave 20 minutes. Works every-single-time, and the chicken is juicy!).
Chop & toss – Cool chicken, dice into 2cm / 0.8″ cubes. Toss with salt, pepper and a slosh of Dressing.

Assemble – Pile the lettuce onto a large platter or bowl. Arrange the following across the surface in neat rows: chicken, avocado, tomato, bacon, egg. Crumble blue cheese across the surface, then scatter with chives. Serve with dressing on the side.
To eat – Let everybody help themselves to the salad, and drizzle on Dressing. Then dive in!

A note on serving Cobb Salad
I serve Cobb Salad by laying out the un-dressed salad on a big platter, then pouring the dressing into a jug. Then I leave everyone to help themselves to the salad and pour over as much or as little Dressing as they wish.
I prefer doing it this way because otherwise you have to toss each vegetable separately in Dressing before laying them out in the signature rows. Which means you end up using quite a lot of dressing, plus the lettuce dressed first ends up a little wilted from the dressing if you spend a little too long fussing with the neat rows (YES I DO!🙈).
Not sure if this is the traditional way to serve Cobb Salad, but it works for me! – Nagi x
Watch how to make it

Cobb Salad
Love the presentation on a big platter with the ingredients in neat rows. Serve Dressing on the side for everyone to help themselves (better than tossing each item individually).Ingredients
Chicken:
- 400g/14 oz chicken breast (2 pieces)
- 1/4 tsp cooking/kosher salt
- 1/4 tsp black pepper
Cobb Salad:
- 200g/7oz streaky bacon strips
- 4 x 9 minute boiled eggs , quartered
- 12 cups cos / romaine lettuce (1 large head, 2 small), chopped (or other crispy lettuce)
- 2 large tomatoes , cut into 8 wedges then halved (or 250g/8oz cherry tomatoes halved)
- 2 avocados , cut into large pieces
- 200g/7oz gorgonzola dolce (my favourite) or roquefort (traditional), crumbled (or other blue cheese – Note 1)
- 2 tbsp chives , finely chopped
Dressing:
- 1 tbsp dijon mustard
- 5 tbsp extra virgin olive oil
- 5 tbsp apple cider vinegar (sub white wine or red wine vinegar)
- 3/4 tsp cooking/kosher salt
- 1/4 tsp black pepper
- 2 tbsp eschallot (US: shallot), very finely minced
- 1/2 tsp white sugar
Instructions
- Dressing: Shake ingredients in a jar.
- Flavour chicken: Poach chicken using this method (20 minute foolproof-guaranteed-juicy). Cool to room temperature then cut into 2cm / 0.75” cubes. Toss with salt, pepper and 2 tablespoons of Dressing. Set aside.
- Crisp bacon: Place bacon strips in a non-stick pan (not heated, no oil). Turn heat onto medium high – as the pan heats up, the fat will begin to melt. Cook for 2 minutes until golden, turn and cook the other side for 1 1/2 minutes until golden. Drain on paper towels. Once cool and crisp, chop into 1.5cm / 0.6" pieces.
- Assemble: Spread lettuce on a large platter. Arrange the ingredients on top in the Cobb Salad signature neat rows: egg, bacon, avocado, tomato and chicken. Crumble blue cheese across the top, sprinkle with chives. Pour dressing into a jug.
- Serving: Let everybody help themselves to the salad and Dressing!
Notes
I love using creamy gorgonzola because it smears on everything so it sort of becomes part of the dressing. Hence why the dressing is a little tangier than traditional vinaigrettes – you need it, to cut through the richness of blue cheese.
Blue cheese newbies – Suggest using a milder blue cheese like Blue Castello. Adamantly against blue cheese? Feta or goats cheese would be my picks, and suggest adding an extra tablespoon of oil into the dressing to make it a little less tangy.
Nutrition per serving. Shave off 60 calories by using turkey or lean bacon. And the blue cheese accounts for 130 calories. Totally makes it!!Nutrition
Life of Dozer
With all the good stuff in this salad, he can’t believe what he was offered.

The post The mighty Cobb Salad appeared first on RecipeTin Eats.
]]> Meet my latest obsession – Arayes! Pita pockets stuffed with seasoned meat kofta filling, then pan fried until crispy. Think: Lebanese quesadillas / easy gozleme. Enjoy for dinner or pass them around as an appetiser. I can’t stop eating these! Arayes – Lebanese street food! Every now and then I happen across a recipe that... Get the Recipe
The post Arayes – Lebanese Meat-Stuffed Crispy Pita appeared first on RecipeTin Eats.
]]>Meet my latest obsession – Arayes! Pita pockets stuffed with seasoned meat kofta filling, then pan fried until crispy. Think: Lebanese quesadillas / easy gozleme. Enjoy for dinner or pass them around as an appetiser. I can’t stop eating these!
Arayes – Lebanese street food!
Every now and then I happen across a recipe that really catches me by surprise. Something I’ve never heard of before that’s devilishly tasty, a little different to the usual yet easy and relatively fast to make.
Today’s Arayes is one such recipe, introduced to me by Chef JB, discovered during his globe trotting days.
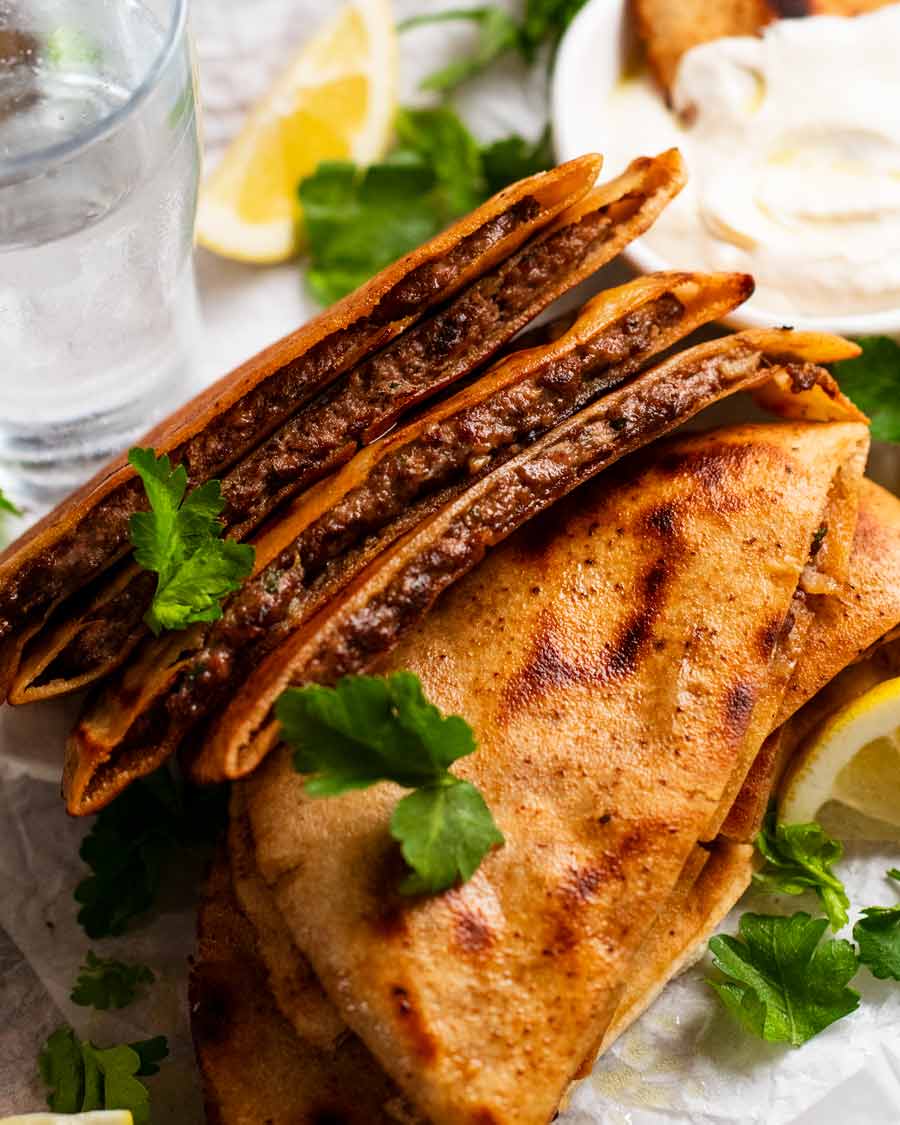
Originating from the Middle East, Arayes is a pita or flatbread that’s stuffed with raw seasoned meat kofta filling then pan fried, grilled or baked until crispy. Think of it like quesadillas – but with Middle Eastern spiced filling – or an easier version of lamb gozleme.
As with many traditional recipes, there are variations between countries, including the seasoning in the meat, the type of bread used, thickness of meat etc. The Arayes I’m sharing today is a Lebanese one. It’s easy. You can get all the ingredients at any grocery store.
And it’s Outrageously Delicious. (You know I’m deadly serious when I capitalise!)

Ingredients in Arayes
Here’s what you need to make Arayes.
Spiced kofta filling
Here’s what you need for the spiced kofta filling used to stuff the pita bread.
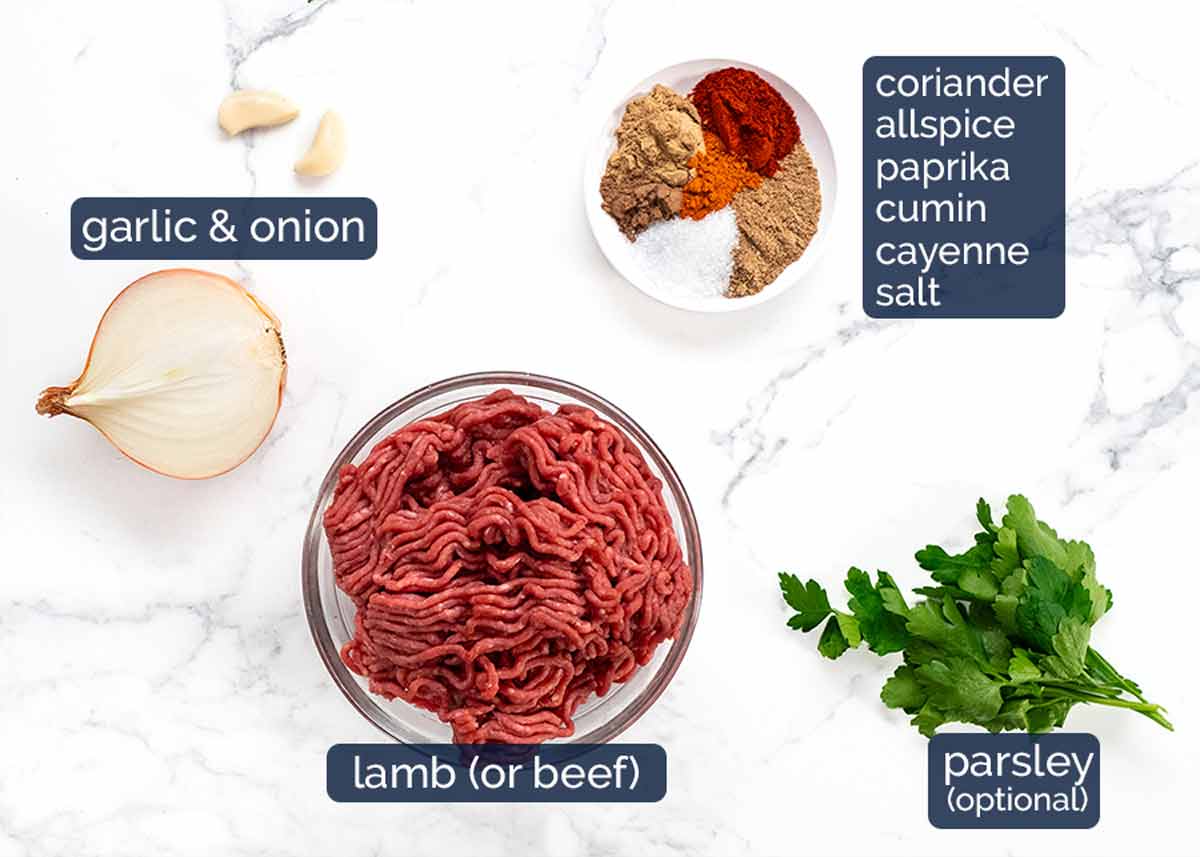
Protein – Lamb is a favoured protein in the Middle East and goes so well with the Lebanese spice mix we’re using today! However, beef is a very close second.
Spice mix – No unusual players here in this Lebanese kofta spice mix! There’s a fairly generous amount – almost 3 tablespoons – which sounds like a lot. This is because the meat is spread very thinly inside each pita bread so you actually don’t end up with very much with each bite. So you want it to be heavy on the spicing!
Spice note: Mild kick, only 1/2 tsp cayenne across 10 pita bread halves. To reduce to subtle, cut down cayenne to 1/4 tsp. Or omit.
Onion and fresh garlic – For aromatic flavour in the kofta filling.
Parsley – Optional for nice little bits of green throughout.
Pita bread and oil
Arayes is and can be made with all sorts of pita breads – large, small, thin, thick. Have fun and experiment!
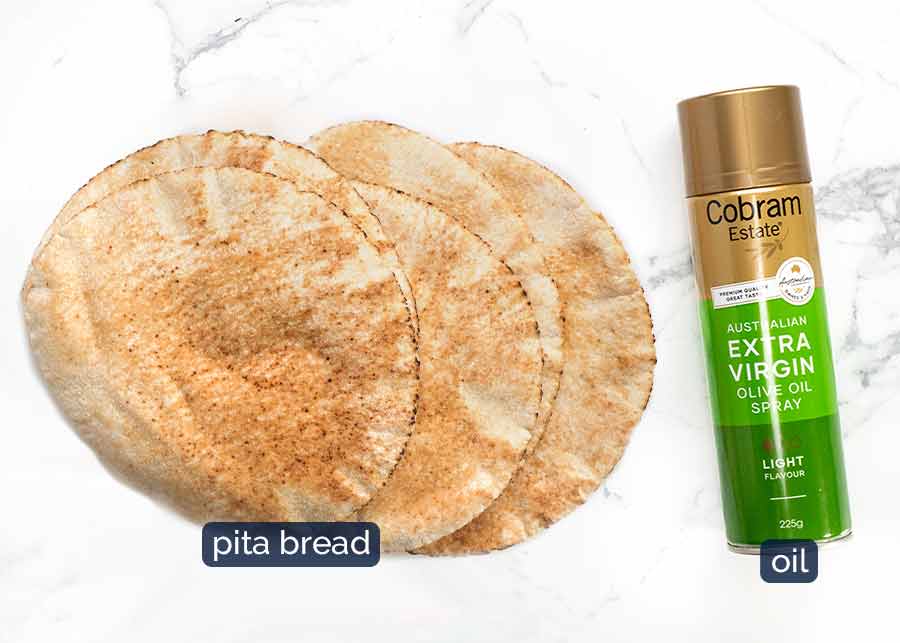
Pita Bread – The pita bread I use is 15cm / 6″ wide. You need pita bread pockets that can be split open to stuff the meat inside. Thinner is better as it’s easier to cook the meat through. Fellow Aussies – I use Nana brand pita bread from Woolies, Coles.
Alternatives/variations – I’ve made this with the breadier, thicker pita bread pockets too (like used in this recipe) and it works great, just takes a minute or two longer for the meat to cook. Large Lebanese bread ~30cm/12″ wide also works! You need 2 to 3, spread the meat inside using a butter knife, pan fry until crisp then cut into pieces. And if you can’t find any pita pockets at all, you could even make Arayes using any flatbreads you can get your hands on, or even tortillas! Just make them like quesadillas – spread the meat filling on half then fold over.
Olive oil spray works best for cooking, I found. Using oil in the pan makes the pita pockets a little too greasy. If you don’t have spray, just brush the surface with olive oil.
How to make Arayes
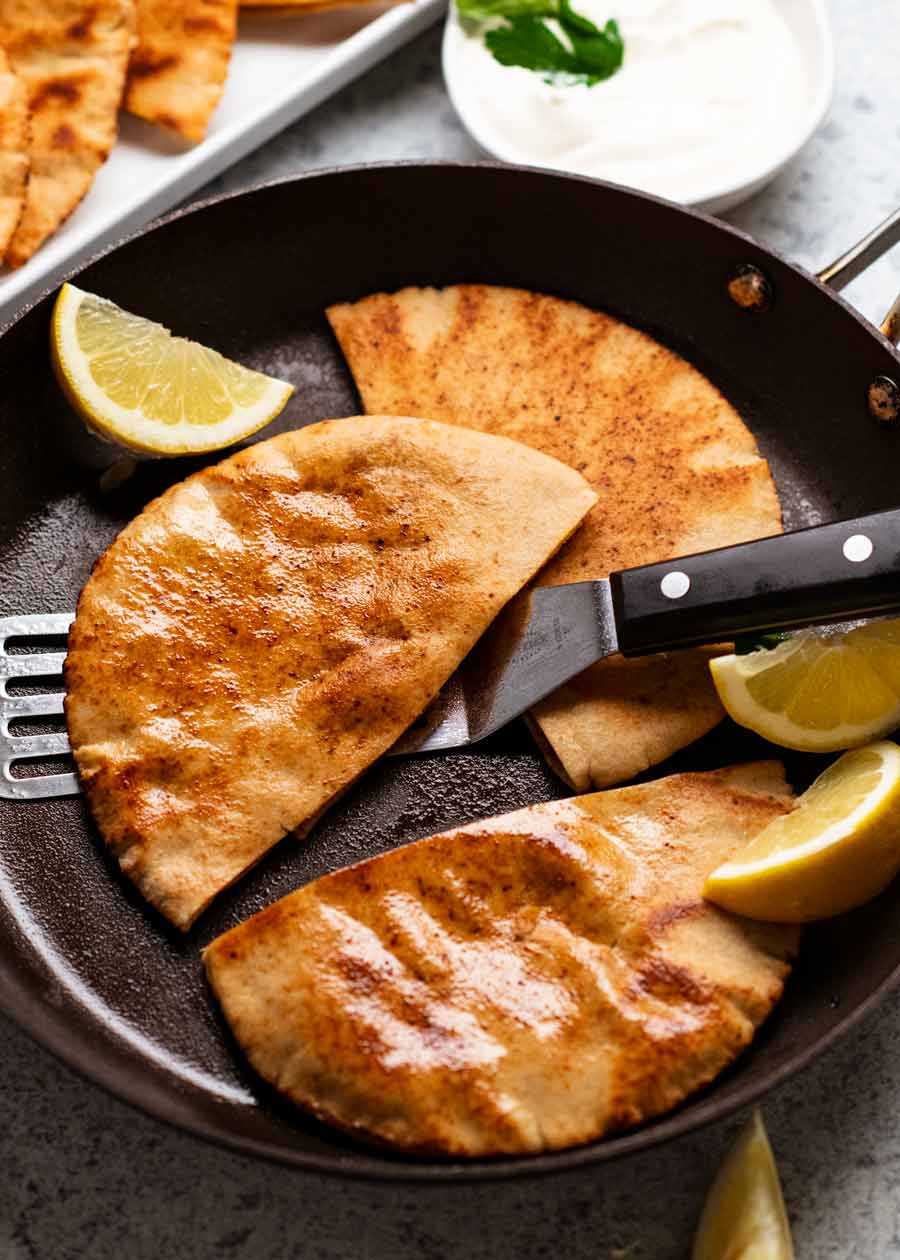
A unique step in making Arayes is that the meat is raw when stuffed inside the pita bread. So as it cooks, the meat juices flavour the inside of the pita bread while the outside goes golden and crispy. It’s sooooo good!!
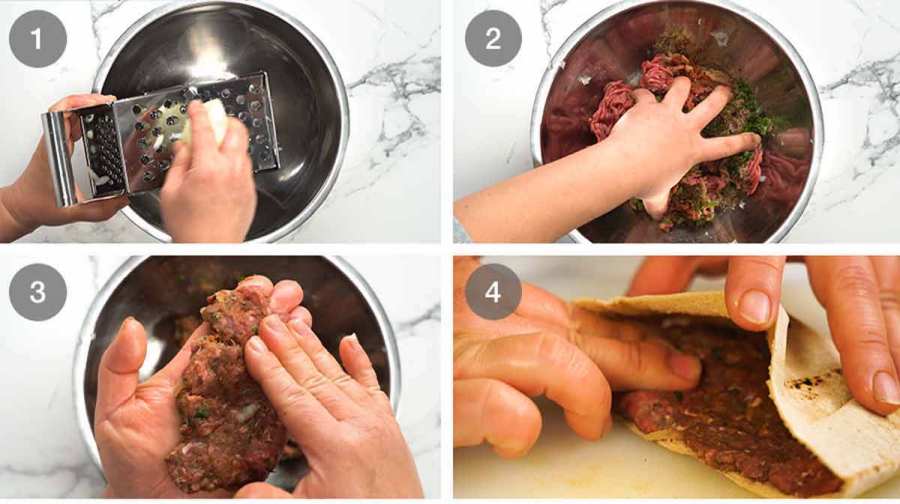
Grate the onion using a standard box grater. Why grate rather than chop? Because grated is finer than chopped so you don’t need to cook the onion separately before mixing into the meat. It will cook enough with the meat. Plus, the onion juices make the meat mixture even tastier!
Filling – Add the meat and all the other filling ingredients, then mix well with your hands.
Semi-circle shape – Divide into 10 portions, roll into a ball then pat into a thin semi-circle shape approximating the size of half a pita bread.
Stuff the meat inside the pita bread. PRO TIP: If you have trouble prying the pocket open, microwave for 15 seconds on high to soften then run a butter knife inside the slit.

Flatten – Close the pita bread then press down and out to spread the meat to the edges of the pita bread. Though – no need to be too meticulous here! You just don’t want giant areas of meat-less pita bread.
Spray each side with oil. I prefer spraying because I found using oil in the pan makes the Arayes too greasy. Plus, you use far less oil!

Pan fry 4 min – Then pan fry on medium high for 2 minutes on each side until crispy. The meat will cook through in this time because it’s so thin! I do 2 or 3 halves at a time. Cook as many as you can fit in a single layer.
Keep cooked Arayes warm in a low oven on a rack set over a tray (rack prevents underside from getting soggy) as you continue cooking. Or – get 2 pans going to speed things up!
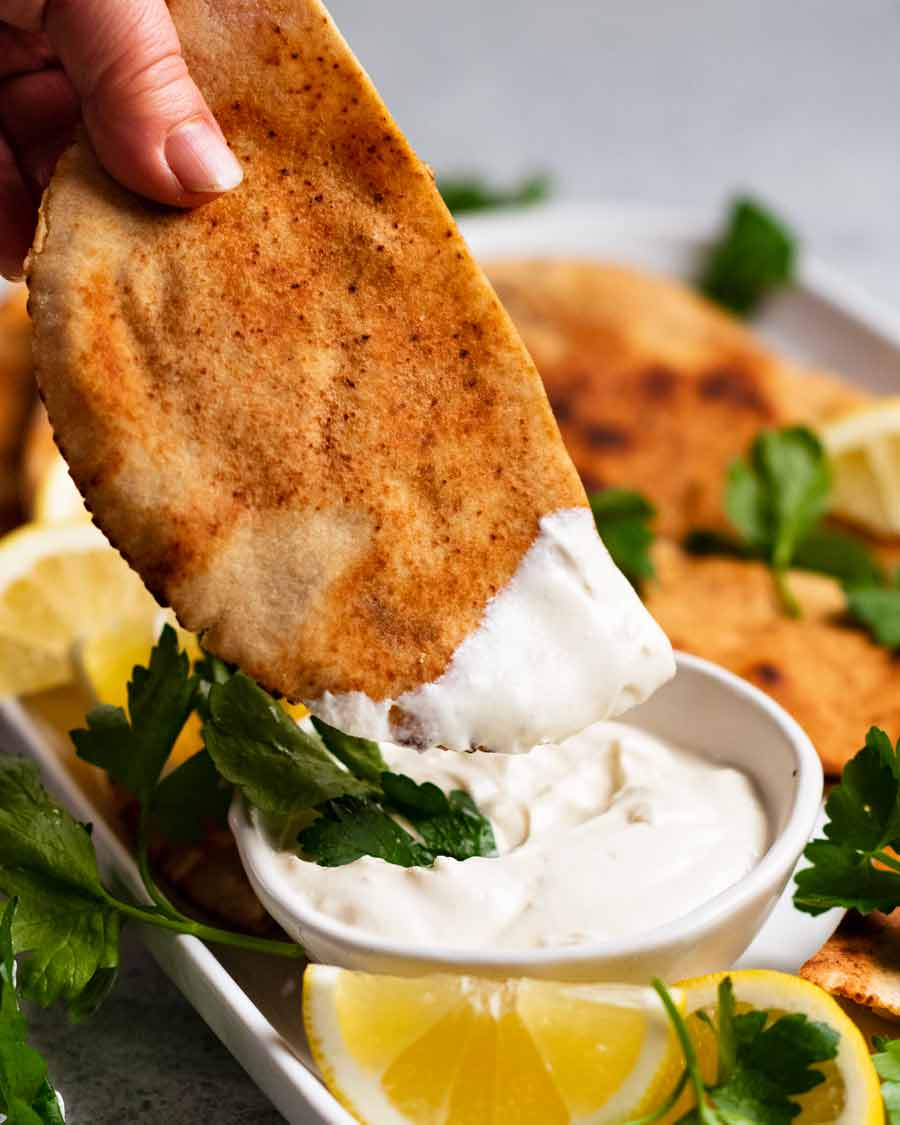
Serving – Pile Arayes onto a platter and serve with Tahini dipping sauce. Serve them whole, as they are. Or cut them into smaller pieces – it’s up to you!
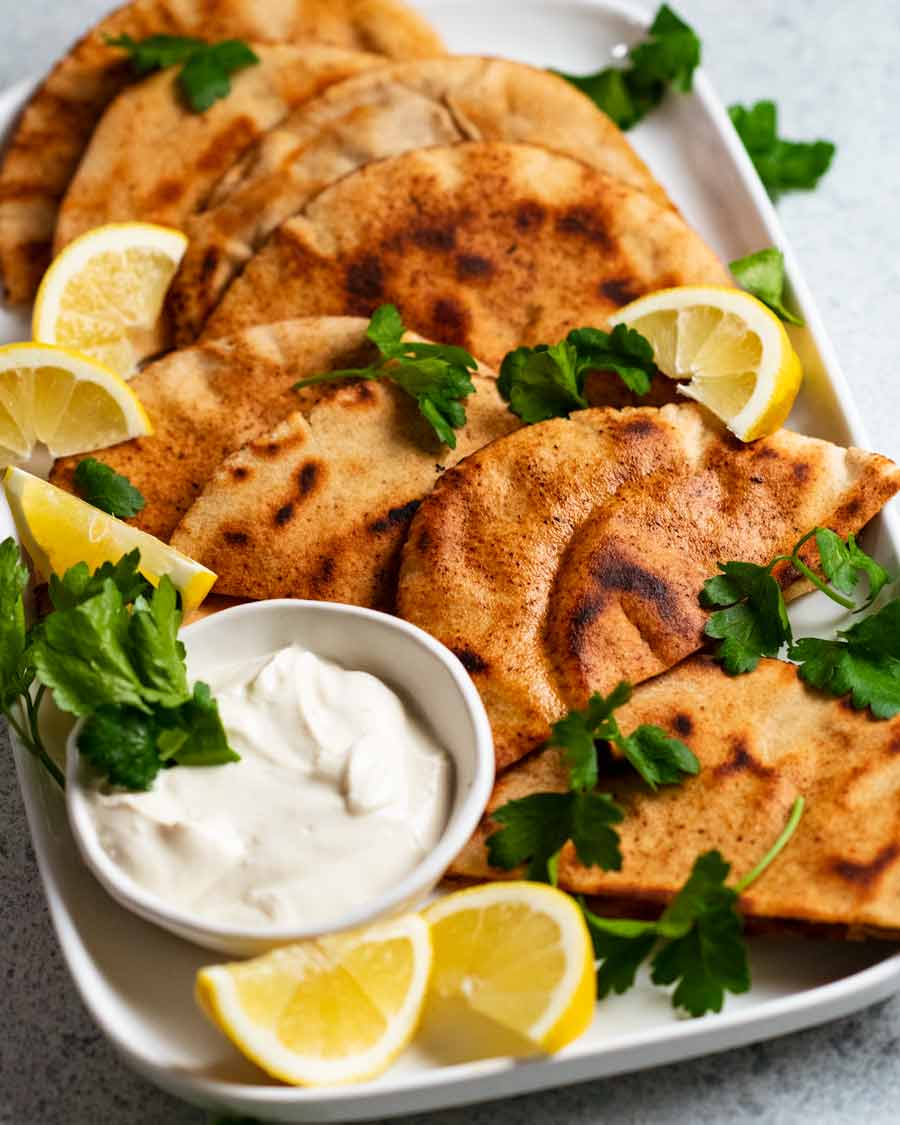
Whipped Tahini Yogurt Dipping Sauce
I think you’ll really like the Whipped Tahini Yogurt dipping sauce too. It’s got a unique texture almost like soft whipped cream. Made with just tahini, yogurt, lemon and garlic, the trick is to warm the mixture in the microwave slightly before whisking. Then as you whisk it, it becomes almost a bit aerated like whipped cream! Neat little trick I picked up from a Fatteh recipe by Nigella Lawson.
If you’ve got any of the sauce leftover, use it as a dip or slather onto toast like you would with goats cheese, then pile on marinated mushrooms or roast vegetables for a delicious crostini. Enjoy! – Nagi x
Watch how to make it

Crispy Lebanese Meat Stuffed Pita – Arayes
The unique method here is that it's cooked with raw meat inside, so the tasty meat juices soaks into and flavours the pita bread as it cooks. It's outrageously delicious. I bet you become as obsessed with these as I have!Ingredients
- 5 pita bread , the thin pocket type, ~15cm/6" diameter (250g/8oz pack), cut in half (Note 1)
- Olive oil spray (or brush with olive oil)
Spiced meat filling:
- 1/2 brown onion
- 500g/ 1 lb lamb or beef mince (ground meat) (Note 2)
- 2 garlic cloves , finely grated
- 1 tbsp finely chopped parsley , optional
- 3 tsp ground coriander
- 3 tsp ground cumin
- 1 1/2 tsp smoked paprika (sub plain paprika)
- 3/4 tsp ground allspice (sub mixed spice)
- 1/2 tsp cayenne pepper (reduce/omit for less spicy – Note 4)
- 1 1/4 tsp cooking/kosher salt
Whipped tahini yogurt sauce:
- 1 cup plain yogurt
- 2 tbsp tahini (or Chinese sesame paste – Note 5)
- 1 tbsp lemon juice
- 1 garlic clove , finely grated
- 1/2 tsp cooking/kosher salt
Instructions
Spiced meat filling:
- Grate the onion in a bowl using a standard box grater. We want the juices and all! (Note 4)
- Meat filling – Add remaining meat filling ingredients. Mix well with your hands.
- Divide stuffing in 10 (about 55 to 60g per portion, 1/4 cup). Flatten into a semi-circle shape slightly smaller than the pita bread half.
- Stuff – Gently open a pita then place the meat inside. Close, then press to spread to the edge and make it fairly evenly flat. (Is your pita tearing? See Note 5 for tip!)
Cooking Arayes:
- Preheat oven to 50C/120F. Place a rack on a tray. (To keep cooked Arayes warm.)
- Cook – Heat a large frying pan over medium high heat. Spray both sides of the pita with olive oil then place 2 or 3 pieces in the pan (whatever you can fit). Cook for about 2 minutes on each side, pressing down lightly with a spatula, until golden and crispy. The meat is spread so thin it cooks really quickly! {Sandwich press – Note 7}
- Keep warm – Transfer cooked Arayes onto the rack and put in the oven to keep warm. Cook remaining pita.
- Serve – Cut in half if desired (sometimes I do, sometimes I don't!). Pile Arayes onto a serving platter. Serve with Whipped Tahini sauce. Enjoy!
Whipped tahini sauce:
- Place ingredients in a heatproof bowl and whisk to combine. Microwave for 15 seconds on high. Whisk again – it should resemble soft whipped cream. Use slightly warm or at room temperature.
Notes
- Large Lebanese bread ~30cm/12″ wide also works! You need 2 to 3, spread the meat inside using a butter knife, pan fry until crisp then cut into pieces.
- Tortillas or other flatbreads – Smear meat on half, fold over like a quesadilla and cook!
Nutrition for one piece (ie half a pita).Nutrition
Similar crispy breads with tasty things inside


Life of Dozer
This dog really will eat anything. (Well, except kale! 😂)
The post Arayes – Lebanese Meat-Stuffed Crispy Pita appeared first on RecipeTin Eats.
]]>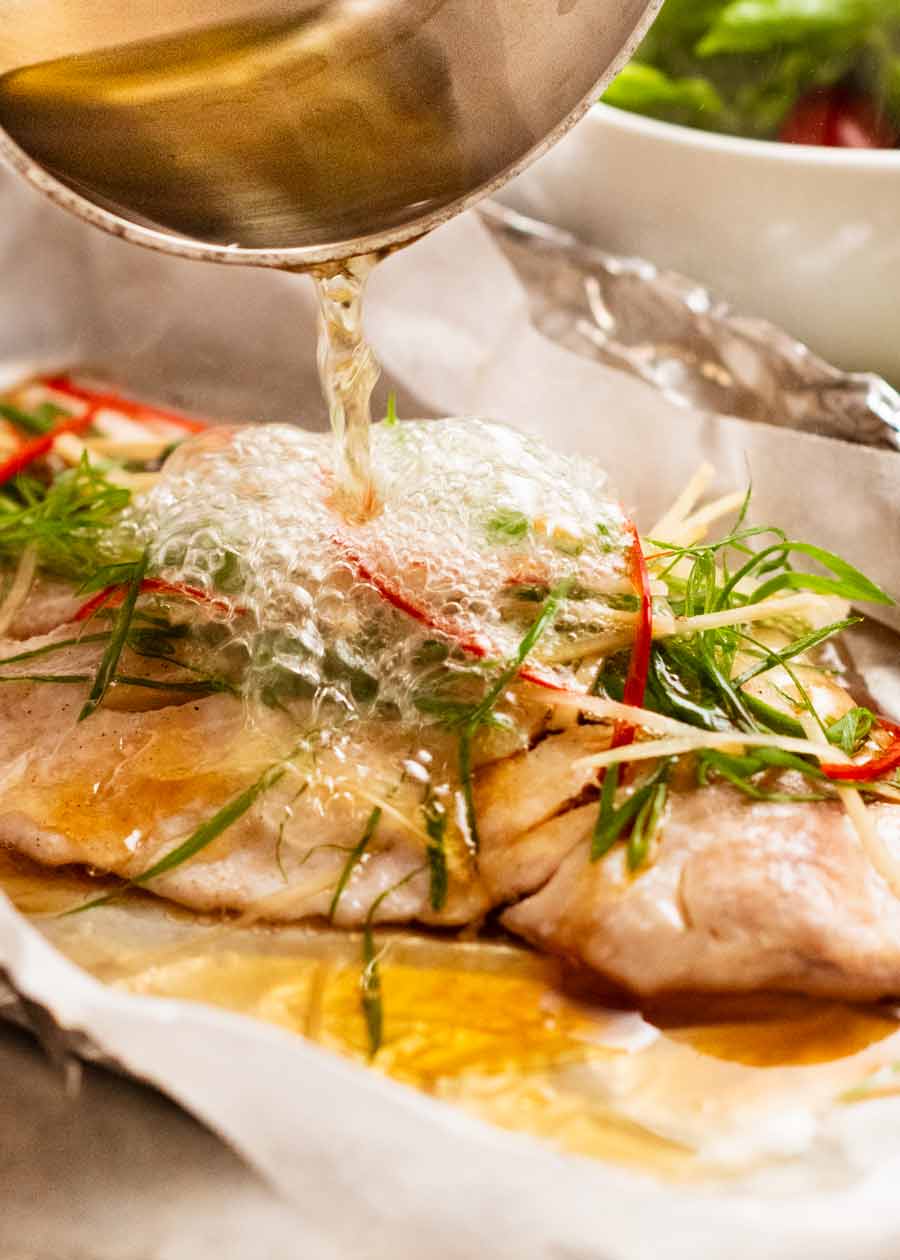 Sizzling Ginger Steamed Fish – named as such because the ginger and green onion topping sizzles dramatically when you pour hot oil over oven steamed fish! An incredibly simple way to make a healthy fish recipe a whole lot more exciting with fresh Asian flavours. Sizzling Ginger Steamed Fish Does anybody jump up and down... Get the Recipe
The post Sizzling Ginger Steamed Fish appeared first on RecipeTin Eats.
]]>Sizzling Ginger Steamed Fish – named as such because the ginger and green onion topping sizzles dramatically when you pour hot oil over oven steamed fish! An incredibly simple way to make a healthy fish recipe a whole lot more exciting with fresh Asian flavours.
Sizzling Ginger Steamed Fish
Does anybody jump up and down with excitement at the thought of steamed fish for dinner? Healthy , yes. But also….kinda bland….
I know, I know, I really need to grow up. I can already see my mother rolling her eyes when she reads this. 😂
However, today’s Sizzling Ginger Fish is a steamed fish recipe I DO get excited about!
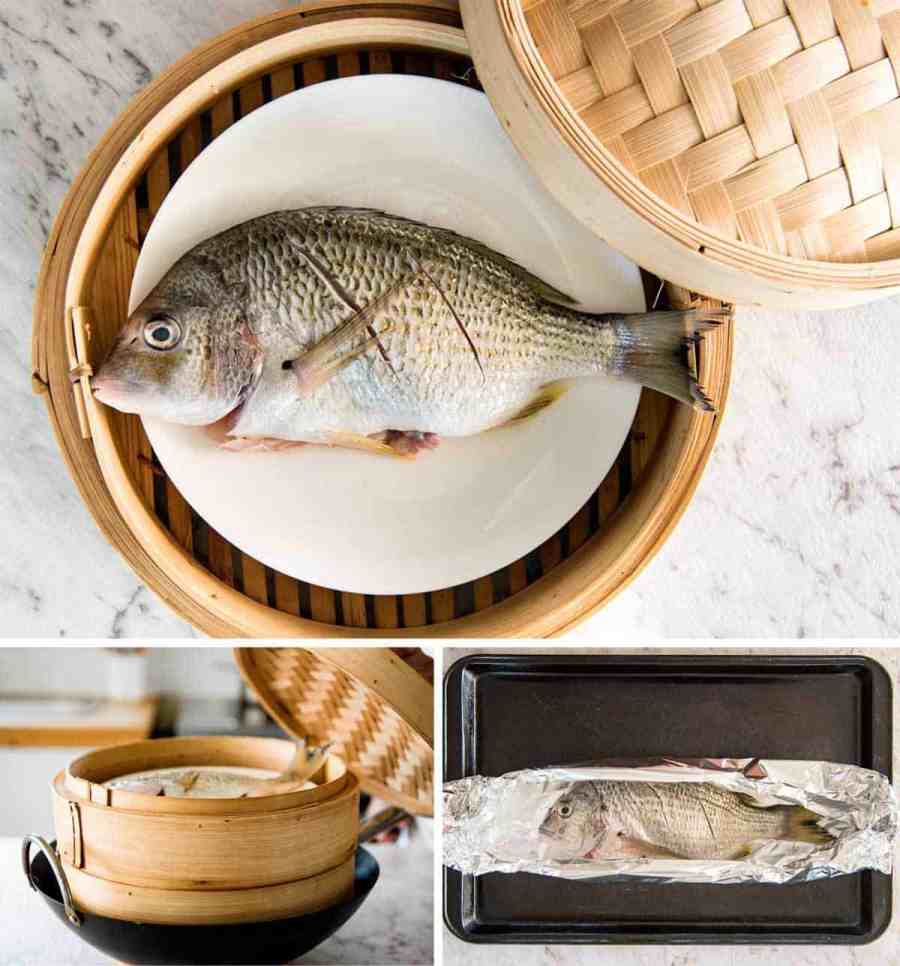
It’s a simpler version of a Cantonese dish where a whole fish is steamed, drizzled with soy sauce then hot oil is poured over a green onion and ginger topping which makes it sizzle dramatically. If you’re a whole fish kind of person (and every chef will tell you it’s the best way to cook fish) here’s my recipe, pictured below.
Traditional Cantonese whole Sizzling Ginger Fish which today’s recipe is based
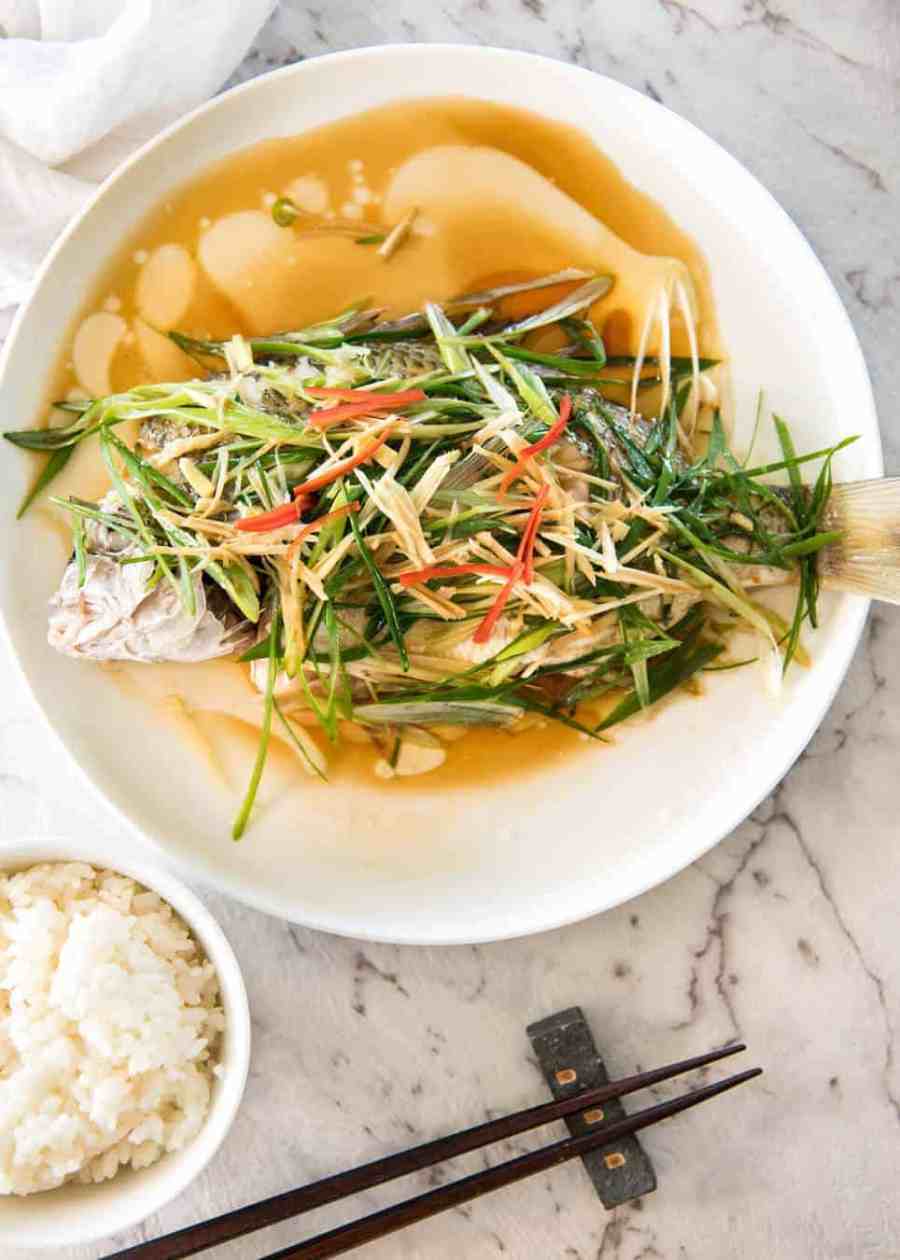
Today, I’m sharing an easier version. Same flavours and the same dramatic sizzling (I was never going to give that up!). Except we’re using fish fillets and steaming them in the oven inside foil packets. Which means – less washing up. Excellent!
That dramatic hot oil sizzle!
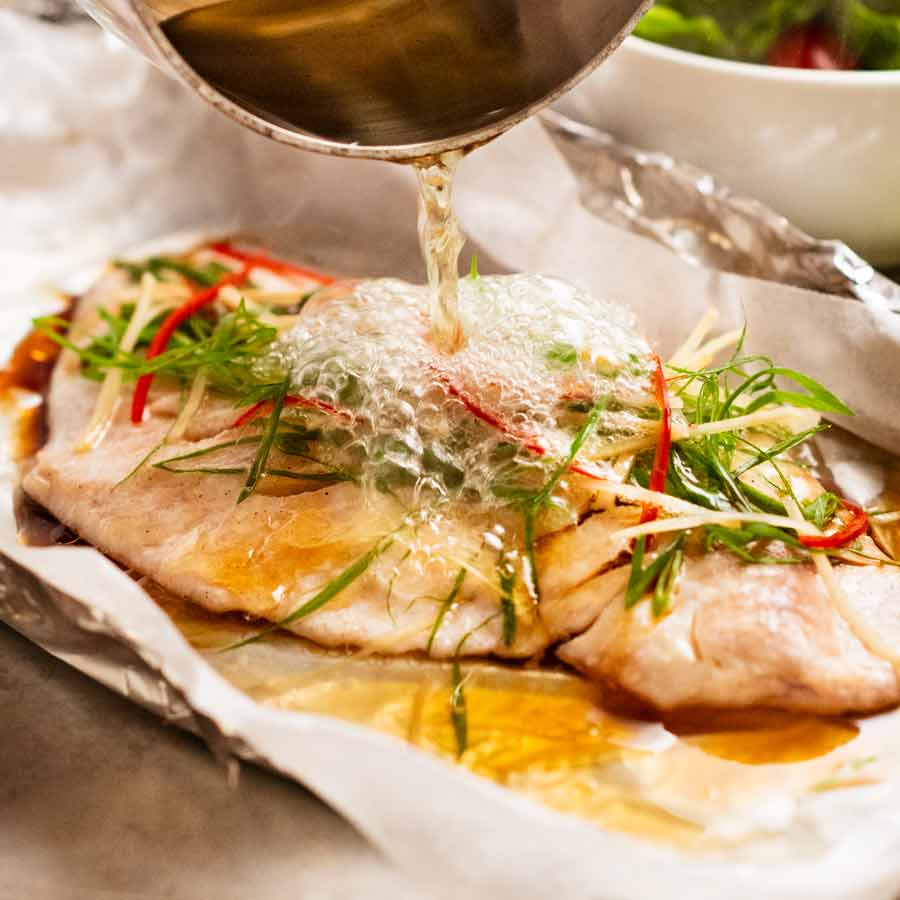
The key step in this recipe is the hot oil drizzle. Just 1 tablespoon per fillet, and 3 important things happen:
the hot oil semi-cooks the green onion and ginger which also flavours the oil itself;
it gently sears the surface of the fish; and
the oil runs off the fish into the foil boat to mingle with the soy sauce, sesame oil, cooking sake and fish juices to create an extraordinarily tasty sauce.
Excessive squidging of every bite of fish in that tasty sauce is not only strongly encouraged, it’s an essential part of the eating experience!
Ingredients in Sizzling Ginger Steamed Fish
Here’s what you need to make this.
Best fish
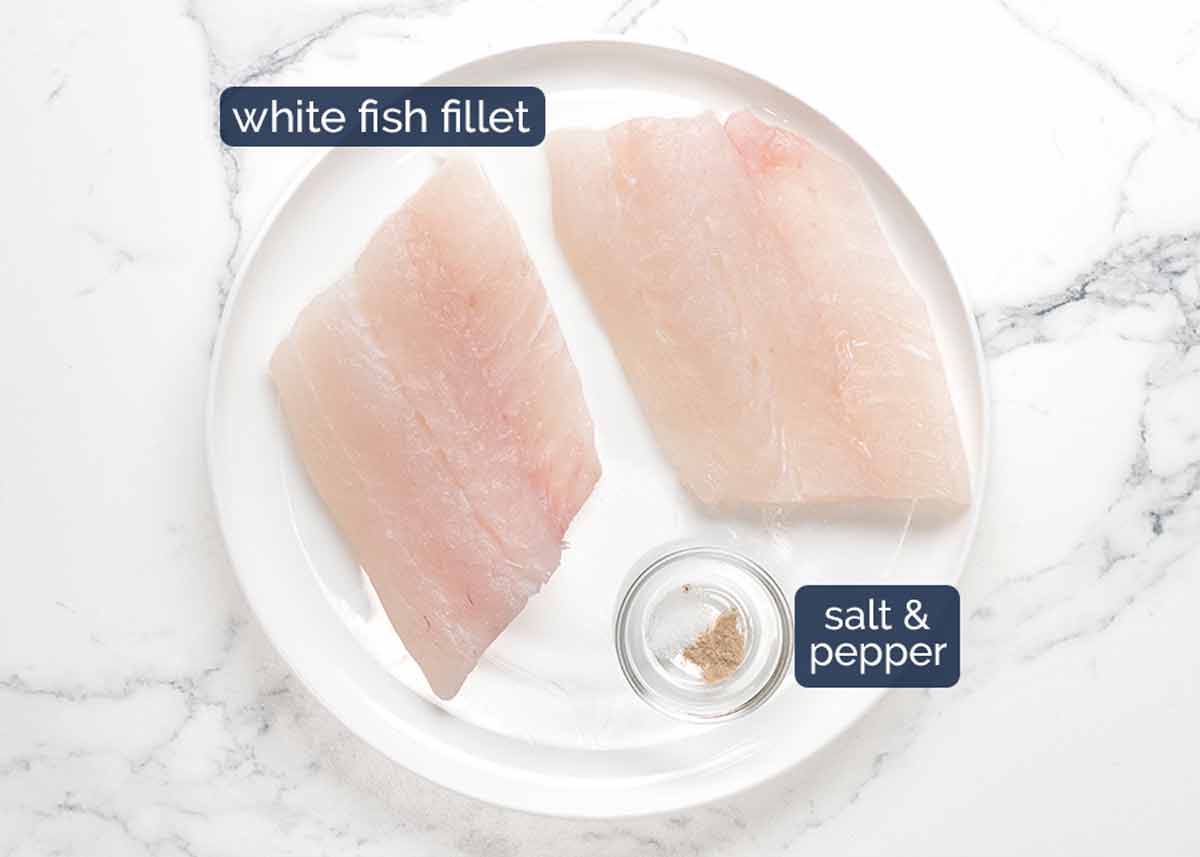
Fish type and shape – More delicate white fish fillets, skinless. Thin fillets recommended, around 1.5cm / 2/3″ thick (at the thickest point), for better sizzling surface area to fish ratio. The recipe does work fine with thicker fillets but the bake time will be longer than the 12 minutes per the recipe.
Great fish for this recipe – barramundi, snapper, basa, jewfish, blue eye cod (trevalla), tilapia, cod, halibut, pollock, hake, John Dory, silver dory, gummy shark (flake). I think salmon and trout are a little too strong flavoured – though the recipe will work fine.
Meatier, firmer fish like ling and monkfish work fine but personally for this dish, I think it’s better with slightly softer white fish fillets (better sauce dispersion throughout flakes).
Remember, the shape of fish means that you get thick cuts from the main body as well as thin cuts from towards the tail. Opt for the thinner cuts!
Frozen fish works just fine, thaw then pat dry well before using.
Fish to avoid
I recommend avoiding:
Fish that dry out easily when cooked – Like swordfish, tuna, bonito, kingfish, marlin, mackerel. Unless you’re extremely careful they can become dry inside so are very prone to overcooking in the oven. I feel these fish are (mostly) better in raw/rare form such as Ceviche, Poke Bowls, Tartare (also see Tuna Steak);
Oily, “fishy” fish – Like mullet and sardines (try this recipe for sardines!).
The sizzling sauce & toppings
The sesame oil, soy and cooking sake are the seasonings. The ginger and green onion are the fresh aromatics, the red chilli is for colour and a hint of warmth (entirely optional). The oil creates the sizzle – when poured over the ginger and green onion!
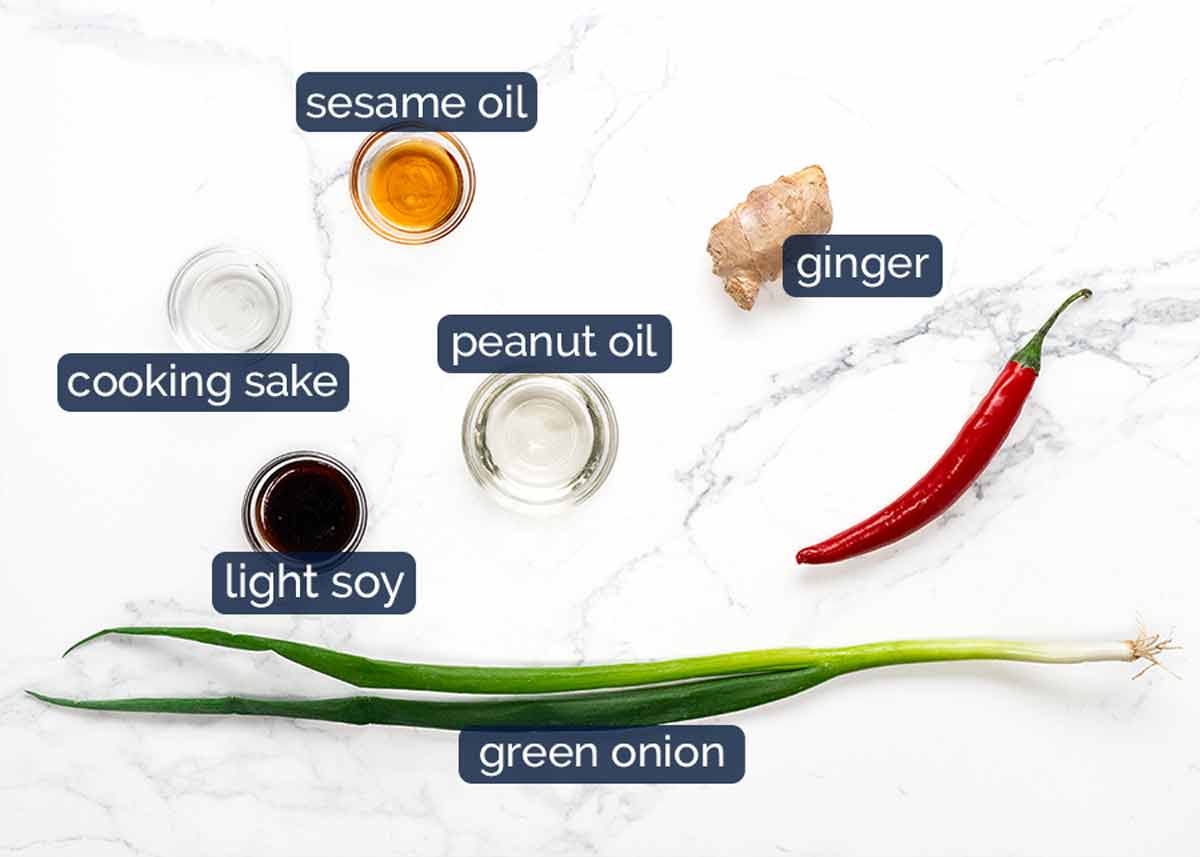
Cooking sake – This is Japanese sake intended for cooking purposes (not pleasant to drink). Like Chinese cooking wine, white and red wine used in Western cooking, it adds a touch of depth of flavour that you can really only get from alcohol.
Find it in the Asian aisle of large grocery stores, and Asian stores. If you can’t consume alcohol, just leave it out.
Soy sauce – Use light or all-purpose soy sauce. Do not use dark soy sauce, too intense!
Sesame oil (toasted) – Use toasted sesame oil which is brown and has more flavour than untoasted (which is yellow). Default sesame oil sold in Australia is toasted, untoasted is harder to find.
Peanut oil – Or any other neutral flavoured oil.
Ginger – Fresh ginger, julienned finely (ie very fine batons) so they partially cook when the hot oil is poured over!
Green onion – The green part only, finely sliced on the diagonal. We only use the green part because it’s more delicate so it too partially cooks when the hot oil is poured over.
Red chilli is for visual purposes mainly and a touch of warm spice (large chillies are not that spicy). Feel free to omit.
How to make Sizzling Ginger Fish
Foil packets serve a double purpose – all the moisture is locked inside as the fish steams gently, plus minimal washing up!
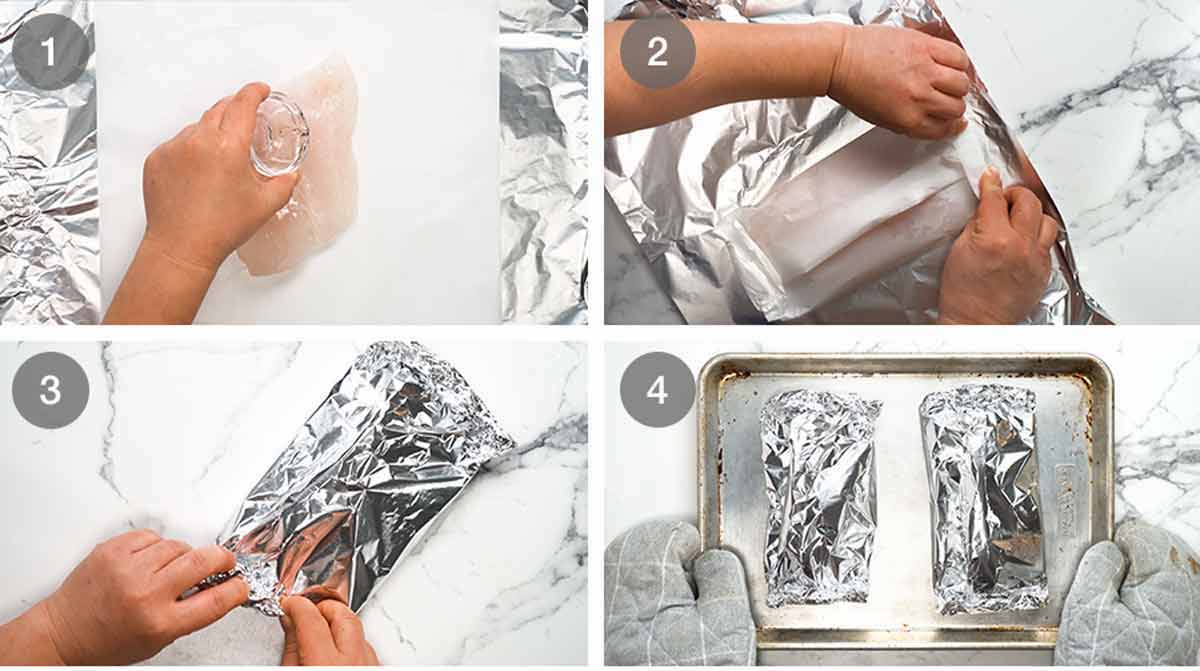
Season fish – Place a ~25cm/10″ sheet of foil on a work surface and top with a piece of paper that is slightly smaller, as pictured. Put the fish on the paper, sprinkle each side with a pinch of salt and pepper then drizzle the top only with the cooking sake.
Paper packet – Wrap the fish up in the paper first, folding the seams to seal. No need to be a present-wrapping master here, just as long as it’s mostly sealed to keep in the steam!
Foil packet – Then wrap the paper packet up with the foil.
Bake – Place the foil packets on a tray and bake for 12 minutes at 200°C/400°F (180°C fan) or until the internal temperature is 55°C/130°F. I pierce thermometer through foil. If you don’t have a thermometer, just open the packet and ensure the fish flesh flakes.
12 minutes?! Is that long enough? Yes it is, if you have a fairly thin fillet around 1.7cm / 2/3″ thick that weighs 180g/6 oz. Thin fish cooks fast when enclosed!
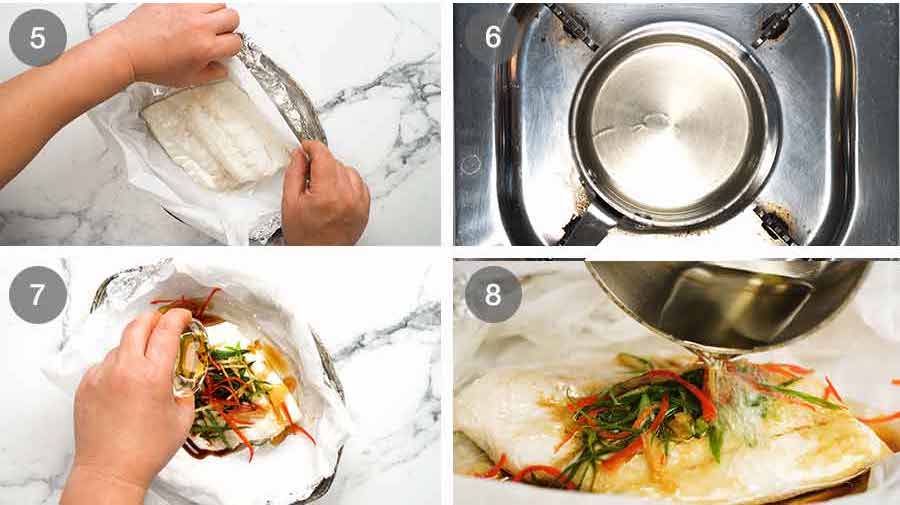
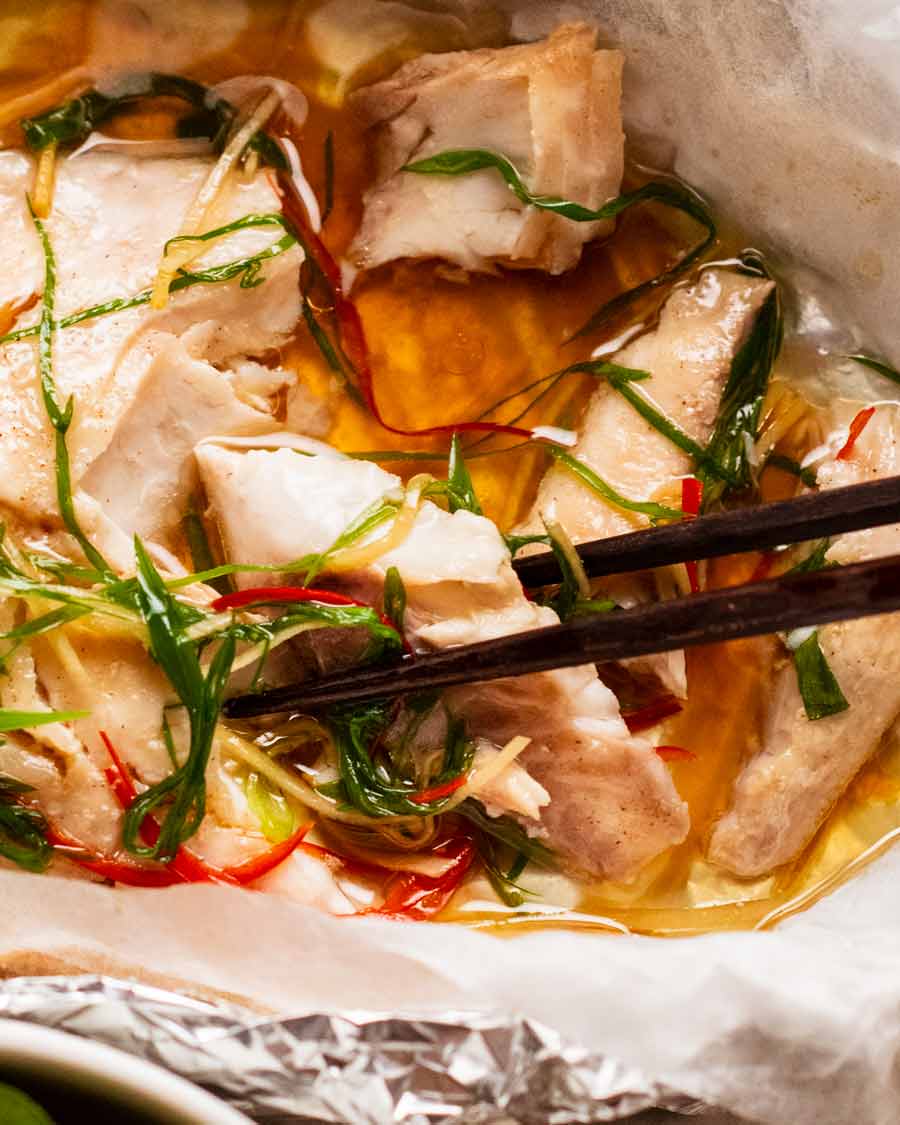
Rest 3 minutes – Remove fish from the tray and put on dinner plates. Open the packets – careful of hot steam! Scrunch/fold down the sides to form a sauce-catching moat around the fish. Leave to rest for 3 minutes while you heat the oil.
Heat oil – Put the oil in a small saucepan or skillet on medium high. Heat the oil up – it will take less than a minute. You don’t need it so hot the oil is smoking. Just hold your hand above the oil and you will feel the heat. Also, oil gets thinner when hot.
Fish toppings – Pile the green onion, ginger and chilli (if using) on each fish. Drizzle over the soy and sesame oil.
Sizzle! Pour the hot oil over the toppings. True to it’s name, it will bubble and sizzle dramatically! As described earlier, the oil cooks / is flavoured by the green onion and ginger and it gently sears the surface of the fish. Then when it settles in the foil boat it mixes up with the soy sauce, sesame oil, cooking sake and fish juices to form part of a tasty sauce that you squidge every bite of fish in.
Now – time to dig in!

Matters of eating Sizzling Ginger Fish
Sizzling Ginger Fish is designed to be eaten out of the foil boat. The idea is that the foil boat holds all the sauce in, and as you break off the tender flakes of fish, you swish it around in the sauce before eating it.
Plus, if you’ve used a good juicy piece of fish, you should actually have plenty of sauce to use for dressing up a bowl of rice on the side to fill out your meal. Add a bowl of instant miso soup (THERE IS NO SHAME) and you’ve got a brilliantly effortless, healthy dinner that’s something a little bit different to the usual.
And look at that! Hardly any dishes to wash up. You kitchen goddess, you. (Or god) – Nagi x
Watch how to make it

Sizzling ginger steamed fish
Ingredients
- 2 x 180g/ 6 oz thinnish white fish fillet , skinless (~1.5 cm/ 2/3" thick) (Note 1)
- 1 tsp cooking sake (sub mirin, Chinese cooking wine, dry sherry) (Note 2)
- Small pinch salt
- Small pinch white pepper (sub black)
TOPPING (divide between 2 fish):
- 1/2 cup green onion , green part only, finely sliced on diagonal (Note 3)
- 2 tbsp ginger , finely julienned (Note 3)
- 1 tbsp large red chilli , deseeded finely julienned on diagonal, optional (Note 4)
SAUCE (divide between 2 fish):
- 2 tsp light soy sauce , or all-purpose soy (Note 5)
- 2 tsp sesame oil , toasted
- 2 tbsp peanut oil (or veg, canola, grapeseed)
Instructions
- Preheat oven to 200°C/400°F (180°C fan).
- Prepare parcel – Place a 2 x 25cm / 10" piece of foil on a work surface. Top with a piece of parchment/baking paper slightly smaller. Place fish on paper.
- Season fish & wrap – Sprinkle each side of the fish with a SMALL pinch of salt and pepper. Drizzle the top of each fish with 1/2 tsp sake. Form a parcel – make a parcel with the paper first, then the foil. (See video or step photos).
- Bake – Place parcels on a tray. Bake for 12 minutes or until the internal temperature is 55°C/130°F (I pierce thermometer through foil) or the fish flesh flakes (open to check). Thin fish cooks fast when enclosed!
- Rest 3 min – Put each parcel on a plate and unwrap, folding down the sides to create a “boat” that will catch the sauce that you can squidge the fish in. Rest for 3 minutes – heat the oil while it rests.
- Heat oil until hot in a tiny saucepan or small pan over medium heat.
- Sizzle! Top the fish with green onion, ginger and chilli. Drizzle with soy and sesame oil. Pour oil all over the green onion and ginger – it will sizzle dramatically!
- Serve immediately. Eat fish out of foil, squidging the flaky pieces well in the sauce before eating. See post for what I served it with!
Notes
Nutrition
Life of Dozer
Dozer had a very special guest over on the weekend to make lunch for him – Andy Hearnden (“Andy Cooks”), a professional chef turned social media “mega-star” who has lots and lots of followers on social media (as in, 12 million or so across various platforms!)


I don’t ordinarily connect or network with “big” social media influencers because I’m so focussed on sharing recipes here on my website rather than worrying about social media. Can’t do it all! Andy is the first such-person whose message I have responded to. Because despite the insane social media following he has, he’s so normal, humble, down to earth and we have very similar taste in food.
We had a fun day sharing war stories of making a living in the online world, the experience of making a cookbook (he just launched his debut cookbook!) and we also filmed a video together that Dozer stars in! I look forward to sharing it with you.


The post Sizzling Ginger Steamed Fish appeared first on RecipeTin Eats.
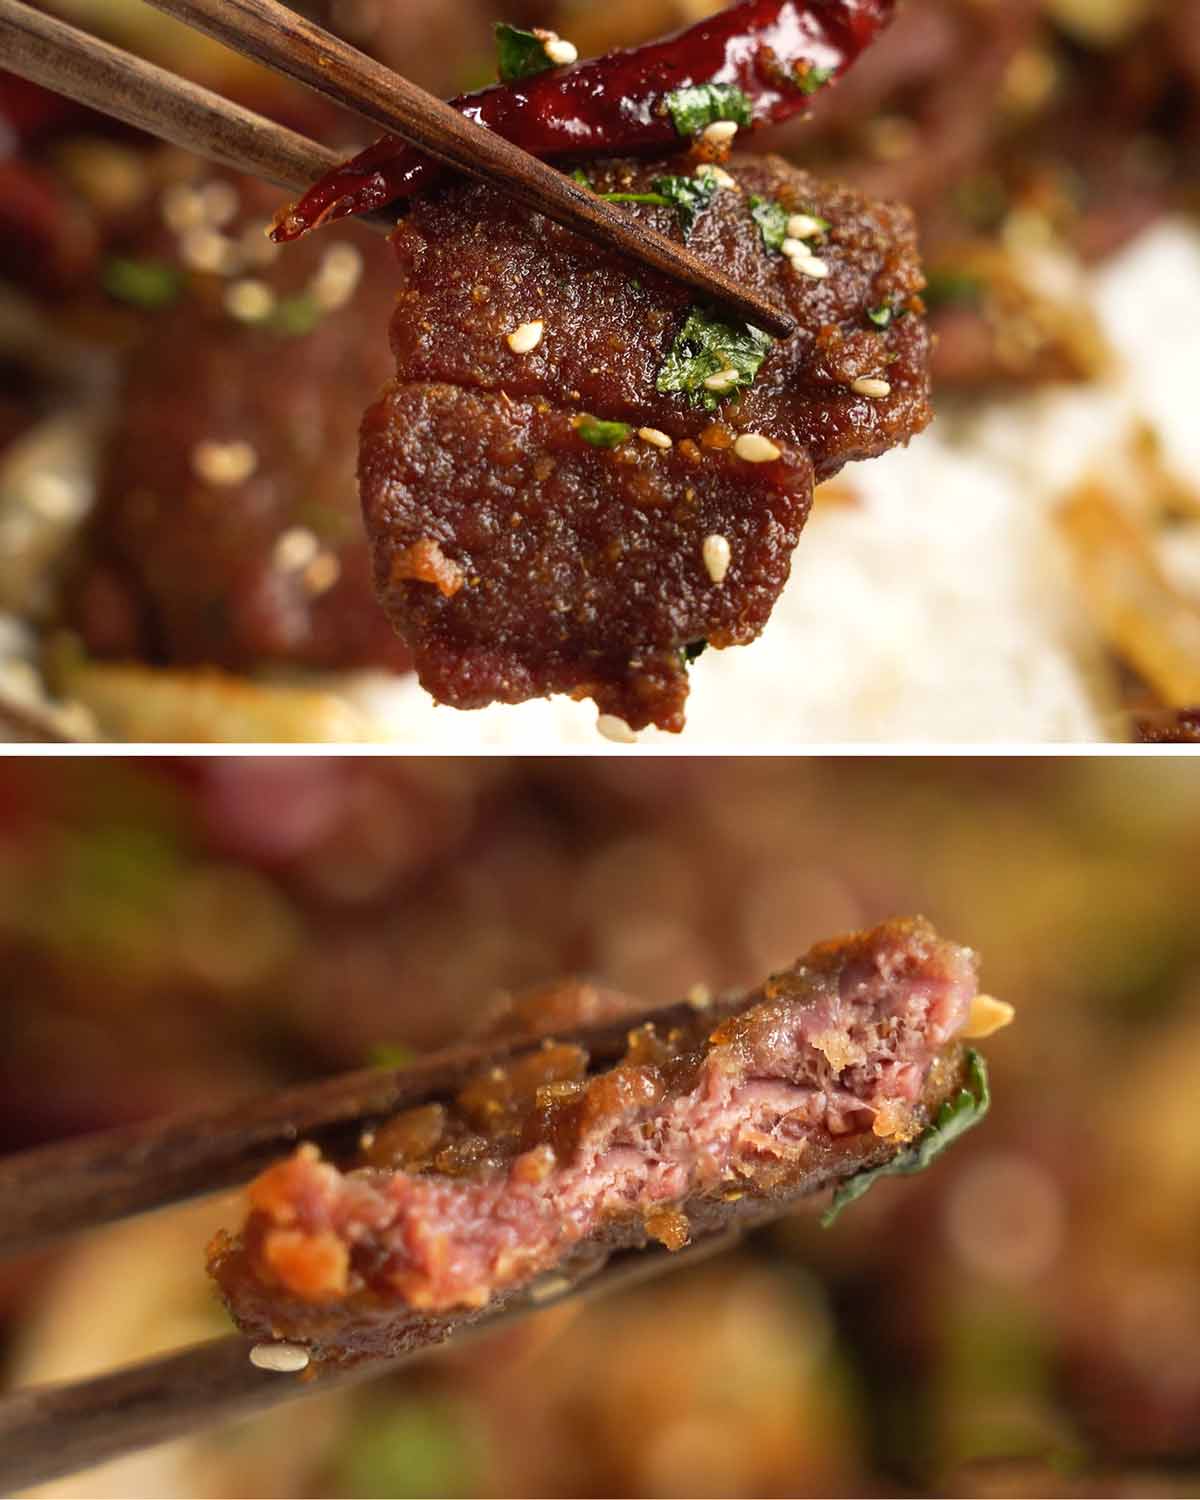
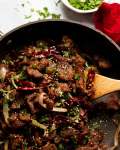
]]> A cumin spiced lamb dish might sound totally un-Chinese, but it’s actually authentic and very on-trend! Hailing from Xinjiang province, this Cumin Lamb stir fry is one of the best easy new recipes I’ve tried in months. Xinjiang Cumin Lamb Stir Fry New recipes that truly catch me by surprise are few and far between these days.... Get the Recipe
The post Xinjiang Cumin Lamb Stir Fry appeared first on RecipeTin Eats.
]]>A cumin spiced lamb dish might sound totally un-Chinese, but it’s actually authentic and very on-trend! Hailing from Xinjiang province, this Cumin Lamb stir fry is one of the best easy new recipes I’ve tried in months.
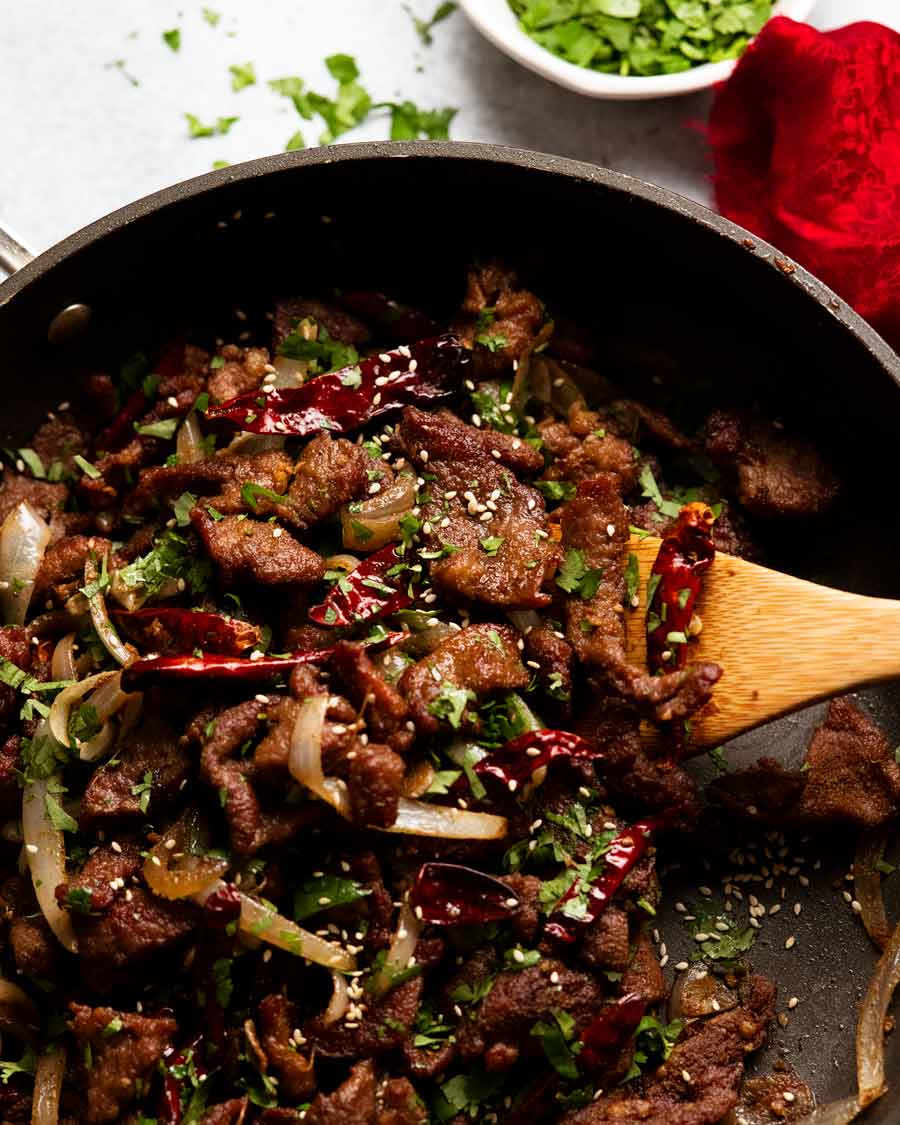
Xinjiang Cumin Lamb Stir Fry
New recipes that truly catch me by surprise are few and far between these days. But this one did – and hit it so far out of the park that I declared I must share the recipe “immediately”!
Succulent pieces of lamb generously flavoured with a cumin-sichuan pepper spice mix, golden on the outside and astonishingly tender inside. This is a dish from the Xinjiang province of China where the food is heavily influenced by food of the Middle East, reflecting the predominantly Muslim population. It’s an absolute dead ringer for the ones I’ve had at restaurants, quick to make, and so good I couldn’t stop eating it straight out of the pan.
But what surprised me the most was the ingredients. Everything from the local grocery store.
Even if you are not familiar with Cumin Lamb, if you love Chinese and Middle Eastern food, I guarantee you will love this!
Xinjiang Cumin Lamb backstory – Xinjiang is a province in the north-west of China, situated on the ancient Silk Road that connected China with the Middle East and Europe. With a predominantly Muslim population, the food of Xinjiang is unlike most Chinese food you probably are familiar with. There’s less soy sauce, no pork, and less rice. Instead, think fragrant spices, lots of lamb, flatbreads, skewers, pilafs and richly spiced sauces. Cumin lamb skewers and today’s Cumin Lamb Stir Fry are two signature dishes from the region. Tarim Uyghur in Auburn (Sydney) is highly rated by the community.
Recipe credit: Today’s recipe is adapted from Real-Deal Xinjiang Cumin Lamb recipe from a wonderful website called Omnivore’s Cookbook, one of my trusted sources for authentic Chinese cooking. I made a few minor tweaks to streamline but the flavour is bang on!
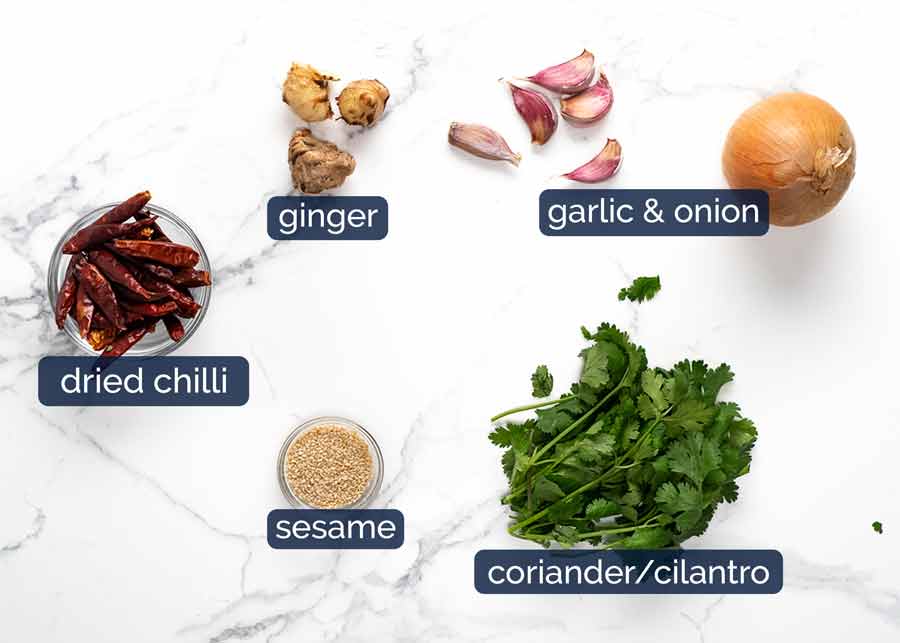
Ingredients in Cumin Lamb
Here’s what you need to make this lamb stir fry.
Marinade & spice mix
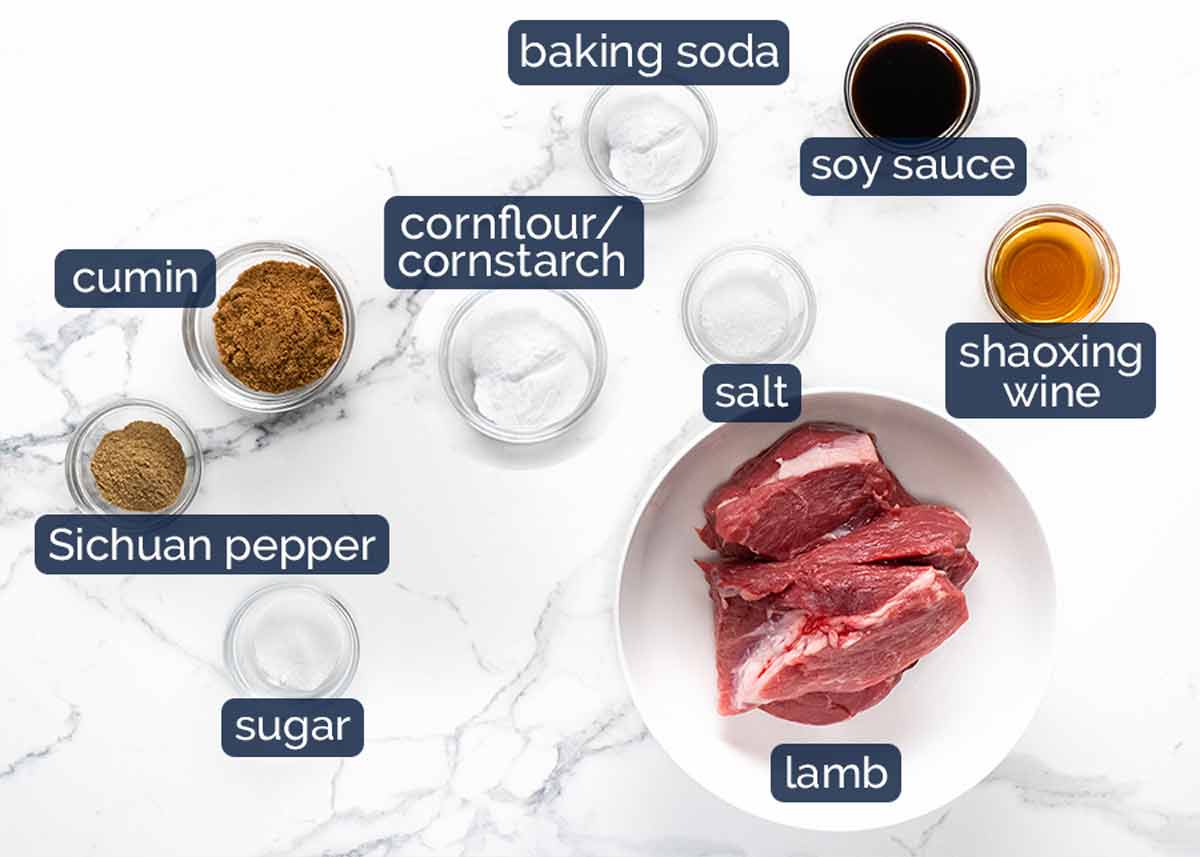
Lamb & marinade
Lamb cut – I recommend using lamb leg or rump. Good lamb flavour, not too fatty, suitable for quick cooking. More expensive cuts such as backstrap or cutlets are wasted on a stir fry (in my humble opinion) especially given we can tenderise the lamb using the Chinese velveting method (just a touch of baking soda – next point!).
Slow cooking cuts – like shoulder and shank – are a too tough for this recipe (tenderising is not as effective) and most other chops are too fatty.
Baking soda – To tenderise the lamb so it stays beautifully succulent and tender even if it’s kept on the stove for a little longer than ideal. Baking soda is used to velvet chicken and beef in Chinese stir fries too. Tried and loved technique! (Note for velveting-fans: In this recipe we use less baking soda for a larger volume of meat so there’s no need to rinse the baking soda off, you can’t taste it!).
Chinese cooking wine (“Shaoxing wine”) – An essential ingredient for making truly “restaurant standard” Chinese dishes! Substitute with Mirin, cooking sake or dry sherry. Non alcoholic sub – substitute with 2 tablespoons chicken stock/broth.
Cornflour/cornstarch – This creates a light coating on the lamb that the spice mix clings to. Some recipes will have you toss the marinated lamb in cornflour. I tried that, and ended with with a gluey mess. It’s far easier to just mix the cornflour in with the marinade – and the end result is practically the same.
Soy sauce – Either light or all purpose soy sauce. But not dark soy sauce – flavour is too strong and the colour is too intense! More on which soy sauce to use when here.
Salt – For seasoning.
Spice Mix
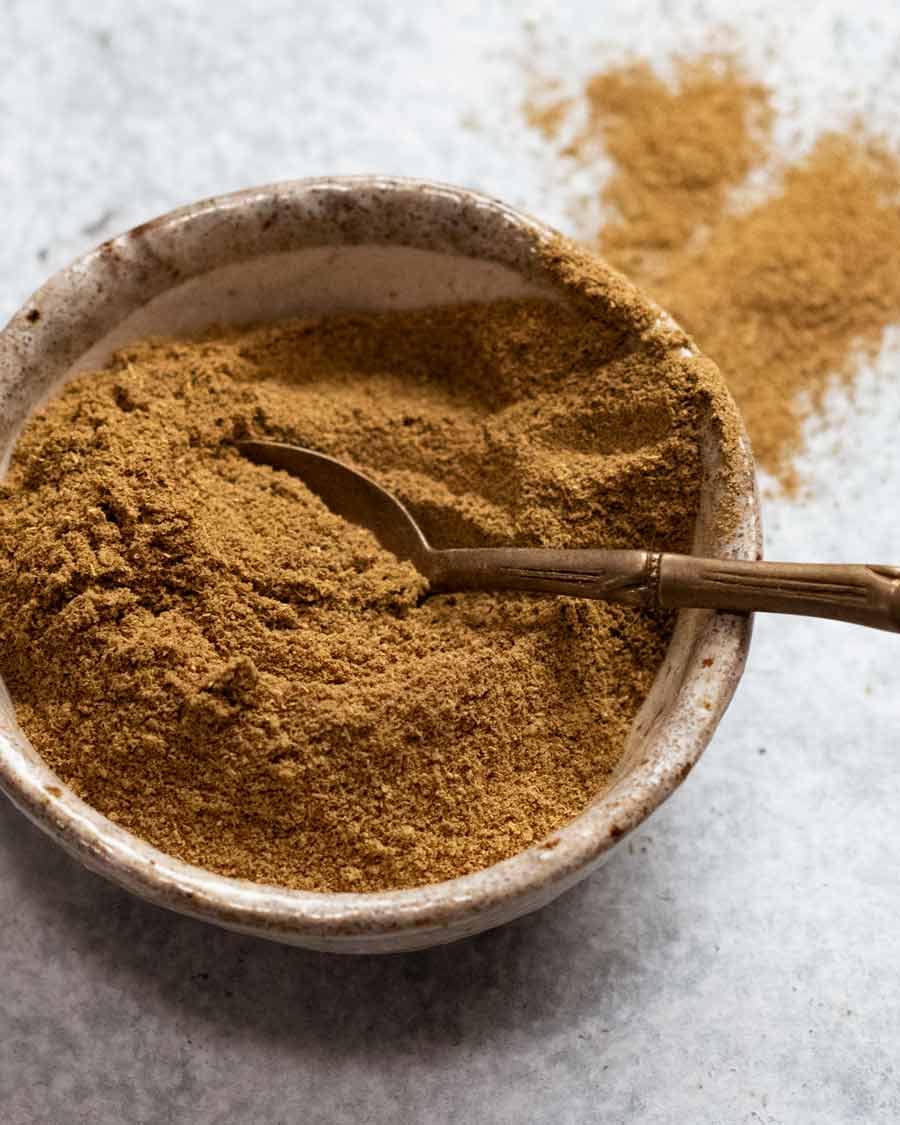
Cumin – LOTS! 2 whole tablespoons!! This is a bold flavoured dish – and true to its name.
Sichuan pepper (pre-ground) – The cool, numbing, almost lemony spiciness of Sichuan pepper that we all know and love is a signature characteristic of this dish! Completely different to the hot spiciness of powders like cayenne pepper.
Usually I’ll urge you to toast and grind your own, for better flavour. But in this recipe, we (Chef JB and I) tried it with freshly ground and pre-ground and honestly, there was no noticeable difference because the cumin and dried chilli are the dominant flavours here. So feel free to use store bought pre-ground – widely available these days in large grocery stores.
To make your own, dry toast whole peppercorns, cool, grind, sift out lumps, then measure out 1/2 teaspoon powder. Whole peppercorns yield just under half in powder, so start with 1 1/2 teaspoons of Sichuan peppercorns.
Substitute with 1/4 teaspoon ground white pepper.
Sugar – Just a small amount, to balance the other flavours. Doesn’t make this dish sweet.
For the stir fry
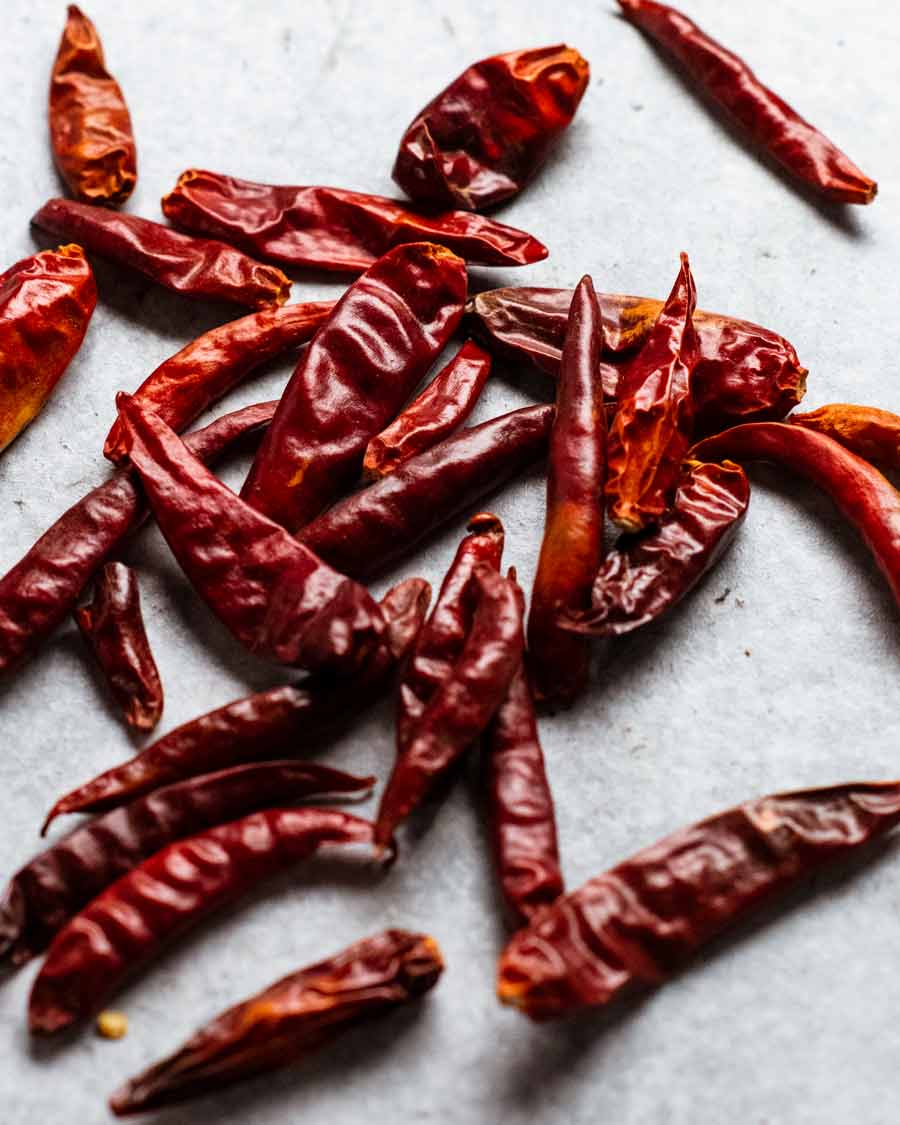
The whole chilli are used for flavour and fragrance, not for eating. They are used in dry form so they are chewy and not very pleasant to eat.
Dried chilli – Asian ones, if you can. But even sub-continent (Indian) chillis or South American chilli will work! As noted above, they are stir fried with the other ingredients for flavour and releasing some heat, but not intended to be eaten. So the exact type and spiciness of the dried chilli is not as important as in other dishes such as Beef Rendang where dried chilli are blitzed into a curry paste.
Ginger and garlic – Plenty, for beautiful aromatics flavour!
Onion – Also for aromatic flavour.
Coriander/cilantro and sesame – Finishes that are tossed in right at the end.
How to make Cumin Lamb Stir Fry
Slices of lamb are marinated for just 30 minutes to tenderise and flavour. The actual cooking part is very quick, as stir fries typically are. Once you start cooking, you’ll be done in less than 5 minutes.
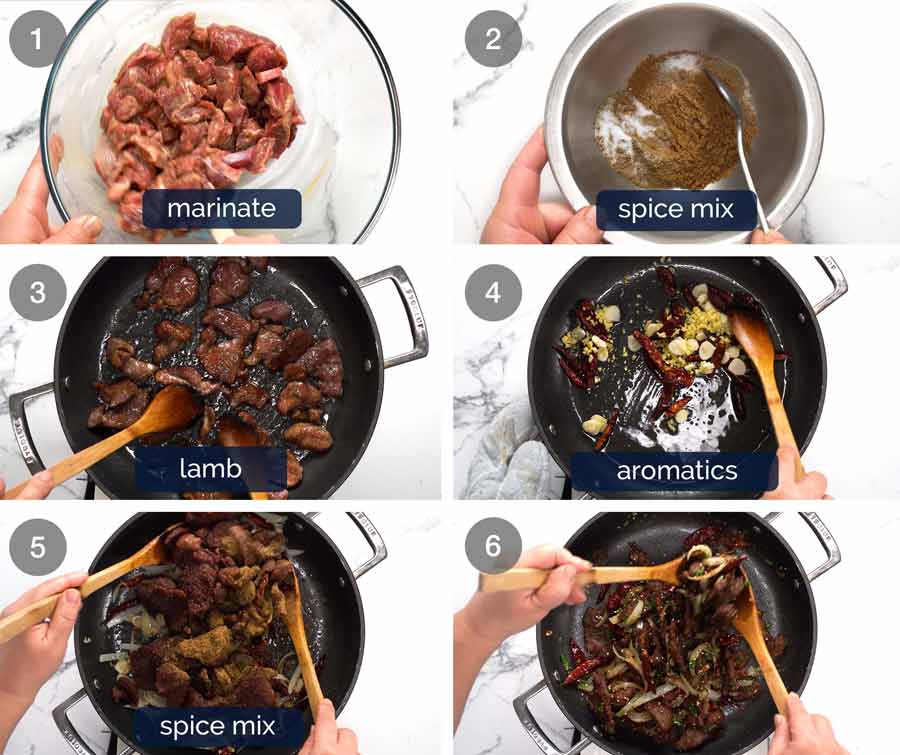
Marinate the sliced lamb with the soy sauce, Chinese cooking wine, cornflour/cornstarch, salt and baking soda to tenderise.
Mix the cumin, Sichuan pepper and sugar in a bowl.
Cook the lamb in two batches in a large non-stick skillet for just 1 1/2 minutes until light golden, then remove. The thin slices do not take long to cook!
Sauté the aromatics – garlic, ginger, onion and whole dried chillies.
Add the lamb back in with the spice mix and toss just to coat the lamb in the spices. It doesn’t need to be cooked.
Toss the coriander/cilantro and sesame in, then toss again just to disperse. Then serve immediately!
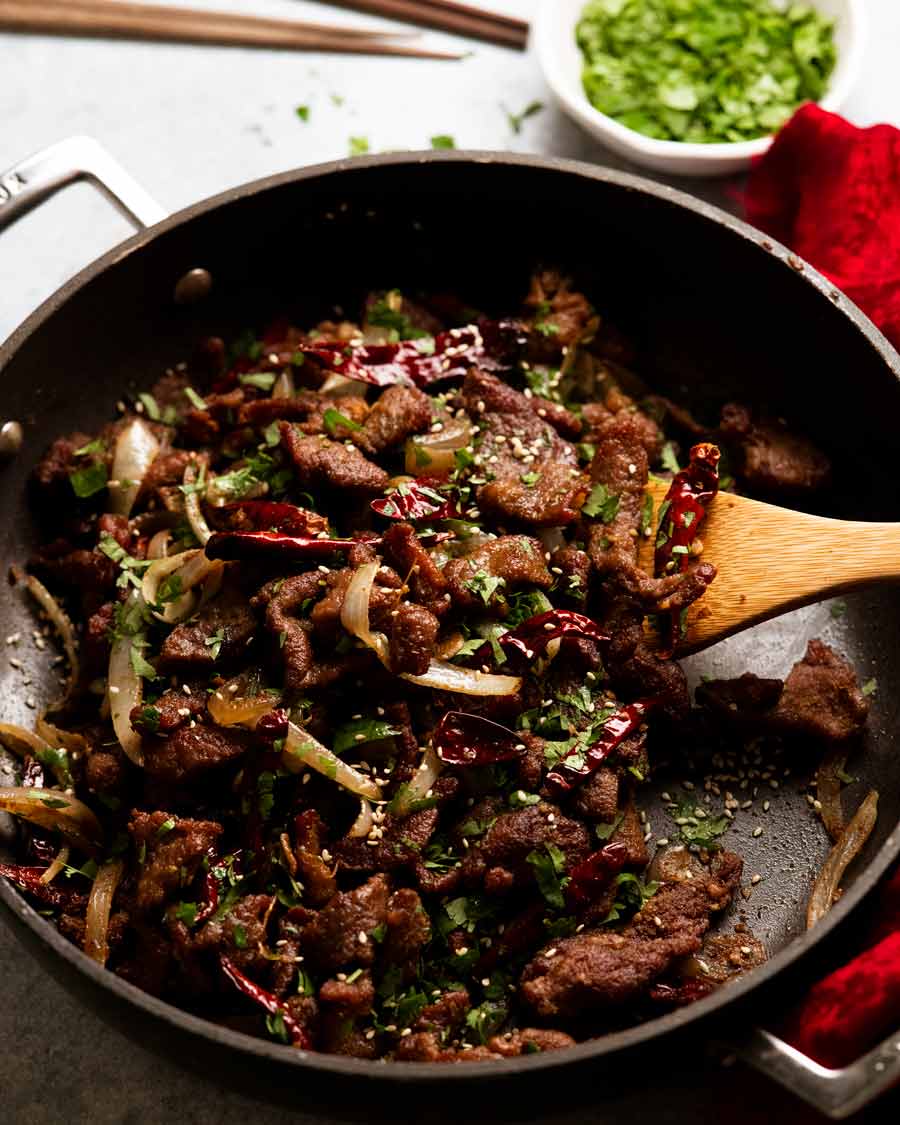
You will love how tender the lamb pieces are! We deliberately keep the slices not too thin so you get a nice satisfying bite of lamb. Caramelised on the outside, pink and succulent inside!
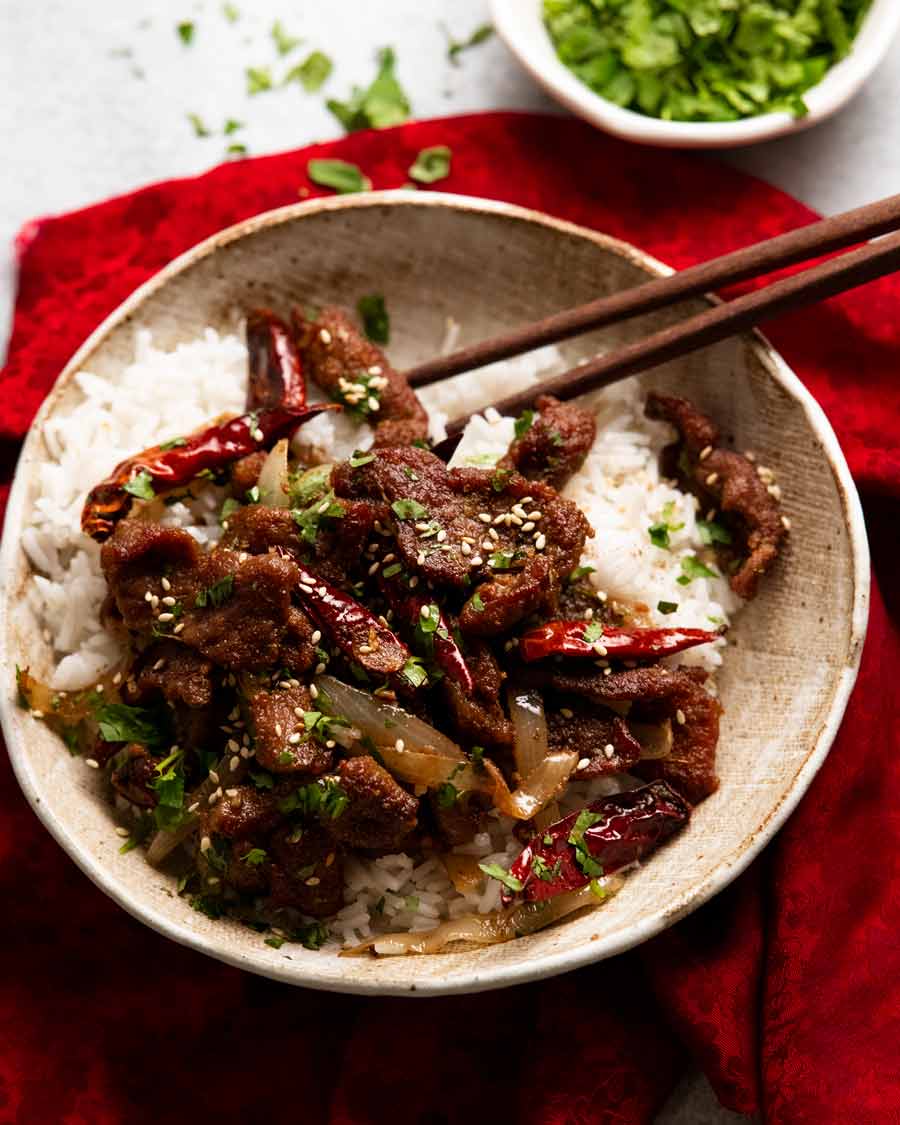
How to serve Cumin Lamb
This is a dry-style stir fry, which means it is one of those stir fries that doesn’t come with loads of sauce. Absence of sauce is compensated for with robust flavours in the stir fry, like you find in other “dry” stir fries like Kung Pao Chicken, Thai Cashew Chicken and Crispy Mongolian Beef.
So personally, I’m fine serving it with plain white rice though I think some people would prefer a flavoured rice – because there’s no sauce for rice soaking. And I get it. If you’re in that camp, try it with Fried Rice (or the now infamous Emergency “Dump & Bake” Fried Rice if you don’t have day-old cooked rice), Garlic Butter Kale Rice or Buttered Rice. Supreme Soy Noodles will also be great as a side dish, along with steamed Asian Greens with Oyster Sauce.
Love to know what you think if you try this! I know it’s a little more niche than the usual stir fries I share. So that should tell you it’s extra great!! – Nagi x
Watch how to make it
Xinjiang Cumin Lamb Stir Fry
Ingredients
Lamb & marinade:
- 500g/ 1 lb boneless lamb leg meat (or rump) , sliced 1/2 cm / 1/5″ thick (Note 1)
- 1 tbsp soy sauce , light or all-purpose (not dark or sweet)
- 1 tbsp Chinese cooking wine (Note 2)
- 1/2 tsp cooking/kosher salt
- 1 1/4 tsp baking soda , sifted if lumpy (Note 3)
- 2 tbsp cornflour / cornstarch
Spice mix:
- 2 tbsp cumin powder
- 1/2 tsp white sugar
- 1/2 tsp ground Sichuan pepper (Note 4 to grind your own)
Stir fry:
- 4 tbsp vegetable oil (or canola, peanut)
- 1/2 cup dried Chinese chillis , whole, 25-30 pcs (Note 5)
- 1 onion , halved then sliced 8mm / 1/4" thick
- 2 tbsp finely minced ginger (~5cm/2″ piece)
- 5 cloves garlic , finely sliced
- 1/2 cup coriander/cilantro , roughly chopped
- 1 tsp toasted sesame seeds
- Plain rice , fried rice – more suggestions listed in post
Instructions
- Marinade – Combine lamb, soy sauce, Chinese cooking wine, salt, baking soda and cornflour in a mixing bowl. Mix well then set aside for marinade for 30 minutes (counter fine).
- Spice mix – Mix the ingredients in a small bowl.
- Cook lamb – Heat 3 tablespoons of the oil in a large non-stick skillet (30cm/1") over medium-high heat until hot. Add half the lamb and spread out in a single layer. Leave for 30 seconds then, using 2 wooden spoons, toss for a further 1 minute until the lamb is slightly golden. Remove onto a plate then repeat with remaining lamb (you shouldn't need more oil).
- Sauté aromatics – Heat the remaining 1 tablespoon of oil. Add the dried chilli, ginger and garlic. Stir for 10 seconds to release flavour, then add the onion. Cook for 2 minutes until the onion just starts to soften.
- Spiced lamb – Add the cooked lamb then sprinkle the spice mix over. Toss well to evenly coat.
- Finish dish – Add the cilantro, sesame seeds and toss. Serve over rice! (Note: the dried chillies are not meant to be eaten.)
Notes
Nutrition
Life of Dozer
Many of you inquired about the well being of Geoff* when I moved away from the northern beaches. I’m happy to report he is well, and still receiving a stead flow of meals from us! My assistant still lives in the northern beaches so she takes meals to him and I still go to the dog beach (Bayview) on weekends. He is also very well looked after by other locals. Small token of appreciation for how well he looks after the park for us!
Here he is with his companion, Cubby, yesterday morning (Sunday).

You’d think Dozer would be more respectful given he doesn’t see Geoff every day anymore. But no. Still begging for a little taste of the breakfast I gave Geoff not 5 seconds ago. #Shameless!

* Geoff is a local who lives in his van at the dog park/beach. He has special permission from the council to park there. He looks after the park like its his own backyard which is why it is the most pristine dog park in the whole of Sydney. He wakes up to gun-barrel views over beautiful Pittwater every morning!
The post Xinjiang Cumin Lamb Stir Fry appeared first on RecipeTin Eats.
]]>