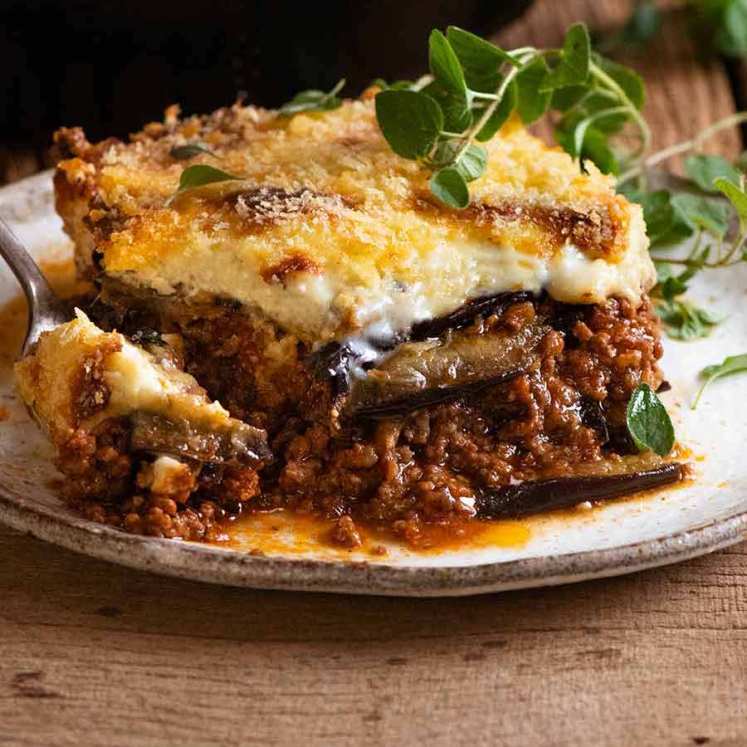
 Try this irresistible, simple recipe for stuffed eggplant: oven-roasted eggplant halves topped with Moroccan spiced lamb or beef. Low-cal, low-carb, low effort and utterly delicious! Moroccan stuffed eggplant You’ll often hear me declaring quite passionately that I think eggplant is one of the most underrated vegetables around. They’re cheap. They’re meaty. And they’re fabulously versatile,... Get the Recipe
The post Easy Moroccan Stuffed Eggplant (beef or lamb) appeared first on RecipeTin Eats.
]]>Try this irresistible, simple recipe for stuffed eggplant: oven-roasted eggplant halves topped with Moroccan spiced lamb or beef. Low-cal, low-carb, low effort and utterly delicious!
Moroccan stuffed eggplant
You’ll often hear me declaring quite passionately that I think eggplant is one of the most underrated vegetables around. They’re cheap. They’re meaty. And they’re fabulously versatile, used in cuisines worldwide like Asian, Italian, Greek and Indian, prepared through various cooking methods including frying, steaming, roasting and simmering.
Today, we’re smearing, roasting and stuffing. Well, topping, not scooping-and-stuffing, in a manner that gives it a semi-stuffed vibe. Think of this as a mid-week take on traditional stuffed eggplant dishes you find in Arabic cuisine that involves hollowing out eggplants, stuffing with rice, meat, herbs and nuts, often baked in a tomato sauce. Sounds magnificent, doesn’t it? And it is. but there’s a lot more pots and pans involved! We’re going simple today. You can make this tonight, after work!!
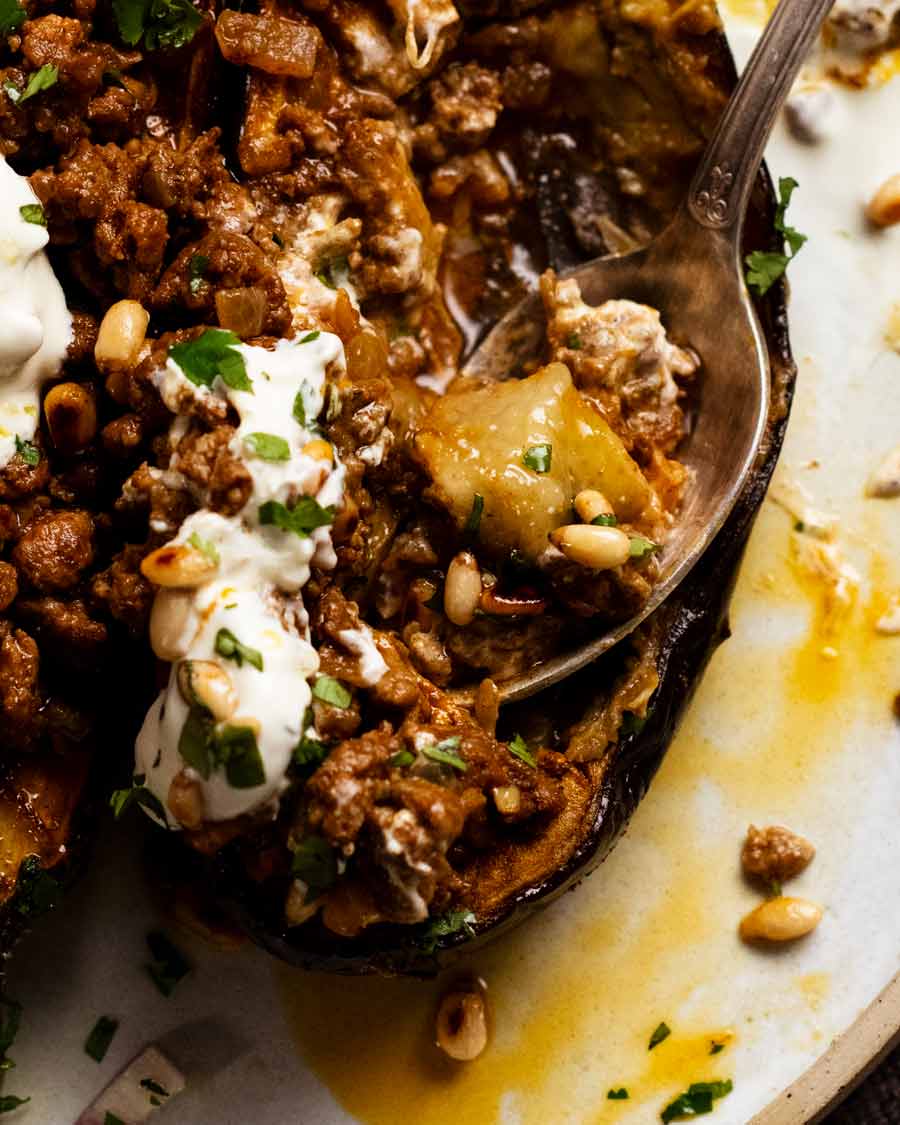
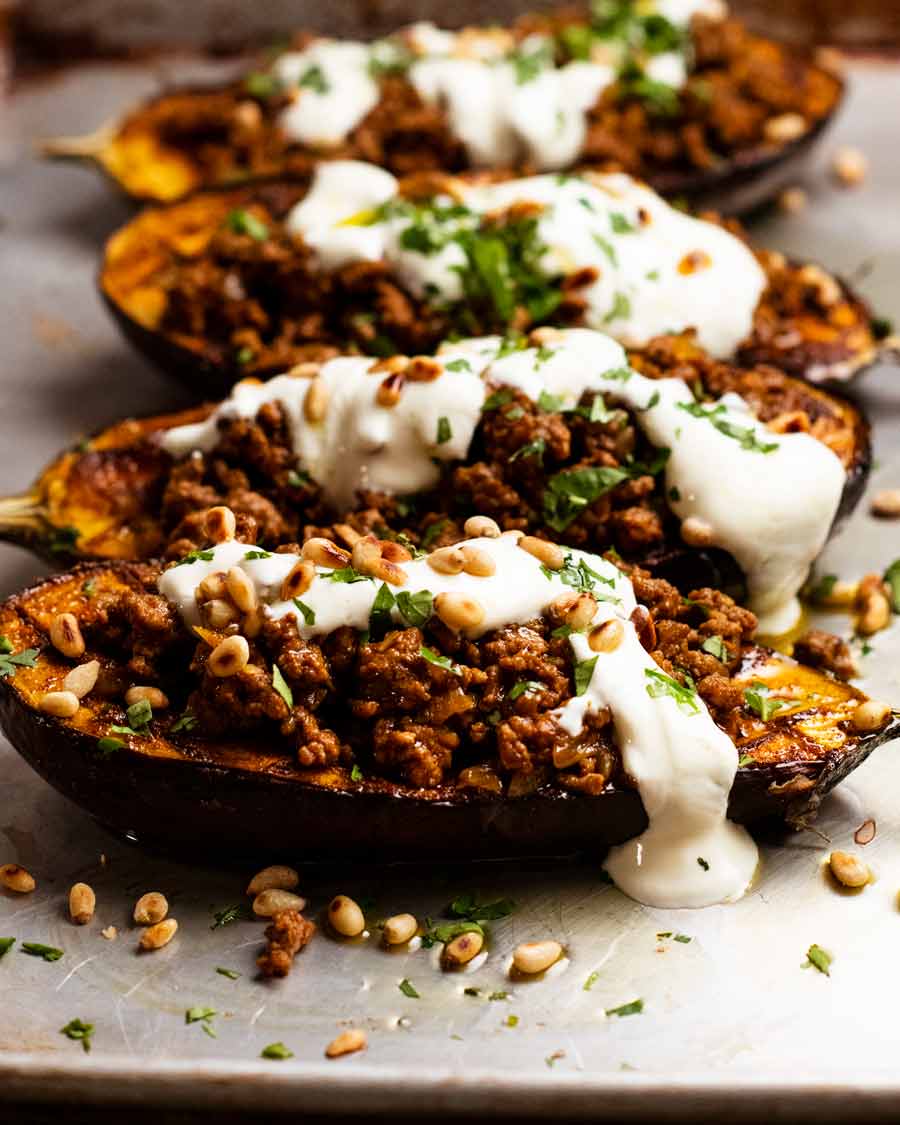
Nice close up of said soft juicy eggplant!
Ingredients in Moroccan stuffed eggplant
The base flavouring for this Moroccan stuffed eggplant is a homemade Chermoula spice mix which does double duty as the spice paste for the eggplant as well as flavouring the meat filling.
Chermoula spice mix
Chermoula is a North African spice mix that traditionally is a marinade or sauce containing fresh coriander, garlic and spices. Sometimes you can also find it in a dry spice mix form. We’re using the dry blend today for our purposes.
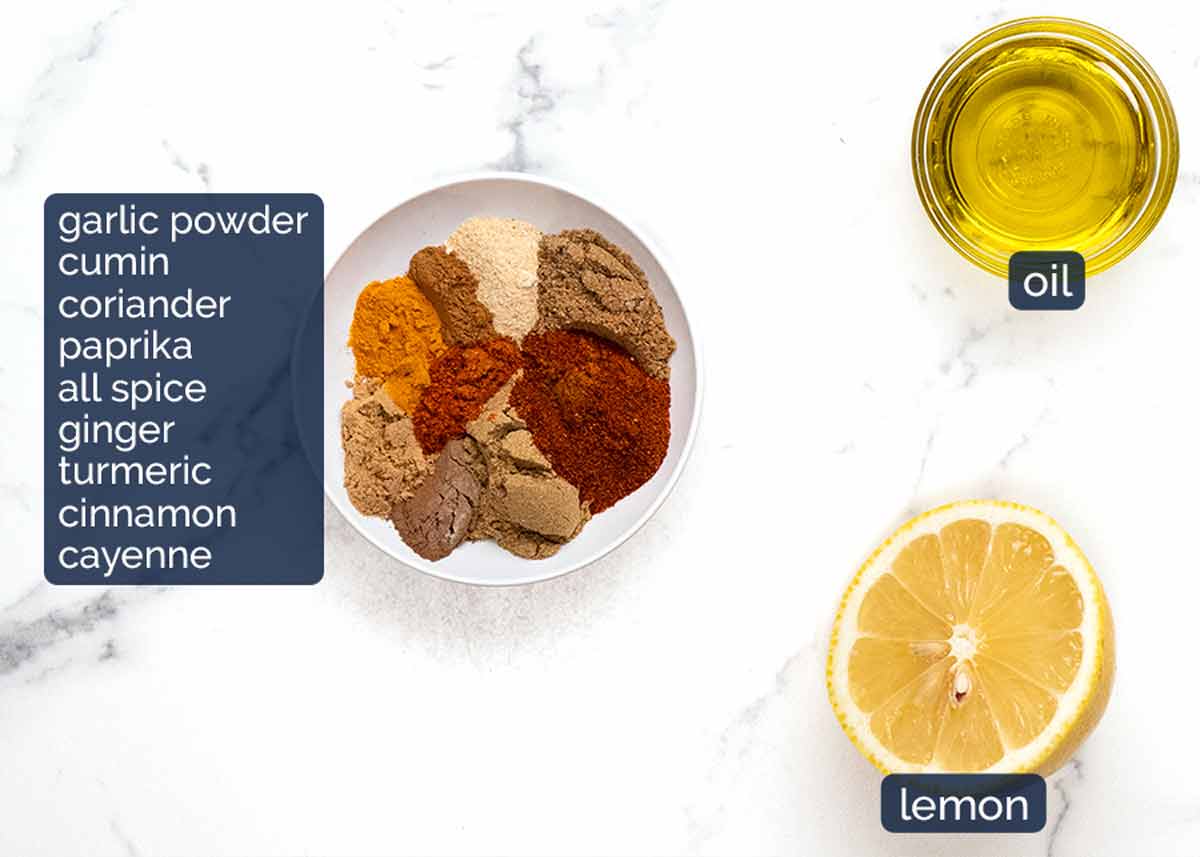
The spices – The majority of the spices are pantry staples, but don’t make a special trip out if you’re missing one or two…or even three! There’s enough in the blend that you can substitute with something else – suggestions are in the recipe notes.
Olive oil and lemon juice – These are used to make the paste. I like to use lemon juice to add a bit of tang as well as cutting down on the oil required to make a smear-able paste.
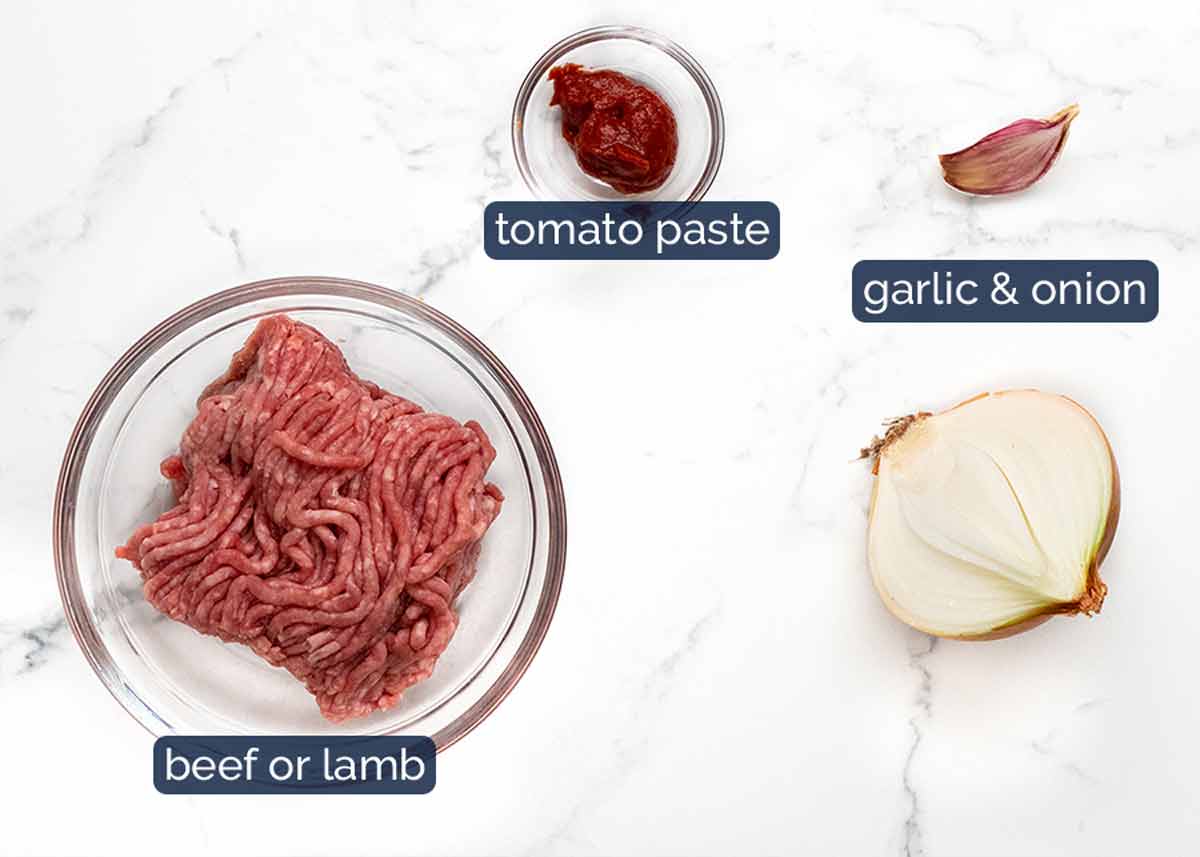
The meat filling (lamb or beef)
Here’s what you need to make the meat filling. You can use lamb or beef, though if I had my pick I’d choose lamb as it’s a classic pairing with flavours from the Arab world.
3 teaspoons of the Chermoula spice blend is used to flavour the filling. In addition to this, we have garlic and onion for aromatics, and a little tomato paste to bind the filling together.
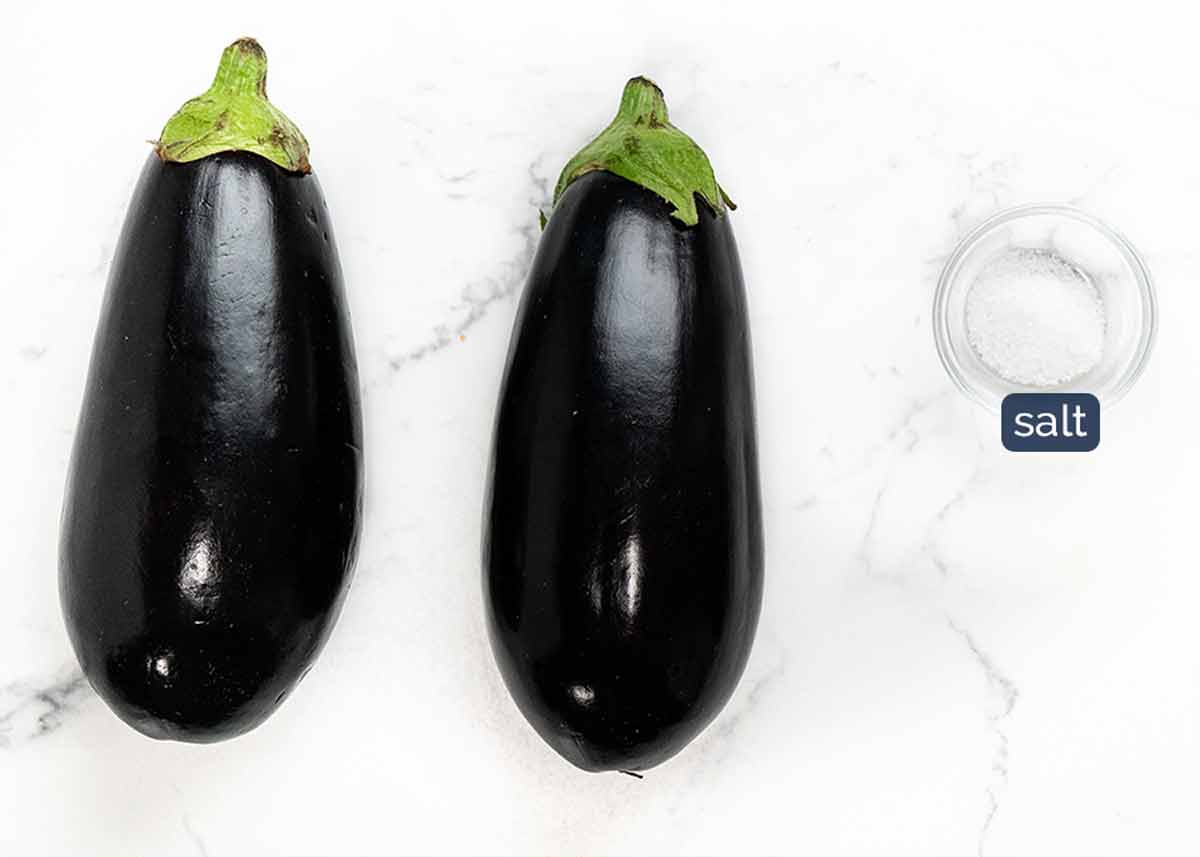
The eggplant
Choose eggplants around 250g/8oz and 17cm/7″ long. Don’t worry about exact size – adjust toppings accordingly. If you end up with larger eggplants, the topping layer might be slightly thinner, but the dish will still be packed with flavor.
Salt helps remove moisture from eggplants. More on this below!
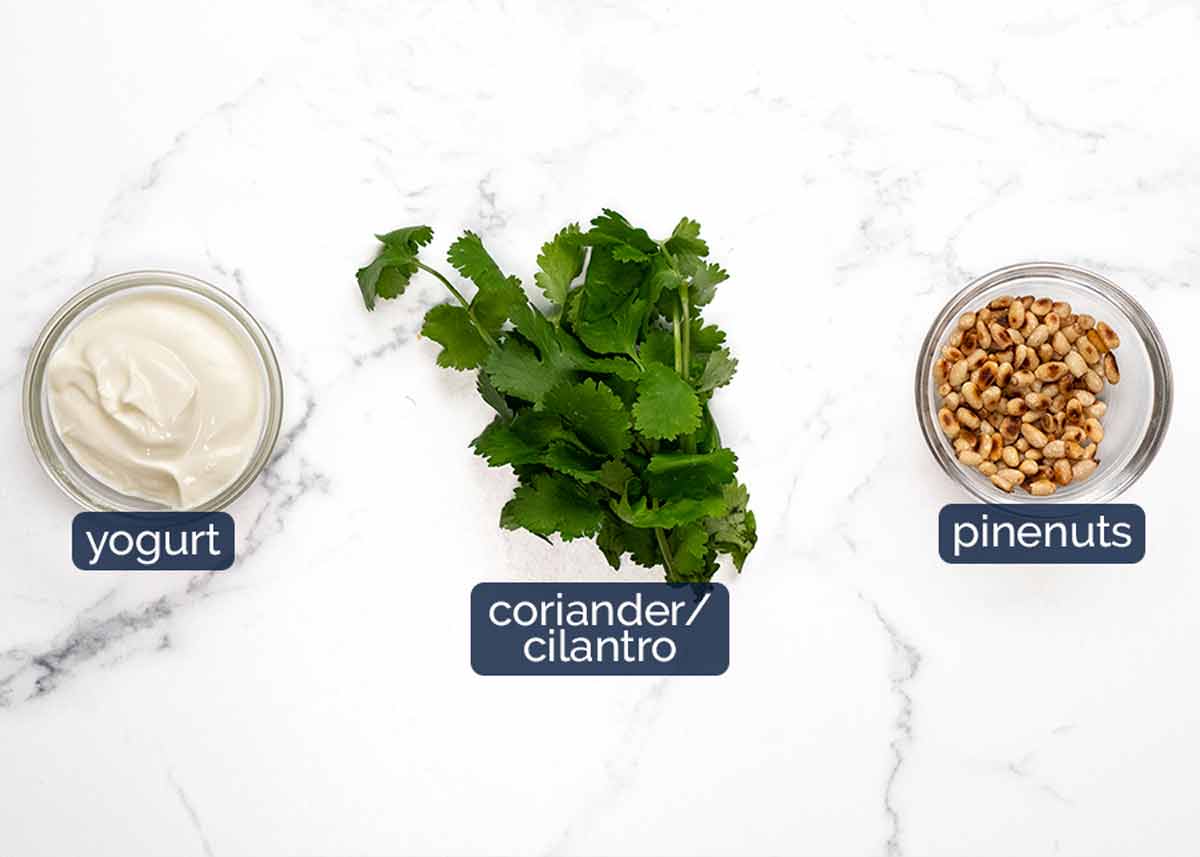
Toppings
And lastly, the toppings! It really finishes this dish so I urge you to use them. The pine nuts are a great finishing touch, though other nuts will make an adequate substitute (almonds, macadamia, walnuts, or seeds).
If you’re anti-coriander/cilantro, switch with parsley!
How to make Moroccan Stuffed Eggplant
As mentioned above, I call it stuffed because describing it as a “topped” eggplant just doesn’t seem to capture the essence of this dish. 😂 But actually, it’s not properly stuffed – which means no scooping necessary, which means it’s easier to make. Win!
Sweating the eggplant (recommended)
Sweating the eggplant to remove excess water is a recommended but not essential step. It seasons the flesh as well as drawing out excess water that otherwise pools in the eggplant which dilutes flavour when you’re eating it.
But you can mostly get around this problem by simply cutting slits in the skin to let the water escape as it roasts. So don’t sweat it if you don’t have time to sweat it! *Sorry, I couldn’t resist!*
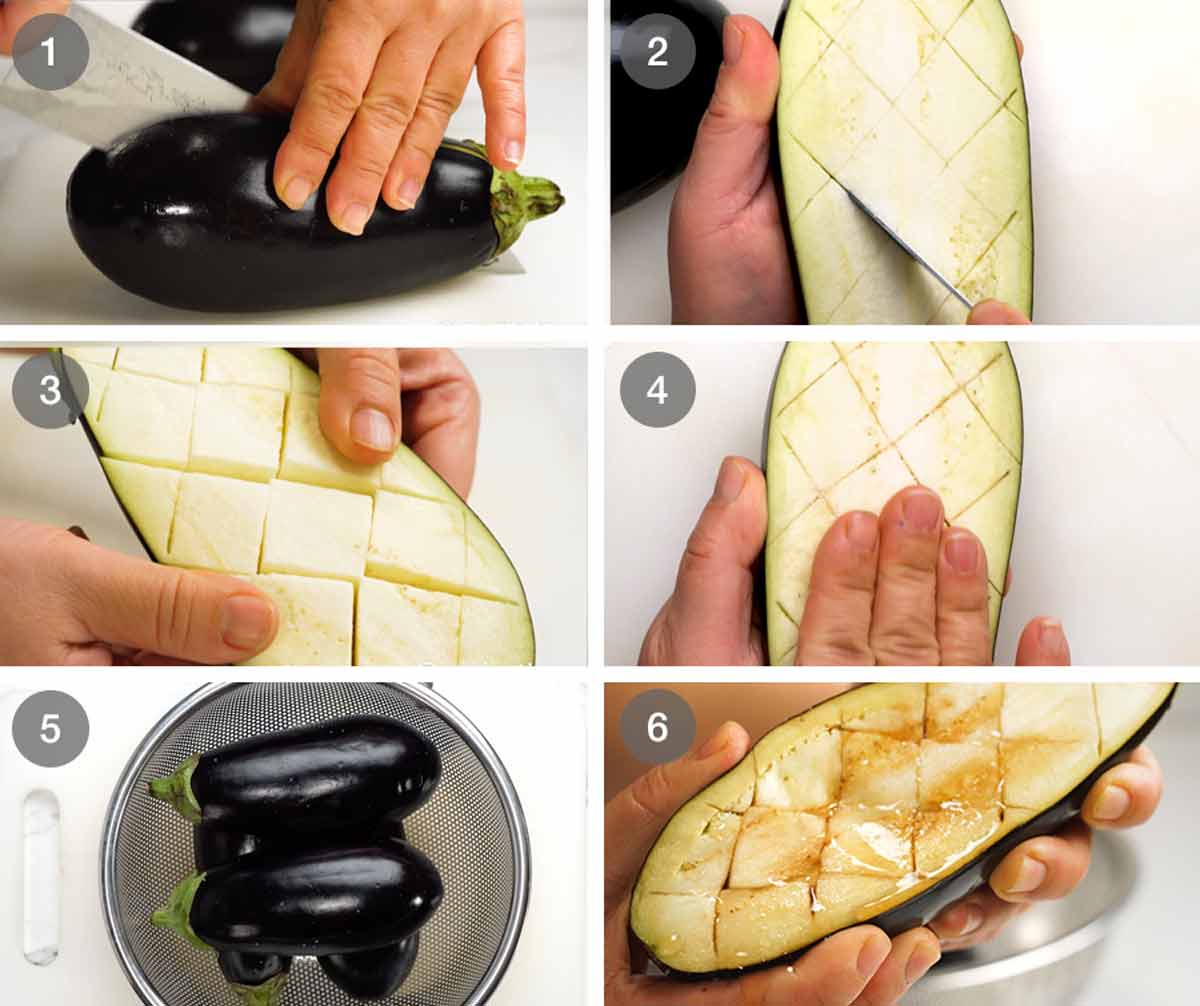
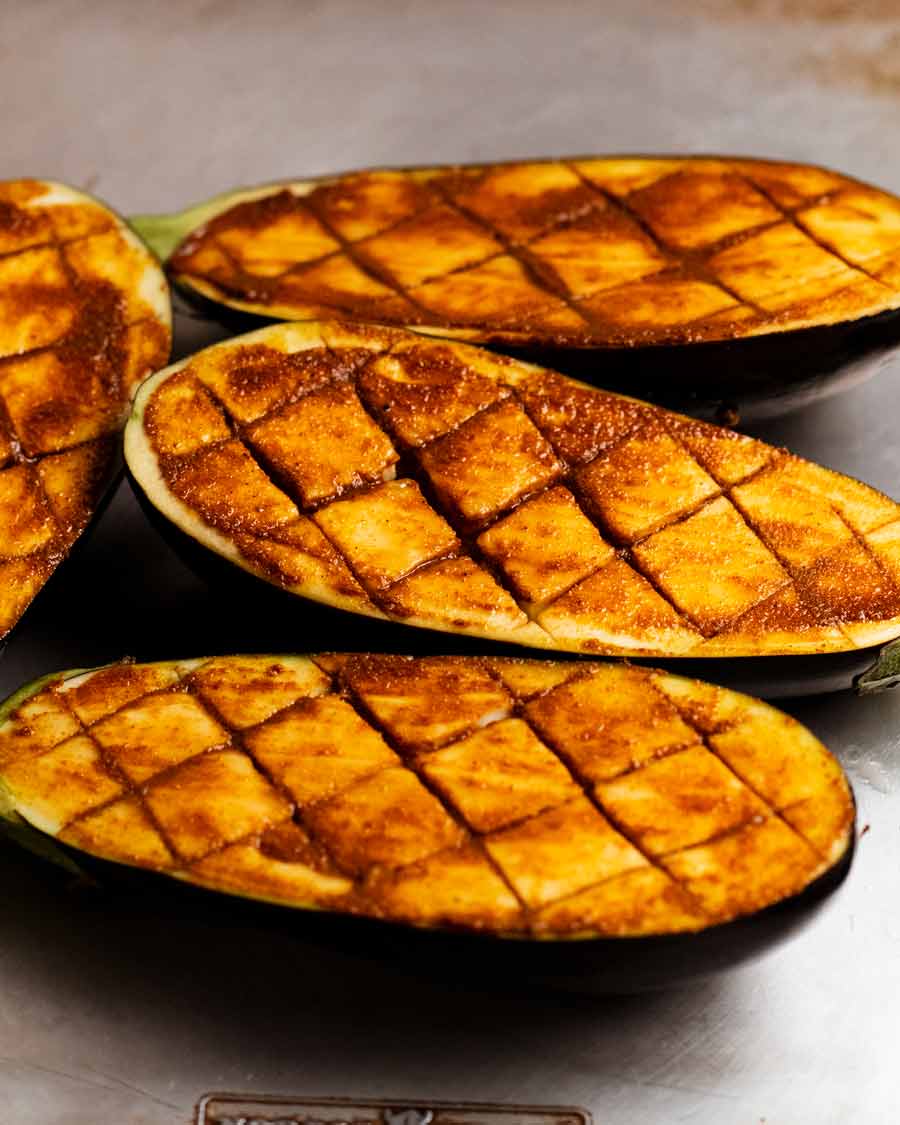
Cut the eggplant in half lengthwise. Keep the cap/stem intact and cut through it, it helps hold the eggplant together once roasted and soft.
Diamonds – Using a small sharp knife, cut 2.5cm/1″ diamonds into the flesh, cutting down as far as you are comfortable without piercing the flesh.
The said diamonds!
Salt – Sprinkle the surface with salt and rub it in. It’s good to get it into the slits but even if you just rub the surface, the salt will make it’s way into the slits.
Sweat for 30 minutes. I put the eggplant upside down in a colander to allow the water to drip out.
Squeeze like sponge to remove the excess water then pat the surface dry.
Making the “stuffed” eggplant
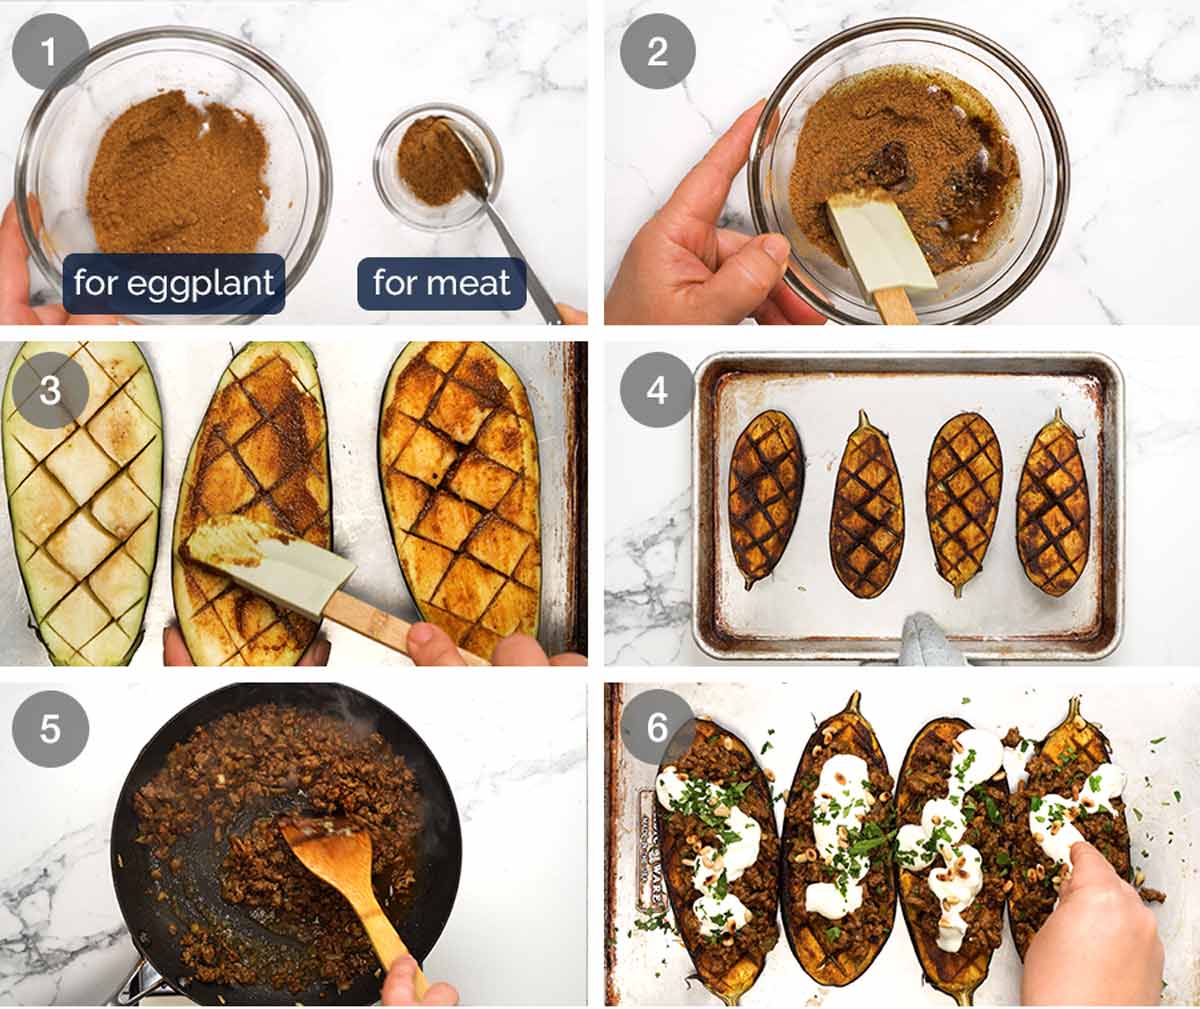
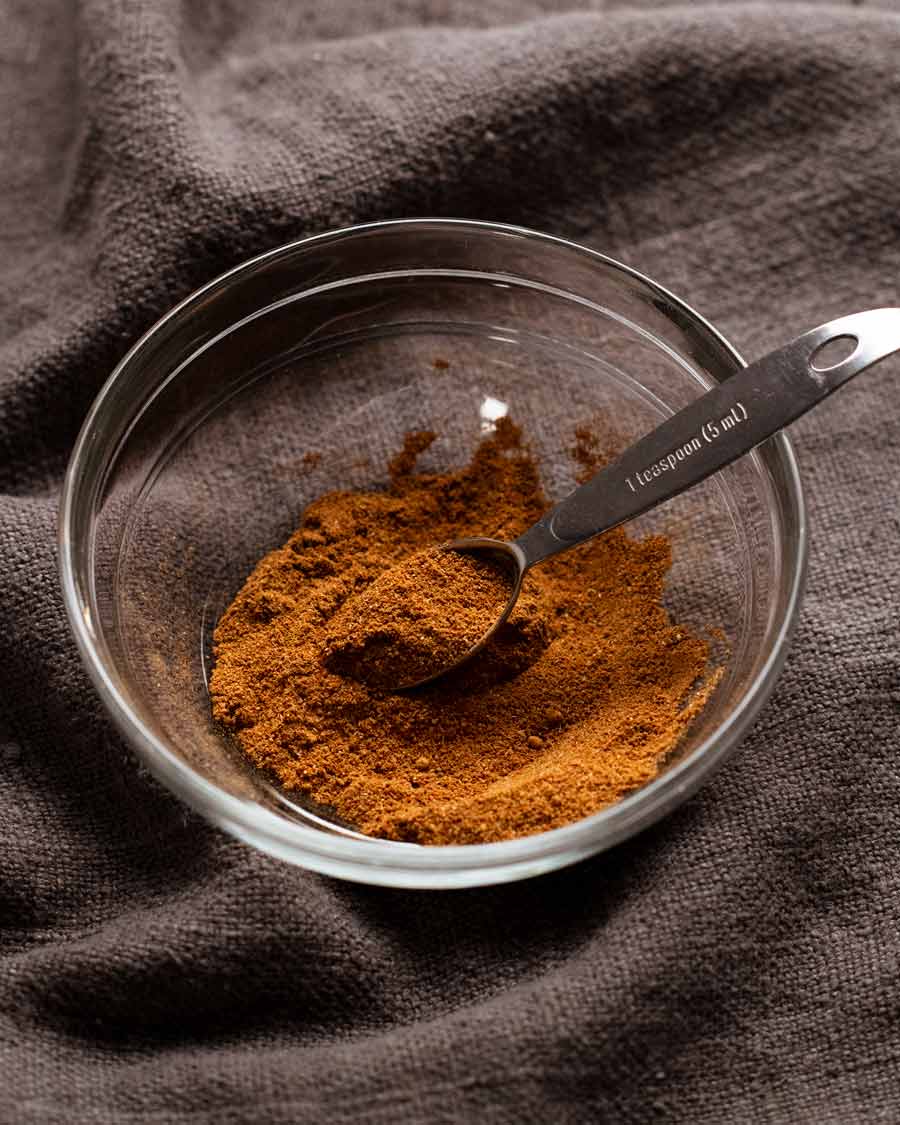
Mix the Chermoula spice blend in a bowl. Measure out 3 teaspoons and set aside for the meat.
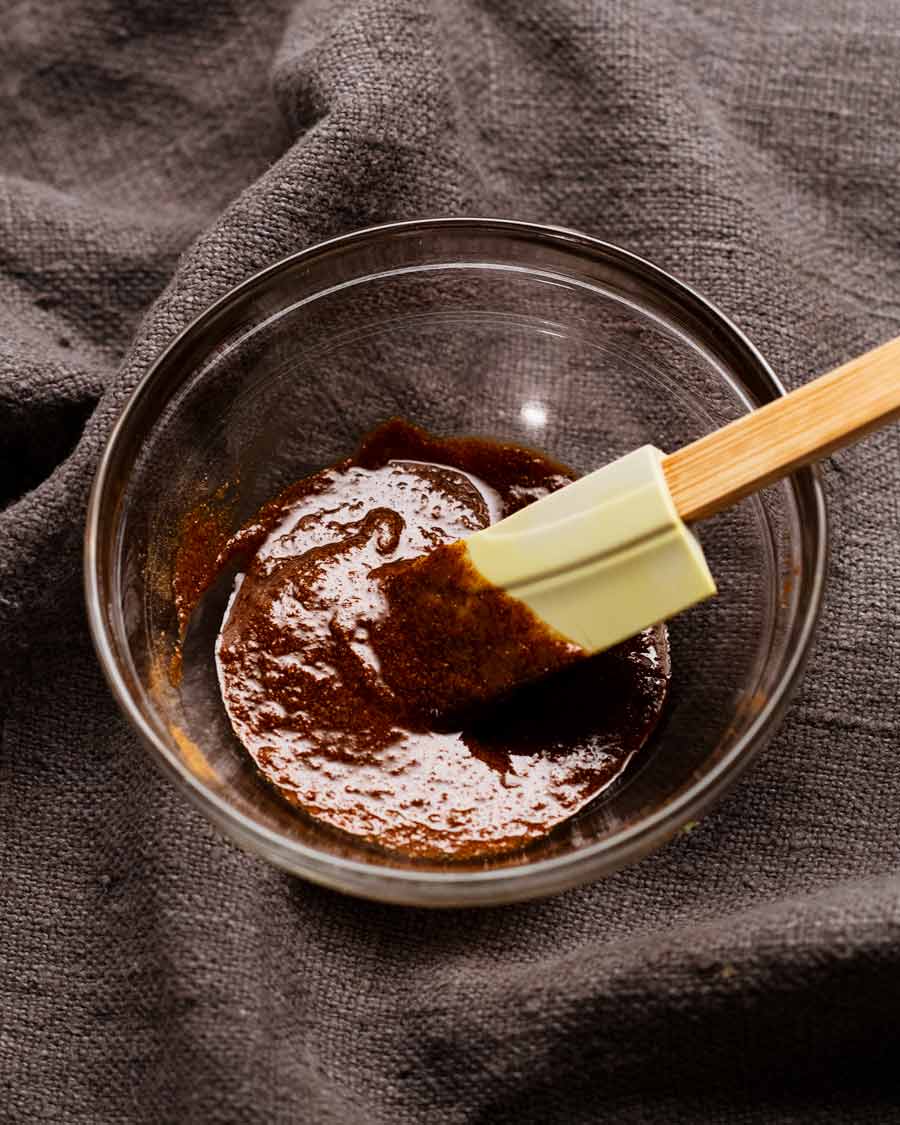
Paste – Add olive oil and lemon juice into the remaining chermoula and mix to form a paste.
Smear the paste onto the surface of the eggplant.
Roast for 45 minutes at 180°C/350°F (160°C fan) or until the eggplant is softened. Sometimes it takes longer – don’t forget to check the edges.
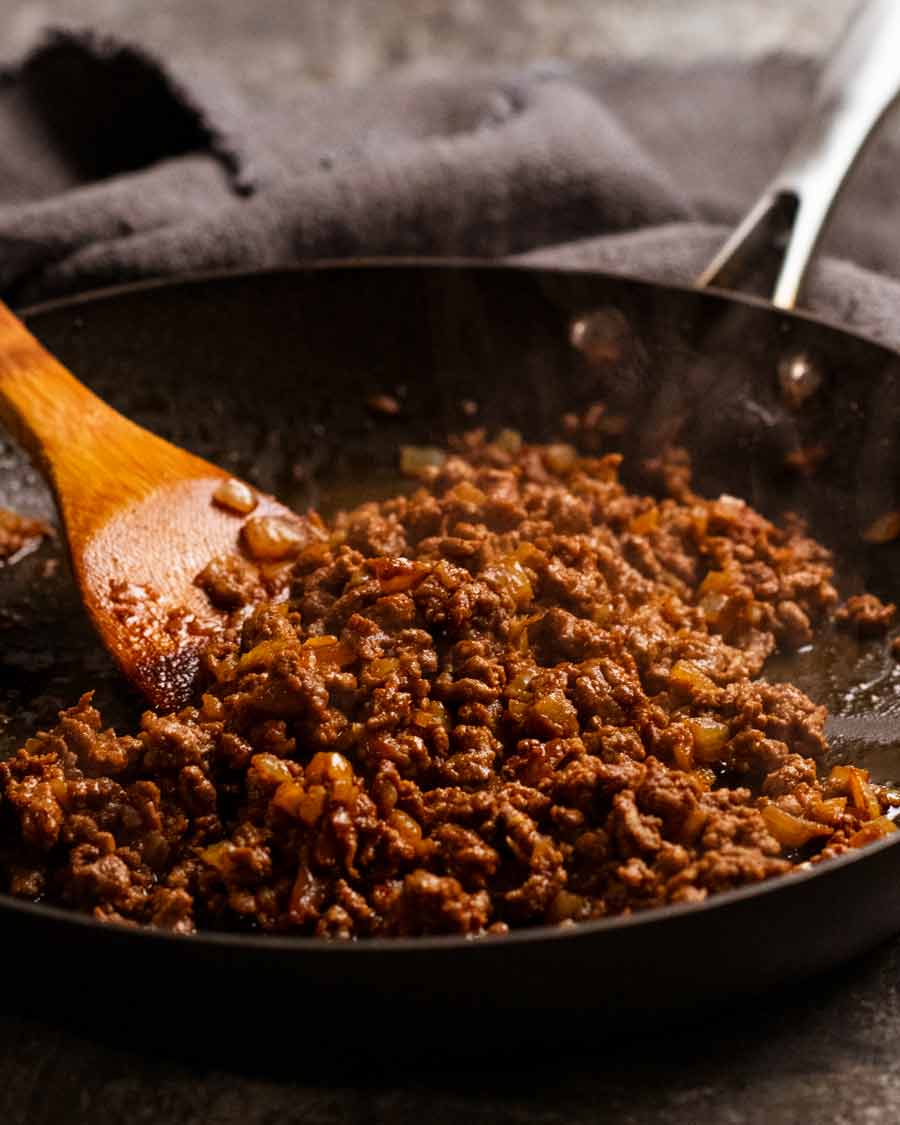
Spiced meat – A quick cook! Sauté the garlic and onion, then cook the lamb with the reserved Chermoula spice blend. Finally, add the tomato paste and water to make the filling “juicy” (rather than dry and crumbly).
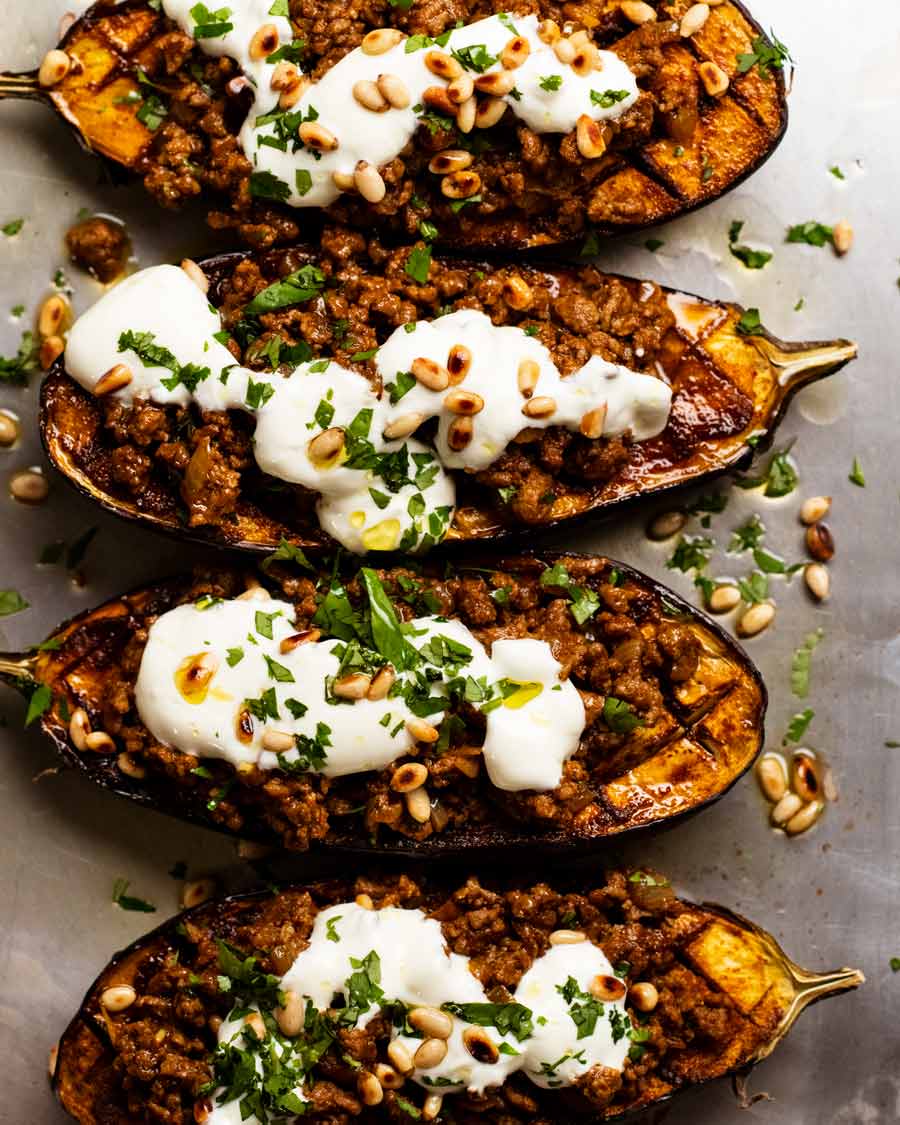
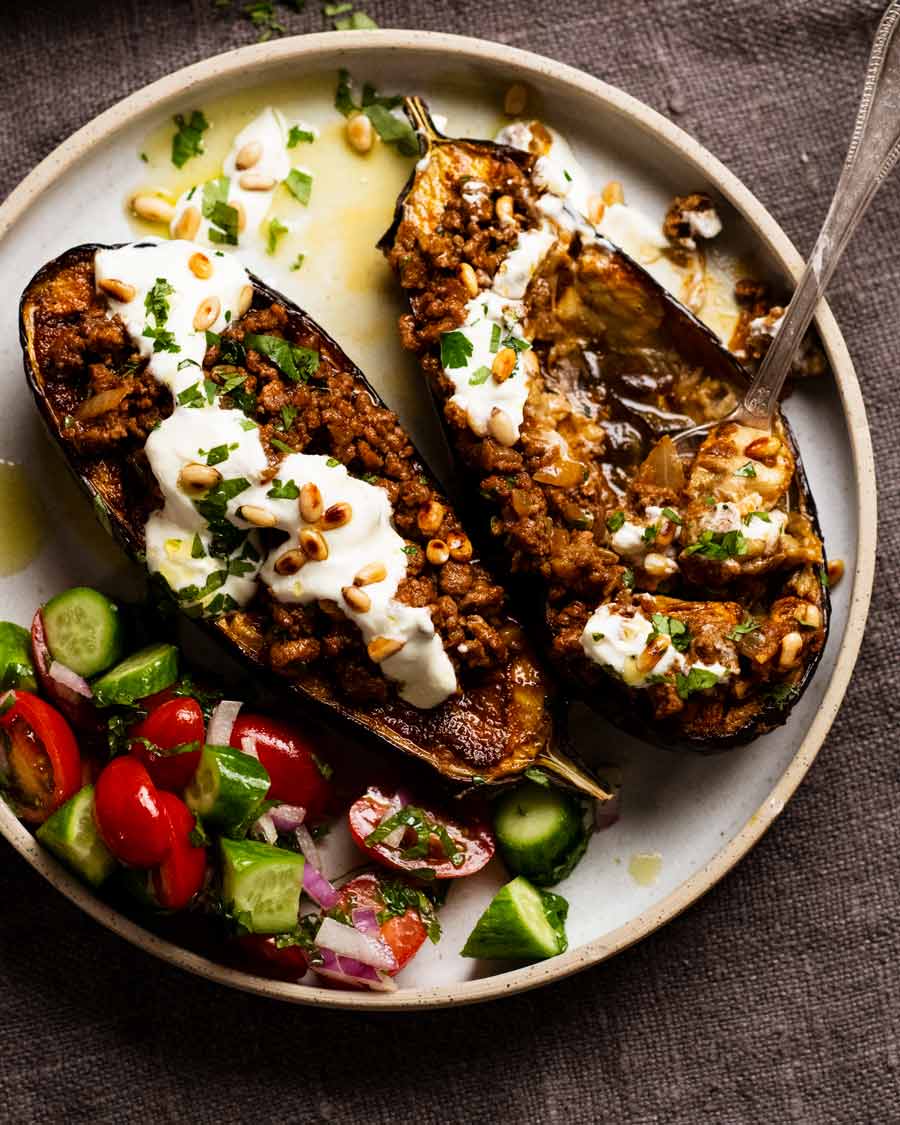
Assemble – Top the roasted eggplant with the lamb filling. Dollop on yogurt, sprinkle with pine nuts and coriander then dig in!
Matters of serving
Servings
This recipe is designed to serve:
2 people as a generous dinner with a small side salad;
4 as a meal with a starch (flatbread, couscous) and a substantial side (like Honey Cinnamon Pumpkin Lentil Salad, roast veg, chickpea salad); or
4 people as a generous starter.
Low carb, low calorie!
For the eggplant alone, it’s a mere 450 calories for a whole eggplant (ie 2 halves) with only 22 grams of carbs. To be honest, a serving of the eggplant alone makes for a satisfying meal – you have protein and vegetables covered! Though I do like to add something fresh on the side, even if it’s just some plain fresh cucumber and tomato.
So, it’s low calorie, low carb, simple to make and a something different to make with beef mince rather than the usual Spag Bol. What do you think?? Feel like giving this a go? I HOPE SO! – Nagi x
Watch how to make it
Easy Moroccan Stuffed Eggplant (beef or lamb)
Ingredients
Eggplant
- 2 x 250g/8oz eggplants (aubergines), ~17cm/7" long (Note 1)
- 3/4 tsp cooking salt / kosher salt
- 1 tbsp extra virgin olive oil
- 1 tbsp lemon juice (or more oil)
Chermoula spice mix (Note 2)
- 1 1/2 tsp EACH coriander, paprika
- 1 tsp cumin
- 3/4 tsp all spice powder
- 1/2 tsp EACH garlic powder, ginger, turmeric powder
- 1/4 tsp cinnamon
- 1/4 tsp cayenne pepper
Spiced beef or Lamb topping
- 1 tbsp olive oil
- 1 garlic clove , finely minced
- 1/2 onion , finely chopped
- 250g / 8oz beef or lamb mince , lean if you can (chicken, turkey, pork also ok)
- 1/2 tsp cooking/kosher salt
- 2 tsp tomato paste (Note 3)
- 1/4 cup water
To Serve
- Yoghurt , plain
- 2 tbsp coriander/cilantro leaves , roughly chopped (sub parsley)
- 2 tbsp pinenuts , toasted (Note 4)
Instructions
- Preheat oven to 180°C/350°F (160°C fan).
- Sweat eggplants (recommended, see Note 5 to skip) – Cut eggplants in half then score with 2.5cm / 1" diamonds. Rub surface with salt, getting some into the slits. Place face down in a colander and set aside for 30 minutes. Gently squeeze like a sponge to remove excess water, pat surface dry.
- Mix Chermoula spice mix ingredients in a bowl. Remove 3 teaspoons for the meat and set aside. Add olive oil and lemon juice into the remaining spice mix and mix into a paste.
- Roast eggplant – Place eggplant on baking tray. Slather spice mix onto the surface. Roast for 45 minutes until softened.
- Spiced topping – Heat oil in a non stick skillet over medium high heat. Cook onion and garlic for 1 minute. Turn heat up to high, add lamb/beef and cook, breaking it up as you go, until you no longer see red. Add reserved spices and salt, then cook for a further 1 minute. Add tomato paste and cook for 1 minute. Stir in water, cook for 1 minute until it's juicy but not watery.
- Assemble – Top eggplant with beef/lamb. Sprinkle over coriander, dollop with yogurt and pine nuts. Finish with an extra drizzle of extra virgin olive oil, if desired!
Notes
- All spice – mixed spice
- Garlic powder – onion powder, or fresh garlic
- Ginger – more garlic
- Turmeric powder – saffron
- Cinnamon – more all spice
 Make ahead – Roast the eggplant and meat filling. Fully cool both, uncovered, then put into containers in the fridge. Re-warm both using method of choice (juice up the meat with a splash of water if needed) then assemble!
Leftovers will keep for 3 days in the fridge. Not convinced cooked eggplant will freeze well but the meat will be fine for 3 months!
Nutrition per serving, using lean beef – 2 eggplant halves (i.e. one whole eggplant) per serving. This is a satisfying meal even by itself!
Make ahead – Roast the eggplant and meat filling. Fully cool both, uncovered, then put into containers in the fridge. Re-warm both using method of choice (juice up the meat with a splash of water if needed) then assemble!
Leftovers will keep for 3 days in the fridge. Not convinced cooked eggplant will freeze well but the meat will be fine for 3 months!
Nutrition per serving, using lean beef – 2 eggplant halves (i.e. one whole eggplant) per serving. This is a satisfying meal even by itself!Nutrition
Originally published in March 2016. Majority spruced up in 2023 with a better, more streamlined recipe with better flavour, sparkling new photos and a brand new recipe video!
Proof of eggplant fondness
Life of Dozer
Can’t even whiteboard recipe ideas without Mr D hovering around.

The post Easy Moroccan Stuffed Eggplant (beef or lamb) appeared first on RecipeTin Eats.
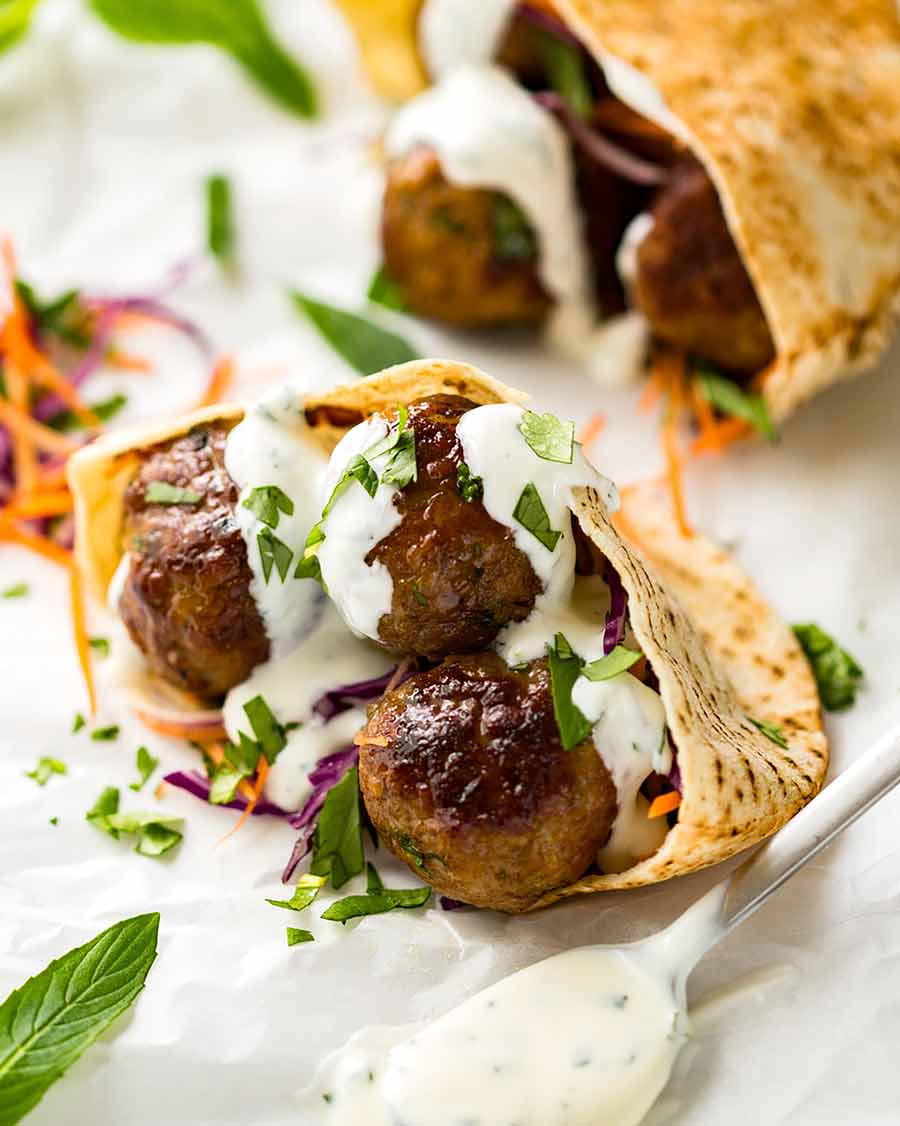
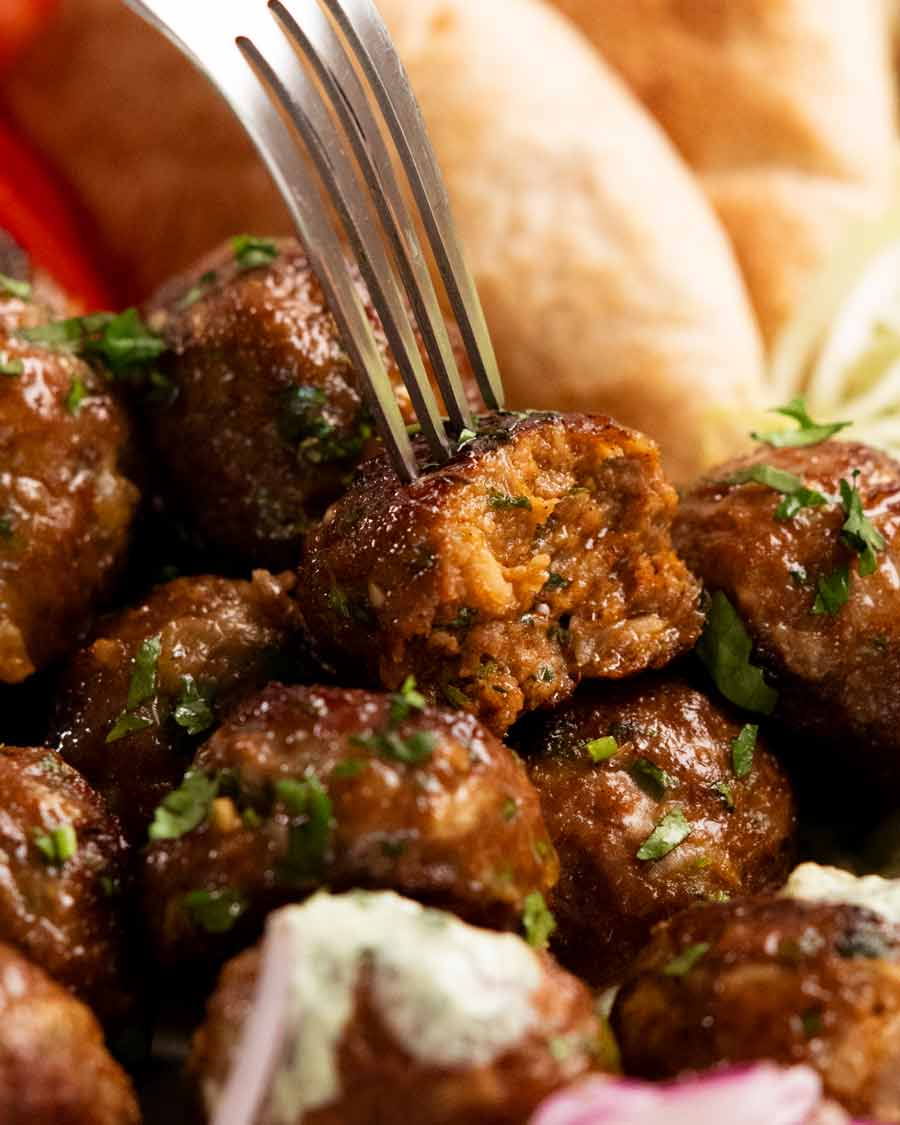
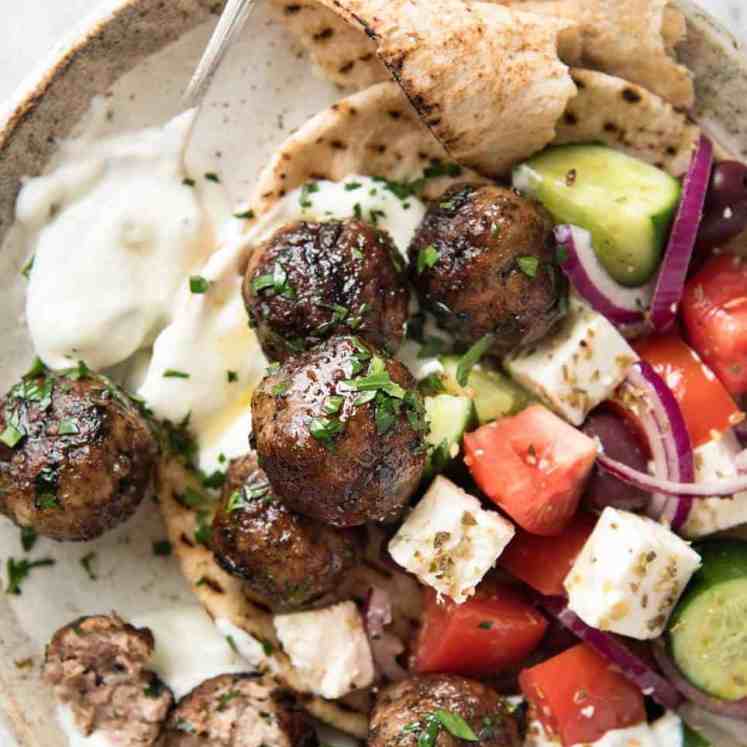
]]> Beautifully spiced Moroccan Lamb Meatballs served with a Mint Yoghurt Sauce. Stuff into pitas, pass them around at a party or pile over pilaf! This is such a great recipe for lamb mince. Lamb loves Middle Eastern spices! Juicy Lamb Meatballs with Moroccan flavours! These Moroccan Lamb Meatballs are inspired by a visit to the... Get the Recipe
The post Moroccan Lamb Meatballs appeared first on RecipeTin Eats.
]]>Beautifully spiced Moroccan Lamb Meatballs served with a Mint Yoghurt Sauce. Stuff into pitas, pass them around at a party or pile over pilaf! This is such a great recipe for lamb mince. Lamb loves Middle Eastern spices!
Juicy Lamb Meatballs with Moroccan flavours!
These Moroccan Lamb Meatballs are inspired by a visit to the Lakemba Night Markets (Sydney) during Ramadan, a holy month for Muslims which involves intensive prayer and fasting from dawn to dusk.
During this period, the main drag of Lakemba transforms at night with food stalls lining the pavements and is a popular place to enjoy iftar, a communal feast to break the fast.

If you love Middle Eastern food, you’ll be in street food heaven. A vibrant, lively mood, the smell of charcoal, the sizzle of BBQ’s, and the most amazing smell of spices that Middle Eastern food wafts through the street!
One of the (ahem – many!) things I’ve enjoyed from these street stalls are spiced lamb meatballs stuffed into pita pockets. So I’ve created my own version using the spice mix from my Middle Eastern Lamb Koftas recipe. Lamb is a protein made for heady Middle Eastern spice flavourings! It pairs so well, and the smell when they’re cooking are outrageous!

What you need for Moroccan lamb meatballs
It’s all about the spice mix. And you’ll be delighted to see they’re all pantry staples – there’s a good chance you’ve got them all!
Lamb mince (ground lamb) – Lamb is a favourite in Middle Eastern cuisine! However, these meatballs would also be terrific made with beef, chicken or turkey.
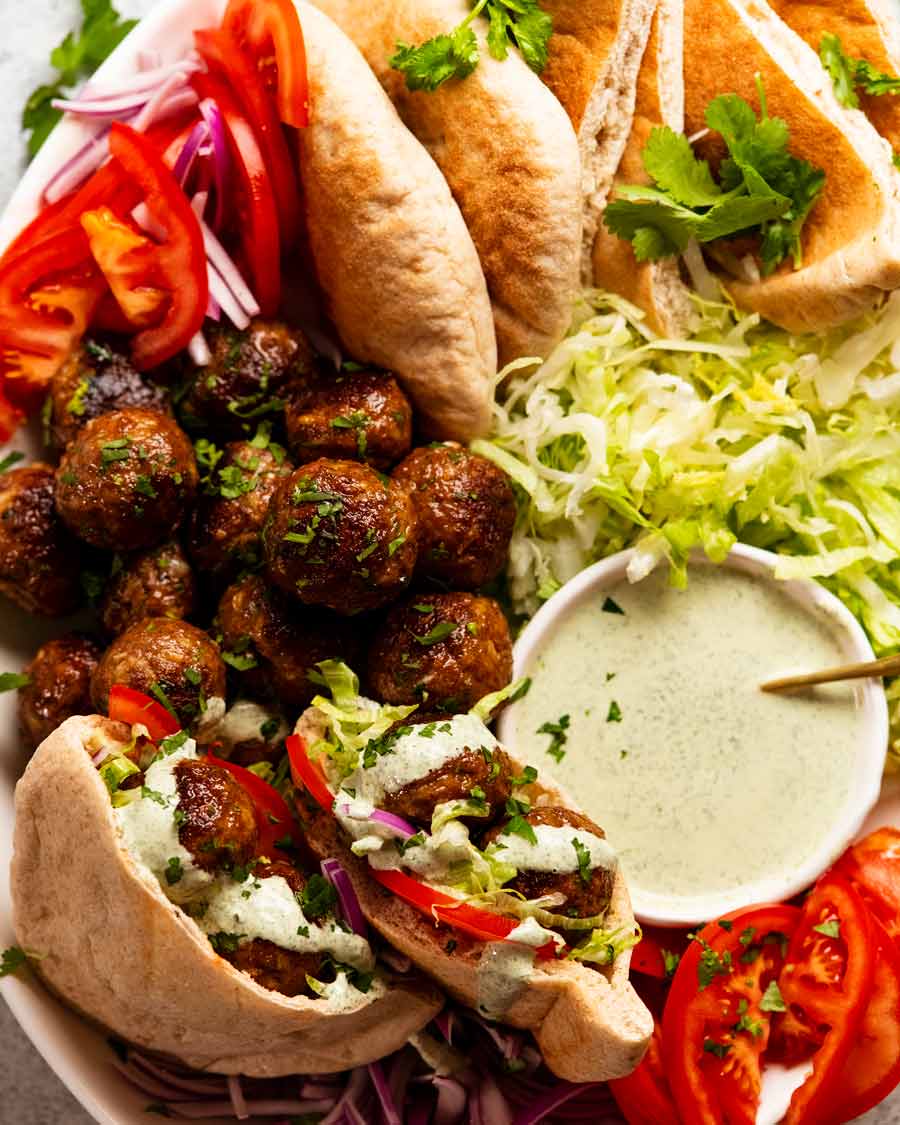
Onion – A key flavour base in most of my savoury dishes! My secret for extra tasty, extra soft meatballs is to grate the onion over the breadcrumbs so it soaks up the juices. It softens the panko which makes the meatballs juicier and more tender.
Plus, if you use diced onion you’d need to cook it separately beforehand. When it’s grated, there’s no need!
Panko breadcrumbs – Adds bulk and absorbs moisture so the mixture isn’t too wet to form meatballs. Panko breadcrumbs are easy to find these days in the Asian and breadcrumb aisle of grocery stores. Ordinary breadcrumbs (smaller and finer, like sand) can also be used but the meatballs will not be quite as tender.
Egg – For keeping the meatballs together. World’s best food glue!
Garlic – Very rare to find savoury dishes on my website that don’t involve garlic!
Spices – Classic Middle Eastern mix. Cumin, coriander, paprika (any, I like smoked), cinnamon (Middle Eastern secret ingredient!), cayenne pepper (spiciness – feel free to increase or omit).
Coriander/cilantro – For a hint of freshness and for visual purposes too. Really worth using, though it can be substituted with parsley.
For the pita pockets
Here’s what you need to make stuffed pita bread pockets:
Pita bread or small Lebanese bread – Anything that can be cut then pried open to stuff. Most of the photos in the post are the slightly thicker “bready” pita pockets. However, small Lebanese bread will work too – pictured below. You’ll fit 3 meatballs in each half.
Flatbreads would be great too. Stuff and roll!
Leafy greens – Fresh lettuce, tomato and red onion – For stuffing. There’s no need for dressing, just plain is fine. Plenty of flavour and juices from the meatballs, plus the mint sauce!
Dressed leafy greens – Shredded purple cabbage, carrot, mint salad pictured in the pita pocket below. This is like a Middle Eastern style slaw and pairs beautifully with the Moroccan spicing in these meatballs, as well as adding a lovely splash of colour!
How to make Moroccan meatballs
1. The mint sauce
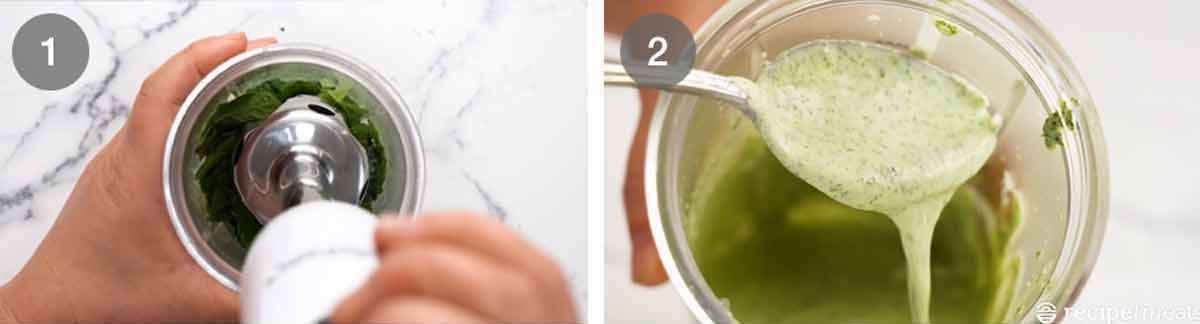
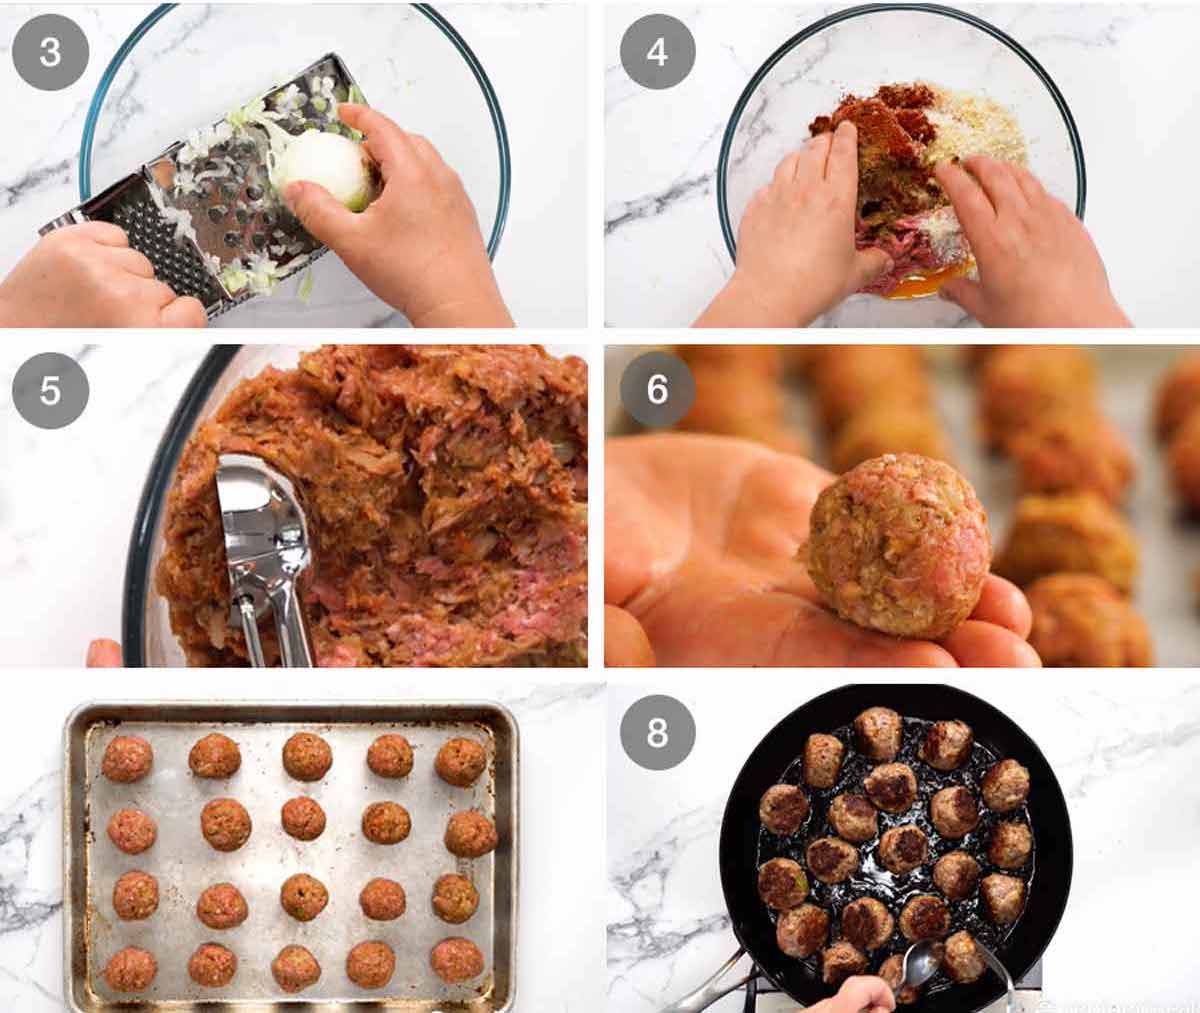
Blitz the fresh mint, lemon and salt with just 1/4 cup of yogurt. Then stir the remaining 1/2 cup of yogurt. Why 2 steps? Because blitzing breaks yogurt and makes it thin and watery. To avoid this, blitz a bit first, then stir in the remaining yogurt.
Mint sauce thickness – The above photo shows the consistency of the mint sauce. Thin enough to drizzle but thick enough to cling! Keep it in the fridge until required.
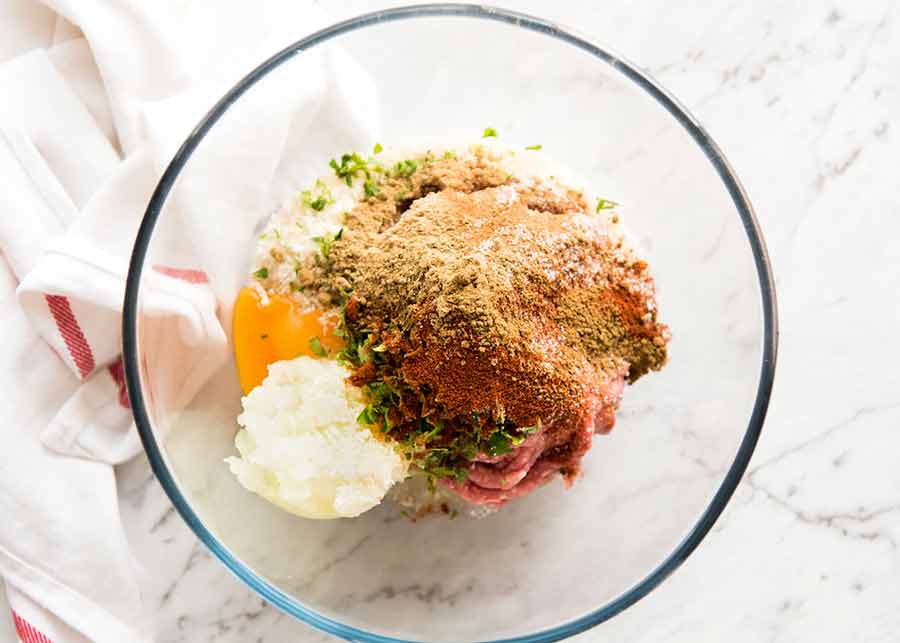
2. Make the meatballs
Grate the onion into a bowl using a standard box grater. Why grate? Because the strands are fine enough so the onion doesn’t need to be cooked separately before mixing into the meat. Also, the onion juices mix throughout which adds extra flavour. Win, win, win!
Mix – Put all the remaining meatball ingredients in a bowl and mix well with your hands.
Portion – I use a cookie scoop to portion the mixture into 20 to 22 meatballs.
Roll the mixture into rounds with your hands.
Tip to keep meatballs rounds – Refrigerate the meatballs for an hour to firm up the mixture before cooking. This will help them stay more round as you cook on the stove.
Pan fry for 8 minutes, rotating to brown all over. These days, I use a spoon and fork to turn the meatballs rather than tongs. I find it easier and also it helps maintain the round shape of the meatballs.
Baking option – The recipe also includes a baking option. I do prefer pan frying over baking because you can get better colour on the outside without overcooking the inside. However, for lamb meatballs, baking works better than other proteins because it’s a fattier meat.
Once the meatballs are cooked, transfer onto a plate and they’re ready to serve!
Proof of juicy insides:
How to serve these Moroccan meatballs
Stuffed in pita pockets, as pictured throughout the post, with fresh lettuce, tomato and onion, drizzled with the mint sauce. Or piled high over a beautiful fruit and nut pilaf, or the golden Jewelled Rice Pilaf that I shared recently.
Or – make salad bowls! I can see them served on the side of a Pearl Couscous Salad, or toss through a Middle Eastern Chickpea salad. Like a meatball salad. YES.
So many possibilities. Share other ideas below! – Nagi xx
Watch how to make it

Moroccan Lamb Meatballs
Ingredients
- 1 1/2 tbsp olive oil (for cooking)
Meatballs:
- 500 g / 1 lb lamb mince (ground lamb) (Note 1)
- 1 small onion , grated using box grater (~1/2 cup, including juices, Note 2)
- 1/2 cup panko breadcrumbs (sub ordinary)
- 1 egg
- 2 cloves garlic, crushed
- 1/4 cup coriander/cilantro leaves , finely chopped
- 1 1/2 tsp EACH cumin, coriander, paprika (any, but I like smoked paprika)
- 1/2 tsp EACH cinnamon, cayenne pepper (add more for spicy)
- 1 tsp cooking/kosher salt
- 1/4 tsp black pepper
Minted Yoghurt Sauce (Note 3):
- 3/4 cup plain yoghurt (I use Greek)
- 1/2 cup (tightly packed) mint leaves
- 2 tsp lemon juice
- 1/4 tsp cooking/kosher salt
To Serve as pockets:
- 4 pita pockets , Lebanese or pita bread
- 5 cups shredded lettuce (iceberg, cost/romaine)
- 2 tomatoes , halved, thinly sliced
- 1 red onion , halved, finely sliced
- OR Shredded Red Cabbage, Carrot and Mint Salad (instead of lettuce, tomato and onion)
- Extra coriander/cilantro leaves, finely chopped (optional)
Instructions
- Mint yogurt sauce – Set aside 1/2 cup yogurt. Place all other ingredients in a jug that fits the head of a stick blender. Blitz until it turns green – it will be runny. Stir in reserved yogurt (this thickens it again). Refrigerate until required.
- Meatballs – Place all Meatball ingredients in a bowl. Mix well with your hands. Measure out 1 heaped tablespoon, then roll into balls. Repeat with remaining mixture – should have 20 – 24 meatballs.
- Cook – Heat oil in a large non stick pan over medium heat. Add half the meatballs and cook, turning to brown all over, for 8 minutes, or until cooked through. Transfer to plate. (Oven option – Note 4)
- Serving – Cut pita pockets in half, warm for 10 seconds in the microwave, then pry it open. Stuff with lettuce, tomato, onion, then meatballs (I do 2 per half pocket). Drizzle with Mint Yogurt Sauce and fresh coriander.
Notes
Nutrition
Originally published July 2017. Updated in April 2022 with a much better video – because I love these meatballs so much! The spicing was also improved slightly.
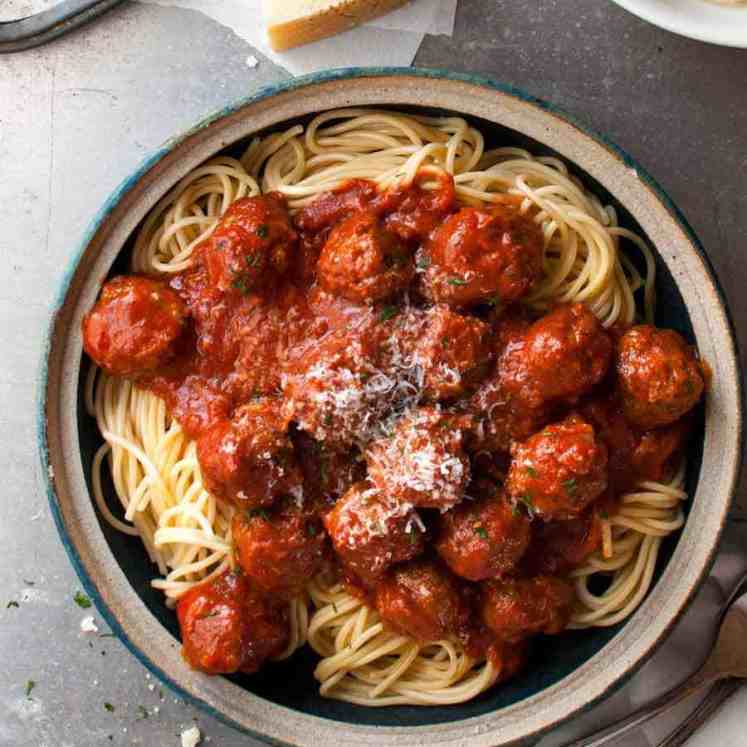
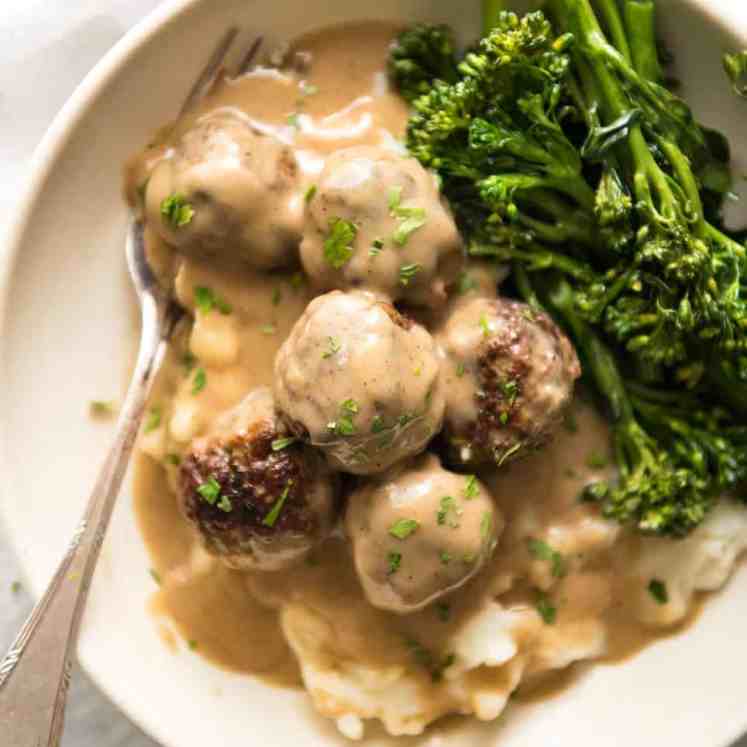
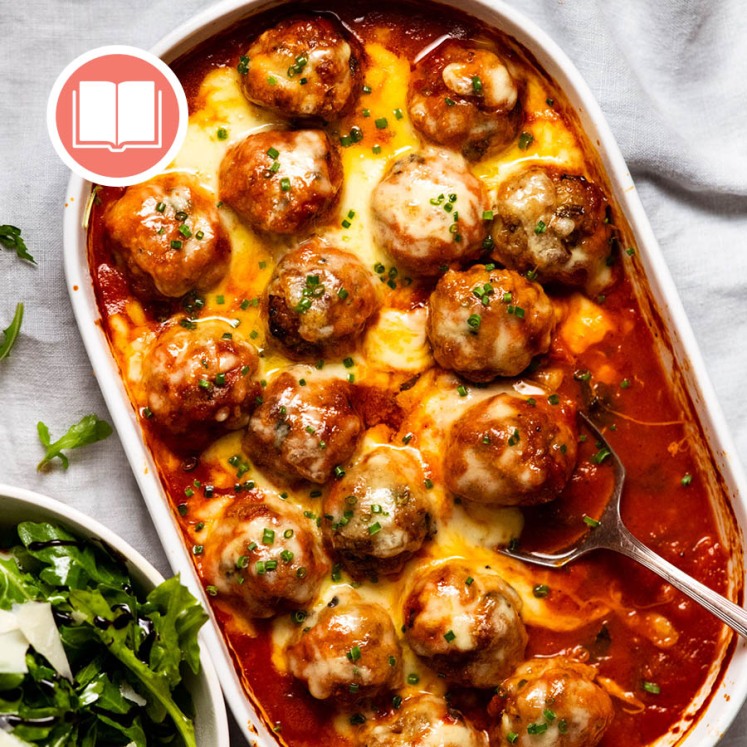
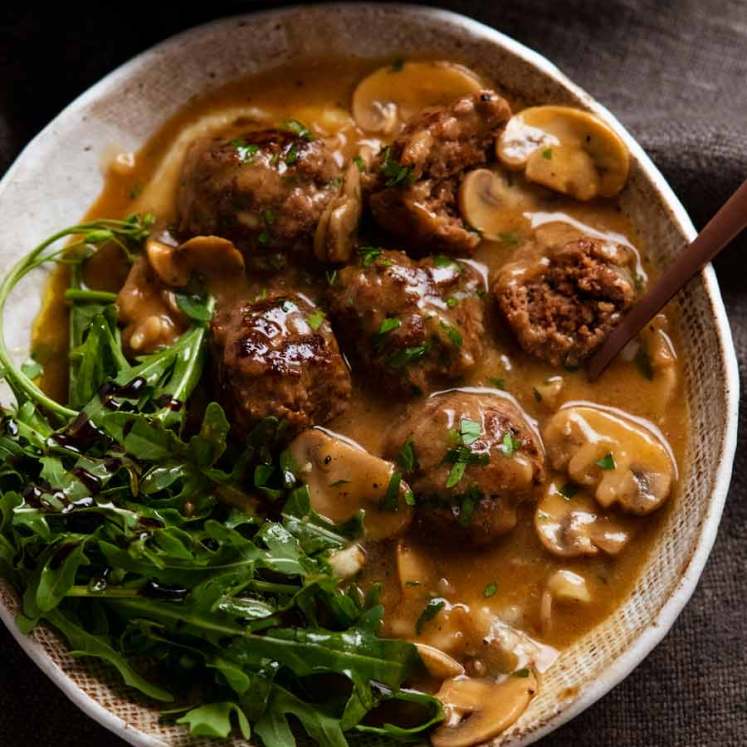
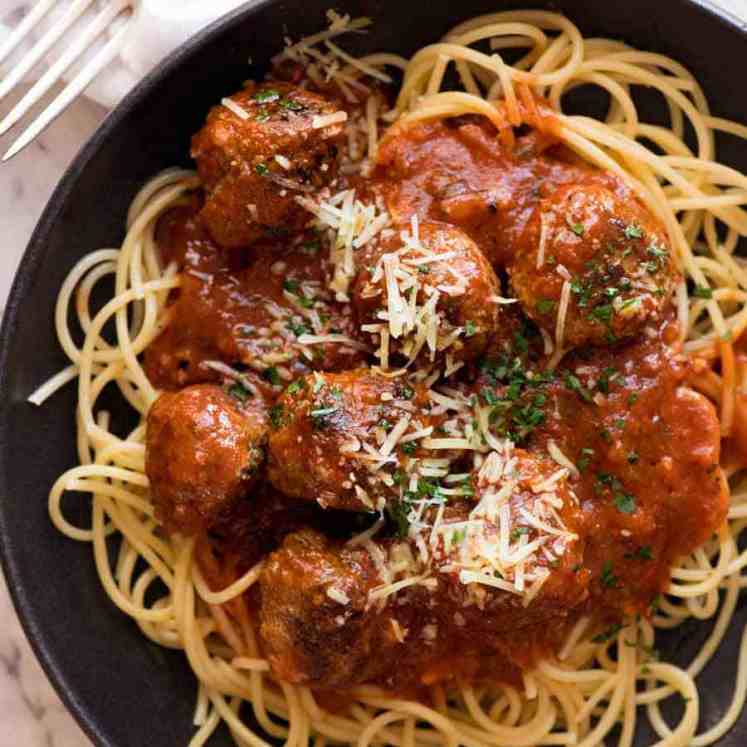
I Get A Round: More Meatball Recipes


Life of Dozer
It still fits! (See Life of Dozer photo below for context….)

And from the original publication date in 2017:
All that mocking of the photo of him in his hoodie. I ask you – does he look unhappy? Humph! He looks perfectly comfortable to me! 😂 #MockingDozerIsFun

The post Moroccan Lamb Meatballs appeared first on RecipeTin Eats.
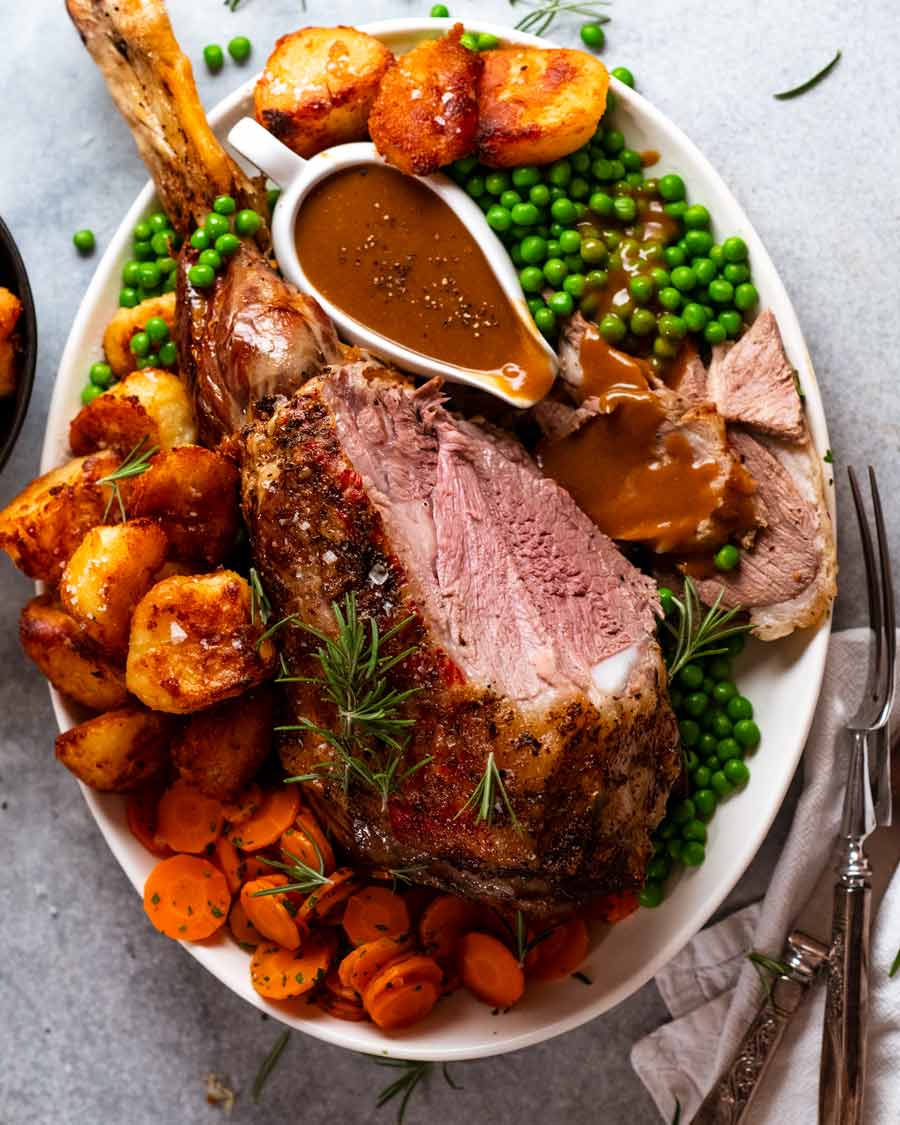
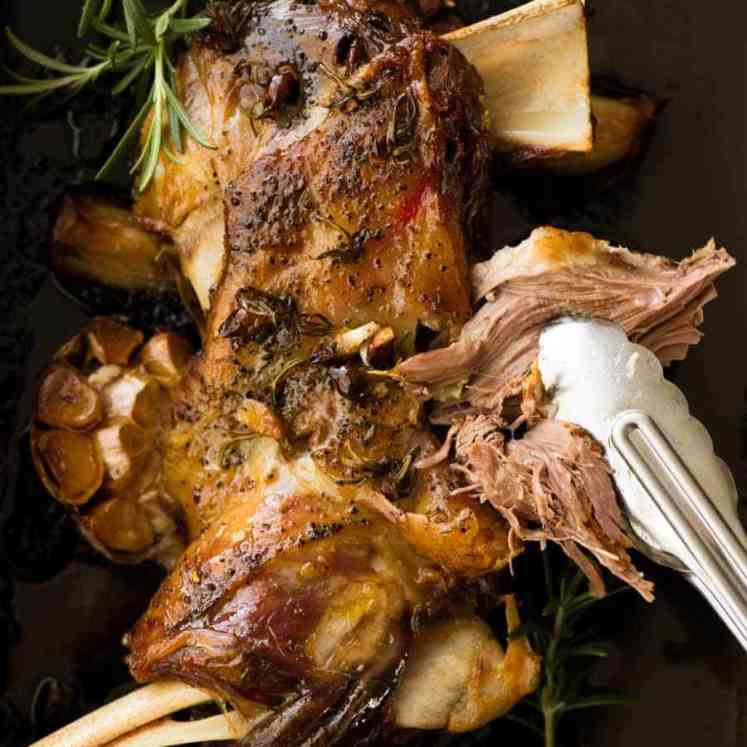
]]>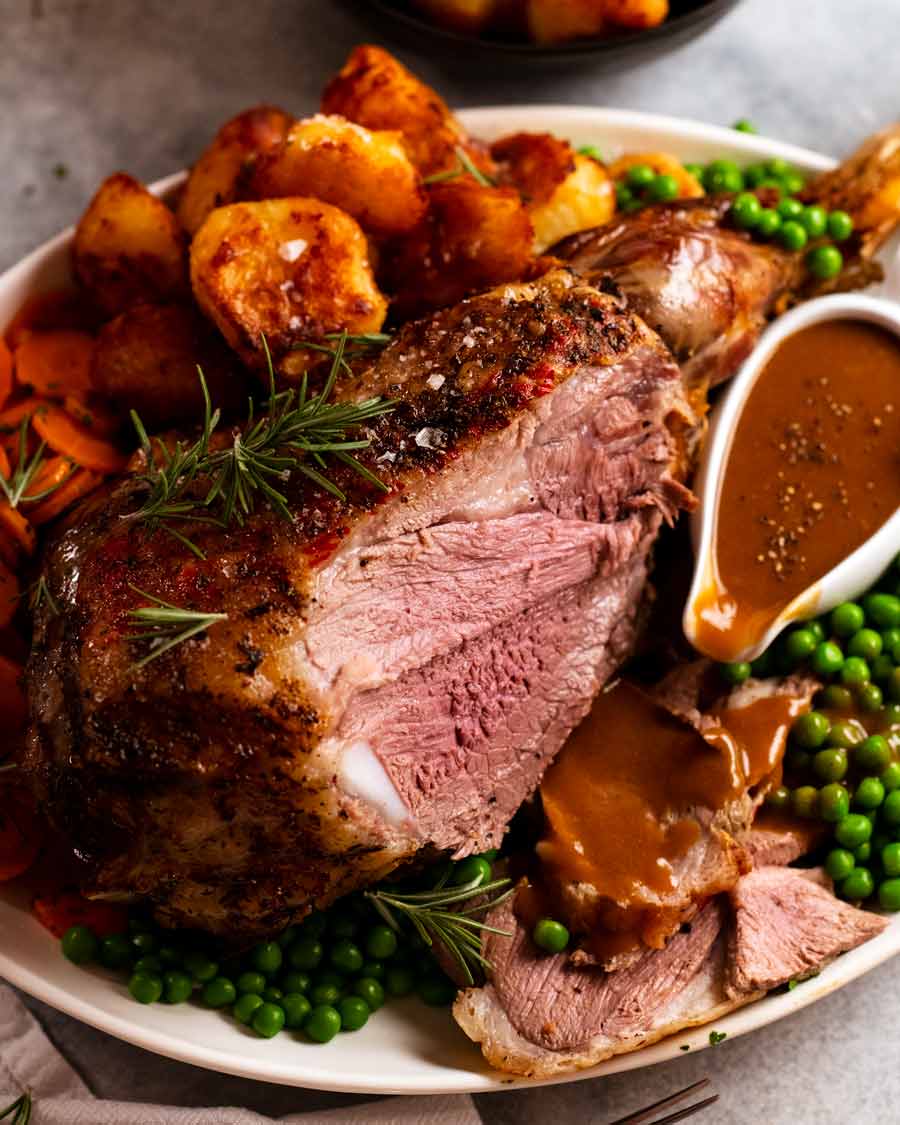 I love a good roast lamb (proof). Here’s my classic recipe for lamb leg, rubbed with garlic and rosemary, served with gravy, peas, carrots and crispy roast potatoes (duck fat or classic). I hope you love it as much as I do! The only thing you need to know for perfect roast lamb leg I... Get the Recipe
The post Roast Lamb Leg with Gravy appeared first on RecipeTin Eats.
]]>I love a good roast lamb (proof). Here’s my classic recipe for lamb leg, rubbed with garlic and rosemary, served with gravy, peas, carrots and crispy roast potatoes (duck fat or classic). I hope you love it as much as I do!
The only thing you need to know for perfect roast lamb leg
I have a lot to say about roasting any kind of meat. Especially Australia’s favourite roast – the great lamb leg. But there’s really only one thing you need to know to make perfect roast lamb leg, every single time:
GET A MEAT THERMOMETER!!
It’s the only way you can take the guesswork out of cooking lamb leg so it’s perfect blushing pink and ridiculously juicy inside. Because – and here’s something Aussies don’t like to talk about – lamb leg is actually very lean so if it’s not pink, it’s dry. Full stop, end of story!
My meat thermometer – For most of my adult life, I was using a $5 thermometer I got on Ebay which never failed me. A few years ago I finally decided it was time to invest in a real one so I got a Thermapen which is pretty well regarded as the best (my thoughts here). Even if you can’t invest in a Thermapen – it’s the 21st century, and even cheap tech isn’t so bad. Invest in a $5 meat thermometer. That’s a lot cheaper than a wasted, overcooked lamb leg!

OK, I do have a few more “how to make the perfect roast lamb leg” tips!
Garlic rosemary rub – classic lamb flavours.
Start on high to get the colour going then lower heat.
Roast on a bed of garlic (or onion).
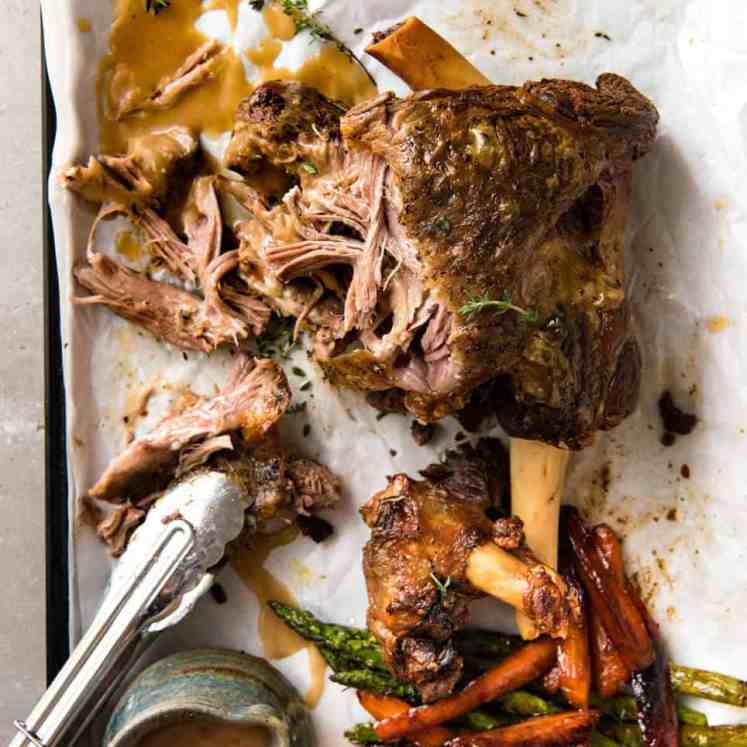
Make the gravy using the pan drippings. Roast lamb gravy is better than every other cut of meat – beef, chicken, pork, none of them compare!

What you need for roast lamb leg
Starting with the hero ingredient – the lamb leg! Get the best you can afford – yes, meat is like wine, the more you pay, the better the quality. Quality of life of the animal also comes into play there.
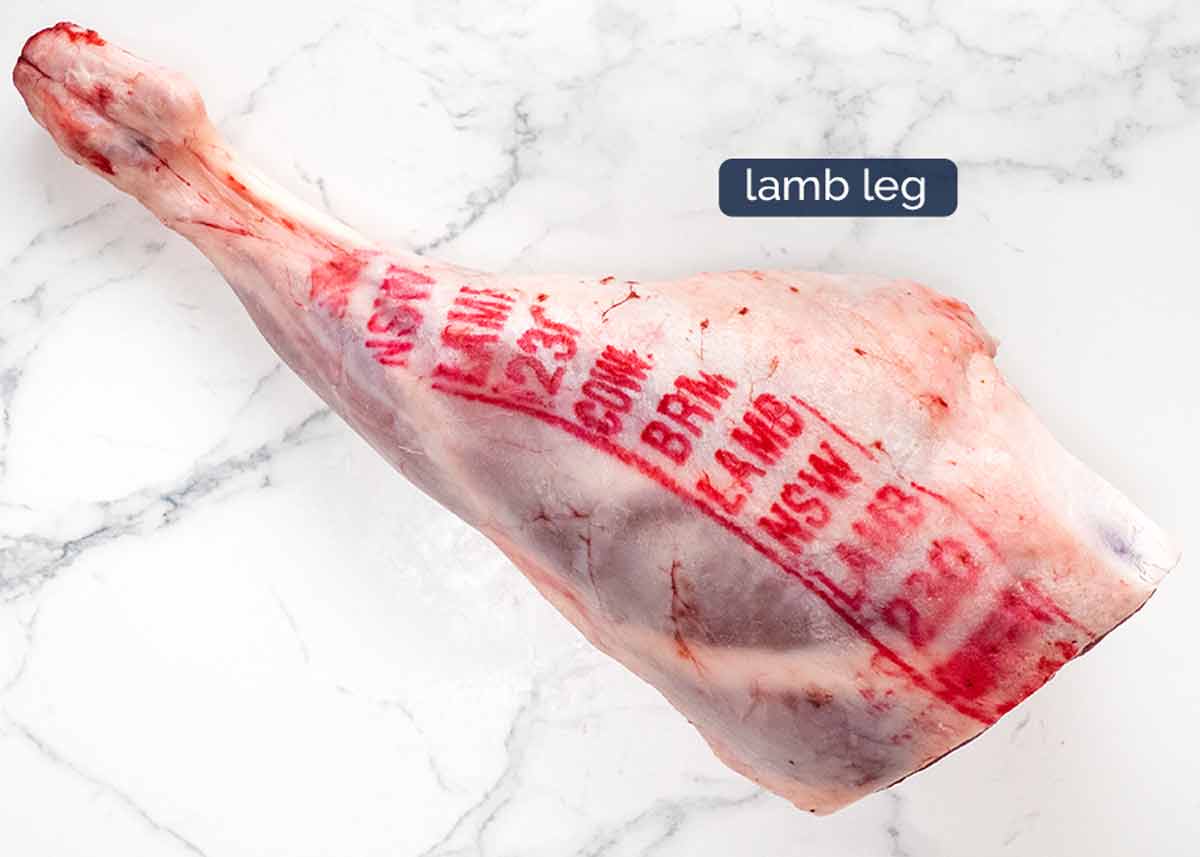
All that red ink you see is perfectly safe to eat and actually, you only see it on better quality lamb. You don’t typically see it on supermarket lamb.
Cut bone – Some (most?) butchers and almost all supermarkets sell lamb leg with the shank (bone) cut. Either fully cut off or partially cut so it folds. This is simply for practical reasons – shelf storage and packing space. For grandness, I like the bone in tact. But it doesn’t matter ,it’s purely a visual decision!
Rub for roast lamb leg
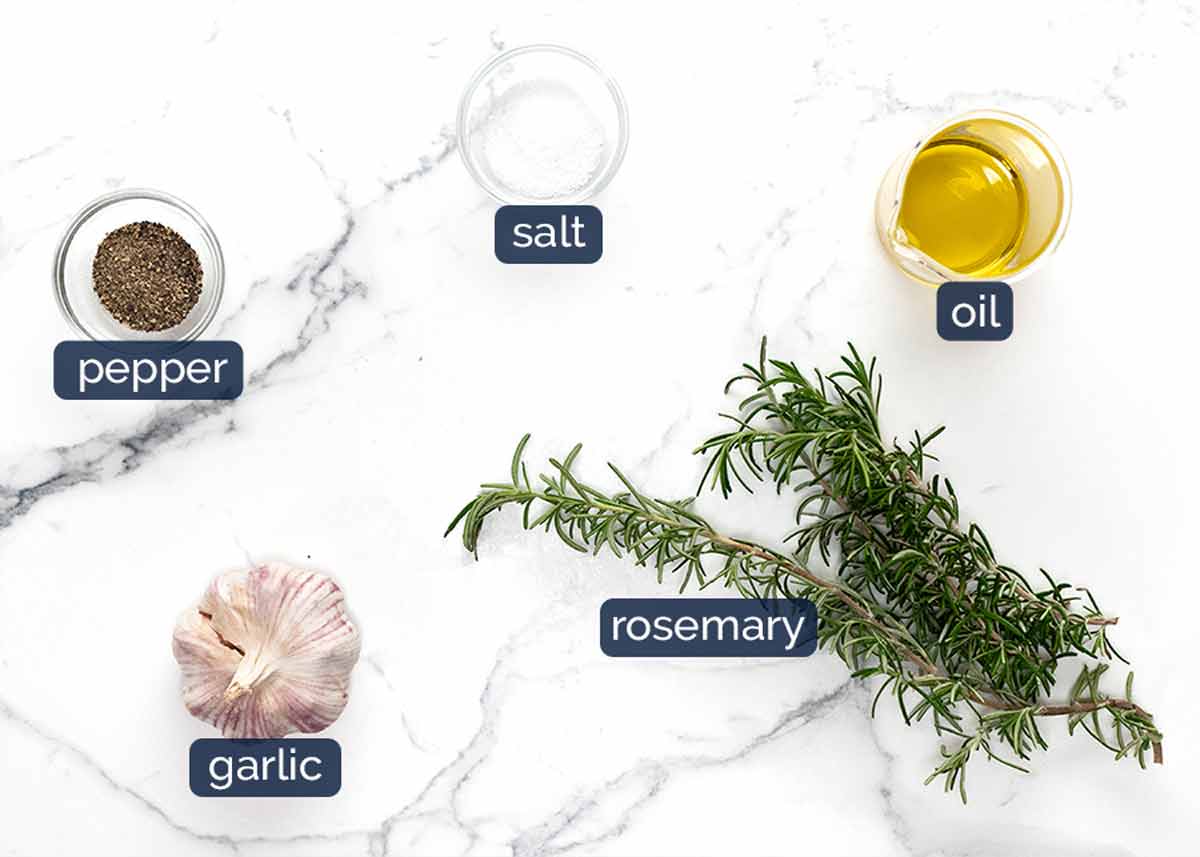
Here’s what you need for the rub: rosemary, garlic, olive oil, salt and pepper. Use fresh rosemary – dried is not the same!
Roast lamb gravy
All you need for gravy is flour for thickening and beef stock/broth for the liquid. You shouldn’t need extra salt for the gravy. I find the salt on the lamb that ends up in the pan drippings plus the salt in the beef stock is enough. But taste and add more if you want!
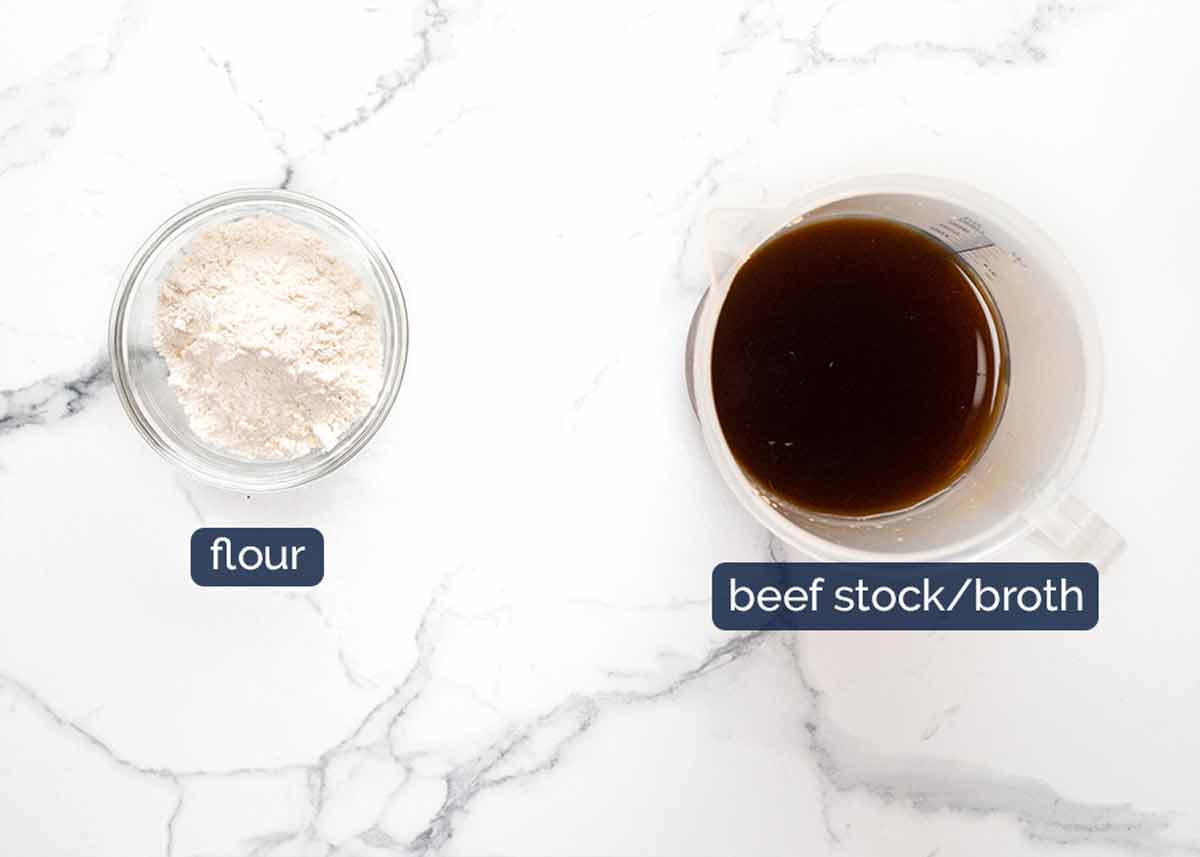
Why beef rather than lamb stock? Well, there’s a reason lamb stock is not typically sold at grocery stores! It’s just very…lamby. Beef has a cleaner flavour. It doesn’t make the gravy taste beefy at all because there is so much lamb flavour from the drippings.
Why not chicken stock? It works fine but the gravy colour is paler. I like my gravy for roast lamb leg to be a really deep brown colour!
How to make roast lamb leg
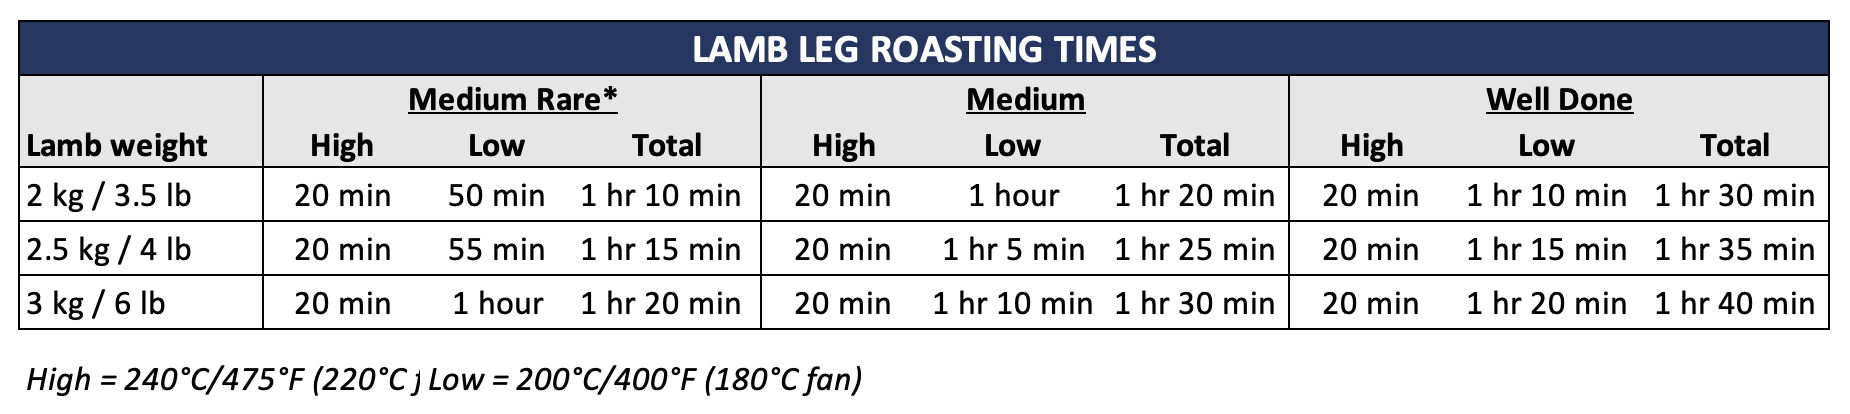
Rub with rosemary and garlic, roast in a hot oven to get the colour going then continue at a lower temperature for 1 hour or until the internal temperature is 53°C/127°F (for blushing pink perfection). Rest for 20 minutes before carving. It will still be very warm even after 1 hour – enough time to make duck fat potatoes!
The lamb leg pictured is a 2.75 kg lamb leg which is about the average size you get from good butchers. Supermarket lamb legs tend to be a little larger from slightly older animals which makes the meat a little less tender and a little stronger “lamby” flavour. Albeit, as you’d expect, cheaper than from butchers.
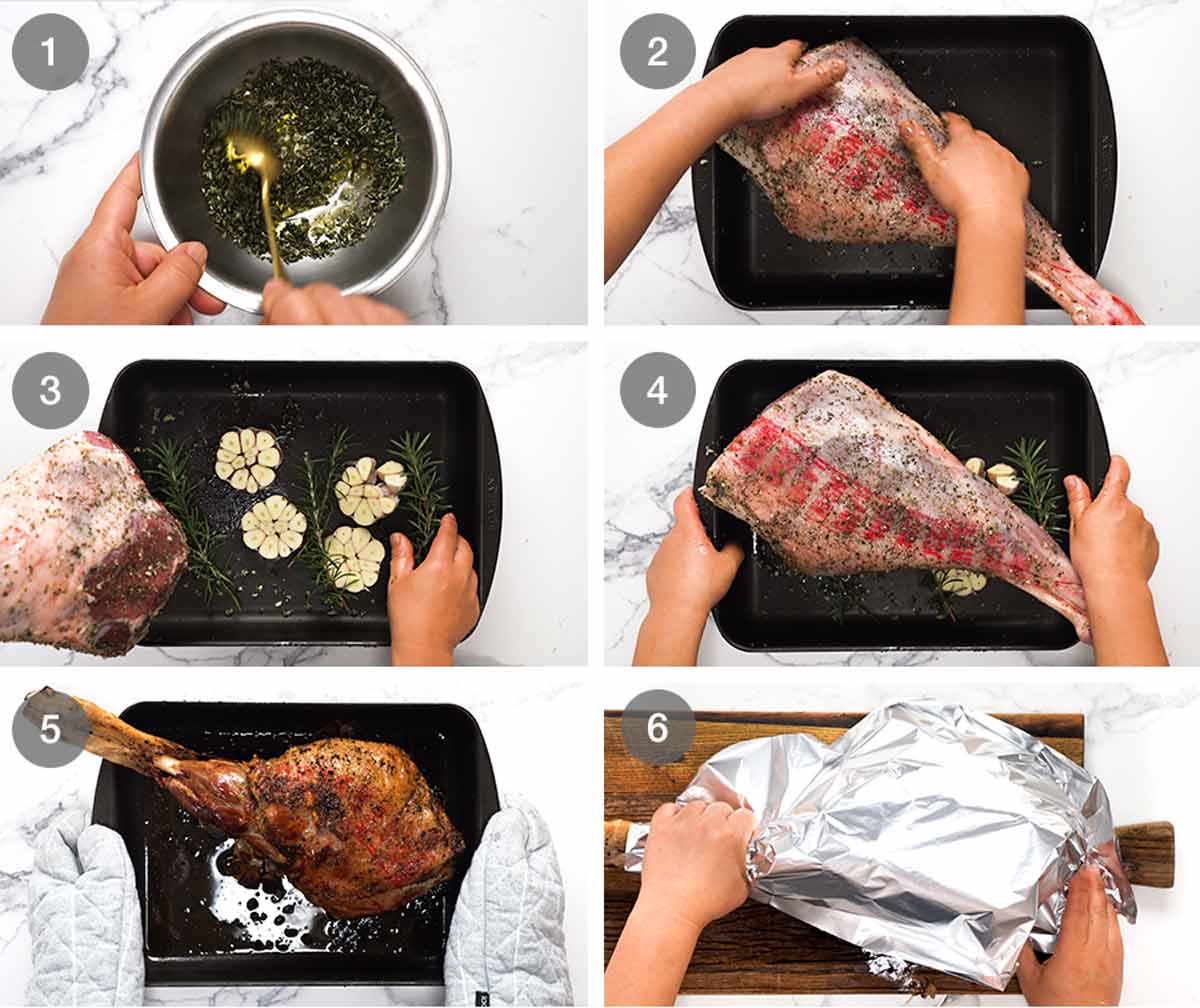
Make rub – Mix oil, garlic and rosemary in a bowl.
Rub then sprinkle – Slather the rub all over the lamb, then sprinkle the salt and pepper all over. It’s better to do it this way for more even dispersion of salt – if you put it in the oil, it doesn’t spread quite as evenly because it pools in the bottom of the bowl.
I do this rubbing step in the roasting pan – why dirty a cutting board??
Garlic bed – Place cut garlic and rosemary under the lamb.
Hot oven 20 minutes – Roast for 20 minutes in a hot 240°C/475°F (220°C fan) oven. This will get the colour going on the lamb. It’s tempting to go longer to get even more colour on it but I find if you go beyond 20 minutes you end up with too much overcooked meat “ring” on the outer edges of the lamb.
1 hour lower oven – Reduce heat to 200°C / 400°F (180°C fan) and roast for a further 1 hour or until the internal temperature of the lamb is 53°C/127°F for blushing pink perfection.
Check the internal temperature at the 45 minute mark. Never rely on a recipe cook time for roast meat, use your thermometer! So many variables can affect the exact roasting time, from oven strength to pan heat distribution, the shape of the lamb leg and how cold the meat is right in the middle.
See below for more information on lamb doneness and different size lambs.
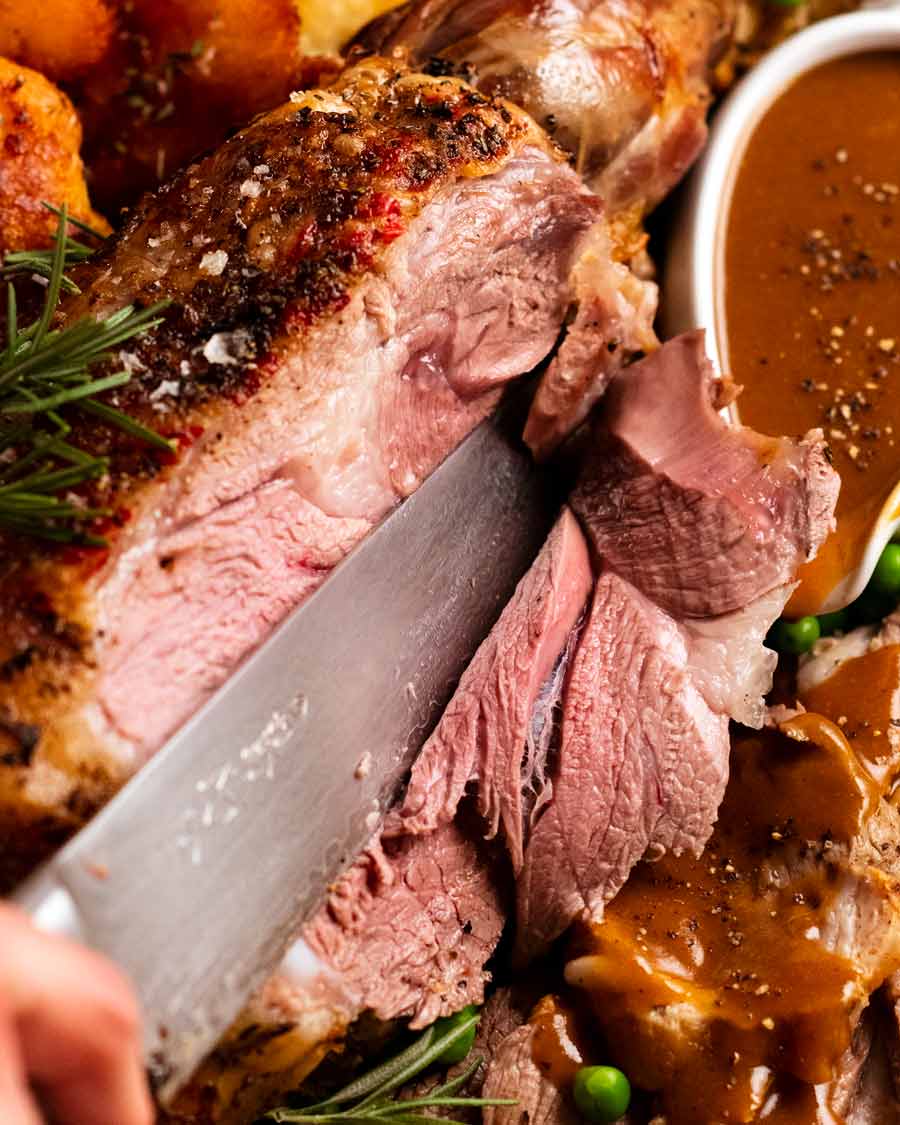
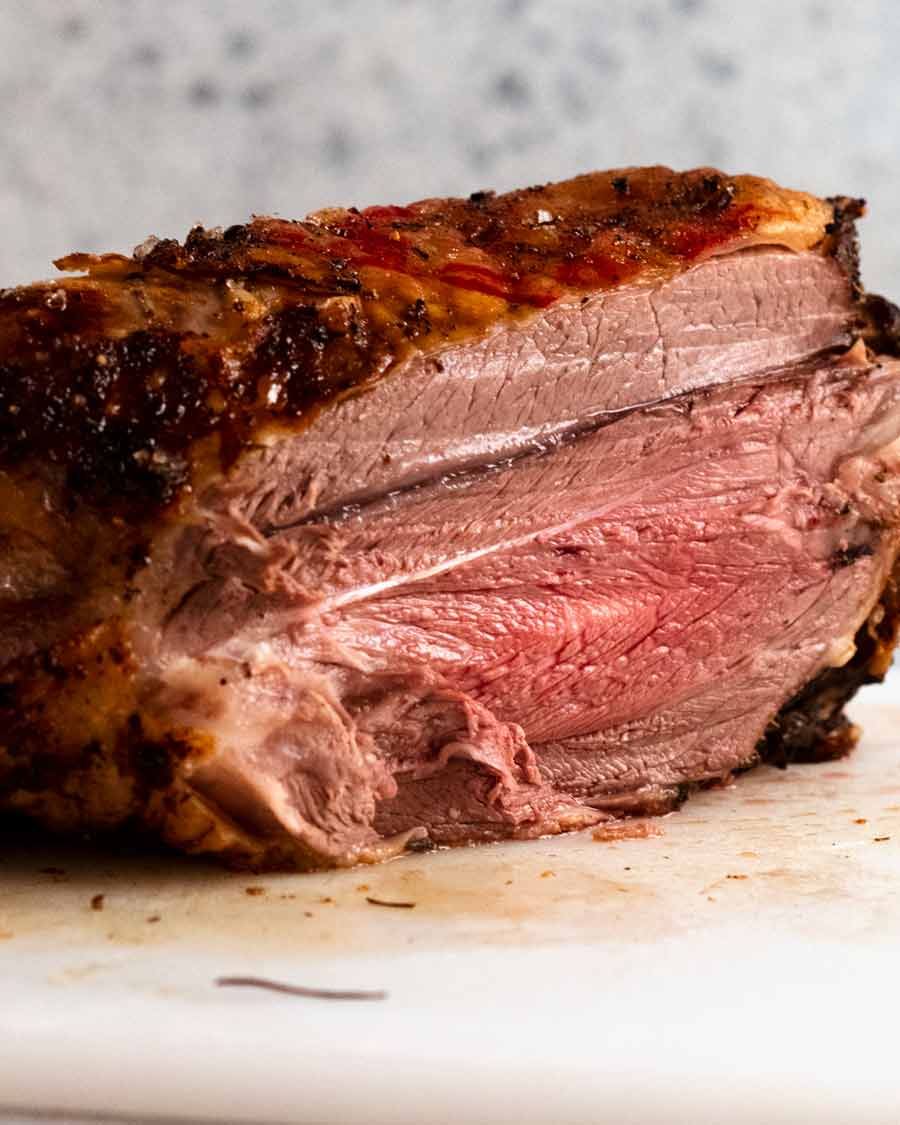
Rest 20 minutes – Rest the lamb for 20 minutes before carving. During this resting stage, the lamb finishes cooking and the internal temperature will rise to 62°C/144°F which is perfect medium rare for lamb.
Also during resting, the lamb juices get re-absorbed by the meat fibres so when you cut into the meat, the juices remain in the meat and eventually end up in your mouth. If you do not rest the meat then the meat juices leak out everywhere when you start carving the lamb.
Internal temperature of roast lamb leg
No credible restaurant would ever serve lamb leg at anything over than medium rare! But I do know some people like their lamb done a little more, so here are the internal temperatures for lamb leg at different levels of doneness.
Take the lamb out when it hits the “temperature out of oven”. After resting for 20 minutes it will rise to your target level of doneness.
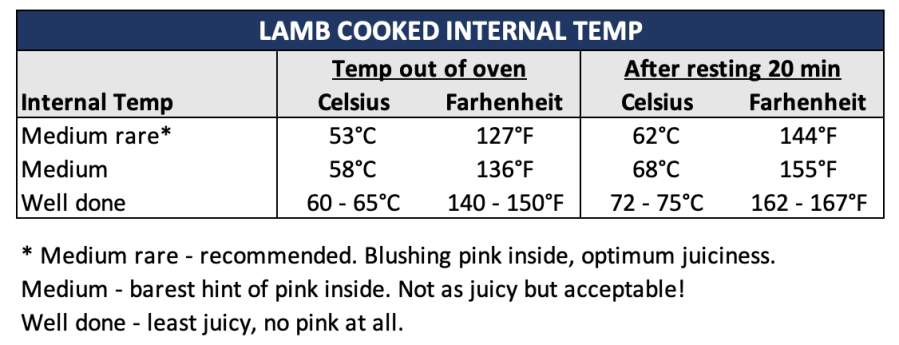
TIP: Take the lamb out early!!!
This is one of the most common mistakes people make when roasting lamb. If you want medium rare lamb and you take the lamb leg out of the oven when it hits 62°C/144°F (which is the medium rare target temperature), it will rise to 73°C/163°F once rested which is well done – no hint of pink at all! This occurs because the lamb continues to cook after you take it out of the oven due to residual heat. It’s called carry-over cooking.
So if you want medium rare, perfectly pink lamb leg, you need to take it out of the oven once the internal temperature reaches 53°C/127°F. At this temperature, the lamb is rare.
But when you rest the lamb for 20 minutes, it will continue to cook and the internal temperature will rise by 9°C/17°F to 62°C/144°F. This temperature is medium rare, the optimum doneness for lamb leg so it’s beautifully juicy. Any more and the lamb meat is drier than ideal, because lamb leg is a lean meat.
How to make gravy for roast lamb leg
Gravy for lamb leg is made using the pan drippings after roasting the lamb. “Drippings” simply refers to the fat and meat juices left in the roasting pan after roasting the meat and it’s our express, free path to a killer gravy.

Heat drippings & cook flour – Once you take the lamb out of the roasting pan, put it straight on the stove to heat the fat. Add flour and stir it for 1 minute to cook it off – it will kind of be like a paste.
Pour in the beef stock, stirring as you go to help dissolve the flour.
Smush the garlic with a potato masher or even a smooth to help release the beautiful caramelised garlic flesh into the gravy.
Strain – Then just simmer for a few minutes until the gravy thickens to your taste then strain into a bowl, pressing the gravy liquid out of the garlic heads. Then pour into a jug to serve!
And that, my friends, is everything you need to know to be the king (or queen) of roast lamb leg from this day forth. The precision by which you roast your lamb to blushing pink perfection will be admired. Your gravy will be whispered about in your circles – the flavour!!! It’s incredible!
Just smile sedately, sit back and bask in the praise. There is no need to reveal your recipe source. 😎
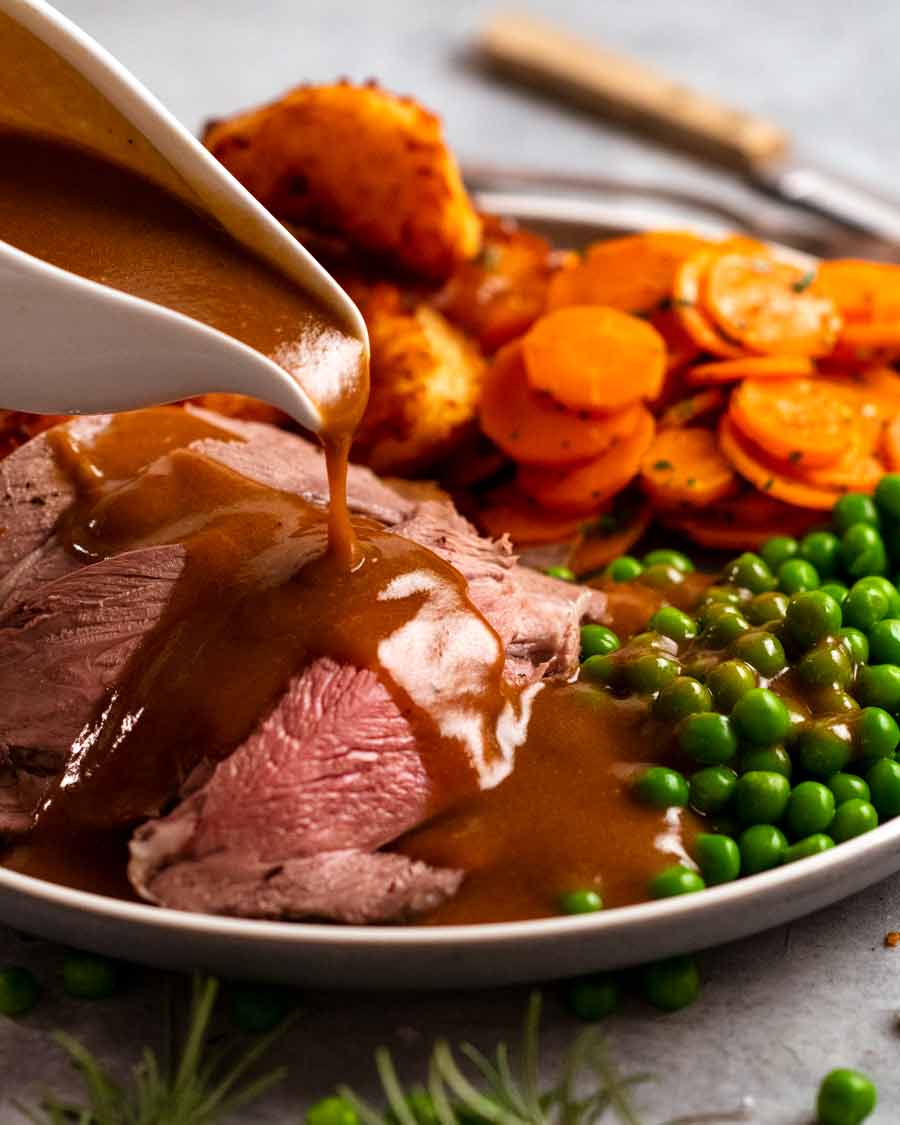
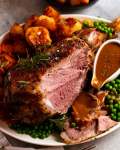
The lamb leg in this post is pictured with duck fat potatoes (the best crispy potatoes in the world!) with peas and steamed carrots tossed with a little butter and parsley. If you don’t have duck fat, make my classic crunchy roast potatoes instead. They are still way crunchier than your usual way of making them.
Go forth and enjoy your new lamb-alicious world! If you’ve got your own lamb leg secrets, sharing in the comments below – readers love hearing what you have to say. – Nagi x
Watch how to make it
Roast Lamb Leg with Gravy
Ingredients
- 2.75 – 3 kg / 5.5 – 6 lb lamb leg , bone-in (Note 1)
- 1 1/2 tsp cooking salt
- 1/2 tsp black pepper
Rub
- 1 1/2 tbsp fresh rosemary leaves , finely chopped
- 3 garlic cloves , finely minced
- 2 tbsp olive oil
Base
- 2 whole heads of garlic , halved horizontally (Note 2)
- Few sprigs rosemary (optional)
Gravy
- 4 tbsp flour , plain/all purpose
- 2 1/2 cups beef broth / stock , low sodium (Note 3)
Instructions
- Take lamb out of fridge at least 1 hour before roasting. (Note 4)
- Preheat oven to 240°C/475°F (220°C fan) with oven shelf in the middle.
- Rub – Mix rosemary, garlic and olive oil.
- Prepare lamb – Place lamb leg in a roasting pan. Coat with the rub using your hands, the sprinkle with the salt and pepper. Place garlic and rosemary sprigs underneath the lamb, garlic cut face up.
- Roast lamb leg for 20 minutes. Turn the oven down to 200°C/400°F (180°C fan) and roast for a further 1 hour or until the internal temperature reaches 53°C/127°F for medium rare (Note 5 other doneness). Check first at 45 minutes – everyone's oven is different!
- Rest – Remove lamb from oven. Transfer lamb to plate, loosely cover with foil and rest for 20 minutes to 1 hour (it will still be warm enough for serving!). The internal temperature will rise to 62°C/144°F (medium rare). Make gravy while lamb is resting – below.
- Serve lamb with gravy, duck fat or classic crunchy roast potatoes, peas and steamed carrots tossed with butter and parsley.
Gravy for roast lamb leg
- Drippings in pan – Discard rosemary sprigs. You should have around 4 – 5 tbsp of fat (drippings). If less, add butter. If much more, discard a bit.
- Add flour – Place roasting pan on stove over medium heat. When the fat starts to bubble, then add flour. Mix flour in and cook for 1 minute.
- Stock – Pour in half the beef stock and mix to dissolve sludge in, then add remaining beef stock and mix.
- Garlic squidging – Use a potato masher (if you're really keen like me) to mush the garlic to squeeze out the flavour (also helps flour caught in garlic to dissolve).
- Taste – Check salt and pepper (I don't add more).
- Thicken – Simmer for a couple of minutes, stirring, until it starts to thicken. Take it off the stove BEFORE the gravy is the thickness you want because it will keep thickening.
- Strain into a bowl, mushing garlic to squeeze all the liquid out. Then pour into gravy jug and serve with lamb!
Notes
 1. Lamb leg – Recipe is based on a whole lamb leg. See roasting time table above for different lamb sizes. Sometimes the bone sticking out is removed, sometimes it is partially cut so it folds inwards. It doesn’t matter either way, but just ensure the bone inside the meat is not removed. (If it is, you have a butterflied lamb leg – use this recipe instead).
Boneless lamb – I love making Greek butterflied lamb leg. If yours is rolled and tied, you could make this recipe but the meat is not quite as juicy because it’s been cut to remove the bone so there’s more escape roots for meat juices! If you can, unroll the lamb to do the rub then roll it back up and tie again (excellent flavour infusion!). Also, cook time likely a bit shorter. I’d do the 20 minute high temp blast, lower oven then check at 40 minute mark.
2. Garlic base – Elevates the lamb slightly so it cooks more evenly and allows the fat to drip over the garlic so the flavour infuses into the drippings that then forms the base of the gravy. Place garlic cut side up so the flavour infuses into the flesh of the lamb.
It is not garlicky at all because when garlic roasts, it becomes sweet and caramelised. It is my big secret for making a killer gravy for roast lamb! You can use 1 onion, quarters (skin on) instead of or in addition to garlic.
3. Gravy for lamb is best made with beef stock/broth because it has a deeper flavour and makes the gravy a beautiful dark brown colour. Store bought is fine, though homemade makes it ultra restaurant-worthy! If you cannot consume beef for religious or health reasons, then chicken broth can be substituted.
4. De-chilling lamb will make it cook more evenly. Cold lamb leg = overcooked on the outside by the time the inside is cooked.
5. Internal temperature of cooked lamb leg:
1. Lamb leg – Recipe is based on a whole lamb leg. See roasting time table above for different lamb sizes. Sometimes the bone sticking out is removed, sometimes it is partially cut so it folds inwards. It doesn’t matter either way, but just ensure the bone inside the meat is not removed. (If it is, you have a butterflied lamb leg – use this recipe instead).
Boneless lamb – I love making Greek butterflied lamb leg. If yours is rolled and tied, you could make this recipe but the meat is not quite as juicy because it’s been cut to remove the bone so there’s more escape roots for meat juices! If you can, unroll the lamb to do the rub then roll it back up and tie again (excellent flavour infusion!). Also, cook time likely a bit shorter. I’d do the 20 minute high temp blast, lower oven then check at 40 minute mark.
2. Garlic base – Elevates the lamb slightly so it cooks more evenly and allows the fat to drip over the garlic so the flavour infuses into the drippings that then forms the base of the gravy. Place garlic cut side up so the flavour infuses into the flesh of the lamb.
It is not garlicky at all because when garlic roasts, it becomes sweet and caramelised. It is my big secret for making a killer gravy for roast lamb! You can use 1 onion, quarters (skin on) instead of or in addition to garlic.
3. Gravy for lamb is best made with beef stock/broth because it has a deeper flavour and makes the gravy a beautiful dark brown colour. Store bought is fine, though homemade makes it ultra restaurant-worthy! If you cannot consume beef for religious or health reasons, then chicken broth can be substituted.
4. De-chilling lamb will make it cook more evenly. Cold lamb leg = overcooked on the outside by the time the inside is cooked.
5. Internal temperature of cooked lamb leg: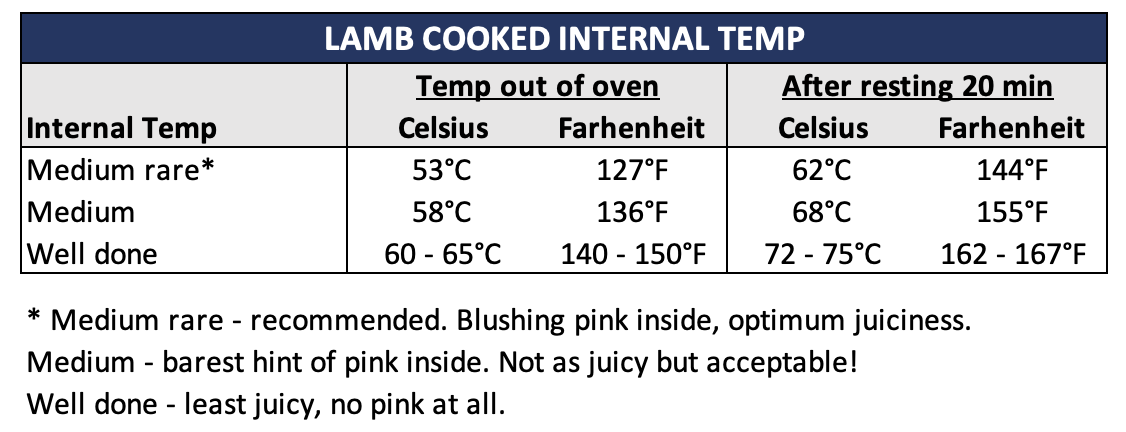 I highly recommend getting a meat thermometer for accuracy – only guaranteed way to get juicy lamb every time!
6. Holding – The lamb leg will stay warm for up to 1 hour, enough time to make duck fat or classic crunchy roast potatoes! The inside of the lamb is still warm even after 3 hours.
7. Servings: A 2.5 kg/5 lb lamb serves 6 very generously and 8 comfortably. After taking into account the bone (500g/1lb) and meat juices lost during roasting, you should end up with around 1.7kg meat after cooking which is around 280g for 6 people (generous!) or 200g for 8 people. If you slice lamb thinly it will go further!
8. Nutrition per serving, assuming 8 servings and that all the gravy is consumed.
I highly recommend getting a meat thermometer for accuracy – only guaranteed way to get juicy lamb every time!
6. Holding – The lamb leg will stay warm for up to 1 hour, enough time to make duck fat or classic crunchy roast potatoes! The inside of the lamb is still warm even after 3 hours.
7. Servings: A 2.5 kg/5 lb lamb serves 6 very generously and 8 comfortably. After taking into account the bone (500g/1lb) and meat juices lost during roasting, you should end up with around 1.7kg meat after cooking which is around 280g for 6 people (generous!) or 200g for 8 people. If you slice lamb thinly it will go further!
8. Nutrition per serving, assuming 8 servings and that all the gravy is consumed.Nutrition
Originally published October 2016. I have been very neglectful not updating one of my favourite recipes with sparkling new photos and a recipe video!
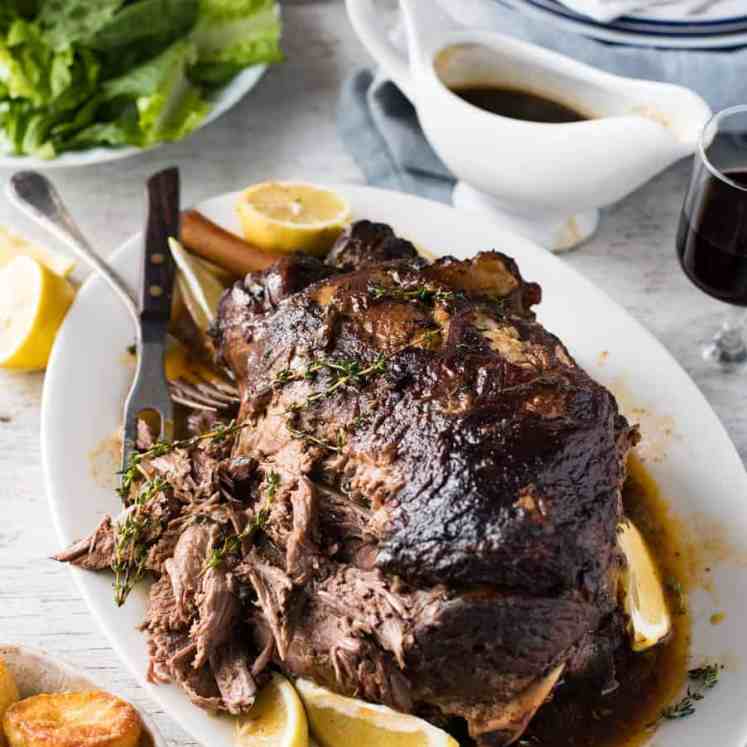
I told you – I LOVE roast lamb! See?
Life of Dozer
Original photo from when I first published this recipe in 2016 still holds true, so no need to update:
DOZER. Don’t breathe your stinky dog breath over my friends while they eat!

The post Roast Lamb Leg with Gravy appeared first on RecipeTin Eats.
]]> This is a great quick recipe that’s got everything you need for a complete dinner, all cooked in one pot. Plenty of vegetables, with risoni/orzo and chicken. Tastes like risotto – loaded with tasty lemon-garlic Greek flavours! One-pot Greek chicken risoni Patience has never been my greatest virtue, so I shared many personal favourite recipes... Get the Recipe
The post One-pot Greek chicken risoni (orzo) appeared first on RecipeTin Eats.
]]>This is a great quick recipe that’s got everything you need for a complete dinner, all cooked in one pot. Plenty of vegetables, with risoni/orzo and chicken. Tastes like risotto – loaded with tasty lemon-garlic Greek flavours!
One-pot Greek chicken risoni
Patience has never been my greatest virtue, so I shared many personal favourite recipes back in the early days when I first started this website in 2014. Every now and then, I like to revisit these older recipes and bring them to the forefront with sparkling new photos (that are in focus, wow!) and recipe videos where the chicken doesn’t have a weird green-ish/yellow tinge.
I have no embarrassment about my photos and videos from the early days because it reminds me how far I’ve come. But I do think it’s nice to spruce up these old recipes for your viewing pleasure – and hopefully convince you to try them. Like today’s new-old recipe: Greek chicken risoni! Complete dinner made in one pot, nice and quick to make, loaded with tasty Greek flavours.

What you need
Here’s what you need to make this Greek risoni recipe.
1. The risoni / orzo
Risoni is actually a pasta that is shaped like long grains of rice. Also known as “orzo”, find it in the pasta aisle. It costs around the same as spaghetti etc.
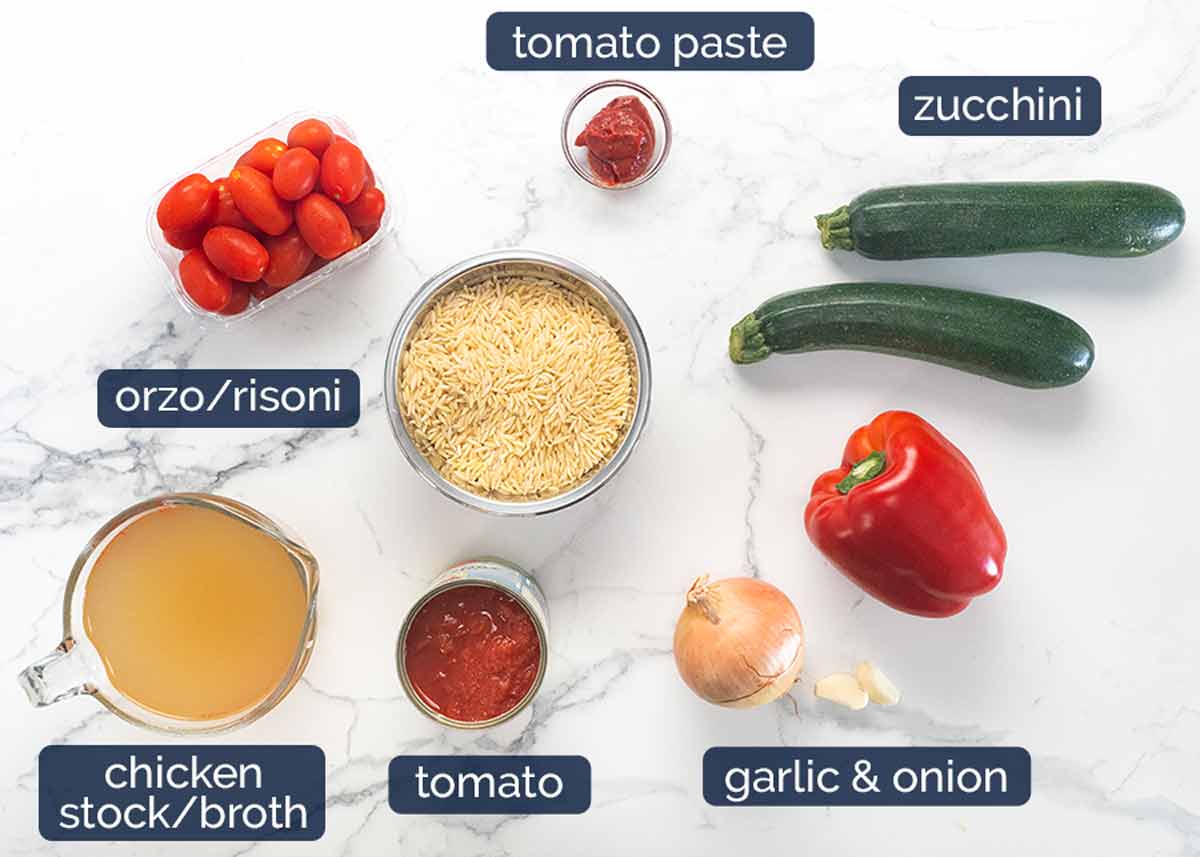
Risoni / orzo – See notes above the photo.
Chicken stock / broth and canned tomato – These are the liquids used to cook the risoni. Better than water because the risoni absorbs the flavour as it cooks!
Tomato paste – This adds a little boost of tomato flavour to the sauce, as well as thickening the sauce slightly so you end up with that really lovely oozy texture in the finished dish. Not the end of the world if you don’t have it.
Vegetables – I use zucchini / courgette and capsicum / bell pepper. Feel free to substitute with other sauté-able vegetables (carrot, beans, peas, fennel, corn, celery, frozen veg mix).
Also, if someone could arrange for the global standardisation of food words, that would be super helpful. Thanks! 😂
Onion and garlic – Flavour base aromatics.
Cherry tomatoes or grape tomatoes – I like to scatter across the surface before popping the dish in the oven. Love the juicy pops of tomato that burst in your mouth!
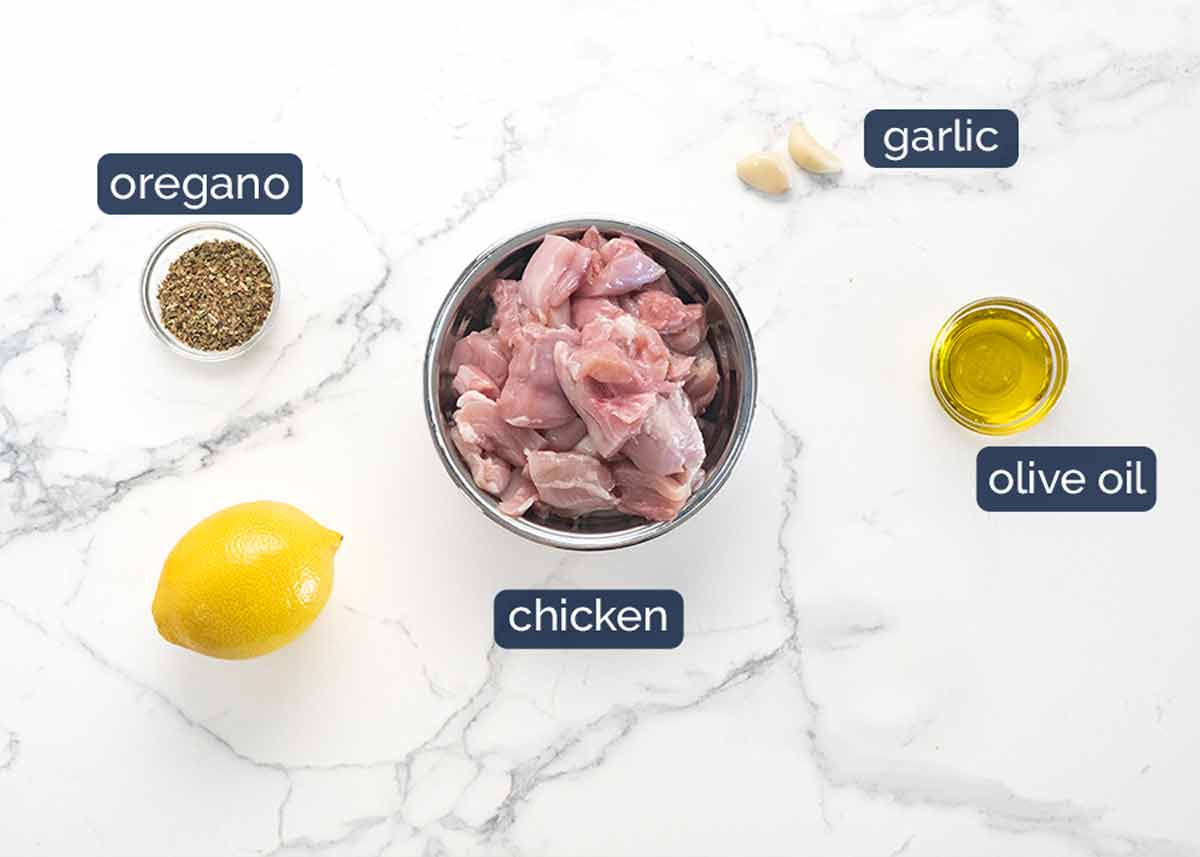
2. Lemon garlic chicken
A brief marinade of the chicken with classic Greek flavours makes the chicken that much tastier! Here’s what you need:
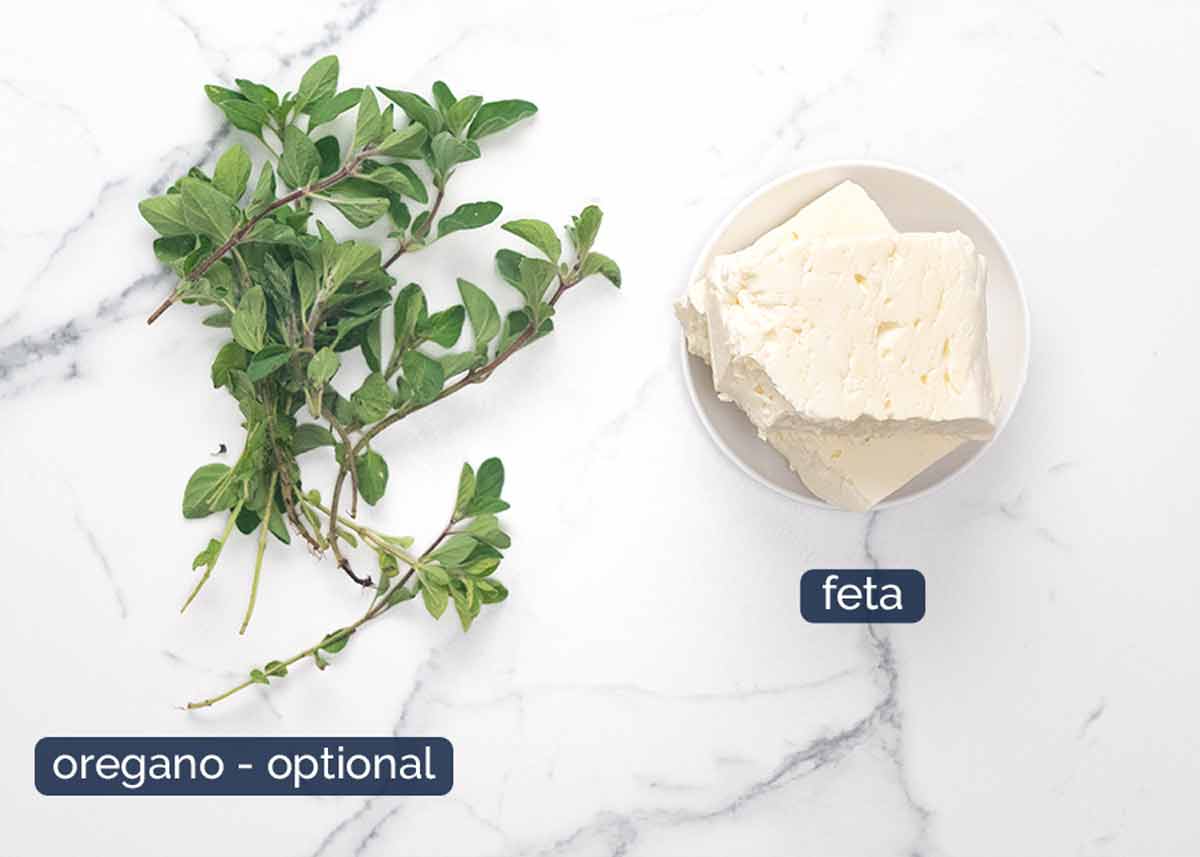
3. Garnishes (semi-optional)
I say it’s “semi-optional” because while you can skip the fresh oregano, the feta is highly, highly recommended!
How to make one-pot Greek chicken risoni
This recipe starts on the stove and is finished in the oven. I like this technique because it’s safer/easier – no need to stir – and the surface gets caramelised which means extra flavour. Anyone who’s made the fan-favourite One Pot Greek Chicken with Lemon Rice will know this method works well!
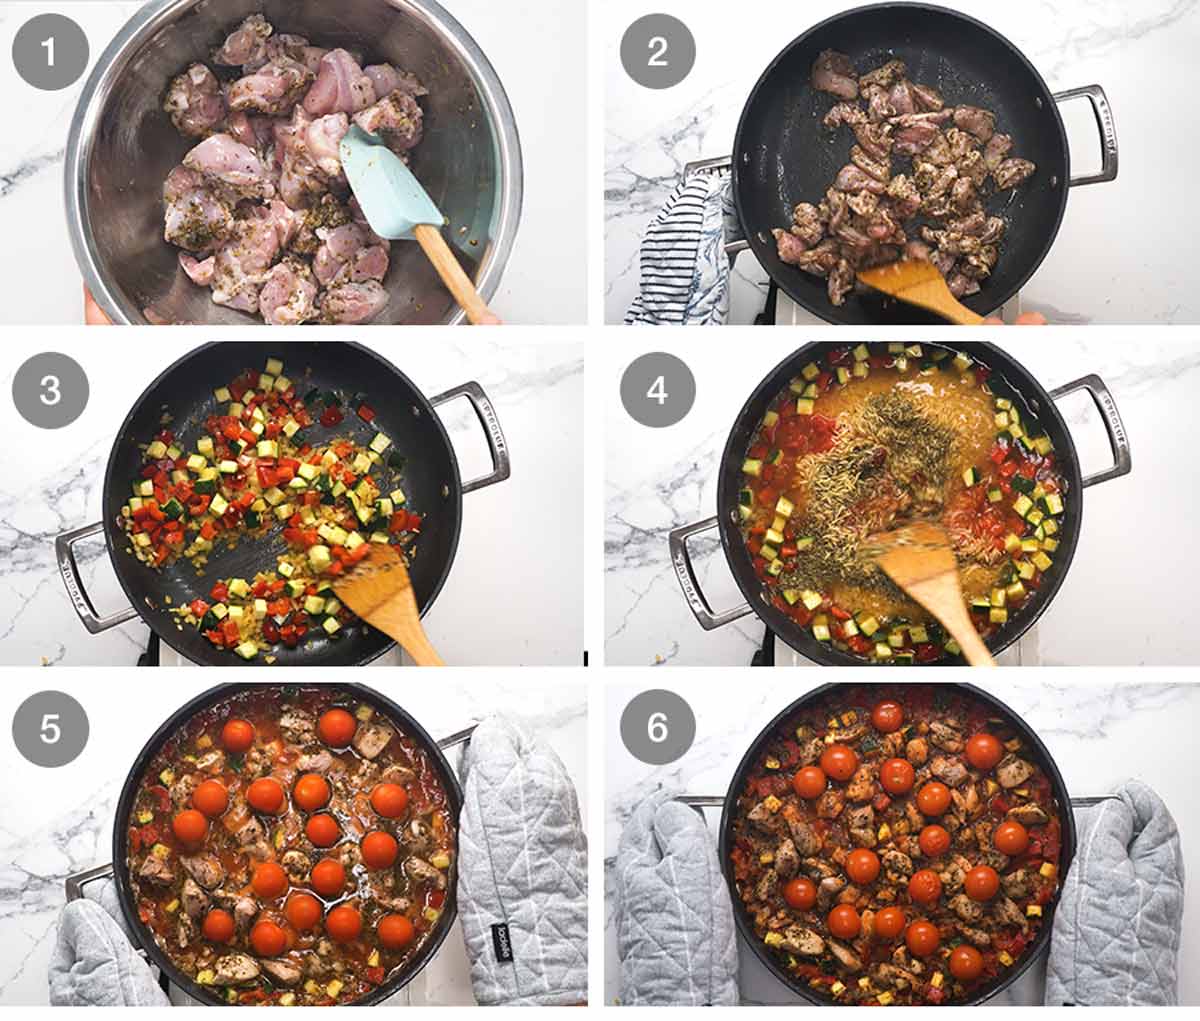
Marinade chicken in the lemon, olive oil, garlic and oregano. Just 20 minutes adds decent flavour into the chicken flesh.
If you’re pressed for time, you can skip the marinade, there’s plenty of flavour in the overall dish and the chicken will absorb flavour as it braises with the risoni. If you want to get ahead, you can marinade the chicken overnight – or even freeze the chicken in the marinade. So many options!
Brown chicken – Use a large ovenproof skillet / frying pan, or large pot. The one I’m using is a 30cm / 12″ non-stick frying pan.
Cook the chicken, just to seal the outside and lightly brown it. It will only take about 2 to 3 minutes. Don’t cook the chicken all the way through as it will finish cooking with the risoni.
Sauté aromatics and vegetables – Once the chicken is browned, remove it from the pan. Then sauté the garlic and onion, followed by the zucchini and capsicum.
Add everything else – Add the risoni and stir to coat in the tasty flavours. Then add everything else – canned tomato, tomato paste, chicken stock, salt and pepper – and stir to combine.
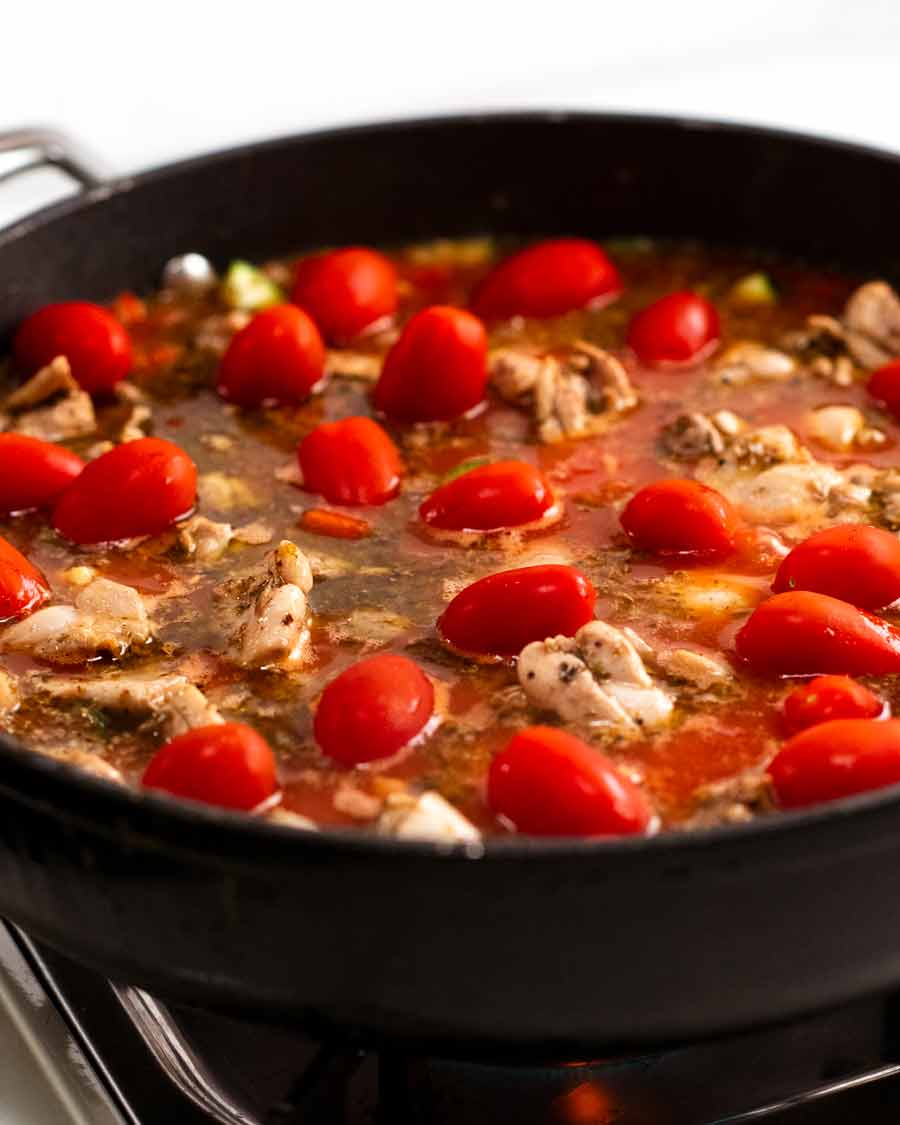
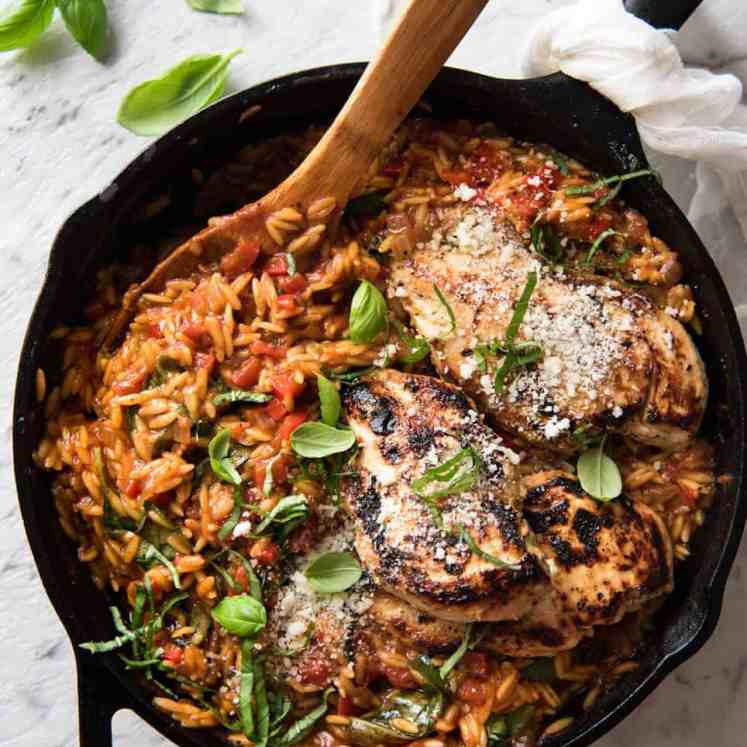
Top with chicken and cherry tomatoes but don’t stir them in.
Oven 15 minutes – As soon as the liquid starts to bubble, transfer the pan to the oven (no lid) and cook for 15 minutes or until the risoni is tender.
Garnish and serve – Remove the pan from the oven. There should still be small pools of liquid on the surface. This is what we want – the dish should be oozy and saucy, not dry and stodgy!
Drizzle the dish with lemon juice, crumble over the not-optional-feta then sprinkle with the optional-fresh-oregano. Then serve!
LOOK how juicy and irresistibly oozy it looks. It’s calling your name!
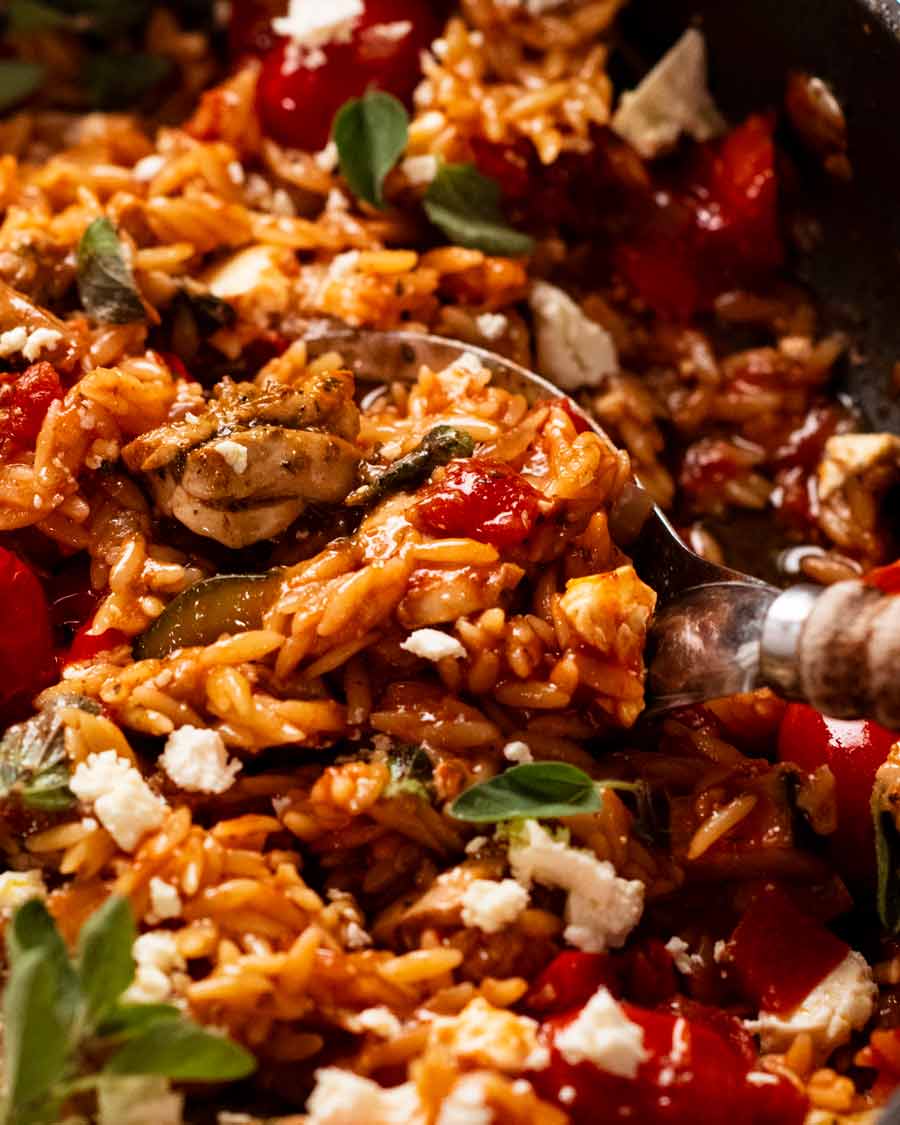
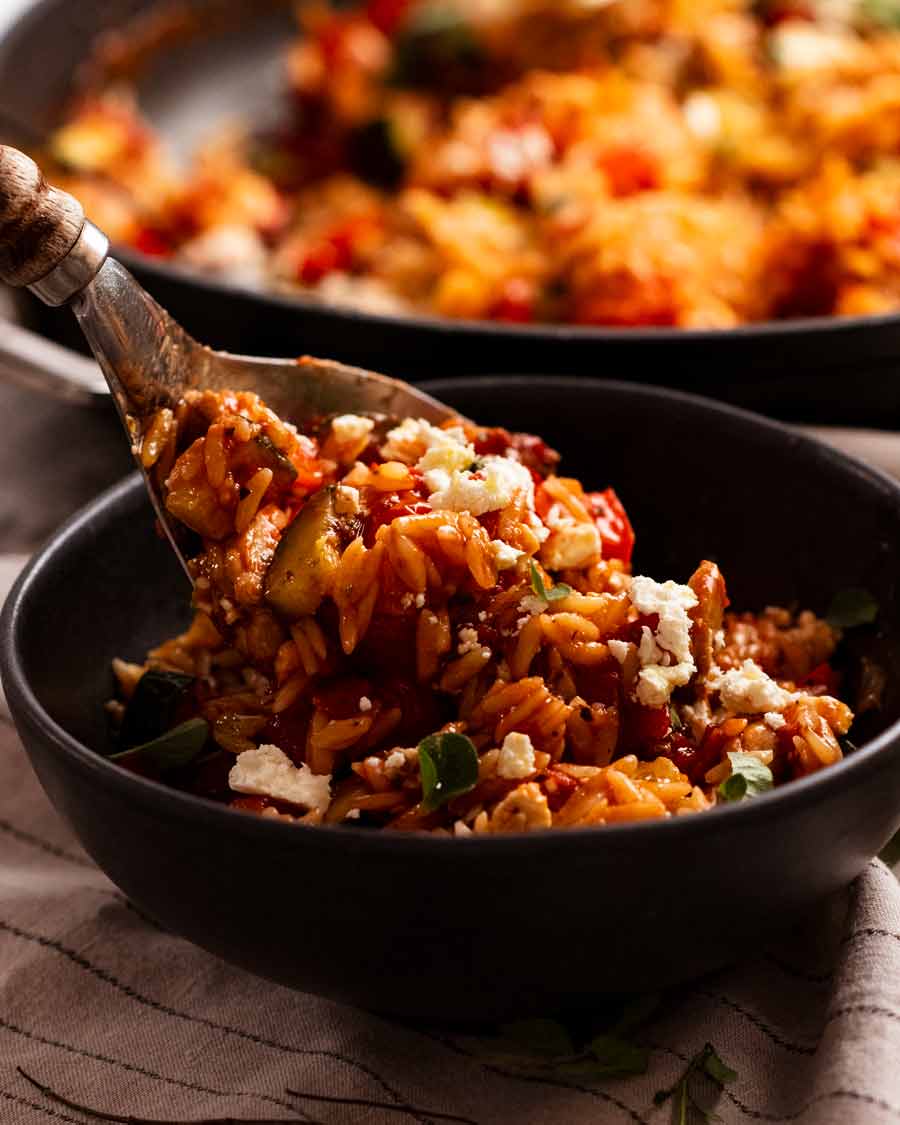
Spoon into bowls, and marvel how it looks just like your favourite risotto. Except, well, you know. You haven’t been slaving over a hot stove for 40 minutes, ladling in stock and stirring, stirring, stirring.
Leftovers, should there be any, will keep for 3 days but won’t be as oozy as pictured because the pasta will absorb the liquid. A little splash of water before you microwave goes a long way to salvage it, as does a fresh sprinkle of feta and spritz of lemon juice (I find lemon juice flavour fades with time).
Hope these sparkling new photos and in-focus-video convinces you to make this!! – Nagi x
PS The Ingredients list in the recipe below looks deceptively long. But actually, there are quite a few double ups because of the way I write the recipe. So don’t be put off! 
Watch how to make it
One Pot Chicken Risoni
Ingredients
Lemon Garlic Chicken
- 1 lb / 500g chicken thighs , boneless skinless (or breast), cut into 2 cm / 1" pieces
- 2 garlic cloves , finely minced
- 1 tbsp dried oregano
- 1 tbsp olive oil
- 1/2 tbsp lemon juice
- 1 tsp lemon zest
- 1/2 tsp each salt and pepper
Orzo/Risoni
- 2 tbsp olive oil
- 2 garlic cloves , minced
- 1 small onion , finely chopped
- 2 zucchini (medium, or 1 large) , cut into 1cm / 1/3" cubes (Note 1)
- 1 red bell pepper/capsicum , cut into 1cm / 1/3" cubes (Note 1)
- 1 tbsp dried oregano
- 2 1/2 cups chicken broth/stock , low sodium
- 14 oz / 400g canned crushed tomatoes
- 1 tbsp tomato paste
- 1 1/2 cups orzo/risoni (Note 2)
- 1 1/2 cups cherry tomatoes (1 Australian punnet)
- 1 tsp cooking salt (kosher salt)
- 1/2 tsp black pepper
Garnish (semi-optional)
- 2 tbsp lemon juice , drizzling at end
- 1/2 cup (100g) Greek feta cheese , crumbled (not optional)
- Fresh oregano leaves (optional)
Instructions
- Marinade chicken – Combine Marinated Chicken ingredients in a bowl and set aside for marinate for 20 minutes. (Skip if in hurry, can also do overnight)
- Preheat oven to 180°C/350°F (160°C fan).
- Brown chicken (raw inside) – Heat 1 tablespoon olive oil in a a large oven proof skillet or pot over high heat (Note 3). Cook chicken until lightly browned but still pink inside. Remove from skillet.
- Sauté vegetables – Add 1 tbsp olive oil, garlic and onion. Saute for 1 minute, then add zucchini and bell peppers/capsicum. Cook for 2 minutes.
- Add everything else – Add risoni, oregano, chicken broth, tomato, tomato paste, salt and pepper.
- Scatter chicken and cherry tomatoes across the surface (don't stir in).
- Bake 15 minutes – Once the liquid comes to a simmer, transfer to the oven (no lid) and bake for 15 minutes (or until risoni is just cooked, tender but still firm). There may be liquid on the surface still – that's good!
- Drizzle with lemon – Remove from oven, drizzle with lemon juice. Garnish with feta and fresh oregano leaves, if desired, then serve.
Notes
The liquid evaporates quite quickly while serving. It was slightly wetter when I took it out of the oven.
4. Leftovers will keep for 3 days in the fridge though it won’t be as oozy as the risoni absorbs the sauce. Resurrect with a splash of water, and microwave.
Nutrition assuming 5 servings.Nutrition
Originally published January 2016. Spruced up with brand new photos and recipe video in February 2021 with minor recipe improvements (mainly process and writing). But most importantly, Life of Dozer section has been added!
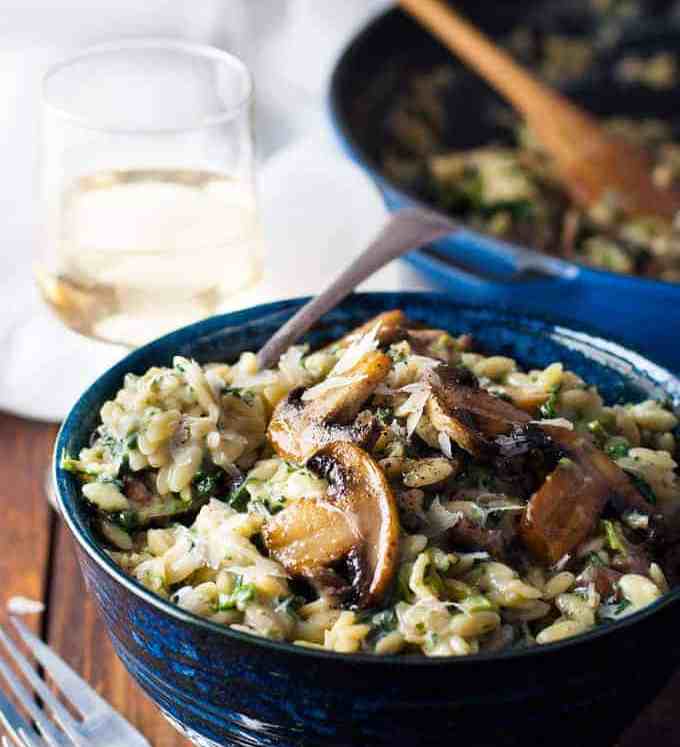
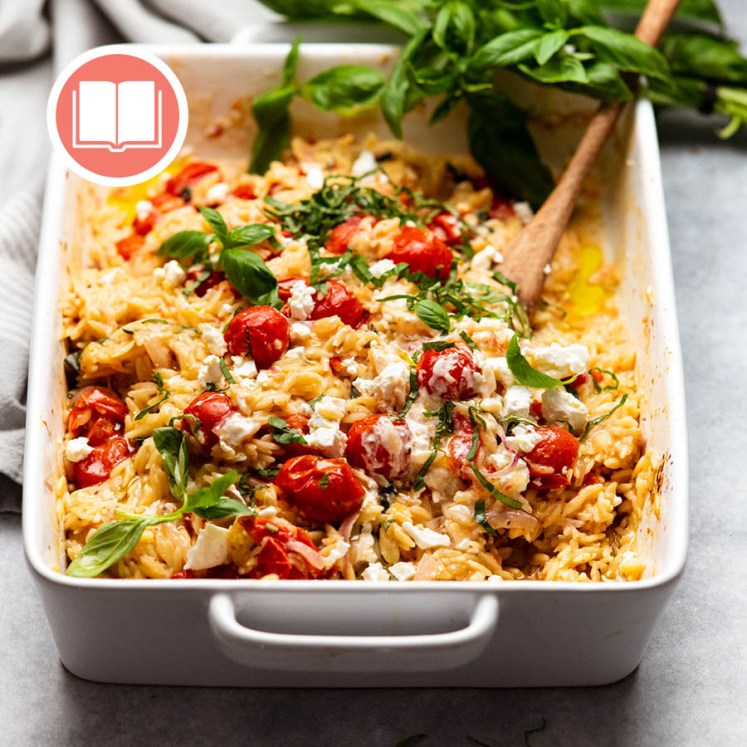
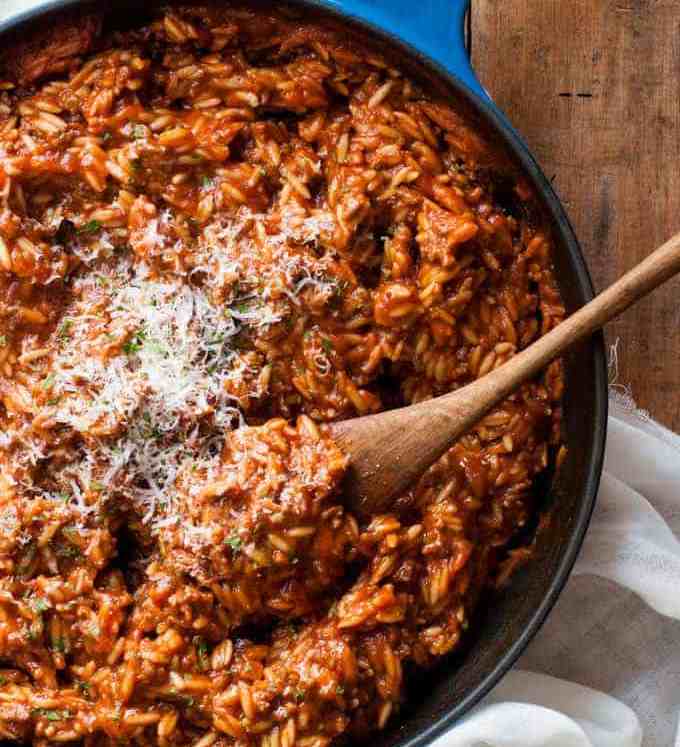
More risoni / orzo recipes
I do love risoni! So quick to cook, tastes like risotto.


Life of Dozer
NO, he’s not being adorable, cuddling up to me. He’s trying to get to my toast on the other side.


The post One-pot Greek chicken risoni (orzo) appeared first on RecipeTin Eats.
]]>