 I’ve updated the way I make omelettes. This “scrambled egg” approach is easier and yields a better result without having to worry about raw egg in the middle. Today’s omelette recipe is filled with ham and cheese. Sauté your ham first! Ham and cheese omelette I used to cook omelettes using the technique whereby you... Get the Recipe
The post Ham and cheese omelette appeared first on RecipeTin Eats.
]]>I’ve updated the way I make omelettes. This “scrambled egg” approach is easier and yields a better result without having to worry about raw egg in the middle. Today’s omelette recipe is filled with ham and cheese. Sauté your ham first!
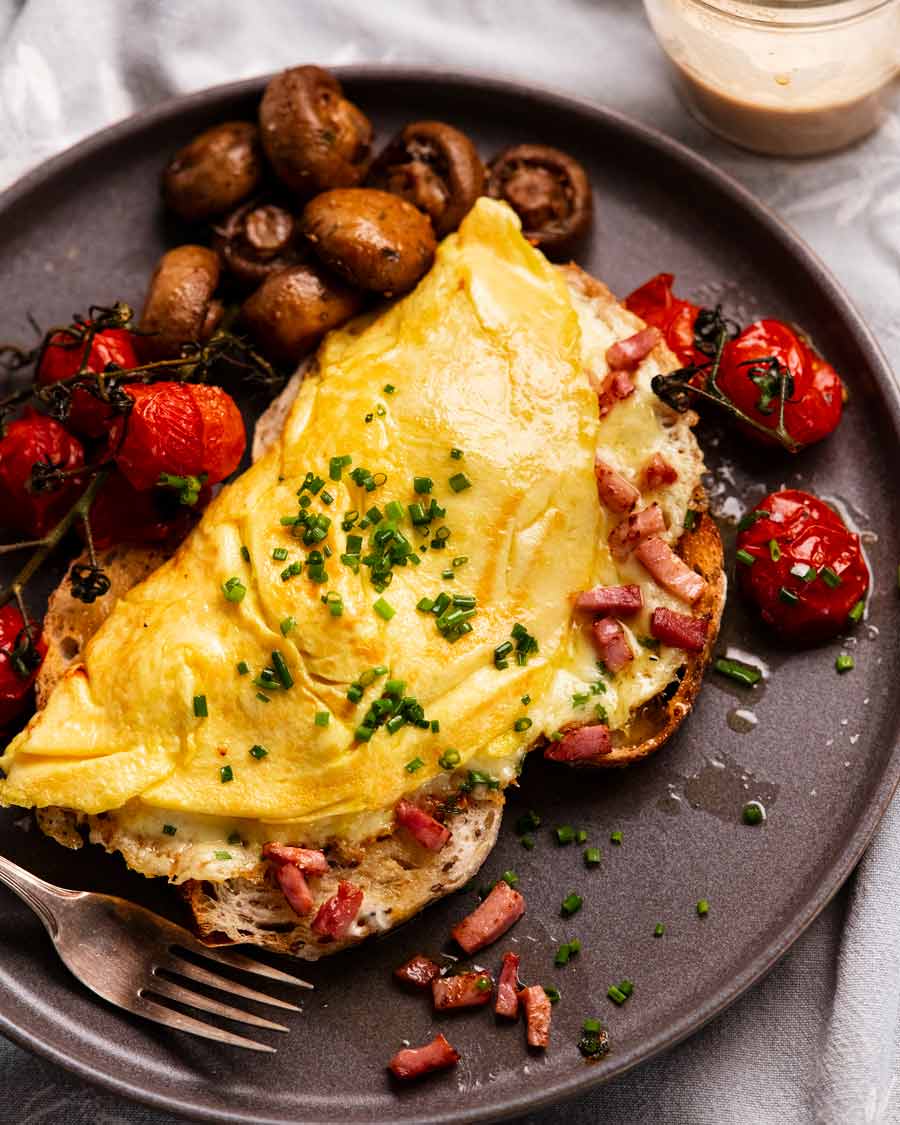
Ham and cheese omelette
I used to cook omelettes using the technique whereby you lift the edge then tilt the pan to allow the raw egg to run underneath. While that method works fine, it does have a tendency for the risk of raw egg in the middle unless you take the omelette to slightly golden on the surface. While perfectly acceptable to me and in every day diners, this is a no-go zone in the high-end culinary world. The surface of omelettes should not even have a hint of golden colour and the surface should be swirl-free. Like this:
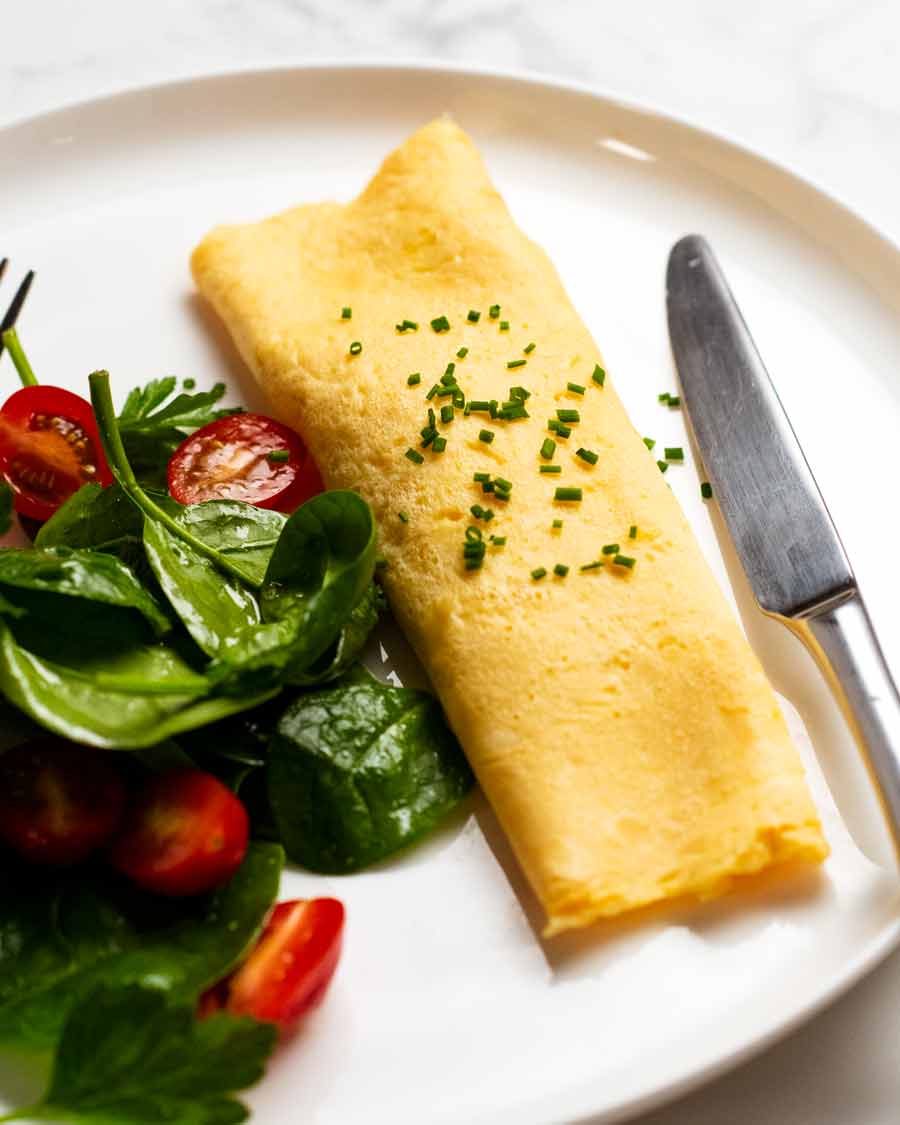
That’s a French omelette, by the way. It’s usually folded in 3, like above, or shaped like an almond rather than half moon. The inside is a little more fluffy than creamy like mine, and there is a little more technique behind it. If you want it, ask me for it! Maybe I should get our French Chef JB to teach you how to make it – would you like that? 
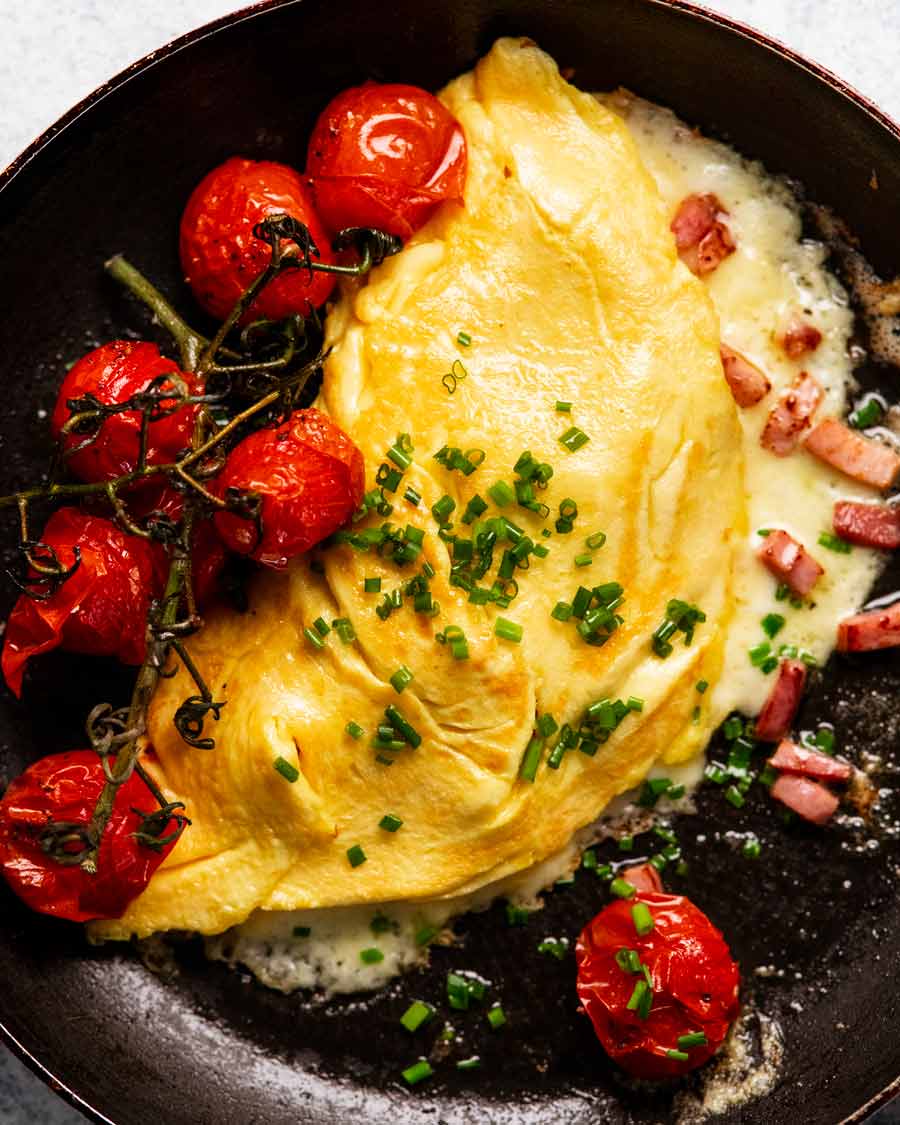
As for today’s omelette, it’s a homestyle one and much more rustic looking. But nevertheless as good as you’ll get at any respectable breakfast bistro around town!
What you need to make an omelette
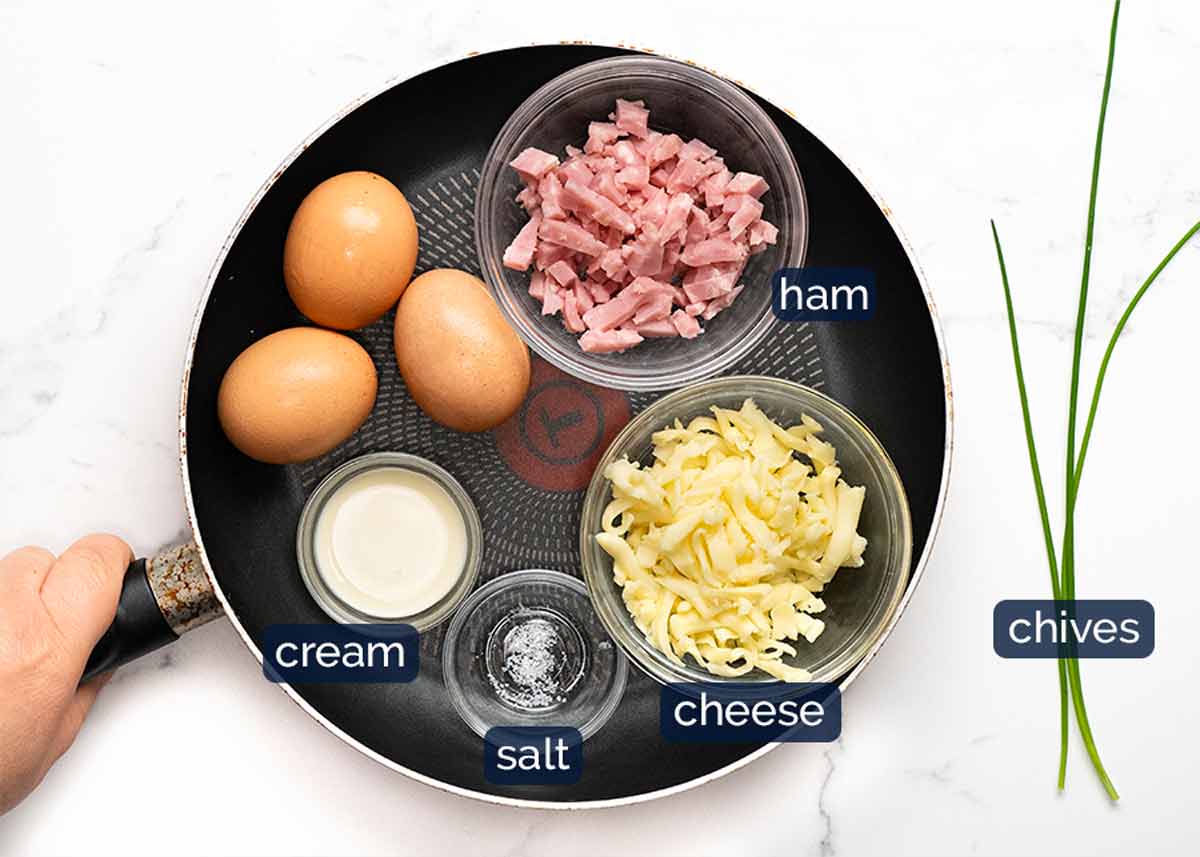
All you need to make the omelette itself is eggs, a pinch of salt and butter or oil for cooking. On the matter of cream or milk – see below!
Do you add cream, milk or water to omelettes? A splash of cream (or milk) is said to make omelettes a little creamier. But in all honesty, the cooking technique makes much more of a difference. No one will ever know if you do or do not include cream. Whereas everybody will know if your omelette is dry and rubbery!!
For me personally, I can’t break the habit so I add cream if I have it, and milk if I don’t.
A note on salt – Eggs, bizarrely, can only take the smallest amount of salt. Even 1/8 teaspoon of salt for 3 eggs makes it too salty – even without ham and cheese. For my egg sandwiches filling, I only use 1/8 teaspoon salt across 6 whole eggs! So for a 3 egg omelette, you only need a pinch of salt.
Butter vs oil – Butter wins every time for flavour! Oil works fine and you can get away with using less. But it doesn’t add to flavour unless you use a really good extra virgin olive oil.
Ham and cheese for omelette
Today’s omelette is stuffed with ham and cheese. For convenience, I used pre-chopped ham (I like that they are a bit meatier than using sliced ham). If you use sliced ham, just chop it into batons or tear into strips.
As for the cheese, I always shred my own because it melts easier than store-bought shredded which is coated with anti-caking agents. Store-bought is also cut thicker which means it takes longer to melt in omelettes.
Use a flavoured melting cheese, like colby (I use this), gruyere, tasty, cheddar, Monterey Jack. Mozzarella melts great but doesn’t have as much flavour so you might want to add a sprinkle of parmesan or pinch of salt on the cheese itself.
Other things to put in omelettes
I’m shameless – I’ll put virtually anything in an omelette. Here are some suggestions – obvious and less obvious!
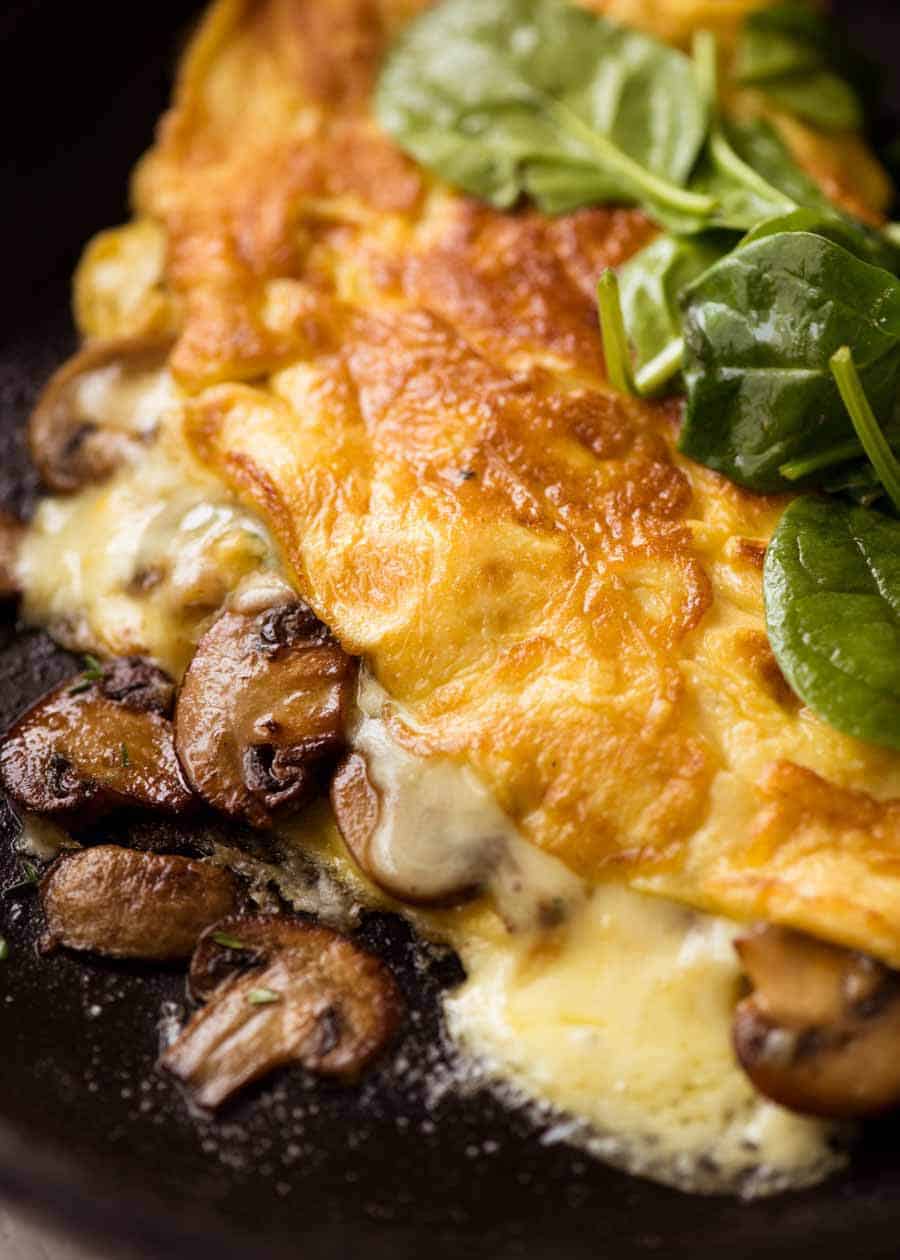
Garlic mushrooms – see Mushroom Omelette recipe
Prosciutto asparagus (in the egg white omelette) – excellent low calorie filling option
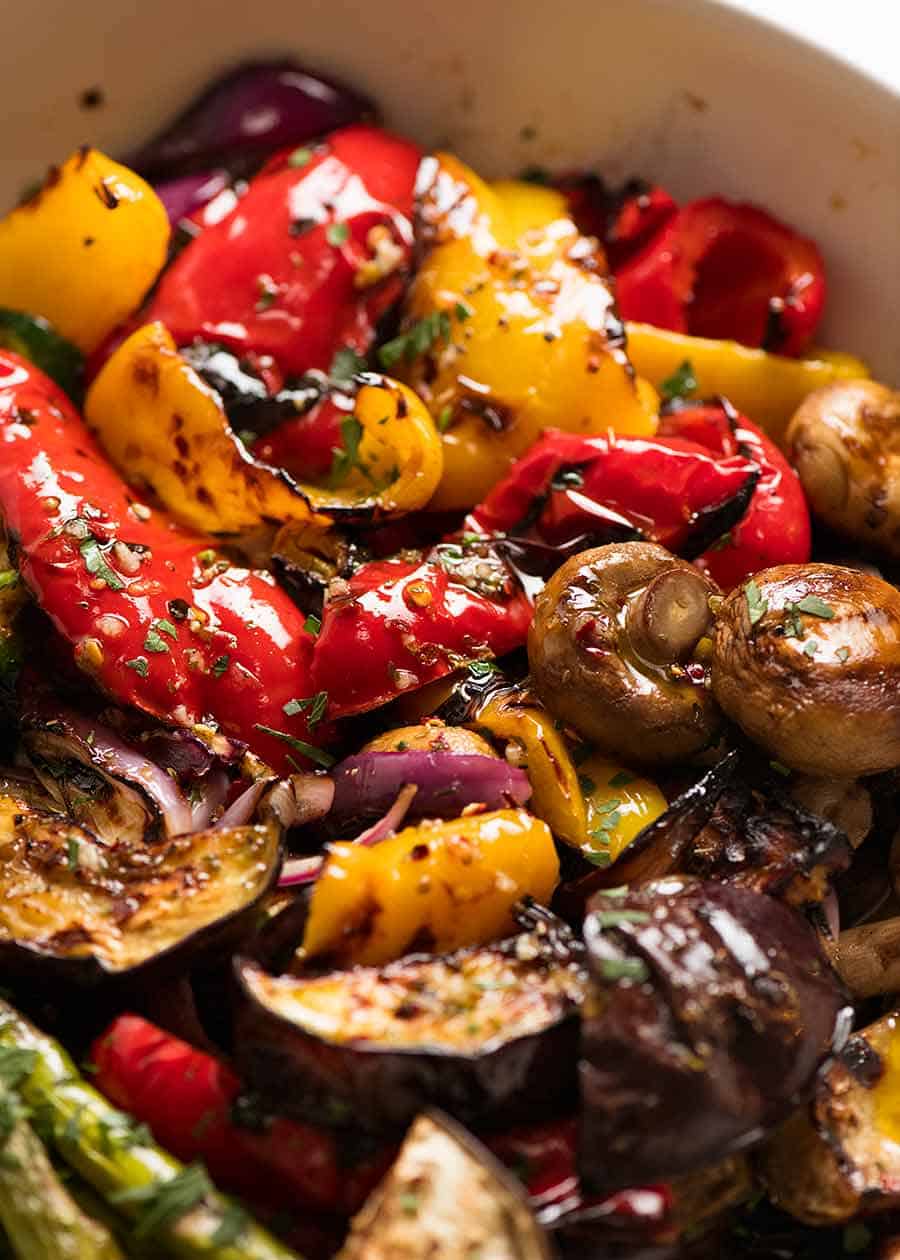
Grilled marinated vegetables or antipasto type things (leftovers from Wednesday’s Antipasto Chickpea Salad!) – chopped
Pizza toppings – pepperoni/salami, capsicum/bell peppers, onion, cheese
Leftover quesadilla fillings
Dinner leftovers – like spaghetti bolognese (I’d add cheese), meatballs (chop them). Good enough for jaffles, good enough for omelettes! Even stir fries will work – Chinese omelettes are a real thing!

It’s gotta be non-stick!
Whatever size pan you use, be sure it has a good non-stick coating. Eggs are the world’s best natural food glue!
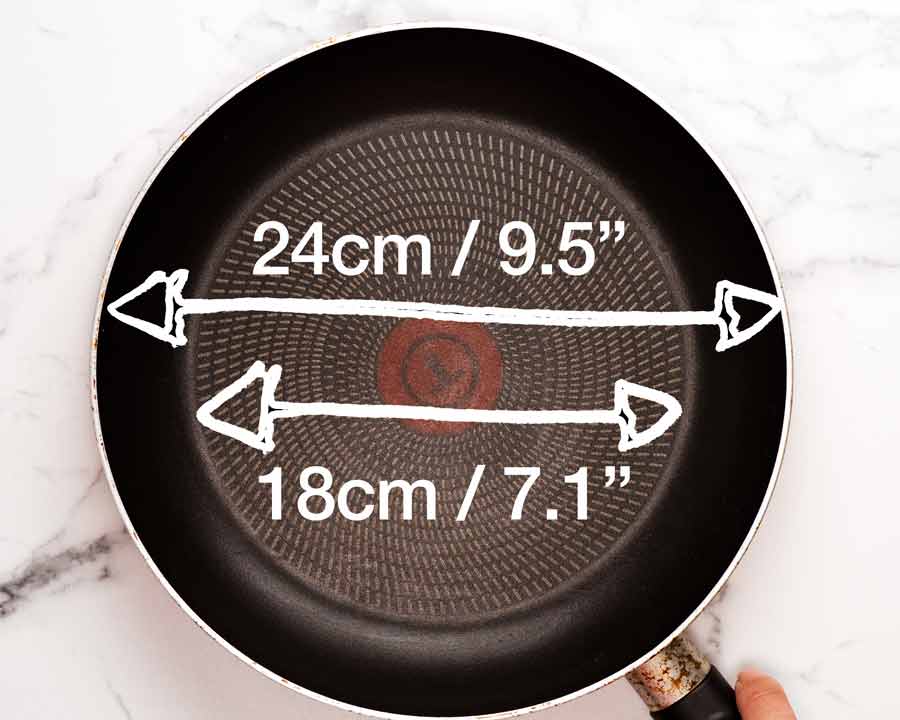
Pan size – The thickness of your omelette will be determined by the size of your omelette pan. I use a 24cm / 9 1/2″ Tefal non-stick pan measured from rim to rim, and this is the size measure the pan is sold as. It has a curved edge, so the flat base of this pan measures 18cm / 7 1/4″ in diameter. This is the size the omelette comes out.
A smaller omelette pan will make a thicker omelette that will take a little longer to cook through. A larger pan will make a thinner omelette. The other thing with a larger omelette is that it can be a little trickier to fold in half, but nothing a little confidence and quick flick of the wrist can manage!
How to make a ham and cheese omelette
I always sauté the ham first, not only to give it a little flavour but also because the warm ham helps the cheese melt faster so you don’t have to worry about over-cooking the omelette to get oozy cheese. Nobody wants to cut into an omelette only to find the cheese inside is not melted!!
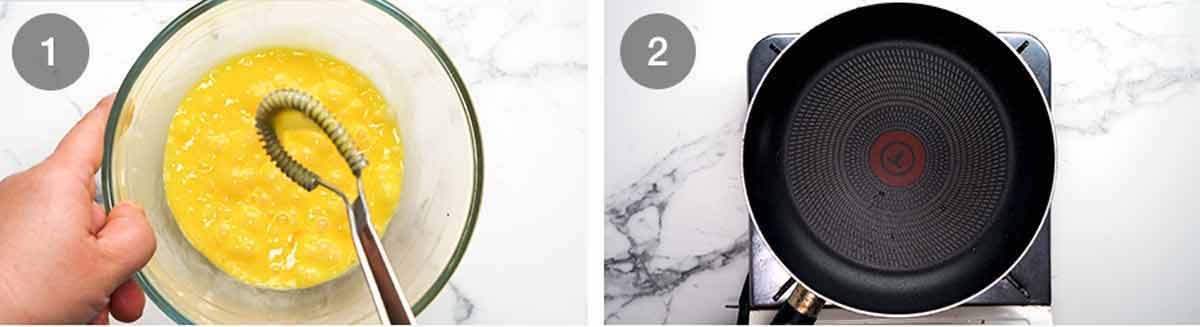
Whisk the eggs with a pinch of salt and cream or milk (if using). Whisk well until fully combined and a bit foamy – takes me about 10 seconds with a mini whisk.
Tools – Use a non stick 24cm/9.5″ wide pan, or thereabouts (18cm/7 1/4″ flat base). You will need at least 1 rubber spatula for cooking, though 2 will make your omelette folding life a whole lot easier!
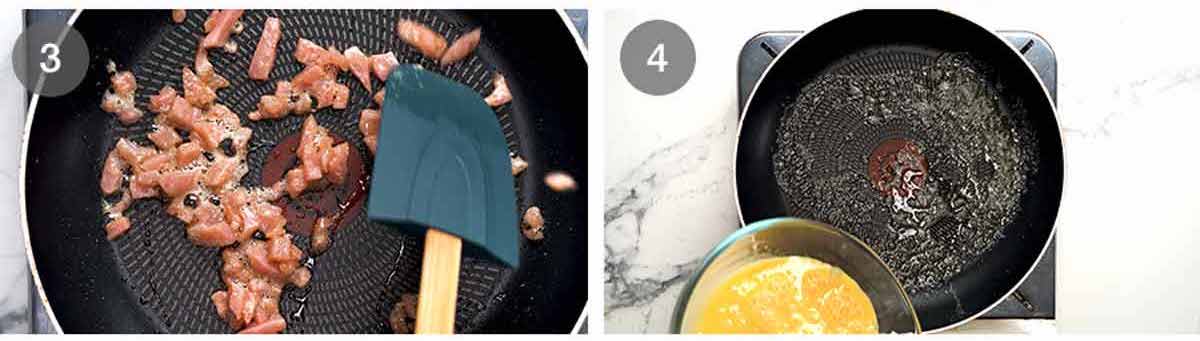
Sauté ham – Melt a tiny dab of butter in the pan over medium heat. Once foaming, swirl/spread then, using a rubber spatula (which we need for the omelette), cook the ham just for a minute or two until it is warmed through. Transfer to a bowl and set aside.
Medium low to medium heat – Return the pan to the stove and melt the remaining butter until foaming. We want the stove on moderate heat – which might be medium low or low for you, depending on the strength of your stove and the size of the stove ring you are using. We don’t want it too high else you’ll have to deal with the surface burning before the inside cooks through. Too low, and the omelette takes so long to cook it kind of turns rubbery. We need to find the happy medium!
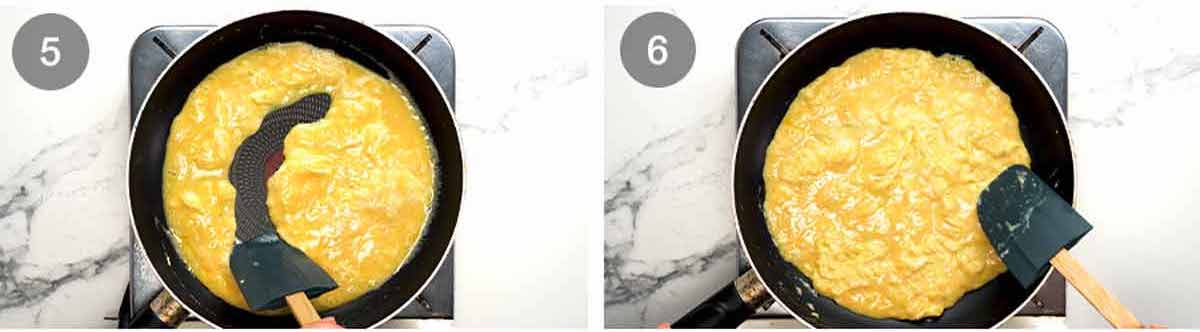
Semi-scrambled your eggs! Give the eggs a quick whisk then pour into the pan. Leave it for 15 seconds or until you see the edges just start to set. Then, using the rubber spatula, start making long, leisurely strokes, scraping the cooked eggs off the base to allow the uncooked egg to run, until the eggs are partially cooked.
GOAL – The eggs should be still raw enough to spread like jam across the base of the skillet, but not raw enough that the eggs run when you tilt the pan.
TIP – If at any point you feel like the eggs are cooking too fast, just remove the skillet off the stove!
Spread the custardy semi-scrambled eggs across the base of the skillet and roughly smooth the surface. Tidy the edges, if you you feel so inclined. (I feel inclined).
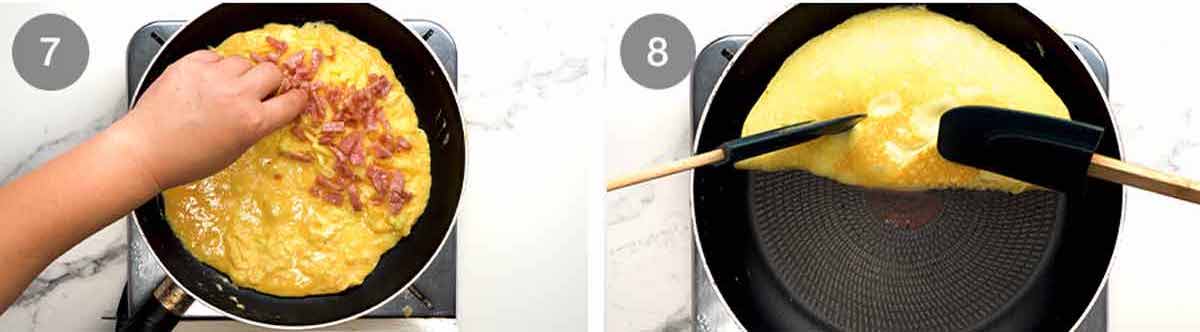
Top – Sprinkle half the omelette with the cheese, then the warmed ham (this helps melt the cheese).
Fold – Ensure the naked side of the omelette is not stuck by running the rubber spatula around the edge (it won’t be, because you are using a good non-stick pan!). Then using 2 rubber spatulas, fold the omelette over.
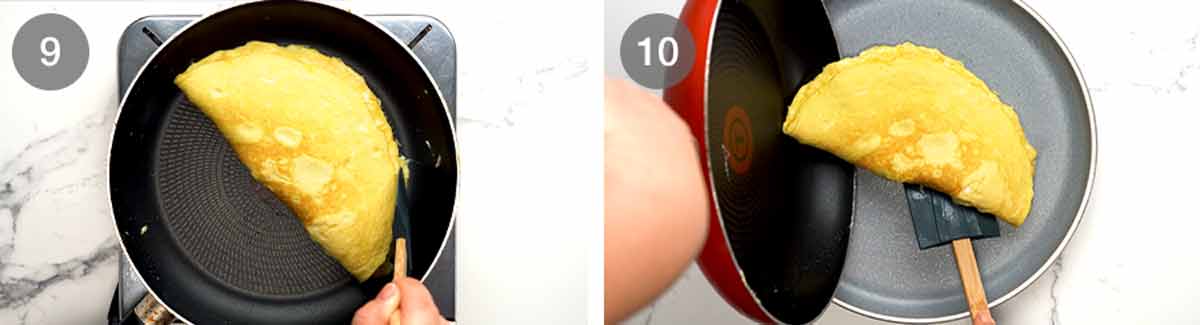
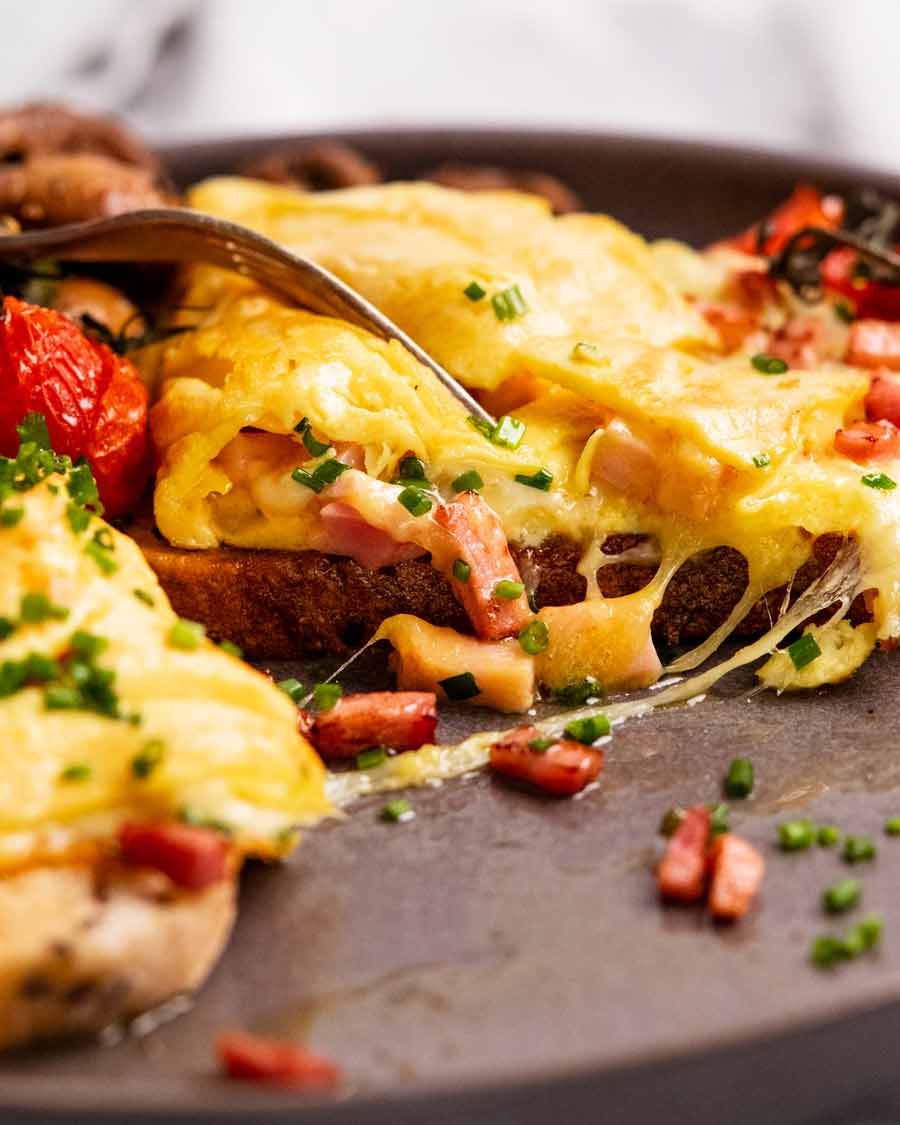
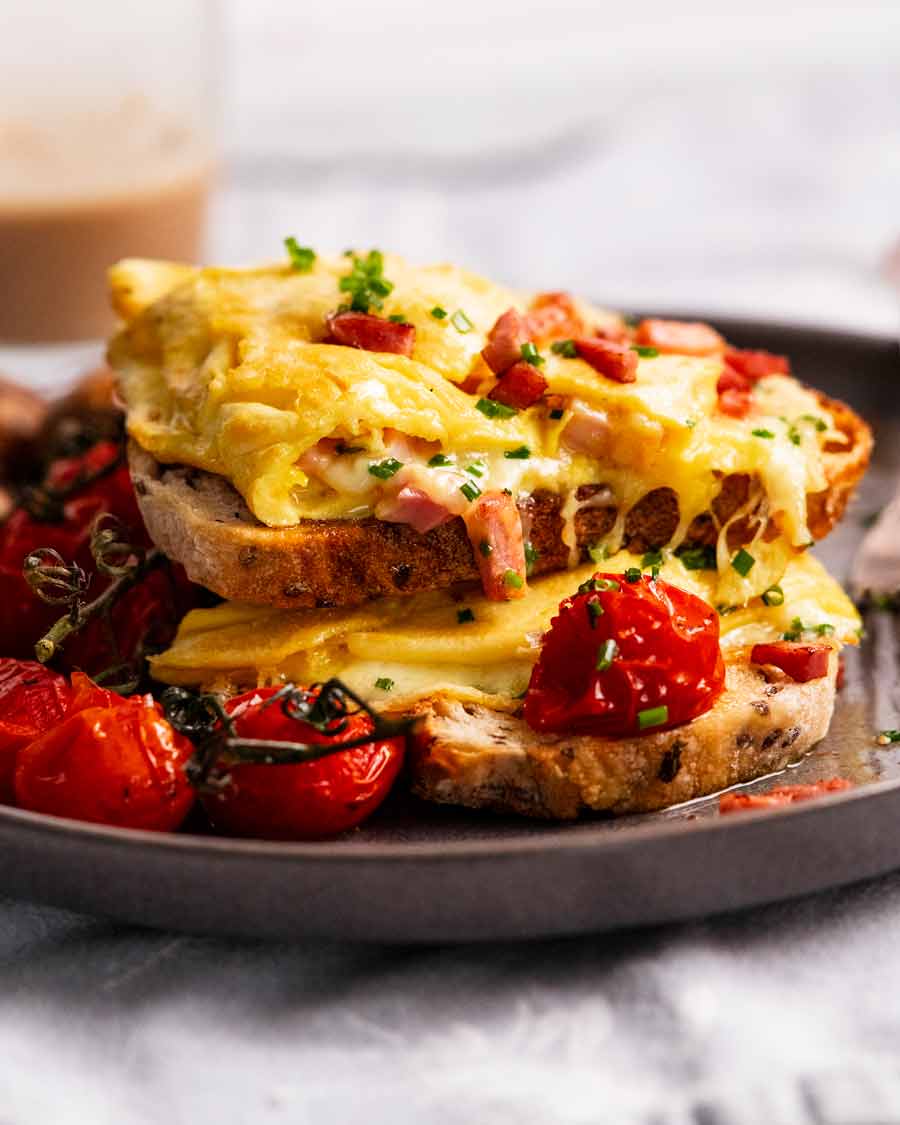
Optional tidy – At this point, sometimes I may push the edges in to make them nice and tidy. Other times, I see the ooze of cheese and think that’s the prettiest sight in the world, why on earth would anyone push that inside to hide it??!
Slide (or flip) out – Checking again to ensure the omelette is not stuck to the pan. Then either slide the omelette out like a normal person or be a bit cheffy and flip it out onto the plate. I show both in the video. Then EAT!
I cannot believe I wrote so much about the humble omelette. Sometimes I even amaze myself at how much I have to say about any type of food!
I’m sorry if I overwhelmed you. And feel free to keep making omelettes as you have been all your life. I get it. If you’re happy with your omelette game, don’t change it! In fact, share your tips!! Bring on the Omelette Debate! – Nagi x
Watch how to make it

Ham and cheese omelette
Ingredients
- 3 large eggs , ~55g/2oz each (fridge cold fine)
- Pinch of salt (that's all you need)
- 1 tbsp cream (or milk), optional (Note 1)
Cooking / add-ins
- 1 tbsp/ 15 g unsalted butter (or 2 tsp extra virgin olive oil)
- 1/3 cup chopped ham (I use store bought, Note 2)
- 1/3 – 1/2 cup shredded colby cheese , use box grater (or cheddar, tasty, gruyere, Monterey Jack – Note 3)
Serving (optional, pictured)
- 1 stem chive , finely chopped
- Garlic butter roasted mushrooms
- Roasted cherry tomatoes (on vine, Note 4)
- Toast
Instructions
- Heat control – If at any stage your omelette is cooking too fast, remove the pan off the stove to let it cool down and lower the heat.
- Whisk the eggs, salt and cream in a bowl for 10 seconds until slightly foamy.
- Warm ham – Melt 1/3 of the butter in a 24cm/9.5" non-stick pan (or thereabouts, Note 5) over medium heat until foamy. Swirl/spread to coat the base, then cook ham using a rubber spatula for 90 seconds until warmed through. Remove into bowl.
- Semi-scramble eggs – Melt and swirl remaining butter in the pan. Give the eggs a quick whisk then pour into the pan. Leave for 15 seconds or until the very edges set, then do long leisurely strokes around and across the pan to scrape up cooked egg and let the raw egg run onto the base. Continue for 30 seconds or so until the egg is partially cooked. GOAL: wet enough to spread like jam, but not so wet that the egg runs when you tilt the pan.
- Spread the egg evenly across the pan (no need to be meticulous). Top half with cheese, then ham. (By this time, the omelette should be almost cooked through but still shiny/custardy on the surface).
- Loosen the naked side then fold over using 2 rubber spatulas. Leave in the pan for another 30 seconds to melt the cheese and finish cooking inside.
- Serve – Slide or flip onto a plate and serve! Sprinkle with chives if desired.
Notes
Nutrition
More egg life essentials

Life of Dozer
Dozer’s favourite spot is under the dining table (no prizes for guessing why). So sometimes, if I want a cuddle, that’s where I’ve gotta go!

The post Ham and cheese omelette appeared first on RecipeTin Eats.
]]> At the heart of a great egg sandwich is a creamy egg filling and essential to this are soft boiled, not hard boiled eggs! The creamy yolks practically makes its own mayonnaise sauce and the soft-set egg whites almost melt in your mouth. Egg sandwich thoughts You wouldn’t think that someone would have so many... Get the Recipe
The post Egg sandwich appeared first on RecipeTin Eats.
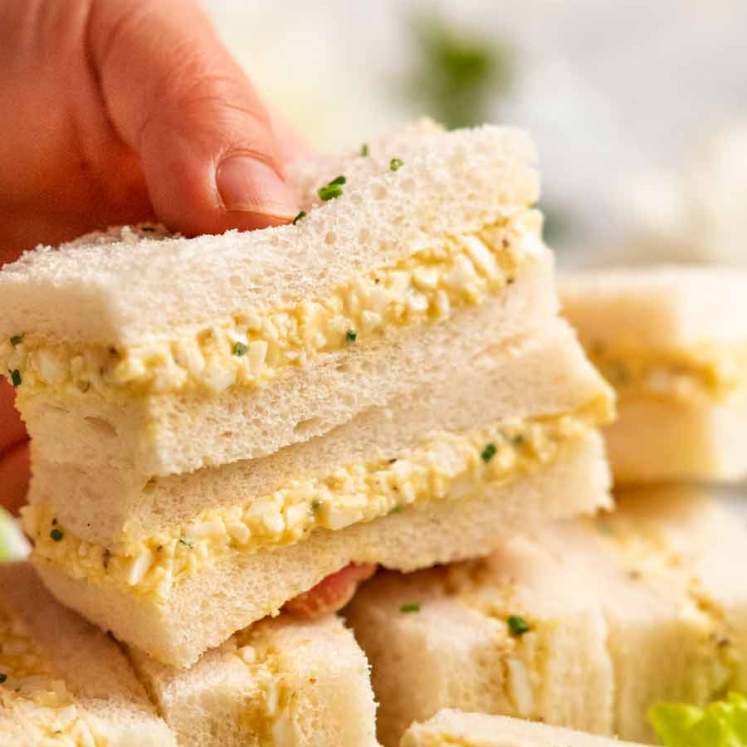
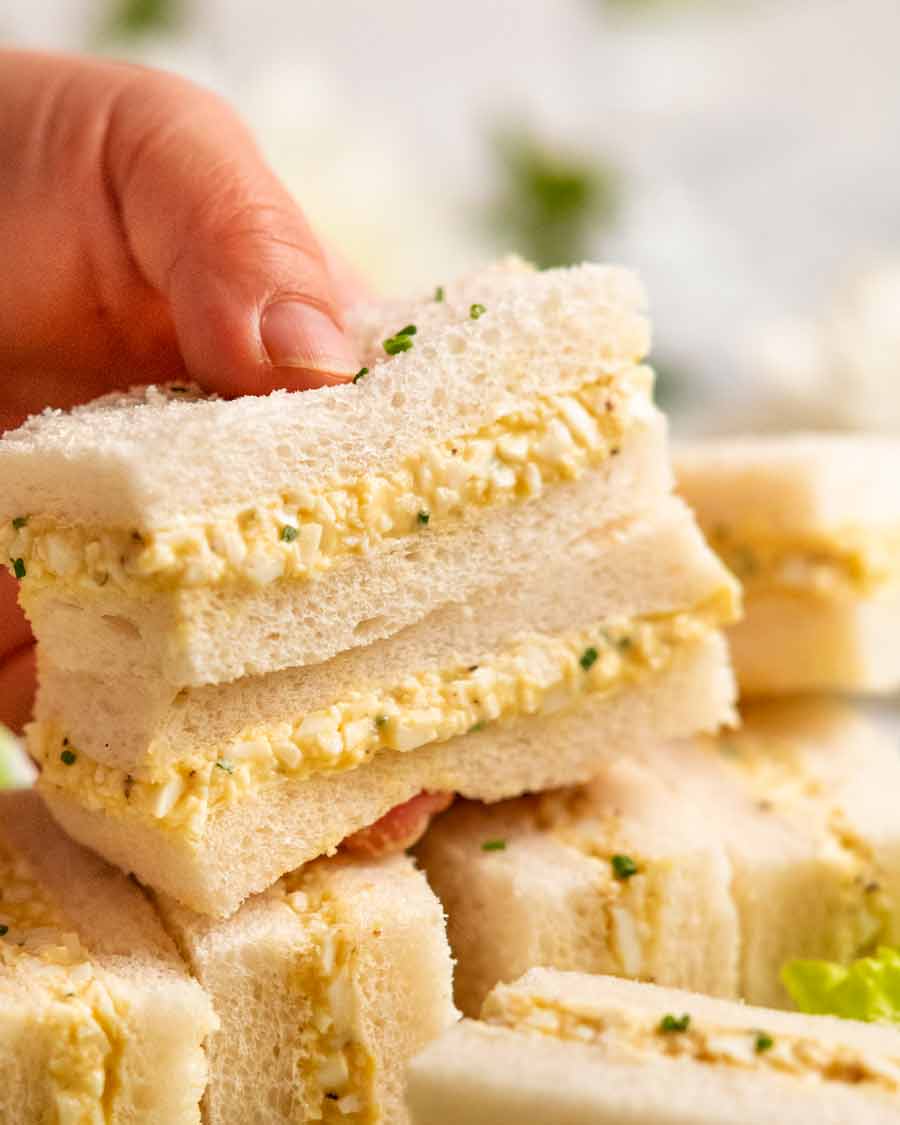
]]>At the heart of a great egg sandwich is a creamy egg filling and essential to this are soft boiled, not hard boiled eggs! The creamy yolks practically makes its own mayonnaise sauce and the soft-set egg whites almost melt in your mouth.
Egg sandwich thoughts
You wouldn’t think that someone would have so many opinions about a simple egg sandwich, but as I sat down to write this recipe, it turns out I do! Here’s my egg sandwich thought-dump, roughly in care-factor order:
No rubbery bits of whites – I don’t like little firm bits of egg whites in what should be a creamy egg filling. So I use soft boiled eggs with soft just-set egg whites, rather than hard boiled eggs which is more common in standard egg sandwiches.
Semi homemade mayo – Soft boiled eggs = creamy yolk = practically makes its own semi-homemade mayonnaise. It’s so good! Better flavour and more luxurious with less mayonnaise required.
No celery. I know that might be an unpopular opinion but crunchy bits in a creamy egg filling, no matter how small or finely sliced, just don’t appeal to me. Goes in the same bucket as #1.
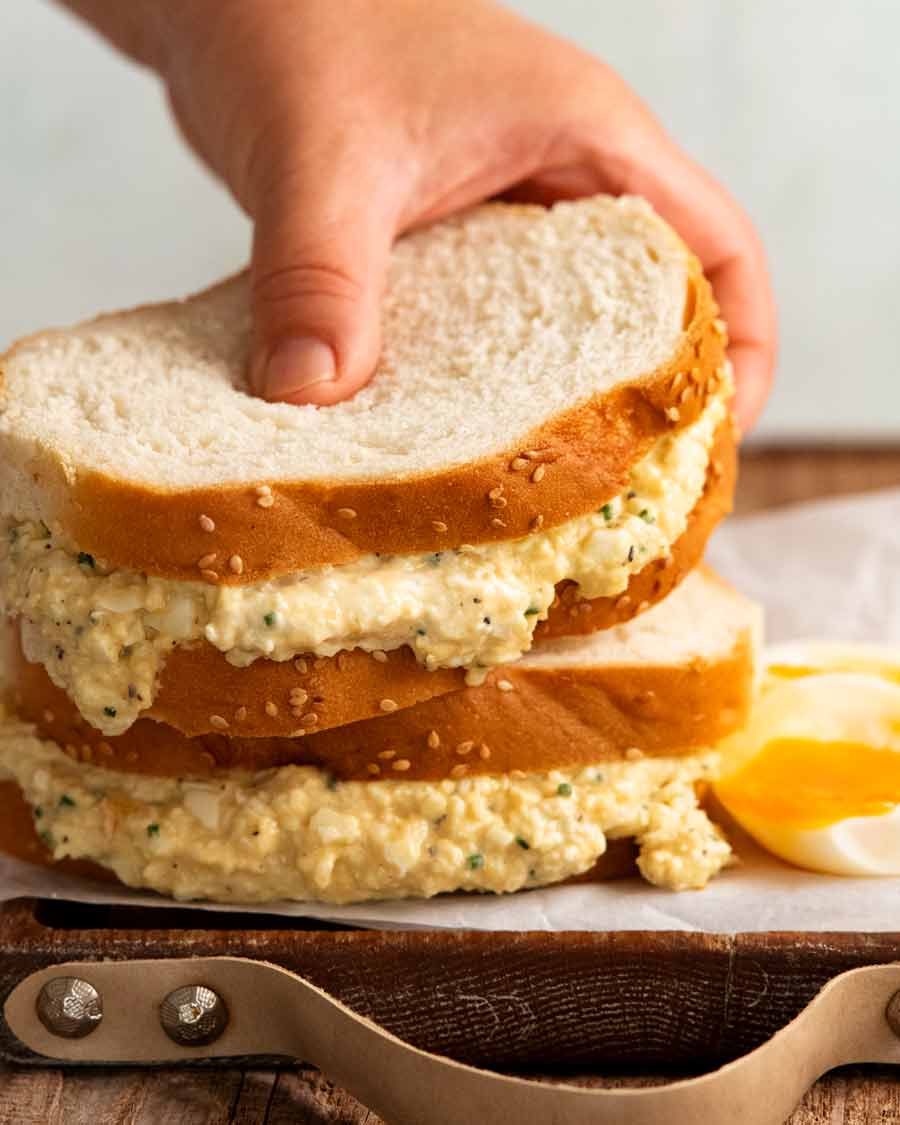
Soft bread is best. Too much filling oozes out when you bite the sandwich if you use chewy, crusty artisan bread like sourdough.
So, if all that sounds good to you, then let me introduce to the egg sandwich of your dreams!
Creamy egg sandwich filling
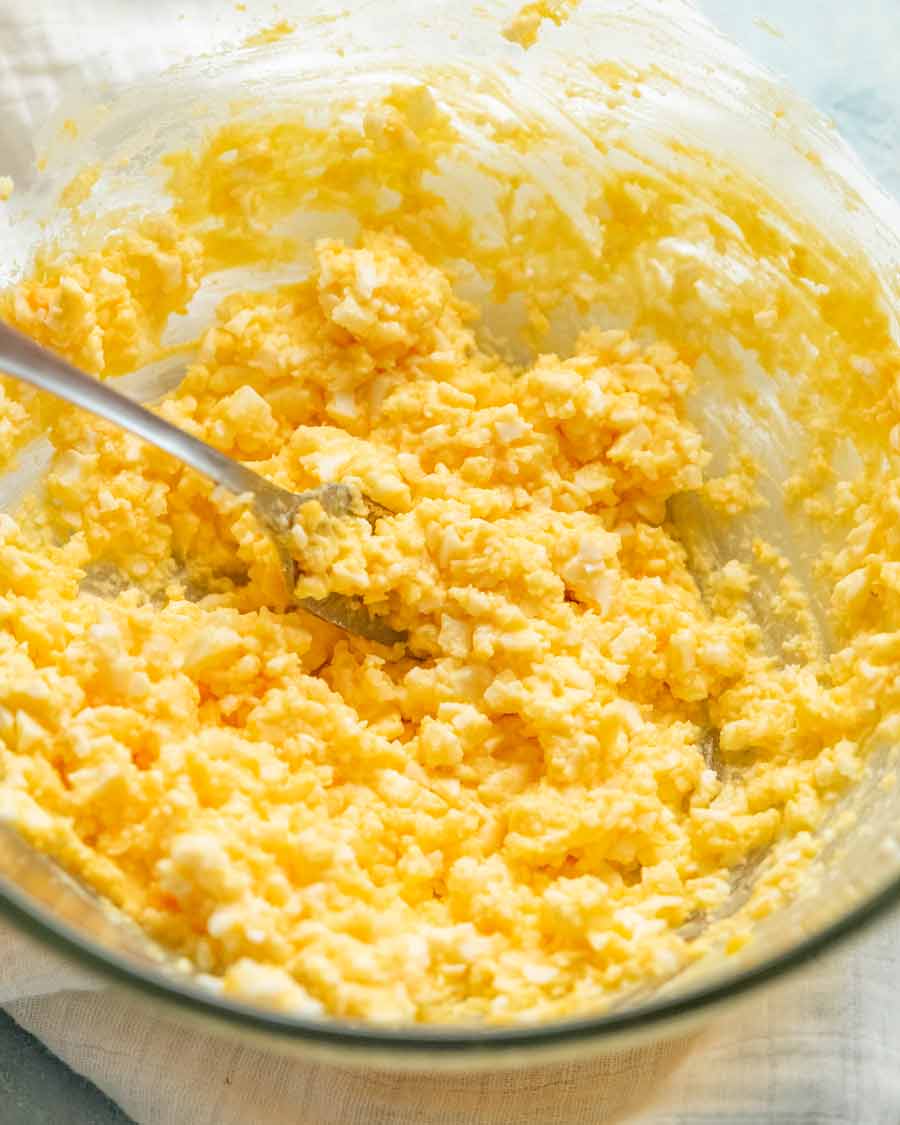
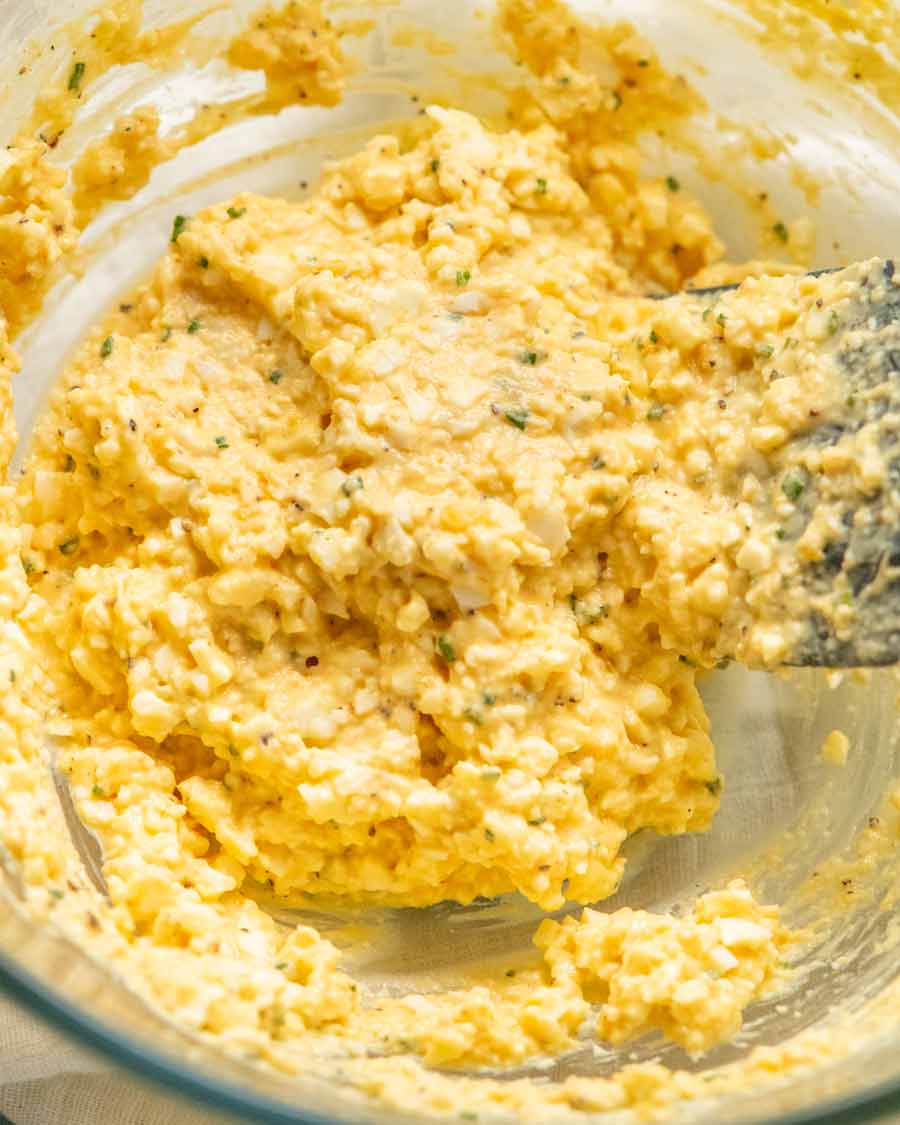
Here’s an up-close-and-personal look at the filling. The left photo is just soft boiled eggs mashed up. You can see that it’s already pretty creamy, even before adding the mayonnaise! Then the photo on the right is the finished filling after adding the mayonnaise and mustard.
What you need for my egg sandwich
As already emphasised a number of times (reeks of passion, right??!), the key ingredient here is soft boiled rather than hard boiled eggs! With creamy yolks, you only need a mere dab of mayonnaise and smidge of mustard for a creamy, luxurious filling.
If you don’t have chives, substitute with finely minced green onion.

Soft boiled eggs – The creamy yolk gives you a head start on the creamy sauce so we only need 1 tablespoon of mayonnaise for 6 eggs (4 sandwiches). So we’re sort of making a semi-homemade mayonnaise here!
Mayonnaise – Whole egg mayo is creamier and less tangy than normal mayo. My favourite brand is S&W (Australia), followed by Hellman’s and Kewpie (equal second).
Dijon mustard – For flavour and a touch of tang.
Chives – For freshness and nice green bits in our filling.
Salt – Just 1/8 teaspoon! Trust me on this. Egg is weirdly salt adverse. The opposite of potatoes which can take loads of salt!
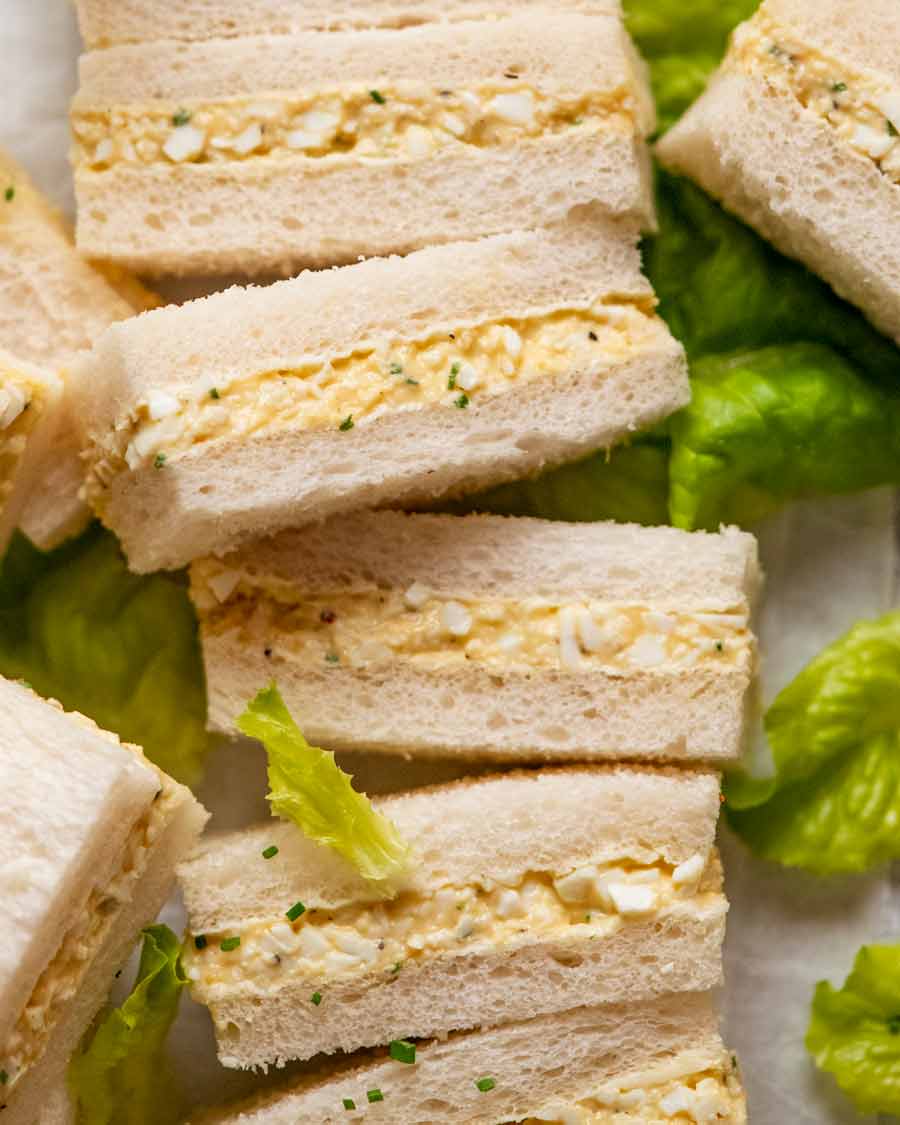
Best bread for egg sandwiches
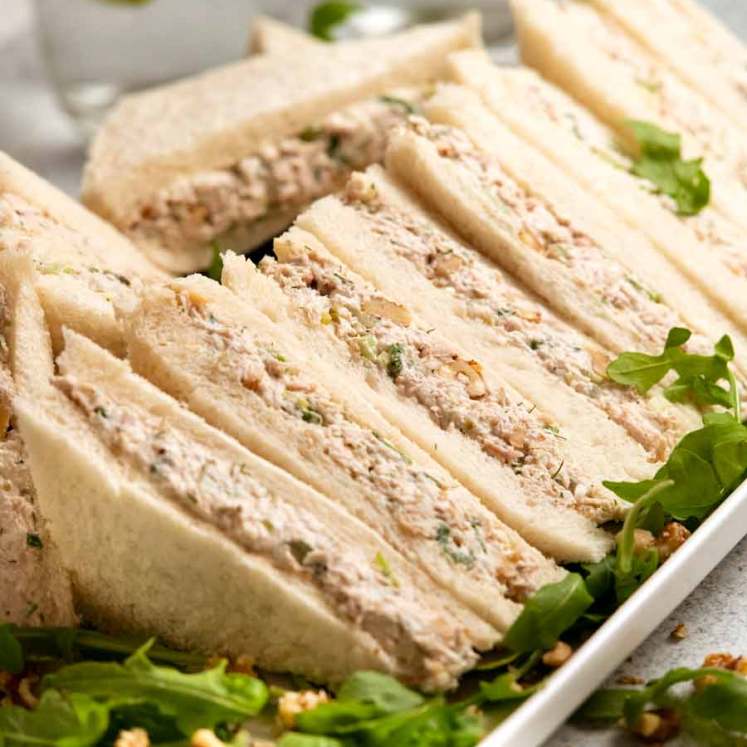
As for the bread, you can really use anything you want though for traditional tea-type sandwiches (like pictured), soft white sandwich bread is the go. My only tip is to avoid crusty, chewy artisan bread (like sourdough). Filling ooze issues. Stick with soft bread!
How to make egg sandwiches
And the making part:
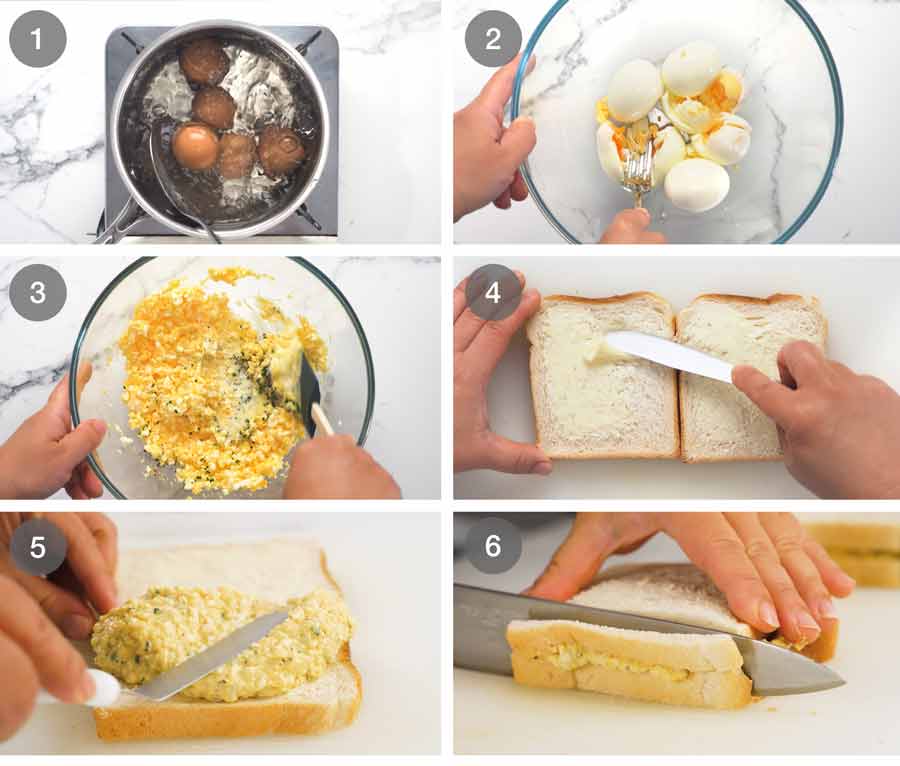
Cook soft boiled eggs and peel (8 minutes in boiling water). For full directions see my boiled eggs recipe, but I’ve included abbreviated directions in the recipe card below.
Mash the eggs using a fork to get it started, then a potato masher. The finer you mash, the creamier your filling! Once well mashed, you’ll see your filling is already semi-creamy.
Filling – Stir in the mayo, mustard, chives, salt and pepper.
Spread butter on the bread.
Spread filling on bread, from edge to edge!
Crusts – If you’re going for quaint English tea sandwiches, trim the crusts off then cut to your desired shape. The sandwiches pictured in post have been cut into 3 rectangles (4 sandwiches cut into a total of 12 finger sandwiches).
TIP: For extra neat edges, refrigerate the sandwiches for 1 hour before cutting. This will set the filling so you can cut more neatly. But be sure to serve at room temperature!
And there you have it! My egg sandwich. I know there are recipes out there with more bells and whistles, using fancier ingredients like creme fraiche, perhaps a smidge of curry powder, and other add-ins.
But to me, all that is unnecessary if you use soft boiled eggs. This is one of those recipes where the end result is so much more than the sum of its parts. I hope you give it a go! Let me know what you think if you do. And also, you know I always love hearing your thoughts on my thoughts on matters of food. Do you disagree with my position on soft boiled eggs? Do you think celery is mandatory? Fancier bread? Bring on the egg sandwich debate! 😂 – Nagi x
Watch how to make it
Egg sandwich
Ingredients
Egg sandwich filling:
- 6 soft boiled eggs , at room temperature (Note 1)
- 1 tbsp whole egg mayonnaise (S&W brand best, Note 2)
- 2 tsp dijon mustard
- 2 tsp finely chopped chives (sub green onion)
- 1/2 tsp black pepper
- 1/8 tsp cooking/kosher salt (yes really, that's all!)
Sandwich:
- 8 slices soft white sandwich bread (Note 3)
- Soft salted butter , for spreading on bread
Instructions
- Mash egg: Place the eggs in a bowl and crush with a fork. Once mostly broken up, use a potato masher to mash them up really well. Smaller egg white bits = creamier filling.
- Filling: Add remaining filling ingredients and gently stir to combine. Taste and add more salt if desired, but add with caution because it's bizarre how little salt eggs can take!
- Make sandwich: Butter the bread. Divide filling between 4 pieces of bread, spread evenly edge to edge. Trim crusts (optional), then cut as you wish. (Note 4 tips)
- Serve: Always serve at room temperature, for best flavour!
Notes
Nutrition
Life’s too short for bland sandwiches!


Life of Dozer
No egg sandwiches for Dozer! 💨💨

The post Egg sandwich appeared first on RecipeTin Eats.
]]> How to boil eggs – Bring water to a boil first, add eggs, start the timer. 6 minutes for runny yolks, 8 minutes for soft boiled (my go-to!), 10 minutes for hard boiled. Peel under water to make life easier. After cramming directions for how to boil eggs in the notes of more recipes than... Get the Recipe
The post How to boil eggs appeared first on RecipeTin Eats.
]]>How to boil eggs – Bring water to a boil first, add eggs, start the timer. 6 minutes for runny yolks, 8 minutes for soft boiled (my go-to!), 10 minutes for hard boiled. Peel under water to make life easier.
After cramming directions for how to boil eggs in the notes of more recipes than I can count, I figured it was high time to share a proper recipe. So here is how I boil eggs!
How to boil eggs
This method will produce consistent results to the level of doneness you desire no matter what pot you use and how weak or strong your stove is.
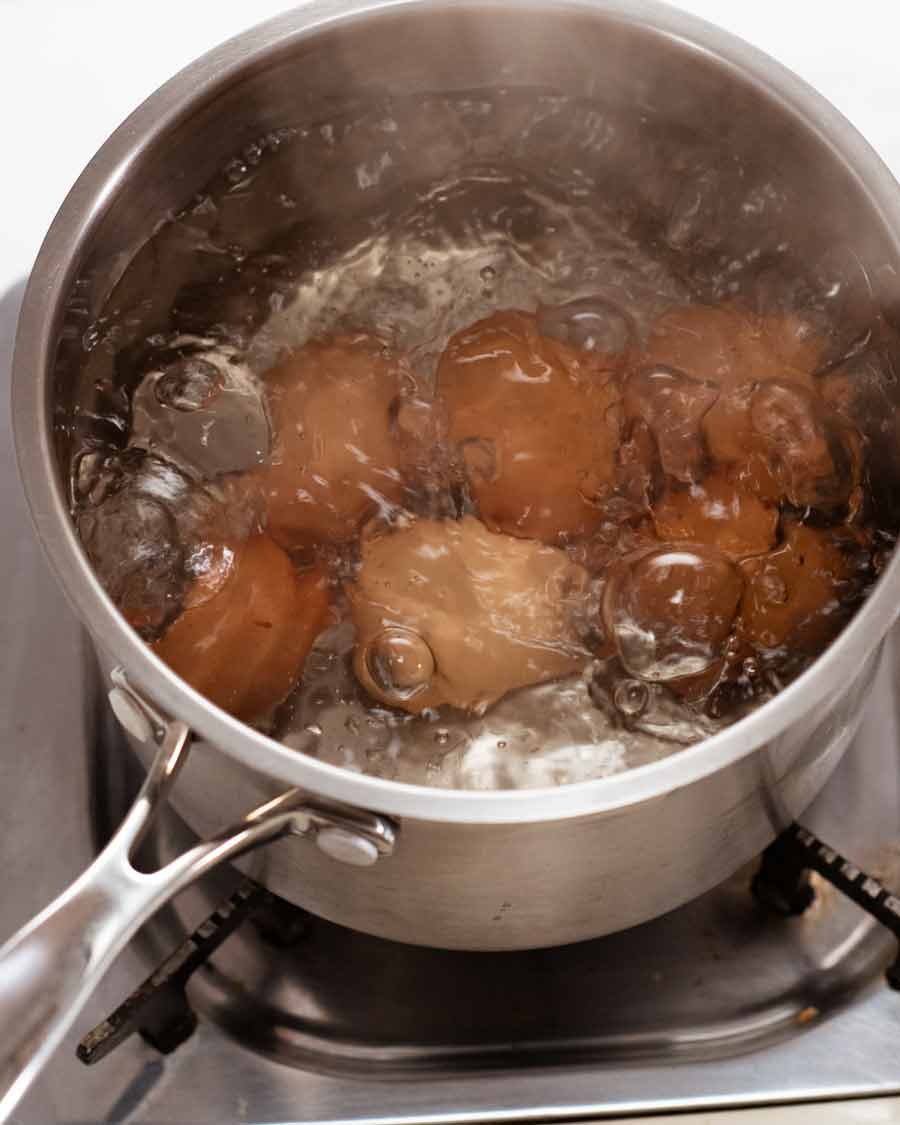
Boil water first.
Gently lower in fridge-cold eggs.
Lower the heat slightly – so the eggs don’t crack due to being bashed around but water is still at a gentle boil.
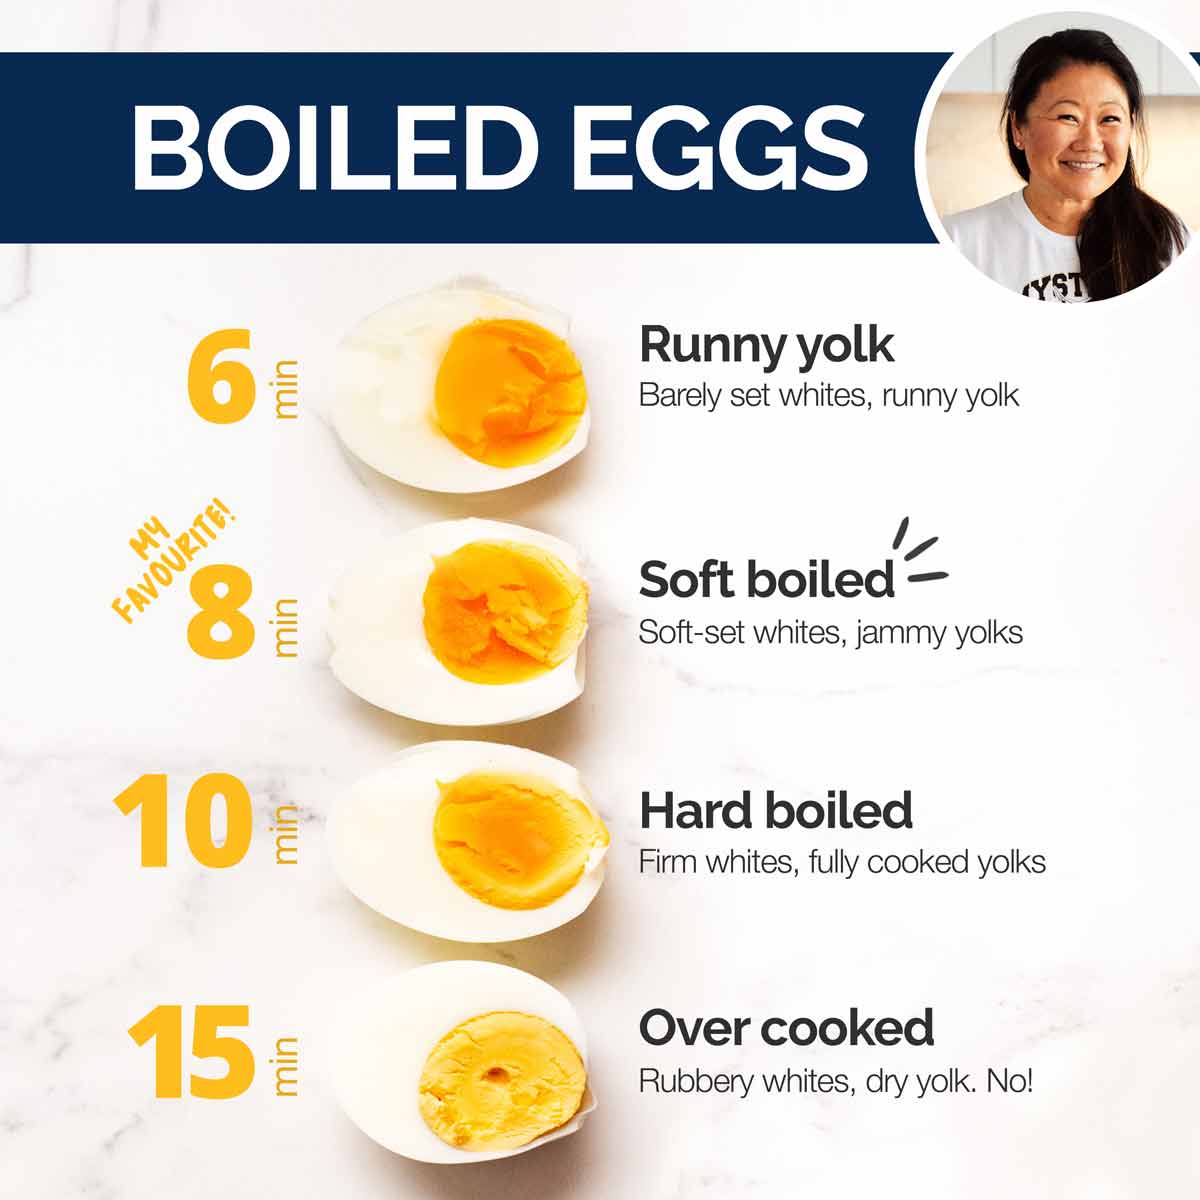
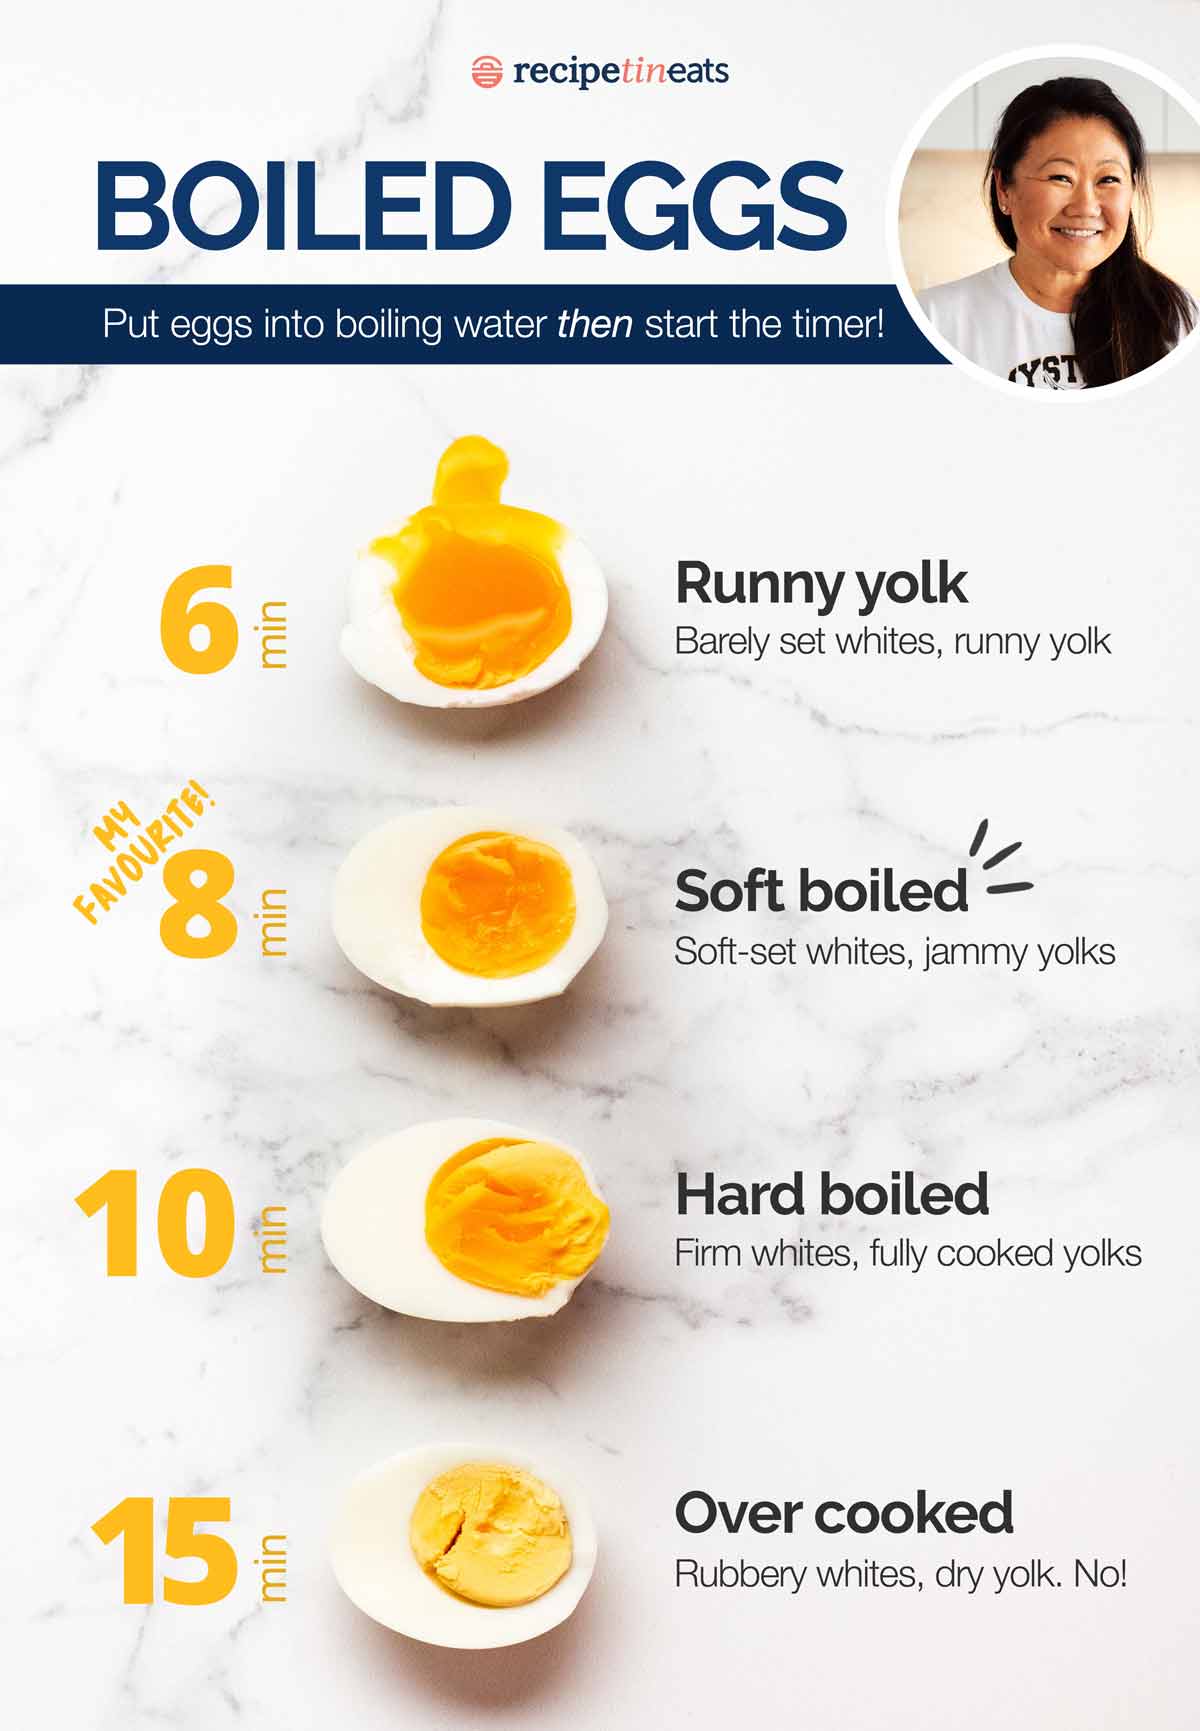
Start the timer – 6 minutes for runny yolks, 8 minutes for soft boiled, 10 minutes for classic hard boiled, 15 minutes for unpleasant rubbery whites and powdery dry yolks.
Transfer into a large bowl or sink of cold water.
Peel under water starting from the base (it’s easier).
And that’s all you need to know. But if you’re wondering about the why, read on!
How long to boil eggs
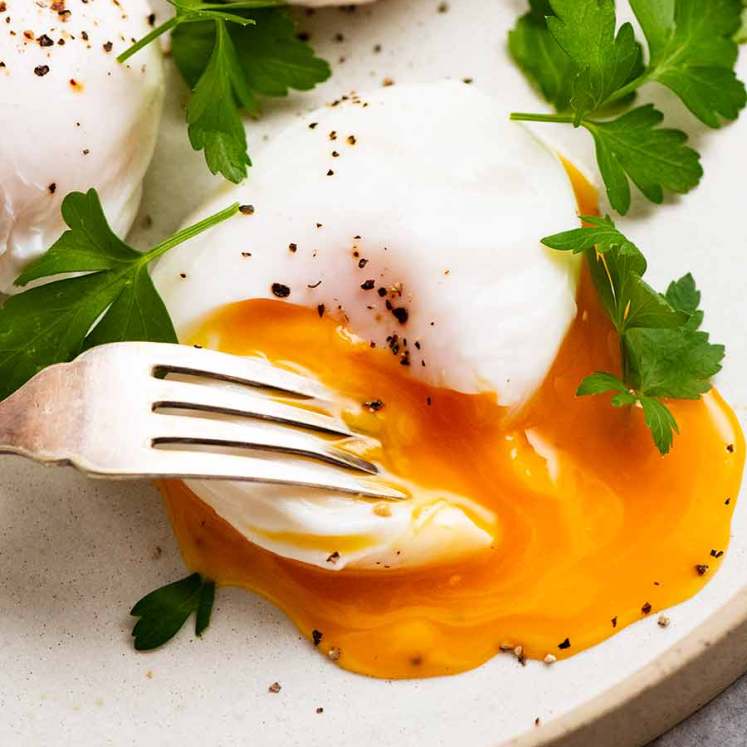
Dippy eggs and soldiers – 3 minutes (can’t peel)
Runny yolks – 6 minutes
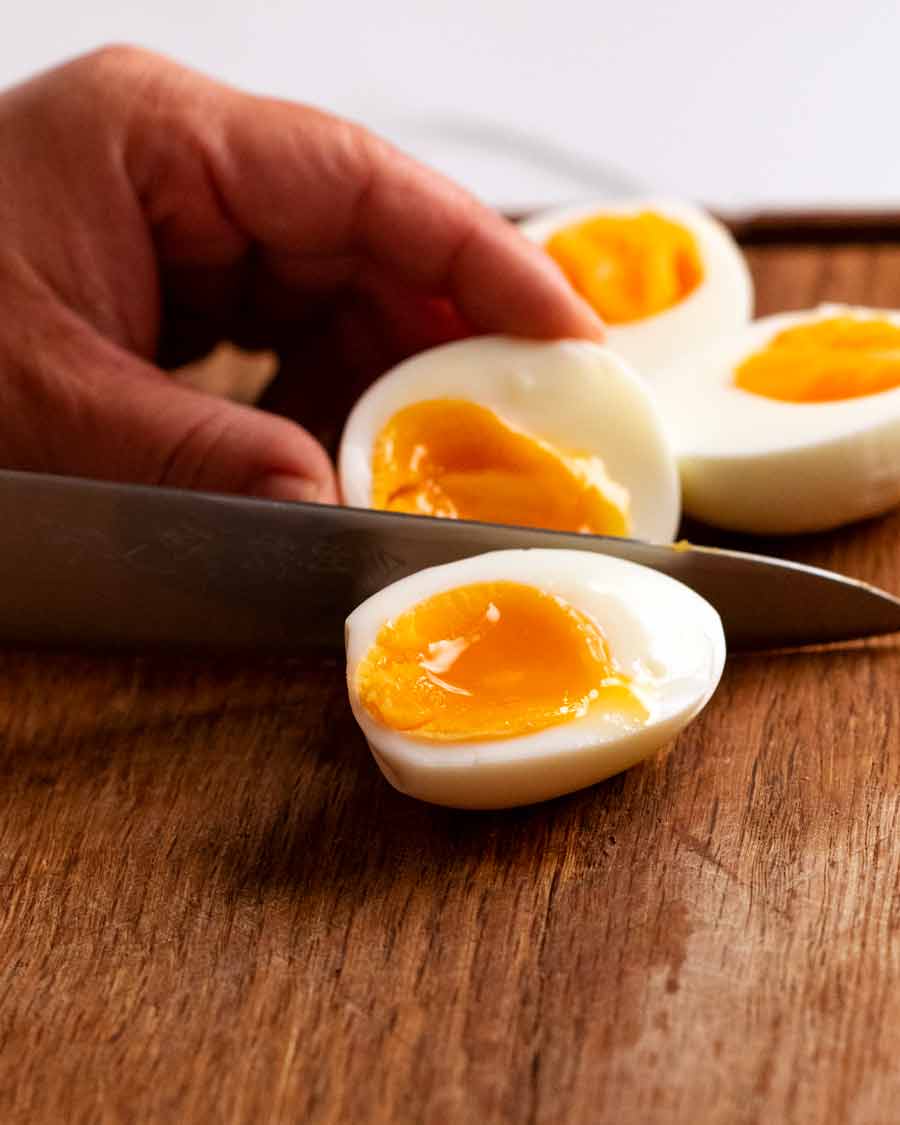
Soft boiled – 8 minutes
Hard boiled – 10 minutes
Remember, lower fridge-cold eggs into boiling water then start the timer!
My egg boiling rules & the why
Boil water before adding eggs – Your water boils faster than mine, because you have a better pot and stronger stove. So if we both start with eggs in cold water then bring it to a boil, our egg cook times will be different.
Plus, at what point really do you consider the water to be boiling so at what point do you start the timer? And who wants to stand over a pot, waiting for that exact moment it comes to a boil so you can start the timer? Remove that variable! Always start your eggs in boiling water.
Lower heat slightly once eggs are added – So the eggs aren’t bashed around so they crack. But keep the water at a gentle boil / rapid simmer else you will lose heat. Goal: maximum water bubbling without eggs cracking.
Fridge-cold eggs – Insurance policy for creamy / runny yolks, eggs are consistently easier to peel, pls there’s a consistent baseline for everyone boiling eggs. 8 minutes for a room temperature egg = hard boiled, fridge cold egg = soft boiled!
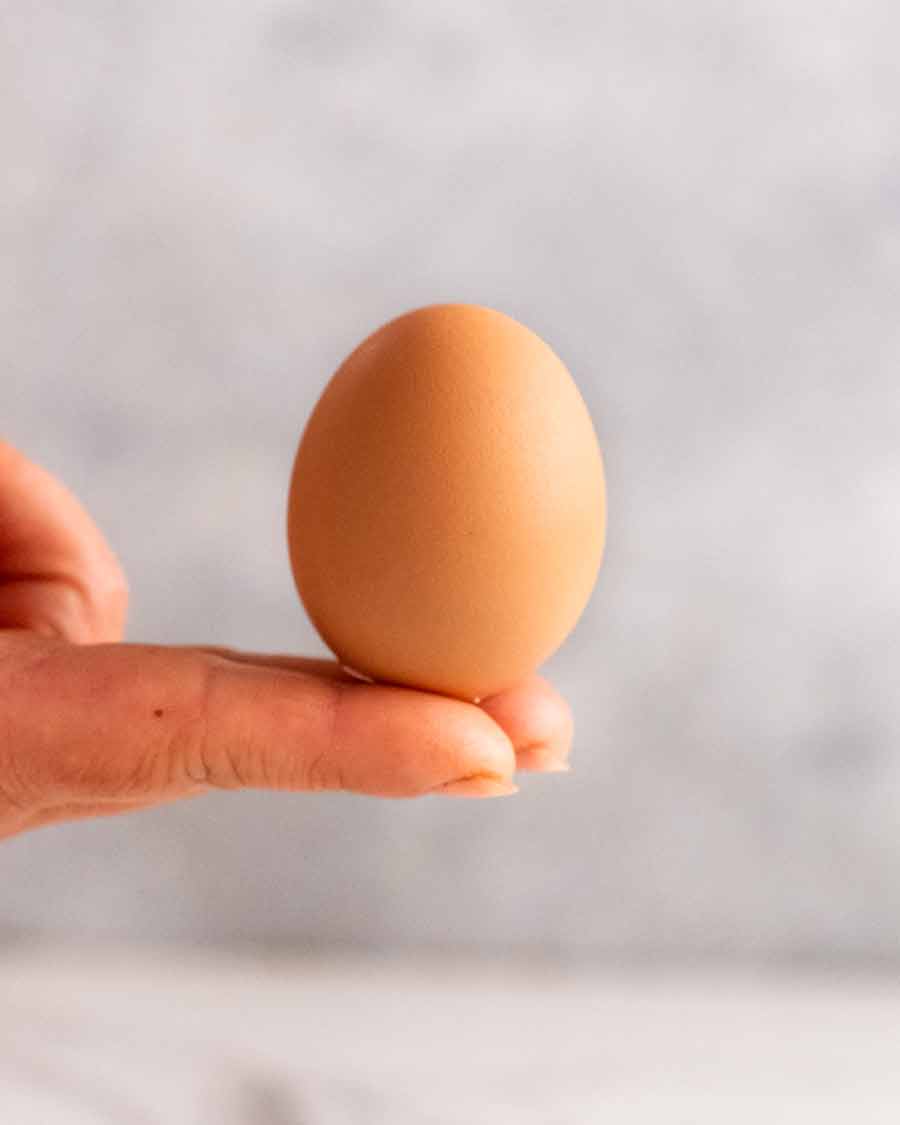
Egg size – The egg cook times provided above are for “large eggs” which are sold in cartons labelled as such. “Large eggs” are ~50 – 55g / 2 oz each, a size prescribed by industry regulations. For other egg sizes:
– Extra-large eggs (60g/2.2 oz): add 30 seconds
– Jumbo eggs (65g /2.5 oz): add an extra 1 minute
– Emu eggs: separate recipe coming one day….. (maybe!😂)Don’t crowd the pan – Small saucepan and too many eggs = not enough heat in the water per egg = slower cook time.
Saucepan size – A 18 cm / 7″ saucepan is suitable for 6 eggs, a 16cm / 6″ pan for 4 eggs.
Save ice for cocktails – Ice is precious around these parts. There’s no need to waste them on your morning eggs! A bowl of cold tap water is enough to stop the cooking process.
Peel from the base – It’s easier. Try it.
Peel under water – Also easier. Try it!
What type of boiled eggs I use for what
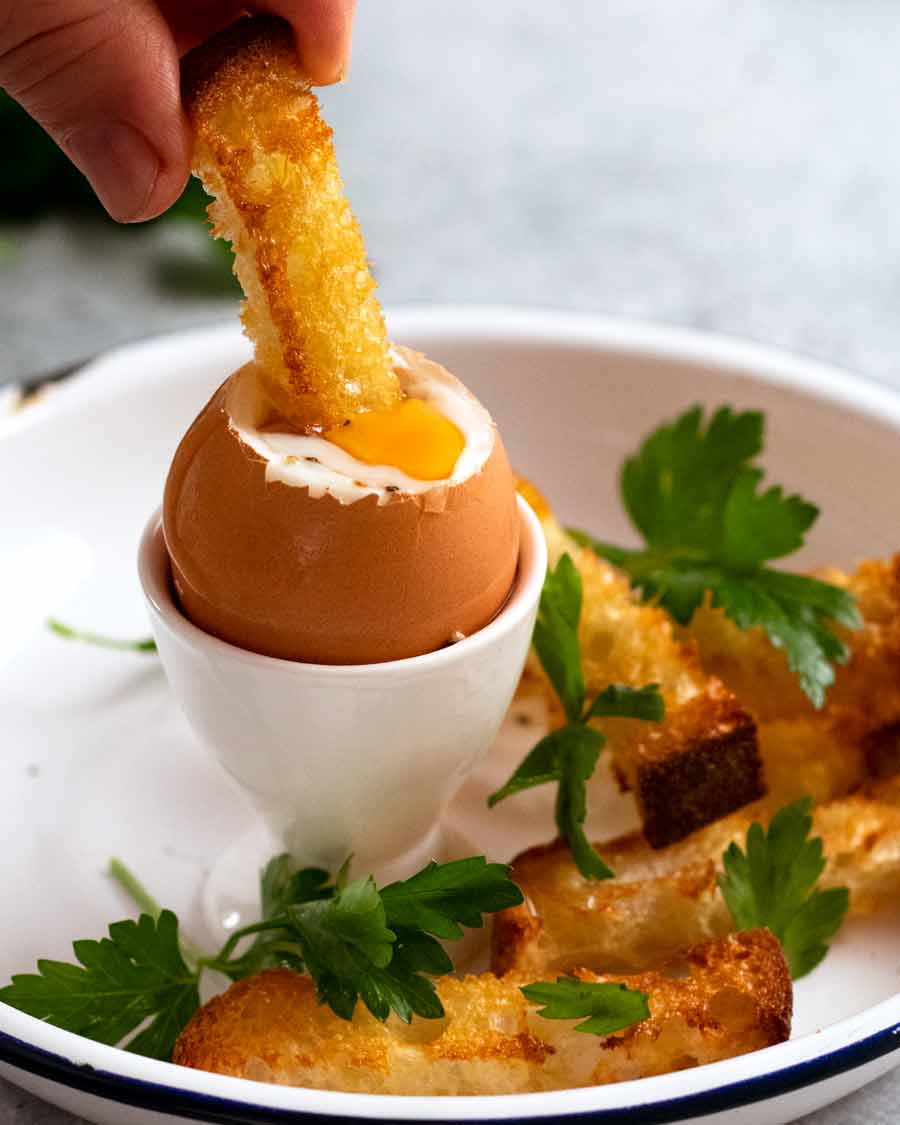
Dippy eggs for soldiers (3 minutes) – Made for dipping in toast sticks (pictured above), these cannot be peeled as only the outer rim of the whites are set. The yolks are runny as is the inner layer of egg whites, so you can mix it up and dip the bread sticks in.
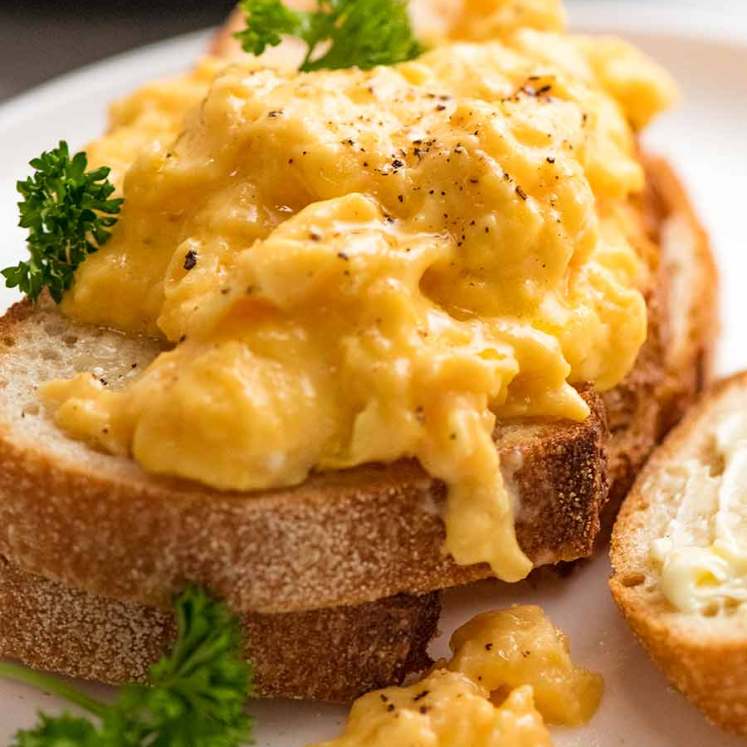
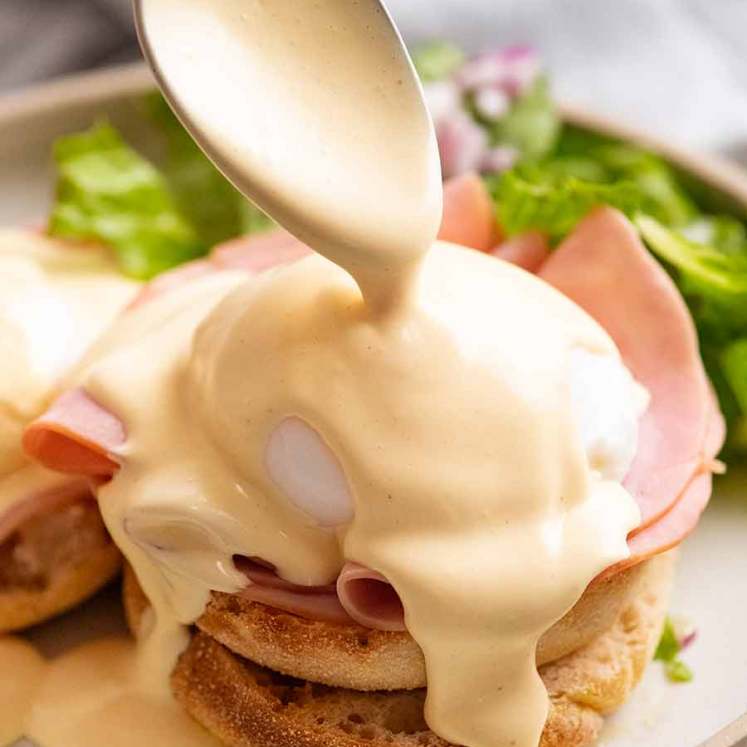
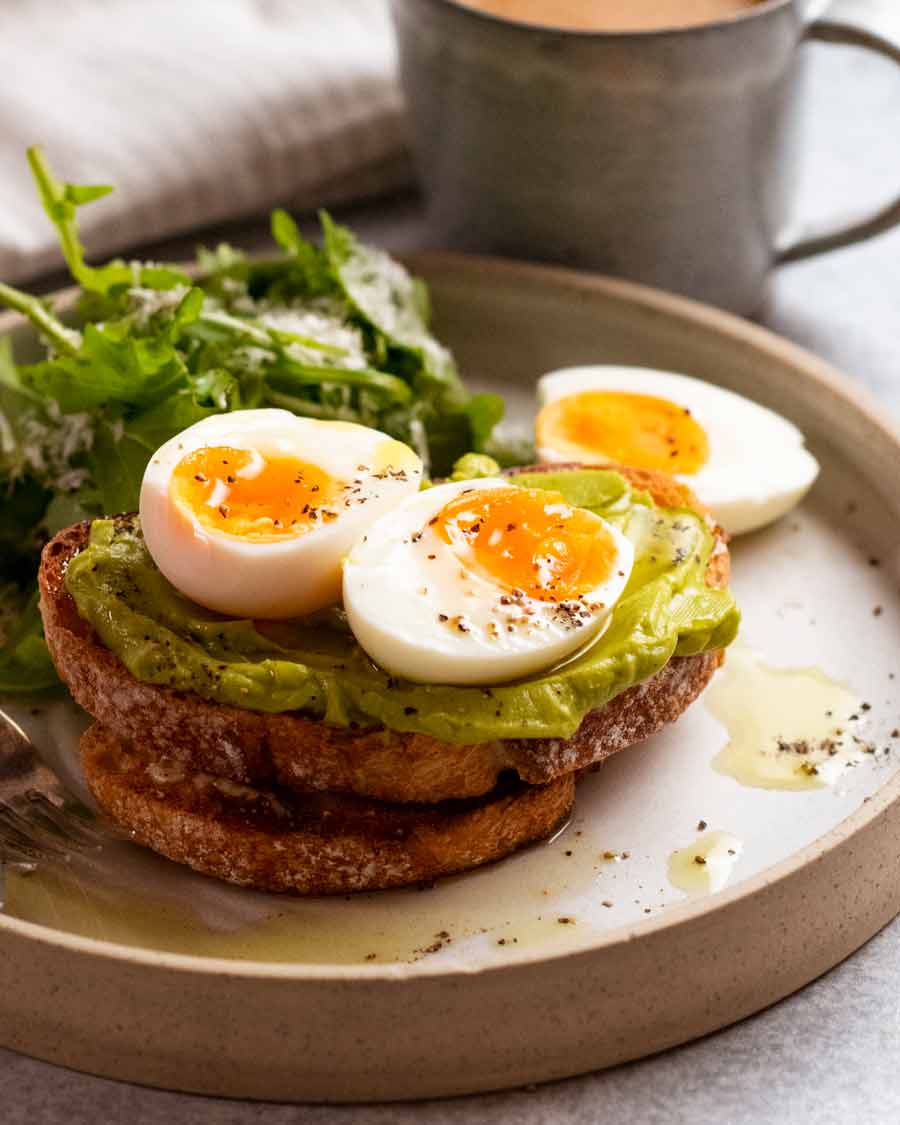
Runny yolks (6 minutes) – I don’t use these very often because they are a bit of a pain to peel because the egg whites are just barely set so they are rather delicate! Usually if I’m after a runny yolk I’ll do poached eggs (such as for Eggs Benedict) or fried eggs sunny-side up (for burgers). Just easier to handle and cook, I find.
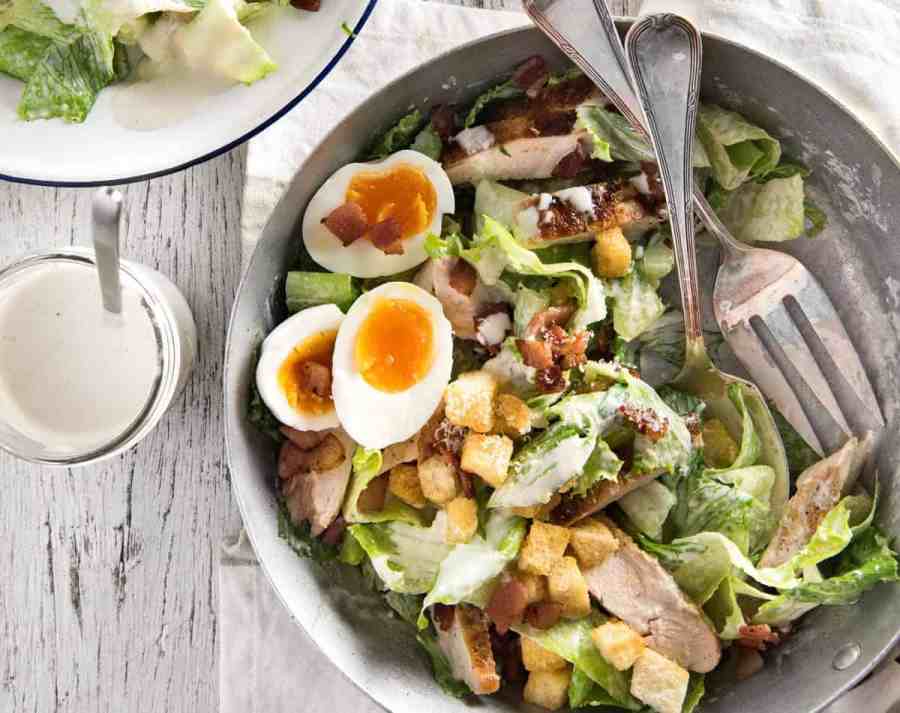
What I use them for – Caesar salad and on toast with avocado in some form (smashed/smeared, guacamole or avocado sauce).
Soft boiled eggs ⭐️ (8 minutes) – My favourite and default boiled egg because it is at its best! Cooked so the yolk is just set which means it is at its optimal creaminess. But the yolk is cooked enough so it doesn’t run when you cut it.
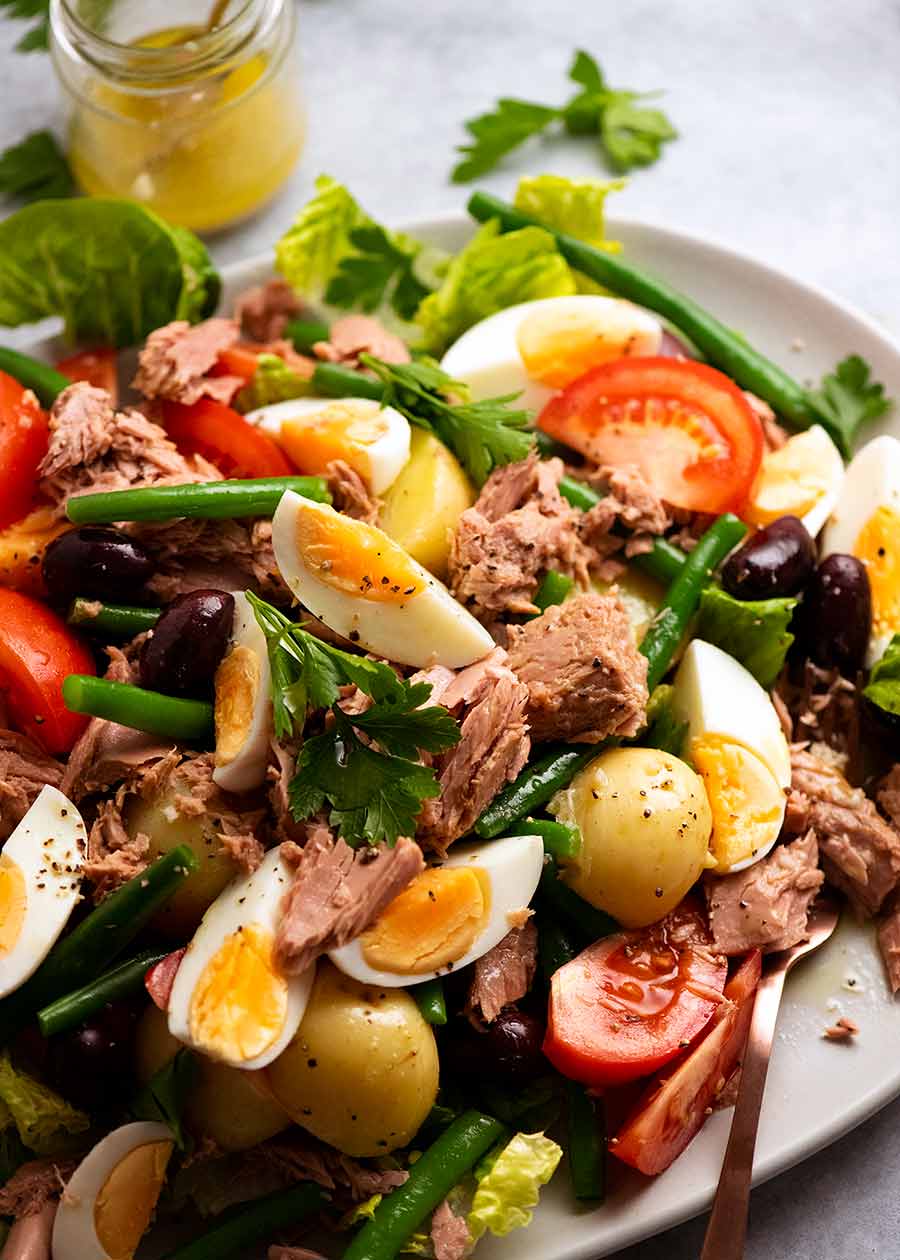
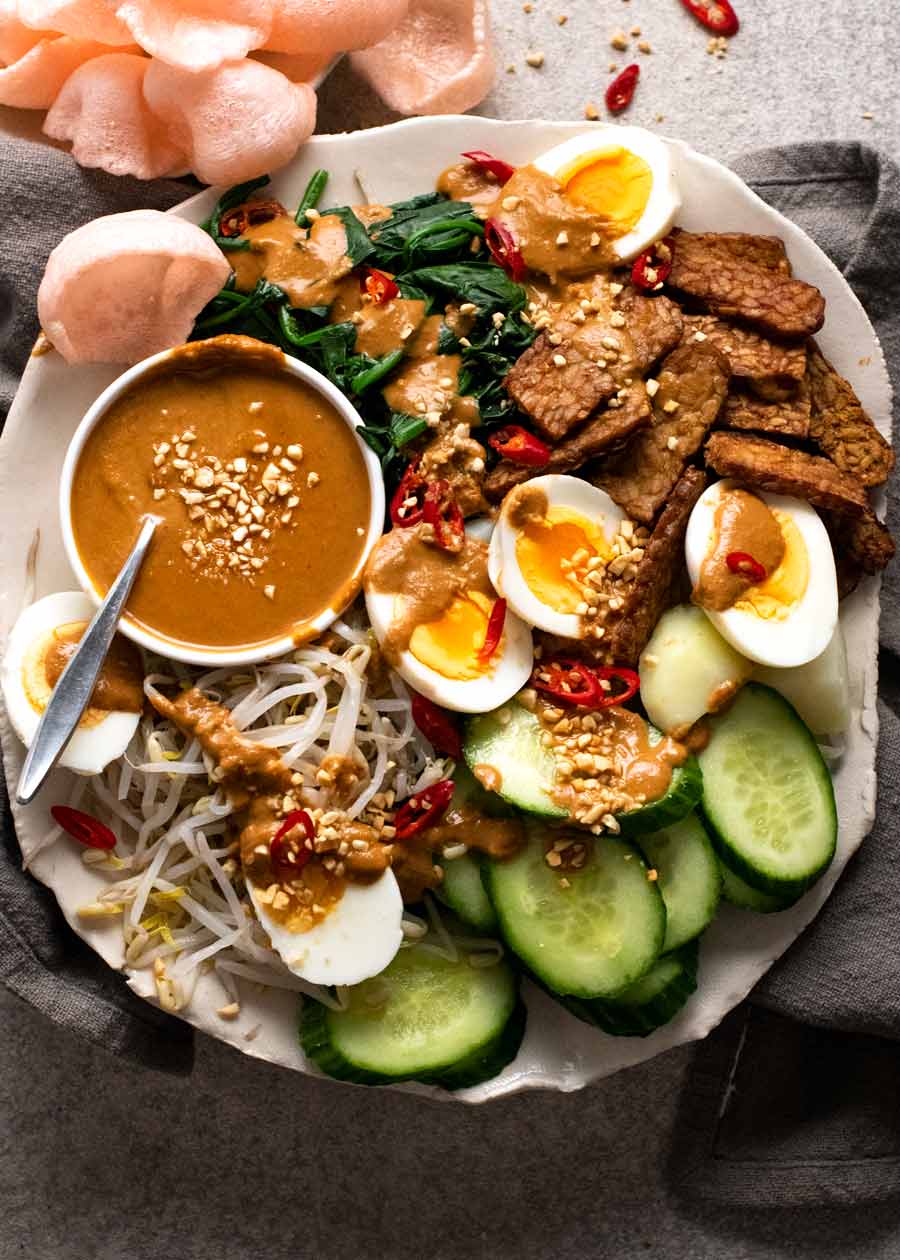
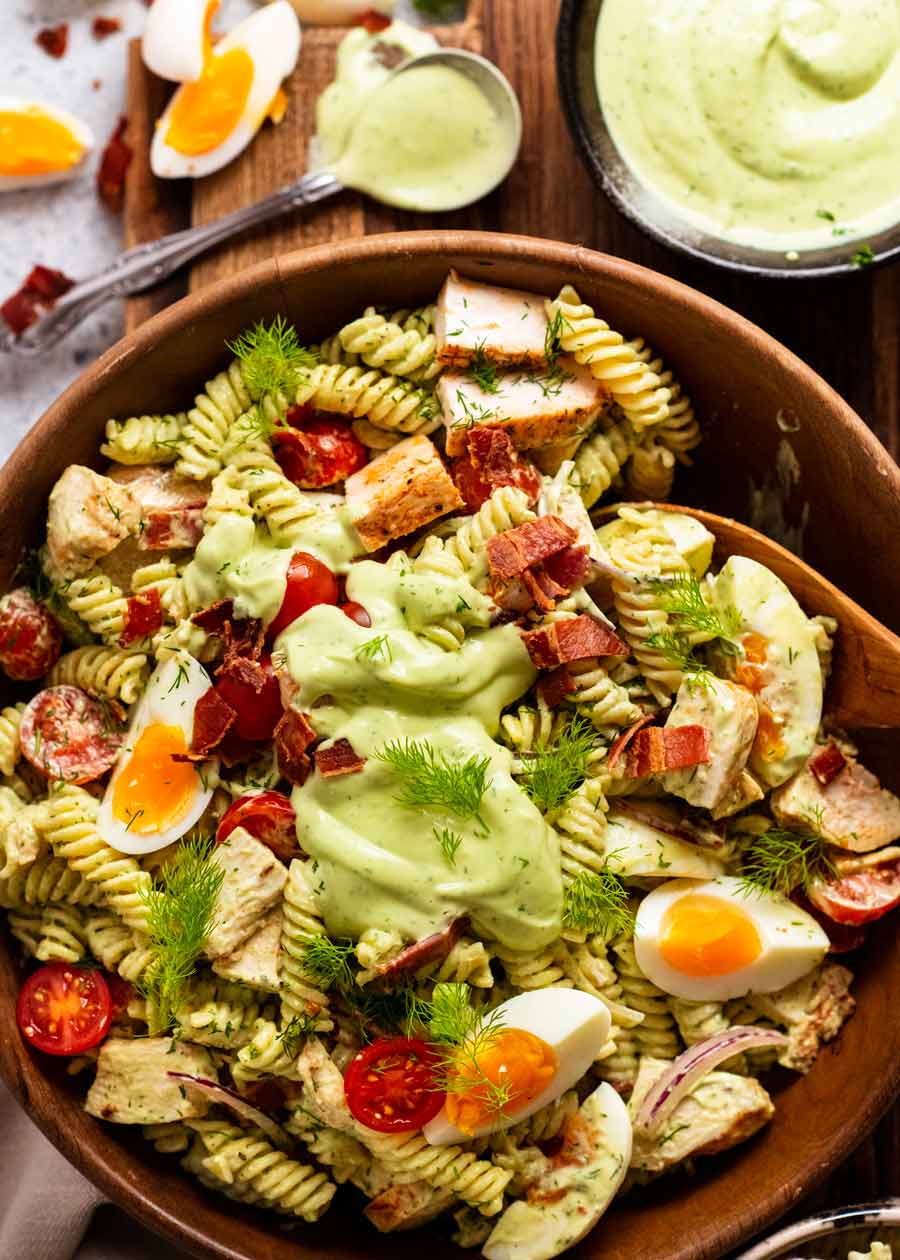
What I use them for – salads (Nicoise, chicken pasta salad, Gado Gado), studded throughout fish pie and for my favourite egg sandwiches.
Hard boiled eggs (10 minutes) – The other alternative level of doneness for the above listed salads. I prefer soft boiled rather than hard boiled simply because the yolks are creamier and the whites are softer.
Overcooked eggs (12 minutes+) – Powdery yolks and rubbery whites are not to my taste, but do your eggs as you wish! I just hope nobody is aiming for the dreaded grey ring around the yolk. That’s as overcooked as you can get!
Egg cracking problems?
To prevent eggs cracking:
Lower the eggs in gently using a slotted spoon or similar – don’t drop them in from a height!
Reduce the heat slightly as soon as the eggs are added so the water isn’t bubbling so furiously that the eggs are thrown around so violently that they crack.
The other thing that can cause egg cracking is thin shells. The thickness of shells varies which can come down to the chicken breed and the quality of the chickens – and therefore the eggs. Do you use free range eggs?
Crater eggs
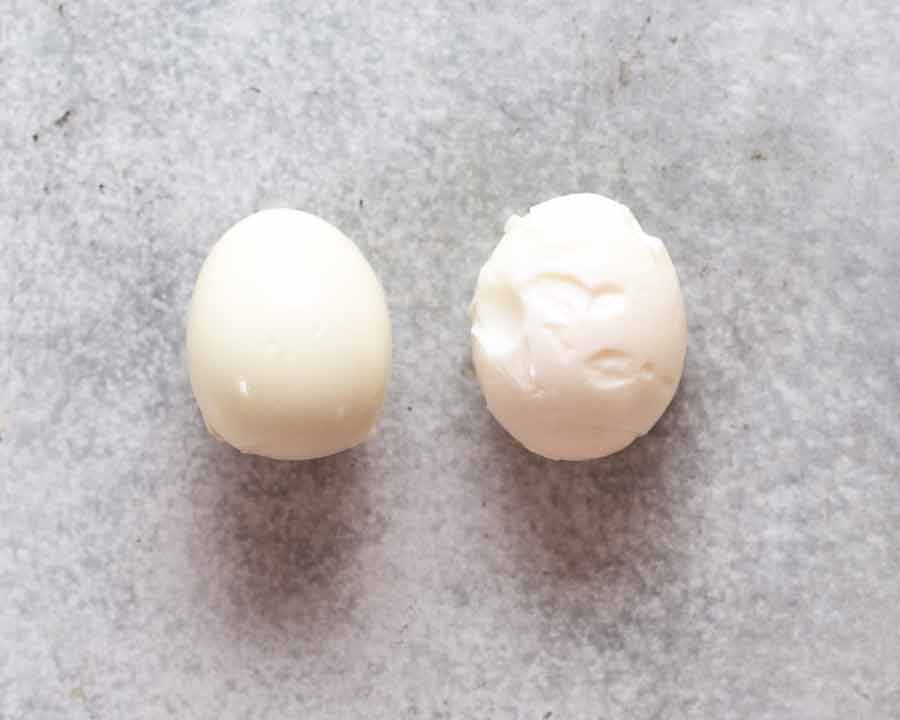
As for the burning question about why some eggs peel neatly and others end up cratered like the moon? Ahh, so much information out there! The only thing I know for sure is that older eggs peel more neatly than fresh eggs. This is simply because the membrane of freshly laid eggs is adhered more firmly to the shell so it’s harder to peel off. The older the egg, the more that membrane degrades = easier to peel.
I find eggs purchased from the store that I’ve had for a week+ in the fridge almost always peel neatly.
And onwards!
And that, my friends, is all the pertinent information I have to impart on the matter of boiling eggs. Go forth and enjoy your new egg boiling life, with guaranteed perfectly boiled eggs every single time!
And for egg boiling experts – share your tips. I love learning new things! – Nagi x
Watch how to make it

How to boil eggs
Ingredients
- Large eggs , fridge cold (55g/2oz each, Note 2)
Instructions
- Water level 3cm/1" – Fill the saucepan with enough water so it will cover the eggs by 3cm / 1" or more.
- Boil first then add eggs – Bring to a rapid boil over high heat. Using a slotted spoon, gently lower fridge-cold eggs into the water.
- Lower heat – Reduce the heat slightly to medium high – water should still be bubbling but not so much the eggs are being bashed around so roughly they crack. (Note 3)
- Start the timer once all the eggs are in. – Dippy solders: 3 minutes (can't peel)– Runny yolks: 6 minutes– Soft boiled: 8 minutes– Hard boiled: 10 minutes
- Cool 10 minutes – Remove eggs using a slotted spoon into a large bowl or sink filled with plenty of cold tap water to cool the eggs. (Ice – Note 4) Cool 10 minutes.
- Peel from base in water – Crack the base of the shell by tapping it on the counter, then peel under water from the base (it's easier).
- Storing – Hard boiled eggs can be stored in the fridge for up to 7 days (peeled or unpeeled). Freezing not recommended (whites go weird).
Notes
Egg doneness
Start timer once eggs put into boiling water:- Dippy soldiers (3 min) – Made for dipping toast stick in (see photo in post). Only outer rim of whites set. Can’t be peeled.
- Runny yolks (6 min) – Barely set whites, runny yolk. Delicate to peel. For runny yolks I usually do poached eggs or sunny-side up.
- Soft boiled (8 min) my favourite – Soft set but fully cooked whites, fully set yolks but a bit jammy. My favourite / most used.
- Hard boiled (10 min) – Firmer whites and fully cooked yolks but not dried out.
- Overcooked (15 min) – No! Unpleasantly firm rubbery whites and powdery dry yolks.
1. Don’t crowd the eggs, they will take longer to cook! Saucepan size for number of eggs: 16cm/6″ – up to 4 eggs 18cm/7″ – 6 eggs More eggs = larger pot 2. Egg size – Eggs are sold in different sizes. The cook times provided in the recipe are for large eggs (55g/2oz each in the shell), sold in cartons labelled as such. For extra-large eggs (60g/2.2oz) add 30 seconds, for jumbo eggs (65g/2.5oz) add 1 minute. 3. Egg cracking – Lower heat as needed to prevent eggs from cracking but goal is to keep it at a gentle boil / rapid simmer. If the water is still, there is not enough heat and your eggs are not cooking fast enough! Still got cracking issues? Thin shells is a problem (are you using free range?) and sometimes eggs already have a hairline fracture (can be invisible). 4. Ice water – there’s no need to waste precious ice for the water though if you have an abundance of ice, feel free to go ahead as it will speed up the cooling time. Just be sure to use enough tap water to cool the eggs. Nutrition per egg.
Nutrition
Life of Dozer
Size context: large eggs and jumbo paws.


The post How to boil eggs appeared first on RecipeTin Eats.
]]> This is a real spaghetti carbonara recipe made the traditional Italian way, without a single drop of cream. It relies solely on egg and cheese to make a luscious, creamy carbonara sauce. Food fit for a king (or queen!) that proves simple can be magnificent. Spaghetti carbonara Carbonara is a beautiful, classic Italian pasta that’s... Get the Recipe
The post Carbonara appeared first on RecipeTin Eats.
]]>This is a real spaghetti carbonara recipe made the traditional Italian way, without a single drop of cream. It relies solely on egg and cheese to make a luscious, creamy carbonara sauce. Food fit for a king (or queen!) that proves simple can be magnificent.
Economical note – Use bacon instead of guanciale and parmesan instead of parmigiano reggiano for a very respectable version of carbonara that will still make Italians proud. But don’t add cream! 😊
Spaghetti carbonara
Carbonara is a beautiful, classic Italian pasta that’s so creamy, you’d swear there’s a good amount of cream in it. And indeed, there’s plenty of recipes that cheat by adding in cream.
But today, we’re making spaghetti carbonara properly, the authentic, traditional way. No cream. Just egg, cheese and a splash of starchy pasta cooking water.
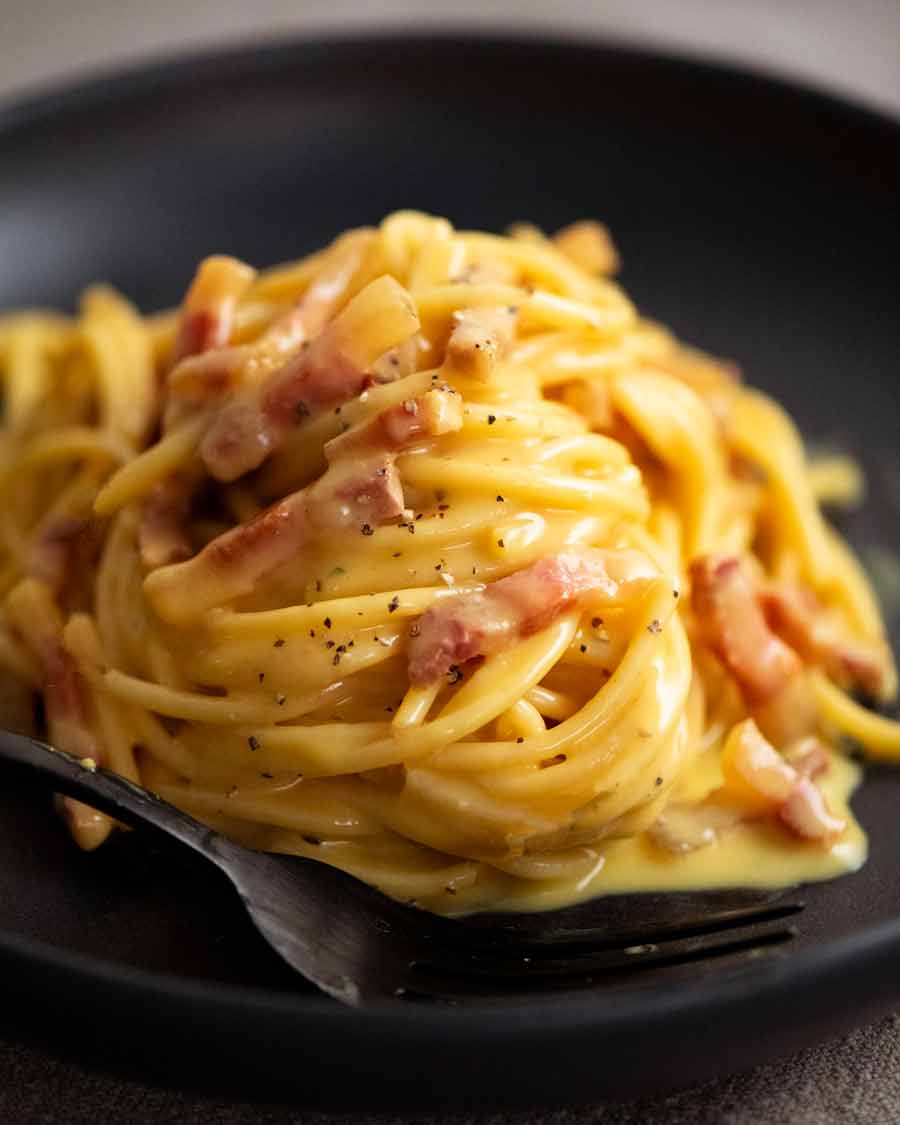
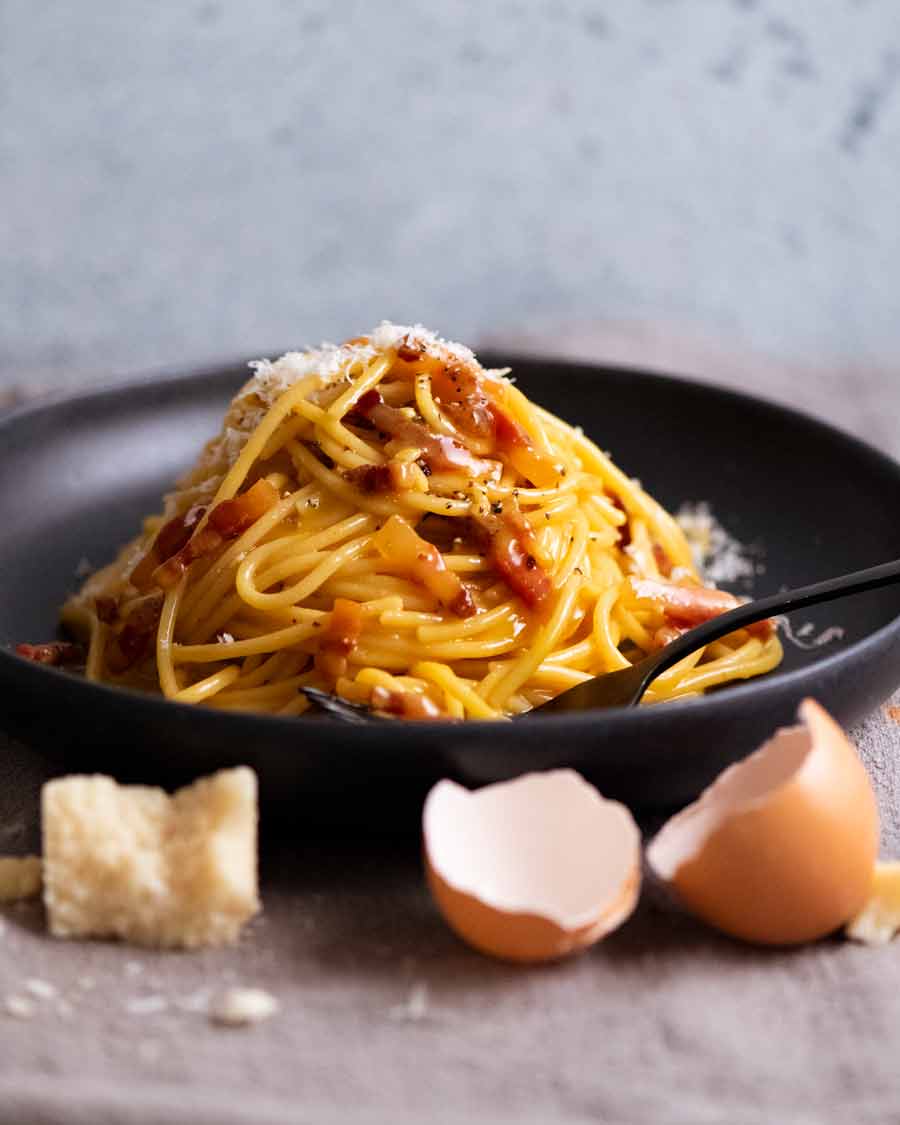
15 minutes later, THIS is the sight that will be in front of you. And you’ll make 60 million Italians beam with pride!
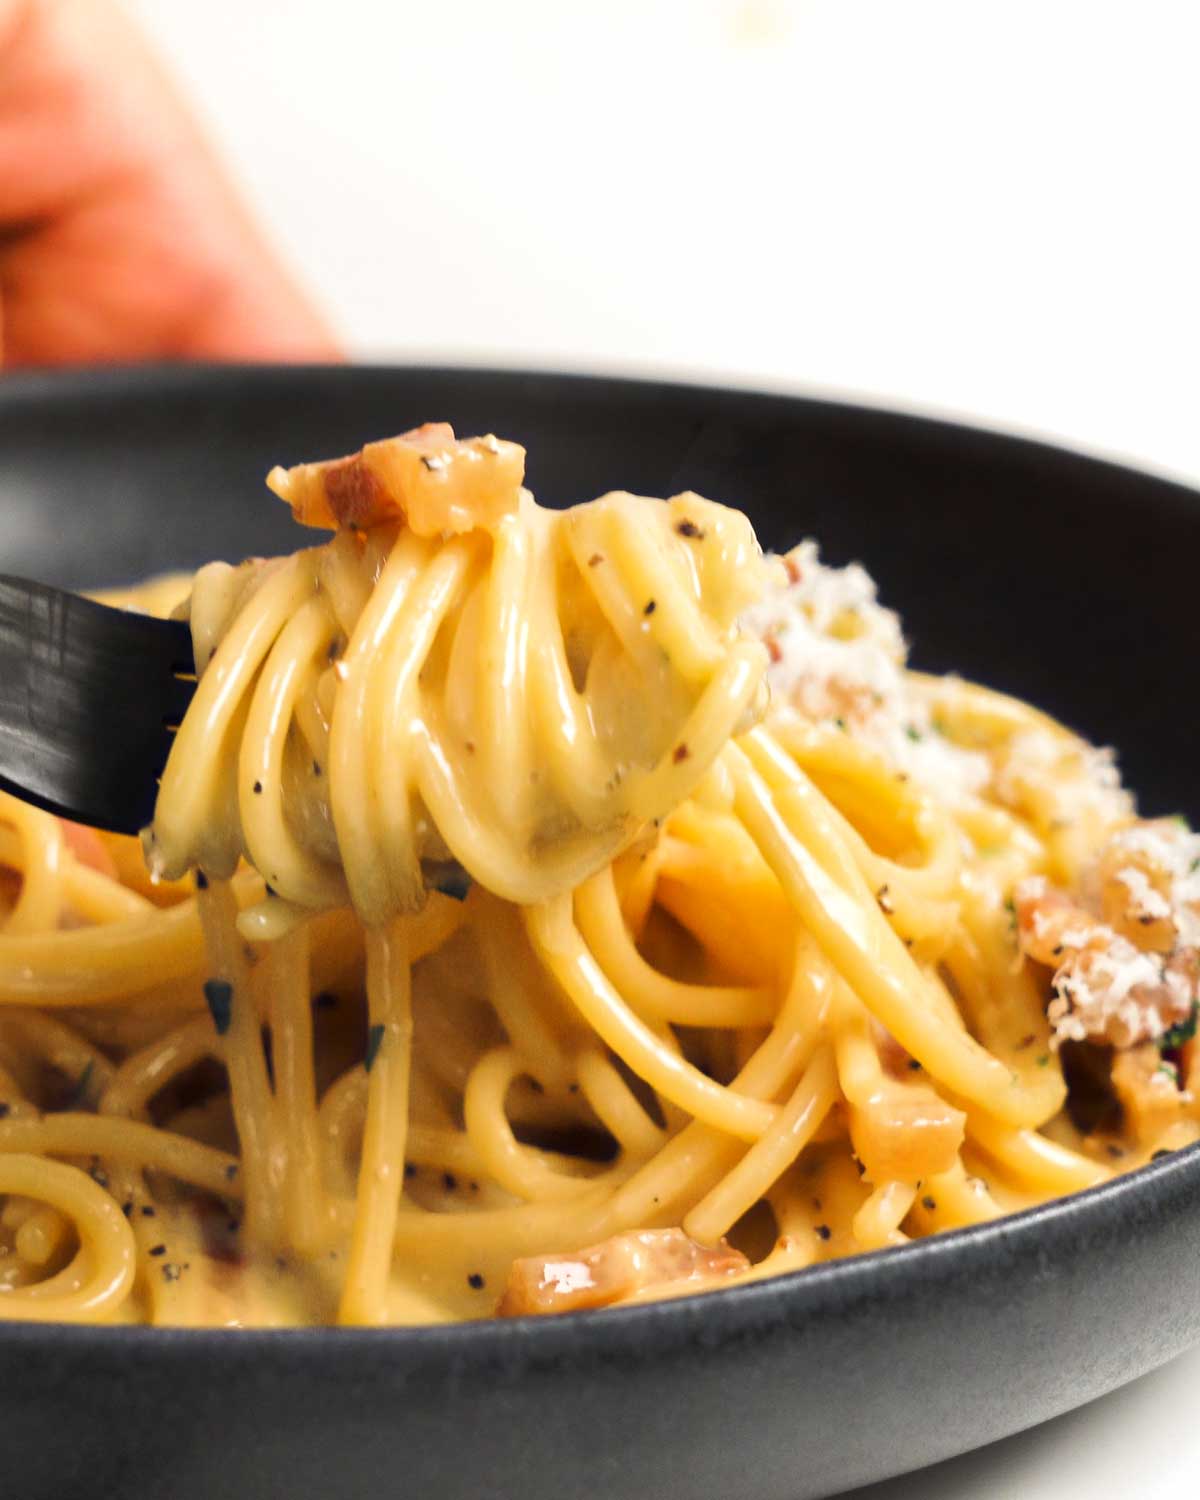
You can imagine eating that mouthful of chewy spaghetti bathed in the creamy sauce, right? Don’t dream about it. Make it a reality!! It’s so quick and easy it will blow your mind!
What happens if I add cream?
Outside of Italy, lots of recipes “cheat” by adding cream into carbonara sauce, for various reasons. Not a bad thing, per se, it’s just that it’s no longer a real carbonara.
But more importantly for me (in addition to, of course, the fact that I’m sharing a recipe with the intention of respecting the origins), cream alters the mouthfeel and flavour. You see, real carbonara is rich and creamy to eat. But you don’t get that slick of dairy fat coating your mouth like you do when eating cream.
Put another way – carbonara is how you get your creamy pasta fix without feeling weighed down like you do when you indulge in pastas doused with heavy cream. Win!
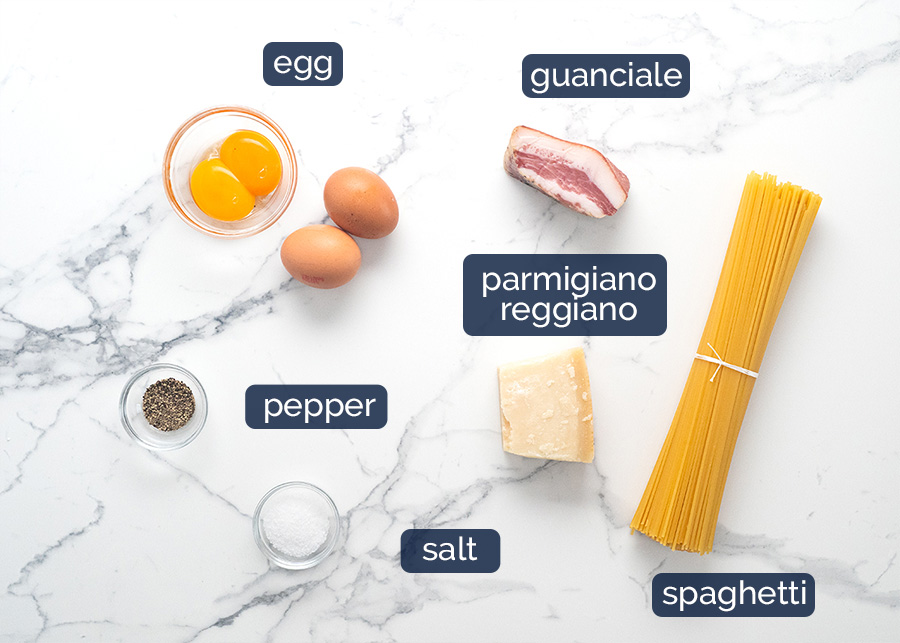
Ingredients in carbonara sauce
Carbonara calls for raw eggs which are stirred vigorously off the stove with hot cooked pasta, guanciale (a cured pork like bacon), parmesan and a splash of pasta cooking water. Watch the magic unfold before your eyes as 4 simple ingredients transforms into a luxurious creamy sauce! NO CREAM allowed!
Economical note: Substitute guanciale with bacon and use parmesan instead of parmigiana reggiano. You’ll still capture the essence of real carbonara that will make Italians proud!
Guanciale – This is a key ingredient in carbonara, and is a cured fatty pork that is similar to bacon and pancetta. It adds adds flavour into the dish and the fat makes the sauce creamy when mixed with the egg and starchy pasta cooking water.
Find it at Italian delis, Harris Farms (Syd, QLD), and speciality produce stores. It’s a bit of a speciality product but can be substituted with pancetta or streaky bacon in a pinch! Best to get block form so you can cut it into thick batons. If pre-sliced is all you can get, try to get thick cut.
More information on guanciale below.
Parmigiano reggiano – This is basically a premium parmesan that’s been aged so it has more complex flavours. It adds salt into the sauce as well as thickening it. Pecorino romano, which is made from sheep milk, is also commonly used, or a combination of the two. Substitute with parmesan cheese.
Must grate your own! Whatever you use, don’t use store bought pre-grated as it won’t melt properly in the sauce.
Egg yolks and whole eggs – The egg combined with the guanciale fat is what makes the stunning creamy carbonara sauce that the world is obsessed with. There’s no need for cream for a creamy sauce! See section above for why.
We use a combination of whole eggs, plus egg yolks for richness. If only yolks are used, the richness is a little too off-the-charts!
Raw egg concerns? These days in developed countries, food safety standards are such that you should not have to be concerned about eating raw eggs sourced from reputable stores. In fact, raw eggs are used more commonly than you probably realise, such as in tiramisu and mayonnaise. So if you’ve ever had any of these at restaurants, you’ve had raw eggs!
However, if you are pregnant or immunity compromised, I would recommend avoiding raw eggs as a precaution. Make fettucine alfredo instead!
Spaghetti – While you can use any long pasta, the most common type used is spaghetti.
Pepper – For seasoning. Freshly ground black pepper recommended here.
No salt in sauce – The pasta cooking water is salted so it flavours the spaghetti as it cooks. And the carbonara sauce gets salt from the guanciale and cheese.
Garlic, optional – While not strictly traditional, garlic is a popular addition and it does add extra flavour into it.
Guanciale for (real) carbonara
Worth hunting down? Yes, if it’s accessible, within your budget and you are keen to experience an authentic carbonara. But bacon or pancetta makes a very respectable substitute!
Guanciale is a cured Italian pork that is made from pig jowls or cheek that looks like a block of bacon. It has more intense flavour than everyday bacon because of the pork cut used and it’s aged 3+ months.
It has a high proportion of fat, and that’s exactly as it should be and is needed for carbonara. The fat that melts out of the guanciale when sautéed until golden is a key flavouring for the creamy carbonara sauce.
Equally important is that the fat that melts out of the guanciale is required to thicken the carbonara sauce to make it creamy. Basically, what happens is that when the fat from the guanciale and in the egg yolks is mixed with starchy pasta cooking water, it thickens. This is what makes the sauce creamy and cling to the pasta strands rather than a watery pool in the base of your bowl. You’ll see in the recipe video below!
If you don’t have enough fat (for example, if you try to make this with lean bacon), your sauce will never thicken.
Substitute guanciale with pancetta or bacon, preferably in block form so you can cut it into batons. Biting into the golden brown chunks of guanciale is a highlight of this dish!! Whichever you use, it’s essential to ensure there’s plenty of streaks of fat.
Pre-sliced bacon? It will work but because the slices are thinner than the ideal baton size, you will end up with a lot more bacon bits throughout your dish than pictured in this post. Perhaps not considered a negative, by some!
How to make (real) carbonara
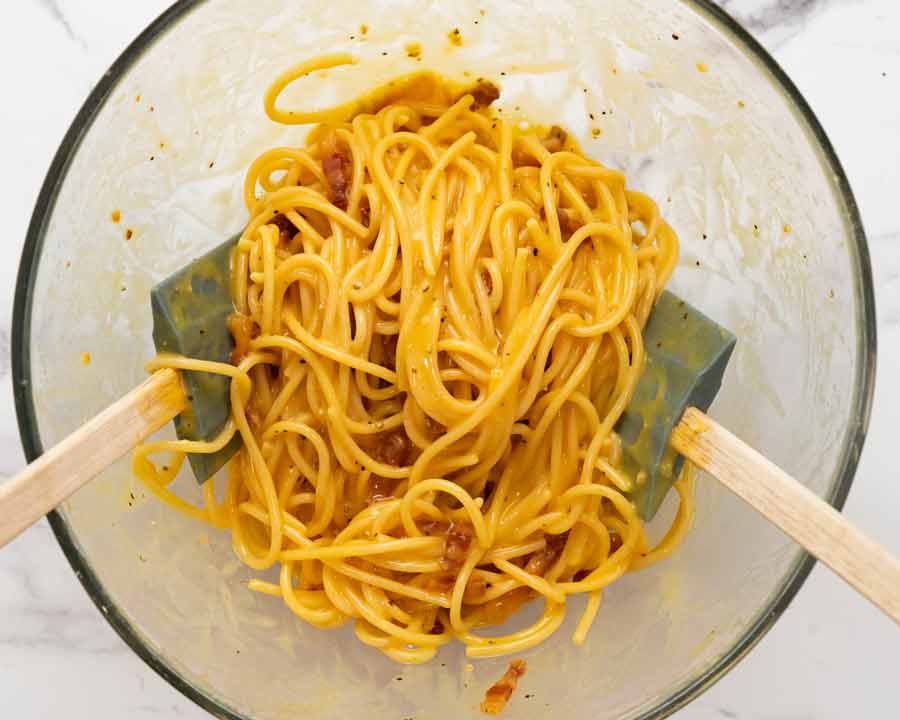
Sauté guanciale until golden. Mix hot cooked pasta vigorously with the guanciale, egg, cheese and a splash of pasta cooking water and watch as it transforms into a luxurious, creamy sauce.
HOT TIP: Use the handle of a wooden spoon to mix. Fast and effective!
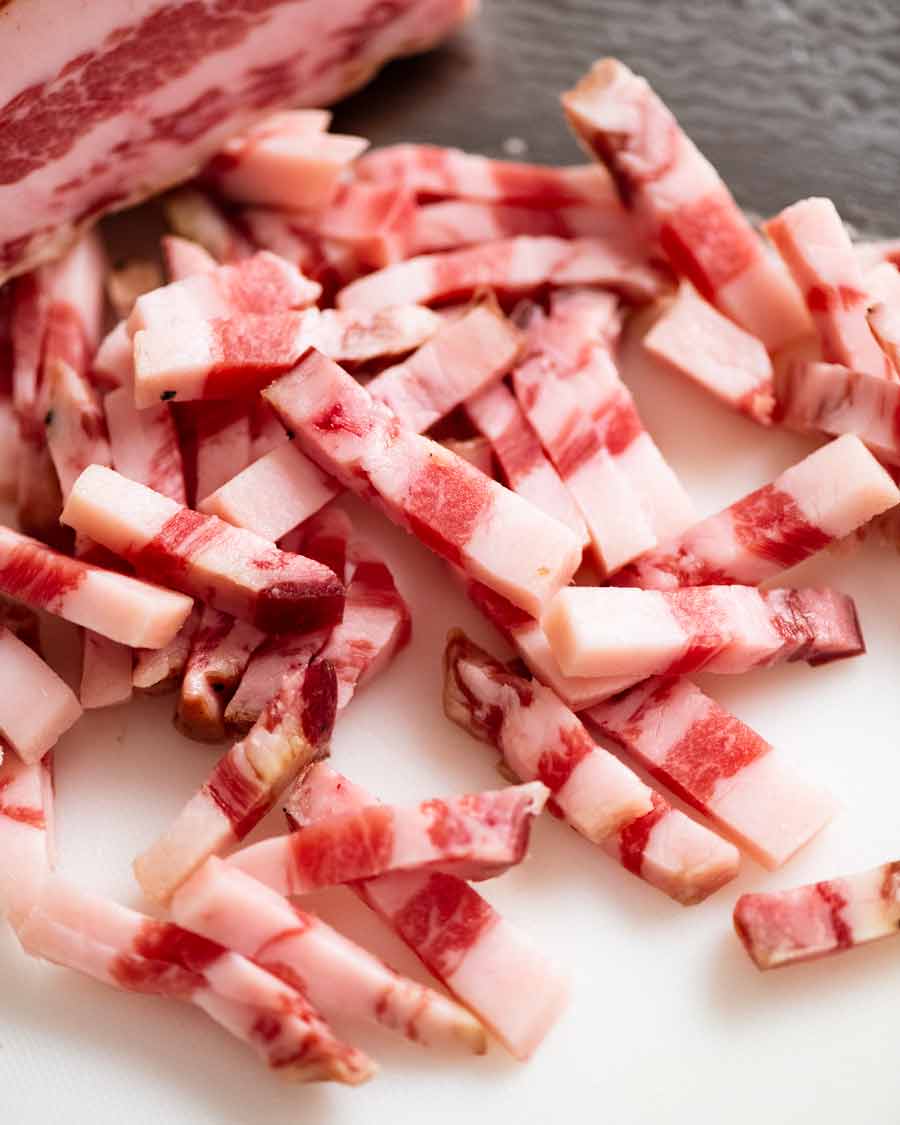
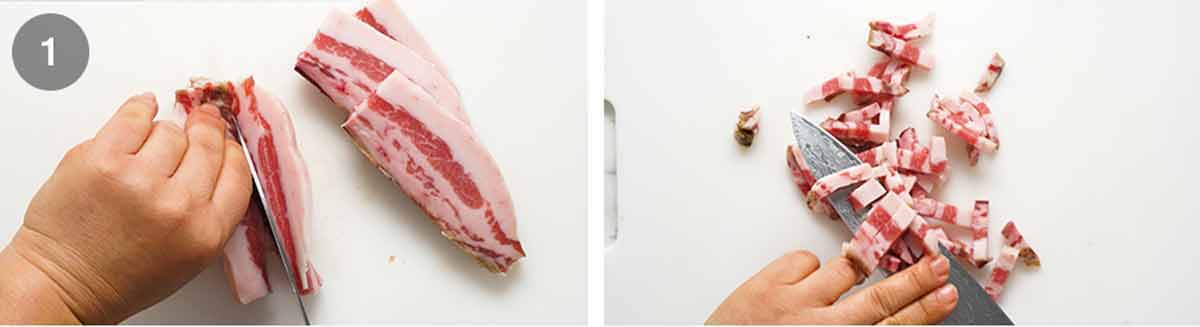
Batons – Cut the guanciale into thick batons. Biting through the golden brown crust into meaty bits of salty guanciale is part of the awesomeness that is carbonara!
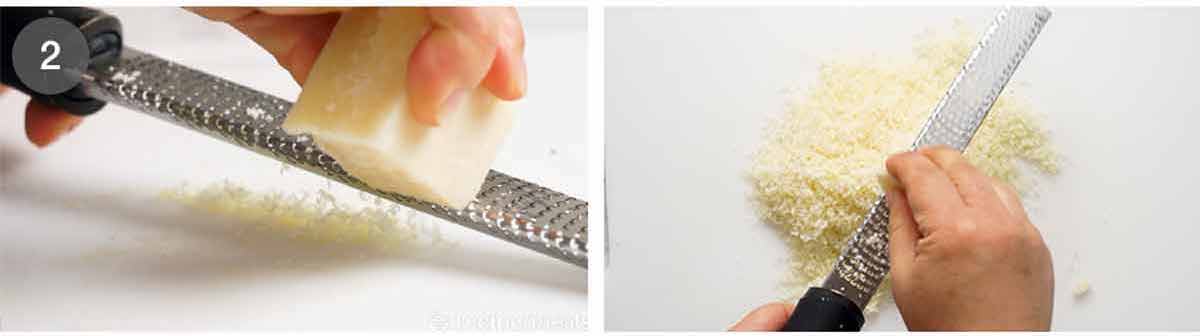
Finely grate the parmigiana reggiano or pecorino. I use a microplane – one of can’t-live-without kitchenware items!
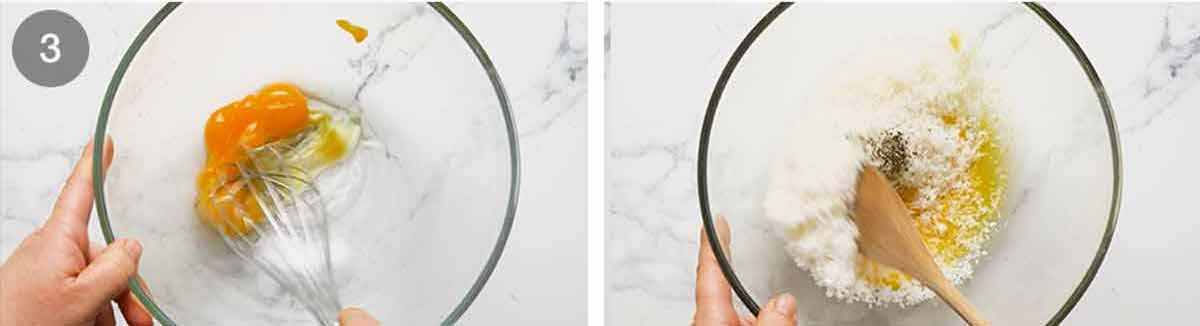
Sauce – Whisk together the egg, cheese and pepper in a large bowl. It needs to be a large bowl because the pasta will be stirred into the sauce in the bowl, off the stove, to avoid scrambling the eggs.
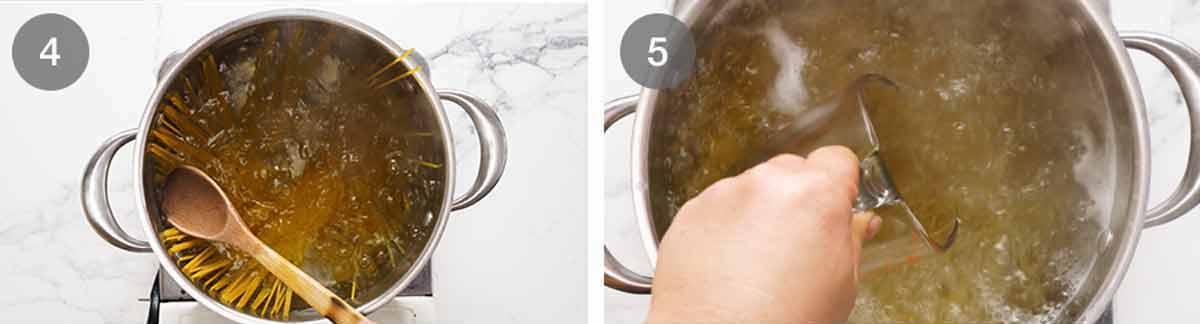
Cook pasta – Bring 4 litres (4 quarts) of water to the boil with 1 tablespoon of salt. Cook the pasta per packet directions. It should be firm, not soft, but fully cooked through.
Reserve pasta cooking water – Just before draining, scoop out one cup of pasta cooking water. Then drain the pasta in a colander.
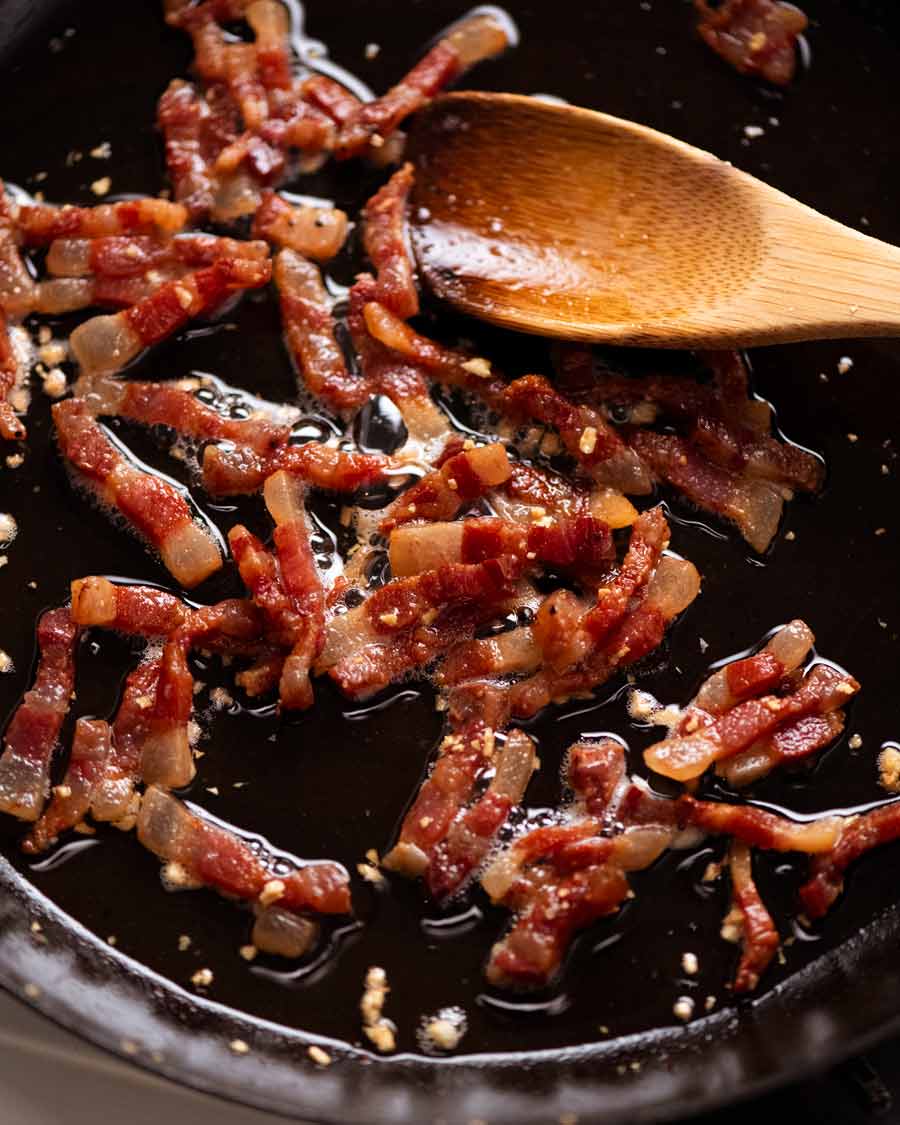
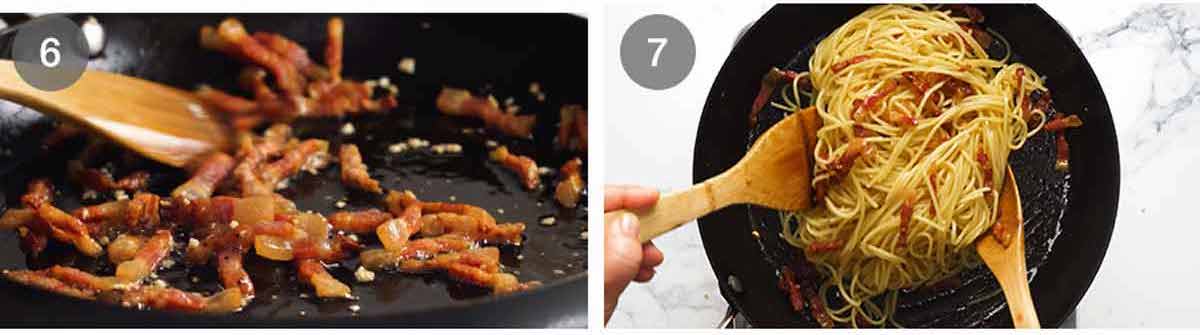
Cook guanciale until golden while the pasta is cooking. You don’t need any oil, the guanciale will fry in its own fat.
Toss pasta in guanciale – Tumble the hot pasta into the pan with the guanciale then toss so the pasta gets coated in the guanciale fat.
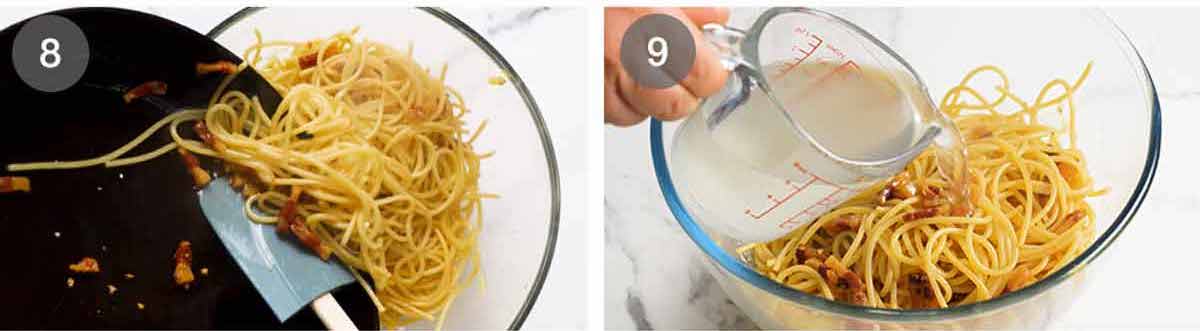
Transfer into sauce bowl – Tip the hot pasta into the bowl with the egg and use a rubber spatula to scrape out every drop of the guanciale fat into the bowl. That stuff is gold!
Add 1/2 cup pasta cooking water into the bowl.
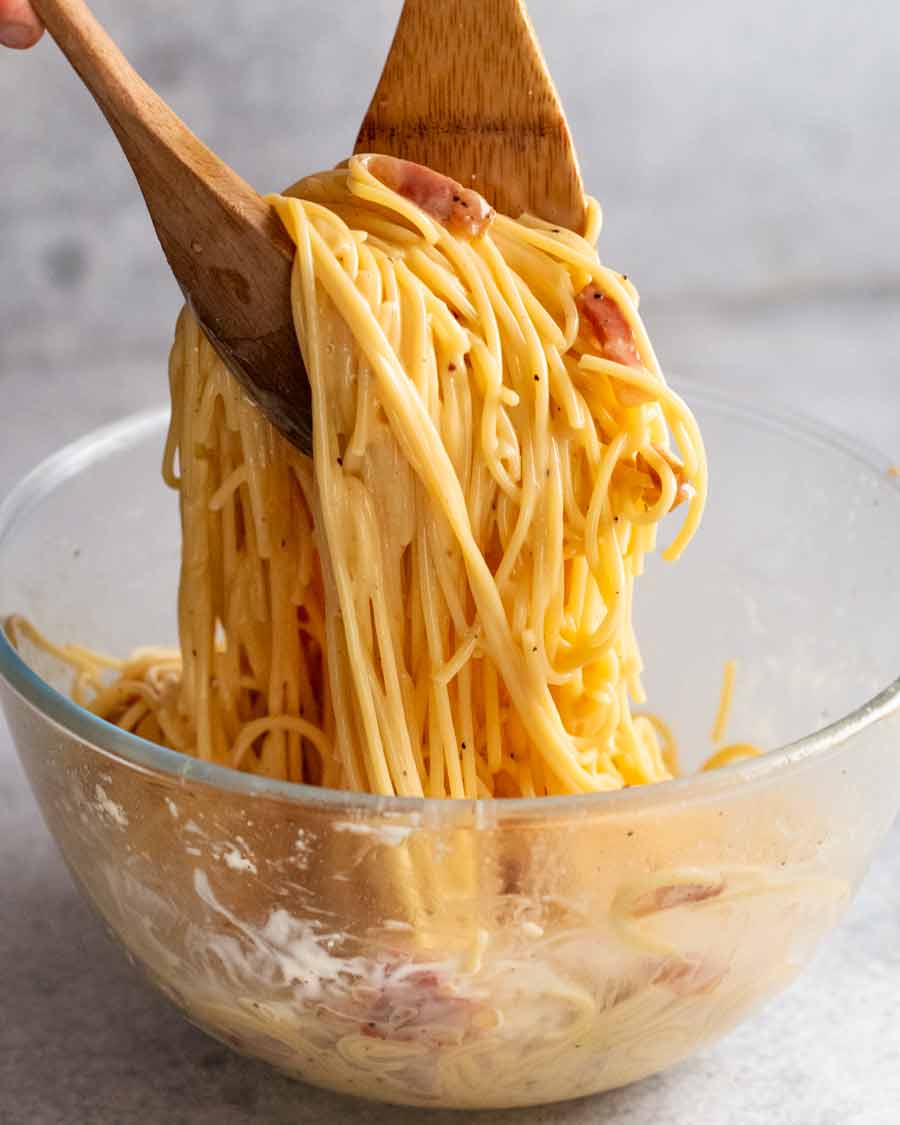
Mix vigorously with the handle of a wooden spoon, spinning the pasta around, for around 30 seconds to 1 minute. Watch as the watery pale yellow liquid magically transforms into a creamy sauce.
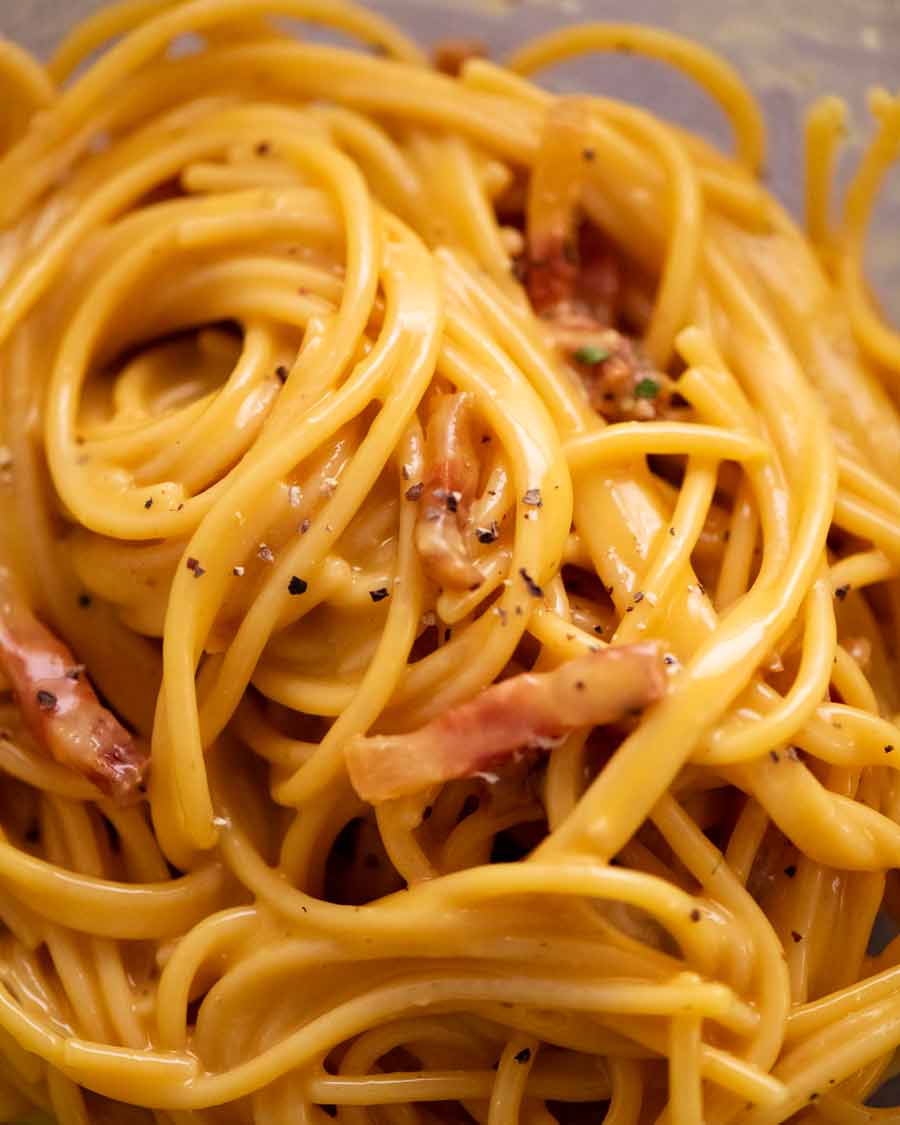
You know it’s ready when the sauce is no longer watery and pooled in the bottom of the bowl. Instead, it will be thickened, creamy, and clinging to the pasta!
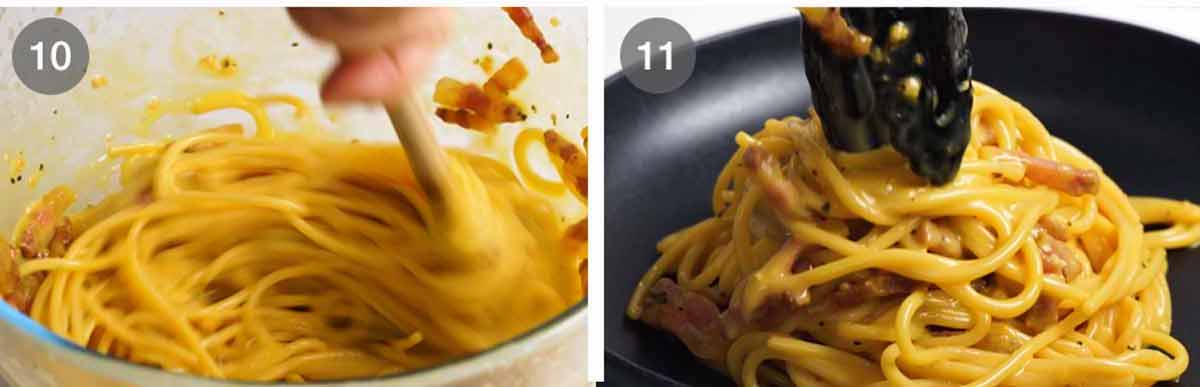
Serve immediately in warm bowls. Pasta waits for no one!
Warm bowls? Yes. I don’t usually warm bowls for serving food, but for pasta, I almost always do. This is because pasta is at its best when it’s freshly made with the sauce is slick and the pasta is juicy. As it cools, the sauce thickens and the pasta gets stodgy. A warm bowl prolongs the life of pasta. I just warm bowls by placing a stack in the microwave for 1 minute. Else, run it under hot water or put in a low oven.
And there you have it. One of the most luxurious pasta dishes in the world. Did you know it was this quick and easy to make? Such is the beauty of Italian food. The simplicity, letting produce take centre stage with a few little tricks to make magnificent good with so few ingredients.
5 ingredients.
15 minutes.
It’s an absolutely stunner. I really hope you try this one day. – Nagi x
Watch how to make it

Carbonara (real)
Ingredients
- 175g/6 oz guanciale (pancetta or block bacon), weight after skin removed (Note 1)
- 2 large eggs (Note 2)
- 2 egg yolks (Note 2)
- 100g/3.5 oz parmigiano reggiano , finely shredded (or pecorino romano, sub parmesan, Note 3)
- 1/4 tsp black pepper
- 400g/14 oz spaghetti
- 1 tbsp cooking/kosher salt (for cooking pasta)
- 1/2 cup pasta cooking water
- 1 garlic clove , finely minced (optional, Note 4)
Garnish (optional):
- Parsley , finely chopped
- Parmigiano reggiano
Instructions
- Guanciale – Cut into 0.5cm / 1/5" thick slices then into batons.
- Carbonara sauce – Place eggs and yolks in a large bowl. Whisk to combine. Then stir in the parmesan and pepper.
- Cook pasta – Bring 4 litres (4 quarts) of water to the boil with the salt. Add pasta and cook per the packet directions.
- Reserve pasta water – Just before draining, scoop out 1 cup of pasta cooking water, then drain the pasta.
- Cook guanciale – While the pasta is cooking, place guanciale in a non stick pan over medium high heat. Cook for 4 to 5 minutes until golden. No oil needed – as the guanciale heats up, the fat will melt so it fries in its own fat. If using garlic, add it in the last minute.
- Pasta in pan – Tip the hot pasta into the pan and toss to coat in guanciale fat.
- Mix pasta in sauce – Transfer the pasta and any residual fat in the pan into the bowl with the egg. Add 1/2 cup (125 ml) pasta cooking water. Stir vigorously using the handle of a wooden spoon for 1 minute and watch as the sauce transforms from watery to creamy and clings to the pasta strands!
- Serve – Transfer into warm bowls. Serve immediately, garnished with a little extra parmigiana reggiano if desired, and a pinch of black pepper and finely chopped parsley.
Notes
5. Leftovers will keep for 3 days but pasta really is always best eaten freshly made, in particular for carbonara!Life of Dozer
Recently discovered iPhone photo Memories on my phone. Here’s the one that came up today!

The post Carbonara appeared first on RecipeTin Eats.
]]>