 There’s nothing like a hot, fresh empanada straight out of the oven! And this recipe is everything you dream an empanada to be: golden, buttery, flaky pastry that’s crispy all over. Inside, a juicy beef filling with an extra flavour punch from chorizo, plus the traditional little bits of chopped egg and olives. A worthy... Get the Recipe
The post Beef empanadas appeared first on RecipeTin Eats.
]]>There’s nothing like a hot, fresh empanada straight out of the oven! And this recipe is everything you dream an empanada to be: golden, buttery, flaky pastry that’s crispy all over. Inside, a juicy beef filling with an extra flavour punch from chorizo, plus the traditional little bits of chopped egg and olives.
A worthy addition to the RecipeTin cult-classic collection!

Empanadas recipe
Great empanadas are hard to come by here in Sydney. They should be hot and crunchy on the outside, with juicy flavourful fillings on the inside.
But all too often the pastry is dry and lacking in the signature crispiness, and the filling is dry and bland. Why-oh-why are so many empanada fillings so dry?? To protect the crispy pastry, I guess. But a dry filling is a high price to pay!
So, that ranting introduction is a good foray into what to expect from my empanadas!
Empanadas 101: These delicious handheld pies are pastries stuffed with a variety of savoury fillings including beef, chicken, pork, cheese and vegetables. There’s also sweet versions too! Native to South America, almost every country in Latin America has their own version. Depending where you are, typical fillings vary and empanadas can be baked or deep fried.

Empanada components
The following sections step through how to make empanadas, as follows:
Empanada filling – Nothing tricky here, it’s like making bolognese!
Empanada dough – Made in a food processor for convenience, or hand if you prefer. You’ll love how easy this dough is to work with.
Wrapping the empanadas – Dead easy, because the pleats are 100% optional!
Baking – Just 20 minutes in the oven.
Empanada Filling
Start with the filling first because the empanada dough can be made in the time it takes to fully cool the filling.
Empanada filling ingredients
Empanadas come with all sorts of fillings. Today, I’m sharing a beef one. It gets a punch of flavour from chorizo and spices.
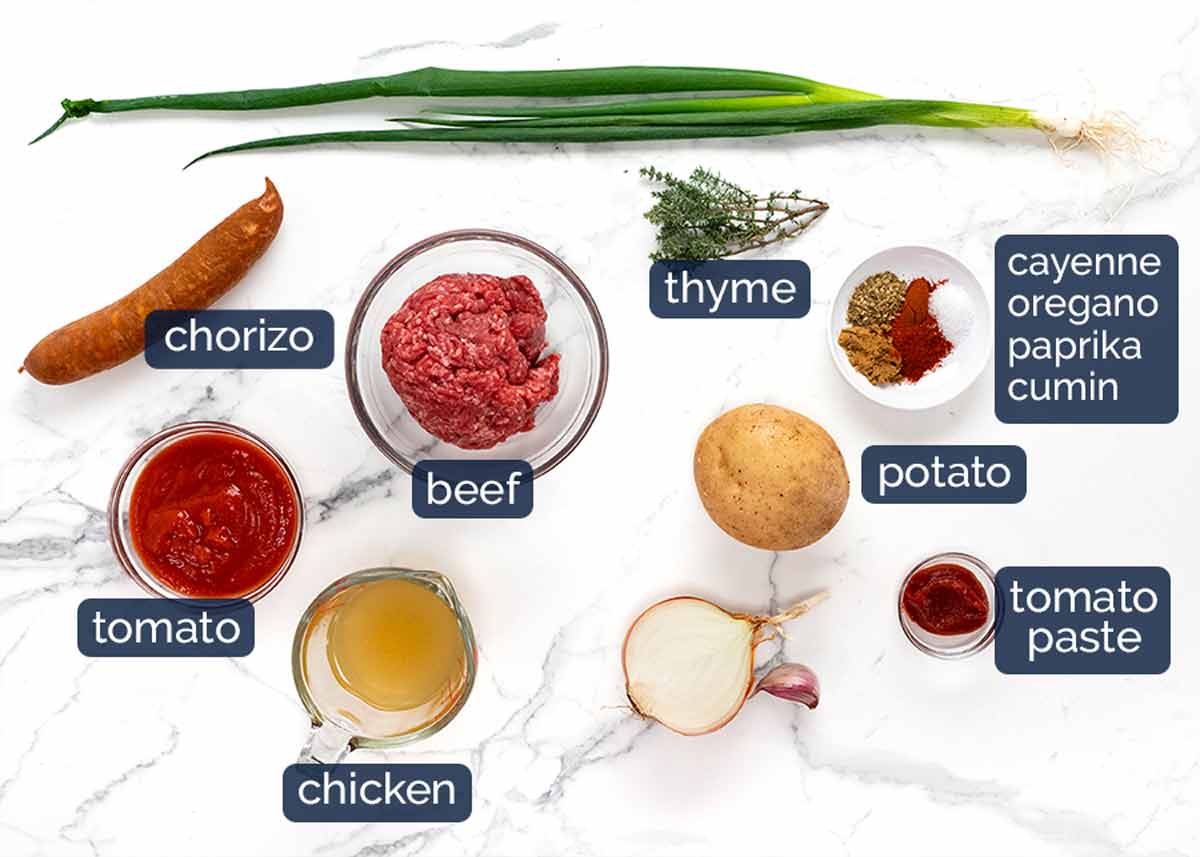
Beef – Just ordinary beef mince / ground beef.
Chorizo – The above mentioned flavour punch! We blitz it up into a paste using a stick blender for maximum effect. LOVE how it blends seamlessly into the beef!
Potato cubes – A traditional inclusion in empanada filling. Starchy potatoes work best because they are fluffier when cooked but any potato really will work just fine.
Herb and spices – Fresh thyme, cayenne, oregano, paprika and cumin. I am a little more heavy handed on the spices than most recipes because I like a punchier flavoured filling. Nobody has ever accused me of bland food! 😂
Tomato paste – For flavour.
Tomato passata (puree) – Pureed, strained plain tomato, widely available these days in Australia in the pasta and canned tomato aisle. See here for more information.
Some will argue that passata is not strictly traditional but I add it because it keeps the filling nice and juicy. Dry filling is a gripe I have with empanadas I’ve tried in my time! Water makes the filling watery which makes the pastry soggy.
Chicken stock/broth – For simmering, to provide a little liquid so the potato cooks.
Garlic and onion – Aromatics for flavour base.
Green onion – For freshness and appealing green bits.
How to make the empanada filling
Really, it’s no different to making bolognese – except it’s less saucy and it has punchier flavours! 😎
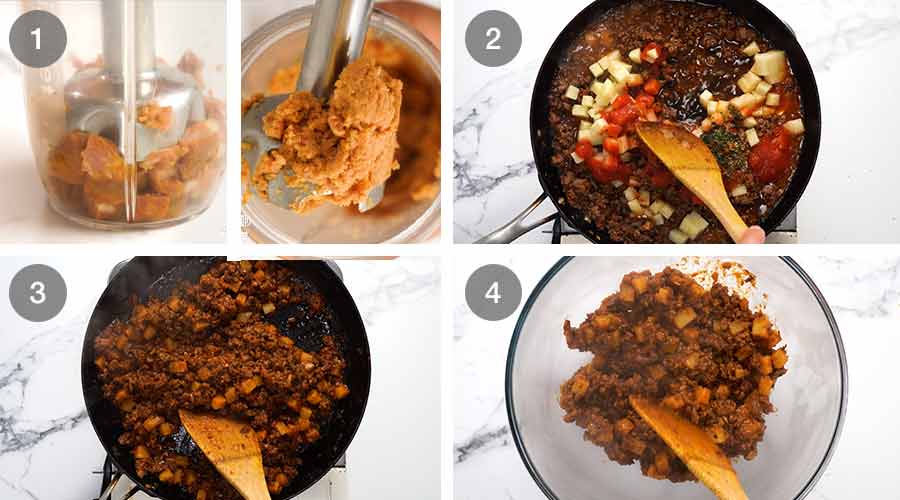
Chorizo blitz – Use a stick blender to blitz the chorizo into a paste. It really does not take long if you chop the chorizo beforehand, just 10 seconds or so. Don’t skip this step! Maximum flavour release and I love how it just seamlessly mixes in with the beef.
Cook like bolognese! Start with onion and garlic, then chorizo to get the tasty red oil out and make it nice and golden. Then cook the beef, breaking it up as you go. Cook off the tomato paste for 1 minute to caramelise it a bit which releases more flavour. Then add everything else, stir, and simmer for 15 minutes.
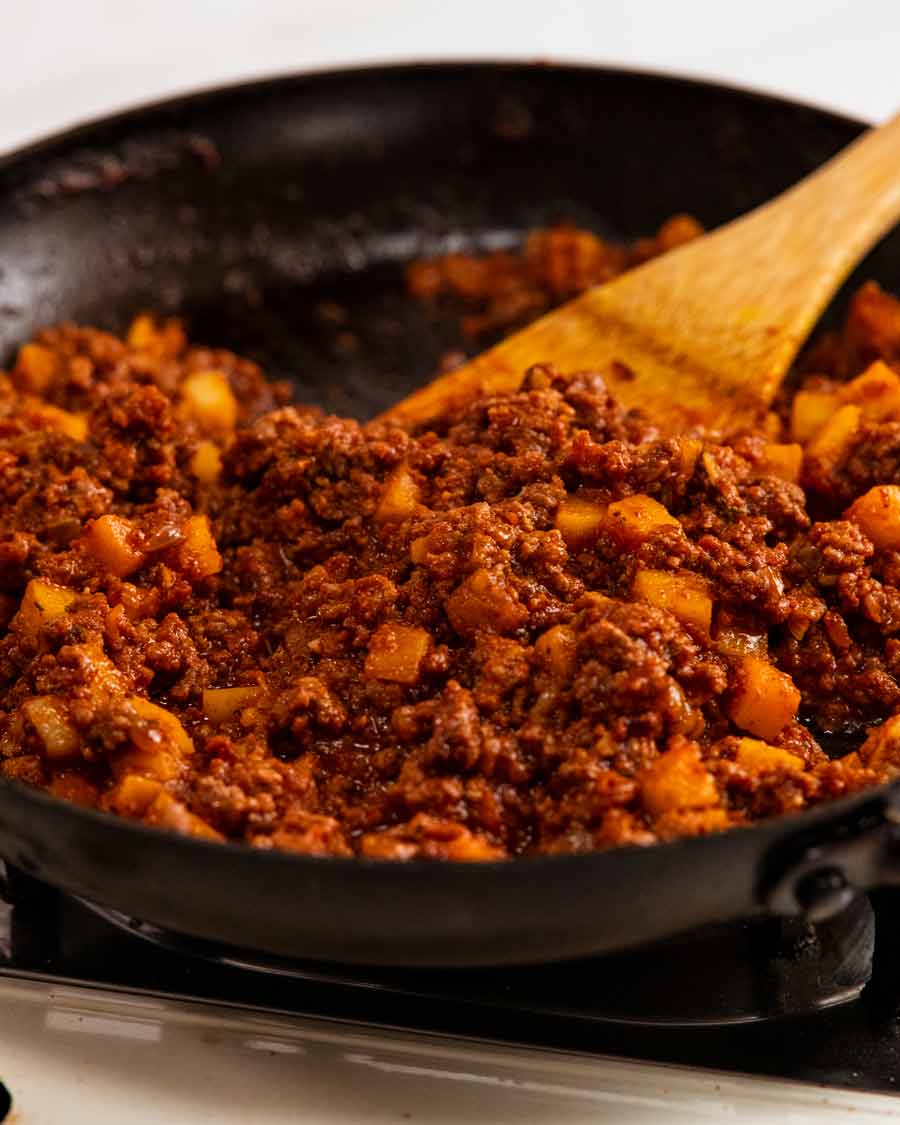
Goal: juicy but not watery – We want the mixture to be juicy (because nobody likes a dry empanada filling!) but not watery (because nobody likes soggy pastry!). Also by this time the potato should be cooked through.
Cool filling completely before using, at least 2 hours. Hot filling = melts butter in pastry = less flaky. Plus also it will “steam” inside the pastry and make it soggy.
Goal filling texture – Cool/cold but spreadable. If you refrigerate overnight (up to 3 days!) it will become a solid block which is impossible to wrap neatly. Let it come to room temp or microwave in bursts, stirring in between, until it becomes spreadable.
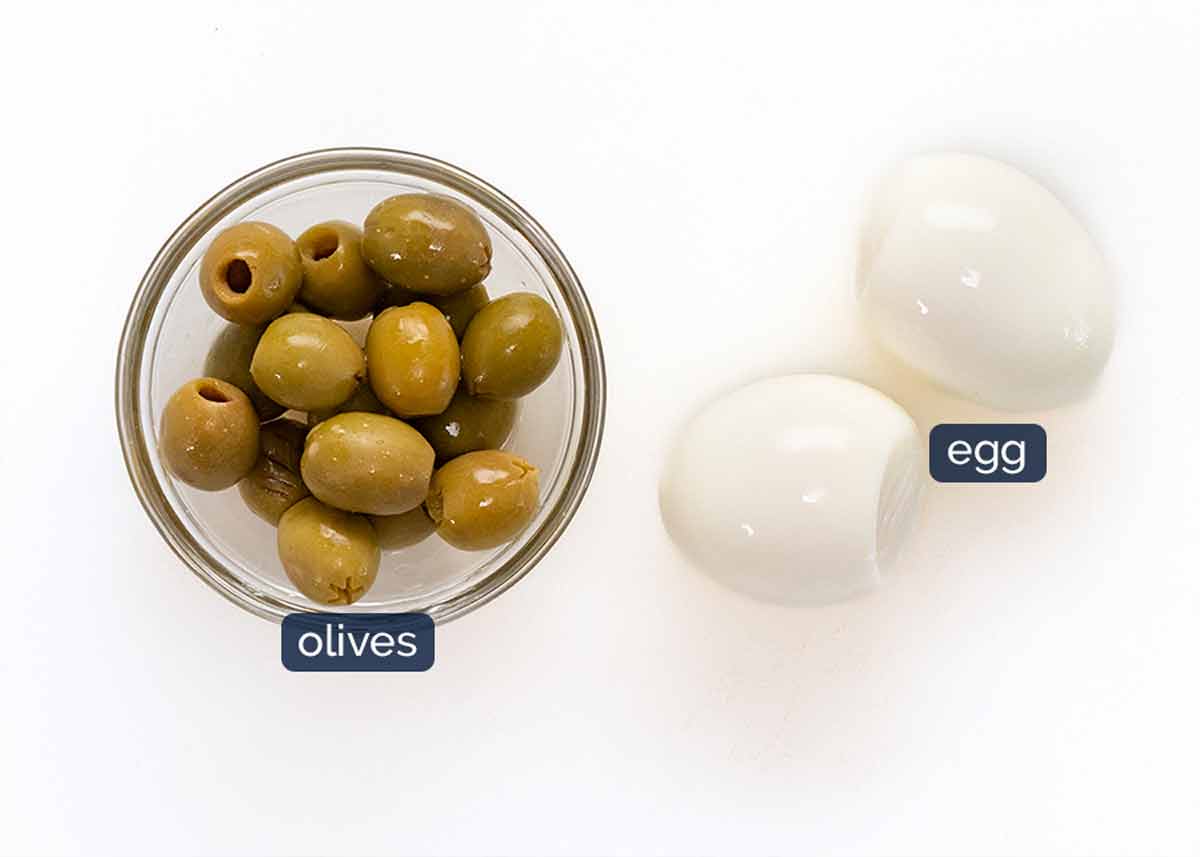
Filling add-ins
This recipe is inspired by Argentinian-style empanadas, so we also include the traditional chopped up olives and hard boiled egg. These additions add interest and make them proper South American-style empanadas, so don’t skip them! They are not mixed into the filling but sprinkled on top just before wrapping.
Empanada dough
Empanada dough is a type of shortcrust pastry. It’s buttery and flaky, similar to the pastry used for pies like pumpkin pie, apple pie etc, but it’s not sweet.
You will love how it’s so easy to work with. It’s easier to work with than store bought puff pastry!
Ingredients in Empanada dough
Here’s what you need to make empanada dough.
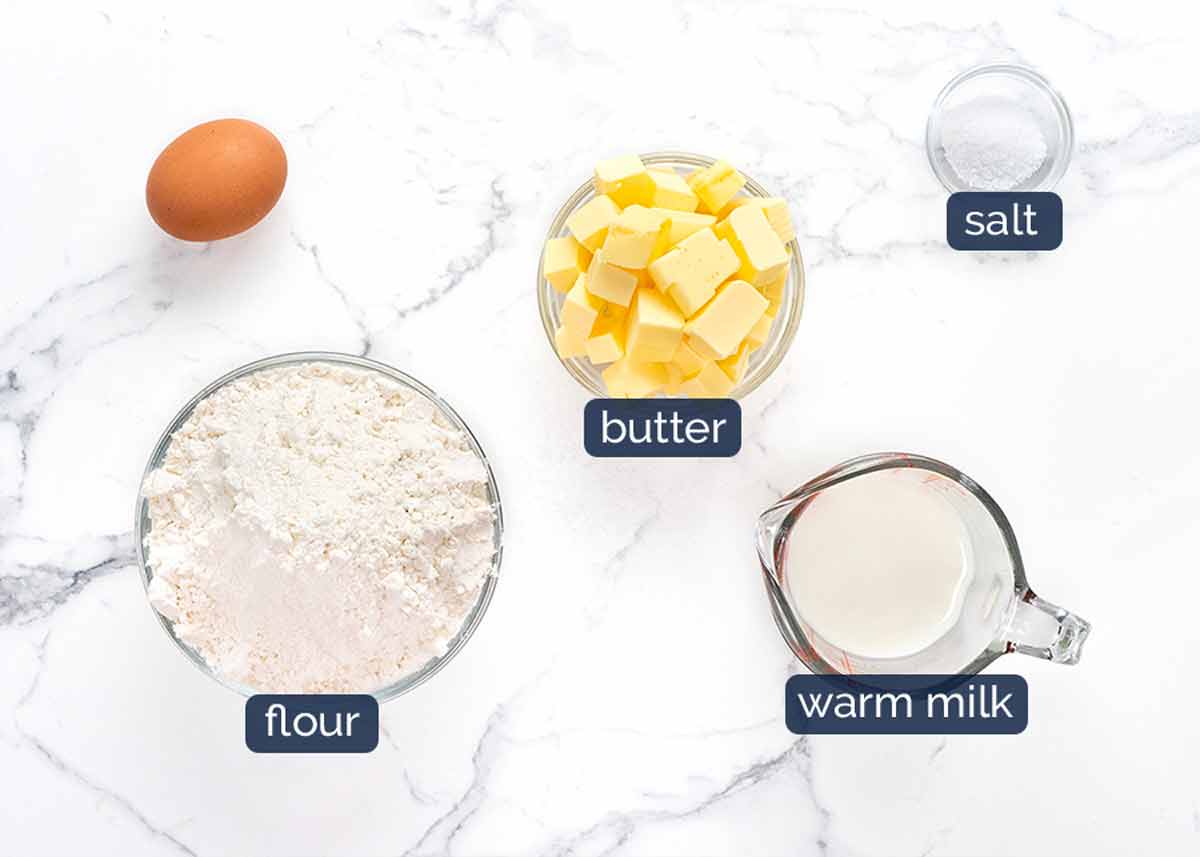
Flour – Just plain / all purpose flour.
Butter – cold, cut into cubes so it’s easy to blitz into fine crumbs in the flour. Tiny little bits of butter throughout the pastry is what makes it beautifully flaky!
Egg – Eggs are not usually included in traditional shortcrust pastry. It makes the dough slightly less crumbly – intentionally, because these are hand held pies. It also has the added bonus that it’s easier to work with as it makes the dough more pliable and less prone to breaking.
Warm milk – Similar to egg, this is not in traditional pastry but makes the pastry slightly less brittle than the pastry on regular pies which is what we want for hand-held empanadas. The milk is warm so it blends into the pastry more easily but because we only use a bit, it’s not enough to melt the butter.
How to make Empanada dough
While it can be made by hand, I opt to use a food processor for ease and speed, as well as to avoid the problem of my hot little hands melting the butter as I work the dough. (As noted above, little butter bits = flaky pastry!).
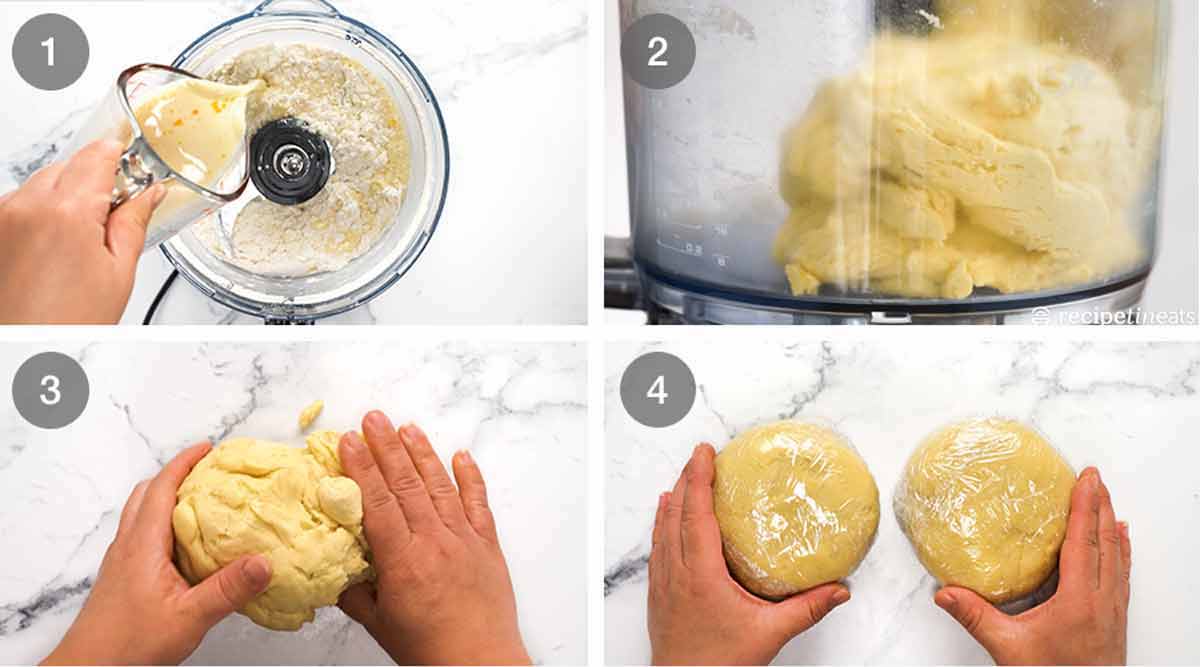
Blitz – Pulse flour, salt and butter until the butter becomes crumbs, usually around 4 to 6 pulses. The largest bits should be no bigger than peas. Whisk the egg and milk together, pour that in then blitz on low speed until the dough comes together – about 10 to 15 seconds.
Blade – Use a dough blade if you’ve got one but as you’ll see in the video, I always forget to switch it from my standard sharp “S” blade and it works just fine!
Dough – This is what the dough looks like in the food processor. Kneaded and ready to go!
Bring together – Turn the dough out onto a work surface then knead it just to bring together into a smooth ball.
Refrigerate 30 minutes – Divide the dough into two pieces then shape into 2cm / 0.8″ thick discs. Wrap in cling wrap and refrigerate for 30 minutes.
It can stay in the fridge for up to 2 days but will become rock hard. Take it out around 30 minutes prior before rolling out.
Hand kneading method
Mix flour and salt in a bowl. Rub cold butter in with fingertips until fine crumbs form. Mix in whisked milk and egg using the handle of a wooden spoon. Turn out onto lightly floured work surface and knead for 5 minutes or until it becomes a smooth ball, as pictured and per video.
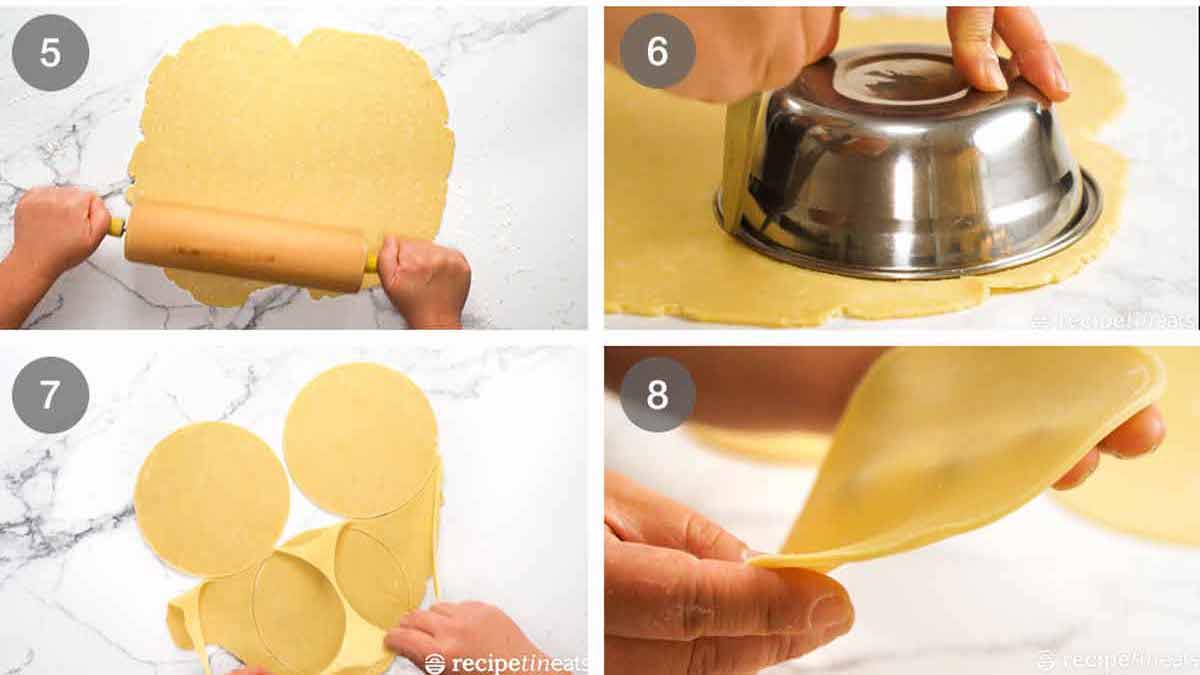
Roll out to 3 mm / 0.1″ thickness. Work with one disc at a time.
Cut 15 cm /6″ rounds (I use a bowl). This is a fairly average traditional empanada size – larger than you think! However, feel free to make them smaller if desired.
Keep cutting – Gather dough scraps into a ball, then repeat to roll out dough and cut rounds. Keep cut rounds covered in the fridge, stacked on paper, as you continue to roll and cut. You should get 10 or 11 rounds.
Dough thickness – 3 mm / 0.1″ thickness is the target thickness. Too thin = filling can break pastry and harder to do pleats. Too thick = a lot of pastry with each bite and harder to do pleats.
You’ll also notice that the dough is easy to work with, not prone to breaking like other doughs.
OK! Pastry done. Let’s wrap some empanadas!

Wrapping empanadas – (can be) easy!
The only part of wrapping empanadas that takes practice is the pleating which is optional! For an easy, faster option, just use a fork (like most store bought frozen empanadas) or keep it flat. It does not affect the eating experience at all!!
The easiest way to learn how to do the empanada pleats is to watch the recipe video – at 3 minute 29 second mark.
1. Filling empanadas
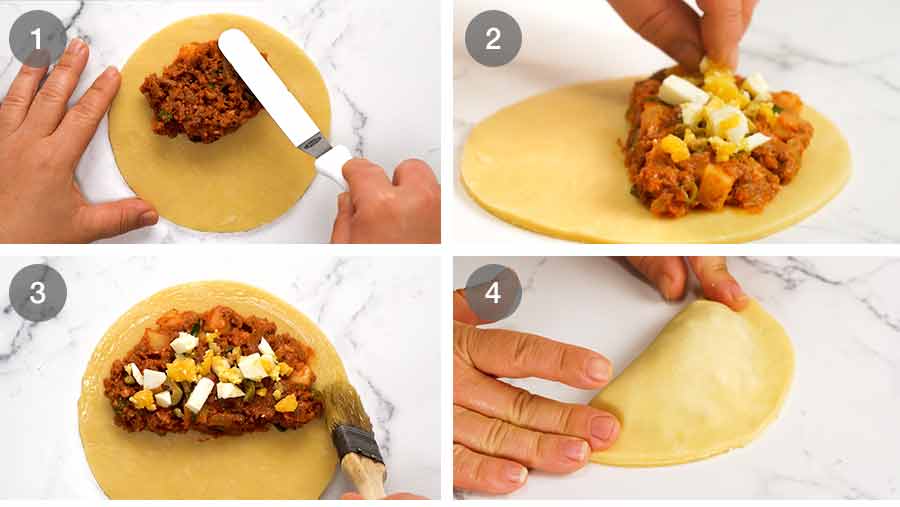
Spread filling in a half moon shape on one side of the round. Make the surface flat. Use 3 tablespoons of filling (55g / 1.94oz to be exact!), leaving a 1.7cm / 2/3″ border (exactness!
 ).
). Sprinkle with a pinch of olives and egg.
Brush with egg whites – Brush the filling side edge with egg whites. We’re reserving the yolks to brush the surface so it bakes up beautifully golden.
Seal – Fold over to enclose filling and press firmly to seal, but don’t squish the pastry and make it thinner – this makes it harder to do neat pleats.
2. Pleating – optional!
As I mentioned above, pleating is optional! You can just decorate using a fork – just press down along the edge – or just leave the seam plain. It will still taste just as good!
For the pleating, the fastest way to learn is to watch the recipe video. Here’s an extract for just the pleating part:

Pleat – Starting from one end, fold the pastry over onto the rim to create a pleat.
Pinch – Without moving your fingers, pinch to make the pleat stay in place and also to make the part of the pastry where the next pleat will be a bit thinner which makes it easier to pleat.
Keep repeating until you finish at the end. Do not be afraid to trim off excess pastry on the corner to tidy it up.
Reshape as needed to push it back into a neat half moon shape. I find mine kind of stretches out in an elongated half moon!
3. Baking
There’s only one thing better than the buttery smell that fills your house when empanadas are in the oven… EATING them!

Brush with egg yolk – this makes them bake up beautifully golden.
Bake for 20 minutes in a hot oven – 220°C/425°F (200°C fan).
Golden brown – The empanadas are ready when they are a beautiful golden brown, and the base is crisp.
EAT! Look at your gorgeous empanadas!! EAT WHILE HOT!!

Empanada dipping sauce
Hot, freshly made empanadas are wonderful eaten just plain. But a dipping sauce just elevates the experience! Here are options:
Empanada sauce (recommended) – A purpose-made spiced roasted tomato based sauce for dipping empanadas which is loosely based on a traditional Colombian sauce called hogao. I’ve published this as a separate recipe because it’s worthy.
It is my recommended option – it’s SO GOOD! Use leftovers as a dip for corn chips, veggie sticks, bread.Chimichurri – This bright green fresh parsley-garlic South American sauce is a natural pairing with empanadas!
Pink sauce – Ketchup + sour cream or yogurt or mayo or any combination thereof.
Avocado sauce – Yes. YES! So good.
Ketchup, or spicy ketchup – I won’t judge. It works. (For spicy, just mix with sriracha).


Worth the effort
This is not a quick and easy recipe. And there will be people reading this no doubt who live in areas where excellent empanadas are abundant. Lucky you!
For the rest of us poor sods, this homemade version will satisfy your empanada cravings. When they come out of the oven, hot and crispy, the buttery smell of the pastry mingling with the spiced filling…. and that moment when you bite into them…..
It’s food so good it almost makes you want to weep with joy. Food that is worth the effort!
This empanadas recipe is one of the best new cult-classic recipes to come out of the RecipeTin kitchen in over a year. I really hope you give them a go – and love them as much as I do! – Nagi x
Recipe credit: With many thanks to RecipeTin’s Chef JB for working through so many iterations with me to create the perfect homemade empanadas! This recipe is such a great example of how we work together on more challenging recipes to achieve what we believe to be the best possible outcome for home cooks, and how having a professional chef in my team has raised the bar on the quality and type of recipes I can share on my website. And make things like empanadas accessible to everybody, of varying skills levels!
Watch how to make it

Beef Empanadas
Ingredients
Empanada shortcrust pastry:
- 2 1/2 cups plain/all-purpose flour
- 175g/ 12 tbsp cold unsalted butter , cut into 1 cm / 1/2″ cubes
- 1 tsp cooking/kosher salt
- 1 egg yolk
- 1/2 cup warm milk , full fat (30 sec microwave)
Empanada Filling:
- 1 1/2 tbsp olive oil
- 1/2 onion , finely chopped
- 1 garlic cloves , minced
- 300g/10 oz beef mince (ground beef)
- 120g/4 oz chorizo
- 2 tsp tomato paste
- 1 tsp fresh thyme , finely chopped
- 1/2 tsp EACH dried oregano, cumin, paprika
- 1/4 tsp cayenne pepper
- 1/4 tsp cooking/kosher salt
- 3/4 cup chicken stock/broth , low sodium
- 1/2 cup tomato passata (sub US tomato sauce or crushed tomato)
- 150g/5oz potato , peeled, cut into 8mm/ 1/3" cubes (~1 cup)
- 1/3 cup green onion , finely sliced
Other:
- 2 hard boiled eggs (9 minutes using this method)
- 1/4 cup green olives , roughly chopped
- 2 eggs , separated, yolks whisked (for sealing and brushing pastry)
Dipping sauces:
- Empanada sauce
- Other options – ketchup, ketchup + sriracha, pink sauce, taco sauce, salsa dip
Instructions
Empanada Filling:
- Blitz chorizo – Roughly chop chorizo into 1.5cm / 1/2" pieces. Blitz using a stick blender until it becomes a paste (Note 1)
- Sauté aromatics – Heat oil in a large non stick pan over high heat. Cook onion and garlic for 2 minutes.
- Cook meat – Add chorizo and cook for 2 minutes. Add beef and cook until you no longer see raw beef. Add tomato paste and cook for 1 minute. Then add everything else except green onion, then stir.
- Cook 15 min – Bring to a simmer then lower heat so it's simmering gently. Cook for 15 minutes, stirring every now and then. Goal – juicy but not watery filling, with cooked potato.
- Cool – Stir through green onion. Transfer to bowl and fully cool before using (~ 2 hours).
Empanada shortcrust pastry:
- Blitz dough – Whisk milk and yolk in a small jug. Pulse flour, salt and butter in a food processor until the butter becomes fine crumbs – largest lumps no bigger than peas (~ 4 to 6 times). Add egg-milk mixture, then blitz on low until it comes together into a ball of dough – about 10 seconds. (Note 2 for hand method)
- Chill 30 min – Turn out onto a lightly floured work surface, then bring together into a smooth log ~20cm/8" long. Cut in half, shape into 2cm / 0/8" thick round discs. Wrap in cling wrap then refrigerate 30 minutes (or overnight – Note 3).
- Cut rounds – Place one chilled disc on a lightly floured work surface. Roll out to 3 mm / 0.1" thickness. Cut 15 cm/6" rounds (I use a bowl), or other size as desired (Note 3). Keep covered in the fridge, stacked on paper, as you continue to roll and cut. You should get 10 or 11 rounds.
Make empanadas:
- Preheat oven to 220°C/425°F (200°C fan).
- Filling – Filling should be cold but spreadable (Note 4). Place 3 tablespoons (55g) of filling on the top half of a round of pastry. Spread flat in a half-moon shape, leaving a 1.5cm / 0.6" border. Sprinkle with olive and egg.
- Seal – Brush edge with egg white, fold to enclose, pressing out air and sealing the edge. Optional: Do empanada pleats – see step photos in post or video at 3 min 30 sec. Alternatively, crimp with fork or leave plain.
- Bake 20 min – Place empanadas on 2 baking trays. Brush with egg yolk. Bake 20 minutes or until golden brown all over and crispy on the base.
- Serve hot with dipping sauce of choice – my favourite is the homemade Empanada Sauce!
Notes
I initially made empanadas the size of gyoza and we were called out by Chef JB’s Chilean friend for making them untraditionally small. So we fixed it! But feel free to make smaller ones (same bake time).
4. Filling – If your filling is ice cold and rock hard, it will be hard to wrap. Allow it to come to room temp (or give it a microwave helping hand) so the mixture is loose but still cold (else it will melt butter in the pastry).Life of Dozer
Dozer thanks everyone for the birthday wishes!! He feels very popular – there was a lot of strutting around today. 😂
Meanwhile, there was a lot of grumbling on my part! Snippet of grumbling from Instagram:

The post Beef empanadas appeared first on RecipeTin Eats.
]]> Today, my cookbook Dinner is released in stores across the UK! Marking this memorable day with a memorable English dish with a memorable name – the infamous toad in the hole. Sausage + giant Yorkshire pudding + gravy. You know it’s going to be good! Excitement evidence in this short home movie – my infamous daggy... Get the Recipe
The post Toad in the hole – UK cookbook release!🎉 appeared first on RecipeTin Eats.
]]>Today, my cookbook Dinner is released in stores across the UK! Marking this memorable day with a memorable English dish with a memorable name – the infamous toad in the hole. Sausage + giant Yorkshire pudding + gravy. You know it’s going to be good!
🇬🇧🇮🇪 Dinner released in the UK & Ireland TODAY!! 🇮🇪🇬🇧
Today is a very special day. My cookbook Dinner hits stores across the UK and Ireland – SO EXCITING!! For those who pre-ordered, my book will be delivered straight to your door – how good is that!?
I wanted to do a special recipe to mark the day. Not just a recipe from the cookbook – too obvious. Instead, I’m sharing a brand new British classic recipe. So now you’ve got 130 recipes in the cookbook to make – plus this toad in the hole recipe! Because we can never have enough good recipes, right? 😇
➤ Cookbook release in other countries: US/Canada 28th March 2023, more countries – stay tuned! More information here.
Excitement evidence in this short home movie – my infamous daggy happy dance. 😂 (PS My usual “official” recipe how-to video is above the recipe card, as always!)
PS Trust me on the mayo! It’s a restaurant secret, brought into my kitchen via the English Chef at my food bank, RecipeTin Meals. I was dubious too, but it really works. Makes Yorkshire pudding more stable – rises more, crispier, deflates far less.

We love hilarious British food names
Toad in the hole, bangers and mash, spotted dick. Be warned – if you intend to google any of these, be sure to add the word “recipe” to your search. I don’t want to be the cause of corrupting your innocence!! 😱😂
Today, it’s toad in the hole
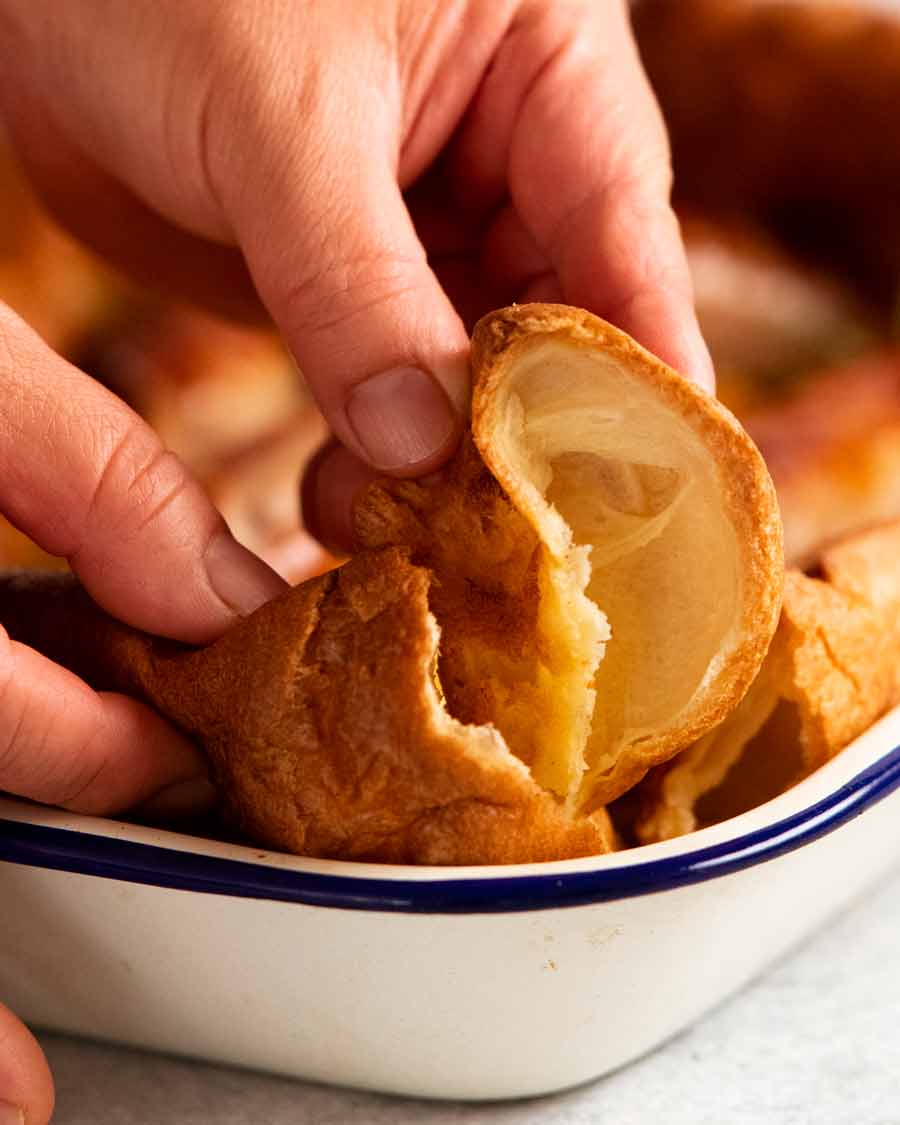
Toad in the hole is a traditional British dish comprised of sausages baked into a giant Yorkshire pudding, typically served with an onion gravy. Yorkshire pudding is similar to popovers in the US and Dutch baby pancakes. Think – puffy edges with crispy ridges and soft insides that taste like savoury crepes.
Normally Yorkshire puddings are made in muffin tins for individual servings alongside roasts. But with toad in a hole, it’s a giant one that you tear into. Look at that cavity made for filling with gravy. YES! These are the food moments I live for!
(PS Bangers and mash = sausages and mash. Spotted dick = dessert pudding studded with raisins ie the spots. It is not in the shape of a log!👼🏻)
Why it’s called “toad in the hole”
Rumour has it that this dish is called “toad in the hole” because the sausages nestled among the crispy/puffy yorkshire pudding resembles toads peeking out of a hole.
I’m not sure I see that. Maybe without my contact lenses, or perhaps after a few wines, my imagination might stretch that far.
But that’s ok! We can just giggle at the name and enjoy the awesome eating experience that is toad in a hole!!
Toad in the hole in the US
In the US, toad in the hole refers to a breakfast dish where an egg is cooked in a round hole cut out of sandwich bread. This recipe I’m sharing today is the English dish, and it’s typically served as a meal. Though, add a fried egg and I’d happily have this for breakfast!

What you need
The sausages
Pork sausages are traditional though you can really use any type of sausages you want – beef, chicken, flavoured, etc. And yes, we are going to pan-fry them lightly before popping in the oven because then we have sausage drippings to make our gravy = tastier gravy!

Couple of tips on choosing sausages:
Size – We don’t want the sausages that are too large else there is not enough Yorkshire pudding surface area. Look for sausages around 85g/3oz each – nice size to cook 8 sausages in total, 2 sausages per serving. If yours are much larger, consider using less.
Better sausages – Look for sausages where you can see “specks” of meat/fat chunks in them (more real meat) rather than the really economical ones that are a smooth uniform pink colour (more fillers).
Toad in the hole batter
The batter used for toad in the hole is actually a Yorkshire pudding batter. Here’s what you need to make it (and yes, I explain the mayonnaise – trust me!):

Mayonnaise – Just 1 tablespoon of mayonnaise gives the notoriously fragile Yorkshire pudding stability so they puff up more and deflate less. It really works! It’s a neat trick taught to me by my English chef (Stephen Fixter) at RecipeTin Meals, my food bank. He was taught this when he worked in pubs and restaurants back in the UK.
Sounds like a blasphemy to destroy a traditional recipe with mayonnaise of all things, but I tried it with and without and can confirm unequivocally that it definitely makes the Yorkies more stable.
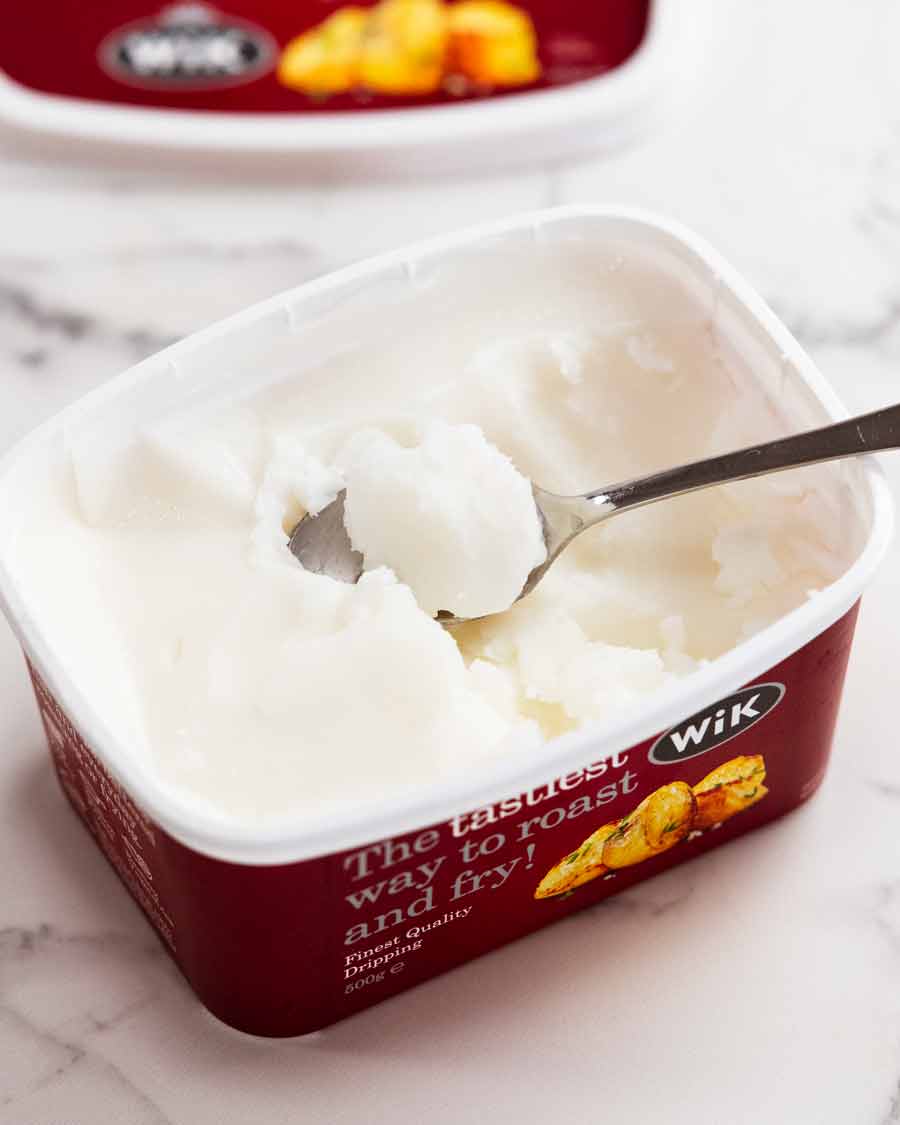
Beef drippings – This is beef fat, the traditional fat used for Yorkshire puddings and toad in a hole. It has a higher smoke point than most oils so is ideal to heat in the oven until smoking hot so when cold batter is poured in, it sizzles and the shock of the heat/cold makes the Yorkshire pudding puff up more.
Plus, it has better flavour than plain oil. Not beefy, but a nice savoury flavour unlike oil which is tasteless!
Where to find it – Sold in tubs, firm like butter, in the fridge alongside butter in large grocery stores in Australia (Coles, Woolies). Scoop then melt to use.
Substitutions / alternatives Duck fat and goose fat would make an excellent substitute with a similar high smoke point and similar “clean” flavoured fat. Lard (pork fat) will also work great but will give the yorkies subtle pork flavour (whereas beef, duck and goose have more neutral flavour).
Oil options – Use vegetable or canola oil for baking and searing sausages, and butter for the gravy (for flavour). Don’t use butter for the sausage searing or in the hot pan, it will burn.
Use leftover beef drippings to replace the fat in Bangers & Mash, gravy, mushroom gravy and duck fat potatoes (beef drippings is similar to duck fat). It’s better than oil, better than butter!

Eggs – A little unusual perhaps, but I’m going to ask you to measure out 250ml / 1 cup of eggs which might be 4 or maybe 5, or even 6 eggs. Why? Because for Yorkshire puddings, being accurate with the quantity of batter really matters to a successful outcome.
If only all those selfish chickens would lay eggs that are exactly the same size, always, then we wouldn’t have to measure our eggs!
Flour and milk – Just ordinary flour and ordinary (cow) milk. I haven’t tried this with non-cow milk.
Onion gravy
Toad in the hole is traditionally served with onion gravy. Starting with sautéed onion goes a long way to make the gravy tastier when you don’t have a pan of roast meat drippings or a homemade beef stock!
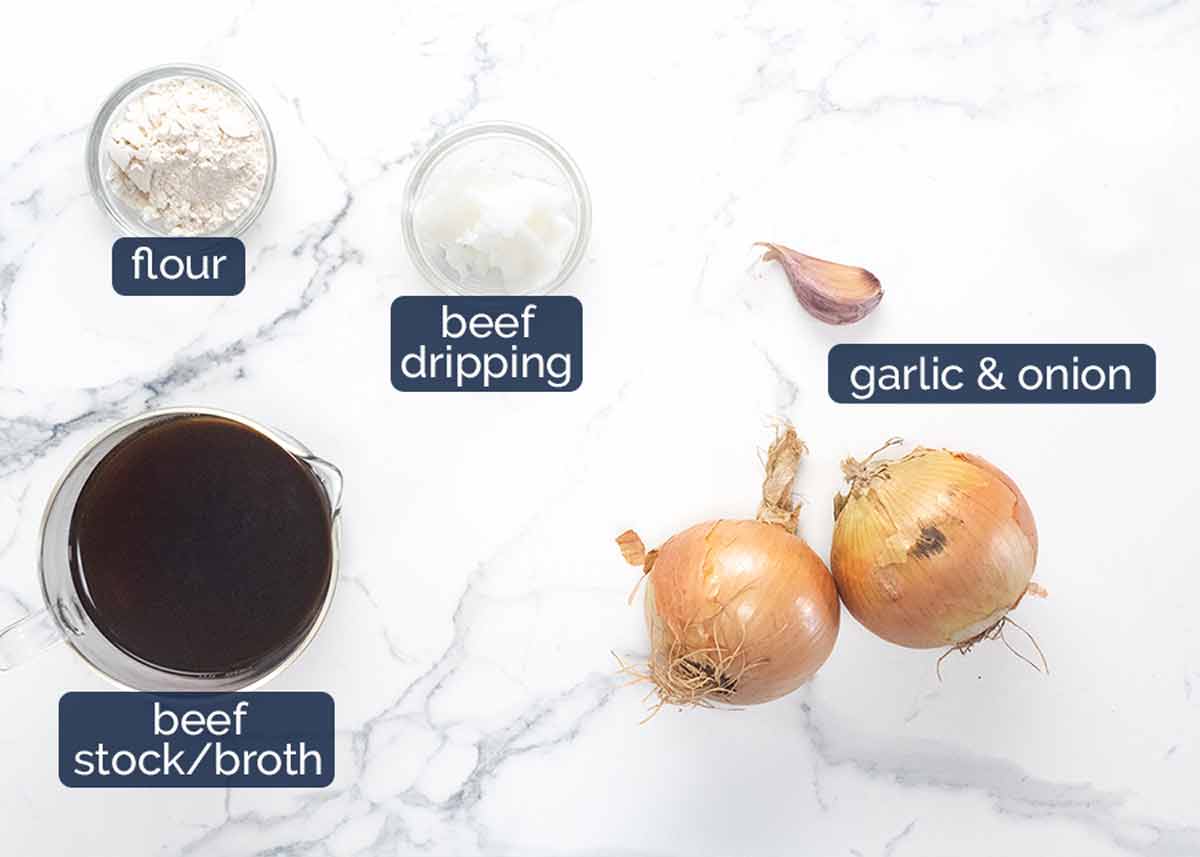
Beef drippings or butter – Beef drippings will give your gravy the best flavour but butter makes a fine substitute.
Beef stock – Use low sodium, else your gravy may end up too salty. (PS If you want to make a royalty-worthy toad in the hole, make your gravy with homemade beef stock. You’ll need to add a bit more salt as homemade beef stock is not salted.)
Flour – to thicken the gravy.
Onion – just regular brown / yellow onions. Red onions also works just fine.
Garlic – for flavour base.
Worcestershire sauce – not pictured, sorry!
Adds a touch of extra savoury flavour. But it’s not critical if you don’t have it, I only use 1/2 teaspoon. Much more and I find it starts to taste too Worcestershire sauce-y.
OK, ingredients covered. Onto making it!!

How to make toad in the hole
It’s actually very straight forward to make. The secret for a great toad in the hole lies more in the method of how it’s made and obviously having the BEST Yorkshire pudding batter (thank you Chef Stephen!).
The toad in the hole part
Many recipes opt to shortcut the method and bake the sausages from raw. While this works, it means you miss out on the sausage drippings left in the frying pan which is then used to make the gravy. Which means the gravy is not as tasty.
Moral to the story? It’s worth the extra 4 minutes to brown the sausages on the stove.
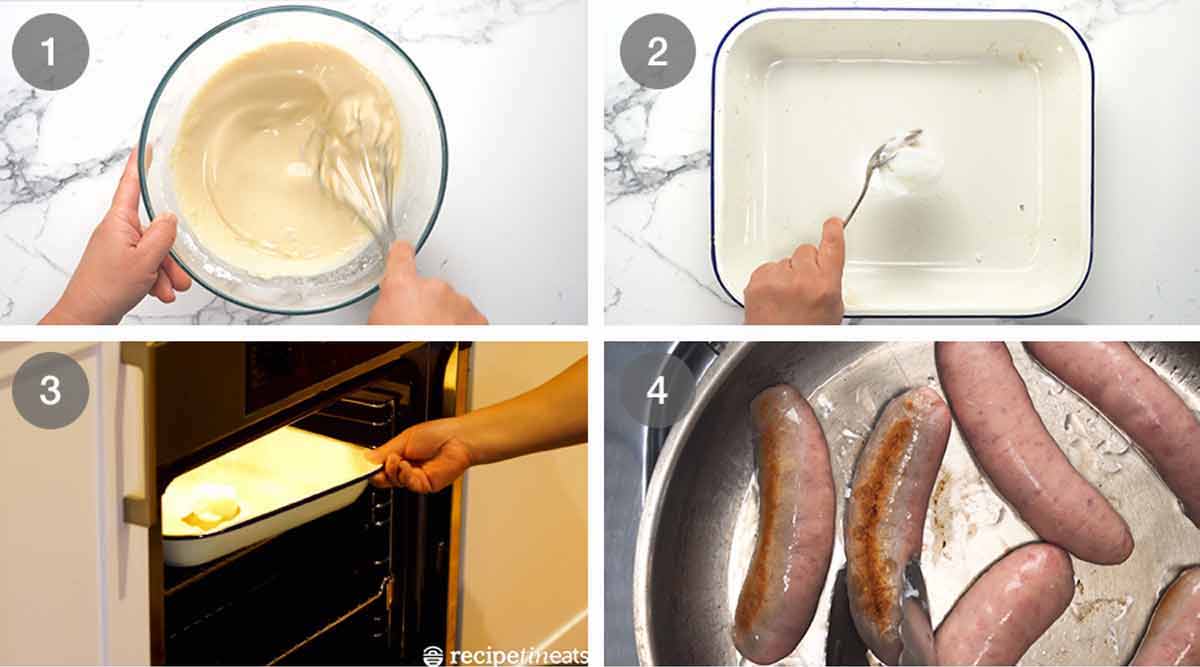
Batter first – Make the Yorkshire pudding batter first. All the ingredients are just whisked up in one bowl using a hand whisk. Nice and easy. Then refrigerate until required. The cold batter hitting the hot fat in the pan helps the Yorkshire pudding puff up.
Drippings in pan – Put the beef drippings in a 23 x 33cm pan (9 x 13″). Beef drippings are scoop-able like butter so scoop (measure) and plonk into the pan.
Heat drippings until hot, for 15 minutes, while you prepare the gravy ingredients and brown the sausages. As noted above, we want our cold batter to hit hot drippings for impressive Yorkshire pudding puff-age!
Brown sausages on the stove in a pan that we will make the gravy in afterwards. Brown them all over but keep them raw inside as they will cook more in the oven.
PRO TIP: Try to keep one side of the sausage just lightly browned, and we will make this side face up in the oven so when it comes out, it will be perfectly browned. If you brown the sausages too aggressively on the stove, the sausages may be on the wrong side of “well browned” after baking in the oven. Not a deal breaker, just a tip!

Sausages in pan – Working quickly (to reduce heat loss) remove the hot pan from the oven then place the sausages in. Arrange them so the walls are kept clear else they may inhibit the batter from puffing up around the sides of the pan.
Pour batter into the pan. It should be about 1/3 of the way up the sausages.
Bake 25 minutes in a hot 220°C/425°F (200°C fan) oven. Do not open the oven for the first 20 minutes else it may collapse!
Puffed perfection! Your toad in the hole should be impressively puffed and golden around the edges, plus some puff-age between the sausages in the centre of the pan.
Be prepared for deflation! It WILL deflate. However, thanks to that dab of mayonnaise you used, it will deflate much less than usual recipes!

The onion gravy
Make your gravy while the toad in the hole is in the oven (25 minutes). The gravy takes around 10 minutes from start to finish so just keep it warm until ready to serve.

Sauté onion in beef drippings (or butter) for 8 minutes or until deep golden brown. This is key not only to flavour but also to help make your gravy a deep brown colour rather than disappointing pale, so don’t be tempted to shortcut this step!
In the last 30 seconds or so, add the garlic and cook until golden.
Mix flour into the onion and stir for 1 minute. Mix well so it’s evenly dispersed throughout the onion – this will make your gravy lump free!
Beef stock – Slowly pour the stock in while stirring constantly. Marvel how your gravy is lump-free! Stir in Worcestershire sauce, salt and pepper.
Simmer for 2 to 3 minutes or until it thickens into a gravy consistency. Don’t forget that gravy always thickens slightly when you take it off the stove so don’t let it get too thick while on the stove. If it gets too thick, just loosen it up with a touch of water.
Then keep warm until ready to serve!
Serving toad in the hole
To serve toad in the hole, cut it using a small knife then use a spatula to pick it up and transfer onto plates.

Then – douse with gravy. Lots of it. Especially if you’ve got greens on the side. Because vegetables become so much more interesting when drowning in gravy, right??!!
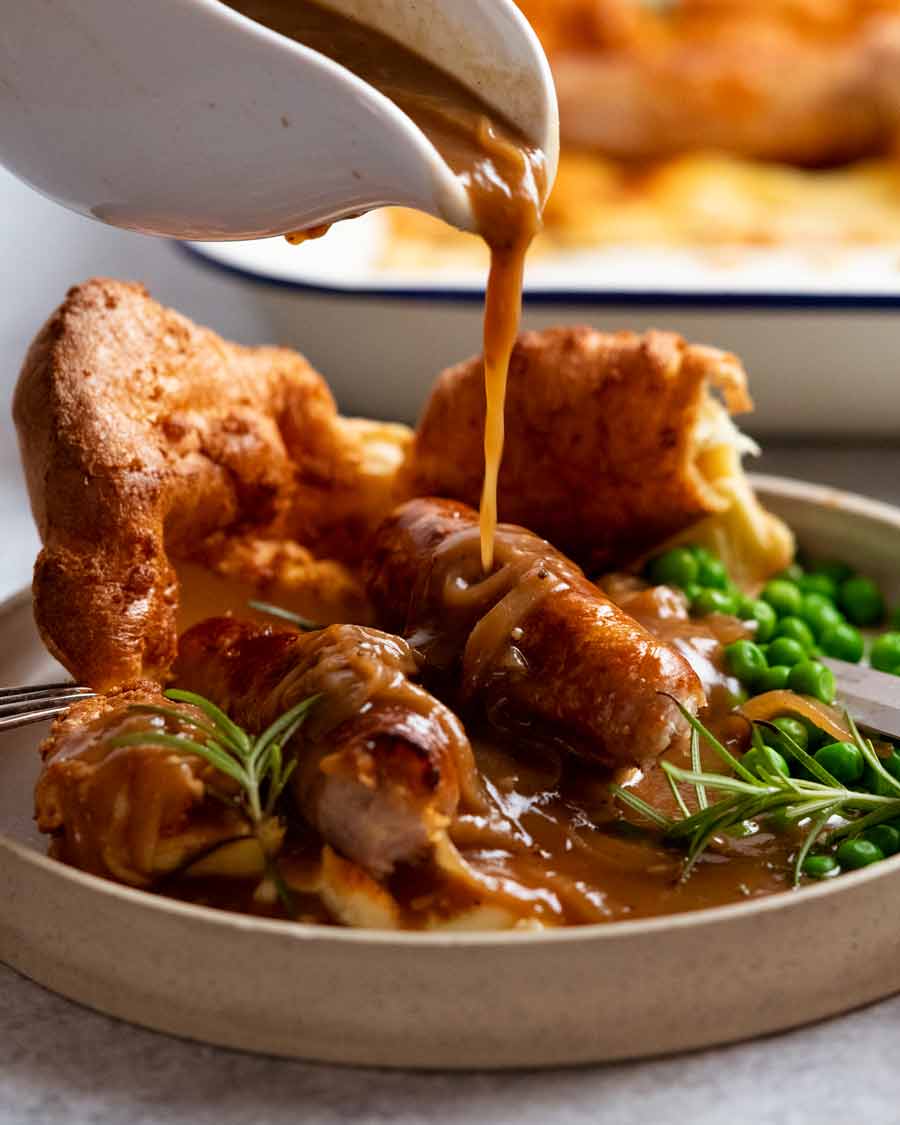
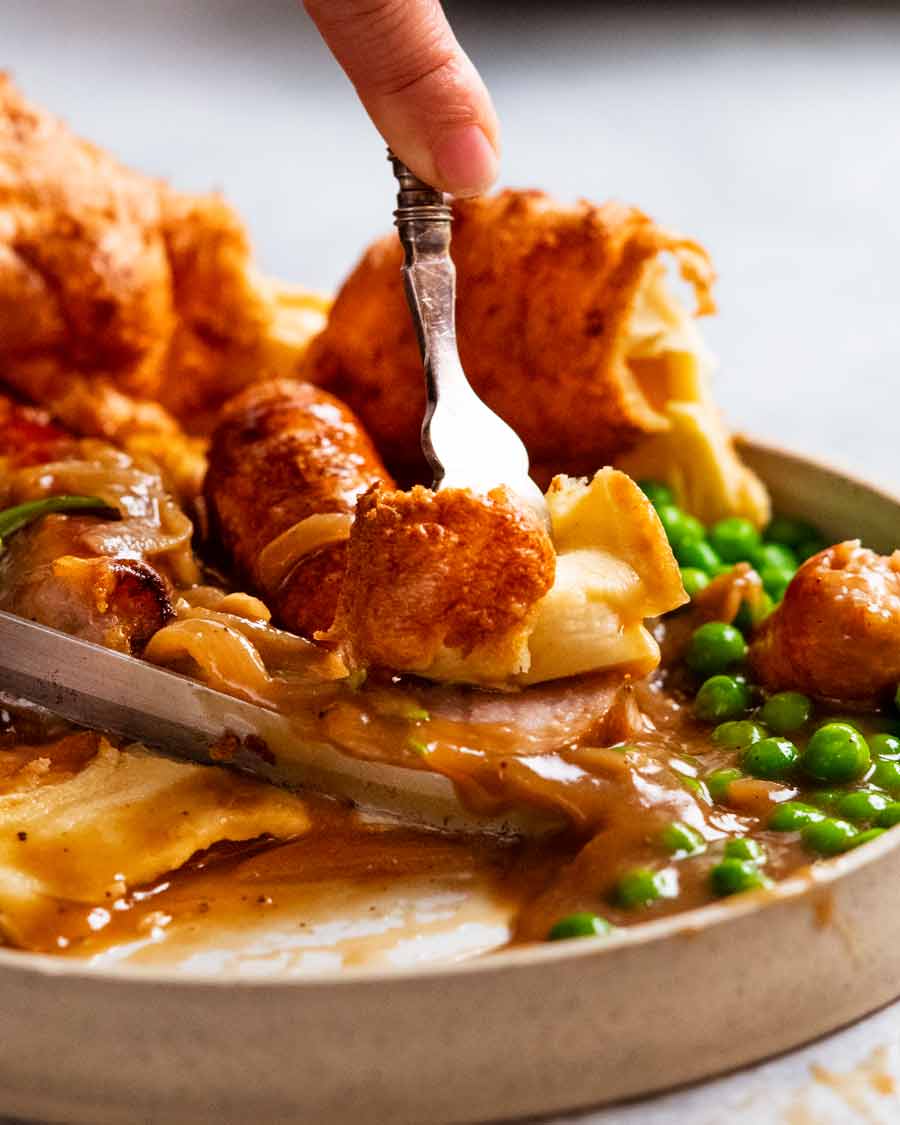
That’s a serious plate of comfort food, right there.
You know, I shouldn’t tell you this, but sometimes when I’m testing recipes, I start to lose steam towards the end. I find myself extra grateful to have a team who can help out with testing things over and over again. Like the Mini Pavlovas. That was particularly painful to finalise. There’s only so much pav a girl can eat!
But toad in a hole? Let’s just say I was perfectly happy making this repeatedly. It’s me on a plate. Pure comfort food. That combination of the crispy edges of the Yorkshire pudding with the soft insides, the juicy golden brown sausages, all doused with gravy (DOUSED, my friends!).
Aggggh. Such good food! – Nagi x
PS Serve this with a side of peas or other steamed greens (broccoli, broccolini, carrots). You don’t need to get creative because you’ve got stacks of gravy for dousing. (Word of the day).
Watch how to make it

Toad in the hole
Ingredients
- 700g/1.4lb pork sausages, or other sausage (8 x 85g/3oz, Note 1)
- 10g / 2 tsp beef drippings OR canola/veg oil (Note 4)
Yorkshire pudding Batter:
- 250 ml / 1 cup eggs , lightly whisked (4-5 large eggs, yes, I need you to measure! Note 2)
- 1 cup plain flour (all-purpose flour)
- 3/4 cup milk , full fat
- 1/4 cup water
- 1 tbsp mayonnaise , full-fat (secret ingredient! See Note 3)
- 1/2 tsp cooking salt (kosher salt)
- Pinch white pepper
- 50g (1/4 cup) beef drippings OR canola/veg oil (Note 4)
Onion gravy:
- 30g / 2 tbsp beef drippings OR unsalted butter (Note 4)
- 2 onions , halved, cut into 7 mm / 1/4″ wedges
- 1 garlic clove , finely minced
- 3 tbsp plain flour (all-purpose flour)
- 2 cups beef stock (broth) , low sodium
- 1/2 tsp Worcestershire sauce
- 1/2 tsp black pepper
- 1/4 tsp cooking salt (kosher salt)
Instructions
- Batter – Whisk eggs in a bowl, then whisk in flour until lump free. Whisk in water, milk, mayonnaise, salt and pepper. Place in the fridge until required.
- Preheat oven to 220°C/425°F (200°C fan). Put the 1/4 cup beef drippings in a 23 x 33cm metal pan (9 x 13"). Place in the oven for 15 minutes to melt and become very hot.
- Brown sausages – Heat the 2 tsp (10g) of drippings in a pan over medium high heat. Brown the sausages all over, but keep one side just lightly browned (this side will brown more in the oven). Keep them raw inside. Remove onto a plate.
- Assemble – Take batter out of fridge and whisk. Working quickly, take the hot pan out of oven. Spread sausages in the pan, lightly browned side up, keeping clear of the pan walls (Note 5 for arranging tip). Pour the batter in around the sausages.
- Bake – Bake 25 minutes on the top shelf until the sides puff up and is golden brown. The top of the edges should be nice and crispy!
- Serve immediately with onion gravy! Expect some deflation – though far less than typical recipes thanks to the mayo.
Onion gravy (Note 6):
- Brown onion – Add beef drippings into the pan used for browning the sausages. Melt over high heat. Add onions and cook, stirring constantly, until nicely browned (~5 minutes). Add garlic and stir 30 seconds. Add flour and stir for 1 minute so it's well mixed through the onions (= lump-free gravy!).
- Add stock – Slowly pour in beef stock, stirring as you go. Add Worcestershire sauce, salt and pepper.
- Thicken – Bring to a simmer, stirring, for 2 minutes until thickens into a gravy. Keep warm until ready to use!
Notes
Nutrition
Life of Dozer
The best cookbook-making-sidekick a girl could ever ask for. Thank you for being there every step of the way, Dozer!

The post Toad in the hole – UK cookbook release!🎉 appeared first on RecipeTin Eats.
]]> This is a real spaghetti carbonara recipe made the traditional Italian way, without a single drop of cream. It relies solely on egg and cheese to make a luscious, creamy carbonara sauce. Food fit for a king (or queen!) that proves simple can be magnificent. Spaghetti carbonara Carbonara is a beautiful, classic Italian pasta that’s... Get the Recipe
The post Carbonara appeared first on RecipeTin Eats.
]]>This is a real spaghetti carbonara recipe made the traditional Italian way, without a single drop of cream. It relies solely on egg and cheese to make a luscious, creamy carbonara sauce. Food fit for a king (or queen!) that proves simple can be magnificent.
Economical note – Use bacon instead of guanciale and parmesan instead of parmigiano reggiano for a very respectable version of carbonara that will still make Italians proud. But don’t add cream! 😊
Spaghetti carbonara
Carbonara is a beautiful, classic Italian pasta that’s so creamy, you’d swear there’s a good amount of cream in it. And indeed, there’s plenty of recipes that cheat by adding in cream.
But today, we’re making spaghetti carbonara properly, the authentic, traditional way. No cream. Just egg, cheese and a splash of starchy pasta cooking water.
15 minutes later, THIS is the sight that will be in front of you. And you’ll make 60 million Italians beam with pride!

You can imagine eating that mouthful of chewy spaghetti bathed in the creamy sauce, right? Don’t dream about it. Make it a reality!! It’s so quick and easy it will blow your mind!
What happens if I add cream?
Outside of Italy, lots of recipes “cheat” by adding cream into carbonara sauce, for various reasons. Not a bad thing, per se, it’s just that it’s no longer a real carbonara.
But more importantly for me (in addition to, of course, the fact that I’m sharing a recipe with the intention of respecting the origins), cream alters the mouthfeel and flavour. You see, real carbonara is rich and creamy to eat. But you don’t get that slick of dairy fat coating your mouth like you do when eating cream.
Put another way – carbonara is how you get your creamy pasta fix without feeling weighed down like you do when you indulge in pastas doused with heavy cream. Win!

Ingredients in carbonara sauce
Carbonara calls for raw eggs which are stirred vigorously off the stove with hot cooked pasta, guanciale (a cured pork like bacon), parmesan and a splash of pasta cooking water. Watch the magic unfold before your eyes as 4 simple ingredients transforms into a luxurious creamy sauce! NO CREAM allowed!
Economical note: Substitute guanciale with bacon and use parmesan instead of parmigiana reggiano. You’ll still capture the essence of real carbonara that will make Italians proud!
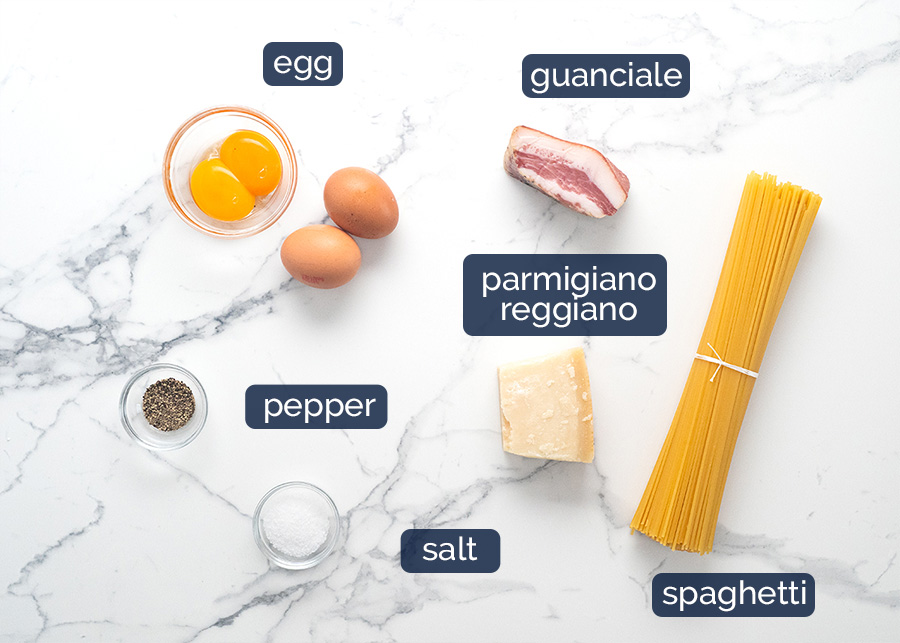
Guanciale – This is a key ingredient in carbonara, and is a cured fatty pork that is similar to bacon and pancetta. It adds adds flavour into the dish and the fat makes the sauce creamy when mixed with the egg and starchy pasta cooking water.
Find it at Italian delis, Harris Farms (Syd, QLD), and speciality produce stores. It’s a bit of a speciality product but can be substituted with pancetta or streaky bacon in a pinch! Best to get block form so you can cut it into thick batons. If pre-sliced is all you can get, try to get thick cut.
More information on guanciale below.
Parmigiano reggiano – This is basically a premium parmesan that’s been aged so it has more complex flavours. It adds salt into the sauce as well as thickening it. Pecorino romano, which is made from sheep milk, is also commonly used, or a combination of the two. Substitute with parmesan cheese.
Must grate your own! Whatever you use, don’t use store bought pre-grated as it won’t melt properly in the sauce.
Egg yolks and whole eggs – The egg combined with the guanciale fat is what makes the stunning creamy carbonara sauce that the world is obsessed with. There’s no need for cream for a creamy sauce! See section above for why.
We use a combination of whole eggs, plus egg yolks for richness. If only yolks are used, the richness is a little too off-the-charts!
Raw egg concerns? These days in developed countries, food safety standards are such that you should not have to be concerned about eating raw eggs sourced from reputable stores. In fact, raw eggs are used more commonly than you probably realise, such as in tiramisu and mayonnaise. So if you’ve ever had any of these at restaurants, you’ve had raw eggs!
However, if you are pregnant or immunity compromised, I would recommend avoiding raw eggs as a precaution. Make fettucine alfredo instead!
Spaghetti – While you can use any long pasta, the most common type used is spaghetti.
Pepper – For seasoning. Freshly ground black pepper recommended here.
No salt in sauce – The pasta cooking water is salted so it flavours the spaghetti as it cooks. And the carbonara sauce gets salt from the guanciale and cheese.
Garlic, optional – While not strictly traditional, garlic is a popular addition and it does add extra flavour into it.
Guanciale for (real) carbonara
Worth hunting down? Yes, if it’s accessible, within your budget and you are keen to experience an authentic carbonara. But bacon or pancetta makes a very respectable substitute!


Guanciale is a cured Italian pork that is made from pig jowls or cheek that looks like a block of bacon. It has more intense flavour than everyday bacon because of the pork cut used and it’s aged 3+ months.
It has a high proportion of fat, and that’s exactly as it should be and is needed for carbonara. The fat that melts out of the guanciale when sautéed until golden is a key flavouring for the creamy carbonara sauce.
Equally important is that the fat that melts out of the guanciale is required to thicken the carbonara sauce to make it creamy. Basically, what happens is that when the fat from the guanciale and in the egg yolks is mixed with starchy pasta cooking water, it thickens. This is what makes the sauce creamy and cling to the pasta strands rather than a watery pool in the base of your bowl. You’ll see in the recipe video below!
If you don’t have enough fat (for example, if you try to make this with lean bacon), your sauce will never thicken.
Substitute guanciale with pancetta or bacon, preferably in block form so you can cut it into batons. Biting into the golden brown chunks of guanciale is a highlight of this dish!! Whichever you use, it’s essential to ensure there’s plenty of streaks of fat.
Pre-sliced bacon? It will work but because the slices are thinner than the ideal baton size, you will end up with a lot more bacon bits throughout your dish than pictured in this post. Perhaps not considered a negative, by some!
How to make (real) carbonara
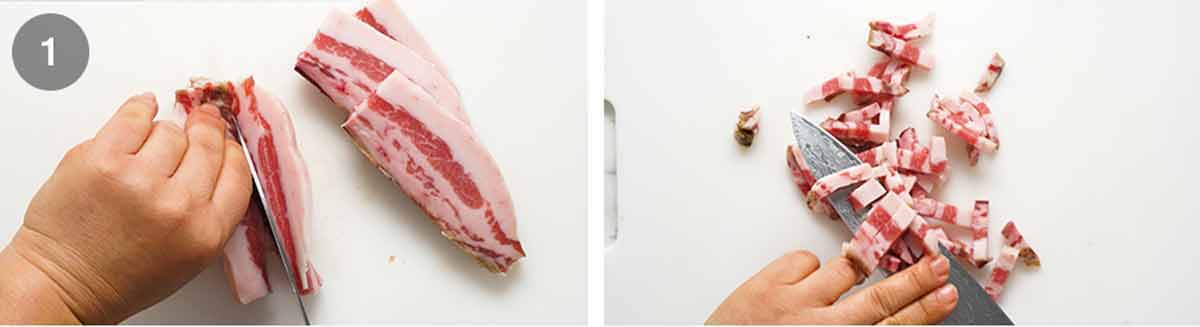
Sauté guanciale until golden. Mix hot cooked pasta vigorously with the guanciale, egg, cheese and a splash of pasta cooking water and watch as it transforms into a luxurious, creamy sauce.
HOT TIP: Use the handle of a wooden spoon to mix. Fast and effective!
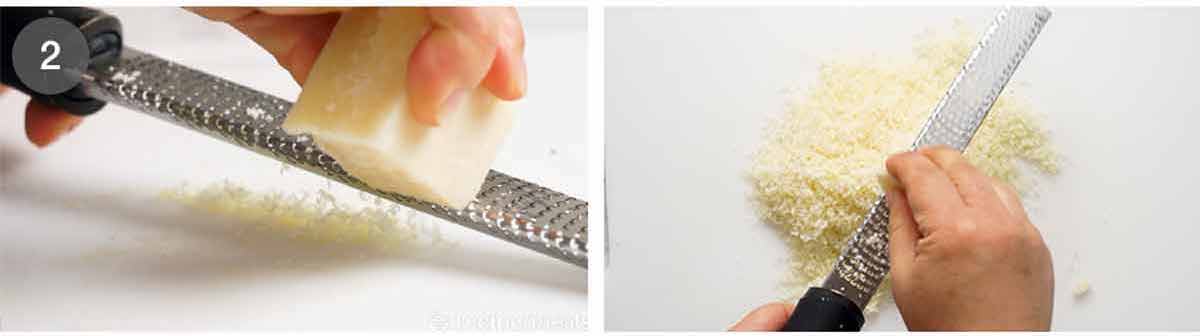
Batons – Cut the guanciale into thick batons. Biting through the golden brown crust into meaty bits of salty guanciale is part of the awesomeness that is carbonara!
Finely grate the parmigiana reggiano or pecorino. I use a microplane – one of can’t-live-without kitchenware items!
Sauce – Whisk together the egg, cheese and pepper in a large bowl. It needs to be a large bowl because the pasta will be stirred into the sauce in the bowl, off the stove, to avoid scrambling the eggs.

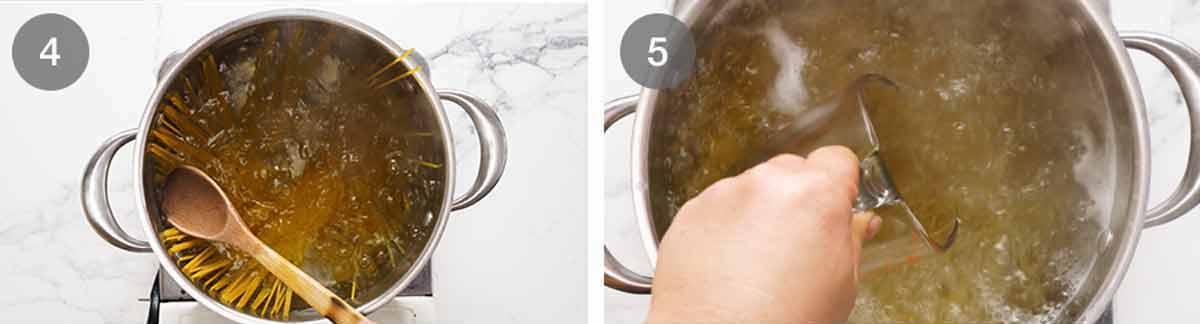
Cook pasta – Bring 4 litres (4 quarts) of water to the boil with 1 tablespoon of salt. Cook the pasta per packet directions. It should be firm, not soft, but fully cooked through.
Reserve pasta cooking water – Just before draining, scoop out one cup of pasta cooking water. Then drain the pasta in a colander.
Cook guanciale until golden while the pasta is cooking. You don’t need any oil, the guanciale will fry in its own fat.
Toss pasta in guanciale – Tumble the hot pasta into the pan with the guanciale then toss so the pasta gets coated in the guanciale fat.

Transfer into sauce bowl – Tip the hot pasta into the bowl with the egg and use a rubber spatula to scrape out every drop of the guanciale fat into the bowl. That stuff is gold!
Add 1/2 cup pasta cooking water into the bowl.

Mix vigorously with the handle of a wooden spoon, spinning the pasta around, for around 30 seconds to 1 minute. Watch as the watery pale yellow liquid magically transforms into a creamy sauce.
You know it’s ready when the sauce is no longer watery and pooled in the bottom of the bowl. Instead, it will be thickened, creamy, and clinging to the pasta!


Serve immediately in warm bowls. Pasta waits for no one!
Warm bowls? Yes. I don’t usually warm bowls for serving food, but for pasta, I almost always do. This is because pasta is at its best when it’s freshly made with the sauce is slick and the pasta is juicy. As it cools, the sauce thickens and the pasta gets stodgy. A warm bowl prolongs the life of pasta. I just warm bowls by placing a stack in the microwave for 1 minute. Else, run it under hot water or put in a low oven.


And there you have it. One of the most luxurious pasta dishes in the world. Did you know it was this quick and easy to make? Such is the beauty of Italian food. The simplicity, letting produce take centre stage with a few little tricks to make magnificent good with so few ingredients.
5 ingredients.
15 minutes.
It’s an absolutely stunner. I really hope you try this one day. – Nagi x
Watch how to make it

Carbonara (real)
Ingredients
- 175g/6 oz guanciale (pancetta or block bacon), weight after skin removed (Note 1)
- 2 large eggs (Note 2)
- 2 egg yolks (Note 2)
- 100g/3.5 oz parmigiano reggiano , finely shredded (or pecorino romano, sub parmesan, Note 3)
- 1/4 tsp black pepper
- 400g/14 oz spaghetti
- 1 tbsp cooking/kosher salt (for cooking pasta)
- 1/2 cup pasta cooking water
- 1 garlic clove , finely minced (optional, Note 4)
Garnish (optional):
- Parsley , finely chopped
- Parmigiano reggiano
Instructions
- Guanciale – Cut into 0.5cm / 1/5" thick slices then into batons.
- Carbonara sauce – Place eggs and yolks in a large bowl. Whisk to combine. Then stir in the parmesan and pepper.
- Cook pasta – Bring 4 litres (4 quarts) of water to the boil with the salt. Add pasta and cook per the packet directions.
- Reserve pasta water – Just before draining, scoop out 1 cup of pasta cooking water, then drain the pasta.
- Cook guanciale – While the pasta is cooking, place guanciale in a non stick pan over medium high heat. Cook for 4 to 5 minutes until golden. No oil needed – as the guanciale heats up, the fat will melt so it fries in its own fat. If using garlic, add it in the last minute.
- Pasta in pan – Tip the hot pasta into the pan and toss to coat in guanciale fat.
- Mix pasta in sauce – Transfer the pasta and any residual fat in the pan into the bowl with the egg. Add 1/2 cup (125 ml) pasta cooking water. Stir vigorously using the handle of a wooden spoon for 1 minute and watch as the sauce transforms from watery to creamy and clings to the pasta strands!
- Serve – Transfer into warm bowls. Serve immediately, garnished with a little extra parmigiana reggiano if desired, and a pinch of black pepper and finely chopped parsley.
Notes
5. Leftovers will keep for 3 days but pasta really is always best eaten freshly made, in particular for carbonara!Life of Dozer
Recently discovered iPhone photo Memories on my phone. Here’s the one that came up today!

The post Carbonara appeared first on RecipeTin Eats.
]]> This is my Rolls Royce of Pulled Pork recipes. A 24-hour brine injects flavour and locks in juices, then a 12-hour oven slow roast makes the pork more succulent than you ever imagined it could be! Don’t have time for this version? I get it. Make my Slow Cooker Pulled Pork instead! 36-hour Pulled Pork... Get the Recipe
The post My best Pulled Pork appeared first on RecipeTin Eats.
]]>This is my Rolls Royce of Pulled Pork recipes. A 24-hour brine injects flavour and locks in juices, then a 12-hour oven slow roast makes the pork more succulent than you ever imagined it could be!
Don’t have time for this version? I get it. Make my Slow Cooker Pulled Pork instead!
36-hour Pulled Pork
That’s right, 36 hours is what it takes to make my very best Pulled Pork recipe: A 24-hour dry-brine in a heavily-flavoured rub, followed by a 12-hour slow roast in the oven.
I would not share a 36-hour recipe though if I was not 100% sure it produces the very best results! I can assure you it really does, and the reasons are simple:
Brining overnight locks in juices and injects flavour all the way through the pork so every mouthful of pork is seasoned; and
Slow-roasting at a very low temperature means less moisture loss and in turn more succulent meat.
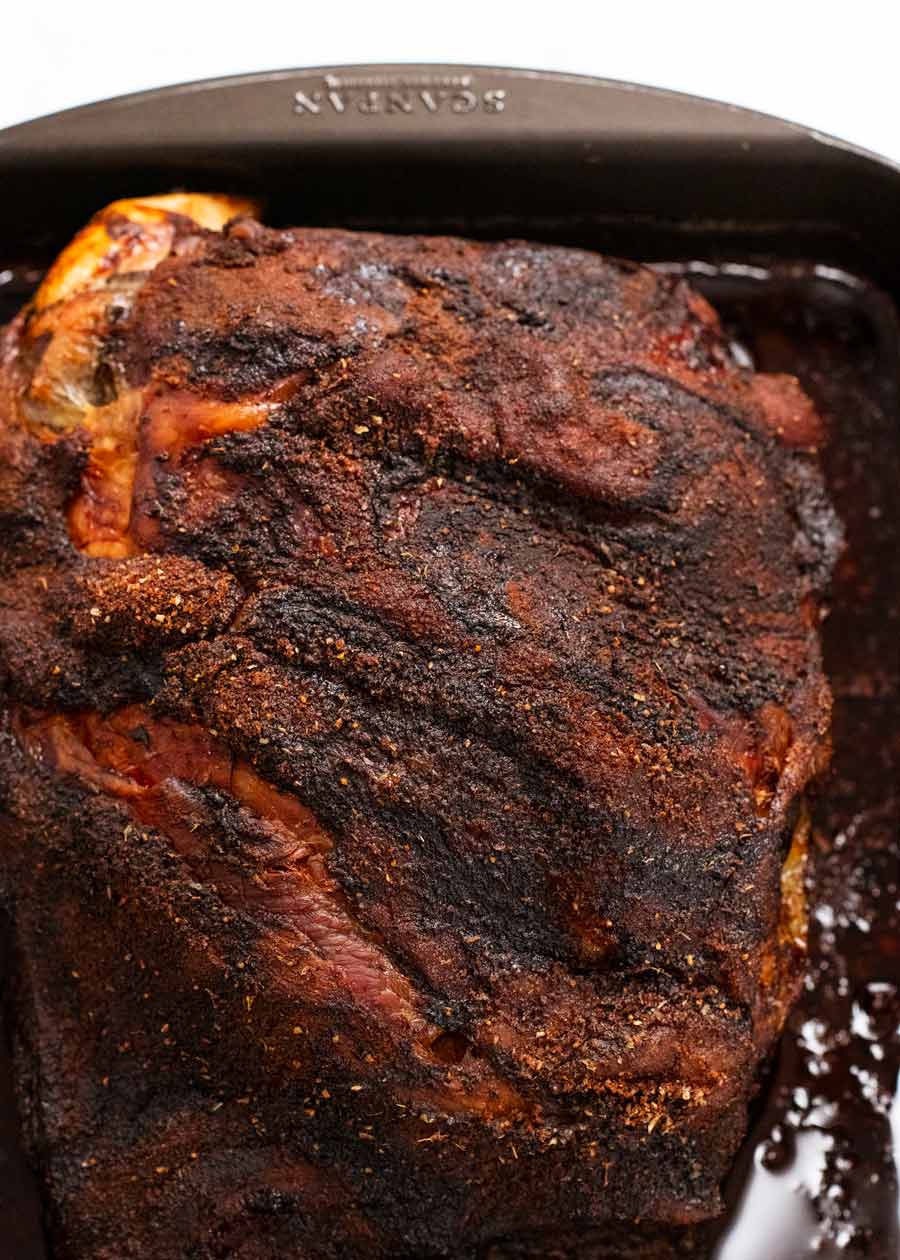
Cooking in this way also gets you that desirable “bark” on the surface that people love about traditional BBQ food. It’s my favourite part. It’s so tempting to lift the whole thing off and run away with it!
Check out the proof of epic bark:
And proof of ultra-tender, juicy meat:
My typical 36-hour Pulled Pork timeline
Here’s my basic game plan with timings to help you ensure your pork is ready for when you want to serve it, for either lunch or dinner.
2 days prior, anytime (usually evening) – Coat pork in rub and leave to brine/marinate for 24 to 48 hours in the fridge.
Evening before serving – Put pork in oven to slow-roast overnight.
Next morning (day of serving) – Remove pork from oven. Keep whole until required. Shred pork as close as possible to serving time, for optimum juiciness.
If serving for lunch – Time the cooking to finish within 2 hours of serving so the pork stays warm, and no need to reheat.
If serving for dinner (reheating whole pork) – Allow pork to fully cool on the counter, uncovered (if you cover, bark will go soggy). When cool, cover and refrigerate.
Remove from fridge 3 hours prior, leave on counter for 1 hour. Then cover loosely with foil and reheat in a 150°C/300°F oven for 2 hours or until the centre is hot, then shred as close as possible to serving time.
Microwave emergency – If you forgot to allow for reheating, you can microwave it uncovered in an emergency. It actually works well because it keeps the meat juicy!
What you need to make my best Pulled Pork
Here’s what you need for the Pulled Pork:
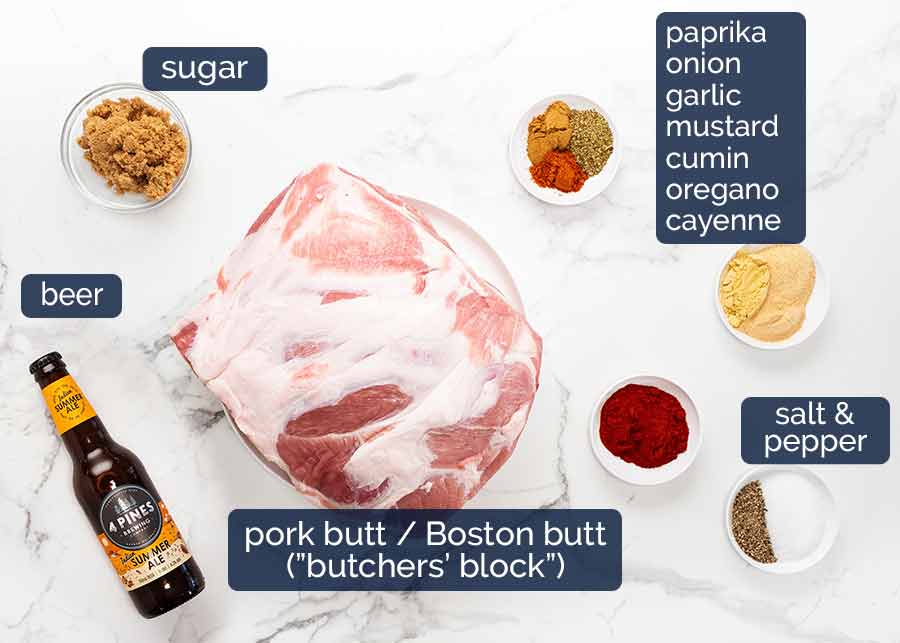
Pork butt / Boston butt (4 – 5 kg / 8 – 10 lb) – Also known as “butcher’s block” or “square cut shoulder of pork” in Australia, this is a big rectangular block of pork from the of the upper pork shoulder (not its butt!) It’s best for Pulled Pork because it’s well marbled and a uniform shape. It comes with a layer of fat on the surface, no skin (in Australia), and a bone inside.
Where to find it – Though widely available and very good value in the US, here in Australia it’s not available at everyday supermarkets. However, it IS sold at Costco! Otherwise, find it at good butchers.
What to ask for – Pork butt / Boston butt / butcher’s block / square cut pork shoulder. Describe it as a 4 to 5 kg rectangular block of pork shoulder. Insist / ask politely that it be bone-in, skinless, with some but not all the fat removed from the surface.
Best substitute – Regular pork shoulder works but it will need to be a minimum of 3 kg / 6 lb (including the bone). If it’s too small it will cook too fast and defeat the purpose of the 12-hour slow roasting that yields the ultra-juiciness of the meat. Usually here in Australia, pork shoulder is only about 2 – 2.5 kg / 4 – 5 lb (once the skin is removed).
Beer – This has multiple purposes. It’s used as (1) the liquid in the pan to prevent the pan from drying out during the slow-roasting, (2) for extra flavour on the pork flesh, and (3) making tasty pan juices which are later tossed through the shredded pork and stirred into the homemade BBQ sauce.
Beer type – You can use any beer other than very dark beers like Guinness. Dark beers can be a bit too intense and dominate the pan juice flavours.
Substitute with alcoholic apple cider (dry/hard cider), non-alcoholic beer or apple juice, which I’ve used in the past for similar recipes to great success (like BBQ pork ribs).
Rub ingredients – The sugar, salt, pepper and spices you see in the photo above are all for the rub. The seasonings (a good number from my 12 Essential Spices list!!) are for flavour, while the salt dry-brines the pork to make it juicier.
What is dry-brining? Brining exploits the effect of salt on muscle fibres so meat retains more moisture as it cooks. As a handy bonus, it also fully seasons the meat on the inside – great for large cuts like pork butt. Dry-brining is a type of brining where no water is used, just salt (contrasted with wet-brining where you soak protein in salted water). We get the same effects (juiciness and seasoning) except it’s even better because the flesh isn’t bloated with flavourless water, which dilutes meat’s flavour. It’s also convenient because you don’t have to deal with the logistics of keeping a giant piece of pork submerged in liquid in the fridge.
Bottom line: Dry-brining works better and is easier. It’s how I do my turkey every year. Dry brine, dry brine, I say!
How much pork do you need per person?
To figure out how many people your pork will serve, multiply each kilo of raw pork by 3 to get normal servings or by 2.4 for generous servings. Imperial measurements: Multiply each lb of pork weight by 1.5 for normal servings or 1.2 for large servings.
Example:
5 kg pork: 5 x 3 = 15 servings (normal portions) or 5 x 2.4 = 12 servings (large portions)
10 lb pork: 10 x 1.5 = 15 servings (normal portions) or 10 x 1.2 = 12 servings (large portions)
It might sound like a lot of pork per person (335g – 410g / 11 – 14 oz) but remember, pork loses about 40% of its weight once cooked!
What you need for homemade BBQ Sauce
Nothing groundbreaking here! All the usual classic BBQ sauce suspects are present:
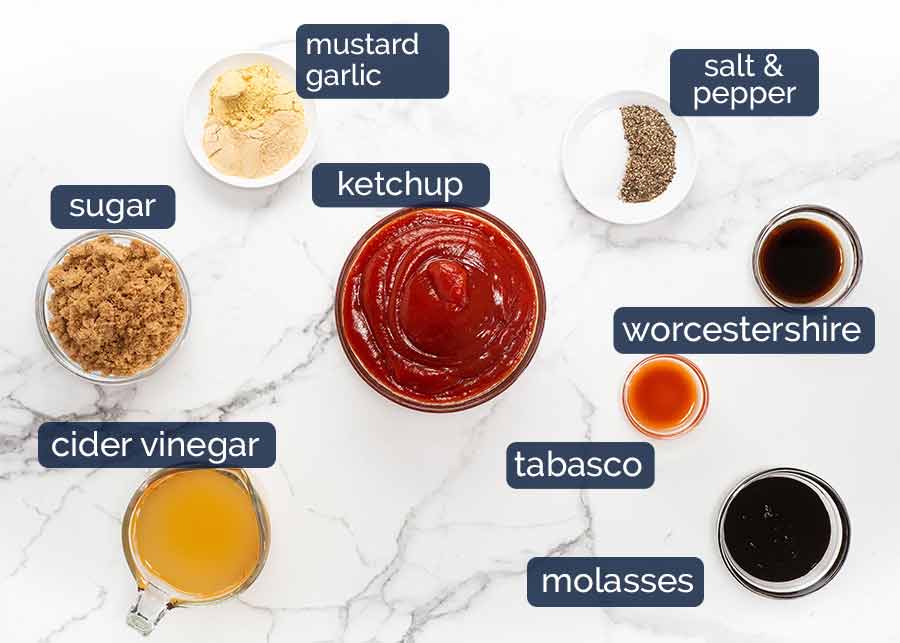
Ketchup – The key ingredient in BBQ sauce. I know it’s totally un-Australian of me to say, but I really prefer ketchup over tomato sauce. Better flavour. Sorry Australia!! Best substitute – Well, tomato sauce!
Apple cider vinegar – For the tang in BBQ sauce. Substitute with white or red wine vinegar.
Molasses (light/true molasses, NOT blackstrap) – Adds sweetness, colour, gloss and flavour. Easy substitute: golden syrup!
Worcestershire sauce – For savoury flavour.
Tabasco – Optional, for a hit of heat!
Sugar – BBQ sauce is sweet, tangy and a bit savoury. This helps with the sweetness!
Mustard and garlic powder – The savoury seasonings. I prefer powdered garlic over fresh garlic, and powdered mustard over mustard spread because the powder versions have a more earthy flavour that I think works better for BBQ sauce.
How to make my best Pulled Pork
It might take 36 hours all up, but it’s actually very straight forward as a process. Also, the brining step, though recommended for truly the best results, can actually be skipped if you want. You still get plenty of flavour on the bark that gets mixed through the meat, as well as in the roasting pan juices that we toss through the meat. The BBQ sauce also adds a good load of flavour!
1. Brining
As mentioned above, a 24-hour dry brine locks in the juices as well as seasoning the flesh right to the middle of that considerable hunk of meat!
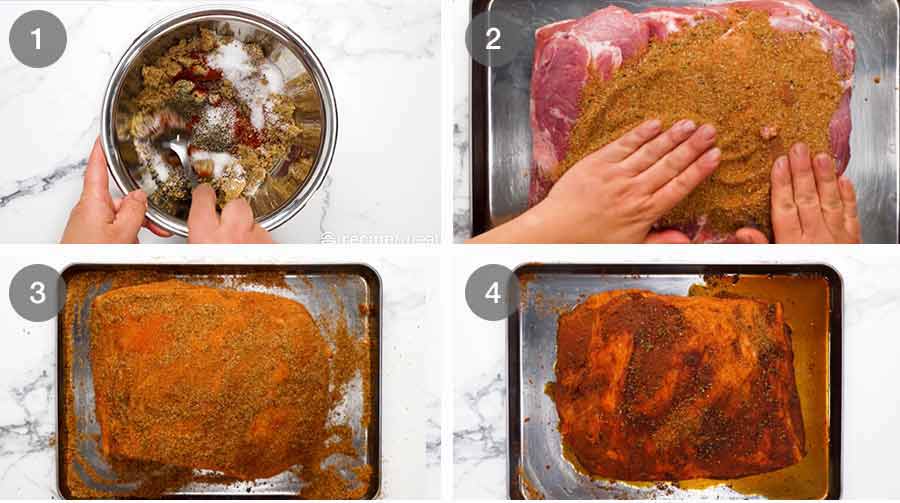
Rub – Mix the rub ingredients in a small bowl.
Coat the pork all over with the rub and use your hands to …well, rub it in. 😂 Get right into all those cracks and crevices. Yep, I know some people hate it / laugh when I write that, and I write it every time I use a rub. Have a giggle and rub away!!!
Get as much rub as possible to stick to the pork, being particularly generous on the top. You will end up with some excess rub loose on the tray, as you can see in the photo above. That’s OK.
Brine 24 hours – Position the pork fat side up (smoother side). Place the pork UNCOVERED in the fridge overnight. Uncovered is best because that way your pork will not sweat under cling wrap or similar. It also dries out the surface of the pork which is key to the best bark!!!
Can I brine for longer? Yep! I’ve done it for up to 48 hours. I actually didn’t notice a difference between 24 hours and 48 hours however, so there’s no additional benefit to brining for longer. More that if you forgot or the timing suits you, it’s no issue.
Post-brining – This photo shows what it looks like after brining. There will be some liquid in the pan, which is a bit of pork juices mixed with dissolved salt. Discard this liquid when transferring the pork to the roasting pan. We only want whatever stuff sticks to the pork.
2. 12-hour slow-roasting
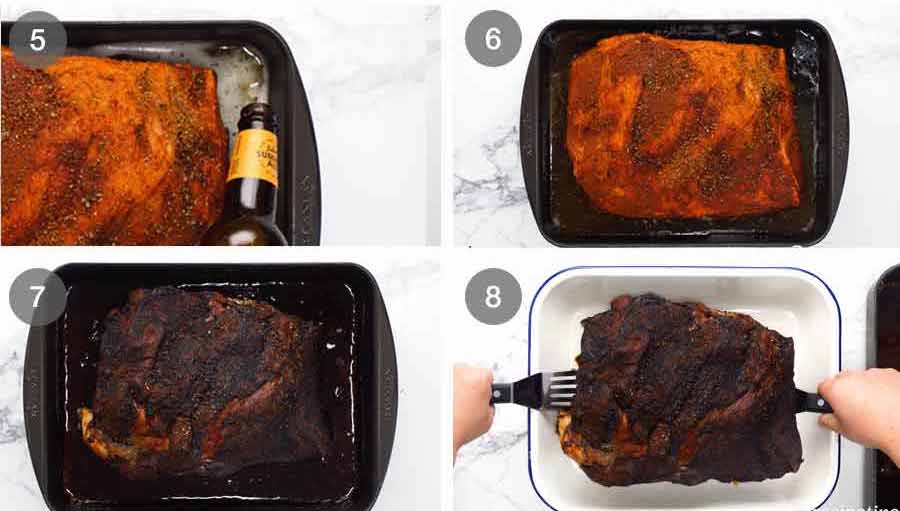
Liquids for cooking – Transfer the pork into a roasting pan. Then pour the beer and water around it, using additional water to top up as needed so that the liquid level is 2.5 cm / 1″. This is to ensure the pan doesn’t dry out during the slow roasting time. It means the pork will be even juicier (nice and steamy environment!) as well as ensuring we end up with some roasting pan juices that we toss through the pork at the end + stir into the BBQ sauce (it’s free flavour!).
Slow roast the pork uncovered for 12 hours at 110°C/230°F (both fan-forced and standard). Some notes on the slow cooking part:
a) Low temperature – We want to use lowest temperature possible to cook this pork at because the lower the temperature, the less moistures is lost from the flesh of the pork which in turn means juicier pork meat. I found that 110°C/230°F is the minimum temperature for the middle of the pork to peak at 95°C. At this temperature, the meat will be tender enough to shred with no effort. Cooking at a temperature lower than 110°C/230°F, I found the pork never became “fall-apart-at-a-touch”.
b) Uncovered – The pork is cooked uncovered so we get that desirable, intensely-flavoured bark on the surface all over the pork. This part is everyone’s favourite!
c) Overnight roasting – At such a low temperature and with the amount of liquid we put in the pan, I feel perfectly safe sleeping with the oven on. It’s also super-handy to do the slow-roasting overnight because it’s entirely hands-off. The cooked pork reheats perfectly so I can serve it anytime the next day.
d) ⚠️ OVEN AUTO-OFF – Many ovens, including mine, will automatically turn off after 12 hours. This is for safety reasons. So be sure to check if yours has an auto-off function (check the manual)! If it does, firstly preheat the oven, put the pork in then turn it off. Immediately turn it back on (to restart the 12-hr clock, so to speak). Now you’re good to go. Also, how handy that your oven will now turn itself off bang on 12 hours when your pork is ready!
Slow-roasted pork – After 12 hours, the pork should be fall-apart-tender with a thick, almost black crust. Pick a bit off and have a nibble – cooks’ treat!
There should still be some liquid remaining in the pan. How much depends on a lot of things, like the size of your pork, your oven and so on, but usually there is around 1.5 – 2 cm / 3/4″ of liquid.
Transfer the pork to a different pan, large enough for shredding. Rest the meat for 20 minutes before shredding. Just because we slow-cooked the meat does not mean we can skip the essential step of resting the meat! During this time juices inside the meat are reabsorbed back into the meat fibres = juicier!!
Shredding
We come to the best part – because you get to pick and nibble throughout the whole process!
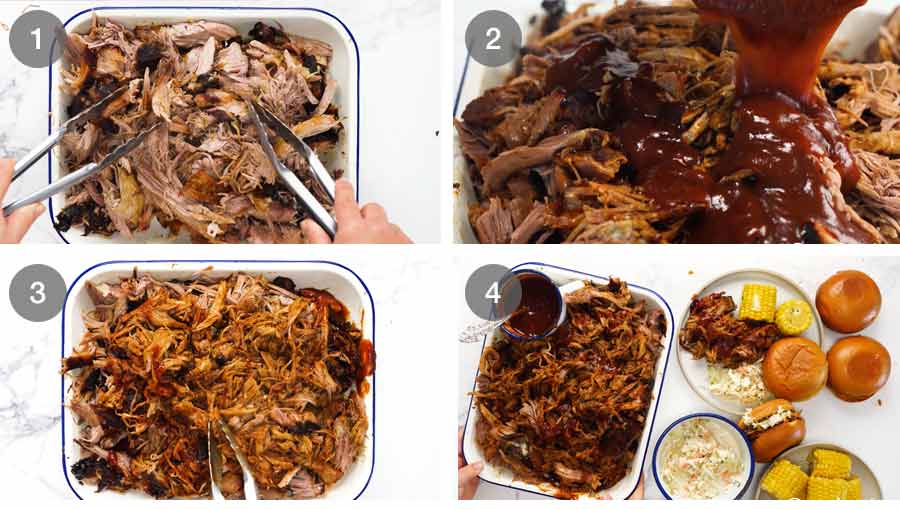
Shred the pork using two forks or tongs. It’s so tender it will be effortless! Shred into strand sizes you desire. Some people like superfine, others like chunks. I’m sort of in-between.
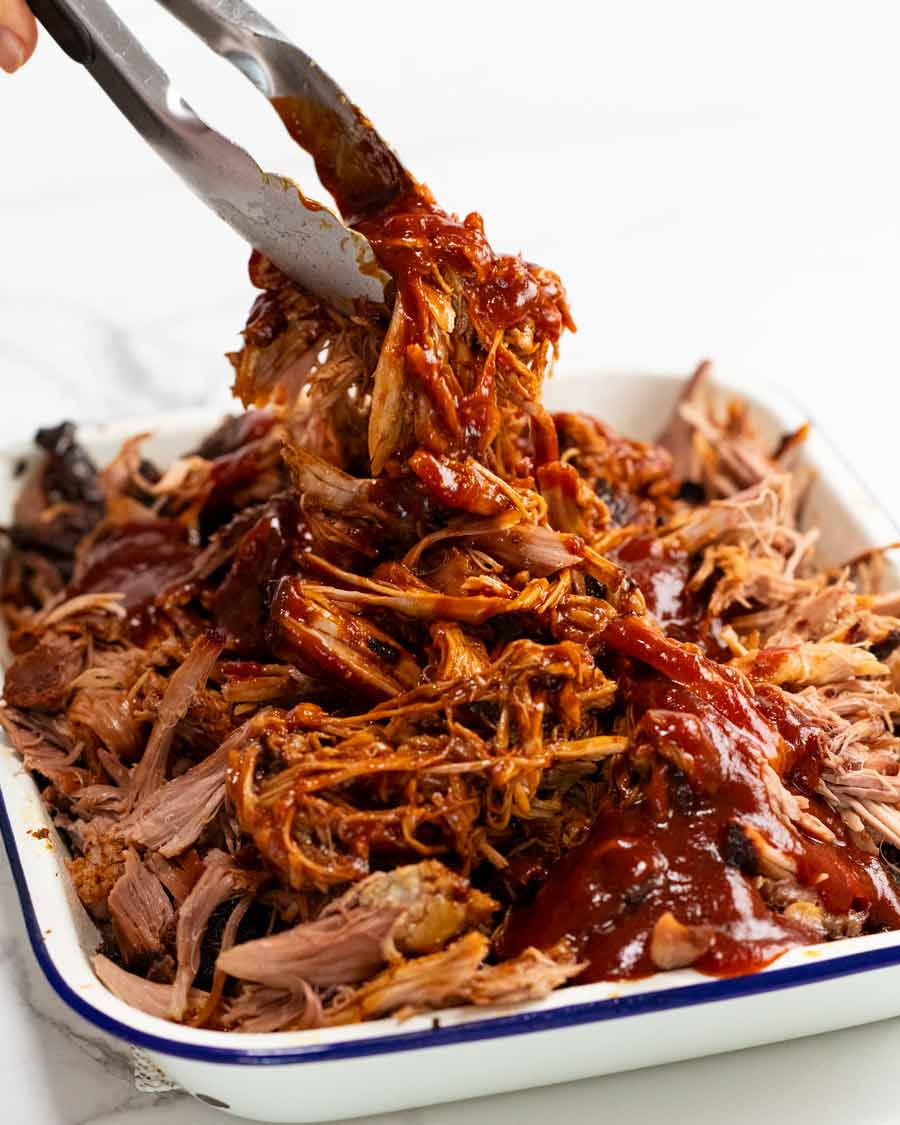
Pan juices and BBQ sauce – Pour over some roasting pan juices (it’s got tons of flavour, we are NOT wasting it!) and some BBQ sauce. Just enough of both to juice up the meat a bit, not drown it! I prefer to serve BBQ sauce on the side so people can use as much or as little as they want.
Toss well.
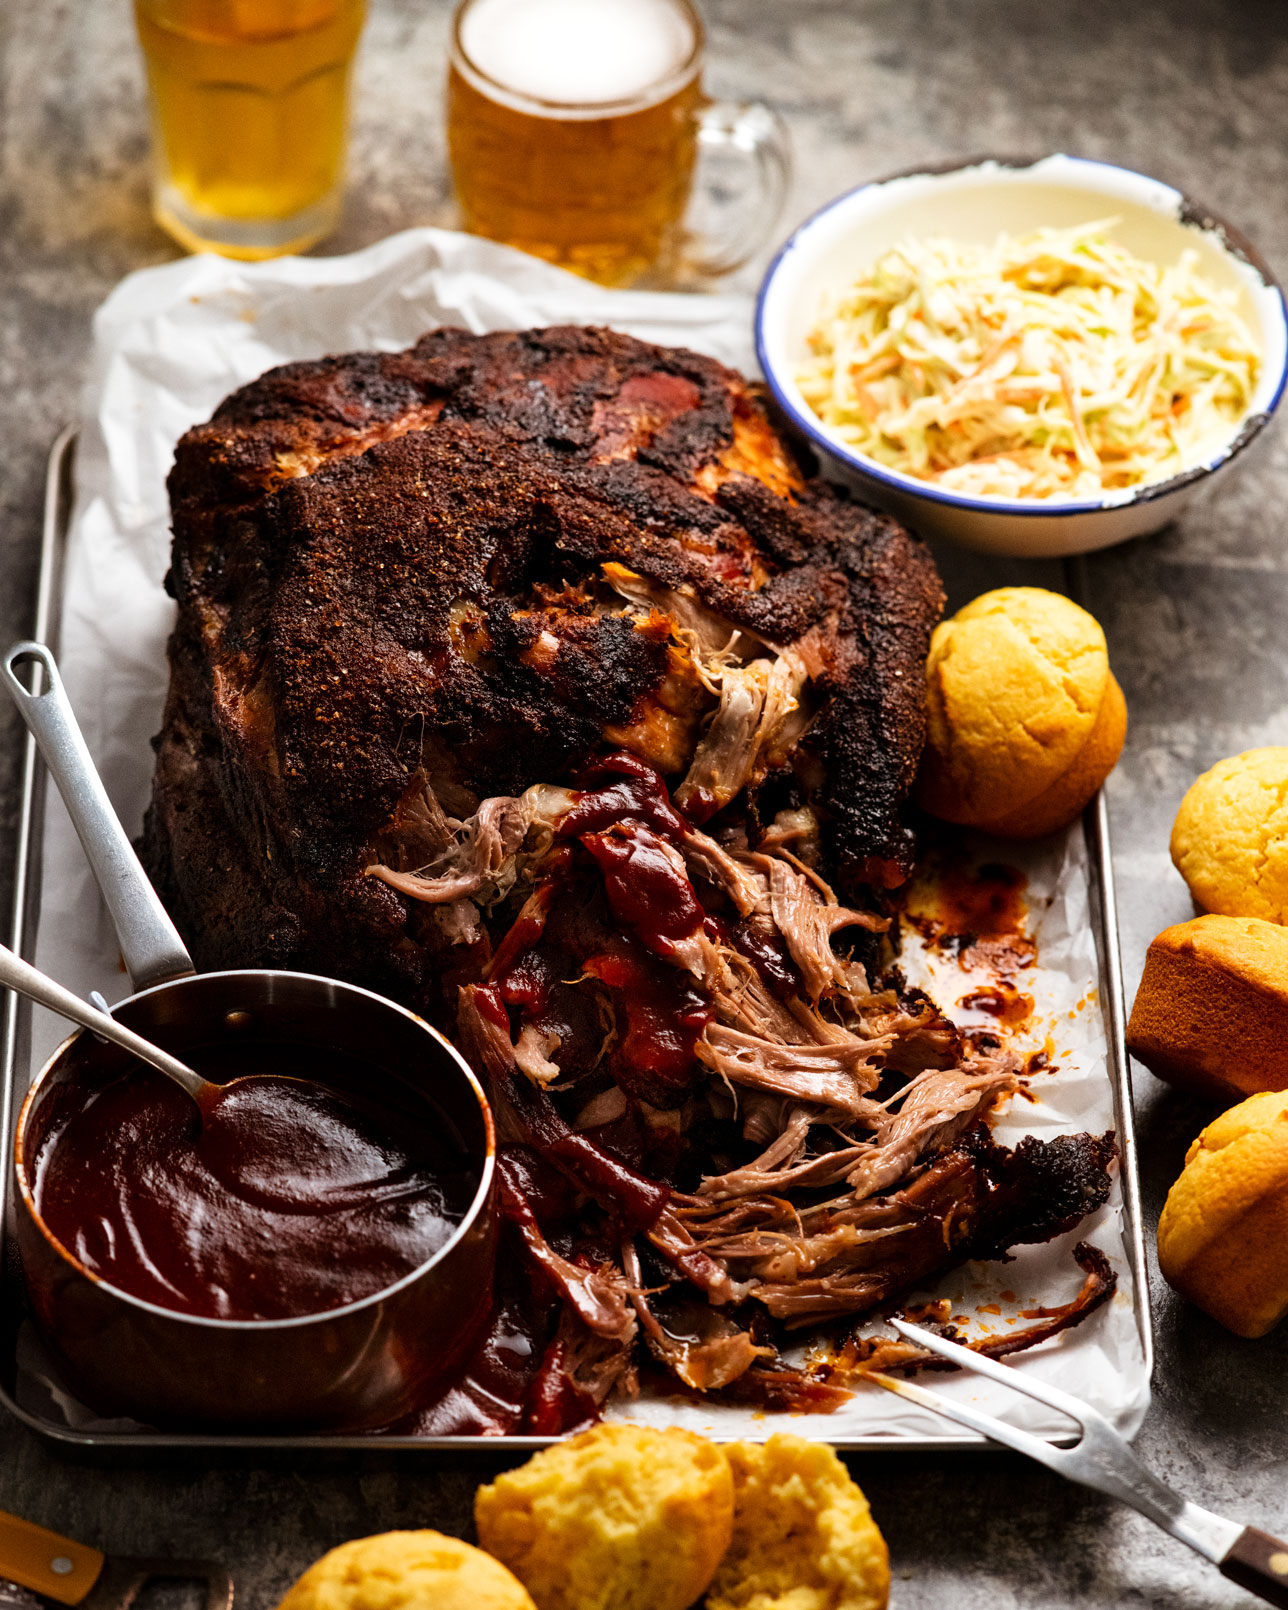
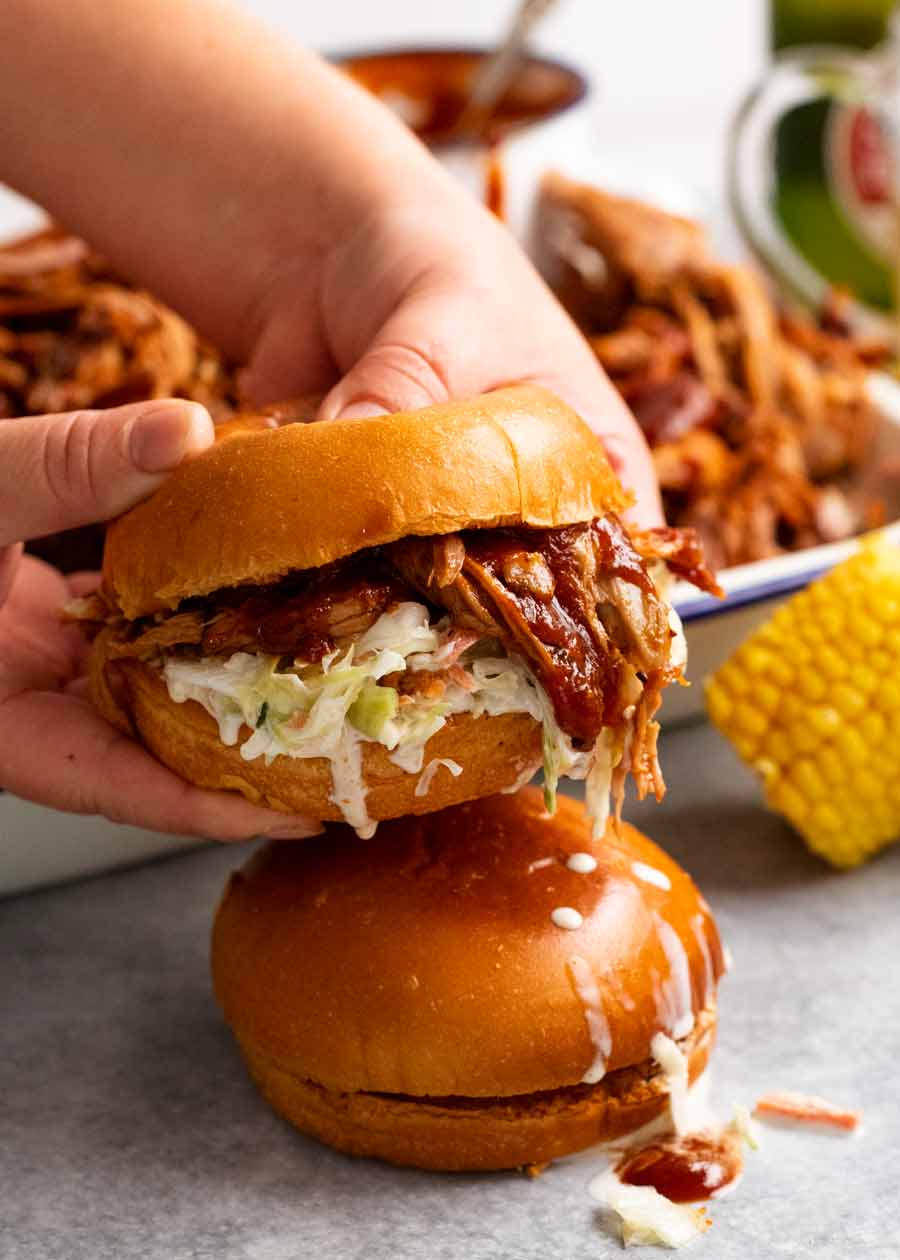
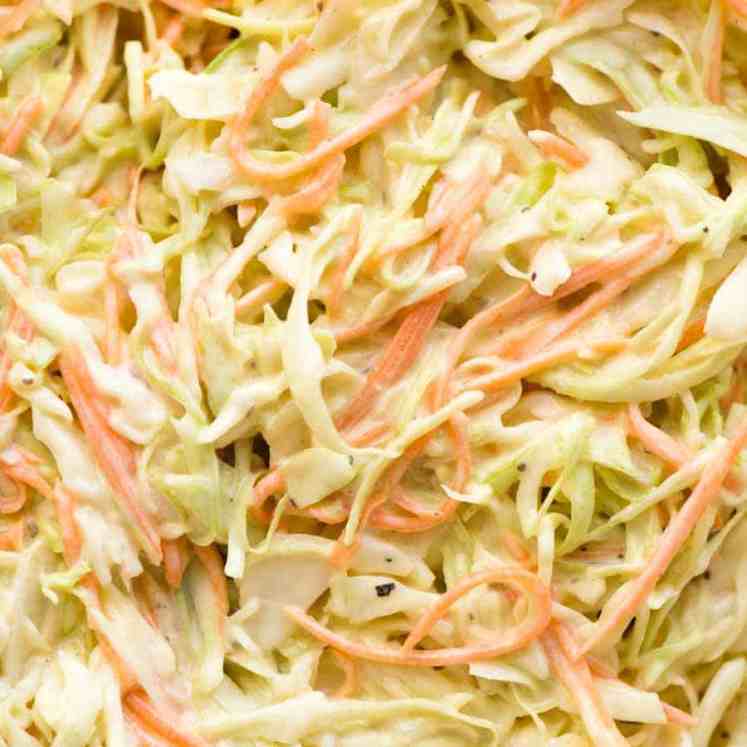
Serve – Now serve with remaining BBQ sauce on the side! Pictured above with soft buns and coleslaw, to make Pulled Pork Sandwiches. YESSS!!!! (Some more serving suggestions below).
Homemade BBQ Sauce
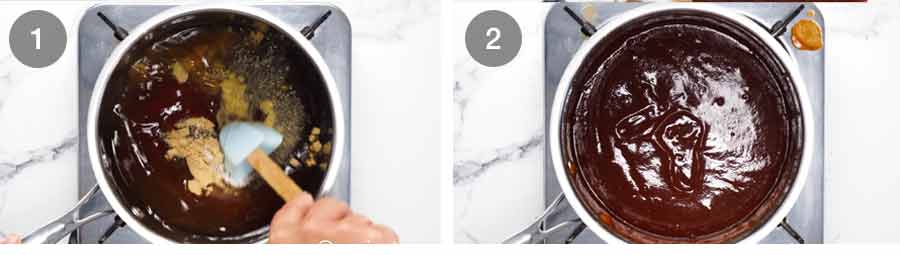
Just briefly, the BBQ sauce. It’s a plonk-and-stir, simmer-for-45-minutes job. Very easy! It can be made at any time that suits you as it keeps and reheats perfectly.

Honestly, that sight … a big pan of juicy meat that’s had my love and attention for the last 36 hours … (albeit I’ve been asleep for most of that time, but that’s not the point!)… now THIS is my kind of food.
I know this is totally un-lady like. I’m not the dainty sort, not in my food choices, nor in how I barrel through life. But boy does it make for a tasty life!!!
Case in point, Pulled Pork Sandwiches, dripping with pork juices mingling with BBQ sauce. Oh and look, Coleslaw joining the party too:
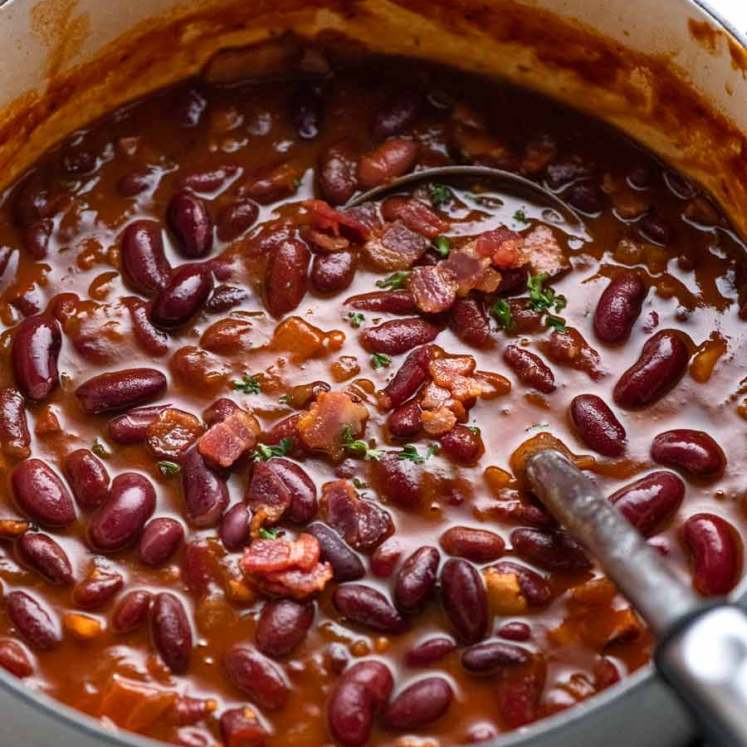
Or, try a big Southern dinner spread by adding classic sides that you’d swear were invented just to serve alongside Pulled Pork!
Great Southern sides to serve with Pulled Pork


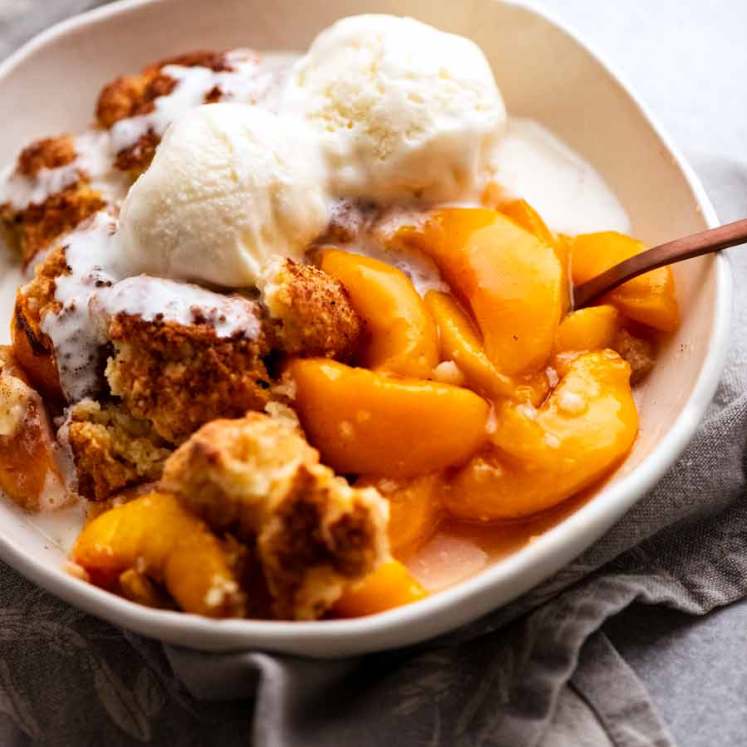
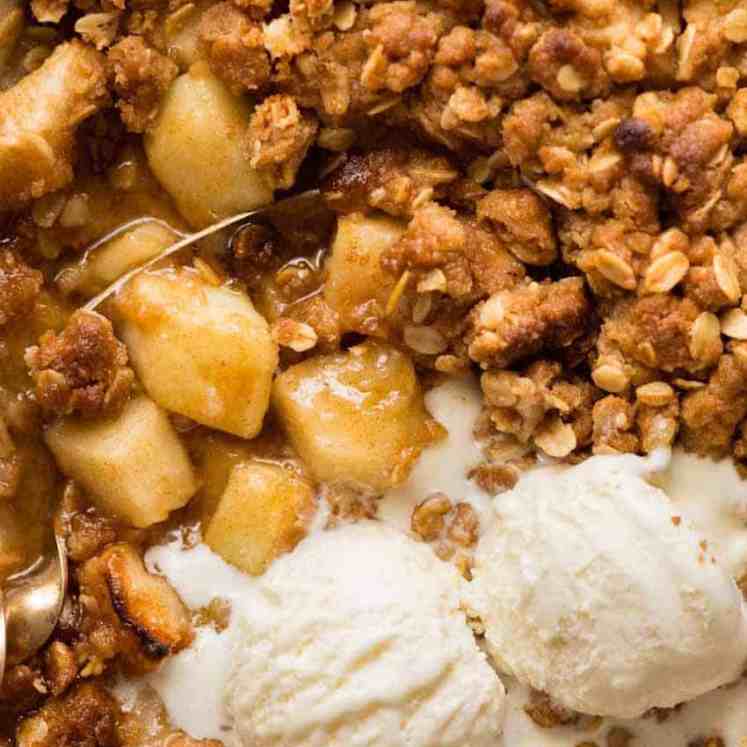
As for dessert? Try one of these!
Desserts. Because we ALWAYS have room for dessert!


So, have I convinced you it’s time for a BIG PULLED PORK feast this weekend? Oh, not this weekend? So – next weekend?? 😉 – Nagi x
12 hour roast not for you? I get it. Try my easy Slow Cooker Pulled Pork instead. Long standing reader favourite!
Watch how to make it

My best Pulled Pork
Ingredients
- 4 – 5 kg / 8 – 10 lb pork butt / Boston butt / square cut pork shoulder (skinless, bone in, fat cap on, Note 1)
- 1 1/2 cups beer , any except dark beers like Guinness (Note 2)
- 1 cup water
RUB (Note 3):
- 6 tbsp brown sugar
- 2 tbsp paprika powder
- 1 tbsp garlic powder
- 1 tbsp onion powder
- 1 tbsp mustard powder
- 2 tsp cumin powder
- 2 tsp dried oregano
- 1 tsp cayenne pepper (can omit)
- 2 tbsp cooking/kosher salt* (Note 4)
- 2 tsp black pepper
BARBECUE SAUCE:
- 1 cup apple cider vinegar (Note 5)
- 3 cups ketchup (or Aussie tomato sauce)
- 1 cup water
- 3 tbsp molasses (original, not backstrap, Note 6)
- 2/3 cup brown sugar
- 4 tsp Worcestershire sauce
- 2 tsp Tabasco (optional spiciness)
- 4 tsp mustard powder
- 3 tsp garlic powder (sub onion powder)
- 2 tsp cooking/kosher salt (Note 4)
- 2 tsp black pepper
Instructions
- Dry brine overnight (Note 7) – Pat the pork dry and place in a large ceramic dish. Mix Brine ingredients in a small bowl and rub it all over the pork, being sure to get into the cracks and crevices. Turn it fat side up (smoother side) covered with as much rub as possible. Refrigerate uncovered for 24 hours.
- Preheat oven to 110°C (both fan-forced and standard) / 230°F.
- Prepare for roasting – Transfer pork to a roasting pan (do not wipe the rub off) with the fat side up. Discard any liquid and residual rub left in the brining dish. Pour beer and water around the pork, topping up with extra water as needed so the liquid level is 2.5 cm / 1" (insurance against pan going dry).
- Slow roast 12 hours (Note 8) – Roast, uncovered, for 12 hours, or until the internal temperature reaches 95°C/203°F and the meat falls apart effortlessly using two forks. ⚠️ Make sure your oven does not automatically turn off mid cook, many have auto-off functions that kick in at 12 hours (also factor in oven pre-heating time)!
- Shred – Transfer the pork to a large pan (reserve juices in roasting pan). Rest for 20 minutes then shred with tongs / forks – it will be effortless! You can discard the fat cap at this stage if you want. I leave some, it makes the shredded pork even juicier.
- Sauce it – Pour 3/4 cup of the juices from the roasting pan and 1 cup of Barbecue Sauce (see below) over the pork, and toss.
- Serve Pulled Pork with remaining Barbecue Sauce on the side so people can help themselves. Either make a big Southern feast with a side of cornbread, coleslaw and potato salad or macaroni salad. Or make Pulled Pork buns with soft rolls stuffed with coleslaw, Pulled Pork and the BBQ sauce!
Barbecue sauce:
- Place ingredients in a large saucepan and whisk to combine.
- Simmer 45 minutes: Bring to simmer on medium heat, then reduce to a low simmer for 45 minutes. Stir occasionally.
- Add pork juices: When the pork is cooked, add 1/2 cup of the juices from the roasting pan into the BBQ sauce and simmer for 5 minutes. Use water to control thickness – it should have a thick syrupy consistency. Serve warm or at room temperature (not fridge cold).
Notes
- Garlic powder and onion powder – substitute with more of the other
- Mustard powder – same amount of dijon mustard spread
- Oregano leaves – omit
- Brown sugar – white sugar or honey
Shred then serve per recipe.
10. How much to make per person – To figure out how many people your pork will serve, multiply each kilo of pork by 3 to get normal servings or by 2.4 for generous servings. Imperial measurements: Multiply each lb of pork weight by 1.5 for normal servings or 1.2 for large servings. Example:
- 5 kg pork: 5 x 3 = 15 servings (normal portions) or 5 x 2.4 = 12 servings (large portions)
- 10 lb pork: 10 x 1.5 = 15 servings (normal portions) or 10 x 1.2 = 12 servings (large portions)
Nutrition
Life of Dozer
In digestion mode. Too much Pulled Pork.

The post My best Pulled Pork appeared first on RecipeTin Eats.
]]>