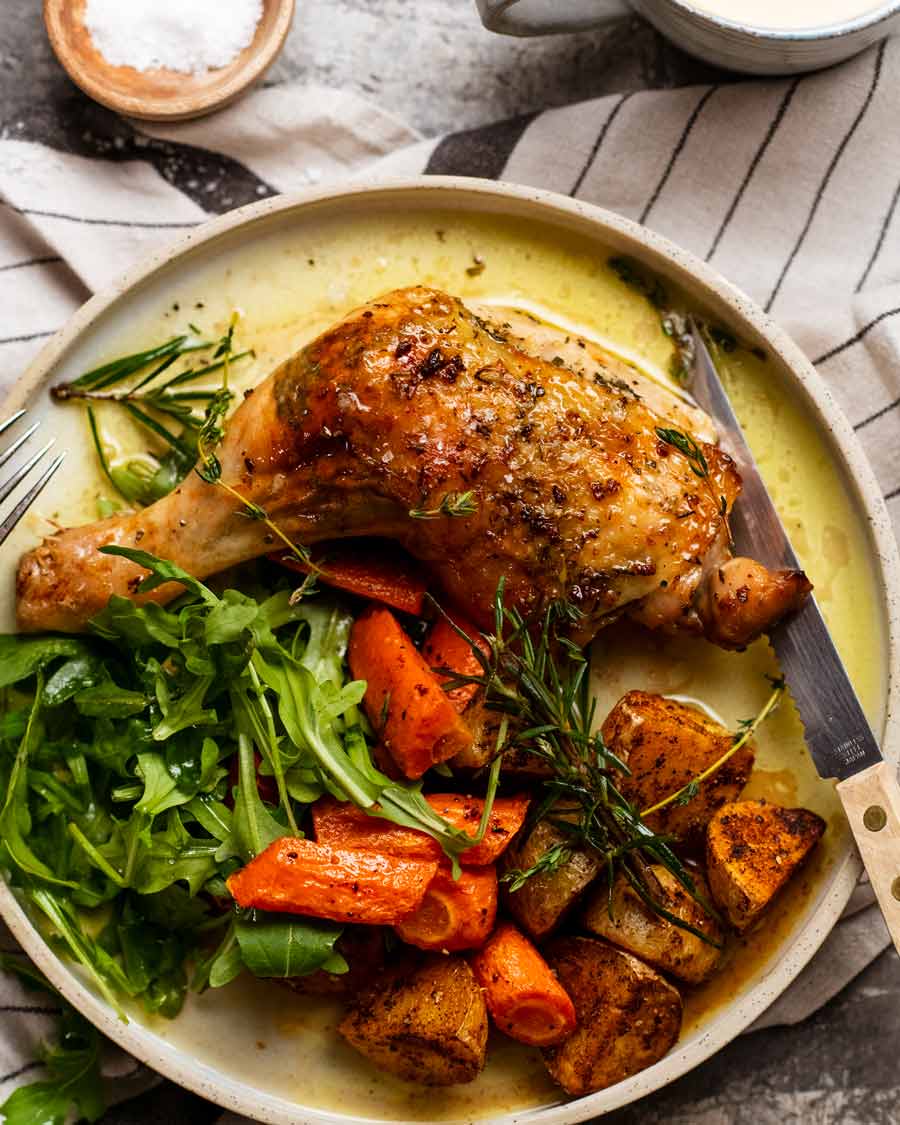
 Chicken marylands: such an under-utilised cut of chicken! Cheap, juicy, flavourful, hard to stuff up. It’s like roast chicken, without the mess of carving. Slather in herb & garlic butter, bake until golden, then serve with potato gratin or creamy mash with garlic sautéed green beans for the perfect meal! Chicken marylands (aka chicken leg quarters) Chicken maryland is a... Get the Recipe
The post Herb & Garlic Chicken Marylands appeared first on RecipeTin Eats.
]]>Chicken marylands: such an under-utilised cut of chicken! Cheap, juicy, flavourful, hard to stuff up. It’s like roast chicken, without the mess of carving. Slather in herb & garlic butter, bake until golden, then serve with potato gratin or creamy mash with garlic sautéed green beans for the perfect meal!
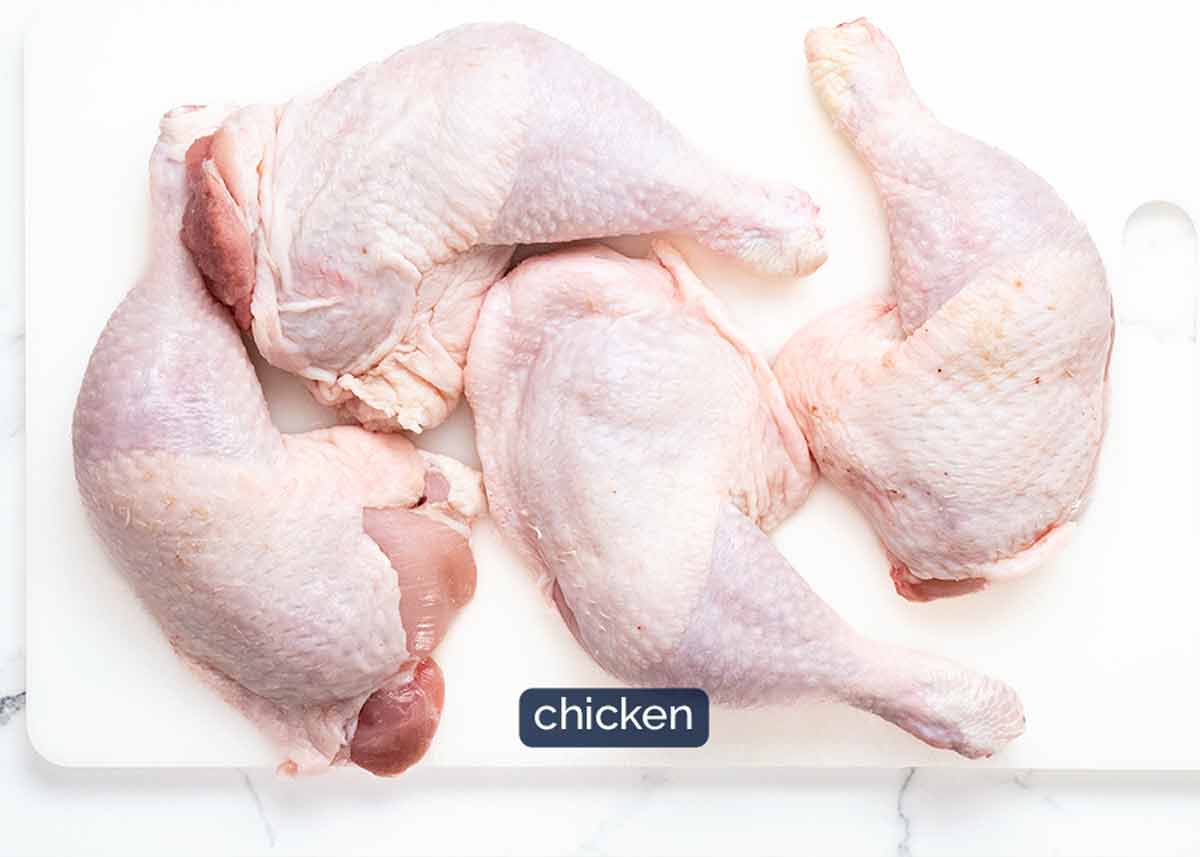
Chicken marylands (aka chicken leg quarters)
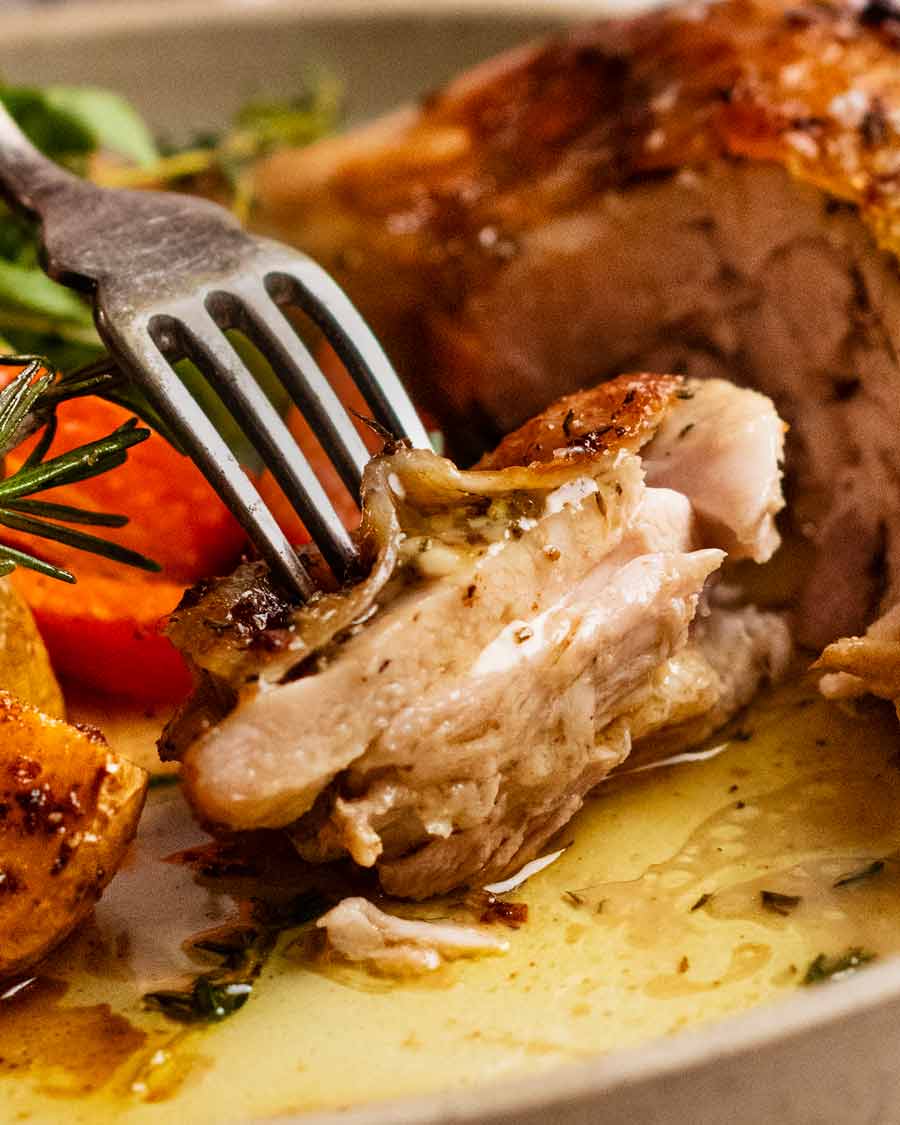
Chicken maryland is a massively underrated economical cut of chicken. I tell people it’s like roasting up a whole chicken – without dealing with the mess of bones and juices from carving up a whole chicken! A substantial piece of meat with plenty of golden skin, juicier* than drumsticks and thighs, and super flavourful.
It’s nearly impossible to mess up since you don’t have to worry about precise roasting time to prevent dry, bland breast. Because this cut doesn’t include chicken breast! Why aren’t we cooking chicken marylands all the time??!!
* Why it’s juicier – because it’s a larger single piece of bone-in meat. Which means less juice-escaping-crevices by meat weight = juicier meat.
What is a chicken maryland – to you?
As it turns out, chicken marylands means different things in different countries. Here in Australia, it refers to a cut which is a chicken leg with the thigh attached, pictured below. It’s called whole chicken leg quarters in the States and just chicken legs in the UK. I know it’s confusing, but at least the cut is easily identifiable!
In the States, “Chicken Maryland” or “Maryland Chicken” refers to a dish originating from the state of Maryland comprised of fried chicken with creamy gravy. This immediately got added to my ever-growing List of Things To Make.
In the UK, “Chicken Maryland” refers to a retro Chinese fried chicken dish served with a banana fritter, corn fritter and bacon.
This did not get added to my List of Things To Make! 😂
PS I put this little table together just to clear up the confusion in my head. Though it might be useful to you too. 
| Chicken cut names | Australia | US | UK |
|---|---|---|---|
| Chicken maryland (leg + thigh attached – today’s recipe) | Chicken maryland | Chicken leg quarters | Chicken legs |
| Chicken drumsticks (ie no thigh attached) | Chicken leg or drumsticks | Chicken leg or drumsticks | Chicken drumsticks |
Ingredients you need
Today, we’re roasting this chicken slathered in a herb and garlic butter. Here’s what you need for the butter – see above for the photo and talk about the chicken marylands!
Herb & garlic butter
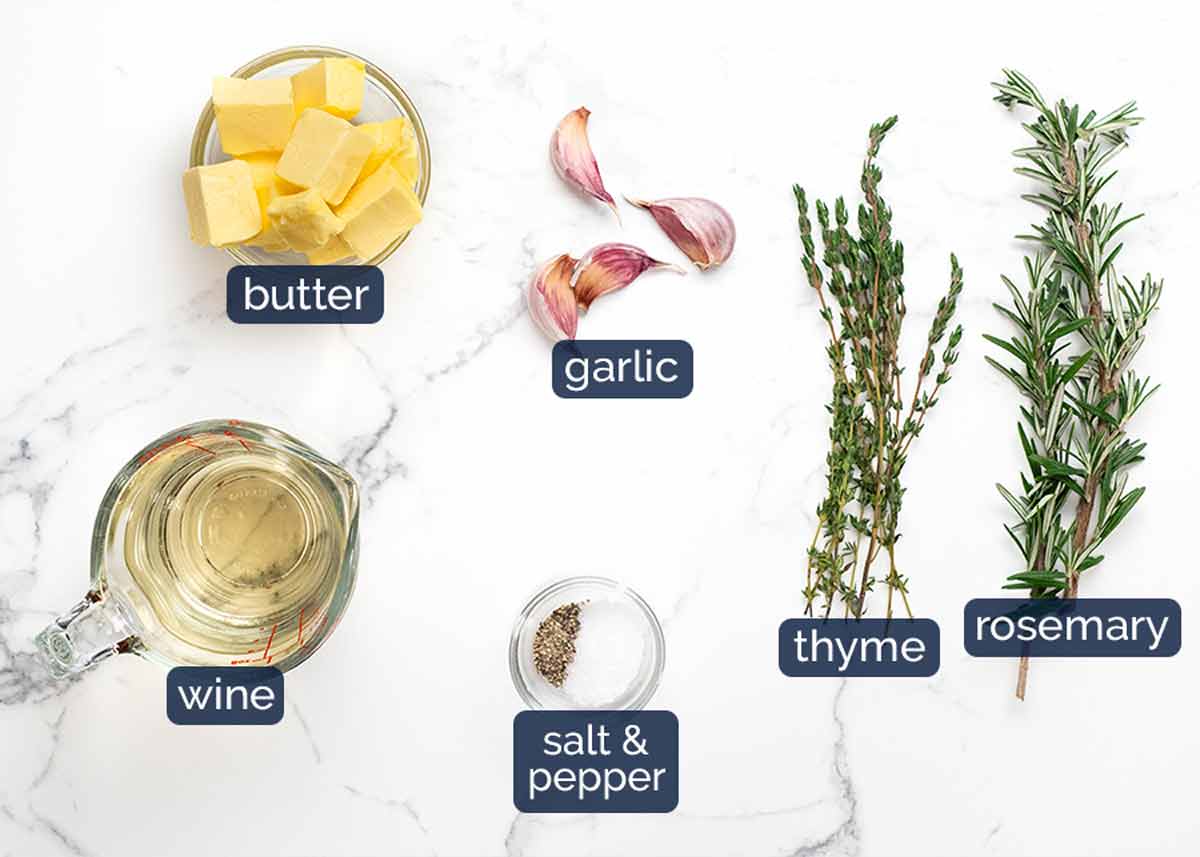
Thyme and rosemary – Fresh is best, for maximum flavour impact. However, dried will work as a substitute.
Garlic – Fresh and only fresh! Jarred stuff just doesn’t compare – it’s sour and doesn’t have real garlic flavour.
Unsalted butter – I prefer using unsalted so I can control the amount of salt. However, if you only have salted it will work too, just halve the salt.
White wine – Serves a triple purpose: keeps the underside of the chicken moist as it roasts, infuses flavour into the flesh, and makes the juices in the roasting pan so tasty it’s like liquid gold. All that flavour from the herb & garlic butter mingling with the chicken juices plus the white wine = sauce perfection!
Substitute with chicken stock/broth, low sodium or just a splash of water (you’ll end up with less sauce but don’t worry, there’s plenty of flavour in the chicken itself!).
How to make Herb & Garlic Butter Chicken Marylands
This recipe calls for the herb & garlic butter to be slathered under the skin. Don’t worry, it’s not hard – access is easy with this cut of chicken! Also, while I’ve used marylands here, this recipe would be terrific made with bone-in thighs (use 8).
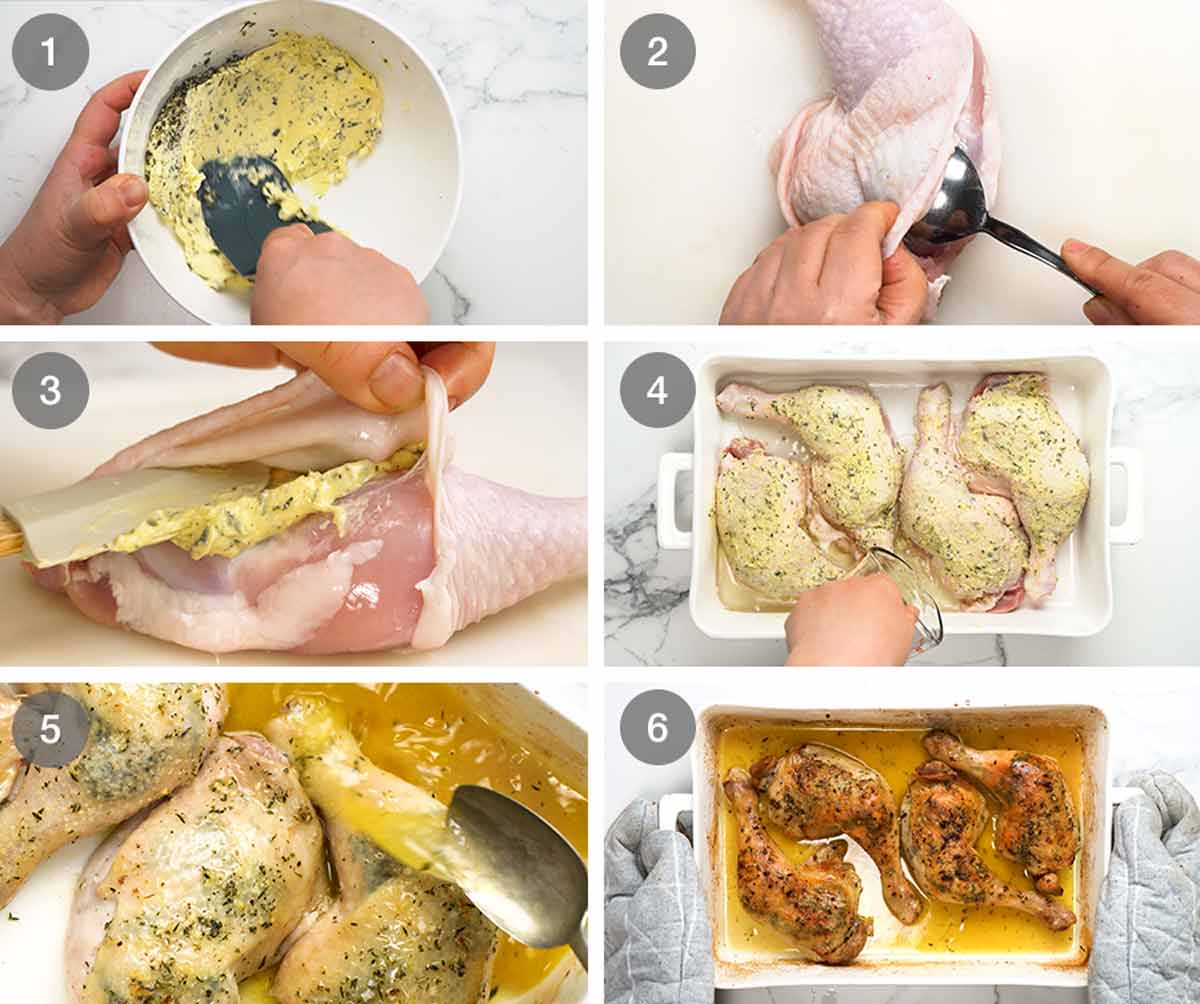
Mix softened butter with garlic, herbs and salt. Use a garlic press or microplane to finely grate the garlic and make it “juicy” so it mixes through the butter, for better garlic flavour. (If you don’t have one, very finely chop it).
Loosen the skin using a tablespoon. The spoon hugs the curves of the chicken flesh so it won’t pierce the skin. Access the skin from the straight edge of the thigh, as pictured above, and move the spoon around to create butter pockets (including on the drumstick).
Slather butter under the skin. It’s easy, I promise – lift skin, stuff butter under then spread by pressing/pushing on the skin. No need to be exact here, the butter melts and runs everywhere anyway. Even if you spread a wad in the middle that’ll do the trick.
How much butter where – Put about 75% of the butter under the skin. Then only a small amount (~5% ) on the flesh (underside), then the remainder on the skin. Why? Because the flesh side is going to get tons of flavour from roasting in the wine and the butter/chicken juices run-off. It doesn’t need extra butter help!
Roast for 50 minutes – Put the chicken in a baking dish skin side up. Pour the wine around then roast for 50 minutes.
Start off high at 220°C/425°F (200°C fan) for 10 minutes to get the skin browning, then on a slightly lower 200°C /400°F (180°C fan) for 40 minutes or until the skin is golden and the chicken is cooked.
Baste twice at the 30 minute and 40 minute mark (ie spoon pan juices over the chicken skin).
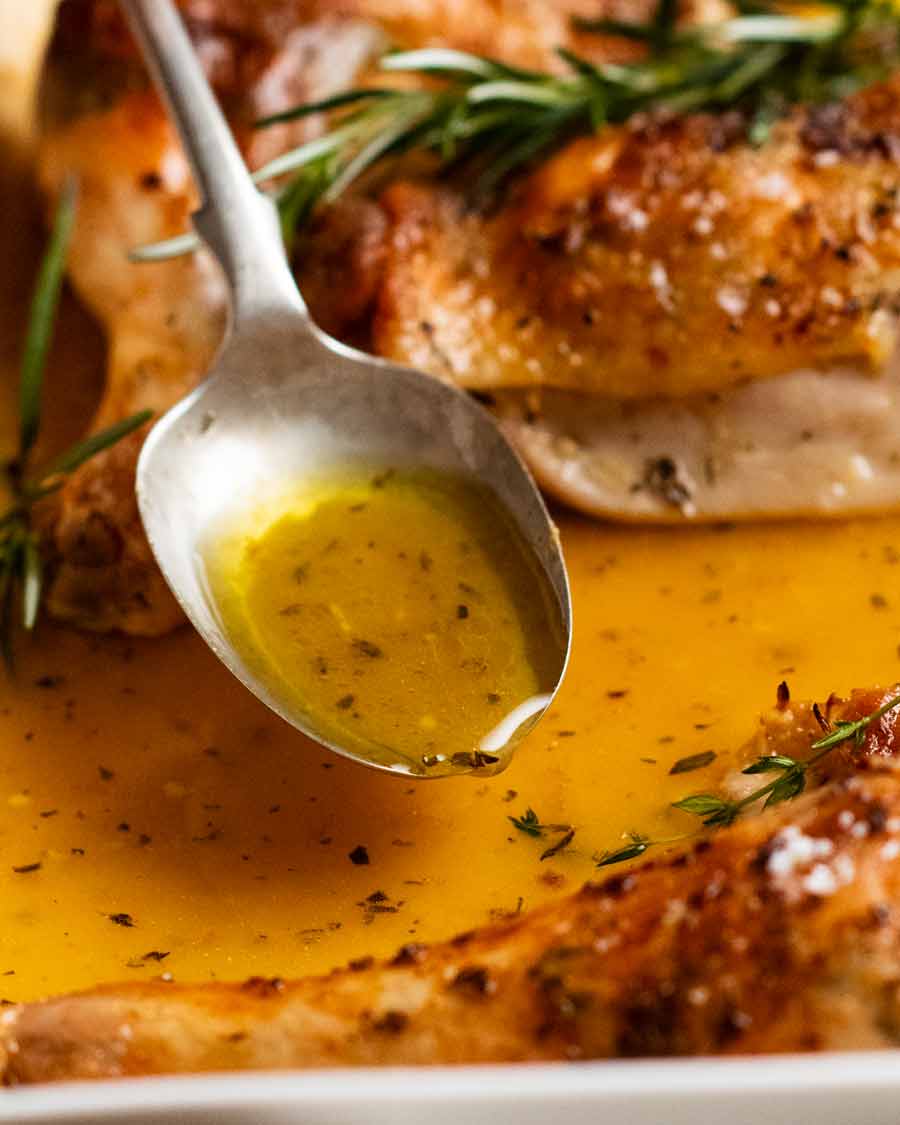
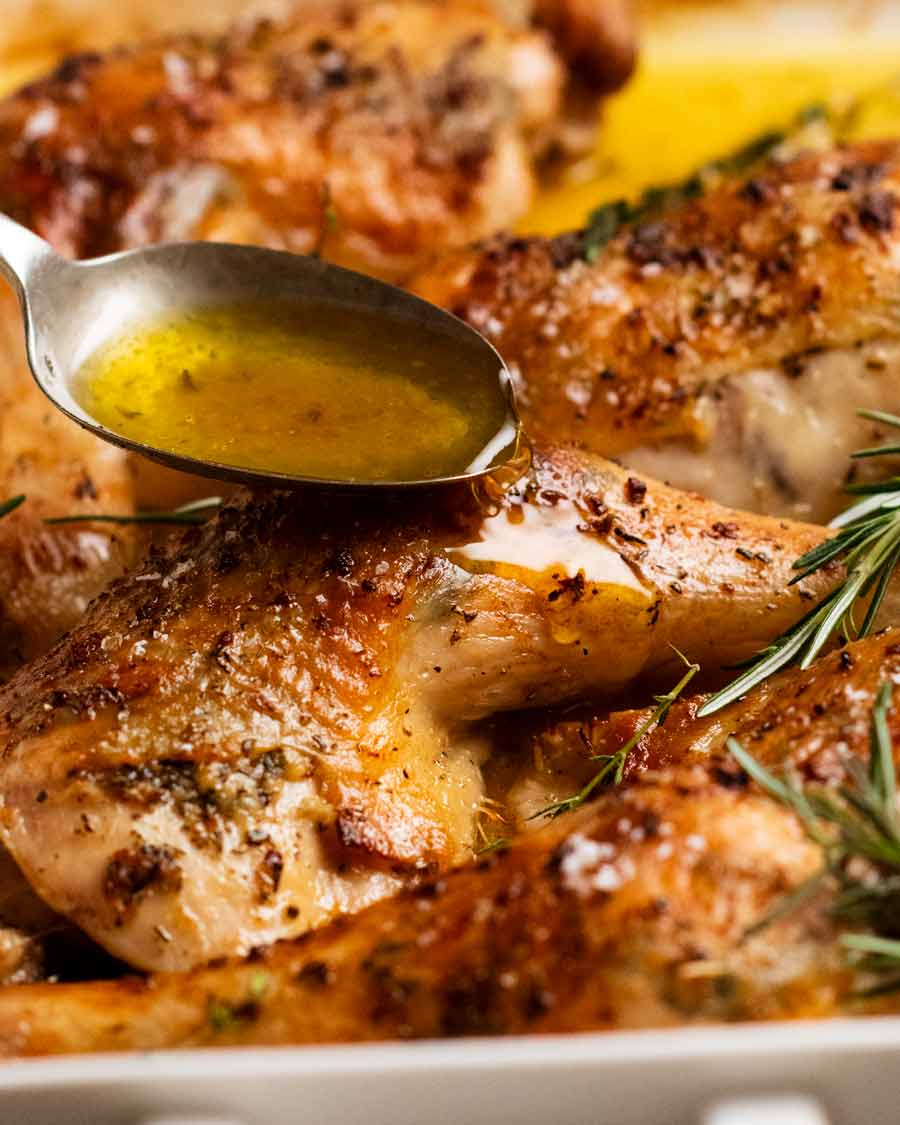
Rest for 5 minutes before serving, using the juices in the roasting pan as the sauce. That stuff is pure gold!!
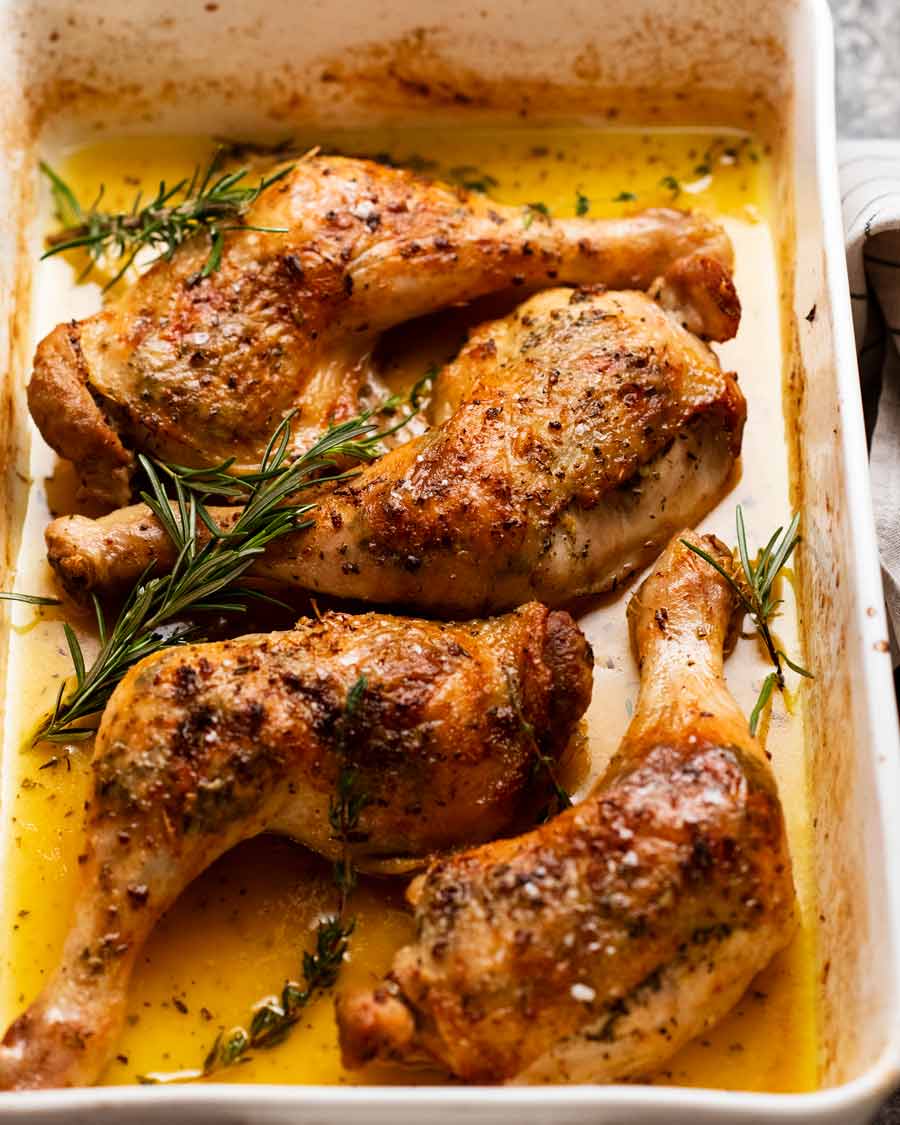
Close up of said golden roasting juices:
What to serve on the side
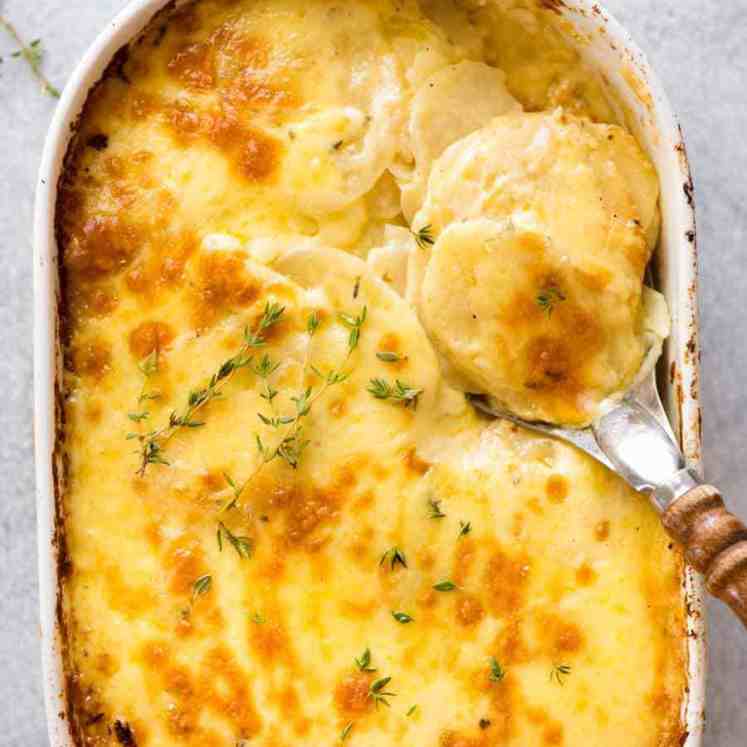
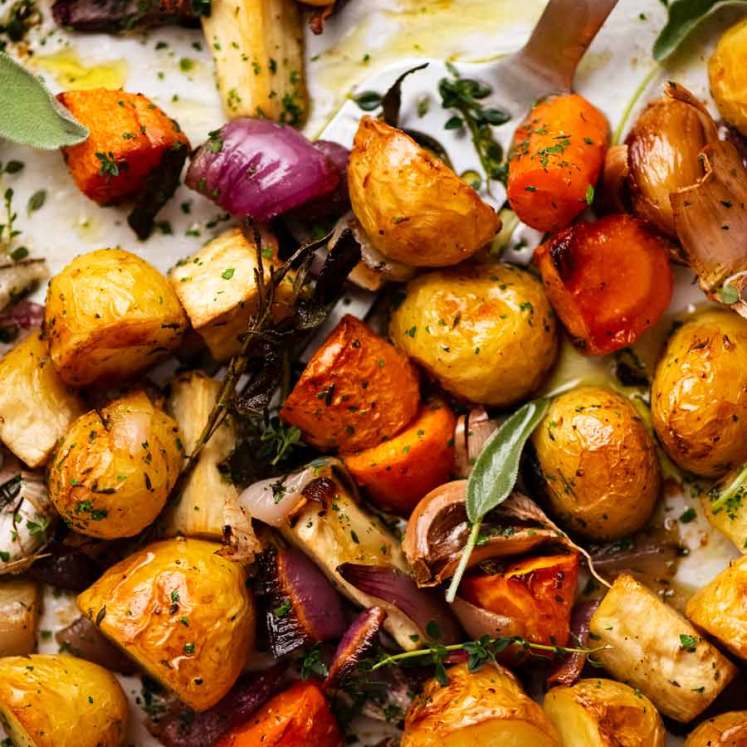
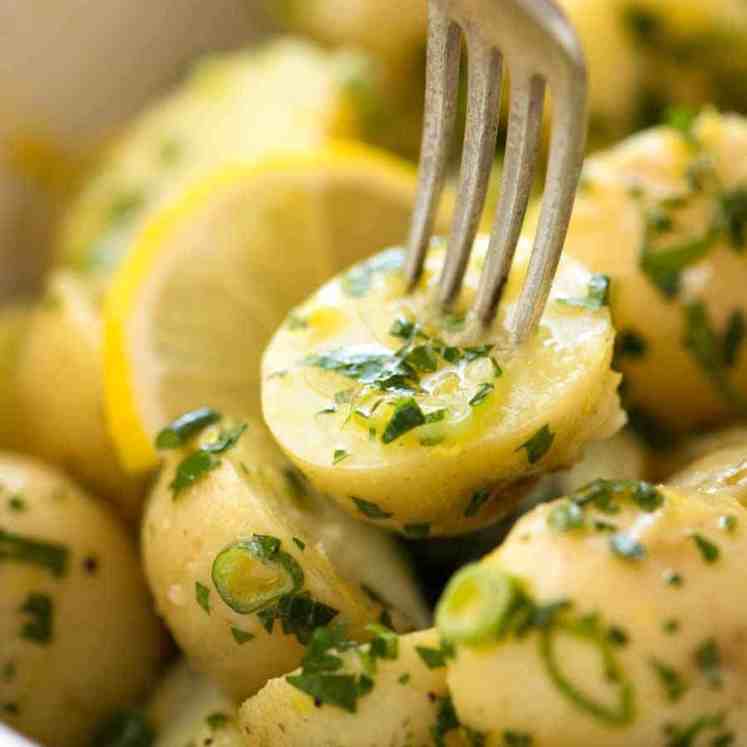
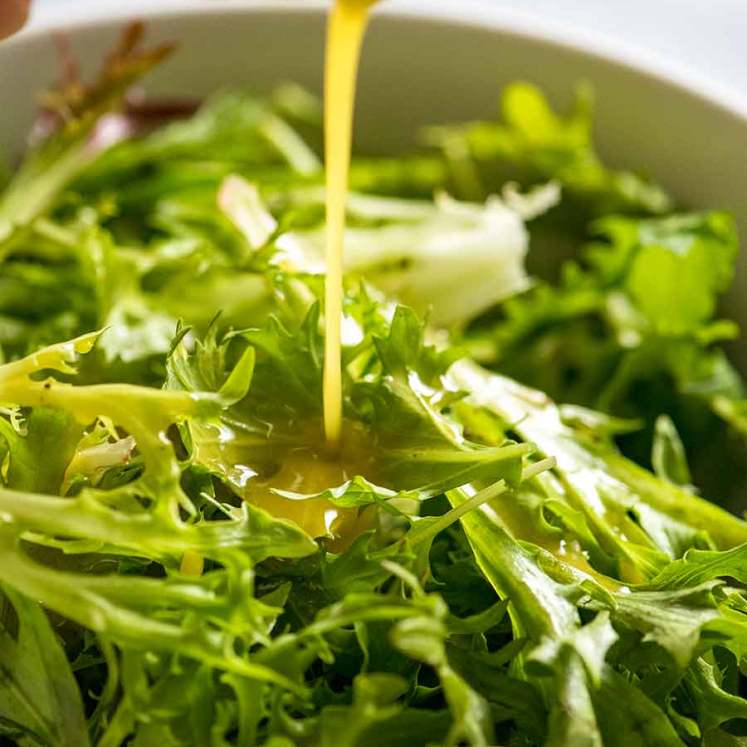
I served this with roasted vegetables and a rocket/arugula tossed with my Everyday Dressing. If I was making for company, I would opt for a potato gratin (make it in advance then reheat it while the chicken is roasting – allow an extra 10 minutes for the chicken roasting time) or Lemon Potato Salad (served warm) for something a little fresher.
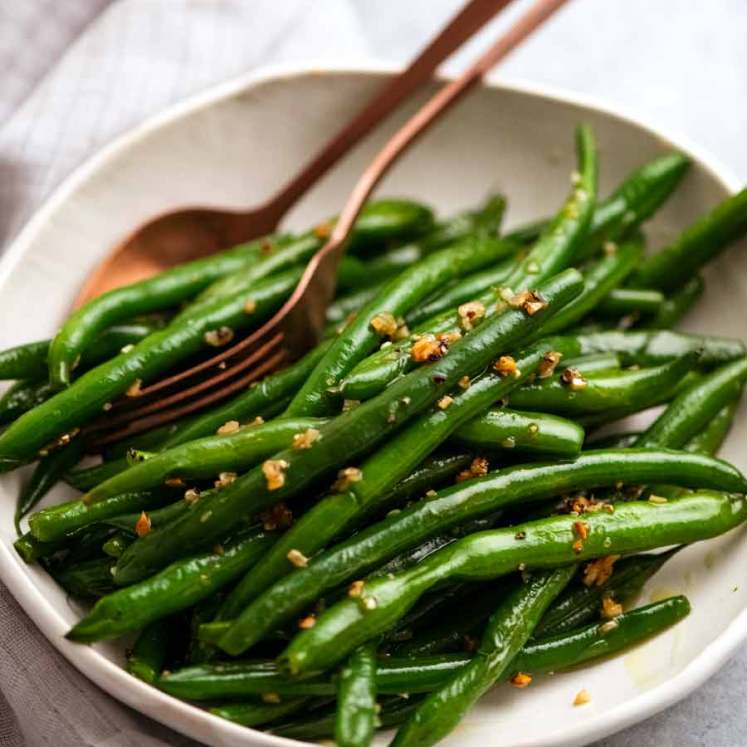
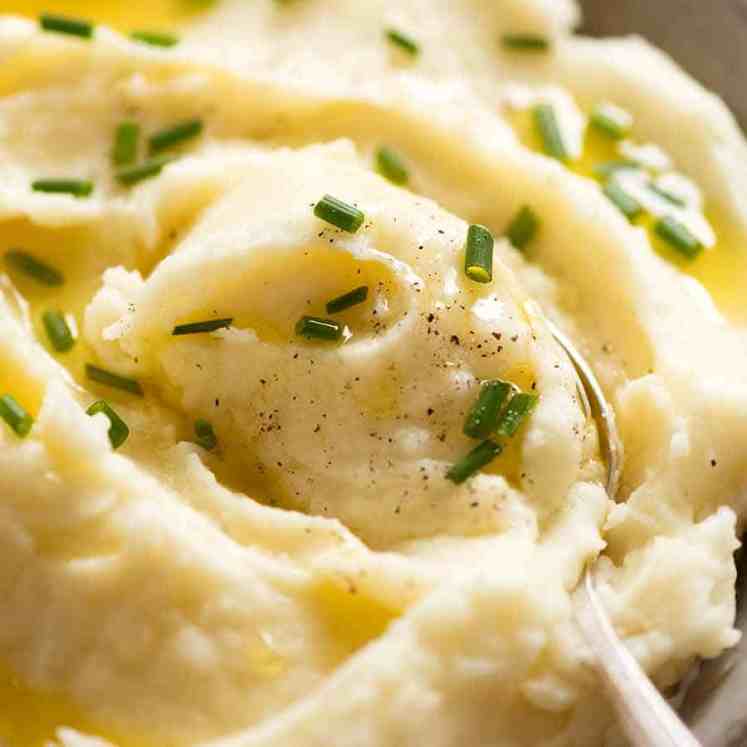
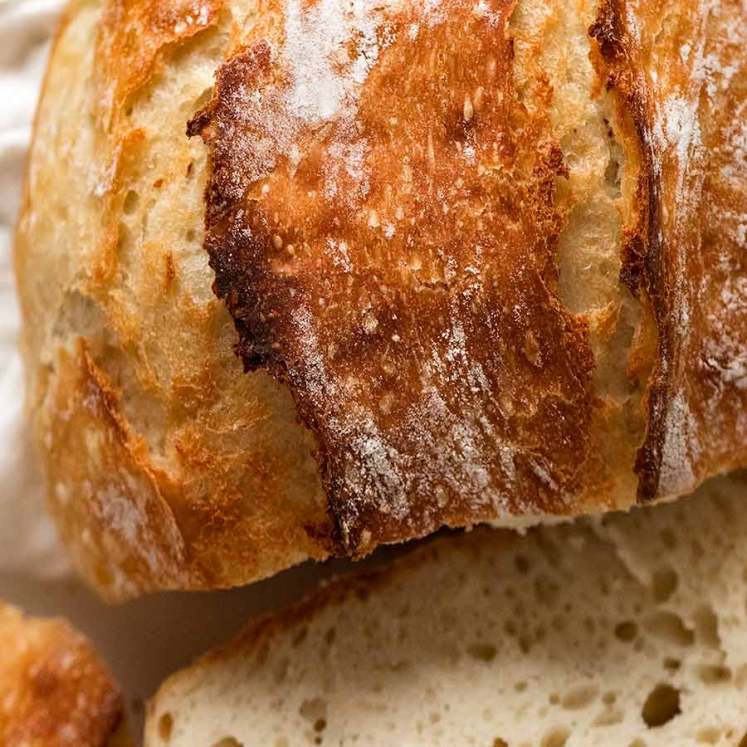
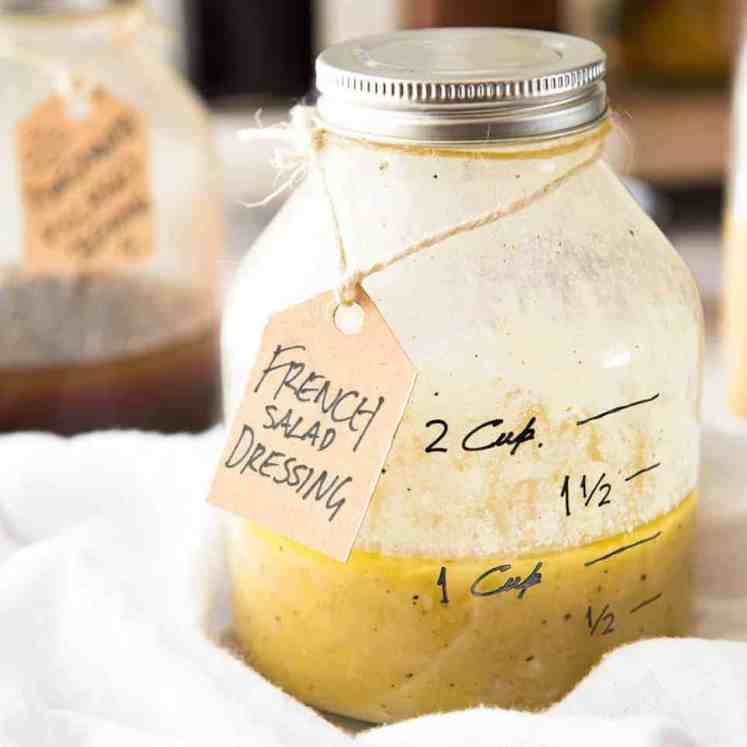
I can also see a pile of Sautéed Green Beans with Garlic with Creamy Buttery Mashed Potato on the side. Or for a simple option, just steam vegetables of choice (peas, carrots, broccoli) then toss with French Dressing and serve with a hunk of bread on the side (for plate mopping).
Love to know what you’d serve this with for company. I’m having a dinner party this weekend – I was going to do a Mexican Fiesta but I’m expecting some not-so-subtle requests for today’s dish instead! – Nagi x
Suggested sides
Watch how to make it
Herb & Garlic Butter Chicken Marylands (chicken leg quarters)
Ingredients
- 4 pieces (~1.5 kg/3 lb) chicken marylands (US: leg quarters) or 8 bone-in, skin-on thighs (Note 1)
- 1/2 tsp cooking/kosher salt
- 1/3 cup chardonnay or other dry white wine (sub low-sodium chicken stock/broth)
Herb & garlic butter:
- 100g/7 tbsp unsalted butter , softened
- 4 garlic cloves , minced using a garlic press (Note 2)
- 2 tsp fresh rosemary leaves , finely chopped (Note 3 for dried)
- 2 tsp thyme leaves , finely chopped (Note 3 for dried)
- 3/4 tsp cooking/kosher salt
- 1/4 tsp black pepper
Instructions
- Preheat oven to 220°C/425°F (200°C fan).
- Mix Herb & Garlic Butter ingredients until combined.
- Butter chicken – Use an upside down tablespoon to loosen the chicken skin from the flesh on the thigh and most of the leg (Note 4). Smear 80% of the butter under the skin, just a small amount (~5%) on the underside (flesh side) then the remainder on top of the skin. (The flesh side gets lots of flavour from the pan juices).
- Put chicken in roasting pan, skin side up. Sprinkle skin with the 1/2 tsp salt. Pour wine around chicken.
- Roast 50 minutes – Roast 10 minutes to get the skin going. Then reduce the heat to 200°C /400°F (180°C fan) and roast for a further 40 minutes, basting every 10 minutes from the 20 minute mark onwards.
- Rest & serve – Remove from oven. Rest 10 minutes then serve with the garlic-herb-butter pan juices as the sauce!
Notes
Nutrition
Life of Dozer
Passed out from exhaustion after snuffling around unsuccessfully in someone’s backpack for treats. (Or….perhaps not unsuccessful!)

The post Herb & Garlic Chicken Marylands appeared first on RecipeTin Eats.
]]> Chicken Marsala – Golden crispy cutlets, rich creamy Marsala wine sauce. Comforting yet luxurious. Midweek-fast yet restaurant-worthy. Economical. Easy. The perfect meal! Chicken Marsala Chicken Marsala is an Italian-American classic, one of those dishes born from blending Italian recipes with American tastes. A dish that is now so beloved that it’s a staple in restaurants... Get the Recipe
The post Chicken Marsala appeared first on RecipeTin Eats.
]]>Chicken Marsala – Golden crispy cutlets, rich creamy Marsala wine sauce. Comforting yet luxurious. Midweek-fast yet restaurant-worthy. Economical. Easy. The perfect meal!
Chicken Marsala
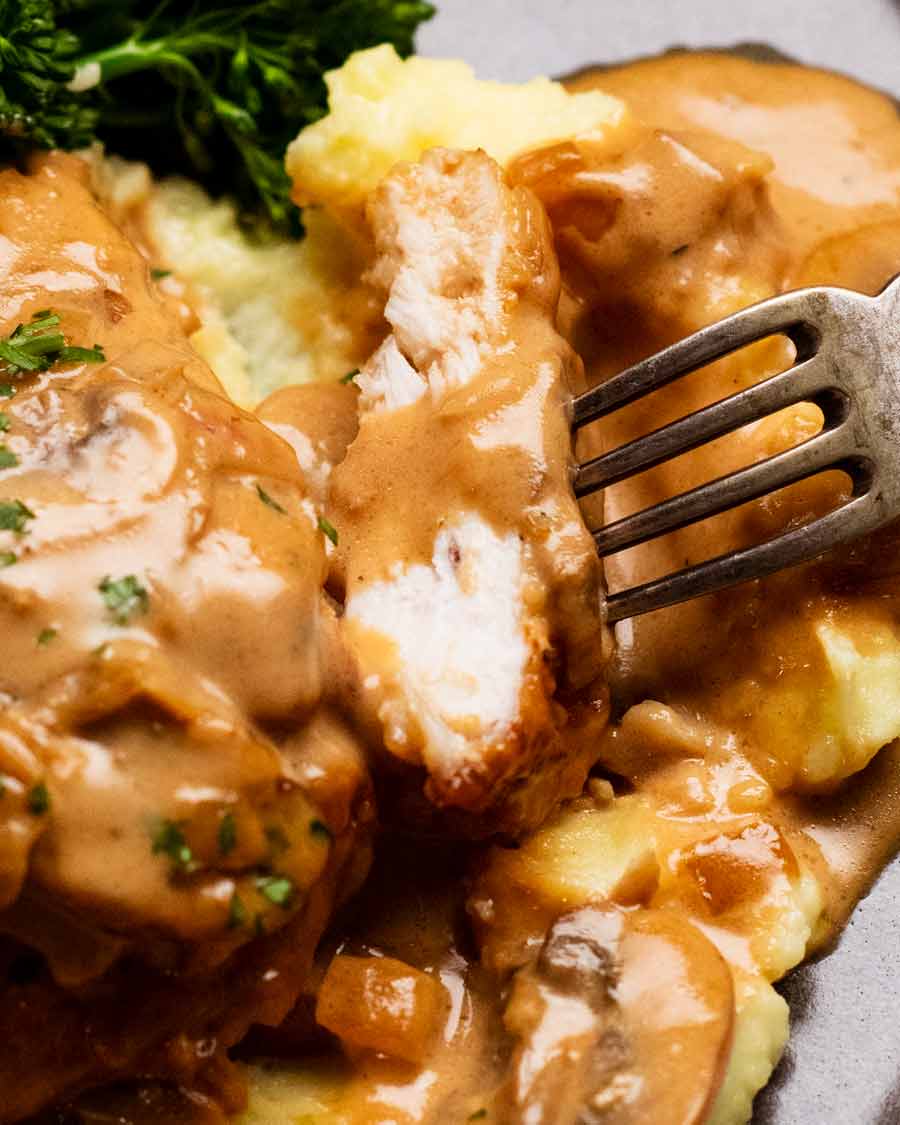
Chicken Marsala is an Italian-American classic, one of those dishes born from blending Italian recipes with American tastes. A dish that is now so beloved that it’s a staple in restaurants across the States and well beyond.
One bite is all it takes to be hooked for life, just as I was!
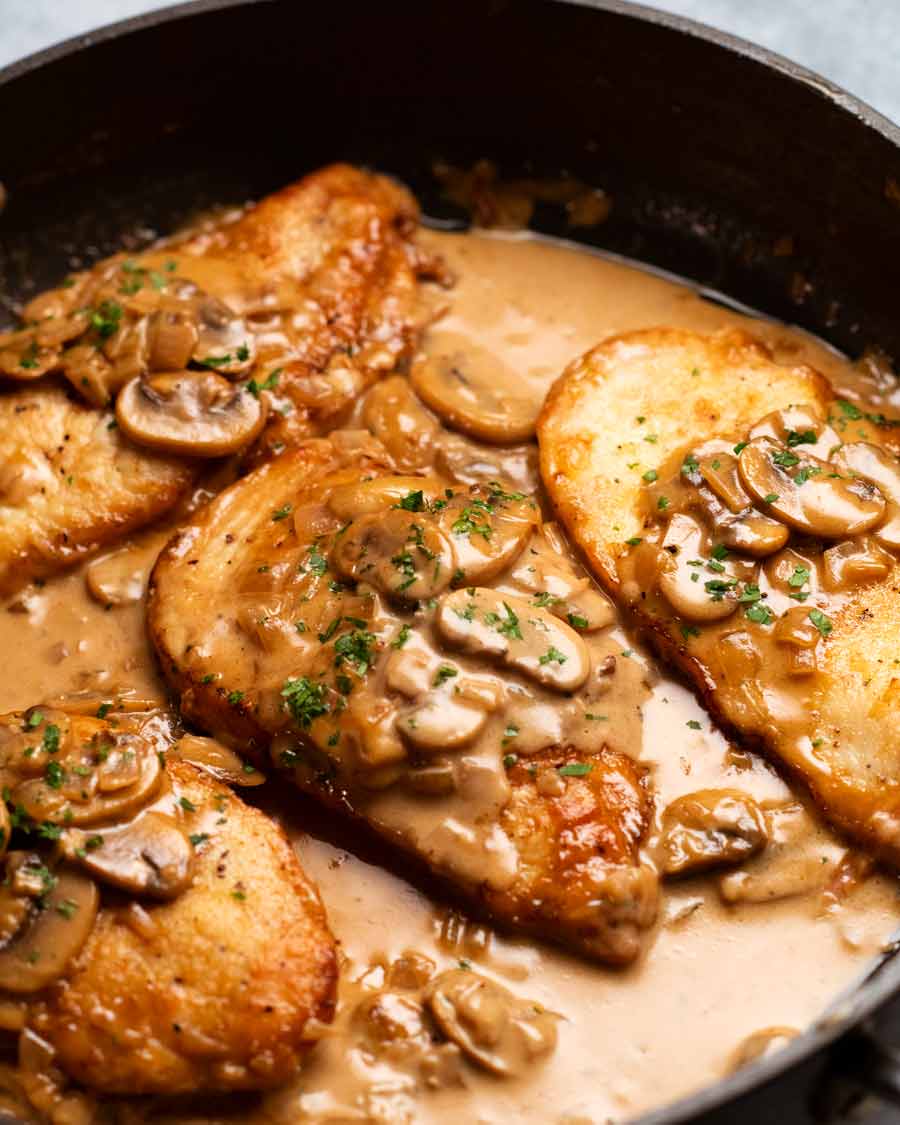
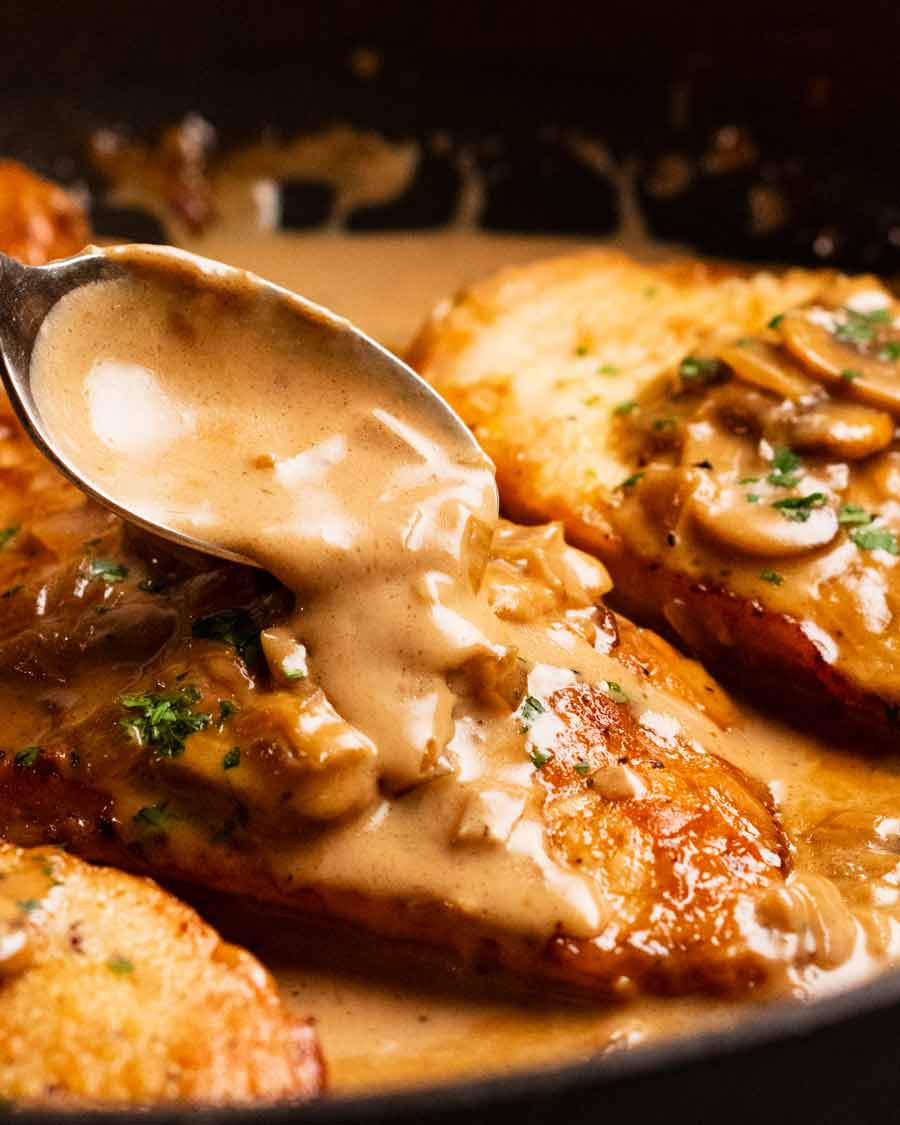
It’s essentially a variation of traditional Italian scaloppine dishes. A thin chicken cutlet is coated in flour then pan fried until crispy and golden, then smothered in a rich sauce that is flavoured with Marsala which is a fortified Italian wine.
Marsala is one of those secret weapon ingredients. A splash of that, and it’s like you added stock, honey, vinegar and Worcestershire sauce with a touch woody nuttiness into the sauce. The flavour that goes so well with chicken, especially with a little bit of cream to finish it off.
That sauce! It’s absolutely stunning. Thank you Mr Marsala!
This one’s for the grown-ups
And in case you’re worried, no, the sauce doesn’t taste “alcoholic” at all. The Marsala wine is simmered rapidly to cook out most of the alcohol, leaving behind just the flavour.
Having said that though, this dish uses more than the usual small splash of wine I use in other recipes so it’s not one I’d recommend for the kids. I’d recommend the Chicken in Creamy Mushroom Sauce instead – everyone can enjoy that!
Ingredients in chicken marsala
As noted above, the key ingredient in Chicken Marsala Sauce is marsala which is a fortified wine (like port) from the Marsala region of Italy. It’s got a sweet, nutty flavour that’s more complex and richer than red wine.
Use a dry marsala rather than sweet marsala which is more commonly used in desserts.
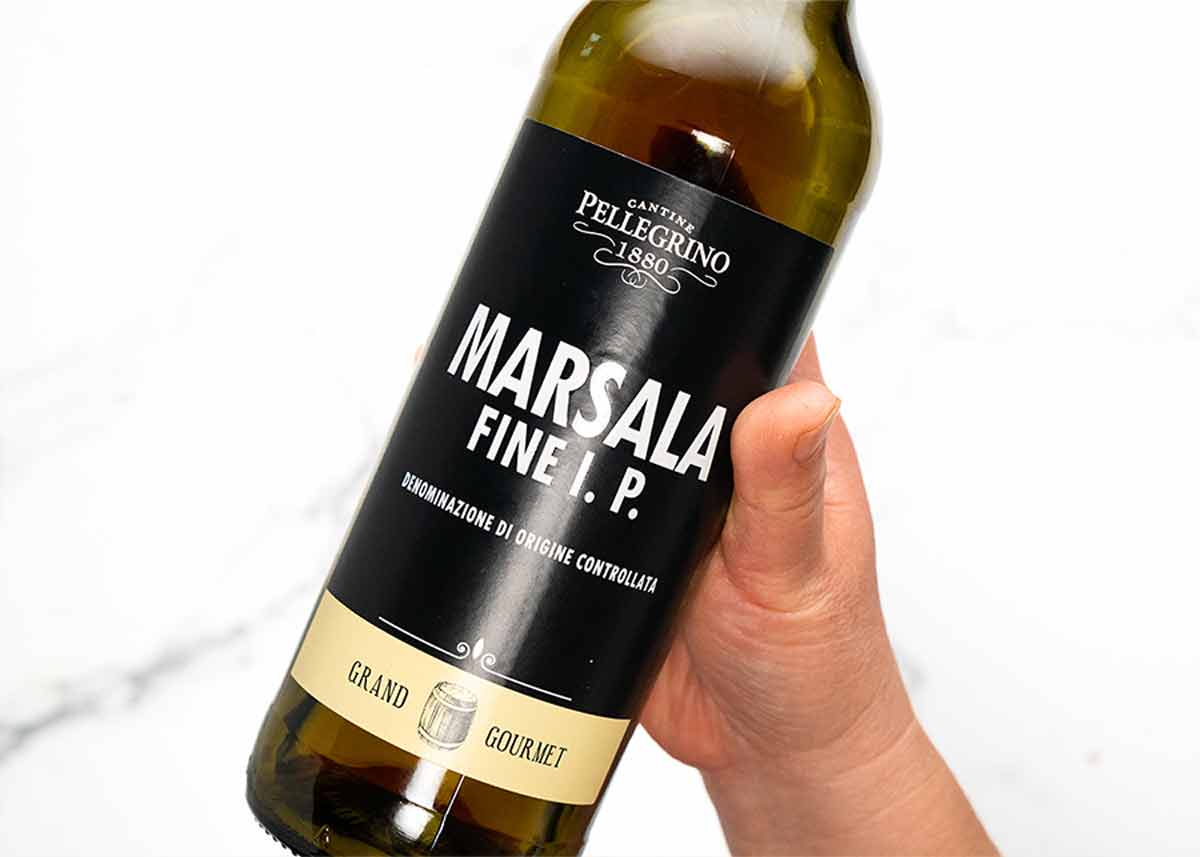
It’s a standard item at liquor stores and while premium marsala is pricey, there’s no need to go crazy here. The marsala pictured below cost around $20 but you can pick up bottles for less than $10. It will last “forever” and can be used in place of port in dishes like Slow Cooked Pork Braised Lamb Shanks.
Substitutes – Port wine, sherry, or madeira. For non alcoholic version of this recipe, use Chicken with Creamy Mushroom Sauce!
Everything else you need
And here’s the other ingredients you need.
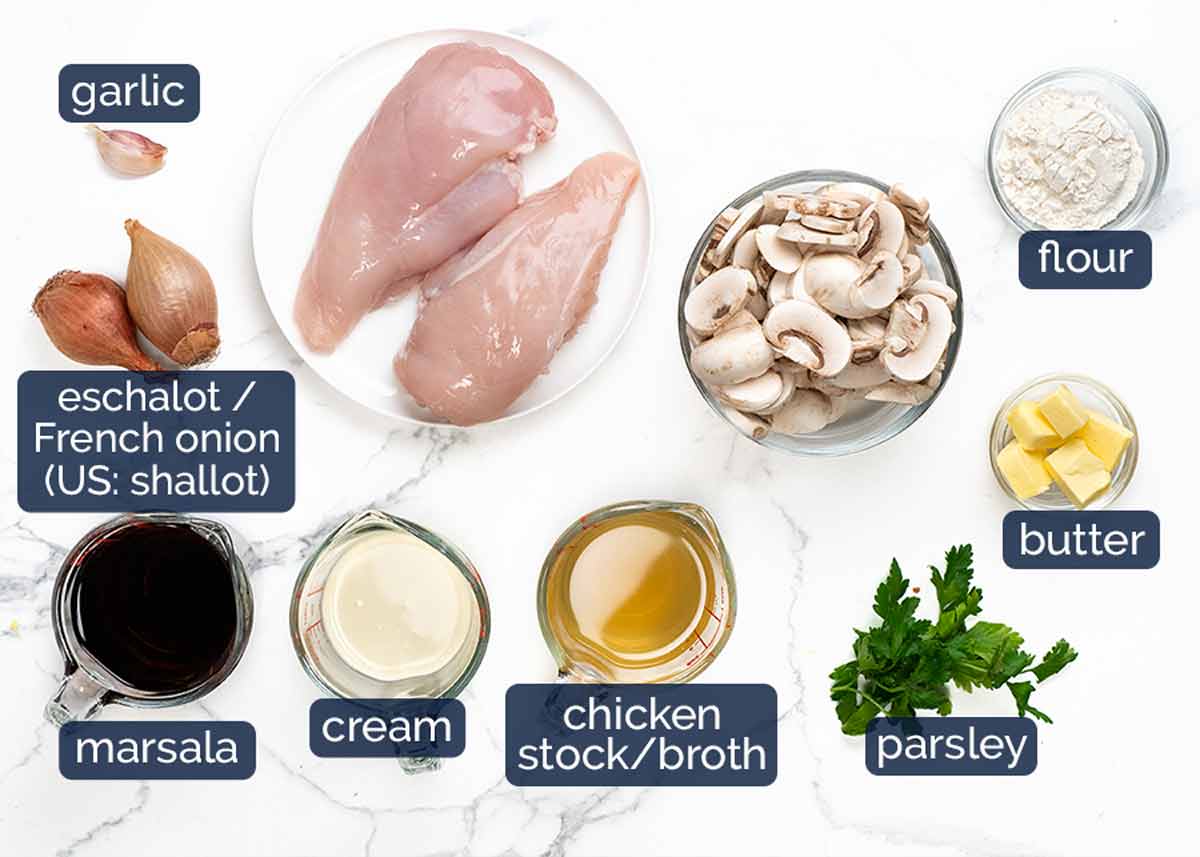
Chicken breast – 2 large ones which we split in 2 horizontally to create 4 steaks in total. Substitute with four boneless chicken thighs.
Cream – To add a little luxuriousness to the sauce. To reduce calories a bit, you can substitute with evaporated milk as cream is not the primary ingredient in this sauce. The sauce will not have the same creamy mouthful but it will still have the same beautiful marsala flavour.
Chicken stock/broth – To add savouriness into the sauce. Without it, it’s just lacking a bit of flavour.
Eschalot / French onion (called shallots in the US) – I like using eschalots in this dish because they are sweeter and also finer so they kind of meld into the finished sauce better, rather than having chunky lumps of onion. However, you can substitute with 1/2 small onion OR 1/4 cup of the white part of green onions (split in half lengthwise then slice into 1cm / 1/3″ squares).
Mushrooms – White mushrooms or Swiss brown/cremini. Whichever you prefer!
Butter and oil – For cooking the chicken and making the sauce. We want the butter for flavour, but it burns if we only use butter so it’s best to use oil as well.
Flour – To add a lovely golden crust on the chicken that the sauce can cling to!
Garlic – Because…garlic!
Parsley – Just an optional garnish!
How to make Chicken Marsala
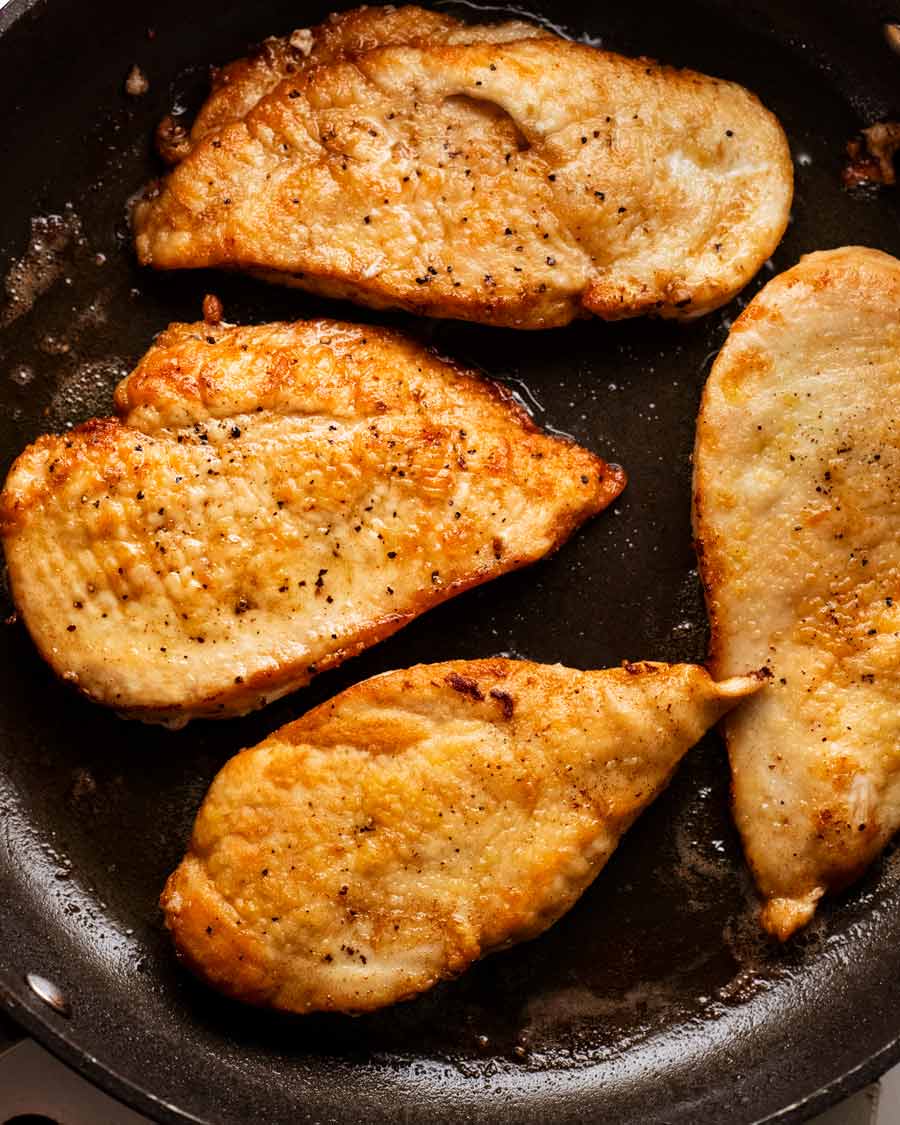
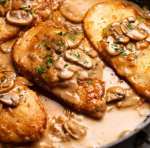
Chicken Marsala is made by cooking the chicken first until golden and crispy. Then it’s set aside on a plate while the sauce is made in the same pan (we want all those tasty chicken drippings in the sauce!) , then added back into the sauce at the end just to warm through again.
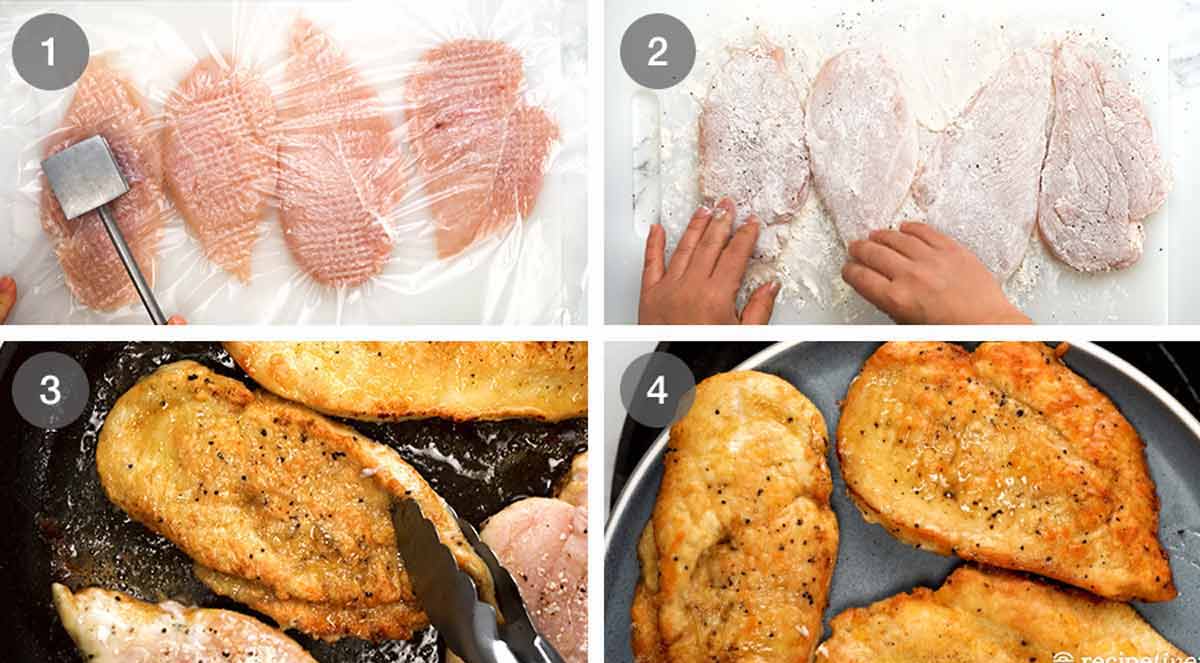
Pound chicken Cut each breast in half to form 2 thin steaks (so you have 4 in total). Cover with a freezer bag or Go-Between and pound to 1 cm / 0.4″ thickness using a meat mallet or rolling pin. Go-between is like cling wrap but it’s thicker and doesn’t stick to itself. Sold alongside cling wrap at the grocery store, it’s useful for keeping stacked food in the freezer from sticking to each other, and protecting meat from being damaged when pounding.
Why we pound the meat – To make the chicken even thickness so it cooks through evenly as well as tenderising it.
Season and dust – Sprinkle the chicken with salt and pepper. Then sprinkle with flour and lightly rub it across the surface with your hands.
Shake off excess flour before cooking, else you’ll end up with lots of excess flour in the pan which will burn.
Sear chicken – Melt the butter and heat the oil in a large non-stick pan over medium high heat. When the butter is foamy, cook the chicken for 4 minutes until golden and crispy. Turn the chicken then cook the other side for 2 minutes or until the chicken is cooked through.
Remove the chicken onto a plate and set aside while we make the sauce in the same pan. It will cool down but that’s ok because we reheat the chicken in the sauce just before serving.
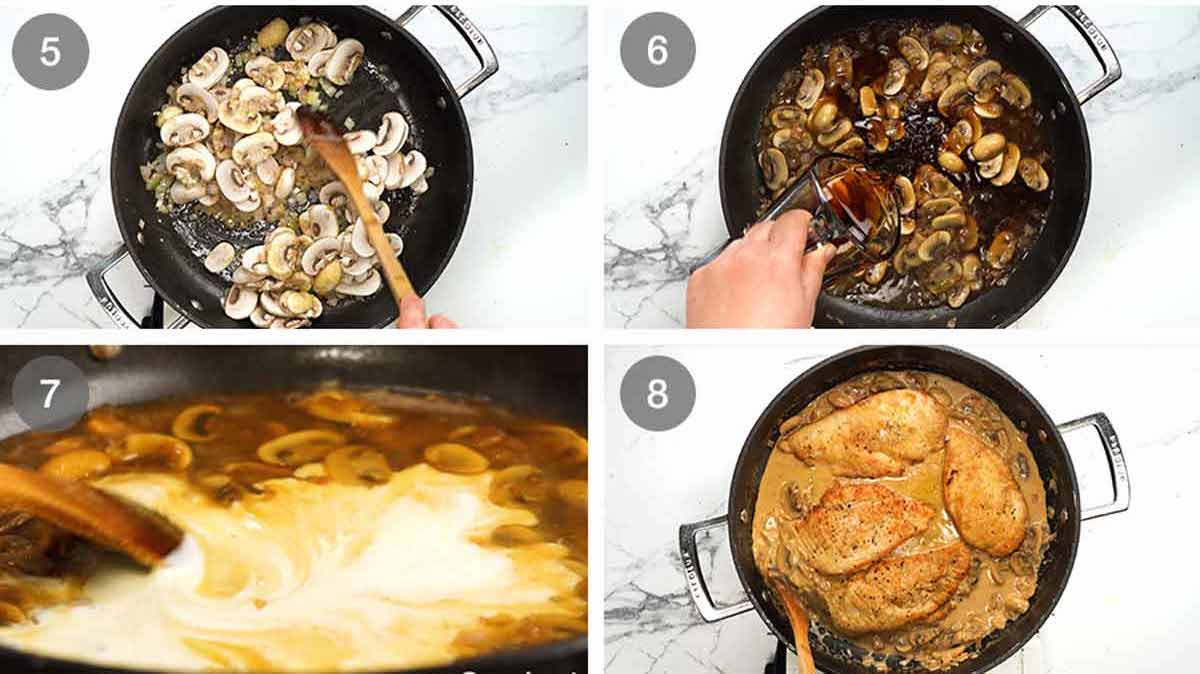
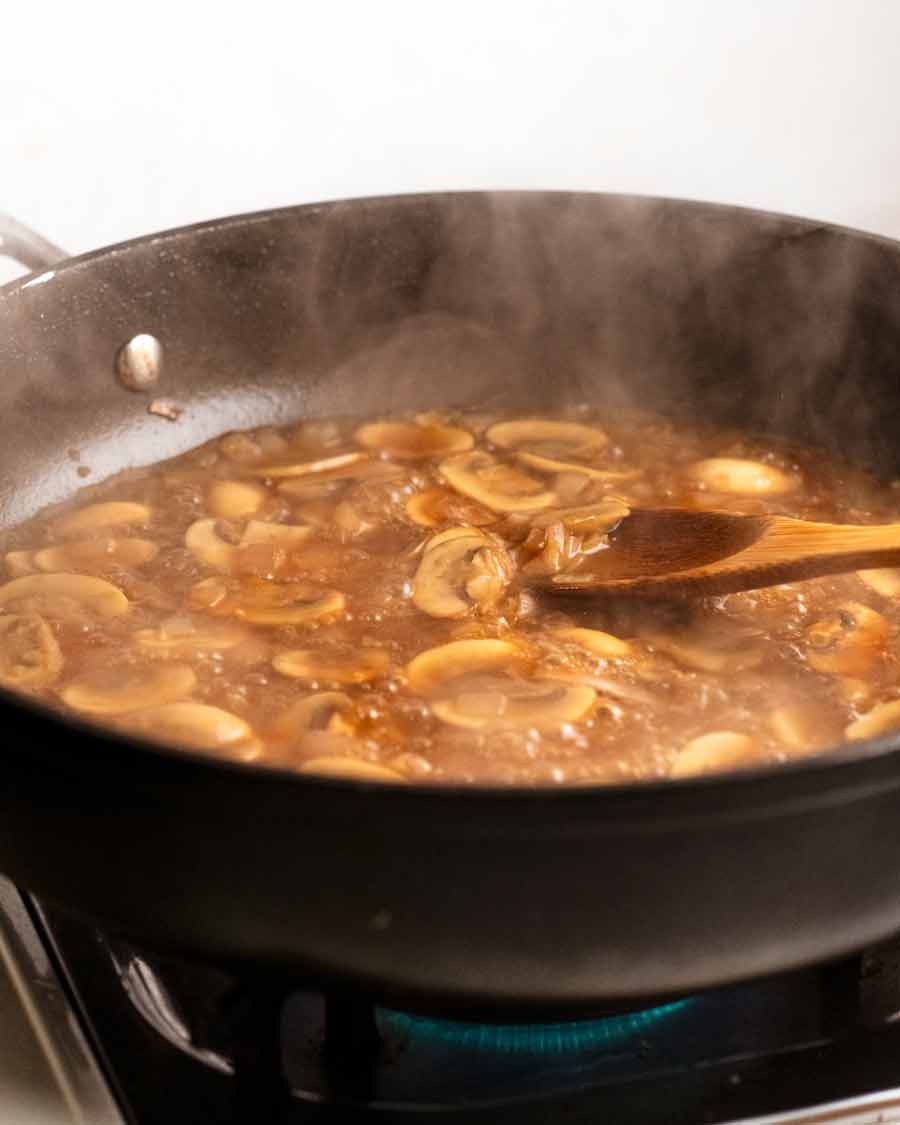
Make sauce – Using the same pan, because we want all the tasty flavour left by searing the chicken, melt the remaining butter and oil. Sauté the eschalots and garlic for just 1 minute – this gives them a head start as well as flavouring the butter/oil. Then cook the mushrooms until they soften – this takes around 4 to 5 minutes.
Reduce marsala – Next, rapidly simmer the marsala for a few minutes until it reduces by half. This not only cooks out most of the alcohol flavour but also reduces and concentrates the flavour.
Creamy and thickened – Pour in the cream, salt and pepper. Then simmer for 3 to 5 minutes or until the sauce thickens to a cream consistency. Initially the sauce will be quite pale but it will darken as it reduces.
Don’t let it reduce and thicken too much as we are simmering it for a further 1 minute to re-warm the chicken and the sauce thickens a surprising amount as it cools when serving.
Re-warm chicken – Put the chicken into the sauce and let it simmer for 1 minute, just to reheat. Don’t forget to pour in any juices pooled on the plate – never waste free flavour!
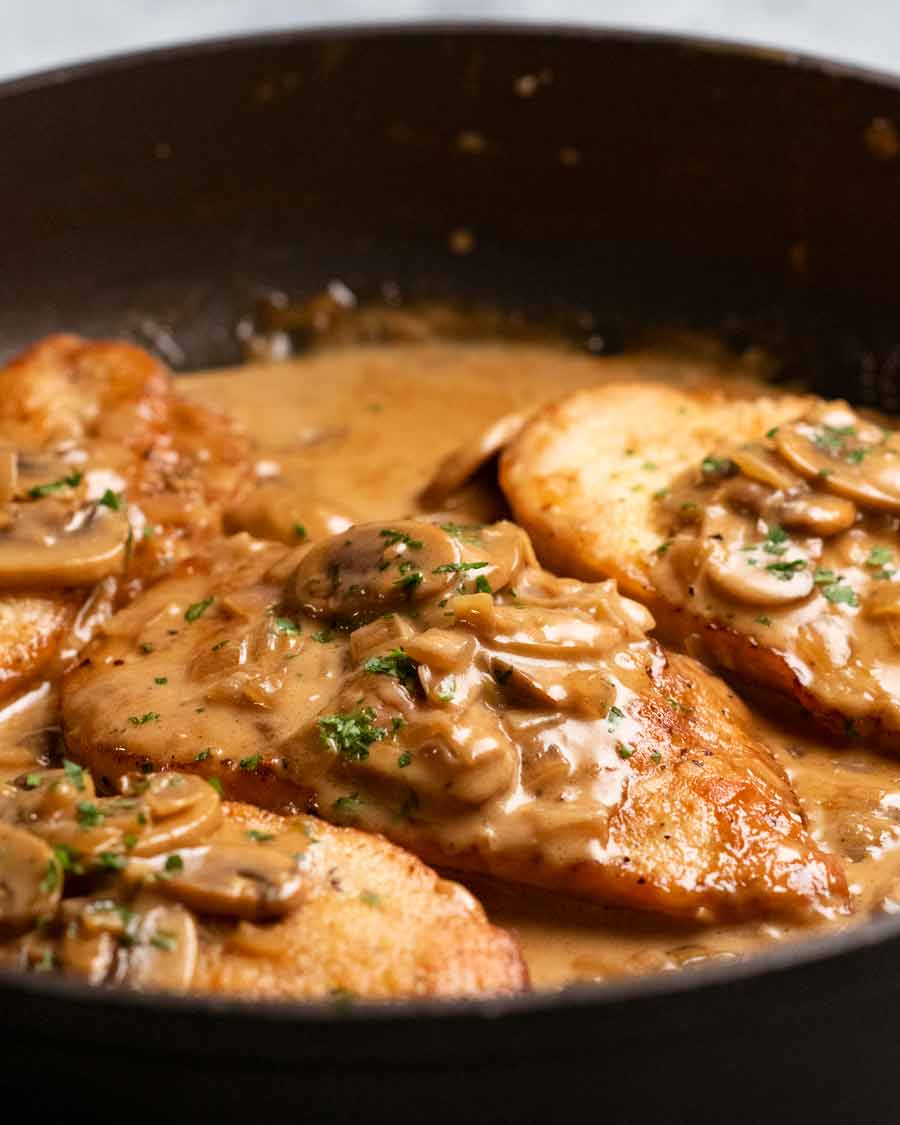
What to serve with Chicken Marsala
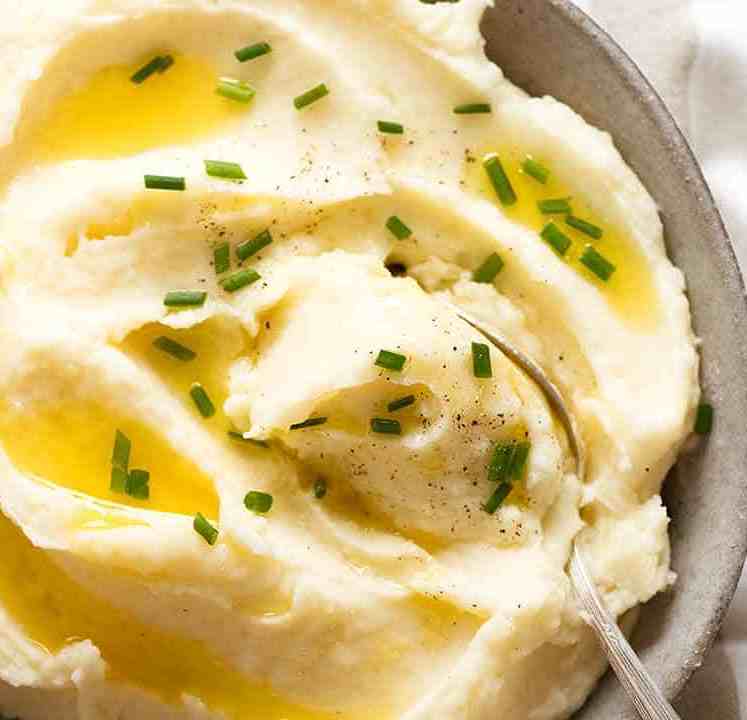
A sauce this good requires some form of starchy vehicle for sauce soaking / mopping. Mashed potato (pictured), creamy polenta, pasta (long, short, small), even rice. I can totally see myself serving this with garlic butter kale rice!
For a blow-out Italian meal, add a Mega Italian Salad and Garlic Bread on the side. If you’ve made the salad before, you’ll understand the name! – Nagi x
Watch how to make it
Chicken Marsala
Ingredients
Golden crusted chicken:
- 2 large chicken breasts (300g/10oz each), cut in half horizontally (or 4 thighs, Note 1)
- 1/2 tsp cooking salt / kosher salt
- 1/2 tsp black pepper
- 1/4 cup flour , plain/all-purpose
Marsala sauce:
- 2 tbsp extra virgin olive oil
- 2 tbsp / 30g unsalted butter
- 2 eschalots (US: shallots), peeled and cut into 1cm / 1/3″ squares (Note 2)
- 1 garlic , finely minced
- 2 cups white mushrooms , sliced 0.5cm / 1/5" thick
- 1 cup dry marsala wine (Note 3)
- 1/2 cup chicken stock/broth , low sodium
- 1/2 cup thickened / heavy cream (Note 4)
- 1/4 tsp cooking salt / kosher salt
- 1/8 tsp black pepper
- 1 tbsp finely chopped parsley , for garnish (optional)
Instructions
Chicken escalopes:
- Pound – Cut each breast in half to form 2 thin steaks. Cover with a freezer bag or Go-Between (Note 5) and pound to 1 cm / 0.4″ thickness using a meat mallet or rolling pin. This tenderises and ensures even cooking of the chicken.
- Dust – Sprinkle the surface with half the salt, pepper then flour. Lightly rub flour across surface, turn and repeat with remaining salt, pepper and flour. Shake excess flour off each piece just before cooking.
- Cook – Put half the butter and oil in a large non-stick pan over medium high heat. Once the butter is melted and foamy, place chicken in, then cook for 3 to 4 minutes until it's gorgeously golden and crispy. Turn and cook the other side for 2 minutes. Remove onto a plate.
Creamy marsala sauce:
- Sauté aromatics – In the same pan, add remaining butter and oil. Once butter is melted, add eschalots and garlic. Cook for 1 minute.
- Cook mushrooms – Add mushrooms. Cook for 3 minutes, stirring regularly.
- Reduce marsala – Add marsala, turn up heat to high and boil for 3 minutes or until reduced by half.
- Thicken sauce – Add chicken stock, cream, salt and pepper. Stir, then lower heat so it's simmering (not boiling rapidly) and simmer for 3 to 5 minutes until the sauce thickens to a cream consistency (not too thick, will thicken more).
- Rewarm chicken – Nestle chicken into sauce and leave for 30 seconds to reheat.
- Serve! Take off the stove. Sprinkle with parsley, serve over starchy vehicle of choice (I chose mash. Rice, small pasta, polenta or bread for plate mopping also work well!).
Notes
Nutrition
Life of Dozer
I spent this morning in a photography studio with a team of professionals shooting recipes for a magazine. Dozer came. So much food, so many people to harass. He was in his element! (And his conversion rate was extremely high).
Pictured below with Rob Palmer (photographer) and Emma Knowles (stylist). I love working with these two!

The post Chicken Marsala appeared first on RecipeTin Eats.
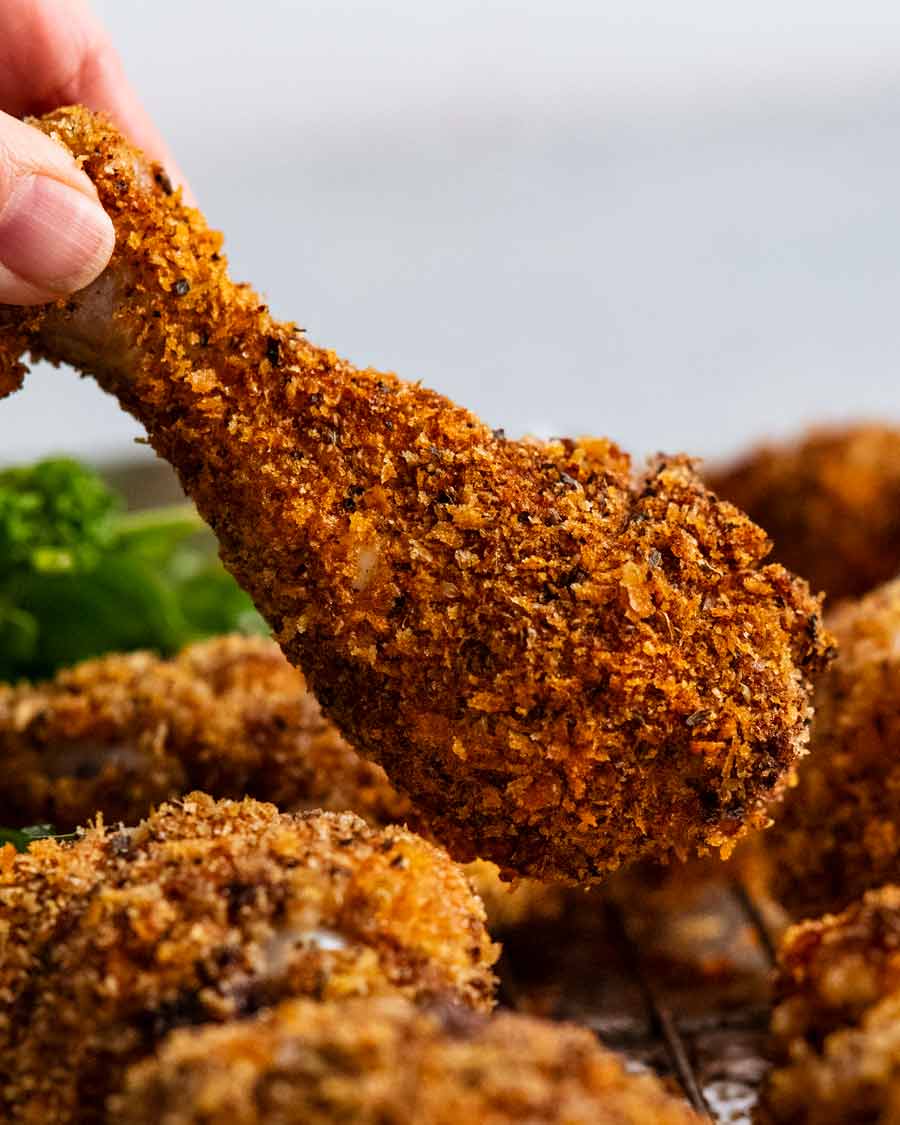
]]> Oven baked crunchy crumbed chicken drumsticks. Great seasoning, great crispy exterior, juicy flesh. Tastes like KFC – minus all the calories and grease! Crunchy crumbed chicken drumsticks I have a soft spot for chicken legs. Juicier and more flavourful than lean chicken breast, and more economical at that. With the bonus that there’s something extra... Get the Recipe
The post Crunchy crumbed chicken drumsticks appeared first on RecipeTin Eats.
]]>Oven baked crunchy crumbed chicken drumsticks. Great seasoning, great crispy exterior, juicy flesh. Tastes like KFC – minus all the calories and grease!
Crunchy crumbed chicken drumsticks
I have a soft spot for chicken legs. Juicier and more flavourful than lean chicken breast, and more economical at that. With the bonus that there’s something extra enjoyable about food that has to be eaten with your hands.
Nobody eats drumsticks with a fork and knife, do they?? Surely not! Way too civilised and way too much meat wastage. There’s no way you can pick the bone clean of every scrap of meat with cutlery!!!
Hands all the way. GRAB and DEVOUR!
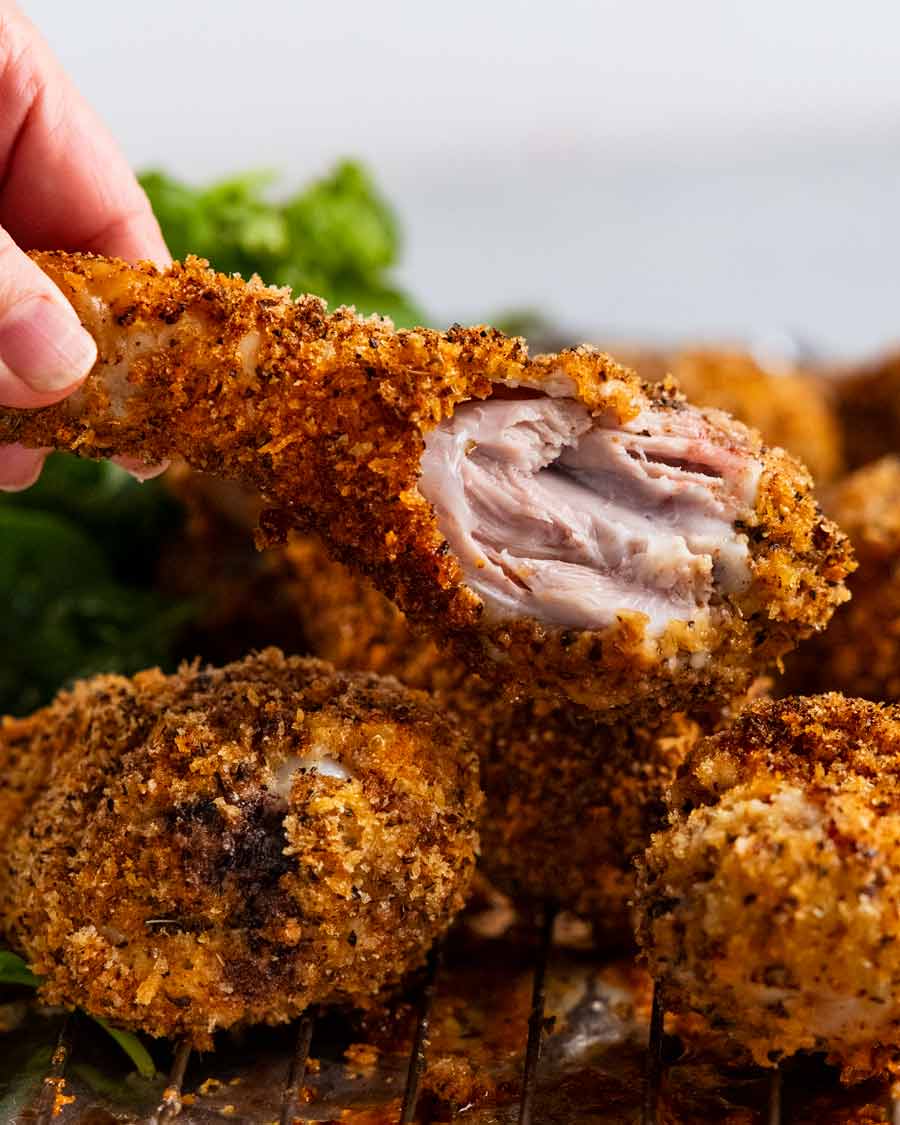
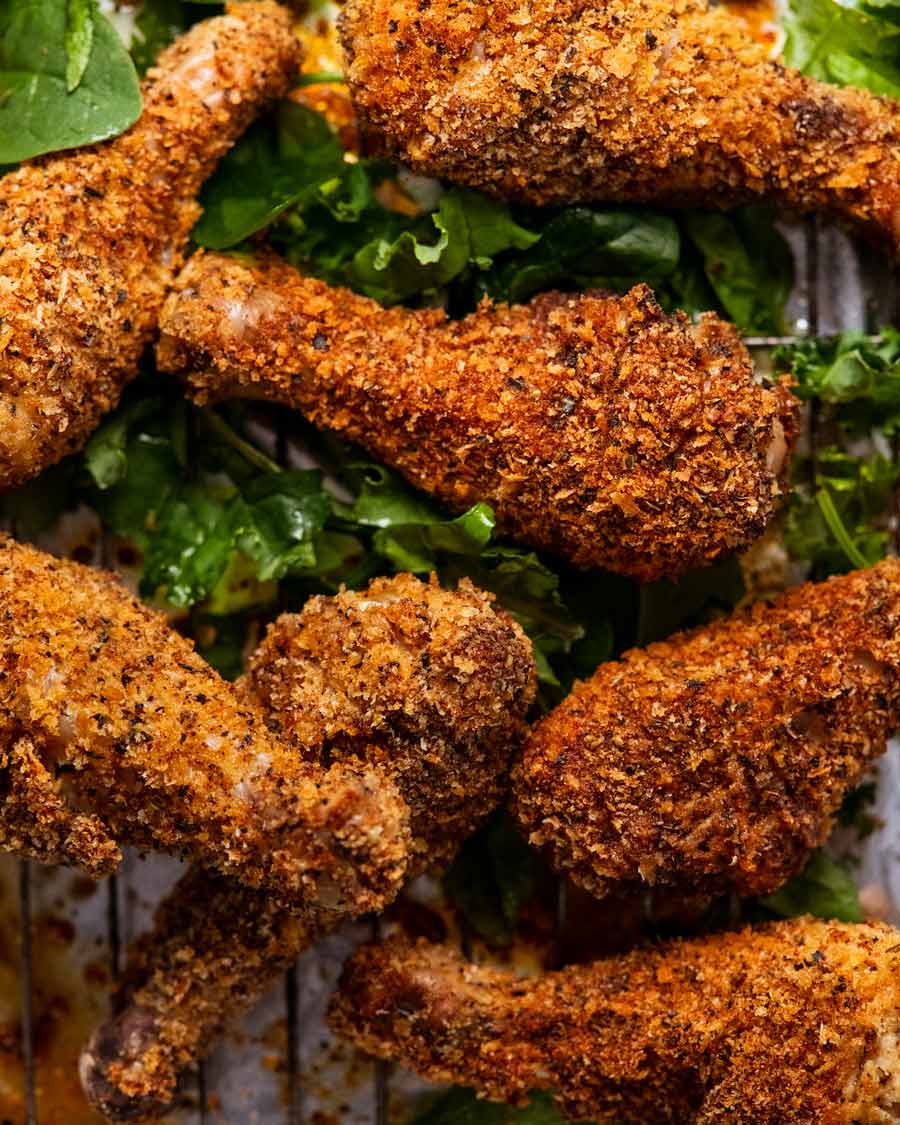
Today’s drumsticks are fabulously crunchy all over, and very well seasoned so there’s no need to marinate it overnight. You can make it right now, for dinner tonight. And yours will be as gorgeously golden as you see in the photos as long as you’re generous with the oil spray. Spray, spray, spray!
Ingredients in crunchy crumbed chicken drumsticks
The seasoning
The key to this recipe is a bold flavoured seasoning so there’s plenty of flavour in every bite even though we haven’t marinated the chicken. Here’s what you need – all pantry staples!
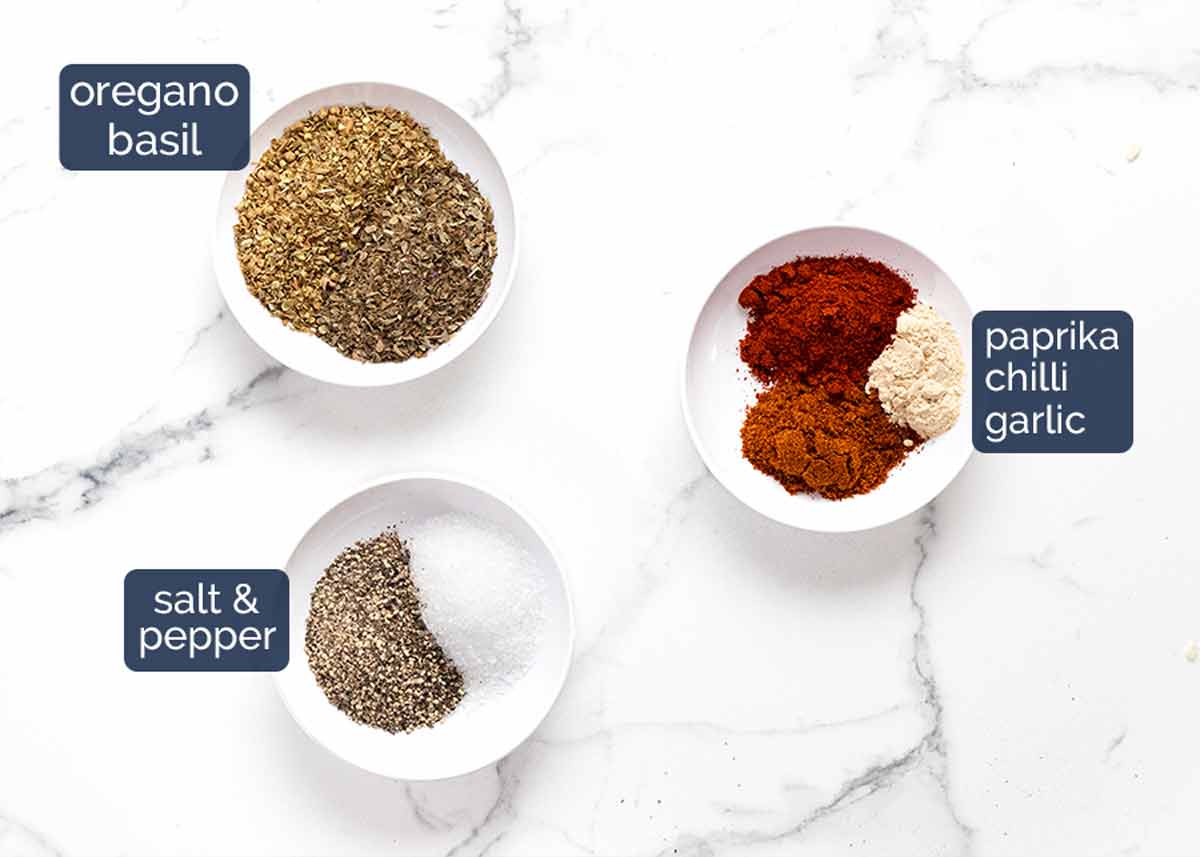
The spiciness comes from the chilli / cayenne pepper and a good amount of black pepper. There are adjustments in the recipe to make this kid friendly by either completely eliminating the spiciness or reducing it.
The crumbing
And here’s what you need for the crumb coating.
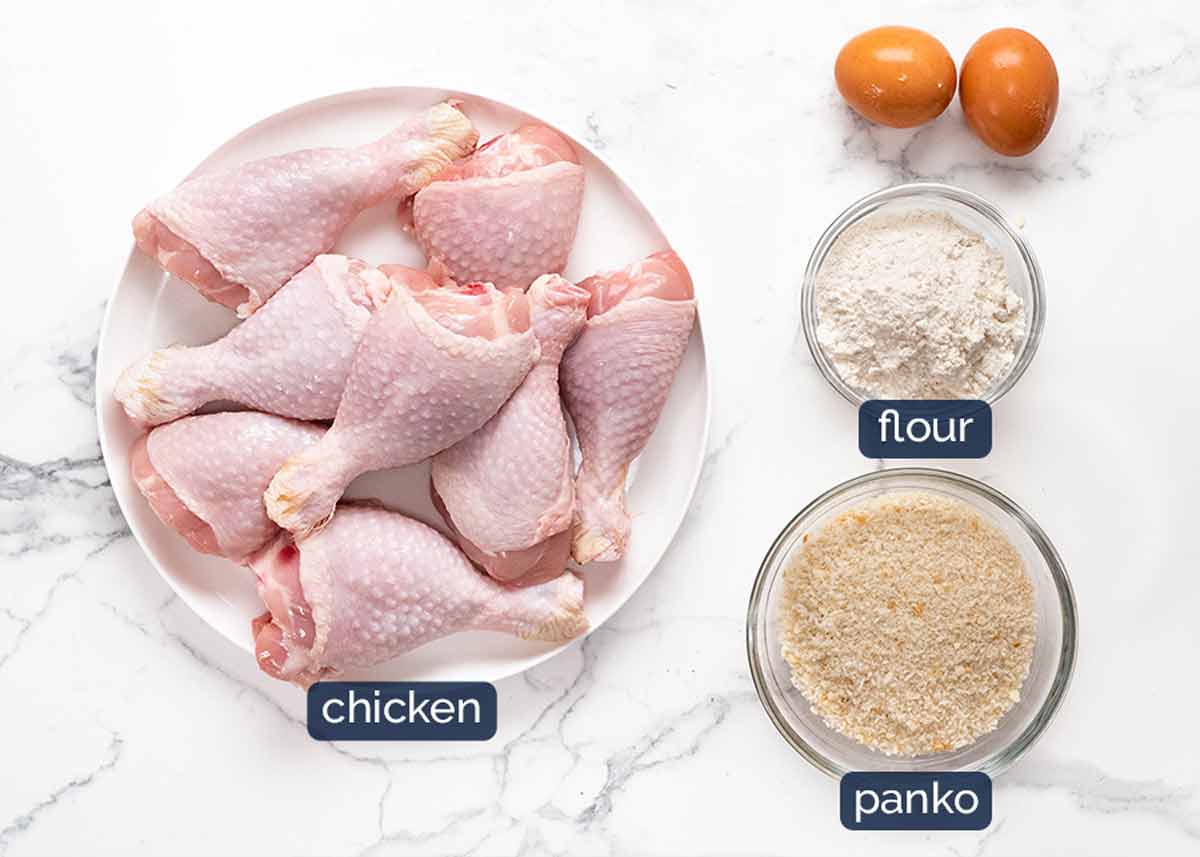
Chicken drumsticks aka chicken legs. If yours were frozen, thaw thoroughly and pat dry extra well else you will end up with soggy patches.
Egg and flour – the glue for the breadcrumbs. (PS I thought 2 eggs was enough but actually, we need 3.)
Panko breadcrumbs – A Japanese breadcrumb favoured for the extra-crispy coating it gives crumbed foods. You can buy it at most big supermarkets (AUS – Coles, Woolworths, Harris) in the Asian foods section and Asian stores (cheaper!). Substitute with regular breadcrumbs.
How to make crunchy crumbed drumsticks
I like to split the seasoning between the flour and the panko, for maximum flavour effect!
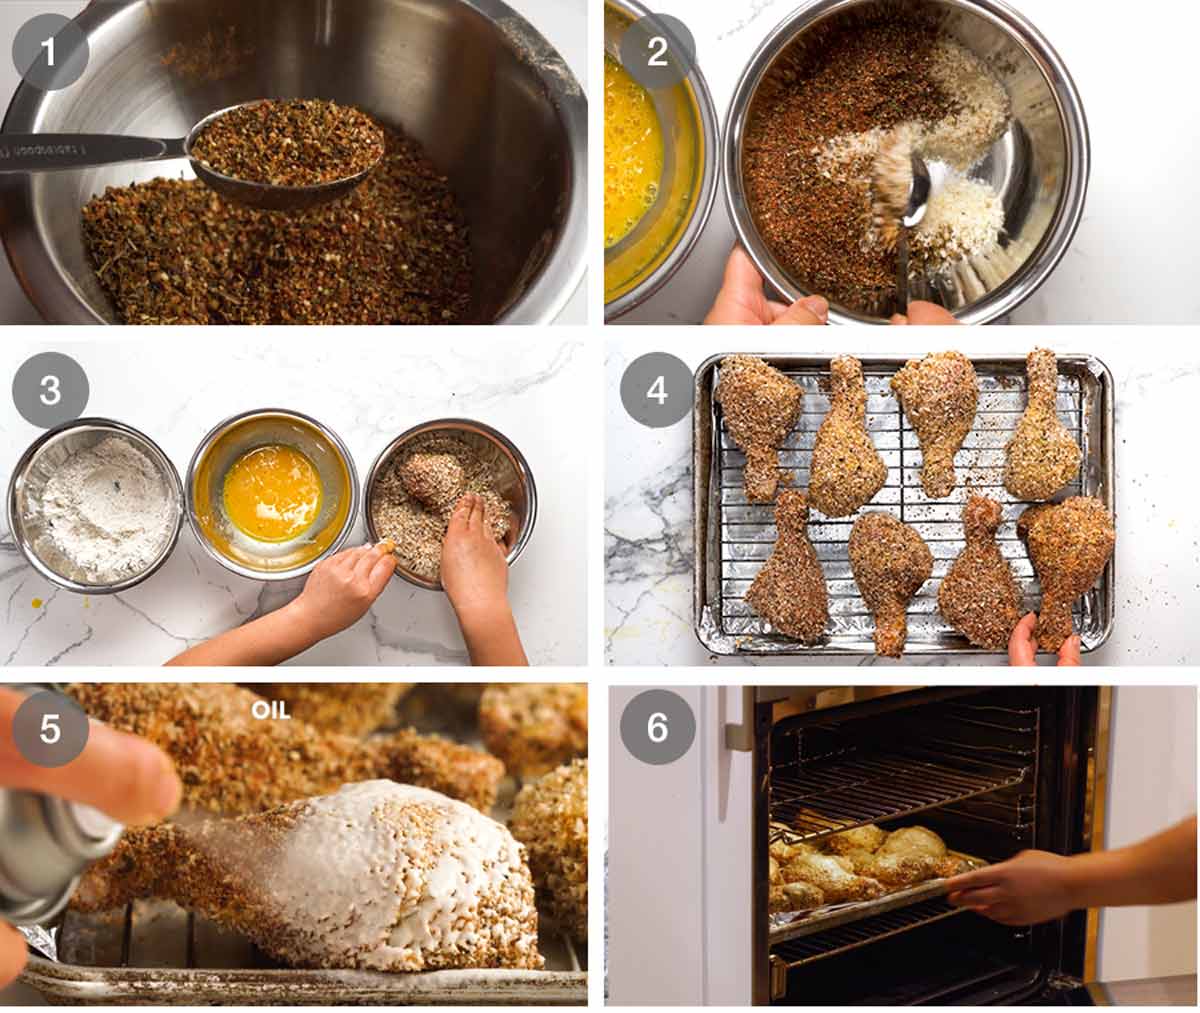
Seasoning – Mix the seasoning in a small bowl.
Season flour and breadcrumbs – Use 1 tablespoon of the seasoning for the flour, then mix the rest in with the panko.
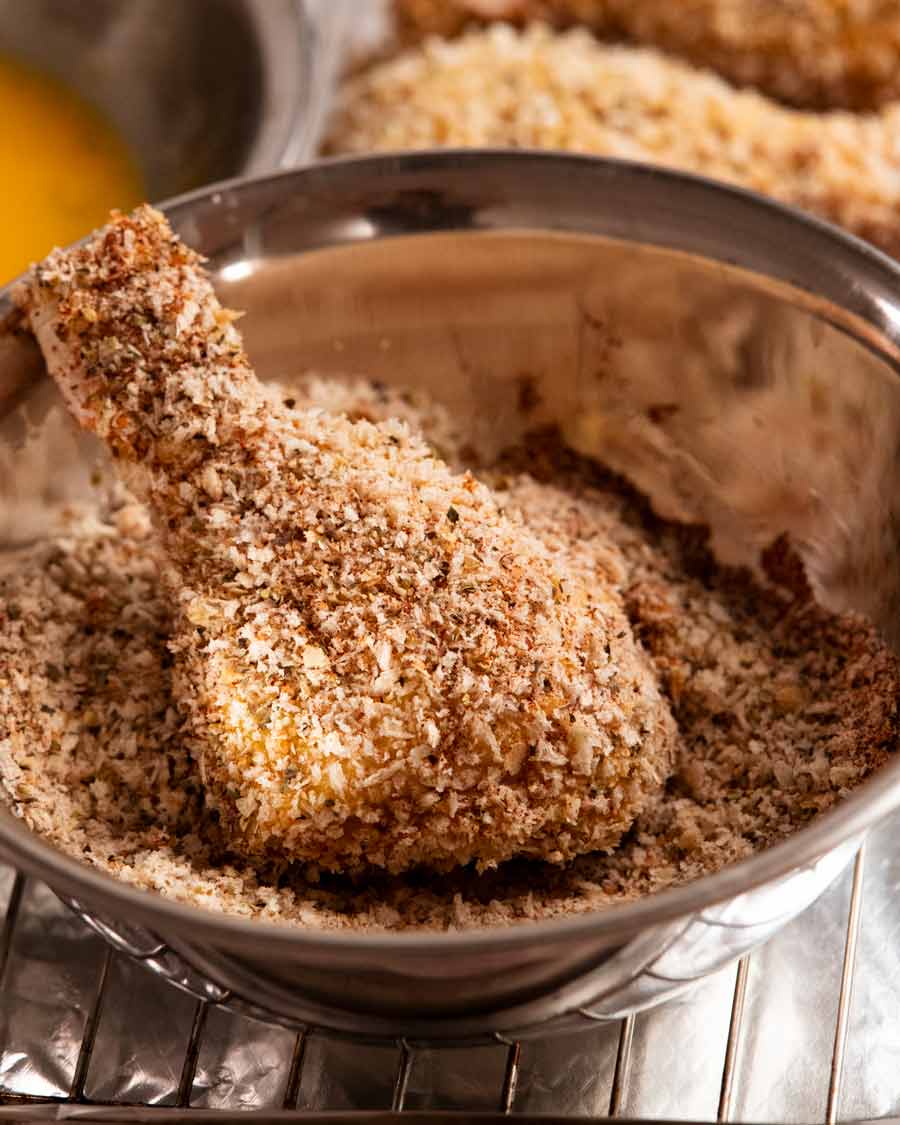
Crumbing (without making a mess!)- Use one hand to coat a drumstick in the flour then shake off excess. Use the same hand to coat the drumstick in egg, then allow the excess to drip off. Still using the same hand, place the drumstick in the panko, then use your other hand to sprinkle with panko. Press to adhere, rotate and coat all over with panko. Place on rack. Marvel at clean(ish) hands!!
Repeat with remaining drumsticks, lining them up so they are evenly spaced.
Spray generously with canola or other oil. I like to use canola oil because it comes out like a foam so I can see where I’ve sprayed. (PS The more you spray, the more golden and crunchy the coating. So don’t hold back!)
Bake for 25 minutes at 200°C/400°F (180°C fan). Flip drumsticks, spray again, then bake for a further 20 minutes or until gorgeously golden and crunchy. Let them cool for 5 minutes – which also gives the crumb a chance to “set” – then dive in!

What to serve with crunchy drumsticks
Gosh, there’s really no rules here. I had them with leftover Supreme Soy Noodles and Smashed Cucumbers on the day I made the recipe video. Certainly not obviously choices but it was still enjoyable! 😂
To keep your life easy, try serving this with what I call two-in-one-side dishes. These are sides that combine plenty of vegetables with starch in one dish so you can just serve that as the side rather than making a side salad plus a starch to fill out a meal.
Some personal two-in-one favourites include:
Purple Rice – made with red cabbage in it (imagine how colourful your dinner plate will be!)
Garlic Butter Rice with Kale – the best way I know to convert kale haters!!
Enjoy! – Nagi x
Watch how to make it

Crunchy crumbed chicken drumsticks
Ingredients
- 8 chicken drumsticks
- 1/2 cup flour , plain/all purpose
- 3 large eggs , beaten
- 1 cup panko breadcrumbs (Note 1)
- Canola oil spray (or other oil)
Seasoning:
- 1 tbsp dried oregano
- 1 tbsp dried basil
- 1 tsp garlic powder
- 1 1/2 tsp smoked paprika
- 1 1/2 tsp cayenne pepper or pure chilli powder – Note 2 (omit for kid-friendly)
- 1 1/2 tsp cooking salt
- 2 tsp black pepper (reduce to 1/2 tsp for kid-friendly)
Instructions
- Preheat oven to 200°C/400°F (180°C fan). Place a rack on a foil lined tray. Spray rack with oil.
- Crumbing bowls – Place the flour, whisked eggs and panko in 3 separate medium bowls (bear in mind shape to fit the drumsticks!).
- Mix Seasoning in a small bowl. Put 1 tablespoon into the flour and the rest in the panko, then mix.
- Crumb – Pat drumsticks dry with paper towels. Coat in flour (shake off excess), then egg (let excess drip off). Place in panko and rotate, pressing to adhere all over, including the handle. (Note 3 for mess-free hands technique!)
- Spray – Place drumstick on the rack. Repeat with remaining chicken. Spray very generously with oil.
- Bake 25 minutes. Turn drumsticks, spray again with oil. Bake a further 20 minutes until golden brown and super crunchy!
- Serve Eat and enjoy the CRUNCH!
Notes
- Honey mustard sauce: Mix together 1/3 cup whole-egg mayonnaise, 2 tbsp dijon mustard, 2 tbsp honey, 1 – 2 tsp lemon juice (sub vinegar), salt and pepper.
- Pink sauce – 1/2 cup (100g) sour cream + 3 tbsp ketchup
- Ketchup, BBQ sauce or other store bought sauce of choice
Nutrition
Life of Dozer
Dozer on move day. He was delighted to have so many new targets for treats – and he was rather successful, actually!

The post Crunchy crumbed chicken drumsticks appeared first on RecipeTin Eats.
]]> A nice change from the usual creamy versions, this chicken pasta bake is made with a tomato pasta sauce. Filled with bacon, sizzling seasoned chicken and generous on the cheese, it’s cosy and hearty and thrifty and just so, so delicious! Excellent complete meal for making ahead and freezing. Chicken pasta bake If you can... Get the Recipe
The post Chicken pasta bake appeared first on RecipeTin Eats.
]]>A nice change from the usual creamy versions, this chicken pasta bake is made with a tomato pasta sauce. Filled with bacon, sizzling seasoned chicken and generous on the cheese, it’s cosy and hearty and thrifty and just so, so delicious! Excellent complete meal for making ahead and freezing.
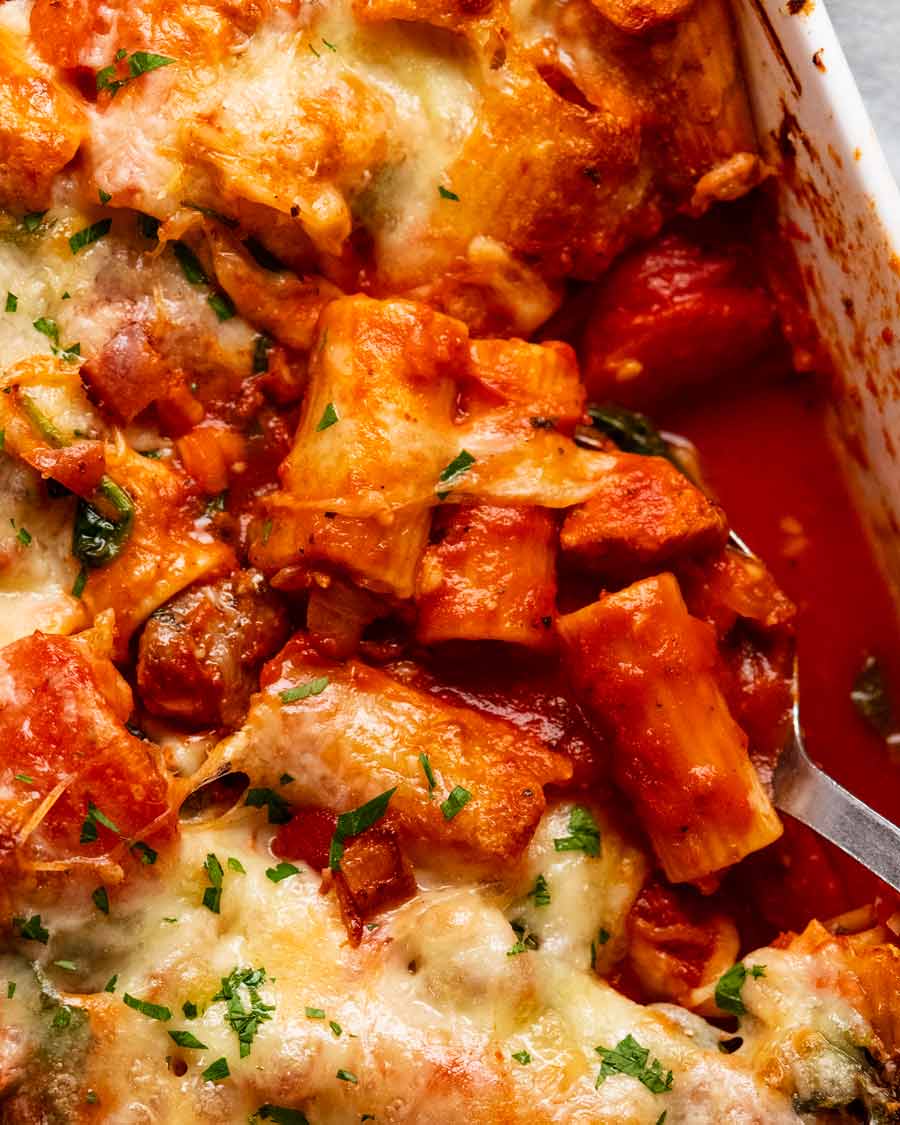
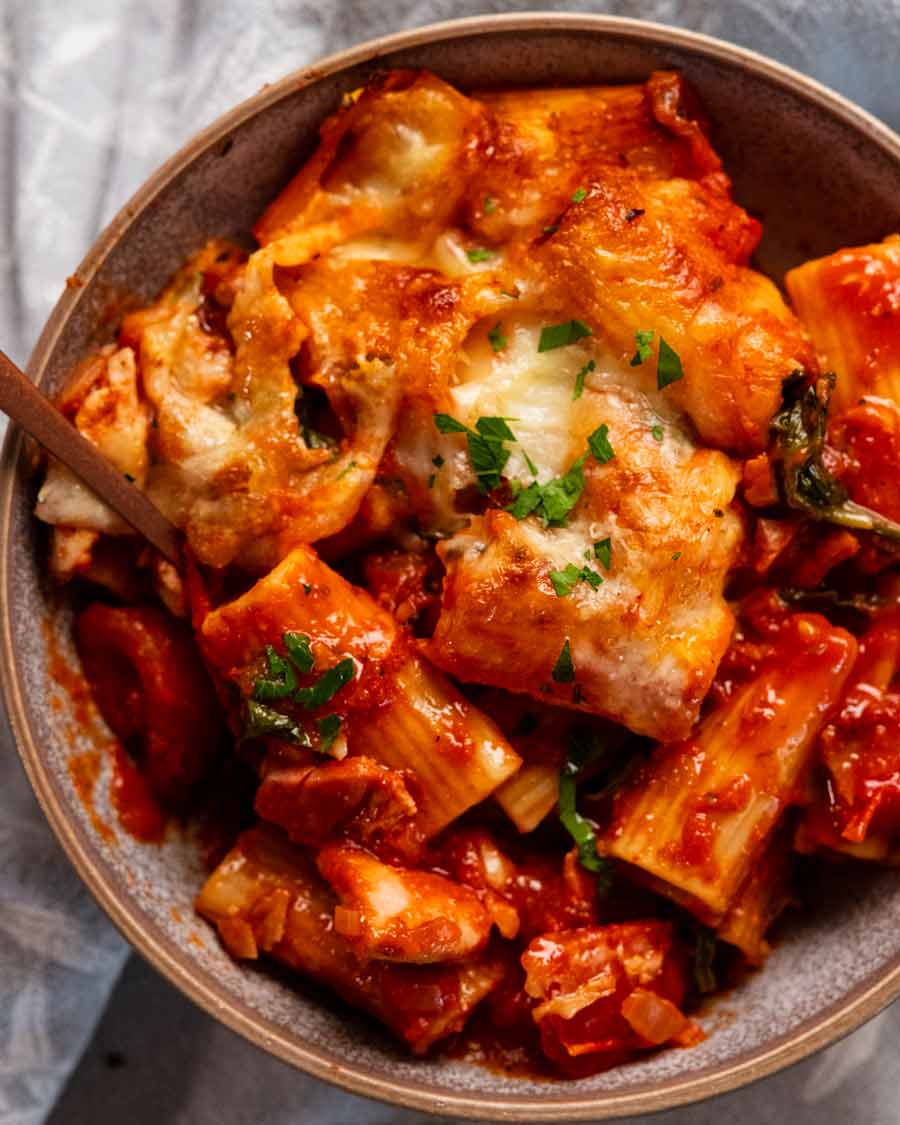
Chicken pasta bake
If you can cut a pasta bake like cake – I’m talking straight vertical walls with sharp edges – that is not a good thing. It just screams dry pasta bake!
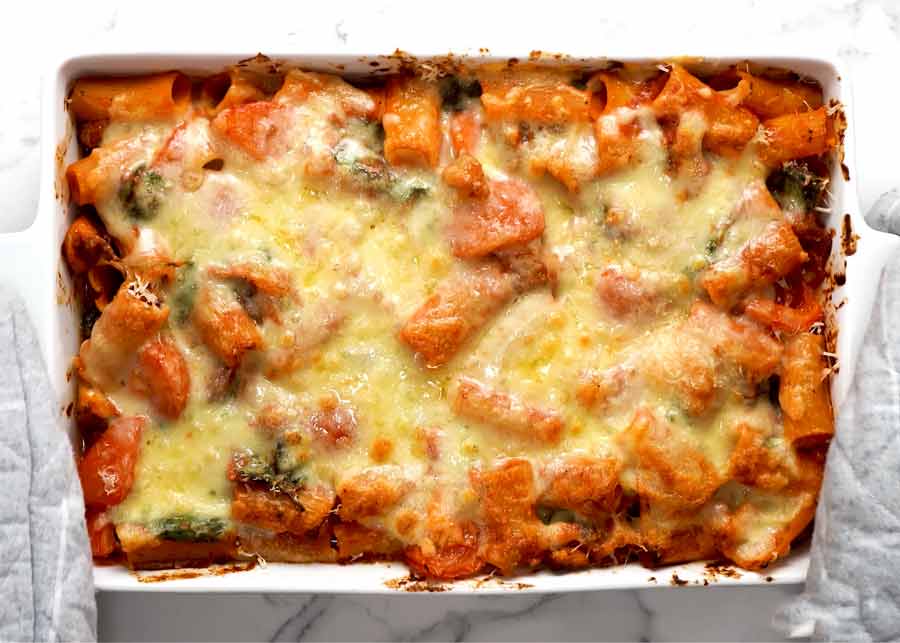
Nope. Not in my world. Pasta bakes should be saucy and juicy, molten and oozy! Generously loaded with add-ins, if you’re going for a dinner pasta bake (as opposed to a side dish like Mac and Cheese).
This one ticks all those boxes. Proof by picture – juicy / saucy:
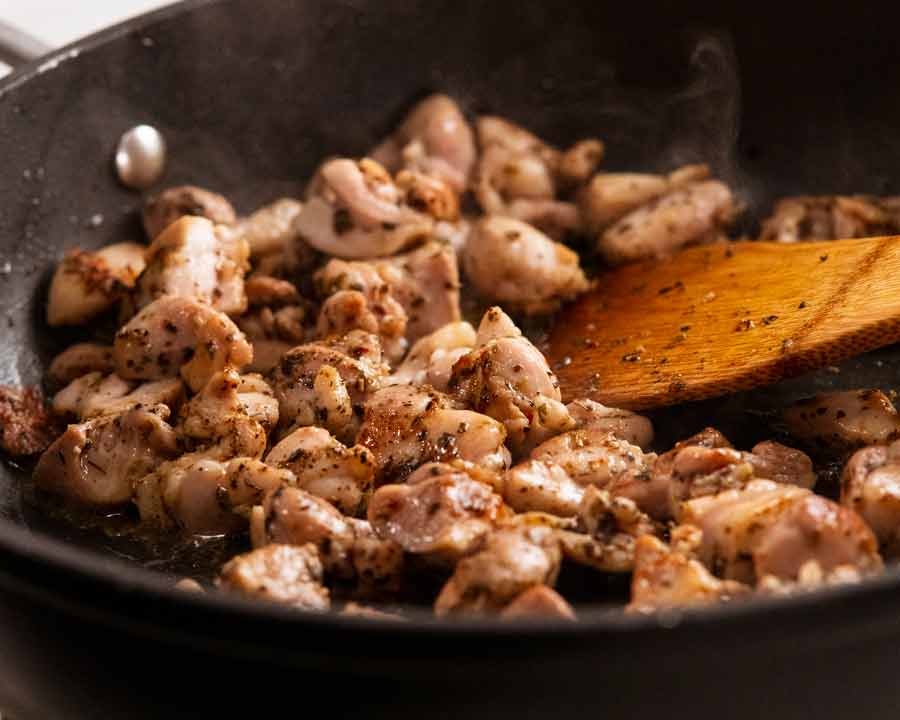
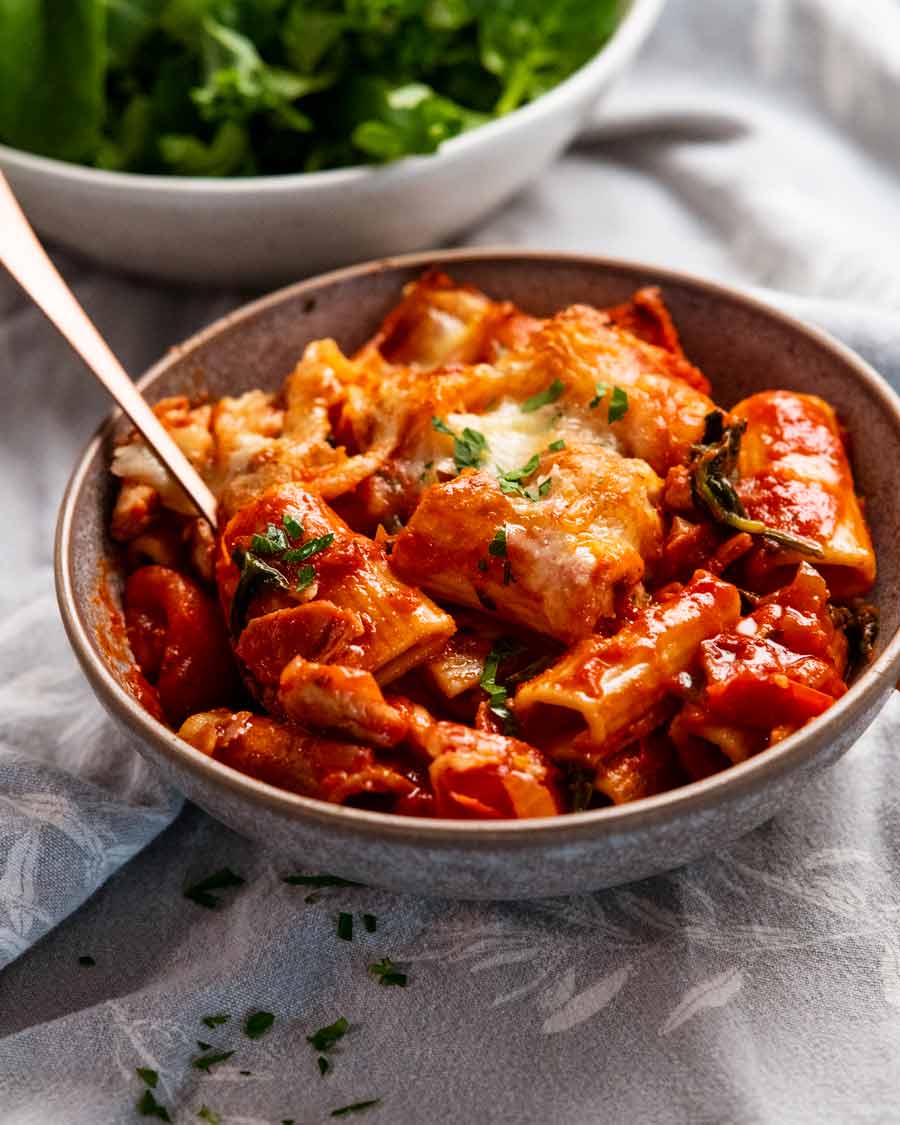
Tasty add-ins – sizzling seasoned chicken! Love the smell when the chicken hits the pan.
So if that sounds good to you, read on so you can see how to make your new favourite chicken pasta bake!
Ingredients in chicken pasta bake
You’ll be able to get everything from your local grocery store. Nothing pricey on the list!
Sizzling seasoned chicken
The pasta bake starts with sizzling chicken that’s been tossed in a simple, tasty seasoning. Here’s what you need:

Chicken – I like using chicken thighs as they stay juicier in dishes like pasta bakes where they are twice cooked (ie before adding into sauce then in the oven with the pasta).
Seasoning – Using a store bought Italian herb mix is a great shortcut here. I always like to add an extra spice, garlic in this paste, for extra flavour oomph.
Tomato pasta sauce for the pasta bake
A good tomato-based pasta bake needs a good tomato pasta sauce! No shortcuts here – I tried and just found it too bland. So here’s what we need:

Pasta type – I like the substantialness of rigatoni, there’s something extra cosy and satisfying about it in pasta bakes. However, feel free to use other short pastas like macaroni, penne, ziti, shells etc.
Tomato passata – for a thick, smooth sauce with better tomato flavour and red colour, use passata instead of crushed or diced tomato. It’s just pureed plain tomato! Readily available here in Australia in the pasta or canned tomato aisle and costs around the same as canned tomato. More on passata here.
Tomato paste – for sauce thickening and extra tomato flavour.
Garlic and onion – essential flavour base!
Oregano – for earthy flavour.
Chilli flakes / red pepper flakes – for a hum of warmth!
Wine – secret ingredient! Simmered rapidly to reduce and cook out the alcohol and winey flavour, just leaving behind tasty flavour. My favourite white wine for cooking is chardonnay which adds superior flavour compared to more neutral whites like sauvignon blanc. Substitute with low sodium chicken stock/broth.
Chicken pasta bake add-ins & topping
Lots of add-in options, but here’s what I’ve gone with!
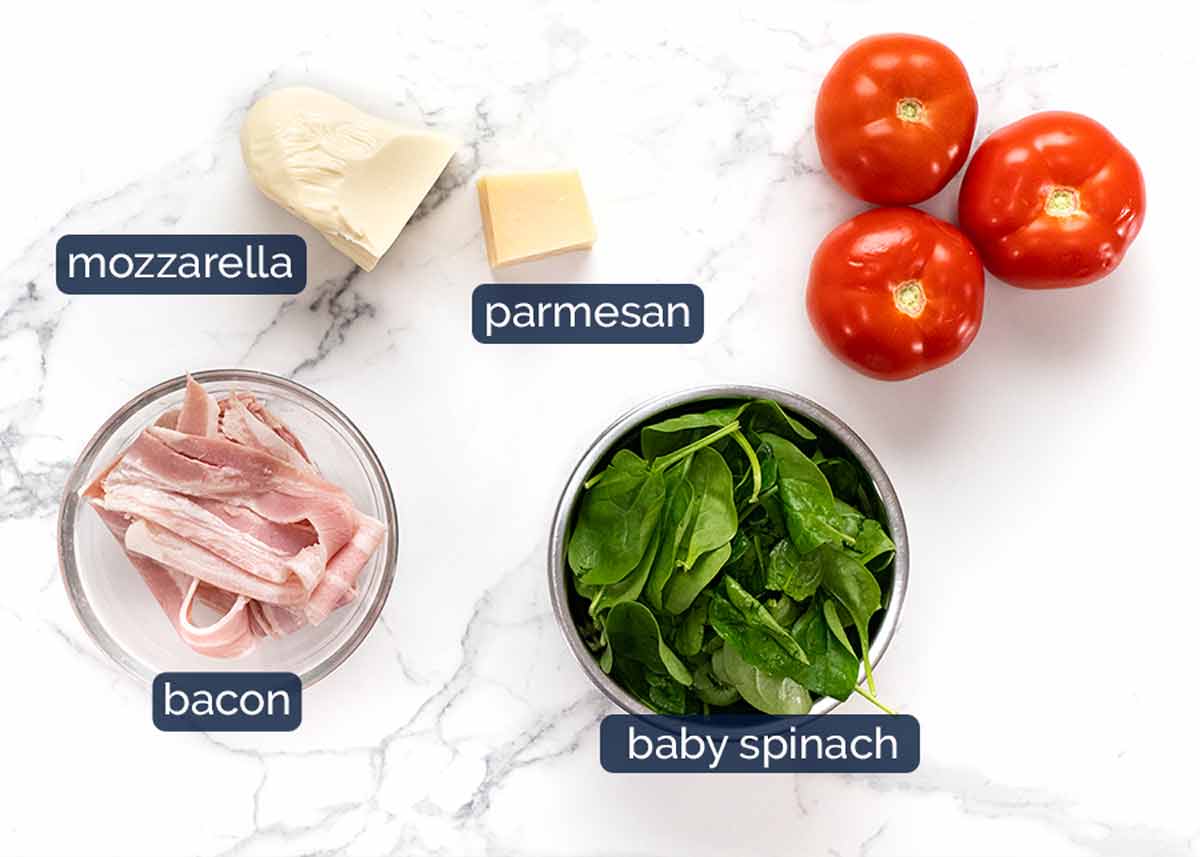
Bacon – cooked first until crisp, chopped, and tossed through the pasta bake. Then we use the bacon fat left in the pan to cooke the chicken. Free flavour not to be wasted! Substitute with ham bits or chopped ham.
Tomato – adds lovely juicy chunks of tomato in the pasta bake as well as filling it out and increasing the vegetable quota.
Baby spinach – for more hidden greens as well as adding nice streaks of green into the pasta bake.
Cheese – mozzarella for stretch and melting qualities, parmesan for flavour! (Because mozzarella actually does not have much flavour).
Feel free to substitute the tomato and baby spinach with other add-ins of choice.
How to make chicken pasta bake
There’s a time and a place for quick, low-effort one-pot pasta bakes. Then there’s all those times when you want a really good pasta bake so you’ll do it properly. Crisp the bacon, sear the chicken, simmer the sauce, then bring it all together into one big bubbling pasta bake.
Today is one of those days!
1. Crisp bacon (no oil)
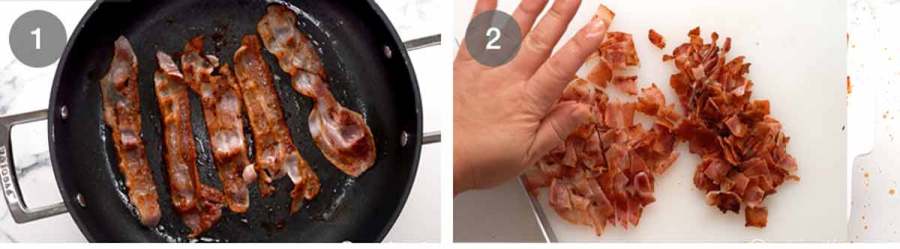
First, cook the bacon in a non-stick pan until golden and crisp. You won’t need any oil to do this as the fat in the bacon will melt and release fat into the pan. So it cooks in its own fat!
Drain on paper towels, leaving the fat in the pan (we will use this to cook the chicken). The bacon will go crispy when it cools, then chop into pieces.
2. Making the pasta bake
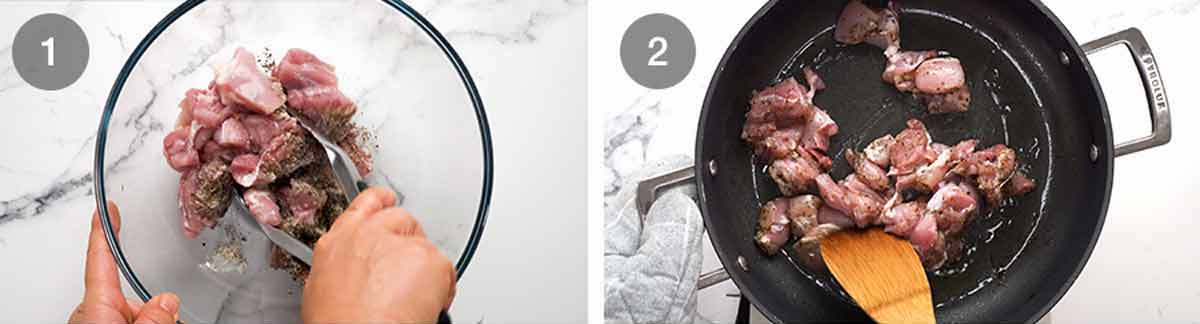
Toss the chicken in the Italian herbs, garlic powder, salt and pepper.
Sear – Using a very big pan or a large pot (because we’re mixing the sauce with pasta in this pan), sear the chicken until light golden in the reserved bacon fat.
Don’t worry whether it’s cooked through inside, it will finish cooking in the sauce and oven. Remove chicken with a slotted spoon and set aside in a bowl, leaving the tasty chicken/bacon fat in the pan (you see all this flavour building going on, right??!)
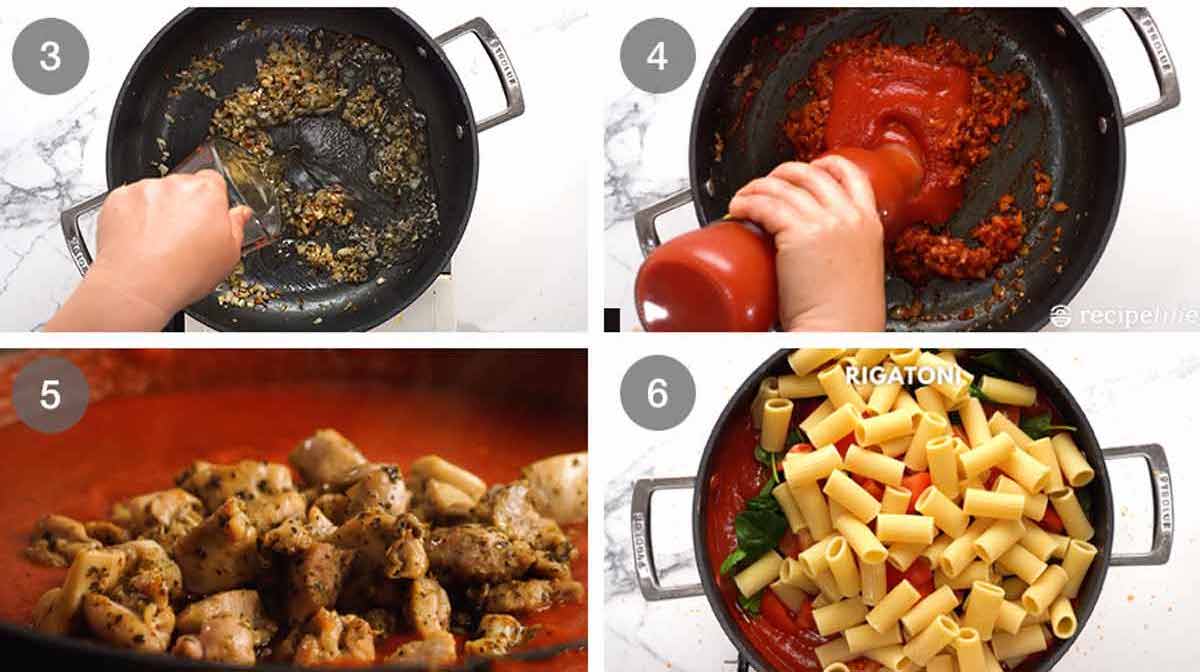
Sauté the onion and garlic with the chilli flakes and dried oregano – good trick for bringing out extra flavour from dried herbs! Then add the wine and simmer rapidly to mostly reduce – this cooks out the alcohol and removes the winey flavour, just leaving behind tasty flavour which adds a little something-something into the sauce.
Sauce – Next, cook off the tomato paste. Similar to toasting the herbs, this improves the flavour of tomato paste, taking off the sour edge, intensifying the tomato flavour and sweetening it. Good Cheffy tip!
Then we add all the liquids – the tomato passata, water (use it to rinse out the bottle) – salt and pepper for seasoning.
Simmer – Then stir in the chicken – don’t forget to add all the juices pooled in the bowl! Simmer for 5 minutes to bring the flavours together – this is when the magic happens so don’t skip or shortcut this step. I tried – to speed things up – but the sauce just lacked flavour.
Add-ins – Add the baby spinach, tomato, cooked pasta and bacon in that order, so the heavier add-ins weigh down the considerable volume of baby spinach.
Oh! If you remember, you can hold back a bit of bacon for sprinkling on at the end. But to be honest, I usually forget.

Mix well – Give it all a good stir to mix it all together. You DID use a big pan, right?? 🙂 If you didn’t, this is the part where you’ll start crying or cursing – been there, done that!
Baking pan – Transfer to a 23 x 33cm / 9 x 13″ pan and level the surface.
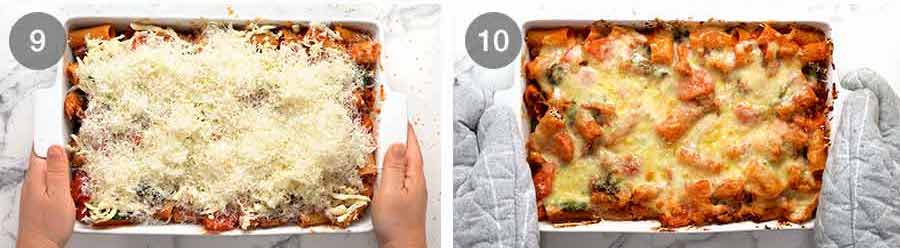
Cheese it! Top with mozzarella then parmesan cheese. Doing it in this order gives the surface a lovely golden crust thanks to the parmesan, but it’s not the end of the world if you do it the other way.
Bake for just 25 minutes until the cheese is melted with some lovely golden spots. Rest for 5 minutes, just to let it settle so the sauce clings to the pasta a bit better. Then serve!
Make-ahead / freezing tip
Most pasta bakes are terrific make-ahead-bake-later options, and this chicken pasta bake is no exception!
The best way to make ahead is to cook the sauce and pasta separately, allow both to cool completely. Then toss together and assemble the pasta bake – including topping with cheese. Cover well with cling wrap and refrigerate 3 days or freeze up to 3 months (thaw thoroughly). Then bake covered for 20 minutes then uncovered for 20 minutes. It will take longer for the centre to get hot if you’re baking from fridge-cold but the cheese will get too brown if you leave it uncovered for this full baking time.
Complete meal – veg, starch, protein!
It is not often I get to tell you that a pasta dish is a complete meal, so let me enjoy the moment. This one’s got it all! Starch, protein and plenty of vegetables – the tomato passata (yes it’s a vegetable!), chunks of fresh tomato and a good amount of baby spinach too.
Which means – unlike most of my creamy pasta bakes – no need to make a salad for the side to round out the meal. Always a bonus when it comes to choosing what to make for dinner tonight, right?? – Nagi x
PS Having just made that statement, I just realised the photo above has a side salad in it. 😂 It’s the rocket salad (arugula) with balsamic dressing minus the parmesan shavings (because I figured there was enough cheese in the pasta bake!). It was already made for another recipe I was shooting so I just grabbed it as a background prop for the photo!
PPS Despite saying this is a complete meal, a side of garlic bread would certainly take dinner to another level!
Watch how to make it
Chicken pasta bake
Ingredients
Seasoned Chicken
- 500g / 1 lb chicken thighs , cut into small bite size pieces (Note 1)
- 1/2 tsp cooking/kosher salt
- 1/4 tsp black pepper
- 1/2 tsp garlic powder
- 2 tsp Italian herb mix , any store bought type
Pasta bake
- 300g/10oz rigatoni (or penne, elbow macaroni, shells or similar)
- 2 tsp salt , for cooking pasta
- 5 slices streaky bacon
- 1/2 onion , finely chopped
- 2 garlic cloves , minced
- 1 1/2 tsp dried oregano
- 1/2 tsp chilli flakes / red pepper flakes
- 1/2 cup chardonnay or other dry white wine (Note 2)
- 2 tbsp tomato paste
- 700g / 24oz tomato passata (Note 3)
- 1/2 cup water
- 1 tsp cooking/kosher salt
- 1/2 tsp black pepper
- 3 tomatoes , cut into 8 wedges then halved
- 2 big handfuls baby spinach (or bite size kale)
- 2 cups mozzarella, shredded
- 1/2 cup (tightly packed) parmesan, finely shredded
Instructions
- Preheat oven to 180°C/350°F (160°C fan).
- Cook pasta per packet directions, using boiling water seasoned with the 2 teaspoons of salt. Drain, rinse briefly under tap water, then set aside to cool while making the sauce.
- Season chicken – Toss together Seasoned Chicken ingredients in a bowl.
- Crisp bacon – Put bacon in an unheated very large non-stick pan (Note 2). Turn stove on medium high. The fat will melt so the bacon cooks in its own fat. Cook until light golden, remove onto paper towels, leaving fat in the pan. Once cool, cut into 1cm / 1/3" pieces.
- Sizzle chicken – Top up bacon fat with olive oil if you don’t have at least 1 tbsp. Increase heat to high. Cook chicken for 3 minutes until light golden on the outside but still raw inside. Remove into a bowl with a slotted spoon.
- Sauce – In the same pan, cook garlic and onion for 1 minute, then add chilli flakes and oregano. Cook for 2 minutes until onion is translucent. Add wine and rapidly simmer for 1 to 2 minutes until mostly evaporated. Add tomato paste and cook for 1 minute to concentrate and improve flavour. Add passata, then use the water to rinse out the bottle. Add salt, pepper, chicken (including all juices on the plate). Mix, then simmer for 5 minutes on medium.
- Toss – Add baby spinach, tomato, pasta and bacon. Toss well.
- Assemble – Transfer to 23 x 33cm/9 x 13" pan. Top with mozzarella then parmesan. Bake 25 minutes until melted with some golden spots.
- Serve – Stand for 5 minutes then serve!
Notes
Nutrition
Life of Dozer
Sunset walk. Such a beautiful part of Sydney! (It’s Bayview dog park in Sydney’s northern beaches).

The post Chicken pasta bake appeared first on RecipeTin Eats.
]]>