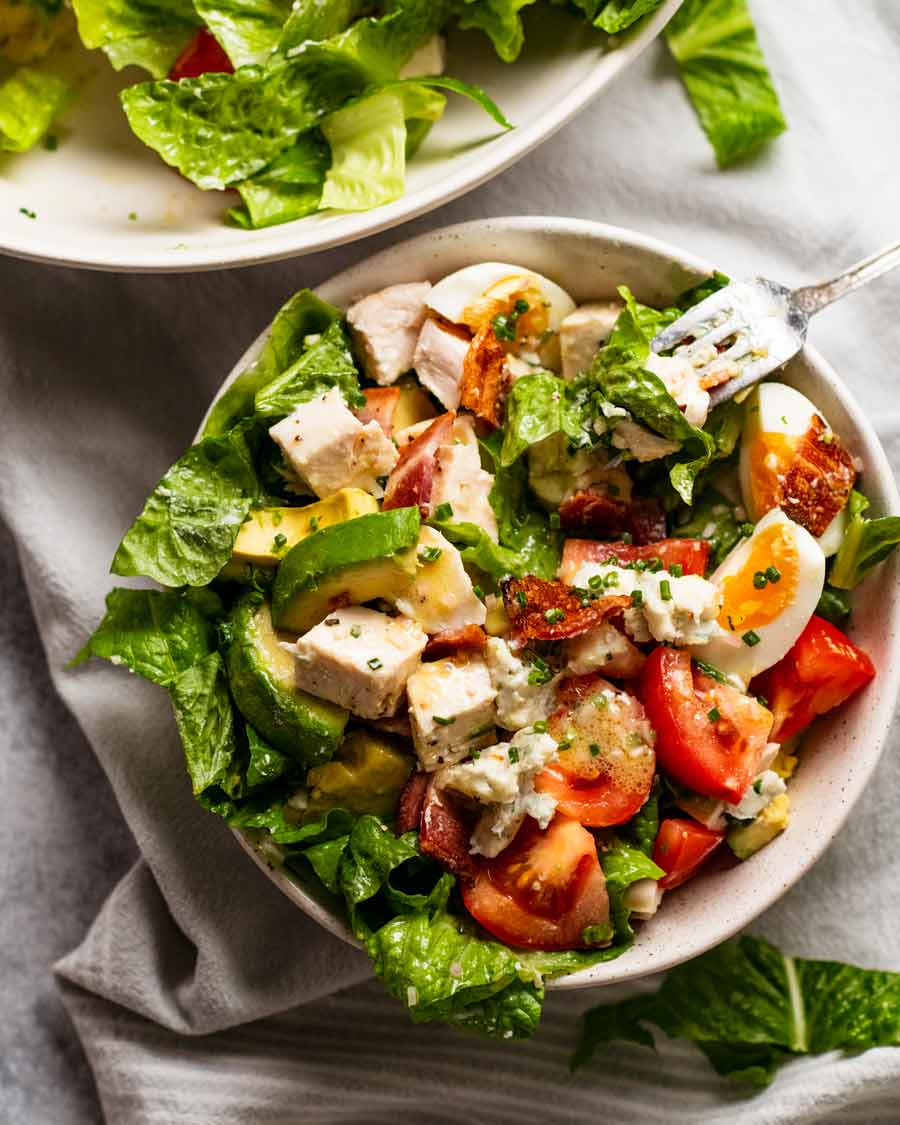
 The mighty Cobb Salad has arrived! All the essential players present – juicy bites of chicken, crispy lettuce, chunks of tomato, creamy avocado, salty bacon and creamy blue cheese, arranged in the signature rows. Served with a homemade Cobb Salad dressing. Salad was never so delicious! Cobb Salad I feel like I’ve done endless iterations... Get the Recipe
The post The mighty Cobb Salad appeared first on RecipeTin Eats.
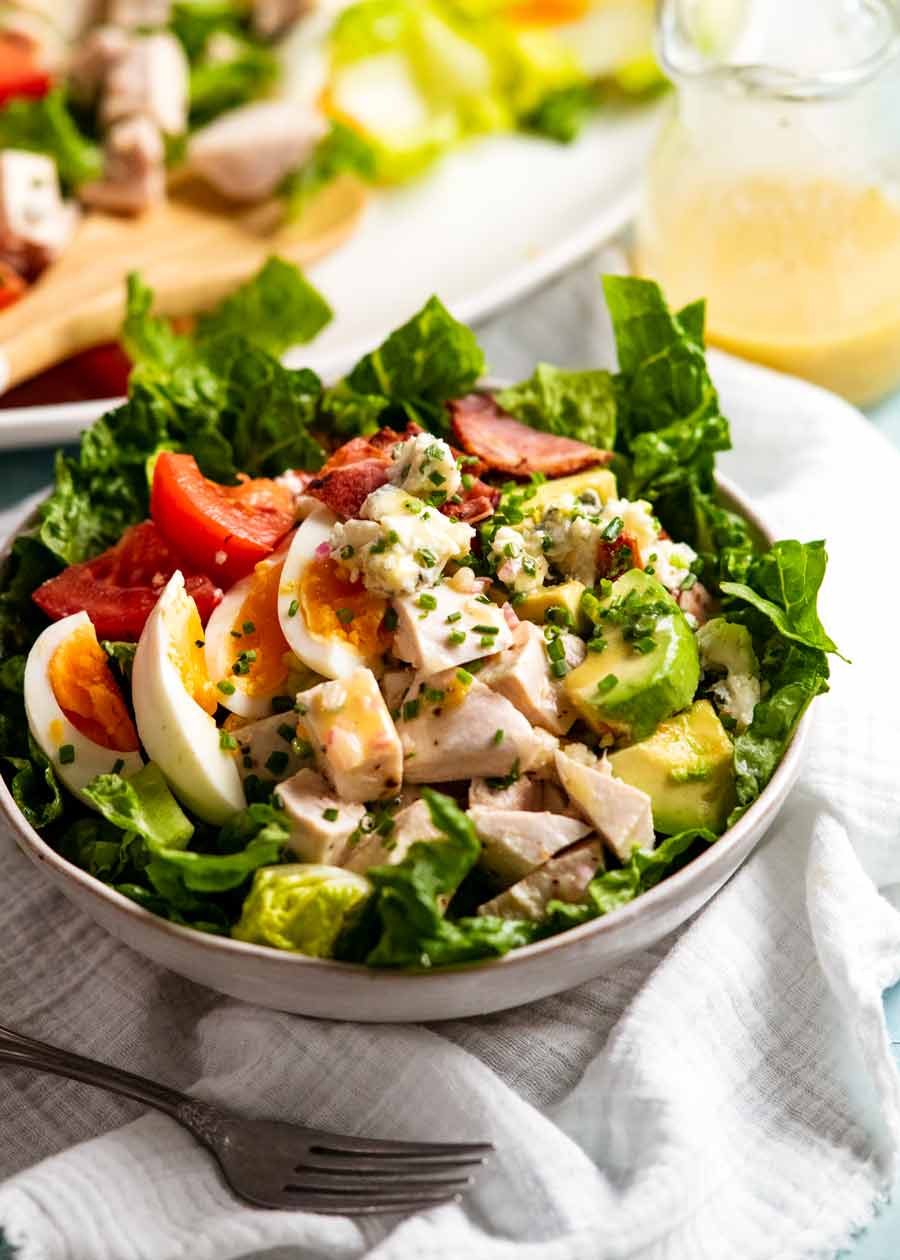
]]>The mighty Cobb Salad has arrived! All the essential players present – juicy bites of chicken, crispy lettuce, chunks of tomato, creamy avocado, salty bacon and creamy blue cheese, arranged in the signature rows. Served with a homemade Cobb Salad dressing. Salad was never so delicious!
Cobb Salad
I feel like I’ve done endless iterations of chicken salad, from Chinese to Vietnamese, Mexican to Thai, not to mention all the various non-Asian ones from the Avocado Ranch pasta one to Lemon Chicken to that one I copied from a trendy San Francisco bistro (<- This was is super good!).
So I was a little surprised that I hadn’t done what is probably the most classic of all chicken salads – the great Cobb Salad! Though actually, it was traditionally made with turkey rather than chicken. But these days chicken is more common, especially for homemade versions.
Though there are various tales about the origins of Cobb Salad, one thing everybody agrees on is that the ingredients should be presented in neat rows on a large bed of lettuce. The presence of blue cheese is also essential – otherwise, it’s just another chicken salad! 
Cobb Salad Dressing – sharper than most
Another thing worth mentioning is that Cobb Salad Dressing is a little sharper than standard dressings, with a 50/50 oil to vinegar ratio compared to the usual 1 part vinegar to 3 or 4 parts oil. The slightly tangier dressing works really well here because it offsets the richness of the blue cheese, with the added benefit of lower calories!

Ingredients in Cobb Salad
Feel free to cut the vegetables as you wish. Some like them more chunky, to give the salad a sense of heft. Others prefer them chopped into smaller pieces. It’s entirely up to you!
Cobb Salad Vegetables
Here are the vegetables in a classic Cobb Salad.
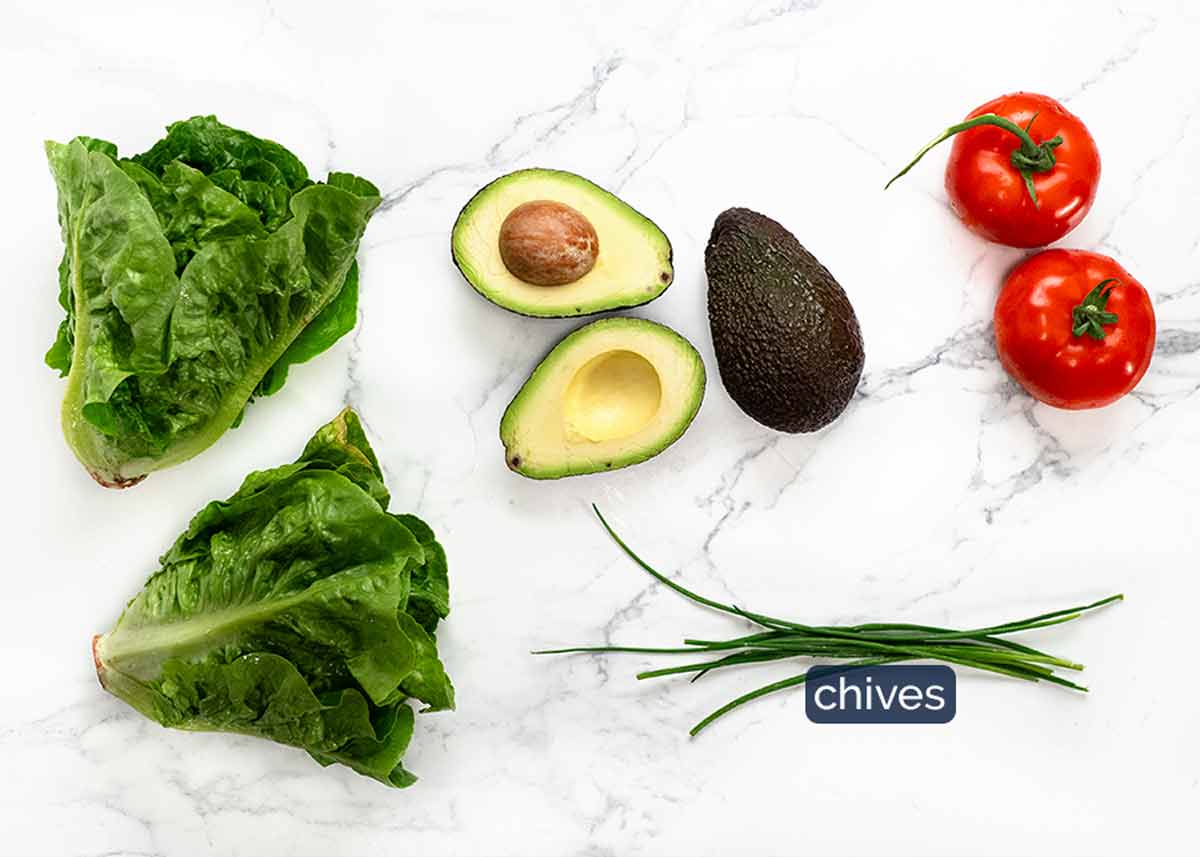
Cos / romaine lettuce – Either 1 large or 2 small ones (“hearts”), chopped into large bite size pieces. You want around 12 cups, lightly packed, slightly heaped. I know, it’s hard to measure! It’s flexible. The recipe has plenty of dressing!
Tomatoes – Either 2 large ones cut into chunks (I prefer this) or 250g/8oz cherry tomatoes, halved.
Avocados – Two medium avocados or one really large on.
Chives – This is an optional garnish. Finely chop then sprinkled on at the end.
Cobb Salad Proteins & Blue Cheese
Not a fan of blue cheese? You’re missing out! 😂
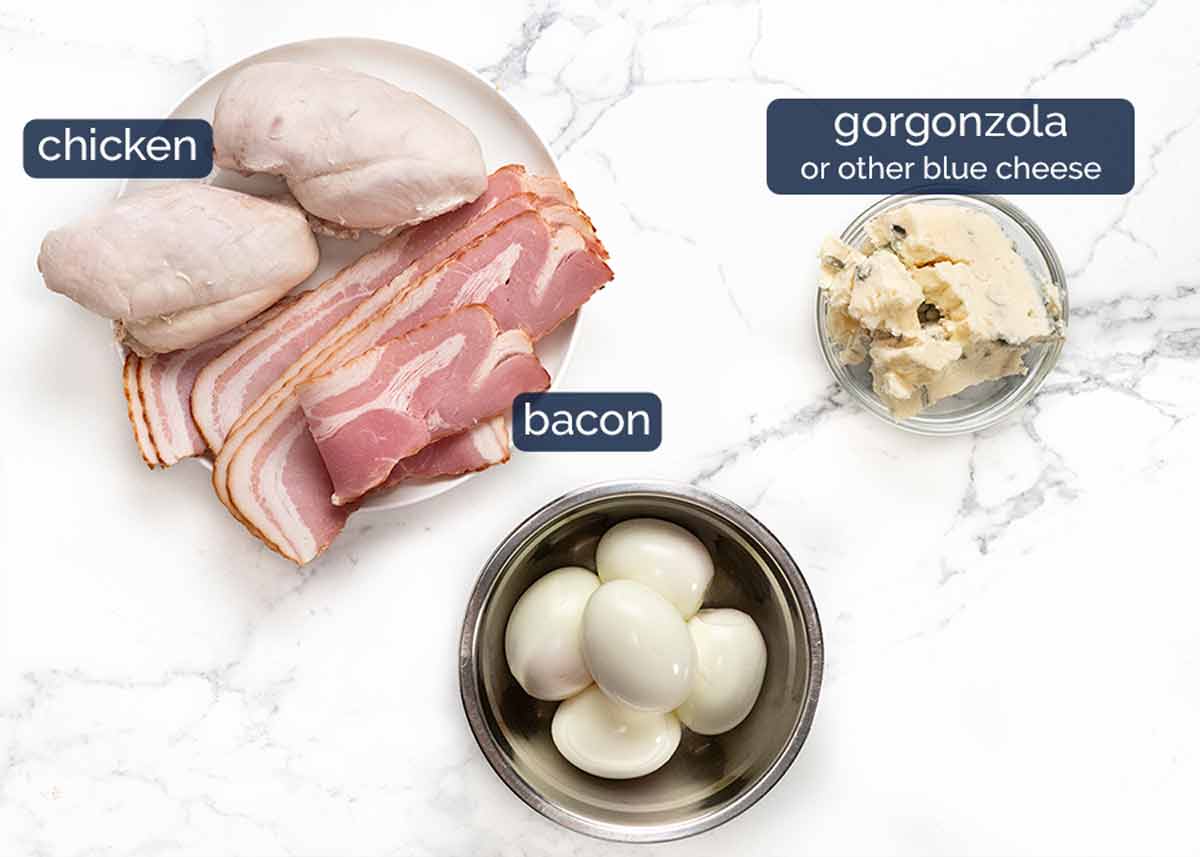
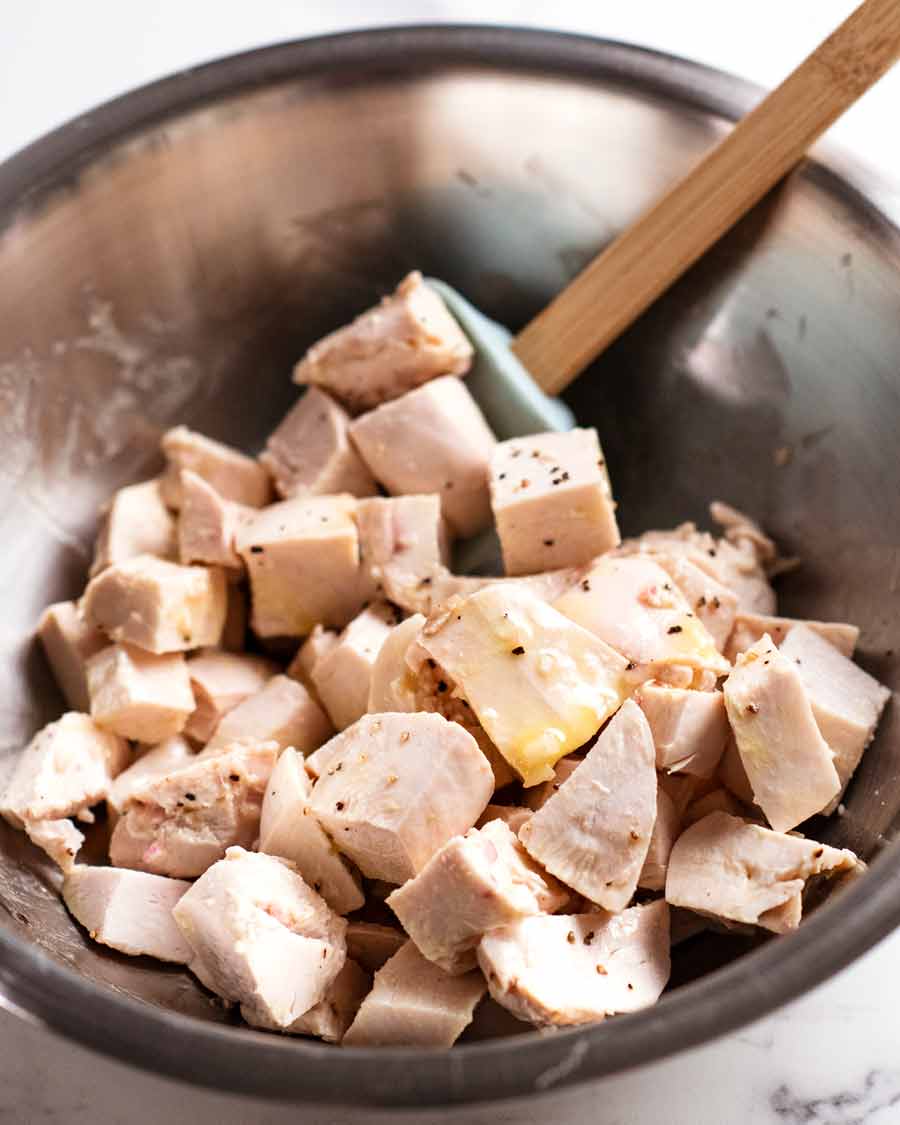
Chicken – You can either poach your own (you will love my foolproof entirely hands-off method) or use store bought roast chicken. Though not standard, I like to toss my cooked chicken in a little salt, pepper and dressing. Just – more flavour.
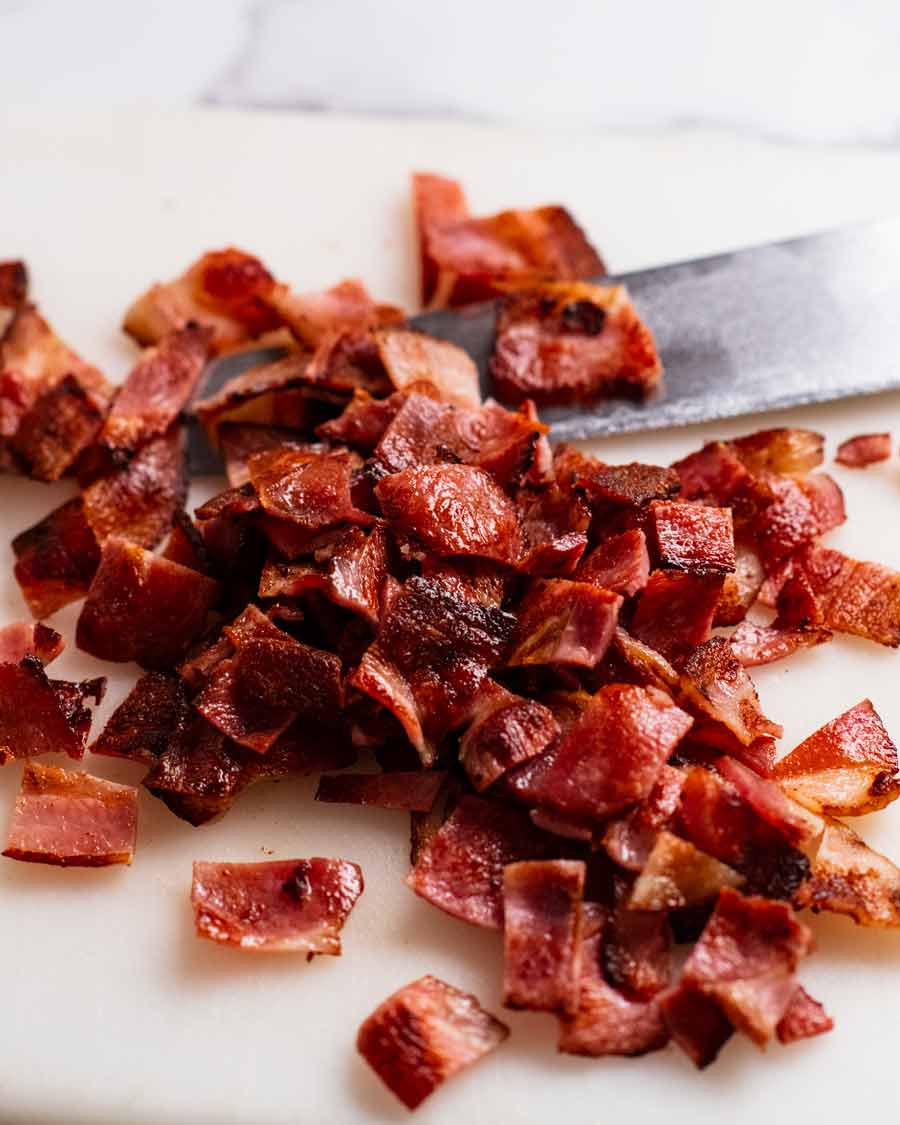
Bacon – These days I tend to cook the strips whole then chop afterwards because it’s less effort. So much easier to cut crispy bacon than raw, and less effort to cook strips than a pan full of lots of tiny pieces that keep popping in my face!
Blue cheese – There might not be full consensus on exactly what type of blue cheese is the classic to use in a Cobb Salad. But for me, there’s no question: creamy is better than crumbly/drier. Creamy blue cheese smears and gets on “everything”, and everything it touches is tastier!!
My favourite blue cheese for salads is gorgonzola. Gorgonzola Dolce is my preference for a creamier, rounder blue cheese flavour – this is the more common type of Gorgonzola. Though if you like your blue cheese really sharp, then go for Gorgonzola Picante!
New to blue cheese? Try Blue Castello. It’s probably the most mild out of all the blue cheese, plus it’s better value.
Boiled eggs – I like mine soft boiled so the yolks are slightly jammy but not runny. 9 minutes in boiling water – boil the water first, lower eggs in then set the timer! (Boiled egg directions here).
Cobb Salad Dressing ingredients
As noted above, Cobb Salad Dressing is tangier than typical vinaigrettes. To help with thickening (because less oil = thinner dressing), a touch of Dijon mustard is used.
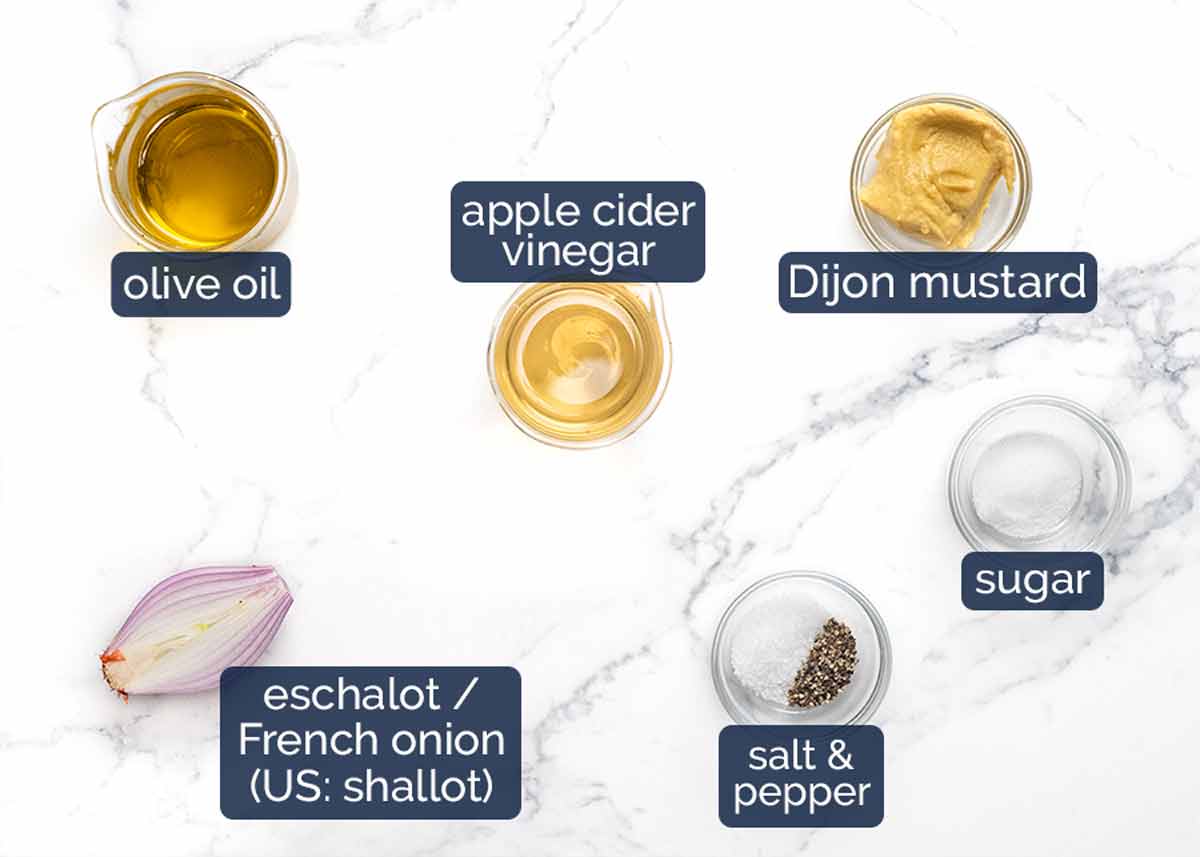
Extra virgin olive oil – Use the best you can afford! The better the olive oil, the tastier your dressings.
Apple cider vinegar – Good all rounder vinegar for dressings that’s not as sharp as white vinegar. Substitute with white wine or red wine vinegar.
Dijon mustard – Adds flavour as well as thickening the dressing which is particularly important here because this dressing uses less oil. So the dressing would be very watery without the dijon.
Eschallot (US: shallot) – The small onions which are finer than ordinary onions so the minced pieces blend into the dressing better, rather than having lots of big chunks. Also, the flavour is not as sharp as ordinary onions. This adds good value into the dressing so don’t skip it! Substitute with 1 tablespoon finely grated red onion.
Sugar – Just 1/2 a teaspoon takes a bit of the tangy edge off this dressing.
I’m using a classic Cobb Salad dressing today so there’s no garlic in it. But a finely grated garlic clove certainly wouldn’t go astray here!
How to make Cobb Salad
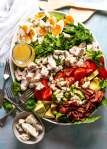
The presentation of Cobb Salad is one of its defining features. Traditionally, it’s served on a large platter with the ingredients artfully arranged in neat rows. I see no reason to stray from tradition when it looks so good!
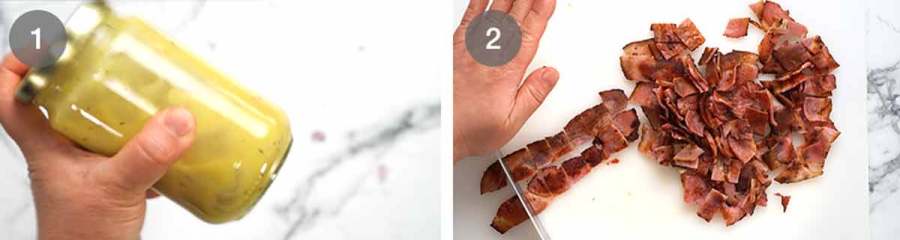
Dressing – Shake everything up in a jar. It really is a quick and easy way to properly mix dressings so they become thick and creamy as they should be.
Cook bacon strips until crisp then chop. (See comment in the ingredients section about my preference to cook first then chop later these days).

Poach chicken breast using my foolproof poached chicken recipe. (plonk in boiling water, turn stove off, leave 20 minutes. Works every-single-time, and the chicken is juicy!).
Chop & toss – Cool chicken, dice into 2cm / 0.8″ cubes. Toss with salt, pepper and a slosh of Dressing.
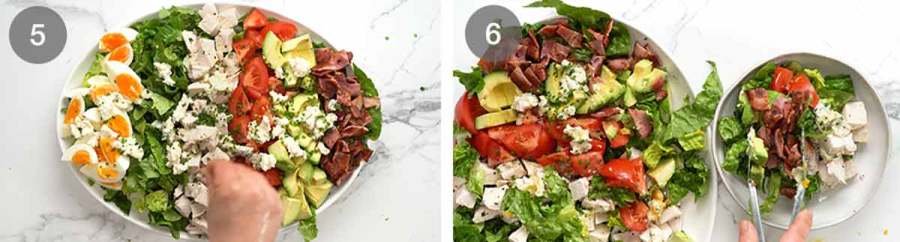
Assemble – Pile the lettuce onto a large platter or bowl. Arrange the following across the surface in neat rows: chicken, avocado, tomato, bacon, egg. Crumble blue cheese across the surface, then scatter with chives. Serve with dressing on the side.
To eat – Let everybody help themselves to the salad, and drizzle on Dressing. Then dive in!

A note on serving Cobb Salad
I serve Cobb Salad by laying out the un-dressed salad on a big platter, then pouring the dressing into a jug. Then I leave everyone to help themselves to the salad and pour over as much or as little Dressing as they wish.
I prefer doing it this way because otherwise you have to toss each vegetable separately in Dressing before laying them out in the signature rows. Which means you end up using quite a lot of dressing, plus the lettuce dressed first ends up a little wilted from the dressing if you spend a little too long fussing with the neat rows (YES I DO!🙈).
Not sure if this is the traditional way to serve Cobb Salad, but it works for me! – Nagi x
Watch how to make it
Cobb Salad
Love the presentation on a big platter with the ingredients in neat rows. Serve Dressing on the side for everyone to help themselves (better than tossing each item individually).Ingredients
Chicken:
- 400g/14 oz chicken breast (2 pieces)
- 1/4 tsp cooking/kosher salt
- 1/4 tsp black pepper
Cobb Salad:
- 200g/7oz streaky bacon strips
- 4 x 9 minute boiled eggs , quartered
- 12 cups cos / romaine lettuce (1 large head, 2 small), chopped (or other crispy lettuce)
- 2 large tomatoes , cut into 8 wedges then halved (or 250g/8oz cherry tomatoes halved)
- 2 avocados , cut into large pieces
- 200g/7oz gorgonzola dolce (my favourite) or roquefort (traditional), crumbled (or other blue cheese – Note 1)
- 2 tbsp chives , finely chopped
Dressing:
- 1 tbsp dijon mustard
- 5 tbsp extra virgin olive oil
- 5 tbsp apple cider vinegar (sub white wine or red wine vinegar)
- 3/4 tsp cooking/kosher salt
- 1/4 tsp black pepper
- 2 tbsp eschallot (US: shallot), very finely minced
- 1/2 tsp white sugar
Instructions
- Dressing: Shake ingredients in a jar.
- Flavour chicken: Poach chicken using this method (20 minute foolproof-guaranteed-juicy). Cool to room temperature then cut into 2cm / 0.75” cubes. Toss with salt, pepper and 2 tablespoons of Dressing. Set aside.
- Crisp bacon: Place bacon strips in a non-stick pan (not heated, no oil). Turn heat onto medium high – as the pan heats up, the fat will begin to melt. Cook for 2 minutes until golden, turn and cook the other side for 1 1/2 minutes until golden. Drain on paper towels. Once cool and crisp, chop into 1.5cm / 0.6" pieces.
- Assemble: Spread lettuce on a large platter. Arrange the ingredients on top in the Cobb Salad signature neat rows: egg, bacon, avocado, tomato and chicken. Crumble blue cheese across the top, sprinkle with chives. Pour dressing into a jug.
- Serving: Let everybody help themselves to the salad and Dressing!
Notes
I love using creamy gorgonzola because it smears on everything so it sort of becomes part of the dressing. Hence why the dressing is a little tangier than traditional vinaigrettes – you need it, to cut through the richness of blue cheese.
Blue cheese newbies – Suggest using a milder blue cheese like Blue Castello. Adamantly against blue cheese? Feta or goats cheese would be my picks, and suggest adding an extra tablespoon of oil into the dressing to make it a little less tangy.
Nutrition per serving. Shave off 60 calories by using turkey or lean bacon. And the blue cheese accounts for 130 calories. Totally makes it!!Nutrition
Life of Dozer
With all the good stuff in this salad, he can’t believe what he was offered.

The post The mighty Cobb Salad appeared first on RecipeTin Eats.
]]> Meet my latest obsession – Arayes! Pita pockets stuffed with seasoned meat kofta filling, then pan fried until crispy. Think: Lebanese quesadillas / easy gozleme. Enjoy for dinner or pass them around as an appetiser. I can’t stop eating these! Arayes – Lebanese street food! Every now and then I happen across a recipe that... Get the Recipe
The post Arayes – Lebanese Meat-Stuffed Crispy Pita appeared first on RecipeTin Eats.
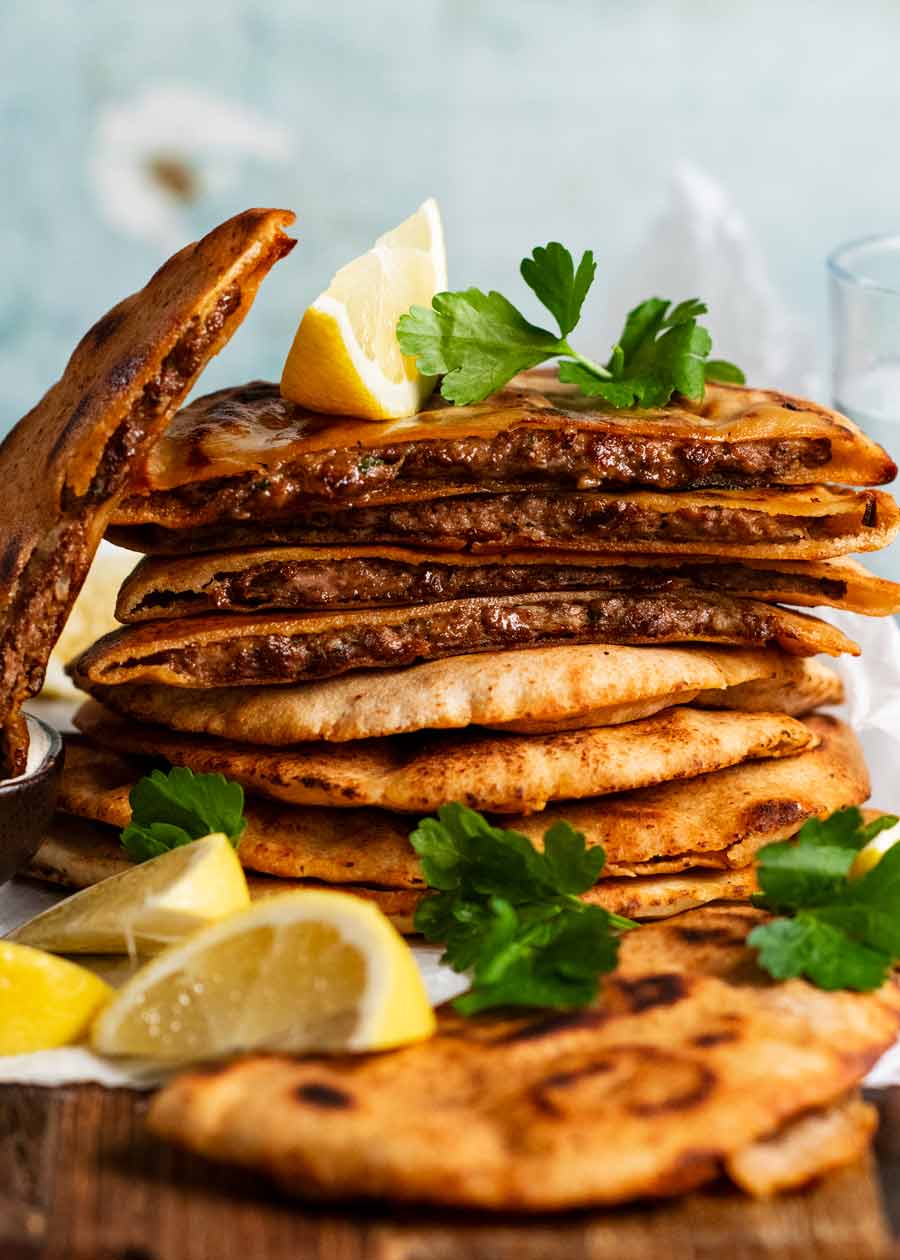
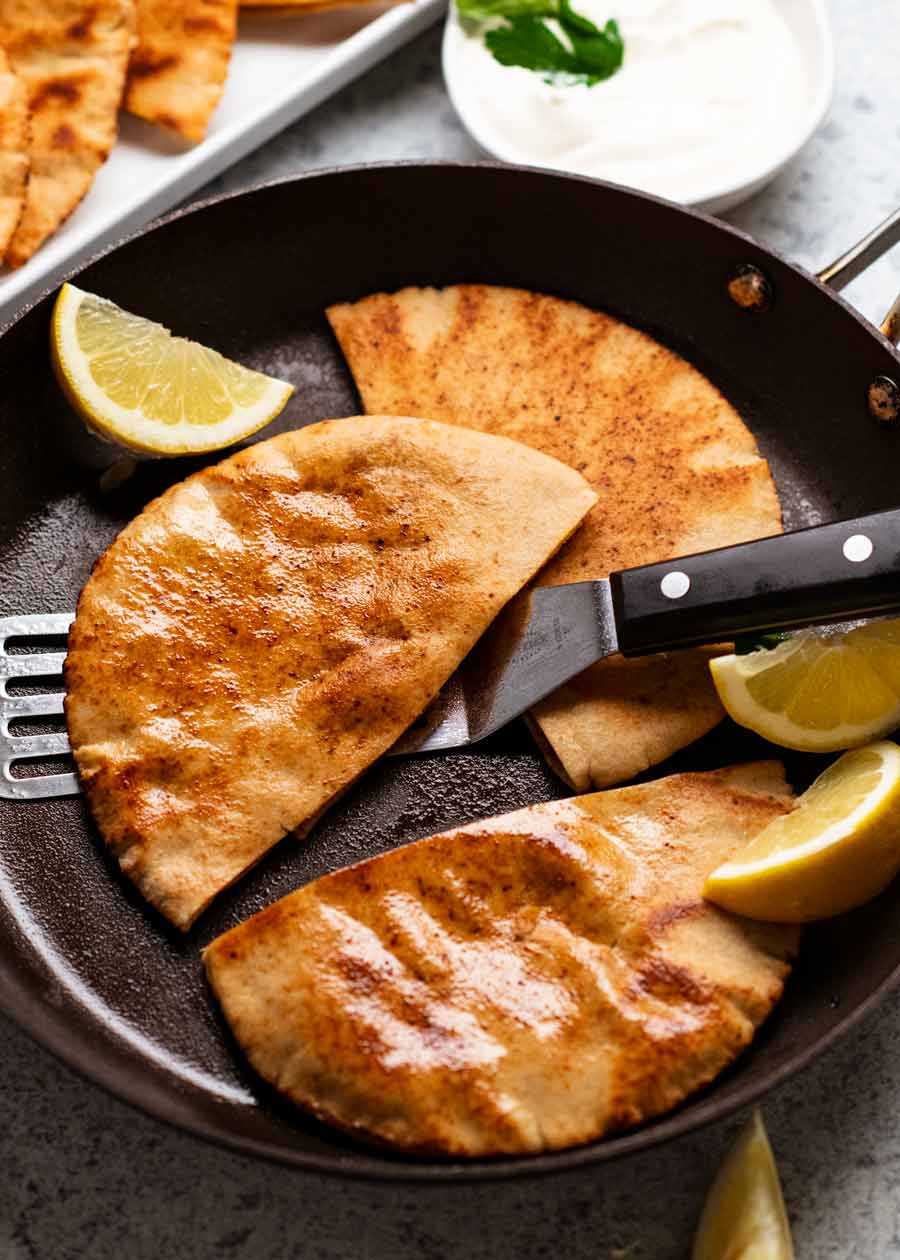
]]>Meet my latest obsession – Arayes! Pita pockets stuffed with seasoned meat kofta filling, then pan fried until crispy. Think: Lebanese quesadillas / easy gozleme. Enjoy for dinner or pass them around as an appetiser. I can’t stop eating these!
Arayes – Lebanese street food!
Every now and then I happen across a recipe that really catches me by surprise. Something I’ve never heard of before that’s devilishly tasty, a little different to the usual yet easy and relatively fast to make.
Today’s Arayes is one such recipe, introduced to me by Chef JB, discovered during his globe trotting days.
Originating from the Middle East, Arayes is a pita or flatbread that’s stuffed with raw seasoned meat kofta filling then pan fried, grilled or baked until crispy. Think of it like quesadillas – but with Middle Eastern spiced filling – or an easier version of lamb gozleme.
As with many traditional recipes, there are variations between countries, including the seasoning in the meat, the type of bread used, thickness of meat etc. The Arayes I’m sharing today is a Lebanese one. It’s easy. You can get all the ingredients at any grocery store.
And it’s Outrageously Delicious. (You know I’m deadly serious when I capitalise!)

Ingredients in Arayes
Here’s what you need to make Arayes.
Spiced kofta filling
Here’s what you need for the spiced kofta filling used to stuff the pita bread.
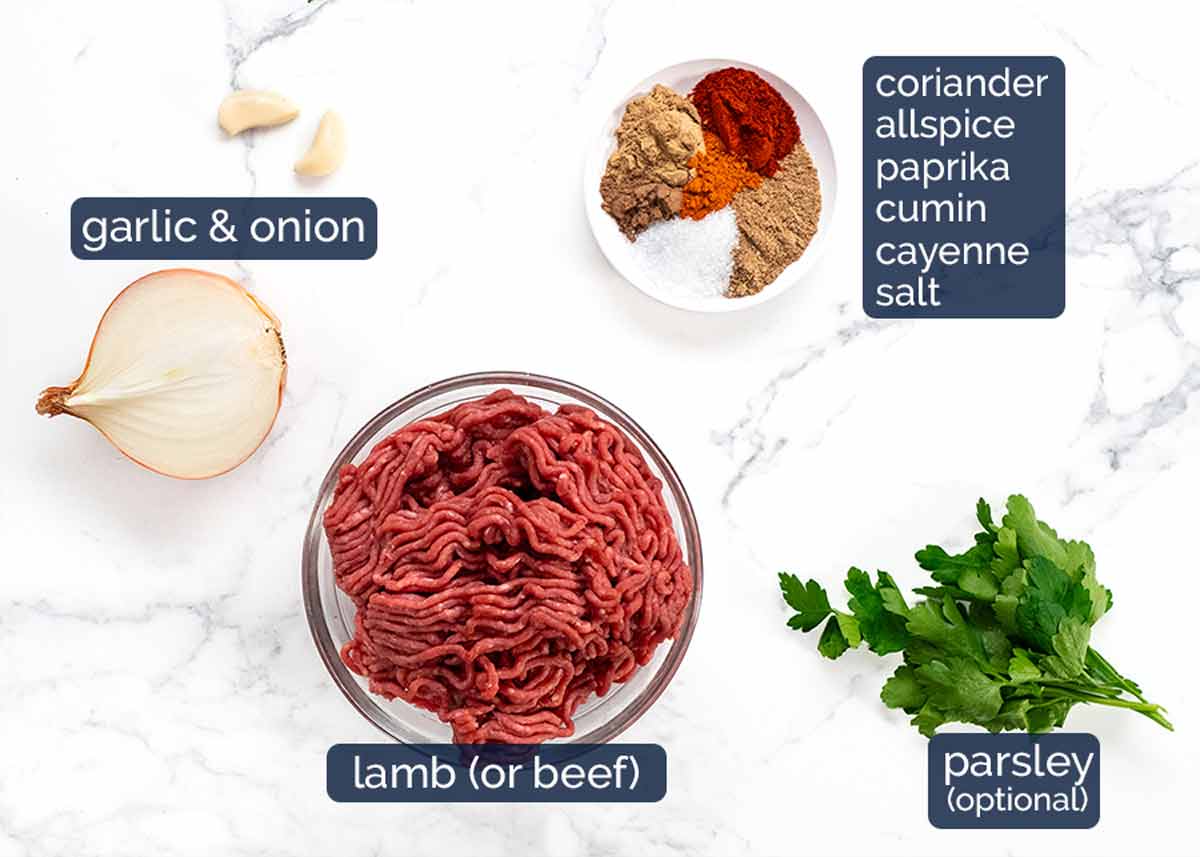
Protein – Lamb is a favoured protein in the Middle East and goes so well with the Lebanese spice mix we’re using today! However, beef is a very close second.
Spice mix – No unusual players here in this Lebanese kofta spice mix! There’s a fairly generous amount – almost 3 tablespoons – which sounds like a lot. This is because the meat is spread very thinly inside each pita bread so you actually don’t end up with very much with each bite. So you want it to be heavy on the spicing!
Spice note: Mild kick, only 1/2 tsp cayenne across 10 pita bread halves. To reduce to subtle, cut down cayenne to 1/4 tsp. Or omit.
Onion and fresh garlic – For aromatic flavour in the kofta filling.
Parsley – Optional for nice little bits of green throughout.
Pita bread and oil
Arayes is and can be made with all sorts of pita breads – large, small, thin, thick. Have fun and experiment!
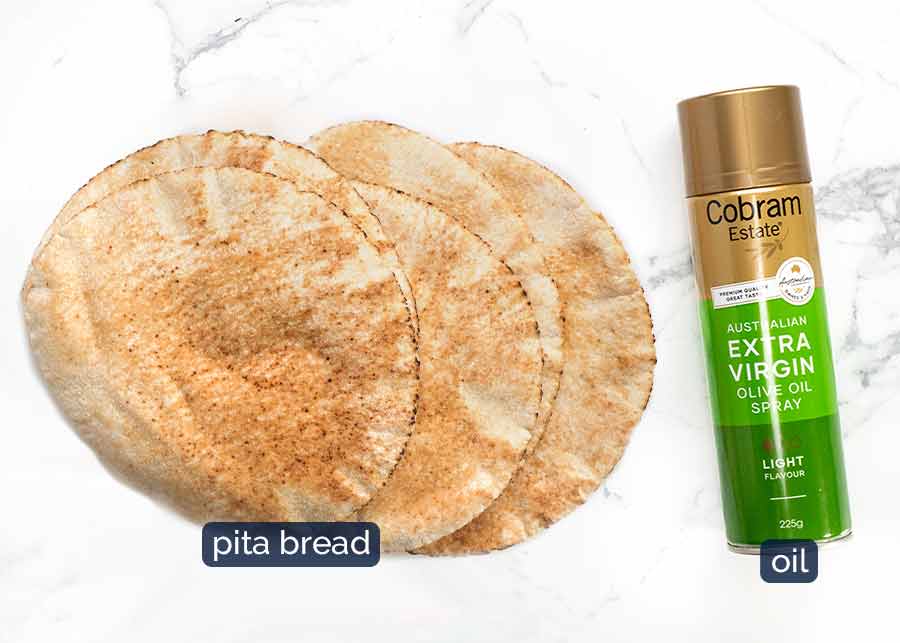
Pita Bread – The pita bread I use is 15cm / 6″ wide. You need pita bread pockets that can be split open to stuff the meat inside. Thinner is better as it’s easier to cook the meat through. Fellow Aussies – I use Nana brand pita bread from Woolies, Coles.
Alternatives/variations – I’ve made this with the breadier, thicker pita bread pockets too (like used in this recipe) and it works great, just takes a minute or two longer for the meat to cook. Large Lebanese bread ~30cm/12″ wide also works! You need 2 to 3, spread the meat inside using a butter knife, pan fry until crisp then cut into pieces. And if you can’t find any pita pockets at all, you could even make Arayes using any flatbreads you can get your hands on, or even tortillas! Just make them like quesadillas – spread the meat filling on half then fold over.
Olive oil spray works best for cooking, I found. Using oil in the pan makes the pita pockets a little too greasy. If you don’t have spray, just brush the surface with olive oil.
How to make Arayes
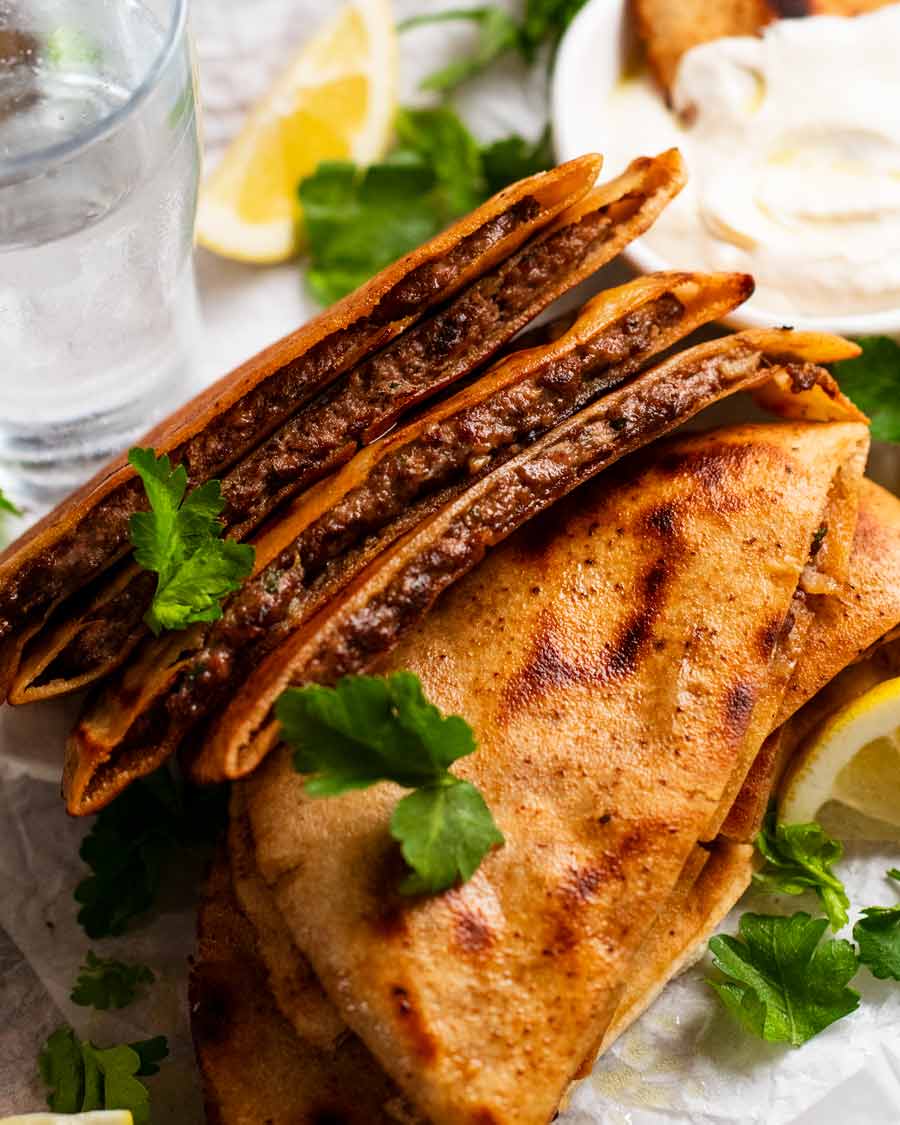
A unique step in making Arayes is that the meat is raw when stuffed inside the pita bread. So as it cooks, the meat juices flavour the inside of the pita bread while the outside goes golden and crispy. It’s sooooo good!!
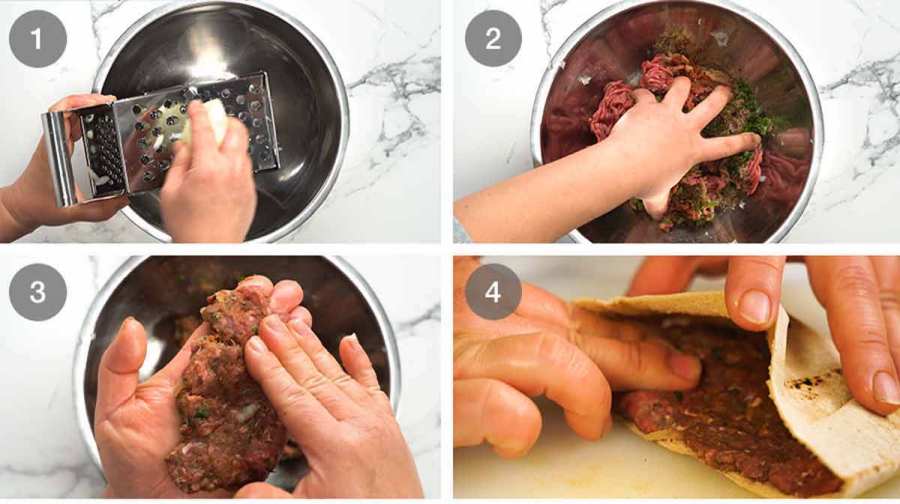
Grate the onion using a standard box grater. Why grate rather than chop? Because grated is finer than chopped so you don’t need to cook the onion separately before mixing into the meat. It will cook enough with the meat. Plus, the onion juices make the meat mixture even tastier!
Filling – Add the meat and all the other filling ingredients, then mix well with your hands.
Semi-circle shape – Divide into 10 portions, roll into a ball then pat into a thin semi-circle shape approximating the size of half a pita bread.
Stuff the meat inside the pita bread. PRO TIP: If you have trouble prying the pocket open, microwave for 15 seconds on high to soften then run a butter knife inside the slit.
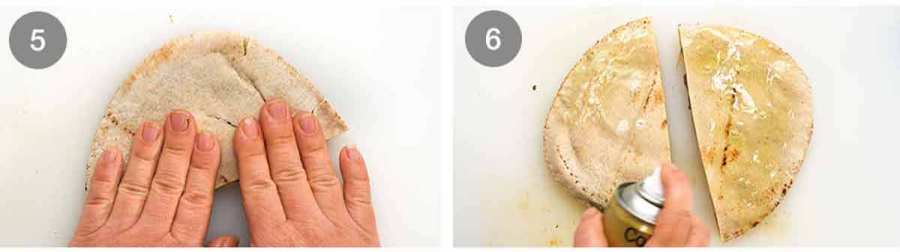
Flatten – Close the pita bread then press down and out to spread the meat to the edges of the pita bread. Though – no need to be too meticulous here! You just don’t want giant areas of meat-less pita bread.
Spray each side with oil. I prefer spraying because I found using oil in the pan makes the Arayes too greasy. Plus, you use far less oil!

Pan fry 4 min – Then pan fry on medium high for 2 minutes on each side until crispy. The meat will cook through in this time because it’s so thin! I do 2 or 3 halves at a time. Cook as many as you can fit in a single layer.
Keep cooked Arayes warm in a low oven on a rack set over a tray (rack prevents underside from getting soggy) as you continue cooking. Or – get 2 pans going to speed things up!
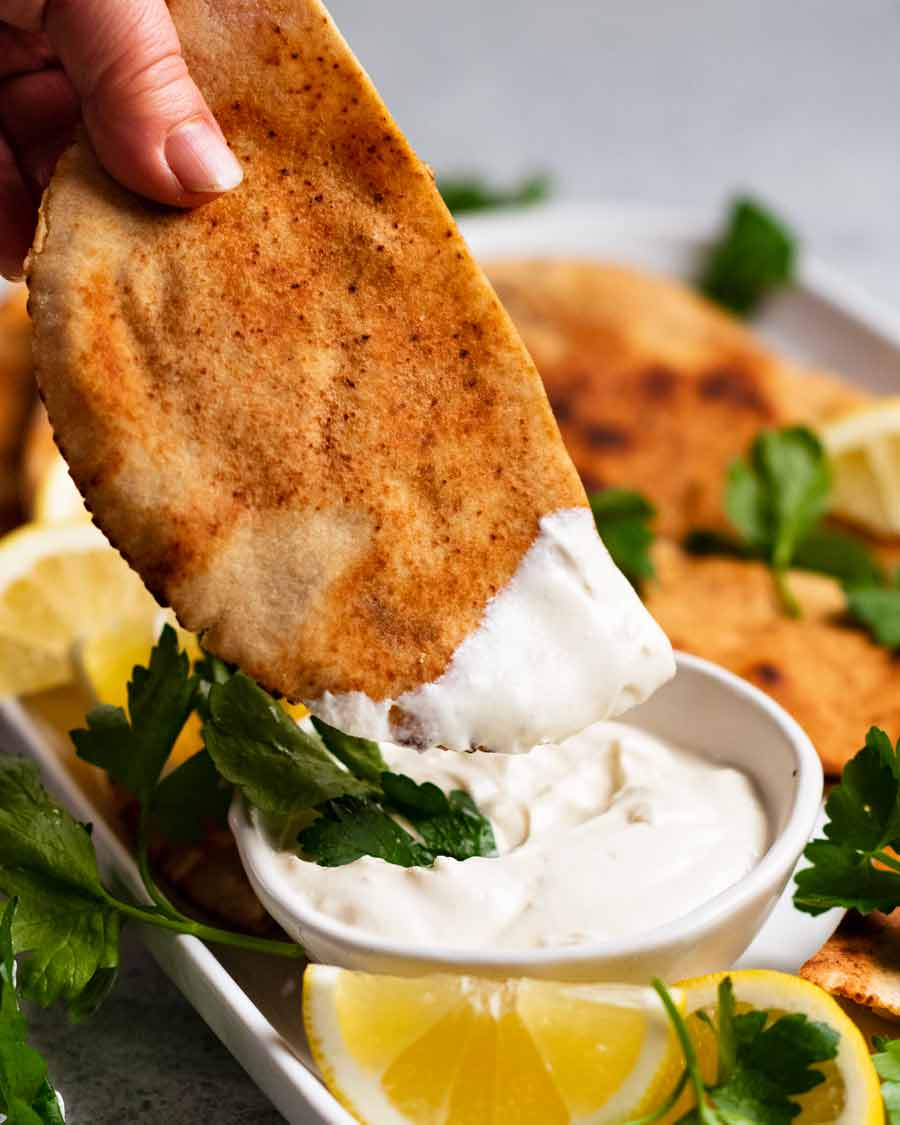
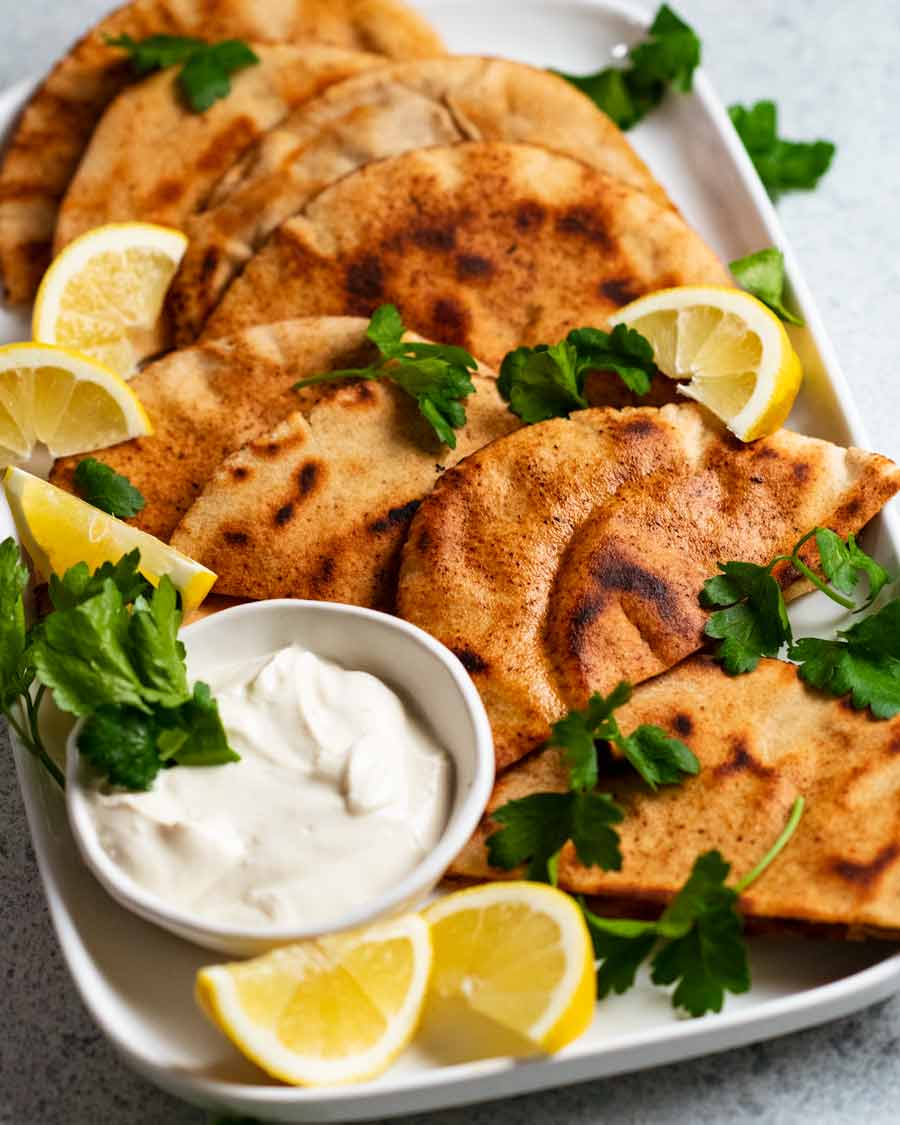
Serving – Pile Arayes onto a platter and serve with Tahini dipping sauce. Serve them whole, as they are. Or cut them into smaller pieces – it’s up to you!
Whipped Tahini Yogurt Dipping Sauce
I think you’ll really like the Whipped Tahini Yogurt dipping sauce too. It’s got a unique texture almost like soft whipped cream. Made with just tahini, yogurt, lemon and garlic, the trick is to warm the mixture in the microwave slightly before whisking. Then as you whisk it, it becomes almost a bit aerated like whipped cream! Neat little trick I picked up from a Fatteh recipe by Nigella Lawson.
If you’ve got any of the sauce leftover, use it as a dip or slather onto toast like you would with goats cheese, then pile on marinated mushrooms or roast vegetables for a delicious crostini. Enjoy! – Nagi x
Watch how to make it

Crispy Lebanese Meat Stuffed Pita – Arayes
The unique method here is that it's cooked with raw meat inside, so the tasty meat juices soaks into and flavours the pita bread as it cooks. It's outrageously delicious. I bet you become as obsessed with these as I have!Ingredients
- 5 pita bread , the thin pocket type, ~15cm/6" diameter (250g/8oz pack), cut in half (Note 1)
- Olive oil spray (or brush with olive oil)
Spiced meat filling:
- 1/2 brown onion
- 500g/ 1 lb lamb or beef mince (ground meat) (Note 2)
- 2 garlic cloves , finely grated
- 1 tbsp finely chopped parsley , optional
- 3 tsp ground coriander
- 3 tsp ground cumin
- 1 1/2 tsp smoked paprika (sub plain paprika)
- 3/4 tsp ground allspice (sub mixed spice)
- 1/2 tsp cayenne pepper (reduce/omit for less spicy – Note 4)
- 1 1/4 tsp cooking/kosher salt
Whipped tahini yogurt sauce:
- 1 cup plain yogurt
- 2 tbsp tahini (or Chinese sesame paste – Note 5)
- 1 tbsp lemon juice
- 1 garlic clove , finely grated
- 1/2 tsp cooking/kosher salt
Instructions
Spiced meat filling:
- Grate the onion in a bowl using a standard box grater. We want the juices and all! (Note 4)
- Meat filling – Add remaining meat filling ingredients. Mix well with your hands.
- Divide stuffing in 10 (about 55 to 60g per portion, 1/4 cup). Flatten into a semi-circle shape slightly smaller than the pita bread half.
- Stuff – Gently open a pita then place the meat inside. Close, then press to spread to the edge and make it fairly evenly flat. (Is your pita tearing? See Note 5 for tip!)
Cooking Arayes:
- Preheat oven to 50C/120F. Place a rack on a tray. (To keep cooked Arayes warm.)
- Cook – Heat a large frying pan over medium high heat. Spray both sides of the pita with olive oil then place 2 or 3 pieces in the pan (whatever you can fit). Cook for about 2 minutes on each side, pressing down lightly with a spatula, until golden and crispy. The meat is spread so thin it cooks really quickly! {Sandwich press – Note 7}
- Keep warm – Transfer cooked Arayes onto the rack and put in the oven to keep warm. Cook remaining pita.
- Serve – Cut in half if desired (sometimes I do, sometimes I don't!). Pile Arayes onto a serving platter. Serve with Whipped Tahini sauce. Enjoy!
Whipped tahini sauce:
- Place ingredients in a heatproof bowl and whisk to combine. Microwave for 15 seconds on high. Whisk again – it should resemble soft whipped cream. Use slightly warm or at room temperature.
Notes
- Large Lebanese bread ~30cm/12″ wide also works! You need 2 to 3, spread the meat inside using a butter knife, pan fry until crisp then cut into pieces.
- Tortillas or other flatbreads – Smear meat on half, fold over like a quesadilla and cook!
Nutrition for one piece (ie half a pita).Nutrition
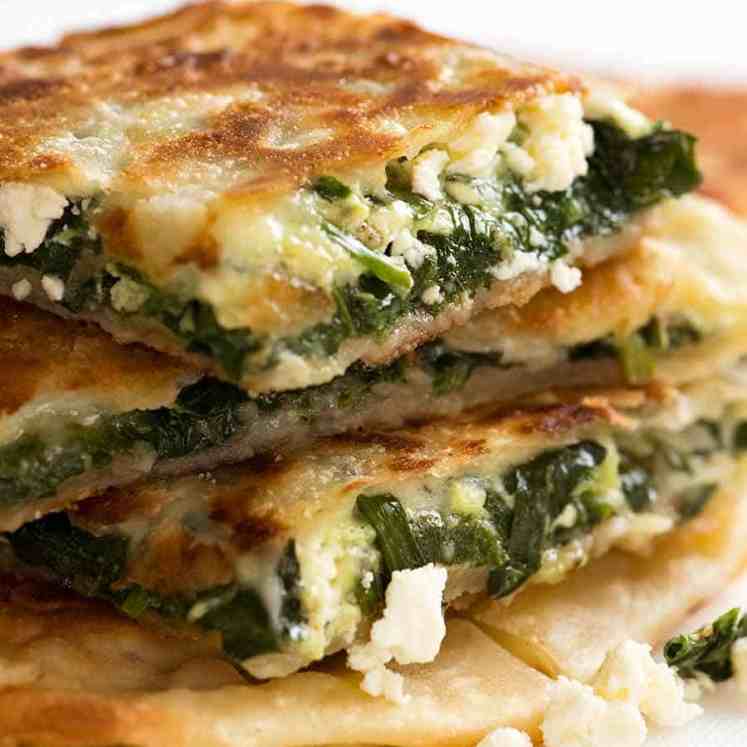
Similar crispy breads with tasty things inside


Life of Dozer
This dog really will eat anything. (Well, except kale! 😂)
The post Arayes – Lebanese Meat-Stuffed Crispy Pita appeared first on RecipeTin Eats.
]]> A grilled cheese sandwich is not diet food. So when I have one, it has to be great! Crispy, salty, buttery exterior and oozy, molten cheese inside. Are you ready to meet the ultimate cheese toastie?? My two golden rules for a great Grilled Cheese I realise it might seem strange to share a recipe... Get the Recipe
The post My Best Grilled Cheese Sandwich appeared first on RecipeTin Eats.
]]>A grilled cheese sandwich is not diet food. So when I have one, it has to be great! Crispy, salty, buttery exterior and oozy, molten cheese inside. Are you ready to meet the ultimate cheese toastie??
My two golden rules for a great Grilled Cheese
I realise it might seem strange to share a recipe for what is fundamentally just melted cheese between bread. And really, is there even such a thing as a bad grilled cheese? Perhaps not.
But there is such a thing as a GREAT grilled cheese sandwich!
So here are my two golden rules for my very best grilled cheese:
Use TWO types of cheese – mozzarella for stretch and another for flavour (gruyere and vintage cheddar are my favourites)
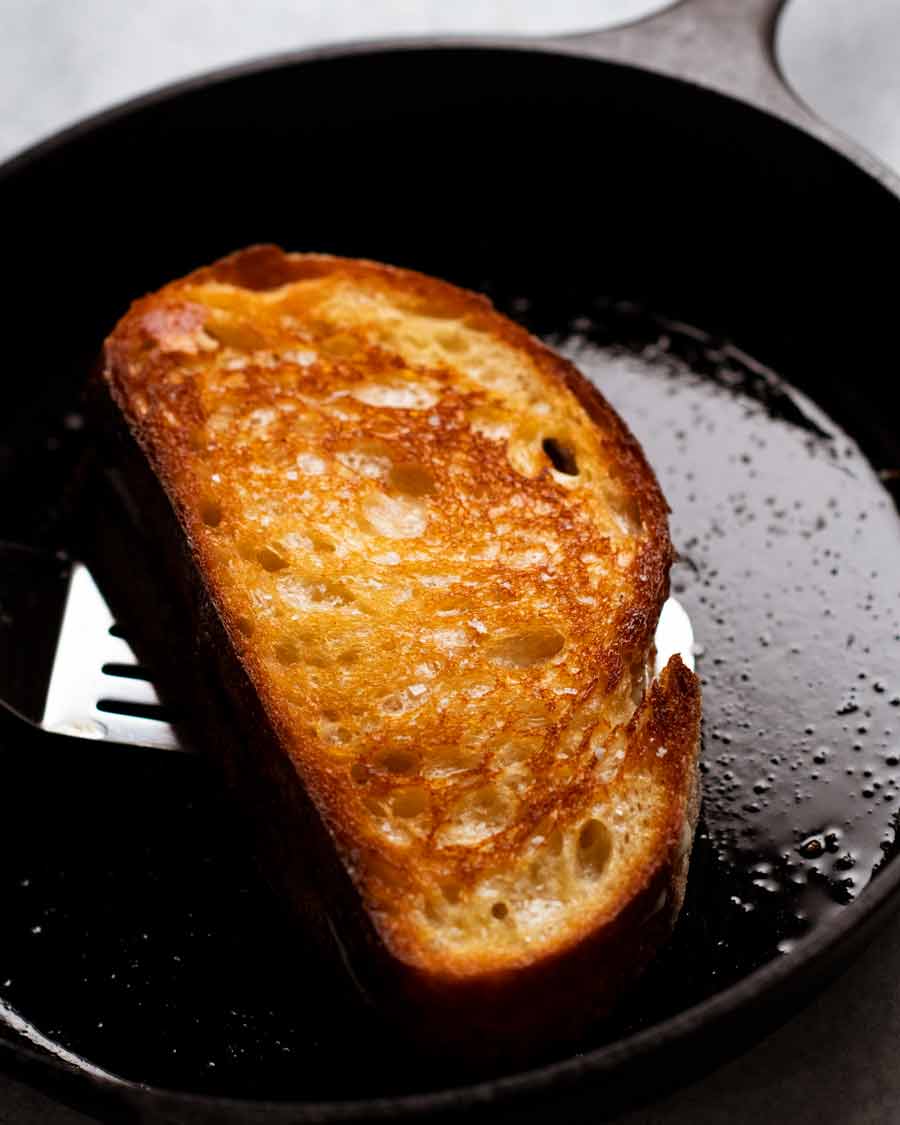
Give your sandwich press a miss. Use a pan on your stove! Just look at the superior golden buttery crust you get to bite into! ↓↓↓
Then to take it from excellent to new heights of greatness….
Use sourdough bread instead of ordinary sandwich bread;
Use freshly grated cheese instead of sliced or pre-shredded;
Butter both sides of each slice of bread; and
Be sure to use salted butter!
Grilled cheese vs cheese toastie – Fundamentally they are both toasted bread with melted cheese sandwiched between them. But toasties are made using a sandwich press or toastie maker, while grilled cheese is made on the stove in a skillet, griddle or pan.
Which is better? While it comes down to personal taste and convenience / speed, for me the grilled cheese wins hands down. The bread gets too squished in toasties and sandwich makers – even the ones that have a “thick set” option. The weight of the lid presses down on the bread too much. This also causes cheese to ooze out, limiting the amount you can put in the sandwich to not-enough. Travesty!!

And a quick note on other cooking methods…..
Broiler/grill – This method works fine and is a good alternative for batch cheese toastie making but you can’t achieve that same awesome melding of buttery-bread-molten-cheese like you do in a pan. Nor will you get the same golden buttery crust! However, useful method to use for batch cheese-toastie making (my method: toast bread, place on rack, butter, cheese, grill, eat open face or sandwich together)
Jaffle maker –The sealed edges and squished bread are the cons here. Though, still perfectly acceptable to scratch your cheese-toasties itch!
Microwave – No, you haven’t, have you??? *YES I HAVE!* 🙈
What you need for a grilled cheese sandwich
Here’s what you need to make my idea of the perfect grilled cheese. However, rest assured there’s flexibility and options! It’s more about technique.
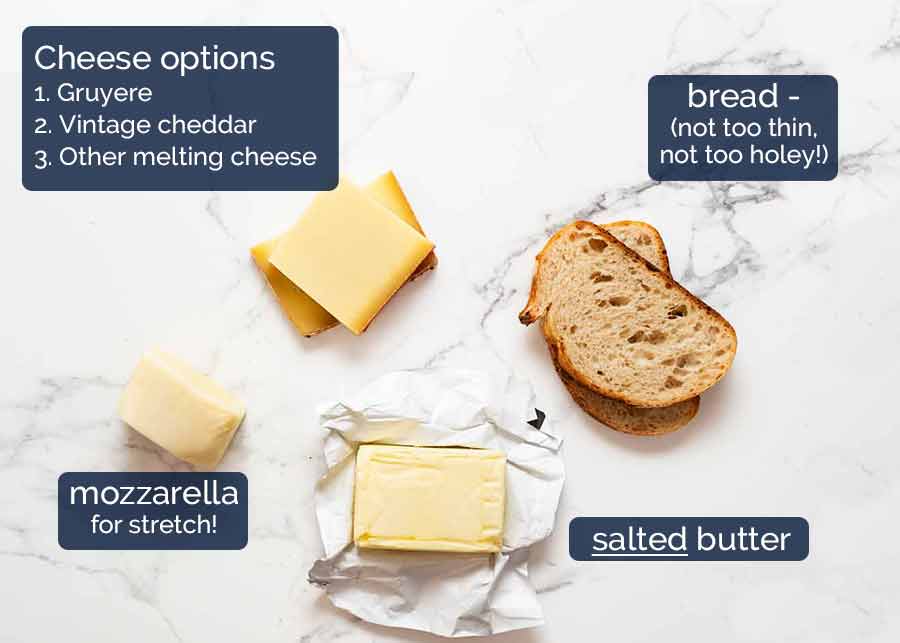
Bread – This recipe will work fine with any sliced bread (sandwich, loaf etc) though you want to ensure the slices are not too thick (cheese might not melt), too thin or too soft (will get squished by the cheese) or too holey (cheese-escape-routes).
My favourite is a nice sourdough but not those super fancy ones that come with a crazy thick, tough teeth-breaking crust. Just a normal, good sourdough is all you need!
Cheese options – For the best grilled cheese, you want to use a combination of mozzarella (for its cheese pull and non-greasy melting qualities) with a flavoured cheese – because mozzarella actually has a very mild flavour. A good vintage cheddar or gruyere are my absolute favourites.
Otherwise, I’ll use anything and everything – tasty, Monterey Jack, colby, swiss, cheddar. Just give me my grilled cheese!!!
Grate your own cheese for the ultimate grilled cheese! The melt is superior – smoother, more even, and “softer”. Store bought pre-grated cheese is coated with anti-caking agents that prevents it from melting well, so it can end up kind of gloopy and rubbery. Cheese slices are better than using packet shredded cheese.
Salted butter – Just your everyday butter that you use to spread on bread and crackers. Else, use unsalted and add a light sprinkle of salt. Trust me – you really want the salt!
How to make the best grilled cheese sandwich (in my world)
I added “(my world)” to the end because I realise that some people might not agree or have different tastes etc. and that’s totally ok! I’m just here today to share what I think is the very best grilled cheese in the world. (I mean, MY world 😂)
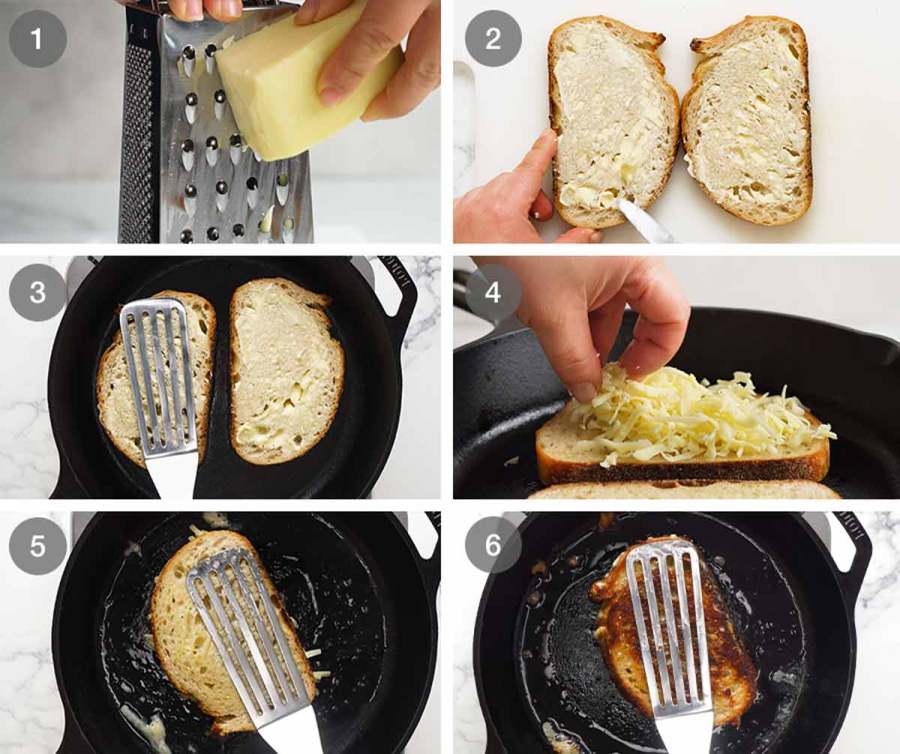
Grate cheese – If not using store bought pre-sliced cheese, grate the cheese using a standard box grater. As noted above, store bought pre-shredded cheese is coated with anti-caking agents which prevents it from melting properly.
Butter both sides of each bread. Yes that’s right, all four sides. Trust me on this!
Head start fry – Place the bread in a pre-heated heavy based skillet or non-stick fry pan over medium low heat. Let it lightly toast just for 1 minute. This will give this side of the bread a little extra toasty flavour as well as giving the cheese melting a head start – because we are going to flip the bread before piling the cheese on.
Flip bread & cheese it! Turn one slice of bread then pile the cheese on top (any order). Place the other piece of bread on top with the hot toasted side in contact with the cheese.
3 minutes – Press down lightly and cook for 3 minutes until the underside is a deep, even golden brown colour. If it is browning too quickly, remove the pan from the stove, let it cool slightly and lower the heat.
Turn, 3 minutes – Carefully turn the sandwich. Cook the other side for another 3 minutes until golden and crisp, and (most importantly!) the cheese is melted. Take a quick peek if you are unsure.

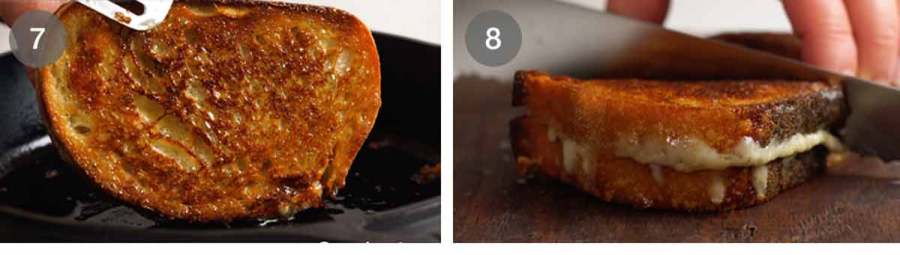
Golden brown – This is what your bread should look like from edge to edge! A deep golden brown, even coloured, crisp. You know this is going to be good!
Cut – Transfer to a cutting board and cut in half, decisively and with intention. And then….wait for it…. THE CHEESE PULL!
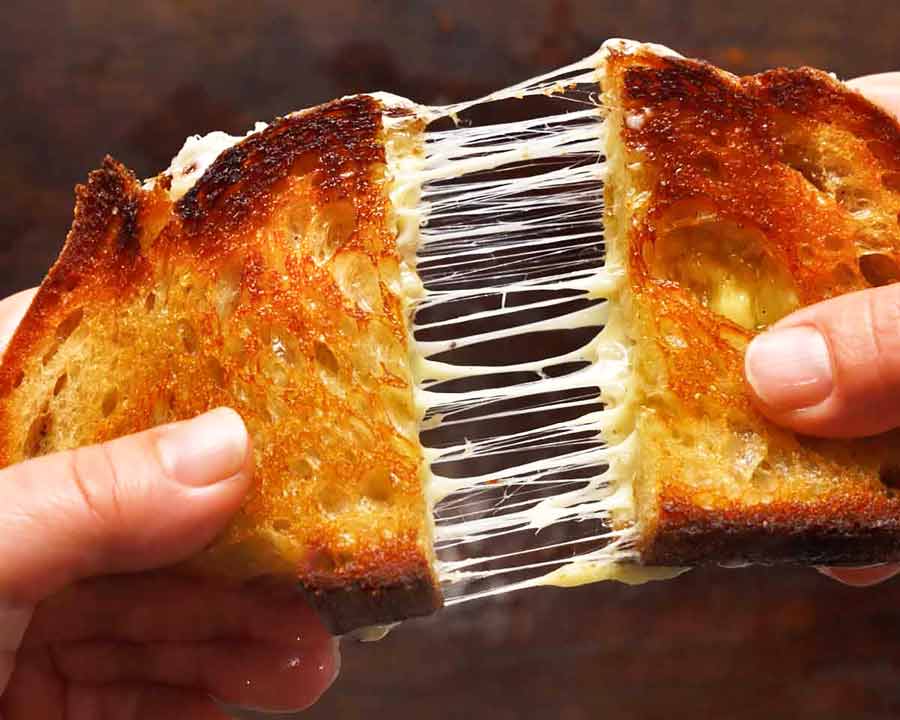

Yup, that piece has my name all over it. JUST LOOK AT IT.
That golden, salty, buttery crust.
The molten cheese, the perfect combination of the beautiful melting qualities of mozzarella mixed with the flavour of gruyere or cheddar….
The first bite is EVERYTHING!
I really hope you give this recipe a go, even if you only make it once, just so you can experience the greatness of a really, really good grilled cheese sandwich!! – Nagi x
PS Reading back over this post, I find my extreme enthusiasm for butter-cheese-bread somewhat worrying. I hope that one day, my salad recipes read with the same level of energy.
Watch how to make it

My best Grilled Cheese Sandwich
Ingredients
- 2 slices sourdough bread , sliced 1.3–1.5cm thick (0.5 – 0.6″) – Note 1
- 30g/ 2 tbsp SALTED butter , for spreading on bread (or unsalted + pinch of salt)
- 1/3 cup (heaped) vintage cheddar cheese or gruyere, freshly grated (or other melting cheese of choice) – Note 2
- 30g/ 1/3 cup mozzarella, freshly grated – Note 2
Instructions
- Butter bread – Slather both sides of each piece of bread with the butter (yes, all 4 sides!).
- Light toast – Heat a heavy-based skillet or frying pan over medium low heat (no oil or butter). Place both pieces of bread in the skillet and lightly toast for 1 minute to warm it through and create a light crust. (When we flip, this gives the cheese a head start).
- Pile on cheese – Flip one slice of bread, then pile on the cheddar cheese followed by the mozzarella. Place the other slice of bread on top, with the hot toasted side in contact with the cheese.
- Cook 3 minutes – Cook for 3 minutes or until the bread is evenly golden and crisp, pressing down lightly with a spatula every now and then. If it's browning too quickly, remove remove from the stove to cool down a bit and lower heat.
- Flip, 3 minutes – Turn the sandwich over, and cook the other side for 3 minutes or until the bread is golden and the cheese is melted.
- Devour – Transfer to cutting board. Cut in half in one swift motion. Admire cheese pull. Devour.
Notes
1. Bread – This recipe will work fine with any bread though you want to ensure it’s not too thick (cheese might not melt), too thin or too soft (will get squished by the cheese), too holey (cheese-escape-routes). My favourite is a nice sourdough but not those super fancy ones that come with a crazy thick, tough teeth-breaking crust. Just a normal, good sourdough is all you need!
2. Cheese options – For the best grilled cheese, you want to use a combination of mozzarella (for its cheese pull and non-greasy melting qualities) with a flavoured cheese – because mozzarella actually has a very mild flavour. A good vintage cheddar or gruyere are my absolute favourites.
Otherwise, I’ll use anything and everything – tasty, Monterey Jack, colby, swiss, cheddar. Just give me my grilled cheese!!!
Cheese slices work fine but honestly, you get a better melt using shredded. I promise. (I’ve had a lot of experience with both!). Please grate your own – packet shredded has anti caking agents, never melts as well.Nutrition
Life of Dozer
Post trip re-uniting treat, for both of us! He’s not usually allowed up on the couch without a full-towel-coverage situation. The fur…SO MUCH FUR. I’ll be vacuuming that couch tomorrow!

The post My Best Grilled Cheese Sandwich appeared first on RecipeTin Eats.
]]> Japchae – the bright, colourful Korean noodle dish made with an abundance of vegetables, juicy bits of marinated beef and a sesame-forward dressing. Made with sweet potato noodles which have a unique slippery, chewy texture, this is sort of a stir fry, sort of a noodle salad, and 100% YUM! Japchae Japchae is a famous... Get the Recipe
The post Japchae – Korean noodles appeared first on RecipeTin Eats.
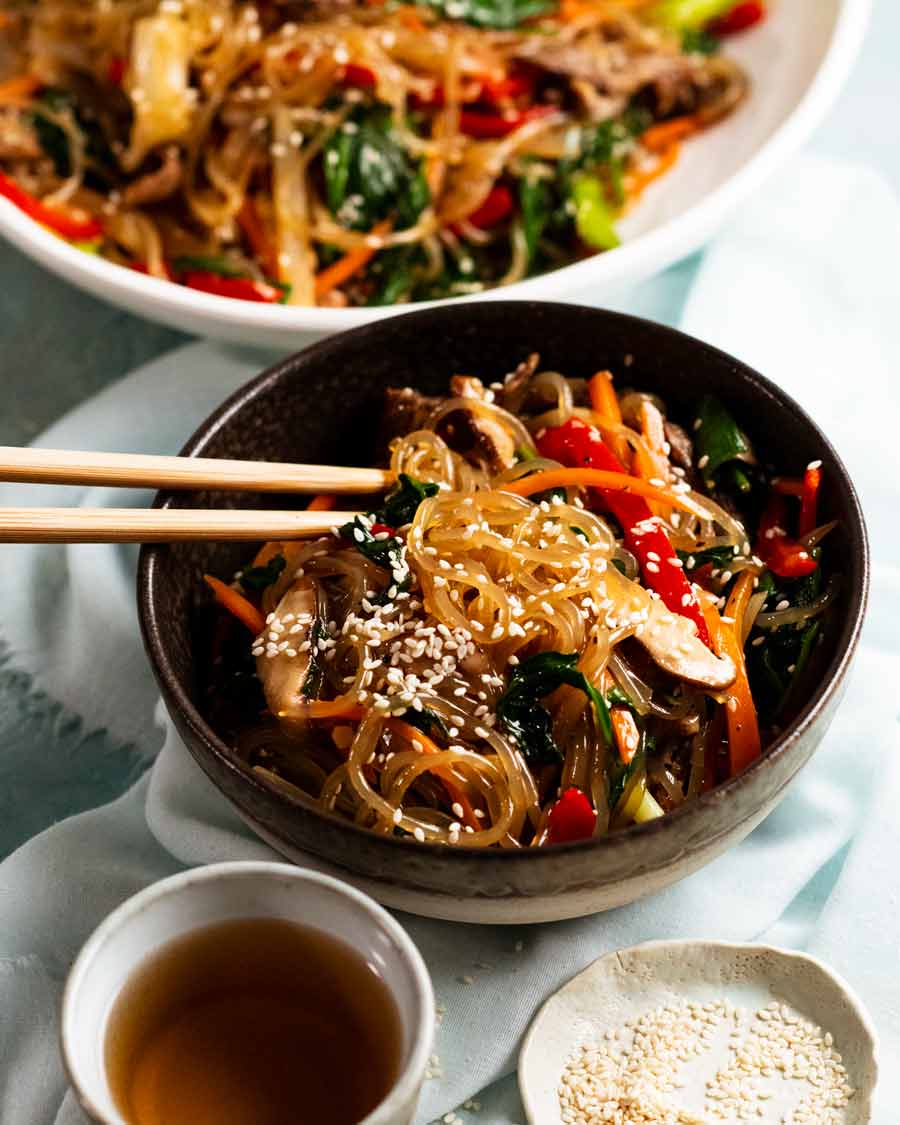
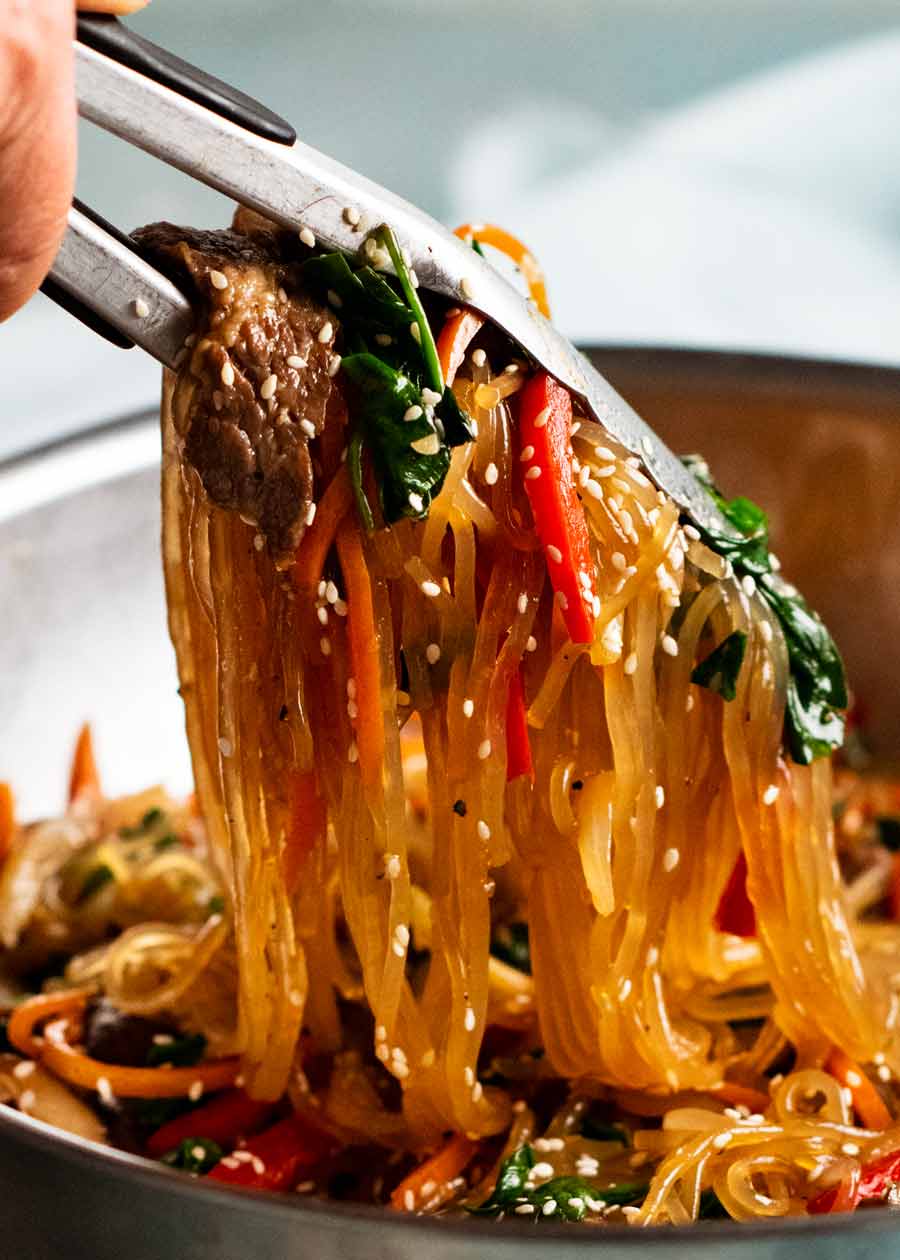
]]>Japchae – the bright, colourful Korean noodle dish made with an abundance of vegetables, juicy bits of marinated beef and a sesame-forward dressing. Made with sweet potato noodles which have a unique slippery, chewy texture, this is sort of a stir fry, sort of a noodle salad, and 100% YUM!
Japchae
Japchae is a famous Korean noodle dish that I describe as sort of a stir fry, sort of a salad. It’s a cross between the two in my mind because stir fried vegetables are tossed with noodles and sauce in a bowl rather than on the stove, and served barely warm.
You start by mixing the sauce in a giant bowl, then pile all the ingredients in one after the other – the noodles, a giant mound of cooked vegetables then lastly the seared marinated beef. Then finally, you give it a big toss to mix it all together in the bowl. This part is really satisfying, getting really stuck into it! (Just make sure you use a really big bowl else you’ll be cursing!).
Ingredients in Japchae
Here’s what you need to make Japchae. I’ve broken it up into:
Noodles and sauce
Beef and marinade
All the colourful veg!
The noodles & sauce
Here’s what you need for the noodles and sauce:

Some notes on some of the pictured ingredients:
Japchae noodles – The noodles used in Japchae are dried sweet potato noodles called dangmyeon. They are made from sweet potato starch and are almost transparent when cooked. It’s like the Korean version of glass noodles! The packets shown above are sold at large grocery stores in the Asian aisle, though you can get them cheaper at Asian stores.
Substitute with glass noodles (ie the clear vermicelli noodles). And though Korean nationals may have my head for saying this, just quietly, you can totally make this recipe with any noodles. It will still be delicious!
Soy sauce – Either light or all purpose soy sauce. But not dark soy sauce – flavour is too strong and the colour is too intense! More on which soy sauce to use when here.
Sesame oil – toasted sesame oil is brown and has more flavour than untoasted (which is yellow). The default sesame oil sold in Australia is toasted, untoasted is harder to find.
Beef and marinade
We’re using beef short ribs in today’s recipe. Yes, it’s an unusual option for a stir fry – but I think you’ll be really impressed. It surprised me!
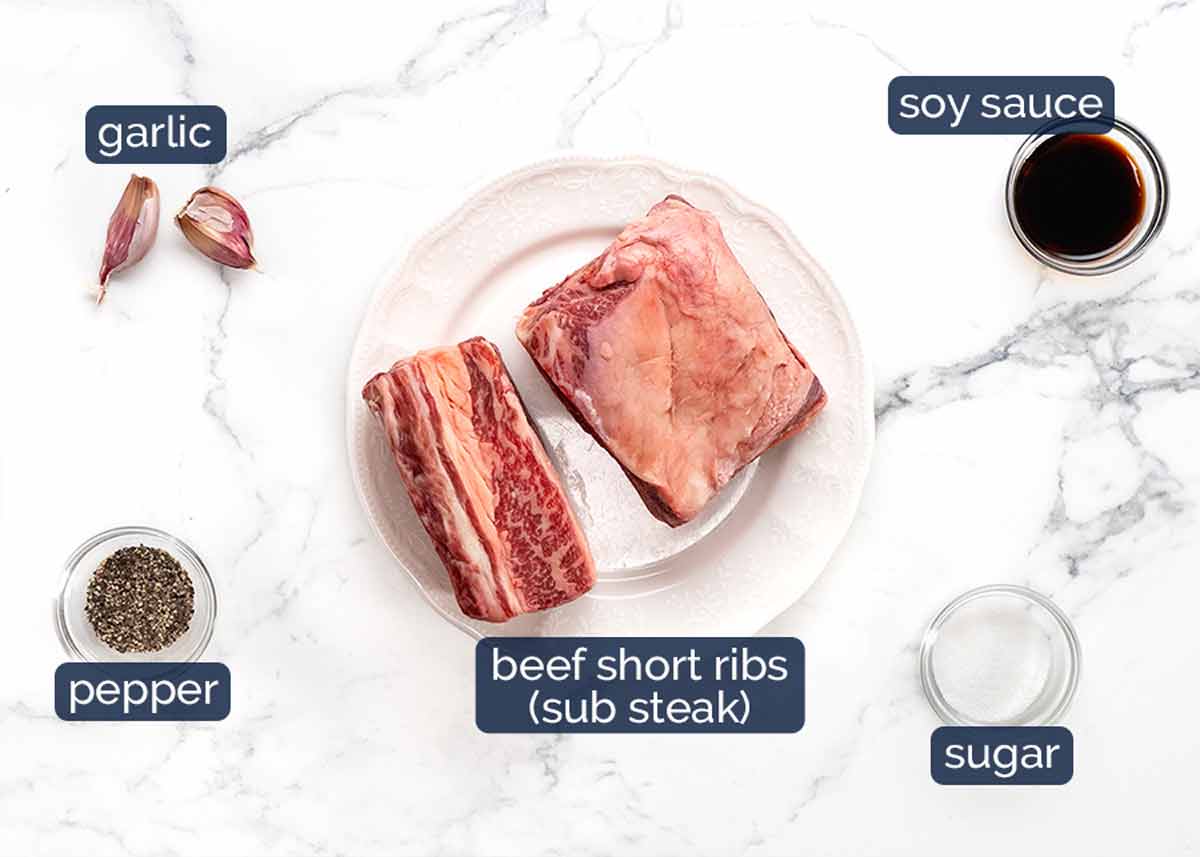
Beef (choices!) – Beef short rib is my favourite cut to use in Japchae. Contrary to popular belief, it’s not just for slow cooking! When cut off the bone then thinly sliced, the beautifully marbled meat is juicy, tender and flavourful when cooked quickly on high heat – just 90 seconds. (If using beef short ribs whole, however, they must be slow cooked to break down the tough fibres. Try this, this, this or this recipe).
It really is so much nicer to have the beef bits extra tender and juicy in a noodle dish that is not as saucy as your everyday Chinese Beef Stir Fry. So I really hope you give beef ribs a go! I honestly think it’s better than even pricier steaks like scotch / rib-eye.
Other options – Scotch fillet/boneless rib eye is best, as it is the juiciest. If using other steak cuts like rump, porterhouse/t-bone, sirloin/strip etc (especially if economical), I recommend tenderising them before using in the recipe so the beef pieces are extra tender (directions in recipe card). Thin strips of beef are difficult to keep juicy as they overcook in a microsecond. As mentioned above, you can get away with that in saucy Beef Stir Fries. Not so much in noodle dishes.
Soy sauce – As above!
Vegetables
The vegetables shown below is a fairly common combination for Japchae, with a lovely contrast of colour, textures and flavour. But you can really use any stir-fry-able vegetables you want.
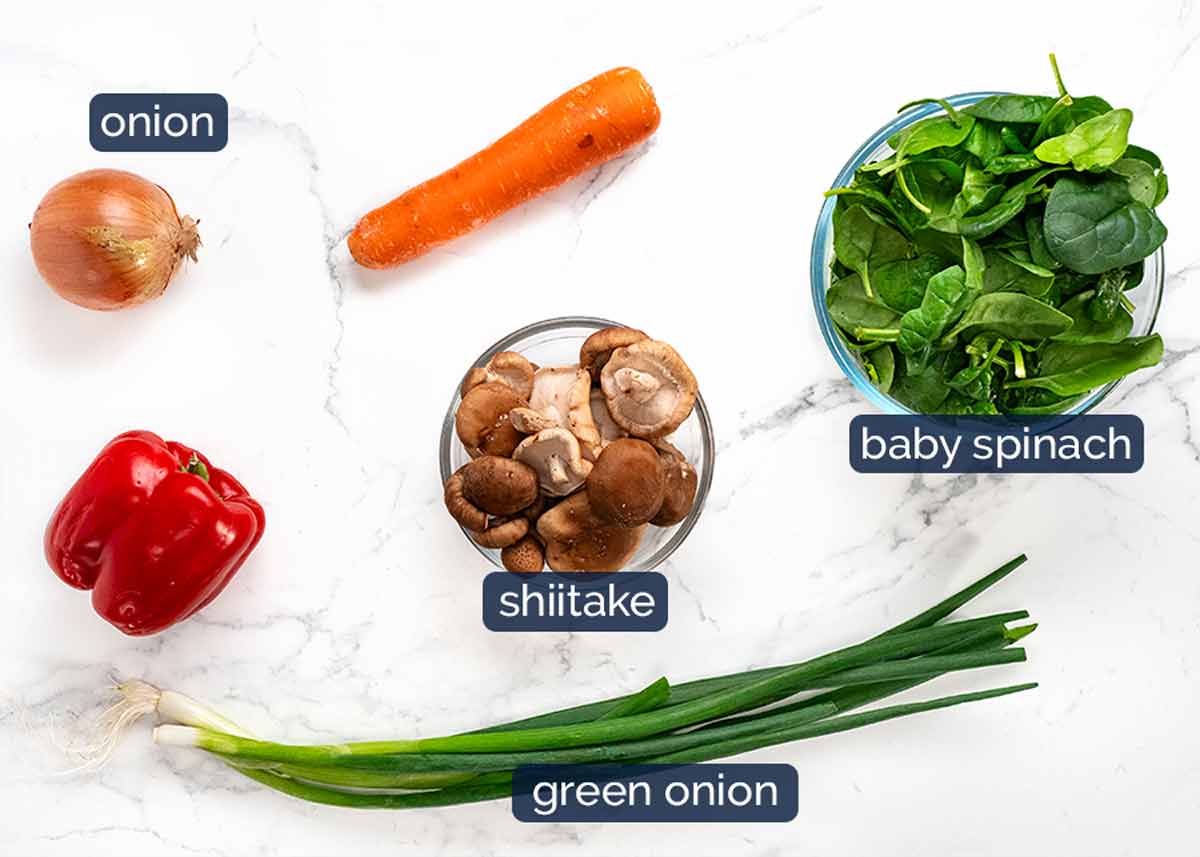
Just a note on a few of the vegetables:
Shiitake mushrooms – These are Asian mushrooms with a more intense mushroomy flavour than standard white mushrooms, brown/cremini mushrooms etc. However, if you can’t find them or they are a bit pricey, feel free to use ordinary mushrooms. They are, as you’d expect, better value in Asian stores.
Baby spinach – Substitute with chopped English spinach, the leafy part of Asian greens or even kale. *She ducks as Koreans start throwing rotten tomatoes at her*
How to make Japchae (semi-traditional way)
Traditional Japchae recipes call for each vegetable to be cooked individually to factor in the different cook times and preserve the flavour of each. Yes, it’s cumbersome (you count 6 vegetables above!).
But if you jumble them all up into one giant stir fry then the flavours do tend to bleed into each other a bit. So I’ve compromised and cooked the vegetables in 2 lots, bundling vegetables together by factoring in cook times and flavour “bleeding” to best replicate the same result where vegetables are cooked individually. Bonus: We use less oil.
I hope my slight short-cut method doesn’t offend Korean nationals! 😇
Cutting beef short ribs
As noted above, I really think the best beef for Japchae is beef short ribs – juiciest, best flavour. It’s typically sold on the bone (off the bone is not common here in Australia), so here is how to slice the meat.
If you are using a boneless steak instead, or boneless beef short ribs, then you obviously don’t need to cut the meat off the bone!
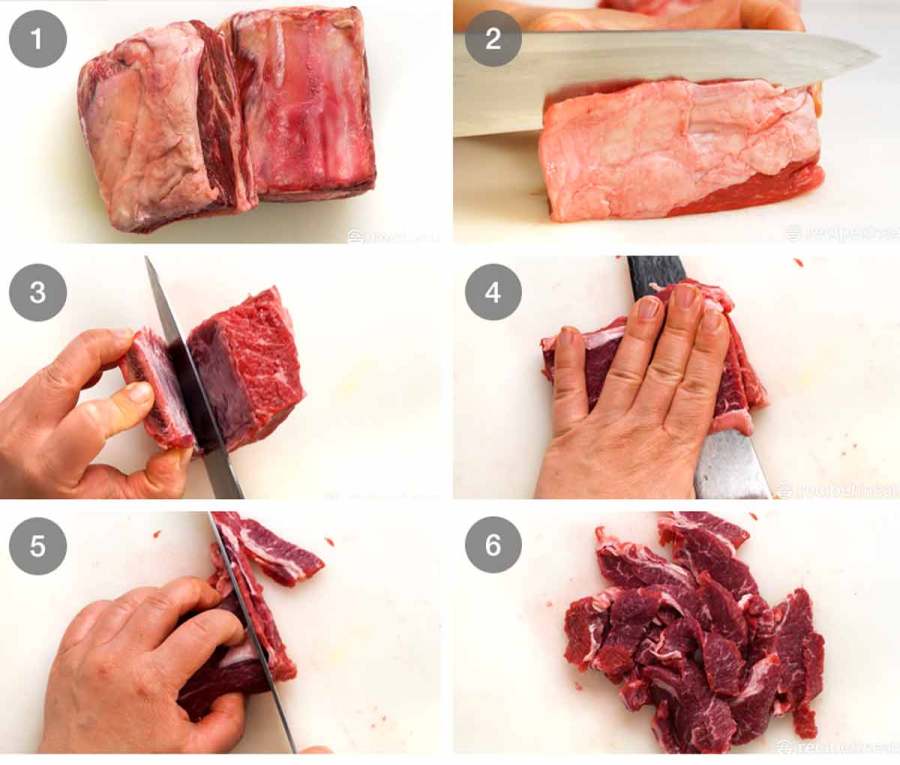
Beef ribs – Not gonna lie. My step photo templates use even number of photos and I only had 5. So I stuck this in as a filler. “Beef short ribs. Ta da!”
Trim excess fat – Beef ribs tend to have quite a generous layer of fat on them. So slice off the thick layers on the surface. Not all of it though! The fat is what keeps it juicy!
Cut the meat off the bone simply by holding the beef rib upright then slicing the knife down against the bone. It’s easy – the bone is straight and flat.
Cut in half horizontally to form 2 thin steaks so we can cut thin beef strips.
Cut strips – Keep the halves stacked. Then cut into thin 0.5cm/ 1/5″ slices.
Voila! Tasty beef strips. You are going to love how juicy these are!
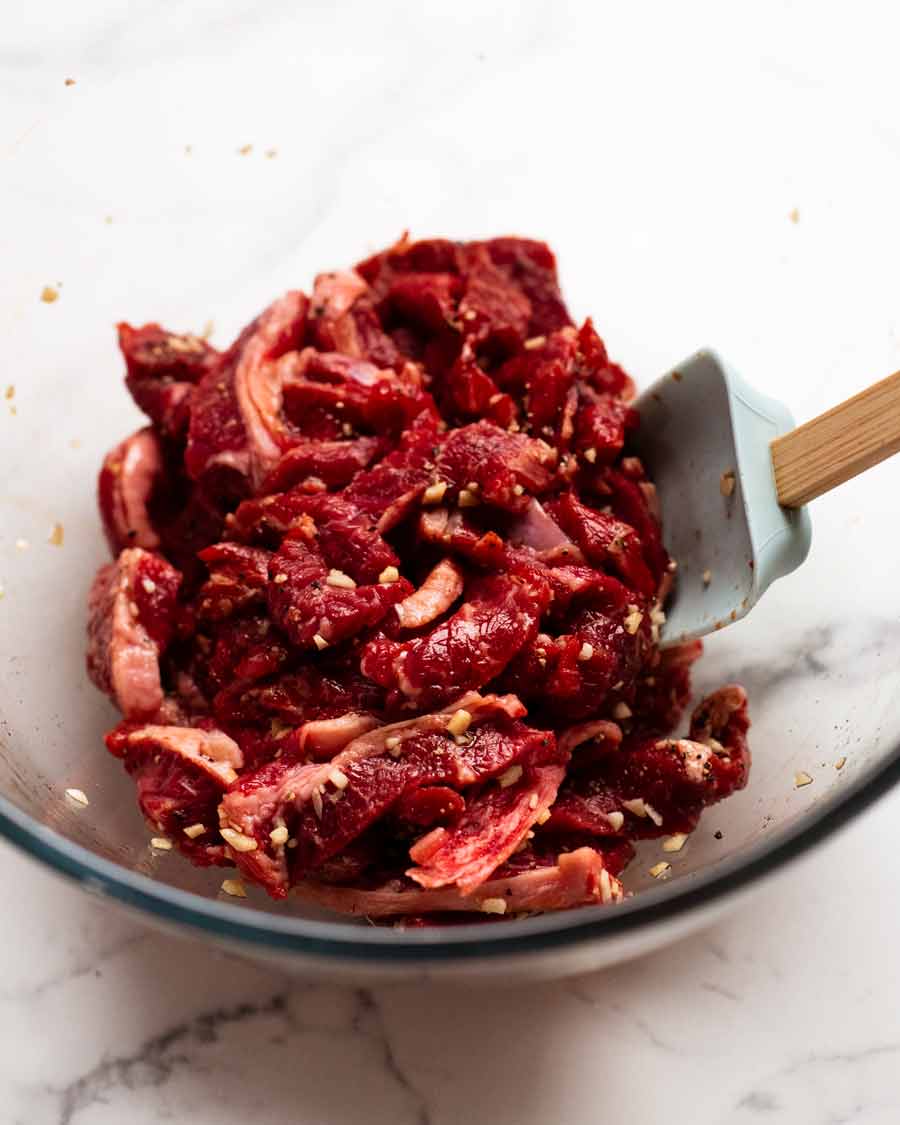
Cooking Japchae
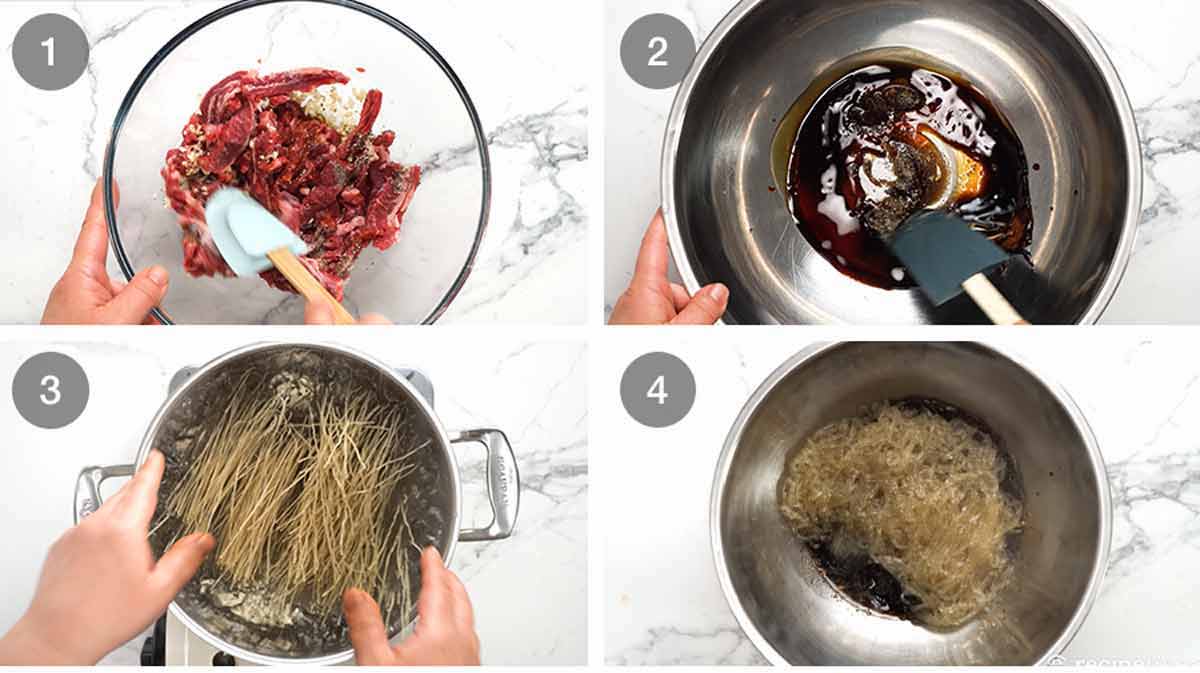
Marinate beef ~20 minutes – Place the beef with the marinade ingredients into a bowl and toss to combine. Then just set aside while you prepare and cook everything else, so it ends up marinating for around 20 minutes. It doesn’t need to be marinated for long because the beef strips are so thin, though it wouldn’t hurt to leave overnight.
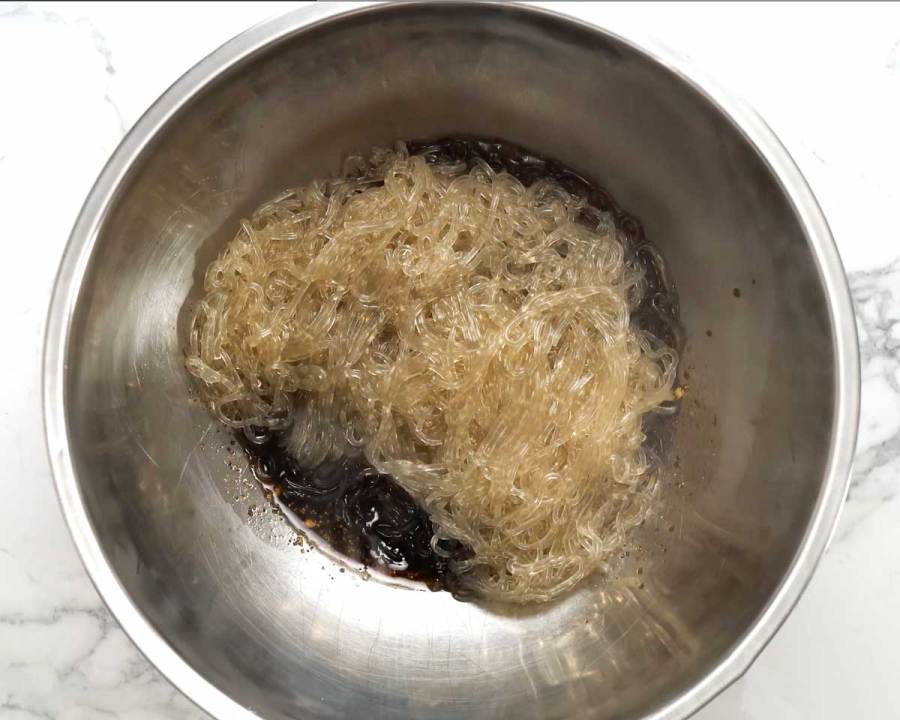
Mix the sauce ingredients in a very big bowl. We are going to be tossing the whole batch of Japchae in this bowl so I really mean it when I say make it a big one!
Cook the Japchae noodles per packet directions. Mine says 8 minutes in boiling water.
Noodles on sauce – Drain, rinse briefly under tap water, shake off excess water well then place in the bowl with the sauce. Do not mix – just leave it there.
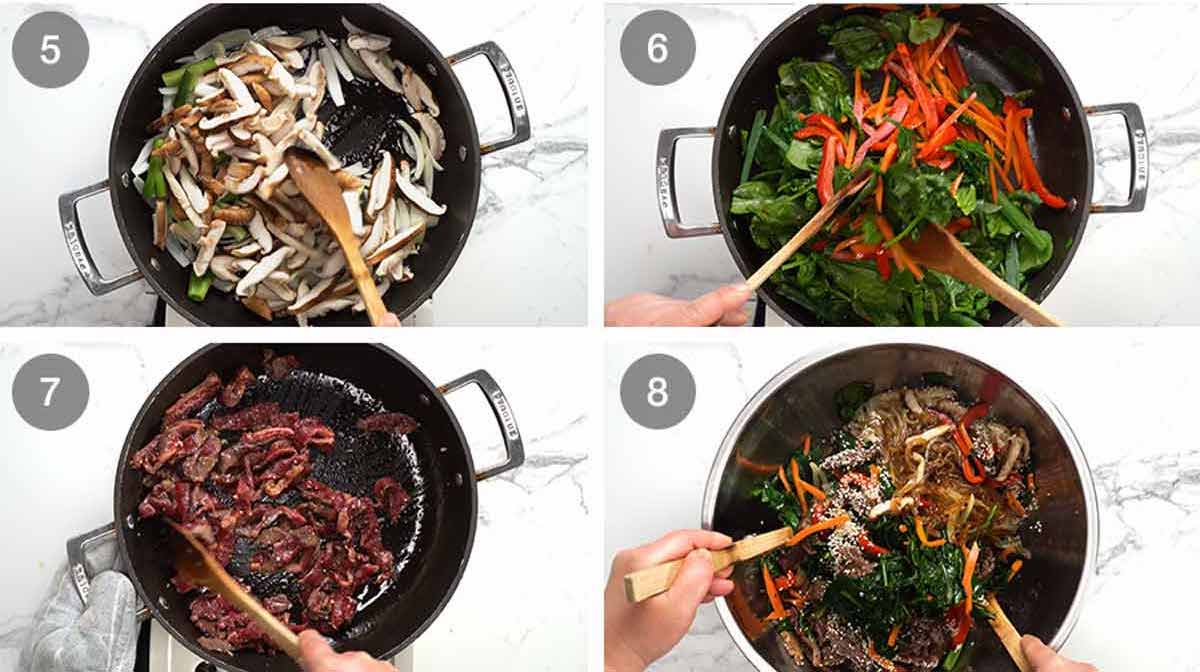
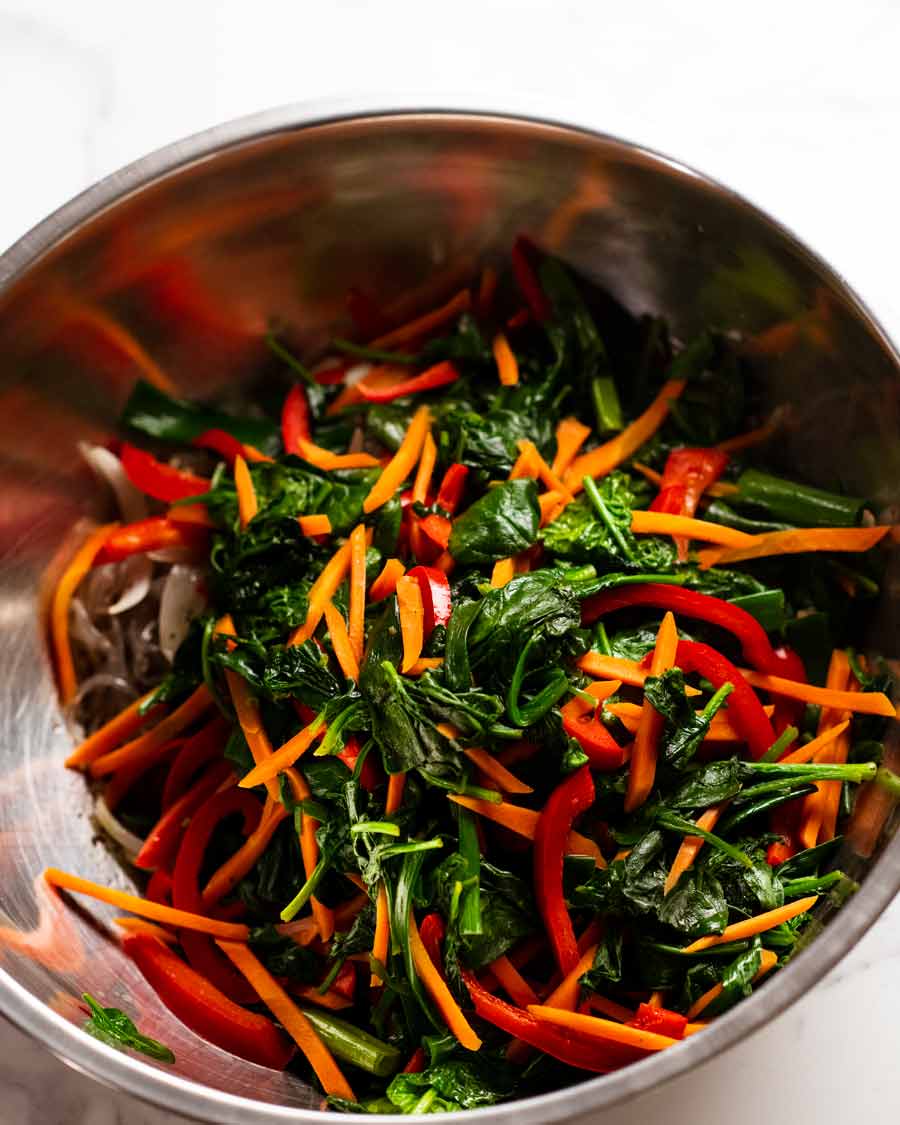
Vegetables Batch 1 – Cook the onion, mushrooms and white part of green onions first, until the mushrooms just start to soft. Then transfer into the noodle bowl.
Vegetables batch 2 – Next, cook the carrot and capsicum/bell pepper first, until they are just cooked but still have a soft bite to them. ie “tender crisp”. Soggy floppy overcooked vegetables is unacceptable! 😂 Then add the spinach and the green part of the green onions and toss for a minute just until the spinach is wilted. Then transfer into the noodle bowl.
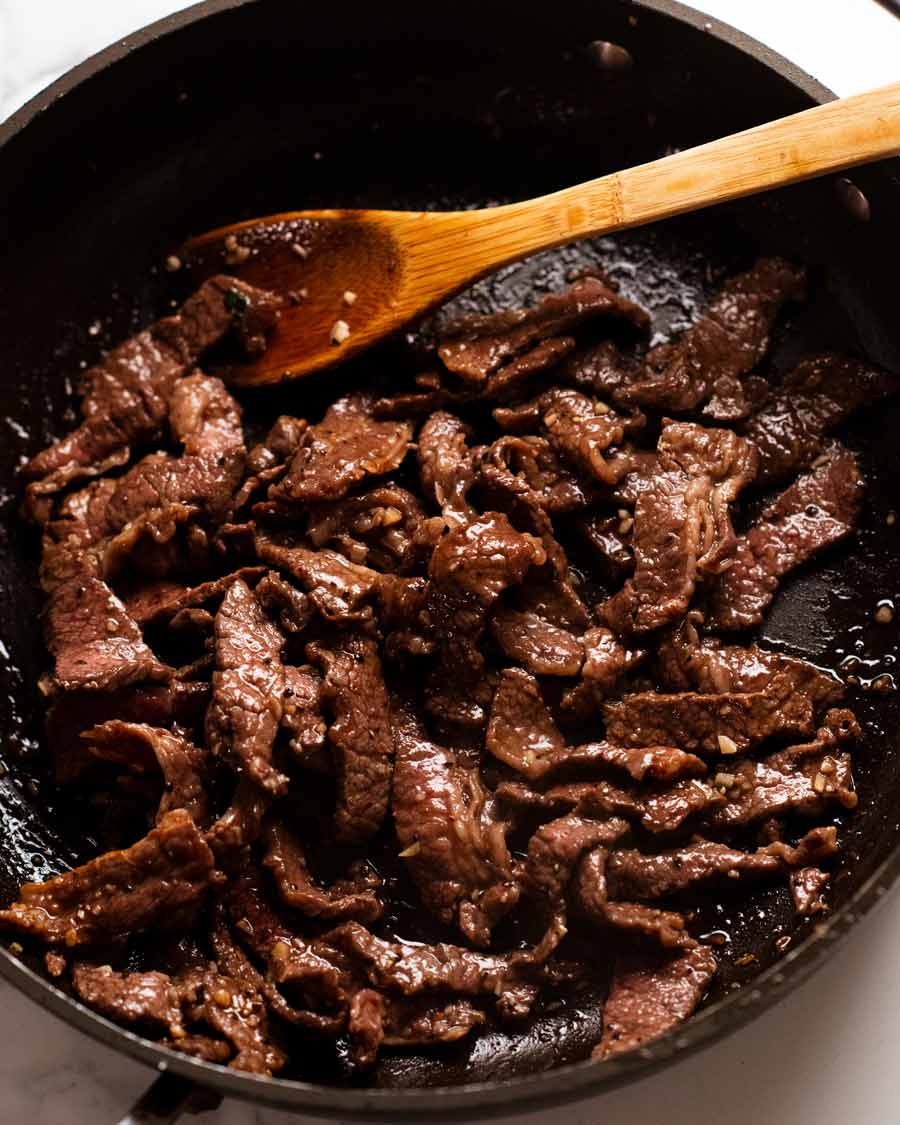
Cook beef – Lastly, cook the beef! Cook it on high heat just until you no longer see red – with a strong stove and good pan it should be barely 90 seconds. Hopefully in this time you’ll get a bit of browning in some patches too. Then add it into the bowl.
Toss! Add the sesame seeds, and now it’s time to toss! You used a giant bowl right, like I said to right at the start?? If you didn’t, you’ll start to cry (or swear) right about now.
Toss, toss, toss, until the sauce is evenly distributed. Check by looking at the colour of the noodles – the sauce stains the glassy noodles a brown colour.
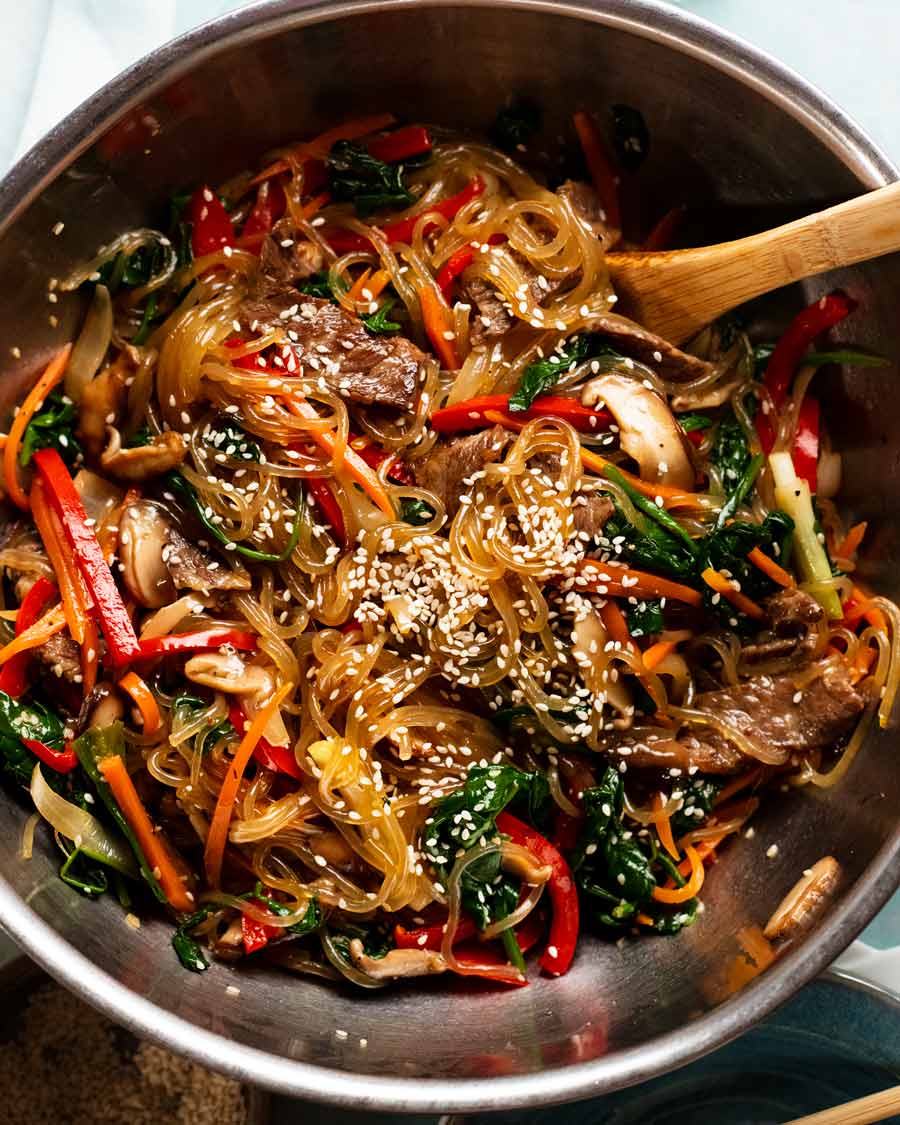
Then tumble it all into a bowl, finish with a sprinkle of sesame seeds and serve!
YUM. That sauce is everything! I really like that it’s not as sweet as the Japchae sauce you get at some Korean restaurants which I find a little too sweet.
This is a big batch recipe so it’s an excellent one for taking leftovers to work. It will keep for 3 days in the fridge. Just lightly warm it – or serve hot if you want. Though honestly, it’s also very good at room temperature too! – Nagi x
Watch how to make it
Japchae – Korean Noodles
Ingredients
Choose beef option (Note 1):
- 600g/1.2lb bone-in beef short ribs *RECOMMENDED* (300g/10oz boneless)
- 300g/10 oz boneless beef short ribs *RECOMMENDED*
- 300g/10oz scotch fillet / boneless rib eye or other steak, recommend tenderising (Note 1)
Beef marinade:
- 2 tsp soy sauce , all-purpose or light soy (Note 2)
- 2 tsp white sugar
- 2 tsp finely minced garlic
- 1/2 tsp black pepper
Noodle dressing:
- 1/4 cup soy sauce , all-purpose or light soy (Note 2)
- 2 tsp white sugar
- 1/2 tsp finely minced garlic
- 1 1/2 tbsp sesame oil
- 1/2 tsp cooking/kosher salt
- 1/2 tsp black pepper
Noodles & vegetables:
- 250g/ 8oz sweet potato noodles (dangmyeon), dried (Note 3)
- 4 tbsp vegetable oil (or other plain oil)
- 1 tsp cooking/kosher salt , divided
- 1 onion , peeled, halved, sliced into 6mm/1/4″ wedges
- 3 green onion stems , cut into 5cm / 2″ lengths, white & green parts separated
- 200g/7oz fresh shiitake mushrooms , stem removed, cut into 5mm/1/5″ slices (Note 4)
- 2 carrots , peeled, cut into 3mm / 1/8" batons
- 1 red capsicum/bell pepper , cut into 0.5cm / 1/5″ slices
- 4 1/2 cups (tightly packed) baby spinach
- 2 tbsp white sesame seeds
Instructions
Quick beef marinade:
- Cut beef into strips that are ~ 5mm thick, 1cm wide and about 5cm long (1/5" x 2/5" x 2"). If using shortribs, trim excess fat, cut the meat off the bone. Then cut each piece in half lengthwise (to form 2 "steaks") then slice into 5mm thick. (See step photos in post or video at 0.11s, Note 6)
- Marinate – Put beef in a bowl. Add marinade ingredients, then mix. Set aside marinate while you proceed with recipe, ~15 – 20 minutes is all it needs. (Note 5)
Sauce and noodles:
- Sauce – Mix the Sauce ingredients in a very large mixing bowl.
- Noodles – Cook sweet potato noodles per packet directions (normally 8 min in boiling water). Drain, briefly rinse under tap water then shake off excess water well. Add noodles into the bowl with the dressing. DO NOT MIX.
Vegetables:
- Batch 1 – Heat 2 tablespoons of oil in a large non-stick pan (30cm/12") over high heat. Cook the brown onion, white part of green onion and shiitake mushrooms with 1/2 tsp salt for 2 1/2 to 3 minutes, stirring constantly, just until starting to soften but not going golden. Pour on top of the noodles – don't mix yet!
- Batch 2 – Using the same pan still on high heat, heat 1 tbsp oil then cook the carrot and capsicum for 1 1/2 minutes, constantly stirring. Add spinach, green onion and the final 1/2 tsp salt. Keep cooking for 1 1/2 minutes until the spinach is wilted. Transfer into the noodle bowl – still don't mix!
- Cook beef – In the same pan, heat the final 1 tbsp of oil still on high heat. Add beef and cook for 1 1/2 minutes until very lightly golden and just cooked through. Add to the noodle bowl. Don't mix!
- Mix! Add most of the sesame seeds (reserve some for topping). NOW you can mix! Toss, toss, toss.
- Serve – Transfer into a serving bowl, sprinkle with remaining sesame seeds. This is meant to be eaten warm, not piping hot. Eat!
Notes
Nutrition
Life of Dozer
I can feel him heavy breathing on my feet. 🙄 Also, don’t miss Dozer’s cameo in today’s recipe video – at 0:36!

The post Japchae – Korean noodles appeared first on RecipeTin Eats.
]]>