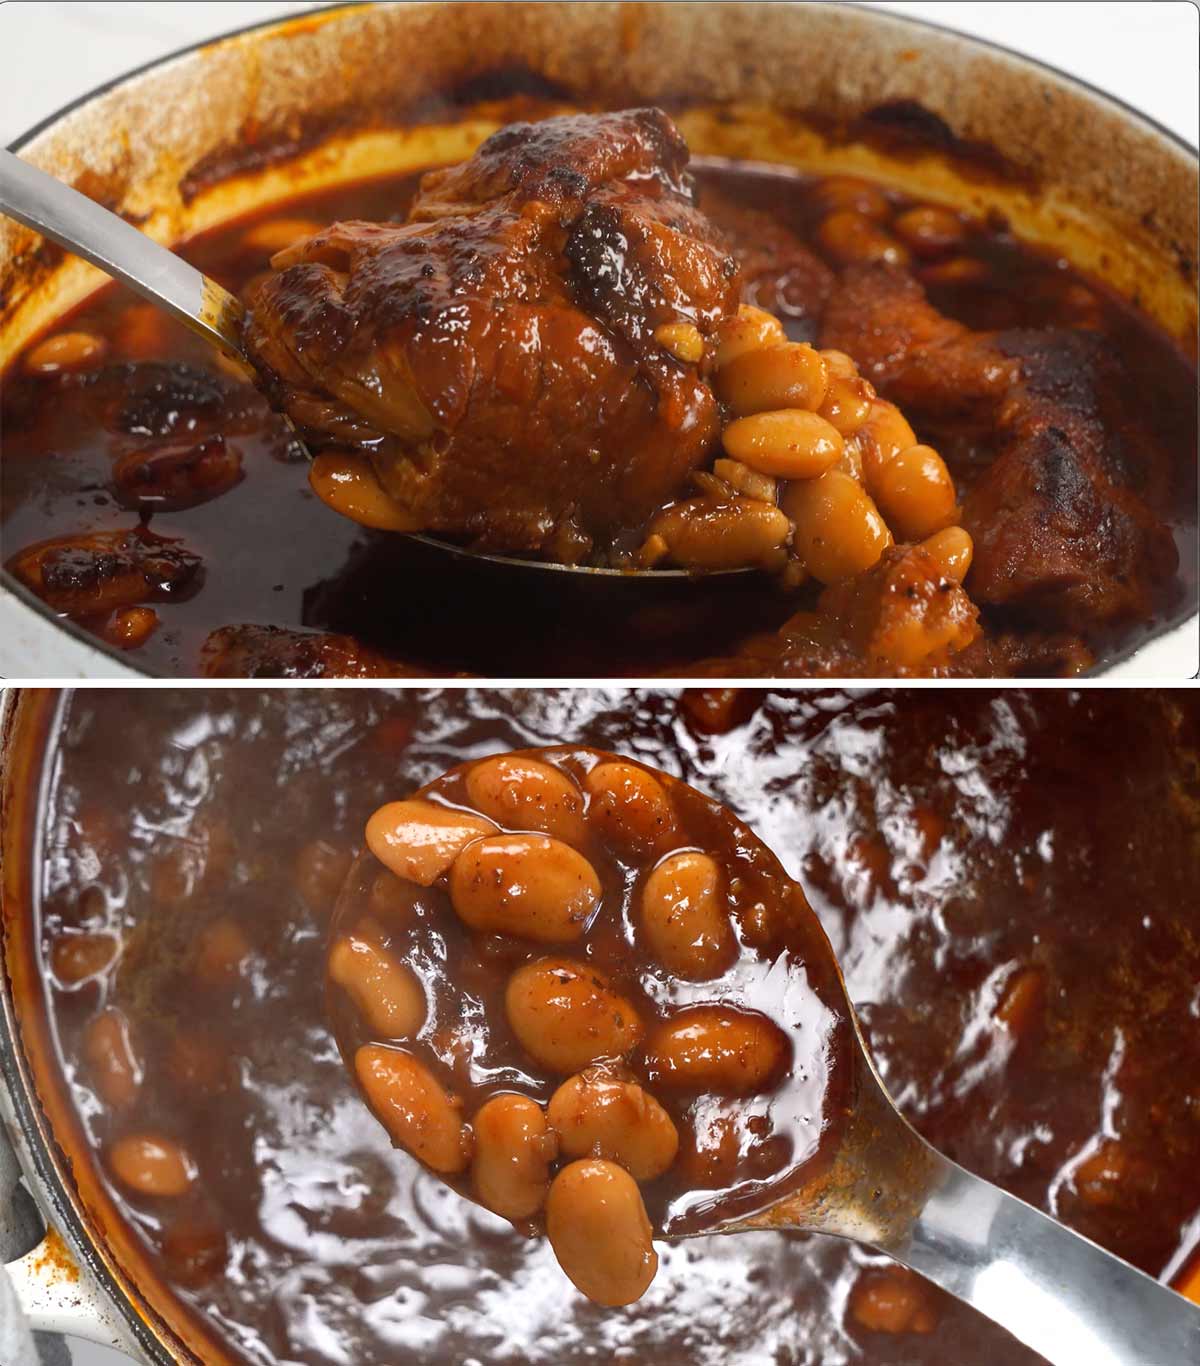
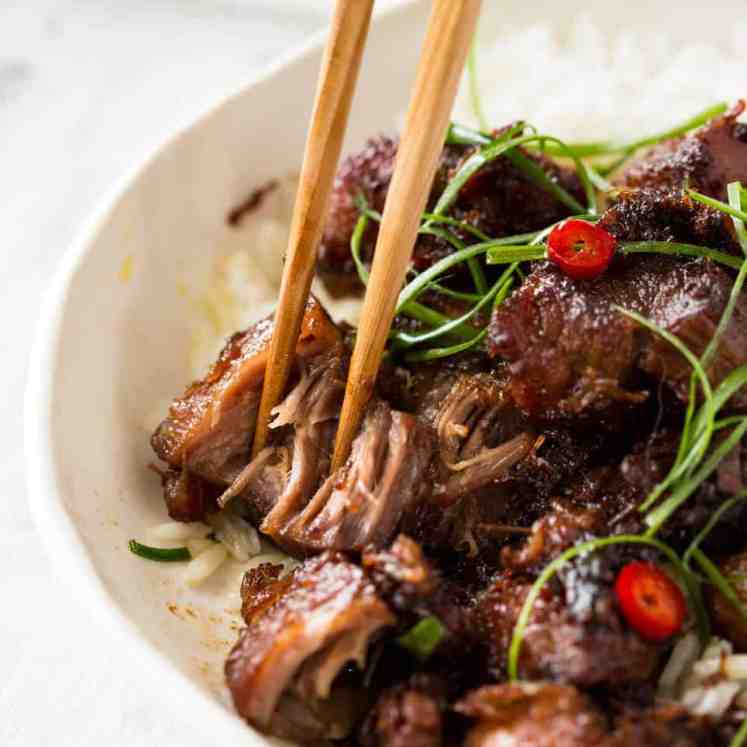
 Mexican Chipotle Pork and Beans is a big pot of saucy, shreddable meat in a rich, spicy, chipotle sauce. Pork shoulder is slow cooked into fall-apart submission with meaty lima beans that absorbs the bold flavoured sauce. Stuff in tacos, serve over red rice, or eat like stew! Mexican Chipotle Pork and Beans This food... Get the Recipe
The post Mexican Chipotle Pork & Beans appeared first on RecipeTin Eats.
]]>Mexican Chipotle Pork and Beans is a big pot of saucy, shreddable meat in a rich, spicy, chipotle sauce. Pork shoulder is slow cooked into fall-apart submission with meaty lima beans that absorbs the bold flavoured sauce. Stuff in tacos, serve over red rice, or eat like stew!
Mexican Chipotle Pork and Beans
This food is me on a plate.
Well, in a pot.
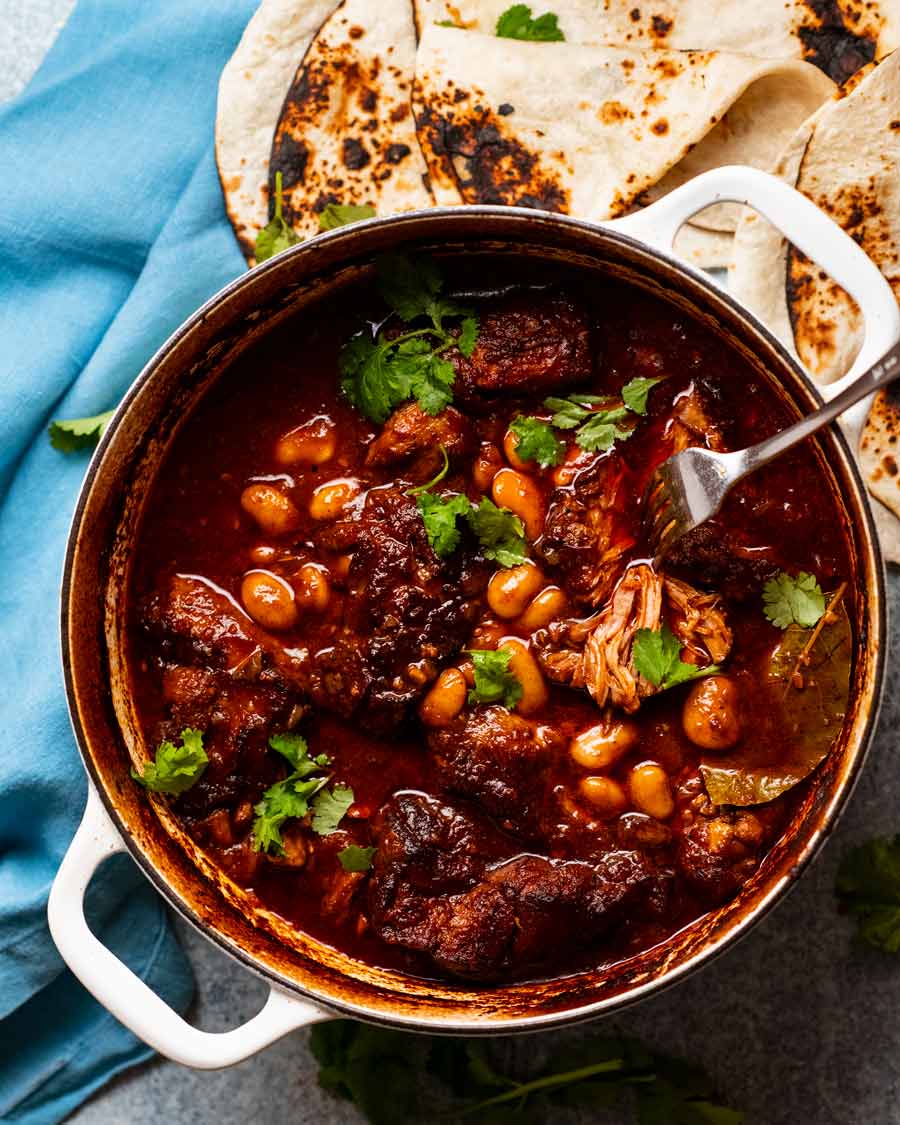
Hunks of juicy meat that’s so tender, it’s barely holding together when you scoop it out. A bold sauce that’s spicy, tangy and deeply savoury. Big creamy beans littered throughout that’s absorbed the flavour of the sauce, making beans tastier and dreamier than you ever imagined possible.
That it’s straightforward to make is a (big) bonus. It’s just like making a stew. In fact, that’s my favourite way to serve this – ladled into bowls like stew, except with tortillas on the side for dunking instead of serving it over the usual mash!
Ingredients in Mexican Chipotle Pork and Bean
Here’s what you need to make big pot of Mexican deliciousness!
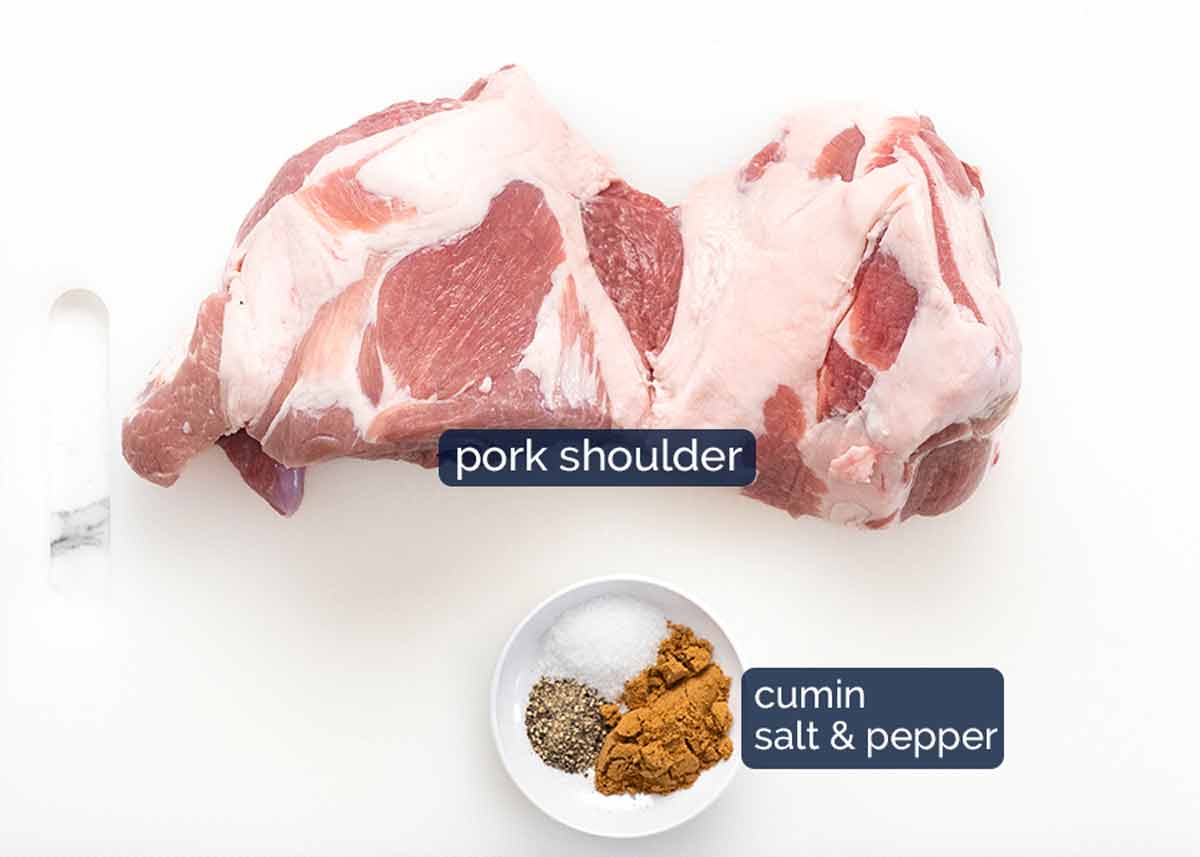
Seasoned pork
This dish is made with pork shoulder which is an economical tough cut of meat that needs to be slow cooked to fall-apart tenderness. I just use cumin to flavour it before searing because the pork absorbs so much flavour while it’s slow cooking, it really doesn’t need much on the surface!
The chipotle sauce (and beans!)
And here’s what you need to make the rich chipotle sauce that the pork is braised in. Flavour to the max!!
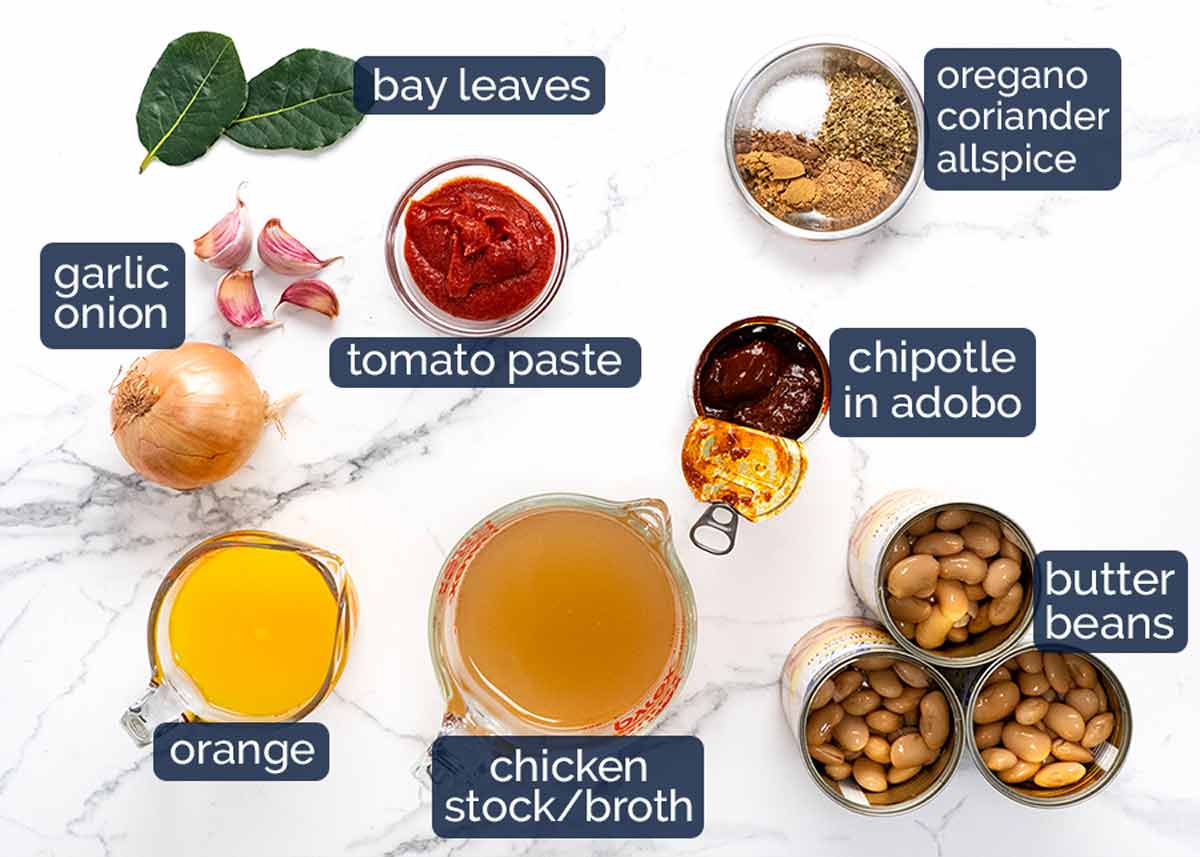
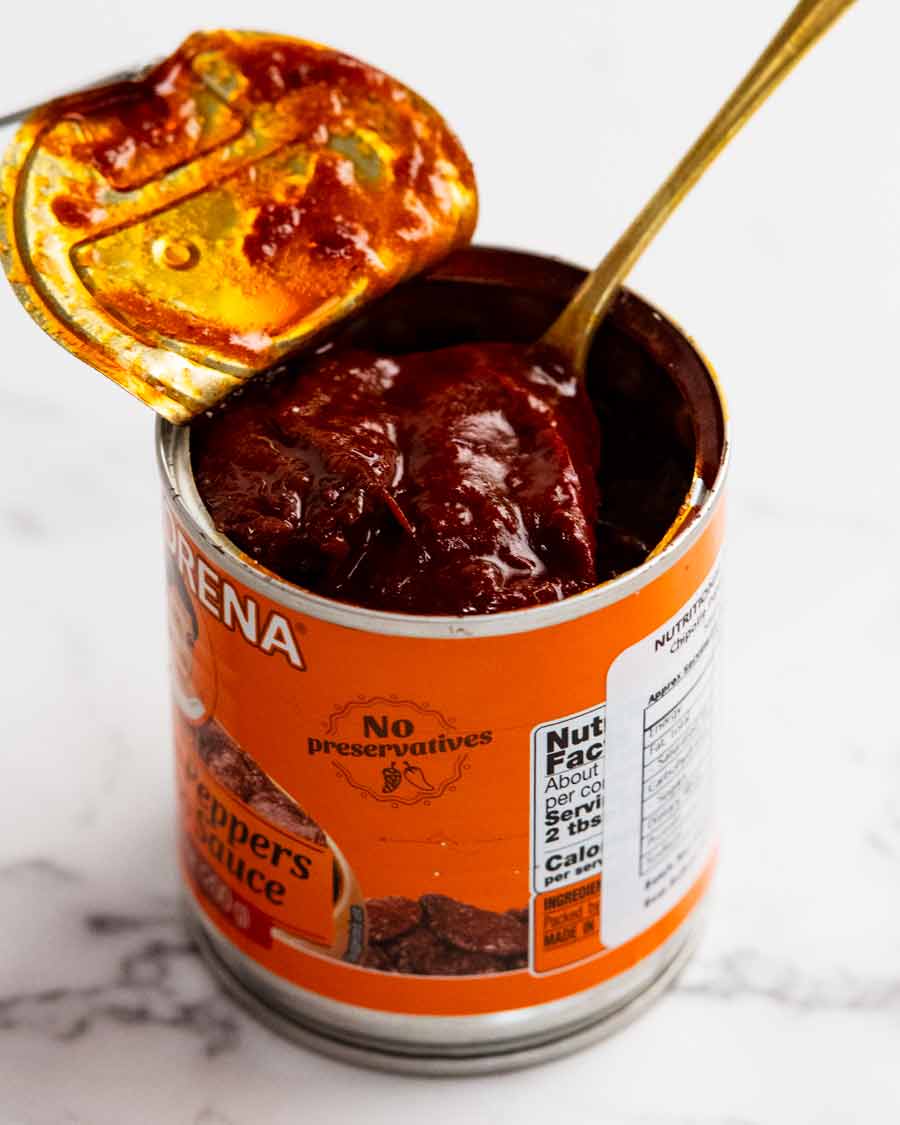
Chipotle in adobo (photo below) – The hero ingredient, I adore this Mexican sauce! It’s made with chipotles which are rehydrated and canned in a tangy, spicy red sauce that packs a load of flavour. (Chipotles are smoked, dried jalapeños).
In this recipe, we’re using both the chipotles and sauce (some recipes only use one or the other) and pureeing the chipotles for maximum flavour release and to make a smooth sauce.
Where to find it – Those of you in the States are lucky enough to find chipotle in adobo virtually “everywhere”! In Australia – find it in the Mexican aisle of large grocery stores (Coles, Woolies), Harris Farms, as well as independent grocers. I use La Morena which I buy from Harris Farms – $3.29 for 200g/7 oz (we use the whole can).
Butter beans (aka lima beans) – The big, fat, meaty beans you always see at the store that you wonder what to do with. Well, now you know! 😂 Feel free to substitute with other beans, though I do think creamy beans work better than smaller, firm ones like black beans, chickpeas etc.
Why canned instead of dried beans? I find that the cook time for dried beans (especially large ones like butter beans) can vary quite drastically depending on the age, size and quality of the beans. Which means for dishes like this, sometimes the beans are done before the pork is, sometimes they are still hard when the pork is done. It’s not too bad pulling the pork out and leaving the beans to cook for longer. But it is a pain to take the beans out to continue cooking the pork! So, canned is my preference here.
Orange juice – Yes! A secret ingredient used in Mexican cooking to add sweetness and more flavour than just adding sugar into things (eg carnitas, fajitas). Doesn’t make it taste orangey because once it’s slow cooked, the flavour completely transforms.
Chicken stock – For the braising liquid. Low sodium please, otherwise your dish might end up too salty.
Tomato paste – For flavour and thickening. It’s sautéed to cook out the raw, sour flavour before mixing into the braising liquid.
Herbs and spices – Nothing unusual here! Oregano, coriander, allspice, bay leaves.
Onion and garlic – Flavour base.
How to make Chipotle pork and beans
This recipe starts off by searing the pork on the stove before transferring to the oven to braise until the pork is fall-apart tender, giving the sauce time to develop fabulous deep, savoury flavour.
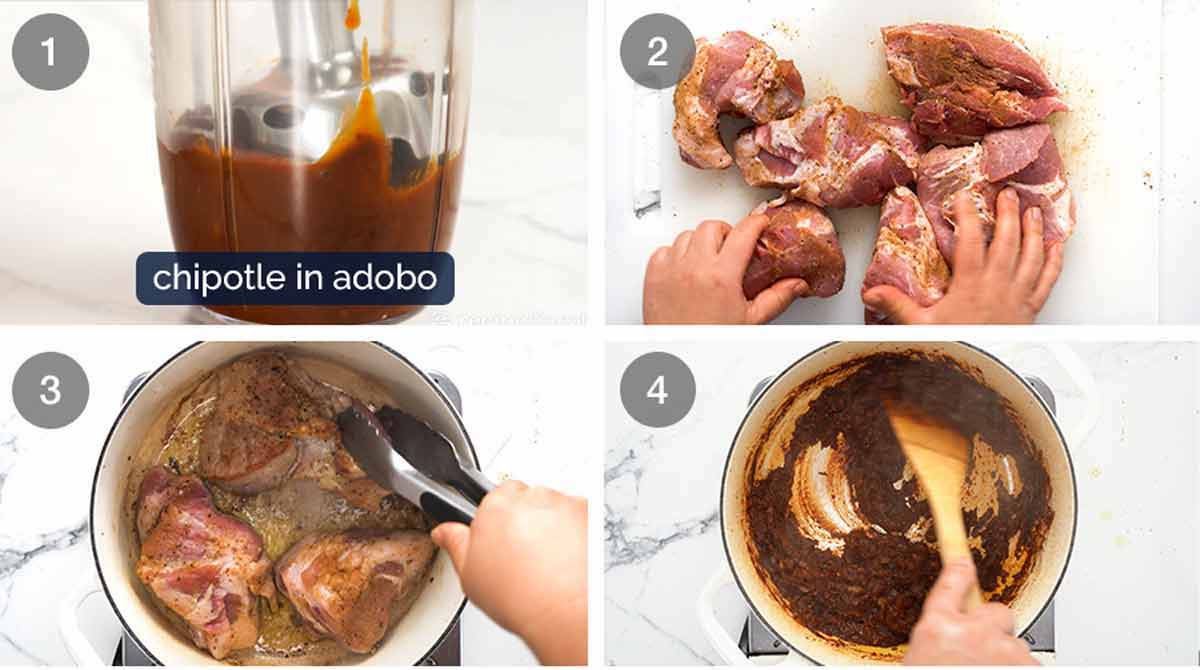
Puree the chipotle in adobo using a stick blender. The chipotle is really soft so it literally takes seconds.
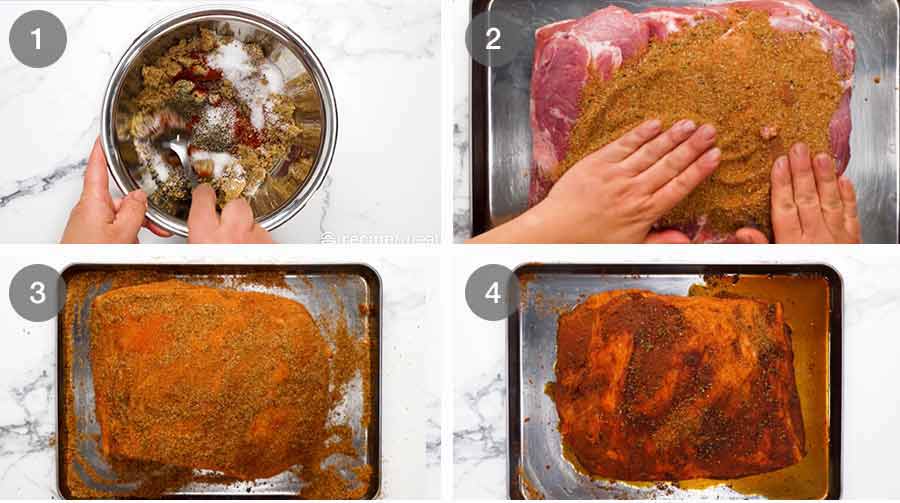
Season pork – Cut the pork into 6 equal pieces, for ease of handling to sear, more surface area for browning and so they cook faster than a whole pork shoulder. Then sprinkle with the cumin, salt and pepper.
Brown the pork in two batches, using a heavy based oven-proof pot. Rotate the pork to brown all over. Remember, colour = flavour! Once done, remove the pork onto a plate.
Sauté sauce flavour base – Using the same pot, sauté the garlic, onion, dried herbs and spices. Sautéing dried herbs and spices is a neat trick for getting extra flavour out of them – it makes them “bloom”.
Next, cook off the tomato paste followed by the pureed chipotle in adobo. Cooking off pastes is a great flavour trick as it intensifies flavour as well as taking off the raw, sour edge. It also depends the savoury flavour so you get more out of less!
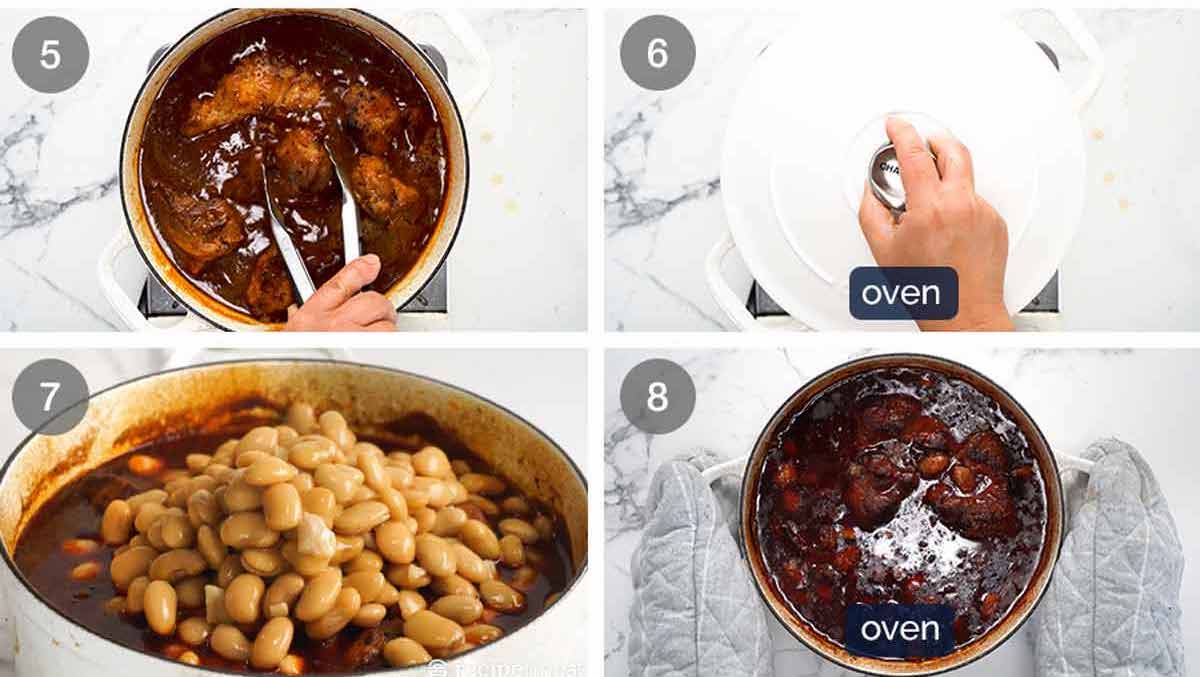
Braising liquid – Add all the remaining ingredients except the beans into the sauce – the orange juice, stock, spices and bay leaves. The beans are added later else they will overcook and become too mushy.
Give it all a good mix then place the pork in, along with any juices pooled on the plate (never waste free flavour!). Arrange the pork as best you can so they are submerged under the liquid. But don’t worry if there’s some of the surface poking above because it will steam-cook and also the pork will shrink as it cooks so it will eventually sink below the surface.
Slow cook – Put the lid on and transfer to the oven to slow cook for 2 hours at 180°C/350°F (160°C fan). This temperature might sound high for slow cooking but it equates to a gentle simmer on the stove, which is suitable for slow cooking meats.
Other cook methods – 6 hours in a slow cooker on low or 2 hours on the stove.
Beans – Remove the pot from the oven. The pork should be pretty much fork tender by this stage. Add the beans and push them in as best you can under the liquid.
Bake uncovered – Return the pot to the oven to bake uncovered for 30 minutes to caramelise the surface which adds extra flavour. Also by this stage, the pork should be tender enough so you can pry it apart using two forks without any effort at all.
If you used your slow cooker or the stove, I do recommend doing this final step in the oven because the caramelising of the surface does add extra flavour!
And that’s it! To serve, just scoop up pieces of pork and beans, and ladle into bowls or onto a plate for serving. See below for ways to eat this pot of fall-apart-spicy-meaty-beany deliciousness!
How to serve Chipotle Pork and Beans
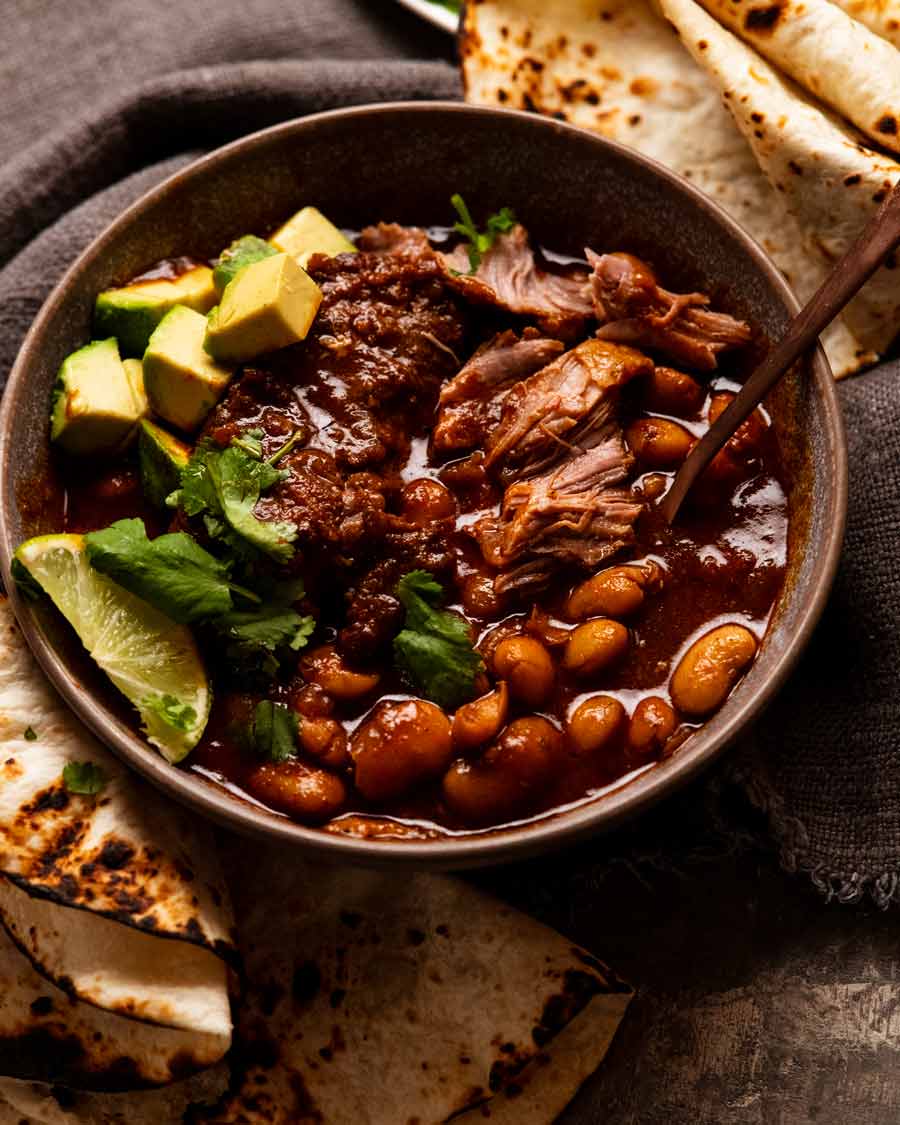
As I mentioned at the beginning, my favourite way. to serve Chipotle Pork and Beans is in a bowl like stew. Just use a spoon or fork to cut off bits of pork (which takes barely a touch!) then get a big scoop with beans and plenty of sauce.
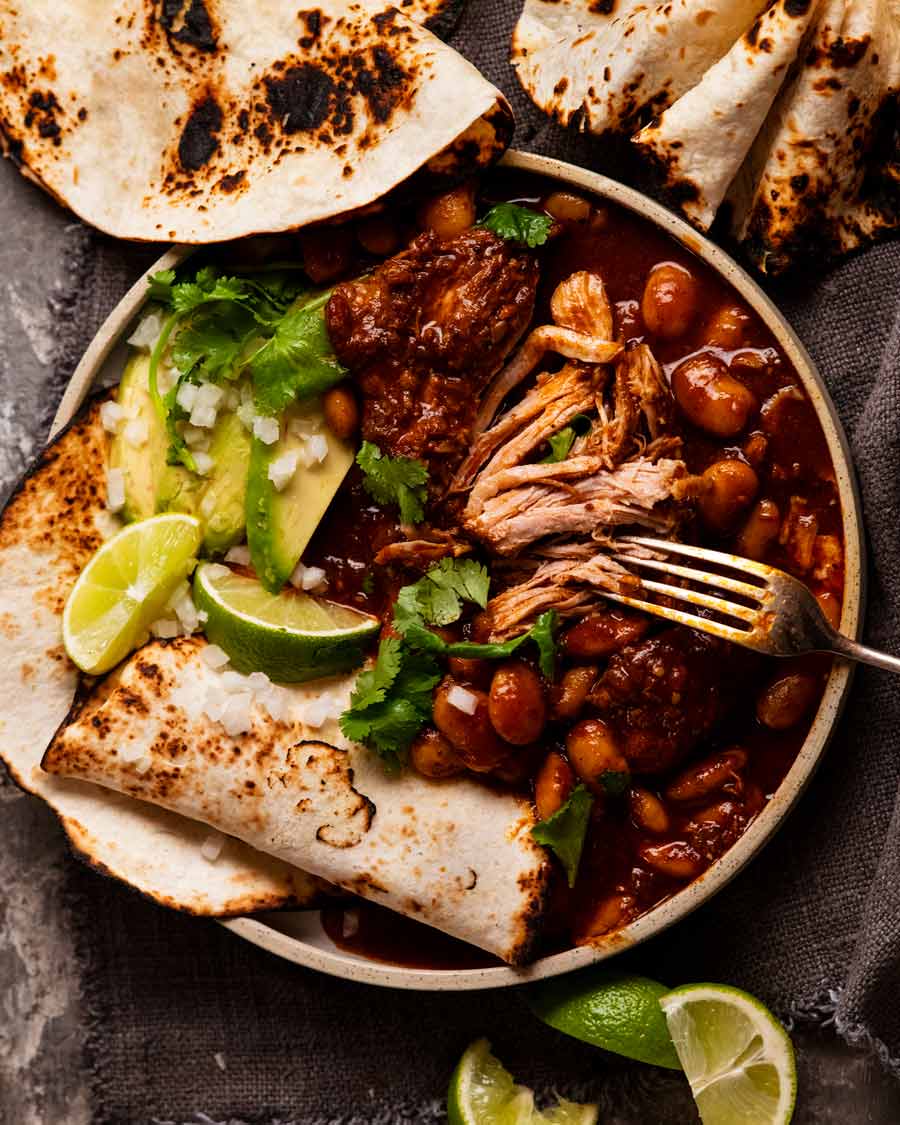
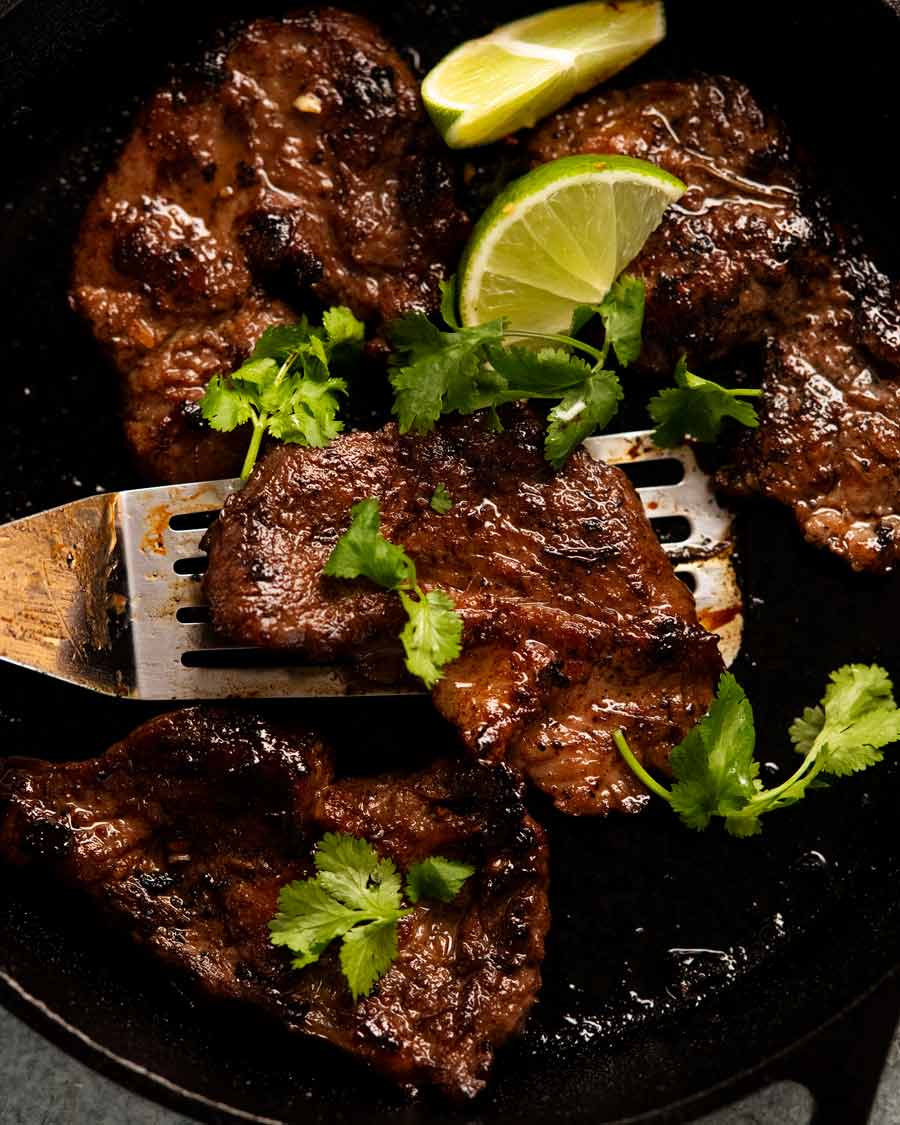
I like to add a bit of avocado and sprinkle of coriander/cilantro for freshness, and tortillas for dunking / bowl mopping is essential in my world.
Having said that, here are some other options – all dish worthy!

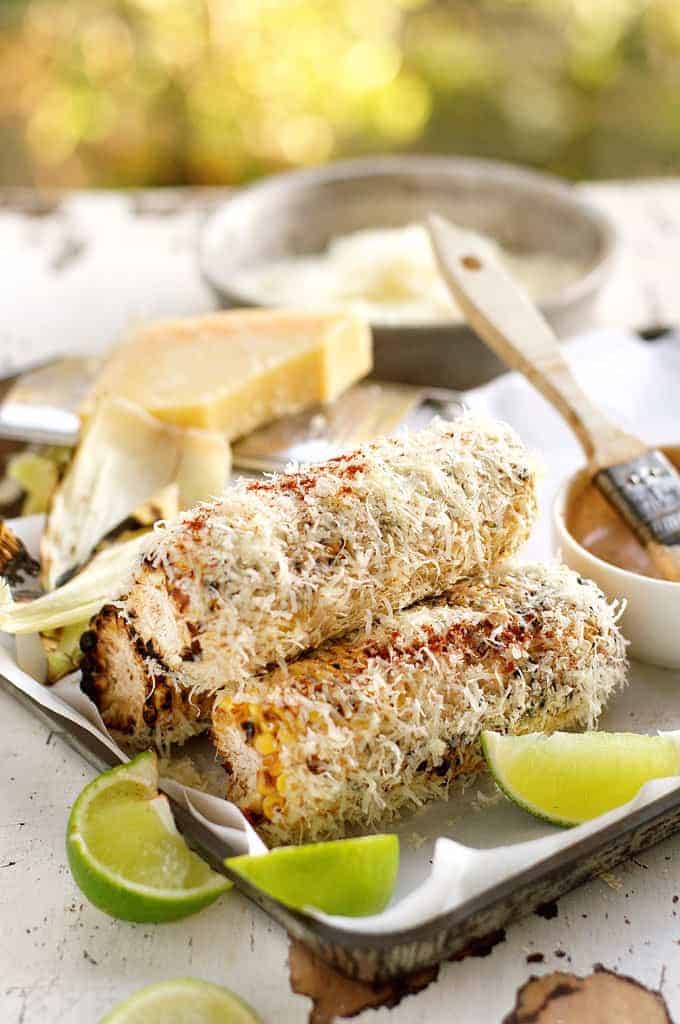
Served over Mexican red rice – or put a big Mexican plate together with Mexican corn cobs (pictured above).
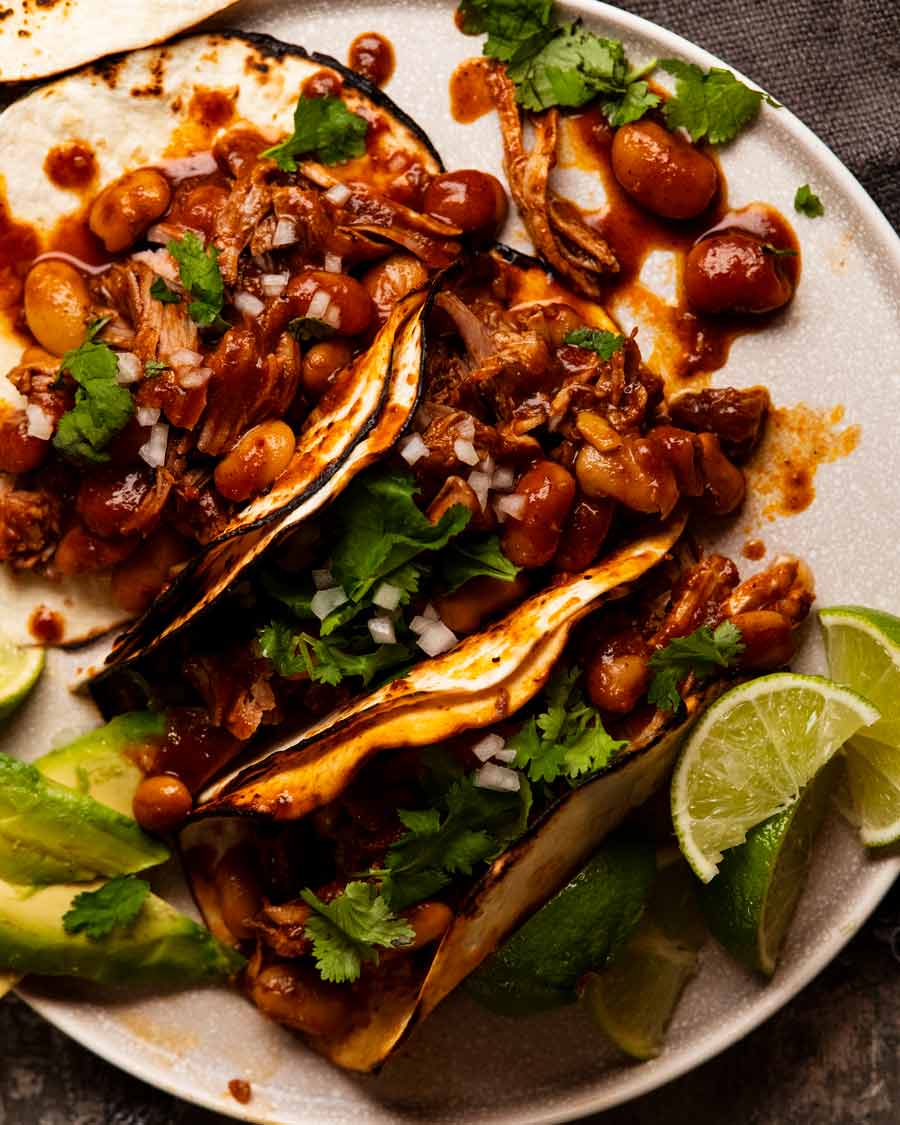
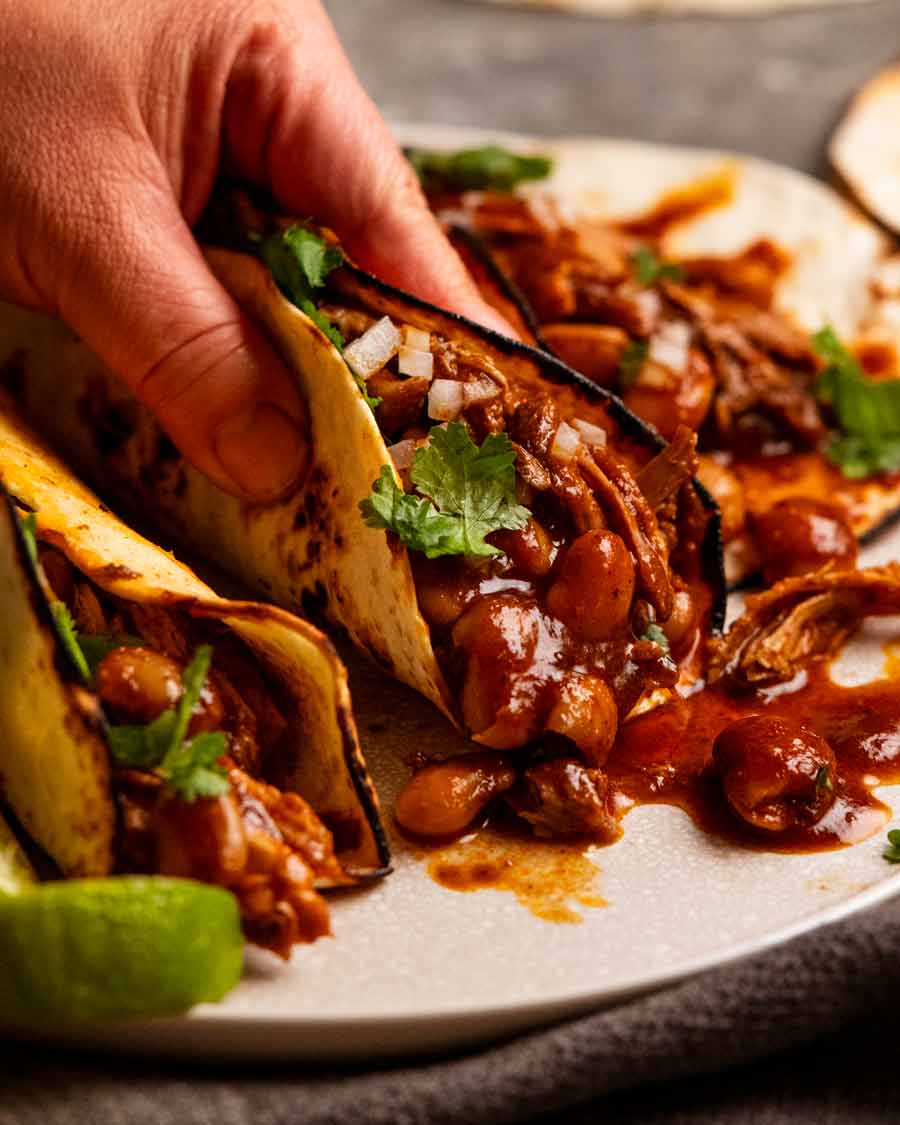
As a taco filling with your toppings of choice! It’s pictured above with avocado slices, finely chopped white onion, fresh coriander/cilantro leaves and lime wedges. There’s no need for a separate sauce – this is saucy enough as is!
Burritos to die for! Switch the chicken in this burrito recipe.
Shred up the pork and mix it up into the sauce with the beans. Then use it to make a giant nachos (switch out the chicken in this nachos recipe), as an enchilada filling, make tostada or simply scoop up with corn chips.
Turn it into a hearty soup – Add extra chicken stock/broth to thin the sauce and make it less intense, so it becomes suitable to be a soup broth. Then serve it as soup!
So many possibilities! What do you think? Which serving option appeals to you? – Nagi x
Watch how to make it

Mexican Chipotle Pork and Beans
Ingredients
Pork:
- 1.5kg / 3lb pork shoulder (skinless, boneless), cut into 6 equal pieces (Note 1)
- 1 tsp cooking/kosher salt
- 1/2 tsp black pepper
- 2 tsp cumin powder
Sauce:
- 200g / 7 oz chipotle in adobo – the chillis + sauce (Note 2)
- 2 tbsp olive oil
- 1 onion , finely chopped
- 4 garlic cloves , finely minced
- 1/4 cup tomato paste
- 1 cup orange juice (real, not reconstituted sweetened stuff – Note 3)
- 2 cups chicken stock/broth , low sodium
- 2 bay leaves (fresh, else dried)
- 1 tsp cooking/kosher salt
- 3 x 420g / 16 oz canned butter beans / lima beans , or other of choice (Note 4)
Dried herbs & spices
- 1 tbsp dried oregano
- 1 tsp cumin powder
- 1 tsp coriander powder
- 1/2 tsp allspice powder
Instructions
- Preheat oven to 180°C/350°F (160°C fan).
- SPICINESS – Read note above about spiciness!
- Puree chipotle in adobo until smooth using a stick blender or similar.
- Sprinkle pork all over with salt, pepper and cumin.
- Brown pork – Heat all the oil in a large oven-proof pot over high heat. Brown the pork all over in 2 batches, the remove onto a plate (~ 1 minute each side).
- Sauté – Cool the pot slightly then return to medium heat. If the pot looks dry, add 1 tbsp oil. Sauté onion, garlic, the herbs & spices for 3 minutes.
- Cook off tomato & chipotle – Add tomato paste and cook it off for 2 minutes. Add chipotle puree and cook for 2 minutes.
- Slow cook 2 hours – Add remaining ingredients EXCEPT beans. Stir, then bring to simmer. Place pork in – arrange so its submerged as best as possible. Cover with lid. Place in oven for 2 hours. (Note 6 other cook methods)
- Add beans, cook 30 min – Remove lid, add beans. Return to oven for 30 minutes without lid to caramelise the surface. The pork will be fork-tender!
- Serve like stew over Mexican red rice or with tortillas for dunking. Or make wickedly food tacos with finely chopped white onion, fresh coriander/cilantro, avocado slices and a squeeze of lime. More serving options above the recipe video.
Notes
Nutrition
Life of Dozer
The Coronation of Prince Edward Dozer Maehashi the first.

The post Mexican Chipotle Pork & Beans appeared first on RecipeTin Eats.
]]> This is such a wonderful recipe to use economical pork shoulder in an exciting new way! A Vietnamese lemongrass marinade infuses with beautiful flavour while a smidge of baking soda is the secret to tenderising so the pork steaks are tender like premium chops. Vietnamese street-food! Vietnamese lemongrass pork I’ve been wanting to recreate the... Get the Recipe
The post Vietnamese lemongrass pork steaks appeared first on RecipeTin Eats.
]]>This is such a wonderful recipe to use economical pork shoulder in an exciting new way! A Vietnamese lemongrass marinade infuses with beautiful flavour while a smidge of baking soda is the secret to tenderising so the pork steaks are tender like premium chops. Vietnamese street-food!
Vietnamese lemongrass pork
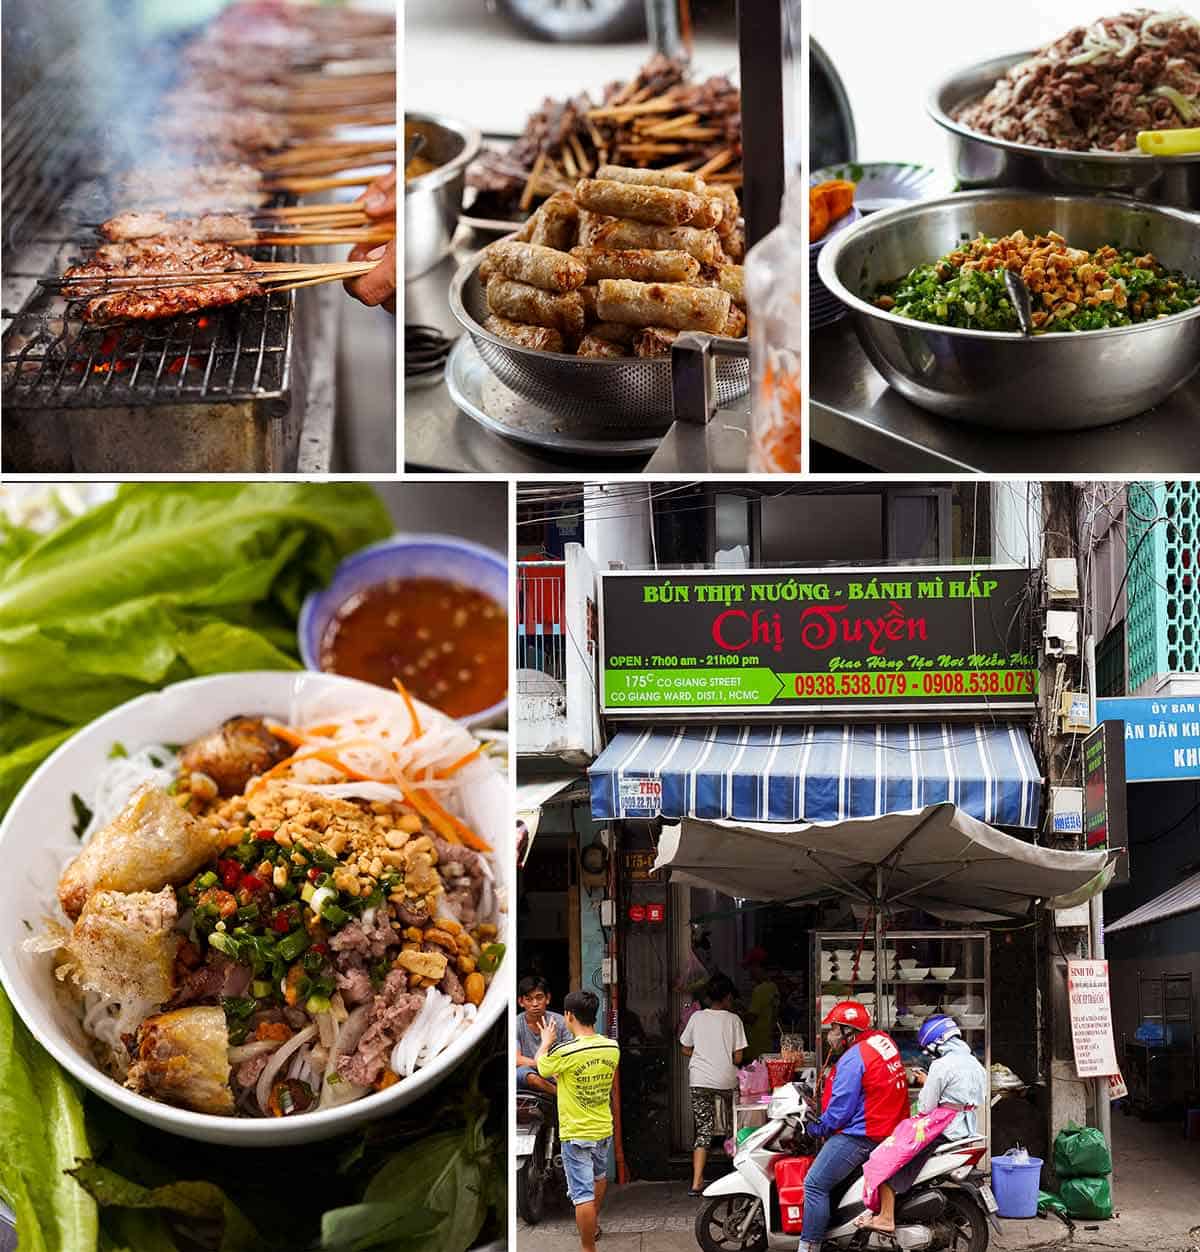
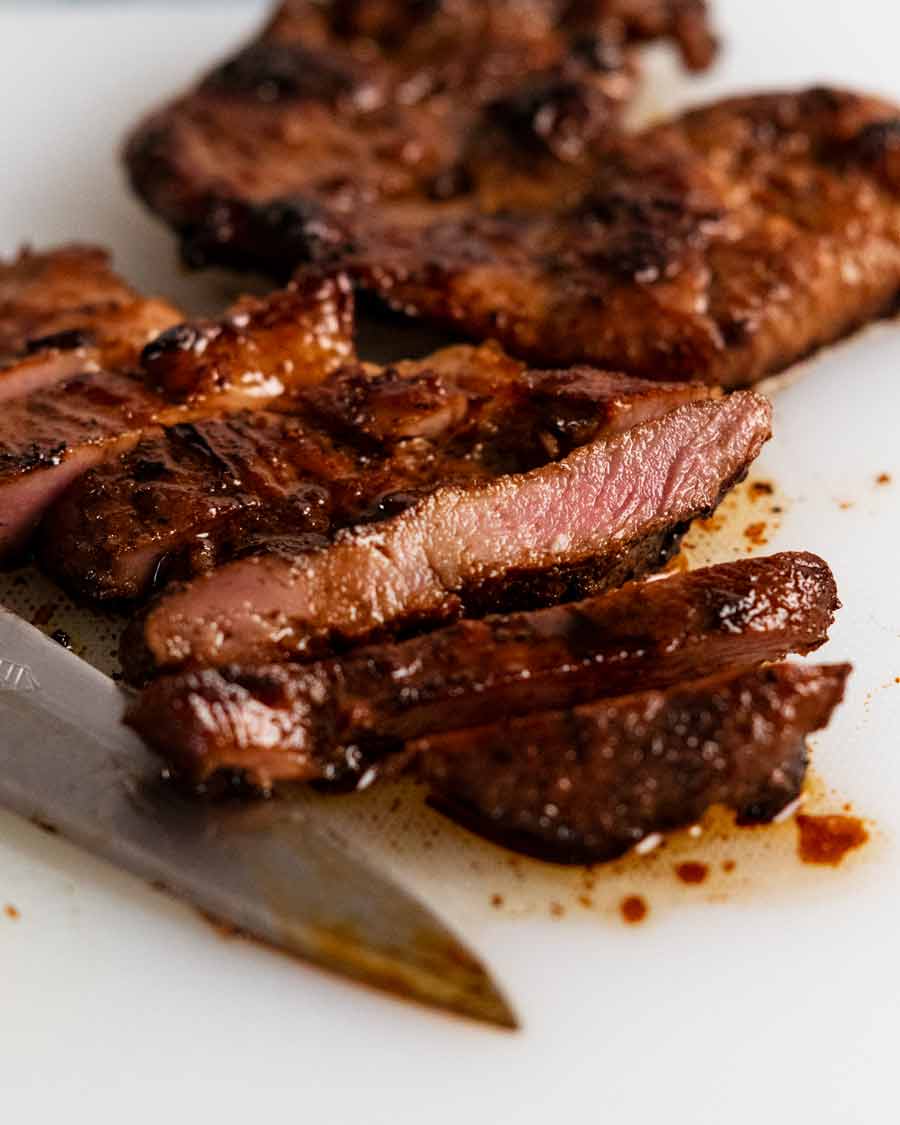
I’ve been wanting to recreate the chargrilled lemongrass marinated pork you find “everywhere” on the streets of Vietnam for years – but it always came out dry. Finally figured out the secret to keeping it juicy, so I had to share the recipe immediately! 😂
Across Vietnam, variations of this lemongrass pork are served in various forms. On rice, soups, in rice paper rolls, even in Banh Mi. While all are delicious, my favourite are the popular Vietnamese noodle bowl salads, bun thit nuong. Thin rice noodles, topped with this pork, pickled vegetables, lettuce, a smattering of peanuts, lime and served with nuoc cham, that sauce served with “everything” in Vietnam.
I’ve shared the pork noodle bowl as a separate recipe as I wanted to publish the marinated pork separately because I think it’s worthy of your attention!
Here’s a photo of the pork rice noodle bowls. I actually took this photo in Vietnam – it’s a dish I bought from a street vendor in Saigon and took back to my hotel to take a photo:

Oh look! And said vendor in Saigon.  They cooked the pork on skewers over charcoal. I’m doing a home version – steaks on a stove. So you can make this any night of the week – rain, hail or shine!
Why you need this Vietnamese pork in your life!
Excellent value – It’s made using economical pork shoulder that is tenderised so it’s juicy like premium pork chops!
Flavour plus value – The meat is sliced and pounded thinly for maximum flavour penetration and so less meat goes further.
Something different but yet so easy, with ingredients you can get from the local shops.
Versatile – Serve at your next BBQ with coconut rice and Asian slaw. Or wait until Friday to make Vietnamese noodle bowls!
Deliciousness factor is extremely high for relatively small effort
And because I know someone will ask – yes you can make this with chicken, here it is!

What you need
Here’s what you need to make this.

Pork shoulder – Generally, this economical, tough cut of pork is slow cooked until it becomes fall-apart tender. Today, we’re using it in a really different way. Sliced thinly, then marinated with baking soda which tenderises it so when it’s cooked hard-and-fast like steak, it is tender like a pricey pork chop. (Links again for glowing reader reviews who have discovered the wonder of this technique with chicken and beef!).
Baking soda – also known as bi-carb / bi-carbonate. As noted in the point above, this is what tenderises the tough pork shoulder meat.
Lemongrass – For unmistakable, irreplaceable beautiful Vietnamese flavour!
Limes – For tang. A Vietnamese food favourite.
Sugar – For sweet and caramelisation.
Soy sauce and fish sauce – The saltiness. I like to use both to get the right flavour balance. Only fish sauce = too fishy. Only soy sauce = lacks complexity of flavour.
Garlic – Lots!
Oil – To increase the volume of the marinade so there is the right flavour infusion for the volume of meat we’re using. (Initially I just had more of all the other ingredients but the pork was too salty).


How to make Vietnamese lemongrass marinated pork
The key to this recipe is to slice and pound the pork as thinly as you can. This serves a few purposes:
head start tenderising the flesh
opens up the fibres to allow the marinade to penetrate thoroughly
increases surface area and flattens the pork to improve surface area char – for optimum real chargrilled street-food flavour!
allows us to make this with economical pork shoulder rather than pricey pork tenderloin or chops.

Slice the pork shoulder into eight thinnish pieces – gives us a head start on the pounding. I find it easiest to do this by cutting the pork on 45 degree angle but if you have the right shaped piece, you could just cut straight down.
PRO TIP: To get even(ish) pieces without pulling out the scales, cut the pork shoulder in half, then each half in half again, then each in half again. Voila – 8 pieces!
Pound to 5mm / 0.2″ thickness thick using a meat mallet (the jagged side) or rolling pin. Cover with go-between or freezer bags to prevent damaging the meat. (Go-between is a purpose made plastic sheet, sold alongside cling wrap. Also useful for stacking foods in the freezer without sticking together).
Post pounding thin pork!
Marinade – Mix the marinade ingredients in a bowl.
Coat pork Add the pork and use tongs to coat well.
Marinate 24 hours – Transfer to a ziplock bag and marinate for 24 hours.
Why mix separately first? To ensure really good, even distribution of the small amount of bi-carb across quite a lot of surface area. I wouldn’t ask you to dirty a bowl unnecessarily
Why a ziplock bag? Because it keeps the meat completely coated in a relatively small amount of marinade. If you prefer a container, use a small one so the meat is as snugly fitted as possible and toss the pork once or twice during the marinading time.
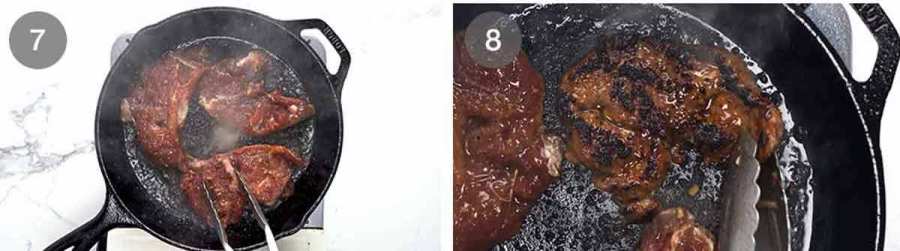
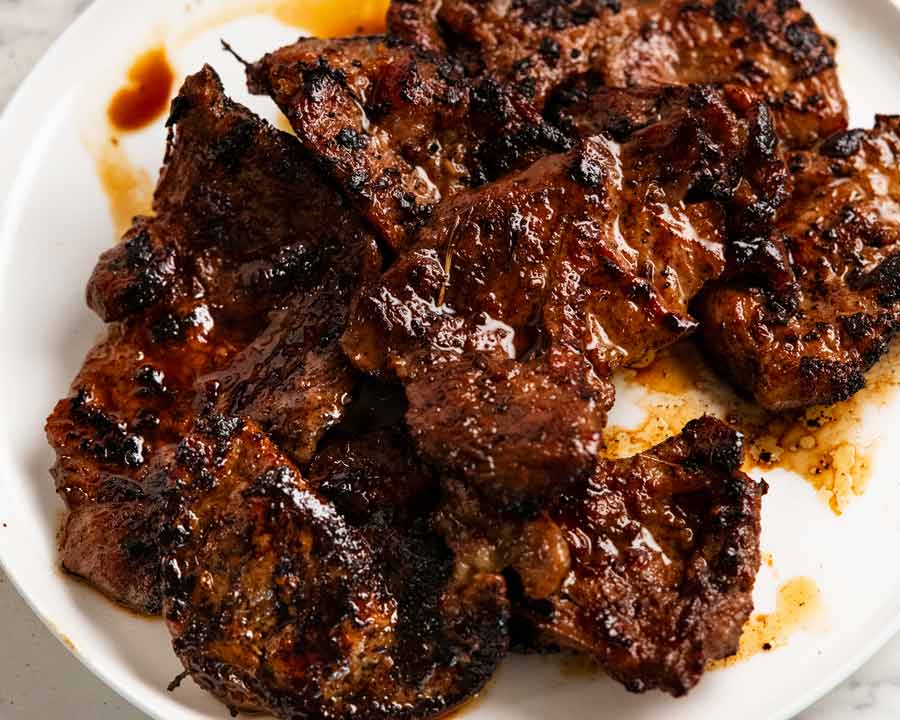
High heat cooking – Cook for 1 1/2 minutes in a hot cast iron skillet OR on your BBQ over high heat. Then cook the other side for 1 minute. Super quick to cook because it’s so thin!
Aim for a nice char – The pork will char quickly because of the sugar in the marinade and that’s what we want, that authentic chargrilled flavour.
STILL TENDER! Technically, with 2 1/2 minutes of high heat blasting, the thin pork should be overcooked and dry inside, not to mention the tough pork shoulder hasn’t been slow cooked as it should so it should be horridly tough. Nope! The inside is still juicy, and it’s more tender than you ever imagined pork shoulder could be, thanks to the baking soda (read more on this above in the ingredients section).
NOTE: Meat tenderised using the baking soda method will be pink inside even when it’s cooked to well done! It’s just what happens. It happens with beef too.
As mentioned above, I’ll share the Vietnamese Pork Noodle Bowls recipe on Friday (UPDATE: here it is!). But think beyond the noodle bowl! Serve it with a side of coconut rice, Vietnamese red fried rice or plain jasmine rice with a side salad. Try one of these:
Vietnamese Chicken salad – minus the chicken
Steamed vegetables or any leafy greens drizzled with Asian Sesame Dressing
And just before I sign off, one more look at the pork noodle bowl:
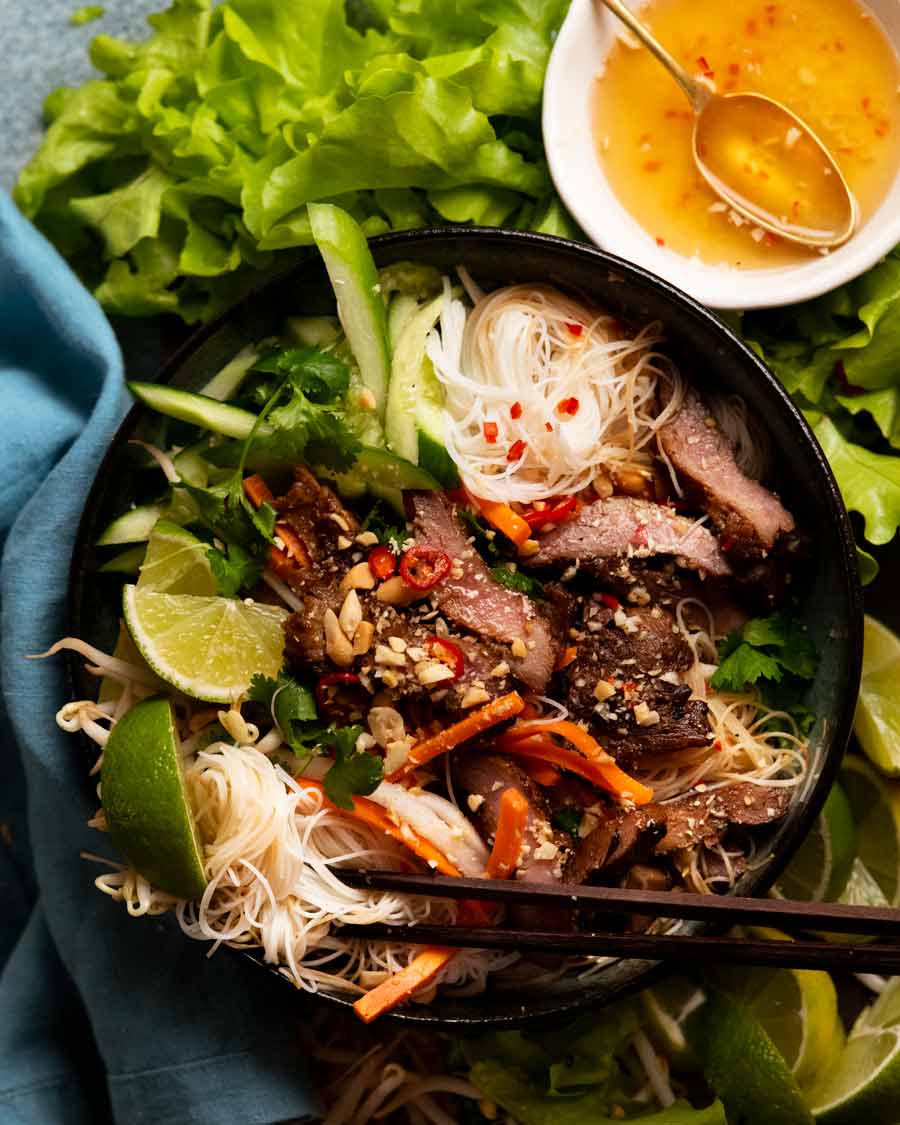
It’s so good! ADORE the contrasting textures of the fresh vegetables and herbs with the flavourful marinated lemongrass pork all doused in nuoc cham, the Vietnamese chilli-garlic sauce served with “everything”.
What do you think?? Have I convinced you to give this Vietnamese pork a go? I hope so!!! If anything, it’s worth experiencing the magic of the marinade and how tender it makes pork shoulder steaks. Try it!! – Nagi x
Watch how to make it

Vietnamese Lemongrass Pork steaks (tenderised!)
Ingredients
- 500g/1 lb pork shoulder , skinless and boneless, or pork scotch (roast or steaks) (Note 1)
- 3 tbsp canola oil
Marinade:
- 2 lemongrass stalks , white part only, bruised, cut into 1 cm / 0.4″ slices on angle (Note 2)
- 4 garlic cloves , finely minced
- 4 tbsp lime juice
- 3 tbsp fish sauce
- 1 tbsp soy sauce (all purpose or light, NOT dark soy, Note 3)
- 4 tbsp brown sugar (tightly packed tablespoons)
- 3 tbsp oil (canola, vegetable, peanut)
- 3/4 tsp baking soda/bi-carb , for tenderising (Note 4)
Instructions
- Cut pork – Cut into 8 equal, thinnish slices of pork. I find it easiest using the knife on a 45° angle, but if you have the right shape piece you can just cut straight down.
- Pound each steak to 5mm / 0.2" thickness using the scary side of a meat mallet (jagged, not flat), using go-between (Note 5) or a freezer bag to avoid damaging the meat. (You can use baking paper for rolling pin or the flat side of the mallet.)
- Marinade – Mix the marinade ingredients in a bowl, it will fizz when the baking soda is added! Add pork then toss well to coat using tongs. Transfer to a ziplock bag and marinate for 24 hours.
- Remove pork from the marinade and brush off the lemongrass pieces. Discard marinade – it's done its job!
- Cook – Heat a cast iron skillet over high heat until you see wisps of smoke. Add 1 1/2 tbsp oil, then cook half the pork for 1 1/2 minutes on one side and 1 minute on the other side until nicely charred. Remove onto a plate. Scrape pan clean of loose black bits then cook the remaining pork.
- Serve! Make Pork Noodle Bowls (bun thit nuong) or serve with rice and a side salad – see note 6 and in post for suggestions!
- NOTE – The thin pork steaks are beyond well done in 2 1/2 minutes but it doesn't matter because the baking soda keeps them tender. It will be blushing pink inside due to the baking soda (same happens with beef). You could cook them for another 5 minutes and they will still be tender inside. Miracle!
Notes
- Vietnamese Chicken salad – minus the chicken
- Asian Slaw
- Chang’s Crispy Noodle Cabbage Salad
- Asian Side Salad
- Steamed vegetables or any leafy greens drizzled with Asian Sesame Dressing
Nutrition
I adore Vietnamese food!
See?


Life of Dozer
When Dozer was in the paper over the Easter break. Specifically, the Good Weekend Magazine!
If you wish to continue to believe I’m an innocent angel, please do not read the article.

The post Vietnamese lemongrass pork steaks appeared first on RecipeTin Eats.
]]> This is my Rolls Royce of Pulled Pork recipes. A 24-hour brine injects flavour and locks in juices, then a 12-hour oven slow roast makes the pork more succulent than you ever imagined it could be! Don’t have time for this version? I get it. Make my Slow Cooker Pulled Pork instead! 36-hour Pulled Pork... Get the Recipe
The post My best Pulled Pork appeared first on RecipeTin Eats.
]]>This is my Rolls Royce of Pulled Pork recipes. A 24-hour brine injects flavour and locks in juices, then a 12-hour oven slow roast makes the pork more succulent than you ever imagined it could be!
Don’t have time for this version? I get it. Make my Slow Cooker Pulled Pork instead!
36-hour Pulled Pork
That’s right, 36 hours is what it takes to make my very best Pulled Pork recipe: A 24-hour dry-brine in a heavily-flavoured rub, followed by a 12-hour slow roast in the oven.
I would not share a 36-hour recipe though if I was not 100% sure it produces the very best results! I can assure you it really does, and the reasons are simple:
Brining overnight locks in juices and injects flavour all the way through the pork so every mouthful of pork is seasoned; and
Slow-roasting at a very low temperature means less moisture loss and in turn more succulent meat.
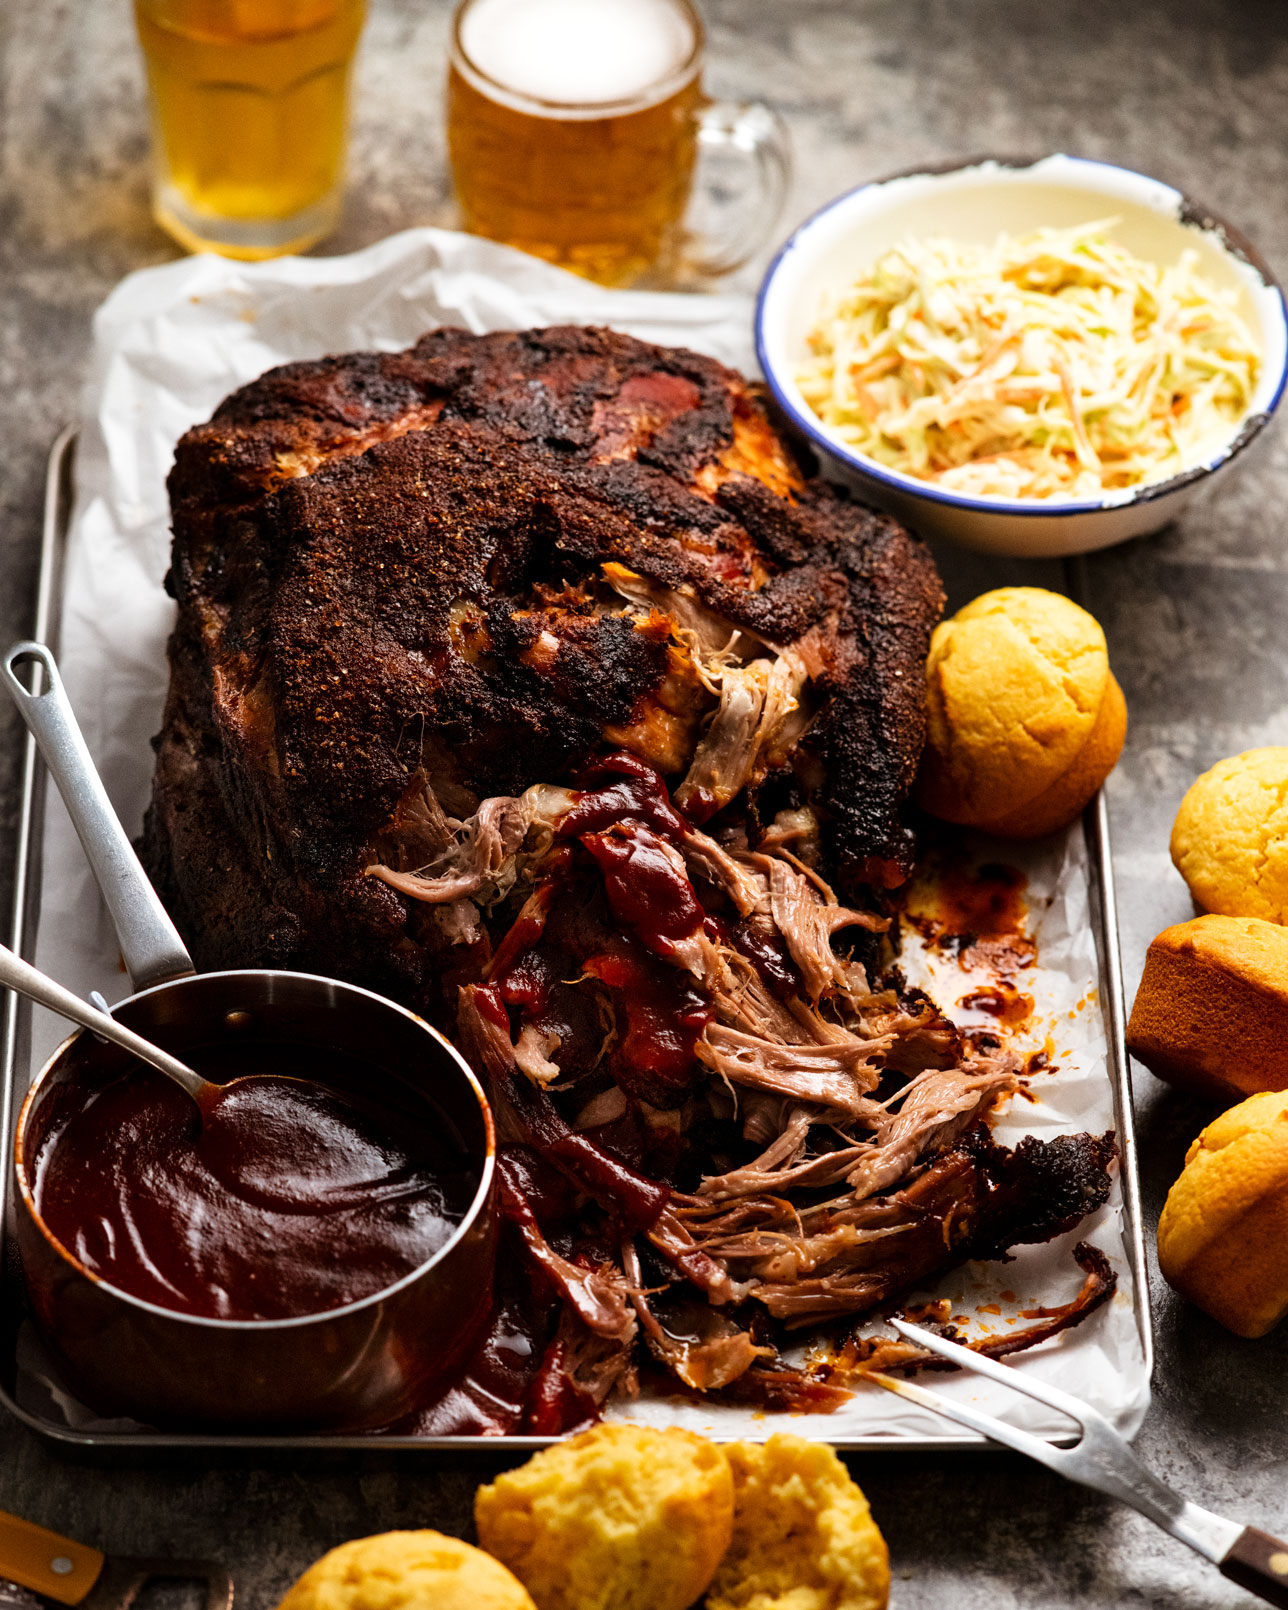
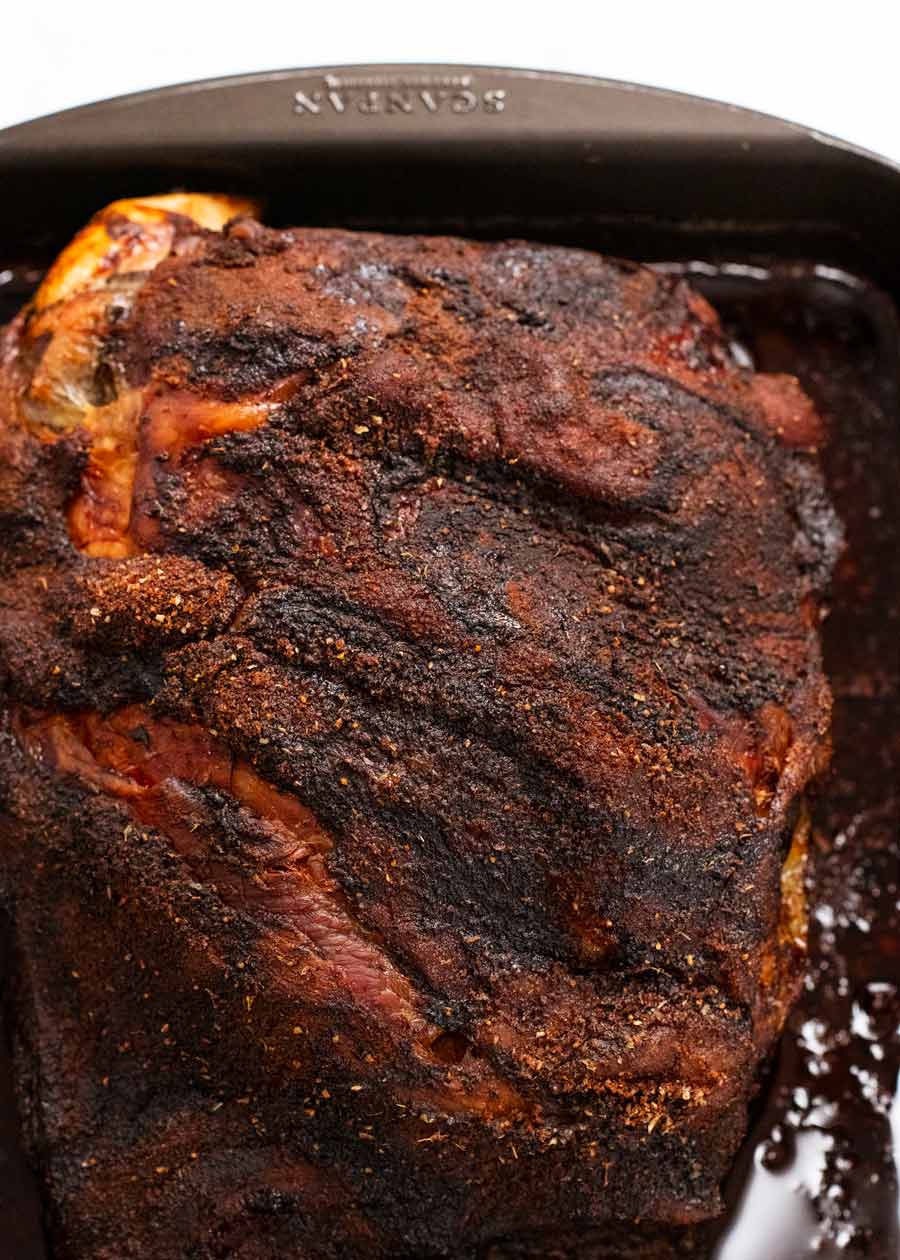
Cooking in this way also gets you that desirable “bark” on the surface that people love about traditional BBQ food. It’s my favourite part. It’s so tempting to lift the whole thing off and run away with it!
Check out the proof of epic bark:
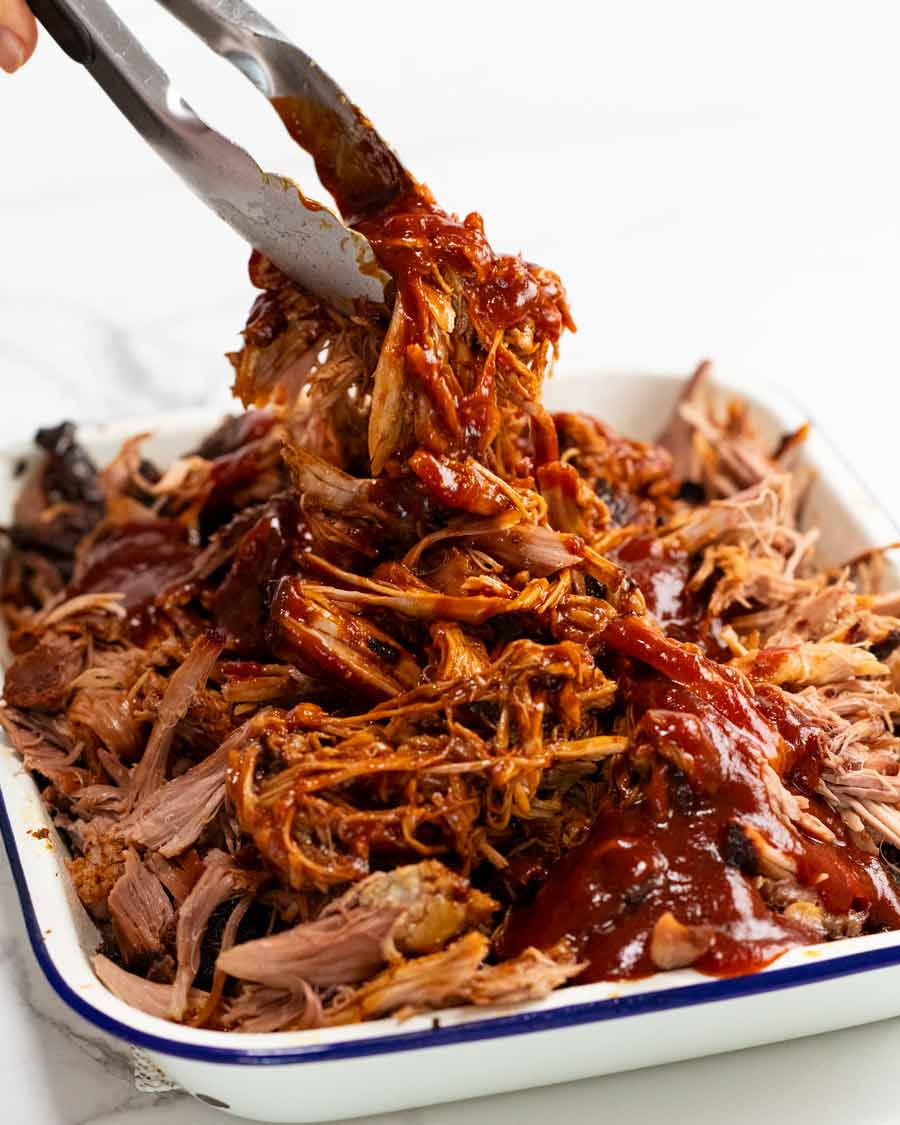
And proof of ultra-tender, juicy meat:
My typical 36-hour Pulled Pork timeline
Here’s my basic game plan with timings to help you ensure your pork is ready for when you want to serve it, for either lunch or dinner.
2 days prior, anytime (usually evening) – Coat pork in rub and leave to brine/marinate for 24 to 48 hours in the fridge.
Evening before serving – Put pork in oven to slow-roast overnight.
Next morning (day of serving) – Remove pork from oven. Keep whole until required. Shred pork as close as possible to serving time, for optimum juiciness.
If serving for lunch – Time the cooking to finish within 2 hours of serving so the pork stays warm, and no need to reheat.
If serving for dinner (reheating whole pork) – Allow pork to fully cool on the counter, uncovered (if you cover, bark will go soggy). When cool, cover and refrigerate.
Remove from fridge 3 hours prior, leave on counter for 1 hour. Then cover loosely with foil and reheat in a 150°C/300°F oven for 2 hours or until the centre is hot, then shred as close as possible to serving time.
Microwave emergency – If you forgot to allow for reheating, you can microwave it uncovered in an emergency. It actually works well because it keeps the meat juicy!
What you need to make my best Pulled Pork
Here’s what you need for the Pulled Pork:
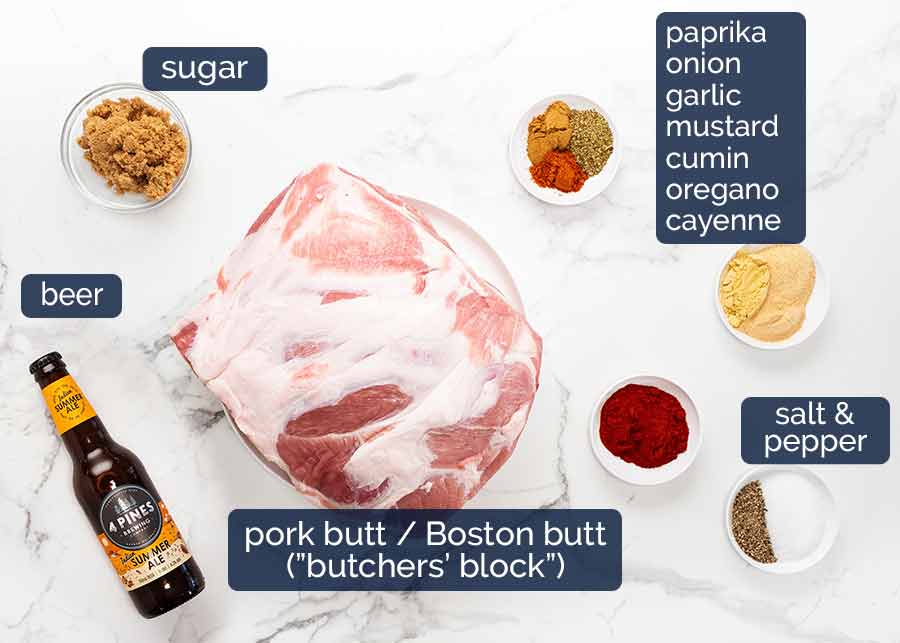
Pork butt / Boston butt (4 – 5 kg / 8 – 10 lb) – Also known as “butcher’s block” or “square cut shoulder of pork” in Australia, this is a big rectangular block of pork from the of the upper pork shoulder (not its butt!) It’s best for Pulled Pork because it’s well marbled and a uniform shape. It comes with a layer of fat on the surface, no skin (in Australia), and a bone inside.
Where to find it – Though widely available and very good value in the US, here in Australia it’s not available at everyday supermarkets. However, it IS sold at Costco! Otherwise, find it at good butchers.
What to ask for – Pork butt / Boston butt / butcher’s block / square cut pork shoulder. Describe it as a 4 to 5 kg rectangular block of pork shoulder. Insist / ask politely that it be bone-in, skinless, with some but not all the fat removed from the surface.
Best substitute – Regular pork shoulder works but it will need to be a minimum of 3 kg / 6 lb (including the bone). If it’s too small it will cook too fast and defeat the purpose of the 12-hour slow roasting that yields the ultra-juiciness of the meat. Usually here in Australia, pork shoulder is only about 2 – 2.5 kg / 4 – 5 lb (once the skin is removed).
Beer – This has multiple purposes. It’s used as (1) the liquid in the pan to prevent the pan from drying out during the slow-roasting, (2) for extra flavour on the pork flesh, and (3) making tasty pan juices which are later tossed through the shredded pork and stirred into the homemade BBQ sauce.
Beer type – You can use any beer other than very dark beers like Guinness. Dark beers can be a bit too intense and dominate the pan juice flavours.
Substitute with alcoholic apple cider (dry/hard cider), non-alcoholic beer or apple juice, which I’ve used in the past for similar recipes to great success (like BBQ pork ribs).
Rub ingredients – The sugar, salt, pepper and spices you see in the photo above are all for the rub. The seasonings (a good number from my 12 Essential Spices list!!) are for flavour, while the salt dry-brines the pork to make it juicier.
What is dry-brining? Brining exploits the effect of salt on muscle fibres so meat retains more moisture as it cooks. As a handy bonus, it also fully seasons the meat on the inside – great for large cuts like pork butt. Dry-brining is a type of brining where no water is used, just salt (contrasted with wet-brining where you soak protein in salted water). We get the same effects (juiciness and seasoning) except it’s even better because the flesh isn’t bloated with flavourless water, which dilutes meat’s flavour. It’s also convenient because you don’t have to deal with the logistics of keeping a giant piece of pork submerged in liquid in the fridge.
Bottom line: Dry-brining works better and is easier. It’s how I do my turkey every year. Dry brine, dry brine, I say!
How much pork do you need per person?
To figure out how many people your pork will serve, multiply each kilo of raw pork by 3 to get normal servings or by 2.4 for generous servings. Imperial measurements: Multiply each lb of pork weight by 1.5 for normal servings or 1.2 for large servings.
Example:
5 kg pork: 5 x 3 = 15 servings (normal portions) or 5 x 2.4 = 12 servings (large portions)
10 lb pork: 10 x 1.5 = 15 servings (normal portions) or 10 x 1.2 = 12 servings (large portions)
It might sound like a lot of pork per person (335g – 410g / 11 – 14 oz) but remember, pork loses about 40% of its weight once cooked!
What you need for homemade BBQ Sauce
Nothing groundbreaking here! All the usual classic BBQ sauce suspects are present:
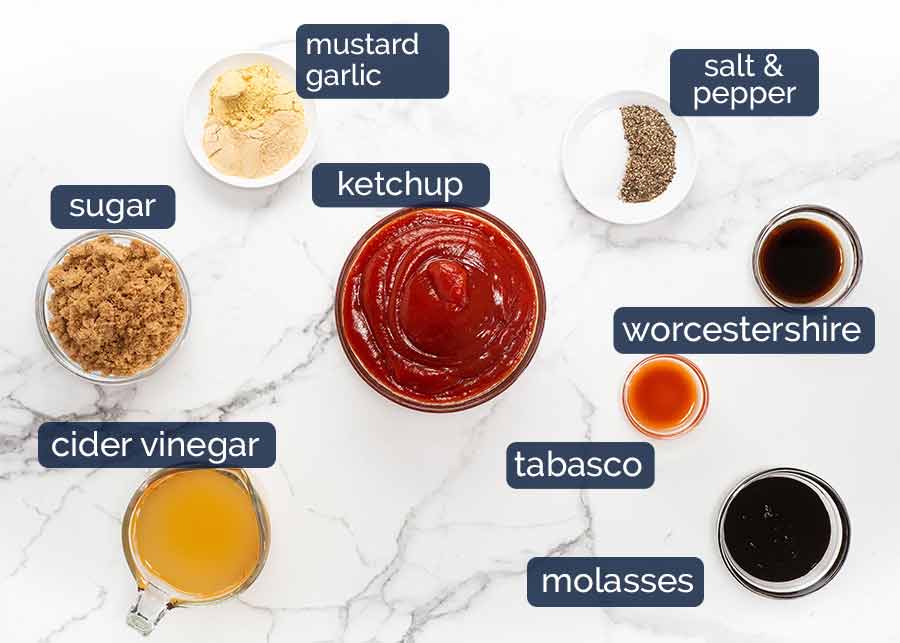
Ketchup – The key ingredient in BBQ sauce. I know it’s totally un-Australian of me to say, but I really prefer ketchup over tomato sauce. Better flavour. Sorry Australia!! Best substitute – Well, tomato sauce!
Apple cider vinegar – For the tang in BBQ sauce. Substitute with white or red wine vinegar.
Molasses (light/true molasses, NOT blackstrap) – Adds sweetness, colour, gloss and flavour. Easy substitute: golden syrup!
Worcestershire sauce – For savoury flavour.
Tabasco – Optional, for a hit of heat!
Sugar – BBQ sauce is sweet, tangy and a bit savoury. This helps with the sweetness!
Mustard and garlic powder – The savoury seasonings. I prefer powdered garlic over fresh garlic, and powdered mustard over mustard spread because the powder versions have a more earthy flavour that I think works better for BBQ sauce.
How to make my best Pulled Pork
It might take 36 hours all up, but it’s actually very straight forward as a process. Also, the brining step, though recommended for truly the best results, can actually be skipped if you want. You still get plenty of flavour on the bark that gets mixed through the meat, as well as in the roasting pan juices that we toss through the meat. The BBQ sauce also adds a good load of flavour!
1. Brining
As mentioned above, a 24-hour dry brine locks in the juices as well as seasoning the flesh right to the middle of that considerable hunk of meat!
Rub – Mix the rub ingredients in a small bowl.
Coat the pork all over with the rub and use your hands to …well, rub it in. 😂 Get right into all those cracks and crevices. Yep, I know some people hate it / laugh when I write that, and I write it every time I use a rub. Have a giggle and rub away!!!
Get as much rub as possible to stick to the pork, being particularly generous on the top. You will end up with some excess rub loose on the tray, as you can see in the photo above. That’s OK.
Brine 24 hours – Position the pork fat side up (smoother side). Place the pork UNCOVERED in the fridge overnight. Uncovered is best because that way your pork will not sweat under cling wrap or similar. It also dries out the surface of the pork which is key to the best bark!!!
Can I brine for longer? Yep! I’ve done it for up to 48 hours. I actually didn’t notice a difference between 24 hours and 48 hours however, so there’s no additional benefit to brining for longer. More that if you forgot or the timing suits you, it’s no issue.
Post-brining – This photo shows what it looks like after brining. There will be some liquid in the pan, which is a bit of pork juices mixed with dissolved salt. Discard this liquid when transferring the pork to the roasting pan. We only want whatever stuff sticks to the pork.
2. 12-hour slow-roasting
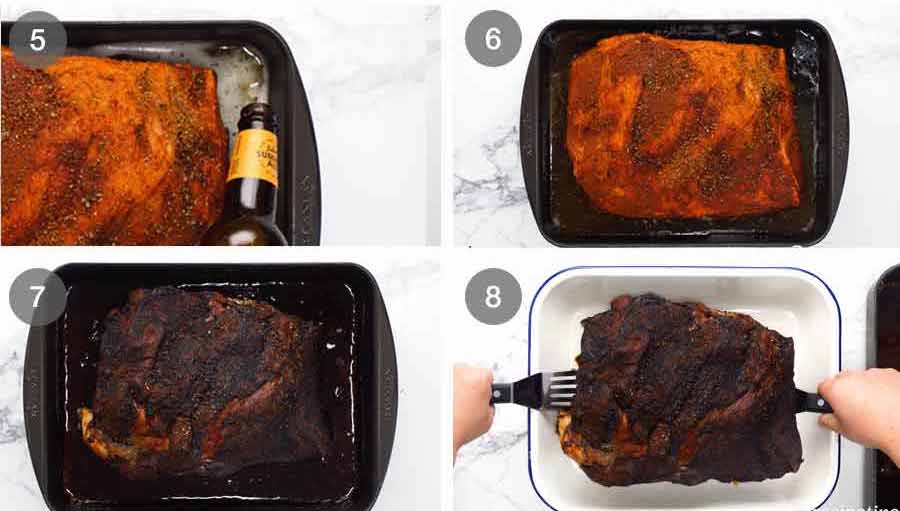
Liquids for cooking – Transfer the pork into a roasting pan. Then pour the beer and water around it, using additional water to top up as needed so that the liquid level is 2.5 cm / 1″. This is to ensure the pan doesn’t dry out during the slow roasting time. It means the pork will be even juicier (nice and steamy environment!) as well as ensuring we end up with some roasting pan juices that we toss through the pork at the end + stir into the BBQ sauce (it’s free flavour!).
Slow roast the pork uncovered for 12 hours at 110°C/230°F (both fan-forced and standard). Some notes on the slow cooking part:
a) Low temperature – We want to use lowest temperature possible to cook this pork at because the lower the temperature, the less moistures is lost from the flesh of the pork which in turn means juicier pork meat. I found that 110°C/230°F is the minimum temperature for the middle of the pork to peak at 95°C. At this temperature, the meat will be tender enough to shred with no effort. Cooking at a temperature lower than 110°C/230°F, I found the pork never became “fall-apart-at-a-touch”.
b) Uncovered – The pork is cooked uncovered so we get that desirable, intensely-flavoured bark on the surface all over the pork. This part is everyone’s favourite!
c) Overnight roasting – At such a low temperature and with the amount of liquid we put in the pan, I feel perfectly safe sleeping with the oven on. It’s also super-handy to do the slow-roasting overnight because it’s entirely hands-off. The cooked pork reheats perfectly so I can serve it anytime the next day.
d) ⚠️ OVEN AUTO-OFF – Many ovens, including mine, will automatically turn off after 12 hours. This is for safety reasons. So be sure to check if yours has an auto-off function (check the manual)! If it does, firstly preheat the oven, put the pork in then turn it off. Immediately turn it back on (to restart the 12-hr clock, so to speak). Now you’re good to go. Also, how handy that your oven will now turn itself off bang on 12 hours when your pork is ready!
Slow-roasted pork – After 12 hours, the pork should be fall-apart-tender with a thick, almost black crust. Pick a bit off and have a nibble – cooks’ treat!
There should still be some liquid remaining in the pan. How much depends on a lot of things, like the size of your pork, your oven and so on, but usually there is around 1.5 – 2 cm / 3/4″ of liquid.
Transfer the pork to a different pan, large enough for shredding. Rest the meat for 20 minutes before shredding. Just because we slow-cooked the meat does not mean we can skip the essential step of resting the meat! During this time juices inside the meat are reabsorbed back into the meat fibres = juicier!!
Shredding
We come to the best part – because you get to pick and nibble throughout the whole process!
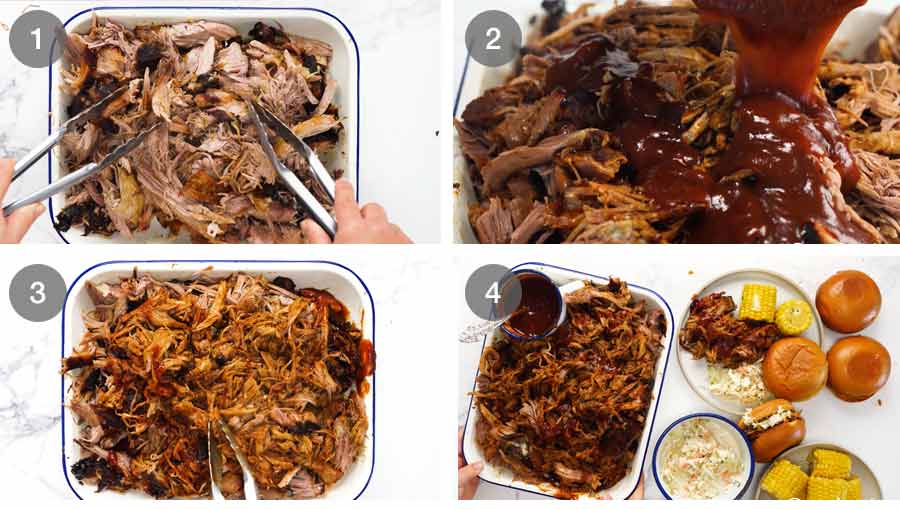
Shred the pork using two forks or tongs. It’s so tender it will be effortless! Shred into strand sizes you desire. Some people like superfine, others like chunks. I’m sort of in-between.
Pan juices and BBQ sauce – Pour over some roasting pan juices (it’s got tons of flavour, we are NOT wasting it!) and some BBQ sauce. Just enough of both to juice up the meat a bit, not drown it! I prefer to serve BBQ sauce on the side so people can use as much or as little as they want.
Toss well.
Serve – Now serve with remaining BBQ sauce on the side! Pictured above with soft buns and coleslaw, to make Pulled Pork Sandwiches. YESSS!!!! (Some more serving suggestions below).
Homemade BBQ Sauce
Just briefly, the BBQ sauce. It’s a plonk-and-stir, simmer-for-45-minutes job. Very easy! It can be made at any time that suits you as it keeps and reheats perfectly.


Honestly, that sight … a big pan of juicy meat that’s had my love and attention for the last 36 hours … (albeit I’ve been asleep for most of that time, but that’s not the point!)… now THIS is my kind of food.
I know this is totally un-lady like. I’m not the dainty sort, not in my food choices, nor in how I barrel through life. But boy does it make for a tasty life!!!
Case in point, Pulled Pork Sandwiches, dripping with pork juices mingling with BBQ sauce. Oh and look, Coleslaw joining the party too:

Or, try a big Southern dinner spread by adding classic sides that you’d swear were invented just to serve alongside Pulled Pork!
Great Southern sides to serve with Pulled Pork


As for dessert? Try one of these!
Desserts. Because we ALWAYS have room for dessert!


So, have I convinced you it’s time for a BIG PULLED PORK feast this weekend? Oh, not this weekend? So – next weekend?? 😉 – Nagi x
12 hour roast not for you? I get it. Try my easy Slow Cooker Pulled Pork instead. Long standing reader favourite!
Watch how to make it

My best Pulled Pork
Ingredients
- 4 – 5 kg / 8 – 10 lb pork butt / Boston butt / square cut pork shoulder (skinless, bone in, fat cap on, Note 1)
- 1 1/2 cups beer , any except dark beers like Guinness (Note 2)
- 1 cup water
RUB (Note 3):
- 6 tbsp brown sugar
- 2 tbsp paprika powder
- 1 tbsp garlic powder
- 1 tbsp onion powder
- 1 tbsp mustard powder
- 2 tsp cumin powder
- 2 tsp dried oregano
- 1 tsp cayenne pepper (can omit)
- 2 tbsp cooking/kosher salt* (Note 4)
- 2 tsp black pepper
BARBECUE SAUCE:
- 1 cup apple cider vinegar (Note 5)
- 3 cups ketchup (or Aussie tomato sauce)
- 1 cup water
- 3 tbsp molasses (original, not backstrap, Note 6)
- 2/3 cup brown sugar
- 4 tsp Worcestershire sauce
- 2 tsp Tabasco (optional spiciness)
- 4 tsp mustard powder
- 3 tsp garlic powder (sub onion powder)
- 2 tsp cooking/kosher salt (Note 4)
- 2 tsp black pepper
Instructions
- Dry brine overnight (Note 7) – Pat the pork dry and place in a large ceramic dish. Mix Brine ingredients in a small bowl and rub it all over the pork, being sure to get into the cracks and crevices. Turn it fat side up (smoother side) covered with as much rub as possible. Refrigerate uncovered for 24 hours.
- Preheat oven to 110°C (both fan-forced and standard) / 230°F.
- Prepare for roasting – Transfer pork to a roasting pan (do not wipe the rub off) with the fat side up. Discard any liquid and residual rub left in the brining dish. Pour beer and water around the pork, topping up with extra water as needed so the liquid level is 2.5 cm / 1" (insurance against pan going dry).
- Slow roast 12 hours (Note 8) – Roast, uncovered, for 12 hours, or until the internal temperature reaches 95°C/203°F and the meat falls apart effortlessly using two forks. ⚠️ Make sure your oven does not automatically turn off mid cook, many have auto-off functions that kick in at 12 hours (also factor in oven pre-heating time)!
- Shred – Transfer the pork to a large pan (reserve juices in roasting pan). Rest for 20 minutes then shred with tongs / forks – it will be effortless! You can discard the fat cap at this stage if you want. I leave some, it makes the shredded pork even juicier.
- Sauce it – Pour 3/4 cup of the juices from the roasting pan and 1 cup of Barbecue Sauce (see below) over the pork, and toss.
- Serve Pulled Pork with remaining Barbecue Sauce on the side so people can help themselves. Either make a big Southern feast with a side of cornbread, coleslaw and potato salad or macaroni salad. Or make Pulled Pork buns with soft rolls stuffed with coleslaw, Pulled Pork and the BBQ sauce!
Barbecue sauce:
- Place ingredients in a large saucepan and whisk to combine.
- Simmer 45 minutes: Bring to simmer on medium heat, then reduce to a low simmer for 45 minutes. Stir occasionally.
- Add pork juices: When the pork is cooked, add 1/2 cup of the juices from the roasting pan into the BBQ sauce and simmer for 5 minutes. Use water to control thickness – it should have a thick syrupy consistency. Serve warm or at room temperature (not fridge cold).
Notes
- Garlic powder and onion powder – substitute with more of the other
- Mustard powder – same amount of dijon mustard spread
- Oregano leaves – omit
- Brown sugar – white sugar or honey
Shred then serve per recipe.
10. How much to make per person – To figure out how many people your pork will serve, multiply each kilo of pork by 3 to get normal servings or by 2.4 for generous servings. Imperial measurements: Multiply each lb of pork weight by 1.5 for normal servings or 1.2 for large servings. Example:
- 5 kg pork: 5 x 3 = 15 servings (normal portions) or 5 x 2.4 = 12 servings (large portions)
- 10 lb pork: 10 x 1.5 = 15 servings (normal portions) or 10 x 1.2 = 12 servings (large portions)
Nutrition
Life of Dozer
In digestion mode. Too much Pulled Pork.

The post My best Pulled Pork appeared first on RecipeTin Eats.
]]> Saltimbocca is a traditional Italian dish that’s super-quick and economical too! I adore the textural contrast of the crispy prosciutto, tender meat and the silky white wine butter sauce. Traditionally made with veal, saltimbocca is also excellent made with chicken, pork and beef. HOT TIP: Great dinner party / make-ahead recipe. Keep it prepped in... Get the Recipe
The post Saltimbocca appeared first on RecipeTin Eats.
]]>Saltimbocca is a traditional Italian dish that’s super-quick and economical too! I adore the textural contrast of the crispy prosciutto, tender meat and the silky white wine butter sauce. Traditionally made with veal, saltimbocca is also excellent made with chicken, pork and beef.
HOT TIP: Great dinner party / make-ahead recipe. Keep it prepped in the fridge, then it’s just a 3 1/2-minute cook (including the sauce!).
Saltimbocca
The literal translation of Saltimbocca is “to jump in your mouth” which is probably in reference to the flavour that hits your palate on first bite. But also, perhaps, about the speed at which it can be made. As in: So fast, it jumps in your mouth. You see what I did there??! 😂
A classic Italian dish originating from Rome, Saltimbocca is traditionally made with thin veal cutlets wrapped or topped with prosciutto, and a whole sage leaf often pressed or pinned on top with a toothpick. Pan-frying turns the prosciutto golden and the meat inside is so thin, it literally takes 2 1/2 minutes flat to cook. Then the buttery, silky white wine sauce is made in the same pan – this takes just another minute!
It’s simple, classic, rustic and fabulous. A cursory browse of internet recipes show some rather eyebrow-raising takes on Saltimbocca – rolled versions, skewered versions and versions smothered in cheese that look suspiciously like Parmigiana. Whereas actually true Saltimbocca is far simpler. After all, why mess with perfection?
Veal, beef, pork or chicken Saltimbocca
As mentioned earlier, Saltimbocca is traditionally made with veal. However it works just as well with chicken, pork or beef, which for many people is easier to get and cheaper.
Veal vs beef Saltimbocca – I’ve tried both and here are the differences. Veal is a more delicate, tender version of beef – with a lighter flavour and a more giving texture. Beef, once pounded into thin steaks suitable for saltimbocca, is still more tender than a thick-cut steak but not as soft as veal.
That’s not to say that veal tastes better than beef in my view. They are just different! And different again is using pork or chicken for saltimbocca. Both mighty delicious, I should add!
The chicken saltimbocca pictured below was lunch yesterday. I snapped a quick photo then hoovered it down still warm!

Ingredients in Saltimbocca
Here’s what you need to make traditional Italian Saltimbocca:
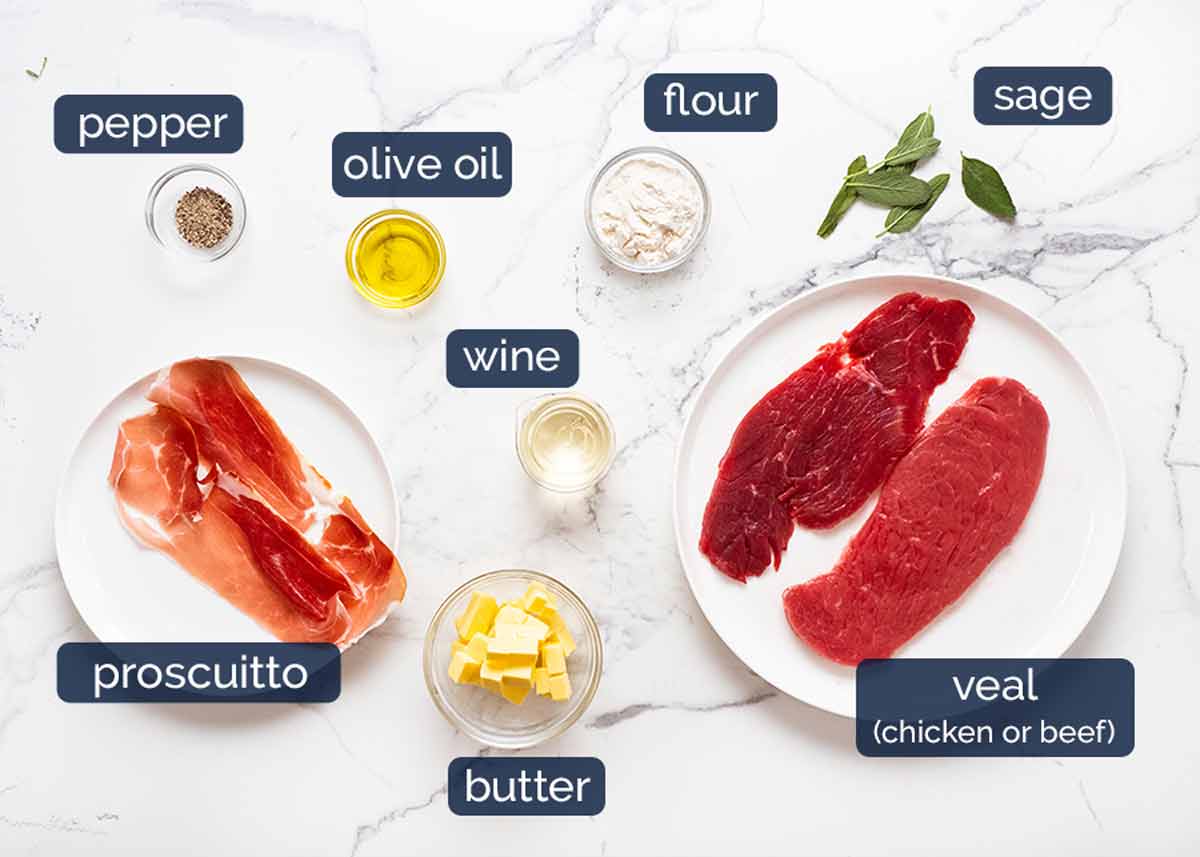
Saltimbocca is unexpectedly economical, calling for just 80g / 2.5 oz protein and 2 small slices of prosciutto per serve.
Veal (or chicken or beef) – Whatever your protein of choice, it needs to be in a thin piece of meat! It’s handy if you can buy them as already thinly sliced steaks (sometimes sold as “sizzle steaks”, “scallopini” or “schnitzel” here in Australia) so they only require a light pounding out. Otherwise, you can slice meat yourself and then flatten the steaks out. Here in Australia, veal steaks in particular are always sold thin, rather than thick-cut like beef steaks.
If you’re preparing your own Saltimbocca meat, just make sure you are using a cut of meat that is suitable for quick-cooking like steaks. Tougher cuts that require slow cooking to make them tender such as chuck, ribs, belly and shoulder (ie cuts you use for stews and casseroles) are not suitable.
Chicken – Use a whole breast, sliced into steaks and pounded out. See step photos below for more guidance (I promise it’s easy, and it doesn’t need to be perfect, just cook-able).
Prosciutto – This is what makes Saltimbocca, well, Saltimbocca rather than a plain ol’ pan-fried piece of meat! Prosciutto is also provides the main seasoning for this dish. We only add the tiniest pinch of salt in the sauce, and none on the veal!
How much prosciutto you need – 4 small pieces or 2 very large slices. Enough to cover one side of the veal when folded over itself as a double layer of prosciutto. The underside is not covered in prosciutto (it can be made wrapped all around but I prefer not).
Fresh sage – The essential herb in Saltimbocca, sage pairs beautifully with the prosciutto and meat. It also brings a pop of colour. I love how it crisps up as it fries!

White wine – A splash of wine is the secret to make a really tasty pan sauce without fussing with lots of ingredients. The wine is reduced to evaporate most of the alcohol, leaving behind just flavour. So it doesn’t taste winey at all.
Wine type – Pinot grigio, being a wine variety popular in Italy, is fitting. However I personally also like chardonnay for the assertive flavours this wine brings to food.
Actually any white wine will work fine here, and even a sparkling wine/champagne. Marsala is a fortified wine that is sometimes also traditionally used in Saltimbocca in Italy, but note it is quite sweet and strongly flavoured – so use less.
Non-alcoholic sub: I think non-alcoholic white wine would be the best alternative here, followed low-sodium chicken stock/broth (be sure to use low-salt else the dish may end up a tad too salty).
COLD butter – Butter is how you transform a watery liquid into a silky, lightly viscous sauce without using any thickening agent like flour or cornflour/cornstarch, properly called “mounting a sauce” in classical cookery. The butter must be cold in order for it to work properly, cut into cubes so it melts evenly and slowly into the sauce. Watch the sauce magic happen in the recipe video below.
Flour – This is used to dust the non-prosciutto side of the veal. Once cooked, it creates a thin crust that gives the sauce something to cling to. Without it, the sauce just slips off the surface of the meat like Teflon. It also helps make the veal or other protein get a little colour on it in the very short cook time.
Pepper only – No salt required! The salt from the prosciutto is all we need on the veal. Although I do like to add a pinch into the sauce, it barely needs it.
Olive oil – For pan-frying the veal.
How to make Saltimbocca
As I re-read this post, it dawned on me that I included a fair amount of step photos for a recipe that I assured you is so fast and easy! It’s really not hard, I promise. I just thought perhaps assembling the Saltimbocca might be new to some readers so I wanted to show it step by step.
If you’re an old hand at Saltimbocca however, you can bypass this whole section. Here’s all you need to know right here:
How to make Saltimbocca: A shorthand recipe for pros!
Assemble: Secure folded prosciutto and sage onto 3 mm pounded veal. Dust underside with flour.
Cook: Prosciutto side 90 seconds, flip, 60 seconds on the other.
Deglaze: Remove veal, discard excess oil. Deglaze pan with wine, turn off stove, drop in butter and swirl to melt. Serve!
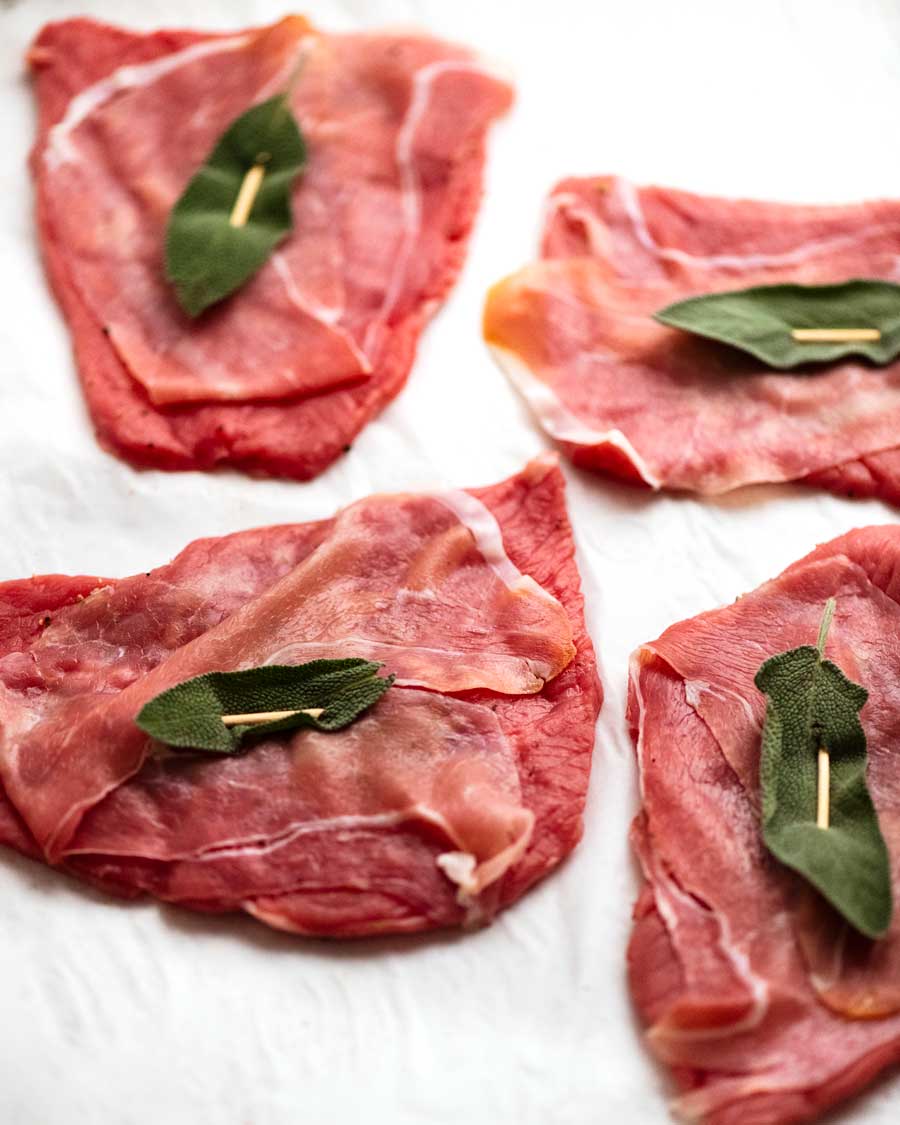
1. Assemble the saltimbocca
You can make short work of the prep if you purchase ready-to-cook thin slices of veal, which is how they are typically sold here in Australia. Chicken and beef are also often sold in thinly-sliced form here.
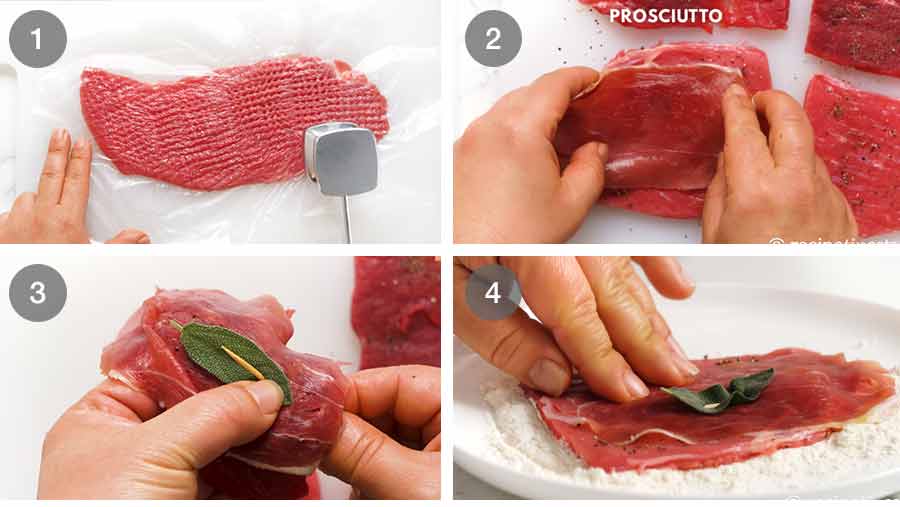
Pound until thin – Pound the veal to a 3mm thickness, then cut each piece to form 4 pieces of veal. It doesn’t matter what size or shape the pieces are, more important is the thickness.
Best way to pound meat: Place the veal between 2 freezer bags, baking paper (parchment paper) or purpose-made plastic sheets called “Go-Between*” (pictured, see below) to protect the meat. Then use a meat mallet or rolling pin to pound the veal gently and evenly so it flattens uniformly.
I use the toothed face of the meat mallet for red meat (veal and beef), and the smooth face for chicken, which is more delicate.
Cutting chicken for saltimbocca – see info box below for detailed steps.
Prosciutto – Sprinkle the veal with pepper (no salt, we get enough from the prosciutto). Fold the prosciutto in half then place on top of the veal. Note it’s does not wrap the meat, it is only covering the top surface.
Secure with toothpick – Place a nice big leaf of sage on top of the prosciutto, then secure both the prosciutto and sage in place with a toothpick. Pierce the meat from the underside, weave through the prosciutto and sage, then back out the underside. This way they sit flatter against the meat and cook more evenly.
Dust underside with flour – Press the side of the veal without prosciutto on it into the flour, shaking off the excess.
* Go-Between is a plastic sheet that comes in rolls, which you tear off to size like cling wrap. It’s used to protect delicate meats when pounding, and also to put between layers of things to stop them from sticking (hence the name!) It’s especially useful for freezing things.
How to cut chicken for Saltimbocca
Chicken breast is easiest to handle for Saltimbocca. You will only need one large 220 – 250g / 7 – 8oz breast. Option 1: Slice in half horizontally to form 2 thin steaks, pound to 0.5cm / 1/5″ thickness (using the flat side) then cut each piece in half so you have 4 pieces in total. Option 2: Slice whole breast on a steep angle to make 4 steaks (steps pictured) then pound each one out. Note that I make chicken steaks slightly thicker than veal as chicken flesh is more delicate and is prone to tearing if too thin.


Boneless thighs are another option if you prefer. Use 2 small thighs. Cut open and spread (butterfly) the thicker end to even out the thickness, then pound.
2. Cooking Saltimbocca

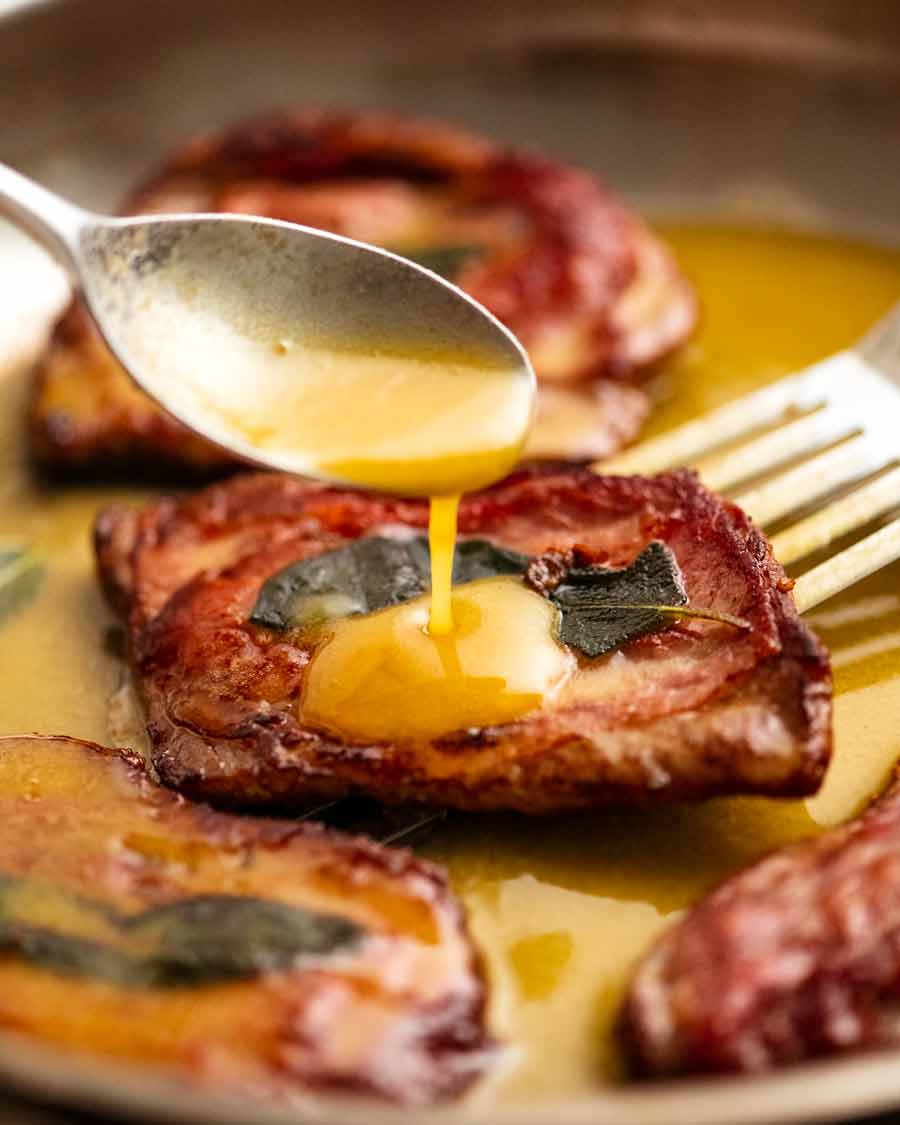
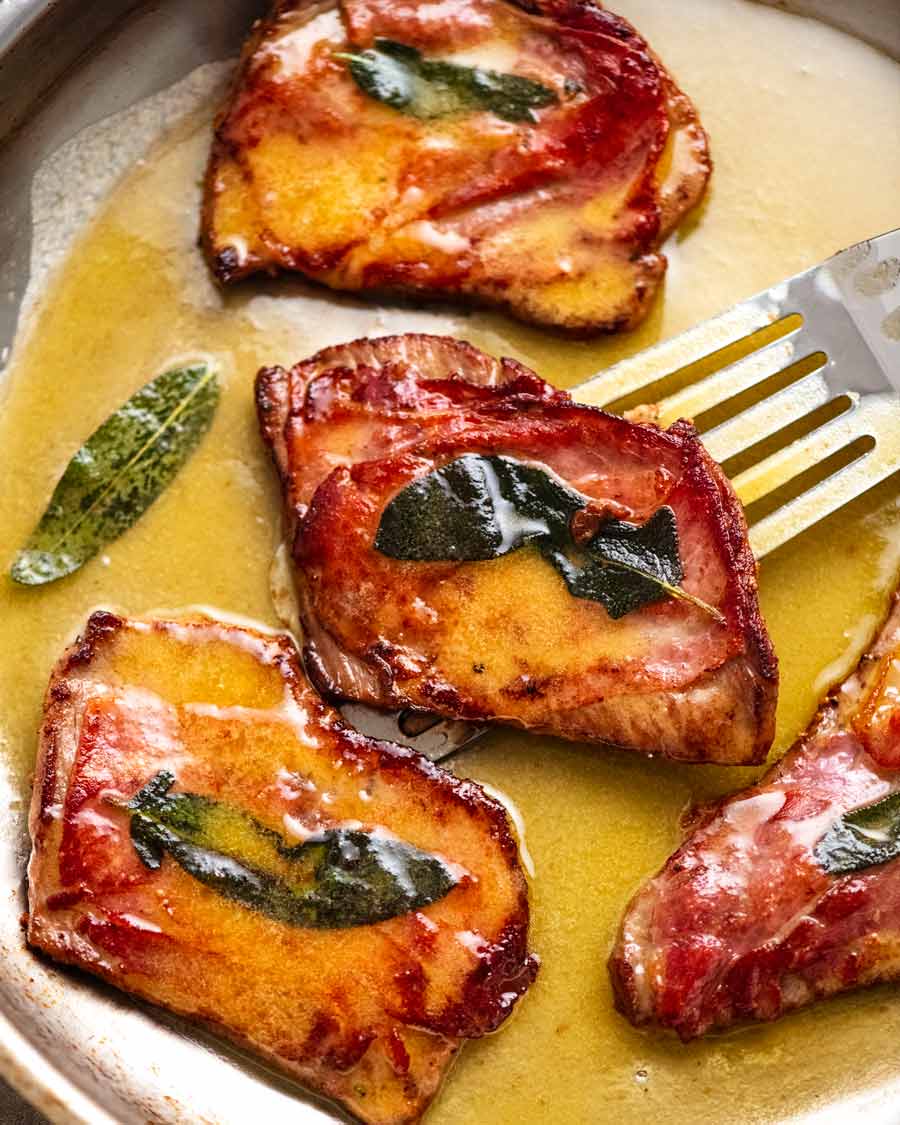
Sear – Cook the prosciutto side of the veal first until golden, around 1 1/2 minutes.
Flip and cook the flour dusted side for 60 more seconds.
Remove the veal straight on to a serving plate (or individual plates) to rest while we make the sauce.
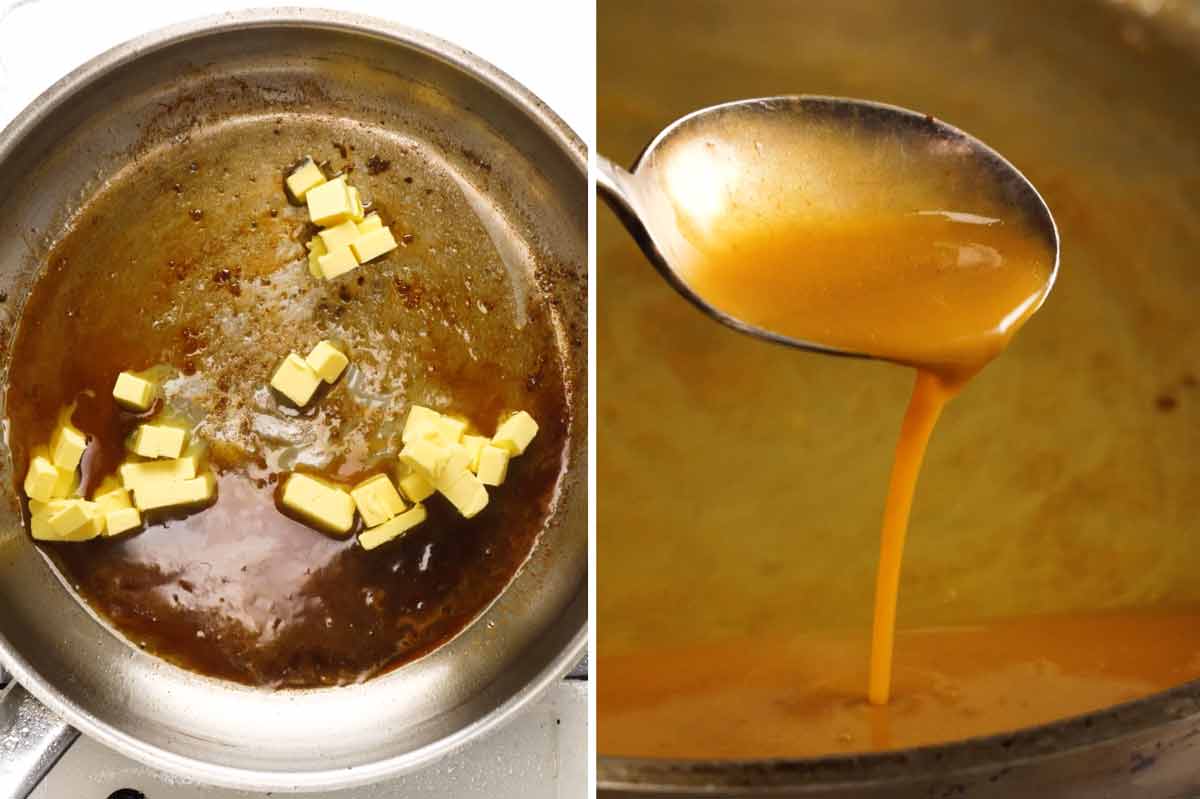
Discard excess oil in the pan. Tip it out, but don’t scrape the pan clean. All that golden stuff you see stuck to the pan is called fond. Fond is packed with umami and concentrated flavour, and is the secret to an incredible tasting pan sauce made with just wine and butter!
3. Saltimbocca sauce
The pan sauce takes 1 minute flat to make: 30 seconds to reduce the wine then 30 seconds to swirl cold butter cubes in until they melt to create a silky sauce.
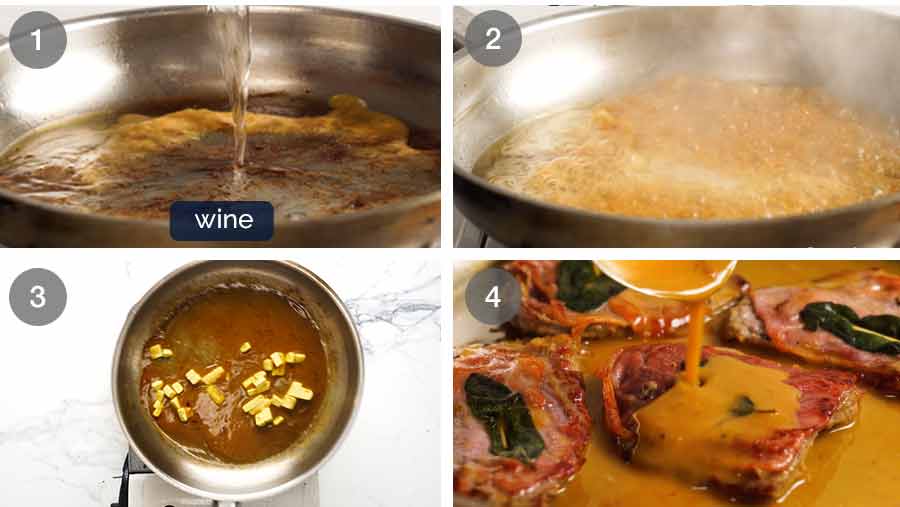
Wine – Return the pan to the stove then add the wine.
Reduce wine by half – The wine will simmer rapidly because we only use a small amount (1/4 cup / 60 ml) in a large, hot pan. Reduce by half, around 20 to 30 seconds.
Add cold butter – Turn the stove off, scatter in the butter cubes and swirl the pan until the butter melts (or just use a wooden spoon). Melting cold butter slowly on a turned off stove is the trick to making an opaque, thickened sauce like the Saltimbocca white wine sauce. High heat means the butter melts faster and becomes more transparent, and you’ll find the sauce won’t thicken as effectively. But, it’s still tasty!
Thickened sauce – And here it is! Look how creamy and glossy that sauce looks. That’s what happens when you slowly melt cold butter into a sauce!
Note on sauce colour: The final colour of your sauce will be affected by the amount of fond in the pan. More fond = browner or more orange-coloured sauce (like in the video). Less fond = more butter-yellow sauce, like in the photos in this post.
And with that, we’re done! Super fast, see? It HAS to be, or else you’ll overcook the veal. Time to plate up: put the Saltimbocca on serving plates then spoon over that dreamy sauce.


What to serve with Saltimbocca
Starchy vehicle – I always serve Saltimbocca over a starchy base suitable for maximising enjoyment of the sauce. Which means creamy mashed potato on normal days, cauliflower mash on “I’m trying to be good!” days, polenta on “I’m really going for a proper Italian vibe here!” days, and bread for plate-mopping on “I can’t even handle making mash today!” days.
Side salad – Try a side of Sautéed Garlic Green Beans, my favourite Tomato Salad. Or if speed is of the essence, a quick Italian Rocket/Arugula Salad. For something a little special and different, like if you’re serving Saltimbocca for a dinner party, this Bitterleaf Orange Salad or a big Panzanella are options that will turn heads!
More ideas in my vegetable sides section – you can browse by vegetable type which my friends tell me they find quite handy.
I’d love to know what you serve Saltimbocca with if you give this a go, let me know! – Nagi x
Watch how to make it

Saltimbocca
Ingredients
- 2 x 80g / 3 oz thin veal steaks or boneless cutlets (sizzle steaks, schnitzel, scallopini) OR thinly cut beef steaks, pork or a chicken breast (Note 1)
- 1/4 tsp black pepper
- 4 large sage leaves
- 4 prosciutto slices (finely sliced, Note 2)
- 2 tbsp flour (plain/all-purpose)
- 2 tbsp olive oil
Saltimbocca Sauce:
- 50 g / 3 tbsp COLD unsalted butter , cut into 1cm / 1/3″ cubes (Note 3)
- 1/4 cup white wine , pinot grigio or chardonnay (Note 4)
- Small pinch of salt
Instructions
Prepare saltimbocca:
- Pound: Place the veal between sheets of cling wrap or paper. Pound to an even 3mm thickness using a meat mallet (Note 5 for tips!) Cut each piece in half so you have 4 pieces in total, and sprinkle both sides with pepper.
- Prosciutto and sage: Fold a slice of prosciutto in half then place on one piece of veal (trim if needed so it's not hanging off the sides too much). Place a sage leaf on top then secure with a toothpick, piercing from the underside (see step photos or video). Do the same with the other piece of veal.
- Dust: Spread flour on a plate. Press the non-prosciutto side of the veal into the flour, shaking off excess (do not flour the prosciutto side).
Cook:
- First side 1 1/2 minutes: Heat oil in a large fry pan over medium-high heat. Place veal slices in the pan, prosciutto-side down, and cook for 90 seconds until prosciutto is beautifully golden.
- Other side 1 min:Turn veal and cook the other side for 1 minute. Remove to a warm plate.
- Tip out excess oil (do not scrape pan clean however). Return skillet to stove, with heat still on.
Sauce:
- Reduce wine: Pour in wine (careful, it will be steamy!) plus pinch of salt. Bring to a simmer then let it cook for 20 to 30 seconds, stirring to scrape up the brown fond from the base of the pan, until wine is reduced by half.
- Swirl butter: Keep the pan on the stove but turn the stove OFF. Scatter the butter in the pan then swirl (or stir) until it melts. The clear liquid will thicken magically into a luscious butter sauce!
Serve:
- Divide veal between plates. Spoon over sauce. Devour! (Careful of the toothpick!)
Notes
Nutrition
Life of Dozer
Rugs are for humans to enjoy looking at and walk on with bare feet.
Kleenex’s are to wipe eye-snot and unidentifiable goop coming out of one’s nose.
One and the same to him.

The post Saltimbocca appeared first on RecipeTin Eats.
]]>