 Sizzling Ginger Steamed Fish – named as such because the ginger and green onion topping sizzles dramatically when you pour hot oil over oven steamed fish! An incredibly simple way to make a healthy fish recipe a whole lot more exciting with fresh Asian flavours. Sizzling Ginger Steamed Fish Does anybody jump up and down... Get the Recipe
The post Sizzling Ginger Steamed Fish appeared first on RecipeTin Eats.
]]>Sizzling Ginger Steamed Fish – named as such because the ginger and green onion topping sizzles dramatically when you pour hot oil over oven steamed fish! An incredibly simple way to make a healthy fish recipe a whole lot more exciting with fresh Asian flavours.
Sizzling Ginger Steamed Fish
Does anybody jump up and down with excitement at the thought of steamed fish for dinner? Healthy , yes. But also….kinda bland….
I know, I know, I really need to grow up. I can already see my mother rolling her eyes when she reads this. 😂
However, today’s Sizzling Ginger Fish is a steamed fish recipe I DO get excited about!
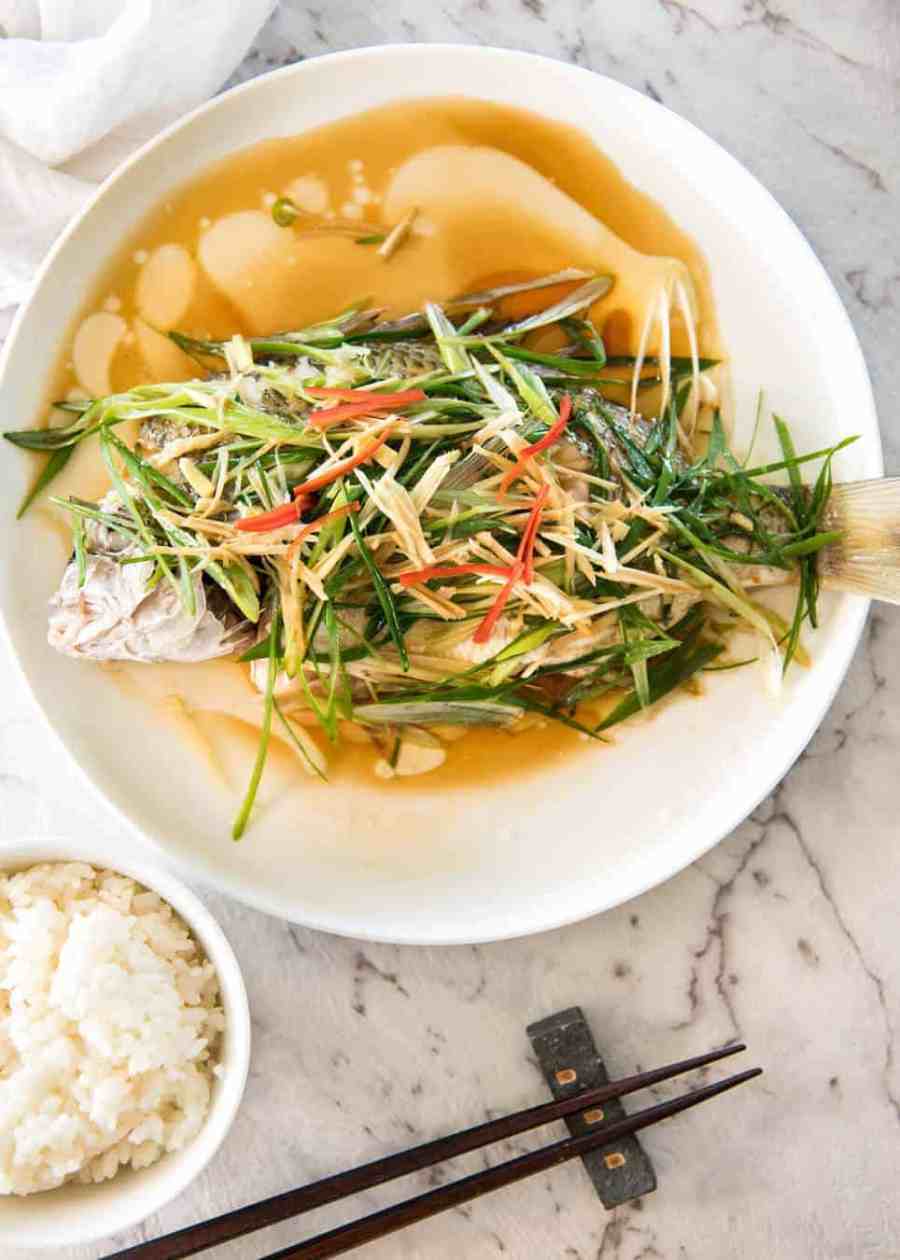
It’s a simpler version of a Cantonese dish where a whole fish is steamed, drizzled with soy sauce then hot oil is poured over a green onion and ginger topping which makes it sizzle dramatically. If you’re a whole fish kind of person (and every chef will tell you it’s the best way to cook fish) here’s my recipe, pictured below.
Traditional Cantonese whole Sizzling Ginger Fish which today’s recipe is based
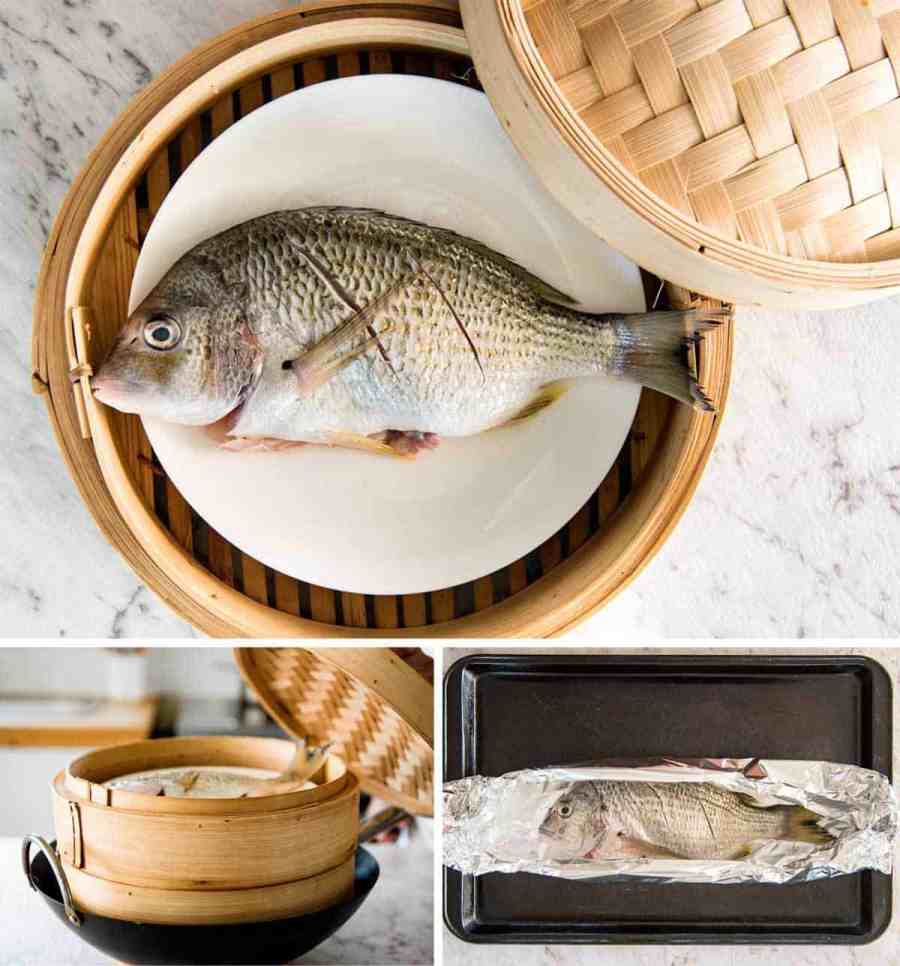
Today, I’m sharing an easier version. Same flavours and the same dramatic sizzling (I was never going to give that up!). Except we’re using fish fillets and steaming them in the oven inside foil packets. Which means – less washing up. Excellent!
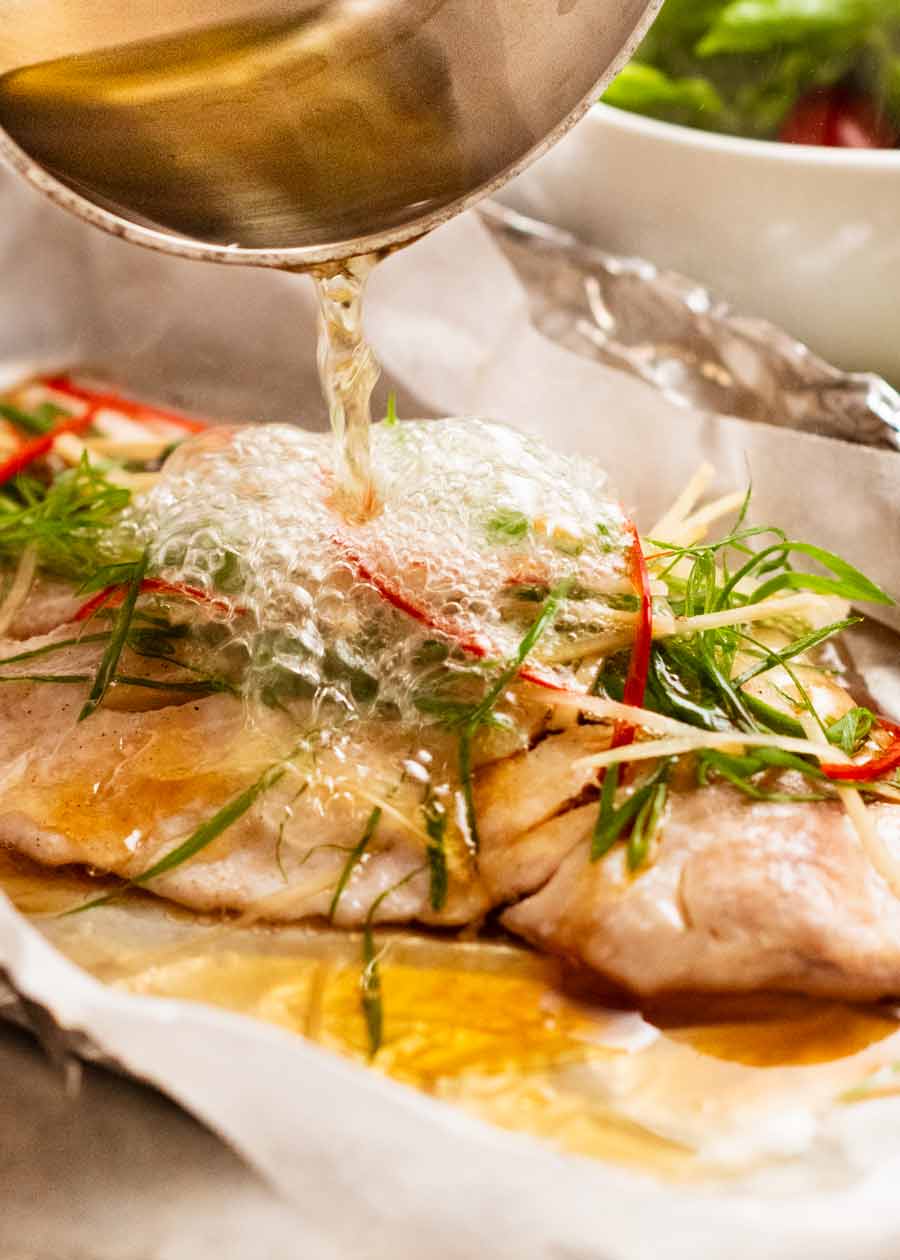
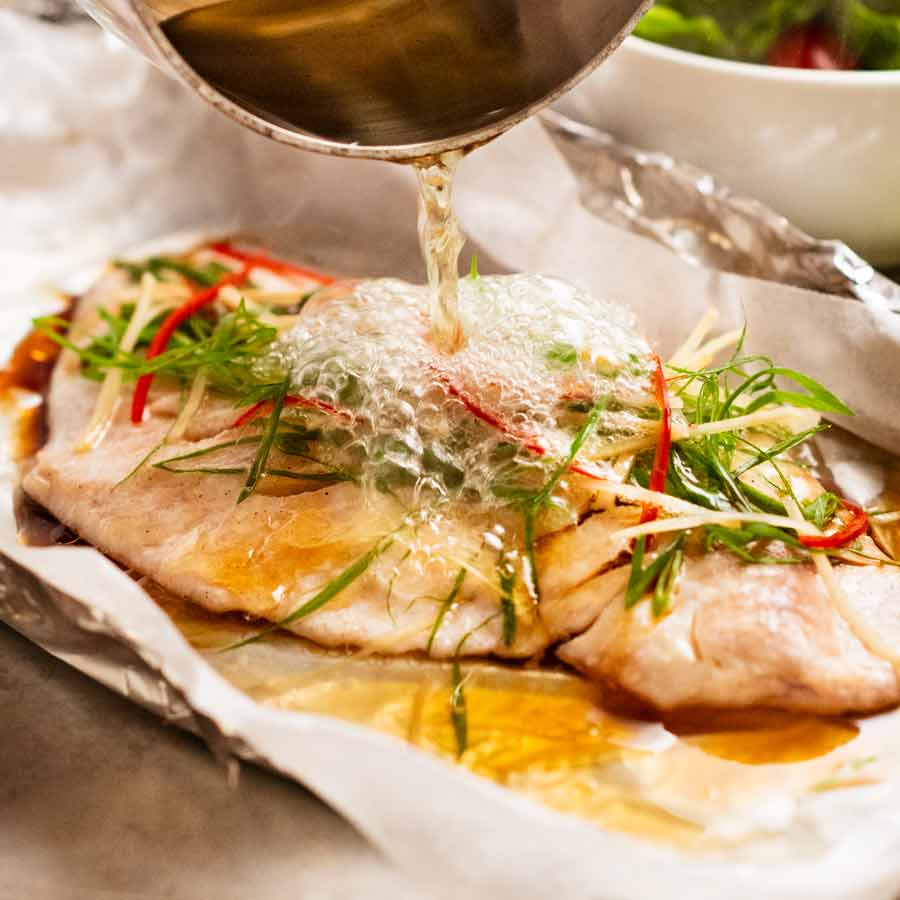
That dramatic hot oil sizzle!
The key step in this recipe is the hot oil drizzle. Just 1 tablespoon per fillet, and 3 important things happen:
the hot oil semi-cooks the green onion and ginger which also flavours the oil itself;
it gently sears the surface of the fish; and
the oil runs off the fish into the foil boat to mingle with the soy sauce, sesame oil, cooking sake and fish juices to create an extraordinarily tasty sauce.
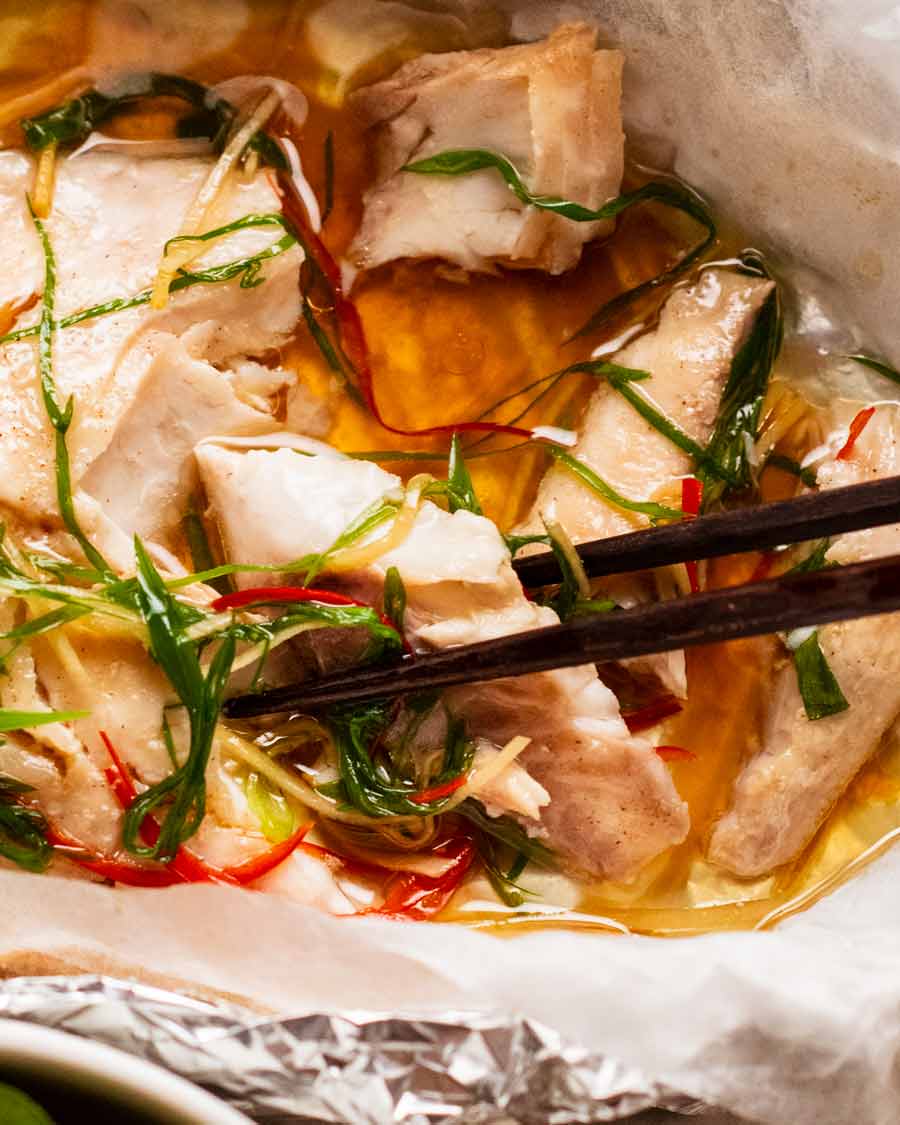
Excessive squidging of every bite of fish in that tasty sauce is not only strongly encouraged, it’s an essential part of the eating experience!
Ingredients in Sizzling Ginger Steamed Fish
Here’s what you need to make this.
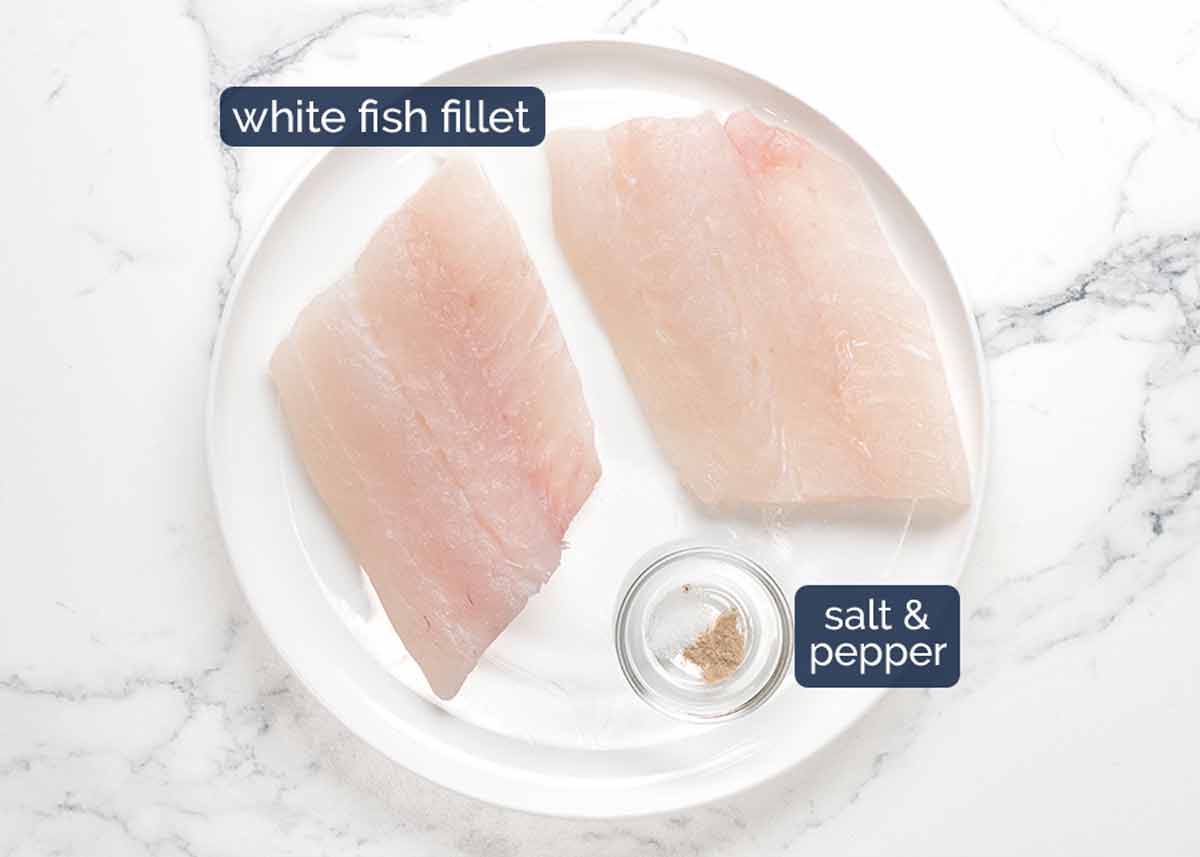
Best fish
Fish type and shape – More delicate white fish fillets, skinless. Thin fillets recommended, around 1.5cm / 2/3″ thick (at the thickest point), for better sizzling surface area to fish ratio. The recipe does work fine with thicker fillets but the bake time will be longer than the 12 minutes per the recipe.
Great fish for this recipe – barramundi, snapper, basa, jewfish, blue eye cod (trevalla), tilapia, cod, halibut, pollock, hake, John Dory, silver dory, gummy shark (flake). I think salmon and trout are a little too strong flavoured – though the recipe will work fine.
Meatier, firmer fish like ling and monkfish work fine but personally for this dish, I think it’s better with slightly softer white fish fillets (better sauce dispersion throughout flakes).
Remember, the shape of fish means that you get thick cuts from the main body as well as thin cuts from towards the tail. Opt for the thinner cuts!
Frozen fish works just fine, thaw then pat dry well before using.
Fish to avoid
I recommend avoiding:
Fish that dry out easily when cooked – Like swordfish, tuna, bonito, kingfish, marlin, mackerel. Unless you’re extremely careful they can become dry inside so are very prone to overcooking in the oven. I feel these fish are (mostly) better in raw/rare form such as Ceviche, Poke Bowls, Tartare (also see Tuna Steak);
Oily, “fishy” fish – Like mullet and sardines (try this recipe for sardines!).
The sizzling sauce & toppings
The sesame oil, soy and cooking sake are the seasonings. The ginger and green onion are the fresh aromatics, the red chilli is for colour and a hint of warmth (entirely optional). The oil creates the sizzle – when poured over the ginger and green onion!
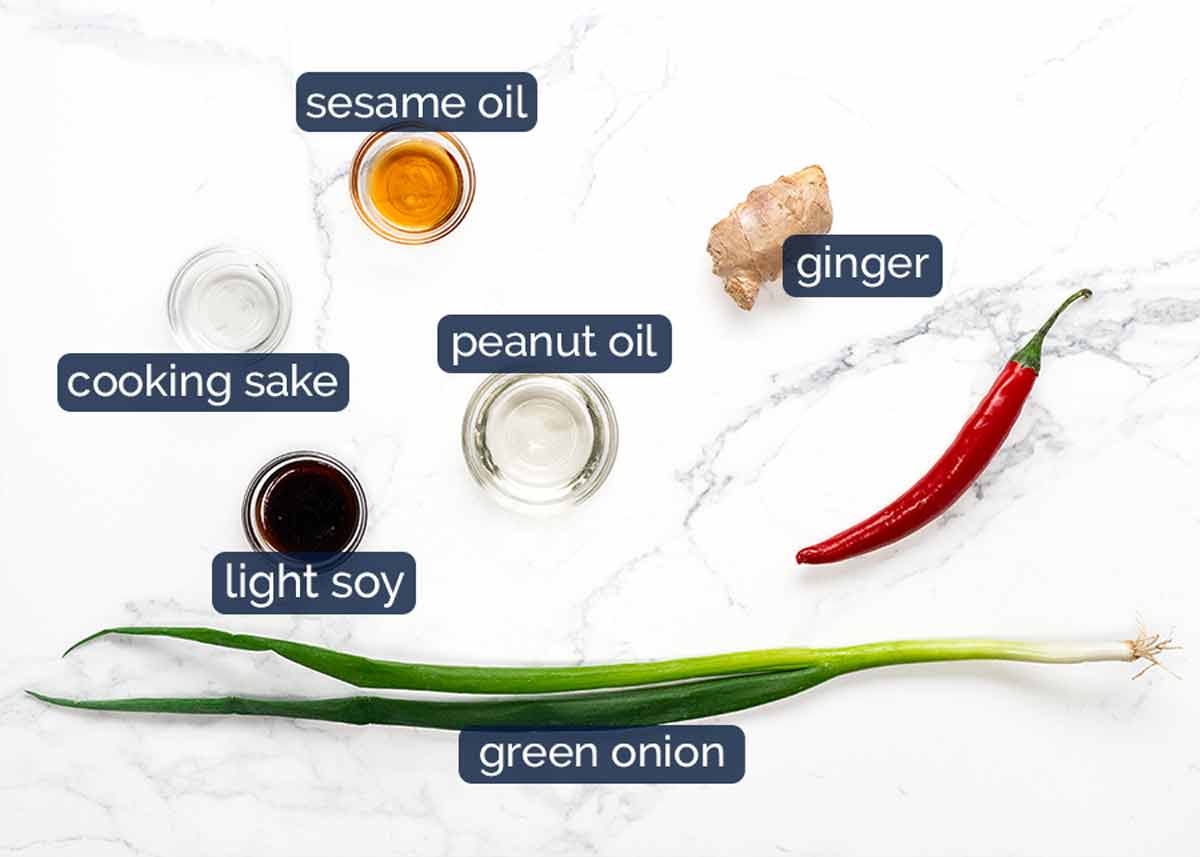
Cooking sake – This is Japanese sake intended for cooking purposes (not pleasant to drink). Like Chinese cooking wine, white and red wine used in Western cooking, it adds a touch of depth of flavour that you can really only get from alcohol.
Find it in the Asian aisle of large grocery stores, and Asian stores. If you can’t consume alcohol, just leave it out.
Soy sauce – Use light or all-purpose soy sauce. Do not use dark soy sauce, too intense!
Sesame oil (toasted) – Use toasted sesame oil which is brown and has more flavour than untoasted (which is yellow). Default sesame oil sold in Australia is toasted, untoasted is harder to find.
Peanut oil – Or any other neutral flavoured oil.
Ginger – Fresh ginger, julienned finely (ie very fine batons) so they partially cook when the hot oil is poured over!
Green onion – The green part only, finely sliced on the diagonal. We only use the green part because it’s more delicate so it too partially cooks when the hot oil is poured over.
Red chilli is for visual purposes mainly and a touch of warm spice (large chillies are not that spicy). Feel free to omit.
How to make Sizzling Ginger Fish
Foil packets serve a double purpose – all the moisture is locked inside as the fish steams gently, plus minimal washing up!
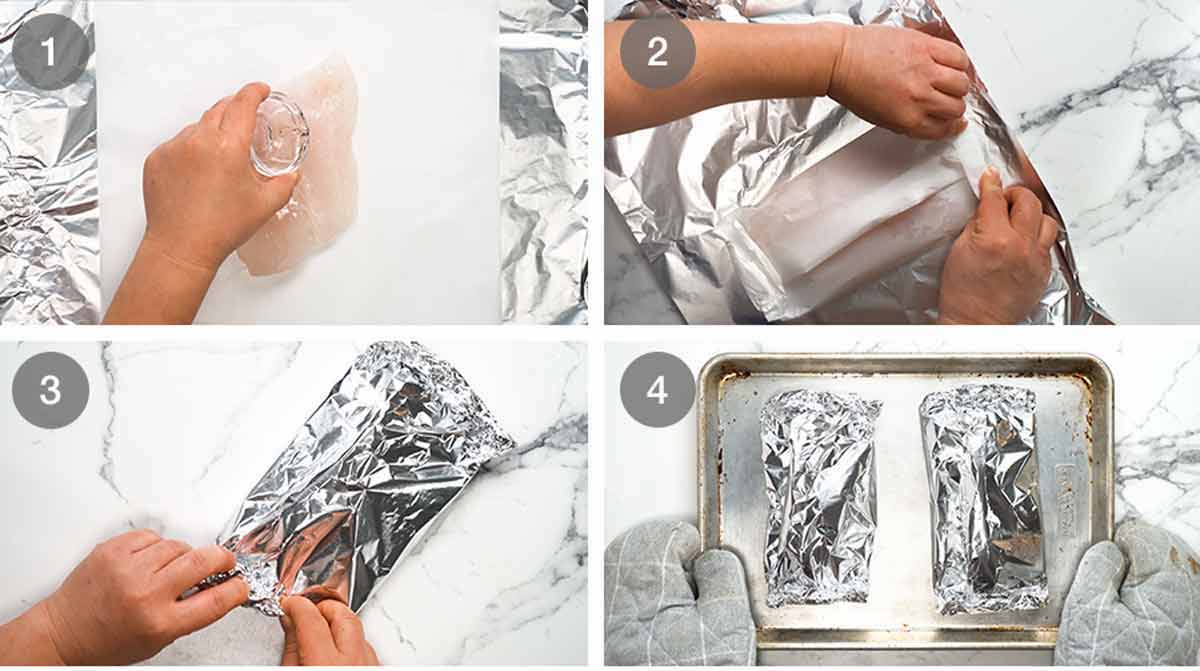
Season fish – Place a ~25cm/10″ sheet of foil on a work surface and top with a piece of paper that is slightly smaller, as pictured. Put the fish on the paper, sprinkle each side with a pinch of salt and pepper then drizzle the top only with the cooking sake.
Paper packet – Wrap the fish up in the paper first, folding the seams to seal. No need to be a present-wrapping master here, just as long as it’s mostly sealed to keep in the steam!
Foil packet – Then wrap the paper packet up with the foil.
Bake – Place the foil packets on a tray and bake for 12 minutes at 200°C/400°F (180°C fan) or until the internal temperature is 55°C/130°F. I pierce thermometer through foil. If you don’t have a thermometer, just open the packet and ensure the fish flesh flakes.
12 minutes?! Is that long enough? Yes it is, if you have a fairly thin fillet around 1.7cm / 2/3″ thick that weighs 180g/6 oz. Thin fish cooks fast when enclosed!
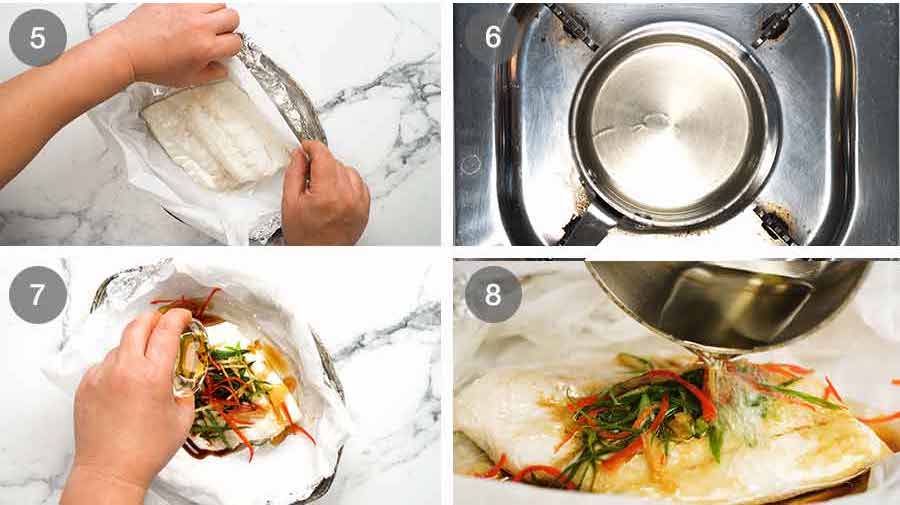
Rest 3 minutes – Remove fish from the tray and put on dinner plates. Open the packets – careful of hot steam! Scrunch/fold down the sides to form a sauce-catching moat around the fish. Leave to rest for 3 minutes while you heat the oil.
Heat oil – Put the oil in a small saucepan or skillet on medium high. Heat the oil up – it will take less than a minute. You don’t need it so hot the oil is smoking. Just hold your hand above the oil and you will feel the heat. Also, oil gets thinner when hot.
Fish toppings – Pile the green onion, ginger and chilli (if using) on each fish. Drizzle over the soy and sesame oil.
Sizzle! Pour the hot oil over the toppings. True to it’s name, it will bubble and sizzle dramatically! As described earlier, the oil cooks / is flavoured by the green onion and ginger and it gently sears the surface of the fish. Then when it settles in the foil boat it mixes up with the soy sauce, sesame oil, cooking sake and fish juices to form part of a tasty sauce that you squidge every bite of fish in.
Now – time to dig in!

Matters of eating Sizzling Ginger Fish
Sizzling Ginger Fish is designed to be eaten out of the foil boat. The idea is that the foil boat holds all the sauce in, and as you break off the tender flakes of fish, you swish it around in the sauce before eating it.
Plus, if you’ve used a good juicy piece of fish, you should actually have plenty of sauce to use for dressing up a bowl of rice on the side to fill out your meal. Add a bowl of instant miso soup (THERE IS NO SHAME) and you’ve got a brilliantly effortless, healthy dinner that’s something a little bit different to the usual.
And look at that! Hardly any dishes to wash up. You kitchen goddess, you. (Or god) – Nagi x
Watch how to make it

Sizzling ginger steamed fish
Ingredients
- 2 x 180g/ 6 oz thinnish white fish fillet , skinless (~1.5 cm/ 2/3" thick) (Note 1)
- 1 tsp cooking sake (sub mirin, Chinese cooking wine, dry sherry) (Note 2)
- Small pinch salt
- Small pinch white pepper (sub black)
TOPPING (divide between 2 fish):
- 1/2 cup green onion , green part only, finely sliced on diagonal (Note 3)
- 2 tbsp ginger , finely julienned (Note 3)
- 1 tbsp large red chilli , deseeded finely julienned on diagonal, optional (Note 4)
SAUCE (divide between 2 fish):
- 2 tsp light soy sauce , or all-purpose soy (Note 5)
- 2 tsp sesame oil , toasted
- 2 tbsp peanut oil (or veg, canola, grapeseed)
Instructions
- Preheat oven to 200°C/400°F (180°C fan).
- Prepare parcel – Place a 2 x 25cm / 10" piece of foil on a work surface. Top with a piece of parchment/baking paper slightly smaller. Place fish on paper.
- Season fish & wrap – Sprinkle each side of the fish with a SMALL pinch of salt and pepper. Drizzle the top of each fish with 1/2 tsp sake. Form a parcel – make a parcel with the paper first, then the foil. (See video or step photos).
- Bake – Place parcels on a tray. Bake for 12 minutes or until the internal temperature is 55°C/130°F (I pierce thermometer through foil) or the fish flesh flakes (open to check). Thin fish cooks fast when enclosed!
- Rest 3 min – Put each parcel on a plate and unwrap, folding down the sides to create a “boat” that will catch the sauce that you can squidge the fish in. Rest for 3 minutes – heat the oil while it rests.
- Heat oil until hot in a tiny saucepan or small pan over medium heat.
- Sizzle! Top the fish with green onion, ginger and chilli. Drizzle with soy and sesame oil. Pour oil all over the green onion and ginger – it will sizzle dramatically!
- Serve immediately. Eat fish out of foil, squidging the flaky pieces well in the sauce before eating. See post for what I served it with!
Notes
Nutrition
Life of Dozer
Dozer had a very special guest over on the weekend to make lunch for him – Andy Hearnden (“Andy Cooks”), a professional chef turned social media “mega-star” who has lots and lots of followers on social media (as in, 12 million or so across various platforms!)


I don’t ordinarily connect or network with “big” social media influencers because I’m so focussed on sharing recipes here on my website rather than worrying about social media. Can’t do it all!  Andy is the first such-person whose message I have responded to. Because despite the insane social media following he has, he’s so normal, humble, down to earth and we have very similar taste in food.
We had a fun day sharing war stories of making a living in the online world, the experience of making a cookbook (he just launched his debut cookbook!) and we also filmed a video together that Dozer stars in! I look forward to sharing it with you.


The post Sizzling Ginger Steamed Fish appeared first on RecipeTin Eats.
]]> This Spicy Tuna Crispy Rice recipe is a shameless copycat of a signature appetiser at the trendy Nobu restaurant. Bite size crispy rice is served with tuna in a creamy spicy dressing. I love it. It’s expensive. So I copied it. And added a canned tuna option too. 🙂 Nobu copycat: Spicy Tuna Crispy Rice... Get the Recipe
The post Spicy Tuna Crispy Rice (Nobu) appeared first on RecipeTin Eats.
]]>This Spicy Tuna Crispy Rice recipe is a shameless copycat of a signature appetiser at the trendy Nobu restaurant. Bite size crispy rice is served with tuna in a creamy spicy dressing. I love it. It’s expensive. So I copied it. And added a canned tuna option too.
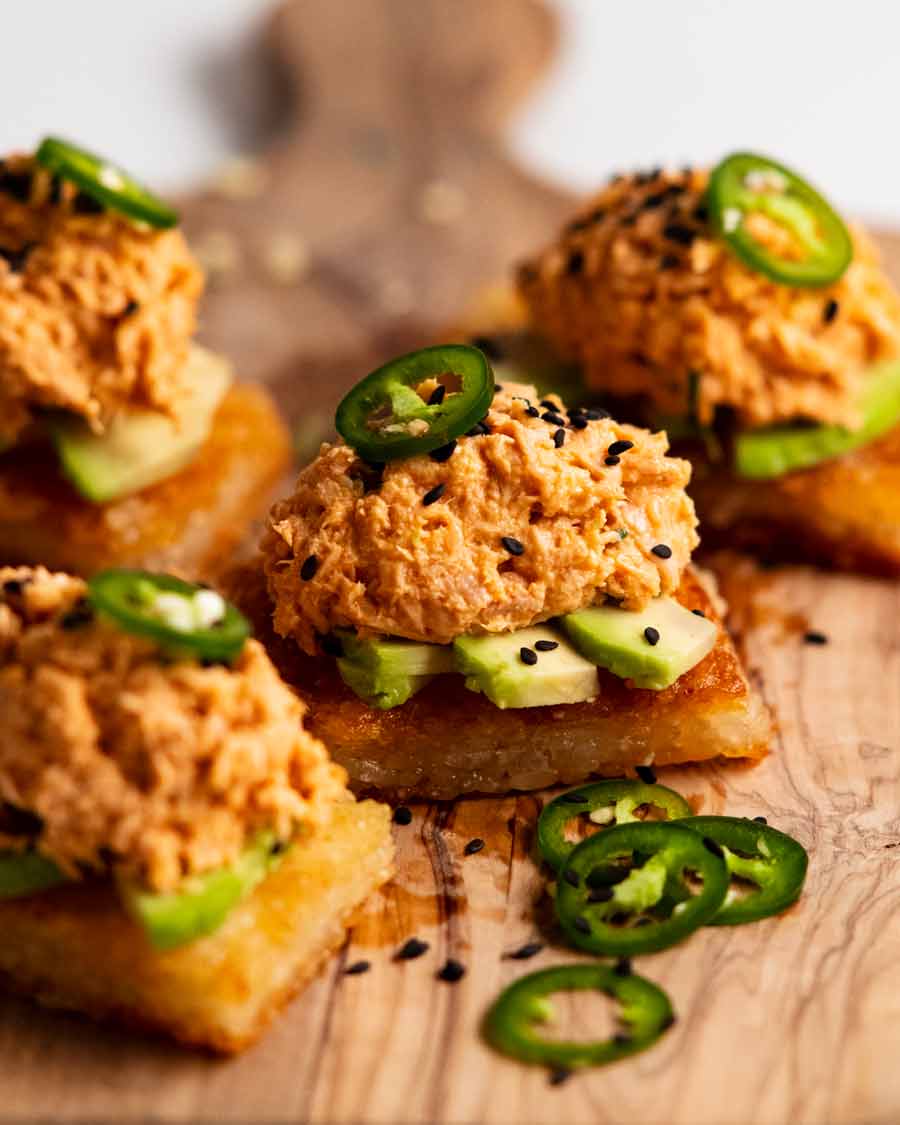
Nobu copycat: Spicy Tuna Crispy Rice
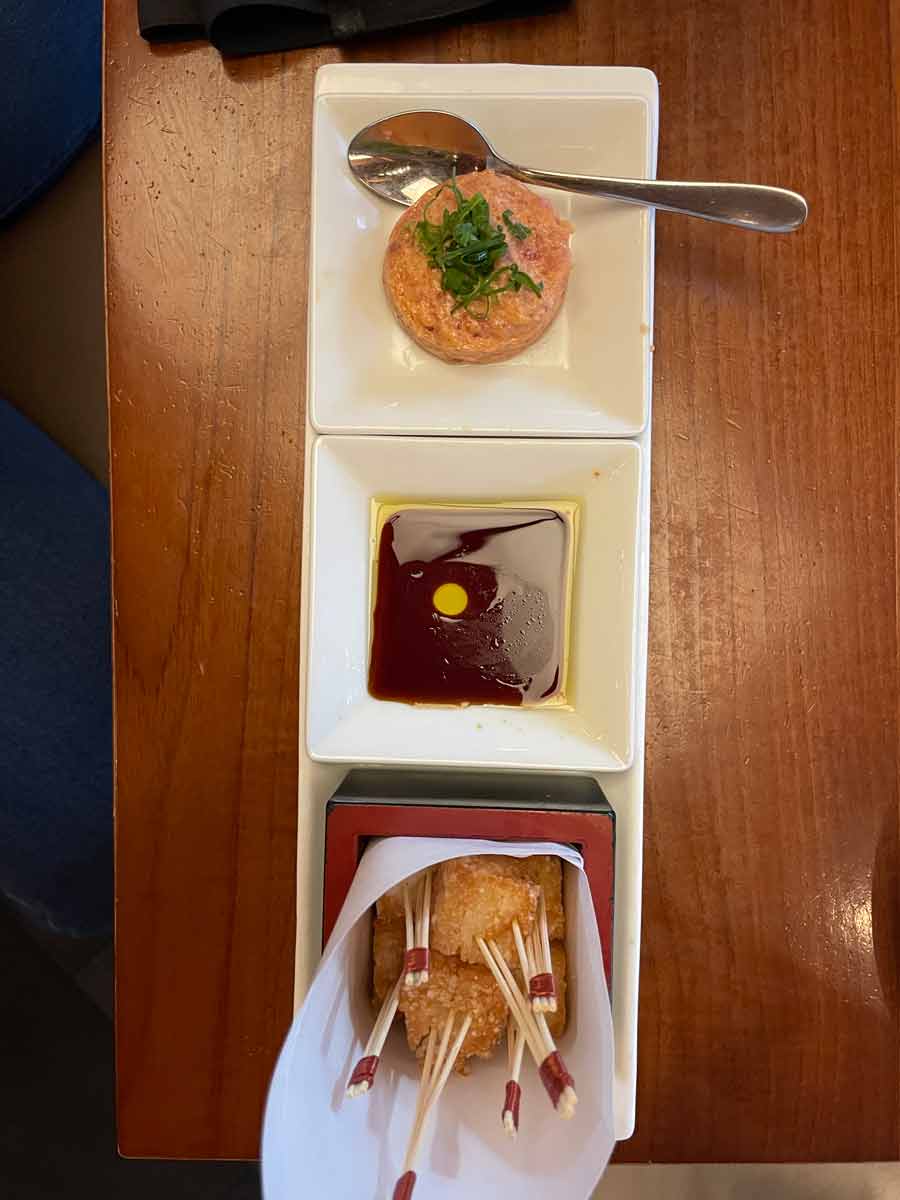
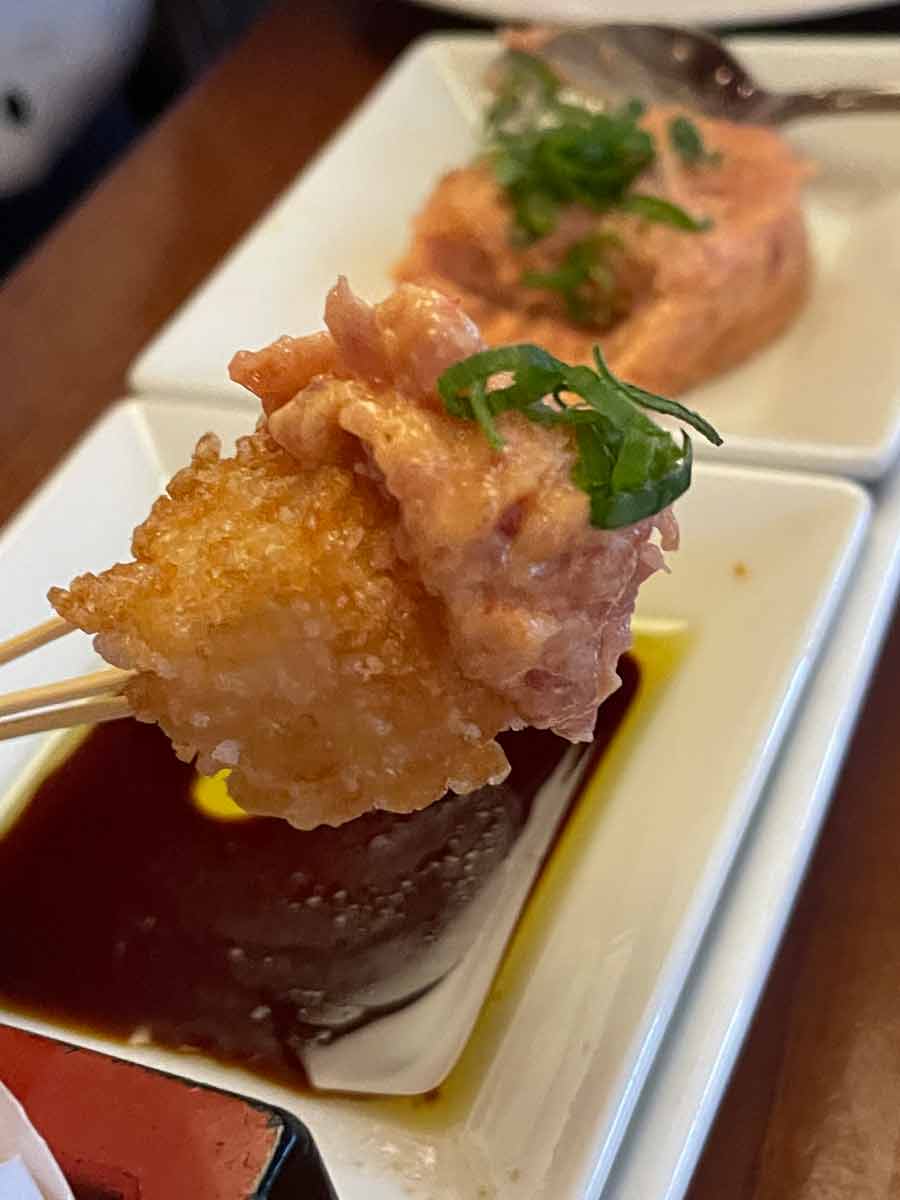
There’s no feel-good story behind today’s recipe. It’s just a blatant fact that I really love the Spicy Tuna Crispy Rice at Nobu* which is a signature starter of this globally renowned restaurant. But you pay through the nose for it – $30 for a very small serving. Here it is at Melbourne Nobu – top quality phone snaps! 😂
* In case you’re not familiar with Nobu, it’s a trendy modern Japanese restaurant founded by world-famous chef Nobuyuki Matsuhisa that is now global with a presence in major cities like New York, Tokyo, London, Dubai, Sydney. Won’t lie – I’ve had hits and misses in various cities. But overall, it’s very reliable. Firm favourite with celebrities.
Price aside, I don’t want to go to Nobu every time I want to have it. So I decided to copy it. It seemed like a simple enough recipe – and it is! Crispy rice topped with raw finely chopped tuna mixed with a creamy spicy dressing.


Nobu vs my version
At Nobu, the rice is served in small cube form which you stab with (fancy) toothpicks then dip into the tuna which is so finely minced it is like a spread. Based on the perfect golden colour on each side of the rice cubes, I suspect they are deep fried.
I’ve made my rice cakes flatter so they can be pan fried instead of deep fried, and pre-assembled with the toppings. I also do not have a dipping sauce because I’ve incorporated seasonings in the tuna toppings.
Plus, I’ve made a canned tuna version as well, as an option you make right now instead of going out to find sashimi-grade tuna! Think – canned tuna fillings in sushi rolls. It’s really tasty! This is the canned tuna version:
What you need
Here’s what you need to make this Nobu copycat Spicy Tuna Crispy Rice.
1. Sashimi tuna or salmon – OR canned!
As mentioned above, the base recipe is a copy-cat of the Nobu version which is made with raw sashimi-grade tuna, Plus, I’ve created a canned tuna version too as an easier make it now version / those who can’t get or don’t like raw tuna. It’s like the canned tuna filling you get in sushi rolls – it’s really tasty!
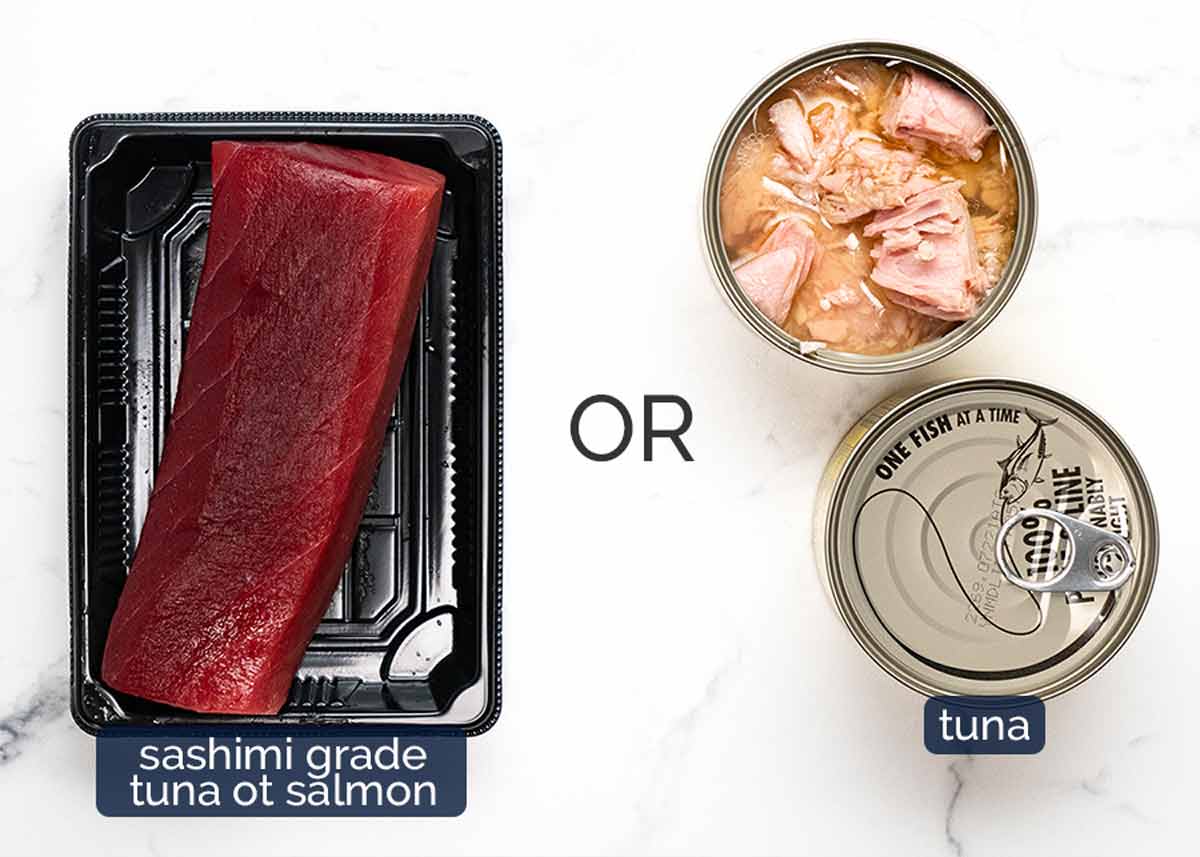
Sashimi grade tuna – To make the raw tuna version, you will need to get sashimi grade tuna. This is tuna that is fresh enough, handled and stored in a manner suitable for eating raw. It is more expensive than tuna intended for cooking.
Common sashimi tuna types
Bluefin tuna – the frontrunner, most premium type. For flavour, colour and texture.
Yellowfin and bigeye tuna (ahi ahi) – The more common type that is more economical. It is softer, not as red.
Canned tuna – Tuna in oil is best. If using tuna in spring water, the mixture is a little drier so perhaps add extra mayo.
2. Spicy creamy dressing & assembling
Here’s what you need to make the creamy dressing and for assembling. The same ingredients are used for both, it’s just that you need more for the canned tuna (lots of little tuna bits = more surface area = more dressing required).
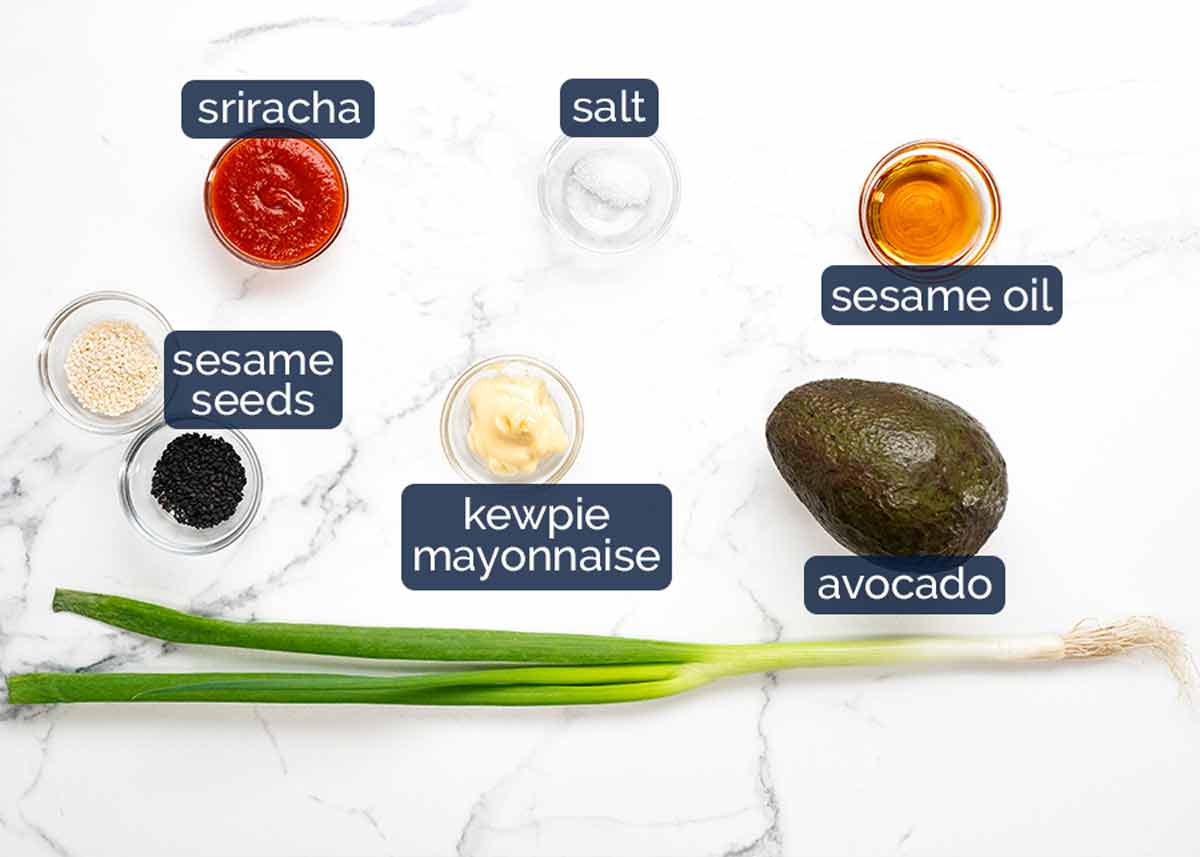
Kewpie mayonnaise is a Japanese mayonnaise that has a smoother flavour than Western ones. Substitute with whole egg mayonnaise. Normal mayonnaise (ie not labelled “whole-egg”) is tangier / sweeter which will dominate the raw tuna version too much but ok for the canned tuna version.
Sriracha is a red Asian spicy sauce that has other flavours in it in addition to chilli, such as vinegar and garlic. Substitute with other spicy sauce of choice, but adjust quantity based on spiciness.
Non spicy option – Ketchup!
Green onion – For nice green specks and a bit of freshness.
Sesame oil & seeds – For toasty sesame flavour!
Lemon – For the canned tuna version, I found a hint of extra tang was desirable. For the raw tuna version, fresh lemon juice made the dressing a little too loose so I stick with using the tang in sriracha.
Avocado – Optional (and not in Nobu’s version), but I really like how it adds an extra creamy element. If avocado is not in season or pricey, I’d skip it.
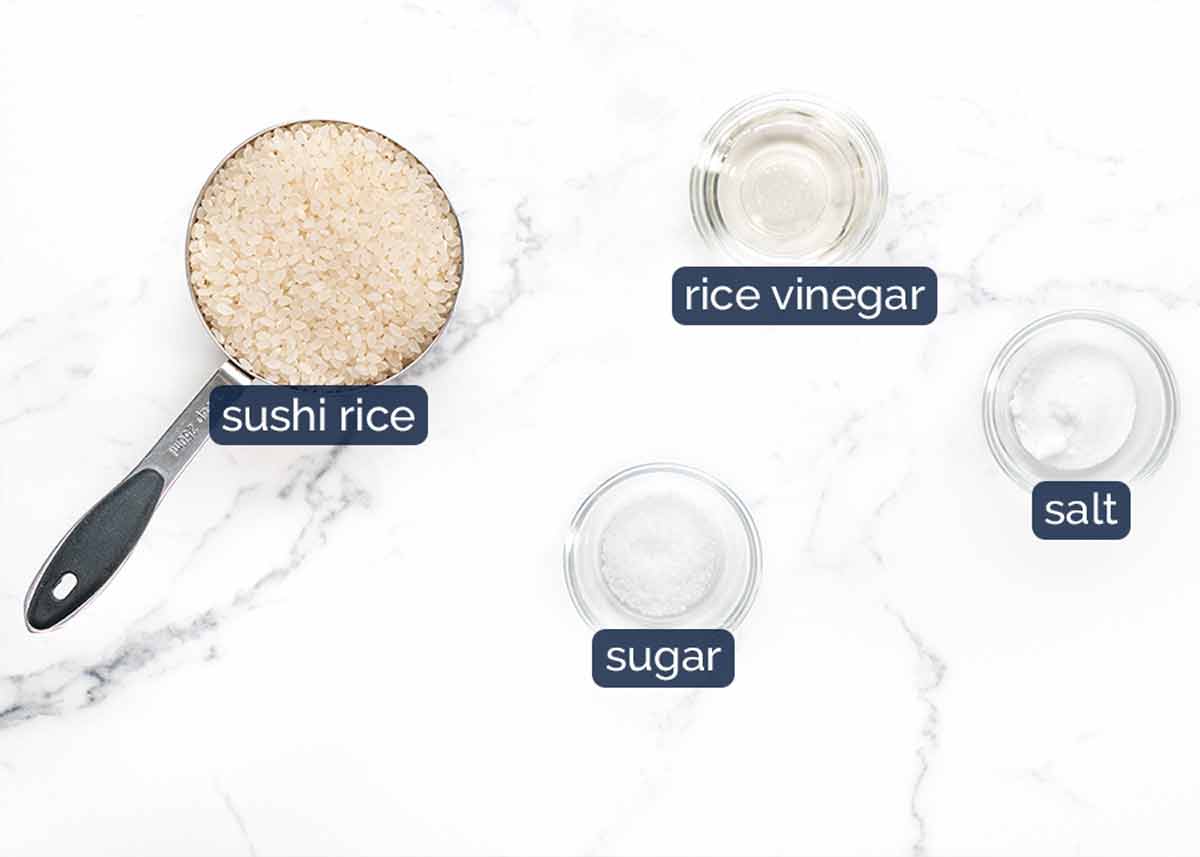
Crispy rice
All you really need for the crispy rice is sushi rice, oil for cooking and salt for seasoning. But it makes it extra tasty to flavour the rice with sushi rice seasoning – just rice vinegar and sugar.
See the separate crispy rice recipe for commentary on the ingredients.
How to make Nobu’s crispy rice with spicy tuna
The crispy rice cakes has been published as a separate recipe – because it’s deemed worthy as such! It’s really easy – cook rice, press in pan, chill to set, cut, pan fry.
So the steps below are for the topping and assembling.
1. Nobu spicy tuna topping
Tip: Raw fish is hard to finely dice because it is so soft. To make it (much!) easier, partially freeze the fish first to make it firmer. Just 30 minutes in the freezer.
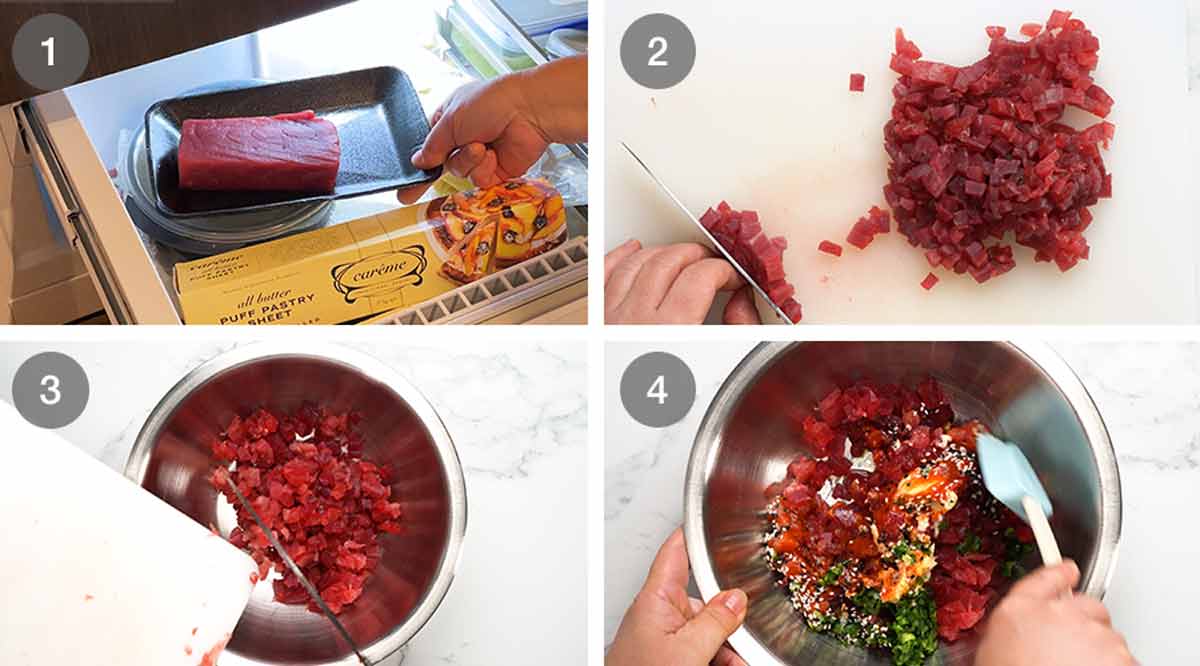
Partially freeze the raw tuna (or salmon) in the freezer for 30 minutes. This will make it much easier to cut.
Cut into small 0.5cm / 1/5″ dice. To do this, I slice 0.5cm / 1/5″ thick pieces, then 0.5cm / 1/5″ strips, then dice.
De-chill the fish for 20 minutes or so, so it’s not ice-cold. Sushi tastes best when at room temperature which is around 18C/65F. Small diced tuna will de-chill fairly quickly.
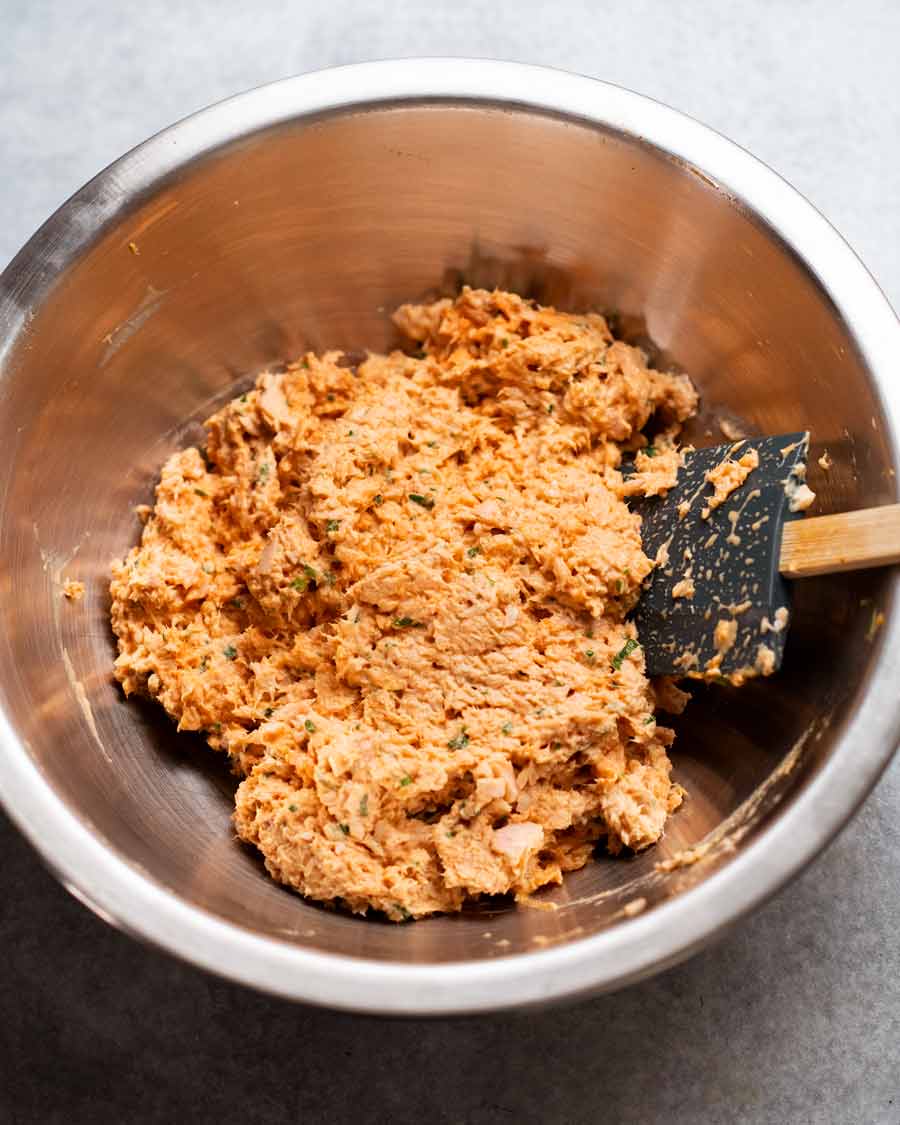
Mix – Add the mayonnaise, sriracha, green onion, sesame oil, sesame seeds and salt. Mix gently to combine. Then refrigerate until required. But remember to aim for the room temperature for serving! Warm crispy rice cakes with ice-cold tuna isn’t ideal.
Creamy canned tuna topping

Mash the drained canned tuna with a fork until it’s really fine. The finer the better.
Add everything else and mix!
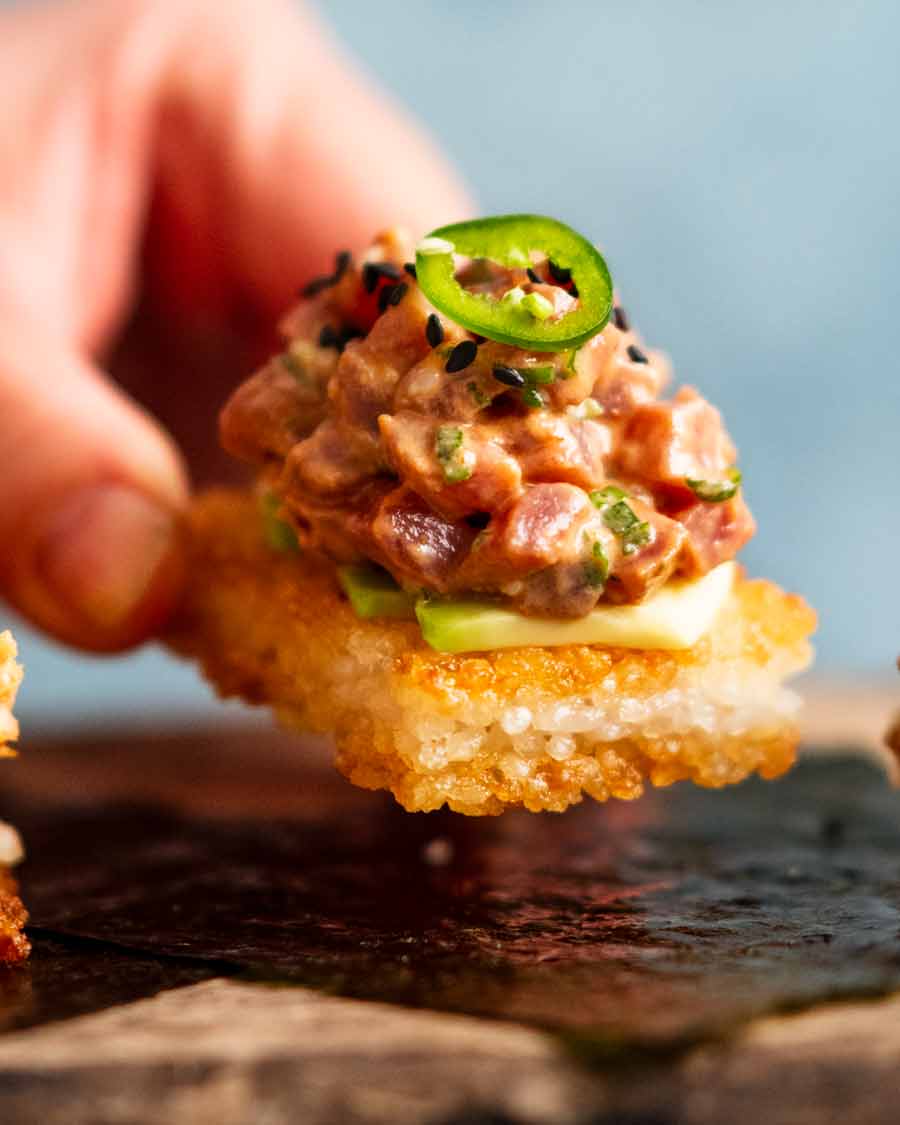
3. Assembling the crispy rice cakes
Nobu serves this as a DIY set up with cubes of rice that is speared with fancy toothpicks then dunked into the spicy tuna which is almost in paste-like form. I like to assemble for an easy finger food option.
Also, cubes of rice either need to be turned 6 times in a pan (what a pain!) or deep fried (what a pain!). Pan frying 2 sides of a flatter pieces is so much less effort!

Cook the rice cakes after you’ve mixed the toppings. See directions in the crispy rice cakes recipe.
Avocado – Place on a serving platter and top with avocado slices. You can either use 1 large, or fan out smaller pieces as I have done. You could also pipe on avocado sauce – a good option for speedy assembling if making big batches.
Shape – Use 2 teaspoons to shape a mound of the topping into a “football” shape so it sticks together.
Assemble – Place tuna on avocado. Sprinkle with sesame seeds, top with jalapeño. Repeat with remaining rice cakes. EAT!

I see you making this for friends who come round for Saturday night drinks. Impressing the pants off your friends at book club. For your mum’s birthday lunch.
And just generally because you want to eat Nobu in the comfort of your own home, in trackies and your favourite slouchy t-shirt, and feel smug that it cost you around…oh I don’t know. About 80% less? At least!! – Smug Nagi x
Watch how to make it

Crispy rice with spicy tuna (Nobu copycat)
Ingredients
- 1 batch crispy rice cakes (15 pieces)
- ONE topping of choice (below) – Nobu sashimi tuna or canned tuna
- 1 avocado , cut into small thin slices (or make avocado sauce)
- 15 jalapeño slices , thin, optional garnish
- 1/2 tsp black sesame seeds , for garnish
Nobu spicy tuna (raw):
- 225g / 7oz sashimi grade tuna , or salmon (Note 1)
- 1 tbsp sriracha , adjust spiciness to taste (Note 2)
- 4 tsp kewpie mayonnaise (Note 3)
- 1 tsp sesame oil
- 1/4 tsp cooking salt
- 2 tbsp finely chopped green onion
- 1 tsp white sesame seeds
- 1/2 tsp black sesame seeds , divided
Creamy spicy canned tuna topping:
- 360g/12oz canned tuna in oil , drained (Note 4)
- 3 tbsp sriracha (Note 2)
- 4 tbsp kewpie mayonnaise (Note 3)
- 1 tbsp lemon juice (sub rice vinegar)
- 1 tsp sesame oil
- 1/2 tsp cooking/kosher salt
- 1/4 cup finely chopped green onion
- 2 tsp white sesame seeds , optional
- 1 1/2 tsp black sesame seeds , divided
Instructions
- Start the rice the day before or first thing in the morning – it needs minimum 4 hours to chill.
- Make the toppings first, then refrigerate while you cook the crispy rice cakes.
- Cook the crispy rice cakes and sprinkle with salt per the recipe.
- Assemble – Place rice cakes on a serving platter. Pile on toppings – I use teaspoons to make football shapes then slide on. Sprinkle with black sesame seeds, top with jalapeño. Eat!
Nobu spicy tuna topping:
- Freeze to firm – Place tuna in the freezer for 30 minutes to partially freeze – it's much easier to finely chop when slightly firm.
- Cut into 0.5cm / 1/2" cubes – the smaller the better! Place into a bowl and let it de-chill for 20 minutes (not as nice ice-cold).
- Mix – Add everything into the tuna and mix until combined.
Creamy canned tuna (sushi-roll filling style):
- Place tuna in a bowl and use a fork to mash it up really finely. Add everything else and mix well.
Notes
Nutrition
Life of Dozer
Crispy rice cake size context.

The post Spicy Tuna Crispy Rice (Nobu) appeared first on RecipeTin Eats.
]]> This is a one-pan meal with fish baked in cream on top of a potato gratin with a golden crunchy topping. It’s a cross between a casserole, gratin and a pie. Fabulously cosy, rustic, oven baked fish recipe that’s effortless yet company worthy! Creamy baked fish on potato gratin This dish gives off very French-country... Get the Recipe
The post Creamy baked fish on potato gratin appeared first on RecipeTin Eats.
]]>This is a one-pan meal with fish baked in cream on top of a potato gratin with a golden crunchy topping. It’s a cross between a casserole, gratin and a pie. Fabulously cosy, rustic, oven baked fish recipe that’s effortless yet company worthy!
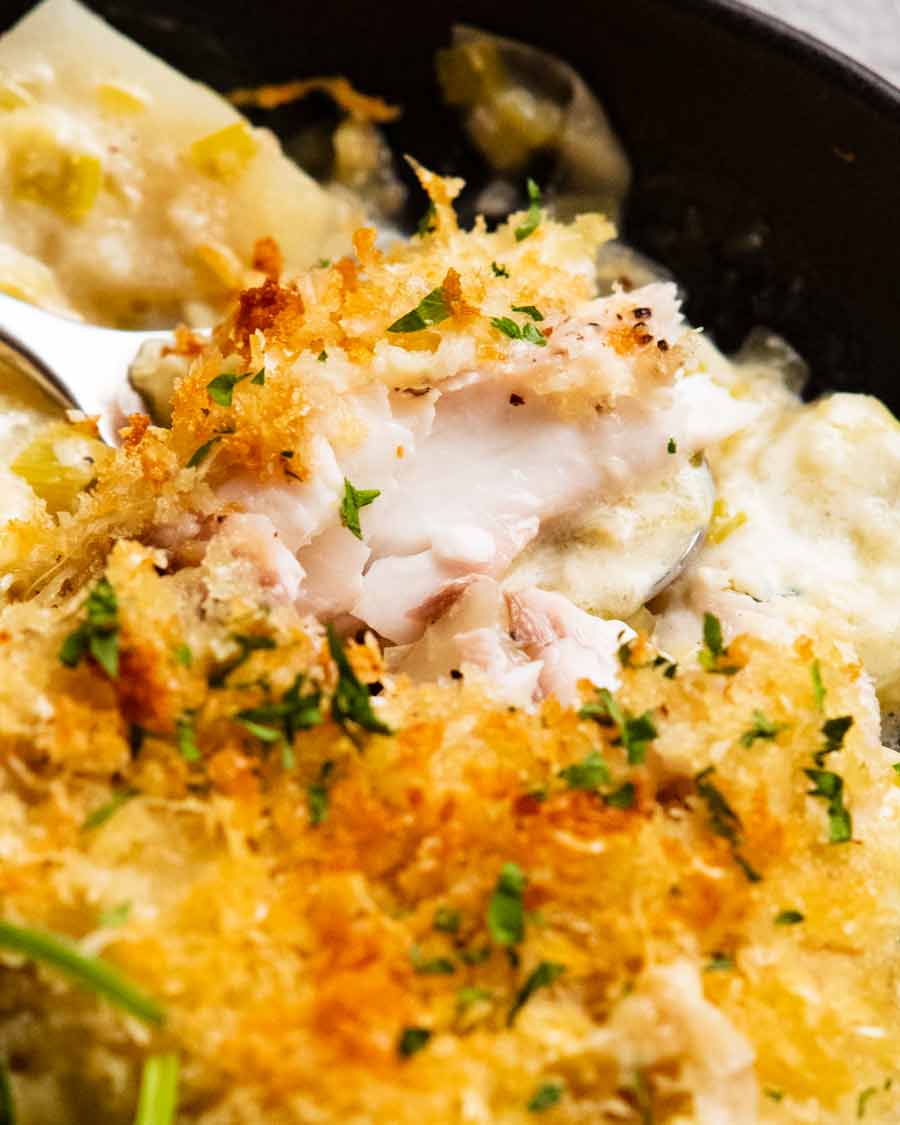
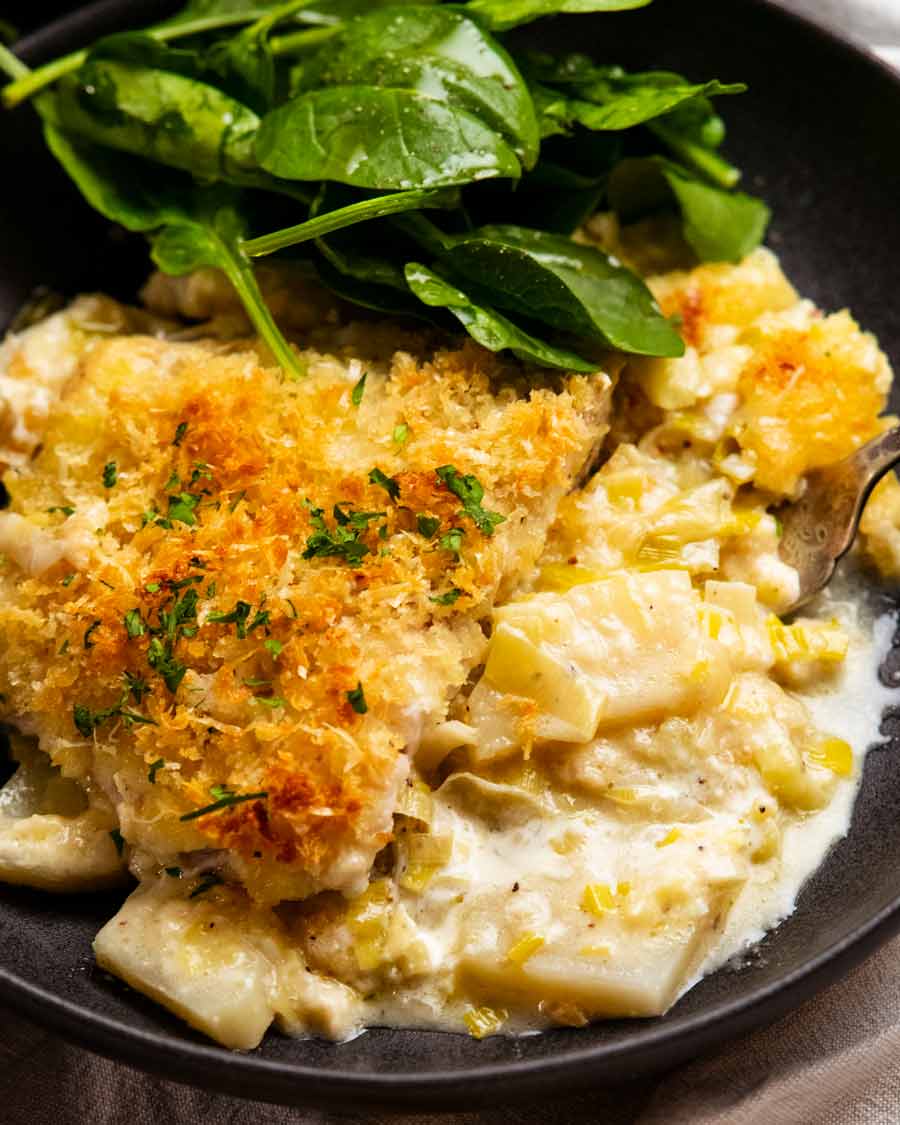
Creamy baked fish on potato gratin
This dish gives off very French-country vibes. Which, in hindsight, is rather unsurprising given it’s a recipe that our very own Chef JB just casually threw together one day. We ate it, loved it so much, declared it was “website-worthy” then proceeded to remake it…oh, I don’t know. Maybe 10, 12 times before we were fully happy with it and closed out all the “what ifs”?
Basically, it’s a creamy potato gratin, heavy on the leek (or onion), with fish that is baked on top at the same time, covered in a crunchy golden breadcrumb topping. So essentially, the breadcrumb topping acts as a lid, keeping everything steamy and succulent as the fish bubbles away in the creamy sauce while the gratin soaks up the tasty fish juices.
It’s just an all-out cosy dish of deliciousness!
Ingredients
Here’s what you need to make this:
Best fish
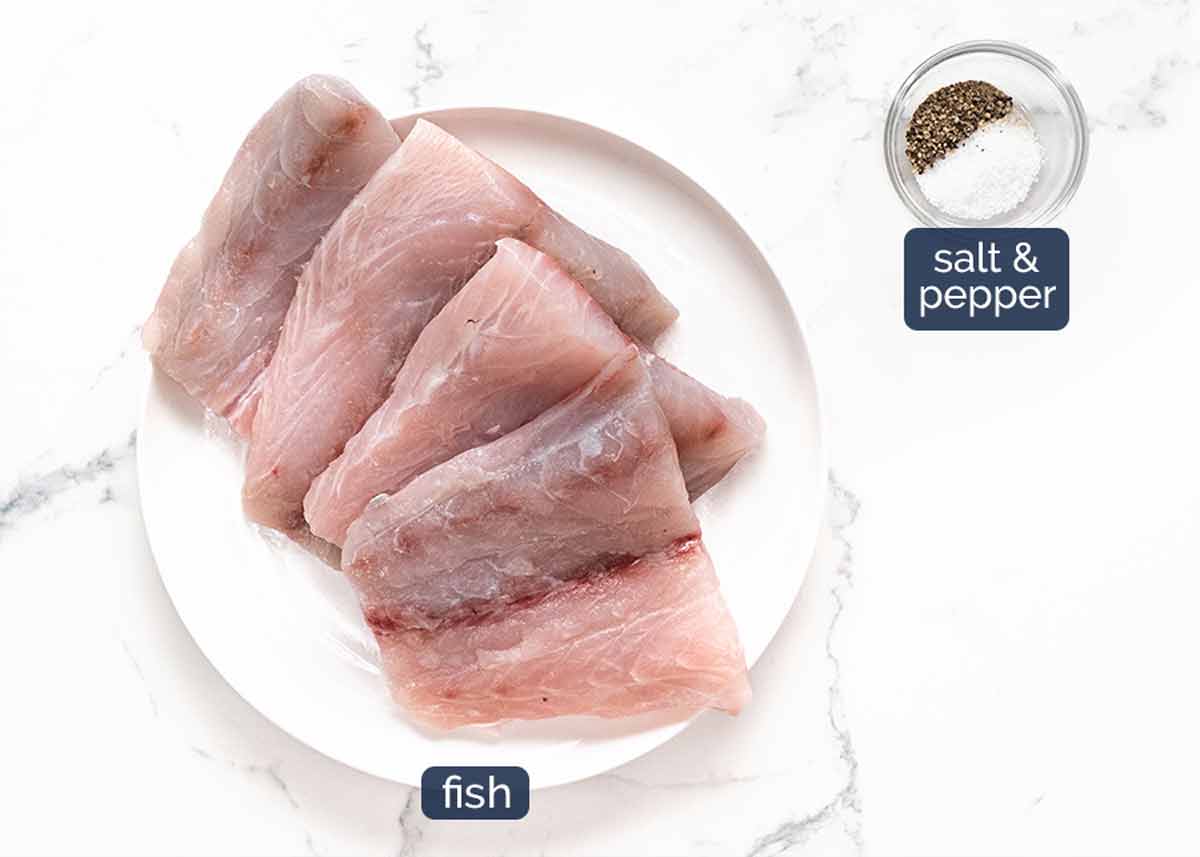
This recipe is best made with the more delicate white fish fillets that are around 2 cm (0.8″) thick. We don’t want fillets too thin else they will overcook. (UPDATE: Readers have made and loved it with salmon – read feedback in comments section!)
Our favourite fish to make this with is barramundi which is a popular Australian fish. Here are some more fish with similar cooking characteristics that will work great:
barramundi (pictured), John Dory, snapper, basa, jewfish, blue eye cod (trevalla), tilapia, cod, halibut, pollock, hake, and salmon (readers have tried and loved – see recipe comments!).
Remember, the shape of fish means that you get thick cuts from the main body as well as thin cuts from towards the tail. Opt for the thicker cuts, aiming for 2cm/0.8″ thick. Pictured above is barramundi which is a thicker fish so we used the tail.
Skin on or off? Either is fine, it really won’t affect the bake time. But the skin won’t be crispy. If this is a turn-off for you, just eat the flesh and leave the skin.
Fish to avoid
I recommend avoiding:
Fish that dry out easily when cooked – Like swordfish, tuna, bonito, kingfish, marlin, mackerel. Unless you’re extremely careful they can become dry inside so are very prone to overcooking in the oven. I feel these fish are (mostly) better in raw/rare form such as Ceviche, Poke Bowls, Tartare (also see Tuna Steak);
Oily, “fishy” fish – Like mullet and sardines (try this recipe for sardines!).
For the potato gratin and creamy sauce
And here’s what you need for the rest of the dish:
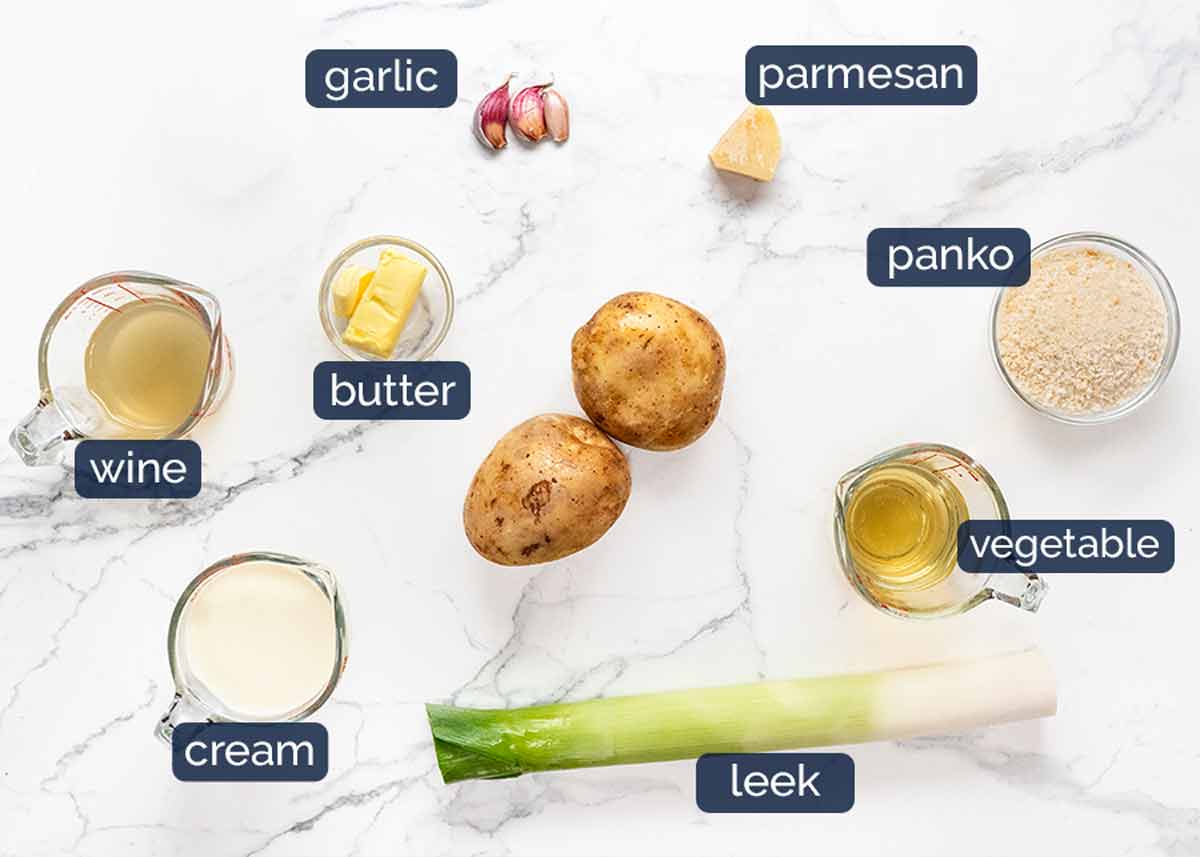
Potatoes – Floury (starchy) and all-rounder potatoes work best to achieve a lovely potato gratin flavour.
– Australia: the cheap dirt-brushed potatoes sold everywhere (called Sebago) are ideal
– US: Russet
– UK: Maris PiperLeek – Flavour base for the gratin. Feel free to substitute with a standard onion!
Garlic – Flavour base.
Chardonnay or other dry white wine – This gives the sauce depth of flavour. Without, it tastes more one dimensional and like it’s missing “something”. Chardonnay is my favourite but any dry white wine that’s not too sweet or too woody will work fine. Non alcoholic substitute – More vegetable stock.
Vegetable stock/broth – For semi braising the potatoes in a flavoured broth, tastier than using just water!
Butter – For pan sautéing the potatoes before finishing them off in the oven.
Panko, parmesan and olive oil – The crunchy topping!
How to make Creamy Fish on Potato Gratin
This is a one pan meal that starts off on the stove and is finished in the oven. It would be handy if the whole dish could just be done in the oven, but we tried and the flavour was not as good. Whereas using the stove-to-oven method makes it company-worthy good!
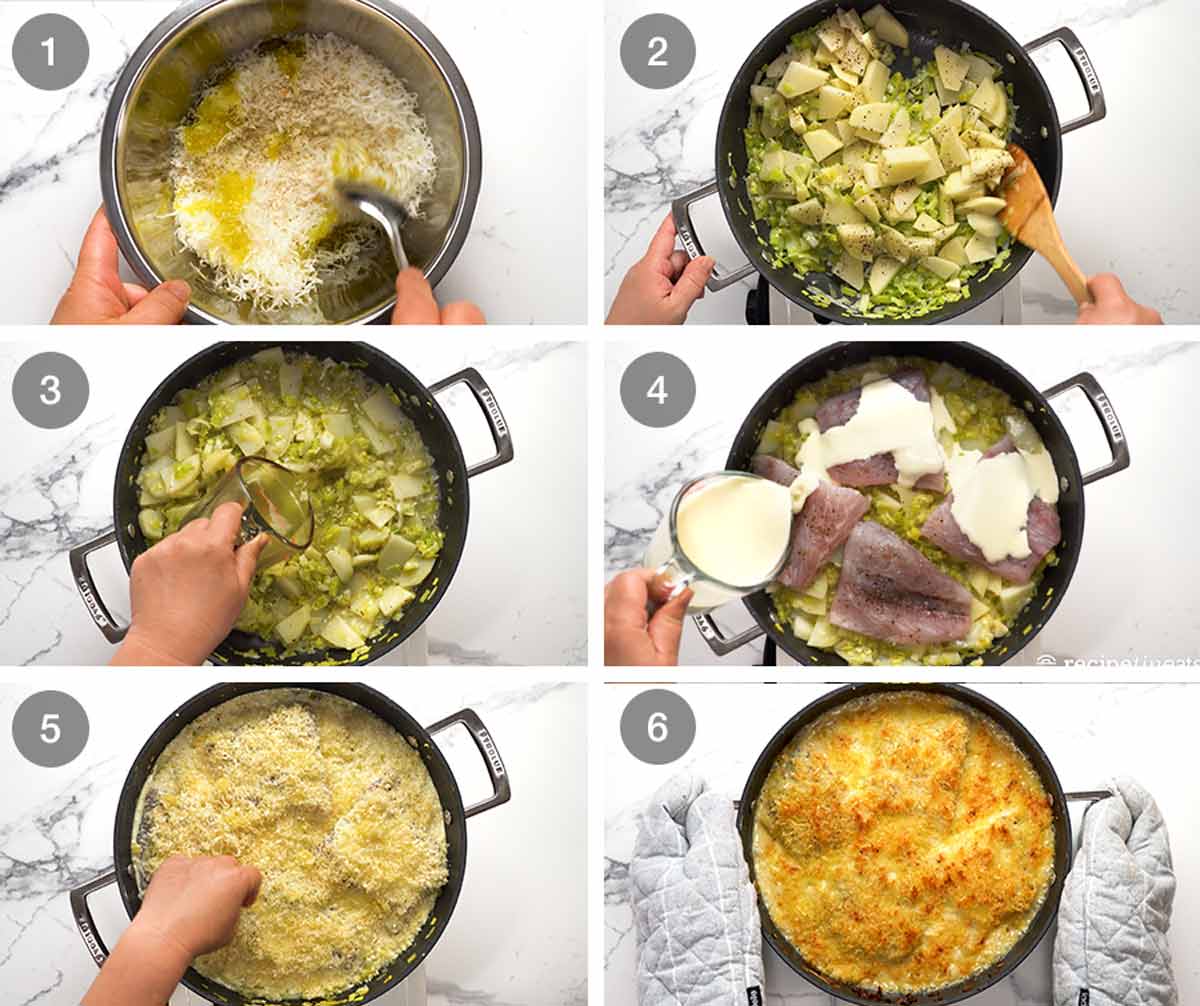
Crunchy topping – Mix the panko and olive oil together, then stir through the parmesan.
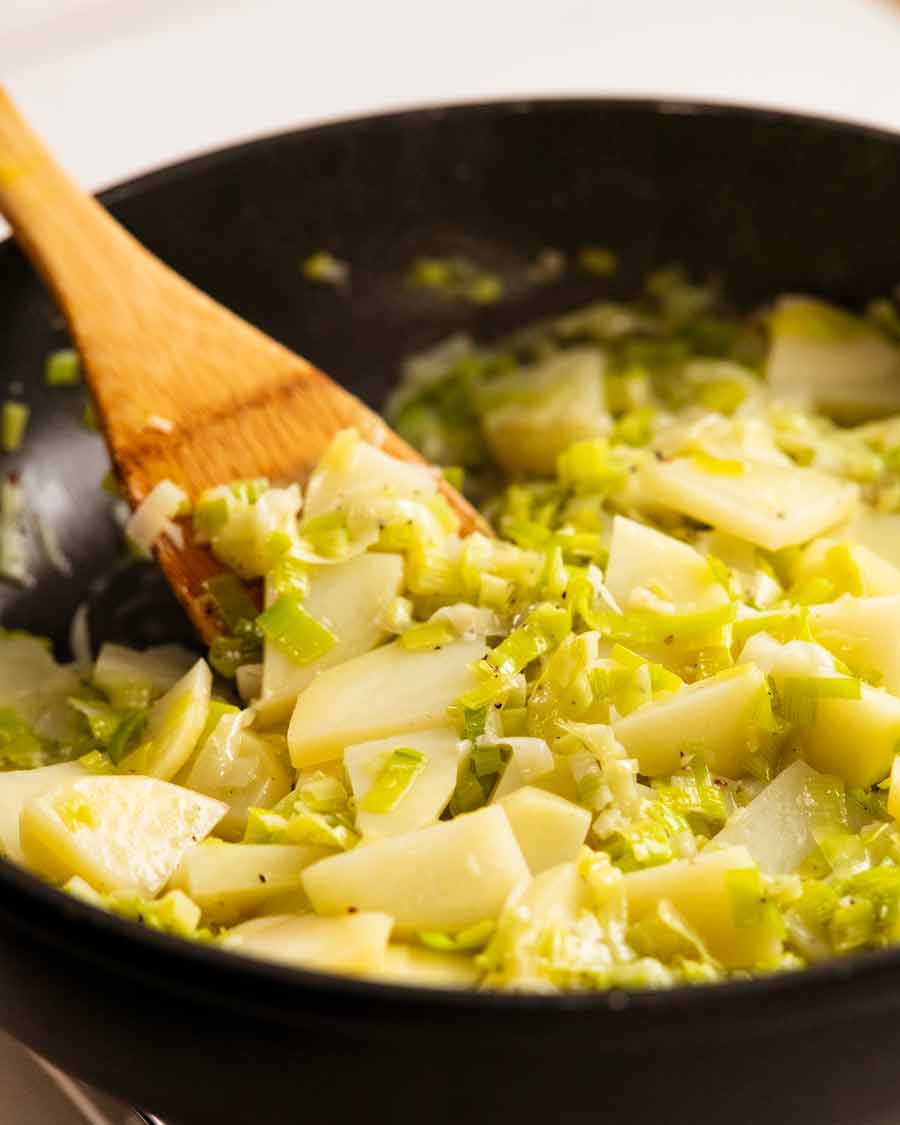
Sauté the leeks and garlic, then cook the sliced potatoes for 6 minutes or until they are partially cooked. During this step, the potatoes absorb the flavour of the leek and garlic which is what makes the gratin so good!
Braise the potatoes firstly in wine for 1 minute (simmer rapidly to almost fully reduce to cook out the alcohol) then the vegetable stock for 1 1/2 minutes until reduced by half.
Top with fish pieces (which we first sprinkle with salt and pepper). Then pour over the cream, aiming for as much coverage as possible.
Topping – Sprinkle the entire surface with the crunchy topping.
Bake for 30 minutes – I PROMISE THE FISH DOES NOT OVERCOOK!! You would think it does, but it doesn’t. All that creamy goodness under the breadcrumb topping keeps everything moist and succulent!
Broil/grill 4 minutes – Then to finish it off, I like to give it a quick 4 minute blast under the oven grill/broiler to give the topping lovely colour.
Rest 5 minutes – Place on the counter and let it rest for 5 minutes before serving. Don’t skip this step! This is when the juices in the fish gets reabsorbed into the fibres so when you cut into the fish, it stays in the fish flesh (and ends up in your mouth) rather than running out onto the plate.


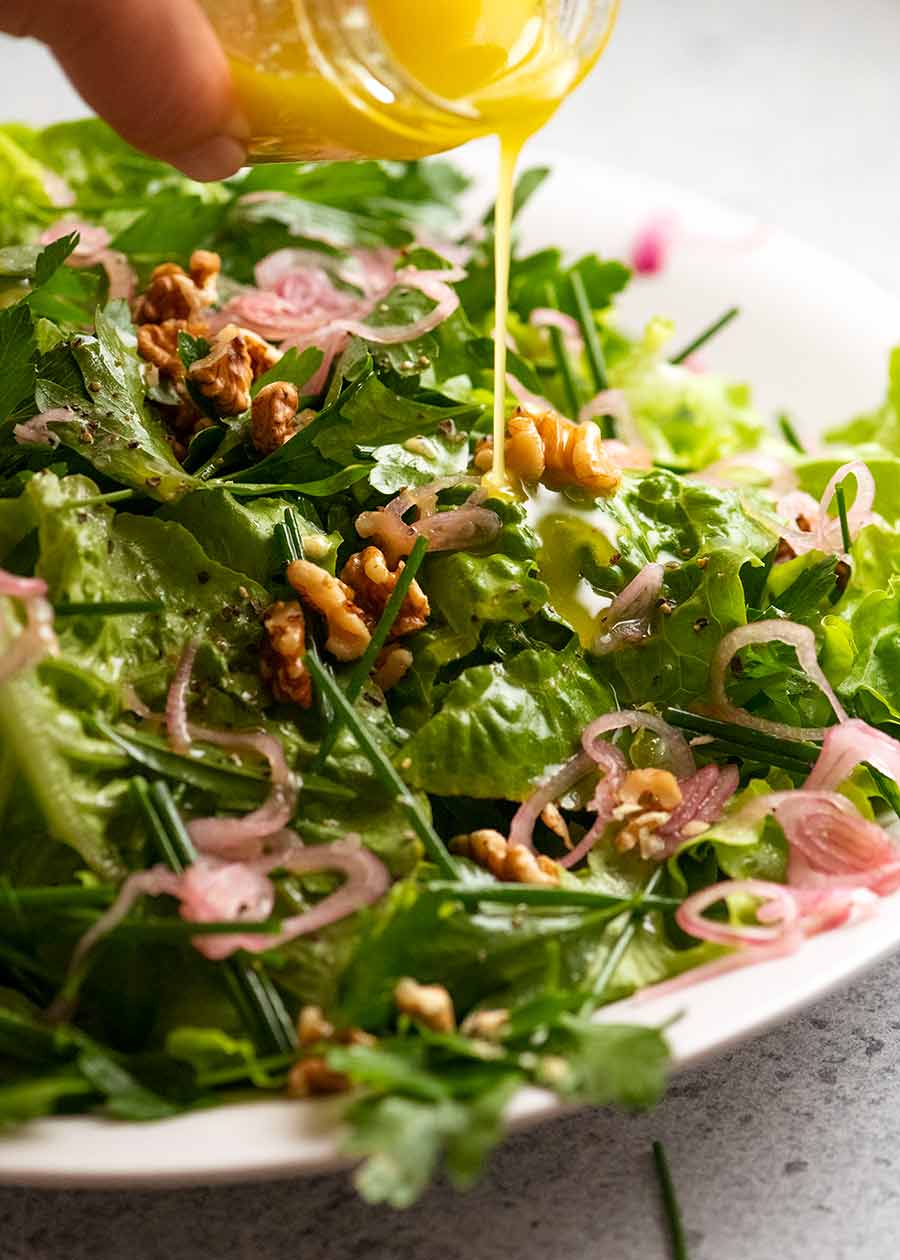
What to serve with Creamy Fish on Potato Gratin
All you need to finish off this meal is a fresh, crisp salad to serve on the side. Just toss leafy greens in French Dressing, or if you’re cooking for company, try the French Bistro Salad. On theme with the French-ish vibes going on in this dish!
I also wouldn’t say no to some crusty bread for mopping the plate clean. And for dessert – anyone for a pile of fresh baked Madeleines? Fast becoming a go-to for dinner parties because the batter is made in advance (you can even freeze it!) and stored in piping bags or jugs. Then it literally takes 2 minutes to pipe into the pan and 10 minutes to bake. How good is that!!! – Nagi x
Suggested sides


Watch how to make it

Creamy fish on potato gratin
Ingredients
- 4 x 160g/5oz white fish fillets , ~2cm / 0.8" thick, skinless (barramundi, snapper, tilapia, cod, salmon – Note 1)
- 1/2 tsp cooking/kosher salt
- 1/4 tsp black pepper
Potato gratin:
- 3 tbsp / 50g unsalted butter
- 2 large leeks , white and pale green part only, washed, cut in half lengthways, sliced 5mm / 0.2" thick OR 2 onions (Note 2)
- 3 garlic cloves , minced
- 2 medium starchy potatoes (250g / 8oz each), peeled (Note 3)
- 3/4 tsp cooking/kosher salt
- 1/2 tsp black pepper
- 1/2 cup dry white wine , any type, sub more veg stock (Note 4)
- 1/2 cup vegetable stock/broth , low sodium
- 1 cup thickened/heavy cream
Crunchy topping:
- 3/4 cup panko breadcrumbs
- 2 tbsp extra virgin olive oil
- 1/4 cup parmesan , finely shredded
Instructions
- Preheat the oven to 180°C/350°F (160°C fan) with a shelf in the middle.
- Potatoes – Cut the potatoes into quarters, then sliced 4mm / 1/6" thick. Place cut potato in a large bowl of water (prevents from going brown, removes excess starch so it cooks quicker). Drain before use.
- Crunchy topping: Mix panko and olive oil in a bowl. Then stir in parmesan.
- Season fish: Sprinkle salt and pepper on both sides of the fish fillets. Set aside.
- Sauté – Melt butter in a large oven-proof skillet (30cm/12") over high heat until foamy. Add leek and garlic, then cook for 3 minutes.
- Sauté potatoes – Add potato, salt and pepper. Cook for 6 minutes, stirring regularly. The potatoes should be half cooked at this stage.
- Reduce wine and stock – Pour in white wine. Simmer rapidly until it is mostly evaporated – about 1 minute. Pour in stock, then simmer for 1 1/2 minutes or until reduced by half.
- Top with fish – Turn the stove off. Place fish on top of the potatoes, presentation side up. (Note 1) Pour cream all over, aiming for full coverage. Sprinkle with panko breadcrumbs.
- Bake for 30 minutes – I know this sounds like a long time but the fish stays succulent!
- Colour topping – Switch to the oven grill (broiler) on high and move the skillet up to the top shelf. Grill/broil 4 minutes or until golden.
- Rest – Remove and rest for 5 minutes, then serve! Eat the fish and gratin together with each mouthful for maximum eating pleasure!!
Notes
– Australia: the cheap dirt-brushed potatoes sold everywhere (called Sebago) are ideal
– US: Russet
– UK: Maris Piper 4. Wine adds more flavour into this dish but doesn’t make it taste winey because we cook the alcohol out. Substitute with more vegetable stock. Leftovers will keep for 3 days in the fridge. Not suitable for freezing. Nutrition per serving.
Nutrition
Life of Dozer
The best handbag a girl can ask for!

The post Creamy baked fish on potato gratin appeared first on RecipeTin Eats.
]]> Kedgeree – a traditional English dish comprised of curried rice with smoked fish and boiled eggs. Think of it like a British biryani! A fabulous, economical fish and rice recipe that’s easy to make and seriously delicious. Kedgeree – English smoked fish and rice Is it totally uncouth to call Kedgeree an “English biryani”?? It’s... Get the Recipe
The post Kedgeree – English curried rice and fish appeared first on RecipeTin Eats.
]]>Kedgeree – a traditional English dish comprised of curried rice with smoked fish and boiled eggs. Think of it like a British biryani! A fabulous, economical fish and rice recipe that’s easy to make and seriously delicious.
Kedgeree – English smoked fish and rice
Is it totally uncouth to call Kedgeree an “English biryani”?? It’s just how I sometimes think of it and I mean it in the most flattering way. It’s a pretty well established fact that I consider biryani to be one of the great rice dishes on this planet.
In all seriousness though, Kedgeree is a wonderful example of true fusion food. It brings together rice and spices from the Subcontinent with classic English breakfast foods like boiled eggs and smoked fish. The result is a delicious and unique Anglo-Indian whirlwind of flavours and textures.
Traditionally kedgeree was a breakfast dish in Britain but these days it’s served at anytime throughout the day. Straightforward to make, if you’re new to using smoked fish in meals, it’s an excellent way to start!

Ingredients in Kedgeree
I’m sure there are fancy versions of kedgeree out there but we’re making a traditional version today. The hero ingredient is the smoked fish. Smoked haddock is probably the most traditional choice though cod makes an excellent alternative.
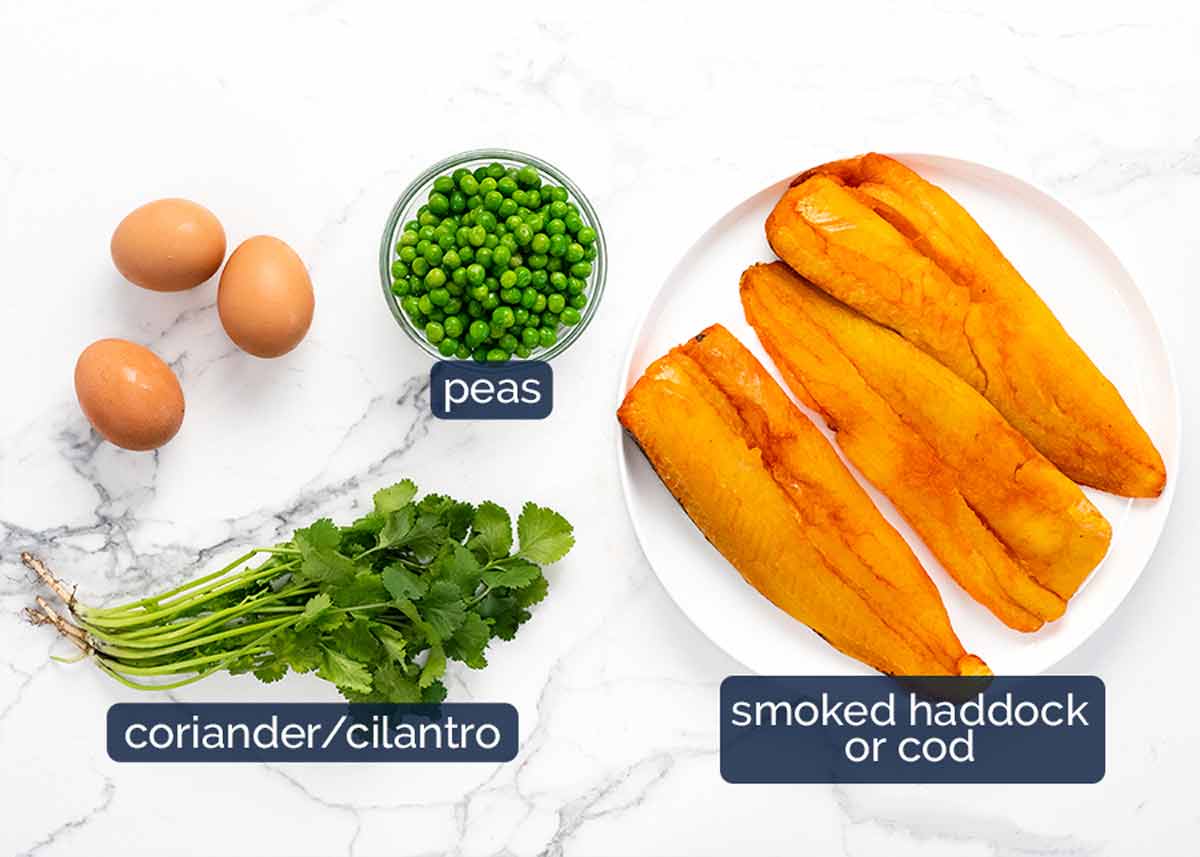
Smoked haddock (or cod) – Smoked haddock is a preserved fish fillet product sold at grocery stores at the seafood counter, deli or packed in the fridge section. Oh, also fish mongers of course! It offers an especially economical way to use fish in a meal because smoked haddock/cod is firstly much cheaper than most fresh fish, only about $15/kg here in Australia compared to, say, raw snapper fillets which are around $50/kg. Being packed with flavour, a little also goes a long way.
What exactly is smoked haddock? Smoked haddock is fresh haddock (a northern European cod) that’s been brined (ie. infused with salt) then cold smoked to infuse it with a lovely smokey flavour. When haddock is naturally smoked, it is a pale yellow-brown colour. Commercial produced smoked haddock tends to lack colour so is often dyed an orange colour to make it look more like the “real thing”.
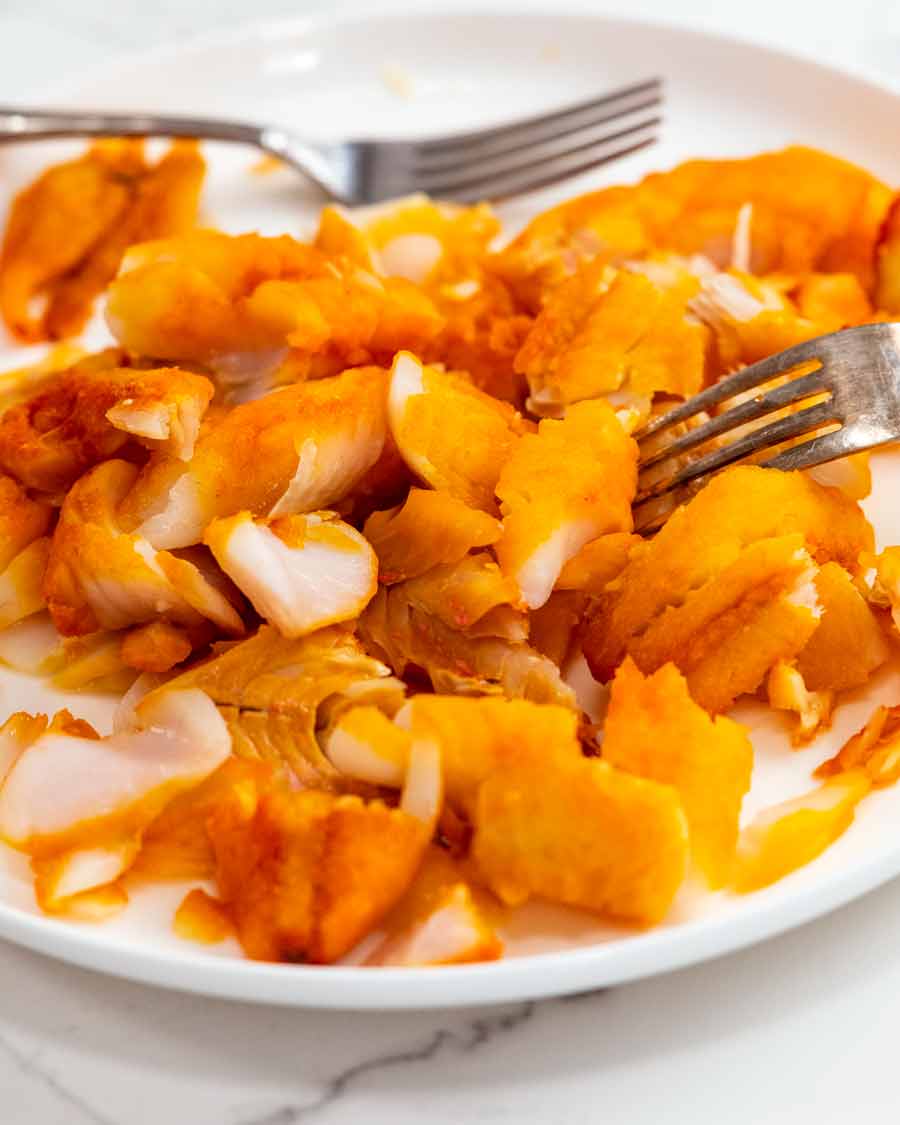
The fish is poached and then flaked into chunks. We use the flavoured poaching liquid to then cook the rice.
Boiled eggs (9 minute eggs using my boiled eggs recipe) – Traditional addition along with smoked fish. Eggs also stretch the fish by adding further protein.
Peas – For pops of freshness, colour and introduce some good vegetable matter into our rice dish.
Coriander/cilantro – For stirring through and garnish.
Rice and curried butter
The thing that makes Kedgeree special is the spiced butter!
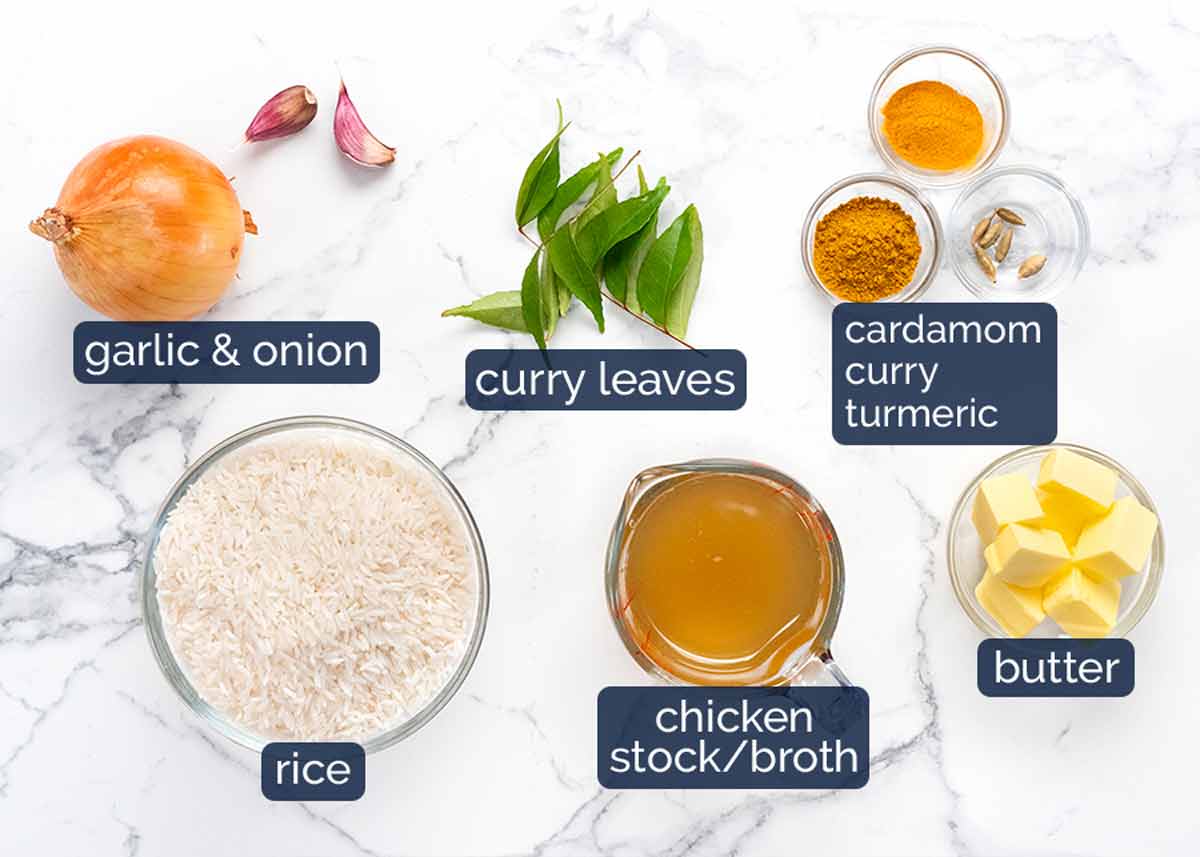
Rice – Carries the bulk of the dish! Long grain or basmati rice is best for this dish, for nice long-shaped rice grains and the desired fluffy texture. Medium grain and short grain (sushi) rice will work too though the rice is a little sticker, as is the nature of the rice.
Recipe is not suitable for risotto rice, paella rice, brown rice, wild rice, quinoa or faux rice (cauliflower rice etc).
Spices: Curry powder and turmeric – You can really use any curry powder here though traditionally used is an English / Western curry powder (as opposed to authentic Indian or Asian curry powder mix). It’s not spicy (unless you opt for the HOT type!), it’s a mix of warm spices including cumin, coriander, clove and turmeric. I use Clives of India and Keens.
We add a little extra turmeric to brighten the dish’s colour, otherwise the rice can look a little brown.
Curry leaves and cardamom – Additional nods to the Indian heritage of this dish. Curry leaves for fragrance and because it looks attractive, while cardamom for its unique perfume and flavour. However both are optional!
Curry leaves – A magnificent ingredient used in Indian/Sri Lankan cooking! Fairly widely available these days in grocery stores in Australia (Coles, woolies, Harris farms), leftovers freeze 100% perfectly. Use in Vindaloo, Dal, South Indian eggplant curry and Samosa Pie. Also easy to grow (I have a plant *says the plant-killer, smugly*) (PS. curry plants are indestructible)
Butter – For sauteing and rich flavour.
Onion and garlic – Usual base flavourings.
Chicken stock – Cooking the rice in the chicken stock flavoured with the fish imparts a deliciously savoury taste to the rice that’s a step up the flavour ladder from plain water.
Why not fish stock? Because mass produced store bought fish stock is not very nice! However if you have fresh fish stock and prefer a more seafood-y tasting biryani, go for it!
How to make Kedgeree
Kedgeree is made by poaching the fish, then cooking the rice in the poaching liquid. The rice is then tossed in a flavourful curried butter before tossing the fish back in and finishing with boiled eggs.
Cooking the smoked fish
Cold smoked fish (other than salmon or other sashimi grade fish) needs to be cooked before eating. For Kedgeree, the fish is gently poached in stock which is then used to cook the rice. Flavour retention to the max!
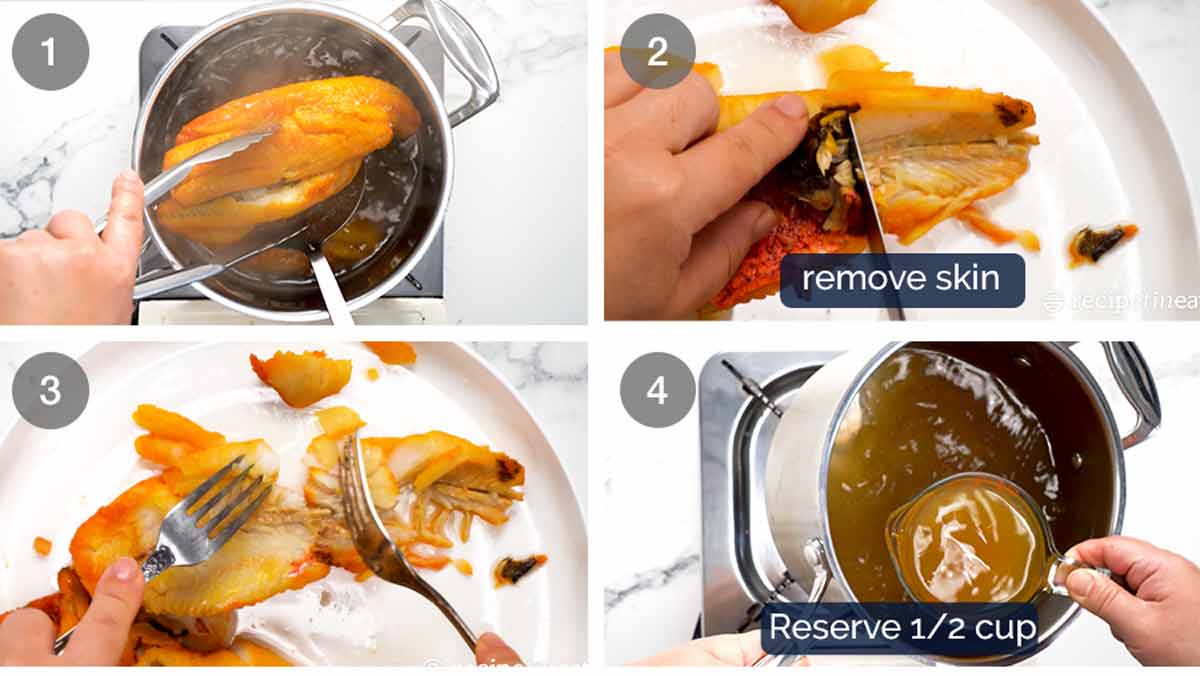
Poach fish 8 minutes – Bring the stock to a boil. Place the fish in then turn the heat down so the liquid is barely rippling. Poach for 8 minutes or until the flesh flakes.
Remove skin – Remove the fish from the poaching liquid and transfer to a plate. Remove and discard the skin – I find a butter knife helpful.
Flake the flesh into large chunks. Keep them large as they will break a little more when tossed through the rice.
Reserve 1/2 cup liquid – Measure out 1/2 cup (125 ml) of the poaching liquid. Set aside – we will drizzle this over the finished dish to moisten the rice.
Cook rice
Fish done. Now we cook the rice in the flavoured poaching liquid and make a cured butter to toss the rice in. You know this is going to be good!
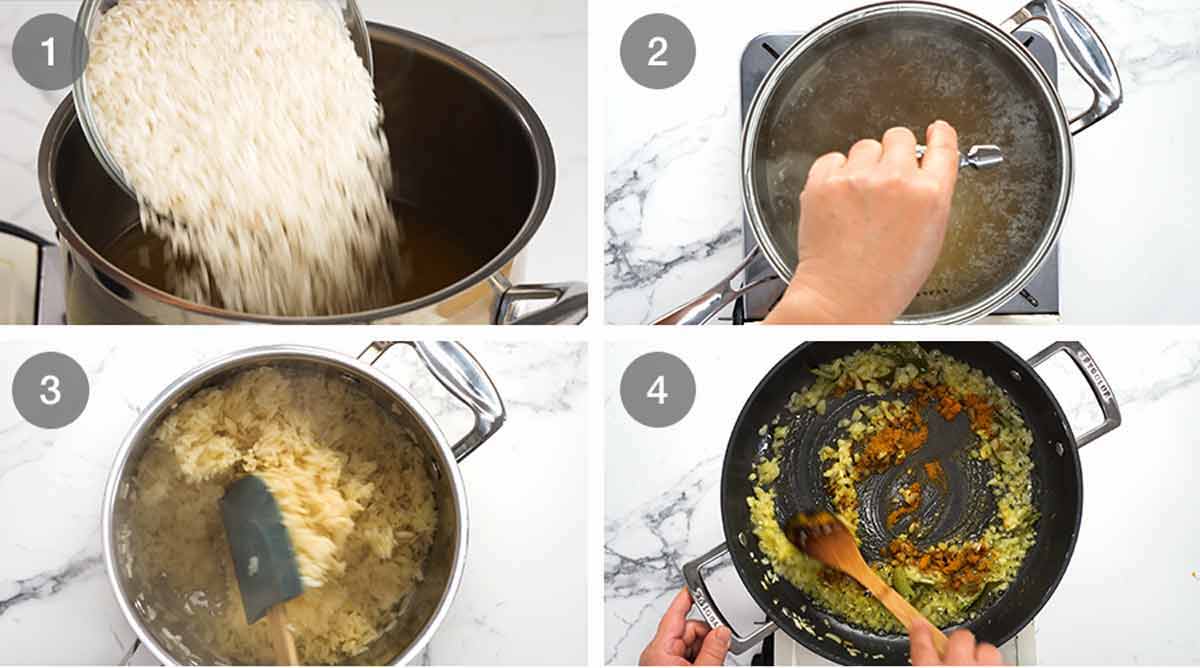
Add the rice into the poaching liquid then bring it to a simmer on high heat without the lid.
Cook 13 minutes – Place the lid on then turn the heat down to low. Cook for 13 minutes or until all the liquid has been absorbed. No peeking, no stirring!
Rest and fluff – Remove from the stove with the lid still on and rest for 10 minutes (lid still on!). Then fluff the rice, ready to toss into the curried butter!
Curried butter – While the rice is resting, start the curried butter. Melt the butter in a large skillet or pot (large enough to fit all the rice). Add the cardamom pods and curry leaves and stir for 30 seconds. Sauté the garlic and onion then stir in the spices. Be prepared for amazing smells!
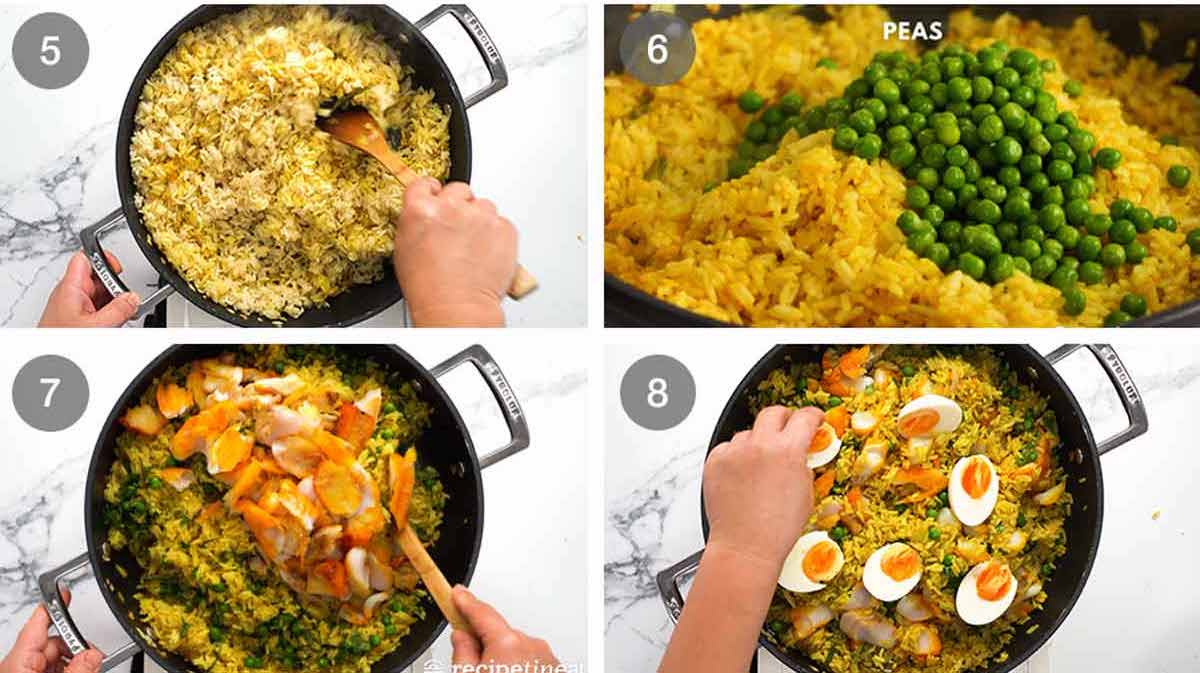
Add the rice and toss to coat in the curried butter. Add the reserved stock and toss through – this moistens the rice.
Peas and coriander – Add the thawed peas and most of the coriander (reserve a bit for garnish) and toss through. The heat from the rice is all that’s needed to cook warm through the thawed peas.
Fish – Add the flakes of fish and toss through gently, taking care to ensure there are some nice large chunks.
Stud with eggs – Tops with halved eggs and sprinkle with coriander. Then serve!

To serve, just spoon into bowls and eat as is. There’s no need for sauce – the rice is nice and moist, and there’s certainly no need for extra flavour!
It will keep for a few days in the fridge but it’s best freshly made as rice tends to dry out in the fridge overnight. Reheating is best done in the microwave with a sprinkle of water to make the rice nice and steamy again.
If you try this, tell me if you agree with my description of it as an English biryani!!! – Nagi x
Watch how to make it

Kedgeree – British curried rice and fish
Ingredients
- 4 cups/ 1 litre chicken stock/broth , low-sodium
- 500g/1 lb smoked haddock or cod , skin-on (or other smoked fish, Note 1)
- 2 1/4 cups long grain rice , uncooked
- 75g / 5 tbsp unsalted butter
- 15 curry leaves (Note 2)
- 6 green cardamom pods , lightly crushed (Note 3)
- 1 brown onion , diced
- 2 garlic cloves , finely minced
- 2 tsp curry powder (anything! Use spicy if you want, I use mild)
- 1/2 tsp turmeric powder
- 1 cup frozen peas , thawed
- 1/2 cup coriander/cilantro leaves , roughly chopped (sub green onion or parsley)
- 3 hard boiled eggs , halved or quartered (9 minute cook)
Instructions
- Poach fish – Bring chicken stock to a boil in a large saucepan or small pot. Place fish in (it should all be just about submerged, Note 4) and adjust heat so the stock is barely rippling. Poach it gently for 8 minutes or until the fish flakes apart. Remove fish onto a large plate.
- Flake fish – When cool enough to handle, discard skin (gently scrape with a butter knife) and flake fish into large pieces, checking for any bones.
- Reserve stock – Measure out 1/2 cup of the poaching liquid and set aside for later (drizzle on at end to juice up the rice).
- Cook rice 13 min – Add rice into the poaching liquid in the saucepan. Bring to a simmer over high heat. Cover with lid then reduce heat to low. Cook for 13 minutes.
- Rest rice 10 min – Remove the saucepan from the stove with the lid on and rest for 10 minutes. Fluff rice using a rubber spatula.
- Curried butter – While the rice is resting, melt the butter in a very large (30cm/12") non stick skillet or pot, over medium-high heat. Add the cardamom pods and curry leaves and stir for 30 seconds. Add the onions, garlic and sauté for 5 minutes until browning at the edges, stirring regularly.
- Toss rice – Lower heat to medium. Stir in the curry powder and turmeric, and then the rice. Toss the rice in the spiced butter until well coated and uniformly yellow. Pour over the reserved 1/2 cup of fish poaching stock, and toss to mix through (it moistens the rice).
- Peas & fish – Stir through the peas and most of the coriander (hold some back for garnish). Then gently fold through the fish, taking care to keep some pieces in large chunks.
- Serve – Spoon out rice onto one large platter or individual plates to serve. Top with boiled egg halves, and garnish with the remaining coriander. EAT!
Notes
Life of Dozer
When I took the photo for a big Mother’s Day KitchenAid giveaway currently happening on Instagram….

…..there’s just no way this wasn’t going to happen!! 😂

The post Kedgeree – English curried rice and fish appeared first on RecipeTin Eats.
]]>