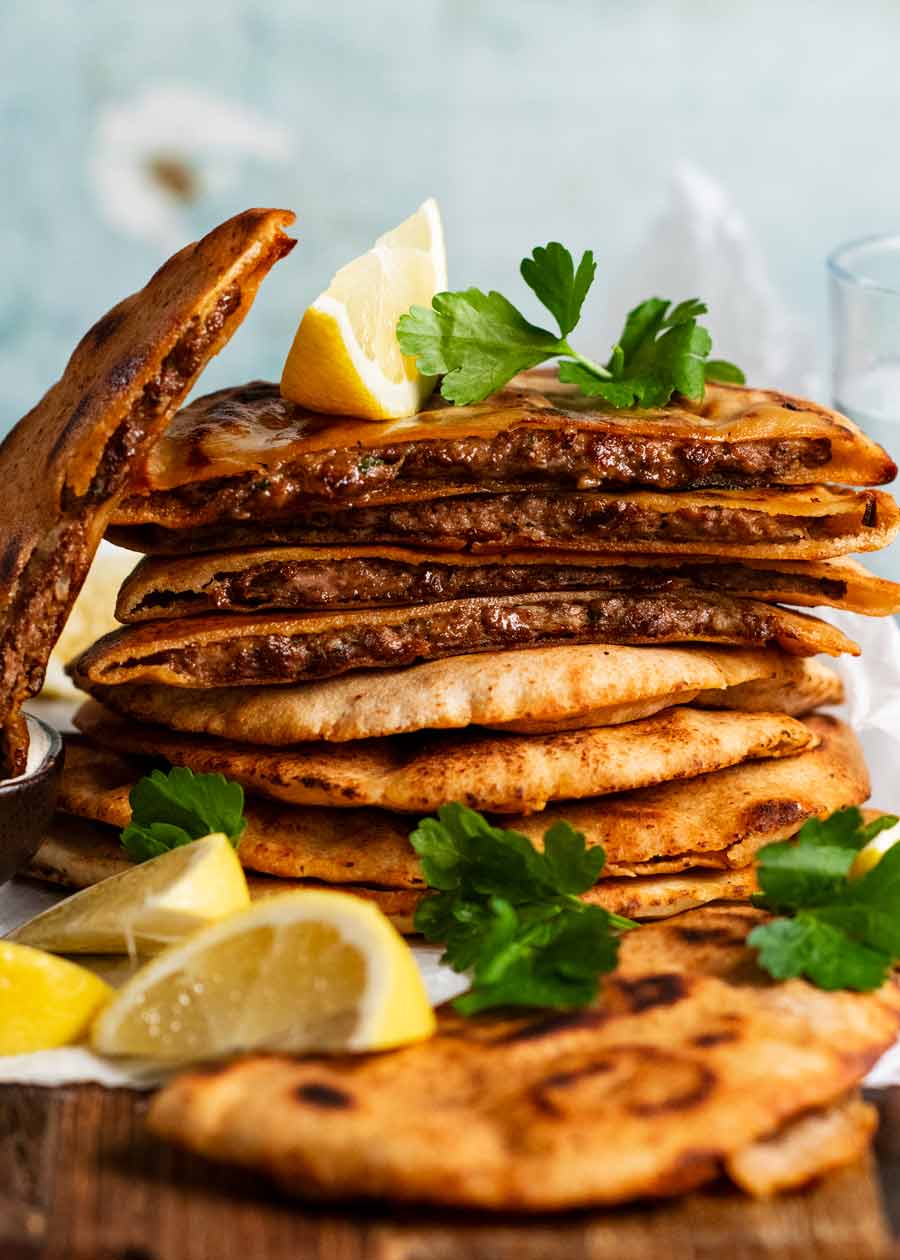
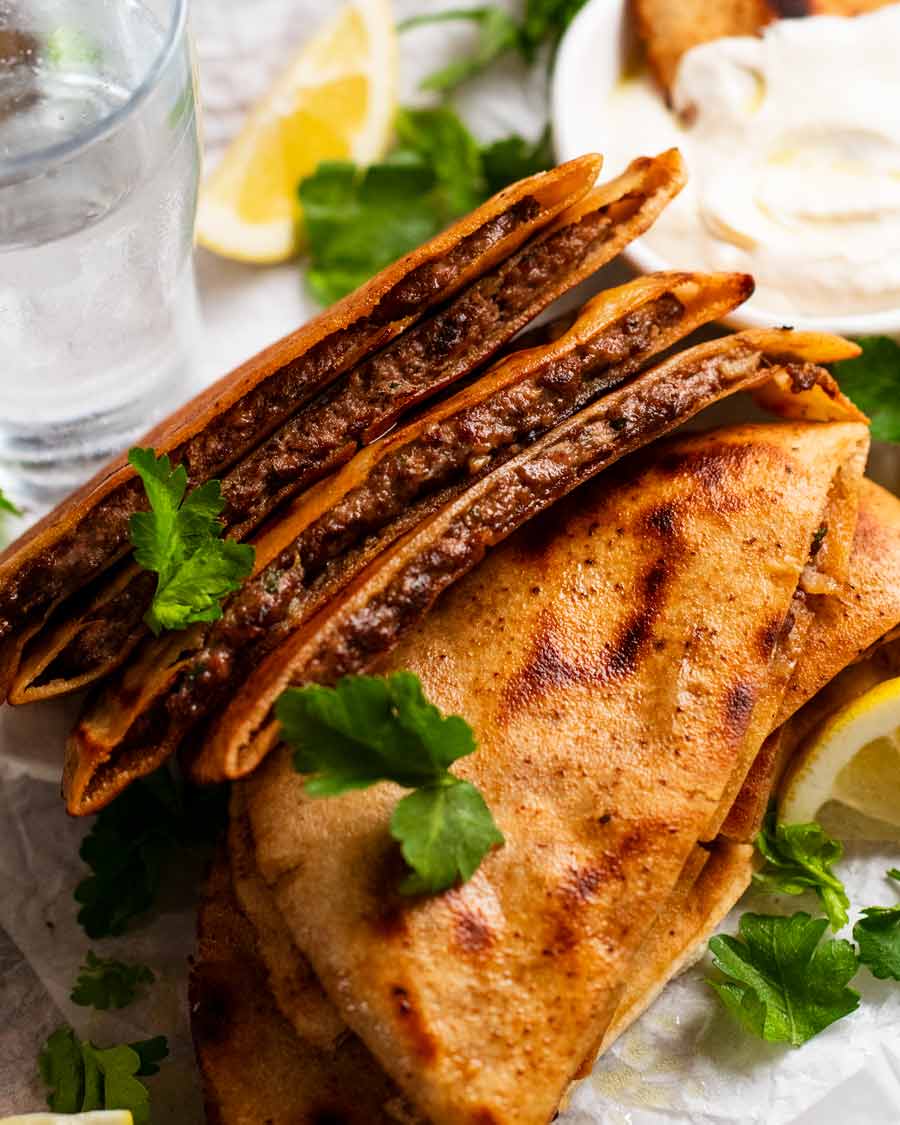
 Meet my latest obsession – Arayes! Pita pockets stuffed with seasoned meat kofta filling, then pan fried until crispy. Think: Lebanese quesadillas / easy gozleme. Enjoy for dinner or pass them around as an appetiser. I can’t stop eating these! Arayes – Lebanese street food! Every now and then I happen across a recipe that... Get the Recipe
The post Arayes – Lebanese Meat-Stuffed Crispy Pita appeared first on RecipeTin Eats.
]]>Meet my latest obsession – Arayes! Pita pockets stuffed with seasoned meat kofta filling, then pan fried until crispy. Think: Lebanese quesadillas / easy gozleme. Enjoy for dinner or pass them around as an appetiser. I can’t stop eating these!
Arayes – Lebanese street food!
Every now and then I happen across a recipe that really catches me by surprise. Something I’ve never heard of before that’s devilishly tasty, a little different to the usual yet easy and relatively fast to make.
Today’s Arayes is one such recipe, introduced to me by Chef JB, discovered during his globe trotting days.
Originating from the Middle East, Arayes is a pita or flatbread that’s stuffed with raw seasoned meat kofta filling then pan fried, grilled or baked until crispy. Think of it like quesadillas – but with Middle Eastern spiced filling – or an easier version of lamb gozleme.
As with many traditional recipes, there are variations between countries, including the seasoning in the meat, the type of bread used, thickness of meat etc. The Arayes I’m sharing today is a Lebanese one. It’s easy. You can get all the ingredients at any grocery store.
And it’s Outrageously Delicious. (You know I’m deadly serious when I capitalise!)

Ingredients in Arayes
Here’s what you need to make Arayes.
Spiced kofta filling
Here’s what you need for the spiced kofta filling used to stuff the pita bread.
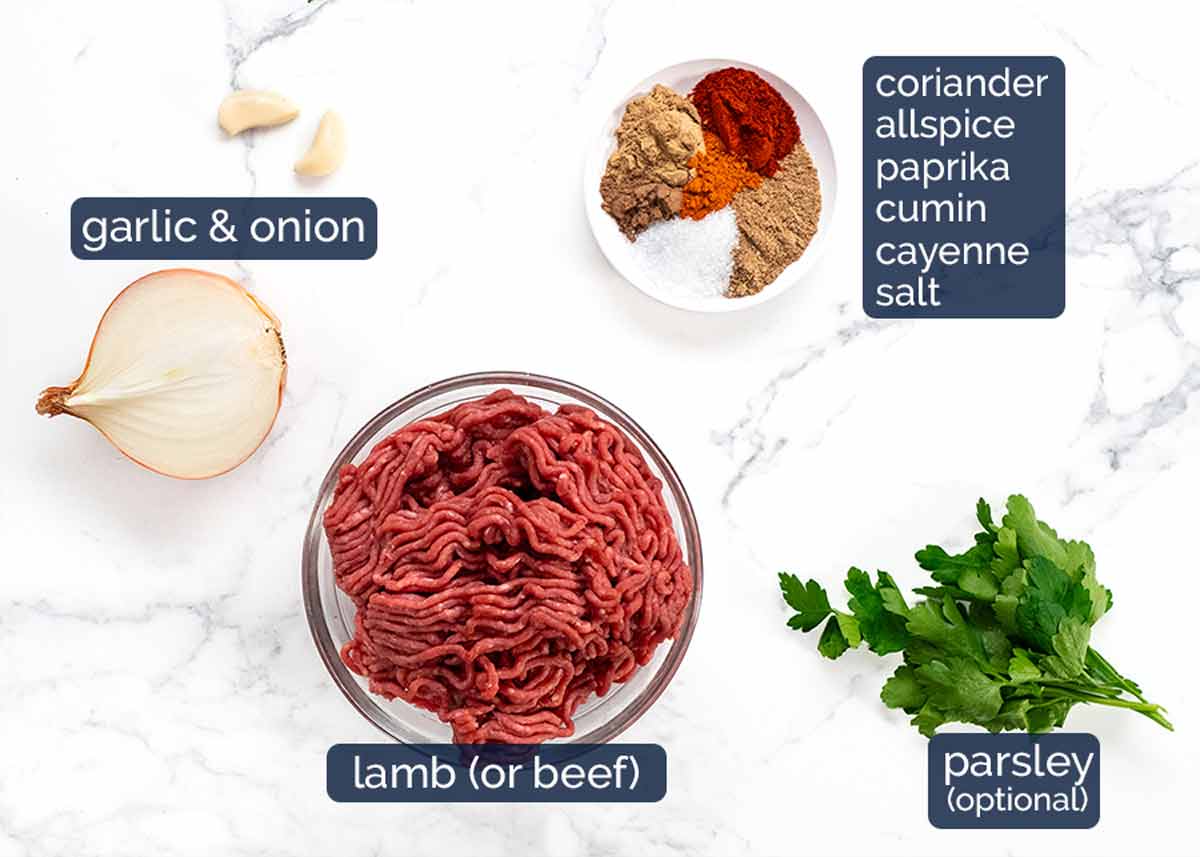
Protein – Lamb is a favoured protein in the Middle East and goes so well with the Lebanese spice mix we’re using today! However, beef is a very close second.
Spice mix – No unusual players here in this Lebanese kofta spice mix! There’s a fairly generous amount – almost 3 tablespoons – which sounds like a lot. This is because the meat is spread very thinly inside each pita bread so you actually don’t end up with very much with each bite. So you want it to be heavy on the spicing!
Spice note: Mild kick, only 1/2 tsp cayenne across 10 pita bread halves. To reduce to subtle, cut down cayenne to 1/4 tsp. Or omit.
Onion and fresh garlic – For aromatic flavour in the kofta filling.
Parsley – Optional for nice little bits of green throughout.
Pita bread and oil
Arayes is and can be made with all sorts of pita breads – large, small, thin, thick. Have fun and experiment!
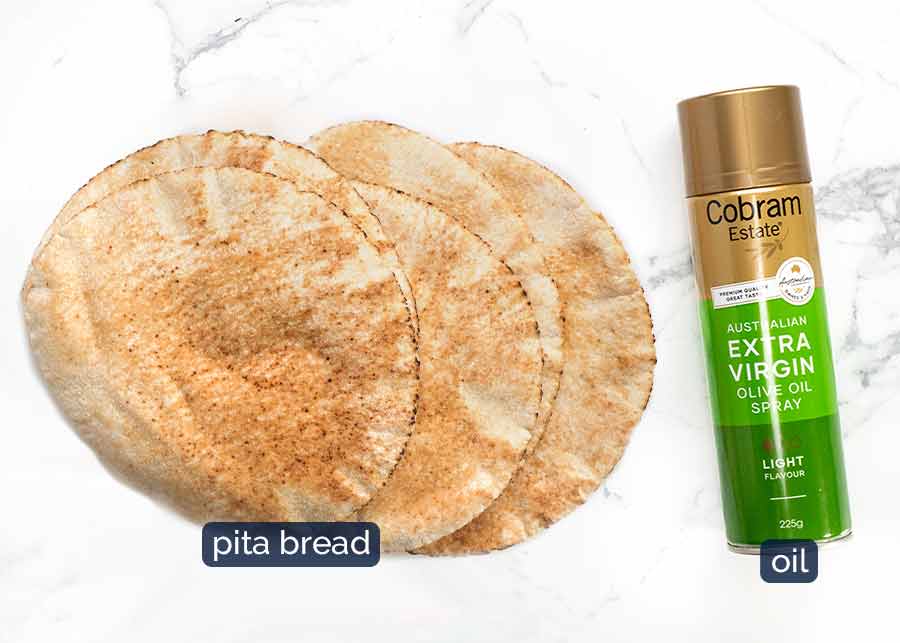
Pita Bread – The pita bread I use is 15cm / 6″ wide. You need pita bread pockets that can be split open to stuff the meat inside. Thinner is better as it’s easier to cook the meat through. Fellow Aussies – I use Nana brand pita bread from Woolies, Coles.
Alternatives/variations – I’ve made this with the breadier, thicker pita bread pockets too (like used in this recipe) and it works great, just takes a minute or two longer for the meat to cook. Large Lebanese bread ~30cm/12″ wide also works! You need 2 to 3, spread the meat inside using a butter knife, pan fry until crisp then cut into pieces. And if you can’t find any pita pockets at all, you could even make Arayes using any flatbreads you can get your hands on, or even tortillas! Just make them like quesadillas – spread the meat filling on half then fold over.
Olive oil spray works best for cooking, I found. Using oil in the pan makes the pita pockets a little too greasy. If you don’t have spray, just brush the surface with olive oil.
How to make Arayes
A unique step in making Arayes is that the meat is raw when stuffed inside the pita bread. So as it cooks, the meat juices flavour the inside of the pita bread while the outside goes golden and crispy. It’s sooooo good!!
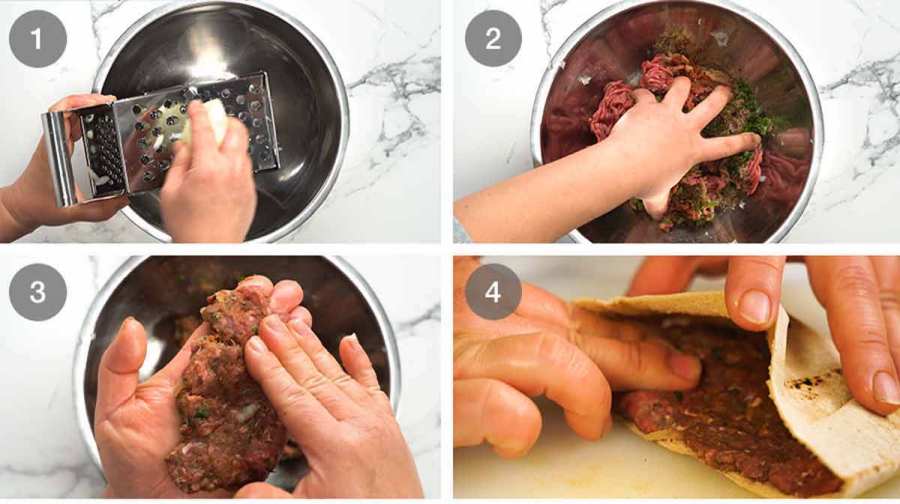
Grate the onion using a standard box grater. Why grate rather than chop? Because grated is finer than chopped so you don’t need to cook the onion separately before mixing into the meat. It will cook enough with the meat. Plus, the onion juices make the meat mixture even tastier!
Filling – Add the meat and all the other filling ingredients, then mix well with your hands.
Semi-circle shape – Divide into 10 portions, roll into a ball then pat into a thin semi-circle shape approximating the size of half a pita bread.
Stuff the meat inside the pita bread. PRO TIP: If you have trouble prying the pocket open, microwave for 15 seconds on high to soften then run a butter knife inside the slit.
Flatten – Close the pita bread then press down and out to spread the meat to the edges of the pita bread. Though – no need to be too meticulous here! You just don’t want giant areas of meat-less pita bread.
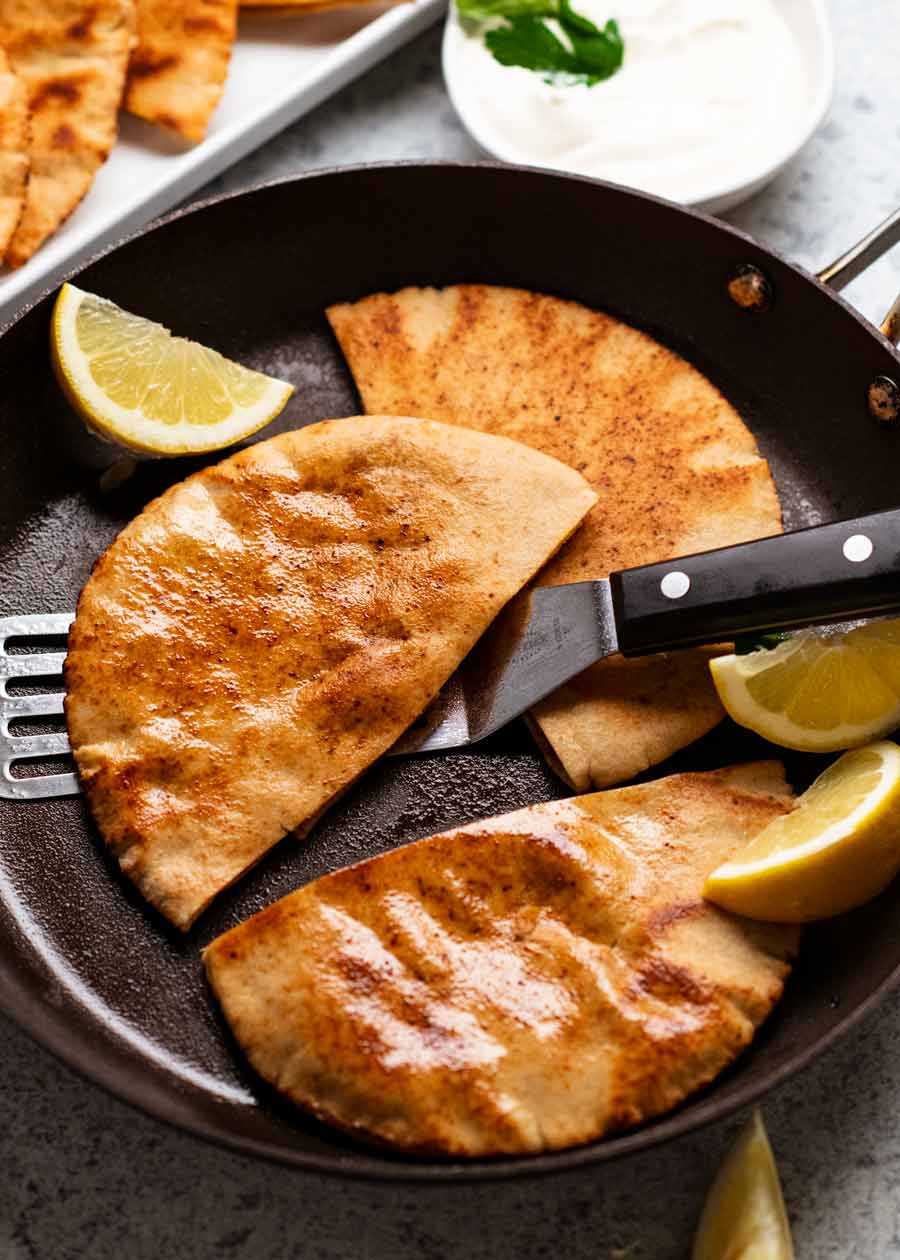
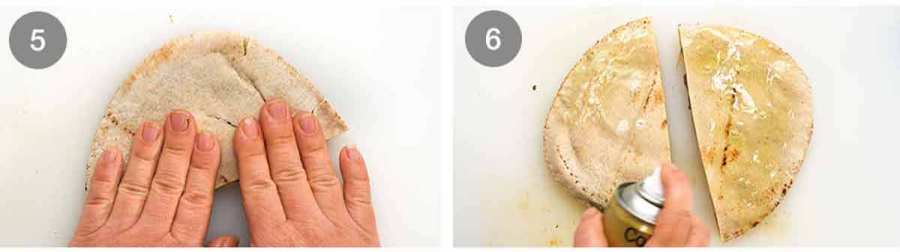
Spray each side with oil. I prefer spraying because I found using oil in the pan makes the Arayes too greasy. Plus, you use far less oil!

Pan fry 4 min – Then pan fry on medium high for 2 minutes on each side until crispy. The meat will cook through in this time because it’s so thin! I do 2 or 3 halves at a time. Cook as many as you can fit in a single layer.
Keep cooked Arayes warm in a low oven on a rack set over a tray (rack prevents underside from getting soggy) as you continue cooking. Or – get 2 pans going to speed things up!
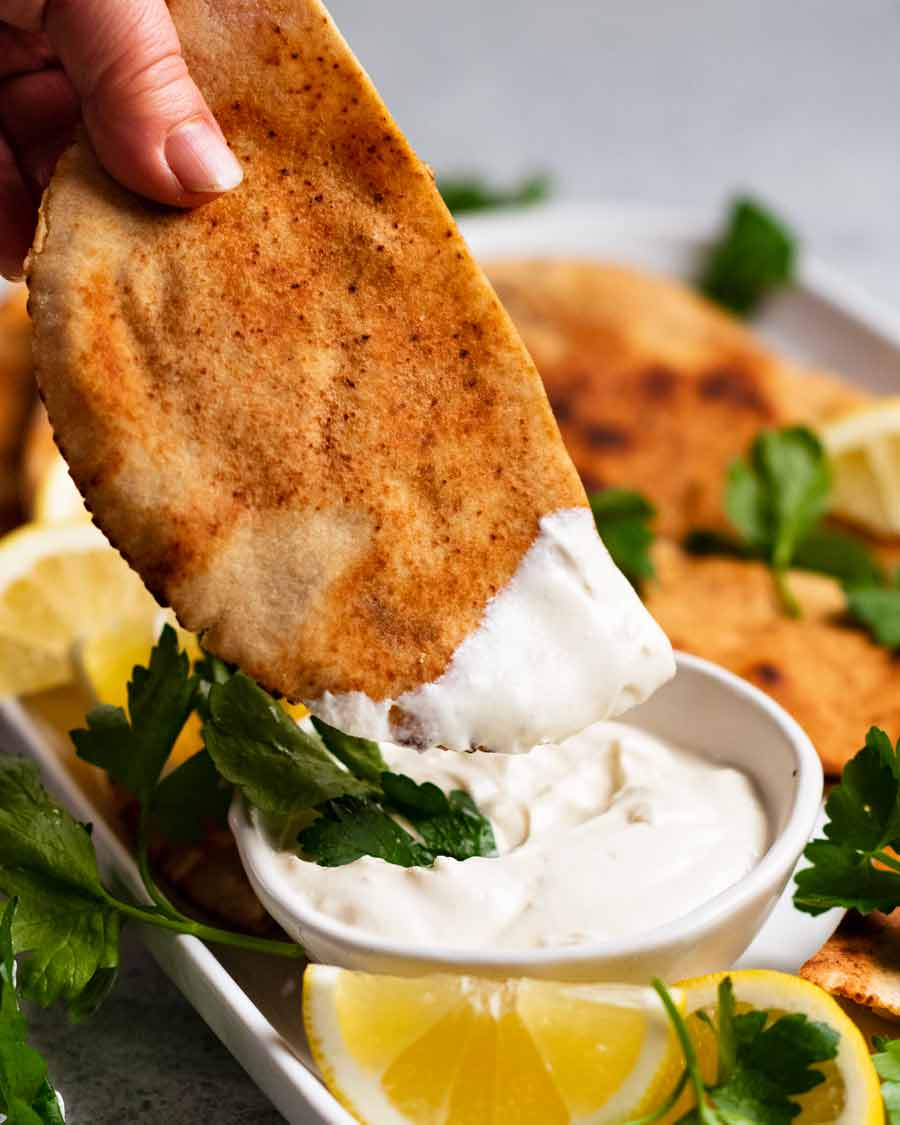
Serving – Pile Arayes onto a platter and serve with Tahini dipping sauce. Serve them whole, as they are. Or cut them into smaller pieces – it’s up to you!
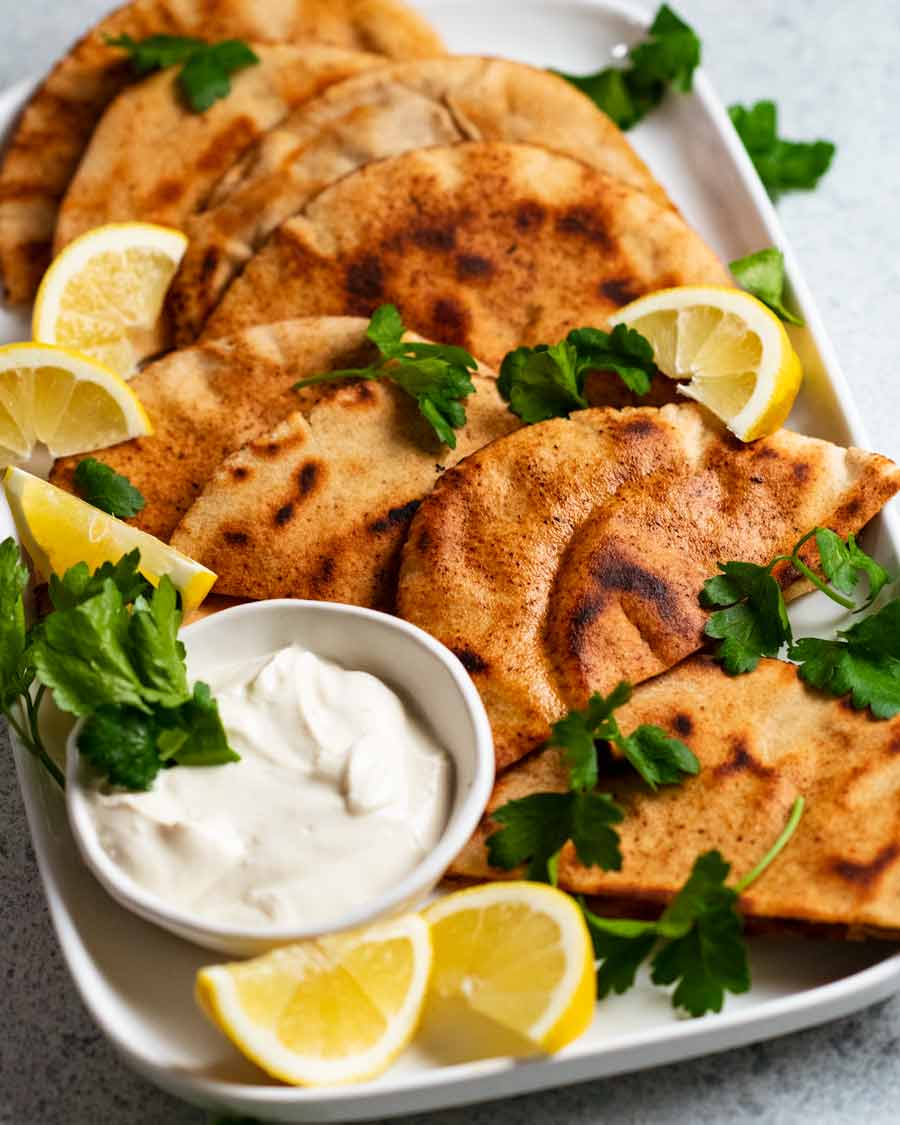
Whipped Tahini Yogurt Dipping Sauce
I think you’ll really like the Whipped Tahini Yogurt dipping sauce too. It’s got a unique texture almost like soft whipped cream. Made with just tahini, yogurt, lemon and garlic, the trick is to warm the mixture in the microwave slightly before whisking. Then as you whisk it, it becomes almost a bit aerated like whipped cream! Neat little trick I picked up from a Fatteh recipe by Nigella Lawson.
If you’ve got any of the sauce leftover, use it as a dip or slather onto toast like you would with goats cheese, then pile on marinated mushrooms or roast vegetables for a delicious crostini. Enjoy! – Nagi x
Watch how to make it

Crispy Lebanese Meat Stuffed Pita – Arayes
 The unique method here is that it's cooked with raw meat inside, so the tasty meat juices soaks into and flavours the pita bread as it cooks. It's outrageously delicious. I bet you become as obsessed with these as I have!
Ingredients
- 5 pita bread , the thin pocket type, ~15cm/6" diameter (250g/8oz pack), cut in half (Note 1)
- Olive oil spray (or brush with olive oil)
Spiced meat filling:
- 1/2 brown onion
- 500g/ 1 lb lamb or beef mince (ground meat) (Note 2)
- 2 garlic cloves , finely grated
- 1 tbsp finely chopped parsley , optional
- 3 tsp ground coriander
- 3 tsp ground cumin
- 1 1/2 tsp smoked paprika (sub plain paprika)
- 3/4 tsp ground allspice (sub mixed spice)
- 1/2 tsp cayenne pepper (reduce/omit for less spicy – Note 4)
- 1 1/4 tsp cooking/kosher salt
Whipped tahini yogurt sauce:
- 1 cup plain yogurt
- 2 tbsp tahini (or Chinese sesame paste – Note 5)
- 1 tbsp lemon juice
- 1 garlic clove , finely grated
- 1/2 tsp cooking/kosher salt
Instructions
Spiced meat filling:
- Grate the onion in a bowl using a standard box grater. We want the juices and all! (Note 4)
- Meat filling – Add remaining meat filling ingredients. Mix well with your hands.
- Divide stuffing in 10 (about 55 to 60g per portion, 1/4 cup). Flatten into a semi-circle shape slightly smaller than the pita bread half.
- Stuff – Gently open a pita then place the meat inside. Close, then press to spread to the edge and make it fairly evenly flat. (Is your pita tearing? See Note 5 for tip!)
Cooking Arayes:
- Preheat oven to 50C/120F. Place a rack on a tray. (To keep cooked Arayes warm.)
- Cook – Heat a large frying pan over medium high heat. Spray both sides of the pita with olive oil then place 2 or 3 pieces in the pan (whatever you can fit). Cook for about 2 minutes on each side, pressing down lightly with a spatula, until golden and crispy. The meat is spread so thin it cooks really quickly! {Sandwich press – Note 7}
- Keep warm – Transfer cooked Arayes onto the rack and put in the oven to keep warm. Cook remaining pita.
- Serve – Cut in half if desired (sometimes I do, sometimes I don't!). Pile Arayes onto a serving platter. Serve with Whipped Tahini sauce. Enjoy!
Whipped tahini sauce:
- Place ingredients in a heatproof bowl and whisk to combine. Microwave for 15 seconds on high. Whisk again – it should resemble soft whipped cream. Use slightly warm or at room temperature.
Notes
- Large Lebanese bread ~30cm/12″ wide also works! You need 2 to 3, spread the meat inside using a butter knife, pan fry until crisp then cut into pieces.
- Tortillas or other flatbreads – Smear meat on half, fold over like a quesadilla and cook!
Nutrition for one piece (ie half a pita).Nutrition
Similar crispy breads with tasty things inside


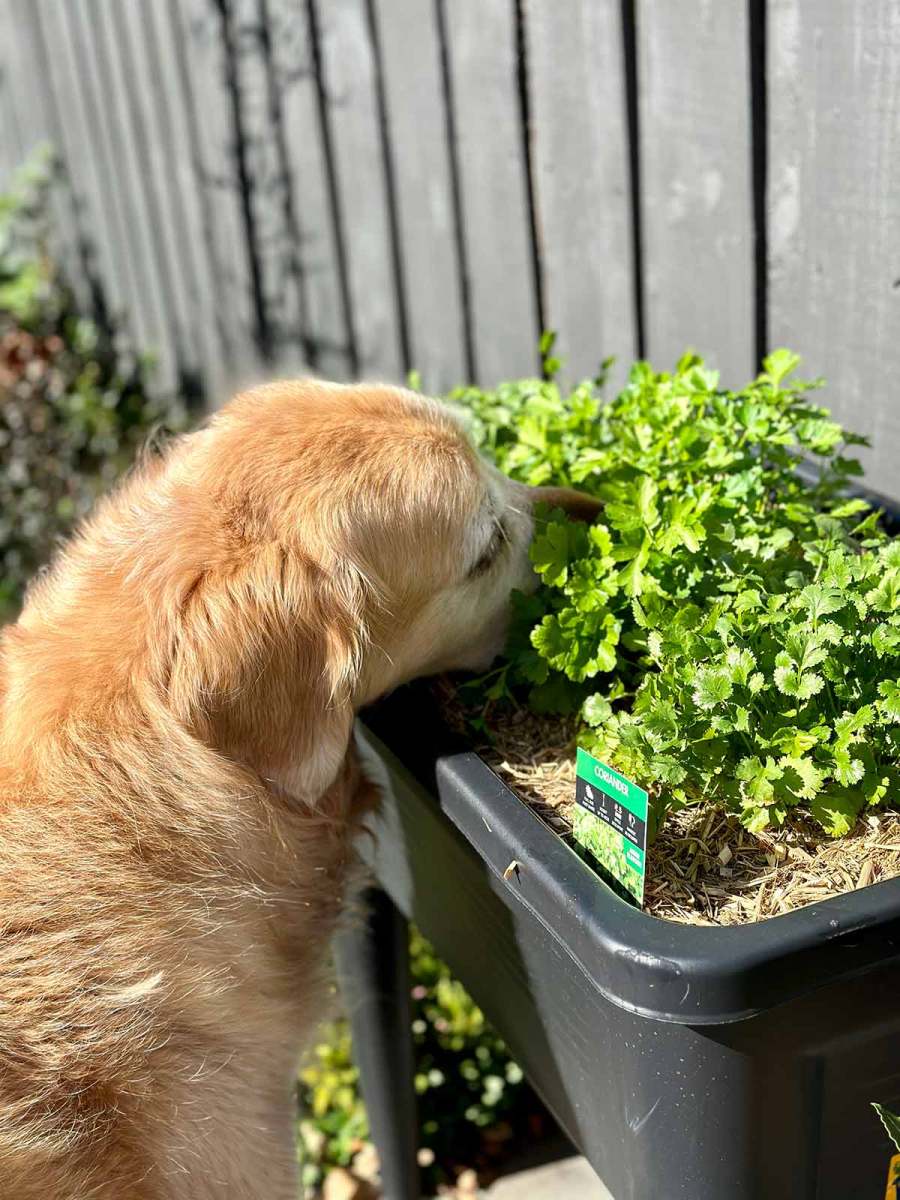
Life of Dozer
This dog really will eat anything. (Well, except kale! 😂)
The post Arayes – Lebanese Meat-Stuffed Crispy Pita appeared first on RecipeTin Eats.
]]>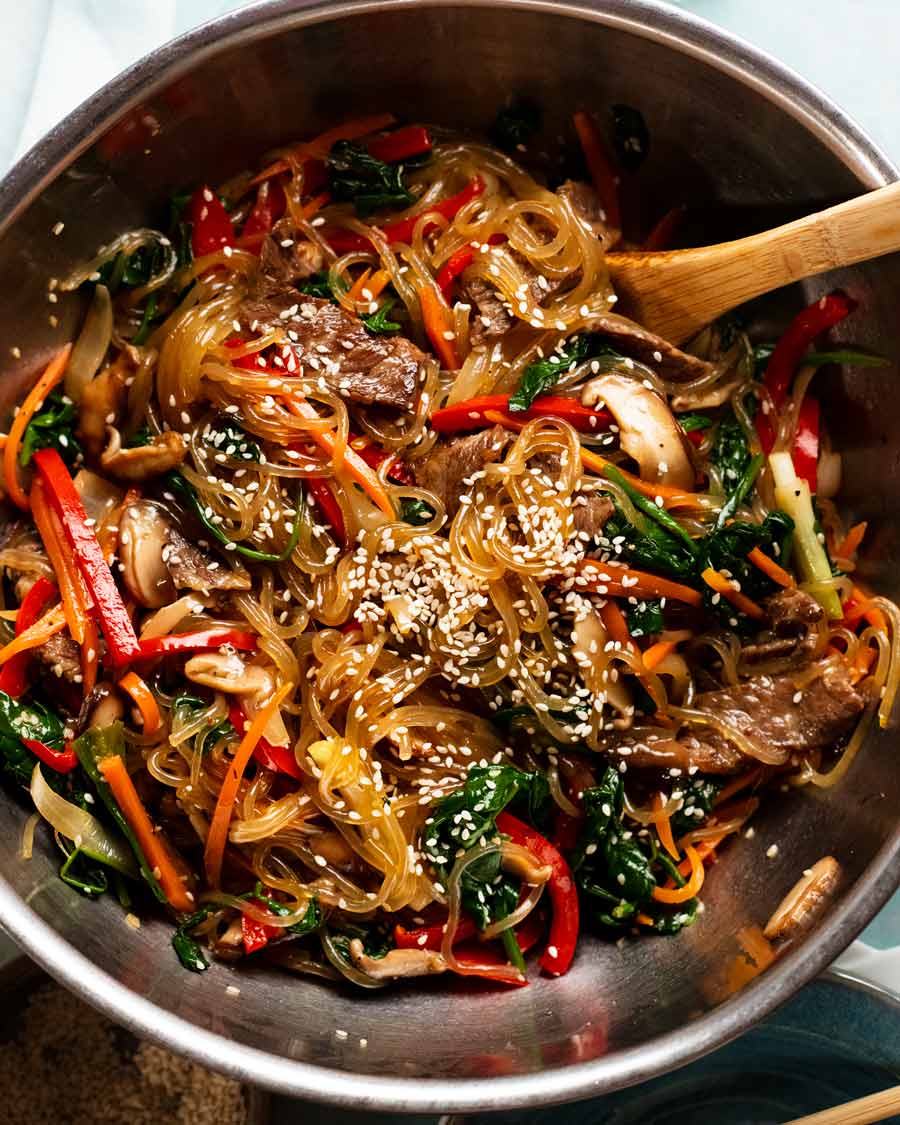 Japchae – the bright, colourful Korean noodle dish made with an abundance of vegetables, juicy bits of marinated beef and a sesame-forward dressing. Made with sweet potato noodles which have a unique slippery, chewy texture, this is sort of a stir fry, sort of a noodle salad, and 100% YUM! Japchae Japchae is a famous... Get the Recipe
The post Japchae – Korean noodles appeared first on RecipeTin Eats.
]]>Japchae – the bright, colourful Korean noodle dish made with an abundance of vegetables, juicy bits of marinated beef and a sesame-forward dressing. Made with sweet potato noodles which have a unique slippery, chewy texture, this is sort of a stir fry, sort of a noodle salad, and 100% YUM!
Japchae
Japchae is a famous Korean noodle dish that I describe as sort of a stir fry, sort of a salad. It’s a cross between the two in my mind because stir fried vegetables are tossed with noodles and sauce in a bowl rather than on the stove, and served barely warm.
You start by mixing the sauce in a giant bowl, then pile all the ingredients in one after the other – the noodles, a giant mound of cooked vegetables then lastly the seared marinated beef. Then finally, you give it a big toss to mix it all together in the bowl. This part is really satisfying, getting really stuck into it! (Just make sure you use a really big bowl else you’ll be cursing!).
Ingredients in Japchae
Here’s what you need to make Japchae. I’ve broken it up into:
Noodles and sauce
Beef and marinade
All the colourful veg!
The noodles & sauce
Here’s what you need for the noodles and sauce:

Some notes on some of the pictured ingredients:
Japchae noodles – The noodles used in Japchae are dried sweet potato noodles called dangmyeon. They are made from sweet potato starch and are almost transparent when cooked. It’s like the Korean version of glass noodles! The packets shown above are sold at large grocery stores in the Asian aisle, though you can get them cheaper at Asian stores.
Substitute with glass noodles (ie the clear vermicelli noodles). And though Korean nationals may have my head for saying this, just quietly, you can totally make this recipe with any noodles. It will still be delicious!
Soy sauce – Either light or all purpose soy sauce. But not dark soy sauce – flavour is too strong and the colour is too intense! More on which soy sauce to use when here.
Sesame oil – toasted sesame oil is brown and has more flavour than untoasted (which is yellow). The default sesame oil sold in Australia is toasted, untoasted is harder to find.
Beef and marinade
We’re using beef short ribs in today’s recipe. Yes, it’s an unusual option for a stir fry – but I think you’ll be really impressed. It surprised me!
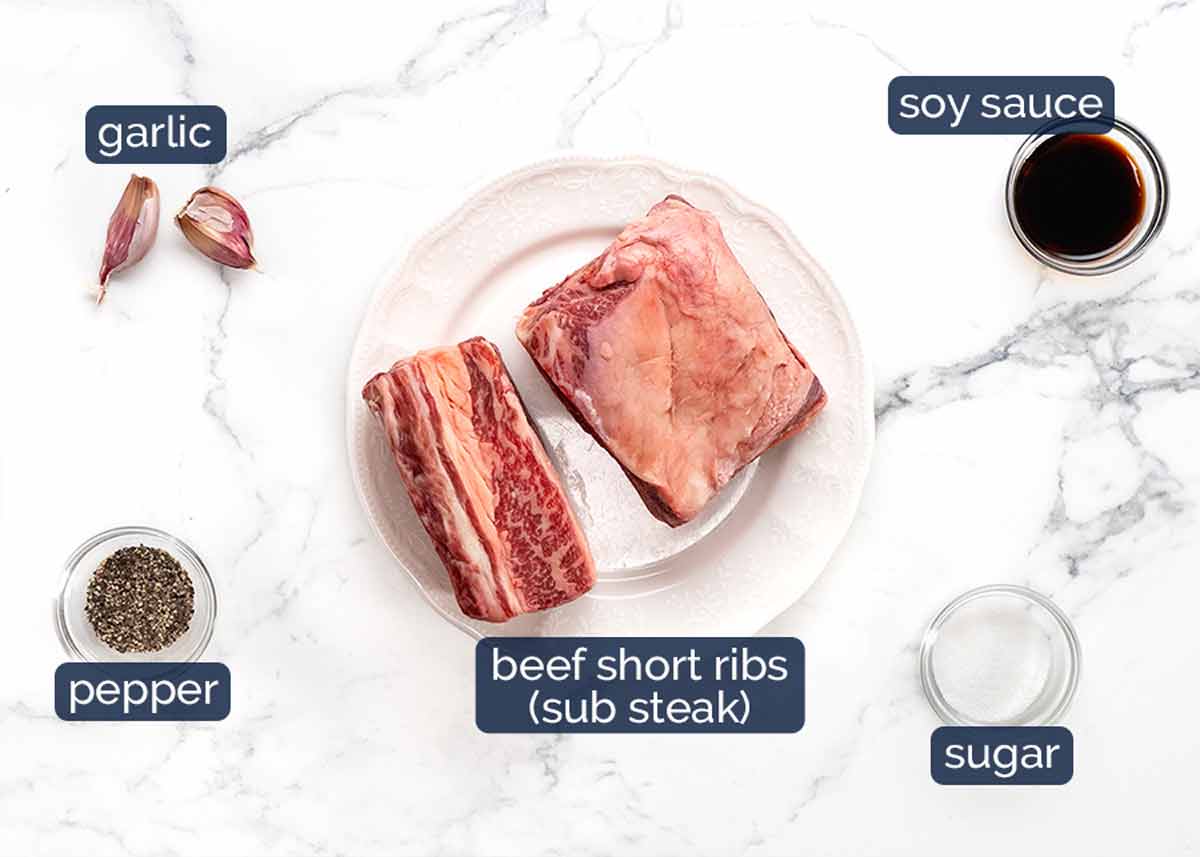
Beef (choices!) – Beef short rib is my favourite cut to use in Japchae. Contrary to popular belief, it’s not just for slow cooking! When cut off the bone then thinly sliced, the beautifully marbled meat is juicy, tender and flavourful when cooked quickly on high heat – just 90 seconds. (If using beef short ribs whole, however, they must be slow cooked to break down the tough fibres. Try this, this, this or this recipe).
It really is so much nicer to have the beef bits extra tender and juicy in a noodle dish that is not as saucy as your everyday Chinese Beef Stir Fry. So I really hope you give beef ribs a go! I honestly think it’s better than even pricier steaks like scotch / rib-eye.
Other options – Scotch fillet/boneless rib eye is best, as it is the juiciest. If using other steak cuts like rump, porterhouse/t-bone, sirloin/strip etc (especially if economical), I recommend tenderising them before using in the recipe so the beef pieces are extra tender (directions in recipe card). Thin strips of beef are difficult to keep juicy as they overcook in a microsecond. As mentioned above, you can get away with that in saucy Beef Stir Fries. Not so much in noodle dishes.
Soy sauce – As above!
Vegetables
The vegetables shown below is a fairly common combination for Japchae, with a lovely contrast of colour, textures and flavour. But you can really use any stir-fry-able vegetables you want.
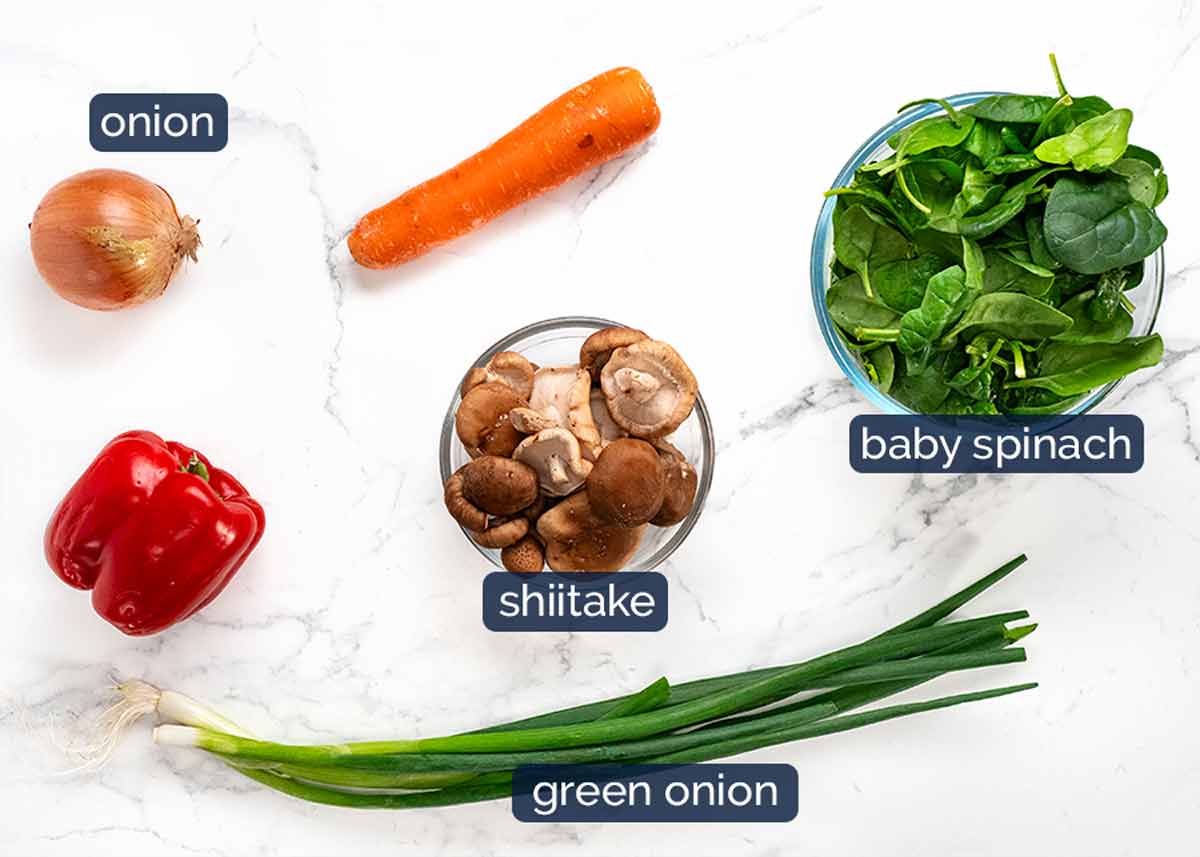
Just a note on a few of the vegetables:
Shiitake mushrooms – These are Asian mushrooms with a more intense mushroomy flavour than standard white mushrooms, brown/cremini mushrooms etc. However, if you can’t find them or they are a bit pricey, feel free to use ordinary mushrooms. They are, as you’d expect, better value in Asian stores.
Baby spinach – Substitute with chopped English spinach, the leafy part of Asian greens or even kale. *She ducks as Koreans start throwing rotten tomatoes at her*
How to make Japchae (semi-traditional way)
Traditional Japchae recipes call for each vegetable to be cooked individually to factor in the different cook times and preserve the flavour of each. Yes, it’s cumbersome (you count 6 vegetables above!).
But if you jumble them all up into one giant stir fry then the flavours do tend to bleed into each other a bit. So I’ve compromised and cooked the vegetables in 2 lots, bundling vegetables together by factoring in cook times and flavour “bleeding” to best replicate the same result where vegetables are cooked individually. Bonus: We use less oil.
I hope my slight short-cut method doesn’t offend Korean nationals! 😇
Cutting beef short ribs
As noted above, I really think the best beef for Japchae is beef short ribs – juiciest, best flavour. It’s typically sold on the bone (off the bone is not common here in Australia), so here is how to slice the meat.
If you are using a boneless steak instead, or boneless beef short ribs, then you obviously don’t need to cut the meat off the bone!
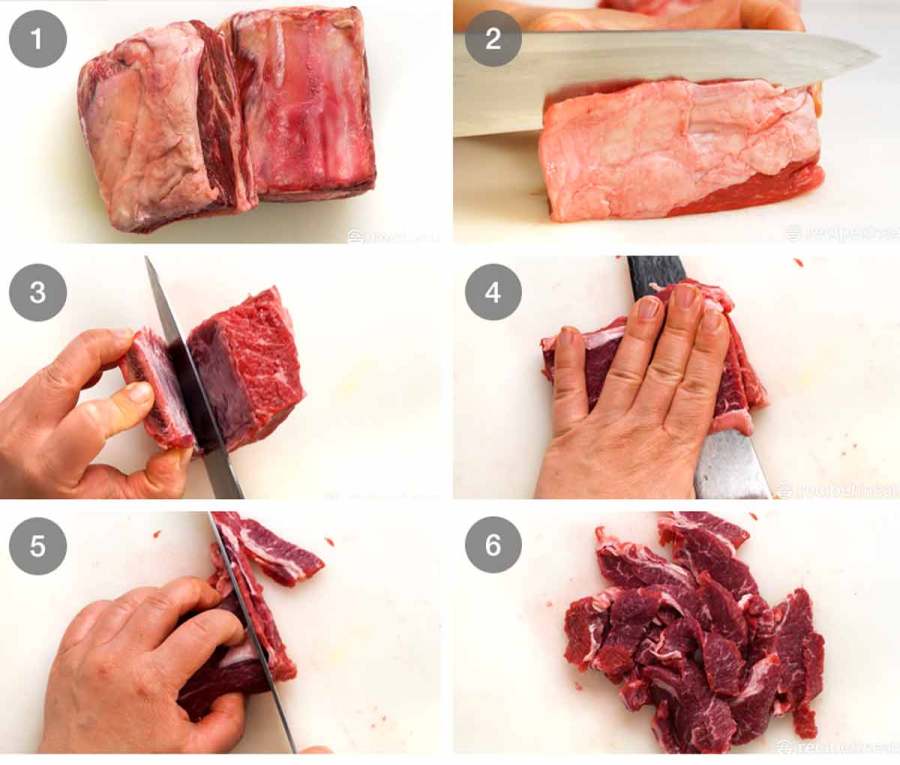
Beef ribs – Not gonna lie. My step photo templates use even number of photos and I only had 5. So I stuck this in as a filler. “Beef short ribs. Ta da!”
Trim excess fat – Beef ribs tend to have quite a generous layer of fat on them. So slice off the thick layers on the surface. Not all of it though! The fat is what keeps it juicy!
Cut the meat off the bone simply by holding the beef rib upright then slicing the knife down against the bone. It’s easy – the bone is straight and flat.
Cut in half horizontally to form 2 thin steaks so we can cut thin beef strips.
Cut strips – Keep the halves stacked. Then cut into thin 0.5cm/ 1/5″ slices.
Voila! Tasty beef strips. You are going to love how juicy these are!
Cooking Japchae
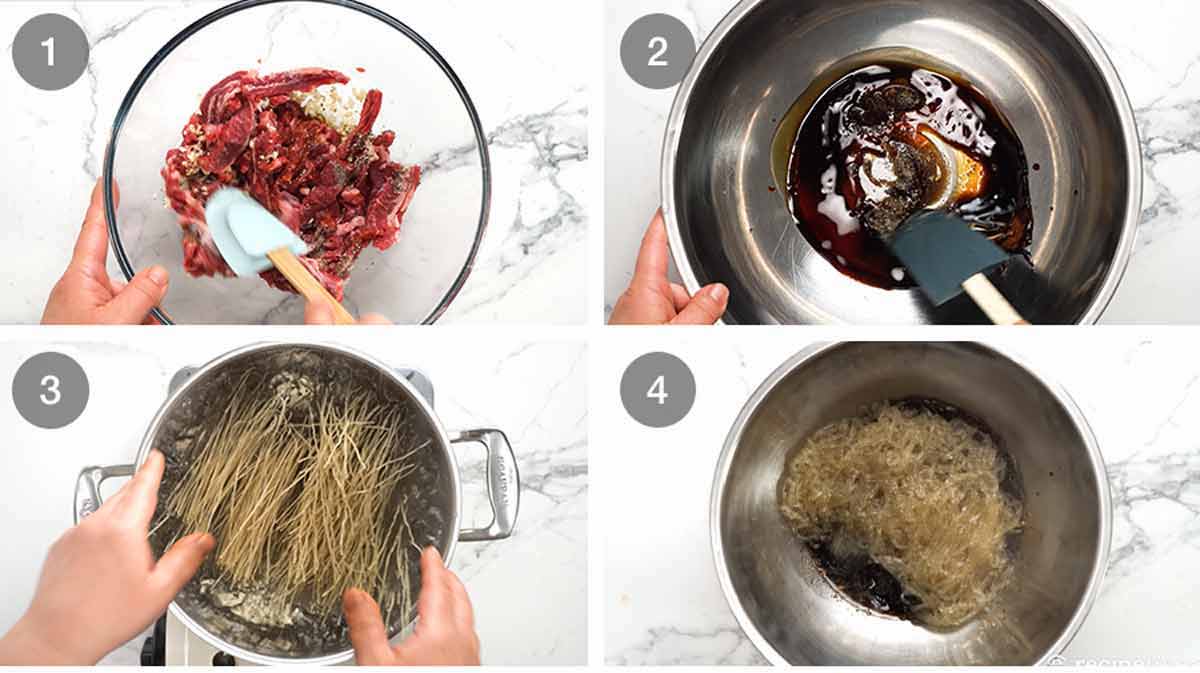
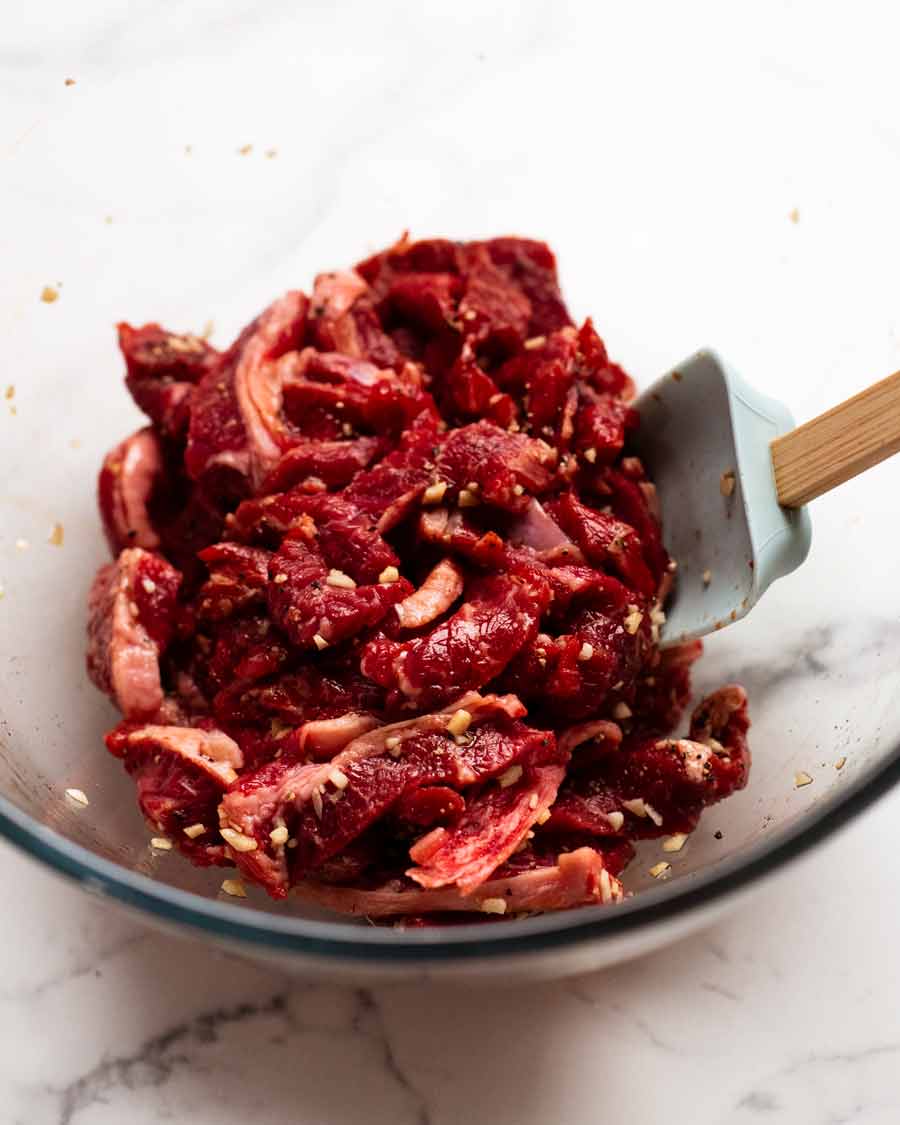
Marinate beef ~20 minutes – Place the beef with the marinade ingredients into a bowl and toss to combine. Then just set aside while you prepare and cook everything else, so it ends up marinating for around 20 minutes. It doesn’t need to be marinated for long because the beef strips are so thin, though it wouldn’t hurt to leave overnight.
Mix the sauce ingredients in a very big bowl. We are going to be tossing the whole batch of Japchae in this bowl so I really mean it when I say make it a big one!
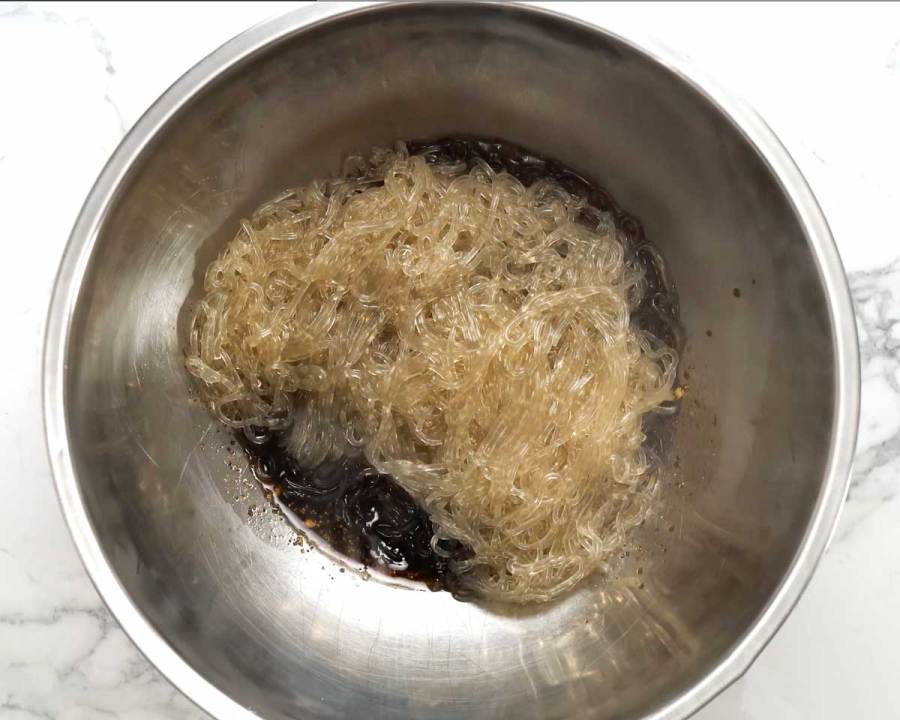
Cook the Japchae noodles per packet directions. Mine says 8 minutes in boiling water.
Noodles on sauce – Drain, rinse briefly under tap water, shake off excess water well then place in the bowl with the sauce. Do not mix – just leave it there.
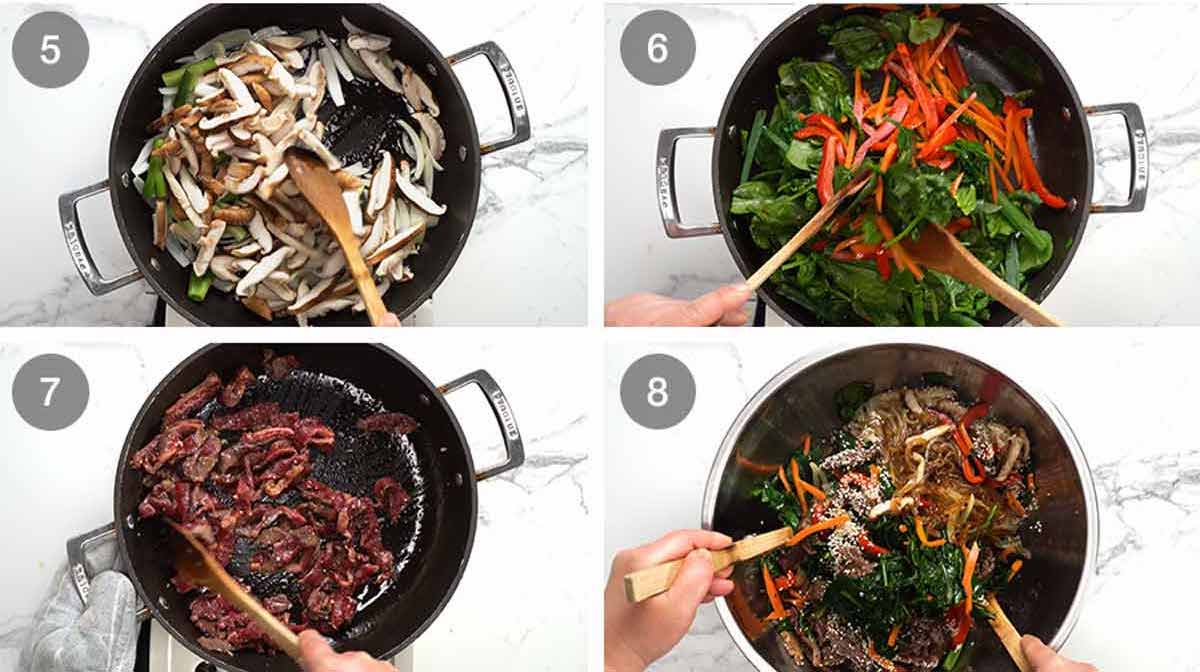
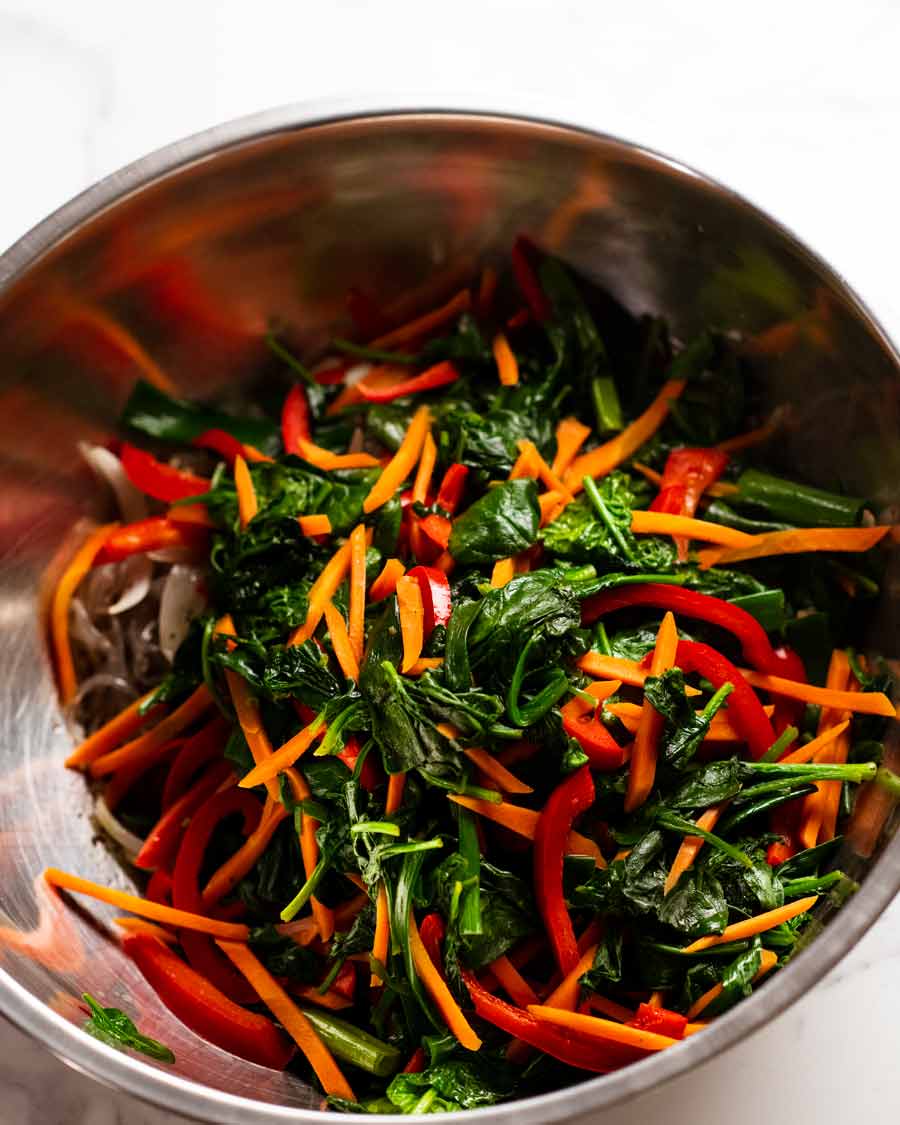
Vegetables Batch 1 – Cook the onion, mushrooms and white part of green onions first, until the mushrooms just start to soft. Then transfer into the noodle bowl.
Vegetables batch 2 – Next, cook the carrot and capsicum/bell pepper first, until they are just cooked but still have a soft bite to them. ie “tender crisp”. Soggy floppy overcooked vegetables is unacceptable! 😂 Then add the spinach and the green part of the green onions and toss for a minute just until the spinach is wilted. Then transfer into the noodle bowl.
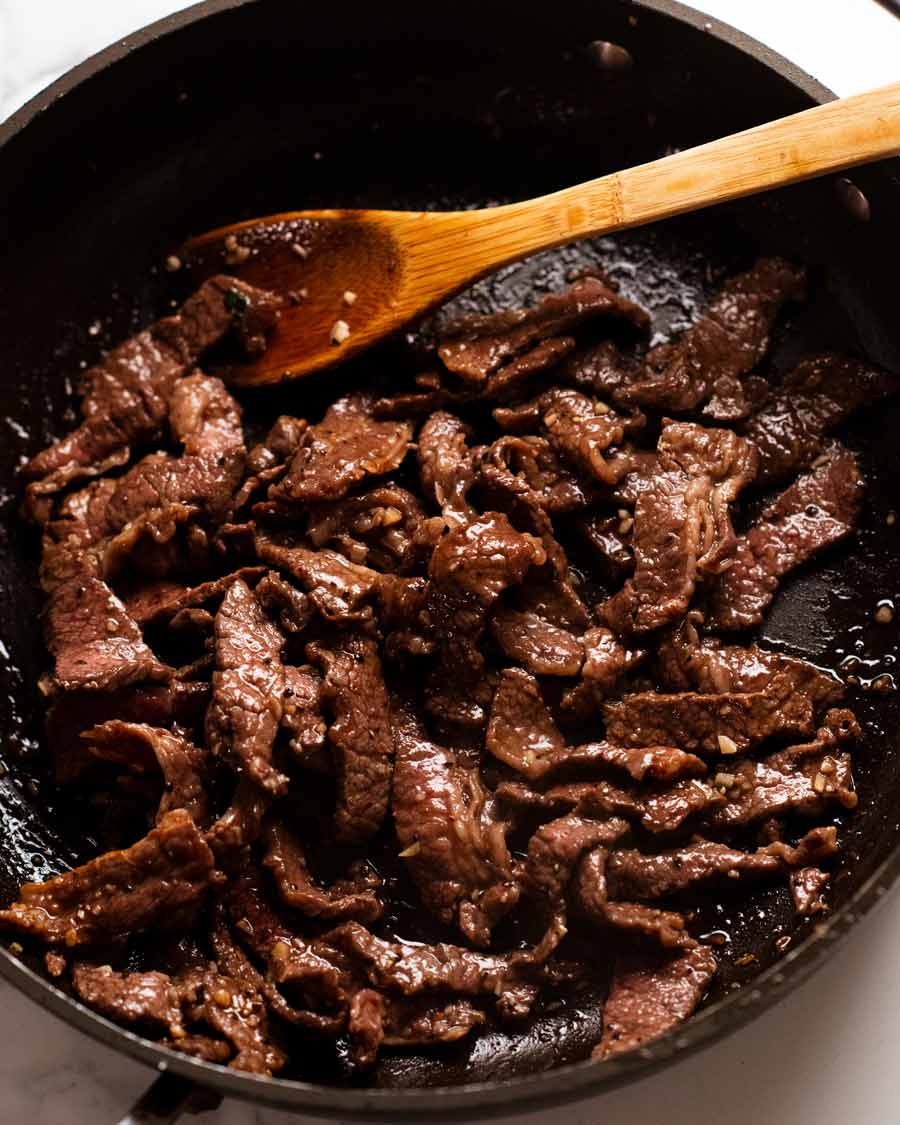
Cook beef – Lastly, cook the beef! Cook it on high heat just until you no longer see red – with a strong stove and good pan it should be barely 90 seconds. Hopefully in this time you’ll get a bit of browning in some patches too. Then add it into the bowl.
Toss! Add the sesame seeds, and now it’s time to toss! You used a giant bowl right, like I said to right at the start?? If you didn’t, you’ll start to cry (or swear) right about now.
Toss, toss, toss, until the sauce is evenly distributed. Check by looking at the colour of the noodles – the sauce stains the glassy noodles a brown colour.
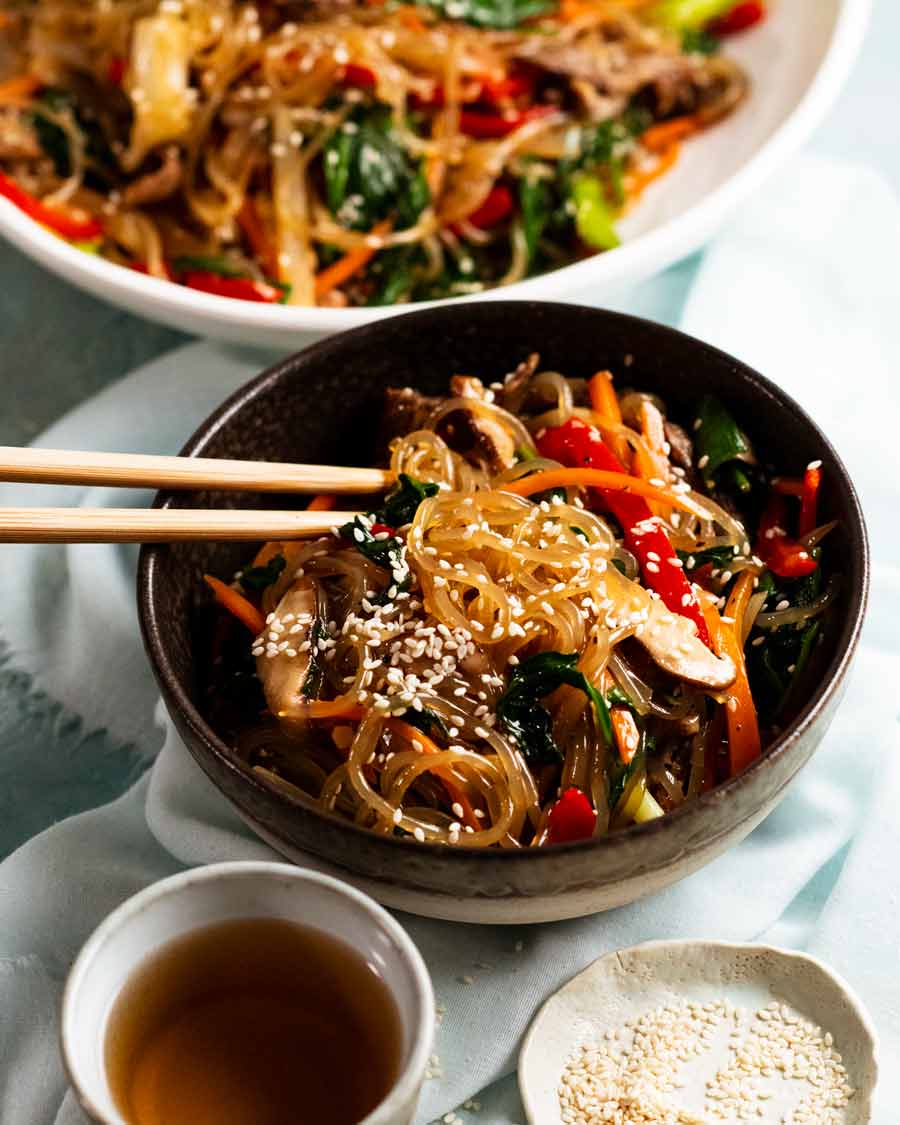
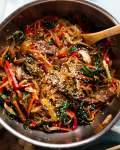
Then tumble it all into a bowl, finish with a sprinkle of sesame seeds and serve!
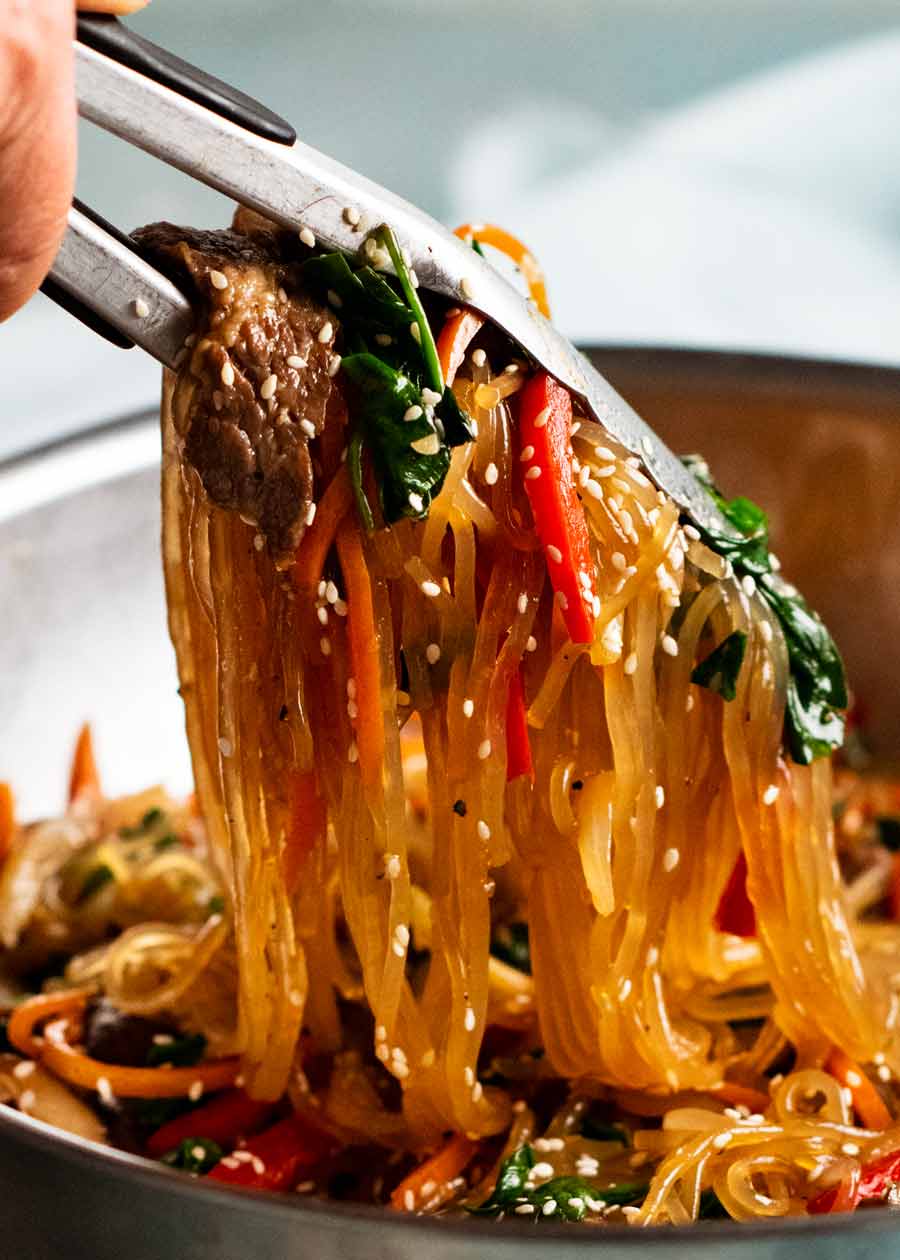
YUM. That sauce is everything! I really like that it’s not as sweet as the Japchae sauce you get at some Korean restaurants which I find a little too sweet.
This is a big batch recipe so it’s an excellent one for taking leftovers to work. It will keep for 3 days in the fridge. Just lightly warm it – or serve hot if you want. Though honestly, it’s also very good at room temperature too! – Nagi x
Watch how to make it
Japchae – Korean Noodles
Ingredients
Choose beef option (Note 1):
- 600g/1.2lb bone-in beef short ribs *RECOMMENDED* (300g/10oz boneless)
- 300g/10 oz boneless beef short ribs *RECOMMENDED*
- 300g/10oz scotch fillet / boneless rib eye or other steak, recommend tenderising (Note 1)
Beef marinade:
- 2 tsp soy sauce , all-purpose or light soy (Note 2)
- 2 tsp white sugar
- 2 tsp finely minced garlic
- 1/2 tsp black pepper
Noodle dressing:
- 1/4 cup soy sauce , all-purpose or light soy (Note 2)
- 2 tsp white sugar
- 1/2 tsp finely minced garlic
- 1 1/2 tbsp sesame oil
- 1/2 tsp cooking/kosher salt
- 1/2 tsp black pepper
Noodles & vegetables:
- 250g/ 8oz sweet potato noodles (dangmyeon), dried (Note 3)
- 4 tbsp vegetable oil (or other plain oil)
- 1 tsp cooking/kosher salt , divided
- 1 onion , peeled, halved, sliced into 6mm/1/4″ wedges
- 3 green onion stems , cut into 5cm / 2″ lengths, white & green parts separated
- 200g/7oz fresh shiitake mushrooms , stem removed, cut into 5mm/1/5″ slices (Note 4)
- 2 carrots , peeled, cut into 3mm / 1/8" batons
- 1 red capsicum/bell pepper , cut into 0.5cm / 1/5″ slices
- 4 1/2 cups (tightly packed) baby spinach
- 2 tbsp white sesame seeds
Instructions
Quick beef marinade:
- Cut beef into strips that are ~ 5mm thick, 1cm wide and about 5cm long (1/5" x 2/5" x 2"). If using shortribs, trim excess fat, cut the meat off the bone. Then cut each piece in half lengthwise (to form 2 "steaks") then slice into 5mm thick. (See step photos in post or video at 0.11s, Note 6)
- Marinate – Put beef in a bowl. Add marinade ingredients, then mix. Set aside marinate while you proceed with recipe, ~15 – 20 minutes is all it needs. (Note 5)
Sauce and noodles:
- Sauce – Mix the Sauce ingredients in a very large mixing bowl.
- Noodles – Cook sweet potato noodles per packet directions (normally 8 min in boiling water). Drain, briefly rinse under tap water then shake off excess water well. Add noodles into the bowl with the dressing. DO NOT MIX.
Vegetables:
- Batch 1 – Heat 2 tablespoons of oil in a large non-stick pan (30cm/12") over high heat. Cook the brown onion, white part of green onion and shiitake mushrooms with 1/2 tsp salt for 2 1/2 to 3 minutes, stirring constantly, just until starting to soften but not going golden. Pour on top of the noodles – don't mix yet!
- Batch 2 – Using the same pan still on high heat, heat 1 tbsp oil then cook the carrot and capsicum for 1 1/2 minutes, constantly stirring. Add spinach, green onion and the final 1/2 tsp salt. Keep cooking for 1 1/2 minutes until the spinach is wilted. Transfer into the noodle bowl – still don't mix!
- Cook beef – In the same pan, heat the final 1 tbsp of oil still on high heat. Add beef and cook for 1 1/2 minutes until very lightly golden and just cooked through. Add to the noodle bowl. Don't mix!
- Mix! Add most of the sesame seeds (reserve some for topping). NOW you can mix! Toss, toss, toss.
- Serve – Transfer into a serving bowl, sprinkle with remaining sesame seeds. This is meant to be eaten warm, not piping hot. Eat!
Notes
Nutrition
Life of Dozer
I can feel him heavy breathing on my feet. 🙄 Also, don’t miss Dozer’s cameo in today’s recipe video – at 0:36!

The post Japchae – Korean noodles appeared first on RecipeTin Eats.
]]> My favourite burrata recipe – Bursty Tomato Burrata Salad. Juicy roasted cherry tomatoes, creamy burrata cheese, dollops of pesto, swish of olive oil and crusty bread. Simple, luscious, rustic perfection. A gorgeous appetiser or light meal that’s not too expensive to make. This is my favourite burrata recipe Burrata seems to be all the rage... Get the Recipe
The post Bursty Tomato Burrata Salad appeared first on RecipeTin Eats.
]]>My favourite burrata recipe – Bursty Tomato Burrata Salad. Juicy roasted cherry tomatoes, creamy burrata cheese, dollops of pesto, swish of olive oil and crusty bread. Simple, luscious, rustic perfection. A gorgeous appetiser or light meal that’s not too expensive to make.
This is my favourite burrata recipe
Burrata seems to be all the rage these days, on the menu of just about every trendy restaurant. That strange looking wobbly white ball of cheese with a molten centre that oozes out when you cut into it, there is no other cheese like it. (Is there??)
The name burrata is linked to the Italian word for butter, which hints at the rich and creamy taste of burrata. With a cheese this good yet not that expensive to buy, you can make something really special with very little effort and modest cost.
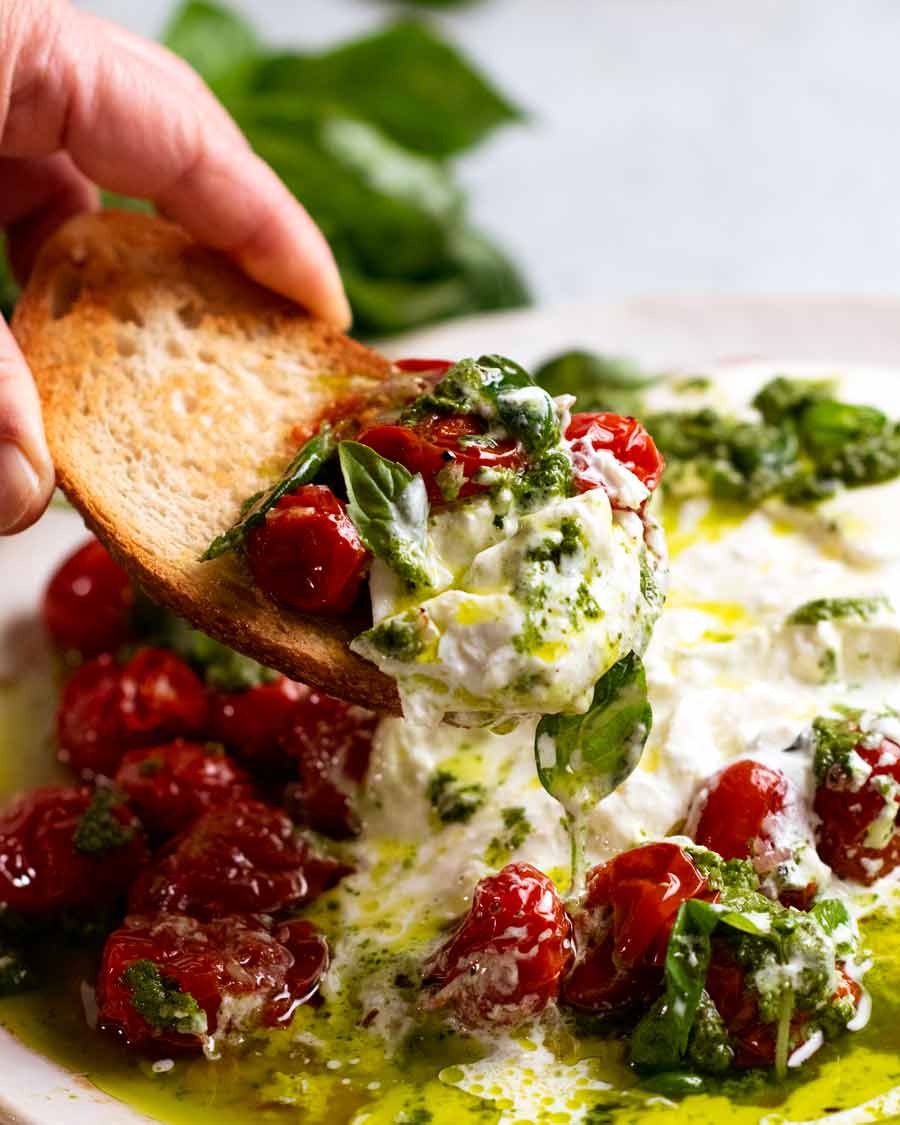
For me, juicy, bursty roasted cherry tomatoes served warm with a plump burrata ball plonked on top and a side of warm bread is just about as good as food gets. It’s on the table in 15 minutes, costs around $15, and it’s always a hit. Always!
What is burrata?
Burrata is an Italian fresh cheese. It is essentially a ball of fresh mozzarella filled with cream. The outside shell is stretchy and curdy like mozzarella while the inside is soft and creamy, and oozes out when you cut into the ball. It’s rich and intensely milky in taste, yet somehow fresh and delicate at the same time. The flavour is actually pretty mild, like fresh mozzarella. It’s not salty or heavily flavoured like an aged brie or cheddar.
Originating from the Puglia region of Italy, it’s made from cow milk (sometimes buffalo milk) and is so delicate it comes in water in tubs.
Not to be confused with fresh mozzarella or bocconcini (also sold in water in tubs) which are not oozy inside.
How to eat burrata – Burrata is eaten as is ie. no cooking. To me, because of the mild flavour, burrata is more about what you serve with it rather than the cheese itself. You need to add flavour and salt, and treat burrata almost like cream that makes a sauce. You’d never just dump just cream on a pasta, right? Need to add salt and flavourings. Bacon! Chicken! Parmesan!
How it’s used in dishes – Plonked on pastas, salads and toasts, as well as served plain with just a drizzle of olive oil and grilled bread on the side. Think of it as an instant sauce!
Today’s recipe is a burrata salad – and it’s my favourite way to use burrata in a dish.
Note: Not all burrata is created equal!
Good burrata will have a creamy centre that oozes out when you cut into it and have a beautiful luscious mouthfeel. Lesser quality burrata will not ooze properly.
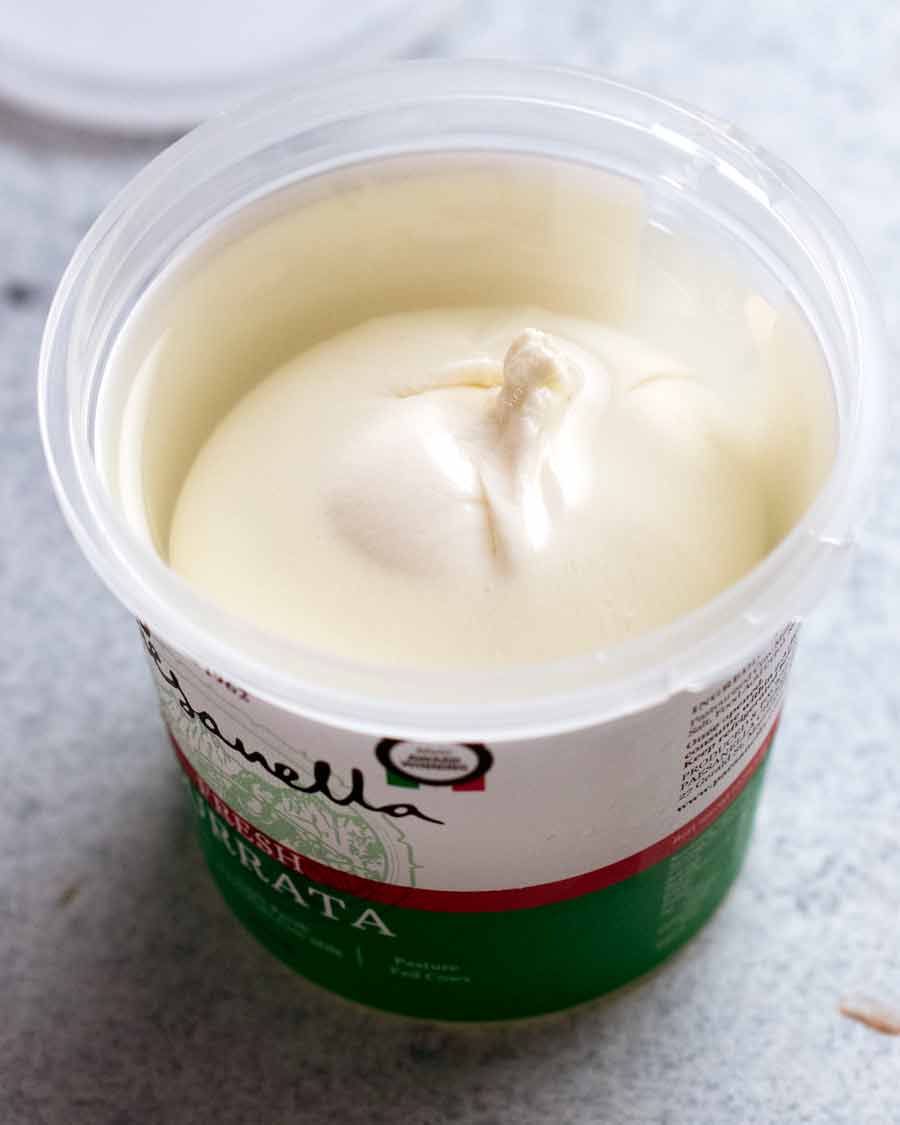
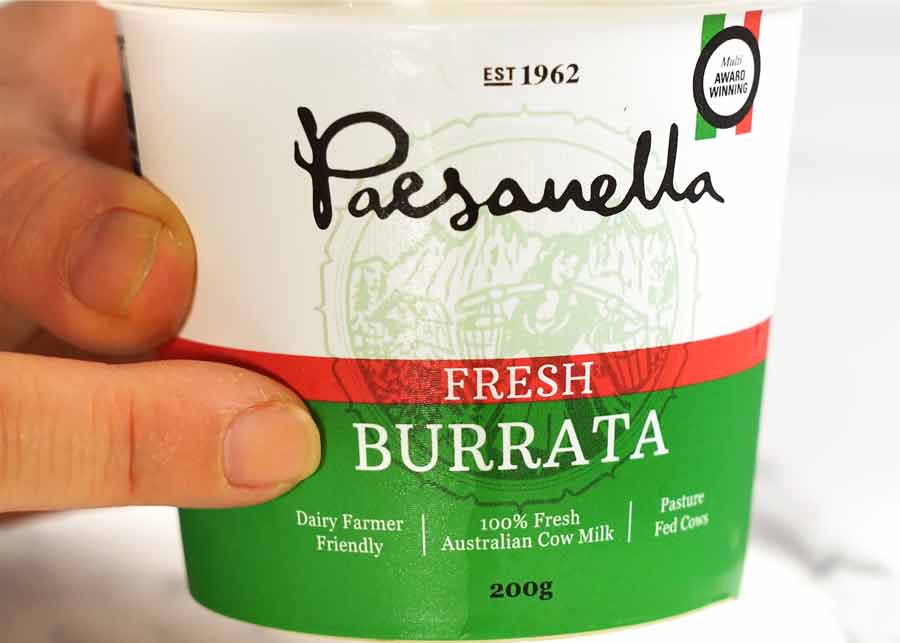
My go-to brand is Paesanella. It’s a local Australian brand fairly widely available these days here in Australian grocery stores and fresh produces stores. You can find even better ones at (good) Italian / cheese delis from artisan small batch producers.
Ingredients in Bursty Tomato Burrata Salad
Finishing with dollops of pesto takes this over the top. Taste wise – and also looks. Love how it turns the juices green!
But it’s still worth making even without. If basil is either extortionately expensive or a rummage in the freezer for leftover pesto is unsuccessful, I still make this though I do add something else to compensate, like dried herbs with the roasted tomatoes. I’ve popped some suggestions in the recipe card for pesto alternatives.
Burrata and (semi-optional) pesto
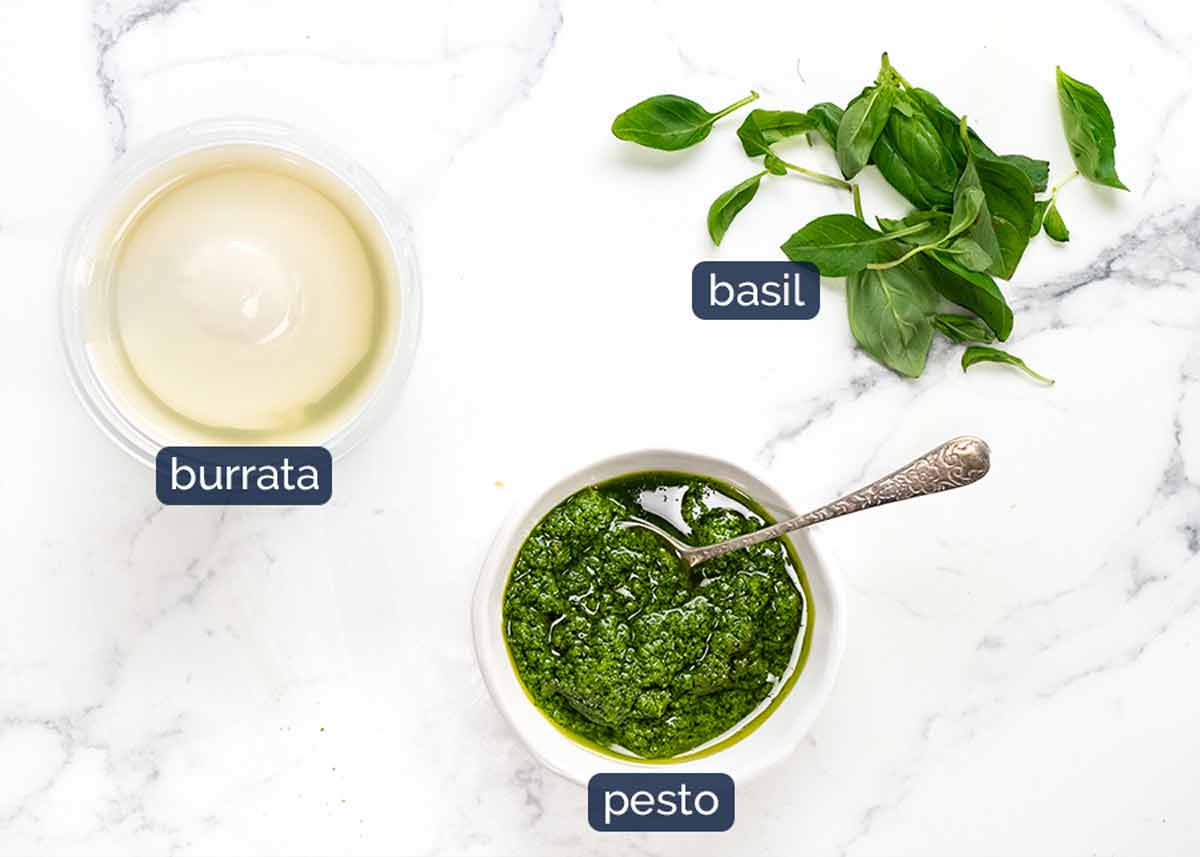
Burrata – See box above for information about burrata. No preparation is need to use it, just drain the liquid and use as is. However, just emphasising my recommendation to get a good one. If it doesn’t ooze, frankly, you may as well just get ricotta! My go-to brand is Paesanella which is available at some large grocery stores and fresh produce stores. Else, Italian / cheese delis.
Pesto – As noted above the photo, recommended for my favourite version of this dish but I still make it without. Use homemade pesto (freezes so great!) or a good store-bought.
Fresh basil – For sprinkling. As with with pesto comments, highly recommended but still worth making without.
The burst tomatoes and sauce
Here’s what you need for the sauce and burst tomatoes. Which, in case you hadn’t gathered yet, is just a cute name for roasted cherry tomatoes – because they go wrinkly and soft, ready to “burst” at a touch!
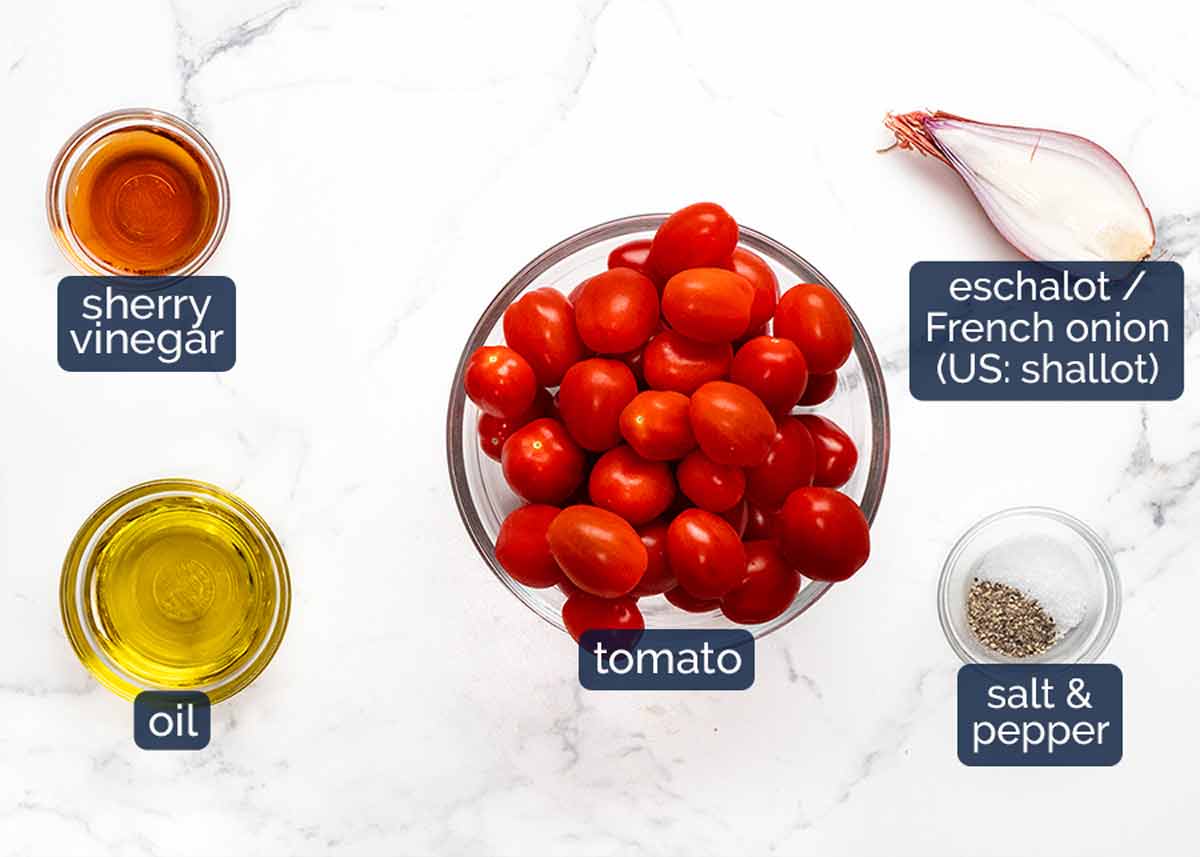
Cherry or grape tomatoes – 500g/1lb, about 4 cups in total, 2 standard Australian punnets. Because we are roasting them, they are delicious even when they are not in their summer prime. But imagine how good this dish is when cherry tomatoes are at their sweetest!
Eschalot (US: Shallot) – Also known as French onions and called “shallots” in the US. They are like baby onions, but with purple-skinned flesh. Not to be confused with what some people in Australia call “shallots”, ie. the long green onions. More delicate and not as sharp as ordinary onions so you don’t end up with giant lumps of onion with the tomatoes. Substitute with a garlic clove, finely minced white part of green onions, or finely shaved red onion.
Sherry vinegar – A little drizzle of vinegar to cut through all the olive oil and rich cheese really lifts this dish, I find. Use any clear(ish) vinegar that’s not as sharp as plain white vinegar. eg. like white wine vinegar, red wine or apple cider vinegar.
Standard olive oil – For roasting the tomatoes. No need to use your good stuff for cooking.
GOOD extra virgin olive oil – For drizzling over the dish at the end! This is what you use your good stuff for. Better flavour, richer colour!
How to make Bursty Tomato Burrata Salad
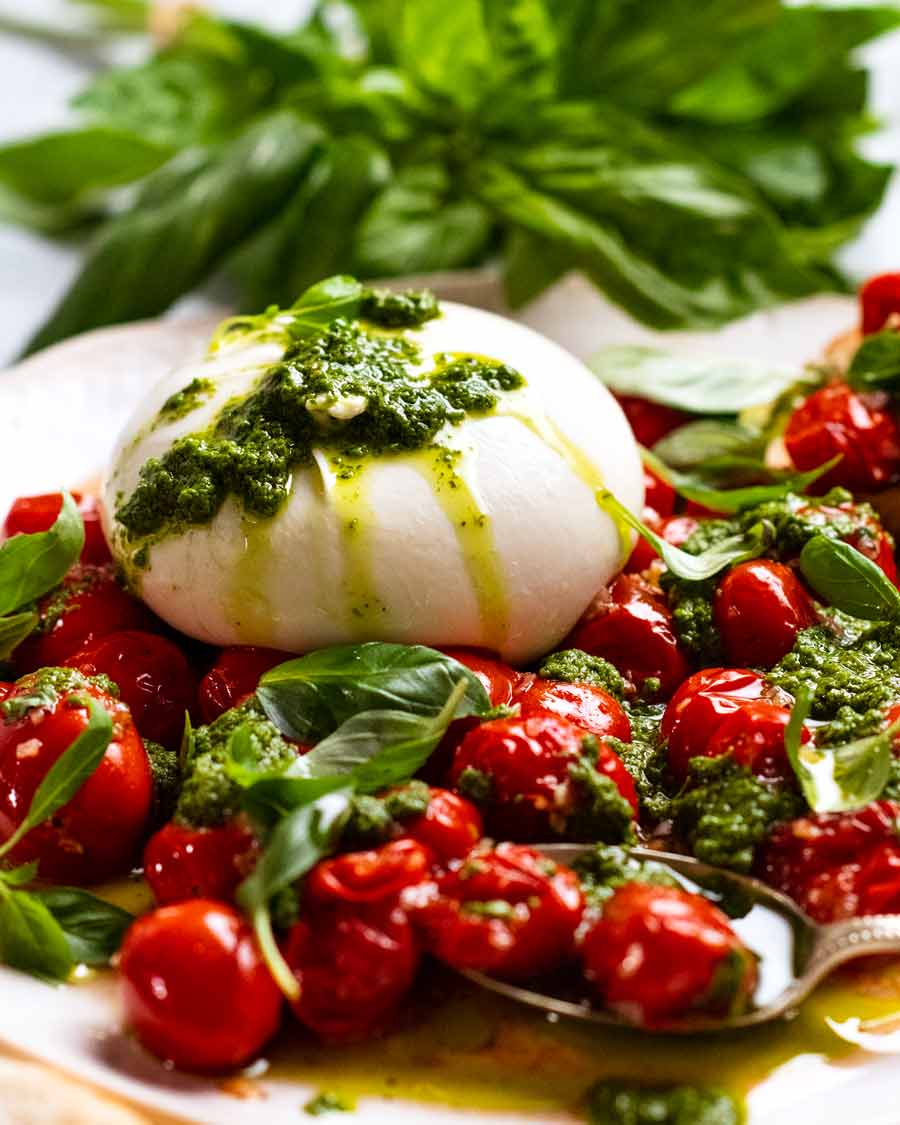
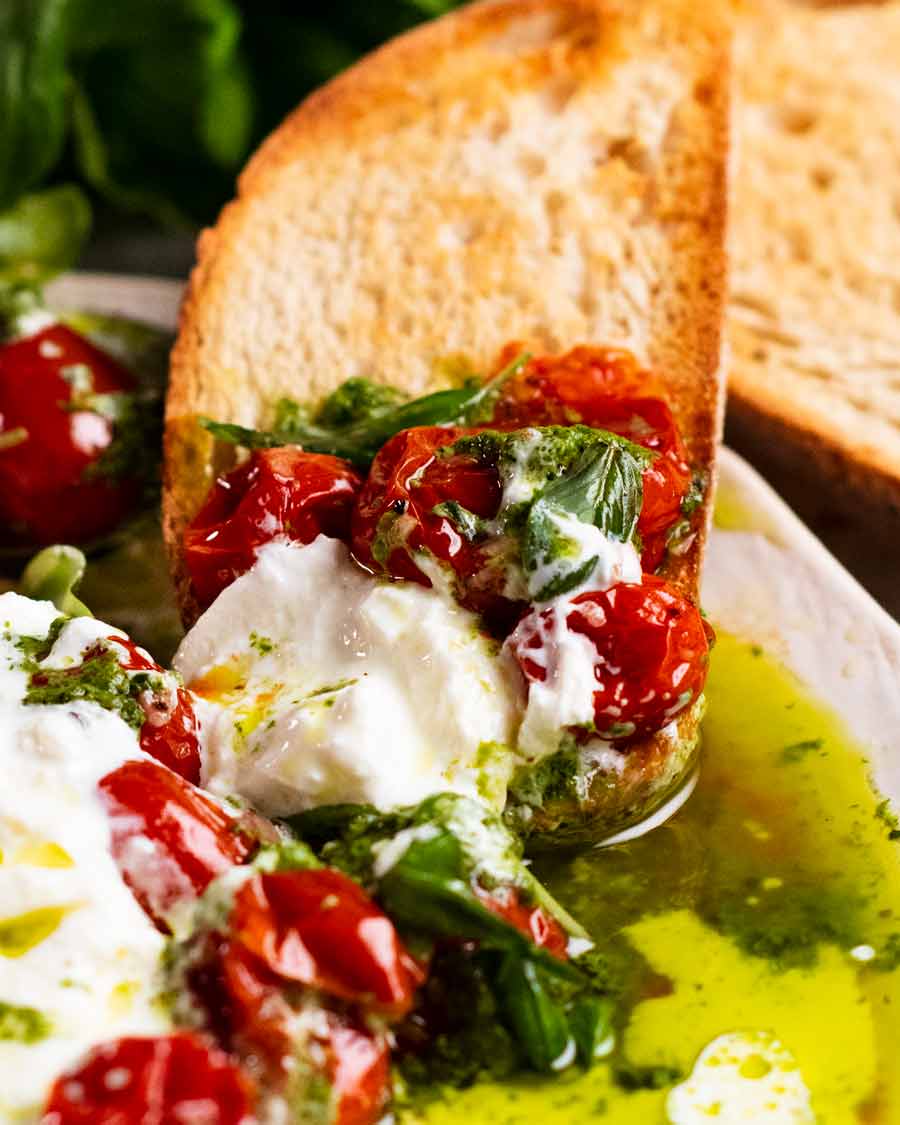
The tomatoes only take 10 minutes in the oven to become softened and a bit wrinkly but still holding their shape. The perfect state of almost-bursting (we want most of the actual bursting to happen in our mouth!).

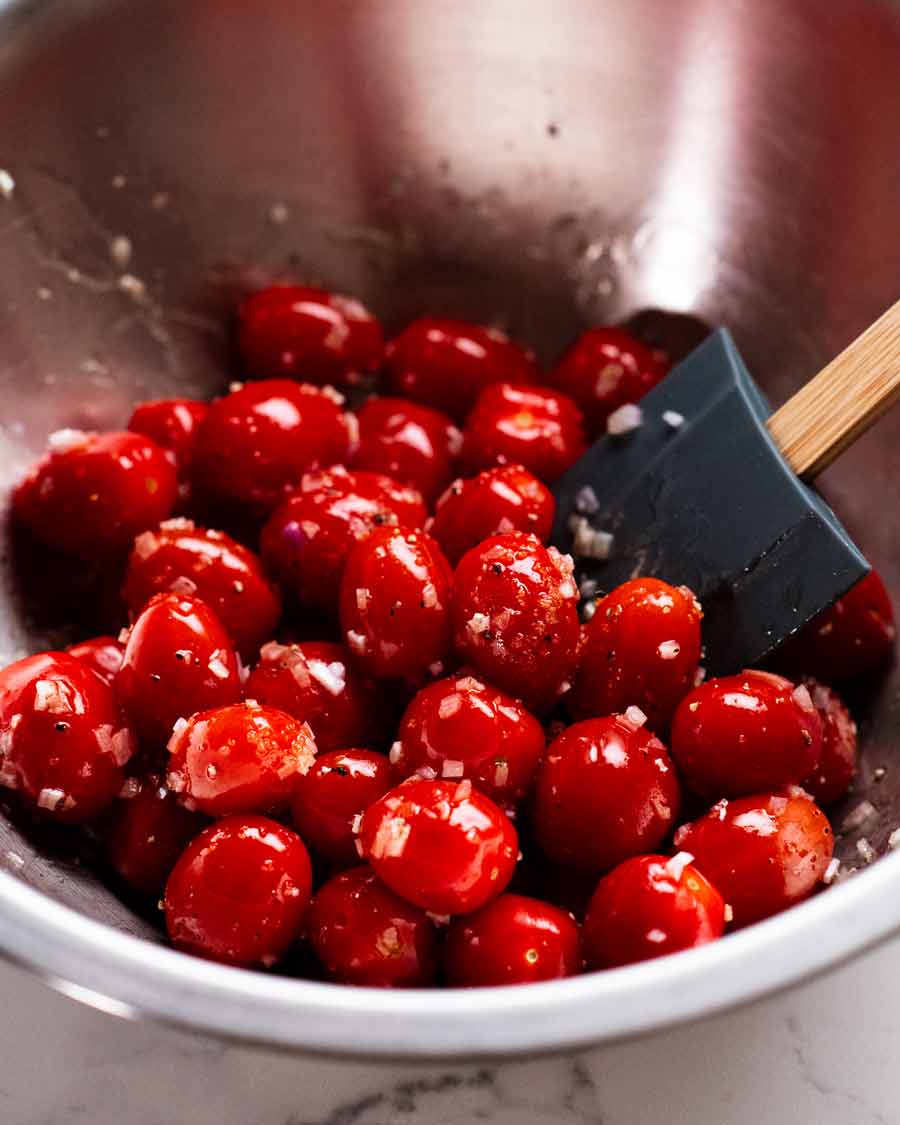
Bake 10 minutes – Toss the tomatoes with olive oil, salt, pepper and the eshallots (US: shallots). Spread on a tray and bake for 10 minutes at 200°C/400°F (180°C fan) until the tomatoes are softened, some are wrinkly, but they are all still holding their shape and not collapsed into mush.
Vinegar – Gently push the tomatoes to one side of the tray (so they are bunched up together) and drizzle with the vinegar.
Transfer – Then gently transfer the tomatoes to a serving plate, in a single layer.
How to handle the burrata:
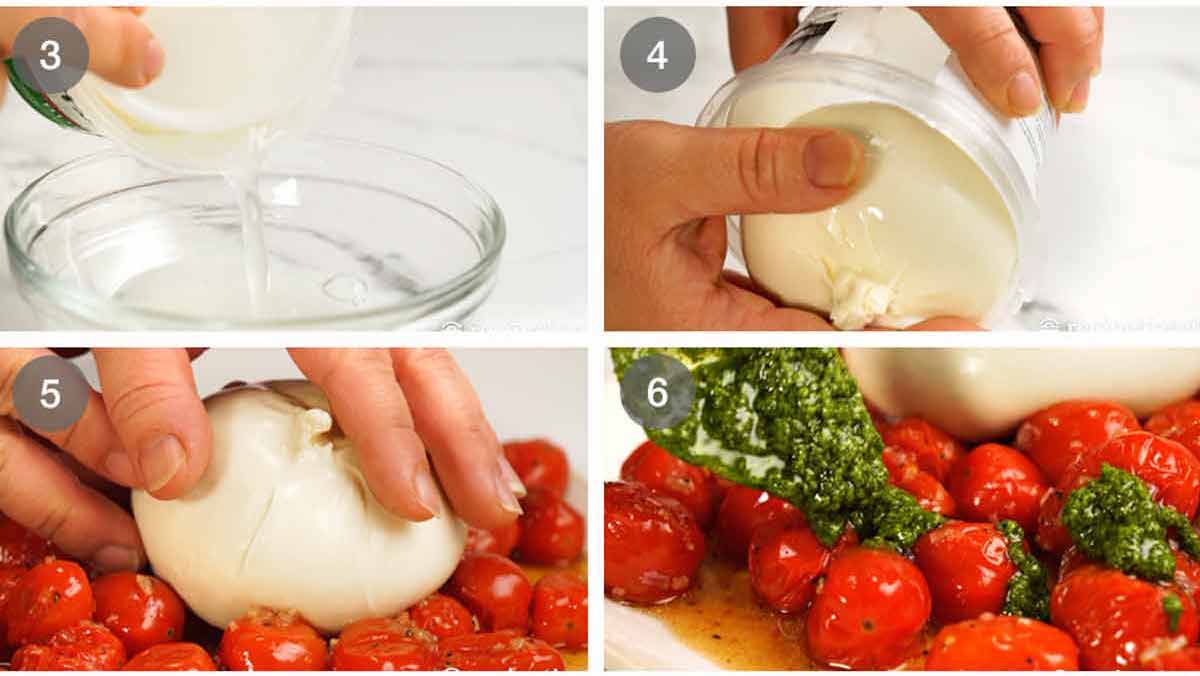
Now, burrata time! Nothing needs to be done to prepare it, we use it straight out of the tub.
GENTLY drain the liquid out of the burrata tub.
GENTLY roll the burrata out of the tub into your hand.
GENTLY place the burrata on top of the tomatoes.
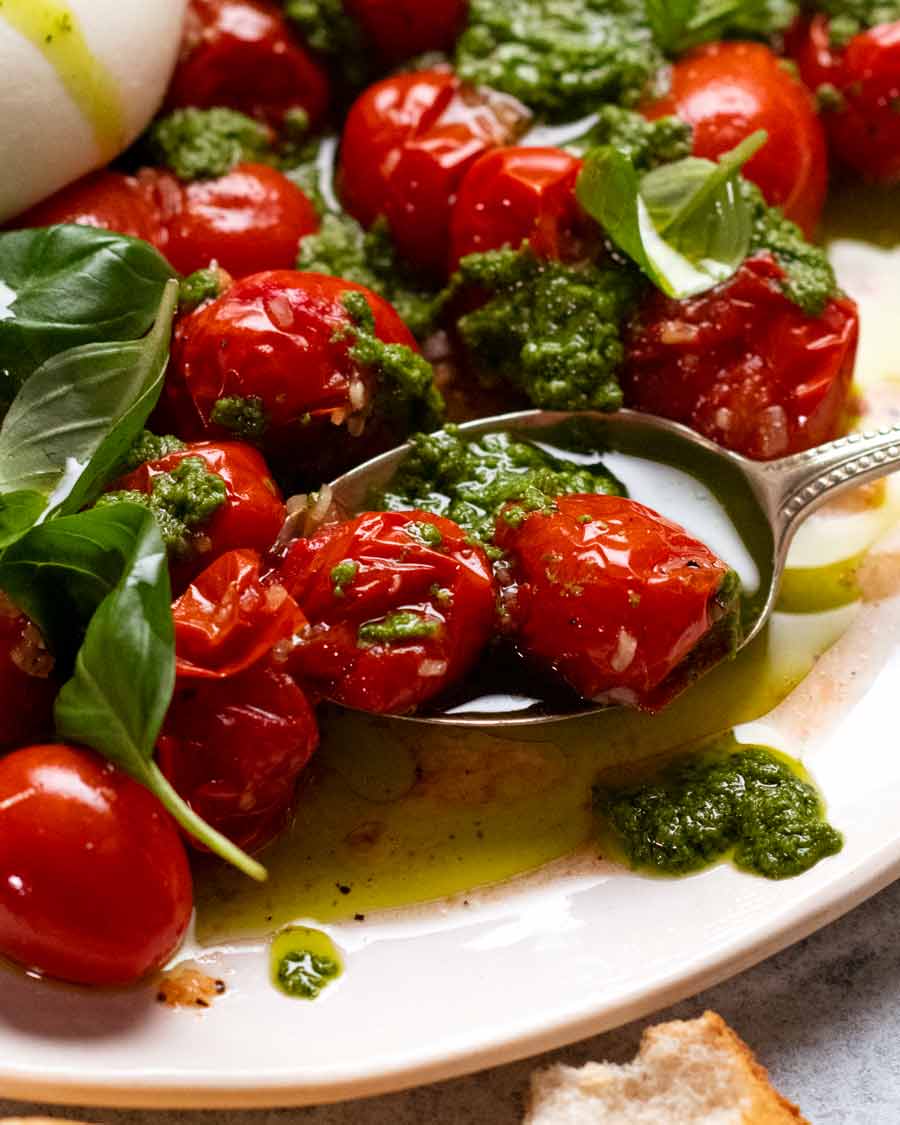
Dollop pesto randomly across the tomatoes – I also do some on the burrata. Why not?
Do you see a theme in the instructions here? 😂 Burratas are delicate – the mozzarella shell is thin and barely holding in that molten creamy good inside. Fairy fingers are essential here to avoid a burrata explosion in your hands. Not fun, my friends! (Says the girl who did it just 2 days ago).
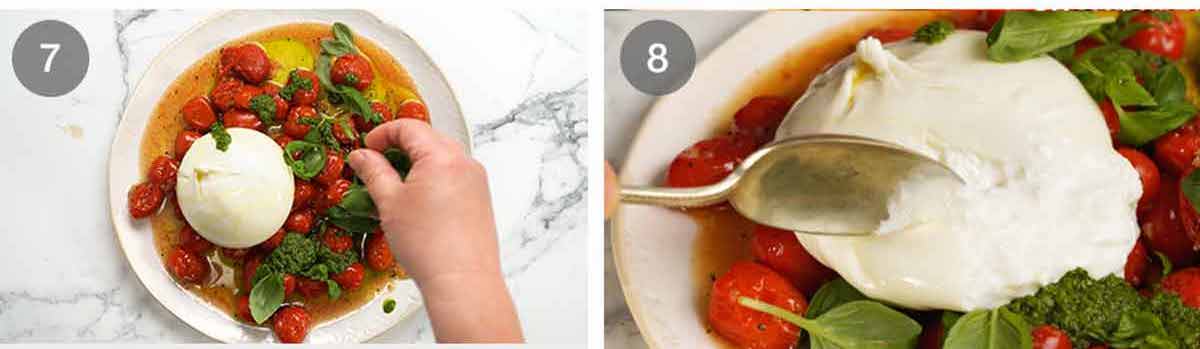
Finish with a swish of olive oil and sprinkle of fresh basil laves. Then serve your colourful bright burrata salad with a side of crusty bread!
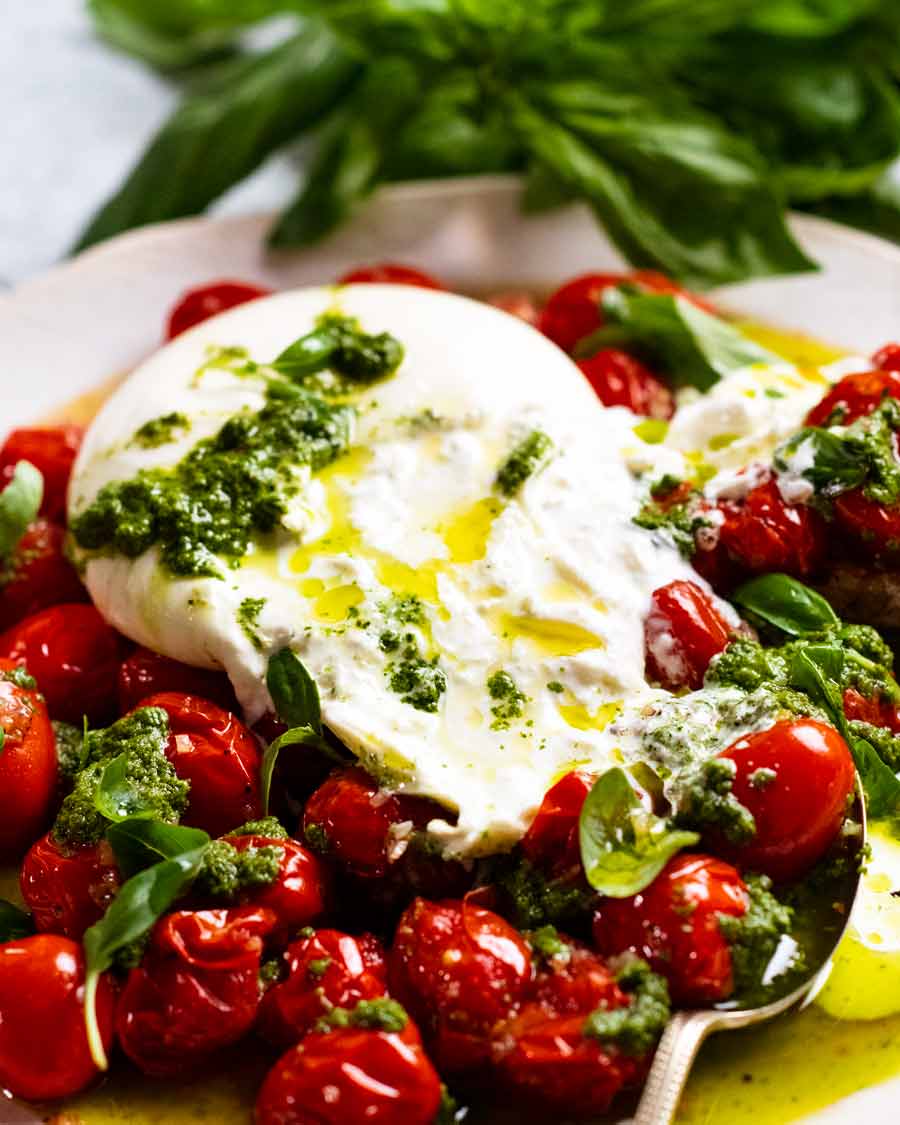
Nominate a lucky person to break into the burrata to let the molten centre come oozing out. Let that creamy centre run everywhere, mingling with the tomato juices and the pesto…you’re imagining it, right???
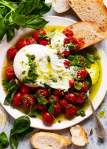
Here’s your masterpiece before everyone gets stuck in. A glorious plate of rustic perfection!
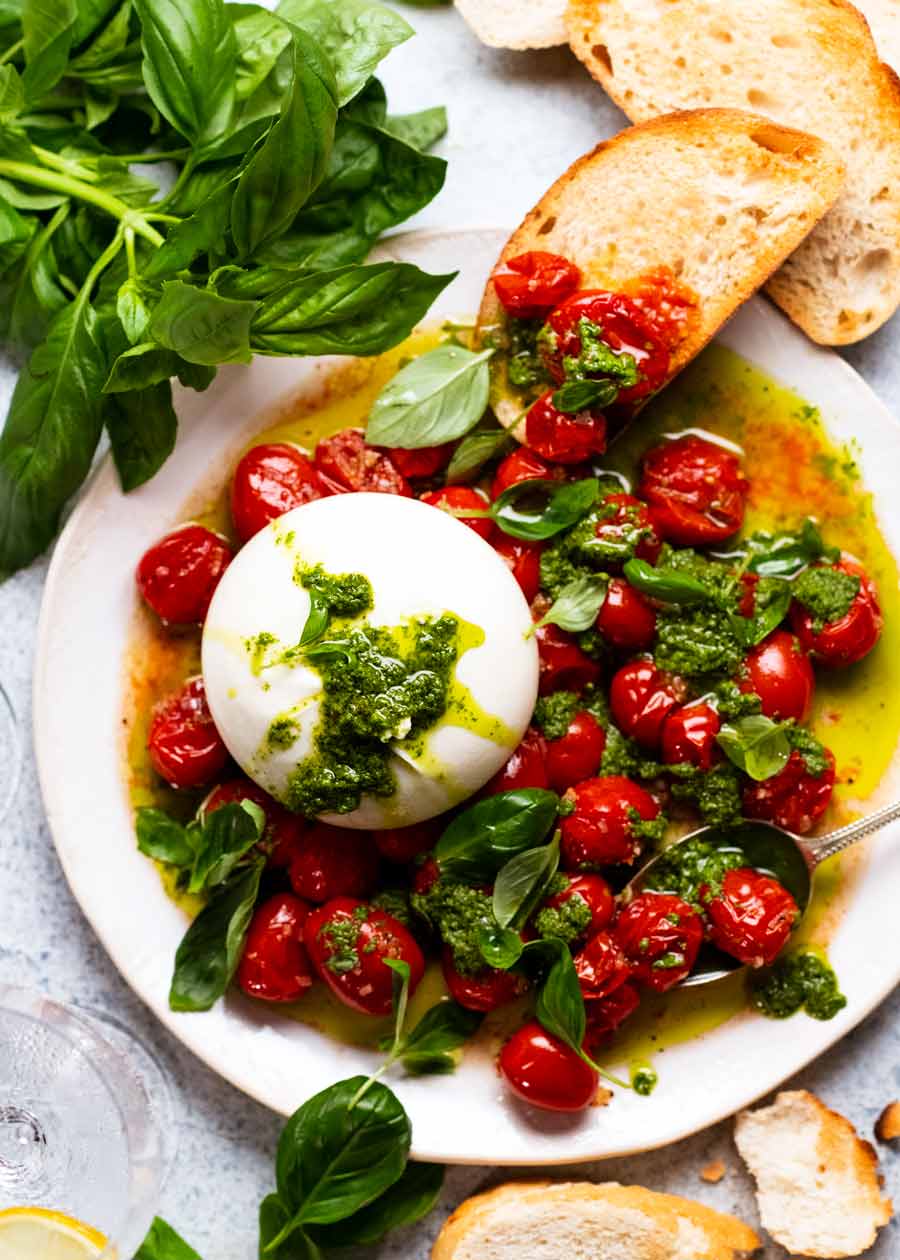
And here it is, 5 seconds later.
Honestly, for a burrata plate this big which would easily serve 2 if not 3 people for lunch, I’d expect to pay upwards of $30 at a trendy bistro – plus bread which they’d probably charge another $10 for.
All the ingredients here cost me around $15, bearing in mind you only use about 1/4 of a full batch of pesto (it freezes perfectly).
Colourful, bright food that’s made for sharing, perfectly imperfect delicious mess. This is 100% my kind of food! – Nagi x
Watch how to make it
Bursty Tomato Burrata Salad
Ingredients
- 200g/ 6 oz x 1 fresh burrata cheese (Aus: Paesanella is my go-to, Note 1)
- 1/4 cup basil pesto , preferably homemade, recommended but not essential (Note 2)
Roasted tomato:
- 500g/ 1 lb (4 cups) cherry or grape tomatoes
- 2 tbsp extra virgin olive oil
- 2 tbsp eschalot , finely chopped (US: shallot), ~1/2 small (Note 3 subs)
- 1/2 tsp cooking/kosher salt
- 1/4 tsp black pepper
- 2 tsp sherry vinegar (or apple cider or red wine vinegar)
Serving:
- 1/2 tsp salt flakes (or half the quantity for cooking/kosher salt) (Note 4)
- 1 tbsp extra virgin olive oil , a good one is best, for finishing
- Few fresh basil leaves , for sprinkling (Note 2)
- Warmed crusty bread , for mopping
Instructions
- De-chill – Take the burrata out of the fridge and leave on the counter for 30 minutes, to take the fridge-chill out of it. Keep it in the water in the tub.
Roasted tomatoes:
- Preheat oven to 200°C/400°F (180°C fan).
- Roast 10 min – Toss the cherry tomatoes with the olive oil, eschalot, salt and pepper (in a bowl, or on a tray). Spread on a tray. Roast 10 minutes until softened but not collapsing.
- Vinegar – Gently push the tomatoes to one end of the tray. Drizzle over vinegar. No need to mix.
Assembling:
- Tomatoes – Carefully transfer tomatoes to a plate, spreading them out in a single layer.
- Burrata – Gently (GENTLY!!) drain the water out of the tub and roll the burrata out into your hand. Place a burrata on top of tomatoes.
- Finish – Drizzle the 1 tablespoon of good extra virgin olive oil all over the plate. Dollop pesto randomly all over. Sprinkle with salt flakes and basil.
- Serve with crusty bread on the side!
- Eating!
- Nominate a person to do the cutting honours. Break into the burrata with a serving spoon. Let the centre ooze out. Make sure you scoop up a bit of everything, pile onto bread and eat! Don't forget to mop the plate clean. The juices are the best part.
Notes
Nutrition
Life of Dozer
Overseeing the shooting of today’s recipe. He had useful suggestions for styling (they involved burrata and bread and his mouth).

The post Bursty Tomato Burrata Salad appeared first on RecipeTin Eats.
]]> My current favourite chicken soup! Creamy broth, juicy little bits of chicken, pasta shells and swirls of spinach with a sprinkle of sun dried tomato I use in place of croutons. Think – under the Tuscan Sun. Except – sweater weather food! Creamy Tuscan Chicken Soup Let me just say upfront – I call this... Get the Recipe
The post Creamy Tuscan Chicken Soup appeared first on RecipeTin Eats.
]]>My current favourite chicken soup! Creamy broth, juicy little bits of chicken, pasta shells and swirls of spinach with a sprinkle of sun dried tomato I use in place of croutons. Think – under the Tuscan Sun. Except – sweater weather food!
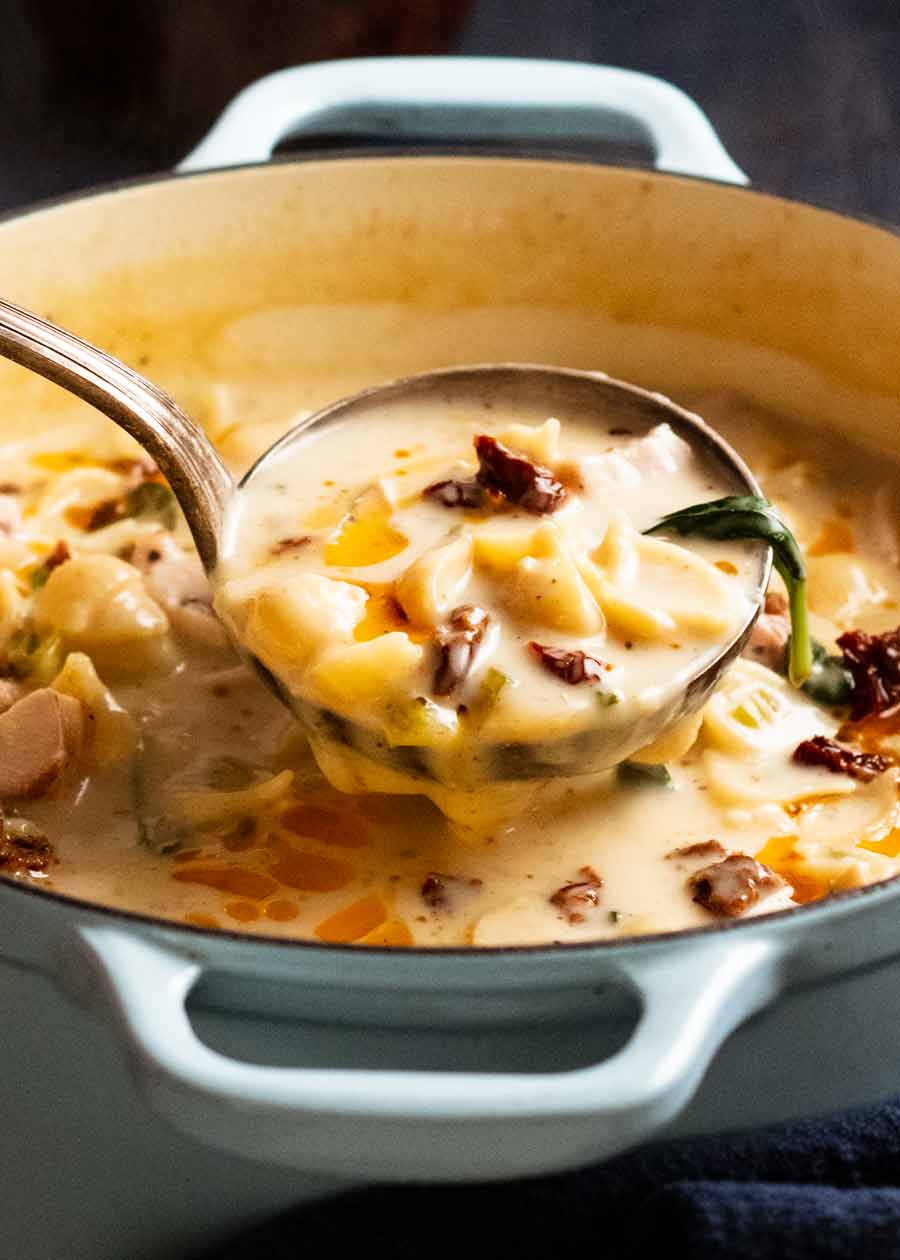
Creamy Tuscan Chicken Soup
Let me just say upfront – I call this Tuscan but there’s nothing authentically Tuscan about it (as far as I know). To me, it has Tuscan vibes, so I gave it a cute name with the hopes to pique your interest. Just in case my photos and writing doesn’t do the job well enough to convince you that you really need to try this creamy chicken soup!!!
In all honesty, I was gazing longingly at my Tuscan Chicken Pasta Bake from my cookbook, trying to muster up the energy to make it. Because that big bubbling pasta bake does require a semi-modest commitment of time to make. Worth it, but sadly, time is not always on my side.
This Tuscan Soup was born from similar ingredients. A faster, soup version of the pasta bake. I hope you fall in love with this soup as much as I have!

Ingredients in Creamy Tuscan Chicken Soup
Those of you who have made the Tuscan Chicken Pasta Bake will recognise most of these ingredients. All the star players are present – sun dried tomato, spinach, chicken, pasta, cream, cheese!
Things in the soup
Here are the things that are bobbing about in the creamy soup broth:
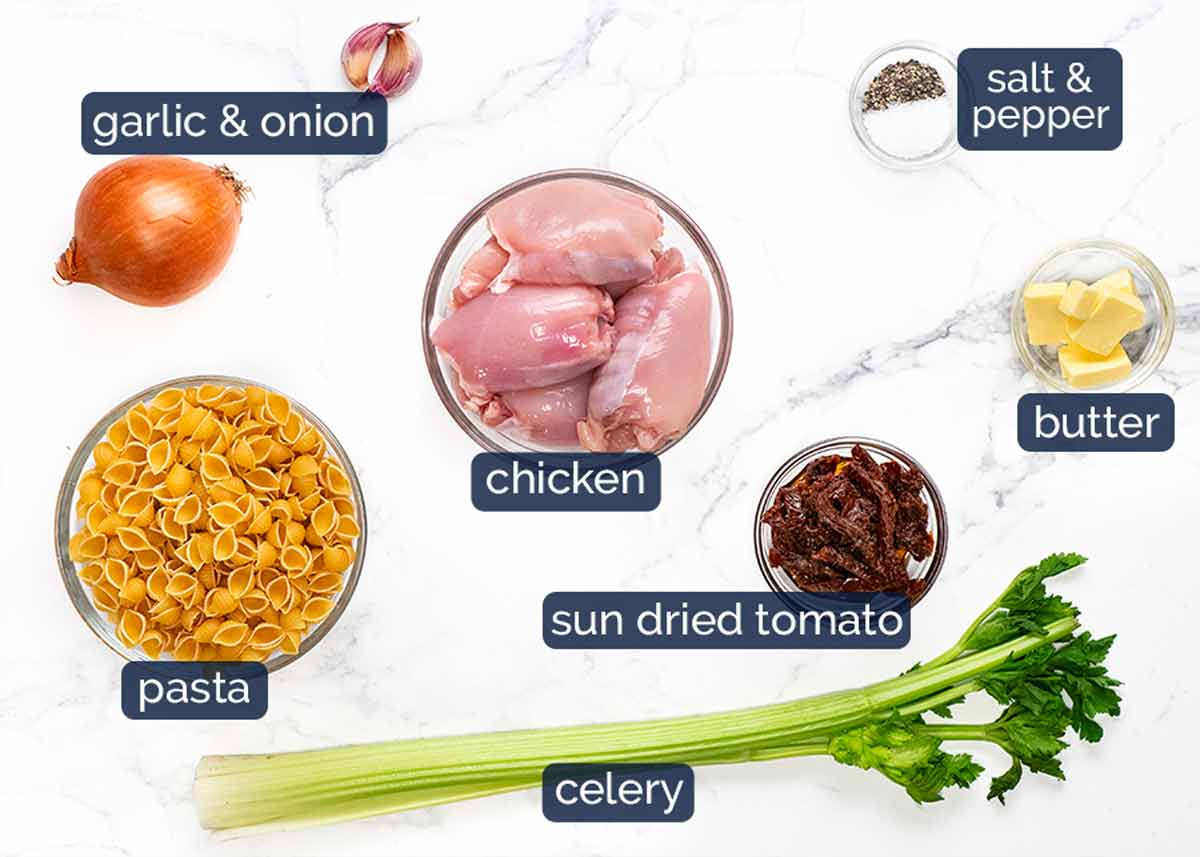
Chicken – I prefer thigh because it’s juicier, has better flavour and is thin enough to cook whole, so no raw meat chopping called for. But breast can be used too. If using chicken breast, slice horizontally into thin steaks to sear. The thick whole breasts are too thick.
Pasta – I use small shells. Any small pasta is fine here. Think – ditalini, small macaroni, risoni/orzo (you’ve got half the packet left from last weeks’ salad, right!?). Anything small enough to be easy to scoop up with a spoon that cooks in around 10 minutes. Broken spaghetti or other long pasta will also work – break into 4cm / 1.5″ pieces.
Sun dried tomato – This is the garnish for this soup! Instead of using croutons, nuts etc.
Little chewy pops of concentrated savoury tomato flavour with swirls of the red oil from the sun dried tomato jar.Garlic and onion – Flavour base!
Celery – Vegetable of choice here. I like it because the colour sort of blends into the soup, keeping it lovely and white so the bright red sun dried tomato and swirls of spinach stand out. Plus, celery is a classic flavour base for many savoury things. Substitute with other cook-able vegetables. Think: diced zucchini, corn, carrots.
Butter – The cooking fat of choice, because it’s got more flavour than oil.
Creamy chicken soup broth
A splash of white wine, good handful of parmesan and finishing with cream gives the Tuscan soup broth great flavour!
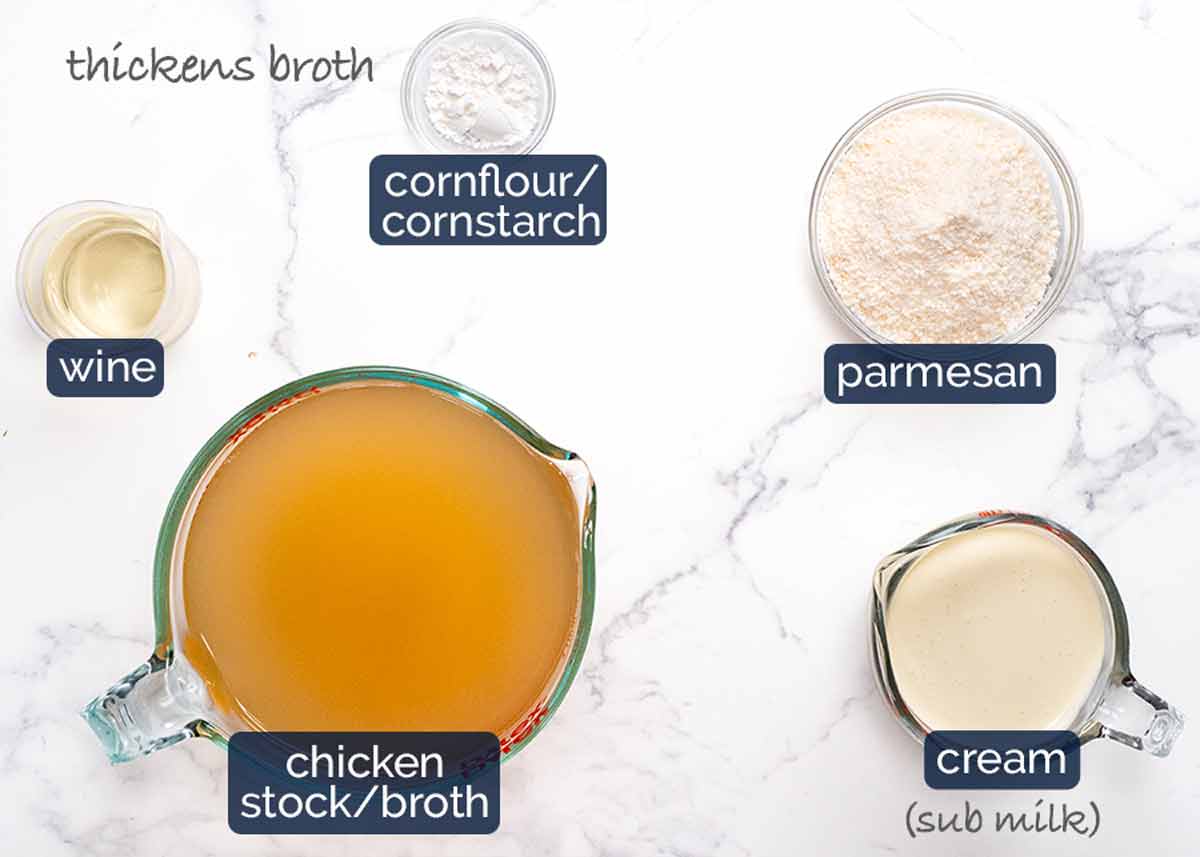
Cornflour/cornstarch – This is what is used to thicken the soup. I opted to use this over flour for calorie control reasons. Using flour, I would’ve needed an extra 30g/2 tbsp of butter to stir the flour into at the beginning to make a roux. With cornflour, you just mix with a bit of water then stir it into the soup right at the end. Also, cornflour makes the soup nice and shiny, which I like in this soup (flour makes broths dull).
Wine – Just 1/2 a cup, adds extra depth of flavour so you there’s enough flavour using half stock, half water, rather than 2 litres / quarts of water. Money saving tip.
It’s like free stock! Doesn’t make the broth taste winey, because we cook out the alcohol, just leaving behind lovely savoury flavour. Can’t consume alcohol? Switch half the water for more chicken stock/broth.
Cream – Gives the soup a lovely creamy mouthfeel finish as well as making the soup white. You can opt to use milk instead, but reduce water by 1/2 cup and use 1 1/2 cups milk (else soup colour not as white). To get a nice finish, I’d add a knob of butter!
Parmesan – Another flavour boost. Normally I recommend shredding your own but I used store-bought pre-shredded for convenience here and it melted fine in the hot soup (unlike in cheesy sauces). The sandy-type, from the fridge (not aisle please! If it ain’t in the fridge, it ain’t real cheese!
)
How to make Creamy Tuscan Chicken Soup
Searing our own chicken makes this soup tastier than just adding pre-cooked chicken into the soup broth. Because colour on the chicken = tastier chicken, and the soup broth gets extra (free!) flavour from the golden bits left in the pot from searing the chicken.
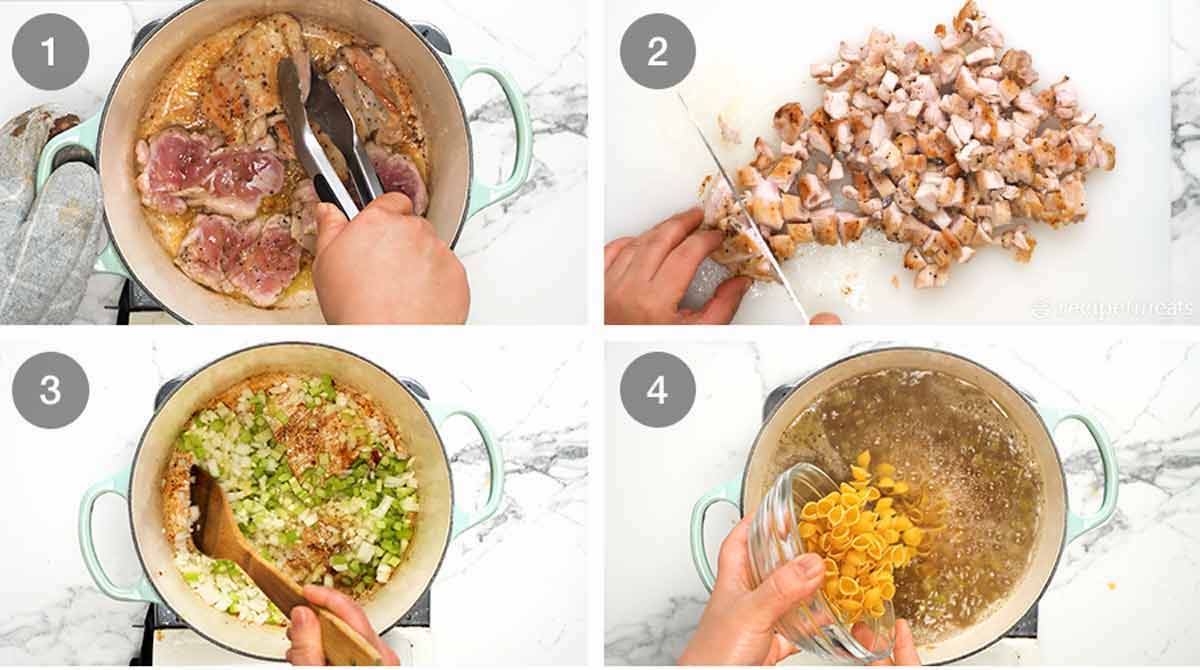
Sear the chicken in the butter, just to get some colour on the surface. It doesn’t matter if it’s not cooked all the way through because after we chop it, it gets added back into the soup. As noted above, cooking our own chicken gets us on the path to a more delicious soup!
Chop the chicken once it’s cool enough to handle. I do this while the pasta is cooking. Don’t worry about raw bits, they will cook through quickly once added back into the hot soup broth.
Sauté the onion, garlic and celery in the same pot using the residual butter.
Broth & pasta – Deglaze the pot by simmering the white wine rapidly until reduced by half. Deglazing just means to dissolve the chicken-searing golden bits on the base of the pot into the liquid for extra flavour in the soup broth.
Pasta – Once the broth is brought back up to the boil, add the pasta and cook it for the time per the packet directions (10 minutes for the small shells I used).
Chopped chicken – Once the pasta is in, I chop the chicken then just add it into the broth about halfway through the pasta cooking time.
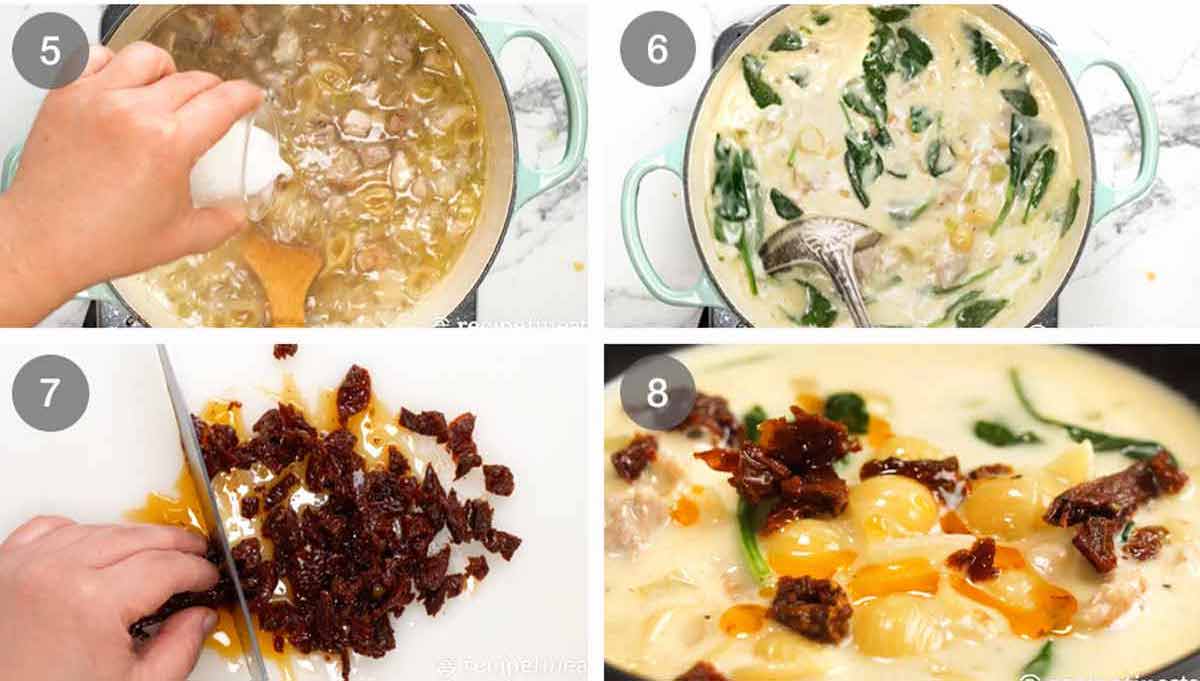
Thicken soup – Mix together the cornflour/cornstarch with a smidge of water then stir it into the soup broth. We only use a bit of cornflour because the soup gets thickening help from the gluten in the pasta and the cream.
Soup finishes – Then stir in the parmesan, follow by the cream and spinach. Once the spinach has wilted, which should only take a minute or so, the cornflour will have thickened the soup. And that’s it – ready to serve!
Sun dried tomatoes – Chop sun dried tomatoes into scattering-size-pieces.
Ladle the soup into bowls. Sprinkle with sun dried tomato and a little drizzle of the oil from the sun dried tomato jars (love how the red looks against the white soup). A sprinkle of extra parmesan wouldn’t hurt either. Then dig in!

Pasta soup storage matters!
Pasta loves to absorb liquid. So if you leave the pasta overnight in the broth, it will bloat and become overly soft.
So to store leftovers, it’s best to separate the broth from the pasta. Just use a slotted spoon to scoop out the pasta bits then store the pasta and broth in separate containers in the fridge. They will keep for 3 to 4 days.
Making ahead intentionally
This is a great soup to prepare ahead to reheat later! Just cook the pasta, drain, thicken the soup , then store the chicken with pasta and soup broth separately. They can be refrigerated for 4 days or frozen for 3 months. Reheat the soup broth first, then add the pasta and chicken to reheat. I’ve popped these directions in the recipe card too.
Hope you enjoy! – Nagi x
Watch how to make it

Creamy Tuscan Chicken Soup
Ingredients
- 500 g/1 lb chicken thighs , skinless boneless (Note 1 for breast)
- 1/2 tsp each salt and pepper
Soup:
- 30g / 2 tbsp unsalted butter
- 1 onion , finely chopped
- 2 garlic cloves , minced
- 2 large celery stems , finely sliced (sub 2 carrots)
- 1/2 cup chardonnay or other dry white wine, optional (Note 2)
- 4 cups chicken stock/broth , low sodium
- 3 cups water
- 1 tsp cooking/kosher salt
- 1/2 tsp black pepper
- 250g/8 oz small pasta shells (or other small pasta, rice, potato etc – see Note 3)
- 1 cup (tightly packed) parmesan, finely grated or store bought pre-grated (sandy type) (Note 4)
- 1 cup thickened/heavy cream (Note 5 for milk sub)
- 2 packed cups baby spinach , chopped kale or similar
- 1/2 cup sun dried tomato strips , chopped into 1cm pieces, plus bit of oil drizzling (Note 6)
Soup thickener (cornflour slurry):
- 2 tsp cornflour/cornstarch mixed with 2 tsp water
Instructions
- Cook outside of chicken – Sprinkle each side with the salt and pepper. Melt butter in a large pot over medium high heat. Once foamy, place the chicken in and cook the first side for 3 minutes or until light golden, then the other side for 2 minutes – it's fine if the inside is still raw, it cooks more later. Remove onto a plate.
- Soup flavour base – Turn the stove down to medium low. Add garlic, onion and celery into the same pot then cook for 3 minutes or until the onion is softened.
- Deglaze – Turn up to high, add wine, stir, then let it simmer until the wine reduces by half.
- Broth & pasta – Add stock/broth, water, salt and pepper. Bring to a boil then add the pasta. Cook for the time per the pasta packet directions (~10 minutes), stirring every now and then so the pasta doesn't stick to the base of the pot.
- Add chicken partway – While the pasta is cooking, chop the chicken into 1.5cm / 1/2" pieces then add into the pot to finish cooking.
- Finish soup – Once the pasta is cooked, turn heat down to low. Stir in parmesan until melted. Stir in the cornflour-water mixture, cream and spinach. Stir for a minute until spinach is wilted and soup thickens slightly.
- Serve – Ladle into bowls. Sprinkle with sun dried tomato strips (and a bit of oil looks nice for finishing). Eat!
- Storing – Separate pasta from soup so it doesn't bloat, refrigerate both. Just scoop out with slotted spoon. (Note 6)
Notes
). It’s like free stock!
For non alcoholic, either use zero-alcohol white wine or substitute half the water for more chicken stock (otherwise the broth will lack a bit of flavour).
3. Pasta subs – Other small pasta like ditalini, small macaroni, rison/orzo can be used in the recipe as written, cook per packet time. Break long strand pasta into spoonable bits.
Gluten free pasta – Make recipe as written but you might want to increase the cornflour/cornstarch slightly to thicken the soup a little because the recipe relies on the starch in gluten pasta to help thicken the soup slightly.
Potato – cube, and reduce soup cook time (1.5 cm / 0.6″ cubes cook in around 7 min). You might want to increase cornflour/cornstarch to thicken soup (same reason as GF pasta).
Rice – White rice, use recipe as written, ~1 cup uncooked rice. Not brown rice (takes too long to cook).
4. Parmesan – Store bought sandy-type parmesan melts fine in this soup. But – fridge. Not from the aisle (that ain’t cheese!)
5. Cream gives the soup a lovely creamy mouthfeel finish as well as making the soup white. If using milk instead, reduce water by 1/2 cup and use 1 1/2 cups full-fat milk (else soup colour not as white). This will shave 140 calories off each serving. Though I’d add a knob of butter!
6. Sun dried tomato is the sprinkle for this soup that keeps things interesting! All my recipes I call “Tuscan this-and-that” has it in it. Nice change from the usual croutons and nuts, and adds a little punch of flavour, plus the red oil looks good!
7. Storing – Pasta left in broth will bloat and soften overnight. For leftovers, just scoop out all the pasta etc using a slotted spoon and store separately from the broth, in the fridge. If making ahead intentionally, for best results: do to the end of step 5, drain soup in colander, return broth into pot. Thicken soup with parmesan and cornflour slurry, add spinach. Cool. Let pasta, chicken etc in colander cool. Store both separately. Can even freeze!
Nutrition per serving. Shave 140 calories off by switching cream for milk, per note 4.Nutrition
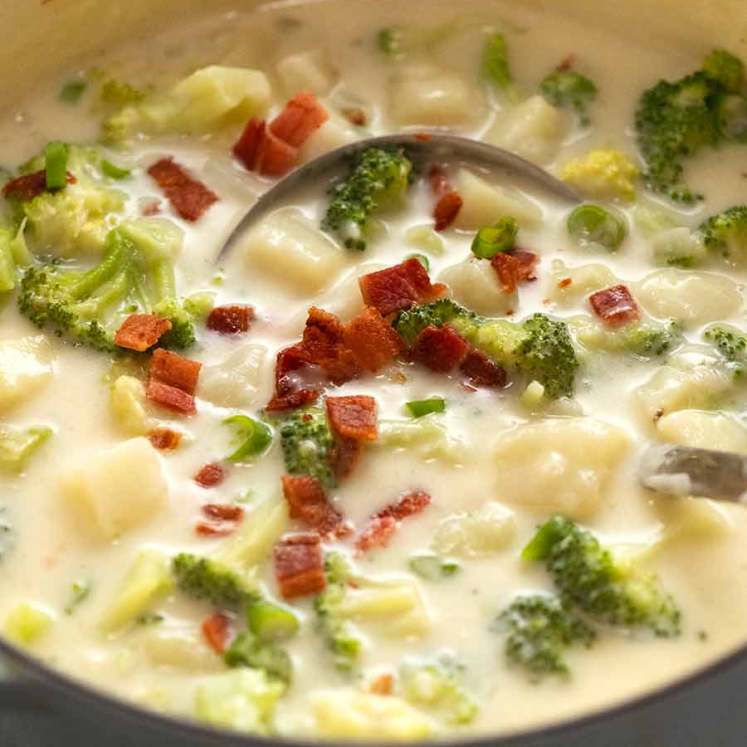
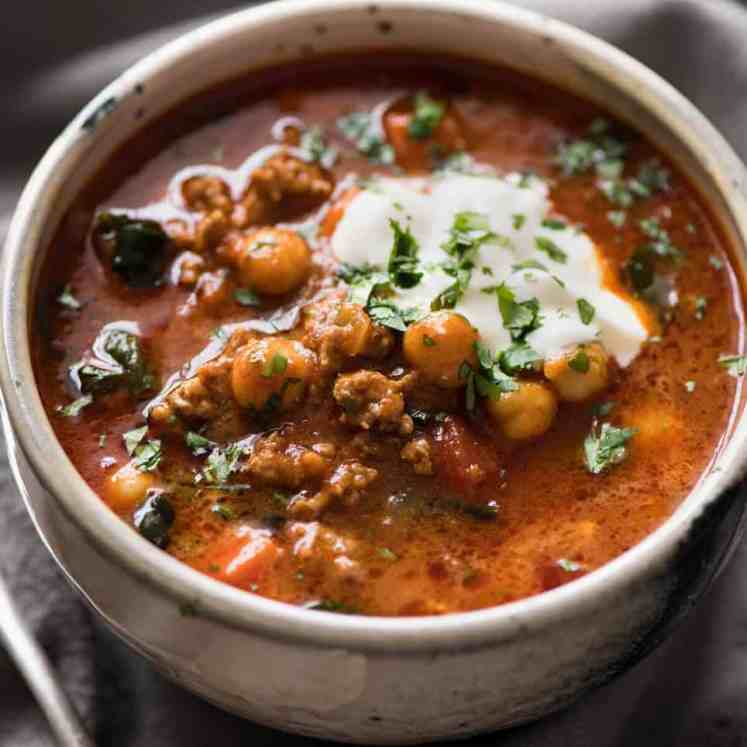
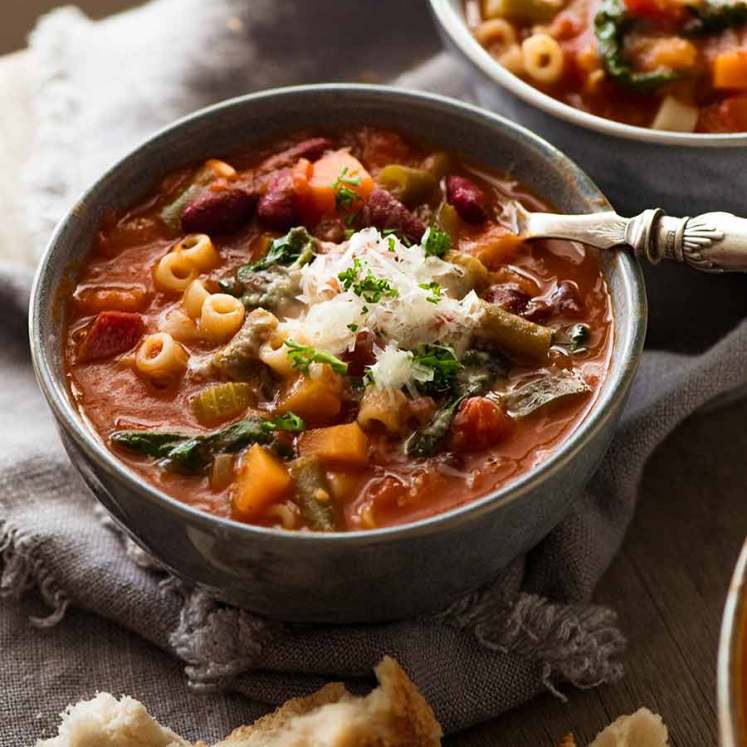
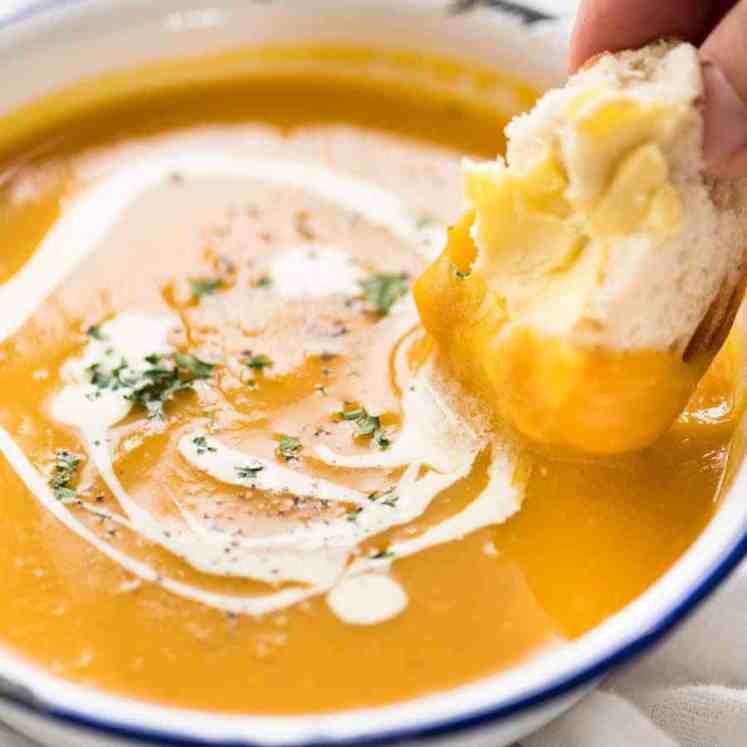
More soup love


Life of Dozer
Licking up drips from dirty dishes. He’s such a grot.

The post Creamy Tuscan Chicken Soup appeared first on RecipeTin Eats.
]]>