 This is a one-pan meal with fish baked in cream on top of a potato gratin with a golden crunchy topping. It’s a cross between a casserole, gratin and a pie. Fabulously cosy, rustic, oven baked fish recipe that’s effortless yet company worthy! Creamy baked fish on potato gratin This dish gives off very French-country... Get the Recipe
The post Creamy baked fish on potato gratin appeared first on RecipeTin Eats.
]]>This is a one-pan meal with fish baked in cream on top of a potato gratin with a golden crunchy topping. It’s a cross between a casserole, gratin and a pie. Fabulously cosy, rustic, oven baked fish recipe that’s effortless yet company worthy!
Creamy baked fish on potato gratin
This dish gives off very French-country vibes. Which, in hindsight, is rather unsurprising given it’s a recipe that our very own Chef JB just casually threw together one day. We ate it, loved it so much, declared it was “website-worthy” then proceeded to remake it…oh, I don’t know. Maybe 10, 12 times before we were fully happy with it and closed out all the “what ifs”?
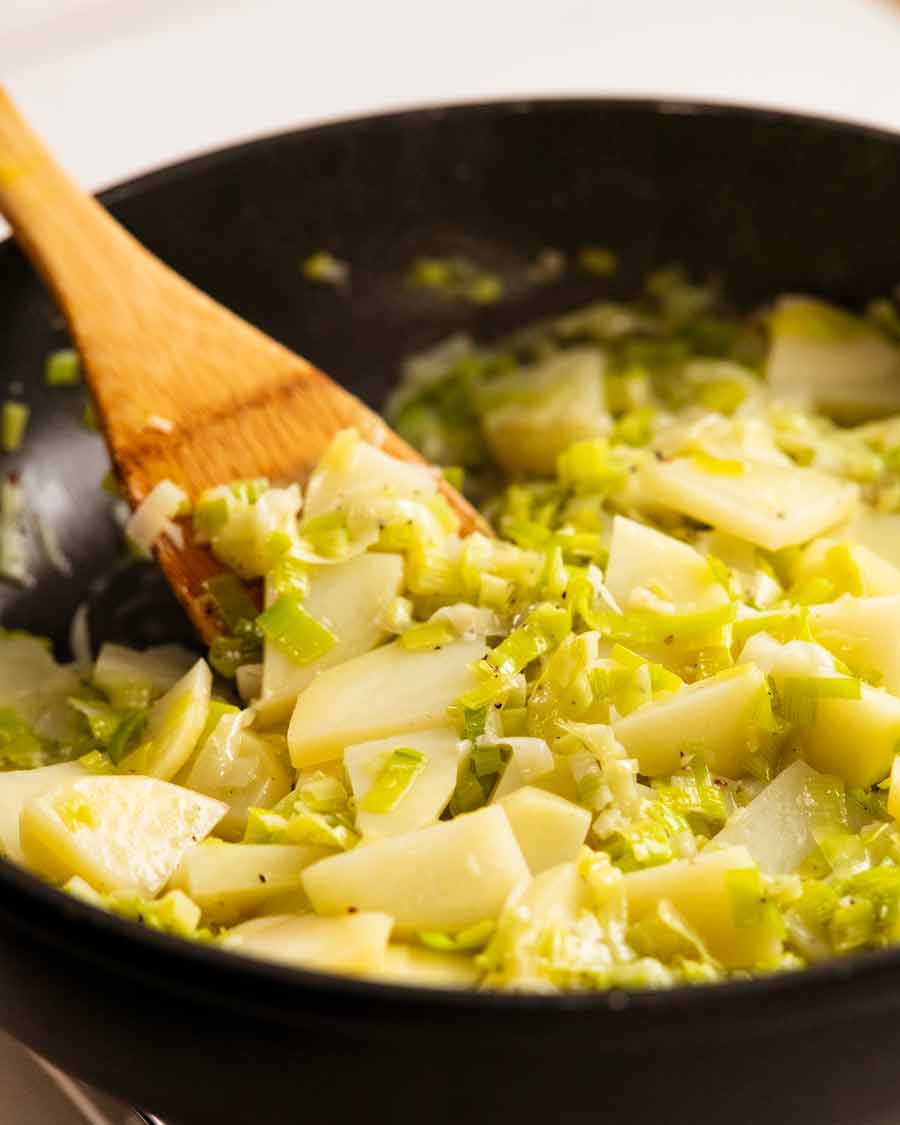
Basically, it’s a creamy potato gratin, heavy on the leek (or onion), with fish that is baked on top at the same time, covered in a crunchy golden breadcrumb topping. So essentially, the breadcrumb topping acts as a lid, keeping everything steamy and succulent as the fish bubbles away in the creamy sauce while the gratin soaks up the tasty fish juices.
It’s just an all-out cosy dish of deliciousness!


Ingredients
Here’s what you need to make this:
Best fish
This recipe is best made with the more delicate white fish fillets that are around 2 cm (0.8″) thick. We don’t want fillets too thin else they will overcook. (UPDATE: Readers have made and loved it with salmon – read feedback in comments section!)
Our favourite fish to make this with is barramundi which is a popular Australian fish. Here are some more fish with similar cooking characteristics that will work great:
barramundi (pictured), John Dory, snapper, basa, jewfish, blue eye cod (trevalla), tilapia, cod, halibut, pollock, hake, and salmon (readers have tried and loved – see recipe comments!).
Remember, the shape of fish means that you get thick cuts from the main body as well as thin cuts from towards the tail. Opt for the thicker cuts, aiming for 2cm/0.8″ thick. Pictured above is barramundi which is a thicker fish so we used the tail.
Skin on or off? Either is fine, it really won’t affect the bake time. But the skin won’t be crispy. If this is a turn-off for you, just eat the flesh and leave the skin.
Fish to avoid
I recommend avoiding:
Fish that dry out easily when cooked – Like swordfish, tuna, bonito, kingfish, marlin, mackerel. Unless you’re extremely careful they can become dry inside so are very prone to overcooking in the oven. I feel these fish are (mostly) better in raw/rare form such as Ceviche, Poke Bowls, Tartare (also see Tuna Steak);
Oily, “fishy” fish – Like mullet and sardines (try this recipe for sardines!).
For the potato gratin and creamy sauce
And here’s what you need for the rest of the dish:
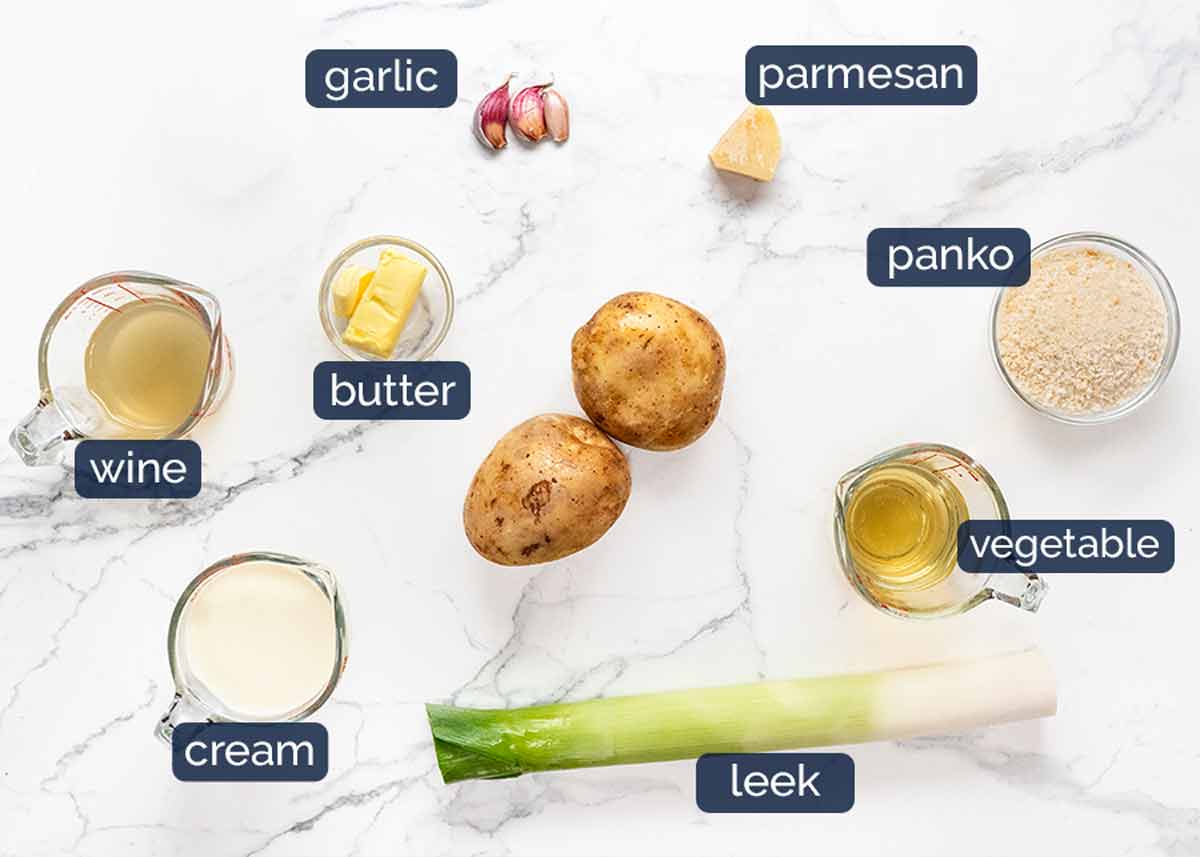
Potatoes – Floury (starchy) and all-rounder potatoes work best to achieve a lovely potato gratin flavour.
– Australia: the cheap dirt-brushed potatoes sold everywhere (called Sebago) are ideal
– US: Russet
– UK: Maris PiperLeek – Flavour base for the gratin. Feel free to substitute with a standard onion!
Garlic – Flavour base.
Chardonnay or other dry white wine – This gives the sauce depth of flavour. Without, it tastes more one dimensional and like it’s missing “something”. Chardonnay is my favourite but any dry white wine that’s not too sweet or too woody will work fine. Non alcoholic substitute – More vegetable stock.
Vegetable stock/broth – For semi braising the potatoes in a flavoured broth, tastier than using just water!
Butter – For pan sautéing the potatoes before finishing them off in the oven.
Panko, parmesan and olive oil – The crunchy topping!
How to make Creamy Fish on Potato Gratin
This is a one pan meal that starts off on the stove and is finished in the oven. It would be handy if the whole dish could just be done in the oven, but we tried and the flavour was not as good. Whereas using the stove-to-oven method makes it company-worthy good!
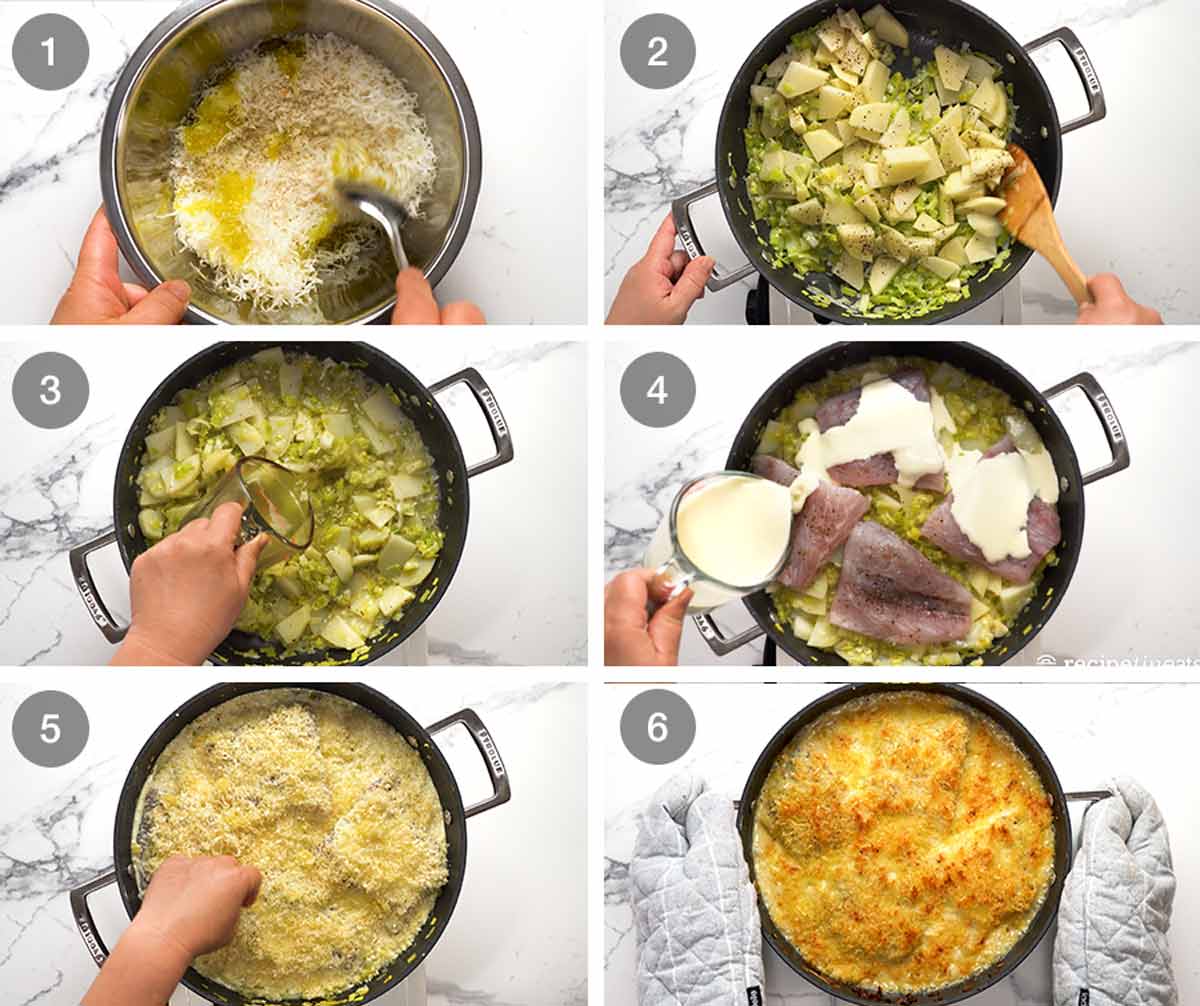
Crunchy topping – Mix the panko and olive oil together, then stir through the parmesan.
Sauté the leeks and garlic, then cook the sliced potatoes for 6 minutes or until they are partially cooked. During this step, the potatoes absorb the flavour of the leek and garlic which is what makes the gratin so good!
Braise the potatoes firstly in wine for 1 minute (simmer rapidly to almost fully reduce to cook out the alcohol) then the vegetable stock for 1 1/2 minutes until reduced by half.
Top with fish pieces (which we first sprinkle with salt and pepper). Then pour over the cream, aiming for as much coverage as possible.
Topping – Sprinkle the entire surface with the crunchy topping.
Bake for 30 minutes – I PROMISE THE FISH DOES NOT OVERCOOK!! You would think it does, but it doesn’t. All that creamy goodness under the breadcrumb topping keeps everything moist and succulent!
Broil/grill 4 minutes – Then to finish it off, I like to give it a quick 4 minute blast under the oven grill/broiler to give the topping lovely colour.
Rest 5 minutes – Place on the counter and let it rest for 5 minutes before serving. Don’t skip this step! This is when the juices in the fish gets reabsorbed into the fibres so when you cut into the fish, it stays in the fish flesh (and ends up in your mouth) rather than running out onto the plate.


What to serve with Creamy Fish on Potato Gratin
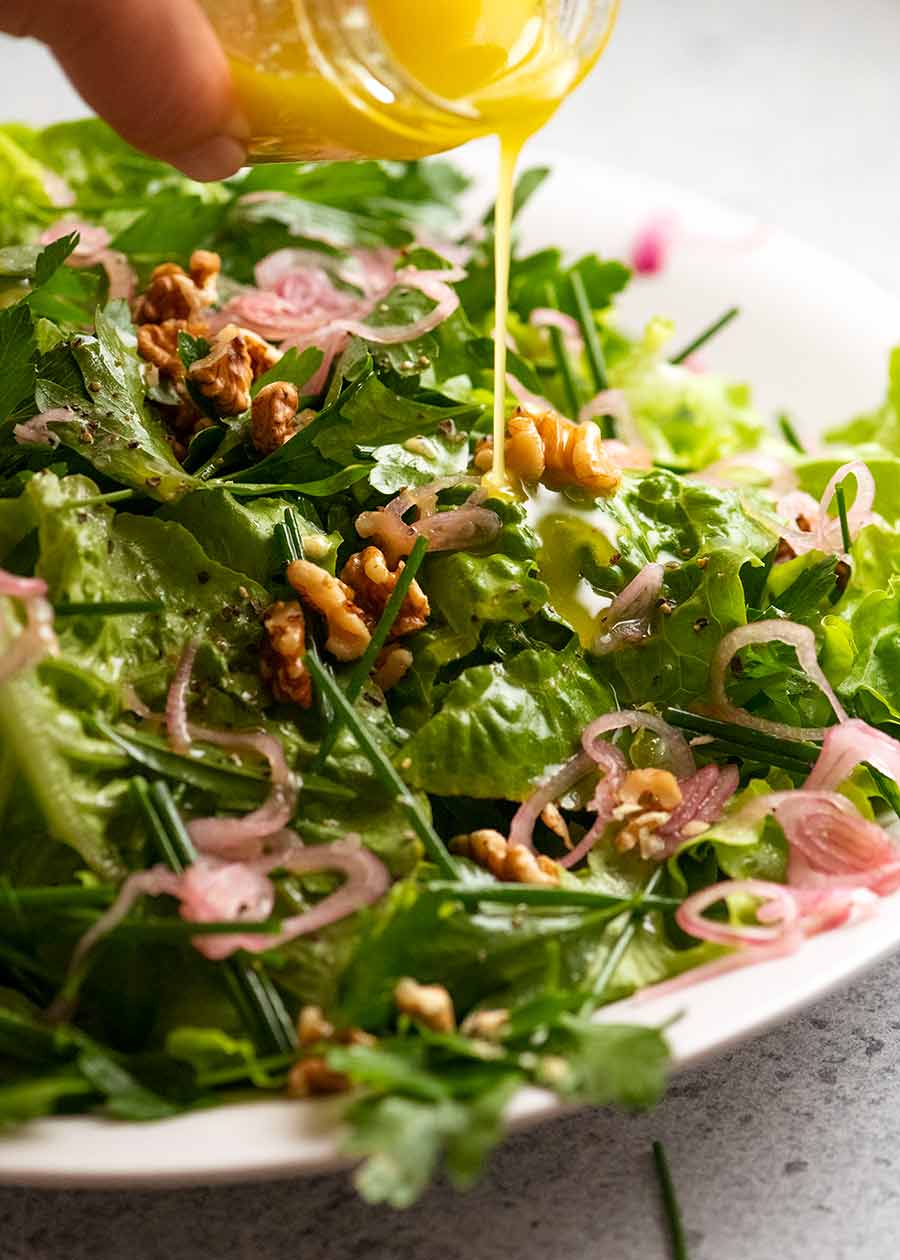
All you need to finish off this meal is a fresh, crisp salad to serve on the side. Just toss leafy greens in French Dressing, or if you’re cooking for company, try the French Bistro Salad. On theme with the French-ish vibes going on in this dish!
I also wouldn’t say no to some crusty bread for mopping the plate clean. And for dessert – anyone for a pile of fresh baked Madeleines? Fast becoming a go-to for dinner parties because the batter is made in advance (you can even freeze it!) and stored in piping bags or jugs. Then it literally takes 2 minutes to pipe into the pan and 10 minutes to bake. How good is that!!! – Nagi x
Suggested sides


Watch how to make it

Creamy fish on potato gratin
Ingredients
- 4 x 160g/5oz white fish fillets , ~2cm / 0.8" thick, skinless (barramundi, snapper, tilapia, cod, salmon – Note 1)
- 1/2 tsp cooking/kosher salt
- 1/4 tsp black pepper
Potato gratin:
- 3 tbsp / 50g unsalted butter
- 2 large leeks , white and pale green part only, washed, cut in half lengthways, sliced 5mm / 0.2" thick OR 2 onions (Note 2)
- 3 garlic cloves , minced
- 2 medium starchy potatoes (250g / 8oz each), peeled (Note 3)
- 3/4 tsp cooking/kosher salt
- 1/2 tsp black pepper
- 1/2 cup dry white wine , any type, sub more veg stock (Note 4)
- 1/2 cup vegetable stock/broth , low sodium
- 1 cup thickened/heavy cream
Crunchy topping:
- 3/4 cup panko breadcrumbs
- 2 tbsp extra virgin olive oil
- 1/4 cup parmesan , finely shredded
Instructions
- Preheat the oven to 180°C/350°F (160°C fan) with a shelf in the middle.
- Potatoes – Cut the potatoes into quarters, then sliced 4mm / 1/6" thick. Place cut potato in a large bowl of water (prevents from going brown, removes excess starch so it cooks quicker). Drain before use.
- Crunchy topping: Mix panko and olive oil in a bowl. Then stir in parmesan.
- Season fish: Sprinkle salt and pepper on both sides of the fish fillets. Set aside.
- Sauté – Melt butter in a large oven-proof skillet (30cm/12") over high heat until foamy. Add leek and garlic, then cook for 3 minutes.
- Sauté potatoes – Add potato, salt and pepper. Cook for 6 minutes, stirring regularly. The potatoes should be half cooked at this stage.
- Reduce wine and stock – Pour in white wine. Simmer rapidly until it is mostly evaporated – about 1 minute. Pour in stock, then simmer for 1 1/2 minutes or until reduced by half.
- Top with fish – Turn the stove off. Place fish on top of the potatoes, presentation side up. (Note 1) Pour cream all over, aiming for full coverage. Sprinkle with panko breadcrumbs.
- Bake for 30 minutes – I know this sounds like a long time but the fish stays succulent!
- Colour topping – Switch to the oven grill (broiler) on high and move the skillet up to the top shelf. Grill/broil 4 minutes or until golden.
- Rest – Remove and rest for 5 minutes, then serve! Eat the fish and gratin together with each mouthful for maximum eating pleasure!!
Notes
– Australia: the cheap dirt-brushed potatoes sold everywhere (called Sebago) are ideal
– US: Russet
– UK: Maris Piper 4. Wine adds more flavour into this dish but doesn’t make it taste winey because we cook the alcohol out. Substitute with more vegetable stock. Leftovers will keep for 3 days in the fridge. Not suitable for freezing. Nutrition per serving.
Nutrition
Life of Dozer
The best handbag a girl can ask for!

The post Creamy baked fish on potato gratin appeared first on RecipeTin Eats.
]]> I really did mean to post a classic pot roast chicken. But this Thai red curry version is SO MUCH MORE EXCITING!! To-die-for red curry sauce with outrageously juicy chicken, you’ll have this in the oven in 10 minutes. Effortless recipes with incredible results, this is my kind of food! Thai red curry pot roast... Get the Recipe
The post Thai red curry pot roast chicken appeared first on RecipeTin Eats.
]]>I really did mean to post a classic pot roast chicken. But this Thai red curry version is SO MUCH MORE EXCITING!! To-die-for red curry sauce with outrageously juicy chicken, you’ll have this in the oven in 10 minutes. Effortless recipes with incredible results, this is my kind of food!
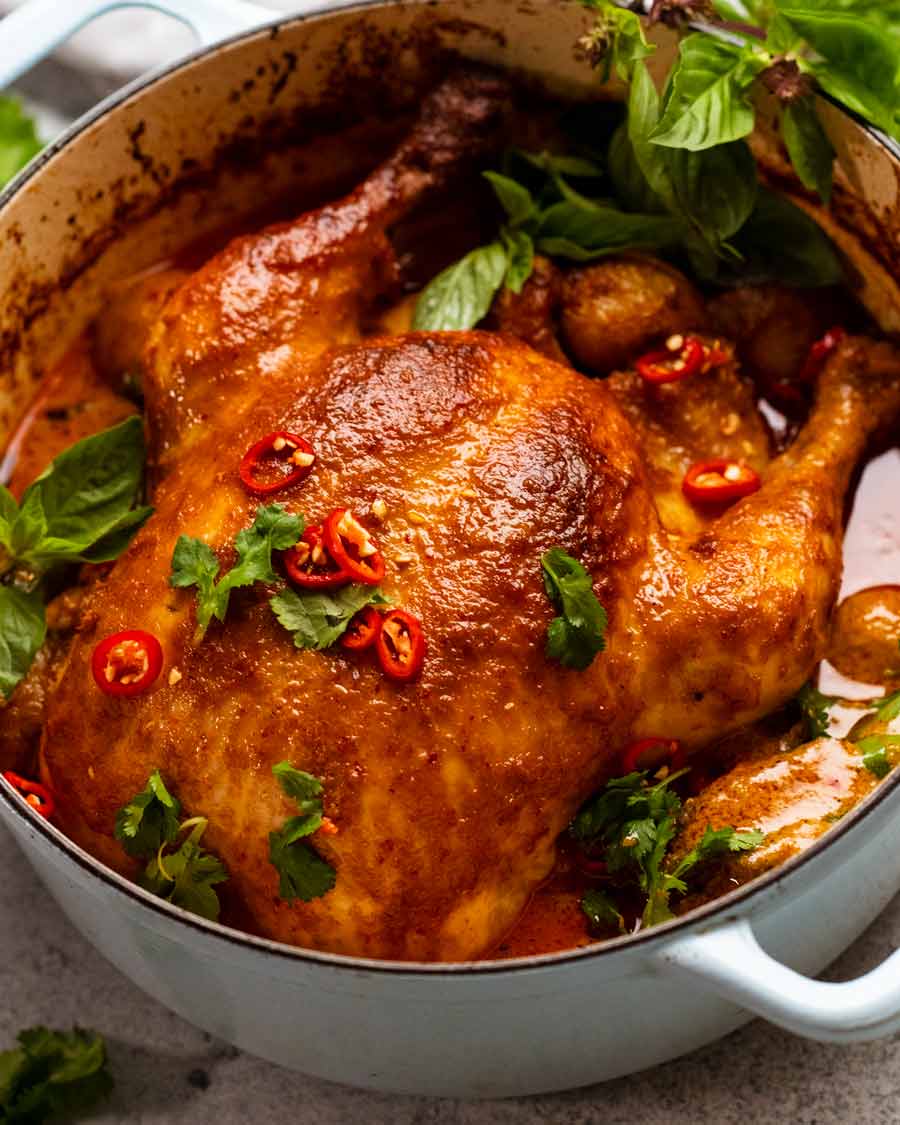
Thai red curry pot roast chicken
Consider this to be the roast chicken version of Lamb Shanks Massaman Curry, and beloved fan-favourite where you just put everything in a pan, pop it in the oven, then out comes fall-apart bronzed lamb shanks smothered in a rich massaman curry sauce.
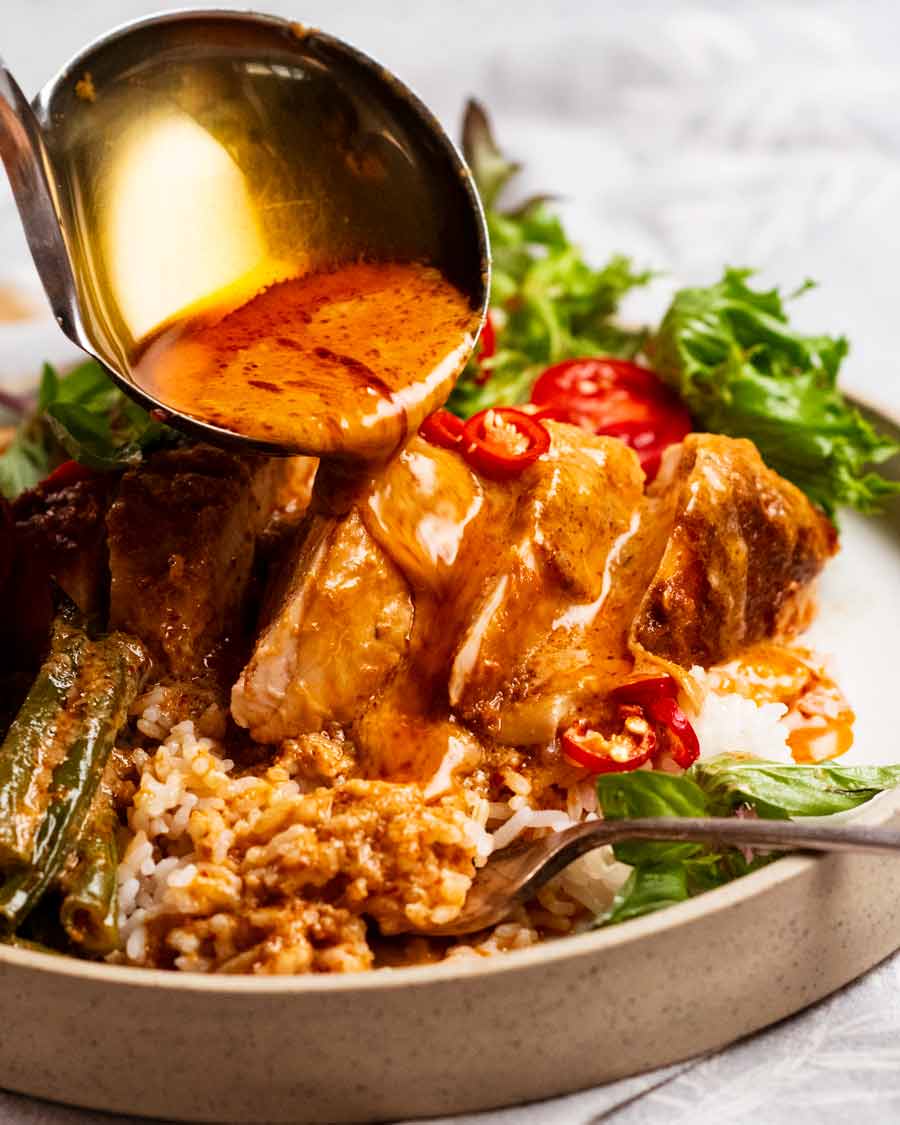
Admittedly, this roast chicken red curry version does call for one extra step – sautéing the curry paste with aromatics (garlic, ginger, lemongrass) – before adding everything else and transferring it into the oven. Well worth a whole 2 minutes of effort for the extra depth of flavour you get in the Thai red curry sauce. And LOOK at the sauce!!
Speaking of sauce – did I mention we’re using store bought instead of homemade red curry paste today? For ease. Which brings me to an important topic:
My favourite red curry paste – Maesri
The best and cheapest. Full stop, end of story!

There is just no other than compares in mainstream grocery stores and Asian stores here in Australia. For authentic flavour – fresh, real, and not too sweet (why-oh-why are all the “western” red curry pastes so darn sweet??!!). Given the tick of approval by Thai nationals and it happens to be the cheapest curry paste clocking in at $2.10 a can.
While I highly recommend Maesri, this recipe does work with other red curry paste brands too. But the sauce will only be as good as the curry paste you use!
Where to find Maesri red curry paste
Asian grocery stores (it’s very common here in Australia)
Australia – Woolworths, Harris Farms, Amazon, asianpantry.com.au
Other countries – Amazon US, Amazon UK, Amazon CA (strangely pricey in Canada??)
Ingredients in Thai red curry pot roast chicken
Here’s what you need to make today’s recipe.
The red curry sauce
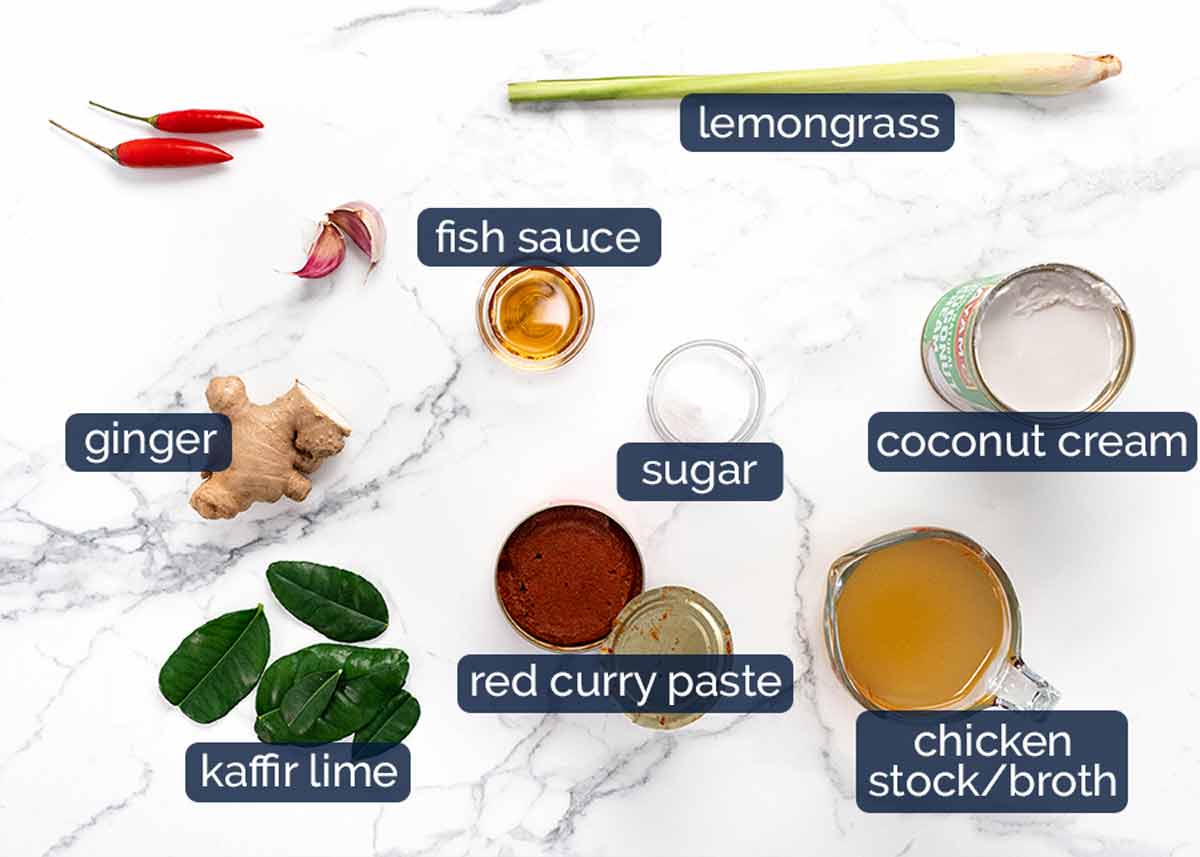
Red curry paste – As per section above, Maesri is my preferred! Cheapest and most authentic flavour.
Lemongrass, garlic and ginger – Adding these gives the store bought curry paste a flavour boost that makes it virtually like homemade red curry paste. It really makes a different!
Lemongrass – Substitute with 1 tablespoon of lemongrass paste. But one day, I hope you can make this with fresh lemongrass because it really is better!
Coconut cream – Not all coconut cream is created equal! Good ones are 100% coconut and have better flavour. Economical ones use water + thickener.
Coconut milk will also work but coconut flavour is not as intense (the sauce gets a ton of juices from chicken which dilutes the coconut flavour which is why coconut cream works better than milk).
Kaffir lime leaves – For authentic Thai curry flavour! Fairly accessible these days at large grocery stores and Asian stores. They freeze 100% perfectly which is handy.
Use leftover kaffire lime leaves in Thai red curry, Tom Yum soup, Thai meatballs, beef rendang, Malaysian chicken satay curry, green curry, golden turmeric baked fish and everybody’s favourite Asian coconut rice!
Fish sauce – This is used as the salt in red curry. More flavour than plain salt!
Sugar – For the right touch of sweetness you find in red curry sauce.
Red chilli – For optional garnish.
Vegetables and herbs
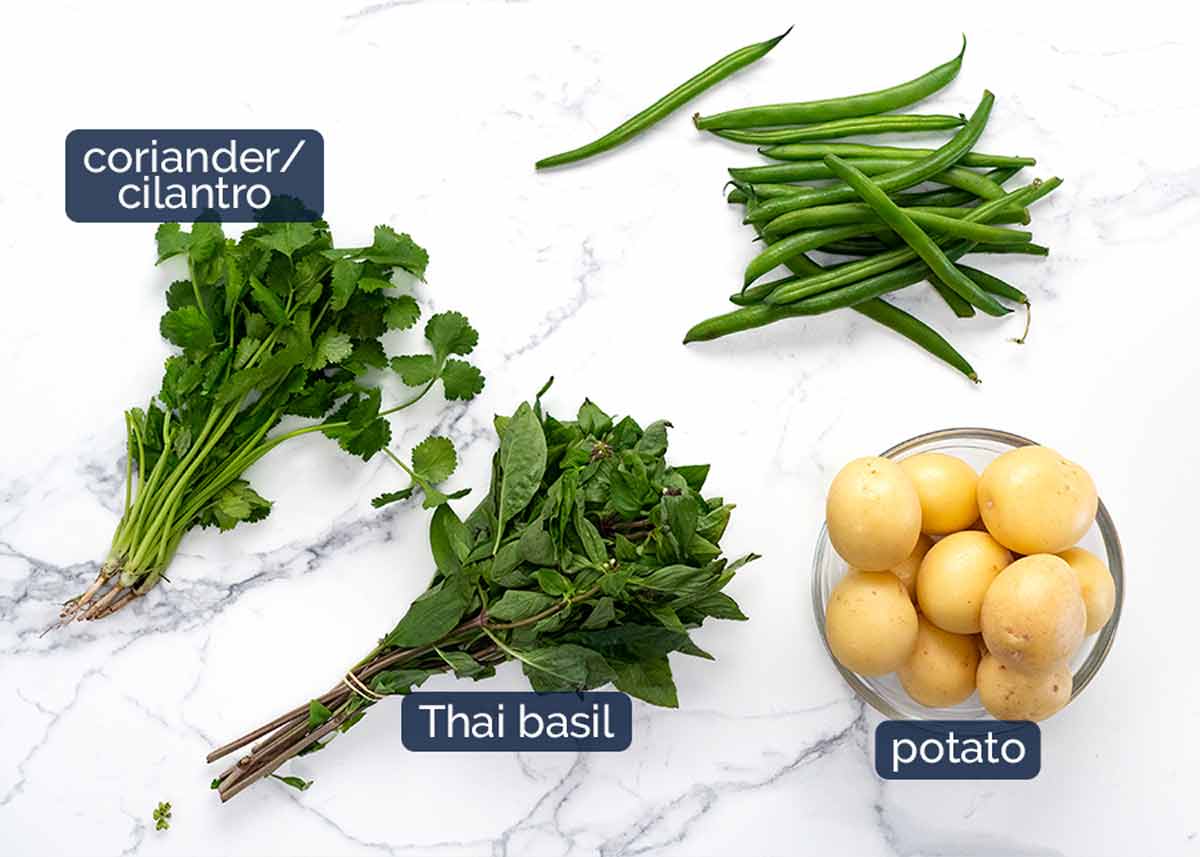
Potatoes – Small, skin on whole potatoes are best as the skin holds them together while they cook up beautifully creamy inside. If using cut pieces, add them partway through cooking else they will disintegrate.
Green beans – Just to add some vegetables into the sauce, plus a sprinkle of green. Feel free to add other vegetables!
Thai Basil has a slight aniseed flavour. Italian basil can be used in a pinch! Really adds a special touch to the finished dish so try not to skip it. But if this is the only thing you’re missing, still worth making!
Coriander/cilantro (optional) – This is mainly for garnish, though if you don’t have Thai Basil this makes a good alternative as a fresh herb addition to the dish.
Whole chicken
Oh yes, and you will need a whole chicken. Let’s not make today’s recipe like that time I forgot to include pork in a roast pork recipe!! 😂
I use a 1.8kg/3.6lb chicken. It’s fine to use one a little larger or smaller as the pot-roasting method of cooking we’re using today is very forgiving. It will keep chicken juicy even if you take it over (small chickens) and cooks evenly and fast so larger chickens will cook through.

How to make Thai red curry pot roast chicken
This all gets made in one pot, and you’ll have it in the oven in 10 minutes!

Cook off curry paste – Sauté the curry paste with lemongrass, ginger and garlic for a couple of minutes. The curry paste will dry out and caramelise which intensifies and improves the flavour. An essential step when using any store bought curry paste!
Sauce – Add the chicken stock then reduce it by half to concentrate the flavour. Add the remaining sauce ingredients – coconut cream, fish sauce, sugar, kaffir lime leaves – and stir to combine.
Put the chicken into the sauce and spoon sauce over. Then place the potatoes around it.
Bake covered for 40 minutes.

Brown the chicken – After 40 minutes, remove the lid and bake for a further 30 minutes, basting every 10 minutes. Oh, and push the beans into the sauce for the last 10 minutes! Any earlier and they’ll overcook far too much.
Just use a spoon to baste the chicken (which simple means spooning the sauce over) though if you have a turkey baster, it will make your life even easier.
Final baste – Give the chicken a final baste then transfer it to a plate to rest for 10 minutes before cutting it into pieces.
Thai Basil leaves – Stir the basil leaves into the sauce just before plating up, so as to retain the freshness of the flavour.
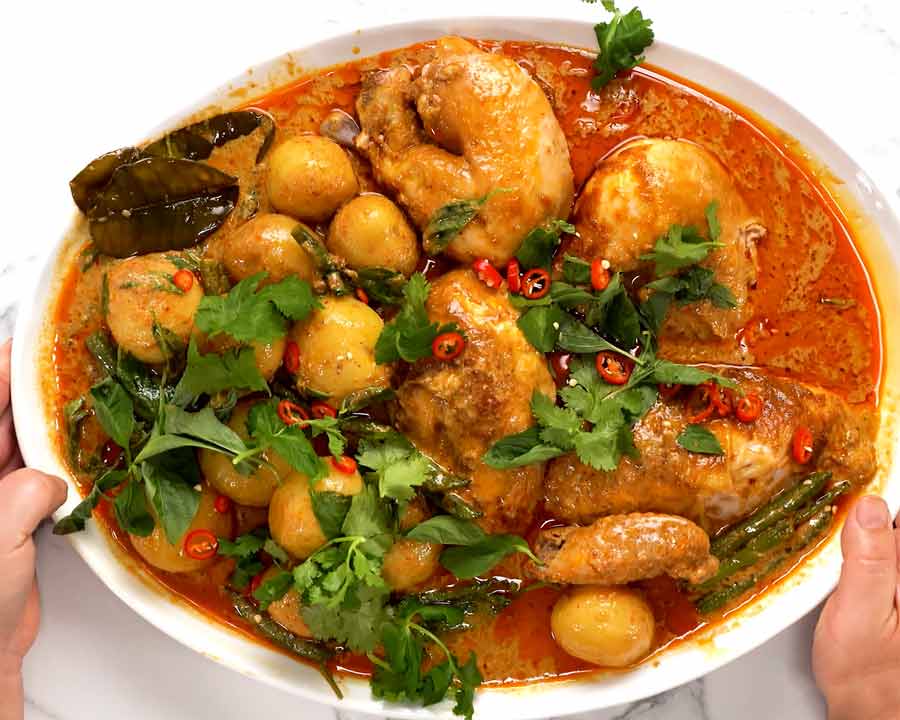
To serve – Place the chicken pieces on a platter then pour over the sauce, potatoes and beans. Garnish with extra chilli and fresh coriander if desired, then take it to the table!
I know I’ve been going on and on about the sauce – and it really is worthy of the talk, I promise – but I shouldn’t undersell how juicy the chicken is, thanks to the pot roasting method of cooking! So much more forgiving than traditional roast chicken – which we all love, but does require more accuracy to ensure you don’t end up with a dry breast.

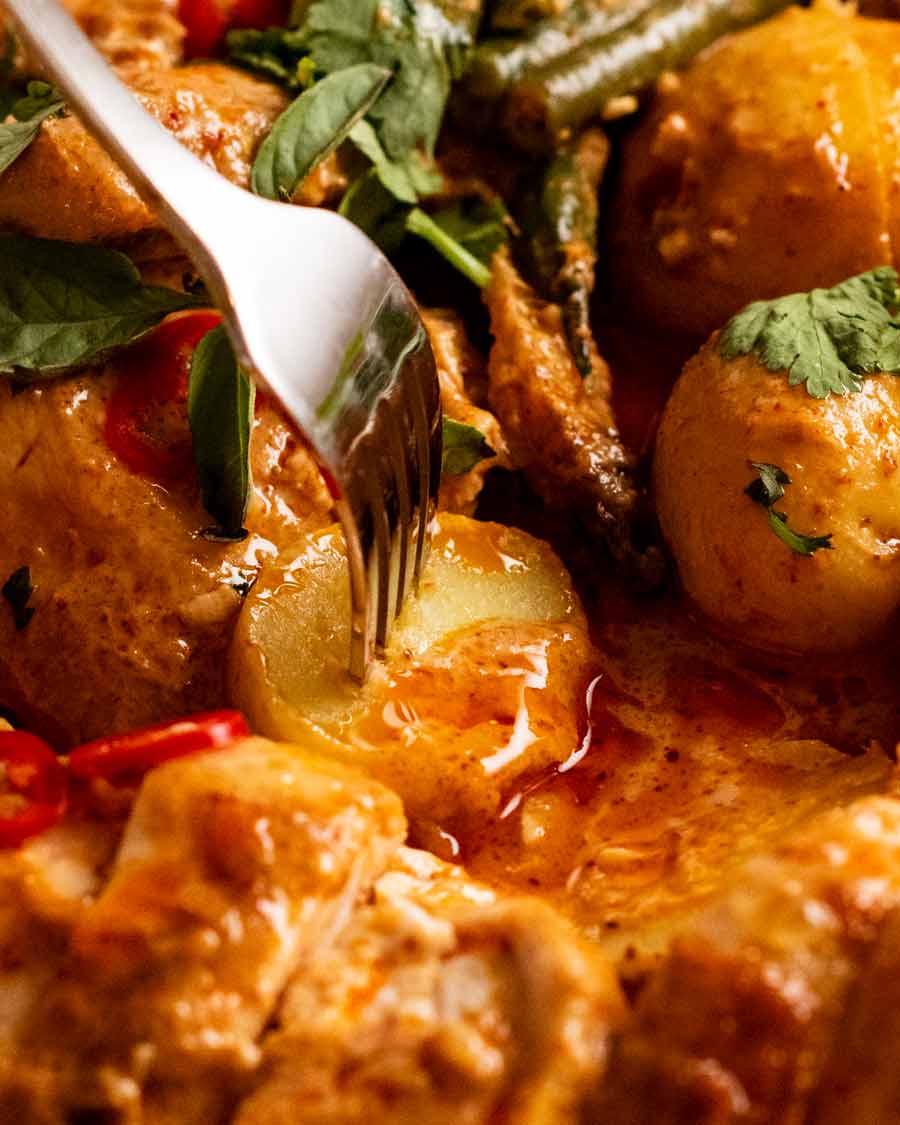
Ah, also, the potatoes!! Using whole small baby potatoes means we can cook them until they are really soft and creamy inside without disintegrating. If you only have large potatoes, cut them into 1.5cm / 0.6″ chunks and add them about halfway through the cook time, otherwise they will over-cook and turn into mush.

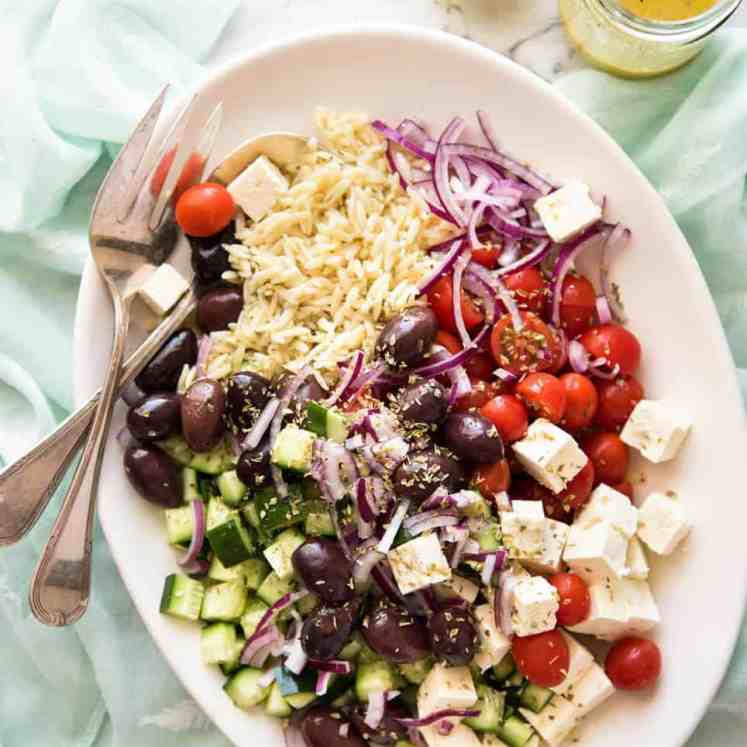
Serve over jasmine rice, to soak up all that beautiful curry sauce, and a perky side salad for something fresh. Pictured above is my Asian side salad but if I had a choice, I probably would’ve opted for smashed cucumbers or my favourite Chang’s Crispy Noodle Cabbage Salad.
I really hope you try this recipe one of these days! Something a little different but very straight forward to make that’s forgiving, with knock-your-socks-off results. It’s Amazing – with a capital A. Everybody knows when I use capitals, I really mean it! 😂 – Nagi x
Watch how to make it

Thai red curry pot roast chicken
Ingredients
- 1.8 kg/ 3.6 lb whole chicken
- 1 tsp cooking/kosher salt
- 3 tbsp vegetable oil
- 115g/ 4 oz (1/2 cup) Thai red curry paste (Maesri recommended, Note 1)
- 2 large garlic cloves , finely grated (Note 2)
- 2 tsp fresh ginger , finely grated (Note 2)
- 2 tsp fresh lemongrass , finely grated, white / pale green part only (Note 2)
- 1 cup chicken stock/broth , low sodium
- 400 ml/ 14 oz coconut cream (Note 3)
- 6 kaffir lime leaves , crushed in hand (Note 4)
- 1 tbsp white sugar
- 2 tsp fish sauce
- 600g/ 1.2lb small potatoes (12 or so), skin on (Note 5)
- 120g/ 4oz green beans , trimmed and cut in half
- 15 Thai basil leaves , or more! (sub ordinary Italian basil, Note 6)
Serving + optional garnishes:
- Jasmine rice
- Red chilli , finely sliced
- Coriander / cilantro leaves
Instructions
- De-chill & salt chicken – Take the chicken out of the fridge 1 hour prior. Pat dry then sprinkle with the salt.
- Preheat oven to 200°C/400°F (180°C fan).
- Sauté curry paste – Use a large, oven-proof pot with a lid. Heat oil on medium high heat. Cook curry paste, garlic, ginger and lemongrass for 2 minutes. This step substantially improves the flavour of store bought curry paste.
- Sauce – Add chicken stock, stir, then simmer rapidly for 3 minutes to reduce by half. Stir in coconut cream, hand-crushed kaffir lime leaves, sugar and fish sauce.
- Place chicken into the sauce. Spoon over sauce. Surround with potatoes.
- Bake 1 hour – Place the lid on and bake for 40 minutes. Remove lid spoon sauce over chicken (ie. baste). Turn the oven up to 220°C/425°F (200°C fan). Bake uncovered for 10 minutes, baste, bake another 10 minutes.
- Beans, then bake 10 minutes – Push beans into the sauce (wherever they fit!). Baste again then bake for a final 10 minutes (no lid).
- Rest 10 minutes – Remove chicken onto a plate (Note 7). Rest 10 minutes. Put lid on pot to keep sauce warm.
- Serving – Carve chicken, place on platter. Stir basil leaves into sauce. Pour/spoon sauce, potatoes and beans over chicken. Garnish with chilli and coriander, if desired. Serve with jasmine rice!
Notes
Nutrition
Life of Dozer
Typical.

The post Thai red curry pot roast chicken appeared first on RecipeTin Eats.
]]> A bubbly casserole of sorts, this Mexican beef and bean is like a baked version of chilli con carne with lots of melty cheese – but faster to make. Think of it like your ultimate all-purpose Mexican beef – stuff in tacos, DIY burrito wraps, dunk with corn chips – like nachos! Cheesy Mexican beef... Get the Recipe
The post Cheesy Mexican beef and bean bake appeared first on RecipeTin Eats.
]]>A bubbly casserole of sorts, this Mexican beef and bean is like a baked version of chilli con carne with lots of melty cheese – but faster to make. Think of it like your ultimate all-purpose Mexican beef – stuff in tacos, DIY burrito wraps, dunk with corn chips – like nachos!
Cheesy Mexican beef and bean bake
I can’t remember how this Mexican beef and bean dish first came to be. All I know is that when it came out of the oven in all its bubbly, melty cheesy glory, I wanted to get stuck into immediately but paralysed with indecision for how. So many options!
Like chili, with a warm tortillas on the side for dunking??

OR with corn chips, deconstructed nachos style?

Making stuffed tortilla pillows?? Which, I realised, is just a burrito actually. 😂 *Light-bulb-moment* DIY burritos! Add a pile of warm tortillas, sour cream + guacamole or quick avocado sauce for dunking. Everybody make your own!

All-inclusive-taco filling? So juicy and cheesy already, it’s like a good ole’ classic beef mince taco filling + taco sauce + cheese, all rolled into one. Efficiency, for the win!
Then another light-bulb moment. This is like the ultimate all-purpose Mexican beef filling!! It’s almost a little concerning how excited I was when I came to this conclusion. Good food has a habit of doing that to me. 🤭
What you need for Mexican beef and beans
Here’s what you need to make this Mexican beef and bean bake:
This is a casual, rustic dish – which means, lots of flexibility. I’m not so relaxed with substitutions for some recipes, so take it when you can! 😂
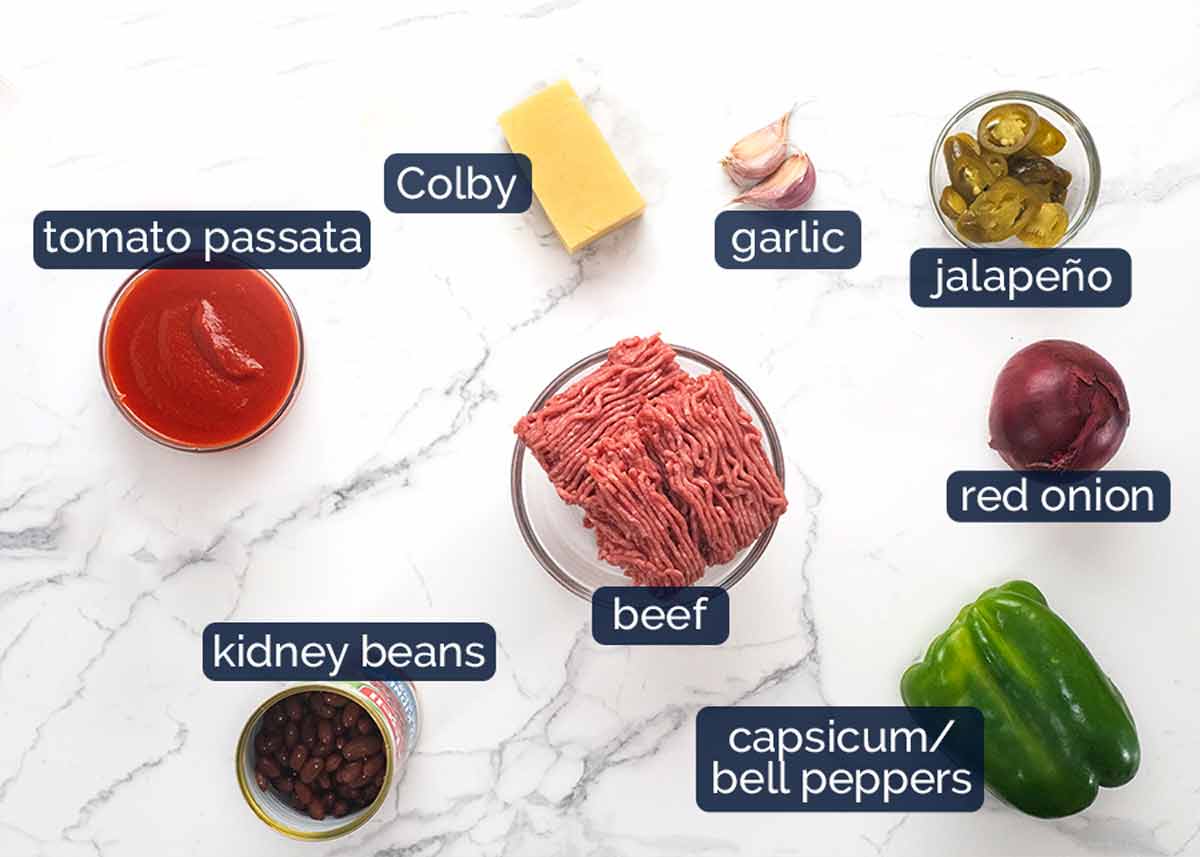
Ground beef / beef mince – Or chicken, turkey or pork. Any of these would work. (Even lamb actually).
Red onion – Or ordinary brown / yellow onions.
Green capsicum (bell pepper) – Or other colour capsicum, or other sauté-able vegetables like diced zucchini/courgette, carrot, green beans (chopped), corn. Even a cup of diced mixed frozen vegetables would work here!
Red kidney beans – Or black beans (on theme with Mexican food), or any other beans of choice. Or, more vegetables.
Tomato passata – This is pureed, strained tomato that is smooth, rather than lump like canned tomato. Substituted with crushed canned tomato, or what’s called tomato sauce or tomato puree in the US (eg Hunts).
Pickled jalapeno – Adds a sprinkle of spiciness plus tang because it’s pickled which is nice in this beefy dish. Canned chopped green chillies would be an excellent sub here (but this is a US thing, hoping it becomes a staple here in Australia one of these days!).
Garlic – Can’t be flexible here!

Cheese – Definitely not flexible here! Well, not flexible about the inclusion of some form of melting cheese. I’ve opted for Colby – adds flavour, melts well, gets a nice bit of golden colour on the surface, not too greasy. Feel free to use any of choice. If you use mozzarella, I’d suggest adding a sprinkling of parmesan on top (because mozzarella, while it melts beautifully, doesn’t have a much flavour).
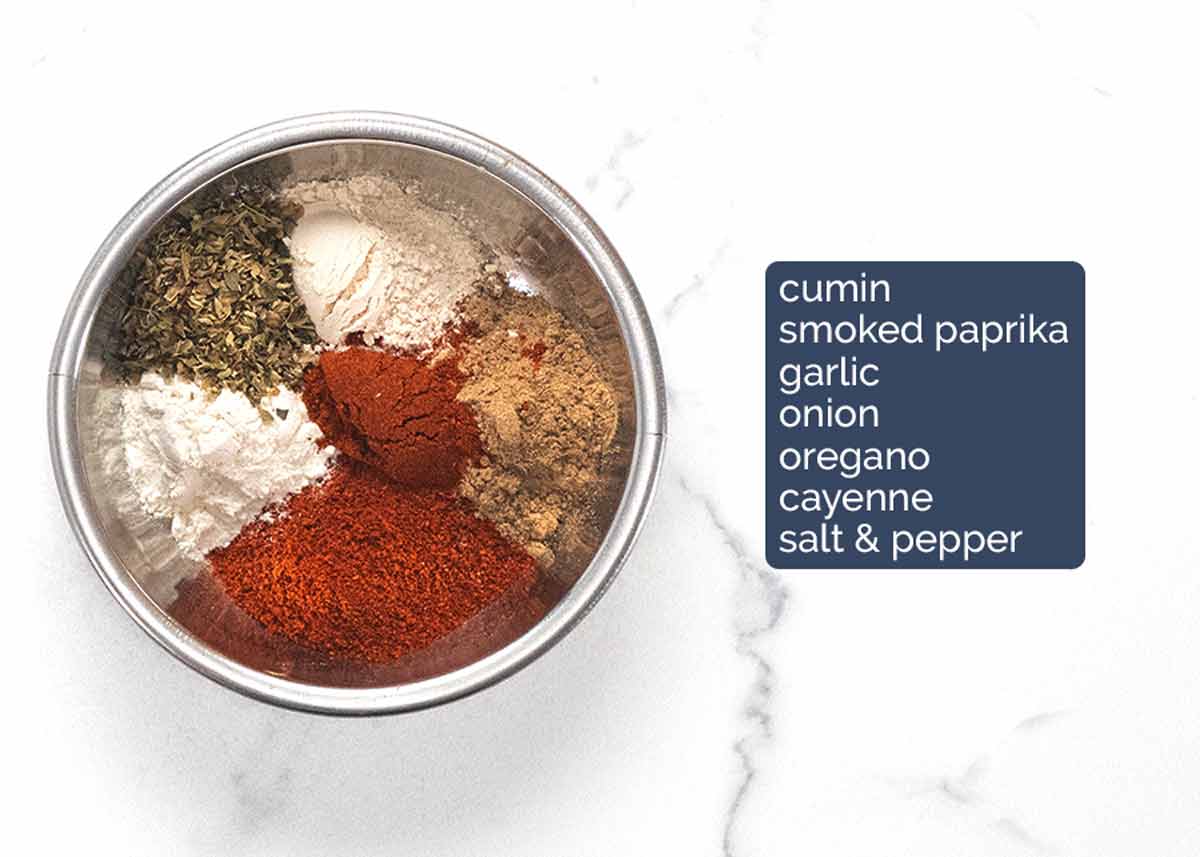
The Mexican spice mix
And here’s what you need for the homemade Mexican spice mix. Some Mexican recipes I share have a longer list of spices. For me, this is about the minimum you can go without the flavour missing something. All staple spices! (You can substitute smoked paprika with plain).
How to make Cheesy Mexican beef and beans
It’s like chili cone carne – but faster to make because by finishing it off in the oven with a generous sprinkling of cheese, we can skip the stove simmer.
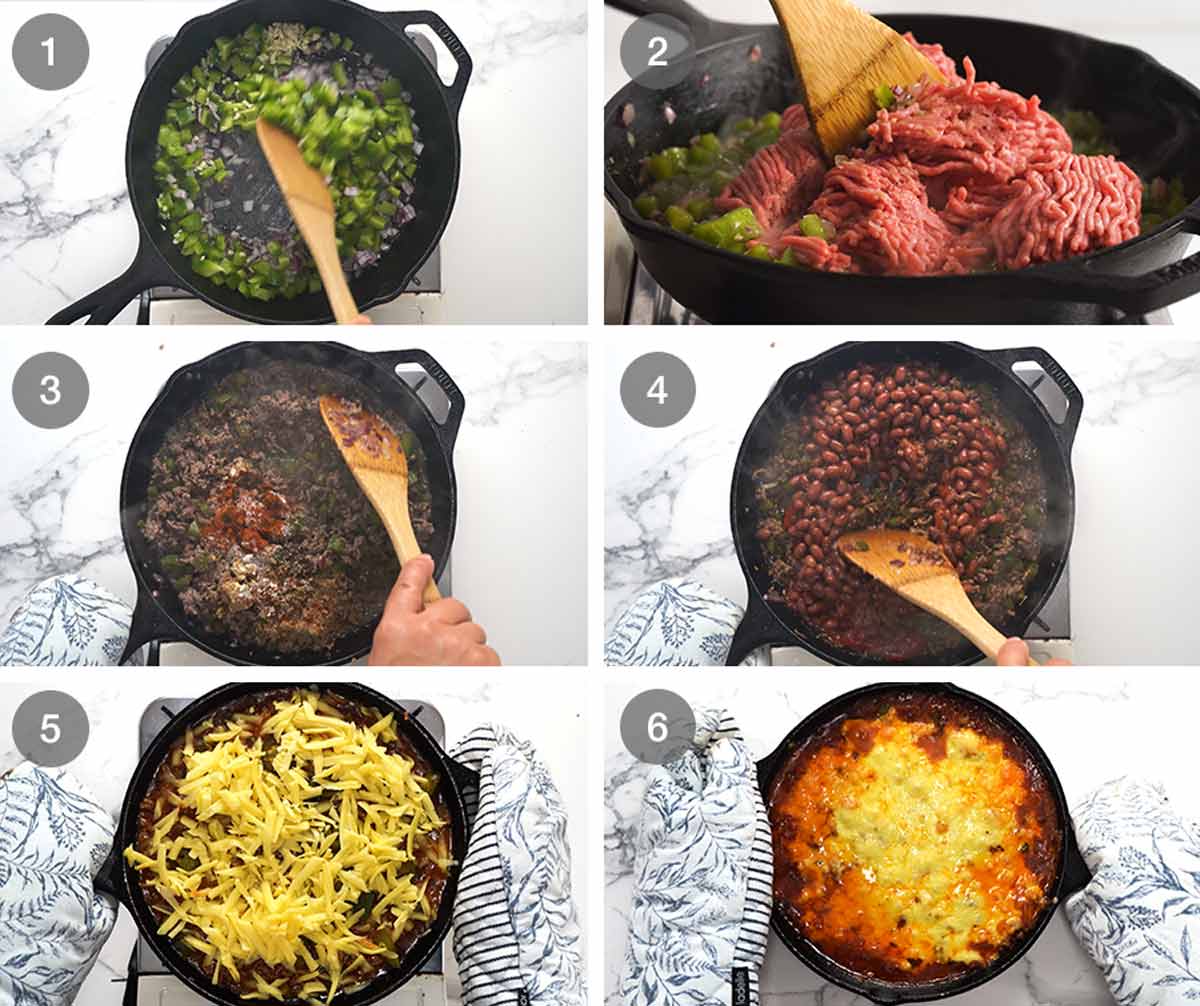
Sauté the onion, garlic and capsicum first. Use an ovenproof skillet. Pictured is my much-loved 26cm / 10.5″Lodge cast iron skillet (my essential kitchenware list is here!).
Cook the beef, breaking it up as you go.
Toast the spices with the beef. Good way to bring out flavour in spices plus get better flavour into beef mince / ground beef – FAST.
Add beans and tomato passata, give it a good mix then bring to a simmer.
Top with cheese then bake for 15 minutes just to melt the cheese.
Remove from oven and start the agonising process of deciding how to serve it! Tacos? Corn chip dunking? Burrito stuffing? ENCHILADAS? Nachos?? #FirstWorldProblems


Sides / toppings
Pictured in post for serving in all the above listed forms are:
Guacamole, and sometimes avocado sauce (essentially a smooth, faster version of guac)
Pico de gallo (fresh tomato salsa). Also this pureed tomato salsa would be great.
Sour cream (sub yogurt)
Fresh coriander/cilantro
Tortillas – small ones and larger enchilada size ones (for making small burritos).
Corn chips – for dunking
Other excellent options includes:
Mexican red rice, plain white rice (or brown, or cauliflower rice if you’re doing the low-carb thing). Rice in bowls then smother with the Mexican beef and beans.
And….. eeer… I’m stuck. Help?
– Nagi x
Watch how to make it

Cheesy baked Mexican beef and beans
Ingredients
- 2 tbsp olive oil
- 1 red onion , finely chopped
- 2 garlic cloves , finely minced
- 1 green capsicum / bell pepper , cut into 1cm / 1/2″ cubes (or other colour)
- 500g/ 1 lb beef mince (ground beef) (Note 1)
- 400g/ 14oz can red kidney beans or black beans , drained (or other beans)
- 1 cup tomato passata (Note 2)
- 1/3 cup pickled sliced jalapeño (Note 3)
- 1 1/2 cups Colby cheese , shredded (or other cheese, Note 4)
Mexican spice mix:
- 1 1/2 tsp cumin powder
- 1 1/2 tsp smoked paprika (sub normal paprika)
- 1 tsp garlic powder (sub onion powder)
- 1 tsp onion powder (sub garlic powder)
- 1 tsp dried oregano
- 1/2 tsp cayenne pepper (sub black pepper)
- 1 tsp cooking/kosher salt
Instructions
- Preheat oven to 200°C / 400°F (180°C fan).
- Sauté – Heat the olive oil in a cast-iron skillet over medium high heat (or other oven-proof pan). Cook onion, garlic and capsicum for 3 minutes.
- Cook beef & spices – Add beef and cook, breaking it up as you go, until you no longer see raw meat. Add spices, then cook for 1 minute.
- Beans & tomato – Add kidney beans and passata. Stir, then bring to a simmer.
- Cheese it! Scatter the jalapeño across the surface, top with cheese.
- Bake 15 minutes (no lid) then remove from the oven.
- Serve! Scoop into bowls and serve with corn chips or tortillas with your favourite Mexican fixings (guacamole or avocado sauce pico de gallo or restaurant style salsa, fresh coriander/coriander, sour cream). Dunk like nachos, make DIY burritos or tacos!
Notes
Nutrition
Life of Dozer
Dozer’s idea of obeying my command to stay outside the shop.

The post Cheesy Mexican beef and bean bake appeared first on RecipeTin Eats.
]]> This is a great quick recipe that’s got everything you need for a complete dinner, all cooked in one pot. Plenty of vegetables, with risoni/orzo and chicken. Tastes like risotto – loaded with tasty lemon-garlic Greek flavours! One-pot Greek chicken risoni Patience has never been my greatest virtue, so I shared many personal favourite recipes... Get the Recipe
The post One-pot Greek chicken risoni (orzo) appeared first on RecipeTin Eats.
]]>This is a great quick recipe that’s got everything you need for a complete dinner, all cooked in one pot. Plenty of vegetables, with risoni/orzo and chicken. Tastes like risotto – loaded with tasty lemon-garlic Greek flavours!
One-pot Greek chicken risoni
Patience has never been my greatest virtue, so I shared many personal favourite recipes back in the early days when I first started this website in 2014. Every now and then, I like to revisit these older recipes and bring them to the forefront with sparkling new photos (that are in focus, wow!) and recipe videos where the chicken doesn’t have a weird green-ish/yellow tinge.
I have no embarrassment about my photos and videos from the early days because it reminds me how far I’ve come. But I do think it’s nice to spruce up these old recipes for your viewing pleasure – and hopefully convince you to try them. Like today’s new-old recipe: Greek chicken risoni! Complete dinner made in one pot, nice and quick to make, loaded with tasty Greek flavours.


What you need
Here’s what you need to make this Greek risoni recipe.
1. The risoni / orzo
Risoni is actually a pasta that is shaped like long grains of rice. Also known as “orzo”, find it in the pasta aisle. It costs around the same as spaghetti etc.
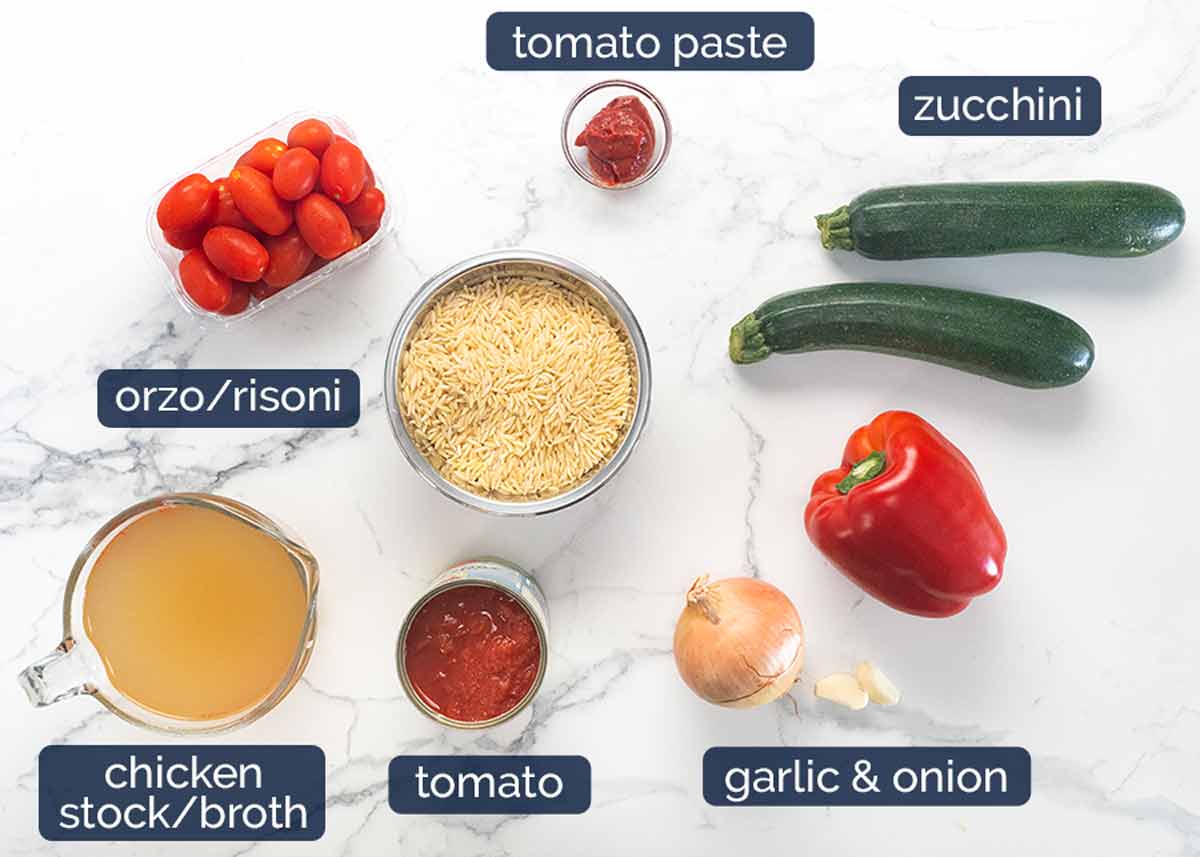
Risoni / orzo – See notes above the photo.
Chicken stock / broth and canned tomato – These are the liquids used to cook the risoni. Better than water because the risoni absorbs the flavour as it cooks!
Tomato paste – This adds a little boost of tomato flavour to the sauce, as well as thickening the sauce slightly so you end up with that really lovely oozy texture in the finished dish. Not the end of the world if you don’t have it.
Vegetables – I use zucchini / courgette and capsicum / bell pepper. Feel free to substitute with other sauté-able vegetables (carrot, beans, peas, fennel, corn, celery, frozen veg mix).
Also, if someone could arrange for the global standardisation of food words, that would be super helpful. Thanks! 😂
Onion and garlic – Flavour base aromatics.
Cherry tomatoes or grape tomatoes – I like to scatter across the surface before popping the dish in the oven. Love the juicy pops of tomato that burst in your mouth!
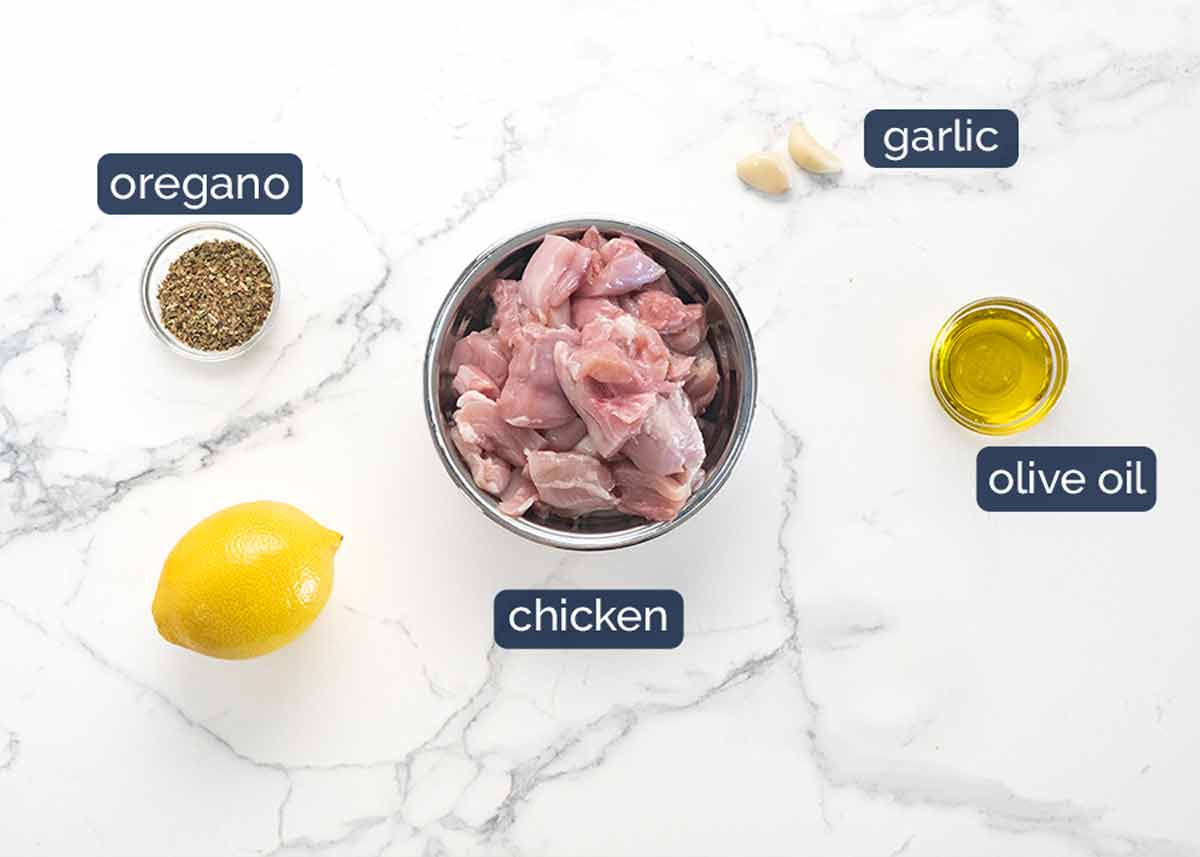
2. Lemon garlic chicken
A brief marinade of the chicken with classic Greek flavours makes the chicken that much tastier! Here’s what you need:
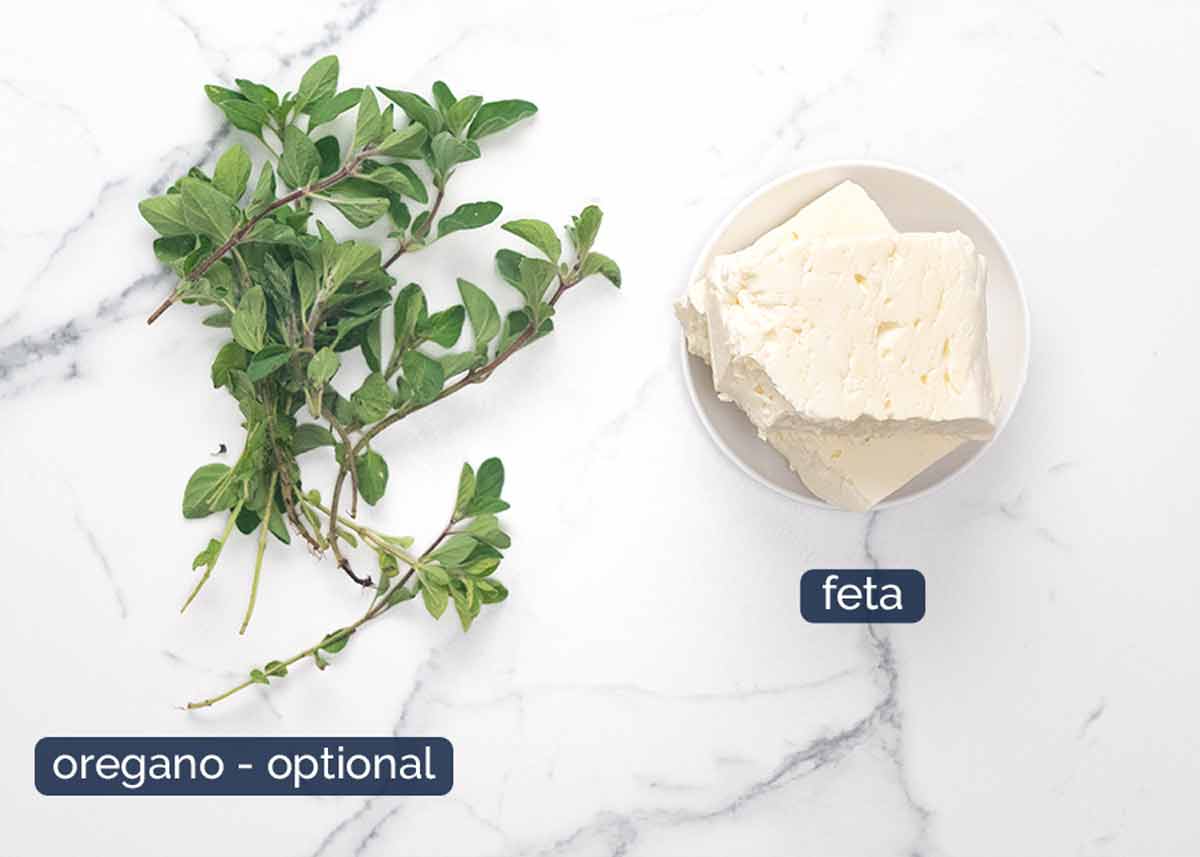
3. Garnishes (semi-optional)
I say it’s “semi-optional” because while you can skip the fresh oregano, the feta is highly, highly recommended!
How to make one-pot Greek chicken risoni
This recipe starts on the stove and is finished in the oven. I like this technique because it’s safer/easier – no need to stir – and the surface gets caramelised which means extra flavour. Anyone who’s made the fan-favourite One Pot Greek Chicken with Lemon Rice will know this method works well!
Marinade chicken in the lemon, olive oil, garlic and oregano. Just 20 minutes adds decent flavour into the chicken flesh.
If you’re pressed for time, you can skip the marinade, there’s plenty of flavour in the overall dish and the chicken will absorb flavour as it braises with the risoni. If you want to get ahead, you can marinade the chicken overnight – or even freeze the chicken in the marinade. So many options!
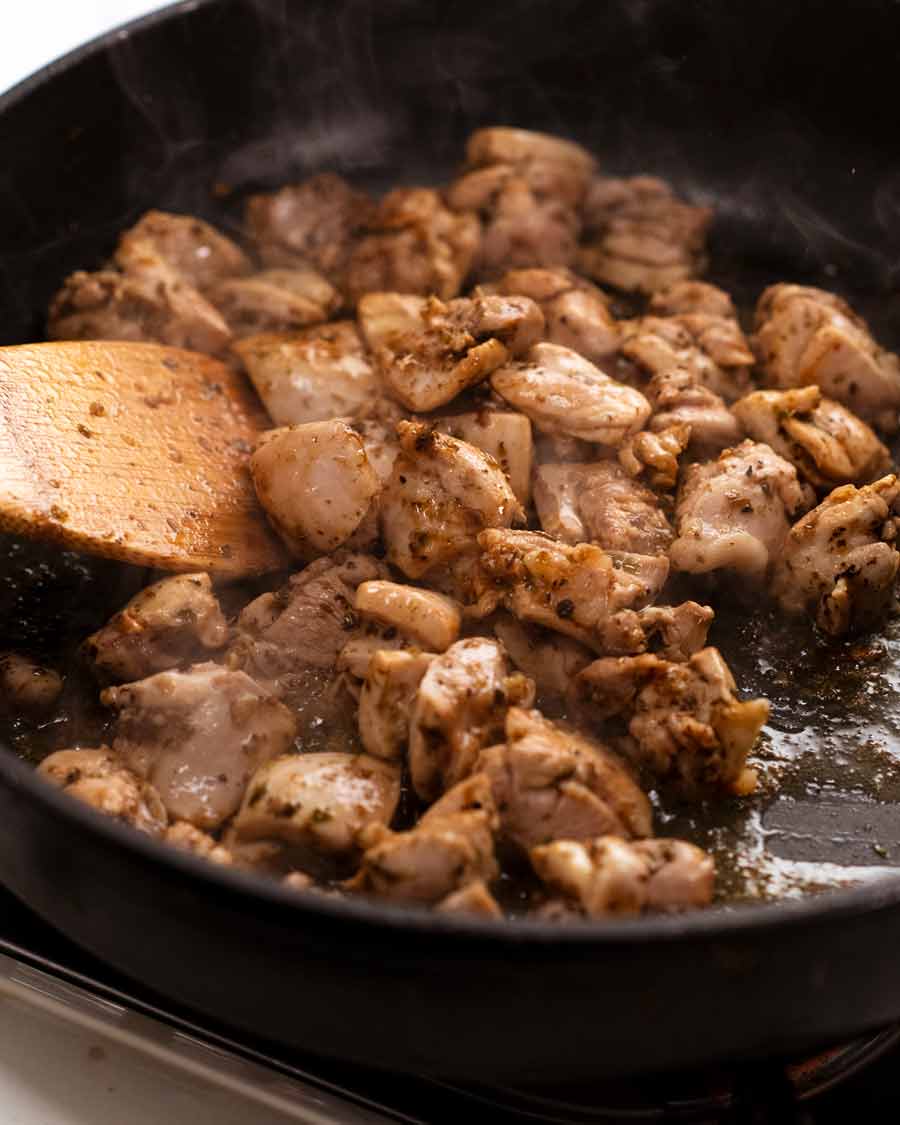
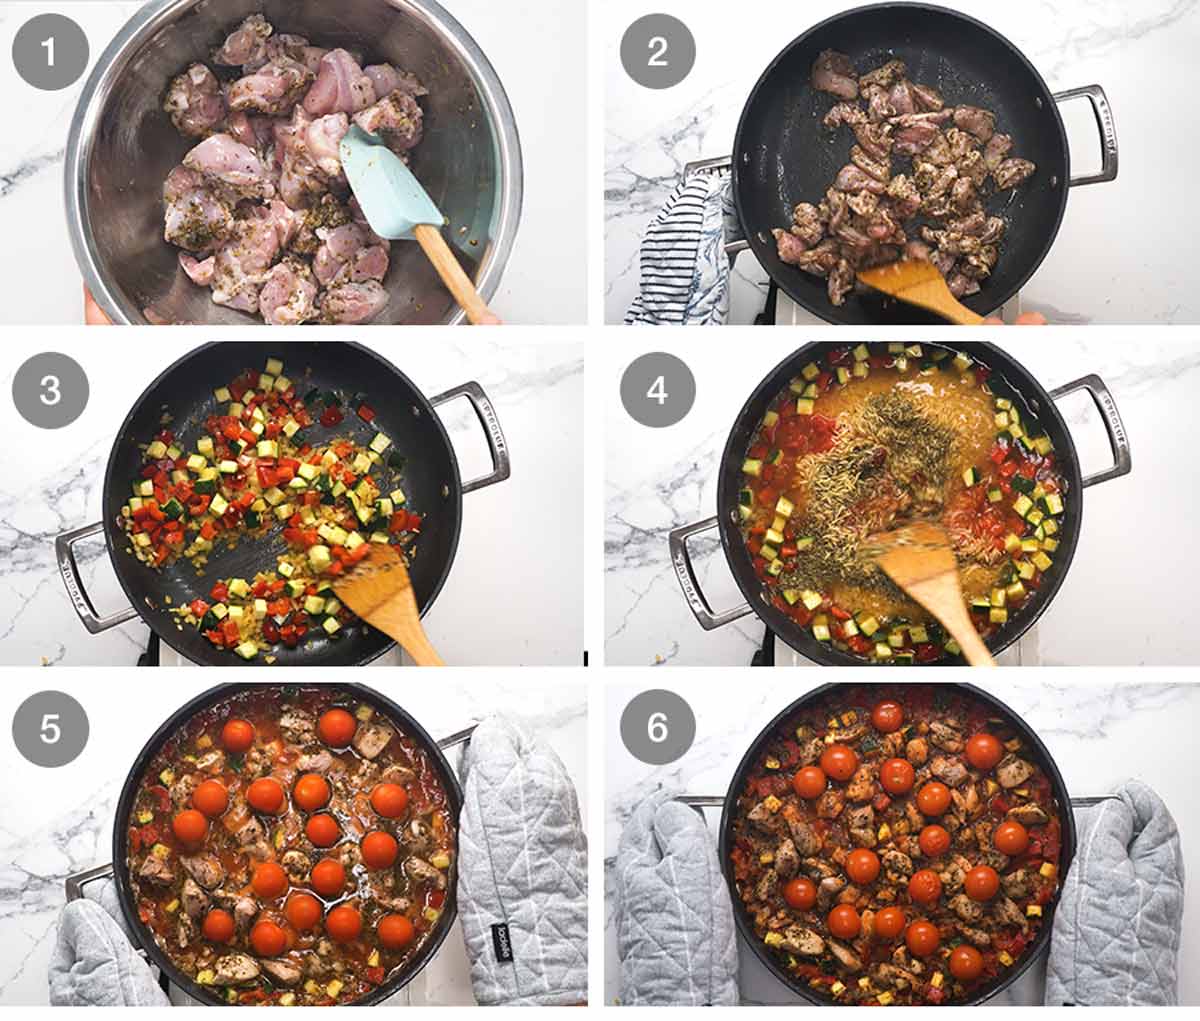
Brown chicken – Use a large ovenproof skillet / frying pan, or large pot. The one I’m using is a 30cm / 12″ non-stick frying pan.
Cook the chicken, just to seal the outside and lightly brown it. It will only take about 2 to 3 minutes. Don’t cook the chicken all the way through as it will finish cooking with the risoni.
Sauté aromatics and vegetables – Once the chicken is browned, remove it from the pan. Then sauté the garlic and onion, followed by the zucchini and capsicum.
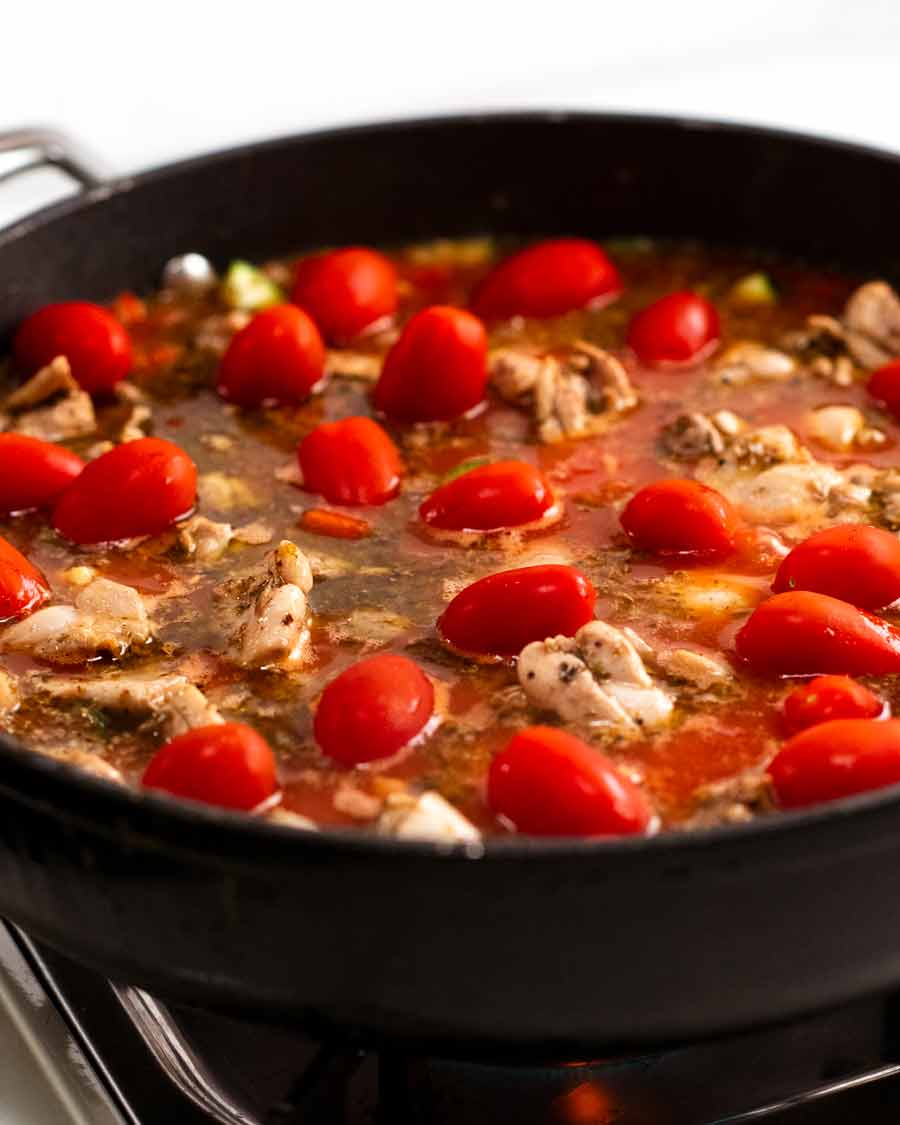
Add everything else – Add the risoni and stir to coat in the tasty flavours. Then add everything else – canned tomato, tomato paste, chicken stock, salt and pepper – and stir to combine.
Top with chicken and cherry tomatoes but don’t stir them in.
Oven 15 minutes – As soon as the liquid starts to bubble, transfer the pan to the oven (no lid) and cook for 15 minutes or until the risoni is tender.
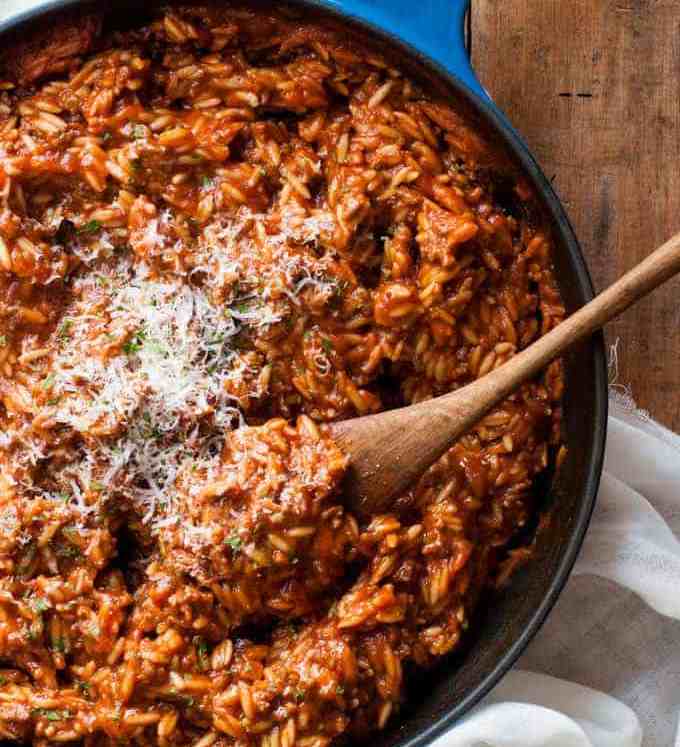
Garnish and serve – Remove the pan from the oven. There should still be small pools of liquid on the surface. This is what we want – the dish should be oozy and saucy, not dry and stodgy!
Drizzle the dish with lemon juice, crumble over the not-optional-feta then sprinkle with the optional-fresh-oregano. Then serve!
LOOK how juicy and irresistibly oozy it looks. It’s calling your name!
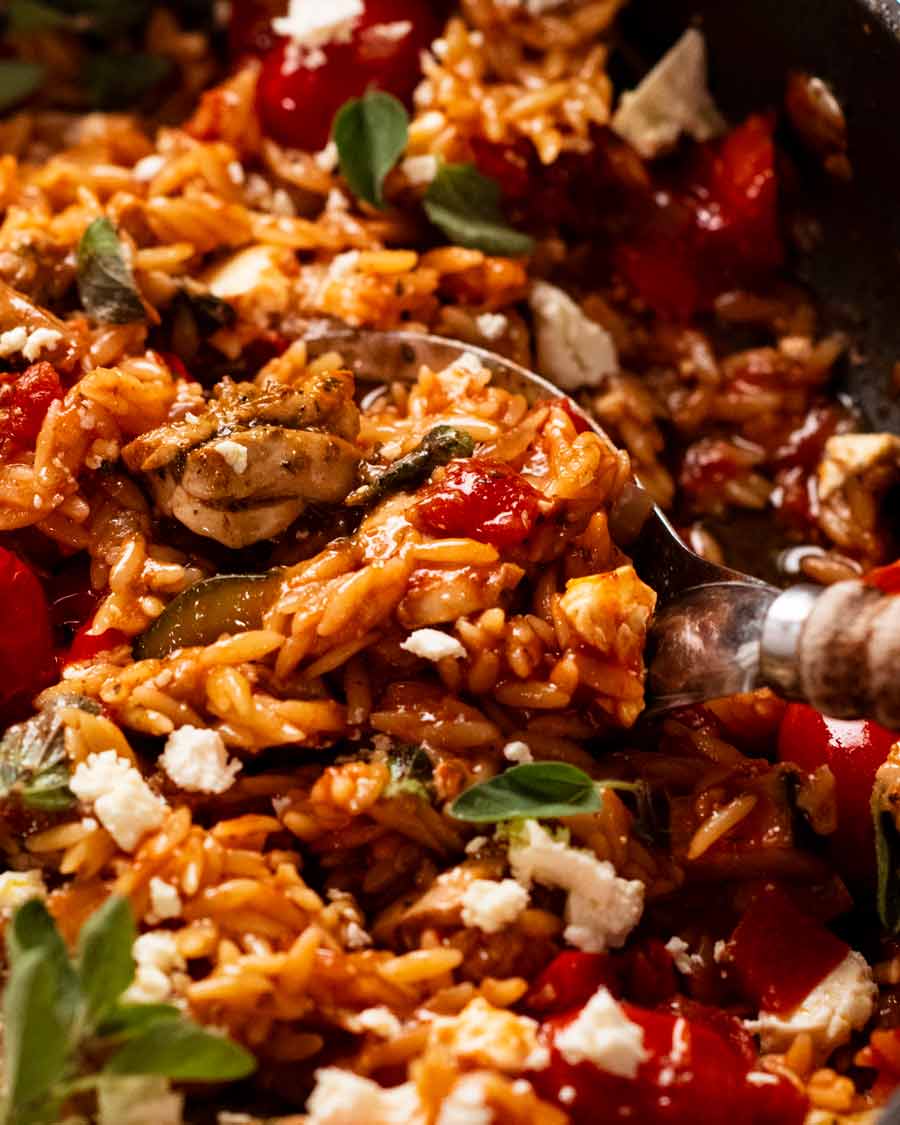
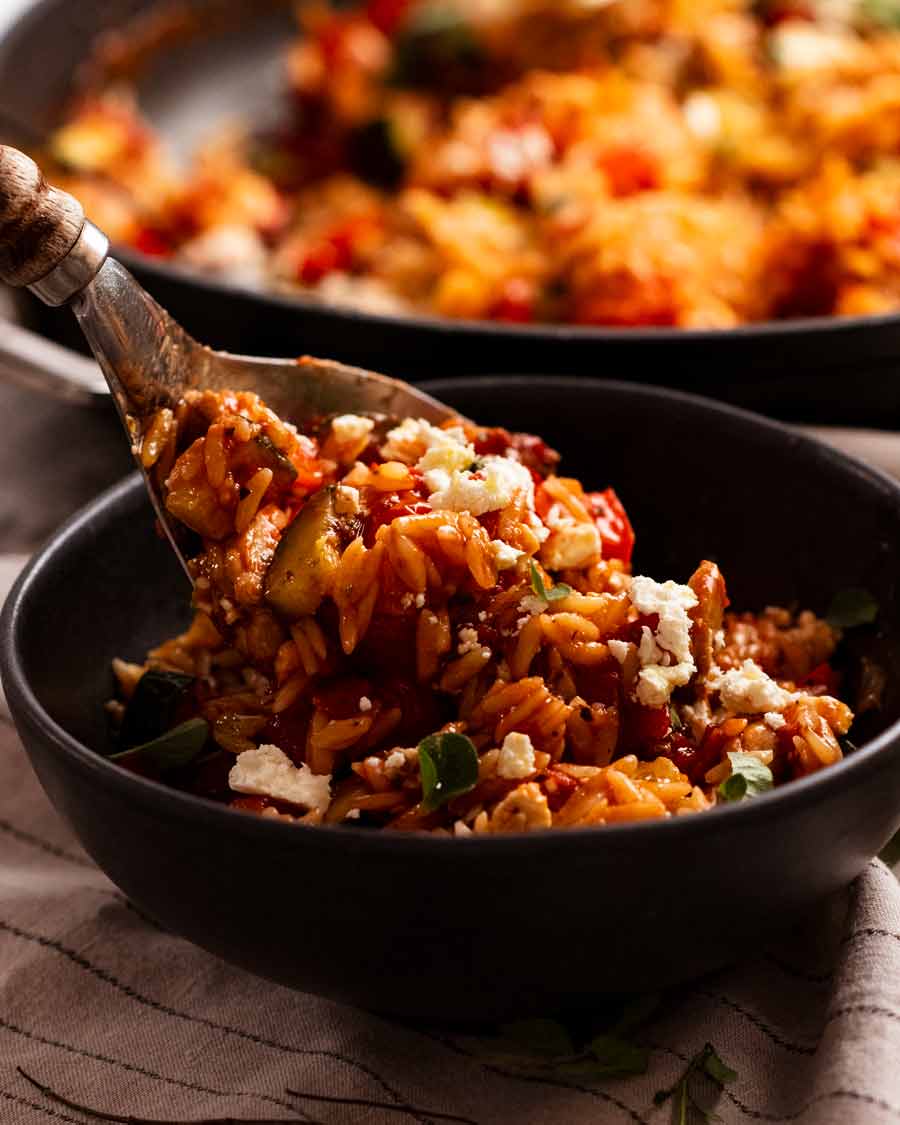
Spoon into bowls, and marvel how it looks just like your favourite risotto. Except, well, you know. You haven’t been slaving over a hot stove for 40 minutes, ladling in stock and stirring, stirring, stirring.
Leftovers, should there be any, will keep for 3 days but won’t be as oozy as pictured because the pasta will absorb the liquid. A little splash of water before you microwave goes a long way to salvage it, as does a fresh sprinkle of feta and spritz of lemon juice (I find lemon juice flavour fades with time).
Hope these sparkling new photos and in-focus-video convinces you to make this!! – Nagi x
PS The Ingredients list in the recipe below looks deceptively long. But actually, there are quite a few double ups because of the way I write the recipe. So don’t be put off! 
Watch how to make it

One Pot Chicken Risoni
Ingredients
Lemon Garlic Chicken
- 1 lb / 500g chicken thighs , boneless skinless (or breast), cut into 2 cm / 1" pieces
- 2 garlic cloves , finely minced
- 1 tbsp dried oregano
- 1 tbsp olive oil
- 1/2 tbsp lemon juice
- 1 tsp lemon zest
- 1/2 tsp each salt and pepper
Orzo/Risoni
- 2 tbsp olive oil
- 2 garlic cloves , minced
- 1 small onion , finely chopped
- 2 zucchini (medium, or 1 large) , cut into 1cm / 1/3" cubes (Note 1)
- 1 red bell pepper/capsicum , cut into 1cm / 1/3" cubes (Note 1)
- 1 tbsp dried oregano
- 2 1/2 cups chicken broth/stock , low sodium
- 14 oz / 400g canned crushed tomatoes
- 1 tbsp tomato paste
- 1 1/2 cups orzo/risoni (Note 2)
- 1 1/2 cups cherry tomatoes (1 Australian punnet)
- 1 tsp cooking salt (kosher salt)
- 1/2 tsp black pepper
Garnish (semi-optional)
- 2 tbsp lemon juice , drizzling at end
- 1/2 cup (100g) Greek feta cheese , crumbled (not optional)
- Fresh oregano leaves (optional)
Instructions
- Marinade chicken – Combine Marinated Chicken ingredients in a bowl and set aside for marinate for 20 minutes. (Skip if in hurry, can also do overnight)
- Preheat oven to 180°C/350°F (160°C fan).
- Brown chicken (raw inside) – Heat 1 tablespoon olive oil in a a large oven proof skillet or pot over high heat (Note 3). Cook chicken until lightly browned but still pink inside. Remove from skillet.
- Sauté vegetables – Add 1 tbsp olive oil, garlic and onion. Saute for 1 minute, then add zucchini and bell peppers/capsicum. Cook for 2 minutes.
- Add everything else – Add risoni, oregano, chicken broth, tomato, tomato paste, salt and pepper.
- Scatter chicken and cherry tomatoes across the surface (don't stir in).
- Bake 15 minutes – Once the liquid comes to a simmer, transfer to the oven (no lid) and bake for 15 minutes (or until risoni is just cooked, tender but still firm). There may be liquid on the surface still – that's good!
- Drizzle with lemon – Remove from oven, drizzle with lemon juice. Garnish with feta and fresh oregano leaves, if desired, then serve.
Notes
The liquid evaporates quite quickly while serving. It was slightly wetter when I took it out of the oven.
4. Leftovers will keep for 3 days in the fridge though it won’t be as oozy as the risoni absorbs the sauce. Resurrect with a splash of water, and microwave.
Nutrition assuming 5 servings.Nutrition
Originally published January 2016. Spruced up with brand new photos and recipe video in February 2021 with minor recipe improvements (mainly process and writing). But most importantly, Life of Dozer section has been added!
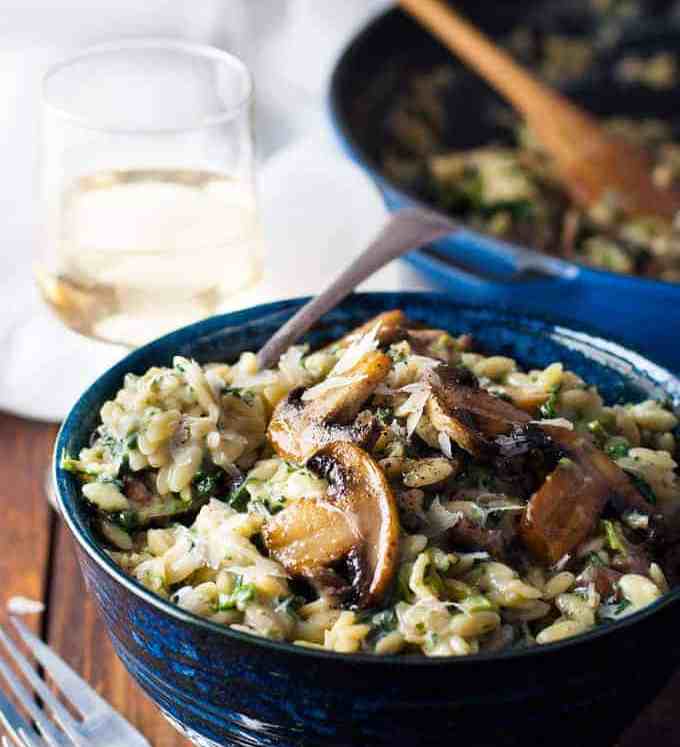
More risoni / orzo recipes
I do love risoni! So quick to cook, tastes like risotto.


Life of Dozer
NO, he’s not being adorable, cuddling up to me. He’s trying to get to my toast on the other side.


The post One-pot Greek chicken risoni (orzo) appeared first on RecipeTin Eats.
]]>