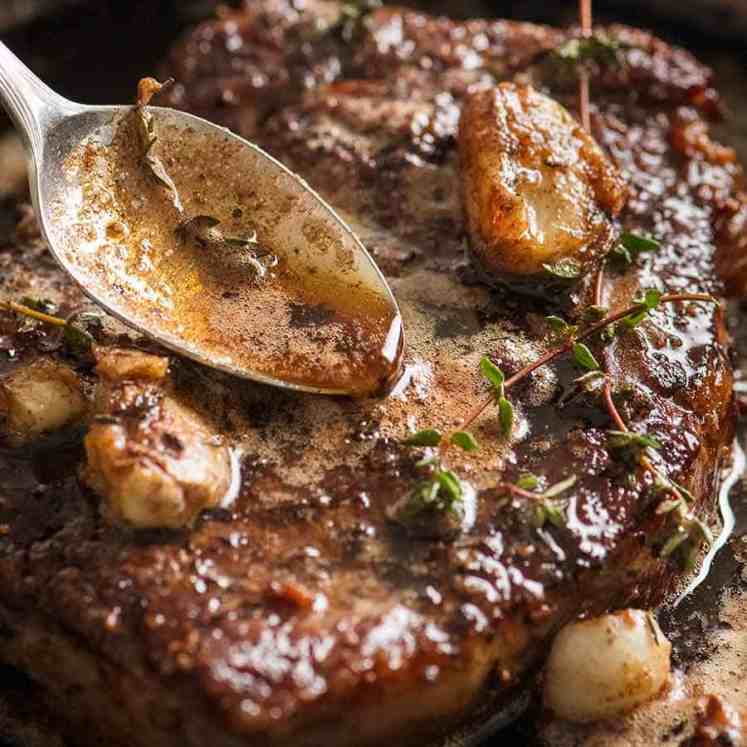
 Roasted mushrooms are delicious. Marinated mushrooms are a whole new level! Imagine a blend of balsamic vinegar, olive oil, garlic and thyme soaked up by the mushrooms that squirts in your mouth when you bite into it……yes!!! Marinated mushrooms Mushrooms are awesome little sponges that absorbs the flavour of anything they’re cooked in. Today, we’re... Get the Recipe
The post Balsamic marinated mushrooms appeared first on RecipeTin Eats.
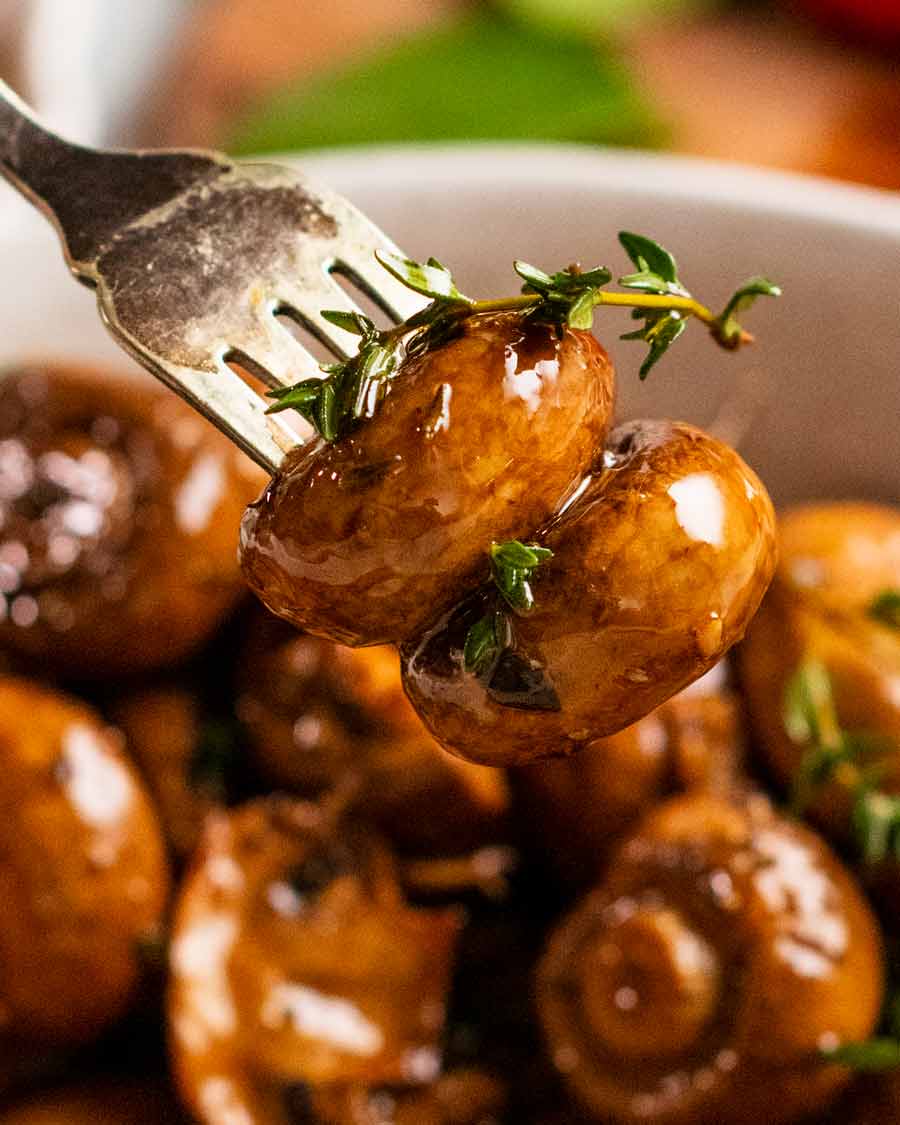
]]>Roasted mushrooms are delicious. Marinated mushrooms are a whole new level! Imagine a blend of balsamic vinegar, olive oil, garlic and thyme soaked up by the mushrooms that squirts in your mouth when you bite into it……yes!!!
Marinated mushrooms
Mushrooms are awesome little sponges that absorbs the flavour of anything they’re cooked in.
Today, we’re marinating garlic roasted mushrooms in balsamic vinegar and olive oil. You will be amazed how much of the marinade the mushrooms soak up in just a couple of hours. That moment you bite into a mushroom and the balsamic juice squirts out in your mouth….that’s a little bit of food heaven right there!
As for what to use these for?
As a meal – on toast or over mash or similar (mushrooms are so meaty!)
Side dish – for breakfast or a steak dinner
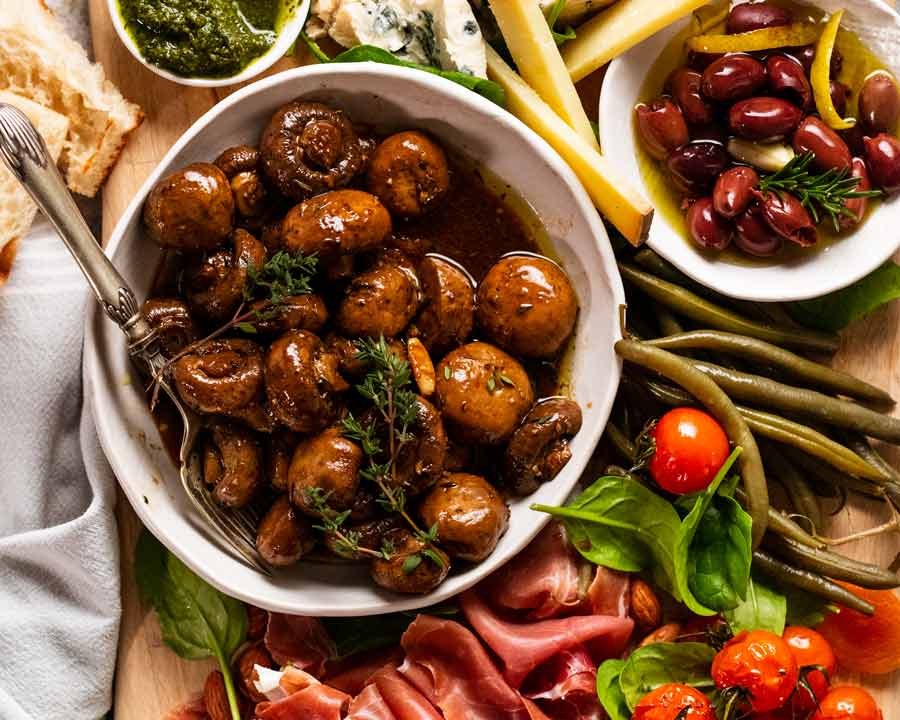
Grazing board – the most perfect “I MADE THESE MYSELF!” addition to your next cheese platter.
Many more suggestions with links to suggested recipes below.
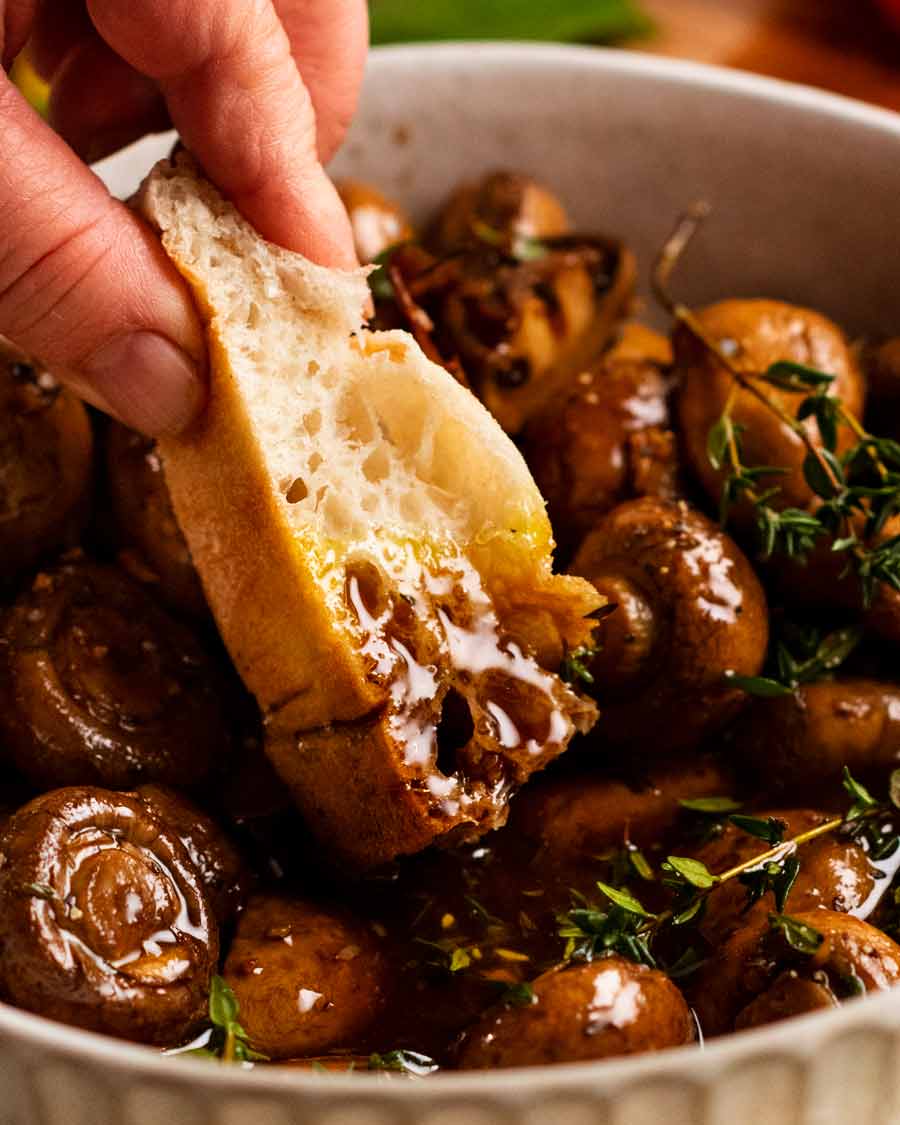
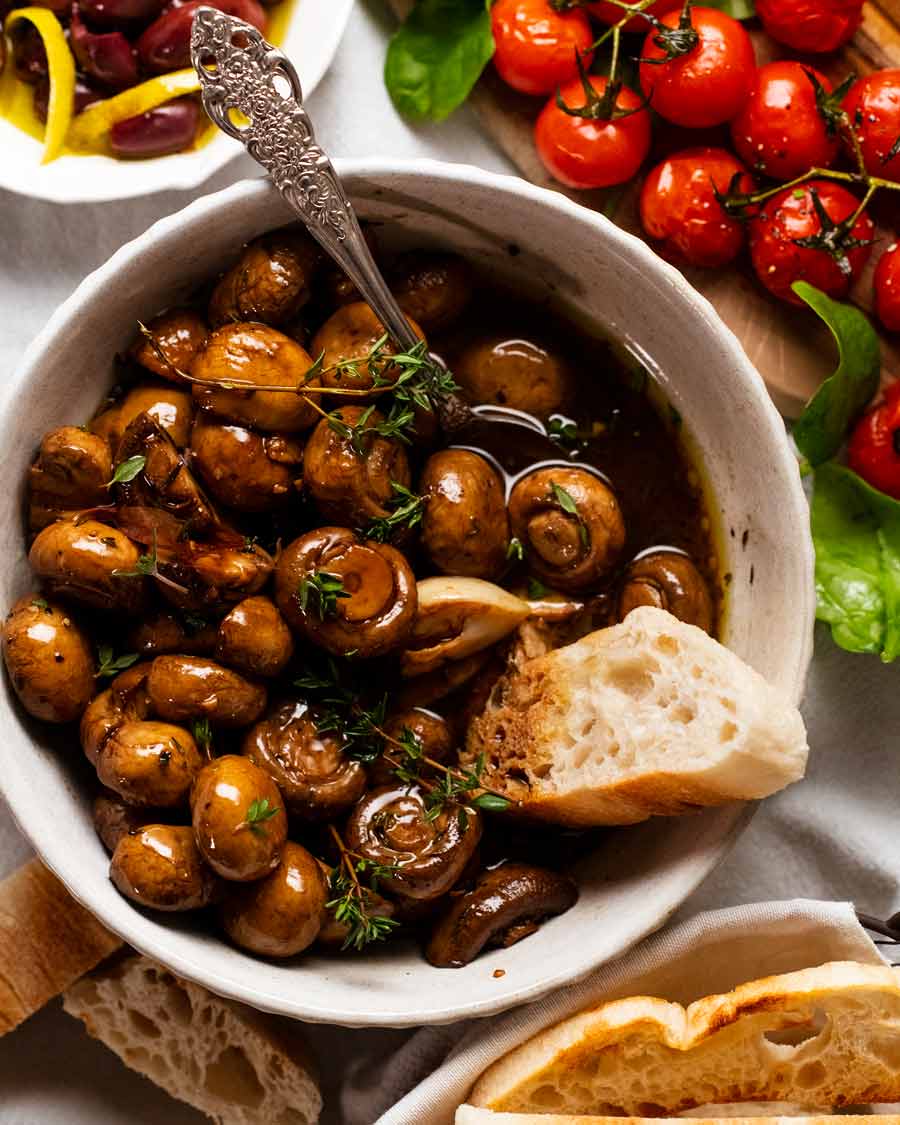
Bonus: Dunking bread in the mushroom-y balsamic juices. Today’s recipe is the gift that keeps on giving!
Ingredients
Here’s all you need to make balsamic marinated mushrooms. It’s all in the method – tossing hot mushrooms soaked in the balsamic blend for maximum flavour absorption!
Mushroom chatter:
Type (flexible). Size (flexible)!
Type I’m using plain white mushrooms today. Swiss brown / cremini would be a perfect substitute. In theory, this recipe will work for most mushrooms that can be roasted, just cut them as appropriate. Portobello / large flat mushrooms (cut into large pieces or slice), Shiitake (whole), oyster (whole / halve larger ones), king oysters/trumpet (hmm, I’d probably slice thickly). I’d probably avoid the stringy / thinner types, like enoki and shimeji.
Size My preference is to use smaller mushrooms around 3 – 3.5cm wide (1.2 – 1.4″) so I can keep them whole for maximum effect of biting into a juicy mushroom.
However, mushrooms, being the selfish uncooperative things that they are, do not always grow to the exact size specification I wish for. So cut larger ones in half, or quarters / into cubes for really big ones. The goal is to make them all roughly the same size so they roast in about the same time. Bear in mind they will shrink about 30% once roasted.
Balsamic blend and roasting flavours
Balsamic vinegar – For marinating. Chosen for flavour and because it stains the mushrooms a mahogany colour. Other milder vinegars like white vinegar vinegar, sherry vinegar will also work. Lemon and plain white vinegar are sharper so just use less.
Garlic and thyme – For roasting flavours. I mince half the garlic (so it disperses) and keep 2 whole, smashed, so they impart garlic flavour throughout while roasting and also while marinating. For the thyme, fresh sprigs will bring the best flavour but dried will work as a substitute.
Extra virgin olive oil – For roasting and marinating.
How to make marinated mushrooms
Simple recipe with few ingredients. It’s all in the method – roast first, then toss hot mushrooms in the balsamic blend. When they are hot, the pores are open so this provides maximum flavour absorption opportunity!
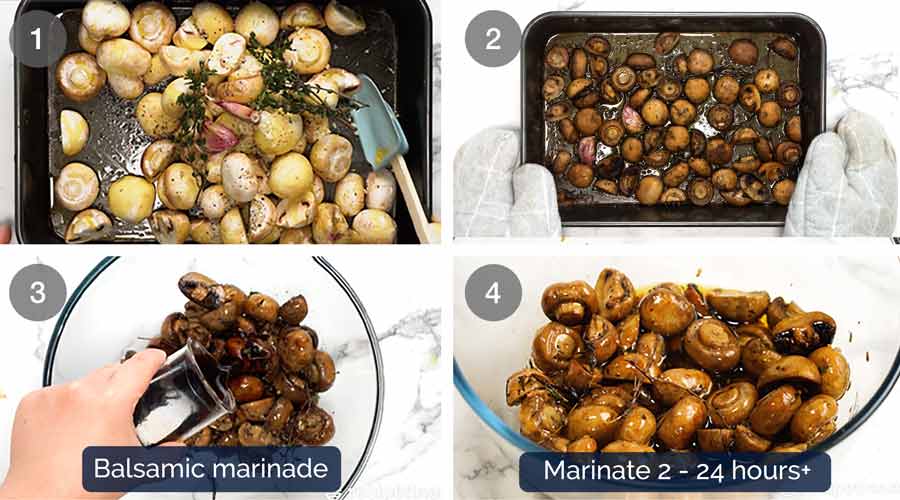
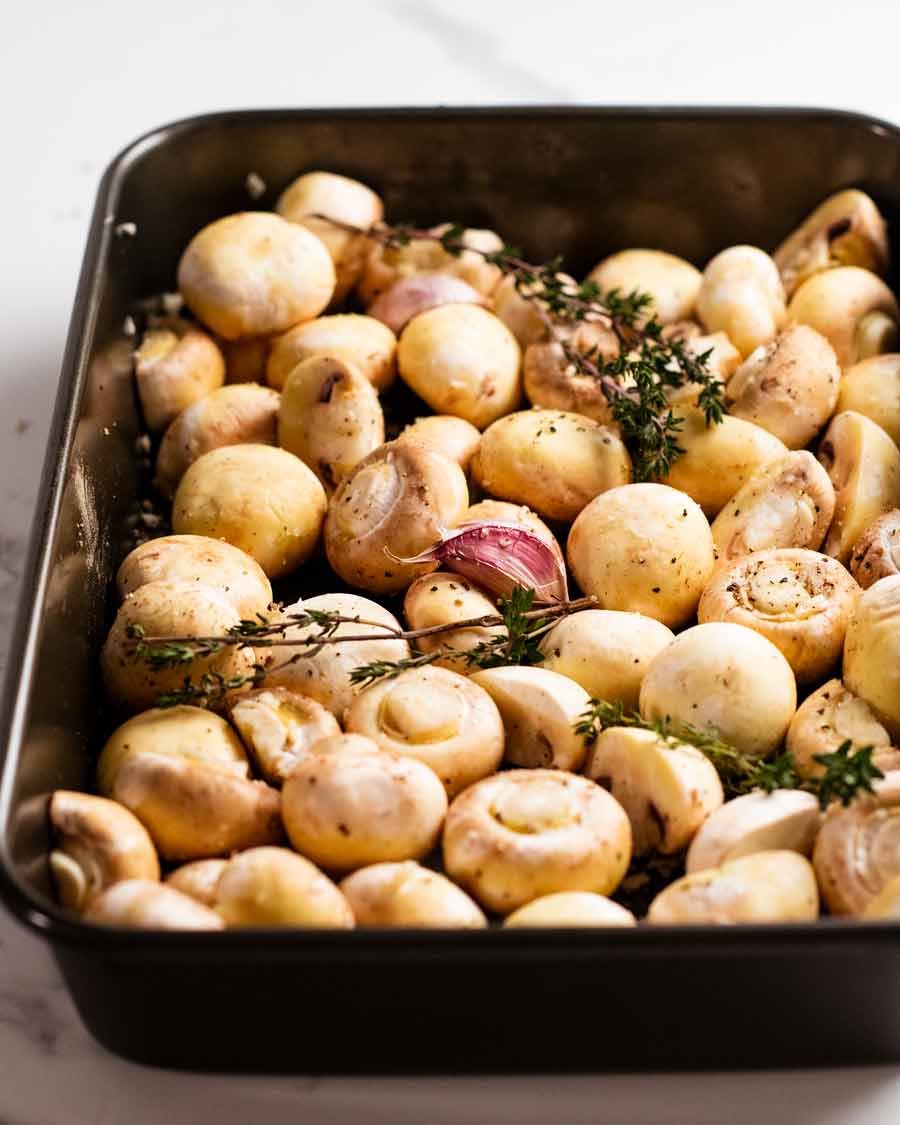
Toss the raw mushrooms with olive oil first. Then add the minced and whole garlic cloves, thyme, salt and pepper. Toss again.
Use a large roasting pan – easier for tossing than a baking tray. The mushrooms can be very, very snug in a single layer. They will shrink about 30%.
Roast for 35 minutes at 200°C/400°F (180°C fan-forced), tossing during the halfway mark, until browned and soft but still juicy inside. Don’t roast them for so long that they become shrivelled and sad!
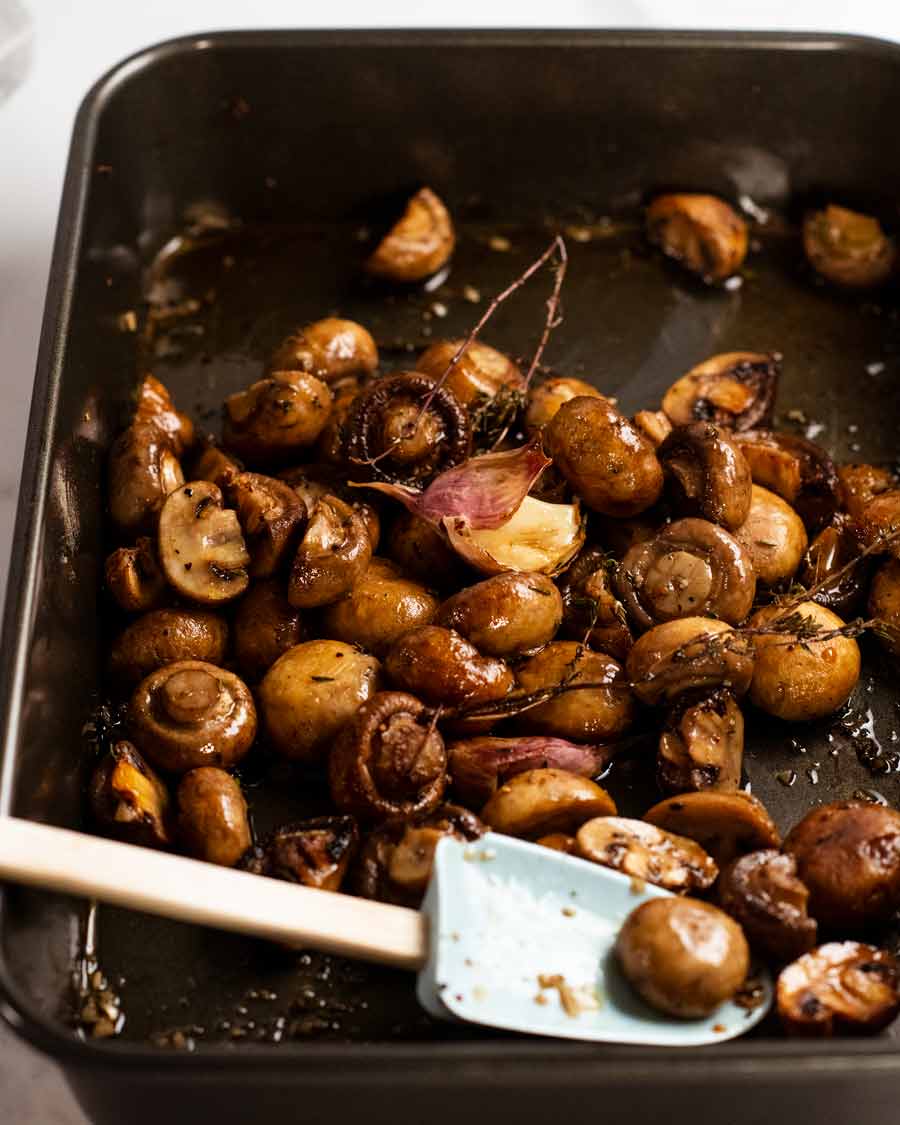
Marinade – Immediately pour all the mushrooms and juices in the pan into a large bowl. Then add the balsamic vinegar and more olive oil, then toss, toss, toss!
Marinate – Leave the bowl uncovered (we don’t want condensation diluting the flavour!) and let the mushrooms marinate as they cool, tossing once (or twice or three times!). It will take about 2 hours to come to room temperature and that’s enough time for the mushrooms to absorb sufficient flavour to serve / start picking at for a “taste test”.😈
However, if you have the time, refrigerate and leave them overnight! They will absorb even more flavour.
Serve at room temperature or slightly warm for maximum appreciation of flavour! It really brings out the garlic and thyme flavour when slightly warmed.
Now, the fun part – serving options!
How to eat / serve marinated mushrooms
SO MANY POSSIBILITIES!
Pop in mouth straight out of the bowl – yup, these little juicy flavour bomb mushrooms are can’t-stop-eating-them good. My most common way of eating them!
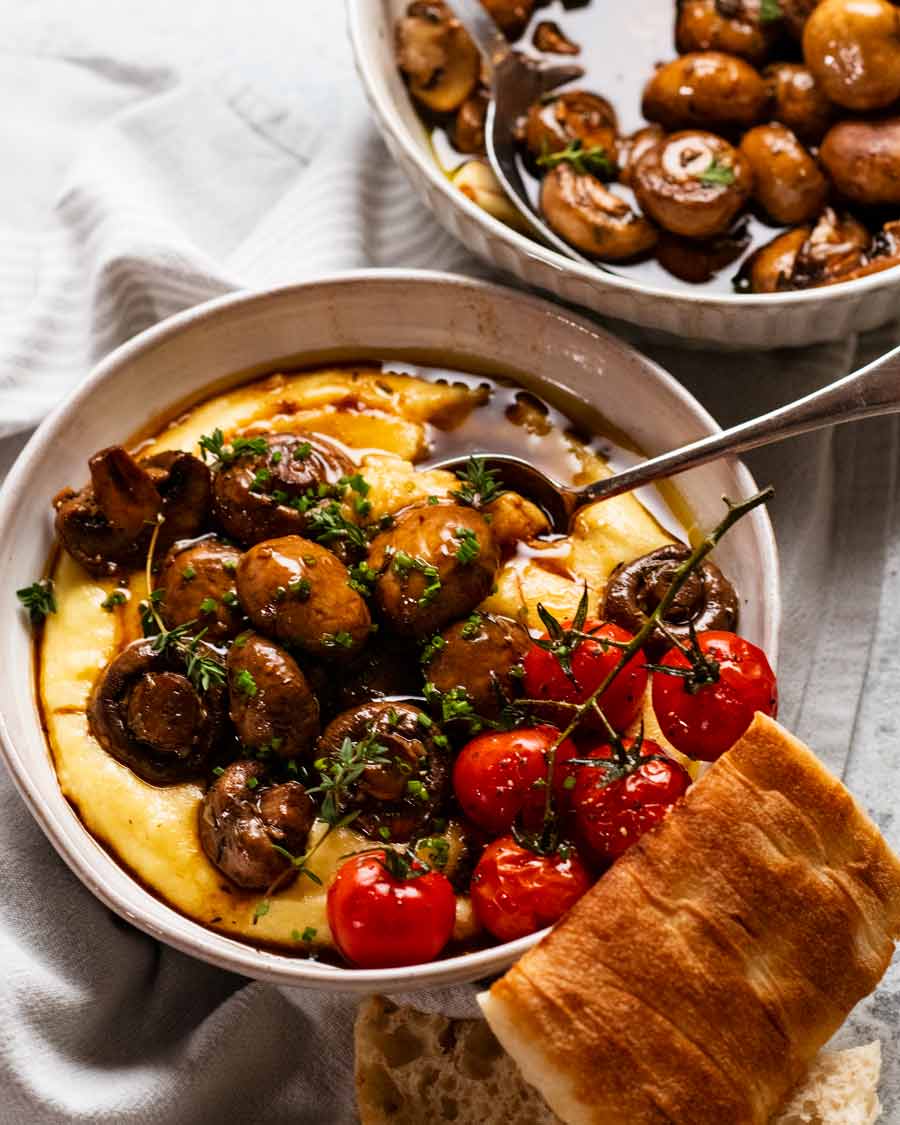
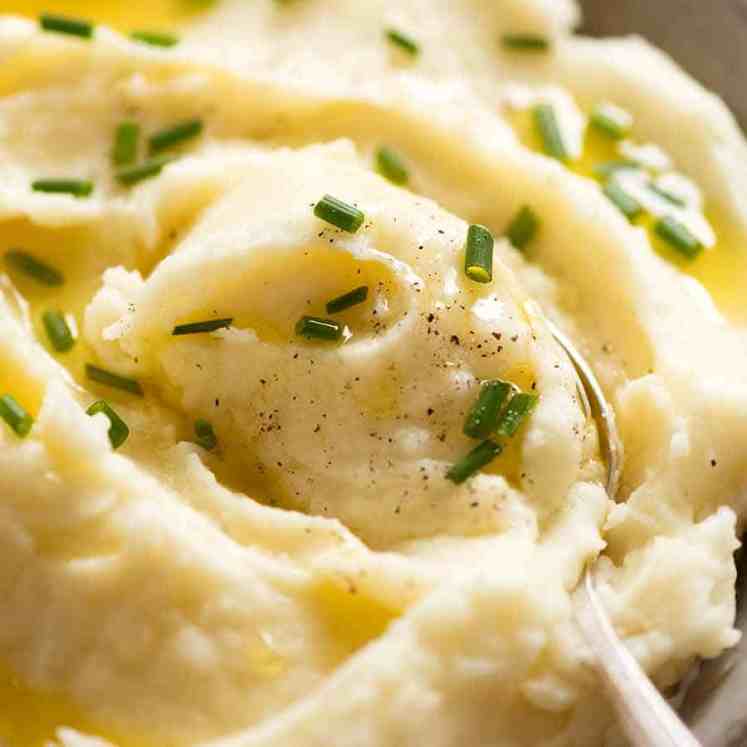
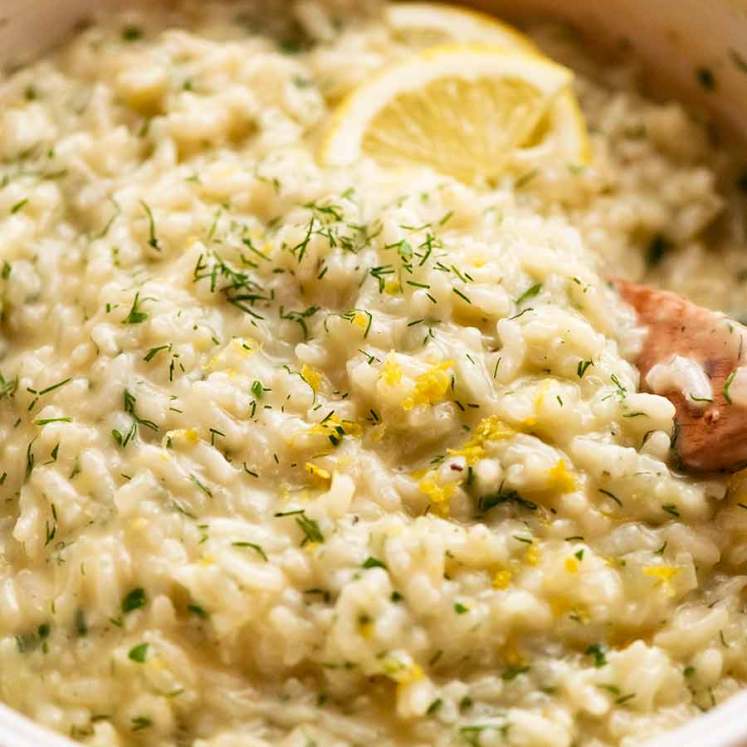
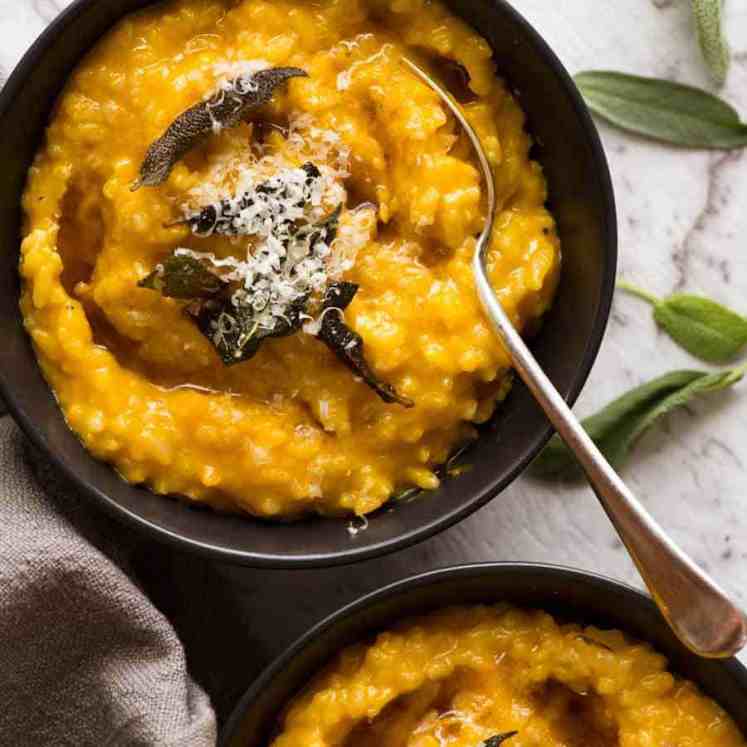
As a meal (see polenta photo at top of post) – Piled over creamy polenta (use directions in this recipe), mash (potato, sweet potato or cauliflower puree) or risotto (this No-Stir Creamy Lemon & Herb Baked Risotto and Creamy Baked Pumpkin Risotto come to mind). Note on pasta, rice etc – I don’t think there’s enough balsamic sauce to serve over plain cooked pasta or rice. You might disagree. Let me know if you do!!
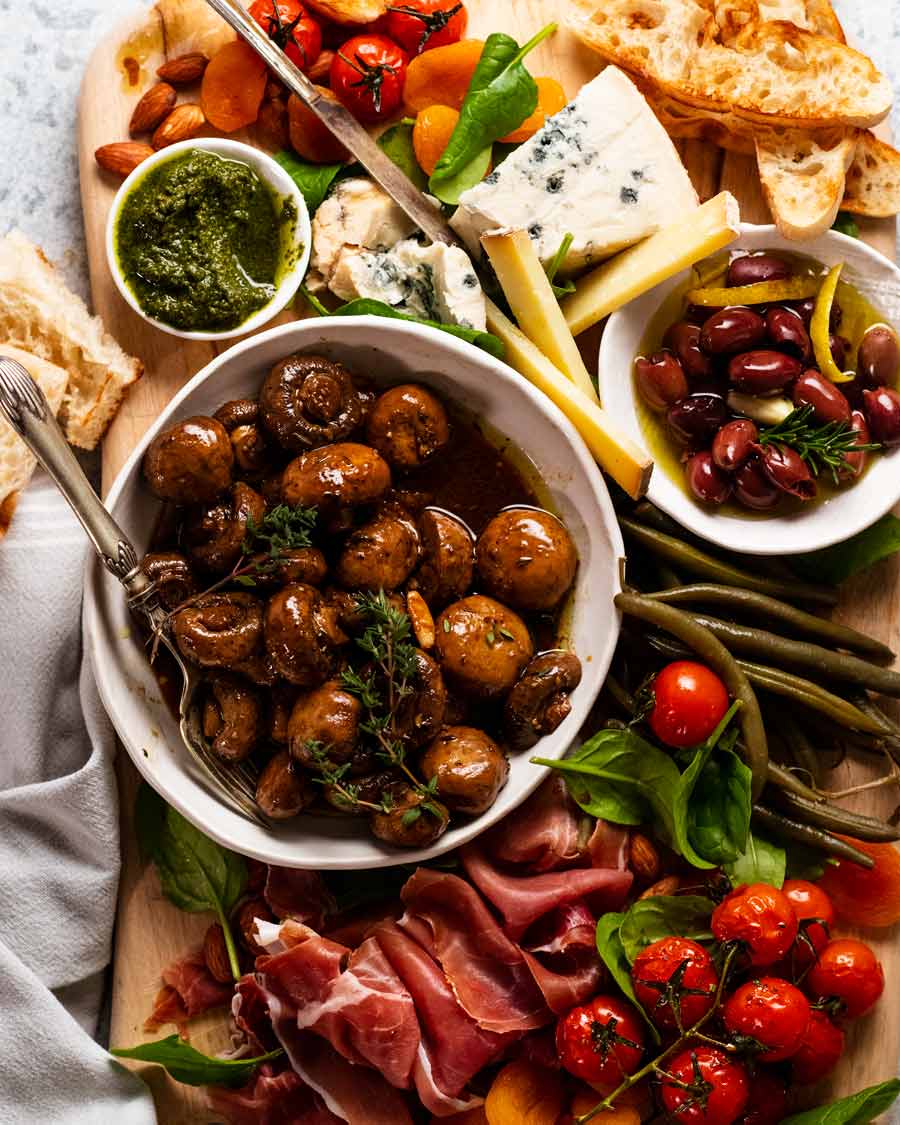
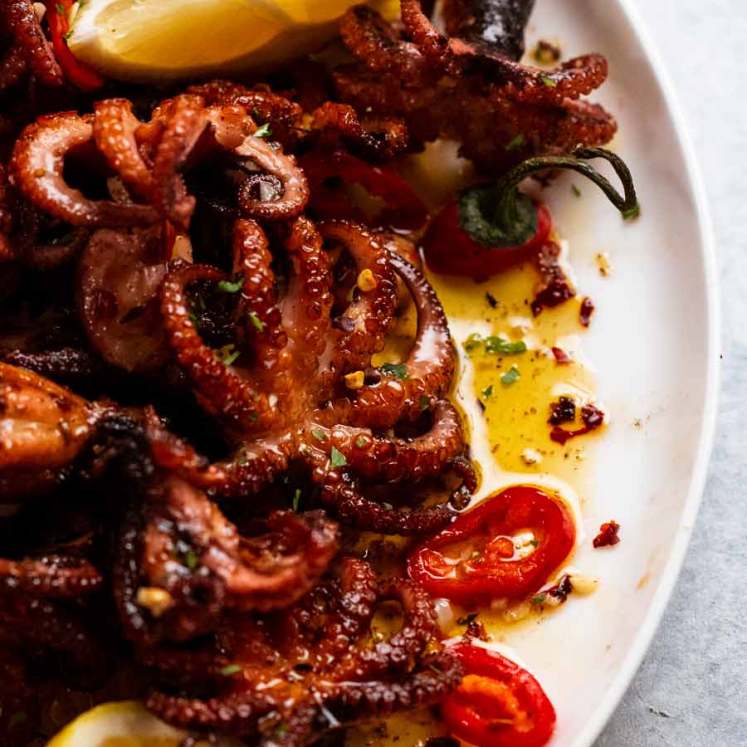
Grazing board (below) – Make these the hero of your next cheese platter! Serve alongside cheese, charcuterie, pickles, crackers, bread and why not some crispy grilled baby octopus? Serve the mushrooms whole or sliced so they can be piled onto crackers or crostini smeared with blue cheese (RTE team fave!) or goats cheese.
“Interesting salads” lunch spread – Something I’ve been doing more of lately! Make a lunch spread with a selection of interesting salads for a leisurely Sunday lunch with friends. I see these marinated mushrooms alongside a Roasted Cauliflower Salad, Lentil and Roasted Eggplant Salad and perhaps a leafy Iceberg Lettuce Dill Salad with crusty bread (or cheese bread!) for plate mopping.
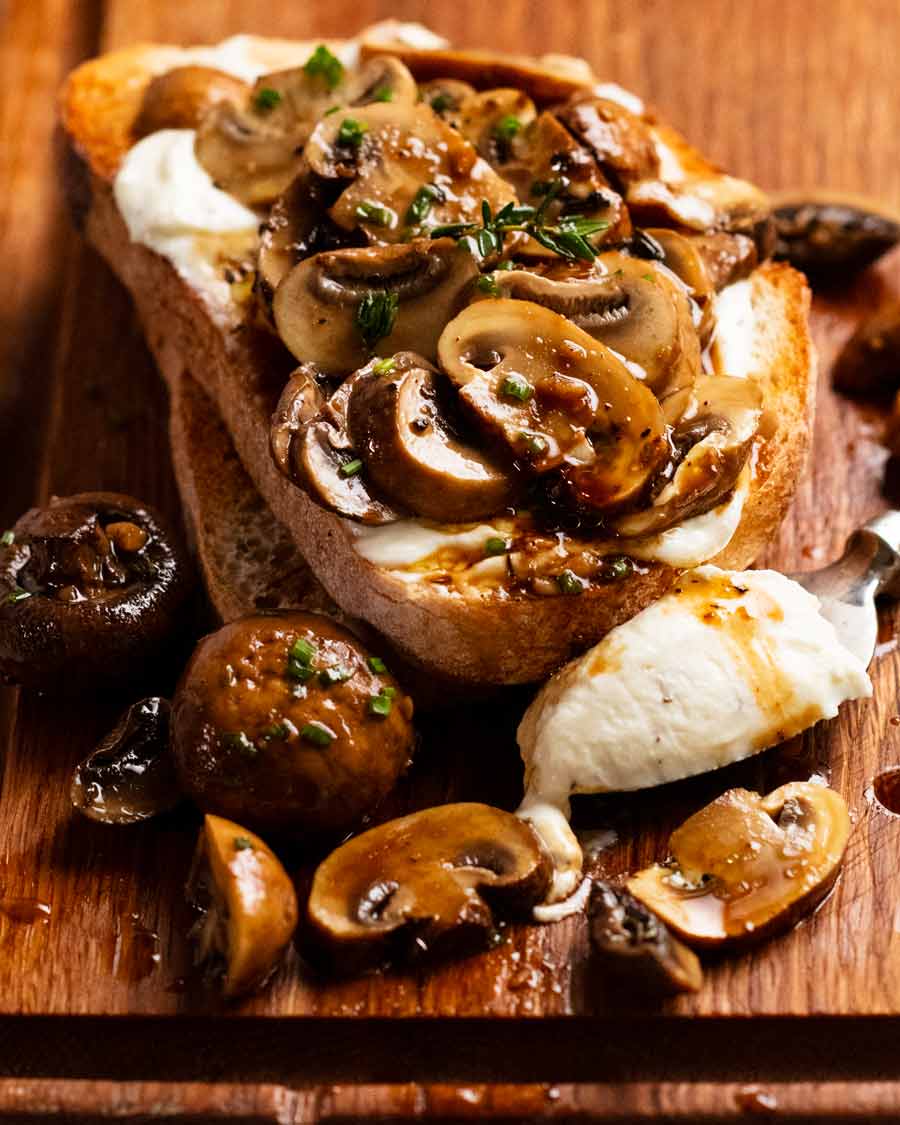
Toast (pictured below) – Slather toasted bread with avocado, goats cheese, blue cheese, cream cheese or anything that can act as a “glue” for the mushrooms. If serving with a knife and fork, the mushrooms can be kept whole. If eating with your hands, I’d suggest slicing or quartering so the mushrooms don’t tumble off.
Stuffed in a sandwich – Take a big soft roll. Slather with cream cheese or goats cheese. Pile with rocket/arugula, slices of tomato, and a big pile of these mushrooms. YES!
As a side dish! For all these, I’d warm the mushrooms slightly. See list below.
Serve marinated mushrooms on the side of…
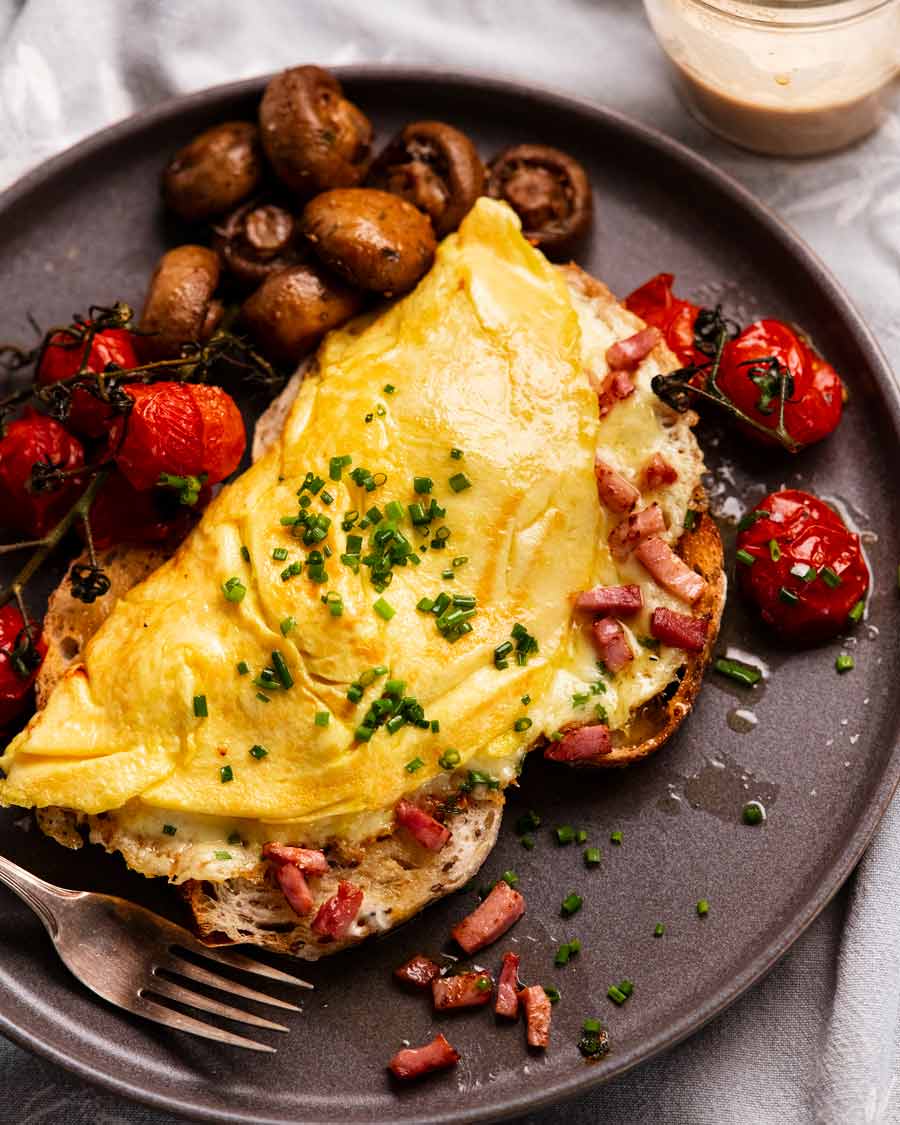
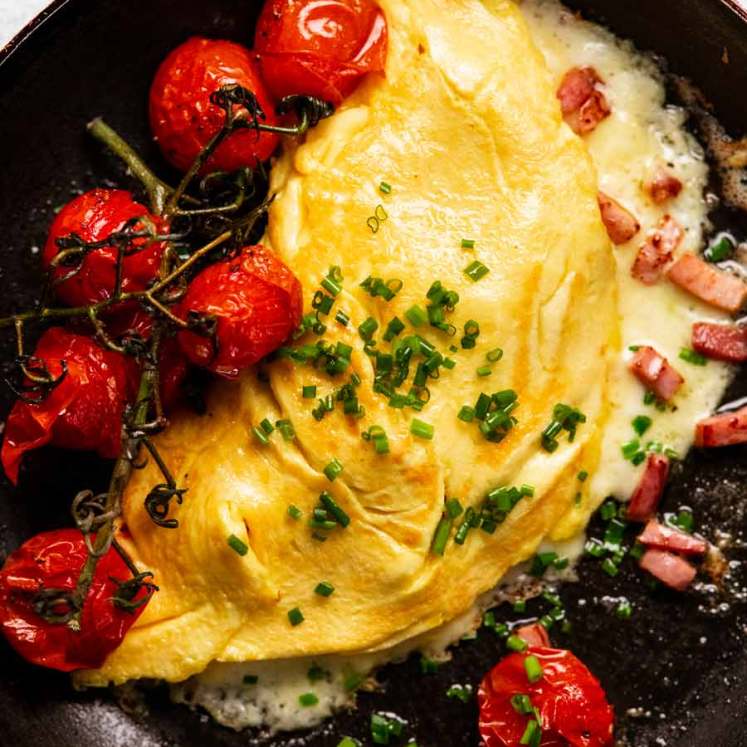
Breakfast – On the side of bacon & eggs, a ham & cheese omelette, fluffy egg white omelette or frittata.
Steak dinner! I see a scotch fillet/boneless rib eye with Café de Paris or Béarnaise Sauce with a side of Sautéed Green Beans with Garlic and Baby Potatoes with Butter & Herbs.
As a steak sauce – Make your favourite steak (this one of course 😂) then serve it with a pile of marinated mushrooms (sliced) on top. Spoon over the balsamic juices. Yum, yum, yum!
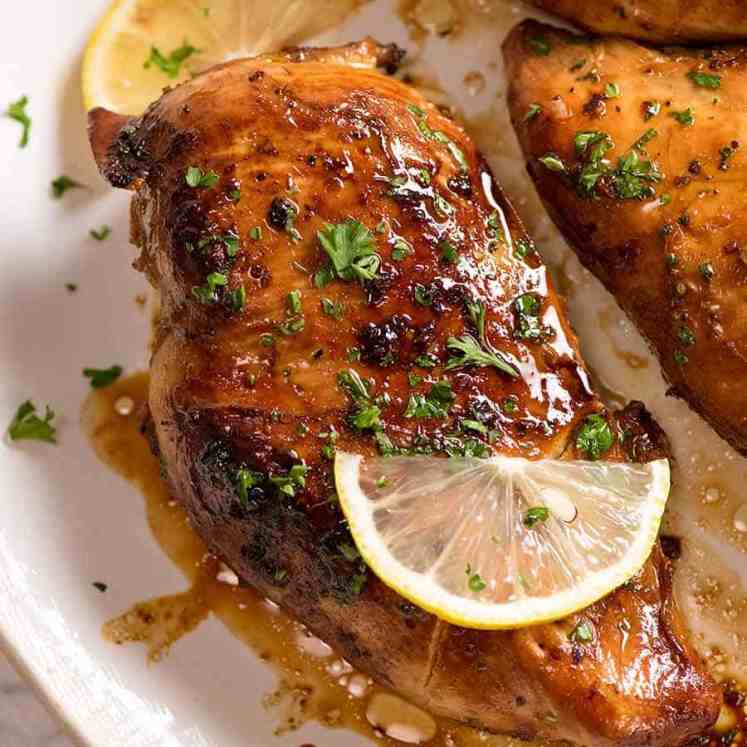
On a simple piece of chicken breast – Do the same with a simple piece of pan seared marinated chicken breast. Or pile a generous amount over poached chicken breast – you’ve used my foolproof guaranteed-juicy-every-time method, right??

Well that’s enough ideas from me! I want to know how you’d serve these mushrooms. Share your suggestions below! – Nagi x
Watch how to make it
Balsamic marinated mushrooms
Ingredients
Roasted mushrooms:
- 700g/ 1.4 lb small whole white mushrooms or halved larger ones (Note 1)
- 3 tbsp extra virgin olive oil
- 1 tsp cooking/kosher salt
- 1/2 tsp black pepper
- 5 sprigs fresh thyme (sub 1/2 tsp dried thyme)
- 2 garlic cloves , finely minced
- 2 garlic cloves (skin on fine), smashed (Note 2)
Balsamic marinade:
- 4 tbsp balsamic vinegar
- 3 tbsp extra virgin olive oil
Instructions
- Preheat oven to 200°C/375°F (180°C fan).
- Season – Put mushrooms into a roasting pan (not tray, easier to mix well in pan). They can be snug but should be in a single layer (mushrooms shrink ~25-30%). Toss with olive oil first. Then add salt, pepper, thyme and garlic (minced & whole), then toss again.
- Roast 35 minutes, tossing well at the 20 minute mark, or until the mushrooms are browned and soft.
- Marinade – While hot, transfer mushrooms into a bowl (including all the juices). Add balsamic and olive oil. Toss well.
- Marinate 2 to 24 hrs – Let the mushrooms cool and marinate for 2 hours (uncovered), tossing once or twice, or for even better flavour, marinate overnight (covered in fridge once cool).
- Serving – Always serve at room temperature or slightly warmed, for best flavour. And don't waste the juices – it's full of flavour!
- Serving options – As part of a grazing board, on polenta or mash as a meal, on toast slathered with goats cheese or cream cheese, on the side of fried eggs, on creamy risotto or risoni/orzo. See in post for a long list!
Notes
Nutrition
Life of Dozer
Nowhere to be seen while I was making the mushrooms. Then the cheese board appears and poof! There he is!

The post Balsamic marinated mushrooms appeared first on RecipeTin Eats.
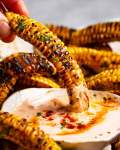
]]> Corn ribs are a top-notch eating experience!! Seasoned juicy corn kernels and garlic butter bursting in your mouth with every bite in a way you’ll never get with whole corn cobs. Epic app or side dish, ideal for the BBQ or make these in your oven! Corn ribs Named as such because of the rib-like... Get the Recipe
The post Corn Ribs – your new favourite way with corn appeared first on RecipeTin Eats.
]]>Corn ribs are a top-notch eating experience!! Seasoned juicy corn kernels and garlic butter bursting in your mouth with every bite in a way you’ll never get with whole corn cobs. Epic app or side dish, ideal for the BBQ or make these in your oven!
Corn ribs
Named as such because of the rib-like shape and the manner in which it is eaten (like ribs!), corn ribs are apparently a food trend that went nuts a couple of years ago. I’m so unfashionable when it comes to anything – food, fashion, or otherwise – I didn’t even realise this was a trend until I started writing this post today and did my usual obligatory Google research!
Also, truthfully, I find most food trends disappoint. This one, however, did not!
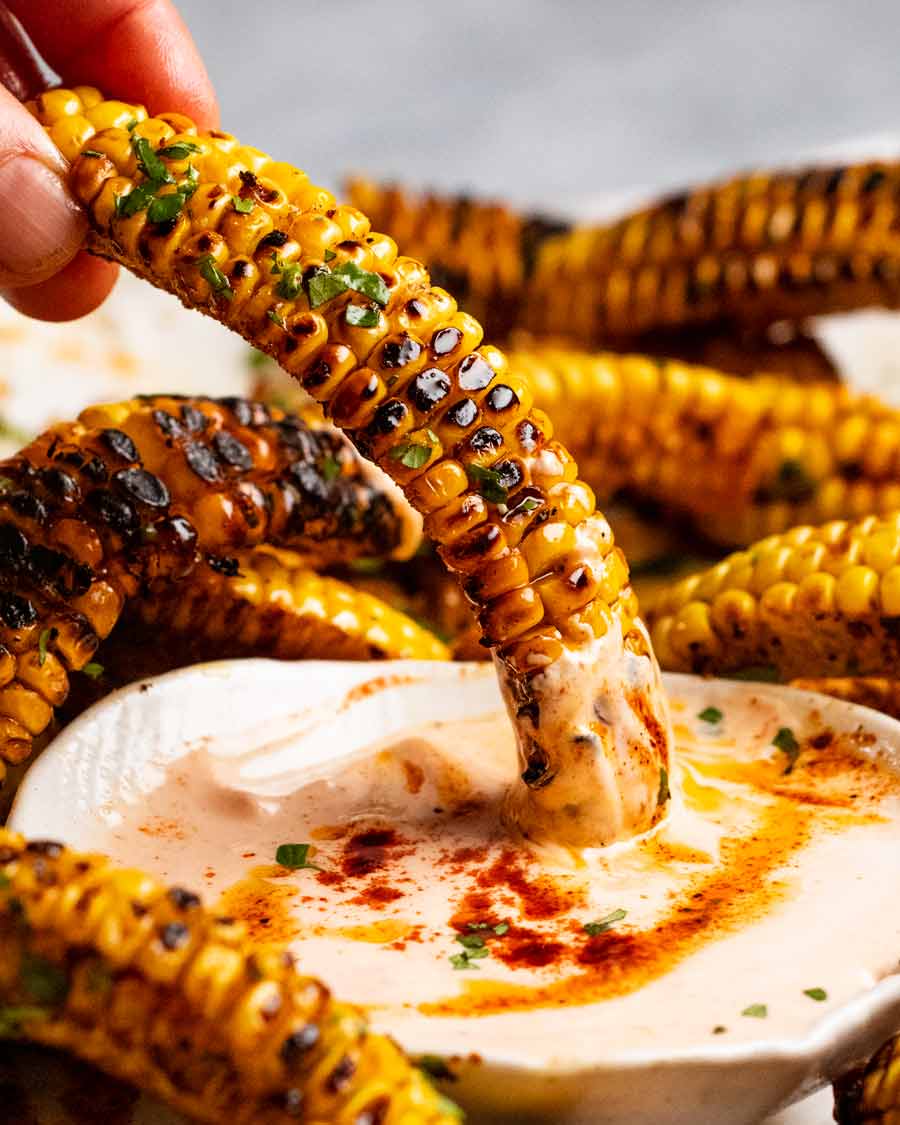
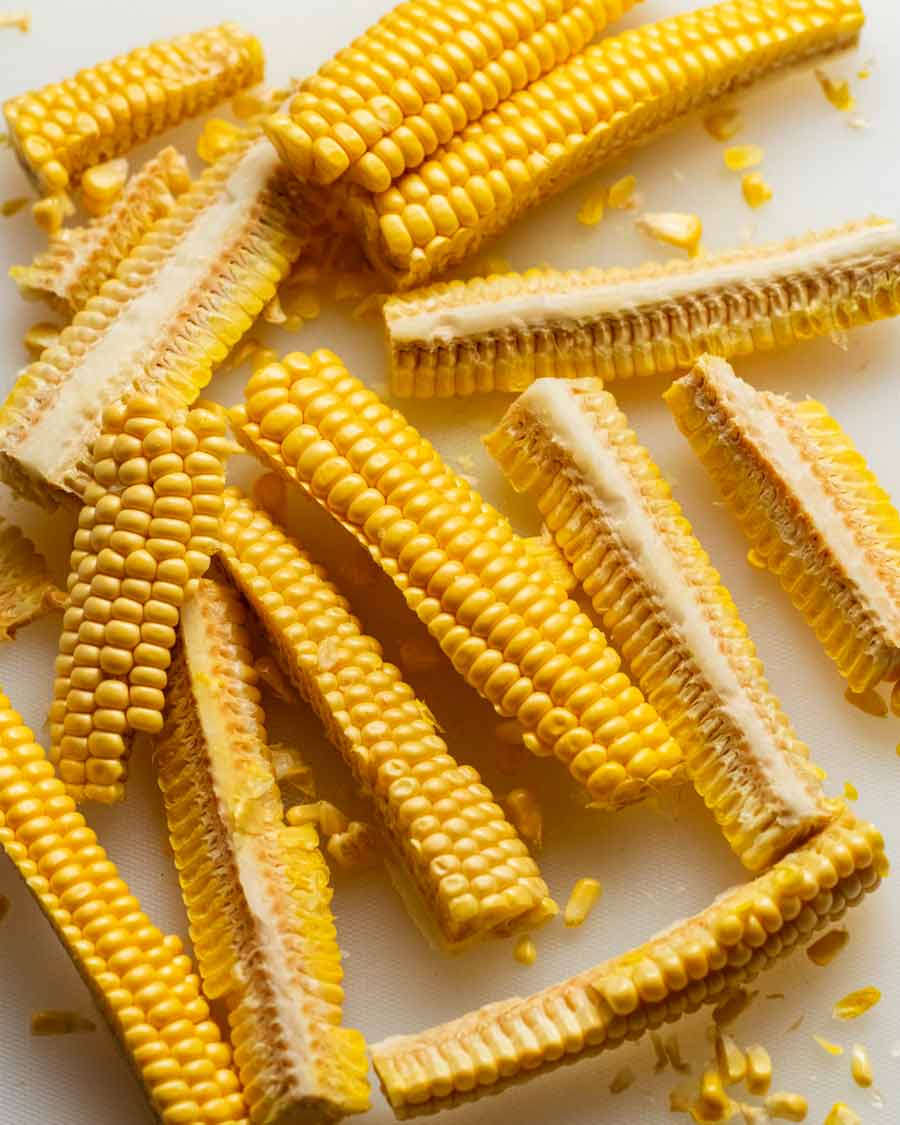
Why corn ribs are so good – It’s so much more than just the novelty factor of the curled corn. The beauty of cooking corn this way is that the kernels open up in a way they never do when you cook whole corn on the cob. So you can get your flavour of choice (seasoned garlic butter, in my case) to seep all the way into the cob. Which means every time you take a bite of corn kernels you get a squirt of the flavourful garlic butter in your mouth as well. It’s just insanely delicious!!
* Just to clarify, after a number of reader messages, you do NOT eat the cob! It gets soaked in the seasoned garlic butter and you sort of suck it out when you bite the kernels off the cob. It’s a delivery vehicle for flavour, not part of what you eat!

About these particular corn ribs
A lot of recipes seem to sparingly brush or sprinkle the corn ribs with oil and seasoning. I tried…but personally found it lacking and seemingly unworthy for a dish with such great eating potential.
Also, I’m not going to lie – cutting the corn takes more effort than slicing bread. (Read my steps, learn from my mistakes!). So if I’m cutting corn ribs, then the end result needs to be worth it!
So in the spirit of extra amazing-ness, these corn ribs are tossed in a generous amount of spicing (it will seem like too much – until the first bite), cooked (BBQ or oven) then doused in garlic butter which seeps into the kernels that open up like flowers as the corn ribs curl up.
Flavour before and after cooking makes it exponentially good. I promise you, this is worth making. I’m absolutely addicted!
What you need for corn ribs
Here’s what you need to make corn ribs. Firstly, corn. Yes, corn! 😂
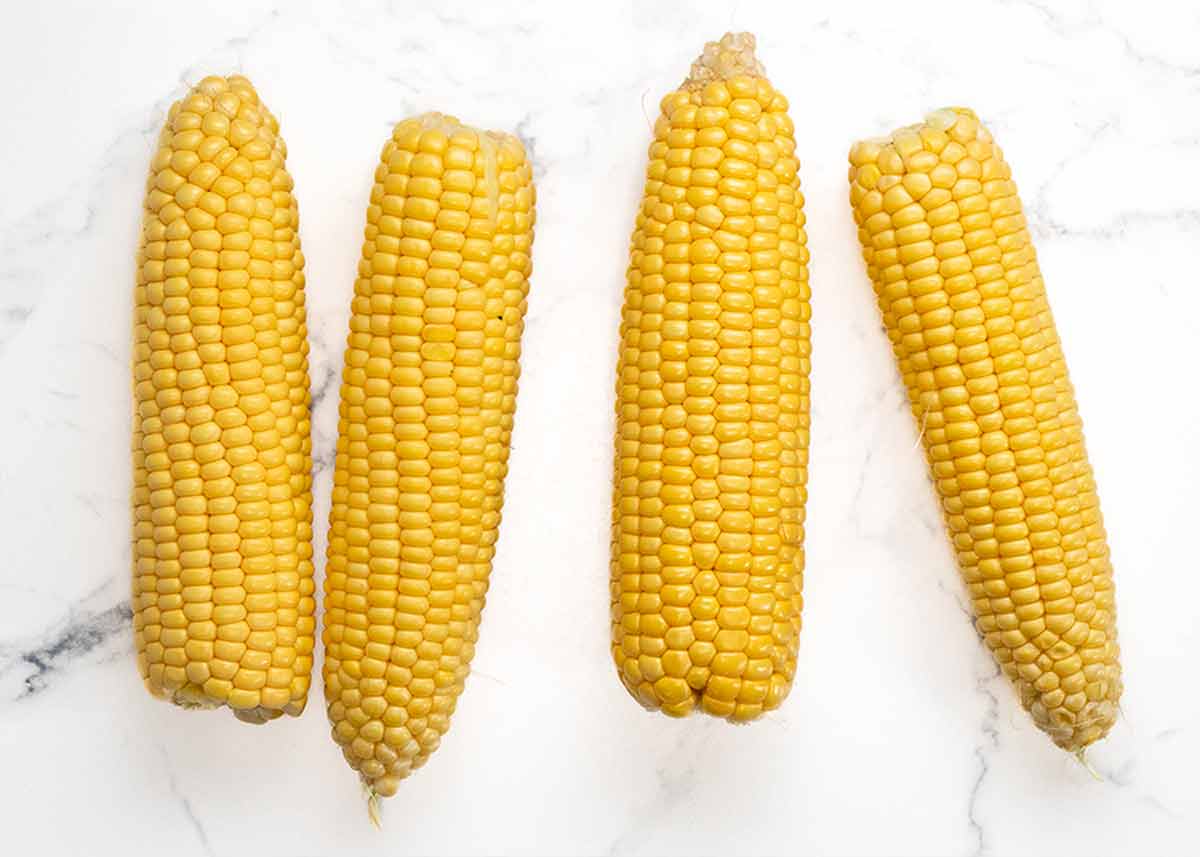
Whole corn on the cob. At its prime in summer, albeit the mild climate here in Australia means we get good corn year round, and generally for very good value too.
And for all the flavour…
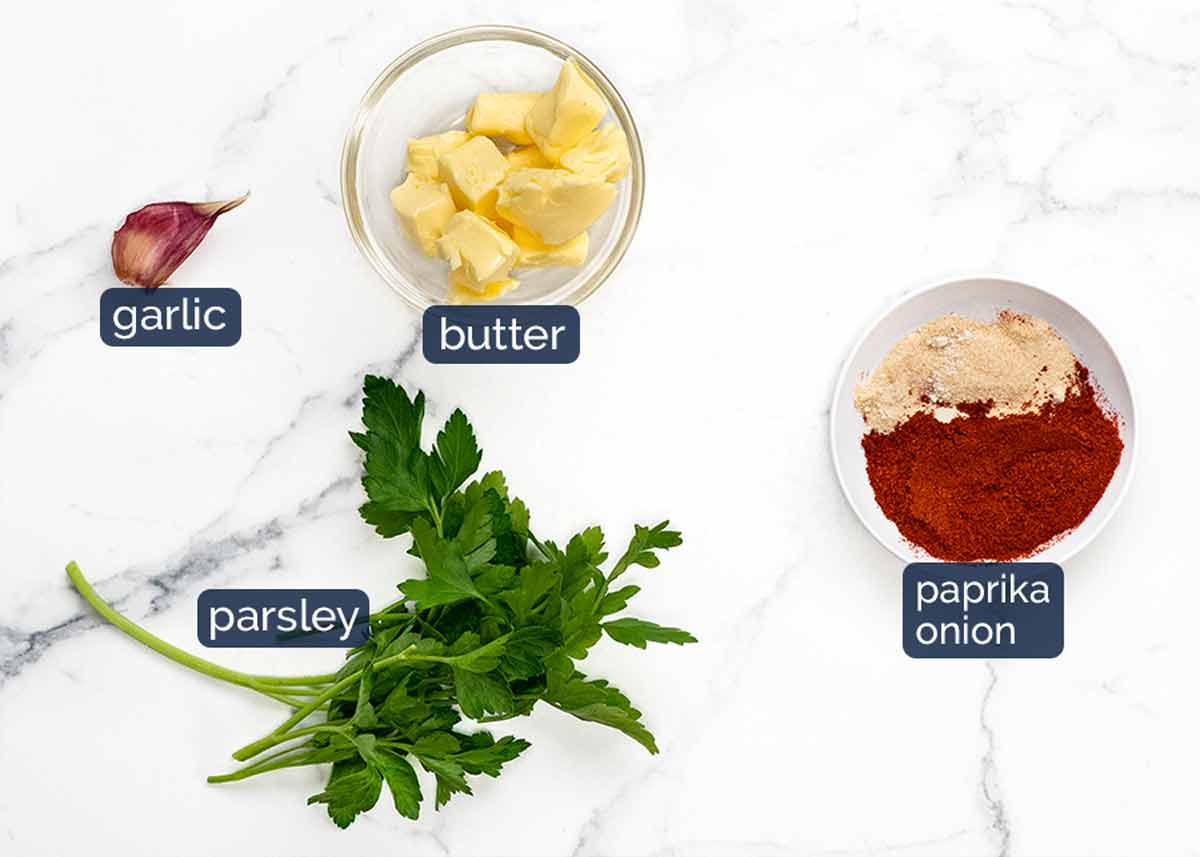
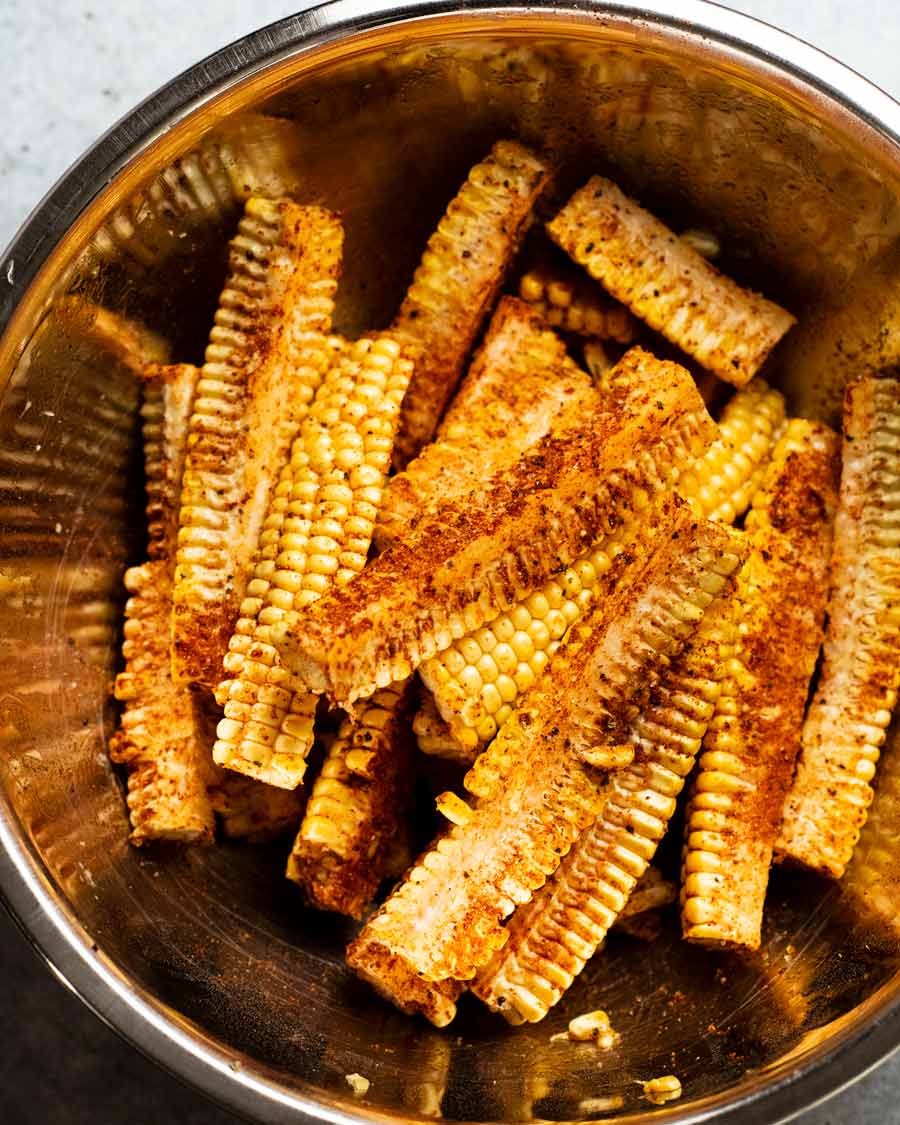
Seasoning – smoked paprika (or plain), garlic powder, salt and pepper. For tossing the corn. There’s a generous amount for the amount of corn because so much of it gets stuck on the cut side of the corn! Trust me on this. You want a LOT of seasoning!
Garlic and butter – for dousing at the end. Dream of all that butter seeping in between the kernels….
Parsley, coriander/cilantro, chives or something else green finely chopped, for optional garnish.
How to make corn ribs
After suffering through more corn rib cutting grievances than I care to confess (how did that tiny girl cut those corn ribs on TikTok??🤯), I think I’ve figured out the easiest and safest method that doesn’t call for brute strength.
(PS That tiny girl did not show cutting her own corn ribs on TikTok… #cynic!)
Cutting corn ribs
Heads up – If you’re a first timer, you’ll probably end up with some crooked and broken pieces. I’ve had considerable practice and I still end up with broken ribs every now and then. So what? Still delicious! 
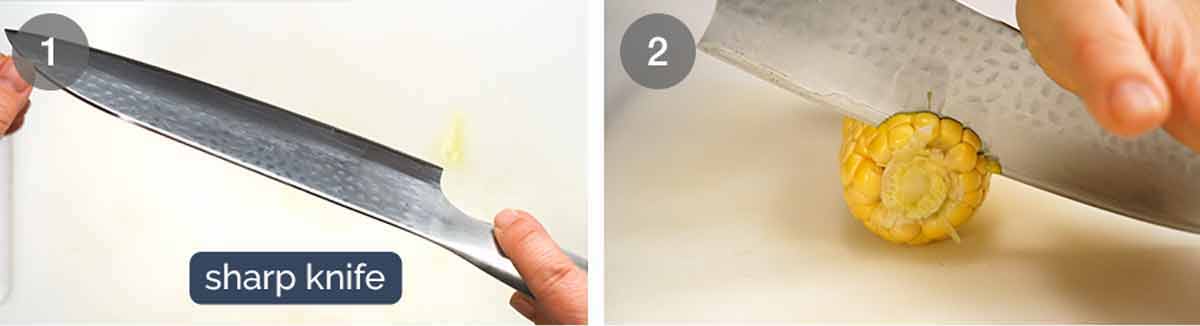
Knife – Use a large sharp knife. Don’t attempt this recipe if your knife is blunt! The risk of the knife slipping as you cut the corn is just too great. Not even corn ribs are worth losing a finger for!
Non-slip cutting board – Put a wet cloth or similar under your cutting board to ensure it does not move. I always have a wet chux under my cutting board before cutting anything. First thing I do when I walk into the kitchen!
Trim ends – Cut the base and end off the corn. This will create a stable flat base to stand the corn upright. And it’s easier to cut straight down if you create a flat top to start the knife on, rather than a pointy end. Trial and error discovery.
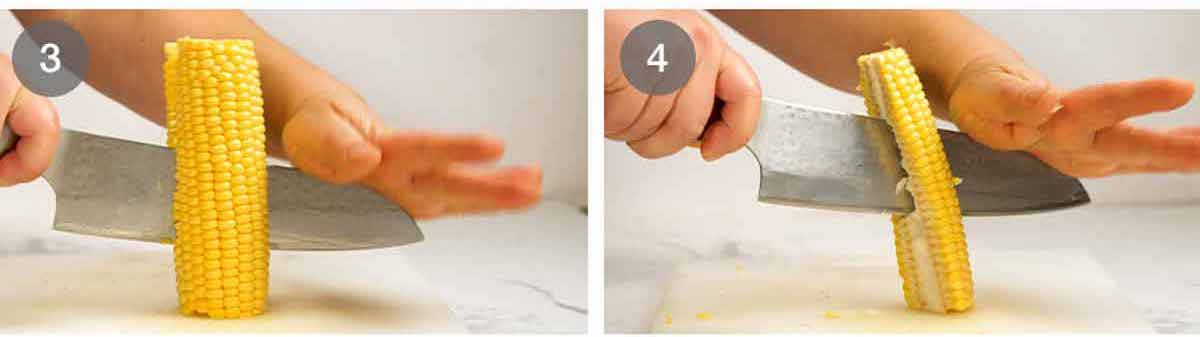
Bang knife to cut down – Stand the corn upright. ⚠️ DO NOT HOLD THE CORN with your hand under the knife. This is dangerous as the knife jerks down through the corn as it cuts down. Again – a corn rib is not worth your finger!!
Hold the knife with one hand then use your other hand to hit the knife so it catches on the top of the corn. Then keep banging the knife to make it move down the middle of the corn, guiding it and making little adjustments if needed to keep it on track to cut straight down the middle.
TIP: The sharper your knife and fresher the corn, the easier it is to cut straight and without the corn breaking.
Cut into quarters – Take one half of the corn. Stand it upright, then cut it in half.
PS I know you’re thinking “gee, surely it’s easier if you lie the corn cut face down then cut in half!”. It’s not. Go ahead and give it a try. I certainly did!
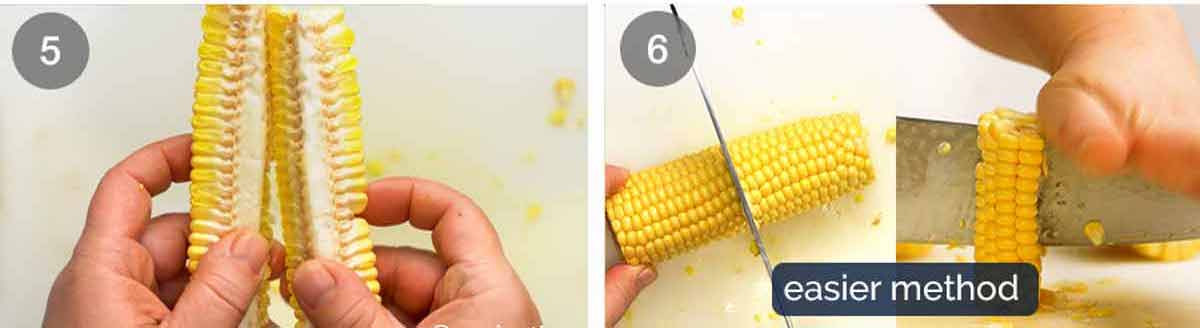
Congratulations! You’ve just cut your first corn rib! 🎉
Too hard? Broken / wonky corn? So what?
It’s still going to be delicious! But if it’s proving too hard for you, try the easier method in step 6 below.Easier method – It’s easier to cut corn into ribs if they are shorter. So cut the corn in half, stand it upright, then cut into quarters using the method above.
Seasoning & cooking corn ribs
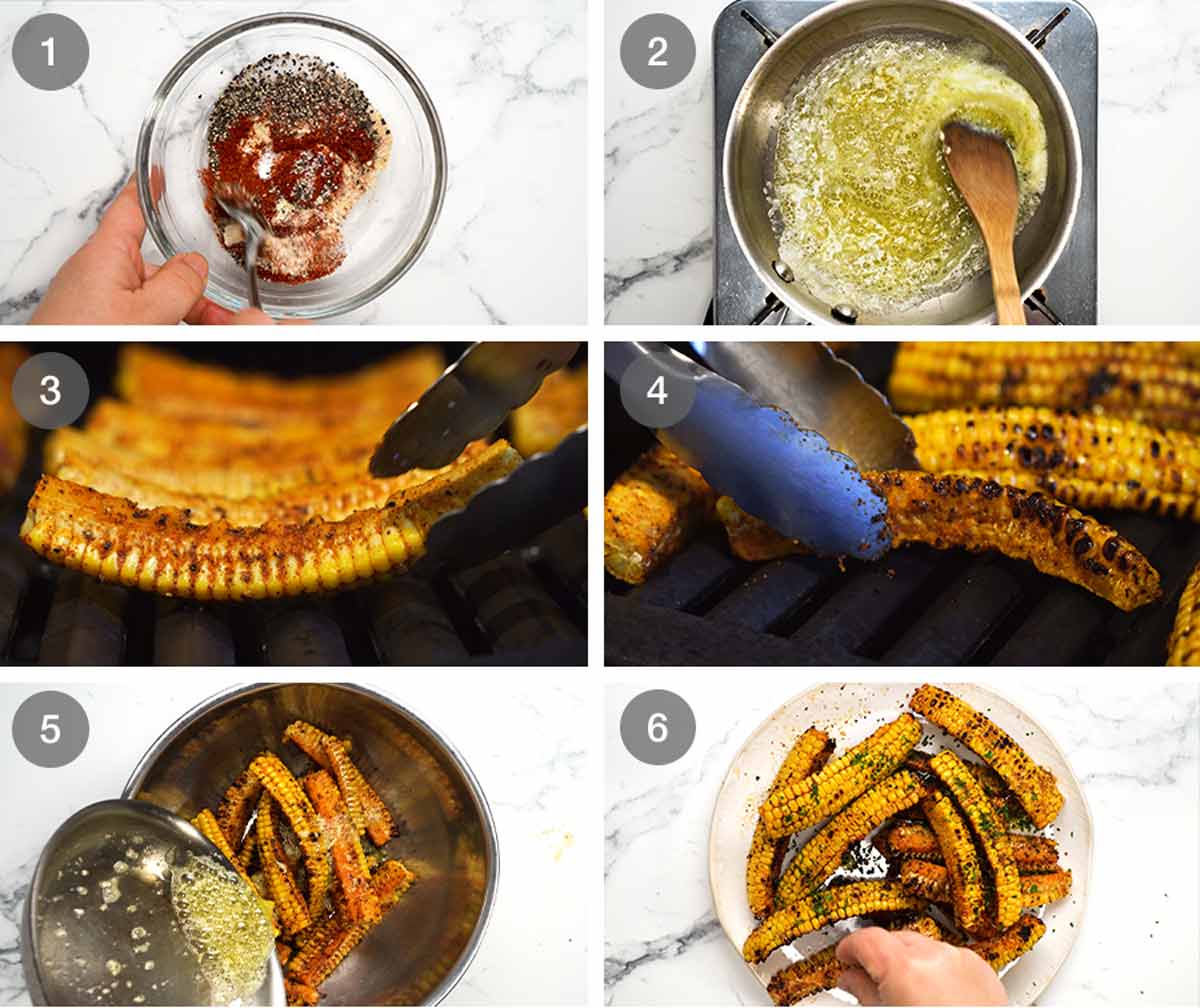
Season corn – Using a large bowl, toss the corn ribs with oil first. Then sprinkle over the seasoning progressively as you toss. This helps coat the corn more evenly.
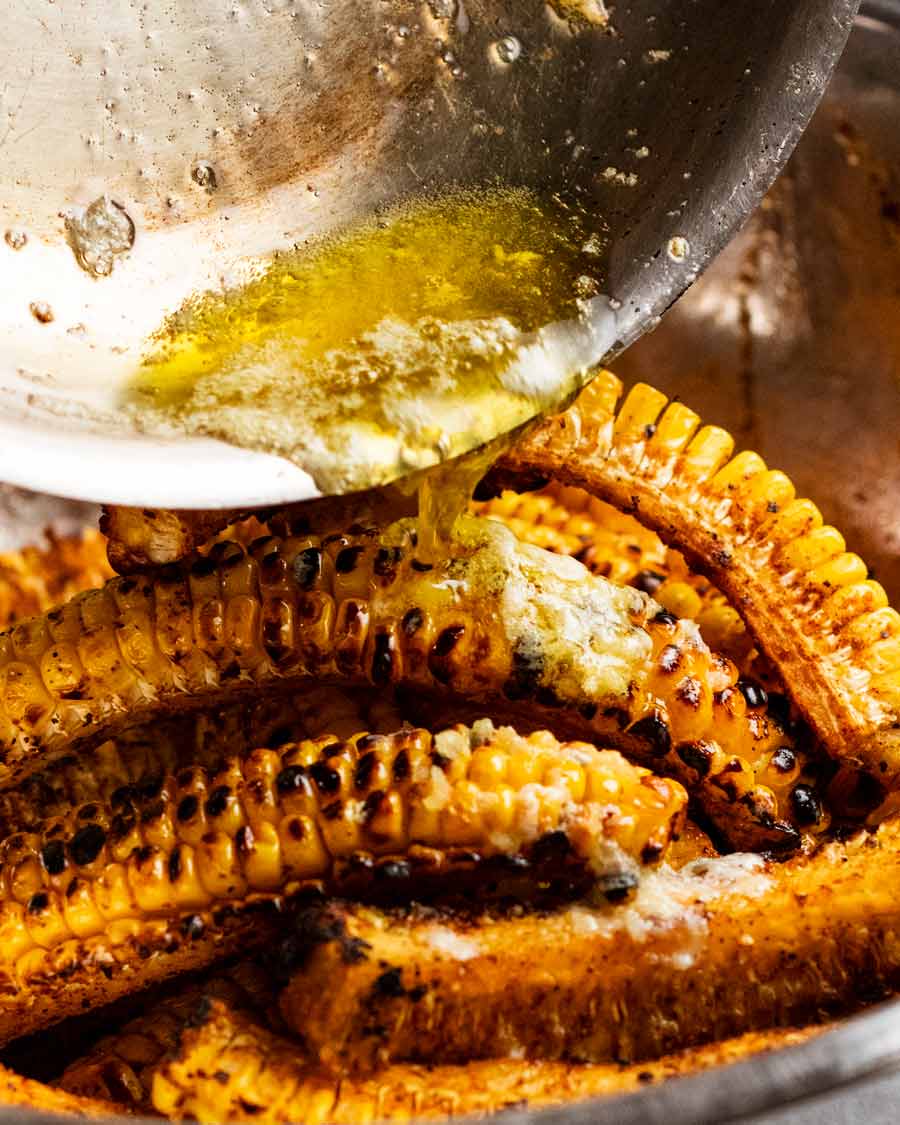
Garlic butter – Melt the butter in a small skillet or saucepan then add the garlic and stir for just 20 seconds. Keep the butter warm/pourable while you cook the corn – usually I just pop it on the side of the BBQ.
Cook corn – Preheat the BBQ on high. Then cook the corn kernels side down for 6 to 8 minutes or until it has black spots. Watch the corn curl into “ribs”!
Turn and cook each cut side for just 1 minute. There’s loads of flavour on the cut face so don’t skip cooking it because everyone is going to be sucking out the buttery goodness from the cobs!
Butter it! Place the cooked corn back in the bowl, pour over the garlic butter and toss using a rubber spatula.
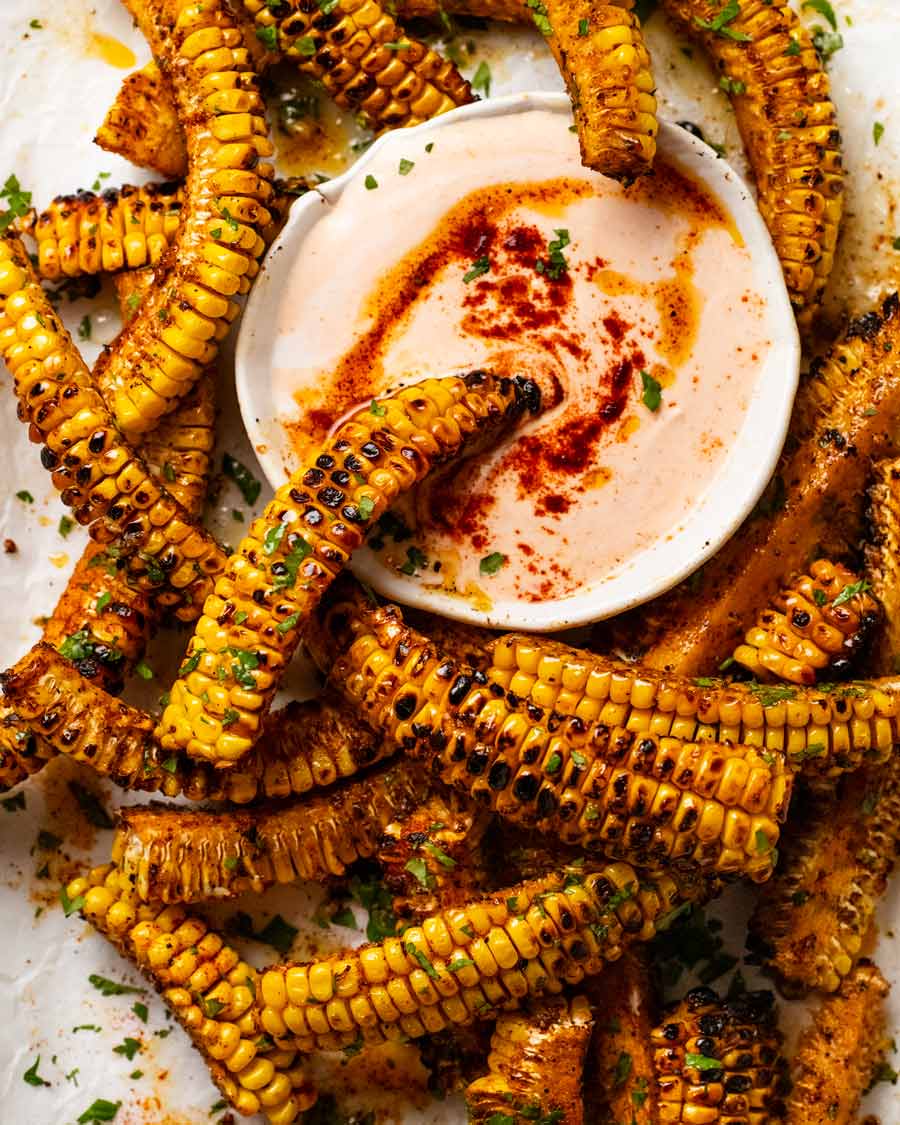
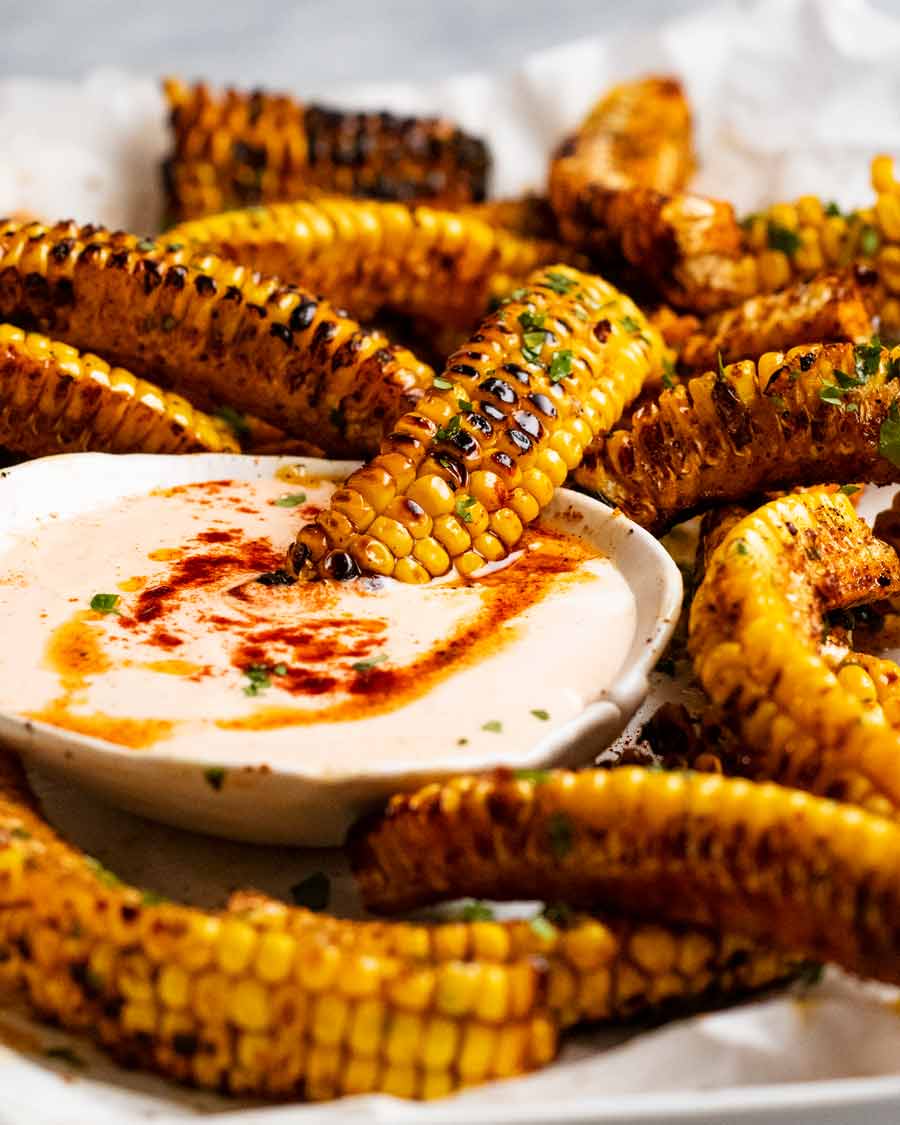
Serving – Pile the corn onto a platter, sprinkle with parsley or coriander/cilantro and extra paprika if desired. Then serve!
Sauce for corn ribs
As I ranted on at the start, this method of cooking corn means the cobs soak up all the seasoned garlic butter, so there’s stacks of juicy flavour in every bite. So if you’re serving these hot and fresh, there is absolutely no need for sauce.
However! If you are a sauce person (I get it), or if you are making a huge pile of these ahead to serve as apps and want to pep them up a bit by providing a sauce, here are some sauce options:
Creamy Sriracha Dipping sauce – (mayo + yogurt + sriracha or ketchup). The freshness of the yogurt pairs well with the buttery goodness and sweetness of the corn. Recipe is in the notes of the recipe card.
Avocado Sauce – dead set perfect match with the seasoning on this corn! Also, corn plus avocado = 💯
Plain ketchup or Aussie tomato sauce.
Chipotle mayo – Blitz chipotle in adobo with sour cream + mayo. Add lime and salt to taste.
Thousand Island / Marie Rose – recipes here.
If you’re a corn rib first timer and you make this, you must tell me what you think!! I need to know it’s not just me who lost her mind over corn ribs!! – Nagi x
Watch how to make it
Corn ribs
Ingredients
- 4 whole corn cobs
- 3 tbsp extra virgin olive oil
- 2 tbsp parsley or coriander/cilantro , roughly chopped (optional garnish)
Seasoning:
- 1 1/2 tsp garlic powder
- 2 1/2 tsp smoked paprika (or ordinary), plus more for garnish if desired
- 2 tsp cooking/kosher salt
- 2 tsp black pepper
Garlic butter:
- 50g/ 3 tbsp unsalted butter
- 1 garlic clove , finely minced
Instructions
Corn cutting (Note 1 tips!):
- Cut corn – Using a sharp knife and a non-slip cutting board, cut off the base and the pointy end of the corn. Stand the corn upright then cut the corn into half then half again to make quarters. My way: Bang the knife with your hand to lock it into the top of the corn, then keep hitting the knife to move it down the corn. Halfway, you might be able to stop banging and just rock the knife down.
- Easiest method – Cut half length ribs. Shorter ribs = easier to cut. See note 2.
Cooking:
- BBQ (best!) or oven – Heat BBQ on high or oven 200°C/375°F (180°C fan).
- Garlic butter – Melt the butter in a small saucepan over medium heat. Then add the garlic and cook for 20 seconds until it smells amazing! Remove from the stove and keep warm/liquid (I usually put it on the side of the BBQ).
- Seasoning – mix in a small bowl.
- Season corn – Place corn in a large bowl. Toss with olive oil. Then sprinkle the seasoning over gradually, tossing in between, to coat as evenly as possible. Most will get stuck in the cob – tasty "bone" sucking!
- BBQ – Place corn on the BBQ kernel side down. Cook for 8 minutes or until you get charred spots – watch it curl into "ribs"! Then cook each cut side for 1 minute.
- Oven – Bake for 25 to 30 minutes, kernel side up. (Note: the corn doesn't curl as much, also, no charred spots).
- Butter it – Transfer corn back into the bowl. Pour over garlic butter and toss.
- Serve – Pile onto plate, sprinkle with parsley then grab and eat like ribs! Optional pink sauce pictured in notes. Don't forget to suck all the seasoned garlic butter from the cob "bone" – it might be the best part.
Notes
2. Easier method – Cut shorter ribs. Lie the corn on its side and cut it in half to create 2 shorter pieces. Then stand upright and cut into quarters. Much easier than cutting full length corns!
3. Pictured creamy Sriracha Sauce – 2 tsp sriracha + 1/4 cup each mayo + yogurt (or just yogurt) + pinch of salt.
4. Leftovers will keep for 3 to 4 days in the fridge. Don’t think freezing is ideal, feel like there will be too much loss of quality.
Nutrition per rib (recipe makes 16 ribs).Life of Dozer
Seriously wondering if he’s surrounded by food.
(Autumn leaves is a new thing to him – we didn’t really have deciduous trees in the Northern Beaches. But they’re abundant in the new area we call home!)

The post Corn Ribs – your new favourite way with corn appeared first on RecipeTin Eats.
]]> Purple rice is a garlicky, butter rice side that owes its vibrant colour to red cabbage! Love this 2-in-1 that combines starch plus plenty of vegetables in one dish, rather than making a salad plus a starch separately. Goes with everything – Western, Asian, Mediterranean, Indian, Mexican! Purple rice You know those nights when you... Get the Recipe
The post Purple rice (red cabbage rice) appeared first on RecipeTin Eats.
]]>Purple rice is a garlicky, butter rice side that owes its vibrant colour to red cabbage! Love this 2-in-1 that combines starch plus plenty of vegetables in one dish, rather than making a salad plus a starch separately. Goes with everything – Western, Asian, Mediterranean, Indian, Mexican!
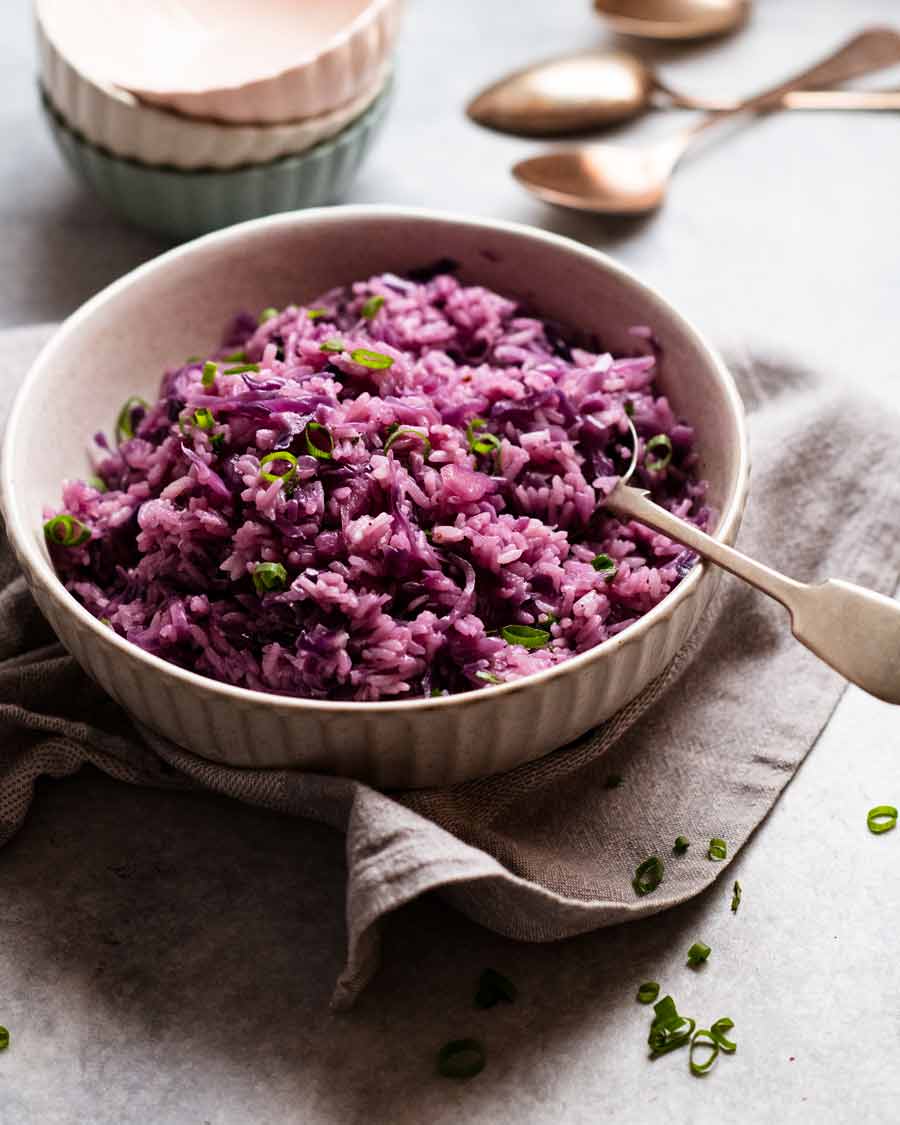
Purple rice
You know those nights when you feel all smug because you got ahead on the weekend and marinated some chicken so you could whip up a “quick dinner” during the week, only to realise you didn’t plan for sides to fill out the meal?
Well, today’s recipe is just the sort of thing that will save you. It’s one of those side dishes I call a two-in-one because it includes plenty of vegetables as well as a starch to fill out the meal. As opposed to making two sides, like mashed potato plus a garden salad.
What it tastes like: Buttery and garlicky, and very mild cabbage flavour actually which will appeal to people who don’t jump up and down at the mention of cabbage for dinner. Bonus: it’s such a fun colour!!!

Ingredients in purple rice
Here’s what you need to make this colourful, veg loaded rice!
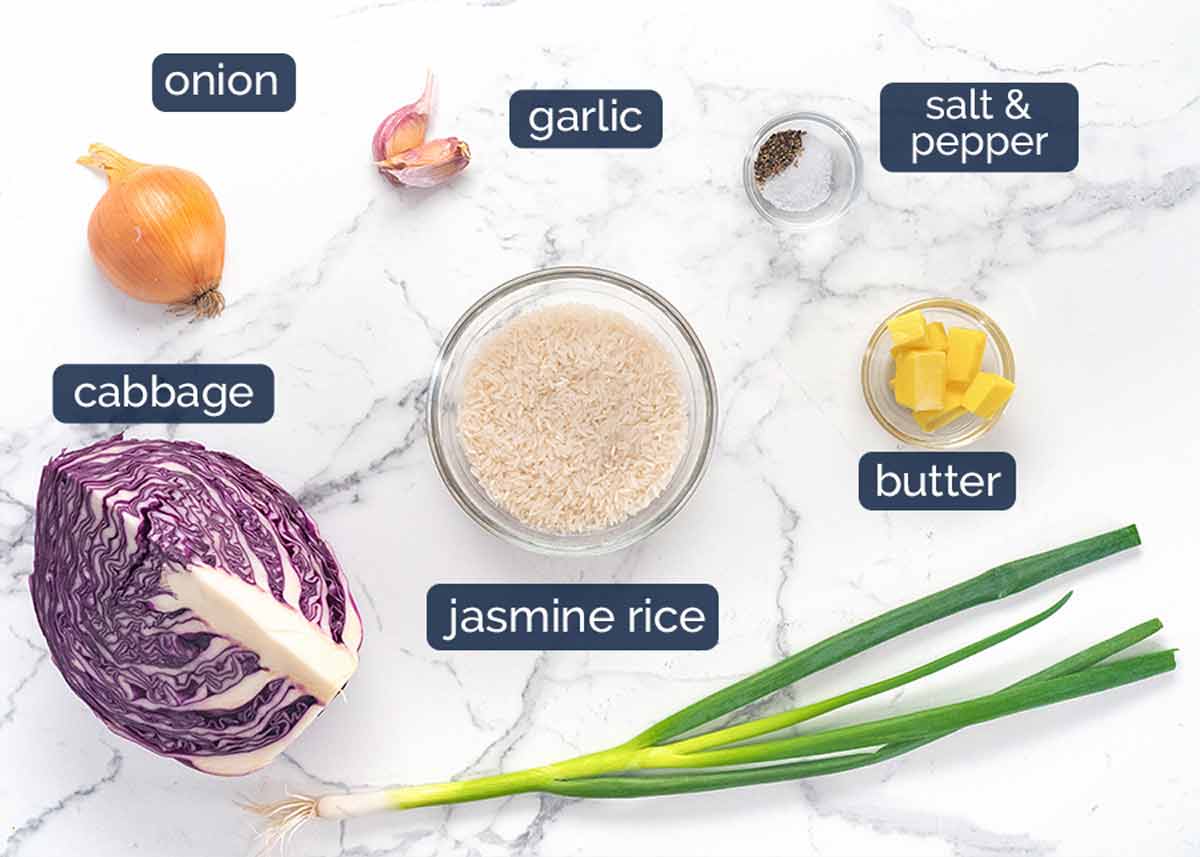
Jasmine rice – I like using jasmine rice in this dish because you get that lovely subtle fragrance.
Other rice – the recipe will work with long grain rice, medium grain rice and basmati rice, though you will need an extra 1/4 cup of water or vegetable stock/broth. This is because jasmine rice requires less liquid to cook than other varieties of rice (more on this in my plain jasmine rice recipe!).
The recipe is not suited to brown rice, arborio/risotto rice, paella rice, wild rice or faux rice (cauliflower rice, quinoa etc) as the cook times and methods differ so I’d need to alter the recipe.
Red cabbage – Also called purple cabbage, this is what gives the rice the vibrant purple hue! You can use plain ole’ green cabbage if you want, but where’s the fun in that?? 😎
Garlic and onion – Flavour base aromatics. You will adore the butter garlic flavour in this rice!
Butter – As above, for promised buttery flavour! You’ll be surprised how buttery it tastes even though we’re only using 30 grams / 2 tablespoons of butter.
Vegetable stock – The rice cooking liquid, tastier than water! Use low sodium stock. If yours is full salt, skip the salt in the recipe.
Salt and pepper – Seasoning for the rice.
Green onion – For fresh garnish at the end, though I wouldn’t say it’s critical.
No need to rinse your rice!
There is no need to rinse the jasmine rice to wash off excess starch to make the rice fluffy. This is a myth. You just need the correct liquid-to-rice-ratio which is 1.25 : 1 (1.25 cups of water/stock to 1 cup of rice) and the rice will be fluffy even without washing it. Most recipes get it wrong, using way too much water.
The only reason to wash jasmine rice is if you’re worried about the rice being dirty. If you bought yours at the supermarket, you shouldn’t need to clean it. If you clean your rice, reduce the stock by 2 tablespoons to account for the waterlogged rice.
How to make purple rice
One big, fat rice-making rule that applies to ANY rice you cook: DO NOT STIR, DO NOT PEEK once your put the lid on the pot! Unless, of course, you like your rice unevenly cooked, gluey and mushy. 🤷🏻♀️
Use a large saucepan or small pot, around the size of mine which is 28cm/11″. If you use a saucepan that is too small (~20cm/8″) then the rice-cabbage mixture will be too deep which will cause the rice to cook unevenly.
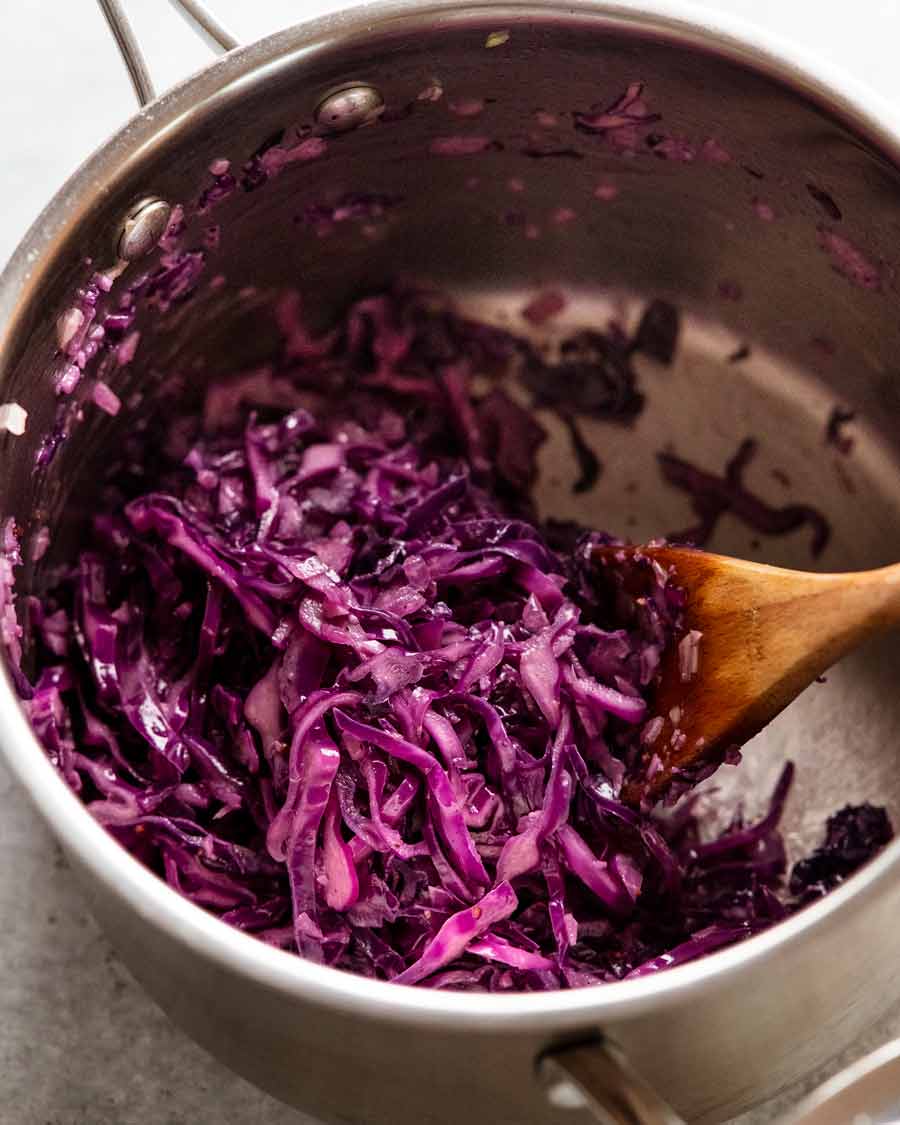
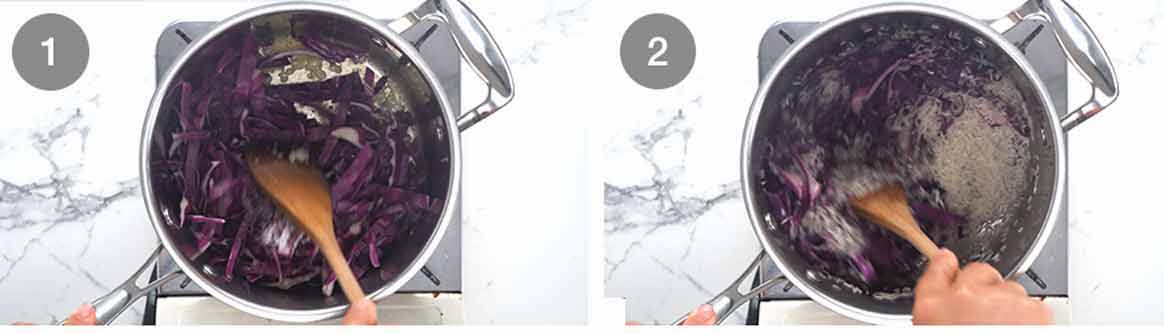
Sauté the garlic and onion in the butter until it smells amazing / onion is translucent. Then cook the cabbage for a few minutes until it starts to soften (rather than being stiff and pokey). Don’t let it get completely wilted and soft because it will cook more with the rice.
Add rice and stir to coat in the garlic butter.

Add stock then scrape down the sides and push the cabbage-rice under the surface of the liquid, as best you can. The main thing is that you want all the rice under the liquid. A few grains poking above the surface will be fine, they will steam-cook.
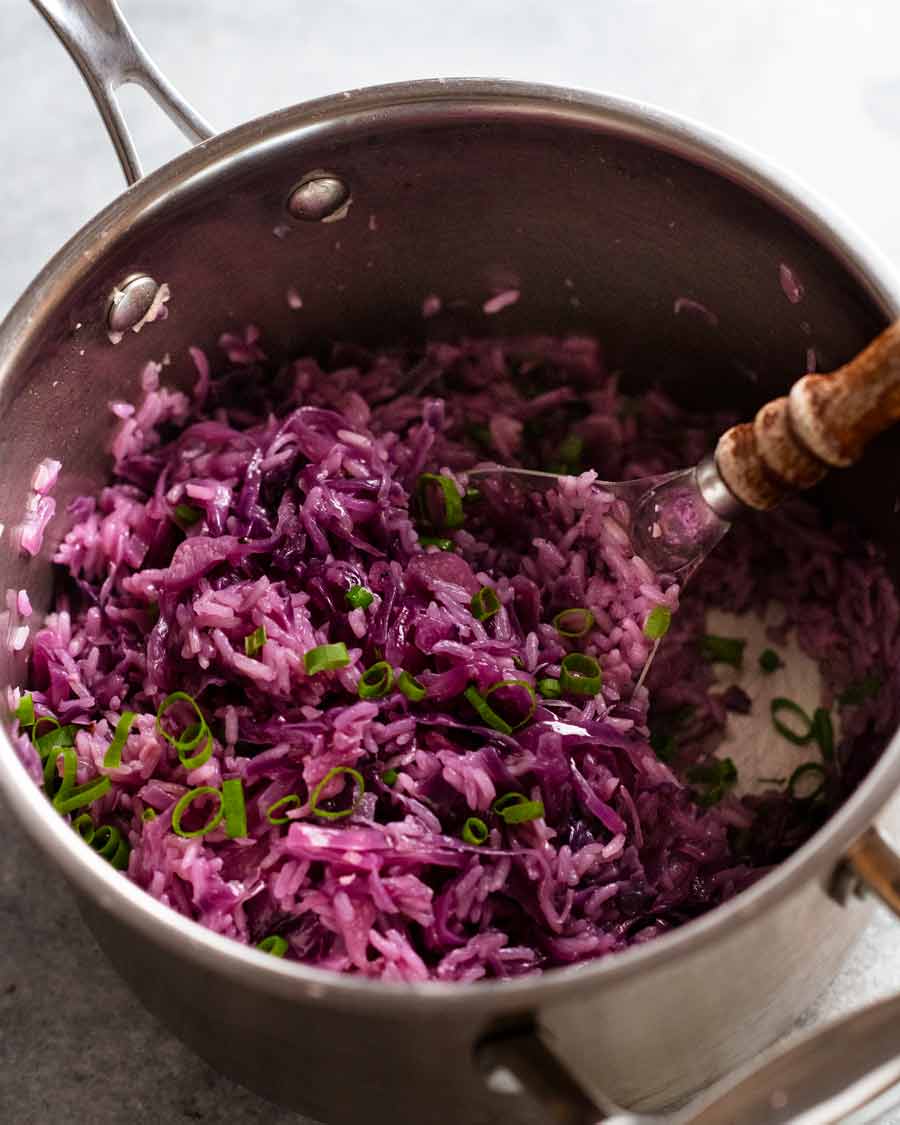
Cook 12 minutes – Bring the liquid to a simmer, then put the lid on and lower the heat to medium low, or low if your burner is very strong. Leave to cook undisturbed for 12 minutes. Do not lift the lid to peek and most definitely do not stir! That will disrupt the rice cooking and you’ll end up with unevenly cooked rice that’s mushy and gluey.
Check – At the 12 minute mark, working quickly, remove the lid and tilt the saucepan to ensure all the liquid has been absorbed. If it has not, leave it on the stove for another minute or two.
Rest 10 minutes – Remove the saucepan from the stove with the lid still on and rest for 10 minutes. Never skip the rice resting step! The rice will finish cooking and the liquid on the surface of each rice grain gets absorbed = fluffy rice.
Fluff then serve, garnished with a sprinkle of green onion!
What to serve with purple rice
This cabbage rice is fairly neutral flavoured, with a lovely buttery, garlic flavour. Which means it will go with pretty much any dish, and any cuisine, both Western and Asian.
While the possibilities are endless, here’s a starting point for you – some quick mains that I’d serve alongside purple rice:
And of course, it goes without saying that your purple rice will taste even better if you serenade it with Prince’s Purple Rain while it’s steaming on the stove. 🎶 Go on, do it. You know I did!! – Nagi x
Watch how to make it

Purple rice
Ingredients
- 30g / 2 tbsp unsalted butter
- 2 garlic cloves , finely minced
- 1/2 onion , finely diced
- 3 cups finely shredded red cabbage (tightly packed)
- 1/2 tsp cooking salt (kosher salt)
- 1/4 tsp black pepper
- 1 cup jasmin rice , no need to rinse or soak (Note 1 for other rice)
- 1 1/4 cup vegetable stock , low sodium (or chicken stock or water + 1 stock cube- Note 2)
Garnish, optional:
- 1/4 cup green onion , finely chopped
Instructions
- Melt butter in a large saucepan or small pot over medium heat. (Note 3)
- Sauté veg – Cook onion and garlic for 1 minute until soft. Add cabbage, salt, and pepper. Cook for 2 to 3 minutes, stirring from time to time, until the cabbage starts to soften but not completely floppy (as it will cook more with the rice).
- Coat rice – Add rice and stir well to coat in the flavour.
- Add the vegetable stock. Scrape down the sides and press the cabbage-rice mixture down so all the rice is submerged.
- Cook 12 minutes – Bring to a simmer, then cover with a lid, turn the stove down to medium low (or low on a stronger burner) and cook for 12 minutes. Do not peek or stir!
- Rest 10 minutes – Turn off the heat, remove the saucepan from the stove and let to rest for another 10 minutes (with the lid on).
- Fluff & serve – Use a rubber spatula or rice paddle to fluff the rice then tumble into a serving dish. Sprinkle with green onion and serve!
Notes
Nutrition
Life of Dozer
What do you think – will he spit it out?? 😂
The post Purple rice (red cabbage rice) appeared first on RecipeTin Eats.
]]> Mashed Potato Casserole is an outrageously delicious yet highly practical way to make mashed potato ahead of time! A layer of cheese and bacon prevents the mash from drying out as it reheats in the oven, while transforming this humble side into something extra-devilish and decadent. Oh the power of cheese (plus bacon)! Make it... Get the Recipe
The post Make-ahead Mashed Potato Casserole appeared first on RecipeTin Eats.
]]>Mashed Potato Casserole is an outrageously delicious yet highly practical way to make mashed potato ahead of time! A layer of cheese and bacon prevents the mash from drying out as it reheats in the oven, while transforming this humble side into something extra-devilish and decadent. Oh the power of cheese (plus bacon)!
Make it fresh, or assemble ahead and reheat when required. Serve in place of plain ole’ mash.
Make-ahead mashed potato
With the holidays fast approaching, I thought it would be timely to share my favourite way to make mashed potato ahead of time.
The thing with make-ahead mash is that you cannot simply reheat it in the microwave or oven. You might think a splash of milk and good stir is all it takes to restore it. But I can tell you that’s the path to a mouthful of gluey horridness.
While there are nifty ways to reheat cold mashed potato successfully*, a big dish of creamy Mashed Potato Casserole takes the prize for the most foolproof-yet-show-stopping way I know! It also wins the prize for the lowest effort on the day-of because you literally just pop the pre-assembled dish into the oven. It’s a win-win, 10/10 – nothing could be more fitting for your holiday feast menu!!
* How I reheat plain mashed potato: Cold mash in hot cream (recipe here, but note it’s more work on the day) or in heavy duty piping bags submerged in boiling water, a trick caterers use (see my demo here on Instagram).
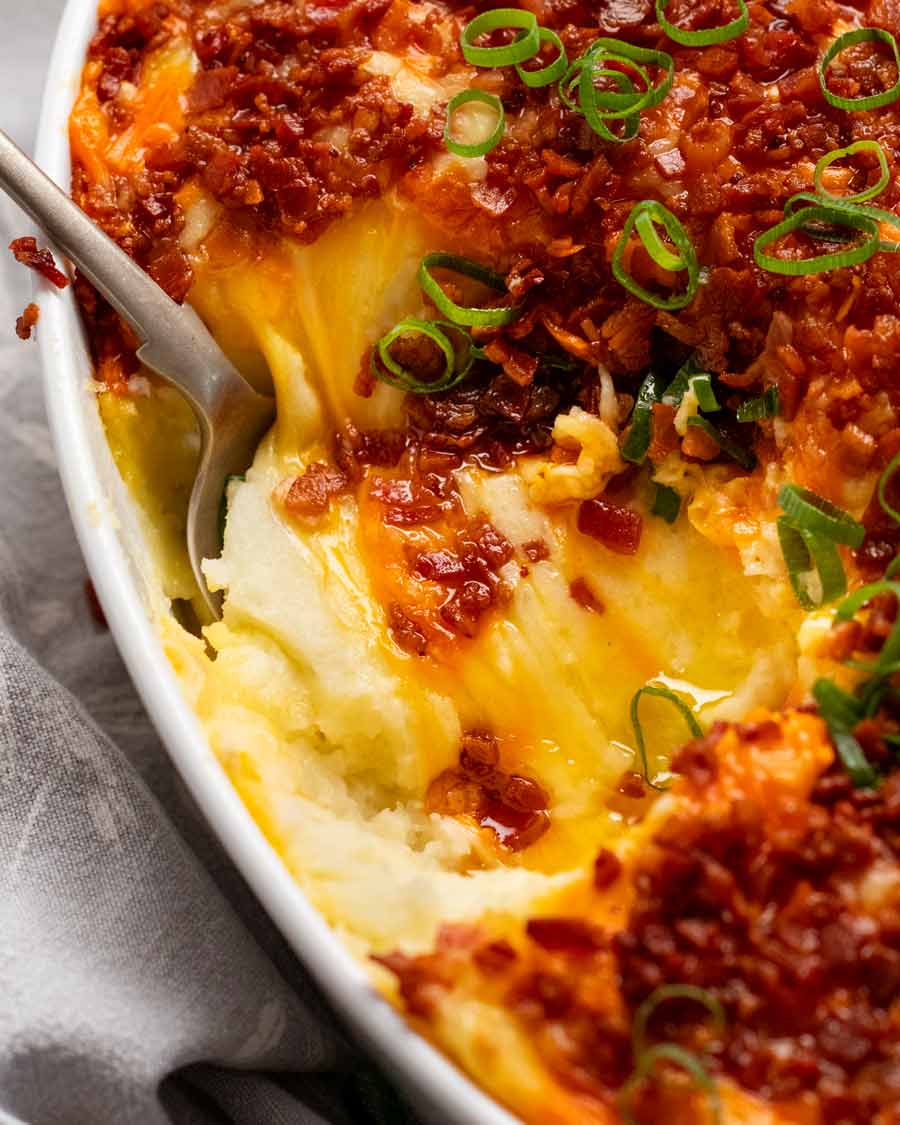
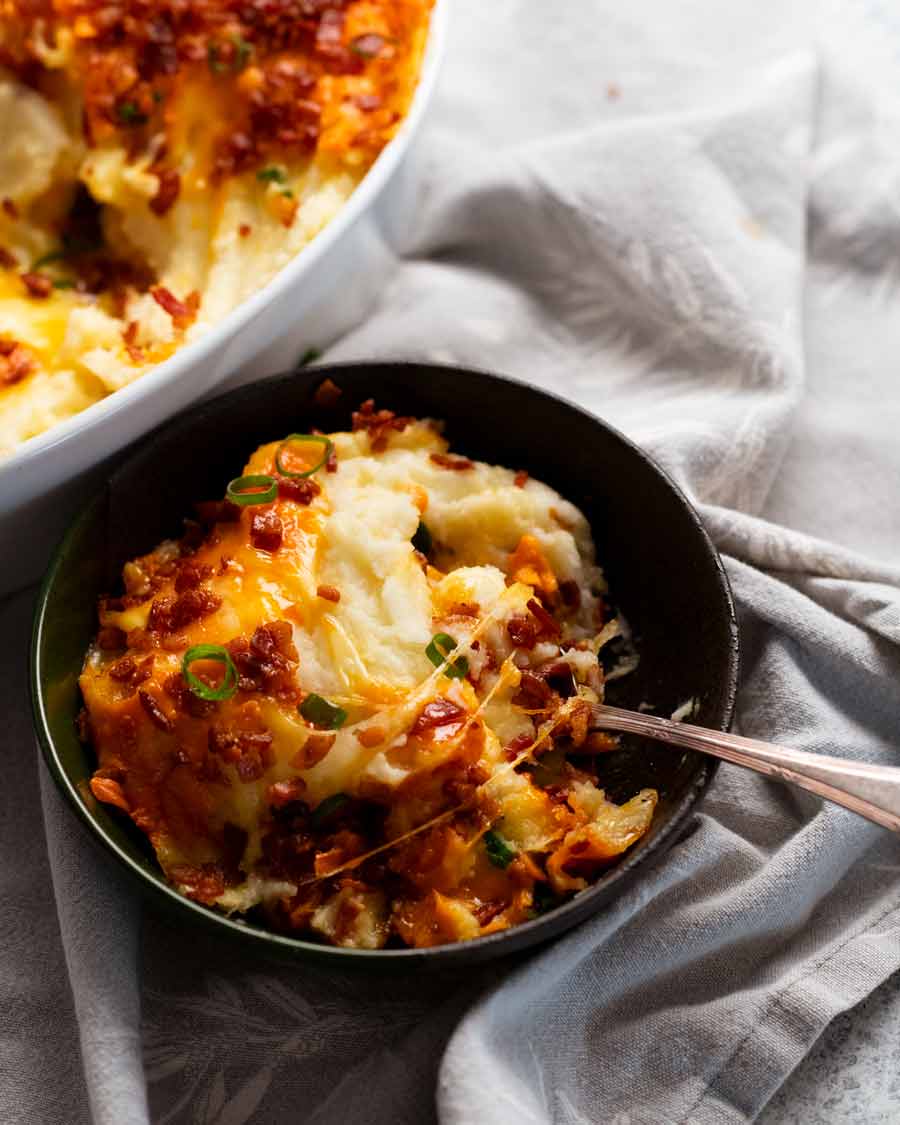
Is there such a thing as too much bacon??
Confession: I think I was a little heavy-handed with the bacon in the photos while being a tad short on the stuff for the recipe video!! So the recipe card as written is a happy medium. 😊
But actually, looking at the photo below, it does look pretty enticing with almost full bacon coverage on the surface. And … is there even such a thing as too much bacon?? (Yeah nah)

What you need for Mashed Potato Casserole
Here’s what you need to make Mashed Potato Casserole:
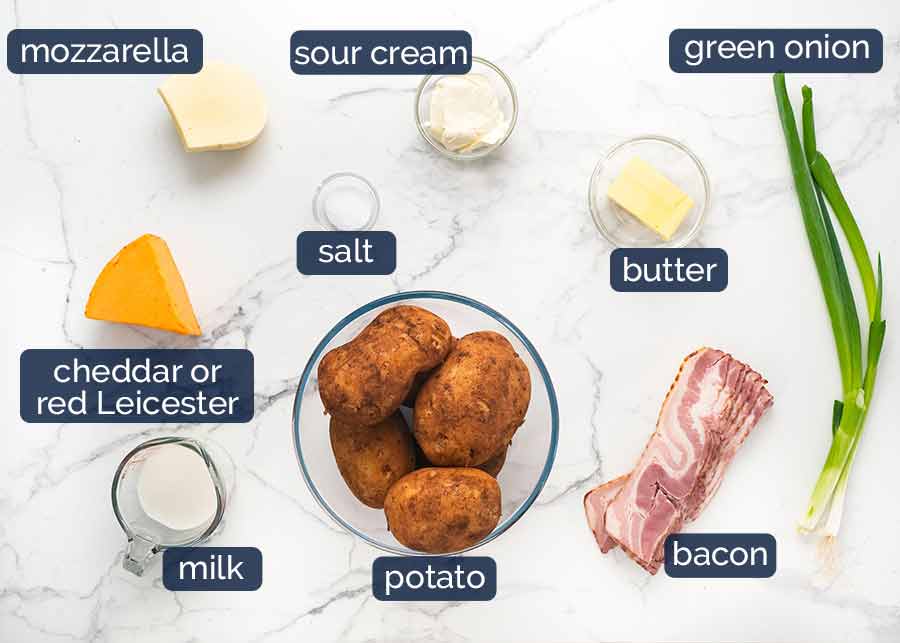
Potato – Floury and all-rounder potatoes work best to achieve a fluffy yet creamy mash without fussing with potato ricers and other gadgets.
– Australia: the cheap dirt-brushed potatoes sold everywhere (called Sebago) are ideal
– US: Russet
– UK: Maris PiperMilk – Our liquid to loosen the potato up to form mash. If making ahead, we add extra (see How To Make section for more).
Sour cream – I prefer using sour cream rather than cream in mashed potato casserole because the slight tang makes a nice counterpoint to all the other richness going on here (butter, cheese, bacon). It doesn’t make it sour in the least. It sort of adds creaminess into the mash without adding cloying richness. Does that makes sense??
Butter – Mash without butter is not mash. #strongopinions!
Cheese – I use a combination: Mozzarella for excellent melty-cheesy-stretchiness. Then Red Leicester for flavour (it’s savoury and a bit sharp, like aged cheddar), and to add a lovely orange hue to the mash surface. If you’re in the States, your orange cheddar is ideal here.
Otherwise, use any melting cheese you like (colby and Monterey Jack are other personal favourites). If you opt to use mozzarella as your main cheese, add a handful of parmesan for flavour because mozzarella alone is actually quite bland and lacks saltiness.
Shred your own – One of my five non-negotiable rules stated loudly on the first page of my cookbook is, “Always shred your own cheese”! Store-bought pre-shredded cheese is coated in anti-caking agents which prevent it from melting as well as freshly-grated. I use a standard box grater for the work.
Pack your cups of cheese – For consistency I prefer weight over volume to measure cheese. So I’ll weigh a hunk of cheese before grating it. But if you are using cup measures, be sure to pack your cups tightly when measuring the shredded cheese otherwise you will be short. Nobody wants to be short on cheese, ever!Bacon – For sprinkling over the casserole surface. Note: I always use streaky bacon. Because fat = flavour! Also, fatty bacon crisps up and colours better, without drying out.
Green onion – For a touch of oniony freshness and colour.
How to make Mashed Potato Casserole
No rocket science here. We make mash, spread it into a casserole dish, top with cheese, bacon and then stop here if making ahead. Finally, on the day of your do, bake it!
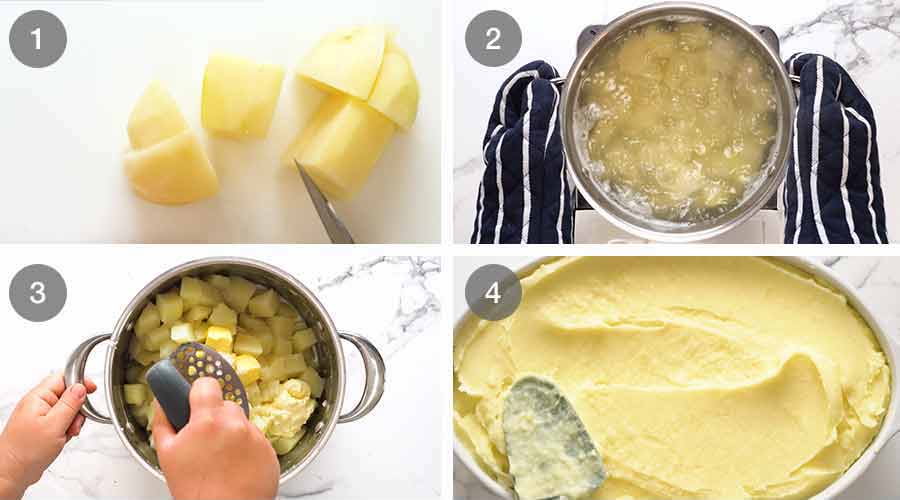
Cut potatoes – Peel and cut the potatoes into even sized pieces.
Boil until soft – Place the potatoes in cold salted water. Bring it up to a boil over high heat then reduce the heat down to medium high or medium so it is simmering rapidly. Cook for 15 minutes (no lid) or until the potatoes are very soft. They should fall apart when you jab it with a fork.
Mash – Drain the potatoes well in a colander and pour them back into the empty pot. Mash with the butter, milk, sour cream and salt.
MAKE-AHEAD ADJUSTMENT – If you are making this dish with the intention of serving it the next day, then add an extra 2/3 cup milk. The mash will seem too loose, but this is intentional. It is to factor in the fact that mashed potato firms up when refrigerated overnight. So once reheated, it has the same consistency as when it is freshly made!
Potato masher – I like to use a potato masher that is like a round disc with holes in it, as pictured above. It’s the fastest and most effective tool for a smooth mash without using a potato ricer (which I reserve just for Paris Mash, when seeking that next-level-luxe, ultra-smooth, 3-Michelin-restaurant result!).
Spread in a casserole dish.
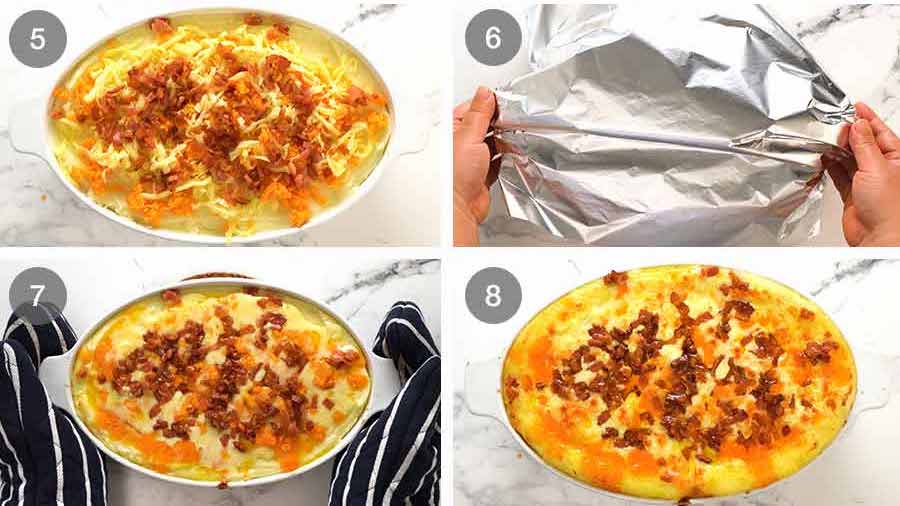
Top with the cheeses and bacon. (Yes you eagle-eyed spotters, I was short on bacon for these shots 😂)
For make ahead – At this stage, the assembled dish can be popped in the fridge for up to 3 days. Just take it out of the fridge 2 hours ahead so it has time to de-chill. This will make it reheat faster and more evenly in the oven.Cover with foil then bake for 20 minutes at 200°C / 400°F (180°C fan), if freshly made. Add an extra 15 minutes if you’re reheating a make-ahead casserole you prepared the day before.
Uncover – Remove from the oven and bake for a further 10 minutes until bubbly and golden.
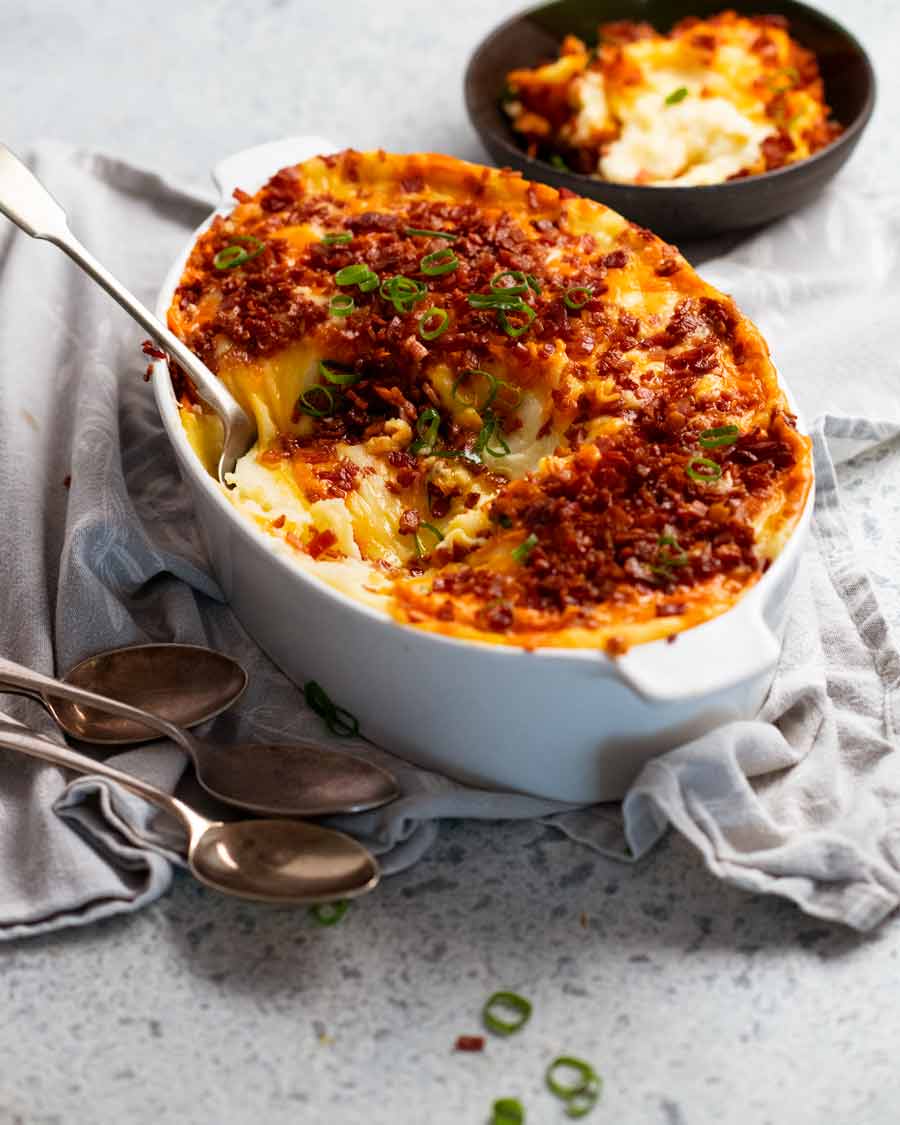
Voila, ready to serve! Crack through that molten cheese surface and marvel at how creamy the mash underneath is!
How to serve Mashed Potato Casserole
This is a dish designed to be a side. (I know we can all picture it moonlighting as a standalone dish after a big night on the turps or a shocking day at work, but it’s meant to take the place of traditional plain mashed potato, I swear.) Because actually, though this has cheese and bacon on it, underneath is all creamy plain mashed potato.
So place it on the table or on the buffet alongside the mains and let everybody dig in and help themselves! Try to get in first though. Because you know full well the first in line are going to take more than their fair share of that cheese bacon topping – and we know full well we also cannot blame them….. – Nagi x
Watch how to make it

Mashed Potato Casserole
Ingredients
- 1.75kg/ 3.5 lb potatoes (Sebago (Aus), Russet (US), Maris Piper / King Edwards (UK)(Note 1)
- 1 tbsp cooking / kosher salt , for cooking potatoes
- 2/3 cup milk (preferably full fat/whole milk but lite ok)
- 2/3 cup EXTRA milk , for make-ahead option only (Note 2)
- 75g / 5 tbsp unsalted butter , cut into 1cm / 1/2″ cubes
- 1/2 cup sour cream (or yogurt), full fat best
- 1 tsp cooking/kosher salt , or to taste
- 1 1/2 cups (tightly packed) mozzarella , freshly shredded (Note 3)
- 1 cup (tightly packed) Red Leicester, cheddar or other flavoured cheese(Note 3)
- 200g / 6 oz bacon (streaky), chopped (Note 4)
- 1/4 cup green onion , finely sliced
Instructions
Cook bacon:
- Place bacon in a cold non-stick pan over medium heat (no oil). As the pan heats up the bacon fat will melt. Once you see some melted bacon fat, turn the heat up to medium high and stir for 3 minute or until golden.
- Drain on paper towels.
Mash:
- Potatoes – Peel then cut into 3cm /1" chunks.
- Boil – Place in a large pot and cover with water so it’s 10cm / 4” above the potatoes. Add 1 tablespoon salt. Bring to a boil over high heat then reduce heat so it’s simmering rapidly. Cook 15 minutes or until potatoes are very soft (jab with fork to test, they should fall apart).
- Drain well, then return into pot. Leave for 1 minute, shaking pot every now and then, to encourage evaporation of water.
- Mash – Add milk (including EXTRA milk if making-ahead), butter, sour cream and 1 tsp salt. Mash until smooth. (Do not use food processor, blender or beater, makes it gluey!)
Make-ahead directions:
- Fridge – Allow to fully cool on the counter then cover tightly with cling wrap and refrigerate.
- Dechill – Take out onto counter 2 hours prior to reheating.
Assemble:
- Preheat oven to 200°C / 400°F (180°C fan).
- Spread the potato in a 2 litre / 2 quart baking dish (Note 5). Smooth the surface.
- Sprinkle – Sprinkle potato with the cheeses, then bacon.
- Bake covered – Cover loosely with foil. Bake for 20 minutes covered (if freshly made) or 35 minutes (make-ahead option).
- Bake uncovered – Remove foil then bake a further 10 minutes until the cheese is bubbly and golden.
- Serve – Sprinkle with green onion then serve! It stays warm for a good 20 minutes thanks to that protective layer of cheese. Oh, the powers of cheese!
Notes
5. Dish – A 2 litre / 2 quart baking dish is the ideal size, it will be filled to the brim. A 23 x 33cm / 9 x 13″ dish (3L/3 qt) works fine too – will be filled about 2/3 of the way up.
6. Make-head – Keeps for 3 days in the fridge, uncooked, fully assembled except for the green onion. Be sure to take it out of the fridge 2 hours prior to reheating to take the chill out of the it so it reheats more evenly.
Freezing – A former team member reported excellent results freezing the assembled dish, thawing then reheating. But I never tried it myself – I will come back and update if (no, when!) I do.
Leftovers will keep for 3 days, but the mash won’t be as creamy. Consider using it to make mashed potato cakes instead!
7. Nutrition per serving assuming 12 servings, as part of a larger banquet.Nutrition
Life of Dozer
People have been wondering how Jeff is, our friendly local who lives at my local dog park (Bayview, in Sydney’s northern beaches), an official RecipeTin taste tester. He is doing well! This is how I start every weekend – coffee for Jeff, a ham and cheese croissant for his dog Cubby (sometimes Jeff gets a bite) and Dozer, waiting for scraps – until he gives up and gallops down to the beach to join his mates in the water!

Photo captured by Kevin of Unleashed Northern Beaches, a local photographer. Wonderful gift idea: voucher for a private pooch photo shoot!
The post Make-ahead Mashed Potato Casserole appeared first on RecipeTin Eats.
]]>