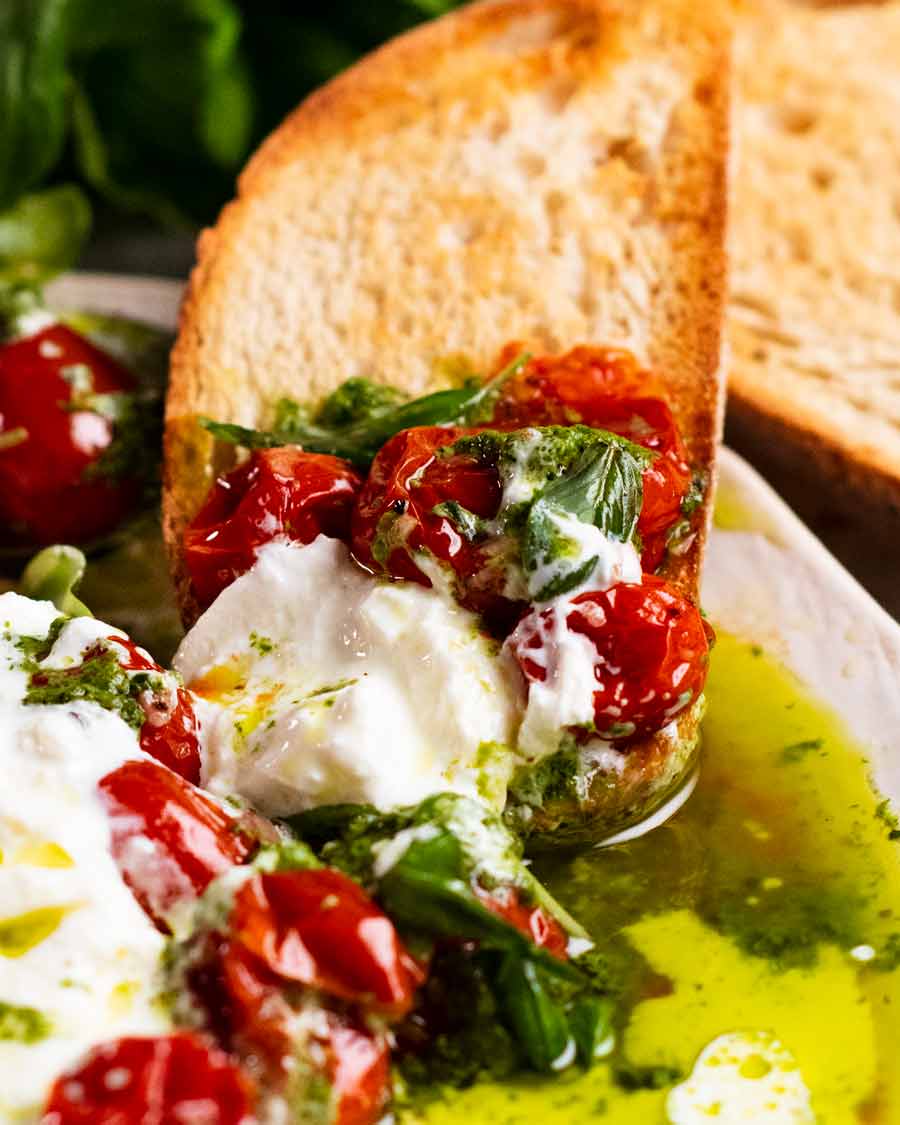
 My favourite burrata recipe – Bursty Tomato Burrata Salad. Juicy roasted cherry tomatoes, creamy burrata cheese, dollops of pesto, swish of olive oil and crusty bread. Simple, luscious, rustic perfection. A gorgeous appetiser or light meal that’s not too expensive to make. This is my favourite burrata recipe Burrata seems to be all the rage... Get the Recipe
The post Bursty Tomato Burrata Salad appeared first on RecipeTin Eats.
]]>My favourite burrata recipe – Bursty Tomato Burrata Salad. Juicy roasted cherry tomatoes, creamy burrata cheese, dollops of pesto, swish of olive oil and crusty bread. Simple, luscious, rustic perfection. A gorgeous appetiser or light meal that’s not too expensive to make.
This is my favourite burrata recipe
Burrata seems to be all the rage these days, on the menu of just about every trendy restaurant. That strange looking wobbly white ball of cheese with a molten centre that oozes out when you cut into it, there is no other cheese like it. (Is there??)
The name burrata is linked to the Italian word for butter, which hints at the rich and creamy taste of burrata. With a cheese this good yet not that expensive to buy, you can make something really special with very little effort and modest cost.
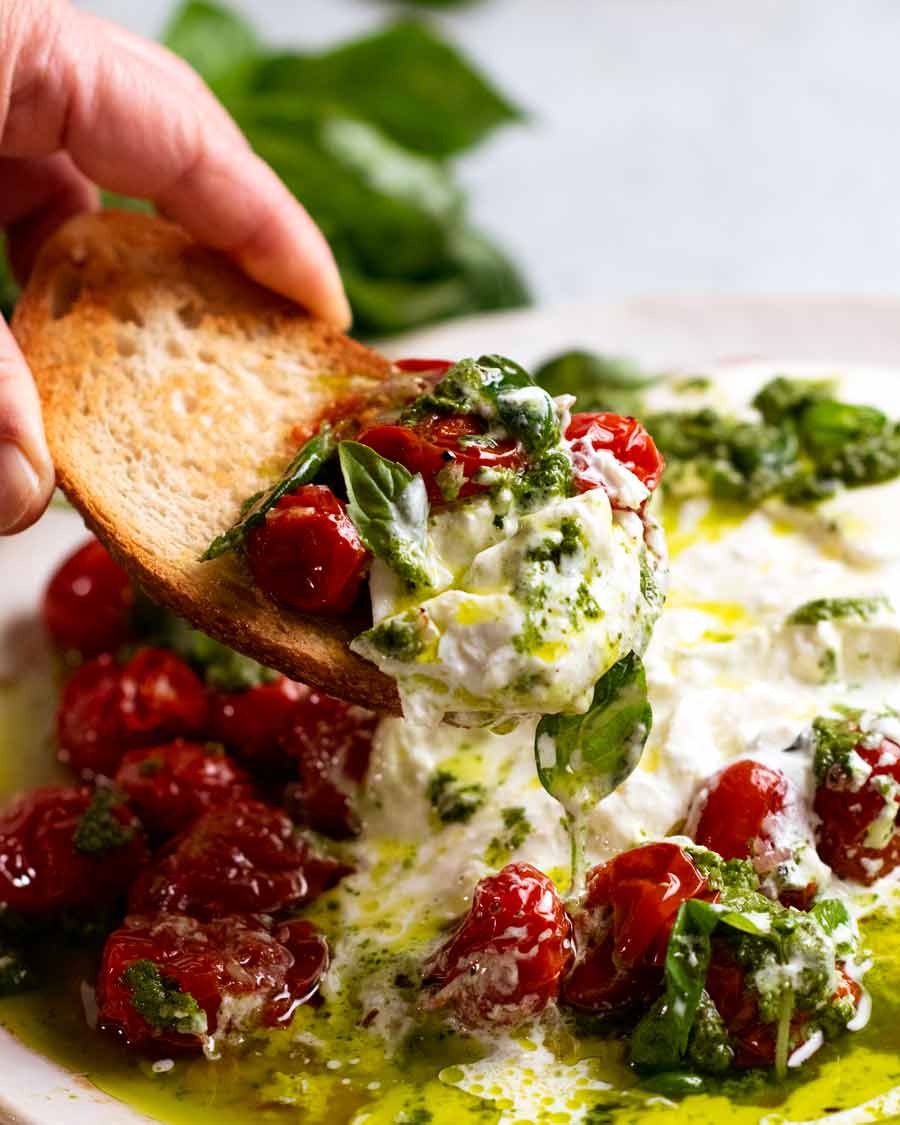
For me, juicy, bursty roasted cherry tomatoes served warm with a plump burrata ball plonked on top and a side of warm bread is just about as good as food gets. It’s on the table in 15 minutes, costs around $15, and it’s always a hit. Always!
What is burrata?
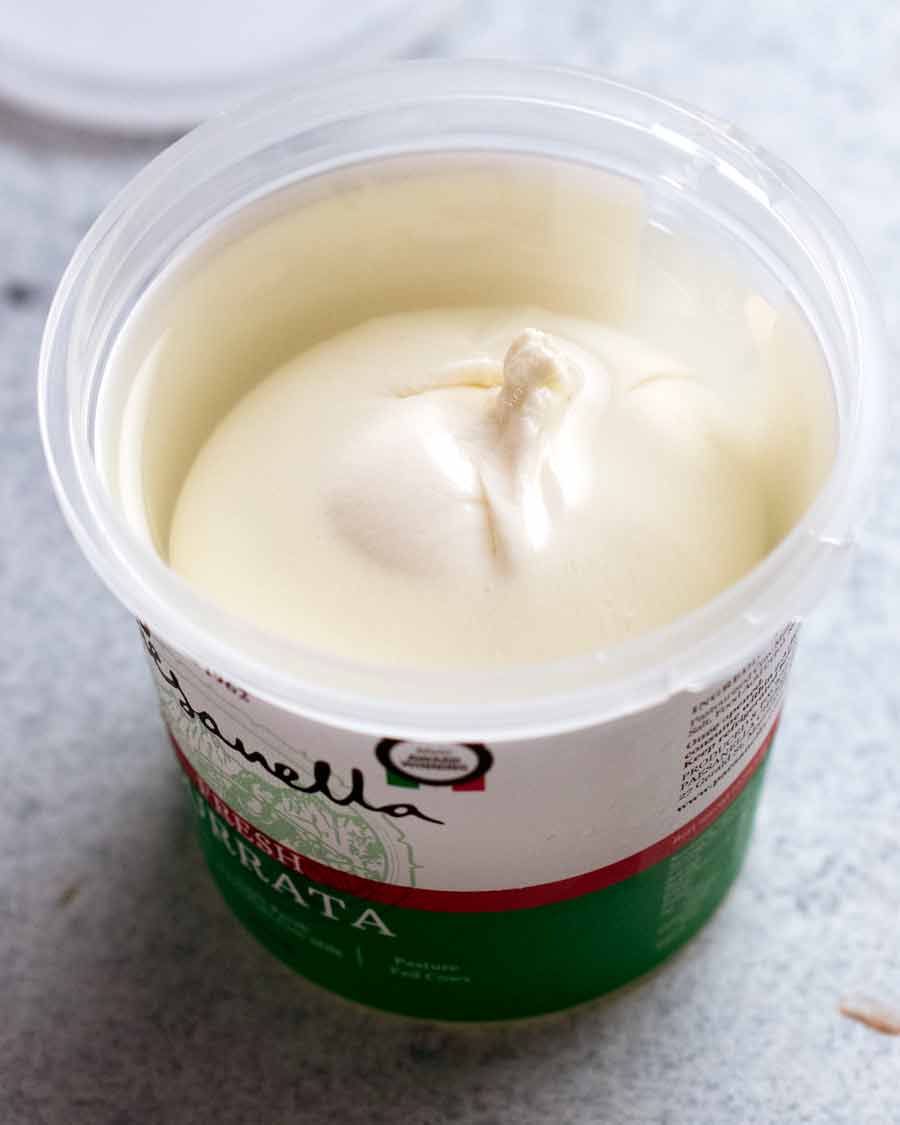
Burrata is an Italian fresh cheese. It is essentially a ball of fresh mozzarella filled with cream. The outside shell is stretchy and curdy like mozzarella while the inside is soft and creamy, and oozes out when you cut into the ball. It’s rich and intensely milky in taste, yet somehow fresh and delicate at the same time. The flavour is actually pretty mild, like fresh mozzarella. It’s not salty or heavily flavoured like an aged brie or cheddar.
Originating from the Puglia region of Italy, it’s made from cow milk (sometimes buffalo milk) and is so delicate it comes in water in tubs.
Not to be confused with fresh mozzarella or bocconcini (also sold in water in tubs) which are not oozy inside.
How to eat burrata – Burrata is eaten as is ie. no cooking. To me, because of the mild flavour, burrata is more about what you serve with it rather than the cheese itself. You need to add flavour and salt, and treat burrata almost like cream that makes a sauce. You’d never just dump just cream on a pasta, right? Need to add salt and flavourings. Bacon! Chicken! Parmesan!
How it’s used in dishes – Plonked on pastas, salads and toasts, as well as served plain with just a drizzle of olive oil and grilled bread on the side. Think of it as an instant sauce!
Today’s recipe is a burrata salad – and it’s my favourite way to use burrata in a dish.
Note: Not all burrata is created equal!
Good burrata will have a creamy centre that oozes out when you cut into it and have a beautiful luscious mouthfeel. Lesser quality burrata will not ooze properly.
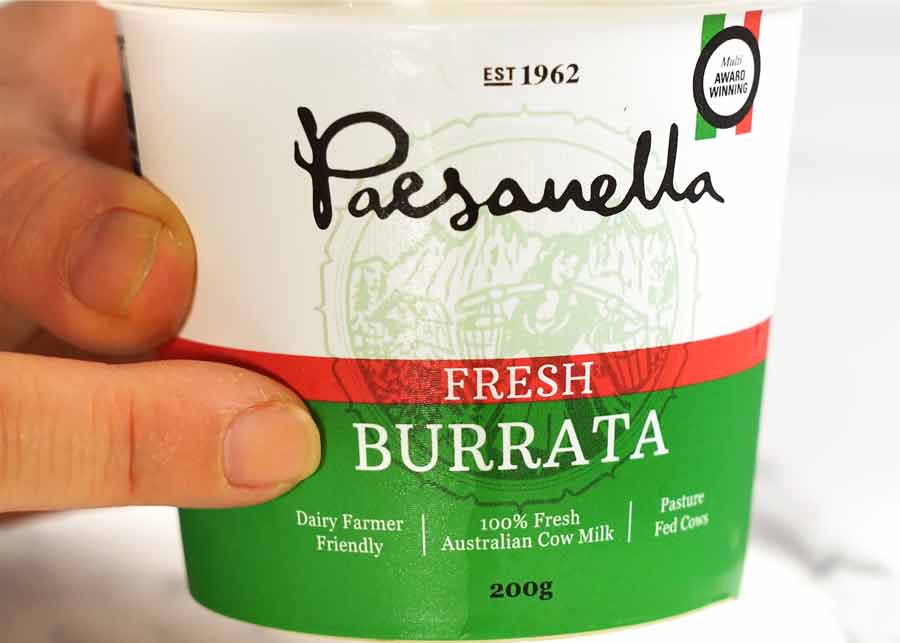
My go-to brand is Paesanella. It’s a local Australian brand fairly widely available these days here in Australian grocery stores and fresh produces stores. You can find even better ones at (good) Italian / cheese delis from artisan small batch producers.
Ingredients in Bursty Tomato Burrata Salad
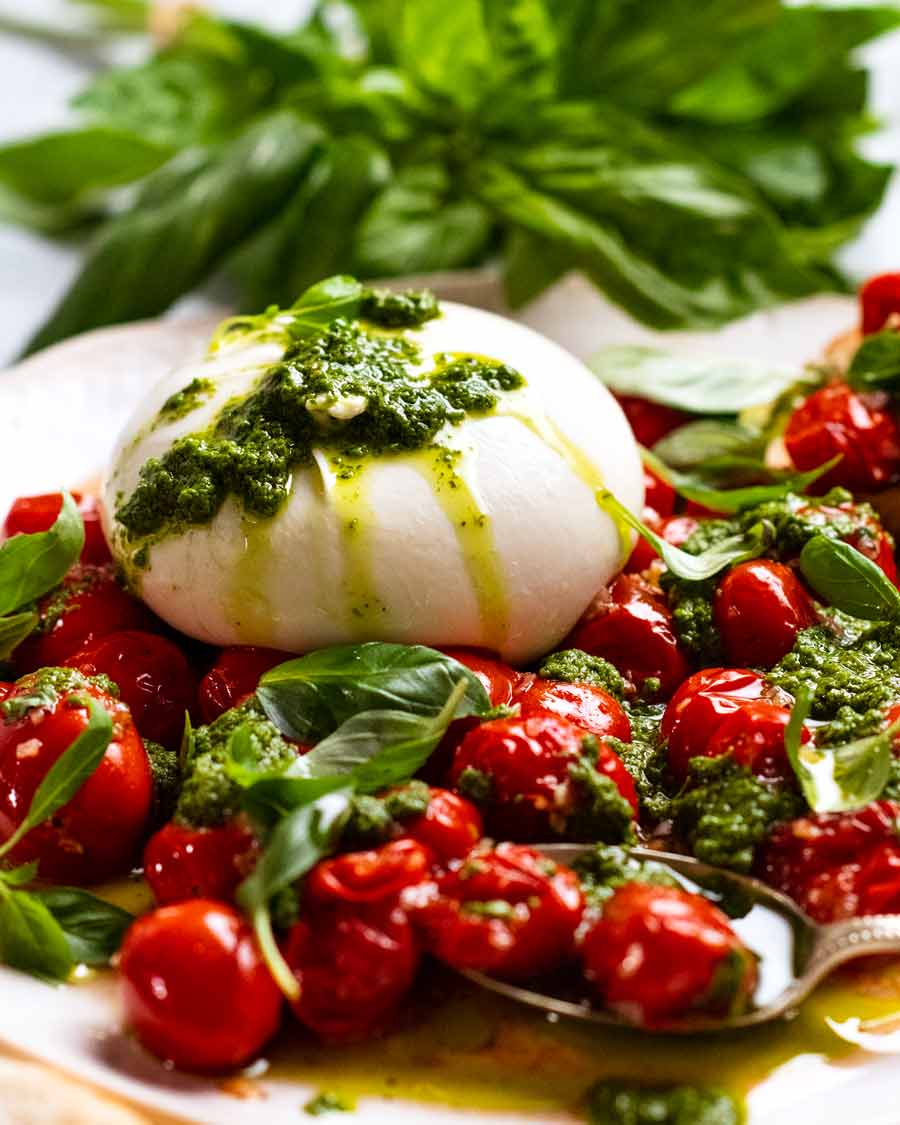
Finishing with dollops of pesto takes this over the top. Taste wise – and also looks. Love how it turns the juices green!
But it’s still worth making even without. If basil is either extortionately expensive or a rummage in the freezer for leftover pesto is unsuccessful, I still make this though I do add something else to compensate, like dried herbs with the roasted tomatoes. I’ve popped some suggestions in the recipe card for pesto alternatives.
Burrata and (semi-optional) pesto
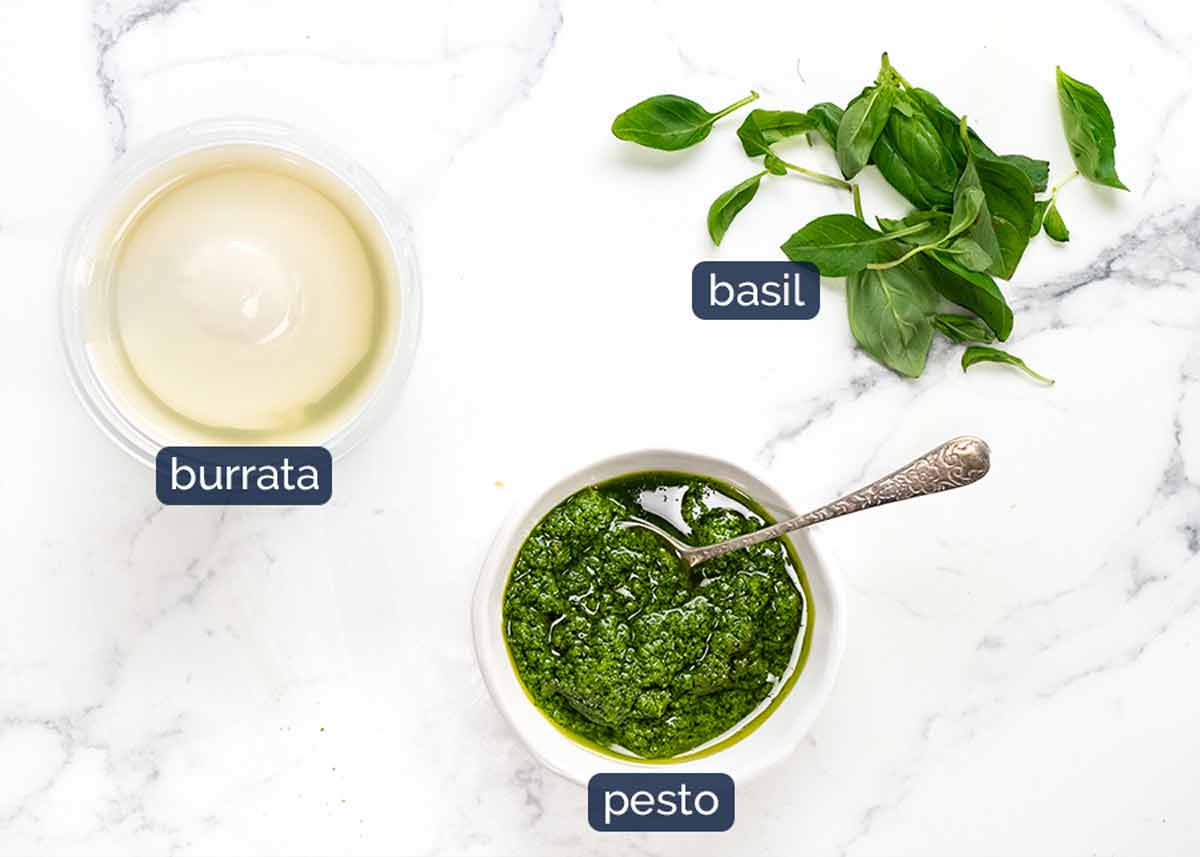
Burrata – See box above for information about burrata. No preparation is need to use it, just drain the liquid and use as is. However, just emphasising my recommendation to get a good one. If it doesn’t ooze, frankly, you may as well just get ricotta! My go-to brand is Paesanella which is available at some large grocery stores and fresh produce stores. Else, Italian / cheese delis.
Pesto – As noted above the photo, recommended for my favourite version of this dish but I still make it without. Use homemade pesto (freezes so great!) or a good store-bought.
Fresh basil – For sprinkling. As with with pesto comments, highly recommended but still worth making without.
The burst tomatoes and sauce
Here’s what you need for the sauce and burst tomatoes. Which, in case you hadn’t gathered yet, is just a cute name for roasted cherry tomatoes – because they go wrinkly and soft, ready to “burst” at a touch!
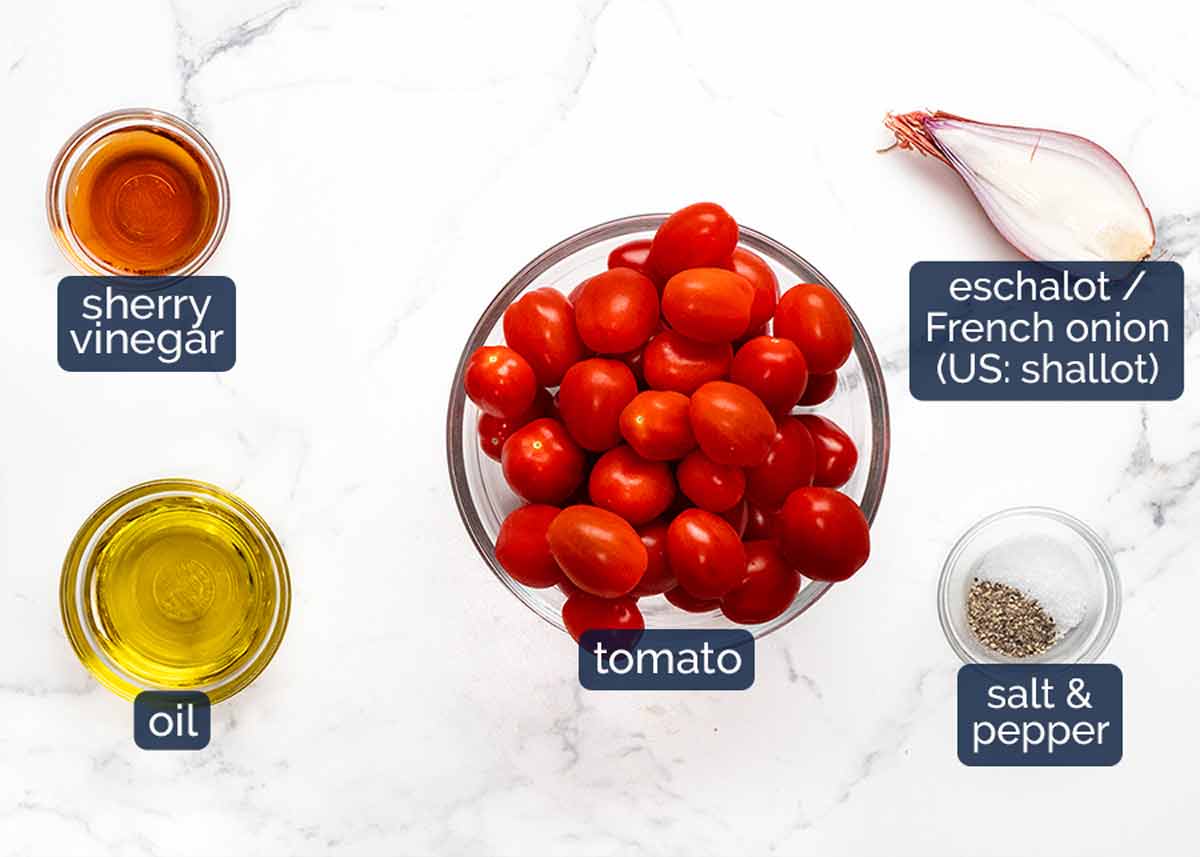
Cherry or grape tomatoes – 500g/1lb, about 4 cups in total, 2 standard Australian punnets. Because we are roasting them, they are delicious even when they are not in their summer prime. But imagine how good this dish is when cherry tomatoes are at their sweetest!
Eschalot (US: Shallot) – Also known as French onions and called “shallots” in the US. They are like baby onions, but with purple-skinned flesh. Not to be confused with what some people in Australia call “shallots”, ie. the long green onions. More delicate and not as sharp as ordinary onions so you don’t end up with giant lumps of onion with the tomatoes. Substitute with a garlic clove, finely minced white part of green onions, or finely shaved red onion.
Sherry vinegar – A little drizzle of vinegar to cut through all the olive oil and rich cheese really lifts this dish, I find. Use any clear(ish) vinegar that’s not as sharp as plain white vinegar. eg. like white wine vinegar, red wine or apple cider vinegar.
Standard olive oil – For roasting the tomatoes. No need to use your good stuff for cooking.
GOOD extra virgin olive oil – For drizzling over the dish at the end! This is what you use your good stuff for. Better flavour, richer colour!
How to make Bursty Tomato Burrata Salad
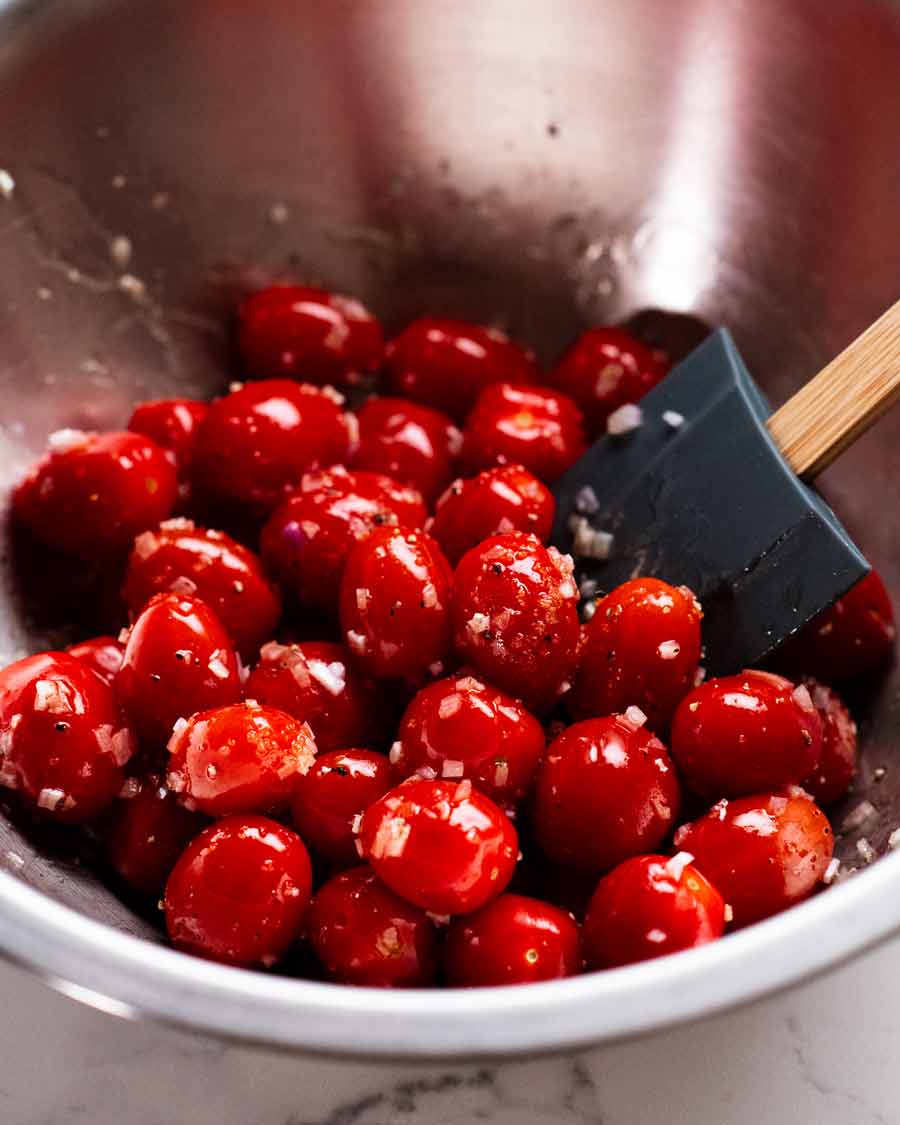
The tomatoes only take 10 minutes in the oven to become softened and a bit wrinkly but still holding their shape. The perfect state of almost-bursting (we want most of the actual bursting to happen in our mouth!).

Bake 10 minutes – Toss the tomatoes with olive oil, salt, pepper and the eshallots (US: shallots). Spread on a tray and bake for 10 minutes at 200°C/400°F (180°C fan) until the tomatoes are softened, some are wrinkly, but they are all still holding their shape and not collapsed into mush.
Vinegar – Gently push the tomatoes to one side of the tray (so they are bunched up together) and drizzle with the vinegar.
Transfer – Then gently transfer the tomatoes to a serving plate, in a single layer.
How to handle the burrata:
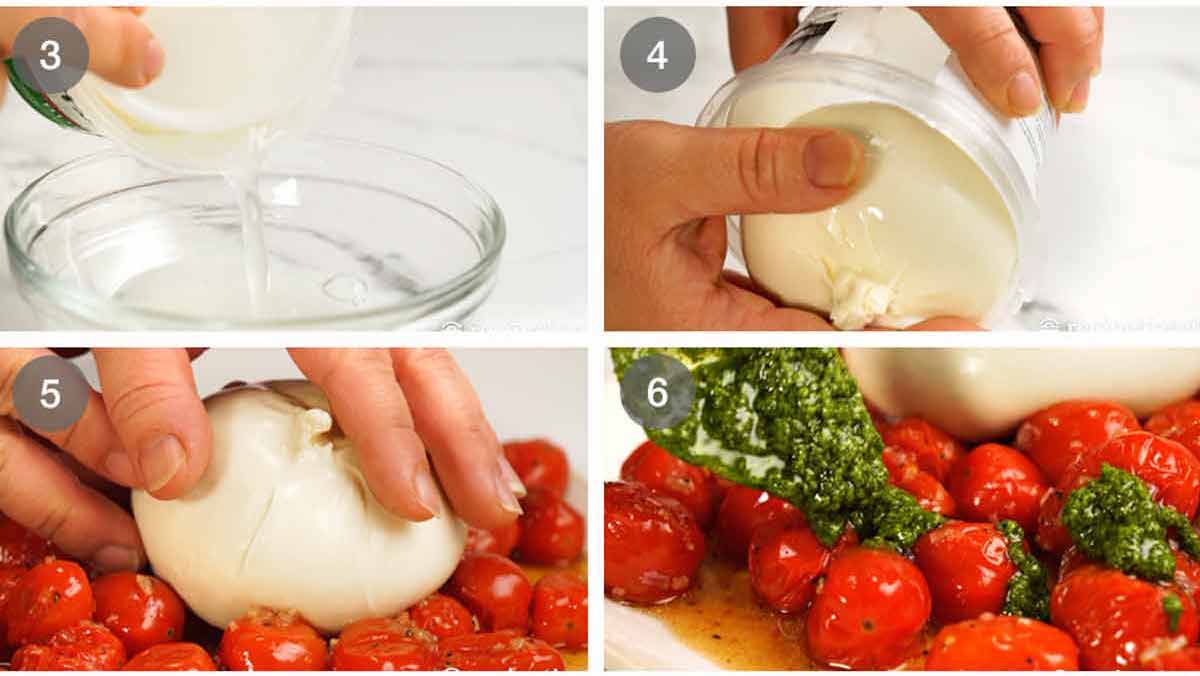
Now, burrata time! Nothing needs to be done to prepare it, we use it straight out of the tub.
GENTLY drain the liquid out of the burrata tub.
GENTLY roll the burrata out of the tub into your hand.
GENTLY place the burrata on top of the tomatoes.
Dollop pesto randomly across the tomatoes – I also do some on the burrata. Why not?

Do you see a theme in the instructions here? 😂 Burratas are delicate – the mozzarella shell is thin and barely holding in that molten creamy good inside. Fairy fingers are essential here to avoid a burrata explosion in your hands. Not fun, my friends! (Says the girl who did it just 2 days ago).
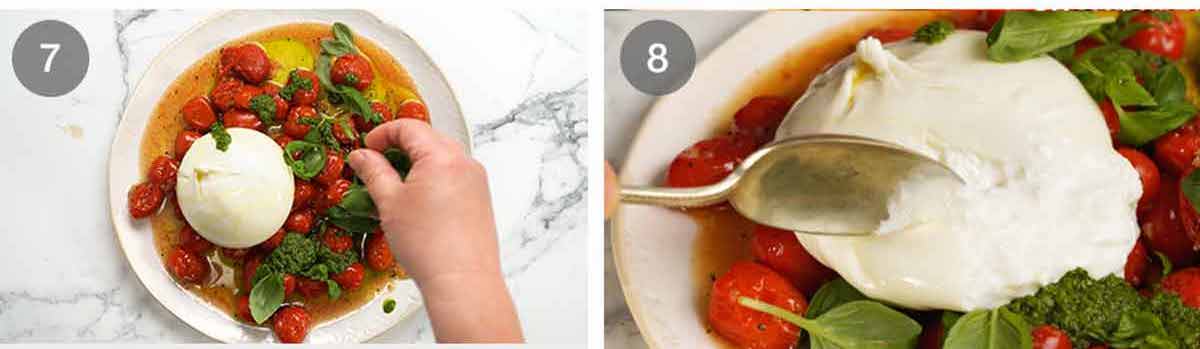
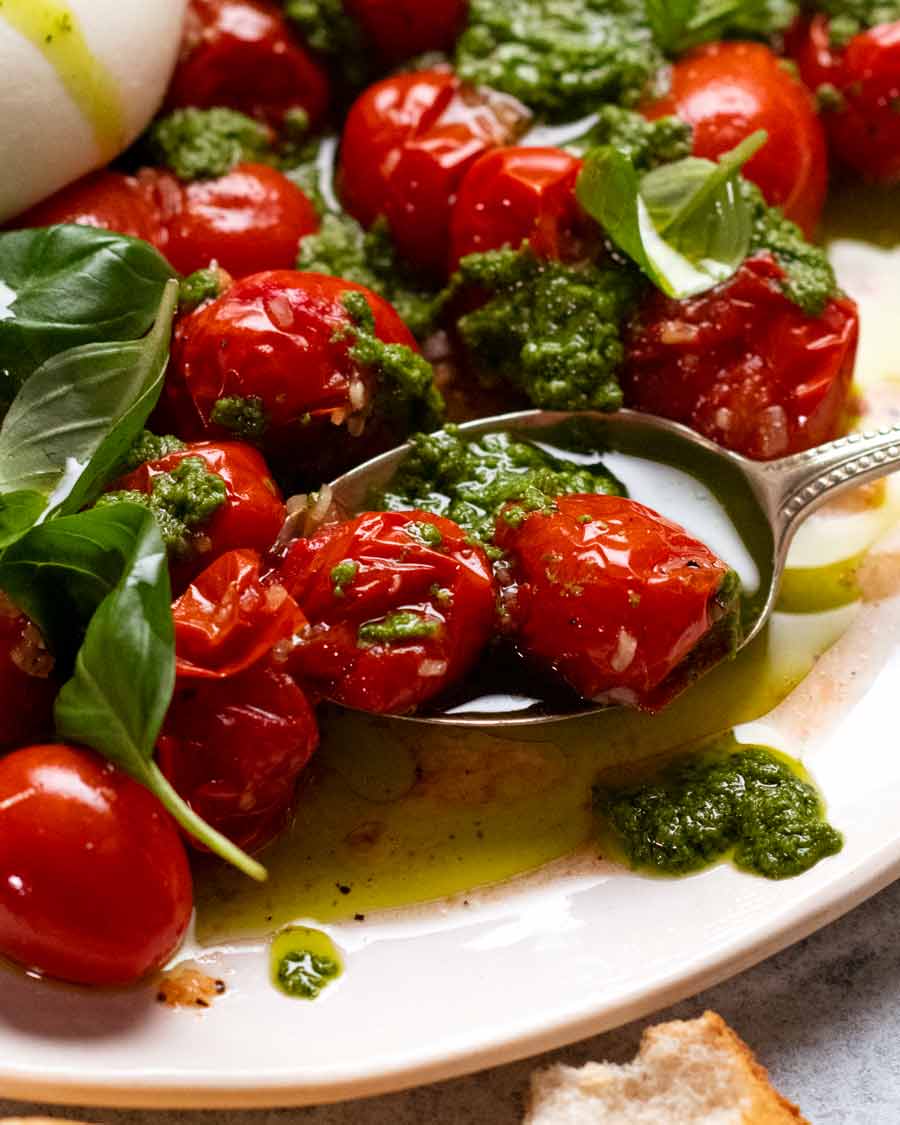
Finish with a swish of olive oil and sprinkle of fresh basil laves. Then serve your colourful bright burrata salad with a side of crusty bread!
Nominate a lucky person to break into the burrata to let the molten centre come oozing out. Let that creamy centre run everywhere, mingling with the tomato juices and the pesto…you’re imagining it, right???
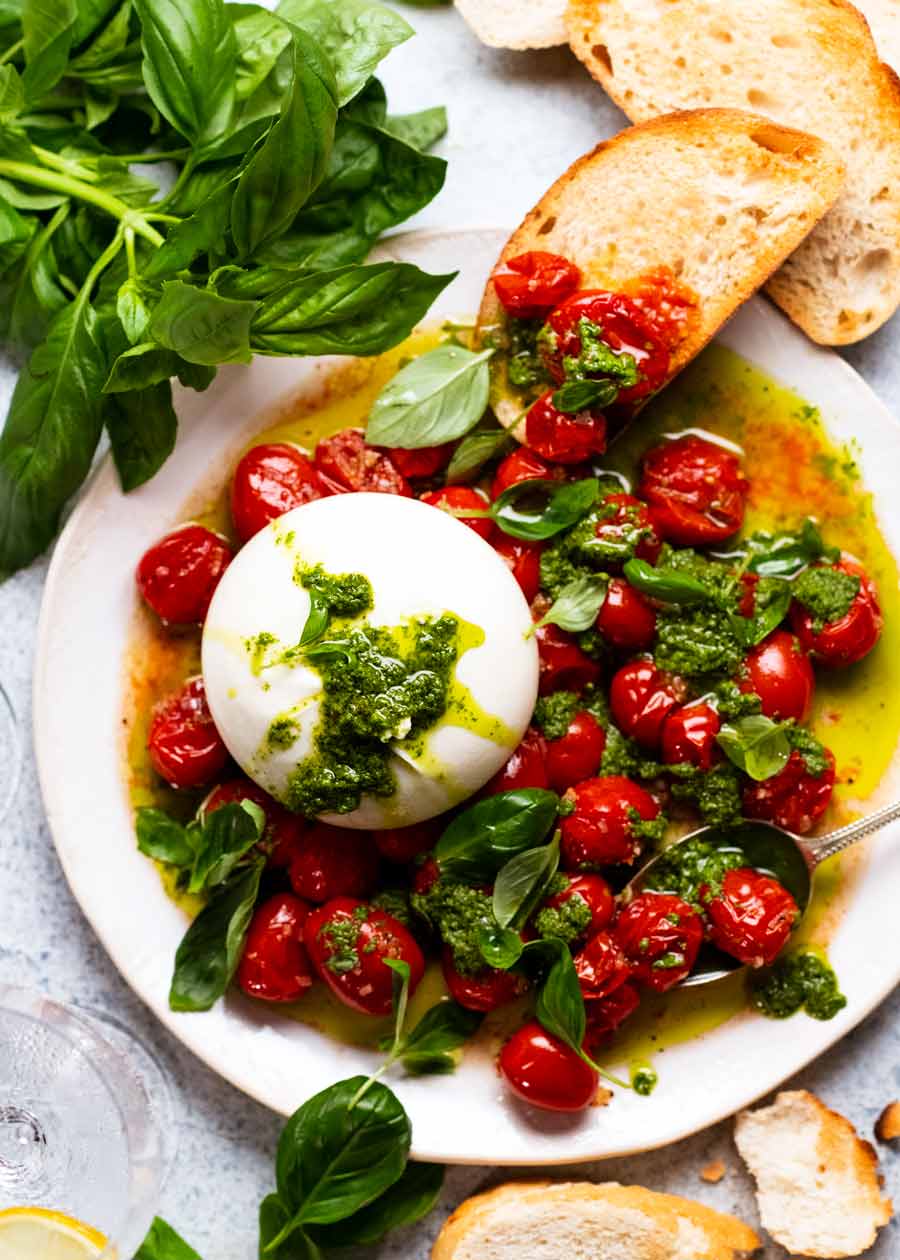
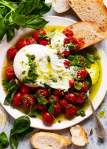
Here’s your masterpiece before everyone gets stuck in. A glorious plate of rustic perfection!
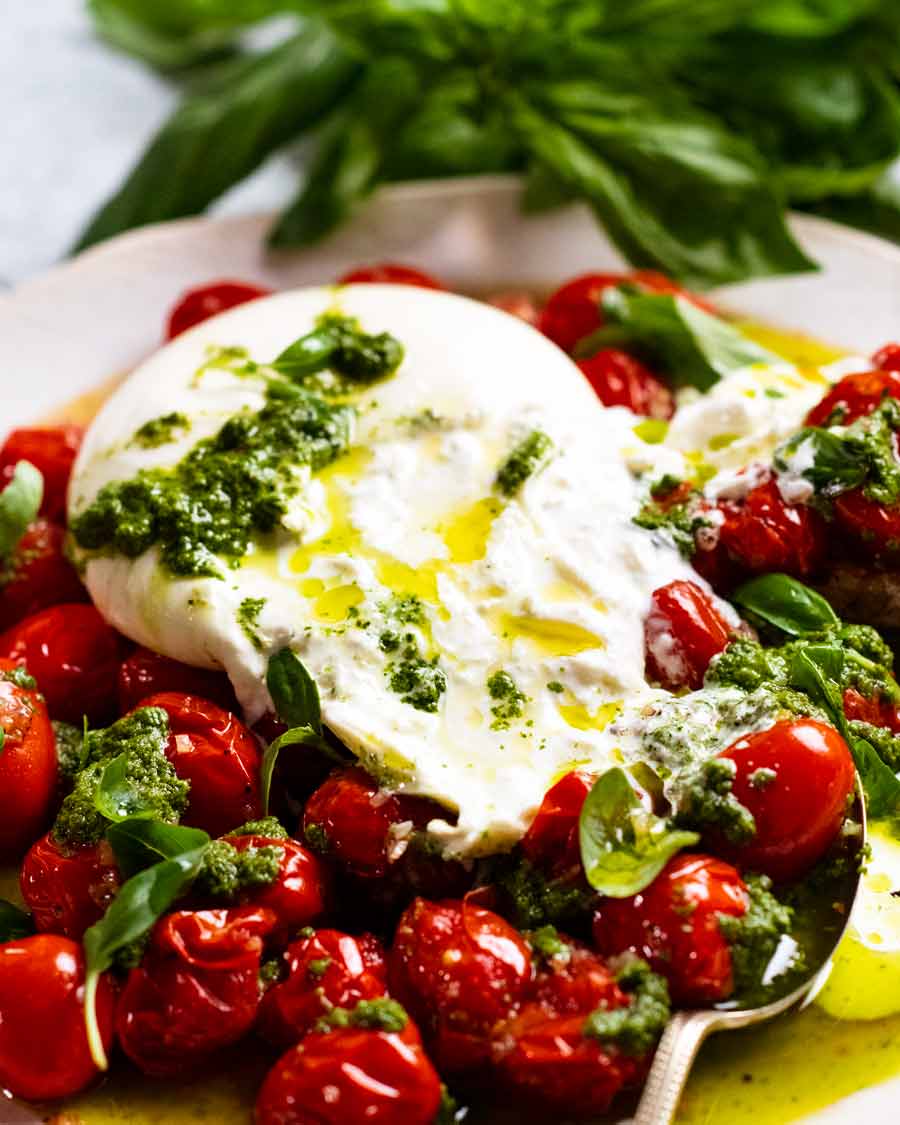
And here it is, 5 seconds later.
Honestly, for a burrata plate this big which would easily serve 2 if not 3 people for lunch, I’d expect to pay upwards of $30 at a trendy bistro – plus bread which they’d probably charge another $10 for.
All the ingredients here cost me around $15, bearing in mind you only use about 1/4 of a full batch of pesto (it freezes perfectly).
Colourful, bright food that’s made for sharing, perfectly imperfect delicious mess. This is 100% my kind of food! – Nagi x
Watch how to make it
Bursty Tomato Burrata Salad
Ingredients
- 200g/ 6 oz x 1 fresh burrata cheese (Aus: Paesanella is my go-to, Note 1)
- 1/4 cup basil pesto , preferably homemade, recommended but not essential (Note 2)
Roasted tomato:
- 500g/ 1 lb (4 cups) cherry or grape tomatoes
- 2 tbsp extra virgin olive oil
- 2 tbsp eschalot , finely chopped (US: shallot), ~1/2 small (Note 3 subs)
- 1/2 tsp cooking/kosher salt
- 1/4 tsp black pepper
- 2 tsp sherry vinegar (or apple cider or red wine vinegar)
Serving:
- 1/2 tsp salt flakes (or half the quantity for cooking/kosher salt) (Note 4)
- 1 tbsp extra virgin olive oil , a good one is best, for finishing
- Few fresh basil leaves , for sprinkling (Note 2)
- Warmed crusty bread , for mopping
Instructions
- De-chill – Take the burrata out of the fridge and leave on the counter for 30 minutes, to take the fridge-chill out of it. Keep it in the water in the tub.
Roasted tomatoes:
- Preheat oven to 200°C/400°F (180°C fan).
- Roast 10 min – Toss the cherry tomatoes with the olive oil, eschalot, salt and pepper (in a bowl, or on a tray). Spread on a tray. Roast 10 minutes until softened but not collapsing.
- Vinegar – Gently push the tomatoes to one end of the tray. Drizzle over vinegar. No need to mix.
Assembling:
- Tomatoes – Carefully transfer tomatoes to a plate, spreading them out in a single layer.
- Burrata – Gently (GENTLY!!) drain the water out of the tub and roll the burrata out into your hand. Place a burrata on top of tomatoes.
- Finish – Drizzle the 1 tablespoon of good extra virgin olive oil all over the plate. Dollop pesto randomly all over. Sprinkle with salt flakes and basil.
- Serve with crusty bread on the side!
- Eating!
- Nominate a person to do the cutting honours. Break into the burrata with a serving spoon. Let the centre ooze out. Make sure you scoop up a bit of everything, pile onto bread and eat! Don't forget to mop the plate clean. The juices are the best part.
Notes
Nutrition
Life of Dozer
Overseeing the shooting of today’s recipe. He had useful suggestions for styling (they involved burrata and bread and his mouth).

The post Bursty Tomato Burrata Salad appeared first on RecipeTin Eats.
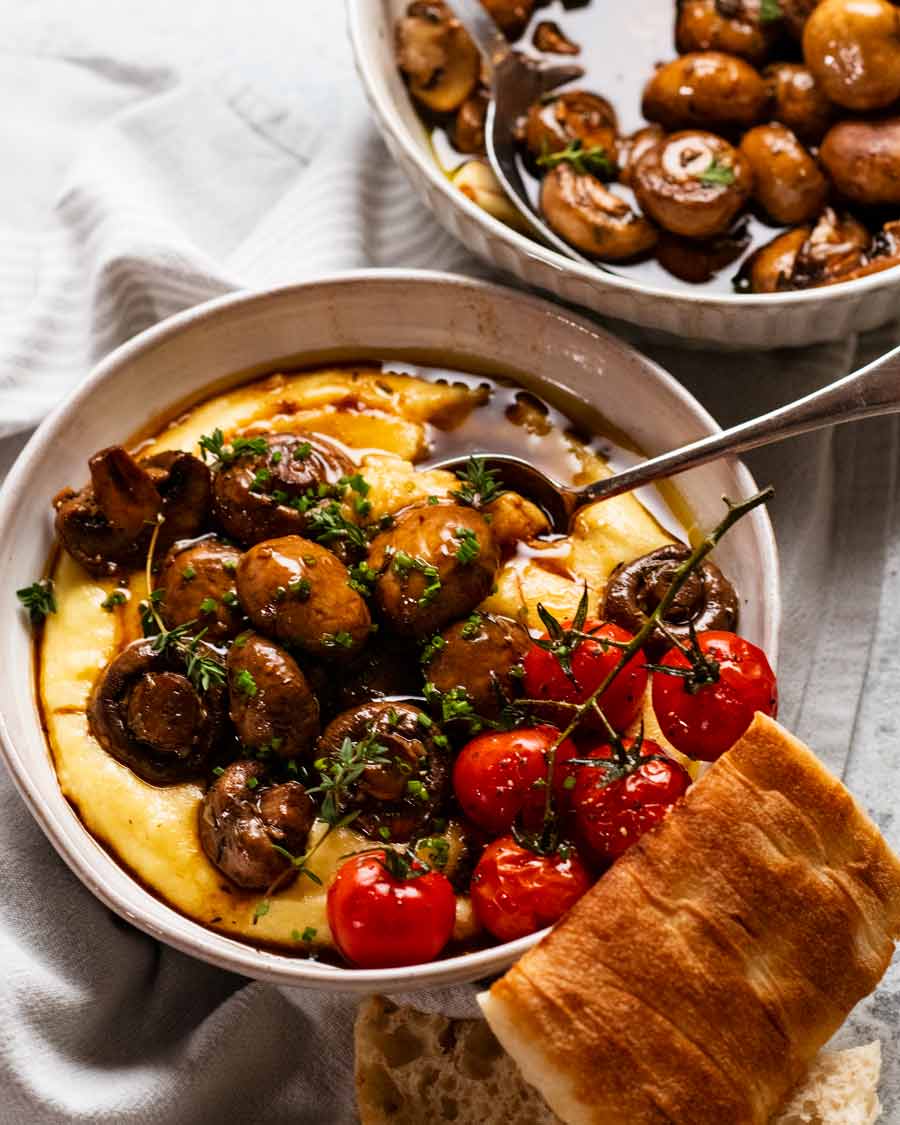
]]> Roasted mushrooms are delicious. Marinated mushrooms are a whole new level! Imagine a blend of balsamic vinegar, olive oil, garlic and thyme soaked up by the mushrooms that squirts in your mouth when you bite into it……yes!!! Marinated mushrooms Mushrooms are awesome little sponges that absorbs the flavour of anything they’re cooked in. Today, we’re... Get the Recipe
The post Balsamic marinated mushrooms appeared first on RecipeTin Eats.
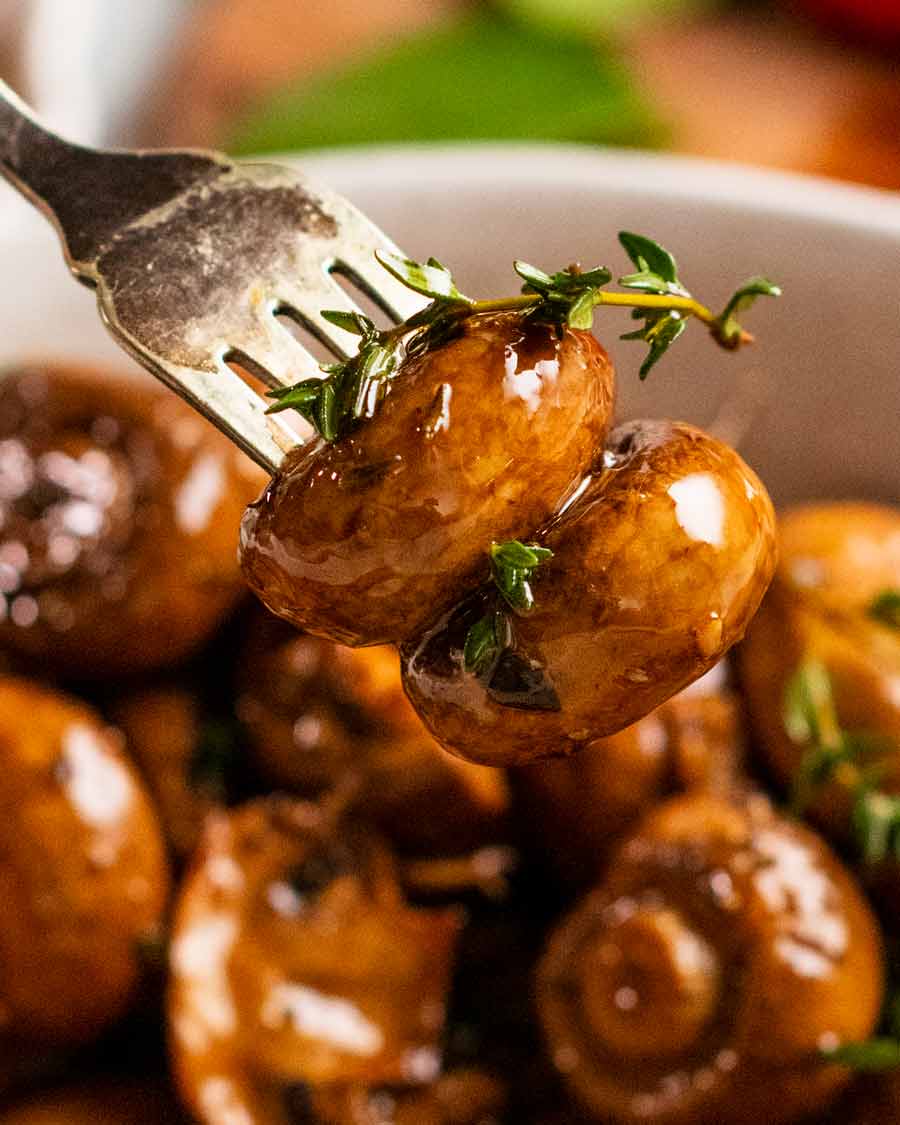
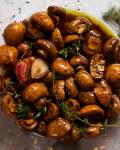
]]>Roasted mushrooms are delicious. Marinated mushrooms are a whole new level! Imagine a blend of balsamic vinegar, olive oil, garlic and thyme soaked up by the mushrooms that squirts in your mouth when you bite into it……yes!!!
Marinated mushrooms
Mushrooms are awesome little sponges that absorbs the flavour of anything they’re cooked in.
Today, we’re marinating garlic roasted mushrooms in balsamic vinegar and olive oil. You will be amazed how much of the marinade the mushrooms soak up in just a couple of hours. That moment you bite into a mushroom and the balsamic juice squirts out in your mouth….that’s a little bit of food heaven right there!
As for what to use these for?
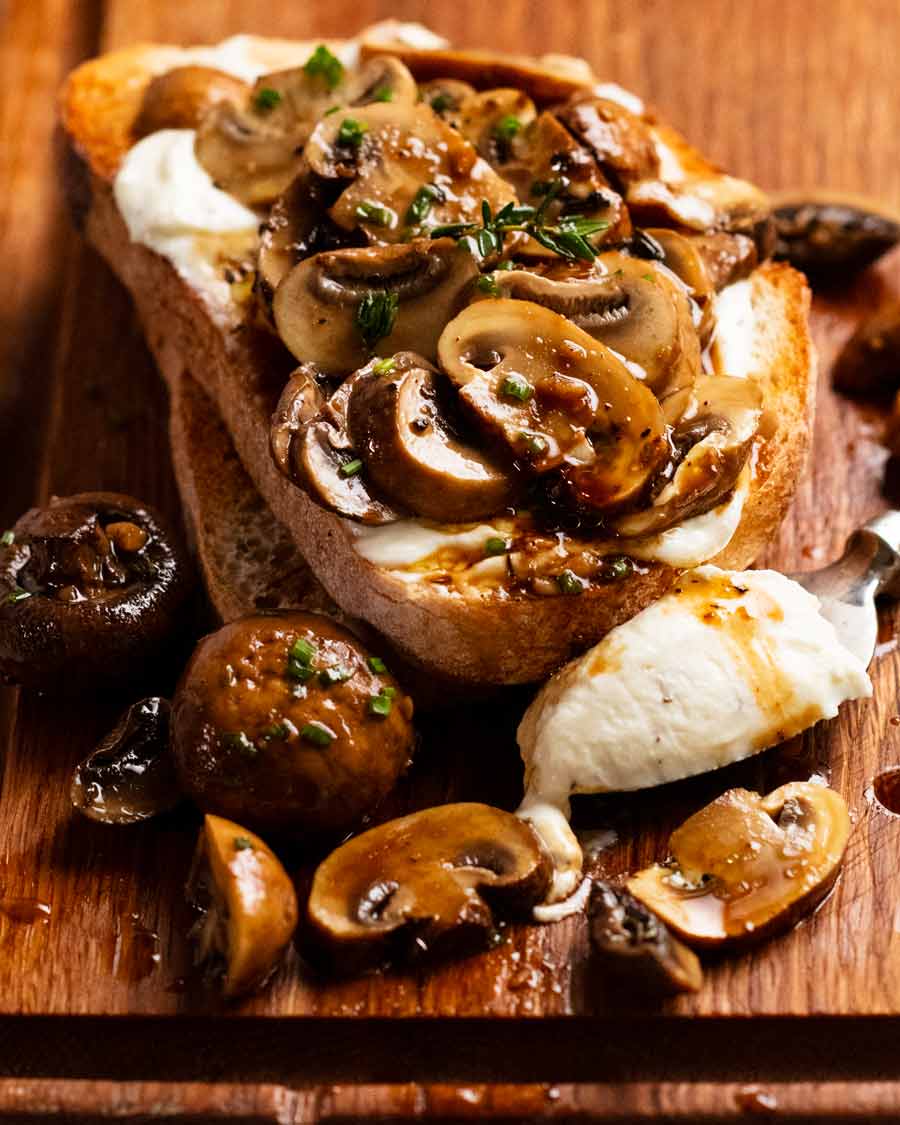
As a meal – on toast or over mash or similar (mushrooms are so meaty!)
Side dish – for breakfast or a steak dinner
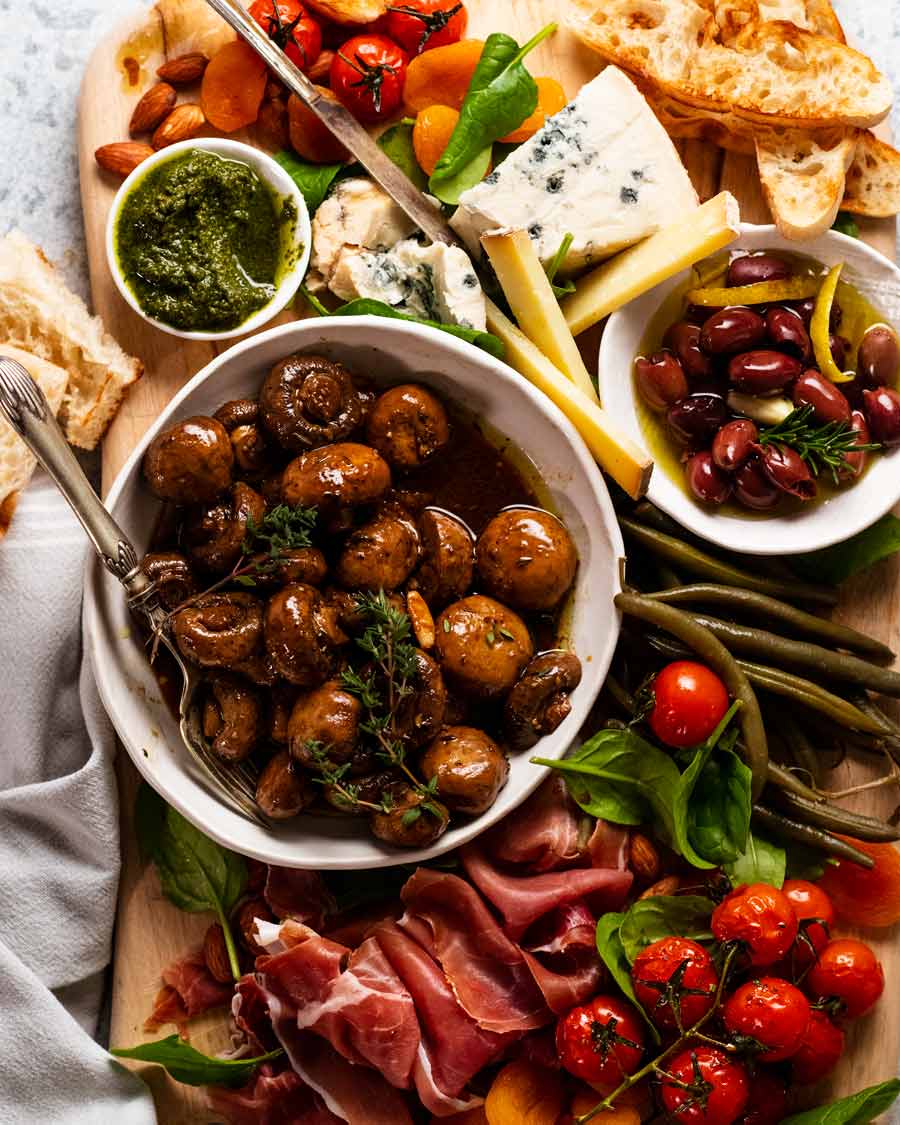
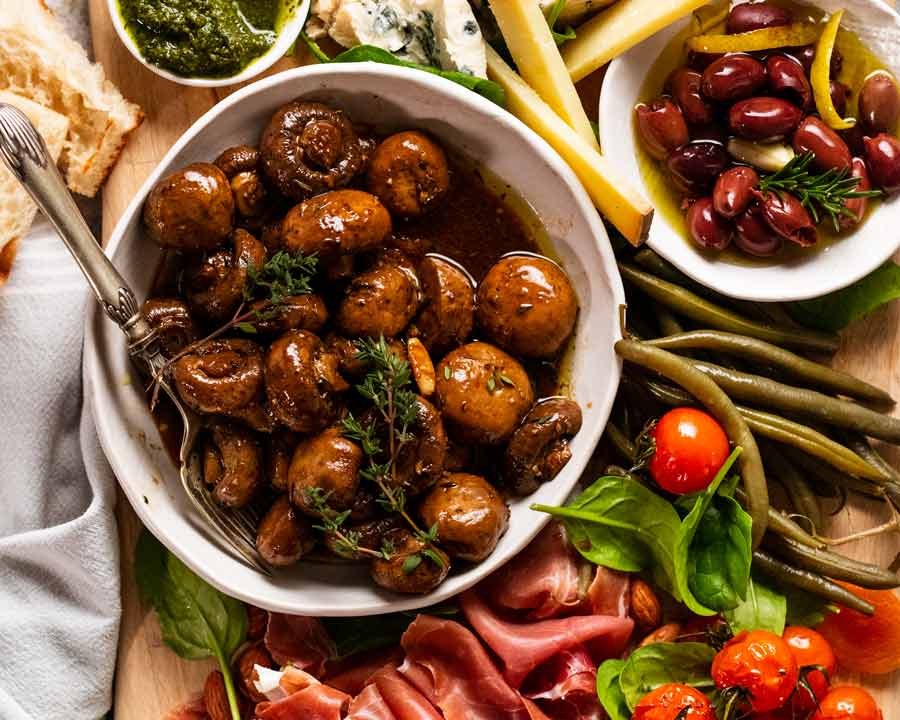
Grazing board – the most perfect “I MADE THESE MYSELF!” addition to your next cheese platter.
Many more suggestions with links to suggested recipes below.
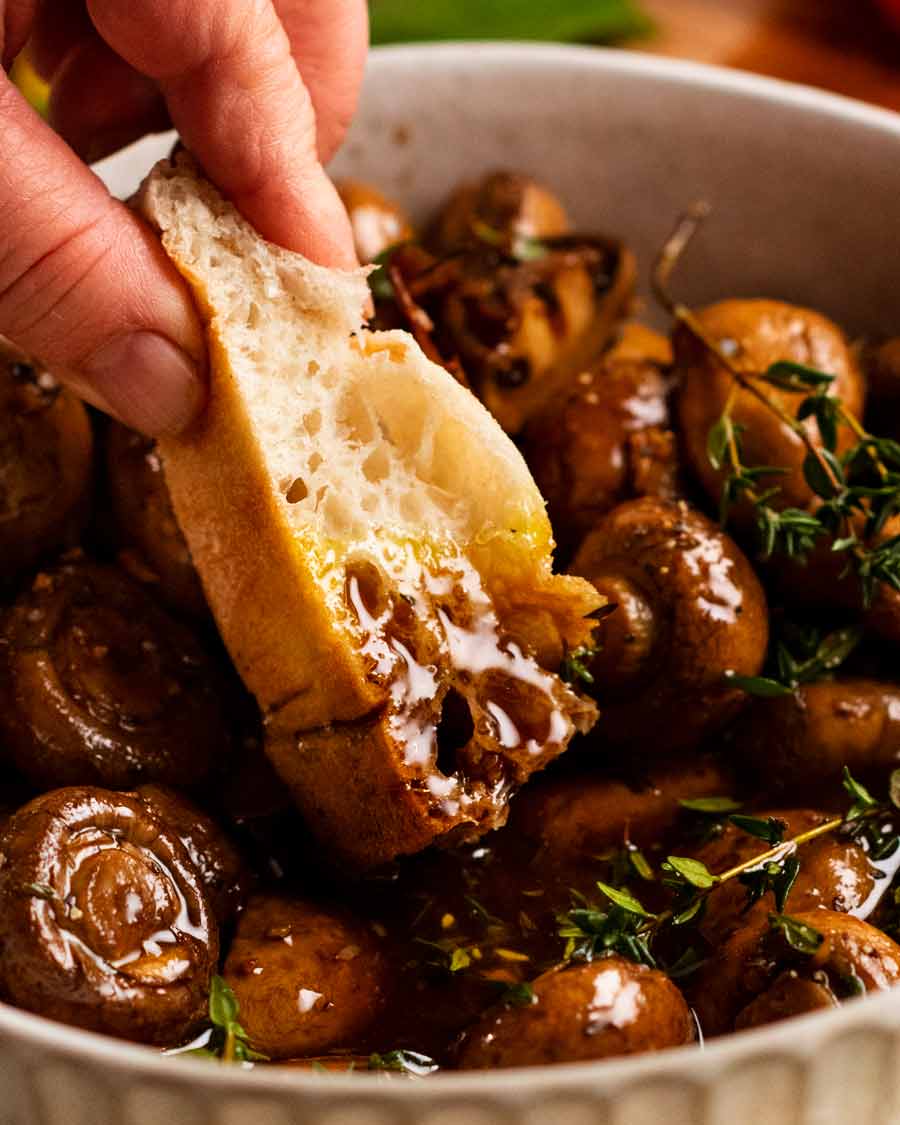
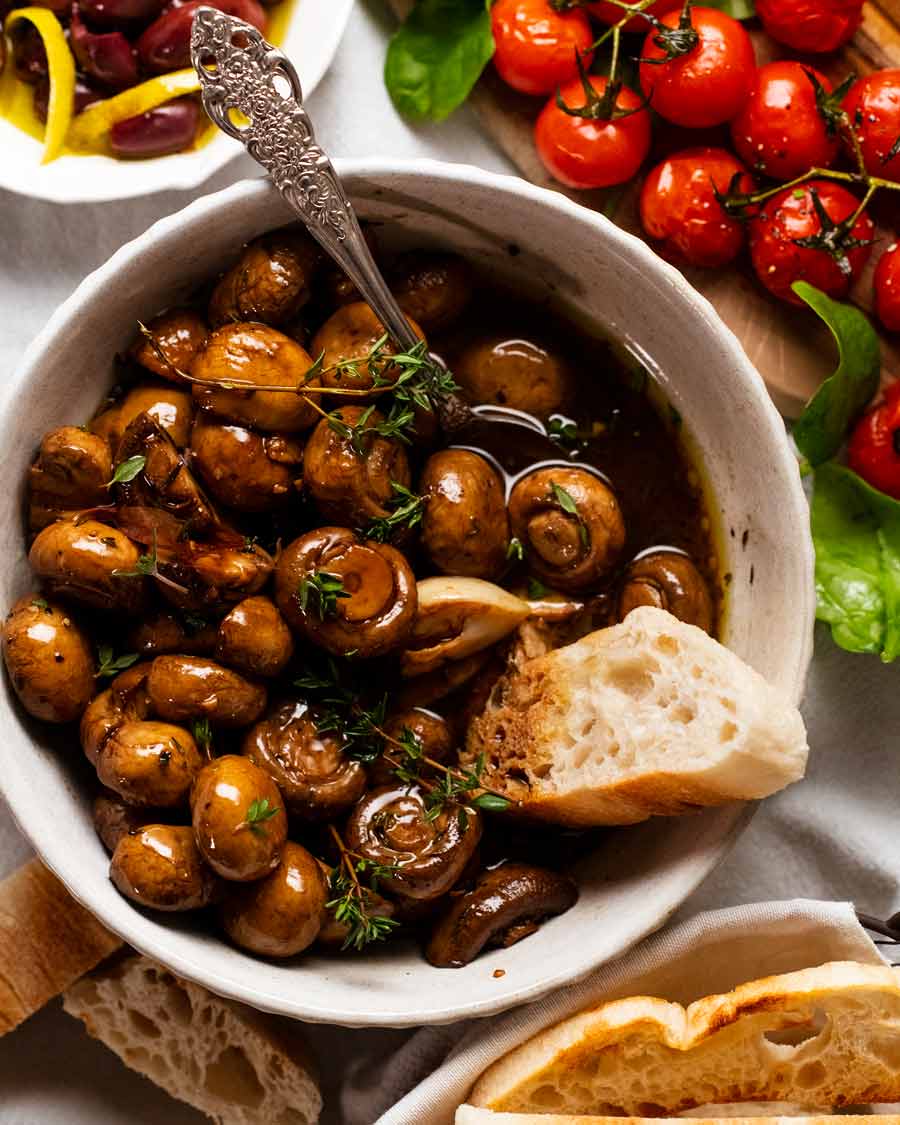
Bonus: Dunking bread in the mushroom-y balsamic juices. Today’s recipe is the gift that keeps on giving!
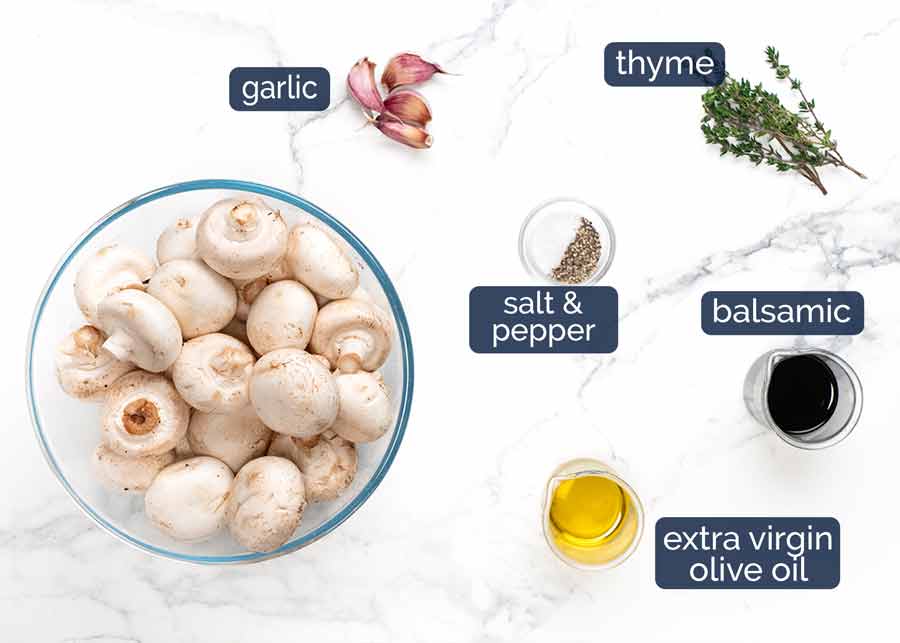
Ingredients
Here’s all you need to make balsamic marinated mushrooms. It’s all in the method – tossing hot mushrooms soaked in the balsamic blend for maximum flavour absorption!
Mushroom chatter:
Type (flexible). Size (flexible)!
Type I’m using plain white mushrooms today. Swiss brown / cremini would be a perfect substitute. In theory, this recipe will work for most mushrooms that can be roasted, just cut them as appropriate. Portobello / large flat mushrooms (cut into large pieces or slice), Shiitake (whole), oyster (whole / halve larger ones), king oysters/trumpet (hmm, I’d probably slice thickly). I’d probably avoid the stringy / thinner types, like enoki and shimeji.
Size My preference is to use smaller mushrooms around 3 – 3.5cm wide (1.2 – 1.4″) so I can keep them whole for maximum effect of biting into a juicy mushroom.
However, mushrooms, being the selfish uncooperative things that they are, do not always grow to the exact size specification I wish for. So cut larger ones in half, or quarters / into cubes for really big ones. The goal is to make them all roughly the same size so they roast in about the same time. Bear in mind they will shrink about 30% once roasted.
Balsamic blend and roasting flavours
Balsamic vinegar – For marinating. Chosen for flavour and because it stains the mushrooms a mahogany colour. Other milder vinegars like white vinegar vinegar, sherry vinegar will also work. Lemon and plain white vinegar are sharper so just use less.
Garlic and thyme – For roasting flavours. I mince half the garlic (so it disperses) and keep 2 whole, smashed, so they impart garlic flavour throughout while roasting and also while marinating. For the thyme, fresh sprigs will bring the best flavour but dried will work as a substitute.
Extra virgin olive oil – For roasting and marinating.
How to make marinated mushrooms
Simple recipe with few ingredients. It’s all in the method – roast first, then toss hot mushrooms in the balsamic blend. When they are hot, the pores are open so this provides maximum flavour absorption opportunity!
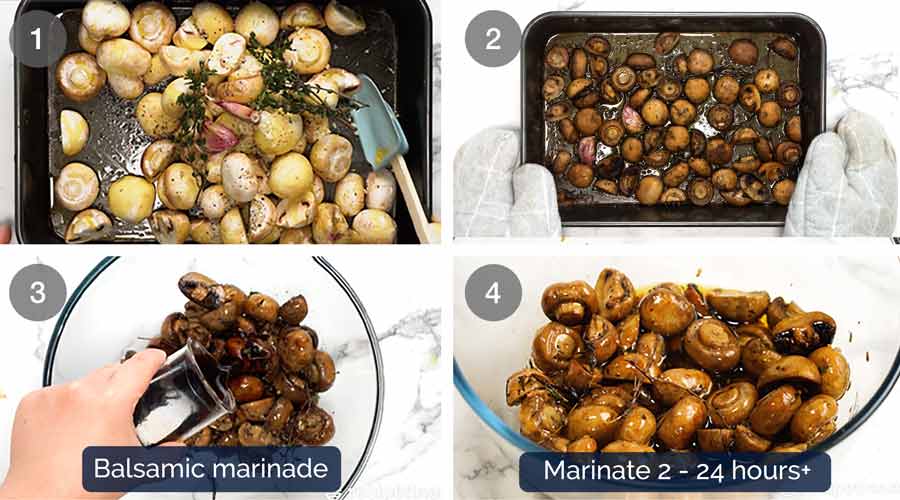
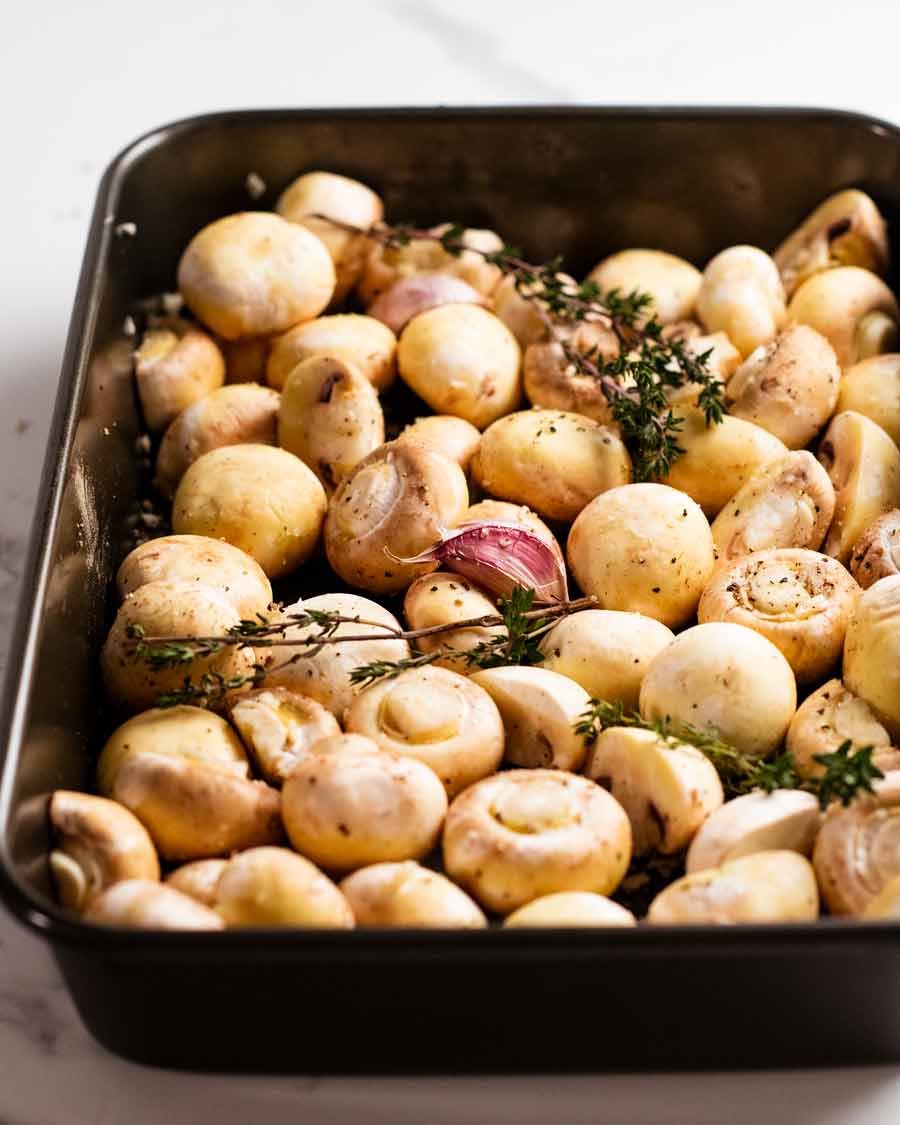
Toss the raw mushrooms with olive oil first. Then add the minced and whole garlic cloves, thyme, salt and pepper. Toss again.
Use a large roasting pan – easier for tossing than a baking tray. The mushrooms can be very, very snug in a single layer. They will shrink about 30%.
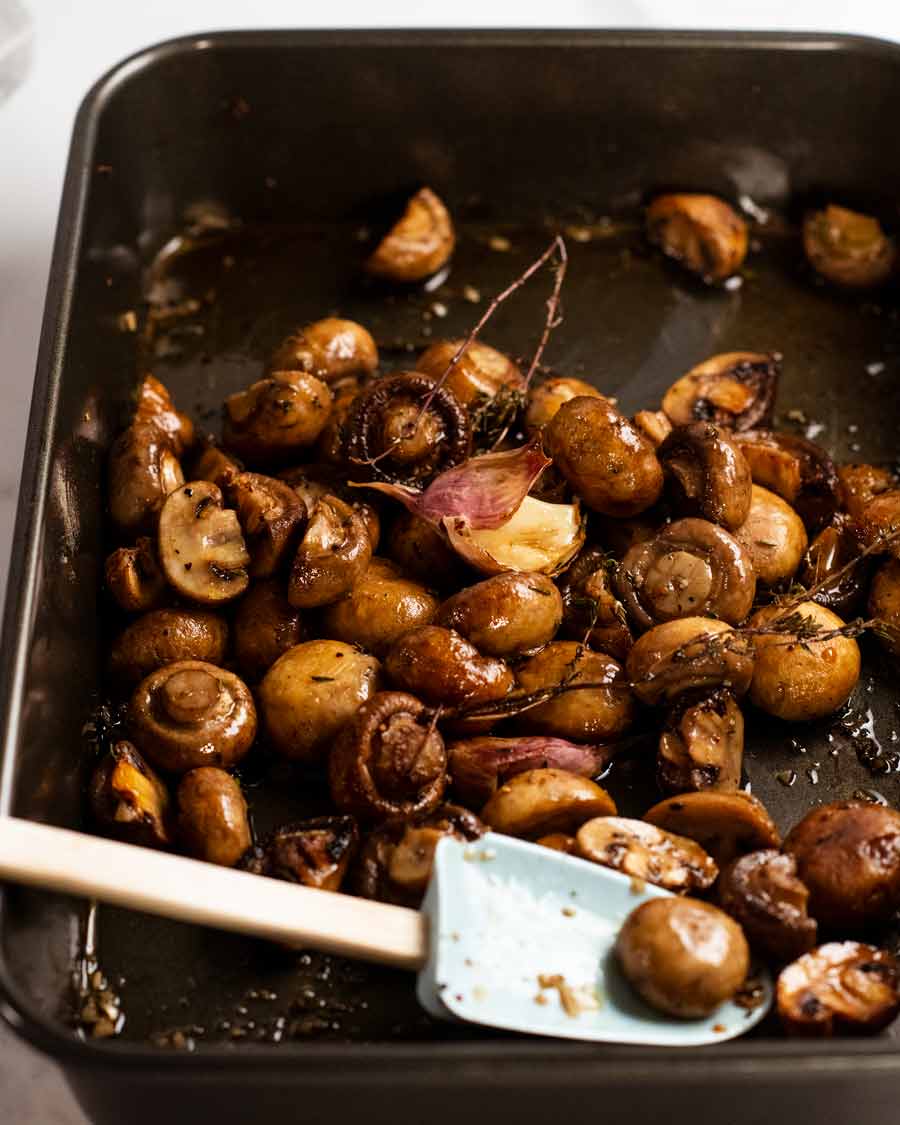
Roast for 35 minutes at 200°C/400°F (180°C fan-forced), tossing during the halfway mark, until browned and soft but still juicy inside. Don’t roast them for so long that they become shrivelled and sad!
Marinade – Immediately pour all the mushrooms and juices in the pan into a large bowl. Then add the balsamic vinegar and more olive oil, then toss, toss, toss!
Marinate – Leave the bowl uncovered (we don’t want condensation diluting the flavour!) and let the mushrooms marinate as they cool, tossing once (or twice or three times!). It will take about 2 hours to come to room temperature and that’s enough time for the mushrooms to absorb sufficient flavour to serve / start picking at for a “taste test”.😈
However, if you have the time, refrigerate and leave them overnight! They will absorb even more flavour.
Serve at room temperature or slightly warm for maximum appreciation of flavour! It really brings out the garlic and thyme flavour when slightly warmed.
Now, the fun part – serving options!
How to eat / serve marinated mushrooms
SO MANY POSSIBILITIES!
Pop in mouth straight out of the bowl – yup, these little juicy flavour bomb mushrooms are can’t-stop-eating-them good. My most common way of eating them!
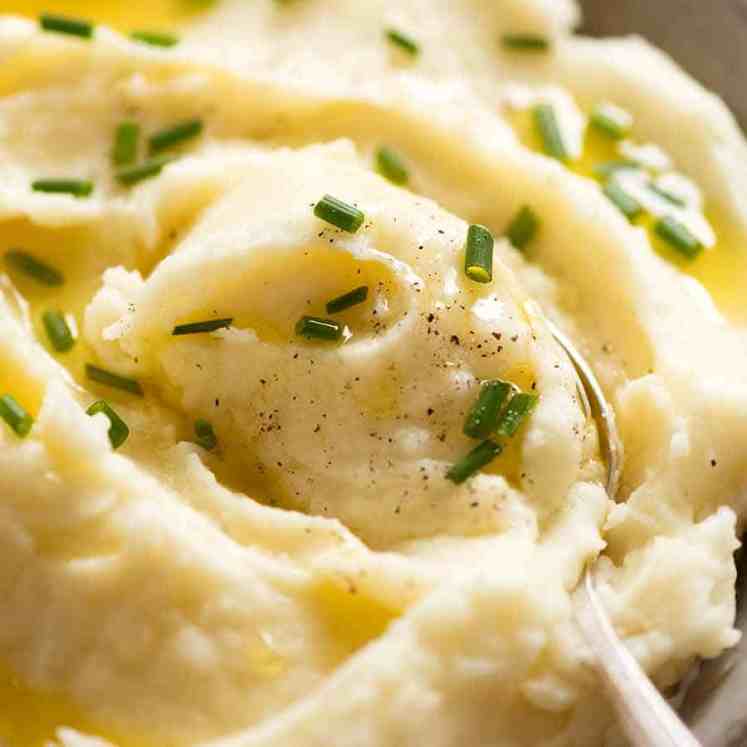
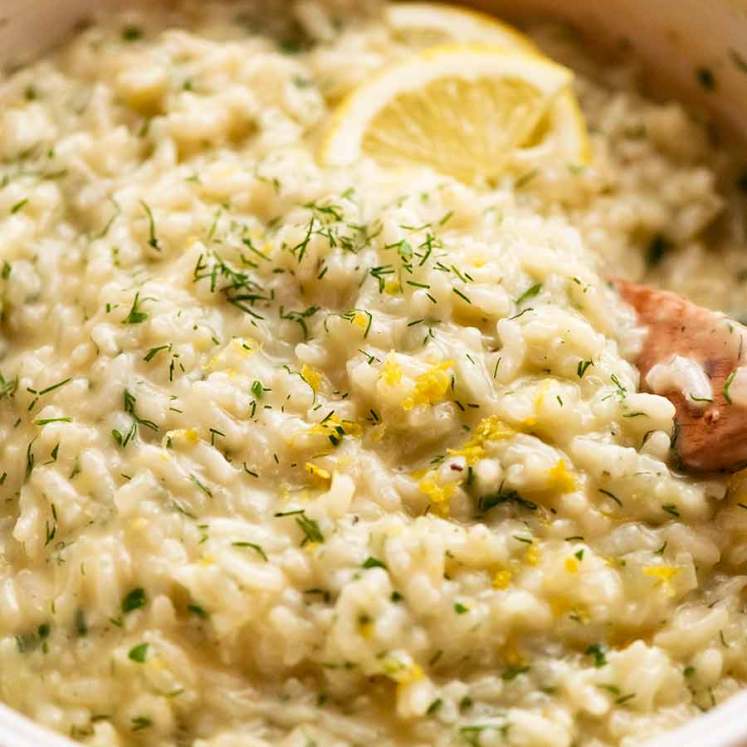
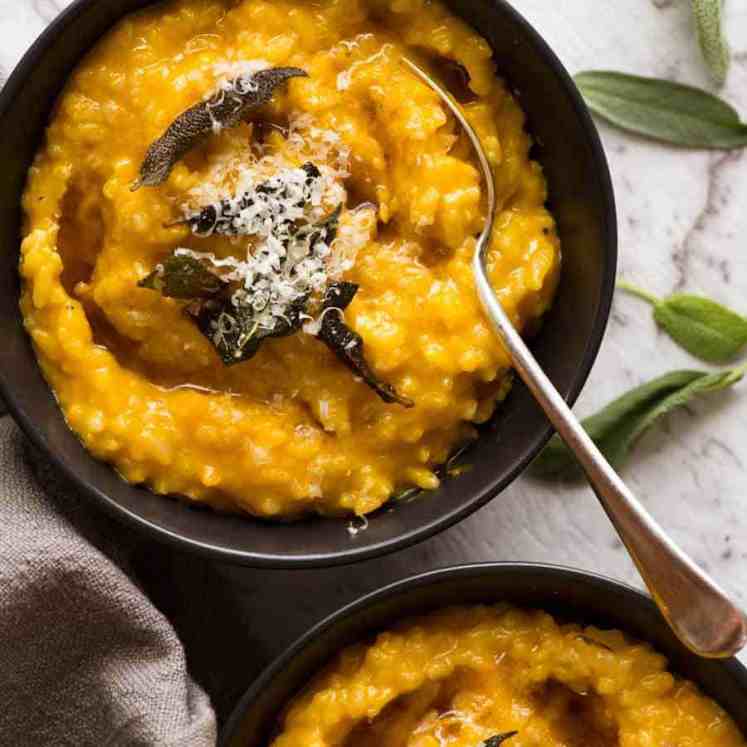
As a meal (see polenta photo at top of post) – Piled over creamy polenta (use directions in this recipe), mash (potato, sweet potato or cauliflower puree) or risotto (this No-Stir Creamy Lemon & Herb Baked Risotto and Creamy Baked Pumpkin Risotto come to mind). Note on pasta, rice etc – I don’t think there’s enough balsamic sauce to serve over plain cooked pasta or rice. You might disagree. Let me know if you do!!
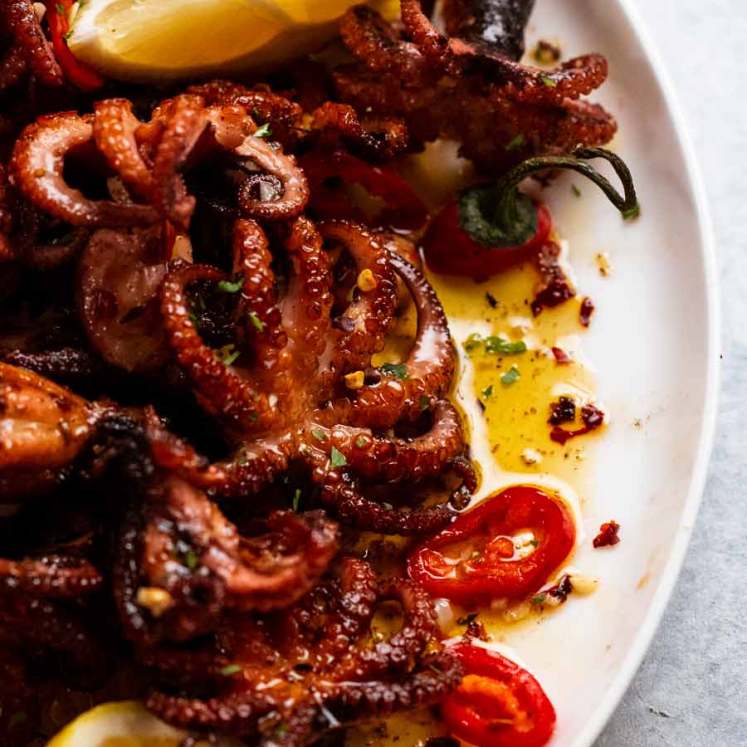
Grazing board (below) – Make these the hero of your next cheese platter! Serve alongside cheese, charcuterie, pickles, crackers, bread and why not some crispy grilled baby octopus? Serve the mushrooms whole or sliced so they can be piled onto crackers or crostini smeared with blue cheese (RTE team fave!) or goats cheese.
“Interesting salads” lunch spread – Something I’ve been doing more of lately! Make a lunch spread with a selection of interesting salads for a leisurely Sunday lunch with friends. I see these marinated mushrooms alongside a Roasted Cauliflower Salad, Lentil and Roasted Eggplant Salad and perhaps a leafy Iceberg Lettuce Dill Salad with crusty bread (or cheese bread!) for plate mopping.
Toast (pictured below) – Slather toasted bread with avocado, goats cheese, blue cheese, cream cheese or anything that can act as a “glue” for the mushrooms. If serving with a knife and fork, the mushrooms can be kept whole. If eating with your hands, I’d suggest slicing or quartering so the mushrooms don’t tumble off.
Stuffed in a sandwich – Take a big soft roll. Slather with cream cheese or goats cheese. Pile with rocket/arugula, slices of tomato, and a big pile of these mushrooms. YES!
As a side dish! For all these, I’d warm the mushrooms slightly. See list below.
Serve marinated mushrooms on the side of…
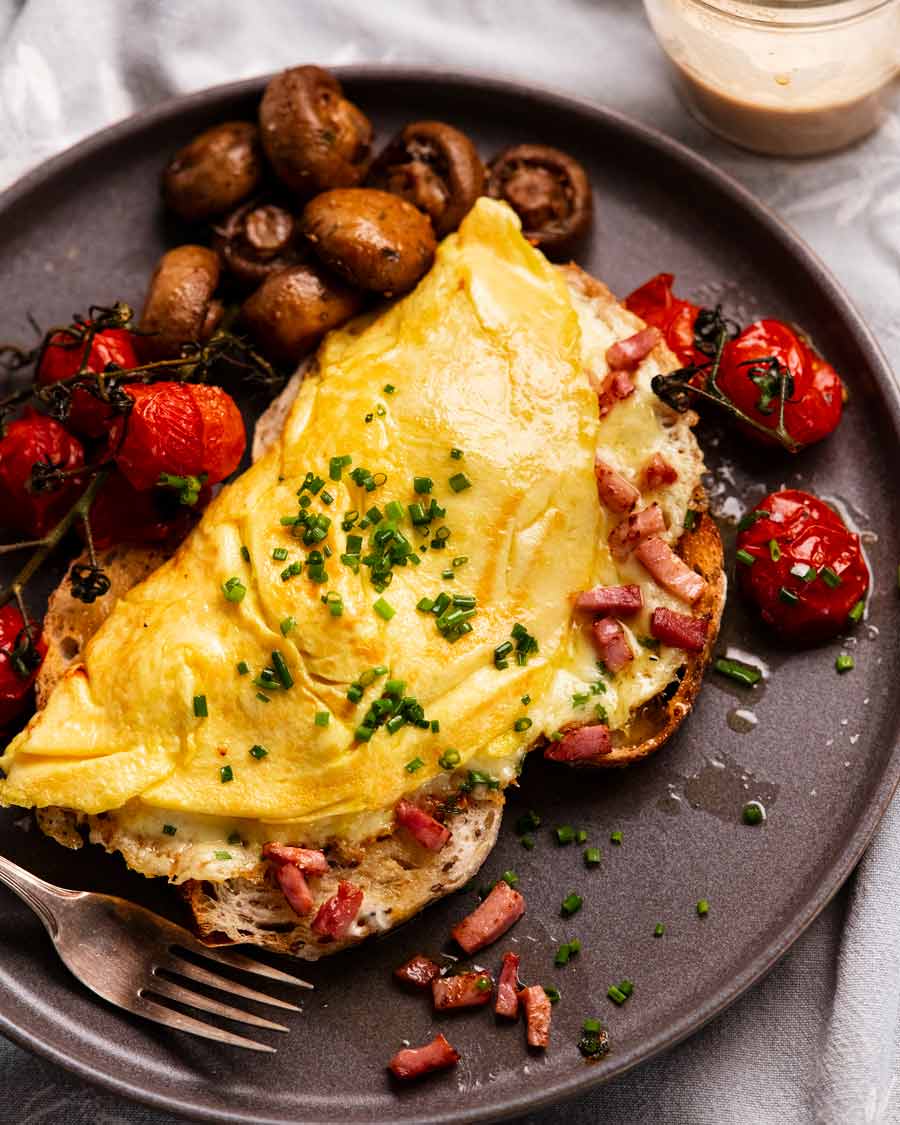
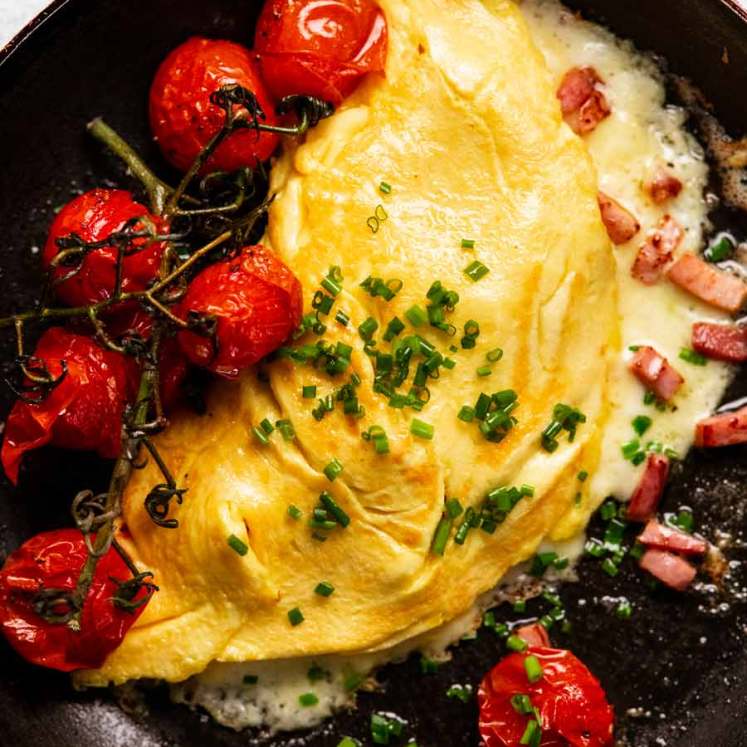
Breakfast – On the side of bacon & eggs, a ham & cheese omelette, fluffy egg white omelette or frittata.
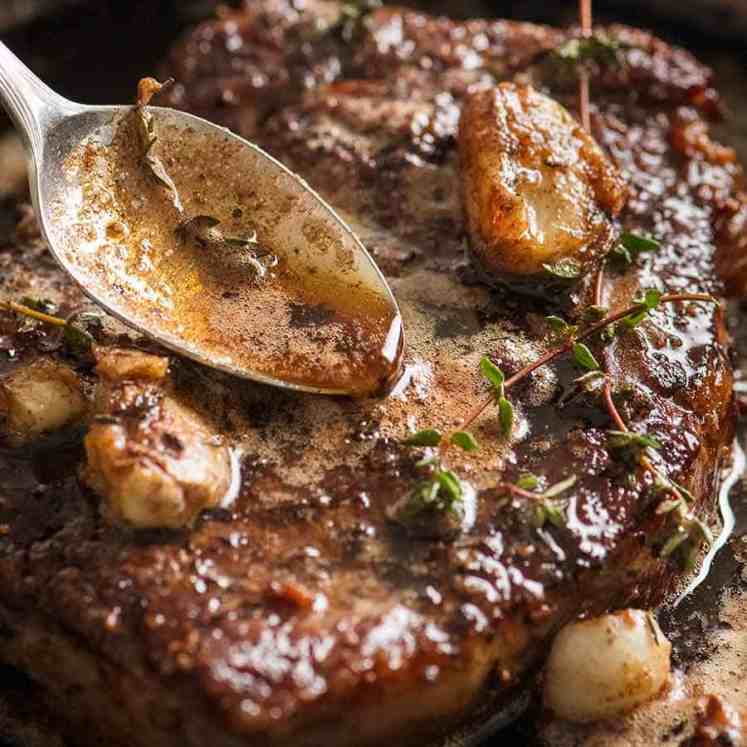
Steak dinner! I see a scotch fillet/boneless rib eye with Café de Paris or Béarnaise Sauce with a side of Sautéed Green Beans with Garlic and Baby Potatoes with Butter & Herbs.
As a steak sauce – Make your favourite steak (this one of course 😂) then serve it with a pile of marinated mushrooms (sliced) on top. Spoon over the balsamic juices. Yum, yum, yum!
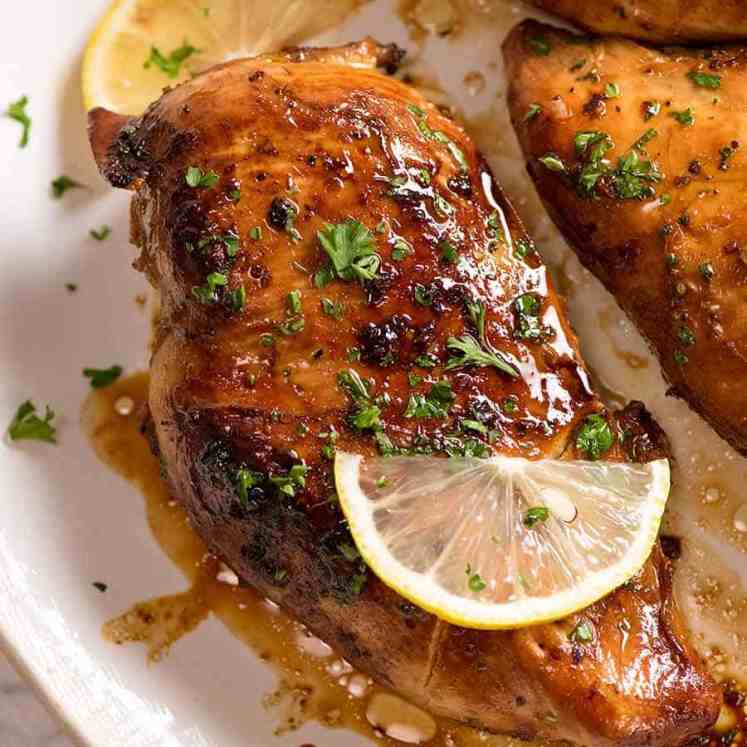
On a simple piece of chicken breast – Do the same with a simple piece of pan seared marinated chicken breast. Or pile a generous amount over poached chicken breast – you’ve used my foolproof guaranteed-juicy-every-time method, right??

Well that’s enough ideas from me! I want to know how you’d serve these mushrooms. Share your suggestions below! – Nagi x
Watch how to make it
Balsamic marinated mushrooms
Ingredients
Roasted mushrooms:
- 700g/ 1.4 lb small whole white mushrooms or halved larger ones (Note 1)
- 3 tbsp extra virgin olive oil
- 1 tsp cooking/kosher salt
- 1/2 tsp black pepper
- 5 sprigs fresh thyme (sub 1/2 tsp dried thyme)
- 2 garlic cloves , finely minced
- 2 garlic cloves (skin on fine), smashed (Note 2)
Balsamic marinade:
- 4 tbsp balsamic vinegar
- 3 tbsp extra virgin olive oil
Instructions
- Preheat oven to 200°C/375°F (180°C fan).
- Season – Put mushrooms into a roasting pan (not tray, easier to mix well in pan). They can be snug but should be in a single layer (mushrooms shrink ~25-30%). Toss with olive oil first. Then add salt, pepper, thyme and garlic (minced & whole), then toss again.
- Roast 35 minutes, tossing well at the 20 minute mark, or until the mushrooms are browned and soft.
- Marinade – While hot, transfer mushrooms into a bowl (including all the juices). Add balsamic and olive oil. Toss well.
- Marinate 2 to 24 hrs – Let the mushrooms cool and marinate for 2 hours (uncovered), tossing once or twice, or for even better flavour, marinate overnight (covered in fridge once cool).
- Serving – Always serve at room temperature or slightly warmed, for best flavour. And don't waste the juices – it's full of flavour!
- Serving options – As part of a grazing board, on polenta or mash as a meal, on toast slathered with goats cheese or cream cheese, on the side of fried eggs, on creamy risotto or risoni/orzo. See in post for a long list!
Notes
Nutrition
Life of Dozer
Nowhere to be seen while I was making the mushrooms. Then the cheese board appears and poof! There he is!

The post Balsamic marinated mushrooms appeared first on RecipeTin Eats.
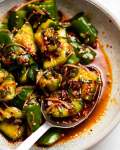
]]> If you love cucumbers, or even if you don’t, you have to try this Asian cucumber salad recipe! Smashing is essential to the making and eating experience – it creates crevices for the chunky chilli dressing to nestle in. The perfect combination of refreshing and firecracker heat. OBSESSED! Spicy cucumber salad Everybody who knows me... Get the Recipe
The post Spicy Asian Cucumber Salad appeared first on RecipeTin Eats.
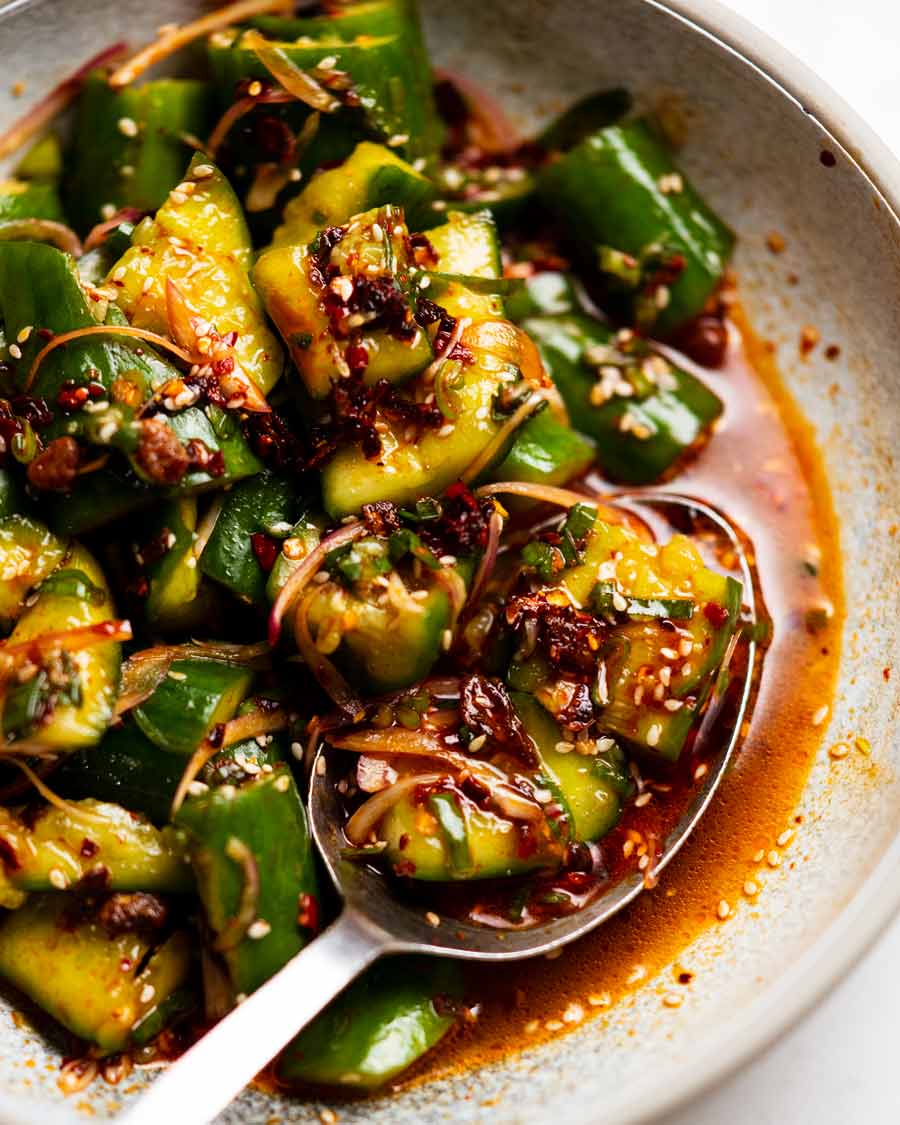
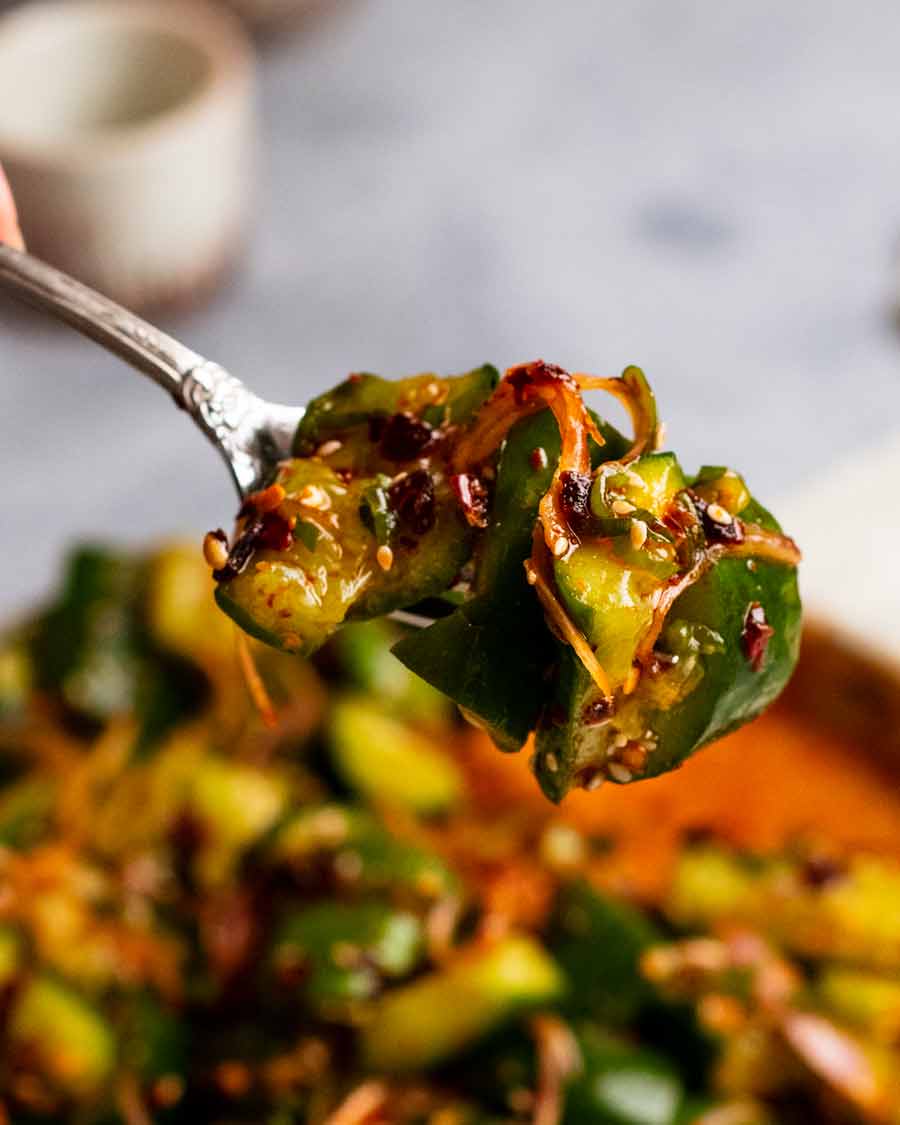
]]>If you love cucumbers, or even if you don’t, you have to try this Asian cucumber salad recipe! Smashing is essential to the making and eating experience – it creates crevices for the chunky chilli dressing to nestle in. The perfect combination of refreshing and firecracker heat. OBSESSED!
Spicy cucumber salad
Everybody who knows me knows that I become obsessed with shiny new toys and right now, that shiny new toy is Spicy Cucumber Salad. I’ve been making and eating it obsessively for weeks, sometimes as a meal, defensively using recipe checking as an excuse whenever someone commented on the presence of yet another tub of this in my fridge.
It’s quick to make. An addictive combination of refreshing cucumber with a spicy in-your-face dressing balanced with a generous handful of green onion and eschallots.
I can’t wait for you to become as obsessed as me. Let’s be defensive about our obsession together!
Scared of the chilli? Make Smashed Cucumbers with ginger sauce instead!
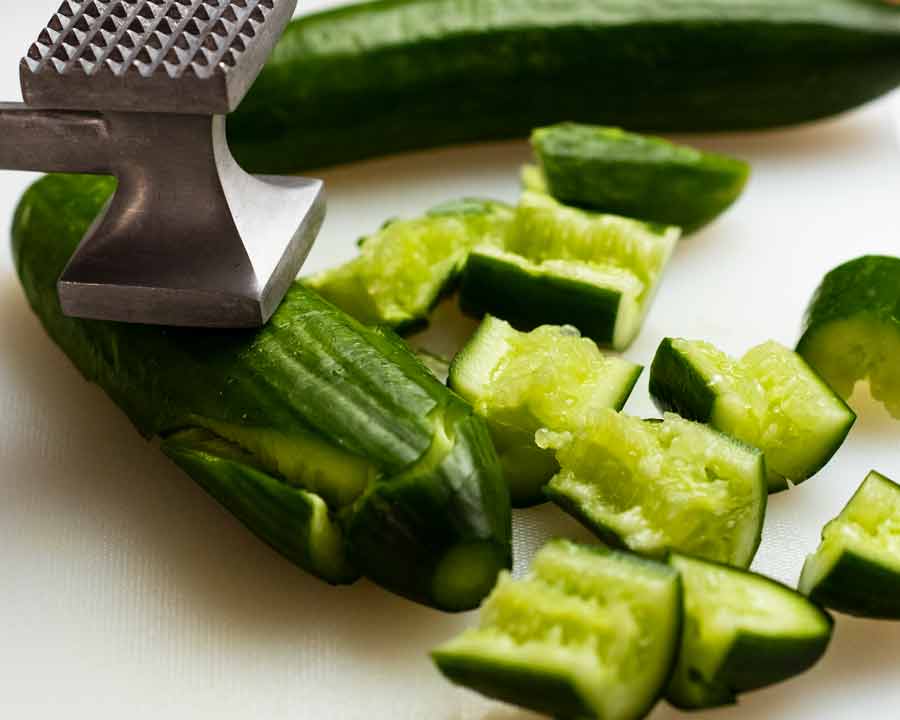
This cucumber smashing business
Cucumbers are slippery suckers. Dressing just doesn’t stick to it.
Which is why Asians are so fond of smashing cucumbers. Bash them with a meat mallet, rolling pin or other such heavy object so they burst open a bit. This creates splits and crevices for dressing and other salad add-ins (like green onions, sesame seeds) etc to nestle in. Which means more flavour in every bite. Plus you can salt them which draws excess water out which dilutes flavour when you eat them.
It’s a great technique. It’s effective for eating experience, and it’s fantastically therapeutic. Come home after a bad day at work and bash away!
Ingredients in Spicy Asian Cucumber Salad
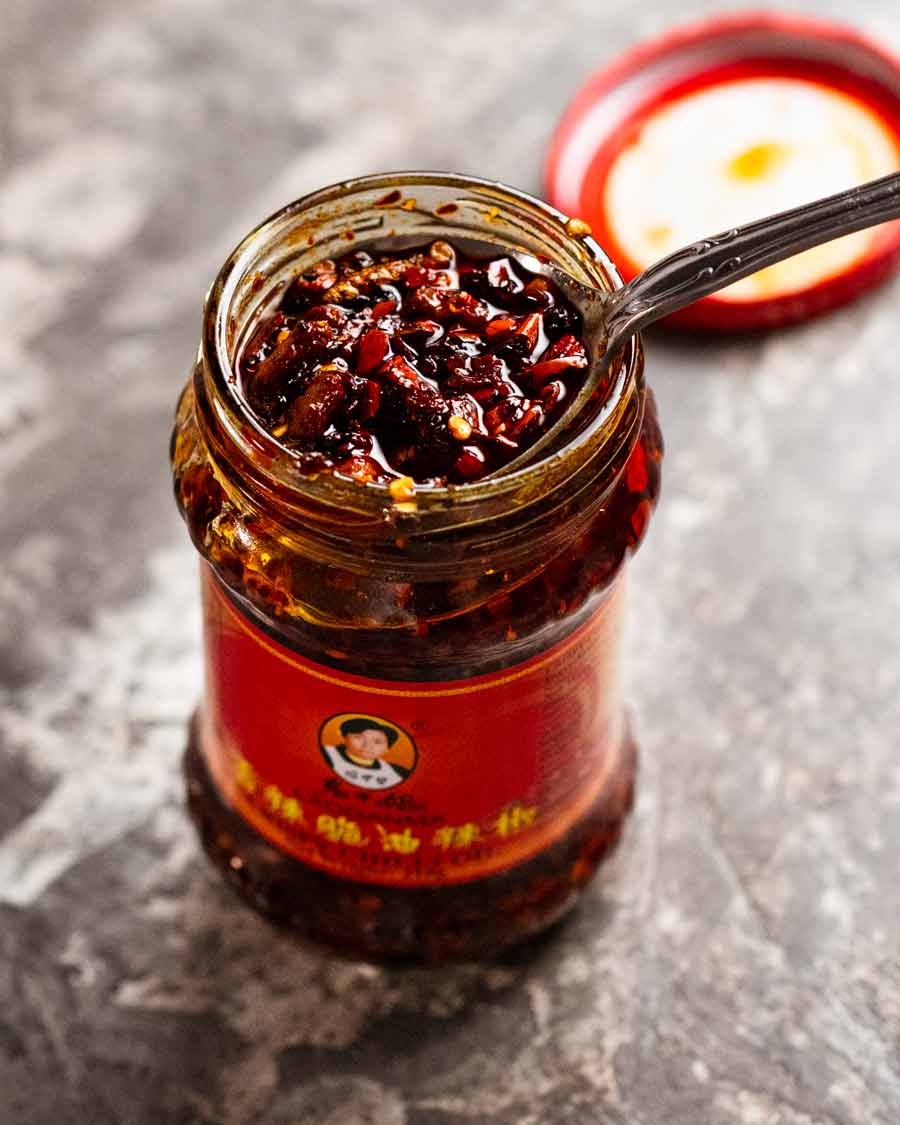
Chilli crisp!
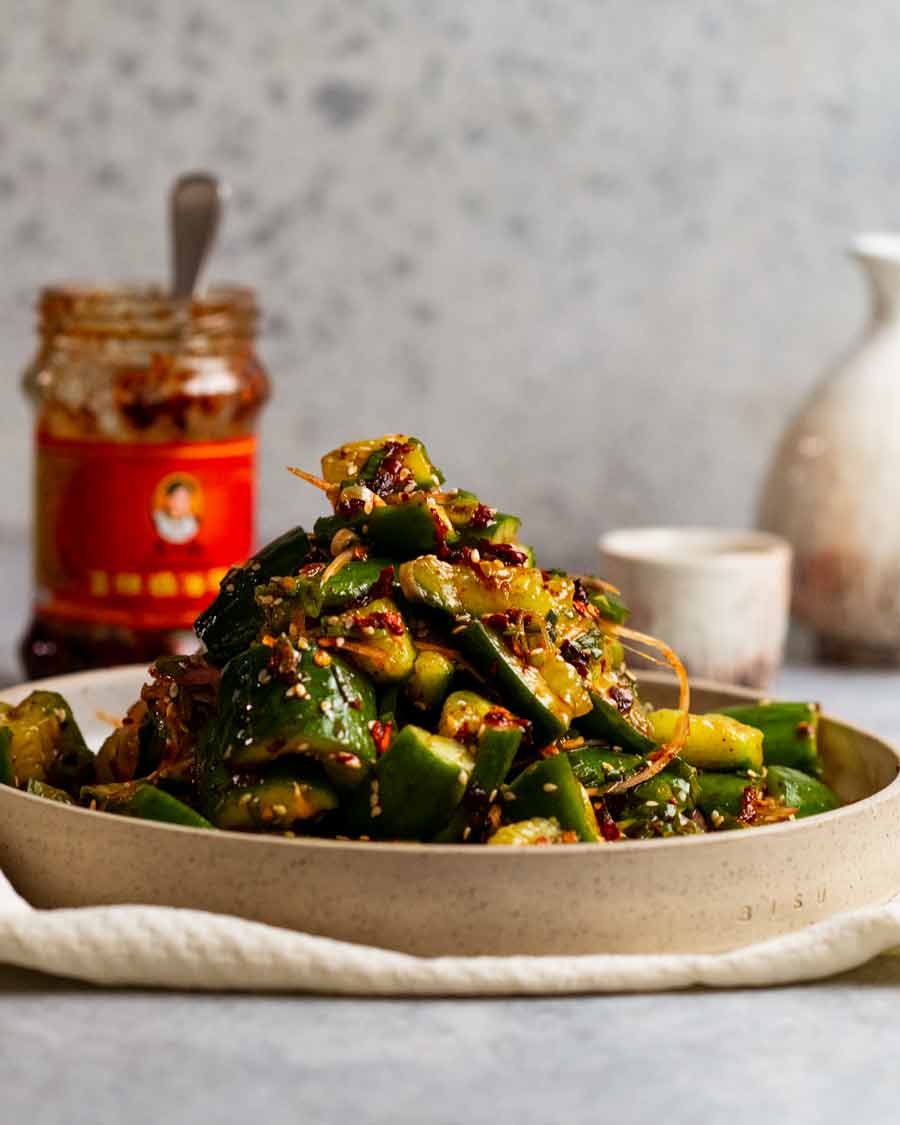
We’re welcoming back our old friend chilli crisp that I know you dashed out to get to make the Chilli Crisp Noodles from a few weeks ago. 😂 Adds great crunch from crispy chilli bits, bright red chilli oil and savoury flavour that all comes free in the jar – especially if you get the worldwide favourite Laoganma Crispy Chilli Oil which is popular for good reason. (Pictured below)
Spiciness – Surprisingly not that spicy, it looks far more fierce than it actually is! I can eat (small-ish) spoonfuls of it straight out of the jar.
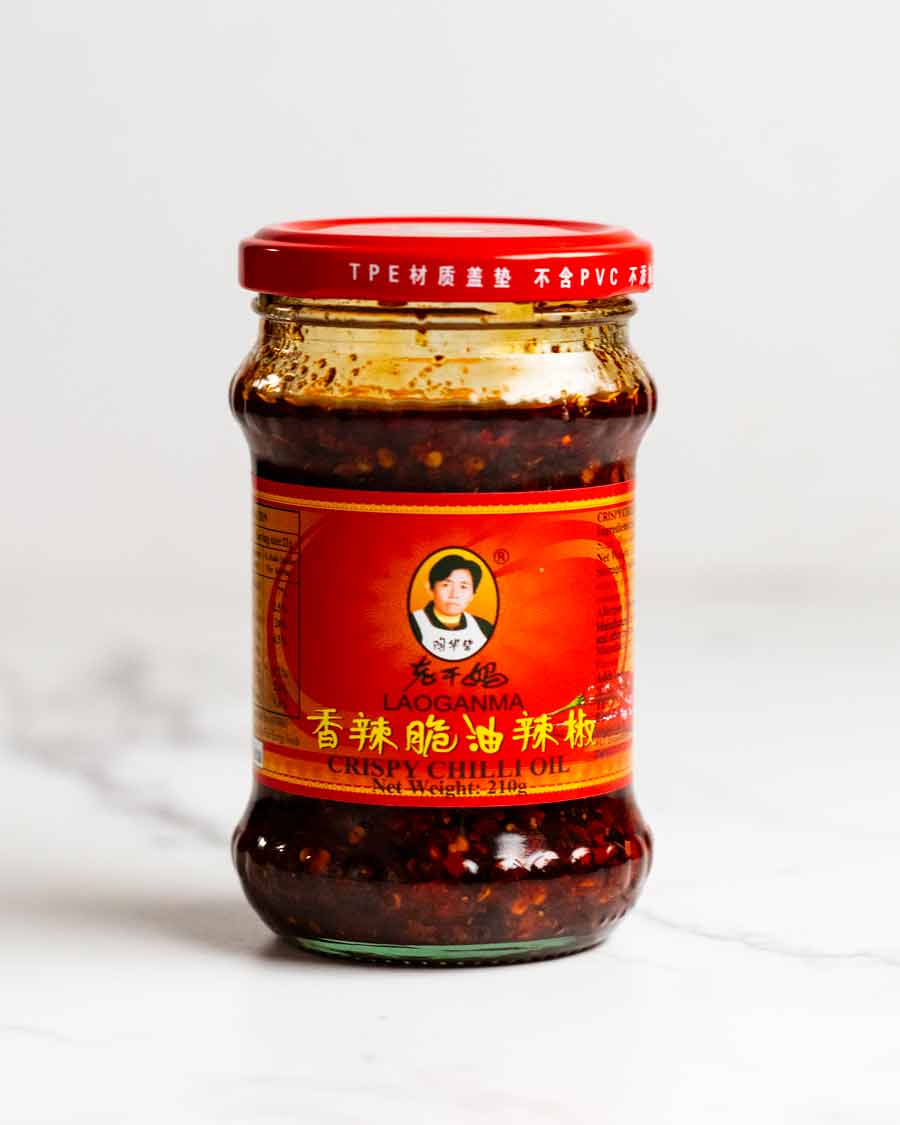
Find Laoganma Crispy Chilli Oil in the Asian aisle of large grocery stores (Aus: Woolies), else in Asian stores, and read more about this addictive paste in the Chilli Crisp Noodles. Not to be confused with other chilli sauces made by this brand and similar, like Spicy Chilli Oil, Hot Chilli Sauce, Hot Chilli Oil. Look for the word CRISP or CRISPY or CRUNCH!
Other chilli crisp brands – There’s plenty out there, mass produced and boutique ones. Sold under various names but all akin to similar meaning – crispy chilli oil, chilli crunch, crunchy chilli oil, and just plainly “chilli crisp”. Also remember in the States, chilli is spelt with one “l” – chili.
The salad things
Here’s what you need for the salad part:

Cucumbers – Use four cucumbers around 19 – 20cm / 7-8″ long. Scale up or down if yours are larger or smaller. I use four of what we call Lebanese cucumbers here in Australia (pictured) or 2 longer English / telegraph cucumbers which are around 30cm/1 foot long.
Eschallot / French onion – Called shallots in the US, these baby onions are not as harsh onion-y and finer than regular onions. I find them a pain to peel – because they have fine, papery skin – so generally try to avoid them unless I really do think it makes a dish better. In today’s case, I like them because a) we use them raw and b) they flop better rather than being all pokey. Substitute with red onion but slice them extra finely. Maybe use a mandolin.
Green onion – For more freshness in the salad. With all the cucumber freshness and the bold spicy sauce, this salad can can take it. It wants it!
Sesame seeds – Tossed into the salad for extra sesame goodness.
The dressing
And here’s all you need for the very simple dressing. Because the chilli crisp does so much of the flavour heavy lifting here – it has garlic, salt, sugar, oil!
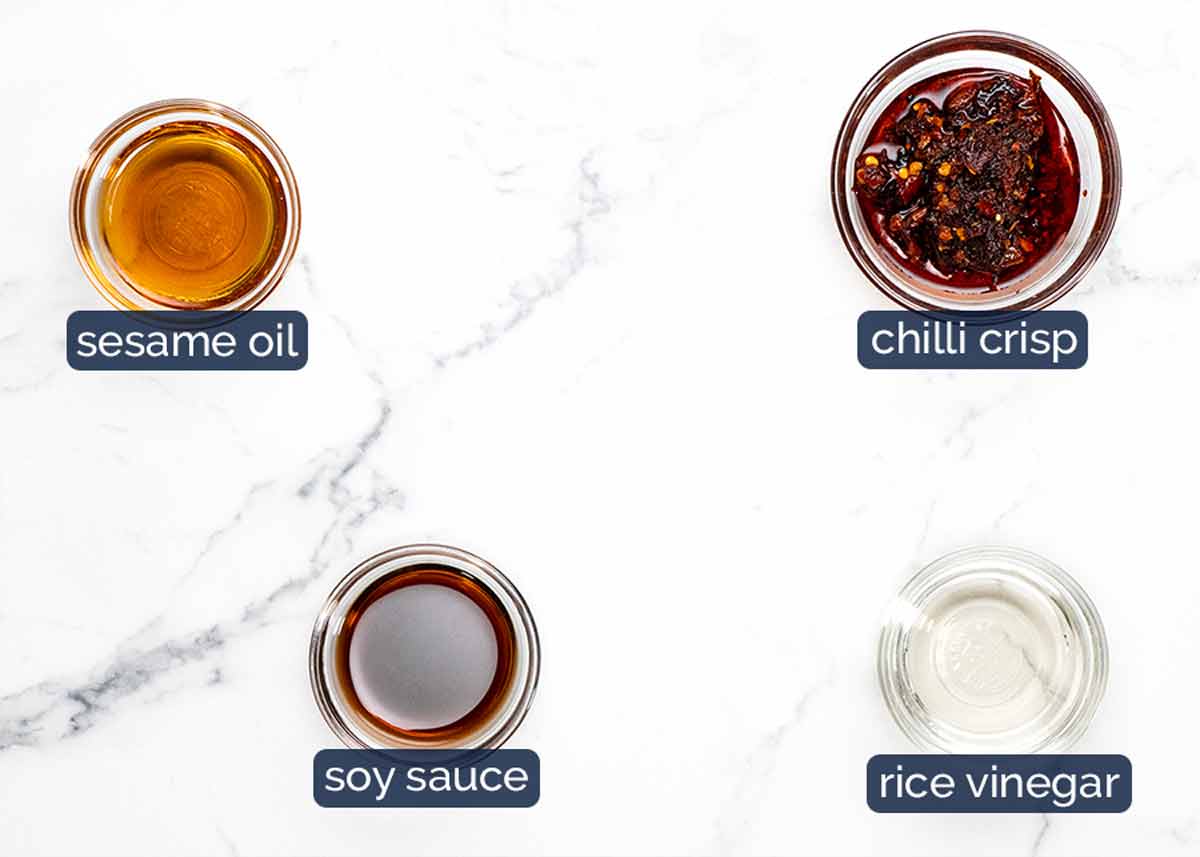
Sesame oil – For beautiful sesame flavour. Use toasted sesame oil – it’s brown and has more flavour than untoasted (which is yellow). Default sesame oil sold in Australia is toasted, untoasted is harder to find.
Rice vinegar – Because it’s an Asian salad, we’re using an Asian vinegar here which is milder than most western vinegars. However, any clear vinegar can be substituted in a pinch because this is not a primary ingredient – ordinary white vinegar, apple cider, champagne vinegar etc.
Soy sauce – The salt in the dressing. Use an all-purpose one or light soy sauce. Don’t use dark soy sauce (too strong) or sweet soy sauce (too sweet).
How to make Spicy Asian Cucumber Salad
Super simple – smash cucumber, salt it (draws out water that dilutes flavour), toss with 3 ingredient dressing and as much chilli crisp as you dare!
Smash and salt
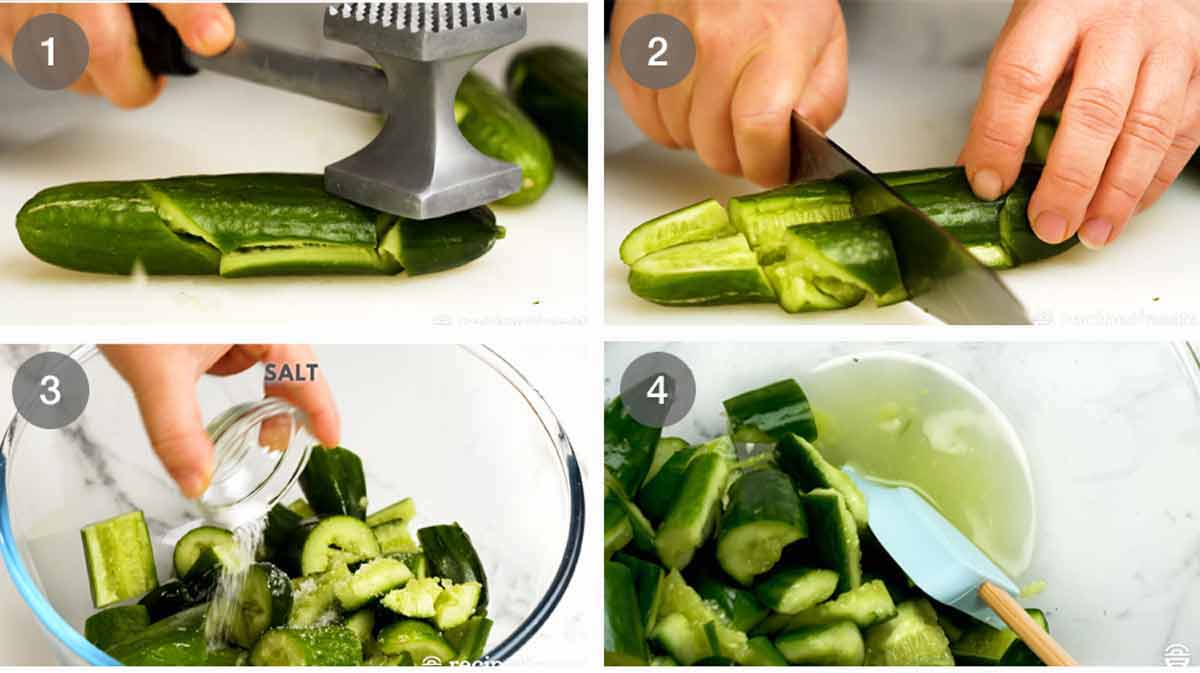
Smashing – Hit the cucumber with a meat mallet, rolling pin, hammer or similar and relish in the stress relief or simply enjoy the fun factor. Hit hard enough to make them split open down the sides but not so hard you squish them into mush.
Cut the cucumber lengthwise down the middle then into 2.4cm/1″ pieces.
Salt 30 minutes – Put them in a bowl then toss with salt. Leave for 30 minutes. The salt will draw out water from the cucumbers which dilutes flavour when you eat them. It also seasons the cucumbers all the way though.
We’re only using 3/4 teaspoon salt here and you’ll be surprised how effective this is for the amount of cucumber we’re using.
Drain and discard the cucumber water from the bowl (too salty to re-use for another purpose). Use a colander if you want to be thorough else just drain it out of the bowl, using your hand to hold the cucumbers in.
Dress & toss
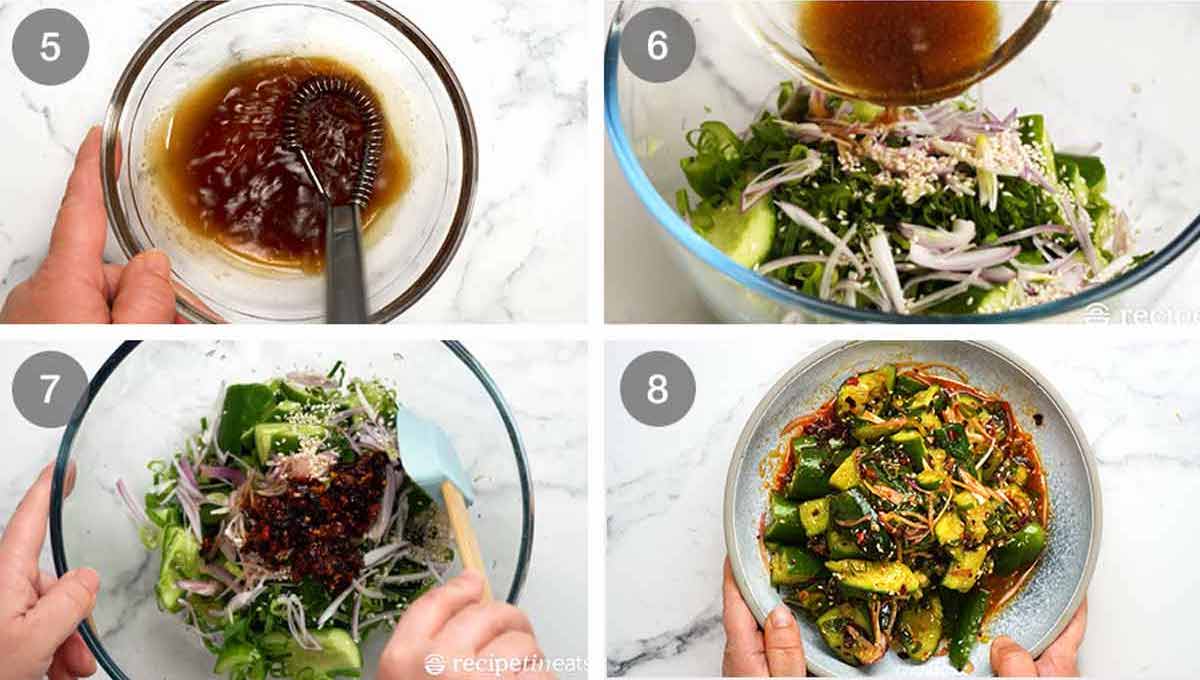
Dressing – Whisk the soy sauce, sesame oil and vinegar in a bowl until it combines properly. You’ll know because it becomes murky and thicker, rather than clear and split.
Dress – Add green onion, eschallots, sesame and dressing in a bowl.
CHILLI CRISP! Add 2 tablespoons of chilli crisp – or more if you dare! You want to get a mound of the crispy chilli – it will be well soaked with the red chilli oil that colours this salad. You can always add more after you toss. Taste and add, taste and add!
Toss well until the eschalots become floppy. Then pile up high into a shallow bowl and serve!
Eat with spoon
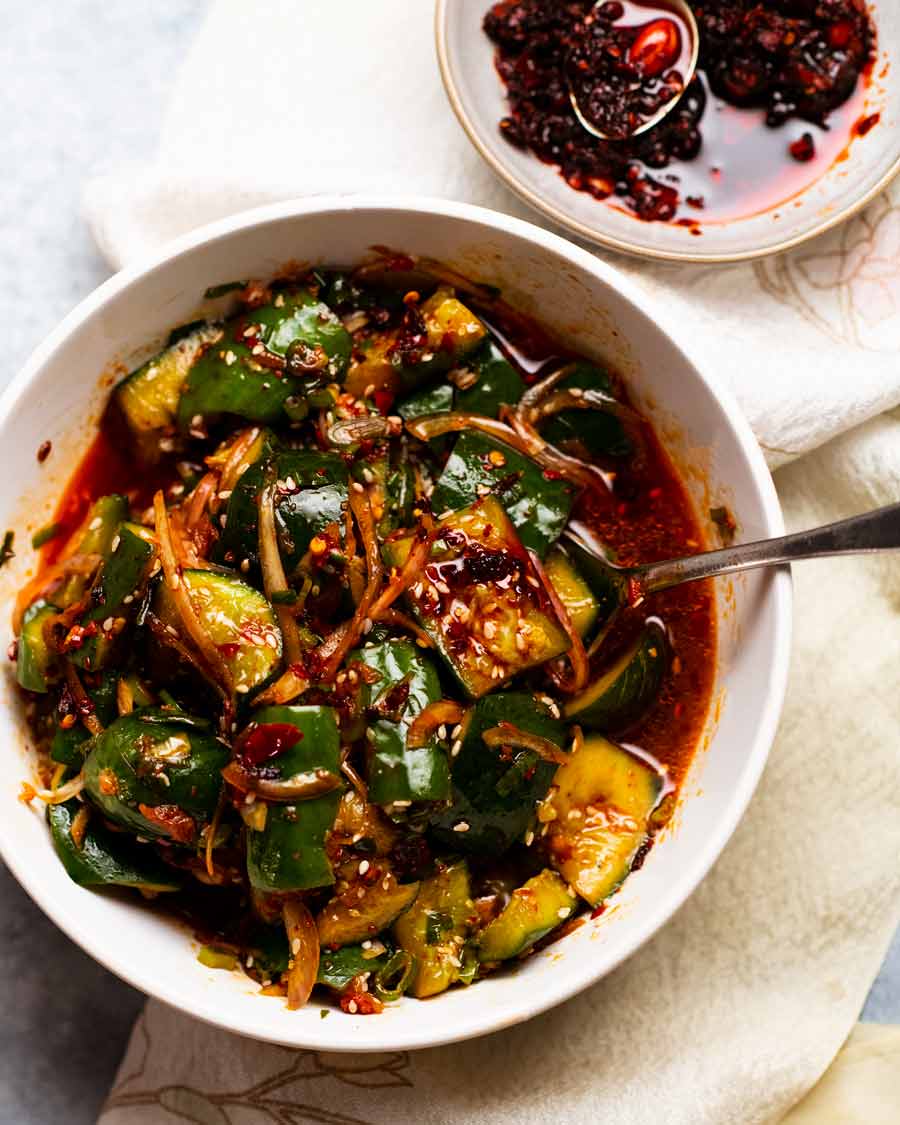
You’ll find that the longer this salad sits around, the more water is drawn out of the cucumbers. So a few hours after making / the next day, it looks like the above.
So, my unusual eating advice for this salad is as follows:
Freshly made – The dressing is more intense flavoured and coats / gets stuck in the cucumber crevices better, less/little pooled on plate. Serve and eat with fork.
After few hours / next day – Dressing is diluted from extra water drawn out of the cucumbers. It’s not watery and flavourless, but it’s not as intense as when freshly made. So eat with a spoon like soup to get plenty of dressing in each mouthful. It’s so good!
Enjoy! – Nagi x
Watch how to make it
Spicy Asian Cucumber Salad
Ingredients
- 4 cucumbers (~20cm/8", scale up/down for shorter/longer, Note 1)
- 3/4 tsp cooking/kosher salt
- 1 eschalot/French onion , halved then very thinly sliced (US: shallot) (Note 2)
- 1 cup green onion , green part only finely sliced (1 large, 2 small stems)
- 2 tbsp+ chilli crisp (crispy chilli oil) – Laoganma is my fave (Note 3)
- 2 tsp white seame seeds , toasted (save some for topping)
Dressing:
- 1 1/2 tbsp rice vinegar (sub any clear vinegar)
- 2 tsp soy sauce , all-purpose or light (Note 4)
- 2 tsp sesame oil , toasted (ie brown, not yellow)
Instructions
Smash & salt cucumbers
- Smash – Hit cucumbers with a meat mallet, rolling pin or similar to make the sides burst open. Cut in half lengthwise then into 2.5cm/1" pieces.
- Salt 30 min – Place in a bowl, toss with salt. Set aside for 30 minutes to draw out water (Note 5). Drain/strain and discard salty water, leave cucumbers in same bowl.
Salad
- Whisk Dressing in a bowl.
- CHECK spiciness of your chilli crisp – they vary by brand. If using Laoganma, stick with recipe, else adjust to taste.
- Toss – Put green onion, eschalots, sesame seeds, dressing and chilli crisp in with the cucumbers. Toss until eschalots go floppy – ~30 seconds.
- Serve, sprinkled with extra sesame seeds and dollops of chilli crisp if you dare!
- Note: Water continues to come out of cucumbers so after few hours/next day, you'll have a lot more dressing but not as intense flavoured. So eat/serve with spoon to get plenty of dressing in every bite!
Notes
Nutrition
Life of Dozer
Empty. Told you!

The post Spicy Asian Cucumber Salad appeared first on RecipeTin Eats.
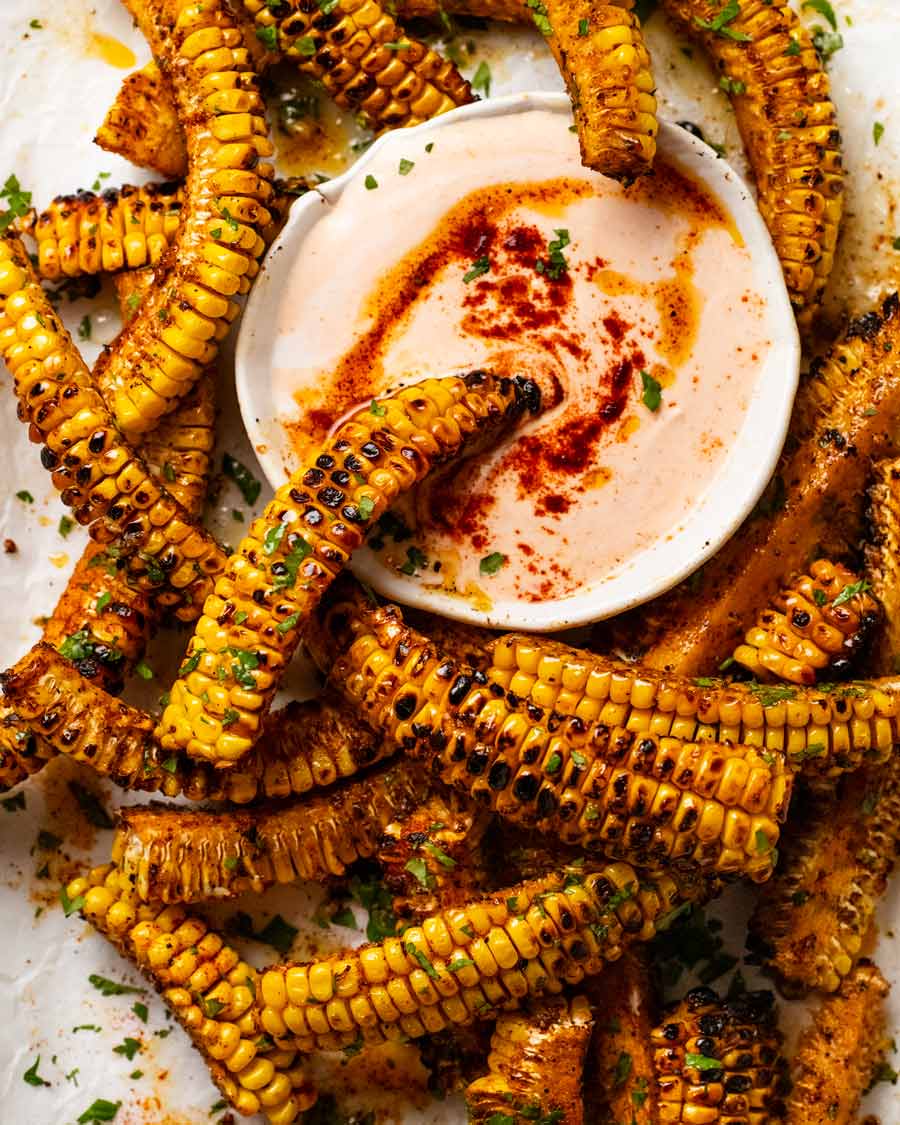
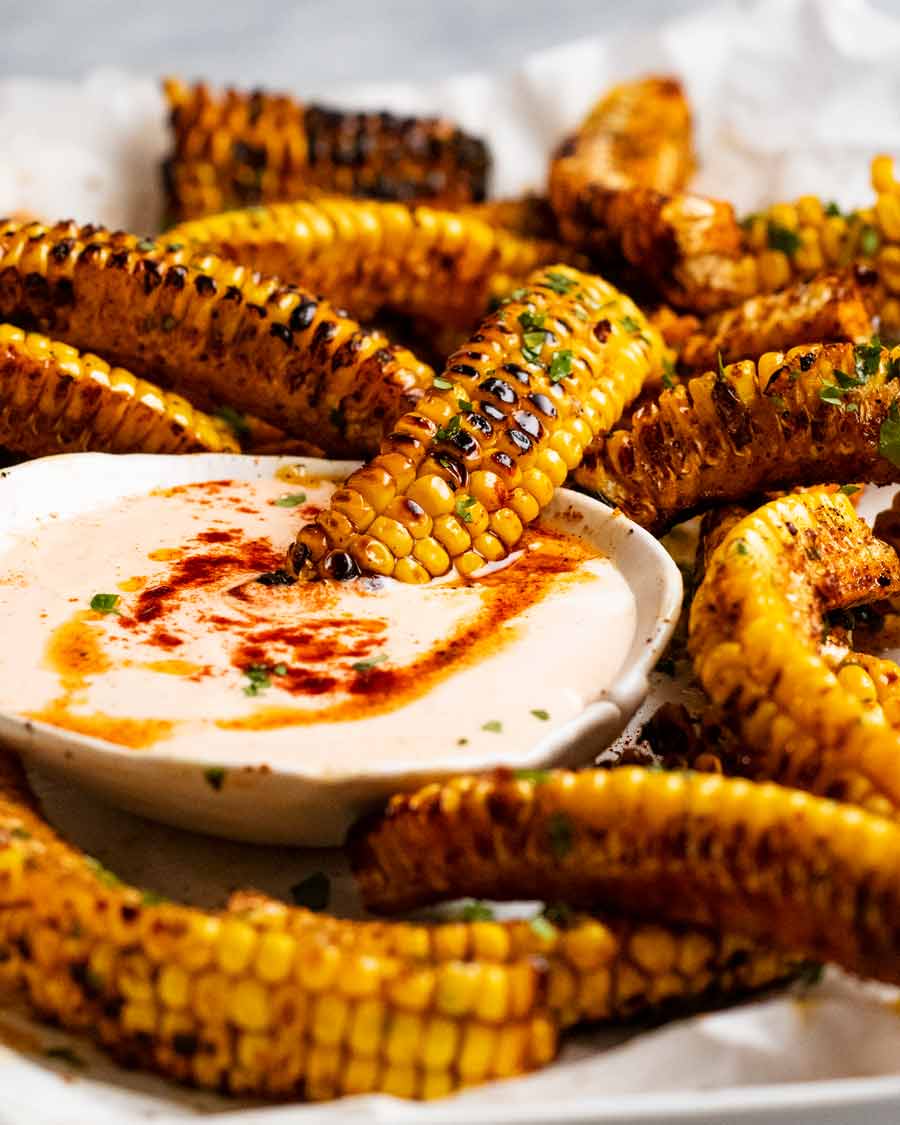
]]> Corn ribs are a top-notch eating experience!! Seasoned juicy corn kernels and garlic butter bursting in your mouth with every bite in a way you’ll never get with whole corn cobs. Epic app or side dish, ideal for the BBQ or make these in your oven! Corn ribs Named as such because of the rib-like... Get the Recipe
The post Corn Ribs – your new favourite way with corn appeared first on RecipeTin Eats.
]]>Corn ribs are a top-notch eating experience!! Seasoned juicy corn kernels and garlic butter bursting in your mouth with every bite in a way you’ll never get with whole corn cobs. Epic app or side dish, ideal for the BBQ or make these in your oven!
Corn ribs
Named as such because of the rib-like shape and the manner in which it is eaten (like ribs!), corn ribs are apparently a food trend that went nuts a couple of years ago. I’m so unfashionable when it comes to anything – food, fashion, or otherwise – I didn’t even realise this was a trend until I started writing this post today and did my usual obligatory Google research!
Also, truthfully, I find most food trends disappoint. This one, however, did not!
Why corn ribs are so good – It’s so much more than just the novelty factor of the curled corn. The beauty of cooking corn this way is that the kernels open up in a way they never do when you cook whole corn on the cob. So you can get your flavour of choice (seasoned garlic butter, in my case) to seep all the way into the cob. Which means every time you take a bite of corn kernels you get a squirt of the flavourful garlic butter in your mouth as well. It’s just insanely delicious!!
* Just to clarify, after a number of reader messages, you do NOT eat the cob! It gets soaked in the seasoned garlic butter and you sort of suck it out when you bite the kernels off the cob. It’s a delivery vehicle for flavour, not part of what you eat!

About these particular corn ribs
A lot of recipes seem to sparingly brush or sprinkle the corn ribs with oil and seasoning. I tried…but personally found it lacking and seemingly unworthy for a dish with such great eating potential.
Also, I’m not going to lie – cutting the corn takes more effort than slicing bread. (Read my steps, learn from my mistakes!). So if I’m cutting corn ribs, then the end result needs to be worth it!
So in the spirit of extra amazing-ness, these corn ribs are tossed in a generous amount of spicing (it will seem like too much – until the first bite), cooked (BBQ or oven) then doused in garlic butter which seeps into the kernels that open up like flowers as the corn ribs curl up.
Flavour before and after cooking makes it exponentially good. I promise you, this is worth making. I’m absolutely addicted!
What you need for corn ribs
Here’s what you need to make corn ribs. Firstly, corn. Yes, corn! 😂
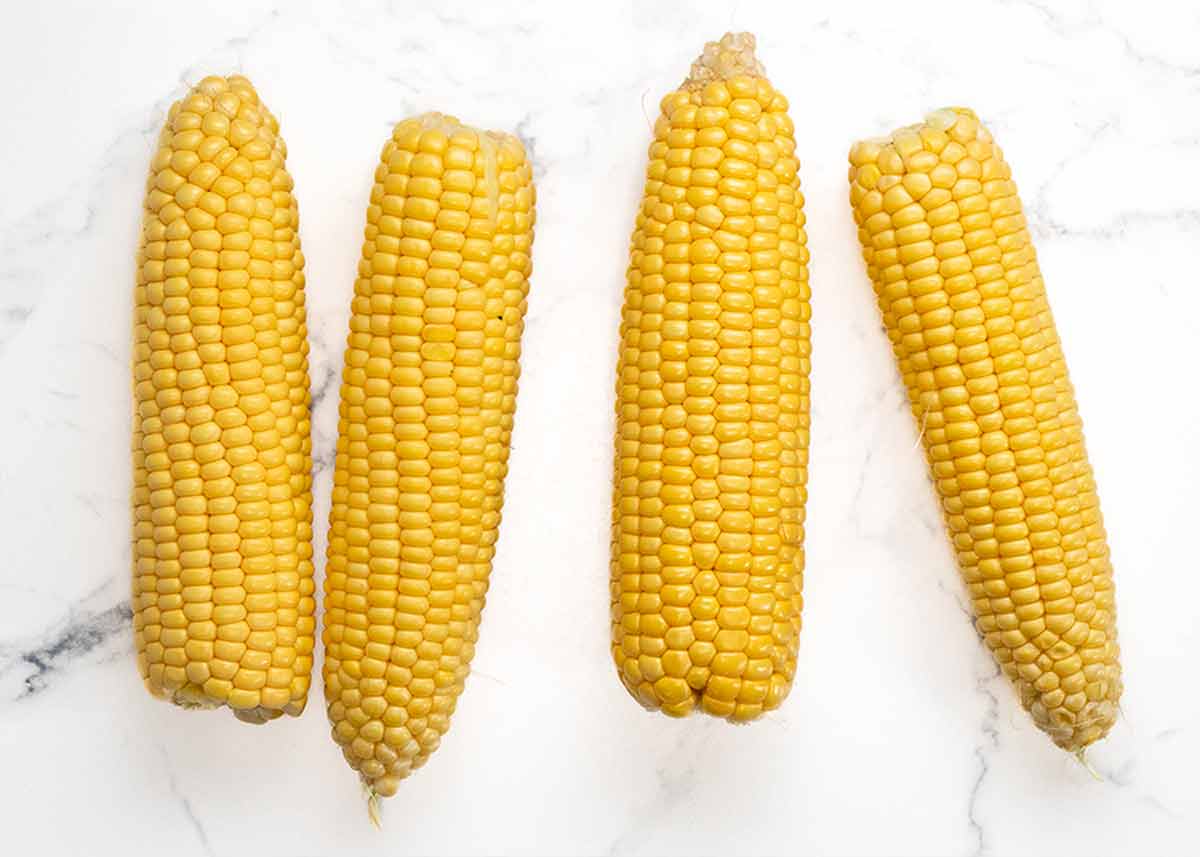
Whole corn on the cob. At its prime in summer, albeit the mild climate here in Australia means we get good corn year round, and generally for very good value too.
And for all the flavour…
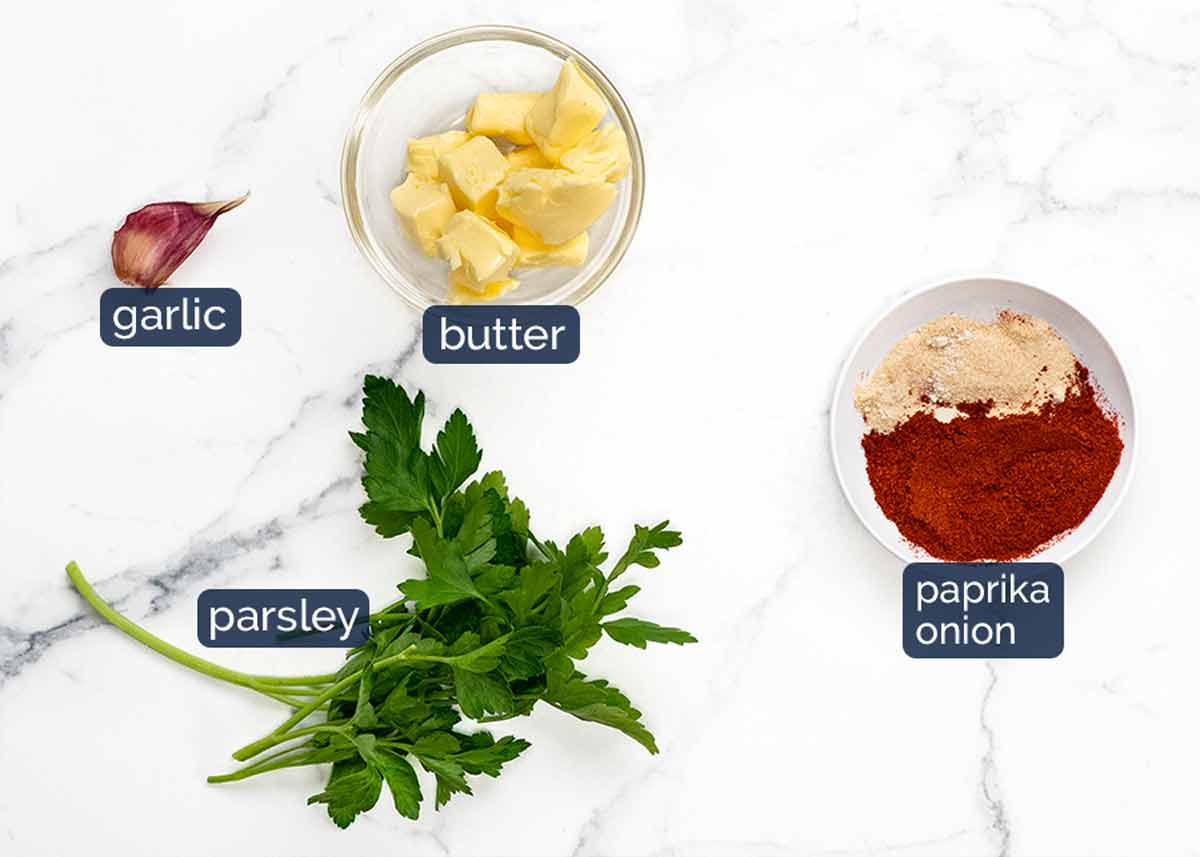
Seasoning – smoked paprika (or plain), garlic powder, salt and pepper. For tossing the corn. There’s a generous amount for the amount of corn because so much of it gets stuck on the cut side of the corn! Trust me on this. You want a LOT of seasoning!
Garlic and butter – for dousing at the end. Dream of all that butter seeping in between the kernels….
Parsley, coriander/cilantro, chives or something else green finely chopped, for optional garnish.
How to make corn ribs
After suffering through more corn rib cutting grievances than I care to confess (how did that tiny girl cut those corn ribs on TikTok??🤯), I think I’ve figured out the easiest and safest method that doesn’t call for brute strength.
(PS That tiny girl did not show cutting her own corn ribs on TikTok… #cynic!)
Cutting corn ribs
Heads up – If you’re a first timer, you’ll probably end up with some crooked and broken pieces. I’ve had considerable practice and I still end up with broken ribs every now and then. So what? Still delicious!
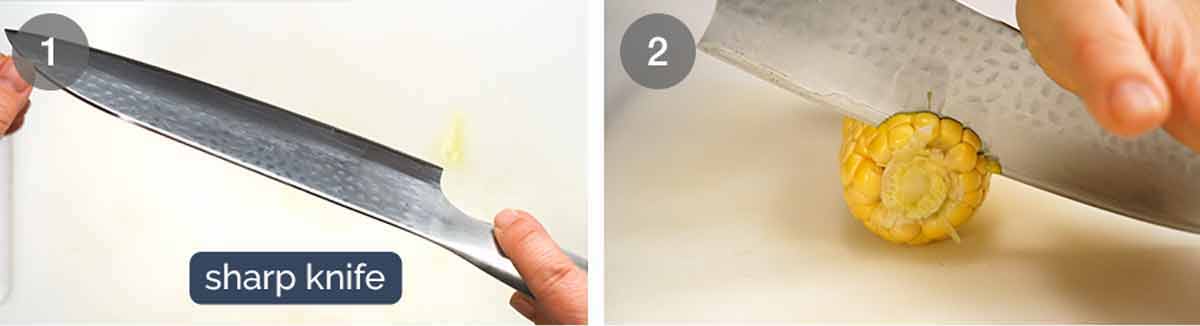
Knife – Use a large sharp knife. Don’t attempt this recipe if your knife is blunt! The risk of the knife slipping as you cut the corn is just too great. Not even corn ribs are worth losing a finger for!
Non-slip cutting board – Put a wet cloth or similar under your cutting board to ensure it does not move. I always have a wet chux under my cutting board before cutting anything. First thing I do when I walk into the kitchen!
Trim ends – Cut the base and end off the corn. This will create a stable flat base to stand the corn upright. And it’s easier to cut straight down if you create a flat top to start the knife on, rather than a pointy end. Trial and error discovery.
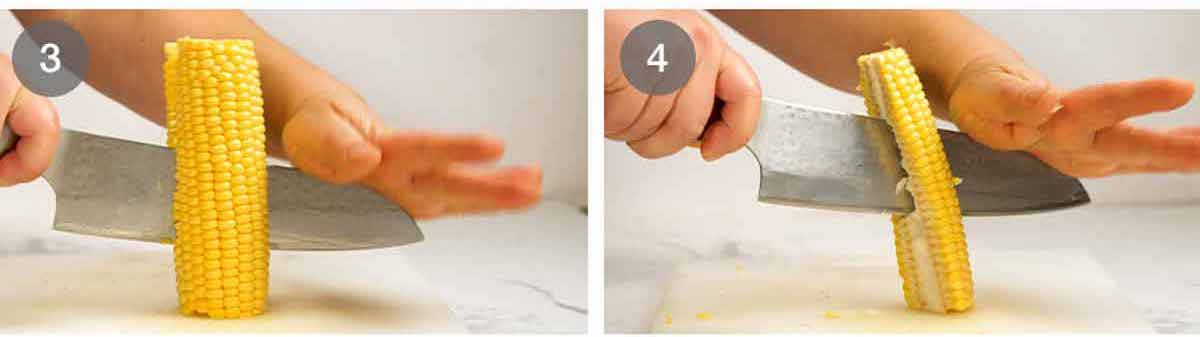
Bang knife to cut down – Stand the corn upright. ⚠️ DO NOT HOLD THE CORN with your hand under the knife. This is dangerous as the knife jerks down through the corn as it cuts down. Again – a corn rib is not worth your finger!!
Hold the knife with one hand then use your other hand to hit the knife so it catches on the top of the corn. Then keep banging the knife to make it move down the middle of the corn, guiding it and making little adjustments if needed to keep it on track to cut straight down the middle.
TIP: The sharper your knife and fresher the corn, the easier it is to cut straight and without the corn breaking.
Cut into quarters – Take one half of the corn. Stand it upright, then cut it in half.
PS I know you’re thinking “gee, surely it’s easier if you lie the corn cut face down then cut in half!”. It’s not. Go ahead and give it a try. I certainly did!
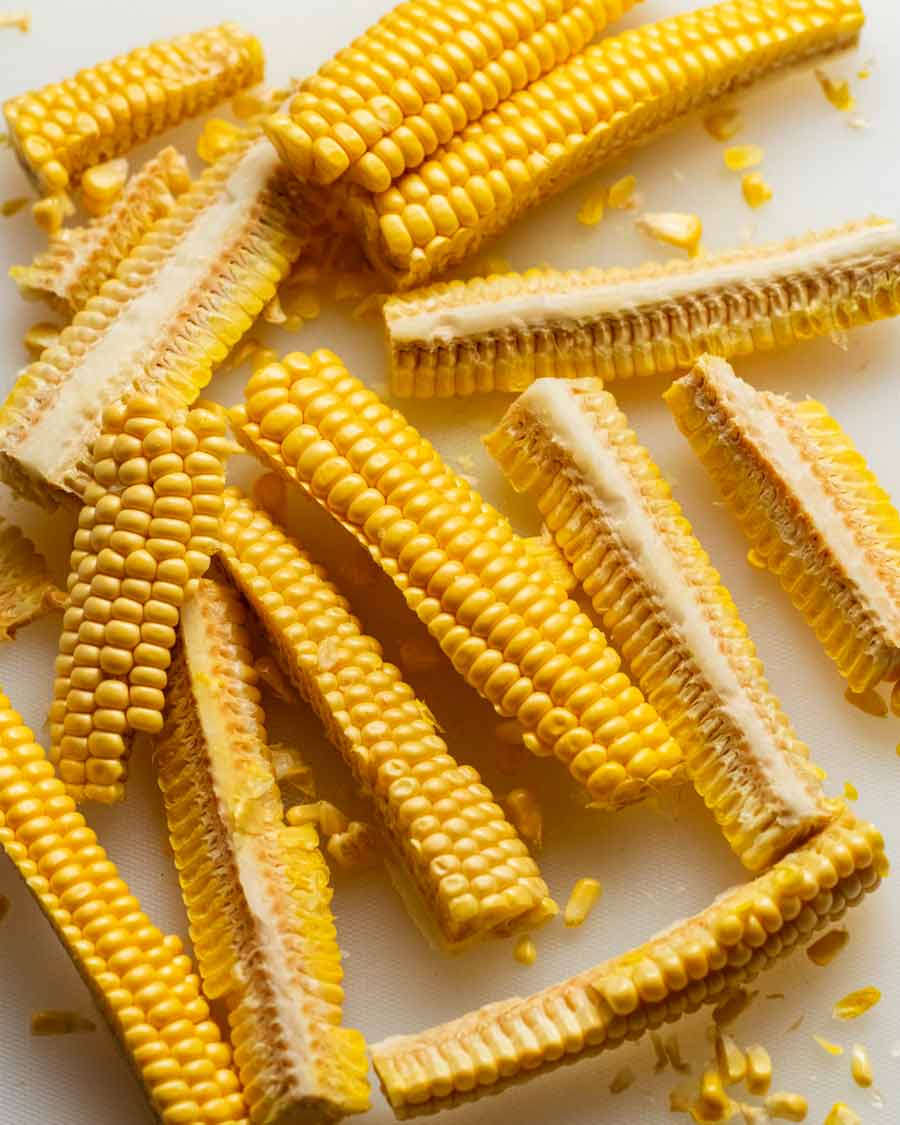
Congratulations! You’ve just cut your first corn rib! 🎉
Too hard? Broken / wonky corn? So what?
It’s still going to be delicious! But if it’s proving too hard for you, try the easier method in step 6 below.Easier method – It’s easier to cut corn into ribs if they are shorter. So cut the corn in half, stand it upright, then cut into quarters using the method above.
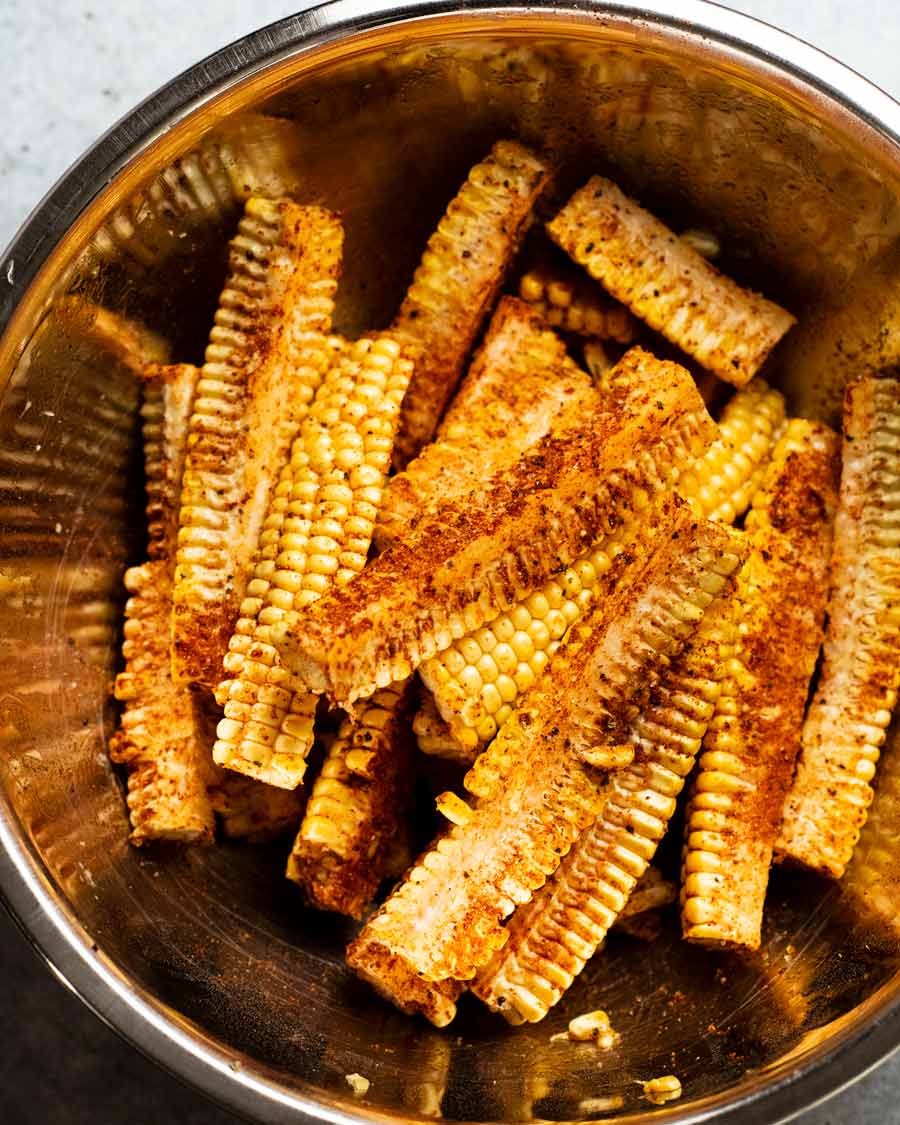
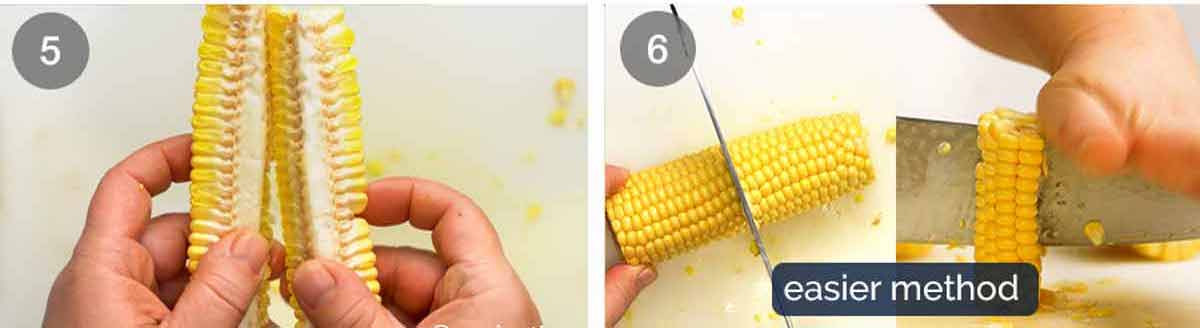
Seasoning & cooking corn ribs
Season corn – Using a large bowl, toss the corn ribs with oil first. Then sprinkle over the seasoning progressively as you toss. This helps coat the corn more evenly.
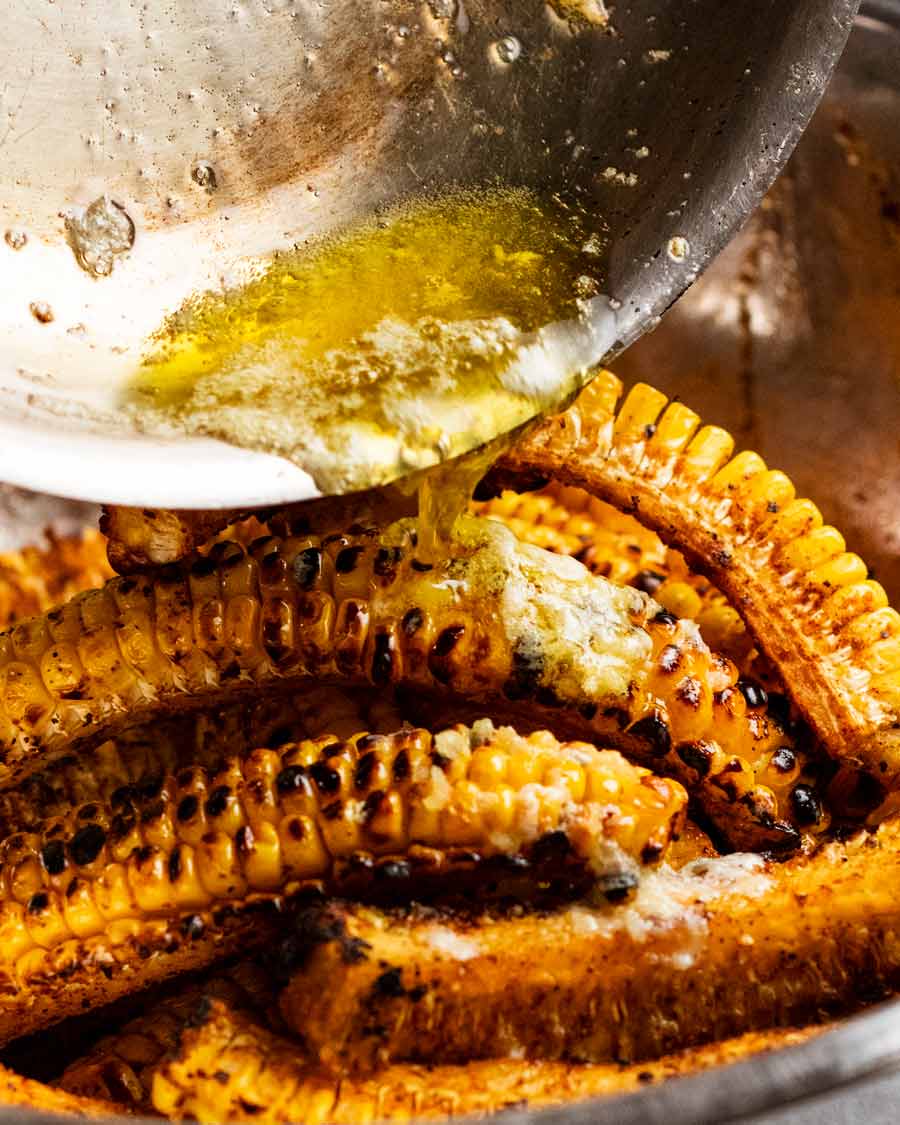
Garlic butter – Melt the butter in a small skillet or saucepan then add the garlic and stir for just 20 seconds. Keep the butter warm/pourable while you cook the corn – usually I just pop it on the side of the BBQ.
Cook corn – Preheat the BBQ on high. Then cook the corn kernels side down for 6 to 8 minutes or until it has black spots. Watch the corn curl into “ribs”!
Turn and cook each cut side for just 1 minute. There’s loads of flavour on the cut face so don’t skip cooking it because everyone is going to be sucking out the buttery goodness from the cobs!
Butter it! Place the cooked corn back in the bowl, pour over the garlic butter and toss using a rubber spatula.
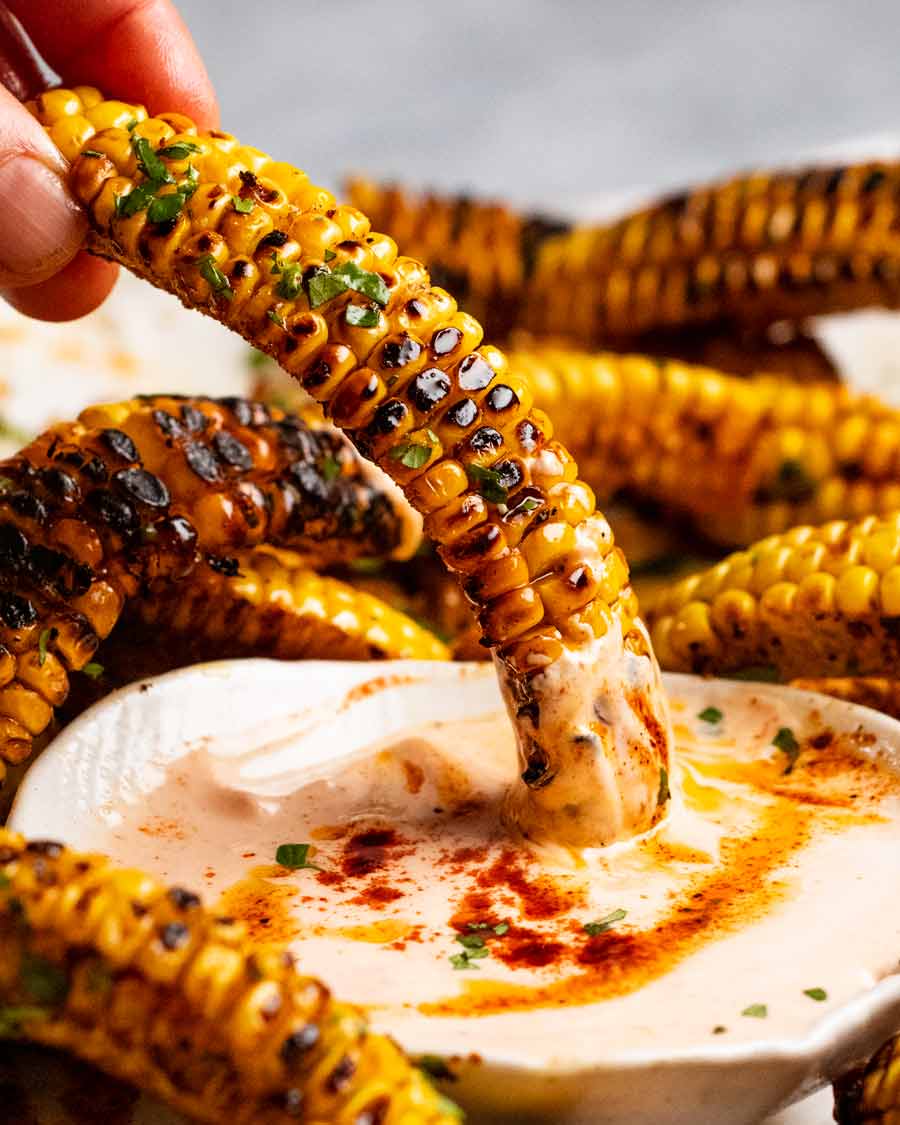
Serving – Pile the corn onto a platter, sprinkle with parsley or coriander/cilantro and extra paprika if desired. Then serve!
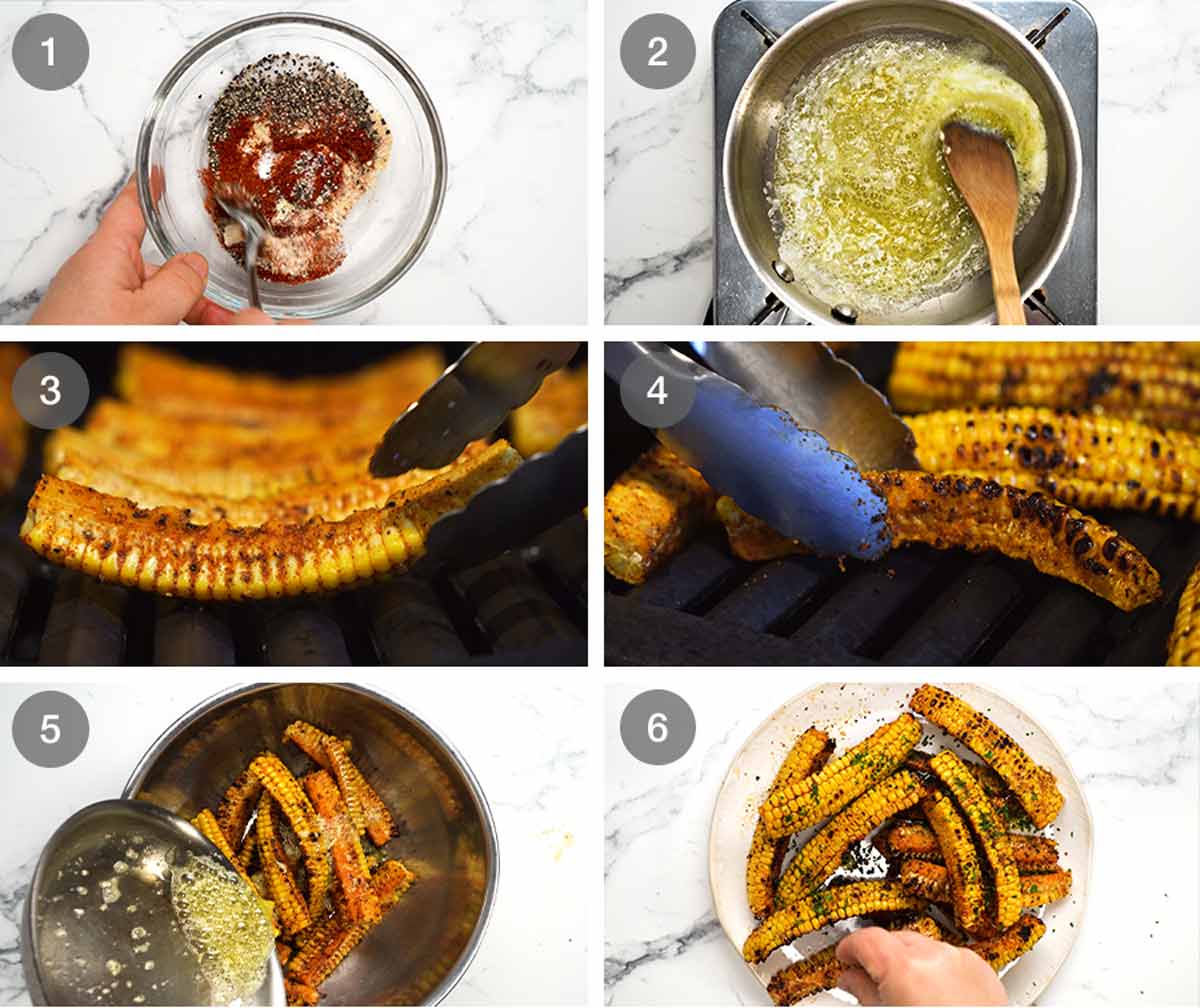
Sauce for corn ribs
As I ranted on at the start, this method of cooking corn means the cobs soak up all the seasoned garlic butter, so there’s stacks of juicy flavour in every bite. So if you’re serving these hot and fresh, there is absolutely no need for sauce.
However! If you are a sauce person (I get it), or if you are making a huge pile of these ahead to serve as apps and want to pep them up a bit by providing a sauce, here are some sauce options:
Creamy Sriracha Dipping sauce – (mayo + yogurt + sriracha or ketchup). The freshness of the yogurt pairs well with the buttery goodness and sweetness of the corn. Recipe is in the notes of the recipe card.
Avocado Sauce – dead set perfect match with the seasoning on this corn! Also, corn plus avocado = 💯
Plain ketchup or Aussie tomato sauce.
Chipotle mayo – Blitz chipotle in adobo with sour cream + mayo. Add lime and salt to taste.
Thousand Island / Marie Rose – recipes here.
If you’re a corn rib first timer and you make this, you must tell me what you think!! I need to know it’s not just me who lost her mind over corn ribs!! – Nagi x
Watch how to make it
Corn ribs
Ingredients
- 4 whole corn cobs
- 3 tbsp extra virgin olive oil
- 2 tbsp parsley or coriander/cilantro , roughly chopped (optional garnish)
Seasoning:
- 1 1/2 tsp garlic powder
- 2 1/2 tsp smoked paprika (or ordinary), plus more for garnish if desired
- 2 tsp cooking/kosher salt
- 2 tsp black pepper
Garlic butter:
- 50g/ 3 tbsp unsalted butter
- 1 garlic clove , finely minced
Instructions
Corn cutting (Note 1 tips!):
- Cut corn – Using a sharp knife and a non-slip cutting board, cut off the base and the pointy end of the corn. Stand the corn upright then cut the corn into half then half again to make quarters. My way: Bang the knife with your hand to lock it into the top of the corn, then keep hitting the knife to move it down the corn. Halfway, you might be able to stop banging and just rock the knife down.
- Easiest method – Cut half length ribs. Shorter ribs = easier to cut. See note 2.
Cooking:
- BBQ (best!) or oven – Heat BBQ on high or oven 200°C/375°F (180°C fan).
- Garlic butter – Melt the butter in a small saucepan over medium heat. Then add the garlic and cook for 20 seconds until it smells amazing! Remove from the stove and keep warm/liquid (I usually put it on the side of the BBQ).
- Seasoning – mix in a small bowl.
- Season corn – Place corn in a large bowl. Toss with olive oil. Then sprinkle the seasoning over gradually, tossing in between, to coat as evenly as possible. Most will get stuck in the cob – tasty "bone" sucking!
- BBQ – Place corn on the BBQ kernel side down. Cook for 8 minutes or until you get charred spots – watch it curl into "ribs"! Then cook each cut side for 1 minute.
- Oven – Bake for 25 to 30 minutes, kernel side up. (Note: the corn doesn't curl as much, also, no charred spots).
- Butter it – Transfer corn back into the bowl. Pour over garlic butter and toss.
- Serve – Pile onto plate, sprinkle with parsley then grab and eat like ribs! Optional pink sauce pictured in notes. Don't forget to suck all the seasoned garlic butter from the cob "bone" – it might be the best part.
Notes
2. Easier method – Cut shorter ribs. Lie the corn on its side and cut it in half to create 2 shorter pieces. Then stand upright and cut into quarters. Much easier than cutting full length corns!
3. Pictured creamy Sriracha Sauce – 2 tsp sriracha + 1/4 cup each mayo + yogurt (or just yogurt) + pinch of salt.
4. Leftovers will keep for 3 to 4 days in the fridge. Don’t think freezing is ideal, feel like there will be too much loss of quality.
Nutrition per rib (recipe makes 16 ribs).Life of Dozer
Seriously wondering if he’s surrounded by food.
(Autumn leaves is a new thing to him – we didn’t really have deciduous trees in the Northern Beaches. But they’re abundant in the new area we call home!)

The post Corn Ribs – your new favourite way with corn appeared first on RecipeTin Eats.
]]>