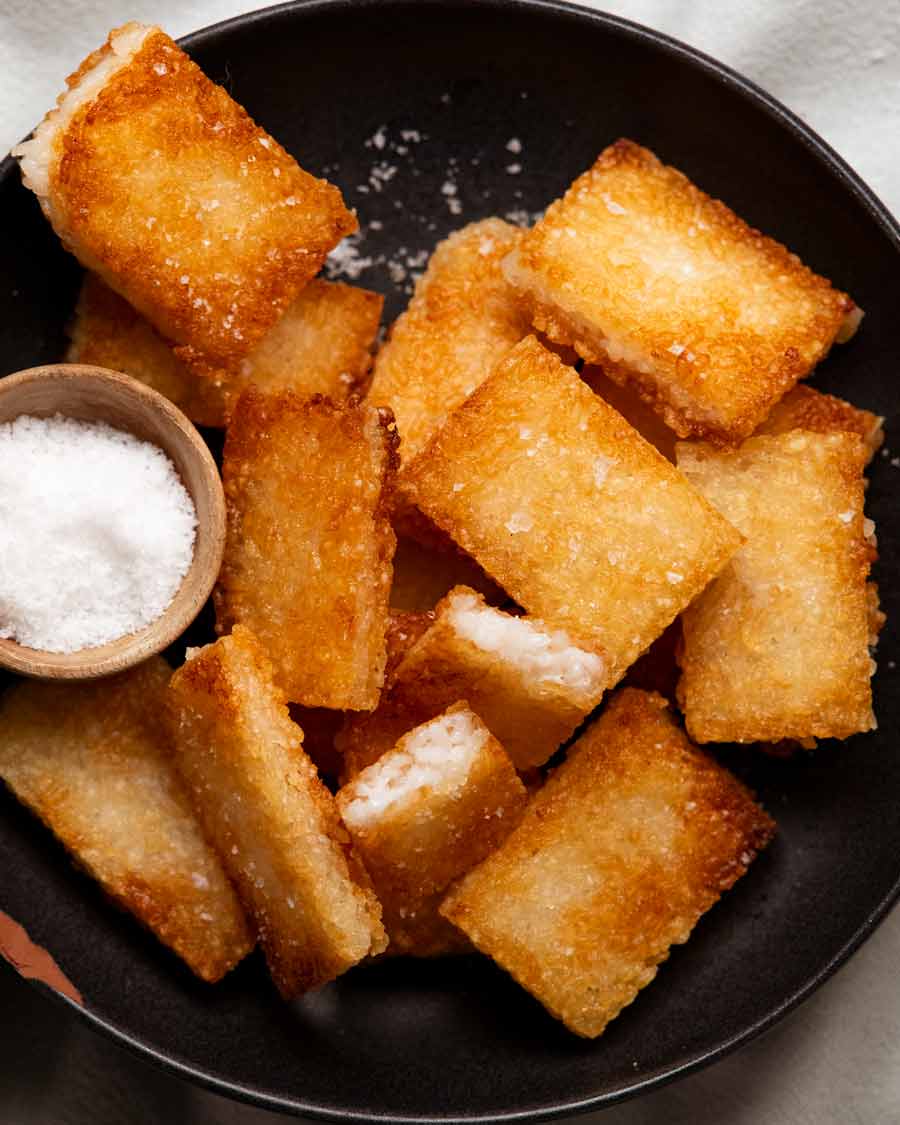
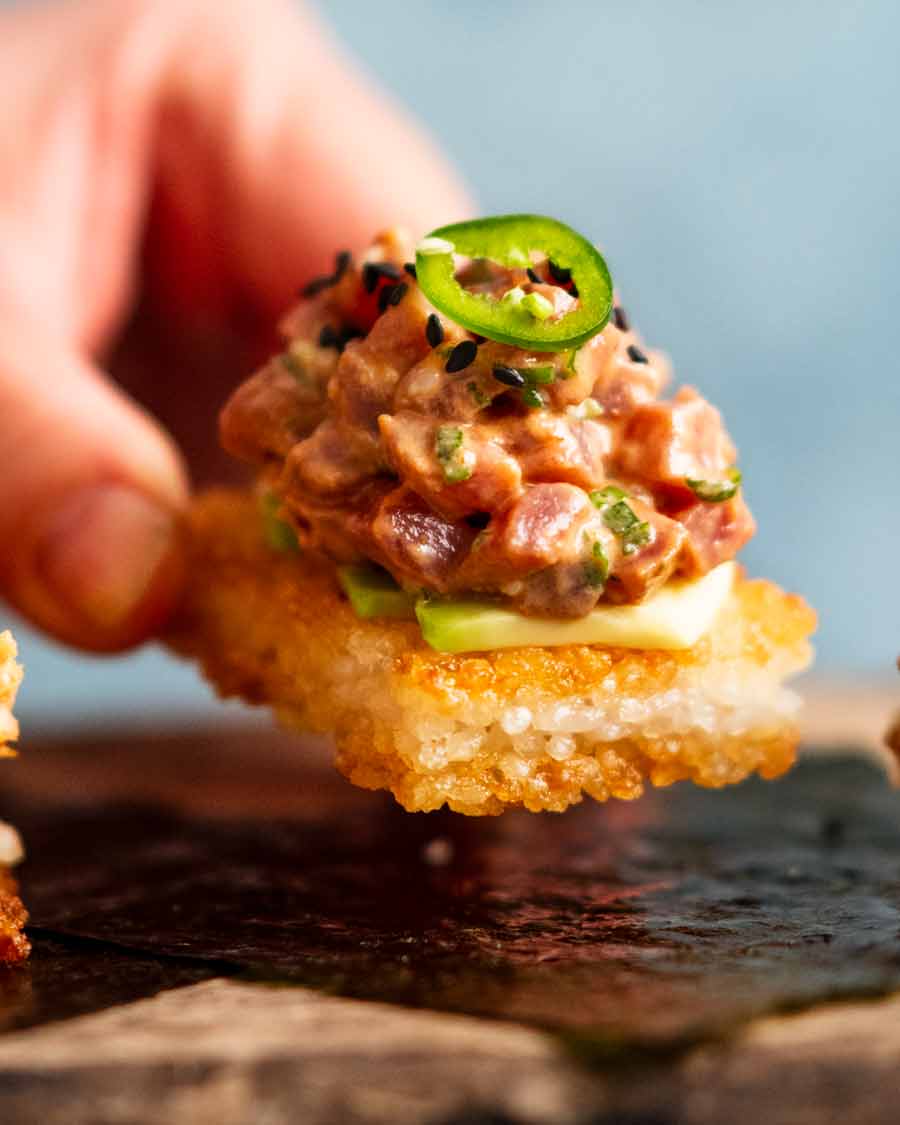
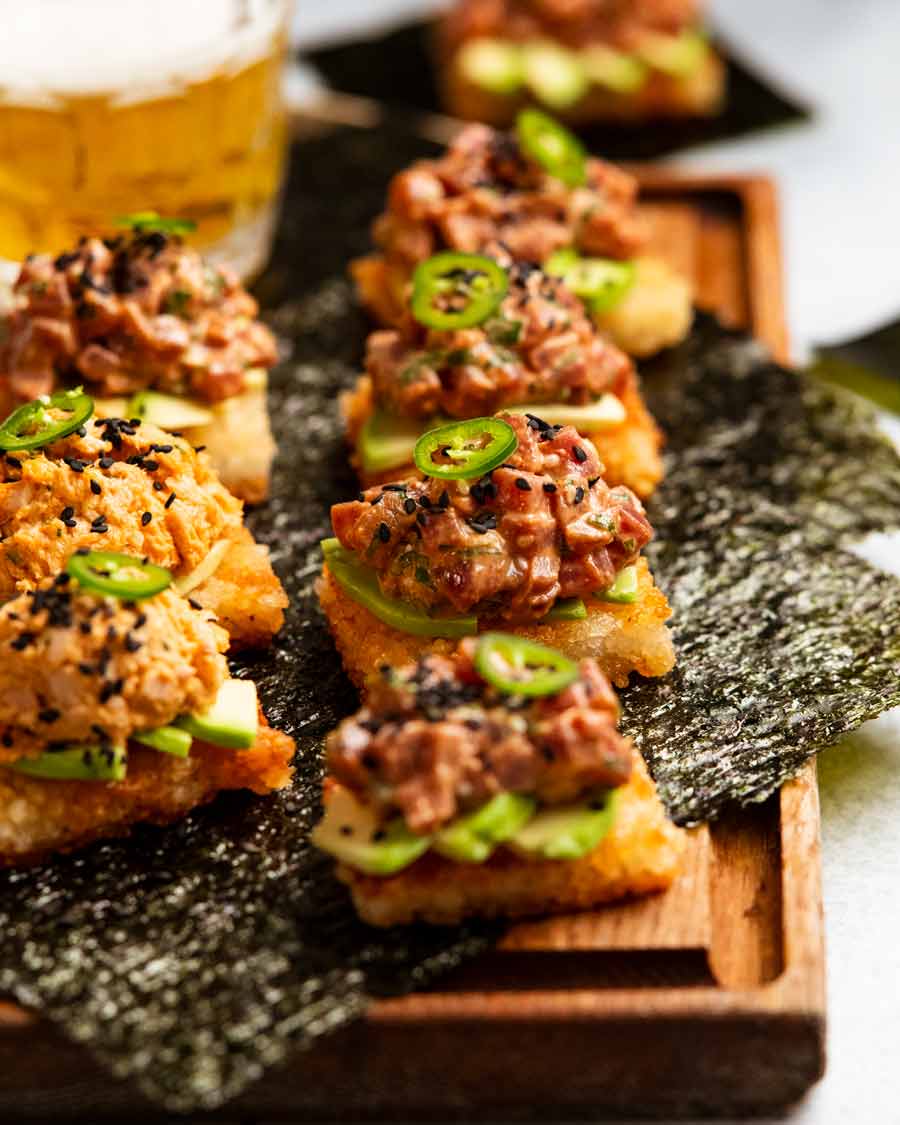
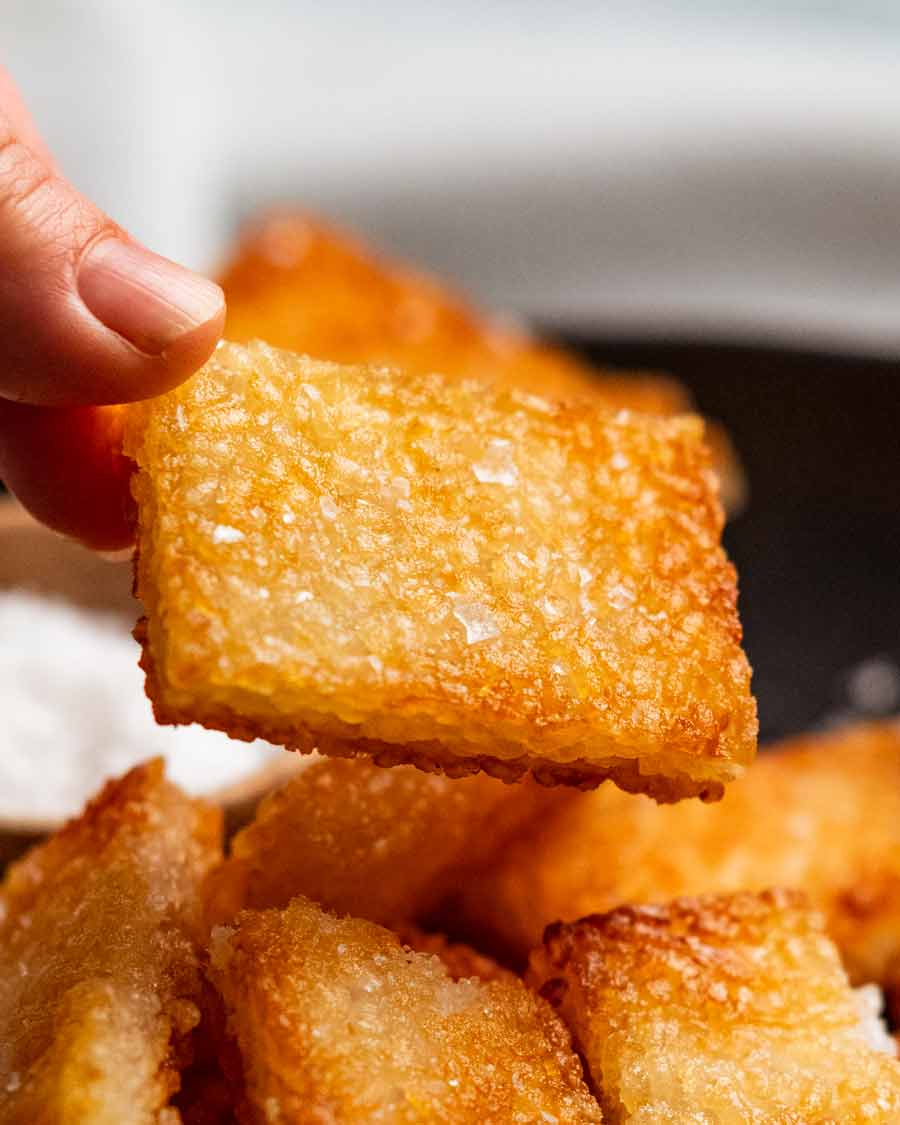
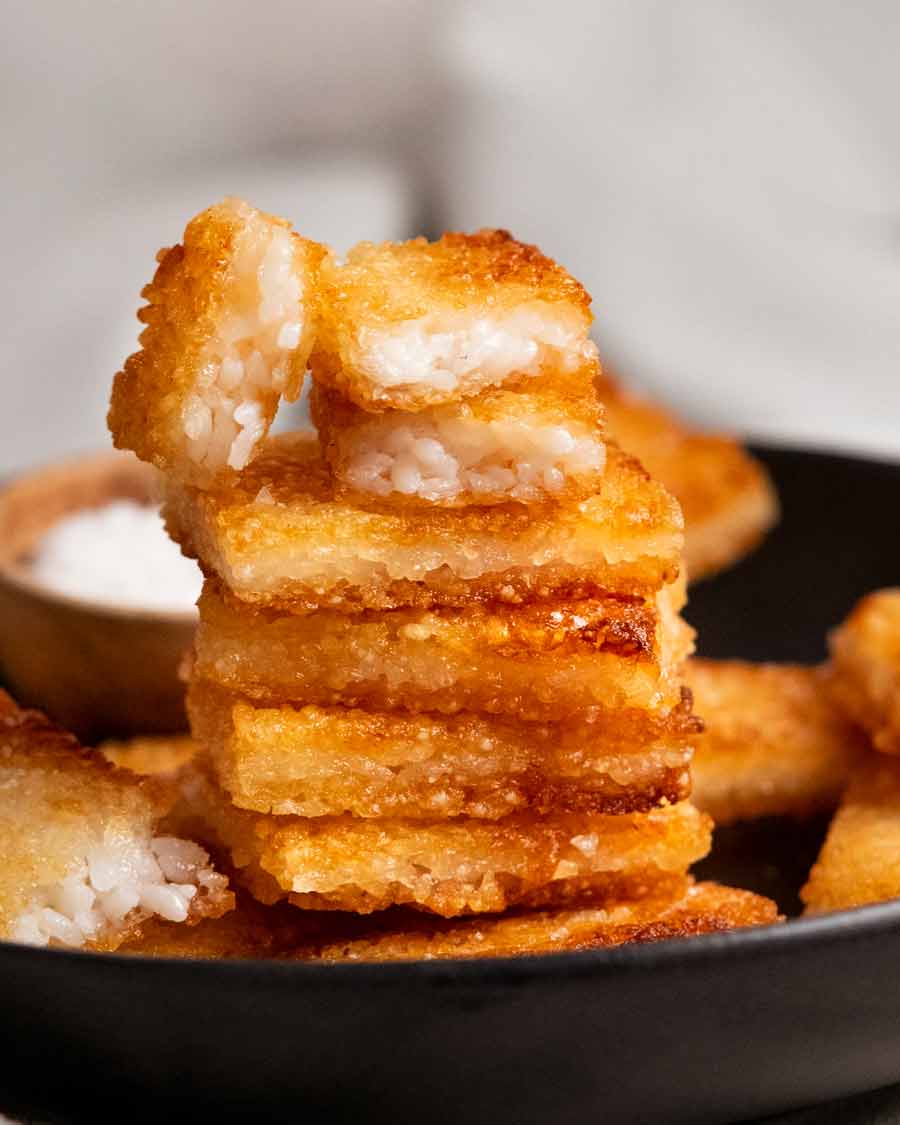
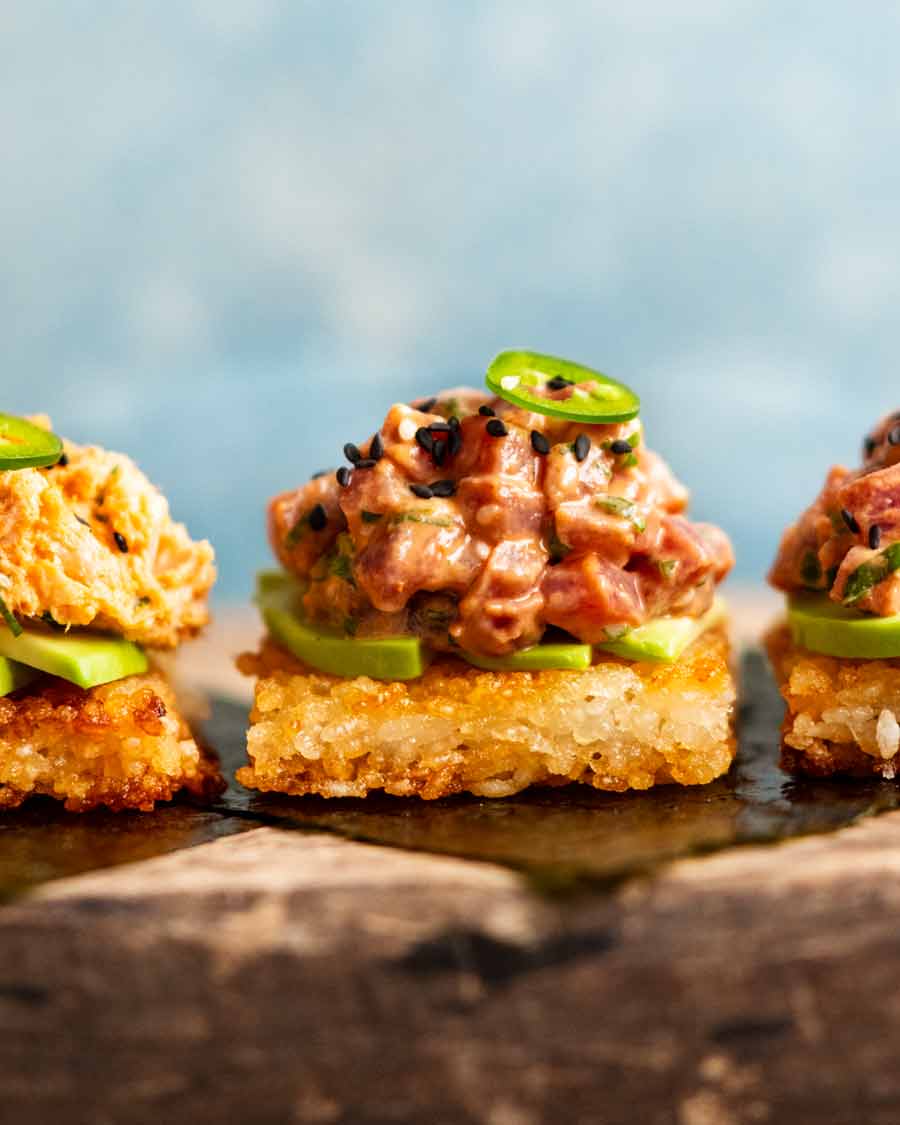
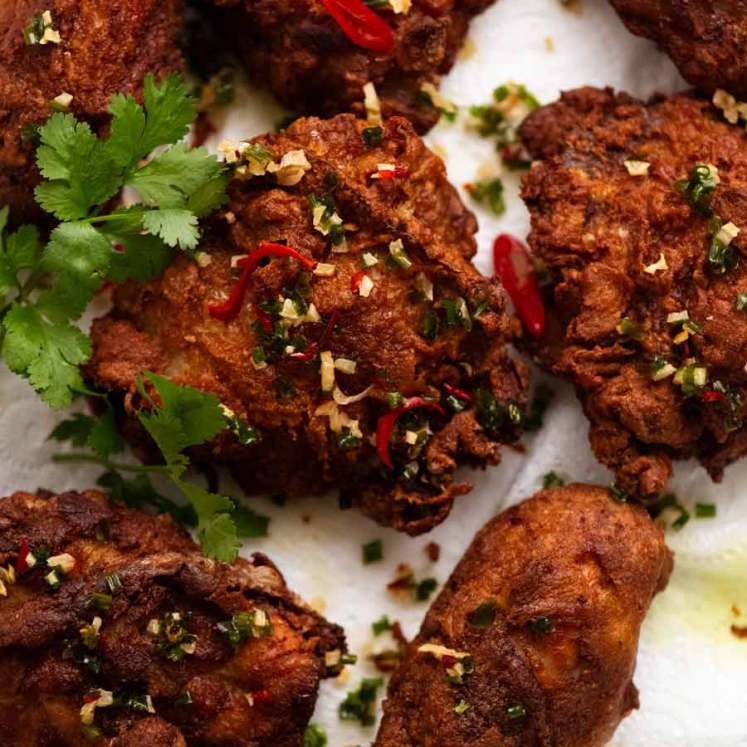
 Crispy rice is just rice that’s packed in a pan, cut then pan fried until golden and ultra crispy. Can’t-stop-eating-them good! Munch on them plain like chips, or use as a base for toppings to make modern Asian-style canapés – like Nobu’s Spicy Tuna Crispy Rice. Crispy rice cakes These are the base for the... Get the Recipe
The post Crispy rice appeared first on RecipeTin Eats.
]]>Crispy rice is just rice that’s packed in a pan, cut then pan fried until golden and ultra crispy. Can’t-stop-eating-them good! Munch on them plain like chips, or use as a base for toppings to make modern Asian-style canapés – like Nobu’s Spicy Tuna Crispy Rice.
Crispy rice cakes
These are the base for the Nobu copy-cat Spicy Tuna Crispy Rice recipe that I also published today. But everyone who’s tried the plain crispy rice cakes declared them so good, they insisted they should be published as a separate recipe. So here it is!
Ingredients
All you really need to make crispy rice cakes is rice, oil for frying and salt for seasoning. However, the rice is tastier if you add sushi rice seasoning which is just sugar and rice vinegar. Especially if you plan to serve these as plain snacks with no toppings.
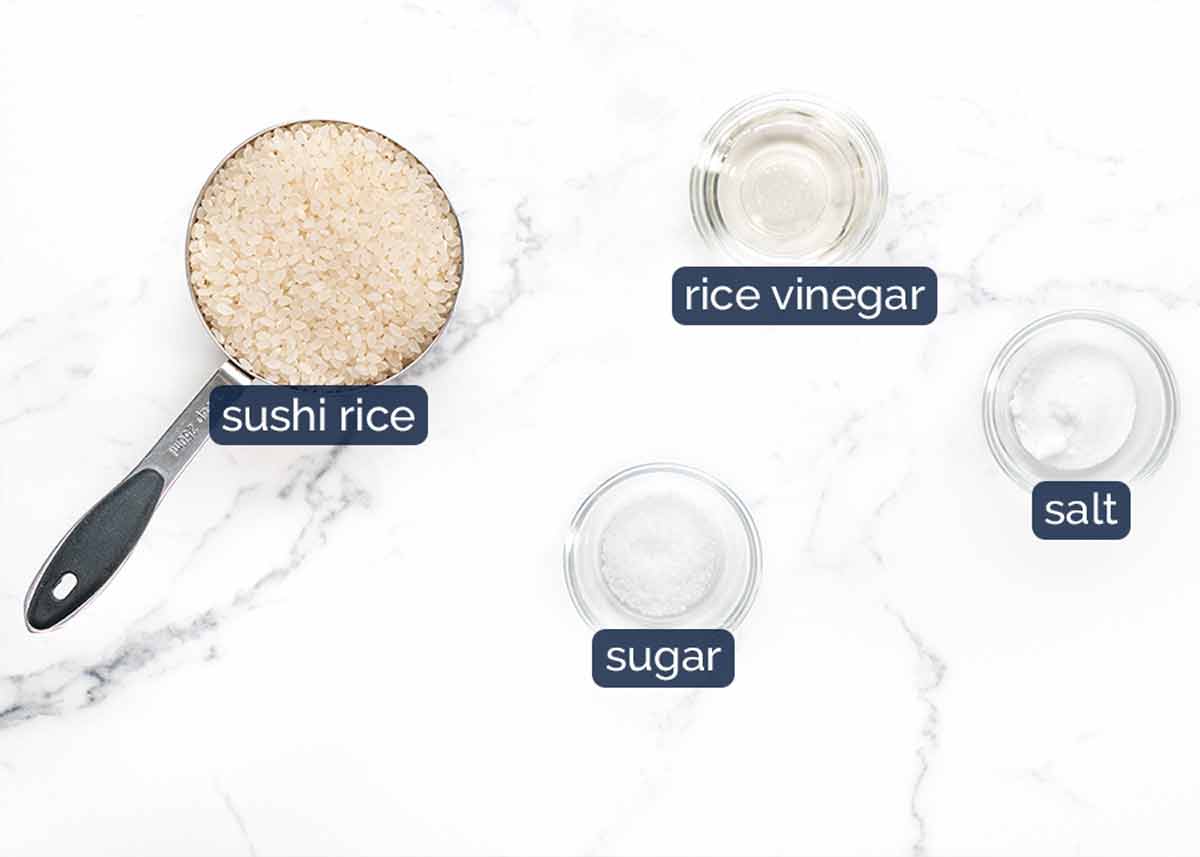
Sushi rice – Find this type of rice labelled as such alongside other rice at the grocery store. It’s a short grain type of rice that is stickier than other types of rice, so the rice sticks together to make the rice balls for sushi.
For the same reason, it’s the best type of rice to make rice cakes! Other rice types won’t stick together as firmly so the rice cakes won’t cut as neatly or fry up as golden and crispy. Medium grain rice should work nearly as well (because it’s fairly sticky too) but I don’t recommend trying this with long grain rice, brown rice, wild rice or basmati rice.
Rice vinegar – An Asian vinegar made from….wait for it….rice! Smoother and milder than plain white vinegar, this is used to flavour rice to make sushi. As noted above, it can be skipped but it makes the rice cakes tastier.
Sugar – Also for seasoning the rice.
Salt – For sprinkling on the cooked rice cakes. I use 3/4 teaspoon. It will seem like a lot for the amount of rice cakes but they can take it! They are like potato – they take more salt than you think. Also, some salt falls off when you turn them to sprinkle the other side.
How to make crispy rice cakes
You simply cook rice, press in a pan, cool to make it solid, cut, then pan fry until golden. Then munch away!
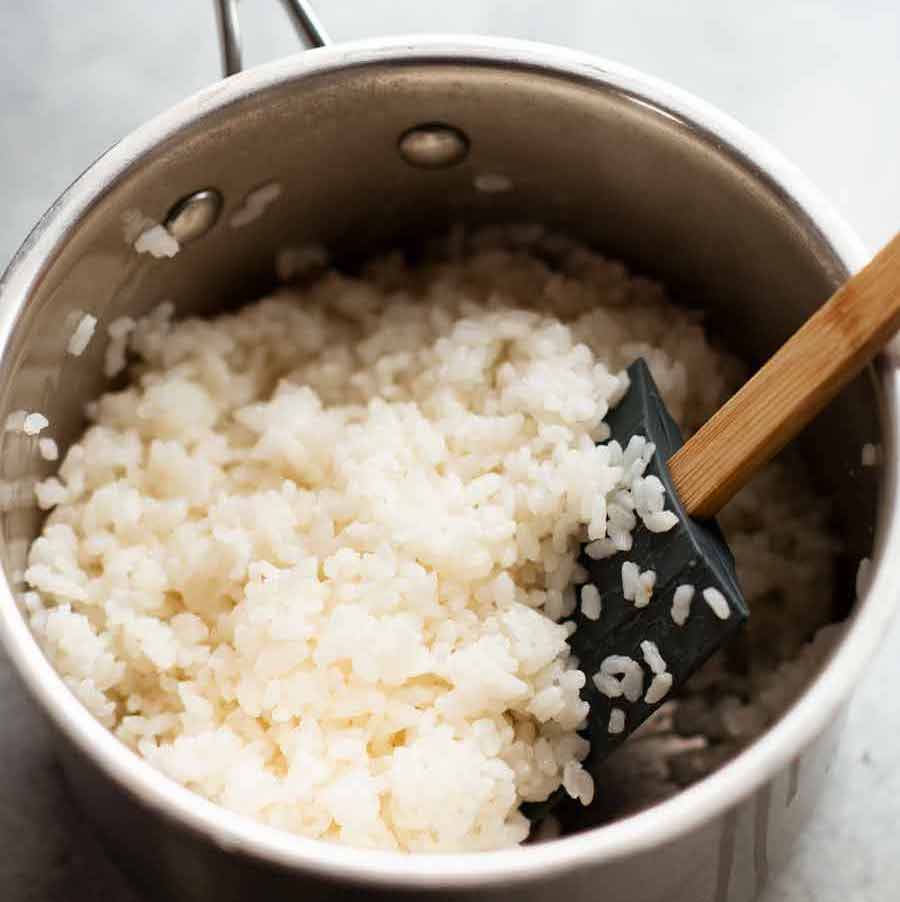
1. Cook and flavour rice
No need to rinse. Use the right amount of water. And don’t peek! My full rice-making rants here.
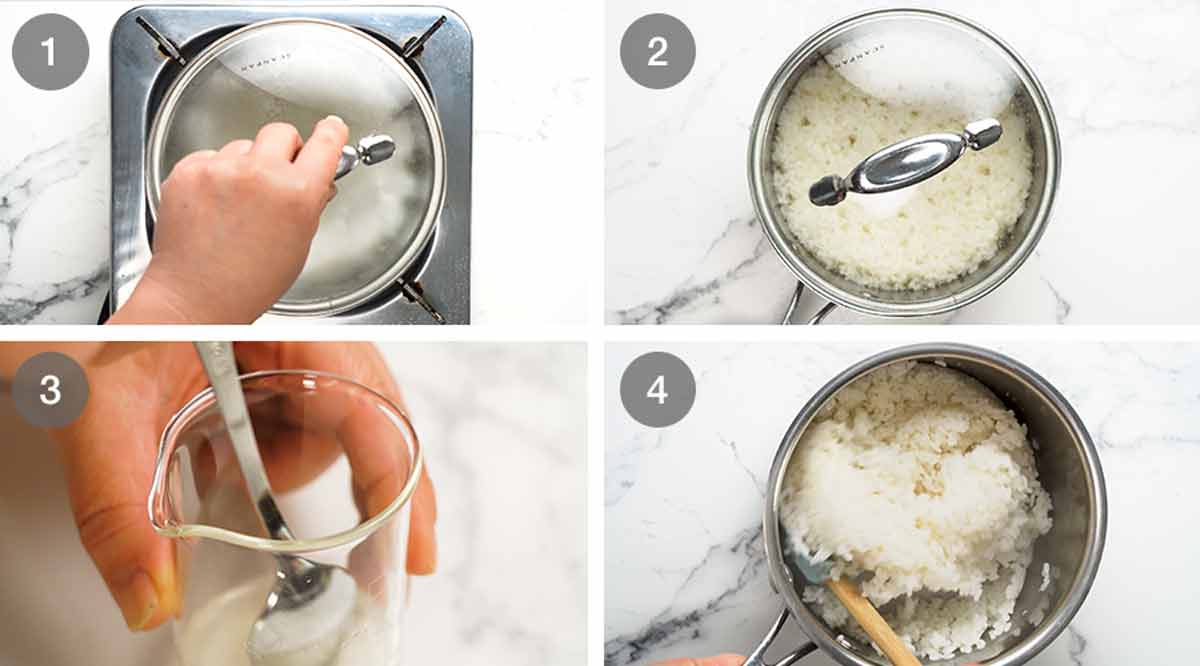
Cook rice – Place rice and water in a small pot (no lid) over medium high heat. Once it’s bubbling, put the lid on and turn down to medium low. Cook for 13 minutes or until water is absorbed – no peeking!
Rest for 10 minutes with the lid on.
Sushi rice seasoning – Mix the vinegar and sugar together until the sugar dissolves.
Fluff – Pour seasoning over the hot rice. Fluff with a rice paddle or rubber spatula. The rice will absorb the flavour as it cools in the pan.
2. Press and cut
For really crispy rice cakes, be sure to press the rice in firmly.
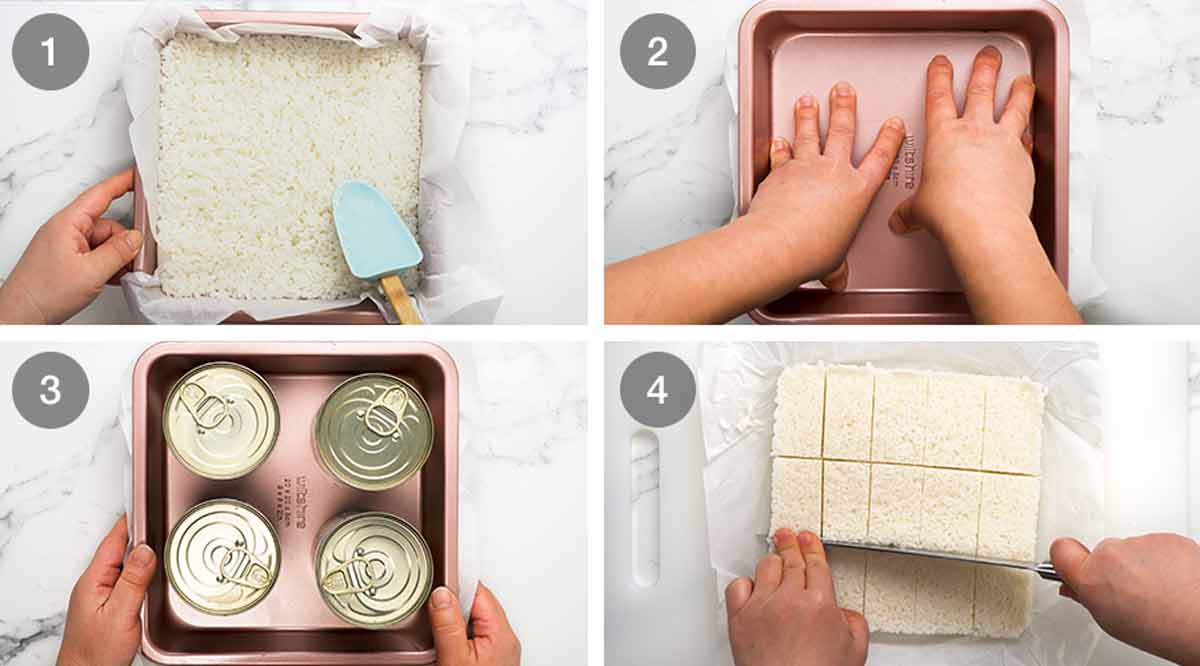
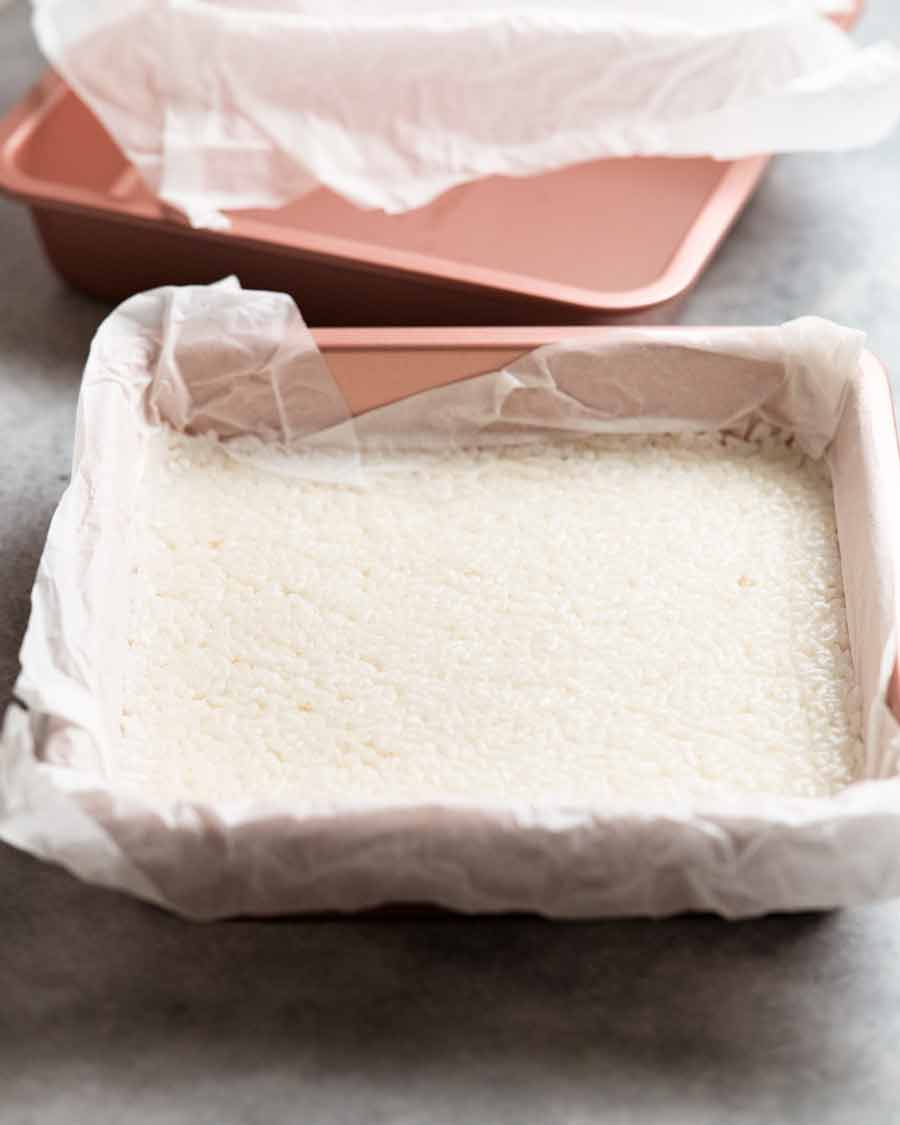
Press – Place a sheet of baking/parchment paper on a 20cm/8″ square pan. Scrape the hot rice into the pan and spread evenly. Cover with another piece of paper and press the rice in very firmly, concentrating on the corners and edges. The rice should be around 1.25cm / 1/2″ thick.
Weigh down (recommended) – For best results, place something flat on top then weigh it down with 4 or 5 x 400g/14oz cans. I used a second pan that is the same size.
Weighing down the rice packs the rice together more tightly as it sets in the fridge. This means you can cut neater pieces and they will crisp up better. It’s also just generally really irritating when you get little loose bits of rice in the pan when you’re frying up the rice cakes!
Cool – Fully cool, then refrigerate overnight (minimum 6 hours). As it cools, the rice will stick together and become a solid slab you can lift up and cut.
Speedy option for the impatient: Put the rice in the fridge until it’s fully cool (around 1 hour), then freezer for 1 hour (edges will semi-freeze, centre should be perfect), then back in the fridge for 1 hour (to thaw edges). Warning: Do not let the rice freeze fully, it will become loose and wet when it thaws so not suitable for rice cakes!
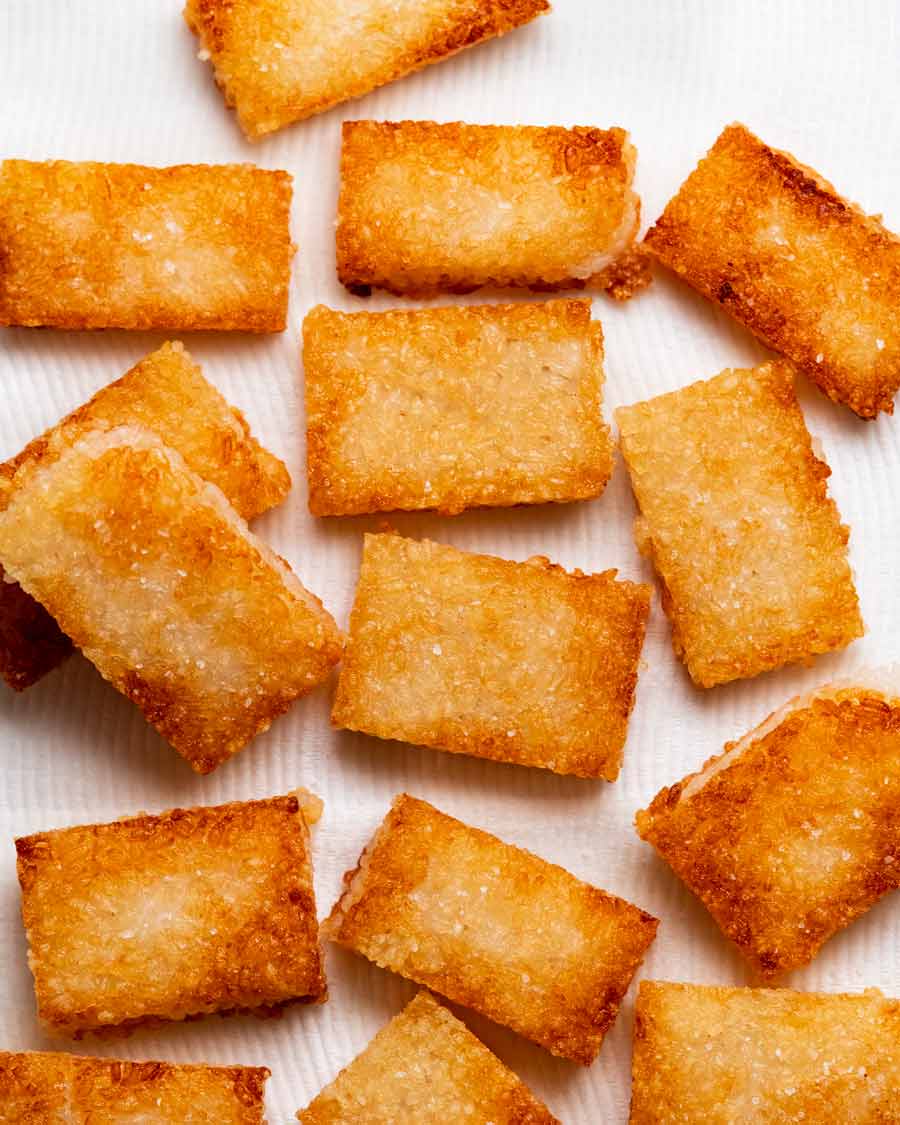
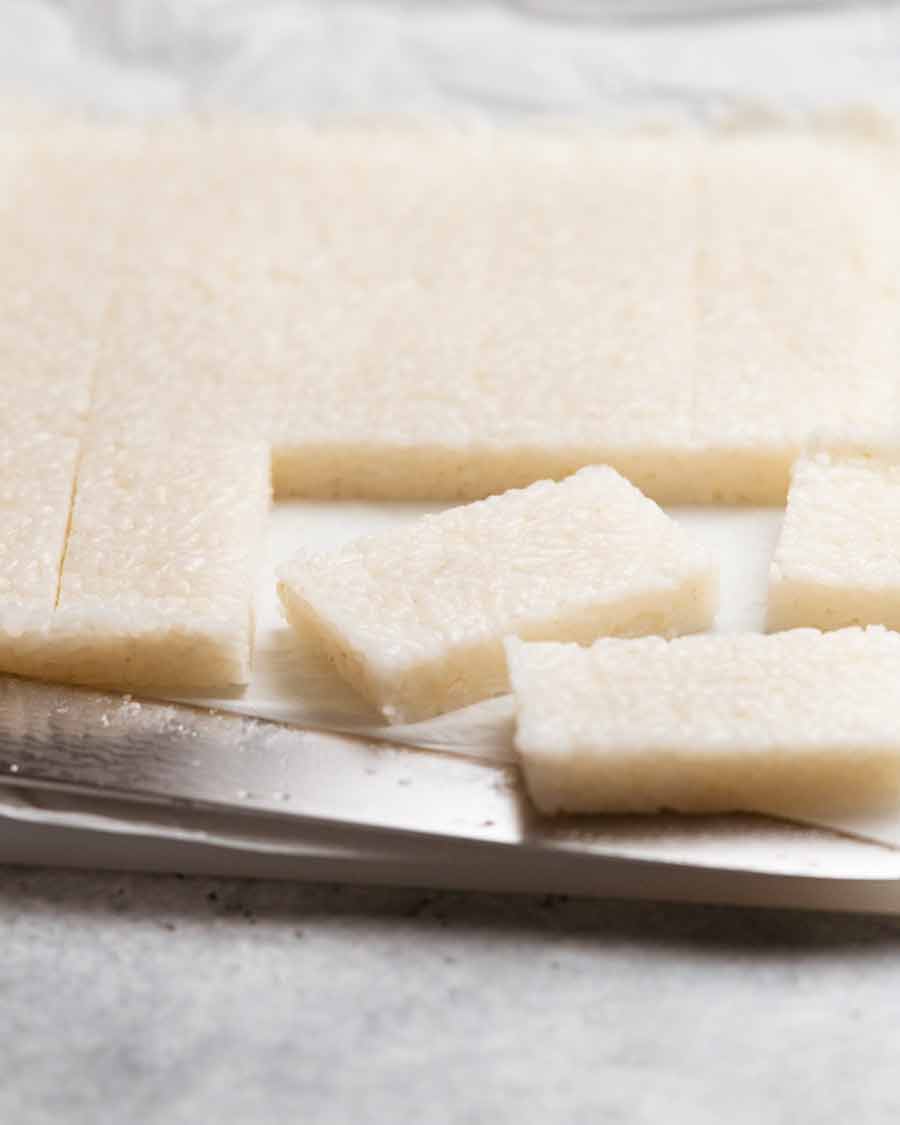
Cut – Lift rice out using paper overhang. Wet the knife blade (neater cuts). Cut rice into desired shapes. I do 15 rectangles for the pictured Nobu Crispy Rice with Spicy Tuna (5 strips, then each into 3). Smaller and more would make great snacking options, albeit lots of turning in the pan!
3. Cooking:
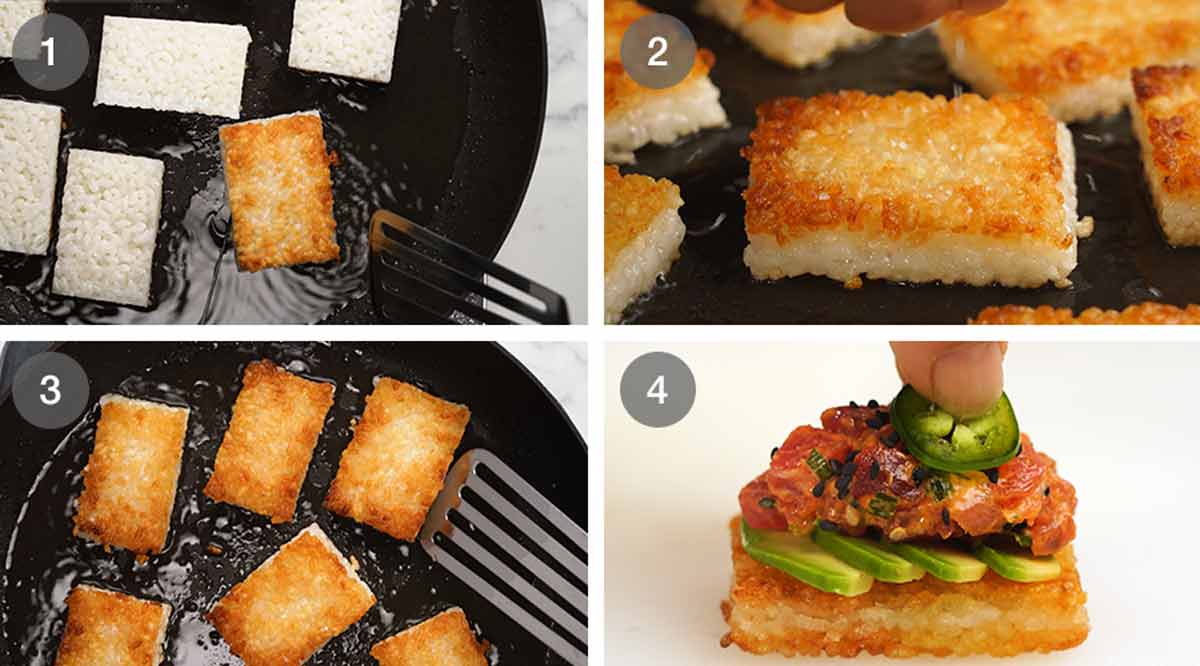
Pan fry – Heat about 1/4 cup of the oil in a large non-stick pan over medium high. Place in half the rice cakes – they should sizzle gently. Lower heat to medium. Cook for 4 minutes until really golden and crispy. Turn and cook the other side for 4 minutes.
Salt – Remove onto a paper towels lined plate. Sprinkle each side with salt while hot.
Keep cooking – Add remaining oil and cook remaining rice cakes.
Serve as snack (you won’t be able to stop!) or use as a base for canapés. See the separate recipe for the spicy tuna topping I also shared today which is a blatant Nobu restaurant copy-cat. See next section for more topping suggestions!
How to serve crispy rice cakes
Serve them plain for snacking or add toppings to make irresistible appetisers.
Serving plain
Eat like potato chips! You won’t be able to stop. I probably wouldn’t say no to some kind of dip either – French Onion Dip immediately comes to mind.
Topping suggestions
As noted above, I’m sharing this crispy rice cakes recipe as a base for a creamy spicy tuna topping to make a copycat of a signature Nobu restaurant appetiser, Spicy Tuna Crispy Rice (raw or canned). However, given the flavour of the rice cakes is fairly neutral rather than specifically Asian, there’s stacks of topping options! Here’s some ideas that come to mind:
Creamy spicy tuna or salmon – Nobu copycat made with sashimi grade tuna or salmon. Canned tuna option included.
Tuna poke – A no mayo topping option with sashimi tuna in a gingery soy sauce dressing
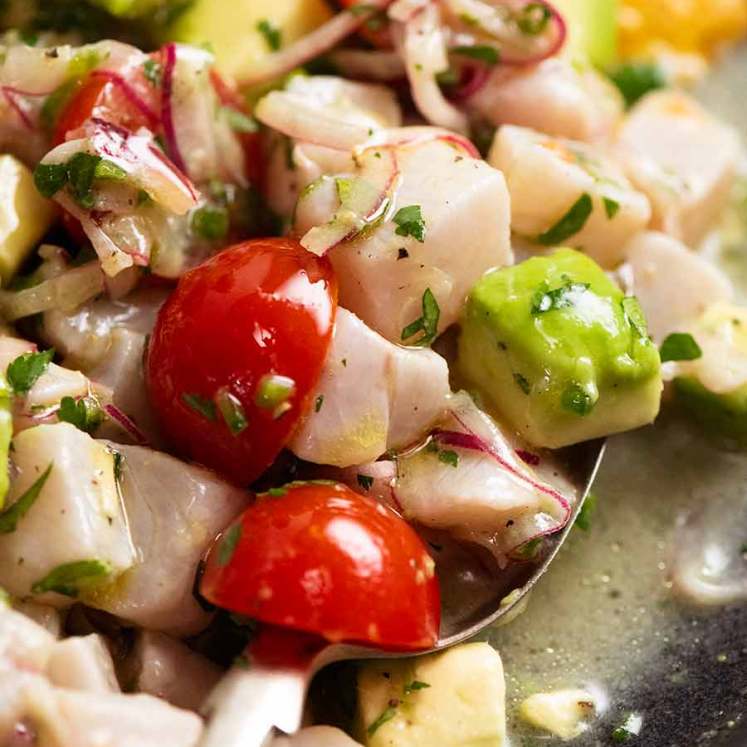
Kingfish ceviche – YES! I can’t wait to try this. (Chop everything smaller so they stay on the rice cakes or use the rice cakes for scooping)
Salmon mousse – I pipe this on cucumber rounds for a fancy(ish) healthy(ish) canapé. Would be perfect on rice cakes!
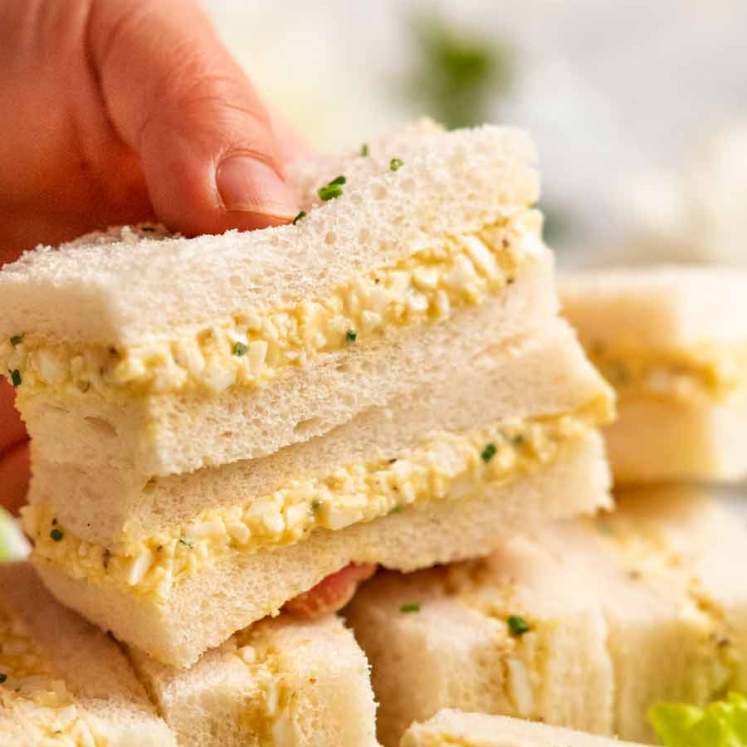
Chicken or egg sandwich fillings – I’d add finely chopped pickles or green onion for freshness
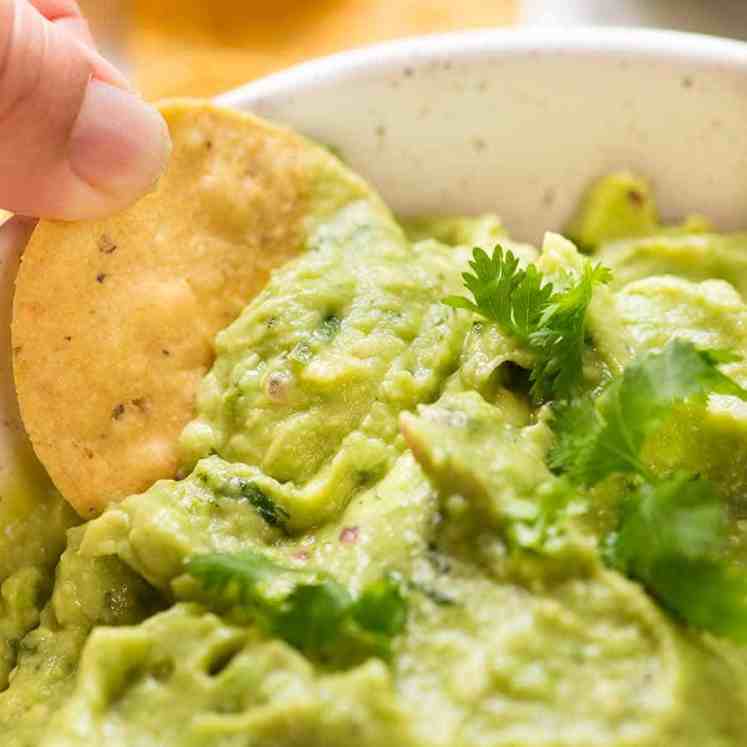
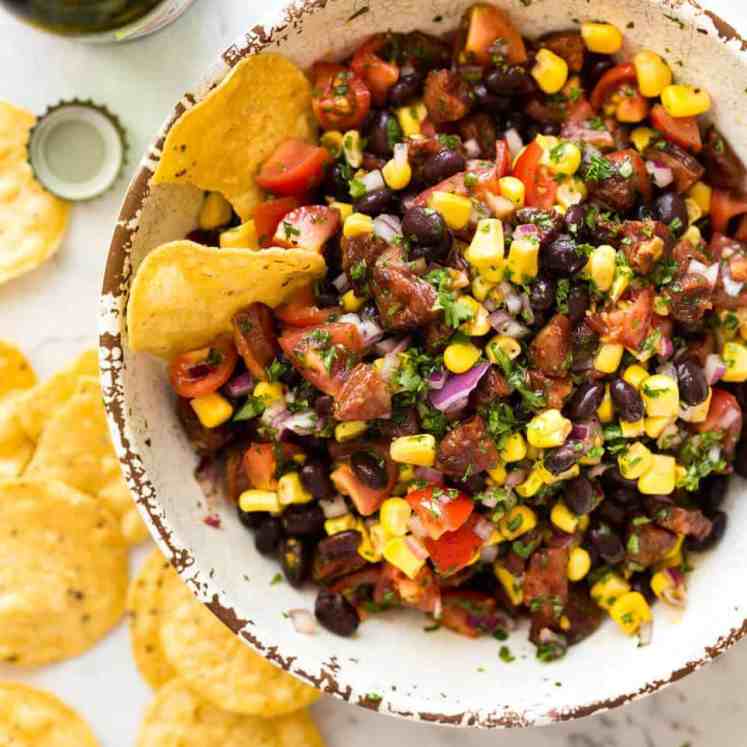
Spread with guacamole then top with Pig Out Salsa or Mexican Corn Salad


I’d love to hear your suggestions! What will you top these with? – Nagi x
Watch how to make it

Crispy rice
Ingredients
- 1 cup sushi rice (Note 1)
- 1 1/2 cups water
- 1/3 cup canola oil (vegetable, peanut or other neutral oil)
- 3/4 tsp cooking / kosher salt , for sprinkling rice cakes (Note 2)
Sushi seasoning:
- 1 tbsp rice vinegar (Note 3)
- 1 tsp caster sugar (Note 3)
Instructions
SUMMARY RECIPE
- Cook rice, rest, pour over seasoning, fluff. Press firmly into 20cm/8" lined pan, weigh down. Cool, fridge overnight (min 6 hrs). Cut into 15 rectangles, pan fry 4 min each side, sprinkle with salt.
FULL RECIPE
- Sushi seasoning – Mix together until sugar dissolves.
- Cook rice (Note 4) – Place rice and water in a small pot (no lid) over medium high heat. Once it's bubbling on the edges and the middle is rippling, put the lid on and turn down to medium low (or low for strong stoves). Cook for 13 minutes or until water is absorbed.
- Rest – Remove from heat then rest for 10 minutes with the lid still on.
- Season – Remove lid. Pour over sushi seasoning. Fluff rice with rubber spatula.
Press, cool, cut:
- Press – Place a sheet of baking/parchment paper on a 20cm/8" square pan. Scrape hot rice into the pan and spread evenly. Cover with another piece of paper and press in very firmly.
- Weigh down (recommended, Note 5) – For best results, place something flat on top (2nd same size pan is ideal) then weigh down with 5 x 400g/14oz cans.
- Cool – Fully cool, cover with cling wrap, then refrigerate overnight (min 6 hours). Speedy option: Fridge uncovered until fully cool, cover, freeze 1 hour, fridge 1 hour.
- Cut – Lift rice out using paper overhang. Wet the knife blade (neater cuts). Cut rice into 15 rectangles (5 strips, then each into 3).
Cooking:
- Pan fry – Heat about 1/4 cup of the oil in a large non-stick pan over medium high. Place in half the rice cakes – they should sizzle gently. Lower heat to medium. Cook for 4 minutes until really golden and crispy. Turn and cook the other side for 4 minutes.
- Salt – Remove onto a paper towels lined plate. Sprinkle each side with salt while hot.
- Keep cooking – Add remaining oil and cook remaining rice cakes.
Serving:
- Serve as snack (you won't be able to stop!) or a base for canapés.
- Topping suggestions – Spicy tuna (Nobu copycat), tuna poke, salmon mousse, crostini toppings.
Notes
2. I know this seems like a lot but these can take a lot of salt. Use less if you doubt me then add more later when you realise you need it!
3. Seasonings for sushi rice. They can be skipped but it makes the rice cakes tastier, and in the spirit of crispy sushi rice!
4. Rice cooking – Use a pot ~17cm/7″ wide. Not much larger else the rice doesn’t have enough depth = risk of burning base. No need to rinse the rice if you bought it in packs at the shop, the rice will be fluffy cooking it my way and with the right water/rice ratio. If you insist on rinsing the rice, reduce water by 2 tablespoons (to account for water logged in the rice).
5. Packing the rice in tightly makes the rice cakes firmer so you can cut neat squares, plus they are crispier. Weighing down while cooling is best, but still ok if you just press the rice really tightly with your hands. If you don’t, then they will crumble on the edges when you cut and fry. Not fatal, but annoying – and not quite as crispy.
Nutrition
Life of Dozer
This is his sitting up straight look-how-good-I-am food scavenging position. It’s highly effective!

The post Crispy rice appeared first on RecipeTin Eats.
]]> Named as such for the sparkling colours, this is a striking rice pilaf that is made for festive occasions – like Easter! It’s a bright yellow Persian saffron rice that’s flavoured with spices and mixed with a jumble of fruit and nuts. Stunner to look at – and eat! Jewelled rice pilaf There are many... Get the Recipe
The post Jewelled rice pilaf – for Easter! appeared first on RecipeTin Eats.
]]>Named as such for the sparkling colours, this is a striking rice pilaf that is made for festive occasions – like Easter! It’s a bright yellow Persian saffron rice that’s flavoured with spices and mixed with a jumble of fruit and nuts. Stunner to look at – and eat!
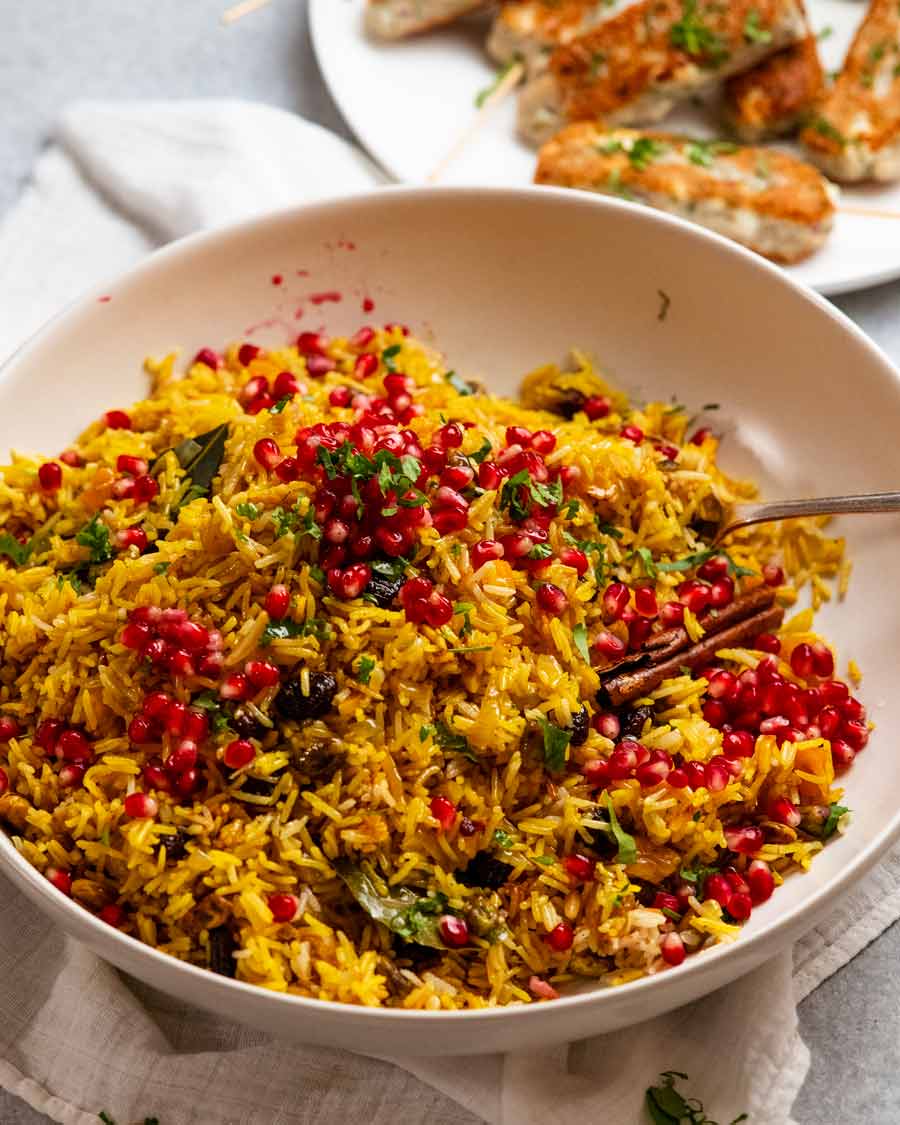
Jewelled rice pilaf
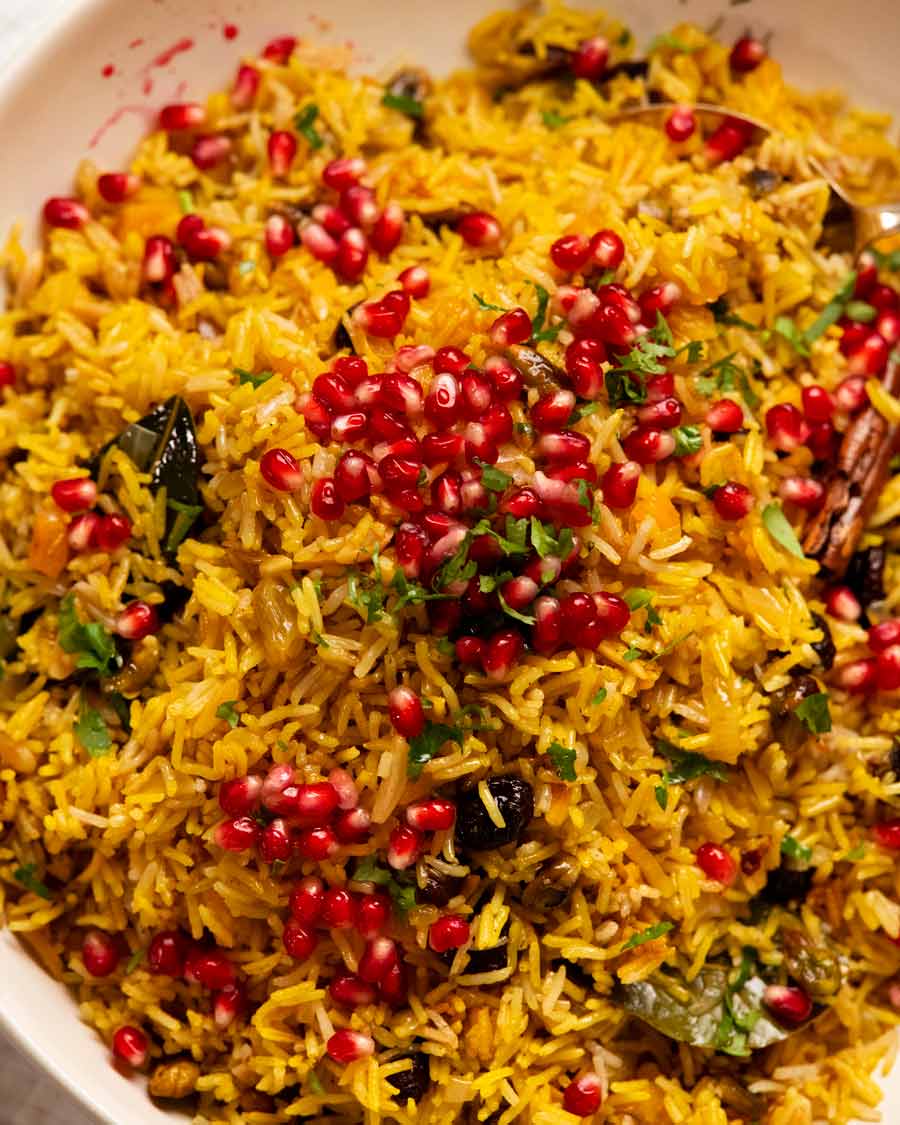
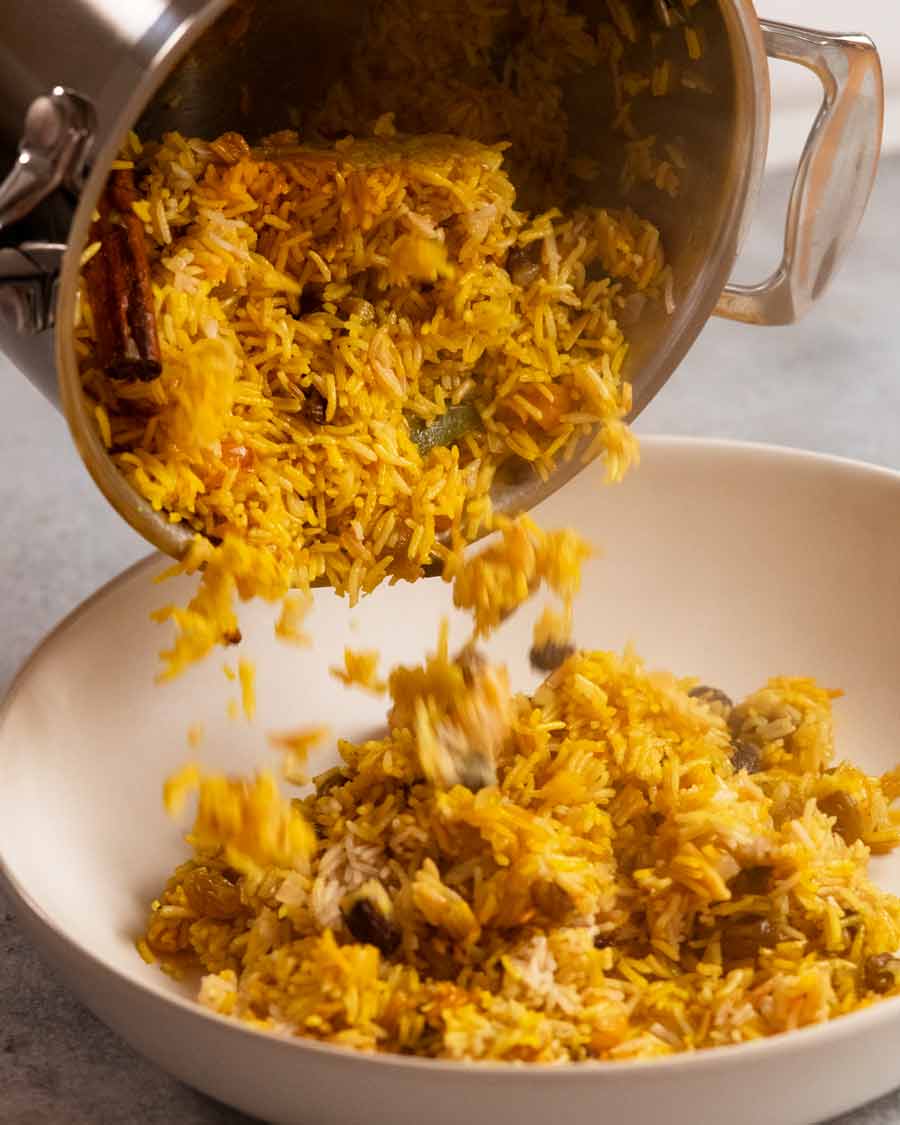
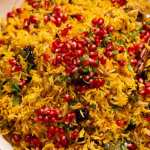
There are many rice dishes on this website, but this is the crown jewel of them all. Just LOOK at that colour! And the flavour – WOW. It’s a fruit-nut pilaf delicately perfumed with traditional Persian spices – cumin, fennel, cinnamon, all spice and cardamom – with that unmistakable, intoxicating scent and bright yellow colour that you only get from the world’s most coveted spice: saffron.
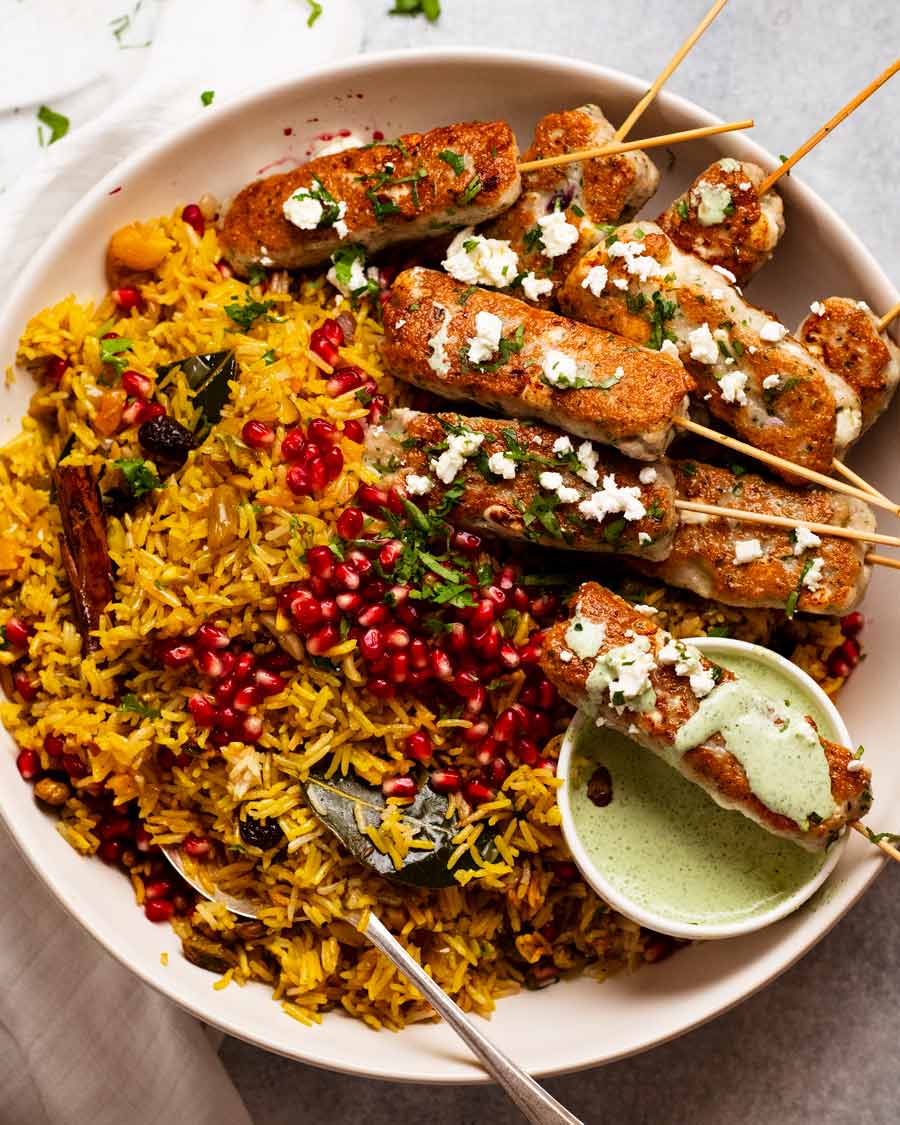
While this Persian /Middle Eastern rice is flavoured enough to make you want to eat it straight out of the pot, the flavour is still mild enough so it’s suitable to serve alongside bold flavoured mains. Think – Persian Lamb Shanks, Chicken or Lamb Shawarma, lamb koftas, chicken or vegetable tagine. For more, see here for all Middle Eastern recipes. Also, Mediterranean food will pair beautifully and I certainly wouldn’t hesitate to serve this alongside a roast chicken or a roast lamb.
And finally, a new one on offer – fish koftas. Coming this Wednesday, created especially to serve on this pilaf!
Ingredients in Jewelled Rice Pilaf
Let’s stuff with the fun ingredients in this pilaf: the add-ins and flavourings. 
Add-ins and flavourings
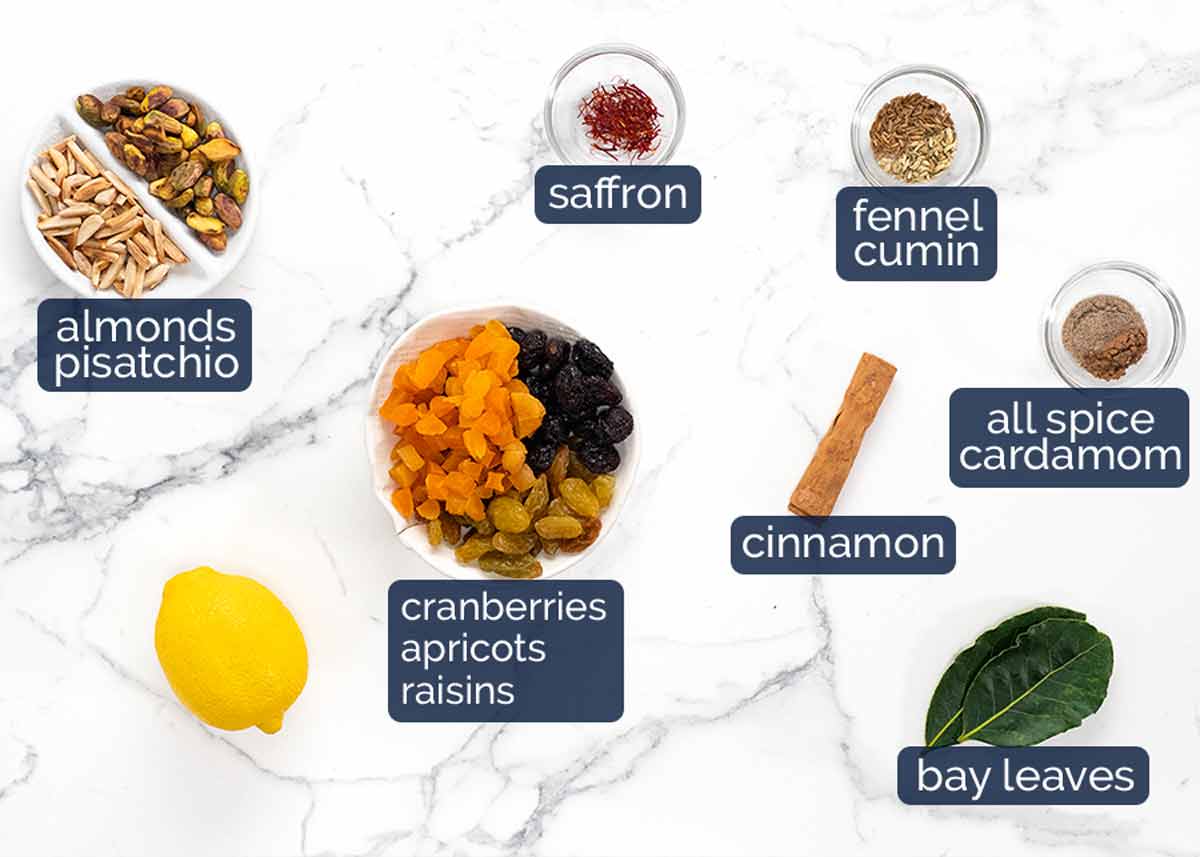
Saffron – This is an exotic spice used in Middle Easter / Persian cooking. It’s famous for being the world’s most expensive spice, reflecting the labour intensive production. There’s 3 tiny strands in each flower which blooms for only one week every year!
Saffron makes anything it touches a bright vibrant yellow with a subtle perfume of earthy flavour unlike anything other spice.
Find it in large grocery stores (here in Australia), Middle Eastern/Persian stores and online.
Better value substitutes – I freely use turmeric in place of saffron, for a similar yellow colour albeit it doesn’t have the same flavour. Imitation saffron powder will provide the colour but doesn’t provide flavour. To be honest, there’s plenty of other flavour in this pilaf from the spices, so it’s actually fine to use imitation.
Spices – Cumin and fennel seeds, cardamom, all spice and a cinnamon stick. This is a combination of spices that reflects the Persian / Middle Eastern roots of this pilaf.
Note: I choose to use cumin and fennel seeds and a cinnamon stick rather than powder because you end up with a more vibrant yellow rice. If you use powder then the rice ends up a slightly brown colour so when you add the saffron, it’s a slightly more muddied yellow colour.
Bay leaves – Aromatic added to cook the rice.
Lemon – We use the zest only, for a perfume of lemon flavour. It adds that little touch of extra-something.
Fruit and nuts – I use almonds, pistachios, apricots, golden raisins and cranberries. This is a combination that I think provides colour (green from pistachios, orange apricots, yellow rather than black raisins) as well as a good flavour combination.
Other – You can really make this pilaf your own! Sultanas, raisins, figs, peach, cherries, mangoes, pineapple all would work here. For nuts, I’d suggest walnuts, cashews, macadamias and non-nuts like pepita. Peanuts would be a little out of place, I think.

The rice part
No less important but let’s face it, not as exciting as all the add-ins. 😊
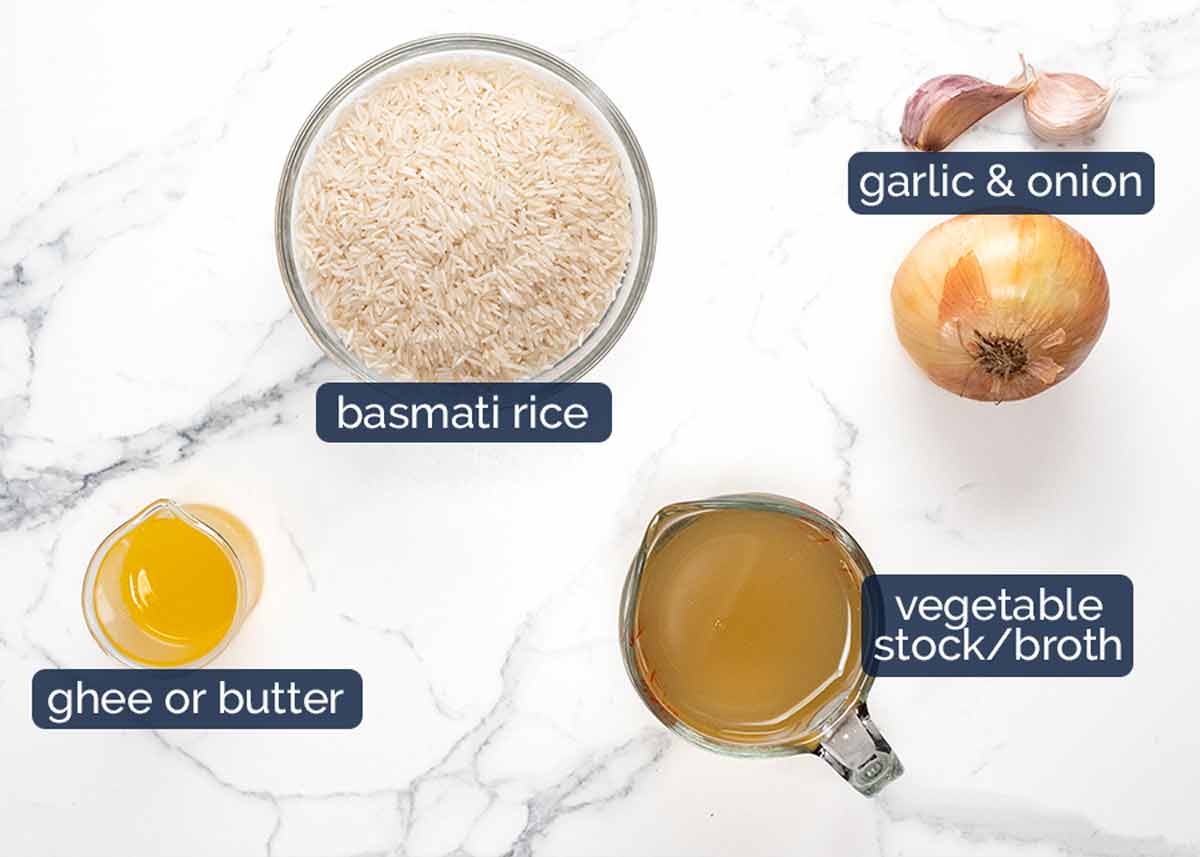
Basmati rice – this is the traditional rice for pilafs. The rice grains are distinctively long with a perfume of flavour.
Other rice that will work – long grain and jasmine rice. Medium grain rice will also work though the rice will be a touch stickier (because that’s how the rice is).
Please do not use: wild rice, risotto, paella rice, brown rice or faux rice (quinoa, cauliflower rice etc).
Ghee is a type of clarified butter that has a more concentrated butter flavour because it’s 100% fat. Stored in pantry not in fridge. Make your own or just use butter.
Onion and garlic – Flavour base aromatics.
Stock rather than water, for better flavour. I use vegetable stock to keep this vegetarian but chicken stock works great too.
How to make Jewelled Rice Pilaf
Saffron water
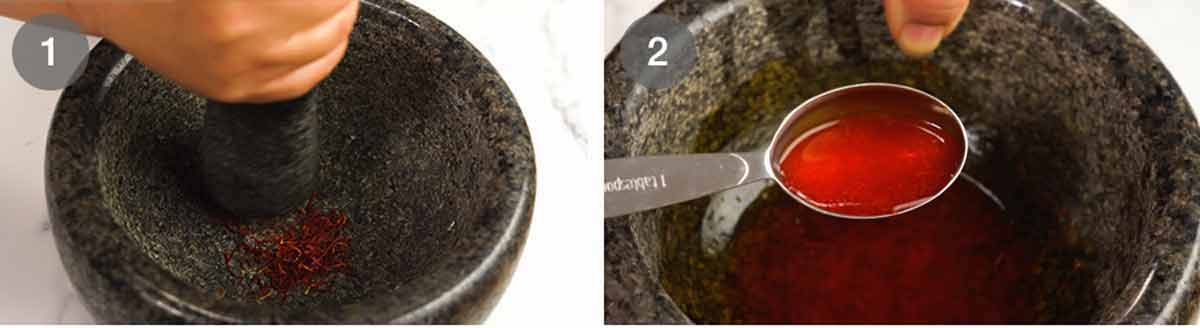
Grind the saffron threads into a powder. This extracts more flavour and colour out of it – we want to do this for the world’s most expect spice!!! If you don’t have a mortar and pestle that’s ok, just soak the strands, it will still work.
Soak – Add a bit of boiling water and mix. Set aside to steep while the rice cooks, and the colour will intensify.
Make pilaf
It’s no harder than making plain white rice, except we start with sautéed aromatics that adds so much flavour to the end result!
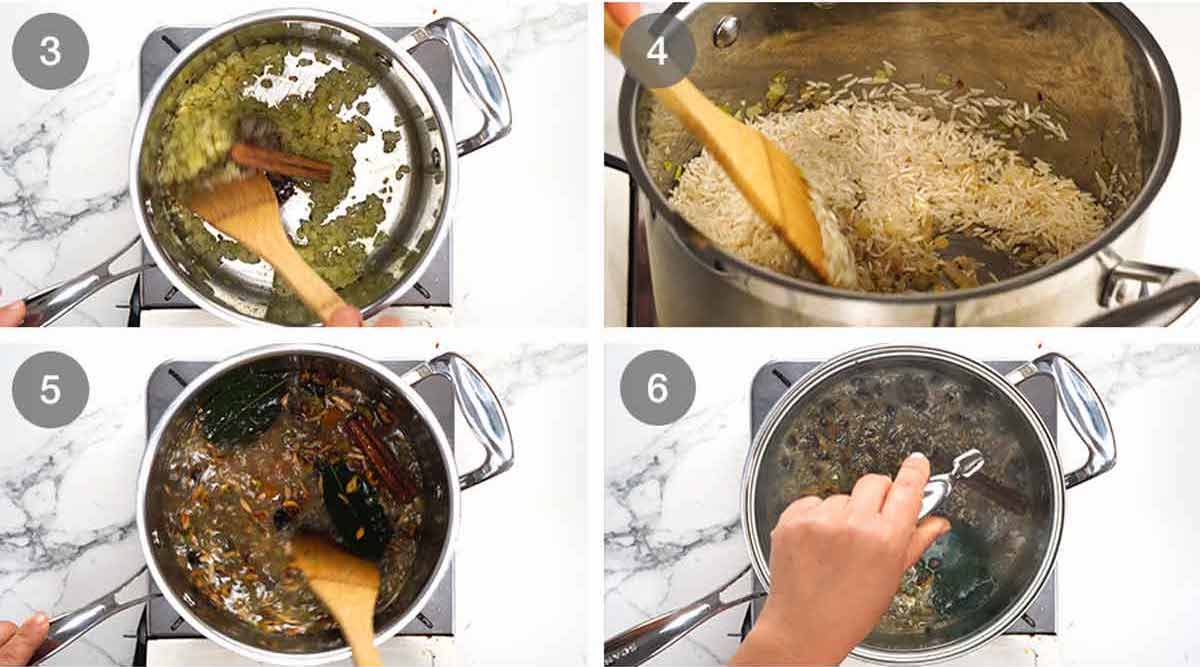
Sauté the fennel and cumin seeds first. This brings out their flavour. Then cook the onion and garlic for 5 minutes until the onion is translucent. And lastly, add the cinnamon stick, cardamom and all spice powder and stir for 30 seconds – again, to bring out their flavour.
Coat rice – Add the rice and give it a good stir to coat the rice grains in all those tasty flavours.
Cooking liquid – Add the stock, bay leaves, lemon, salt, fruit and nuts.
Steam rice – Stir, bring to a simmer, then put the lid on. Reduce stove to low – but it should still be simmering gently around edges otherwise the rice is just sitting there, getting bloated in hot water. Cook for 14 minutes or until the liquid is all absorbed. Do not peek or stir while it’s cooking!
Rest
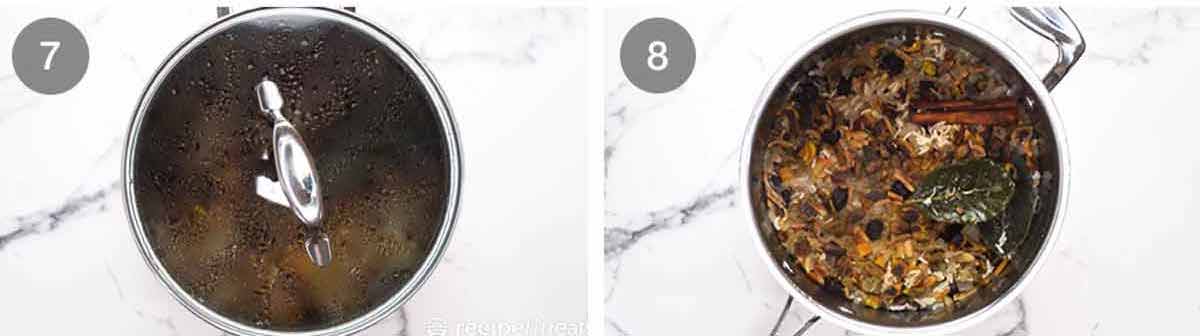
Rest – Remove the saucepan from the stove with the lid still on and set aside for 10 minutes. During this resting stage, the rice grains will finish cooking and the residual water on the surface of each grain gets absorbed, leaving you with fluffy rice rather than gluey mushy rice.
Cooked rice – This is what it looks like when you remove the lid. The rice surface will be level and the colour is a light brown. We will fluff and colour it up in the next steps!
Sparkling jewels!
The best part – sparkle it up!
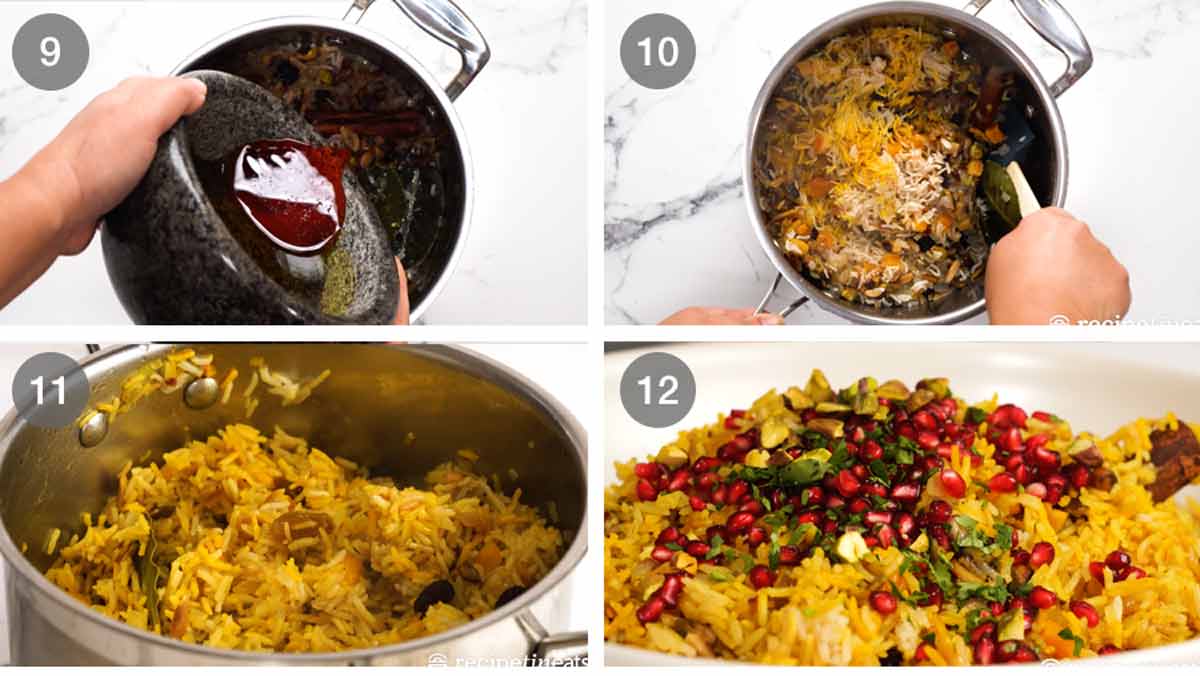
Saffron water – Pour over half the saffron water.
Gently fluff the rice using a rubber spatula. Be very gentle! The long rice basmati rice strands are fragile, we don’t want to break them.
Repeat – Once the rice is fluffed and is mostly yellow (some white spots still expected at this stage), pour in the remaining saffron water plus the melted ghee or butter. Then gently toss again until the rice is all yellow.
Sparkling jewels! Tumble the rice onto a serving platter then sprinkle with pomegranate seeds, pistachios and coriander. Then serve!
Fish koftas coming Wednesday!
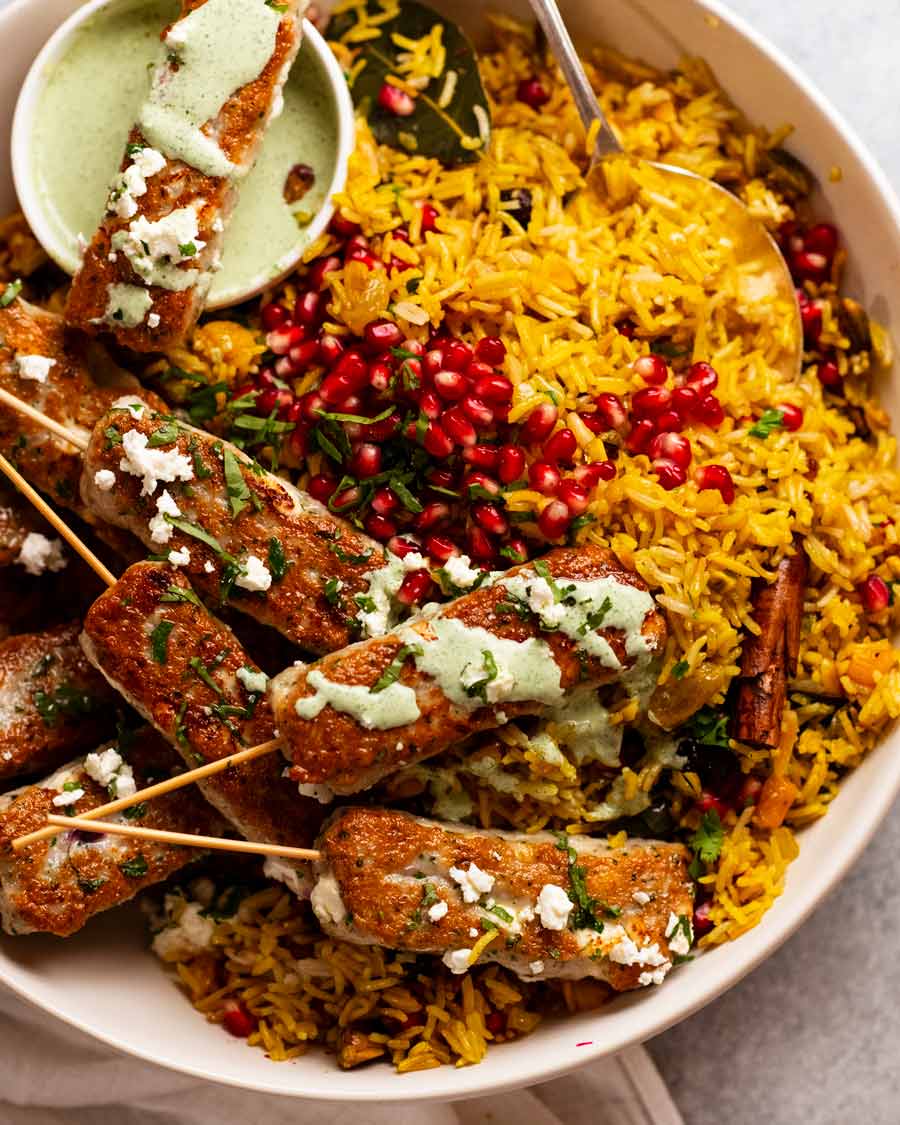
As mentioned earlier, the Jewelled Rice Pilaf is pictured in post with fish koftas. Fish mixed with spices then skewered and pan fried, this is a new recipe created especially to rest atop of a big pile of this fluffy saffron rice, a magnificent Easter Friday-worthy meat-free main. You’ve never had fish like it before – and it’s so easy!
I really hope some of you give this a go one day. Even just seeing the colourful photos puts me in a good mood and makes me feel all festive!! – Nagi x
Watch how to make it
Jewelled rice pilaf
Ingredients
Saffron water:
- 1/2 – 1 tsp saffron threads (125 – 250mg) (SUB: 1/4 tsp saffron powder OR 1/2 tsp tumeric powder) (Note 1)
- 2 tbsp boiling water
Rice pilaf:
- 2 tbsp (30g) ghee or butter (Note 2)
- 1/4 tsp fennel seeds
- 1/4 tsp cumin seeds
- 1 onion , finely diced
- 2 garlic cloves , minced
- 1 cinnamon stick
- 1/8 tsp all spice
- 1/8 tsp cardamom powder
- 1 1/2 cups basmati rice (Note 3)
- 2 1/4 cups vegetable stock , low sodium (or chicken)
- 3/4 tsp cooking/kosher salt
- 2 bay leaves (preferably fresh, else dried)
- 1/2 tsp lemon zest
Fruit & nuts (your choice, Note 4):
- 1/4 cup dried cranberries
- 1/4 cup dried apricots , cut in 1cm / 1/3″ pieces
- 1/4 cup golden raisins
- 1/4 cup pistachios , toasted (Note 5)
- 1/4 cup slivered almonds , toasted (Note 5)
Finishing:
- 2 tbsp (30g) ghee or butter, melted
- 1/2 pomegranate , seeds only (Note 6)
- 2 tbsp coriander/cilantro leaves roughly chopped
- 2 tbsp roughly chopped toasted pistachios (Note 5)
Instructions
- Soak saffron – Grind saffron into a powder using a mortar and pestle (Note 1). Mix in boiling water then set aside while the rice is cooking.
- Sauté – Melt ghee or butter in large saucepan over medium high heat. Add fennel and cumin, then stir for 30 seconds. Add onion and garlic. Cook for 5 minutes. Add cinnamon, cardamom and all spice, then stir for 30 seconds. Add rice and stir for 1 minute to coat in the beautiful flavour.
- Cook rice – Add the stock, bay leaves, lemon, salt, fruit and nuts. Stir, bring to a simmer, then put lid on. Reduce stove to low (should still be simmering gently around edges), and cook for 14 minutes. Do not peek or stir!
- Rest – Quickly check to ensure liquid is absorbed. Remove from the stove (lid still on) and leave for 10 minutes.
- Yellow! Pour over half the saffron water then very gently fluff the rice using a rubber spatula (so you don't break the long rice strands). Once mostly mixed through, add remaining saffron water and ghee. Gently toss until the rice is all yellow.
- Serve – Tumble onto serving platter. Sprinkle with pomegranate seeds, coriander, pistachios and serve with fish koftas.
Notes
Nutrition
Life of Dozer
Wondering how many shots he has to suffer through before he can launch himself onto those Easter eggs (doggy friendly ones, of course!).

The post Jewelled rice pilaf – for Easter! appeared first on RecipeTin Eats.
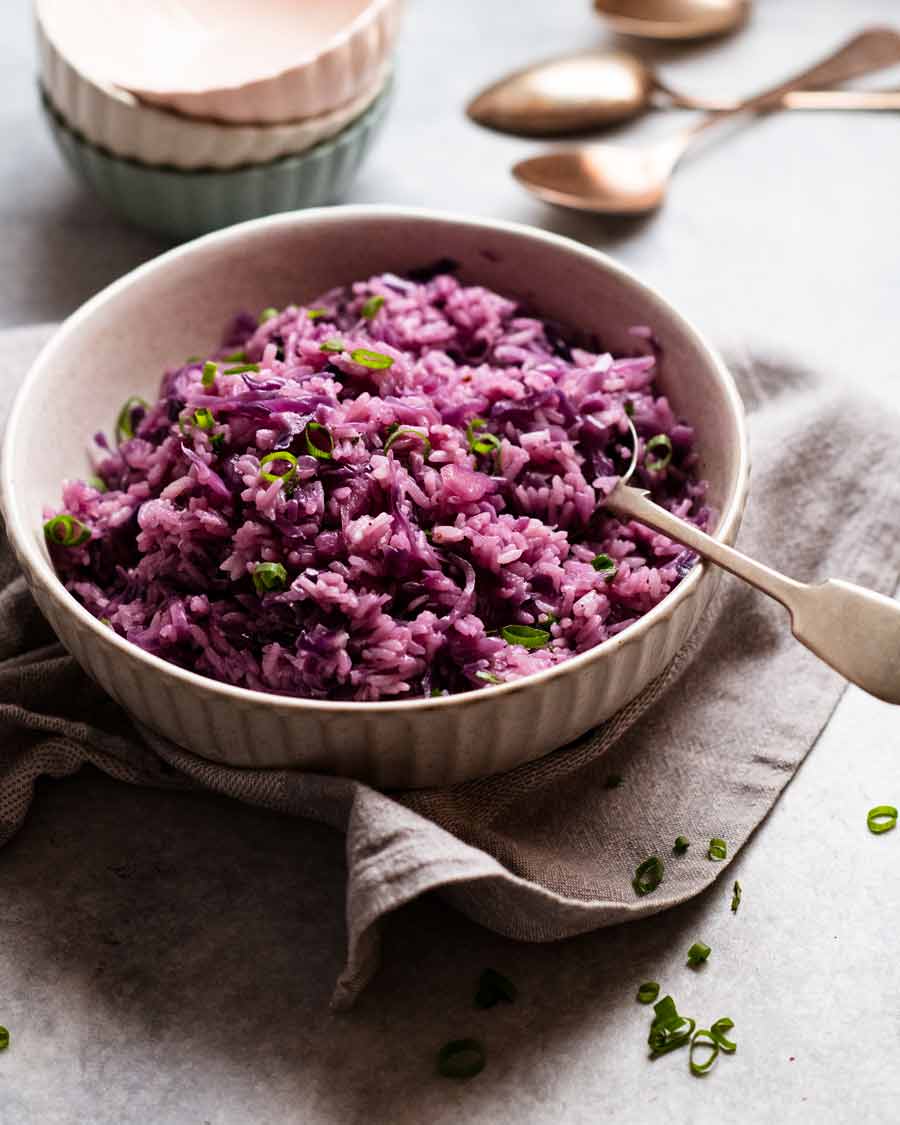
]]> Purple rice is a garlicky, butter rice side that owes its vibrant colour to red cabbage! Love this 2-in-1 that combines starch plus plenty of vegetables in one dish, rather than making a salad plus a starch separately. Goes with everything – Western, Asian, Mediterranean, Indian, Mexican! Purple rice You know those nights when you... Get the Recipe
The post Purple rice (red cabbage rice) appeared first on RecipeTin Eats.
]]>Purple rice is a garlicky, butter rice side that owes its vibrant colour to red cabbage! Love this 2-in-1 that combines starch plus plenty of vegetables in one dish, rather than making a salad plus a starch separately. Goes with everything – Western, Asian, Mediterranean, Indian, Mexican!
Purple rice
You know those nights when you feel all smug because you got ahead on the weekend and marinated some chicken so you could whip up a “quick dinner” during the week, only to realise you didn’t plan for sides to fill out the meal?
Well, today’s recipe is just the sort of thing that will save you. It’s one of those side dishes I call a two-in-one because it includes plenty of vegetables as well as a starch to fill out the meal. As opposed to making two sides, like mashed potato plus a garden salad.
What it tastes like: Buttery and garlicky, and very mild cabbage flavour actually which will appeal to people who don’t jump up and down at the mention of cabbage for dinner. Bonus: it’s such a fun colour!!!

Ingredients in purple rice
Here’s what you need to make this colourful, veg loaded rice!
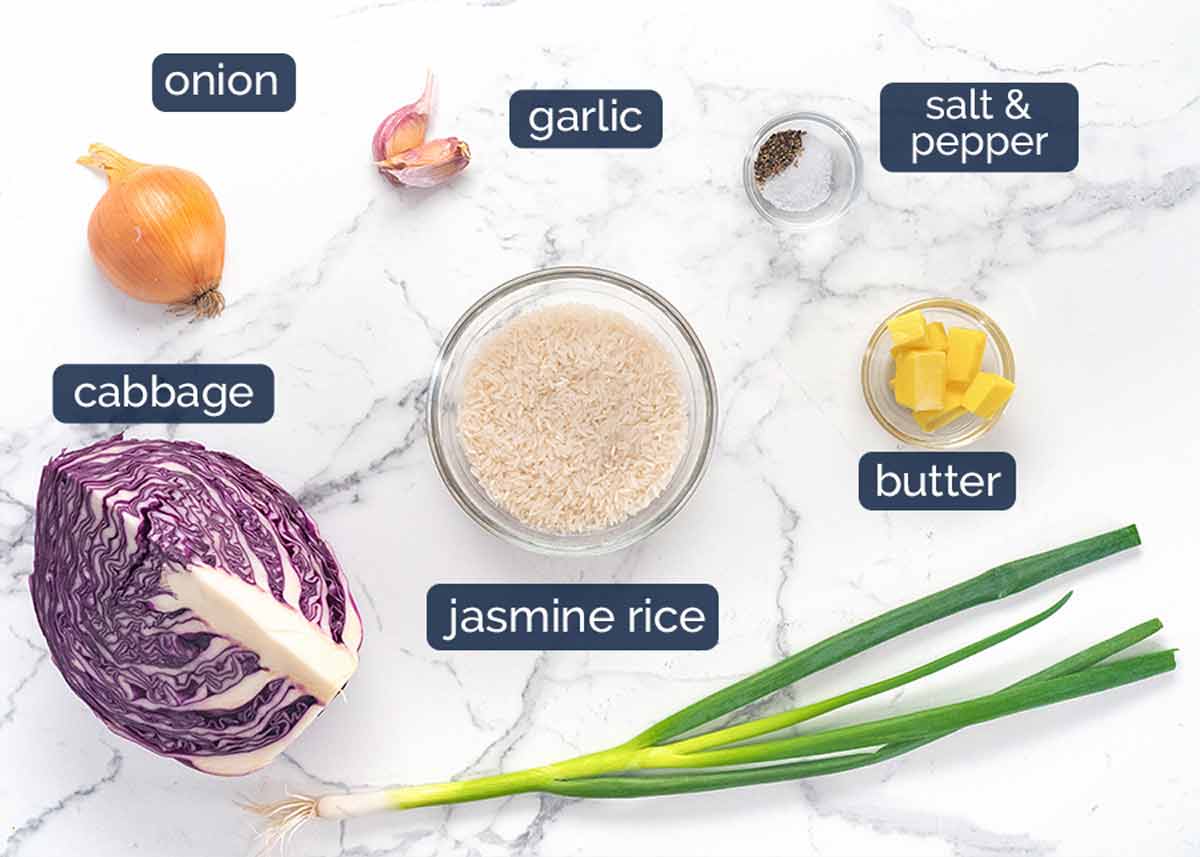
Jasmine rice – I like using jasmine rice in this dish because you get that lovely subtle fragrance.
Other rice – the recipe will work with long grain rice, medium grain rice and basmati rice, though you will need an extra 1/4 cup of water or vegetable stock/broth. This is because jasmine rice requires less liquid to cook than other varieties of rice (more on this in my plain jasmine rice recipe!).
The recipe is not suited to brown rice, arborio/risotto rice, paella rice, wild rice or faux rice (cauliflower rice, quinoa etc) as the cook times and methods differ so I’d need to alter the recipe.
Red cabbage – Also called purple cabbage, this is what gives the rice the vibrant purple hue! You can use plain ole’ green cabbage if you want, but where’s the fun in that?? 😎
Garlic and onion – Flavour base aromatics. You will adore the butter garlic flavour in this rice!
Butter – As above, for promised buttery flavour! You’ll be surprised how buttery it tastes even though we’re only using 30 grams / 2 tablespoons of butter.
Vegetable stock – The rice cooking liquid, tastier than water! Use low sodium stock. If yours is full salt, skip the salt in the recipe.
Salt and pepper – Seasoning for the rice.
Green onion – For fresh garnish at the end, though I wouldn’t say it’s critical.
No need to rinse your rice!
There is no need to rinse the jasmine rice to wash off excess starch to make the rice fluffy. This is a myth. You just need the correct liquid-to-rice-ratio which is 1.25 : 1 (1.25 cups of water/stock to 1 cup of rice) and the rice will be fluffy even without washing it. Most recipes get it wrong, using way too much water.
The only reason to wash jasmine rice is if you’re worried about the rice being dirty. If you bought yours at the supermarket, you shouldn’t need to clean it. If you clean your rice, reduce the stock by 2 tablespoons to account for the waterlogged rice.
How to make purple rice
One big, fat rice-making rule that applies to ANY rice you cook: DO NOT STIR, DO NOT PEEK once your put the lid on the pot! Unless, of course, you like your rice unevenly cooked, gluey and mushy. 🤷🏻♀️
Use a large saucepan or small pot, around the size of mine which is 28cm/11″. If you use a saucepan that is too small (~20cm/8″) then the rice-cabbage mixture will be too deep which will cause the rice to cook unevenly.
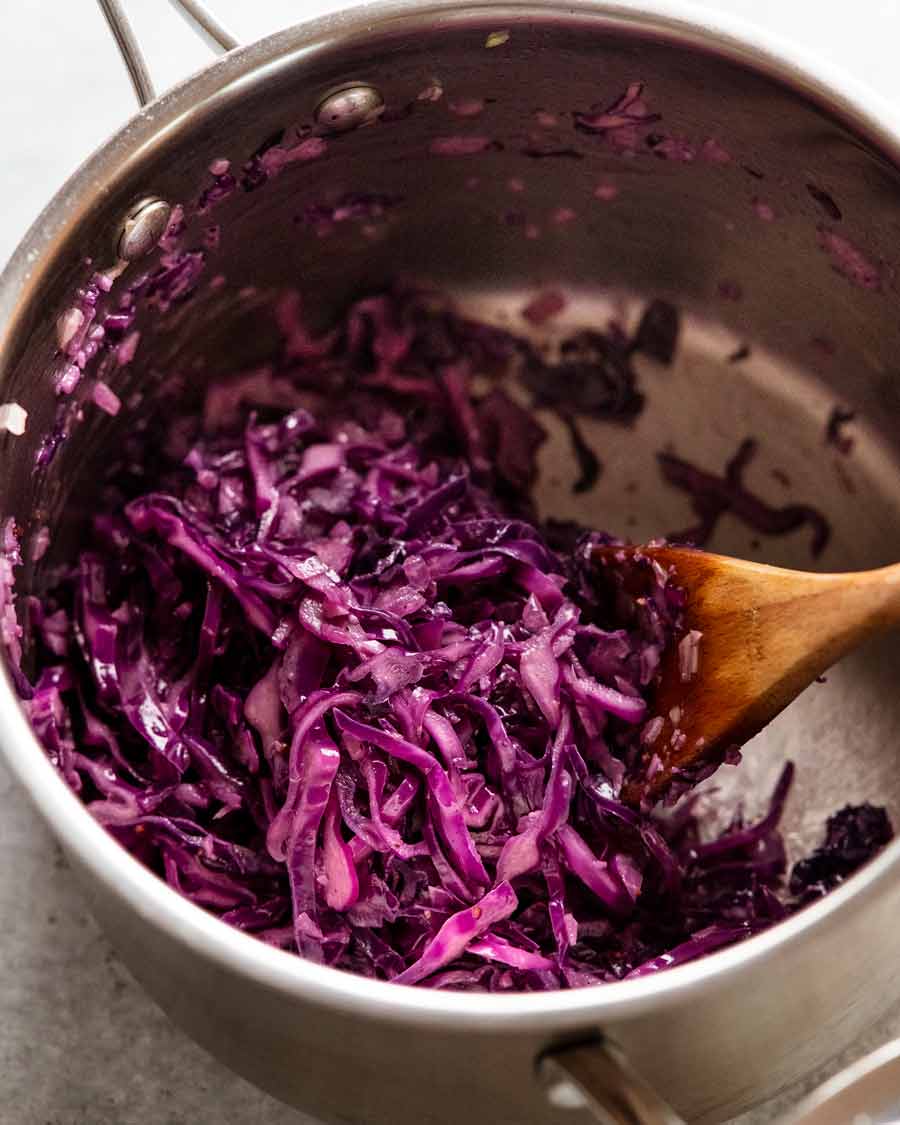
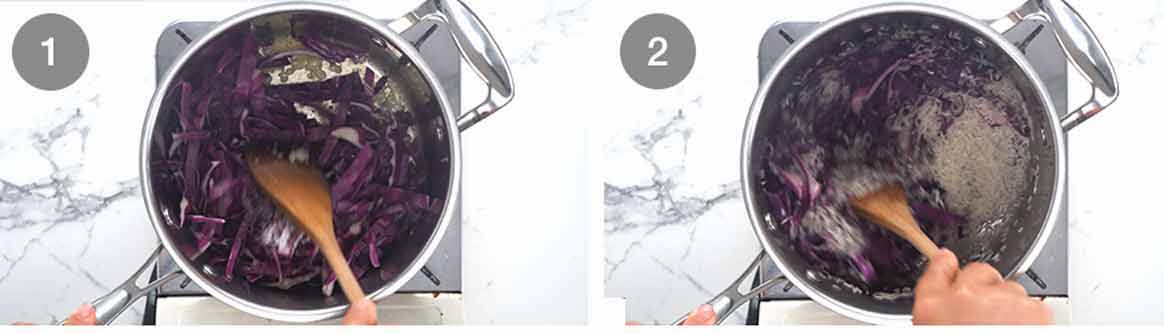
Sauté the garlic and onion in the butter until it smells amazing / onion is translucent. Then cook the cabbage for a few minutes until it starts to soften (rather than being stiff and pokey). Don’t let it get completely wilted and soft because it will cook more with the rice.
Add rice and stir to coat in the garlic butter.

Add stock then scrape down the sides and push the cabbage-rice under the surface of the liquid, as best you can. The main thing is that you want all the rice under the liquid. A few grains poking above the surface will be fine, they will steam-cook.
Cook 12 minutes – Bring the liquid to a simmer, then put the lid on and lower the heat to medium low, or low if your burner is very strong. Leave to cook undisturbed for 12 minutes. Do not lift the lid to peek and most definitely do not stir! That will disrupt the rice cooking and you’ll end up with unevenly cooked rice that’s mushy and gluey.
Check – At the 12 minute mark, working quickly, remove the lid and tilt the saucepan to ensure all the liquid has been absorbed. If it has not, leave it on the stove for another minute or two.
Rest 10 minutes – Remove the saucepan from the stove with the lid still on and rest for 10 minutes. Never skip the rice resting step! The rice will finish cooking and the liquid on the surface of each rice grain gets absorbed = fluffy rice.
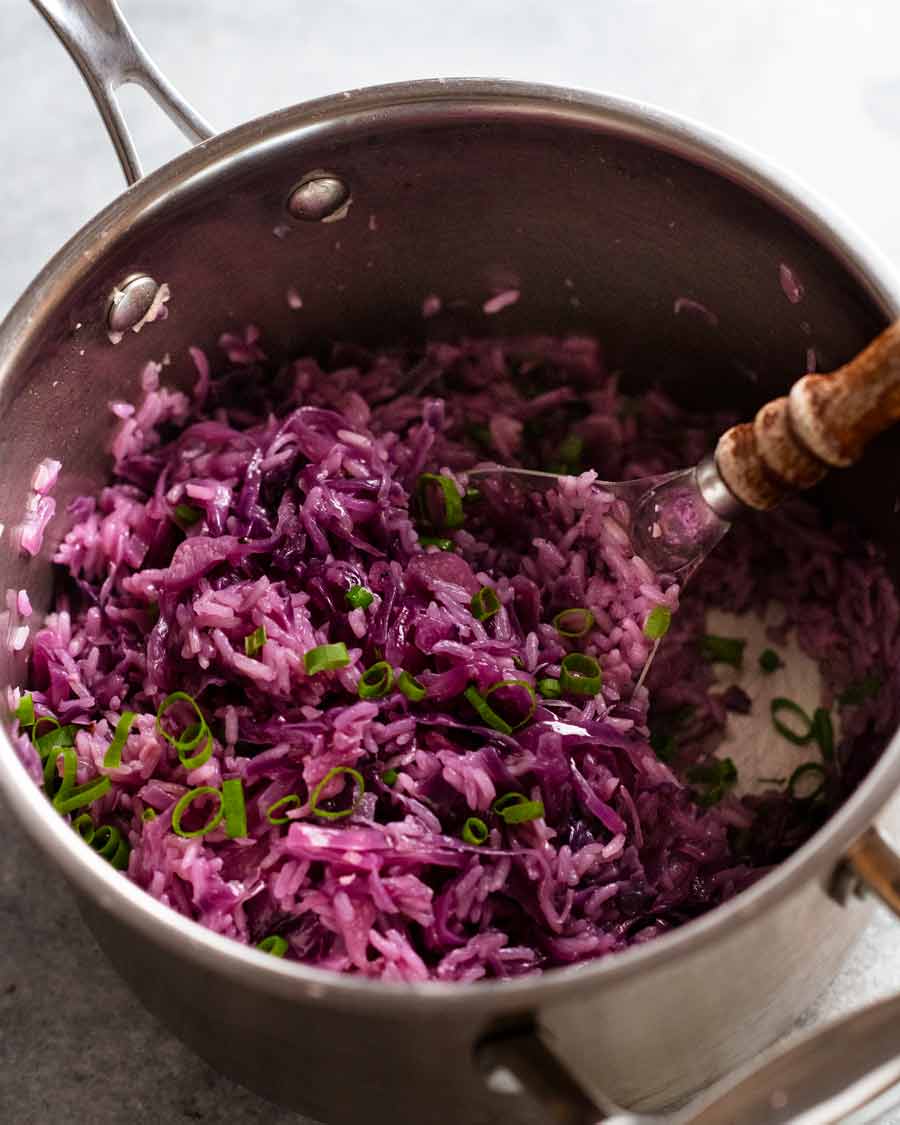
Fluff then serve, garnished with a sprinkle of green onion!
What to serve with purple rice
This cabbage rice is fairly neutral flavoured, with a lovely buttery, garlic flavour. Which means it will go with pretty much any dish, and any cuisine, both Western and Asian.
While the possibilities are endless, here’s a starting point for you – some quick mains that I’d serve alongside purple rice:

And of course, it goes without saying that your purple rice will taste even better if you serenade it with Prince’s Purple Rain while it’s steaming on the stove. 🎶 Go on, do it. You know I did!! – Nagi x
Watch how to make it

Purple rice
Ingredients
- 30g / 2 tbsp unsalted butter
- 2 garlic cloves , finely minced
- 1/2 onion , finely diced
- 3 cups finely shredded red cabbage (tightly packed)
- 1/2 tsp cooking salt (kosher salt)
- 1/4 tsp black pepper
- 1 cup jasmin rice , no need to rinse or soak (Note 1 for other rice)
- 1 1/4 cup vegetable stock , low sodium (or chicken stock or water + 1 stock cube- Note 2)
Garnish, optional:
- 1/4 cup green onion , finely chopped
Instructions
- Melt butter in a large saucepan or small pot over medium heat. (Note 3)
- Sauté veg – Cook onion and garlic for 1 minute until soft. Add cabbage, salt, and pepper. Cook for 2 to 3 minutes, stirring from time to time, until the cabbage starts to soften but not completely floppy (as it will cook more with the rice).
- Coat rice – Add rice and stir well to coat in the flavour.
- Add the vegetable stock. Scrape down the sides and press the cabbage-rice mixture down so all the rice is submerged.
- Cook 12 minutes – Bring to a simmer, then cover with a lid, turn the stove down to medium low (or low on a stronger burner) and cook for 12 minutes. Do not peek or stir!
- Rest 10 minutes – Turn off the heat, remove the saucepan from the stove and let to rest for another 10 minutes (with the lid on).
- Fluff & serve – Use a rubber spatula or rice paddle to fluff the rice then tumble into a serving dish. Sprinkle with green onion and serve!
Notes
Nutrition
Life of Dozer
What do you think – will he spit it out?? 😂
The post Purple rice (red cabbage rice) appeared first on RecipeTin Eats.
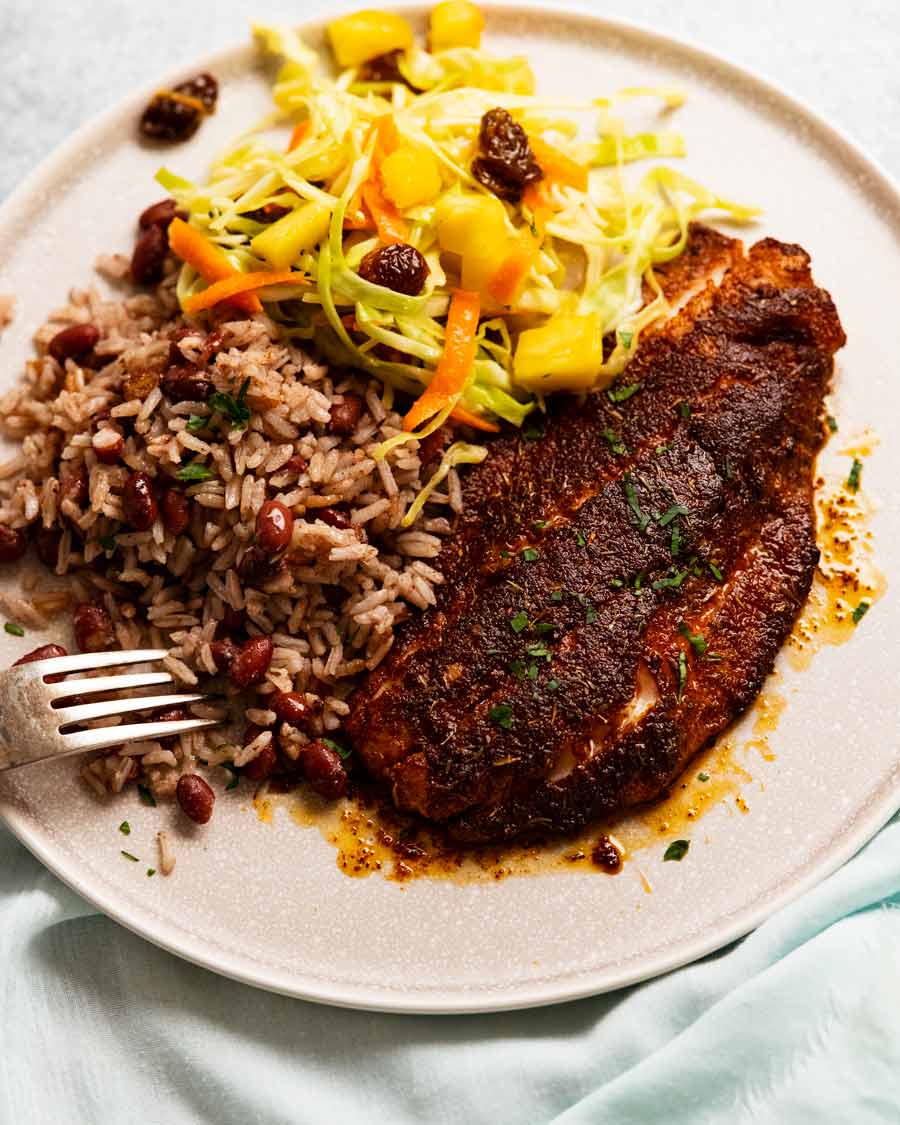
]]> Rice and peas is a Jamaican side dish of coconut rice mixed with red beans, perfumed with spices, and a whisper of warmth from fresh chilli. Traditionally cooked on the stove but I find it much safer to cook in the oven as coconut milk has a tendency to catch on the base. Excellent accompaniment... Get the Recipe
The post Jamaican rice and peas (beans) appeared first on RecipeTin Eats.
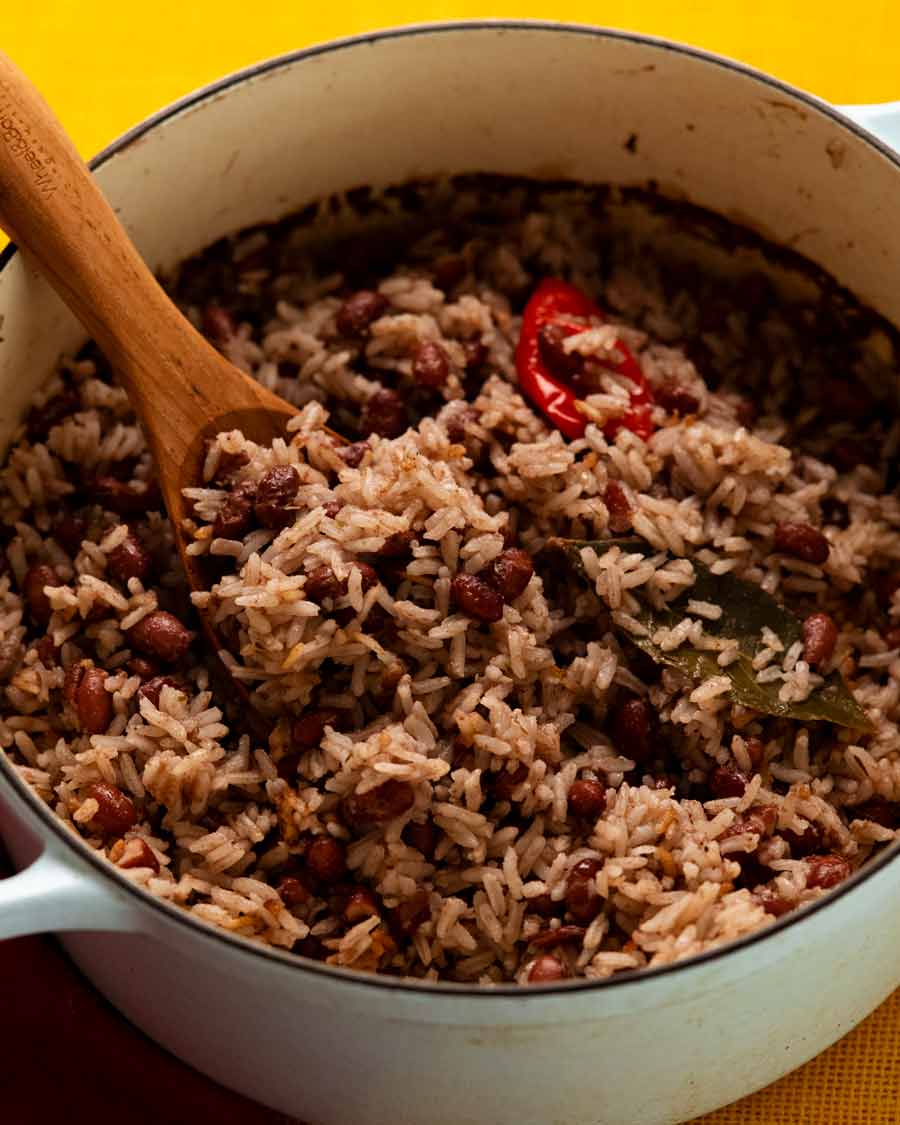
]]>Rice and peas is a Jamaican side dish of coconut rice mixed with red beans, perfumed with spices, and a whisper of warmth from fresh chilli. Traditionally cooked on the stove but I find it much safer to cook in the oven as coconut milk has a tendency to catch on the base.
Excellent accompaniment with all things Jamaican, Caribbean and tropical. Or eat it straight out of the pot!
Welcome back to Jamaican week!

It’s Jamaican week here on RecipeTin Eats! A week where I’m sharing a set of recipes so you can enjoy a Jamaican-themed dinner in the comfort of your own home! Here’s the menu:
🌴 Jamaican menu 🌴
Main – Jerk Fish
Side salad – Jamaican Slaw
Side – this Jamaican Coconut Rice and Peas (beans)
Dessert – rum and raisin ice cream without an ice cream maker!
Jamaican coconut rice and peas (beans!)
Rice and peas is a staple side dish in Jamaica and much of the Caribbean. Though called rice and peas, it’s actually made with beans! The reason this name came to be is because Jamaicans call red kidney beans peas – though funnily enough, other varieties of beans are called beans.
Confused?
That’s ok. All you need to know is that this coconut rice is delicious and any day it makes an appearance on your dinner plate is a good day!
What you need for Jamaican rice and peas
Remember – Jamaican’s call this dish rice and peas but it’s made with red kidney beans, not peas. So there’s no peas in sight!!!
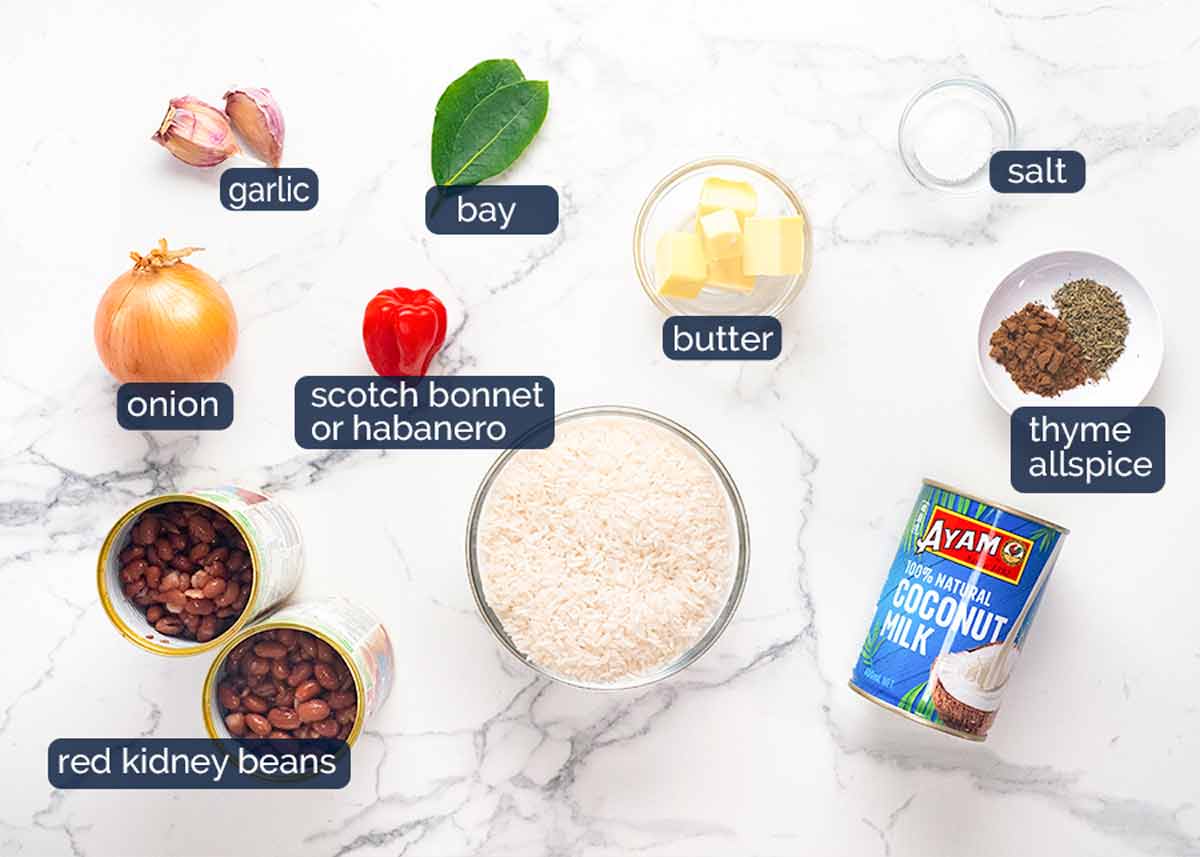
Rice types – Long grain works best as the grains will separate best. But you can also use basmati, jasmine and medium grain rice. Recipe will also work for sushi rice (short grain rice) but the rice will be stickier (because that’s the nature of the rice).
Rice types not suitable for this recipe – brown rice, risotto (arborio), paella or faux rice (cauliflower, quinoa).
Red kidney beans – Traditionally, dried beans are used which require overnight soaking. I’ve opted for canned for convenience.
Other beans – Black beans also works and will look similar. Other beans will work fine too but will make the end dish look different..
Scotch bonnet or habanero chilli – This adds a subtle hint of heat and flavour into this dish. Authentic! But you can skip it, if you prefer not spicy.
Scotch bonnet is traditional but hard to find here in Sydney, so Habanero makes a great sub (sold at Coles, Woolies, some Harris Farms) else use a large red cayenne pepper or 1 birds eye chilli.
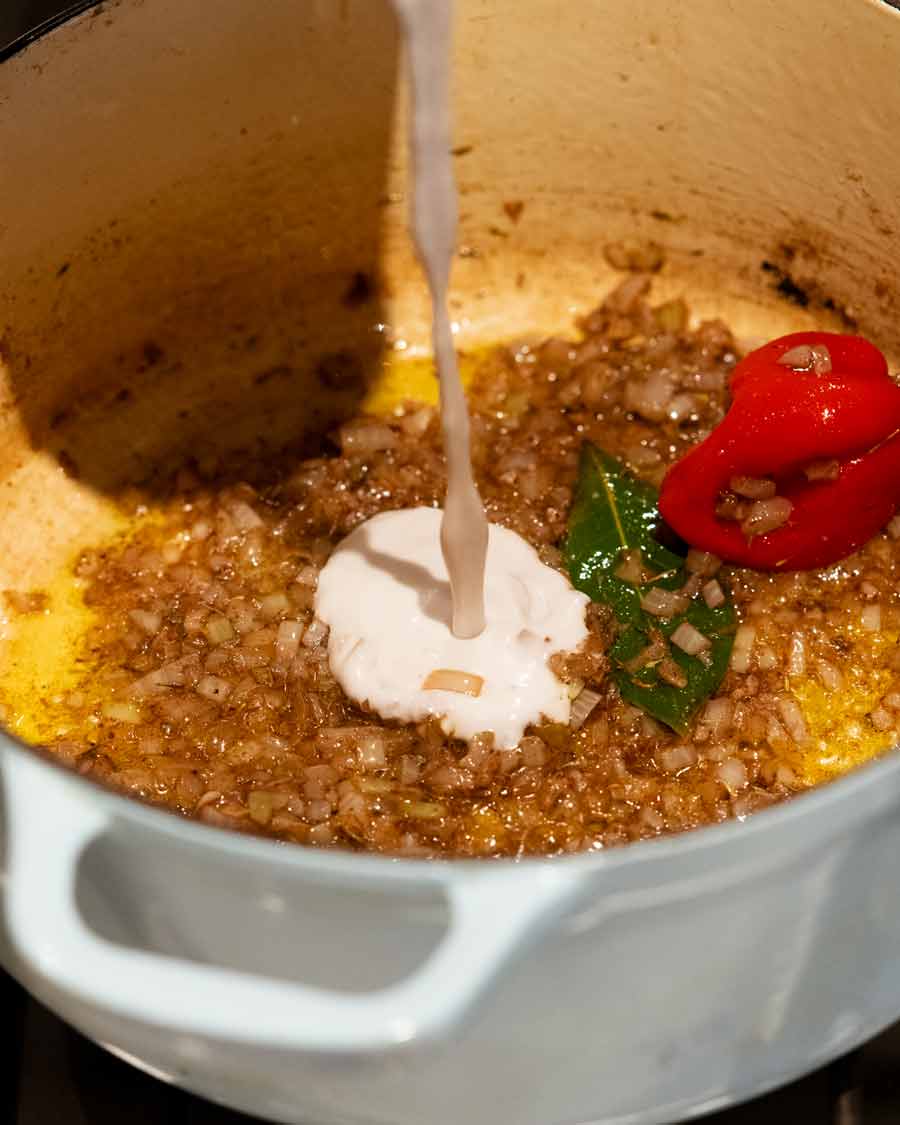
Coconut milk – Not all coconut milk is created equal! Cheaper = less coconut %, more water = less coconut flavour. Aim for > 70% (I use Ayam which is 89%). Check the ingredients label. Low fat – doesn’t have as good a coconut flavour. But it will work.
Dried thyme – A commonly used dried herb in Caribbean cooking.
All spice – For beautiful warmth, another ingredient that makes a regular appearance in Caribbean food! Also used in Jerk seasoning (see Jerk Fish). Substitute with mixed spice.
Bay leaf – Earthy aromatic. Fresh is best if you can, else dried.
Garlic and onion – Essential aromatics that we sauté with butter and the spices. So good!
Butter – You can use oil if you prefer, but butter is better flavour!
Note on authenticity
(Because I got some very cranky messages about the authenticity of this recipe!)
Traditionally, rice and peas is prepared on the stove using dried beans which are soaked overnight. I choose to use canned beans for convenience, and I cook the rice in the oven rather than stove because I find it is the best fuss-free, least risky way to cook rice with coconut milk.
While coconut rice can be successfully and well cooked on the stove, it does require exactness of stove strength, a good pot and certain coconut milk quantities (thin consistency but good coconut flavour, hard to find in ordinary Western grocery stores). The oven is much easier for home cooks!
Avoid the stress. Use your oven! Trust me on this. My team and I tested coconut rice over 30 times to perfect it for my cookbook. It’s taken almost 8 months before we could face a coconut rice recipe again!!
How to make Jamaican rice and peas
This recipe starts off on the stove to sauté the aromatics then is finished in the oven so your coconut rice will come out beautifully fluffy every single time. No more mushy coconut rice, ever again!
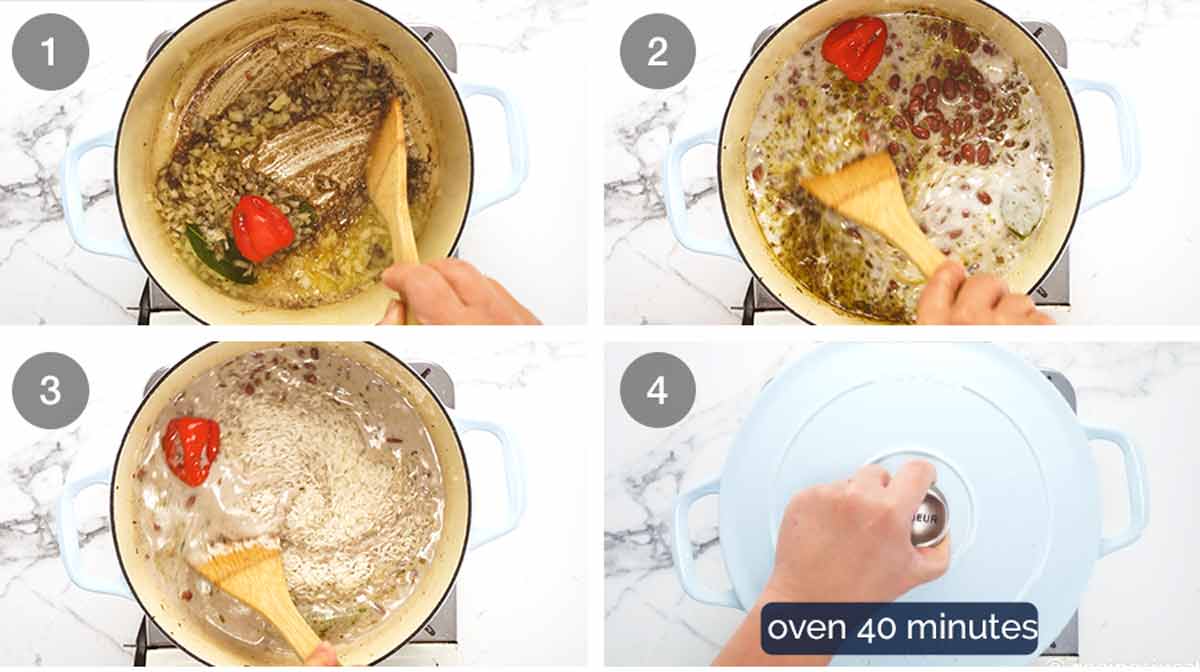
Sauté the garlic, onion, thyme, all spice, bay leaves, scotch bonnet habanero chilli until the onion is translucent – about 3 minutes.
Liquids – Add coconut, water, kidney beans and salt.
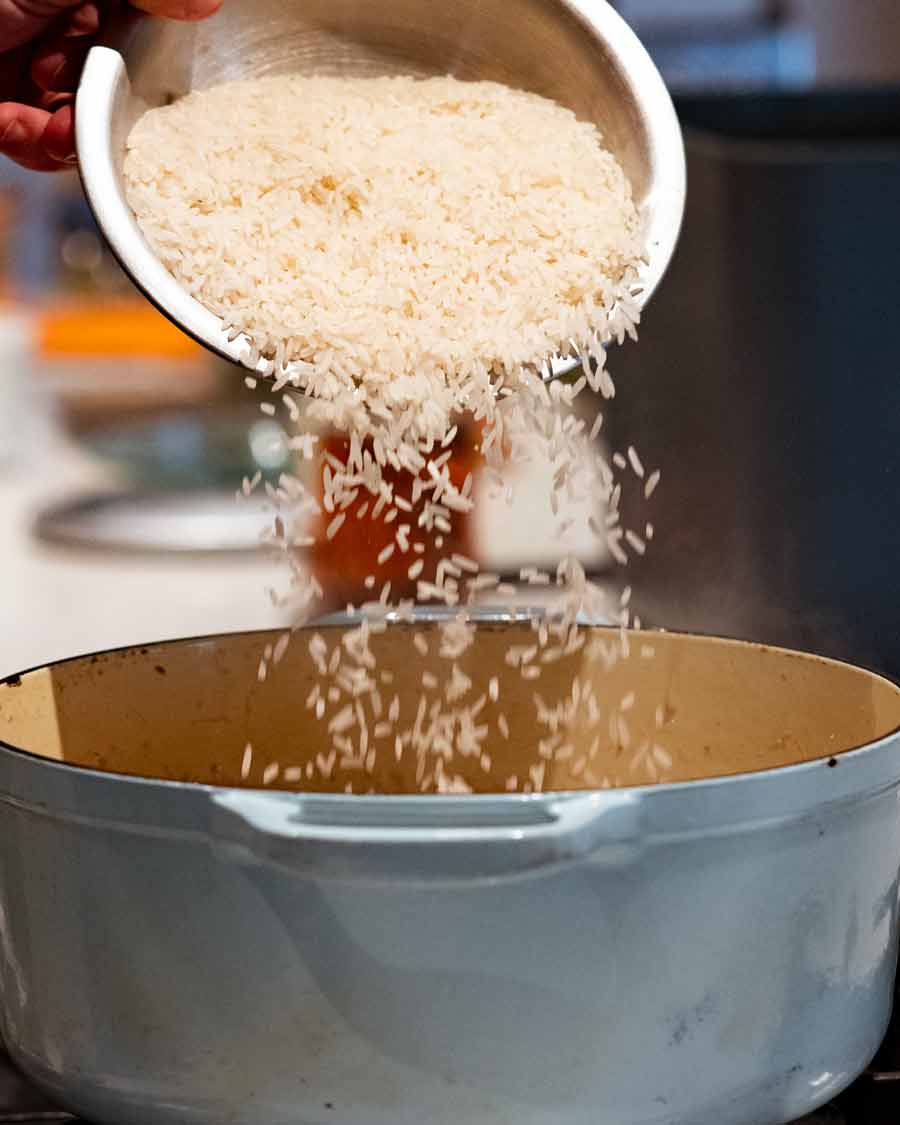
Rice – Once it comes to a simmer, add rice then give it a quick stir. Once you see bubbles breaking the surface, immediately cover then transfer to oven.
Don’t have an ovenproof pot? Transfer to a baking dish once the liquid is simmering, cover tightly with foil and add 5 minutes to the bake time (to give it time to come up to temperature in the oven).
Bake for 40 minutes. All the liquid should be absorbed (tilt to check) though you will have some coconut cream on the surface.
If you taste the rice at this stage, most grains will still have a small amount of firmness in the middle and be wetter than ideal. This self corrects in the next step when we rest!

Rest 15 minutes – Leave the pot on the counter with the lid on for 15 minutes. During this step, the rice grains will finish cooking so they are tender all the way through, and each grain of rice will absorb the liquid sitting on the surface when you first pull it out of the oven. This is what makes rice fluffy rather than ending up with a pot of mushy rice!
Usually plain rice is rested for only 10 minutes. But for coconut rice, the extra 5 minutes makes all the difference due to the thickness of the coconut milk which takes longer to be absorbed. If you only rest for 10 minutes, the grains will be slightly firmer than ideal and the surface is stickier.
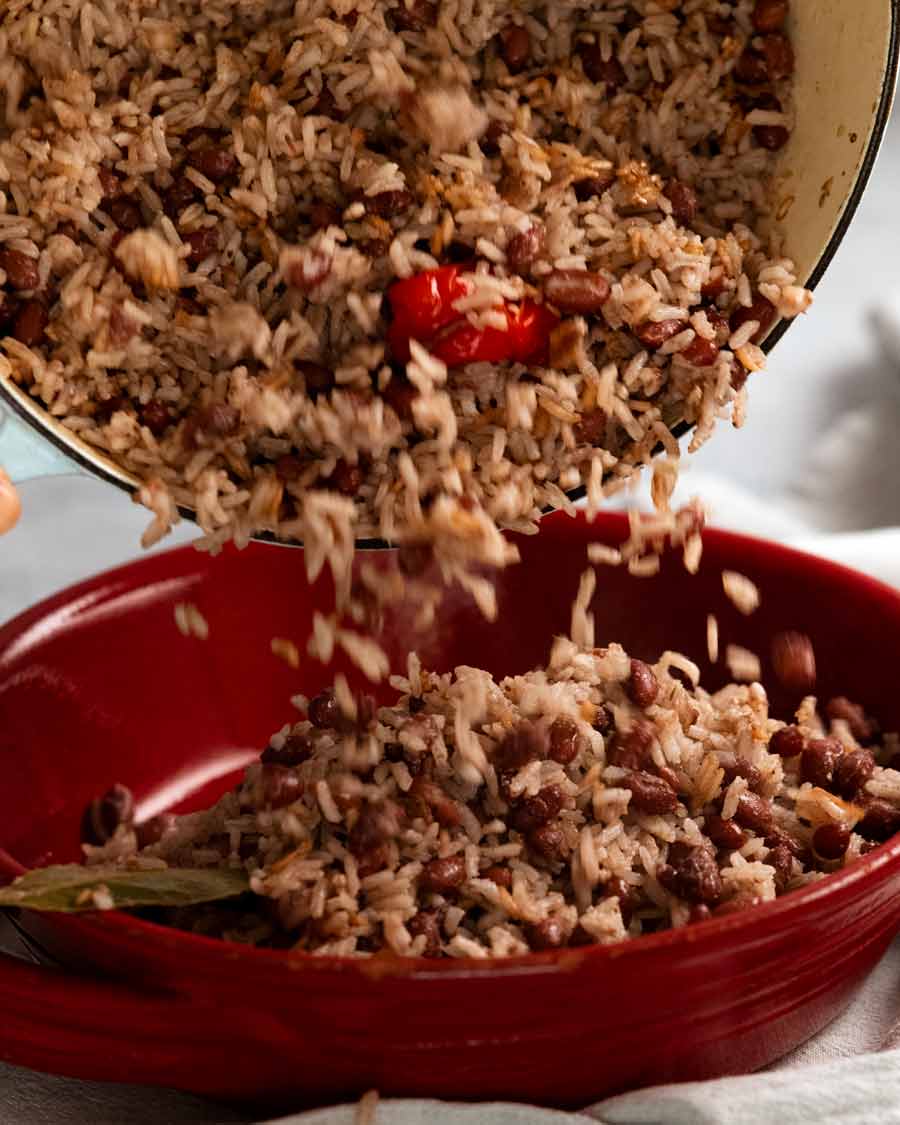
Fluff and serve! Pick out the chilli and bay leave, if you want. Fluff with a rice paddle or rubber spatula, then tumble the rice into a bowl and serve!
What to serve with Jamaican rice and peas (beans!)
Today’s recipe comes as part of a set of recipes for a Jamaican dinner menu. Jerk fish for the main, a tangy tropical Jamaican Slaw, this rice and peas and rum and raisin ice cream (without an ice cream maker) for dessert! See top of post for photo of your Jamaican dinner plate.
As a Jamaican staple dish that’s popular across the Caribbean, rice and peas will be a perfect accompaniment with any dish from this region. But I wouldn’t stop there! Anything tropical or with tropical(ish!) vibes, seafood and citrus flavours would be a fitting match. Think – Huli Huli Hawaiian chicken, lime chicken, Lemon garlic pork chops, steak with chimichurri sauce (yes!) garlic prawns or a beautiful piece of fresh fish with crispy skin finished with a simple squeeze of lemon.
So many possibilities! Share your suggestions for what you’d pair this Jamaican rice with! – Nagi x
Watch how to make it

Jamaican rice and peas
Ingredients
- 50g / 3 tbsp unsalted butter (or 2 tbsp canola or veg oil)
- 2 garlic cloves , finely minced
- 1 small onion , finely chopped
- 1 tsp dried thyme
- 1 tsp all spice powder (sub mixed spice)
- 2 bay leaves , preferably fresh
- 1 scotch bonnet or habanero chilli – any colour (optional), keep whole (Note 1)
- 2 x 400g / 14oz cans red kidney beans , drained (Note 2)
- 1 x 400 ml / 14oz coconut milk , full fat (Note 3)
- 1 cup water
- 1 tsp cooking salt
- 2 cups long grain white rice (Note 4)
Instructions
- Preheat oven to 200°C/400°F (180°C fan).
- Sauté aromatics – Melt butter over medium-high heat in a medium or large ovenproof pot (Note 5). Cook garlic, onion, thyme, all spice, bay leaves, scotch bonnet until onion is translucent (~ 3 minutes).
- Add coconut milk, water, beans and salt. Once it comes to a simmer, add rice then give it a quick stir. Once you see bubbles breaking the surface, immediately cover then transfer to oven.
- Bake for 40 minutes. All liquid should be absorbed (tilt to check) though you will have some coconut cream on the surface.
- Rest – Leave the pot on the counter with the lid on for 15 minutes. Then fluff and serve!
Notes
Life of Dozer
It’s Jamaican week. You know this had to happen…. I’m so predictable! 😂

The post Jamaican rice and peas (beans) appeared first on RecipeTin Eats.
]]>