 This is a GREAT beef mince recipe. Fried rice made with ground beef tossed in an intense savoury sauce, it’s got extra protein from egg and good amount of veg so it’s a complete dinner you can get on the table quickly. And seriously delicious (you’ll see me scoff it!). ➤ See all my ground... Get the Recipe
The post Beef fried rice appeared first on RecipeTin Eats.
]]>This is a GREAT beef mince recipe. Fried rice made with ground beef tossed in an intense savoury sauce, it’s got extra protein from egg and good amount of veg so it’s a complete dinner you can get on the table quickly. And seriously delicious (you’ll see me scoff it!).
➤ See all my ground beef / beef mince recipes here.

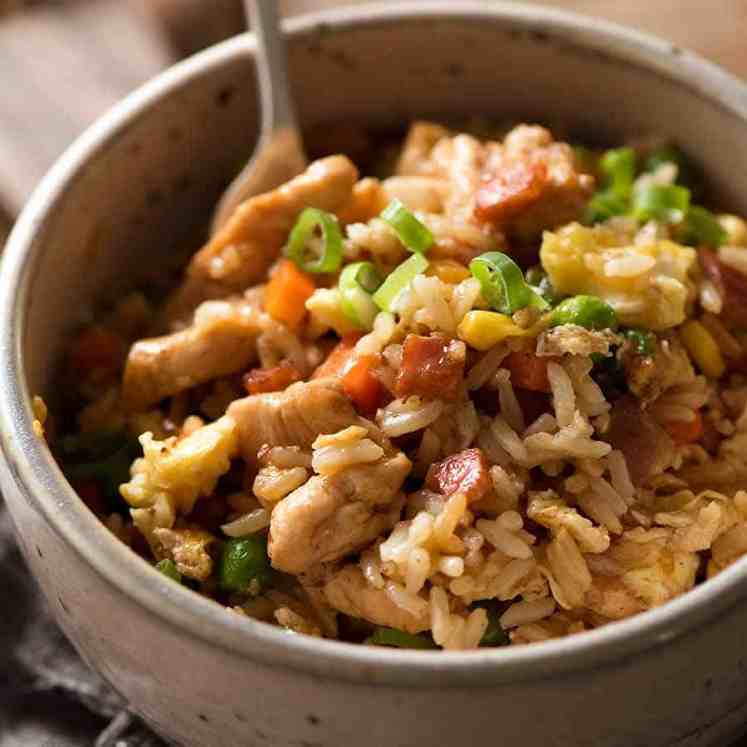
Beef fried rice
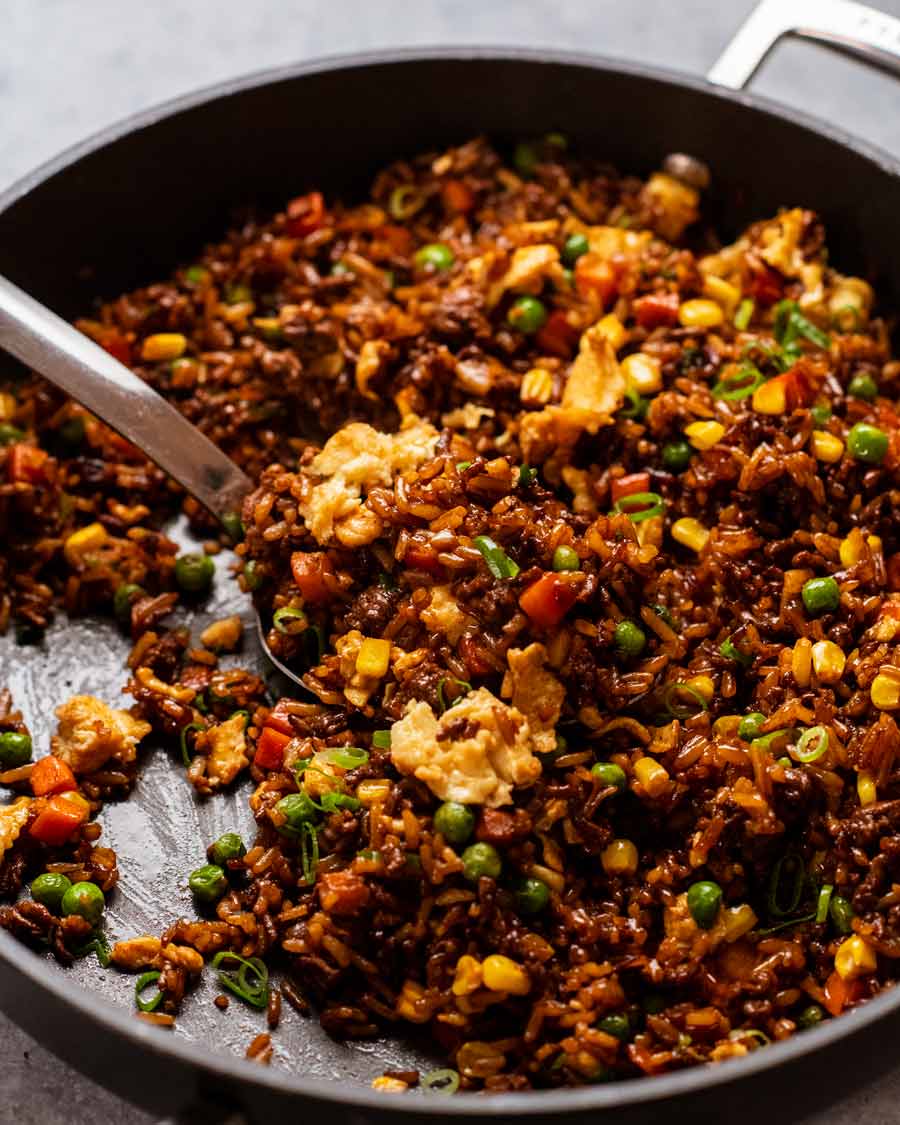
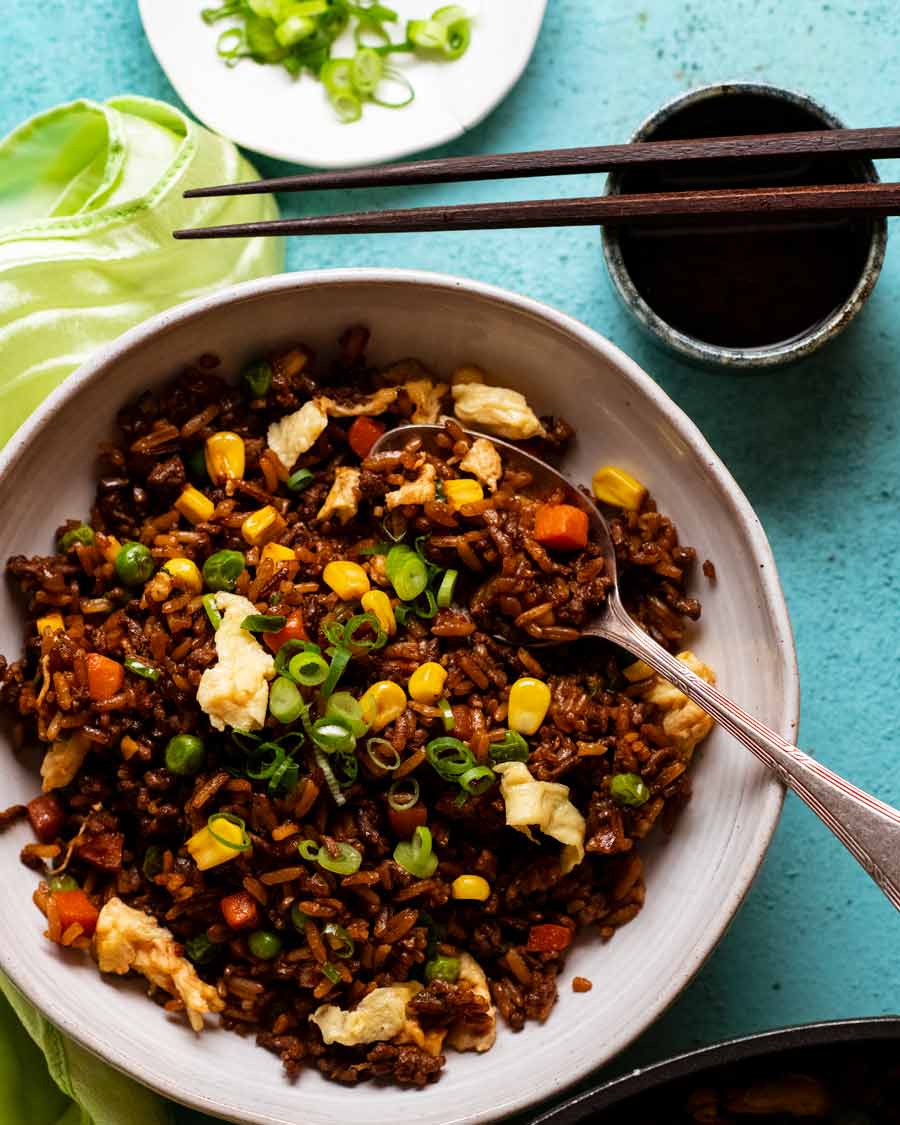
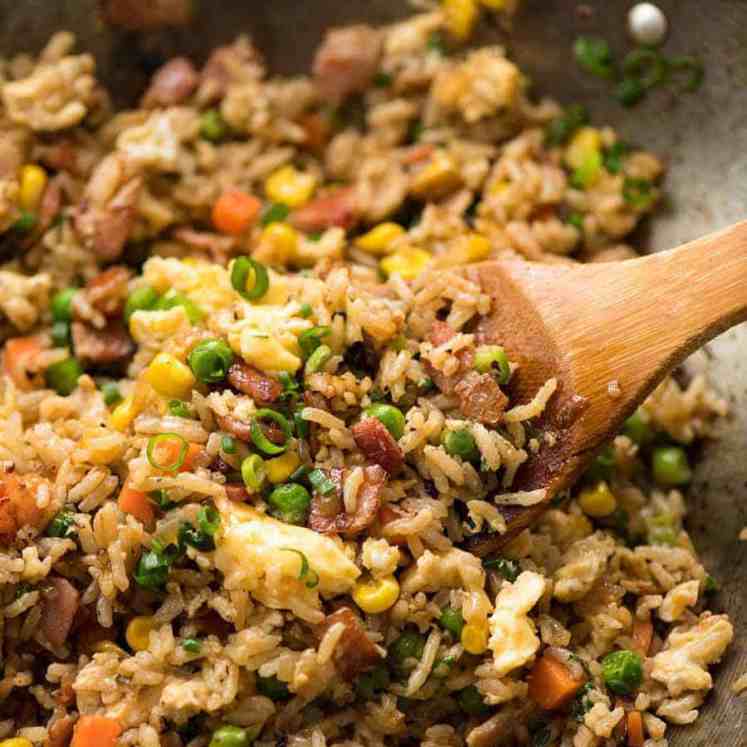
Have you ever thought to make fried rice with beef mince? It works beautifully! Fry up ground beef in an intense savoury sauce until it’s beautifully caramelised, then toss it through rice with fluffy bits of scrambled egg and vegetables of choice.
So quick to make – no chopping raw meat! And in my version, I’ve opted for even more convenience by making this with frozen diced veg. Because I totally buy into the whole snap-frozen thing.
But if you’re a better person than me, please do not let me stop you from chopping up fresh vegetables. Also, excellent fridge clean-out opportunity!
In case you doubt me – here’s proof of deliciousness, and how fast this is to cook! (Errr, yes, and classy moment dropping rice down my top 😂).
What you need
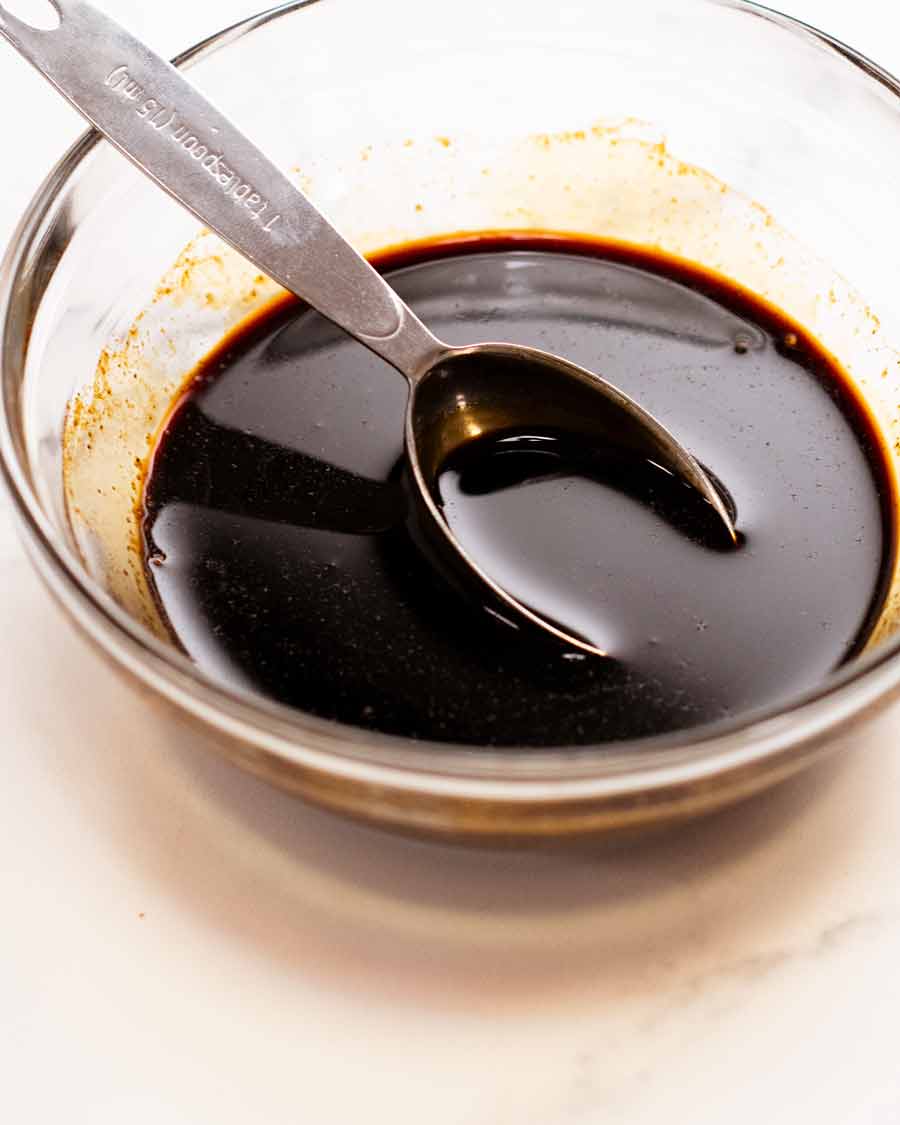
I like to use quite an intense flavoured savoury sauce to fry up the beef so the rice doesn’t taste too “beefy”. Which might sound contradictory, but is what I want with fried rice – a nice balance of all the flavours jumbled together rather than the beef flavour dominating.
Beef fried rice sauce
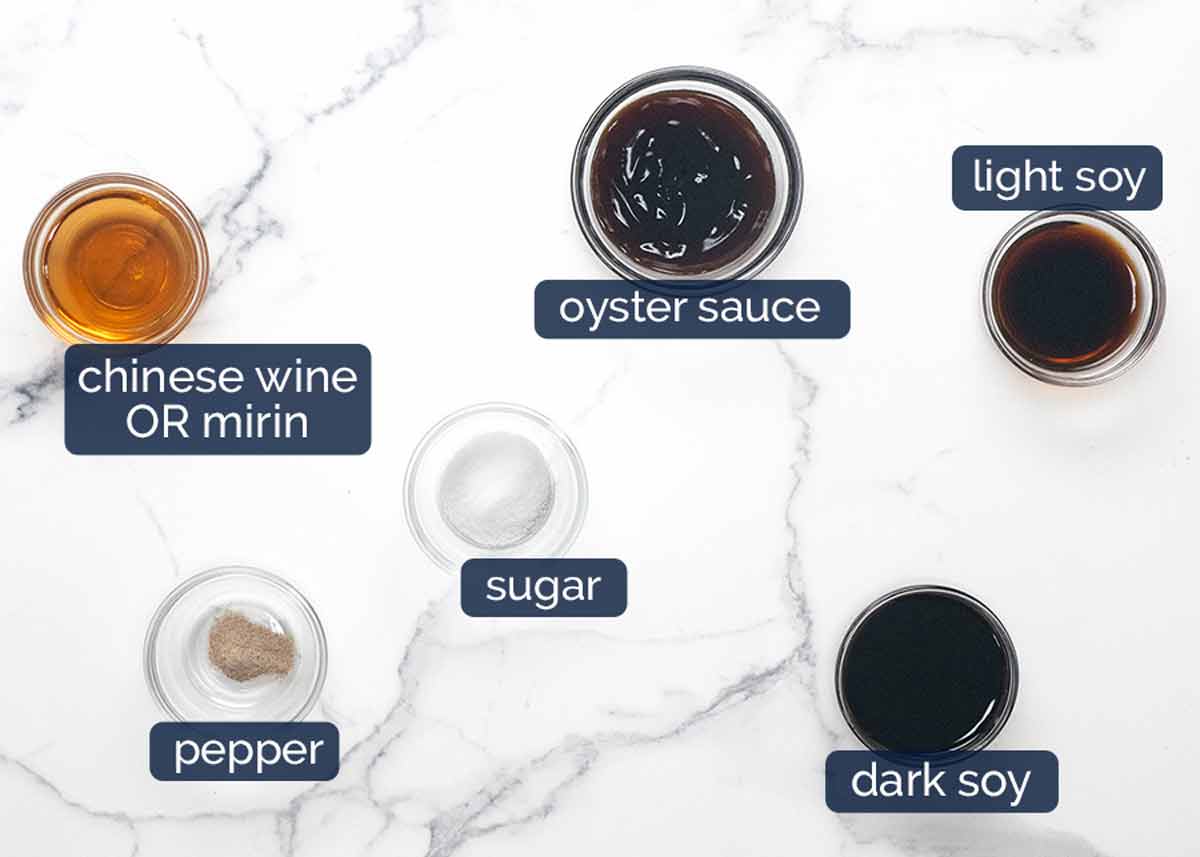
Soy sauces – We’re using both light and dark soy sauce in this recipe. What’s the difference? Dark soy stains the rice that deep mahogany colour as well as adding quite intense soy flavour. Light soy sauce provides the salt without overwhelming with soy flavour, and does not stain the rice.
Substitutions -You can use only light soy sauce or just an all-purpose soy sauce (ie bottle just labelled “soy sauce” without “light” or “dark” in front of it) but the rice colour won’t be as dark. But you cannot use only dark soy sauce as it will make the rice black and the soy flavour will be way too much! More on different types of soy sauces here.
Oyster sauce – A load of flavour, all in one sauce! It’s sweet and savoury and add is a neat flavour shortcut in dishes. Makes a regular appearance in Asian dishes, from Pad See Ew to Asian Glazed Salmon to Honey Pepper Beef to Supreme Soy Noodles. And Steamed Asian Greens with Oyster Sauce!
Vegetarian oyster sauce is available these days, at Asian stores and some large grocery stores (Australia – there’s Ayam vegetarian oyster sauce at Woolies)
Chinese cooking wine (Shaoxing wine) is an essential ingredient for making truly “restaurant tasting” fried rice (and noodles and stir fries!). Without it, the dish will be lacking something.
Substitute with Mirin, cooking sake or dry sherry.
Non alcoholic sub – sub cooking wine with 1/4 cup low sodium chicken broth/stock, expect to stir fry an extra minute to allow for evaporation. And (big tip) add a knob of butter at the end and toss through until melted.
White pepper and sugar – For seasoning. White pepper is commonly used in Asian dishes because you can’t see it in clear glossy sauces in stir fries, like cashew chicken, chop suey (chicken stir fry). Whereas if you use black pepper, you end up with little specks in the sauce.
Stuff in the fried rice
Don’t have day-old-cooked rice? Don’t try this recipe – you’ll be disappointed with gluey fried rice! Make Baked Fried Rice instead (starts with uncooked rice, and it’s awesome!). Use the beef to make Asian Beef and serve together.
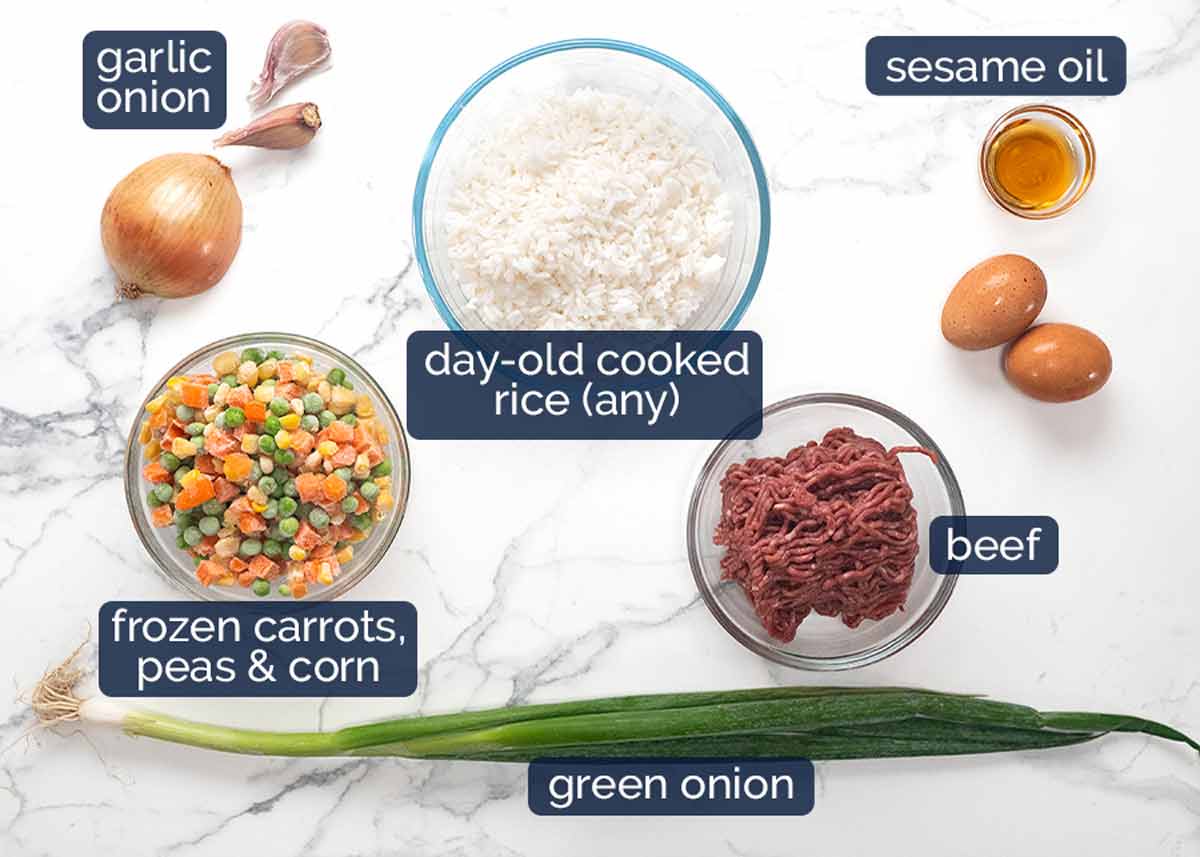
Cooked rice – Any type of rice can be used but it needs to be day old so it’s dried out. So then when it’s fried up with sauce, the rice gets nicely moistened but is still fluffy and crumbly, rather than gluey and sticky.
TIP – Keep bags of cooked rice in your freezer. Super handy standby for stir fries, and fried rice on demand!
Beef mince – That’s ground beef, to Americans. I use lean in fried rice. Pork, chicken and turkey also work great in this recipe!
Frozen veg – I use frozen for convenience, in the spirit of this quick ‘n easy recipe. But please feel free to be a better person than me and chop up whatever vegetables you want!
Onion and garlic – Essential flavour base. We sauté it up first to flavour the oil.
Eggs – We scramble these in sesame oil for lovely flavour. I love fluffy egg bits in my fried rice, plus it’s extra protein!
Green onion – For freshness and colour. Though you won’t destroy this dish if you don’t have it.
How to make beef fried rice
Using beef mince is so handy for quick meals – no cutting or prep required!
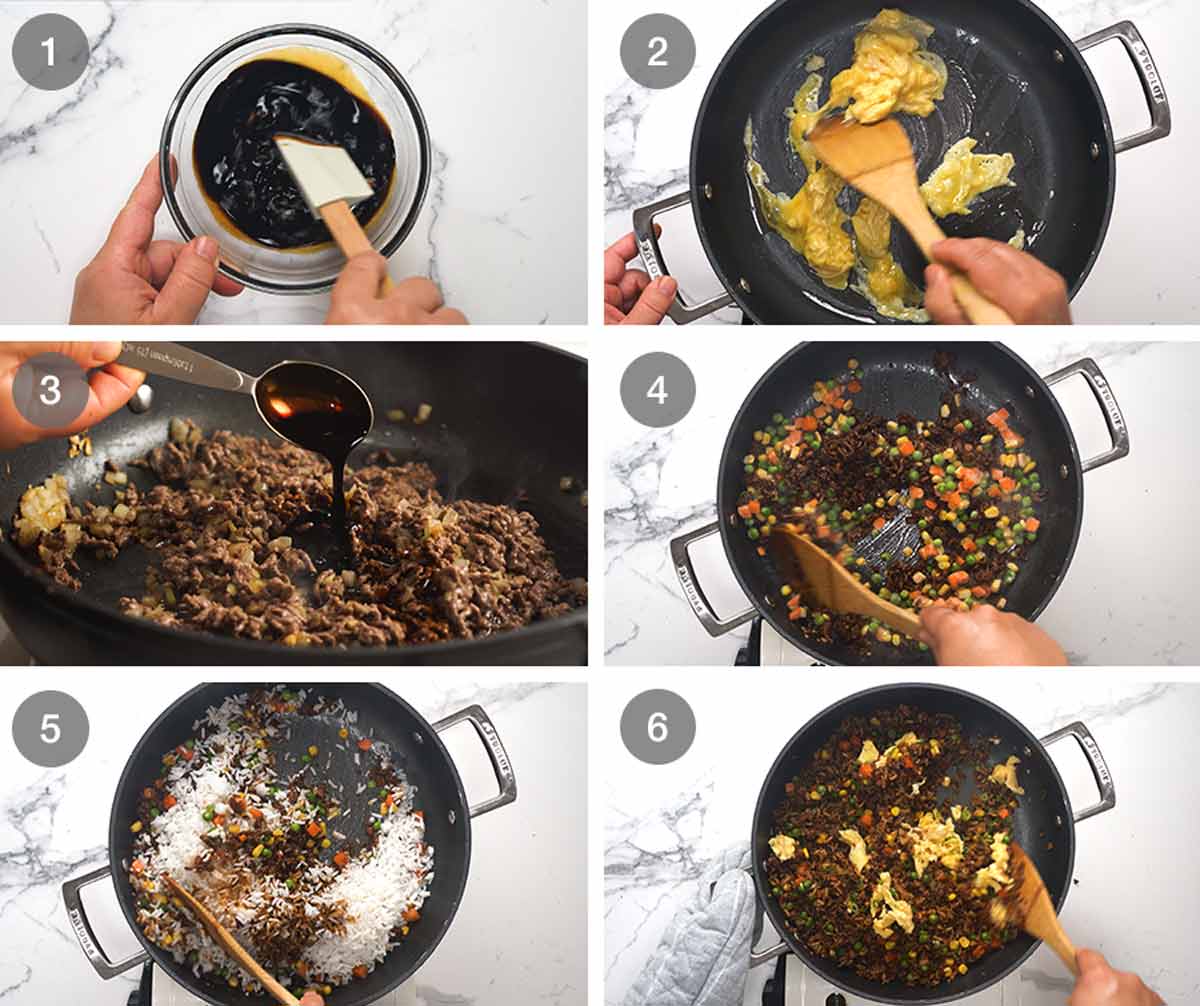
Mix the sauce in a small bowl.
Scramble the eggs in a little sesame oil (love the flavour it adds!) then remove onto a plate. (BTW, this fried rice can be cooked in a large wok or a large non-stick pan).
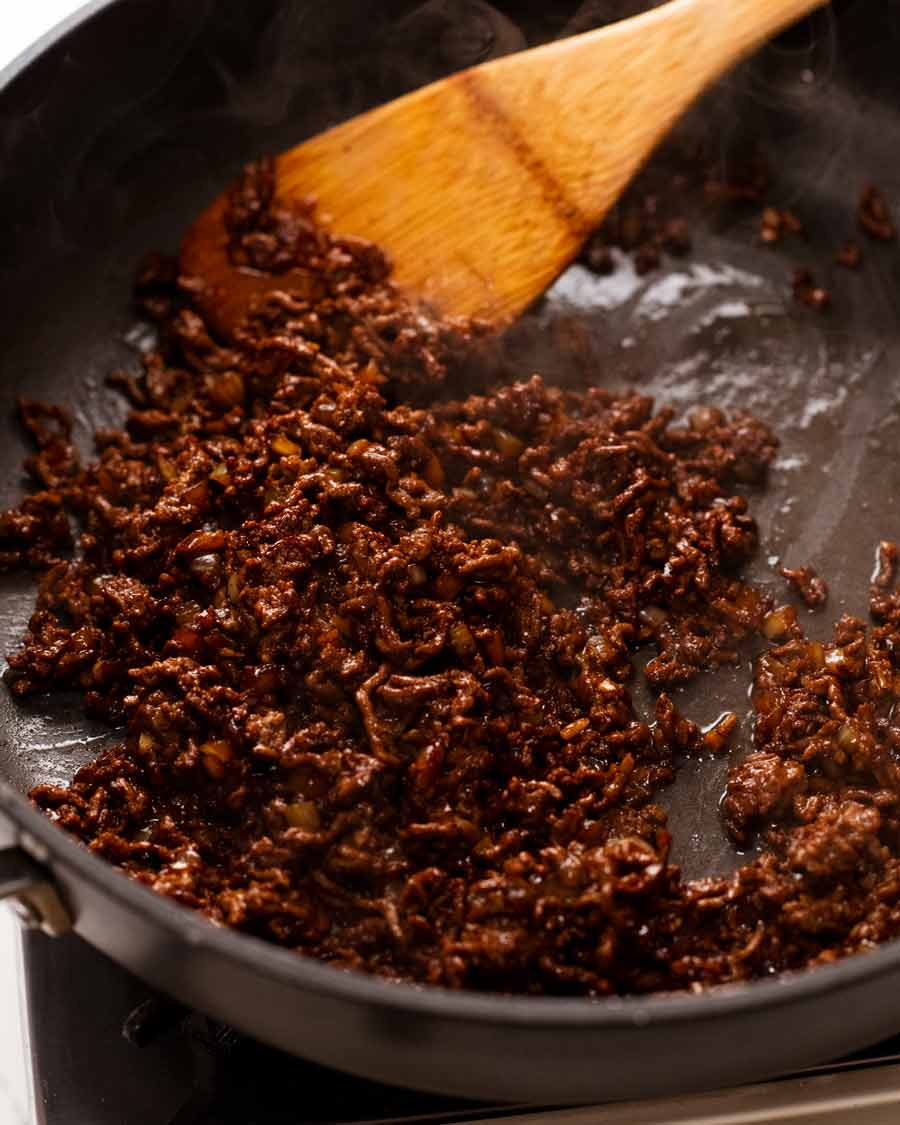
Cook beef with sauce – Start by cooking the onion and garlic to get the oil nicely flavoured. Then cook the beef, breaking it up as you go, until you no longer see raw meat. Then add 2 tablespoons of the sauce and cook for 2 minutes.
Caramelise beef – Add the frozen vegetables (still frozen is fine) then cook for a further 2 minutes to thaw and cook the vegetables, plus get the beef nicely caramelised. Caramelisation is key for good flavour here! It makes such a difference getting a nice “sear” on mince (case in point: Vietnamese Caramelised Pork Bowls, Asian Beef Bowls, Spicy Firecracker Beef – and so on…).
Rice – Add rice and sauce, toss for a couple of minutes until the rice starts to caramelise too.
Toss through egg – Then finally, toss through green onion and scrambled egg then serve!
And there you have it! It really is a quick recipe. 12 minutes to cook up and minimal prep. It’s kid friendly but if you want to give it a fiery boost, a drizzle of sriracha or dollop of your favourite chilli paste certainly wouldn’t go astray.
Love to know if you give it a go! – Nagi x
Watch how to make it
Beef fried rice
Ingredients
Sauce:
- 1 tbsp dark soy sauce (Note 1)
- 2 tsp light soy sauce (Note 1)
- 2 tbsp oyster sauce (Note 2)
- 1 tbsp Chinese cooking wine (Note 3)
- 1/2 tsp white sugar
- 1/8 tsp white pepper (sub black)
Scrambled eggs:
- 1 tsp sesame oil
- 2 eggs , lightly whisked
Fried rice:
- 2 tbsp oil (peanut, veg, canola or other neutral oil)
- 1/2 onion , finely diced
- 2 garlic cloves , finely minced
- 250g / 8 oz beef mince / ground beef (I use lean, Note 4)
- 2 cups frozen diced carrots, peas, corn (still frozen fine!) (or fresh diced veg)
- 3 cups day-old cooked rice (1c uncooked rice = 3c cooked, Note 5)
- 1/2 cup finely sliced green onions (1-2 stems)
Instructions
- Mix Sauce ingredients in a small bowl, then set aside.
- Scramble eggs – Heat sesame oil in a large wok or non-stick pan over medium high heat. Add egg and cook, stirring gently, so it is softly scrambled. Remove onto a plate.
- Cook beef – Heat vegetable oil in the same pan over high heat. Add onion and garlic, cook for 30 seconds. Add beef and cook, breaking it up as you go, for 2 minutes or until you no longer see raw beef. Add 2 tablespoons of sauce and cook for 1 minute.
- Veg / caramelise beef – Add frozen vegetables and cook for 2 minutes or until the beef gets nicely caramelised – this is the trick to great flavour so do not shortcut this!
- Rice & sauce – Add rice and remaining sauce. Toss for 2 minutes until the sauce is well dispersed throughout the rice and the rice grains start to caramelise a bit.
- Egg & green onion – Then add scrambled eggs and green onion, give it a quick toss to disperse then divide between bowls. EAT!
Notes
* Dark soy sauce is labelled as such, provides colour and gives more flavour to the sauce than other soy sauces. Sold at Aussie grocery stores nowadays. Fallback: sub with more ordinary or light soy (below)
* Soy Sauce – ordinary all purpose soy sauce, they just say “soy sauce” on the label (eg. Kikkoman). Can also use Light soy sauce – bottle is labelled as such. 2. Oyster sauce – can be substituted with a vegan/vegetarian oyster sauce (see here for Ayam at Woolies, Australia). OR use hoisin instead – similar thickness and adds similar amount of flavour but has five spice flavour added. Different but similar levels of tastiness (if that makes sense!) 3. Chinese cooking wine (“Shaoxing wine”) is an essential ingredient for making truly “restaurant standard” fried rice. Substitute with Mirin, cooking sake or dry sherry. Non alcoholic sub – sub cooking wine with 1/4 cup low sodium chicken broth/stock, expect to stir fry an extra minute to allow for evaporation. And (big tip) add a knob of butter at the end and toss through until melted. 4. Meat – can sub pork, chicken, turkey mince 5. Rice – Needs to be day old rice so the rice is dry and the fried rice is crumbly. If it’s freshly cooked, the fried rice ends up sticky and gluey. Not good, my friends! TIP: Keep bags of cooked rice in your freezer. This is what I do. Handy to just reheat for stir fries (sprinkle of water makes it all steamy!) and it’s crumbly enough for fried rice. Win win! 6. Leftovers will keep for 2 days. Can be frozen – reheat in microwave with a sprinkle of water to moisten it up. Nutrition per serving assuming 4 servings.
Nutrition
Yet to meet a fried rice I don’t love!

Life of Dozer
When the wind slammed the door and he got trapped in the bathroom. I do NOT want to know why he was in there in the first place!

The post Beef fried rice appeared first on RecipeTin Eats.
]]> This is the fried rice version of traditional Vietnamese red rice, a plain tomato rice made by steaming in a pot. I added ham, peas and egg to turn it into a quick and easy meal. Frying up the tomato rice with garlic adds extra flavour which is on point! Red Vietnamese Fried Rice Fried... Get the Recipe
The post Red Vietnamese Fried Rice appeared first on RecipeTin Eats.
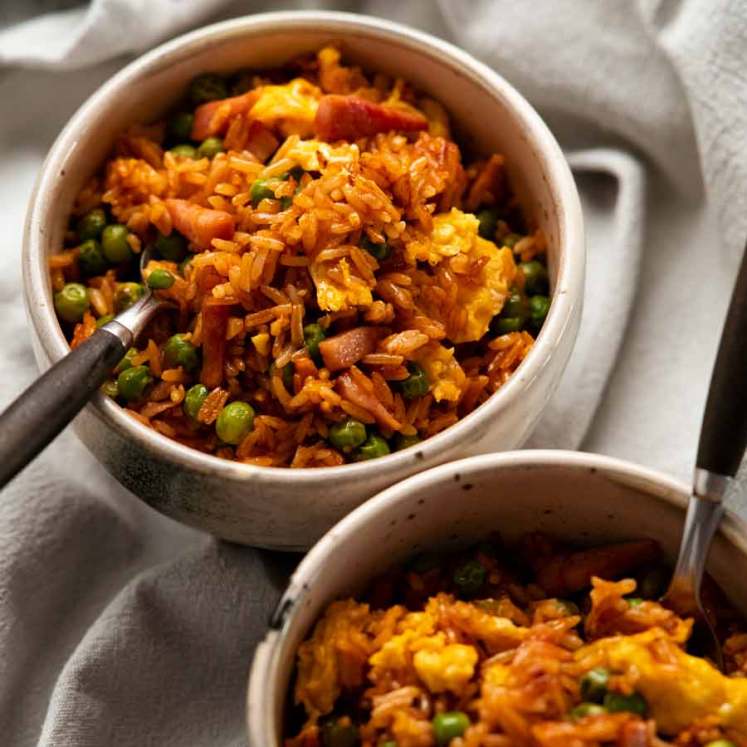
]]>This is the fried rice version of traditional Vietnamese red rice, a plain tomato rice made by steaming in a pot. I added ham, peas and egg to turn it into a quick and easy meal. Frying up the tomato rice with garlic adds extra flavour which is on point!
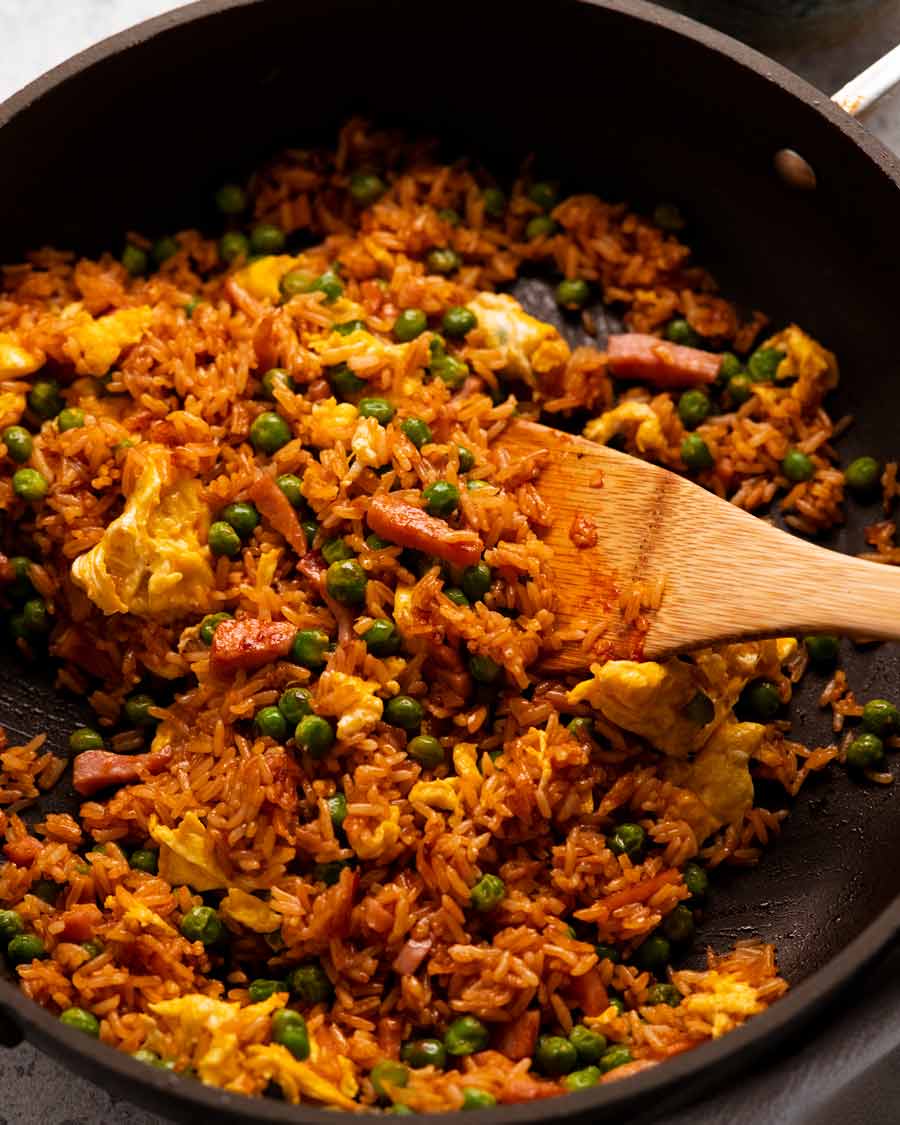
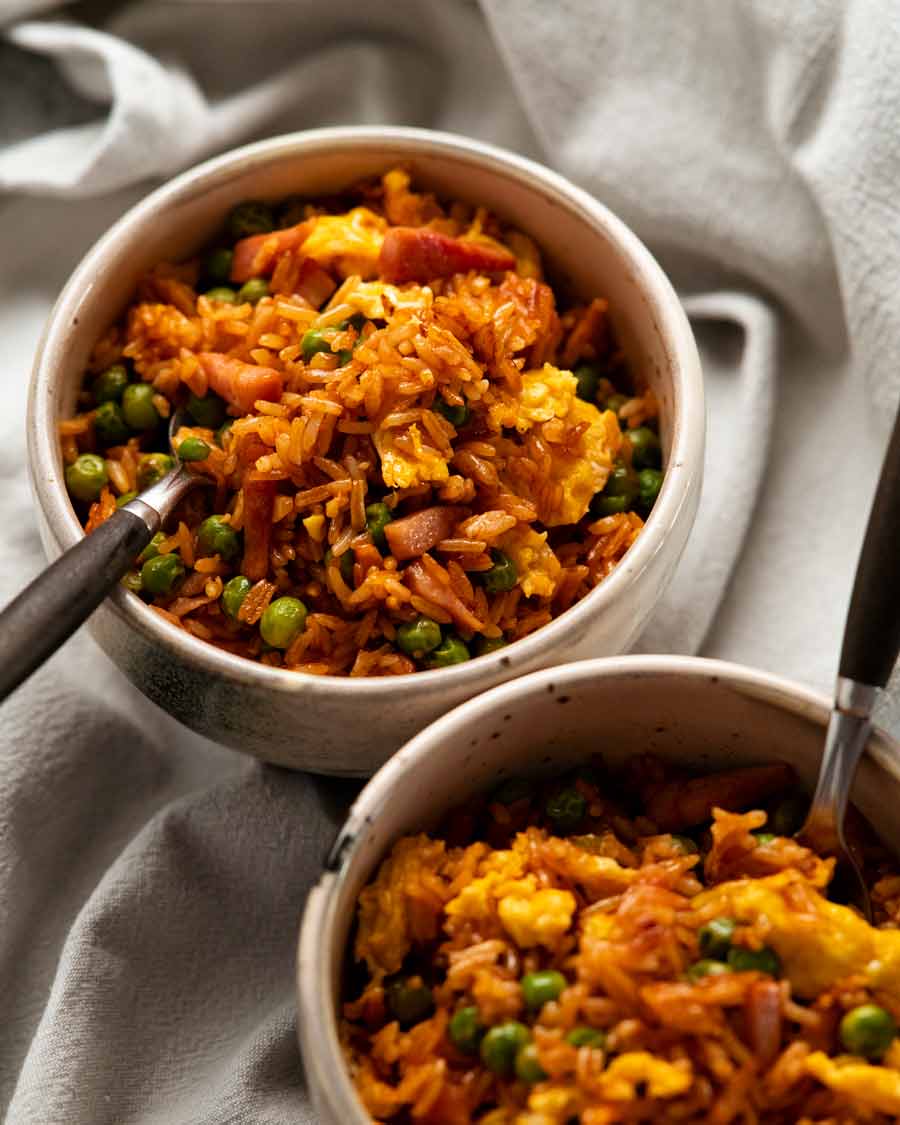
Red Vietnamese Fried Rice
Fried rice always makes for a great quick meal if you can incorporate enough “stuff” into it to fill it out from a nutrition perspective so you can justify calling it “dinner” rather than just a side dish. Today we’re turning to frozen peas, pre-chopped ham and egg for literal no-effort, no-prep add-ins to make this tasty dish I’ve called Red Vietnamese Fried Rice.
In case I wasn’t clear about it in the opening, this is not an authentic Vietnamese recipe! At least, not to my knowledge. It is based on a traditional Vietnamese dish, Red Rice, which is a tomato-flavoured rice served with meats and other mains, somewhat like Mexican Red Rice. I have always loved the flavour but I wanted to turn Vietnamese Red Rice into a more substantial, can-be-a-standalone meal. So I thought I’d spin it into a fried rice dish, and here it is!
What you need
Here’s what you need to make this quick meal.
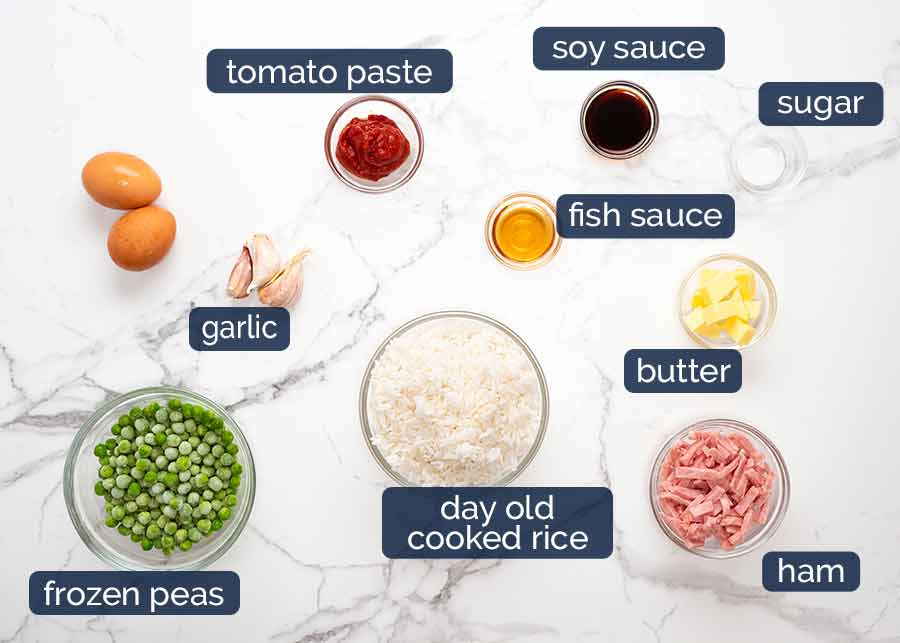
Day-old cooked rice – Cooked rice refrigerated overnight or frozen cooked rice (thawed) is best for all fried rice recipes to get the the right texture. Freshly cooked rice is too moist and your fried rice will clump and become sticky. The taste is fine, but the texture is not ideal! Tip of the day: I always have bags of frozen cooked rice in the freezer for this purpose. I get the jitters if I’m out!
If it’s an emergency and you’re all out of day-old cooked rice (it happens): Cook rice of choice, spread out on a tray to rapid cool on counter. Then refrigerate for as long as you can until cooled.
Rice type: I’ve used jasmine rice which is popular in Vietnamese cooking. However, any plain cooked rice can be used (white, brown, basmati).
Tomato paste – For the tomato flavour and red colour.
Ham (or bacon) – I use pre-chopped ham bits for convenience (being that this is a quick meal) and also because I like that they are chunkier than chopped sliced deli ham.
Fish sauce – The soy sauce of Vietnam! It has a more complex, deep flavour than soy sauce. It smells pungent on its own but when cooked out what remains is a delicious and incomparable savoury flavour. Having said that, I did find that using just fish sauce for the seasoning was a bit fishy even for my taste so I’ve used a combination of half fish sauce, half soy sauce.
Soy sauce – As mentioned above, I found using a combination of fish sauce and soy sauce works best for this dish. Use light soy sauce or all-purpose soy sauce, not dark soy sauce, which is too intense and will overwhelm the dish. More on different soy sauces and when to use which here.
Butter – My fat of choice; more flavour than using plain ol’ boring oil! If you’re thinking, “butter isn’t an authentic ingredient in Asian cooking!!!”, don’t forget Vietnam was once colonised by France, the land of bread and butter! (Banh Mi is another tasty legacy of the French occupation)
Garlic – I doubt you’ll ever see a fried rice recipe on my website that doesn’t include garlic!
Eggs – To get some extra protein into this dish, and because soft golden curds of scrambled egg littered through red rice both looks and tastes great.
Frozen peas – Some veg and colour! Feel free to substitute with any chopped vegetables you like (eg. carrot, corn, zucchini) or throw in a handful of quick-cooking leafy greens (baby spinach, kale, cabbage).
How to make Red Vietnamese Fried Rice
Use a nice big pan to give yourself plenty of space for tossing the rice with abandon so you can get nice caramelisation on the rice. It also makes it easier to shove the rice to one side to make room for scrambling the eggs in the pan without interference.
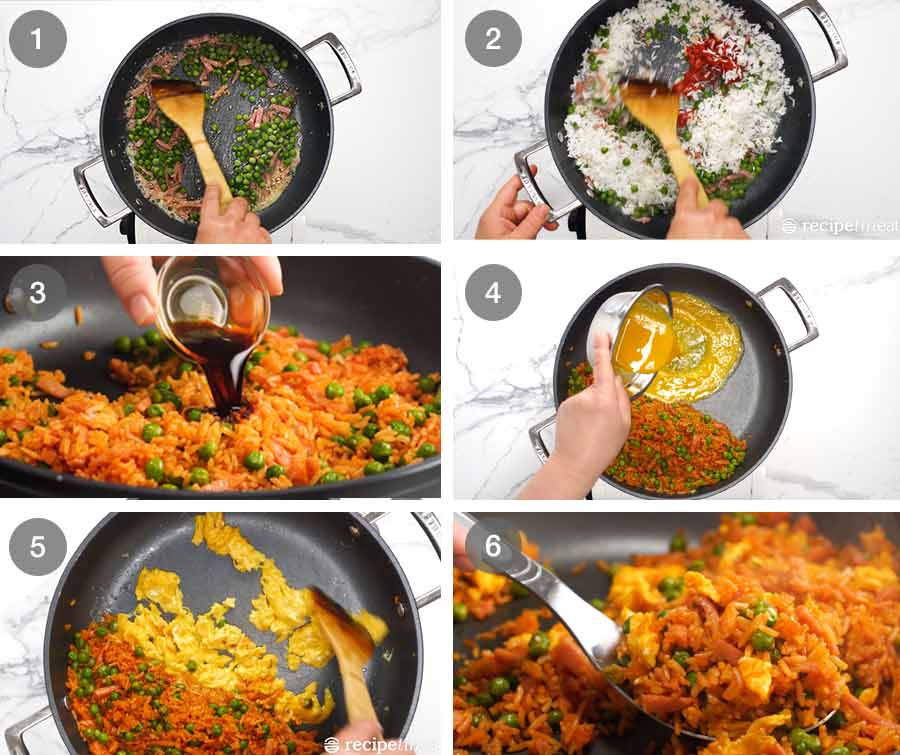
Aromatics and ham – Melt the butter and start by sautéing the garlic for just 10 seconds to flavour the butter, but don’t let the garlic go golden yet. Next, add the ham and cook for 30 seconds. Now add the peas (still frozen is fine) and cook for another 30 seconds. By this time, the garlic should have turned almost golden and the ham will also be on its way to getting some nice colour on it.
Rice and tomato – Next add the tomato paste and rice. Cook them for 2 minutes to cook out the raw flavour from the tomato paste. Meanwhile your ham will have nicely bronzed.
Seasonings – Add the fish sauce, soy and sugar and cook for a further 1 minute until the rice starts to caramelise. Don’t shortcut this step – caramelisation = extra flavour!
Scramble eggs – Scrape the rice to one side of the pan. Melt a bit of extra butter (literally just 1 teaspoon is enough) in the cleared space, pour in the eggs and scramble them. With the heat of the pan this will take just 1 minute or so.
Toss the cooked eggs through the rice.
Done! That’s it, you’re done. Time to eat!
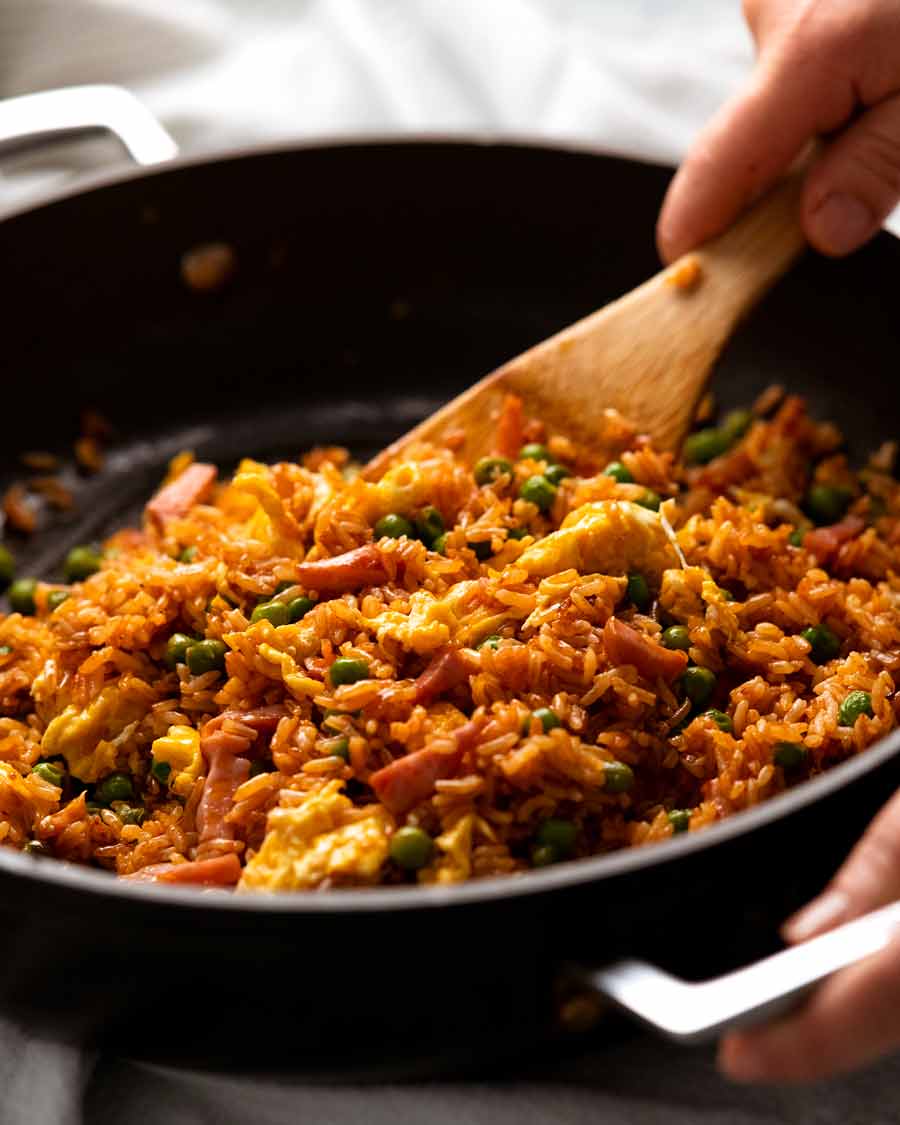
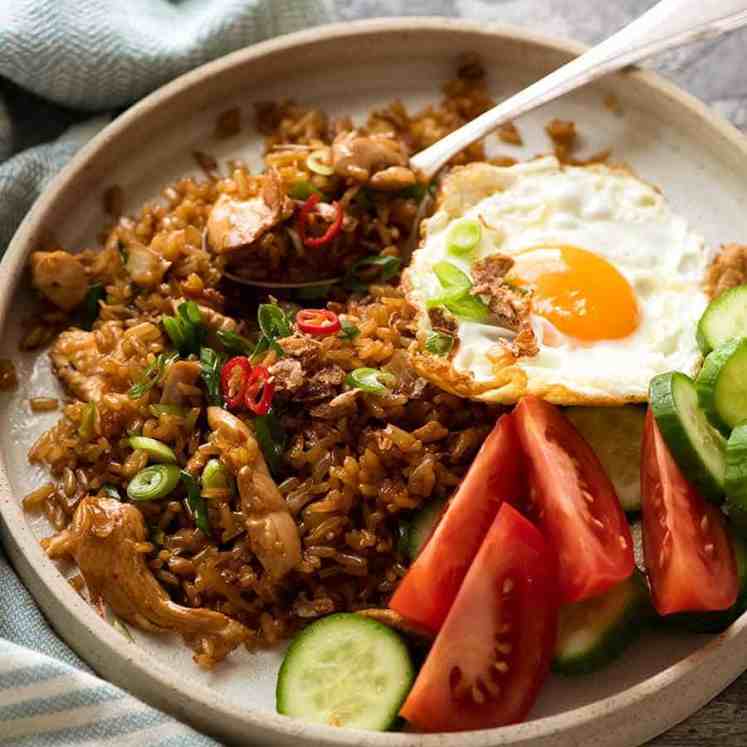
Serve as a meal – or a side
I’ve been making this for myself as a quick lunch but it would also make a great side for a Vietnamese or Asian spread. Sometimes I also throw in a handful of bean sprouts and finely sliced cabbage to freshen things and kick up the vegetable quotient of my bowl. It’s a pretty flexible dish in this regard, though you don’t want to go overboard lest you dilute the flavours. Because we can’t have that!
I hope you give it a go. Let me know what you think if you do! And don’t forget my tip of the day: keep bags of cooked plain rice in your freezer. It’s super handy to have rice on cue to serve with all your stir fries or (more relevantly to today’s recipe) to make a quick fried rice on demand, whether this Vietnamese fried rice or any of my other ones! – Nagi x
Watch how to make it
Red Vietnamese Fried Rice
Ingredients
- 30g / 2 tbsp unsalted butter
- 3 garlic cloves , finely minced
- 1/2 cup diced ham (I use pre-chopped, Note 1)
- 1 cup frozen peas
- 2 1/2 cups day-old cooked jasmine rice (Note 2)
- 2 tbsp tomato paste
- 2 tsp fish sauce (Note 3)
- 2 tsp soy sauce (all purpose or light, not dark soy, Note 4)
- 1/4 tsp white sugar
- 2 eggs , whisked
Instructions
- Melt most of the butter in a large non-stick skillet over high heat (save a dab for scrambling eggs).
- Add garlic, cook for 10 seconds.
- Add ham, stir for 30 seconds.
- Add peas, stir for 30 seconds.
- Rice and tomato paste – Add rice and tomato paste, cook for 2 minutes.
- Sauces – Add fish sauce, soy and sugar, cook 1 minute to get a bit of nice caramelisation on the tomatoey rice.
- Scramble eggs – Push rice to one side of the pan. In the cleared space, melt reserved butter then pour in the egg and scramble until just set.
- Serve – Toss cooked egg through the rice. Serve!
Notes
 )
4. Soy sauce – Light or all-purpose soy sauce. Not dark soy, it’s too strong!
)
4. Soy sauce – Light or all-purpose soy sauce. Not dark soy, it’s too strong!Nutrition
Love fried rice? Me too!
Life of Dozer
When my foot warmer fell asleep on my feet warmers!

The post Red Vietnamese Fried Rice appeared first on RecipeTin Eats.
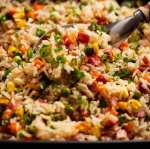
]]> To make baked fried rice, just place uncooked rice, stock, soy sauce and a few other flavourings in a baking pan, give it a mix then shove it in the oven. Out comes fluffy, seasoned fried rice that’s so good, you may never wok-toss fried rice ever again! (Well, maybe not. Nothing beats the real... Get the Recipe
The post Emergency “Dump & Bake” Fried Rice appeared first on RecipeTin Eats.
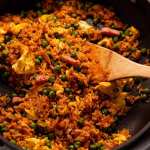
]]>To make baked fried rice, just place uncooked rice, stock, soy sauce and a few other flavourings in a baking pan, give it a mix then shove it in the oven. Out comes fluffy, seasoned fried rice that’s so good, you may never wok-toss fried rice ever again!
(Well, maybe not. Nothing beats the real deal, after all. But this emergency version is excellent for the minimal effort required!)
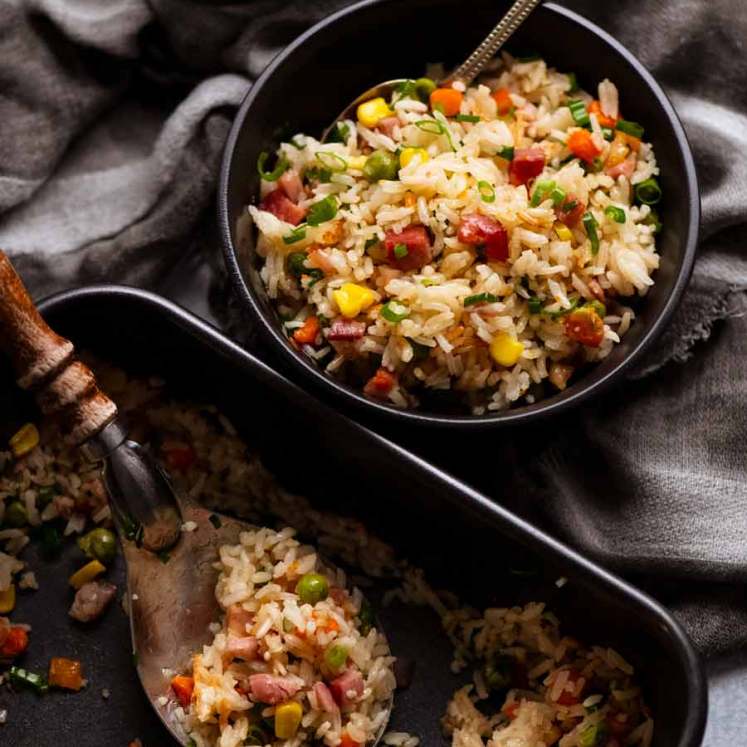
Emergency baked fried rice
OK, you’re right, this isn’t fried rice per se! It’s a baked rice. But I call it a baked fried rice because it’s everything we love about fried rice, without the frying! It will save you on all those nights when you’re scrambling for a quick side dish that will go with almost everything and please everyone.
Unlike the normal way fried rice is cooked, there’s no need to plan ahead and cook rice the day before so that it has time to dry out overnight in the fridge. You don’t even need to chop anything (hello, frozen veg!).
Just dump everything in the pan – uncooked rice, stock, frozen pre-chopped vegetables, raw bacon – then whack it in the oven. There’s no need to stir while cooking – in fact, I forbid it, because it makes the rice mushy!
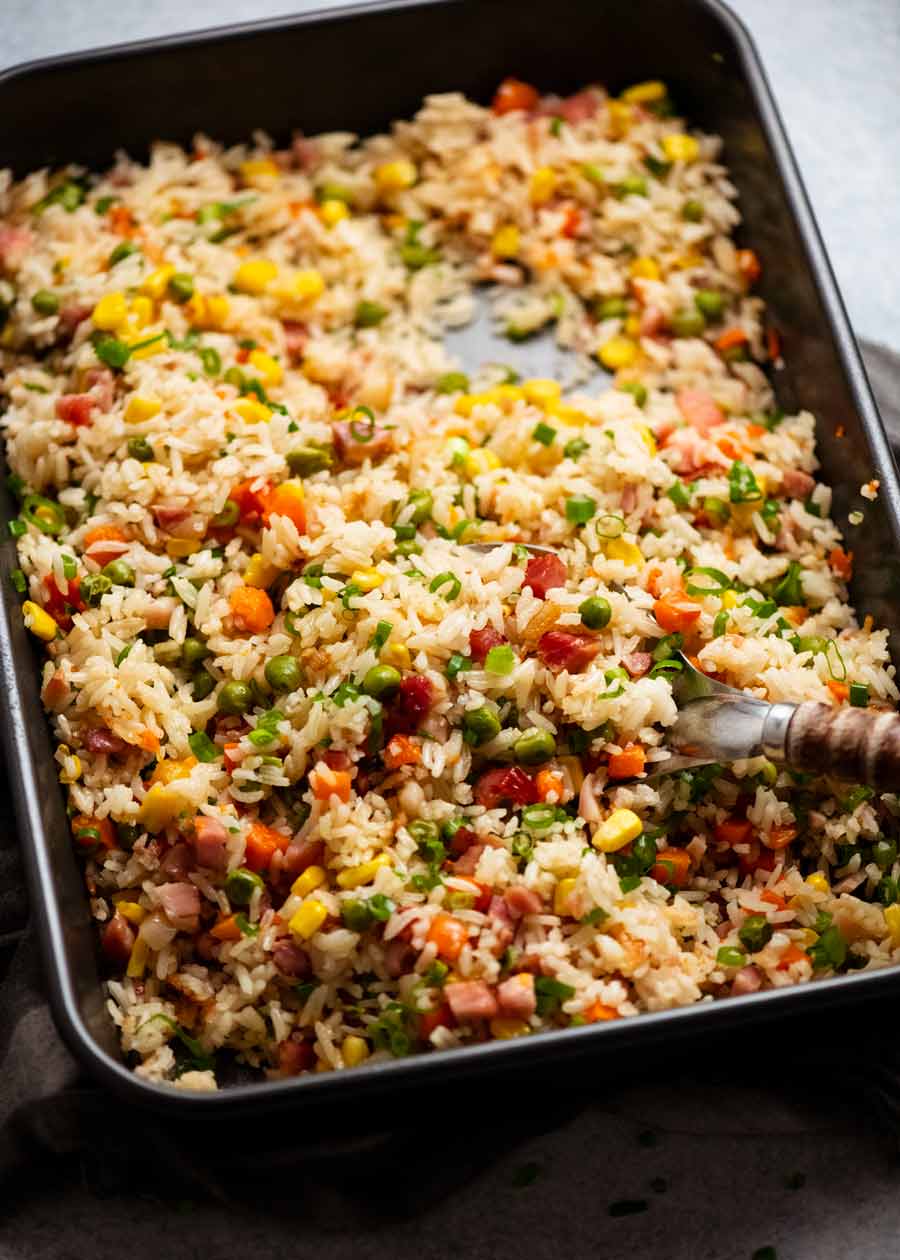
And for all that effort, you will be rewarded with THIS ↓↓↓ (“this” being a big pan of fluffy seasoned fried rice that’s littered with vegetables and oh wow, even the bacon is nice and golden!!🙌🏻)

Ingredients for baked fried rice
This is an excellent recipe to customise and make your own, with lots of options for changing up add-ins! Here’s what I use in this baked fried rice recipe:
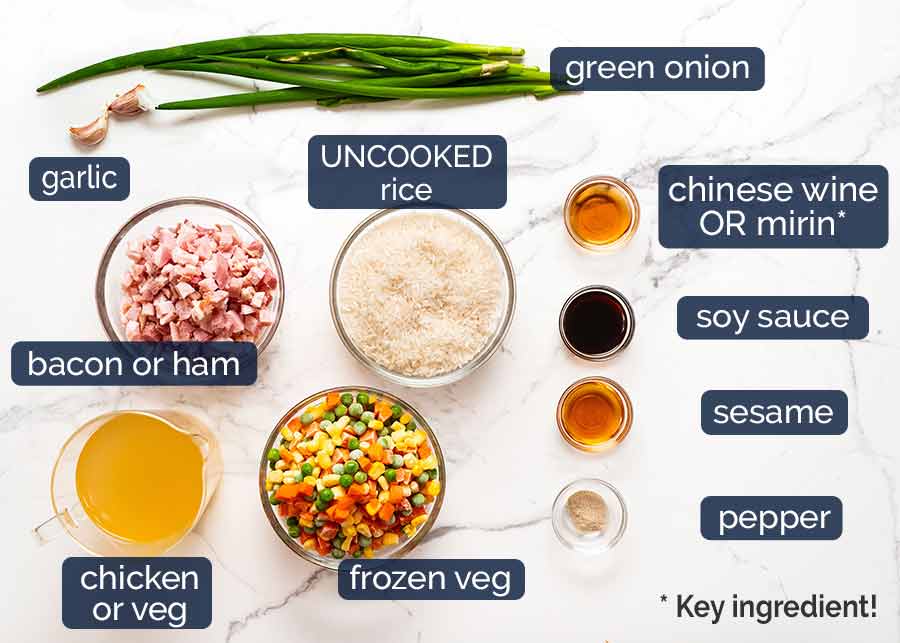
Rice – Best made with long grain white rice because it’s the least sticky. This means you get that nice, crumbly and fluffy fried rice texture with this “dump ‘n bake” cooking method.
Other rice types that work:
→ Basmati rice: Has the same fluffy texture but you get the basmati aroma (it’s not traditional with fried rice seasoning, but it’s rather nice!)
→ Medium and short grain white rice: Works perfectly but these rices are a bit stickier so don’t expect quite the same rice texture you see in the video (it will clump a little more).
→ Jasmine rice: Reduce water by 1/4 cup (water to rice ratio is lower, see here for cooking plain jasmine rice).This recipe won’t work as-written for the following: Brown rice, paella or risotto rice, wild rice, quinoa or other speciality rices. I’d need to figure out special liquid/rice ratios and bake times, which I have not done!
Stock/broth – Chicken stock will give a better flavour (it’s not chicken-y as such, it has just a more deeply seasoned flavour), but vegetable stock works just fine too. Whichever you use, make sure it’s low sodium otherwise the rice ends up a tad saltier than is ideal.
Don’t have liquid stock? Use water plus stock powder. Make up 2 cups according to the stock powder directions and use per the recipe.
Vegetables – Because this is conceived as a recipe for “dinner emergencies”, I’ve used frozen diced vegetables here. Fresh vegetables can be used, but you’ll need to increase the water by 1/4 cup because the liquid to rice ratio factors in the water that comes off the frozen vegetables (a surprising amount!).
Garlic – I can’t ever imagine making any type of fried rice without garlic. And that includes an emergency baked version!
Bacon (uncooked) or ham – Just like we do in wok tossed fried rice! Here, it’s scattered across the surface and it adds flavour into the stock as it cooks.
There’s no need to cook the bacon beforehand, it will brown at the end when we finish the rice off uncovered in the oven.
Soy sauce – I’ve used light soy sauce here which adds seasoning without discolouring the rice too much. All purpose soy sauce will work just fine too.
Dark soy sauce – It’s much more intense in flavour so use half the quantity and be prepared for your rice to be much browner in colour.
Chinese cooking wine (Shaoxing wine) – adds umami / depth of flavour which is important for this method of cooking that skips the usual “sauté garlic and onion” etc.
Best substitute – Dry sherry, followed by cooking sake, followed by mirin (though rice will be a touch sweeter).
Non alcoholic option – Skip the wine and add an extra 1/2 tbsp of soy sauce PLUS add 30g / 2 tbsp of unsalted butter with the sesame (butter compensates for loss of flavour from skipping the cooking wine). It’s not the same, but equally delicious!
Pepper – For a touch of warmth. White pepper is typically used for fried rice because you can’t see it. Substitute with black pepper.
Sesame oil & green onion – For finishing. We add sesame oil at the end to preserve the flavour, and the green onion is tossed through at the end for a hit of freshness and colour.
How to make baked fried rice
Are you ready to see how easy it is??
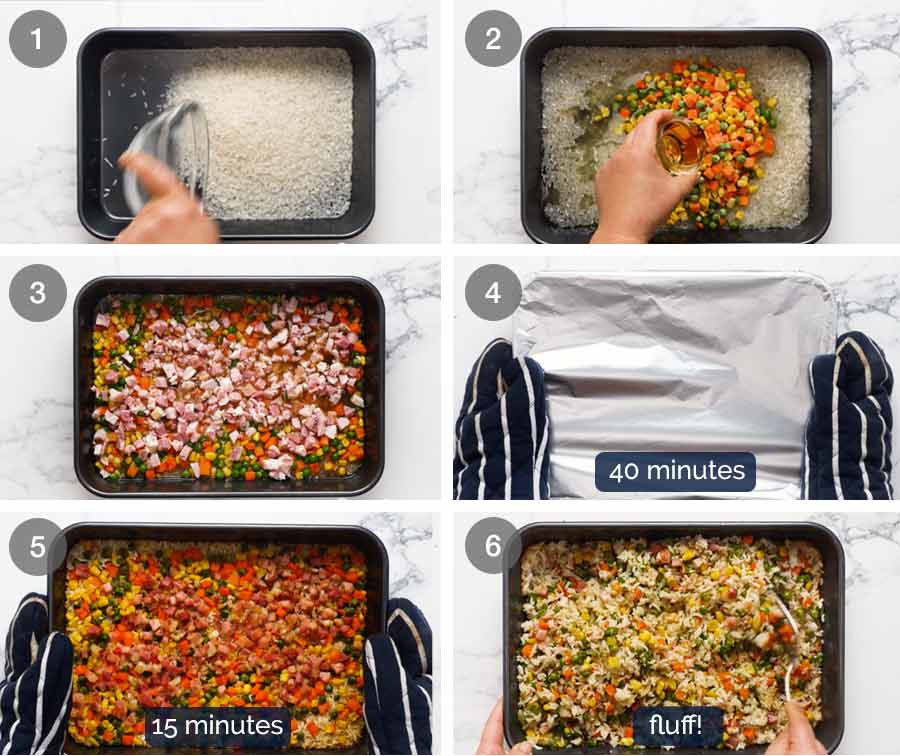
Put the uncooked rice into the baking pan;
Add everything else except the bacon;
Give it a mix, then scatter the bacon across the surface (because we want it to get some colour when we bake it uncovered);
Cover with foil and bake 40 minutes at 200°C / 390°F (180°C fan);
Remove foil and bake for a further 15 minutes. This gives the bacon some nice colour;
Remove from the oven, cover with foil then let it rest for 10 minutes. To finish the dish, add sesame oil and green onion, fluff with a fork then serve!
Why we rest rice – When you take it out of the oven, there should be no liquid left in the pan and the rice will be cooked through though a tiny bit firmer than ideal. You’ll also notice that the surface of the rice grains will be wet.
When we rest the rice for 10 minutes, the grains finish cooking through using the residual heat, and the wetness on the rice grains gets absorbed. This is an essential step with any rice you cook, no matter what method you use – stove, absorption, boil and drain, oven, microwave or rice cooker!
Here’s a nice close up for you so you can see how the grains are fluffy and separated, and how the bacon bits are lovely and golden.
No mushy, overcooked rice in sight!


What to serve with baked fried rice
Serve to accompany dishes you would with fried rice, which these days is far and beyond just Asian foods! Try it with the Mushroom Stuffed Chicken I shared a couple of weeks ago, or as a side for a fillet of seasoned pan fried fish.
Pair it with something sticky like this Chilli Chicken, Honey Garlic Chicken or a tropical Hawaiian Huli-Huli chicken. For vegetarian options, skip the bacon and instead, pile over juicy and buttery garlic mushrooms or a medley of marinated grilled vegetables.
The rules are: there are no rules! This is a rice side that will go with virtually anything, Asian or not! – Nagi x
PS. I just had a fleeting thought. If you’d like to turn this into a meal, trying stirring through a big handful of baby spinach or chopped English spinach when fluffing it up at the end. By upping the veg in this, it would be great as a meal!
Watch how to make it
Emergency “Dump ‘n Bake” Fried Rice
Ingredients
Baked Fried Rice:
- 1 1/2 cups long grain white rice , UNCOOKED (Note 1)
- 2 cups chicken or veg stock , low sodium
- 1 1/2 tbsp light soy sauce (Note 2)
- 1 tbsp Chinese cooking wine (dry sherry, mirin or sake, Note 3)
- 2 garlic cloves , minced with crusher (straight into pan)
- 2 cups frozen diced veg (carrots, peas, corn mix, Note 4 fresh veg)
- 1/4 tsp white pepper
- 1 1/4 cups / 180g bacon (uncooked) or ham , chopped (I use store bought chopped bacon, Note 5)
Finishing:
- 1 tbsp sesame oil
- 1/2 cup green onion , finely sliced (2 – 3 stems)
Instructions
- Preheat oven to 200°C / 390°F (180°C fan).
- Mix ingredients in baking dish: Place all Baked Fried Rice ingredients except bacon in a baking dish (~22 x 32cm / 9 x 13"). Stir, then spread rice evenly across pan.
- Top with bacon: Scatter bacon across surface.
- Bake covered 40 min: Cover with foil. Bake 40 minutes.
- Bake uncovered 15 min: Remove foil. Bake uncovered 15 minutes – this will colour the bacon. Liquid should be absorbed, rice should be cooked (but will seem wet, will absorb and soften while resting).
- Rest 10 min: Cover loosely with foil, stand for 10 minutes.
- Fluff: Add green onion and sesame oil. Fluff rice with fork, marvel at how perfectly cooked the rice grains are. Serve!
Notes
1. Rice types – Best made with long grain rice because it’s the least sticky so you get that nice crumbly, fluffy fried rice texture with this “dump ‘n bake” cooking method. Other rice types that work:
- Basmati rice – same fluffy texture but you get the basmati aroma (it’s not traditional with fried rice seasoning, but it’s rather nice!)
- Medium and short grain white rice – works perfectly but the rice is a bit stickier (that’s the way it is) so don’t expect the same rice texture you see in the video (it will clump a little more).
- Jasmine rice – NOT RECOMMENDED. This rice is softer and difficult to get exactly right for this recipe.
- Carrots, peas, corn, onion – use in recipe as written.
- Cauliflower, broccoli, green beans, asparagus, zucchini, capsicum/bell peppers (chopped) – add them 30 min into bake time.
) Turkey bacon.
Vegetarian – leave it out, or try fried tofu puffs (slice then scatter), otherwise garnish with about 1/4 cup of store bought crispy fried shallots or onion just before serving (crispy salty oily pops of goodness will add a nice hit of extra flavour!)
6. Pan size matters! Do not go larger – rice will dry out and won’t cook evenly. If you go much smaller (eg 20cm/8″ square) it will work ok but rice in the middle will be softer.
7. Add in options: Oh, the possibilities!
- Egg – Cook separately and stir in when fluffing rice. Either scramble, or make ribbons (cook a thin omelette using 2 whisked eggs, roll it up like a cigar then finely slice)
- Cooked chicken (or other cooked protein), char siu – dice or shred, toss on top of rice when resting (residual heat will warm up), then mix through well fluffing rice.
- Raw prawns/shrimp – small ones. When you remove the foil, scatter them across the surface, pop into oven for the last 15 min uncovered bake time.
- Baby spinach or chopped spinach – Stir it through at end with fluffing rice, residual heat will make it wilt.
- Spicy! Add a squirt of sriracha or dollop of your favourite chilli paste during cooking, or stir through a big handful of chopped kimchi just before serving.
Nutrition
Life of Dozer
Weekend car problems. Dozer was keen to help. (Well that’s a big fat lie! We all know he was just snuffling around for treats from the road side assistance man.)

The post Emergency “Dump & Bake” Fried Rice appeared first on RecipeTin Eats.
]]>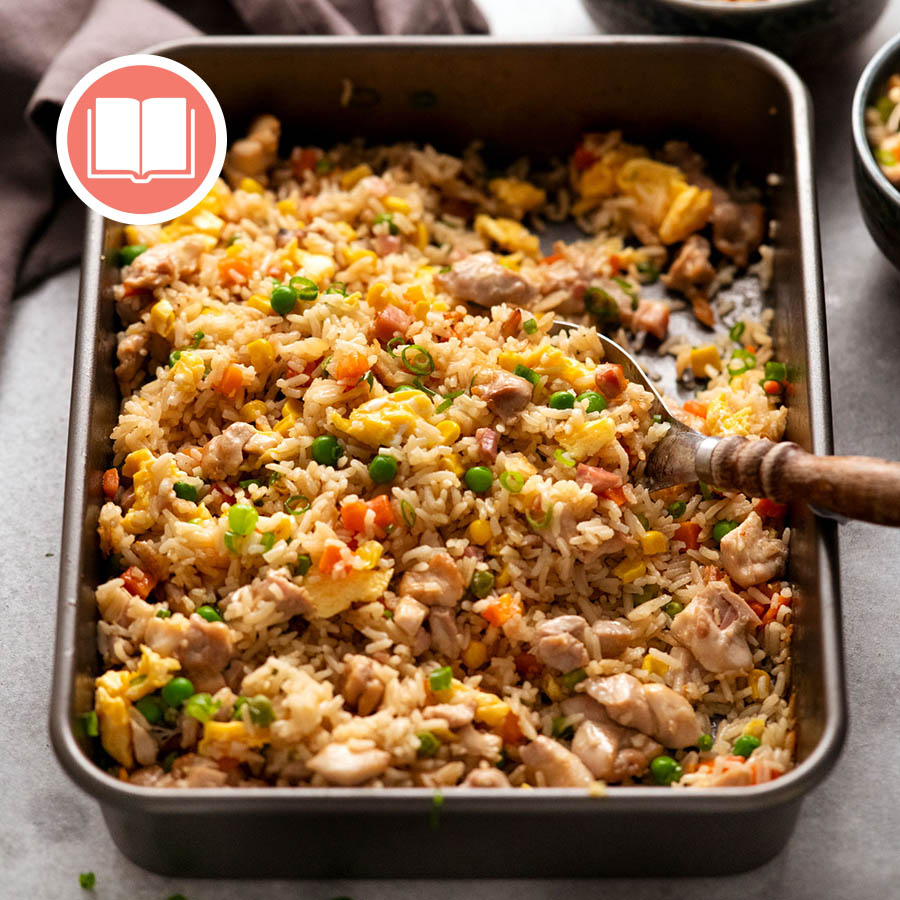 This recipe was a smash hit when I first published it, attracting 100,000 views in 24 hours! It’s a “dump and bake” recipe that’s as high on deliciousness as it is low on effort.
The post Magic Baked Chicken Fried Rice appeared first on RecipeTin Eats.
]]>This recipe was a smash hit when I first published it, attracting 100,000 views in 24 hours! It’s a “dump and bake” recipe that’s as high on deliciousness as it is low on effort.
This is a cookbook exclusive recipe!
This recipe is exclusive to my debut cookbook Dinner which includes a how-to video for every recipe. Just scan the QR code!
Just to explain….
I know, it’s confusing! You’re so used to getting recipes on my website – there’s over 1,200 of them, after all. And here you are looking at a tasty recipe video and I haven’t provided the recipe. 🙀
I’m not just doing this to torture you, I promise.
This page exists to display the how-to video for this recipe which I exclusively created for my debut cookbook, Dinner. Every recipe in the cookbook has a tutorial video. To watch it, you simply scan the QR code with your phone or tablet and it will take you straight to the recipe video like the one shown above!
Curious about my cookbook?
Read the cookbook overview
Browse all cookbook exclusive recipes here
Read the Cookbook Tales. Spoiler alert: there’s A LOT of dirty dishes!! And quite a lot of Dozer. 😂
Stay tuned for more on this page! Some cookbook exclusive recipes will have extra information added as well as extra tips. I am also looking at enabling comments for selected recipes so I can answer reader questions about cookbook recipes. I’m just a little snowed under during this launch period – book tours, getting 131 recipe videos out, launching the book overseas. Please bear with me! – Nagi x (10 October 2022)
The post Magic Baked Chicken Fried Rice appeared first on RecipeTin Eats.
]]>