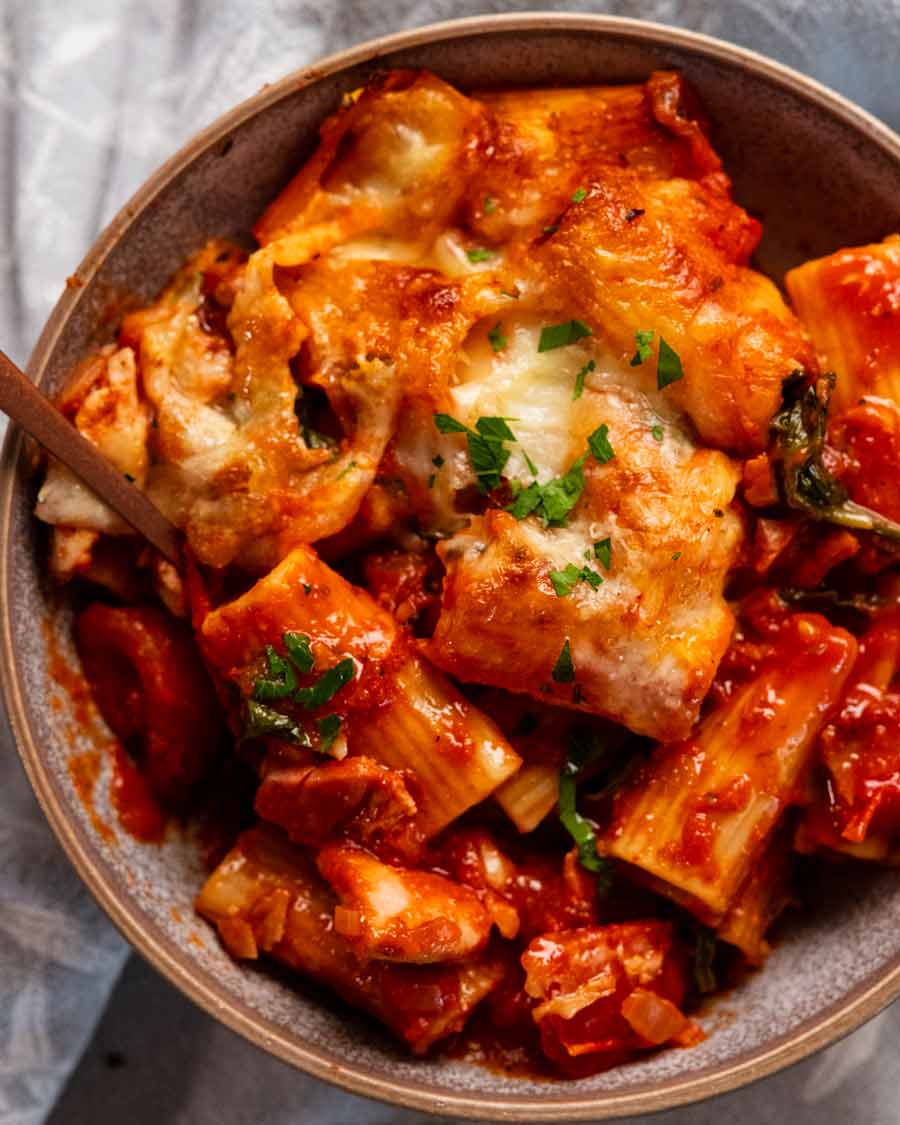
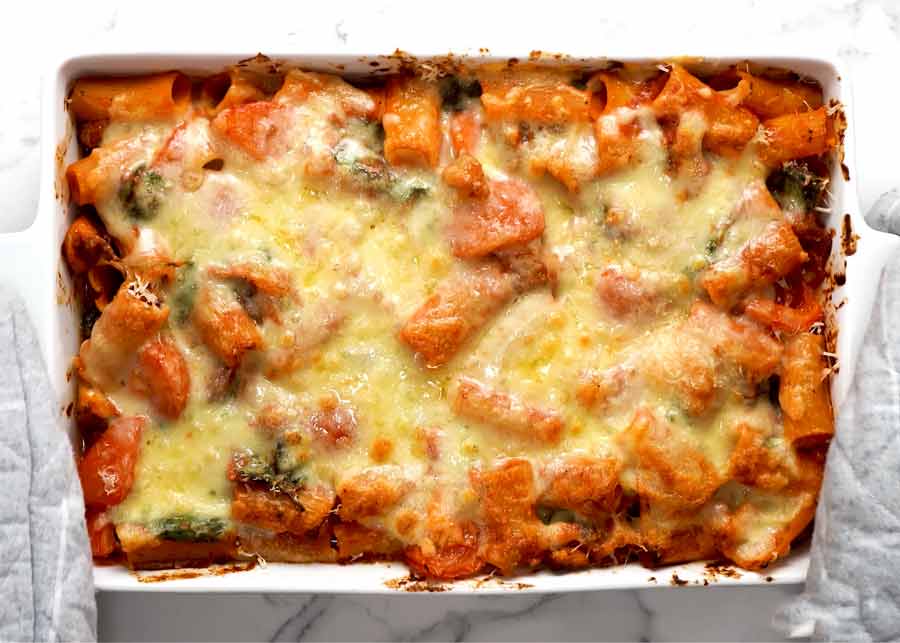
 A nice change from the usual creamy versions, this chicken pasta bake is made with a tomato pasta sauce. Filled with bacon, sizzling seasoned chicken and generous on the cheese, it’s cosy and hearty and thrifty and just so, so delicious! Excellent complete meal for making ahead and freezing. Chicken pasta bake If you can... Get the Recipe
The post Chicken pasta bake appeared first on RecipeTin Eats.
]]>A nice change from the usual creamy versions, this chicken pasta bake is made with a tomato pasta sauce. Filled with bacon, sizzling seasoned chicken and generous on the cheese, it’s cosy and hearty and thrifty and just so, so delicious! Excellent complete meal for making ahead and freezing.
Chicken pasta bake
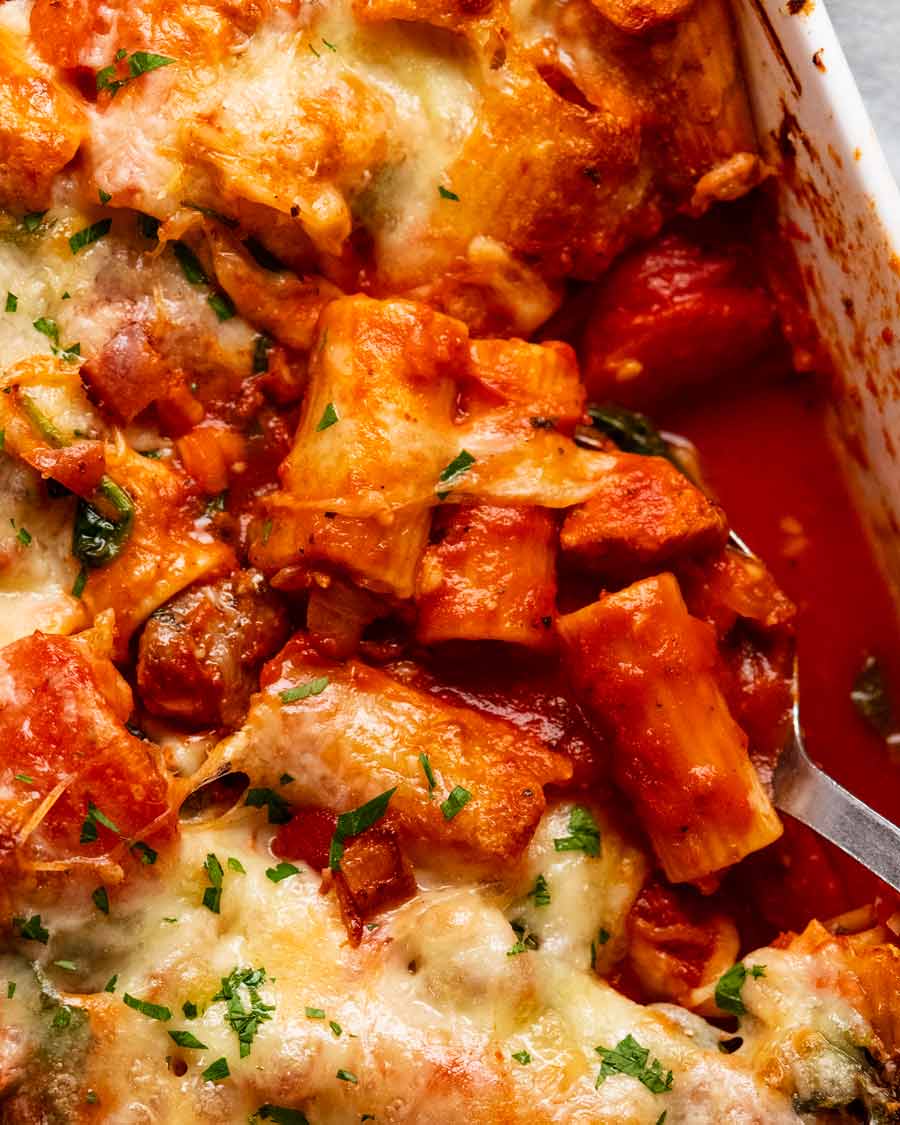
If you can cut a pasta bake like cake – I’m talking straight vertical walls with sharp edges – that is not a good thing. It just screams dry pasta bake!
Nope. Not in my world. Pasta bakes should be saucy and juicy, molten and oozy! Generously loaded with add-ins, if you’re going for a dinner pasta bake (as opposed to a side dish like Mac and Cheese).
This one ticks all those boxes. Proof by picture – juicy / saucy:
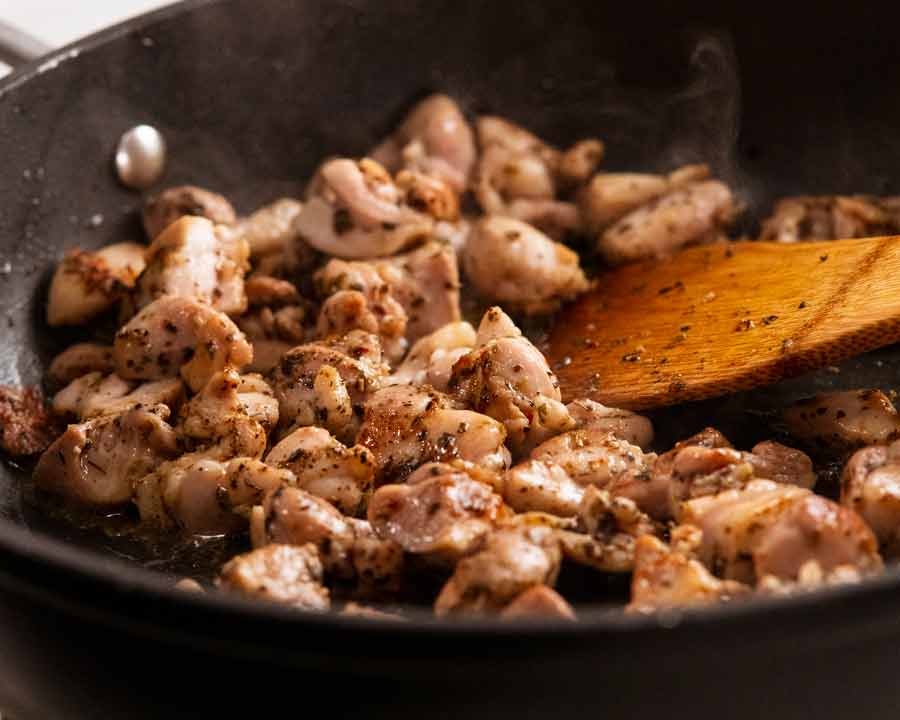
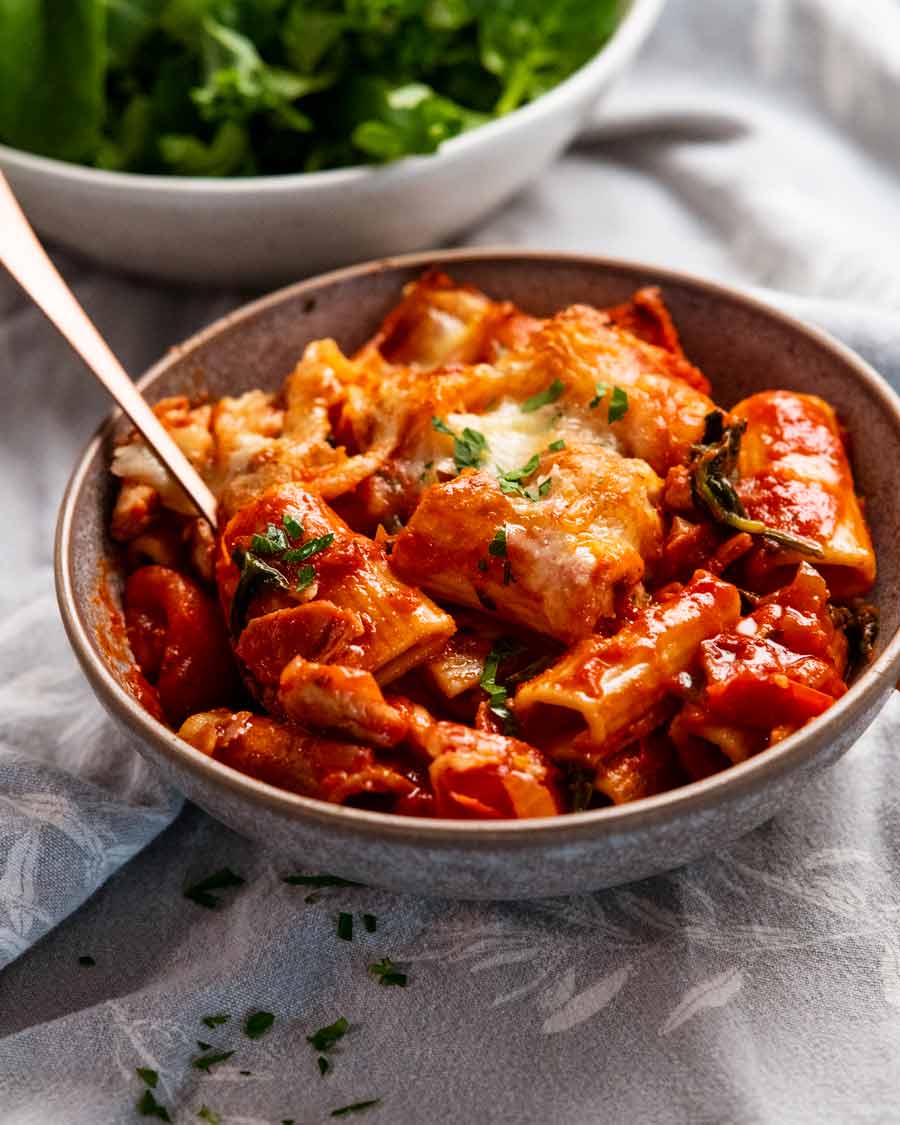
Tasty add-ins – sizzling seasoned chicken! Love the smell when the chicken hits the pan.
So if that sounds good to you, read on so you can see how to make your new favourite chicken pasta bake!
Ingredients in chicken pasta bake
You’ll be able to get everything from your local grocery store. Nothing pricey on the list!
Sizzling seasoned chicken
The pasta bake starts with sizzling chicken that’s been tossed in a simple, tasty seasoning. Here’s what you need:

Chicken – I like using chicken thighs as they stay juicier in dishes like pasta bakes where they are twice cooked (ie before adding into sauce then in the oven with the pasta).
Seasoning – Using a store bought Italian herb mix is a great shortcut here. I always like to add an extra spice, garlic in this paste, for extra flavour oomph.
Tomato pasta sauce for the pasta bake
A good tomato-based pasta bake needs a good tomato pasta sauce! No shortcuts here – I tried and just found it too bland. So here’s what we need:

Pasta type – I like the substantialness of rigatoni, there’s something extra cosy and satisfying about it in pasta bakes. However, feel free to use other short pastas like macaroni, penne, ziti, shells etc.
Tomato passata – for a thick, smooth sauce with better tomato flavour and red colour, use passata instead of crushed or diced tomato. It’s just pureed plain tomato! Readily available here in Australia in the pasta or canned tomato aisle and costs around the same as canned tomato. More on passata here.
Tomato paste – for sauce thickening and extra tomato flavour.
Garlic and onion – essential flavour base!
Oregano – for earthy flavour.
Chilli flakes / red pepper flakes – for a hum of warmth!
Wine – secret ingredient! Simmered rapidly to reduce and cook out the alcohol and winey flavour, just leaving behind tasty flavour. My favourite white wine for cooking is chardonnay which adds superior flavour compared to more neutral whites like sauvignon blanc. Substitute with low sodium chicken stock/broth.
Chicken pasta bake add-ins & topping
Lots of add-in options, but here’s what I’ve gone with!
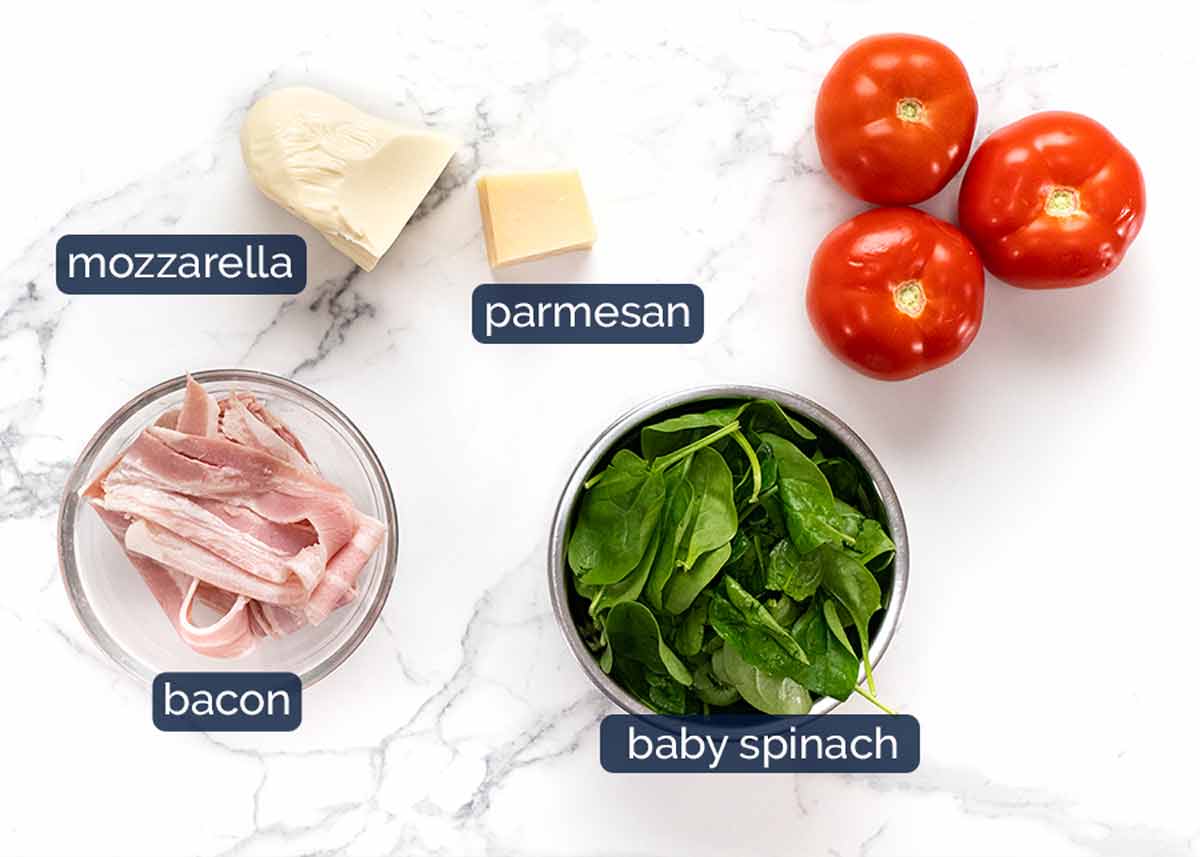
Bacon – cooked first until crisp, chopped, and tossed through the pasta bake. Then we use the bacon fat left in the pan to cooke the chicken. Free flavour not to be wasted! Substitute with ham bits or chopped ham.
Tomato – adds lovely juicy chunks of tomato in the pasta bake as well as filling it out and increasing the vegetable quota.
Baby spinach – for more hidden greens as well as adding nice streaks of green into the pasta bake.
Cheese – mozzarella for stretch and melting qualities, parmesan for flavour! (Because mozzarella actually does not have much flavour).
Feel free to substitute the tomato and baby spinach with other add-ins of choice.
How to make chicken pasta bake
There’s a time and a place for quick, low-effort one-pot pasta bakes. Then there’s all those times when you want a really good pasta bake so you’ll do it properly. Crisp the bacon, sear the chicken, simmer the sauce, then bring it all together into one big bubbling pasta bake.
Today is one of those days!
1. Crisp bacon (no oil)
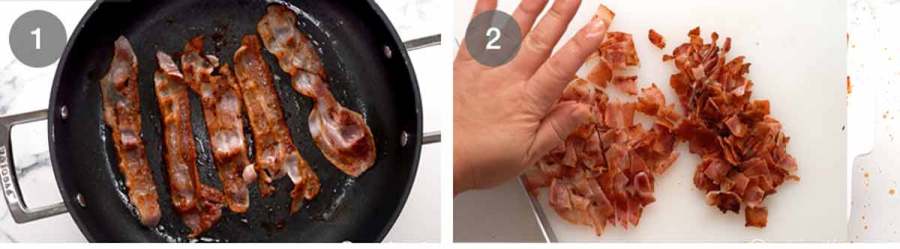
First, cook the bacon in a non-stick pan until golden and crisp. You won’t need any oil to do this as the fat in the bacon will melt and release fat into the pan. So it cooks in its own fat!
Drain on paper towels, leaving the fat in the pan (we will use this to cook the chicken). The bacon will go crispy when it cools, then chop into pieces.
2. Making the pasta bake
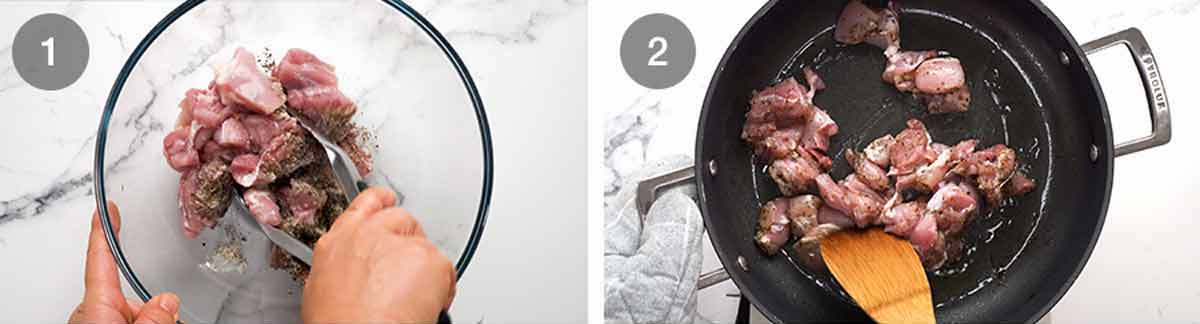
Toss the chicken in the Italian herbs, garlic powder, salt and pepper.
Sear – Using a very big pan or a large pot (because we’re mixing the sauce with pasta in this pan), sear the chicken until light golden in the reserved bacon fat.
Don’t worry whether it’s cooked through inside, it will finish cooking in the sauce and oven. Remove chicken with a slotted spoon and set aside in a bowl, leaving the tasty chicken/bacon fat in the pan (you see all this flavour building going on, right??!)
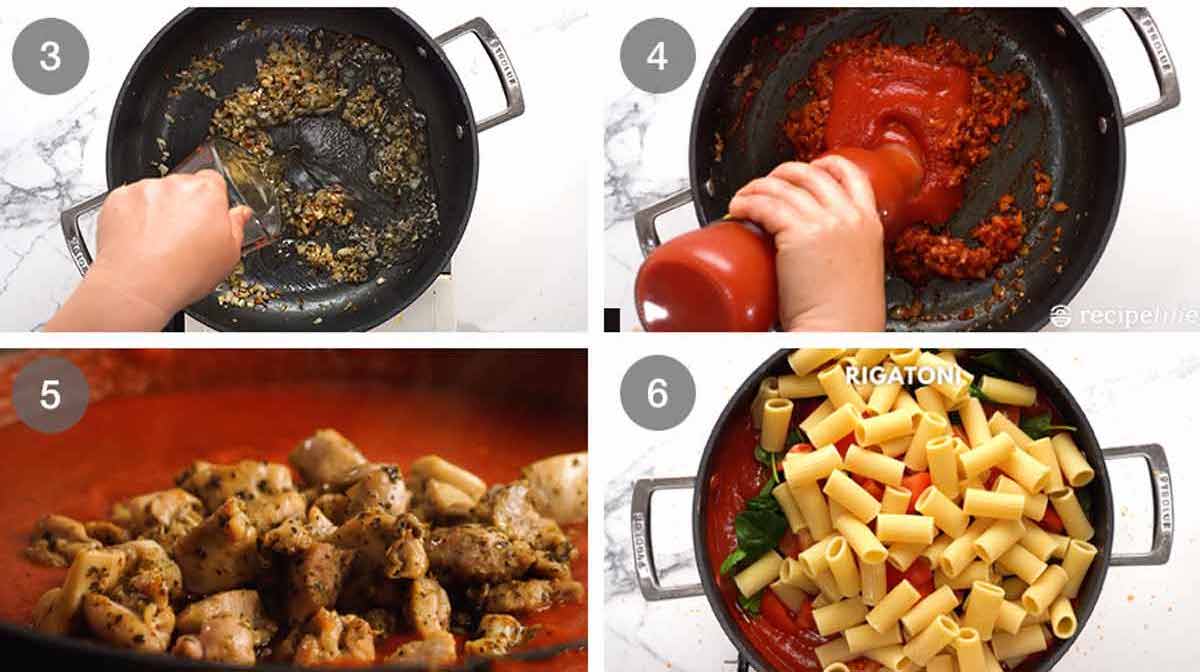
Sauté the onion and garlic with the chilli flakes and dried oregano – good trick for bringing out extra flavour from dried herbs! Then add the wine and simmer rapidly to mostly reduce – this cooks out the alcohol and removes the winey flavour, just leaving behind tasty flavour which adds a little something-something into the sauce.
Sauce – Next, cook off the tomato paste. Similar to toasting the herbs, this improves the flavour of tomato paste, taking off the sour edge, intensifying the tomato flavour and sweetening it. Good Cheffy tip!
Then we add all the liquids – the tomato passata, water (use it to rinse out the bottle) – salt and pepper for seasoning.
Simmer – Then stir in the chicken – don’t forget to add all the juices pooled in the bowl! Simmer for 5 minutes to bring the flavours together – this is when the magic happens so don’t skip or shortcut this step. I tried – to speed things up – but the sauce just lacked flavour.
Add-ins – Add the baby spinach, tomato, cooked pasta and bacon in that order, so the heavier add-ins weigh down the considerable volume of baby spinach.
Oh! If you remember, you can hold back a bit of bacon for sprinkling on at the end. But to be honest, I usually forget.

Mix well – Give it all a good stir to mix it all together. You DID use a big pan, right?? 🙂 If you didn’t, this is the part where you’ll start crying or cursing – been there, done that!
Baking pan – Transfer to a 23 x 33cm / 9 x 13″ pan and level the surface.
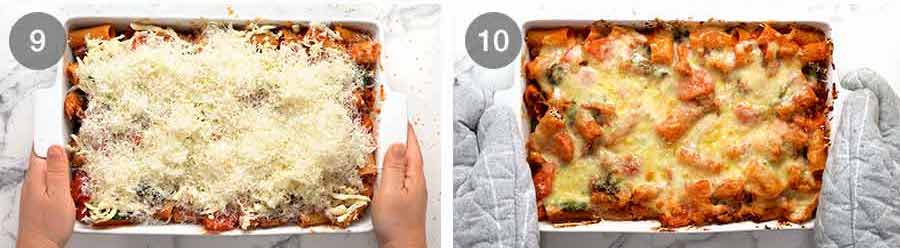
Cheese it! Top with mozzarella then parmesan cheese. Doing it in this order gives the surface a lovely golden crust thanks to the parmesan, but it’s not the end of the world if you do it the other way.
Bake for just 25 minutes until the cheese is melted with some lovely golden spots. Rest for 5 minutes, just to let it settle so the sauce clings to the pasta a bit better. Then serve!
Make-ahead / freezing tip
Most pasta bakes are terrific make-ahead-bake-later options, and this chicken pasta bake is no exception!
The best way to make ahead is to cook the sauce and pasta separately, allow both to cool completely. Then toss together and assemble the pasta bake – including topping with cheese. Cover well with cling wrap and refrigerate 3 days or freeze up to 3 months (thaw thoroughly). Then bake covered for 20 minutes then uncovered for 20 minutes. It will take longer for the centre to get hot if you’re baking from fridge-cold but the cheese will get too brown if you leave it uncovered for this full baking time.
Complete meal – veg, starch, protein!
It is not often I get to tell you that a pasta dish is a complete meal, so let me enjoy the moment. This one’s got it all! Starch, protein and plenty of vegetables – the tomato passata (yes it’s a vegetable!), chunks of fresh tomato and a good amount of baby spinach too.
Which means – unlike most of my creamy pasta bakes – no need to make a salad for the side to round out the meal. Always a bonus when it comes to choosing what to make for dinner tonight, right?? – Nagi x
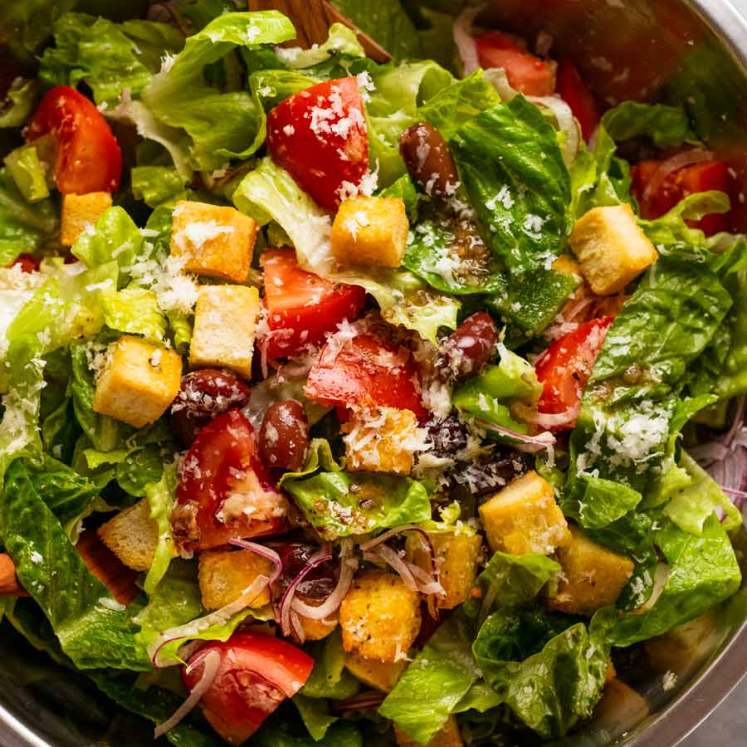
PS Having just made that statement, I just realised the photo above has a side salad in it. 😂 It’s the rocket salad (arugula) with balsamic dressing minus the parmesan shavings (because I figured there was enough cheese in the pasta bake!). It was already made for another recipe I was shooting so I just grabbed it as a background prop for the photo!
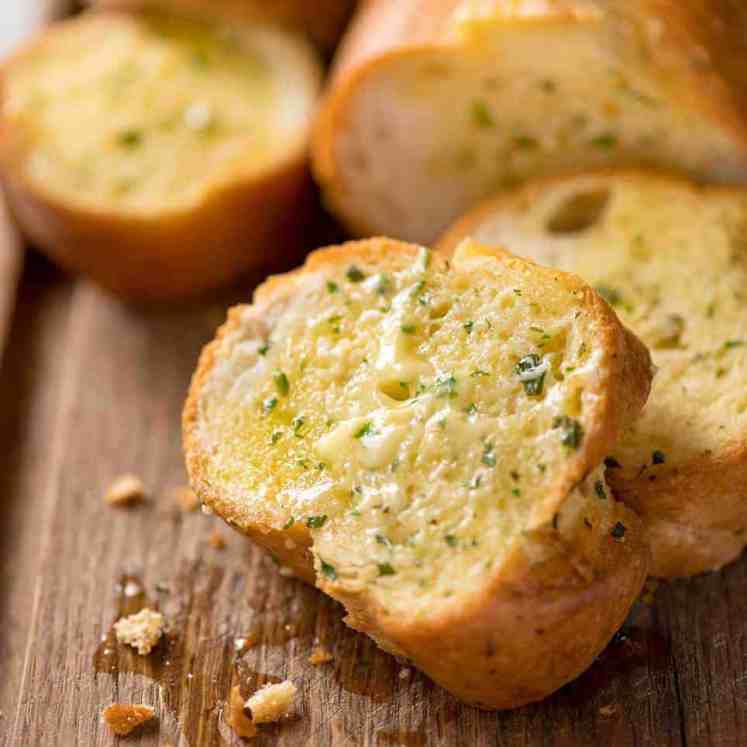
PPS Despite saying this is a complete meal, a side of garlic bread would certainly take dinner to another level!
Watch how to make it
Chicken pasta bake
Ingredients
Seasoned Chicken
- 500g / 1 lb chicken thighs , cut into small bite size pieces (Note 1)
- 1/2 tsp cooking/kosher salt
- 1/4 tsp black pepper
- 1/2 tsp garlic powder
- 2 tsp Italian herb mix , any store bought type
Pasta bake
- 300g/10oz rigatoni (or penne, elbow macaroni, shells or similar)
- 2 tsp salt , for cooking pasta
- 5 slices streaky bacon
- 1/2 onion , finely chopped
- 2 garlic cloves , minced
- 1 1/2 tsp dried oregano
- 1/2 tsp chilli flakes / red pepper flakes
- 1/2 cup chardonnay or other dry white wine (Note 2)
- 2 tbsp tomato paste
- 700g / 24oz tomato passata (Note 3)
- 1/2 cup water
- 1 tsp cooking/kosher salt
- 1/2 tsp black pepper
- 3 tomatoes , cut into 8 wedges then halved
- 2 big handfuls baby spinach (or bite size kale)
- 2 cups mozzarella, shredded
- 1/2 cup (tightly packed) parmesan, finely shredded
Instructions
- Preheat oven to 180°C/350°F (160°C fan).
- Cook pasta per packet directions, using boiling water seasoned with the 2 teaspoons of salt. Drain, rinse briefly under tap water, then set aside to cool while making the sauce.
- Season chicken – Toss together Seasoned Chicken ingredients in a bowl.
- Crisp bacon – Put bacon in an unheated very large non-stick pan (Note 2). Turn stove on medium high. The fat will melt so the bacon cooks in its own fat. Cook until light golden, remove onto paper towels, leaving fat in the pan. Once cool, cut into 1cm / 1/3" pieces.
- Sizzle chicken – Top up bacon fat with olive oil if you don’t have at least 1 tbsp. Increase heat to high. Cook chicken for 3 minutes until light golden on the outside but still raw inside. Remove into a bowl with a slotted spoon.
- Sauce – In the same pan, cook garlic and onion for 1 minute, then add chilli flakes and oregano. Cook for 2 minutes until onion is translucent. Add wine and rapidly simmer for 1 to 2 minutes until mostly evaporated. Add tomato paste and cook for 1 minute to concentrate and improve flavour. Add passata, then use the water to rinse out the bottle. Add salt, pepper, chicken (including all juices on the plate). Mix, then simmer for 5 minutes on medium.
- Toss – Add baby spinach, tomato, pasta and bacon. Toss well.
- Assemble – Transfer to 23 x 33cm/9 x 13" pan. Top with mozzarella then parmesan. Bake 25 minutes until melted with some golden spots.
- Serve – Stand for 5 minutes then serve!
Notes
Nutrition
Life of Dozer
Sunset walk. Such a beautiful part of Sydney! (It’s Bayview dog park in Sydney’s northern beaches).

The post Chicken pasta bake appeared first on RecipeTin Eats.
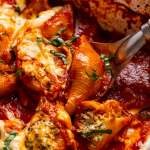
]]>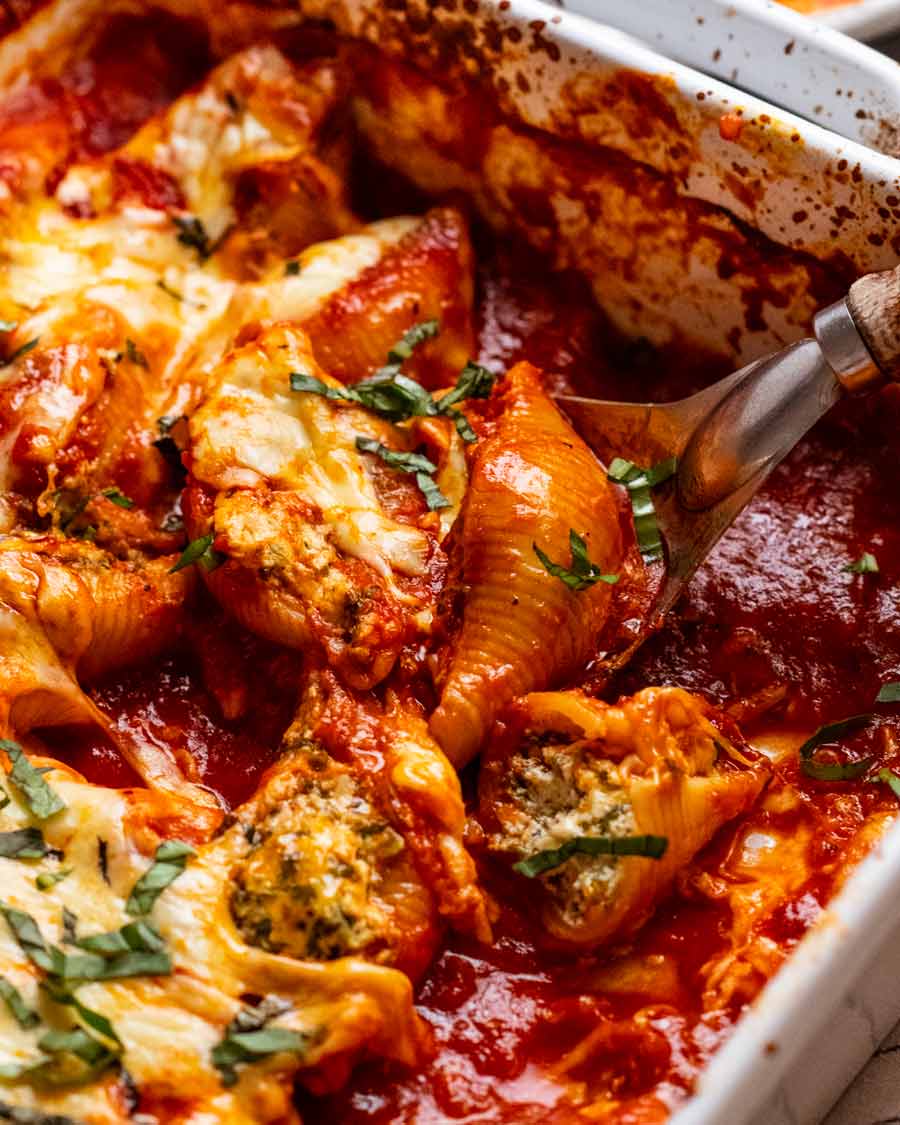 There’s no need to pre-cook shells before you stuff them. Such a pain messing around with hot floppy shells! Just bake in loads of sauce and they’ll cook in the oven. These jumbo shells, called conchiglioni in Italian, are stuffed with spinach and ricotta. Serve with a Mega Italian Salad and garlic bread for the... Get the Recipe
The post Spinach ricotta stuffed shells appeared first on RecipeTin Eats.
]]>There’s no need to pre-cook shells before you stuff them. Such a pain messing around with hot floppy shells! Just bake in loads of sauce and they’ll cook in the oven. These jumbo shells, called conchiglioni in Italian, are stuffed with spinach and ricotta. Serve with a Mega Italian Salad and garlic bread for the perfect dinner.
Stuffed shells
I don’t know if you’ve ever tried, but stuffing hot cooked pasta shells is a nightmare. Slipper suckers that they are, and they break so easily.
There’s no need to suffer through all that! It’s much easier to stuff raw, uncooked pasta shells and cook them in the oven simply by covering them in a LOT of sauce. It 100% works. It’s the way I’ve been cooking cannelloni/manicotti all my life.
The trick is simply to start with a large volume of watery sauce that the pasta shells cook in. Not dissimilar to cooking pasta in a pot of boiling water, actually. And by the end, that watery sauce reduces down into a lovely thick pasta sauce!
This method of cooking also deals with another pet-peeve of mine: dry pasta shells. No worries about that here, we end up with plenty of tomato sauce for serving!
What you need for stuffed pasta shells
While there’s many stuffing options for pasta shells, the most popular is probably spinach and ricotta and that’s what I’ve gone with today. Sorry for being predictable? 
Jumbo shells (conchiglioni)
Jumbo shells (conchiglioni is the proper Italian name) are more readily available these days in Australian grocery stores (Woolies, Coles, Harris Farms) and the primary reason I went on a stuffed shells bender.
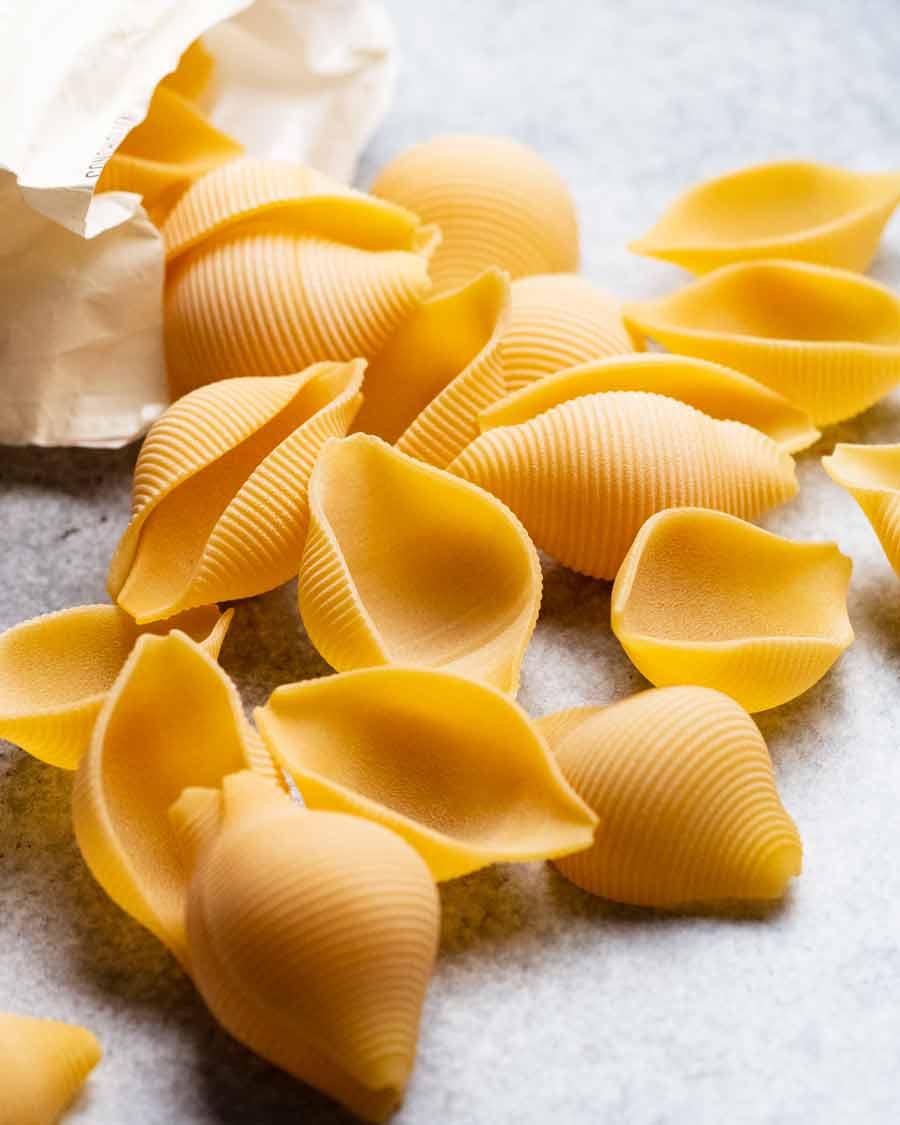
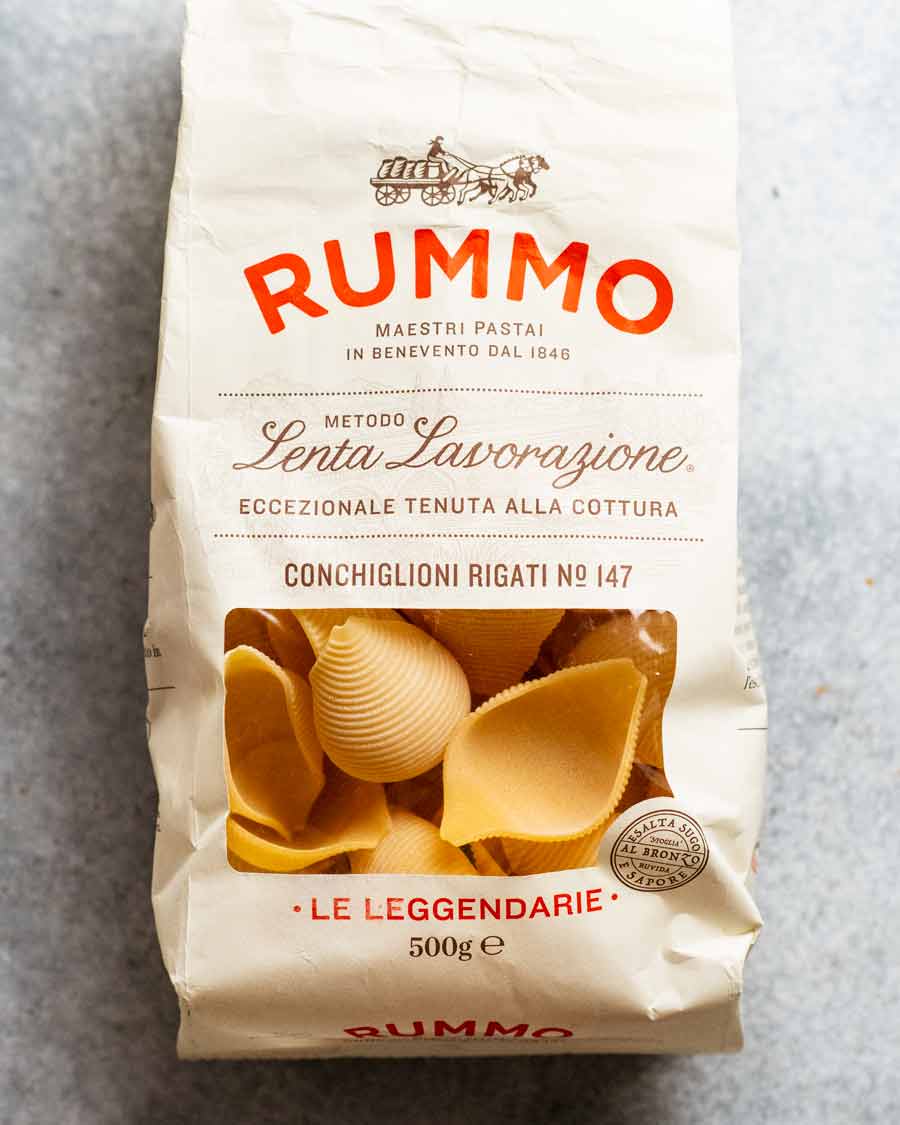
They are a little more expensive than typical pasta shapes – around $5 for a 500g / 1 lb packet. But they go further. You’ll need 250g / 8 oz for this recipe which serves 5 generously, possibly 6. (Let me remind you, I have a rather robust appetite! My serving portions are not skimpy).
The spinach ricotta stuffing
Here’s what you need for the stuffing. Exactly the same combination I use for spinach ricotta cannelloni, spinach ricotta rolls and the fan-favourite spinach ricotta rotolo.
For a meat option, use the beef filling in Beef Cannelloni instead.
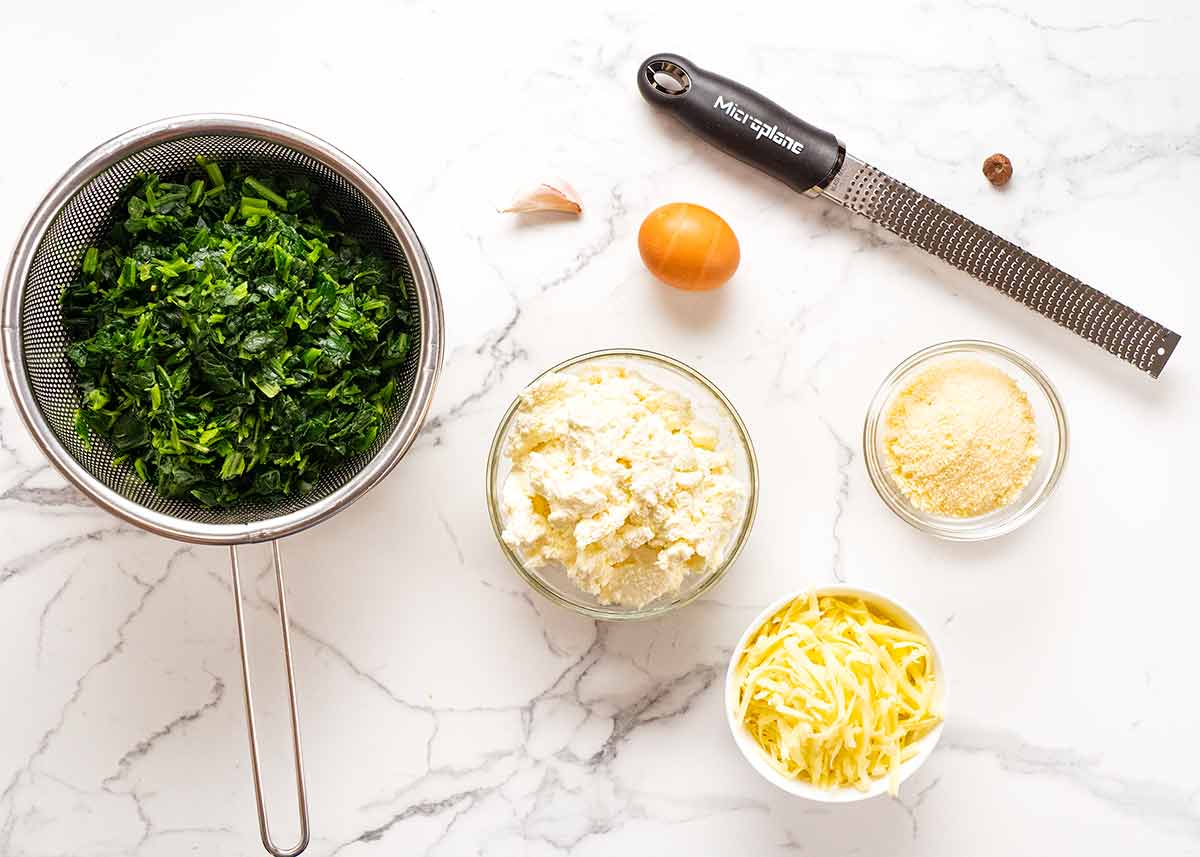
Spinach – use frozen for convenience (thaw, remove excess water before using), or fresh if you’ve got an abundance of it
Ricotta – be sure to use a food quality full fat, creamy one. Tip for Australians: avoid Perfect Italiano tub in the fridge aisle of major supermarkets. It’s quite powdery and unpleasant. My favourite is Paesanella which is sold at Harris Farms and over the deli counter at large supermarkets.
Shredded cheese – A flavoured one is best, like cheddar, tasty, gruyere. Save the mozzarella for the topping (which melts well but doesn’t have that much flavour).
Parmesan – don’t skip this! It adds extra savouriness and seasoning to the filling. Just store bought finely shredded or grated is fine, or grate your own.
Garlic – because it makes everything better
Egg – for binding.
Nutmeg – optional, but it’s a lovely touch. I use it in almost all my spinach ricotta fillings.
Salt and pepper
The sauce
I find this method of cooking stuffed shells from raw works best with a smooth pasta sauce rather than one with lumps of crushed or diced tomatoes. The shells cook more evenly and when it finishes baking, you’re left with a lovely smooth pasta sauce.
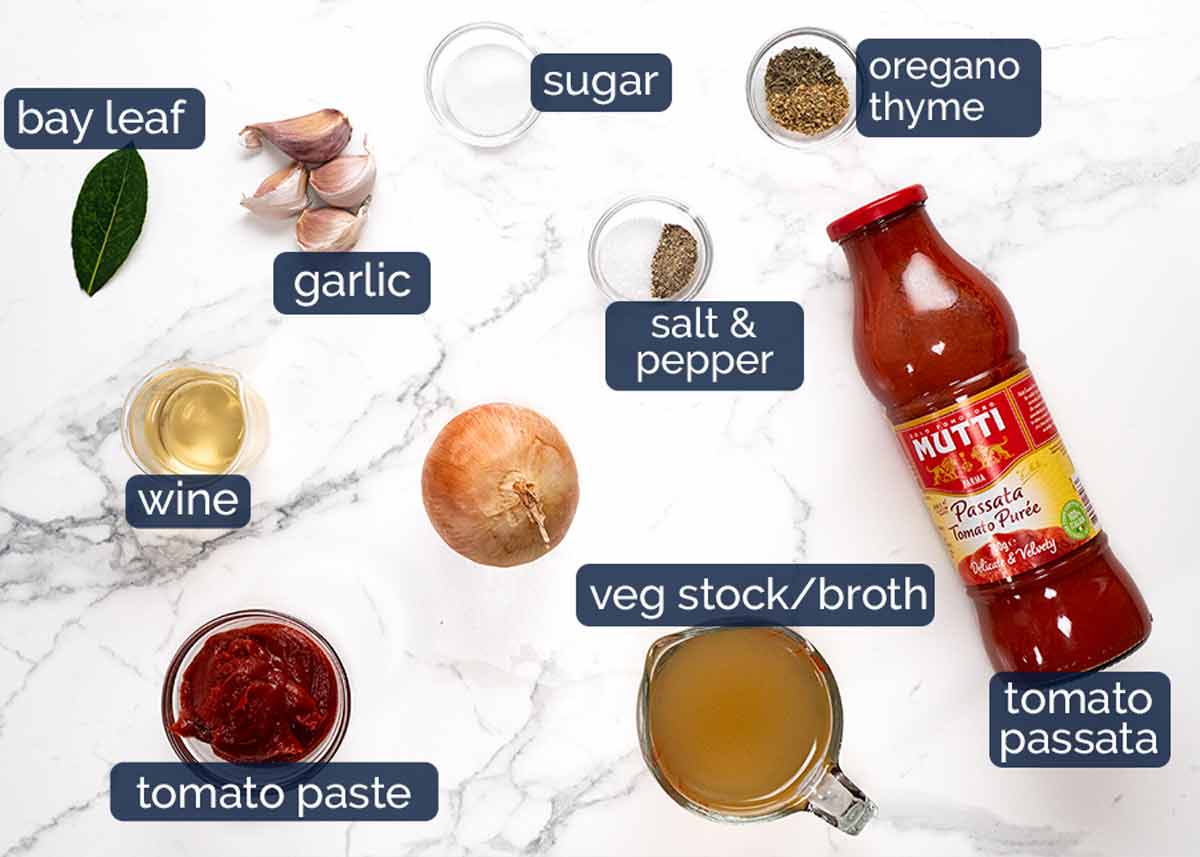
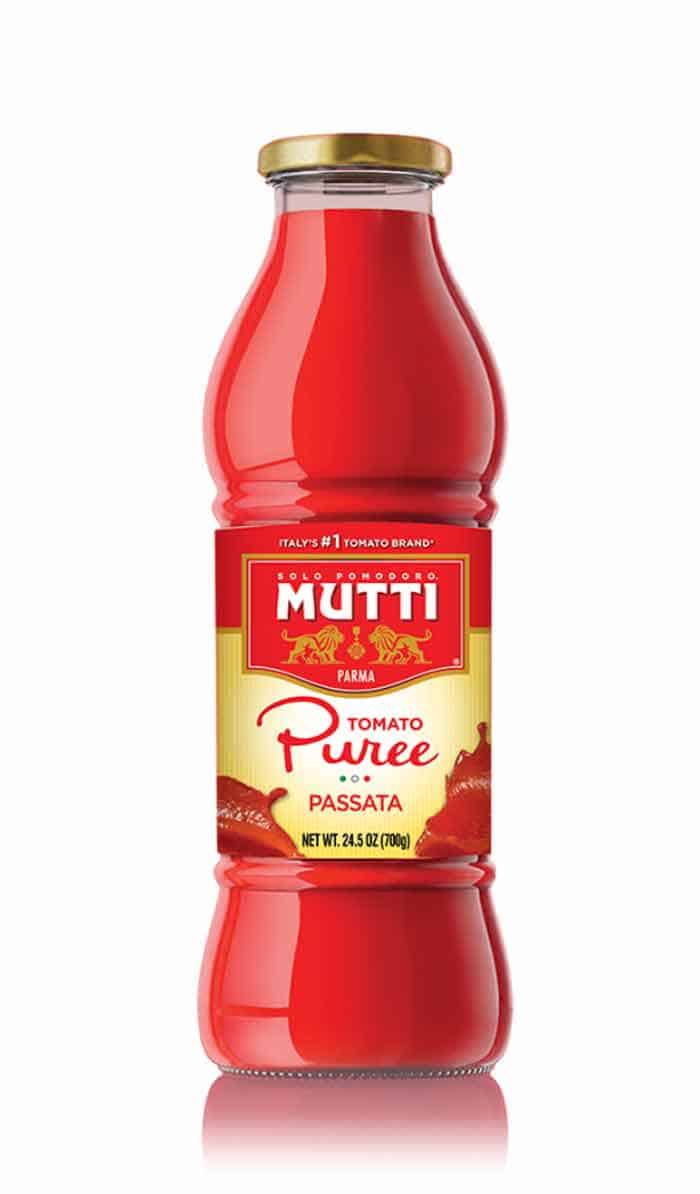
Tomato passata – Pureed, strained plain tomatoes, sometimes labelled “tomato puree” in the US (here’s a photo of Mutti tomato passata sold at Walmart). Readily available in Australian supermarkets nowadays, alongside pasta sauces. Excellent for making smooth sauces rather than simmering for ages to breakdown crushed or diced tomato. More on tomato passata here.
Substitutes – US Hunt’s tomato sauce is a perfect alternative. Otherwise, use crushed canned tomato then puree (like I do for cannelloni/,manicotti).
Eschalots –Also known as French onions, and called “shallots” in the US. They look like baby onions, but have purple-skinned flesh, are finer and sweeter. Not to be confused with what some people in Australia call “shallots” ie the long green onions.
I like using eshalots rather than onions because they are finer so they almost disappear into the sauce so you get a lovely smooth sauce. However, you can substitute with a small onion.
Herbs and spices – Fresh garlic, bay leaf, dried thyme and dried oregano.
Tomato paste – To intensify the tomato flavour and thicken the sauce slightly.
White wine – Adds depth of flavour / complexity into the sauce in a way only wine can! It’s only 1/3 of a cup and we simmer to cook out the alcohol. Substitute with more stock, or just skip it.
Vegetable stock – We need a whole litre / quart (4 cups) because we’re making a LOT of VERY watery sauce here! Just watch the video and you’ll see how it all gets absorbed by the pasta shells, leaving behind a lovely thickened pasta sauce for serving.
Sugar – Just a smidge, to take the sour edge off the tomato paste we’re using (tomato paste is sour!).
How to make stuffed shells
It’s actually extremely straight forward and the recipe has a nice flow to it: make the sauce first, then while it’s simmering, stuff the shells. Then assemble and bake!
How to make sauce for stuffed shells
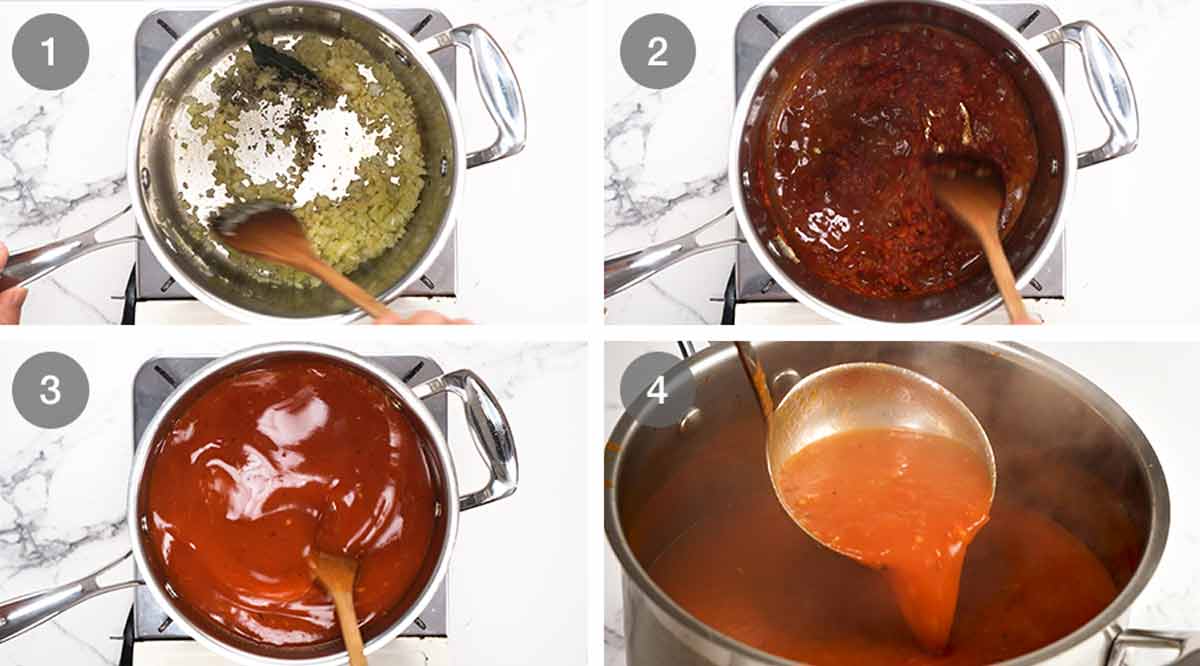
Sauté aromatics – Cook the garlic and eschalots with the herbs in a large saucepan or small pot.
Tomato paste and wine – Cook off the tomato paste for 1 minute (this takes the raw sour edge off and deepens the flavour) then add the wine and simmer rapidly on high heat until it’s mostly evaporated.
Simmer 20 minutes – Add the remaining ingredients then simmer on low for 20 minutes with the lid off.
Watery sauce! The sauce will be VERY watery and there will be loads. Have faith! You need it all – the shells absorb most of that liquid. Keep the sauce hot – we want to use it hot.
Stuffing & bake
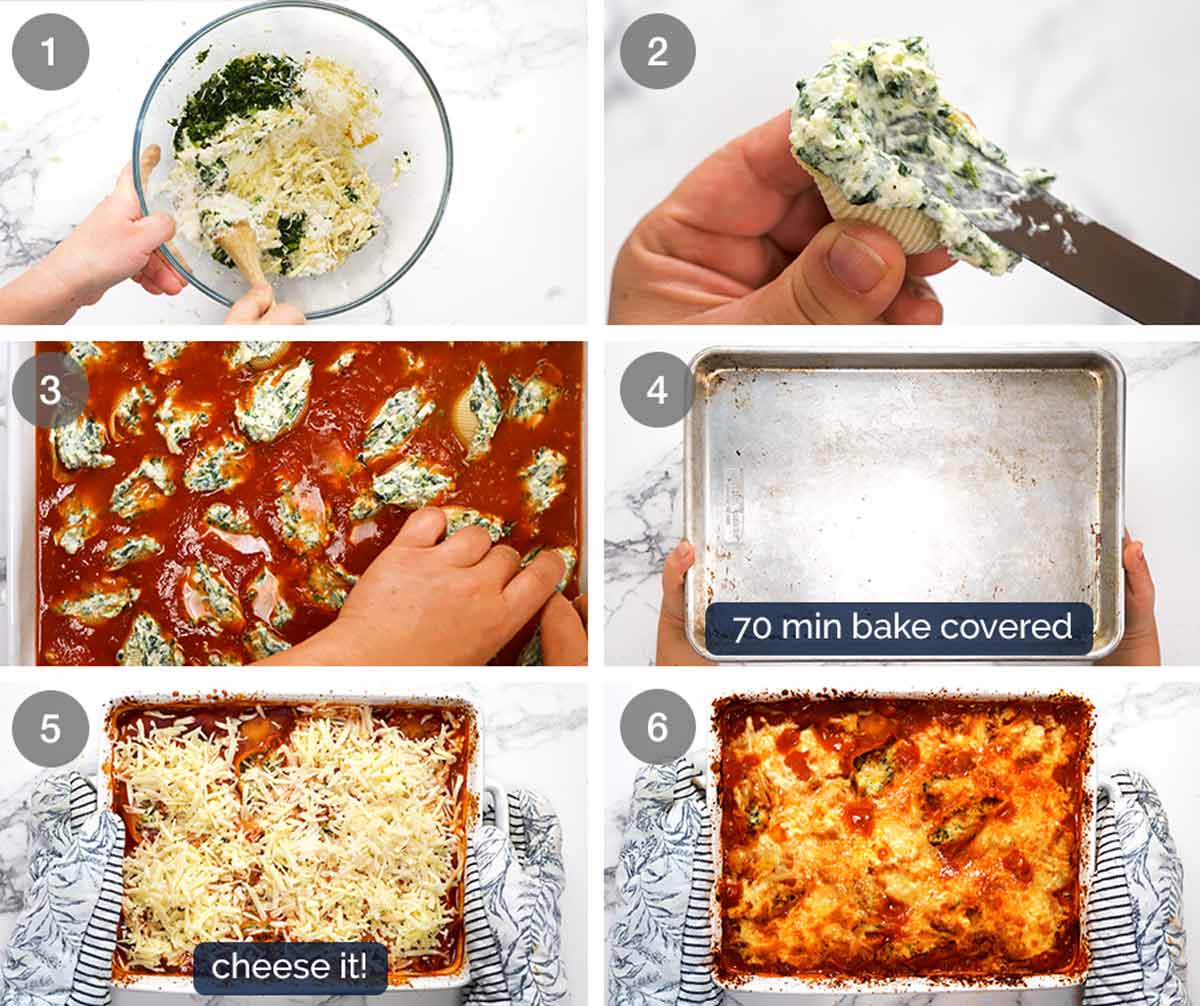
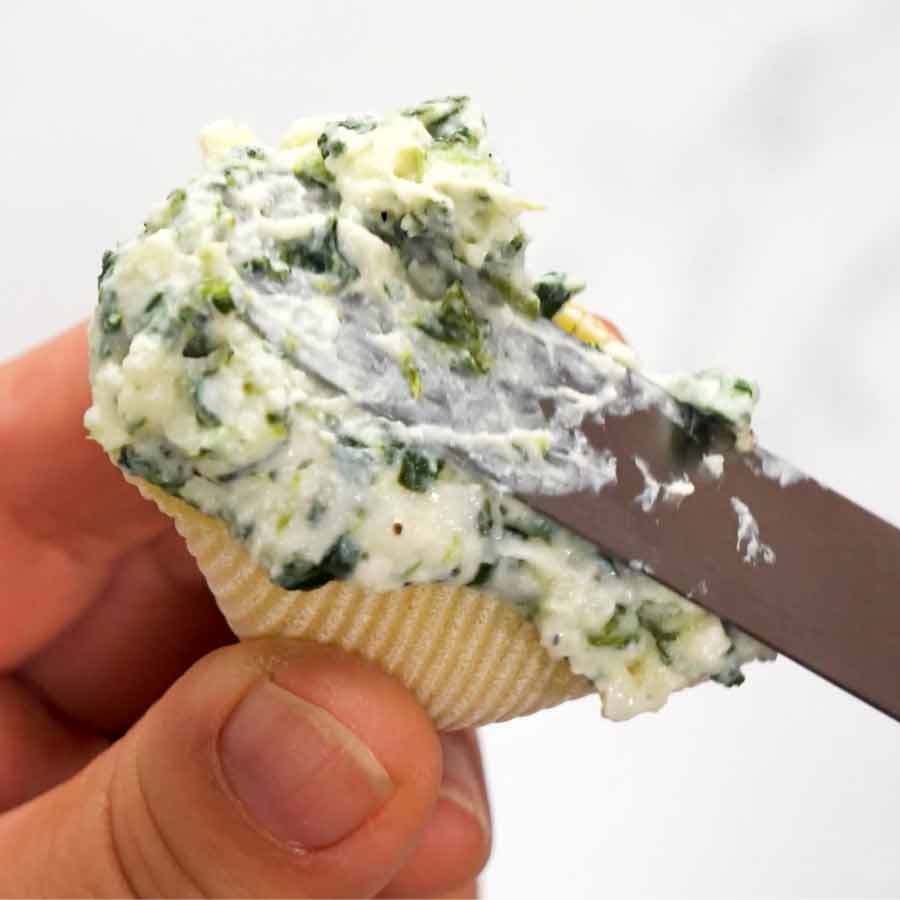
Stuffing – Mix the spinach ricotta stuffing ingredients together.
Stuff the raw uncooked shells. I find it easiest to use a small offset spatula (like a butter knife with a bend in it, super useful kitchen tool). Else a knife, spoon – whatever you find makes it easiest for you.
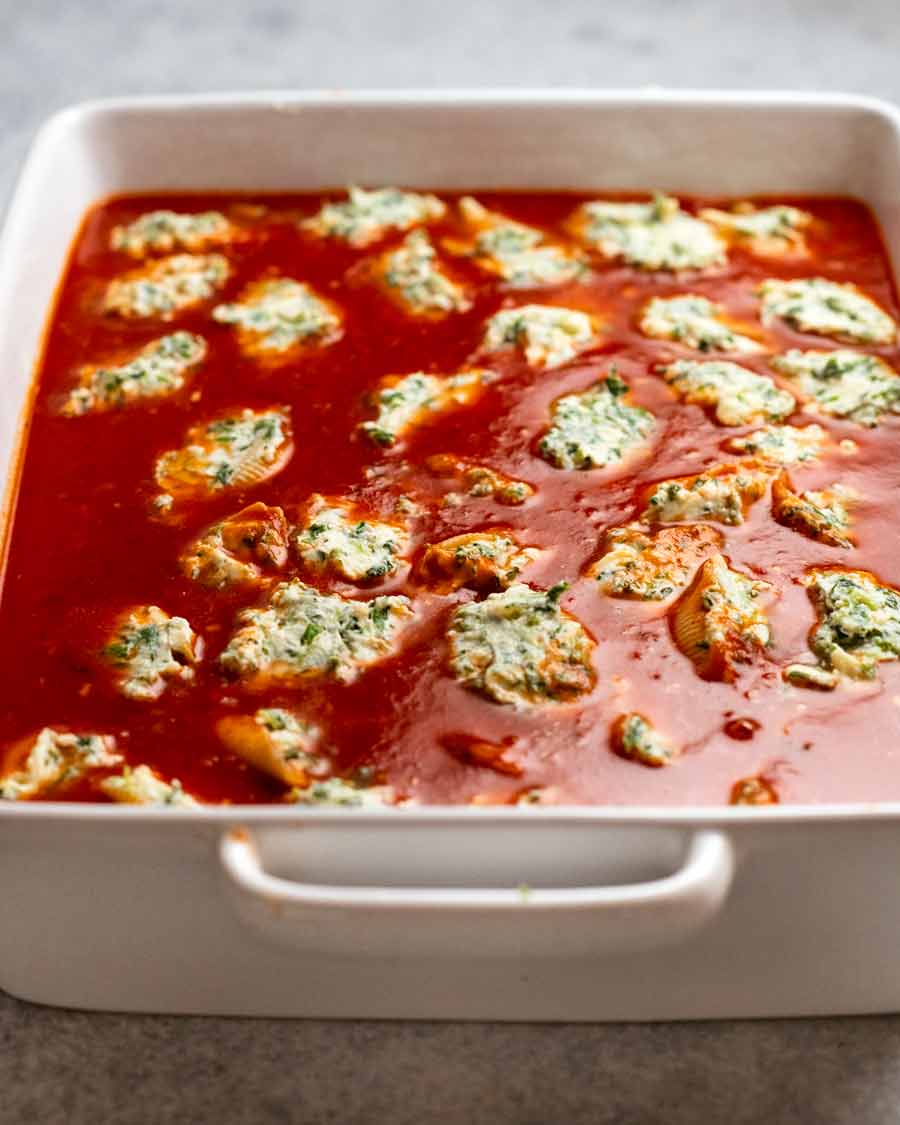
Assemble – Pour the hot sauce into a 23 x 33cm / 9 x 13″ baking dish. Then gently place the pasta shells in. They will be mostly submerged, some might semi-float. But you want most if not all of the pasta submerged under liquid so it cooks evenly (a bit poking above is fine as it will steam-cook).
Bake 70 min covered – Cover the dish with a baking tray (or foil) and bake for 70 minutes. Yes, really, it will take that long!
Why a baking tray? Easy way to cover the baking dish, no waste, no burning yourself, and it lets a little bit of steam escape to help the sauce reduce just the right amount.
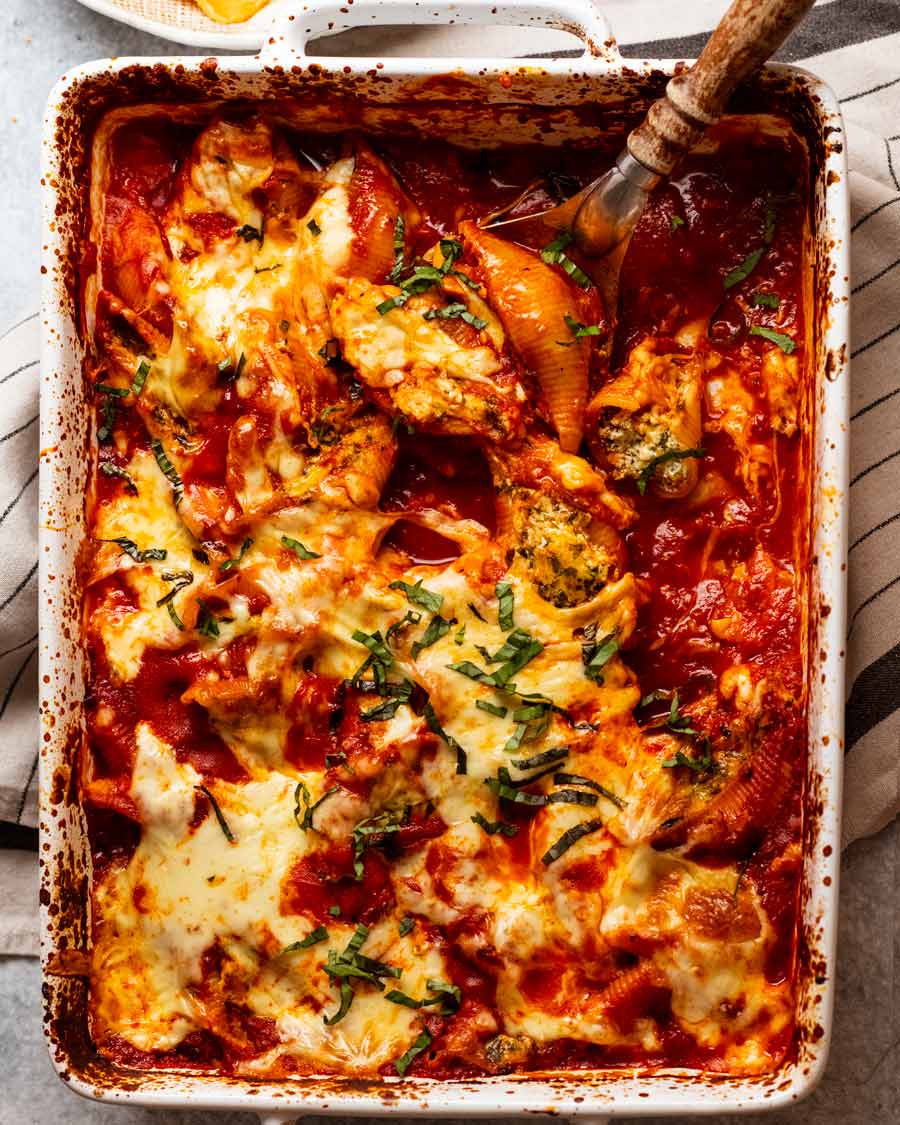
15 min bake, cheesed – Remove the baking dish from the oven. Sprinkle with cheese then bake for a further 15 minutes until bubbly and golden.
Serve! Scoop and serve. Marvel at how the shells are perfectly al dente and how there’s so much lovely sauce to serve it with!
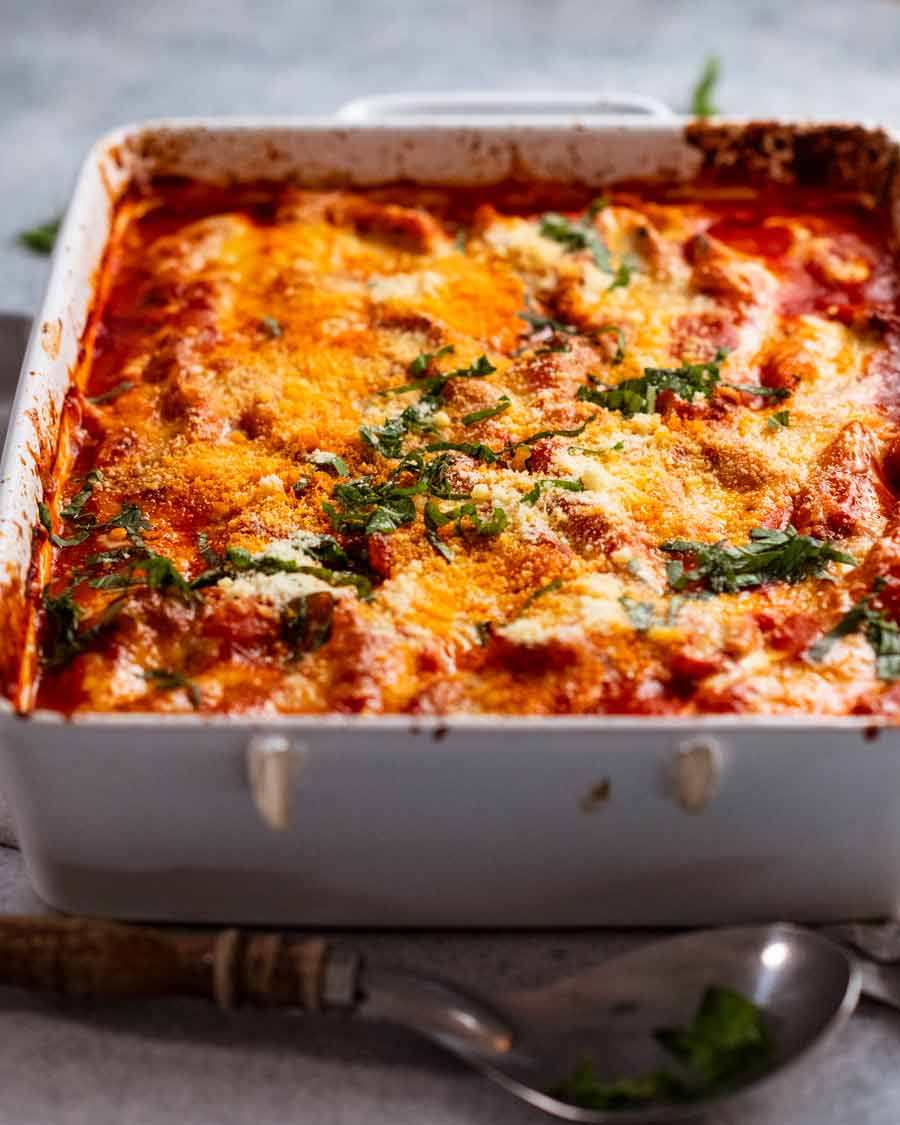
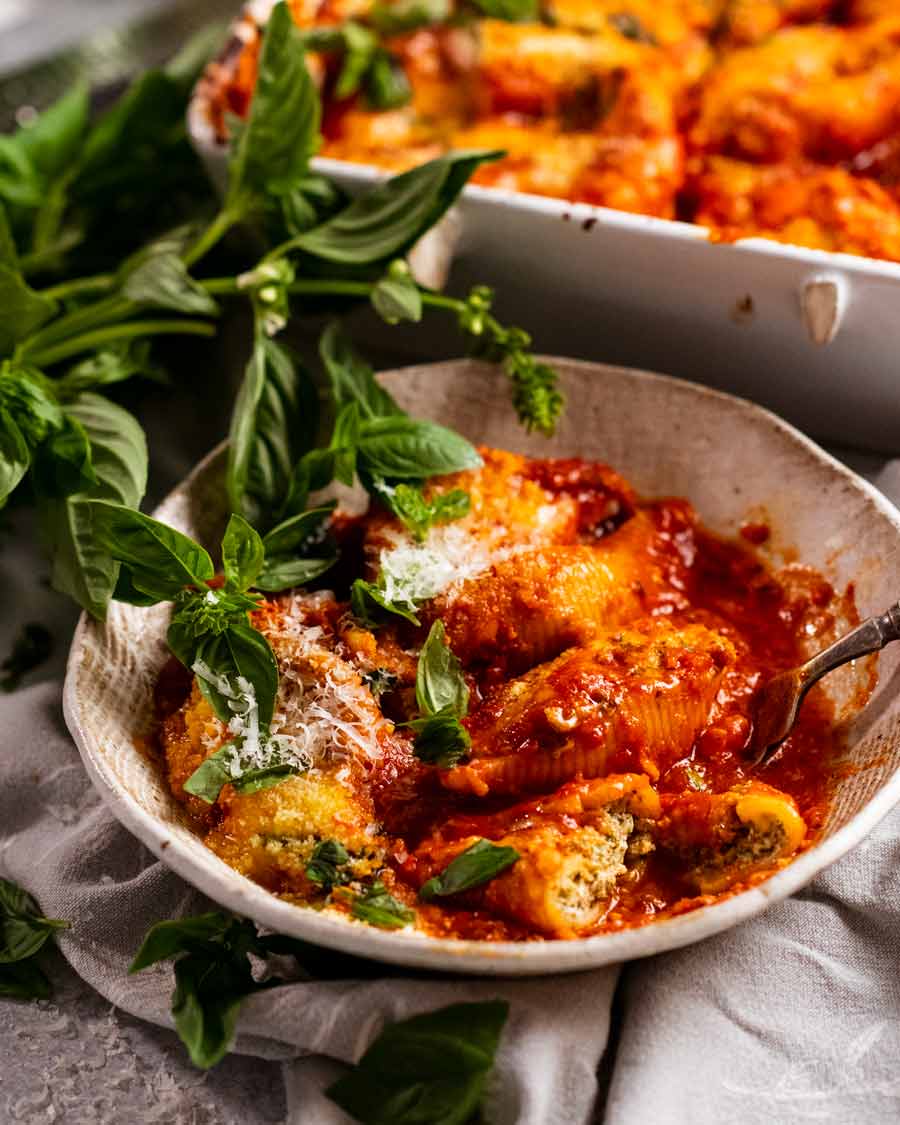
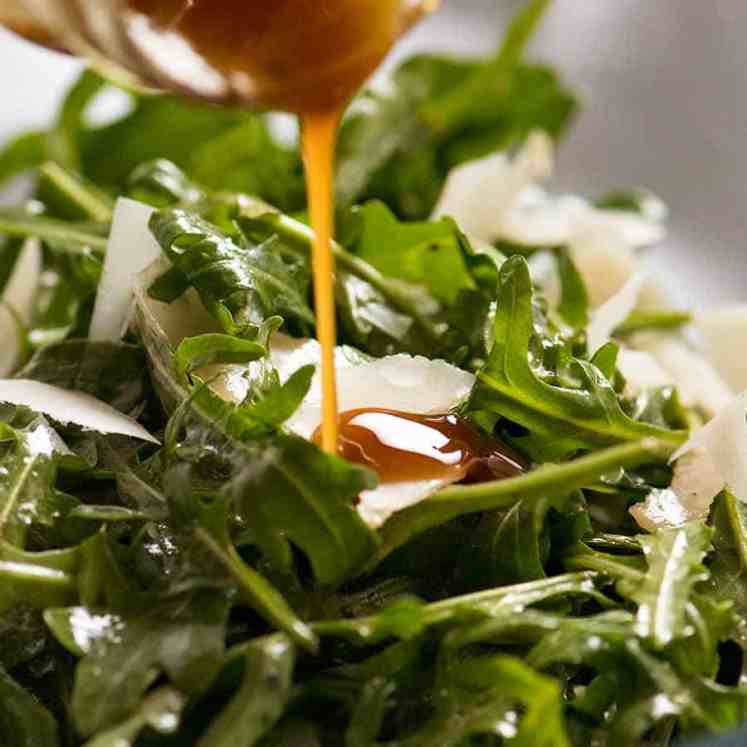
Serve with a quick rocket balsamic salad (that’s arugula, to those of you in the States!) or if you’re out to impress, a Mega Italian Salad (it lives up to its name). Add a side of garlic bread and tiramisu to finish, and that’s pretty much my idea of a perfect dinner. When am I coming over?? – Nagi x

Watch how to make it
Spinach Ricotta Stuffed Shells (Conchiglioni)
Ingredients
Sauce (you need LOTS!):
- 2 tbsp olive oil
- 2 eschallots/shallots or 1 small onion , finely chopped (Note 1)
- 4 garlic cloves , finely minced
- 1 bay leaf , fresh (sub dried)
- 1/2 tsp each dried thyme and oregano
- 1/3 cup tomato paste
- 700g / 25 oz tomato passata (US: tomato sauce) (Note 2)
- 1/3 cup Chardonnay or other dry white wine (sub more stock)
- 4 cups vegetable stock/broth , low sodium
- 3/4 tsp salt
- 1 1/2 tsp white sugar
- 1/3 tsp black pepper
Filling:
- 250g / 8 oz frozen chopped spinach , thawed (Note 3)
- 500g / 1 lb ricotta , full fat please (Note 4)
- 1/2 cup parmesan , finely shredded
- 1 cup shredded cheese (Mozzarella, Colby, Cheddar, Tasty, Gruyere, Swiss, anything!)
- 1 egg
- 1 large garlic clove , minced
- Grated fresh nutmeg (just a sprinkling) or 1/8 tsp nutmeg powder (optional)
- 3/4 tsp cooking / kosher salt
- 1/2 tsp black pepper
Stuffed shells
- 250g / 8 oz jumbo pasta shells (conchiglioni) (Note 3)
- 1 1/2 cups shredded mozzarella
- 1/2 cup parmesan , shredded
- Fresh basil and parmesan , for garnish (optional)
Instructions
Sauce:
- Sauté – Heat oil in a small pot over medium high heat. Add garlic, onion, bay leaf, thyme and oregano. Cook for 3 – 4 minutes until the onion is translucent. Add tomato paste and cook for 1 minute.
- Reduce wine – Add wine, increase heat to high and let it simmer rapidly until mostly evaporated (about 2 minutes).
- Simmer – Add passata, stock, sugar, salt and pepper. Stir then simmer on low *(uncovered) for 20 minutes. Use while hot.
Filling:
- Squeeze spinach – Grab handfuls of spinach and squeeze out excess water.
- Mix filling – Place spinach in a bowl with remaining Filling ingredients. Mix well.
Assemble & Bake:
- Preheat oven to 200°C/400°F (180°C fan).
- Stuff – Stuff UNCOOKED shells with spinach ricotta filling. Stuff them full!
- Assemble – Pour the hot tomato sauce in a 23 x 33 cm / 9 x 13" baking dish. Gently place the stuffed shells in – most will be submerged, some may poke above surface.
- Bake – Cover with a baking tray (or foil) then bake for 70 minutes.
- Cheese it! Check the shells – they should be al dente! (If not, return to oven, covered). Sprinkle with mozzarella then parmesan. Bake 15 minutes until melted.
- Serve, garnished with extra parmesan and basil if desired!
Notes
Nutrition
Life of Dozer
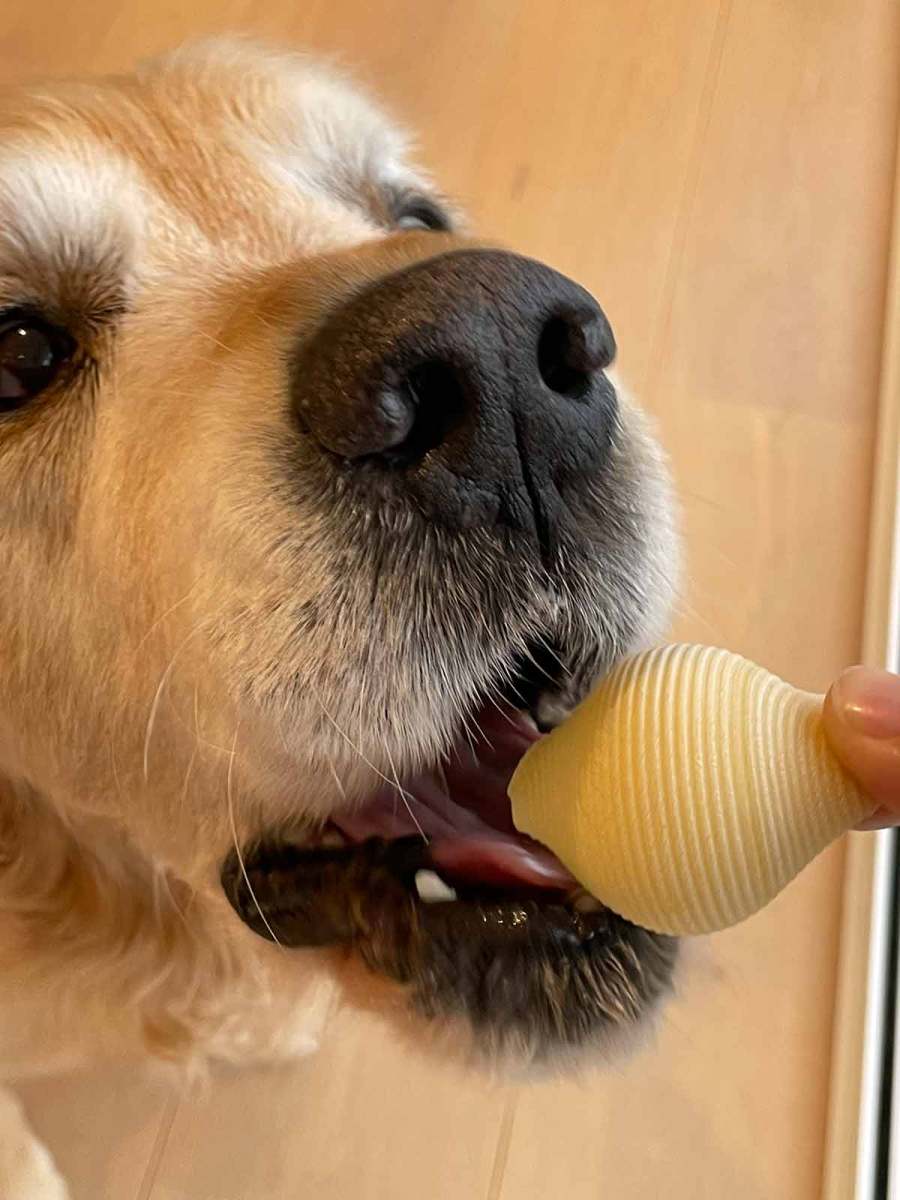
Wow. He really will eat anything.
The post Spinach ricotta stuffed shells appeared first on RecipeTin Eats.
]]>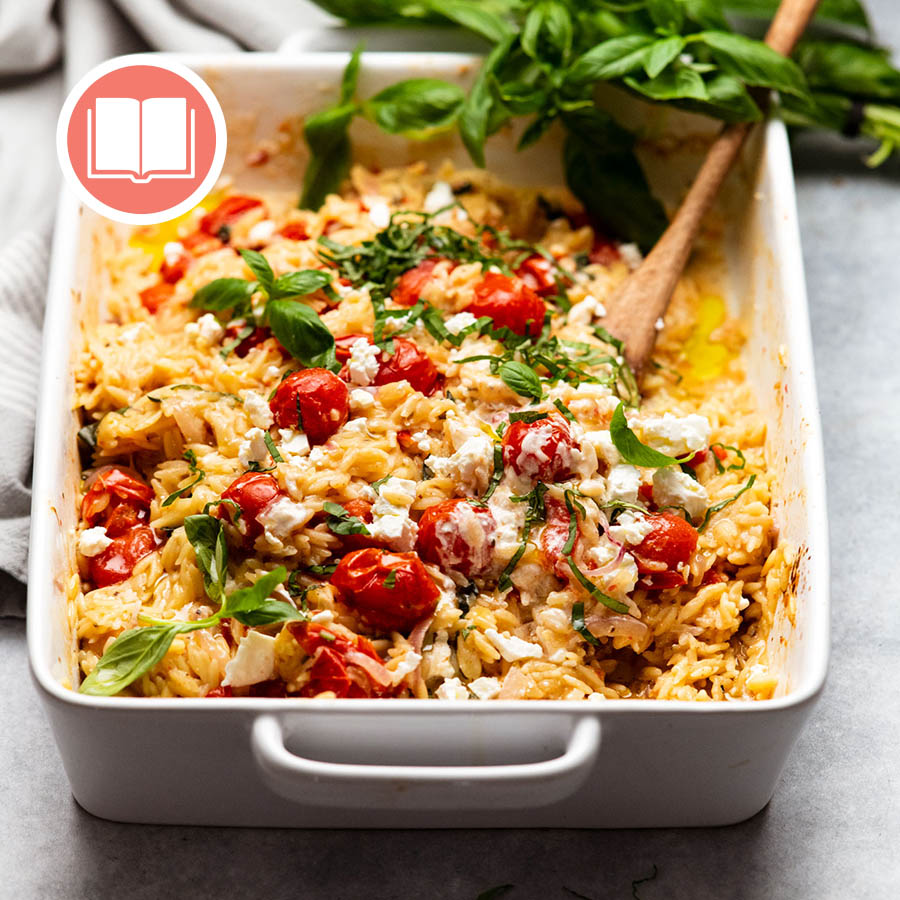 Think risotto, but with pasta, all baked in one dish! Don’t skip the feta – some of it melts to make a creamy sauce and some remains as smeary little salty nuggets.
The post Baked Creamy Feta Risoni appeared first on RecipeTin Eats.
]]>Think risotto, but with pasta, all baked in one dish! Don’t skip the feta – some of it melts to make a creamy sauce and some remains as smeary little salty nuggets.
This is a cookbook exclusive recipe!
This recipe is exclusive to my debut cookbook Dinner which includes a how-to video for every recipe. Just scan the QR code!
Just to explain….
I know, it’s confusing! You’re so used to getting recipes on my website – there’s over 1,200 of them, after all. And here you are looking at a tasty recipe video and I haven’t provided the recipe. 🙀
I’m not just doing this to torture you, I promise.
This page exists to display the how-to video for this recipe which I exclusively created for my debut cookbook, Dinner. Every recipe in the cookbook has a tutorial video. To watch it, you simply scan the QR code with your phone or tablet and it will take you straight to the recipe video like the one shown above!
Curious about my cookbook?
Read the cookbook overview
Browse all cookbook exclusive recipes here
Read the Cookbook Tales. Spoiler alert: there’s A LOT of dirty dishes!! And quite a lot of Dozer. 😂
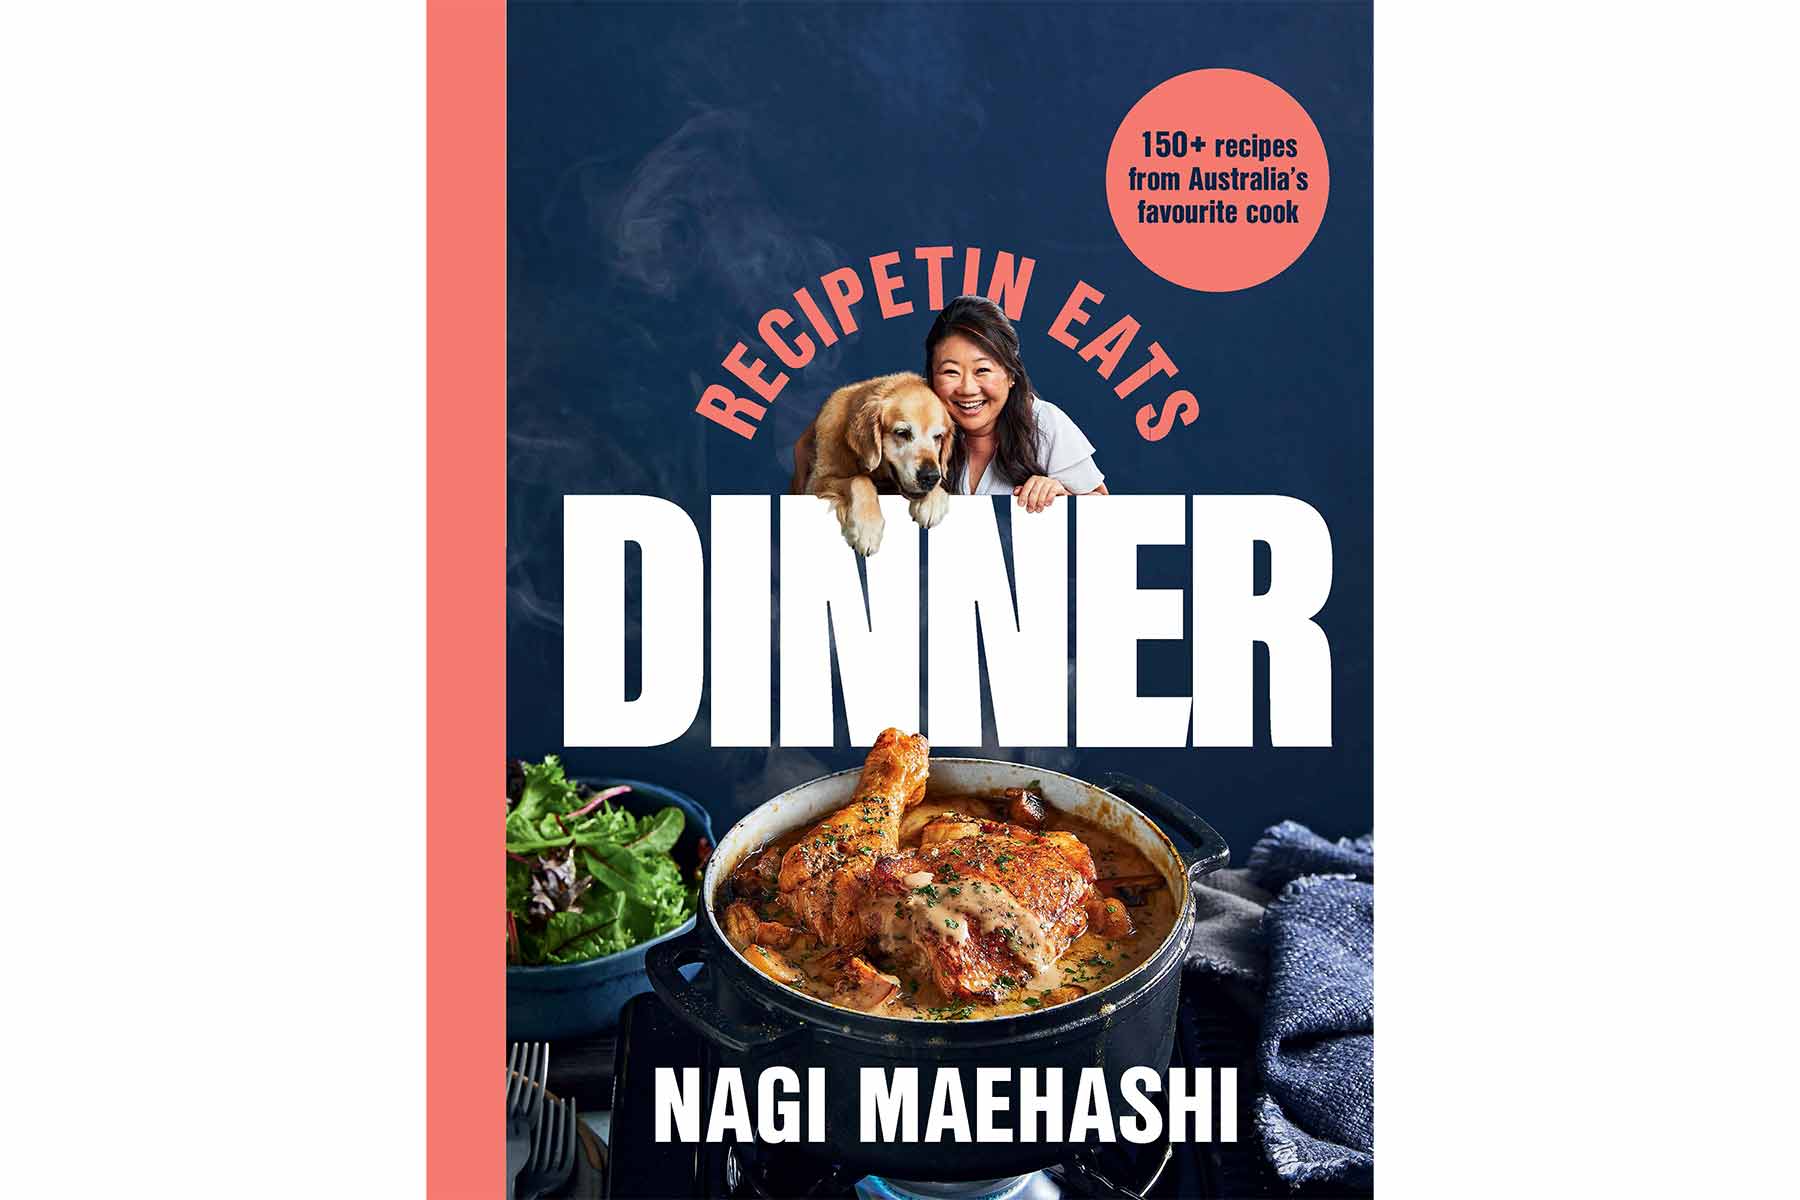
Stay tuned for more on this page! Some cookbook exclusive recipes will have extra information added as well as extra tips. I am also looking at enabling comments for selected recipes so I can answer reader questions about cookbook recipes. I’m just a little snowed under during this launch period – book tours, getting 131 recipe videos out, launching the book overseas. Please bear with me! – Nagi x (10 October 2022)
The post Baked Creamy Feta Risoni appeared first on RecipeTin Eats.
]]> Still the best Baked Mac and Cheese I’ve ever had, with a stunning white creamy cheese sauce and a buttery breadcrumb topping. This is THE Macaroni Cheese recipe that’s wildly popular every Thanksgiving and Christmas! Baked Mac and Cheese I don’t want to be morbid, but if I had to choose a Last Meal, this... Get the Recipe
The post Baked Mac and Cheese appeared first on RecipeTin Eats.
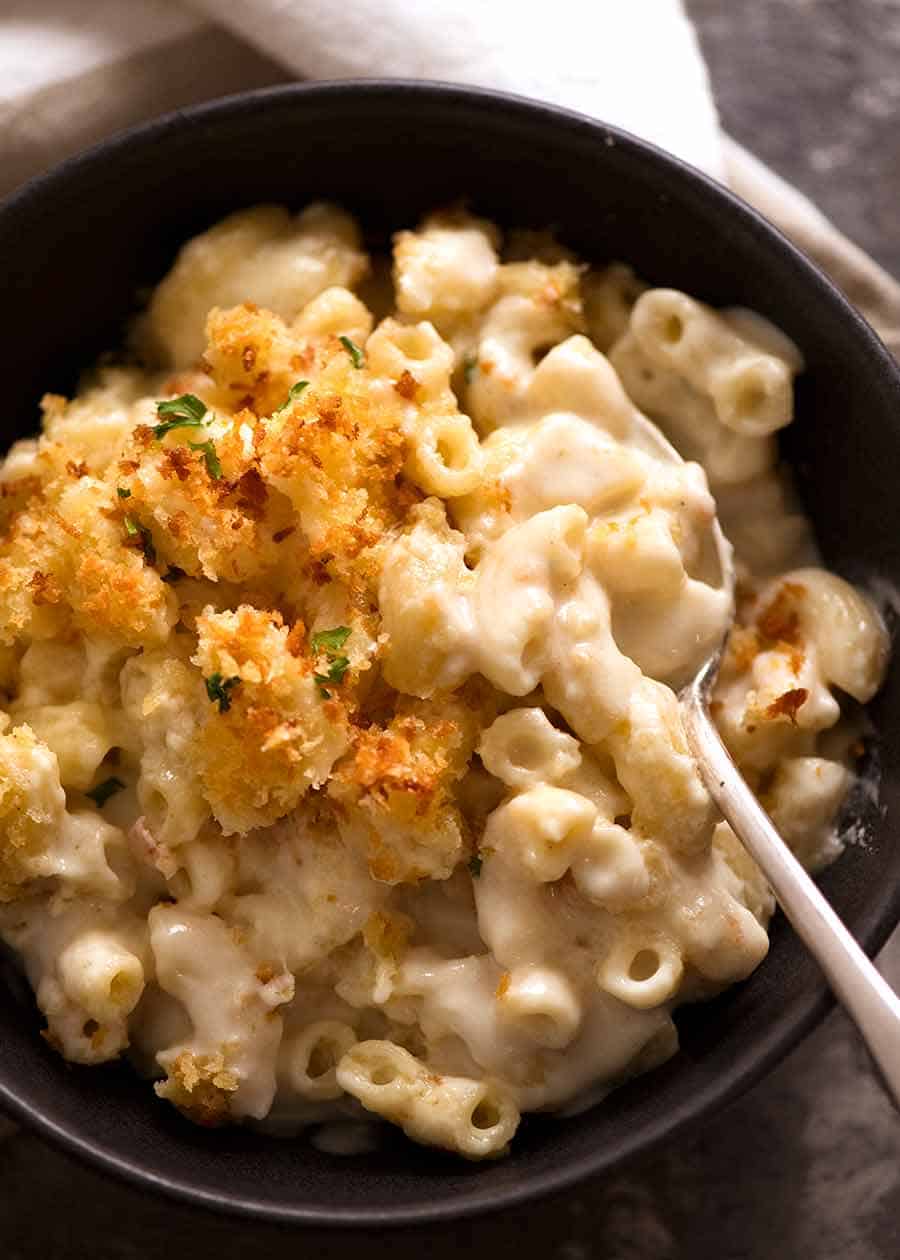
]]>Still the best Baked Mac and Cheese I’ve ever had, with a stunning white creamy cheese sauce and a buttery breadcrumb topping. This is THE Macaroni Cheese recipe that’s wildly popular every Thanksgiving and Christmas!
This is a reader-favourite recipe included by popular demand in my debut cookbook “Dinner”!
Baked Mac and Cheese
I don’t want to be morbid, but if I had to choose a Last Meal, this Baked Mac and Cheese may possibly be it. Put me in a room with Macaroni Cheese, and neither of us stand a chance. Said Mac and Cheese would be ravaged.
And of all the Mac and Cheeses in the world, this is still the best Mac and Cheese I’ve ever had!
About this Macaroni and Cheese
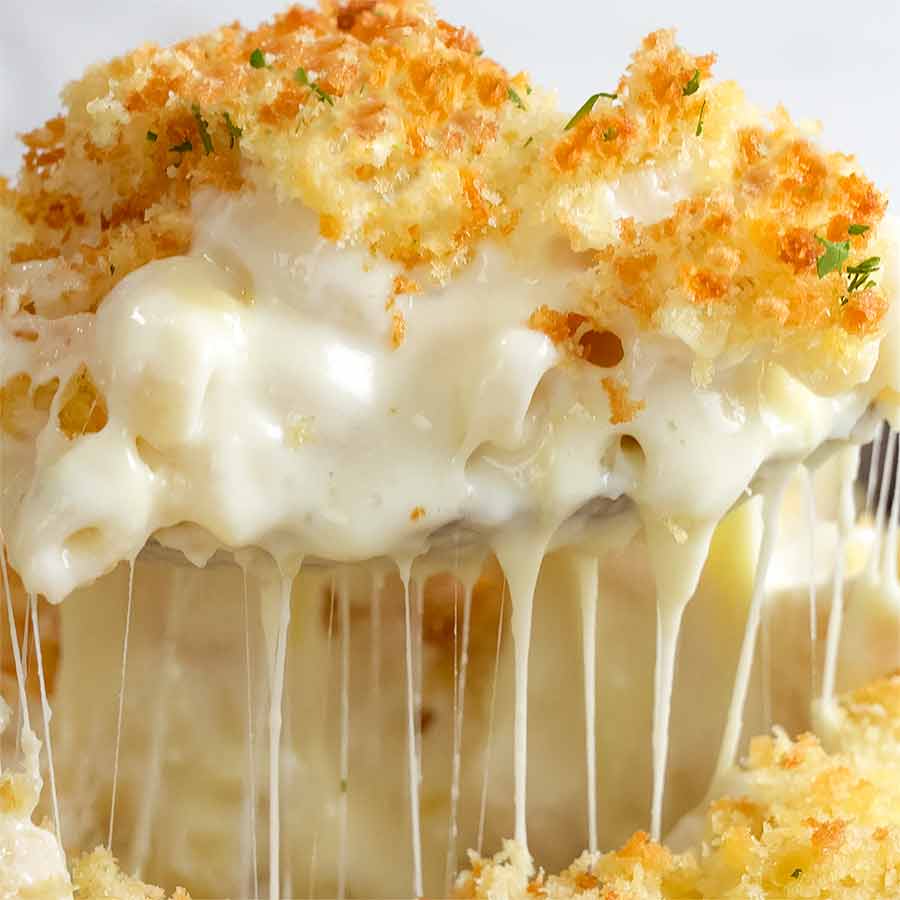
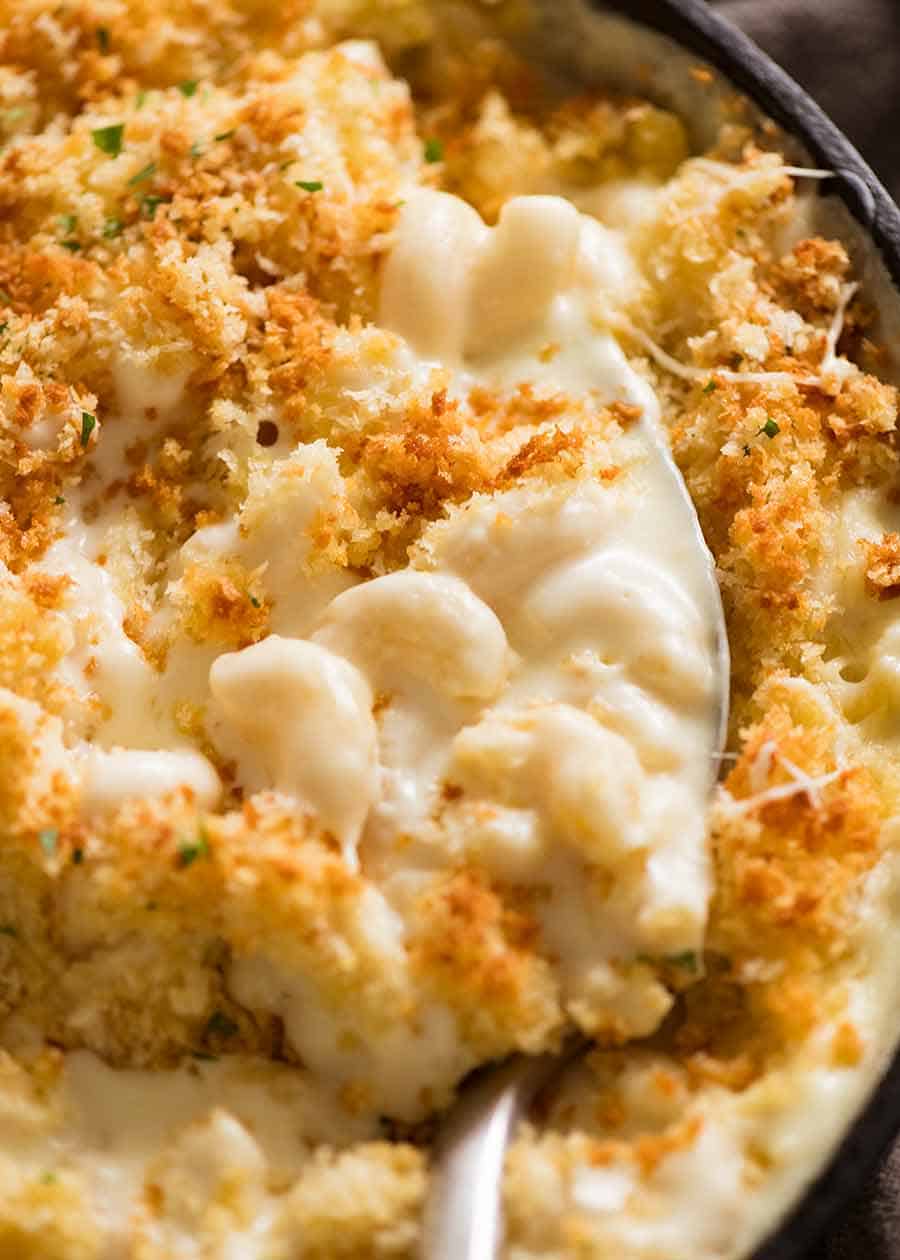
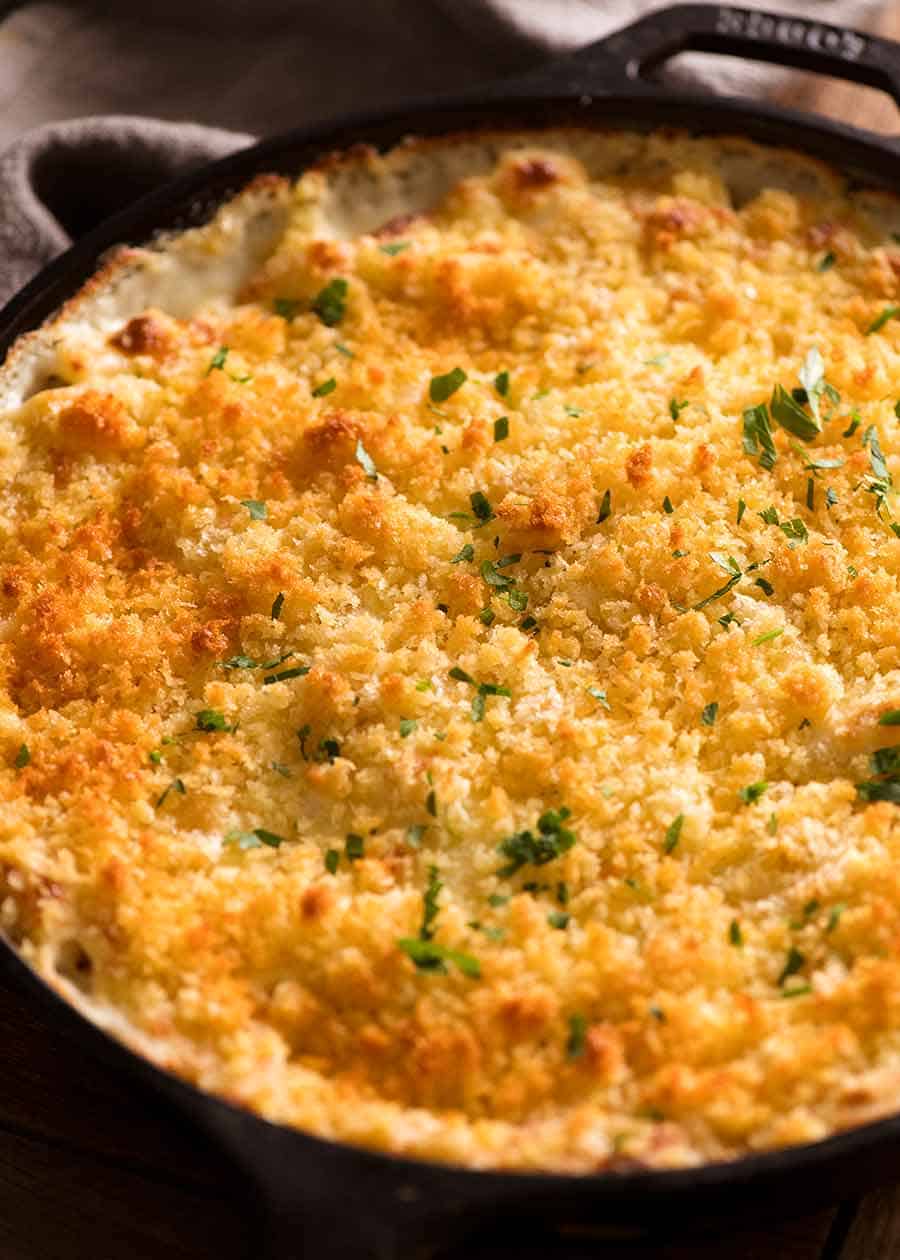
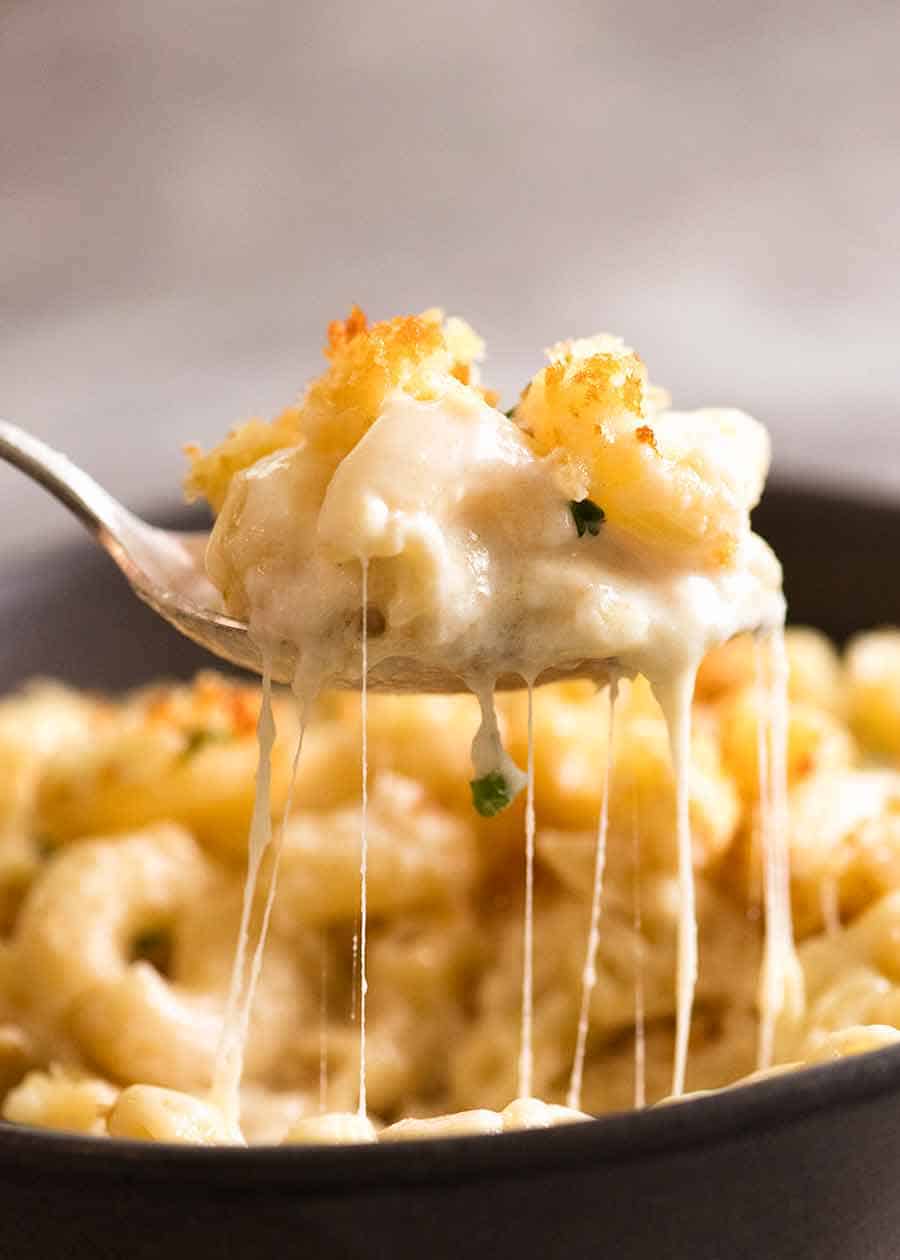
This is a Mac and Cheese recipe that is everything you want in a knock-your-socks off Macaroni Cheese – cheesy and creamy, with perfectly cooked macaroni (no bloated pasta!), plenty of sauce and a crunchy buttery top (essential in my world!)
What goes in Baked Mac and Cheese
Here’s what you need. Cheese. Butter. Pasta. All the essential food groups covered!😂

Best pasta for Mac and Cheese?
Macaroni, also known as elbow pasta. But really, any short pasta will work just fine – penne, ziti, twirls etc.
Best cheese for Mac and Cheese?
A combination of Gruyere and mozzarella cheese. Gruyere for the most superior flavour with the best melting qualities for creamy sauces such as this – there’s no contention in my view. And mozzarella for stretch – nothing does the cheese pull like a good mozzarella!
But honestly, any cheese that melts well works is excellent with Mac and Cheese, such as cheddar, tasty, Colby, Swiss, Pepper Jack, Emmental.
No cream?
NO! You do NOT need it. This sauce is rich enough as it is from the butter and cheese. Cream makes it so rich you can’t eat more than a few spoonfuls. How disappointing!!!
How to make Baked Mac and Cheese
It’s a straightforward recipe, starting with a basic butter-flour roux that is used to thicken milk to make the cheese sauce. For first timers, I think the short video below will help give you the confidence that you’ve got this!
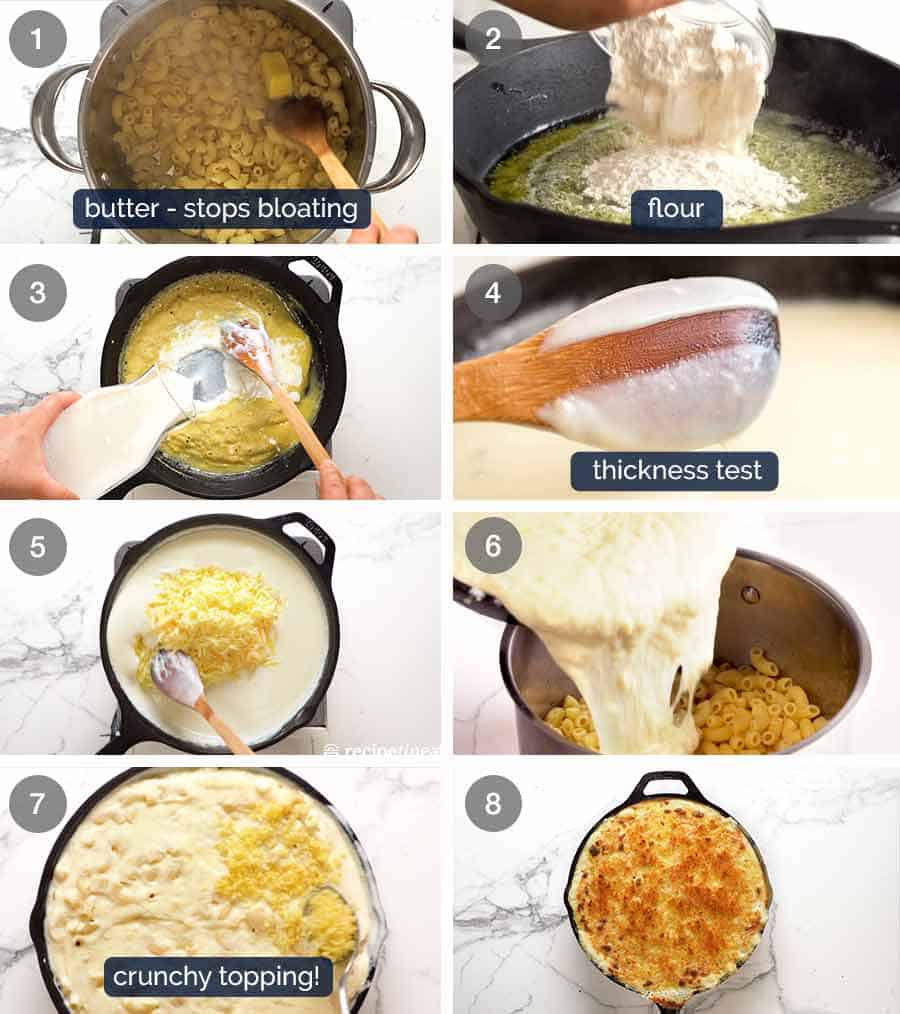
The simple trick to avoid lumps in the Mac and Cheese Sauce is to pour the milk in slowly while constantly stirring, then just switch to a whisk if needed to remove any stubborn lumps!
Tips for the BEST Mac & Cheese!
Freshly grated cheese – don’t use pre shredded. They have anti caking agents that can make the sauce grainy.
No bloated overcooked pasta – Cool macaroni slightly and lightly coat in butter. This stops the macaroni from absorbing more liquid while baking, resulting in bloated overcooked pasta (hot pasta absorbs liquid faster, butter creates thin film of protection) and less sauce.
To avoid lumps in your sauce, stir constantly as you slowly pour the milk in and keep stirring once the milk is all added. If necessary, switch to a whisk to get rid of stubborn little lumps!
Plenty of sauce – Because I like my Mac and Cheese saucy, not dried up so you can cut it like cake!
Can you make Mac and Cheese ahead of time? Most recipes are not suitable for making ahead, but this recipe is! The best way is to cool pasta then toss with sauce and adding breadcrumb topping. Cool, refrigerate or freeze then bake on the day of (see recipe Note 5 for baking time).
How long can Mac and Cheese stay in the fridge? Unlike most, this Macaroni Cheese recipe is good for 3 to 5 days in the fridge. Most Mac and Cheese will not keep well because there’s not enough sauce so it gets absorbed by the pasta and you’re left with dry, sauceless pasta.
Freezing? Yes! Assemble, cool, do not bake, just freeze it. Thaw then on the day of, bake per Note 5 in the recipe.
Add ins? This recipe is great as it is, but there’s tons of add-in options. Add shredded chicken, sautéed onion and bell peppers/capsicum, bacon, hot sauce (for heat!), dried herbs of choice.
What to serve with Baked Mac and Cheese
Mac and Cheese is worthy of serving as a meal in its own right, served with just a fresh green salad or simple vegetable side. Nothing heavy because Macaroni Cheese is so rich as it is!
As a side dish, it will compliment virtually any non-Asian main dish. From simple Baked Pork Chops to Steak, a Roast Chicken to Crispy Garlic Chicken Thighs, the only things I probably would not serve with Mac and Cheese would be very light summery mains such as a Tuna Tartare – just a little too much contrast.
And of course, festive gatherings! Thanksgiving, Christmas, Easter – alongside a grand Roast Turkey or your Herb & Garlic Butter Slathered Turkey Breast, the juicy Roast Pork with impossibly Crispy Crackling or your Prime Rib that’s so perfectly blushing pink all the way through, it makes you want to weep.
Holidays would not be the same without this Mac and Cheese!! – Nagi xx
Baked Mac and Cheese recipe
Watch how to make it
This recipe features in my debut cookbook Dinner. The book is mostly new recipes, but this is a reader favourite included by popular demand!

Baked Mac and Cheese
Ingredients
Macaroni:
- 250g / 8 oz macaroni (elbow pasta)
- 1 tbsp (15g) unsalted butter (or 2 tsp oil)
Topping:
- 2/3 cup panko breadcrumbs (Note 1)
- 2 tbsp (30g) unsalted butter , melted
- 1/4 tsp salt
Sauce:
- 4 tbsp (60g) unsalted butter
- 1/3 cup flour , plain / all purpose
- 3 cups milk , warmed (low or full fat)
- 2 cups freshly shredded cheese, gruyere best (followed by cheddar and Colby) (Note 2)
- 1 cup freshly shredded mozzarella cheese , or more other cheese of choice (Note 2)
- 3/4 tsp salt
Seasonings (optional):
- 1 tsp garlic powder
- 1/2 tsp onion powder
- 1/2 tsp mustard powder
Instructions
Pasta:
- Cook pasta: Bring a large pot of water to the boil. Add macaroni and cook per packet directions MINUS 1 minute.
- Toss in butter: Drain, return pasta to pot, add butter and toss until melted. Set aside to cool while making the Sauce (Optional – Note 3).
Topping:
- Mix together Topping. Set aside.
Sauce (video is helpful):
- Preheat oven to 180°C/350°F (all oven types).
- Make roux: In a large saucepan or in an ovenproof skillet (I use my 26cm/9" Lodge cast iron skillet), melt butter over medium heat. Add flour and cook, stirring constantly, for 1 minute.
- Add milk: Add about 1 cup of the milk and mix to dissolve the paste into the milk. Then add remaining milk and mix until lump free (use whisk if required).
- Add Seasonings: Mix in salt and Seasonings if using.
- Thicken sauce: Cook, stirring/whisking regularly, for 5 – 8 minutes until thickened to a cream consistency. When the Sauce coats the back of a wooden spoon, you should be able to draw a path with your finger.
- Add cheese: Remove from stove, add cheese and stir – cheese doesn't need to melt.
- Check salt: Adjust salt to taste (if you use recommended cheeses, you won't need more).
Assembling:
- Assemble: Pour Sauce into pot with Macaroni. Stir quickly, then pour back into the skillet (I did this) or a baking dish (Note 4). Sprinkle with breadcrumb topping.
- Bake for 25 minutes or until top is light golden. Don't bake too long otherwise you'll bake away the Sauce!
- Serve: Serve immediately! I sprinkled mine with a bit of fresh parsley. See notes for best make-ahead method.
Notes
- Main Cheese (2 cups) – my favourite is gruyere (used in video), for flavour and melting quality. Can use any flavoured melting cheese. Other cheeses I like for this include: cheddar, Monterey Jack, Colby, provolone. (Australia/NZ: Tasty cheese works & super tasty but sauce is not quite as smooth);
- I like to use mozzarella for the 2nd cheese (1 cup). It melts really well into the sauce, has that nice stretch, and isn’t as oily like other cheese can tend to be. Also, it’s less salty. However, you can just use more of the Main Cheese.
- Always grate your own cheese for cheese sauces. Store bought shredded cheese have anti caking agents which don’t melt so can give the sauce a slight powdery texture.
- SALTINESS of cheeses vary so if you use another cheese other than gruyere for the Main Cheese that is much less salty (eg Jarlsberg), you may need to add a pinch or two of extra salt into the sauce. Taste and check! Most cheeses are of similar salt levels though.
Nutrition
Recipe first published July 2017. Updated a few times since then with better photos, addition of recipe video. Updated November 2021 to reconfirm that it is STILL the best Mac I’ve ever had!! No changes to recipe – readers would never forgive me!!
The RecipeTin Eats MAC & CHEESE COLLECTION
I love a good Mac & Cheese! See??
Baked Mac and Cheese – this recipe, huge reader favourite!
Stovetop Mac and Cheese – one pot, 20 minutes, my best speedy emergency version.
Chili Mac – a cross between Chili and Mac and Cheese, a one pot dinner wonder!
Shrimp Mac and Cheese – outrageously delicious!
Life of Dozer
When Dozer went camping: Are we there yet, are we there yet??

The post Baked Mac and Cheese appeared first on RecipeTin Eats.
]]>