 Affogato – coffee, dessert and your after dinner drink, all rolled into one. This is what you have when you’re “too full for dessert”! Just pour espresso coffee over vanilla gelato or ice cream, enjoy the melty swirls and dig in. The Italians are genius. Affogato When was your last affogato? It’s my go-to dessert... Get the Recipe
The post Affogato appeared first on RecipeTin Eats.
]]>Affogato – coffee, dessert and your after dinner drink, all rolled into one. This is what you have when you’re “too full for dessert”! Just pour espresso coffee over vanilla gelato or ice cream, enjoy the melty swirls and dig in. The Italians are genius.
Affogato
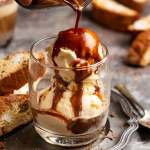
When was your last affogato? It’s my go-to dessert at restaurants. Even if I claim I’m too full, affogato doesn’t count as it’s practically liquid, right? It’s like having a glass of water! (Yes, really, that’s how my mind works – don’t judge me!😂)
For those new to affogato, it’s a traditional Italian coffee-dessert where hot espresso is poured over gelato or ice cream, with the option of adding a splash of liquor. It’s coffee, dessert, and an after-dinner drink, all rolled into one. The contrast of hot, bitter coffee with cold, creamy ice cream is utter perfection. And the fact that it’s so simple with a bonus DIY fun factor? Brilliant!

Ingredients in Affogato
All you need for affogato is a shot of hot espresso (coffee), ice cream or gelato and optional half a shot of liquor (Frangelico, amaretto, rum). A little more information on each of these below!
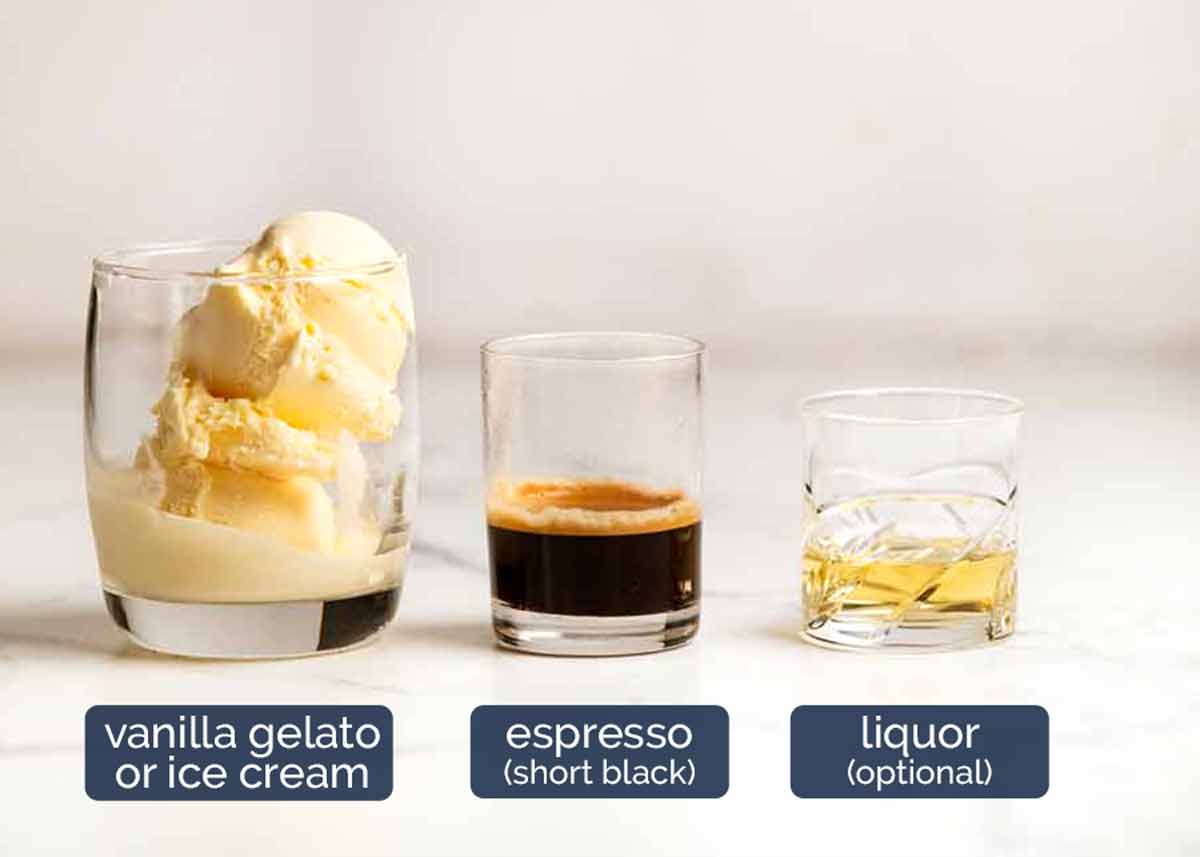
Espresso – This is a small concentrated shot of hot coffee. The standard size for a shot of espresso is 30 ml (1 ounce).
It goes without saying that the better your coffee, the better your affogato!
Vanilla gelato or ice cream – Traditionally gelato though ice cream is just as good, in my opinion! More important is the flavour. Vanilla is the classic choice because it pairs so well with coffee. Feel free to experiment!
How much ice cream – Use one large(ish) or two small(ish) scoops for one shot of coffee, for a good balance of the two. Though if using liquor, I lean towards two medium scoops, as pictured.
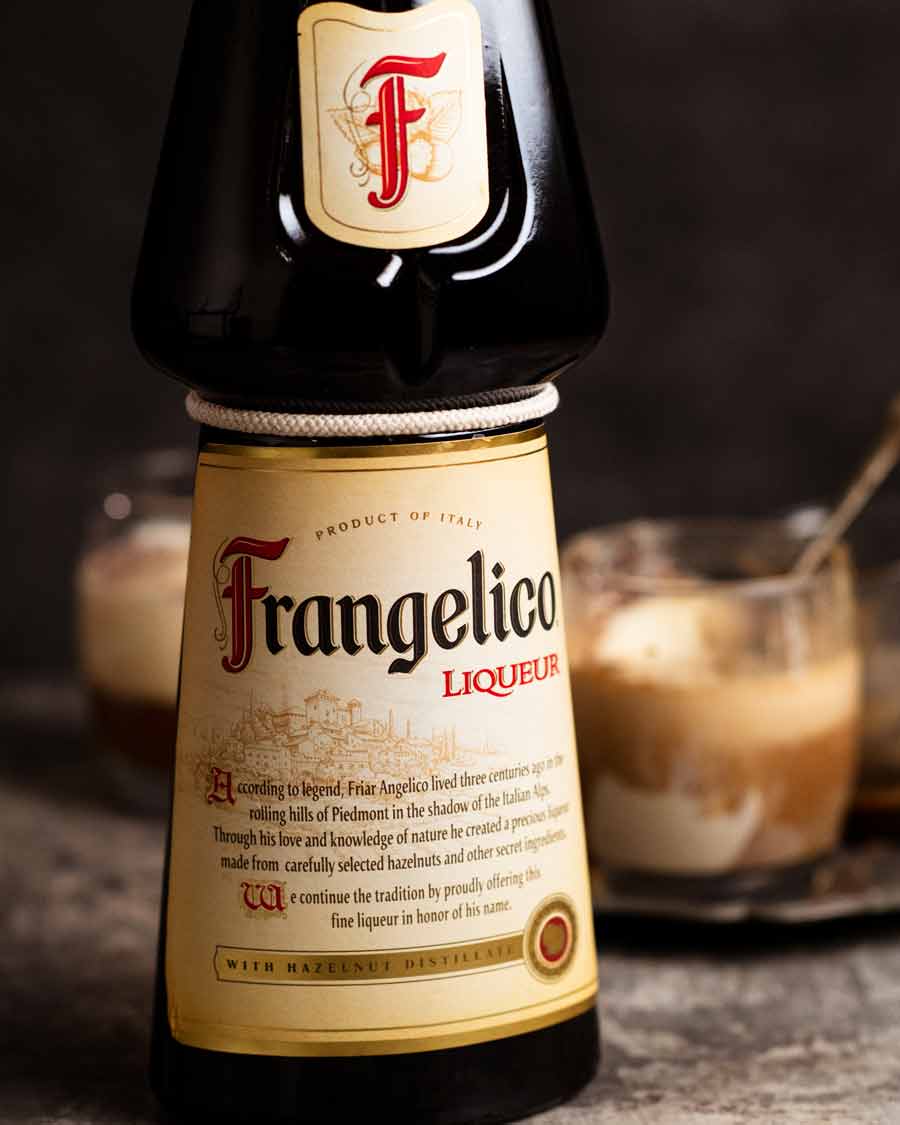
Liquor (optional) – To roll your after dinner drink into this all-in-one dessert, add half a shot of liquor! Amaretto (almond flavour) and frangelico (hazelnut) are probably the most common. Rum, sambuca and Kahlua are also standard offerings at Italian restaurants, and multiple readers suggested orange liqueurs (such as Grand Marnier and Cointreau). Though really, you can add anything you think/know goes well with coffee!
PS A shot of liquor is 30 ml / 1 ounce so half a shot is 15 ml / 0.5 ounce which is 1 tablespoon. Though nobody will hold you back from dialling the quantity up.


Optional extras
The traditional affogato is nothing more than espresso, gelato and optional liquor. However, even in restaurants these days there’s all sorts of optional extras. So adapt to your taste and make affogato your own! Here are some suggestions:
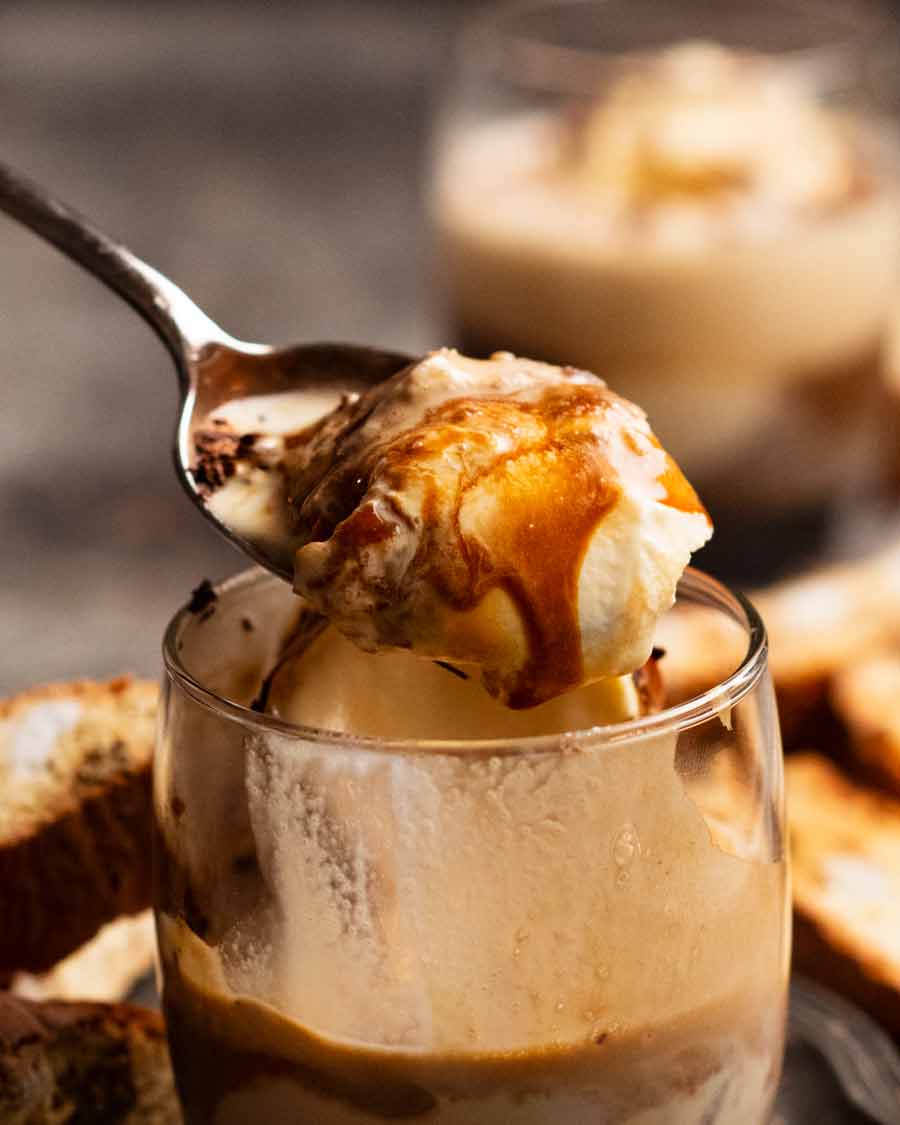
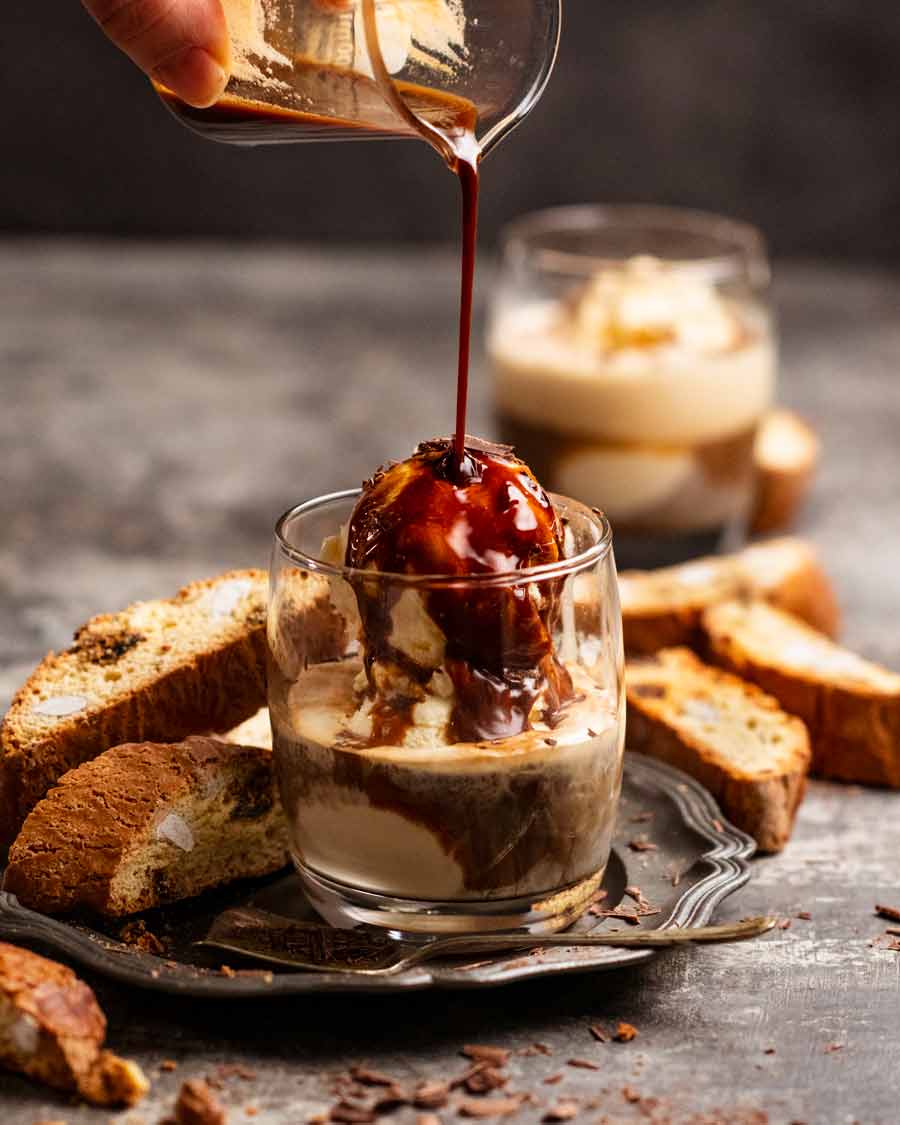
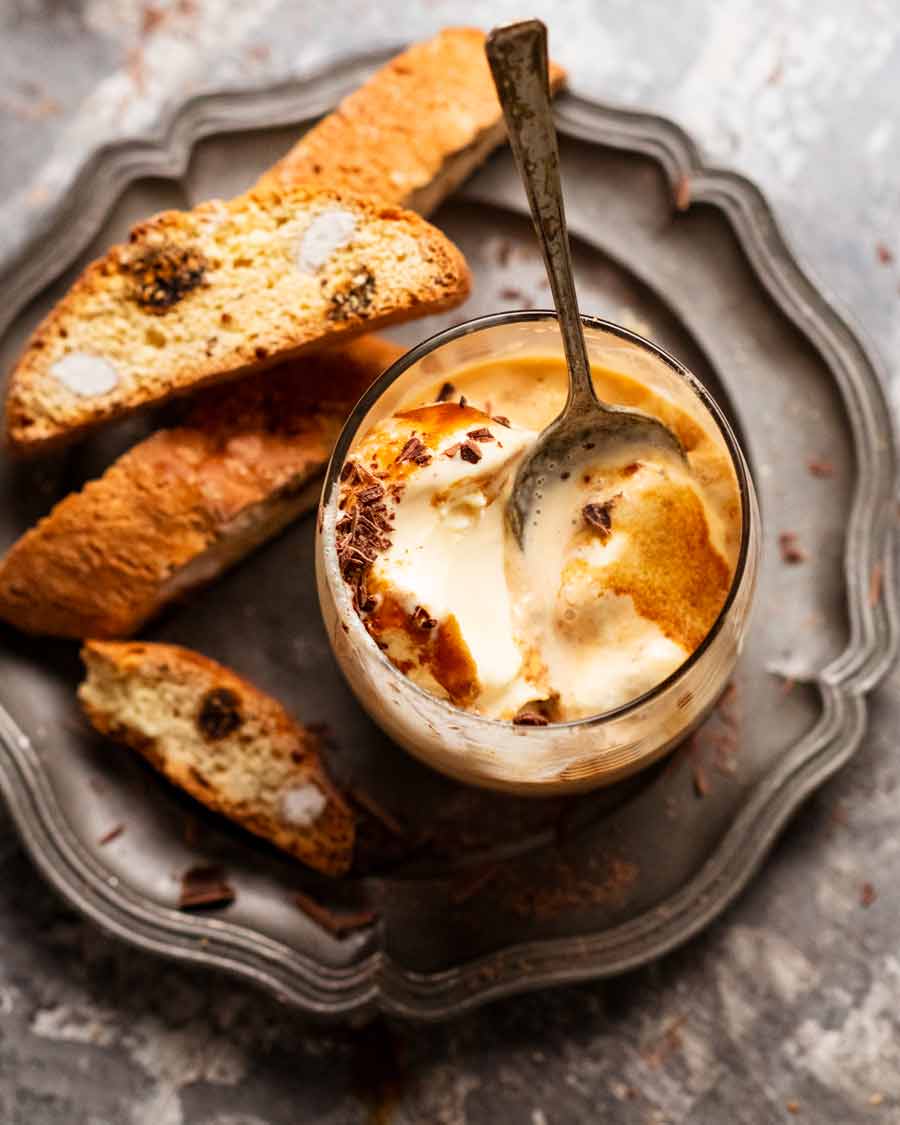
Chocolate grated or shaved on the ice cream (I did this)
Biscotti for dunking (I also did this!) – or Italian Almonds cookies (thank you to the reader who suggested this!)
Whipped cream
Melted chocolate – I’d drizzle across the ice cream
Crushed or chopped nuts – pistachio and hazelnuts would be on theme here
I know I’m missing a stack of other ideas – drop suggestions in the comments below so I can come back and add to the list!
How to make affogato
I need more recipes with so few steps!
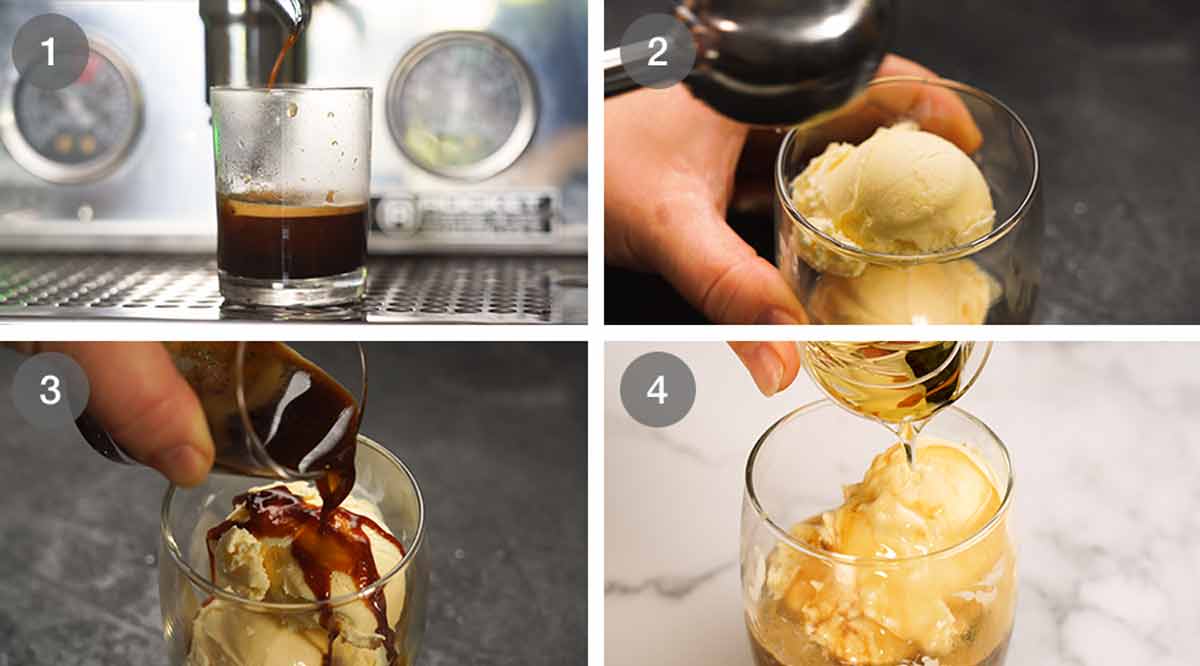
Brew hot espresso using your coffee making appliance of choice. That’s 30 ml/1 ounce for a single shot.
Put a scoop or two of ice cream in a glass.
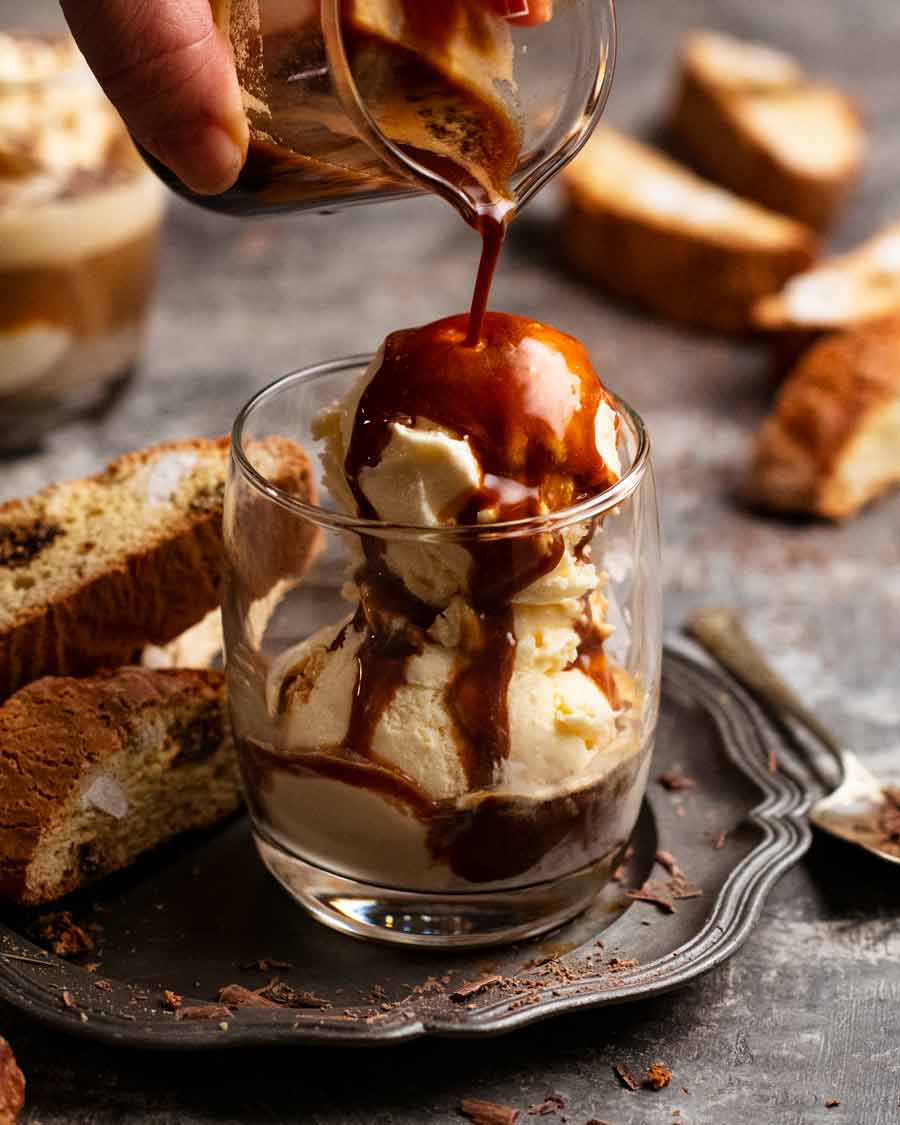
Pour over hot coffee. Enjoy watching the ice cream swirls melting into the hot coffee!
If using liquor, pour that over next. Eat!
PS I used a small beaker to do the pour shot so I could do a neat pour for the photos. I don’t use a beaker in real life!
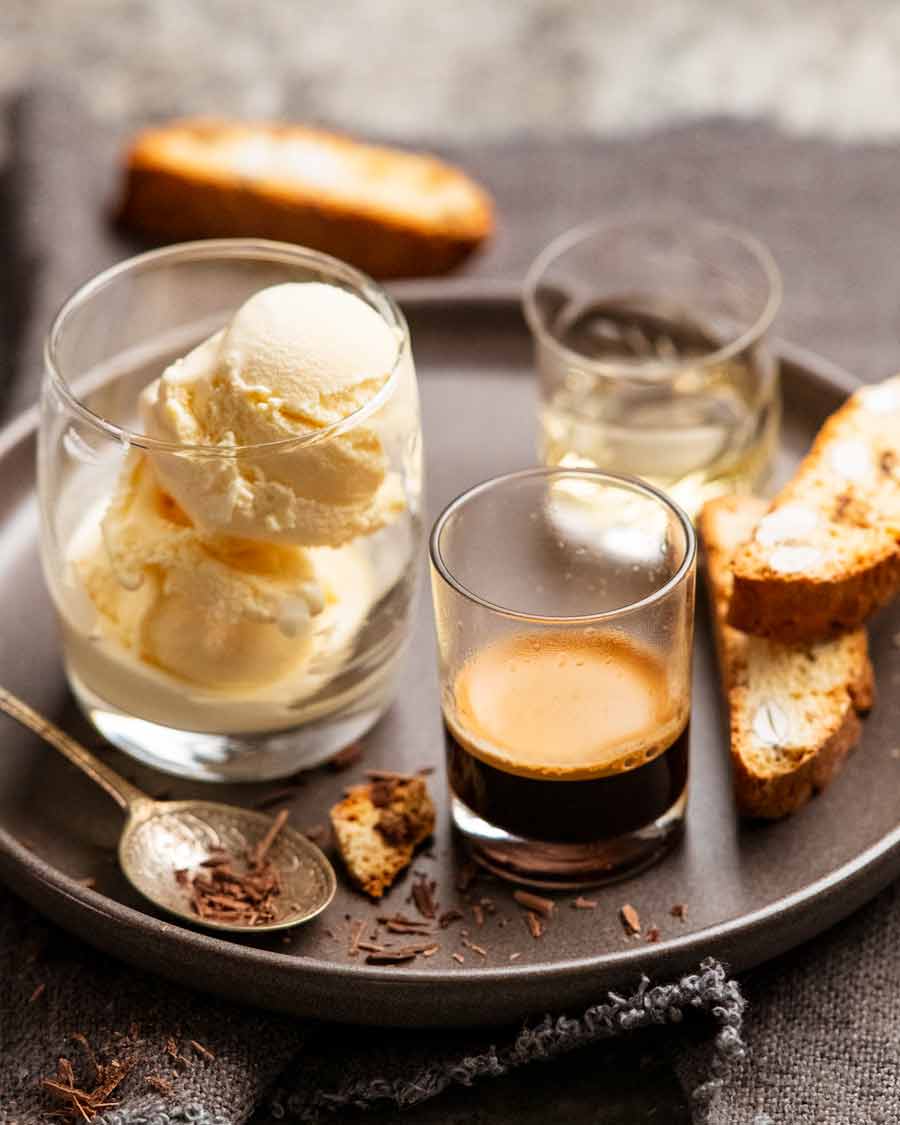
Serving – for DIY pour
From a practical perspective, as restaurants do, serve the glass with just the ice cream in it and the espresso on the side. So the eater can pour then dig straight into the affogato before the ice cream fully melts.

Oh, and a side of biscotti for dunking wouldn’t go astray either. Recipe coming up soon. Never been fully happy with my biscotti attempts! Need to put some time into it, and it’s currently on my radar.
Share your affogato twists! Do you like yours straight up, classic, just coffee and vanilla gelato? Or are you all about the toppings and getting creative with ice cream flavours?? Don’t let anyone tell you how you should or shouldn’t take your affogato – make it your own! – Nagi x
Watch how to make it
Affogato
Ingredients
- 1 large or 2 small(ish) scoops vanilla gelato or ice cream (Note 1)
- 1 shot (30 ml/1 oz) hot espresso coffee (short black) – Note 2
- 1 tbsp frangelico, amaretto or other liquor (optional) – Note 3
Instructions
- Put ice cream in glass suitable for affogato eating (Note 4).
- Place shot of espresso and liquor (if using) on the side.
- Pour the hot espresso then liquor over the ice cream. Enjoy swirls of melty ice cream blending into the coffee. Dig in immediately!
Notes
- Biscotti (excellent for dunking)
- Chocolate shavings – use microplane or potato peeler
- Whipped cream
- Melted chocolate – on ice cream
- Nuts – roughly chopped pistacchio and hazelnuts on theme
Nutrition
Life of Dozer
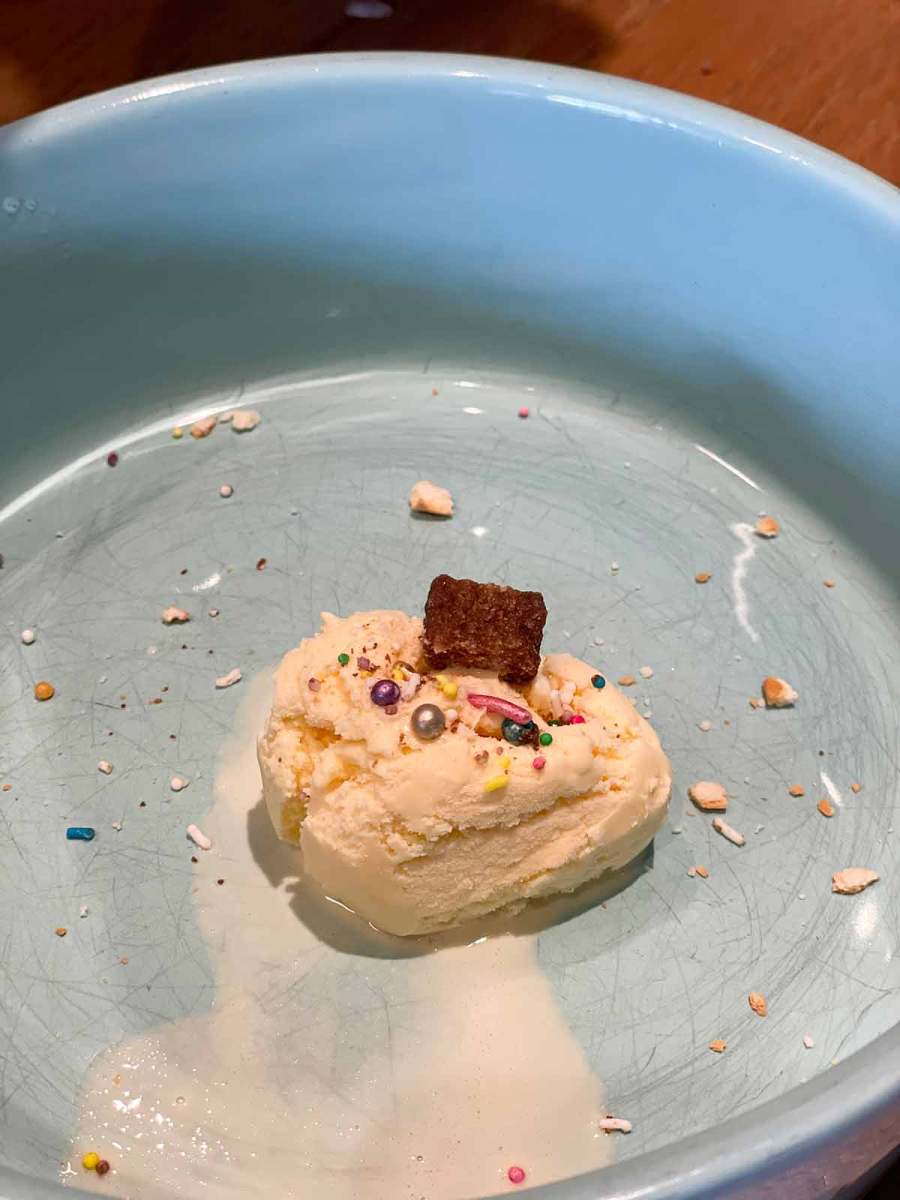
Going to town on ice cream garnished with a liver treat and doggie friendly sprinkles (pinched off another doggie treat!).
The post Affogato appeared first on RecipeTin Eats.
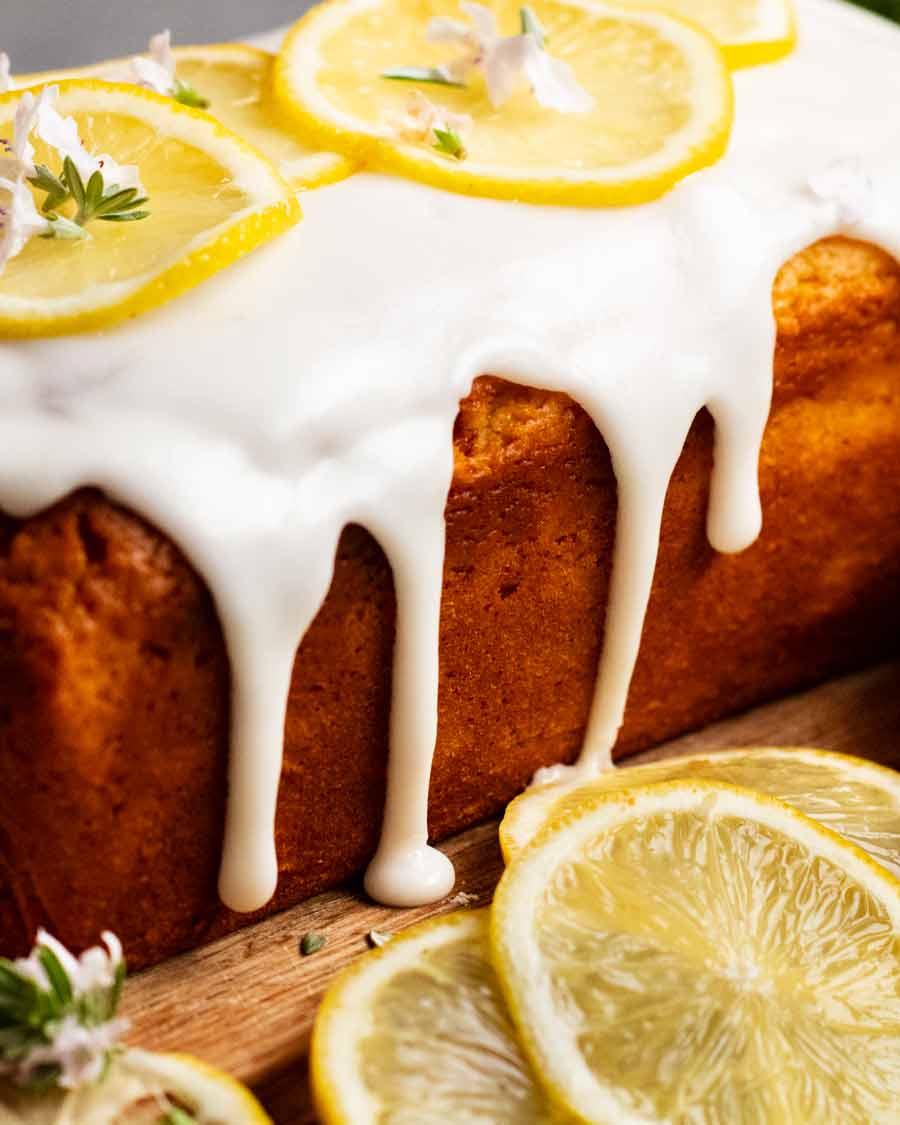
]]> Glazed lemon loaf is what you make when you’re after something not too sweet that’s fuss-free to make. Lovely bright lemon flavour with buttery undertones, it’s a quick bread which means no yeast and easy to make. Excellent shelf life of 5 days! Glazed lemon loaf Quick breads are a great option for those times... Get the Recipe
The post Glazed lemon loaf appeared first on RecipeTin Eats.
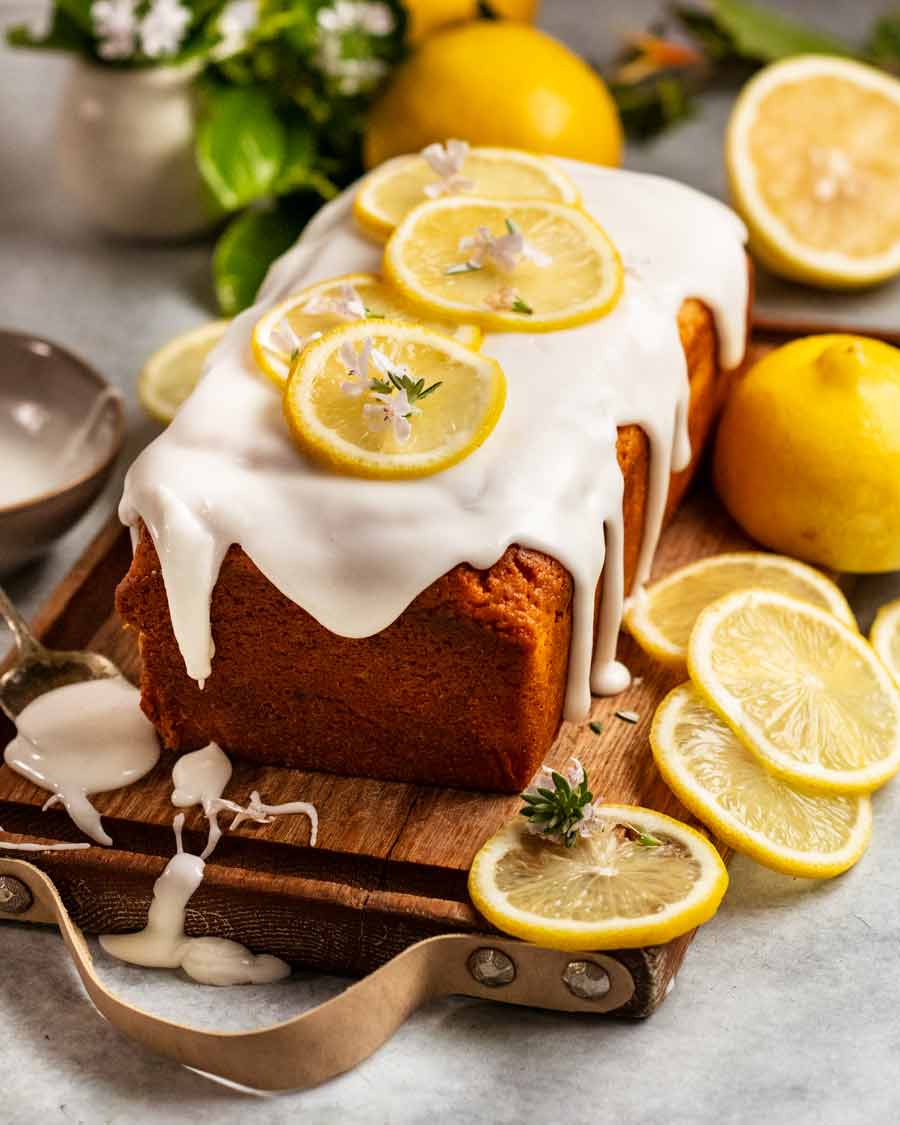
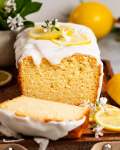
]]>Glazed lemon loaf is what you make when you’re after something not too sweet that’s fuss-free to make. Lovely bright lemon flavour with buttery undertones, it’s a quick bread which means no yeast and easy to make. Excellent shelf life of 5 days!
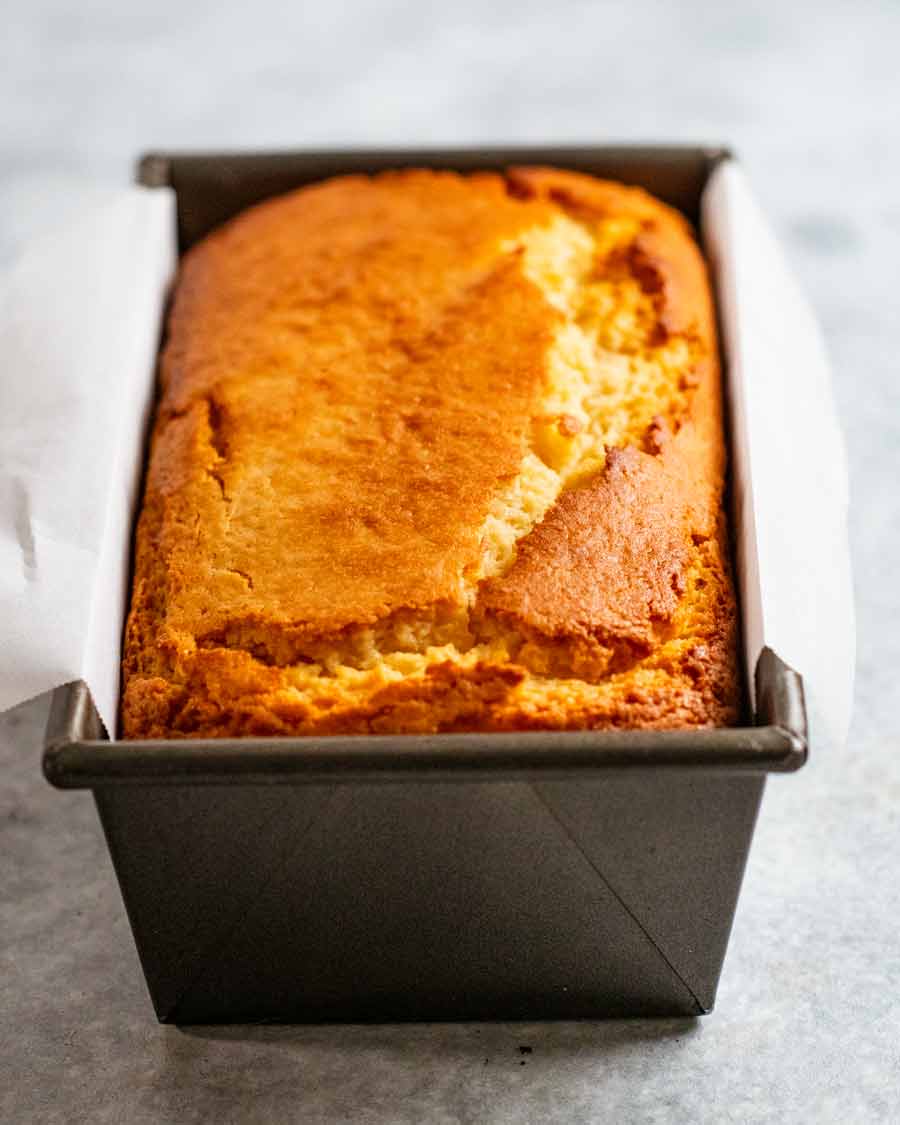
Glazed lemon loaf
Quick breads are a great option for those times when you have the urge or need to bake, but don’t have the time for more involved recipes. They’re also convenient – easy to transport and easy to serve. Slice like bread and eat on a napkin!
As for today’s lemon glazed loaf, it’s here after I responded to a question on Facebook for how to convert my simple Lemon Yogurt Cake into a loaf. “Use the recipe as is but I’d switch half the oil with melted butter to get buttery flavour into it, because it’ll be taller than the cake so there’s less frosting-to-cake ratio so you’ll want the cake to have more flavour. I’d probably dial up the lemon flavour for the same reason. And it will take longer to bake – just keep testing with a skewer!”
By the time I got to the end of the response, the “just do this” suddenly seemed a little less simple. So I decided to create and properly test it, write it up and publish it! 😂
Ingredients in Glazed Lemon Loaf
Here’s what you need to make this. Note: Lemon extract is recommended for really good lemon flavour, but you can get away with doubling the zest instead!
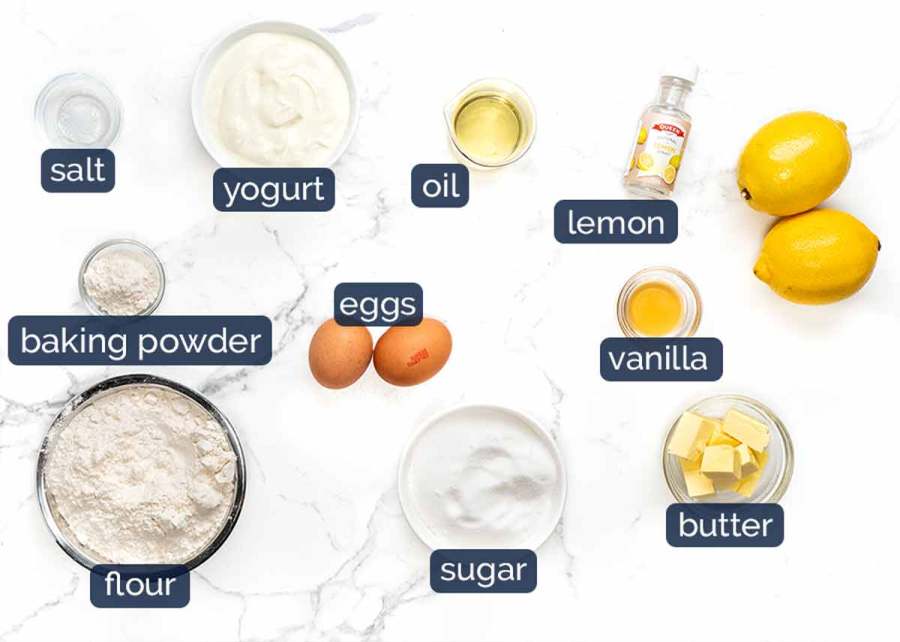
Yogurt – A “secret ingredient” in baking to make batters that bake up into lovely moist cakes, muffins etc. Any plain, unsweetened yogurt is fine here. I typically use Greek Yogurt. Substitute with sour cream (full fat).
Flour – Just plain / all purpose flour. Self-rising flour can be used in place of flour and baking powder, however, the loaf won’t be quite as soft or rise as well. Baking powder + flour is just more effective.
Gluten-free – I have not tried myself but reader Julie reported great success using gluten free flour! See her comment on this recipe dated 12 June 2023.
Baking powder – This makes this loaf rise.
Butter AND oil – Butter adds lovely buttery flavour into baked goods while oil makes the crumb moist. In this particular loaf, I wanted the best of both worlds so we’re using both.
In most recipes, I use one or the other – or I use butter plus another technique to keep the crumb moist (like the more involved technique for the reader-favourite plush Vanilla Cake).
Oil types – Vegetable or canola oil, or any other plain flavoured oil (such as sunflower, grapeseed oil) can be used. For the butter, use unsalted.
Fresh lemon – Fresh please! We need the zest and juice. Zest is where all the lemon flavour is! Juice provides mostly tang, not much lemon flavour.
Lemon extract (natural) – To make the lemon flavour in this un-missable. It really does enhance the lemon flavour in a way that you can’t achieve using just fresh lemons. But if you’ve got a stack of fresh lemons, feel free to skip this and double up on zest instead.
Vanilla – For flavour. I use vanilla extract here which is real vanilla flavour. Vanilla essence is artificial so the flavour is not as good. I typically only use pricier vanilla bean paste or vanilla beans for more refined dessert recipes, such as Creme Brûlée and Flan Pâtissier (the world’s greatest Custard Tart!)
Sugar – Just 1 cup which makes this loaf on the less-sweet side.
Eggs – At room temperature, so they incorporate easily into the batter. I use large eggs which are ~55g / 2 oz each, an industry standard so the eggs will be labelled “large eggs” on the carton.
Salt – Just a touch, to bring out the flavours. This is good general practice for all (well, most!) sweet baking recipes.
Lemon glaze
For the glaze, you just need soft icing sugar / powdered sugar and lemon juice. Australia – be sure to use soft icing sugar, not pure icing sugar which will set into a hard icing, like royal icing.

How to make this lemon loaf
Mix dry ingredients. Mix wet ingredients. Mix wet into dry. Bake! How easy it that!
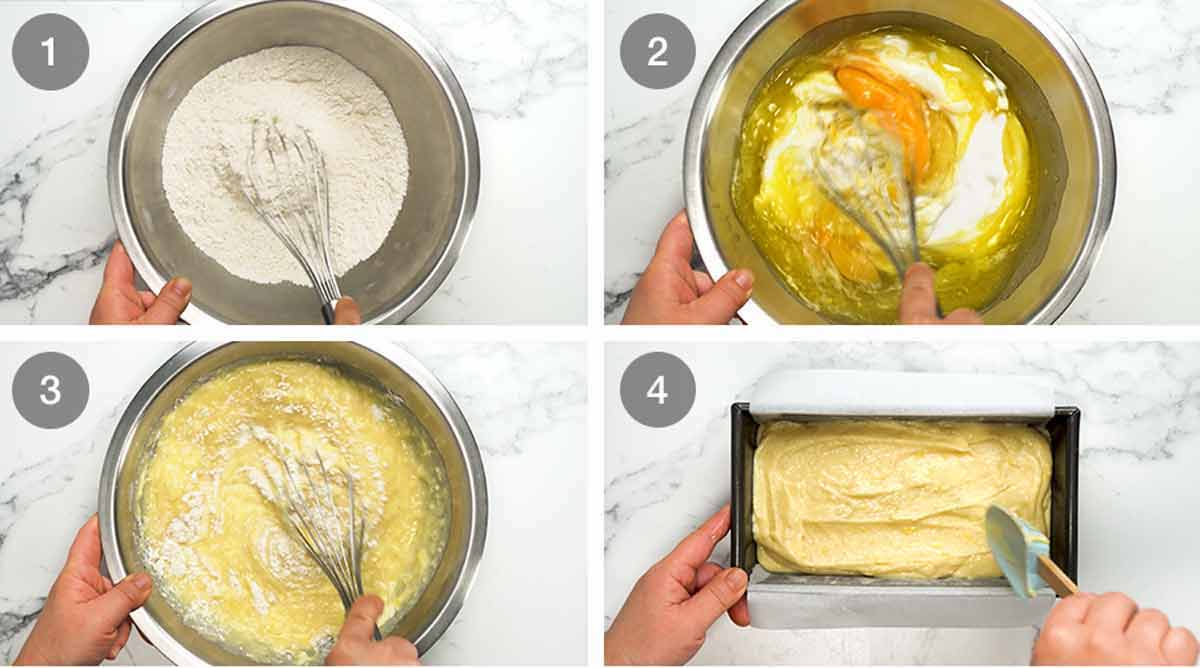
Whisk the dry ingredients in a large bowl.
Whisk the wet ingredients in a separate bowl until combined.
Pour the wet into the dry ingredients then whisk just until combined and lump free. Don’t keep whisking as this will cause your cake to come out hard!
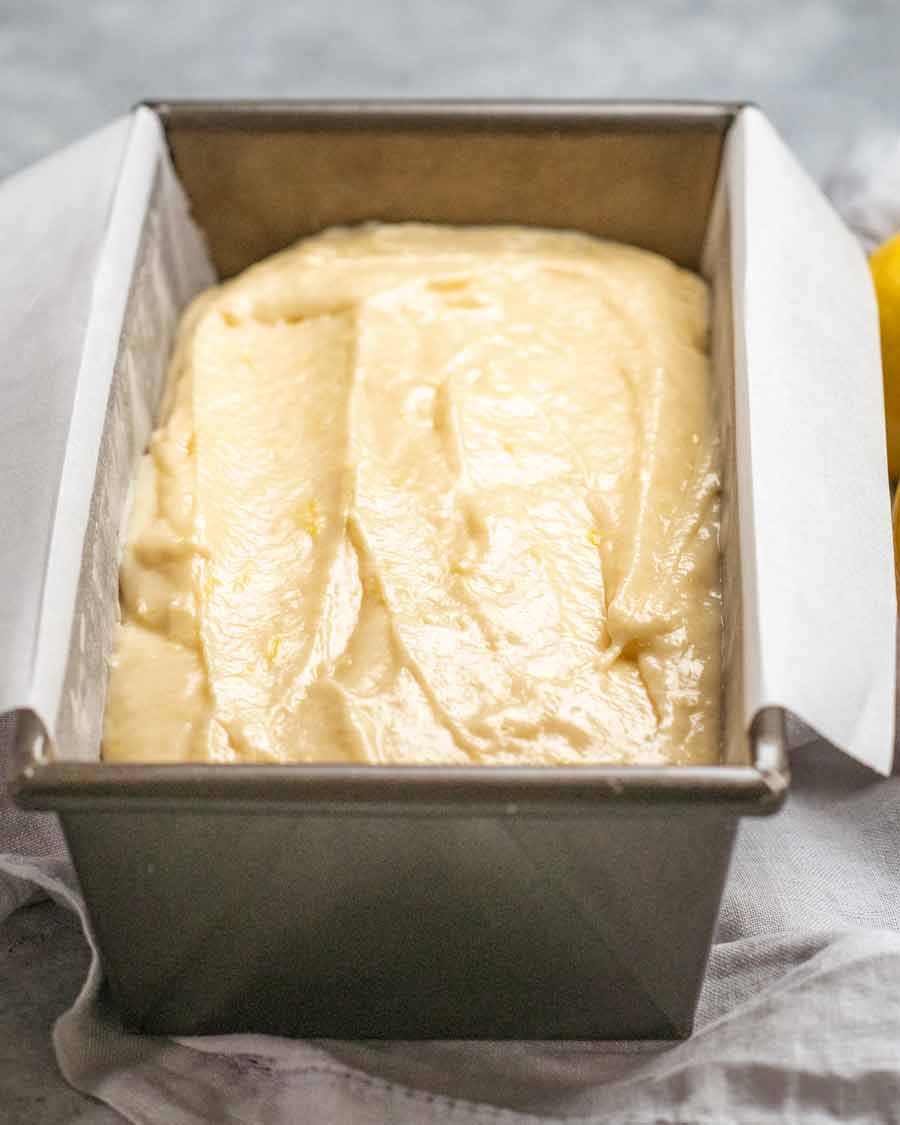
Pour / scrape the batter into a lined pan. (Note – when I say “lined pan”, I use a single sheet of baking / parchment paper to line the long sides and base. I don’t bother with the short side – no sticking problems if you grease it).
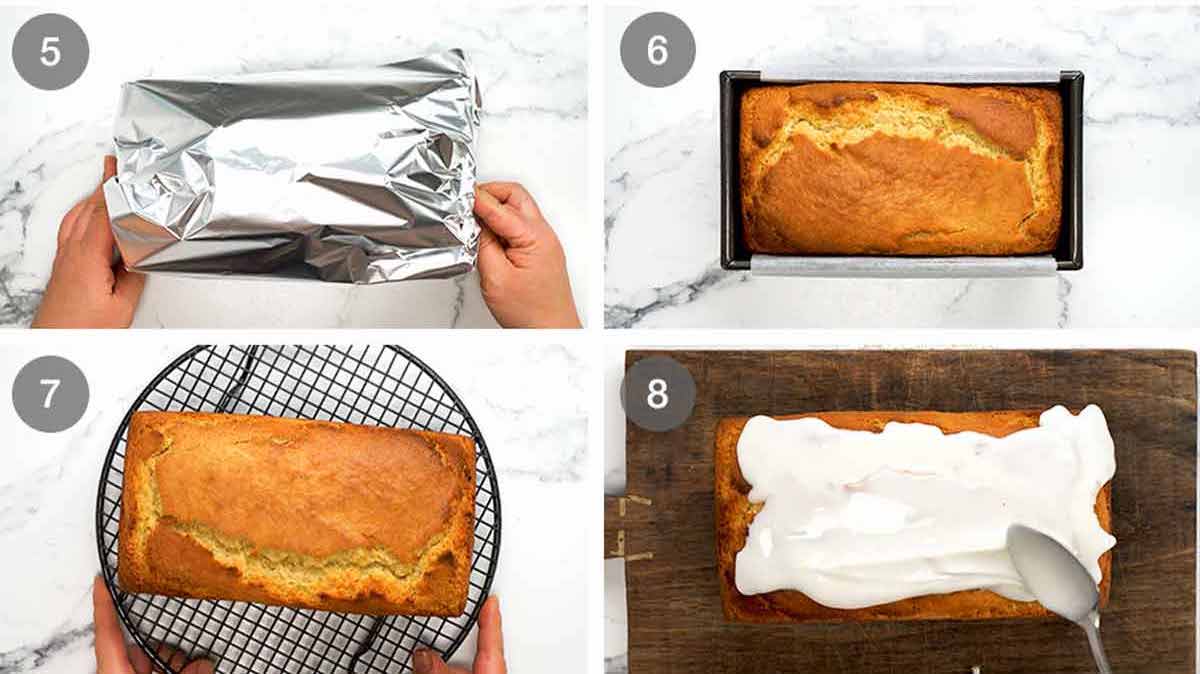
Bake 45 minutes uncovered, then loosely cover with foil and bake for a further 20 minutes or until a skewer inserted into the centre comes out clean.
Rest 10 minutes – Let it rest in the pan for 10 minutes (all cakes are very fragile when fresh out of the oven) before transferring it onto a cooling rack.
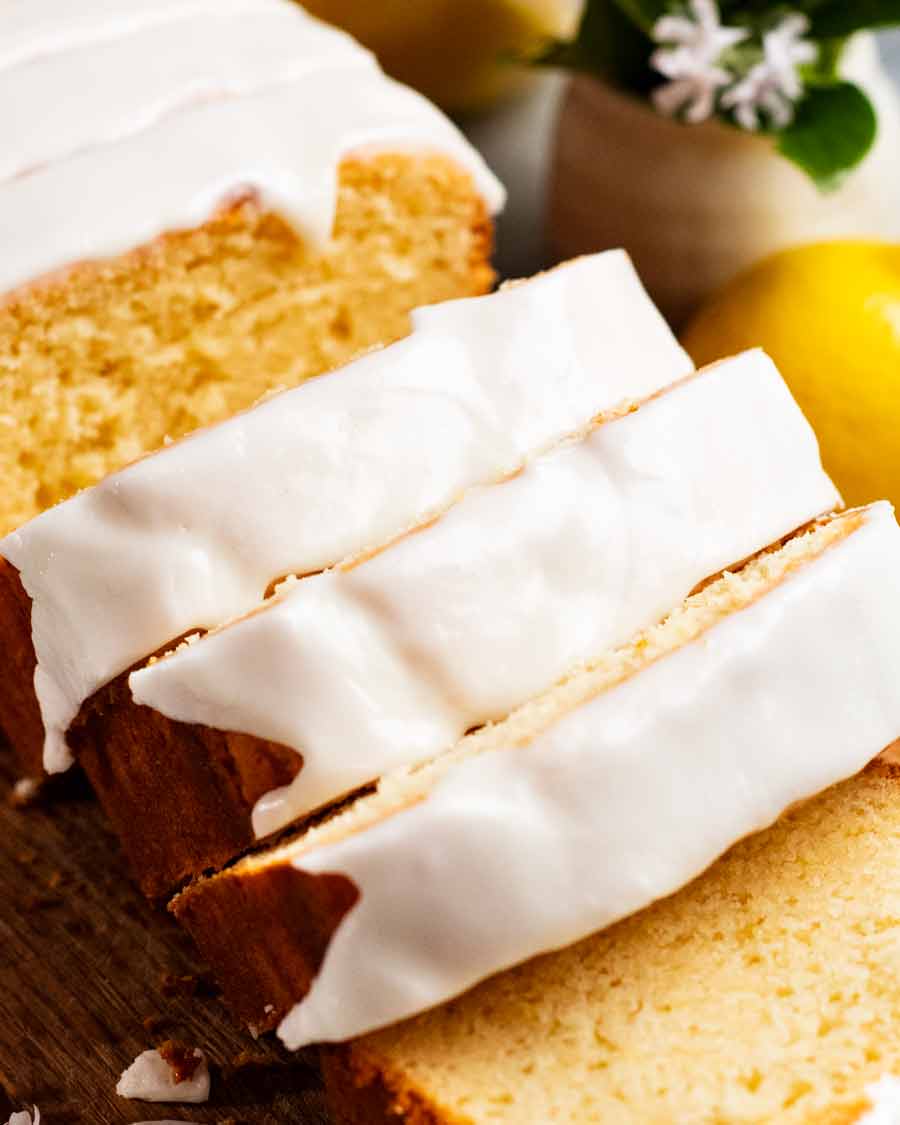
Cool – Use the paper overhang to lift it out onto a cooling rack, then cool completely for 3+ hours before glazing!
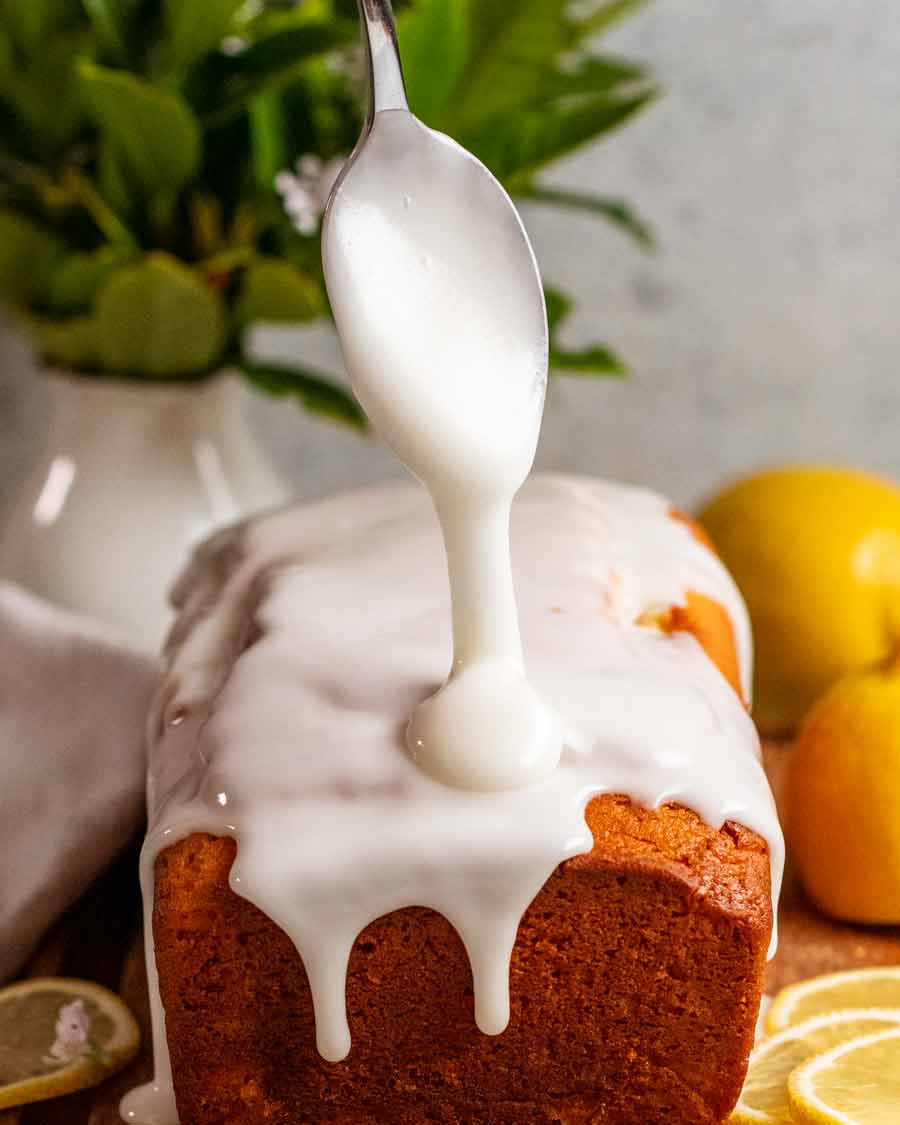
Glaze – To make the glaze, just mix the icing sugar (powdered sugar) and lemon juice together. Then spoon / spread it onto the surface, coaxing drips down the side.
⚠️ GLAZE THICKNESS CAUTIONARY NOTE!
I find glazes will go from seemingly too thick to way too thin with just even the barest smidge of extra liquid. So take care and be patient when mixing the glaze! I only use 3 1/2 teaspoons of lemon juice for 1 cup of icing sugar. At first it will seem like there’s nowhere near enough liquid, but be patient, keep mixing! It will turn into a thick glaze that will drape over your lemon loaf rather than spreading into a thin, transparent (unsatisfying) glaze.
The no-glaze option
“Everybody” loves the glaze but actually, there’s a good case for a no-glaze version too. No glaze means you can toast it like bread – literally, in a toaster. Then slather with butter and for a really great finishing touch, drizzle with honey.
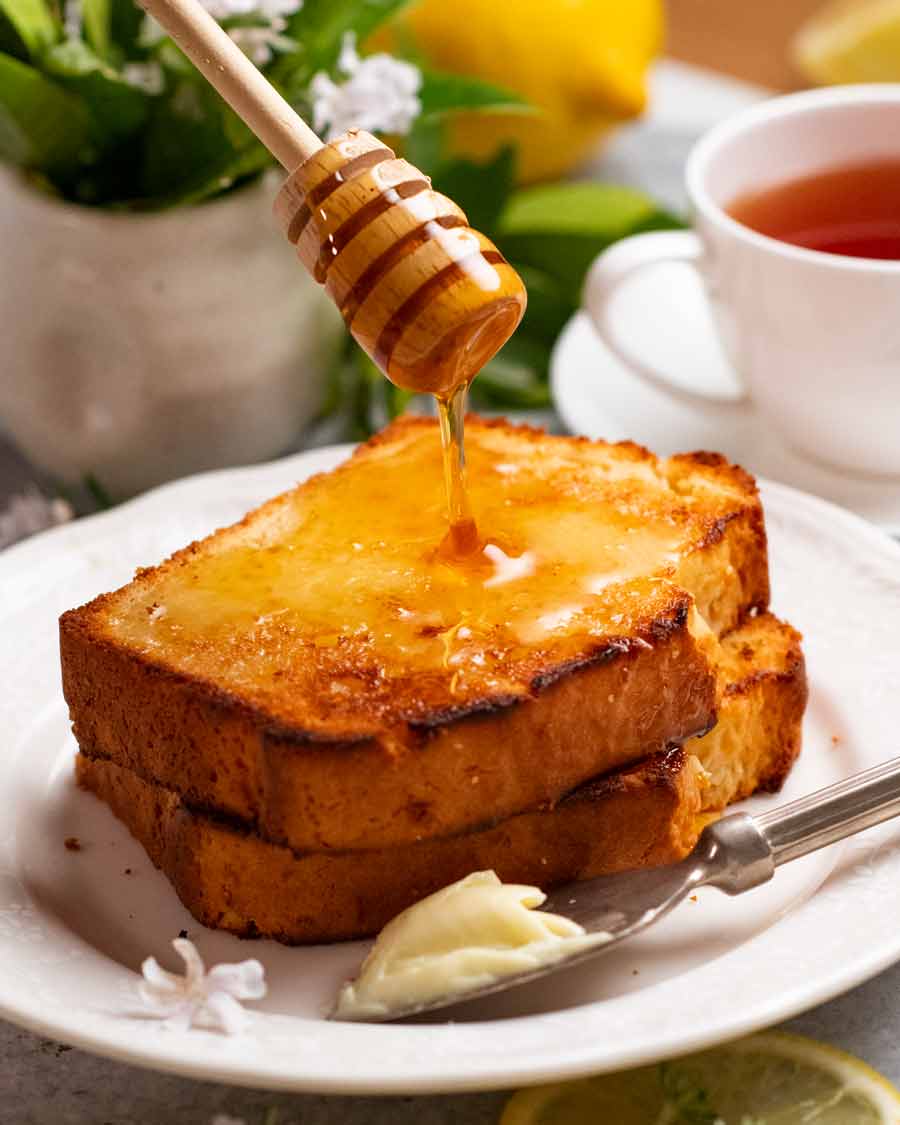
You can just imagine the flavour combo here, right?? Not-too-sweet lemony cake soaked with lightly salted melted butter and sweet honey. It’s so good I almost published this recipe without the glaze!!
Whichever way you go, glaze or no glaze, you can’t go wrong with this lemon loaf. It’s also one of those recipes that’s quite forgiving, so it’s a good one for those new to baking or if you have little helpers keen to get involved.
Stays fresh 5 days
And finally – this lemon loaf has an excellent shelf life. Regular readers know that I am notorious for extending the shelf life of baked goods! It used to drive me mad that people would just accept that homemade muffins would go stale overnight, and that cakes are best made on the day of serving as they lose freshness within 24 hours. Who has the time to bake fresh on the day, not to mention the disappointment of not being able to enjoy cakes for days afterwards? The reader-favourite Vanilla Cake and Cupcakes are probably the most famous examples around here – they stay fresh for 4 to 5 days which is unheard of!
As for this lemon loaf – it’s perfect for 3 days, still great 5 days later. Keep it in the fridge if it’s warm where you are, but if not, the pantry is fine.
Enjoy! – Nagi x
Watch how to make it
Glazed lemon loaf
Ingredients
Dry ingredients:
- 2 cups plain flour / all-purpose flour (Note 1 for GF)
- 4 tsp baking powder (make sure yours is alive!)
- 1/8 tsp salt
Wet ingredients (Note 2 – room temp):
- 1 cup plain yogurt , at room temperature
- 2 large eggs (~55g/2oz each), at room temperature
- 75g / 5 tbsp unsalted butter , melted and cooled
- 1/4 cup vegetable or canola oil (or other neutral flavoured oil)
- 2 tbsp lemon zest (~2 large lemons)
- 1/4 cup lemon juice
- 1 1/4 cups caster sugar / superfine sugar (sub normal/granulated sugar)
- 1/2 tsp vanilla extract
- 1 1/2 tsp lemon extract – sub 1 tbsp extra zest (Note 3)
Glaze (optional):
- 1 cup soft icing sugar/powdered sugar , sifted
- 3 – 3 1/2 tsp+ lemon juice
Instructions
- Preheat oven to 180°C/350°F (160°C fan-forced). Grease then line a 21 x 11 x 7 cm (8.5 x 4.5 x 2.75") with baking / parchment paper. (Note 4)
- Batter – Whisk Dry ingredients in a large bowl. Whisk Wet ingredients in a separate bowl. Pour Wet ingredients into the Dry ingredients. Whisk just until lump free. Pour into the prepared loaf pan then smooth the surface.
- Bake 45 minutes uncovered. Loosely cover with foil then bake a further 20 minutes or until a skewer inserted comes out clean.
- Cool & glaze – Stand 10 min in pan then turn out onto a cooling rack. Fully cool before glazing (~3 hours). Use a spoon to spread and coax lovely glaze drips down the side! Cut thick slices and serve.
- Glaze – Whisk ingredients until combined and smooth, a thick smooth frosting that will drip thickly, not be transparent. Start with 3 1/2 teaspoons lemon juice, and add 1/2 tsp extra, as needed. (Note 5 on thickness)
Notes
Nutrition
Life of Dozer
Dunno why I look so happy when Dozer looks so tortured, waiting to taste that bit of lemon cake!

The post Glazed lemon loaf appeared first on RecipeTin Eats.
]]> I’m not kidding! These chewy caramel-y chocolate nut bars are made without a single bowl. From scratch. They’ll save you all those times you promise to make something sweet but run out of time! Meet my emergency quick sweet-treat! I am one of those people who always overcommits. Especially when it comes to anything food... Get the Recipe
The post No-bowl Chocolate Nut Bars appeared first on RecipeTin Eats.
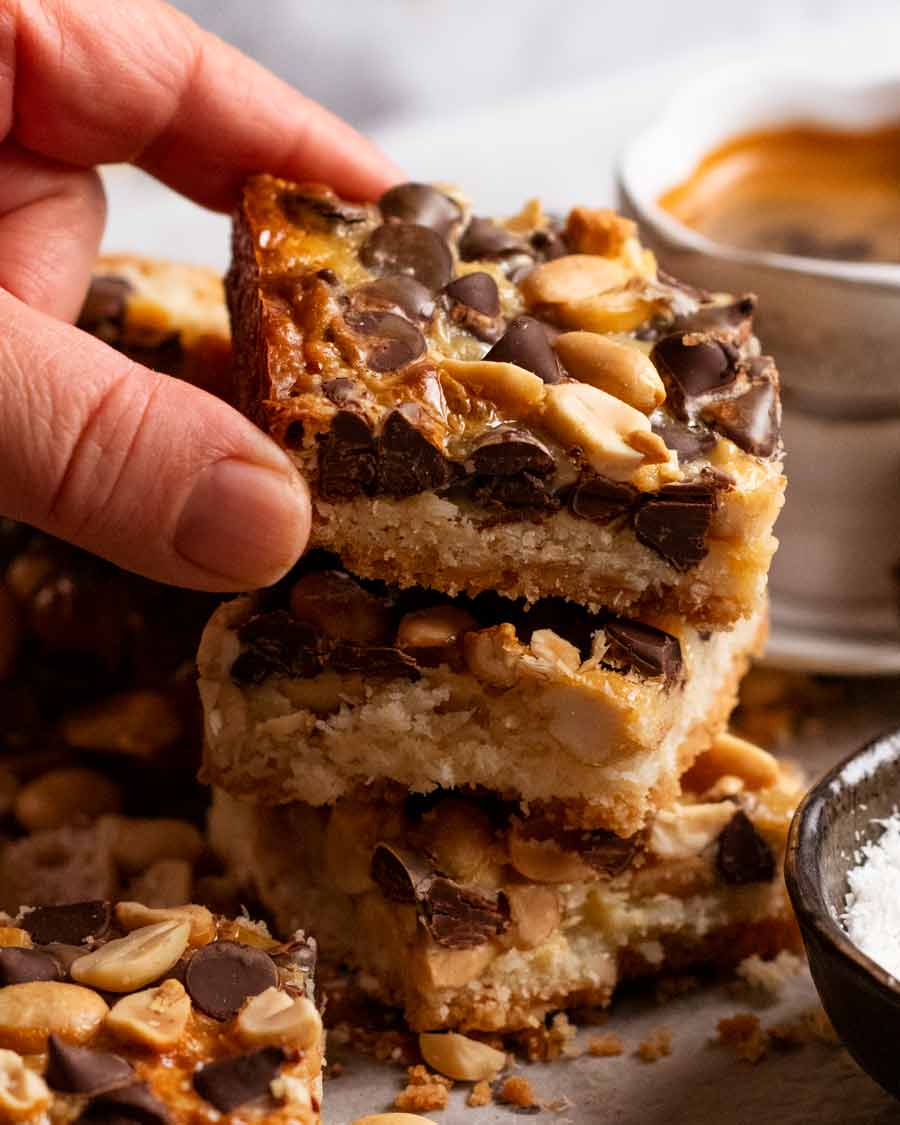
]]>I’m not kidding! These chewy caramel-y chocolate nut bars are made without a single bowl. From scratch. They’ll save you all those times you promise to make something sweet but run out of time!
Meet my emergency quick sweet-treat!
I am one of those people who always overcommits. Especially when it comes to anything food related. Then 7 out of 10 times, I find myself in a flurry at the last minute because I promised to bring something sweet for lunch with friends, or to make something for my friends’ son’s school bake sale because she works full time and doesn’t have the time to bake something.
So it’s super handy to have a few really fast sweet recipes up your sleeve and this is one of mine. Just wait until you see how it’s made – it’s SO QUICK and you don’t need a SINGLE BOWL!
How to make these no-bowl chocolate nut bars
I know you’re probably wondering how on earth these bars are made without using a bowl at all so I’ll cut straight to the chase! Here’s how it’s done:
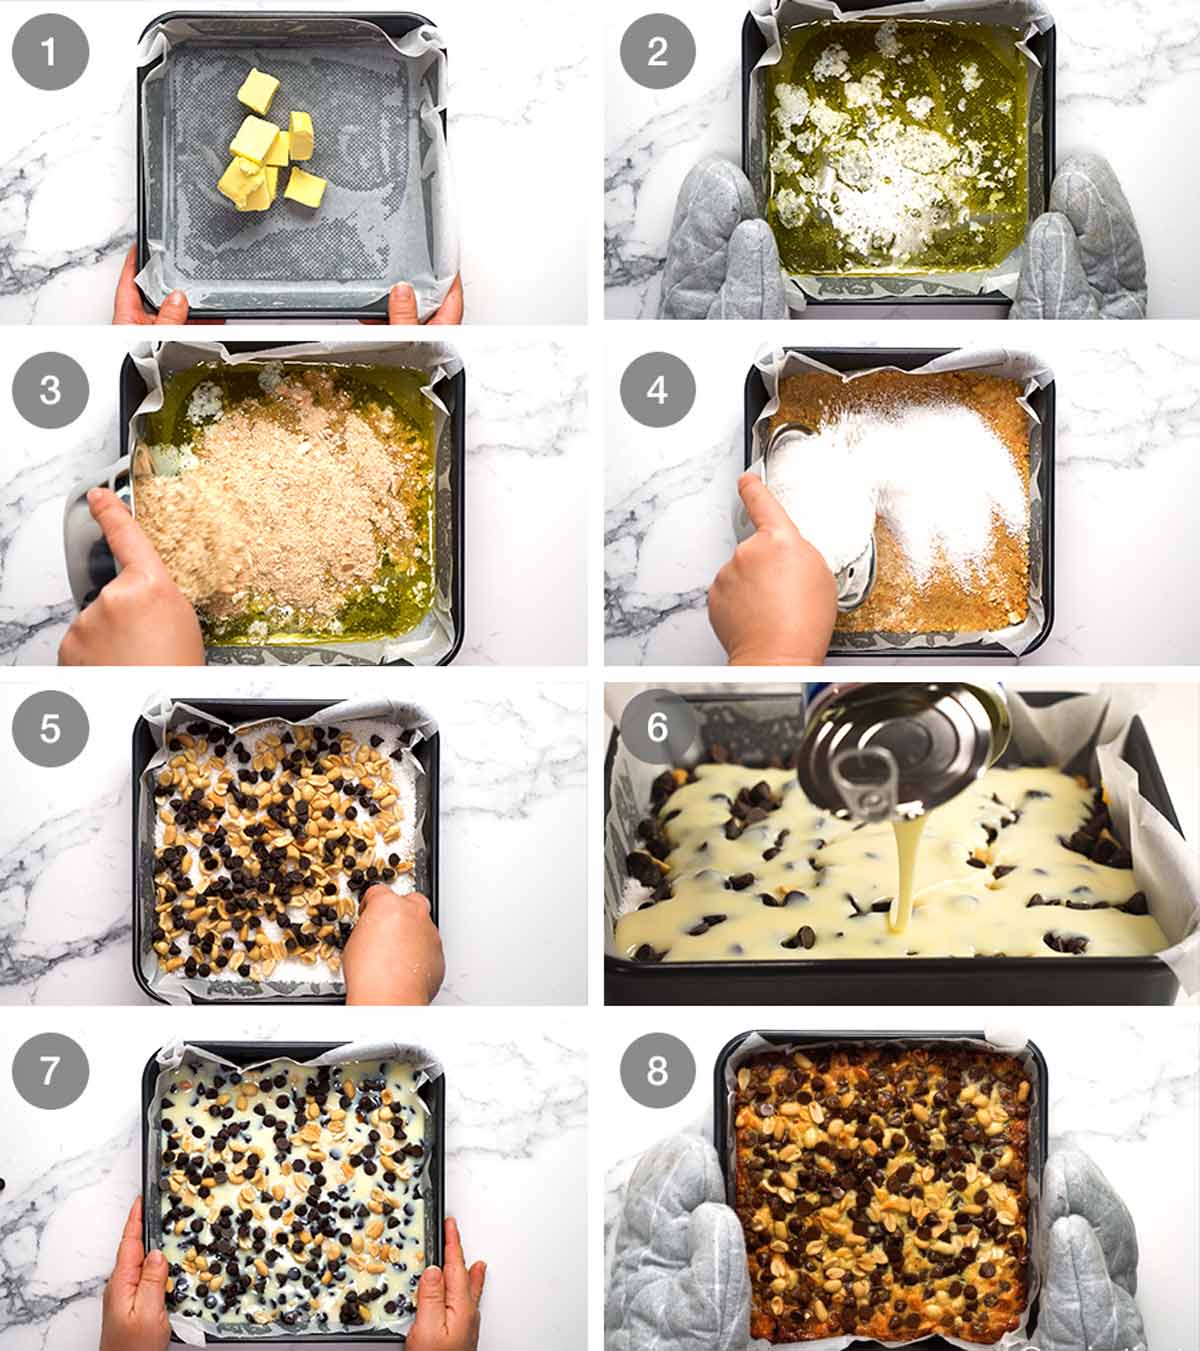
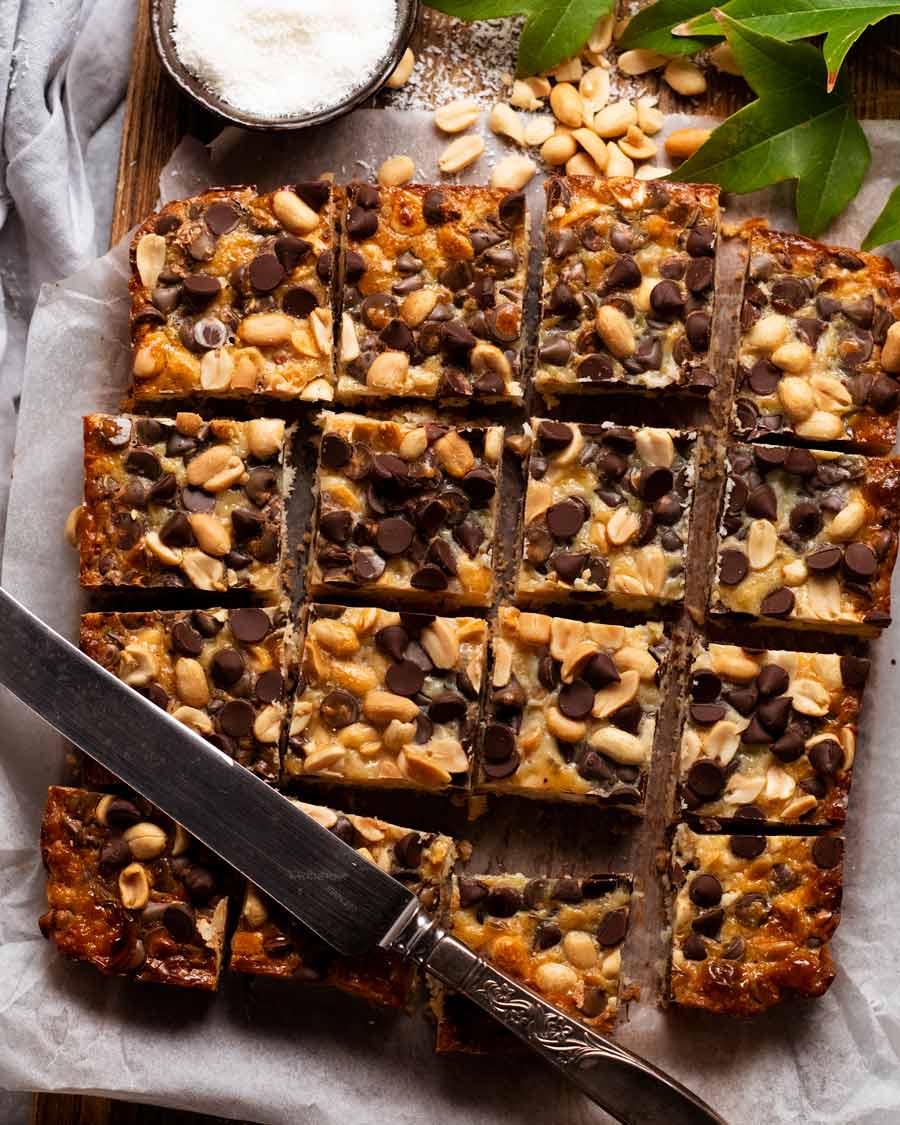
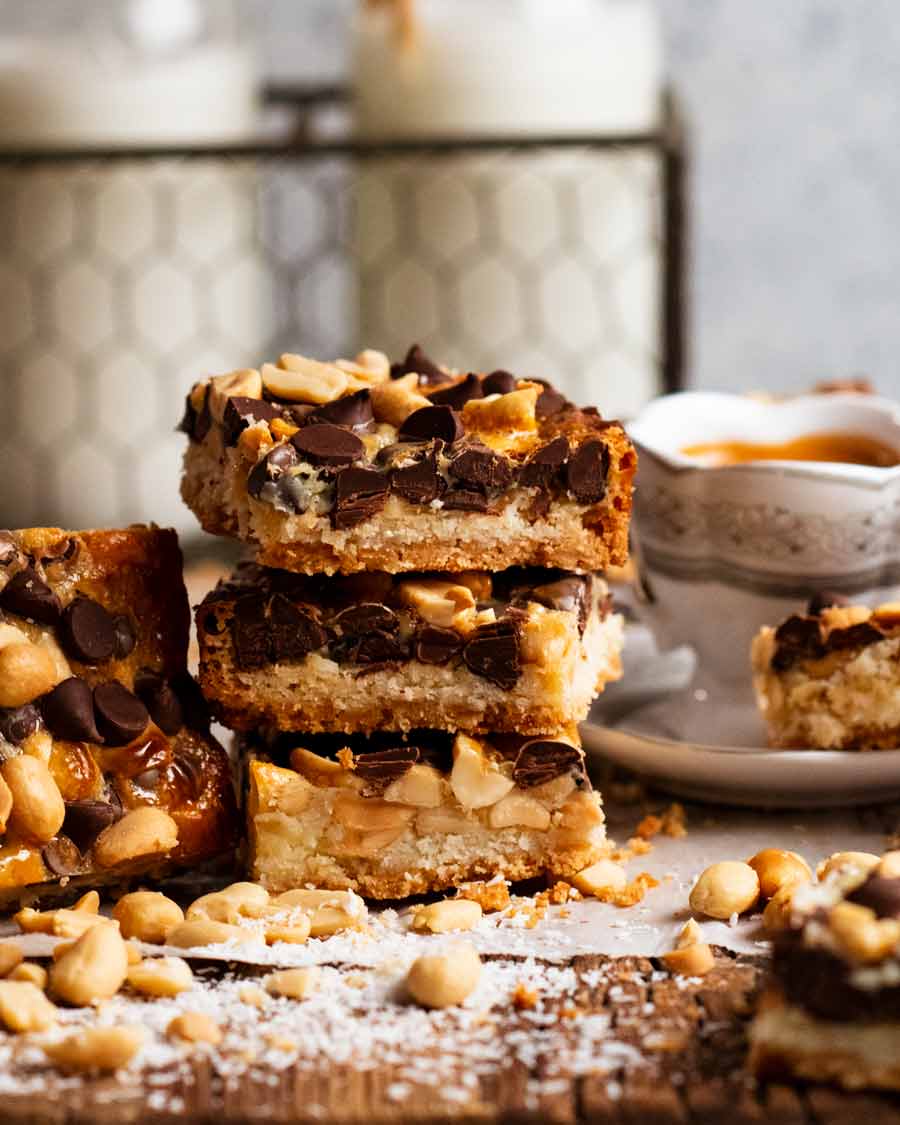
It’s made by creating a biscuit base using butter melted in the pan then sprinkling over crushed biscuits and desiccated coconut. Then it’s topped with nuts (your choice), chocolate chips, then finally topped with condensed milk which is what brings the whole bar together. Once baked, it holds together and becomes gloriously chewy, caramely bar!
Place butter straight into a lined pan and melt it in the oven while it is pre-heating.
Swirl to spread the melted butter across the base.
Sprinkle crushed biscuits across the base, then spread using a spoon/spatula/hands and lightly press down. I’m not meticulous here about even spreading, this is, after all, an emergency recipe!!
Sprinkle coconut across the base.
Top with about 2/3 of the nuts and choc chips
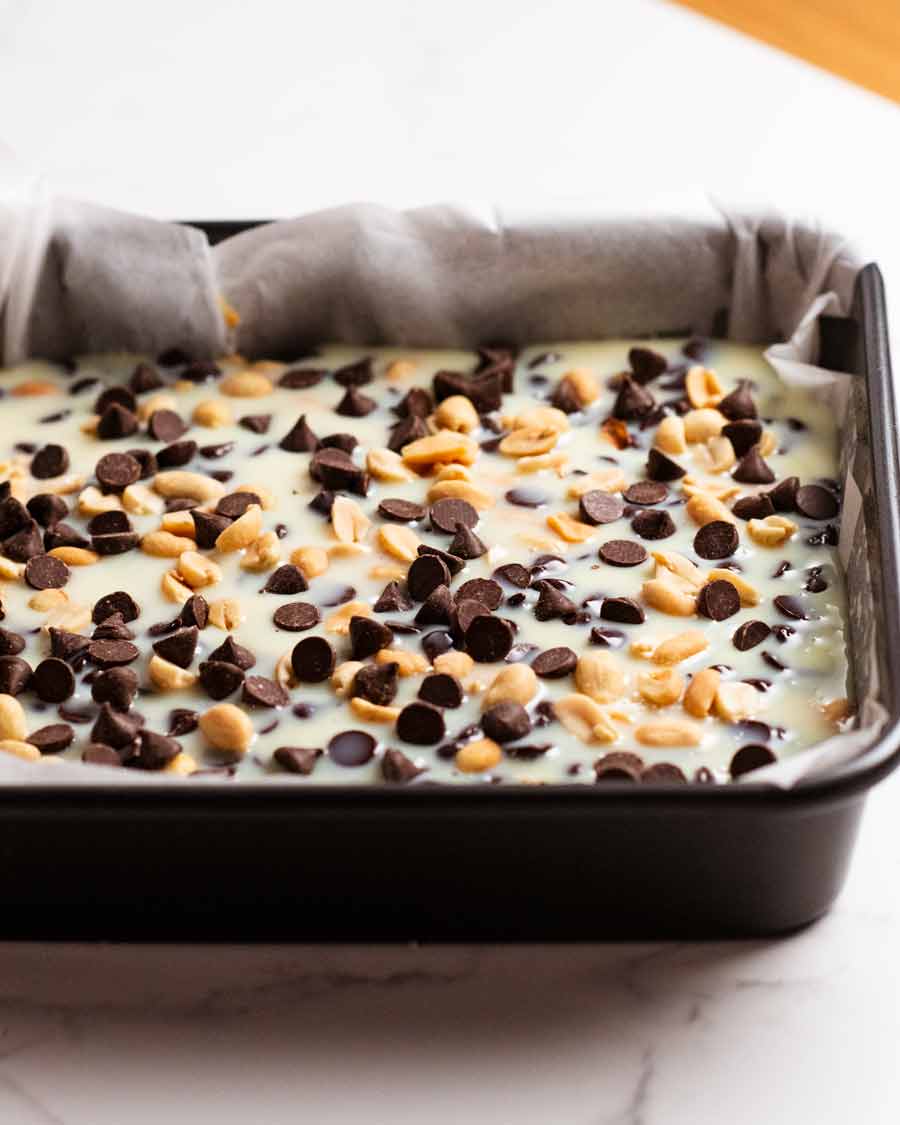
Pour over condensed milk.
Top with remaining nuts and choc chips.
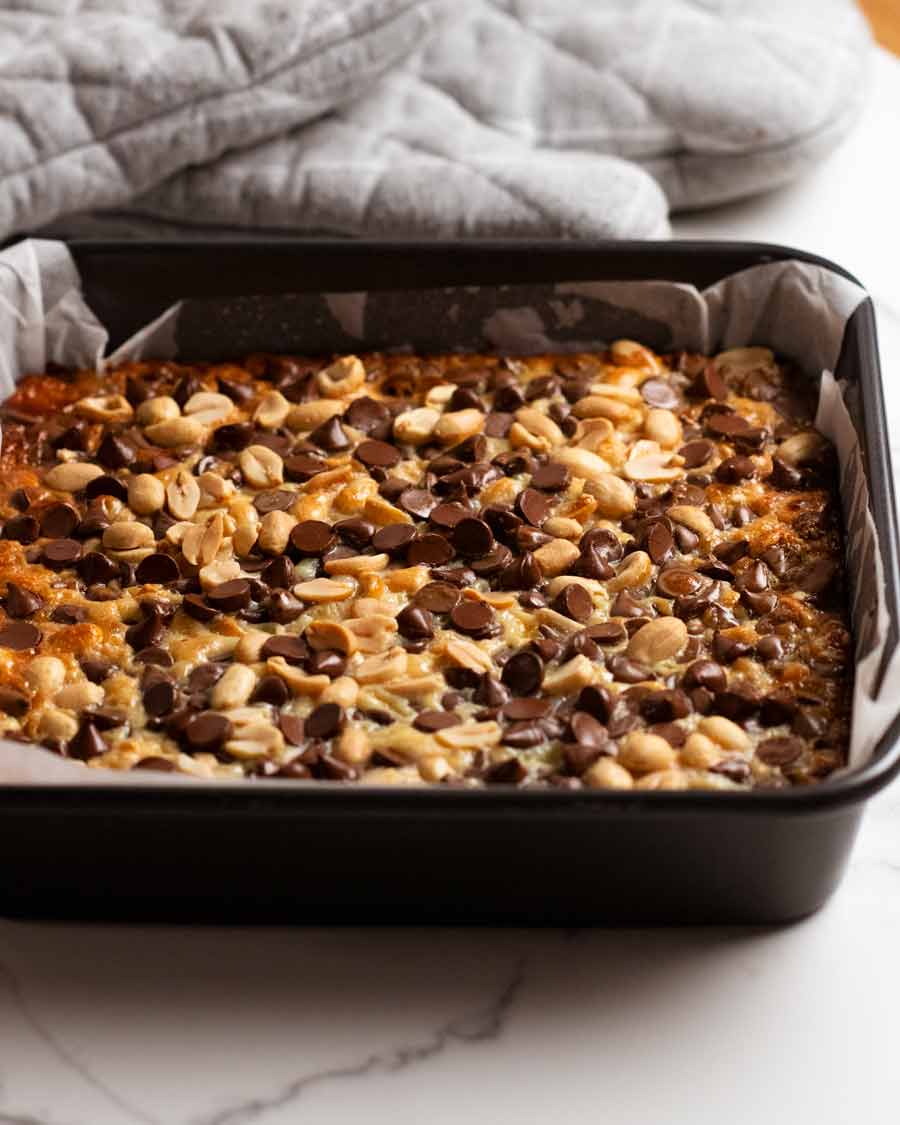
Bake 30 minutes until light golden on the edges, then cool before cutting!
Ingredients in No-bowl chocolate nut bars
Ordinarily I put the ingredients before the recipe steps, but I feel like for this recipe it should be other way round! So, here’s what you need. It’s fabulously versatile – any plain biscuits, switch the peanuts and chocolate chips with other things like dried fruit and other nuts.
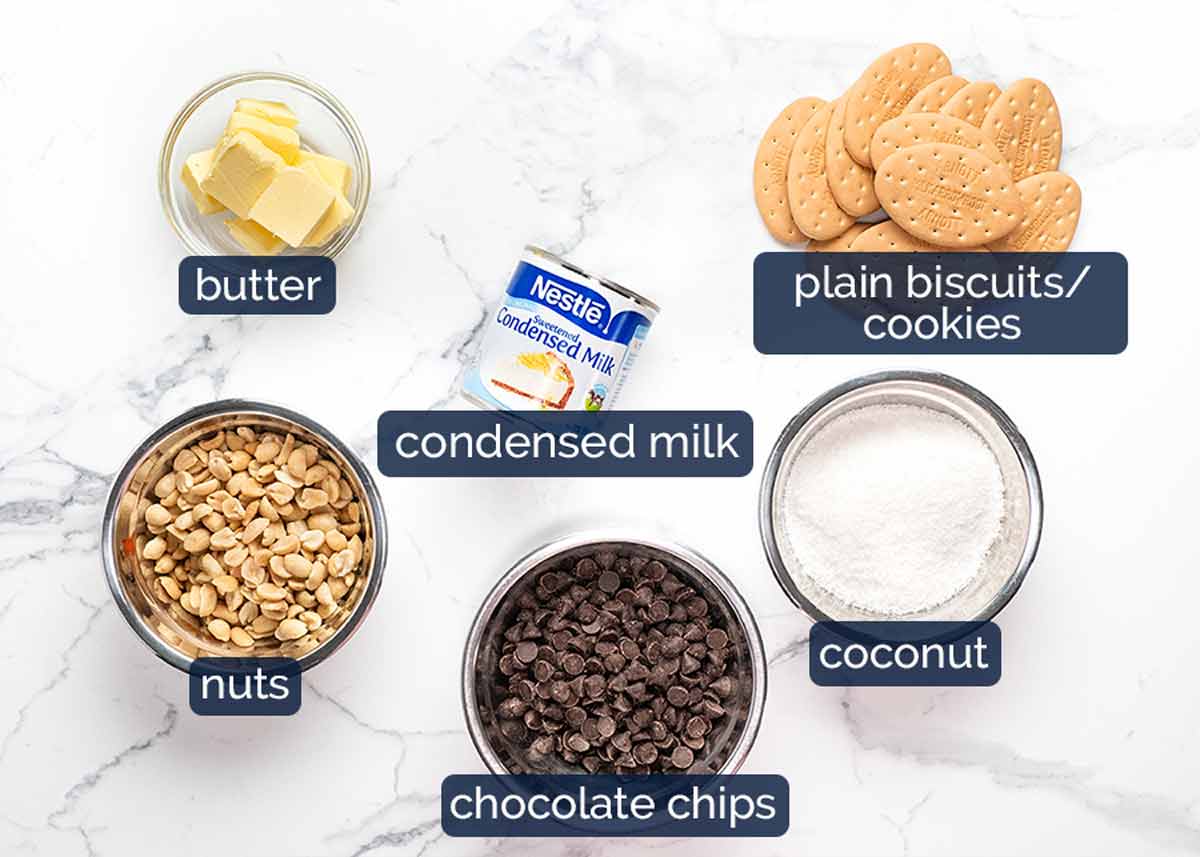
Condensed milk – This sweetened milk is like a thick syrup and this is the key ingredient that holds the bar together. Standard cans here in Australia re 395g (14oz) and are sold in the long-life dairy section in grocery store aisles.
Peanuts & chocolate chips – Feel free to substitute these with other add-ins of choice. Especially hand if you have a peanut or nut allergy in the family. Try pepitas and dried fruit!
Coconut – Desiccated coconut blends into the crushed biscuits to create the base. If you don’t like or don’t have coconut, feel free to add extra biscuits instead, or leftover wheat germ / wheat bran (if you made last weeks’ Breakfast Muffins!).
Butter – For buttery goodness and also to hold the base together.
Plain biscuits/cookies – Anything that can be crushed will work fine here. I’ve used all sorts over the years – Marie, Arrowroot (featured in today’s recipe), Graham crackers, scotch fingers. I once even made this with chocolate Oreo cookies by scraping the filling off!! (It was an emergency and it was darn delicious!)
It’s not a hack
This is one of those recipes that is not a “hack”, but rather an incidental side benefit is that it can be made without dirtying a single bowl. I would make these even if I had to use a bowl to make them!
So keep this one tucked away for one of those days when you’re in a rush and you’ve promised to make a sweet treat for your family or friends!! – Nagi x
Watch how to make it

No-bowl Chocolate Nut Bars
Ingredients
- 100g (7 tbsp) unsalted butter , cut into a few chunks
- 1 cup (100g) plain biscuits, crushed (eg. Marie, Arrowroot, digestives, Graham crackers – Note 1)
- 1 cup desiccated coconut (unsweetened)
- 1 cup unsalted peanuts , or other nuts of choice (Note 2)
- 1 cup dark choc chips (US: semi-sweet chips) (Note 2)
- 395g (14 oz) (1 can) sweetened condensed milk (Note 3)
Instructions
- Preheat oven to 180C/350F (160C fan-forced)
- Line pan – Lightly spray a 20cm/8" square pan with oil then press in a sheet of paper (no need to be meticulous here).
- Melt butter – Place the butter in the pan then melt in the oven for 5 minutes.
- Biscuit base – Swirl pan to spread butter then sprinkle over crushed biscuits. Spread then gently press down (again, I am not meticulous about evenness here).
- Layer – Scatter over the coconut, followed by about 2/3 of the peanuts and choc chips (reserve some for the top). Pour over condensed milk, spread for even coverage. Top with remaining nuts and chocolate chips.
- Bake for 30 minutes or until the edge of the surface is golden brown.
- Fully cool before cutting (3 hours on counter, or 1 hr counter + 1 hr fridge). Remove using paper overhang then cut and eat!
Notes
Nutrition
Originally published way back in September 2015. Republished with a brand new video and photos by reader request!
Life of Dozer
New house. New shoot studio. Same scavenger.

The post No-bowl Chocolate Nut Bars appeared first on RecipeTin Eats.
]]> Healthy muffins that are actually delicious! A copy-cat of the raspberry bran muffins from Sydney’s beloved Bowan Island Bakery, these breakfast muffins are a nutritious, convenient breakfast option that’s far better for you than take-away on the way to school or work. Up-and-go Breakfast Muffins Being a savoury gal, I’ve always been partial to savoury... Get the Recipe
The post Up-and-go breakfast muffins! appeared first on RecipeTin Eats.
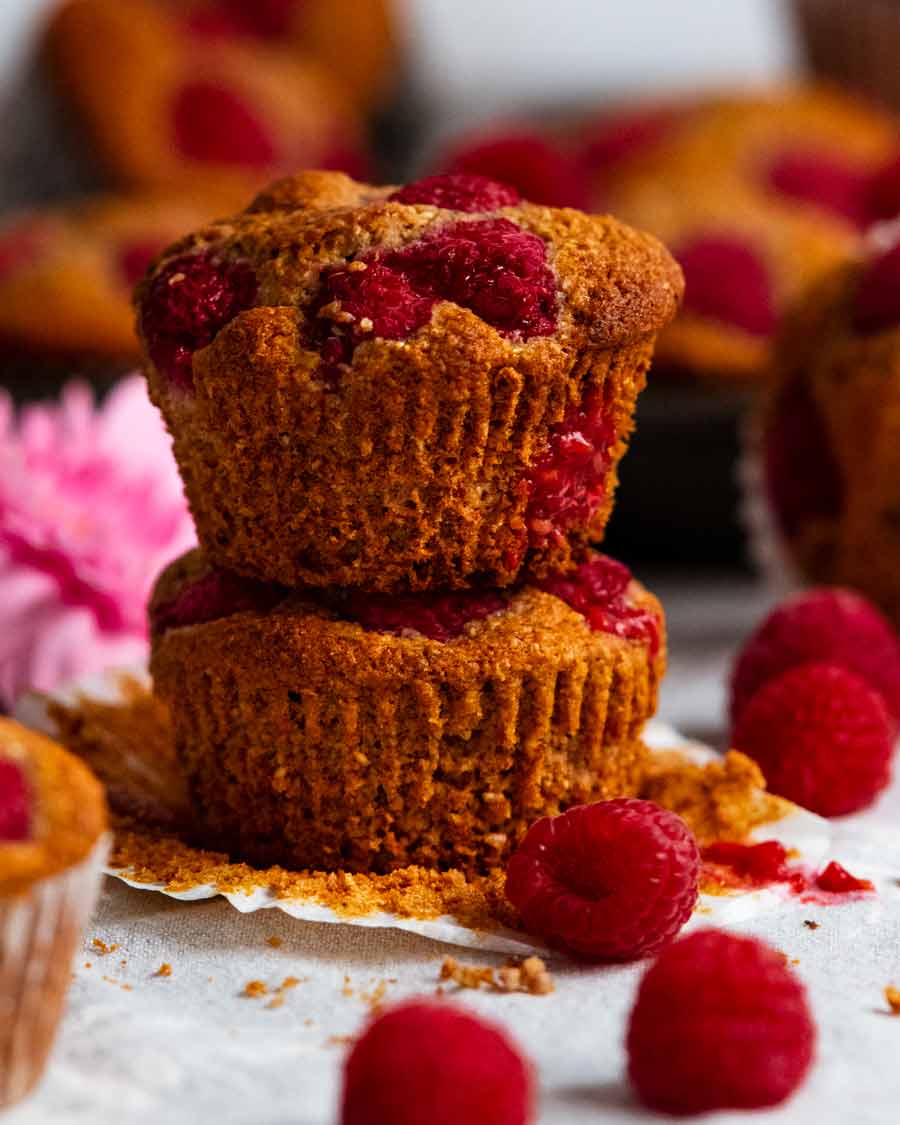
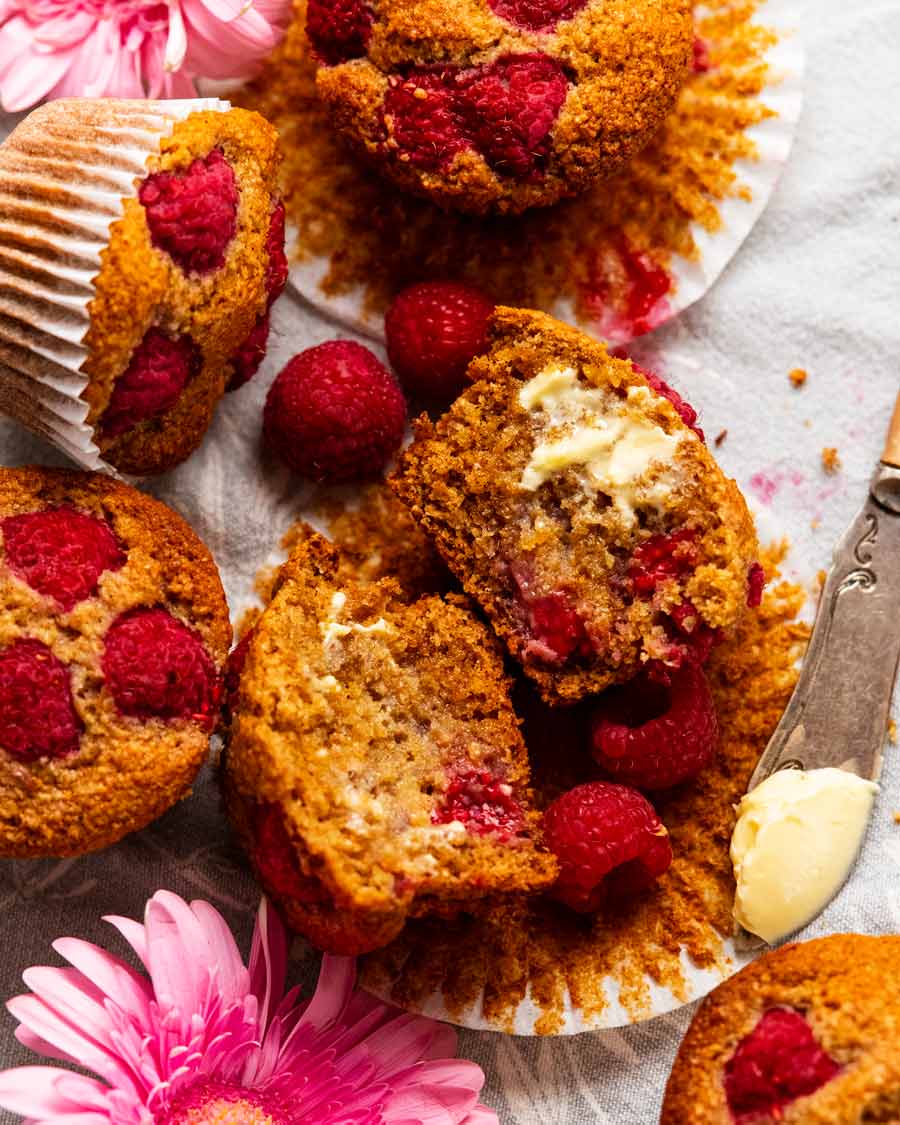
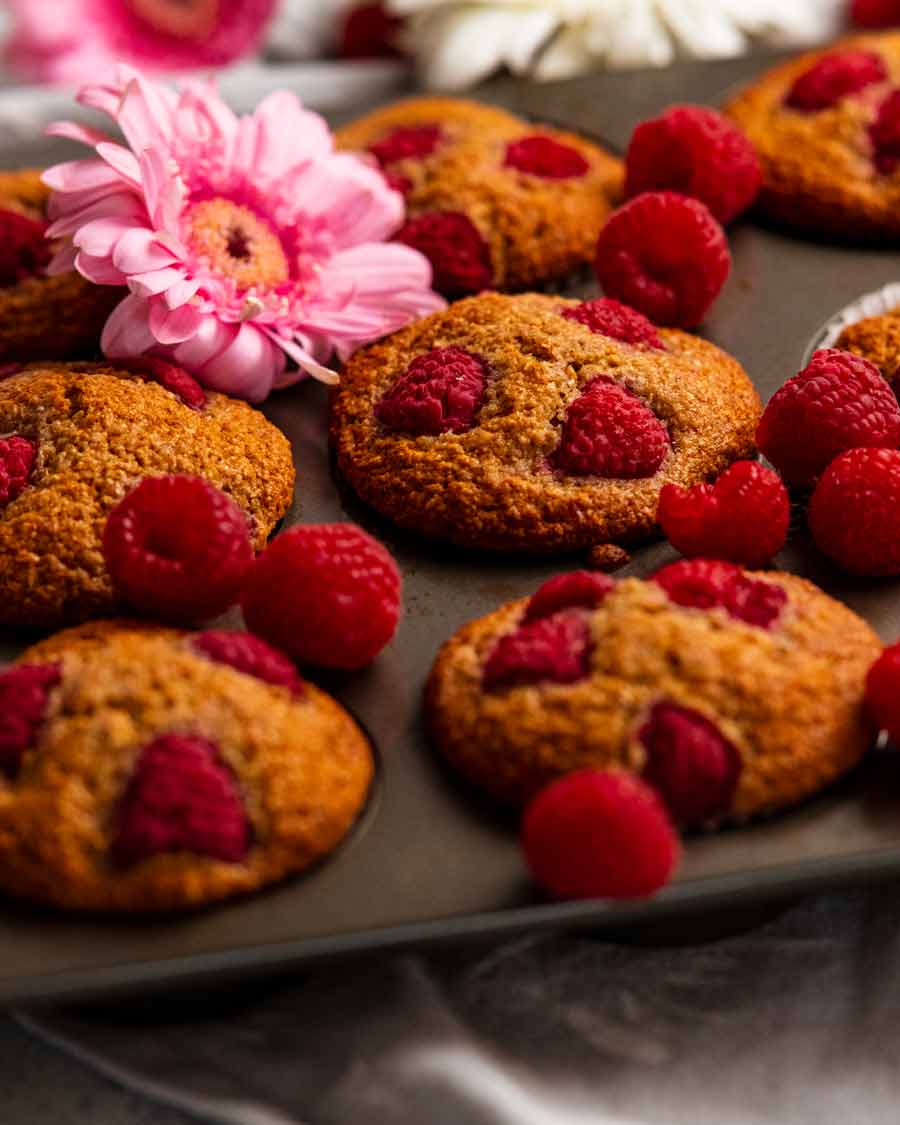
]]>Healthy muffins that are actually delicious! A copy-cat of the raspberry bran muffins from Sydney’s beloved Bowan Island Bakery, these breakfast muffins are a nutritious, convenient breakfast option that’s far better for you than take-away on the way to school or work.
Up-and-go Breakfast Muffins
Being a savoury gal, I’ve always been partial to savoury muffins for breakfast (proof here, here and here). But a breakfast muffin with a sweet slant has been on my list for a while. I’m talking about the type that doesn’t make you feel like you’re eating cake for breakfast, a muffin that is just sweet enough but still good for you and good to eat.
So here it is!
Why these muffins are better for you
Low fat – just 1 1/4 tsp coconut oil per muffin
Refined-sugar free
Lightly sweetened – Just 2 teaspoons honey per muffin
Extra dietary fibre – keeps your insides….err….moving, shall we say ☺️ as well as keeping you full for longer and stabilising your blood sugars.
Convenient – Grab and go! No need to reheat, eat on the move.
Long shelf life – These last for 4 to 5 days, and are freezable.
Easy to make – One-bowl batter mixed with just a wooden spoon
Add-ins of choice – dried fruit and nuts, oats, fruit, choc chips!
Ingredients in breakfast muffins
Here’s what you need to make these breakfast muffins. Add-ins are flexible – see below for suggestions.
The key ingredient in this for goodness and flavour is wheat germ. Good-for-you extra fibre that gives these muffins a fabulous nutty flavour and lovely warm brown colour!
Dry ingredients
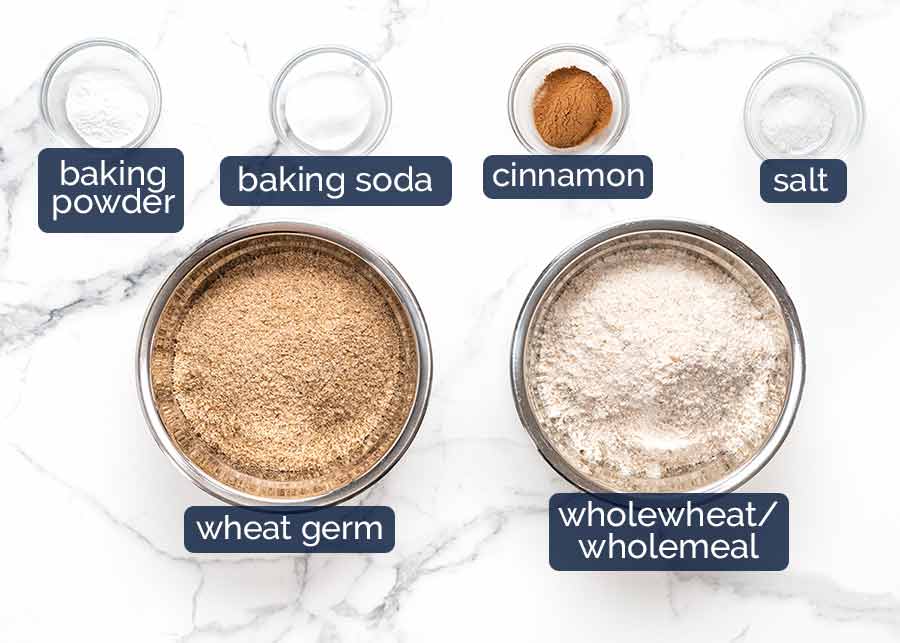
Wheat germ (sub wheat bran) – The good-for-you extra fibre boost! Found in either the cereal aisle, health food section or flour aisle or grocery stores. While both wheat germ and wheat bran work, I think wheat germ is nicer. It has lovely nutty flavour because it’s the seed inside wheat kernels. Whereas wheat germ is the exterior of wheat kernels so it gives the muffins a slightly earthier flavour. Both have similar nutrition characteristics – high in dietary fibre as well as other nutrients. Better for you than plain flour!
Wholewheat / wholemeal flour – In keeping with the better-for-you spirit of these muffins, I’ve opted for wholemeal rather than plain white flour. It has more nutrients because it’s less processed, plus it enhances the nutty flavour of these muffins.
Baking powder AND baking soda (bi-carbonate) – These both make things rise but baking soda is 3x as strong and they each have different rising characteristics. For this recipe, using a combination of both delivers the muffin top shape and crumb texture I want.
The baking soda can be substituted with more baking powder but the crumb is not quite as soft. See recipe card notes for quantity.
Cinnamon – For flavour!
Salt – Brings out the other flavours in the muffins, doesn’t make it salty!
Wet ingredients
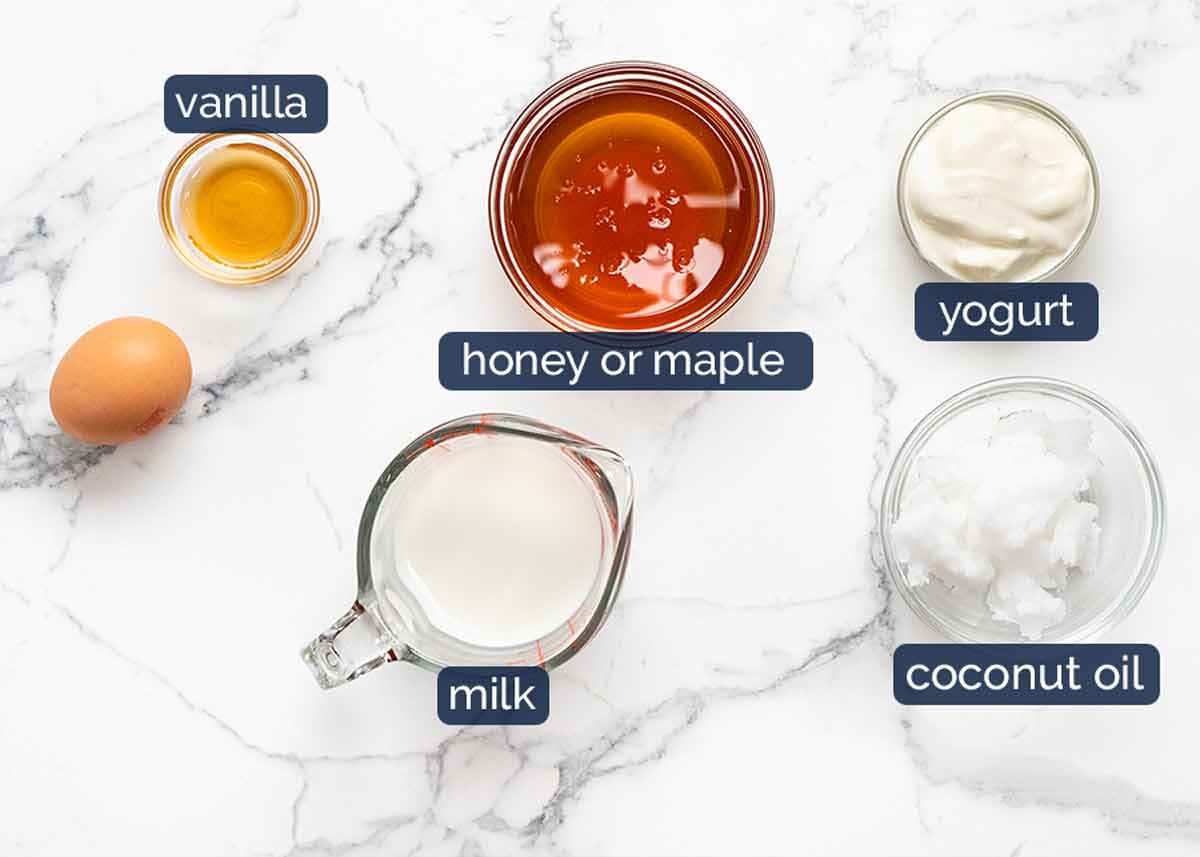
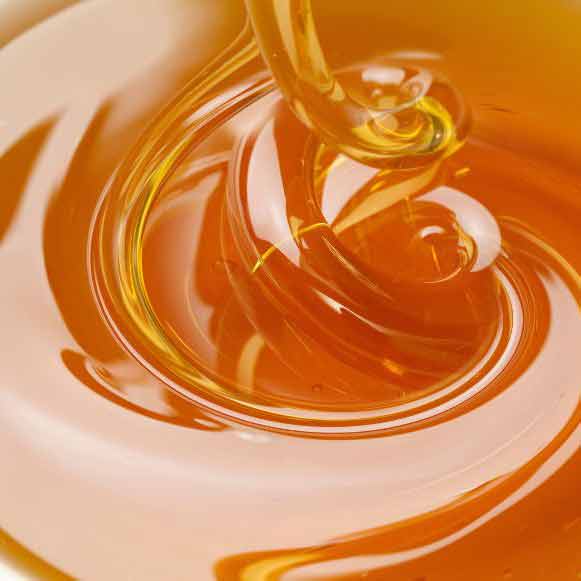
Honey or maple syrup – For sweetening! We only use 1/2 cup across 12 muffins which equates to 2 teaspoons per muffin. See commentary below on why honey is better for you than sugar.
Coconut oil – This is the fat in the muffins. I like to use unrefined / virgin coconut oil which adds a lovely very subtle coconut flavour into the muffins. By no means would anyone call these “coconut muffins”! Use the type that is firm like butter and needs to be melted to mix into batters, rather than the pourable type.
Note: There is also refined coconut oil which is stripped of all coconut oil and aroma. This and other oils will work in this recipe but will not add flavour. If you opt for another oil, I’d suggest doubling the vanilla and adding extra cinnamon.
Yogurt and milk – This is the wet in the batter. Using yogurt serves two purposes. Firstly, it has acid in it which gives the baking soda a rising kick start. Sometimes I use a teaspoon of vinegar in recipes to serve the same purpose, like in my Magic Stay-Moist Apple Muffins.
Secondly, yogurt is not as watery as milk. So it adds wetness to batters without making it as loose which means less flour needed = muffin more moist!
Egg – Just one, to hold the muffins together. Using only 1 egg makes a massive difference to the moistness of the crumb of muffins as the more egg you use, the sturdier but drier the crumb gets.
Vanilla – For flavour.
Why is honey better than sugar?
Because honey is:
sweeter than sugar so you can use less in recipes;
lower GI so your blood sugar levels won’t spike as quickly – which keeps you feeling full for longer; and
more nutritious than sugar which is “empty calories”. That is, sugar literally just contains sugar and nothing else! Honey contains nutrients such as amino acids, enzymes, vitamins and minerals.
Add-ins of choice!
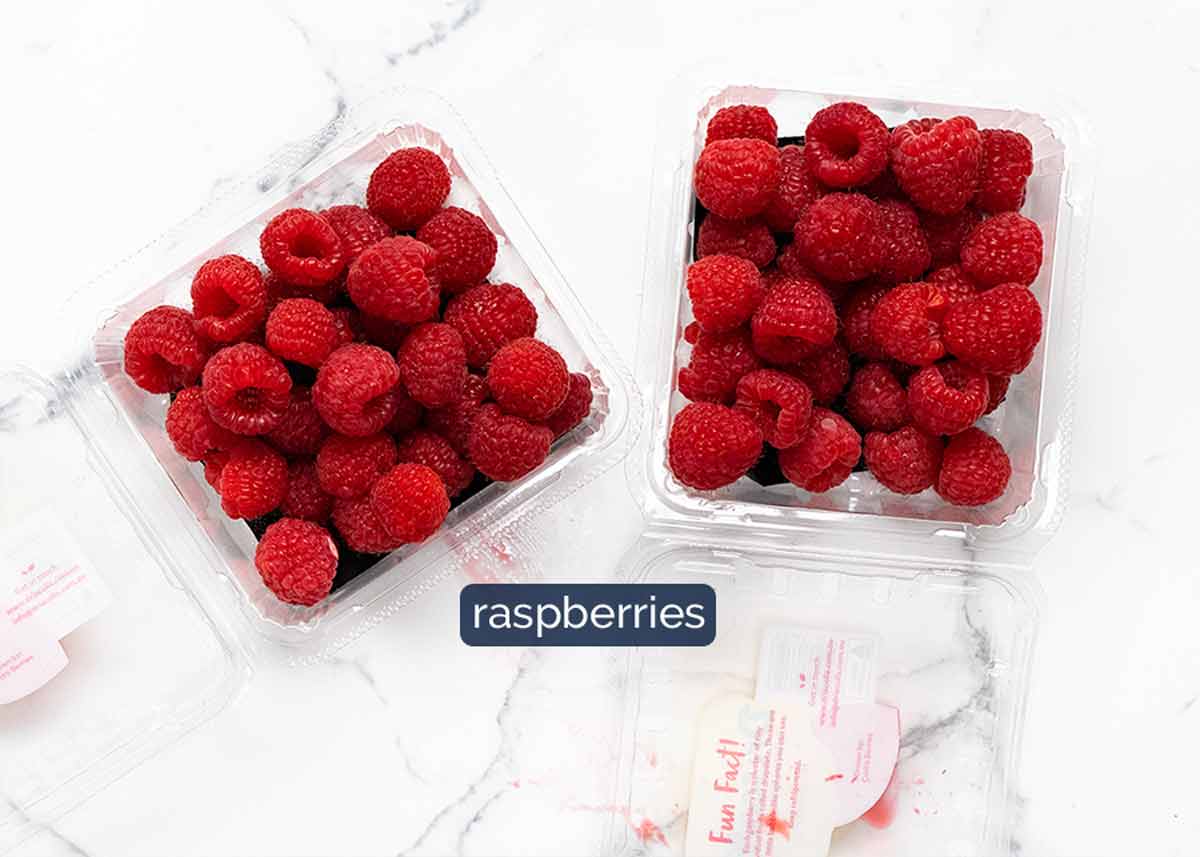
I’ve used raspberries in these because they were on special. However, you really can add any add-ins you want. See suggestions below.
Add-in options:
Raspberries or blueberries, other berries – 250g/8oz, 2 heaped cups
Chopped fruit like apple, pears, cherries, grapes. (Not overly juicy fruit like oranges, peaches etc as they will leech too much liquid into the batter)
Dried fruit – sultanas, apricots, cranberries, apple, mango – anything goes!
Nuts and seeds
Chocolate chips – I mean, the rest of the muffin is healthy. So this tips the scales back to neutral? 😈
How to make breakfast muffins
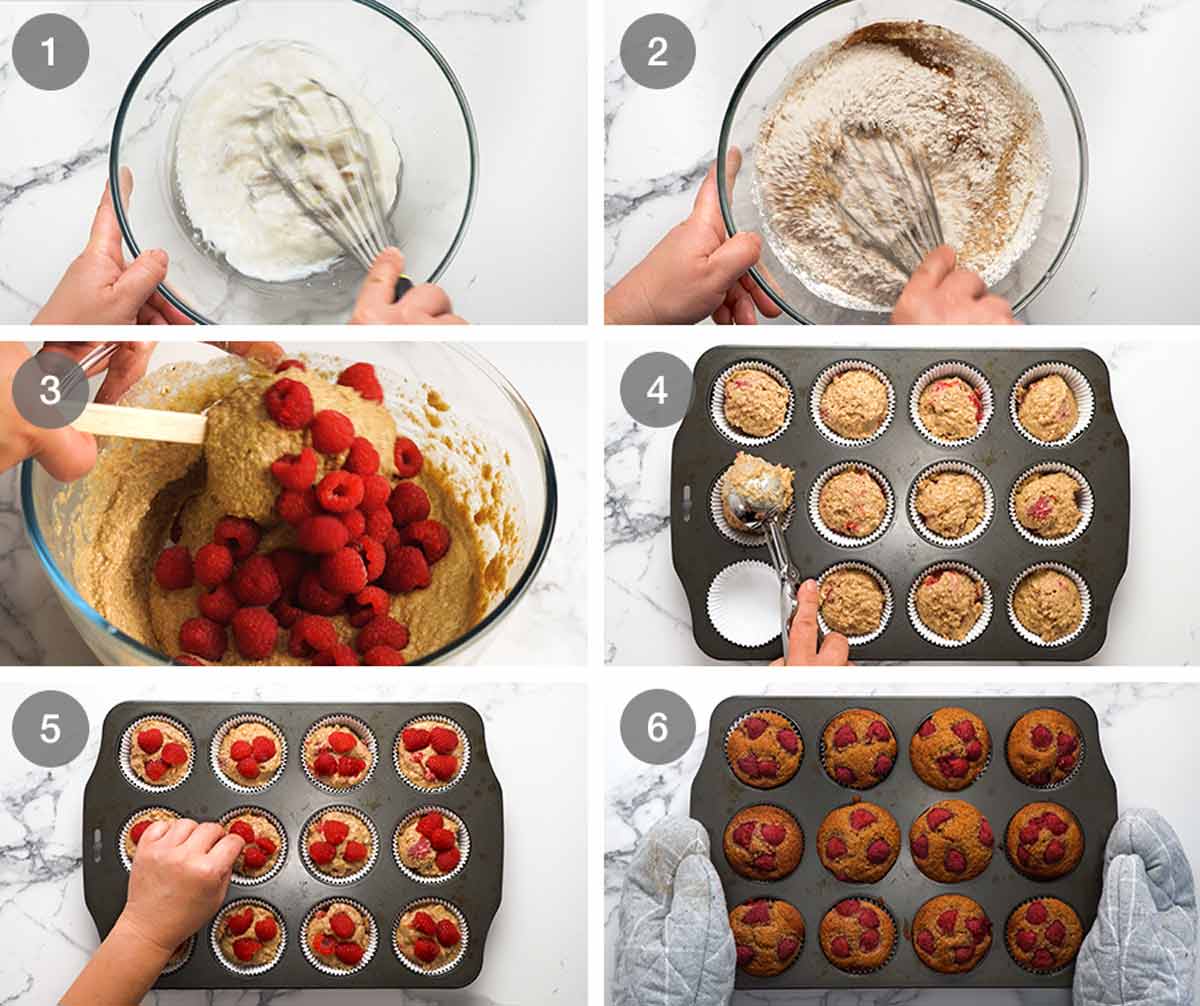
It’s as easy as 1-2-3:
Mix wet ingredients
Mix in dry ingredients
Fill muffin holes and bake!
I like to reserve some raspberries to decorate the top, but this entirely optional – for visual purposes only. I know some people prefer more INSIDE the muffins!
Whisk wet – Melt the coconut oil in a microwavable bowl. Then whisk in all the wet ingredients: egg, yogurt, milk, honey and vanilla.
Mix in dry ingredients – Scatter across the surface (incorporates easier) then whisk in. Once you can no longer see flour, stop! Don’t get too enthusiastic with mixing as it will make the muffins tough.
Add-ins – Fold through the raspberries or whatever add-ins you’re using.
Divide between 12 holes. I used liners but it’s not essential, you could just spray with oil.
Top with reserved raspberries, if using.
Bake for 25 minutes at 190°C / 375°F (170°C fan) or until golden brown on the surface. Cool then devour!
Other matters of Up-and-Go Breakfast Muffins
Breakfast on the run – I’ve named these breakfast muffins as such because they are a great grab-and-go breakfast that doesn’t need heating and can be literally eaten on the run. More filling and less sweet than than muesli bars which I personally consider to be more suitable for a snack rather than breakfast.
Storage – These will keep for 4 to 5 days without going stale because they are more moist than typical muffins thanks to the coconut oil and yogurt. If it’s hot where you are, best to keep them in the fridge, otherwise just keep them in the pantry in an airtight container. They will also freeze for 3 months.
And with that, I think I’ve said all I need to on the matter of these breakfast muffins! Just to reiterate, these are less sweet than your usual muffins. To me, they are the perfect sweetness to have as breakfast without feeling like you’re being naughty and eating cake. And they are just sweet enough to have as a morning tea treat. In fact, people who often find Western cakes and cookies too sweet will probably find these the perfect level of sweetness.
Hope you give them a go! Love to know what add-ins you use if you do. – Nagi x
Watch how to make it

Up-and-go breakfast muffins!
Stays fresh for days.Ingredients
Wet:
- 1/3 cup coconut oil , virgin or unrefined (normal oil also works but not as tasty, Note 1)
- 1 large egg , at room temperature (~55g/2oz)
- 2/3 cup milk , at room temperature – full fat best (low fat and non-dairy ok too)
- 1/3 cup yogurt , plain/unsweetened
- 1/2 cup honey (or maple syrup)
- 1/2 tsp vanilla extract
Dry:
- 1 1/4 cups wheat germ (best) OR 1 1/4 cups (80g) wheat bran (Note 2)
- 1 1/2 cups wholemeal flour (sub ordinary flour – Note 3)
- 1/4 tsp salt
- 1 tsp cinnamon powder
- 1 tsp baking powder (Note 4)
- 1 tsp baking soda , sifted if lumpy (or 3 tsp extra baking powder) – Note 4
Add ins – CHOOSE ONE:
- 250g / 8 oz raspberries , 18 set aside and cut in half to decorate top if desired
- 2 cups diced fresh fruit (not watery) – like apples, pears
- 1 1/4 cups dried fruit, nuts, choc chips etc
Instructions
- Preheat oven to 190°C / 375°F (170°C fan). Line a 12 hole standard muffin tin with muffin cases OR spray generously with oil.
- Whisk wet – Place coconut oil in a microwave proof bowl. Microwave for 45 seconds on high or until melted. Add remaining Wet ingredients, whisk until smooth.
- Mix in Dry – Sprinkle the Dry ingredients across the surface in the order listed. Mix just until combined.
- Raspberries – Gently stir in the whole raspberries or other add-ins of choice.
- Fill muffin tin – Divide batter between the 12 holes using an ice cream scoop. Decorate top with halved raspberries.
- Bake 25 minutes. Cool 5 minutes then transfer to a cooling rack.
Notes
Nutrition
Life of Dozer
While I’m in Melbourne for the Good Food & Wine Show, Dozer is with the golden retriever boarder and apparently not showing any signs of separation anxiety. Hmmph!

The post Up-and-go breakfast muffins! appeared first on RecipeTin Eats.
]]>