 Hot Chocolate Fudge Cake – think of this as a sliceable version of Chocolate Self Saucing Pudding – with a LOT more chocolate fudge sauce! The perfect cosy dessert for cool winter days that’s easy to make. The chocolate cake of your dreams… I know this is a great dessert for sweater weather. But holy... Get the Recipe
The post Hot chocolate fudge cake appeared first on RecipeTin Eats.
]]>Hot Chocolate Fudge Cake – think of this as a sliceable version of Chocolate Self Saucing Pudding – with a LOT more chocolate fudge sauce! The perfect cosy dessert for cool winter days that’s easy to make.
The chocolate cake of your dreams…
I know this is a great dessert for sweater weather. But holy moly. It’s so good, I’ll wager that after you’ve made it once, you’ll make it over and over again regardless of the weather.
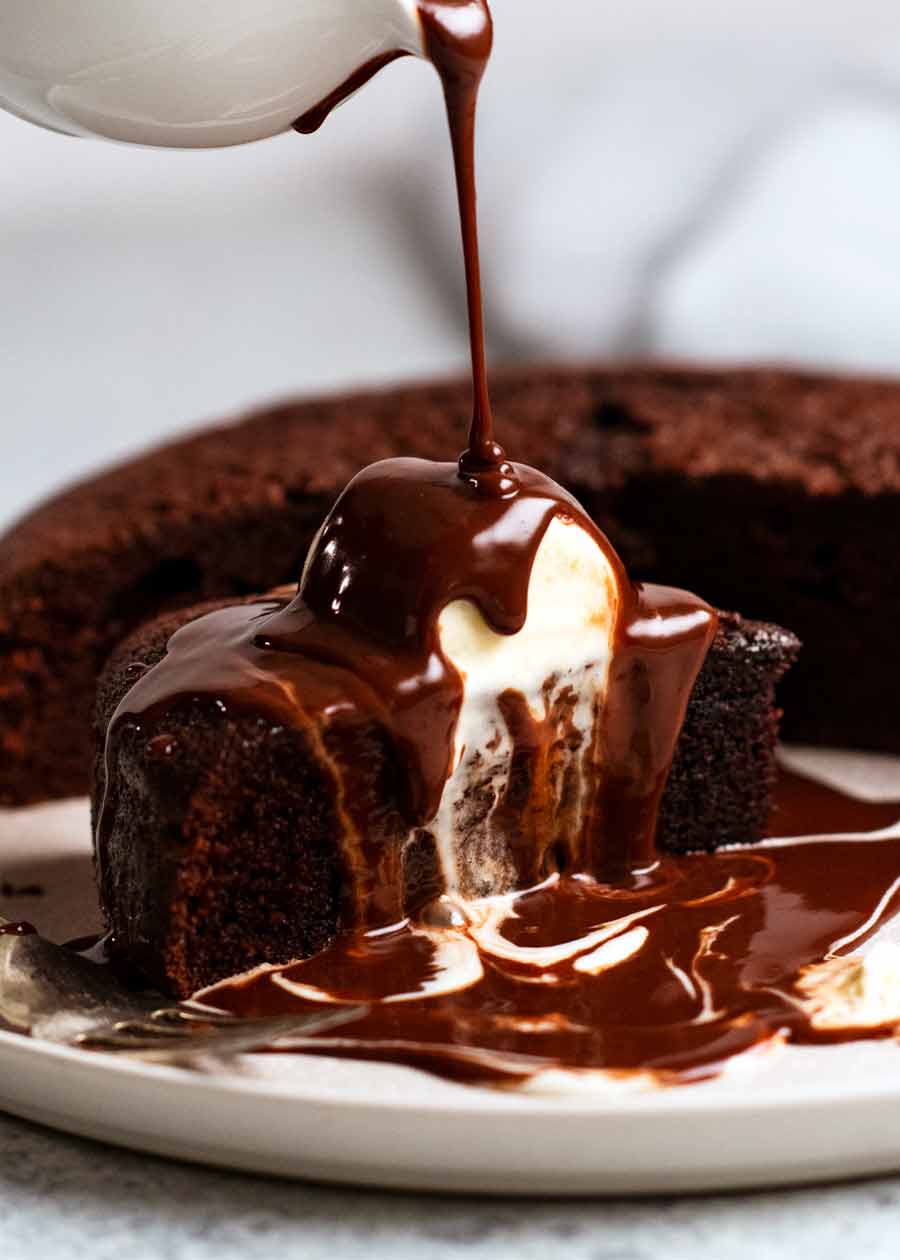
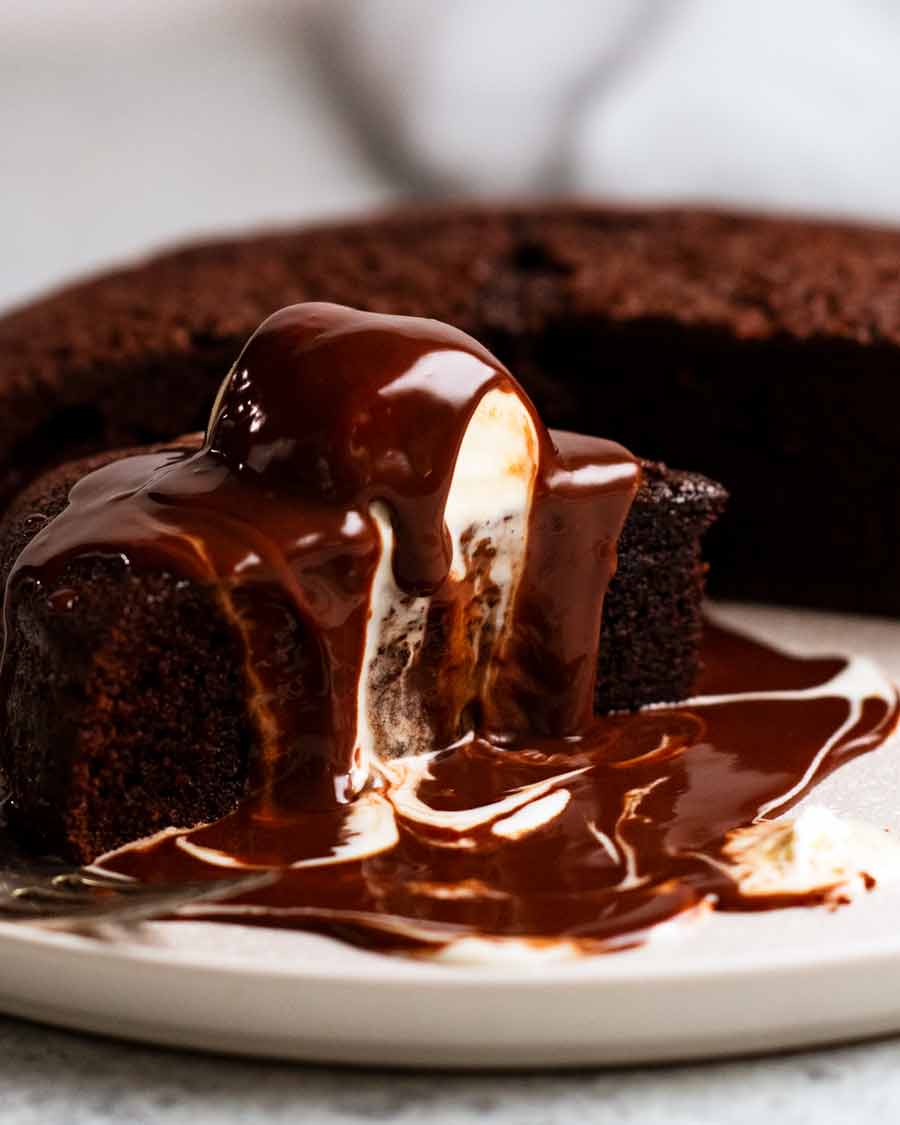
Let me paint the picture for you. A warm slice of soft chocolate cake, moist in a way that cakes can only be when warm. A scoop of melty vanilla ice cream on top.
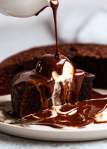
Then you douse – douse, my friends! – with hot chocolate fudge sauce. The ice cream starts to melt, and you get beautiful swirls of chocolate with white streaks pooling around your cake. You dig in with a spoon, getting a big scoop of cake soaked with the chocolate sauce and melted ice cream, and that first bite, that first glorious bite…..
Knees. WEAK.
Did I mention how easy this Hot Chocolate Fudge Cake is to me? The batter is made in a single bowl with a wooden spoon. And that fudge sauce is 2 ingredients – just cream and chocolate.
Ingredients in Hot Chocolate Fudge Cake
Here’s what you need to make this winter dessert. The recipe is based on my classic Chocolate Cake, with some minor adjustments to make it suitable for serving hot as a single layer, unfrosted cake.
Dry ingredients for the warm chocolate cake
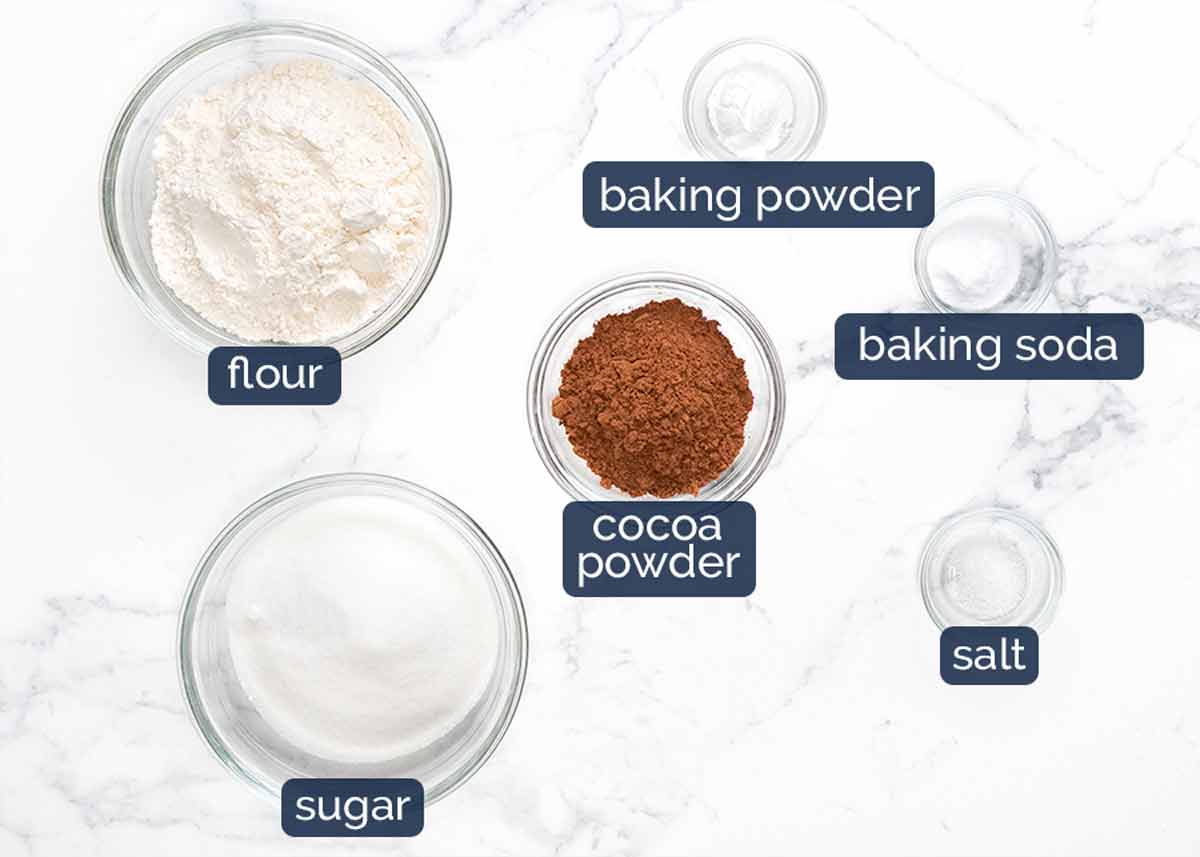
Flour – Just plain / all-purpose flour. Self raising flour will also work but the cake crumb is not as soft. (Skip the baking soda and baking powder if you use self-raising flour).
Baking soda (bi-carb) and baking powder, or use more of either – Both of these makes cakes, muffins etc rise but work differently depending on what you’re making. Baking soda is also ~3x stronger than baking powder. I like using a combination of the two for this cake for a lovely tender crumb and nice shape to the surface of the cake. However, if you only have one or the other, you can use more of what you have. See recipe notes for quantities.
Cocoa powder – Just plain cocoa powder, unsweetened. Not dutch processed – though you can use it if you’ve got this more expensive, more intense type.
White sugar – Use caster sugar / superfine sugar if you’ve got it, because it’s finer so you can be confident it dissolves easily. Else ordinary white sugar / granulated sugar works ok too.
Salt – Just a pinch brings out the flavours in this cake, especially the chocolate. Fairly standard baking practice for me these days, adding a touch of salt for this purpose!
Wet ingredients
And here are the wet ingredients in this cake:

Melted butter AND oil – Butter adds flavour into this cake while oil keeps the crumb fresh and moist for longer. Using both gives us the best of both worlds!
Egg – 1 large egg which means an egg that is sold in cartons labelled “large eggs” which is an industry standard. It is also best to be at room temperature – see this post for a quick way to do this.
Vanilla – For flavour, which compliments the chocolate.
Boiling water – Using hot rather than cold water makes the cocoa flavour “bloom” so the cake tastes more chocolatey. You’ll smell the chocolate the moment the hot water mixes into the batter!
No coffee? Some chocolate cakes include a touch of coffee which brings out the chocolate flavour. I tried it but it didn’t add anything to this cake because you get so much chocolate flavour from the hot fudge sauce!
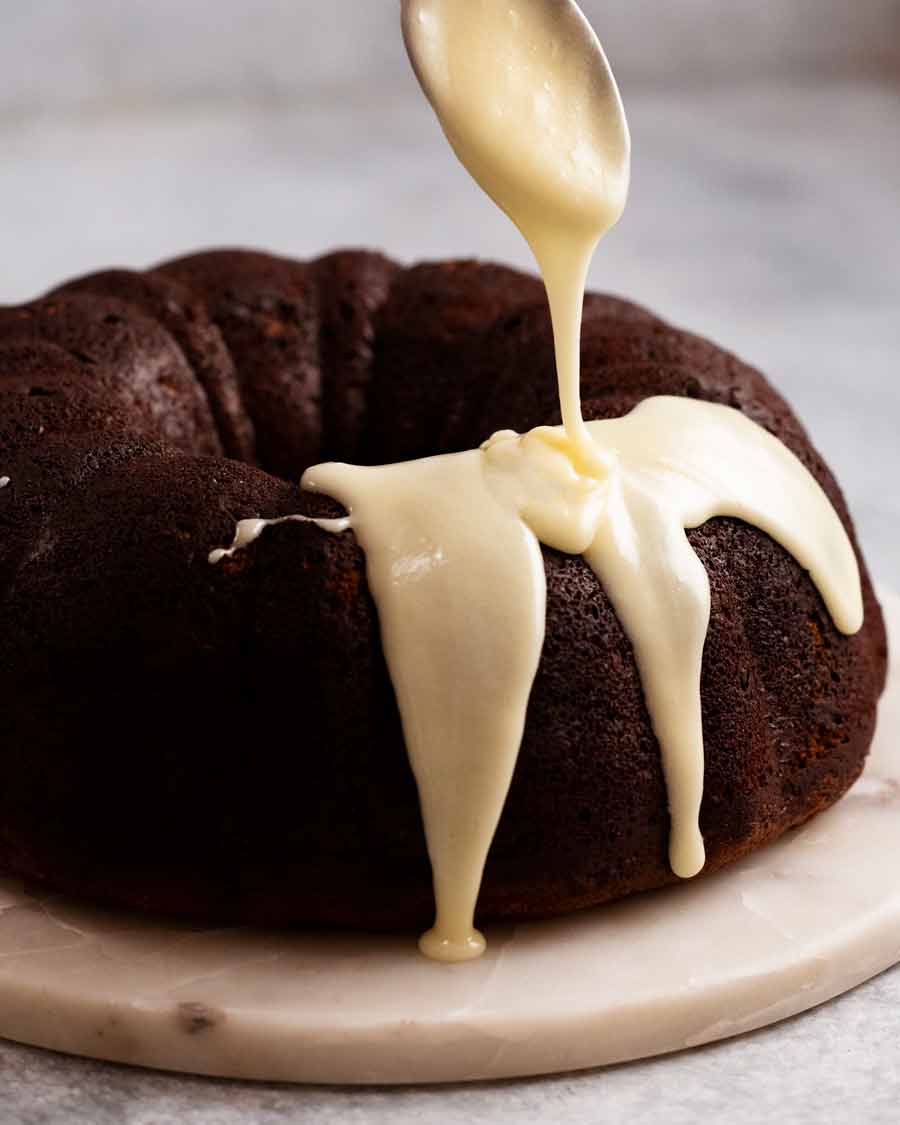
Hot chocolate fudge sauce
Fudge sauce comes in many forms – some made with cocoa powder and evaporated milk, some with melted chocolate, some a combination of the two. The hot fudge sauce for this cake is the most luxurious of its kind – pourable chocolate ganache that’s made with just chocolate and cream.
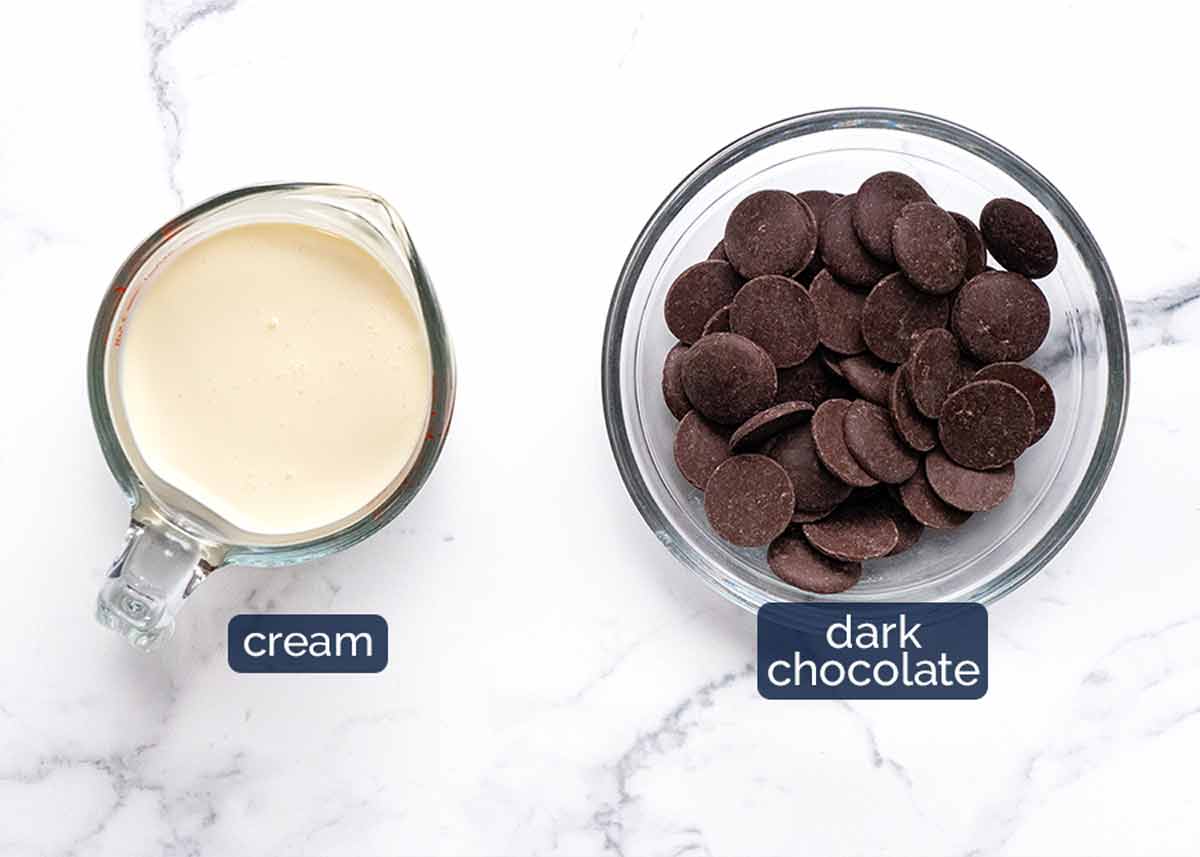
The ratio of chocolate to cream is 1:1 for ganache. However, as I want the sauce to be slightly thicker when warm, I’ve increased the chocolate slightly so it’s 1/ 1/4 cups of chocolate (200g) to 1 cup / 250ml of cream.
Dark chocolate – I use standard baking dark chocolate melts or chips (US: semi-sweet chocolate chips). You can also use chopped 50 – 70% dark chocolate (Lindt is my favourite).
Chocolate melts are just a type of chocolate chips that is available here in Australia. It comes in a disc shape and is designed to melt easily and smoothly. Whereas chocolate chips, while they can also be used for melting, are designed specifically to hold their shape for your favourite chocolate chip cookies rather than melting into puddles.
Milk and white chocolate – These will work but you will need to reduce the amount of cream slightly else the fudge sauce will be too runny. This is because they are softer than dark chocolate. Fellow baking nerds can read more about this in my Chocolate Ganache recipe!
Cream – Either heavy / thickened cream or pure cream will work here. Full fat essential. Reduced fat doesn’t always mix properly into the chocolate and also the sauce will be too thin.
How to make Hot Chocolate Fudge Cake
Get the cake in the oven first. Then make the chocolate fudge sauce – it will need 20 to 30 minutes to cool a bit to allow it to thicken slightly before using.
1. Making the hot fudge cake
Just mixed up in one bowl with a whisk. No stand-mixer or electric beater required. This is a very forgiving cake. Just be sure to get it in the oven as soon as you mix the batter, don’t leave it lying around.
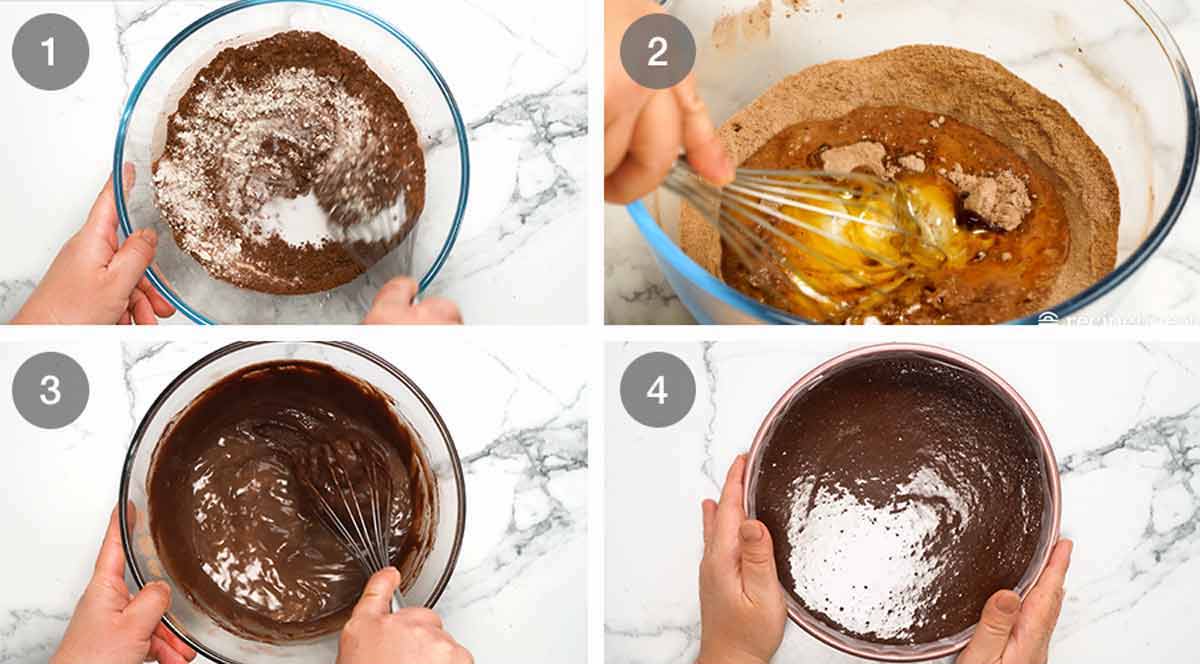
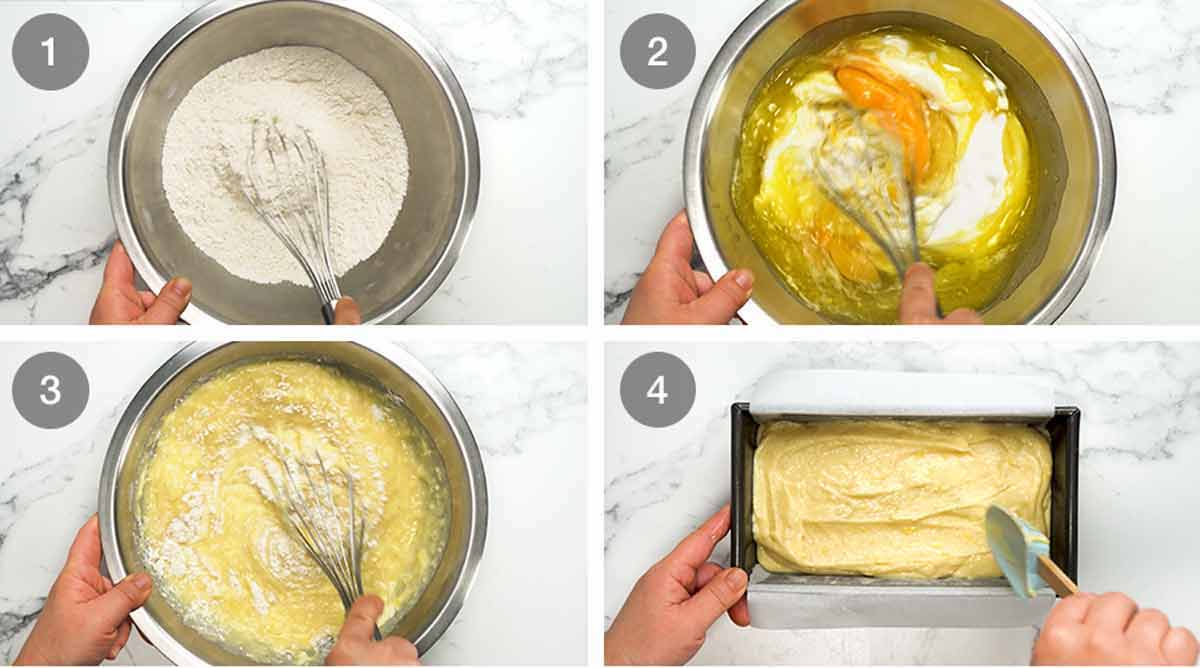
Mix Dry – Whisk the Dry ingredients in a large bowl.
Add Wet – Add the Wet ingredients, except the boiling water, into the same bowl.
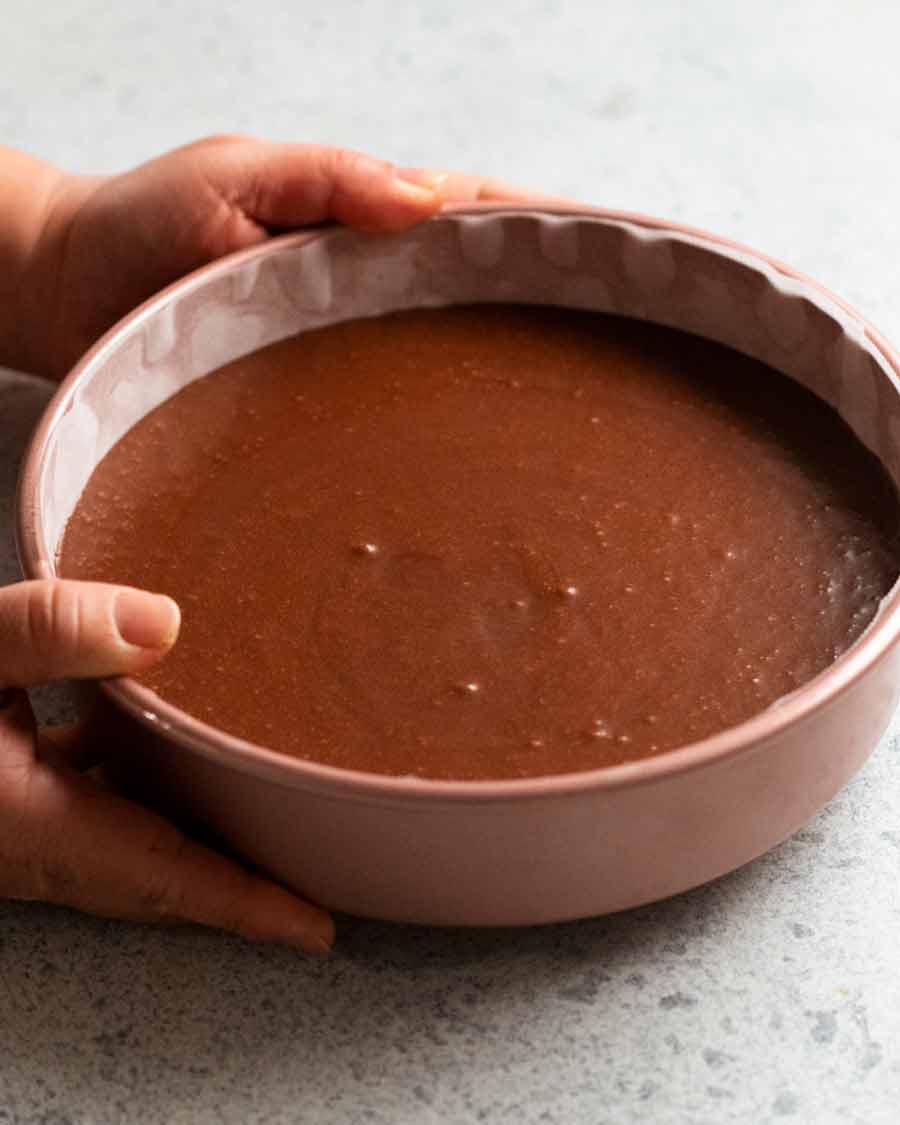
Whisk until combined. Then whisk the boiling water in. The batter will be pretty thin – not as thin as the Chocolate Cake on which this recipe is based, but still pretty thin.
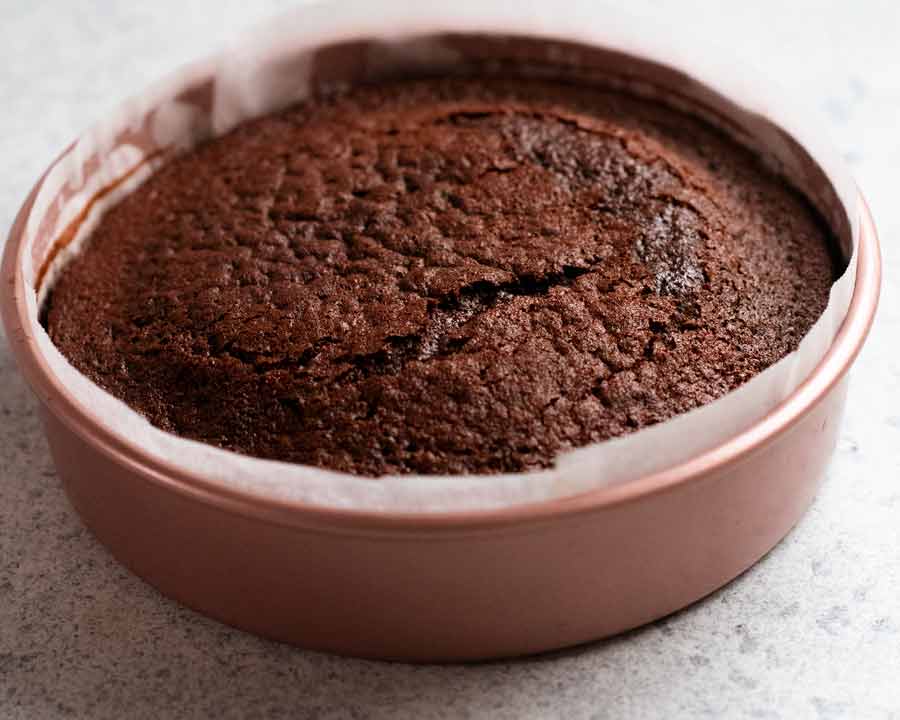
Pour the batter into a lined 20cm/8″ pan. It’s best not to use a springform pan to avoid any chance of batter leakage – because as noted above, the batter is fairly thin.
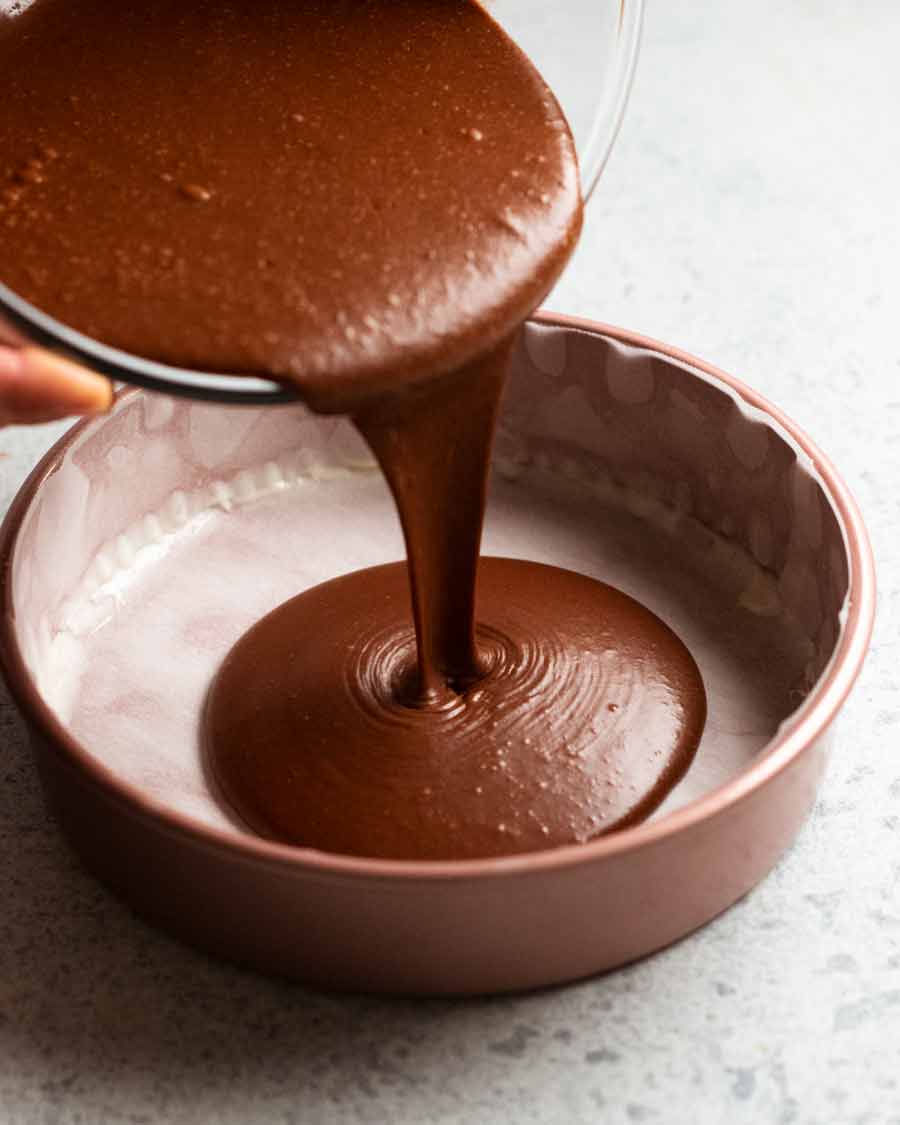
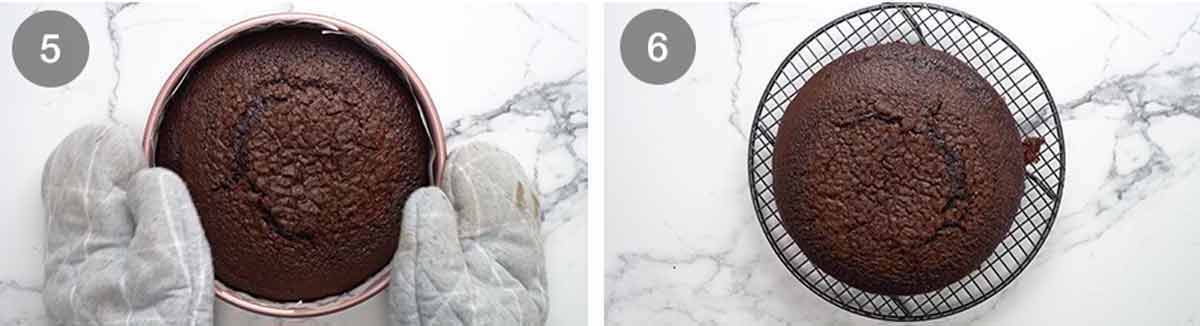
Bake for 40 minutes at 180°C/350°F (160°C fan) or until a toothpick inserted into the centre comes out clean or nearly clean. Remember, we’re making a hot fudge cake here, so it’s fine if the centre is slightly damp!

Cool in the pan for 10 minutes. Then turn it out and let it cool for just another 10 minutes before slicing to serve. Don’t worry, the cake will still be lovely and warm! We just want to rest the cake a bit before slicing. Hot cake is very delicate!
2. Making the hot fudge sauce
While it’s tempting to just put both cold cream and chocolate in a bowl and microwave to melt, this can lead to the chocolate seizing so you end up with a lumpy mess in your hands. Yep, speaking from first hand experience here! Make ganache properly – by pouring hot cream over the chocolate and leaving it to melt before mixing to combine.

Pour hot cream over chocolate – Heat the cream until steamy and hot using whatever method you choose: saucepan or microwave. Then pour it over the chocolate in a bowl.
Full coverage! Shake the bowl / poke as needed to ensure all the chocolate is submerged.
5 minutes – Cover with a plate and leave for 5 minutes so the cream melts the chocolate.
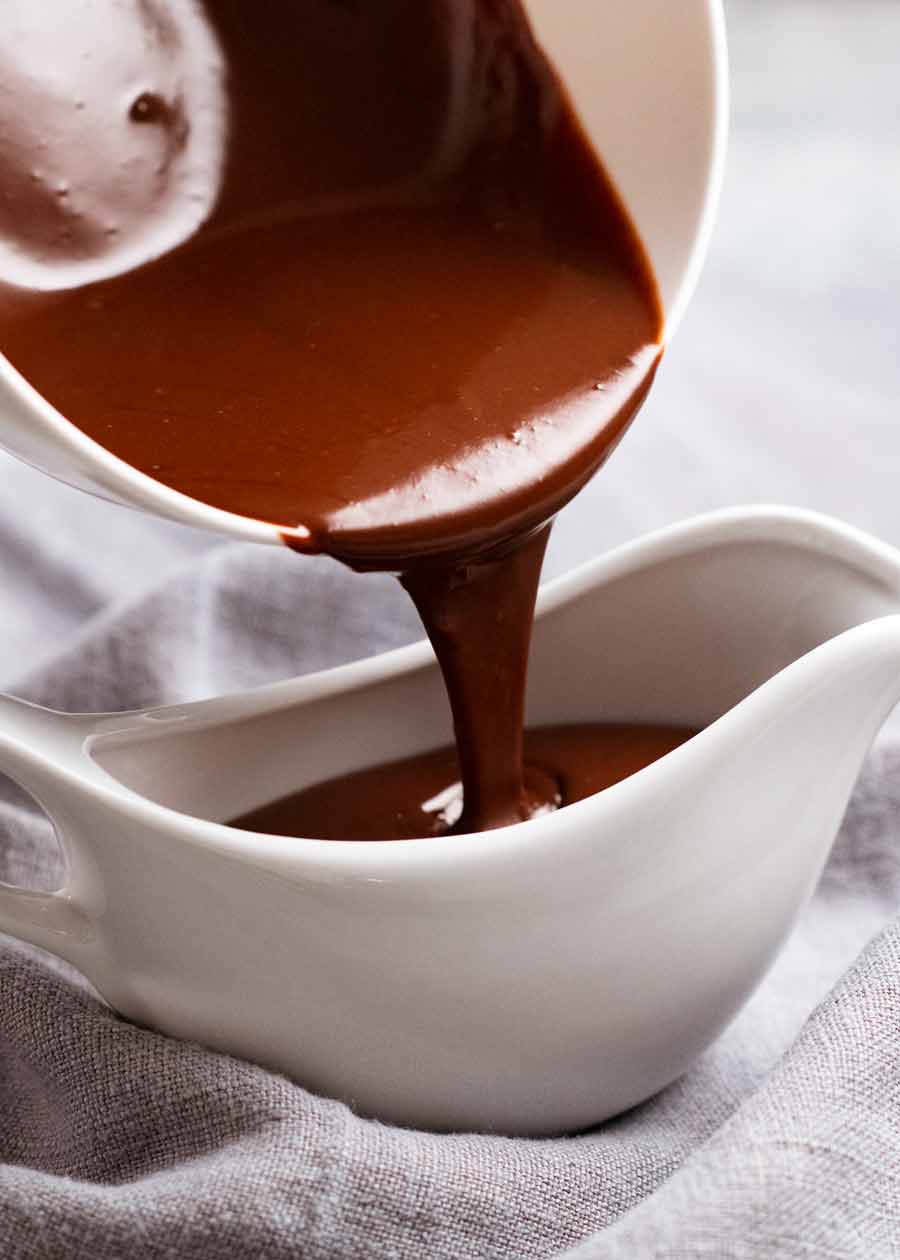
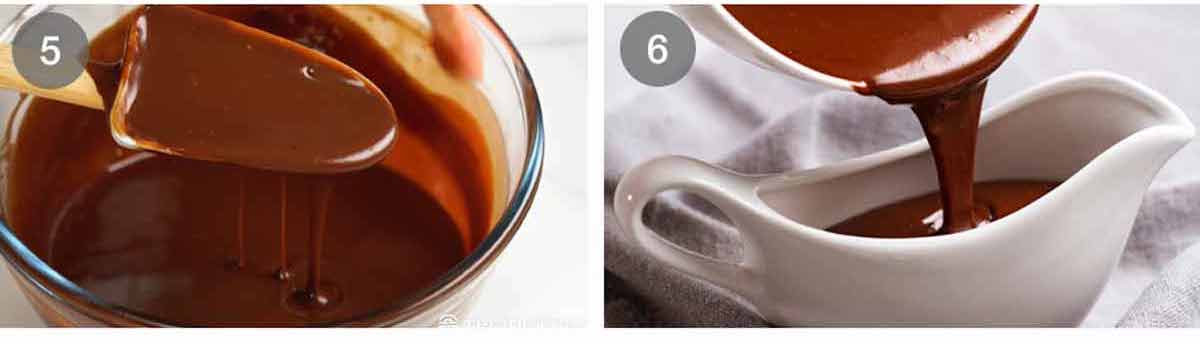
Mix until the cream and chocolate combine into a glossy chocolate sauce. Be patient – it will happen! If you have little chocolate lumps at the end, just pop it in the microwave for 20 seconds for a heat boost, then mix again.
Cool for 20 minutes to let the sauce thicken slightly. Just leave it in the bowl.
Serving – Give it a mix to make it smooth again. Then pour into serving jugs to let everyone help themselves. (Or, if you’re concerned about portion control, you can serve it!).
Reheating and storage – The chocolate sauce will firm up to a peanut butter consistency when refrigerated but can simply be reheated in the microwave back to perfect pourable consistency. It will keep for at least a week – just bear in mind the shelf life of the cream.
3. Serving the hot fudge cake
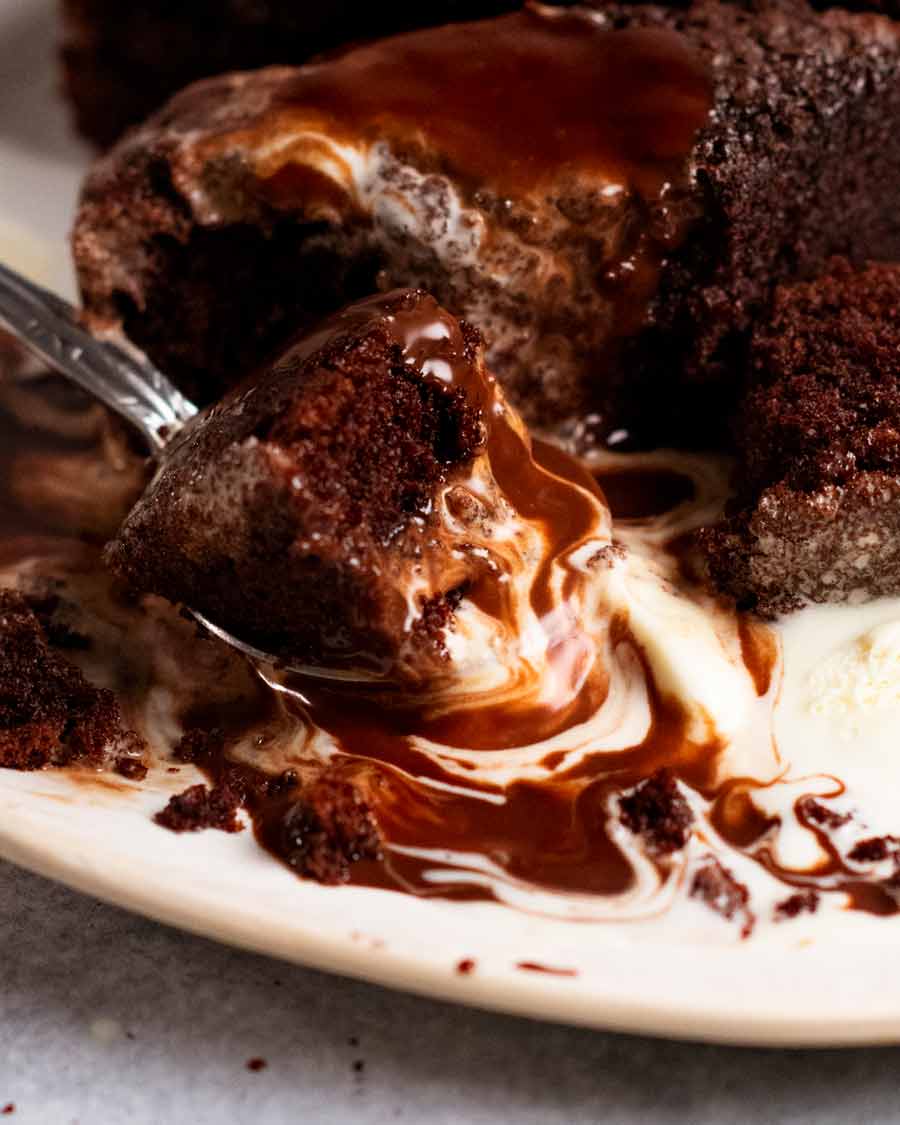
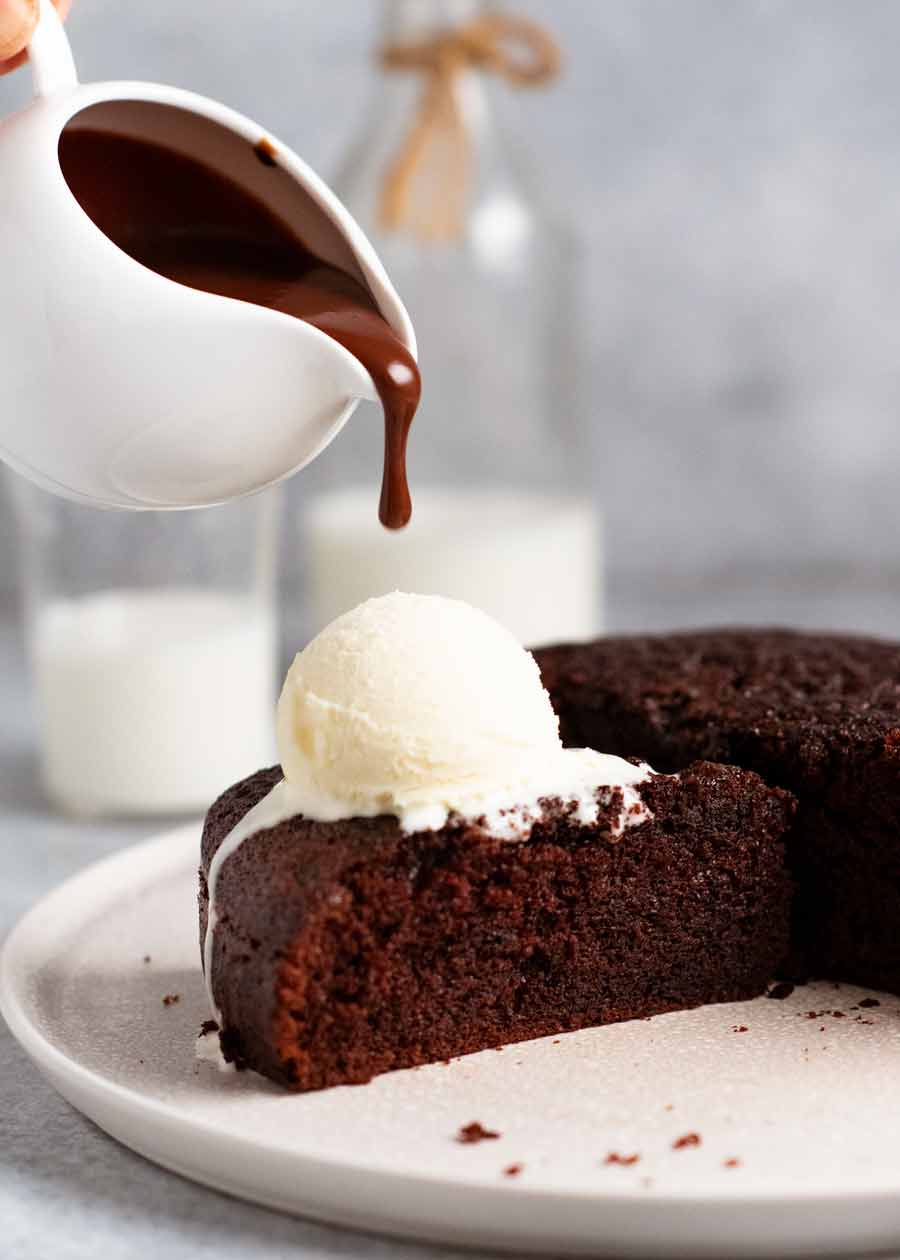
To serve this gloriously cosy, decadent hot chocolate cake, cut slices of cake as generous as you want. Put on a plate – or a shallow bowl (for easy chocolate-sauce-melted-ice-cream scooping). Top with a scoop of vanilla ice cream then douse with warm chocolate fudge sauce. Dive in and swoon!!
And 10 seconds later…..
Matters of storage
The cake has an excellent shelf life of 5 to 7 days in the fridge. It won’t go stale thanks to the smidge of oil we’re using, and also because it is intended to serve hot. Any baked good heated up wipes out any trace of staleness!
The fudge sauce can also be kept for at least 7 days, limited only by the shelf life of the cream. Keep it in the fridge – it will firm up to a peanut butter like consistency. Scoop out what you need, then just microwave to re-melt.
And PS, in case you’re concerned, there’s plenty of hot fudge sauce for serving. 2 whole cups, that’s 500 ml. Imagine running out of chocolate sauce! Devastating. – Nagi x
Watch how to make it
Hot Chocolate Fudge Cake
Ingredients
Dry:
- 1 cup plain/all-purpose flour (Note 2)
- 1/3 cup cocoa powder (unsweetened), sifted (Note 1)30g
- 3/4 tsp baking powder (Note 2)
- 3/4 tsp baking soda/bi-carb (sifted if lumpy) (Note 2)
- 1 cup caster/superfine sugar (sub ordinary white sugar)
- 1/4 tsp salt
Wet:
- 1 large egg , at room temperature
- 1/2 cup milk , full fat, at room temperature
- 75g / 5 tbsp unsalted butter , melted and cooled slightly
- 1 tbsp oil (canola, veg or other neutral oil) – keeps cake moist for days
- 1 tsp vanilla extract
- 1/2 cup boiling water
Chocolate fudge sauce:
- 1 cup thickened / heavy cream, or pure cream (not low fat, too thin)
- 1 1/4 cups dark chocolate melts or chips (US: semi-sweet chips) – or finely chopped 60 – 70% cocoa chocolate block (Note 3)
Serving:
- Vanilla ice cream
Instructions
- Preheat oven to 180°C/350°F (160°C fan). Grease a 20cm/8" cake pan with butter then line with paper.
- Whisk Dry ingredients in a large bowl.
- Add Wet – Then add all the Wet ingredients EXCEPT the boiling water. Whisk until combined. Then add the boiling water and whisk until smooth. The batter will be pretty thin.
- Bake 40 min – Pour into the pan. Bake for 40 minutes or until a skewer inserted into the centre comes out mostly clean – a faint smear of batter isn't a bad thing, we're making a fudge cake here!
- Cool in the pan for 10 minutes. Invert onto a plate, then onto a cooling rack or plate right side up. Cool for a further 10 minutes – the cake will still be warm for serving.
- Serving – Cut slices of the warm cake. Top with a scoop of ice cream. Douse with fudge sauce – just shy of 1/4 cup per slice (10 slices). Eat and swoon!
Chocolate fudge sauce (makes 2 cups):
- Heat cream until hot, just before boiling point, using your method of choice – saucepan or microwave.
- Stand 5 min – Put chocolate in bowl. Pour over hot cream. Ensure all chocolate is submerged, then cover with a plate. Leave for 5 minutes.
- Mix – Using a whisk or rubber spatula, mix vigorously until the cream and chocolate combine into a silky chocolate sauce.
- Cool to thicken for 20 minutes. Give it a stir then pour into a jug for serving!
Notes
– Just baking soda: use 1 teaspoon in total Self raising flour – Skip both the baking soda and baking powder, switch the plain flour with self raising flour. The crumb won’t rise quite as much but still fluffy and lovely! 3. Chocolate – Use chocolate intended for baking sold in the baking aisle, not eating chocolate (Lindt 70% is the exception). If using a block, chop it finely. Don’t use ordinary eating chocolate – it’s hit and miss. Some will melt fine, others do not. AUSTRALIA: “Melts” are intended for melting so are safest to use. However, chips will melt fine too. US: Semi-sweet chips are perfect for this. 4. Storage – Cake will keep for 5 – 7 days in the fridge (stays moist thanks to a touch of oil). Warm to serve. Fudge sauce will keep for at least a week – factor in the cream shelf life. Firms up in the fridge, just warm to melt. Both the cake and sauce can also be frozen for up to 3 months. Nutrition per serving, assuming 10 servings and all the sauce is consumed. Excludes ice cream.
Nutrition
Life of Dozer
Busted, helping himself to the bin. He’s so gross! 😝 Probably rebelling because he was deprived of chocolate cake. No chocolate for dogs!

The post Hot chocolate fudge cake appeared first on RecipeTin Eats.
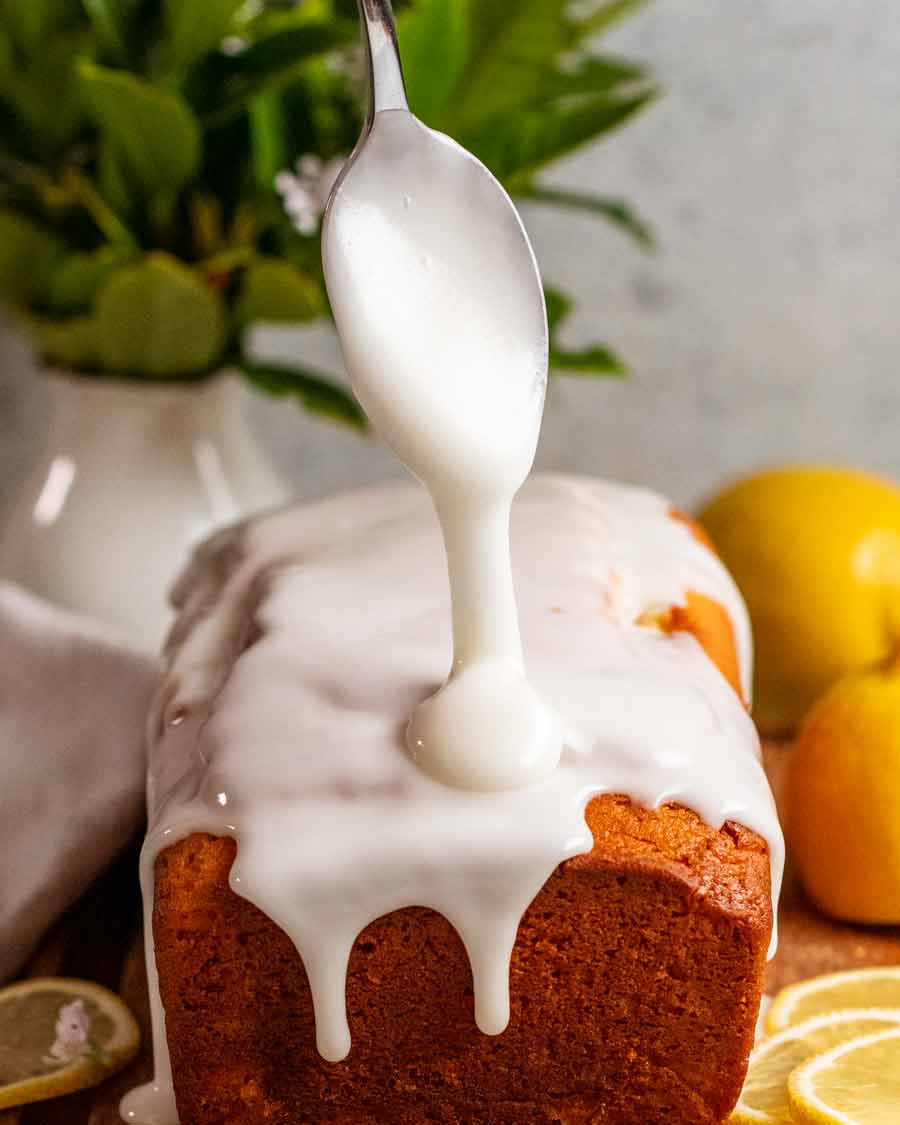
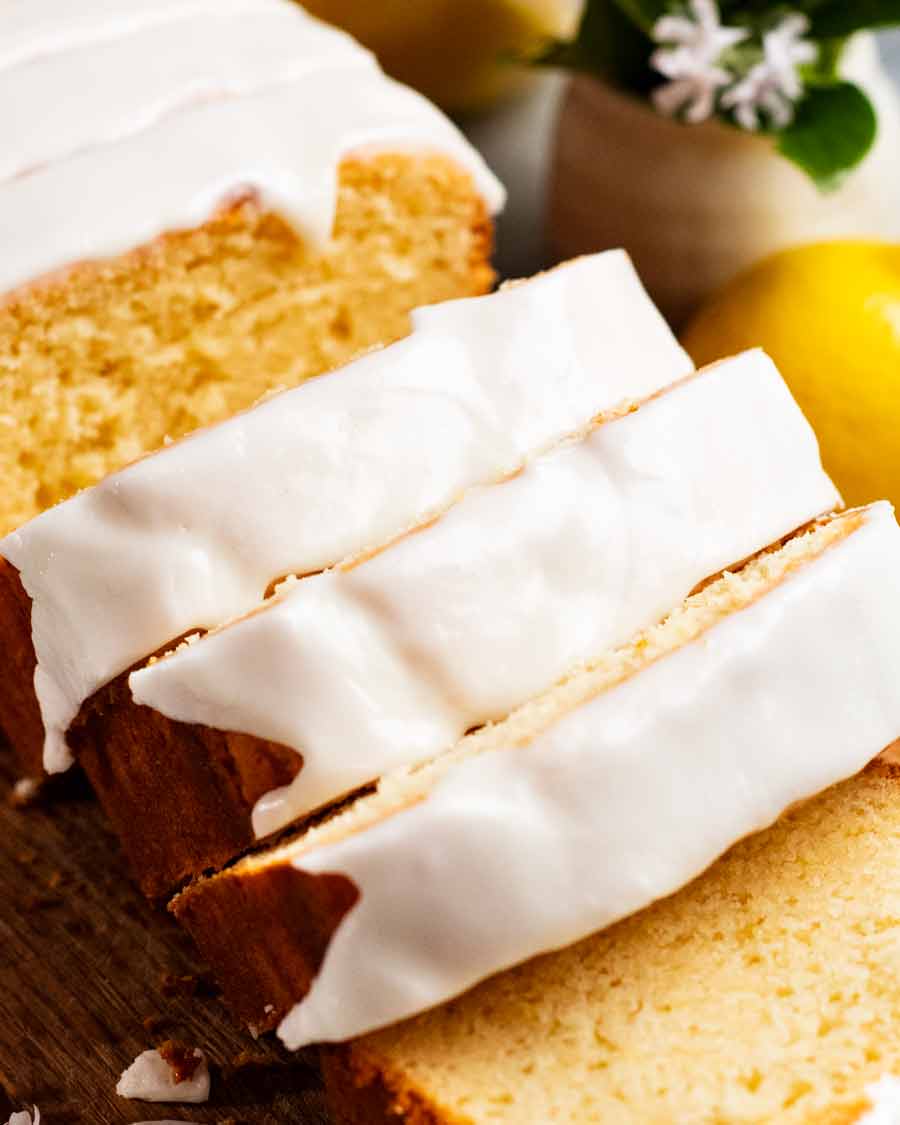
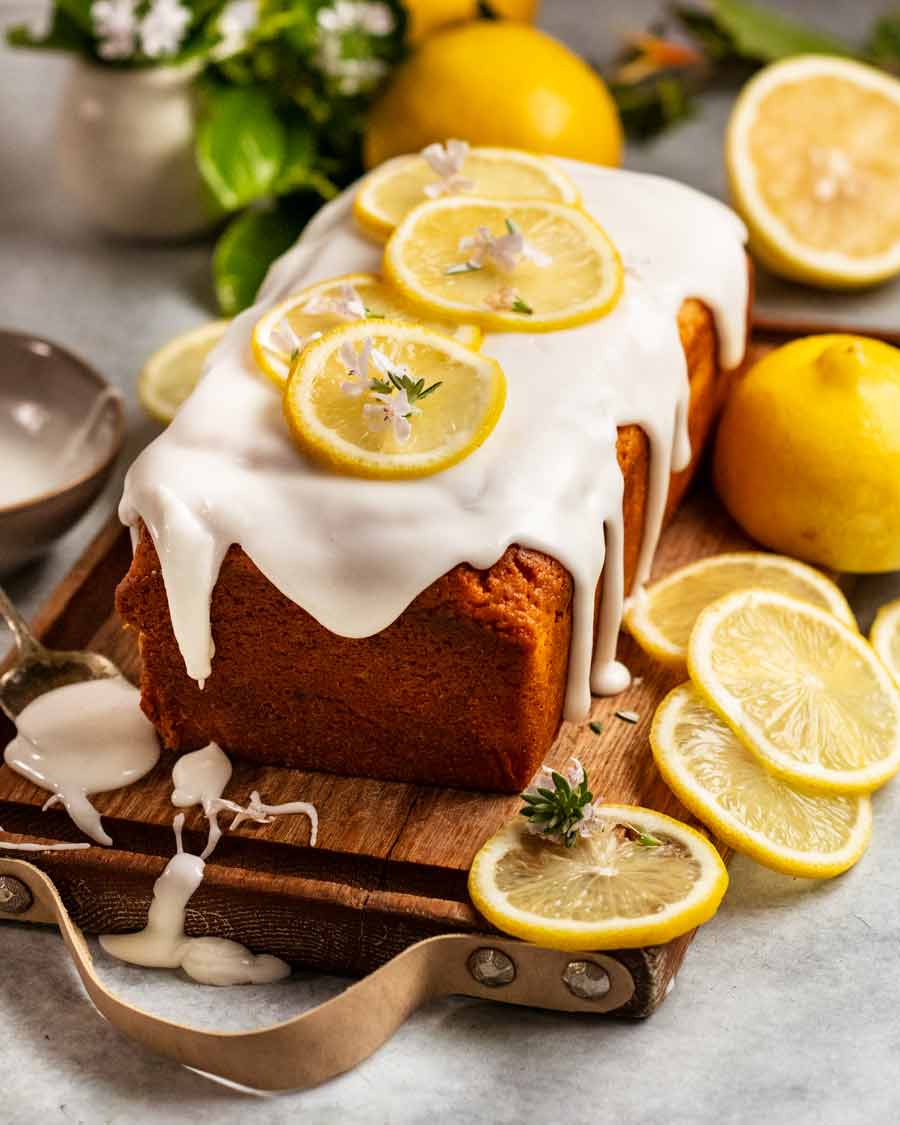
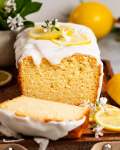
]]> Glazed lemon loaf is what you make when you’re after something not too sweet that’s fuss-free to make. Lovely bright lemon flavour with buttery undertones, it’s a quick bread which means no yeast and easy to make. Excellent shelf life of 5 days! Glazed lemon loaf Quick breads are a great option for those times... Get the Recipe
The post Glazed lemon loaf appeared first on RecipeTin Eats.
]]>Glazed lemon loaf is what you make when you’re after something not too sweet that’s fuss-free to make. Lovely bright lemon flavour with buttery undertones, it’s a quick bread which means no yeast and easy to make. Excellent shelf life of 5 days!
Glazed lemon loaf
Quick breads are a great option for those times when you have the urge or need to bake, but don’t have the time for more involved recipes. They’re also convenient – easy to transport and easy to serve. Slice like bread and eat on a napkin!
As for today’s lemon glazed loaf, it’s here after I responded to a question on Facebook for how to convert my simple Lemon Yogurt Cake into a loaf. “Use the recipe as is but I’d switch half the oil with melted butter to get buttery flavour into it, because it’ll be taller than the cake so there’s less frosting-to-cake ratio so you’ll want the cake to have more flavour. I’d probably dial up the lemon flavour for the same reason. And it will take longer to bake – just keep testing with a skewer!”
By the time I got to the end of the response, the “just do this” suddenly seemed a little less simple. So I decided to create and properly test it, write it up and publish it! 😂
Ingredients in Glazed Lemon Loaf
Here’s what you need to make this. Note: Lemon extract is recommended for really good lemon flavour, but you can get away with doubling the zest instead!
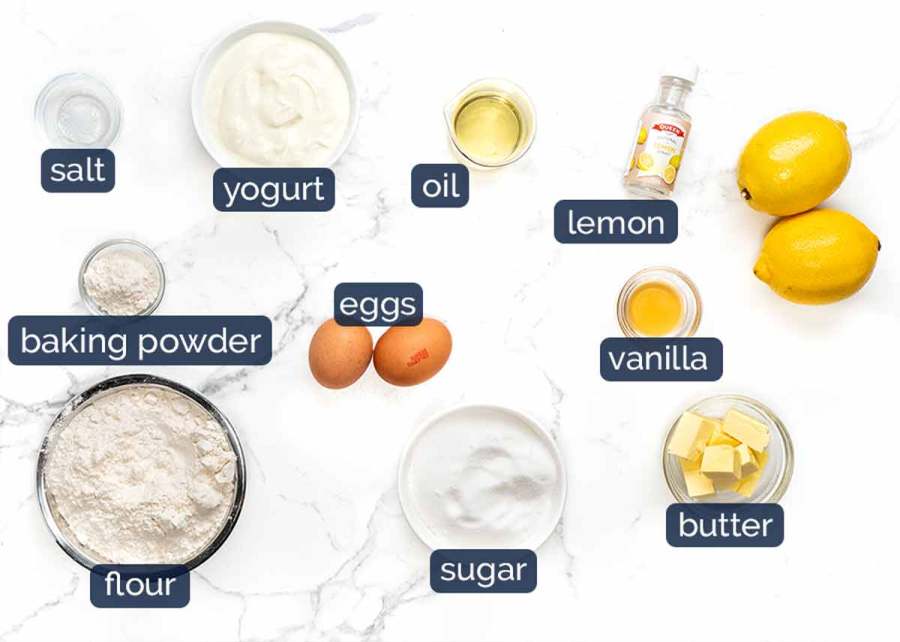
Yogurt – A “secret ingredient” in baking to make batters that bake up into lovely moist cakes, muffins etc. Any plain, unsweetened yogurt is fine here. I typically use Greek Yogurt. Substitute with sour cream (full fat).
Flour – Just plain / all purpose flour. Self-rising flour can be used in place of flour and baking powder, however, the loaf won’t be quite as soft or rise as well. Baking powder + flour is just more effective.
Gluten-free – I have not tried myself but reader Julie reported great success using gluten free flour! See her comment on this recipe dated 12 June 2023.
Baking powder – This makes this loaf rise.
Butter AND oil – Butter adds lovely buttery flavour into baked goods while oil makes the crumb moist. In this particular loaf, I wanted the best of both worlds so we’re using both.
In most recipes, I use one or the other – or I use butter plus another technique to keep the crumb moist (like the more involved technique for the reader-favourite plush Vanilla Cake).
Oil types – Vegetable or canola oil, or any other plain flavoured oil (such as sunflower, grapeseed oil) can be used. For the butter, use unsalted.
Fresh lemon – Fresh please! We need the zest and juice. Zest is where all the lemon flavour is! Juice provides mostly tang, not much lemon flavour.
Lemon extract (natural) – To make the lemon flavour in this un-missable. It really does enhance the lemon flavour in a way that you can’t achieve using just fresh lemons. But if you’ve got a stack of fresh lemons, feel free to skip this and double up on zest instead.
Vanilla – For flavour. I use vanilla extract here which is real vanilla flavour. Vanilla essence is artificial so the flavour is not as good. I typically only use pricier vanilla bean paste or vanilla beans for more refined dessert recipes, such as Creme Brûlée and Flan Pâtissier (the world’s greatest Custard Tart!)
Sugar – Just 1 cup which makes this loaf on the less-sweet side.
Eggs – At room temperature, so they incorporate easily into the batter. I use large eggs which are ~55g / 2 oz each, an industry standard so the eggs will be labelled “large eggs” on the carton.
Salt – Just a touch, to bring out the flavours. This is good general practice for all (well, most!) sweet baking recipes.
Lemon glaze
For the glaze, you just need soft icing sugar / powdered sugar and lemon juice. Australia – be sure to use soft icing sugar, not pure icing sugar which will set into a hard icing, like royal icing.

How to make this lemon loaf
Mix dry ingredients. Mix wet ingredients. Mix wet into dry. Bake! How easy it that!
Whisk the dry ingredients in a large bowl.
Whisk the wet ingredients in a separate bowl until combined.
Pour the wet into the dry ingredients then whisk just until combined and lump free. Don’t keep whisking as this will cause your cake to come out hard!
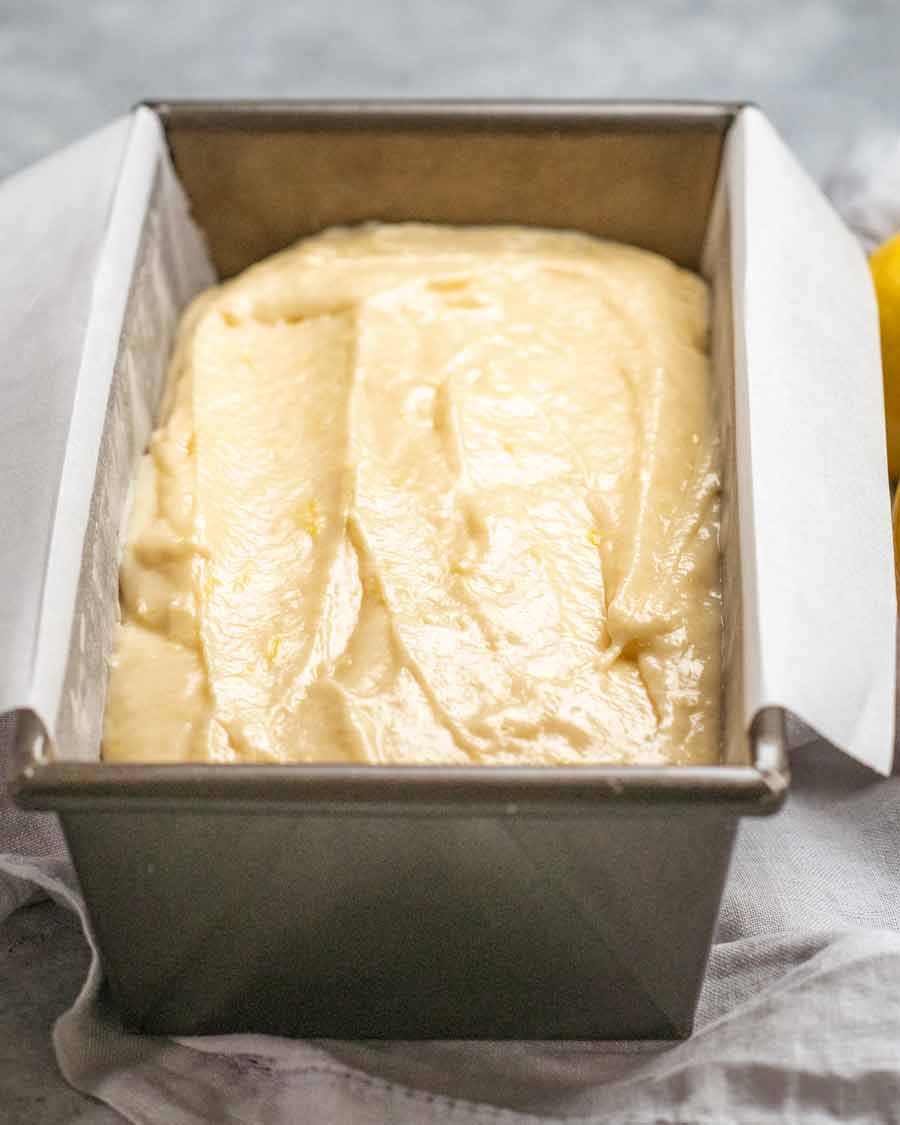
Pour / scrape the batter into a lined pan. (Note – when I say “lined pan”, I use a single sheet of baking / parchment paper to line the long sides and base. I don’t bother with the short side – no sticking problems if you grease it).
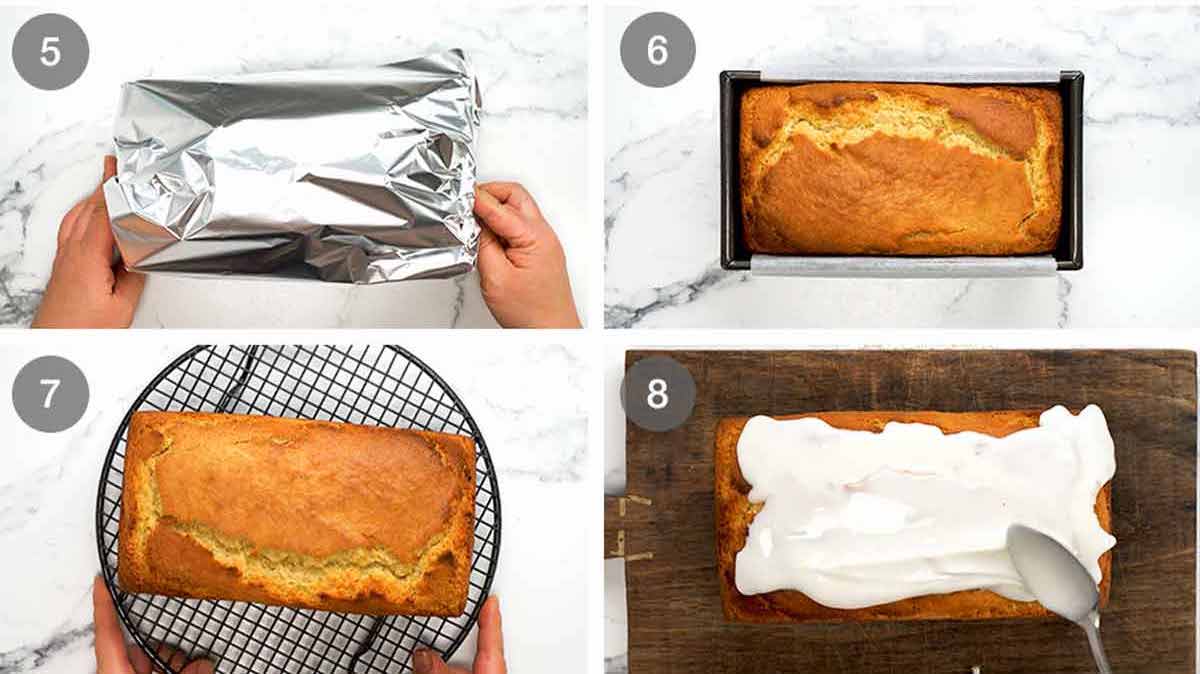
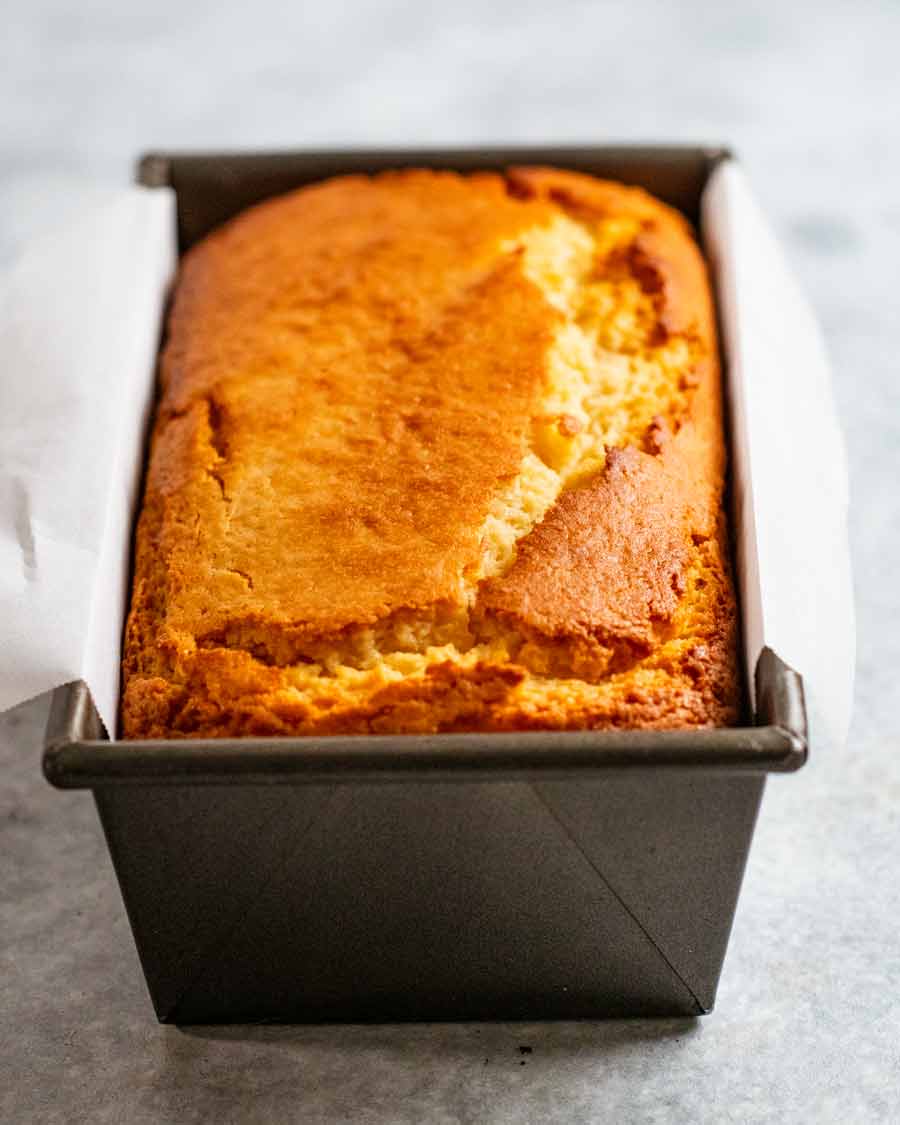
Bake 45 minutes uncovered, then loosely cover with foil and bake for a further 20 minutes or until a skewer inserted into the centre comes out clean.
Rest 10 minutes – Let it rest in the pan for 10 minutes (all cakes are very fragile when fresh out of the oven) before transferring it onto a cooling rack.
Cool – Use the paper overhang to lift it out onto a cooling rack, then cool completely for 3+ hours before glazing!
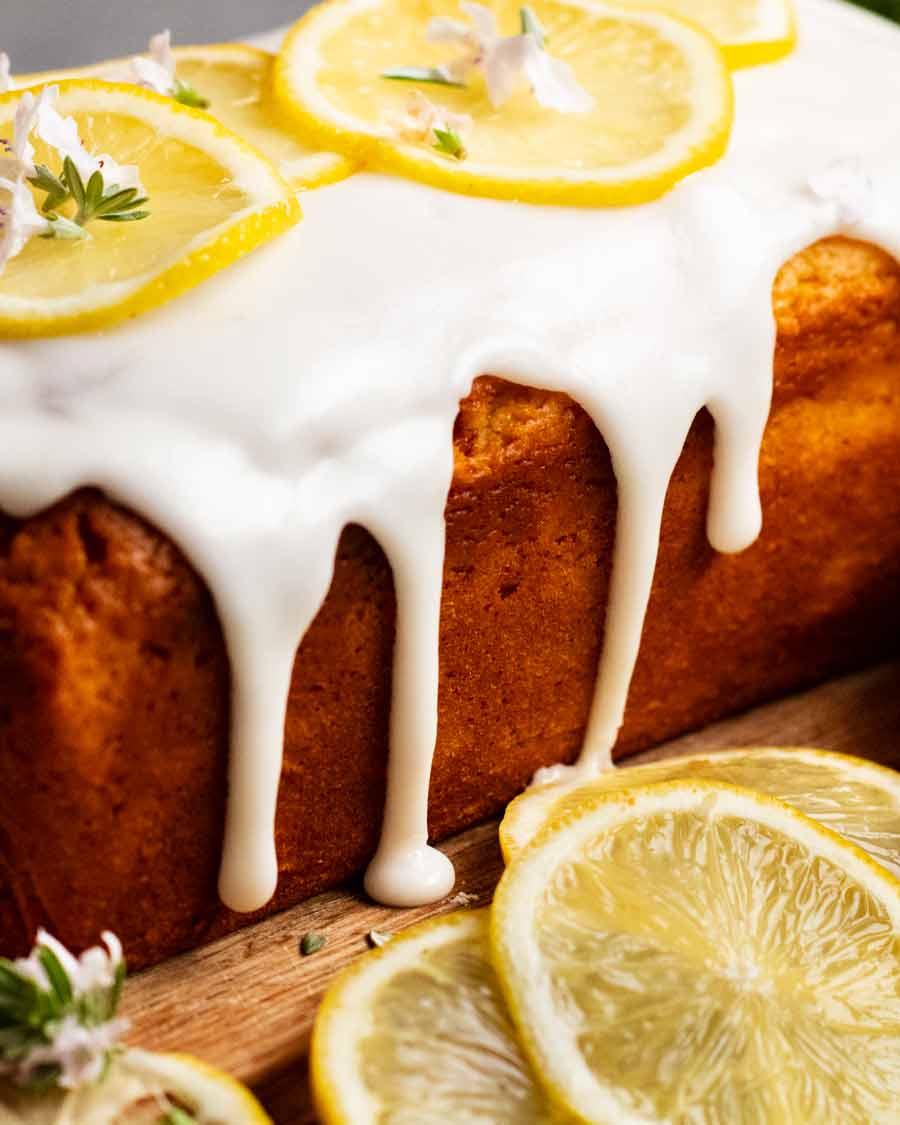
Glaze – To make the glaze, just mix the icing sugar (powdered sugar) and lemon juice together. Then spoon / spread it onto the surface, coaxing drips down the side.
⚠️ GLAZE THICKNESS CAUTIONARY NOTE!
I find glazes will go from seemingly too thick to way too thin with just even the barest smidge of extra liquid. So take care and be patient when mixing the glaze! I only use 3 1/2 teaspoons of lemon juice for 1 cup of icing sugar. At first it will seem like there’s nowhere near enough liquid, but be patient, keep mixing! It will turn into a thick glaze that will drape over your lemon loaf rather than spreading into a thin, transparent (unsatisfying) glaze.
The no-glaze option
“Everybody” loves the glaze but actually, there’s a good case for a no-glaze version too. No glaze means you can toast it like bread – literally, in a toaster. Then slather with butter and for a really great finishing touch, drizzle with honey.
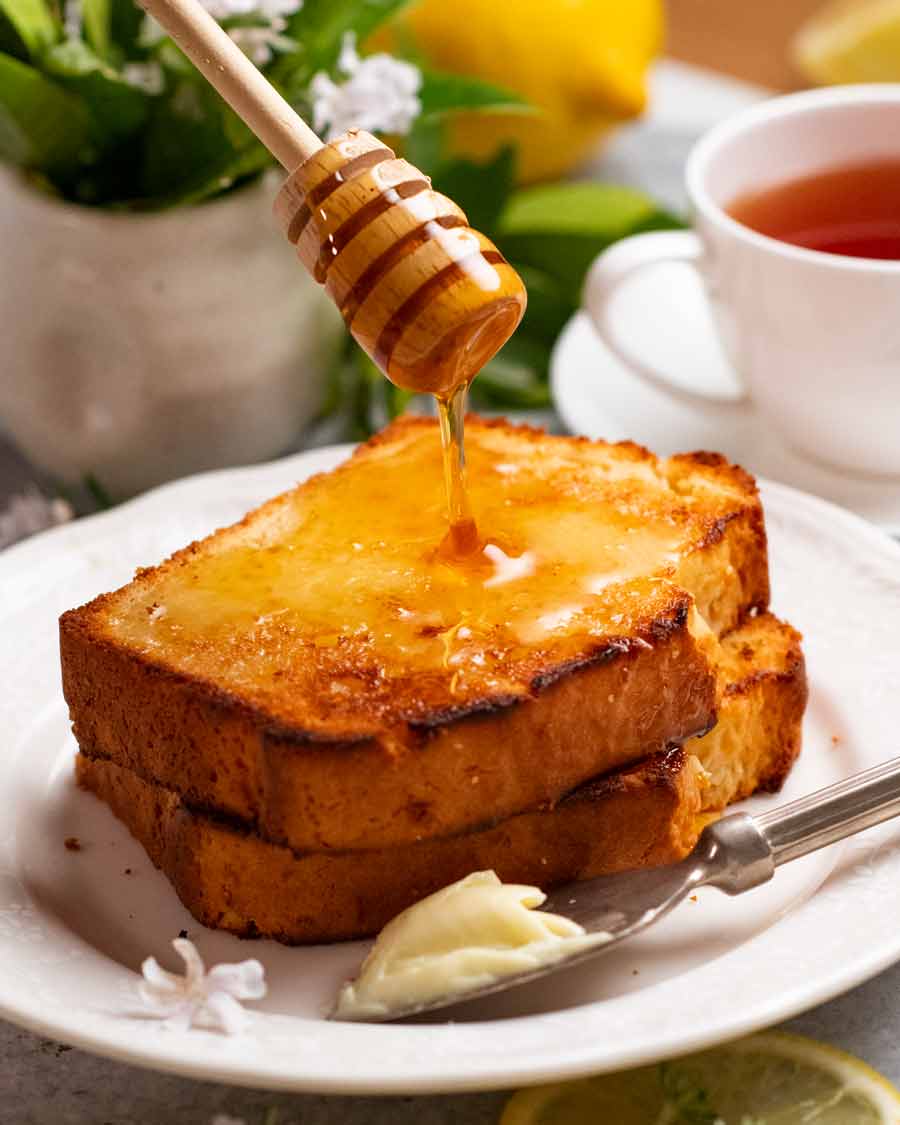
You can just imagine the flavour combo here, right?? Not-too-sweet lemony cake soaked with lightly salted melted butter and sweet honey. It’s so good I almost published this recipe without the glaze!!
Whichever way you go, glaze or no glaze, you can’t go wrong with this lemon loaf. It’s also one of those recipes that’s quite forgiving, so it’s a good one for those new to baking or if you have little helpers keen to get involved.
Stays fresh 5 days
And finally – this lemon loaf has an excellent shelf life. Regular readers know that I am notorious for extending the shelf life of baked goods! It used to drive me mad that people would just accept that homemade muffins would go stale overnight, and that cakes are best made on the day of serving as they lose freshness within 24 hours. Who has the time to bake fresh on the day, not to mention the disappointment of not being able to enjoy cakes for days afterwards? The reader-favourite Vanilla Cake and Cupcakes are probably the most famous examples around here – they stay fresh for 4 to 5 days which is unheard of!
As for this lemon loaf – it’s perfect for 3 days, still great 5 days later. Keep it in the fridge if it’s warm where you are, but if not, the pantry is fine.
Enjoy! – Nagi x
Watch how to make it
Glazed lemon loaf
Ingredients
Dry ingredients:
- 2 cups plain flour / all-purpose flour (Note 1 for GF)
- 4 tsp baking powder (make sure yours is alive!)
- 1/8 tsp salt
Wet ingredients (Note 2 – room temp):
- 1 cup plain yogurt , at room temperature
- 2 large eggs (~55g/2oz each), at room temperature
- 75g / 5 tbsp unsalted butter , melted and cooled
- 1/4 cup vegetable or canola oil (or other neutral flavoured oil)
- 2 tbsp lemon zest (~2 large lemons)
- 1/4 cup lemon juice
- 1 1/4 cups caster sugar / superfine sugar (sub normal/granulated sugar)
- 1/2 tsp vanilla extract
- 1 1/2 tsp lemon extract – sub 1 tbsp extra zest (Note 3)
Glaze (optional):
- 1 cup soft icing sugar/powdered sugar , sifted
- 3 – 3 1/2 tsp+ lemon juice
Instructions
- Preheat oven to 180°C/350°F (160°C fan-forced). Grease then line a 21 x 11 x 7 cm (8.5 x 4.5 x 2.75") with baking / parchment paper. (Note 4)
- Batter – Whisk Dry ingredients in a large bowl. Whisk Wet ingredients in a separate bowl. Pour Wet ingredients into the Dry ingredients. Whisk just until lump free. Pour into the prepared loaf pan then smooth the surface.
- Bake 45 minutes uncovered. Loosely cover with foil then bake a further 20 minutes or until a skewer inserted comes out clean.
- Cool & glaze – Stand 10 min in pan then turn out onto a cooling rack. Fully cool before glazing (~3 hours). Use a spoon to spread and coax lovely glaze drips down the side! Cut thick slices and serve.
- Glaze – Whisk ingredients until combined and smooth, a thick smooth frosting that will drip thickly, not be transparent. Start with 3 1/2 teaspoons lemon juice, and add 1/2 tsp extra, as needed. (Note 5 on thickness)
Notes
Nutrition
Life of Dozer
Dunno why I look so happy when Dozer looks so tortured, waiting to taste that bit of lemon cake!

The post Glazed lemon loaf appeared first on RecipeTin Eats.
]]> HOT OFF THE PRESS: I found out my cookbook made the New York Times Best Sellers list!! Much screeching, jumping and tears, captured in this home movie ❤️: Enough about me. Back to today’s recipe for you – Cheesecake Stuffed Carrot-Bundt Cake! Not usually a fan of bundt cakes. Too much cake, not enough frosting.... Get the Recipe
The post Cheesecake stuffed carrot bundt cake appeared first on RecipeTin Eats.
]]>HOT OFF THE PRESS: I found out my cookbook made the New York Times Best Sellers list!! Much screeching, jumping and tears, captured in this home movie ❤️:
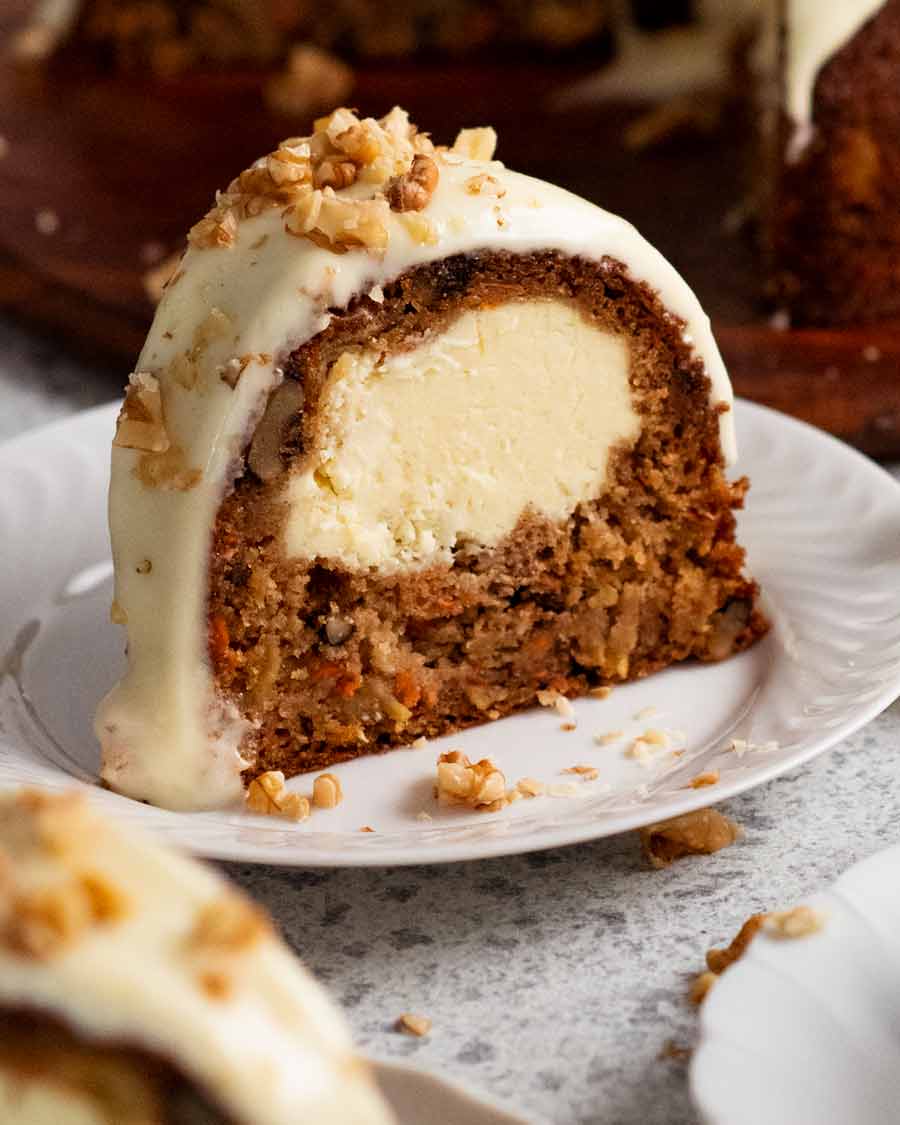
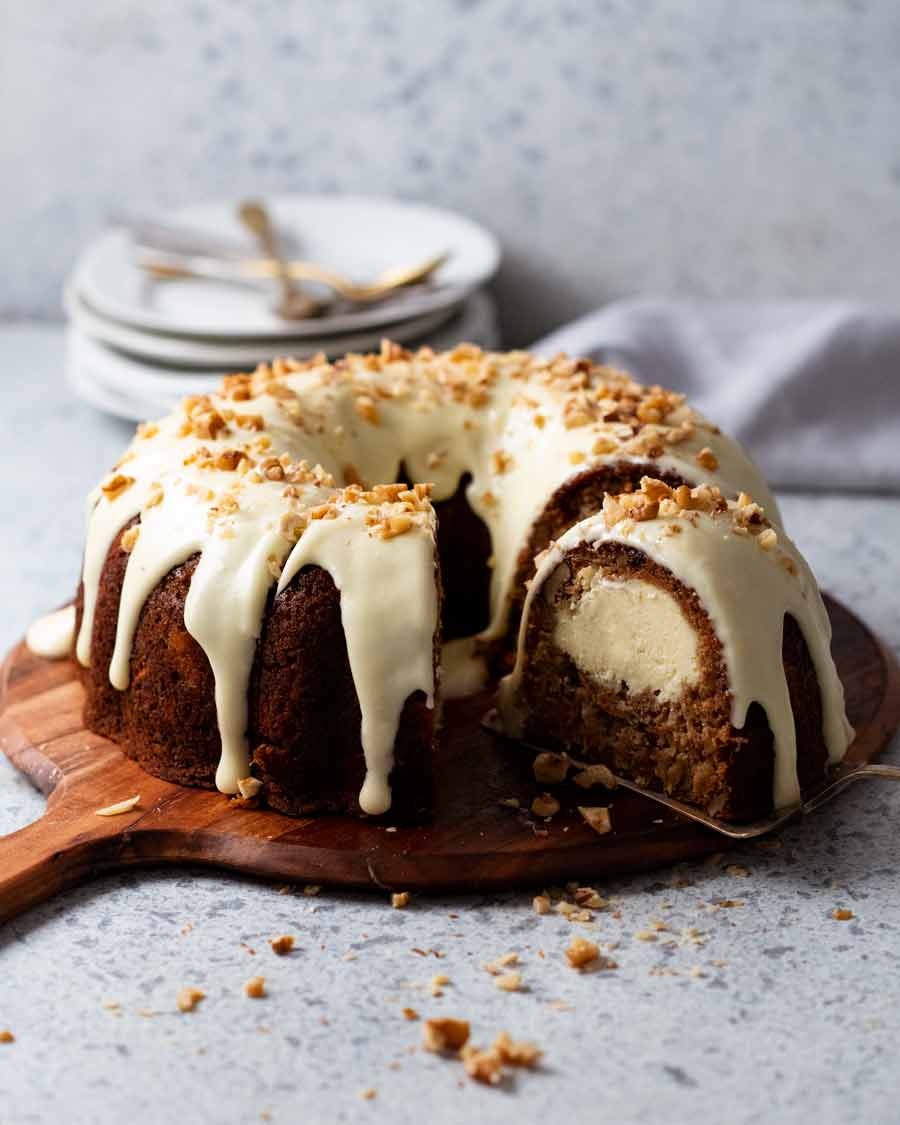
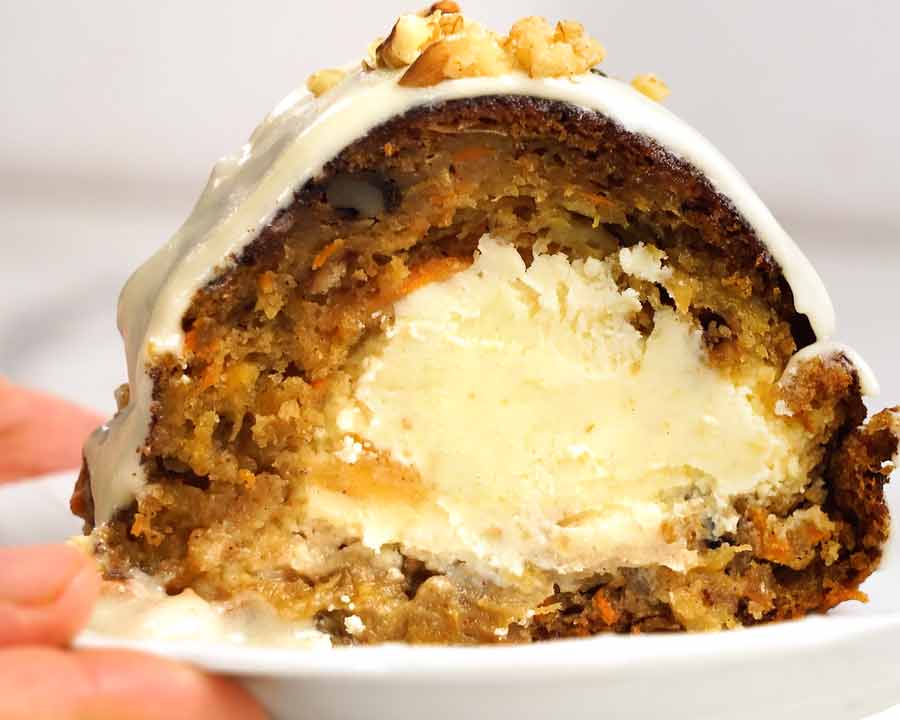
Enough about me. Back to today’s recipe for you – Cheesecake Stuffed Carrot-Bundt Cake!
Not usually a fan of bundt cakes. Too much cake, not enough frosting. But THIS, I’m all over! Three cake favourites in one – a creamy cheesecake stuffed inside carrot cake with a thick cream cheese glaze. YES!
Not your usual bundt cake!
This might be an unpopular opinion, but I don’t understand the appeal of bundt cakes. It’s a thick wad of cake, usually drizzled with a pretty thin glaze. No fluffy frosting sandwiched inside like a layer cake, nor smothered with whipped cream with piles of juicy fruit like pavlova.
Too much cake. Not enough of the fun stuff!
So I decided to up the fun-factor by stuffing it with cheesecake. Inspired by a cake I first saw on my friend Jennifer Sabin Sattley’s website, Carlsbad Cravings. Perfect for a party, it combines two holiday favorites into one – a carrot Bundt cake with creamy cheesecake inside, with a generous amount of thick cream cheese glaze!
What you need
Here’s what you need to make this.
Cheesecake filling
Basically everything you need for cheesecake!
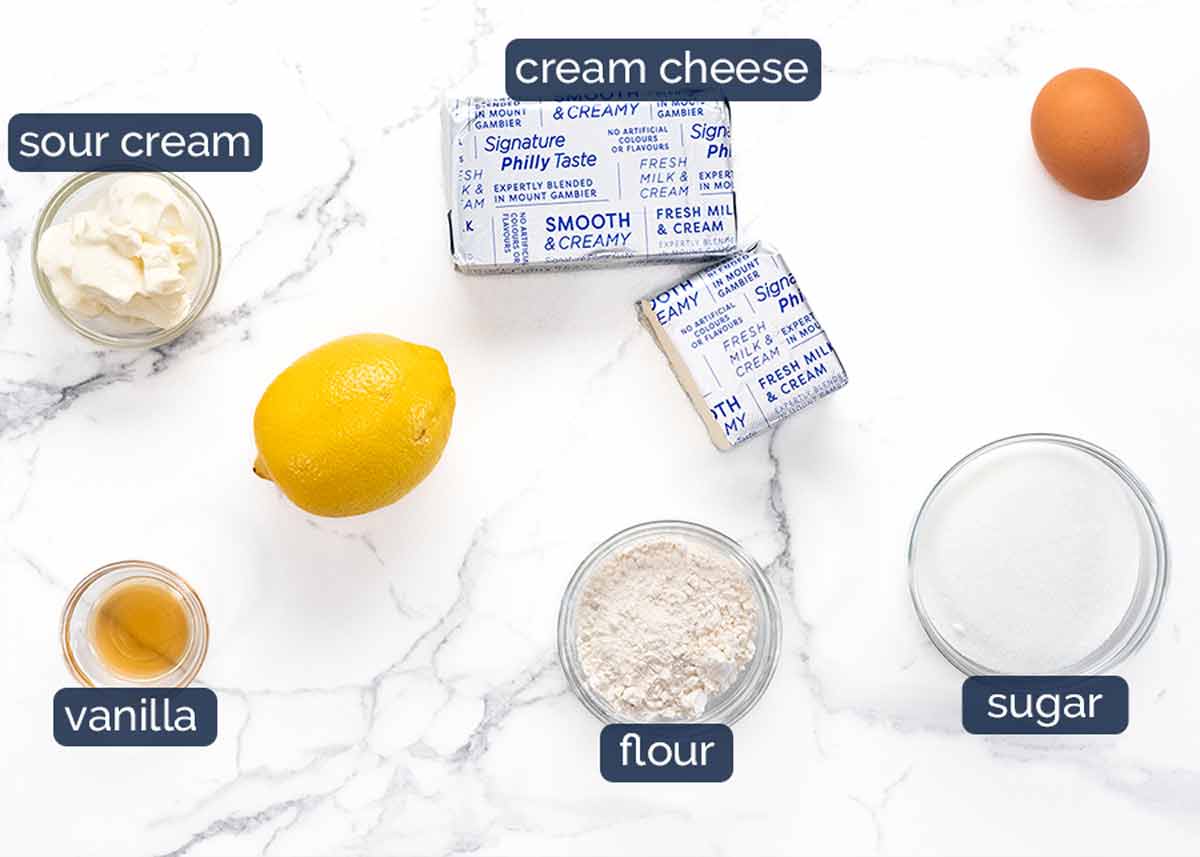
Cream cheese – Blocks are the standard choice for cooking but actually, the spreadable cream cheese in tubs works fine too. You will need 2 whole blocks for this recipe – we use half of one block in the glaze.
Sour cream – Lightens up the cheesecake a bit. Without, it’s just a little rich for my taste. I use sour cream in all my cheesecake recipes.
Flour – This stabilises the cheesecake mixture. Without, it doesn’t set.
Large egg at room temperature. 50 – 55g / 2 oz each, “large eggs” labelled on the carton. Make sure it isn’t fridge cold else it won’t incorporate into the mixture and you’ll end up with lumpy cheesecake. Yup – been there, done that!
Egg plus the flour is what sets the filling so it doesn’t become a runny messy inside the cake.
Lemon zest – Hint of freshness. Love it.
Sugar – For sweetness. Regular / granulated or caster / superfine is fine here.
Vanilla – For flavour.
Carrot cake bundt cake
Here’s what you need for the Carrot Cake part. It is exactly the same as my classic Carrot Cake! The “secret ingredients” in this are:
Crushed pineapple (canned) – this adds to the moistness of the crumb, as well as sweetness and flavour. We’re going to use all of the pineapple and some of the juice; and
Coconut and walnuts (or pecans) – they add a subtle soft crunch which provides great textural contrast in this cake that has a very soft crumb.
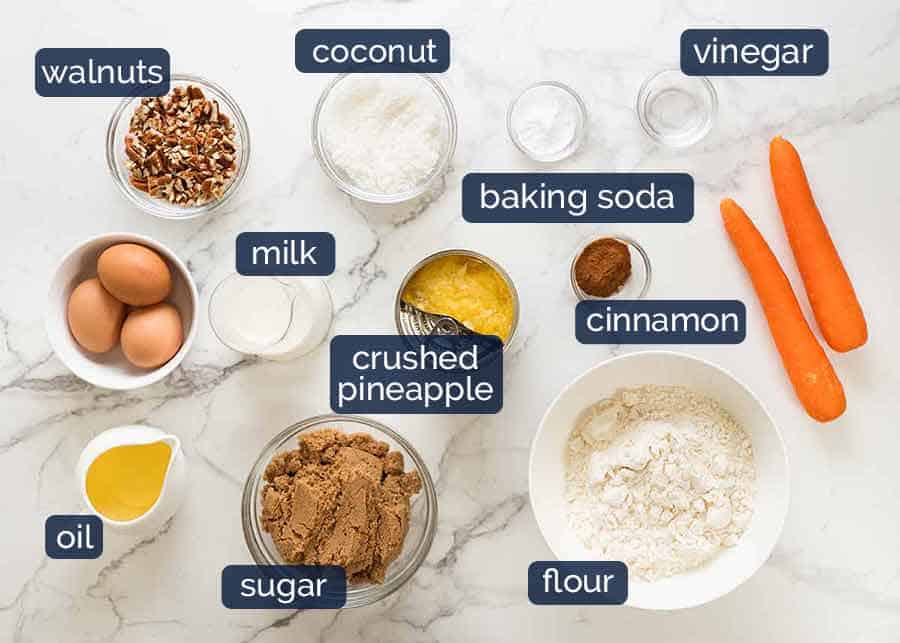
Crushed canned pineapple in natural juice. If the liquid is sweetened, it will still work but unsweetened is better. Can’t find crushed pineapple? Just chop up rings or pieces.
See above photo for commentary on why it’s a secret ingredient in this cake!
Baking soda / bi-carb rather than baking powder. It’s ~3x stronger than baking powder and works better in this cake which benefits from the extra power to make it rise. It’s a sizeable cake! I haven’t tested with baking powder because I’m pretty sure the cake won’t rise as well.
Vinegar activates the baking soda to give it a kick start. Don’t worry, you can’t taste it!
Carrots – peeled and shredded using a standard box grater.
Desiccated coconut – Finely shredded coconut, not the large flakes. Unsweetened is best (this is standard in Australia).
Walnuts – For fabulous CRUNCHY!
Brown sugar for caramel-y goodness and makes the cake crumb softer and more moist than white sugar.
Oil instead of butter which also keeps cakes moist. Why? Simple – butter firms up. Even after melting in a cake. Oil does not. So – moister! (Is that a word??)
Plain / all-purpose flour, not cake flour which will make the cake too damp. Also, self-raising flour cannot be used here. Wrong ratio of rising agent to flour.
Large eggs at room temperature. 50 – 55g / 2 oz each, “large eggs” labelled on the carton. Make sure they aren’t fridge cold else they won’t incorporate into the mixture.
Thick cream cheese glaze
Not a fan of thin see-through glazes. I like mine THICK! The frosting is always the best part, right? 😀 (Though actually, in this cake, it ties with the cheesecake part. The cake is just a vehicle to deliver the glaze and cheesecake. 🤣)
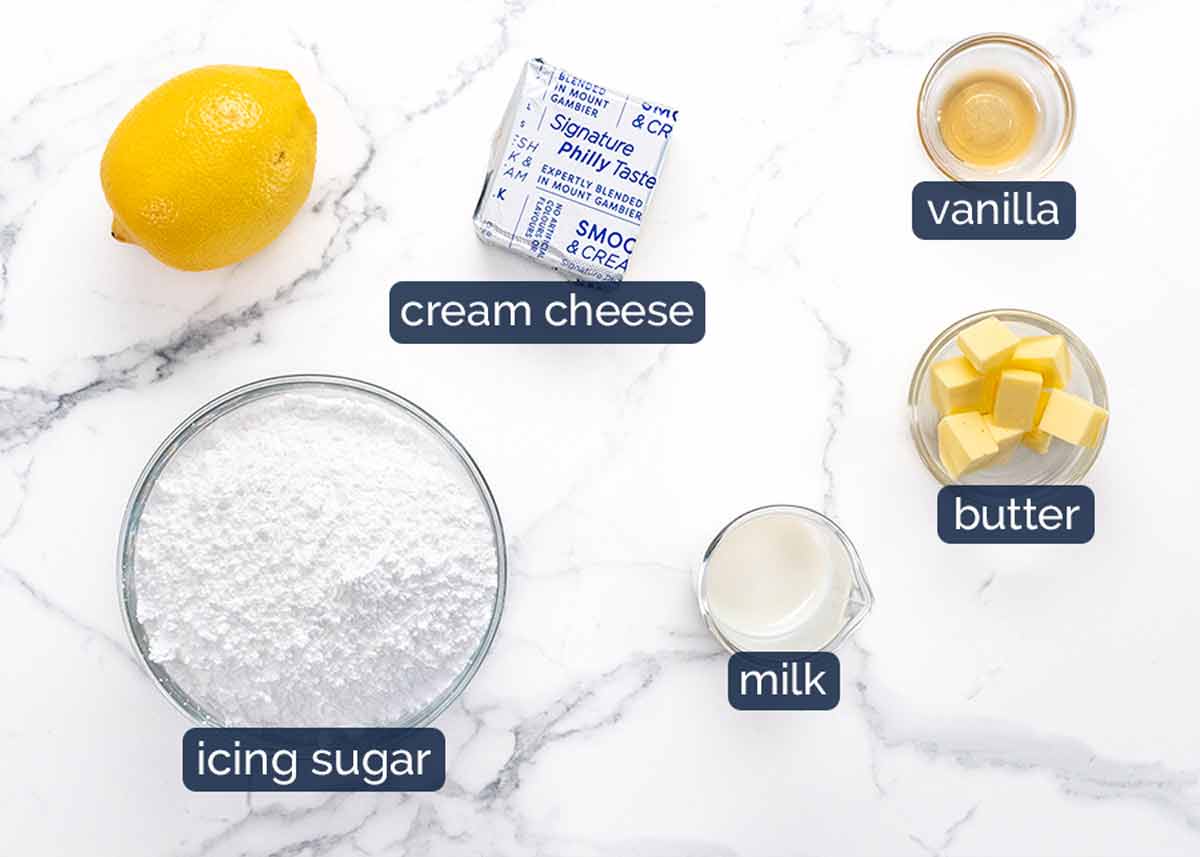
Cream cheese – The rest of the block is used for the cheesecake stuffing.
Butter – For buttery richness in the glaze.
Icing sugar / powdered sugar – Australia: use soft icing sugar, not pure icing sugar which is intended for hard-set icing like royal icing that you decorate biscuits with.
Milk – For loosening. USE WITH CAUTION as I find glazes go from too thick to too thin with just the tiniest amount of liquid!
Lemon and vanilla – For flavour.
How to make cheesecake stuffed bundt cake
OK – the making part! It’s pretty fun actually. Love piping the cheesecake filling into the cake!
1. Cheesecake filling first
Make the cheesecake filling first so it can firm up a bit in the fridge while you make the batter. This makes it easier to pipe.
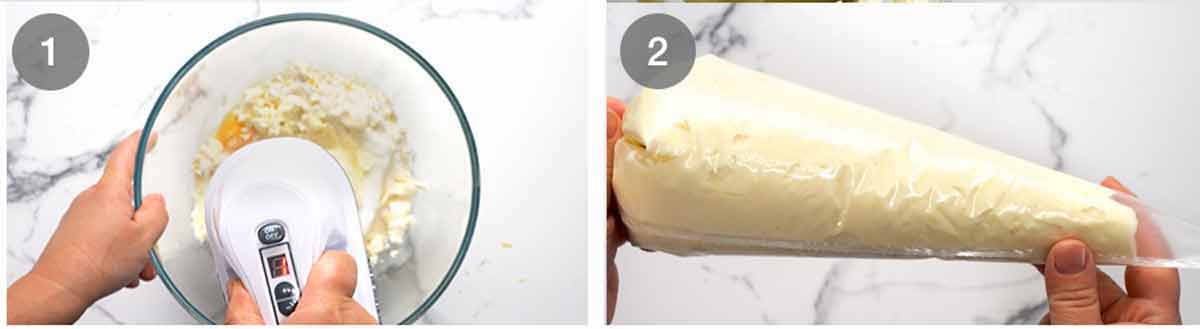
Beat – Beat the cream cheese, sour cream, sugar, and vanilla just until smooth. Beat in flour, just until incorporated. Then beat in the egg until mixed in.
The goal here is to make the filling smooth but minimise the air incorporated into the mixture which can create air bubbles when baking. It’s just a visual think though, and won’t affect the taste!
Fridge – Transfer cheesecake mix into a piping bag fitting with a 1.5 – 2 cm / ~0.6″ round nozzle. Then refrigerate while you assemble the rest of the cake.
2. Batter
It’s very easy – mix wet, mix dry, mix wet and dry!
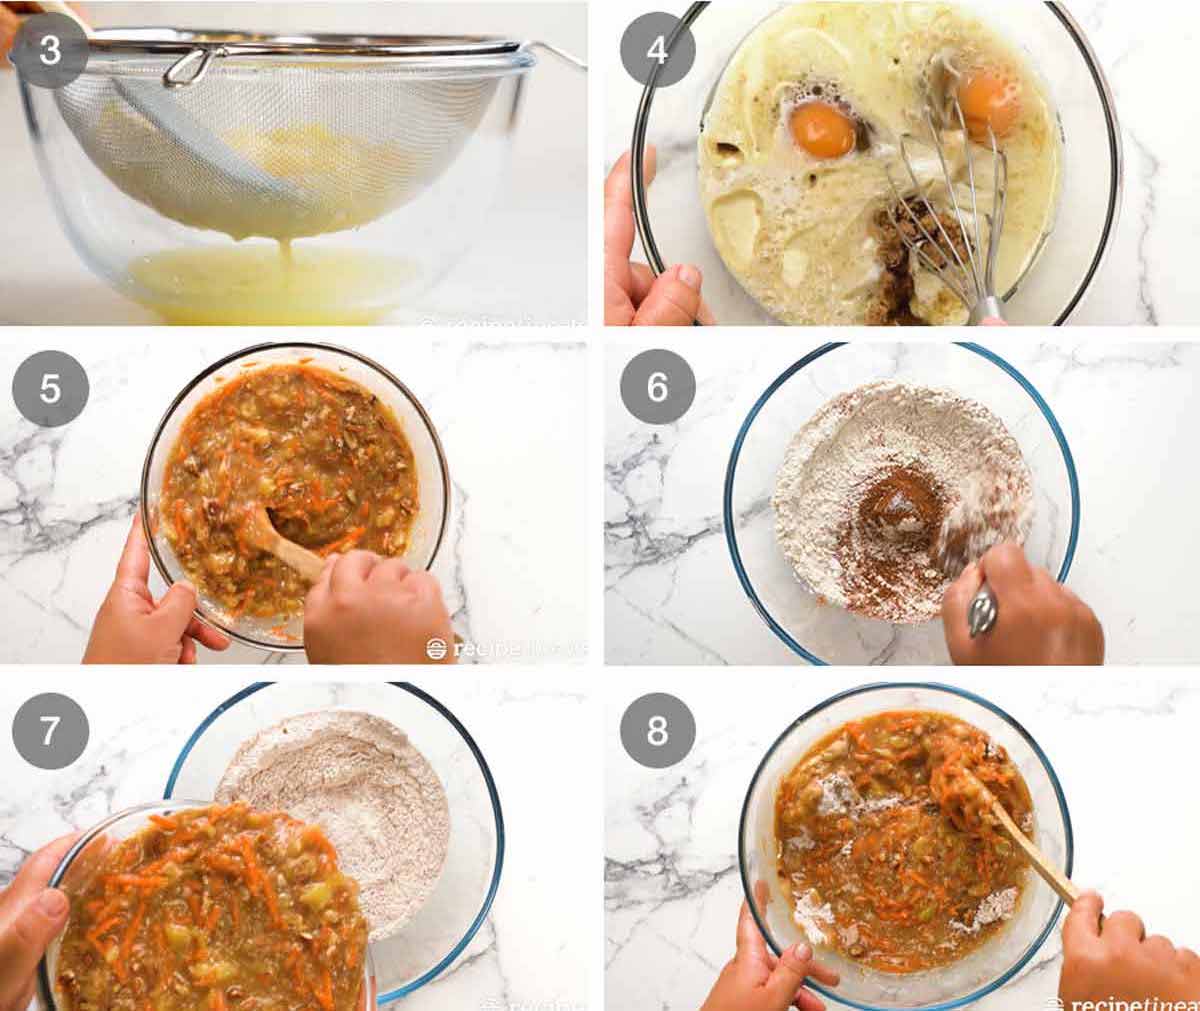
Drain pineapple well in a colander, pressing out excess liquid. Reserve the liquid – you need some for the batter. Use the rest for your morning smoothie!
Whisk wet cake batter ingredients until smooth. Eggs, brown sugar, oil, milk and 1/4 cup of the reserved pineapple juice.
Stir in carrot, coconut and walnuts.
Whisk Dry ingredients in a separate bowl.
Pour wet into the dry ingredients.
Mix just until the flour is incorporated.
3. Assemble
TIP OF THE DAY: Dust your bundt pan with cocoa powder not flour. It will blend invisibly into the cake rather than leaving white flour. Also, dust well! Cakes stuck in a bundt pan is the worst! 😭
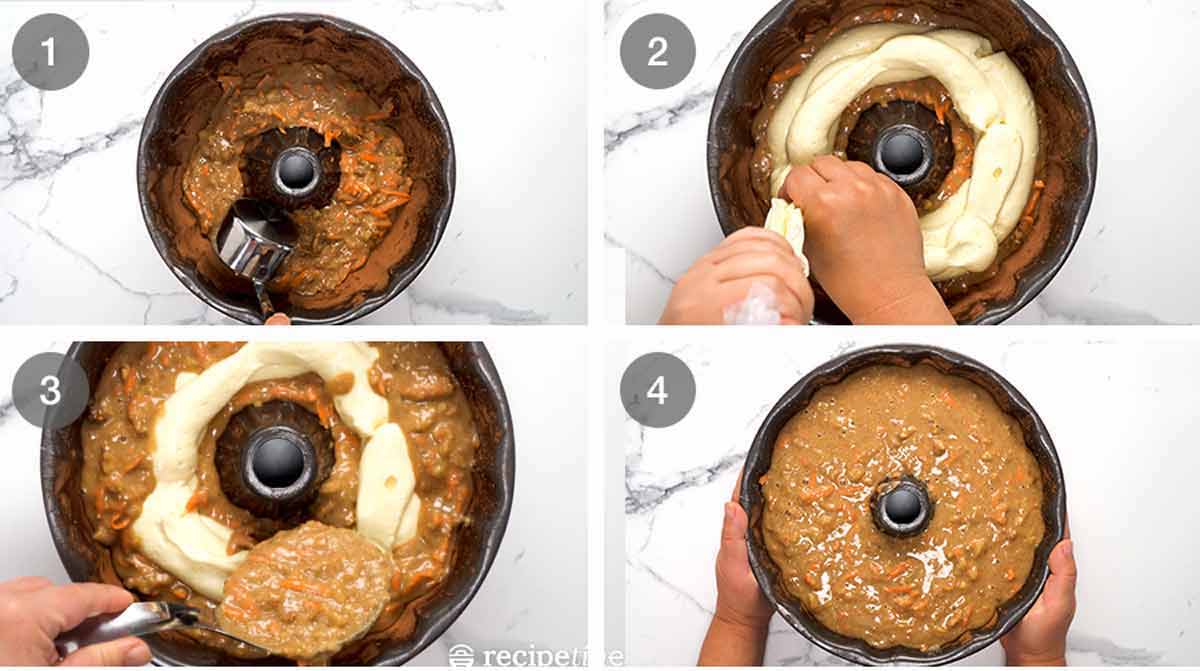
Some batter – Spread 1 1/2 cups of batter into the base of the bundt pan.
Pipe the cheesecake filling in. I do approximately two layers of piping. Avoid touching the walls!
Cover with the remaining batter. I spoon the batter on the edges of the cake first and cover the cheesecake filling last. This helps keep the cheesecake filling where it should remain – right in the middle!
Bake for 60 minutes, covering with foil at the 30 minute mark to prevent it from becoming too brown.
We bake at a little higher temperature than typical for cakes – 200°C/400°F (180°C fan). It needs the heat to cook the cake with all the extra moisture inside from the cheesecake. Also, the slightly higher heat cooks the cake on the outside more and the cheesecake less, which means – yup, you guessed it – beautifully creamy cheesecake!
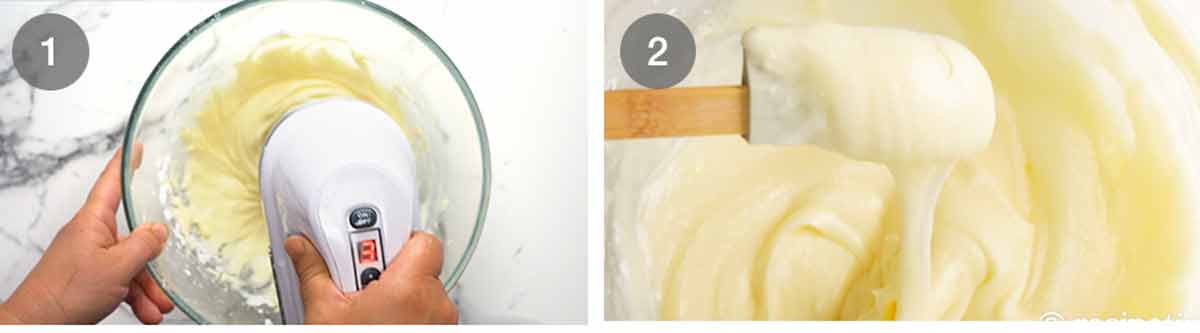
4. The glaze
The glaze is as simple as beating the ingredients together. Use milk to adjust the thickness of the glaze so it’s loose enough to drip slowly down the side of the cake but to cover the cake thickly.
This is what we’re looking for. A thick glaze that covers the cake without being see-through!
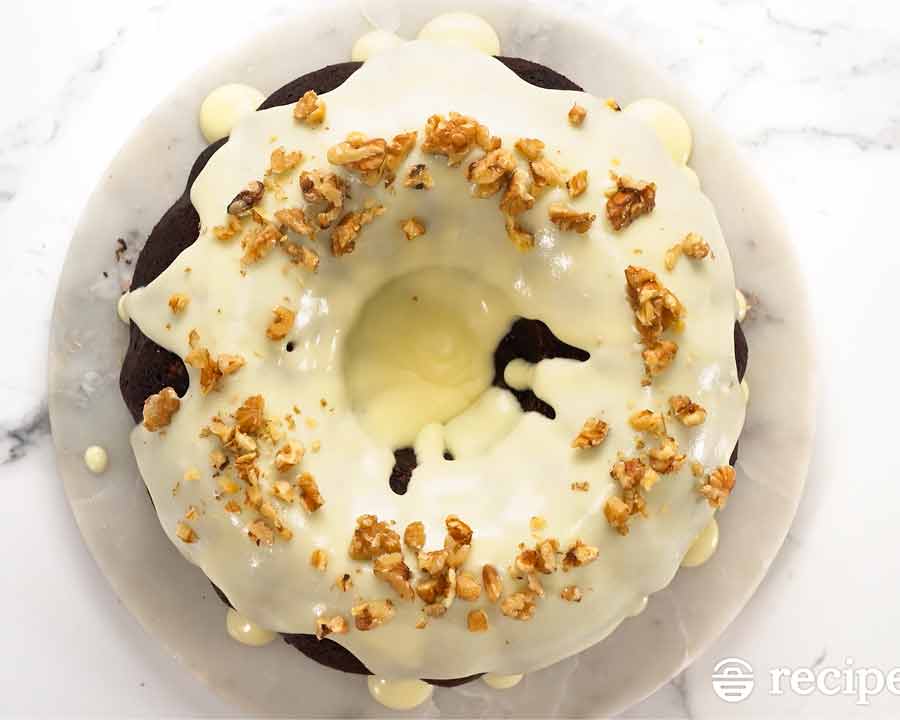
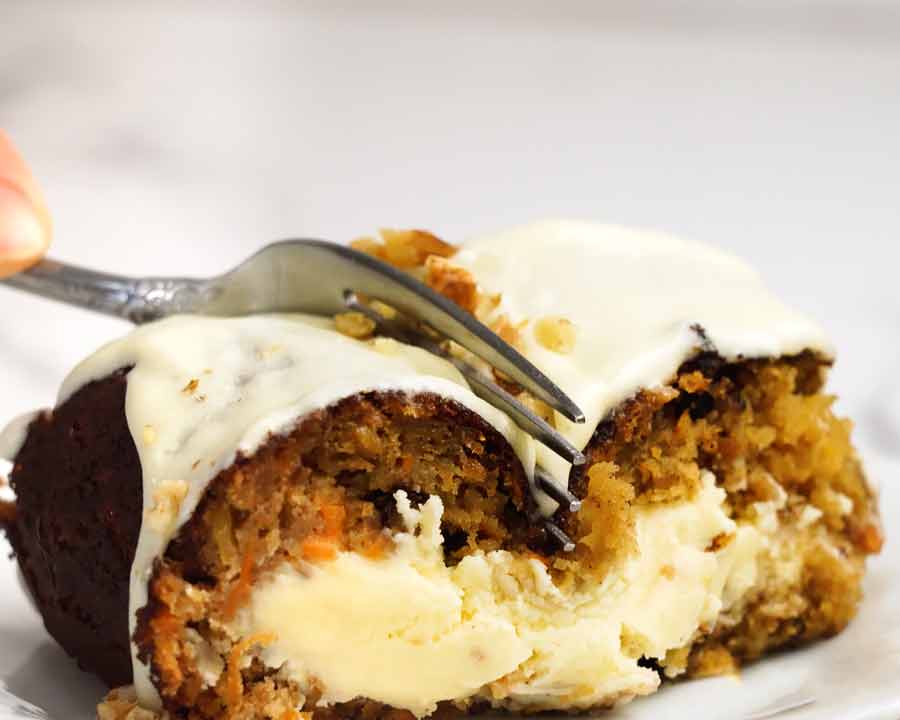
Expect shape variations!!!
Your cheesecake filling shape may not be the same as pictured. It might be more like a smile, some parts of the cake might have more, some less. Some sections might not be fully surrounded by cake, some sections might be a bit wonky.
I chose the best slice for the photos, and crossed my fingers when I did the cake-slice-pull-out for the video. 😀
And it doesn’t matter if it doesn’t look exactly the same. What’s important is the flavour! Creamy cheesecake, moist carrot cake and that cream cheese glaze I keep going on and one about. It’s a winning combo!! – Nagi x
Watch how to make it
Cheesecake stuffed carrot bundt cake
Ingredients
- 400g/14 oz can crushed pineapple in natural juice (Note 1)
- unsalted butter , for greasing
- 1 tbsp cocoa powder (unsweetened), for dusting (Note 2)
Cheesecake Stuffing:
- 340g / 12 oz cream cheese block , softened (Note 3)
- 1/3 cup sour cream , full fat (yoghurt also ok)
- 1/2 cup white sugar (regular/granulated)
- 2 tsp lemon zest
- 1/2 tsp vanilla extract
- 3 tbsp plain/all-purpose flour
- 1 large egg , at room temperature
Batter:
- 2 cups plain/all-purpose flour
- 2 tsp baking soda/bi-carb (NOT baking powder, Note 4)
- 1/2 tsp salt (cooking/kosher salt)
- 2 tsp cinnamon powder
- 2/3 cup milk , full fat, at room temperature (not fridge-cold)
- 1 tsp white vinegar (Note 5)
- 3 large eggs , at room temperature
- 1 1/2 cups (packed) brown sugar
- 1/2 cup canola oil (or other neutral oil)
- 2 cups shredded carrot , using a box grater (2 carrots)
- 1/4 cup desiccated coconut , unsweetened (finely shredded, not large flakes)
- 1 cup walnuts , roughly chopped
Thick cream cheese glaze:
- 115 g / 4 oz cream cheese , softened (Note 3)
- 30g/ 2 tbsp unsalted butter , softened
- 1/2 tsp vanilla extract
- 2 cups soft icing sugar / powdered sugar , sifted
- 1 1/2 tbsp milk , full-fat, plus more as needed
- 1 tbsp lemon juice
Instructions
- Preheat oven to 200°C/400°F (180°C fan). Grease a 12-cup (3 litre) Bundt pan (Note 6) with butter, then dust well with cocoa, shaking out excess. (Why cocoa? See Note 2)
- Prep pineapple – Drain pineapple in a colander, pressing out excess juice and reserving. Set pineapple and juice aside.
- Cheesecake filling – Using an electric beater, beat the cream cheese, sour cream, sugar, lemon and vanilla just until smooth. Beat in flour, just until incorporated. Beat in egg until mixed in. Transfer cheesecake mix into a piping bag and refrigerate until required.
- Batter – Whisk together the flour, baking soda, salt, and cinnamon in a large bowl. Set aside. In a separate bowl, combine the milk, vinegar, eggs, brown sugar, canola oil, and ¼ cup of the reserved pineapple juice. Whisk until smooth, then stir in the crushed pineapple, shredded carrot, coconut flakes, and walnuts, if using. Pour this over the flour mixture and gently stir until combined.
- Assemble – Pour about 2 1/2 cups of batter into the Bundt pan. Cut a 1.8cm / 3/4" hole in the end of the piping bag. Pipe a ring of the filling directly on top of the batter—avoid touching sides of pan. Cover with remaining batter.
- Bake for 30 minutes. Remove, cover loosely with foil and bake for another 30 minutes. Check with a skewer to ensure it's cooked (straight down into cheesecake, and also on the inner wall of the ring)
- Glaze – Cool 20 minutes in the pan. Invert on to a rack and allow to fully cool. Spoon the glaze on top, allowing it to drip down the sides of the cake. Sprinkle with walnuts, if using. Cut with a hot knife (for neater slices) and serve!
Cream cheese glaze:
- Beat butter, cream cheese, and vanilla until smooth. Beat in icing sugar in two batches, starting on a low speed first (to avoid powder storm!).
- Adjust thickness – Beat in milk and lemon juice. Add extra milk 1 teaspoon at a time until it becomes a thick glaze – BE CAREFUL, it will go from too thick to too thin with just a tiny bit of milk! GOAL: a glaze you can spoon onto the cake, so it oozes thickly down the sides, rather than being thin and transparent like most glazes.
Notes
Nutrition
Life of Dozer
Earnestly explaining the reward that awaits him if he co-operates for a photo:

Said photo. (He’s totally looking at the camera, not the treats!)

The post Cheesecake stuffed carrot bundt cake appeared first on RecipeTin Eats.
]]> Many people have tried this now and no one thinks of it as a gluten free cake. It’s just a delicious cake! Love the coconut + lemon + almond meal combination, and the springy, moist crumb. BONUS: Just about the fastest, easiest cake recipe I know. Lemon coconut almond cake This is a cake that... Get the Recipe
The post Easy lemon coconut almond cake appeared first on RecipeTin Eats.
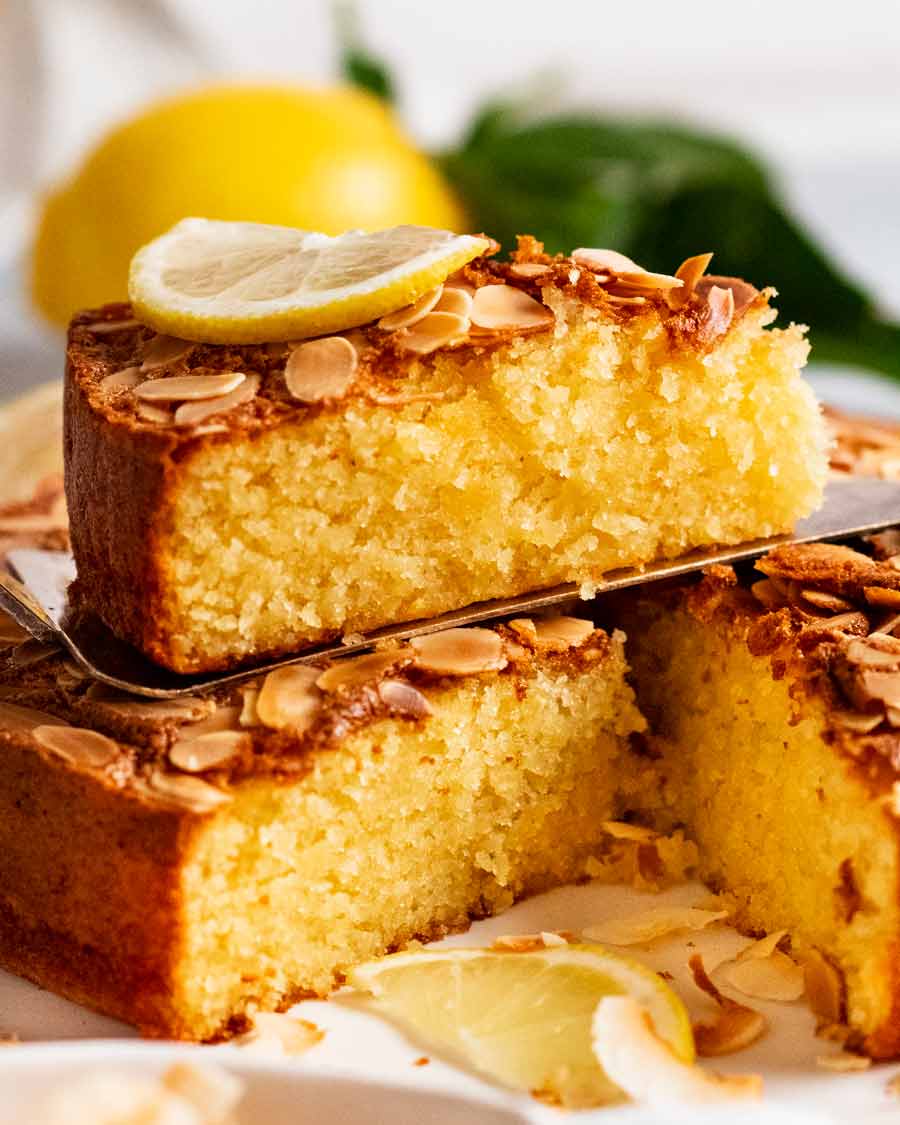
]]>Many people have tried this now and no one thinks of it as a gluten free cake. It’s just a delicious cake! Love the coconut + lemon + almond meal combination, and the springy, moist crumb. BONUS: Just about the fastest, easiest cake recipe I know.
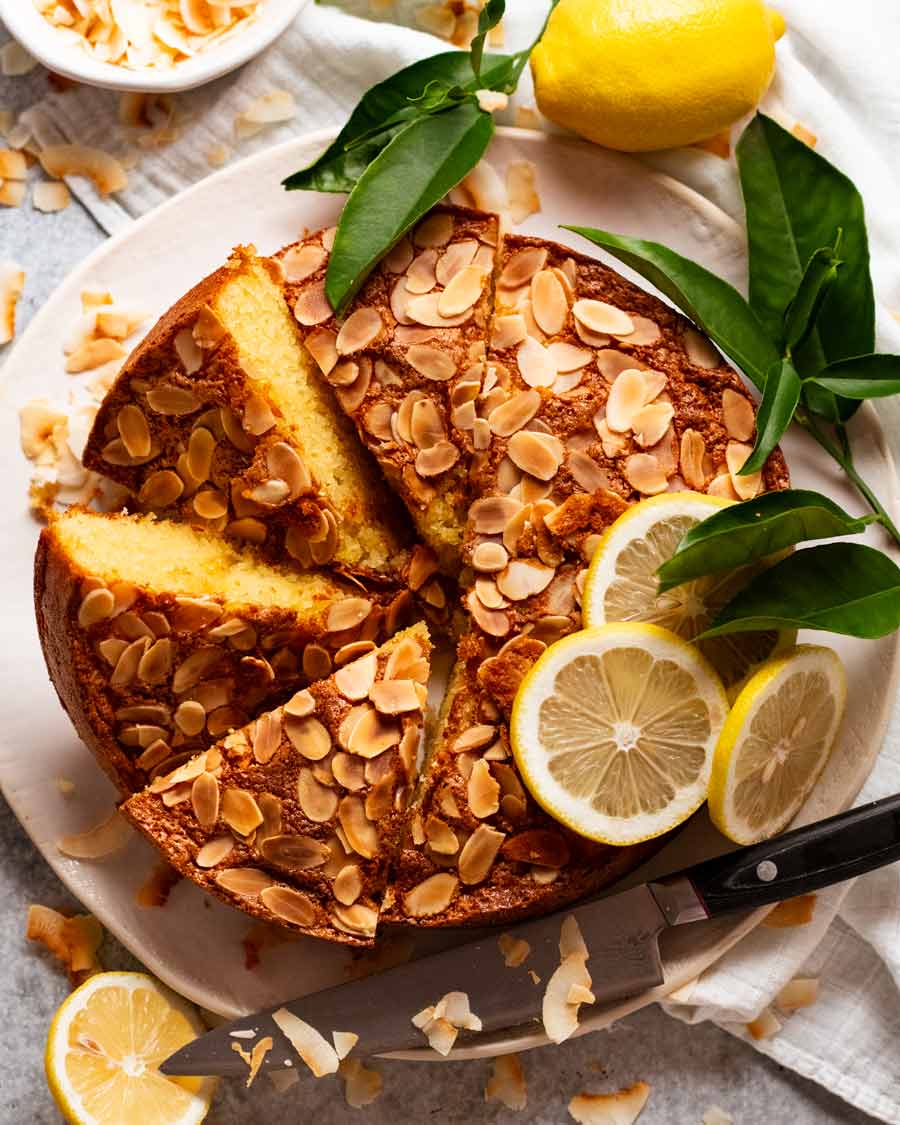
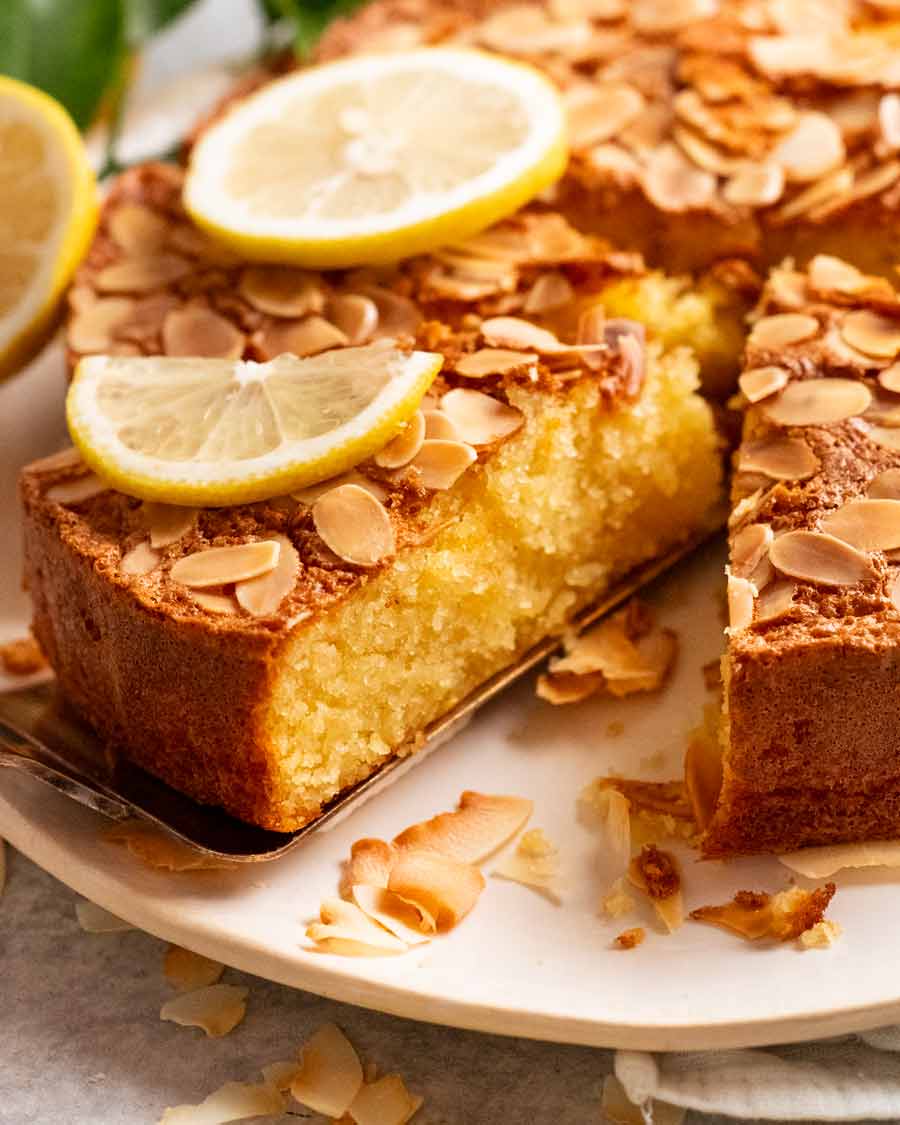
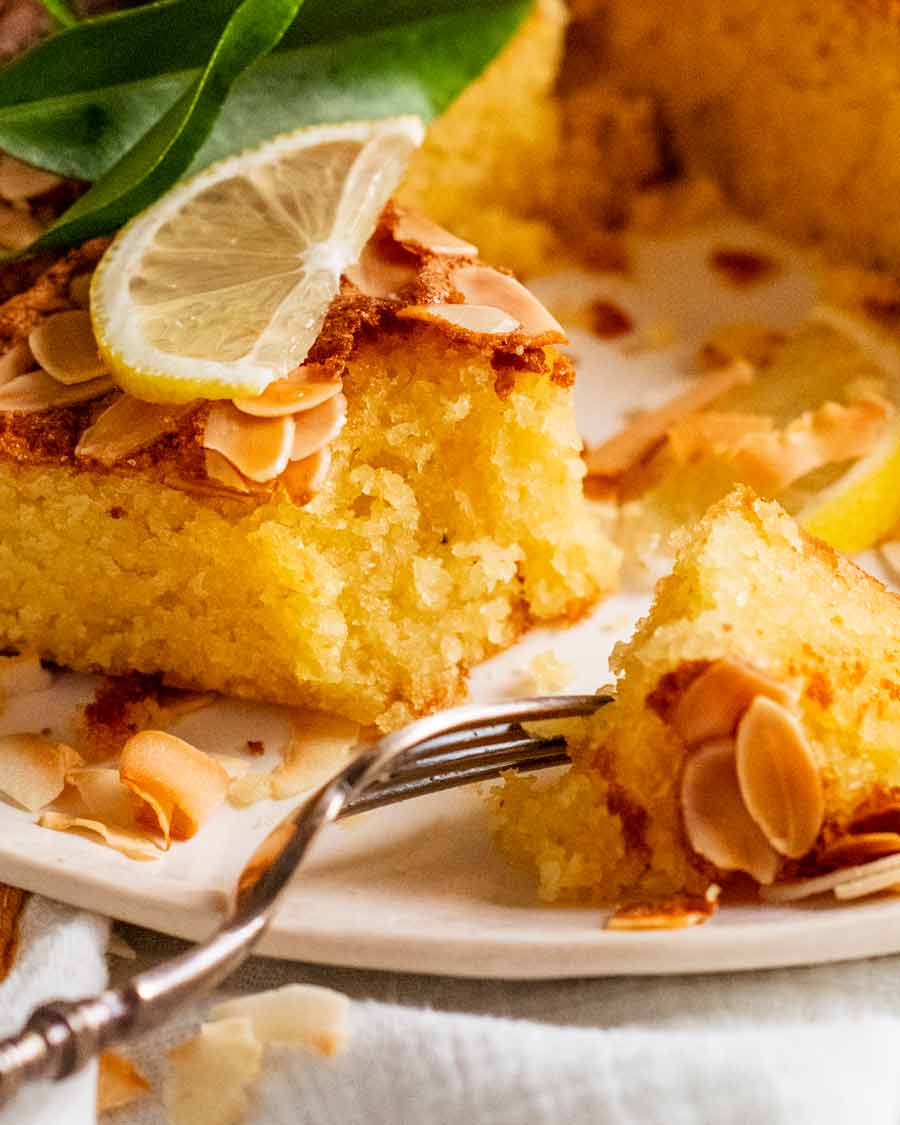
Lemon coconut almond cake
This is a cake that is as delightfully easy to make as it is delicious to eat. Just put everything in a bowl and mix! There’s no need to whip softened butter or pull out your electric beater.
It’s been likened to the fan favourite orange cake in texture – springy yet with an appealing moistness about it. And the flavour! Adore, adore, adore the coconut lemon combination. Idea swiped from my local coffee shop where I’ve been eyeing lemon coconut cake bars for years. This is my copycat.
I don’t actually know if theirs is gluten-free. Mine is, because I’ve never come across a flour-based cake recipe with a crumb as moist as you can make using almond meal.

What you need for this lemon coconut almond cake
Here’s what you need to make this lovely cake:
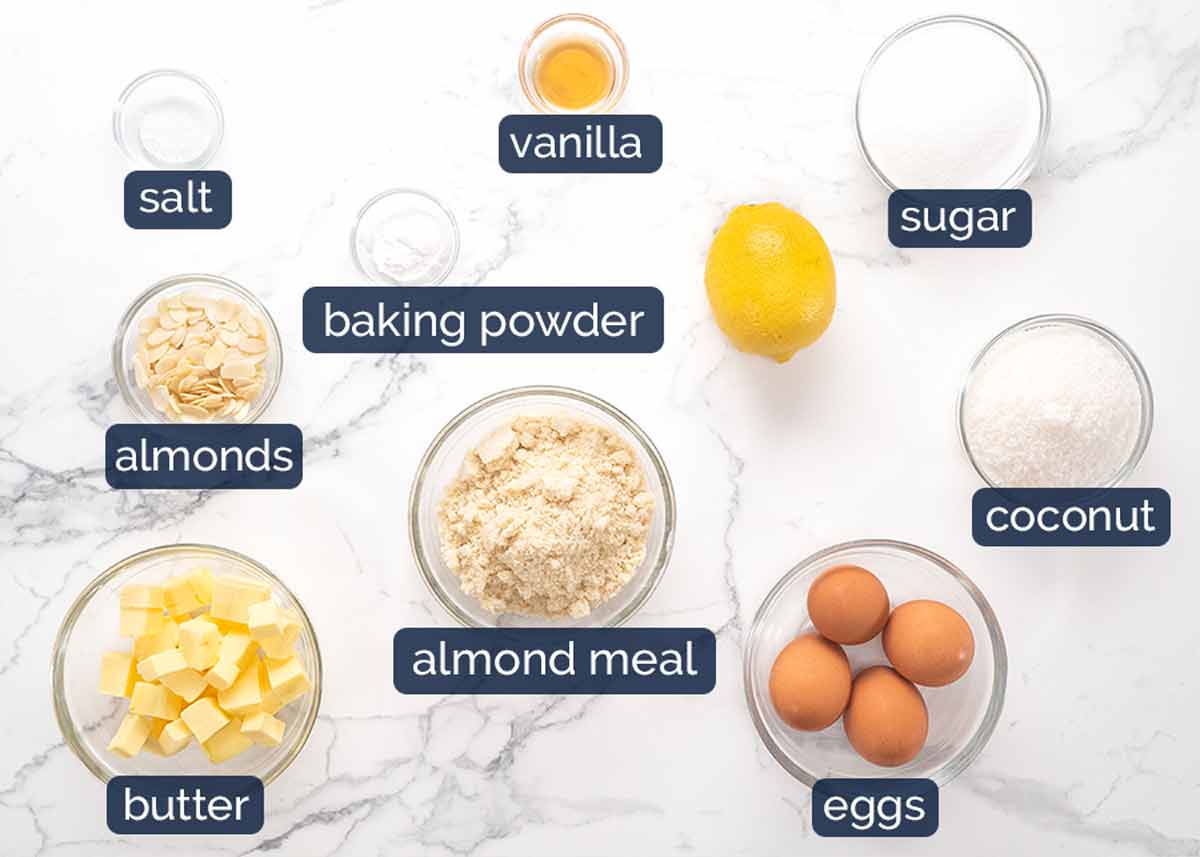
Almond meal (aka ground almonds) – This is raw almonds that are blitzed into a fine powder. Easily found nowadays, sold in the dried fruit & nut section and health food section of grocery stores. Or make your own by blitzing raw, unpeeled, unsalted almonds in a powerful blender (I use a Vitamix) until it becomes a fine powder.
Almond flour can also be used (not as common here in Australia). It’s finer so gives the cake a slightly fluffier texture and less almond flavour. Hazelnut meal can also be substituted though you’ll have lovely hazelnut flavour instead of almond.
Butter – The fat in this recipe, gives it a beautiful buttery flavour.
Baking powder – This is what makes the cake rise.
Eggs – Make sure they are at room temperature so they incorporate more easily into the batter.
Coconut – Desiccated coconut which is finely shredded, unsweetened coconut. Standard shredded coconut (which is like fine strands) will work but you’ll get more coconut texture in the cake. I don’t think coconut flakes (shavings) will work in this cake, it’s not absorbent enough.
Sugar – Use caster / superfine sugar if you can because it is finer so it will dissolve easier. Otherwise, regular / granulated sugar can be used.
Vanilla extract – For flavour. Not to be confused with artificial vanilla essence which is…well, artificial. So not as nice!
Lemon – We are only using the zest in this cake, for beautiful lemon flavour. Because the zest is where all the lemon flavour is – the juice is mostly just sour.
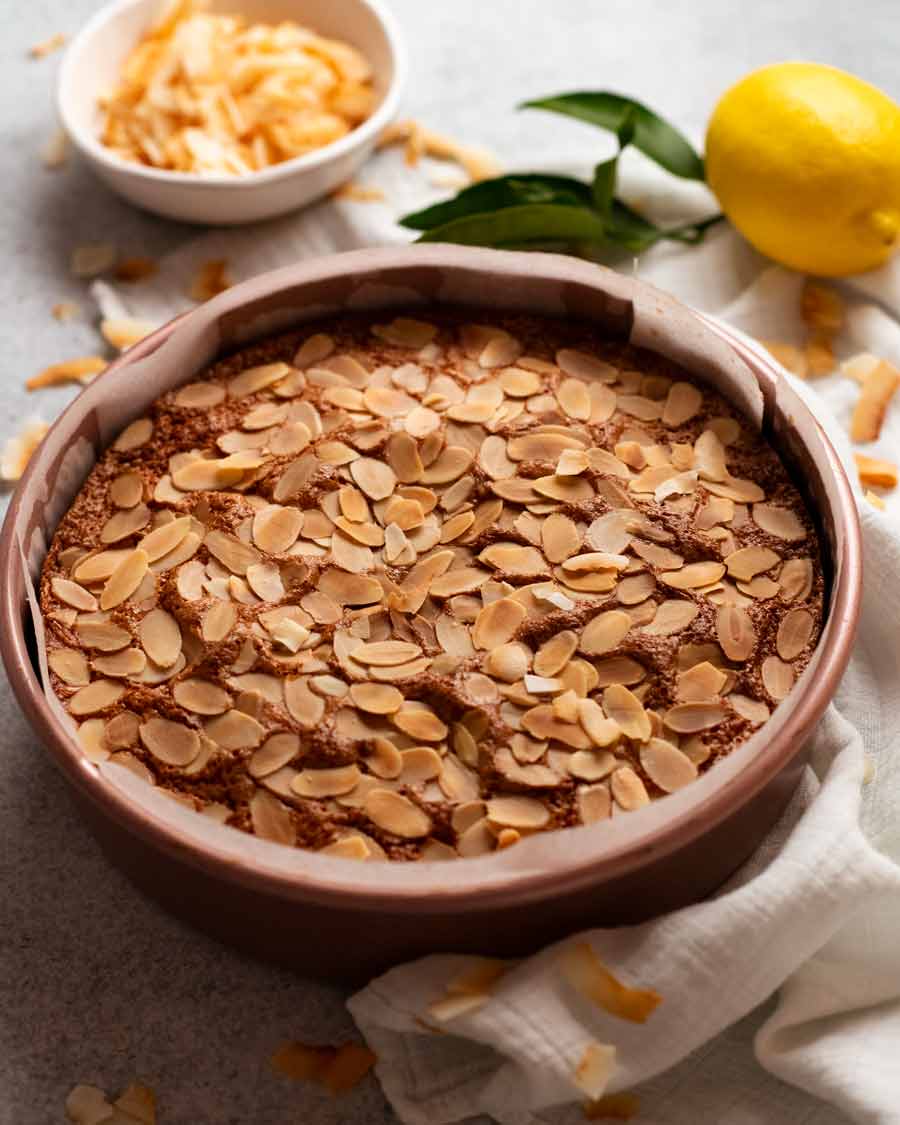
Flaked almonds – for sprinkling on the surface. Adds lovely texture to the cake, looks good and protects the surface from browning too much. But you can skip it you don’t have it!
Salt – Standard inclusion in most of my sweet recipes these days. Just a touch, to bring out the flavours in this cake. Doesn’t make it salty!
How to make lemon coconut cake
Put everything in a bowl and MIX! How good would life be if all baking recipes were this easy??? (Though, my waistline begs to differ).
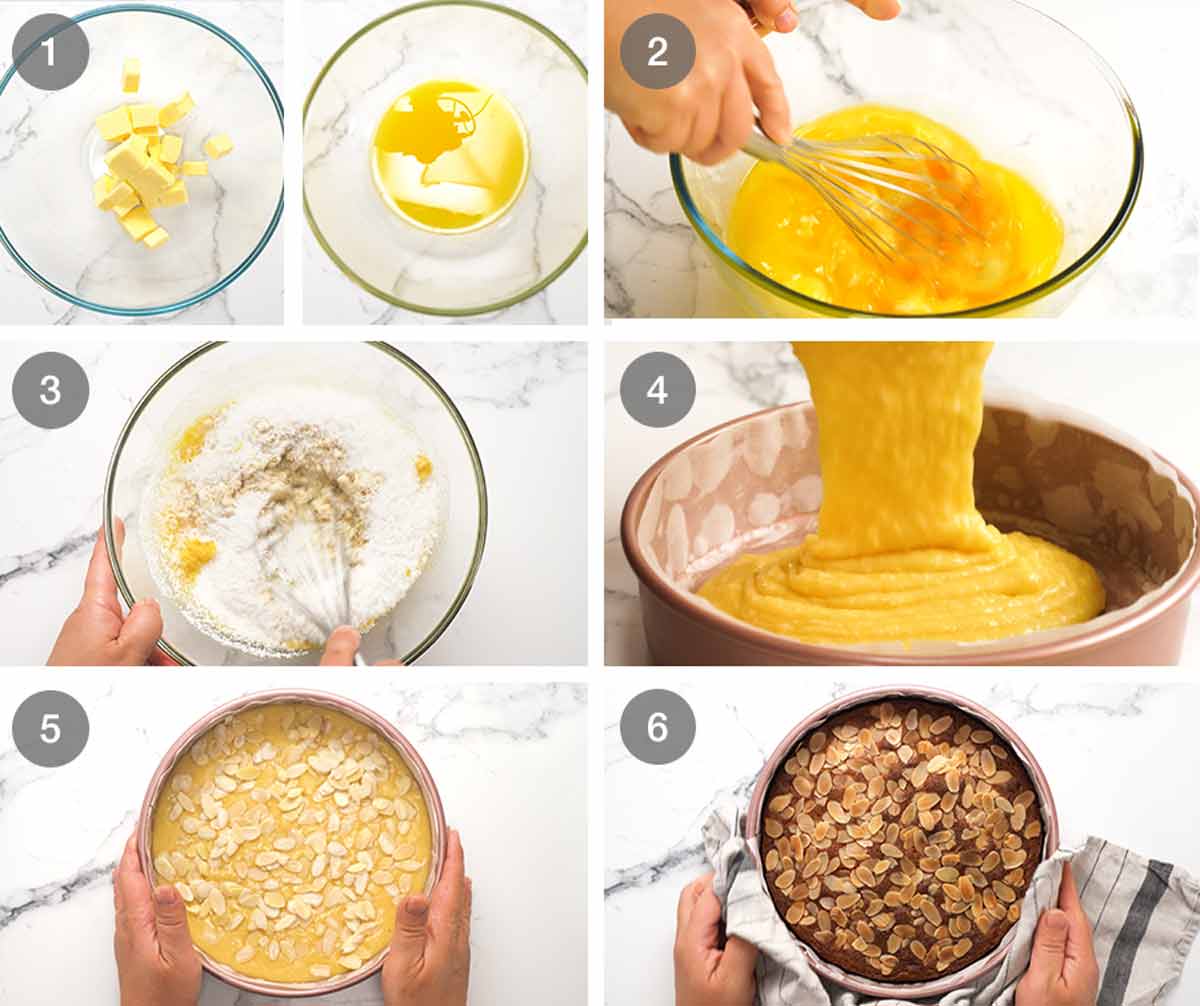
Melt the butter in a bowl using your microwave.
Wet ingredients – Whisk in all the other wet ingredients (eggs, vanilla, sugar – yes, sugar is considered a wet ingredient in baking because it liquifies when mixed with other wet ingredients).
Dry ingredients – Whisk in the almond meal, coconut, baking powder, salt and zest.
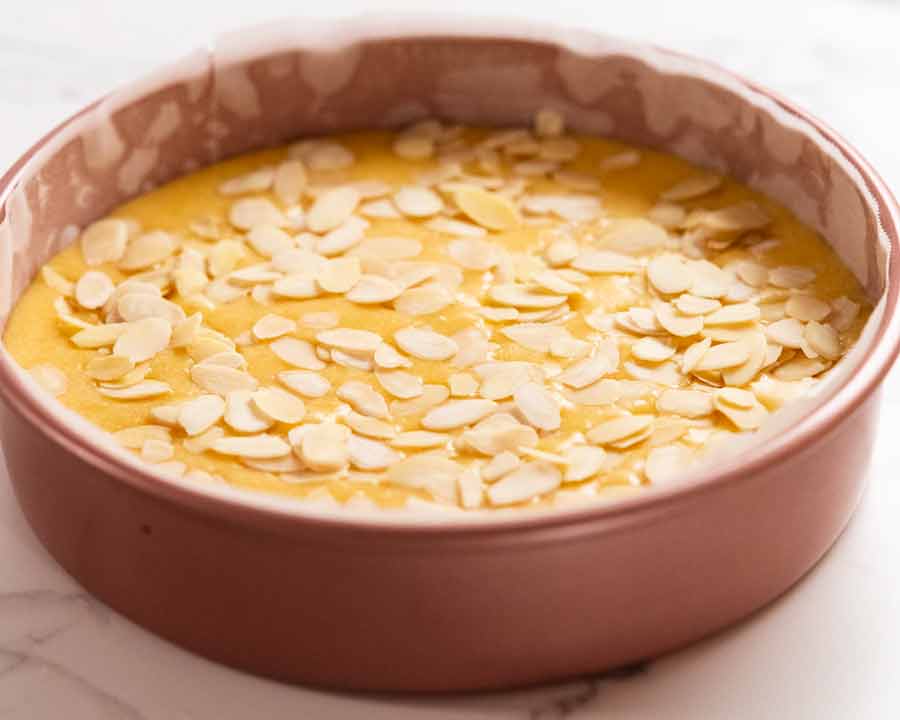
Pour it into a 20cm/8″ lined round cake pan. DO NOT skip lining the pan! Even greasing very generously is not enough to stop it from sticking to the pan, no matter how non-stick you think your pan is. (As you might have guessed, I’m speaking from first hand experience here).
Bake 40 minutes – Sprinkle the surface with almonds then bake for 40 minutes at 180°C/350°F (160°C fan) or until a skewer inserted into the middle comes out clean.
Cool for 1 hour before cutting to serve. I was a bit impatient in early versions and found that because the cake is quite moist, it can appear undercooked if you cut it while still warm. (But it’s not undercooked, it just looks that way if you cut while still hot!).
Serve it plain!
While some cakes I recommend serving with a dollop of cream, ice cream or other such accompaniment, this is a cake that definitely stands on its own two feet. Great flavour (lemon + coconut with a hint of almond) with a very moist crumb which is virtually impossible to replicate with flour-based cakes.
So it’s a great cake for taking places – such as for a work morning tea, book club, school bake sale. Just cut and serve. And those who are gluten-intolerant can enjoy it too. Though honestly, don’t just make this because you need a gluten-free cake. Make it because it’s just a really great cake that happens to be just about one of the easiest, quickest cake recipes I know. – Nagi x
Watch how to make it
Easy Lemon Coconut Almond Cake
Ingredients
- 150g / 10 tbsp unsalted butter
- 4 large eggs (55-60g/2oz each), at room temp
- 1 tsp vanilla extract
- 3/4 cup caster sugar (superfine sugar, Note 2)
- 1 1/2 cups almond meal (ground almond, Note 1)
- 1/4 tsp cooking/kosher salt
- 1 tsp baking powder
- 3/4 cup desiccated coconut (US: finely shredded unsweetened coconut)
- 1 1/2 tsp lemon zest (1 large lemon)
- 1/4 cup flaked almonds , optional (Note 3)
Instructions
- Preheat oven to 180°C/350°F (160°C fan). Grease a 20cm/8” round cake pan (or springform pan) with butter then line with paper.
- Melt butter – Place the butter in a large microwavable bowl and melt in the microwave. Let cool for a couple of minutes.
- Wet ingredients – Add egg, vanilla and sugar and whisk until combined.
- Dry ingredients – Add almond meal, salt, baking powder, coconut and lemon zest. Whisk until combined.
- Bake 40 minutes – Pour into pan. Sprinkle over almonds. Bake 40 minutes. Cool 15 minutes in pan then carefully turn out onto cooling rack.
- Cool at least 1 hour before cutting slices to serve. Moist enough to serve plain – doesn't need cream or anything!
Notes
4. Keeps perfectly for 5 days – best in the fridge if it’s hot.
Nutrition per slice assuming 12 slices.Nutrition
Life of Dozer
Eyeing end of day remnants in a glass cabinet like it’s a big juicy steak.

The post Easy lemon coconut almond cake appeared first on RecipeTin Eats.
]]>