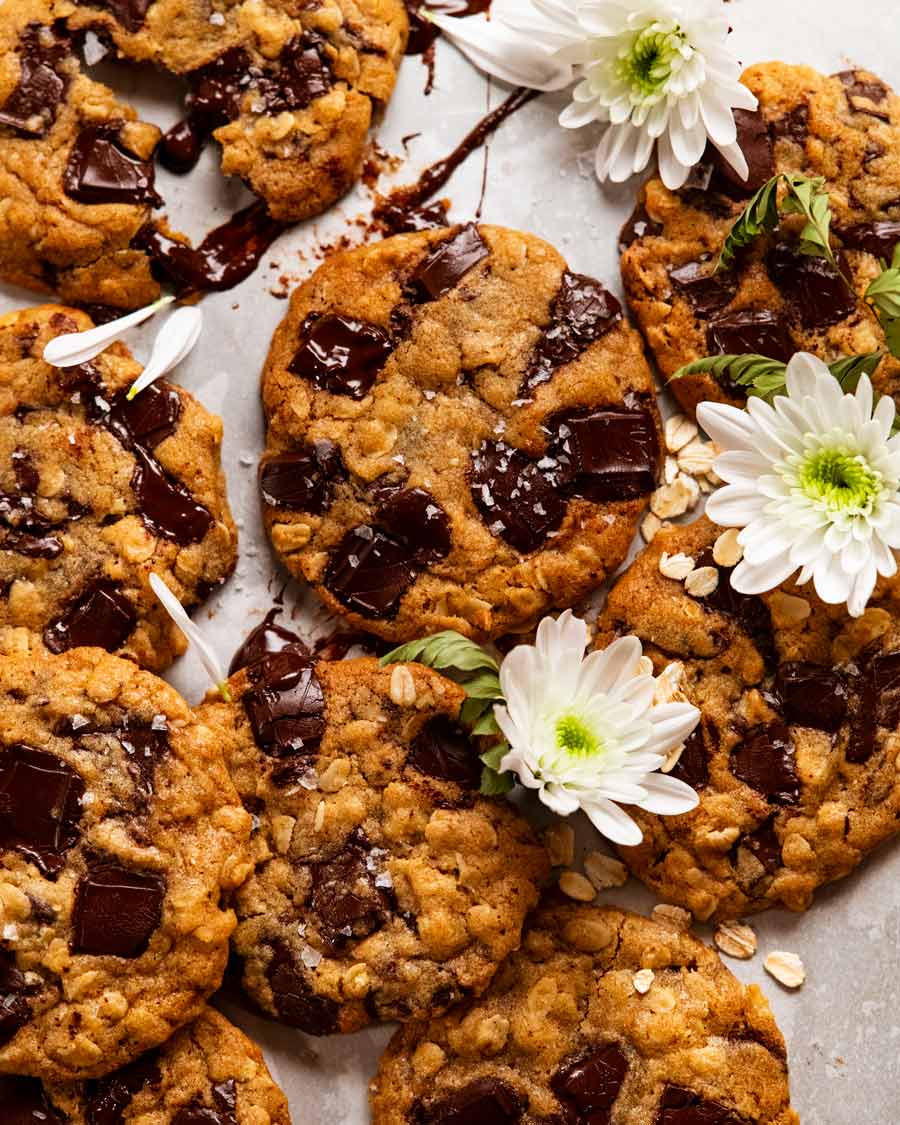
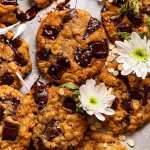
 Meet my favourite cookie in the whole world – Brown Butter Oatmeal Choc Chip Cookies. Buttery. Nutty and caramel-y undertones. Melty pockets of chocolate, crispy on the edges and chewy in the middle. Unbelievably quick and easy – no electric beater, no waiting around for butter to soften. I know there are more “perfect” cookies... Get the Recipe
The post Brown Butter Oatmeal Choc Chip Cookies (easy!) appeared first on RecipeTin Eats.
]]>Meet my favourite cookie in the whole world – Brown Butter Oatmeal Choc Chip Cookies. Buttery. Nutty and caramel-y undertones. Melty pockets of chocolate, crispy on the edges and chewy in the middle. Unbelievably quick and easy – no electric beater, no waiting around for butter to soften.
Rundown: Brown butter oatmeal choc chip cookies
Taste: Nutty buttery-ness from the brown butter with big melty chunks of chocolate
Texture: Crispy on the edges and base, and chewy inside from the oatmeal.
Difficulty: Effortless. No creaming butter. No appliances. Easy to handle dough.
Speed: Faster than usual cookie recipes. No chilling dough. No waiting for butter to soften.
Return for effort: Extremely high. Punches way above its weight!!
I know there are more “perfect” cookies out there in this world. But for effort vs results, these cookies leave them in the dust. It’s one of those rare gems where the end result is not compromised by speed and ease. In the world of baking, this is so rare, I am confident that you, like me, will try these once and know that it’s a Keeper!
They are everything you dream of a chocolate chip cookie to be. Chewy inside (thanks to the oats), crispy edges, very buttery flavour (from the browned butter!) and big melty pockets of chocolate from chunks of chocolates rather than using chocolate chips.
They are perfect. And they are fast and easy!
Ingredients in brown butter choc chip cookies
When I’m making to impress, I prefer to chop up good dark chocolate myself. Lindt is my choice – not cheap, so I stock up when discounted! For everyday purposes, I’ll just use good ole’ choc chips. Bakers’ choice!
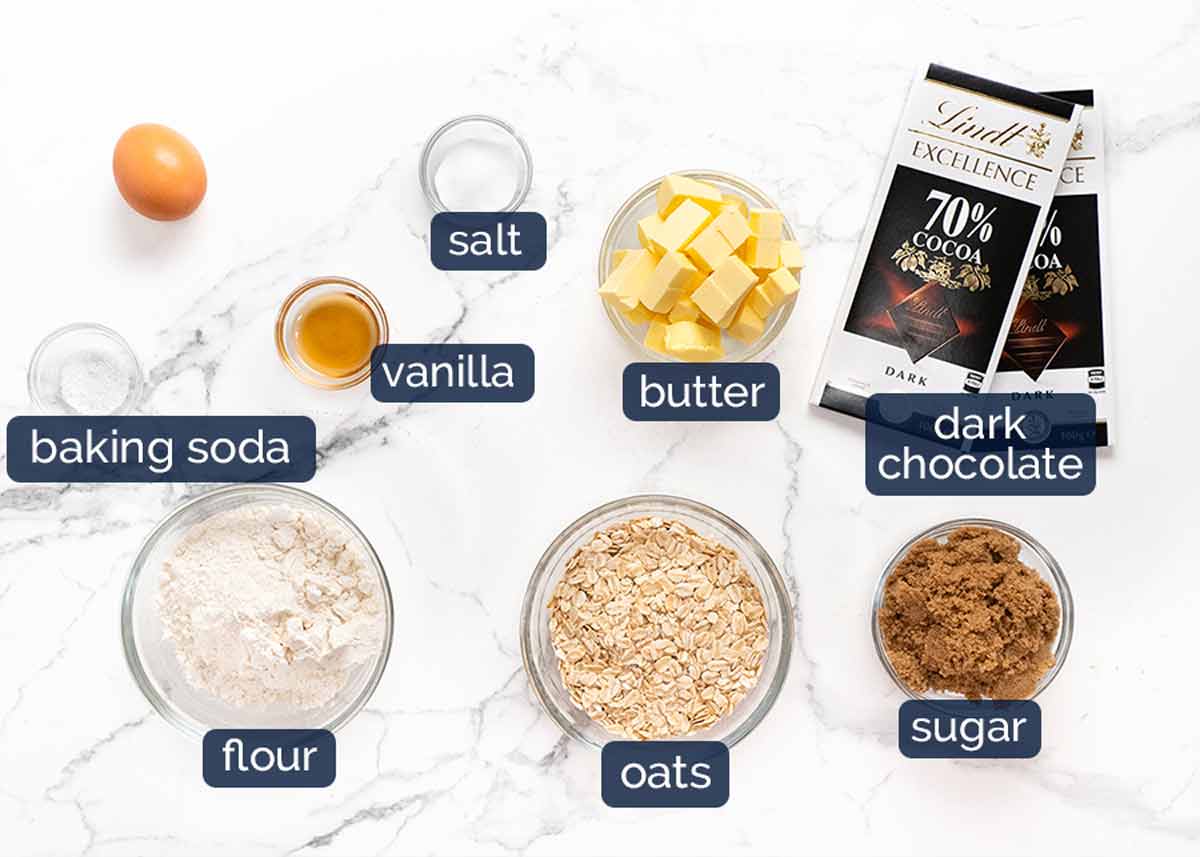
Chocolate or chocolate chips – See notes above photo.
Unsalted butter – This recipe calls for the butter to be browned which intensifies the buttery flavour. It’s really easy – just melt the butter then simmer for a few minutes until it turns brown and smells beautifully nutty. That’s it!
Oats – Just ordinary rolled oats. This is what gives these cookies a great chewiness! Recipe should work with quick oats, but not sure about steel cut oats.
Sugar – Brown sugar for caramely flavour and to make the cookies a bit chewy rather than crisp.
Flour – Just plain / all-purpose flour. Please don’t substitute with self raising flour as it doesn’t have enough rising agent in it.
Baking soda (bi-carb) – This is the leavening agent used in these cookies (ie to make them rise a bit). It is stronger than baking powder and has slightly different leavening effect depending on what you are making. Baking powder makes these cookies dome slightly whereas baking soda makes them rise more evenly which is better.
Vanilla – Just a bit, for flavour.
Salt – It’s generally good practice to add a bit of salt into sweet baking recipes as it brings out the flavours in other ingredients. It doesn’t make these cookies salty. But there’s certainly the option to finish them with a sprinkle of salt flakes!
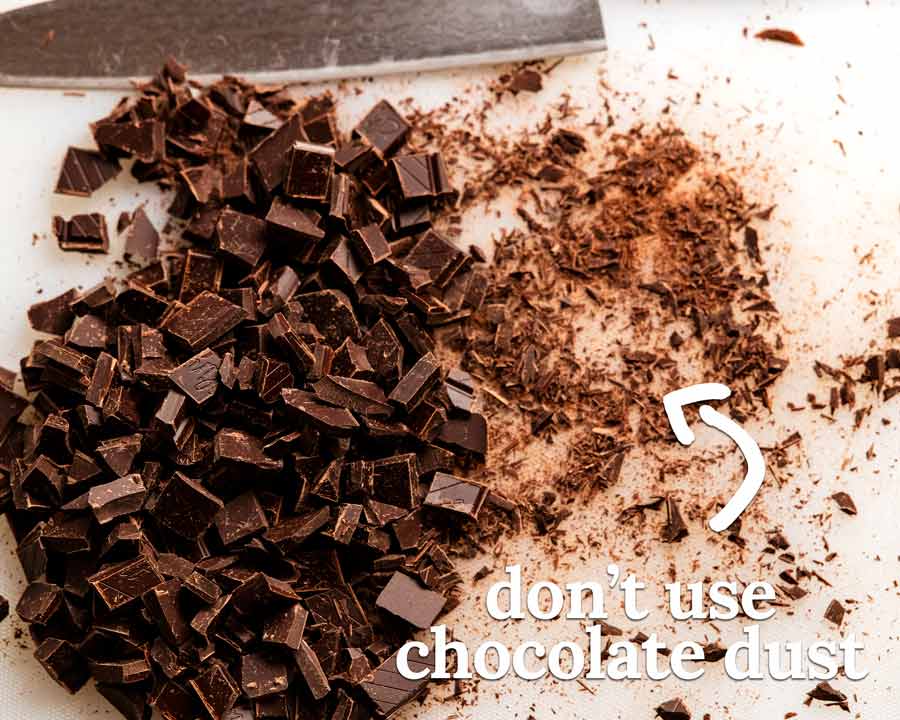
PRO TIP – Don’t use the chocolate “dust”. It melts and smears in the cookie dough and makes it look a bit messy. Save the dust for your cappuccino and just use the chunks for your cookies!
How to make brown butter chocolate chip cookies
Are you ready to see how shockingly and dangerously easy these are to make?
1. Brown the butter
Browning butter is as simple as melting butter then letting it simmer until it changes from yellow to golden brown which only takes a few minutes. This intensifies the buttery flavour and adds nuttiness. Both good things!
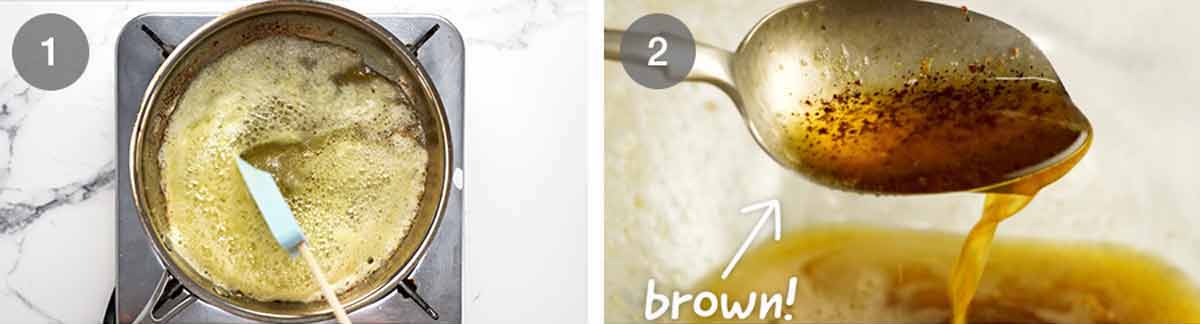
Melt butter in a silver or other non-black saucepan or small pan. Why does the colour of the cooking vessel matter? Because it’s impossible to see when the butter changes from yellow to golden in a black pan. You’ll need to rely on your smell or using a spoon to scoop the butter up to check the colour!
Brown butter! Simmer the melted butter on medium to medium high for 3 to 5 minutes or until you see little golden bits (which are the dairy bits that go toasty) and you can smell the nuttiness. The butter will also change from yellow to golden brown in colour.
Remove from the stove immediately to prevent it from going too brown / burnt. Pour the browned butter into a large mixing bowl (including all the little brown bits – extra flavour!). Then let it cool for 5 minutes.
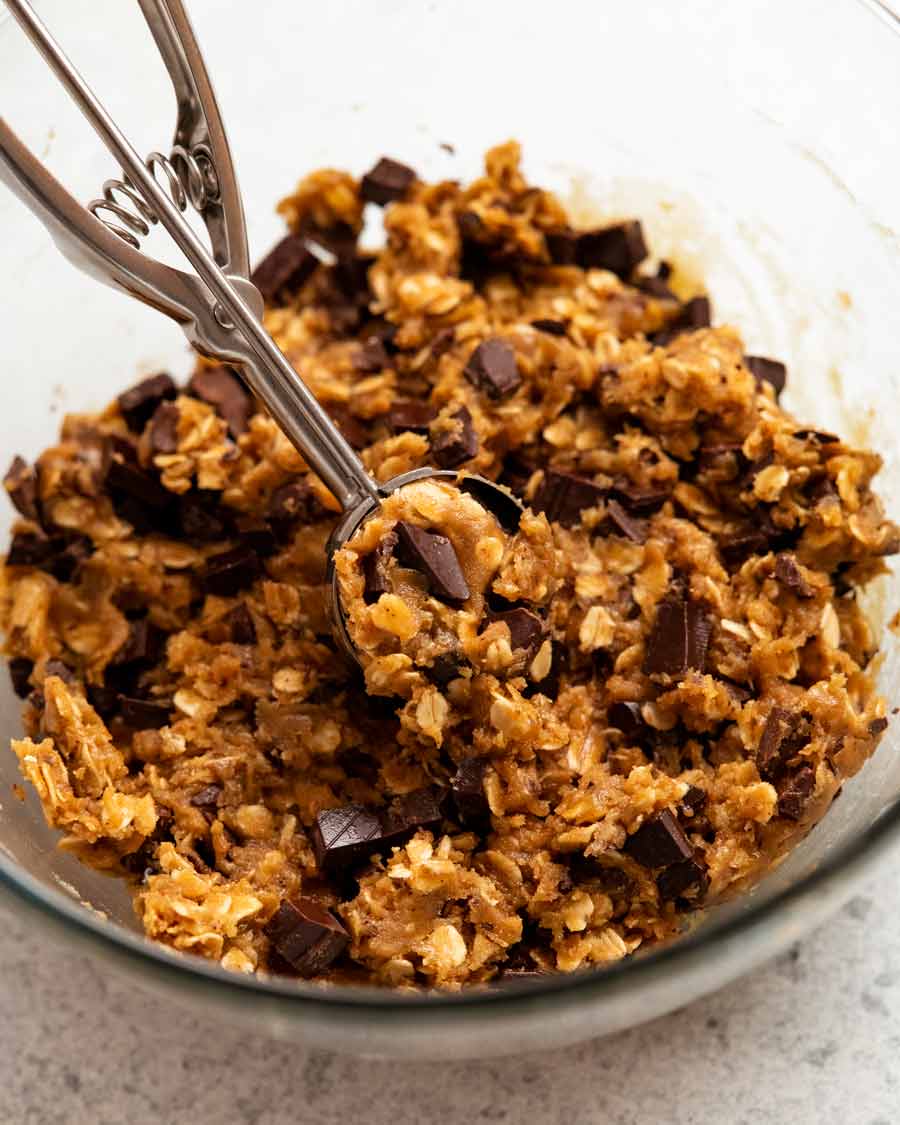
2. Cookie dough – just mix by hand
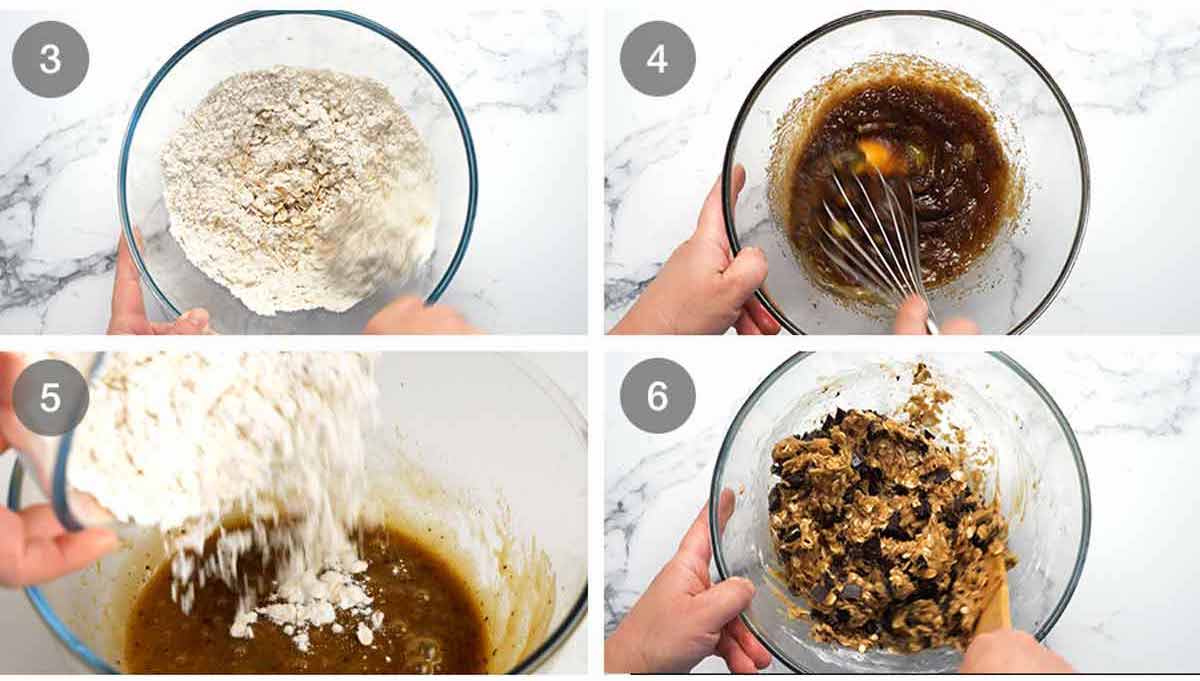
Whisk dry ingredients in a bowl – the flour, oatmeal, salt and baking soda.
Whisk wet – Add sugar into the still warm brown butter and whisk. It will look a bit split, that’s ok, it will come together when you add the egg. Add egg and vanilla then whisk.
Combine wet and dry – Pour the dry ingredients into the wet ingredients. Mix with a wooden spoon until the flour is mostly incorporated.
Then add the chocolate chips and mix through until you can no longer see flour.
5 minutes rest – Set the cookie dough aside for 5 minutes to let it firm up slightly so it’s scoop able into mounds.
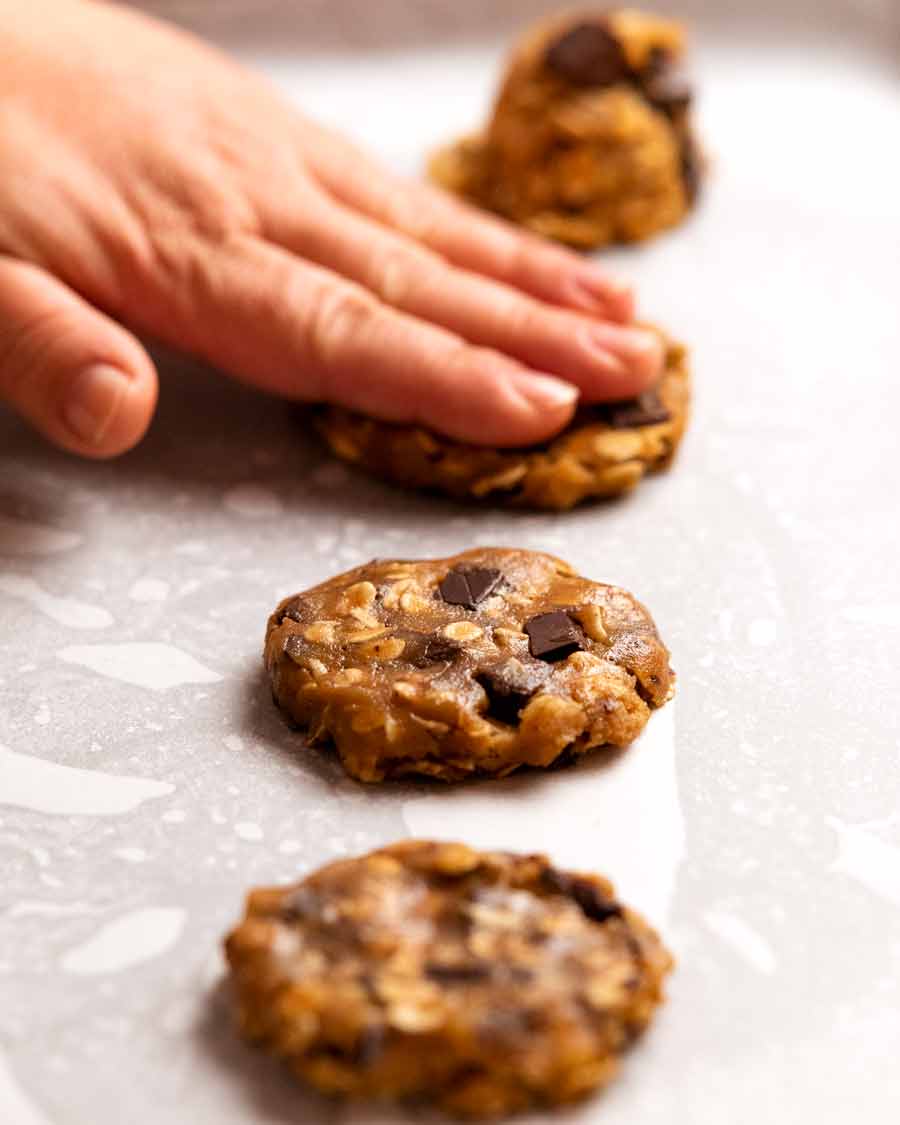
3. Use a cookie scoop for speed!
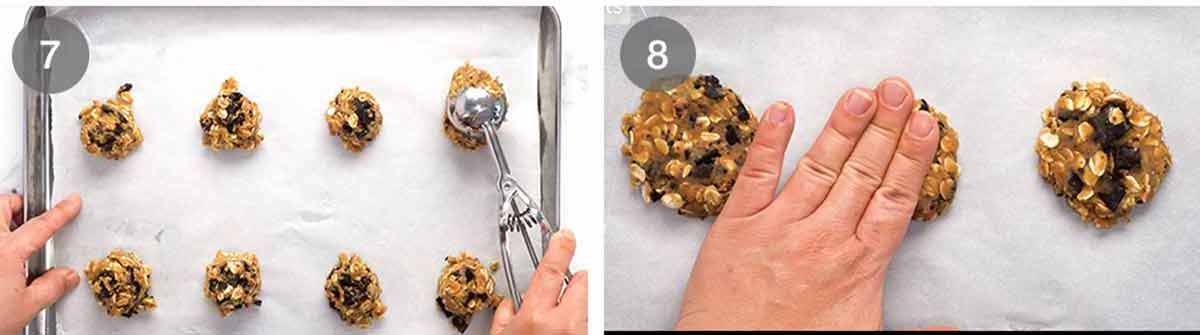
Scoop mounds of cookie dough onto lined trays, 5 cm / 2″ apart. I use a size 40 cookie scoop which is 1 1/2 tablespoons (a heaped tablespoon measure). You should get 22 cookies.
I use 3 trays – 8 cookies on 2 trays and 6 cookies on a 3rd tray.
Press the mounds down to 0.8 cm / 1/3″ thick rounds, reshaping as needed if they split or go wonky.
4. Bake 11 minutes
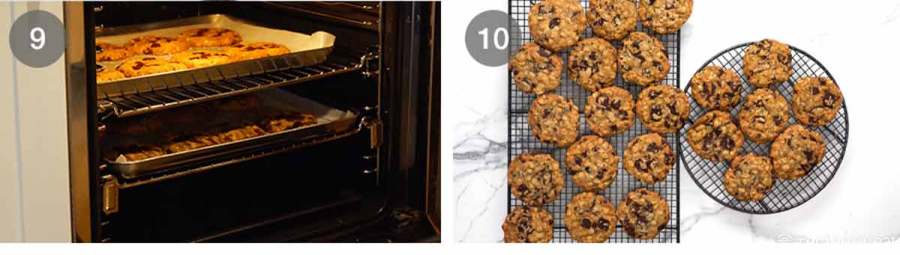
Bake – Bake 2 trays for 11 minutes, switching and rotating the trays at the the 7 minute mark until light golden. Remove, then bake the 3rd tray for 10 minutes, rotating at the 6 minute mark.
Cool cookies on the tray for 10 minutes – they will continue to cook and go a bit more golden. Then transfer to a cooling rack to fully cool. They will crisp up on the edges and base, but be chewy in the middle – best of both worlds! 🙌🏻

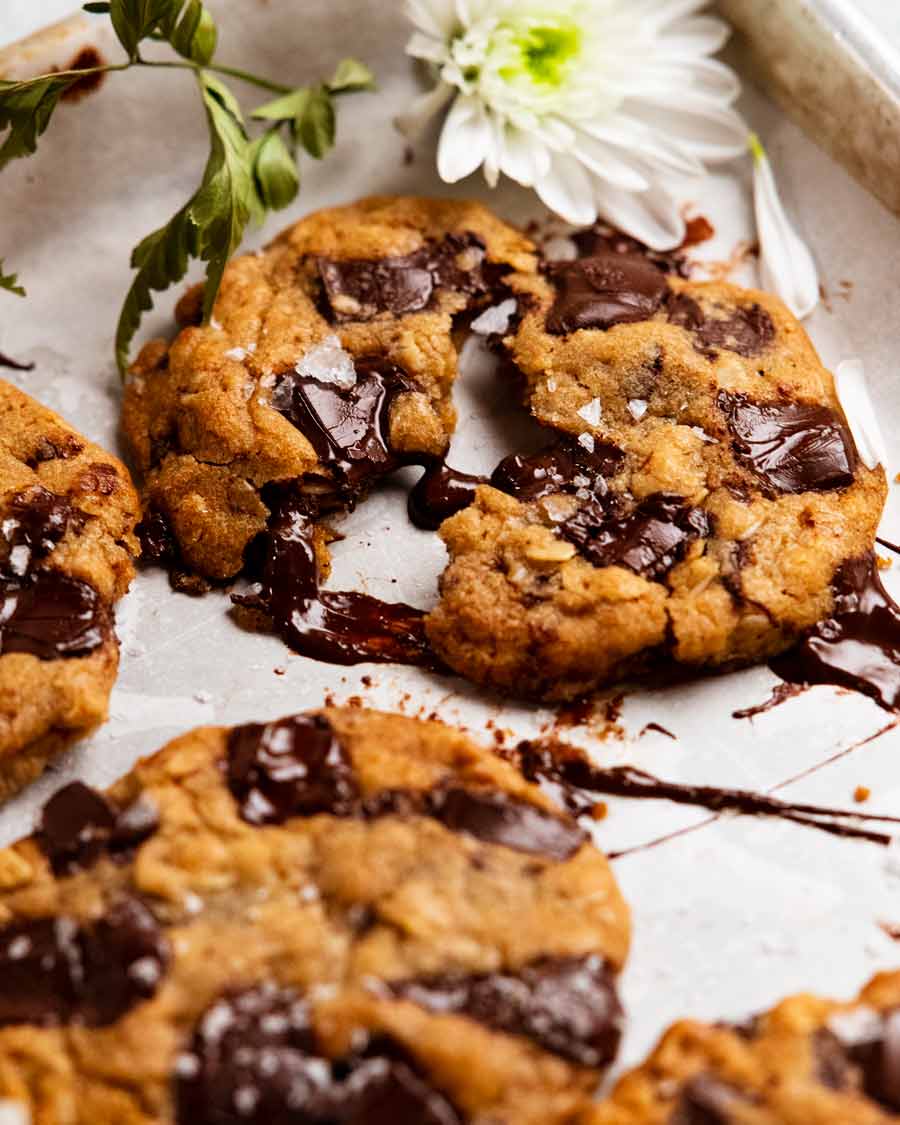
You know the hardest part about these cookies? Picking that point in the cooling time when the cookies have firmed up enough so they aren’t too soft, but the chocolate is still (very!) melty. The window of opportunity is actually wider than you think – around 25 minutes to 50 minutes after pulling them out of the oven.
But I always fret, not wanting to miss the chance – because once the chocolate has hardened, you cannot re-melt it without compromising the cookie itself – and I find myself hovering over the cookies, prodding them every 5 minutes or so wondering if I should go in for the kill.
The Kill being THIS moment:
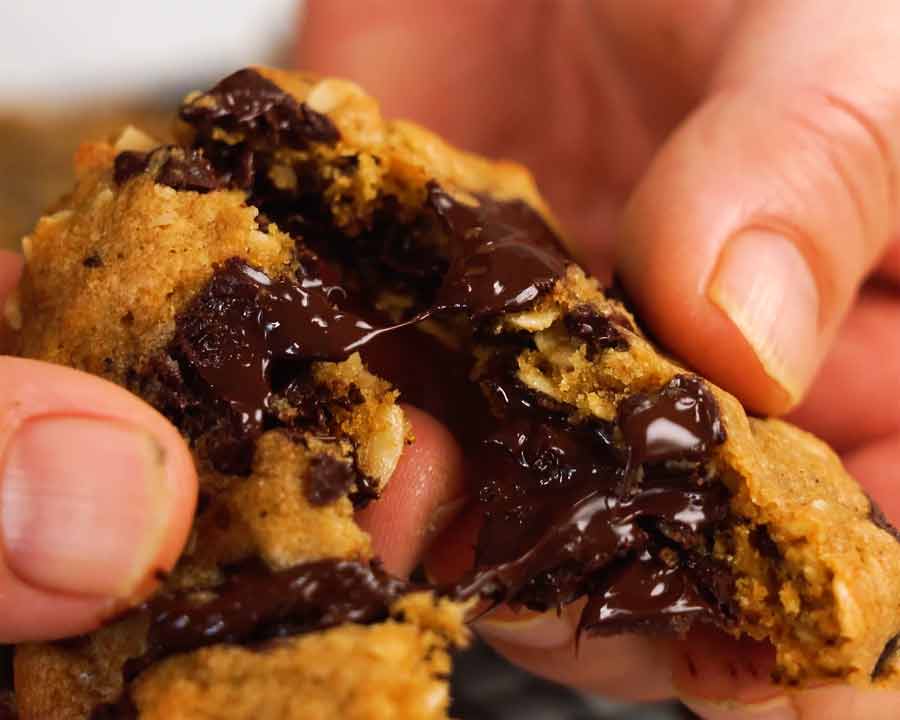
Now you understand, right?
25 to 50 minutes out of the oven. Set your timer, my friends. Don’t miss it.
Or, if you do, just make them again. They’re so easy, why not! 😈 – Nagi x
Watch how to make it
Brown butter oatmeal choc chip cookies
Ingredients
- 150g/10 tbsp unsalted butter , cut into 1cm / 1/2″ cubes
- 1 cup flour , plain/all-purpose
- 1 1/2 cups rolled oats (not quick or steel cut)
- 1 tsp baking soda (bi-carb) , sifted if lumpy
- 1/8 tsp cooking/kosher salt
- 1 cup brown sugar (tightly packed)
- 1 large egg , at room temperature (~55g/2oz)
- 1 tsp vanilla extract
- 200g/ 7 oz 70% dark chocolate block, I use Lindt (Note 1, sub 1 cup / 200g chips)
Instructions
- Preheat oven to 180°C/350°F (160°C fan). Lightly grease then line three baking trays with paper.
- Brown butter – Melt butter in a small silver pan or saucepan over medium heat (Note 2). Leave to simmer on medium heat for 3 to 5 minutes, stirring every now and then, until (when you push foam aside) you see little golden-brown bits. Immediately pour into a bowl (including the golden bits) and set aside to cool for 5 minutes.
- Chop choc – Cut the chocolate into 1cm /1/4" pieces. Transfer the chunks into a bowl and leave the fine chocolate dust behind for another purpose (makes cookies speckled, Note 1).
- Mix dough – Whisk flour, oats, baking soda, and salt in a large bowl. Add sugar to the brown butter and whisk (it might not combine fully). Add egg and vanilla, whisk until smooth.
- Finish dough – Add dry ingredients into the egg mixture. Mix with a wooden spoon until the flour is almost mixed in. Add chocolate, and stir until mixed through and you can no longer see flour. Set aside for 5 minutes to let the mixture firm up a bit.
- Cookies – Scoop a heaped tablespoon of dough onto the tray, 5 cm / 2 " apart. (I use a size 40 cookie scoop, makes 22 cookies) Flatten to 8 mm / 1/3" thick, reshaping sides if needed if they split/go wonky.
- Bake – Bake 2 trays for 11 minutes, switching shelves and rotating the tray at the 7 minute mark, or until the surface is light golden. For 1 tray, bake 10 minutes, rotating the tray at the 6 minute mark.
- Cool on the tray for 10 minutes, then transfer onto a cooling rack to fully cool. (A sprinkle of salt flakes wouldn't go astray!)
Notes
 Lindt is my preferred, I stock up when it goes on sale! Else any dark eating chocolate is fine.
Substitute with 1 cup / 200g dark choc chips / semi sweet chips.
2. Browning butter – Easier to use silver or other light colour pan when browning butter so you can see the golden brown bits (can’t see against black base). Don’t forget to scrape in all the golden bits – it’s free flavour!
3. Baking – For 2 trays, bake 11 minutes, rotating the tray and switching shelves at the 7 minute mark. For 1 tray, bake 10 minutes, rotating at the 6 minute mark.
4. Keeps 5 days in an airtight container, they start softening on day 3+. Keep in fridge if it’s super hot where you are.
Nutrition per cookie, assuming 22 cookies.
Lindt is my preferred, I stock up when it goes on sale! Else any dark eating chocolate is fine.
Substitute with 1 cup / 200g dark choc chips / semi sweet chips.
2. Browning butter – Easier to use silver or other light colour pan when browning butter so you can see the golden brown bits (can’t see against black base). Don’t forget to scrape in all the golden bits – it’s free flavour!
3. Baking – For 2 trays, bake 11 minutes, rotating the tray and switching shelves at the 7 minute mark. For 1 tray, bake 10 minutes, rotating at the 6 minute mark.
4. Keeps 5 days in an airtight container, they start softening on day 3+. Keep in fridge if it’s super hot where you are.
Nutrition per cookie, assuming 22 cookies.Nutrition
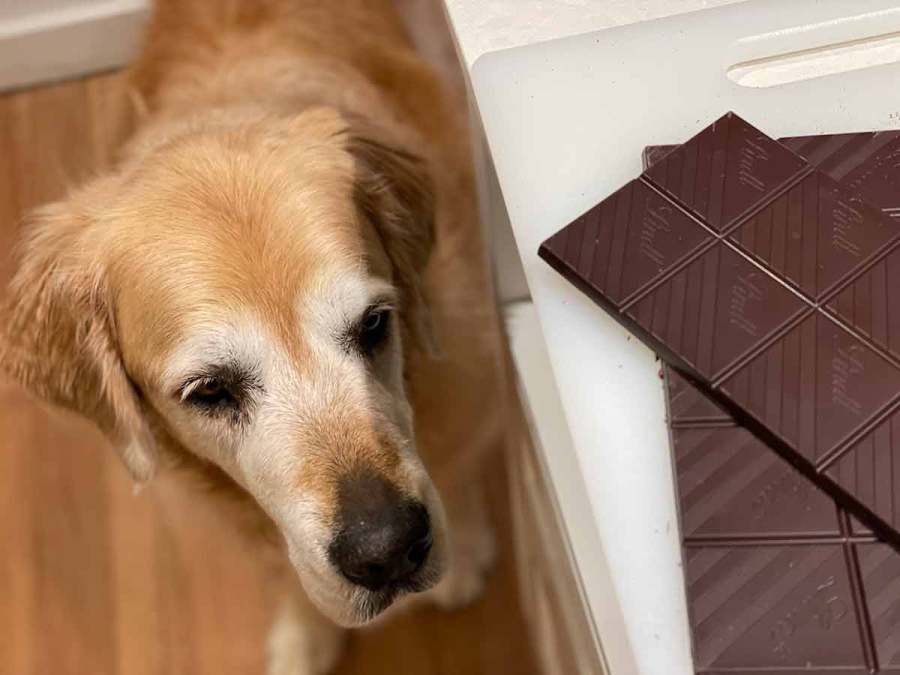
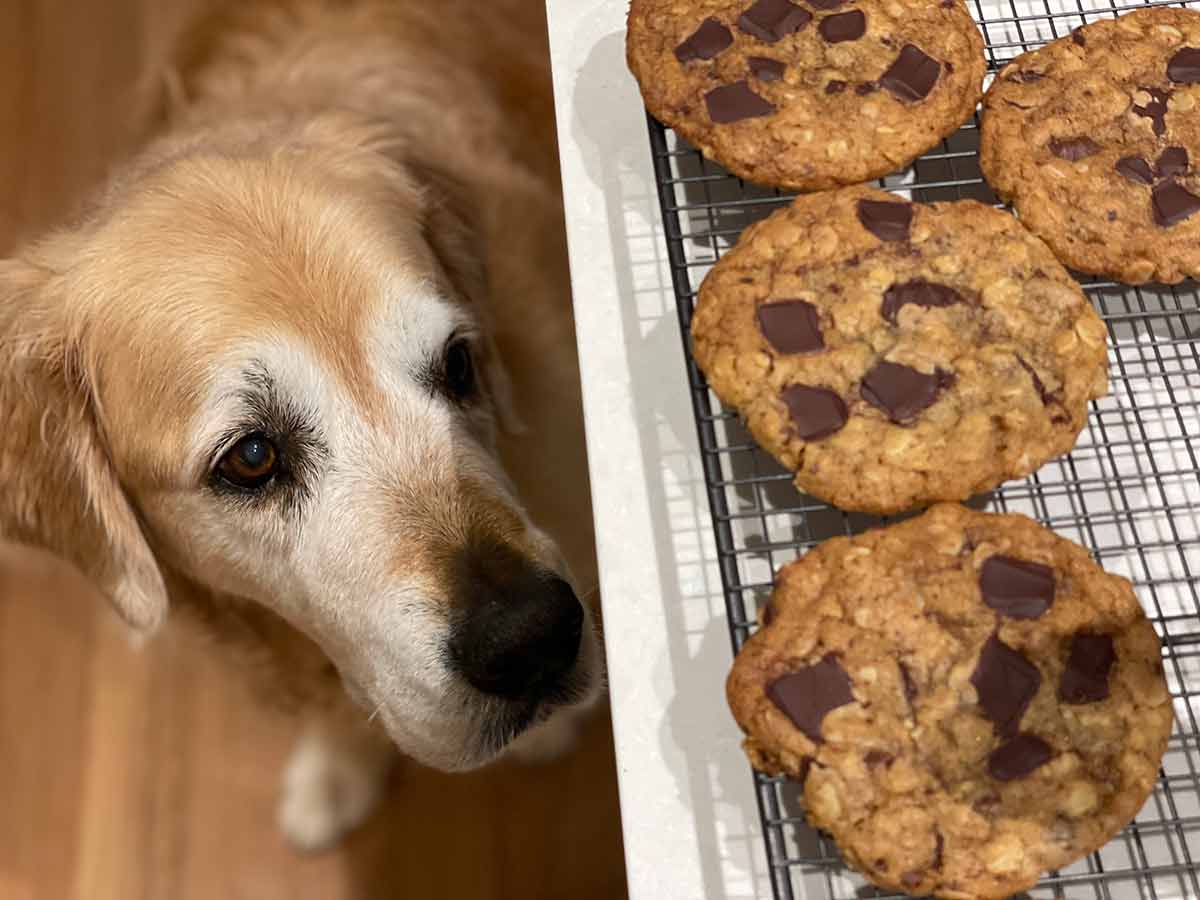
Life of Dozer
Dozer, no amount of hovering is going to get you any chocolate! It’s bad for you!
The post Brown Butter Oatmeal Choc Chip Cookies (easy!) appeared first on RecipeTin Eats.
]]> Take a break from the Christmas madness to make Christmas Cookies! These sugar cookies are classic vanilla biscuits that are made for cutting out shapes because they hold their shape perfectly when baked. NO CHILL time, make them soft OR crispy. Ice them my EASY way, dip in chocolate, dust with icing sugar or serve them plain!... Get the Recipe
The post Christmas Cookies! (Vanilla Biscuits/Sugar Cookies) appeared first on RecipeTin Eats.
]]>Take a break from the Christmas madness to make Christmas Cookies! These sugar cookies are classic vanilla biscuits that are made for cutting out shapes because they hold their shape perfectly when baked.
NO CHILL time, make them soft OR crispy. Ice them my EASY way, dip in chocolate, dust with icing sugar or serve them plain!

Christmas Cookies
What I call “Christmas Cookies” are simply vanilla biscuits cut out in Christmas shapes and iced with colourful festive frosting. They taste like shortbread cookies, but not quite as buttery or crumbly. They are as classic as vanilla biscuits can be.
This particular biscuit recipe is made for cutting out shapes – in this case, Christmas shapes. Most cookies spread snd puff up so they bear little resemblance to the shape you expected!
But these hold their shape perfectly – as you can see by the sharp ridges and corners in the photo below.

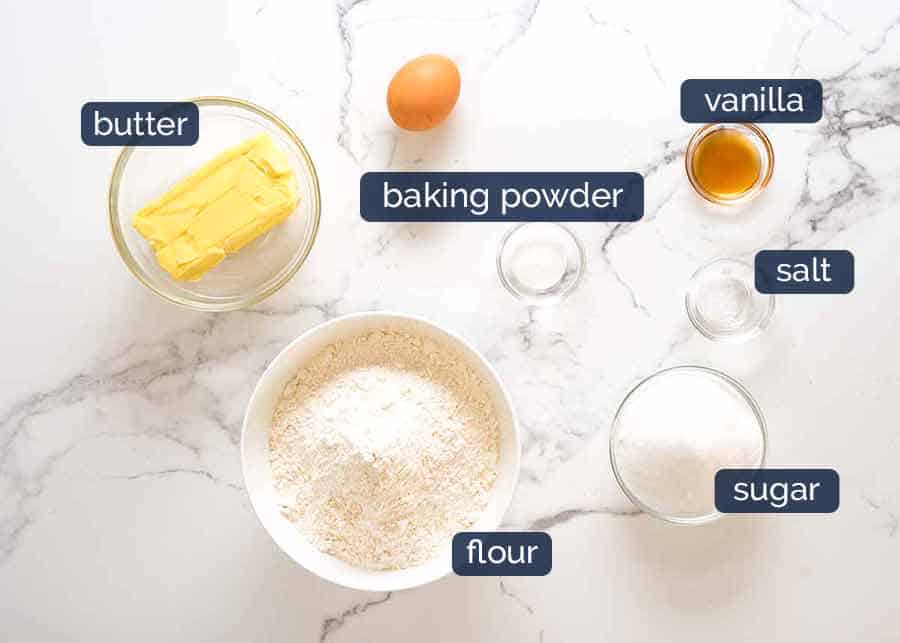
What you need for Christmas Cookies
The nice thing about these Christmas Cookies is that they’re made with pantry staples – so there’s no need to add to your ever growing Christmas grocery shopping list!!!
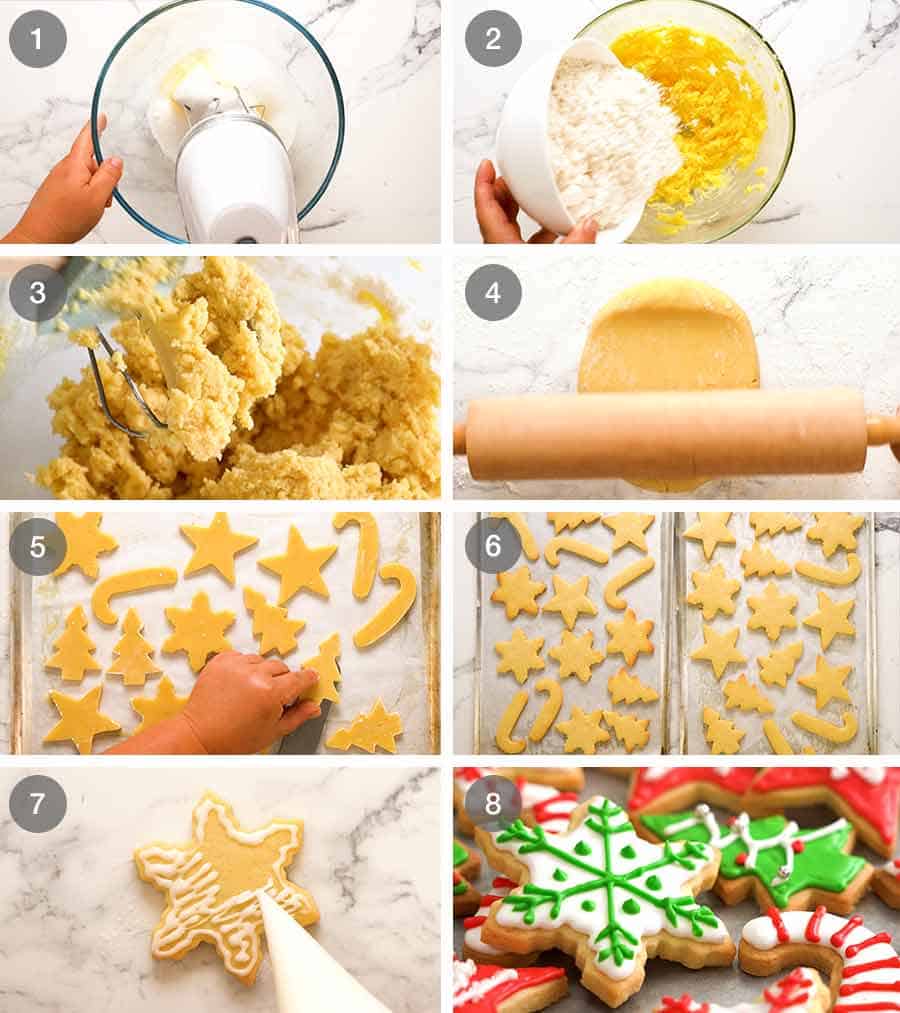
How to make Christmas Cookies
Unlike most cookie doughs suitable for cutting out shape, there’s no chill time required for this recipe. Ain’t nobody got time for chilling during Christmas madness – right??!
Bonus: the dough is easy to handle and can be scrunched up and rolled up again over and over until you’ve used up every scrap.
Because these are sweet vanilla biscuits, they are flavoured enough and sweet enough to serve plain. But if you are inclined to ice them, pop over to my Icing for Christmas Cookies (PS I also share my quick ‘n easy way to ice them!)

So. Many. Cookies.
A sight that will catapult anyone into serious Christmas spirit!!
Make these for Santa, your family, or (if you’re really feeling the holiday spirit) maybe even to gift to someone.
And don’t worry. This is a big batch recipe. Nibble away, no one will miss one or two or five!! 😉 – Nagi x
Watch how to make it

Christmas Cookies (Vanilla Biscuits / Sugar Cookies)
Ingredients
- 225g / 1 cup unsalted butter , softened (or use salted, skip salt)
- 1 cup caster/superfine sugar (granulated/ordinary white sugar ok too)
- 1 1/2 tsp vanilla extract
- 1 large egg (55-60g / 1.9-2oz)
- 3 cups flour , plain / all purpose
- 3/4 tsp baking powder
- 3/4 tsp salt
Icing for Sugar Cookies
Instructions
- Preheat Oven to 180°C / 350°F (160°C fan). Line 2 baking sheets with parchment paper.
- Beat butter and sugar in a large bowl until creamy (1 minute on speed 5)
- Add egg and vanilla, beat until completely combined.
- Add flour, baking powder, and salt.
- Start mixing slowly, then beat until the flour is incorporated – it will be clumpy.
- Dust work surface with flour, scrape dough out of bowl. Pat together then cut in half, then shape into 2 discs.
- Roll out to 0.3cm / 1/8" (for thinner, crispier cookies) or 0.6cm / 1/4" (for thicker, softer cookies), sprinkling with flour under and over the dough so it doesn't stick.
- Use cookie cutters to press out shapes and use a knife or spatula to transfer shapes to prepared baking sheets. (Keep dough that doesn’t fit in the oven in the fridge).
- Bake for 10 minutes, swapping trays halfway (Note 2), until the surface is pale golden and the edges are just beginning to turn light golden.
- Allow cookies to cool completely on trays (they will finish cooking on the trays).
Decorating options:
- Icing – see Icing for Christmas Cookies recipe.
- Melt chocolate then dip the surface into chocolate.
- Dot with icing sugar and decorated with silver balls
- Dust with icing sugar
- Serve plain! They are sweet vanilla biscuits so they are wonderful eaten just as they are!
Notes
Nutrition
Originally published 2019. Reviewed and refreshed as needed every year or so. No change to recipe, it’s a classic!
Life of Dozer
When Dozer got his very own personalised Christmas cookie!!

The post Christmas Cookies! (Vanilla Biscuits/Sugar Cookies) appeared first on RecipeTin Eats.
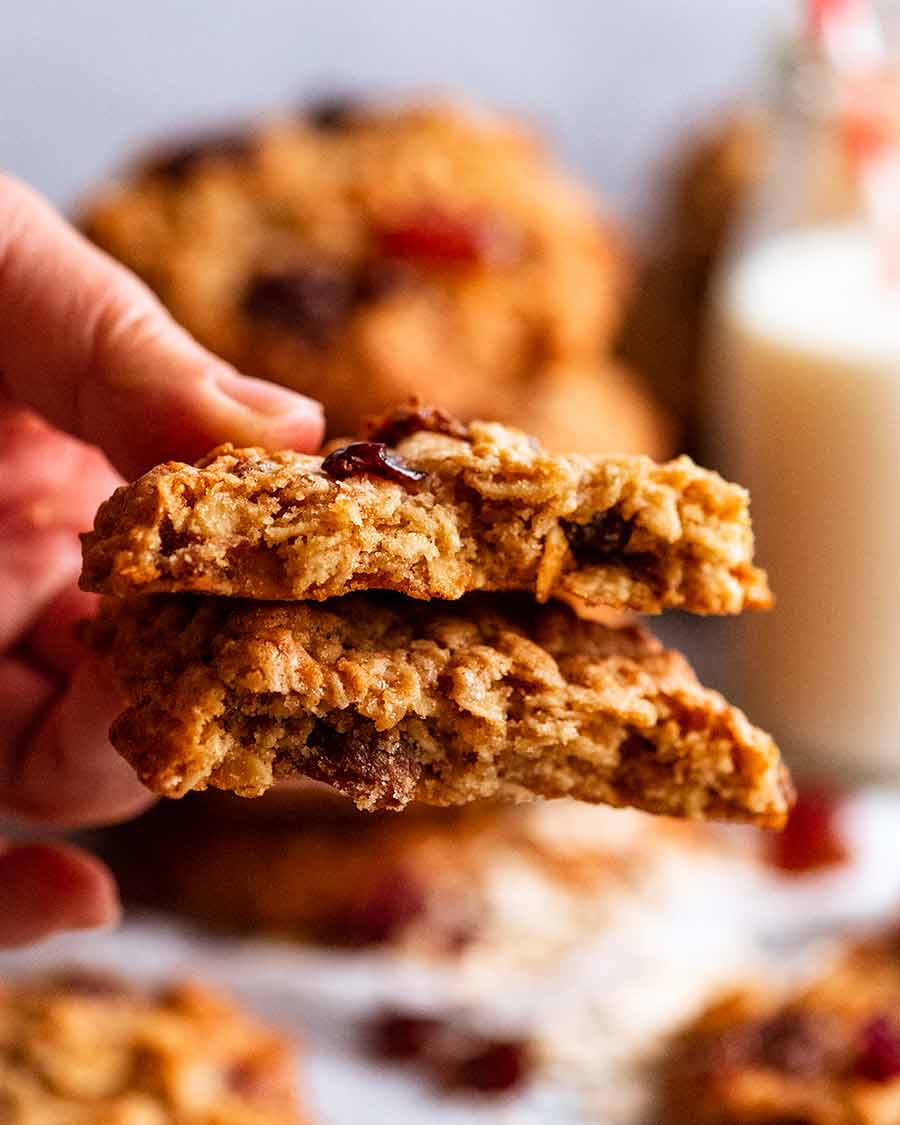
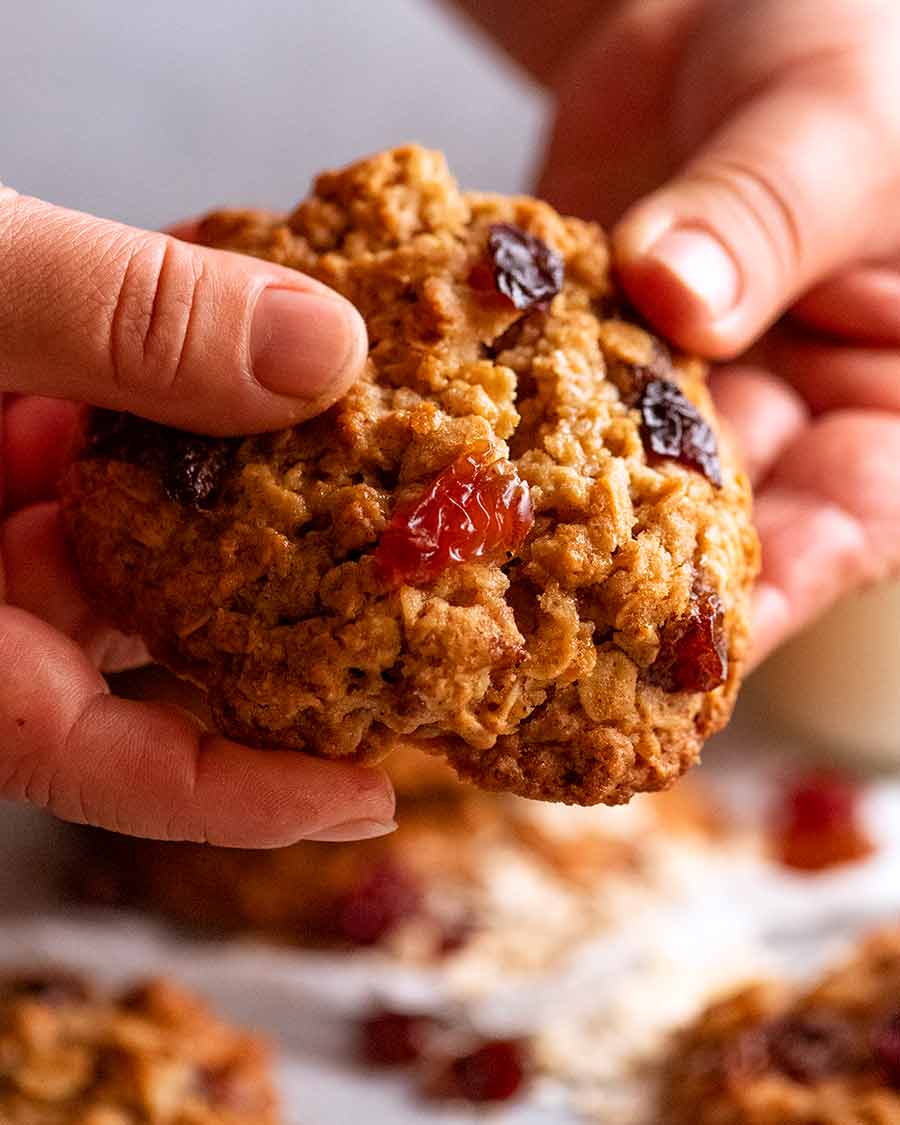
]]>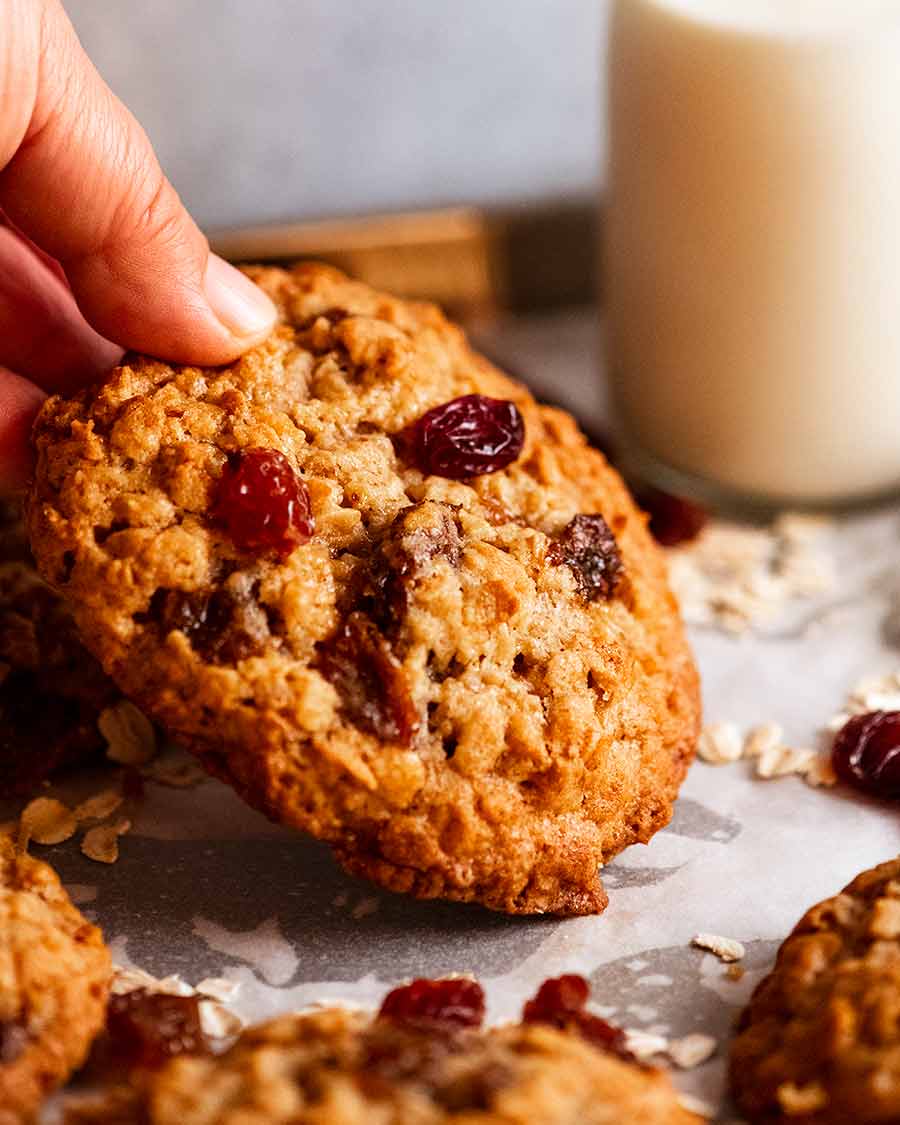 If you love your oatmeal cookies soft and chewy, this is THE Oatmeal Raisin Cookie recipe for you! Nicely crispy around the edges, studded with plump and juicy raisins, and buttery in taste with the faintest wisp of cinnamon, these cookies smell heavenly when they’re in the oven and also keep really well! Oatmeal Raisin Cookies Being... Get the Recipe
The post Oatmeal Raisin Cookies (Soft & Chewy) appeared first on RecipeTin Eats.
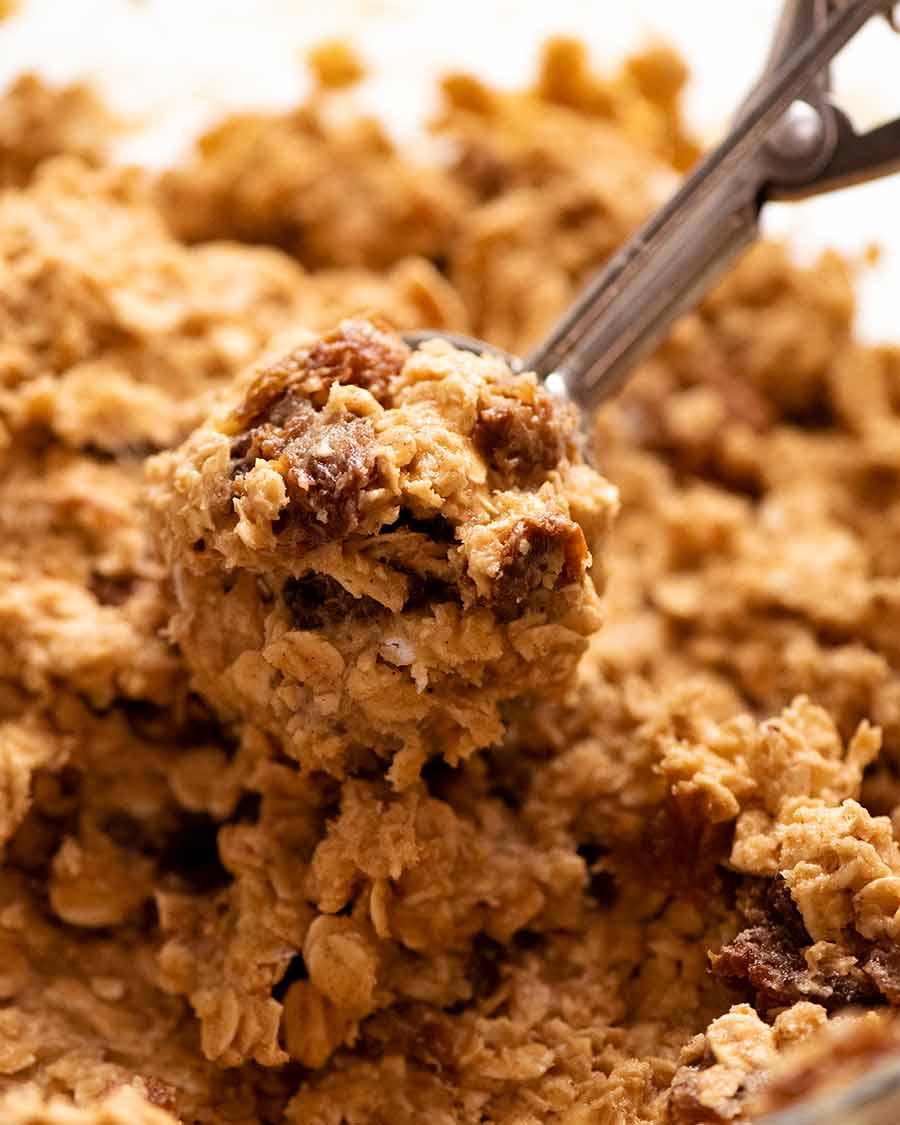
]]>If you love your oatmeal cookies soft and chewy, this is THE Oatmeal Raisin Cookie recipe for you! Nicely crispy around the edges, studded with plump and juicy raisins, and buttery in taste with the faintest wisp of cinnamon, these cookies smell heavenly when they’re in the oven and also keep really well!
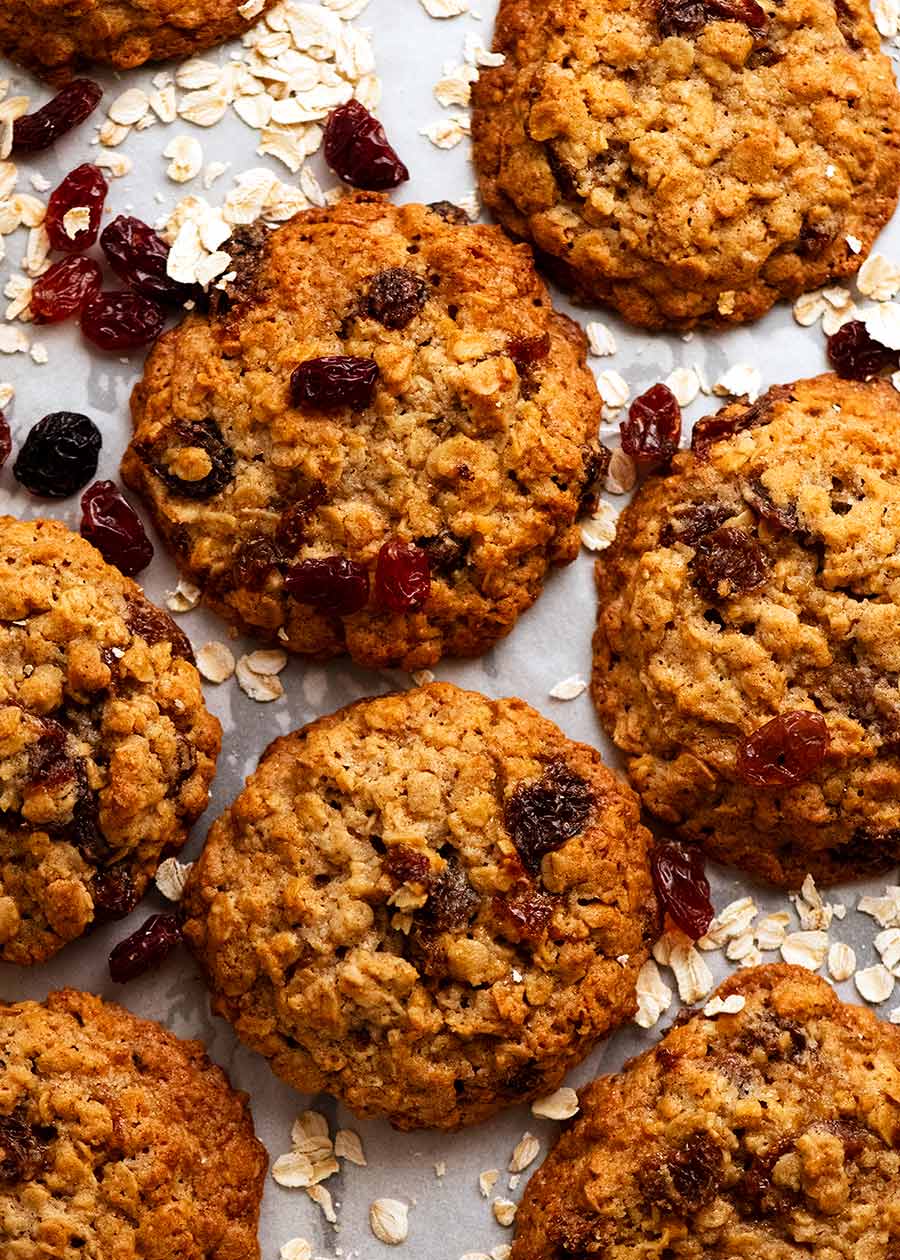
Oatmeal Raisin Cookies
Being more of a savoury than sweet-toothed gal, I’m rarely a victim of the urge to buy cookies or sweet tarts lined up in temptation on the counters of coffee shops. Unless, that is, they have big and fat Oatmeal Raisin Cookies.
Here’s the thing: I’m all about fruit and spice oatmeal cookies, and they rate higher than chocolate chip cookies in my world. For me that magical mix of warm cinnamon and fruit studding a caramelly, chewy cookie just tastes like pure comfort and, well, home. Keep your Insta-friendly hipster cookies and call me a granny, I don’t care – just leave me all the Oatmeal Raisin Cookies!!
Ingredients for Oatmeal Raisin Cookies
This is a recipe adapted fairly closely from a Cook’s Illustrated recipe. I read that it took them 6 months to come up with the perfect soft and chewy Oatmeal Raisin Cookie. I applaud them for their persistence, not least so we may feast on the sweet fruits of their labour!
Here’s what you need:
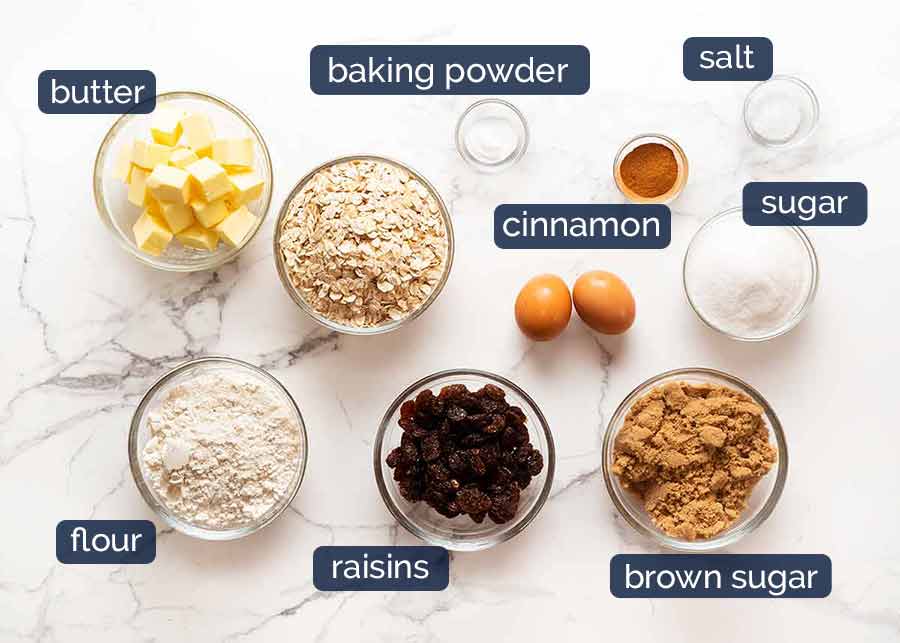
Butter (at room temperature) – When recipes call for butter at room temperature or softened butter, the butter needs to be firmer than you probably think. Ideally it is 18°C / 64°F. This is soft enough to whip until creamy, but still cool enough such that when you touch it, you don’t end up with a slick of grease on your finger.
Butter that is too soft can lead to cookies that split or spread too much in the oven. In fact, this is one of the most common problems people have when making cookies!
A quick way to bring butter to room temperature: Cut fridge-cold butter into 1.5cm cubes (1/2″ thick slices if you have a US stick of butter). Scatter on plate. Microwave 2 cups of cold tap water for 4 minutes on high. Remove jug, quickly put plate in, close door. DO NOT turn microwave back on. The residual heat will soften the butter in 5 minutes.
Baking powder – Most recipes call for baking soda / bicarb, or a combination of baking soda and baking powder. This recipe specifically calls for only baking powder which Cook’s Illustrated found makes the cookie chewier. So, just baking powder it is!;
Flour – Just plain / all-purpose flour. For this recipe, self-raising flour cannot be used in place of the flour and baking powder, because self-raising flour has too much baking powder in it;
Brown sugar AND white sugar – Brown sugar makes the cookie chewier and adds a pleasing caramelly note, while the white sugar gives the cookie crispy edges. The contrast some crispiness around the edges brings to the soft cookie centre is part of the magic of these cookies!;
Raisins – I like my raisins tender and plump, so I soak them briefly in hot water. This is not a step in the Cook’s Illustrated recipe, it’s just something I like to do – a personal preference!
Eggs at room temperature – The eggs need to be at room temperature and not fridge-cold, to ensure it incorporates properly into the cookie dough easily. A quick way to warm up fridge-cold eggs: Place eggs in a large bowl, cover with warm tap water (just warm, not hot) and leave for 5 min. Wipe dry, then use per recipe.
Egg size (“large eggs”): 50 – 55g / 2 oz per egg is the industry standard of sizes sold as “large eggs” in Australia and the US. If your eggs are significantly larger or smaller in size, just weigh different eggs and use 100-110g / 4 oz in total (including shell) or 90 – 100g / 3.6 oz in total excluding shell (useful if you need to use a partial egg to make up the total required weight. Crack eggs, beat whites and yolks together, THEN pour into a bowl to measure out what you need);
Cinnamon – The king of cookie spices! Just a hint in the mix so you know it’s there, but it doesn’t overwhelm. This is another deviation from the Cook’s Illustrated recipe. They omit it so you can taste the oats more. I cannot process that idea! I need the cinnamon!
Salt – Just a touch to bring out the flavour in sweet baked goods.
How to make Oatmeal Raisin Cookies
Part 1: Cookie dough

Soak the raisins to plump them (this is optional);
Drain the raisins then leave to dry, or pat dry to speed things up;
Sift the dry ingredients into a bowl;
Beat butter, sugar and egg: In a separate bowl, beat the butter until smooth and creamy. Then add both brown and white sugars and beat until fluffy – around 2 minutes on high using a handheld beater.
Now beat the eggs in one at a time until incorporated;
Add dry ingredients: Next, switch to a wooden spoon and mix the sifted dry ingredients in. I prefer doing this step by hand rather than the electric beater to ensure I don’t accidentally overwork the cookie dough, which would result in a tough cookie; and
Oats and raisins: Lastly, stir in the oats and raisins. At this point the cookie dough will become quite thick and hard to stir. Dig deep to find the strength – it’s worth it!! 😂 (Just kidding, it’s not that hard! 😇)
Part 2: Rolling and baking
Cookie dough made, now it’s time to bake!
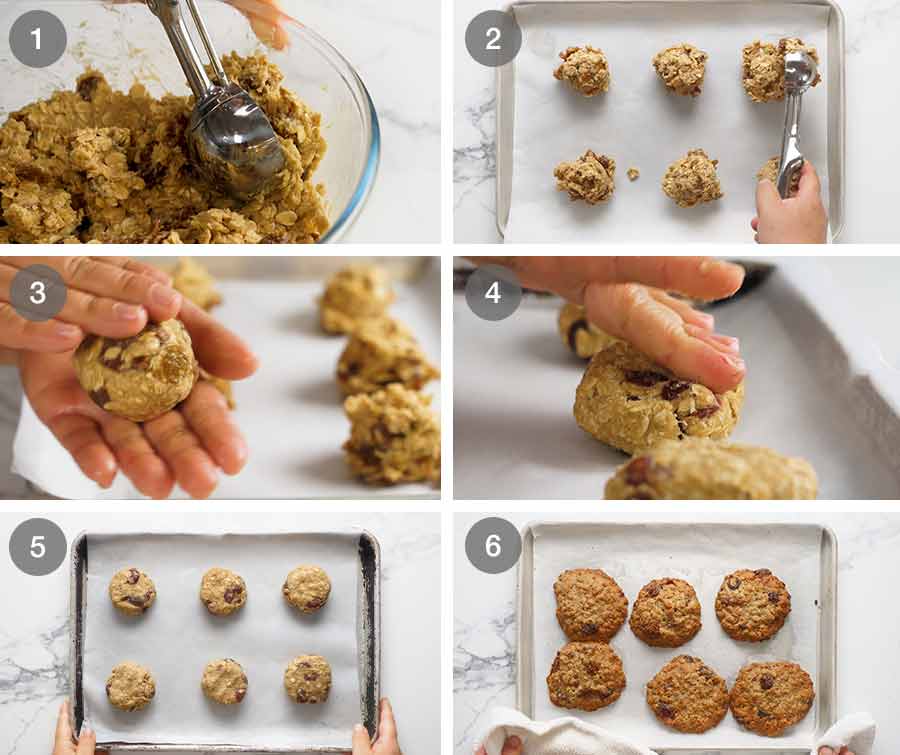
Portion out cookies on to tray: Scoop 2 tablespoons-worth of cookie dough and place in a mound on a tray, for one cookie. An ice cream scoop with a lever or a cookie scoop will make this step speedy!
Repeat: Repeat with the remainder of the dough. I like to portion all the dough out first on to trays before I start rolling because I just find it faster;
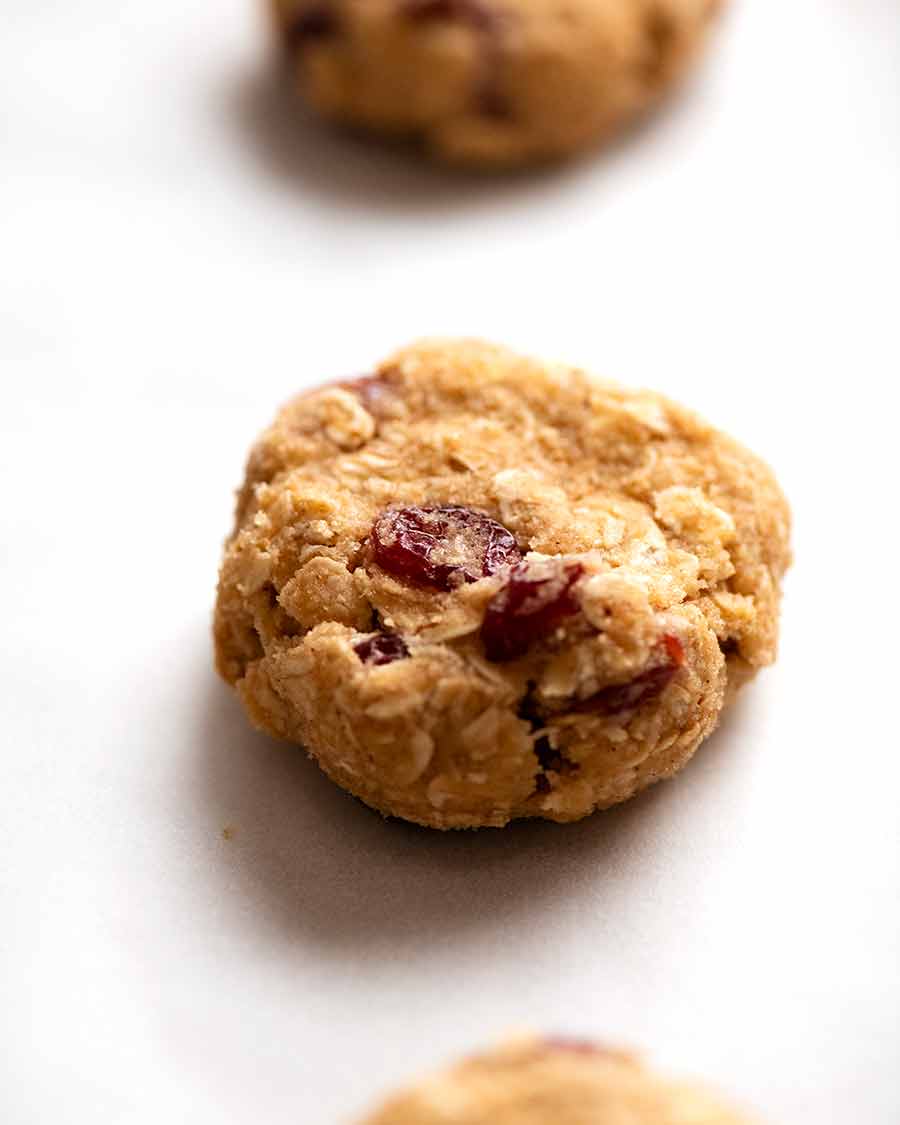
Roll into balls: Wet your hands if needed to stop the dough from sticking. Lightly roll each dough portion into a ball. They should be around 5cm / 2″ wide;
Squash dough balls: Distribute the balls across two trays lined with baking / parchment paper, ensuring you leave plenty of space between them (see photo #5). Lightly press each down to flatten. This is just to help ensure the cookies spread evenly, rather than leaving a mound in the middle;
Bake: Place both trays in the oven with one tray on the middle shelf and the other on a shelf below, ensuring you leave 10cm / 4″ of space between each rack. Bake at 180°C / 350°F (160°C fan) for 11 minutes. Switch the position of the trays and bake for a further 11 to 14 minutes until cookies are golden on the edges and LIGHT golden in the middle. If you cook too long, the cookies will be crispier;
Cool: Cool on the trays for 5 minutes before transferring to cooling rack. Cool for 30 minutes before serving.
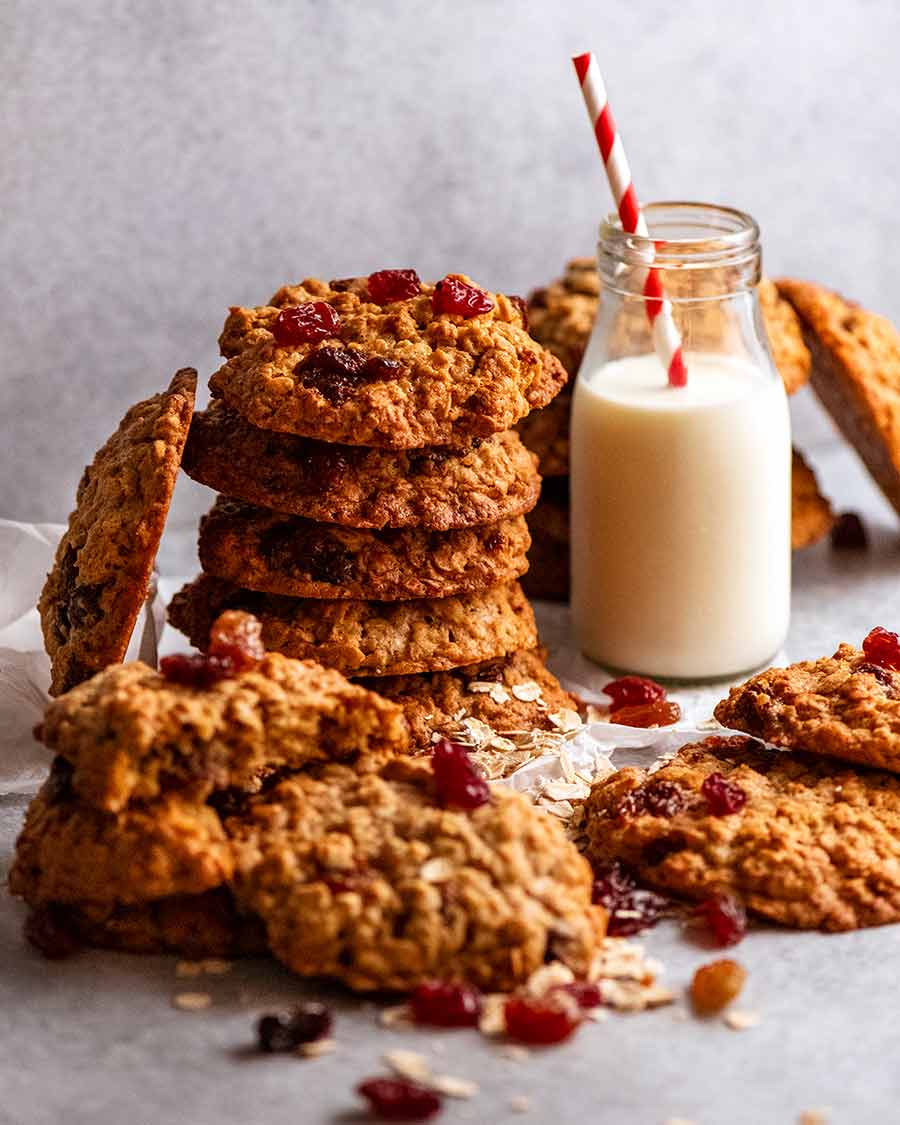
This recipe has been the only Oatmeal Raisin Cookie recipe I have ever used since I found it. It is absolutely perfect, in my humble opinion.
Having said that, I also came across this recipe for Oatmeal Raisin Cookies on a fabulous baking blog called Brown Eyed Baker, run by a talented lady named Michelle. That recipe is by a famous bakery in New York called Sadelle’s. Michelle thinks it is even better than this Cook’s Illustrated one (which I noticed she also has on her blog!) I, for one, trust her judgement on that call.
But there’s one big catch. The Sadelle’s recipe requires the cookies to be flattened onto the cookie sheet, then refrigerated for four days supposedly to enhance the depth of flavour. Yes, FOUR WHOLE DAYS!!!
So if that makes my preferred recipe the world’s second best Oatmeal Raisin Cookie, I’m totally ok with that because at least you can make these RIGHT NOW!!! 😉 – Nagi x
Watch how to make it

Oatmeal Raisin Cookie (Soft & Chewy)
Ingredients
- 1 1/2 cups raisins (Note 1)
- 1 1/2 cups flour (all purpose / plain)
- 1/2 tsp salt
- 1/2 tsp baking powder
- 1 tsp cinnamon powder
- 250g / 8 oz (2 sticks) unsalted butter , at room temperature (Note 2)
- 1 cup brown sugar (packed)
- 1 cup white sugar (granulated. Superfine/caster also ok)
- 2 large eggs , at room temperature (Note 3)
- 3 cups rolled oats (Note 4)
Instructions
- Preheat oven to 180°C/350°F (160°C fan). Adjust oven racks to middle and low position, ensuring you have 4"/10cm between each rack. Line 2 trays with parchment/baking paper.
- Optional: Soak raisins in boiled water for 10 minutes. Drain then pat dry. (This makes them plumper).
- Sift dry ingredients: Sift flour, salt, baking powder and cinnamon into a bowl.
- Cream butter and sugar: Using a stand mixer or electric mixer, beat butter until creamy. Then beat in sugar until fluffy – about 2 – 3 minutes.
- Add eggs: Beat in eggs one at a time until incorporated.
- Mix in flour: Use a wooden spoon to stir the flour mixture in.
- Stir in oats and raisins: Stir in oats and raisins – this requires a bit of effort as the dough gets firm!
- Roll and flatten balls: Form 4cm / 1.6" balls (~18) and place onto baking trays 4"/10cm apart. I use an ice cream scoop. Then press down to slighty flatten into a thick disc shape.
- Bake for 11 minutes. Then swap the trays between the shelves AND turn the trays around. Bake for a further 11 – 14 minutes, or until cookies are golden on the edges and LIGHT golden on the surface.
- Cool on the trays for 5 minutes before transferring to cooling rack. Cool for 30 minutes before serving.
Notes
Nutrition
Originally published July 2016. Updated June 2021 with new photos, video and a streamlined recipe subsequent to further testing to improve the recipe!
For Cookie Monsters 🙋🏻♀️
Life of Dozer
Dozer with his friends post Winter-evening-beach session. It’s a photo from the Golden Retriever boarder where Dozer is boarding while I’m away in Tasmania! I think that’s him in the middle in a red robe…. not 100% sure! 😂

And from the original publication date:
No cookie dough for Dozer!!

The post Oatmeal Raisin Cookies (Soft & Chewy) appeared first on RecipeTin Eats.
]]> Called Ricciarelli, these Italian Almond Cookies are chewy on the inside, filled with wonderful almond flavour and studded with dried cherries. They keep for 10 days, and because they’re gluten free and dairy free, everybody can enjoy them! Italian Almond Cookies If there’s one word that captures these cookies, it’s rustic. And in my world,... Get the Recipe
The post Italian Almond Cookies (Gluten free biscuits, Ricciarelli) appeared first on RecipeTin Eats.
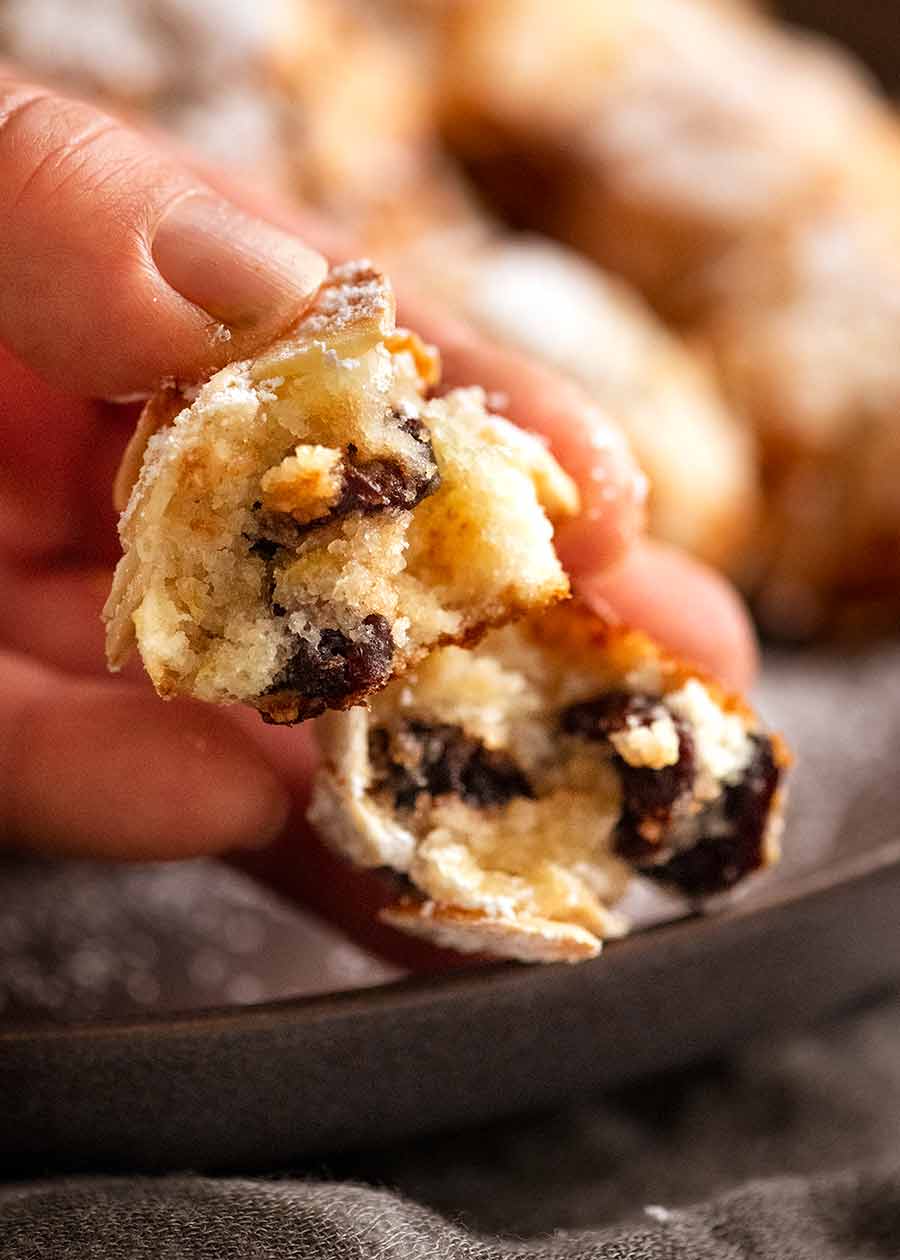
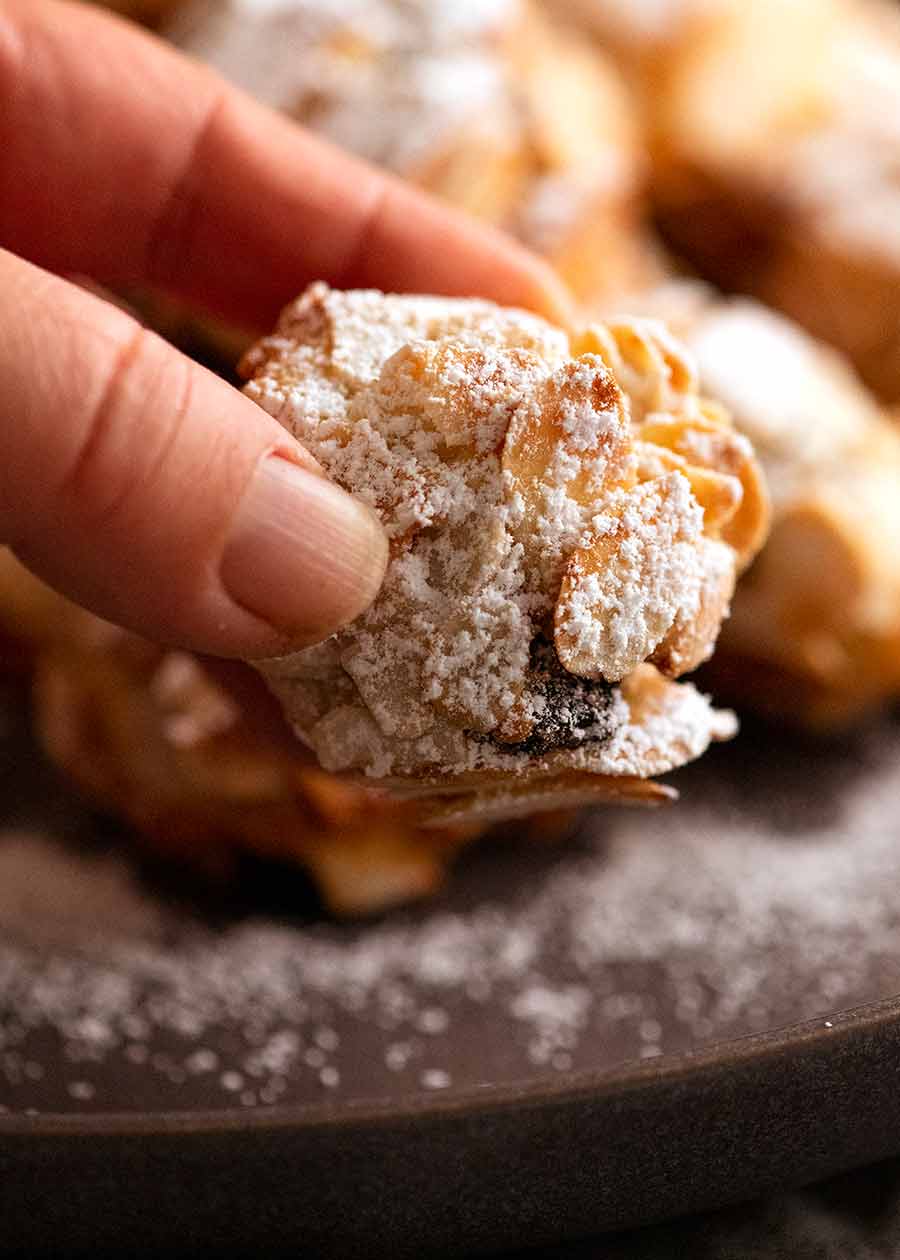
]]>Called Ricciarelli, these Italian Almond Cookies are chewy on the inside, filled with wonderful almond flavour and studded with dried cherries. They keep for 10 days, and because they’re gluten free and dairy free, everybody can enjoy them!
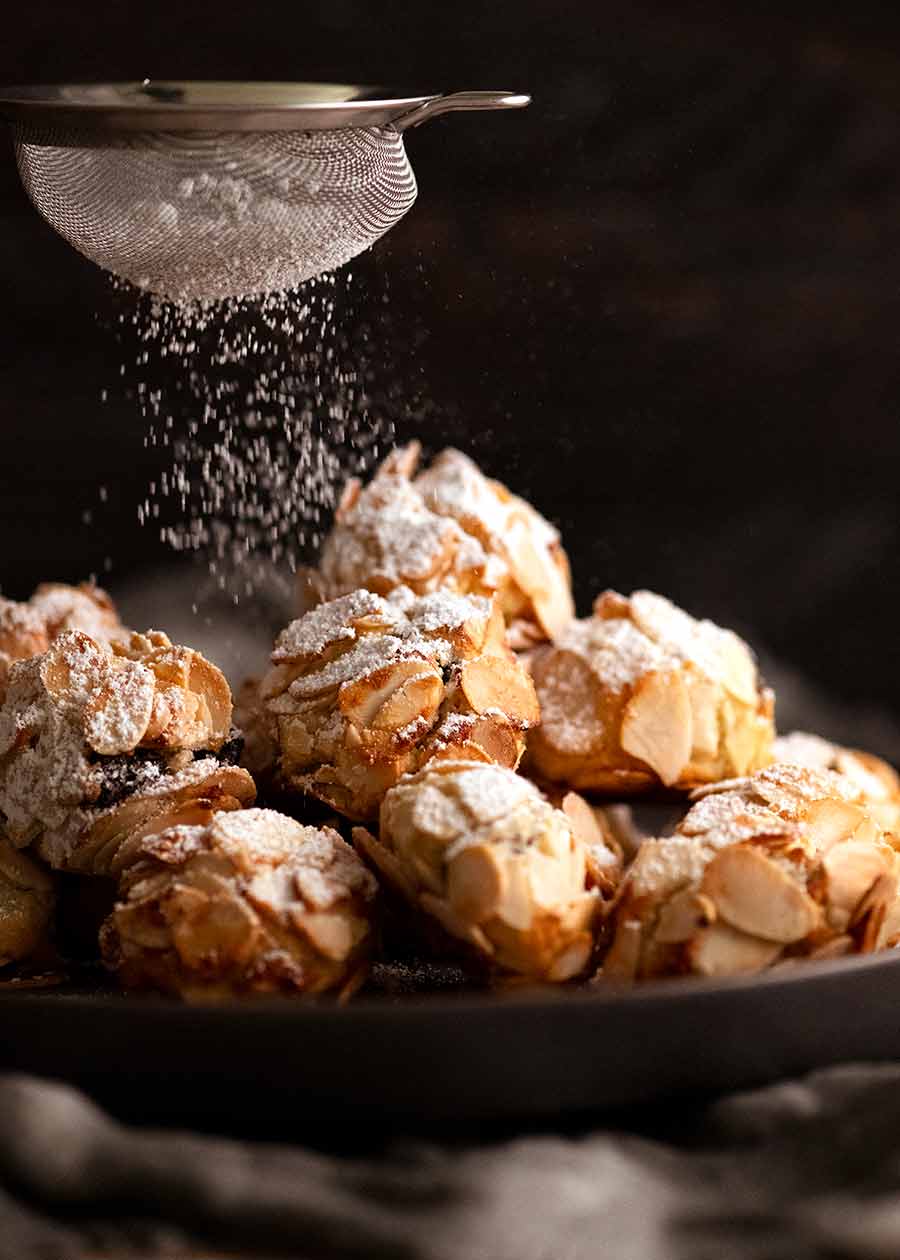
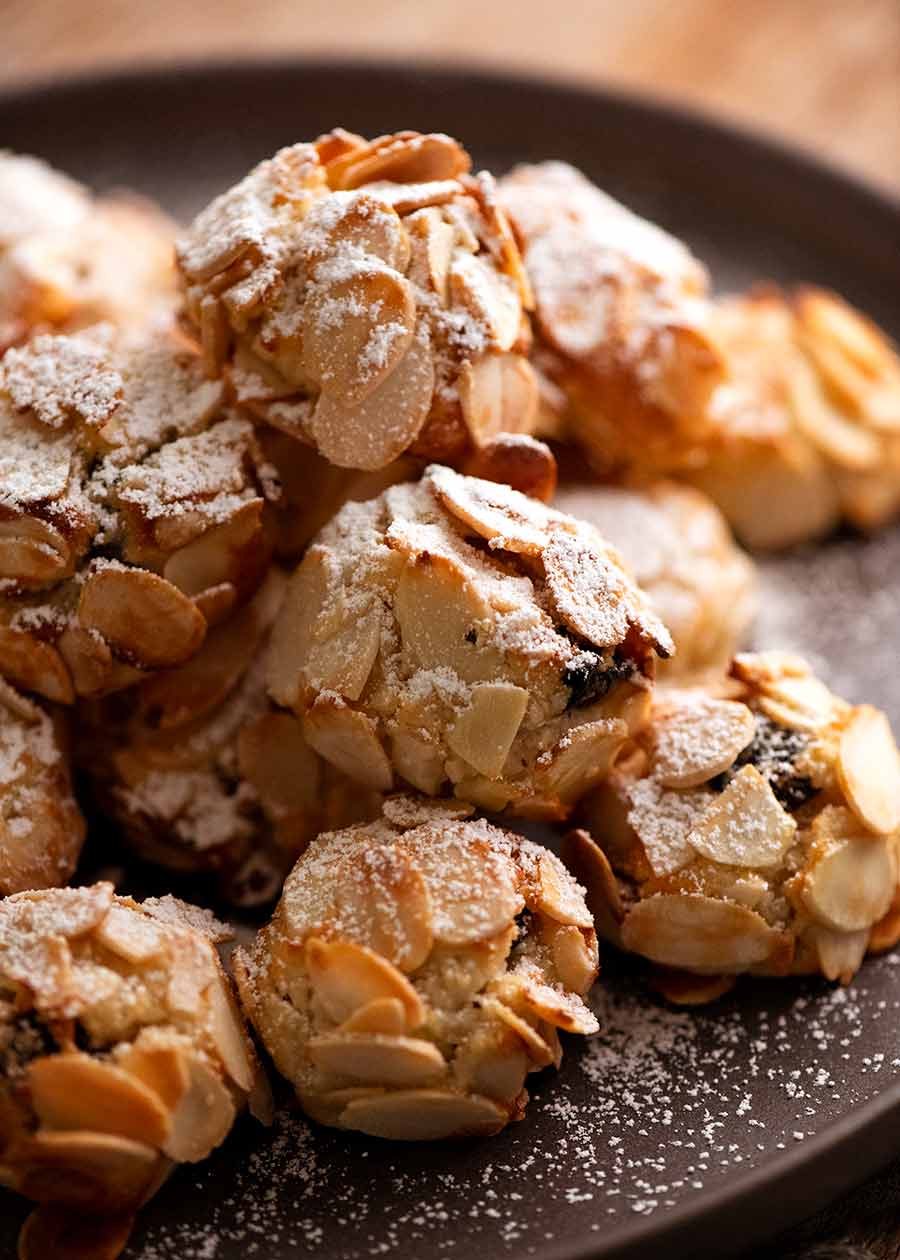
Italian Almond Cookies
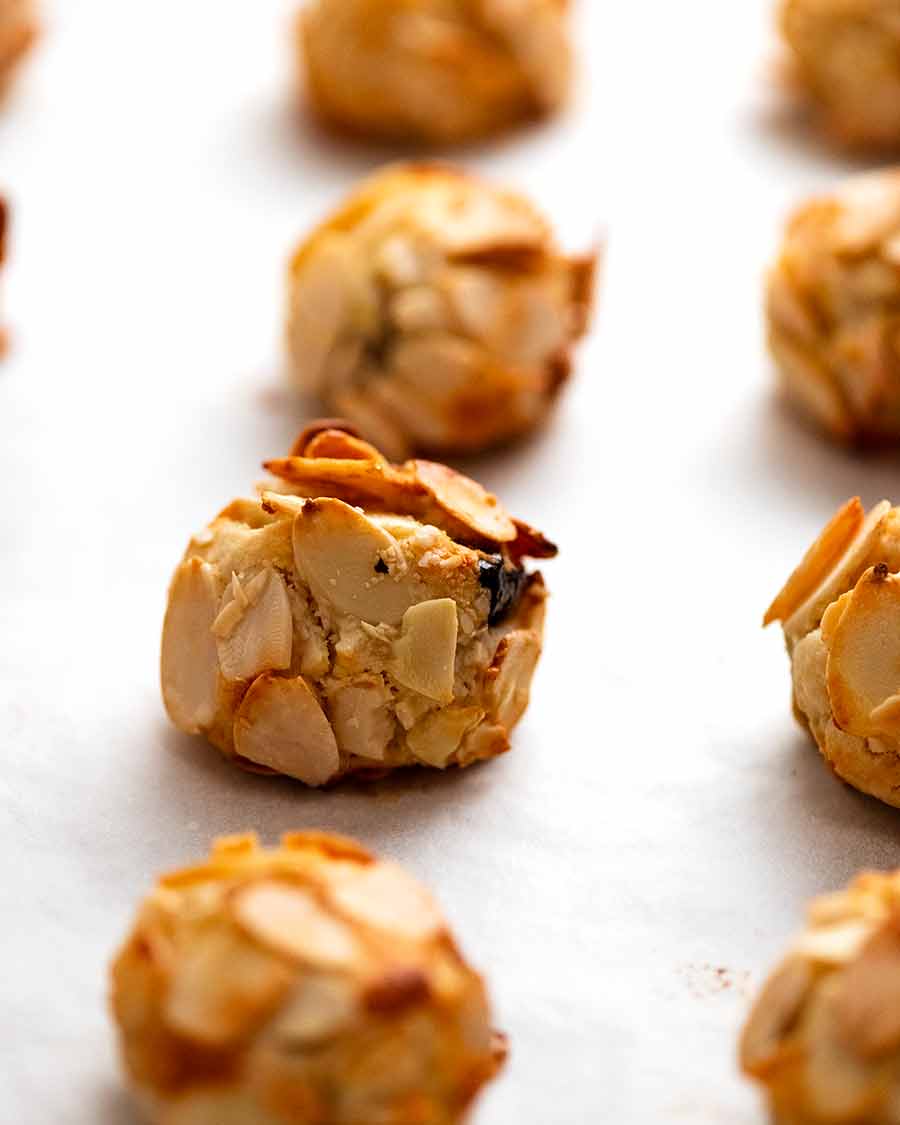
If there’s one word that captures these cookies, it’s rustic. And in my world, what that means is don’t get hung up about making them look perfect. These nubbly little balls will be a bit wonky. Some will be larger than others. There will be almond bits sticking out here and there, you might end up with some bald patches. Some bits might have a double layer of almonds. Some will have more than their fair share of dried cherries in them. Others will miss out.
And that’s ok! These are cookies that are meant to be perfectly imperfect – to look at. But they’re perfectly perfect – to eat!!!
What goes in Italian Almond Cookies
Here’s what you need to make these Almond Cookies:
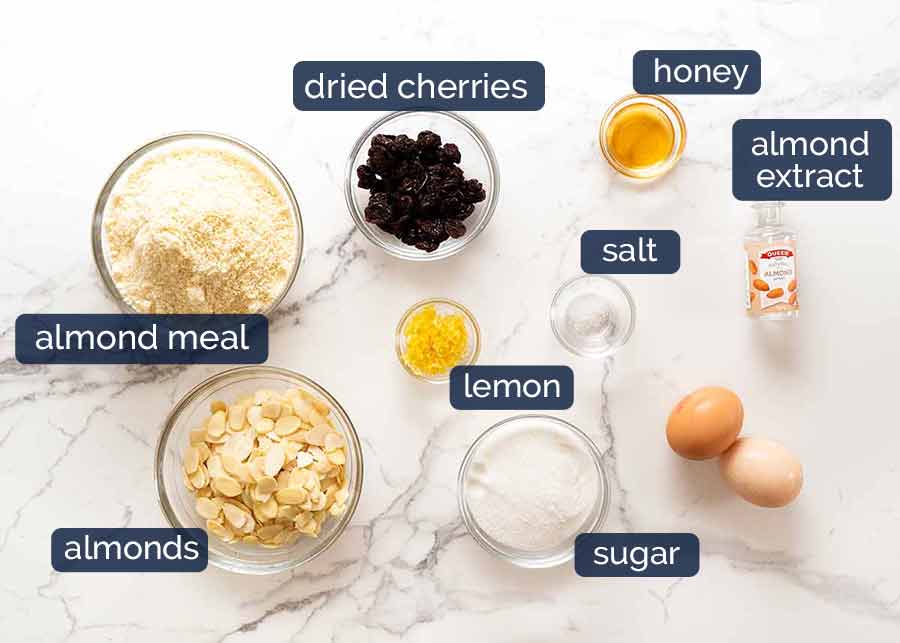
Just a note on a few of the ingredients:
Almond meal (aka Ground Almonds) – This is what we use instead of flour for these gluten free cookies. It is literally raw almonds that are blitzed into a fine powder. It’s easily found nowadays, sold in the bakery, dried fruit & nut section and/or health food section of grocery stores. You can also make your own by blitzing 250g/ 9oz raw, unpeeled, unsalted almonds in a powerful blender (I use a Vitamix) until it becomes a fine powder.
Almond flour is different, it is made with blanched, peeled almonds, blitzed until it becomes powder form. It is lighter in colour (because the brown skin is removed) and it has a finer texture the almond flavour is slightly less. While I have not made these particular cookies with almond flour, I am confident they will work based on other recipes where I’ve interchanged the two, such as this Orange Cake;
Almond extract – Made from the oil of almonds, this adds a rich almond flavour to anything you add it to. Easily found these days in the baking aisle of grocery stores;
Flaked almonds (optional) – These are used to coat the cookies which gives it a terrific textural crust and extra almond flavour. Without the almonds, the outside of the cookies are quite soft and need to be handled rather gently to ensure you don’t crush them.
Also, from an eating perspective, when it’s soft on the outside and inside, my mind thinks “CAKE!!!!” and gets all confused that it’s actually a cookie. So the crispy toasted almond crust makes these biscuits more like what my narrow mind thinks of as cookies – crispy outside, softer inside.
Pretty sure it’s not strictly traditional. Italian readers, perhaps you can shed some light on this? But it’s how an Italian bakery in Sydney makes these cookies. I loved it, so I stole the idea!
Dried cherries (optional) – You won’t see dried cherries in traditional Italian Almond cookie recipe. But this particular recipe is one loosely based on a Yotam Ottolenghi recipe which includes the cherries. I liked it so I kept it in, because it brings an extra something-something to these cookies. But you can skip it, or substitute with any dried fruit really – cranberries, raisins, even chopped apricot!
Sugar – I’m using superfine / caster sugar here which are finer grains than regular sugar which is my standard sugar that I use for baking as it incorporates more easily into batters. But for this particular recipe, regular sugar (granulated sugar) will work just fine too;
Egg Whites (see here for recipes using leftover egg yolks) – use what’s sold labelled as “large eggs”, which are 55 – 60g / 2oz each. These are industry-standard sizes in Australia and the US. If your eggs are significantly larger or smaller in size, just weigh different eggs and use 110-120g / 4 oz in total (including shell) or 100 – 108g / 3.6 oz in total excluding shell (this is useful if you need to use a partial egg to make up the total required weight. Crack eggs, beat whites and yolks together, THEN pour into a bowl to measure out what you need).
Use at room temperature – Eggs need to be at room temperature and not fridge-cold, because they aerate better when beaten. A quick way to warm up fridge-cold eggs: Place eggs in a large bowl, cover with warm tap water (just warm, not hot) and leave for 5 minutes. Wipe dry (to avoid residual water dripping into bowl), then use per recipe.
How to make Italian Almond Cookies
The nice thing about this cookie dough is that it’s really forgiving. No need to worry about overworking the gluten like you do with flour based cookies. It can sit around for ages (like it for hours when I made the recipe video!) and it still works 100% perfectly.
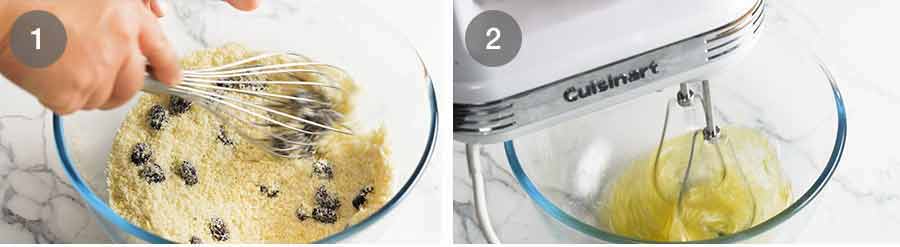
Whisk Dry ingredients – Use a whisk to combine the almond meal, sugar, salt, lemon and almond extract. You could also rub it with your fingers, but a whisk makes short work of this step (literally 5 seconds);
Beat egg whites until fluffy – Beat the egg whites with the honey until soft peaks form. “Soft peaks” is the stage before “stiff peaks” which is what you want when making things such as Pavlova because you need the stiffness for the meringue to hold its shape when baked.
For this recipe, we’re not relying on the egg whites to make the cookies rise as such. It’s more to give the cookie a bit of aeration so they aren’t super dense. So we only need soft peaks – which looks like this:

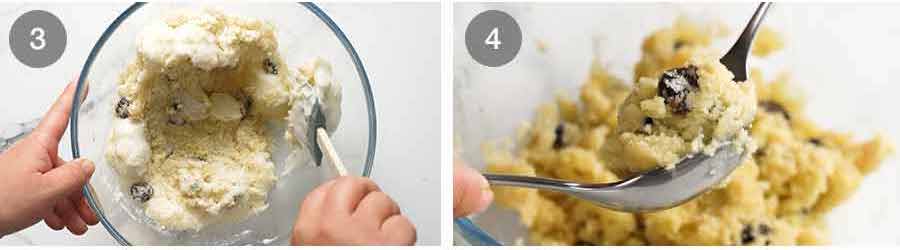
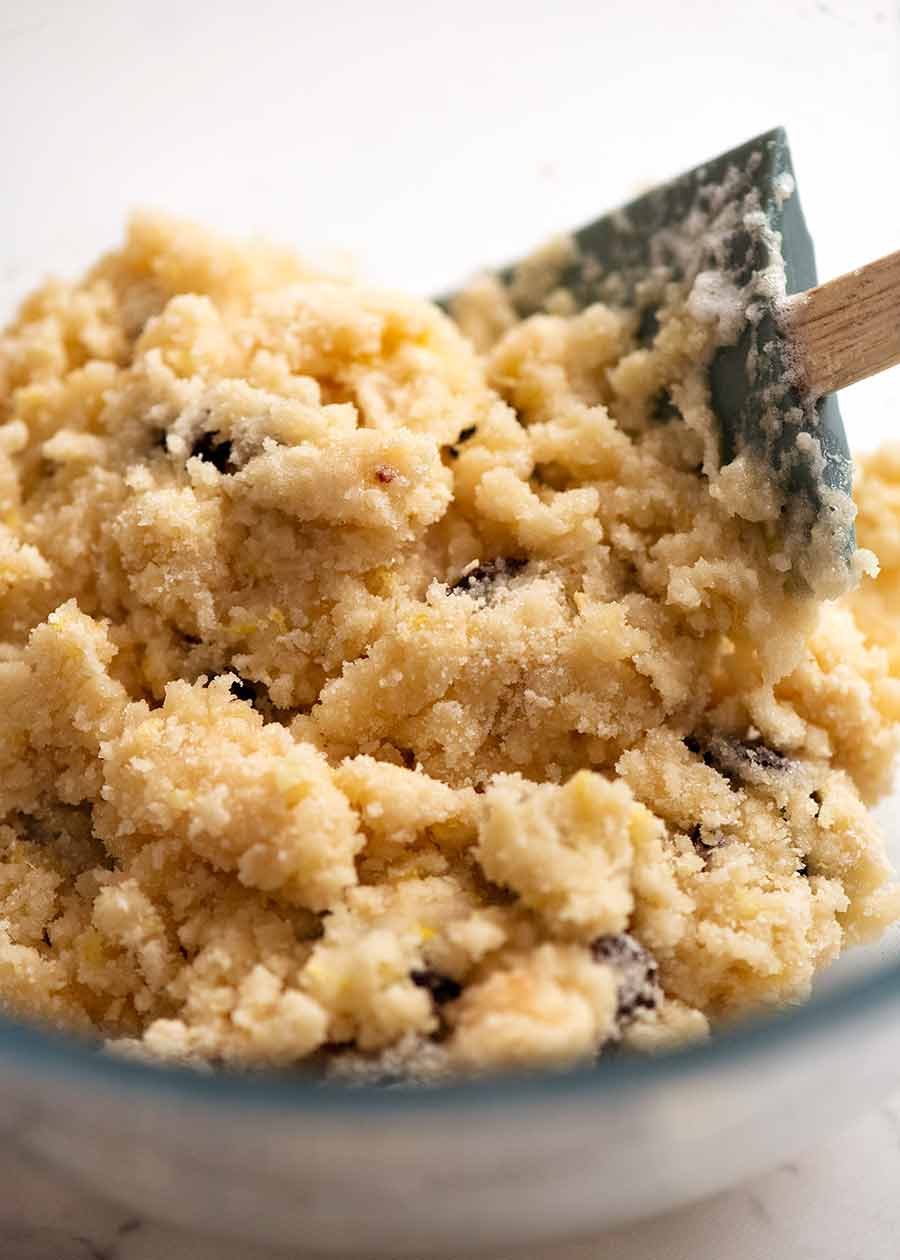
Make dough – Combine the whipped whites with the Dry Ingredients. You will feel like you’re crushing all the air out of the whites as you mix them, but you aren’t. Not completely!
Unlike recipes like the Black Forest Cake I shared last week where the sponge layers rely on the whipped egg whites to make them rise, we don’t need to be so careful folding the egg whites through the batter because for these Almond Cookies, we’re just using egg whites to lighten the mixture, as opposed to making the cookies rise;
Form balls using two spoons – Scoop up about 1 tablespoon of the mixture and shape into a rough ball (2.5cm/1.” ball). I do this using 2 eating spoons – we don’t need perfect balls here. These cookies are supposed to be rustic! Also, the cookies may look small at this stage, but the almonds add bulk.
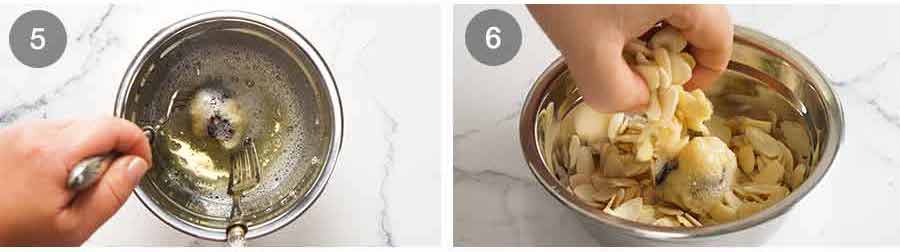
Coat in egg whites – Drop the ball into a bowl of whisked egg whites and roll with two forks to coat. This is used to make the almond flakes stick to the cookies. When it’s wet, the almonds will slide around but once they are baked, the egg white turns into super glue!
Coat in almond flakes – Then use the forks to transfer the cookies into a bowl with the almond flakes. Use your fingers to sprinkle almonds on top, then pick the whole thing up (with plenty of excess almond flakes!), press almonds around the ball and shake off excess.
Again, just a reminder, we’re going for rustic here! Don’t worry about bits of almonds sticking out, some naked patches, some double up patches! Whatever sticks is good, whatever does, doesn’t!
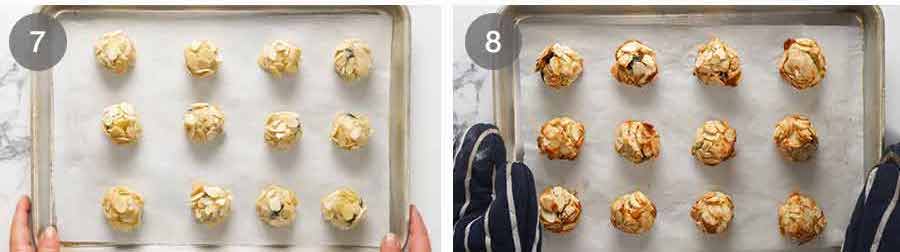
Place on tray – Place on two prepared trays 2.5cm / 1″ apart. Bake for 13-15 minutes in a 180°C/350°F oven until golden brown. Start checking at 12 minutes to be sure the nuts aren’t burning;
Cool – Transfer to rack to cool completely before serving. They cookies will be soft straight out of the oven, but the exterior will crisp up as they cool.
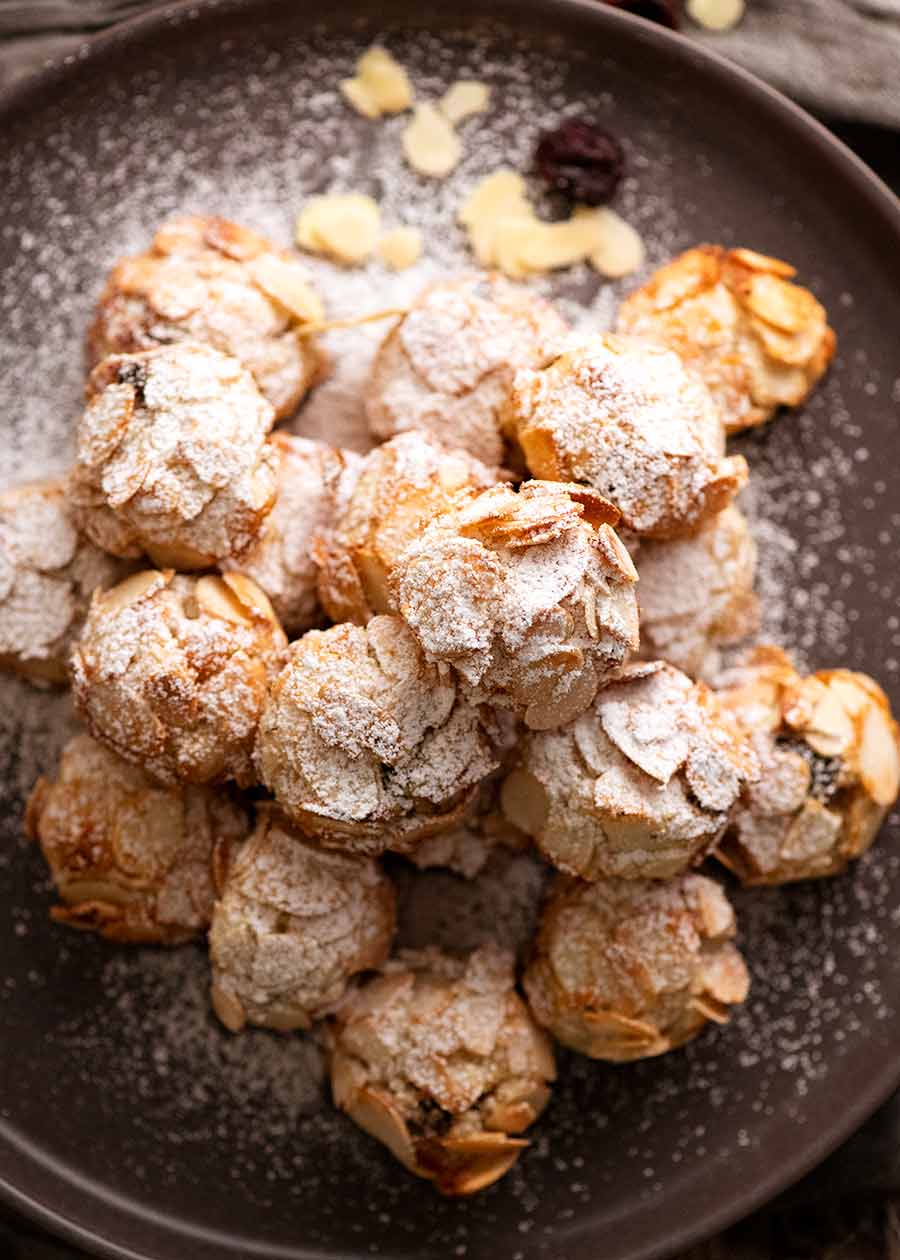
Dusting with icing sugar / powdered sugar is optional, but they do add a lovely little finish to them, don’t you think?
These cookies are terrific for taking to gatherings because it seems inevitable these days that there will be at least one person who is gluten free.
But dietary requirements aside, these cookies keep really well for up to 10 days in a super airtight container which is another reason they are so great. Especially if you opt to do the (not really optional!) coating of almond flakes because it keeps the outside nice and crisp. Whereas without, the crust tends to get softer with time.
Either way though, with or without the almond crust, they are delicious! – Nagi x
Watch how to make it

Italian Almond Cookies (Ricciarelli) – gluten free!
Ingredients
- 2 cups almond meal or blanched ground almonds (Note 1)
- 1/2 cup caster / superfine sugar (Note 2)
- 2 tsp lemon zest (1 lemon)
- 3 drops natural almond extract
- 1/8 tsp salt
- 1/2 cup dried cherries , chopped (Note 3)
- 2 egg whites , at room temperature (from 2 large eggs, Note 4)
- 2 tsp honey
Almond Coating (optional, Note 5):
- 1 Extra egg white
- 1 1/2 cups flaked almonds
Instructions
- Preheat oven to 190°C/375°F (170°C fan). Line 2 trays with baking/parchment paper.
- Combine Dry Ingredients: Place the almond meal, sugar, zest, almond extract and salt in a bowl. Whisk together until zest and almond extract is evenly distributed. Add the cherries and set aside
- Beat eggs whites: Using an electric mixer or a whisk, beat the egg whites and honey to soft peaks (Note 5). About 2 minutes on Speed 8 of a handheld beater, or 1 1/2 minutes on Speed 6 of a stand mixer.
- Fold the beaten egg whites gently into the almond mixture. You will seemingly knock most of the air out of the meringue, that's ok! (You actually haven't ).
Forming & Coating Cookies:
- Place Extra egg white in a small bowl and whisk with a fork until foamy. Place flaked almonds in another bowl.
- Form 2.5cm/1" balls: Scoop up about 1 tablespoon of the mixture and shape into a rough ball (2.5cm/1" ball). I do this using 2 eating spoons – we don't need perfect balls here.
- Coat in egg whites: Drop the ball into foamy egg whites. Use 2 forks to turn to coat, then pick up and place in the flaked almonds.
- Almond coating: Coat cookies with the almonds, pressing them on to cover as completely as you can. Don't worry if you get some double layers or pieces sticking out – no need to be neat or thorough here!
- Bake 13 minutes: Place on prepared tray 2.5cm / 1" apart. Bake for 13-15 minutes until golden brown. Start checking at 12 minutes to be sure the nuts aren’t burning
- Cool: Transfer to rack to cool completely before serving.
- Store: Store in an airtight container. They last up to 10 days in a storage container or can be frozen
Notes
Nutrition
Life of Dozer
Working on a new recipe, comparing various versions. Dozer’s keen to get involved.😂
The post Italian Almond Cookies (Gluten free biscuits, Ricciarelli) appeared first on RecipeTin Eats.
]]>