 Affogato – coffee, dessert and your after dinner drink, all rolled into one. This is what you have when you’re “too full for dessert”! Just pour espresso coffee over vanilla gelato or ice cream, enjoy the melty swirls and dig in. The Italians are genius. Affogato When was your last affogato? It’s my go-to dessert... Get the Recipe
The post Affogato appeared first on RecipeTin Eats.
]]>Affogato – coffee, dessert and your after dinner drink, all rolled into one. This is what you have when you’re “too full for dessert”! Just pour espresso coffee over vanilla gelato or ice cream, enjoy the melty swirls and dig in. The Italians are genius.
Affogato
When was your last affogato? It’s my go-to dessert at restaurants. Even if I claim I’m too full, affogato doesn’t count as it’s practically liquid, right? It’s like having a glass of water! (Yes, really, that’s how my mind works – don’t judge me!😂)
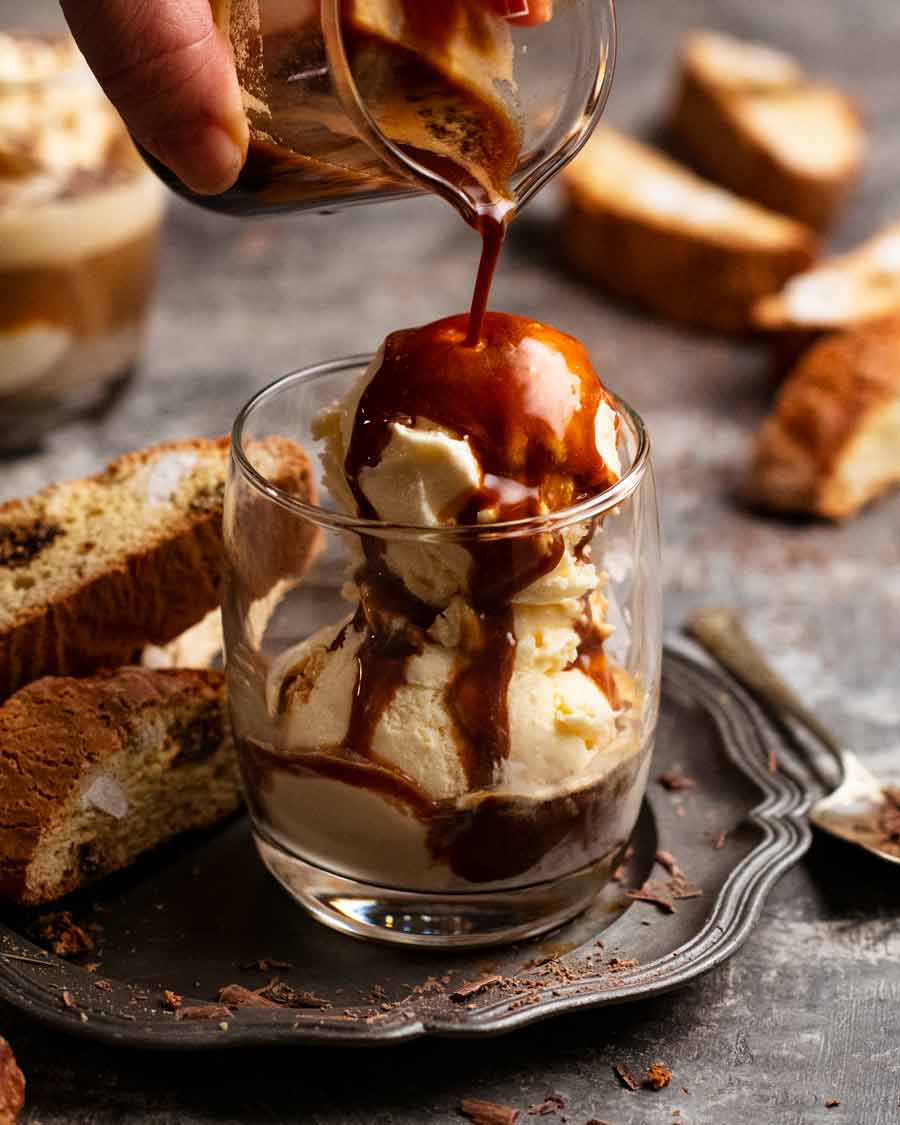
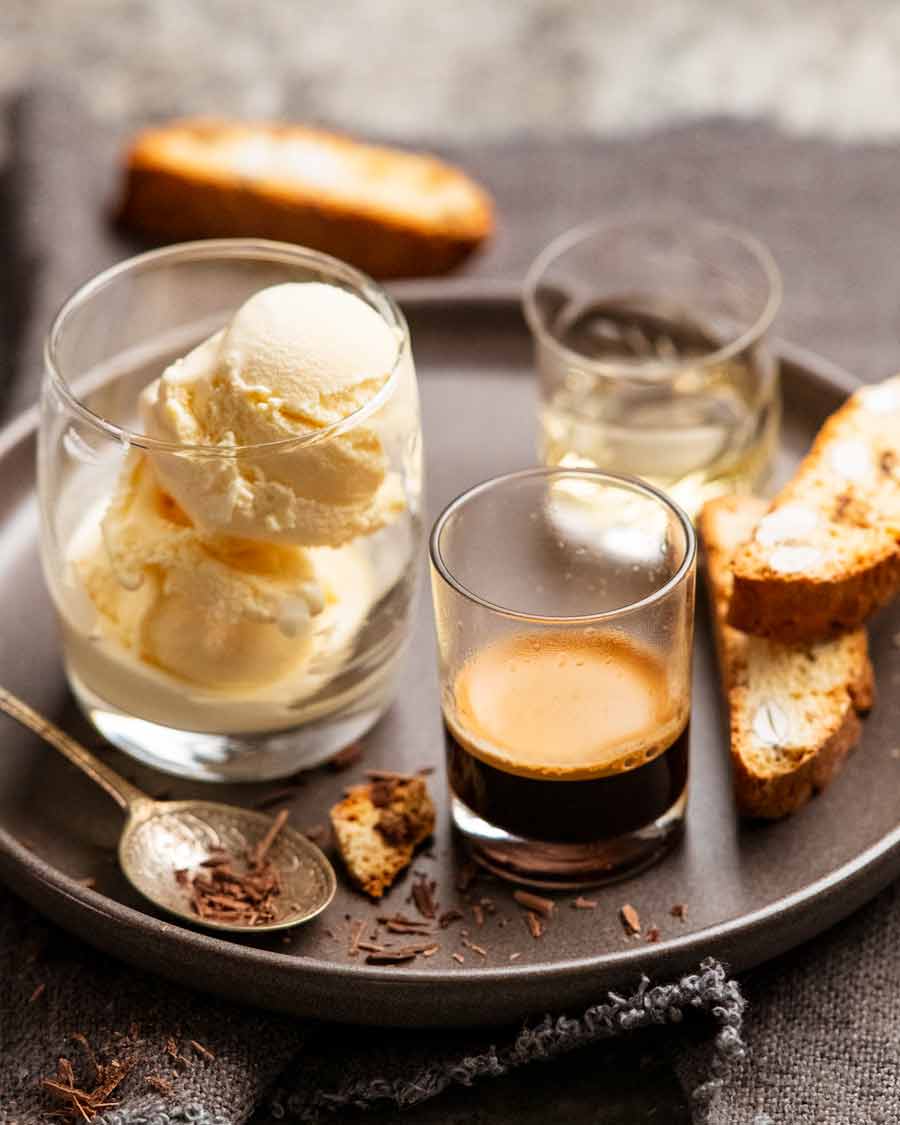
For those new to affogato, it’s a traditional Italian coffee-dessert where hot espresso is poured over gelato or ice cream, with the option of adding a splash of liquor. It’s coffee, dessert, and an after-dinner drink, all rolled into one. The contrast of hot, bitter coffee with cold, creamy ice cream is utter perfection. And the fact that it’s so simple with a bonus DIY fun factor? Brilliant!

Ingredients in Affogato
All you need for affogato is a shot of hot espresso (coffee), ice cream or gelato and optional half a shot of liquor (Frangelico, amaretto, rum). A little more information on each of these below!
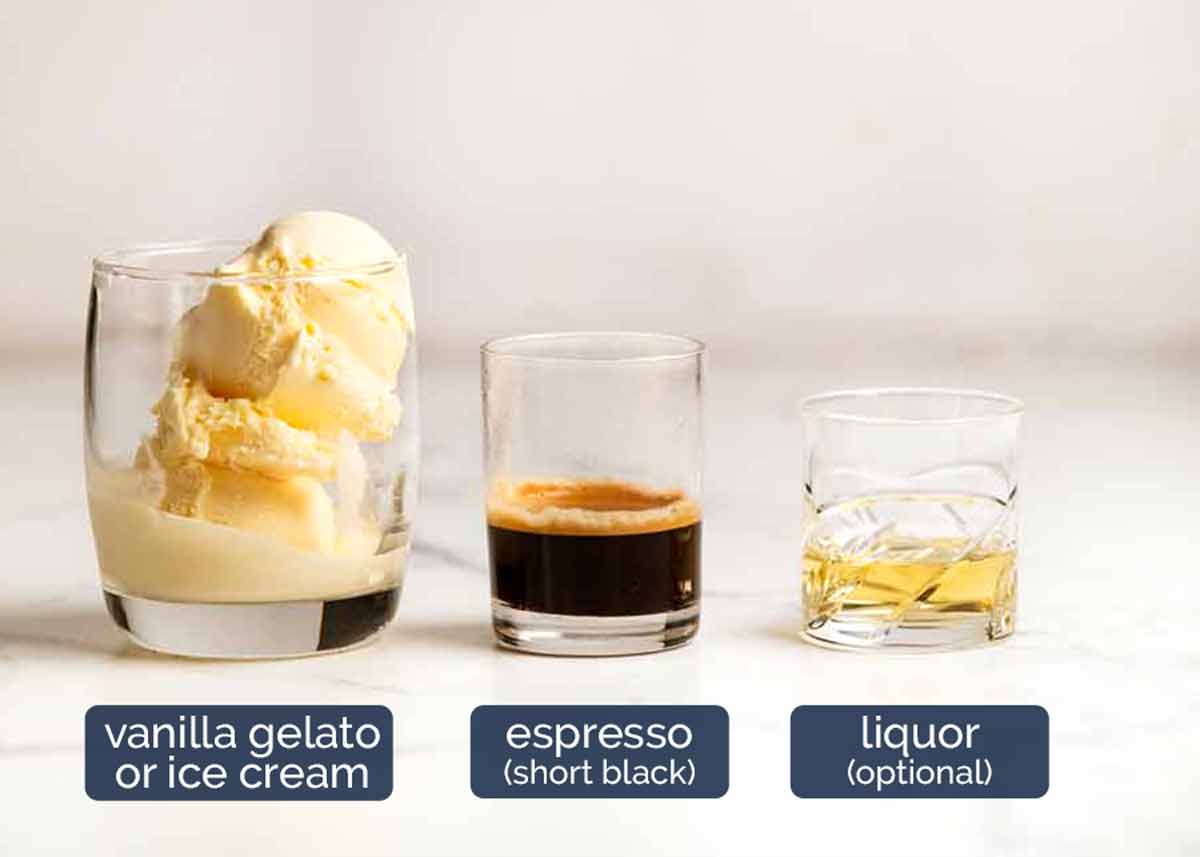
Espresso – This is a small concentrated shot of hot coffee. The standard size for a shot of espresso is 30 ml (1 ounce).
It goes without saying that the better your coffee, the better your affogato!
Vanilla gelato or ice cream – Traditionally gelato though ice cream is just as good, in my opinion! More important is the flavour. Vanilla is the classic choice because it pairs so well with coffee. Feel free to experiment!
How much ice cream – Use one large(ish) or two small(ish) scoops for one shot of coffee, for a good balance of the two. Though if using liquor, I lean towards two medium scoops, as pictured.
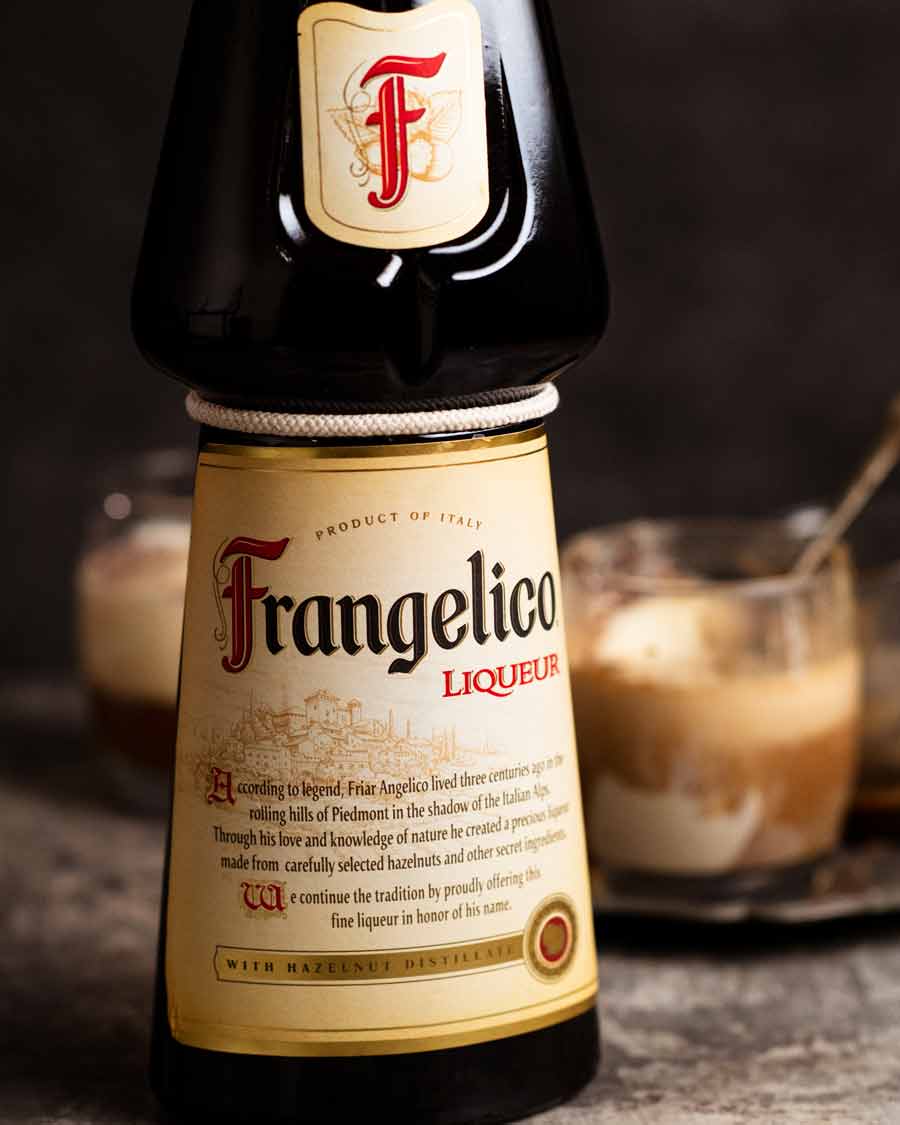
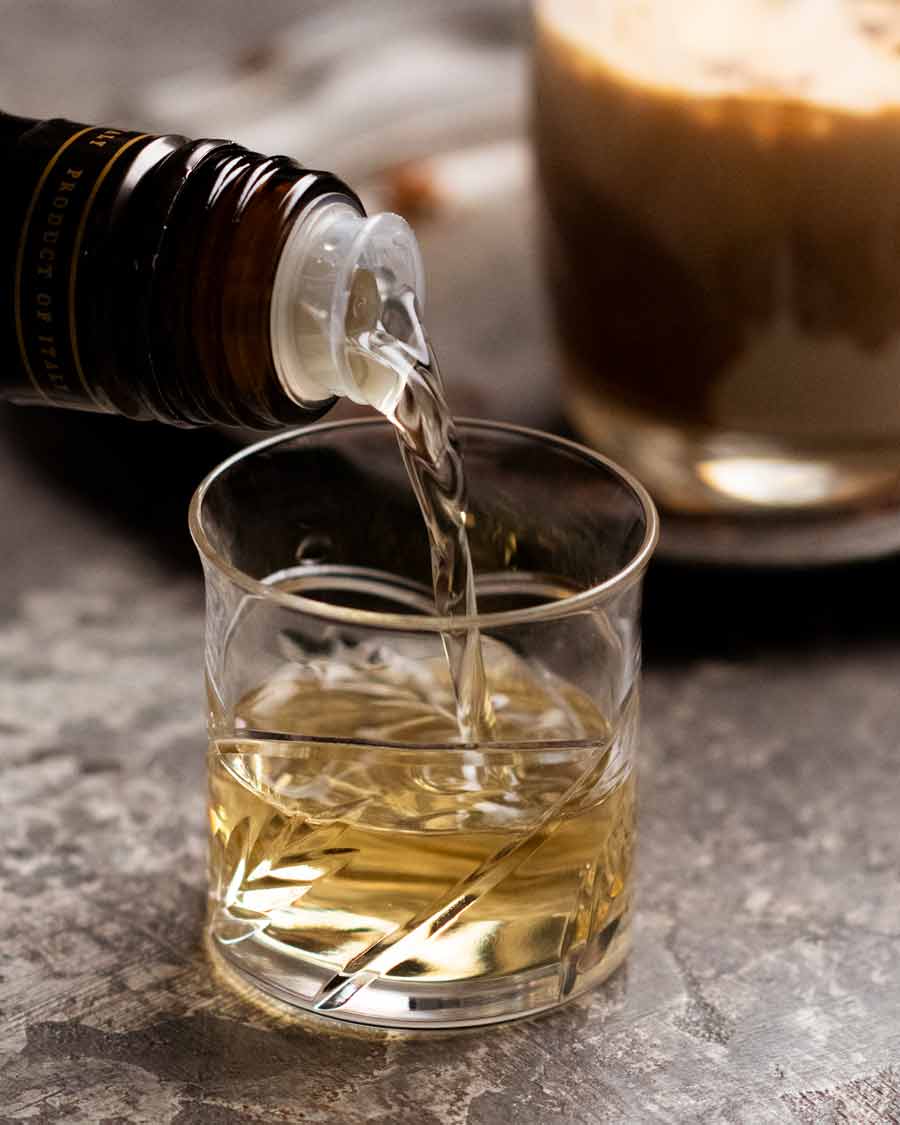
Liquor (optional) – To roll your after dinner drink into this all-in-one dessert, add half a shot of liquor! Amaretto (almond flavour) and frangelico (hazelnut) are probably the most common. Rum, sambuca and Kahlua are also standard offerings at Italian restaurants, and multiple readers suggested orange liqueurs (such as Grand Marnier and Cointreau). Though really, you can add anything you think/know goes well with coffee!
PS A shot of liquor is 30 ml / 1 ounce so half a shot is 15 ml / 0.5 ounce which is 1 tablespoon. Though nobody will hold you back from dialling the quantity up.

Optional extras
The traditional affogato is nothing more than espresso, gelato and optional liquor. However, even in restaurants these days there’s all sorts of optional extras. So adapt to your taste and make affogato your own! Here are some suggestions:
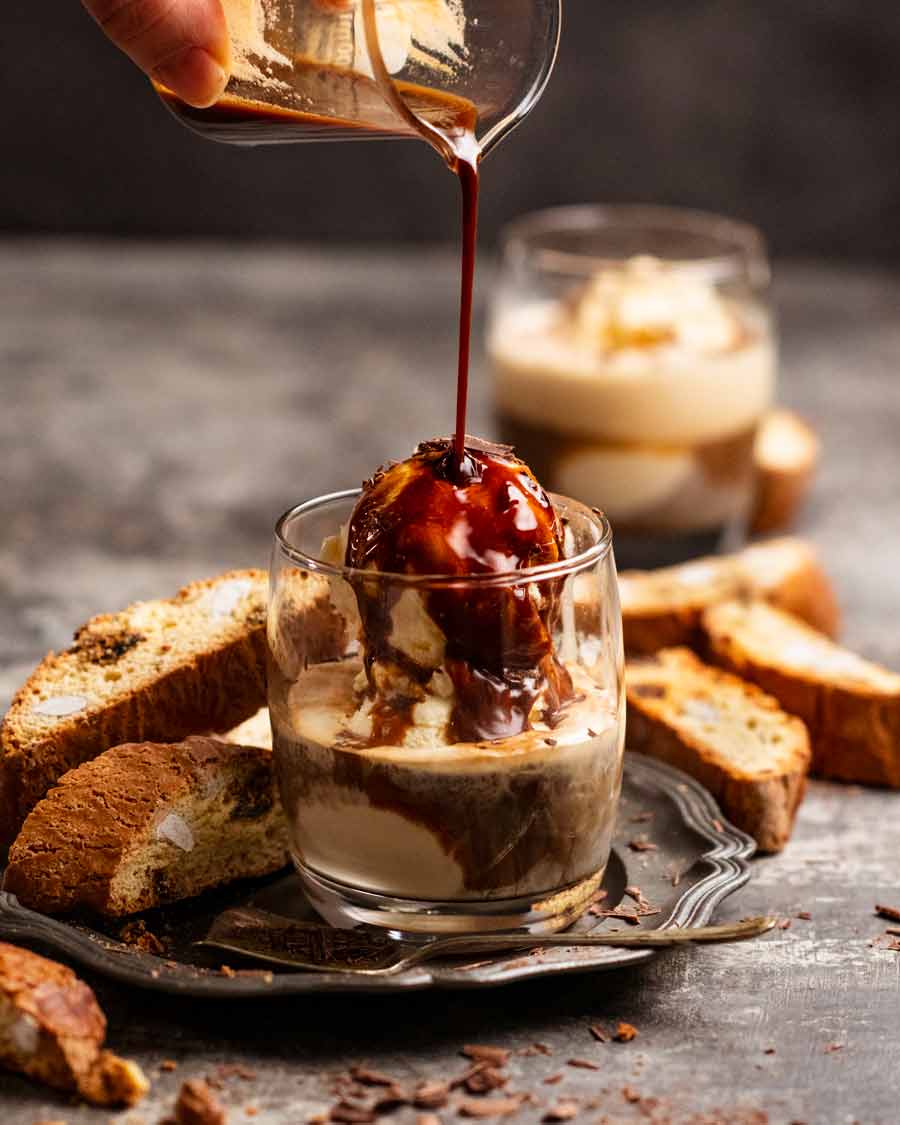
Chocolate grated or shaved on the ice cream (I did this)
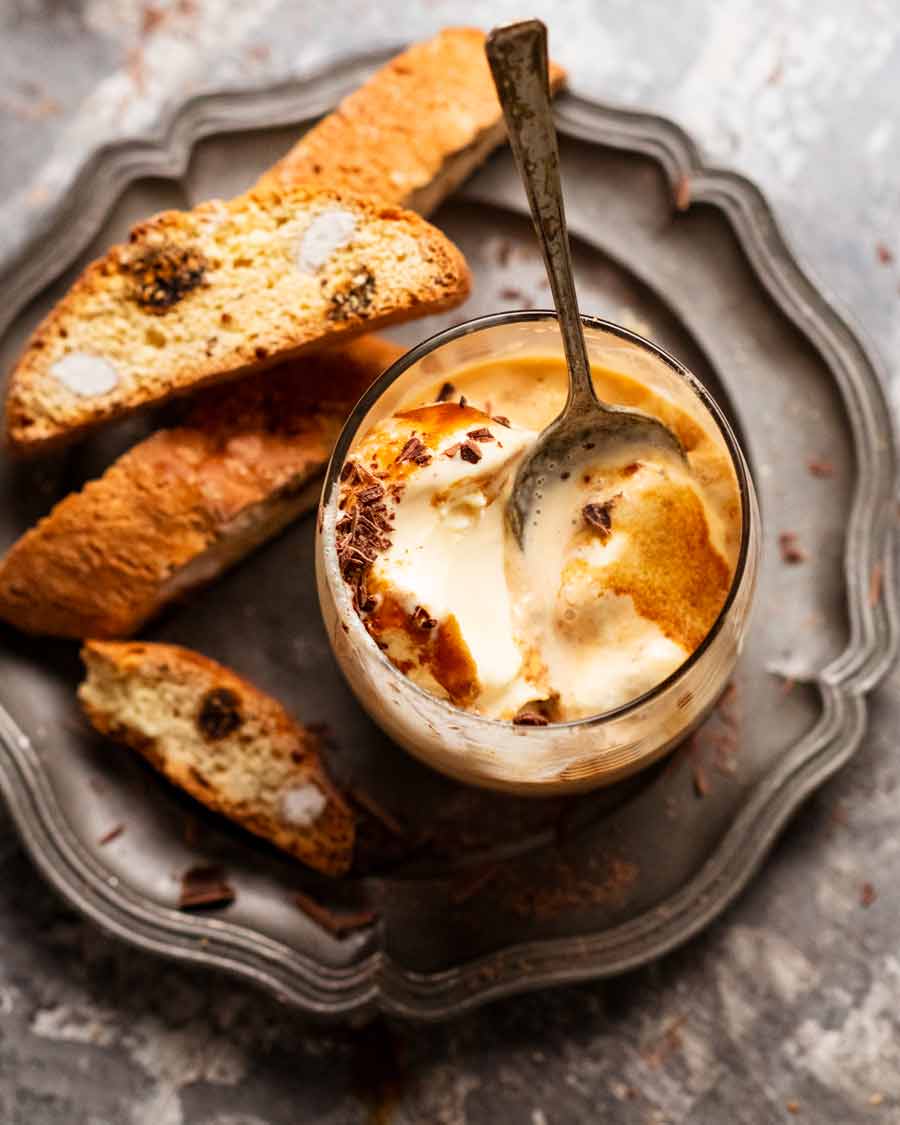
Biscotti for dunking (I also did this!) – or Italian Almonds cookies (thank you to the reader who suggested this!)
Whipped cream
Melted chocolate – I’d drizzle across the ice cream
Crushed or chopped nuts – pistachio and hazelnuts would be on theme here
I know I’m missing a stack of other ideas – drop suggestions in the comments below so I can come back and add to the list!
How to make affogato
I need more recipes with so few steps!
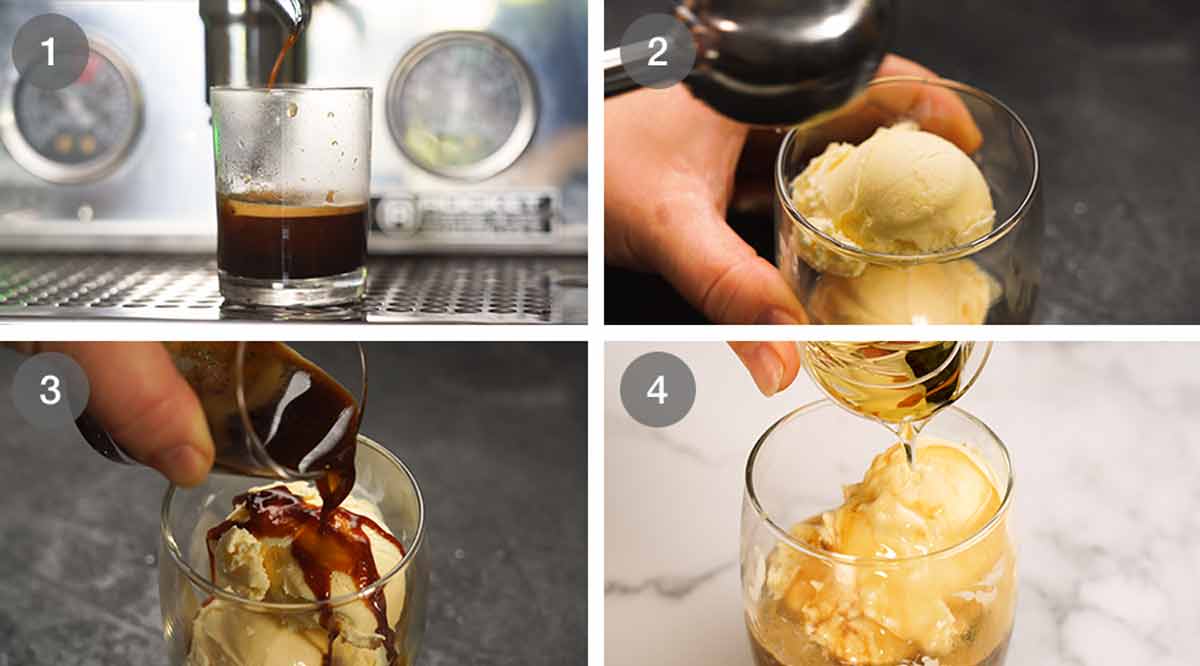
Brew hot espresso using your coffee making appliance of choice. That’s 30 ml/1 ounce for a single shot.
Put a scoop or two of ice cream in a glass.
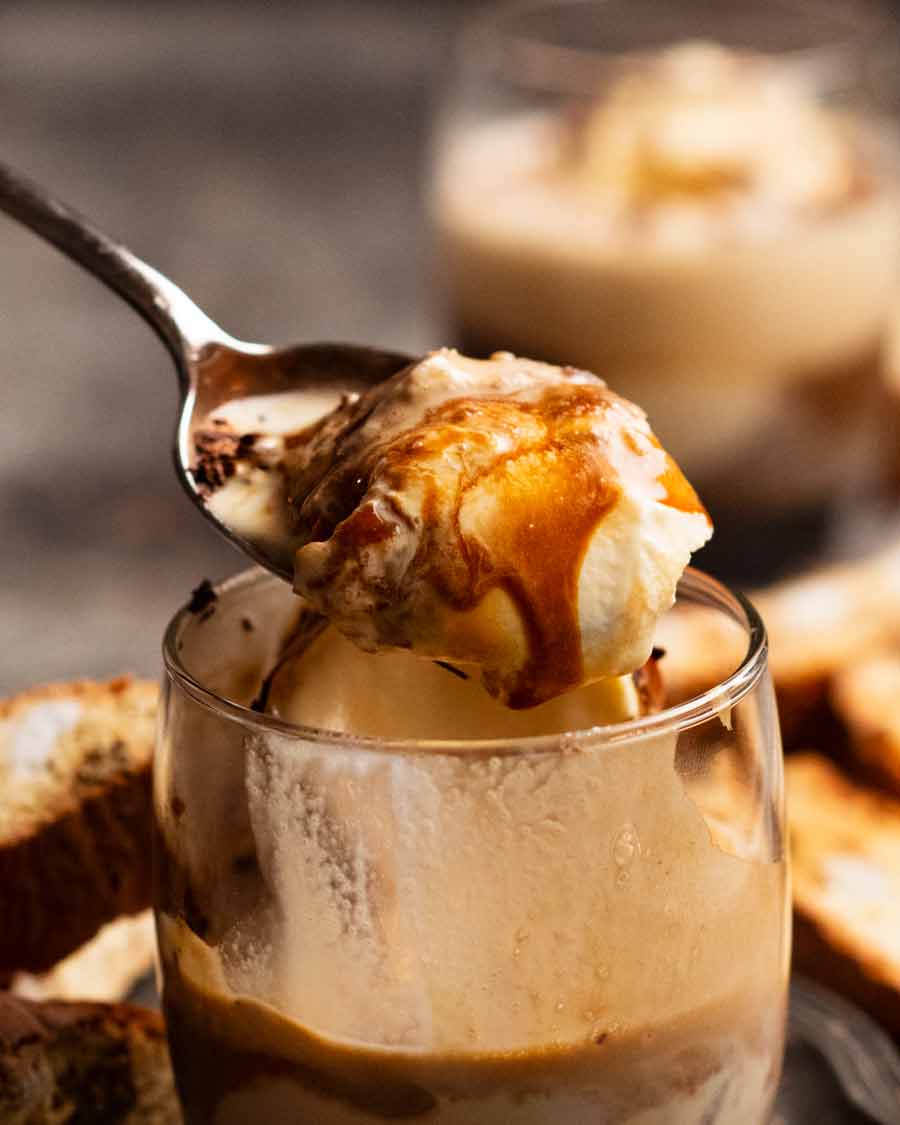
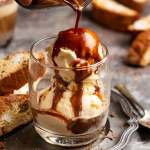
Pour over hot coffee. Enjoy watching the ice cream swirls melting into the hot coffee!
If using liquor, pour that over next. Eat!
PS I used a small beaker to do the pour shot so I could do a neat pour for the photos. I don’t use a beaker in real life!
Serving – for DIY pour
From a practical perspective, as restaurants do, serve the glass with just the ice cream in it and the espresso on the side. So the eater can pour then dig straight into the affogato before the ice cream fully melts.

Oh, and a side of biscotti for dunking wouldn’t go astray either. Recipe coming up soon. Never been fully happy with my biscotti attempts! Need to put some time into it, and it’s currently on my radar.
Share your affogato twists! Do you like yours straight up, classic, just coffee and vanilla gelato? Or are you all about the toppings and getting creative with ice cream flavours?? Don’t let anyone tell you how you should or shouldn’t take your affogato – make it your own! – Nagi x
Watch how to make it
Affogato
Ingredients
- 1 large or 2 small(ish) scoops vanilla gelato or ice cream (Note 1)
- 1 shot (30 ml/1 oz) hot espresso coffee (short black) – Note 2
- 1 tbsp frangelico, amaretto or other liquor (optional) – Note 3
Instructions
- Put ice cream in glass suitable for affogato eating (Note 4).
- Place shot of espresso and liquor (if using) on the side.
- Pour the hot espresso then liquor over the ice cream. Enjoy swirls of melty ice cream blending into the coffee. Dig in immediately!
Notes
- Biscotti (excellent for dunking)
- Chocolate shavings – use microplane or potato peeler
- Whipped cream
- Melted chocolate – on ice cream
- Nuts – roughly chopped pistacchio and hazelnuts on theme
Nutrition
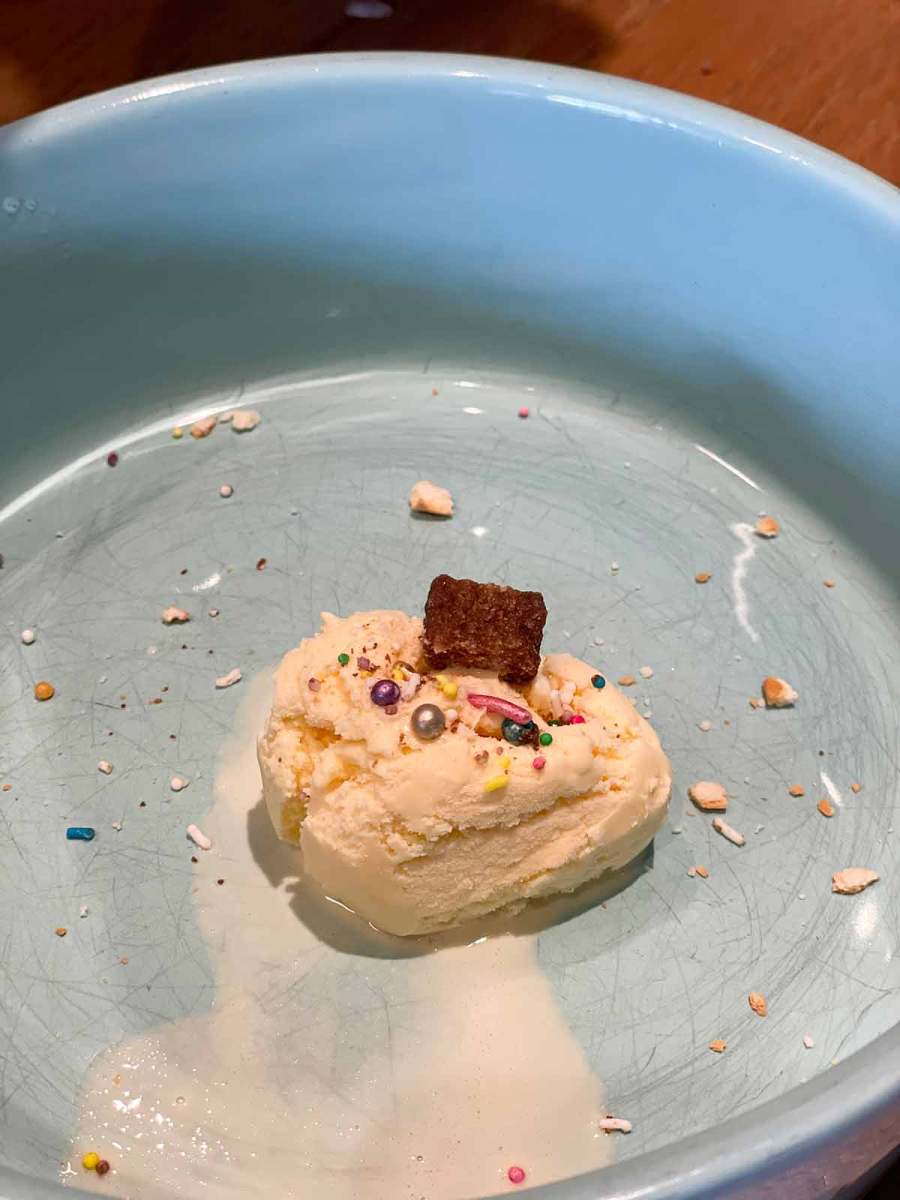
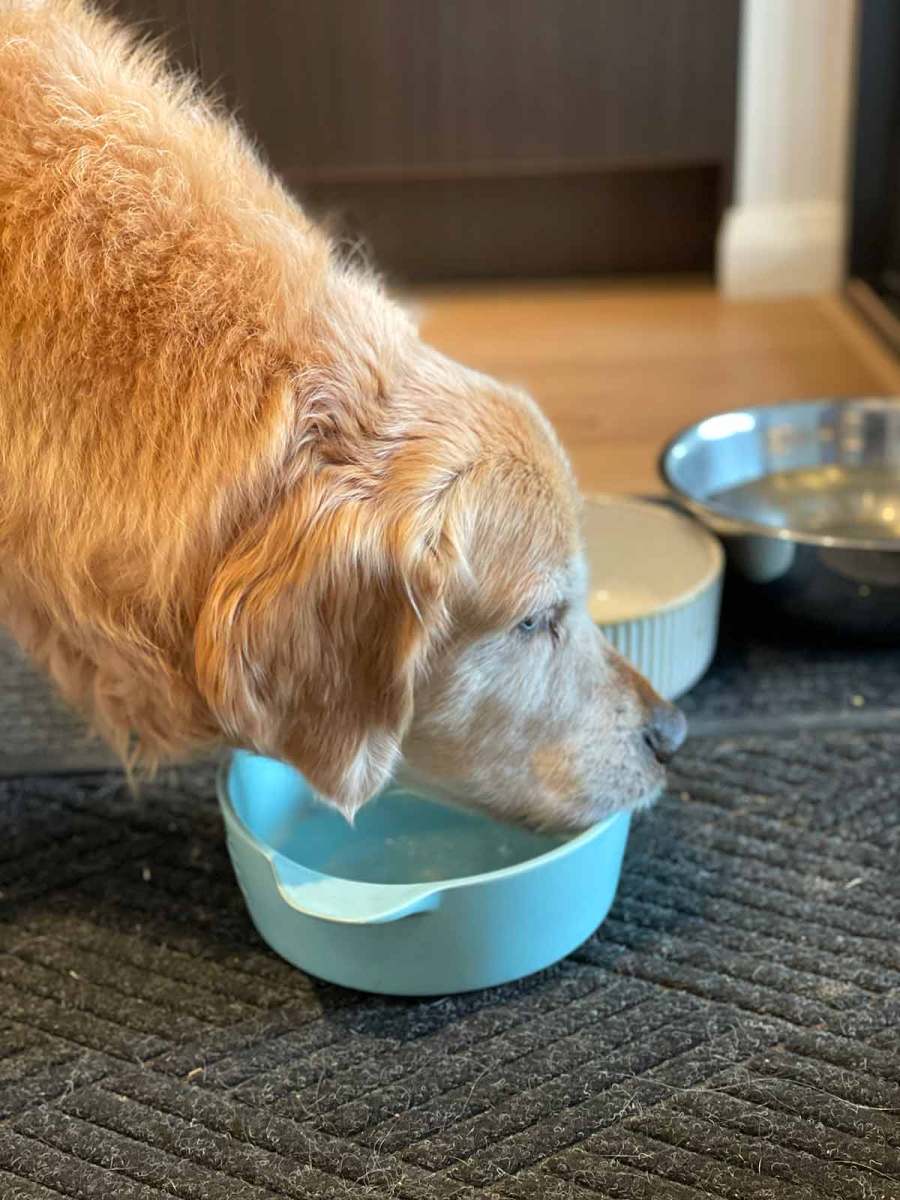
Life of Dozer
Going to town on ice cream garnished with a liver treat and doggie friendly sprinkles (pinched off another doggie treat!).
The post Affogato appeared first on RecipeTin Eats.
]]> Mini Pavlovas are the individual version of traditional Pavlova. A delicate crisp meringue shell with fluffy marshmallow-y insides, they’re adorable, easier to make, and a lot less messy to serve! BONUS: you get the whole thing to yourself. 🙌🏻 How to assemble 12 Mini Pavs in 5 minutes flat I love a traditional Pav, in... Get the Recipe
The post Mini Pavlovas appeared first on RecipeTin Eats.
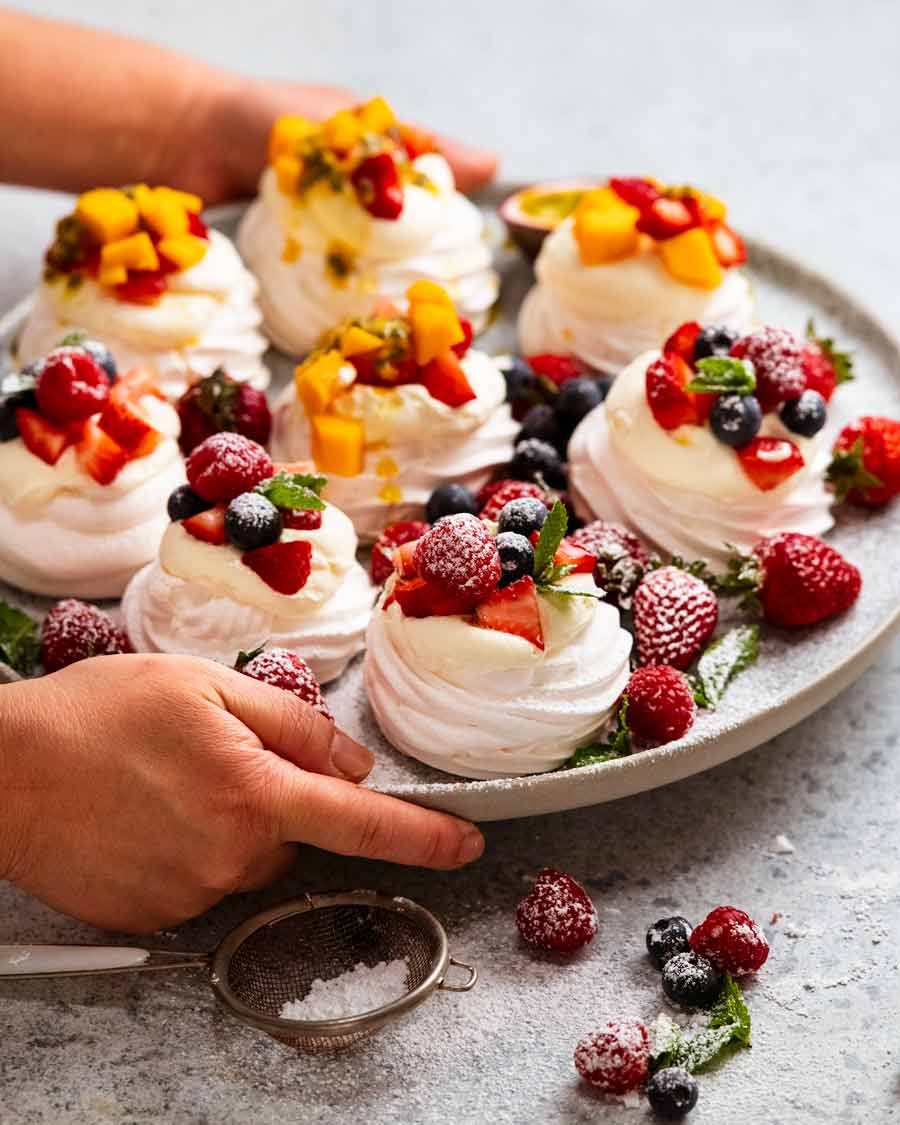
]]>Mini Pavlovas are the individual version of traditional Pavlova. A delicate crisp meringue shell with fluffy marshmallow-y insides, they’re adorable, easier to make, and a lot less messy to serve! BONUS: you get the whole thing to yourself. 🙌🏻
Top 3 pavlova tips
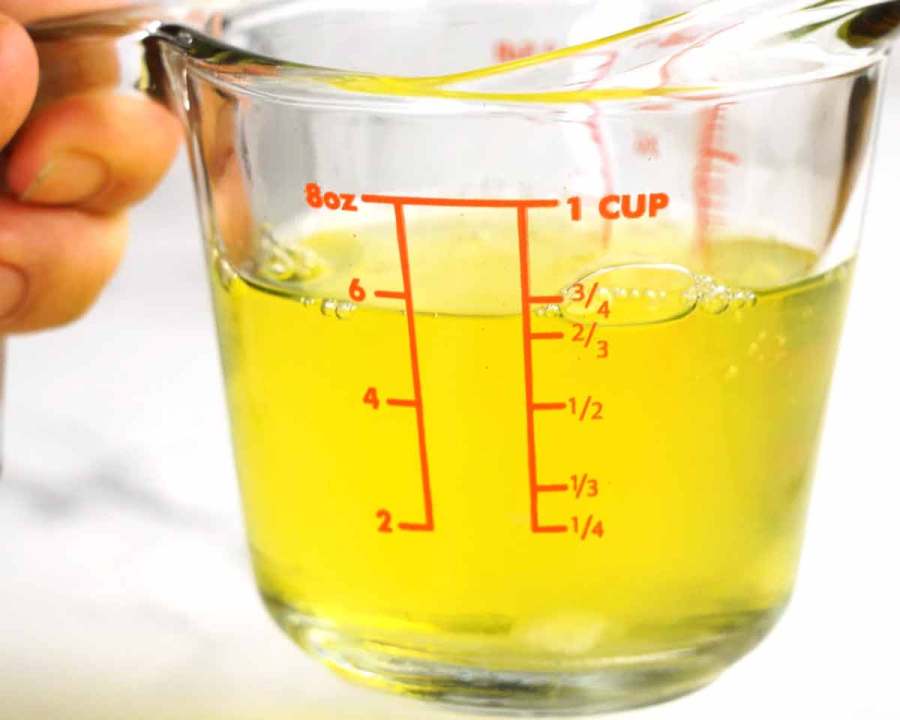
Measure the egg whites (2/3 cup). Don’t just use “5 eggs”. Because, those selfish darn chickens, they just won’t lay exactly the same size eggs every time!😤
Fresh eggs. Because old eggs don’t fluff as well.
Cornflour/cornstarch and vinegar for stabilisation. Just a touch!
Make the Pav the night before and cool overnight in the oven. Serve that day for pav perfection.

How to assemble 12 Mini Pavs in 5 minutes flat
I love a traditional Pav, in all it’s rustic summer beauty. But let’s face it – they are not the easiest to transport. And they are not the best of friends with hot, humid Aussie weather (think – sweaty surface, excessively chewy, weeping sugar, cracking 😭).
And when it comes to messy desserts to serve, pretty sure they take the top spot.
So, this year, avoid the stress and swan in with a platter of mini pavlovas that you assembled within minutes because:
you made the pavs last night;
you brought whipped cream already whipped (because you now know the Stabilised Whipped Cream secret!); and
you brought fruit ready chopped (though mostly berries because…well, no chop 😇).
Oh you domestic goddess, you!! (Or god.)
Difference between pavlova and meringue
Pavlova is a meringue based dessert made with egg white and sugar that is beaten until fluffy (that fluff is called a meringue mixture).
But there’s one big difference between pavlovas and meringues. Both are made from the same meringue mixture. But pavlovas are baked just until the surface has dried out to form a thin crispy shell, and the inside is soft and marshmallow-y.
Meringues, on the other hand, are crisp all the way through.
Meringue nests – bonus recipe!
You can actually make meringues (or meringue nests!) using this same recipe, just by baking it longer until it is fully crisp all the way through. Meringues are handy as they have a longer shelf life – as in 5 days. Whereas mini-pavs are best used within 24 hours because they start to get excessively chewy inside (think – stuck in teeth!) and the surface starts to sweat.
I’ve popped directions in the recipe. Bonus recipe!!
Ingredients for Mini Pavlova
Here’s what you need to make mini pavlovas.
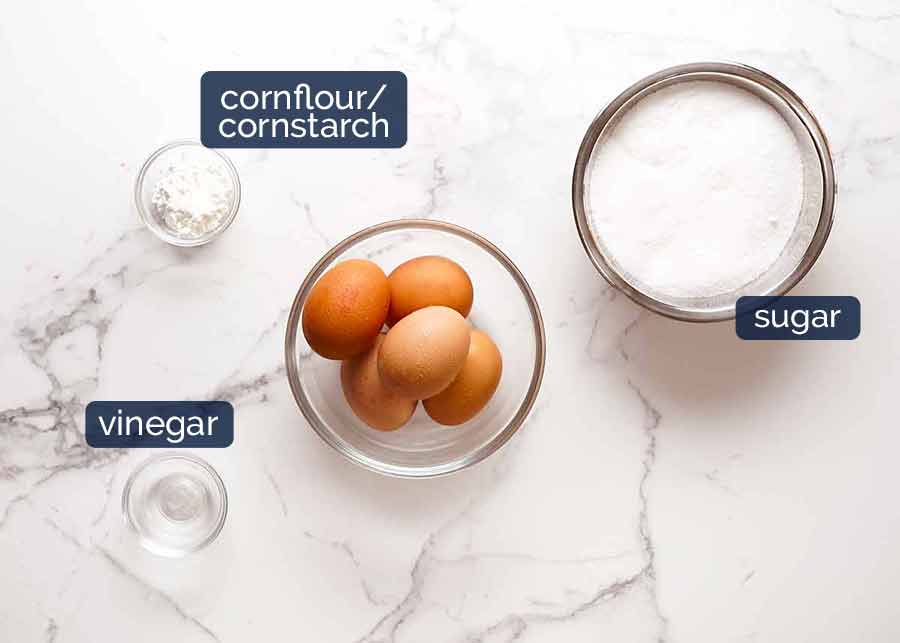
Ordinarily I make notes about each ingredient here in this section. But for pav, I find the commentary flows better as I talk through the steps so you’ll find notes on each ingredient in the How to Make section below.
How to make Mini Pavlova
Key tip – measure your egg whites. Don’t rely on “5 eggs”. Egg sizes vary drastically!!
1. Separate eggs
Use any technique that works for you to separate the eggs. I pass the yolk back and forth between shells so the white slides out. If you’re not confident using this technique, just crack the eggs into your hand and let the whites slip through your fingers. Easy!
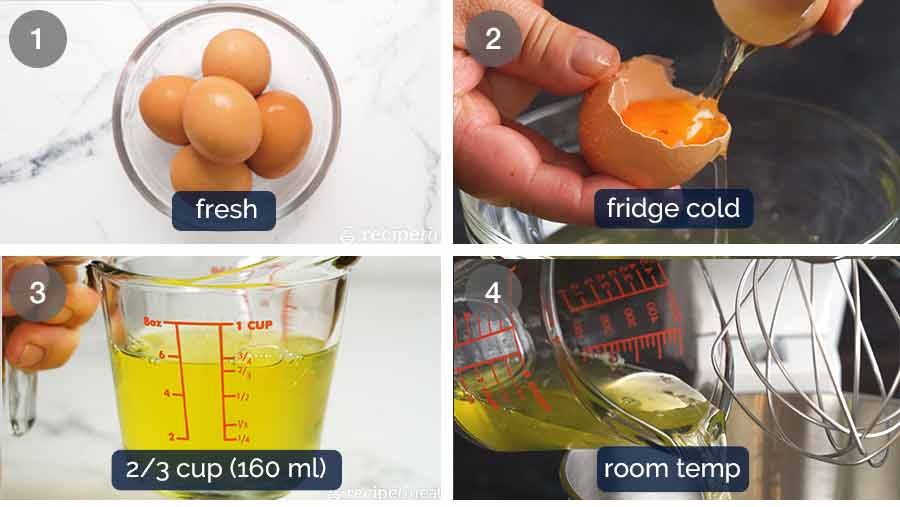
Fresher eggs work better – The older the egg, the more liquid the whites become (see demo photos in Poached Eggs). Loose egg whites will not fluff as well when beaten, so the volume of meringue will be less.
So try to buy fresh eggs close to the date you’re making the pavlova for the best results. Don’t use eggs that are weeks old!
Freshly laid eggs note – If you’re lucky enough to have your own chickens, it’s best not to use freshly laid eggs as the whites are so tight, it takes longer to beat them into a meringue. Use eggs that are 4 – 5 days old. This is the approximate age of eggs by the time they get into grocery stores.
Separate eggs while fridge cold – Whites and yolks separate more easily when cold;
Measure, don’t count eggs – The amount of whites in each egg varies depending on size and other variables. It’s too unreliable to just use “5 eggs”! We need 160ml / 2/3 cup of whites. This might be 5 or 6 eggs. Measure out your whites!
Whip at room temp – While eggs separate better when cold, they fluff up when they are not fridge cold. So after measuring out the egg whites, leave it on the counter while you prepare the other ingredients, tray etc.
⚠️ Precautionary tip – separate one egg at a time!
If you are a budding chef, I recommend separating the yolks and whites of one egg at a time before adding into measuring jug. This way, you don’t risk ruining an entire batch of egg whites if you accidentally pierce a yolk. This is important because even the slightest drop of egg yolk can prevent the egg whites from becoming fluffy.
2. How to make meringue mixture
Making the meringue mixture for the mini pavs is as simple as 1-2-3:
beat
beat
beat!!!
Oh, and make sure your bowl and whisk are clean and dry. Meringue hates grease and water!
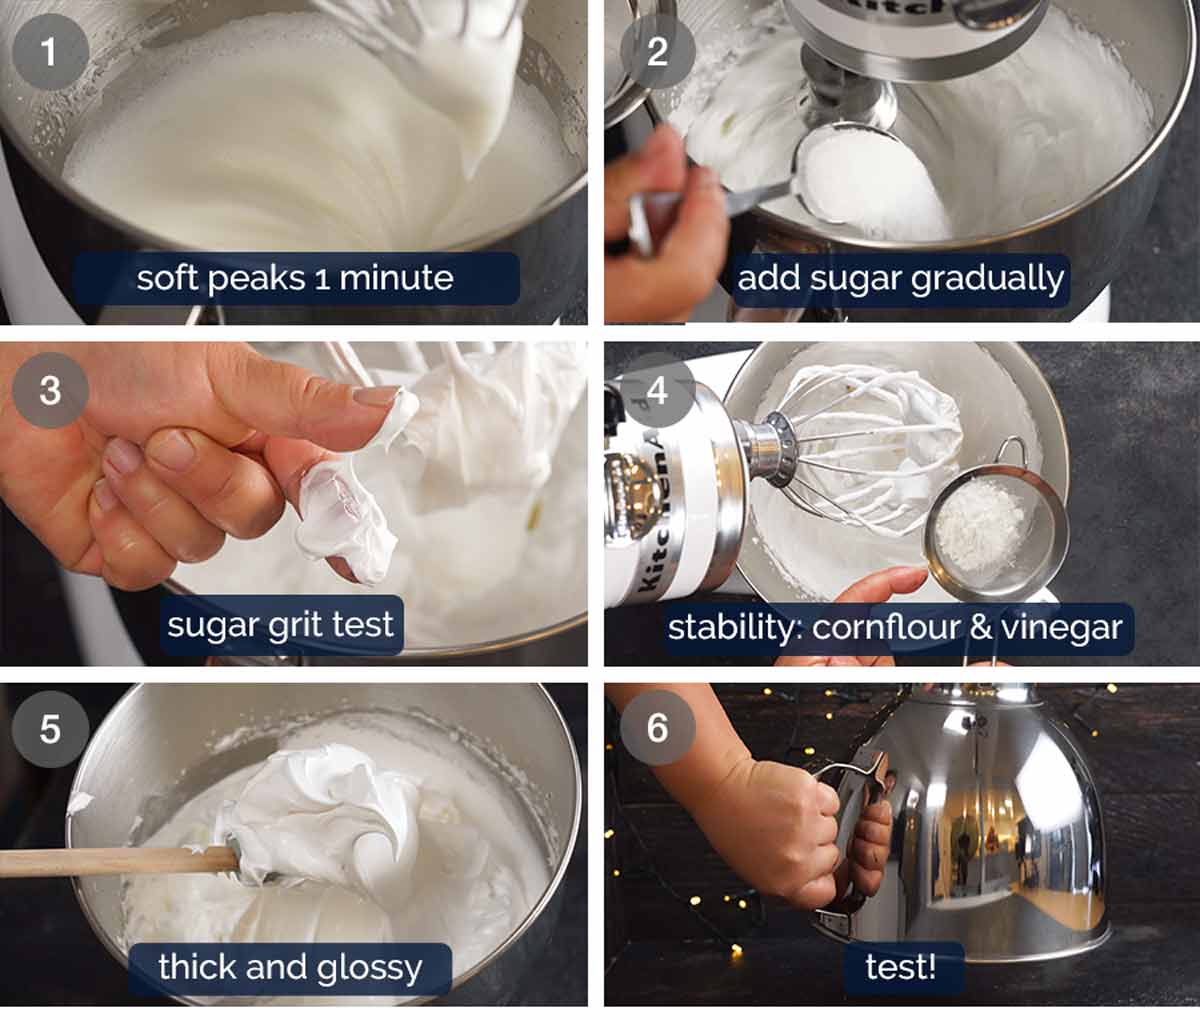
Soft peaks – Beat the egg whites for 1 minute on high speed until soft peaks form. If you have a stand mixer with 10 speeds like I do (I have a KitchenAid), use speed 8.
Gradually add sugar – With the beater running, add sugar one spoonful at a time, taking around 1 minute. This keeps the whites more aerated and ensures the sugar dissolves, compared with dumping all the sugar in one go.
Beat 8 minutes on speed 8. The whites will become thick and glossy, and when you rub between your fingers there should be no sugar grit remaining.
Vinegar & cornflour/cornstarch for added stability – Add the vinegar and cornflour then beat for a further 30 seconds. Just a bit of cornflour and vinegar helps make the pavlova more structurally stable and strong so it won’t crack or collapse which is a common problem with a large traditional pavlova. Though less of a risk with mini ones, why risk it when we can take this easy precautionary measure?
Thick and glossy – The meringue mixture should be thick and glossy, but just to be extra sure, do the ….
Upside down test! Flip the bowl upside down and ensure no meringue drops down. If it doesn’t, you know it’s stiff enough for sure and your mini pavs are going to be perfect. If yours drips down, keep beating!
⚠️ Pipe the meringue straight away else the fluffed egg whites start to deflate!
3. Bake
The trick to the perfect pav is to turn the oven off before the surface of the pav is fully crisp so the insides are still marshmallowy. The surface crisps up by leaving the pavs in the turn off oven for 4 hours – or even overnight.
If you bake for too long, the inside will dry out and you’ll end up with meringues (fully crisp all the way through) rather than pavs (which have the signature cloud-like soft insides).
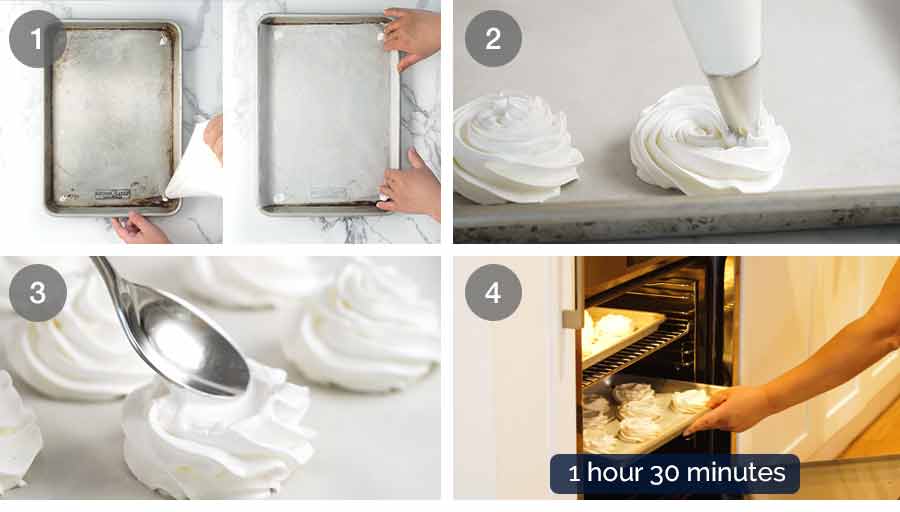
Line trays – Dab a bit of the meringue mixture on the corner of 2 trays, then cover with baking paper (parchment). The meringue will glue the paper in place.
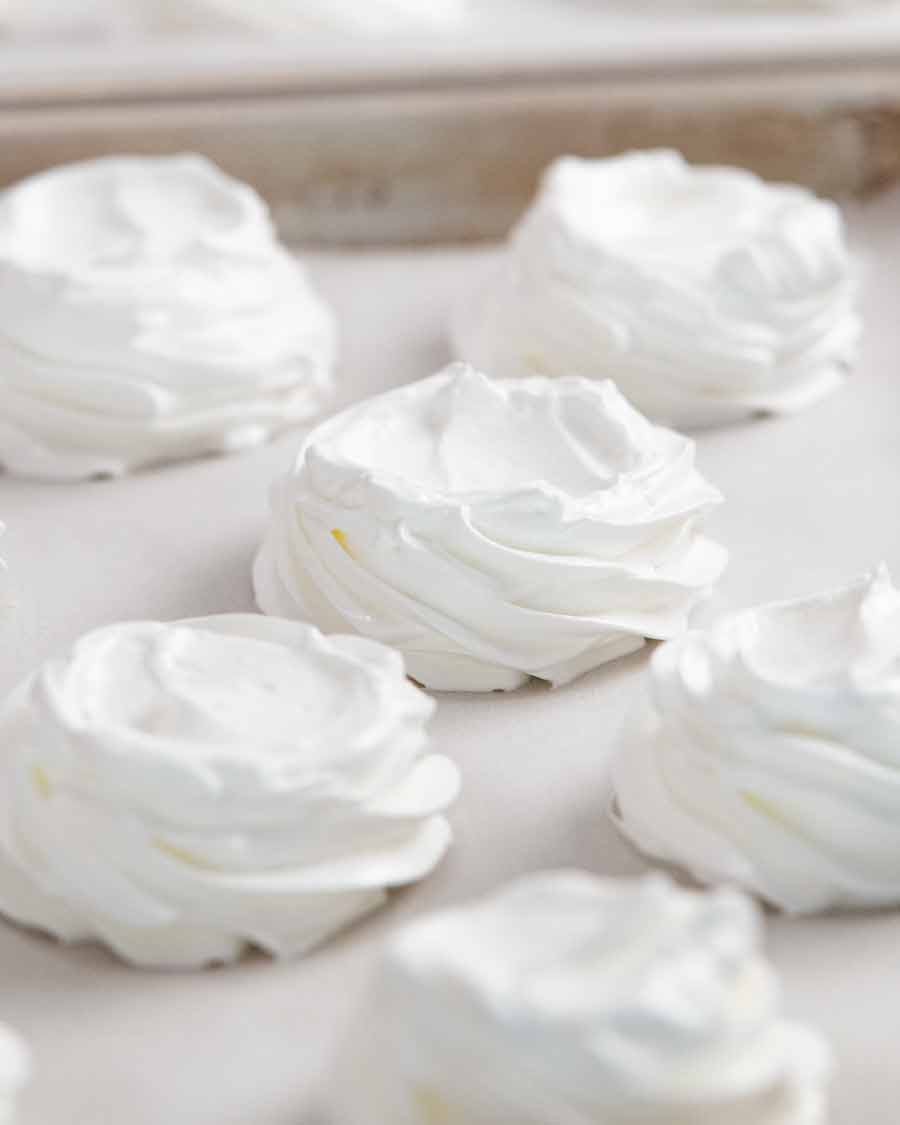
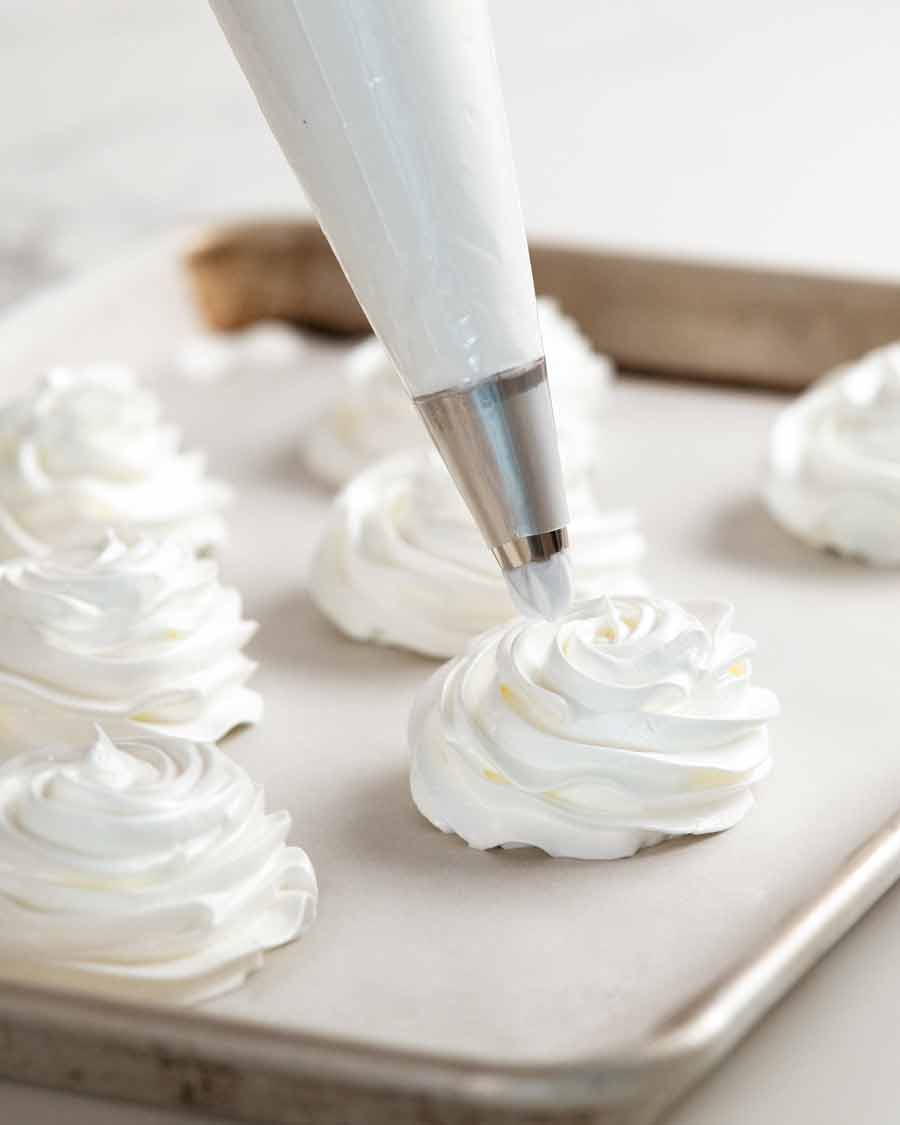
Pipe (or dollop) mounds – Transfer meringue mixture into a large piping bag fitted with a nozzle of choice. Pipe 12 – 13 mounds 6 – 7 cm / 2.5″ wide about 5 cm / 2″ tall. Exact number depends on how much your whites fluffed up by (fresher eggs = more fluff!).
No piping bag? No problem! Just use a spoon and dollop mounds on the tray then shape.
Size matters! You can make yours smaller if you like, and make more. But the smaller they are, the less marshmallow insides you will have ie it becomes more like a meringue. Both delicious, just depends what you’re going for!
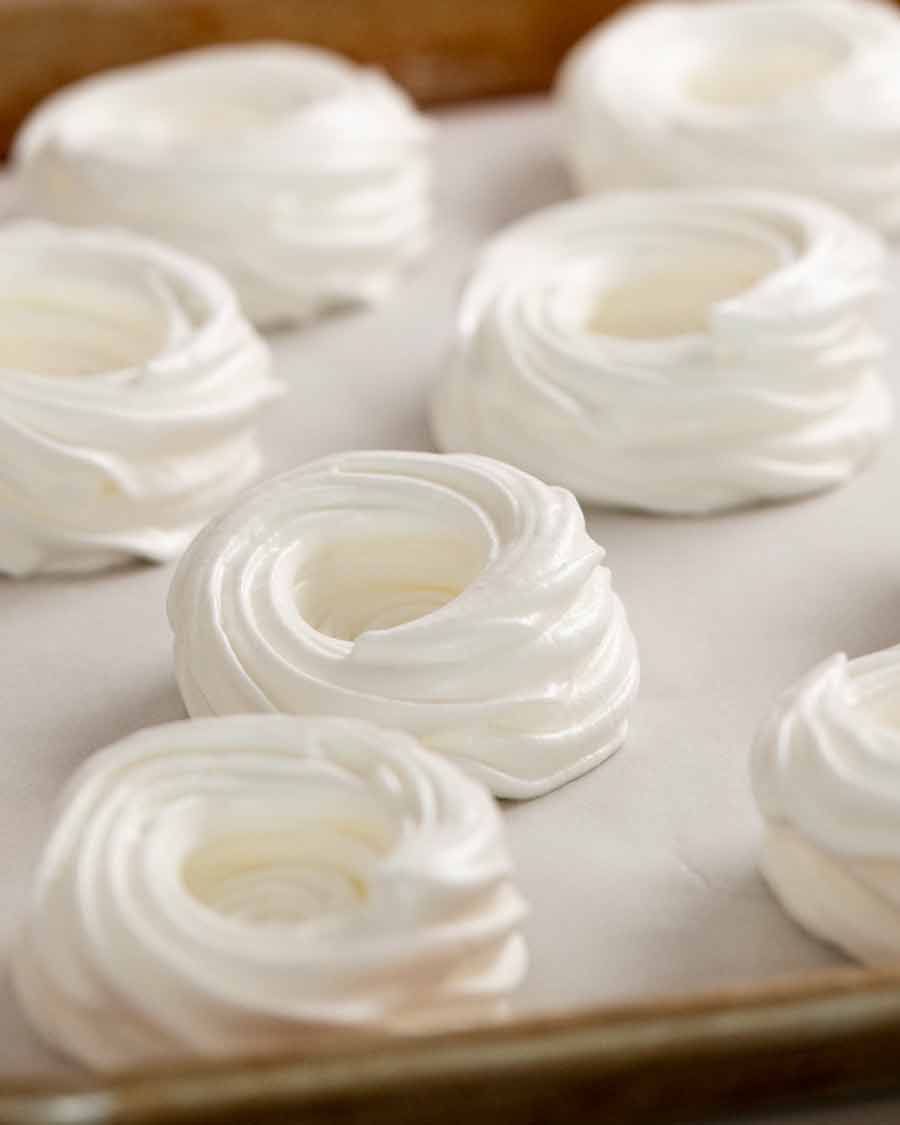
Topping nest – Use the back of a spoon to make a “nest” on the surface for the cream and toppings.
Bake 1 hour 30 minutes – Place both trays in the oven and bake for 1 hour 30 minutes at 110°C/225°F (100°C) or until the surface is dry to touch and lightly crisp. If it is still sticky, keep baking. The circulation and accuracy of heat in ovens can vary so yours may take longer. (Note: Work quickly when checking, we don’t want heat to escape from the oven.)
Because these pavs are small, we really want to be careful not to take the pavs too far else the inside will dry out (ie no marshmallow centre). Which means you’ll end up with meringues instead of pavs. Not a disaster, but not what we’re aiming for here. We want the marshmallowy insides!
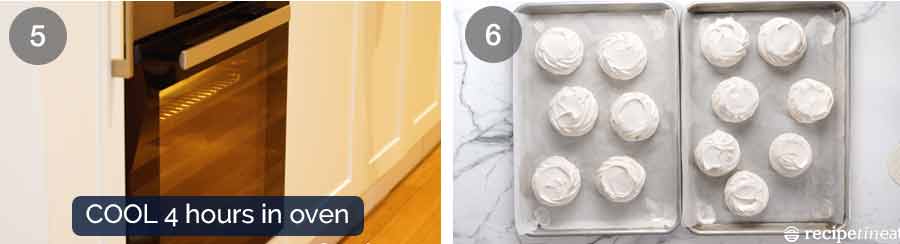
Cool in oven 4 hrs to overnight – Turn the oven off then leave the pavs in the oven for 4 hours or even overnight (this is what I usually do). During this step the surface of the pavs will dry up and crisp up, while the middle will stay nice and marshmallowy.
Don’t shortcut or skip this step else you run the risk of the pavs becoming sticky instead of being dry and crisp within mere hours of making the pav. This is a high risk in the humid Aussie weather!
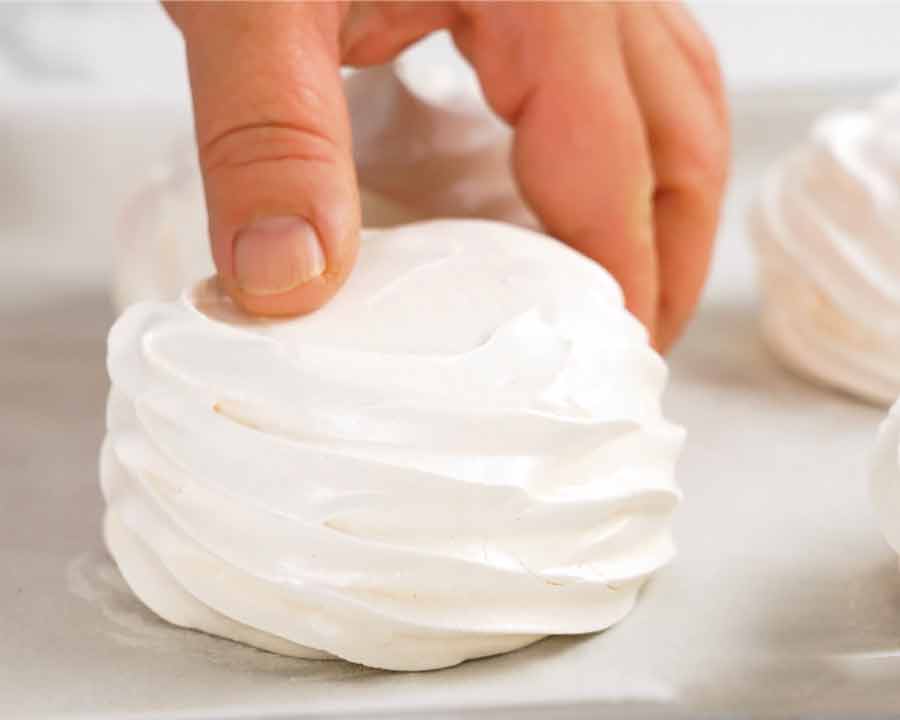
Shelf life and storing – Once the pavs are fully cool, pull them out of the oven. They will be a very pale cream colour and delicately crisp on the outside. Handle gently as the shell is fragile.
Store in an airtight container until required. On hot summer days, be sure to store in them in a cool, dry place. In my house, this is the downstair bathroom!
Shelf life – Though pavs will last for a couple of days, they are best served on the day you take them out of the oven after cooling. The shell will stay dry and crisp for 2 to 3 days, but the marshmallow inside will start to deflate. It reduces by about 1/3 on Day 2.
Also, on very hot humid days and/or if the pavs are not stored in a cool dry room, they can get sticky and chewy.
What I do – I typically bake the night before then leave them overnight in the oven. Pop them straight into a container then use them that day at lunch or dinner.
OK – mini pavs made. Now it’s time to decorate!
As with traditional pavlovas, the mini version is also best decorated just prior to serving as the cream and juices from fruit will soft the delicate shell of the pav.
Pavlova Toppings
You can really use whatever fruit that takes your fancy, though juicy, soft fruit works best texture-wise with pavlova. Berries, mango and kiwi are common. I can’t imagine crunchy apple pieces on a delicate pav…. someone may have thoughts to the contrary!!
Here are my favourite combinations (I’m so predictable 😂):
Whipped cream – A classic and essential pav topping, to act as a glue so you can pile that fruit up on your pav.
Make-ahead stabilised whipped cream – One of my top tips to make your Christmas cooking easier, whip up your cream the day before by making stabilised whipped cream which will stay fluffy and aerated overnight (unlike ordinary whipped cream which deflates and weeps).
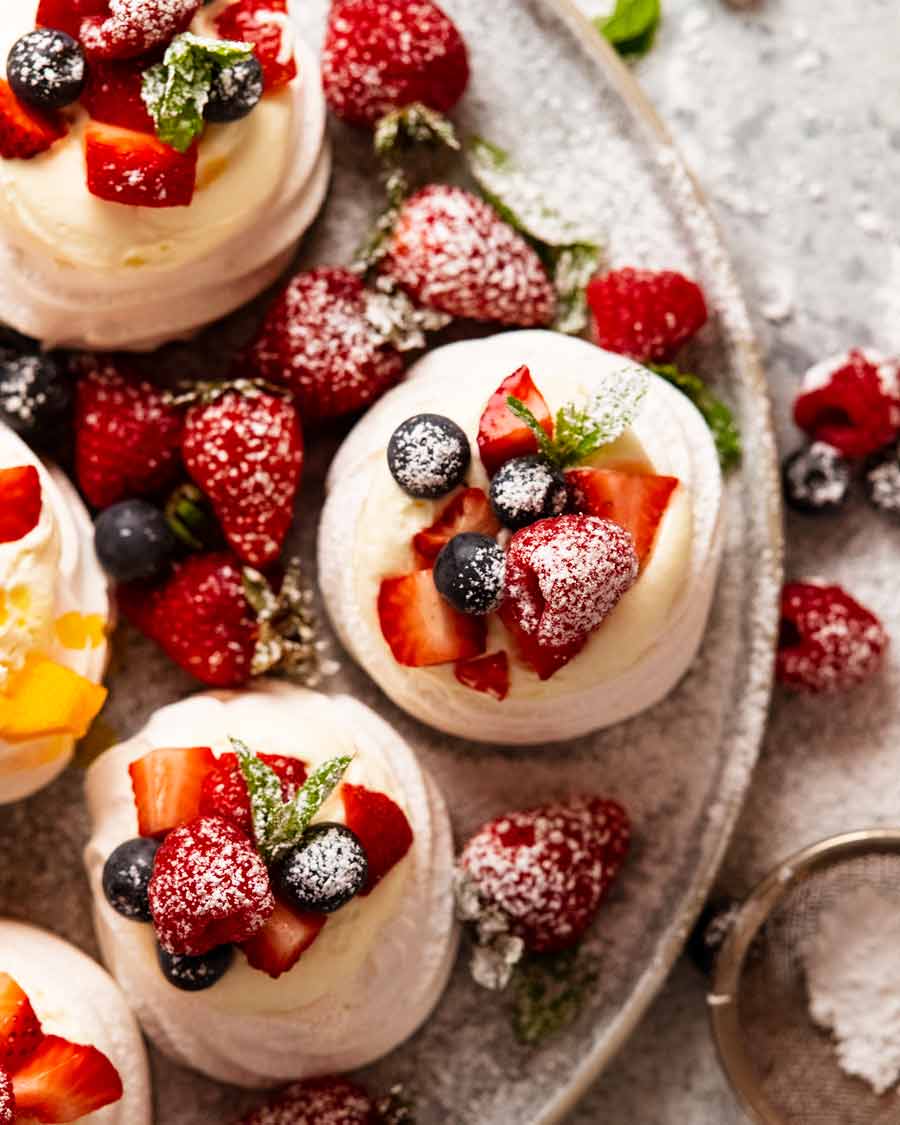
Berries – Diced strawberries, blueberries and raspberries with a small sprig of mint and dusting of icing sugar. This is my classic.
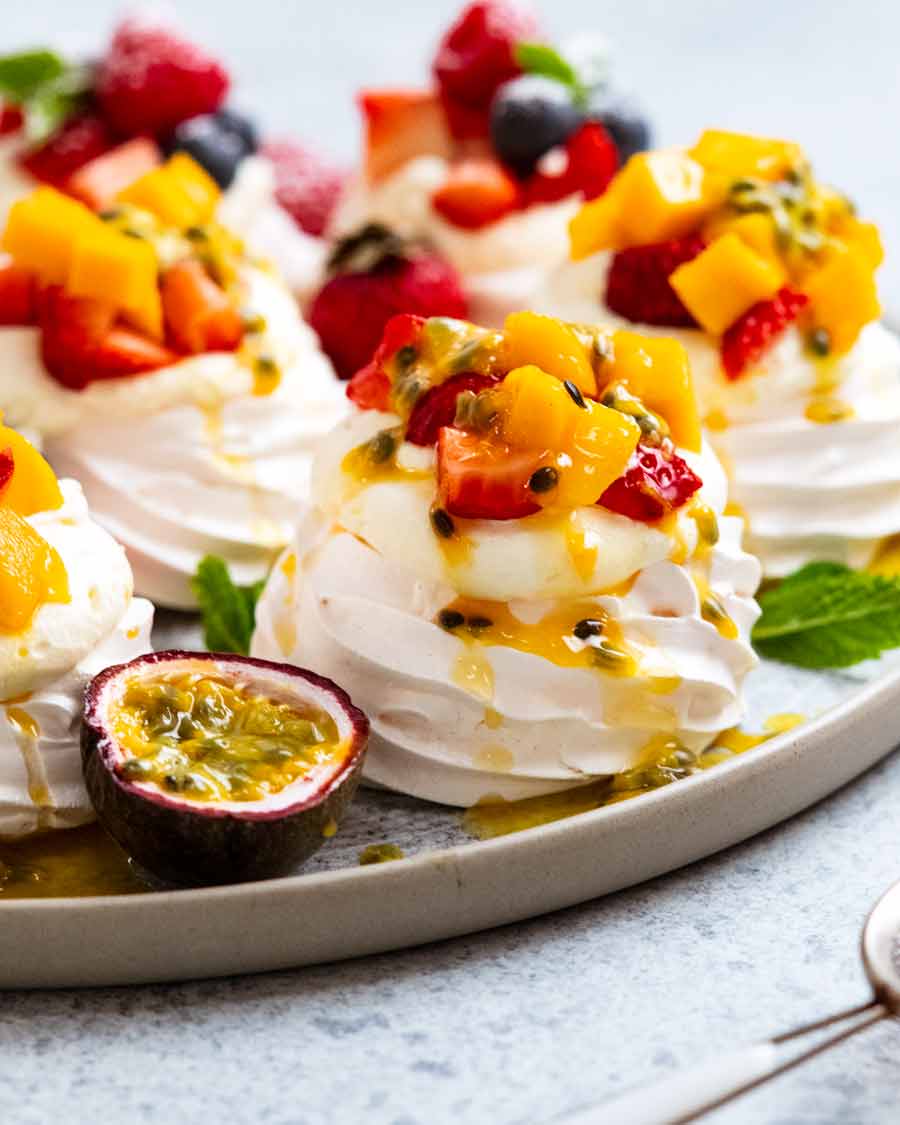
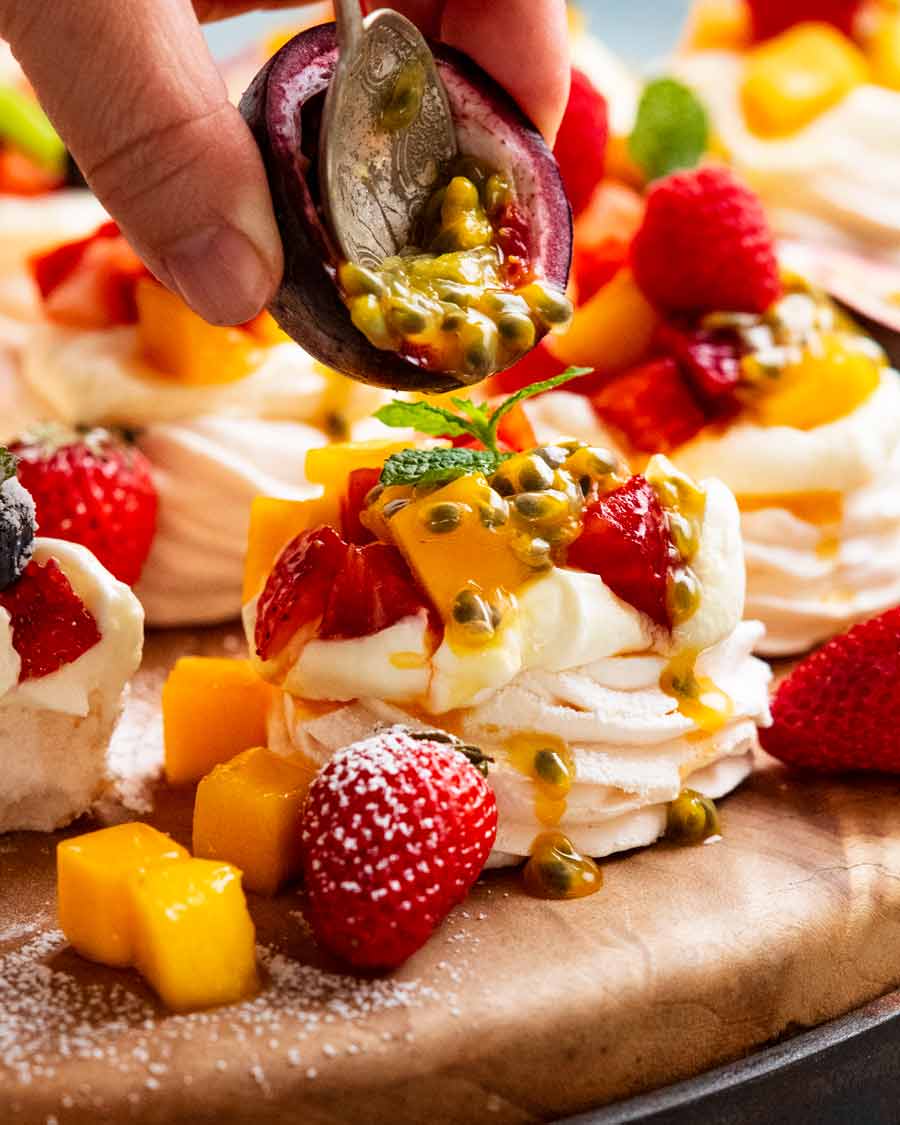
Mango and passionfruit – Diced strawberries and mangoes, finished with a spoonful of passionfruit. A terrific one when mangoes and passionfruit are in season!
Kiwi – Also an excellent topping option. Either half moons or diced. Nice touch of green colour,
Lemon curd or passionfruit curd – One day I’ll get my lemon and passionfruit curd recipes on my website! I would dollop the curd into the nest then pipe on a swirl of cream.
Reader suggestions added to the list! Watermelon, peaches (great one!), crushed peppermint crisp (unique! Might have to try this!).
Hmm. I think that’s pretty much the only combinations I use! I’d love to know if you have any other suggestions. Please share below and I’ll add them to the list! – Nagi x
Watch how to make it

Mini Pavlovas
Ingredients
Mini Pavlovas:
- 160 ml / 2/3 cup egg whites (5 – 6 large eggs) (Note 1)
- 1 1/4 cups caster sugar (superfine sugar)
- 2 1/2 tsp cornflour / cornstarch (Note 2)
- 1 tsp white vinegar (Note 2)
Whipped cream:
- 1 1/2 cups heavy/thickened cream (whipping cream), COLD
- 1/2 cup mascarpone, OPTIONAL for stabilising (Note 3)
- 3 tbsp caster sugar / superfine sugar
- 1 tsp vanilla extract
Toppings – choose:
- Strawberries, mangoes – diced into 1cm / 1/3" cubes
- Blueberries, raspberries, kiwi sliced, passionfruit pulp
- Small mint sprigs
- Icing sugar / powdered sugar , for dusting
Instructions
Mini Pavlovas:
- Egg whites – Separate the egg yolks from egg whites while fridge cold (it's easier). Measure out 2/3 cup (160 ml) egg whites then set aside to come to room temperature for 30 minutes (fluffs better at room temp).
- Preheat oven to 150°C / 325°F (all oven types).
- Add sugar – In a stand mixer or using an electric beater, beat the egg whites on high for 1 minute. While still beating, add the sugar 1 dessert spoon at a time.
- Beat 8 minutes – Continue to beat for 8 minutes on high until it's fluffy, glossy, and there are no sugar grains remaining when you rub a bit between your fingers. Add vinegar and cornflour then beat for a further 30 seconds.
- Line tray – Dab a bit on the corner of 2 trays then cover with baking paper (parchment).
- Pipe mounds Transfer meringue mixture into a large piping bag fitted with nozzle of choice. Pipe 12 – 13 mounds 6 – 7 cm / 2.5" wide about 5 cm / 2" tall. Use a spoon to flatten and make a slight dent on the surface to hold cream and fruit. Pavs should end up about 4 cm / 1.6" high.
- Bake 1 hour 30 minutes – Place both trays in the oven, immediately turn oven DOWN to 110°C/225°F (100°C fan) and bake for 1 hour 30 minutes or until they are dry to touch. Keep baking if still sticky – exact times may vary. (Note 4)
- Cool in oven – Turn oven OFF and leave to fully cool for 4 hours or overnight around 10 hours (I usually do this).
- Airtight container – As soon as the pavs are fully cool, store in an airtight container in a cool, dry place until required. (Note 6)
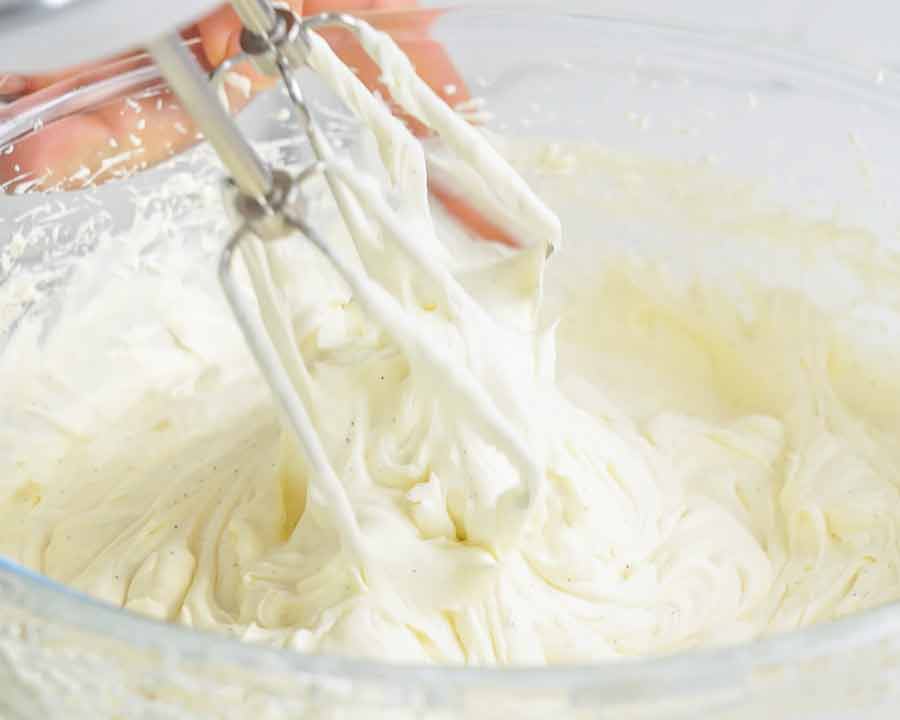
- Cream – Beat cream ingredients (including mascarpone, if using) in a large bowl on high until soft peaks form (1 minute using a stand mixer, 2 – 3 minutes with hand held beater).
- Decorate – Just before serving, spoon a big dollop of cream in the nest, top with fruit and dust with icing sugar if using.
Notes
- For best results, use fresh eggs
- DO NOT use carton egg whites – it doesn’t fluff up nearly as well
- Separate the egg whites from the yolks while fridge cold (it’s easier to do than with warm eggs)
- Measure out the egg whites until you have 2/3 cup (160 ml), usually 5 to 6 eggs. Why measures? Because it turns out not all eggs are the same size…. So annoying right? Someone needs to have a talk to chickens! 😂
- Leave whites for 30 minutes to take out the fridge chill, cold eggs don’t fluff as well.
Life of Dozer
When Dozer was on TV again!!! I was his side kick, just doing a little food demo (Never Ending Meringue Tart!).
It started out very promising, Dozer looking adorably festive with his little elf hat perched on the Dozer Podium next to the cooking bench…..
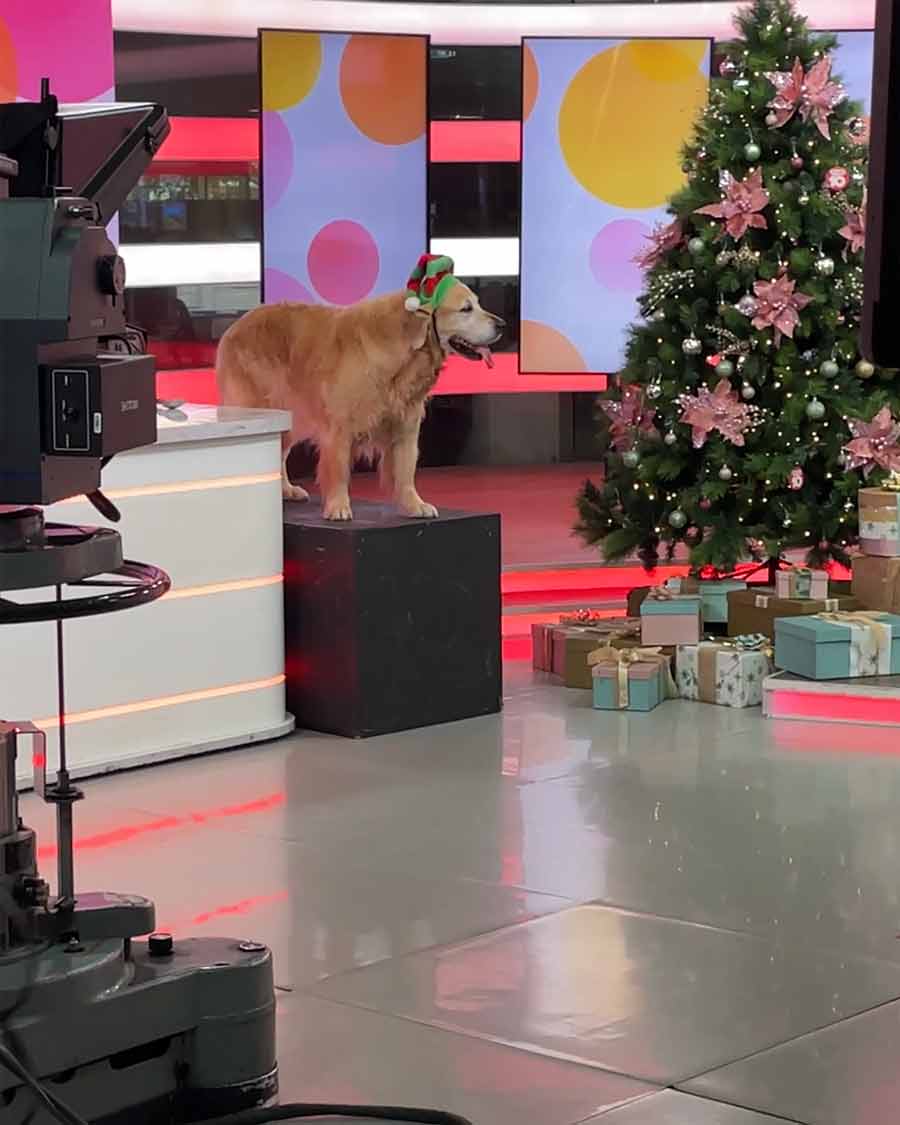

Oh look, there I am, looking so tall and gazelle-like next to good looking TV hosts – story of my life these days!
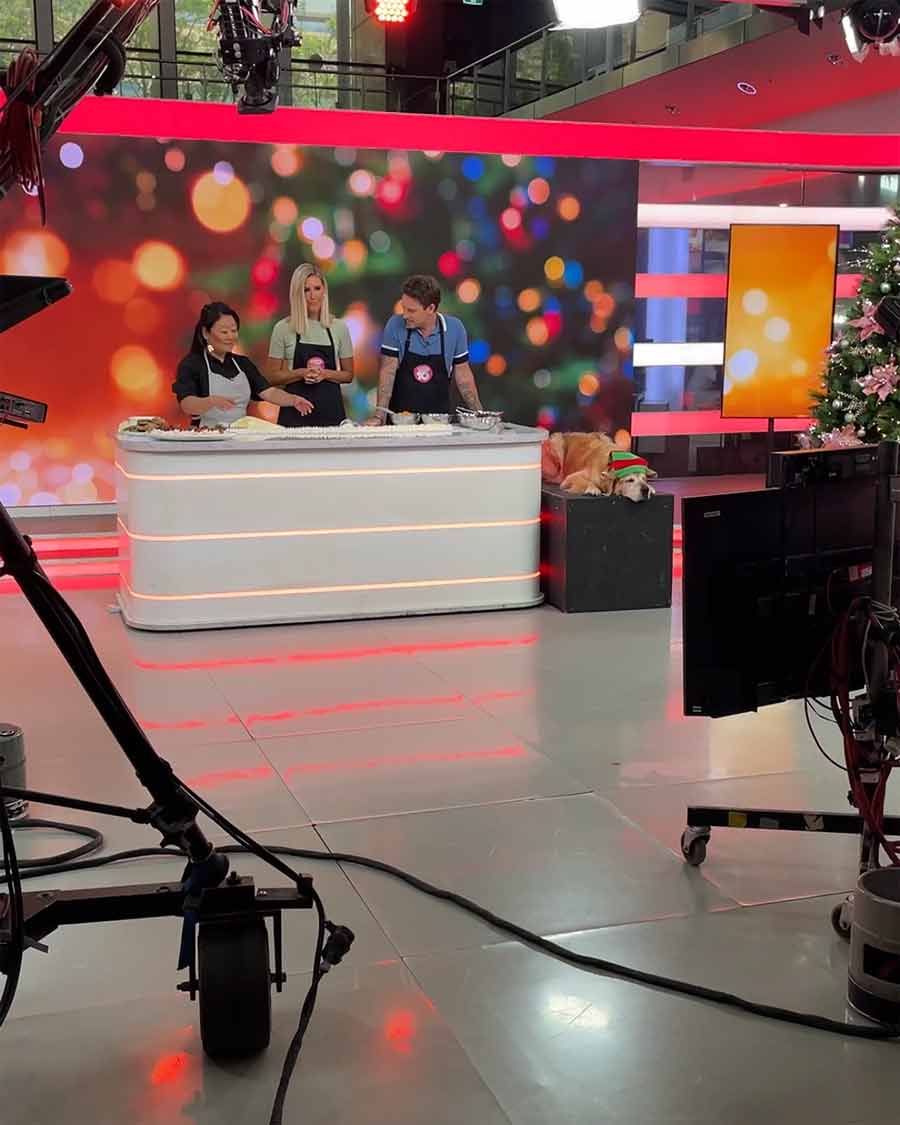
As for Mr Dozer, used to being the star of the show these days, lost interest the moment the cameras swung away from him and turned towards me. And promptly fell asleep. On live television.

Followed by refusing to make his own way off the Dozer Podium (let me remind you, he is 40kg / 80lb!!):

Dozer, you are lucky I love you so darn much. Nobody else would put up with your attitude!!!
And that was the final cookbook TV appearance for 2022. Dozer, you are the best publicity tour wing-mandog any girl could ask for.
Thank you for being a smoochy, cuddly support all those times I was so nervous before stepping out in front of the cameras! Thank you for the laughs with your un-intentional antics, for putting smiles on the face of the TV crew when you waddled up for a pat and your unconditional, unwavering loyalty.
Love you, Dozer! – Nagi x

The post Mini Pavlovas appeared first on RecipeTin Eats.
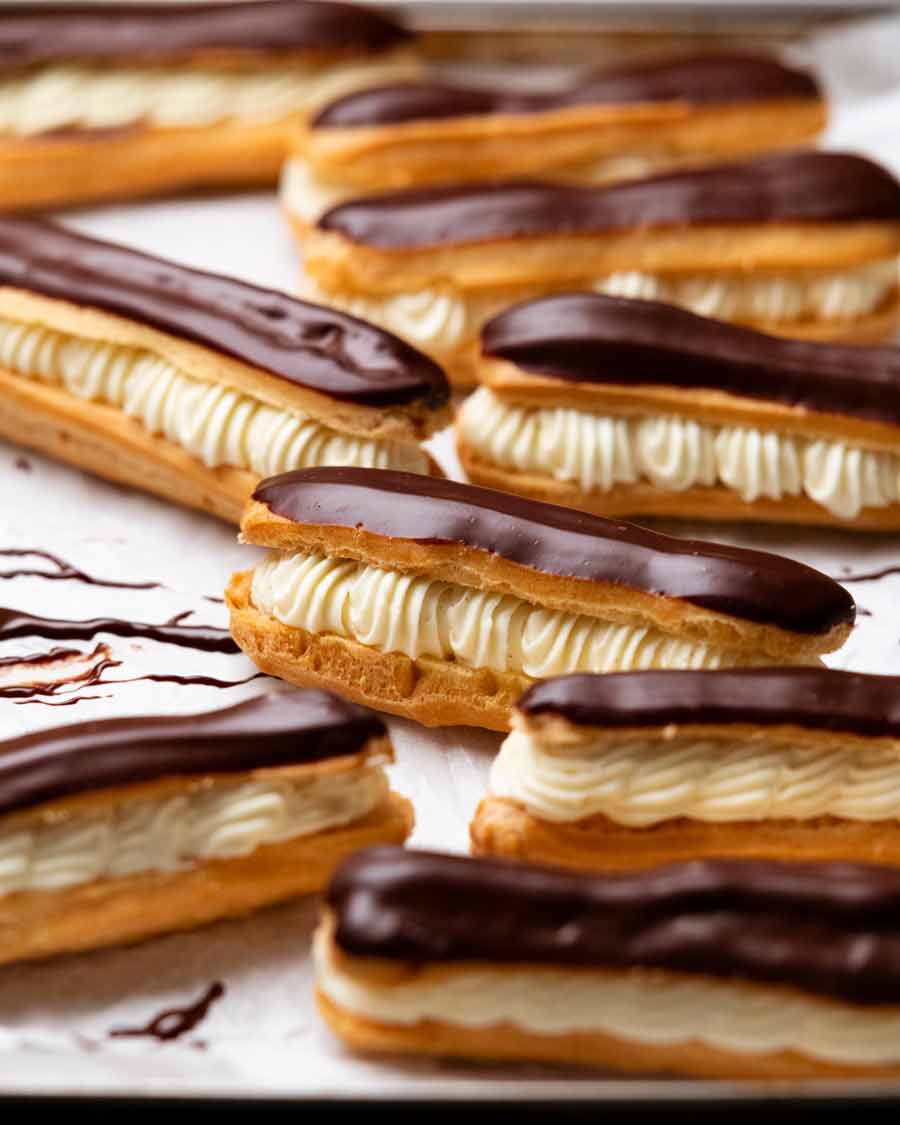
]]> Not even the finest patisseries around town can compete with homemade éclairs! Unlike shop-bought éclairs, the light-as-air choux is at its absolute, delicately-crisp best. Filled with Chantilly whipped cream and coated with a shiny chocolate glaze, this is an éclairs recipe that anyone can follow! An Éclairs recipe anyone can make If you’ve always wanted... Get the Recipe
The post Éclairs appeared first on RecipeTin Eats.
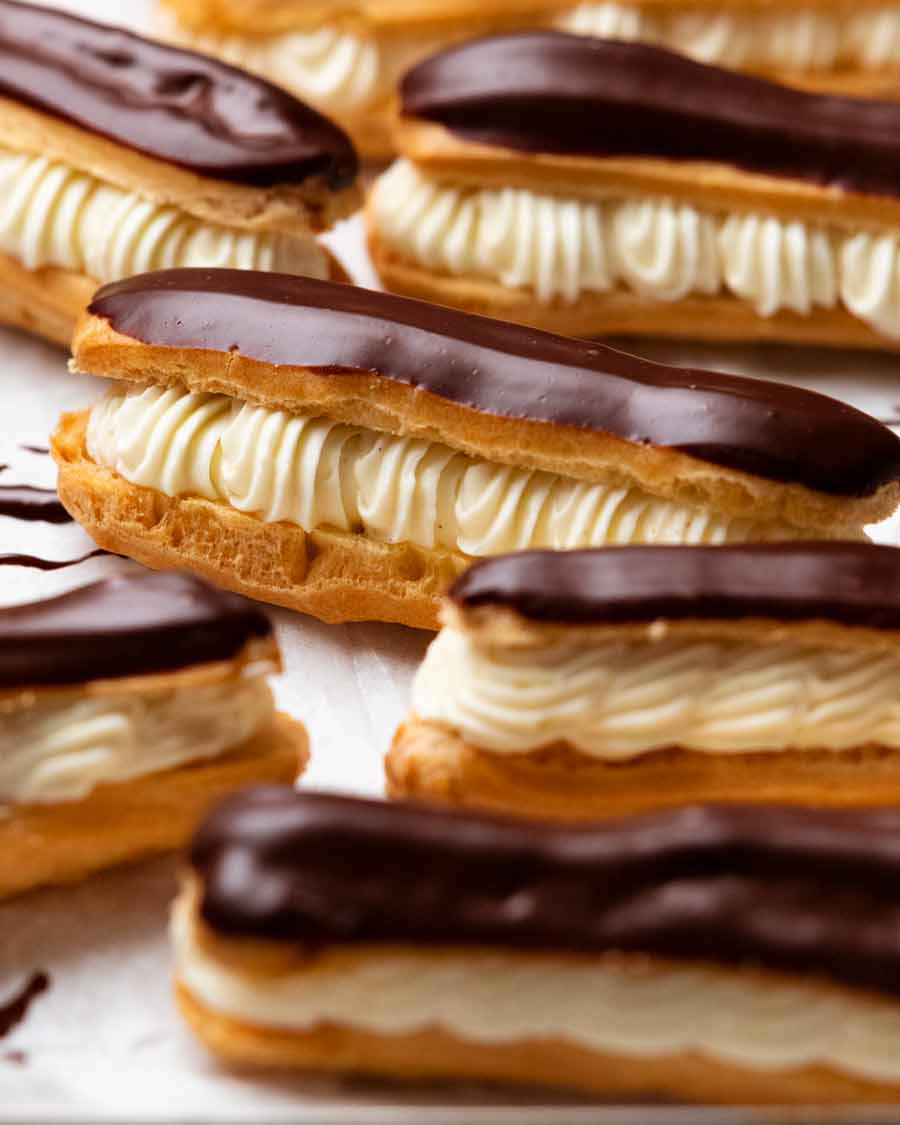
]]>Not even the finest patisseries around town can compete with homemade éclairs! Unlike shop-bought éclairs, the light-as-air choux is at its absolute, delicately-crisp best. Filled with Chantilly whipped cream and coated with a shiny chocolate glaze, this is an éclairs recipe that anyone can follow!
An Éclairs recipe anyone can make
If you’ve always wanted to make éclairs but never had the confidence, this is the recipe for you! I’ve provided a concise how-to video and my recipe includes a few little steps to make it extra foolproof with better results. For example, cooling the choux pastry batter before adding the eggs (no scrambling risk, incorporates better) and opening the oven door to release steam to be extra sure our éclair buns come out crispy!
Why homemade éclairs are better than shop-bought
The best bakeries and patisseries make many things we ordinary home cooks cannot. But the one sweet treat we home cooks will always be able to do better than even a great patisserie is éclairs – those delicate glazed French choux buns stuffed with a rich, creamy filling.
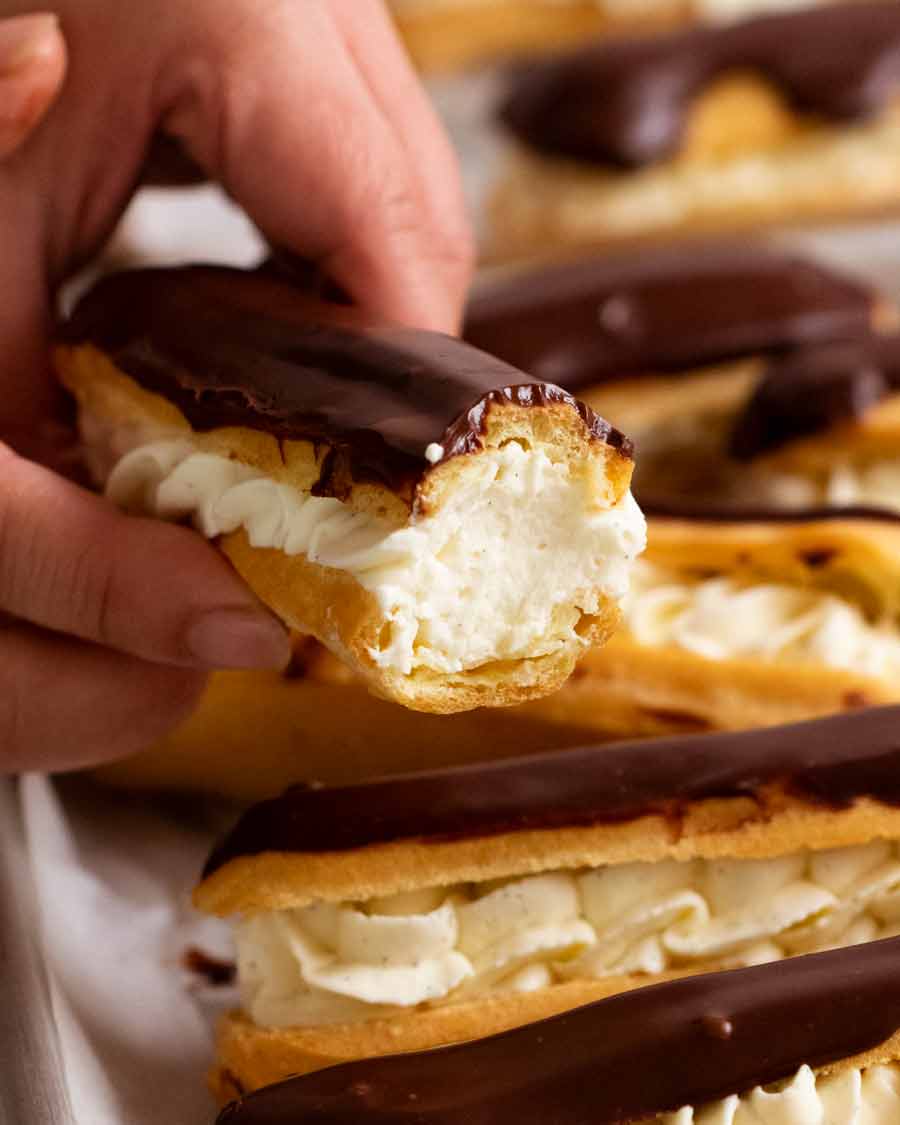
It sounds unlikely but the reason is simple. Once you fill an eclair, within 15 minutes the delicately crispy surface of the choux pastry starts softening. What was initially light with a wafer-like exterior starts deteriorating to a more spongey texture as moisture gets absorbed by the choux.
This is inevitably the fate of all ready-to-eat pre-filled eclairs sold at patisseries. Of course they’re still totally delicious! But the experience of eating a homemade eclair in its optimum state of freshness is something else entirely – something everyone should try it at least once in their life.
Make today the day and read on!!!
Cream vs custard filling = Aussie/UK vs French!
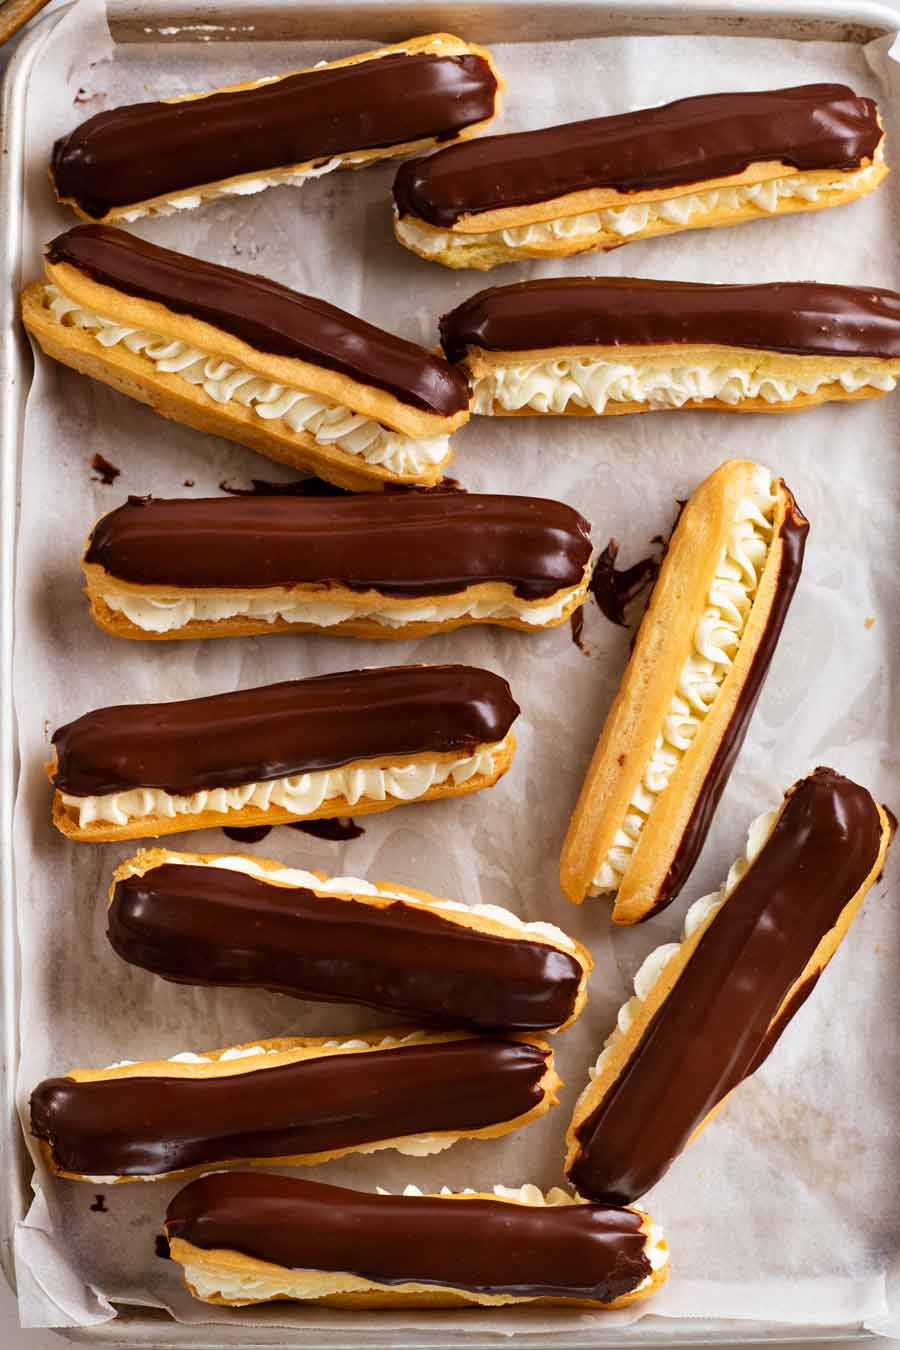
While éclairs in the wonderful world of French pastries are made with custard piped inside, éclairs as we know them here in Australia are split open and filled with whipped cream (specifically, Chantilly cream). And rather generously at that! Nobody wants an éclair that doesn’t have cream bursting from the seams!
So today’s recipe is for Aussie éclairs. French éclairs, next year!
Overview of what makes up an Éclair
Éclairs are made up of 3 things:


Choux pastry (pâte à choux) – A light and airy pastry with a thin, golden, delicately crispy crust. Choux is a foundation pastry in baking, particularly French pastry. It’s used for favourites such as profiteroles, gougères (French cheese puffs!) and the iconic Paris Brest (a giant choux pastry “doughnut” filled with hazelnut custard, which I adore!).
It’s also a close cousin to non-French classics like churros, Yorkshire pudding and American beignets in terms of its texture and composition.
It’s fundamentally simple to make, using just water, butter, flour and eggs.
Chantilly cream – The French name for lightly sweetened vanilla-flavoured cream. I’ve done a separate post on Chantilly Cream – how to make it, how to stabilise cream to stop it deflating, and all the things you can do with this classic cream! But the directions are also included in this éclairs recipe.
Chocolate glaze – Just chocolate and cream plus glucose or corn syrup if you want a lovely shiny finish.
The follow section walks through how to make each of the above components and how to assemble an éclair.
How to make choux pastry for Éclairs
I find a lot of recipe resources tend to make a big deal about how choux pastry is notoriously difficult to make unless you follow precise directions and loads of dogmatic “rules”. But honestly, it’s not hard if you follow a few basic steps. I’ve never experienced a failure with my recipe, though I will say the one step I added over the years to make it even more foolproof is to cool the dough before adding the eggs.
1. Ingredients in choux pastry
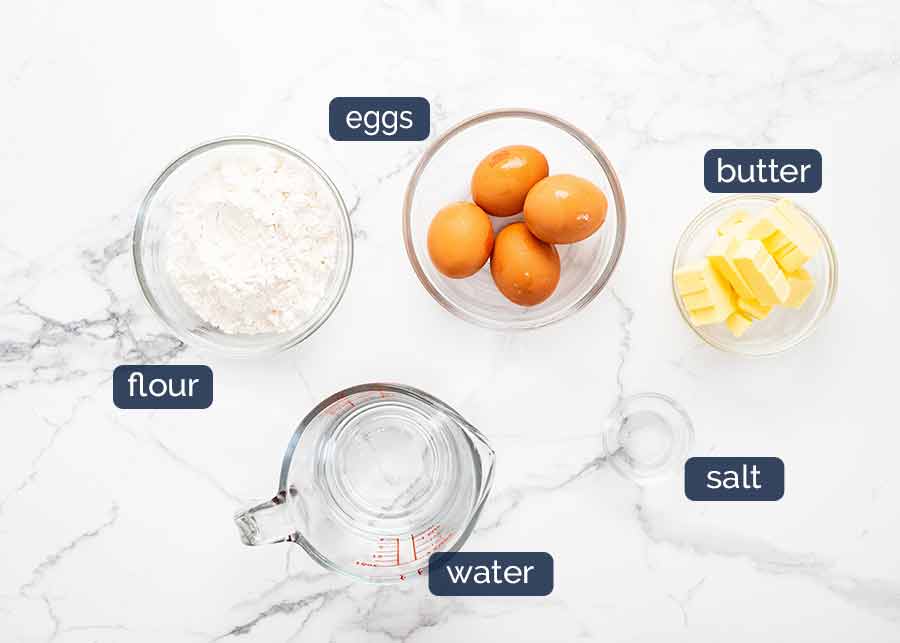
The above ingredients are standard for choux pastry. Some recipes opt to use a combination of milk and water. I use only water because I find the shell comes out a little crisper.
Eggs – Being fussy about the eggs is actually really important because choux pastry relies on egg to puff up.
Size – Use large eggs that are 55 to 60g / 2 ounces each in the shell, a standard size sold in supermarkets with the cartons helpfully labelled “large eggs”! If you use really giant eggs or tiny eggs, you will throw out the ratios in the recipe and your mixture will be too loose (choux will spread in the oven) or too stiff (choux won’t rise).
How to measure – If your carton doesn’t have a label on it, or you have different sized eggs, just crack and whisk your eggs in a jug then measure out 200ml (4/5 cup).
Room temperature – And the last egg rule! Make sure your eggs are at room temperature, not fridge-cold, so they incorporate more easily into the mixture.
Flour – Just plain / all-purpose flour. I know some recipes swear by bread flour and cake flour. I find bread flour makes the choux pastry too firm (because of the higher protein) and cake flour makes them too delicate (for the opposite reason). Ordinary plain / all-purpose flour is a happy medium, I find. Plus, it’s cheaper!
Water – Some recipes use a combination of milk and water for the liquid, others use just water. Milk makes the choux pastry slightly less crispy and delicate. So I prefer just water.
Butter – This is the fat in the dough and also for flavour!
Salt – Just a pinch.
No sugar? That’s right, no sugar! This is typical of choux pastry as recipes rely on fillings and toppings for sweetness and flavour. See profiteroles and churros as examples!
2. How to make choux pastry
And here’s how to make choux pastry: on the stove, in a saucepan!
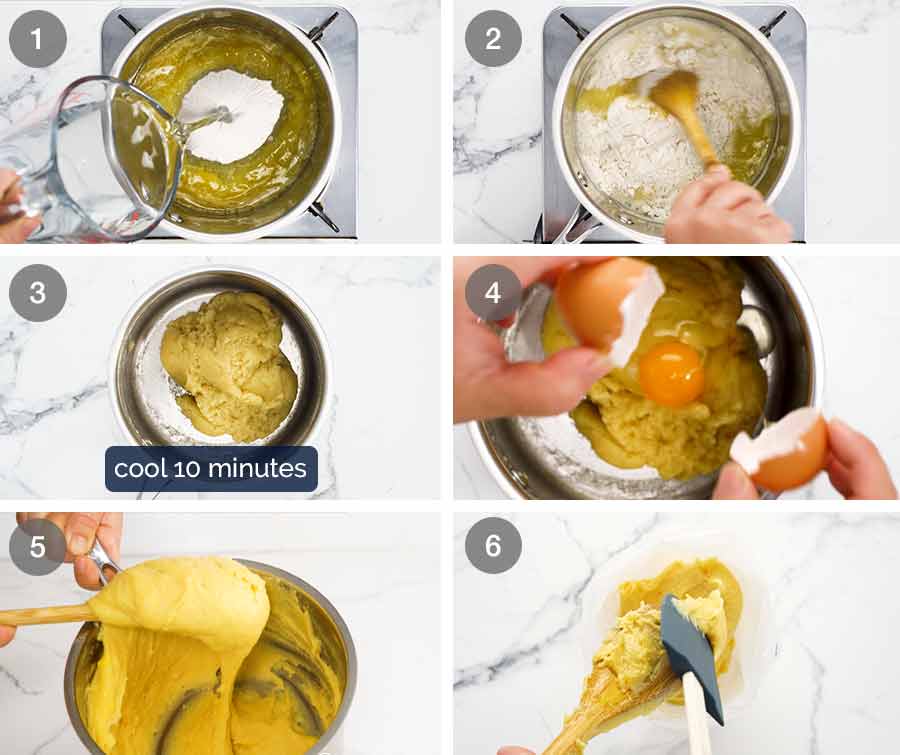
Butter and water – Put the butter in a saucepan over medium heat. Once mostly melted add the water.
Flour – Once the butter and water mixture comes to a simmer, add the flour and mix it in, still heating on the stove. At first it will be pasty but then it will turn into a sticky dough that comes away from the sides of the saucepan. You should be able to scoop it up into a ball with a wooden spoon, like pictured in step 3.
Note: Do not let the butter-water boil for ages before adding flour as this may affect the outcome of the recipe since there will be too much heat in the saucepan.
Cool 10 minutes – Once the dough looks like pictured above, take the saucepan off the stove and let it cool for 10 minutes.
Note: Do not cool for longer than this, and do not shortcut this step. This is an easy foolproofing measure that solves lots of choux pastry issues that people experience.
Eggs – Using a wooden spoon, mix the eggs in one at a time, waiting until each egg is mixed in before adding the next. When you start stirring, the dough will initially look split with the egg but don’t fret! Keep stirring and it will come together.
Choux pastry – This is what it should look like! It’s like a very thick batter that is sticky, a bit stretchy, but too wet to knead like say pizza dough.
Piping bag – Transfer the dough into a piping bag fitted with a 15 mm / 0.6″ star tip nozzle (that’s measured from the points of two opposing stars!). The star tip will give us a lovely fluted bun after it bakes.
No star tip? No problem! Just snip a 1.5cm / 0.6″ off the end, it works fine you just won’t have the grooves along the bun from the nozzle.
No piping bag? Also no problem! Just use a sturdy ziplock bag.
How to bake choux pastry for Éclairs
To ensure your choux pastry comes out beautifully crispy, two tricks. Firstly, don’t crowd the tray. And secondly, open the oven periodically to release steam <–- a game changing tip discovered by my French pastry chef teacher, Jennifer Pogmore. Thanks J-Po!!
1. Piping choux pastry
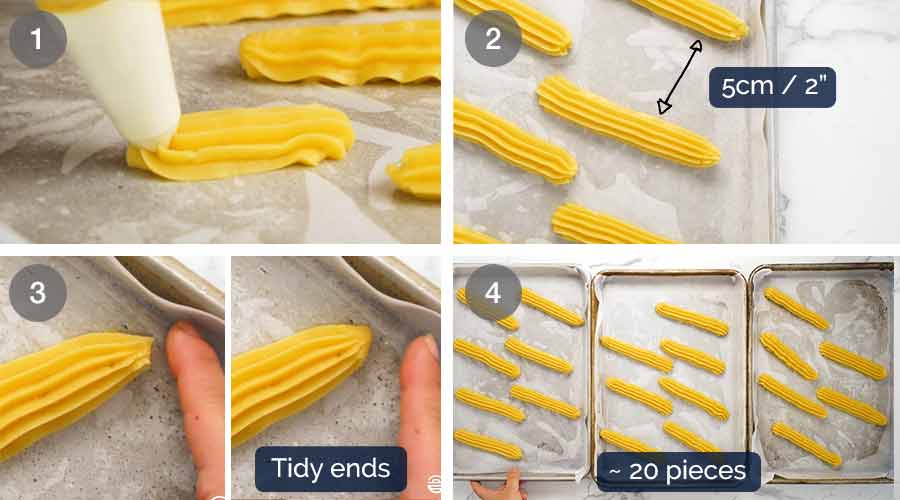
Piping – See section above for piping bag and nozzle tip …errr, tips! 🤭
Pipe on an angle, aiming for logs that are 12 – 14 cm long, 2 cm wide and 1.5 cm tall (5″ long, 0.8″ wide, 0.6″ tall).
Don’t crowd the tray! Be sure to leave plenty of space – 5cm / 2″ – between the logs. If you crowd the tray, they curiously will not crisp up (as I found out first hand!) because of the steam from surrounding buns. I need to use 3 trays to fit all mine. If you have a big oven and big trays, you might only need 2 trays – lucky you! I pipe on an angle because that’s how I can fit the most on each tray while leaving sufficient space between each log.
Tidy ends – Use your finger dipped in water to tidy the ends, if you can be bothered! To be honest, once they puff up, the ends sort of self-neaten. ☺️
Ready to bake! You should have about 20 pieces in total.
2. Baking choux pastry
Note: A giant golden fur ball to photobomb your instruction photos is optional.
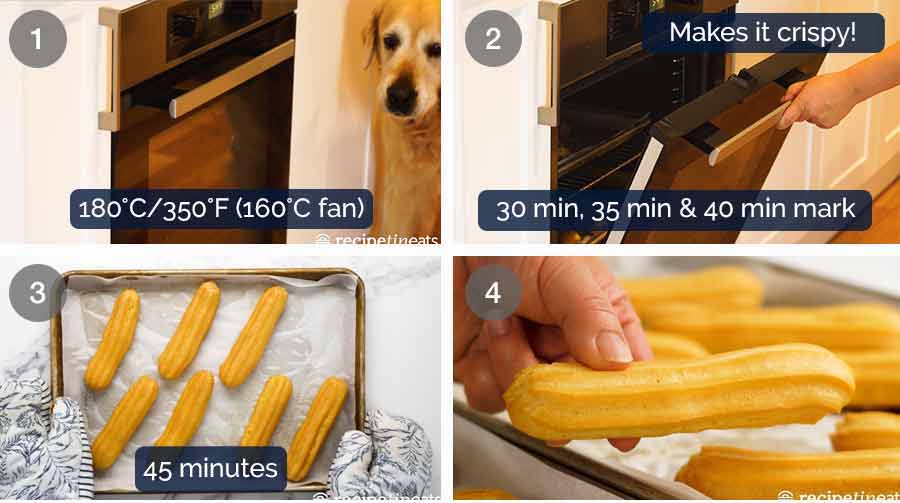
Bake for 45 minutes at 180°C/350°F (160°C fan). At the 30 minute, 35 minute and 40 minute mark, open the door for 2 seconds to release steam. This little step really does make them extra crispy and gives the crispiness a longer shelf life. I tried it with and without this step* and I promise it makes such a difference!
Batches – If you have a standard home oven like me, you will need to bake 2 trays first, then the 3rd separately. Don’t try to bake all 3 trays on 3 different shelves, this crowds the oven and they won’t crisp up properly. If you have a large oven and can fit 3 trays across 2 shelves, you can bake them in one batch.
Steam release – As described above in step 1!
Remove from the oven. If you have a 3rd tray, proceed with baking it.
Cool completely on the trays, left on the counter. Marvel at the crispy perfection!
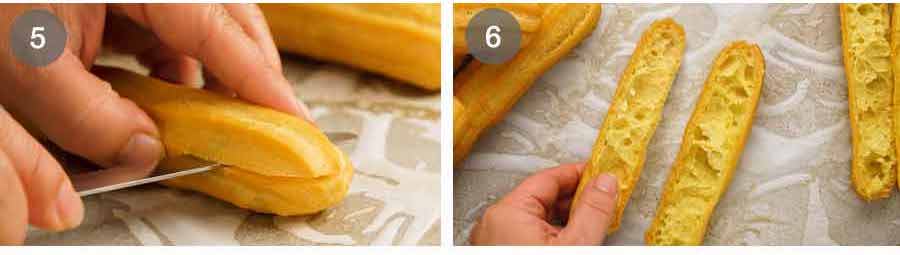
Split – Once the pastry has fully cooled, cut in half horizontally using a serrated knife. A serrated knife will give you a cleaner cut.
Open – Place the lid next to the base to keep them together. Next step – glaze the lid!
* Not because I doubted J-Po, I just had to see it for myself!
Shiny chocolate glaze
A signature feature of éclairs is a shiny chocolate glaze. If you just melt ordinary chocolate chips, the glaze won’t be shiny. The secret is a touch of glucose or corn syrup!
1. Ingredients for shiny chocolate glaze
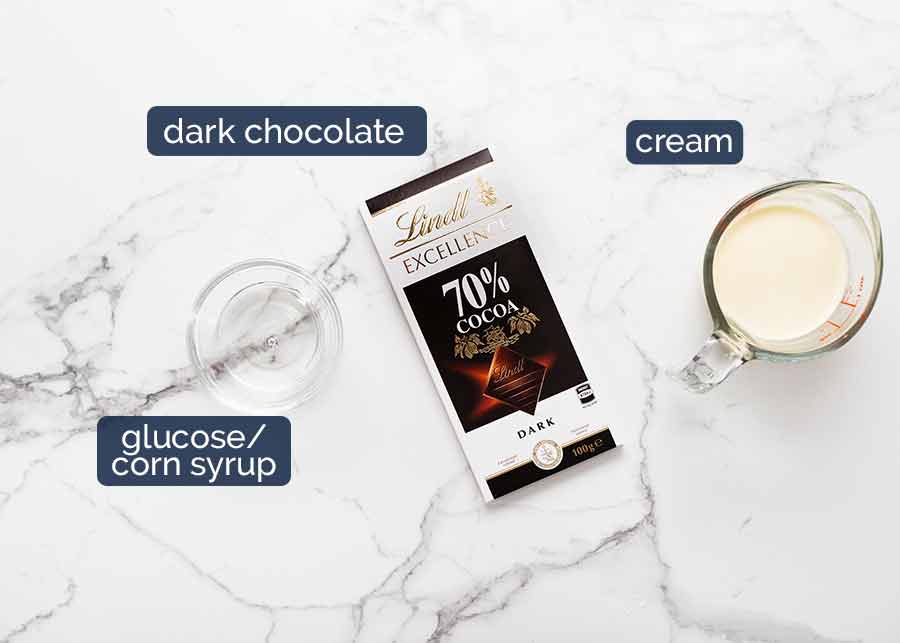
Dark chocolate – For the most luxurious finish, use a 70% cocoa chocolate block and chop it up yourself. You need to use either a good quality chocolate intended for cooking (sold in the baking aisle) or Lindt eating chocolate, in block form (pictured above).
Ordinarily, chocolate for eating is not intended for cooking so it does not always melt well. Lindt is an exception. There are probably other brands, I am just not aware of any.
Regular dark chocolate chips and chocolate melts (US semi-sweet chips) can also be used. However because they have less cocoa it is a softer chocolate so you will need to use less cream. See recipe notes for adjustments to the recipe. (For fellow baking nerds: standard dark chocolate chips you use for your favourite choc chip cookies are typically around 40 – 45% cocoa and the chocolate is not as firm. Which means you have to use less cream else the glaze will be too runny.)
Cream – To loosen the chocolate into a glaze. It must be full fat cream, not light cream, else the glaze will not set.
Glucose or corn syrup (optional) – This gives the glaze a lovely shiny finish, just like the ones sold at fancy patisserie stores. This is optional. If you skip it, the glaze will just be a little more matte.
2. How to do the chocolate glaze
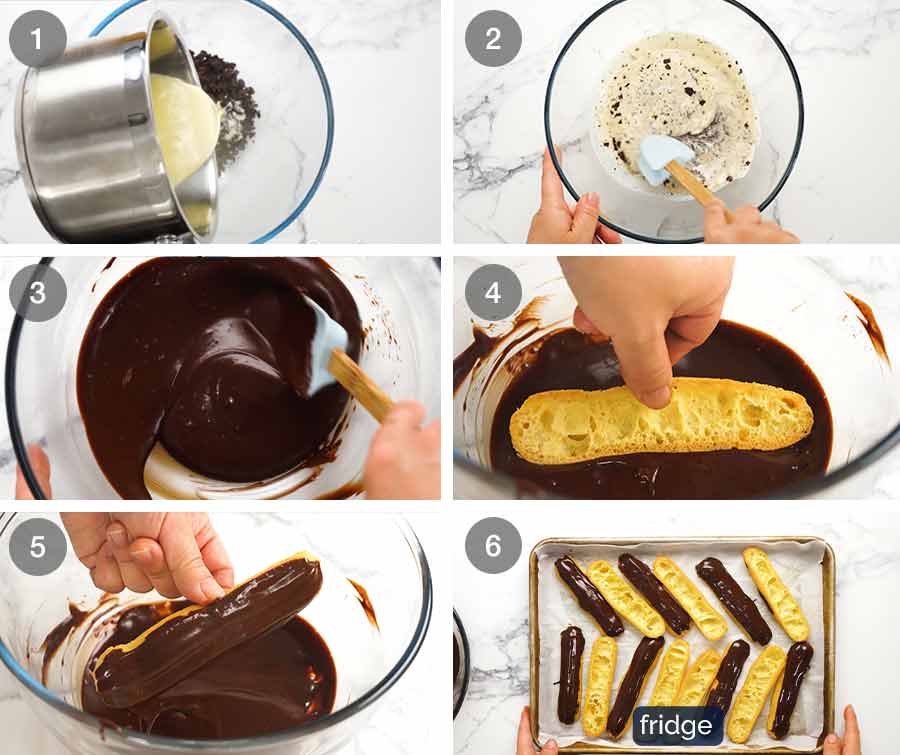
Hot cream – Heat the cream and glucose or corn syrup until hot, then pour it over the finely chopped chocolate.
Stand – Shake the bowl so the chocolate is all submerged under the cream and let it stand for 1 minute.
Stir – Use a rubber spatula to stir until smooth.
Shallow vessel – If required, transfer the chocolate into a shallow bowl wide enough to dip the éclairs. I didn’t have to do this.
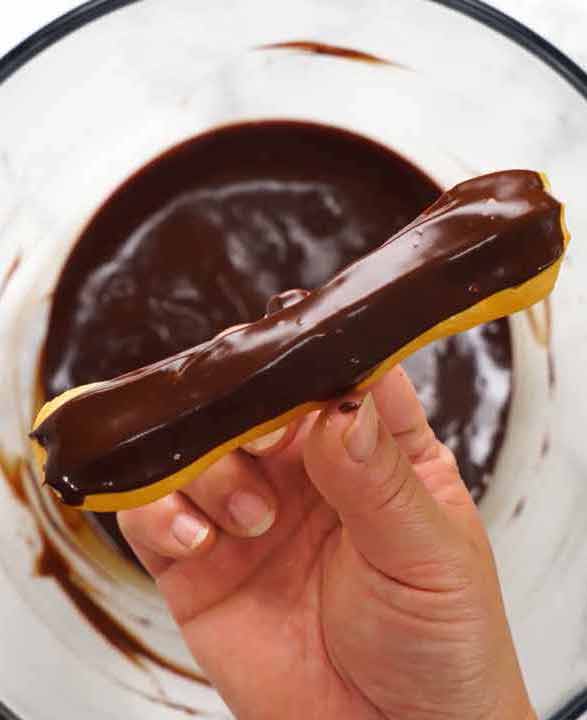
Dip the lid of each éclair into the chocolate.
Drip off excess (or…. don’t, for effect!)
Fridge – Place the lids back on the tray and refrigerate for 30 minutes to set.
Note: You will have leftover chocolate, because too little glaze makes it hard to dip the eclairs. I don’t think you need my help telling you what to do with the leftovers! (It involves a spoon. And your mouth.)
Assembling the Éclairs
We’re on the home stretch here! To assemble, just whip up the cream and pipe it on the bun base.
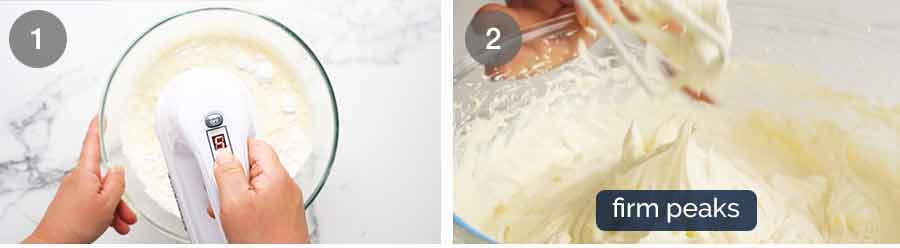
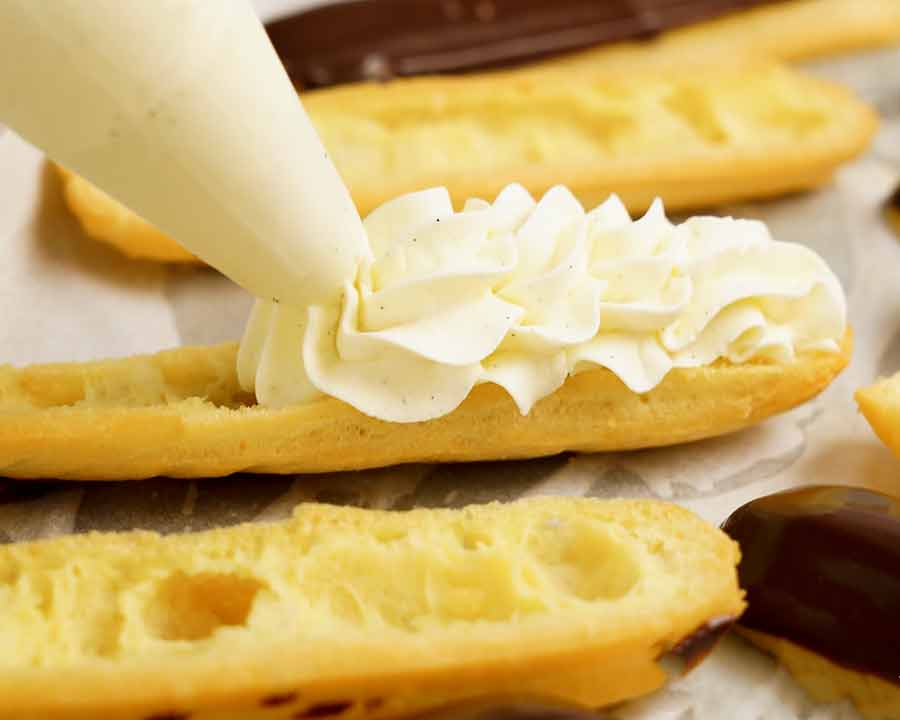
Chantilly cream (French whipped cream for éclairs) – Simply beat together cream, vanilla, icing sugar (powdered sugar) and, if using the stabilised cream option which I highly recommend (see below), mascarpone as well until firm peaks form.
The recipe below includes Chantilly cream instructions but if you want more information and tips, head to the separate recipe here.
Firm peaks means that the peaks stand straight upright , like pictured. (Soft peaks, on the other hand, flop over slightly like Santa hats!).
Why stabilise the cream?
Stabilising whipped cream means giving it additional structure so it doesn’t completely squirt out of the éclair when you take a bite (because don’t you just hate that!?), as well as improving storage life. You know how cream weeps and deflates overnight? If it’s stabilised, it won’t and will stay like it’s freshly made for a couple of days.
Unlike other methods of stabilising cream (cornflour/cornstarch, gelatin, pudding mix), using mascarpone will not alter the flavour or mouthfeel of the whipped cream. A brilliant, thoroughly-tested discovery by – yep, you guessed, it, superstar French Pastry Chef J-Po!
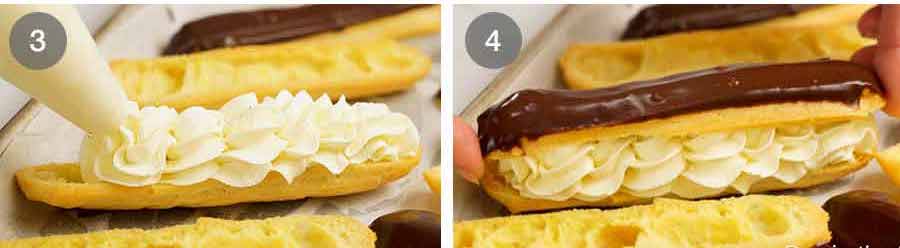
Pipe the cream generously onto the base of the éclairs. Use “looping” motions so you get a nice thick layer of cream!
Lid – Pop the chocolate glazed lid on and that’s it! You’re done.
Now I ask, are you ready for one of the most delightful eating experiences of your life??!!!

Storing and making ahead
The reason homemade éclairs are so magical is because choux pastry is at its absolute eating prime when it’s been out of the oven less than about 4 hours, and only filled with cream just prior to eating.
So here’s my intel and hot tips on the shelf life of éclairs so you can plan and maximise the quality of your eclair-devouring experience!
Filled éclairs start to lose crispiness after about 30 minutes once filled with cream. The choux pastry doesn’t go soggy, it’s just that the surface is not as crispy as when it is freshly made. (See 3rd point below for storage).
Best way to make ahead – Unfilled whole choux pastry can be kept in an airtight container for 3 days. Re-crisp in a 180°C (160°C fan-forced) oven for 5 minutes. Glaze then fill per recipe.
Filled éclairs will keep for 2 to 3 days but the choux pastry loses its crispness as I’ve said many times. It does not stop me hoovering them down, though! They are still very good for 6 to 8 hours after assembling. Then they’re noticeably softer the next day. It’s certainly not unpleasant, just not quite as prime as freshly made! Note the quality of the cream depends on whether it was stabilised or not – see next point.
Stabilised cream can be kept in an airtight container or piping bag for 48 hours. It will be fluffy just like freshly made (even inside the choux pastry) for this length of time.
Non-stabilised whipped cream is best made just before serving as it starts to deflate within an hour. If it is piped inside the choux pastry, it will deflate noticeably overnight and by the end of the day it will start to melt.
More on the beauty of stabilised whipped cream here. (I’m thinking – get ahead for your next Pav!)
Why you need homemade Éclairs in your life
You know, I consider it my job to tell you why your life will not be complete without trying each and every recipe I share.
In this particular case, I really mean it. Well, I always mean it, of course, for every recipe! 😂 But homemade éclairs are extra-special because homemade truly trounces shop-bought for the reasons I’ve mentioned.
Well, that is, unless the pastry chefs are on standby to pipe the cream in fresh for every order … I wish (let me know if you know of a place that does!)
I really hope you give homemade eclairs a try one day. They truly are magnificent! – Nagi x
Watch how to make it

Eclairs
Ingredients
CHOUX PASTRY
- 100g / 7 tbsp unsalted butter , cut into 1 cm / 1/2" cubes
- 1 cup water
- 1 cup plain/all-purpose flour
- Pinch cooking/kosher salt
- 4 large eggs (55-60g/2oz each) , at room temperature (Note 1)
SHINY CHOCOLATE GLAZE:
- 100g/ 3.5 oz 70% cocoa dark chocolate block , finely chopped (Note 2)
- 2/3 cup thickened/heavy cream (Note 3)
- 3 1/2 teaspoons corn syrup or liquid glucose (Note 4)
STABILISED CHANTILLY CREAM (Note 5)
- 3 cups thickened/heavy cream or whipping cream (min 35% fat, Note 3)
- 1 cup mascarpone (40%+ fat, Note 6)
- 1 2/3 cups icing sugar/powdered sugar , sifted
- 2 tsp vanilla bean paste or extract or, 2 vanilla pods (Note 7)
Instructions
- Preheat oven to 180°C/350°F (160°C fan). Position one shelf in the top third of the oven and another in the lower third. Lightly spray 3 trays with canola oil and line with baking/parchment paper.
Choux pastry:
- Simmer liquid – Melt butter in a medium saucepan over medium heat. When the butter is almost melted, add water.
- Flour – Once the liquid starts simmering, add flour and salt, and vigorously stir with a wooden spoon (while still on the stove). The mixture will turn pasty then in about 10 seconds it will transform into a sticky ball of dough that comes away from the walls of the saucepan. Once this happens, remove from the stove and leave to cool for 10 minutes (no longer).
- Eggs – Add eggs one at a time, mixing vigorously with a wooden spoon after each addition, making sure each egg is incorporated before adding the next. At first, the mixture will look separated but when you keep stirring, it comes together. When finished the mixture should be a sticky, thick paste that holds its shape, not sloppy and loose (see video or photos).
- Pipe – Transfer mixture into a piping bag fitted with a 15 mm star tip (Note 8). Pipe logs 12-14 cm long, 2.5 cm wide, 1.5 cm tall, 5 cm apart from each other. (5" long, 1" wide, 0.6" tall, 2" apart) Do not crowd the tray else they won’t go crispy. You should get around 20.
Bake:
- Bake 2 trays on the shelves for 45 minutes. At the 30 minute mark, open the oven door for 2 seconds to release steam (makes them crispier), then again at 35 minutes and 40 minutes. Remove the tray at 45 minutes.
- Cool – Remove choux buns from the oven and allow to fully cool on the trays. If you used 3 trays, bake the 3rd tray of choux pastry per above directions.
- Split – Slice choux buns in half horizontally.
Shiny chocolate glaze:
- Place chocolate in a bowl.
- Pour over hot cream – Heat cream and glucose in a small saucepan over medium heat until just below boiling. Pour mixture over chocolate, shake so the chocolate is submerged. Let stand for 1 minute.
- Mix with a rubber spatula until smooth (do not use a whisk, it creates bubbles). Transfer into a wide, shallow bowl large enough to dip the eclairs.
ASSEMBLE:
- Coat eclairs – Dip the lid of each éclair into the chocolate. Place on a tray and refrigerate for 30 minutes until the chocolate is firm to the touch.
- Whip cream – Place all the Chantilly Cream ingredients in a bowl. Whip using an electric beater on medium high for 3 minutes or until stiff peaks form. Transfer into piping bag fitted with a star tip.
- Fill eclairs – Pipe in cream using whatever pattern takes your fancy, generously thick. Place the lid on then serve!
Notes
Nutrition
Life of Dozer
Every time the publicity gurus at my publisher send through a link to an article about my cookbook, the first thing I search for and fawn over are photos of Dozer.
Honestly. I understand why people are seriously wondering whether I went through all that effort to make a cookbook just so I get to see him splashed all over the media, on TV, on stages!! (You know I love it).

The post Éclairs appeared first on RecipeTin Eats.
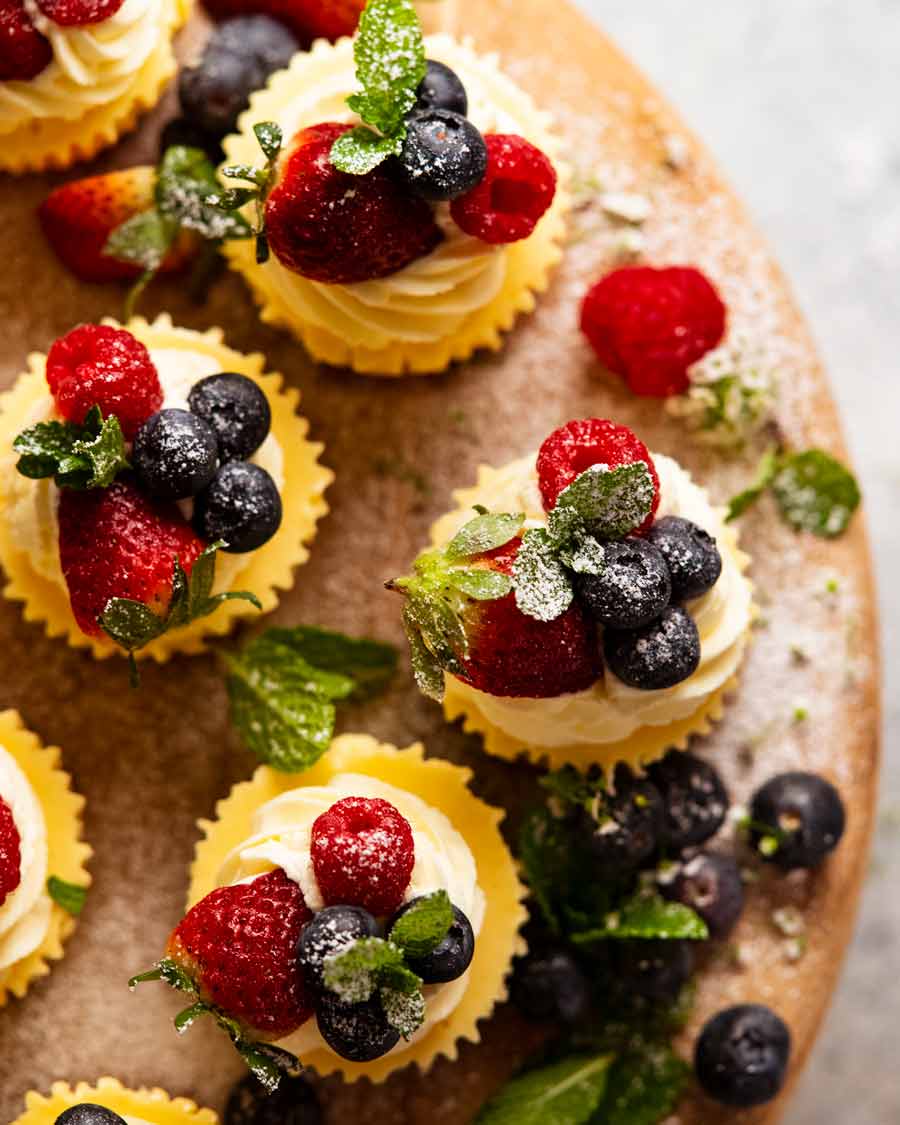
]]> These adorable mini cheesecakes are made in a muffin tin! Easier to make than one large cheesecake, they’re pretty as a picture and a lot less messy to serve. Are you already visualising everybody’s gushing reaction when you turn up at your next gathering with a platter of these petite treats?? Mini cheesecakes When it... Get the Recipe
The post Mini Cheesecakes appeared first on RecipeTin Eats.
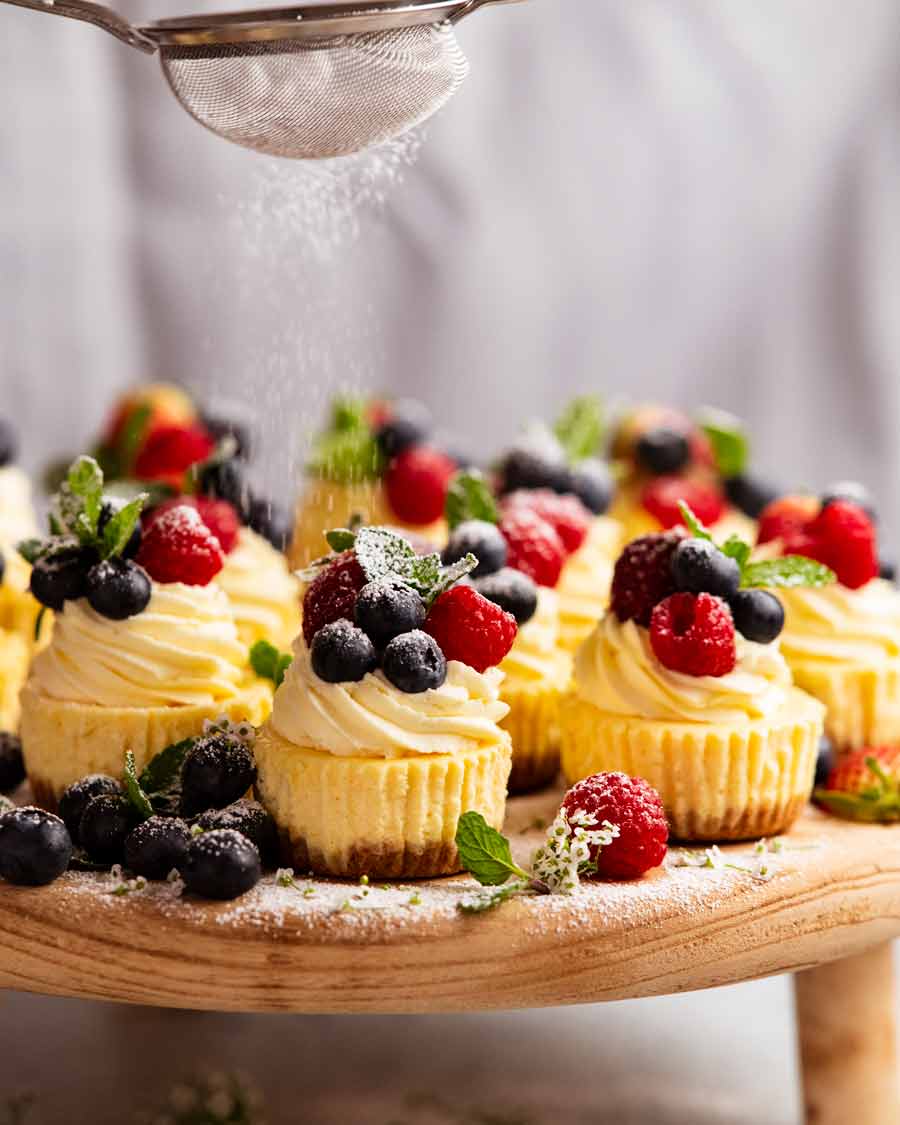
]]>These adorable mini cheesecakes are made in a muffin tin! Easier to make than one large cheesecake, they’re pretty as a picture and a lot less messy to serve. Are you already visualising everybody’s gushing reaction when you turn up at your next gathering with a platter of these petite treats??
Mini cheesecakes
When it comes to party season, my dessert game plan is pretty predictable and heads in one of two directions.
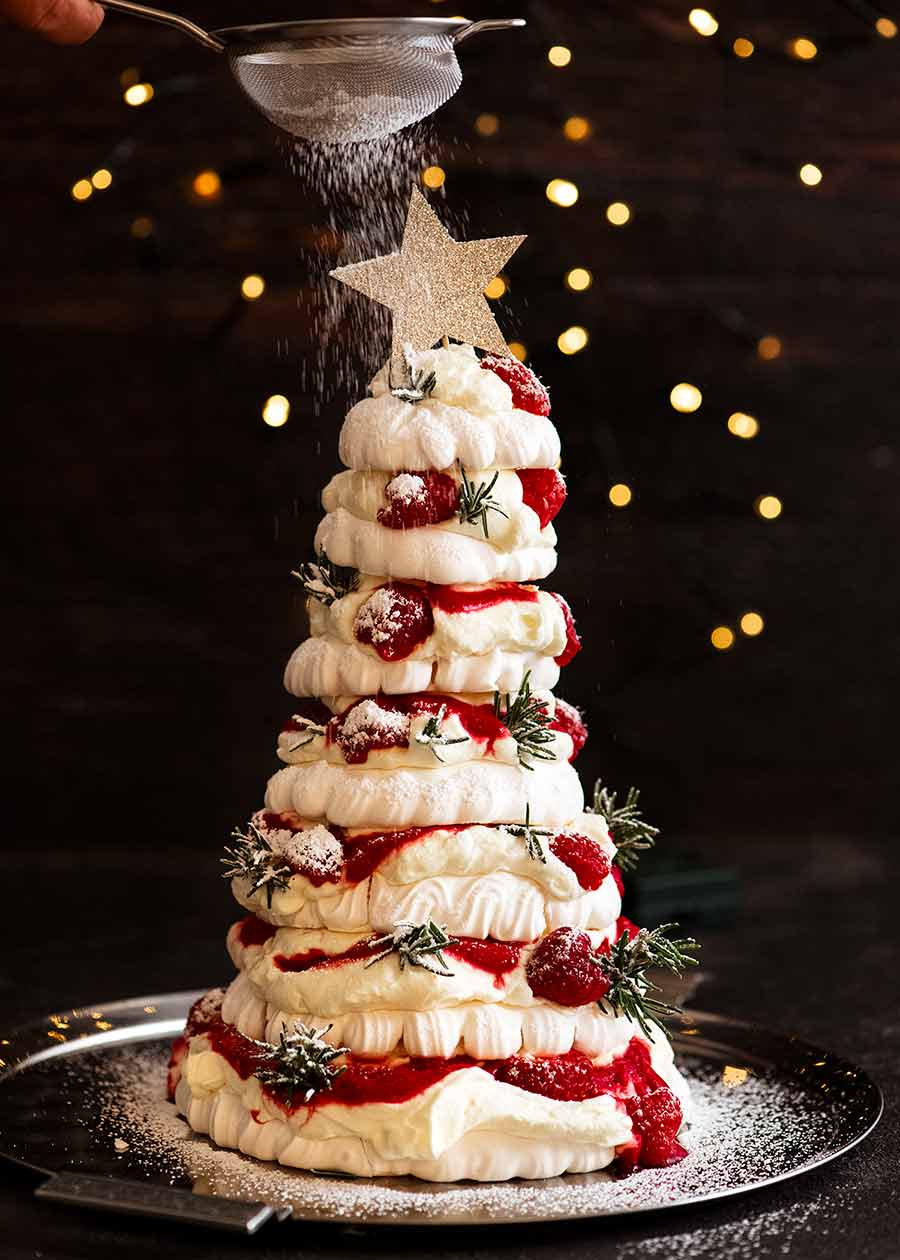
If I have the time and really want to make a splash, I’ll go for a big statement piece like the famous Pavlova Christmas Tree or Never-Ending Meringue Tart, the latter aptly named because you can make it as impressively loooong as you want (4 metres / 12 feet is my record to date!)
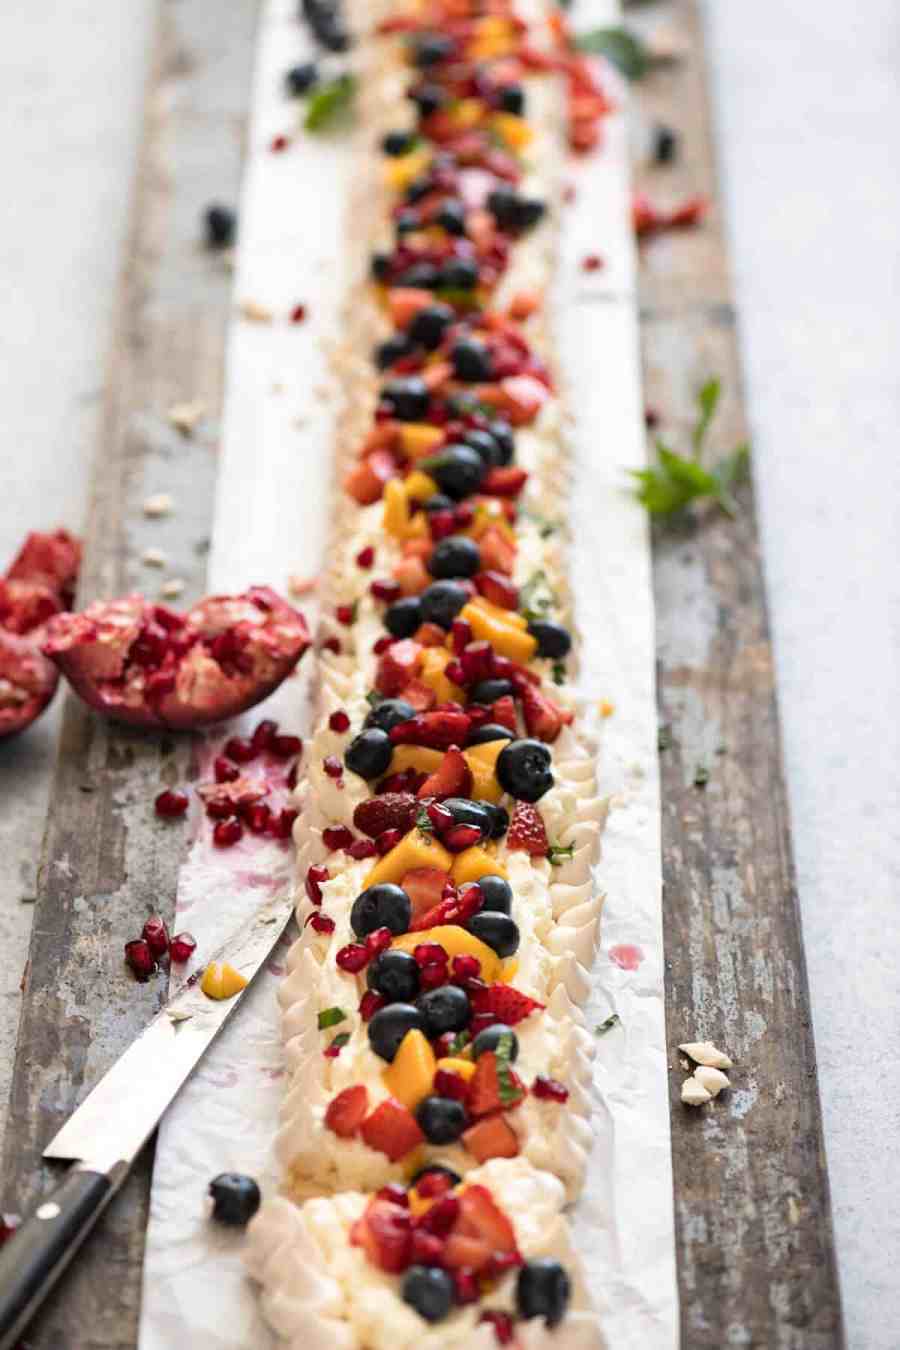
But when I know I’ll be pressed for time – and the holiday season this year will be such a year – I’m always thinking what I can cook up for post-feast sweets that will still make an impact but without the stress. My tick boxes are for something low-risk, make-ahead, pretty, easy to transport and a guaranteed crowd pleaser.
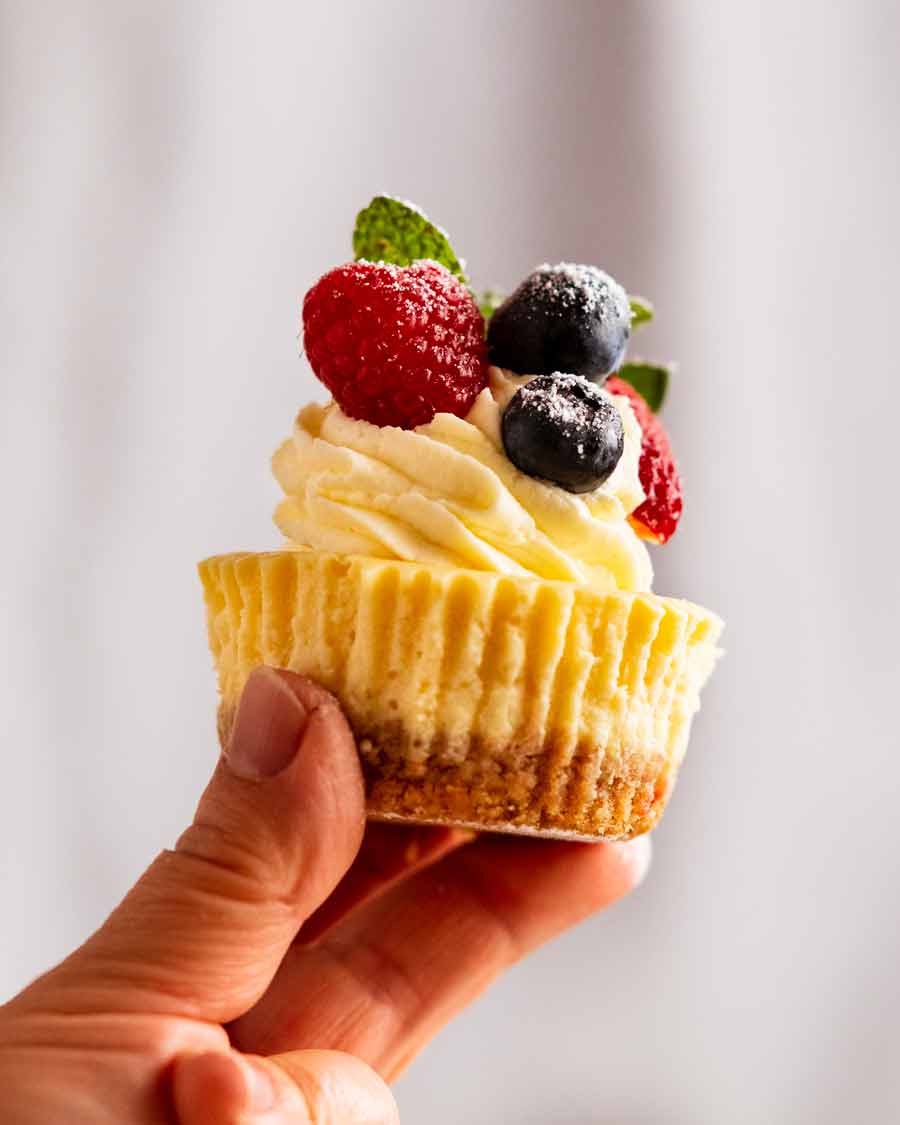
Enter this year’s dessert to the rescue: Mini Cheesecakes! They’re easier to make than one large cheesecake (which are kind of fragile), with the convenience of side-stepping all the hassles of slicing and doling out with plates and cutlery. You can literally eat these with your hands like cupcakes.
And they are just adorable!
What you need for mini cheesecakes
Here’s what you need to make mini cheesecakes.
1. The biscuit base
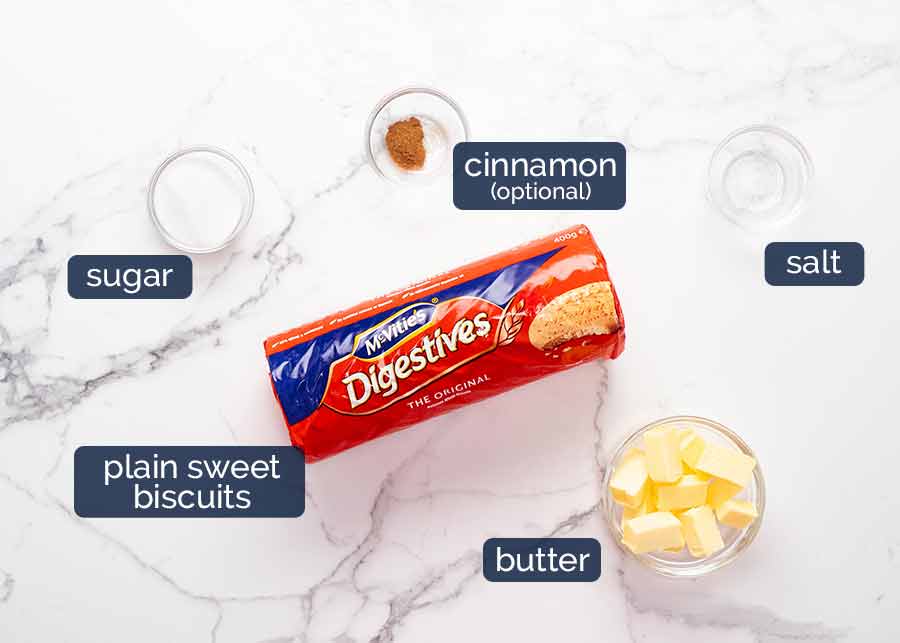
Biscuits – My biscuit of choice for mini cheesecakes is digestive biscuits, for flavour and for the texture. These are a popular biscuit in the UK but also common in Australian grocery stores these days. They are firm but have a crumbly texture so they form crumbs easily, and are not as dry as other plain sweet biscuits.
Substitute with:
– Graham crackers: Very similar in both flavour and texture to Digestives.
– Arnott’s Marie crackers: I use these for large cheesecakes but I found the base a bit dry when I made these mini cheesecakes. However this is easily countered with some extra butter.
– Any other plain sweet biscuits: Just make the biscuit base as written and add a bit of extra butter if needed to achieve the “wet sand” texture you need.Butter – To add flavour and fat to the base, and as a binding so the biscuit crumbs coalesce into a solid base;
Sugar – For a little extra sweetness. We don’t need much.
Cinnamon – Optional, but I like the extra touch of flavour it brings to the biscuit base.
Salt – Just a pinch.
2. The cheesecake filling
The key to a creamy smooth cheesecake filling is to ensure the cold ingredients are at room temperature.
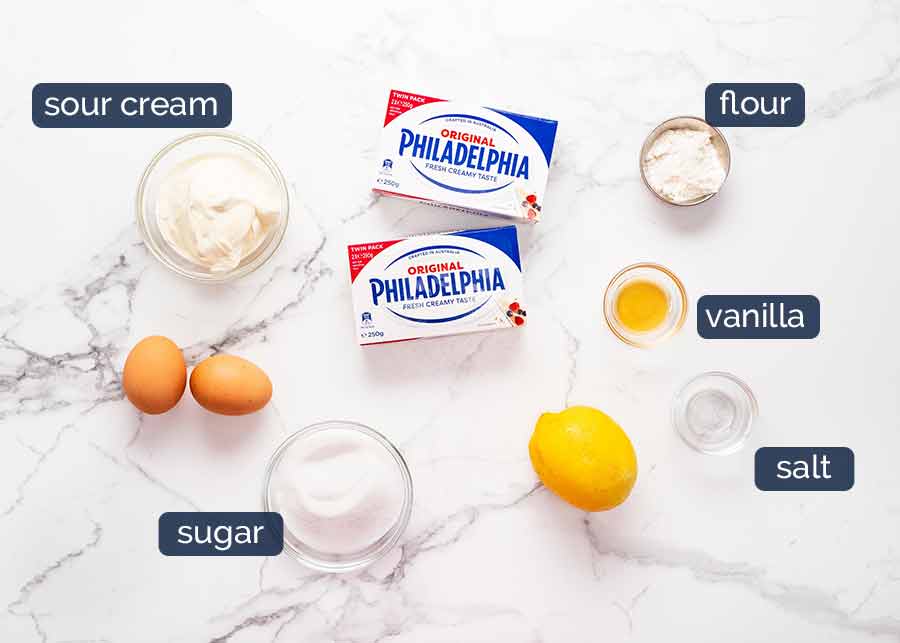
Cream cheese – The primary ingredient in cheesecake! I have always used Philadelphia cream cheese which is the best known cream cheese brand. Use the block sort not the creamy spreadable tub kind, which tends to be softer.
Full fat cream cheese is essential here! Low fat cream cheese won’t set as well and doesn’t have the same flavour. It’s all in or make something else, I say!
Sour cream – This might sound strange but sour cream lightens the cheesecake filling so it’s not as dense. This is a “secret ingredient” I use to make cheesecakes luscious but not overly rich.
You can probably get away with low fat but I haven’t tried it. Plain yogurt also works as a substitute.
Sugar – It’s best to use caster sugar / superfine sugar as the grains are smaller so they will dissolve more easily into the filling mixture. Regular sugar will work too but will require more beating to dissolve. This means your mixture will be more aerated which will lead to some surface bubbles on the cheesecake (not the end of the world though, as we cover it with cream!).
Flour – Just a bit, to provide a bit of stability to the filling and make it set. Without this, the filling sets a bit too flabby and loose.
Eggs – This is our binding agent for the filling that holds everything together. Eggs, the ultimate food glue!
Make sure the eggs are at room temperature and not fridge-cold. This way they will incorporate more easily into the batter and you won’t run the risk of curdling the mixture. Yup, been there, done that! To quickly bring eggs to room temperature, just submerge in warm water for 5 minutes.
Vanilla – For flavour. I like to use extract rather than imitation essence which is, well, fake. I don’t use real vanilla beans for general baking. I reserve that good stuff for special things like Creme Brûlée, Creme Anglaise (pouring custard).
Salt – It’s generally good baking practice to add a bit of salt to most dishes to bring out the flavour of other ingredients. It will not make this taste salty.
Lemon zest – Always welcome in rich things, it brings a touch of brightness to offset some of the creaminess. It doesn’t make this taste like a lemon cheesecake. You need a LOT of zest for a pronounced lemon flavour in cheesecakes, as I found out when creating Lemon Cheesecake for my cookbook!

How to make Mini Cheesecakes
Nice and straightforward. And I really like that you can make these cheesecake days in advance! Don’t worry if you don’t have a food processor or electric beater, there’s other means to make this.
1. Base
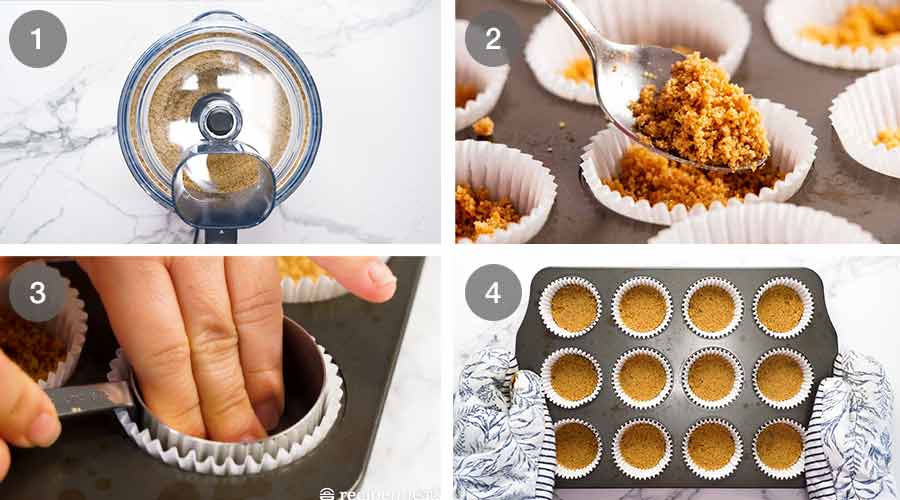
Blitz – Place the biscuits in a food processor and blitz until they become fine crumbs. It takes about 10 seconds in my food processor. Start by pulsing then blitz on high until done. Then add everything else (melted butter, cinnamon, sugar, salt) and blitz again briefly to combine.
Don’t have a food processor? No problems. Just put the biscuits in a ziplock bag and bash using a rolling pin or large tin. It’s very satisfying!
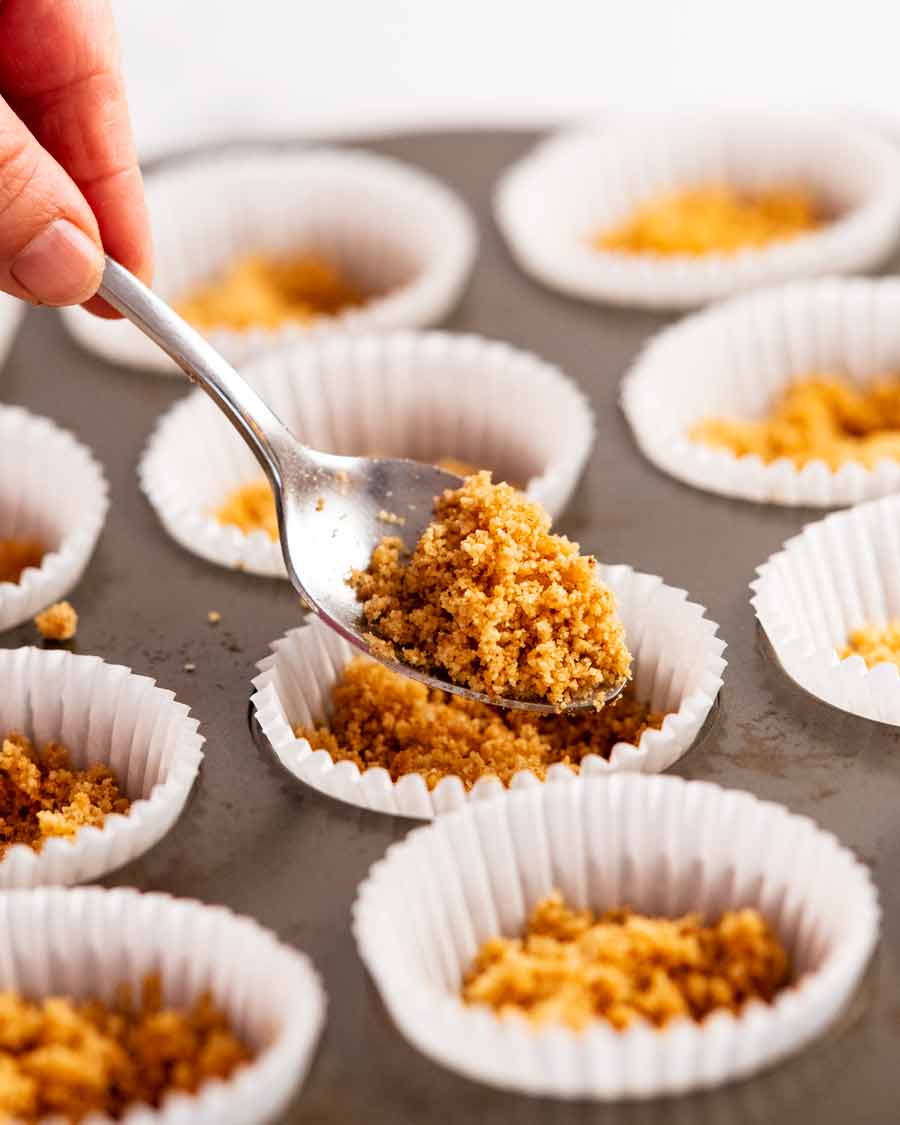
Wet sand texture – The mixture should look like wet sand and holds together when you pinch it between your fingers. Divide the mixture between paper muffin tin liners sitting in each hole.
Press and flatten the crumbs firmly into the base of each hole using something round with a flat base. A 1/4 cup measure is the perfect tool for me.
Bake for 7 minutes then remove and cool for 5 minutes before topping with the cheesecake filling.
2. Cheesecake filling
The goal with the filling is to make it as smooth as you can yet beating as little possible. This will minimise the amount of air bubbles in the mixture so you don’t end up with bubbles or cracks on the surface.
I assume you’ve figured out that this also means the filling is FAST to make!🙌🏻
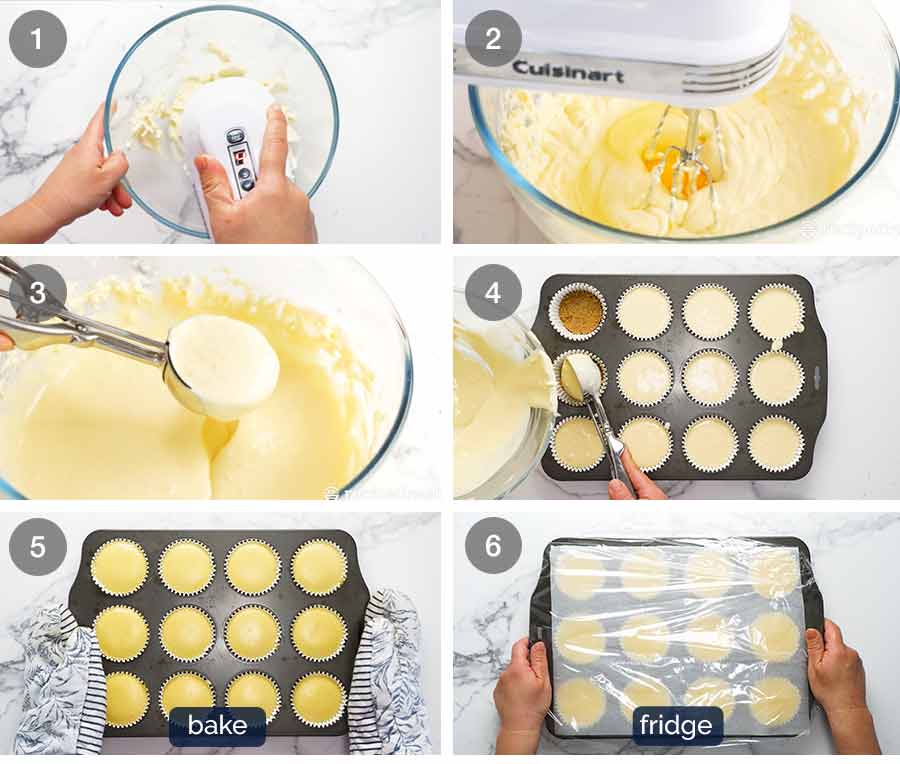
Beat – Start by beating the cream cheese until smooth. If it’s properly at room temperature, this should barely take 10 seconds on a medium speed. Then beat in everything else except the eggs, just until smooth.
Don’t have an electric beater? Just make sure the cream cheese is quite soft then just use a handheld whisk / wooden spoon. It works because we aren’t trying to fluff up the cream cheese like we do with butter for things like buttercream frosting. All we want is to make the cream cheese smooth.
Eggs – Beat the eggs in one at a time, just until incorporated.
Batter thickness – The cheesecake filling should be more like a thick pancake batter, rather than a muffin mixture that can be scooped into mounds.
Divide the mixture between the muffin tin holes. Use it all! You can fill the holes up to 3 mm from the rim as the cheesecake does not rise much.
I like to use an ice cream scoop with a lever. It’s very handy for muffins, cupcakes, pancakes, fritters …. AND ice cream!
Bake for 20 minutes at 160°C / 325°F (140°C fan). A lower temperature avoids browning on the surface while gently baking the delicate cheesecake filling.
Once baked, the filling should still be soft and supple in the centre, not rock hard. But not jiggling like there’s liquid underneath. If it’s too soft, pop it back in the oven for a few minutes.
Cool thoroughly on the counter for at least 1 hour.
Fridge – Cover the surface with a sheet of baking/parchment paper then seal with cling wrap. Place in the fridge for at least 6 hours to fully set, preferably overnight.
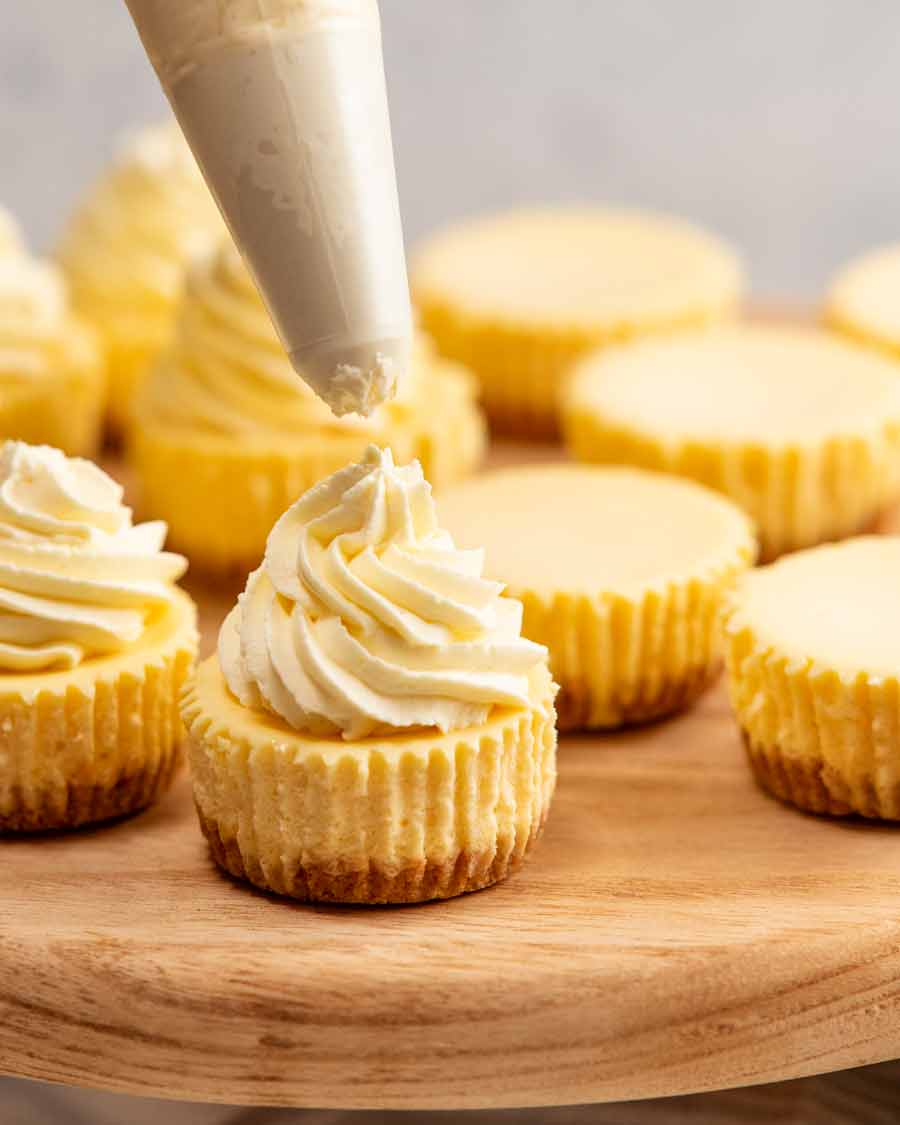
3. Decorating!
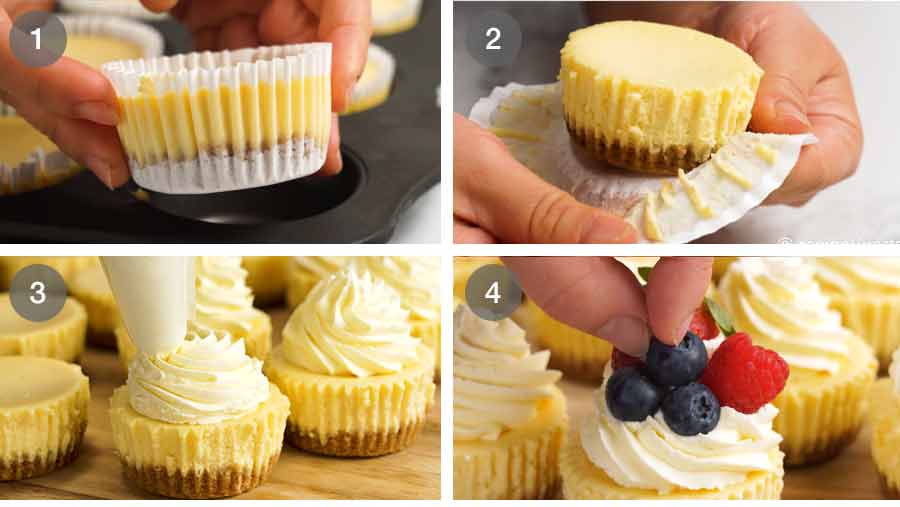
Fully set – Once the mini cheesecakes are thoroughly chilled they will be set enough to pick up.
Peel off the paper liner and place on a serving platter.
Cream – Decorate as you wish! In today’s recipe I’ve gone with Chantilly cream (which is just a fancy name for lightly-sweetened whipped cream) and berries. I’ve piped the cream on using a star tip nozzle but you could also just dollop the cream on using spoons.
Berries – I used small strawberries (halved / quartered), raspberries and blueberries plus a small sprig of mint, all dusted with icing sugar.
More decorating suggestions
Sliced/diced soft tropical fruit like mango, kiwi, peach
Passionfruit – always a nice finishing touch!
A drizzle of chocolate, Nutella or caramel
Colourful sprinkles or silver balls (festive season!)
Fruit compote
Toppings I use for my Strawberry or Blueberry Cheesecakes
The practical stuff: Storage and serving tips
The making part done, I have some practical tips to share with you on serving, storage and assembling so you pull off your dessert without a hitch on party day! In no particular order:
Storage – Keep them in the fridge. They’re excellent for 24 hours after making, and still very, very good at 48 hours. Beyond this the base starts getting softer than is ideal but nobody complains. If needed it keeps for 5 days at least, probably longer. But note the cream will start to deflate after around 24 hours. See tips below for assembling and stabilised cream.
Freezing – The naked cheesecake (ie. no cream) can be frozen for up to 3 months then thawed.
Serve at room temperature – Ideally. Cheesecake is creamier and you can taste more flavours when it’s at room temperature. Though on hot summer days cold cheesecake from the fridge is lovely! In my perfect scenario, I de-chill the cheesecake for 30 minutes to 1 hour, then I decorate just prior to serving.
The practical stuff (continued)
Decorating – Regular freshly whipped cream deflates with time so try to assemble as close to serving as you can. When I really want to impress, I take the Chantilly cream ingredients and equipment with me and whip the cream close to serving.
If I’m feeling more relaxed, I’ll just decorate the cheesecakes prior to leaving my house and put it straight in the fridge when I arrive,. They are fine for a few hours. The cream will deflate a bit but if you whip until stiff it will hold its piped shape for a day.
Stabilised cream – For the best make-ahead results, use a stabilised cream. To do this, switch 1/4 of the (unwhipped) whipping cream with marscapone cheese, a rich Italian soft cheese that tastes like whipped cream but has the texture of spreadable cream cheese.
When you whip marscapone with ordinary cream, the resulting cream stays light and fluffy for far longer than plain whipped cream, ie. it is “stabilised”. It will remain fluffy and near-perfect for 24 to 36 hours. Beyond this, it starts to deflate slightly but is still far superior to plain whipped cream!

And with that, it’s over and out for me!
Time to hand over to you. What do you think of the cheesecake? Is this holiday gatherings-worthy? What will you decorate yours with? Tell me below, I want to know! – Nagi x
Watch how to make it

Mini cheesecakes
Ingredients
Base:
- 150g/ 5 oz digestive biscuits (10 pieces) or Graham Crackers (20 squares) (Note 1 for other biscuits)
- 60g / 4 tbsp unsalted butter , melted
- 1 tbsp caster sugar (superfine sugar)
- 1/8 tsp cinnamon powder (optional)
- Pinch of salt
Filling:
- 375g / 12 oz cream cheese (block), at room temperature (Note 2)
- 1 1/2 tbsp flour , plain / all-purpose
- 1 tsp vanilla extract
- 1/2 cup sour cream , room temperature (or plain yogurt)
- 1/2 cup caster sugar (superfine sugar)
- 1 1/2 tsp lemon zest (1 lemon)
- Pinch of salt
- 2 large eggs , must be at room temperature (Note 3)
Chantilly Cream:
- 1 1/2 cups thickened / heavy cream
- 1/2 tsp vanilla extract
- 15g / 2 tbsp icing sugar / powdered sugar , sifted (or 1 tbsp caster sugar)
Decorating (optional):
- Strawberries (small), blueberries and raspberries
- 12 small sprigs of mint
- Icing sugar / powdered sugar , for dusting
Instructions
- Preheat oven to 160°C / 325°F (140°C fan) with the shelf 1/3 from the bottom of the oven. Line a 12-hole standard muffin tin with paper muffin liners.
Base:
- Blitz: Break the crackers up with your hands then blitz in a food processor until they form fine crumbs – about 10 seconds or so. (Note 4) Add remaining Base ingredients, blitz to combine. It should have the texture of wet sand.
- Press: Divide mixture between the muffin tin holes. Press down firmly to flatten using something flat and round. A 1/3 cup measure fits perfectly in mine my tin holes for this purpose.
- Bake: Backe for 7 minutes then cool bases for 5 minutes before filling.
Filling:
- Filling (Note 5): Beat cream cheese on speed 5 of an electric beater just until smooth (~ 10 seconds). Add flour, vanilla, sour cream, sugar and lemon. Beat on speed 5 just until combined (~10 seconds). Beat in eggs one at a time just until incorporated. Mixture should be like a thick pancake batter.
- Bake filling: Divide mixture between muffin holes. Use it all – you can can go within 3mm of rim as it won’t rise much. Bake for 20 minutes.
- Chill: Remove from the oven then cool for 1 hour on the counter in the muffin tin. When cooled, cover with baking/parchment paper then loosely with cling wrap. Refrigerate for at least 6 hours and preferably overnight, or until the liner can be peeled off cleanly.
Decorate and serve:
- De-chill: If you have the time, remove cheesecakes from the fridge 30 minutes prior to serving, to take some of the fridge chill out (the cheesecake is nicer at room temperature).
- Chantilly cream: Place ingredients in a bowl and beat on high until the cream is thick enough to pipe/dollop.
- Decorate: Pipe or dollop with cream, decorate with berries, dust with icing sugar. Serve proudly!
Notes
Nutrition
Life of Dozer
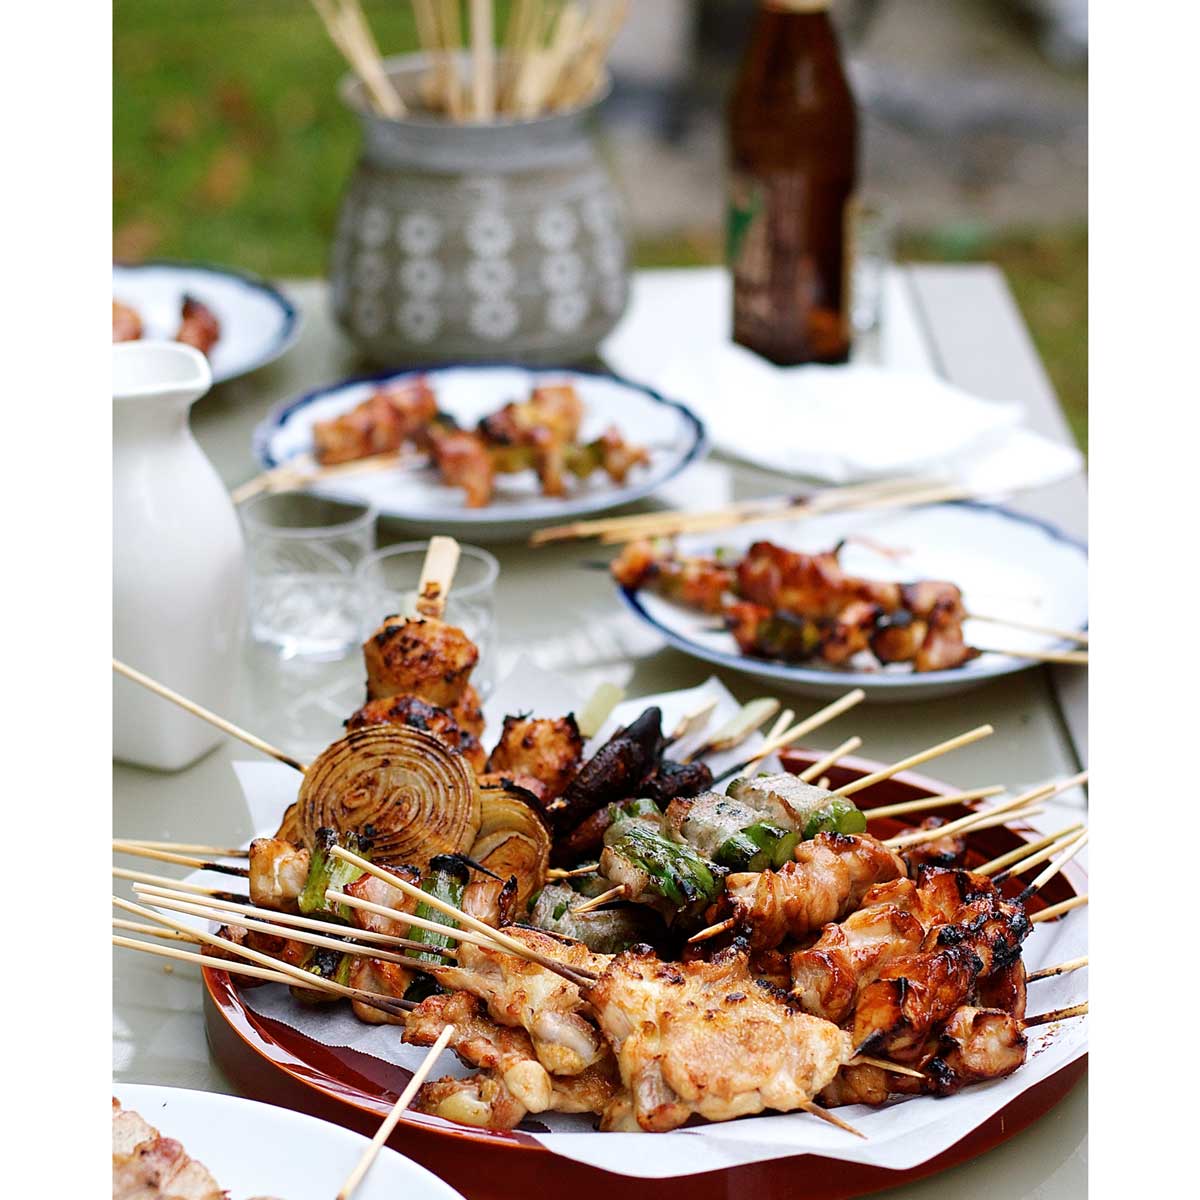
Another Melbourne Cup, another RecipeTin Yakitori backyard BBQ, another Dozer headpiece!

The post Mini Cheesecakes appeared first on RecipeTin Eats.
]]>