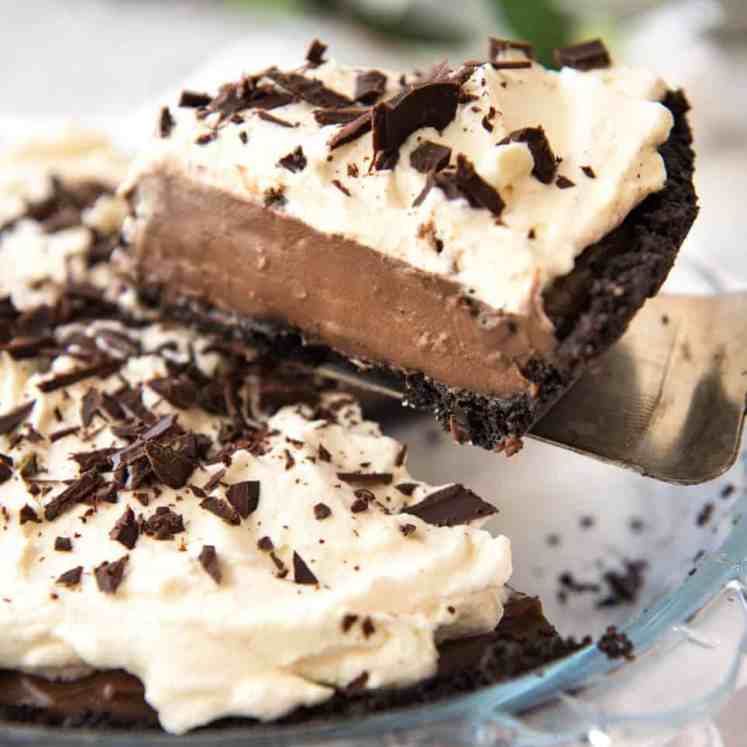
 Whether you consider this a giant chocolate tart or chocolate custard cake, we will agree it’s one of the most delicious desserts you will ever make. A cross between a chocolate mousse cake and a chocolate Flan Patissier, it’s deeply chocolatey, ultra creamy, yet not overly rich, and shockingly straightforward to make. The perfect finale... Get the Recipe
The post Chocolate custard cake appeared first on RecipeTin Eats.
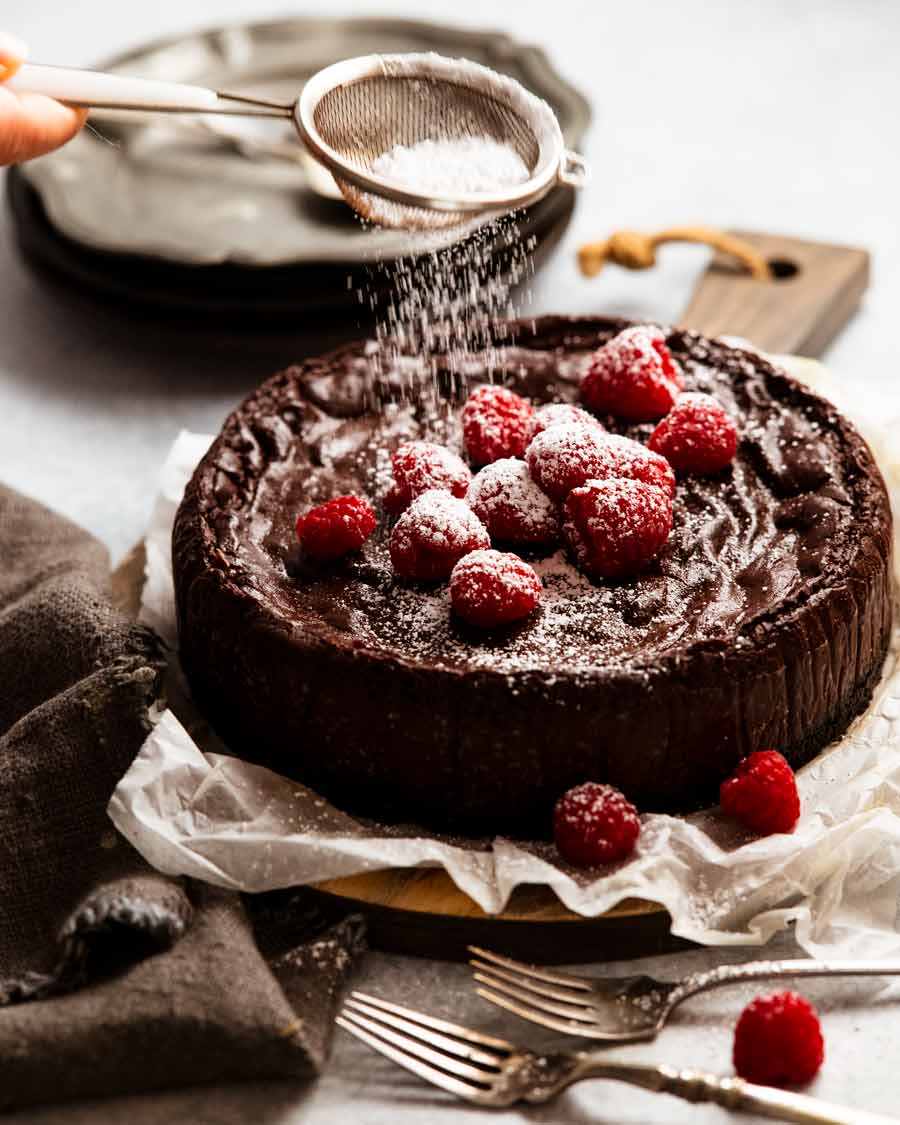
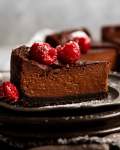
]]>Whether you consider this a giant chocolate tart or chocolate custard cake, we will agree it’s one of the most delicious desserts you will ever make. A cross between a chocolate mousse cake and a chocolate Flan Patissier, it’s deeply chocolatey, ultra creamy, yet not overly rich, and shockingly straightforward to make. The perfect finale for any occasion!
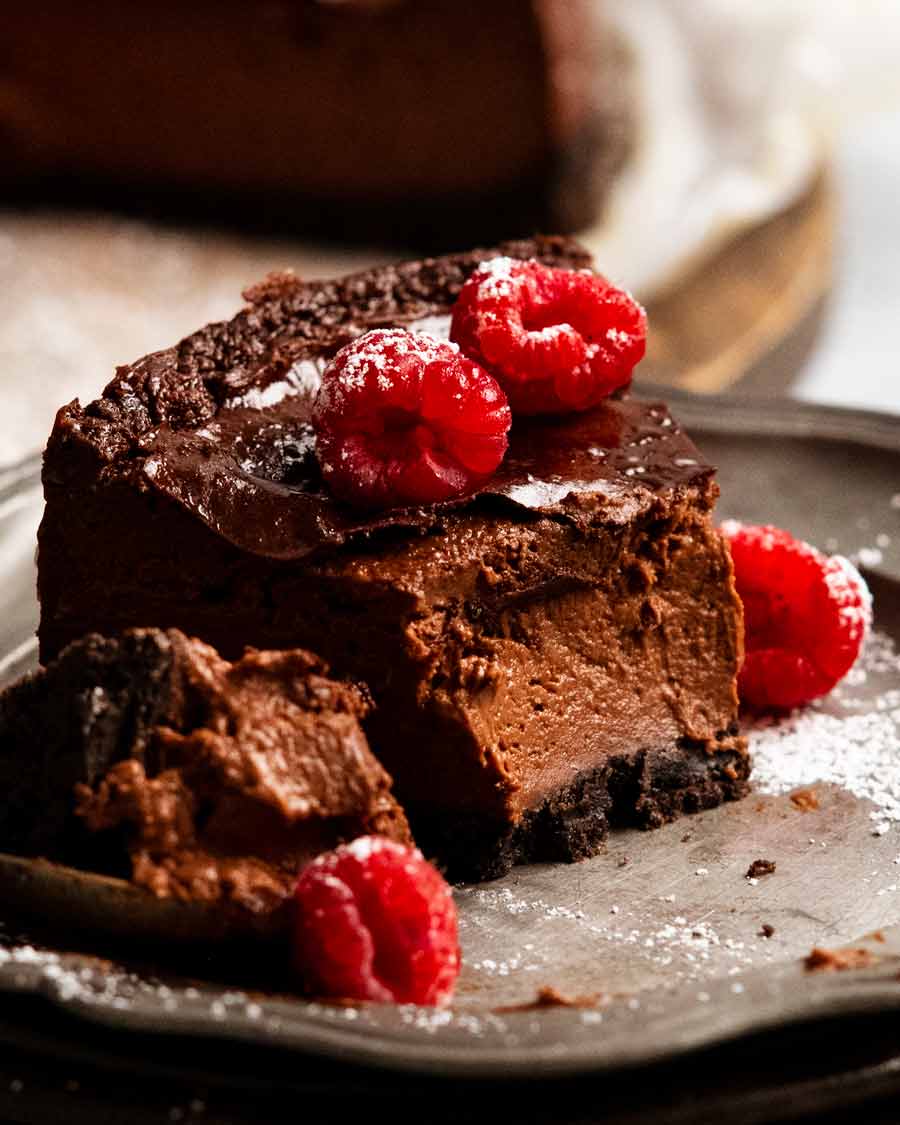
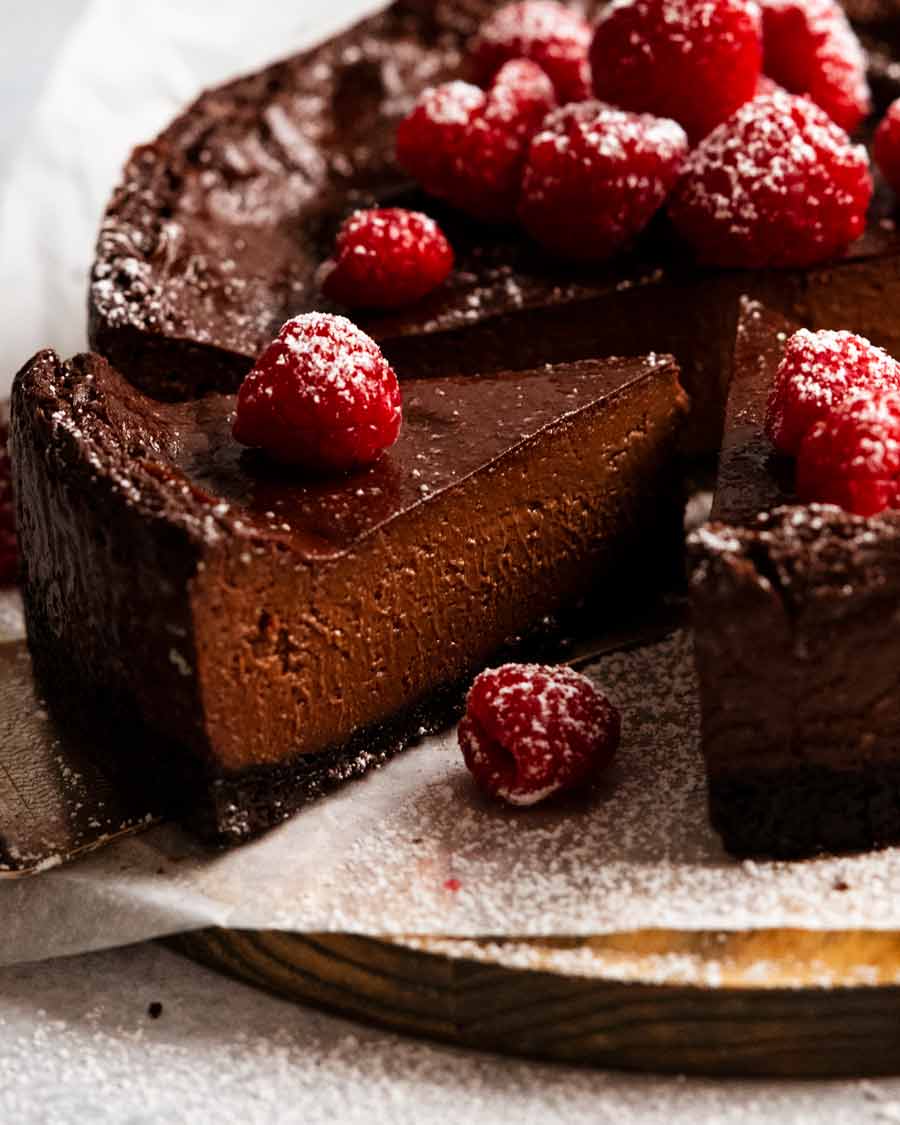
Look at all that creamy chocolate custard! How can this not get you excited???!
Chocolate custard cake
I feel like I don’t need to say much about this cake because the photos and recipe video do all the talking for me.
It’s as chocolatey and creamy as it looks. You can cut it into neat slices (like… cake!). But when you eat it, it’s gloriously creamy.
It’s luxurious, with a rich mouthfeel. It is a real custard, after all, nothing like the fake stuff sold in cartons at the store which is a sad imitation of the real deal.
But this is not overly rich and definitely not overly sweet.
Decadent enough for special occasions, easy enough to make for a morning tea at work.
Wait a sec. Did I just convince myself this is the perfect cake for any occasion??? 😂
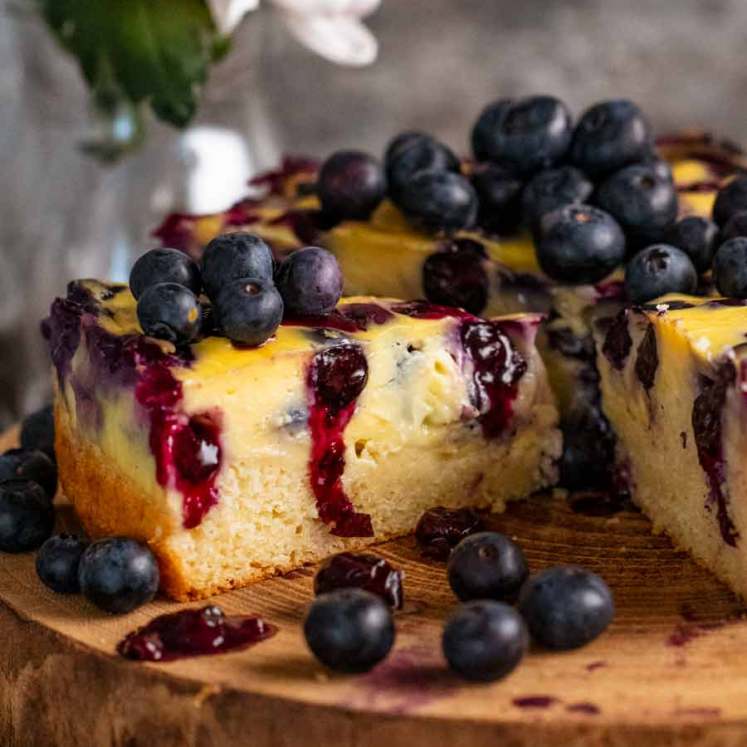
This chocolate custard cake is an invention that started out as a chocolate version of a Blueberry custard cake I shared a few months ago, a recipe where custard is baked on top of a vanilla sponge layer.
Numerous attempts later, I gave up but out of the fails came this glorious chocolate custard cake that is probably one of my best baking inventions ever. Big call – but I’m standing by it!
Also – proof of creaminess:
What you need
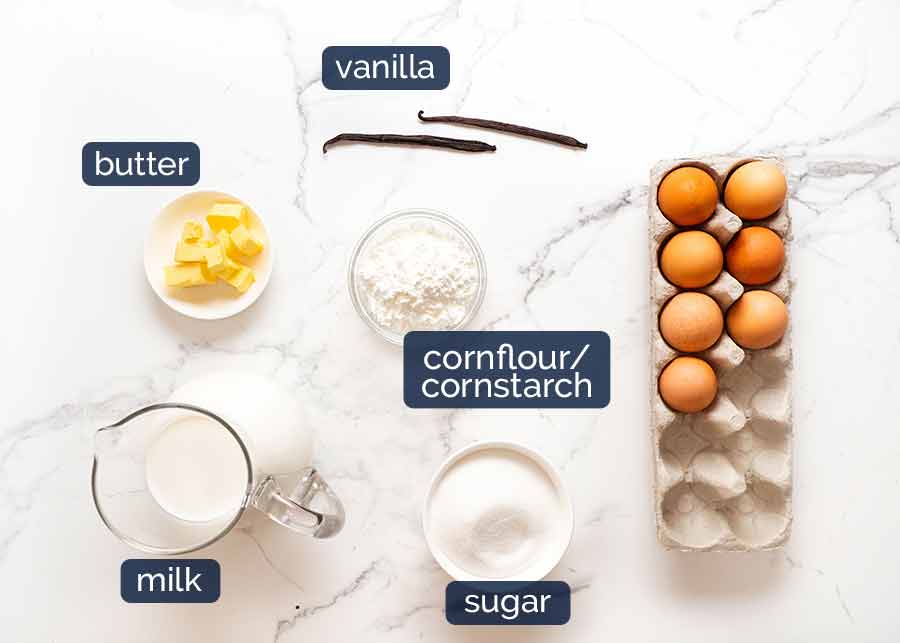
Here’s what you need to make this Chocolate custard cake.
1. Chocolate custard
This cake is made using crème pâtissière, a creamy custard that is used in many French desserts. The recipe I’m using today is based on the custard used in the famous (giant!) French vanilla custard tart, Flan Pâtissier, with chocolate added.
While exact recipes for crème pâtissière vary depending on the intended use (ie. baked vs not baked; required viscosity for pouring vs piping vs filling vs spreading, flavourings added etc), the base ingredients are almost always the same:
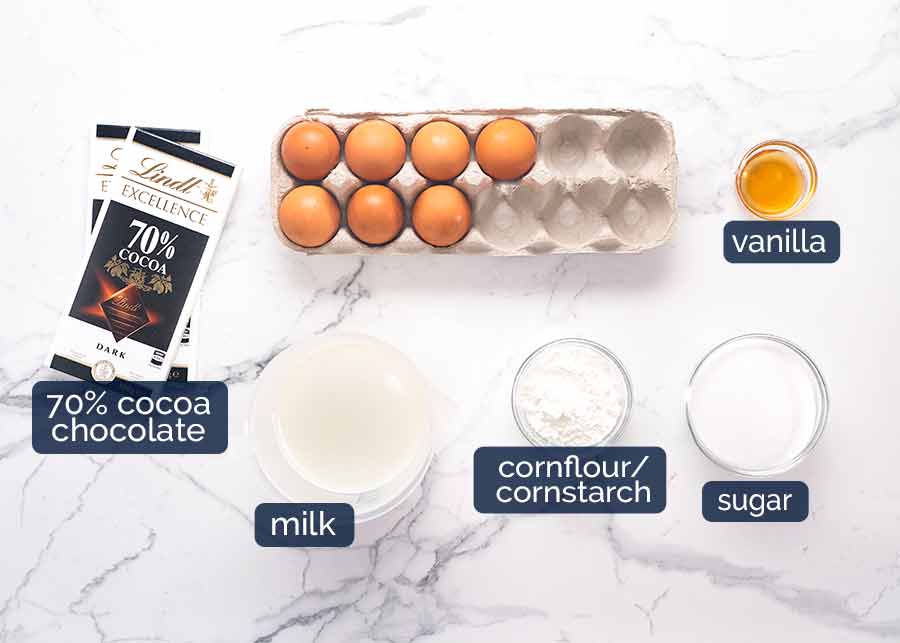
Egg yolks – for richness and also to help set the custard.
Leftover egg whites – Here’s my list of what I do with them and all my egg white recipes can be found in this recipe collection.
Cornflour/cornstarch – For setting the custard and making it shiny (regular flour makes it dull). Attention FRENCH READERS: Do not use yellow cornflour, use white cornstarch!
Sugar – It’s best to use caster sugar / superfine sugar as the grains are finer than regular / granulated sugar so it dissolves more easily.
Note: This chocolate custard cake is not excessively sweet! One of the things I adore about French desserts is that they are far less sweet than other typical Western desserts. It suits my palette as I grew up eating Japanese baked goods which is heavily influenced by French pastry.
Milk – The liquid for custard. Some recipes also use cream, for added richness. I don’t feel it’s needed in this recipe. The chocolate makes it rich enough!
70% cocoa chocolate – This cake needs to be made using 70% cocoa chocolate to ensure the custard sets to the right consistency and good chocolate flavour. Lower cocoa % (eg milk chocolate, usually around 30% cocoa) = softer chocolate & less chocolate flavour = custard sets softer, is paler and chocolate flavour is not as strong. I found this to be the result when I tried this with regular dark chocolate chips (45% cocoa).
Better quality = better result! I use Lindt 70% cocoa dark chocolate which is actually an eating chocolate, and a good quality one at that. It’s better quality than the 70% chocolate sold in the baking aisle, so I always stock up whenever I see it on sale!
Vanilla extract – For background flavour. When making a vanilla crème pâtissière (such as with Flan Pâtissier) or a vanilla pouring custard where vanilla is the forward flavour, I will usually recommend using vanilla beans or vanilla bean paste for better flavour. Plus, let’s just say it, people are always impressed when they see the little black specks. You used real vanilla in this, wow! 😇
Today, chocolate is our primary flavour so there’s no need to indulge in “real vanilla”. Vanilla extract will do nicely. Not vanilla essence please, that tastes like what it is – artificial vanilla flavour.
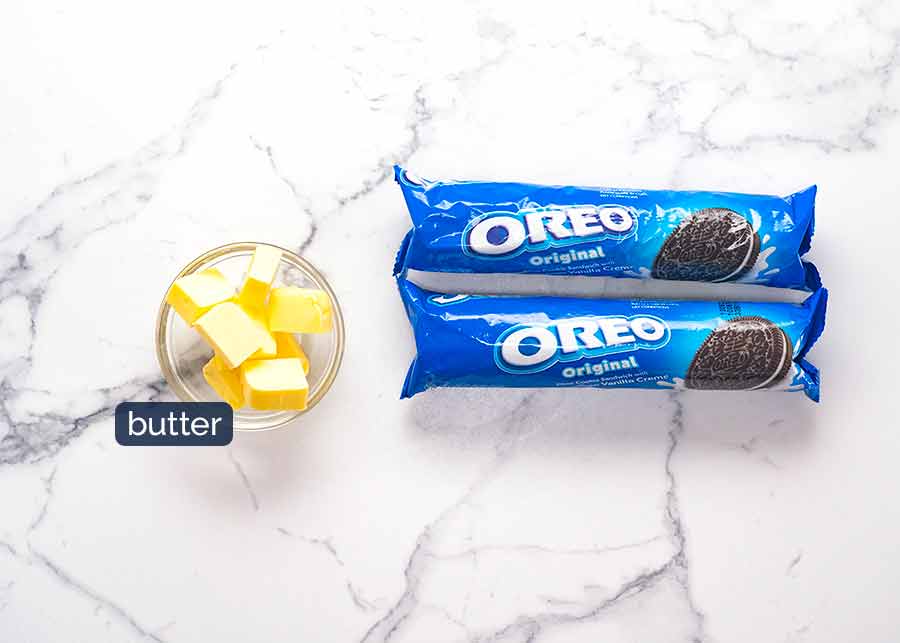
2. Oreo cookie base
Oreos are a great shortcut for a cookie base that’s got intense chocolate flavour and colour, with the bonus that the cream filling helps the crust hold together. (UK readers: Your bourbon cream biscuits works a treat here! Milk chocolate digestives works too.)
Other bases I tried for this cake: chocolate pâte sucrée (French tart crust) and various versions chocolate sponge (this didn’t work, testing notes at the bottom of the post) and this Oreo biscuit base. I preferred the biscuit base because it’s a relatively thin layer which provides the necessary structure but doesn’t detract from the star of the show – the chocolate custard. It’s also a nice textural contrast with the bonus that it’s the easiest to make!
How to make chocolate custard cake
This section has step photos and talks through the why for key parts of the recipe. There’s also the recipe video above the recipe card, though if you’re a baking pro you might just want to skip straight down to the recipe!
1. Preparing the cake pan
Cakes, tarts etc made with crushed up biscuits (like cheesecakes) need to be made in pans with a loose base so you can remove the finished cake. You can’t flip it upside down like a sponge cake because the base will crack and the surface will be ruined!
So for today’s recipe, you will need a springform pan with removable sides. Because the base of springform pans have a lip, it’s best to use it upside down so the finished cake slides off it easily. Insurance policy to ensure the base doesn’t crack!
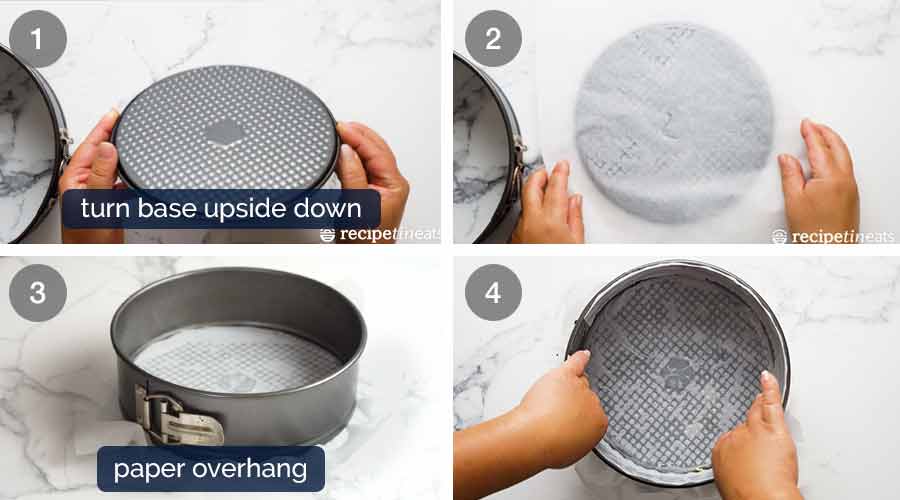
Flip base upside down.
Grease the base with butter then stick a square-ish sheet of baking paper on it (parchment paper).
Clip the sides in place and leave the excess paper sticking out the sides (handy to grip when removing the finished cake).
Clipping the sides onto the inverted base can be a bit fiddly. I find the easiest way is to pop a folded tea towel under the base so it’s slightly elevated off the work surface, then clip the sides in.
Lightly grease the sides with butter then line with baking paper.
* If you are a pastry master and have an entremet ring, you can skip this step. But you already know this! 😇
2. Making the chocolate custard
Please – resist the urge to eat all the custard out of the pot. Save a little for the cake!
Short form – how to make chocolate custard
Heat milk with half sugar. Whisk yolks and remaining sugar, then cornflour. Temper eggs, thicken on stove, whisk 45 seconds after bubbles appear. Stir in chocolate. Done!
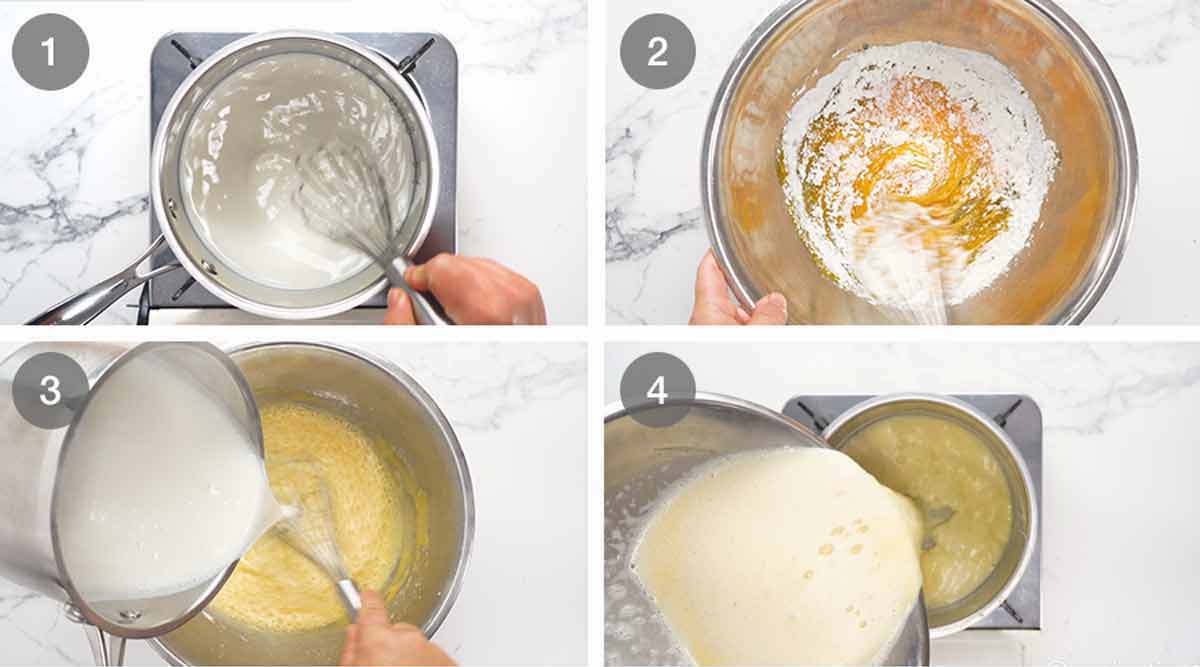
Heat milk with vanilla and about half the sugar until just before boiling. You can just eyeball the amount of sugar that goes in.
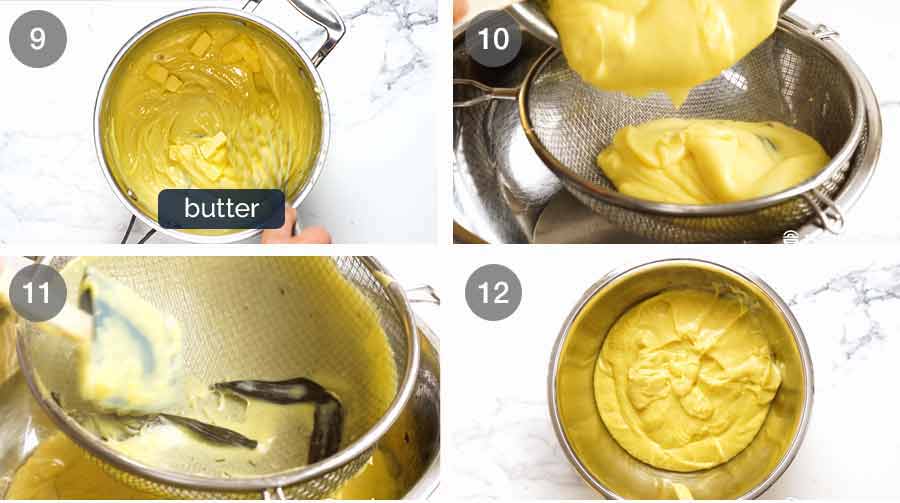
Whisk the egg yolks, remaining sugar and cornflour/cornstarch in a separate large bowl.
Whisk in milk – Slowly pour the hot milk in while whisking constantly, which will ensure the hot milk doesn’t cook the eggs. Pour all the milk in and whisk until combined.
This step by which hot liquid is poured in a controlled manner into cold eggs without causing them to cook is called tempering eggs.
Precaution step: If the saucepan is a little heavy for you, just use a jug or ladle to assist. Once you get about 1 cup of of the milk whisked in, you don’t need to worry about scrambling the eggs!
Transfer the egg-milk mixture back into the saucepan. Now we’re going to cook it for a few minutes until it thickens into a custard.
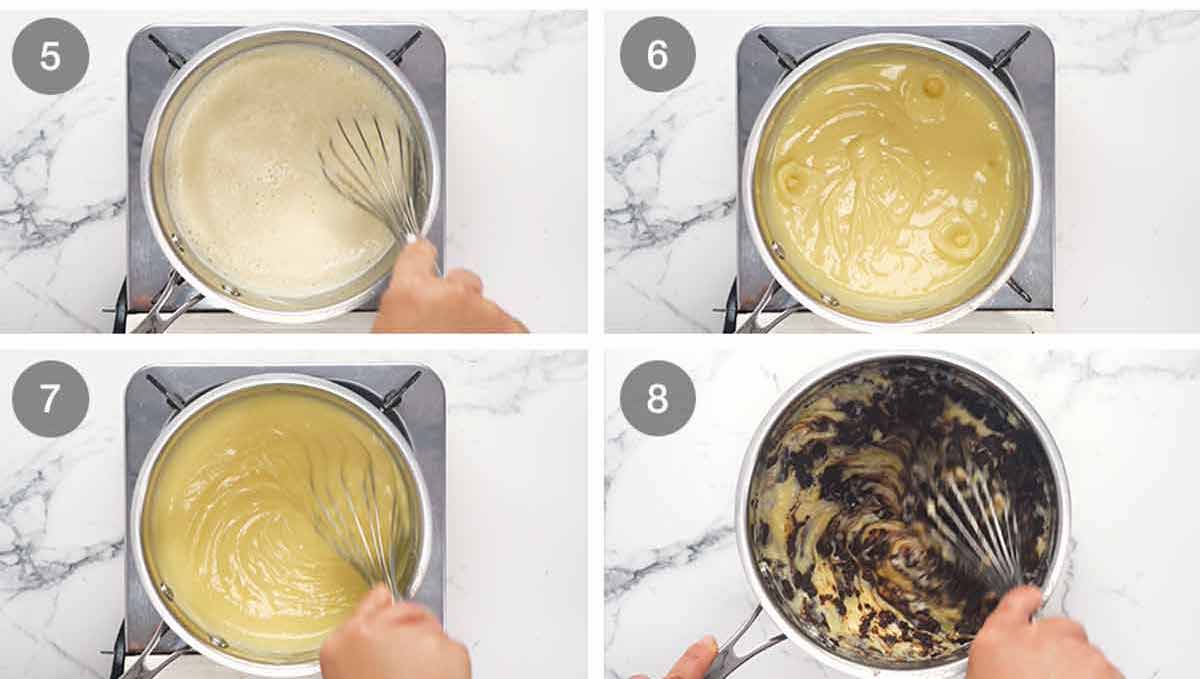
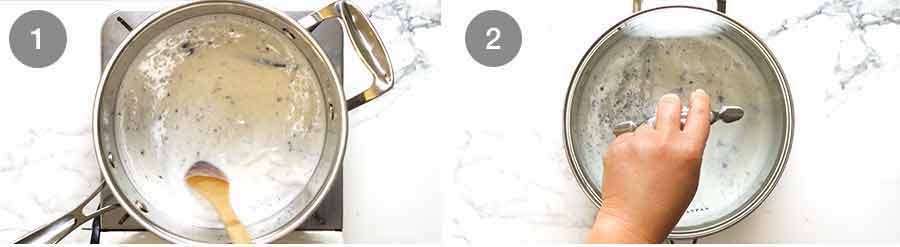
Thicken custard – Pour the egg-milk mixture back into the same saucepan. Place over medium low heat, whisking constantly so the base doesn’t catch, until it starts to thicken (you will feel it). It should happen within 3 to 5 minutes. If it gets lumpy, remove off heat, whisk vigorously – will become smooth.
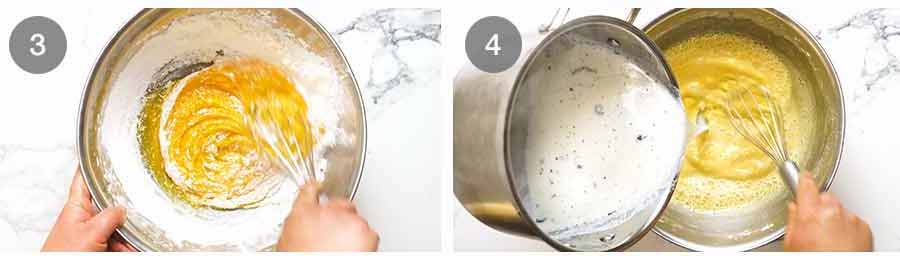
Lazy bubbles – The sight of lazy bubbles is the trigger that determines the right cook time for custard. They will start to appear once the custard is thickened, and it’s hot and steamy. You’ll need to pause stirring for a few seconds to see if they appear.
Stir 45 sec – Once you see the bubbles, whisk constantly on the stove for a further 45 seconds then remove from stove. The rule for making French custard is 30 seconds for every 500ml/2 cups of milk. That is, for every 2 cups of milk used in the custard, stir for 30 seconds after the bubbles start appearing. Because we are using 3 cups of milk, we stir for 45 seconds.
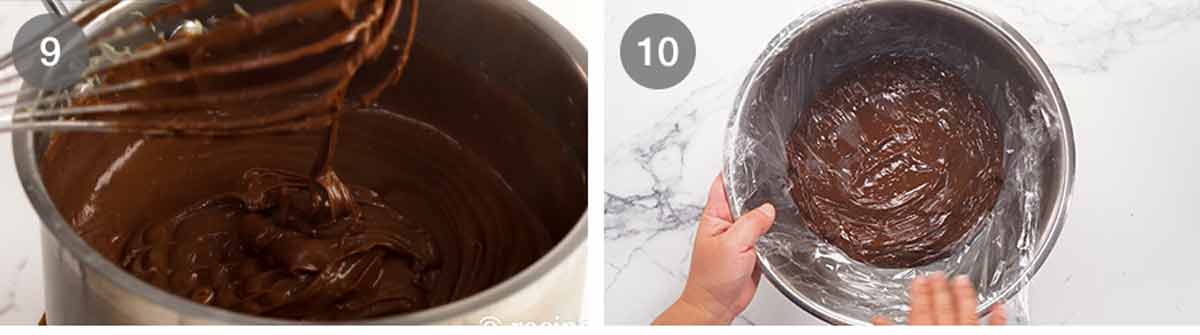
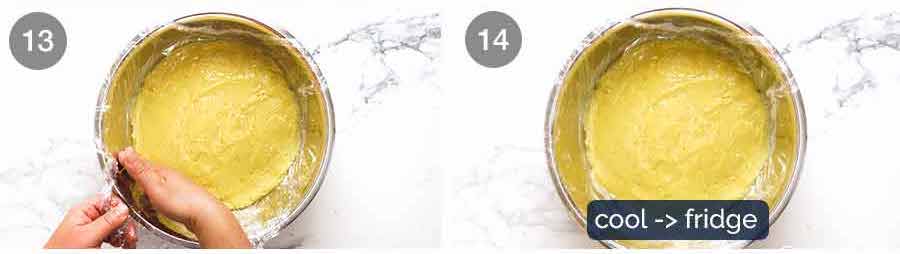
Add chocolate – Remove from the stove, add chocolate and stir until fully melted. See below for what it looks like!
Thickness – The custard should be thick enough such that it mounds slightly on the surface, like pictured above.
Set aside – Transfer into a bowl, immediately cover with cling wrap touching the surface to prevent a skin from forming. If you can see lumps in your custard, feel free to strain through a fine mesh.
Then set the custard aside while preparing the base. There’s no need to rest chocolate custard overnight, like we do with the vanilla custard for Flan Pâtissier. Reason: Vanilla custard is more delicate and benefits from overnight flavour development. Chocolate custard doesn’t need it.
Make-ahead option – If you want to get ahead, the custard can be refrigerated overnight then used the next day.
3. Oreo cookie base
Blitz and press. Nice and easy! No food processor? No worries! Just bash the cookies in a ziplock bag using a rolling pin or something heavy.
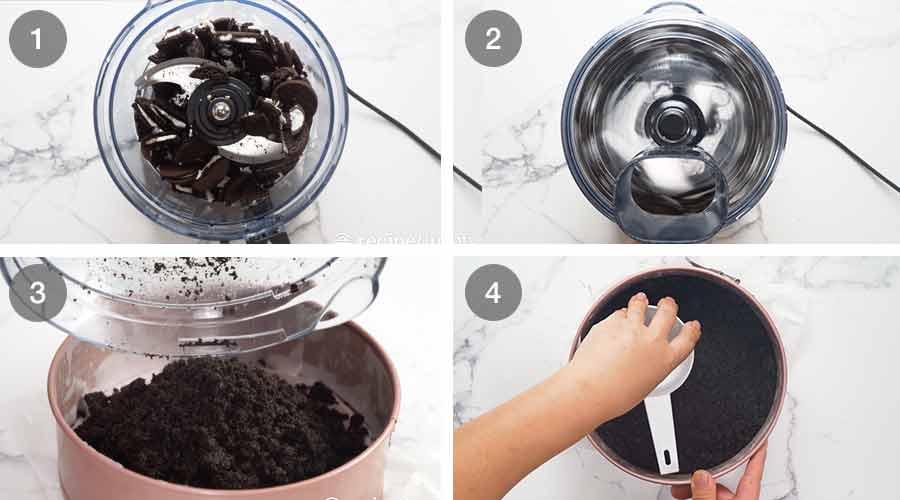
Cookies – Break up the cookies with your hands and place in a food processor.
Blitz until they become fine crumbs. Add melted butter, then blitz again until combined.
Transfer crumbs into prepared pan.
Press evenly and firmly on to the base. I spread the crumbs with a spatula then use the underside of a straight-sided, flat-bottomed measuring cup to press them flat. But honestly, even your hands will do the job!
4. Baking
Home stretch!

Whisk custard until smooth. It firms up as it cools but should still be warm by the time you get to using it. Though you can, as noted above, leave the custard overnight and finish the cake tomorrow.
Pour the custard into the prepared cake pan.
Spread the custard and smooth the surface. No need to be too meticulous here as the custard will thin as it heats up and spread out evenly.
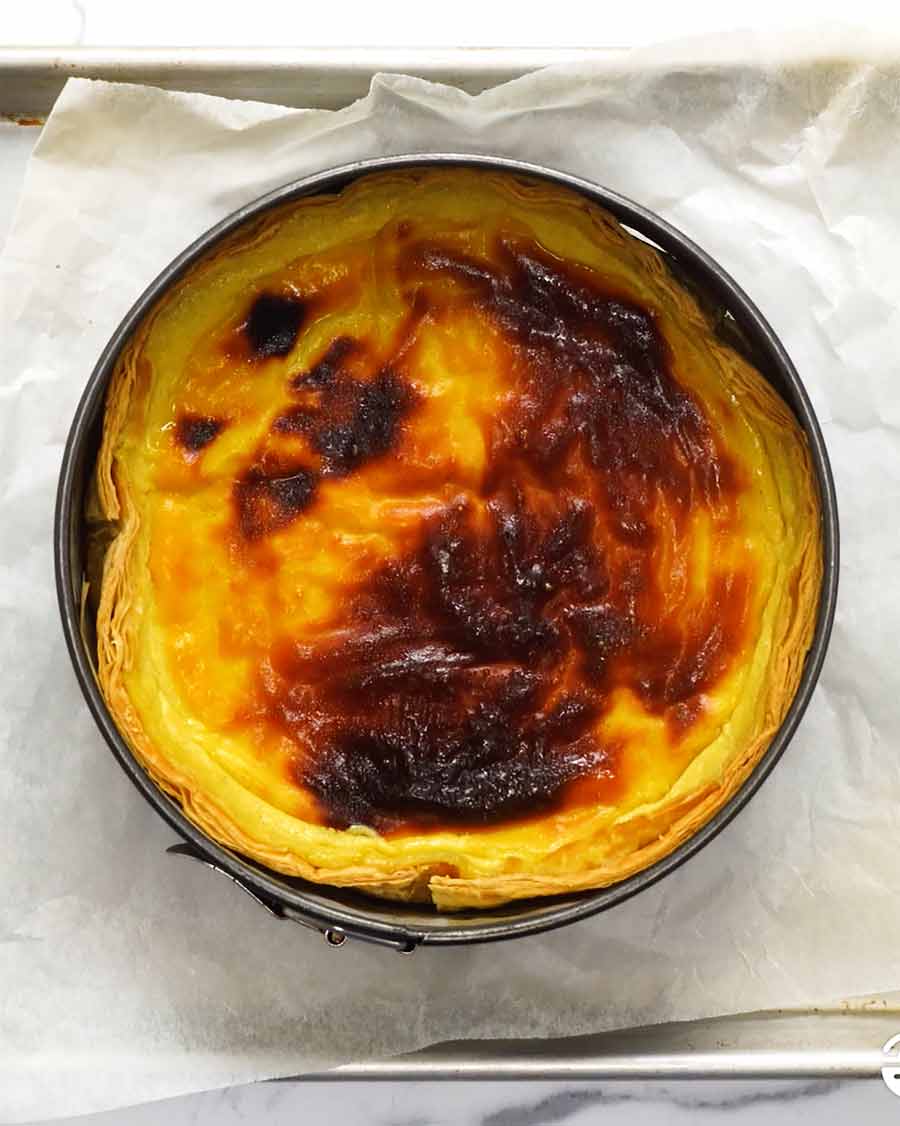
Bake for 1 hour at 180°C/350°F (160°C fan-forced), rotating the cake at the 45 minute mark. The cake will puff up towards the end and a thin (chocolatey!) skin will form on the surface. This is a signature characteristic of Flan Pâtissier (French Custard Tart) on which this recipe is based!
The cake should still be wobbly when you pull it out of the oven. It firms up in the fridge (next step).
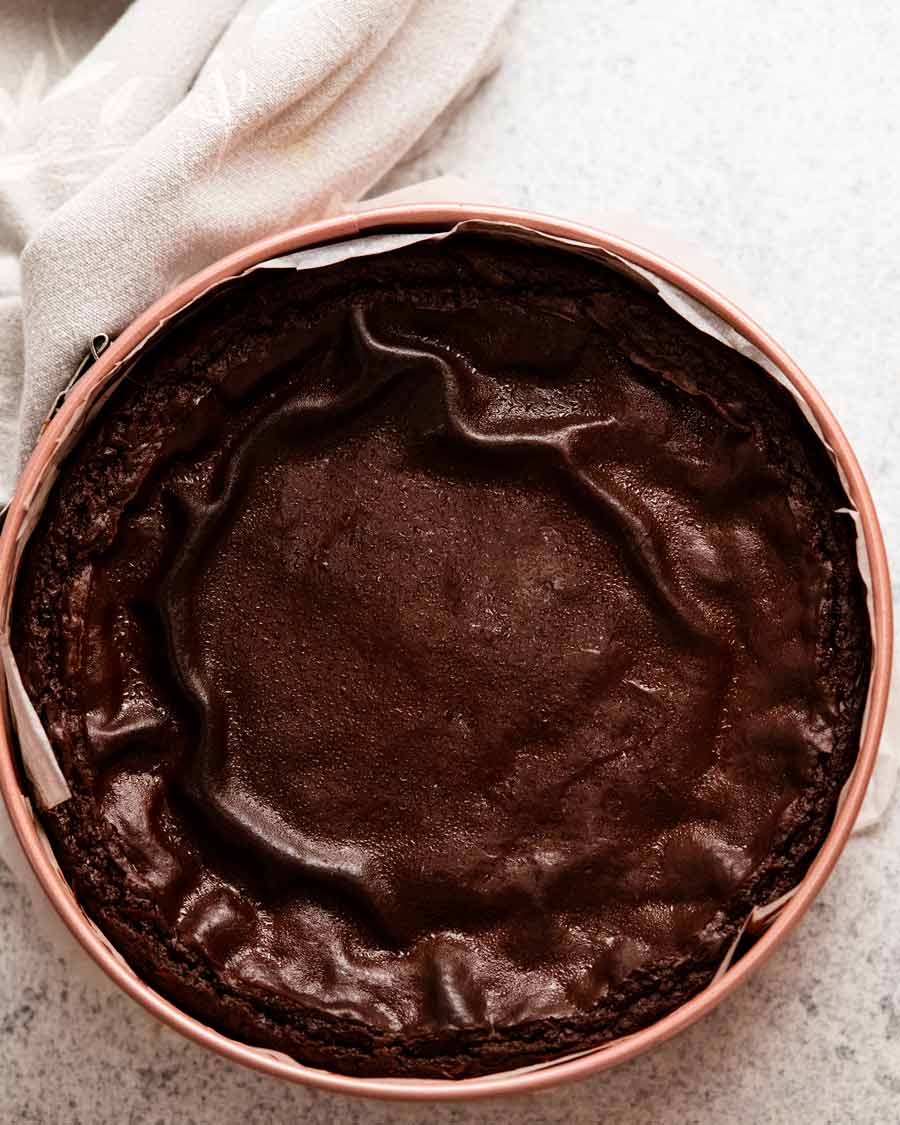
Cool overnight – Remove the cake from the oven and leave to cool on the counter for at least 3 hours. Don’t be alarmed if it deflates – that is what is supposed to happen!
Then refrigerate for at least 12 hours, or even longer.
If there is any hint of warmth in the cake when you put it in the fridge, do not cover the cake with cling wrap as it will make it sweat. Because of the type of cake this is, there is no risk of it drying out so just leave it uncovered.
Remove the sides of the springform pan then slide the cake off the base (and feel smug at how easy it is because you learnt the inverted cake base trick!). Now, it’s ready for serving…… I mean, YAY, it’s time to EAT!!!
More matters of chocolate custard cake
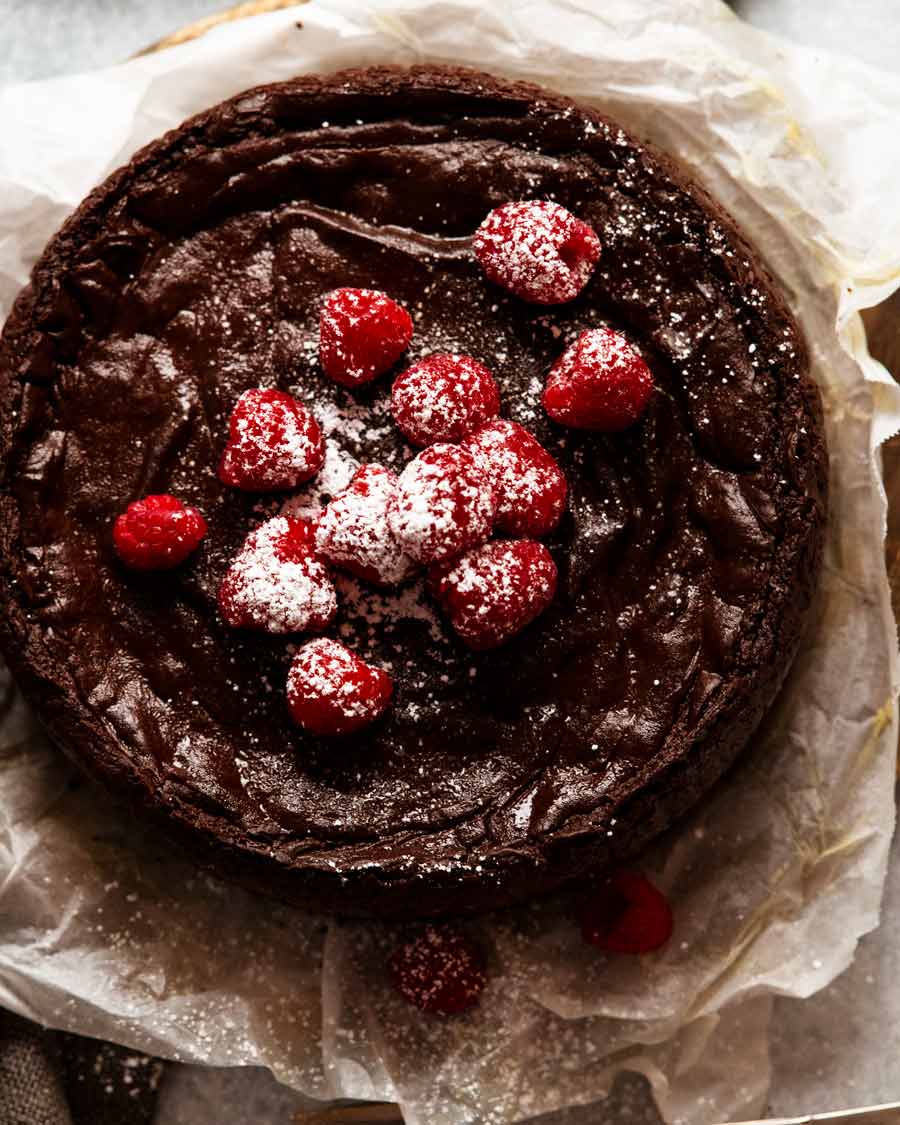
Decorating
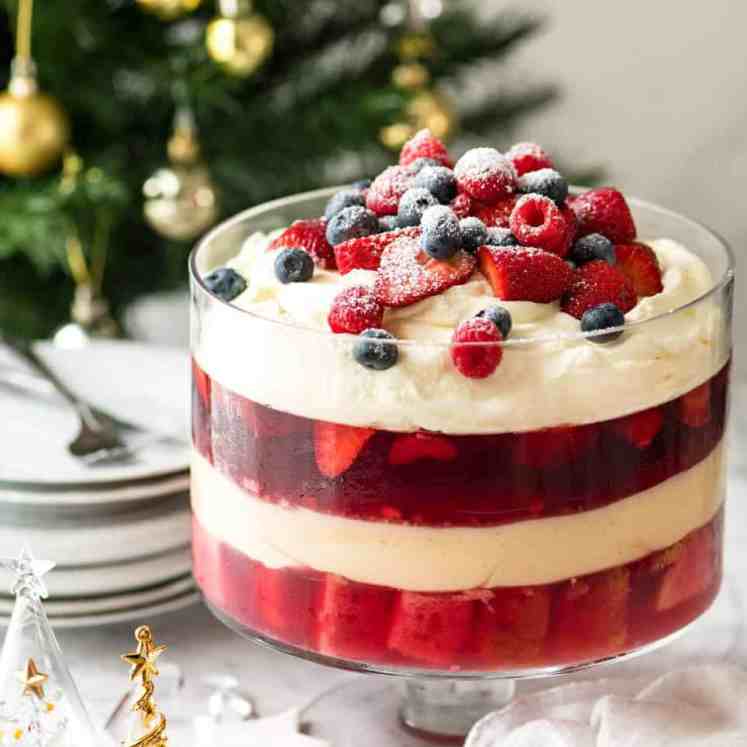
Raspberries or sliced strawberries look lovely on chocolate desserts, as does a dusting of icing sugar (powdered sugar), as pictured in post. A dollop of Chantilly cream (lightly sweetened vanilla cream) or mascarpone wouldn’t go astray either, or a scoop of vanilla ice cream!
Serving
I like to cut the cake while fridge cold, for neat smear-free slices, then leave it out for around 30 minutes to bring to room temperature before serving for the creamiest mouthfeel. Having said that though, on hot summer days, cold custard cake is DIVINE!
Storage
I had to label a slice with an aggressive “DO NOT TOUCH!!!” sign to protect it from vultures to check the shelf life! It was perfect for 48 hours after removing from the cake pan, then still good on day 5 though the biscuit base was noticeably softer.
I forgot to try but I doubt it will freeze. Custards typically don’t freeze well.
And there you have it! A chocolate custard cake. I suppose some would argue that it’s a chocolate tart, and being that it is actually a chocolate version of the French custard tart, Flan Pâtissier.
But with a layer of custard that thick, to me it looks more like a chocolate mousse cake than a tart.
The name might be open to debate, but the delicious is not! I hope you give it a go one day! – Nagi x
Watch how to make it
Chocolate Custard Cake
Ingredients
BASE:
- 200g/ 7oz Oreo cookies (1.5 standard packs, Note 1)
- 60g/ 4 tbsp unsalted butter , melted
CUSTARD:
- 3 cups milk , full fat
- 2 tsp vanilla
- 2/3 cups caster sugar (superfine sugar, sub regular)
- 120g/ 4.2 oz egg yolks (~6 – 7 large eggs, Note 2)
- 5 tbsp (50g) cornflour / cornstarch
- 200g / 7 oz 70% cocoa chocolate , finely chopped (I use Lindt, Note 3)
FOR SERVING (optional):
- Chantilly cream
- Raspberry or strawberries
- Icing sugar / powdered sugar , for dusting
Instructions
PREPARATION:
- Prepare pan: Flip the base of a 20cm / 8" springform pan upside down – this makes it easier to remove the finished cake without the lip in the way. Grease pan base with butter, then press on a square sheet of baking paper. Clip the pan sides onto the base, letting the excess paper stick out (ease of removal later).
- Preheat oven to 180°C / 350°F (160°C fan-forced).
CUSTARD:
- Heat the milk, vanilla and about half the sugar in a large saucepan over medium high heat until just before boiling, stirring to dissolve the sugar.
- Yolk mixture: Place egg yolks and remaining sugar in a large bowl and whisk to combine. Add cornflour and whisk until smooth.
- Temper eggs: While whisking the eggs, slowly pour in the hot milk in a thin stream while whisking. Whisk until fully combined.
- Thicken custard: Pour the egg-milk mixture back into the same saucepan. Place over medium low heat, stirring constantly so the base doesn't catch, until it starts to thicken (you will feel it). It should happen within 3 to 5 minutes. If it gets lumpy, remove off heat, whisk vigorously – will become smooth.
- Stir 45 sec after bubbles: When the custard is thickened and steamy, and you see the first big lazy bubbles appear on the base (pause whisking to see), whisk constantly on the stove for a further 45 seconds then remove from stove.
- Add chocolate and stir until fully melted.
- Cool: Transfer into a bowl, immediately cover with cling wrap touching the surface. (You can strain if you're concerned about lumps). Set aside while preparing the base.
BISCUIT BASE:
- Blitz cookies: Roughly break up Oreos with hands and place in food processor. Blitz until they become fine crumbs. Add melted butter, then blitz again until combined.
- Press: Transfer crumbs into prepared pan, pressing evenly and firmly on to the base (I use the underside of a straight-sided, flat-bottomed cup measure to do this).
BAKE:
- Bake 1 hour: Whisk custard until smooth to loosen. Pour onto the base, smooth surface. Bake 60 minutes, rotating the cake pan at the 45 minute mark. It will still be wobbly when you pull it out of the oven.
- Cool for 3 hours on the counter, in the pan. Refrigerate at least 12 hours to allow the custard to fully set.
- Serve: Best to cut when fridge cold and serve at room temp (for creamiest custard!). Remove springform sides and paper, then use paper overhang to slide the cake off the base. Cut like cake and serve! Lovely with dollop of Chantilly cream and a raspberry or strawberry. Dust with icing sugar to make it pretty!
Notes
Fellow custard-lovers. Unite!

Life of Dozer
No chocolate for you Dozer! How about some croissant instead? (Like I have a choice! 😂)

The post Chocolate custard cake appeared first on RecipeTin Eats.
]]> The one trick with this apple pie recipe that makes all the difference? Baking the apple slices first. It’s the magic key to a crispy base, superior flavour and perfectly-cooked-and-never-mushy filling. It’s also how you get a generous amount of pie filling without the dreaded giant empty cavity under the lid. Serve this all-time favourite... Get the Recipe
The post My Perfect Apple Pie appeared first on RecipeTin Eats.
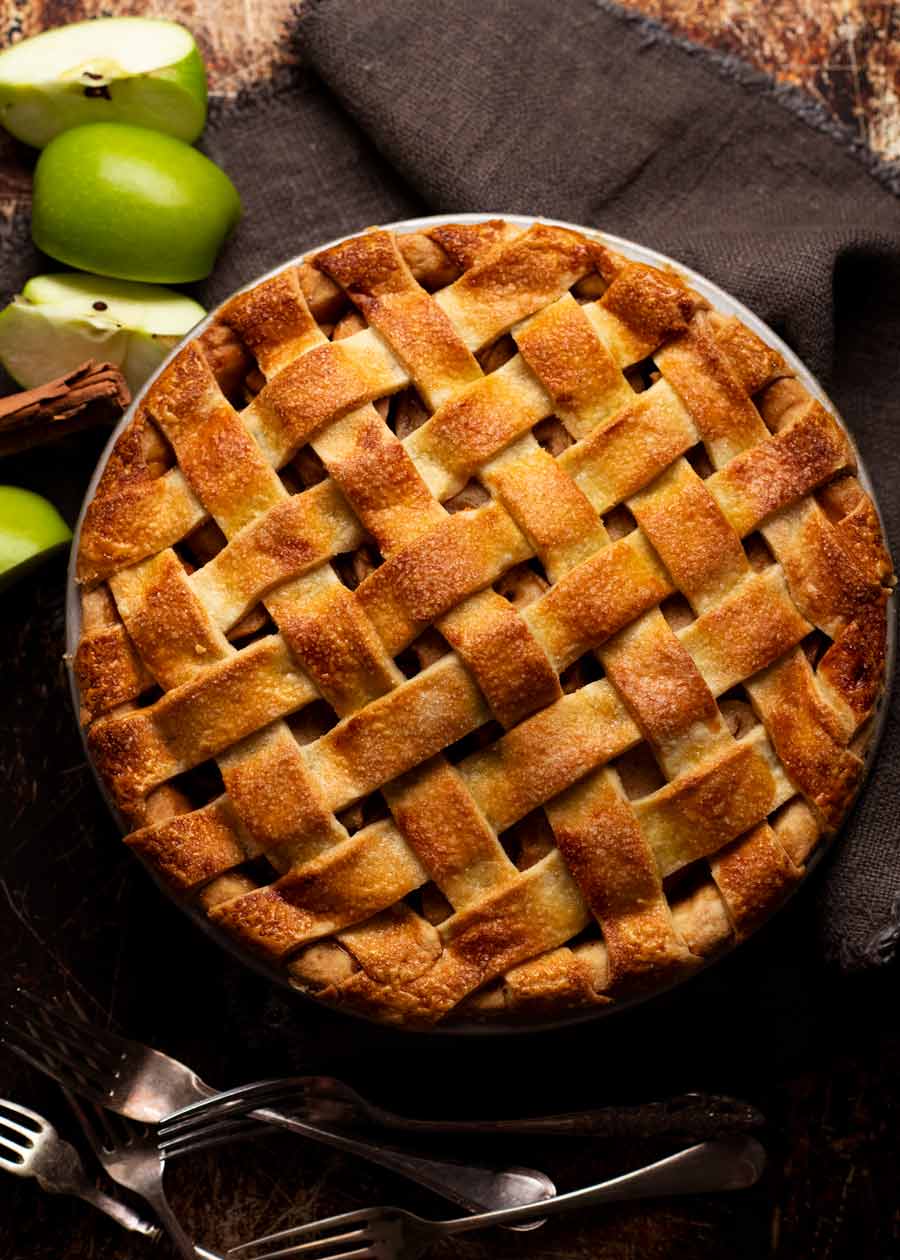
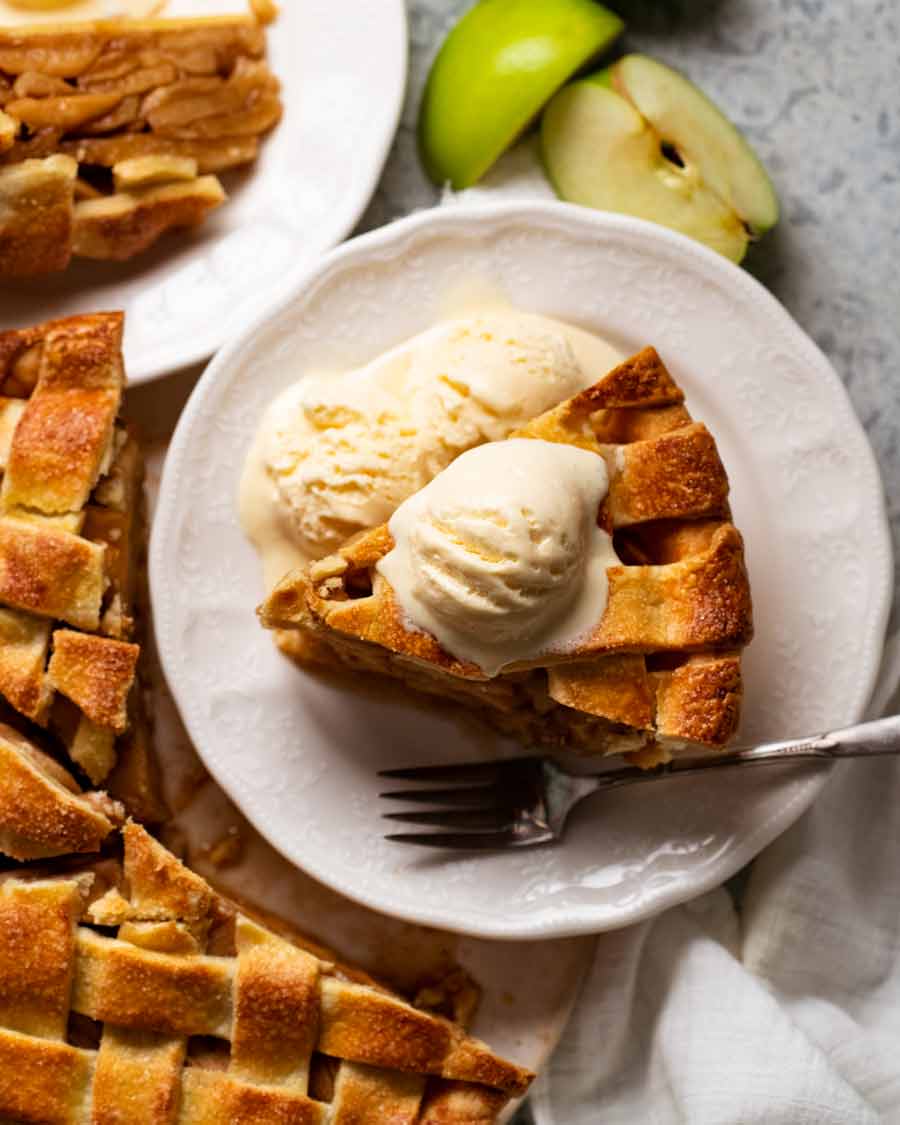
]]>The one trick with this apple pie recipe that makes all the difference? Baking the apple slices first. It’s the magic key to a crispy base, superior flavour and perfectly-cooked-and-never-mushy filling. It’s also how you get a generous amount of pie filling without the dreaded giant empty cavity under the lid.
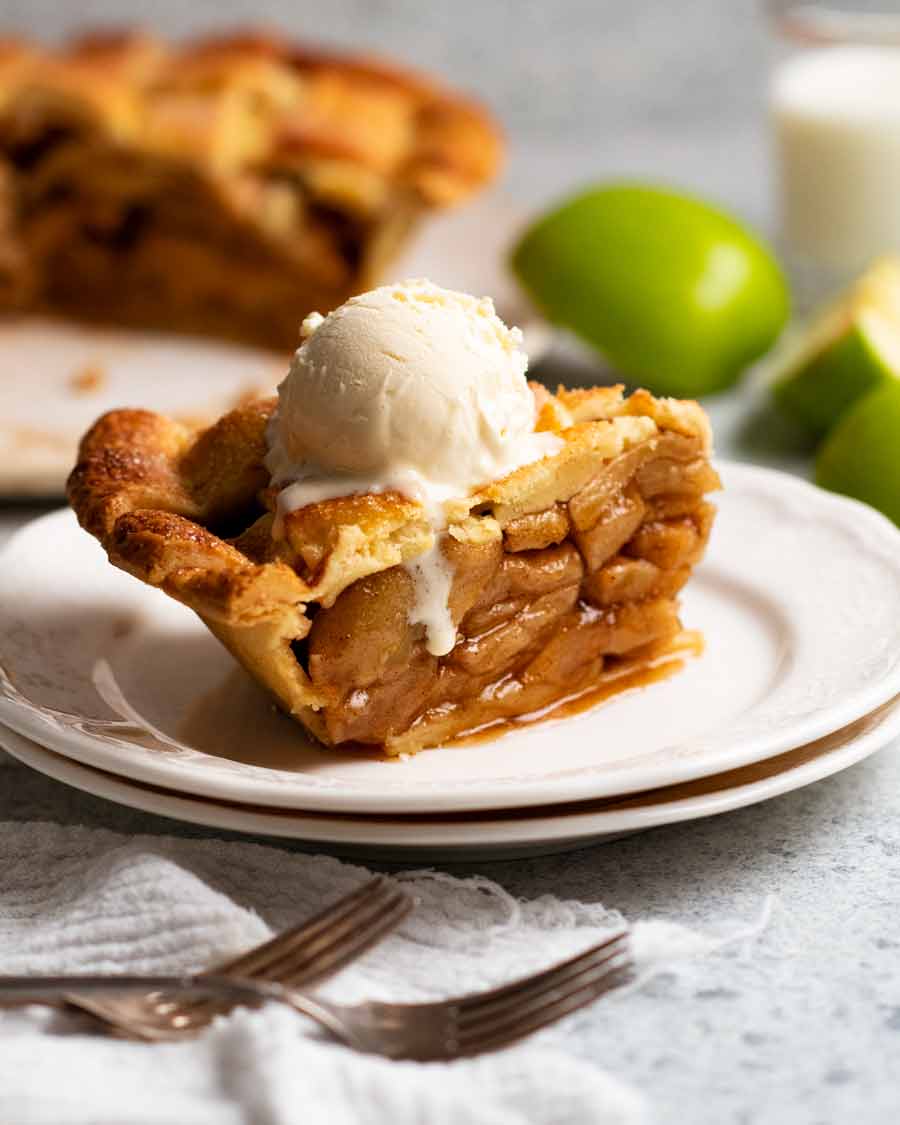
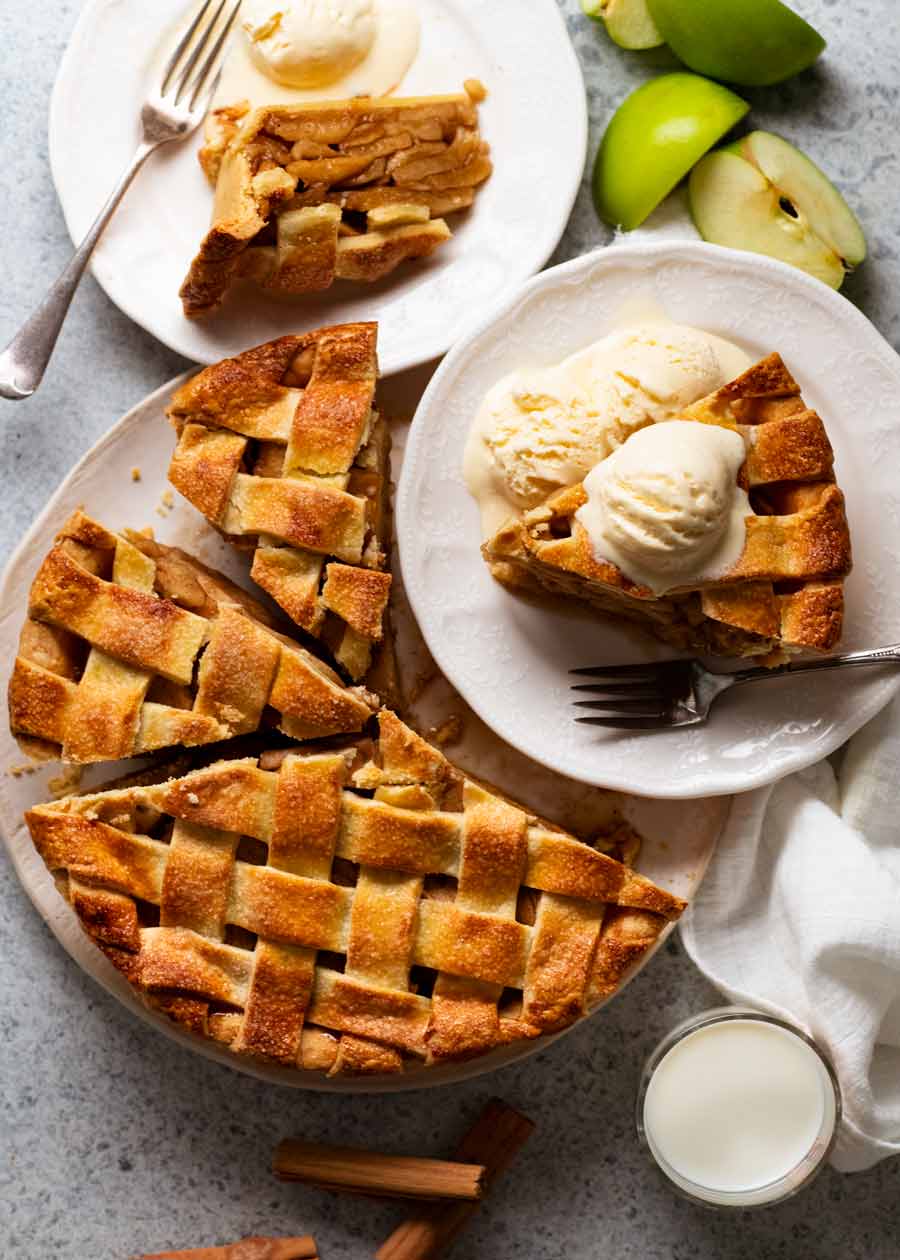
Serve this all-time favourite warm with a scoop of vanilla ice cream for the perfect homemade dessert!
My perfect Apple Pie
Of all the sweet pies out there, Apple Pie might just be the most iconic of them all. In America, it’s practically its own religion and talk about what exactly makes the perfect Apple Pie can get as prickly as politics.
Well, let me weigh in and tell you about my idea of the perfect Apple Pie.
My perfect pie is packed with a generous amount of apple filling that’s never mushy and never undercooked. There’s some spicing but it’s even-handed and doesn’t overwhelm. The filling is also not overly sweet and won’t leave you grasping for a glass of water.
Then the pastry. All this cosy apple goodness is encased in a shell of irresistibly flaky, buttery shortcrust. It’s not chewy nor is it sad and soggy. And let’s not forget the base! Of course it’s got to be perfectly crispy – no exceptions.
That’s my vision of perfect Apple Pie. If that all sounds good to you, then dare I say this might become your perfect apple pie recipe too. I hope you enjoy this recipe for many years to come!
Recipe credits – Many thanks to my French pastry chef teacher Jennifer Pogmore and RecipeTin’s Chef JB for their assistance and expertise to bring my vision of the perfect Apple Pie to life. We did it!!!
Where so many Apple Pie recipes go wrong
I don’t normally write so bluntly. But this is a very long post so I don’t have time for measured politeness!
My recipe for perfect Apple Pie is really borne of all the things I have disliked about other Apple Pie recipes I have tried over the years, which I wanted to address. Here’s my biggest gripes:
Soggy base or crust not properly cooked – This one’s a common problem with recipes where the crust is not blind baked before filling with apples, or raw apples are baked inside the crust. Apple juices have to go somewhere, you know?? That somewhere is into your pastry. (And nope, thickening with cornflour/cornstarch won’t save the pie.)
Mushy apples. Or it’s opposite, crunchy undercooked apples – I don’t know which is worse. Both are just a big fat no!
Overly sweet fillings and spice overkill – I want to taste the apples!
Not much apple flavour – Some recipes even boil apples … ick. Just no.
Skimpy amount of filling – Any recipe calling for less than 1.5kg / 3lb of apples will end up pretty scant on the filling. Pies are supposed to be all about generosity!
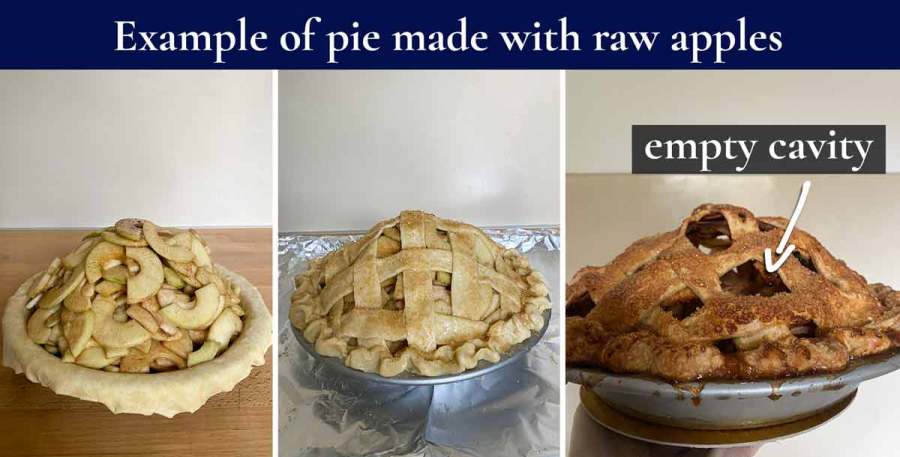
A giant empty cavity under the lid – A recipe calling for raw apples to be piled high in the crust results in a bulging pastry cage for a lid. The lid smashes in when you cut it, creating a frightful (though admittedly still-delicious) mess!
Reading back over my list, you must think I’m a bit of a whiny, difficult-to-please person. 😂 It’s not that at all! People in my life know very well I am far from a hoity-toity type.
For me, the thing about Apple Pie is that it’s not a quick recipe especially when you take the time to make the crust from scratch. So the end result needs to be worth the effort, ie. flawless!
The other thing – and this is the clincher – is that pretty much all of the issues I listed above boil down to how the filling is dealt with. A filling made with raw apples for instance is a very common approach but leads to all sorts of problems like those I mentioned.
If we can just fix the filling, we’re laughing.
The solution: Bake the apples
The solution to my gripes turned out to be simple: Bake the apples. It’s as easy as that.
Here’s why it works:
The apples cook evenly
The apple juices can be reduced to a syrup so it’s not runny and doesn’t soak the base
The apples are cooked down first so you don’t end up with a giant empty pie-lid cavity
It’s far easier than stovetop-cooking your apples. Stirring a tonne of apple slices is not fun, plus they don’t really cook evenly.
And … better flavour!
Here’s the proof!
And here’s photo evidence of the difference baking the apples makes:
Exhibit A: Crispy base
Here are a couple of photos to show you the crispy base.
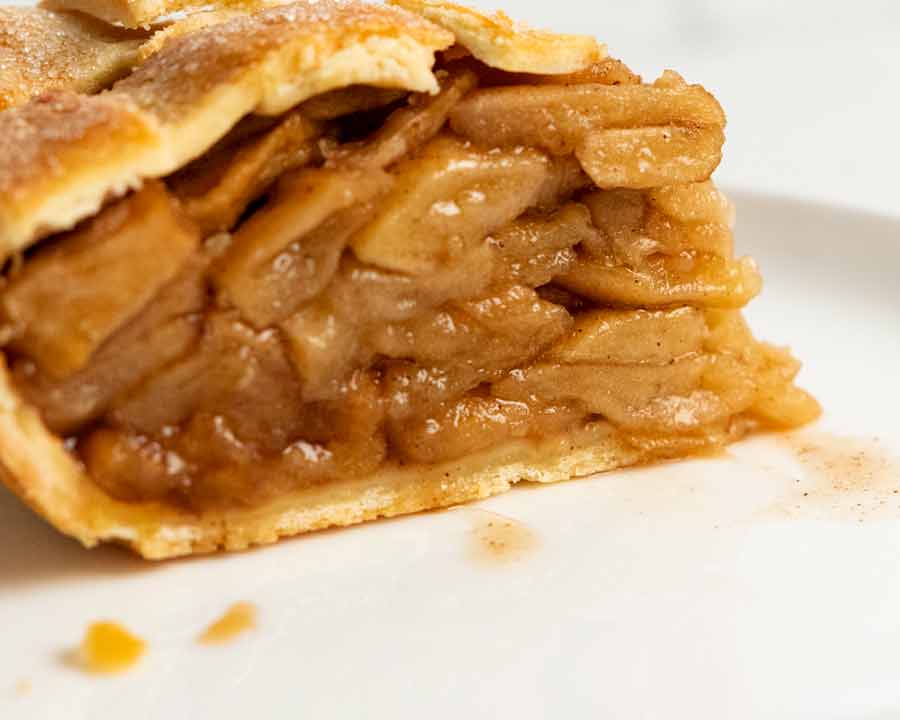
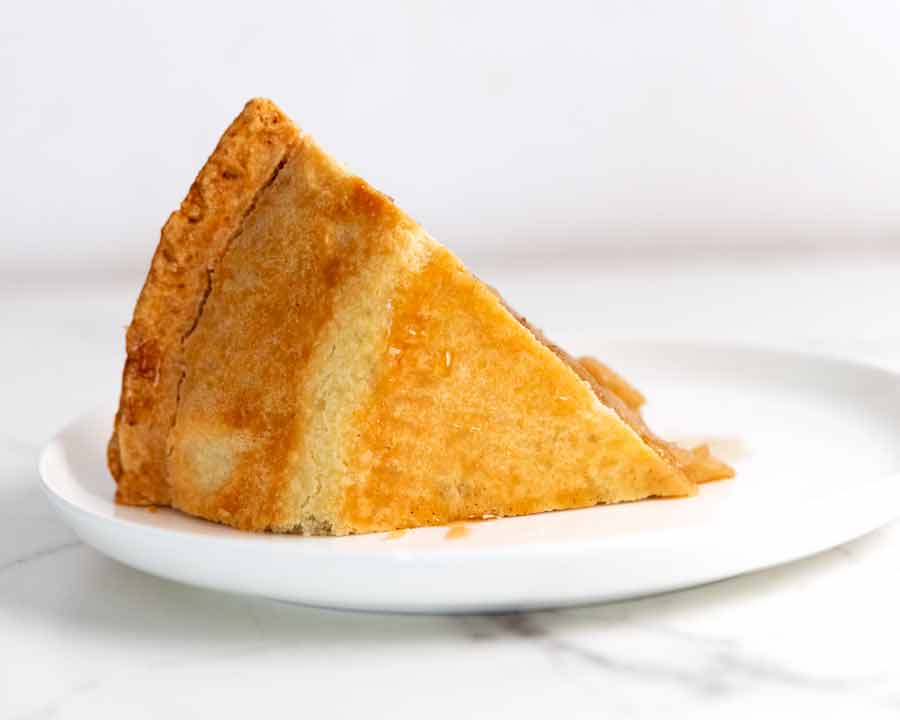
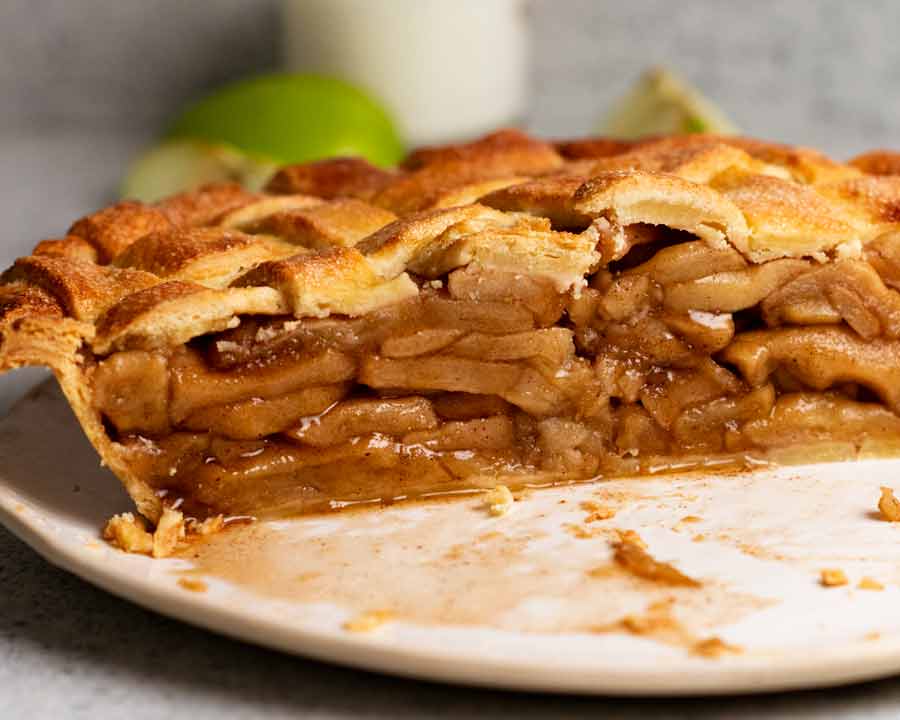
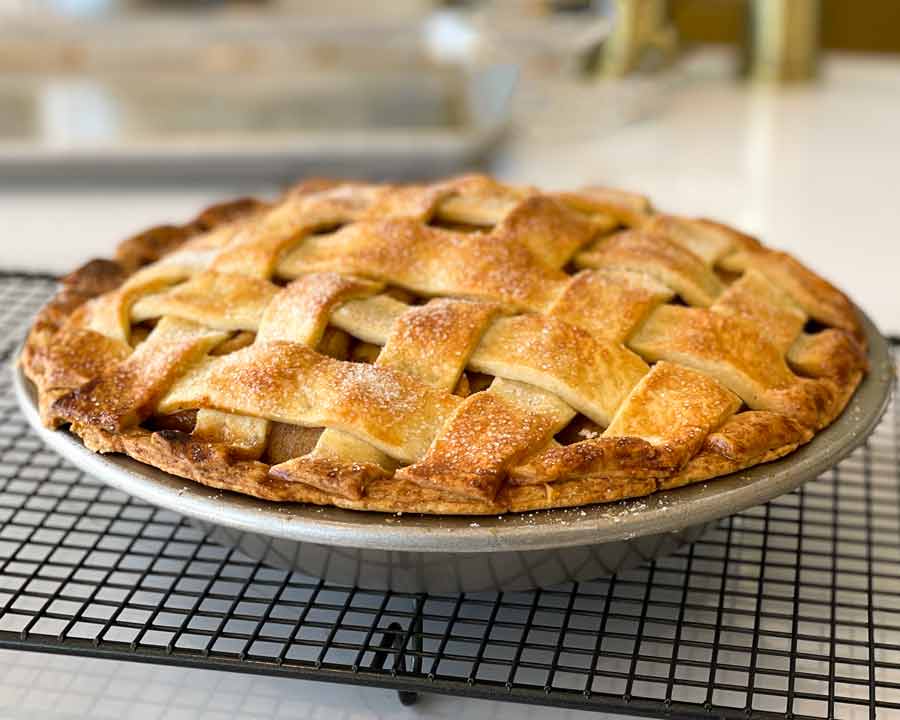
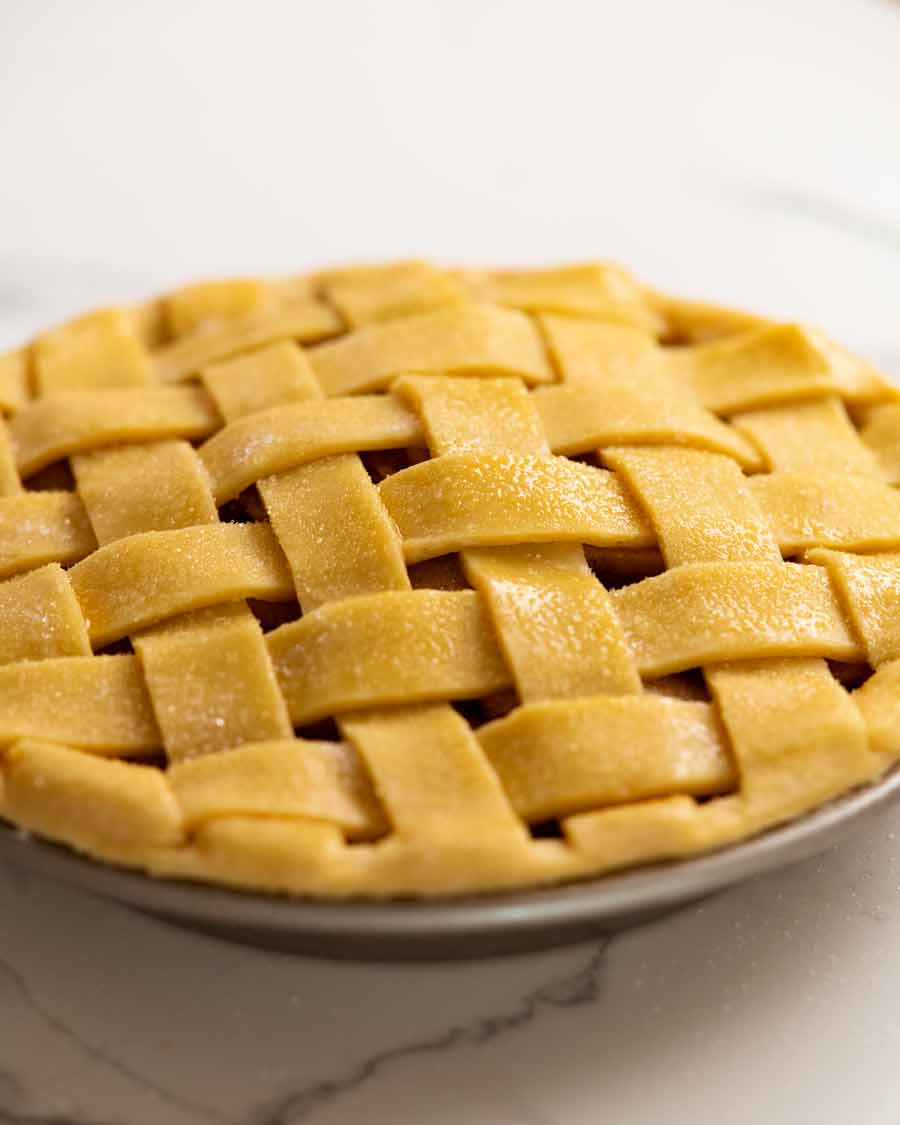
Exhibit B: No giant empty cavity under the lid
And this is what the pie looks like straight out of the oven – Flat lattice, and the inside filled to the brim with apples.
OK! Ready to see how to make my Apple Pie?? Let’s do this!
What you need to make Apple Pie filling
Here’s what you need to make the Apple Pie filling. (PS. The egg is out of place, it’s for brushing the pastry!).
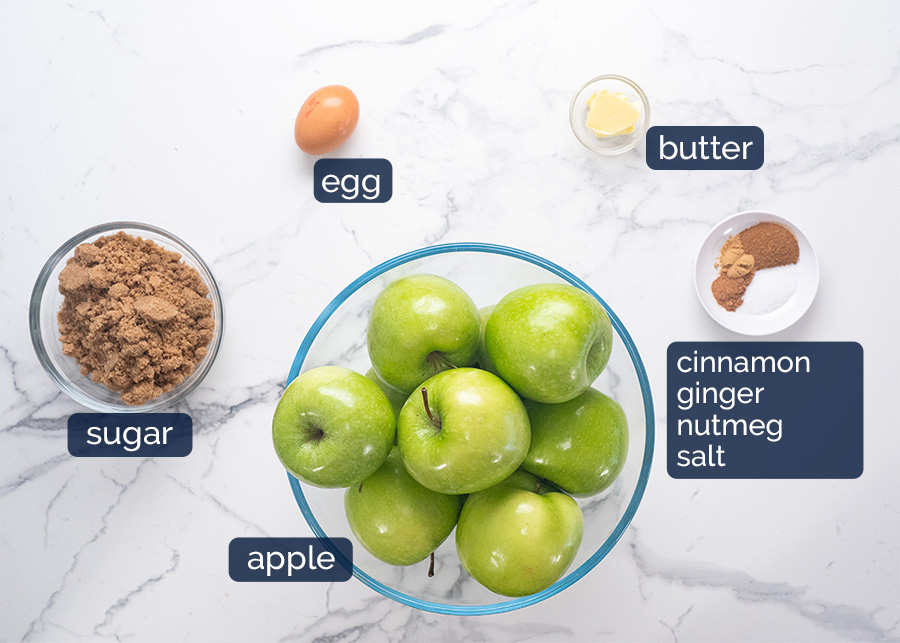
Granny Smith apples – There’s plenty of opinions out there about the best apples for Apple Pie. But for me, Granny Smith is The One, for its tartness and ability to hold its shaped once cooked. This is key to avoiding a mushy filling!
Brown sugar – My choice of sugar for caramelly sweetness. I use 1 cup of brown sugar which, to me, provides the perfect level of sweet-but-not-too-sweet.
Apple Pie spices – Cinnamon, ginger and nutmeg. Mix up your own for better flavour control instead of using a pre-made mix!
Butter – Just a dab, for simmering with the apple juices on the tray to make a syrup for the Apple Pie filling.
Salt – Just a touch, to bring out the other flavours. It doesn’t make it salty at all.
Egg – Used to brush the pie lid to make it a beautiful and shiny golden brown!
Apple Pie crust
The classic crust used for apple pie is shortcrust and that’s what I use. My recipe is very standard (flour, butter, salt, sugar, water). However the one thing I should probably address is the debate over butter vs vegetable shortening.
Advocates of vegetable shortening (which is a type of fat made from vegetable oil) love how it makes shortcrust pastry ultra-crumbly and flaky.
I have no issues with vegetable shortening per se, except that it is tasteless. So while shortcrust pastry made with butter may not be quite as flaky, it is still flaky enough to me and more importantly, is a whole lot tastier to eat.
And if your mind is going straight to “why not use a combination”?, you must think like me because I tried that too. But I just found it still lacked flavour even using a 50/50 mix.
So, all-butter shortcrust it is! Recipe here.
PS. Also – I use a food processor. Because I have hot little hands which melt the little bits of butter as I work with the dough. Food processor = exactly the same results as handmade + superior flakiness + SPEEDIER.
How to make Apple Pie
Heads up – there’s a lot of information here because I explain there why and also provide tutorial information so even first-timers can have the confidence to nail the Great Apple Pie!
If you’re a pro, just skip on ahead to the recipe or the how-to video, or to Dozer. 😂 For everyone else, come along for the ride.
Game plan: My Apple Pie workflow
Make shortcrust pastry.
While the pastry-lined pie tin is in the freezer for 2 hours, bake the apple slices.
While the apple is baking, roll out the pie lid and cut the lattice strips, then refrigerate.
While the apple slices are cooling, blind bake the pastry and reduce the apple juices to make the syrup.
Assemble the pie and bake the whole she-bang!
1. Prepare the pie crust
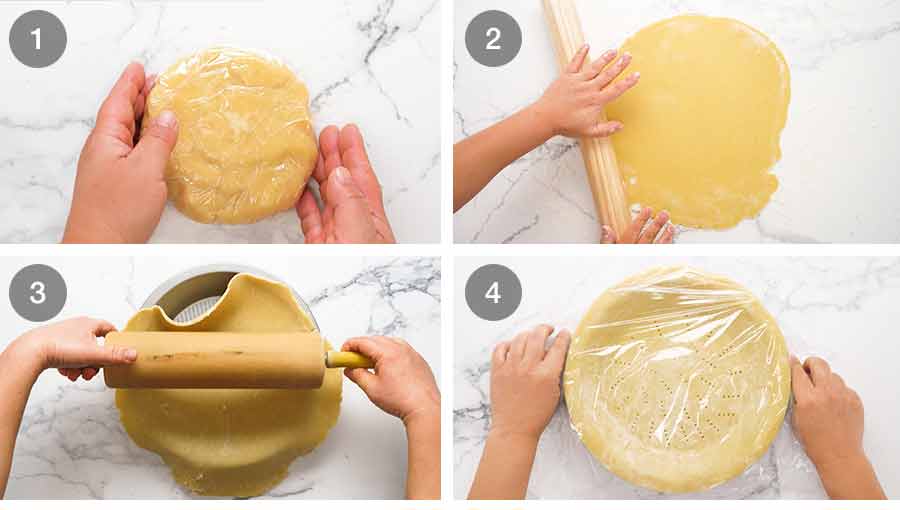
Shortcrust dough – Make a double batch of my (easy!) shortcrust pastry dough. Form two separate discs, wrap and chill for 1 hour in the fridge.
Roll out – Unwrap one ball of dough and roll out on a lightly floured work surface into a round that is about 5 mm / 1/5″ thick (not too thin, it needs to be sturdy enough for lots of juicy filling!)
Line pie tin – I use a 23 cm / 9″ metal pie tin (not a deep dish). Metal is best. You just can’t get a proper crispy base with a glass or ceramic pie tin – we’ve tried. This is the tin I own, and here is a better value one but I haven’t tried it. (Note: There are not affiliate links.)
To line the pie tin, roll the pastry off the work surface on to the rolling pin, then unroll it over the pie tin. This is not just the simplest technique to transfer the pastry (no tearing!) but you will also avoid stretching the pastry which then causes the crust to shrink when it bakes.
Drape the pastry into the pie tin, taking care not to stretch it (as noted above).
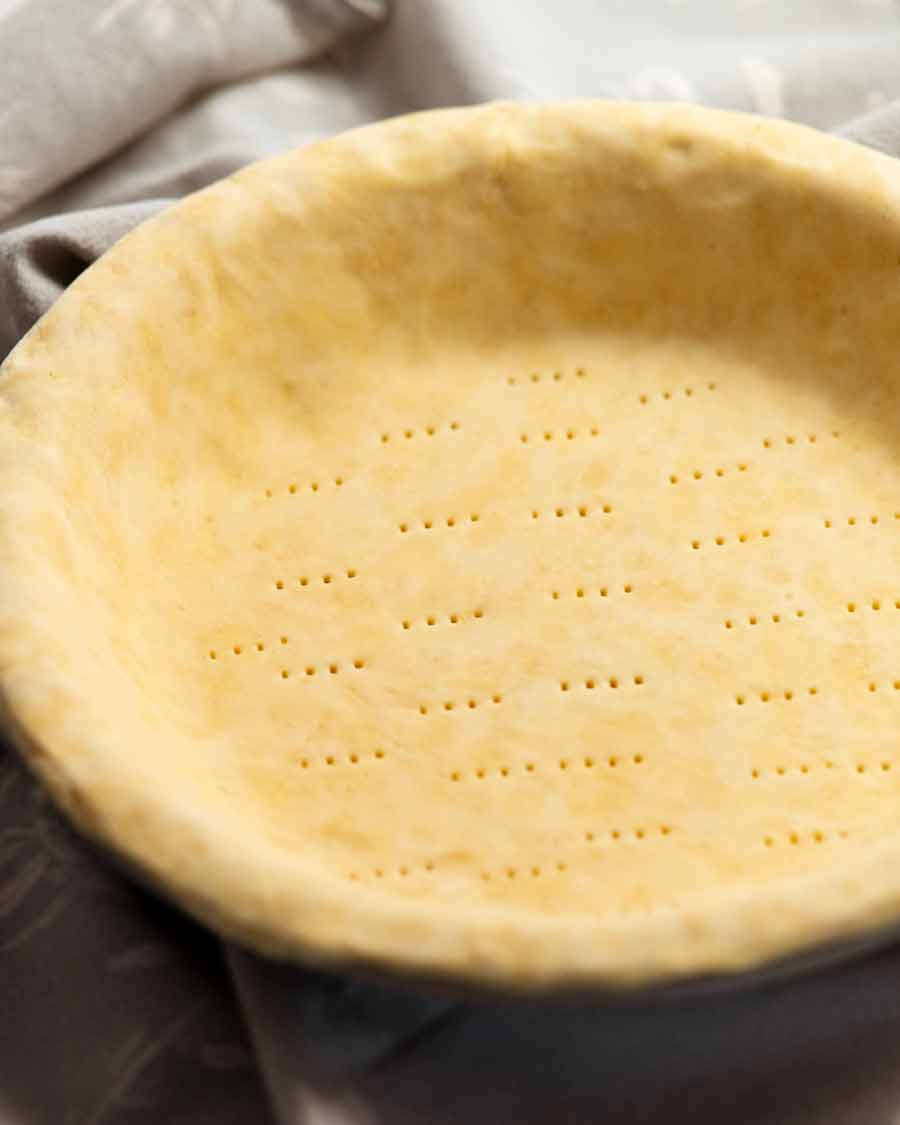
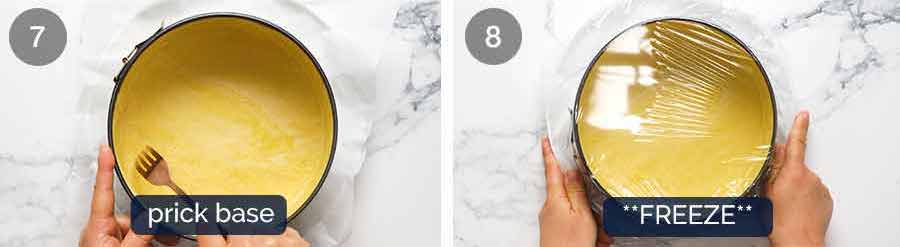
Prick pastry and freeze – Use a fork to gently prick the base around 30 times (don’t go all the way through). This helps prevent the base from bubbling up when baking which can cause pie juice leakages.
Wrap the pie tin in cling wrap and freeze for 2 hours. You can actually even leave it there frozen for up to 1 month (probably longer, I just haven’t tried).
Freezing pastry is a terrific technique I learned from my French pastry chef teacher Jennifer Pogmore (she’s based in France and we work remotely together!) Baking a pastry from frozen results in basically zero pastry shrinkage – and excellent pro tip!
It’s extra-important to avoid pie crusts shrinking with a fully-loaded apple pie because it can lead to a broken crust when the filled pie is baked! Why? Well, imagine all the weight of all that filling pressing against a crust that has shrunk away and is no longer reinforced by the pie tin walls. It can crack like a burst dam. Apple juices seep under the crust which then glues the crust to the pie tin … disaster! (Clearly you can tell I speak from experience 😂).
2. Blind bake the crust
Blind baking (par baking) is key to ensure the crust is not just crispy, but also fully cooked. We tried numerous variations without blind baking the crust. The results were mixed. For some, the base was soggy, and for other attempts, either the base and or/sides were not fully cooked.
Conclusion: blind baking is essential! Here’s how to do it.
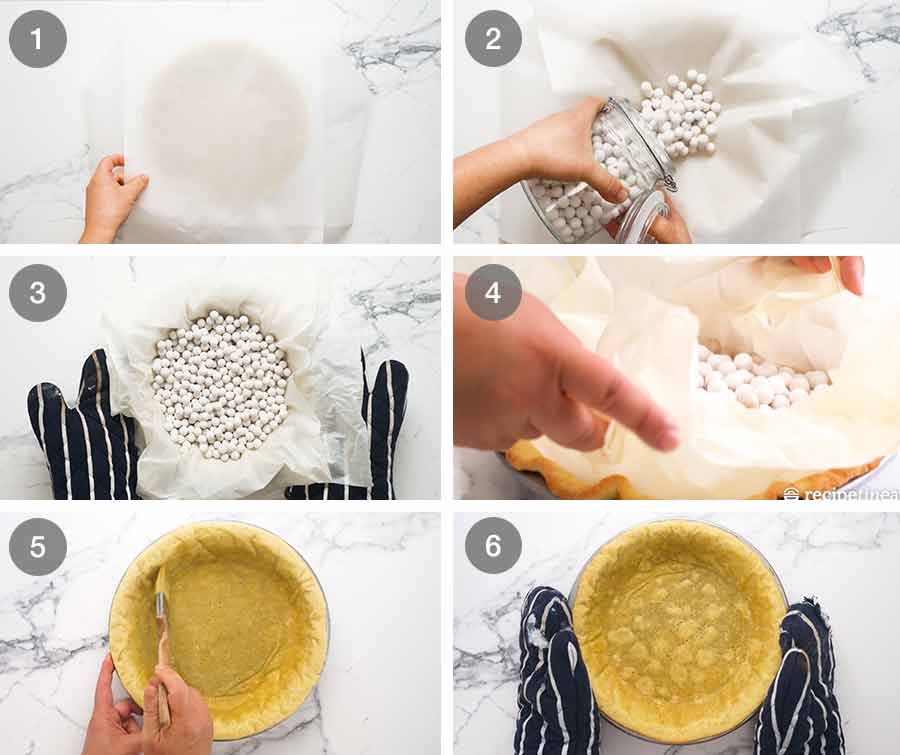
Cover with paper – Cover the frozen pie crust with two overlapping large sheets of baking/parchment paper arranged in a “X”. Excess paper hanging over the edges is necessary to protect the pie rim from browning too fast as well as having plenty to grip so you can remove the hot baking beads safely (see below).
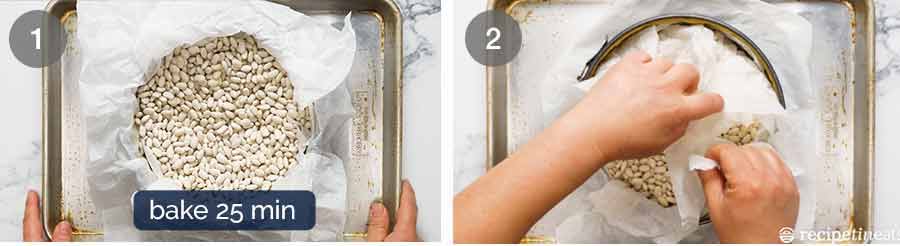
Baking beads – Fill with baking beads until level to the rim. These beads weigh down the base as well as press the pastry against the sides of the pie tin so it prevents the pastry from shrinking. (Read section above for why pastry shrinkage is undesirable for Apple Pie!)
No baking beads? Use uncooked rice or dried beans. Keep for re-use indefinitely.
Bake for 25 minutes at 200°C / 400°F (180°C fan).
Remove the baking beads using the paper overhang to lift out the paper and transfer them to a heatproof bowl.
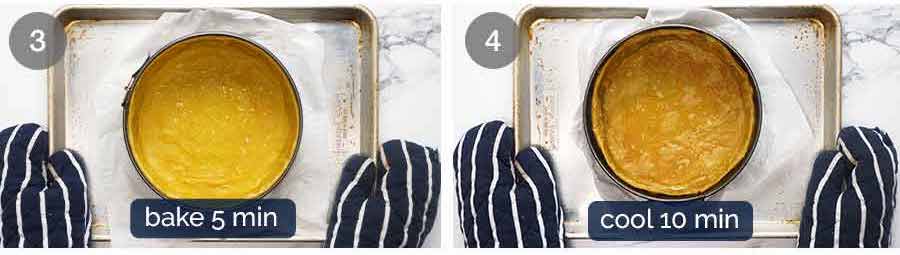
Egg wash – Brush the base and sides (but not rim) lightly with whisked egg. This is a crispy base insurance step. When the egg cooks, it forms a thin water-resistant “barrier” to help prevent the pastry from absorbing the juices.
Bake uncovered for a further 5 minutes then remove from oven. The pie crust should be light golden and look fully cooked.
Leave to cool for 15 minutes before filling with the Apple Pie Filling. This is another crispy base insurance step, ie. hot pastry absorbs liquid more.
3. Baking apple slices
Baking the apple slices is the key step for the Perfect Apple Pie. Read the reasons why in the section above!
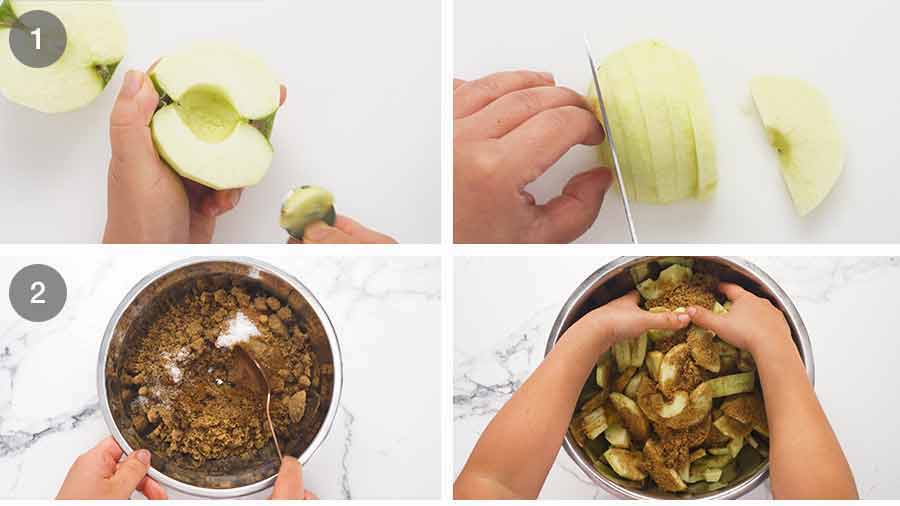
Slice apples – Core the apples using your chosen method. If you’re an apple-cooking fiend like myself, you’ll have an apple corer. If not, you can just core the apples using whatever method best works for you.
Peel then halve the apples. Now place them flat side-down and cut into 1cm / 0.4″ thick slices. Try to cut them as evenly as possible so they cook evenly.
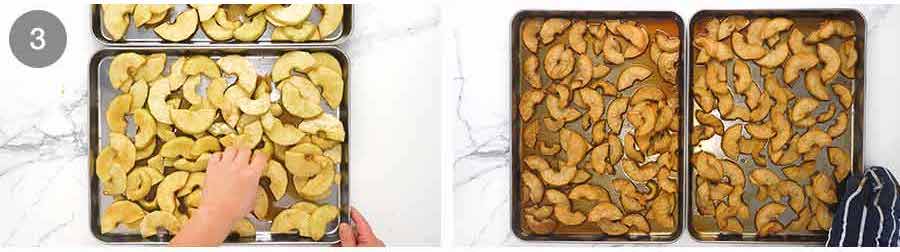
Toss with spices and sugar – Put the apple slices in a large bowl. Mix the sugar and spices in a separate small bowl (I know you just want to dump them straight in but then the spices don’t disperse evenly). Now sprinkle the mixture over the apple slices and use your hands to toss well, separating the apple slices as needed so they are evenly coated.
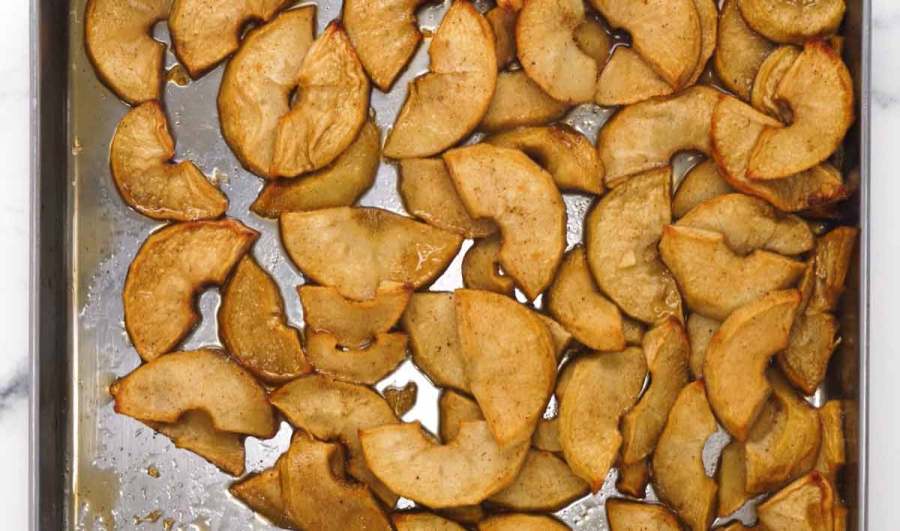
Bake – Spread across 2 trays and bake at 180°C/350°F (160°C fan) until the apples are tender but not mushy. The bake time will vary from 15 minutes to 40 minutes. An interesting discovery when we were testing this recipe as Granny Smith apples here in Australia take 40 minutes whereas in France, they take just 15 minutes. Perhaps this is due to local apple variations? Amazing!
A simple lesson learned: Check your apple doneness early. Easy!
What the done apples should be like: The apple slices should be tender and offer no resistance when you pierce them with a knife. However, you don’t want them mushy. They will be a bit delicate when hot out of the oven but will firm up as they cool. They won’t cook much more once inside the pie, that step is more about melding everything together to become a juicy pie filling.
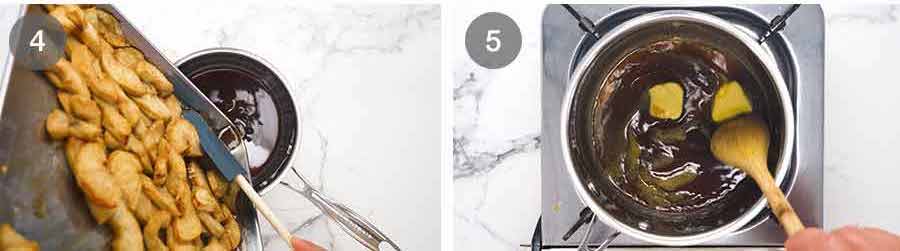
Apple juices – Drain the apple juices on the trays into a saucepan. No need to be fussy here, just tilt the tray and use a spatula to hold back the apple slices while you drain off as much as you can. If there’s some left on the tray that’s ok – we will just add it later.
You should have around 1/2 cup of juices. Some days though I have less, other days I have more. It doesn’t matter because we are reducing it in the next step to a specific amount.
Make syrup – Add the butter to the apple juices and simmer on low heat until it reduces to 1/3 cup (80 ml) and becomes a syrupy consistency. It might take 1 minute if you only had around 1/3 cup, or 5 minutes if you started with 1/2 cup or more.
Reducing the apple juices to a syrup serves 2 purposes. Firstly, we are not wasting free flavour – never, we are getting apple flavour to the max! It made me want to cry every time I read an Apple Pie recipe that directed people to discard apple juices.
Secondly, by reducing the apple juices to a thicker syrup, it will cling to the apple pieces better and will not soak into the base as much. Which means – yup, you guessed it – crispy base!
Once the syrup is ready, set aside to cool.
Cool apples – Meanwhile, also set the cooked apple slices aside to cool. This will make them less delicate to handle and also ensures they don’t overcook into mush when baked inside the pie in the 45 minute cook time required for the pastry lid to cook.
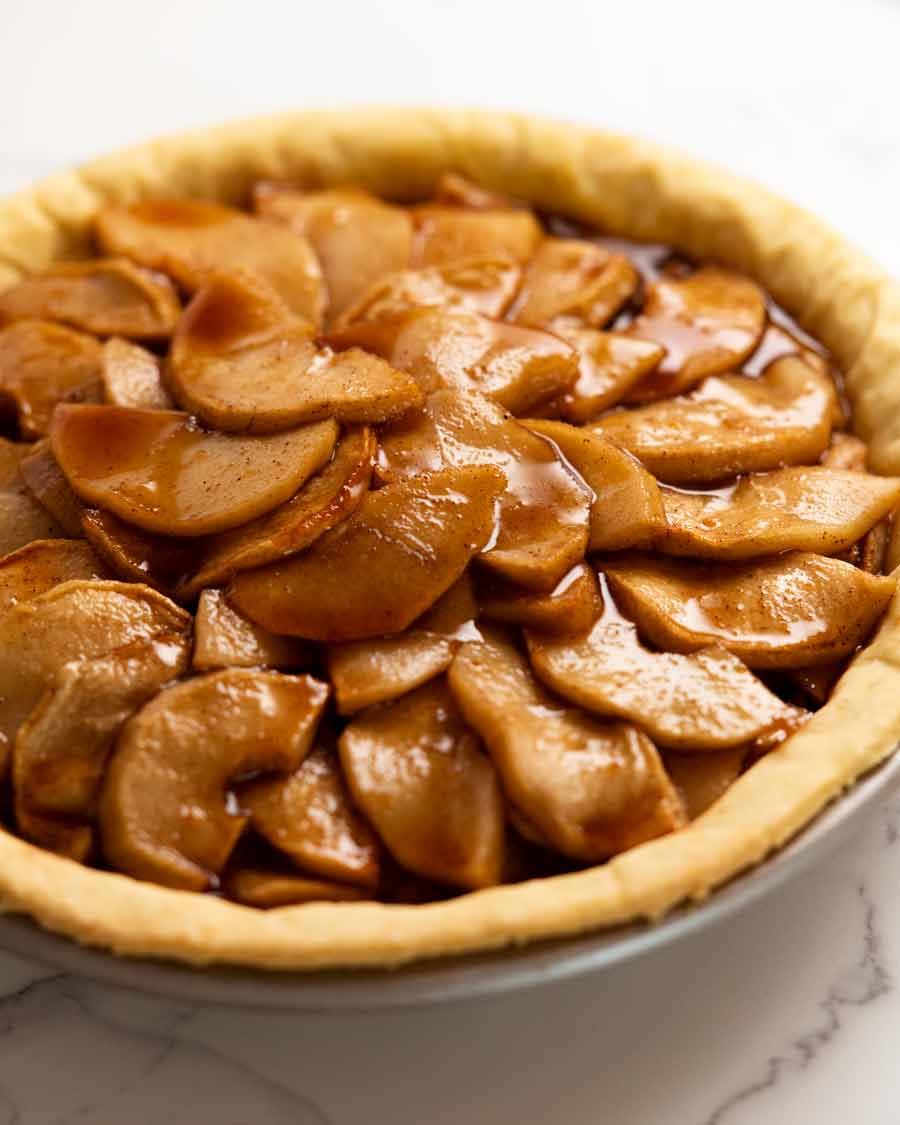
4. Fill the pie
OK! We’re on the home stretch here to the best part: cooking but more importantly, EATING IT!!!
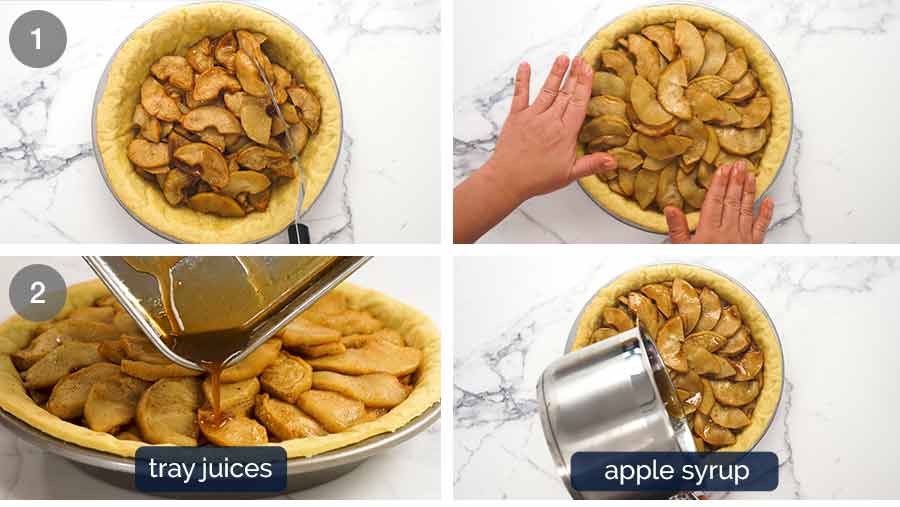
Fill the pie crust with 2/3 of the cooled apple slices. I find using a spatula or egg flip to scoop them up is the best way to handle them. Place them in the pie crust and press down lightly to remove air pockets.
With the remaining apple, firstly arrange some in a heap in the centre to create a slight mound. Then keep layering the rest of the apple slices over the top of the filling. You can see in my photo I’ve placed them slightly overlapping in a neat arrangement. You don’t need to do that!
Pour over the apple syrup and any residual juices left on the tray.
5. Lattice tutorial!
OK! I know we all want our Apple Pies to sport the neat, criss-cross woven pastry lid like we see in every classic Apple Pie photo ever. So here’s a little pie lattice tutorial. I promise it’s not hard!
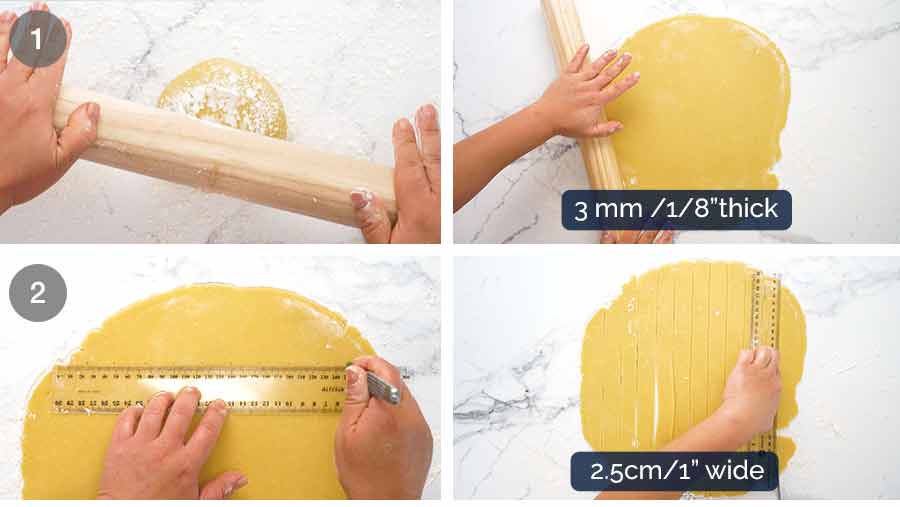
Roll out the pie lid dough on a lightly floured work surface to 3 mm / 1/8″ thick. You don’t want it too thick or it will not cook through by the time the lid surface is a beautiful golden colour.
Cut 12 x 2.5cm / 1″ strips. I use a ruler and a small sharp knife that I run along the ruler to cut the strips.
I try to do this step while the apples are baking, returning the strips to the fridge (covered in cling wrap) until required.
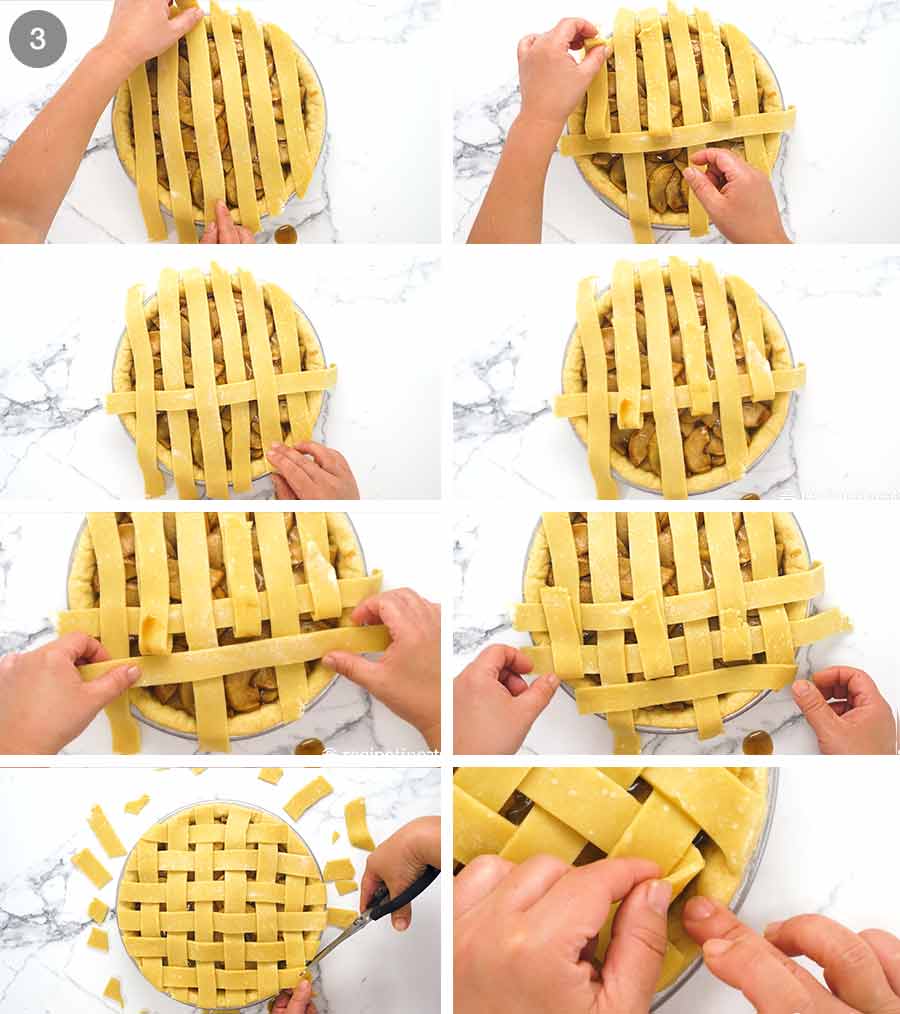
Forming the lattice – Place 6 pastry strips in the same direction on top of the filling, evenly spaced apart.
Fold back every 2nd strip to halfway. Place a strip of pastry perpendicular to the laid strips, right up the strips are folded. Now unfold the strips to return them to how they were. Next, fold up the alternative strips you didn’t fold first time around, and place another strip across the pie in the same way. Repeat with one more strip. Rotate the pie and repeat with the remaining 3 strips to do the other half of the pie. Obviously, this is a good time to watch the video to see how it’s done!
Trim excess strip pastry using scissors or a small sharp knife.
Seal by using water and pressing the strips against the crust to adhere. I find it easiest just to use my finger.
6. Bake it!
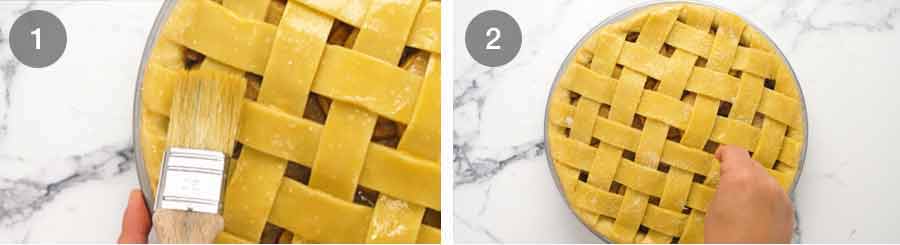
Egg wash – Brush the lattice with egg wash, taking care to avoid the cooked pie rim (else it will get overly brown). Also ensure you don’t end up with pools of egg in the lattice joins, which will be unsightly.
Sugar sprinkle – Then sprinkle with sugar. We use regular sugar and not caster/superfine so we’ll have lovely sparkly sugar crystals bejewelling our lid.

Bake for 45 minutes until the pastry is golden and you see the apple juices bubbling inside.
Cool – Fully cool for at least 3 hours before cutting to serve. If you want to serve after this, you’ll need to cut and serve it out of the pie tin because the pie will not be stable enough to turn out whole. The slices will also be a little rustic.
 Such is the nature of freshly made pies!
Neat slices – If you would prefer to serve neater slices as pictured, just refrigerate the pie overnight. It will firm up and become sturdy enough to turn out onto a plate and cut neat slices. Leaving overnight also gives the pie filling flavours a chance to meld together even more.
To then reheat, cover with foil and reheat in the oven (10 minutes at 180°C/350°F) or use the microwave for a speedy option (1 minute). And yes, the base stays crisp!
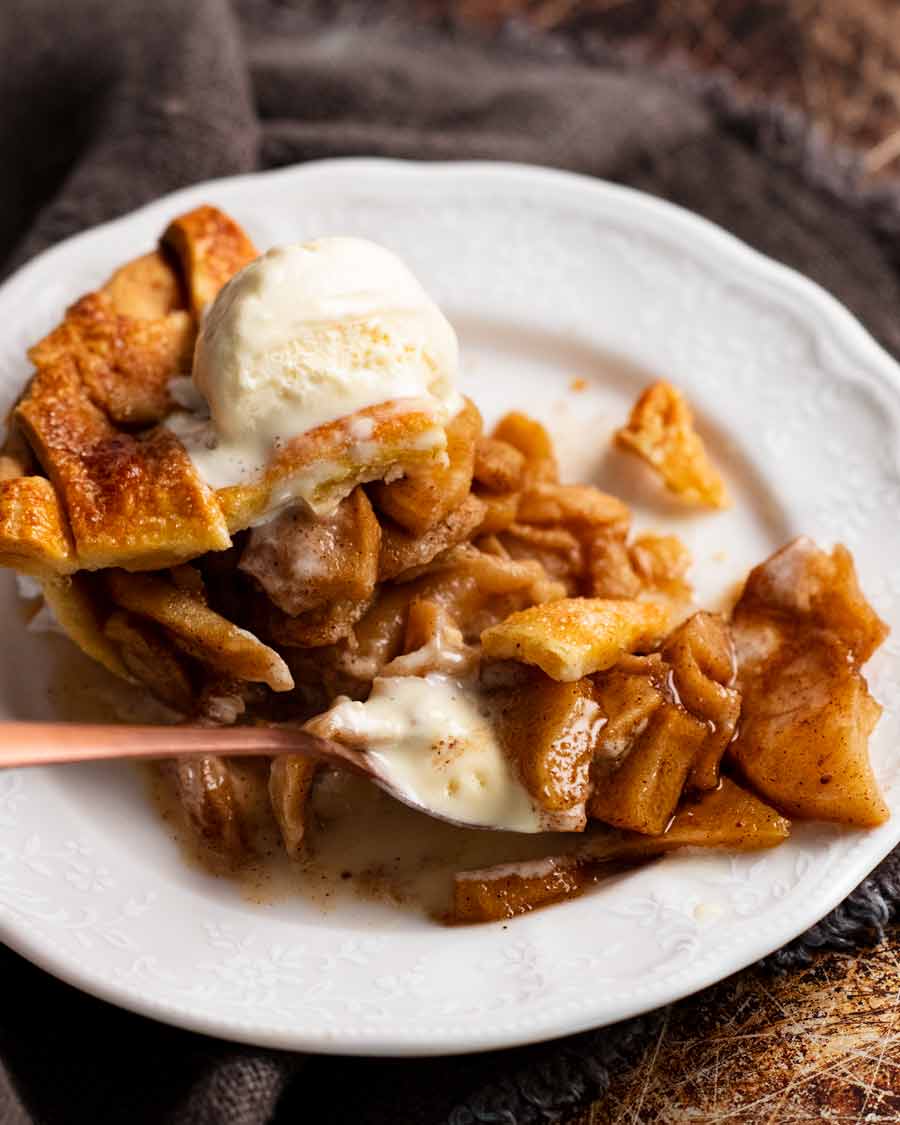
Here’s a close up of the cut apple pie after it’s rested overnight and has been reheated in the oven. It’s still nice and juicy, and cuts neatly.

Serving without vanilla ice cream is not even an option. It goes without saying – right??!! Maybe with cream too – or would that take it over the top?
And there you have it. My perfect Apple Pie! A strange time to share it perhaps, heading into Australian summer. But she cannot always choose when she will finally be happy with a recipe. Still, she is chuffed that she managed to squeeze this in just before Thanksgiving – enjoy, my American friends! – Nagi x
PS. I don’t know why I’m writing about myself in the 3rd person. Note to self: come back and fix this!
Watch how to make it
Recipe

My Perfect Apple Pie
Ingredients
- 2 x homemade shortcrust pastry this recipe, or store bought (Note 1)
- 1 egg , lightly whisked
- 2 tsp white sugar (granulate/regular, not caster/superfine), optional (Note 2)
Apple pie filling:
- 2kg/ 4 lb Granny Smith apples , cored, peeled, halved, cut into 1 cm / 1/3″ thick slices. (Note 3)
- 1 cup brown sugar
- 1 tsp ground cinnamon
- 1/2 tsp ground ginger
- 1/4 tsp ground nutmeg
- 3/4 tsp cooking/kosher salt
- 1 tsp unsalted butter
Serving
- Vanilla ice cream, cream
Instructions
Pie crust:
- Shortcrust: Make a double batch of my shortcrust pastry recipe. Form the dough discs, wrap and refrigerate per the recipe.
- Line tin: Roll out one dough just large enough to fit a 23cm/9" metal pie tin, following directions in the shortcrust recipe. You want the base relatively thick so it's sturdy. Trim off excess pastry, prick the base 30 times with a fork (don't pierce through).
- Freeze (Note 4): Cover with cling wrap and freeze for 2 hours.
- While crust is freezing, make apple filling. Then continue with pie crust steps.
- Preheat oven to 200°C / 400°F (180°C fan).
- Blind bake (Note 5): Place two large sheets of baking/parchment paper in a "X" over the pie tin then fill with baking beads (Note 4). Bake 25 minutes.
- Egg wash (Note 5): Remove from oven. Use paper excess to remove beads into a bowl. Brush base and sides (not rim) lightly with whisked egg. Return crust to oven for 5 minutes.
- Cool: Crust should be light golden and look fully cooked. Cool 15 minutes before filling.
Lattice (Note 6 for full lid):
- Remove remaining dough from fridge 30 minutes prior. Roll out to 3 mm / 1/8" thick and cut into 12 x 2.5cm/1" strips. Transfer to board, cover with cling wrap and refrigerate until required.
Apple Pie Filling:
- Preheat oven to 180°C / 350°F (160°C fan).
- Spice mix: Mix the sugar, cinnamon, ginger, nutmeg and salt in a bowl.
- Toss: In a large bowl, sprinkle spice mix over apple slices. Toss well with hands, separating pieces that are stuck together.
- Bake: Spread across 2 large trays. Bake until soft but still holding form – check first at 15 min, and every 5 mins thereafter (mine take 40 min – Note 7). Do not stir or rotate trays.
- Drain off juices: Remove trays from oven. Using a spatula to hold the apples back, pour apple juices into a saucepan (drain off what you can, you don't need every drop).
- Cool apple: Leave apple slices to cool on the tray, about 15 minutes.
- Apple syrup: Add butter to apple juice saucepan and simmer on low heat until it reduces to 1/3 cup (80 ml), becoming syrupy. This might take 1 minute if you didn't start with much juices, or 3 – 5 minutes if you started with 1/2 cup or more juices. Remove from stove and let cool.
Assemble and bake:
- Turn oven up to 200°C/400°F (180°C fan).
- Fill: Use a spatula or egg flip to scoop up apple slices. Fill the pie crust with 2/3 of the apples, gently pressing out air pockets. Then arrange the remaining apples on top so they mound slightly at the centre. Pour apple syrup over the slices and any residual juices from the baking trays.
- Pastry lattice or lid: Top with pastry lattice – see in post for my method. Trim excess, and press to adhere on to pie crust rim using water to seal. Brush lattice with egg wash (avoid the pie rim else it will over-brown there), ensuring you don't get pools of egg in the joins. Sprinkle with sugar.
- Bake 45 minutes or until the pastry is golden and you see the syrup bubbling through the lattice.
- Serving fresh: Cool at least 3 hours before cutting to serve!
- Option for neat slices: After cooling, refrigerate overnight. Turn pie out of pie dish (it's sturdy enough once cooled). Then you can cut neat slices. Place on a tray, cover with foil and reheat for 10 minutes in a 180°C/350°F oven (or microwave in emergency!).
- In either case serve with vanilla ice cream, always!
Notes
Nutrition
.
Life of Dozer
That time he came to a book signing and he dribbled on one of the books……. 🙀🙀🙀


The post My Perfect Apple Pie appeared first on RecipeTin Eats.
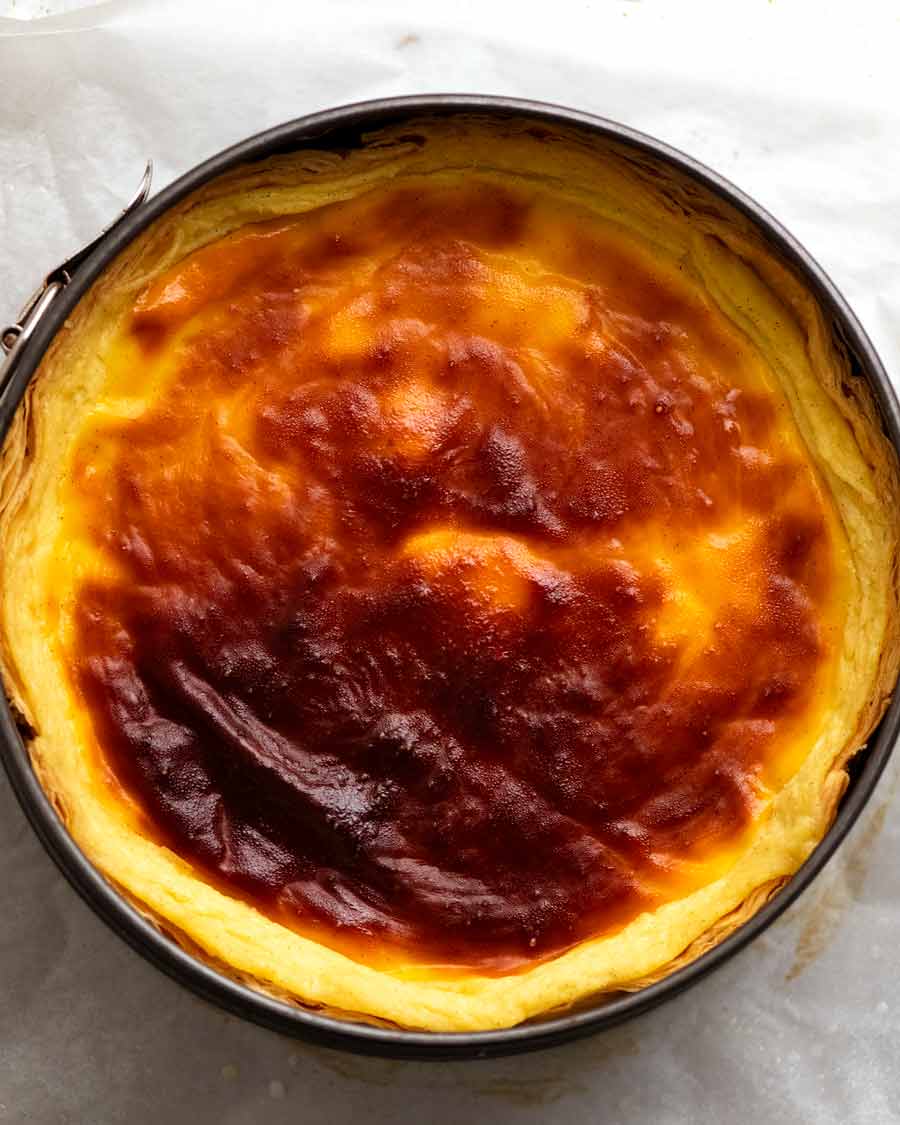
]]> Introducing the world’s greatest custard tart: Flan Pâtissier! Also known as Parisian Flan, this incredible French tart is like a gigantic Portuguese Tart. It’s a flaky pastry crust filled with a wicked amount of creamy and rich vanilla custard that glows with a gorgeous bronze sheen after baking. To say this thing is magnificent would... Get the Recipe
The post Flan Pâtissier (French Custard Tart) appeared first on RecipeTin Eats.
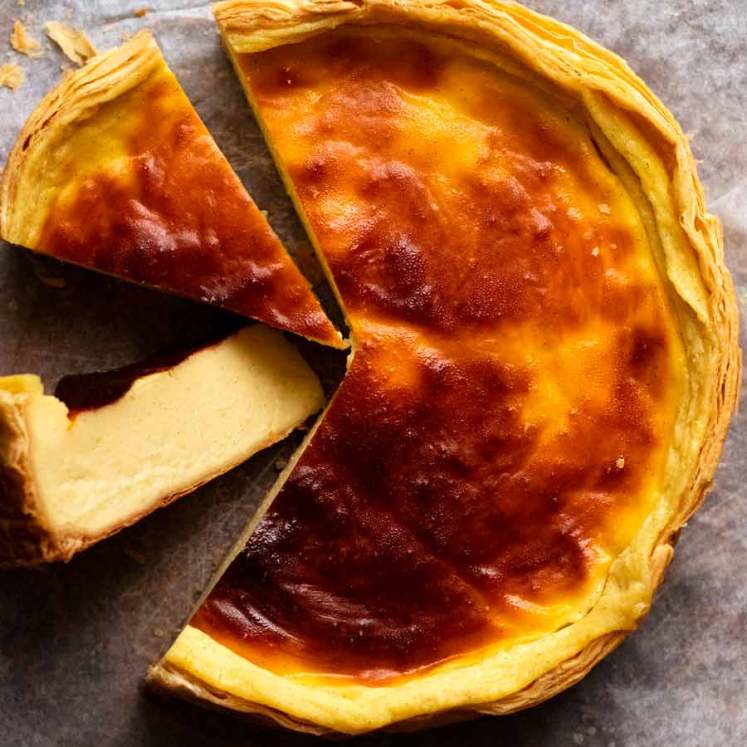
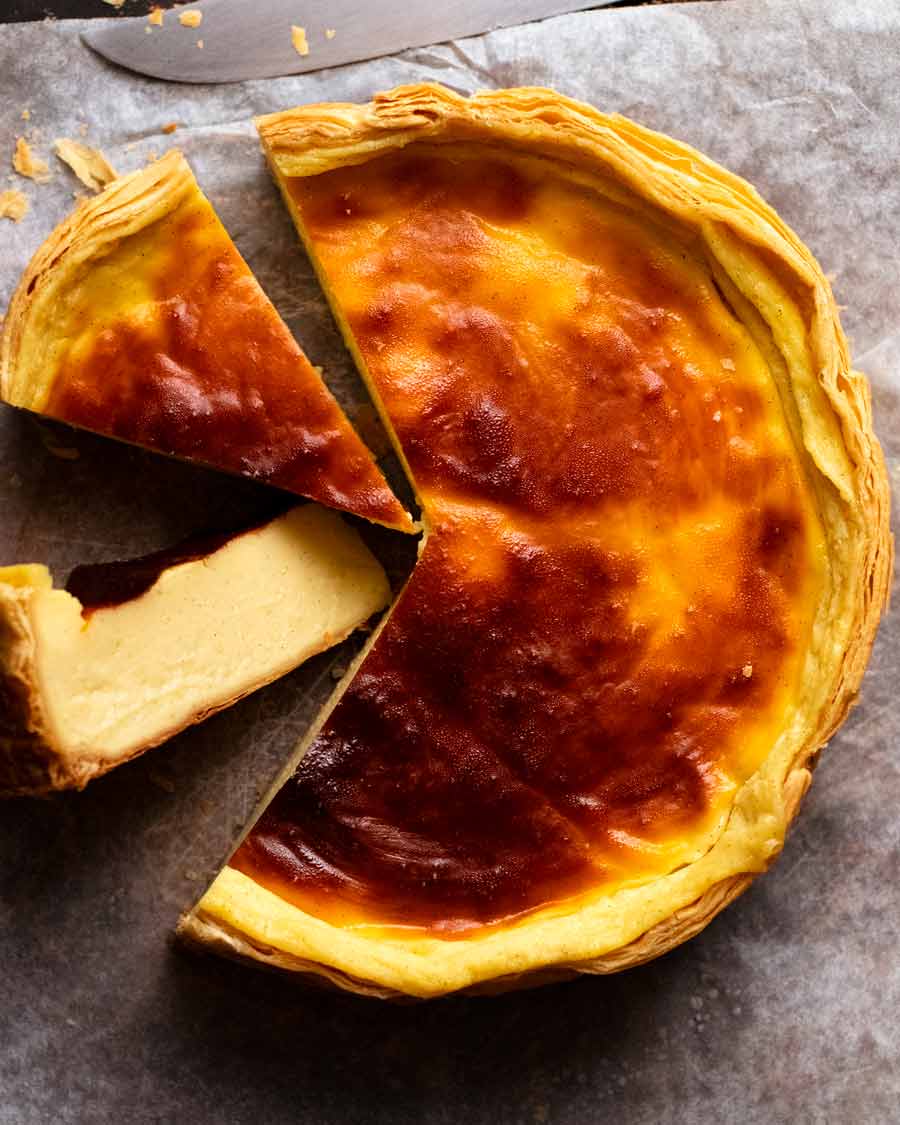
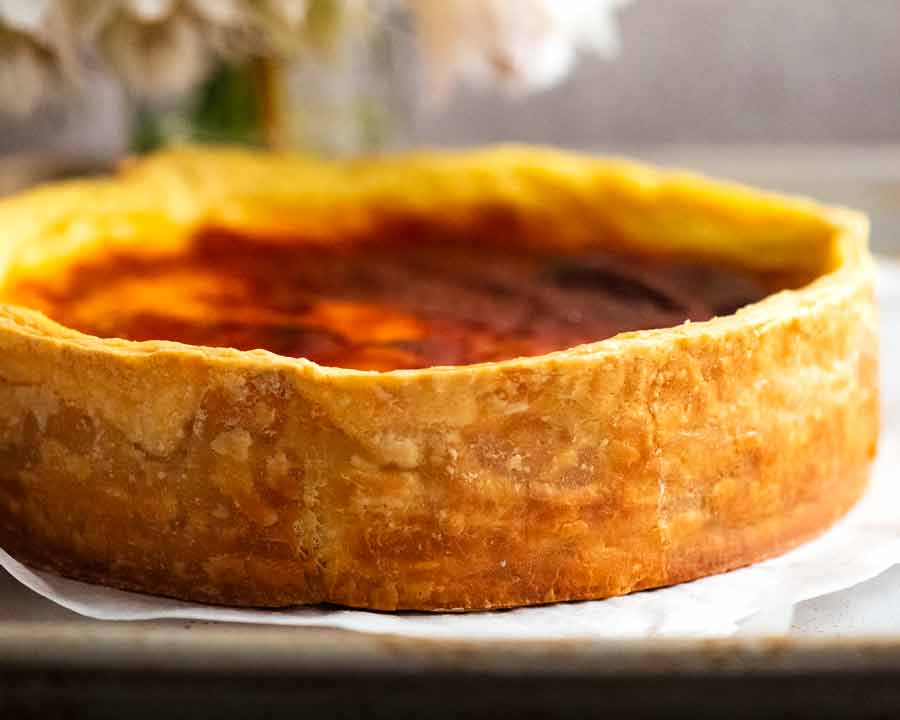
]]>Introducing the world’s greatest custard tart: Flan Pâtissier! Also known as Parisian Flan, this incredible French tart is like a gigantic Portuguese Tart. It’s a flaky pastry crust filled with a wicked amount of creamy and rich vanilla custard that glows with a gorgeous bronze sheen after baking.
To say this thing is magnificent would be the understatement of the year. Words fail me. It’s that good!
Flan Pâtissier – French Custard Tart
Flan Pâtissier is a French custard tart that is made with a pastry crust filled with vanilla custard and baked.
Also known as Parisian Flan, you’ll find it in every suburban bakery all across France. It blows my mind to know that this pastry is so commonplace for the French that to them it’s considered no big deal as far as pastries go. To this Aussie lass, it is a big deal. It is phenomenally good. Indescribably great. My dessert discovery of the year.
Given especially that it’s a rare find in Australia, I was determined to crack the recipe. With the valuable help of a professional French pastry chef Jennifer Pogmore, I’m happy to report success!
Everyone who has tried the 20+ versions we churned out developing the recipe has loved it. They can’t get enough of it.
This is one of those recipes I’m so personally proud of because I worked hard to perfect it and do the original justice. And I’m thrilled to be sharing it with you!
About Flan Pâtissier
The custard used for Flan Pâtissier is Creme Patissiere, a rich and creamy vanilla custard used in many desserts in France. It gets its richness from egg yolks which, combined with cornflour/cornstarch, is what makes it set to a perfect consistency such that it can be sliced neatly but melts in your mouth when you eat it.
Chef Jennifer Pogmore tells me there are no hard rules in France about the type of pastry used for the Flan Pâtissier crust, it just comes down to the pastry chef making it. In both boulangeries (French bakeries) and patisseries, Pâte Sucrée (French sweet tart crust) is quite common, as is shortcrust and puff pastry.
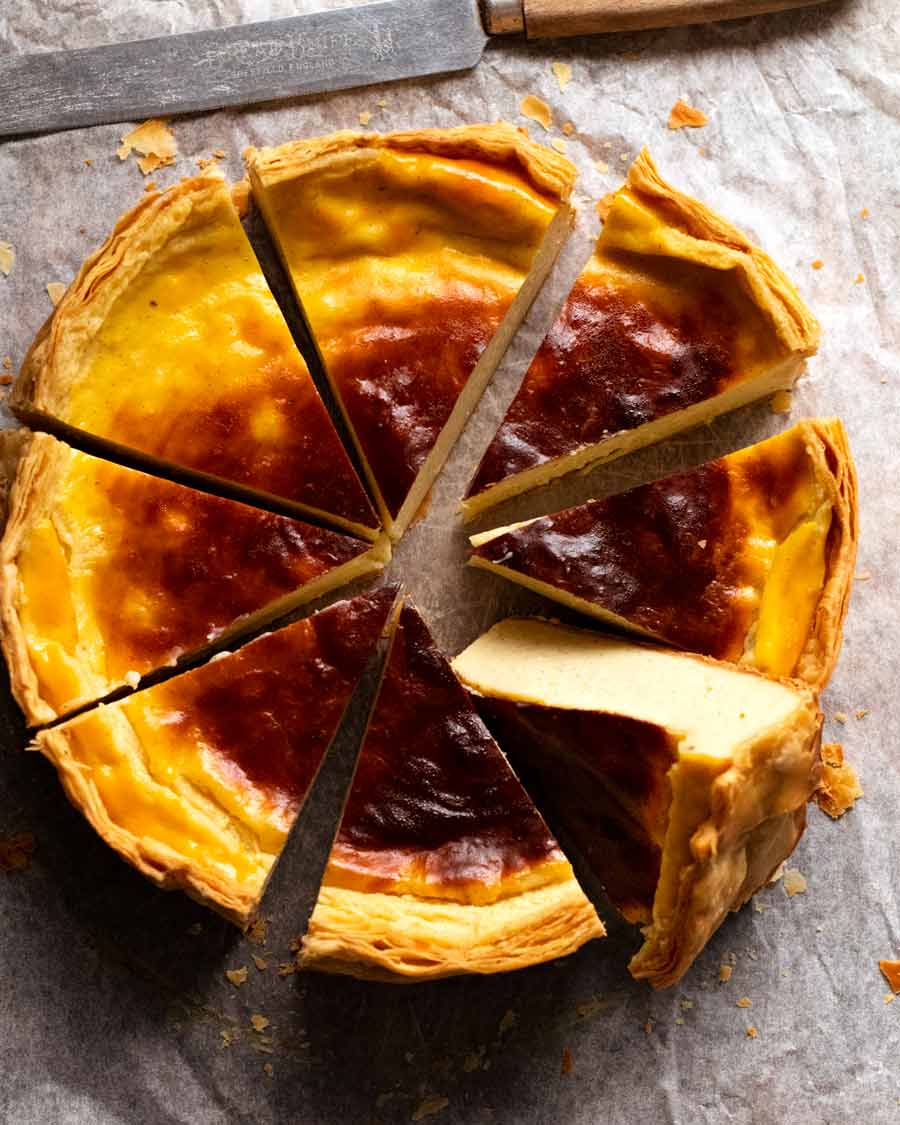
I tried them all. But for me, I can’t look past puff pastry. The contrast of the fine, flaky, buttery pastry with the rich creamy custard just knocks this tart out of the park. And it LOOKS so good too!
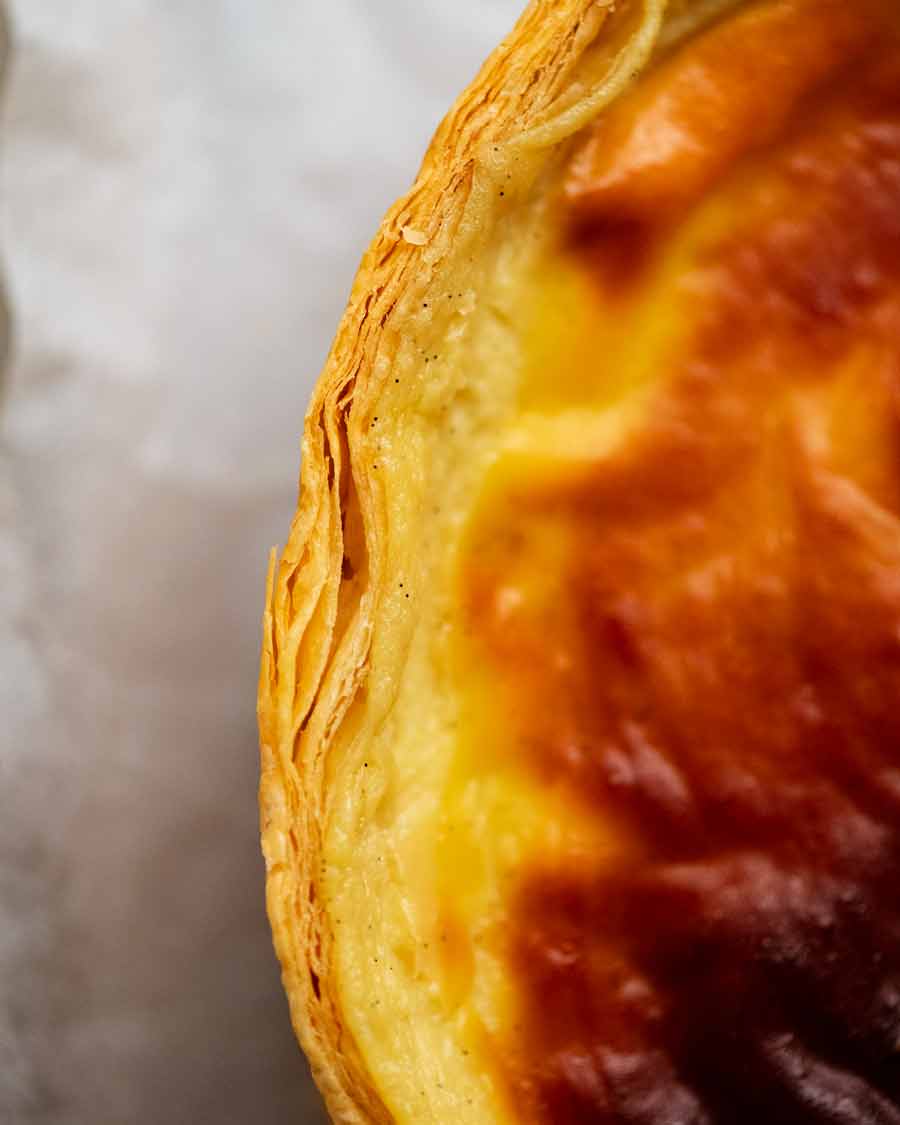
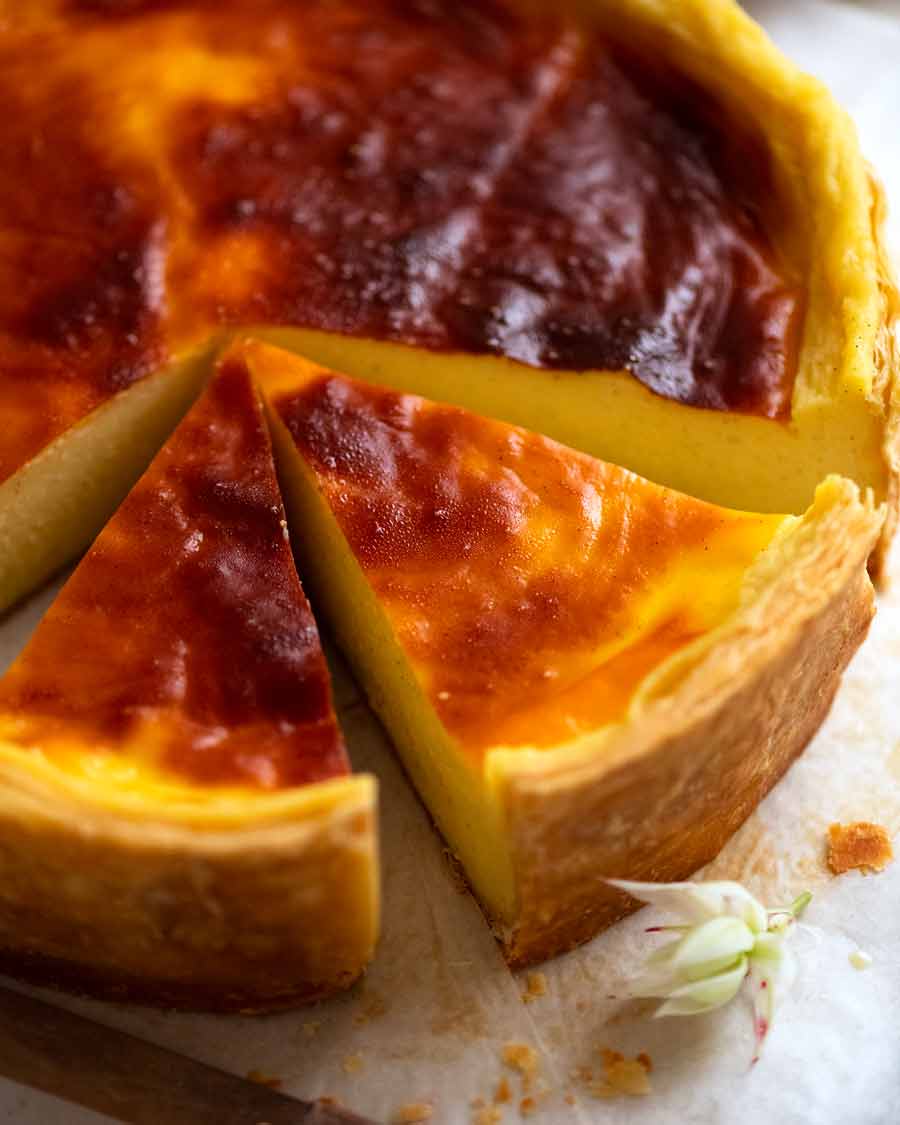
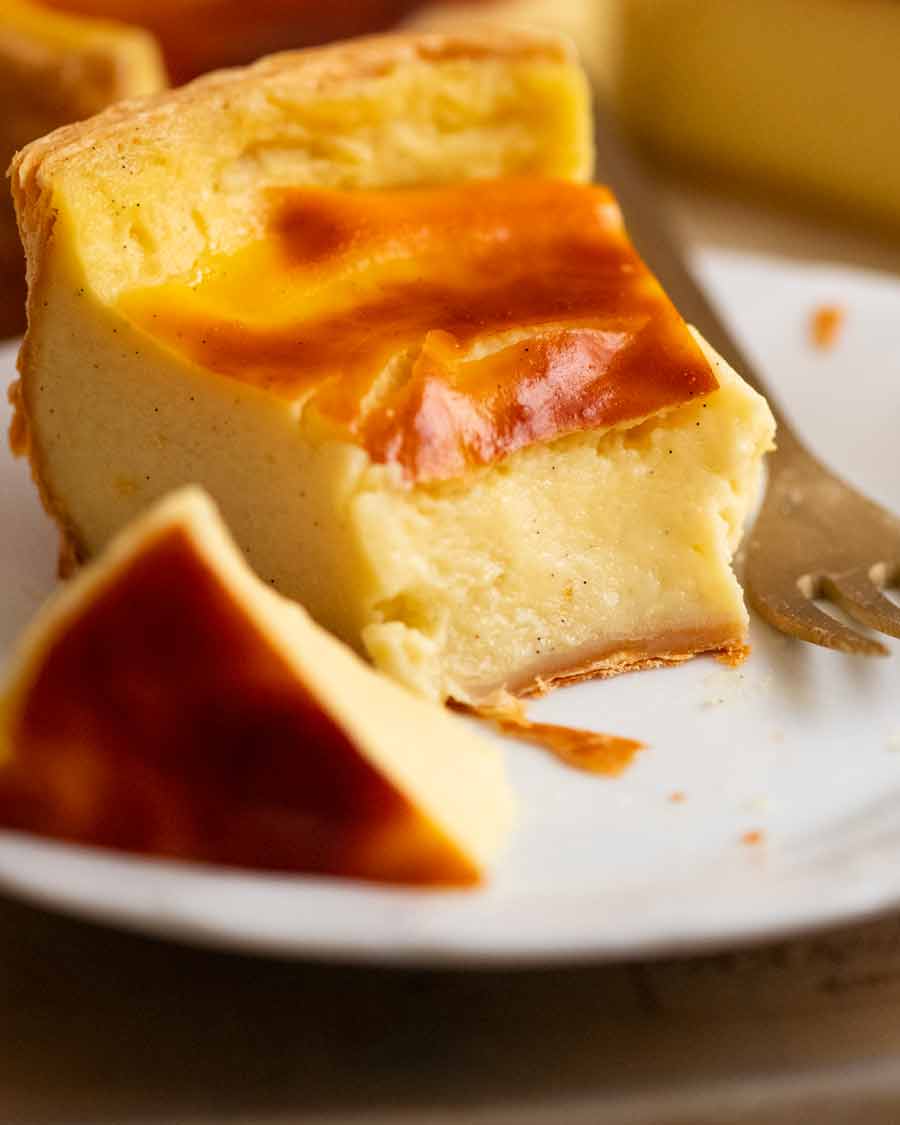
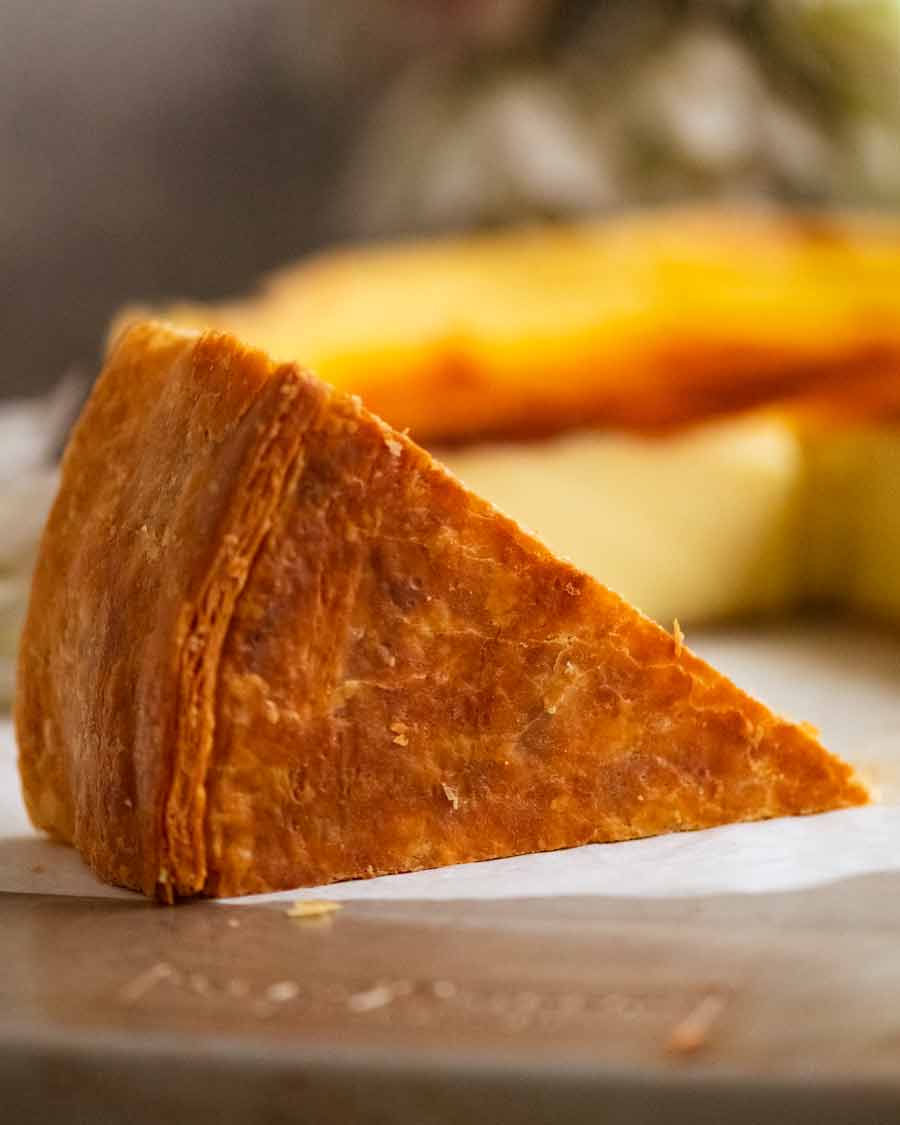
Crispy base!!
You’ll love how the base comes out perfectly crispy in this recipe. Here’s a couple of photos so you can inspect them closely and see for yourself!! Not a patch of sogginess in sight:
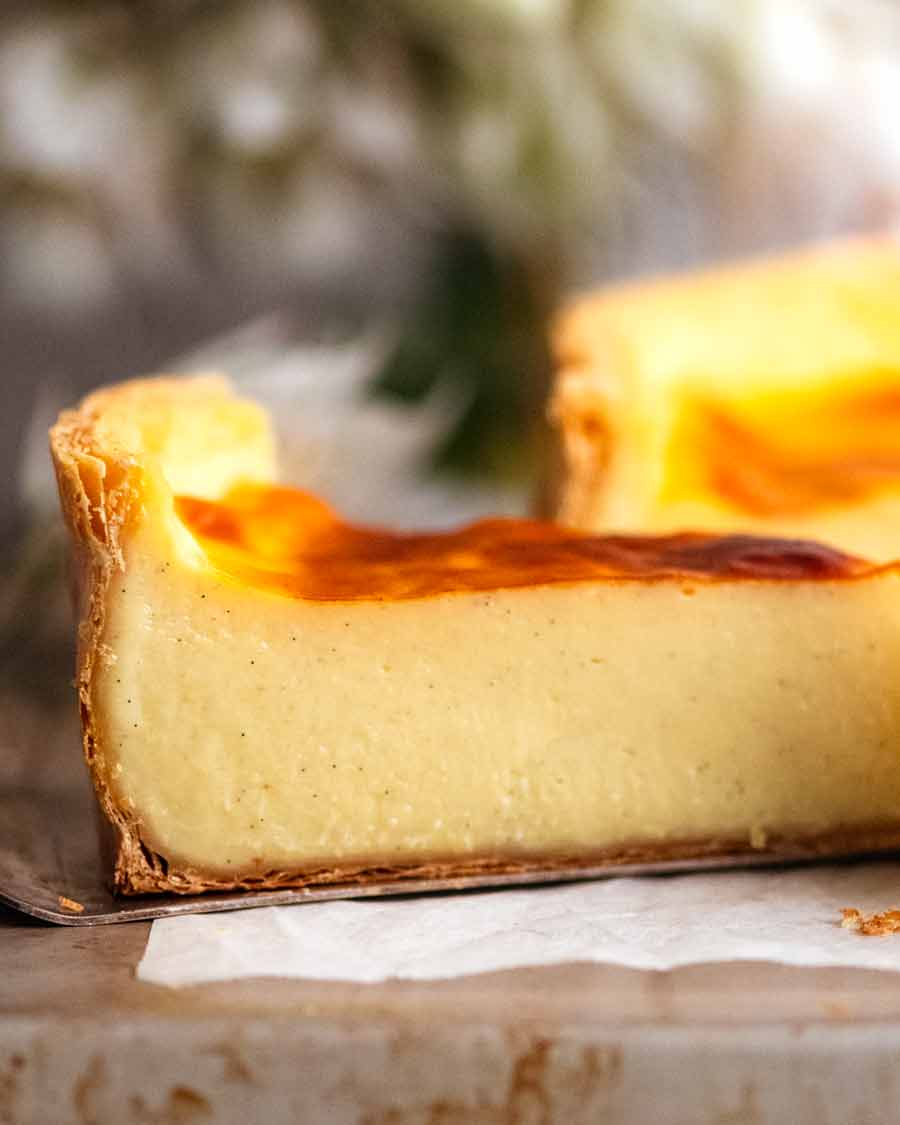
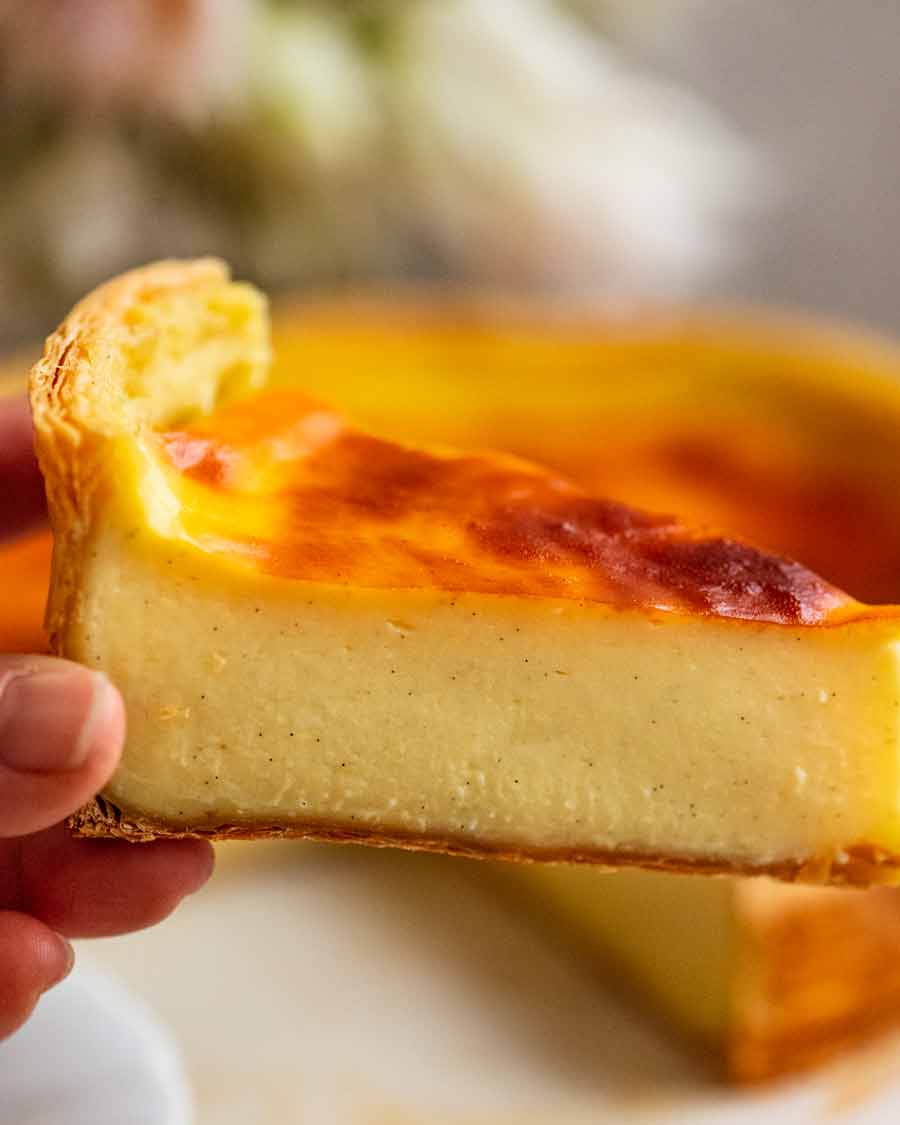
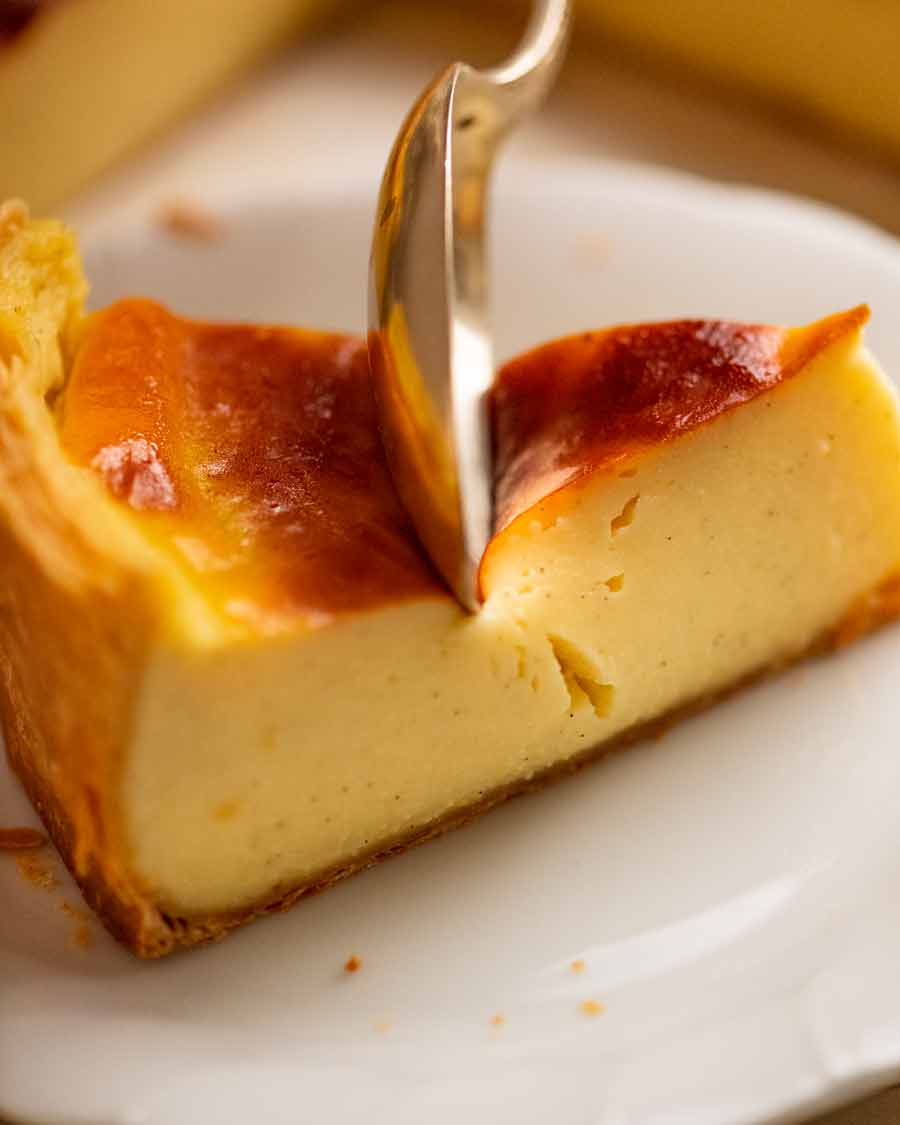
It’s even crisp enough so you can hold the slice cantilevered in your hand. This is by design, because that’s exactly how Flan Pâtissier is supposed to be eaten!
Heads up: This is a long post!
While the idea of making Flan Pâtissier sounds deceptively easy – blind bake a puff pastry crust, fill it with custard and bake it! – the devil is in the detail. This especially applies to those who are not so confident at baking, or are custard first-timers.
To this end I’m sharing quite a lot of information in this post, to ensure success for you whether you are an old hand or new to baking.
If you are a capable baker, feel free to skip all the detail below and jump right to the recipe or recipe video!
Custard for Flan Pâtissier: Creme Patissiere
The custard for Flan Pâtissier is Creme Patissiere, a creamy vanilla custard that is used in many French desserts.
While exact recipes for Creme Patissiere vary depending on the intended use (ie. baked vs not baked; required viscosity for pouring vs piping vs filling vs spreading etc), the base ingredients are almost always the same:
Eggs – Mostly yolks, for richness and also to help set the custard.
Leftover egg whites – Here’s my list of what I do with them and all my egg white recipes can be found in this recipe collection.
Cornflour/cornstarch – For setting the custard and making it shiny (regular flour makes it dull). Attention FRENCH READERS: Do not use yellow cornflour, use white cornstarch!
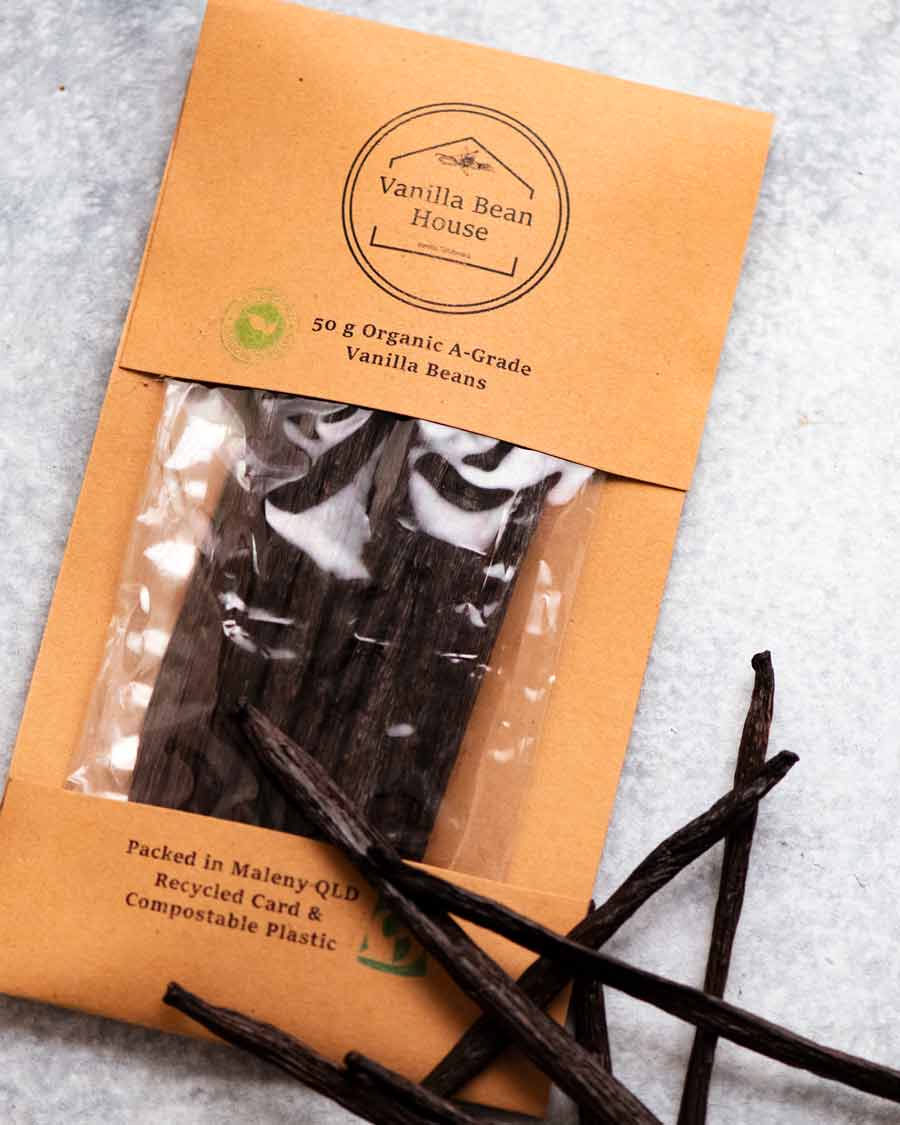
Vanilla beans – For a beautiful vanilla flavour. I used vanilla beans from Vanilla Bean House (Australian online store) – plump and filled with a generous amount of vanilla seeds! Vanilla bean paste is a good substitute here.
Sugar – For sweetness. But not excessive sweetness! One of the things I adore about French desserts is that they are far less sweet than other typical Western desserts.
Milk – The liquid for custard. Some recipes also use cream, for added richness. I prefer the mouthfeel of milk enriched with butter.
Butter – As above, to enrich the custard.
1. How to make the custard for Flan Pâtissier
The custard for Flan Pâtissier uses both egg and cornflour to set it. There’s an ideal balance of the two that will achieve the right richness and set consistency so the tart can be cut into neat slices, yet the custard melts in your mouth when you eat it. I tried quite a few combinations before landing on what I think is the perfect balance!
Infuse milk with vanilla
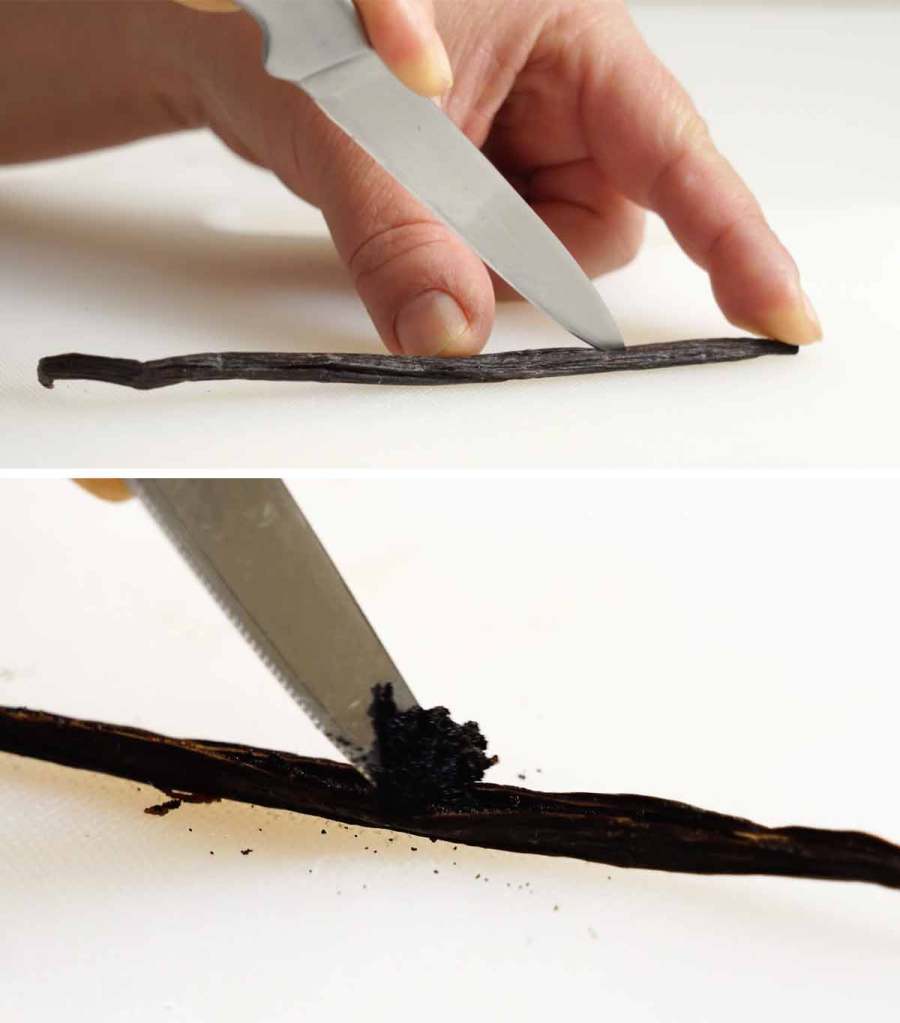
Heat milk with 1/4 cup of sugar*, vanilla seeds and the leftover vanilla pods (see video for how I scrape the seeds out). Bring it to just below a boil. As soon as you see the milk starting to foam and rise, remove it straight from the stove.
TIP: Keep an eye on it as the milk starts to get hot because milk loves to boil over quite quickly!
* Adding a bit of sugar in this step helps to ensure the milk doesn’t scald on the base.
Infuse – Place the lid on (to prevent a skin from forming and loss of volume through evaporation) and leave for 10 minutes. This gives the milk time to be infused with the vanilla flavour as well as to cool slightly which eliminates any risk of hot milk accidentally scrambling the eggs in the next steps.
Eggs and cornflour mixture (thickening)
Eggs and cornflour (cornstarch) – Whisk the egg yolks, whole egg and sugar together until combined. Then whisk the cornflour in. It’s best to whisk eggs and sugar first before adding cornflour else you end up with a flurry of flour!
Slowly add half milk (tempering) – While whisking, slowly pour in half the milk. Just whisk until combined.
Don’t worry, there’s no risk of accidentally scrambling the eggs with the hot milk because it cooled in the 10 minutes we left it to infuse with the vanilla! However we still temper the mixtures in this step as an extra layer of safety.
Cook custard to thicken

Thicken custard on stove – Pour the egg/milk mixture into the saucepan with the remaining hot milk mixture. Then place it on a medium-low stove (or low, if your stove is strong), whisking constantly but leisurely, to ensure the base doesn’t catch. At first the mixture will be watery but after about 2 to 3 minutes as the it starts to heat up, you will suddenly feel the custard starting to thicken. Such a satisfying moment!!
Big lazy bubbles – Once the custard starts thickening, the next thing you are looking for is big, fat lazy bubbles popping up on the surface which indicates the custard is thick enough. Pause stirring for a few seconds to check if you have bubbles (see video).
20 seconds whisking – Once you see the lazy bubbles, keep whisking for another 20 seconds on the stove, then remove it from the heat.
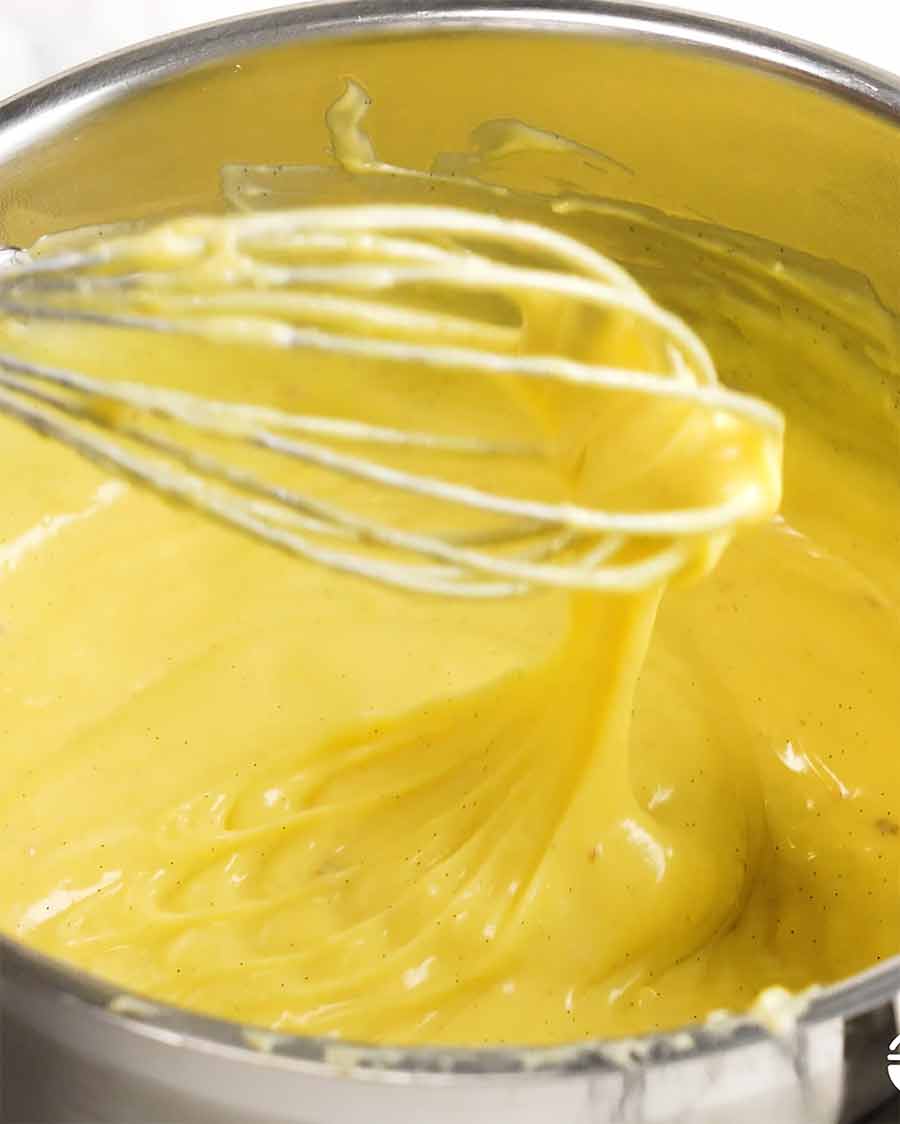
Thick and creamy custard! This photo shows how the custard should look at this stage: Thick and creamy, it should leave ribbons on the surface when drizzled but still be pourable (see below for good visuals, or video).
Butter, straining and cooling
Enrich with butter – This is a FRENCH custard tart, so it should come as no surprise that we’re sneaking some butter in here to enrich the custard!
Strain – Pass the custard through a fine mesh strainer. This is to remove any larger chunks of vanilla that were loosened from the beans.
Press through all the custard and be sure to scrape the base of the strainer well. Then lick that spatula clean. Yes that’s an instruction – don’t waste a drop of that precious custard! 😂
Custard thickness – This is what the custard should look like at this stage. You can tell by looking at the surface how the custard is thick and creamy.
Cooling custard
Cover – Smooth the surface of the custard (I use a small offset spatula) then cover with cling wrap contacting the surface. Doing this prevents a skin from forming on the custard (nobody wants wisps of skin in their otherwise silky smooth custard!) as well as condensation, which will dilute the richness of the custard.
Cool – Let the custard cool on the counter (about 3 to 4 hours) before putting it in the fridge to fully chill.
12 – 24 hours in fridge recommended – Refrigerating the custard overnight will allow for optimal flavour development (a pro tip from professional French pastry chef!). But if you are in a hurry, you can proceed with the recipe as soon as the custard has cooled to room temperature, ie. skip the fridge time. To be honest, I don’t think most people will be able to tell the difference. But I wanted to share this recipe made the proper way!
Custard done, now it’s on to the pastry!
2. Flan Pâtissier puff pastry crust
As noted at the beginning, there’s no hard and fast rule about what crust should be used for a traditional Flan Pâtissier, though Pâte Sucrée (French sweet tart crust) and puff pastry seem to be the most common. For me, I can’t go past puff pastry for the delicious contrast of buttery, flaky pastry and the creamy, silky custard.
These days, store-bought puff pastry is actually quite good quality. Even the standard brands we find at grocery stores here in Australia such as Pampas are perfectly acceptable.
My only rule however is it must be butter puff pastry. Butter has much better flavour and puffs up better than the cheaper margarine/oil-based puff pastry! It’s absolutely worth the extra coin.
Best pan: Springform cake pan with no base
The best way to make the crust for Flan Pâtissier using puff pastry is to use a springform pan WITHOUT the base. We’re going to bake it directly on the tray which is the trick that ensures the base is 100% crispy once filled with custard – this is a big part of the awesomeness that is Flan Pâtissier!
Note: Professional pâtissiers and pastry chefs use tall tart rings which are purpose-built rings without a base. A springform pan ring works just as well for this recipe.
Cut base and sides
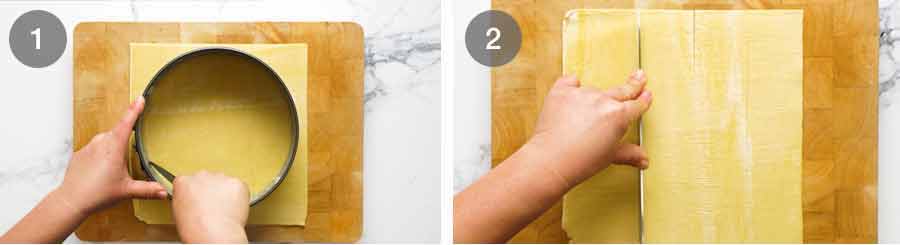
TIP: Work with puff pastry that has thawed just enough that it’s still stiff but workable, and JUST pliable enough to line the springform pan. This is for ease of handling for this tart which has unusually high sides. Fully thawed puff pastry = floppy and sticky = impossible to line the tin sides and very messy to fit the base in.
Cut base using the inside of the springform pan as a guide. Remove excess pastry but SAVE IT in case we need to do emergency patch ups later! Then place the base in the freezer until required.
Cut sides – Cut three 5.5 x 25 cm (2.15 x 10″) strips out of a sheet of puff pastry, ensuring it is still as frozen as workably possible so it doesn’t flop when you line the sides.
TIP: Using a long knife, cut straight down into the pastry rather than slicing by dragging the knife along the pastry. This will preserve the beautifully flaky layers on the rim of the crust, like pictured in this post.
Line sides
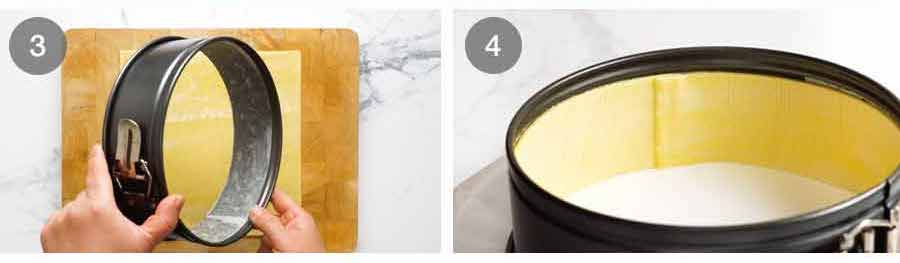
Line springform pan with baking paper – Grease a 20cm / 8″ springform pan ring with butter then line the inner sides with baking paper cut to size. Place the ring on a sheet of baking paper sitting a plate. This is for ease of handling because we are not using the springform pan base. Baking the puff pastry shell directly on a tray guarantees the base remains 100% crispy once filled with the custard.
Baking paper actually isn’t essential, you could just butter or spray the sides with oil. However, the puff pastry tends to look more rustic (ie. flaky rather than neater) if you skip the baking paper.
Line sides with pastry – Line the inner sides of the springform pan with the pastry, overlapping by 1cm and using water to seal. You will need to trim the third strip so it fits.
Remember, work with stiff but just-pliable puff pastry else the sides will flop!
Press seams – At this stage, just press the seams; we will seal it properly later. Right now, we want to work fast while the pastry is still as frozen as possible.
Base
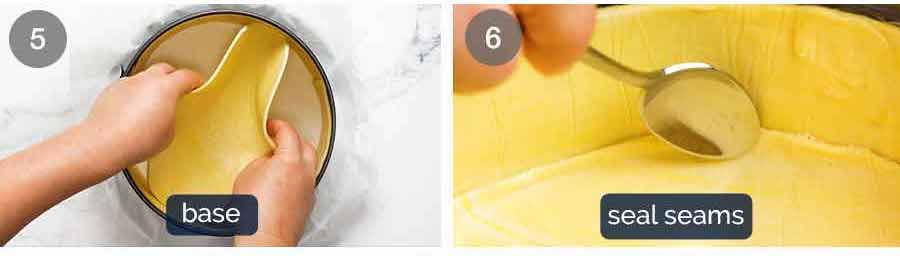
Place base in by gathering it up slightly so it doesn’t drag down the sides. Adjust as needed to centre it as best you can. The circumference of the base will overlap and go up the sides ever so slightly, which is the perfect insurance policy to avoid custard leakage.
Seal seams – Use the back of a teaspoon to press the base into the corners, then to “smear” the now-thawing puff pastry to seal it. Do this for the base and the sides.
Prick and freeze
Prick base with a fork about 30 times. This helps to stop the base from puffing up when we do the blind bake.
Freeze – Cover with cling wrap (with tart still sitting on the plate) then freeze for at least 2 hours. The purpose of freezing is to help reduce shrinkage when blind baking and also to help stop the tall puff pastry sides sliding down as it cooks.
The bonus is that the firmed crust doesn’t get all scratched up and dented when we line with paper and fill with baking beads to blind bake!
Blind baking the crust
Blind baking is an essential step to ensure that the crust bakes up nice and crispy. Nobody wants a soggy crust with their custard tart!!
Bake with baking beads 25 minutes – The first bake is weighed down with baking beads to set the pastry sides so they don’t flop inwards. We bake in a hot oven of 220°C/430·F (200°C fan) which works better when baking from a frozen state.
Filling with baking beads – Remove the fully frozen crust from the freezer. Tear off 2 x 60cm / 2 foot-long sheets of baking paper (parchment paper) then scrunch them up in your hands. This makes it easier to fit inside this taller than usual pastry.
Lay one sheet of paper on top of the other but perpendicular to it (ie. in a “X”) inside the crust shell. Then fill with baking beads or dried beans* right up to 1cm below the rim of the pastry. Gently but firmly press the beads down and outwards to ensure it is pressed into the corners and against the springform pan walls to help ensure the pastry sides set properly without flopping inwards.
No baking beads? Large dried beans work almost as well. They do not conduct heat as well as purpose-made baking beads and they are a little lighter. So the pastry does shrink a little more but it’s not significant. Avoid using rice, lentils or other small dried things that other recipes say are ok to use. Their small size means they pack together too densely, blocking heat from getting through to the inside of the pastry so the sides don’t set properly. (A lesson I learned the hard way!)
Remove baking beads – After 25 minutes, remove the crust from the oven. Grip the paper overhangs and lift, taking the baking beads with the paper. Do this step slowly so you can check to see if the sides start to flop in (eg if your oven runs a bit cool). If they do, leave the baking beads in and bake for a further 5 minutes.
Take care during this step – nobody wants sizzling hot little beads bouncing all over their kitchen floor … sounds terribly dangerous! I pour the beads straight into a metal bowl to cool.
Bake 5 minutes uncovered – Once the baking beads are removed, return crust to oven for a further 5 minutes.
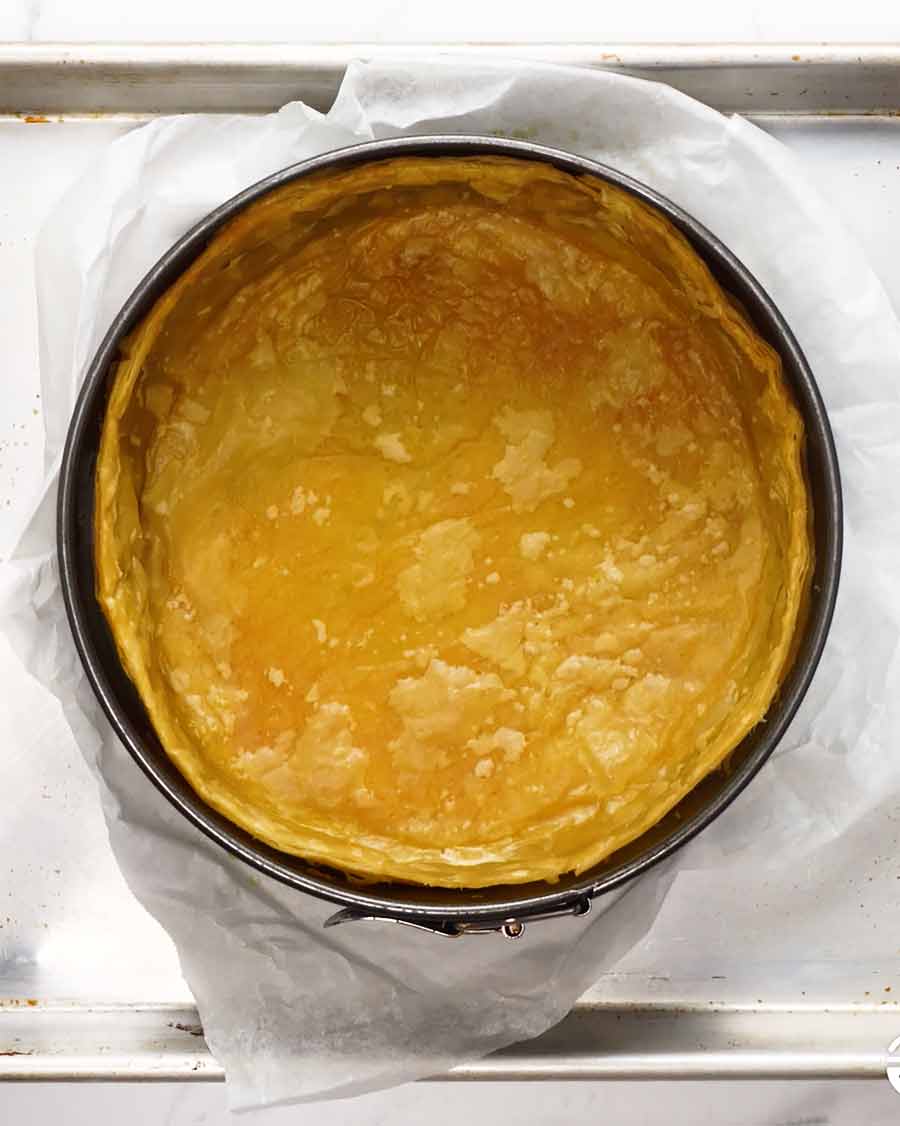
Cool 10 minutes – Remove the crust from the oven. You will see that the surface is dry but the pastry is still a bit undercooked. That’s exactly what we want – it’s partially cooked, ie. Cooked enough so it won’t go soggy once the custard is poured in but undercooked enough so we don’t end up with a burnt, dry pastry crust.
Cool for 10 minutes. Again, this is just an extra crispy-base insurance policy.
Baking the Flan Pâtissier
We are on the home stretch here! So close are we to be able to taste the magic that is Flan Pâtissier!
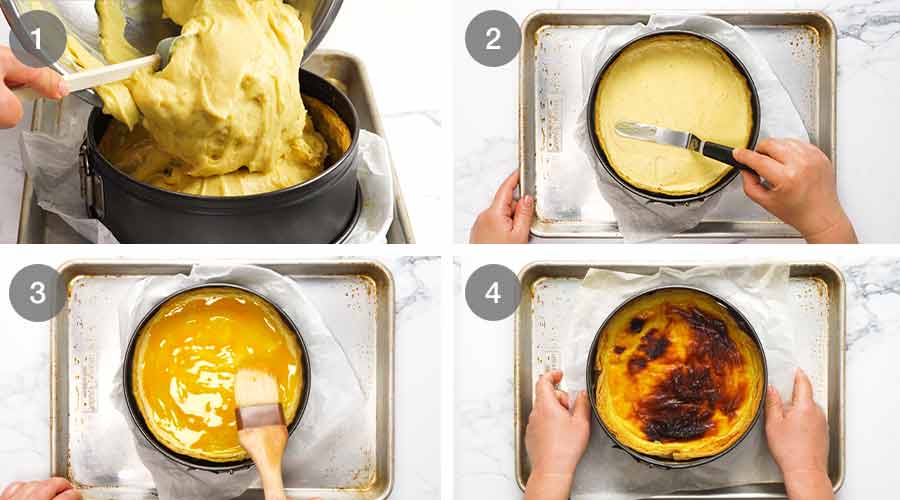
Fill with custard – Remove the chilled custard from the fridge and whisk to loosen. Then fill the pastry crust. Fill to 1cm / 0.4″ below the rim else it will overflow when it bakes.
Leftover custard? The recipe makes the right amount of custard assuming you had no pastry shrinkage or the sides did not slouch when you blind baked your pastry crust. If yours did shrink a bit – and for most people, I expect that it will – then you may have custard leftover. Ideas to use up: as a general-purpose dolloping custard on anything; make mini custard tarts using puff pastry scraps (20 minute bake at 180°C/350°F); fill ramekins and bake; or simply eat with a spoon!
Smooth custard surface using an offset spatula or spoon.
Egg yolk – Brush the surface gently with egg yolk, taking care not to break the surface. This is how we get that gorgeous, signature bronzing on the surface of the Flan Pâtissier.
Bake 65 minutes, fridge 6 hours – Bake 65 minutes at 200°C/390°F (180°C fan), rotating the tray at 45 minutes. The custard will still be VERY wobbly, borderline watery. Have faith! It will set when refrigerated.
Cool on the counter for 4 to 5 hours, then loosely cover and refrigerate for 6 hours+ in the springform pan. It’s important to fully cool to room temperature before refrigerating or condensation will compromise the crispiness of the puff pastry.
And with that, WE ARE DONE!! Time to devour this custardy masterpiece!!
Phew! I know this was a big knowledge dump. But as I explained earlier, I wanted to provide enough information so even less experienced bakers can feel confident enough to make it.
And honestly? Having made this over 20 times in the last few months, I can say this for sure: The only thing that can really go wrong is that the custard doesn’t set so it gloops everywhere when you cut into it. The only way that can happen is if you mis-measure the custard ingredients, if your oven runs cooler than the temperature dial says (I recommend you use an oven thermometer if you have any doubts) or if you do not refrigerate the cooked Flan Patissier to allow it to set.
Even lamentable pastry work can be salvaged from potential custard leakage issues by plugging holes with leftover pastry!
As for everything else, it’s a walk in the park. OK sure, your pastry shell might look a little more rustic than mine. I certainly had my fair share of more rustic-looking crusts on this journey! But that doesn’t affect flavour or the eating experience at all.
And that, my friends, is just about all I can think of that could possibly go wrong.
So really, don’t let the length of the recipe card daunt you. The detail is there to guide you through this. It might take you longer than you expect. But I promise, it really is not that hard.
And it is so, so worth it! – Nagi x
Watch how to make it
Video error! Once the empty pastry crust is baked, it just needs to cool for 10 minutes. It does NOT need to go in the fridge for 6 hours. Oops, sorry, I will replace the video shortly. Follow the written recipe please!
Flan Pâtissier (French Custard Tart)
Ingredients
Creme Patissiere:
- 1 litre / 1 quart milk , full fat
- 2 vanilla beans , seeds scraped, beans reserved (Note 1)
- 1 cup caster sugar , separated
- 120g / 4.2 oz egg yolks (~6 to 7 large eggs, 100 ml, Note 2)
- 1 large egg (55 – 60g / 2 oz)
- 7 tbsp (70g) cornflour/cornstarch (scoop and level, Note 3)
- 50g (5 tbsp) unsalted butter , cut into 1cm cubes (cold)
Pastry:
- 2 sheets butter puff pastry, FROZEN (25cm / 10" squares, 185g/6oz each) (Note 4)
- 1 egg yolk , whisked
- Butter , for greasing
Instructions
Creme Patissiere:
- Infuse milk: Place milk, vanilla seeds, used beans and 50g (1/4 cup) sugar in a large saucepan over medium high heat. Bring to just before boiling, stirring to dissolve the sugar. Remove from heat, place lid on and leave to steep for 10 minutes.
- Yolk mixture: Meanwhile, place egg yolks, egg and remaining sugar in a large bowl and whisk to combine. Add cornflour and whisk until smooth.
- Temper eggs: While whisking the eggs, slowly pour in about half the milk in a thin stream. Whisk until combined.
- Thicken custard: Pour the egg-milk mixture back into the saucepan then whisk to combine. Place over medium low heat, stirring constantly so the base doesn't catch, until it starts to thicken (you will feel it). It should happen within 3 to 5 minutes. If it gets lumpy, remove off heat, whisk vigorously – will become smooth.
- Stir 20 seconds after bubbles appear: When the custard is thickened and hot and you see the first big lazy bubbles appear on the base, whisk constantly on the stove for a further 20 seconds then remove from stove. (To check for bubbles, pause stirring for a few seconds)
- Butter: Whisk butter in until fully incorporated.
- Strain & cool: Immediately strain into a bowl through a fine mesh strainer. Discard vanilla bean. Cover with cling wrap touching the surface. Cool on counter (3 hrs+) then refrigerate 12 – 24 hours. (Note 5)
Crust:
- Work with pastry as frozen as possible – it's easier. (Note 4)
- Cut base and sides: Cut base out using the inside of the pan as a guide on one sheet of puff pastry. Cut three 25 x 5.5cm (2.15 x 10″) wide strips on the other sheet of puff pastry. Place base and sides back in freezer. RESERVE offcuts (for emergency patching).
- Line pan: Butter and line the sides of a 20cm/8" springform pan with a 5.5cm / 2.2" strip of baking paper. We are not using the pan base. (Note 6)
- Line sides: Place cake pan on a square sheet of baking paper on a plate. (Note 6) Remove cut puff pastry from freezer. Working quickly, when sides have JUST thawed enough to bend, line sides of cake pan with puff pastry, overlapping by 1cm / 0.4", using water to seal – just press down for now (will seal properly later).
- Base: Brush base of sides with water. Fit base into cake pan (see video at 2 min 50 sec for technique).
- Seal pastry: Use the back of a teaspoon to press base into the corner. Then smear the now-thawing puff pastry to full seal.
- Prick base: Prick base 30 times with fork. (I always forget!!)
- Freeze: Cover with cling wrap, freeze 4 – 24 hours. (Note 4)
Bake:
- Preheat oven to 220°C/430°F (200°C fan) for 30 minutes.
- Line & fill with beads: Pick up crust using paper and place on tray (on the paper). Crumple 2 x 60cm / 2 feet long sheets of baking paper (Note 7) then fit into crust arranged in X. Fill with baking beads 1cm / 0.4" below rim (Note 8). Press to push paper into corners.
- Blind bake 25 min + 5 min: Bake 25 minutes, then use overhang paper to remove beads carefully (if sides look like they will cave in, return to oven with beads for 5 min). Bake 5 minutes then cool 10 minutes. (Seal any visible cracks with puff pastry scraps)
Assemble Flan Pâtissier:
- Turn oven down to 200°C/390°F (180°C fan).
- Fill with custard: Remove Creme Patissiere from fridge. Whisk to loosen, scrape into crust – fill to 1cm/0.4" below rim. (Leftover custard Note 7) Smooth surface, brush custard surface with egg yolk (use it all).
- Bake 65 minutes, rotating tray 180° at 45 minutes. It will puff up in the last 15 ninutes like a souffle. Remove from oven – it will still be very wobbly, have faith! It will set when cool!Golden surface – If the top is not golden like pictured, switch on broiler to caramelise surface. Watch carefully – takes minutes!
- Cool on counter for 4 hours (in pan). Transfer to plate (still in pan), cover loosely with cling wrap, then refrigerate 12+ hours.
- Serve: Remove from fridge 1 hour prior to serving to bring to room temperature. Cut into slices like cake! The pastry is crispy & flaky. The custard will cut neatly (it will not ooze) but when you bite into it, the custard is beautifully soft and creamy. Traditionally eaten as a hand held bakery treat in France but you can use a plate if you're feeling civilised!
- Shelf life: Flan Pâtissier is at its best in the first 24 hours after it is put in the fridge after baking as this is when the pastry is still beautifully crisp. Beyond this the pastry starts to soften which no one has pointed out yet because everyone is besotted by the custard! But I notice.
Notes
- Risk of taller-than-usual puff pastry sides caving in before they are set – Take care when removing baking beads to ensure it is set. If sides look like they are flopping, put baking beads back in at bake 5 minutes longer until sides stop flopping in.
- Custard doesn’t set – Make sure you measure the cornflour properly, and cook for 20 seconds after big lazy bubbles appear.
- Custard leaking – Use puff pastry scraps to seal any visible cracks.
- Crispy base – Bake directly on tray without using base of springform pan.
- Your pastry isn’t as neat as mine – So what? It’s still gonna be delicious. Besides, this tart is SUPPOSED to look rustic rather than elegant like, say, Lemon Tart.
1. Vanilla beans – Split the beans in half (or cut a slit down the middle) then use a butter knife or teaspoon to scrape the seeds out. Substitute: 2 tsp vanilla bean paste (ie with little vanilla specks in it), this is what I used in early days of testing for economical reasons. Vanilla extract will work (ie liquid, no specks) but vanilla flavour not as pure. As for imitation vanilla, I don’t think it has a place in this recipe I’m afraid! 2. Egg yolks – 120g / 4.2 oz yolks is usually 6 large eggs weighing 55 – 60g / 2 oz each (600g / 1.2lb for a dozen eggs, usually labelled “large eggs” because it’s an industry standard). The fairly long bake time for this recipe guarantees the custard will set (assuming you measure cornflour properly!) so don’t get too hung about about 100% accuracy of yolks by weight. Leftover egg whites – Here’s my list of what I do with them and all my egg white recipes can be found in this recipe collection. 3. Cornflour/cornstarch – You do NOT want to be short on the cornflour as the setting of the custard relies on it! Easiest to weigh for accuracy. Make sure the tablespoon is properly filled, packed in and levelled off with the back of a knife. READERS IN FRANCE – Do not use what you call “cornflour” (ie the yellow powder), use cornstarch (white powder). 4. Puff pastry handling – For this recipe, it is easiest to handle the puff pastry while as stiff as possible (ie frozen), JUST pliable enough to work with. Else it flops/slides/gets sticky. At any point if it thaws too much, just slide it back into the freezer. CUTTING side strips – Use a long knife, cut straight down and up. Don’t drag knife along pastry as this smears the pastry so you won’t see the lovely layers when baked. Freezing lined cake pan overnight – This helps ensure sides don’t collapse during blind baking and helps prevent pastry shrinkage. An excellent tip for any tart / quiche pastry blind baking, per advice from a professional Pastry Chef in France. 5. Fridge custard overnight – This improves the flavour of the custard. But if in a hurry, you can continue on once the custard is completely cool. 6. Not using base – Baking the tart directly on a tray without the cake pan base ensures the puff pastry base is beautifully crisp and golden, not soggy at all. Essentially, we’re using the no-base tart ring baking method that professionals use! Plate – This is just for handling purposes until lined pastry is frozen again, bearing in mind we are not using the cake pan base. Use anything flat. 7. Crumpling the baking paper makes it easier to fit into the taller crust. Also a handy tip for small tart shells! 8. Baking beads – Need to fill quite deep to ensure it holds up the sides as it bakes, else you run the risk of the sides flopping in as it bakes. But not right to top of rim as we want the top of the pastry to bake up with beautiful flaky layers – so pretty! No baking beads? Use large dried beans instead. Super cheap baking beads! Dried lentils/rice etc will also work but add 5 minutes to the baking time. Smaller grains = less heat gets through them = longer bake time required to set the base. 9. Leftover Custard (keeps 3 days in fridge) – Volume of custard is such that expert level bakers will virtually use it all because there will be no pastry shrinkage / sides sliding down which leads to smaller pie crust volume to fill. If you do not use it all, you can either use it as a dolloping custard on anything, eat it with a spoon, fill small ramekins and bake for 20 minutes, or use leftover puff pastry to make mini custard tarts (line muffin in, prick base, bake 18 min at 180C/350F lined with paper and filled with beads, bake 5 min uncovered, cool, fill, brush stop with egg, bake 20 min. 10. Recipe credits – A recipe developed by yours truly over quite a few months with the assistance of:
- Jennifer Pogmore, French Pastry Chef extraordinaire based in France who has found herself in the unexpected position as my teacher of all things French pastry.
- Chef Jean-Baptiste, RecipeTin Eats culinary collaborator and my “this is the faster, better way to do it” mentor, and his father, for going out and buying Flan Patissier samples to send us photos for inspection!
- My wonderful, surprisingly large French Instagram community, for participating in Q&A as I set about determining exactly they thought entailed the “perfect” Flan Patissier!
Life of Dozer
Flan Pat or Lasagna??
Flan Pat. Every. Single. Time.
The post Flan Pâtissier (French Custard Tart) appeared first on RecipeTin Eats.
]]>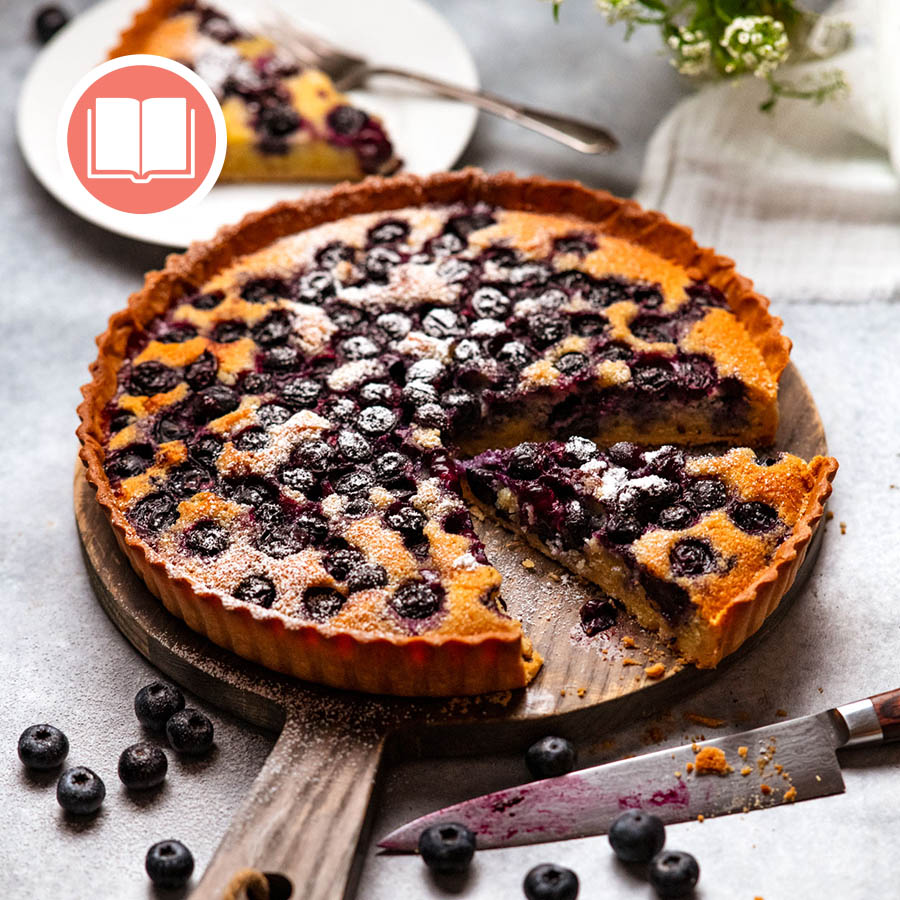 Rustic yet chic, the combination of berries with a classic almond cream filling in a buttery tart crust makes this tart a patisserie favourite. Experiment with different fruits! Try mangoes, peach slices, halved figs, apricots, or other berries. Find the recipe on page 318 of Dinner.
The post Blueberry Tart With Almond Filling appeared first on RecipeTin Eats.
]]>Rustic yet chic, the combination of berries with a classic almond cream filling in a buttery tart crust makes this tart a patisserie favourite. Experiment with different fruits! Try mangoes, peach slices, halved figs, apricots, or other berries.
Find the recipe on page 318 of Dinner.
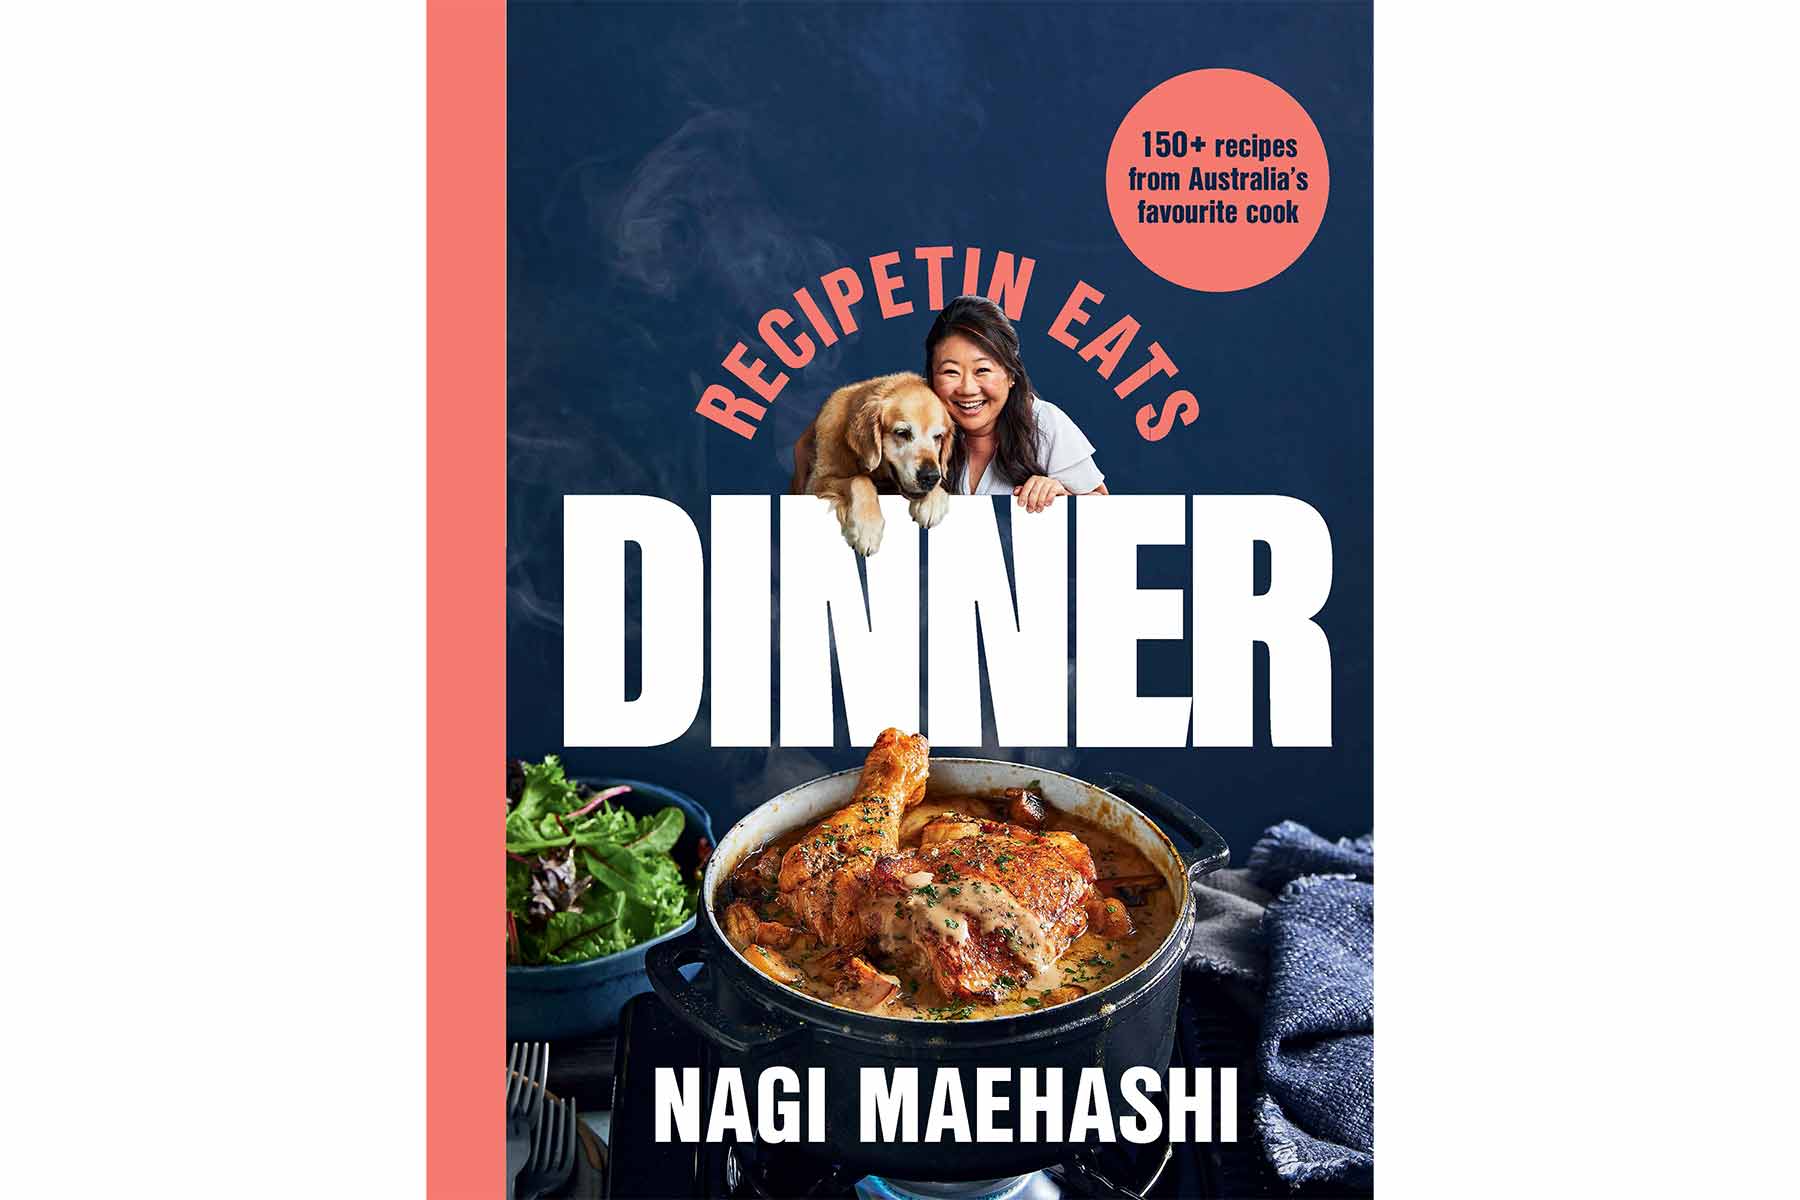
This is a cookbook exclusive recipe!
This recipe is exclusive to my debut cookbook Dinner which includes a how-to video for every recipe. Just scan the QR code!
Just to explain….
I know, it’s confusing! You’re so used to getting recipes on my website – there’s over 1,200 of them, after all. And here you are looking at a tasty recipe video and I haven’t provided the recipe. 🙀
I’m not just doing this to torture you, I promise.
This page exists to display the how-to video for this recipe which I exclusively created for my debut cookbook, Dinner. Every recipe in the cookbook has a tutorial video. To watch it, you simply scan the QR code with your phone or tablet and it will take you straight to the recipe video like the one shown above!
Curious about my cookbook?
Read the cookbook overview
Browse all cookbook exclusive recipes here
Read the Cookbook Tales. Spoiler alert: there’s A LOT of dirty dishes!! And quite a lot of Dozer. 😂
Stay tuned for more on this page! Some cookbook exclusive recipes will have extra information added as well as extra tips. I am also looking at enabling comments for selected recipes so I can answer reader questions about cookbook recipes. I’m just a little snowed under during this launch period – book tours, getting 131 recipe videos out, launching the book overseas. Please bear with me! – Nagi x (10 October 2022)
The post Blueberry Tart With Almond Filling appeared first on RecipeTin Eats.
]]>