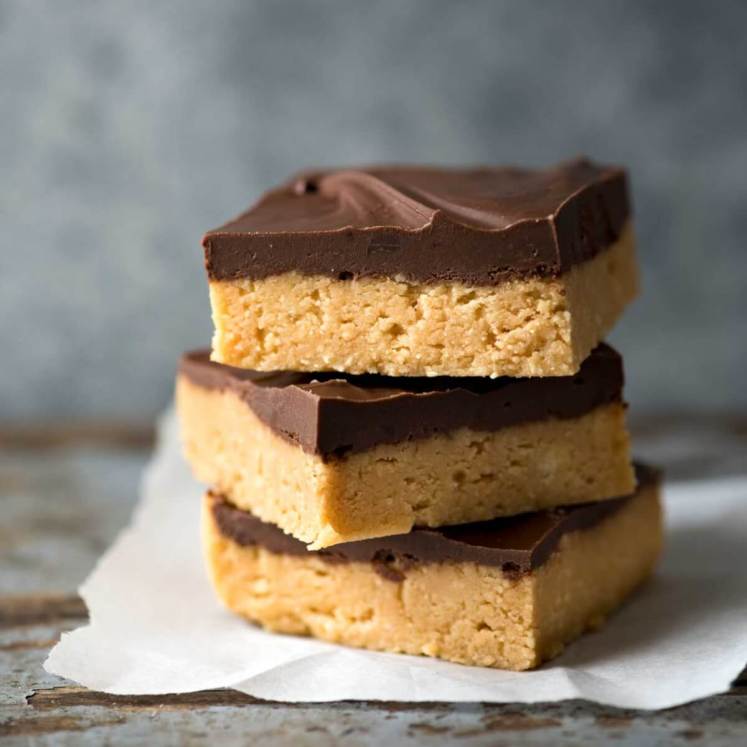
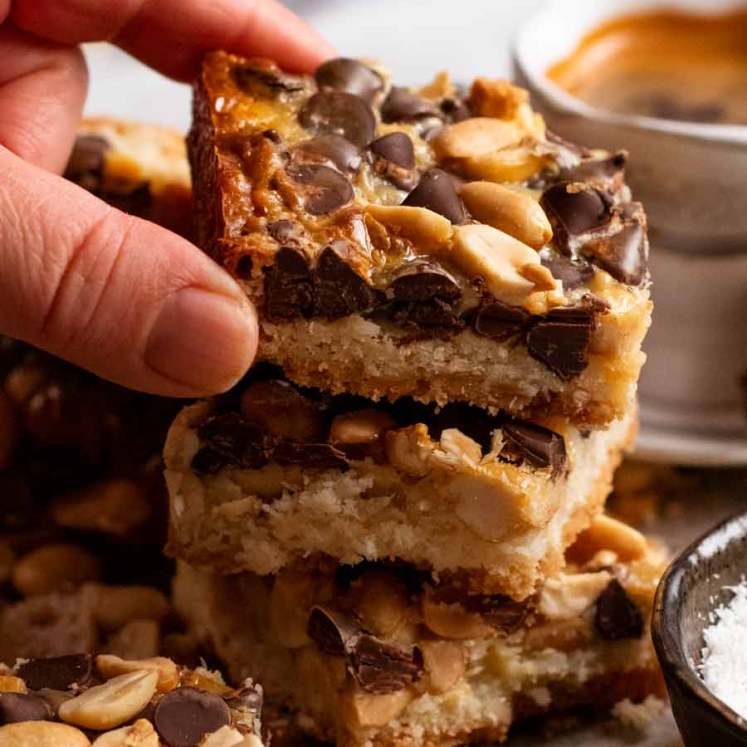
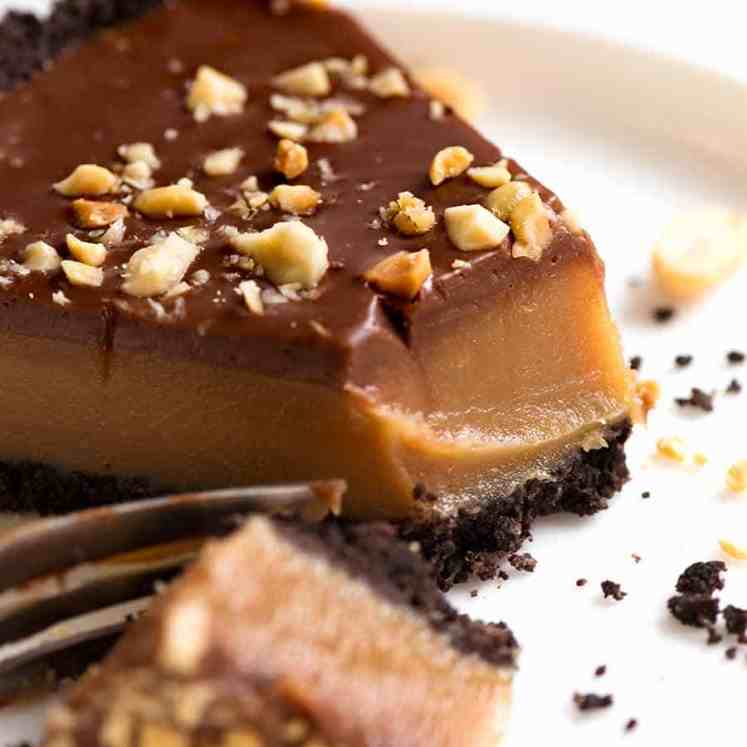
 I’m not kidding! These chewy caramel-y chocolate nut bars are made without a single bowl. From scratch. They’ll save you all those times you promise to make something sweet but run out of time! Meet my emergency quick sweet-treat! I am one of those people who always overcommits. Especially when it comes to anything food... Get the Recipe
The post No-bowl Chocolate Nut Bars appeared first on RecipeTin Eats.
]]>I’m not kidding! These chewy caramel-y chocolate nut bars are made without a single bowl. From scratch. They’ll save you all those times you promise to make something sweet but run out of time!
Meet my emergency quick sweet-treat!
I am one of those people who always overcommits. Especially when it comes to anything food related. Then 7 out of 10 times, I find myself in a flurry at the last minute because I promised to bring something sweet for lunch with friends, or to make something for my friends’ son’s school bake sale because she works full time and doesn’t have the time to bake something.
So it’s super handy to have a few really fast sweet recipes up your sleeve and this is one of mine. Just wait until you see how it’s made – it’s SO QUICK and you don’t need a SINGLE BOWL!
How to make these no-bowl chocolate nut bars
I know you’re probably wondering how on earth these bars are made without using a bowl at all so I’ll cut straight to the chase! Here’s how it’s done:
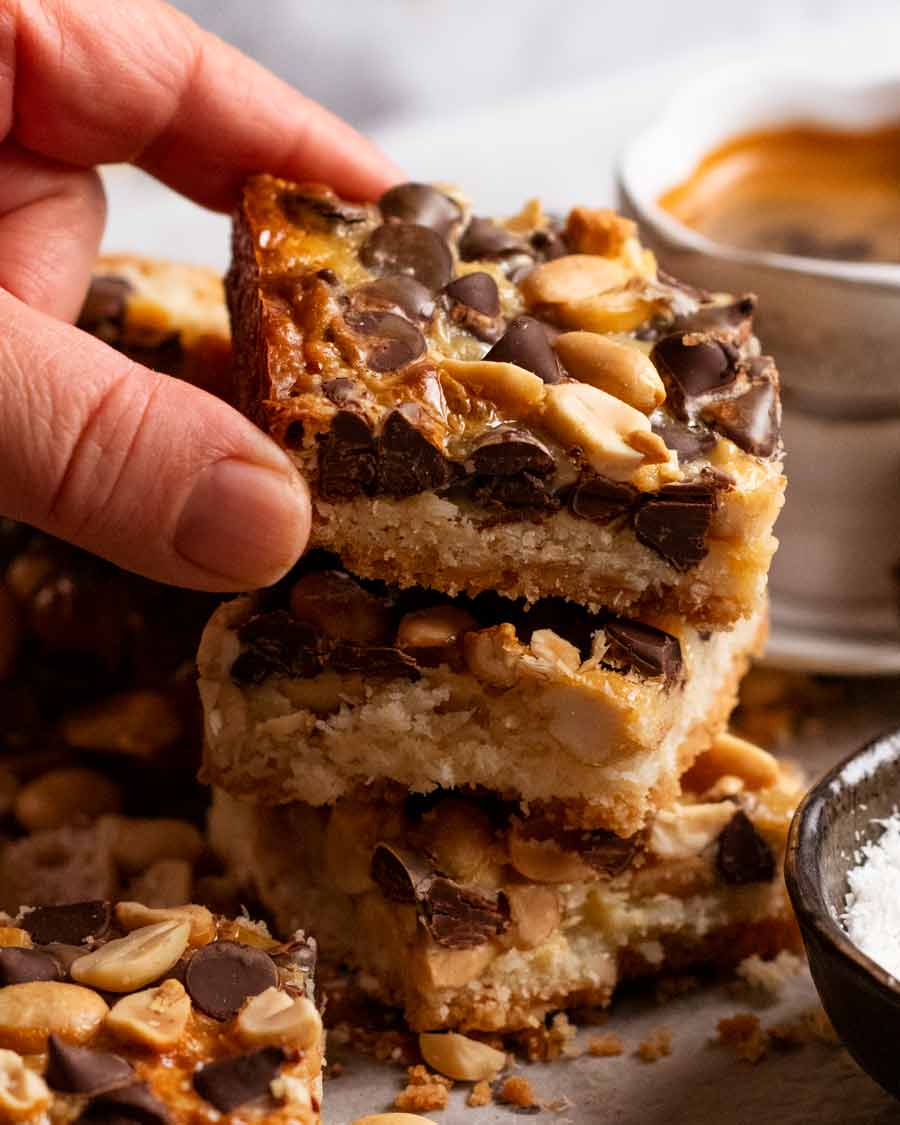
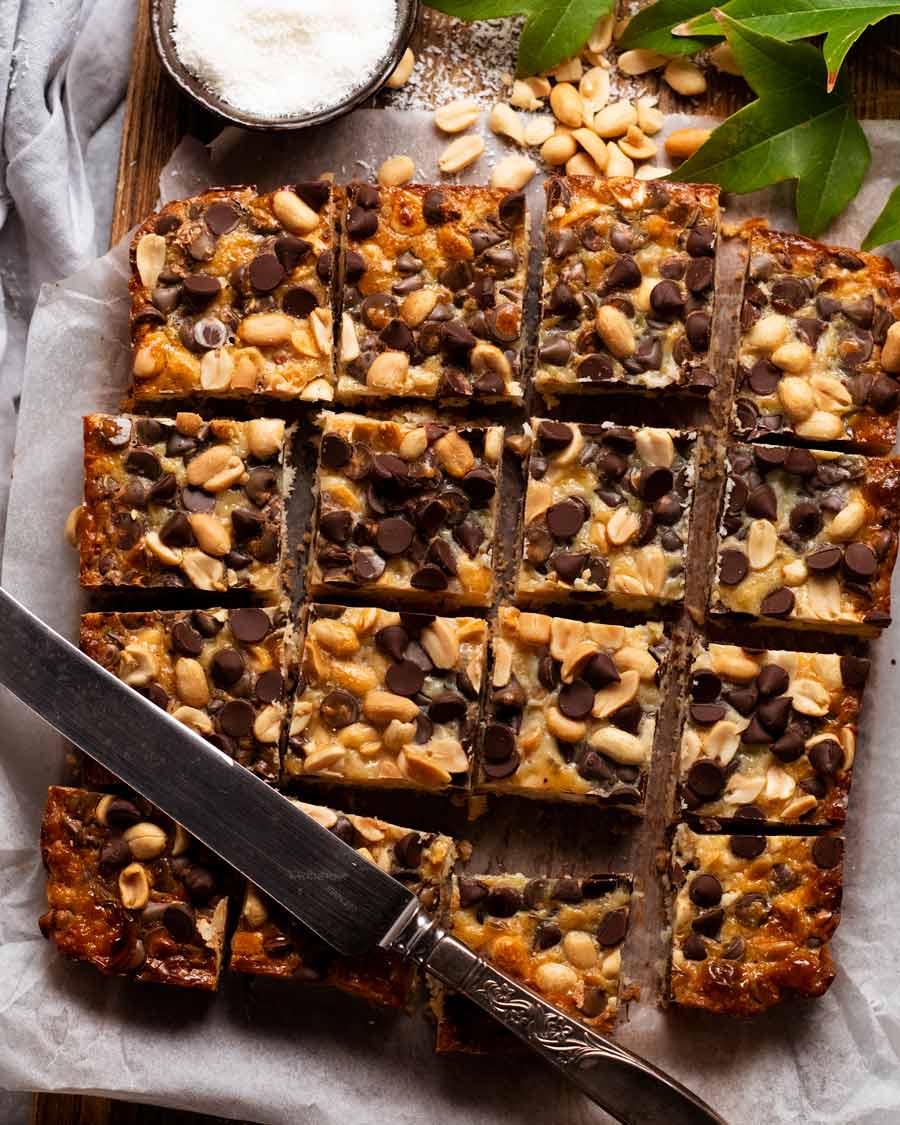
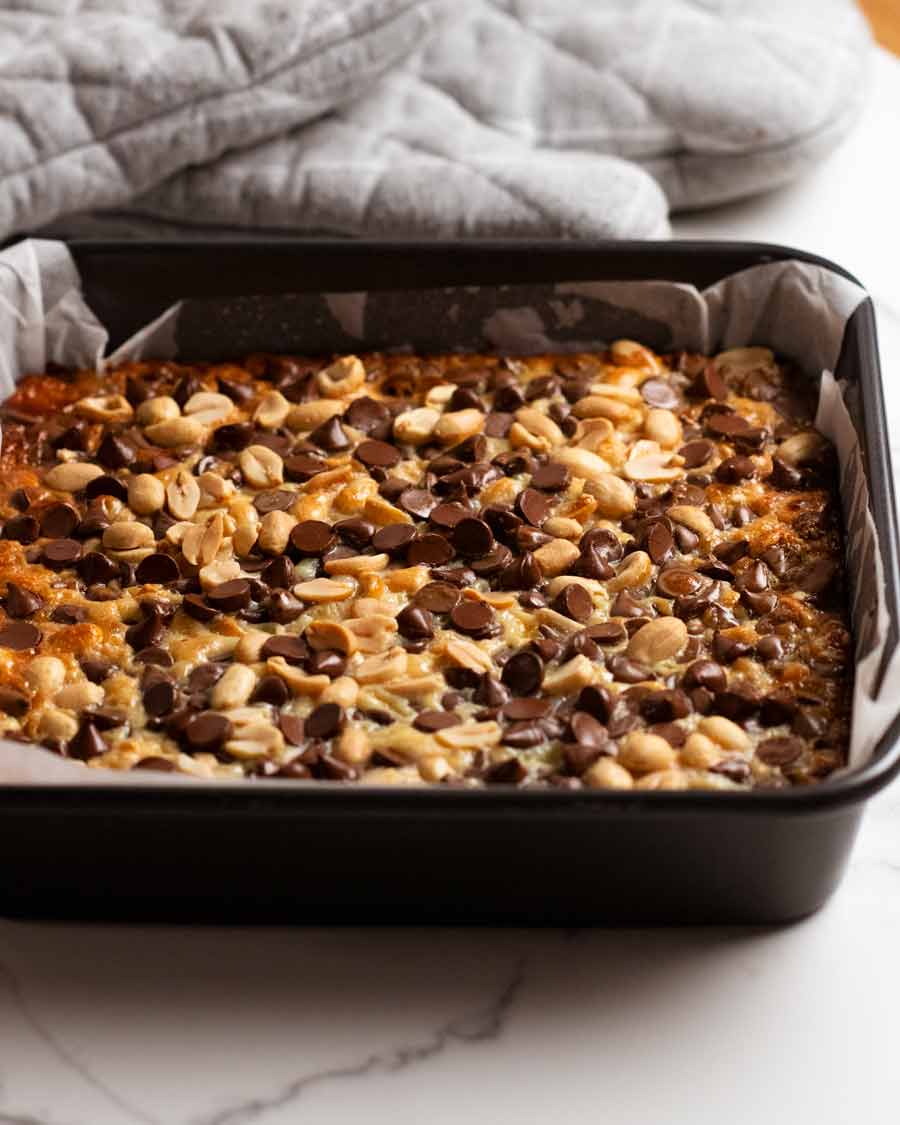
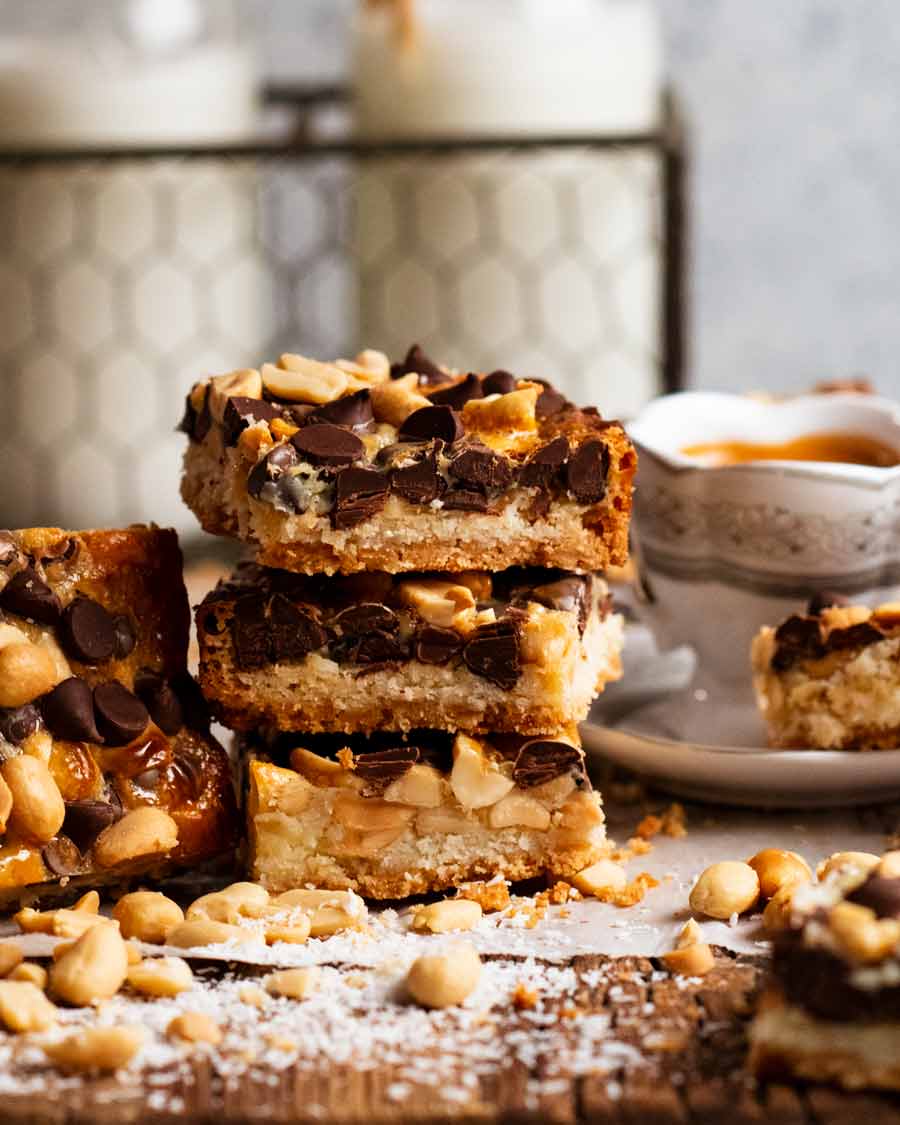
It’s made by creating a biscuit base using butter melted in the pan then sprinkling over crushed biscuits and desiccated coconut. Then it’s topped with nuts (your choice), chocolate chips, then finally topped with condensed milk which is what brings the whole bar together. Once baked, it holds together and becomes gloriously chewy, caramely bar!
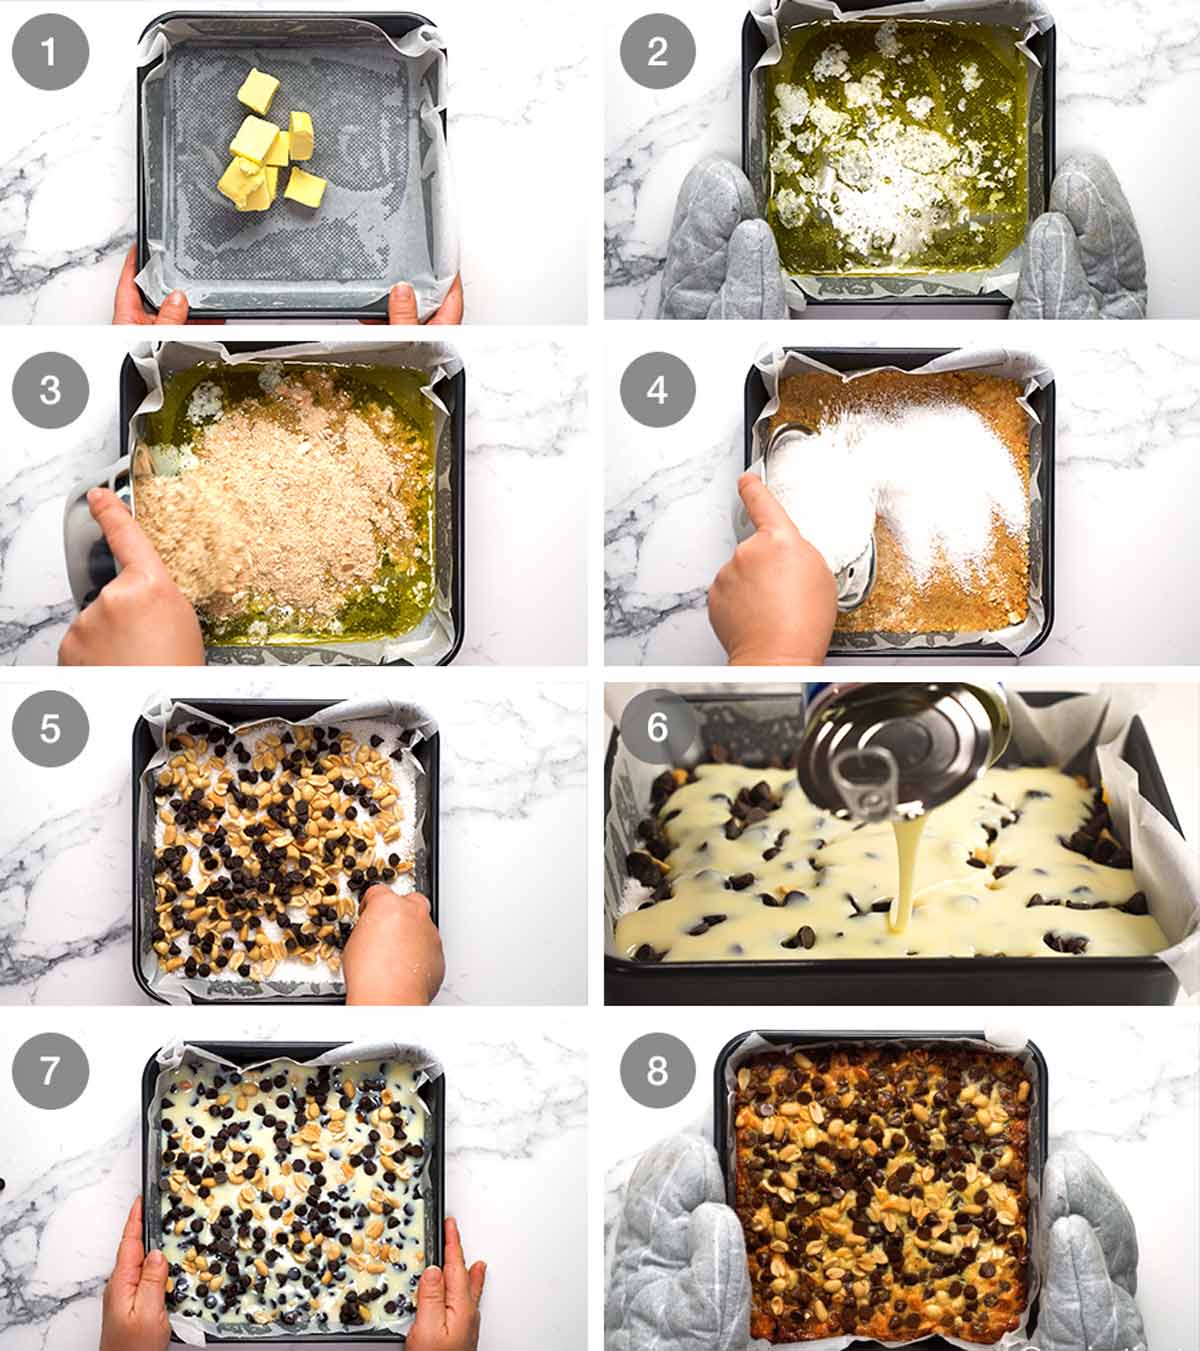
Place butter straight into a lined pan and melt it in the oven while it is pre-heating.
Swirl to spread the melted butter across the base.
Sprinkle crushed biscuits across the base, then spread using a spoon/spatula/hands and lightly press down. I’m not meticulous here about even spreading, this is, after all, an emergency recipe!!
Sprinkle coconut across the base.
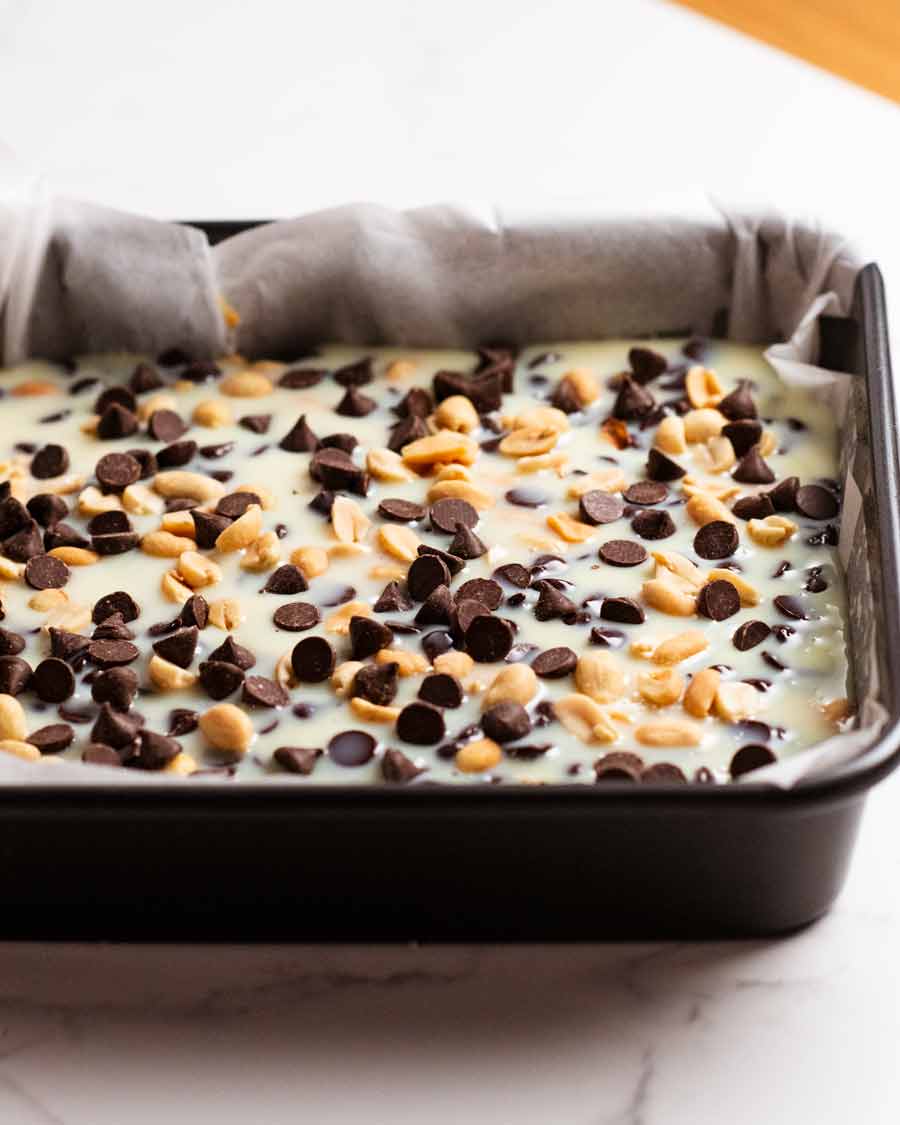
Top with about 2/3 of the nuts and choc chips
Pour over condensed milk.
Top with remaining nuts and choc chips.
Bake 30 minutes until light golden on the edges, then cool before cutting!
Ingredients in No-bowl chocolate nut bars
Ordinarily I put the ingredients before the recipe steps, but I feel like for this recipe it should be other way round! So, here’s what you need. It’s fabulously versatile – any plain biscuits, switch the peanuts and chocolate chips with other things like dried fruit and other nuts.
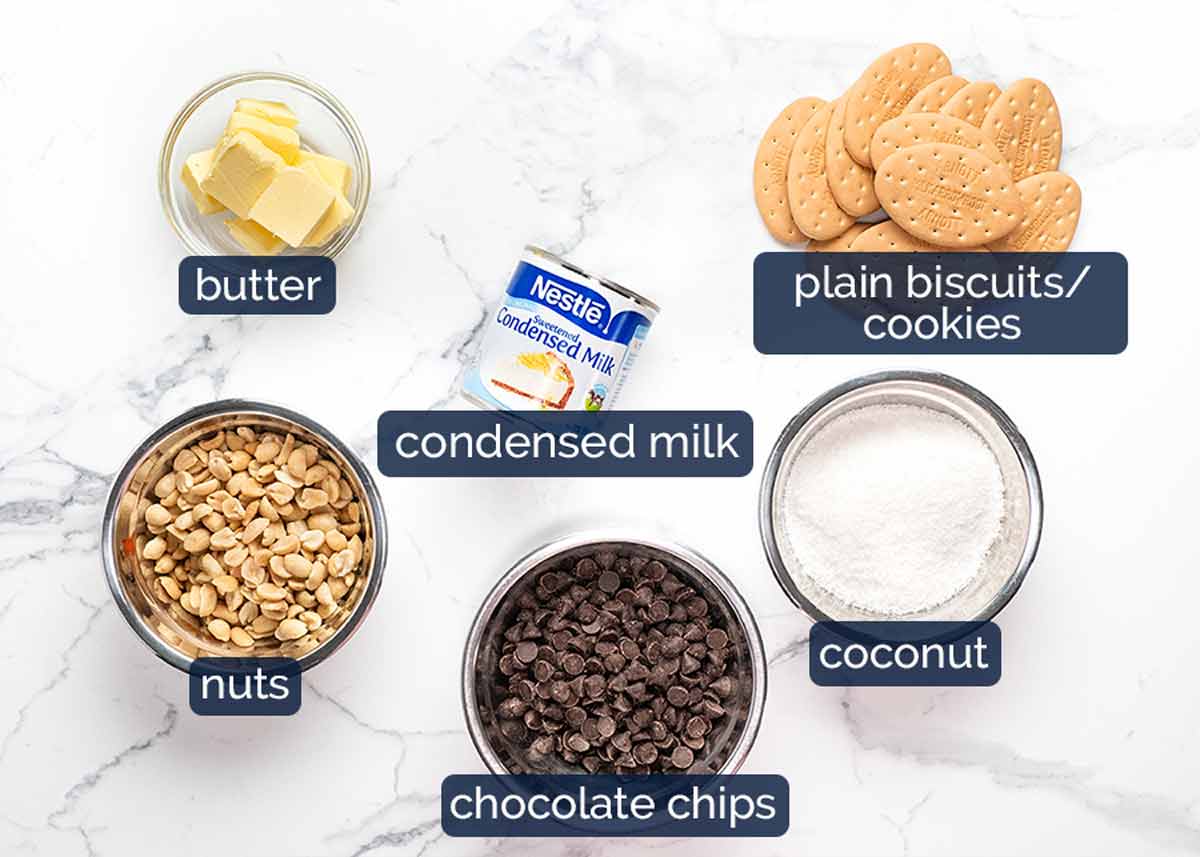
Condensed milk – This sweetened milk is like a thick syrup and this is the key ingredient that holds the bar together. Standard cans here in Australia re 395g (14oz) and are sold in the long-life dairy section in grocery store aisles.
Peanuts & chocolate chips – Feel free to substitute these with other add-ins of choice. Especially hand if you have a peanut or nut allergy in the family. Try pepitas and dried fruit!
Coconut – Desiccated coconut blends into the crushed biscuits to create the base. If you don’t like or don’t have coconut, feel free to add extra biscuits instead, or leftover wheat germ / wheat bran (if you made last weeks’ Breakfast Muffins!).
Butter – For buttery goodness and also to hold the base together.
Plain biscuits/cookies – Anything that can be crushed will work fine here. I’ve used all sorts over the years – Marie, Arrowroot (featured in today’s recipe), Graham crackers, scotch fingers. I once even made this with chocolate Oreo cookies by scraping the filling off!! (It was an emergency and it was darn delicious!)
It’s not a hack
This is one of those recipes that is not a “hack”, but rather an incidental side benefit is that it can be made without dirtying a single bowl. I would make these even if I had to use a bowl to make them!
So keep this one tucked away for one of those days when you’re in a rush and you’ve promised to make a sweet treat for your family or friends!! – Nagi x
Watch how to make it

No-bowl Chocolate Nut Bars
Ingredients
- 100g (7 tbsp) unsalted butter , cut into a few chunks
- 1 cup (100g) plain biscuits, crushed (eg. Marie, Arrowroot, digestives, Graham crackers – Note 1)
- 1 cup desiccated coconut (unsweetened)
- 1 cup unsalted peanuts , or other nuts of choice (Note 2)
- 1 cup dark choc chips (US: semi-sweet chips) (Note 2)
- 395g (14 oz) (1 can) sweetened condensed milk (Note 3)
Instructions
- Preheat oven to 180C/350F (160C fan-forced)
- Line pan – Lightly spray a 20cm/8" square pan with oil then press in a sheet of paper (no need to be meticulous here).
- Melt butter – Place the butter in the pan then melt in the oven for 5 minutes.
- Biscuit base – Swirl pan to spread butter then sprinkle over crushed biscuits. Spread then gently press down (again, I am not meticulous about evenness here).
- Layer – Scatter over the coconut, followed by about 2/3 of the peanuts and choc chips (reserve some for the top). Pour over condensed milk, spread for even coverage. Top with remaining nuts and chocolate chips.
- Bake for 30 minutes or until the edge of the surface is golden brown.
- Fully cool before cutting (3 hours on counter, or 1 hr counter + 1 hr fridge). Remove using paper overhang then cut and eat!
Notes
Nutrition
Originally published way back in September 2015. Republished with a brand new video and photos by reader request!
Life of Dozer
New house. New shoot studio. Same scavenger.

The post No-bowl Chocolate Nut Bars appeared first on RecipeTin Eats.
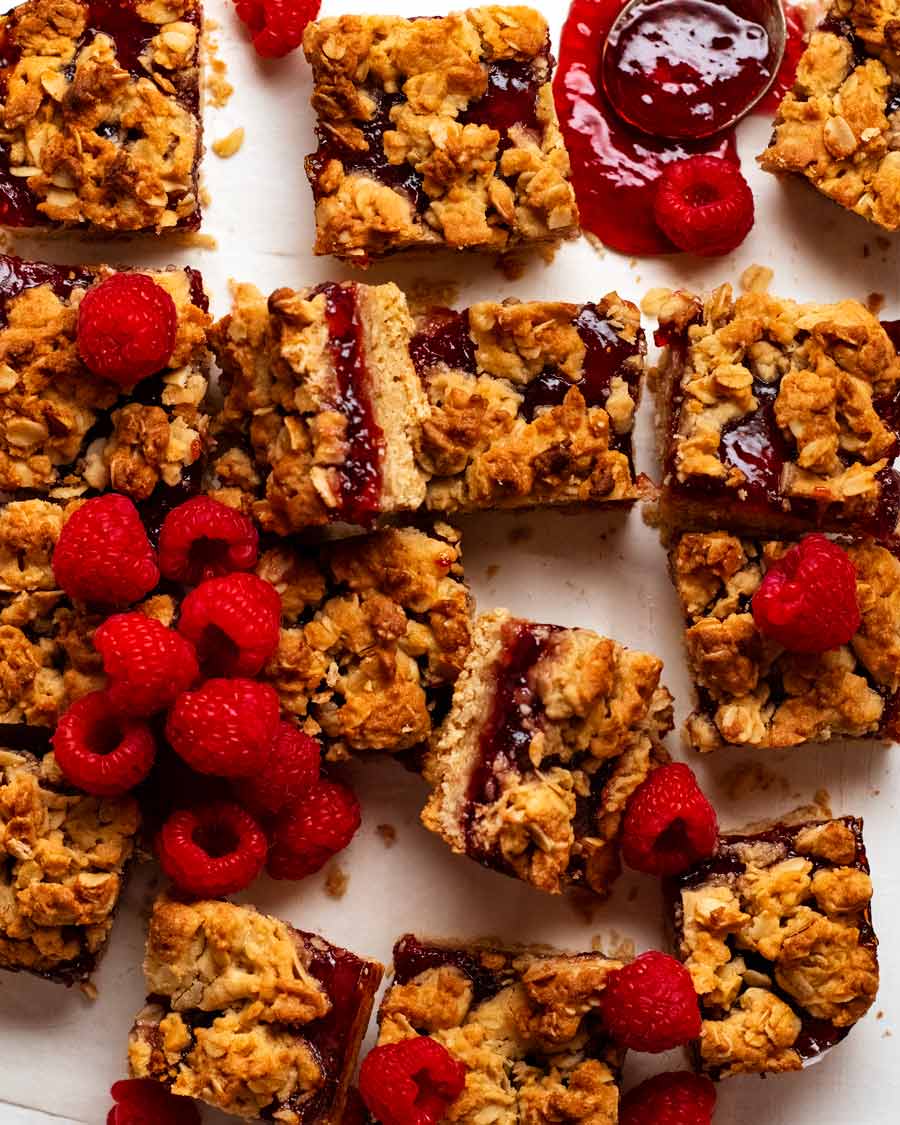
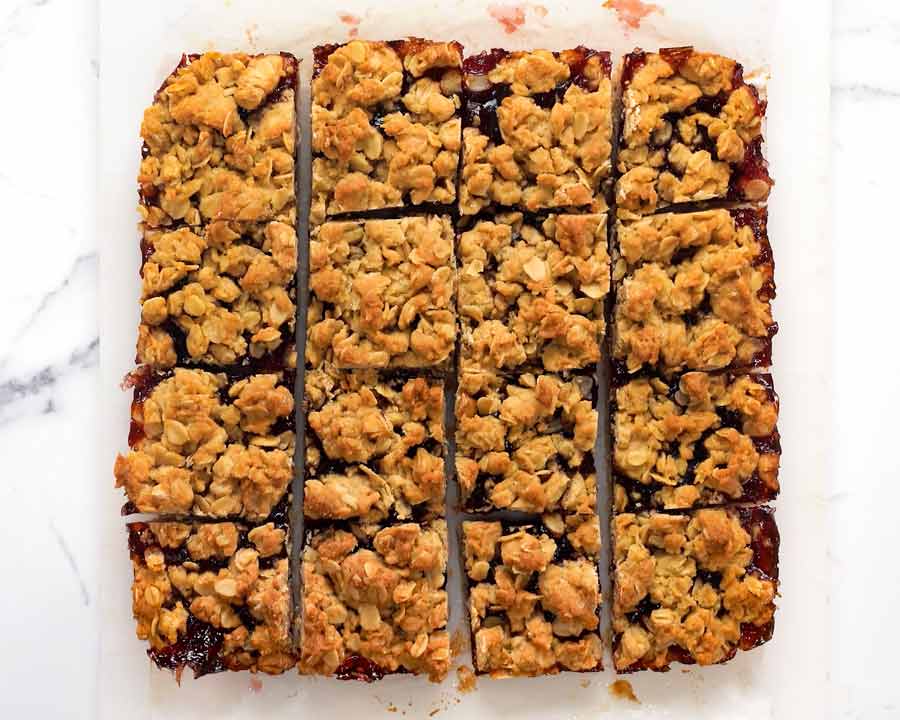
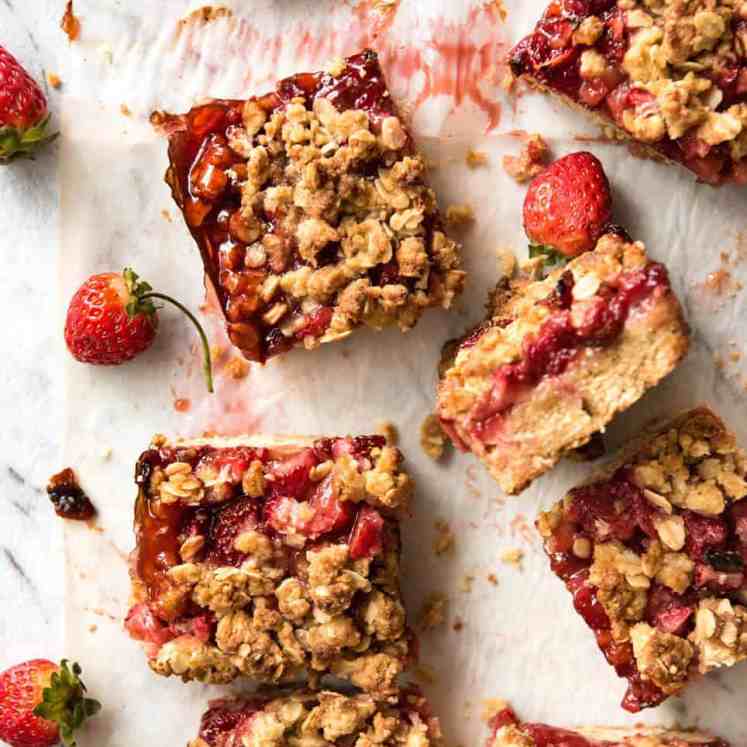
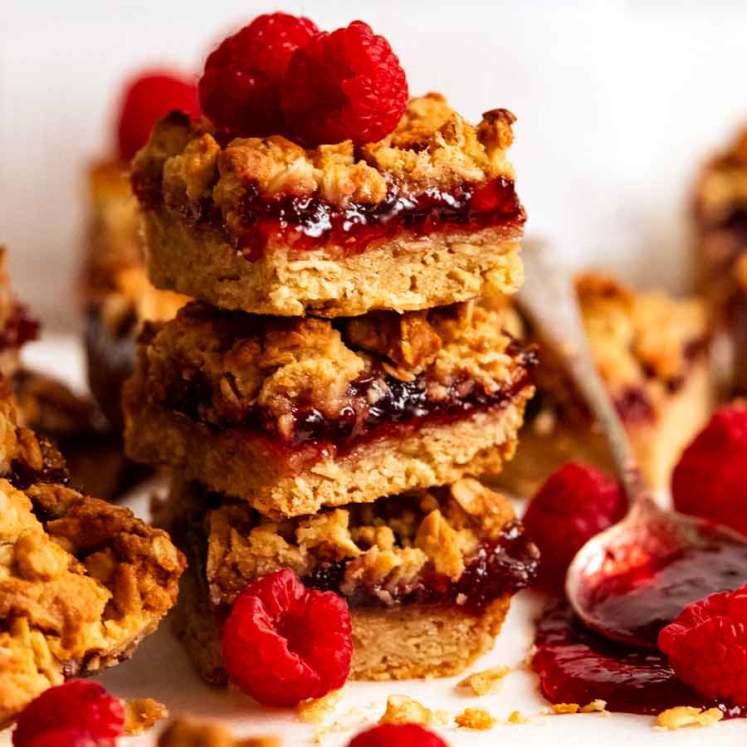
]]> The charm of a crumble pie but in convenient hand-held form, Raspberry Jam Oat Bars have a buttery oatmeal biscuit base, a layer of jam, then topped with a crumble. Love how the same mixture is used for the base and crumbly topping. Handy – and fast to make! Easy raspberry jam oat bars These... Get the Recipe
The post Raspberry Jam Oat Bars appeared first on RecipeTin Eats.
]]>The charm of a crumble pie but in convenient hand-held form, Raspberry Jam Oat Bars have a buttery oatmeal biscuit base, a layer of jam, then topped with a crumble. Love how the same mixture is used for the base and crumbly topping. Handy – and fast to make!
Easy raspberry jam oat bars
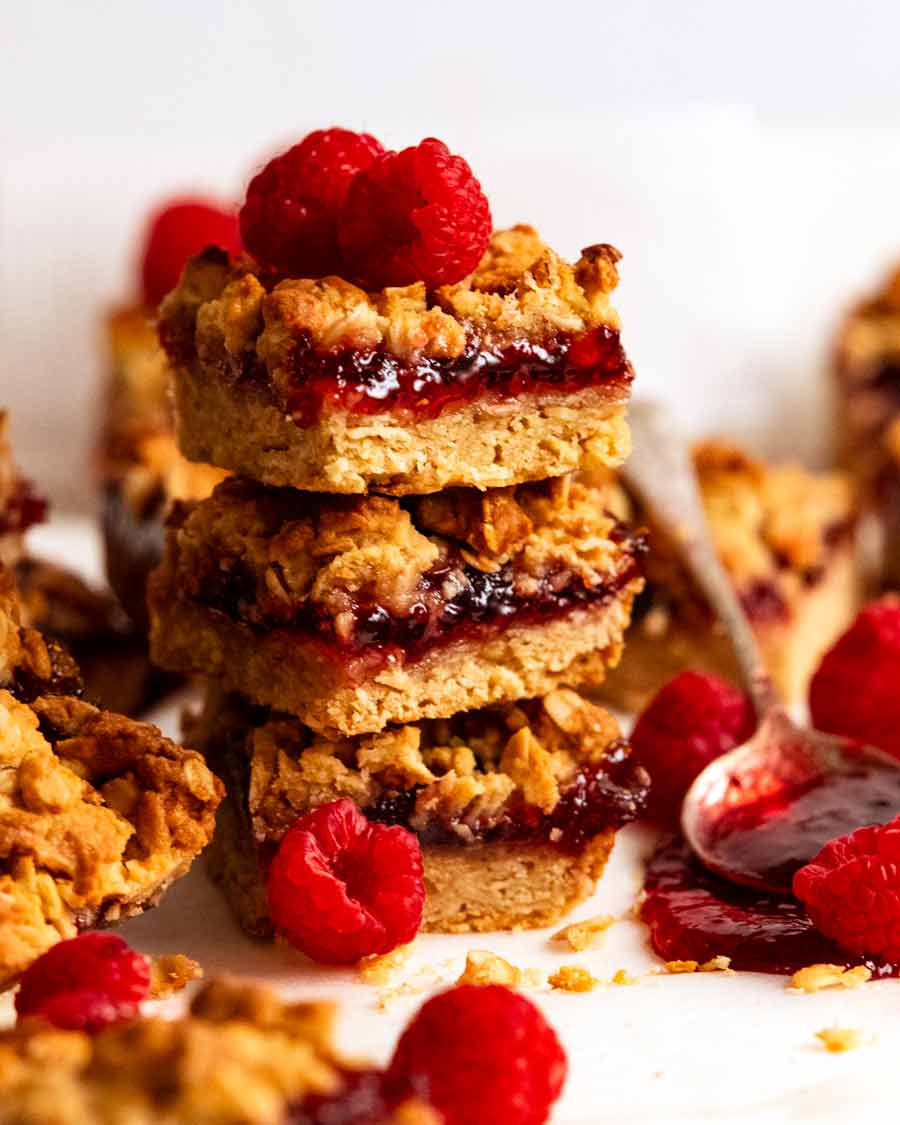
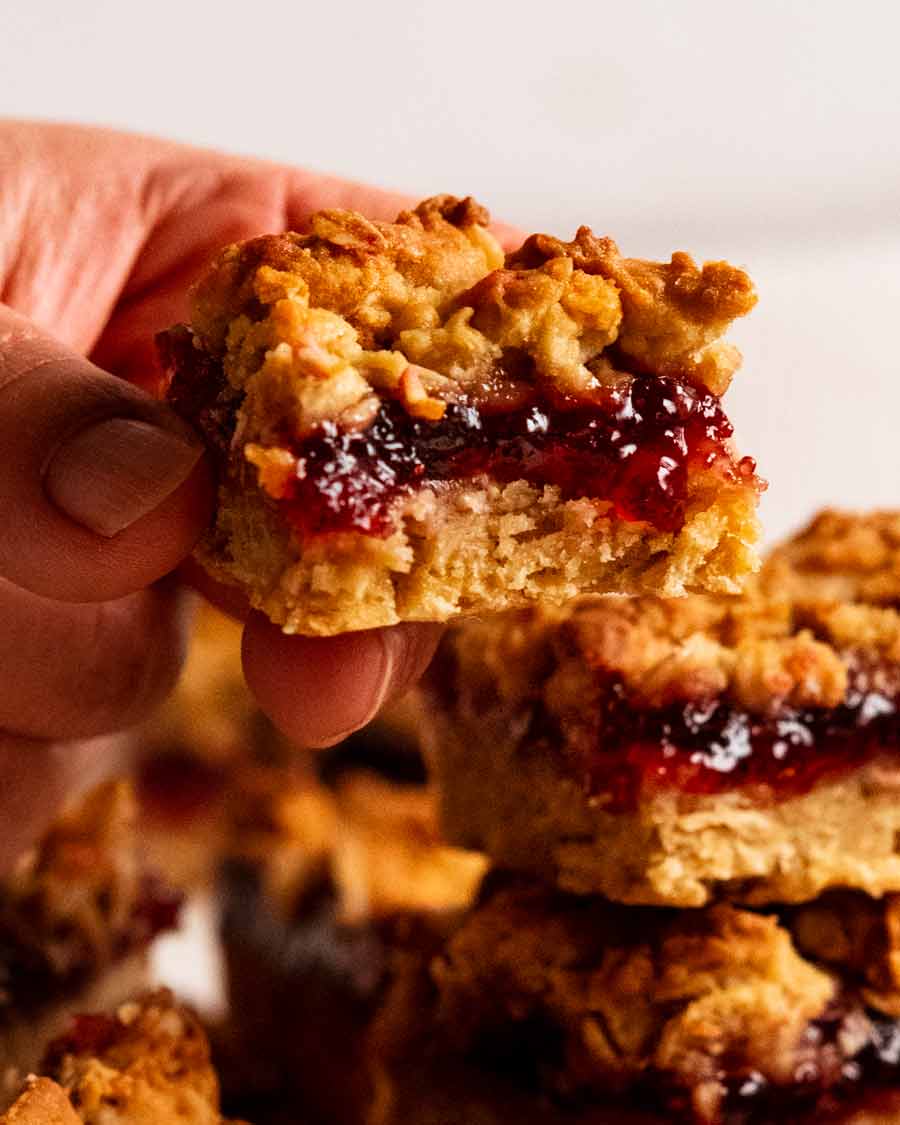
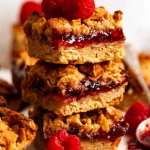
These are deliciously buttery crumble bars that are perfect for any occasion. You’ll love the combination of the sweet fruity jam filling sandwiched between the oatmeal cookie base and the crumbly golden topping.
And you’ll especially love how quick these are to get in the oven! Similar jam bar recipes call for softened butter to be creamed with an electric beater (like for oatmeal cookies) or rubbed into flour using your fingers (like for shortbread).
In contrast, my recipe starts with melted butter which is just mixed with a wooden spoon with oats, flour etc. I’ve made it the standard way, and my way, and the difference is barely discernible.
So my easier way it is!

What goes in raspberry jam oat bars
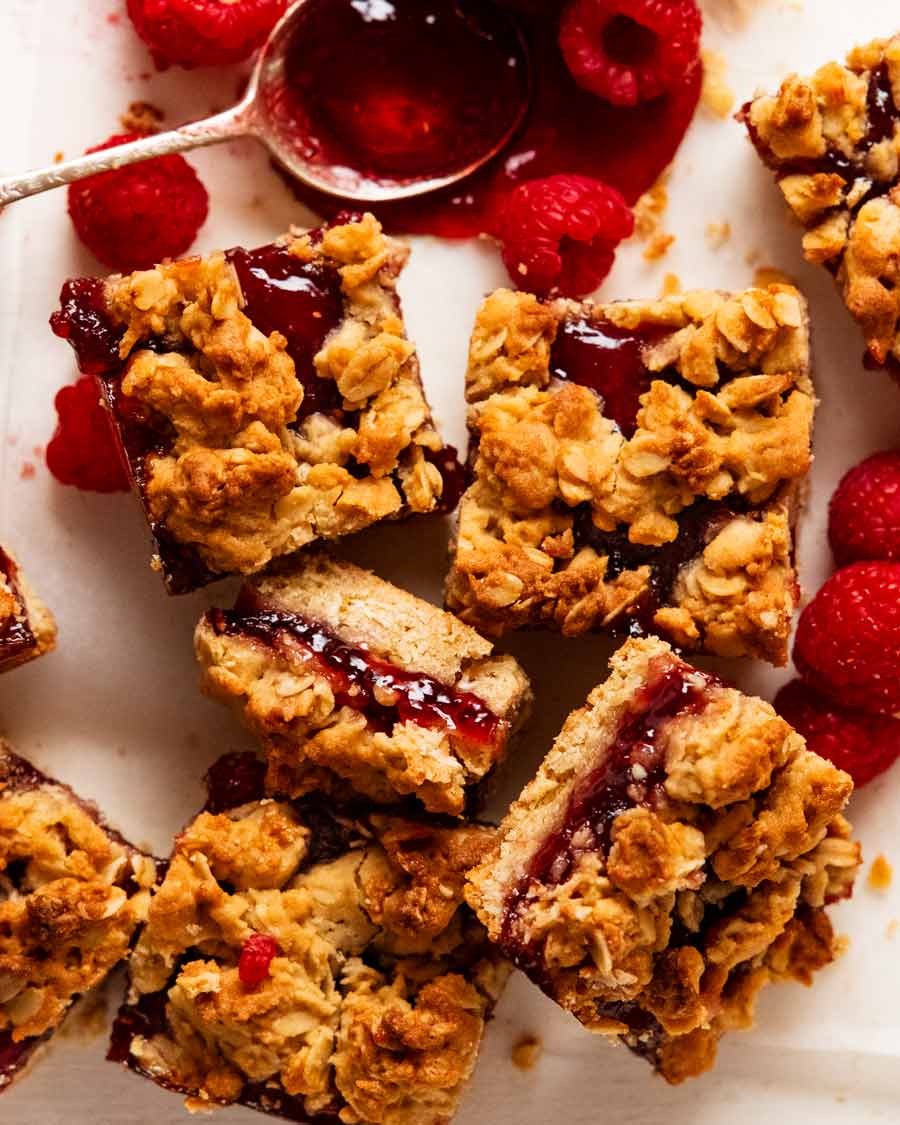
While these are made with raspberry jam, it can be made with any jam flavour your heart desires. Strawberry, blueberry, marmalade, apricot!
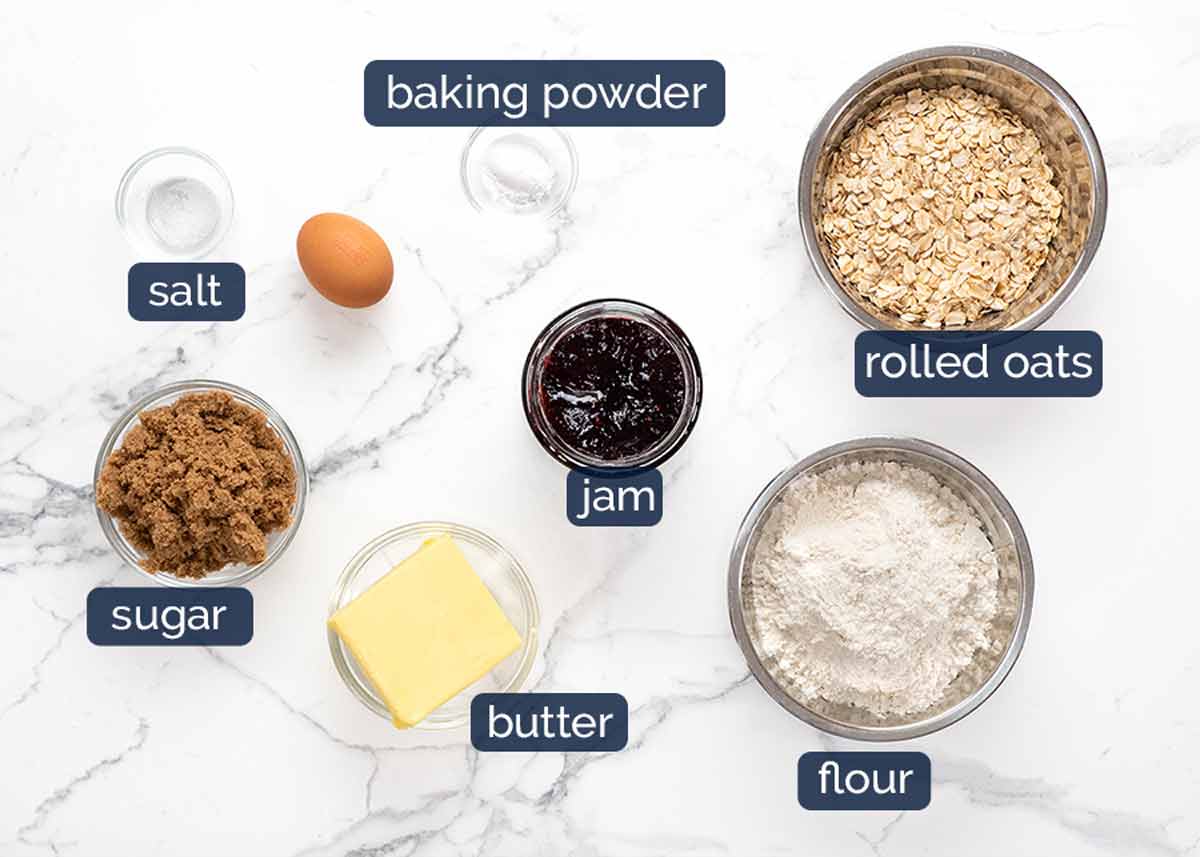
Jam – As noted above, any flavour jam you want can be used! I used raspberry.
Rolled oats – Not quick oats or steel-cut oats. Just plain traditional oats.
Flour – Just plain / all purpose flour. Wholemeal / wholewheat flour will work too. I haven’t tried with gluten-free flour or almond meal (ground almonds).
Butter – Unsalted butter. No need to bring to room temperature as we will melt it.
Sugar – Brown sugar adds lovely caramel-y flavour to the base. However, if you’re out, white sugar can be substituted.
Egg – A large one, from a carton labelled with the size “large”. Industry standard is 55 – 60g / 2 oz each.
Baking powder – Just 1/2 teaspoons adds a bit of lift. It doesn’t make the biscuit base cake, it just prevents it from baking into a concrete block.
Salt – Just a pinch, to bring out the other flavours. It doesn’t make it salty.
The making part – quick & easy!
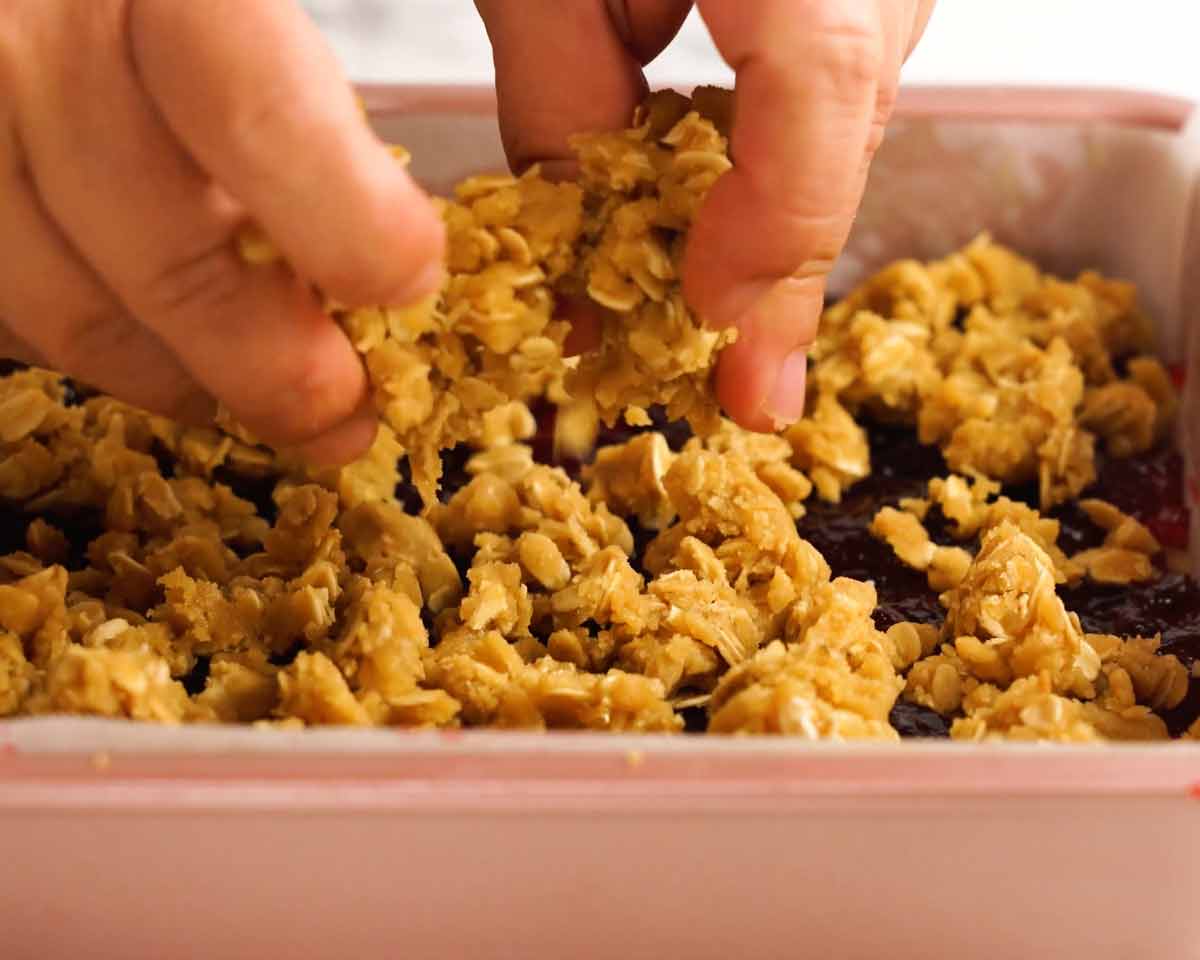
One oats biscuit mixture is used for the base and the crumbly topping. Convenient!
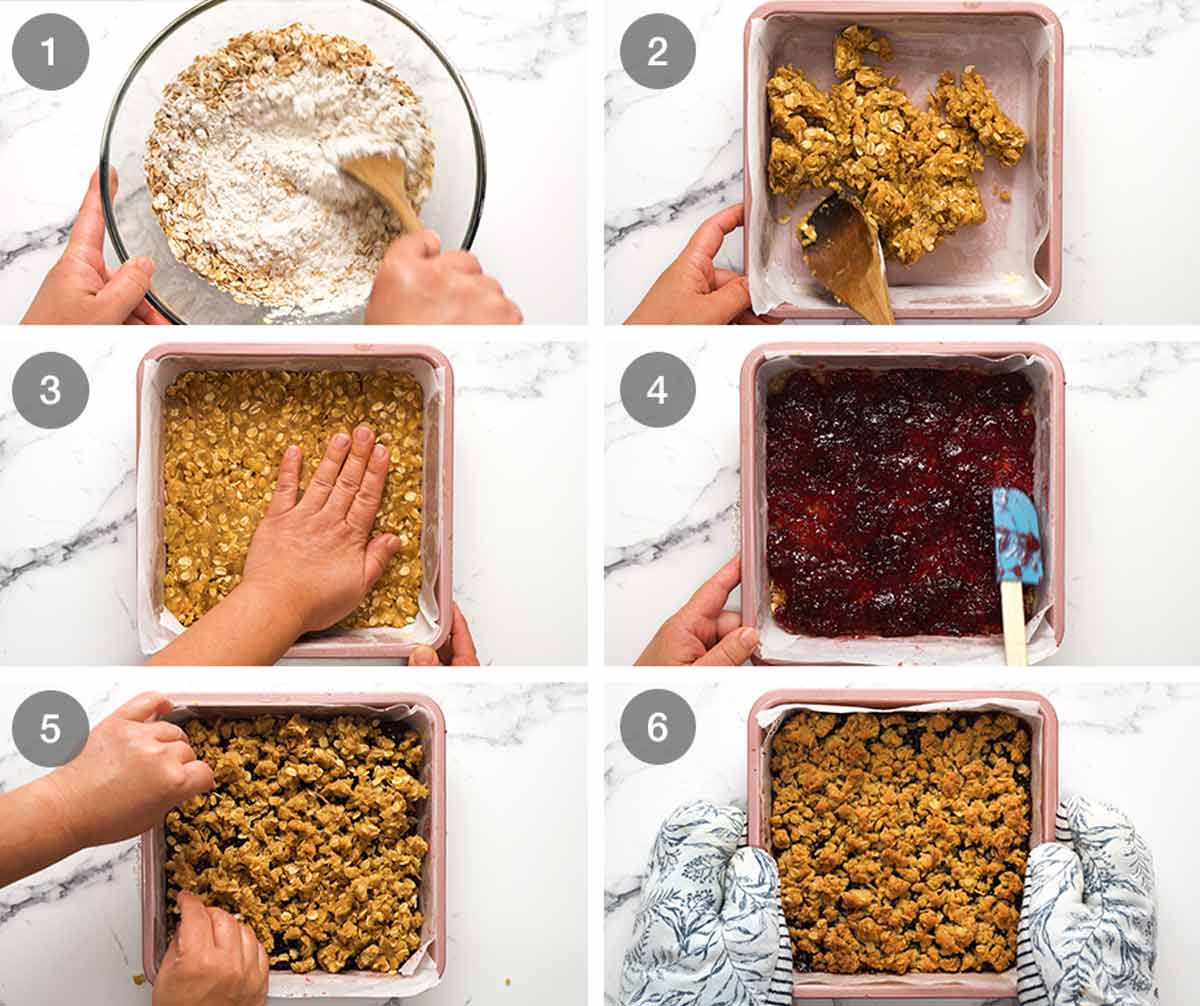
Oat cookie mixture – Melt the butter in a bowl in the microwave. Mix in sugar, then egg, then the flour, oats, baking powder and salt.
Spread in pan – Line a 20cm/8″ square metal pan with paper with overhang to make it easy to lift out later. Spread 1 1/2 cups of the oat mixture across the base. I partially spread it out using a wooden spoon, semi cutting / pressing the clumps. Then I finish it with my hands.
Press the base in firmly and make the surface reasonably smooth. We’re making a rustic dish here, so no need to go to town on an ultra smooth surface.
Spread jam across the surface. If your jam is a bit firm jelly-like, you might want to warm it up briefly to make it easier to spread.
Crumble remaining oat mixture across the surface using your fingers.
Bake for 30 minutes at 200°C/400°F (180°C fan-forced) or until the surface is golden. Cool in the pan before lifting out using the overhang paper and cutting into 16 squares.
TIP to speed up the cooling: cool 30 minutes on the counter, 30 minutes in fridge.
These really might be one of the fastest bars ever to make. Well, the 5 Ingredient Chocolate Peanut Butter Bars are a hot contender for the World’s Speediest Bars too. 
Tuck them into lunch boxes. Take them to book club. Serve them for afternoon tea.
Or, for something different, serve them as dessert, warm like apple crumble with a scoop of vanilla ice cream on top. YES! – Nagi x
PS Those caramelised bits along the edges are the BEST. Like a chewy candy. I’ll fight you for them!
Watch how to make it
Easiest Ever Raspberry Jam Bars
Ingredients
- 125g / 1 stick unsalted butter , melted
- 1/2 cup brown sugar , tightly packed
- 1 large egg (55-60g / 2 oz)
- 1 1/2 cups flour (plain / all-purpose)
- 1 1/2 cups rolled oats (traditional oats, not quick, instant or steel-cut)
- 1/2 tsp baking powder
- Pinch salt
- 1 cup raspberry jam (or other flavour)
Instructions
- Preheat oven to 200°C/400°F (180°C fan). Grease a 20cm/8" metal pan with butter then line with baking/parchment paper with overhang (so it can be lifted out once cooked).
- Oatmeal cookie base – Melt butter in a microwave proof bowl. Mix in sugar until lump free. Add egg then mix until incorporated. Then add flour, oats, baking powder and salt and mix until you can no longer see flour.
- Base – Spread 1 1/2 cups of the mixture in the prepared pan, and press in with your hands. Spread with jam (microwave to loosen, if needed), then use your hands to crumble the remaining mixture over the top (Note 3).
- Bake for 30 – 35 minutes or until the top is deep golden. Remove and allow to fully cool in the pan (~ 2 hours) before lifting out of the tin using the baking paper. (Speed things up: 30 min counter, 30 minute fridge)
- Cut into 16 squares. Enjoy!
Notes
Nutrition
Originally published July 2016, in the days before I learned how to make recipe videos! Updated March 2023 with a recipe video, sparkling new photos and much needed clean up of the writing.
Similar format sweet things
Because I do have a soft spot for hand-held goodies.
Life of Dozer
Normally I update this section with current Dozer happenings, but I though you might like this from the original publication date – Dozer suspiciously sniffing a runaway raspberry, disappointed he didn’t get to taste test the Raspberry Bars!

The post Raspberry Jam Oat Bars appeared first on RecipeTin Eats.
]]> Like my flourless chocolate cake, I make these Flourless Chocolate Brownies even when I’m not after a gluten free dessert because they’re that good! Using almond meal instead of flour adds lovely undertones of nuttiness as well as guaranteeing they’ll be fudgy and moist. One bowl, quick, easy and impossible to stuff up! Flourless Chocolate... Get the Recipe
The post Flourless Chocolate Brownies (gluten free) appeared first on RecipeTin Eats.
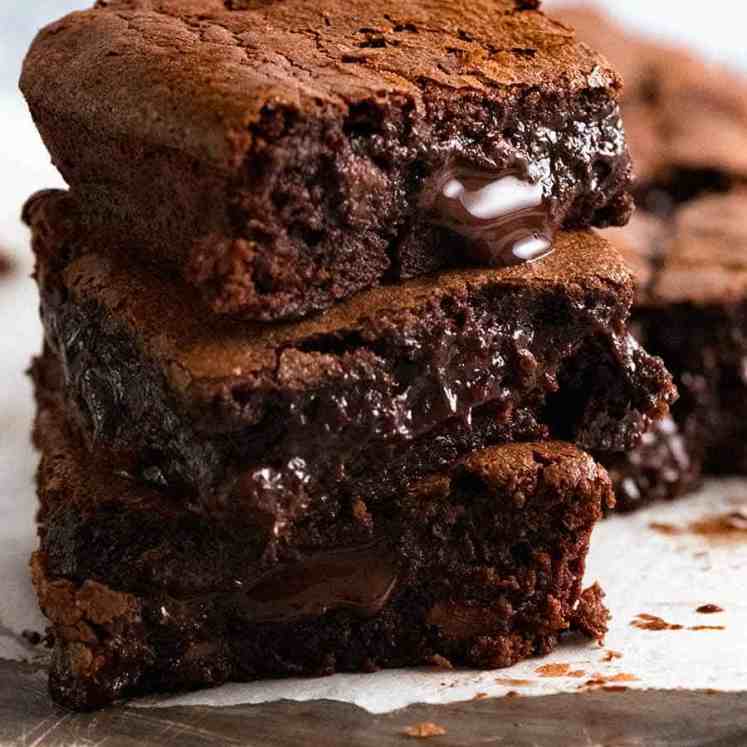
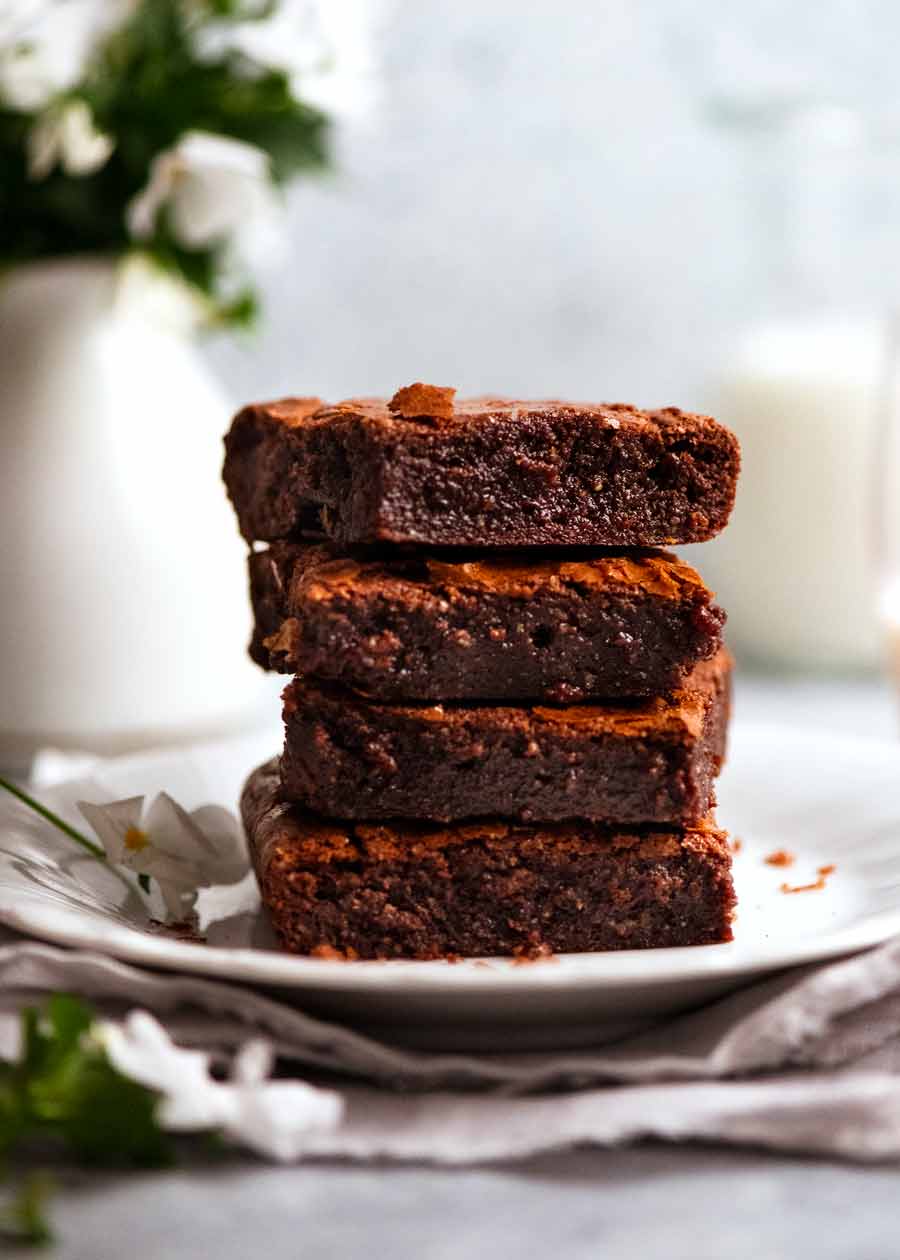
]]>Like my flourless chocolate cake, I make these Flourless Chocolate Brownies even when I’m not after a gluten free dessert because they’re that good! Using almond meal instead of flour adds lovely undertones of nuttiness as well as guaranteeing they’ll be fudgy and moist.
One bowl, quick, easy and impossible to stuff up!
Flourless Chocolate Brownies
I don’t think of these as gluten-free brownies. Rather, I tell people they are flourless chocolate brownies made with almond meal instead of flour, so they happen to be gluten-free.
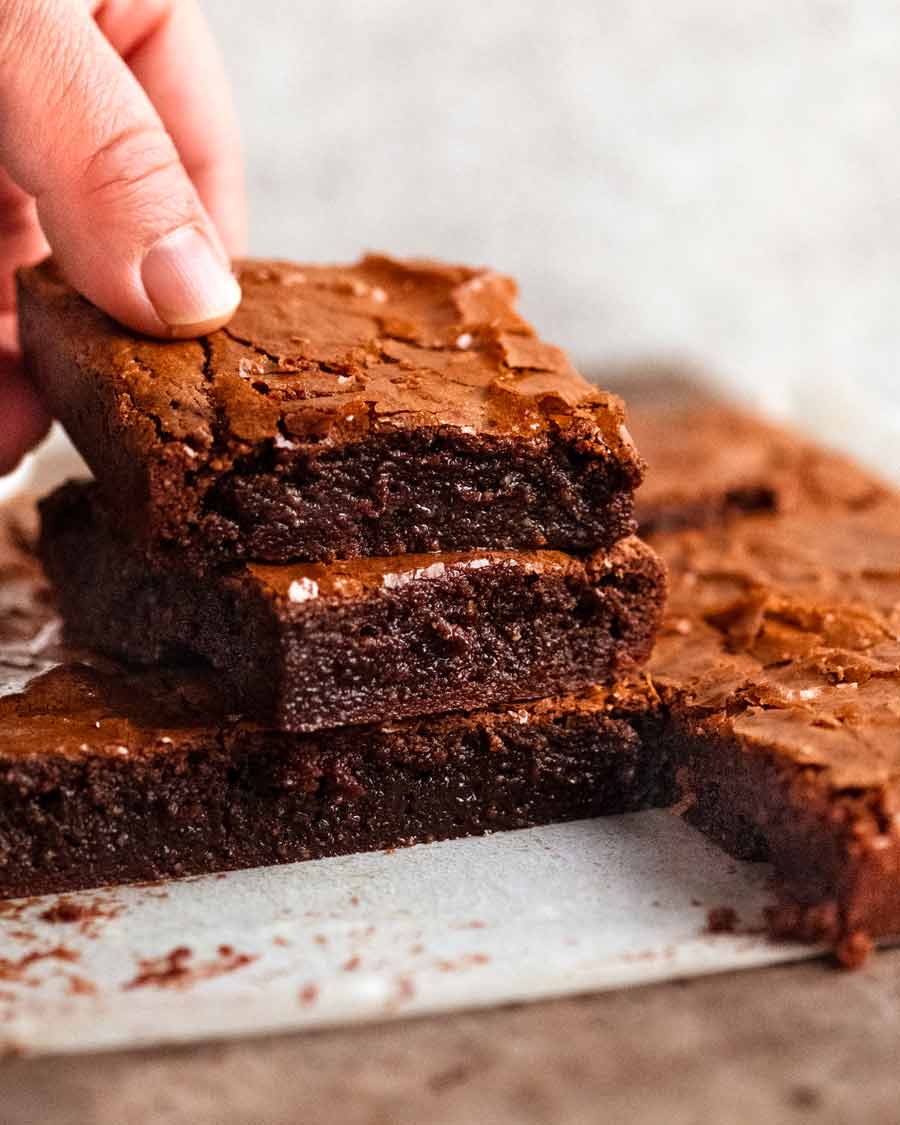
And unlike regular brownies made with flour, these flourless brownies are virtually impossible to overcook to the point that you lose that desirable fudginess that we all know and love about brownies.
Win, win!
However, please note. If you ask me to choose between these flourless brownies and classic brownies, I’ll plead the fifth. There’s enough space in this world for both!! (A phrase I often use for competing food-love-interests).
What goes in gluten-free brownies
Here’s what you need to make these gluten-free brownies:
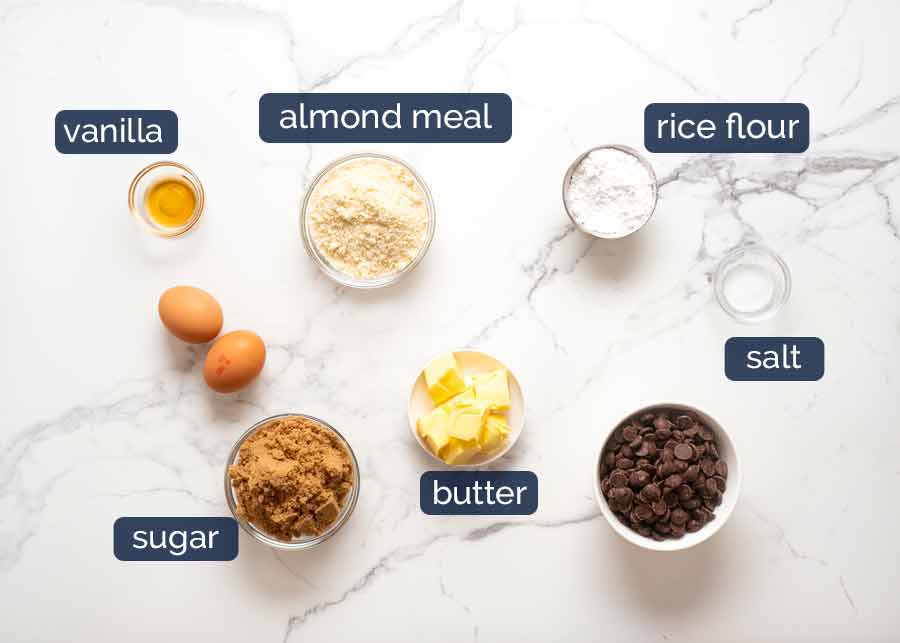
Almond meal / ground almonds (same thing) – this is finely blitzed raw, whole almonds in powder form, used in place of flour to add a beautifully nutty flavour to baked goods (like in this very popular Orange Cake and Flourless Chocolate Cake). It makes them ultra moist and also gluten-free.
Find it in the baking section, dried fruit and nut section or health food section of grocery stores.
Making your own: Blitz whole, raw unsalted almonds until powdered.
Almond flour is slightly different but can be used. Brownie texture will probably be a bit more cake-like (almond flour is made with blanched peeled almonds, no skin, and is finer) and a less pronounced almond flavour.
Rice flour – This is ground rice, widely available these days at everyday grocery stores. It takes the place of flour in this recipe to give the brownies a bit of much needed structure compared to using just almond meal.
Note however that some brands (like McKenzie’s in Australia) are not fully ground into a fine powder and sometimes have a tiny bit of a grit in them. Not a big deal in this recipe, but I prefer using Asian brands as they never seem to have this problem (Asian aisle, Harris Farms in Australia, Asian stores).
Chocolate – Use cooking chocolate chips from the baking section of the supermarket, not eating chocolate. Though actually, Lindt chocolate bars work great, not all eating chocolate does so that’s why I generally don’t recommend it!
Butter – No need to soften it as it is melted with the chocolate.
Large eggs – Use eggs sold in cartons labelled “large eggs” which are 55 – 60g / 2 oz each. This is an industry standard. If you don’t have eggs this size, crack eggs in a bowl, whisk then measure out 90 ml / 100 grams.
Sugar – I like to use brown sugar as it adds a bit of caramely flavour to the brownies. But white sugar works just fine here.
Vanilla – Extract is better quality and flavour than imitation vanilla.
Salt – Generally good practice in baking to include a touch of salt as it brings out the flavour of other ingredients. It doesn’t make these brownies salty!
How to make flourless chocolate brownies
Nice and easy – one bowl and just a wooden spoon!
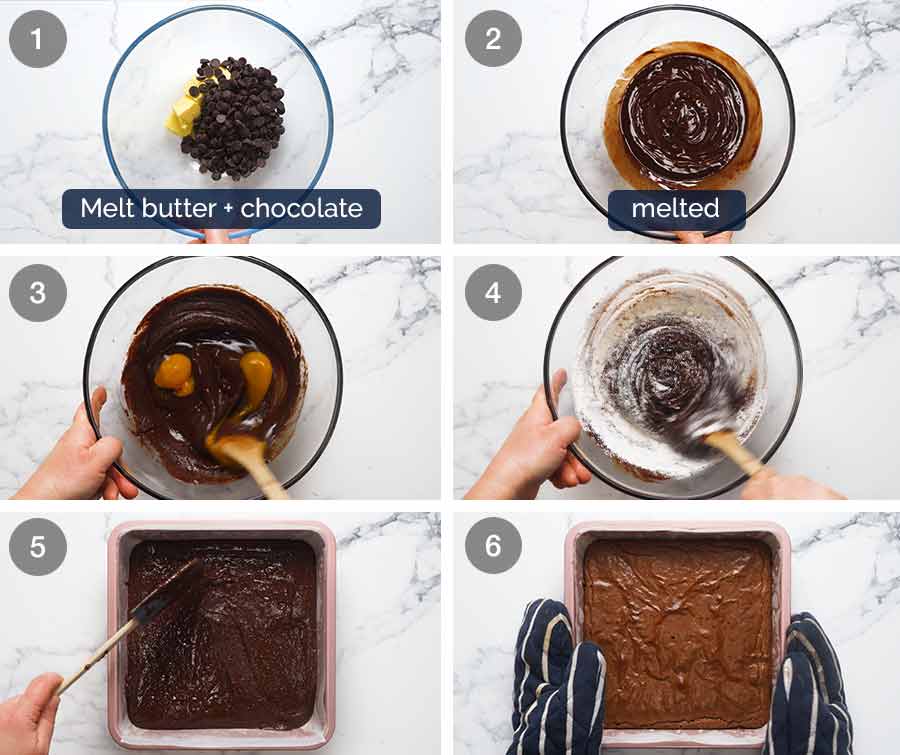
Melt the butter and chocolate in a heatproof bowl. I do this in the microwave – 3 x 30 second bursts on high, stirring in between, until melted and smooth.
Mix well until smooth, then let it cool for 5 minutes just to be sure we don’t accidentally cook the eggs!
Vanilla, sugar, eggs – Stir in the vanilla and sugar, then mix the eggs in until incorporated and the batter is smooth.
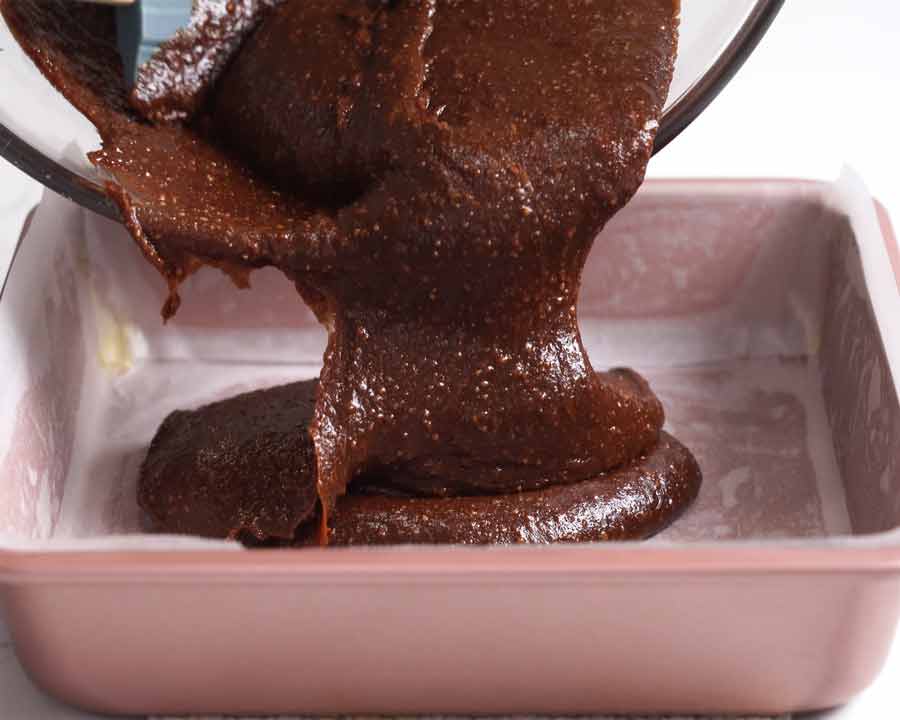
Add dry ingredients – Mix in the almond meal and rice flour.
Bake – Pour into the prepared pan, smooth the surface then bake for 25 minutes or until a toothpick inserted into the centre comes out clean but still a bit wet. You want it to be moist because that means the brownie is still fudgy! Note however that flourless brownies are far more forgiving than brownies made with flour as the absence of flour makes it hard to overcook them to the point of drying out.
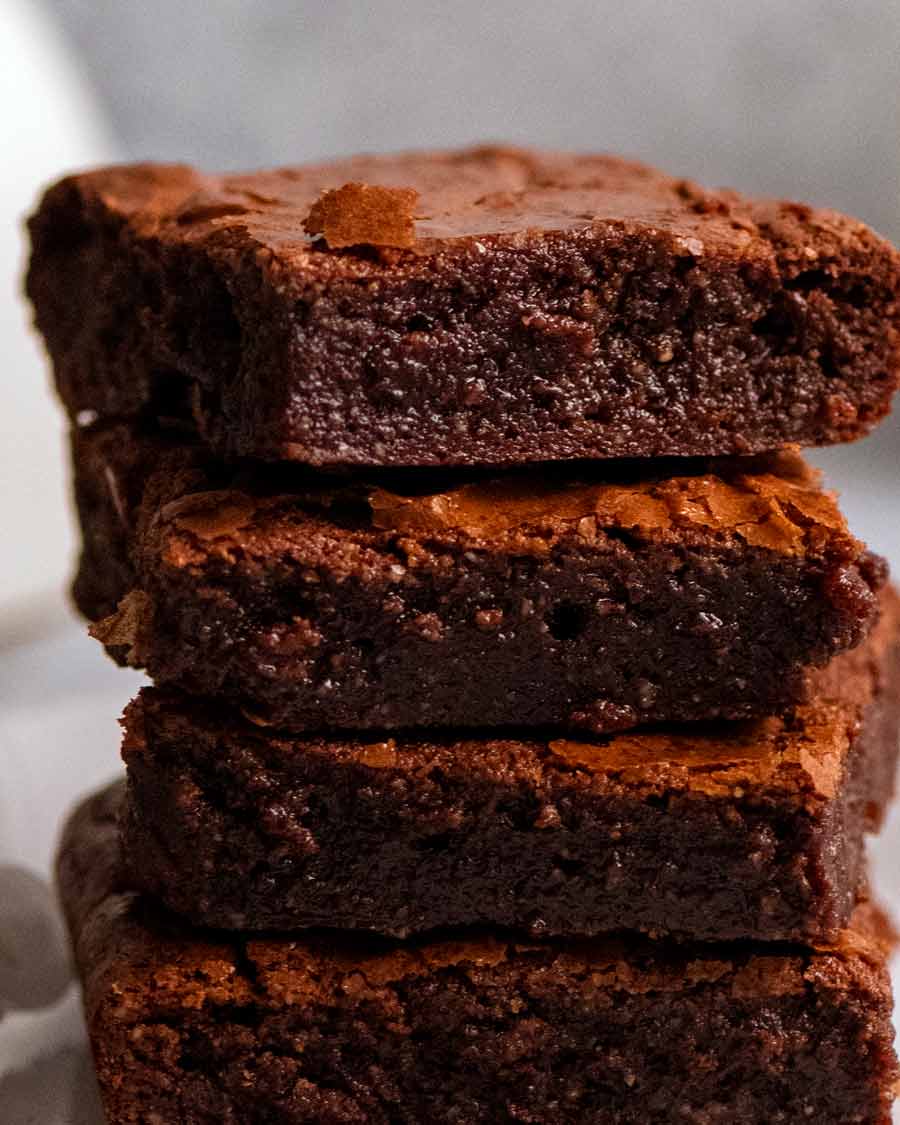
Cool in the pan for at least 30 minutes before using the paper overhang to lift the brownie out of the pan. Then fully cool on a rack before cutting to serve.
Cutting / serving hot v cooled – Fudgy brownies are difficult to cut when warm as they are too gooey. It is best to fully cool to room temperature before slicing. Better yet, for best results, refrigerate so it firms up, slice when cold so you get neat squares. Then allow to fully come to room temperature before serving. This way, you get perfect neat slices but the same gooey eating experience!
Also, close up proof that even though these are flourless brownies, you’ll get the signature crackly brownie surface that we all know and love:
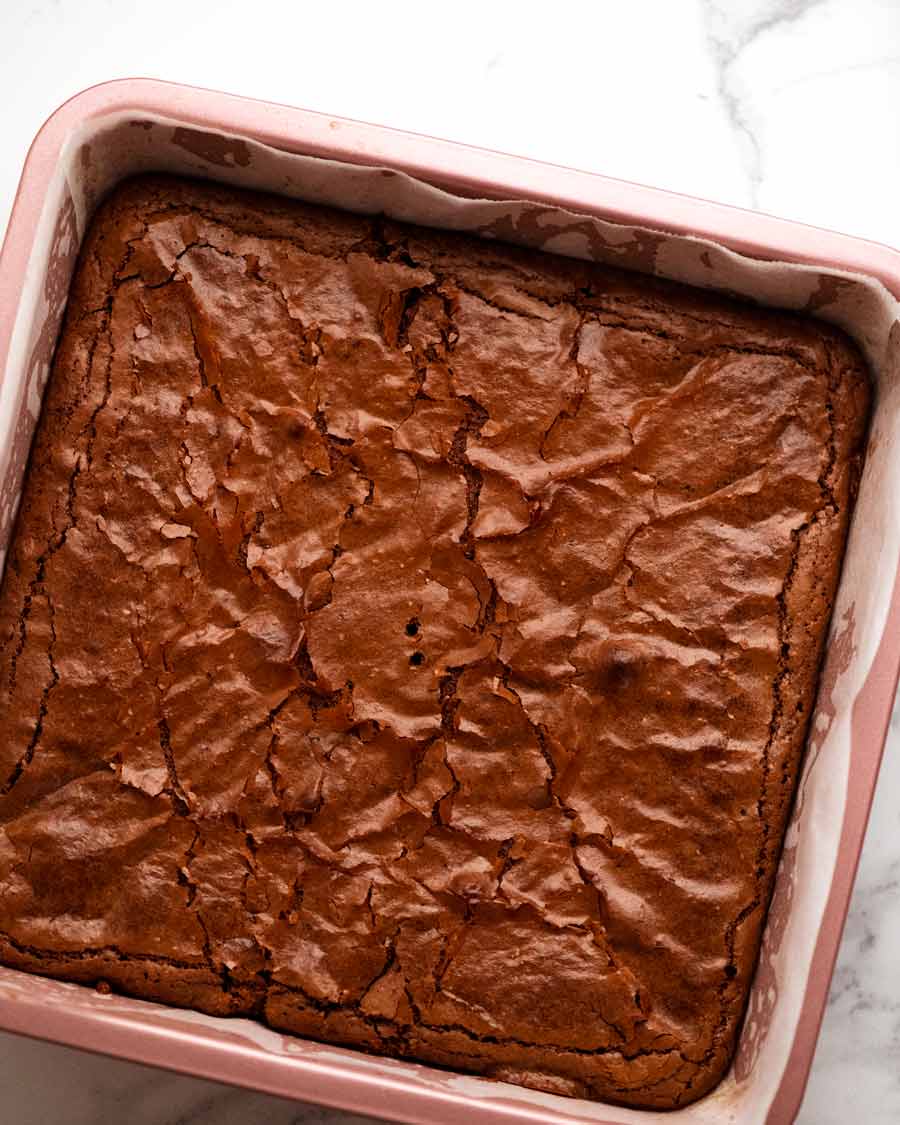
And proof of fudgy insides:
YUM.
I see these fudgy beauties in your future. Very near future, in fact. Like – this weekend.
Then after you’ve made them, come back and tell me how much you loved them!!! 😇 – Nagi x
Watch how to make it
Flourless Chocolate Brownies (gluten free)
Ingredients
- 1 cup dark chocolate chips or melts / semi-sweet chocolate (Note 1)
- 85 g / 6 tbsp unsalted butter , cut into 1 cm / 1/2" cubes
- 1/4 tsp cooking/kosher salt
- 3/4 cup brown sugar (sub white)
- 1 tsp vanilla extract
- 2 large eggs (55-60g / 2 oz each)
- 2/3 cup almond meal / ground almonds (or almond flour, Note 2)
- 1/3 cup rice flour (Note 3)
Instructions
- Preheat the oven to 180°C / 325°F (160°C fan-forced) with a rack in the lower third of the oven.
- Preparation: Grease and line a 20cm / 8" square pan with baking paper (parchment paper) with excess overhang so it's easy to lift out the brownie when cooked.
- Melt butter and chocolate: Place chocolate, butter and salt in a heatproof bowl. Microwave in 3 x 30 second bursts on high, mixing in between, until melted and smooth. You could also do this over simmering water on the stove.
- Cool 5 minutes: Mix well to combine the chocolate and butter then leave to cool for 5 minutes.
- Add vanilla, sugar and eggs: Stir in the vanilla and sugar. Crack the eggs straight into the bowl, and stir until combined.
- Add dry: Add almond meal and rice flour, and mix very well until fully combined.
- Bake: Pour the batter into the prepared pan and smooth the surface. Bake for 25 minutes or until the brownies are slightly puffed all over and a toothpick inserted into the center comes out moist but clean. You want it to be moist!
- Cool and serve: Cool brownies for at least 30 minutes in the pan. Remove the brownie by holding the edges of the baking paper, fully cool on a rack. Then cut into squares (3 x 3 for gigantic ones, 4 x 4 for sensible ones). See Note 4 for more cutting tips.
Notes
Nutrition
Recipe originally published May 2014. Updated with much needed new photos and a video, plus the all important Life of Dozer section! No change to recipe – perfect as is. 😇
Life of Dozer
Massage balls to work knots out of my back regularly go missing around here….

The post Flourless Chocolate Brownies (gluten free) appeared first on RecipeTin Eats.
]]> Q: How do you make brownies even better? A: Stuff ’em with salted caramel. Guilty pleasure? Yep. Caramel Brownies are not for people with a conscience! Caramel Brownies Caramel + brownies in itself isn’t an original idea and if you do a Google search, you’ll find plenty of examples. And I would have used an... Get the Recipe
The post Caramel Brownies appeared first on RecipeTin Eats.
]]>Q: How do you make brownies even better? A: Stuff ’em with salted caramel. Guilty pleasure? Yep. Caramel Brownies are not for people with a conscience!
Caramel Brownies
Caramel + brownies in itself isn’t an original idea and if you do a Google search, you’ll find plenty of examples. And I would have used an existing recipe if I found what I was after, but every recipe I came across:
1. Used store-bought caramel;
2. The caramel was runny, more like a caramel sauce, usually drizzled on top of the brownie; or
3. Required a candy thermometer to get the caramel to the exact temperature so it would soft set, rather than ending up runny OR cooking it too far so it ends up like hard toffee.
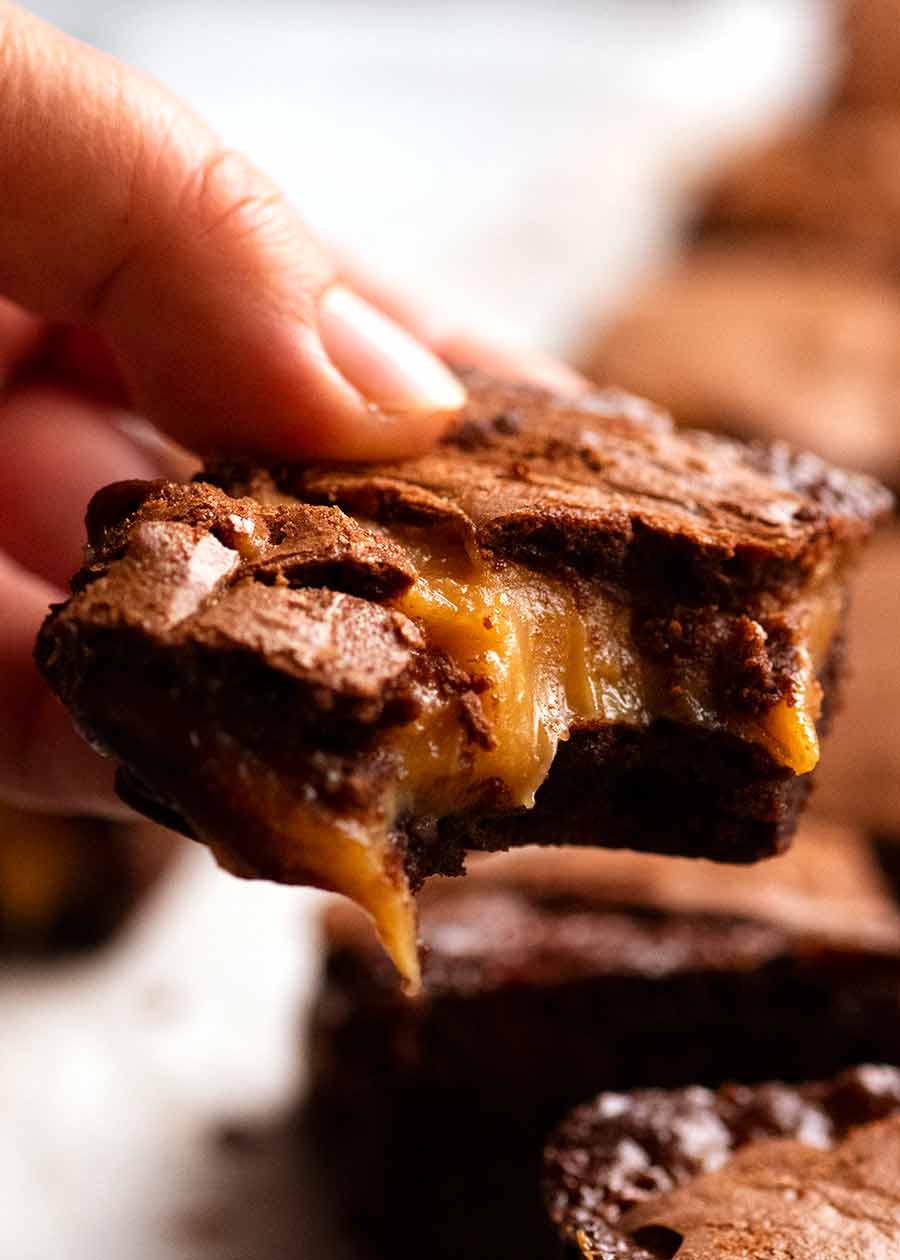
All I wanted was a creamy layer of caramel inside, and no thanks to the candy thermometer.
Solution? Combine my favourite everyday brownie with the easy creamy caramel from our favourite Caramel Slice, and voila: Caramel Brownies!
What goes in Caramel Brownies
Here’s what you need for the brownie part – nothing ground-breaking here:

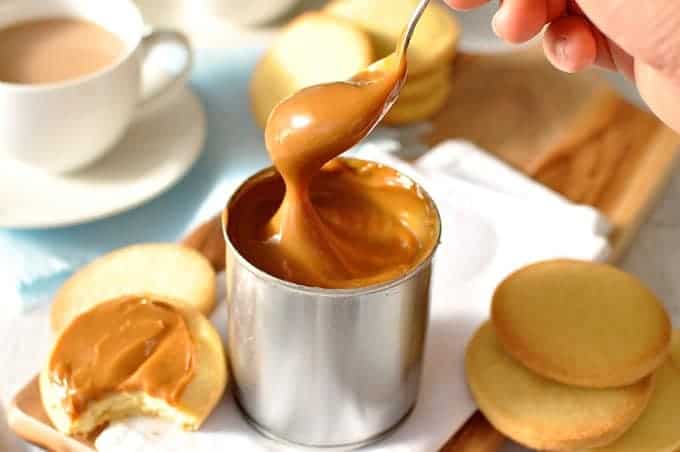
And here’s what you need for the creamy caramel. The key ingredient here is sweetened condensed milk, which is cooked on a low stove until it changes from white to pale golden ➔ ie. caramel!
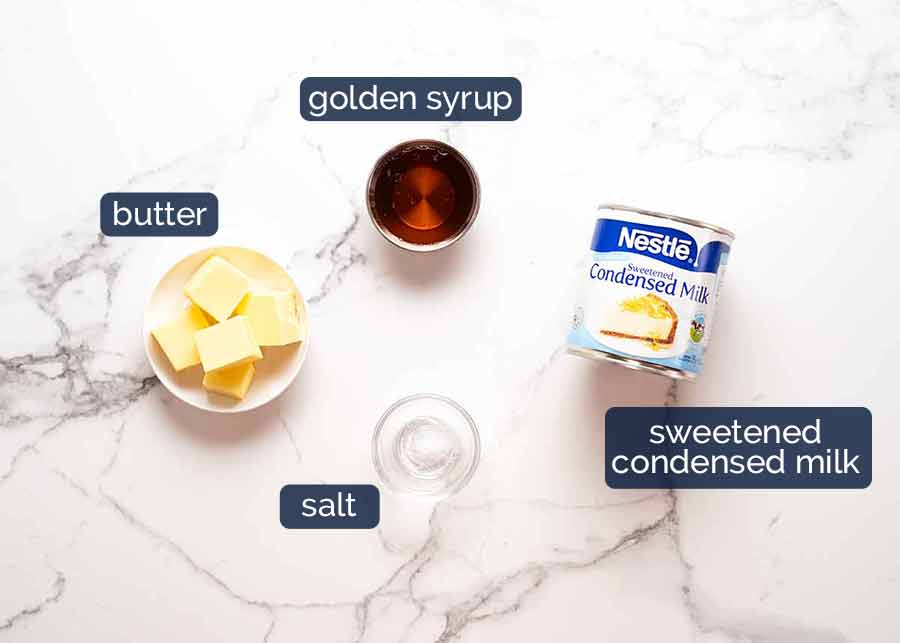
Golden syrup is a little cheat ingredient to give the caramel a little boost of extra caramel flavour without the caramel cooking for so long it becomes super-thick, like a peanut butter consistency. We need the caramel to be a pourable consistency so we can pour it over the brownie batter.
Golden syrup is a gold-coloured syrup that’s common in Australian and British baking. If you don’t have it, no need to fret, hunt it down or even bother making it – just use maple syrup instead, which works a treat.
How to make Caramel Brownies
Firstly, make the caramel part because this takes 7 minutes on the stove whereas the batter takes mere minutes:
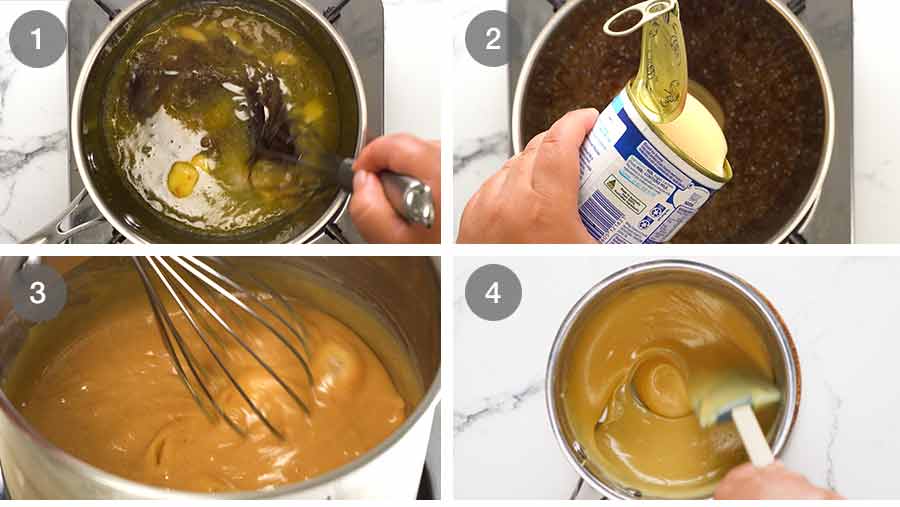
Melt butter in a saucepan with golden syrup or maple syrup and salt;
Add sweetened condensed milk and mix until well-combined;
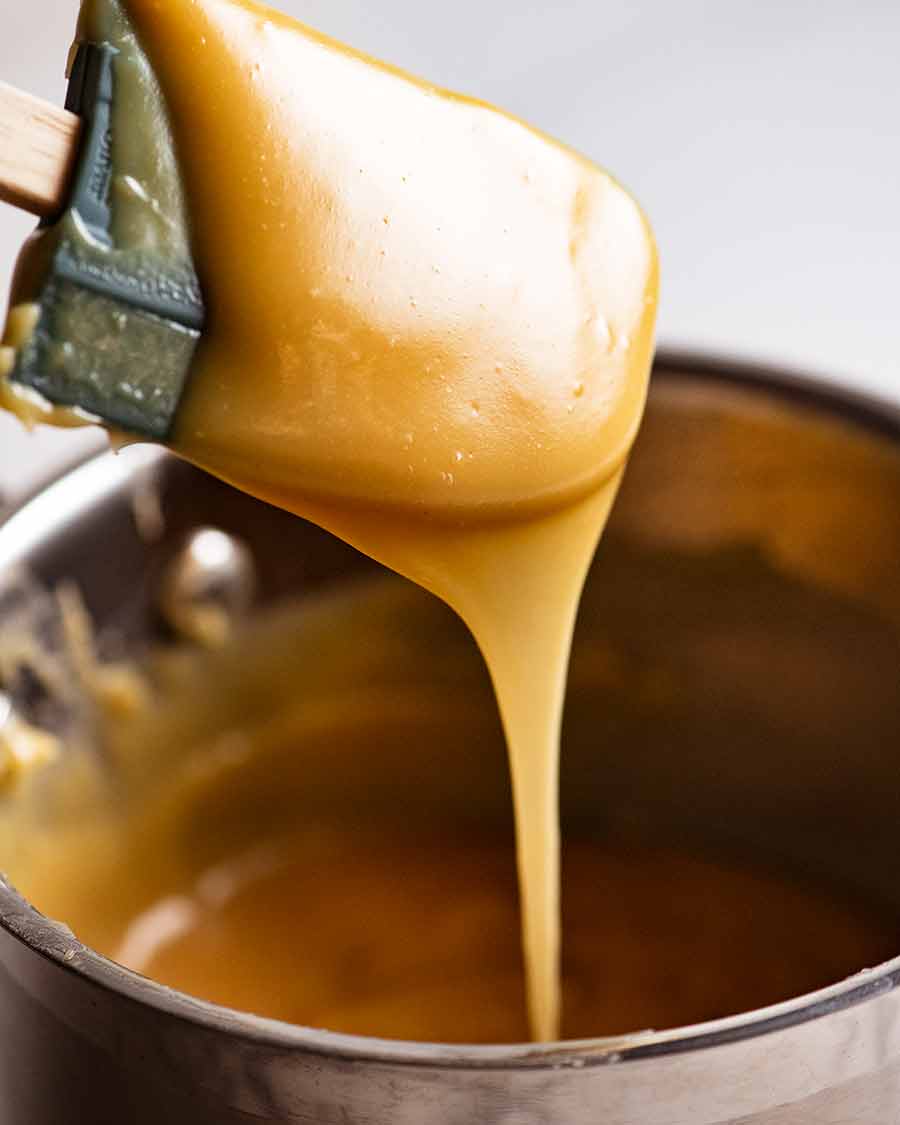
Then cook, stirring very frequently, over low heat until it changes from white to a caramel colour. You can get away with only stirring occasionally for the first few minutes, but as you start to see steam, be sure to stir constantly – albeit leisurely – to ensure it doesn’t catch on the base.
If the caramel happens to catch on the base, you will end up with tiny little brown bits in the caramel. It might look like a big deal when it’s in the saucepan but don’t worry – once it’s baked up inside the brownie and you bite into it, you won’t even notice;
Take it off the stove, then keep stirring for another 30 seconds just to cool it down a touch otherwise the residual heat in the saucepan might still make the caramel catch on the base.
Cover, then keep warm while you make the batter. It needs to be pourable when you use it.
And here’s how the Caramel Brownie is assembled:
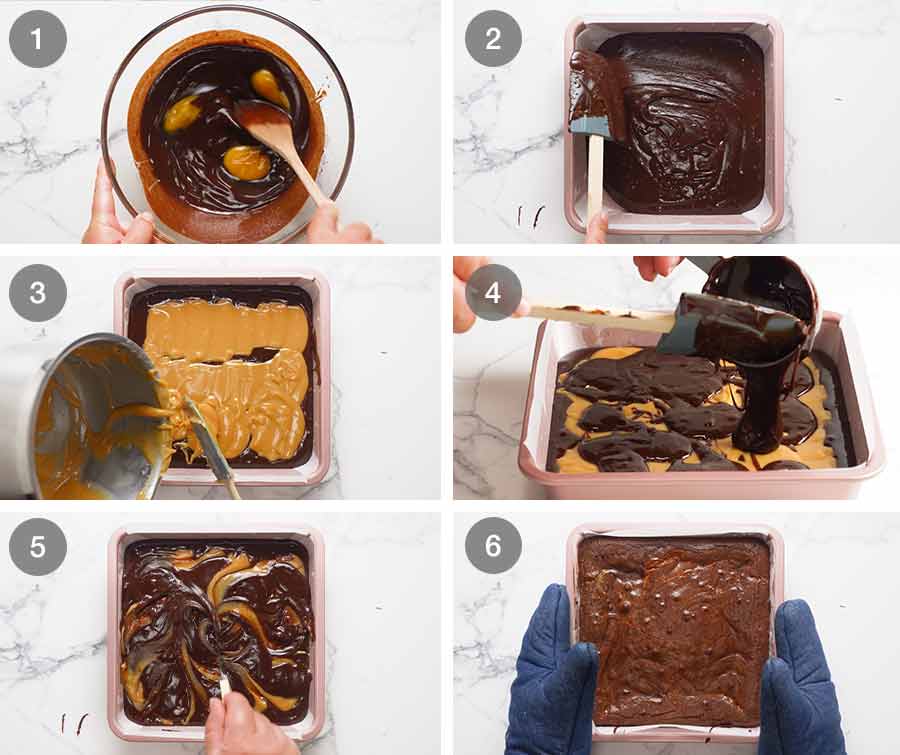
Firstly, make the Brownie batter. It’s very easy and all happens in one bowl. If you want visuals of the steps, pop over to my brownie recipe;
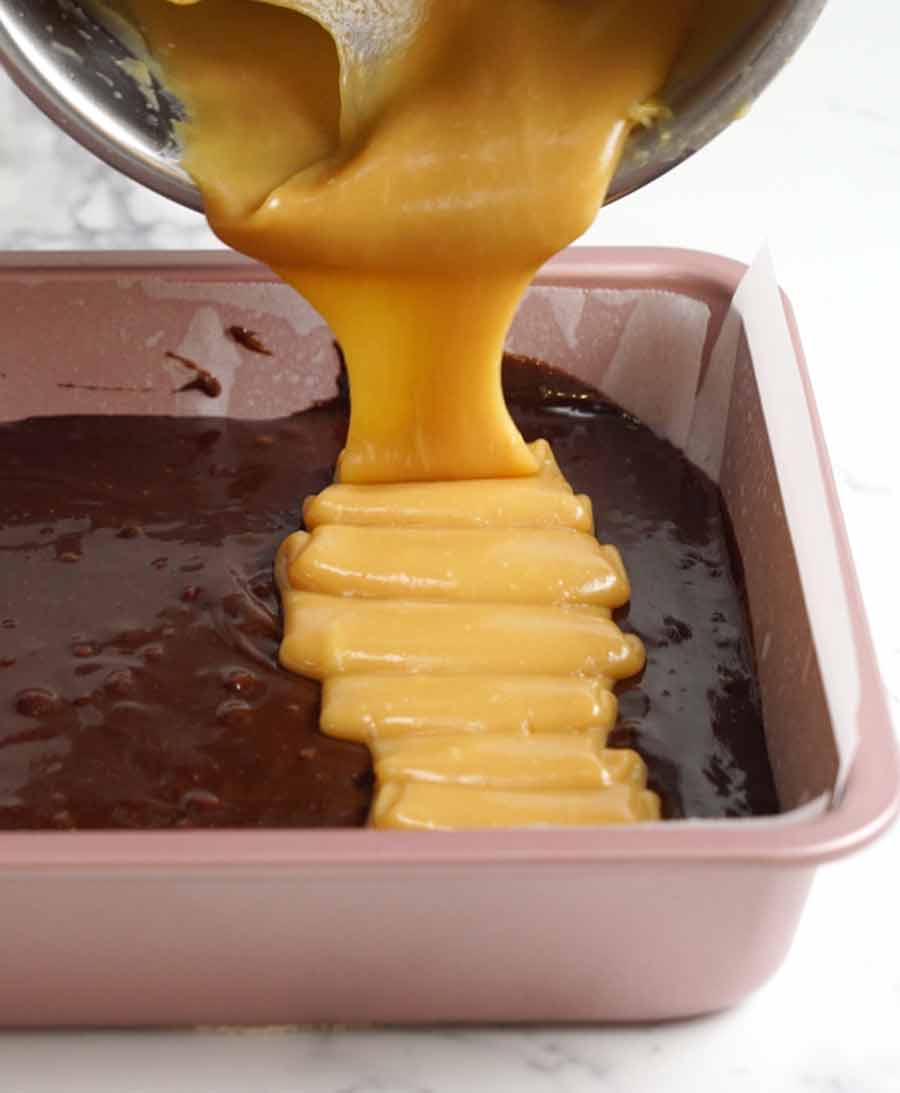
Set aside a heaped ½-cup of the batter for the topping. Then pour the remainder into a 20cm/8″ square pan. A lamington pan will also work well, the slice is just a bit thinner than pictured;
Pour the caramel over as evenly as you can. Note: If your caramel has cooled down to the point that it’s not pourable, just reheat it on a medium stove until it’s pourable again (this literally takes 1 minute). You can’t really spread the caramel because it sinks into the batter once poured. So where you pour is what you get!
Dollop the reserved ½-cup of brownie batter across the top;
Then swirl a butter knife across the surface a few times in large sweeping motions. This is not so much about creating swirl effects on the surface because they don’t really stay once baked, as you can see in Step 6. It’s more about sort-of spreading the brownie batter across the caramel; and
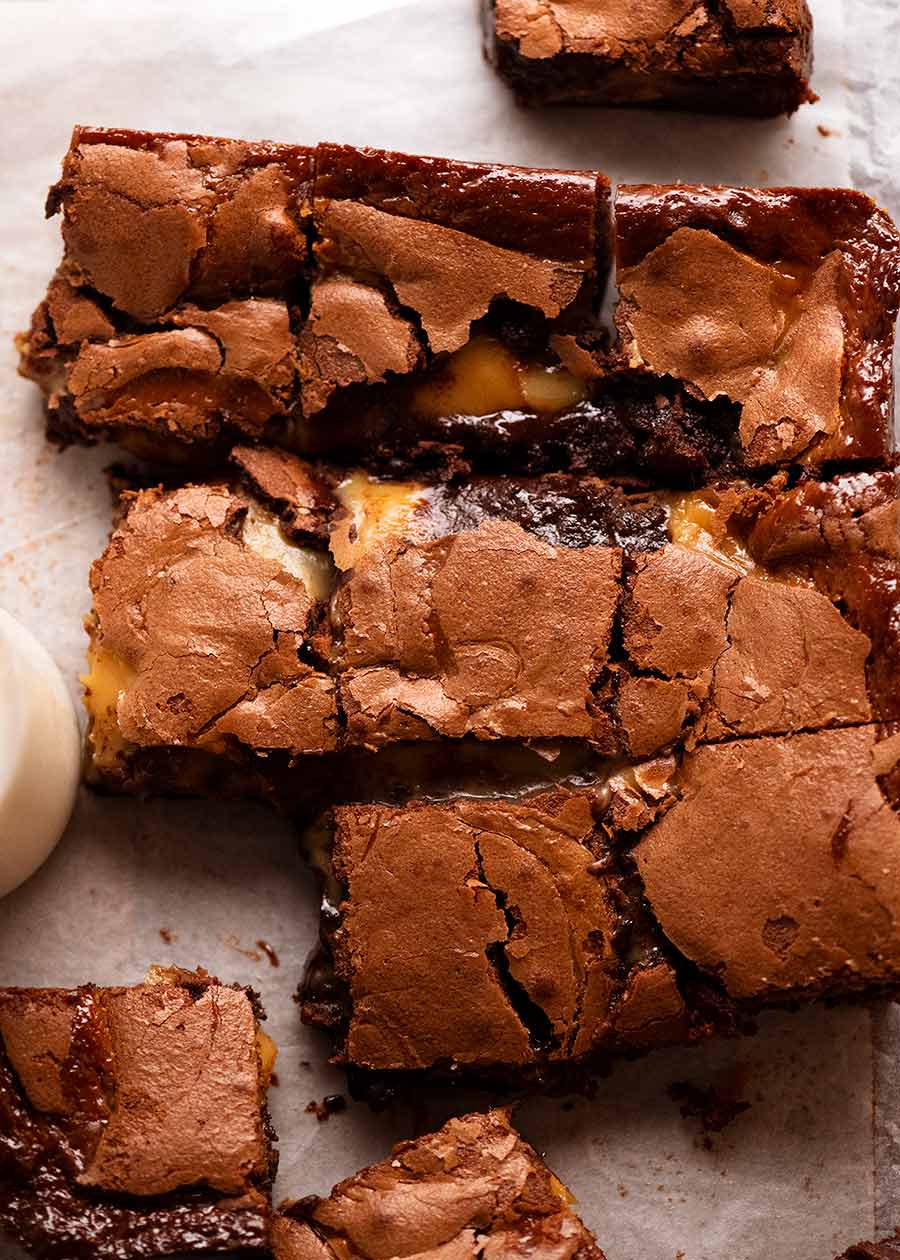
Bake – 30 minutes for very-messy-hands-gooey, as pictured, or 35 minutes for sensible gooey.
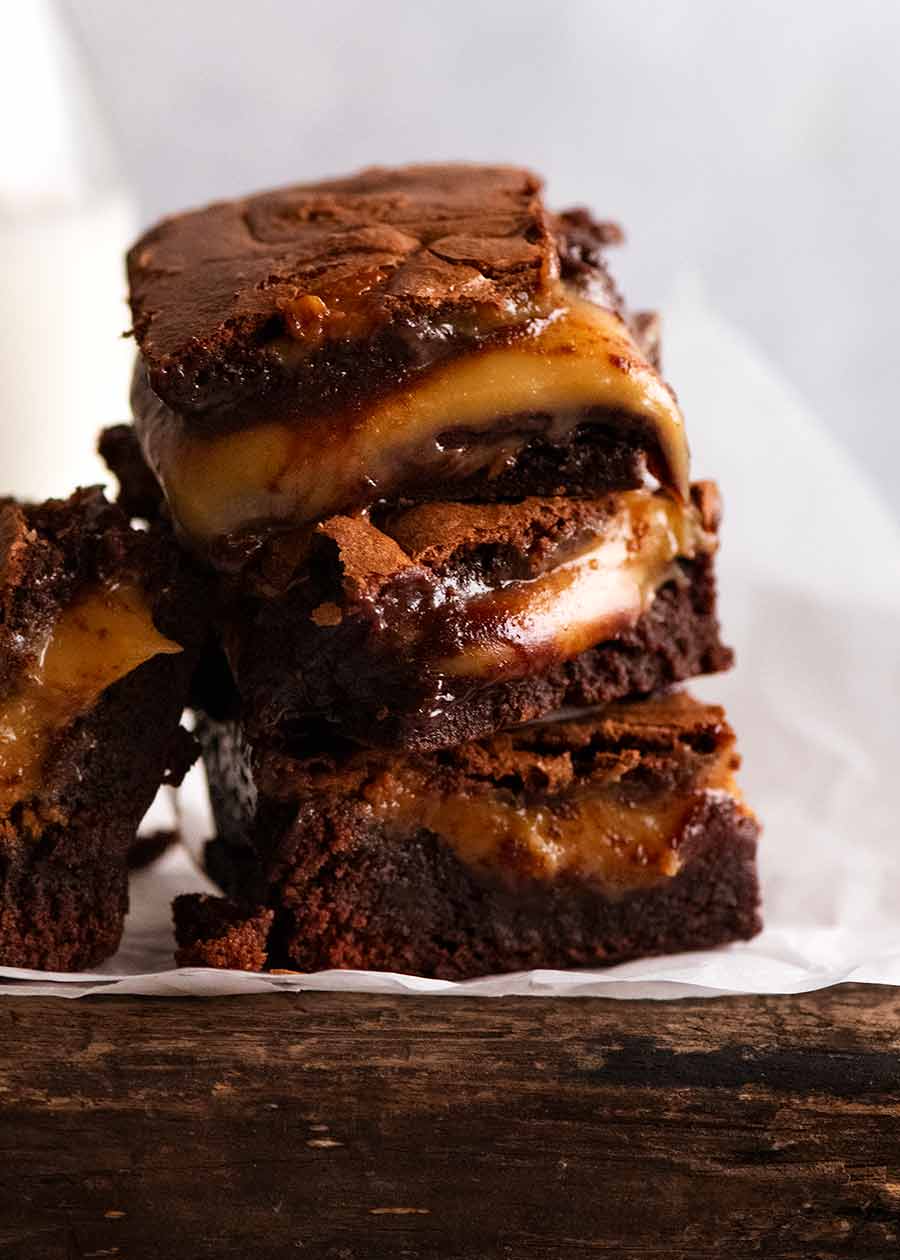
And this is what comes out of the oven:
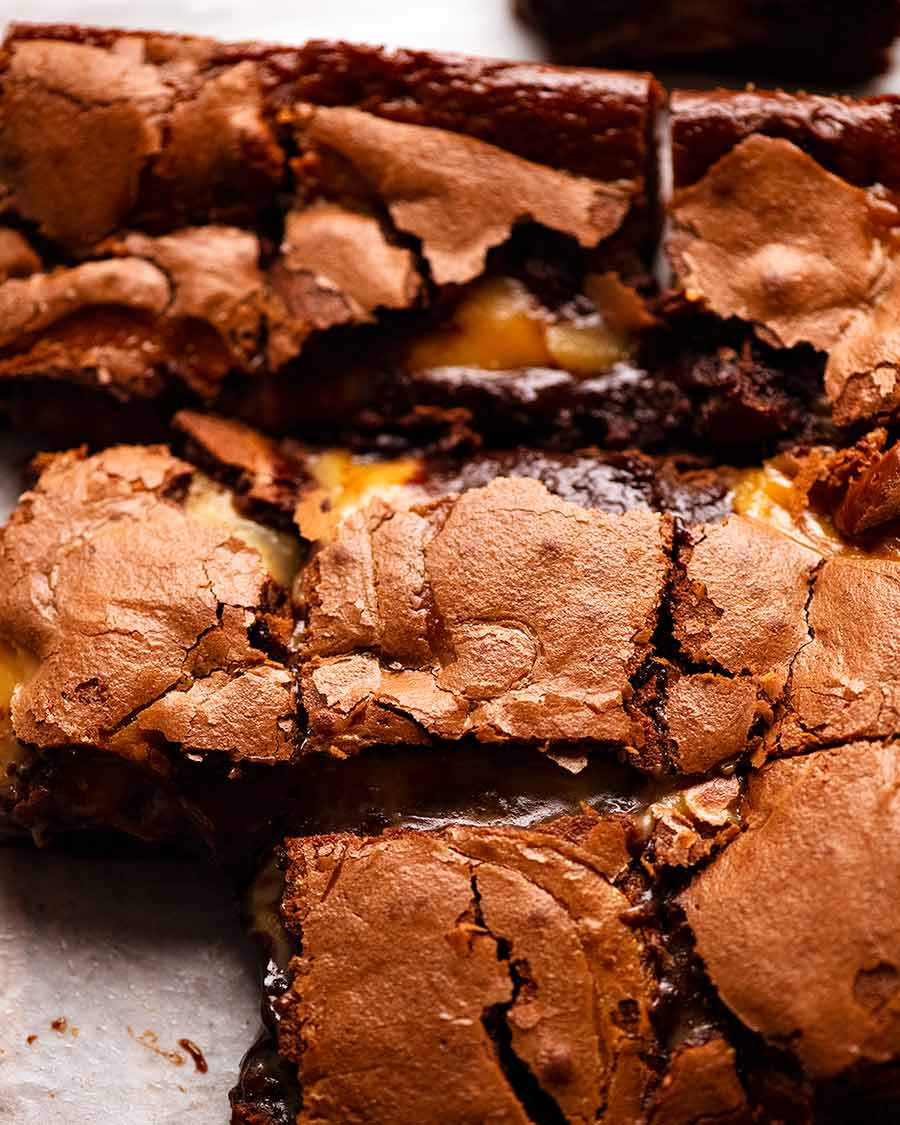
Well, actually, this:
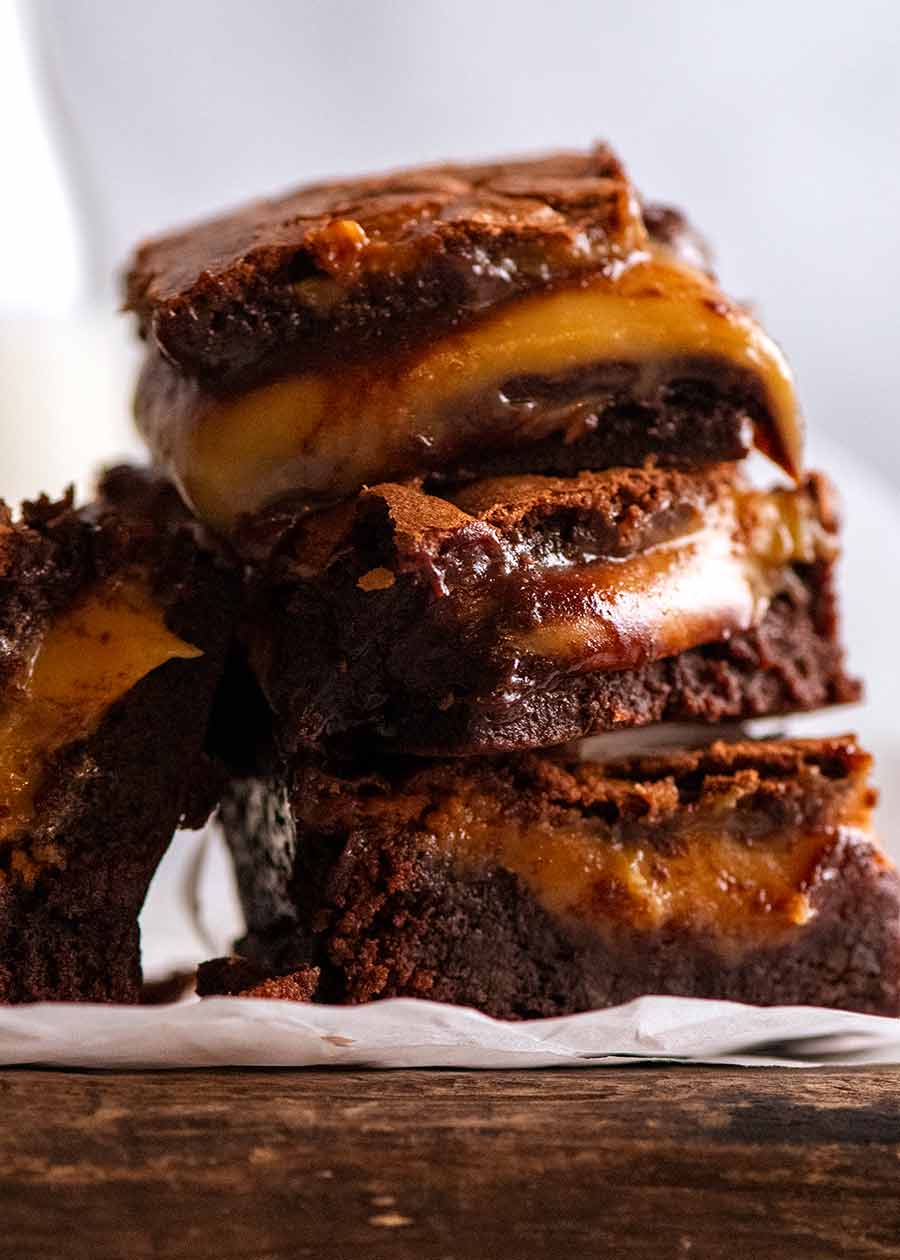
It’s sweet. It’s rich. It’s indulgent. This one is not for the faint-hearted or “I’m-not-really-a-sweets-person” types! It is for die-hard chocolate and caramel lovers – and everyone out there who just feels they deserve a treat.
Wait – that includes you, my friend. Do it! – Nagi x
Watch how to make it
Salted Caramel-Stuffed Brownies
Ingredients
Brownie
- 200g / 7oz unsalted butter
- 200g / 7oz dark chocolate / semi sweet chocolate chips (Note 1)
- 1 cup brown sugar
- 3 eggs , lightly whisked
- 1 tsp vanilla extract (or essence)
- 1/2 cup flour , plain/all purpose
- 1/4 cup cocoa powder
- 1/8 tsp salt
Salted Caramel
- 395g / 14 oz can sweetened condensed milk
- 2 tbsp golden syrup or maple syrup (Note 2)
- 60g / 2 oz unsalted butter
- 1 tsp salt
Instructions
- Preheat oven to 180°C/350°F (all oven types).
- Butter and line a 20cm / 8" square tin with parchment / baking paper.
Salted Caramel
- Place the ingredients in a small saucepan over medium high heat. Stir occasionally for the first 1 minute. When it is heated (ie. when you see wisps of steam), whisk constantly (leisurely, not vigorously!) for 7 minutes, ensuring the base doesn't catch (Note 3). It should be a pale golden colour.
- Remove from stove and whisk for 30 seconds. Place lid on, set aside and keep warm.
Brownies:
- Melt chocolate & butter: Place chocolate and butter in a bowl. Microwave in three 30 second bursts on high, stirring in between bursts, until melted and smooth.
- Add sugar, eggs, vanilla: Add the sugar, eggs and vanilla extract to the chocolate mixture and mix well to combine.
- Add dry ingredients: Sift in the flour, cocoa powder and salt. Mix until smooth and combined.
- Reserve some batter: Measure out 1/2 cup of brownie batter and set aside. Pour the remaining batter into the prepared tin.
- Pour over caramel: Pour the Salted Caramel over the brownie batter, getting as much coverage as you can (as you can't easily spread the caramel once poured). If caramel has cooled and is no longer pourable, reheat it on stove for 1 minute until runny again.
- Cover with reserved brownie batter: Dollop the reserved 1/2 cup of brownie batter randomly over the Salted Caramel. Use a knife or skewer to make “swirls” – they won't be so visible once baked, it's more about spreading brownie batter over the caramel.
- Bake: Place in the oven and bake for 30 minutes (for very gooey brownie, as pictured) to 35 minutes (for very moist but not super-gooey).
- Cool: Leave to cool in pan for 10 minutes. Use surplus paper overhang to lift out onto a cooling rack. Cool for a further 20 minutes before slicing. Note: Caramel is a bit gooey when still warm but sets firmer once fully cooled, ie. it will cut through neatly.
Notes
 )
2. Golden syrup is like a cross between honey and molasses – it is thick and sweet but not as thick as molasses. It is mainly used for colour in this recipe so you can substitute with maple syrup, or even leave it out.
3. Caramel – The condensed milk has a tendency to catch on the bottom of the saucepan which will result in golden bits distributed throughout. Don’t despair if this happens, you will barely notice it once baked. But you do need to whisk consistently to ensure you don’t end up with a sticky, burnt mess in the saucepan!
4. Baking time – The bake time is slightly longer than when you are making a plain brownie because of the caramel layer, which causes the brownie to take longer.
5. Measures – Tablespoon and cup measures differ from country to country. For this recipe, the difference is not enough to impact it. I have made it with both US and Australian measures (the two countries at the extremes in difference) and could not tell the difference. The only exception is Japan – please use weight measures provided (your cups are far too small).
6. Nutrition per brownie, assuming you cut it into 16 squares as directed, rather than into 4 very large squares (tempting as that might be).
)
2. Golden syrup is like a cross between honey and molasses – it is thick and sweet but not as thick as molasses. It is mainly used for colour in this recipe so you can substitute with maple syrup, or even leave it out.
3. Caramel – The condensed milk has a tendency to catch on the bottom of the saucepan which will result in golden bits distributed throughout. Don’t despair if this happens, you will barely notice it once baked. But you do need to whisk consistently to ensure you don’t end up with a sticky, burnt mess in the saucepan!
4. Baking time – The bake time is slightly longer than when you are making a plain brownie because of the caramel layer, which causes the brownie to take longer.
5. Measures – Tablespoon and cup measures differ from country to country. For this recipe, the difference is not enough to impact it. I have made it with both US and Australian measures (the two countries at the extremes in difference) and could not tell the difference. The only exception is Japan – please use weight measures provided (your cups are far too small).
6. Nutrition per brownie, assuming you cut it into 16 squares as directed, rather than into 4 very large squares (tempting as that might be).Nutrition
Originally published August 2015. Updated with brand new photos and video in January 2021 – about time!!
For Caramel Monsters
More slices and bars
Life of Dozer
As always, pushing the boundaries….
The post Caramel Brownies appeared first on RecipeTin Eats.
]]>