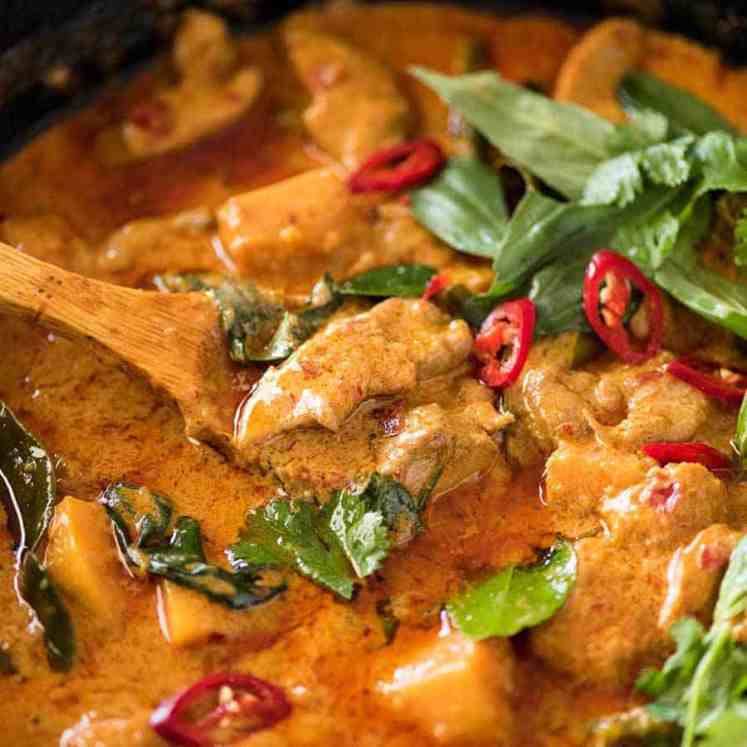
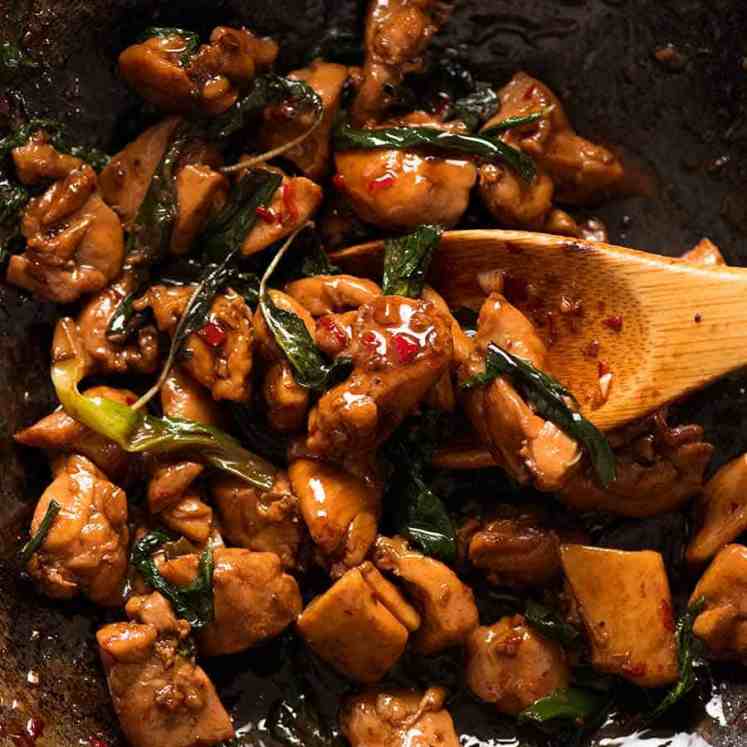
 I really did mean to post a classic pot roast chicken. But this Thai red curry version is SO MUCH MORE EXCITING!! To-die-for red curry sauce with outrageously juicy chicken, you’ll have this in the oven in 10 minutes. Effortless recipes with incredible results, this is my kind of food! Thai red curry pot roast... Get the Recipe
The post Thai red curry pot roast chicken appeared first on RecipeTin Eats.
]]>I really did mean to post a classic pot roast chicken. But this Thai red curry version is SO MUCH MORE EXCITING!! To-die-for red curry sauce with outrageously juicy chicken, you’ll have this in the oven in 10 minutes. Effortless recipes with incredible results, this is my kind of food!
Thai red curry pot roast chicken
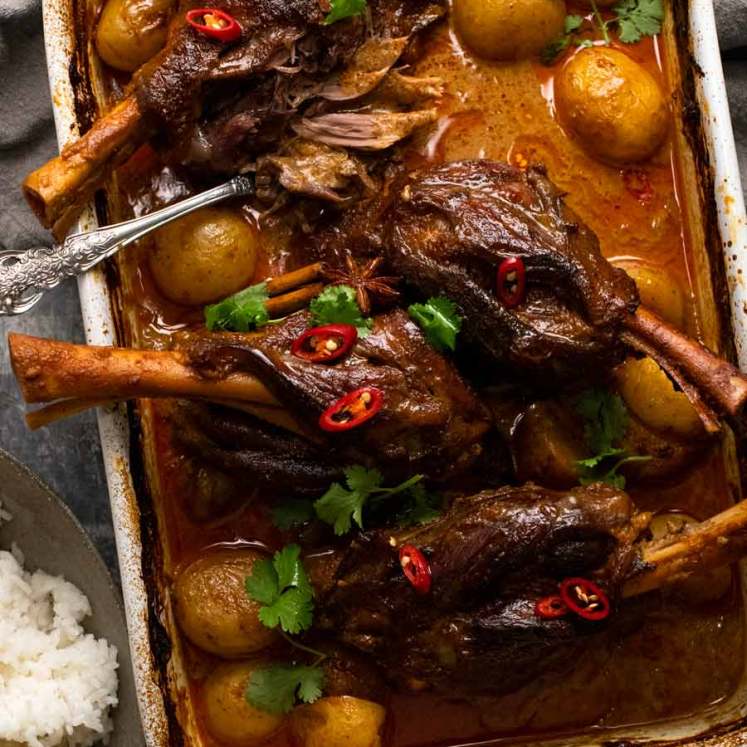
Consider this to be the roast chicken version of Lamb Shanks Massaman Curry, and beloved fan-favourite where you just put everything in a pan, pop it in the oven, then out comes fall-apart bronzed lamb shanks smothered in a rich massaman curry sauce.
Admittedly, this roast chicken red curry version does call for one extra step – sautéing the curry paste with aromatics (garlic, ginger, lemongrass) – before adding everything else and transferring it into the oven. Well worth a whole 2 minutes of effort for the extra depth of flavour you get in the Thai red curry sauce. And LOOK at the sauce!!
Speaking of sauce – did I mention we’re using store bought instead of homemade red curry paste today? For ease. Which brings me to an important topic:
My favourite red curry paste – Maesri
The best and cheapest. Full stop, end of story!
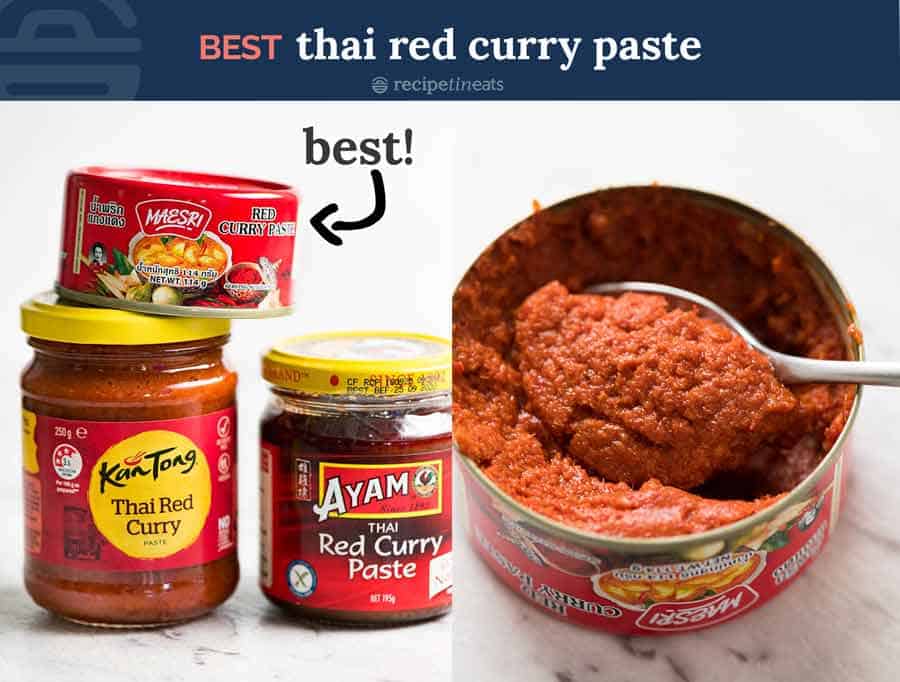
There is just no other than compares in mainstream grocery stores and Asian stores here in Australia. For authentic flavour – fresh, real, and not too sweet (why-oh-why are all the “western” red curry pastes so darn sweet??!!). Given the tick of approval by Thai nationals and it happens to be the cheapest curry paste clocking in at $2.10 a can.
While I highly recommend Maesri, this recipe does work with other red curry paste brands too. But the sauce will only be as good as the curry paste you use!
Where to find Maesri red curry paste
Asian grocery stores (it’s very common here in Australia)
Australia – Woolworths, Harris Farms, Amazon, asianpantry.com.au
Other countries – Amazon US, Amazon UK, Amazon CA (strangely pricey in Canada??)
Ingredients in Thai red curry pot roast chicken
Here’s what you need to make today’s recipe.
The red curry sauce
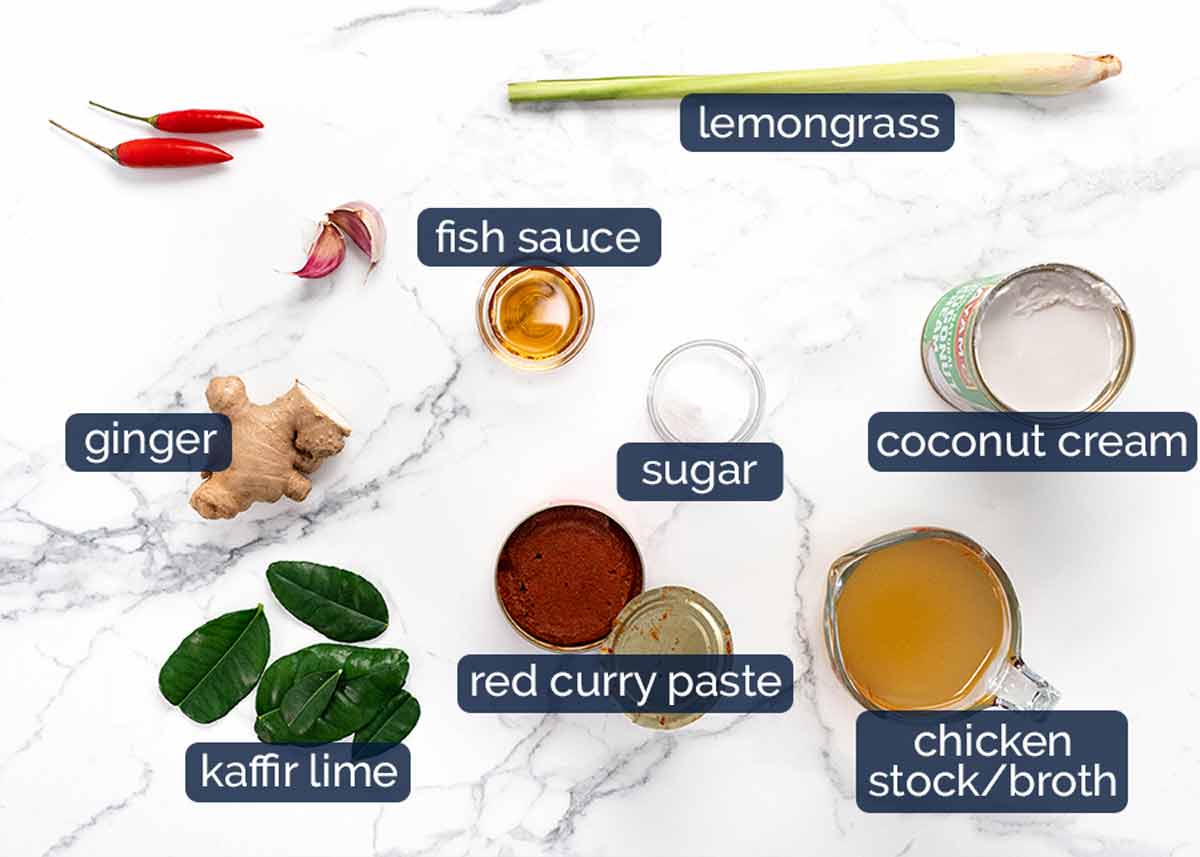
Red curry paste – As per section above, Maesri is my preferred! Cheapest and most authentic flavour.
Lemongrass, garlic and ginger – Adding these gives the store bought curry paste a flavour boost that makes it virtually like homemade red curry paste. It really makes a different!
Lemongrass – Substitute with 1 tablespoon of lemongrass paste. But one day, I hope you can make this with fresh lemongrass because it really is better!
Coconut cream – Not all coconut cream is created equal! Good ones are 100% coconut and have better flavour. Economical ones use water + thickener.
Coconut milk will also work but coconut flavour is not as intense (the sauce gets a ton of juices from chicken which dilutes the coconut flavour which is why coconut cream works better than milk).
Kaffir lime leaves – For authentic Thai curry flavour! Fairly accessible these days at large grocery stores and Asian stores. They freeze 100% perfectly which is handy.
Use leftover kaffire lime leaves in Thai red curry, Tom Yum soup, Thai meatballs, beef rendang, Malaysian chicken satay curry, green curry, golden turmeric baked fish and everybody’s favourite Asian coconut rice!
Fish sauce – This is used as the salt in red curry. More flavour than plain salt!
Sugar – For the right touch of sweetness you find in red curry sauce.
Red chilli – For optional garnish.
Vegetables and herbs
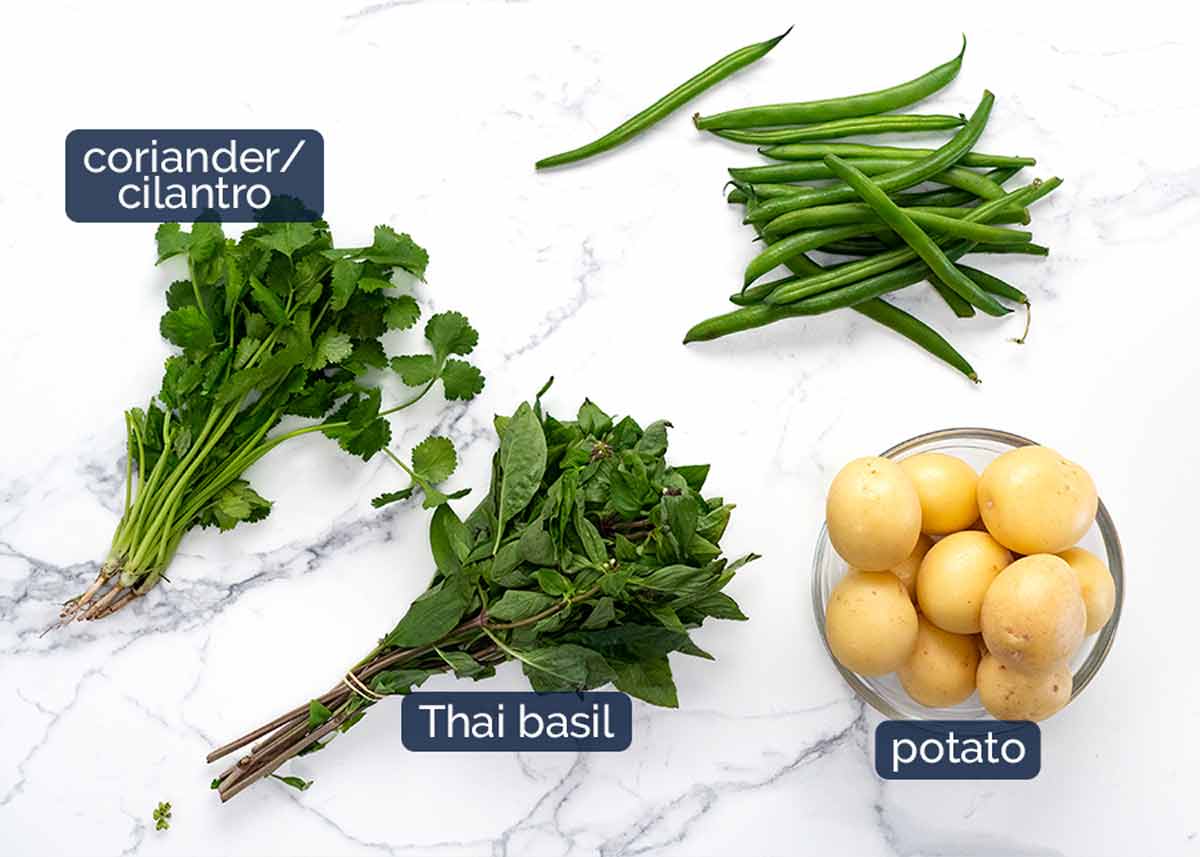
Potatoes – Small, skin on whole potatoes are best as the skin holds them together while they cook up beautifully creamy inside. If using cut pieces, add them partway through cooking else they will disintegrate.
Green beans – Just to add some vegetables into the sauce, plus a sprinkle of green. Feel free to add other vegetables!
Thai Basil has a slight aniseed flavour. Italian basil can be used in a pinch! Really adds a special touch to the finished dish so try not to skip it. But if this is the only thing you’re missing, still worth making!
Coriander/cilantro (optional) – This is mainly for garnish, though if you don’t have Thai Basil this makes a good alternative as a fresh herb addition to the dish.
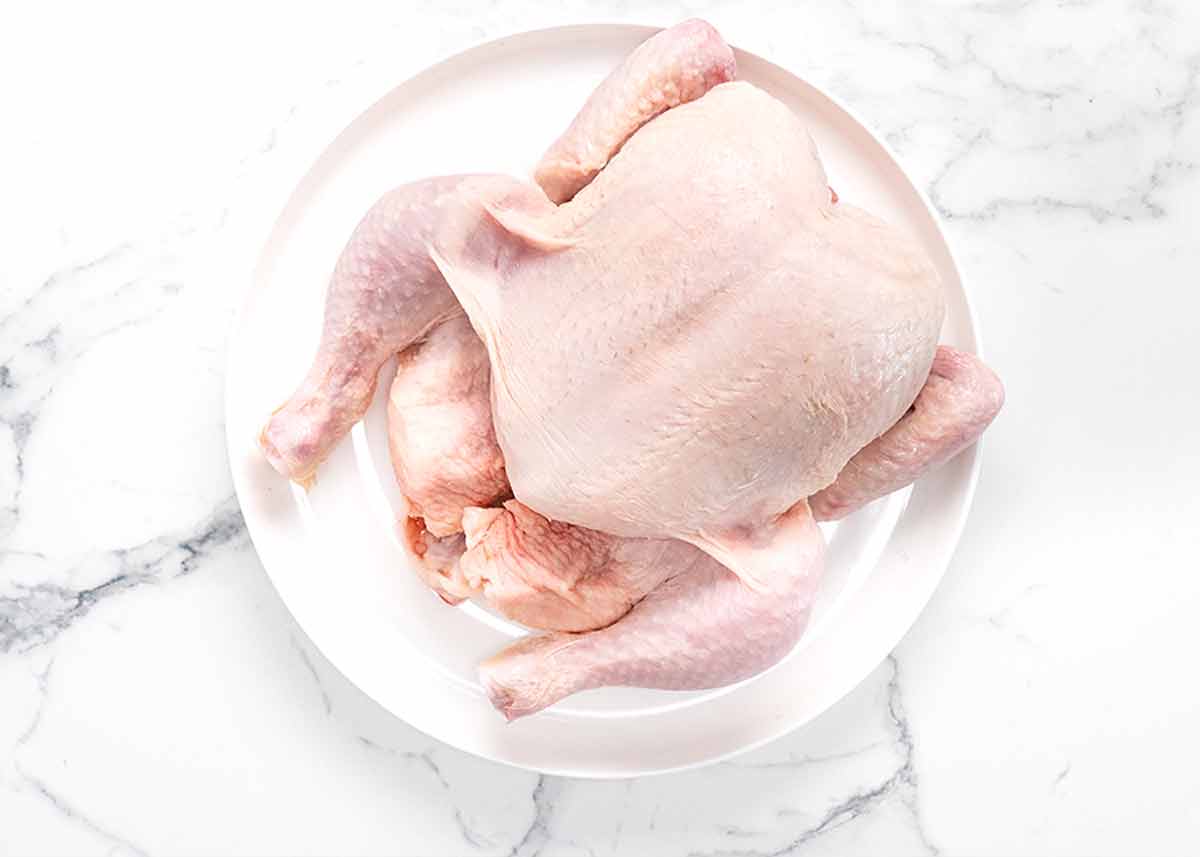
Whole chicken
Oh yes, and you will need a whole chicken. Let’s not make today’s recipe like that time I forgot to include pork in a roast pork recipe!! 😂
I use a 1.8kg/3.6lb chicken. It’s fine to use one a little larger or smaller as the pot-roasting method of cooking we’re using today is very forgiving. It will keep chicken juicy even if you take it over (small chickens) and cooks evenly and fast so larger chickens will cook through.
How to make Thai red curry pot roast chicken
This all gets made in one pot, and you’ll have it in the oven in 10 minutes!
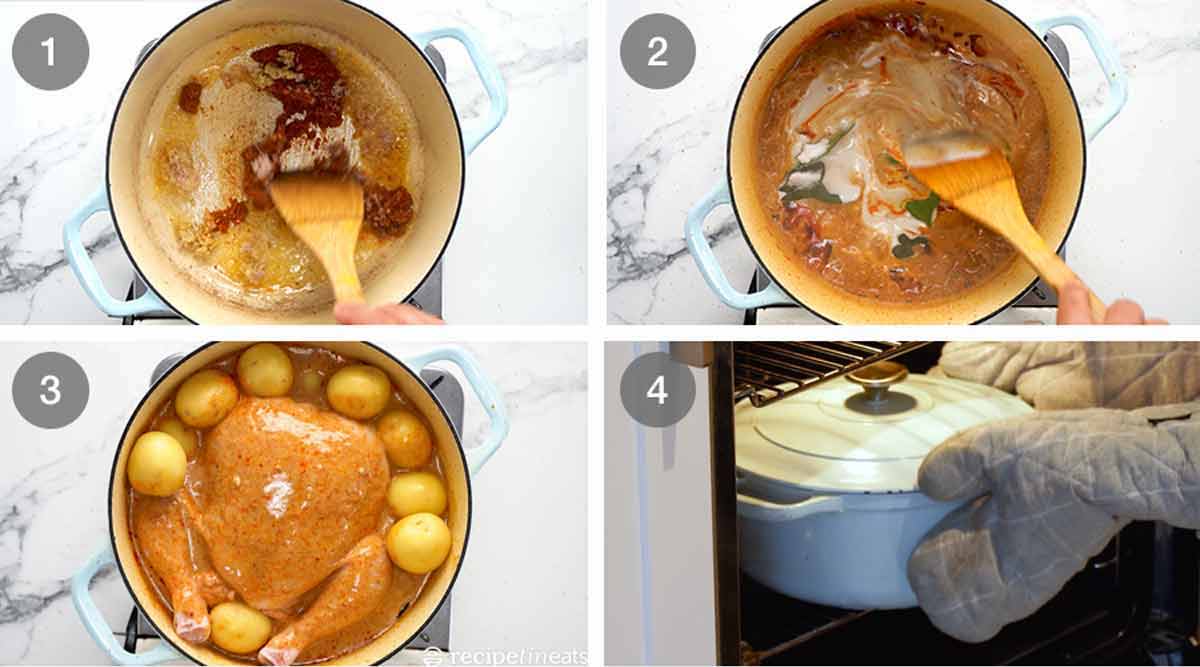
Cook off curry paste – Sauté the curry paste with lemongrass, ginger and garlic for a couple of minutes. The curry paste will dry out and caramelise which intensifies and improves the flavour. An essential step when using any store bought curry paste!
Sauce – Add the chicken stock then reduce it by half to concentrate the flavour. Add the remaining sauce ingredients – coconut cream, fish sauce, sugar, kaffir lime leaves – and stir to combine.
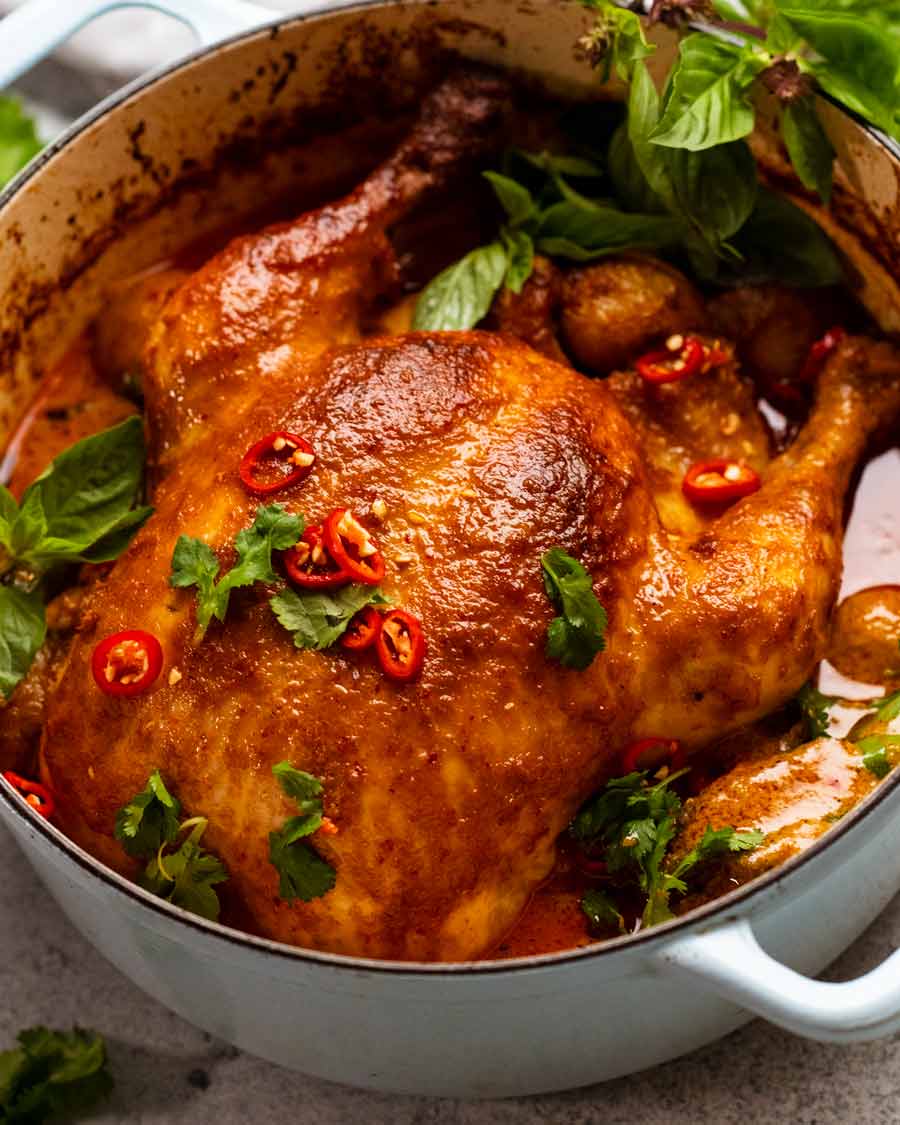
Put the chicken into the sauce and spoon sauce over. Then place the potatoes around it.
Bake covered for 40 minutes.
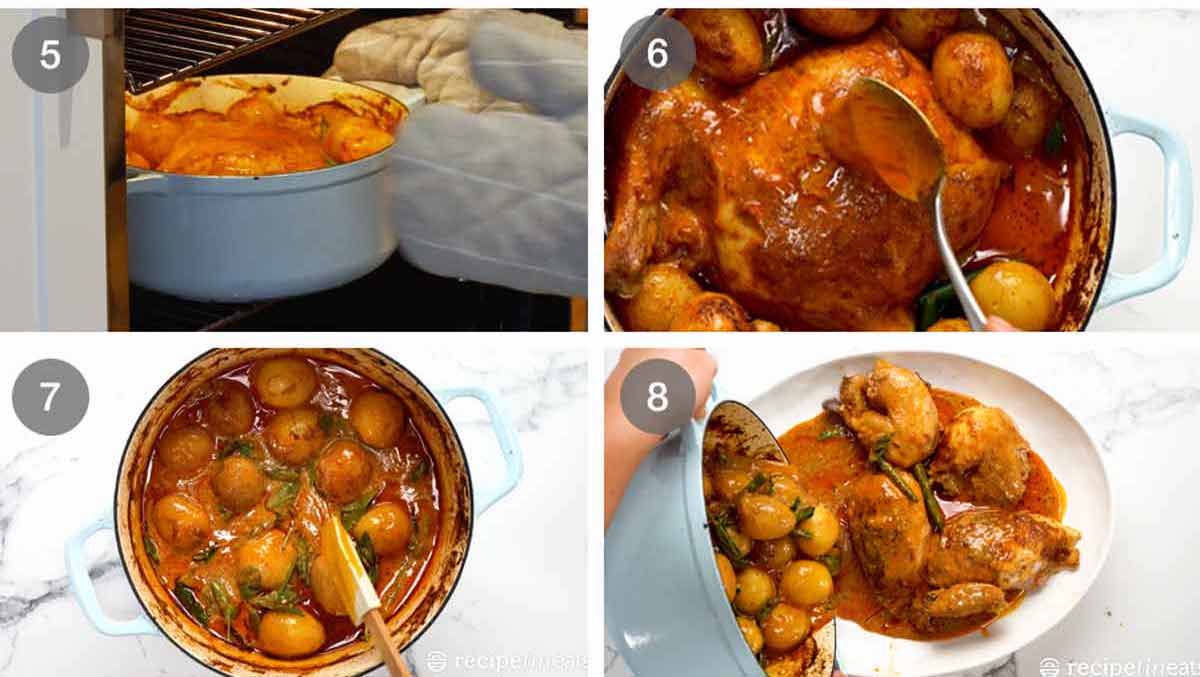
Brown the chicken – After 40 minutes, remove the lid and bake for a further 30 minutes, basting every 10 minutes. Oh, and push the beans into the sauce for the last 10 minutes! Any earlier and they’ll overcook far too much.
Just use a spoon to baste the chicken (which simple means spooning the sauce over) though if you have a turkey baster, it will make your life even easier.
Final baste – Give the chicken a final baste then transfer it to a plate to rest for 10 minutes before cutting it into pieces.
Thai Basil leaves – Stir the basil leaves into the sauce just before plating up, so as to retain the freshness of the flavour.
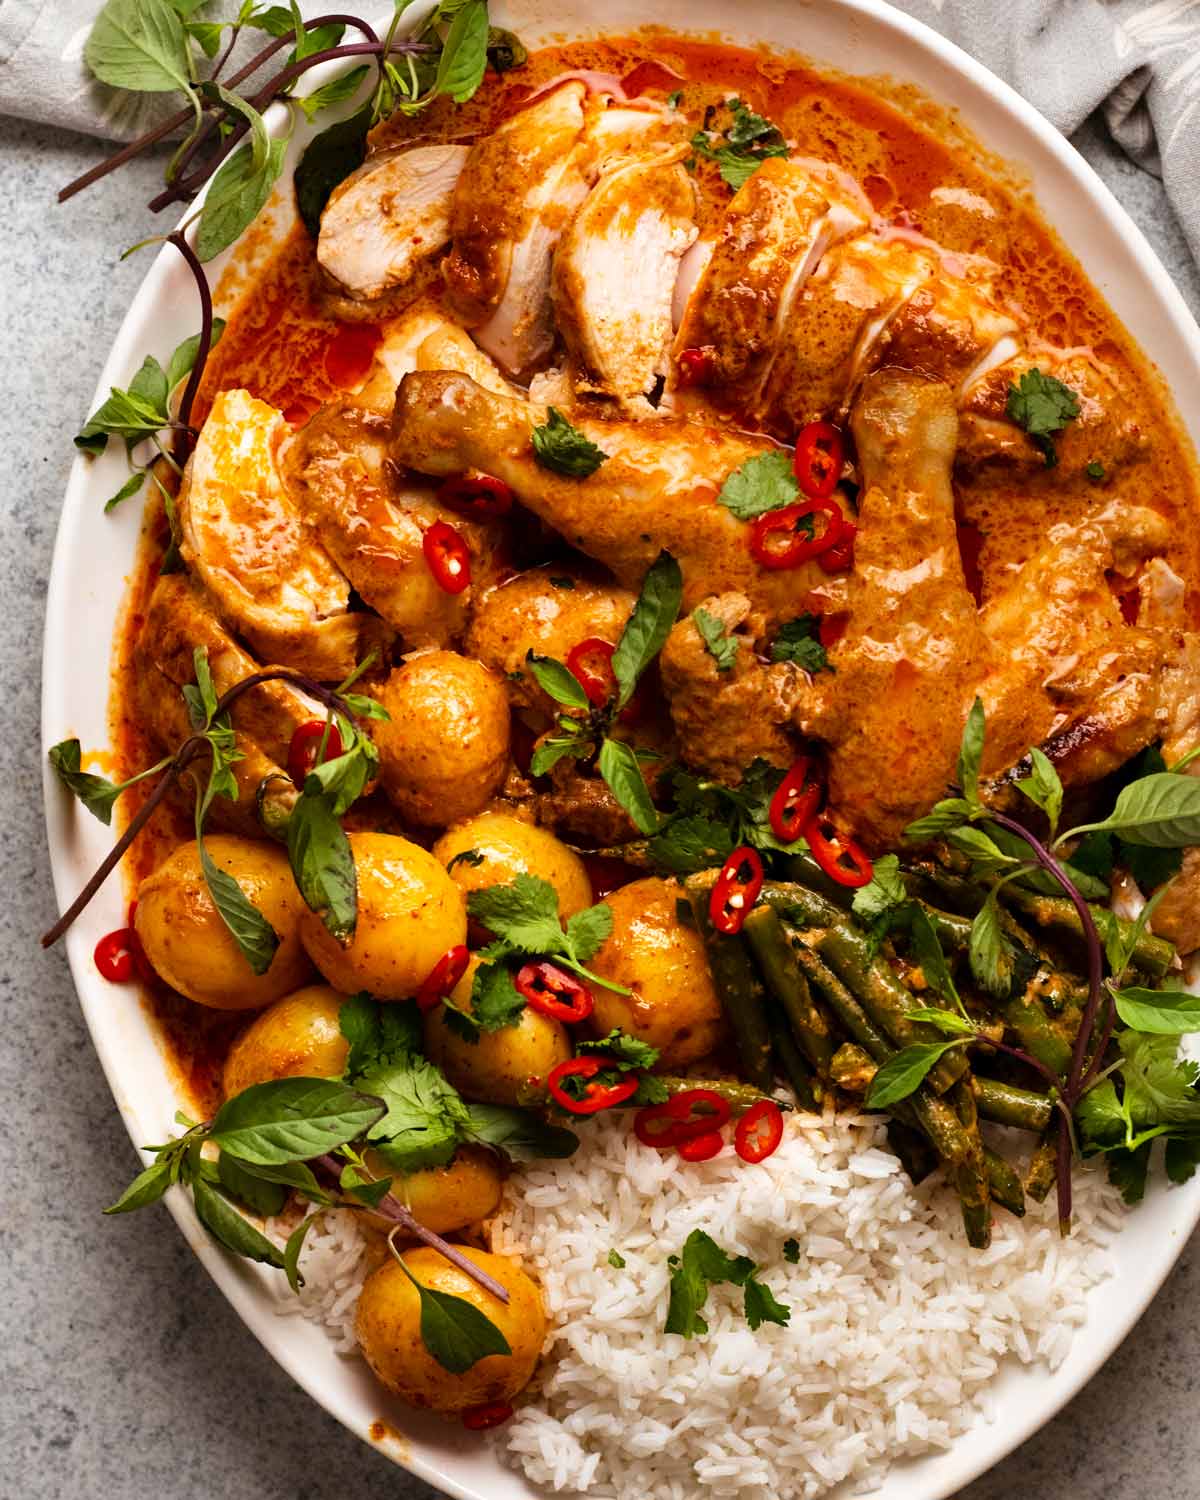
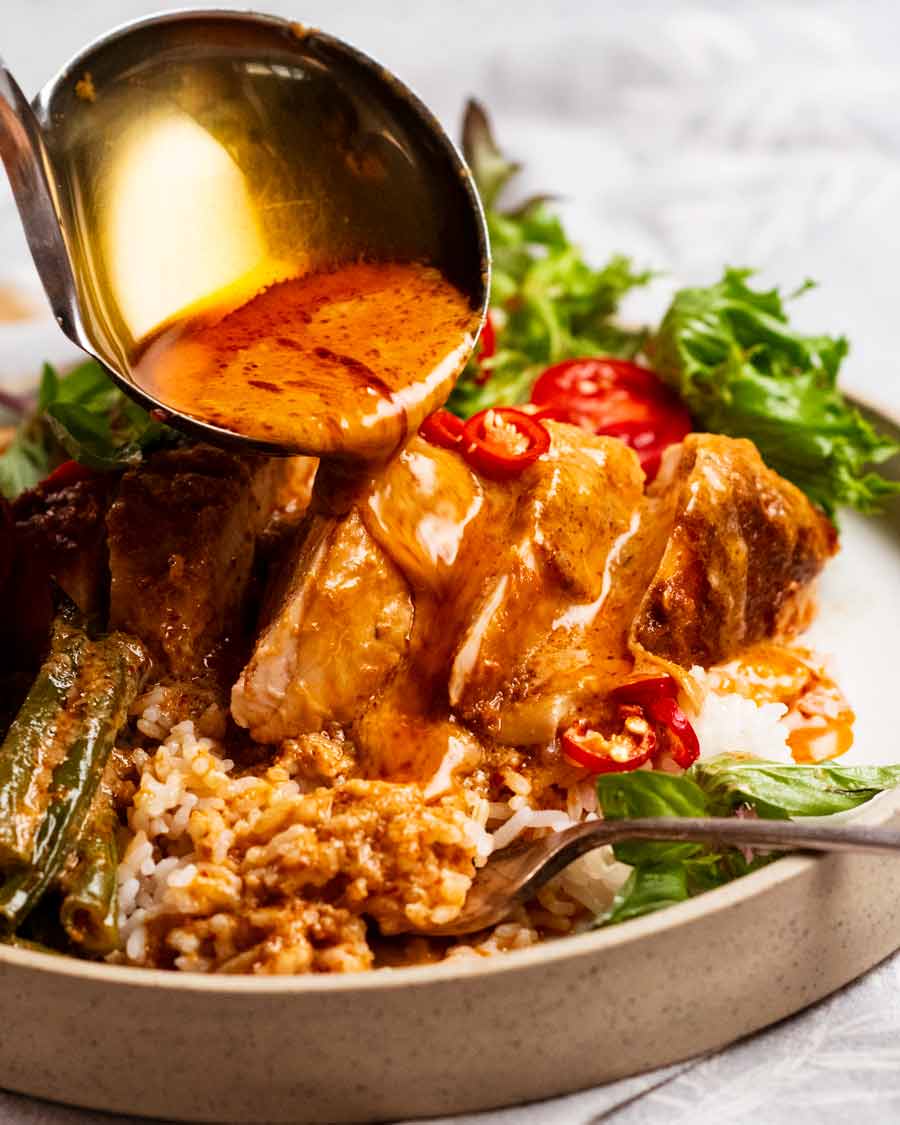
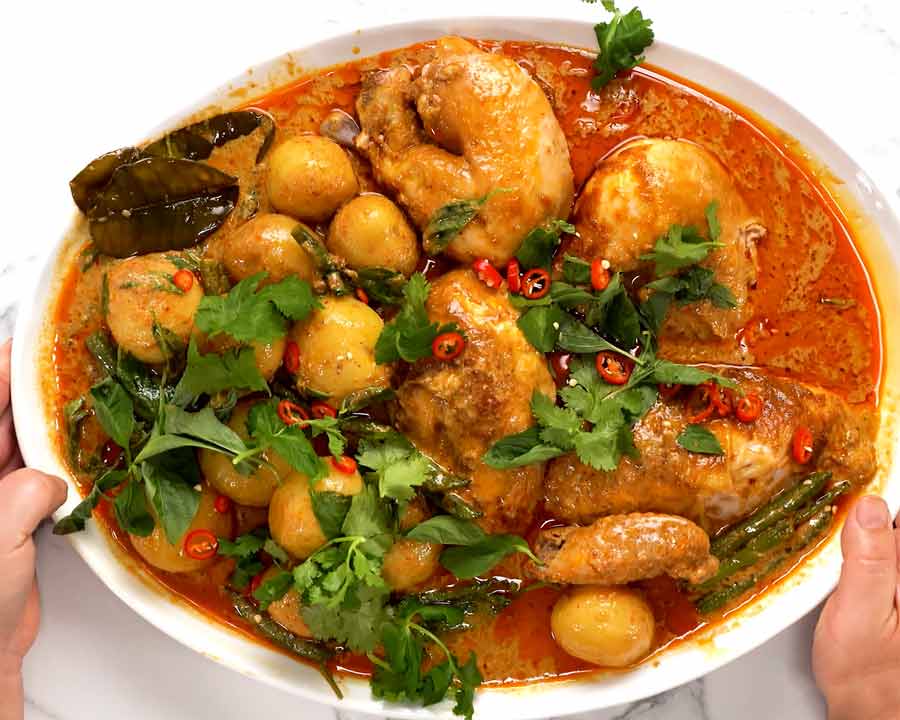
To serve – Place the chicken pieces on a platter then pour over the sauce, potatoes and beans. Garnish with extra chilli and fresh coriander if desired, then take it to the table!
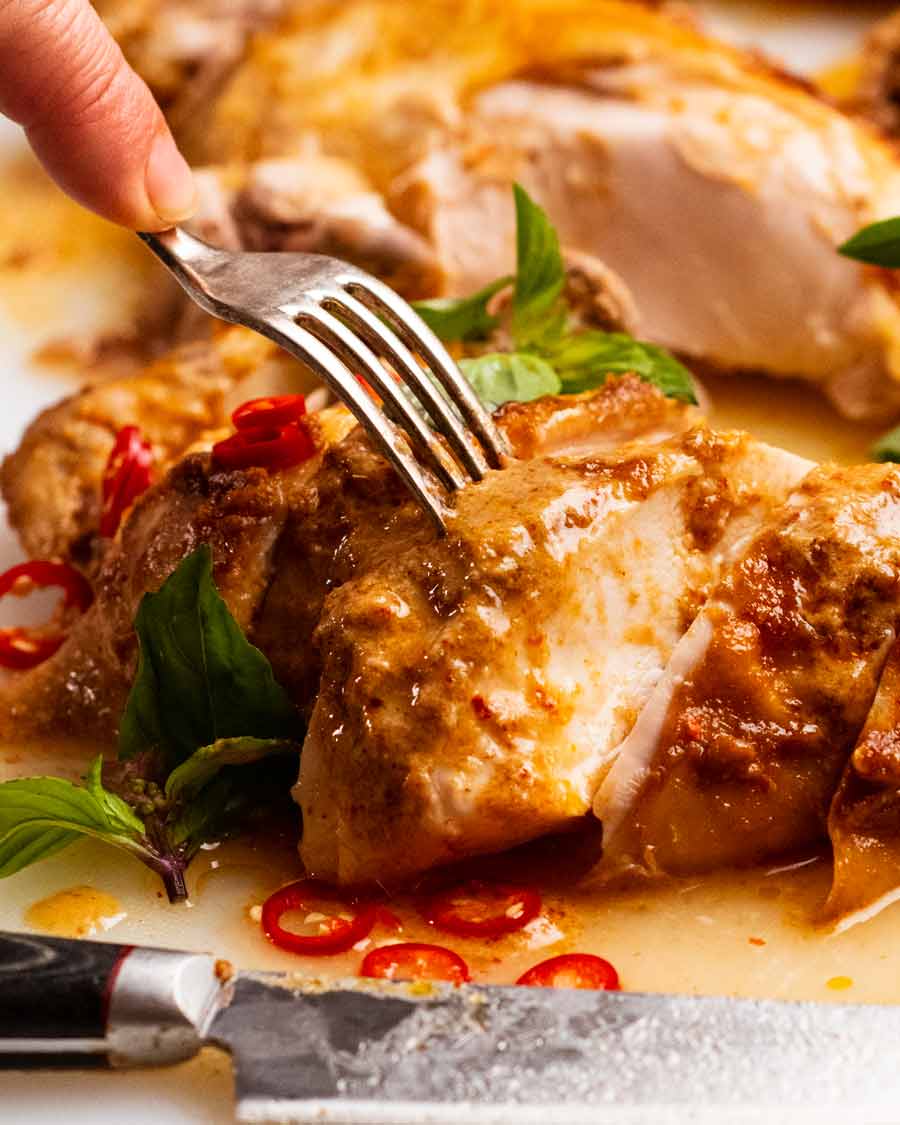
I know I’ve been going on and on about the sauce – and it really is worthy of the talk, I promise – but I shouldn’t undersell how juicy the chicken is, thanks to the pot roasting method of cooking! So much more forgiving than traditional roast chicken – which we all love, but does require more accuracy to ensure you don’t end up with a dry breast.
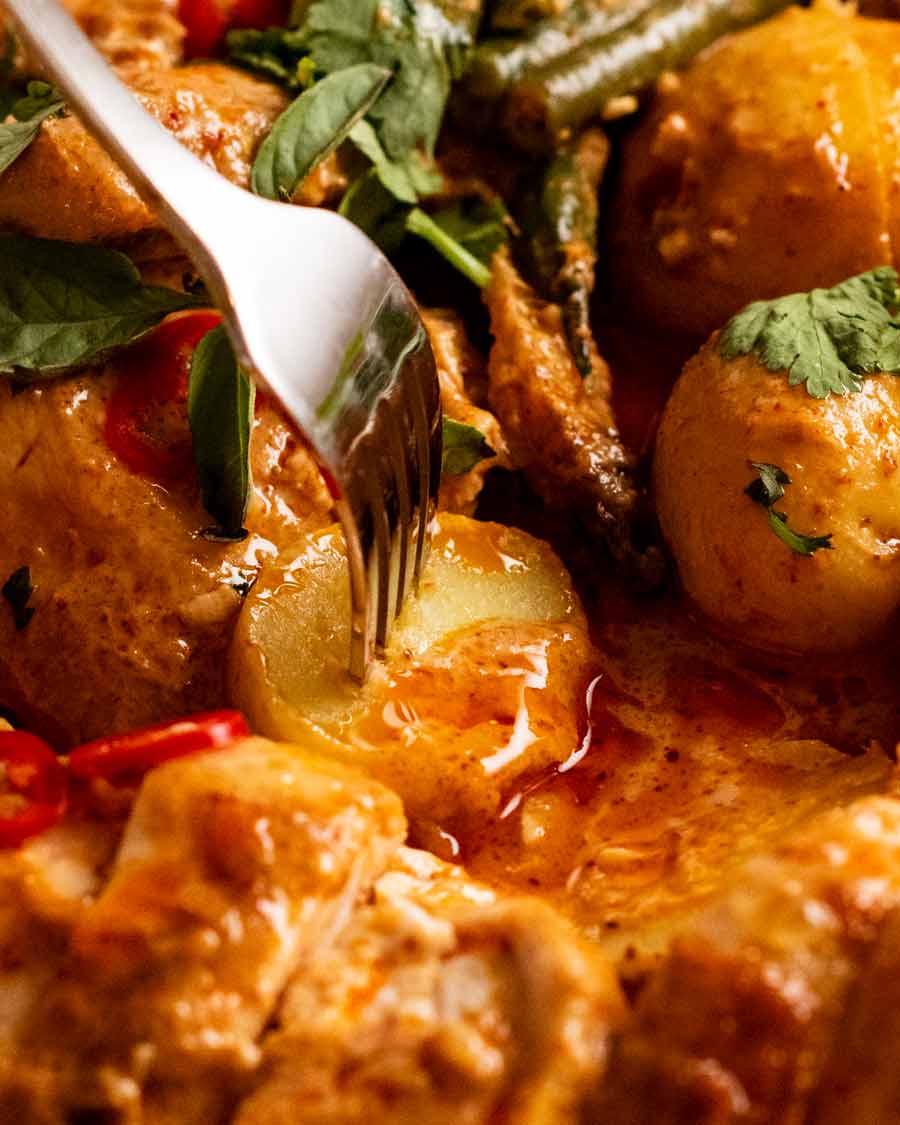
Ah, also, the potatoes!! Using whole small baby potatoes means we can cook them until they are really soft and creamy inside without disintegrating. If you only have large potatoes, cut them into 1.5cm / 0.6″ chunks and add them about halfway through the cook time, otherwise they will over-cook and turn into mush.
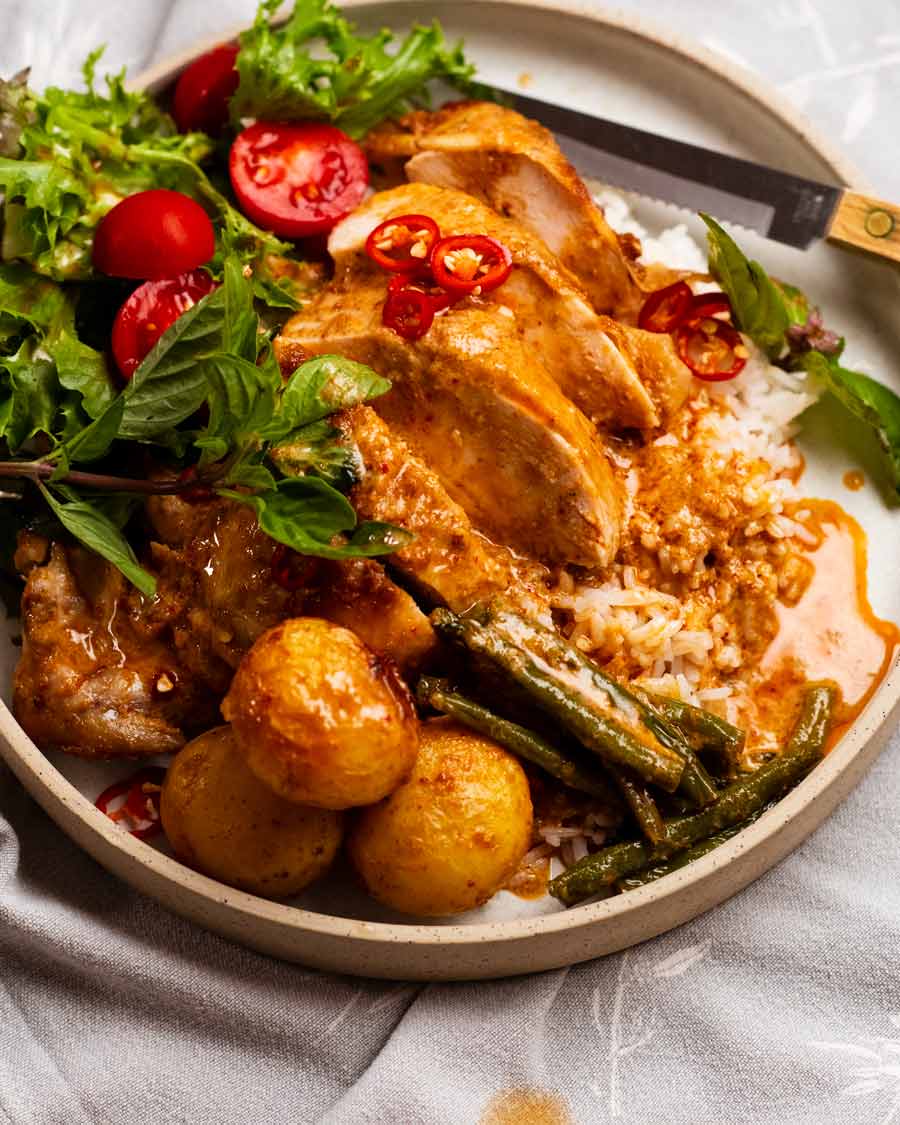
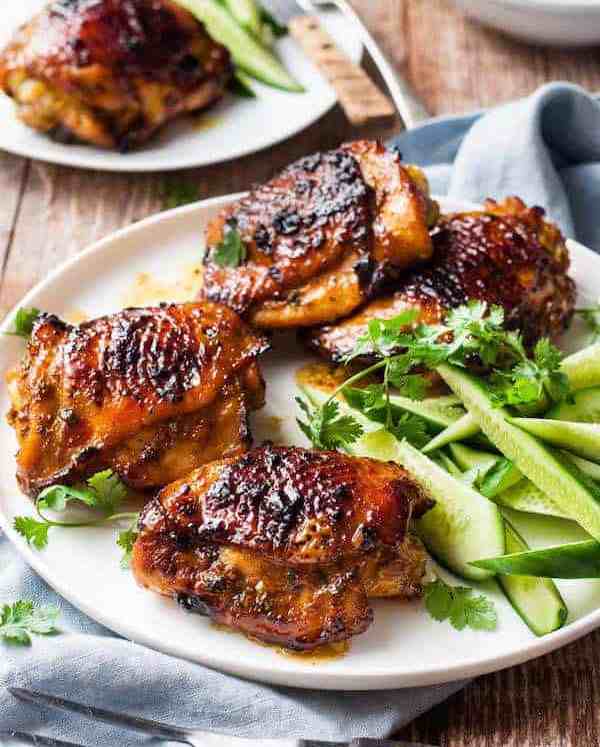
Serve over jasmine rice, to soak up all that beautiful curry sauce, and a perky side salad for something fresh. Pictured above is my Asian side salad but if I had a choice, I probably would’ve opted for smashed cucumbers or my favourite Chang’s Crispy Noodle Cabbage Salad.
I really hope you try this recipe one of these days! Something a little different but very straight forward to make that’s forgiving, with knock-your-socks-off results. It’s Amazing – with a capital A. Everybody knows when I use capitals, I really mean it! 😂 – Nagi x
Watch how to make it

Thai red curry pot roast chicken
Ingredients
- 1.8 kg/ 3.6 lb whole chicken
- 1 tsp cooking/kosher salt
- 3 tbsp vegetable oil
- 115g/ 4 oz (1/2 cup) Thai red curry paste (Maesri recommended, Note 1)
- 2 large garlic cloves , finely grated (Note 2)
- 2 tsp fresh ginger , finely grated (Note 2)
- 2 tsp fresh lemongrass , finely grated, white / pale green part only (Note 2)
- 1 cup chicken stock/broth , low sodium
- 400 ml/ 14 oz coconut cream (Note 3)
- 6 kaffir lime leaves , crushed in hand (Note 4)
- 1 tbsp white sugar
- 2 tsp fish sauce
- 600g/ 1.2lb small potatoes (12 or so), skin on (Note 5)
- 120g/ 4oz green beans , trimmed and cut in half
- 15 Thai basil leaves , or more! (sub ordinary Italian basil, Note 6)
Serving + optional garnishes:
- Jasmine rice
- Red chilli , finely sliced
- Coriander / cilantro leaves
Instructions
- De-chill & salt chicken – Take the chicken out of the fridge 1 hour prior. Pat dry then sprinkle with the salt.
- Preheat oven to 200°C/400°F (180°C fan).
- Sauté curry paste – Use a large, oven-proof pot with a lid. Heat oil on medium high heat. Cook curry paste, garlic, ginger and lemongrass for 2 minutes. This step substantially improves the flavour of store bought curry paste.
- Sauce – Add chicken stock, stir, then simmer rapidly for 3 minutes to reduce by half. Stir in coconut cream, hand-crushed kaffir lime leaves, sugar and fish sauce.
- Place chicken into the sauce. Spoon over sauce. Surround with potatoes.
- Bake 1 hour – Place the lid on and bake for 40 minutes. Remove lid spoon sauce over chicken (ie. baste). Turn the oven up to 220°C/425°F (200°C fan). Bake uncovered for 10 minutes, baste, bake another 10 minutes.
- Beans, then bake 10 minutes – Push beans into the sauce (wherever they fit!). Baste again then bake for a final 10 minutes (no lid).
- Rest 10 minutes – Remove chicken onto a plate (Note 7). Rest 10 minutes. Put lid on pot to keep sauce warm.
- Serving – Carve chicken, place on platter. Stir basil leaves into sauce. Pour/spoon sauce, potatoes and beans over chicken. Garnish with chilli and coriander, if desired. Serve with jasmine rice!
Notes
Nutrition
Life of Dozer
Typical.

The post Thai red curry pot roast chicken appeared first on RecipeTin Eats.
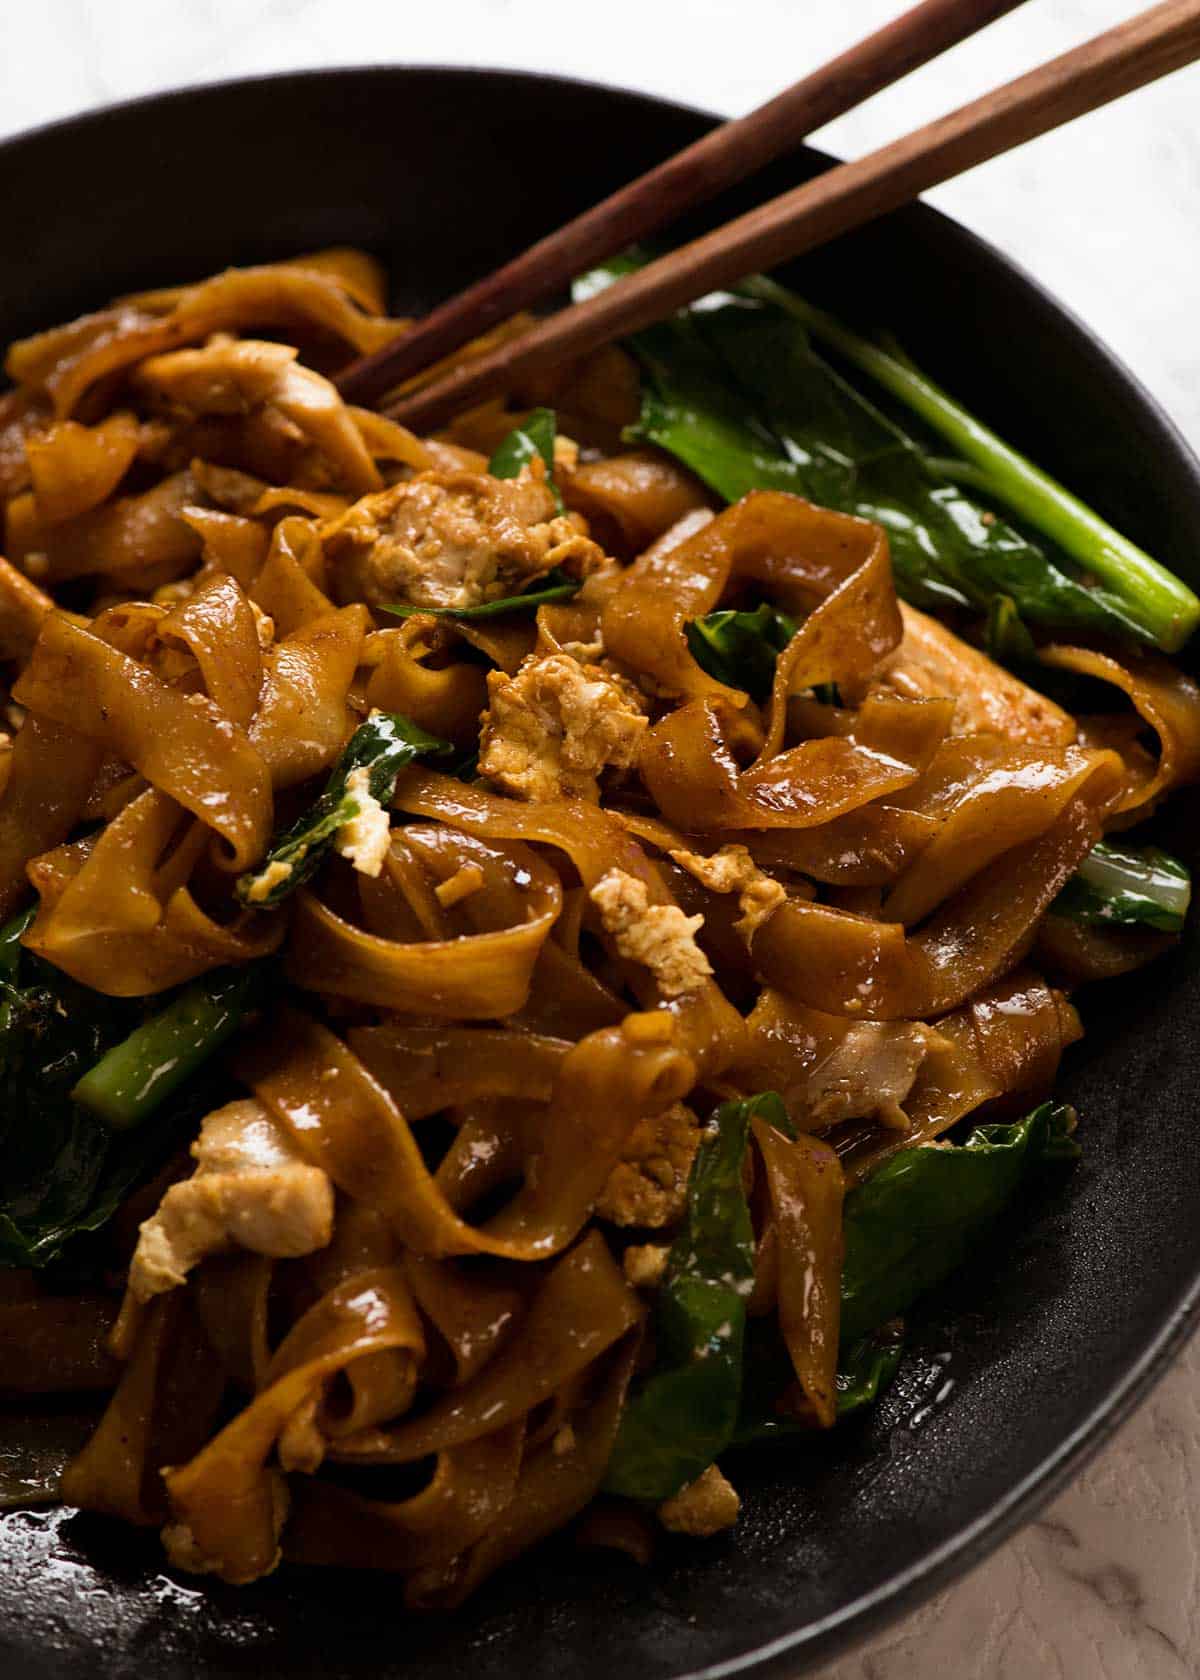
]]>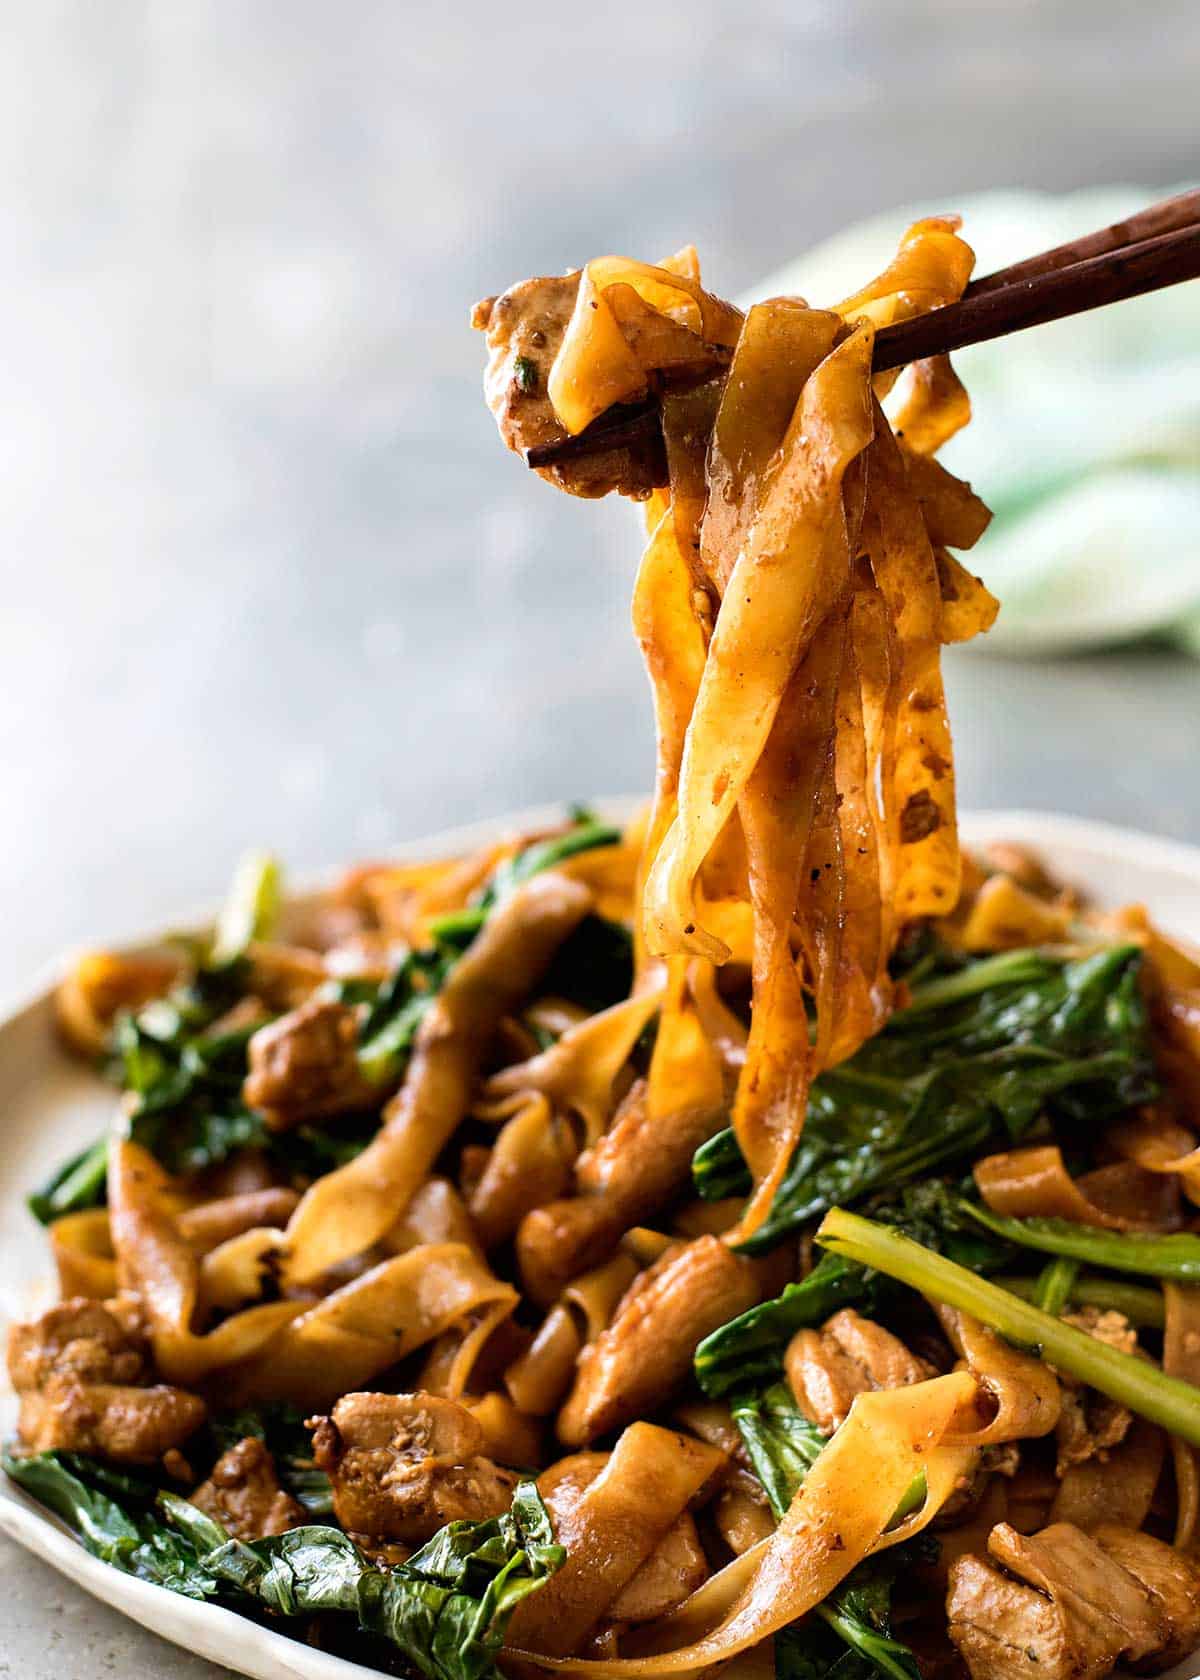 Pad See Ew – the popular Thai stir fried noodles straight from the streets of Thailand made at home! While Pad Thai is sweeter and nuttier, Pad See Ew is salty, balanced with a touch of sour and a wonderful chargrilled flavour which you can create at home! Pad See Ew Pad See Ew, which means “stir fried... Get the Recipe
The post Pad See Ew (Thai Stir Fried Noodles) appeared first on RecipeTin Eats.
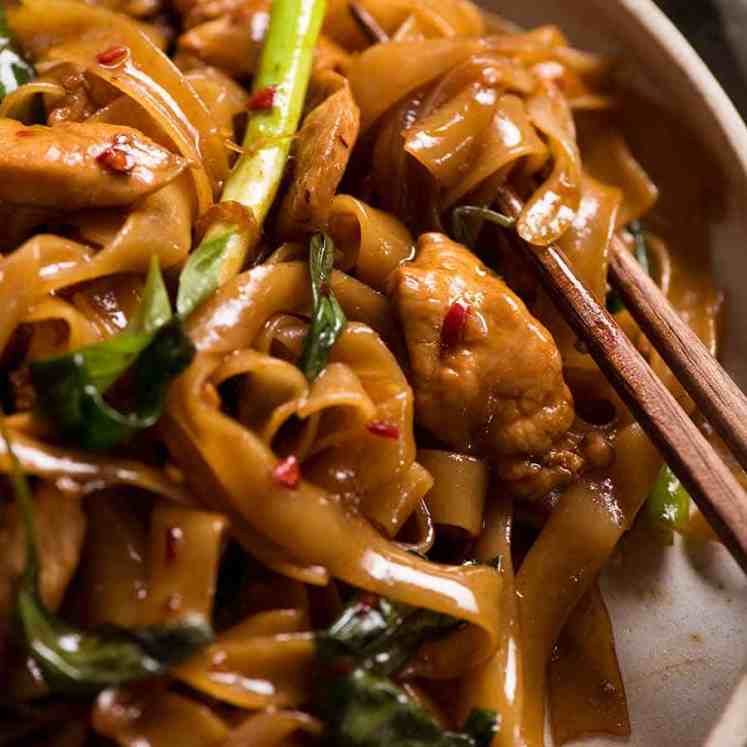
]]>Pad See Ew – the popular Thai stir fried noodles straight from the streets of Thailand made at home! While Pad Thai is sweeter and nuttier, Pad See Ew is salty, balanced with a touch of sour and a wonderful chargrilled flavour which you can create at home!
This is a reader-favourite recipe included by popular demand in my debut cookbook “Dinner”!
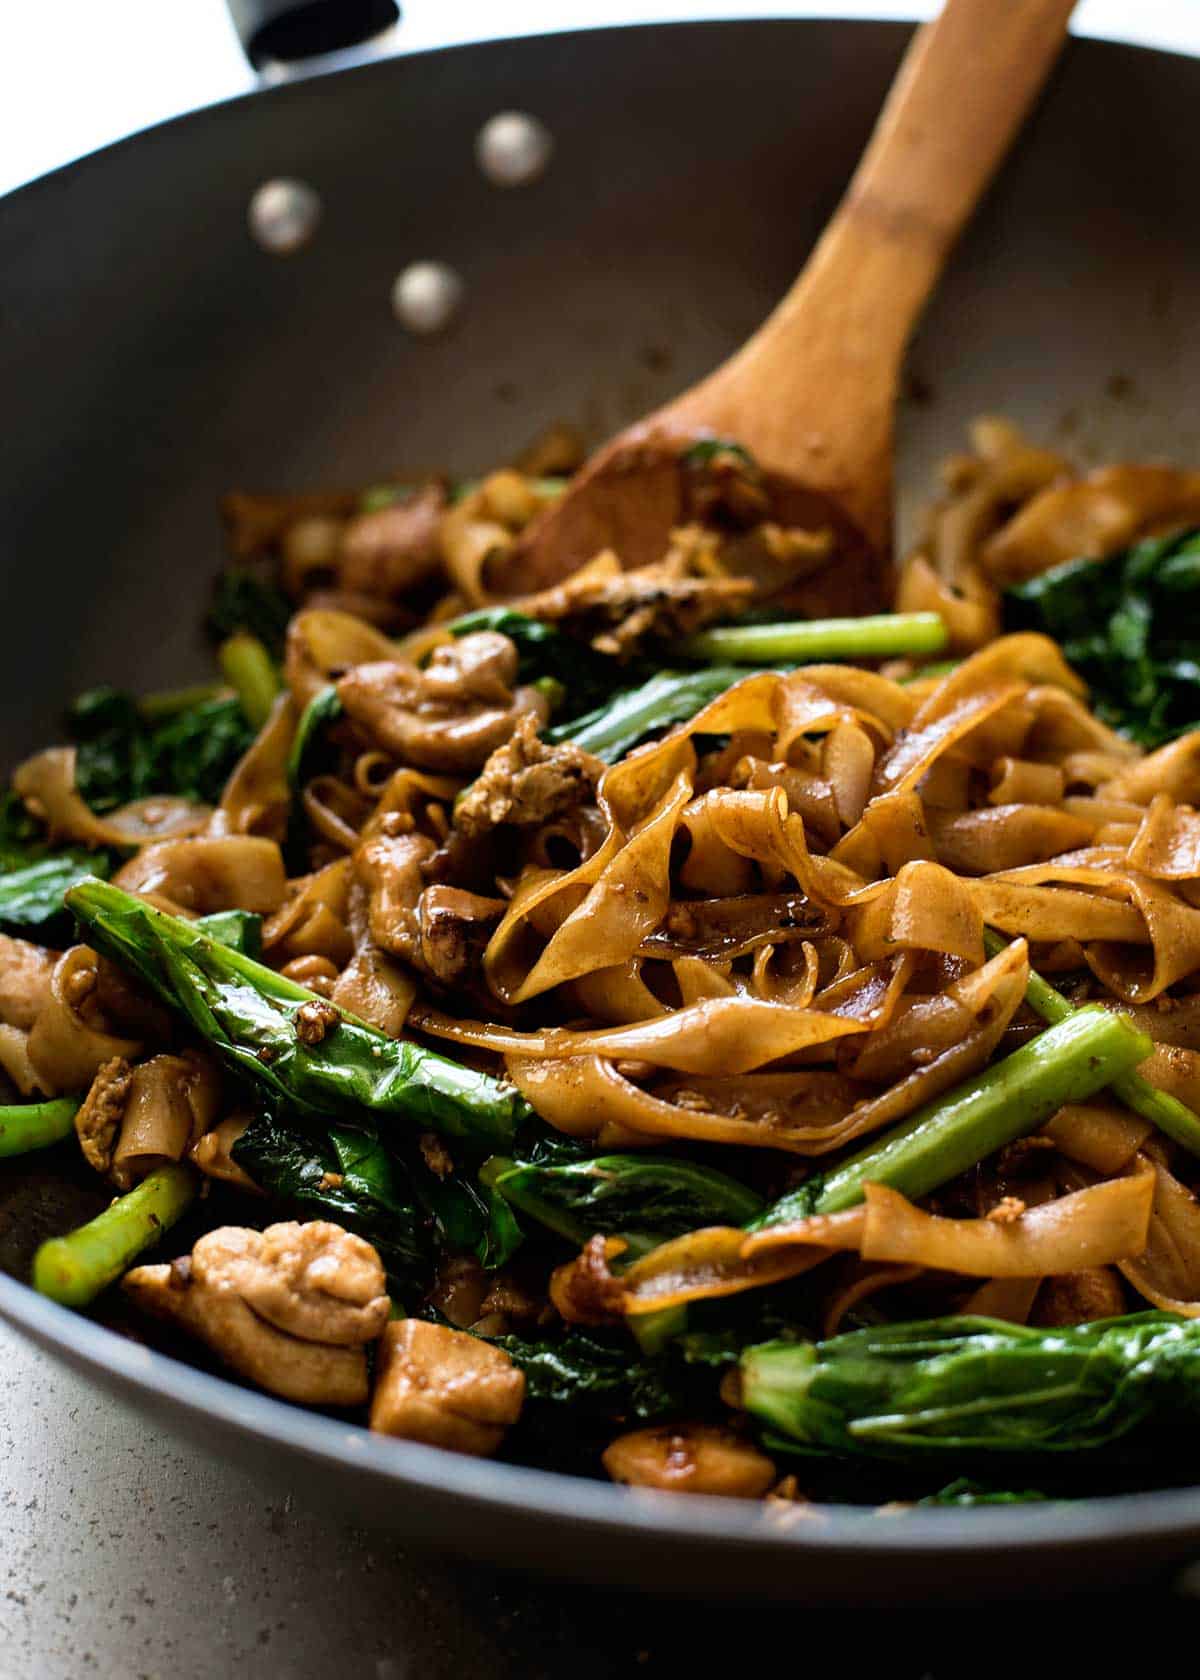
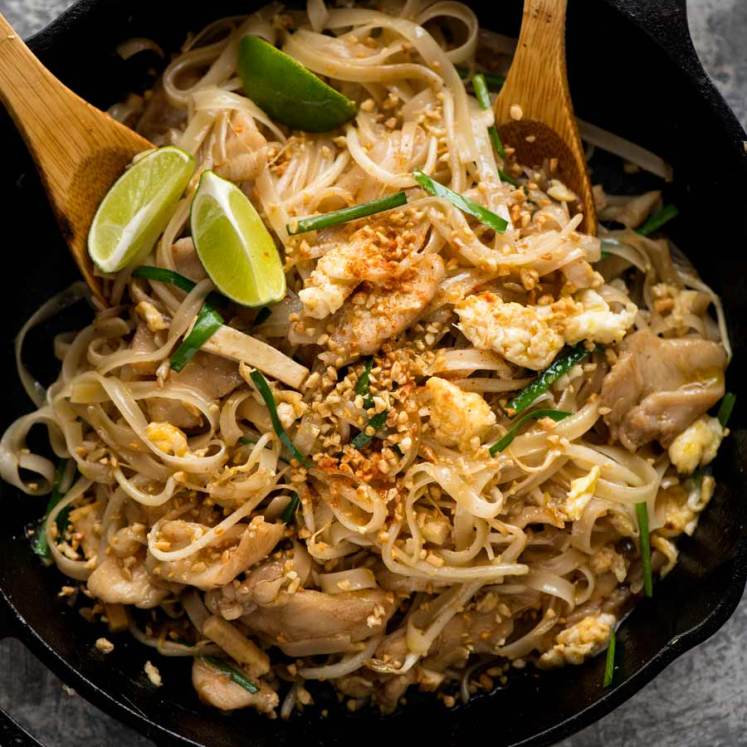
Pad See Ew
Pad See Ew, which means “stir fried soy sauce noodles”, is an extremely popular Thai street food meal and one of the most popular noodles dishes at Thai restaurants here in Australia.
Making a great Pad See Ew at home simply comes down to two things:
The right sauce. Basic recipes online will instruct you to use little more than just soy sauce and sugar. It takes a little more than that!
Caramelising the noodles – Getting a little caramelisation on the noodles makes all the difference between an “ok” and “wow, it’s JUST like you get at restaurants!”.
The trick? Remove the stir fry ingredients. Cook the noodles with sauce separately. Less stuff in the wok (or skillet) = easier to caramelise the noodles. At least, at home. If you’ve got a giant restaurant wok burner, you don’t need to do the noodles separately!
What goes in Pad See Ew
I can’t remember where I originally got the recipe from. Probably from David Thompson, the famous Australian chef who has dedicated his life to mastering the art of Thai cooking. I’ve made it so many times over the years, I can almost make it with my eyes closed. (Not really….but you know what I mean!)
So I had to actually measure the ingredients properly to share the recipe!
1. Pad See Ew Sauce ingredients
Pad See Ew has a sweet-savoury-touch-of-sour flavour, and this is made with a combination of the following ingredients:
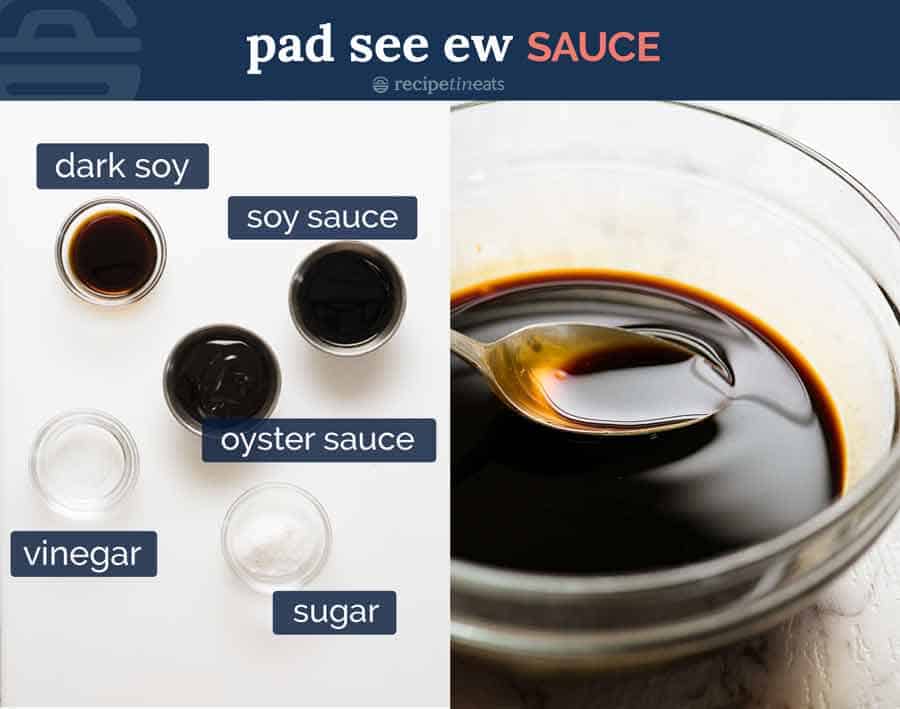
Dark soy sauce – For flavour and staining the noodles a dark brown.
Ordinary or light soy sauce – For seasoning (salt) and a bit of flavour. Most of the flavour comes from the oyster sauce and dark soy sauce. More on different soy sauces and when you can substitute with what in this About Soy Sauces post.
Oyster sauce – Key ingredient, it’s like 10 difference sauces mixed up in one bottle!
Vinegar – To balance the sweet and savoury. Some form of sour is a key ingredient in South East Asian cooking!
Sugar – For sweetness.
2. Pad See Ew ingredients
And here are the other ingredients for Pad See Ew:
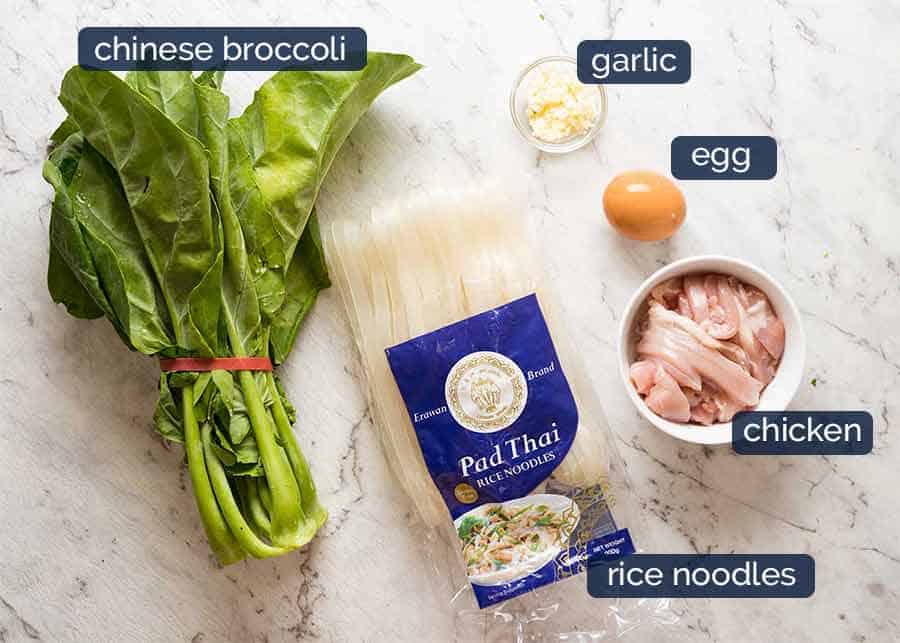
Noodles – Pad See Ew is traditionally made with Sen Yai, which are wide, thin fresh rice noodles that are not easily accessible. Even most Asian stores in Sydney do not sell them – you usually need to go to a Thai grocery store.
So it is perfectly acceptable, and just as delicious, to make them with any wide flat rice noodles. I use dried rice noodles labelled as “Pad Thai” Rice Noodles (pictured below) because they are the widest available at the supermarket.
Once rehydrated, they’re essentially Sen Yai Noodles – just not quite as wide.
Chinese Broccoli / Gai Lan – This is a key authentic ingredient in Pad See Ew. Otherwise known as Gai Lan or Kai lan, it’s leafy and looks quite different to broccoli, but you’ll notice a similarity in the texture of the stems (hence the name).
If you can’t find it, just sub with other Asian greens, or a combination of broccoli or broccolini + spinach.
Chicken and egg – Feel free to use other proteins if you wish. But chicken is by far the most popular.
How to make Thai Stir Fried Noodles
Usually when making stir fried noodles, we toss everything together in one big pan or a wok.
But for Pad See Ew made at home, I do things differently to best replicate a restaurant flavour and minimise noodle breakage:
Cook chicken and vegetables first, then remove
Add noodles and sauce, toss to caramelise (just 15 seconds), then add chicken and vegetables back in.
Reason: A signature flavour in Pad See Ew is the caramelisation of the noodles. Restaurants and street vendors achieve this with super powered gas stoves with fiery heat that you’ll never find in a home kitchen. The only way to replicate that caramelisation on the noodles on a home kitchen stove is to declutter the wok and cook the noodles separately – the noodles will caramelise in 15 seconds.
The other reason is that rice noodles break if you toss them too much. Doing the two-stage toss makes it much easier and faster to disperse the sauce and bring the Pad See Ew together.
Trust me on this point. I’ve made a LOT of Pad See Ew at home in my time, and the two-stage toss it the easiest and most effective technique!
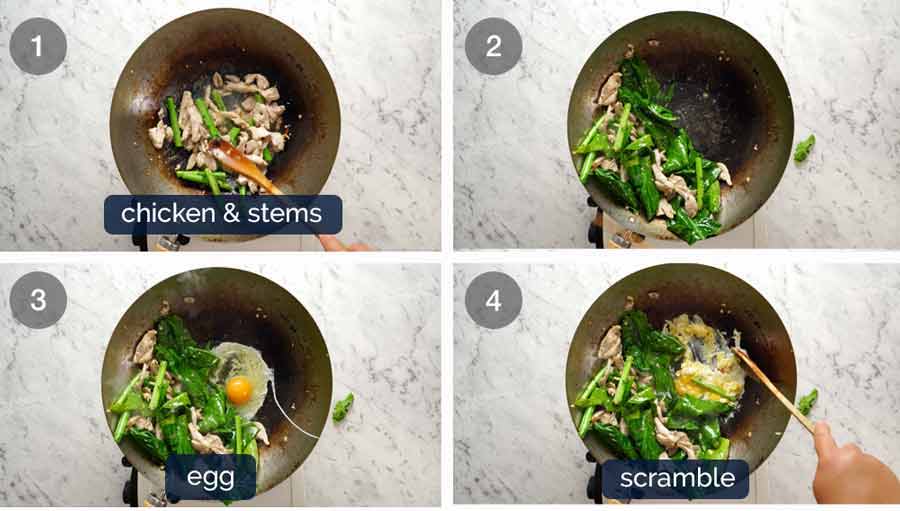
Garlic, chicken and Chinese broccoli STEMS first – Using either a wok or large skillet set over high heat, heat the oil then sauté the garlic until it goes light golden. Add the chicken then once it mostly changes from pink to white, add the Chinese broccoli stems which take longer to cook than the leafy part.
Once the chicken is cooked (it should only take 2 to 3 minutes), toss the Chinese broccoli leaves in and cook for 30 seconds or so just until wilted.
Push everything to the side to make room to scramble the eggs on the side. This is the traditional Thai way of scrambling eggs in Pad See Ew!
Crack egg straight into the wok.
Scramble egg – Then mix to scramble it. Speed is of the essence here – we want scrambled egg not a sunny side up egg!
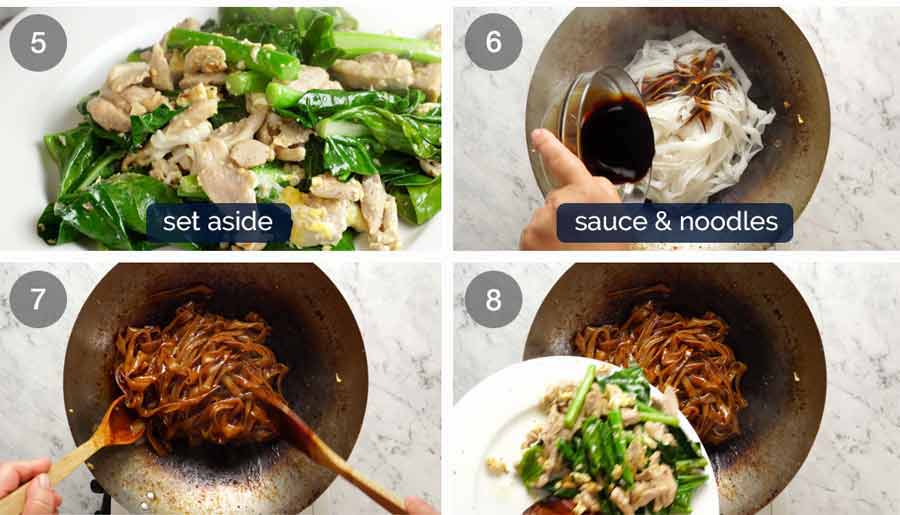
Empty wok – Remove the chicken and vegetables onto plate. As mentioned above, the best way to cook Pad See Ew at home is to cook the noodles separately so we can get some nice caramelisation on them. If we don’t do this, then the noodles just stew instead of caramelising.
Add noodles and sauce into the wok.
Toss quickly for 1 to 1 1/2 minutes until the sauce is dispersed throughout the noodles and you see some caramelisation on the edges.
PRO TIP: You want to be quick here because the longer and more you toss, the more noodle breakfast you have. You’ll notice restaurants typically toss the noodles in the wok without using a wooden spoon or other tool for stirring – this too helps to minimise noodle breakage.
A note on Noodle Breakage – That said, you WILL get some noodle breakage, and that is normal / perfectly acceptable. Ever notice how the wide, flat noodles in Pad See Ew served at Thai restaurants are not long strands? That’s just the way it is. In fact, traditionally, Pad See Ew is served in Thailand with a FORK or spoon instead of noodles for ease of eating.
Add chicken and veg back in – Once the noodles are caramelised, add the chicken and vegetables back in. Give it a quick toss just to disperse, then serve!
As with all stir fries, once you start cooking, it moves very fast! So have everything prepared and ready to throw into the wok because there’s not time to be scrambling around the kitchen!
If you want to add a fresh side, try this Asian Slaw – it’s a great all rounder that goes with all Asian foods. – Nagi x
Watch how to make it
This recipe features in my debut cookbook Dinner. The book is mostly new recipes, but this is a reader favourite included by popular demand!
Pad See Ew – Thai Stir Fried Noodles
Ingredients
Noodles
- 200g / 7 oz dried wide rice stick noodles , or 15 oz / 450g fresh wide flat rice noodles (Sen Yai) (Note 1)
Sauce
- 2 tsp dark soy sauce (Note 2)
- 1 1/2 tbsp oyster sauce
- 1 tbsp light soy sauce (or all purpose, Note 3)
- 2 tsp white vinegar (plain white vinegar)
- 2 tsp sugar (any type)
Stir Fry
- 3 tbsp peanut or vegetable oil , separated
- 2 cloves garlic cloves, very finely chopped
- 1 cup / 150g / 5oz chicken thighs (boneless, skinless), sliced (Note 4)
- 1 large egg
- 4 stems Chinese broccoli (Note 5)
Instructions
Preparation:
- Chinese Broccoli – trim ends, cut into 7.5cm/3" pieces. Separate leaves from stems. Cut thick stems in half vertically so they're no wider than 0.8cm / 0.3" thick.
- Noodles – Prepare according to packet directions and drain. Time it so they’re cooked just before using – do not leave cooked rice noodles lying around, they break in the wok.
- Sauce – Mix ingredients until sugar dissolves.
Cooking:
- Heat oil: Heat 1 tbsp oil in a very large heavy based skillet or wok over high heat.
- Cook garlic and chicken: Add garlic, cook 15 seconds. Add chicken, cook until it mostly changes from pink to white.
- Chinese broccoli STEMS: Add Chinese broccoli stems, cook until chicken is almost cooked through.
- Chinese broccoli LEAVES: Add Chinese broccoli leaves, cook until just wilted.
- Scramble egg: Push everything to one side, crack egg in and scramble.
- REMOVE chicken from wok: Remove everything in the wok onto a plate (scrape wok clean).
- Caramelise noodles: Return wok to stove, heat 2 tbsp oil over high heat until it starts smoking (HOT is key!). Add noodles and Sauce. Toss as few times as possible to disperse Sauce and make edges of noodles caramelise – about 1 to 1 1/2 minutes.
- Add chicken back in: Quickly add chicken and veg back in, and toss to disperse. Serve immediately!
Notes
Nutrition
Originally published 2014, updated 2016. Updated over the course of the years with improved photos, the addition of ingredients and process photos as well as a recipe video. Recipe also updated with a more effective cooking method – cooking the ingredients in two batches. No change to ingredients, but yields a better caramelisation and easier to cook – read in post for explanation.
MORE THAI TAKEOUT FAVOURITES
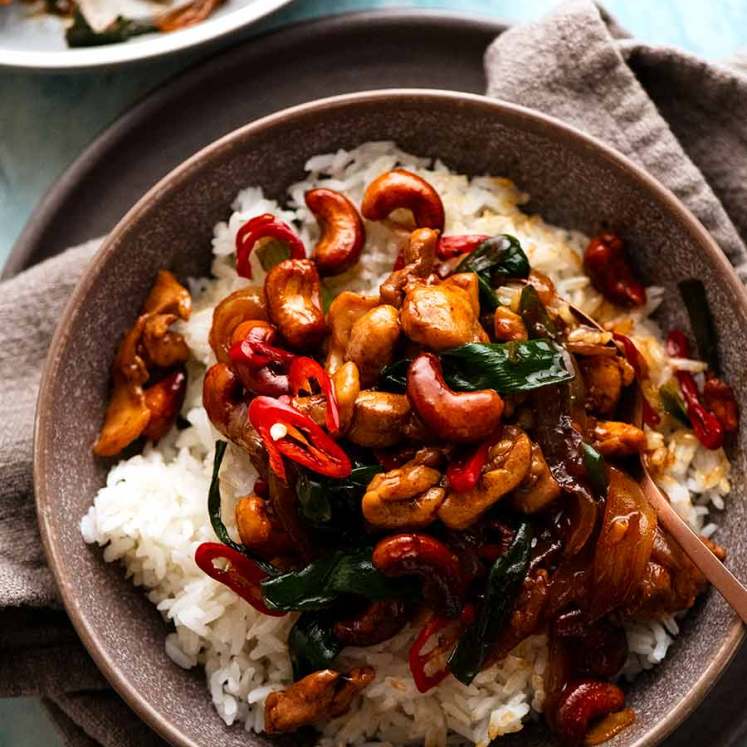
Love noodles? Me too! See my entire Noodle recipes collection.
Life of Dozer
When Dozer ate a VERY spicy piece of chilli biltong!!

The post Pad See Ew (Thai Stir Fried Noodles) appeared first on RecipeTin Eats.
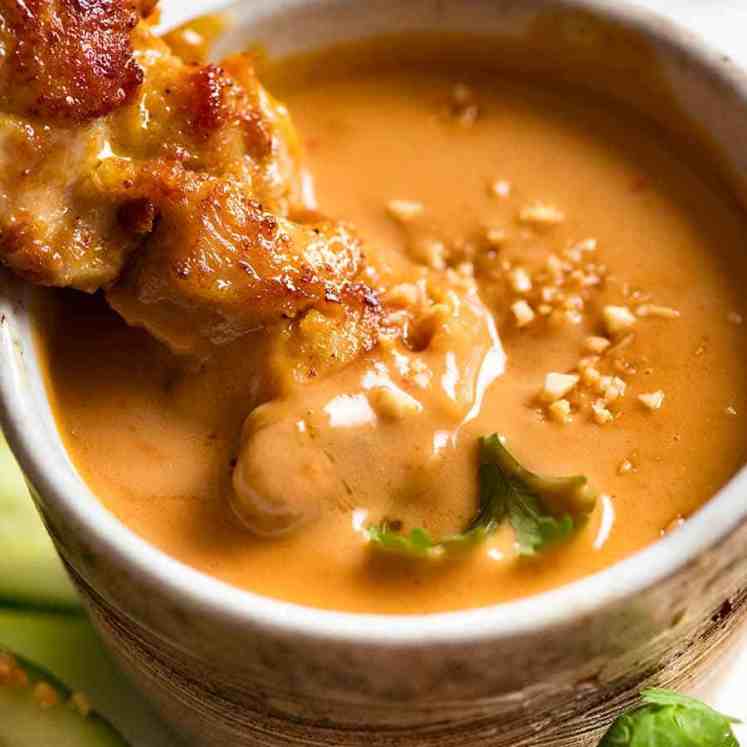
]]> This salad is inspired by a dish from a popular Asian salad bar in my area. The pineapple and bean sprouts are two killer additions that really make this salad, and the satay dressing is impossibly good.
The post The Bangkok – Satay Chicken Noodle Salad appeared first on RecipeTin Eats.
]]>This salad is inspired by a dish from a popular Asian salad bar in my area. The pineapple and bean sprouts are two killer additions that really make this salad, and the satay dressing is impossibly good.
This is a cookbook exclusive recipe!
This recipe is exclusive to my debut cookbook Dinner which includes a how-to video for every recipe. Just scan the QR code!
Just to explain….
I know, it’s confusing! You’re so used to getting recipes on my website – there’s over 1,200 of them, after all. And here you are looking at a tasty recipe video and I haven’t provided the recipe. 🙀
I’m not just doing this to torture you, I promise.
This page exists to display the how-to video for this recipe which I exclusively created for my debut cookbook, Dinner. Every recipe in the cookbook has a tutorial video. To watch it, you simply scan the QR code with your phone or tablet and it will take you straight to the recipe video like the one shown above!
Curious about my cookbook?
Read the cookbook overview
Browse all cookbook exclusive recipes here
Read the Cookbook Tales. Spoiler alert: there’s A LOT of dirty dishes!! And quite a lot of Dozer. 😂
Stay tuned for more on this page! Some cookbook exclusive recipes will have extra information added as well as extra tips. I am also looking at enabling comments for selected recipes so I can answer reader questions about cookbook recipes. I’m just a little snowed under during this launch period – book tours, getting 131 recipe videos out, launching the book overseas. Please bear with me! – Nagi x (10 October 2022)
The post The Bangkok – Satay Chicken Noodle Salad appeared first on RecipeTin Eats.
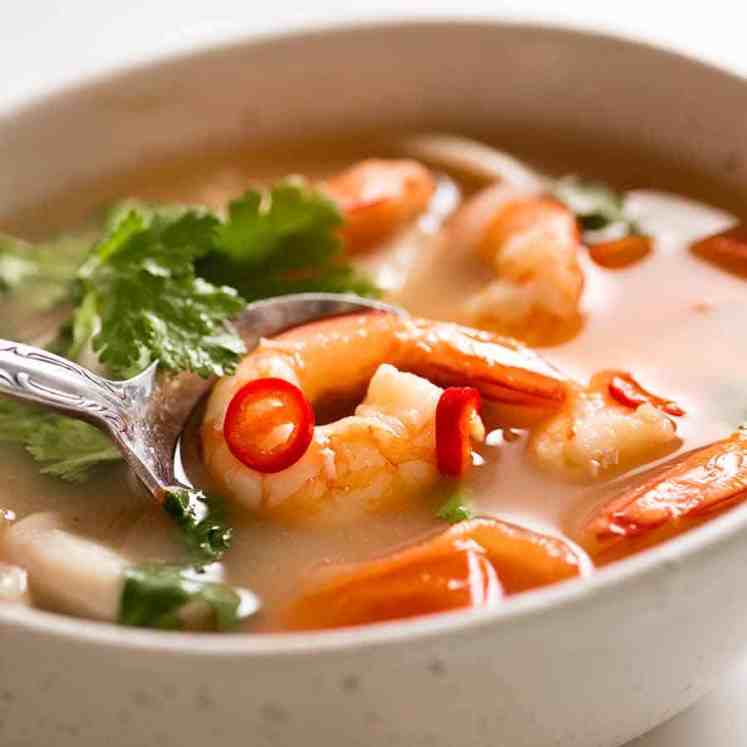
]]> Thai Black Sticky Rice Pudding is a traditional Thai dessert that is favoured by upscale modern Asian restaurants for its striking jet black colour. It’s hard to believe you can make something so delicious that is fundamentally, made with just rice, water and sugar! Welcome back to THAI WEEK! Welcome back to the final instalment... Get the Recipe
The post Thai Black Sticky Rice Pudding appeared first on RecipeTin Eats.
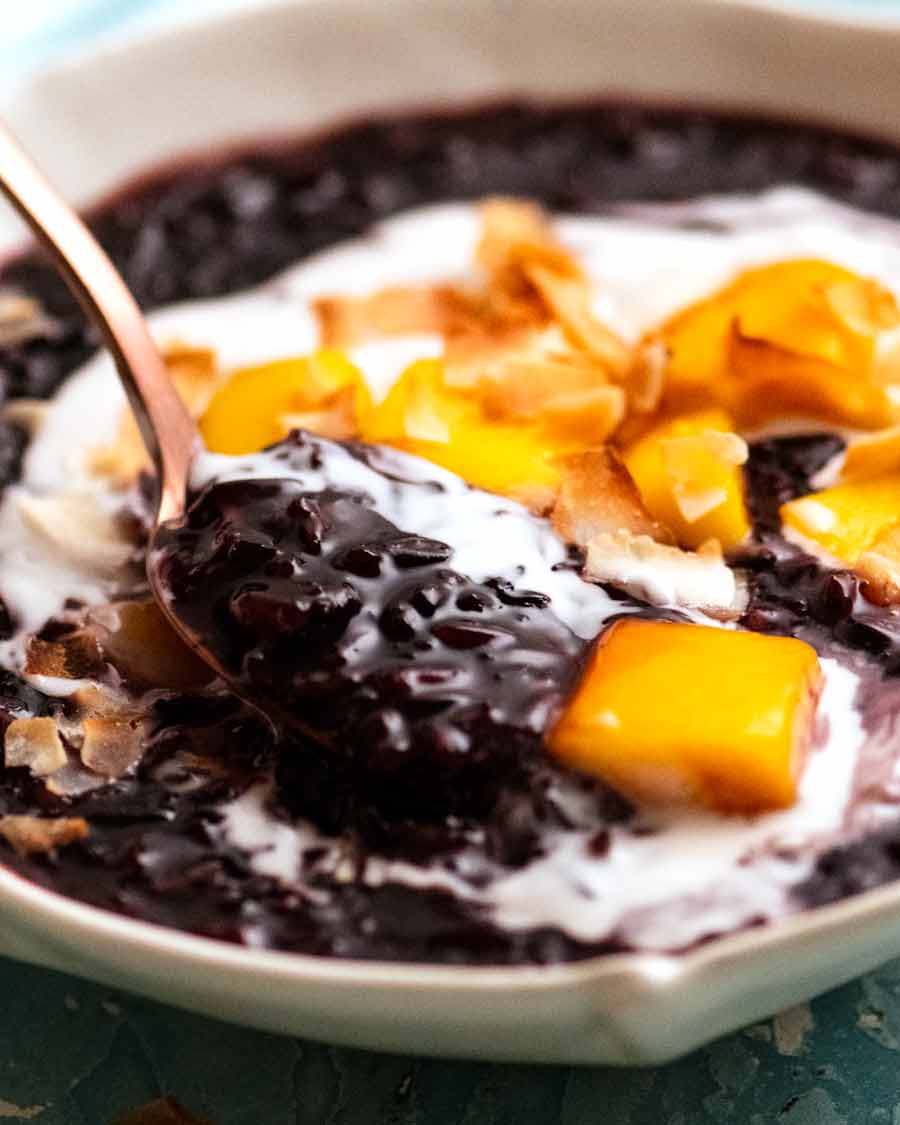
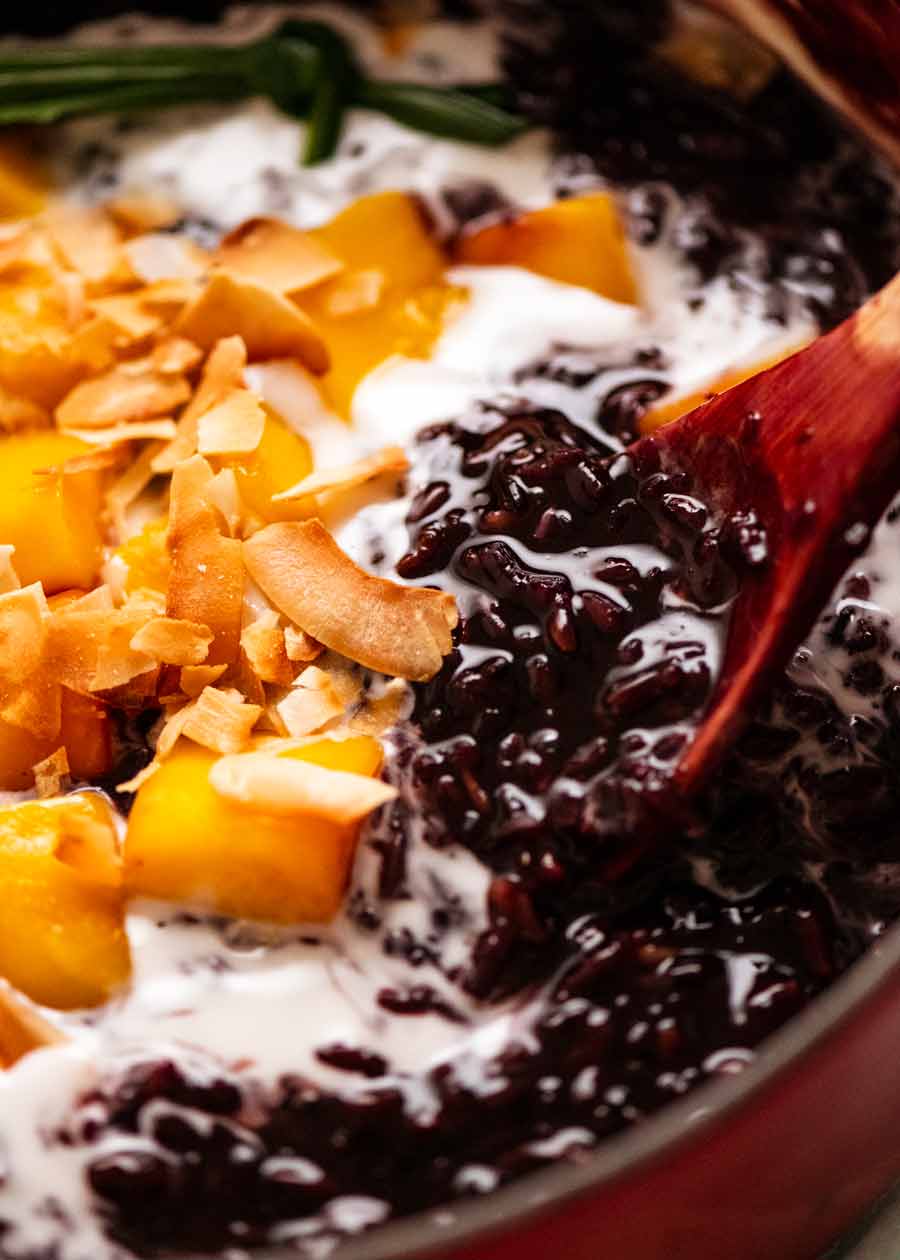
]]>Thai Black Sticky Rice Pudding is a traditional Thai dessert that is favoured by upscale modern Asian restaurants for its striking jet black colour. It’s hard to believe you can make something so delicious that is fundamentally, made with just rice, water and sugar!
Welcome back to THAI WEEK!
Welcome back to the final instalment of THAI WEEK, a week where I’m sharing 3 recipes to make your very own Thai feast at home!
Every now and then, I like to do a recipe theme week. This week it’s THAI week, with three classic recipes to make your very own Thai feast at home:
Thai Yellow Curry – Made from scratch, this is flavour you literally cannot buy in a jar!
Green Papaya Salad – Great as side, yet substantial enough as a starter.
Black Sticky Rice Pudding (this recipe) – Dessert!

Thai Black Sticky Rice Pudding
Black sticky rice is a type of glutinous whole grain rice used to make desserts in Thailand and a number of other South-East Asian nations. It has an eye-popping, natural ink-black colour, and when cooked has a nutty flavour with a creamy and sticky pudding-like texture.
Hence the name of this dish – Black Sticky Rice Pudding!
While white sticky rice pudding may be the more well-known Thai dessert, here in Australia upmarket Thai and Modern Asian restaurants tend to favour black sticky rice, for its exotic and eye-catching appearance. It’s not all looks though – it also has a better flavour!
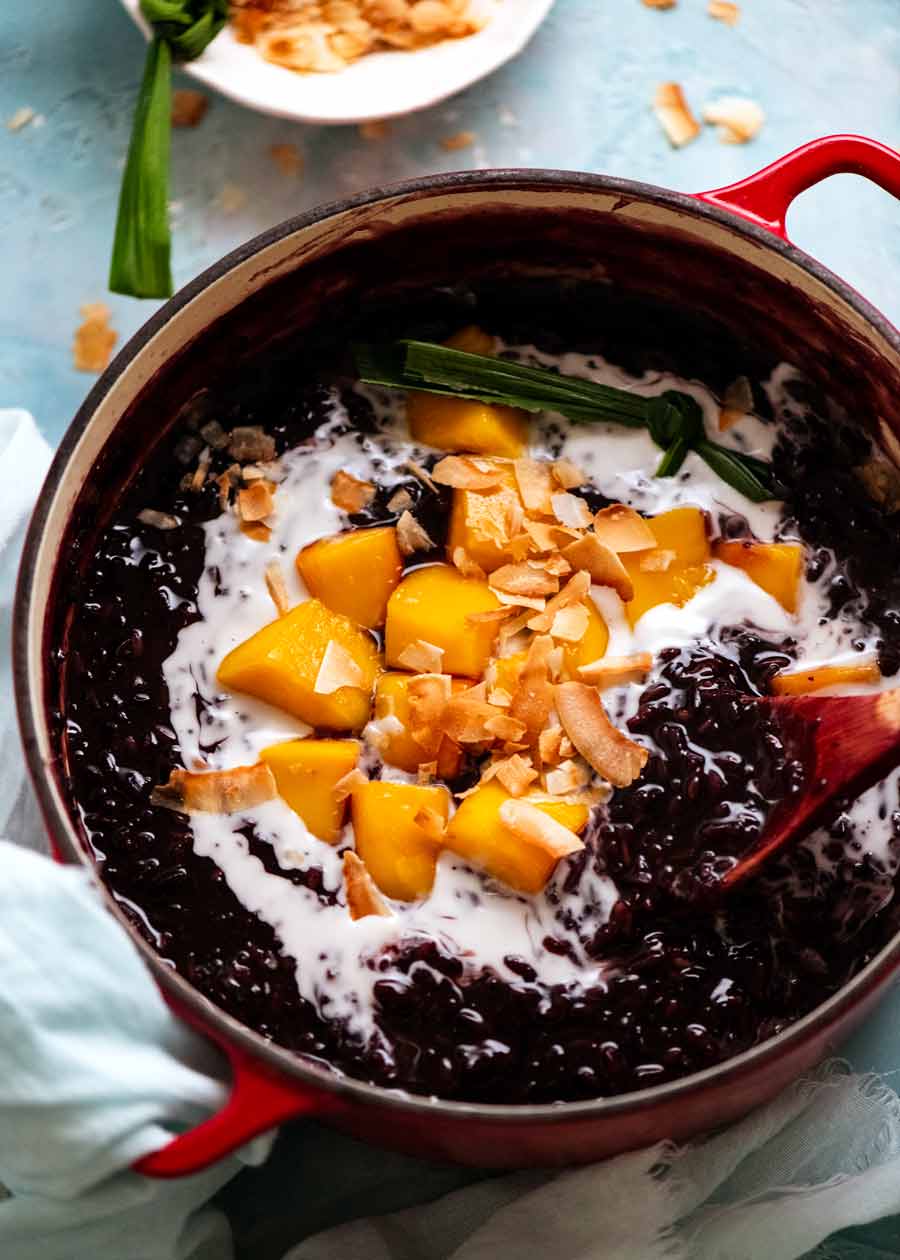
Just like Western puddings, fresh fruit and a creamy sauce are the perfect accessories to complete the dessert. Sticky rice puddings are frequently finished with good drizzle of coconut cream, and sliced tropical fruit of some kind – usually juicy mango.
Rich but not cloying, and shining with the flavours of South-East Asia, this is the quintessential Thai dessert!
(PS. Despite the name, glutinous rice is actually gluten-free. It is rice starch that is responsible for the stickiness. In fact, this dessert is also vegan, nut-free and lactose-free. This might just be the one dish everyone on the planet can happily enjoy!!! 😱🤣)
What you need to make Black Sticky Rice Pudding
At its simplest, you only need sticky rice, sugar, salt and water to make a really delicious sticky rice pudding. Everything else just makes it even better, but is still entirely optional!
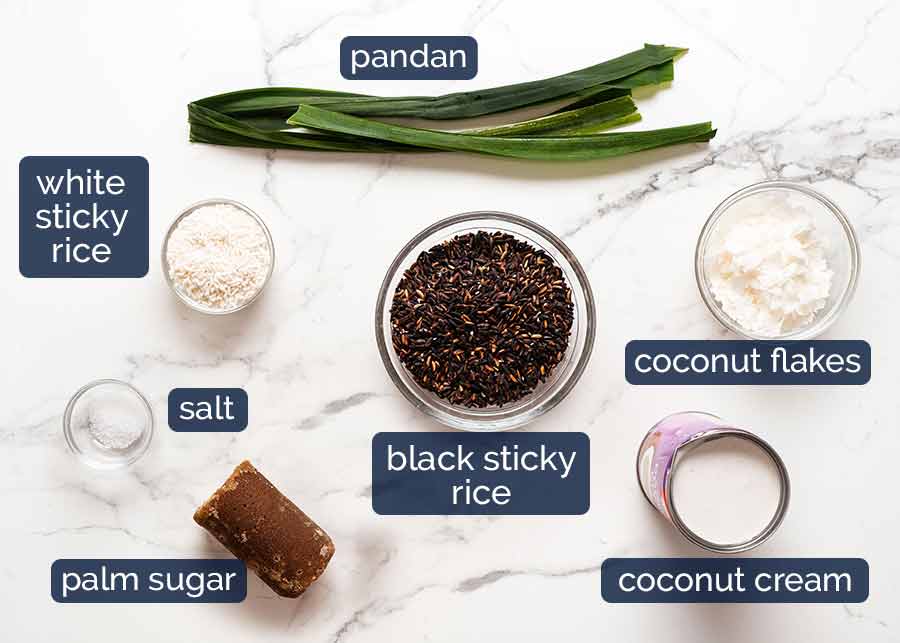
Sticky rice – Usually labelled “glutinous rice”, this rice becomes sticky when cooked which is what gives a creamy texture to this pudding. Black sticky rice has a wonderful nutty flavour already so we only need water to cook it. See below for more on sticky rice.
Find it in Asian and Thai grocery stores, or online such as here and here (Australia).
Pandan leaves – Known in English as screwpine, this is a plant native to South-East Asia that looks similar to a palm tree. The long leaves are added to cooking for their coconut-like scent and flavour for both savoury and sweet applications – especially cakes and desserts. Pandan can be used in powder form, for wrapping things (usually steamed or fried), or just added whole into cooking liquids to infuse like we do in this rice pudding.
It’s sold fresh and frozen in Asian stores and sometimes (🤞🏻) at Harris Farms in Sydney & Queensland.
Can’t find it? Leave it out. This dish is still worth making without it!
Palm sugar – Extracted from palm trees (wait, did the name give it away?😂), this sugar is used in South East Asian cooking for its intense caramel sweetness. Substitute with brown sugar, preferably dark brown sugar for better flavour.
Salt – A distinct flavour in black rice pudding is a noticeable amount of salt. It’s not a dominant taste, like Salted Caramel. But you can definitely taste it and it’s much needed to balance the sweetness.
Optional toppings
Coconut cream – This is used to drizzle on top of the finished dish for serving. It not only adds a lovely touch of rich coconut flavour but also adds a pretty visual flourish to an otherwise very black bowl of rice! Highly recommended but not essential.
Coconut flakes – Lightly toasted for a garnish. This is optional!
Fresh fruit (not pictured above) – Asian tropical fruits are the most authentic choice. I used mango – a classic – but because it’s not mango season, I just used canned mangoes which these days, are actually very, very good! Other fruits that would go brilliantly are papaya, lychees, longan, durian (!!!), mangosteen, dragonfruit etc. If these are hard to source, summer stone fruit, melons or even sweet citrus fruits would also be absolutely lovely.
These toppings are purely optional. Black rice pudding is absolutely worth making with no toppings at all!
Sticky Rice for Thai Black Sticky Rice Pudding
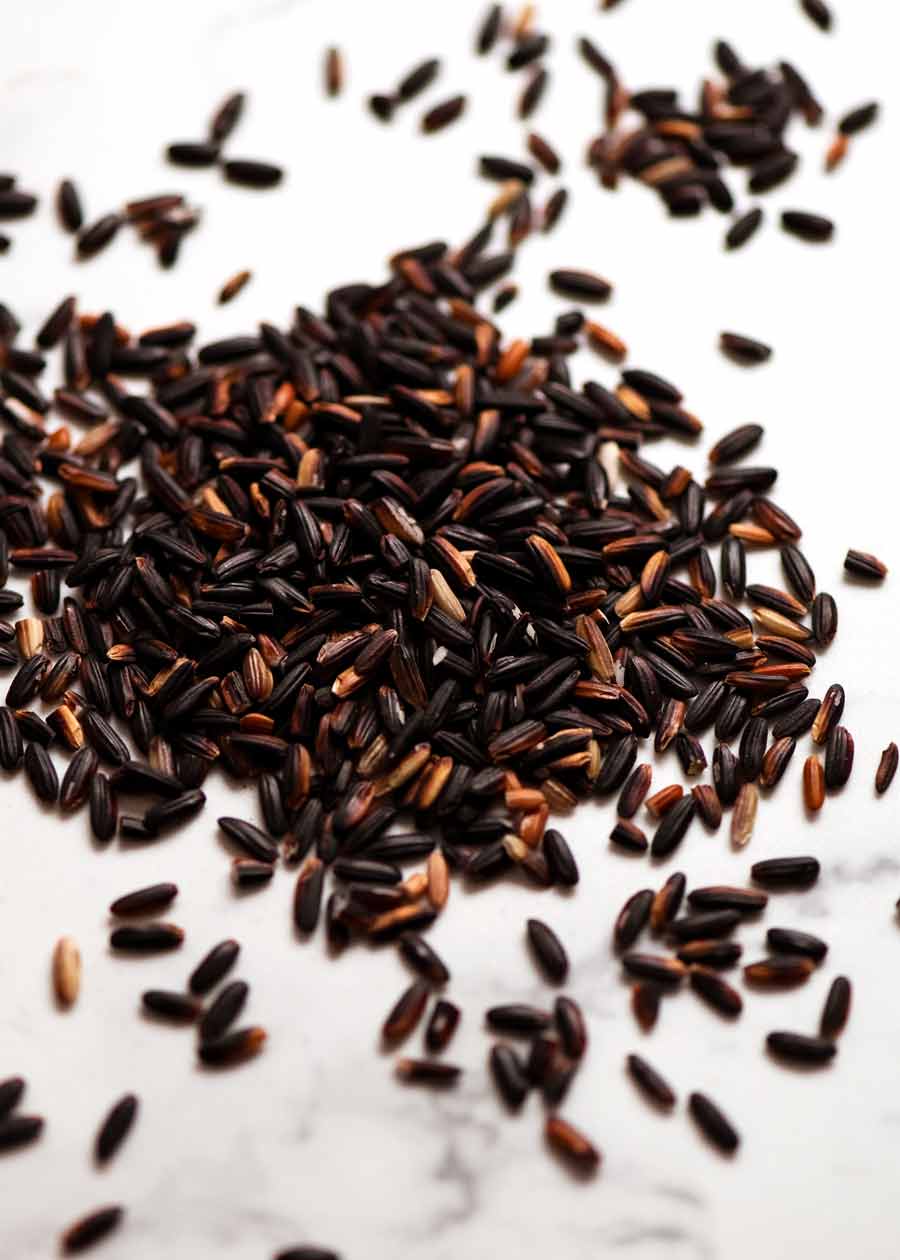
Black sticky rice 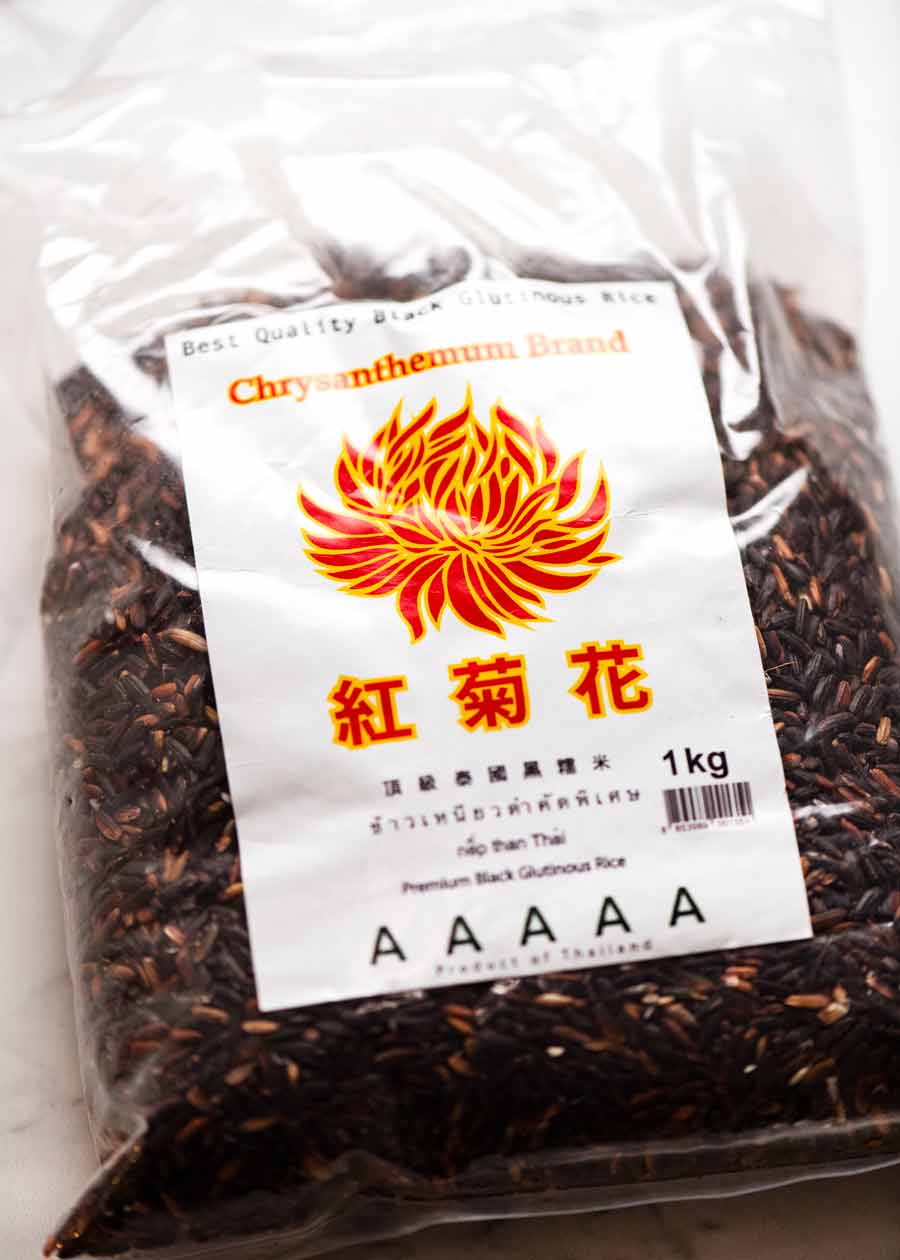
Labelled “black sticky rice” or “glutinous rice” 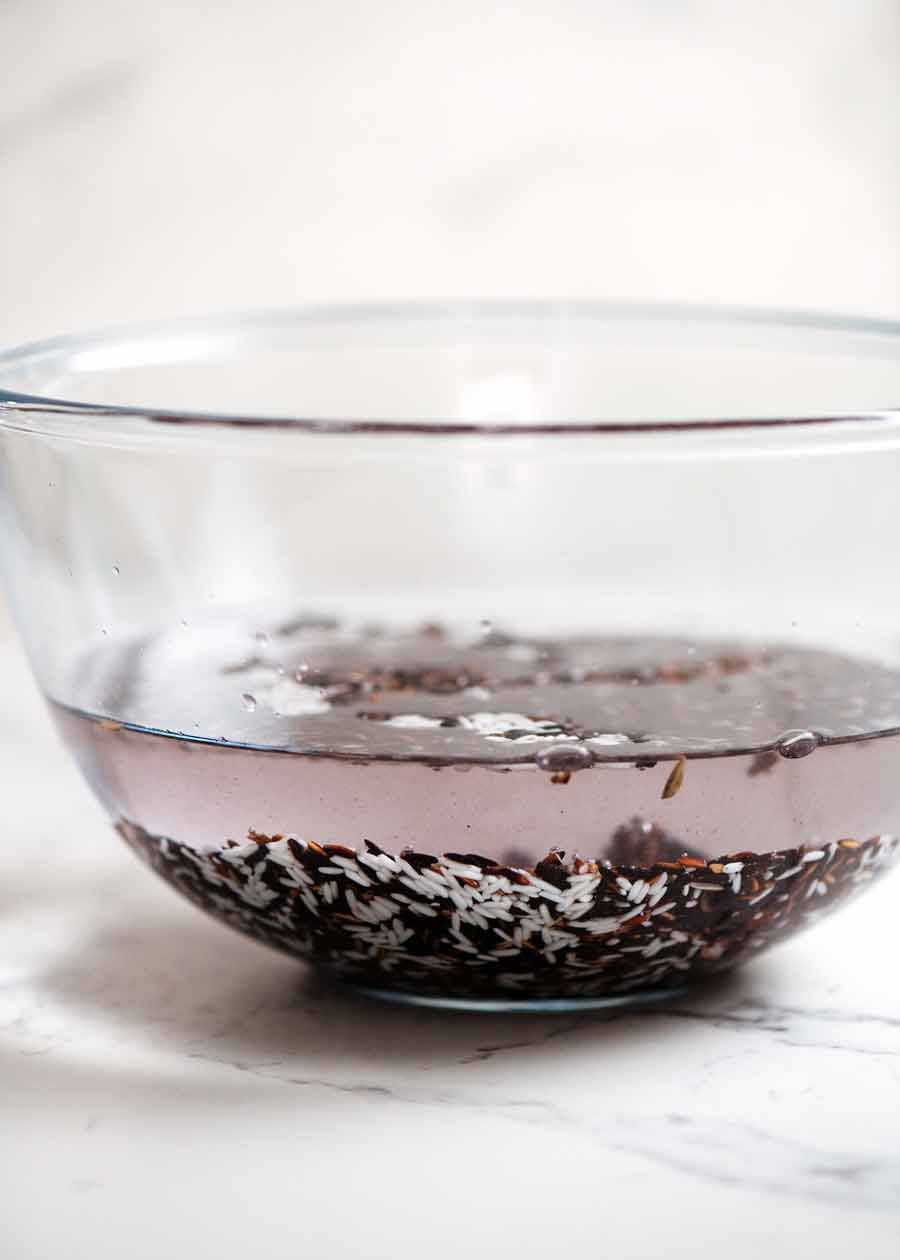
Soaking black and white sticky rice before cooking
There are different varieties of black rice, some of which are glutinous (sticky) and some which are not (such as Chinese Forbidden Rice).
The black rice used to make Thai Sticky Rice Pudding is black glutinous rice. Glutinous rice becomes sticky when cooked, which is the consistency you need to make this glossy, creamy pudding. You won’t get the same result with normal non-glutinous rice, regardless of colour.
Here in Australia, the most common black glutinous rice is from Thailand, though I understand it’s also grown in the Philippines, Indonesian and other Asian countries.
Find it in Asian and Thai grocery stores, or online such as here and here (Australia). It’s usually sold labelled as “glutinous rice”.
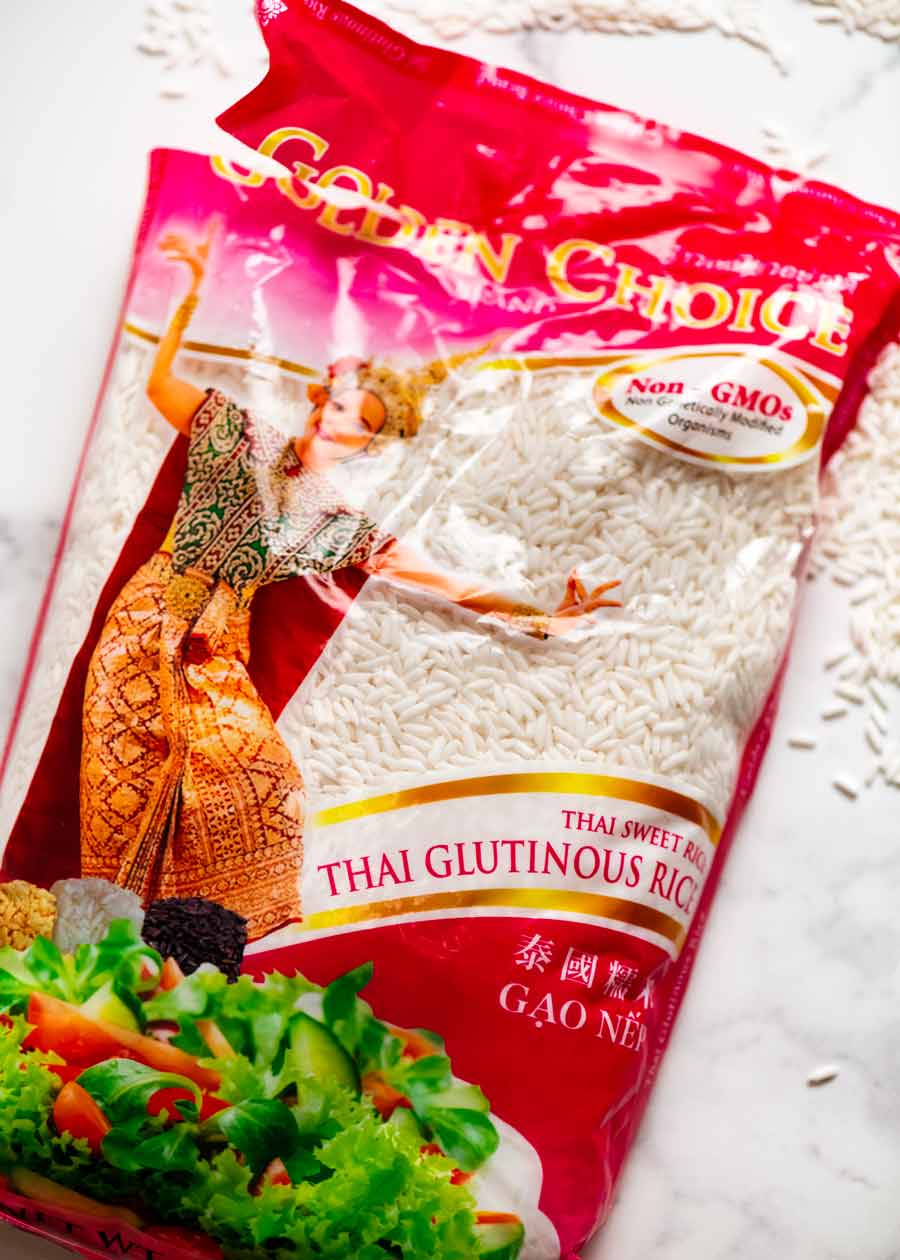
White Sticky Rice (optional)
Funny as it sounds, in addition to black sticky rice the recipe also calls for a small amount of white sticky rice. Most Thai black sticky rice recipes call for a combination of both black and white sticky rice because white rice is stickier than black rice, which gives the rice pudding a thicker and creamier texture, while the black rice has more flavour.
However, I consider the white rice to be optional. This pudding still has a really lovely creamy texture even without white rice. It’s just slightly better with white rice!

How to make Thai Black Sticky Rice Pudding
It’s soooo easy! Soak → Simmer → Eat (psst! This parts the best!😂)
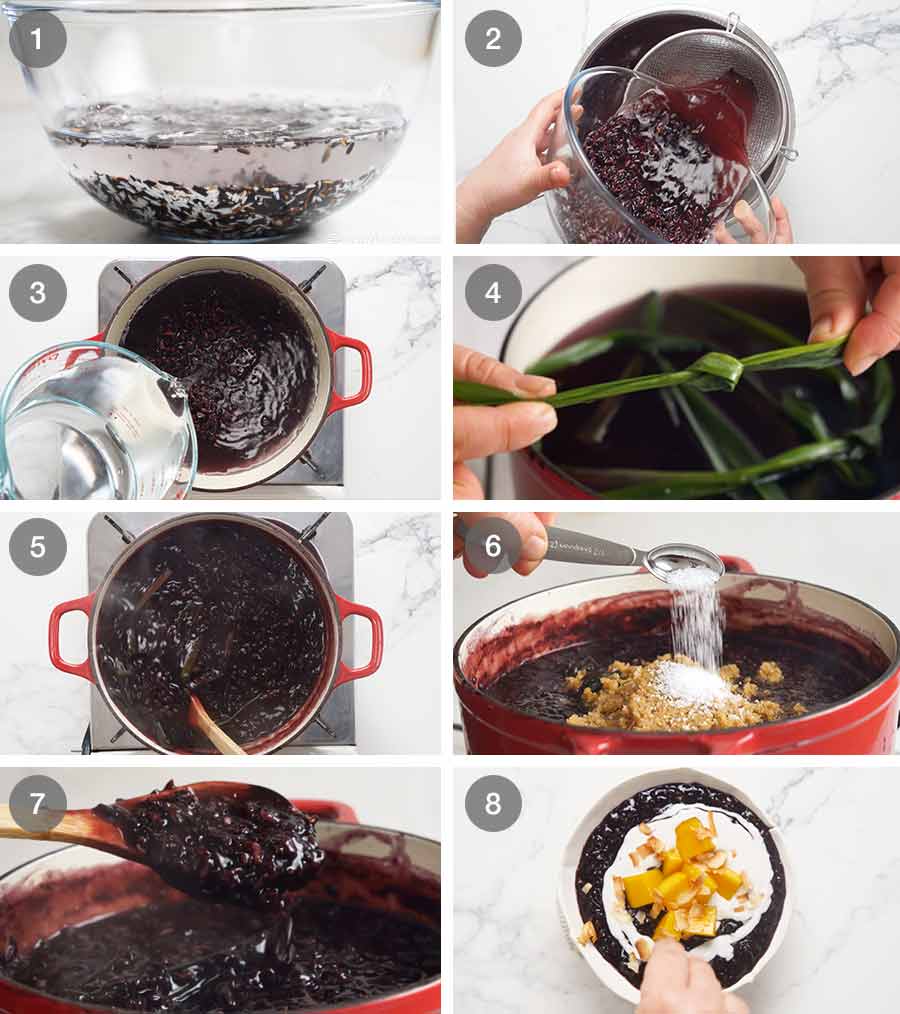
Soak the rice for at least 4 hours, or overnight. This ensures that the rice cooks through evenly. If you skip this step, you’ll find that the outside of the rice grains becomes overly soft before the inside cooks through.
Drain the rice and shake off excess water.
Combine with water – Place rice in a small pot with water.
Pandan leaves – Fold the pandan leaves so they will easily fit inside the pot. Then tie into a knot. This breaks the fibres and releases more flavour into the rice.
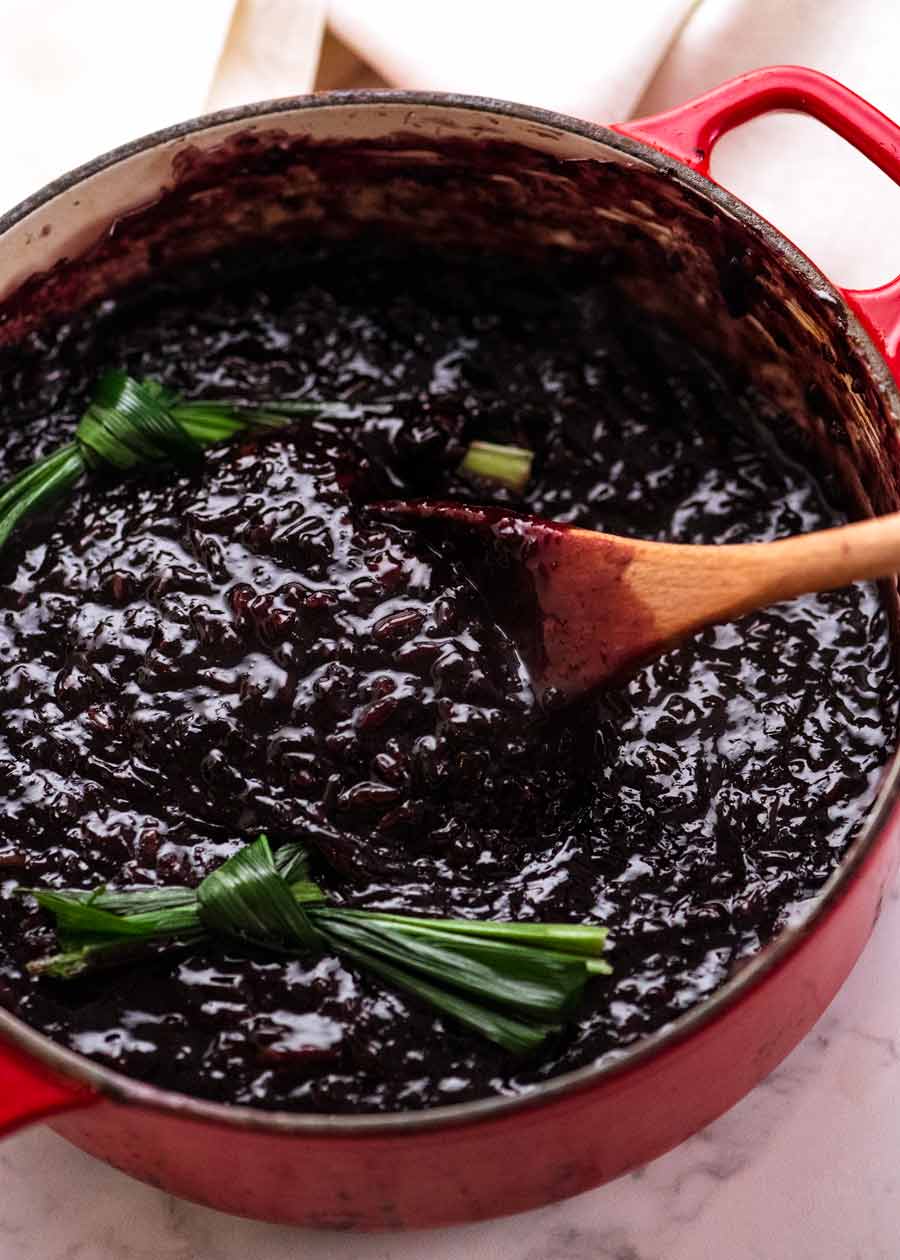
Simmer for 30 minutes on low heat, stirring almost constantly for the last 15 minutes as it thickens to ensure the base doesn’t catch. The liquid will reduce and thicken due to the starch in the rice.
Sugar – Add palm sugar and salt, then stir to dissolve. It will only take around 30 seconds or so.
Thickness – The black rice pudding should be thick, creamy and glossy as pictured above. Not stodgy and gluey! When spooned into serving bowls it should ooze gently, like good risotto.
Serve – Ladle into bowls, then top with a drizzle of coconut cream (highly recommended), toasted coconut flakes (recommended) and diced mango (a lovely extra, but entirely optional), if using.
This is what the consistency should be like – thick and creamy, not stodgy!

In case you are wondering about my hierarchy of topping priorities (highly recommended down to entirely optional), it’s because this rice pudding is so tasty even unadorned that I guarantee you will be tempted to eat it plain, straight out of the pot.
It’s hard to believe that of a rice pudding just made with rice, water and sugar, isn’t it?? But it’s true!
What to serve with Thai Black Sticky Rice
This is dessert! Finally, a Thai dessert to share, after years of sharing Thai starters and main dishes. 🙌🏻
In addition to the Thai Yellow Curry and Green Papaya Salad I shared earlier this week as part of Thai Week, here are some other Thai restaurant favourites to get you inspired:
And with that, Thai week is done! I hope you enjoyed it as much as I did creating, photographing, filming and … oh, who am I kidding? We all know EATING the food tops the list!
Got a request for the next theme week?? Pop it in the comments below! – Nagi
Watch how to make it
Thai Black Sticky Rice Pudding
Ingredients
- 1 cup black glutinous rice (aka black sticky rice) (Note 1)
- 4 tbsp white glutinous rice (white sticky rice) (Note 1)
- 4 cups water
- 2 pandan leaves , folded and knotted (Note 2)
- 1 cup (loosely packed) palm sugar (or brown sugar), grated with box grater (Note 3)
- 1/2 tsp salt
Toppings:
- 1/2 cup coconut cream (very highly recommended)
- 1/8 tsp salt
- 1/2 cup shaved coconut , toasted, optional (Note 4)
- Mango cubes or crushed peanuts , for topping, optional
Instructions
- Soak rice: Place both rices in a bowl and cover with water (5cm / 2" above). Soak for 4 hours (up to 12 hours).
- Strain the rice and add it to a small pot or large saucepan.
- Pandan leaves: Add the knotted pandan leaves.
- Simmer 30 minutes: Add 4 cups of cold water. Bring to boil. Turn stove down to low so it's simmering very gently (small, slow little bubbles). Simmer 30 minutes (no lid), stirring frequently for the last 15 minutes and almost constantly towards the end (so the base does not catch).
- Consistency: Rice should be soft / fully cooked through, water reduced, and sauce should be creamy not watery (starch from rice thickens water).
- Add sugar: Stir in sugar and salt until it dissolves (~20 seconds).
- Ladle into bowls – it should ooze slowly, not be runny nor so thick it stays in a mound, see video for consistency. (If it's too thick, add a touch of water and stir).
- Toppings: Mix coconut cream with salt. Drizzle onto rice pudding. Top with toasted coconut and mango if using. Serve immediately.
Notes
Life of Dozer
The moment when Dozer discovered the fridge was full of French cheese… (for care packages for my team going out shortly!)

And the moment I realised it:

Not sure who was happier…
The post Thai Black Sticky Rice Pudding appeared first on RecipeTin Eats.
]]>