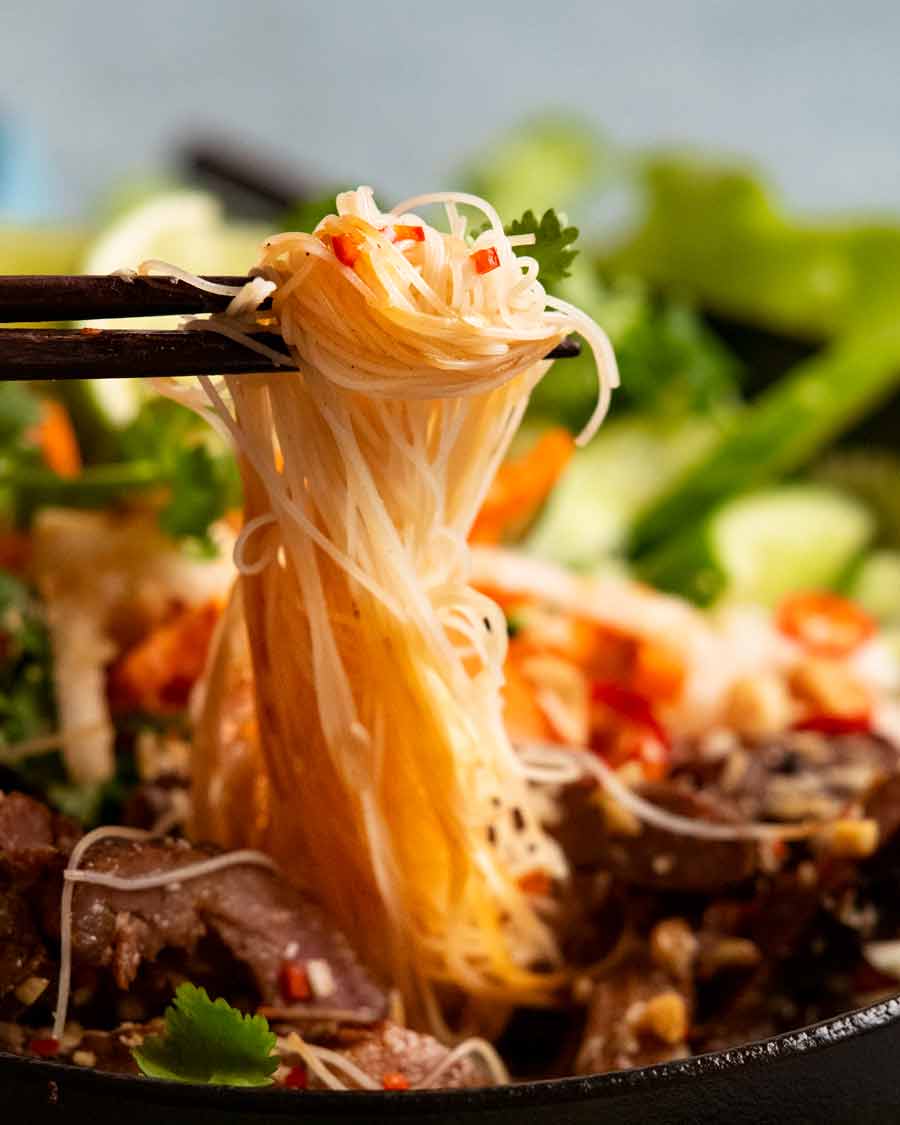
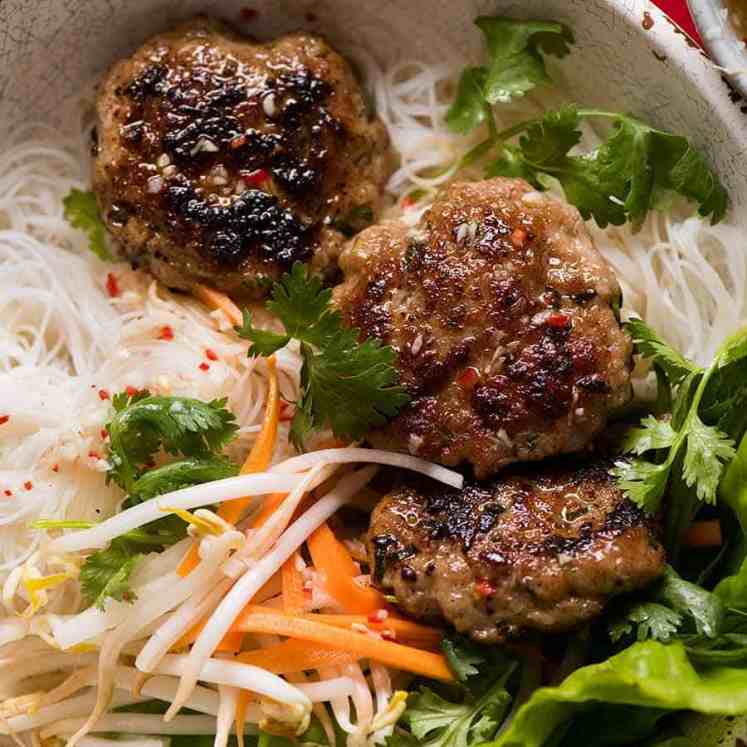
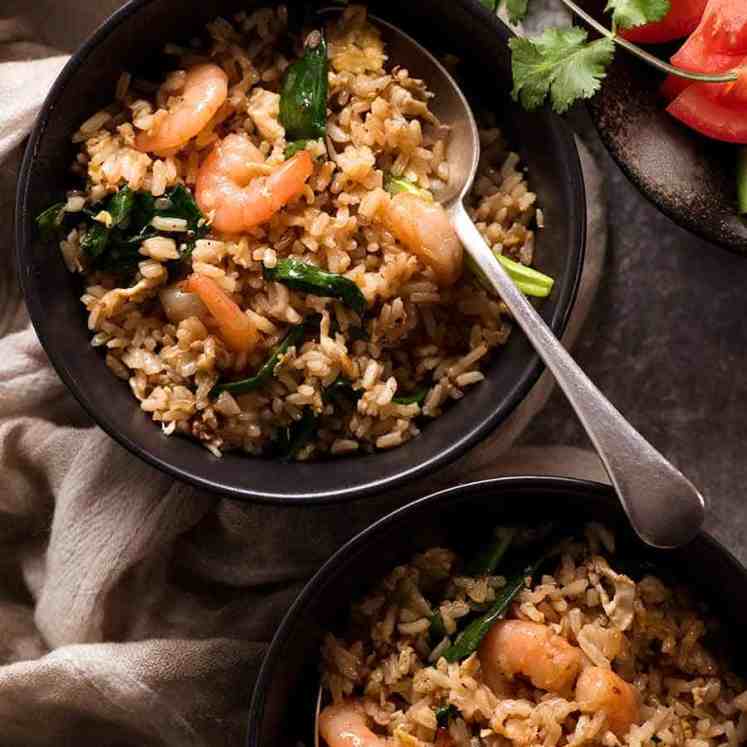
 As promised on Wednesday – Vietnamese pork noodle bowls! This popular salad-type dish is called bun thit nuong – vermicelli noodles topped with fresh and pickled vegetables, herbs and Vietnamese lemongrass pork, doused generously with nuoc cham sauce. Fresh yet full of flavour. Vietnamese pork noodle bowls I find it funny that pho is the... Get the Recipe
The post Vietnamese lemongrass pork noodle bowls (bun thit nuong) appeared first on RecipeTin Eats.
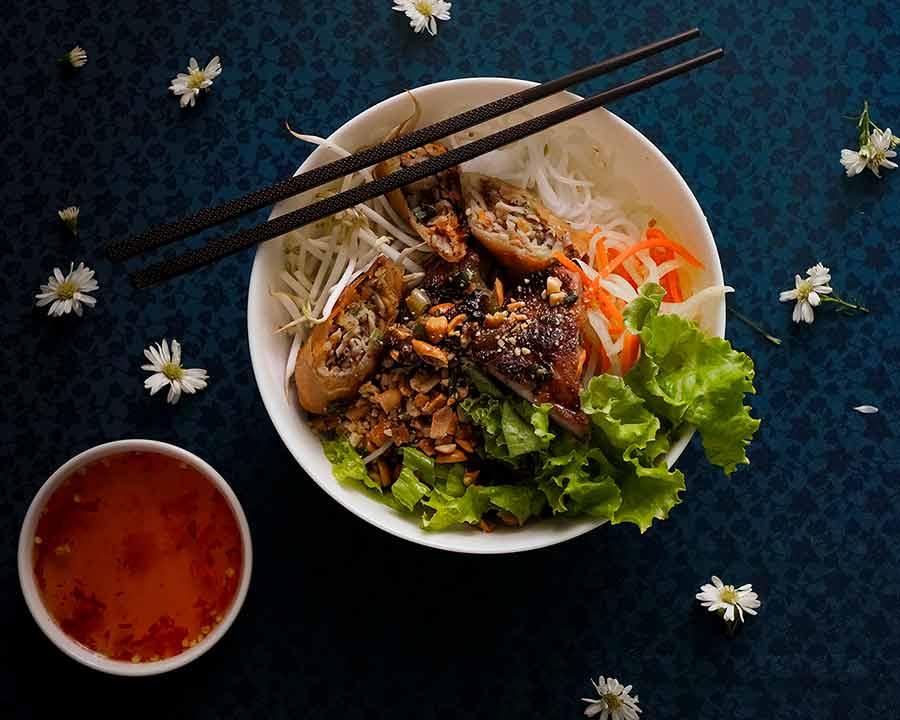
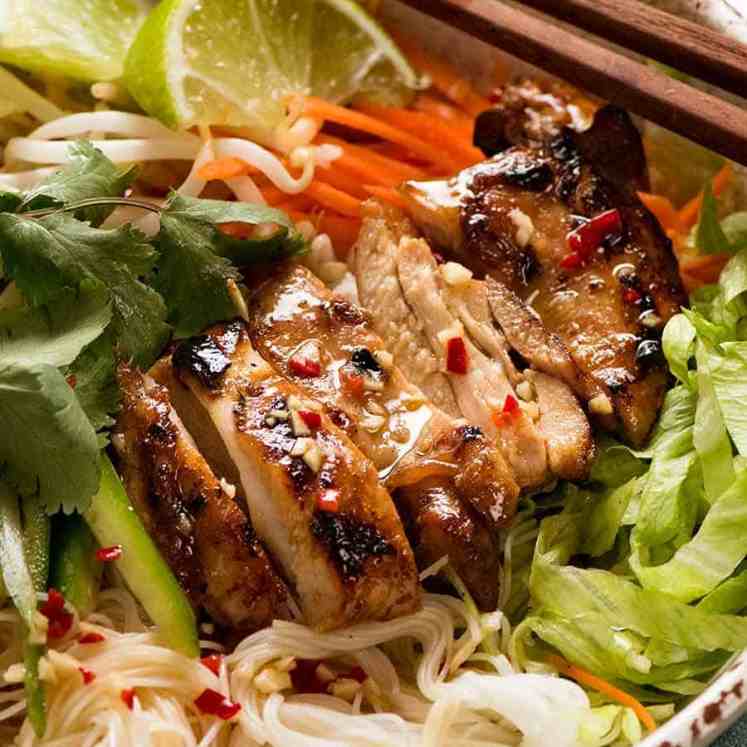
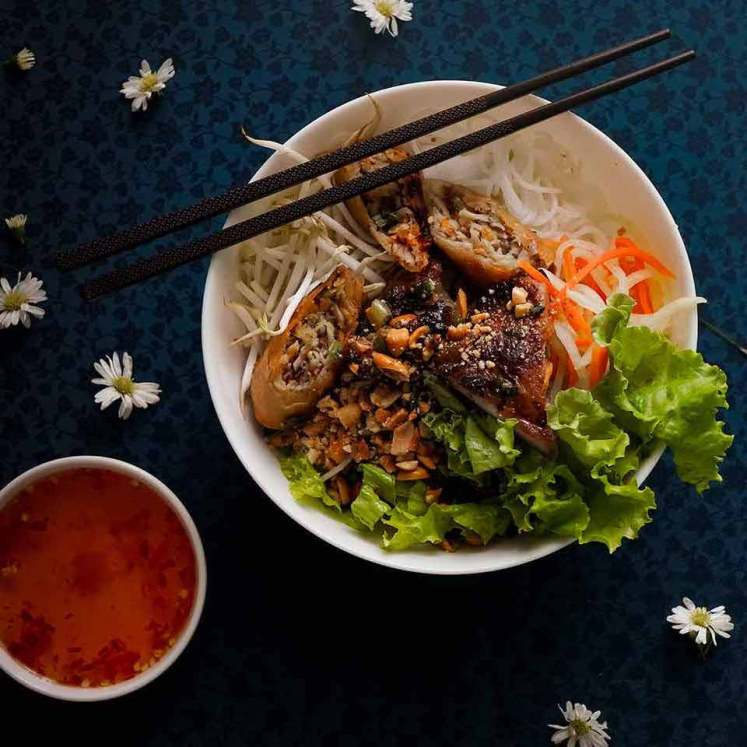
]]>As promised on Wednesday – Vietnamese pork noodle bowls! This popular salad-type dish is called bun thit nuong – vermicelli noodles topped with fresh and pickled vegetables, herbs and Vietnamese lemongrass pork, doused generously with nuoc cham sauce. Fresh yet full of flavour.
Vietnamese pork noodle bowls
I find it funny that pho is the dish that’s become the superstar of Vietnamese food when bun thit nuong is tastier to me! I adore the contrast of fresh vegetables and herbs with delicious grilled meats, that it’s light and healthy yet anything but dull.
It’s a big bowl of delicious, and I shared the chicken version many years ago (bun ga nuong). And as soon as I cracked the pork version, I shared in immediately (just last Wednesday!). And I’m back today with the noodle bowls recipe that is made using the lemongrass pork – just like you get on the streets of Vietnam!
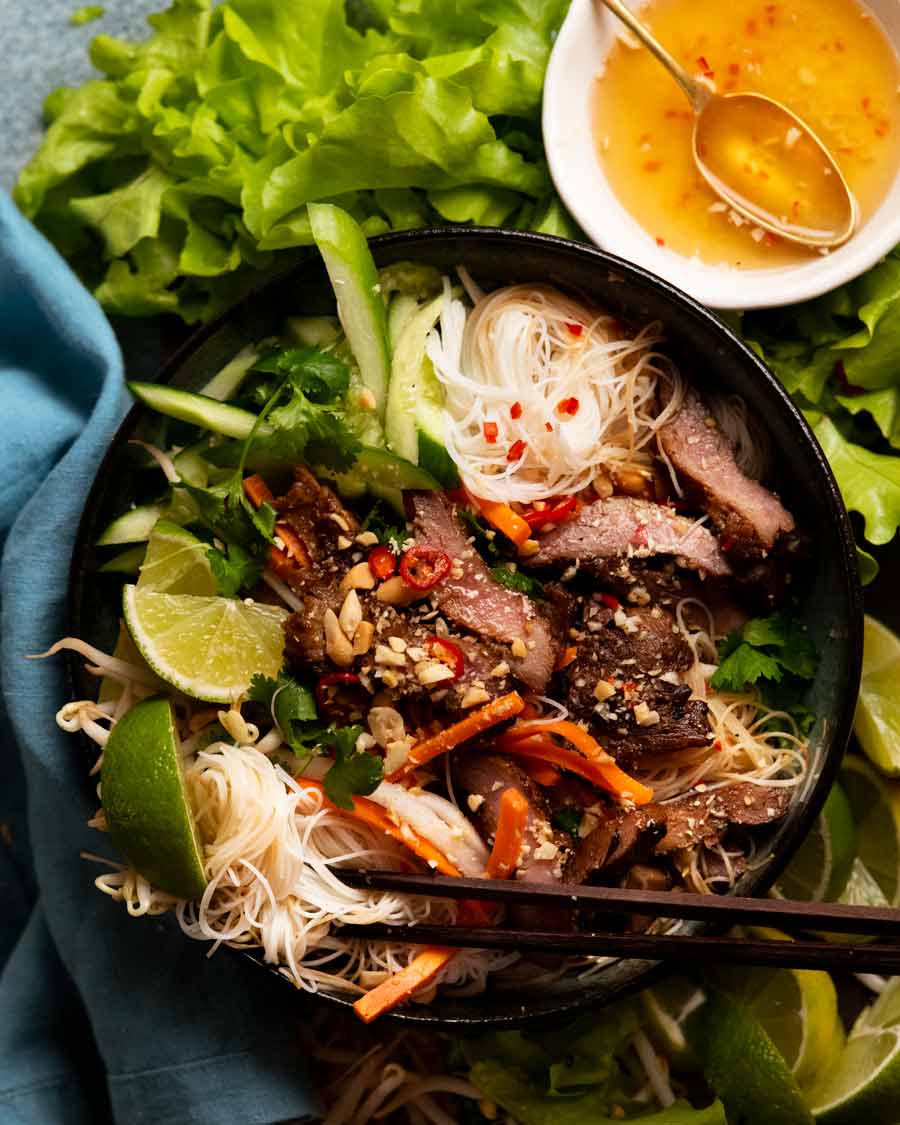
PS The photo below is in my own home. Not the streets of Vietnam!
What you need for Vietnamese pork noodle bowls
There’s variations of bun thit nuong all across Vietnam. But they all have noodles, marinated pork, raw vegetables and sauce.
Lemongrass marinated pork
See separate recipe posted earlier this week. Thin slices of pork shoulder are marinated with lemongrass, garlic, lime, fish sauce, soy sauce and sugar which infuses the flesh with a stack of flavour. Meanwhile, a smidge of baking soda is the secret that tenderises economical pork shoulder, which is usually slow cooked, and keeps the thin pork steaks incredibly tender even when cooked over high heat for a lovely char!


The noodles, vegetables & topping
So here’s what I use – typical of Vietnamese restaurants and takeaway places here in Sydney:
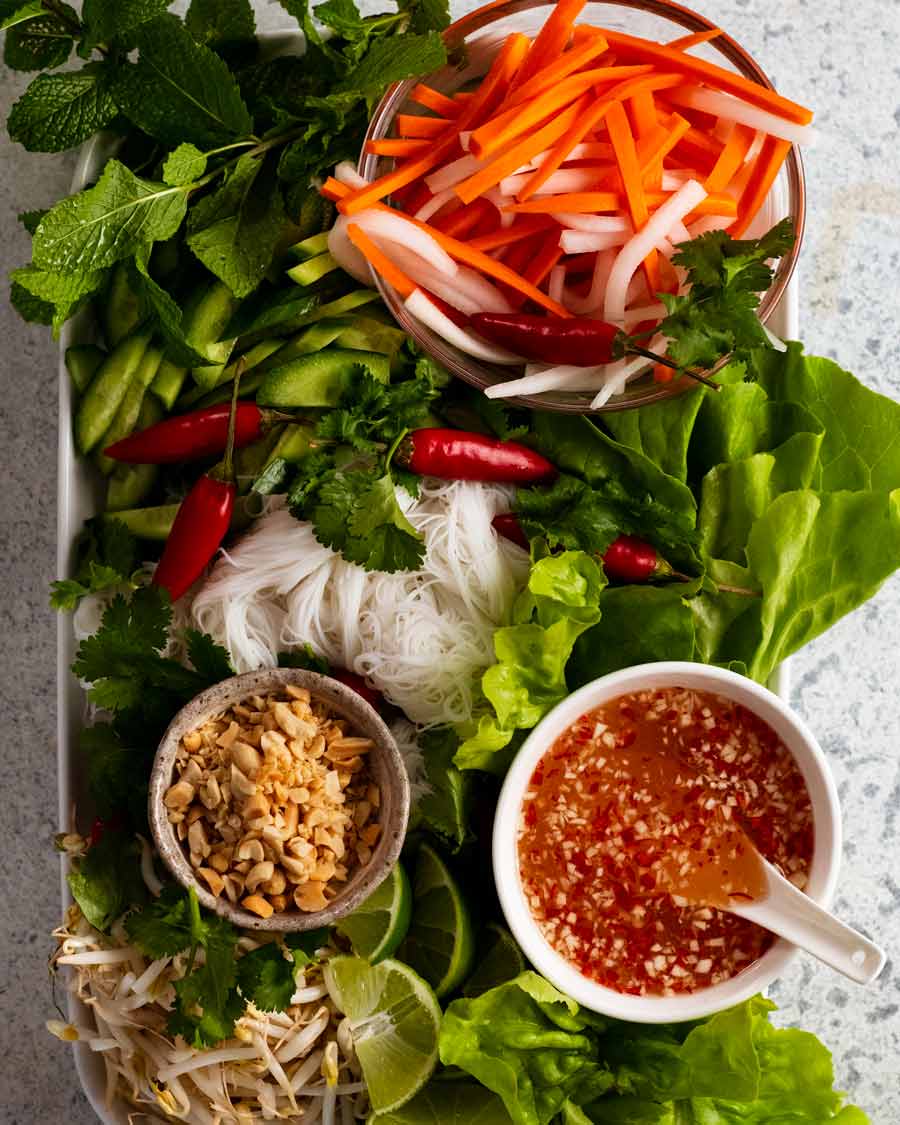
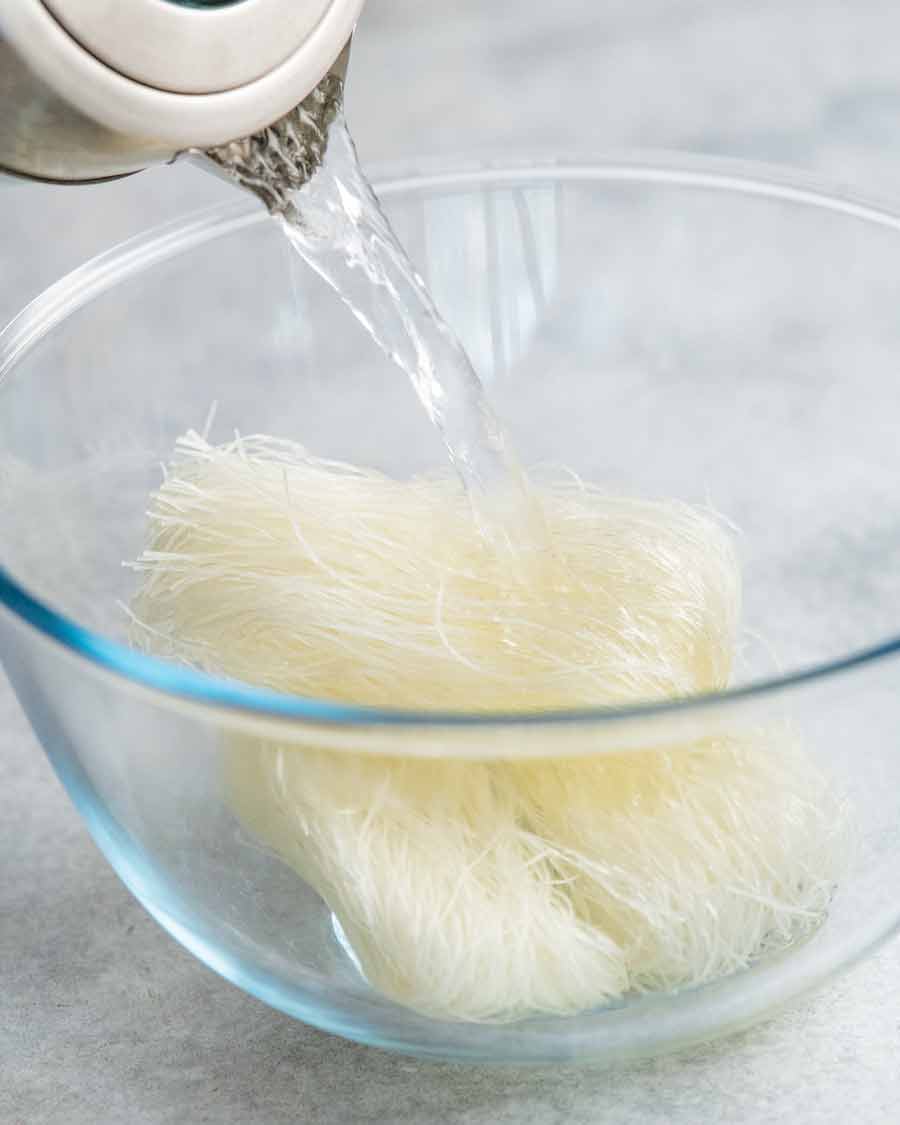
Vermicelli rice noodles – the thin rice noodles prepared by soaking in boiling water. Substitute with other white noodles or bean thread noodles / glass noodles (
Pickled carrot and daikon – quick and easy! See below for more.
Nuoc cham sauce – the chilli-garlic-savoury-limey-sauce served with “everything” in Vietnam (and that’s no exaggeration!). See below.
Lettuce – Either soft butter lettuce torn into bite size pieces or crisp lettuce, like iceberg or cos/romaine, shredded
Cucumber and bean sprouts
Herbs – mint and coriander/cilantro. Thai Basil is also lovely!
Peanuts – finely chopped, for sprinkling
Fresh chilli slices – optional
Lime wedges – for optional extra freshness
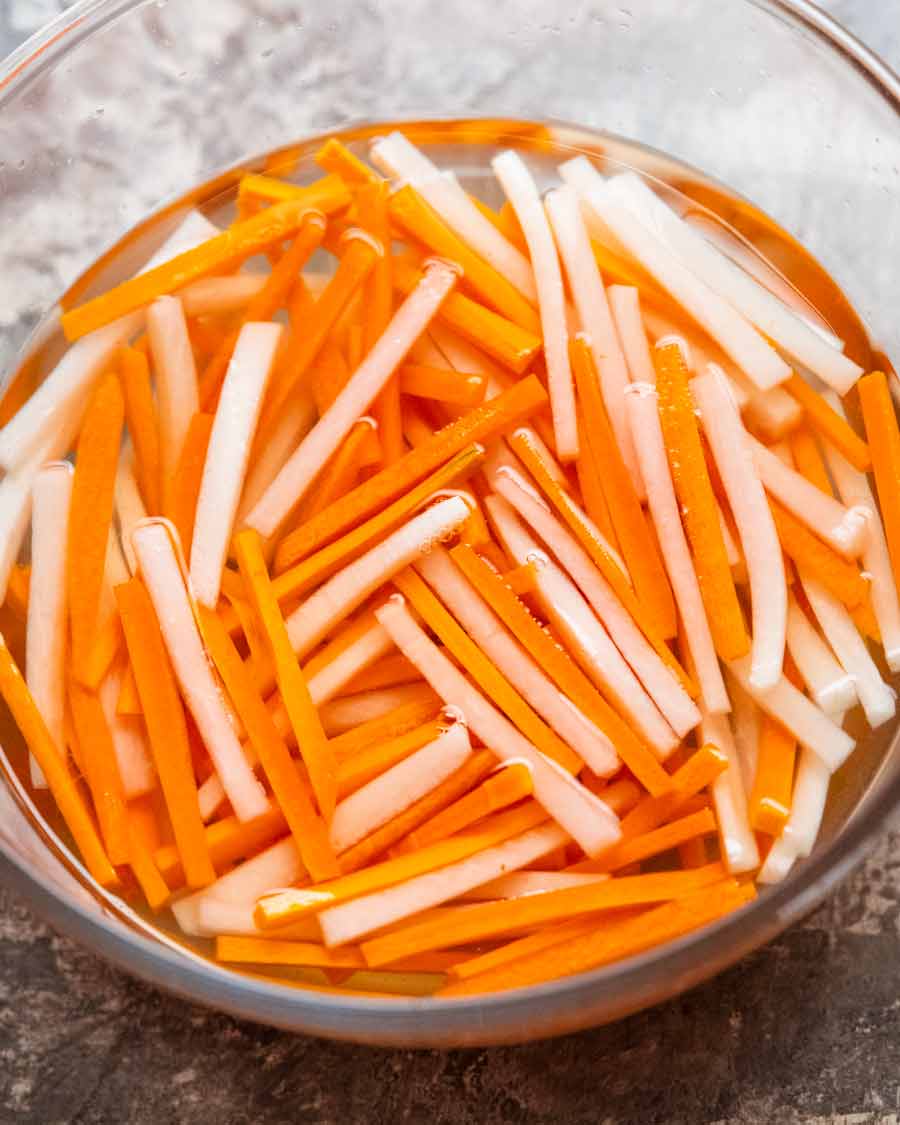
Vietnamese pickled vegetables
The pickled vegetables (pictured above) are the same as the recipe in the Banh Mi recipe. It’s simple to make – mix then soak for 2 hours. It’s the perfect texture-flavour addition to these bowls – the vegetables still have a great crunch to them but are floppy (nobody wants pokey raw carrot batons sticking out in their noodle bowls!) with a sweet, tangy flavour.
So much more interesting than raw carrots!
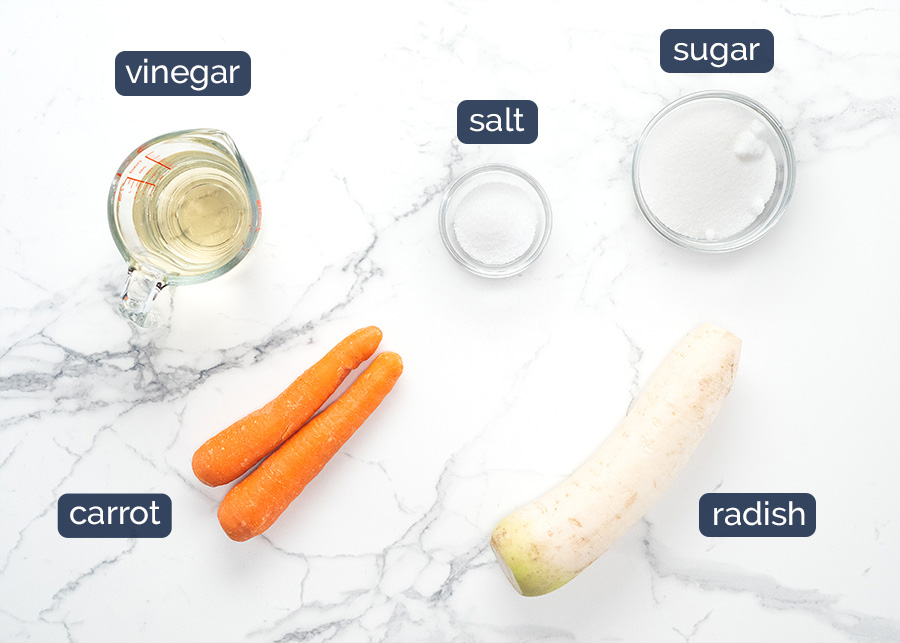
Here’s what you need. Just mix, then pickled the vegetables for 2 hours or even overnight.
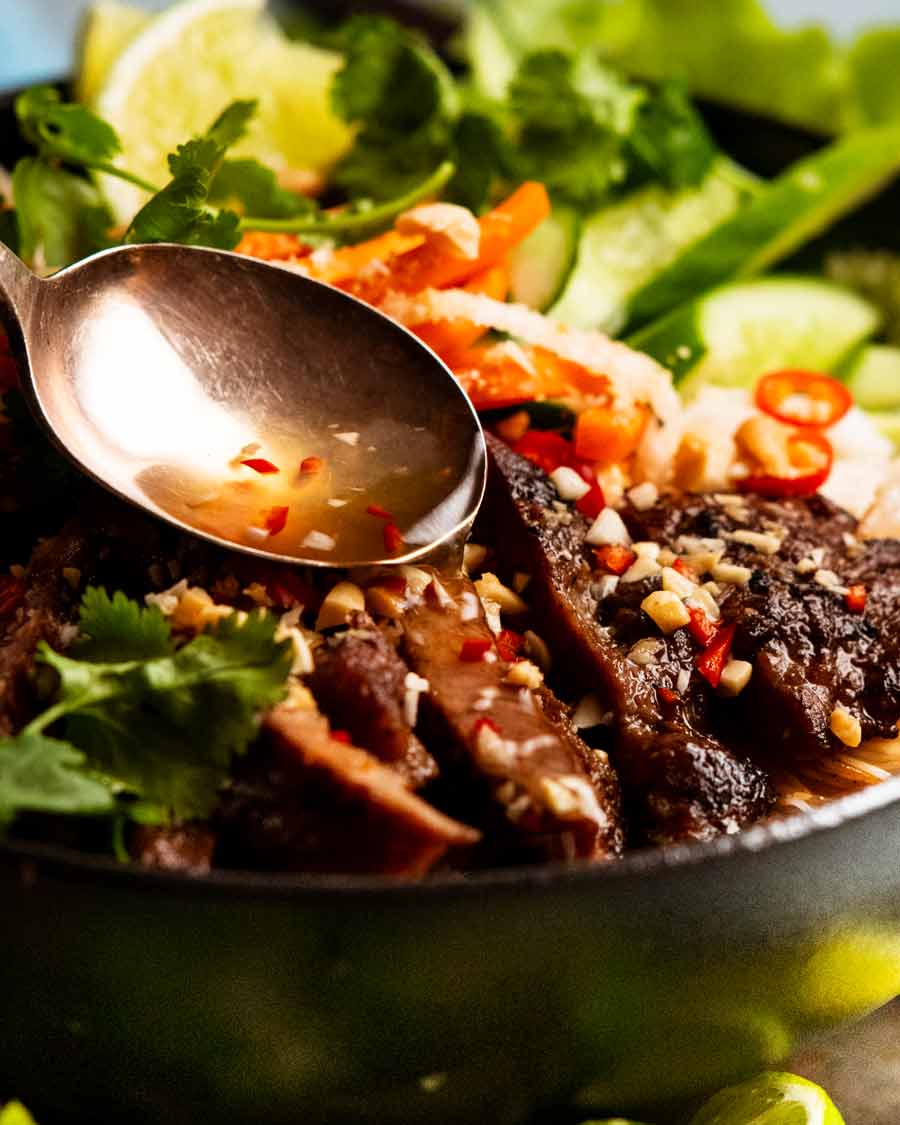
Nuoc cham sauce for Vietnamese pork noodle bowls
The sauce used for Vietnamese pork noodle bowls is Nuoc Cham. As mentioned above, this is the sauce that’s served with “everything” in Vietnam though there’s variations depending on what it’s used for. Sometimes it’s sweeter, some fishier (when used sparingly for dipping), some milder (when used in an almost soup-like form – like with Vietnamese Meatballs bun cha).
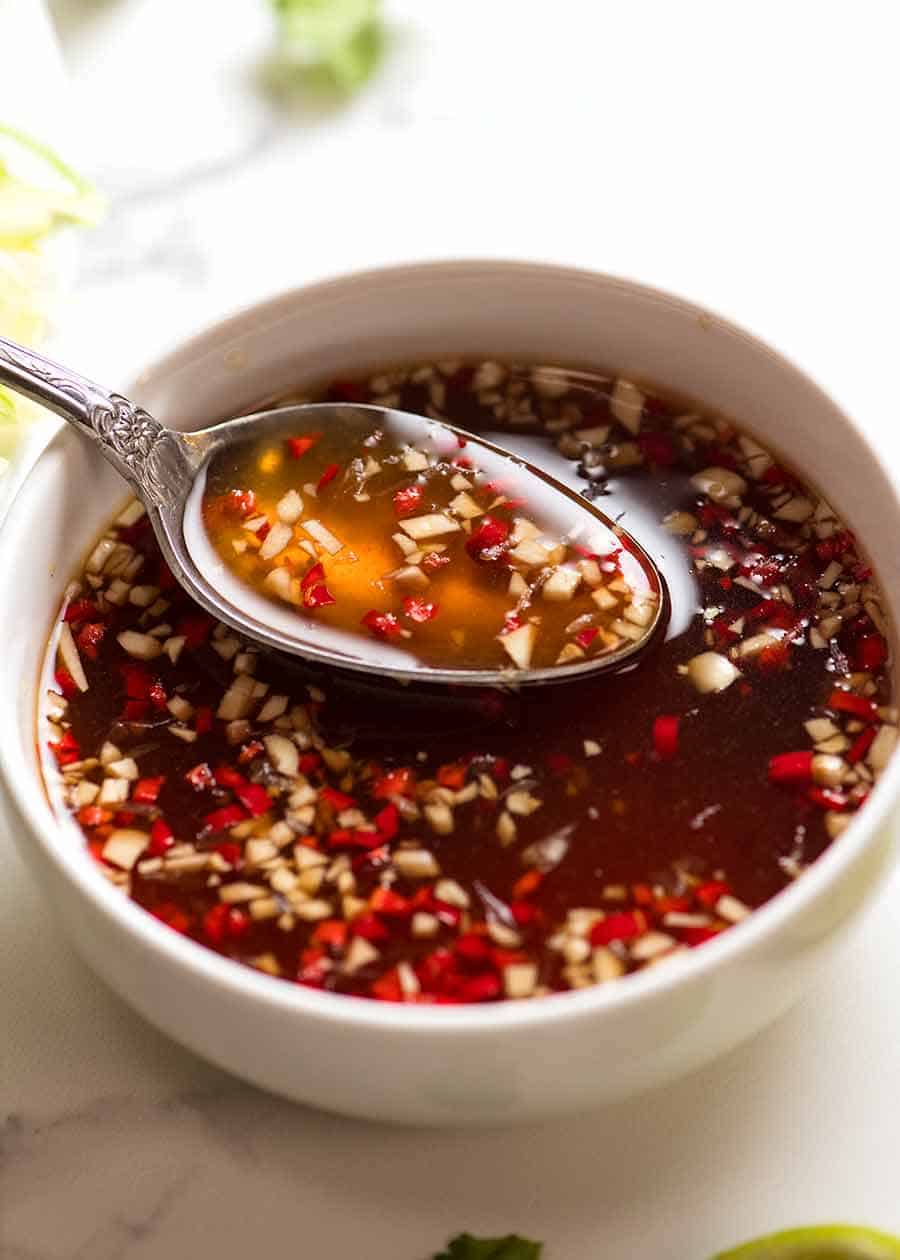
Today’s version is fairly mild, not too fishy, because it’s supposed to be used to douse everything generously. Nobody wants to get to the rice noodles at the bottom of the bowl only to find it’s tasteless!
Here’s what you need to make nuoc cham sauce. Just mix together!

Assembling the pork noodle bowls
Noodles first. Then just pile everything on top! There are no rules, just jam it all in. Abundance is the word that comes to mind with these bowls!
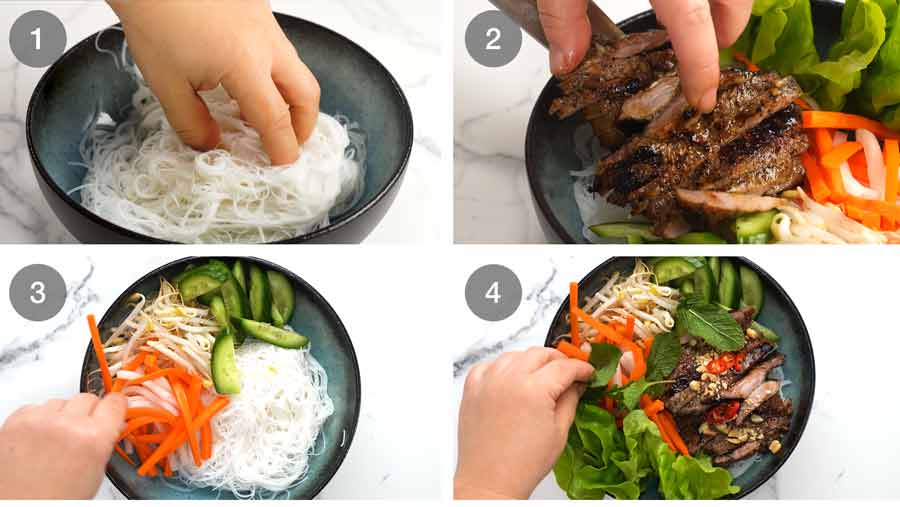
Finish with a good sprinkle of peanuts and fresh chilli if you dare (live life on the edge, I say!). And serve with jugs or bowls of the nuoc cham sauce on the side and douse generously. Remember, this is a mild flavoured nuoc cham, not a fishy one. So you need lots. You’re supposed to use lots!
Getting stuck in
As for the eating part, there really are no rules. Some people (like me) will pick out some of the pork bits first because it’s their favourite part of the bowl. Then mix it up and get stuck in. It will end up looking like a jumbled up mess. A delicious one, at that! And don’t be afraid to keep adding more sauce on an as-need basis, as you continue through your bowls.
DIY spread – great for gatherings!
One last tip! This dish is a great one for gatherings. In fact, the chicken version was for many years my signature for summer BBQ’s. Lay out all the toppings and noodles on a table. Cook the chicken on the BBQ then let everybody put their own bowls together.
One of my favourite formats for entertaining – DIY.
Hope you enjoy! – Nagi x
Watch how to make it
Vietnamese pork noodle bowls (bun thit nuong)

Ingredients
- 1 batch lemongrass marinated pork (it’s marinated overnight. 8 pieces, serves 4)
- 200g/ 7oz dried vermicelli noodles (Note 1)
- 1 head soft lettuce (like butter lettuce), torn into large bite size pieces (or 4 cups shredded iceberg, cos/romaine)
- 2 cucumbers , halved lengthwise then sliced on the diagonal 3mm / 0.15" thick
- 2 cups bean sprouts
- Handful mint leaves
- Handful cilantro/coriander
- 1/4 cup finely chopped unsalted peanuts
- Sliced red chilli (for garnish – optional)
- Lime wedges (to serve – optional but recommended)
Vietnamese pickled vegetables (Note 2)
- 2 medium carrots , peeled cut into 2-3mm / 1/10″ batons
- 1/2 large white radish (daikon) , peeled, cut the same as carrots
- 1 1/2 cups boiling water
- 1/2 cup white sugar
- 4 tsp cooking salt (kosher salt)
- 3/4 cup rice vinegar (sub apple cider vinegar)
Nuoc cham Vietnamese sauce (Note 3):
- 4 1/2 tbsp white sugar
- 4 1/2 tbsp fish sauce (Note 3)
- 3 tbsp rice wine vinegar
- 3 tbsp lime juice
- 1/2 cup water
- 2 birds eye chilli or Thai chilli , deseeded and finely chopped (Note 4)
- 5 cloves garlic , finely chopped
Instructions
Make pickled vegetables:
- Pickle – In a large bowl, dissolve the salt and sugar in the hot water. Stir in vinegar. Add carrots and daikon – they should just about be covered.
- 2 hours – Leave for 2 hours until slightly floppy. Drain well then use per recipe.
Pork bowls:
- Nuoc cham sauce – Mix ingredients together. Until sugar is dissolved.
- Vermicelli noodles – Soak in boiling water for 5 minutes (or per packet directions). Drain, rinse under tap water, then cool and drain thoroughly (nobody likes watery noodles!).
- Toppings – Prepare all the other toppings, ready to use.
- Cook pork per the recipe.
- Assemble bowls – Place noodles in a bowl. Top with lettuce, pickled vegetables, cucumber and bean sprouts. Slice pork, place 2 steaks on each bowl. Top with herbs, sprinkle with peanuts and sliced chilli. Add a lime wedge.
- Serve with nuoc cham on the side so everybody can help themselves. Douse generously! Dive in and eat!
Notes
Nutrition
Life of Dozer
The most dangerous photo shoots are the ones that take place on the ground – so I can get up real high above it to fit everything in the frame.

The post Vietnamese lemongrass pork noodle bowls (bun thit nuong) appeared first on RecipeTin Eats.
]]>This is such a wonderful recipe to use economical pork shoulder in an exciting new way! A Vietnamese lemongrass marinade infuses with beautiful flavour while a smidge of baking soda is the secret to tenderising so the pork steaks are tender like premium chops. Vietnamese street-food! Vietnamese lemongrass pork I’ve been wanting to recreate the... Get the Recipe
The post Vietnamese lemongrass pork steaks appeared first on RecipeTin Eats.
]]>This is such a wonderful recipe to use economical pork shoulder in an exciting new way! A Vietnamese lemongrass marinade infuses with beautiful flavour while a smidge of baking soda is the secret to tenderising so the pork steaks are tender like premium chops. Vietnamese street-food!
Vietnamese lemongrass pork
I’ve been wanting to recreate the chargrilled lemongrass marinated pork you find “everywhere” on the streets of Vietnam for years – but it always came out dry. Finally figured out the secret to keeping it juicy, so I had to share the recipe immediately! 😂
Across Vietnam, variations of this lemongrass pork are served in various forms. On rice, soups, in rice paper rolls, even in Banh Mi. While all are delicious, my favourite are the popular Vietnamese noodle bowl salads, bun thit nuong. Thin rice noodles, topped with this pork, pickled vegetables, lettuce, a smattering of peanuts, lime and served with nuoc cham, that sauce served with “everything” in Vietnam.
I’ve shared the pork noodle bowl as a separate recipe as I wanted to publish the marinated pork separately because I think it’s worthy of your attention!
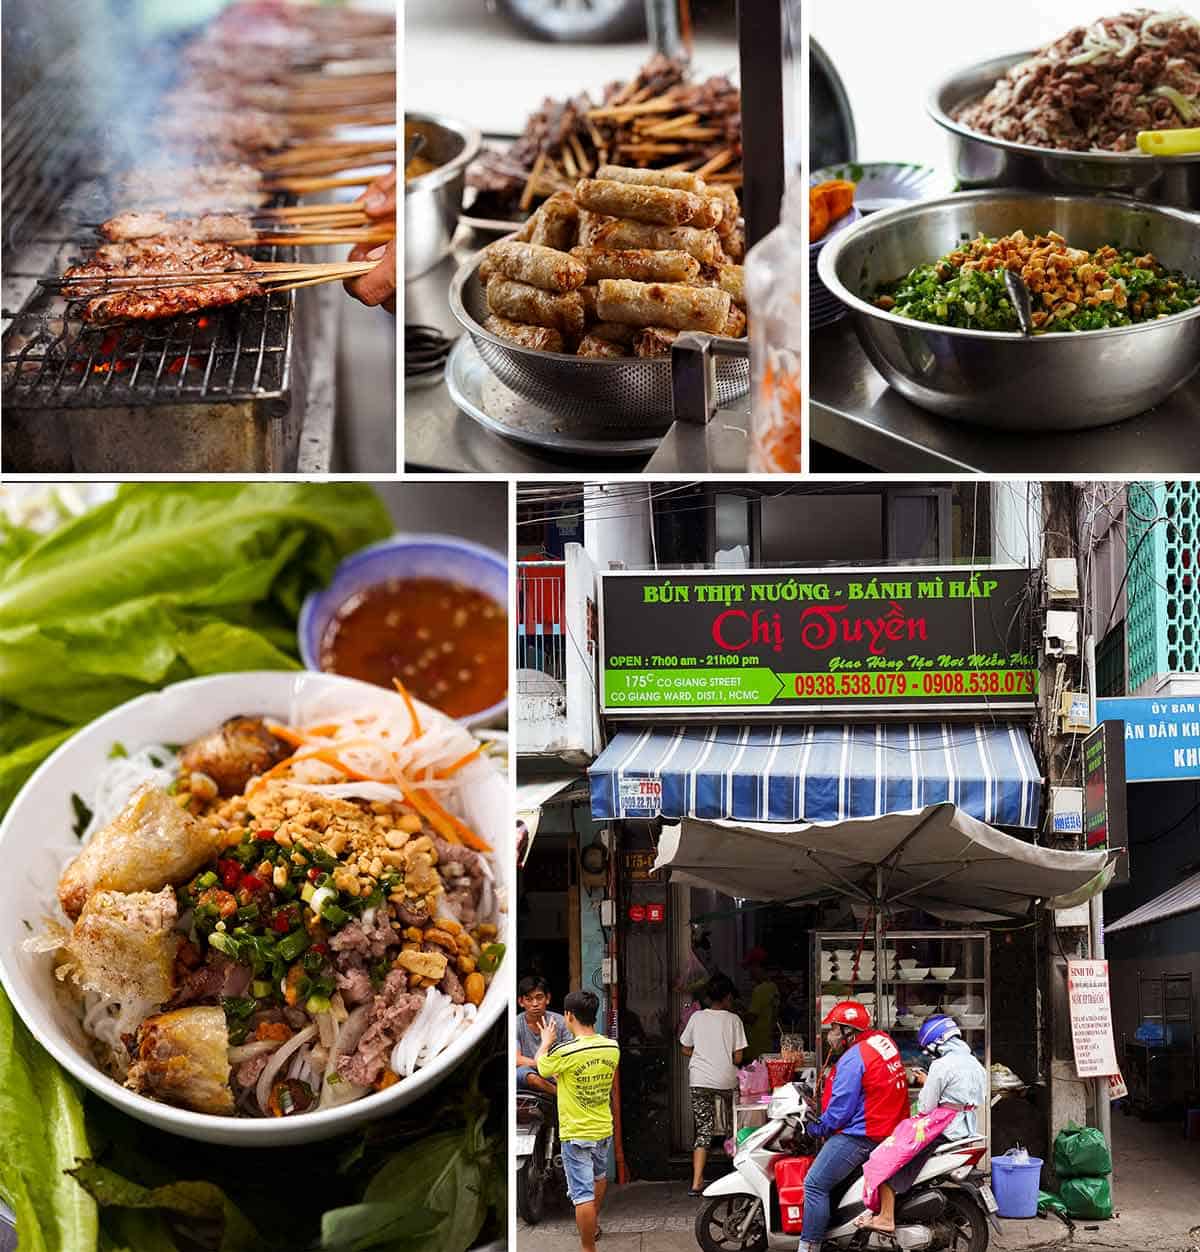
Here’s a photo of the pork rice noodle bowls. I actually took this photo in Vietnam – it’s a dish I bought from a street vendor in Saigon and took back to my hotel to take a photo:
Oh look! And said vendor in Saigon. They cooked the pork on skewers over charcoal. I’m doing a home version – steaks on a stove. So you can make this any night of the week – rain, hail or shine!
Why you need this Vietnamese pork in your life!
Excellent value – It’s made using economical pork shoulder that is tenderised so it’s juicy like premium pork chops!
Flavour plus value – The meat is sliced and pounded thinly for maximum flavour penetration and so less meat goes further.
Something different but yet so easy, with ingredients you can get from the local shops.
Versatile – Serve at your next BBQ with coconut rice and Asian slaw. Or wait until Friday to make Vietnamese noodle bowls!
Deliciousness factor is extremely high for relatively small effort
And because I know someone will ask – yes you can make this with chicken, here it is!
What you need
Here’s what you need to make this.

Pork shoulder – Generally, this economical, tough cut of pork is slow cooked until it becomes fall-apart tender. Today, we’re using it in a really different way. Sliced thinly, then marinated with baking soda which tenderises it so when it’s cooked hard-and-fast like steak, it is tender like a pricey pork chop. (Links again for glowing reader reviews who have discovered the wonder of this technique with chicken and beef!).
Baking soda – also known as bi-carb / bi-carbonate. As noted in the point above, this is what tenderises the tough pork shoulder meat.
Lemongrass – For unmistakable, irreplaceable beautiful Vietnamese flavour!
Limes – For tang. A Vietnamese food favourite.
Sugar – For sweet and caramelisation.
Soy sauce and fish sauce – The saltiness. I like to use both to get the right flavour balance. Only fish sauce = too fishy. Only soy sauce = lacks complexity of flavour.
Garlic – Lots!
Oil – To increase the volume of the marinade so there is the right flavour infusion for the volume of meat we’re using. (Initially I just had more of all the other ingredients but the pork was too salty).
How to make Vietnamese lemongrass marinated pork
The key to this recipe is to slice and pound the pork as thinly as you can. This serves a few purposes:
head start tenderising the flesh
opens up the fibres to allow the marinade to penetrate thoroughly
increases surface area and flattens the pork to improve surface area char – for optimum real chargrilled street-food flavour!
allows us to make this with economical pork shoulder rather than pricey pork tenderloin or chops.

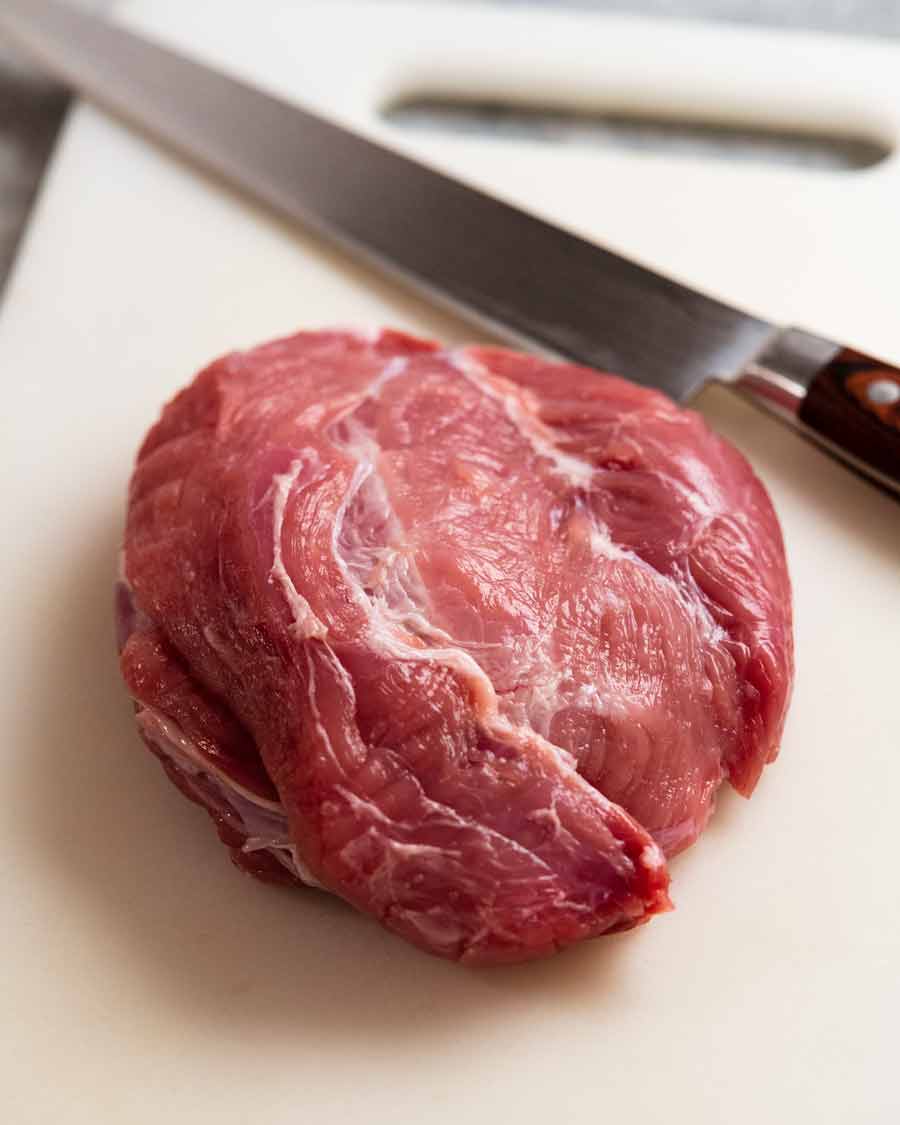
Slice the pork shoulder into eight thinnish pieces – gives us a head start on the pounding. I find it easiest to do this by cutting the pork on 45 degree angle but if you have the right shaped piece, you could just cut straight down.
PRO TIP: To get even(ish) pieces without pulling out the scales, cut the pork shoulder in half, then each half in half again, then each in half again. Voila – 8 pieces!
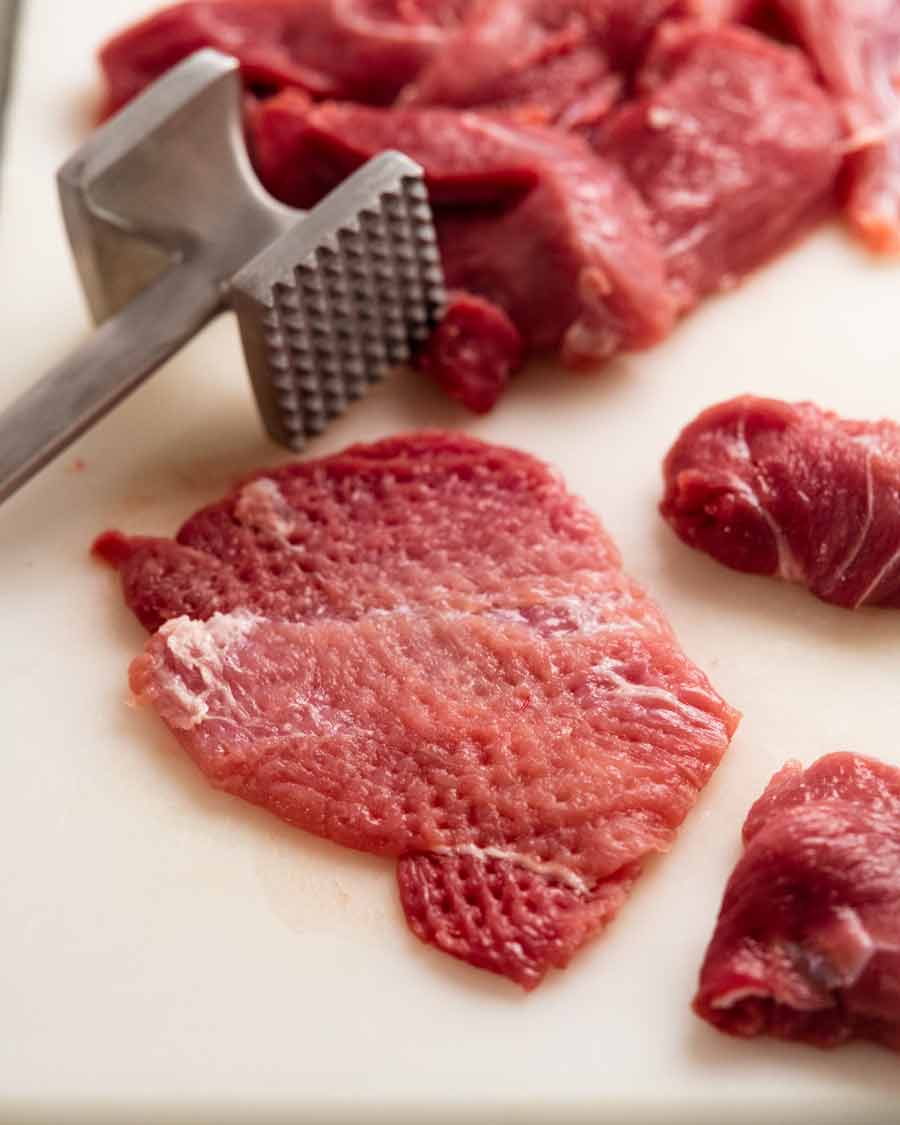
Pound to 5mm / 0.2″ thickness thick using a meat mallet (the jagged side) or rolling pin. Cover with go-between or freezer bags to prevent damaging the meat. (Go-between is a purpose made plastic sheet, sold alongside cling wrap. Also useful for stacking foods in the freezer without sticking together).
Post pounding thin pork!
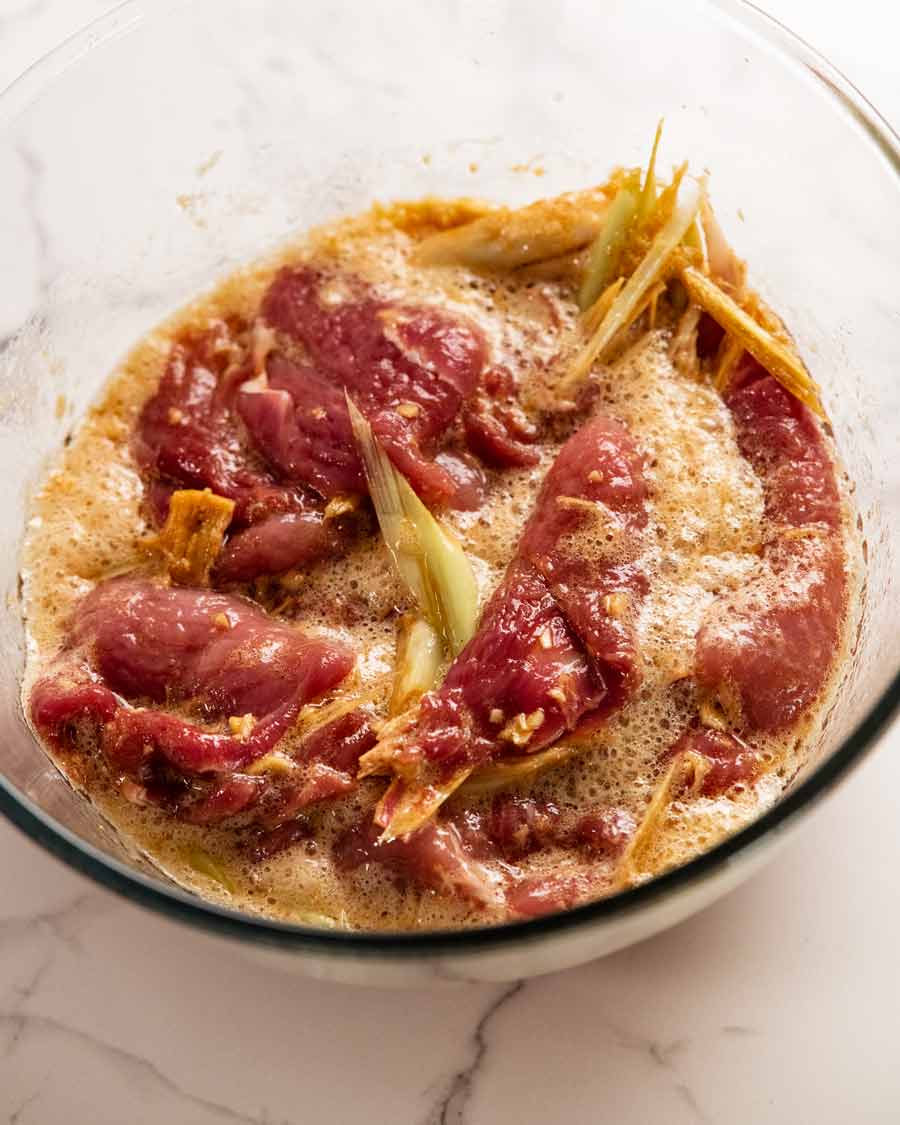
Marinade – Mix the marinade ingredients in a bowl.
Coat pork Add the pork and use tongs to coat well.
Marinate 24 hours – Transfer to a ziplock bag and marinate for 24 hours.
Why mix separately first? To ensure really good, even distribution of the small amount of bi-carb across quite a lot of surface area. I wouldn’t ask you to dirty a bowl unnecessarily
Why a ziplock bag? Because it keeps the meat completely coated in a relatively small amount of marinade. If you prefer a container, use a small one so the meat is as snugly fitted as possible and toss the pork once or twice during the marinading time.
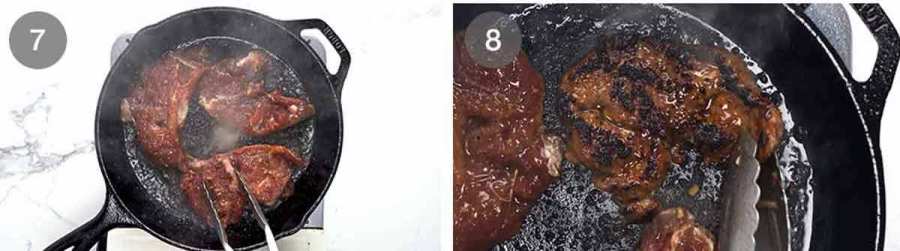
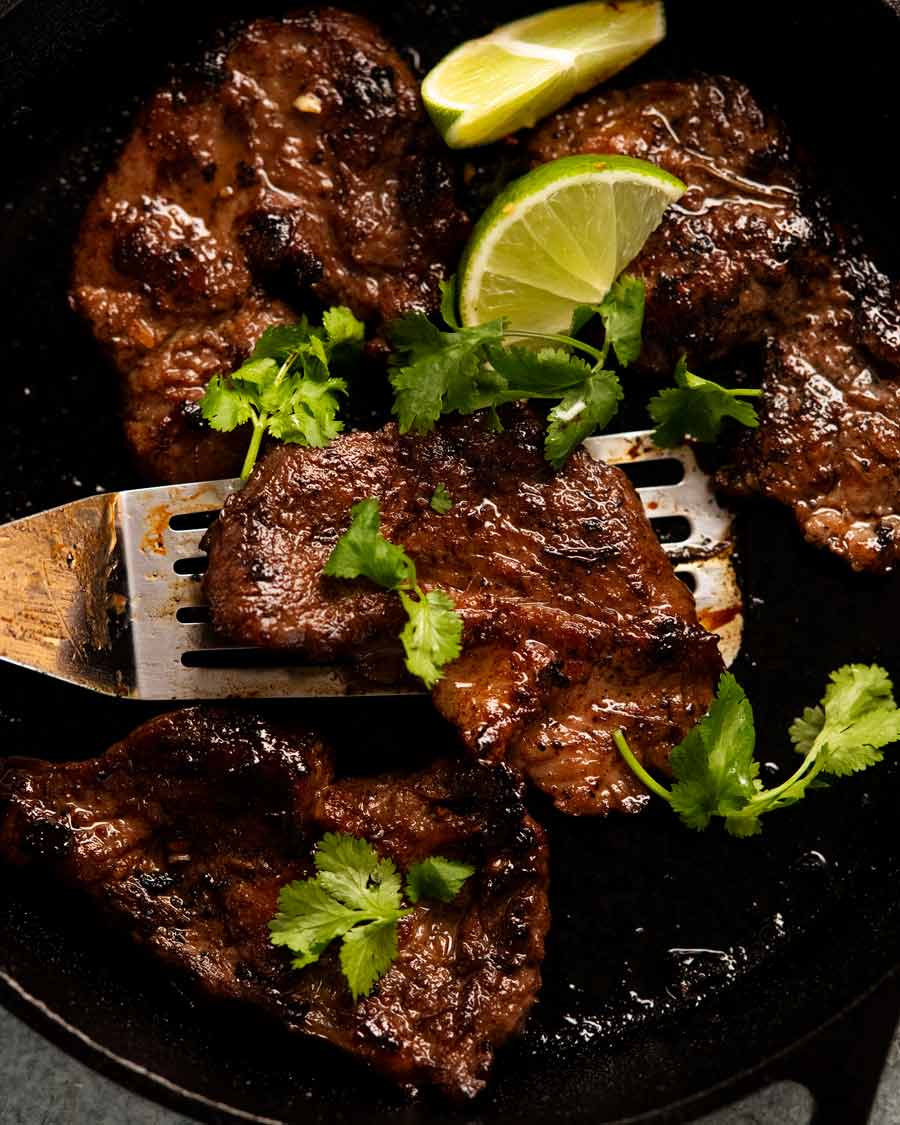
High heat cooking – Cook for 1 1/2 minutes in a hot cast iron skillet OR on your BBQ over high heat. Then cook the other side for 1 minute. Super quick to cook because it’s so thin!
Aim for a nice char – The pork will char quickly because of the sugar in the marinade and that’s what we want, that authentic chargrilled flavour.
STILL TENDER! Technically, with 2 1/2 minutes of high heat blasting, the thin pork should be overcooked and dry inside, not to mention the tough pork shoulder hasn’t been slow cooked as it should so it should be horridly tough. Nope! The inside is still juicy, and it’s more tender than you ever imagined pork shoulder could be, thanks to the baking soda (read more on this above in the ingredients section).
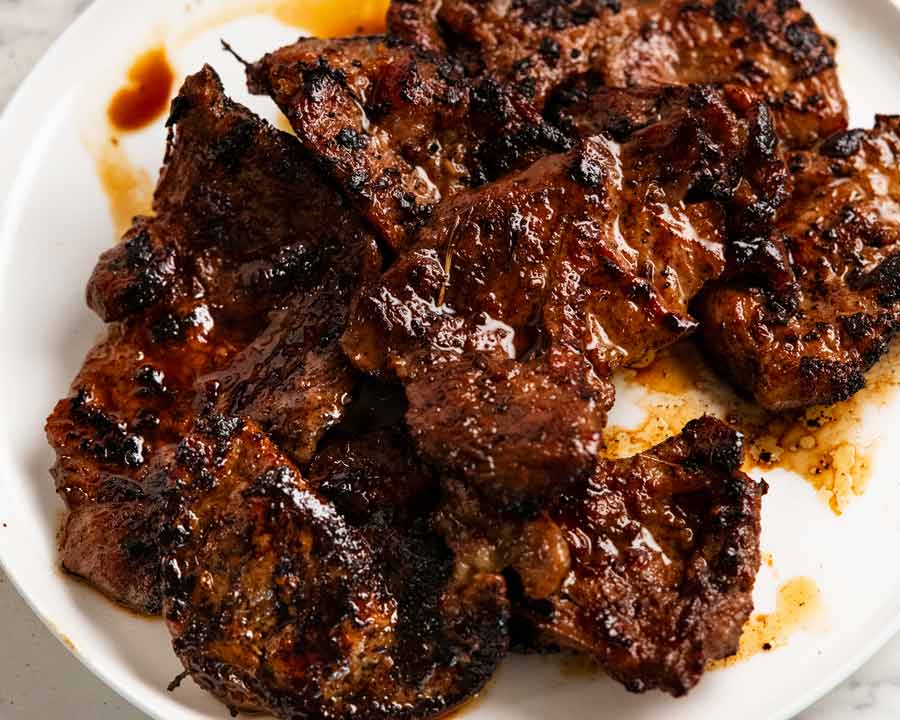
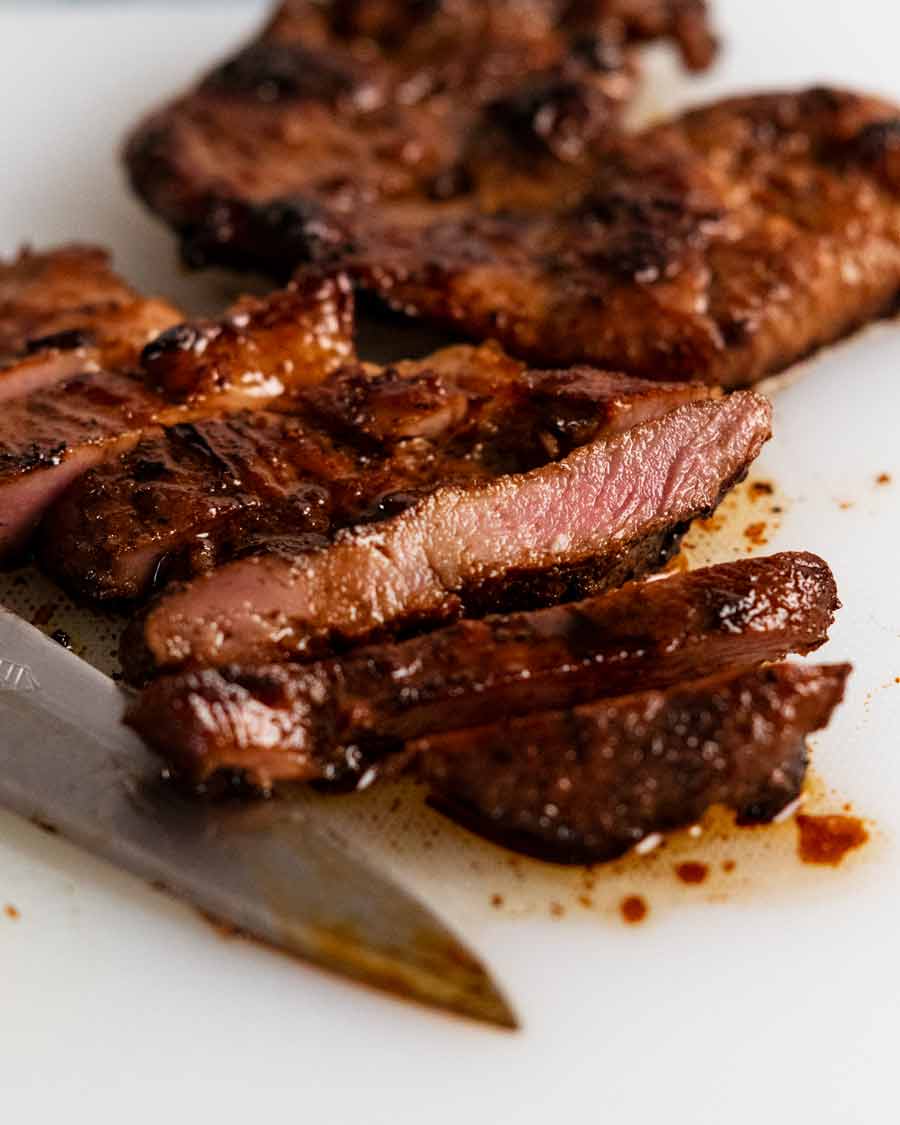
NOTE: Meat tenderised using the baking soda method will be pink inside even when it’s cooked to well done! It’s just what happens. It happens with beef too.
As mentioned above, I’ll share the Vietnamese Pork Noodle Bowls recipe on Friday (UPDATE: here it is!). But think beyond the noodle bowl! Serve it with a side of coconut rice, Vietnamese red fried rice or plain jasmine rice with a side salad. Try one of these:
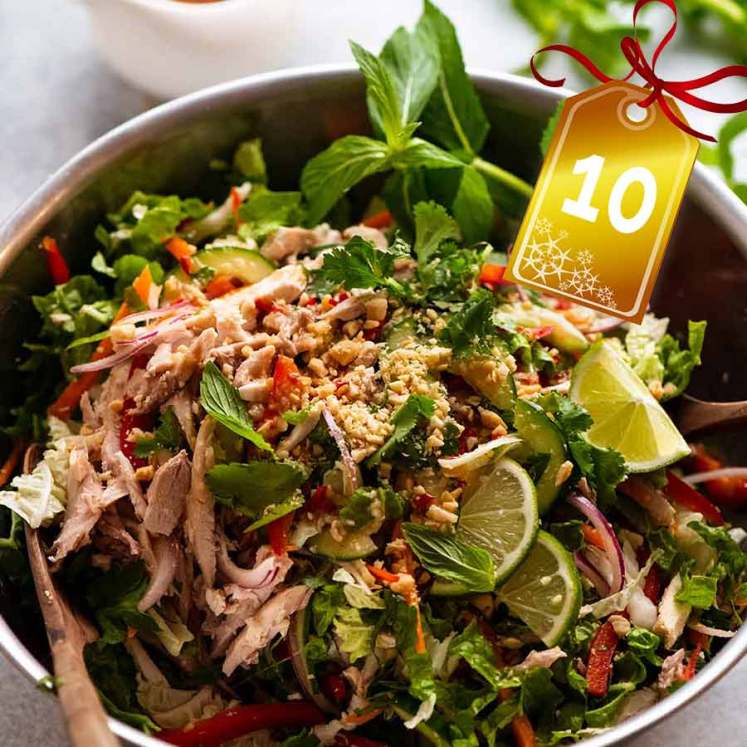
Vietnamese Chicken salad – minus the chicken
Steamed vegetables or any leafy greens drizzled with Asian Sesame Dressing
And just before I sign off, one more look at the pork noodle bowl:
It’s so good! ADORE the contrasting textures of the fresh vegetables and herbs with the flavourful marinated lemongrass pork all doused in nuoc cham, the Vietnamese chilli-garlic sauce served with “everything”.
What do you think?? Have I convinced you to give this Vietnamese pork a go? I hope so!!! If anything, it’s worth experiencing the magic of the marinade and how tender it makes pork shoulder steaks. Try it!! – Nagi x
Watch how to make it

Vietnamese Lemongrass Pork steaks (tenderised!)
Ingredients
- 500g/1 lb pork shoulder , skinless and boneless, or pork scotch (roast or steaks) (Note 1)
- 3 tbsp canola oil
Marinade:
- 2 lemongrass stalks , white part only, bruised, cut into 1 cm / 0.4″ slices on angle (Note 2)
- 4 garlic cloves , finely minced
- 4 tbsp lime juice
- 3 tbsp fish sauce
- 1 tbsp soy sauce (all purpose or light, NOT dark soy, Note 3)
- 4 tbsp brown sugar (tightly packed tablespoons)
- 3 tbsp oil (canola, vegetable, peanut)
- 3/4 tsp baking soda/bi-carb , for tenderising (Note 4)
Instructions
- Cut pork – Cut into 8 equal, thinnish slices of pork. I find it easiest using the knife on a 45° angle, but if you have the right shape piece you can just cut straight down.
- Pound each steak to 5mm / 0.2" thickness using the scary side of a meat mallet (jagged, not flat), using go-between (Note 5) or a freezer bag to avoid damaging the meat. (You can use baking paper for rolling pin or the flat side of the mallet.)
- Marinade – Mix the marinade ingredients in a bowl, it will fizz when the baking soda is added! Add pork then toss well to coat using tongs. Transfer to a ziplock bag and marinate for 24 hours.
- Remove pork from the marinade and brush off the lemongrass pieces. Discard marinade – it's done its job!
- Cook – Heat a cast iron skillet over high heat until you see wisps of smoke. Add 1 1/2 tbsp oil, then cook half the pork for 1 1/2 minutes on one side and 1 minute on the other side until nicely charred. Remove onto a plate. Scrape pan clean of loose black bits then cook the remaining pork.
- Serve! Make Pork Noodle Bowls (bun thit nuong) or serve with rice and a side salad – see note 6 and in post for suggestions!
- NOTE – The thin pork steaks are beyond well done in 2 1/2 minutes but it doesn't matter because the baking soda keeps them tender. It will be blushing pink inside due to the baking soda (same happens with beef). You could cook them for another 5 minutes and they will still be tender inside. Miracle!
Notes
- Vietnamese Chicken salad – minus the chicken
- Asian Slaw
- Chang’s Crispy Noodle Cabbage Salad
- Asian Side Salad
- Steamed vegetables or any leafy greens drizzled with Asian Sesame Dressing
Nutrition
I adore Vietnamese food!
See?


Life of Dozer
When Dozer was in the paper over the Easter break. Specifically, the Good Weekend Magazine!
If you wish to continue to believe I’m an innocent angel, please do not read the article.

The post Vietnamese lemongrass pork steaks appeared first on RecipeTin Eats.
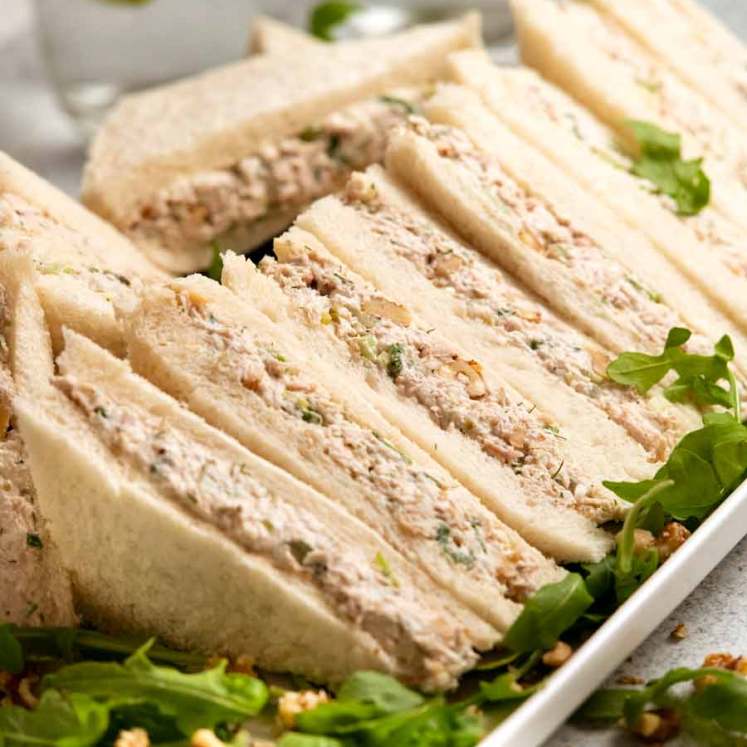
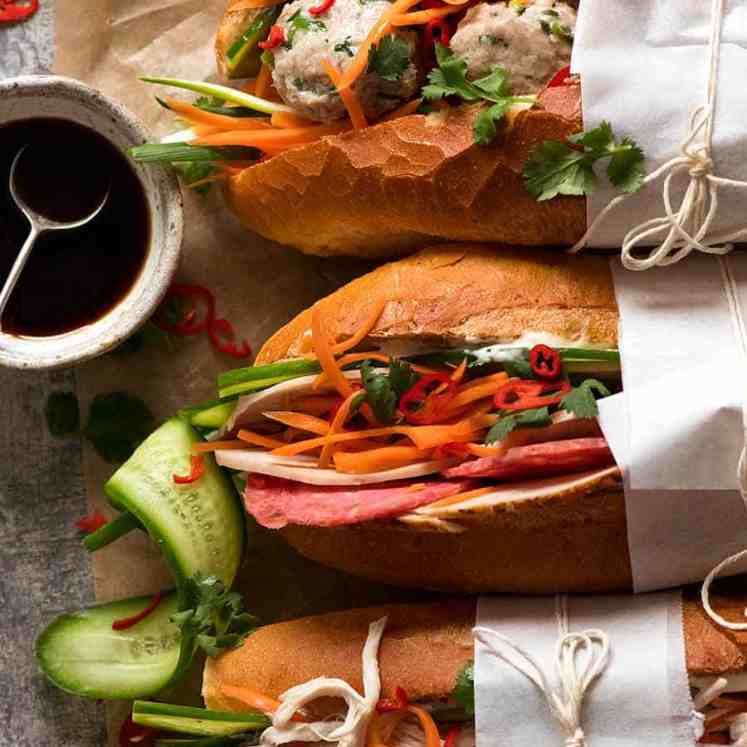
]]> Chicken Banh Mi is the much-loved chicken variety of the classic Vietnamese Banh Mi sandwich. It has all the familiar flavours of Banh Mi – pate, mayo, fresh herbs and pickled vegetables – but instead of mystery pink meat slices, it’s made with chicken! Fabulously effortless. Chicken Banh Mi Banh Mi is a meat filled... Get the Recipe
The post Chicken Banh Mi (Vietnamese sandwich) appeared first on RecipeTin Eats.
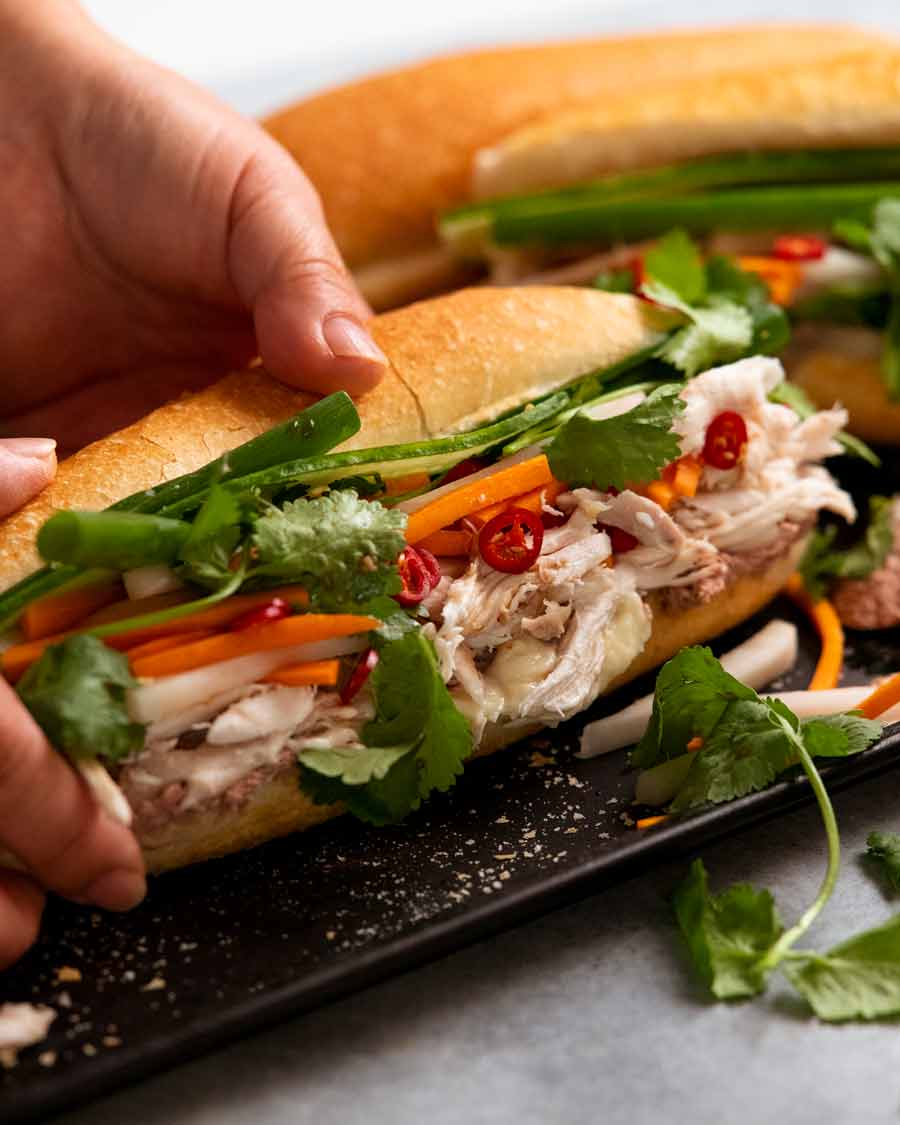
]]>Chicken Banh Mi is the much-loved chicken variety of the classic Vietnamese Banh Mi sandwich. It has all the familiar flavours of Banh Mi – pate, mayo, fresh herbs and pickled vegetables – but instead of mystery pink meat slices, it’s made with chicken! Fabulously effortless.
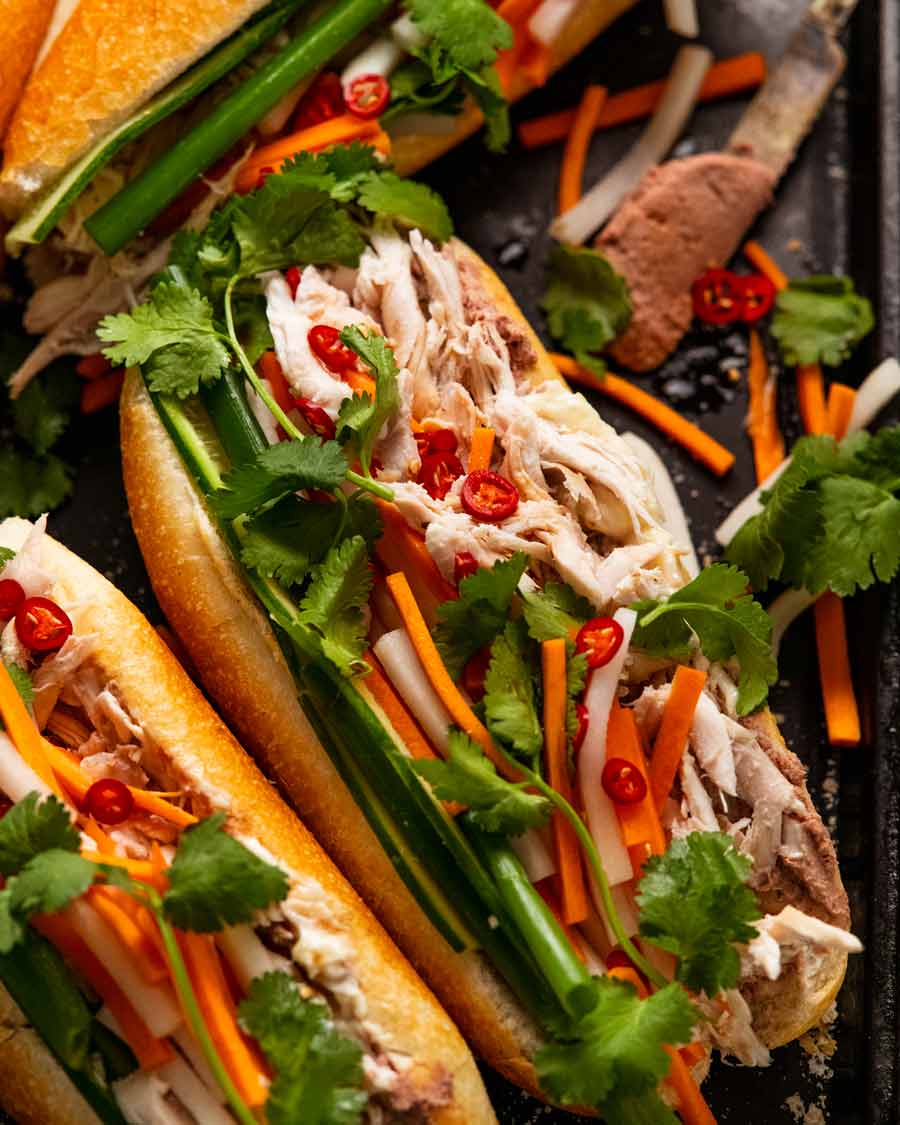
Chicken Banh Mi
Banh Mi is a meat filled French baguette sandwich stuffed with Asian flavours. Born from the time of France’s occupation of Vietnam, I imagine the French just couldn’t cope without crusty bread so they introduced baguettes to the Vietnamese and the Vietnamese filled it with their meats and herbs and voila! The now-world-famous Banh Mi was born.
While Vietnamese locals love the classic mystery-meat-pork-cold-cuts version, there are all sorts of other varieties across Vietnam and around the world these days. Grilled meats, beef, chicken, meatballs, egg, sausage, BBQ pork, fish, egg, to name a few.
Today, I’m sharing a shredded chicken version which is very popular among Sydney locals who remain suspicious of the mystery pink cold-cut slices!!
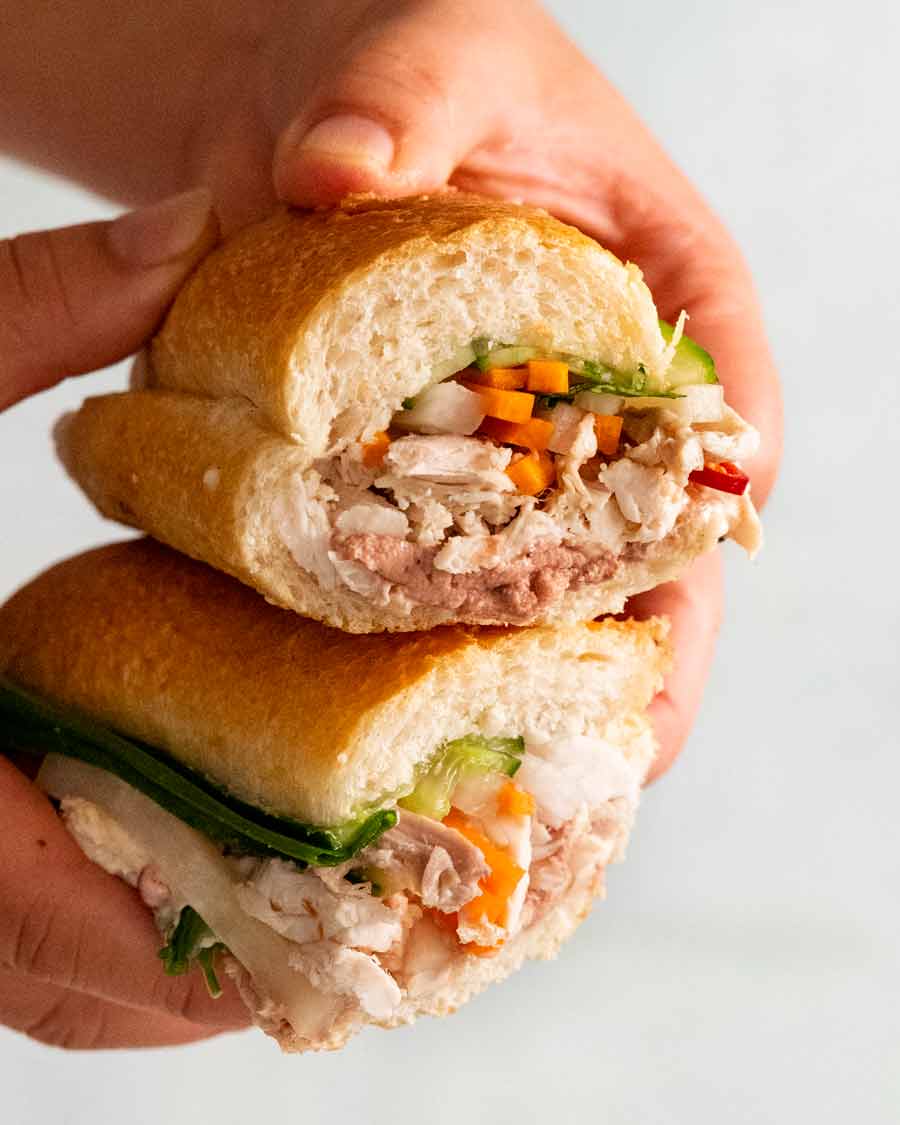
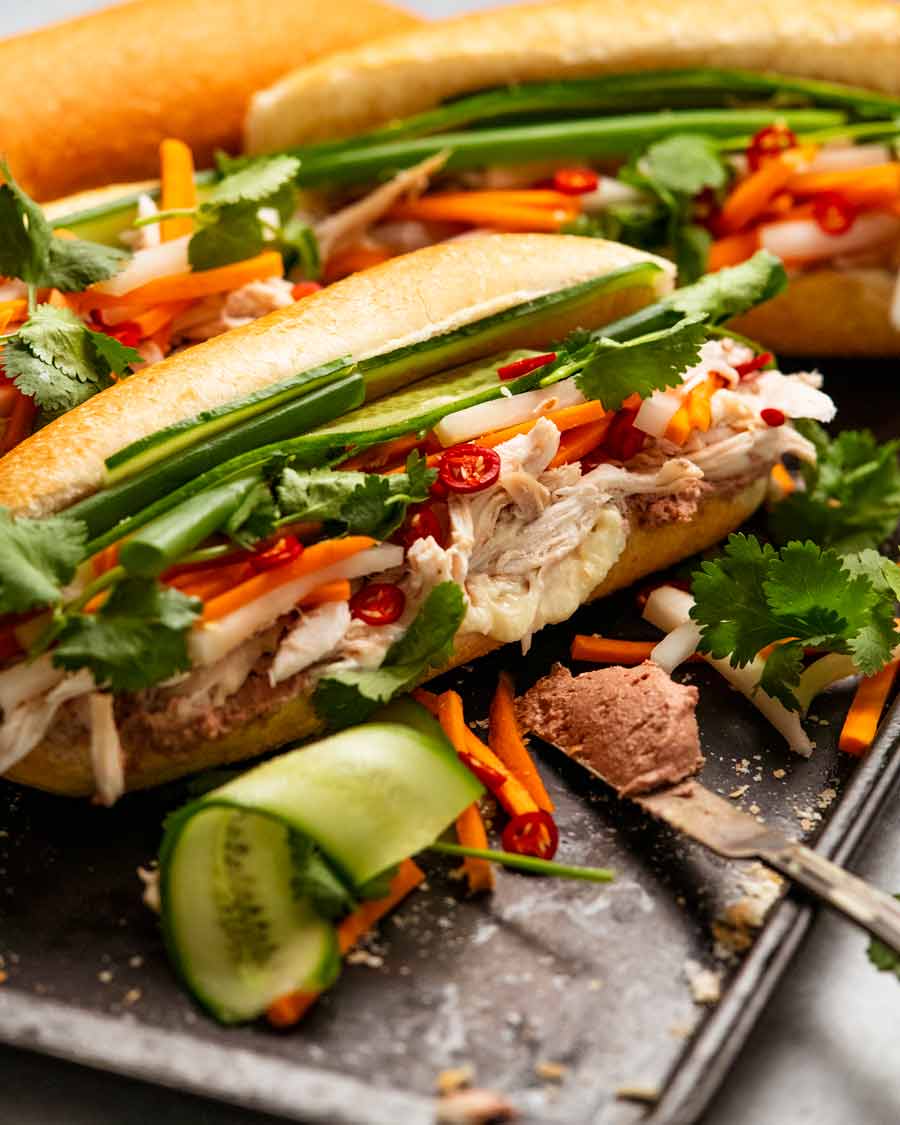
One tip: Stuff generously. The photo is above is how it looks when squished. Look how full it is before I picked it up. ⬇️ The motto here – don’t skimp on fillings!!!
Ingredients in chicken banh mi
Any sandwich is the sum of its parts, and it holds extra true for Banh Mi. Each ingredient in isolation is not extraordinary. The combination sounds odd, for for Banh Mi first timers. But one bite is all it will take to get you jumping onto the Banh Mi train!
The baguette
Use a standard crusty white baguette, not a fancy artisan one like sourdough as they are too chewy. The best baguettes used by the most popular Banh Mi vendors in Vietnam have delicate crispy crusts and fluffy soft insides.
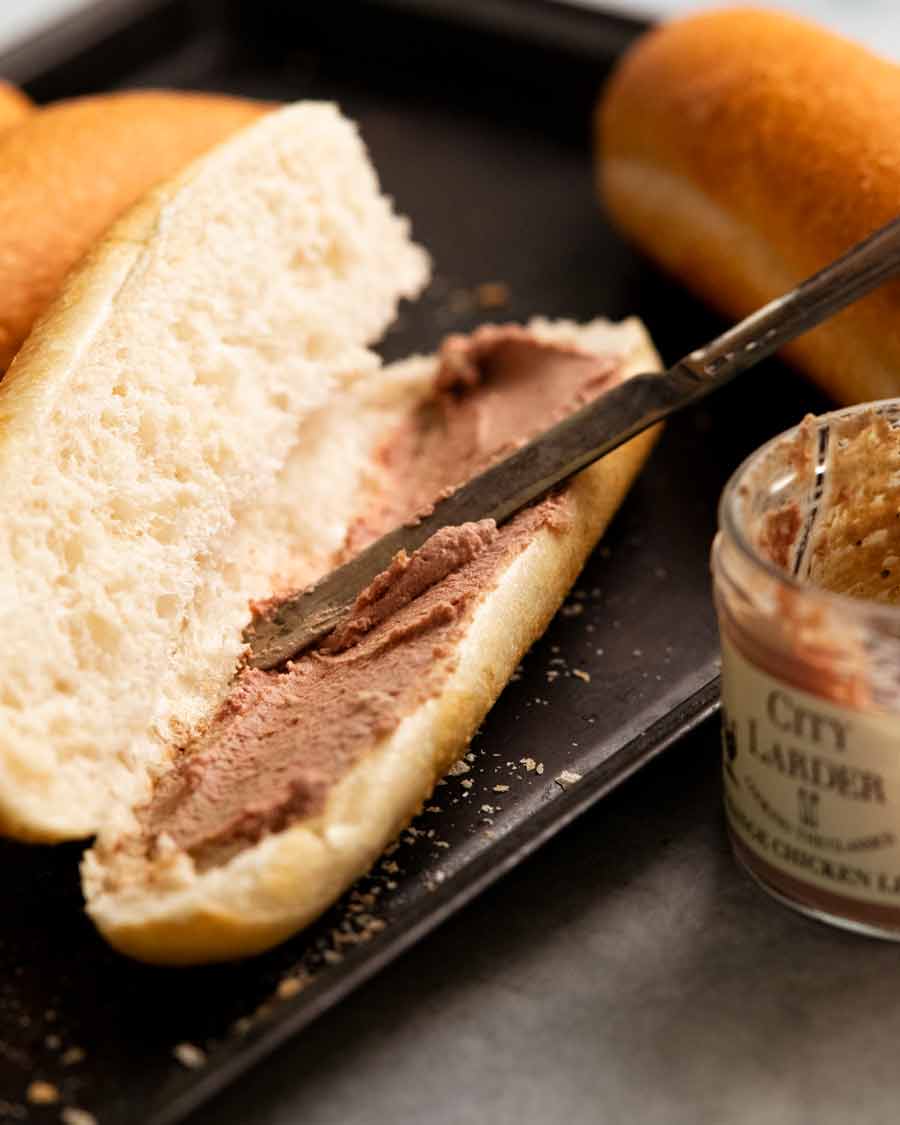
If your baguette is not as crusty as you’d like, just pop it in the oven for a few minutes to crisp up. (I do this because it’s just not a proper Banh Mi unless the crust is crispy!)
Stuff inside
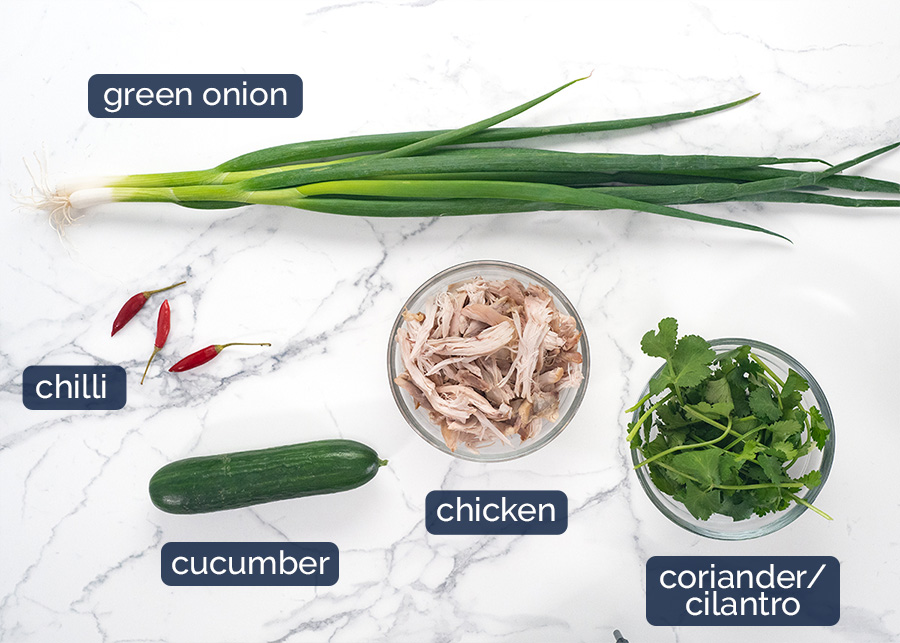
Chicken – I just use a store bought roast chicken for convenience. You could also make your own. Either use a plain brined roast chicken (so the flesh will be seasoned) or poach chicken breast then use a bit of extra Maggi Seasoning.
The amount of chicken you use will depend on the size of your baguette. You can really be as generous as you want. I’m pretty generous!
Grilled lemongrass chicken – There’s also varieties of chicken Banh Mi made with grilled marinated chicken. If that’s what you’re after, use the chicken in this Lemongrass chicken recipe, cut it into slices and use in place of the shredded chicken. Skip the Maggi seasoning, you won’t need it.
Green onion – You need 2 to 3 pieces that are about as long as your bread roll for each Banh Mi.
Cucumber – You will need 2 thin slices (cut lengthwise) for each Banh Mi. 1 cucumber should be enough.
Fresh chilli – Either birds eye chilli (popular ones here in Australia) or Thai red chilli. Anything red and fiery. It’s all part of a great Banh Mi!
Quick pickled vegetables
This is one of the things that makes Banh Mi so special – the crunch of pickled carrot and daikon. It’s so good!! Don’t even think about skipping this. If you can’t find daikon (white radish), just double up on carrot.
Carrot and daikon (white radish) – These are the two pickled vegetables most commonly used in Banh Mi. They are cut into thin batons so you get a terrific crunch (albeit pickled-softened-crunch!) when you bite in them.
Don’t be tempted to shortcut cutting the vegetables by using a box grater. I tried (the lazy cook in me couldn’t resist) – and it just wasn’t the same. A big vinegary pile of coleslaw-like mush. I missed the crunch!
Rice wine vinegar – This is the vinegar used for the pickled vegetables, an Asian vinegar made from rice. Substitute with apple cider vinegar.
Salt and sugar – For pickling. These pickled vegetables are a bit sweet and bit salty, nice balance between the two.
Spreads and sauces
“It’s not a Banh Mi without pate!” she declares vehemently.
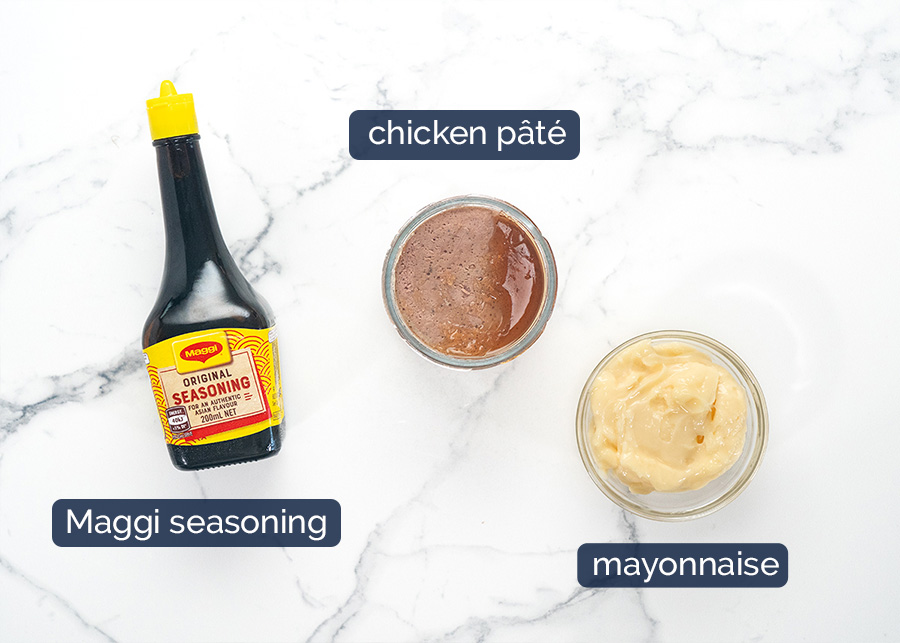
Maggi Seasoning – This is basically like a soy sauce but with more flavour. No, not MSG!
While some Banh Mi vendors make their own secret sauce, this is the most common sauce used straight out of the bottle. Find it in the Asian or sauce aisle at large grocery stores here in Australia.
Pate – Chicken pate is on theme here though you can use any pate you want. While you’re most welcome to go ahead and indulge in expensive pate, there’s actually no need. With so much other stuff going on in this sandwich, no one’s going to know if you used a budget pate or a premium one!
Mayonnaise – Whole egg mayonnaise or Japanese Kewpie mayonnaise please. I don’t use other types of mayonnaise (too vinegary or too sweet).
How to make a chicken banh mi
Making any type of Banh Mi is just about the order in which you layer. Rich and creamy on the bottom, topped with meaty then finished with fresh.

Split the baguette in half but don’t cut it all the way through.
Butter – Spread butter on the lid of the baguette.
Pate and mayo – Spread pate then mayonnaise on the base of the baguette. Don’t skimp – the most popular Banh Mi joints in Vietnam are always the ones that are most generous with the pate!!
Chicken and sauce – Top with shredded chicken then drizzle with Maggi Seasoning, the secret Banh Mi sauce!
Vegetables & herbs – Stuff in a generous amount of pickled carrot and daikon, layer 2 slices of cucumber then stuff with 2 to 3 green onion stems and a few sprigs of coriander.
Chilli – Lastly, sprinkle with as much fresh chilli as you dare, then devour!
Go hard with the chilli! Little pops of fresh chilli buried amongst the freshness of pickled vegetables is a signature characteristic of Banh Mi so don’t be shy with the chilli! In fact, try it the other way. Be brave, go hard, then if it’s too much for you, just pick ’em out!!
And there you have it. The chicken version of the infamous Banh Mi, filled with flavours like you’ll never experience in a Western sandwich! That combination of the fresh herbs and pickled vegetables with the smear of rich creamy pate and mayonnaise is stellar. It works with many proteins, but using chicken is an easy option if you just use a store bought roast chicken like I do.
If you’re new the world of Banh Mi, this is a good one to start with. Hope you give it a go! – Nagi x
Watch how to make it

Chicken banh mi (Vietnamese sandwich)
Don't skip the pickled vegetables. They totally make it.For lemongrass grilled chicken, use the chicken in this recipe in place of the shredded chicken, and skip the Maggi seasoning.Ingredients
Pickled vegetables:
- 2 medium carrots , peeled cut into 2-3mm / 1/10″ batons (Note 1)
- 1/2 large white radish (daikon), peeled, cut the same as carrots (Note 1)
- 1 1/2 cups boiling water
- 1/2 cup white sugar
- 4 tsp cooking / kosher salt
- 3/4 cup rice wine vinegar (sub apple cider vinegar)
Banh Mi:
- 4 crusty white rolls ~ 20cm/8" (Note 2)
- 2 – 3 tbsp salted butter
- 120g/ 4 oz chicken pate (or other pate of choice)
- 4 tbsp whole egg mayonnaise or Kewpie
- 4 cups (400g/ 14oz) shredded chicken (1 small store bought or homemade brined roast chicken, or poached breast)
- 2 – 3 green onion stems , cut to bread roll length (3 pieces per Banh Mi)
- 1 cucumber , thinly sliced lengthwise (2 slices per Banh Mi)
- 1 1/2 cups (lightly packed) coriander/cilantro sprigs
- 1/4 tsp Maggi seasoning per Banh Mi (Note 3)
- 2 – 3 birds eye or Thai red chilli , finely sliced
Instructions
Pickled vegetables:
- Pickle – In a large bowl, dissolve the salt and sugar in the hot water. Stir in vinegar. Add carrots and daikon – they should just about be covered.
- 2 hours – Leave for 2 hours until slightly floppy. Drain well then use per recipe.
Banh Mi:
- Split the bread roll in half but don't cut all the way through.
- Butter – Spread the lid with butter.
- Pate then mayo – Spread the base with 1 to 2 tablespoons pate (be generous!), then 1 1/2 tbsp mayonnaise.
- Chicken & Maggi – Pile on shredded chicken, drizzle with 1/4 tsp Maggi seasoning (you can always add more later).
- Fresh stuff! Stuff with pickled vegetables, 2 slices of cucumber, 3 slices of green onion and coriander. Finally, sprinkle with as much chilli as you dare. Jam the lid down and devour!
Notes
Nutrition
I love a good sandwich.
And there’s more coming soon!


Life of Dozer
He was squinting in the sun….

Now I’m squinting in the sun….

The post Chicken Banh Mi (Vietnamese sandwich) appeared first on RecipeTin Eats.
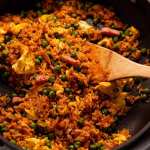
]]>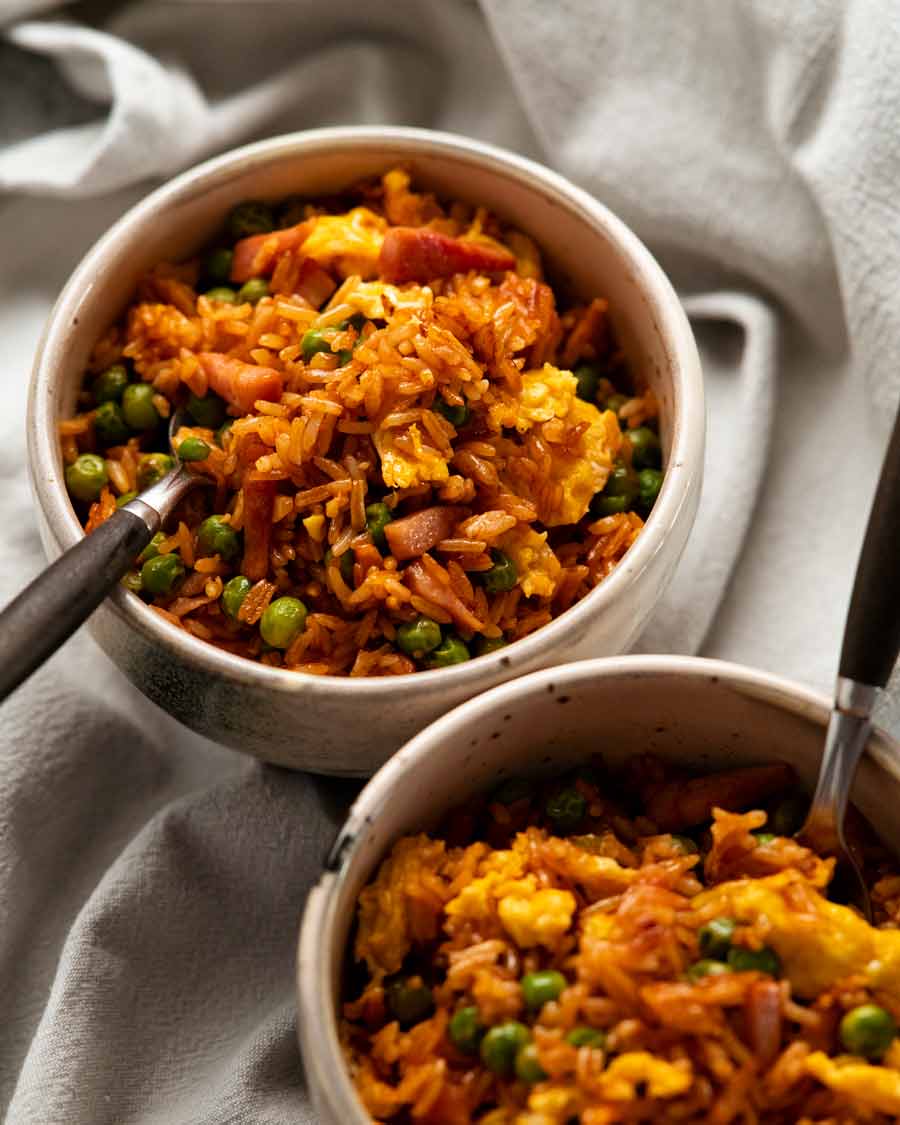 This is the fried rice version of traditional Vietnamese red rice, a plain tomato rice made by steaming in a pot. I added ham, peas and egg to turn it into a quick and easy meal. Frying up the tomato rice with garlic adds extra flavour which is on point! Red Vietnamese Fried Rice Fried... Get the Recipe
The post Red Vietnamese Fried Rice appeared first on RecipeTin Eats.
]]>This is the fried rice version of traditional Vietnamese red rice, a plain tomato rice made by steaming in a pot. I added ham, peas and egg to turn it into a quick and easy meal. Frying up the tomato rice with garlic adds extra flavour which is on point!
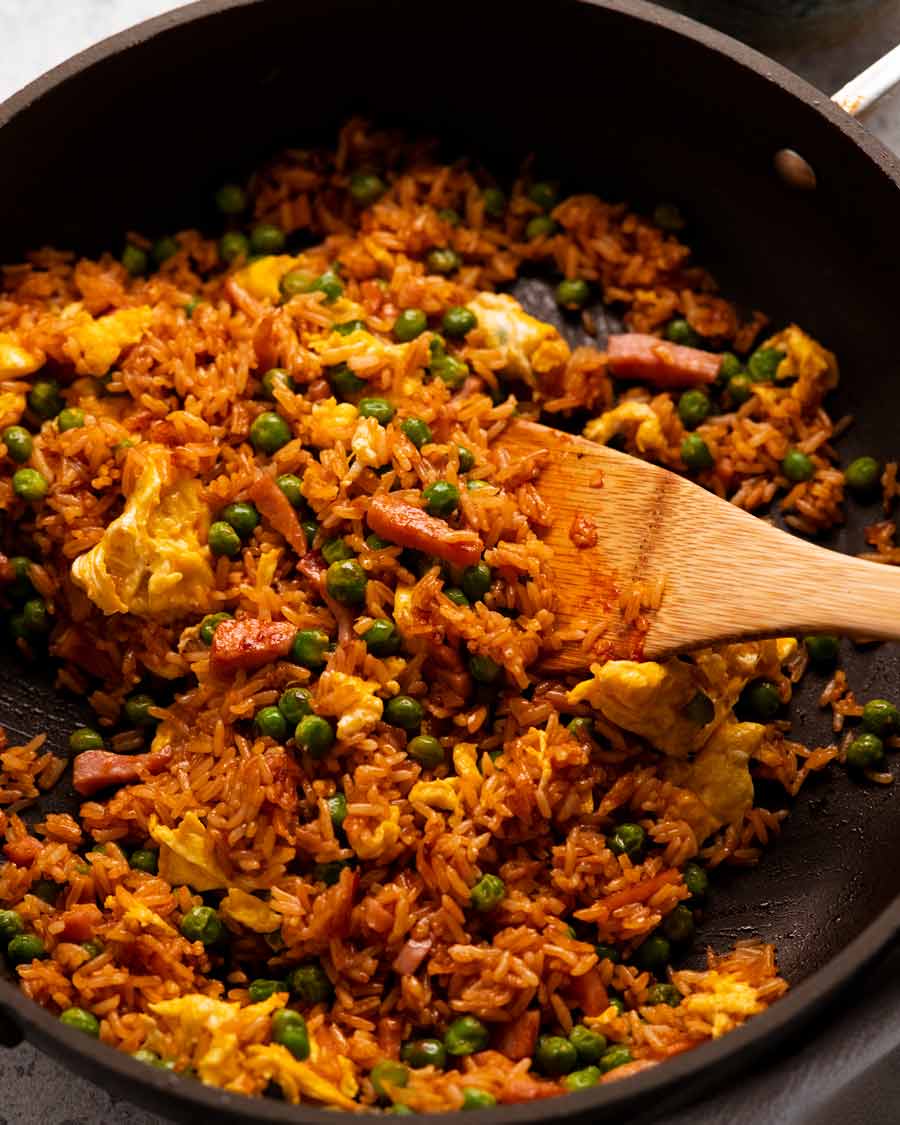
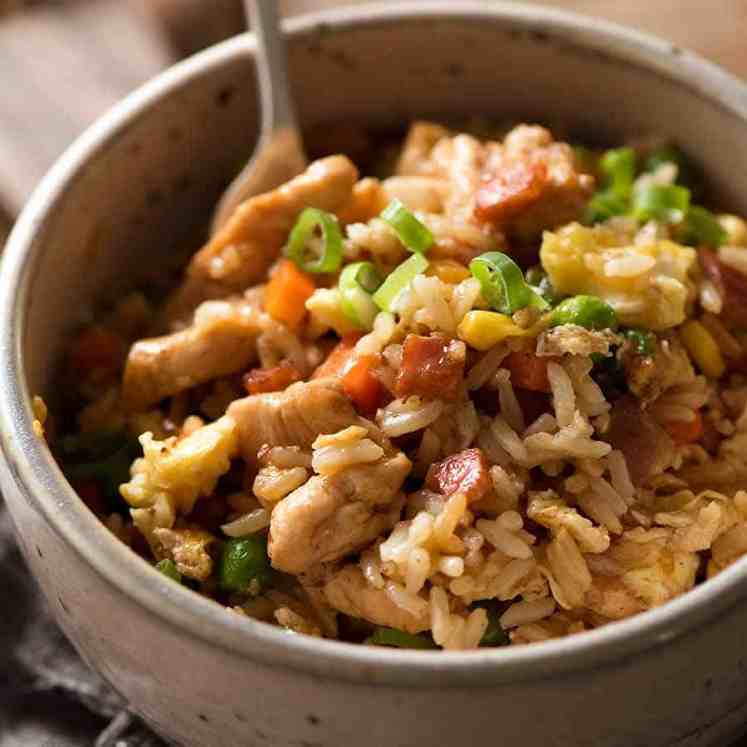
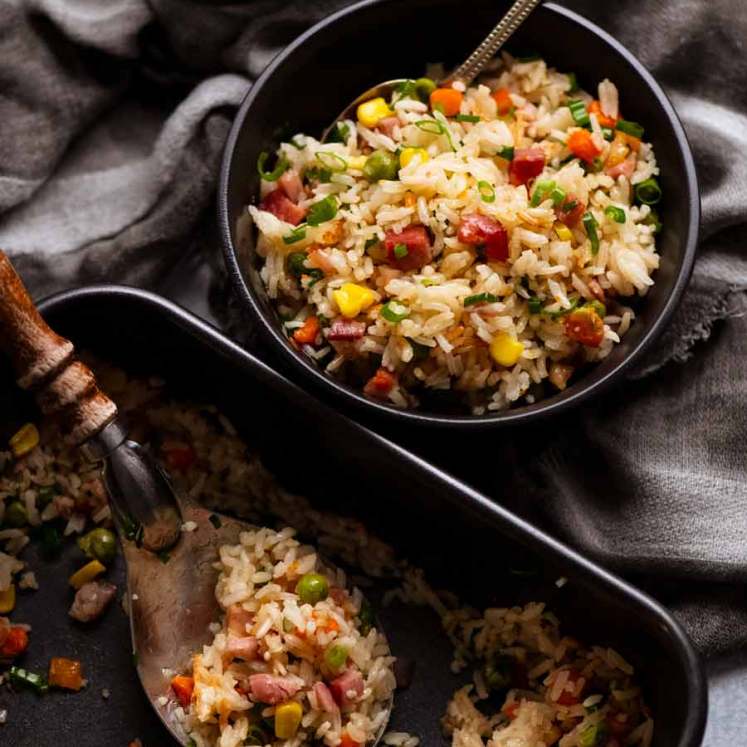
Red Vietnamese Fried Rice
Fried rice always makes for a great quick meal if you can incorporate enough “stuff” into it to fill it out from a nutrition perspective so you can justify calling it “dinner” rather than just a side dish. Today we’re turning to frozen peas, pre-chopped ham and egg for literal no-effort, no-prep add-ins to make this tasty dish I’ve called Red Vietnamese Fried Rice.
In case I wasn’t clear about it in the opening, this is not an authentic Vietnamese recipe! At least, not to my knowledge. It is based on a traditional Vietnamese dish, Red Rice, which is a tomato-flavoured rice served with meats and other mains, somewhat like Mexican Red Rice. I have always loved the flavour but I wanted to turn Vietnamese Red Rice into a more substantial, can-be-a-standalone meal. So I thought I’d spin it into a fried rice dish, and here it is!
What you need
Here’s what you need to make this quick meal.
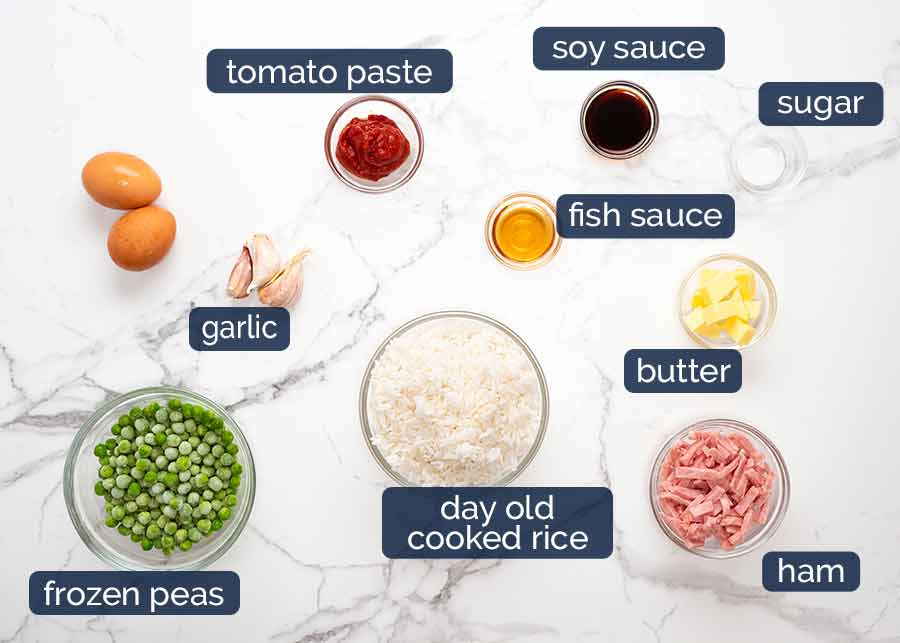
Day-old cooked rice – Cooked rice refrigerated overnight or frozen cooked rice (thawed) is best for all fried rice recipes to get the the right texture. Freshly cooked rice is too moist and your fried rice will clump and become sticky. The taste is fine, but the texture is not ideal! Tip of the day: I always have bags of frozen cooked rice in the freezer for this purpose. I get the jitters if I’m out!
If it’s an emergency and you’re all out of day-old cooked rice (it happens): Cook rice of choice, spread out on a tray to rapid cool on counter. Then refrigerate for as long as you can until cooled.
Rice type: I’ve used jasmine rice which is popular in Vietnamese cooking. However, any plain cooked rice can be used (white, brown, basmati).
Tomato paste – For the tomato flavour and red colour.
Ham (or bacon) – I use pre-chopped ham bits for convenience (being that this is a quick meal) and also because I like that they are chunkier than chopped sliced deli ham.
Fish sauce – The soy sauce of Vietnam! It has a more complex, deep flavour than soy sauce. It smells pungent on its own but when cooked out what remains is a delicious and incomparable savoury flavour. Having said that, I did find that using just fish sauce for the seasoning was a bit fishy even for my taste so I’ve used a combination of half fish sauce, half soy sauce.
Soy sauce – As mentioned above, I found using a combination of fish sauce and soy sauce works best for this dish. Use light soy sauce or all-purpose soy sauce, not dark soy sauce, which is too intense and will overwhelm the dish. More on different soy sauces and when to use which here.
Butter – My fat of choice; more flavour than using plain ol’ boring oil! If you’re thinking, “butter isn’t an authentic ingredient in Asian cooking!!!”, don’t forget Vietnam was once colonised by France, the land of bread and butter! (Banh Mi is another tasty legacy of the French occupation)
Garlic – I doubt you’ll ever see a fried rice recipe on my website that doesn’t include garlic!
Eggs – To get some extra protein into this dish, and because soft golden curds of scrambled egg littered through red rice both looks and tastes great.
Frozen peas – Some veg and colour! Feel free to substitute with any chopped vegetables you like (eg. carrot, corn, zucchini) or throw in a handful of quick-cooking leafy greens (baby spinach, kale, cabbage).
How to make Red Vietnamese Fried Rice
Use a nice big pan to give yourself plenty of space for tossing the rice with abandon so you can get nice caramelisation on the rice. It also makes it easier to shove the rice to one side to make room for scrambling the eggs in the pan without interference.
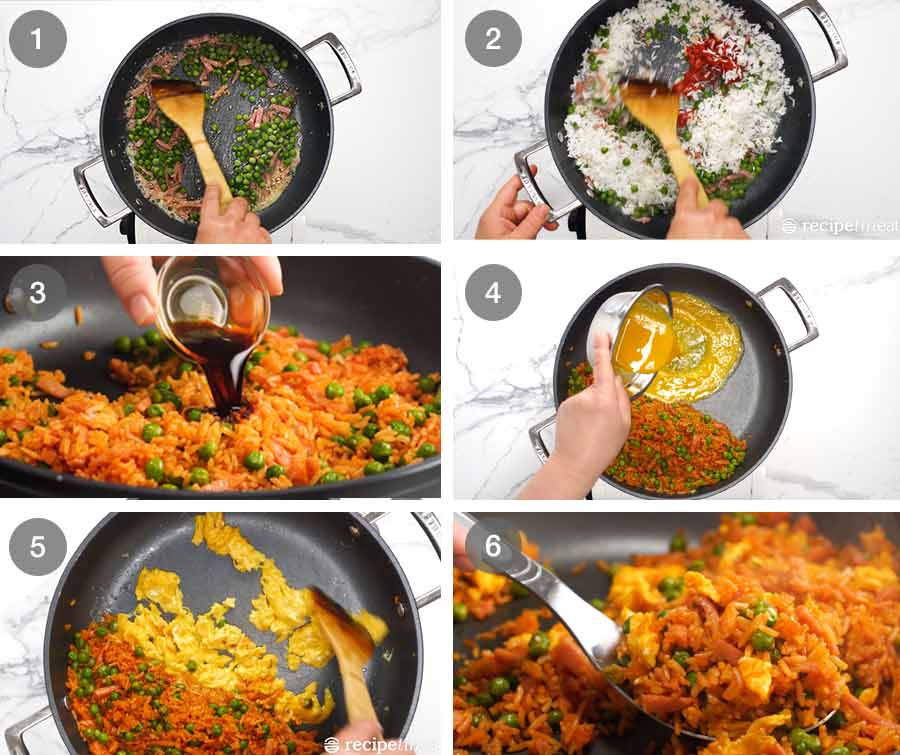
Aromatics and ham – Melt the butter and start by sautéing the garlic for just 10 seconds to flavour the butter, but don’t let the garlic go golden yet. Next, add the ham and cook for 30 seconds. Now add the peas (still frozen is fine) and cook for another 30 seconds. By this time, the garlic should have turned almost golden and the ham will also be on its way to getting some nice colour on it.
Rice and tomato – Next add the tomato paste and rice. Cook them for 2 minutes to cook out the raw flavour from the tomato paste. Meanwhile your ham will have nicely bronzed.
Seasonings – Add the fish sauce, soy and sugar and cook for a further 1 minute until the rice starts to caramelise. Don’t shortcut this step – caramelisation = extra flavour!
Scramble eggs – Scrape the rice to one side of the pan. Melt a bit of extra butter (literally just 1 teaspoon is enough) in the cleared space, pour in the eggs and scramble them. With the heat of the pan this will take just 1 minute or so.
Toss the cooked eggs through the rice.
Done! That’s it, you’re done. Time to eat!
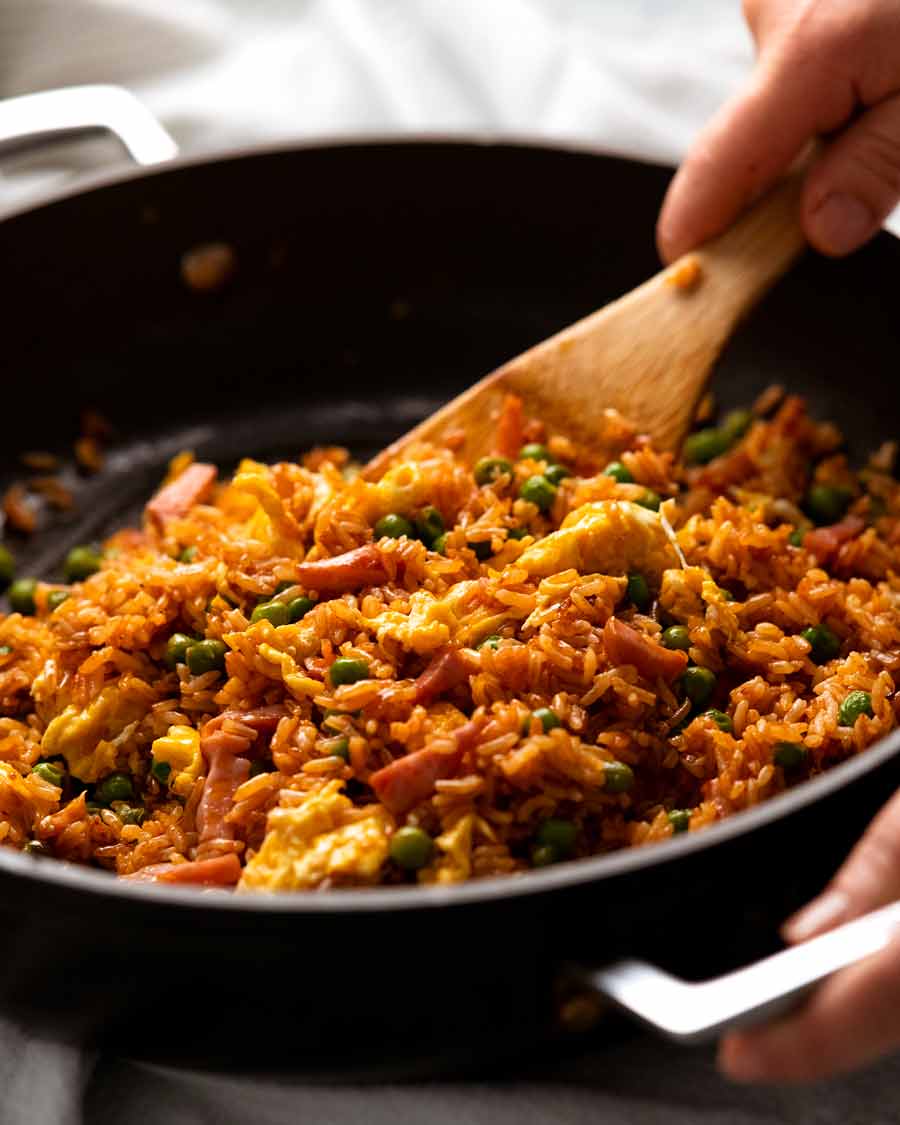
Serve as a meal – or a side
I’ve been making this for myself as a quick lunch but it would also make a great side for a Vietnamese or Asian spread. Sometimes I also throw in a handful of bean sprouts and finely sliced cabbage to freshen things and kick up the vegetable quotient of my bowl. It’s a pretty flexible dish in this regard, though you don’t want to go overboard lest you dilute the flavours. Because we can’t have that!
I hope you give it a go. Let me know what you think if you do! And don’t forget my tip of the day: keep bags of cooked plain rice in your freezer. It’s super handy to have rice on cue to serve with all your stir fries or (more relevantly to today’s recipe) to make a quick fried rice on demand, whether this Vietnamese fried rice or any of my other ones! – Nagi x
Watch how to make it
Red Vietnamese Fried Rice
Ingredients
- 30g / 2 tbsp unsalted butter
- 3 garlic cloves , finely minced
- 1/2 cup diced ham (I use pre-chopped, Note 1)
- 1 cup frozen peas
- 2 1/2 cups day-old cooked jasmine rice (Note 2)
- 2 tbsp tomato paste
- 2 tsp fish sauce (Note 3)
- 2 tsp soy sauce (all purpose or light, not dark soy, Note 4)
- 1/4 tsp white sugar
- 2 eggs , whisked
Instructions
- Melt most of the butter in a large non-stick skillet over high heat (save a dab for scrambling eggs).
- Add garlic, cook for 10 seconds.
- Add ham, stir for 30 seconds.
- Add peas, stir for 30 seconds.
- Rice and tomato paste – Add rice and tomato paste, cook for 2 minutes.
- Sauces – Add fish sauce, soy and sugar, cook 1 minute to get a bit of nice caramelisation on the tomatoey rice.
- Scramble eggs – Push rice to one side of the pan. In the cleared space, melt reserved butter then pour in the egg and scramble until just set.
- Serve – Toss cooked egg through the rice. Serve!
Notes
)
4. Soy sauce – Light or all-purpose soy sauce. Not dark soy, it’s too strong!Nutrition
Love fried rice? Me too!
Life of Dozer
When my foot warmer fell asleep on my feet warmers!

The post Red Vietnamese Fried Rice appeared first on RecipeTin Eats.
]]>