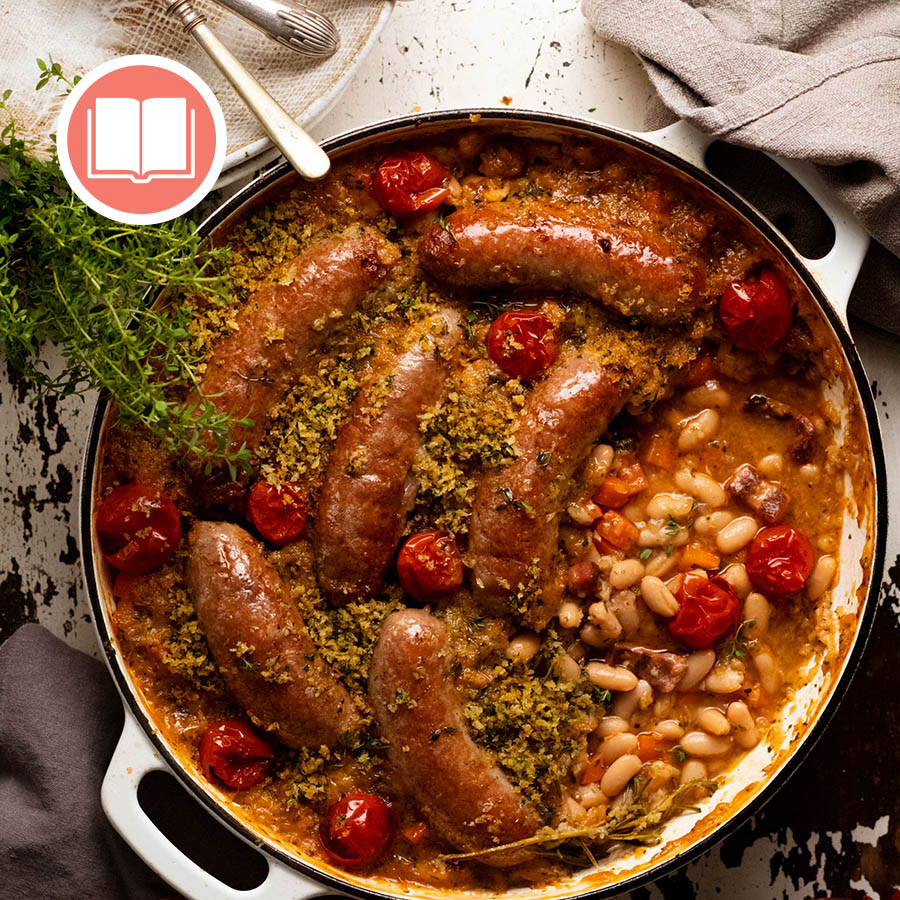
 This is a simplified take on cassoulet, the famous French bean casserole. I keep the sausage but skip the confit duck, and affectionately dub it ‘Poor Man’s Cassoulet’. One bite though and you’ll know there’s nothing poor about this dish. Find this recipe on page 153 of Dinner.
The post French Sausage & Bean Casserole appeared first on RecipeTin Eats.
]]>This is a simplified take on cassoulet, the famous French bean casserole. I keep the sausage but skip the confit duck, and affectionately dub it ‘Poor Man’s Cassoulet’. One bite though and you’ll know there’s nothing poor about this dish.
Find this recipe on page 153 of Dinner.
This is a cookbook exclusive recipe!
This recipe is exclusive to my debut cookbook Dinner which includes a how-to video for every recipe. Just scan the QR code!
Just to explain….
I know, it’s confusing! You’re so used to getting recipes on my website – there’s over 1,200 of them, after all. And here you are looking at a tasty recipe video and I haven’t provided the recipe. 🙀
I’m not just doing this to torture you, I promise.
This page exists to display the how-to video for this recipe which I exclusively created for my debut cookbook, Dinner. Every recipe in the cookbook has a tutorial video. To watch it, you simply scan the QR code with your phone or tablet and it will take you straight to the recipe video like the one shown above!
Curious about my cookbook?
Read the cookbook overview
Browse all cookbook exclusive recipes here
Read the Cookbook Tales. Spoiler alert: there’s A LOT of dirty dishes!! And quite a lot of Dozer. 😂
Stay tuned for more on this page! Some cookbook exclusive recipes will have extra information added as well as extra tips. I am also looking at enabling comments for selected recipes so I can answer reader questions about cookbook recipes. I’m just a little snowed under during this launch period – book tours, getting 131 recipe videos out, launching the book overseas. Please bear with me! – Nagi x (10 October 2022)
The post French Sausage & Bean Casserole appeared first on RecipeTin Eats.
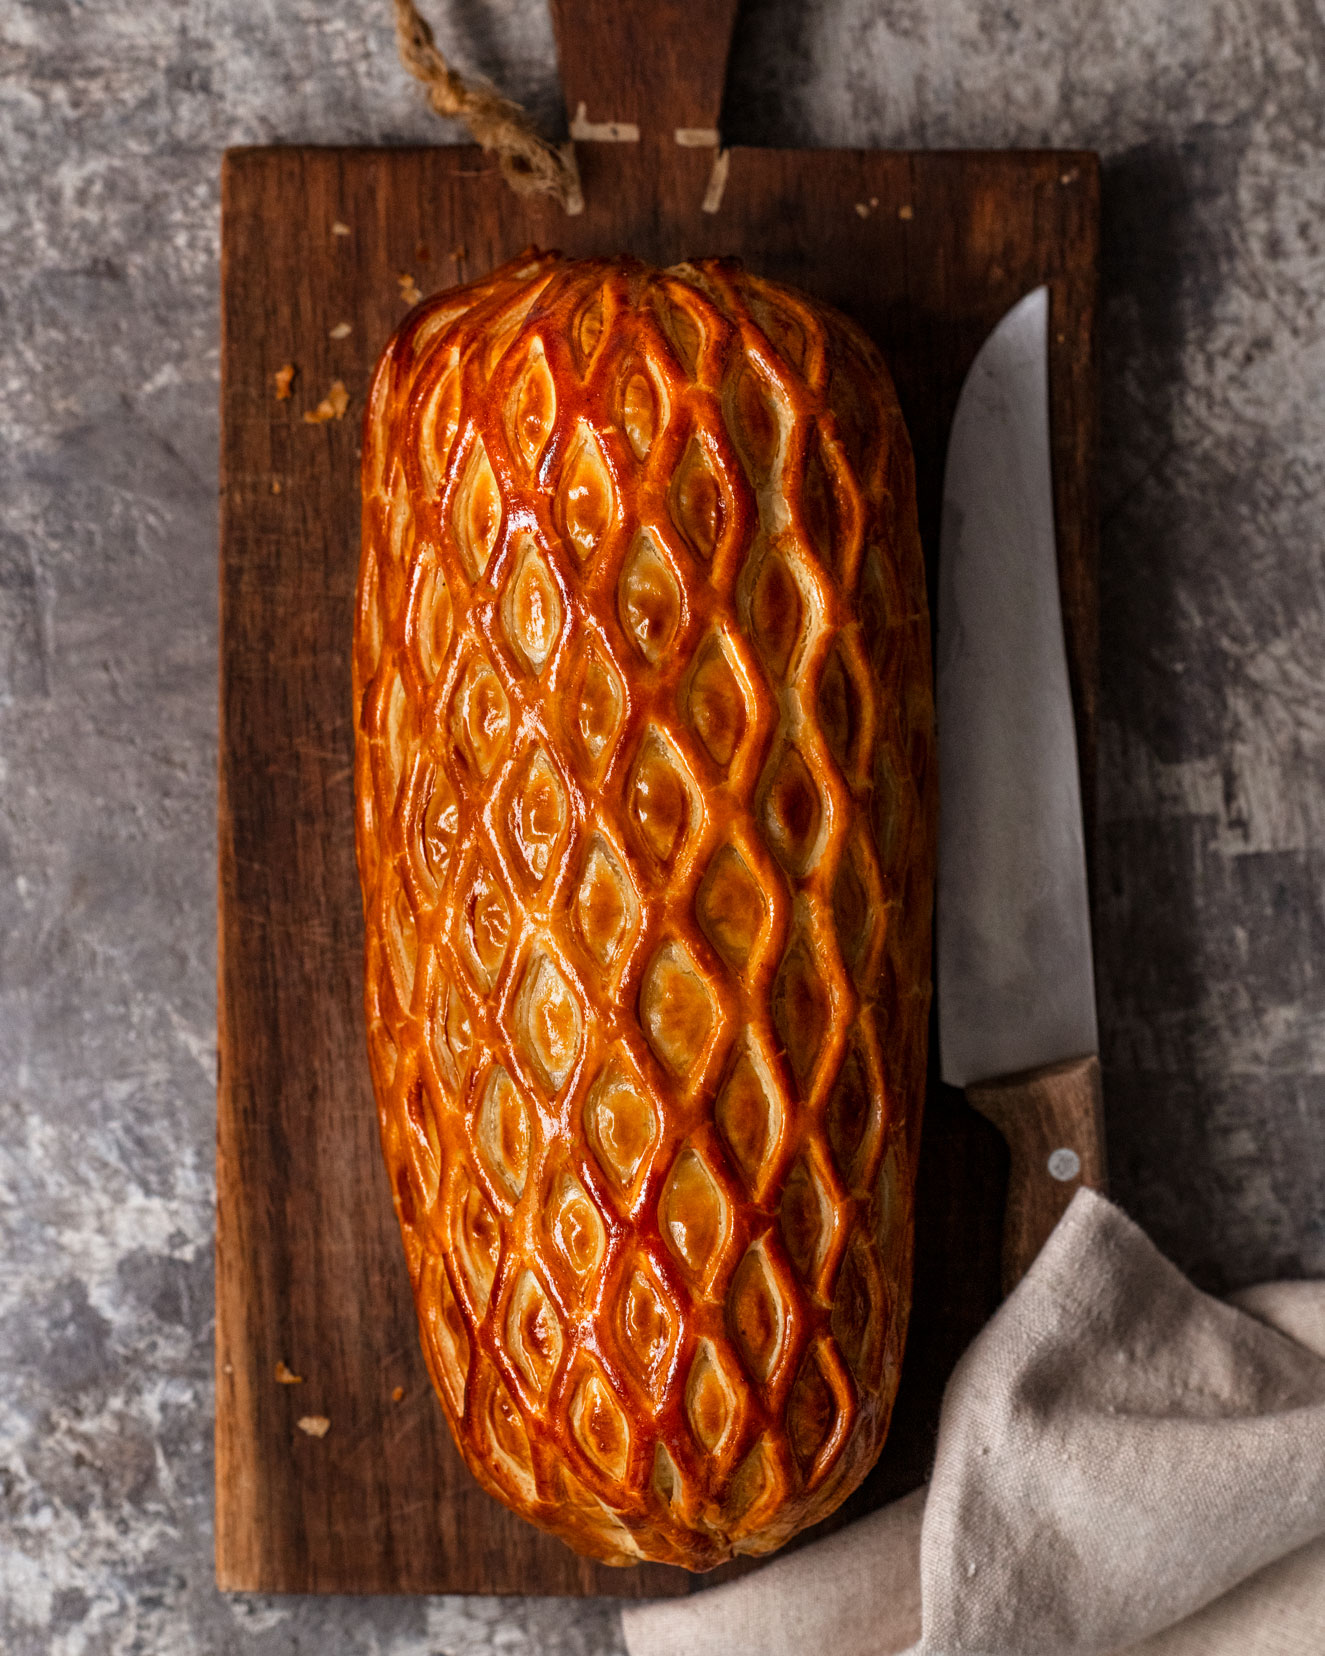
]]>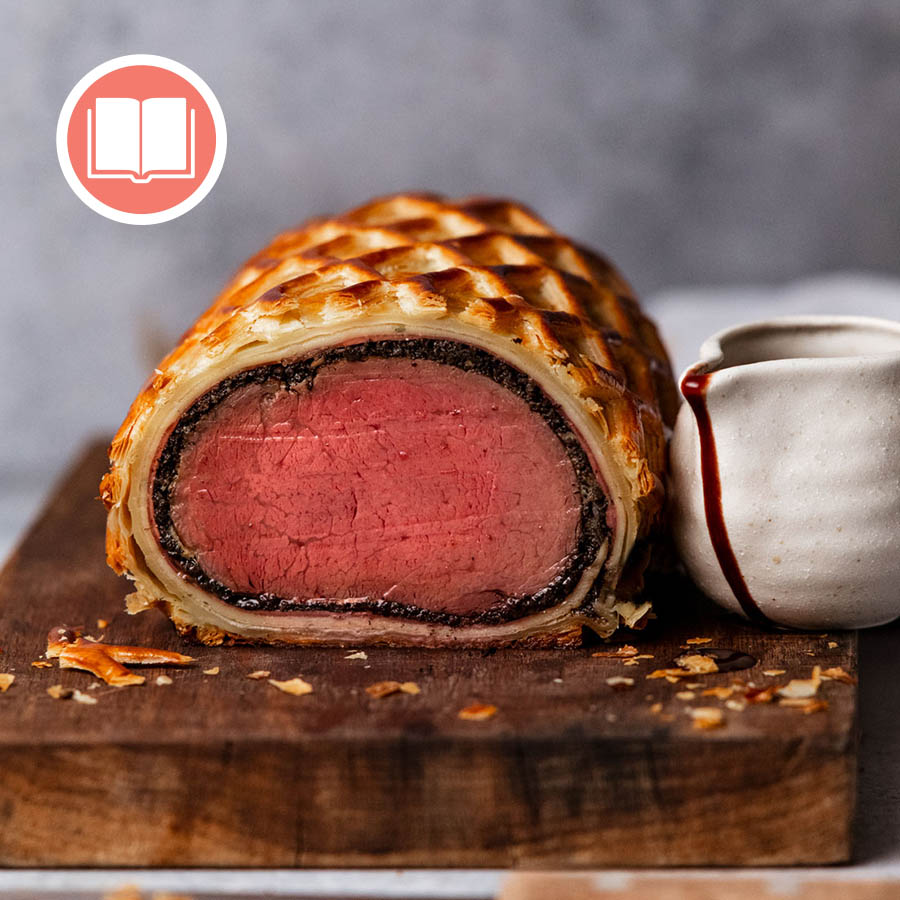 It took loads of attempts but I’m proud to say I’ve finally cracked one of the trickiest of haute cuisine classics, the grand Beef Wellington. The result is incredibly juicy, edge-to-edge rose pink beef encased in pastry boasting a flawlessly crispy base. With this recipe, you too can pull off the perfect Beef Wellington! Proof... Get the Recipe
The post Beef Wellington appeared first on RecipeTin Eats.
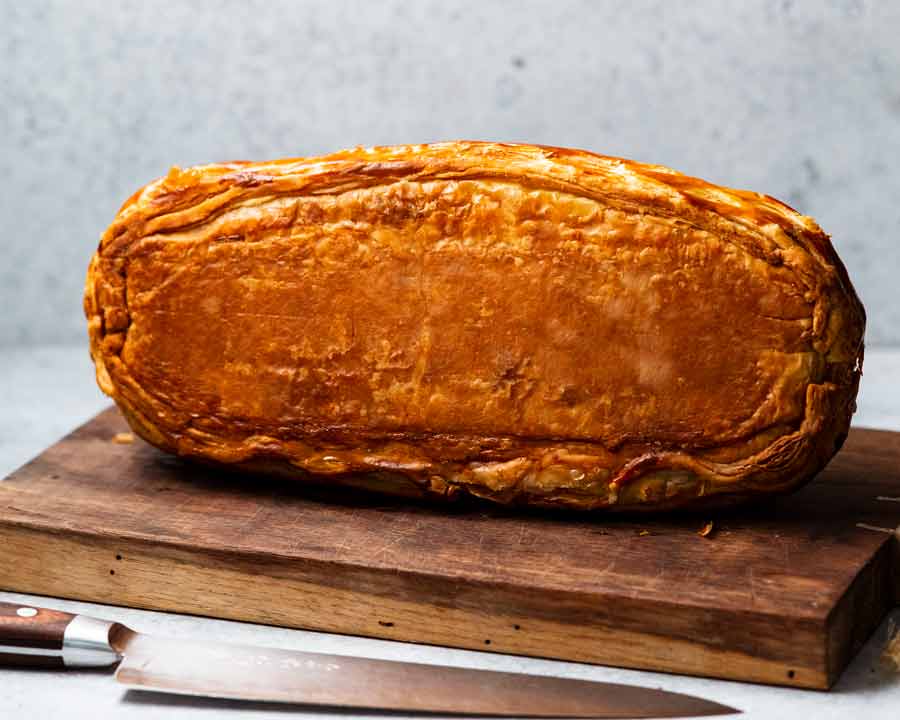
]]>It took loads of attempts but I’m proud to say I’ve finally cracked one of the trickiest of haute cuisine classics, the grand Beef Wellington. The result is incredibly juicy, edge-to-edge rose pink beef encased in pastry boasting a flawlessly crispy base. With this recipe, you too can pull off the perfect Beef Wellington!
This is a cookbook exclusive recipe!
This recipe is exclusive to my debut cookbook Dinner which includes a how-to video for every recipe. Just scan the QR code!
Proof of crispy base:
The cookbook also includes a recipe for a classic Red Wine Sauce. It’s a stunner!

Just to explain….
I know, it’s confusing! You’re so used to getting recipes on my website – there’s over 1,200 of them, after all. And here you are looking at a tasty recipe video and I haven’t provided the recipe. 🙀
I’m not just doing this to torture you, I promise.
This page exists to display the how-to video for this recipe which I exclusively created for my debut cookbook, Dinner. Every recipe in the cookbook has a tutorial video. To watch it, you simply scan the QR code with your phone or tablet and it will take you straight to the recipe video like the one shown above!
Curious about my cookbook?
Read the cookbook overview
Browse all cookbook exclusive recipes here
Read the Cookbook Tales. Spoiler alert: there’s A LOT of dirty dishes!! And quite a lot of Dozer. 😂
Stay tuned for more on this page! Some cookbook exclusive recipes will have extra information added as well as extra tips. I am also looking at enabling comments for selected recipes so I can answer reader questions about cookbook recipes. I’m just a little snowed under during this launch period – book tours, getting 131 recipe videos out, launching the book overseas. Please bear with me! – Nagi x (10 October 2022)
The post Beef Wellington appeared first on RecipeTin Eats.
]]> Mussels in white wine is a French classic that never goes out of style. The best part? It’s insanely quick and easy. Crusty bread for dunking into the broth is essential!
The post Mussels In White Wine appeared first on RecipeTin Eats.
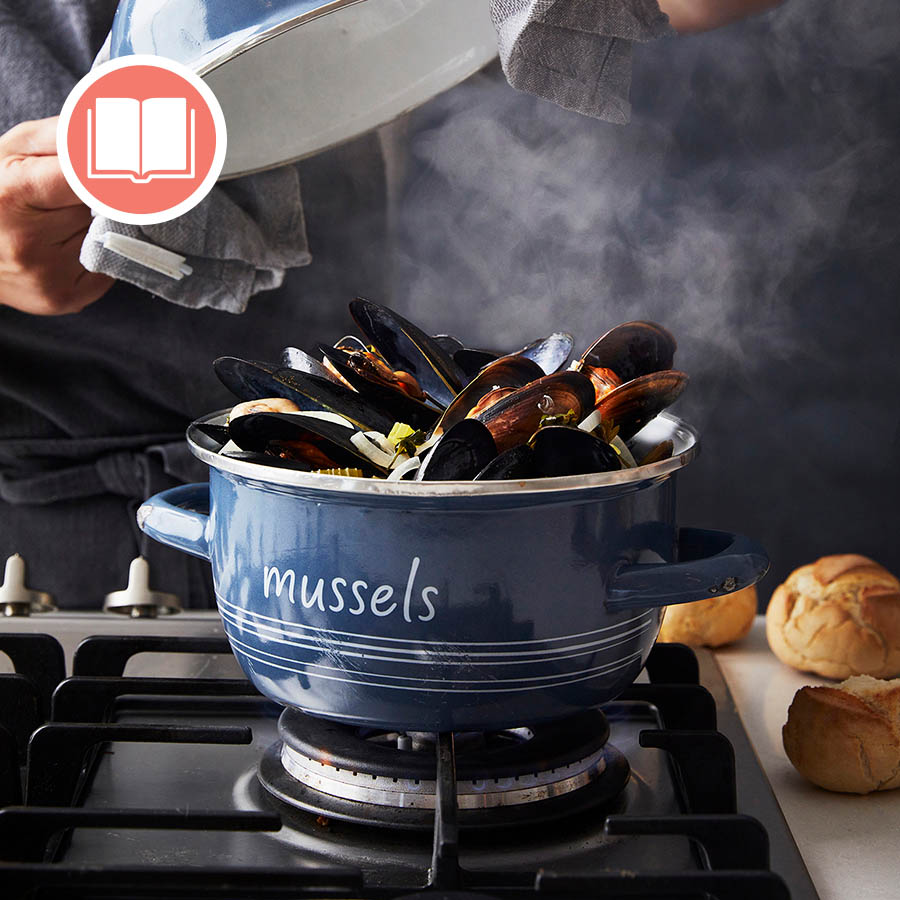
]]>Mussels in white wine is a French classic that never goes out of style. The best part? It’s insanely quick and easy. Crusty bread for dunking into the broth is essential!
This is a cookbook exclusive recipe!
This recipe is exclusive to my debut cookbook Dinner which includes a how-to video for every recipe. Just scan the QR code!
Just to explain….
I know, it’s confusing! You’re so used to getting recipes on my website – there’s over 1,200 of them, after all. And here you are looking at a tasty recipe video and I haven’t provided the recipe. 🙀
I’m not just doing this to torture you, I promise.
This page exists to display the how-to video for this recipe which I exclusively created for my debut cookbook, Dinner. Every recipe in the cookbook has a tutorial video. To watch it, you simply scan the QR code with your phone or tablet and it will take you straight to the recipe video like the one shown above!
Curious about my cookbook?
Read the cookbook overview
Browse all cookbook exclusive recipes here
Read the Cookbook Tales. Spoiler alert: there’s A LOT of dirty dishes!! And quite a lot of Dozer. 😂
Stay tuned for more on this page! Some cookbook exclusive recipes will have extra information added as well as extra tips. I am also looking at enabling comments for selected recipes so I can answer reader questions about cookbook recipes. I’m just a little snowed under during this launch period – book tours, getting 131 recipe videos out, launching the book overseas. Please bear with me! – Nagi x (10 October 2022)
The post Mussels In White Wine appeared first on RecipeTin Eats.
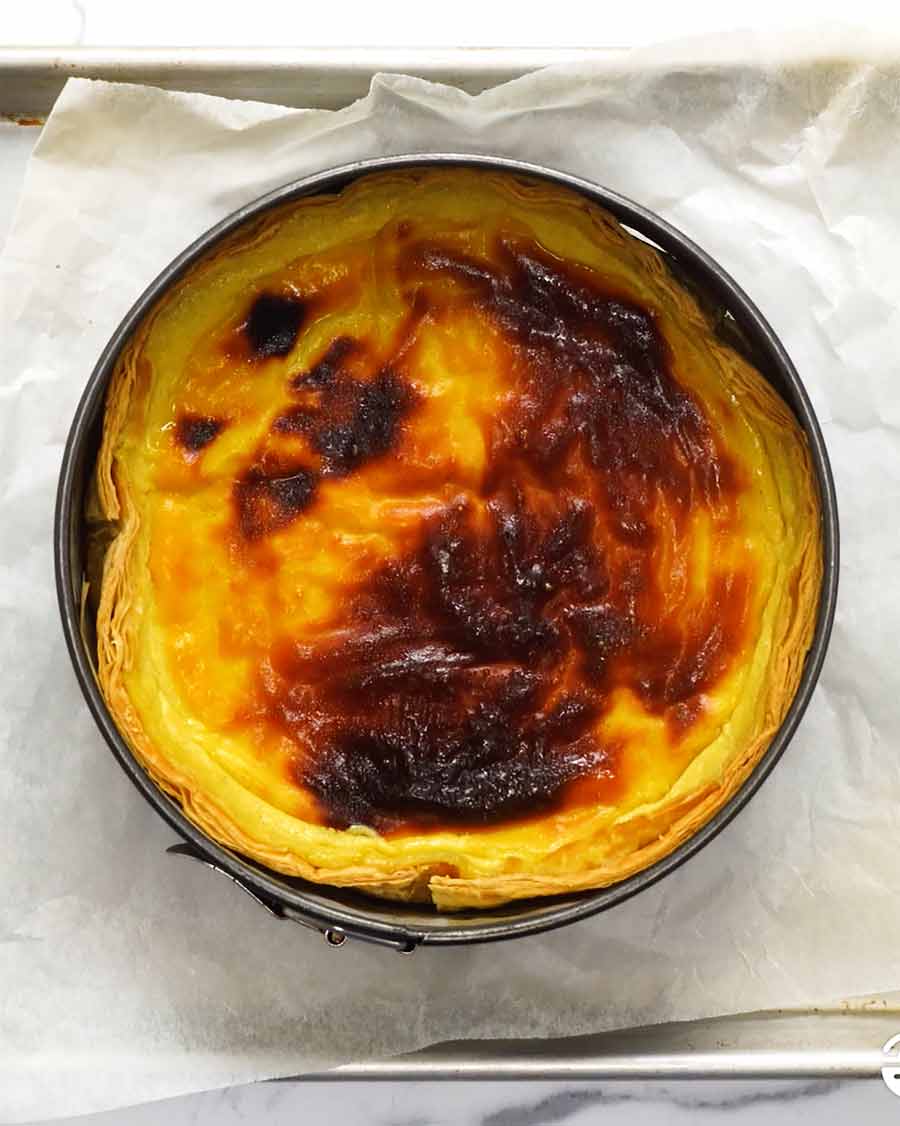
]]> Introducing the world’s greatest custard tart: Flan Pâtissier! Also known as Parisian Flan, this incredible French tart is like a gigantic Portuguese Tart. It’s a flaky pastry crust filled with a wicked amount of creamy and rich vanilla custard that glows with a gorgeous bronze sheen after baking. To say this thing is magnificent would... Get the Recipe
The post Flan Pâtissier (French Custard Tart) appeared first on RecipeTin Eats.
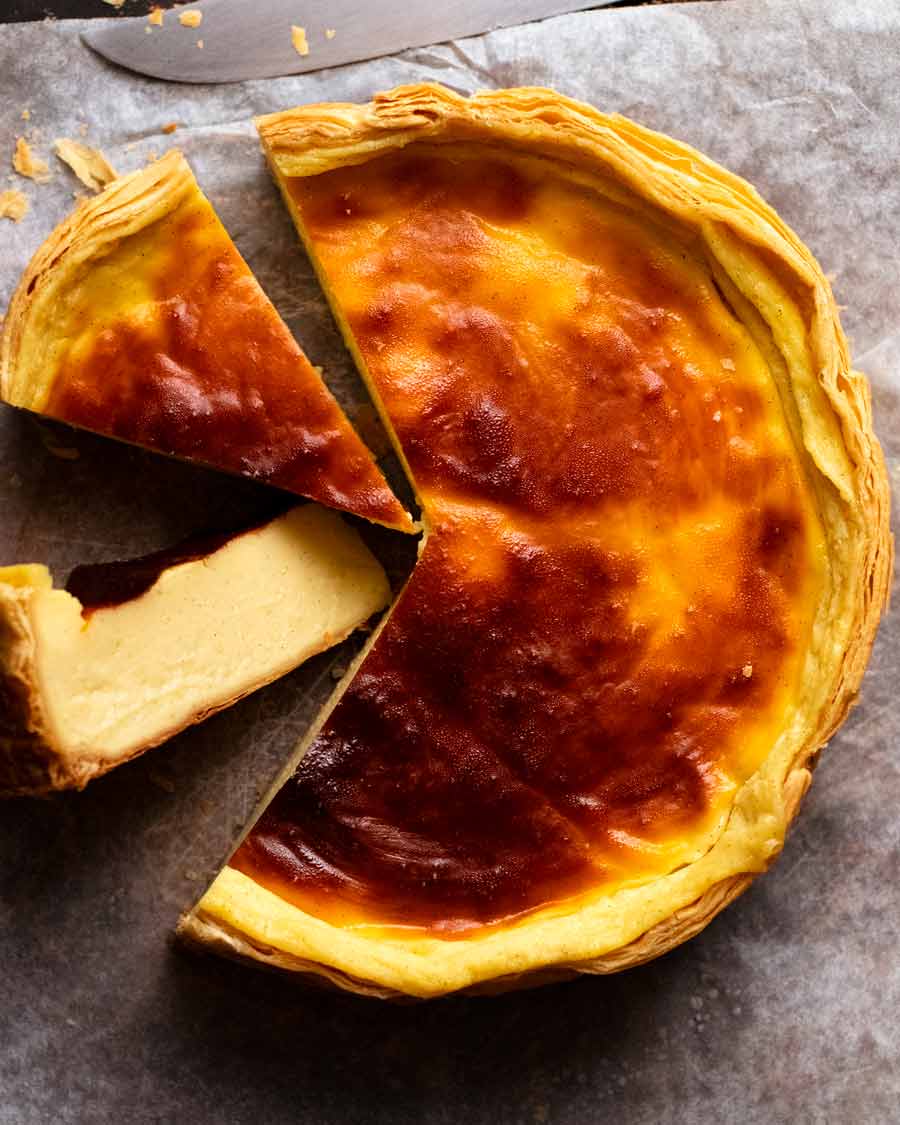
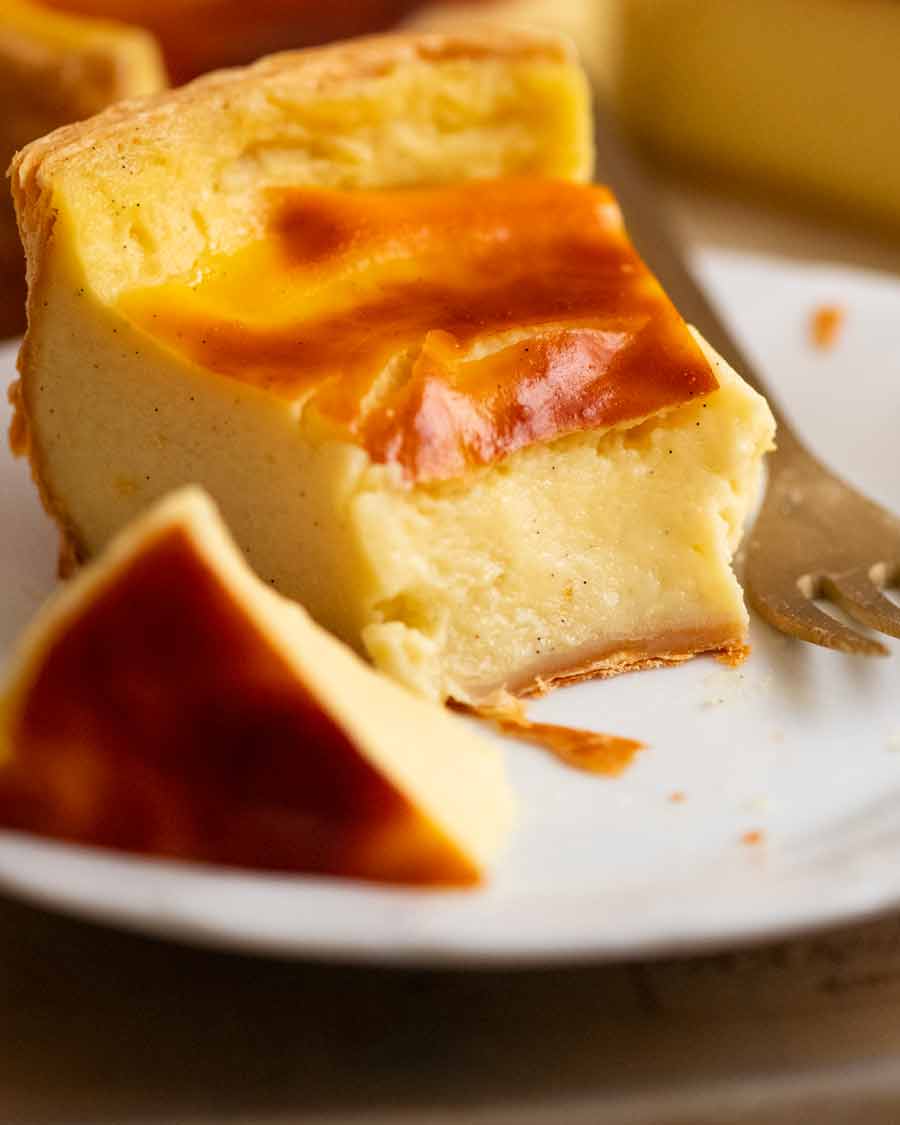
]]>Introducing the world’s greatest custard tart: Flan Pâtissier! Also known as Parisian Flan, this incredible French tart is like a gigantic Portuguese Tart. It’s a flaky pastry crust filled with a wicked amount of creamy and rich vanilla custard that glows with a gorgeous bronze sheen after baking.
To say this thing is magnificent would be the understatement of the year. Words fail me. It’s that good!
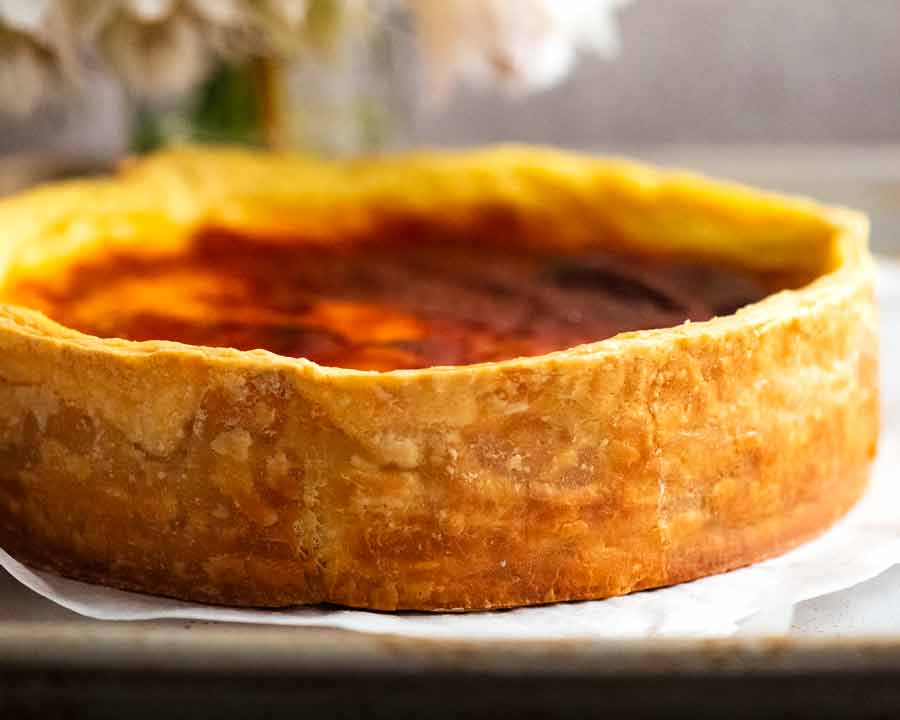
Flan Pâtissier – French Custard Tart
Flan Pâtissier is a French custard tart that is made with a pastry crust filled with vanilla custard and baked.
Also known as Parisian Flan, you’ll find it in every suburban bakery all across France. It blows my mind to know that this pastry is so commonplace for the French that to them it’s considered no big deal as far as pastries go. To this Aussie lass, it is a big deal. It is phenomenally good. Indescribably great. My dessert discovery of the year.
Given especially that it’s a rare find in Australia, I was determined to crack the recipe. With the valuable help of a professional French pastry chef Jennifer Pogmore, I’m happy to report success!
Everyone who has tried the 20+ versions we churned out developing the recipe has loved it. They can’t get enough of it.
This is one of those recipes I’m so personally proud of because I worked hard to perfect it and do the original justice. And I’m thrilled to be sharing it with you!
About Flan Pâtissier
The custard used for Flan Pâtissier is Creme Patissiere, a rich and creamy vanilla custard used in many desserts in France. It gets its richness from egg yolks which, combined with cornflour/cornstarch, is what makes it set to a perfect consistency such that it can be sliced neatly but melts in your mouth when you eat it.
Chef Jennifer Pogmore tells me there are no hard rules in France about the type of pastry used for the Flan Pâtissier crust, it just comes down to the pastry chef making it. In both boulangeries (French bakeries) and patisseries, Pâte Sucrée (French sweet tart crust) is quite common, as is shortcrust and puff pastry.
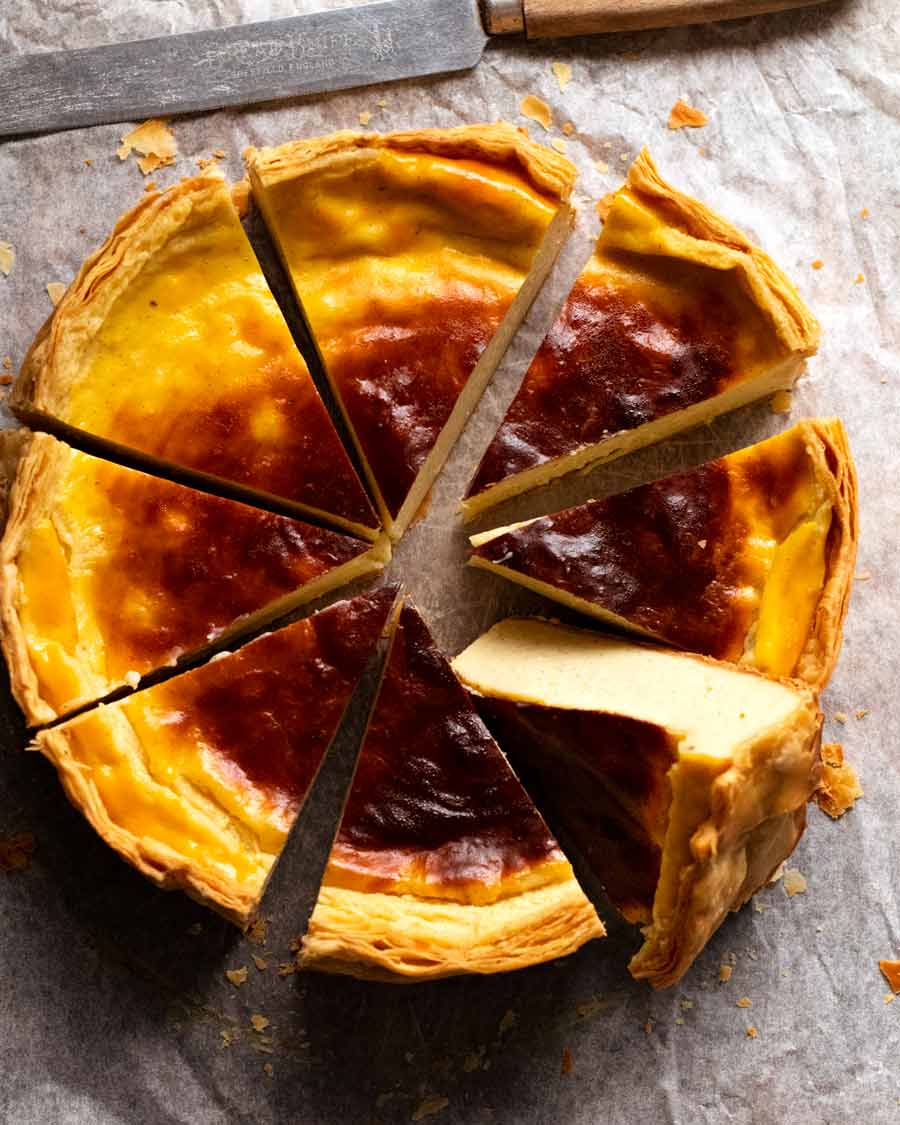
I tried them all. But for me, I can’t look past puff pastry. The contrast of the fine, flaky, buttery pastry with the rich creamy custard just knocks this tart out of the park. And it LOOKS so good too!
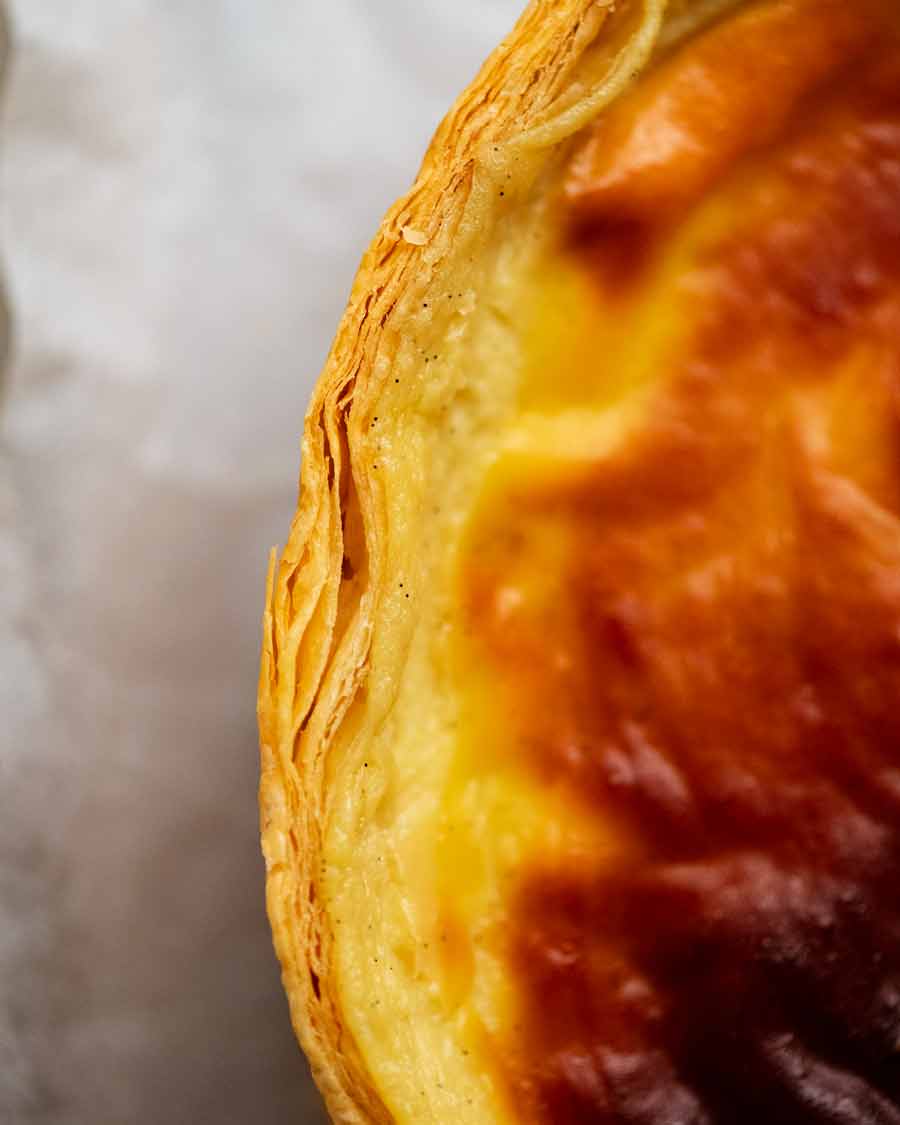
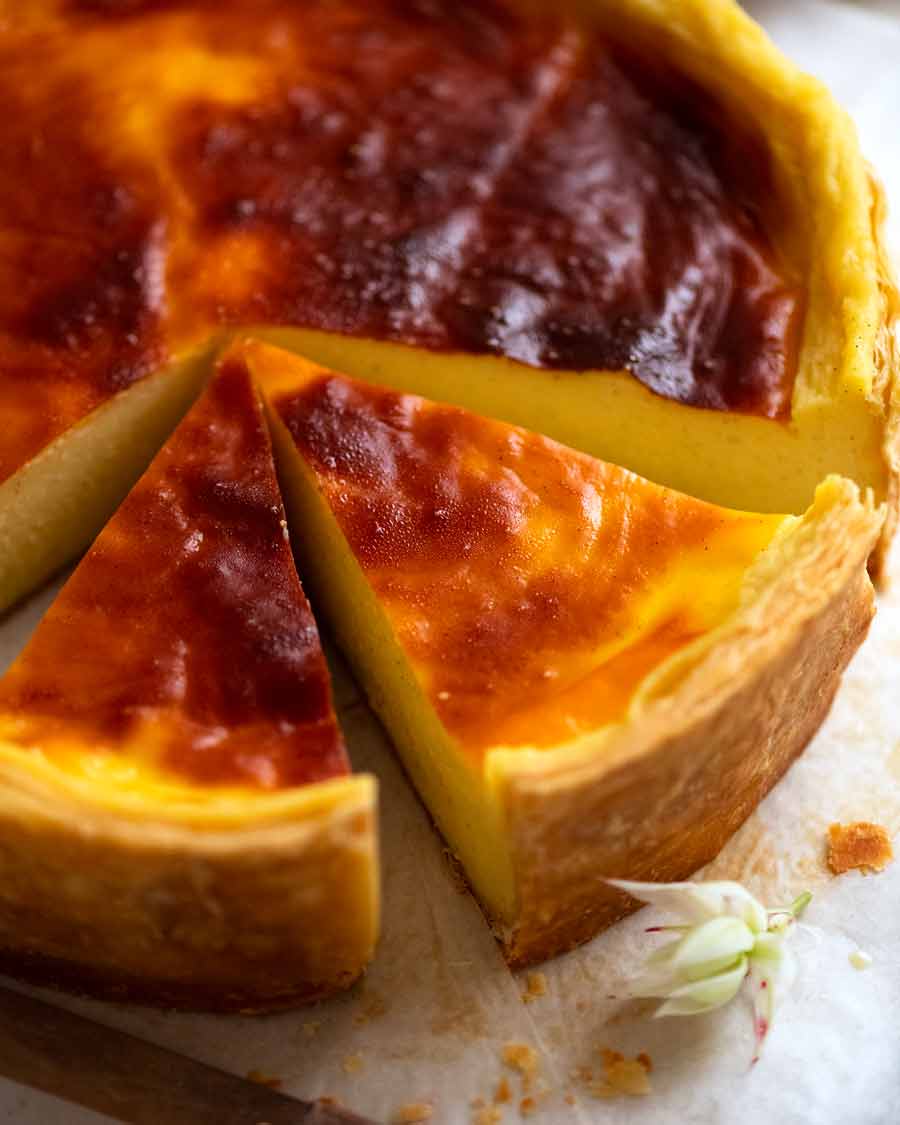
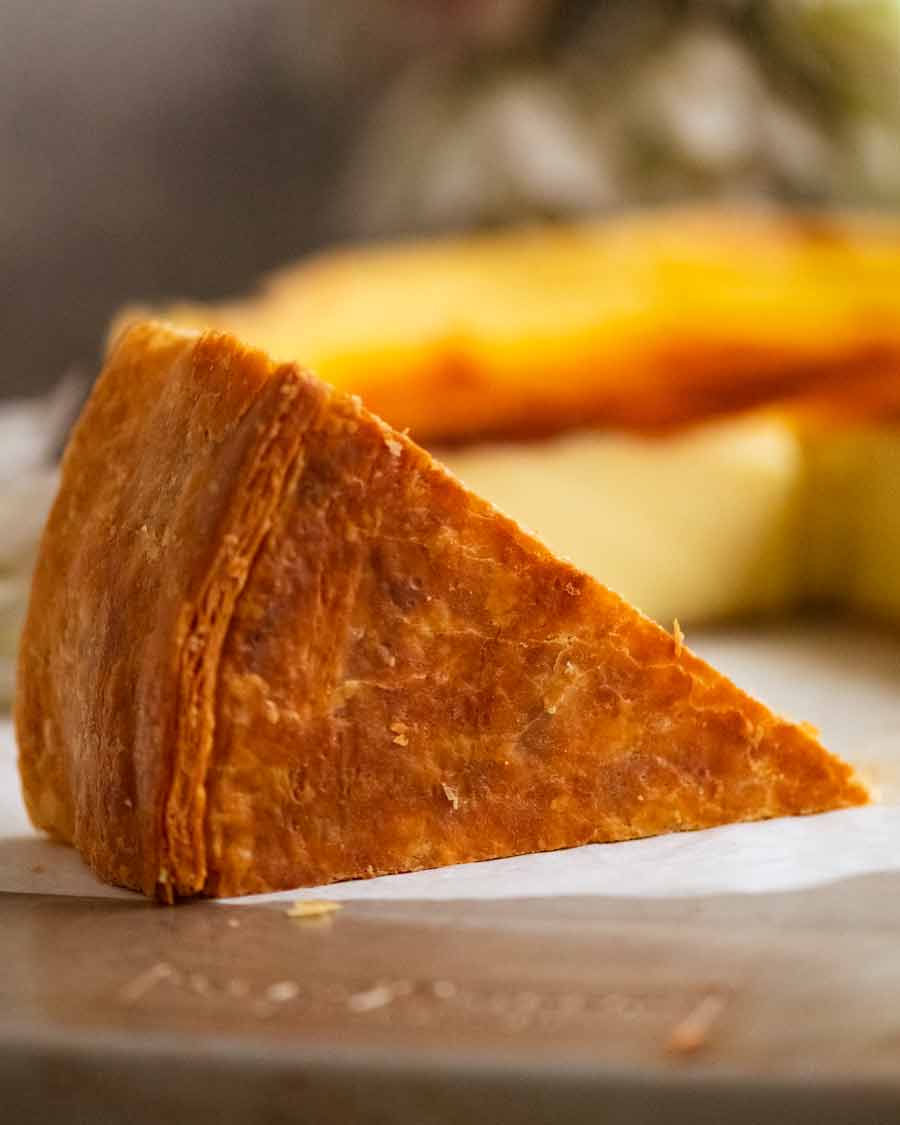
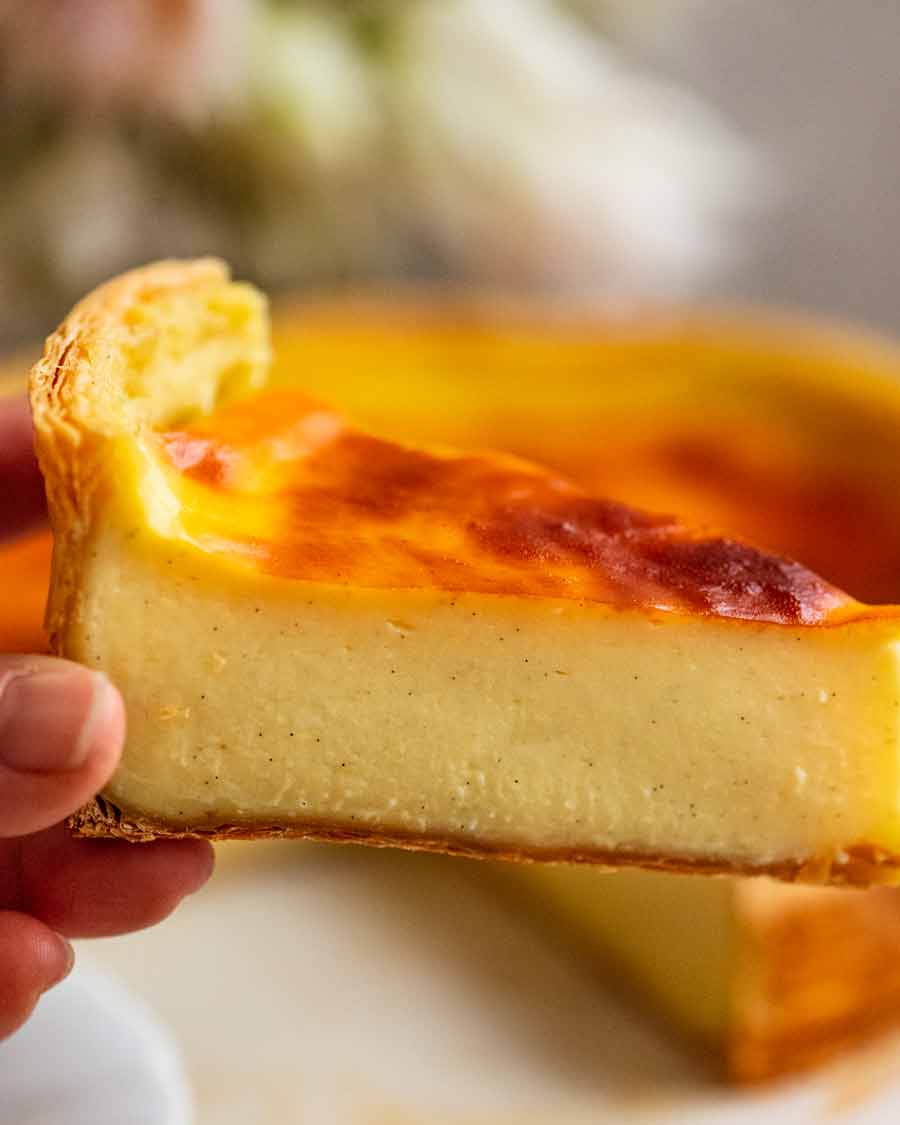
Crispy base!!
You’ll love how the base comes out perfectly crispy in this recipe. Here’s a couple of photos so you can inspect them closely and see for yourself!! Not a patch of sogginess in sight:
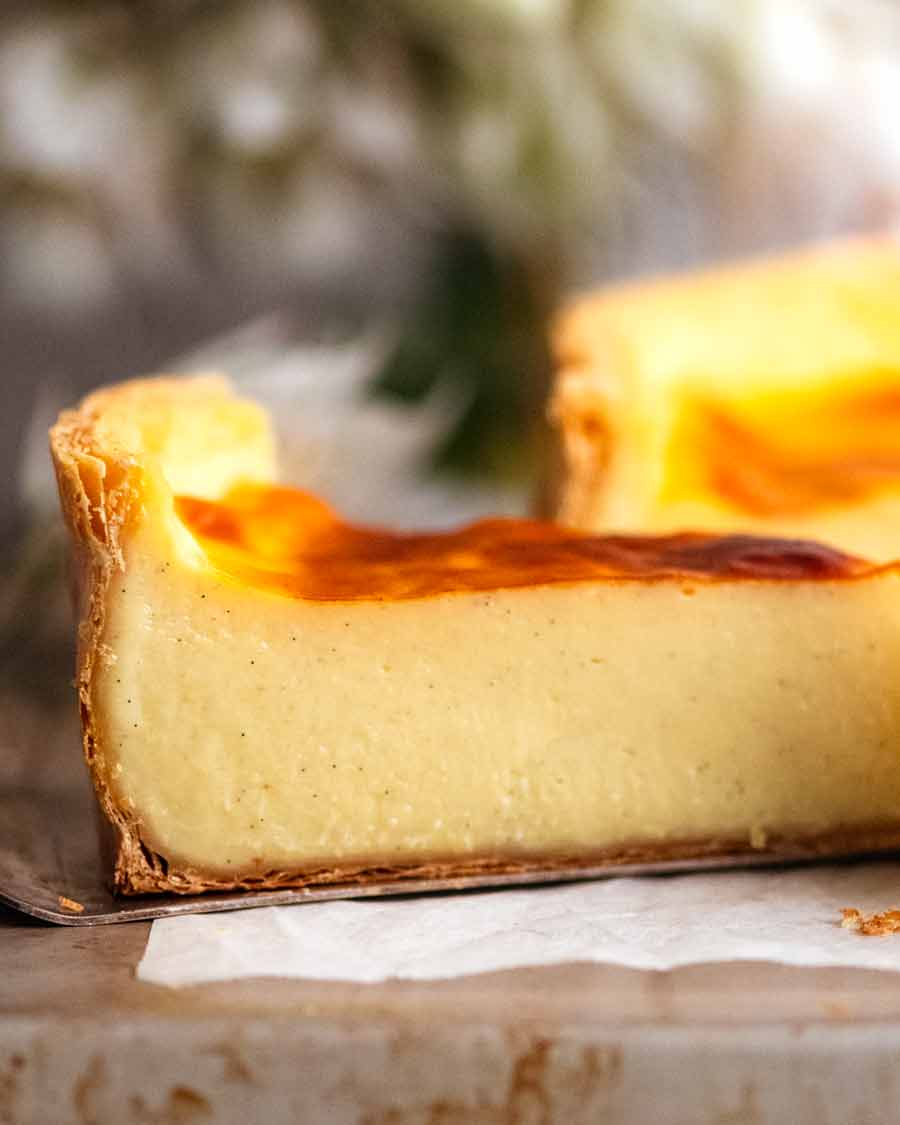
It’s even crisp enough so you can hold the slice cantilevered in your hand. This is by design, because that’s exactly how Flan Pâtissier is supposed to be eaten!
Heads up: This is a long post!
While the idea of making Flan Pâtissier sounds deceptively easy – blind bake a puff pastry crust, fill it with custard and bake it! – the devil is in the detail. This especially applies to those who are not so confident at baking, or are custard first-timers.
To this end I’m sharing quite a lot of information in this post, to ensure success for you whether you are an old hand or new to baking.
If you are a capable baker, feel free to skip all the detail below and jump right to the recipe or recipe video!
Custard for Flan Pâtissier: Creme Patissiere
The custard for Flan Pâtissier is Creme Patissiere, a creamy vanilla custard that is used in many French desserts.
While exact recipes for Creme Patissiere vary depending on the intended use (ie. baked vs not baked; required viscosity for pouring vs piping vs filling vs spreading etc), the base ingredients are almost always the same:
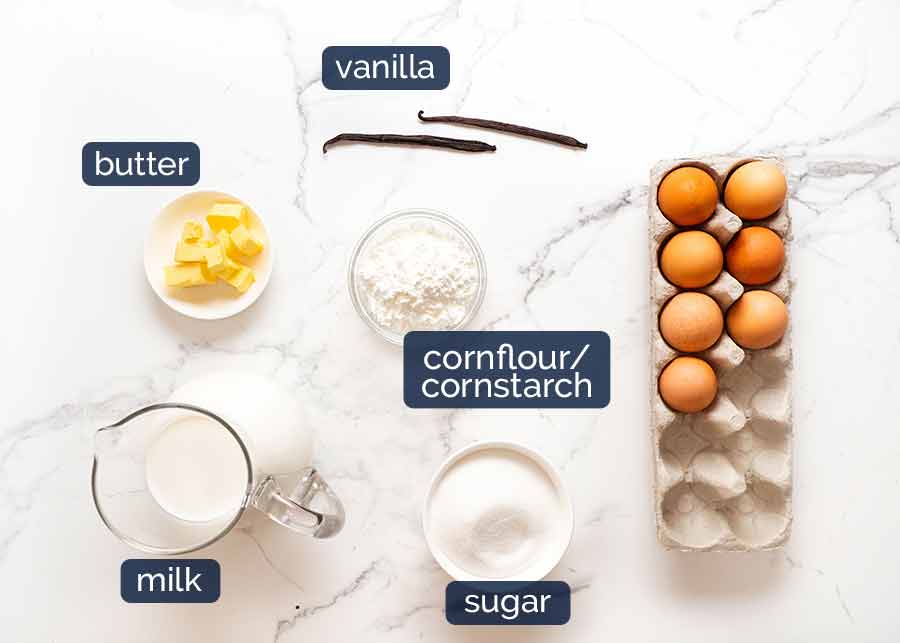
Eggs – Mostly yolks, for richness and also to help set the custard.
Leftover egg whites – Here’s my list of what I do with them and all my egg white recipes can be found in this recipe collection.
Cornflour/cornstarch – For setting the custard and making it shiny (regular flour makes it dull). Attention FRENCH READERS: Do not use yellow cornflour, use white cornstarch!
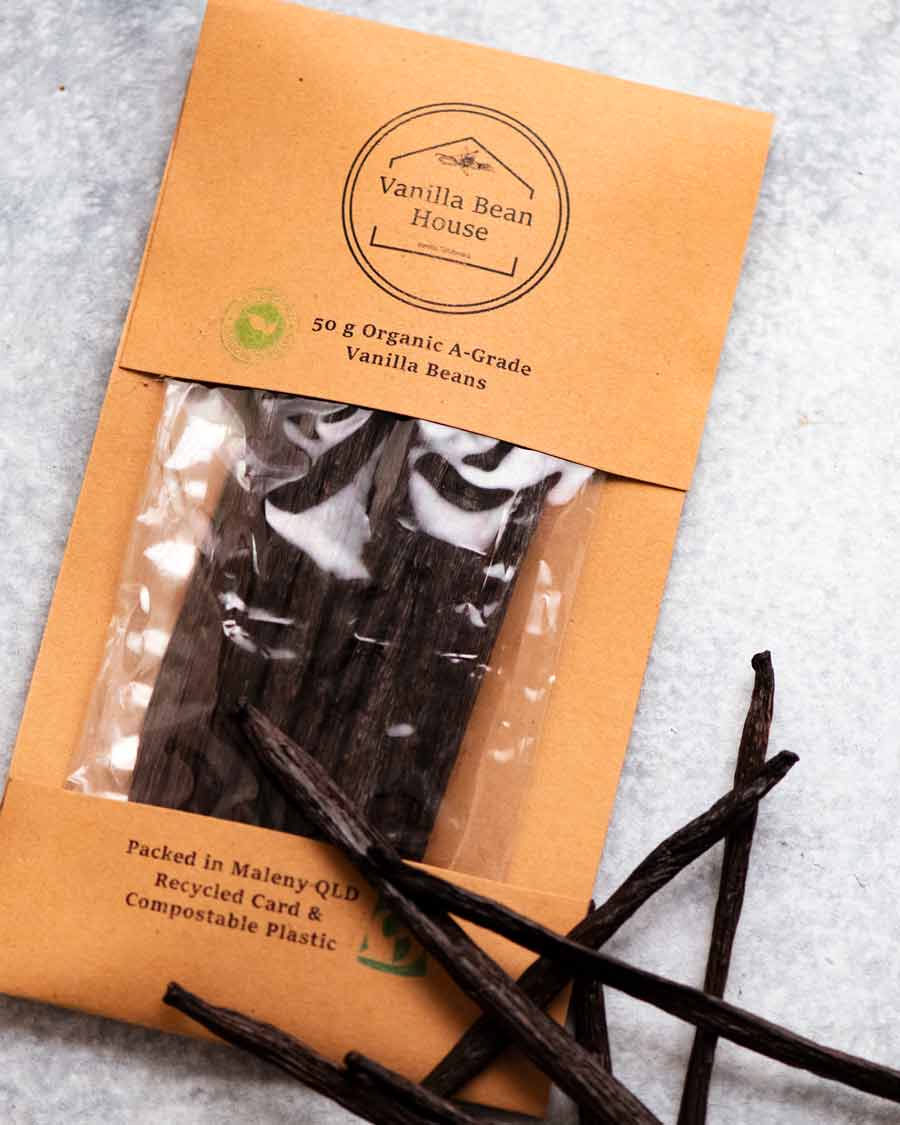
Vanilla beans – For a beautiful vanilla flavour. I used vanilla beans from Vanilla Bean House (Australian online store) – plump and filled with a generous amount of vanilla seeds! Vanilla bean paste is a good substitute here.
Sugar – For sweetness. But not excessive sweetness! One of the things I adore about French desserts is that they are far less sweet than other typical Western desserts.
Milk – The liquid for custard. Some recipes also use cream, for added richness. I prefer the mouthfeel of milk enriched with butter.
Butter – As above, to enrich the custard.
1. How to make the custard for Flan Pâtissier
The custard for Flan Pâtissier uses both egg and cornflour to set it. There’s an ideal balance of the two that will achieve the right richness and set consistency so the tart can be cut into neat slices, yet the custard melts in your mouth when you eat it. I tried quite a few combinations before landing on what I think is the perfect balance!
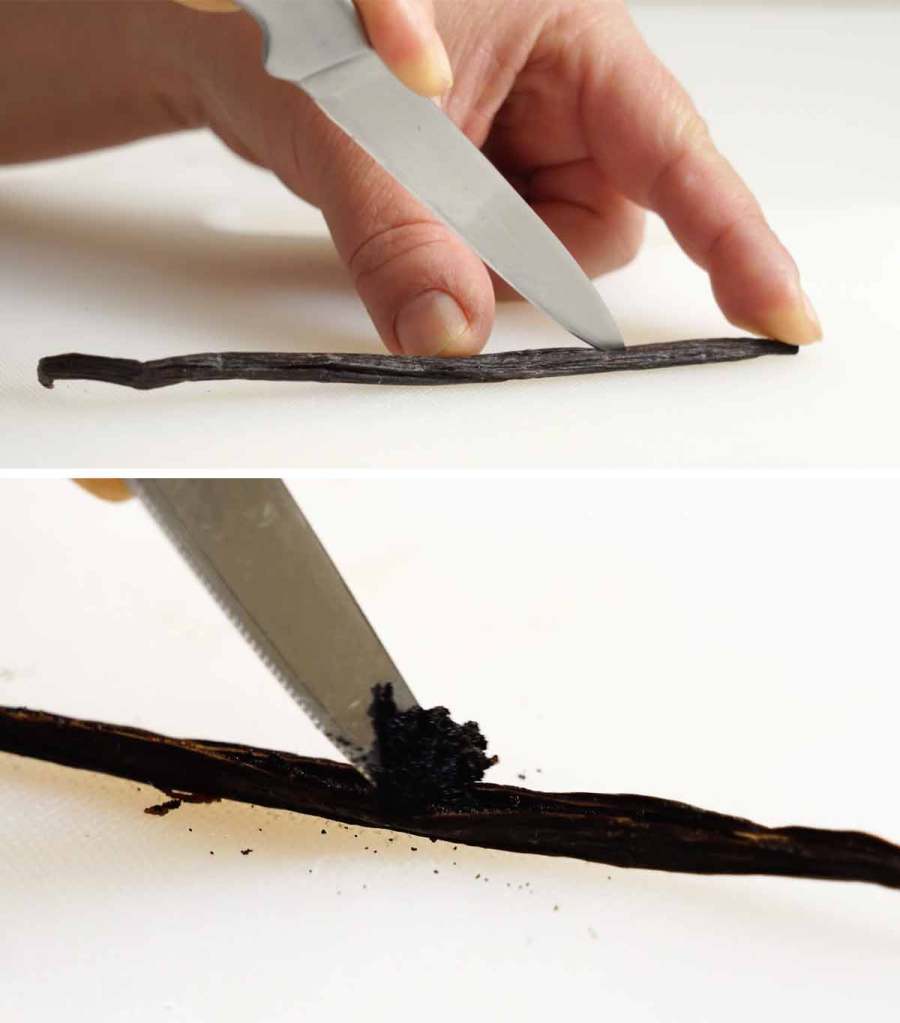
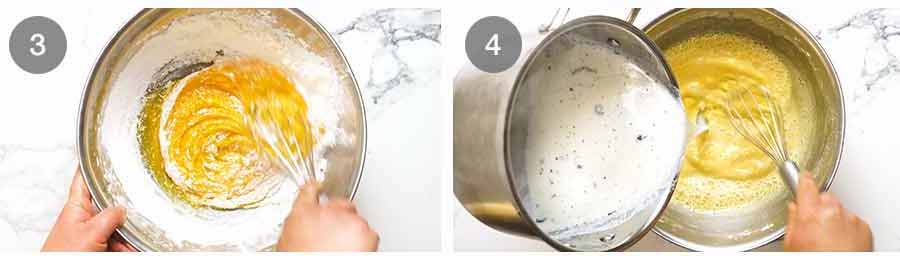
Infuse milk with vanilla
Heat milk with 1/4 cup of sugar*, vanilla seeds and the leftover vanilla pods (see video for how I scrape the seeds out). Bring it to just below a boil. As soon as you see the milk starting to foam and rise, remove it straight from the stove.
TIP: Keep an eye on it as the milk starts to get hot because milk loves to boil over quite quickly!
* Adding a bit of sugar in this step helps to ensure the milk doesn’t scald on the base.
Infuse – Place the lid on (to prevent a skin from forming and loss of volume through evaporation) and leave for 10 minutes. This gives the milk time to be infused with the vanilla flavour as well as to cool slightly which eliminates any risk of hot milk accidentally scrambling the eggs in the next steps.
Eggs and cornflour mixture (thickening)
Eggs and cornflour (cornstarch) – Whisk the egg yolks, whole egg and sugar together until combined. Then whisk the cornflour in. It’s best to whisk eggs and sugar first before adding cornflour else you end up with a flurry of flour!
Slowly add half milk (tempering) – While whisking, slowly pour in half the milk. Just whisk until combined.
Don’t worry, there’s no risk of accidentally scrambling the eggs with the hot milk because it cooled in the 10 minutes we left it to infuse with the vanilla! However we still temper the mixtures in this step as an extra layer of safety.
Cook custard to thicken

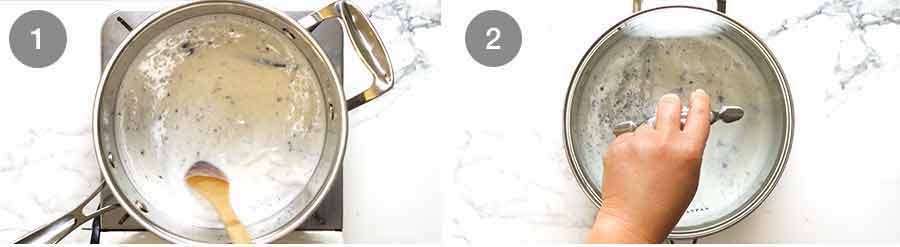
Thicken custard on stove – Pour the egg/milk mixture into the saucepan with the remaining hot milk mixture. Then place it on a medium-low stove (or low, if your stove is strong), whisking constantly but leisurely, to ensure the base doesn’t catch. At first the mixture will be watery but after about 2 to 3 minutes as the it starts to heat up, you will suddenly feel the custard starting to thicken. Such a satisfying moment!!
Big lazy bubbles – Once the custard starts thickening, the next thing you are looking for is big, fat lazy bubbles popping up on the surface which indicates the custard is thick enough. Pause stirring for a few seconds to check if you have bubbles (see video).
20 seconds whisking – Once you see the lazy bubbles, keep whisking for another 20 seconds on the stove, then remove it from the heat.
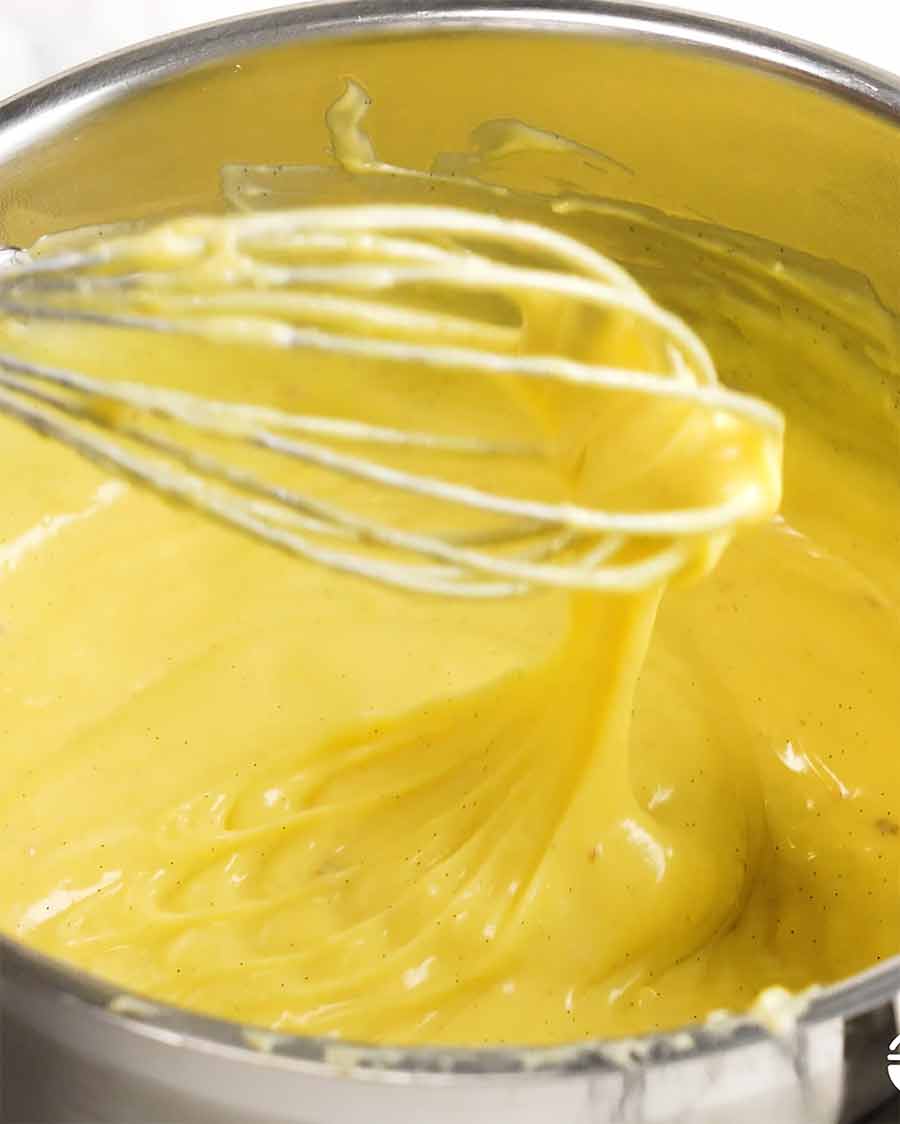
Thick and creamy custard! This photo shows how the custard should look at this stage: Thick and creamy, it should leave ribbons on the surface when drizzled but still be pourable (see below for good visuals, or video).
Butter, straining and cooling
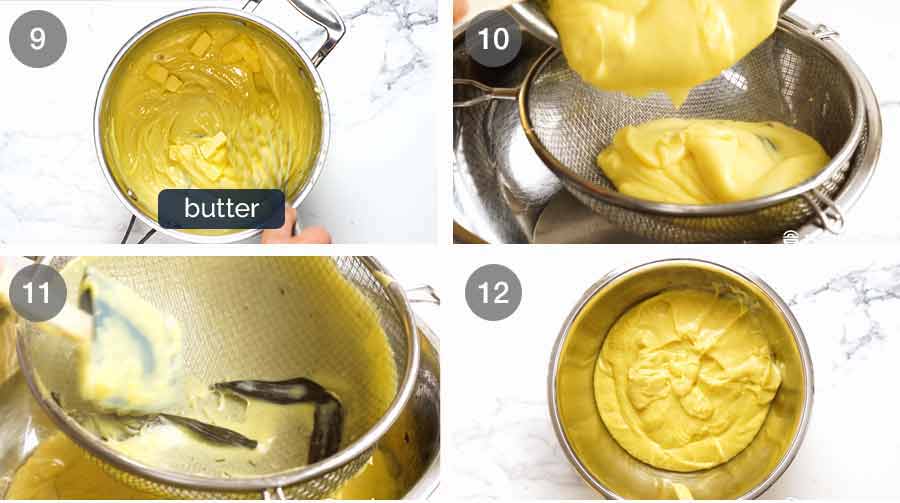
Enrich with butter – This is a FRENCH custard tart, so it should come as no surprise that we’re sneaking some butter in here to enrich the custard!
Strain – Pass the custard through a fine mesh strainer. This is to remove any larger chunks of vanilla that were loosened from the beans.
Press through all the custard and be sure to scrape the base of the strainer well. Then lick that spatula clean. Yes that’s an instruction – don’t waste a drop of that precious custard! 😂
Custard thickness – This is what the custard should look like at this stage. You can tell by looking at the surface how the custard is thick and creamy.
Cooling custard
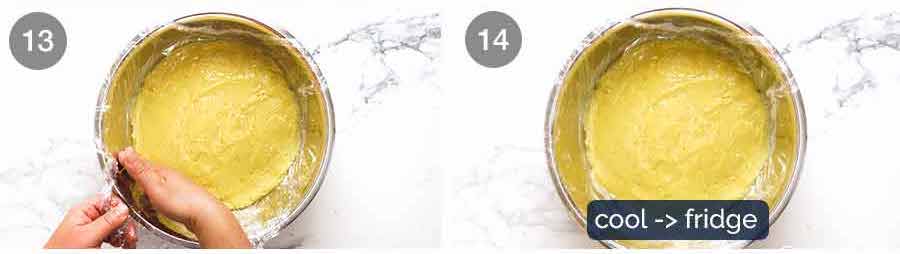
Cover – Smooth the surface of the custard (I use a small offset spatula) then cover with cling wrap contacting the surface. Doing this prevents a skin from forming on the custard (nobody wants wisps of skin in their otherwise silky smooth custard!) as well as condensation, which will dilute the richness of the custard.
Cool – Let the custard cool on the counter (about 3 to 4 hours) before putting it in the fridge to fully chill.
12 – 24 hours in fridge recommended – Refrigerating the custard overnight will allow for optimal flavour development (a pro tip from professional French pastry chef!). But if you are in a hurry, you can proceed with the recipe as soon as the custard has cooled to room temperature, ie. skip the fridge time. To be honest, I don’t think most people will be able to tell the difference. But I wanted to share this recipe made the proper way!
Custard done, now it’s on to the pastry!
2. Flan Pâtissier puff pastry crust
As noted at the beginning, there’s no hard and fast rule about what crust should be used for a traditional Flan Pâtissier, though Pâte Sucrée (French sweet tart crust) and puff pastry seem to be the most common. For me, I can’t go past puff pastry for the delicious contrast of buttery, flaky pastry and the creamy, silky custard.
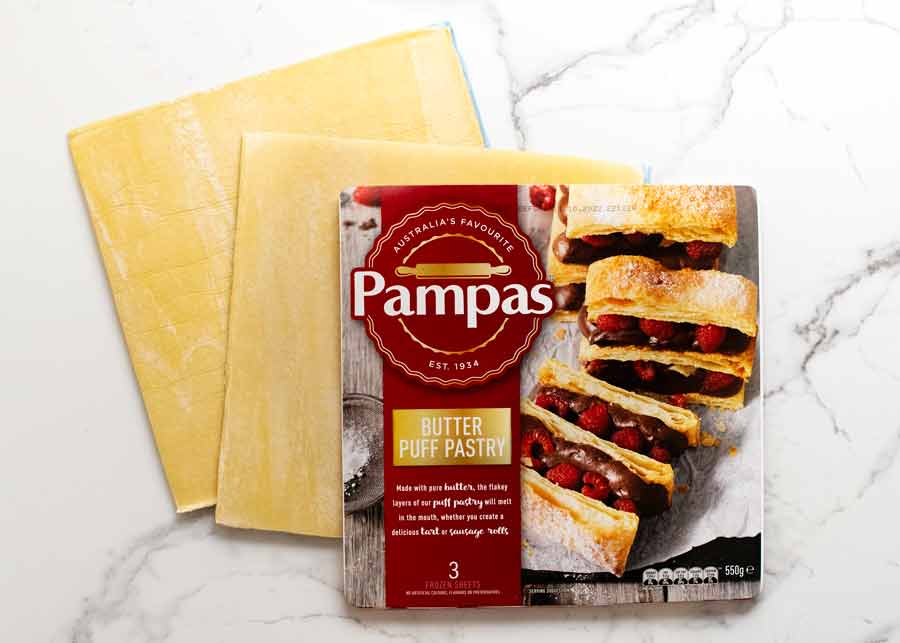
These days, store-bought puff pastry is actually quite good quality. Even the standard brands we find at grocery stores here in Australia such as Pampas are perfectly acceptable.
My only rule however is it must be butter puff pastry. Butter has much better flavour and puffs up better than the cheaper margarine/oil-based puff pastry! It’s absolutely worth the extra coin.
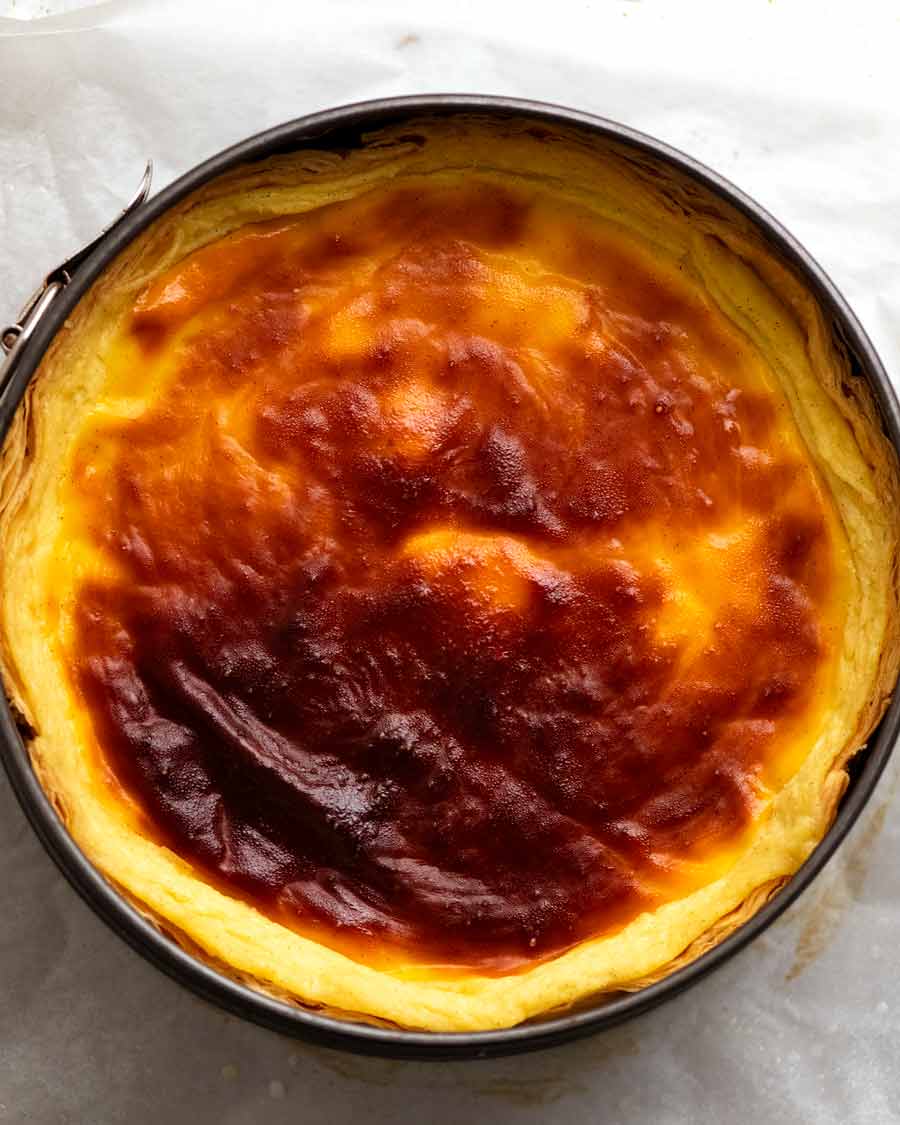
Best pan: Springform cake pan with no base
The best way to make the crust for Flan Pâtissier using puff pastry is to use a springform pan WITHOUT the base. We’re going to bake it directly on the tray which is the trick that ensures the base is 100% crispy once filled with custard – this is a big part of the awesomeness that is Flan Pâtissier!
Note: Professional pâtissiers and pastry chefs use tall tart rings which are purpose-built rings without a base. A springform pan ring works just as well for this recipe. 
Cut base and sides
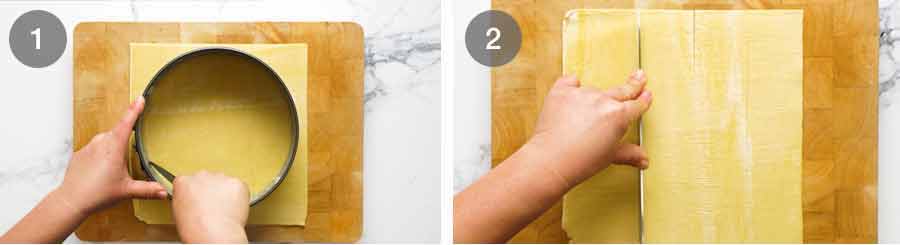
TIP: Work with puff pastry that has thawed just enough that it’s still stiff but workable, and JUST pliable enough to line the springform pan. This is for ease of handling for this tart which has unusually high sides. Fully thawed puff pastry = floppy and sticky = impossible to line the tin sides and very messy to fit the base in.
Cut base using the inside of the springform pan as a guide. Remove excess pastry but SAVE IT in case we need to do emergency patch ups later! Then place the base in the freezer until required.
Cut sides – Cut three 5.5 x 25 cm (2.15 x 10″) strips out of a sheet of puff pastry, ensuring it is still as frozen as workably possible so it doesn’t flop when you line the sides.
TIP: Using a long knife, cut straight down into the pastry rather than slicing by dragging the knife along the pastry. This will preserve the beautifully flaky layers on the rim of the crust, like pictured in this post.
Line sides
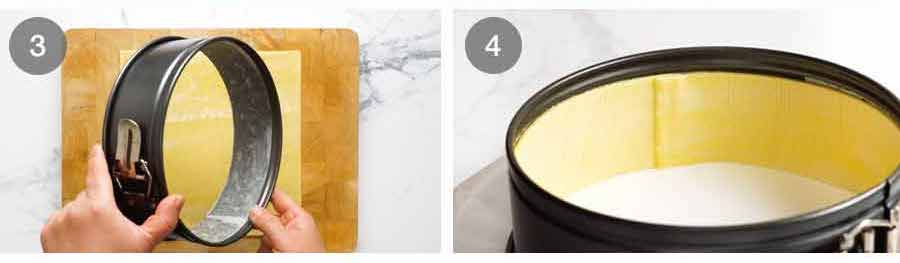
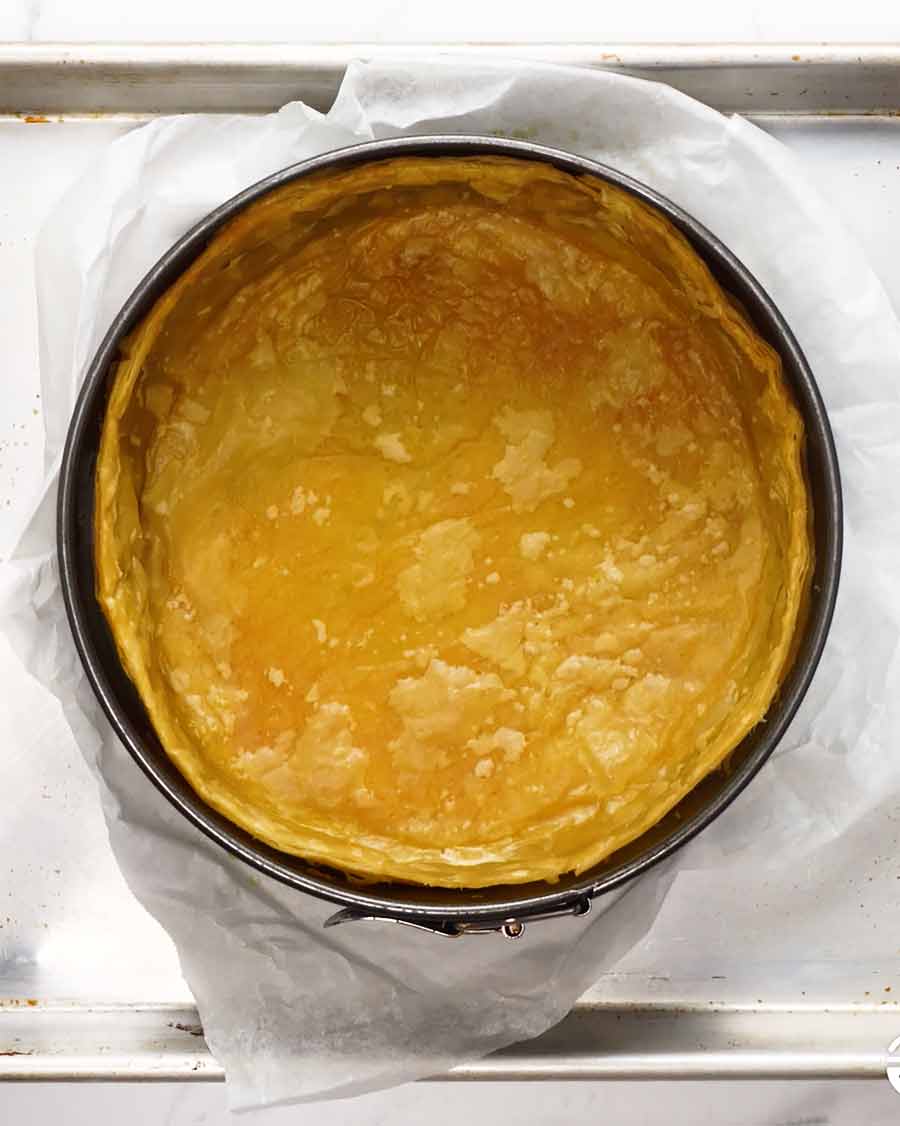
Line springform pan with baking paper – Grease a 20cm / 8″ springform pan ring with butter then line the inner sides with baking paper cut to size. Place the ring on a sheet of baking paper sitting a plate. This is for ease of handling because we are not using the springform pan base. Baking the puff pastry shell directly on a tray guarantees the base remains 100% crispy once filled with the custard.
Baking paper actually isn’t essential, you could just butter or spray the sides with oil. However, the puff pastry tends to look more rustic (ie. flaky rather than neater) if you skip the baking paper.
Line sides with pastry – Line the inner sides of the springform pan with the pastry, overlapping by 1cm and using water to seal. You will need to trim the third strip so it fits.
Remember, work with stiff but just-pliable puff pastry else the sides will flop!
Press seams – At this stage, just press the seams; we will seal it properly later. Right now, we want to work fast while the pastry is still as frozen as possible.
Base
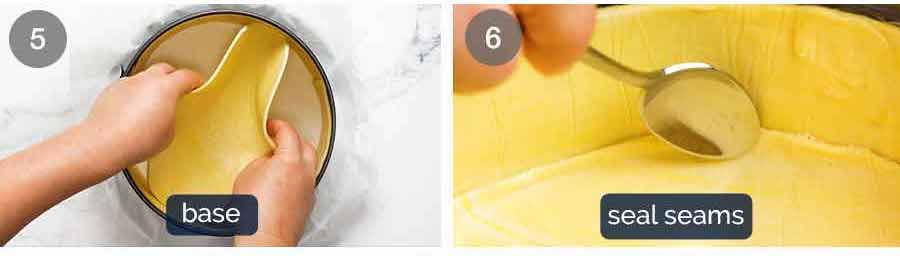
Place base in by gathering it up slightly so it doesn’t drag down the sides. Adjust as needed to centre it as best you can. The circumference of the base will overlap and go up the sides ever so slightly, which is the perfect insurance policy to avoid custard leakage.
Seal seams – Use the back of a teaspoon to press the base into the corners, then to “smear” the now-thawing puff pastry to seal it. Do this for the base and the sides.
Prick and freeze
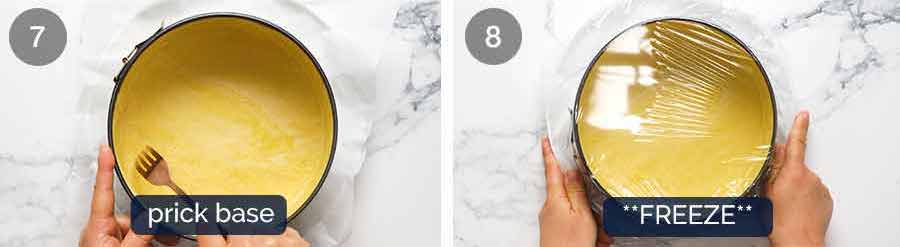
Prick base with a fork about 30 times. This helps to stop the base from puffing up when we do the blind bake.
Freeze – Cover with cling wrap (with tart still sitting on the plate) then freeze for at least 2 hours. The purpose of freezing is to help reduce shrinkage when blind baking and also to help stop the tall puff pastry sides sliding down as it cooks.
The bonus is that the firmed crust doesn’t get all scratched up and dented when we line with paper and fill with baking beads to blind bake!
Blind baking the crust
Blind baking is an essential step to ensure that the crust bakes up nice and crispy. Nobody wants a soggy crust with their custard tart!!
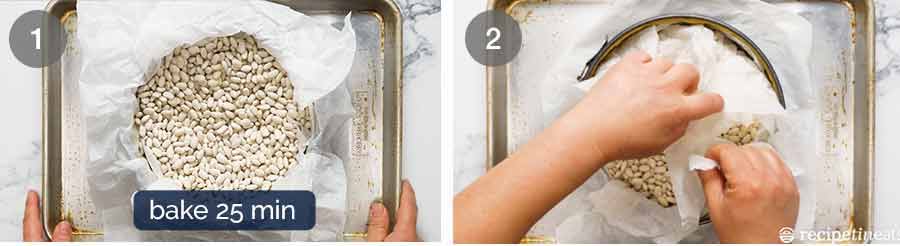
Bake with baking beads 25 minutes – The first bake is weighed down with baking beads to set the pastry sides so they don’t flop inwards. We bake in a hot oven of 220°C/430·F (200°C fan) which works better when baking from a frozen state.
Filling with baking beads – Remove the fully frozen crust from the freezer. Tear off 2 x 60cm / 2 foot-long sheets of baking paper (parchment paper) then scrunch them up in your hands. This makes it easier to fit inside this taller than usual pastry.
Lay one sheet of paper on top of the other but perpendicular to it (ie. in a “X”) inside the crust shell. Then fill with baking beads or dried beans* right up to 1cm below the rim of the pastry. Gently but firmly press the beads down and outwards to ensure it is pressed into the corners and against the springform pan walls to help ensure the pastry sides set properly without flopping inwards.
No baking beads? Large dried beans work almost as well. They do not conduct heat as well as purpose-made baking beads and they are a little lighter. So the pastry does shrink a little more but it’s not significant. Avoid using rice, lentils or other small dried things that other recipes say are ok to use. Their small size means they pack together too densely, blocking heat from getting through to the inside of the pastry so the sides don’t set properly. (A lesson I learned the hard way!)
Remove baking beads – After 25 minutes, remove the crust from the oven. Grip the paper overhangs and lift, taking the baking beads with the paper. Do this step slowly so you can check to see if the sides start to flop in (eg if your oven runs a bit cool). If they do, leave the baking beads in and bake for a further 5 minutes.
Take care during this step – nobody wants sizzling hot little beads bouncing all over their kitchen floor … sounds terribly dangerous! I pour the beads straight into a metal bowl to cool.
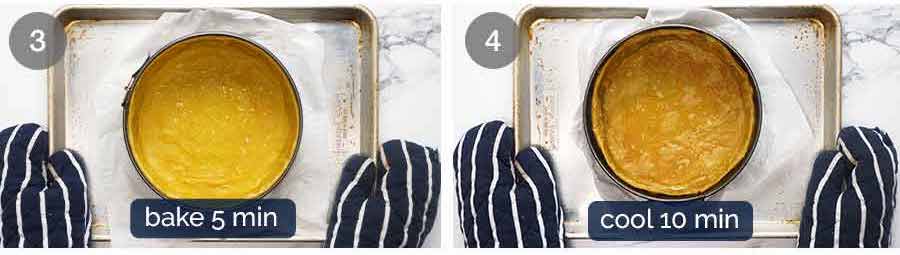
Bake 5 minutes uncovered – Once the baking beads are removed, return crust to oven for a further 5 minutes.
Cool 10 minutes – Remove the crust from the oven. You will see that the surface is dry but the pastry is still a bit undercooked. That’s exactly what we want – it’s partially cooked, ie. Cooked enough so it won’t go soggy once the custard is poured in but undercooked enough so we don’t end up with a burnt, dry pastry crust.
Cool for 10 minutes. Again, this is just an extra crispy-base insurance policy.
Baking the Flan Pâtissier
We are on the home stretch here! So close are we to be able to taste the magic that is Flan Pâtissier!
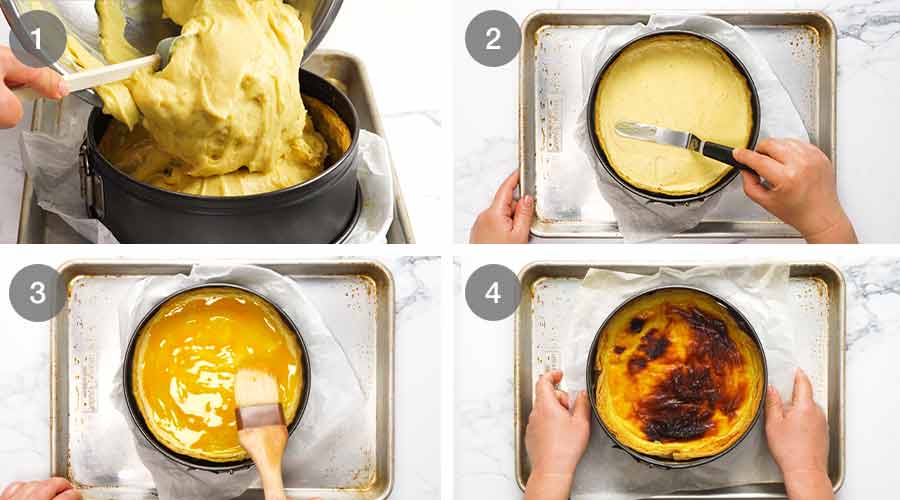
Fill with custard – Remove the chilled custard from the fridge and whisk to loosen. Then fill the pastry crust. Fill to 1cm / 0.4″ below the rim else it will overflow when it bakes.
Leftover custard? The recipe makes the right amount of custard assuming you had no pastry shrinkage or the sides did not slouch when you blind baked your pastry crust. If yours did shrink a bit – and for most people, I expect that it will – then you may have custard leftover. Ideas to use up: as a general-purpose dolloping custard on anything; make mini custard tarts using puff pastry scraps (20 minute bake at 180°C/350°F); fill ramekins and bake; or simply eat with a spoon!
Smooth custard surface using an offset spatula or spoon.
Egg yolk – Brush the surface gently with egg yolk, taking care not to break the surface. This is how we get that gorgeous, signature bronzing on the surface of the Flan Pâtissier.
Bake 65 minutes, fridge 6 hours – Bake 65 minutes at 200°C/390°F (180°C fan), rotating the tray at 45 minutes. The custard will still be VERY wobbly, borderline watery. Have faith! It will set when refrigerated.
Cool on the counter for 4 to 5 hours, then loosely cover and refrigerate for 6 hours+ in the springform pan. It’s important to fully cool to room temperature before refrigerating or condensation will compromise the crispiness of the puff pastry.
And with that, WE ARE DONE!! Time to devour this custardy masterpiece!!
Phew! I know this was a big knowledge dump. But as I explained earlier, I wanted to provide enough information so even less experienced bakers can feel confident enough to make it.
And honestly? Having made this over 20 times in the last few months, I can say this for sure: The only thing that can really go wrong is that the custard doesn’t set so it gloops everywhere when you cut into it. The only way that can happen is if you mis-measure the custard ingredients, if your oven runs cooler than the temperature dial says (I recommend you use an oven thermometer if you have any doubts) or if you do not refrigerate the cooked Flan Patissier to allow it to set.
Even lamentable pastry work can be salvaged from potential custard leakage issues by plugging holes with leftover pastry!
As for everything else, it’s a walk in the park. OK sure, your pastry shell might look a little more rustic than mine. I certainly had my fair share of more rustic-looking crusts on this journey! But that doesn’t affect flavour or the eating experience at all.
And that, my friends, is just about all I can think of that could possibly go wrong.
So really, don’t let the length of the recipe card daunt you. The detail is there to guide you through this. It might take you longer than you expect. But I promise, it really is not that hard.
And it is so, so worth it! – Nagi x
Watch how to make it
Video error! Once the empty pastry crust is baked, it just needs to cool for 10 minutes. It does NOT need to go in the fridge for 6 hours. Oops, sorry, I will replace the video shortly. Follow the written recipe please!
Flan Pâtissier (French Custard Tart)
Ingredients
Creme Patissiere:
- 1 litre / 1 quart milk , full fat
- 2 vanilla beans , seeds scraped, beans reserved (Note 1)
- 1 cup caster sugar , separated
- 120g / 4.2 oz egg yolks (~6 to 7 large eggs, 100 ml, Note 2)
- 1 large egg (55 – 60g / 2 oz)
- 7 tbsp (70g) cornflour/cornstarch (scoop and level, Note 3)
- 50g (5 tbsp) unsalted butter , cut into 1cm cubes (cold)
Pastry:
- 2 sheets butter puff pastry, FROZEN (25cm / 10" squares, 185g/6oz each) (Note 4)
- 1 egg yolk , whisked
- Butter , for greasing
Instructions
Creme Patissiere:
- Infuse milk: Place milk, vanilla seeds, used beans and 50g (1/4 cup) sugar in a large saucepan over medium high heat. Bring to just before boiling, stirring to dissolve the sugar. Remove from heat, place lid on and leave to steep for 10 minutes.
- Yolk mixture: Meanwhile, place egg yolks, egg and remaining sugar in a large bowl and whisk to combine. Add cornflour and whisk until smooth.
- Temper eggs: While whisking the eggs, slowly pour in about half the milk in a thin stream. Whisk until combined.
- Thicken custard: Pour the egg-milk mixture back into the saucepan then whisk to combine. Place over medium low heat, stirring constantly so the base doesn't catch, until it starts to thicken (you will feel it). It should happen within 3 to 5 minutes. If it gets lumpy, remove off heat, whisk vigorously – will become smooth.
- Stir 20 seconds after bubbles appear: When the custard is thickened and hot and you see the first big lazy bubbles appear on the base, whisk constantly on the stove for a further 20 seconds then remove from stove. (To check for bubbles, pause stirring for a few seconds)
- Butter: Whisk butter in until fully incorporated.
- Strain & cool: Immediately strain into a bowl through a fine mesh strainer. Discard vanilla bean. Cover with cling wrap touching the surface. Cool on counter (3 hrs+) then refrigerate 12 – 24 hours. (Note 5)
Crust:
- Work with pastry as frozen as possible – it's easier. (Note 4)
- Cut base and sides: Cut base out using the inside of the pan as a guide on one sheet of puff pastry. Cut three 25 x 5.5cm (2.15 x 10″) wide strips on the other sheet of puff pastry. Place base and sides back in freezer. RESERVE offcuts (for emergency patching).
- Line pan: Butter and line the sides of a 20cm/8" springform pan with a 5.5cm / 2.2" strip of baking paper. We are not using the pan base. (Note 6)
- Line sides: Place cake pan on a square sheet of baking paper on a plate. (Note 6) Remove cut puff pastry from freezer. Working quickly, when sides have JUST thawed enough to bend, line sides of cake pan with puff pastry, overlapping by 1cm / 0.4", using water to seal – just press down for now (will seal properly later).
- Base: Brush base of sides with water. Fit base into cake pan (see video at 2 min 50 sec for technique).
- Seal pastry: Use the back of a teaspoon to press base into the corner. Then smear the now-thawing puff pastry to full seal.
- Prick base: Prick base 30 times with fork. (I always forget!!)
- Freeze: Cover with cling wrap, freeze 4 – 24 hours. (Note 4)
Bake:
- Preheat oven to 220°C/430°F (200°C fan) for 30 minutes.
- Line & fill with beads: Pick up crust using paper and place on tray (on the paper). Crumple 2 x 60cm / 2 feet long sheets of baking paper (Note 7) then fit into crust arranged in X. Fill with baking beads 1cm / 0.4" below rim (Note 8). Press to push paper into corners.
- Blind bake 25 min + 5 min: Bake 25 minutes, then use overhang paper to remove beads carefully (if sides look like they will cave in, return to oven with beads for 5 min). Bake 5 minutes then cool 10 minutes. (Seal any visible cracks with puff pastry scraps)
Assemble Flan Pâtissier:
- Turn oven down to 200°C/390°F (180°C fan).
- Fill with custard: Remove Creme Patissiere from fridge. Whisk to loosen, scrape into crust – fill to 1cm/0.4" below rim. (Leftover custard Note 7) Smooth surface, brush custard surface with egg yolk (use it all).
- Bake 65 minutes, rotating tray 180° at 45 minutes. It will puff up in the last 15 ninutes like a souffle. Remove from oven – it will still be very wobbly, have faith! It will set when cool!Golden surface – If the top is not golden like pictured, switch on broiler to caramelise surface. Watch carefully – takes minutes!
- Cool on counter for 4 hours (in pan). Transfer to plate (still in pan), cover loosely with cling wrap, then refrigerate 12+ hours.
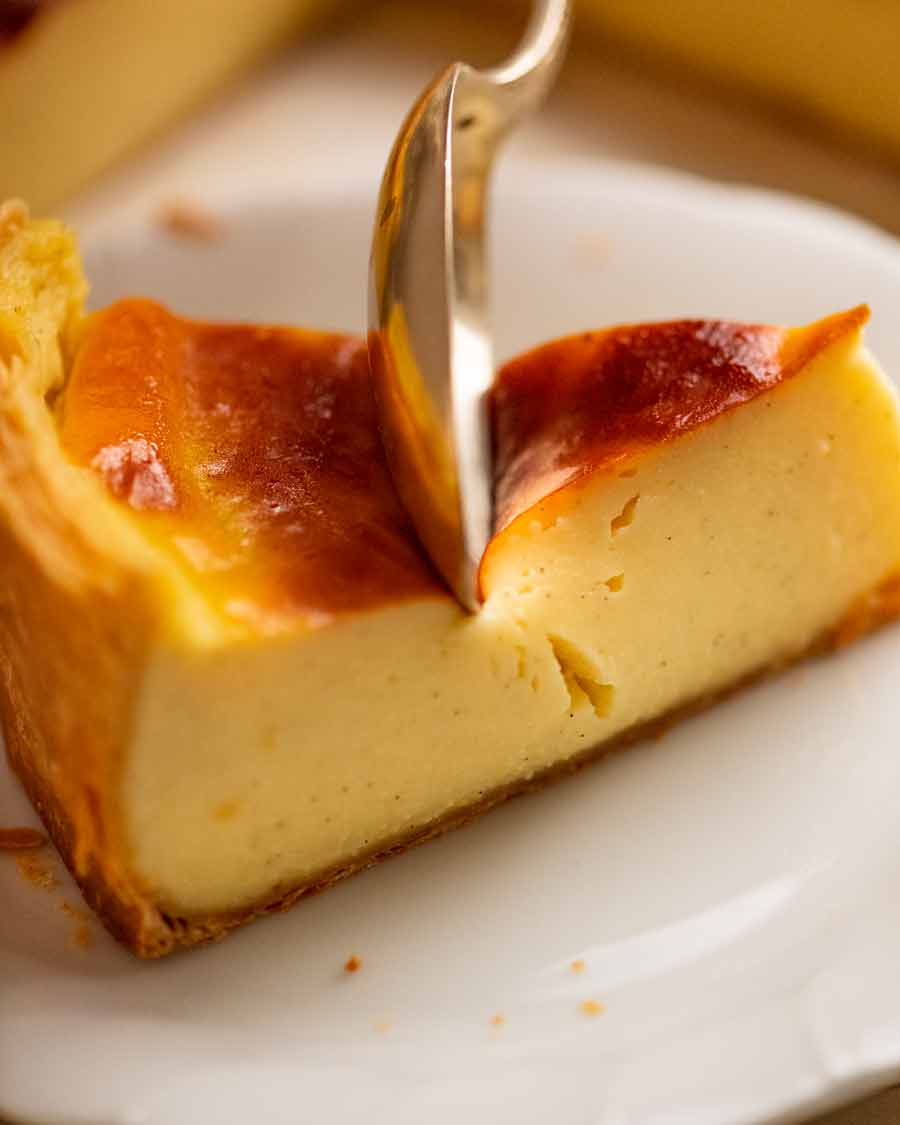
- Serve: Remove from fridge 1 hour prior to serving to bring to room temperature. Cut into slices like cake! The pastry is crispy & flaky. The custard will cut neatly (it will not ooze) but when you bite into it, the custard is beautifully soft and creamy. Traditionally eaten as a hand held bakery treat in France but you can use a plate if you're feeling civilised!
- Shelf life: Flan Pâtissier is at its best in the first 24 hours after it is put in the fridge after baking as this is when the pastry is still beautifully crisp. Beyond this the pastry starts to soften which no one has pointed out yet because everyone is besotted by the custard! But I notice.
Notes
- Risk of taller-than-usual puff pastry sides caving in before they are set – Take care when removing baking beads to ensure it is set. If sides look like they are flopping, put baking beads back in at bake 5 minutes longer until sides stop flopping in.
- Custard doesn’t set – Make sure you measure the cornflour properly, and cook for 20 seconds after big lazy bubbles appear.
- Custard leaking – Use puff pastry scraps to seal any visible cracks.
- Crispy base – Bake directly on tray without using base of springform pan.
- Your pastry isn’t as neat as mine – So what? It’s still gonna be delicious. Besides, this tart is SUPPOSED to look rustic rather than elegant like, say, Lemon Tart.
1. Vanilla beans – Split the beans in half (or cut a slit down the middle) then use a butter knife or teaspoon to scrape the seeds out. Substitute: 2 tsp vanilla bean paste (ie with little vanilla specks in it), this is what I used in early days of testing for economical reasons. Vanilla extract will work (ie liquid, no specks) but vanilla flavour not as pure. As for imitation vanilla, I don’t think it has a place in this recipe I’m afraid! 2. Egg yolks – 120g / 4.2 oz yolks is usually 6 large eggs weighing 55 – 60g / 2 oz each (600g / 1.2lb for a dozen eggs, usually labelled “large eggs” because it’s an industry standard). The fairly long bake time for this recipe guarantees the custard will set (assuming you measure cornflour properly!) so don’t get too hung about about 100% accuracy of yolks by weight. Leftover egg whites – Here’s my list of what I do with them and all my egg white recipes can be found in this recipe collection. 3. Cornflour/cornstarch – You do NOT want to be short on the cornflour as the setting of the custard relies on it! Easiest to weigh for accuracy. Make sure the tablespoon is properly filled, packed in and levelled off with the back of a knife. READERS IN FRANCE – Do not use what you call “cornflour” (ie the yellow powder), use cornstarch (white powder). 4. Puff pastry handling – For this recipe, it is easiest to handle the puff pastry while as stiff as possible (ie frozen), JUST pliable enough to work with. Else it flops/slides/gets sticky. At any point if it thaws too much, just slide it back into the freezer. CUTTING side strips – Use a long knife, cut straight down and up. Don’t drag knife along pastry as this smears the pastry so you won’t see the lovely layers when baked. Freezing lined cake pan overnight – This helps ensure sides don’t collapse during blind baking and helps prevent pastry shrinkage. An excellent tip for any tart / quiche pastry blind baking, per advice from a professional Pastry Chef in France. 5. Fridge custard overnight – This improves the flavour of the custard. But if in a hurry, you can continue on once the custard is completely cool. 6. Not using base – Baking the tart directly on a tray without the cake pan base ensures the puff pastry base is beautifully crisp and golden, not soggy at all. Essentially, we’re using the no-base tart ring baking method that professionals use! Plate – This is just for handling purposes until lined pastry is frozen again, bearing in mind we are not using the cake pan base. Use anything flat. 7. Crumpling the baking paper makes it easier to fit into the taller crust. Also a handy tip for small tart shells! 8. Baking beads – Need to fill quite deep to ensure it holds up the sides as it bakes, else you run the risk of the sides flopping in as it bakes. But not right to top of rim as we want the top of the pastry to bake up with beautiful flaky layers – so pretty! No baking beads? Use large dried beans instead. Super cheap baking beads! Dried lentils/rice etc will also work but add 5 minutes to the baking time. Smaller grains = less heat gets through them = longer bake time required to set the base. 9. Leftover Custard (keeps 3 days in fridge) – Volume of custard is such that expert level bakers will virtually use it all because there will be no pastry shrinkage / sides sliding down which leads to smaller pie crust volume to fill. If you do not use it all, you can either use it as a dolloping custard on anything, eat it with a spoon, fill small ramekins and bake for 20 minutes, or use leftover puff pastry to make mini custard tarts (line muffin in, prick base, bake 18 min at 180C/350F lined with paper and filled with beads, bake 5 min uncovered, cool, fill, brush stop with egg, bake 20 min. 10. Recipe credits – A recipe developed by yours truly over quite a few months with the assistance of:
- Jennifer Pogmore, French Pastry Chef extraordinaire based in France who has found herself in the unexpected position as my teacher of all things French pastry.
- Chef Jean-Baptiste, RecipeTin Eats culinary collaborator and my “this is the faster, better way to do it” mentor, and his father, for going out and buying Flan Patissier samples to send us photos for inspection!
- My wonderful, surprisingly large French Instagram community, for participating in Q&A as I set about determining exactly they thought entailed the “perfect” Flan Patissier!
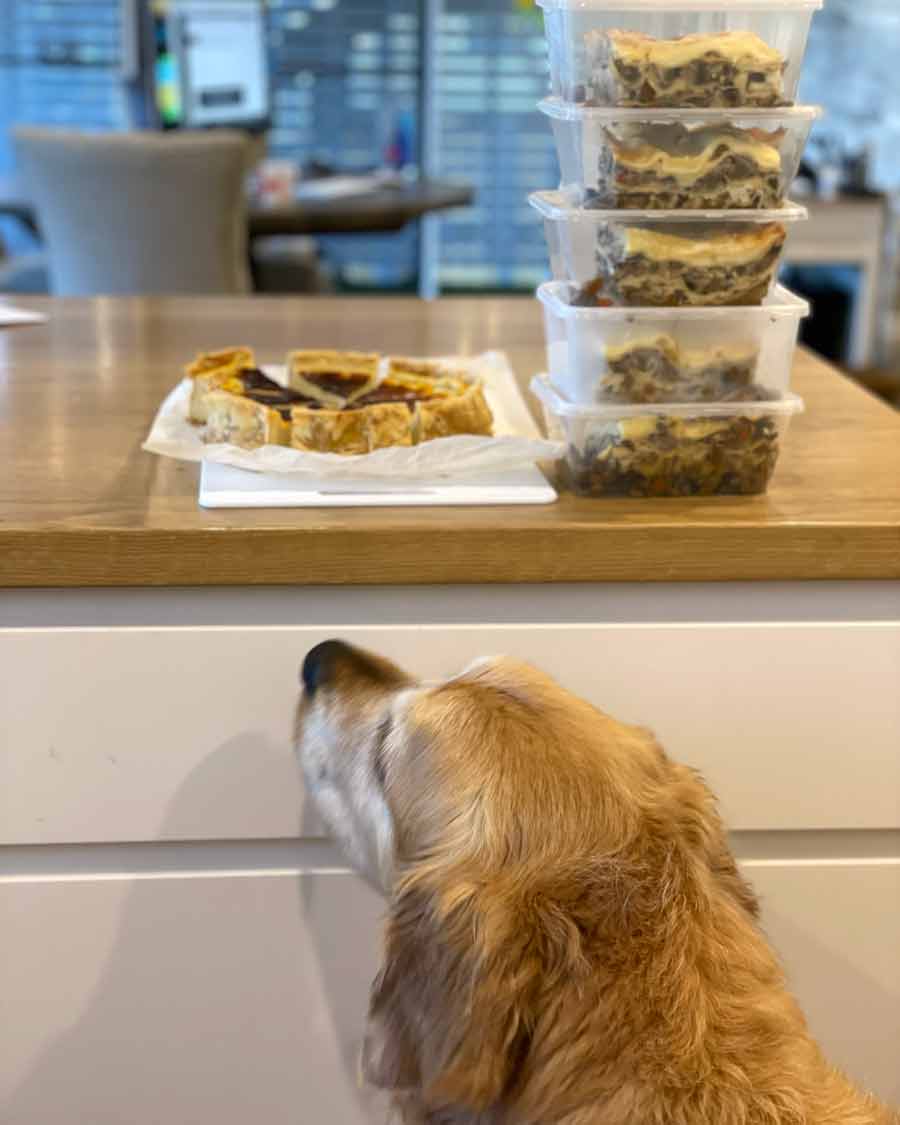
Life of Dozer
Flan Pat or Lasagna??
Flan Pat. Every. Single. Time.
The post Flan Pâtissier (French Custard Tart) appeared first on RecipeTin Eats.
]]>