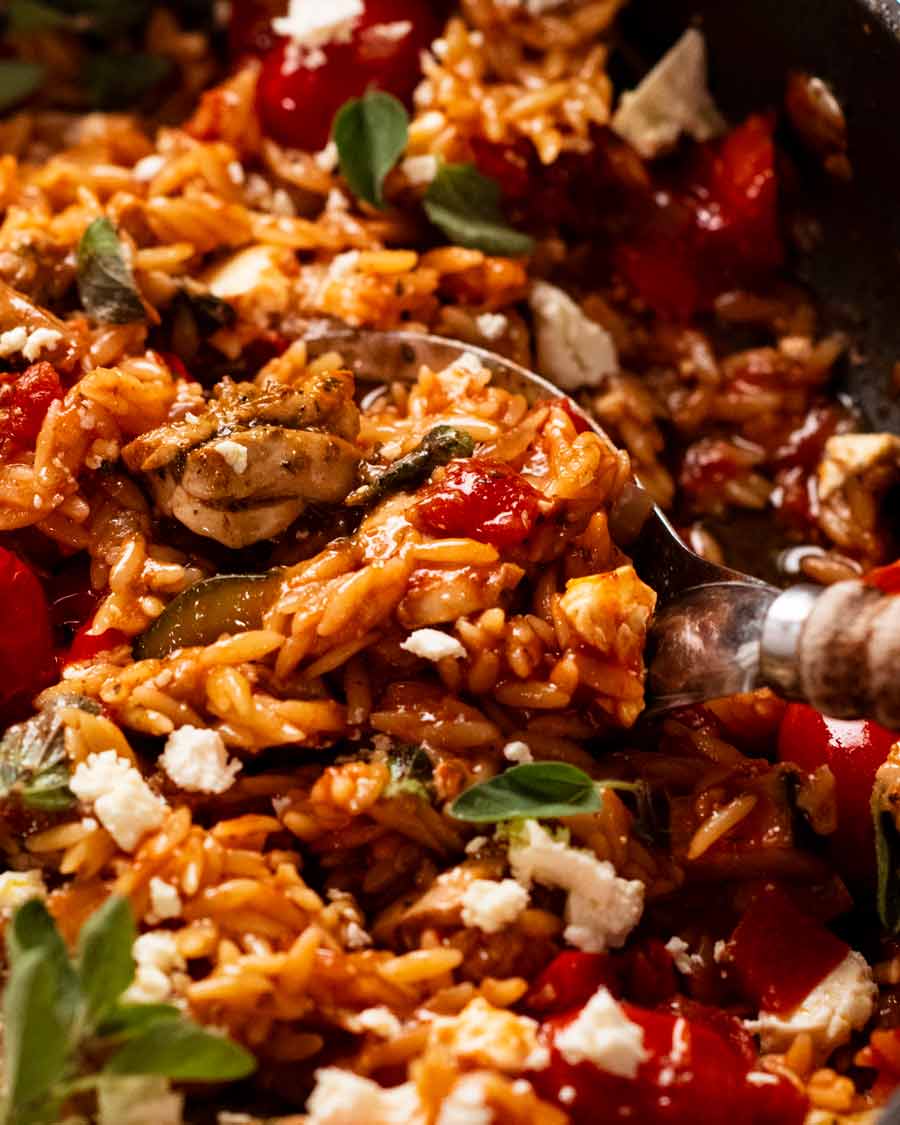
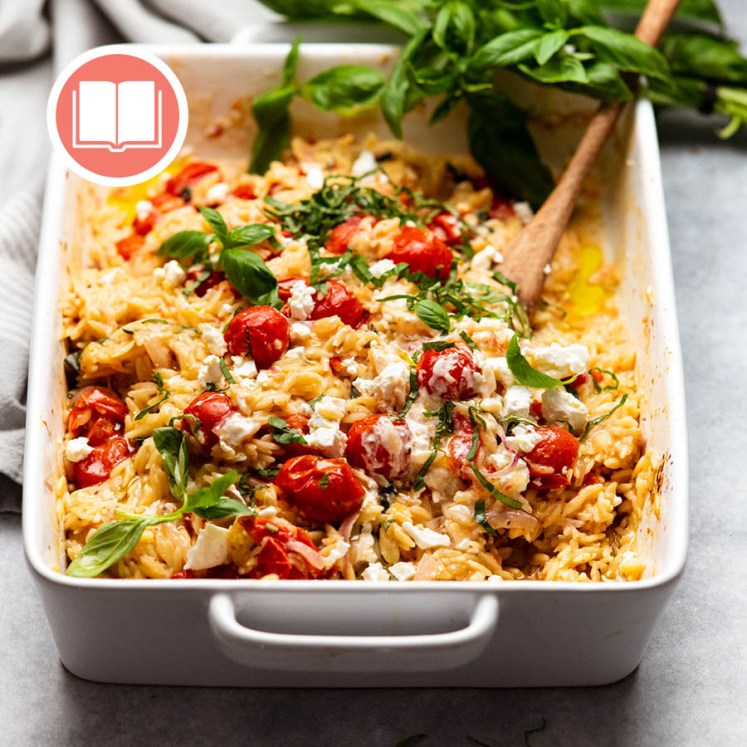
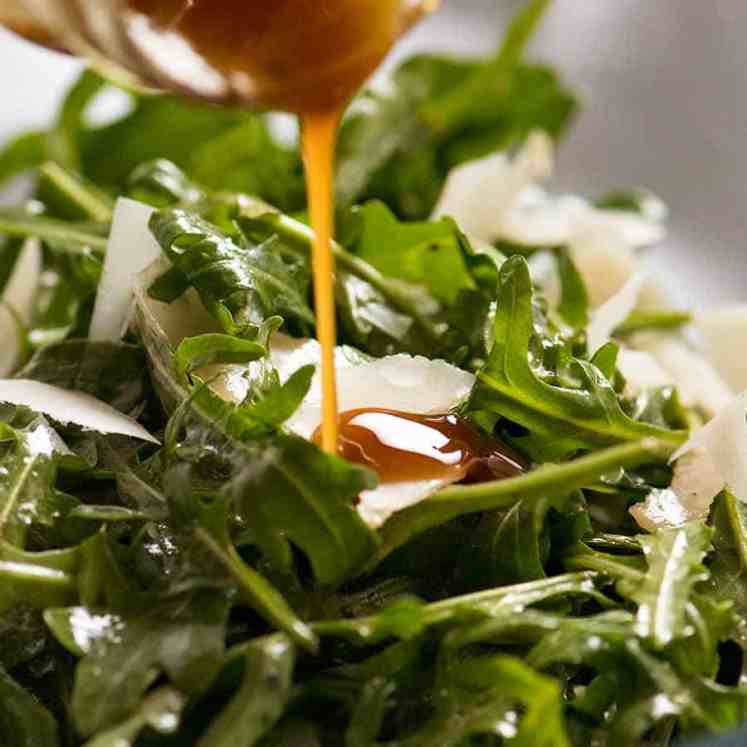
 This is a great quick recipe that’s got everything you need for a complete dinner, all cooked in one pot. Plenty of vegetables, with risoni/orzo and chicken. Tastes like risotto – loaded with tasty lemon-garlic Greek flavours! One-pot Greek chicken risoni Patience has never been my greatest virtue, so I shared many personal favourite recipes... Get the Recipe
The post One-pot Greek chicken risoni (orzo) appeared first on RecipeTin Eats.
]]>This is a great quick recipe that’s got everything you need for a complete dinner, all cooked in one pot. Plenty of vegetables, with risoni/orzo and chicken. Tastes like risotto – loaded with tasty lemon-garlic Greek flavours!
One-pot Greek chicken risoni
Patience has never been my greatest virtue, so I shared many personal favourite recipes back in the early days when I first started this website in 2014. Every now and then, I like to revisit these older recipes and bring them to the forefront with sparkling new photos (that are in focus, wow!) and recipe videos where the chicken doesn’t have a weird green-ish/yellow tinge.
I have no embarrassment about my photos and videos from the early days because it reminds me how far I’ve come. But I do think it’s nice to spruce up these old recipes for your viewing pleasure – and hopefully convince you to try them. Like today’s new-old recipe: Greek chicken risoni! Complete dinner made in one pot, nice and quick to make, loaded with tasty Greek flavours.

What you need
Here’s what you need to make this Greek risoni recipe.
1. The risoni / orzo
Risoni is actually a pasta that is shaped like long grains of rice. Also known as “orzo”, find it in the pasta aisle. It costs around the same as spaghetti etc.
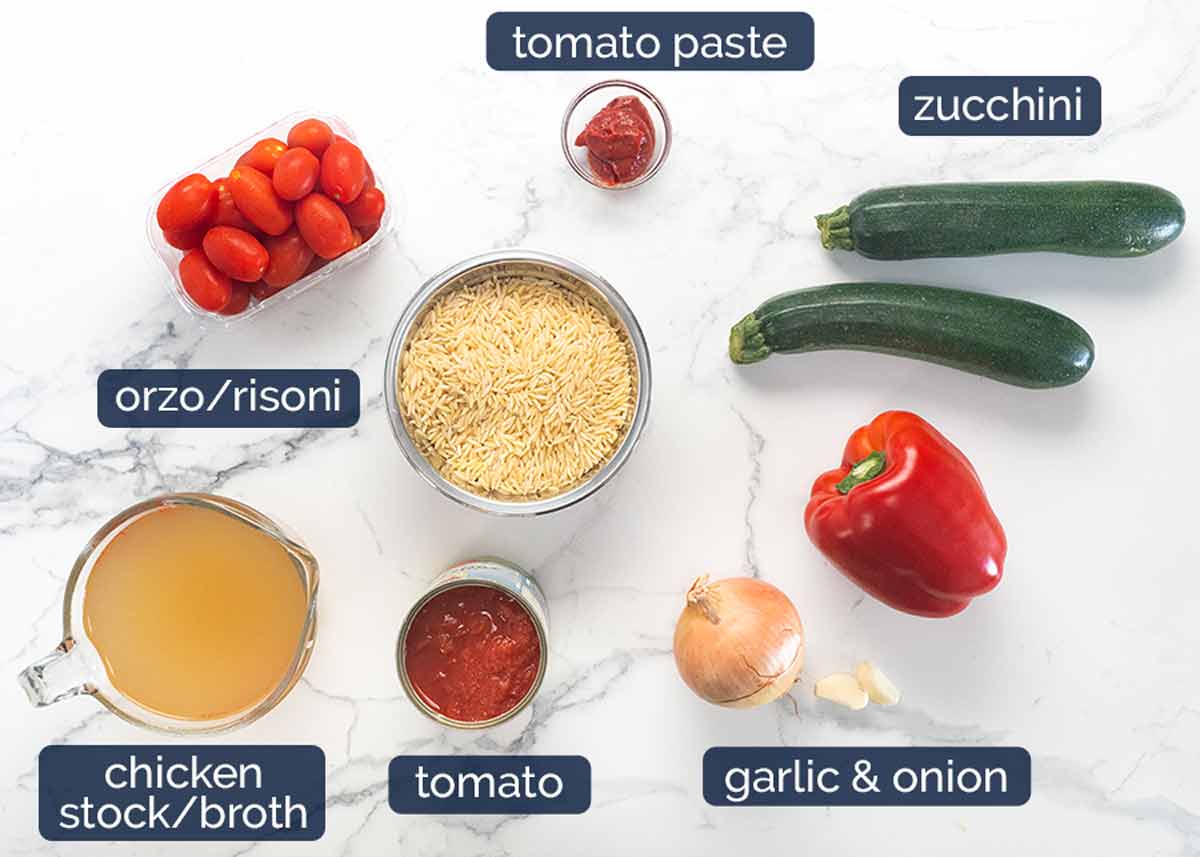
Risoni / orzo – See notes above the photo.
Chicken stock / broth and canned tomato – These are the liquids used to cook the risoni. Better than water because the risoni absorbs the flavour as it cooks!
Tomato paste – This adds a little boost of tomato flavour to the sauce, as well as thickening the sauce slightly so you end up with that really lovely oozy texture in the finished dish. Not the end of the world if you don’t have it.
Vegetables – I use zucchini / courgette and capsicum / bell pepper. Feel free to substitute with other sauté-able vegetables (carrot, beans, peas, fennel, corn, celery, frozen veg mix).
Also, if someone could arrange for the global standardisation of food words, that would be super helpful. Thanks! 😂
Onion and garlic – Flavour base aromatics.
Cherry tomatoes or grape tomatoes – I like to scatter across the surface before popping the dish in the oven. Love the juicy pops of tomato that burst in your mouth!
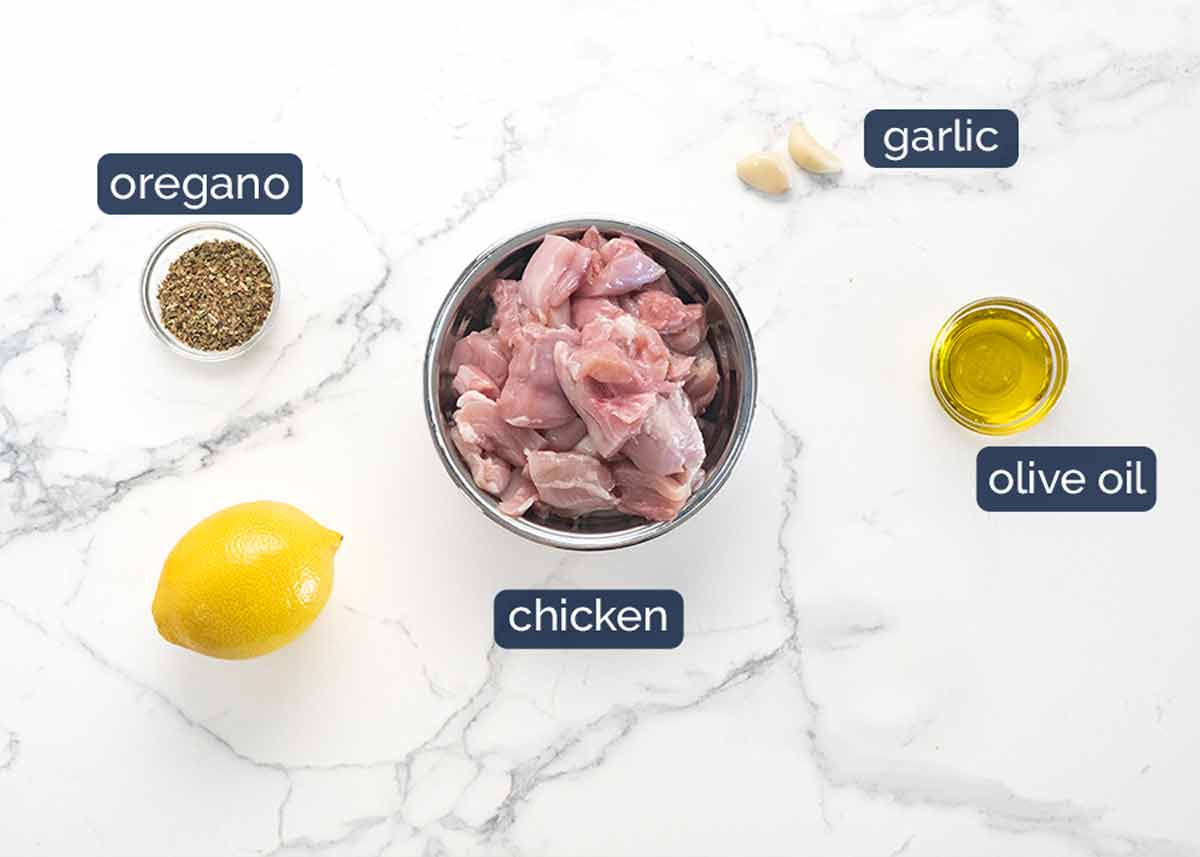
2. Lemon garlic chicken
A brief marinade of the chicken with classic Greek flavours makes the chicken that much tastier! Here’s what you need:
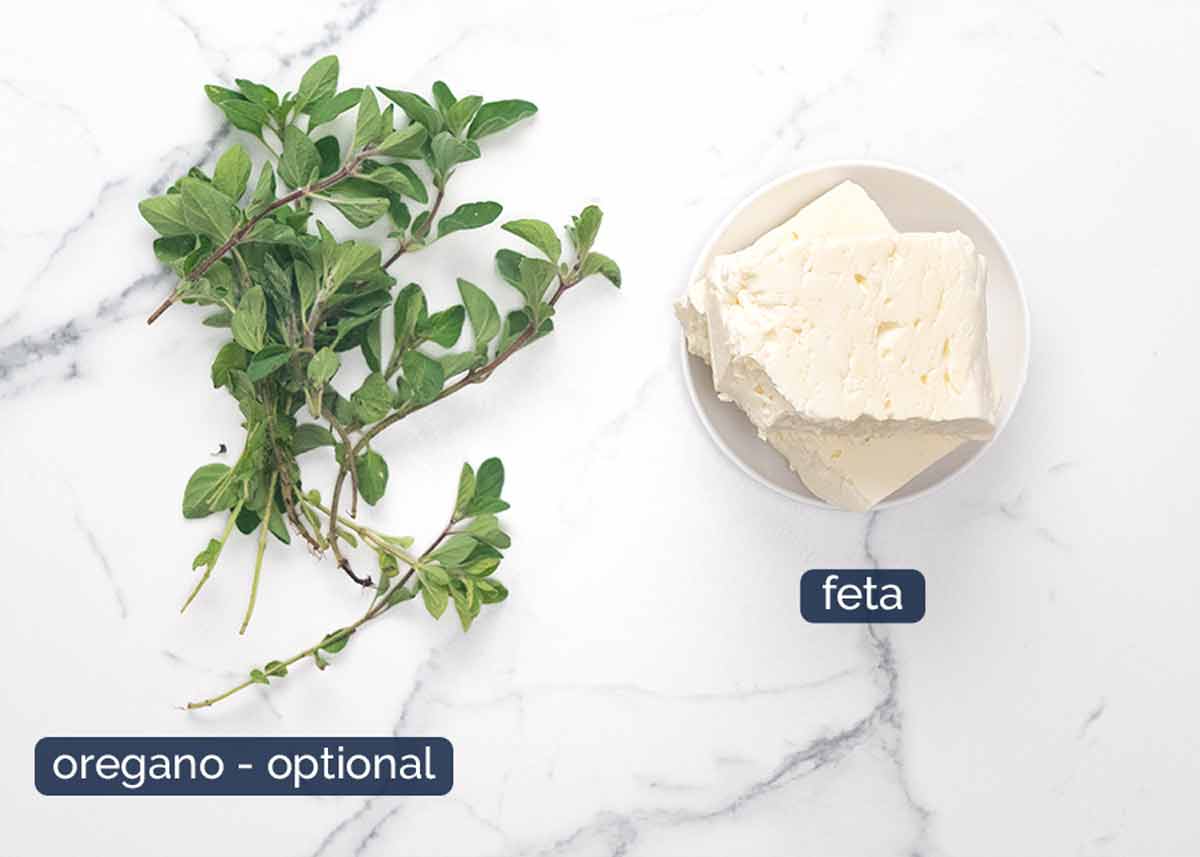
3. Garnishes (semi-optional)
I say it’s “semi-optional” because while you can skip the fresh oregano, the feta is highly, highly recommended!
How to make one-pot Greek chicken risoni
This recipe starts on the stove and is finished in the oven. I like this technique because it’s safer/easier – no need to stir – and the surface gets caramelised which means extra flavour. Anyone who’s made the fan-favourite One Pot Greek Chicken with Lemon Rice will know this method works well!
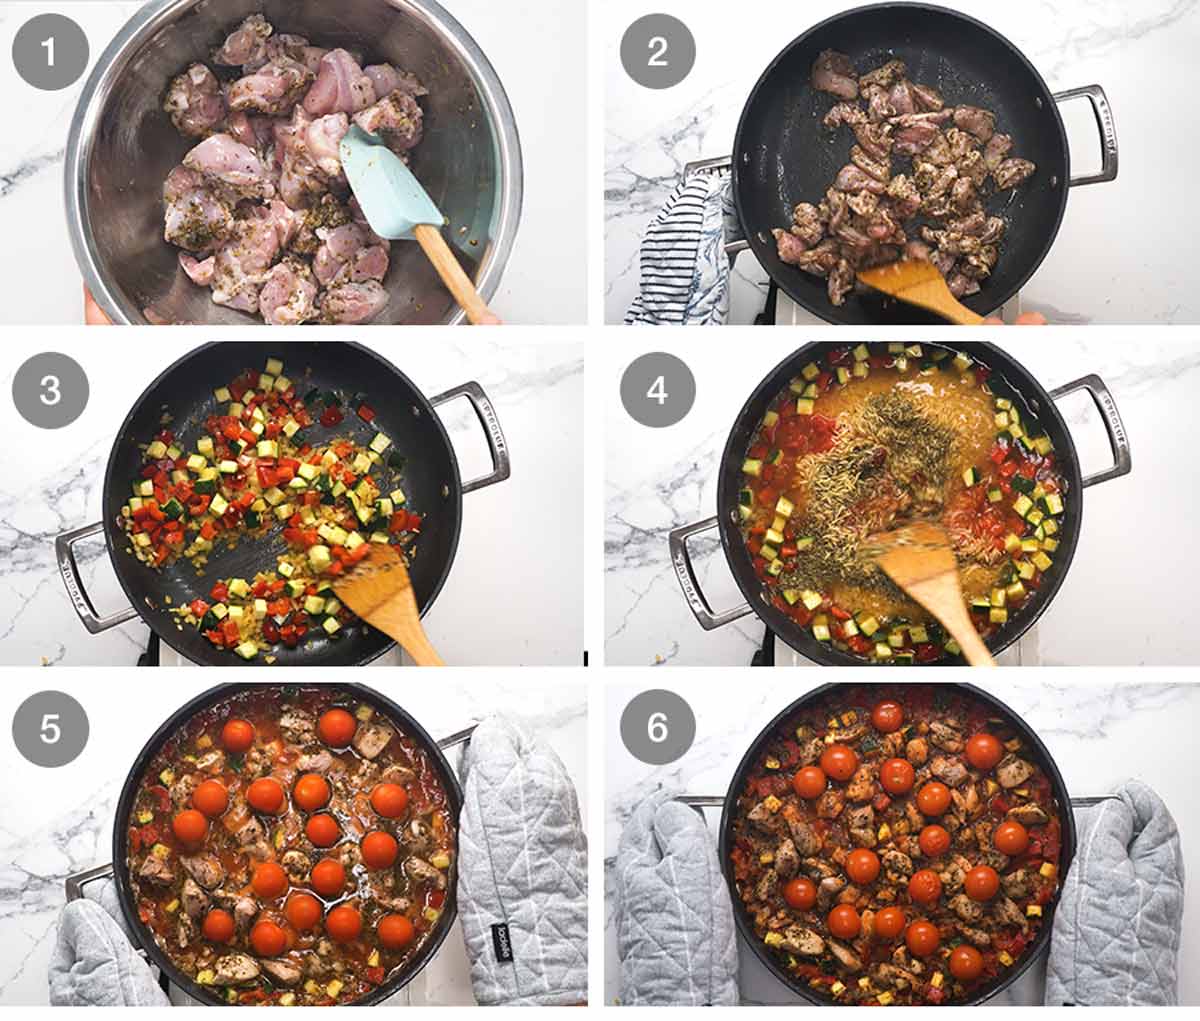
Marinade chicken in the lemon, olive oil, garlic and oregano. Just 20 minutes adds decent flavour into the chicken flesh.
If you’re pressed for time, you can skip the marinade, there’s plenty of flavour in the overall dish and the chicken will absorb flavour as it braises with the risoni. If you want to get ahead, you can marinade the chicken overnight – or even freeze the chicken in the marinade. So many options!

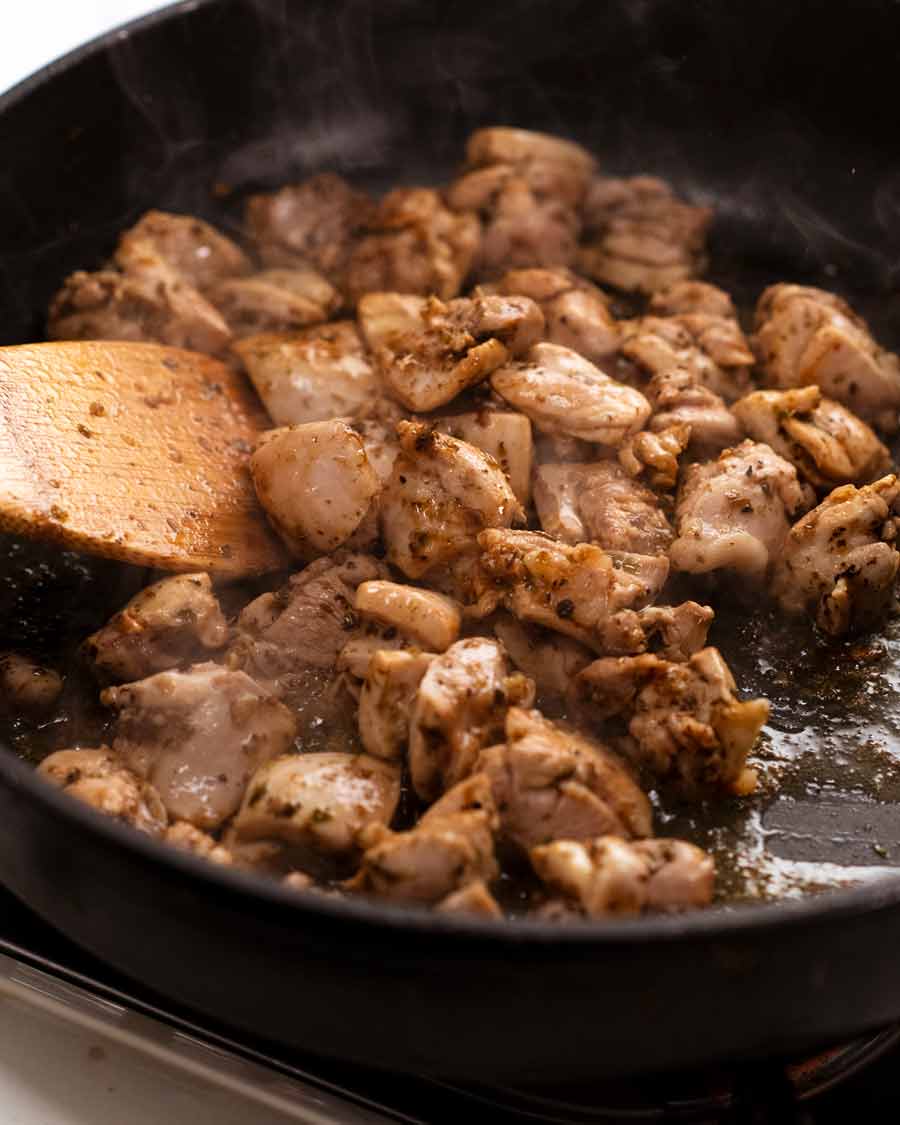
Brown chicken – Use a large ovenproof skillet / frying pan, or large pot. The one I’m using is a 30cm / 12″ non-stick frying pan.
Cook the chicken, just to seal the outside and lightly brown it. It will only take about 2 to 3 minutes. Don’t cook the chicken all the way through as it will finish cooking with the risoni.
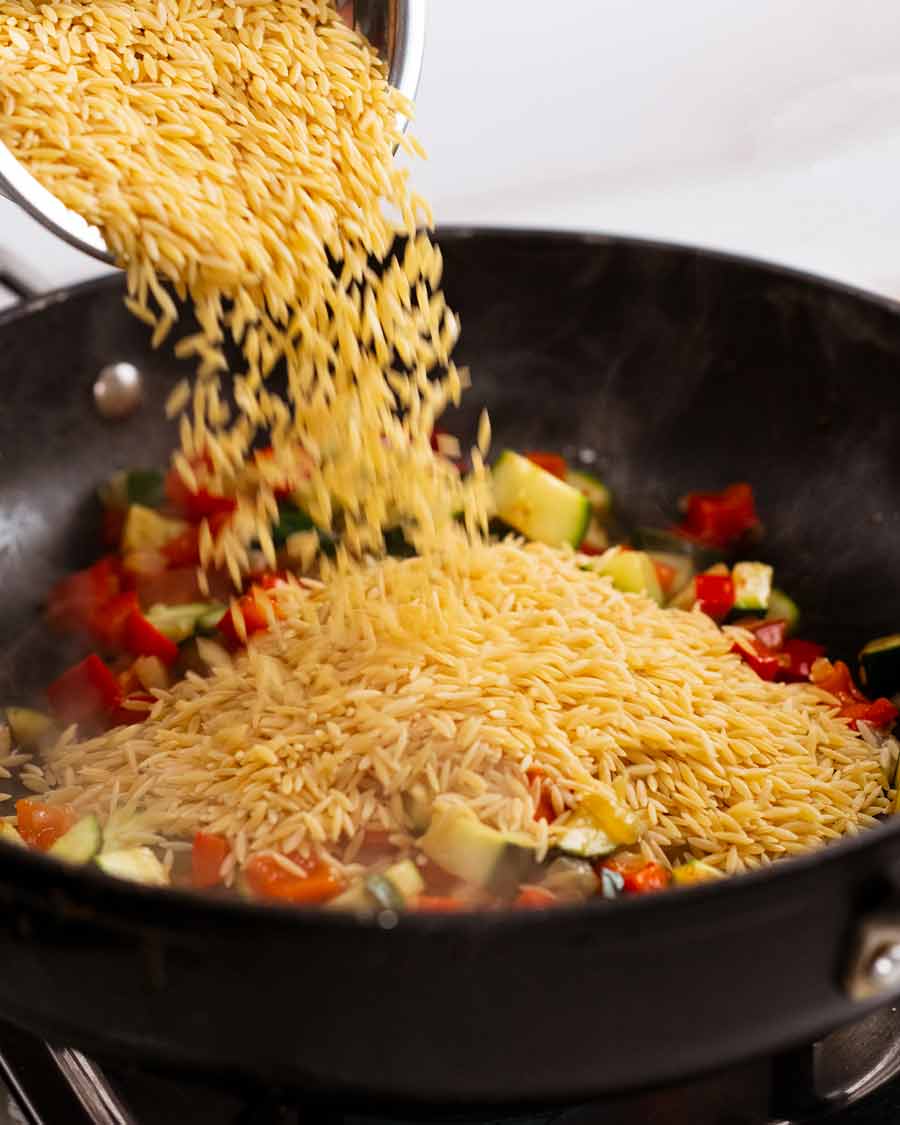
Sauté aromatics and vegetables – Once the chicken is browned, remove it from the pan. Then sauté the garlic and onion, followed by the zucchini and capsicum.
Add everything else – Add the risoni and stir to coat in the tasty flavours. Then add everything else – canned tomato, tomato paste, chicken stock, salt and pepper – and stir to combine.
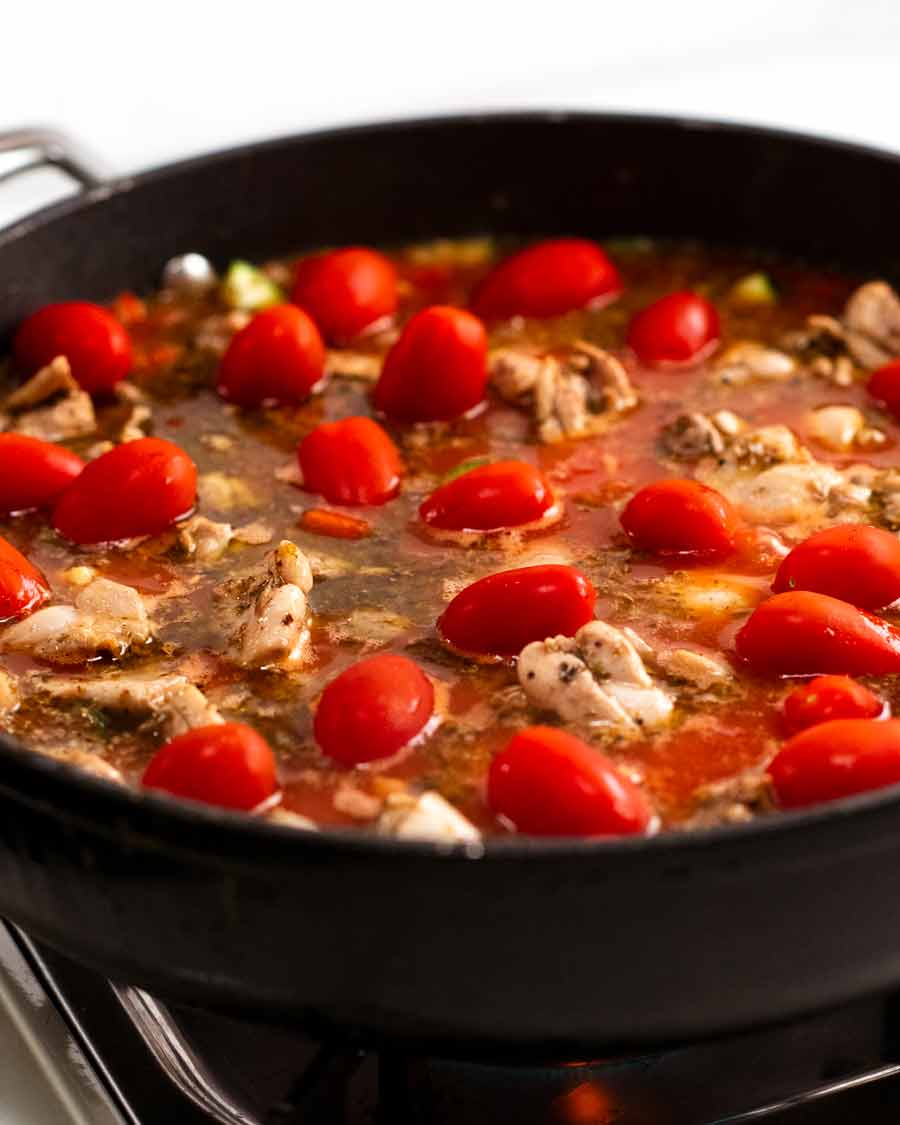
Top with chicken and cherry tomatoes but don’t stir them in.
Oven 15 minutes – As soon as the liquid starts to bubble, transfer the pan to the oven (no lid) and cook for 15 minutes or until the risoni is tender.
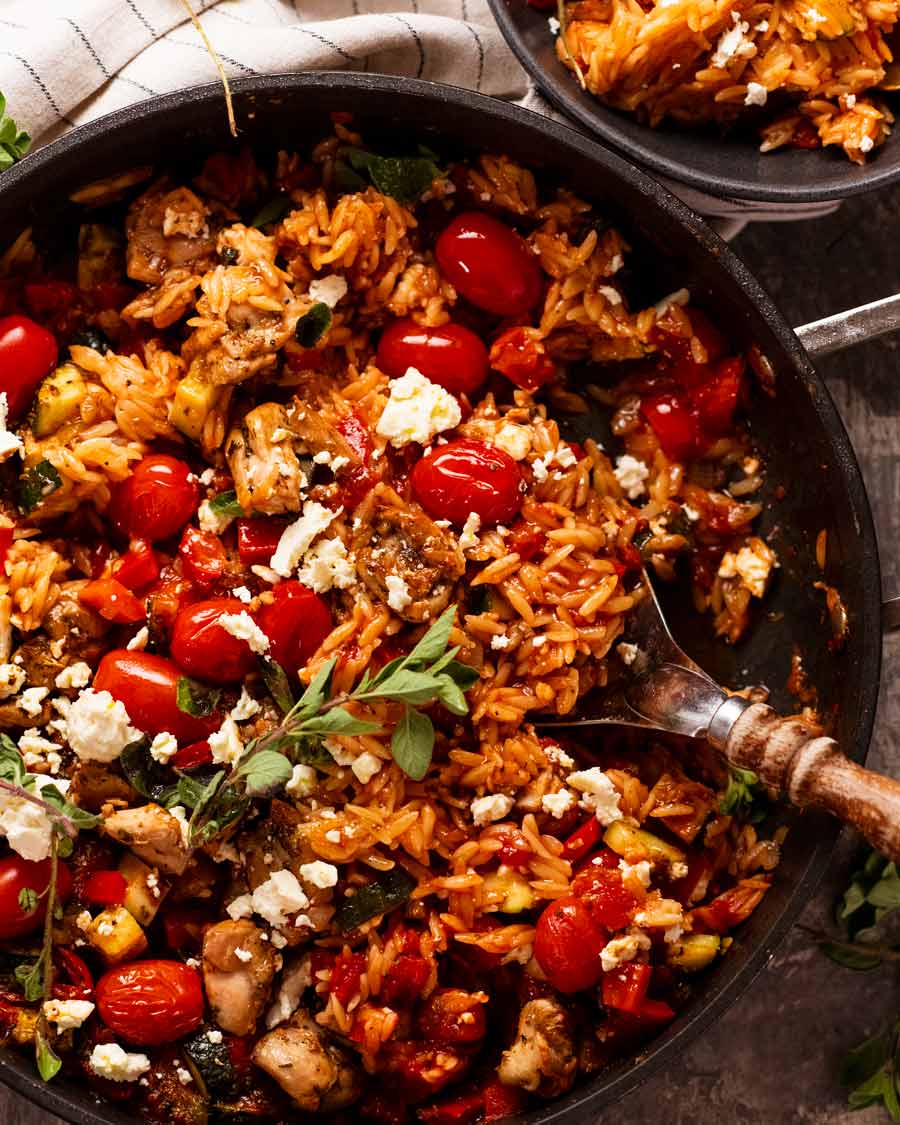
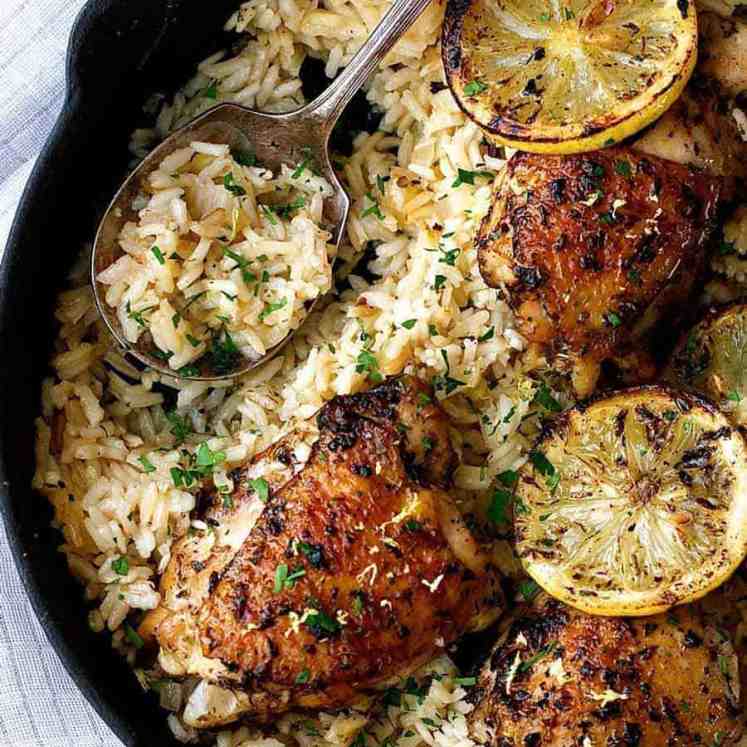
Garnish and serve – Remove the pan from the oven. There should still be small pools of liquid on the surface. This is what we want – the dish should be oozy and saucy, not dry and stodgy!
Drizzle the dish with lemon juice, crumble over the not-optional-feta then sprinkle with the optional-fresh-oregano. Then serve!
LOOK how juicy and irresistibly oozy it looks. It’s calling your name!
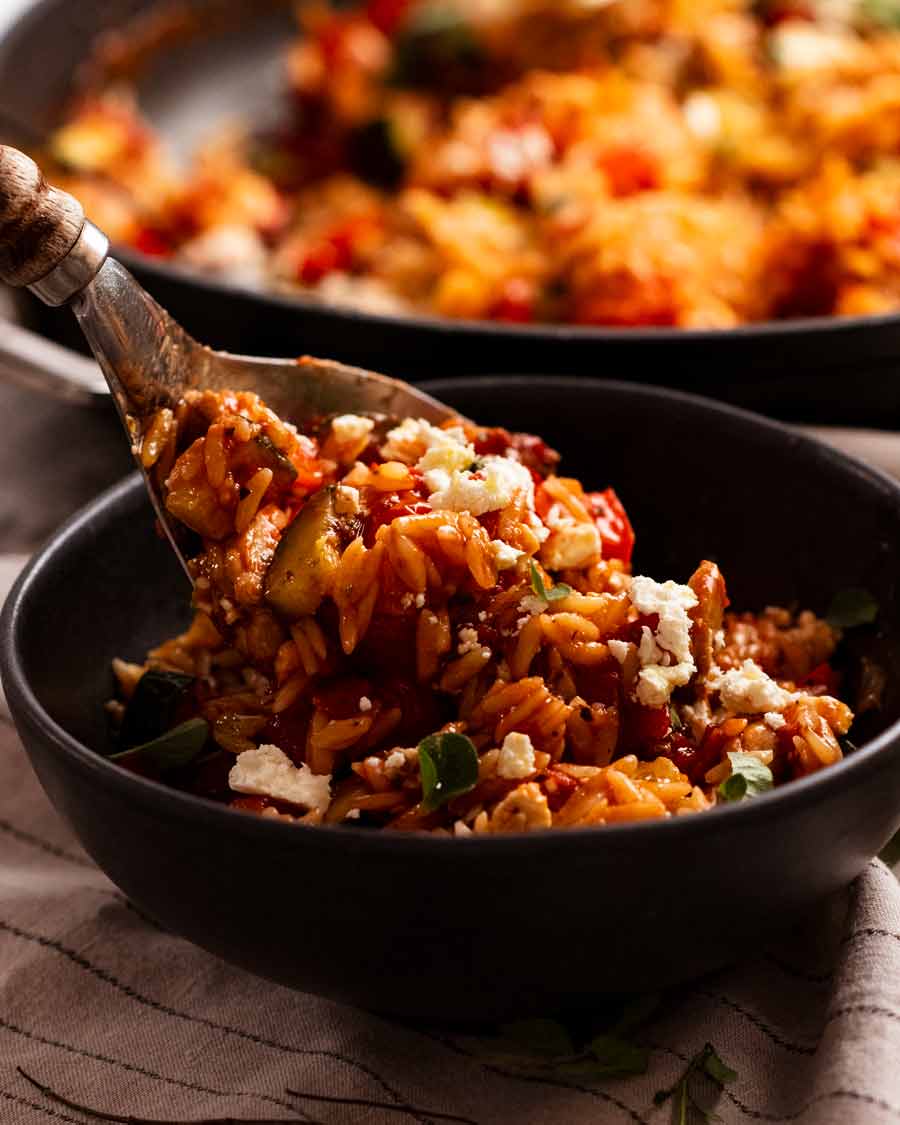
Spoon into bowls, and marvel how it looks just like your favourite risotto. Except, well, you know. You haven’t been slaving over a hot stove for 40 minutes, ladling in stock and stirring, stirring, stirring.
Leftovers, should there be any, will keep for 3 days but won’t be as oozy as pictured because the pasta will absorb the liquid. A little splash of water before you microwave goes a long way to salvage it, as does a fresh sprinkle of feta and spritz of lemon juice (I find lemon juice flavour fades with time).
Hope these sparkling new photos and in-focus-video convinces you to make this!! – Nagi x
PS The Ingredients list in the recipe below looks deceptively long. But actually, there are quite a few double ups because of the way I write the recipe. So don’t be put off! 
Watch how to make it
One Pot Chicken Risoni
Ingredients
Lemon Garlic Chicken
- 1 lb / 500g chicken thighs , boneless skinless (or breast), cut into 2 cm / 1" pieces
- 2 garlic cloves , finely minced
- 1 tbsp dried oregano
- 1 tbsp olive oil
- 1/2 tbsp lemon juice
- 1 tsp lemon zest
- 1/2 tsp each salt and pepper
Orzo/Risoni
- 2 tbsp olive oil
- 2 garlic cloves , minced
- 1 small onion , finely chopped
- 2 zucchini (medium, or 1 large) , cut into 1cm / 1/3" cubes (Note 1)
- 1 red bell pepper/capsicum , cut into 1cm / 1/3" cubes (Note 1)
- 1 tbsp dried oregano
- 2 1/2 cups chicken broth/stock , low sodium
- 14 oz / 400g canned crushed tomatoes
- 1 tbsp tomato paste
- 1 1/2 cups orzo/risoni (Note 2)
- 1 1/2 cups cherry tomatoes (1 Australian punnet)
- 1 tsp cooking salt (kosher salt)
- 1/2 tsp black pepper
Garnish (semi-optional)
- 2 tbsp lemon juice , drizzling at end
- 1/2 cup (100g) Greek feta cheese , crumbled (not optional)
- Fresh oregano leaves (optional)
Instructions
- Marinade chicken – Combine Marinated Chicken ingredients in a bowl and set aside for marinate for 20 minutes. (Skip if in hurry, can also do overnight)
- Preheat oven to 180°C/350°F (160°C fan).
- Brown chicken (raw inside) – Heat 1 tablespoon olive oil in a a large oven proof skillet or pot over high heat (Note 3). Cook chicken until lightly browned but still pink inside. Remove from skillet.
- Sauté vegetables – Add 1 tbsp olive oil, garlic and onion. Saute for 1 minute, then add zucchini and bell peppers/capsicum. Cook for 2 minutes.
- Add everything else – Add risoni, oregano, chicken broth, tomato, tomato paste, salt and pepper.
- Scatter chicken and cherry tomatoes across the surface (don't stir in).
- Bake 15 minutes – Once the liquid comes to a simmer, transfer to the oven (no lid) and bake for 15 minutes (or until risoni is just cooked, tender but still firm). There may be liquid on the surface still – that's good!
- Drizzle with lemon – Remove from oven, drizzle with lemon juice. Garnish with feta and fresh oregano leaves, if desired, then serve.
Notes
The liquid evaporates quite quickly while serving. It was slightly wetter when I took it out of the oven.
4. Leftovers will keep for 3 days in the fridge though it won’t be as oozy as the risoni absorbs the sauce. Resurrect with a splash of water, and microwave.
Nutrition assuming 5 servings.Nutrition
Originally published January 2016. Spruced up with brand new photos and recipe video in February 2021 with minor recipe improvements (mainly process and writing). But most importantly, Life of Dozer section has been added!
More risoni / orzo recipes
I do love risoni! So quick to cook, tastes like risotto.


Life of Dozer
NO, he’s not being adorable, cuddling up to me. He’s trying to get to my toast on the other side.

The post One-pot Greek chicken risoni (orzo) appeared first on RecipeTin Eats.
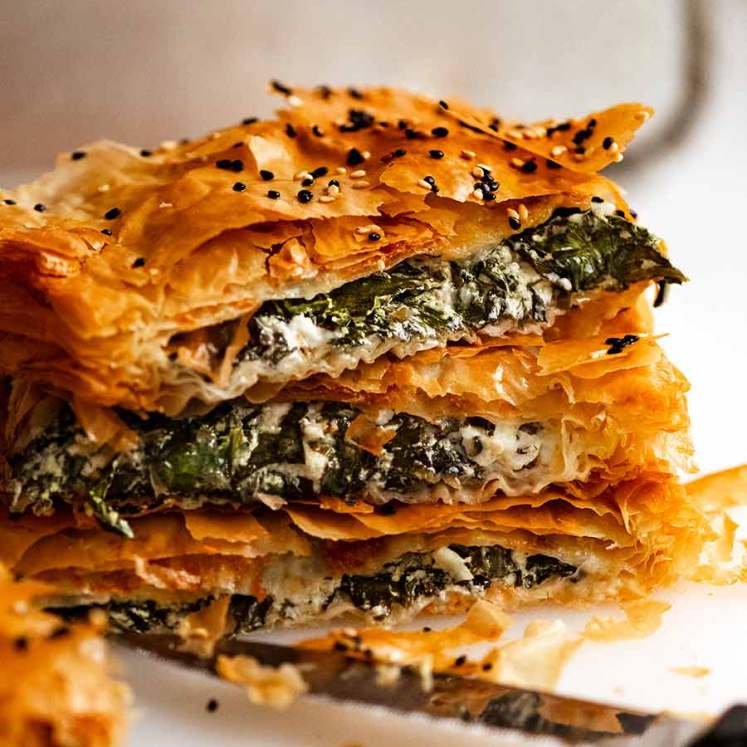
]]> Spanakopita: the iconic traditional Greek Spinach Pie encased in layers upon layers of golden, buttery and flaky filo pastry. For the best Spanakopita of your life, use raw rather than cooked spinach, and bind the phyllo pastry layers using a little finely shredded Greek cheese so they stay together rather than flying everywhere when you... Get the Recipe
The post Spanakopita (Greek Spinach Pie) appeared first on RecipeTin Eats.
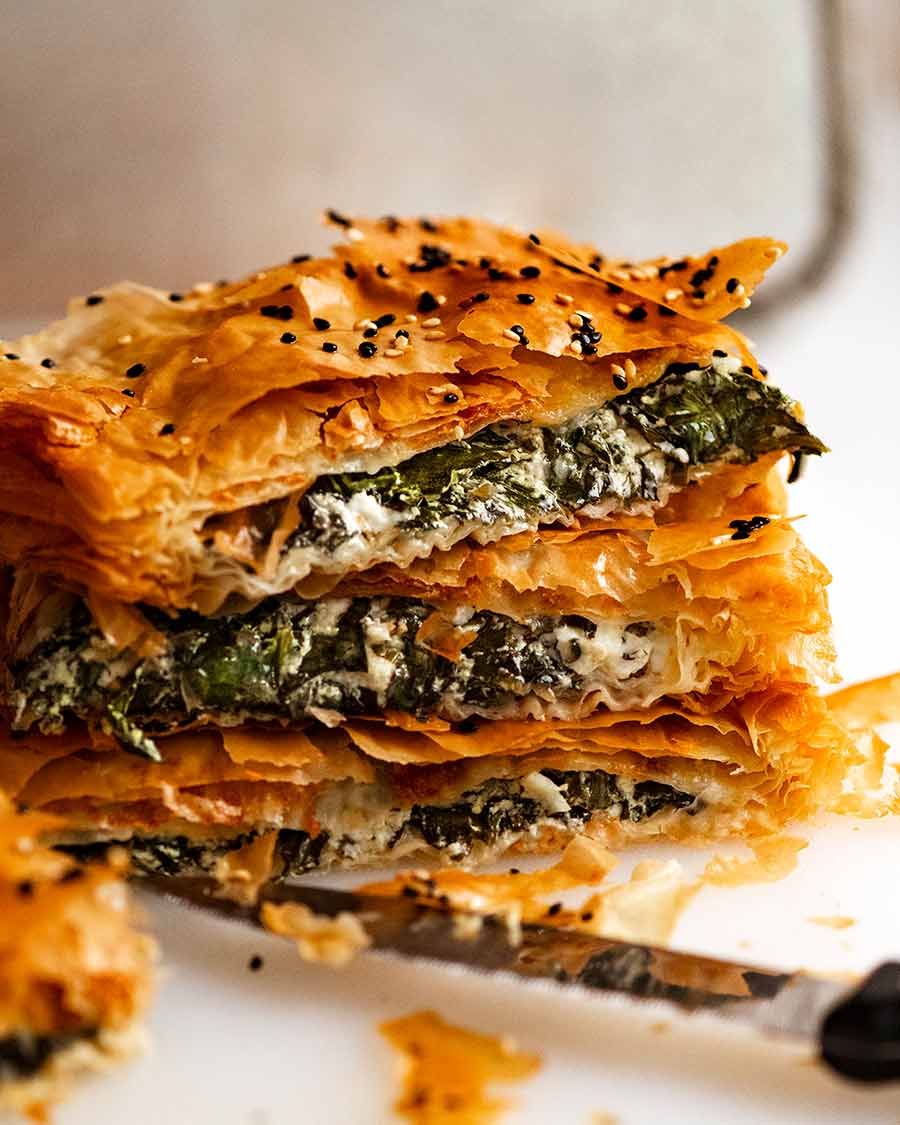
]]>Spanakopita: the iconic traditional Greek Spinach Pie encased in layers upon layers of golden, buttery and flaky filo pastry. For the best Spanakopita of your life, use raw rather than cooked spinach, and bind the phyllo pastry layers using a little finely shredded Greek cheese so they stay together rather than flying everywhere when you cut it!
Spanakopita
If I were to compile the Greatest Hits of dishes I’ve served to friends in recent years, this one shoots straight to the list. It made an appearance at a recent gathering, and to say it was the most popular dish of the night would be an understatement.
It was the first thing to go. There were rave reviews around the table. We were picking at the leftover shards of filo pastry long after the last piece had disappeared.
But the biggest compliment? Silence. To say my group of friends are chatty is a bit of an understatement. So when something renders them totally silent at the table? It’s a serious compliment!! 😂


Ingredients in Spanakopita
Here’s what you need to make this traditional Greek Spinach Pie.
Fresh spinach
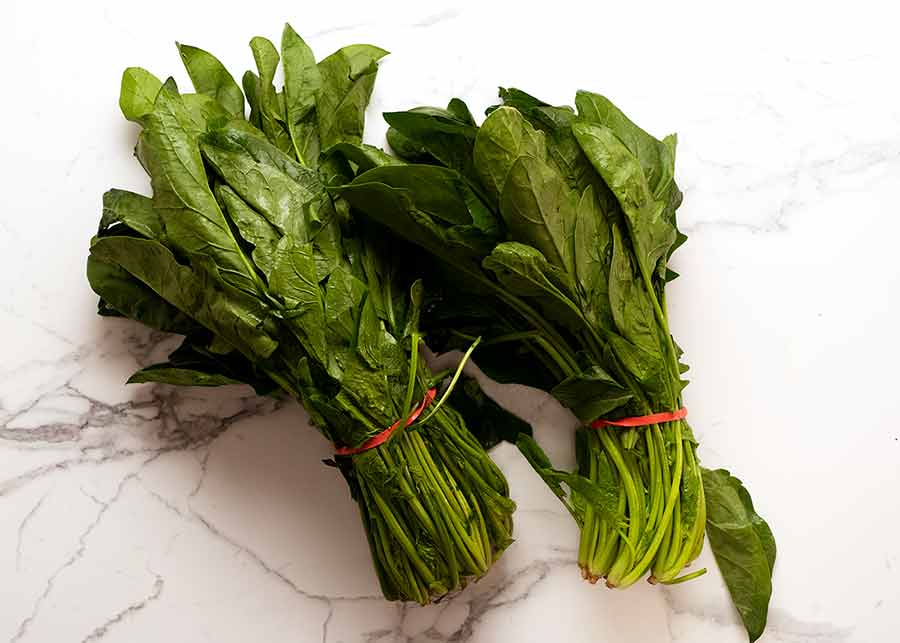
Skip the frozen spinach and convenience bags of baby spinach. For the best flavour, the best filling texture, and to ensure the pie base stays crispy, you cannot beat fresh spinach. Sorry folks! You know I always offer convenient alternatives if I think I can get away with it, but in this case, I can’t!
You will need 2 big bunches weighing around 600g/ 1.2lb in total in order to get ~300g/10oz of spinach leaves, once they’re trimmed from the stems.
Other Ingredients
In addition to spinach, here are the other ingredients you need for the Spanakopita filling:
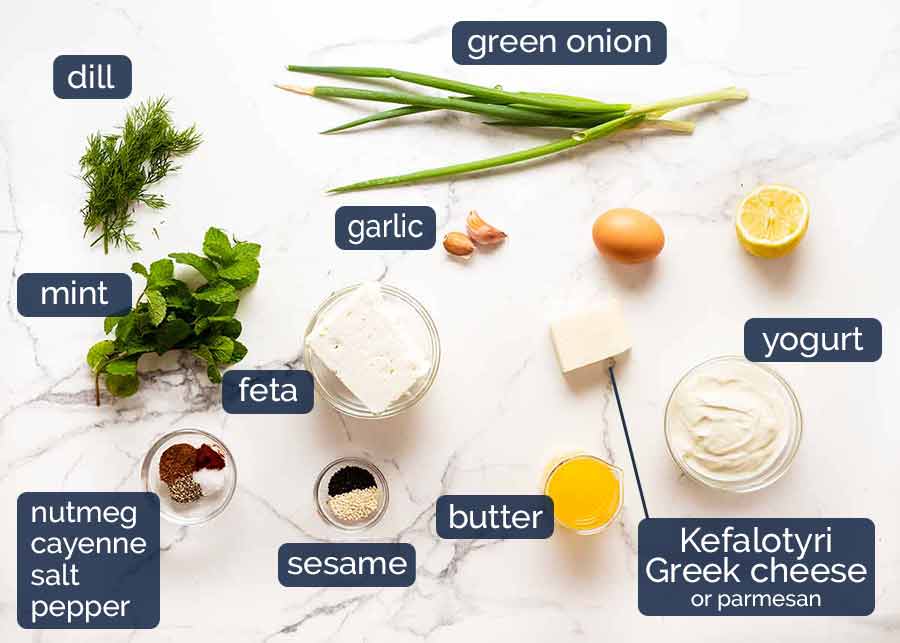
Feta – The other key filling ingredient along with spinach. A combination that’s as Greek as it gets!
Dill and mint – The fresh herb flavours bring an unmissable taste to Spanakopita. Don’t skip it!
Greek yogurt – Or other unsweetened plain yogurt. This is a wet ingredient that makes the filling nice and juicy, but not so wet that it makes the pastry base soggy;
Greek kefalotyri cheese – A traditional Greek hard cheese made from sheep or goat’s milk. It tastes somewhat like parmesan but is different and not as salty or sharp. This is used between the filo sheet layers that form the the top of the Spanakopita so they stick together rather than flying everywhere when you cut – neat trick!
It’s sold at Woolworths and Coles in Australia, or European/Greek delis. Don’t fret if you can’t find it, readily-available cheeses like parmesan, pecorino or romano make excellent substitute! Use leftover kefalotyri cheese for Pastitsio, the traditional Greek Pasta Bake;
Egg – This is what binds the filling together. Egg is, after all, the best food glue known to mankind!
Garlic – Because rarely will you see a Greek dish without garlic (usually much more than just one clove!);
Nutmeg – This is the signature spice used in Spanakopita fillings;
Cayenne pepper – Just a touch, not to make it spicy, but to provide a hint of warmth. It brings an extra little something-something to this Spanakopita!
Lemon – Some zest and juice for brightness;
Green onion – For sweetness and its onion-y taste in the filling;
Butter – Plenty here, for brushing on each and every layer of the filo pastry! It adds flavour plus keeps each layer separated so you get the signature flakiness. Want to up your Spanakopita game? Use clarified butter instead – the buttery flavour is even more intense!
Sesame seeds – To sprinkle on the surface. Using both white and black is a lovely signature look, but you could just double up on one or the other!
Filo pastry for Spanakopita (aka phyllo pastry)
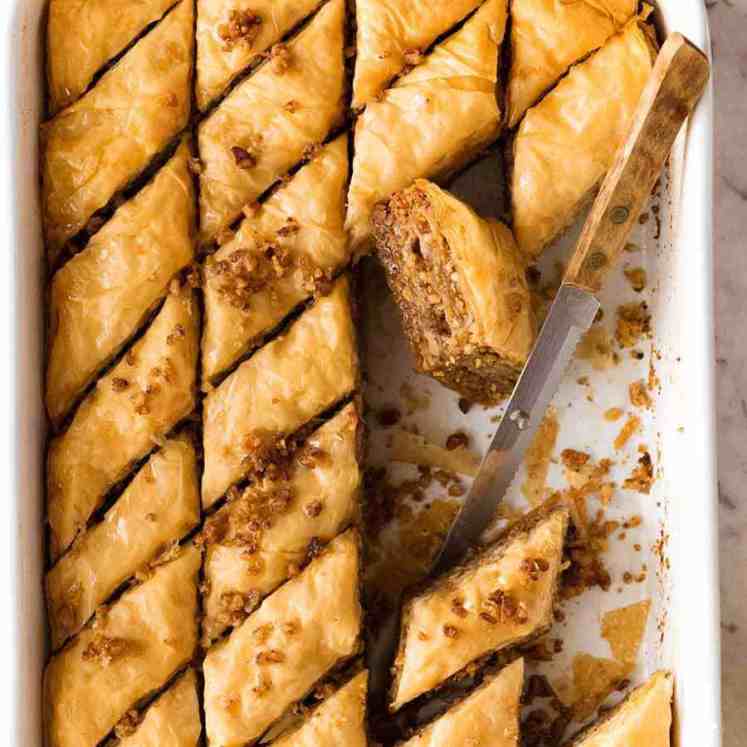
Spanakopita is encased with filo pastry on the base and top. Also known as phyllo pastry, this is a very thin, parchment-like pastry. It is used to make both savoury and sweet pastries and pies in Mediterranean and Middle Eastern cuisines, such as Baklava. It comes frozen or fresh, in the fridge section of grocery stores.
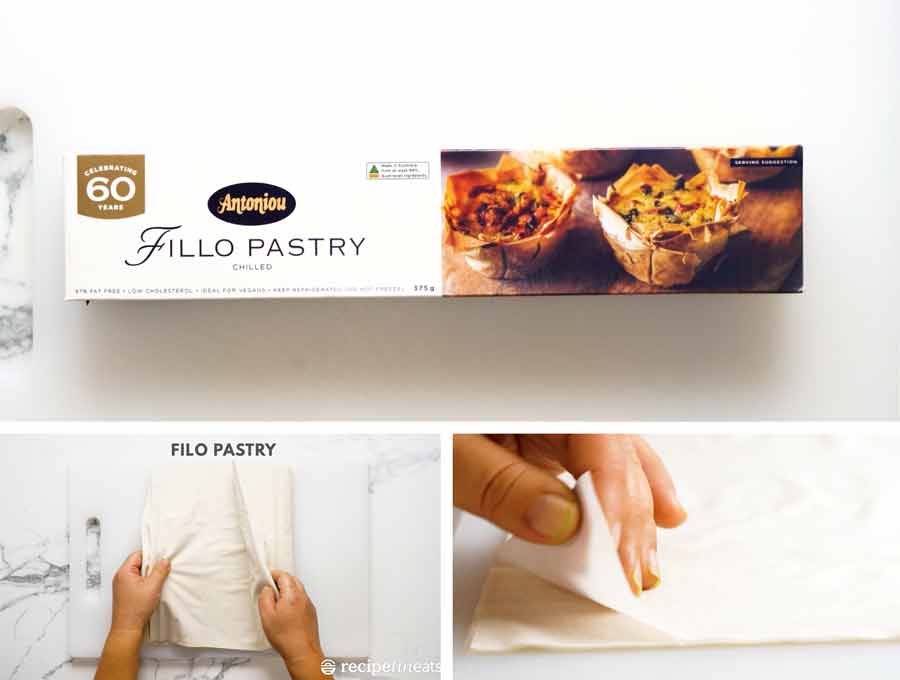
Tips for handling filo pastry
I know some people are a bit intimidated by the thought of working with filo pastry. It can be prone to breaking if not handled correctly. But if you follow a few simple steps, there’s nothing tricky about it at all!
Fridge (ie. fresh) filo pastry is easier to handle – It’s more pliable than frozen-then-thawed, so you don’t need to be as careful handling it. Find it in the fridge section of grocery stores, usually alongside fresh pasta;
If using frozen filo pastry – Thaw overnight in the fridge. Never try to speed up thawing by placing in a warm environment. It dries the pastry out and makes it brittle so it tends to shatter;
Take it out of the fridge 30 minutes beforehand – Whether using frozen thawed or fresh. Bringing it to room temperature makes it more pliable and therefore easier to handle;
Keep the phyllo pastry covered with a slightly damp tea towel to ensure it doesn’t dry out; and
Handle like tissue paper, ie. with fairy fingers. Don’t manhandle it like a slice of ham!
How to make Spanakopita
It does take time to layer and butter the filo pastry sheets one by one. But a little effort aside, I think you’ll be surprise how straightforward Spanakopita is to make!
Part 1: Filling
The key to the filling is to remove as much water from the spinach as you can so it doesn’t make the pastry base soggy. We do not cook the spinach – the filling flavour is better made with raw rather than cooked spinach. A little tip I picked up from one of the best Greek restaurants in Sydney, Alpha Restaurant!
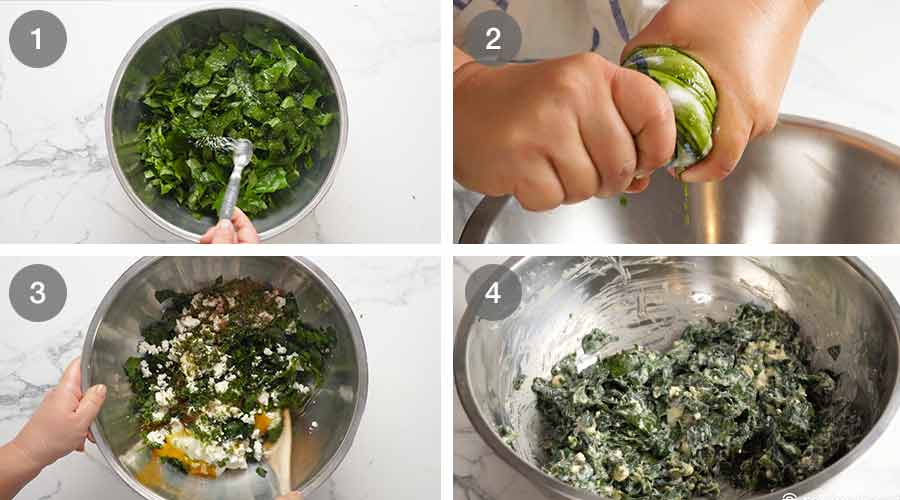
Sweat spinach with salt to remove water – Sprinkle chopped spinach with a little salt, then leave for 10 minutes. The salt will draw moisture out of the spinach which makes it easier to squeeze out the water;
Wring out water – Put a handful of spinach on a clean tea towel. Bundle it up and twist firmly to squeeze out the water. It’s easiest to work with a handful at a time so you can do this step properly. I usually do it in 3 batches;
Filling – Place spinach with the remaining filling ingredients in a large bowl; and
Mix well – Mix filling well until it’s combined. It should be moist and juicy, but you should not see any water leaching out of the spinach into the base of the bowl.
Part 2: Assembling
You sometimes see Spanakopita baked in a pie dish. I prefer it freeform, baked on a tray, because the filo pastry is crispier – the base and sides.
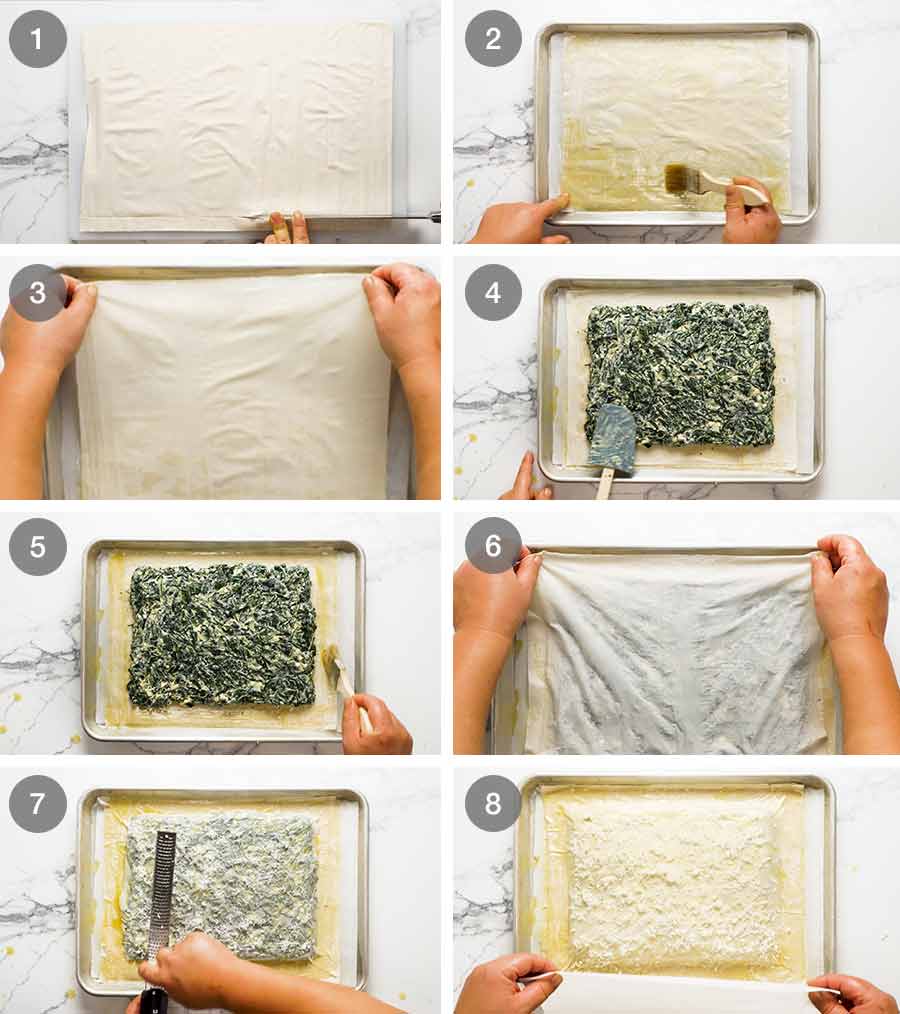
As noted above, I recommend using refrigerated rather than frozen filo pastry because it’s easier to work with. It’s more pliable, and there’s no need to plan ahead and thaw overnight.
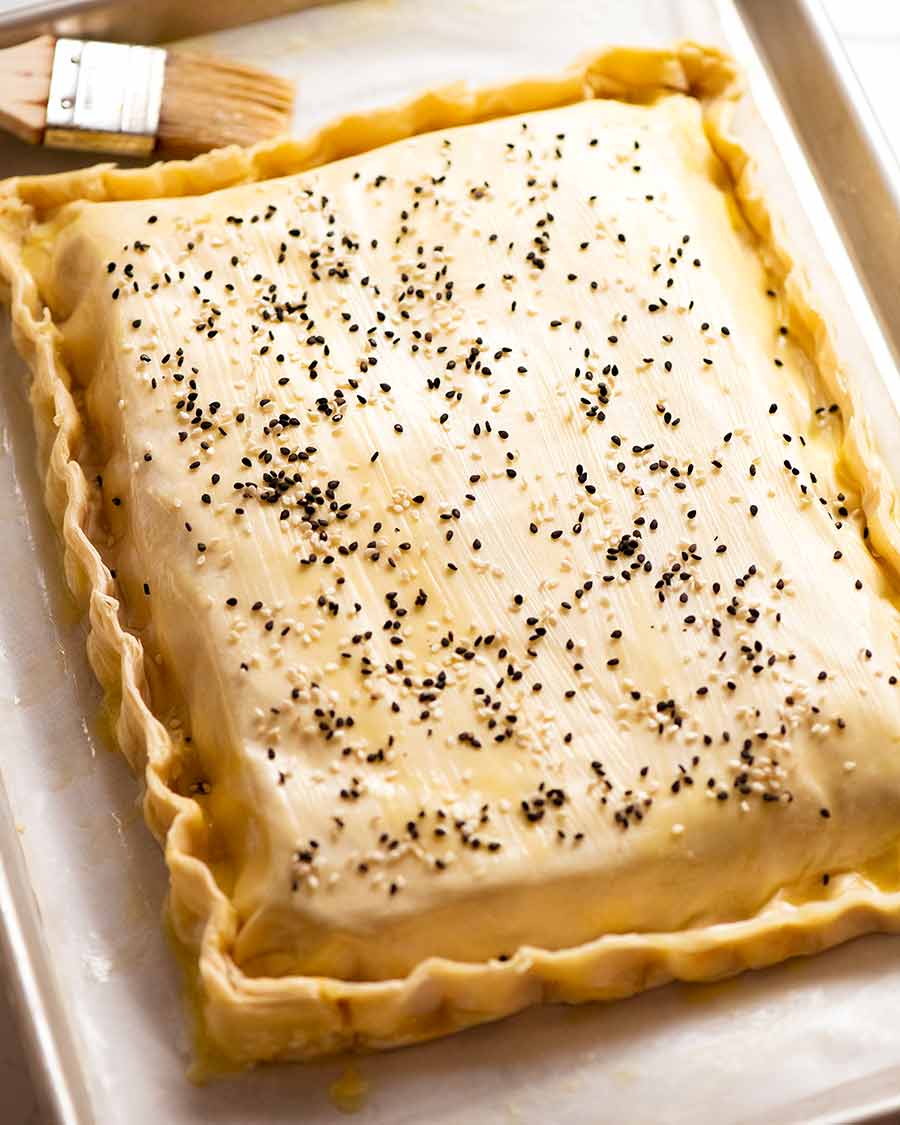
Trim filo pastry – Take the filo pastry out of the fridge 30 minutes prior to bring it to room temperature. This makes it more pliable and less prone to breaking. Then cut 16 sheets to size: 32 x 25cm / 13 x 10″ (rectangle shapes, pictured) or 26cm / 10.5″ squares.
This makes a Spanakopita pie which is 3.5 – 4cm / 1.4 – 1.6″ thick which I think is the perfect thickness for a good filling to pastry ratio. Any thicker, and there’s too much filling. Any thinner, and there’s too much pastry!
The pie base: 8 filo sheets, buttered – Lay a sheet of filo pastry on a baking paper-lined tray, then brush with melted butter. The butter not only adds flavour, it also causes each base layer to separate so you get the signature flakiness;
Repeat – After brushing with butter, top with another sheet of filo pastry and continue repeating until you have used 8 sheets in total;
Filling – Spread the filling in the middle of the pastry base, leaving a 2.5cm/1″ border. Make the surface as level as possible, pressing down lightly to compact the filling;
Brush with butter – Brush the borders of the pastry with butter;
The pie top: 5 filo sheets, butter + cheese – Cover the filling with a sheet of filo pastry. Brush with butter then sprinkle with kefalotyri cheese. Cover with another sheet of filo pastry and repeat. Do filo → butter → kefalotyri cheese for the first 5 sheets of filo pastry;
Grating kefalotyri cheese – You can either grate the cheese then sprinkle it on with your hand, or measure out the amount of cheese required then grate it straight onto the filo pastry (you get more even coverage this way);
The pie top (final sheets): 3 sheets filo, butter only – For filo pastry sheets # 6, #7 and #8, just use butter in between each layer. We skip the cheese for visual reasons; you can see the golden brown bits of cheese under the top layers of the filo otherwise. It also encourages more puffiness for these layers. However it’s really not a big deal if you forget!
Part 3: Finishing
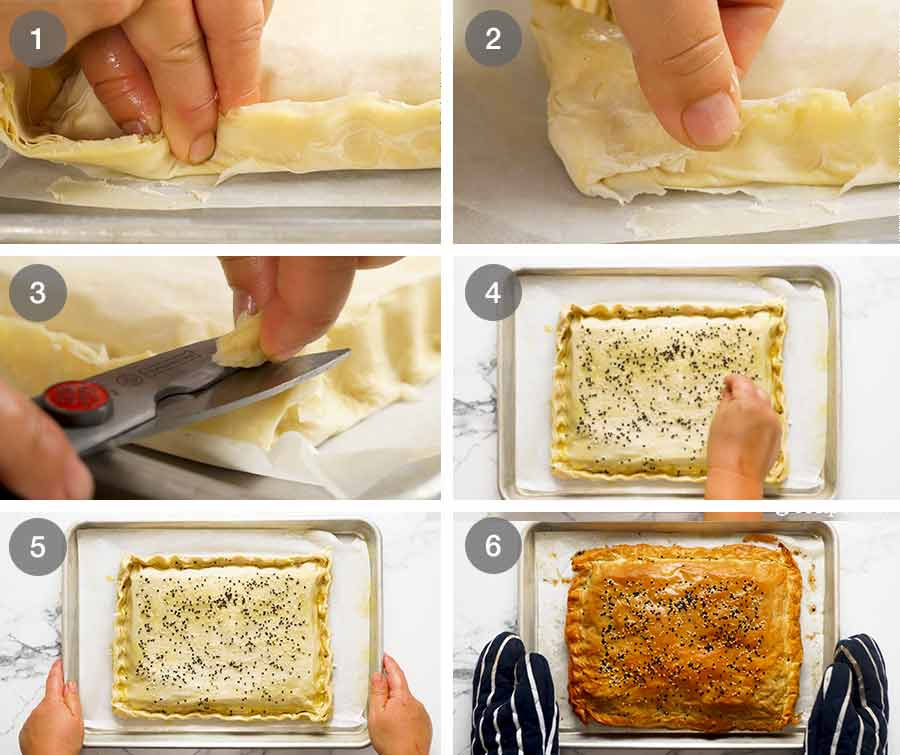
The crimping you see in these steps is optional. It is perfectly acceptable just to press down and seal the edges flat against the tray!
Crimp edges – Fold up the edges then use your fingers to crimp them to create little ruffles. See recipe video below for visual demo;
Pinch corners firmly to tuck in the surplus filo pastry;
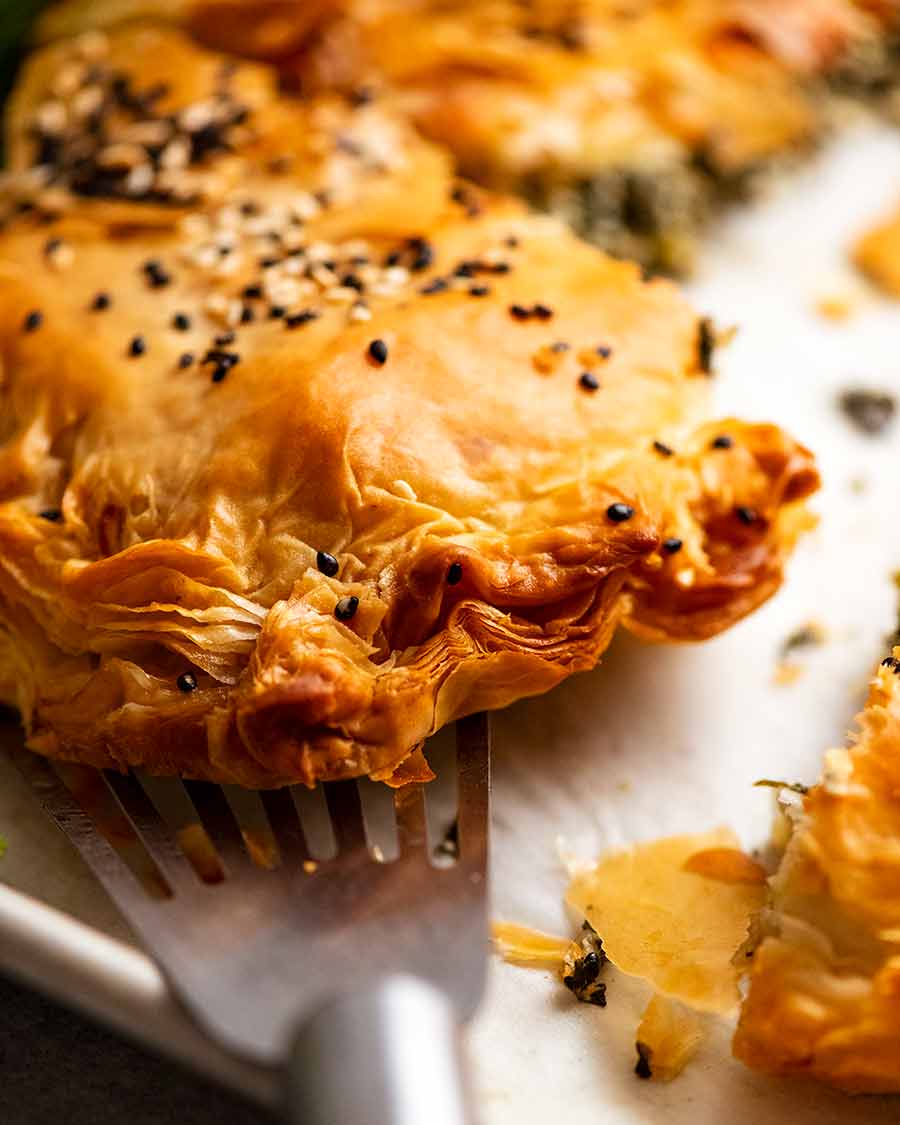
Trim the filo pastry all around using scissors so it is around 2cm / 4/5″ high. We don’t want it sticking up too much higher otherwise the ends might become too browned or burn;
Butter and sesame seeds – Brush the surface with melted butter, then sprinkle with sesame seeds;
Bake 25 minutes in a 220°C/430°F oven. A hot oven is key here to make the pastry beautifully golden and crisp on top and on the base without overcooking the spinach filling!
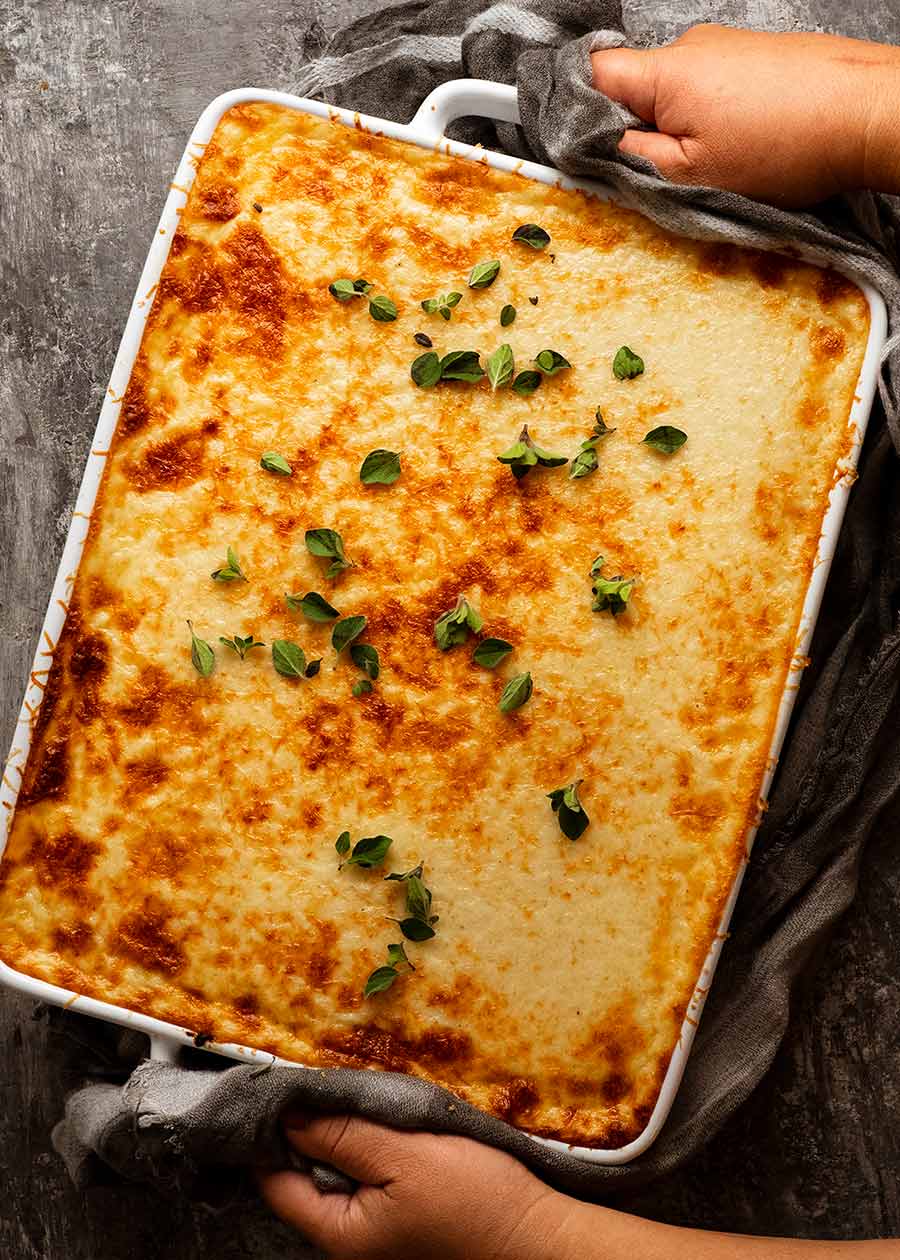
Voila! Set your masterpiece on its serving stage and be prepared for the incredible eating experience about to take place!

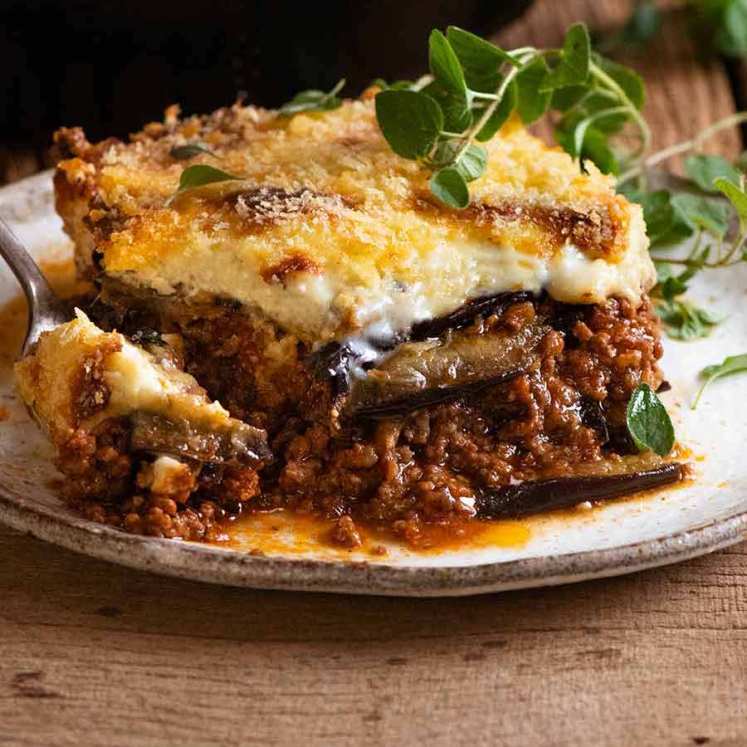
And oh my word … the smell that wafts out from the filling when you cut it open is 100% incredible! The perfume of fresh dill and mint, the fresh spinach, the cheesy goodness of the feta, the subtle notes of nutmeg and garlic … it sends everyone within nose-shot into a salivating stupor!
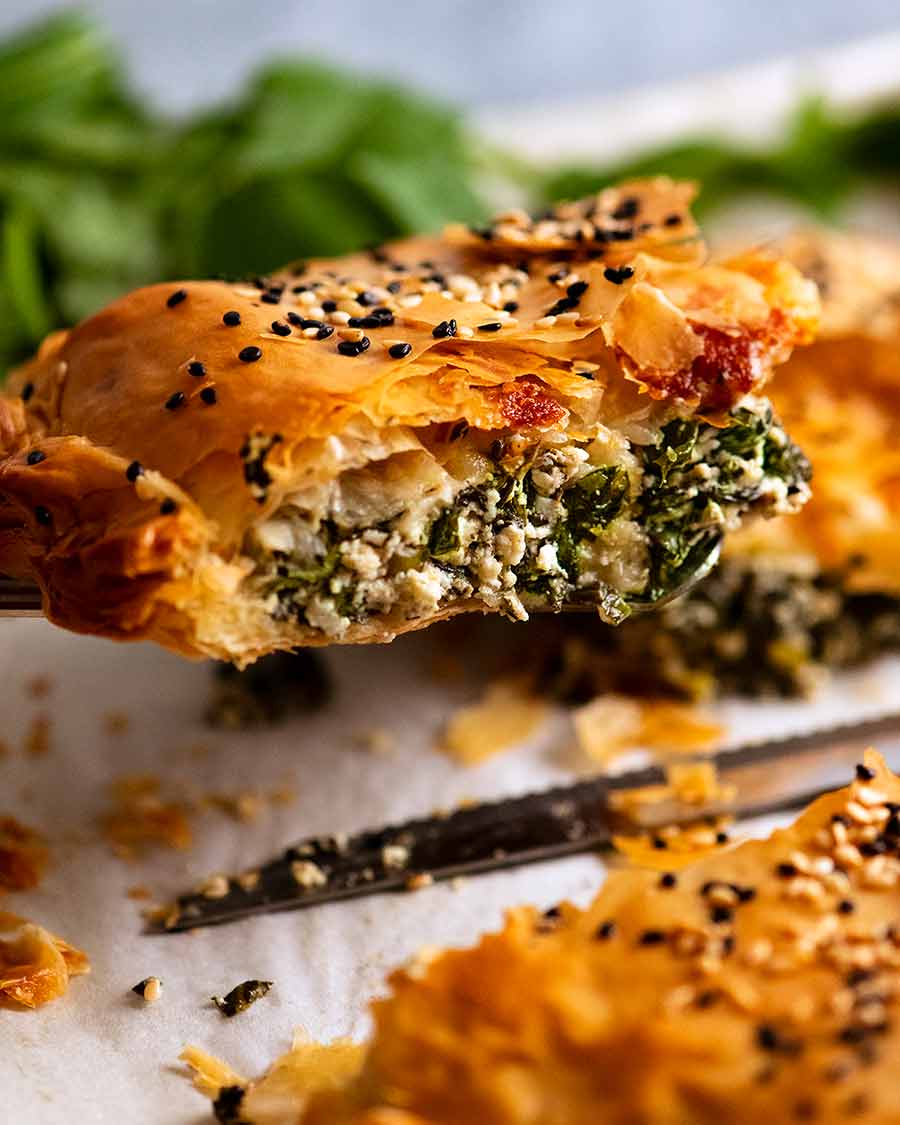
You can see in the photo above how the filo pastry topping is still ultra-flaky but is still (happily) sitting comfortably atop the Filling. This is thanks to the little trick of layering the filo pastry with a bit of cheese which makes them stick together (while simultaneously still allowing for good, flaky, puffing action) rather than flying everywhere.
Because while we do love that spinach filling, let’s face it: Spanakopita wouldn’t be Spanakopita without that flaky, crispy, buttery and wafer-thin pastry. We love it, and we want lots of it. So if it all fell off when we started cutting up the pie, it would just make us sad wouldn’t it?
Sure, we’d scramble and salvage every little pastry shard we could find off the tray / table / plate. But it really is so much more satisfying when all those layers of filo pastry actually stay ON the Spana, leaving the perfect eating experience intact! Right? – Nagi x
PS. It was a wonderful discovery at my “New Years’ Eve (Take 2)” party I held a couple of weeks ago that Spanakopita can be assembled earlier in the day and baked in the evening, and you’d be none the wiser. I was concerned the base might get soggy, but I was wrong. However I’m not convinced you could get as good a result if it’s left in the fridge overnight or frozen (unbaked). I would love to be proven wrong on these points, so please do share your findings in the comment section if you try it!
Watch how to make it

Spanakopita
Ingredients
Spinach:
- 300g/10oz English spinach leaves , trimmed from thick stems, thoroughly washed, dried, then chopped into 2.5cm/1" pieces (Note 1)
- 1/2 tsp salt
Filling:
- 175g/6oz Greek feta , crumbled
- 1/2 cup Greek yoghurt
- 2 green onions / scallions , finely sliced
- 1 egg
- 2 tbsp mint , finely chopped
- 1 tbsp dill , finely chopped
- 1/2 tsp lemon zest
- 1/2 tbsp lemon juice
- 2 garlic cloves , finely chopped
- 1/2 tsp nutmeg , freshly grated
- 1/4 tsp black pepper
- 1/4 tsp salt
- 1/4 tsp cayenne pepper
Filo pastry:
- 16 sheets filo pastry (Note 2)
- 120g/ 8 tbsp butter , melted
- 60g / 2/3 cup Greek Kefalotyri cheese , finely grated (sub parmesan, Note 3)
- 1/2 tsp white sesame seeds (or more black)
- 1/2 tsp black sesame seeds (or more white)
Instructions
- Preheat oven to 220°C/430°F (200°C fan). Line a tray with baking paper / parchment paper.
Filling:
- Sweat spinach: Place spinach in a large colander or bowl. Sprinkle with salt, toss through. Leave for 10 minutes to sweat.
- Wring out water: Place a handful of spinach in a tea towel, then wring out tightly to remove excess water.
- Filling: Place spinach in a bowl with remaining Filling ingredients. Mix well to combine.
Assembly:
- Trim filo: Cut 16 sheets of filo pastry into 32 x 25cm / 13 x 10" (pictured) or 26cm / 10.5" square.
- 8 base layers: Layer 8 sheets of filo pastry on the tray, brushing each layer with melted butter.
- Filling: Spread filling on filo pastry. Smooth surface and leave a 2.5cm / 1" border.
- 8 Filo topping layers (Note 4): Cover spinach with a sheet of filo pastry. Brush with butter, sprinkle with Kefalotyri. Repeat for Sheets #2 to #5. Then cover with filo sheets #6 to #8, brushing with butter in between, but do NOT sprinkle with cheese (neater finish).
- Seal: Press edges down to seal. Crimp and trim if desired (see process steps in post or video) or just leave the edges flat on the tray.
- Sesame seeds: Brush the top with butter, sprinkle with sesame seeds.
- Bake: Bake 25 minutes, or until golden brown on the surface.
- Serve! Serve immediately! It is at its absolute prime fresh out of the oven, though still good as long as its hot (~15 min or so). The base does lose crispiness as it cools.
Notes
Nutrition
More Greek classics

Life of Dozer
Typical scene from a road trip up north – Dozer sprawled across the entire back seat. Me, trying to get some work done in the front (passenger 🙂) seat!


The post Spanakopita (Greek Spinach Pie) appeared first on RecipeTin Eats.
]]> Pastitsio – with layers of pasta, a rich cinnamon-spiked red wine meat sauce, topped with a thick layer of cheese sauce, this is Greece’s answer to Italian Lasagna. Let the fun begin! Pastitsio – Greek pasta bake Pastitsio is so much more than just another pasta bake. A step up from Baked Spaghetti and –... Get the Recipe
The post Pastitsio (Greek beef pasta bake) appeared first on RecipeTin Eats.
]]>Pastitsio – with layers of pasta, a rich cinnamon-spiked red wine meat sauce, topped with a thick layer of cheese sauce, this is Greece’s answer to Italian Lasagna. Let the fun begin!
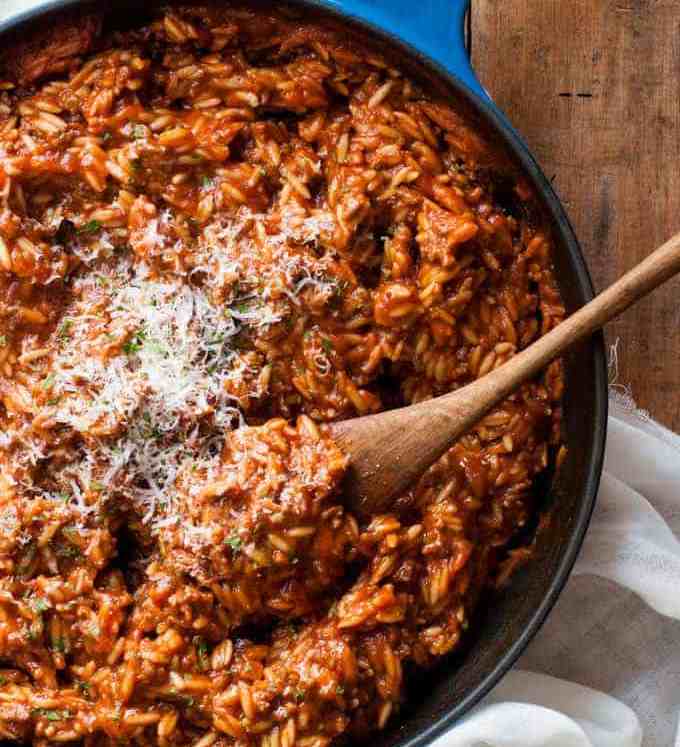
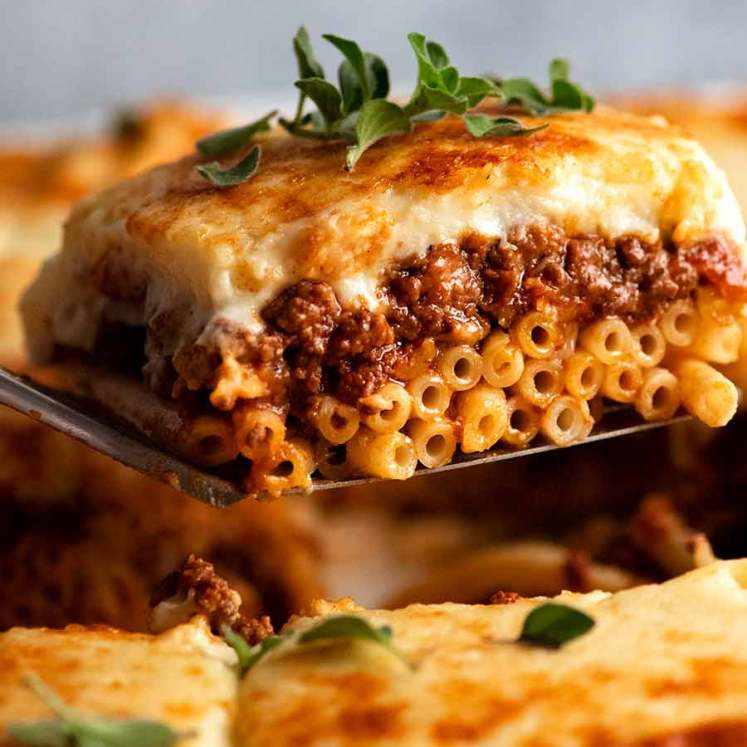
Pastitsio – Greek pasta bake
Pastitsio is so much more than just another pasta bake. A step up from Baked Spaghetti and – dare I say it – even America’s famed Baked Ziti (which regular readers know I hold in high esteem!), this is Greece’s version of classic Italian Lasagna.
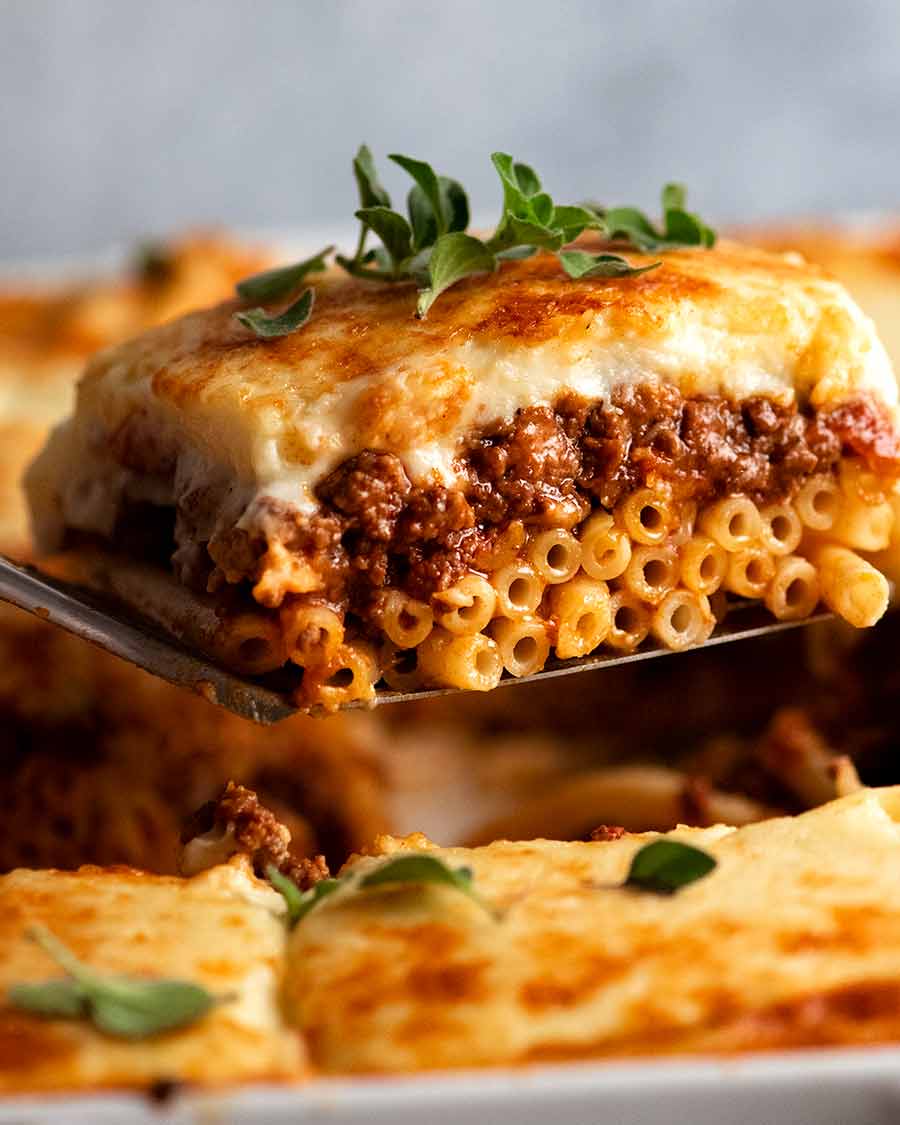
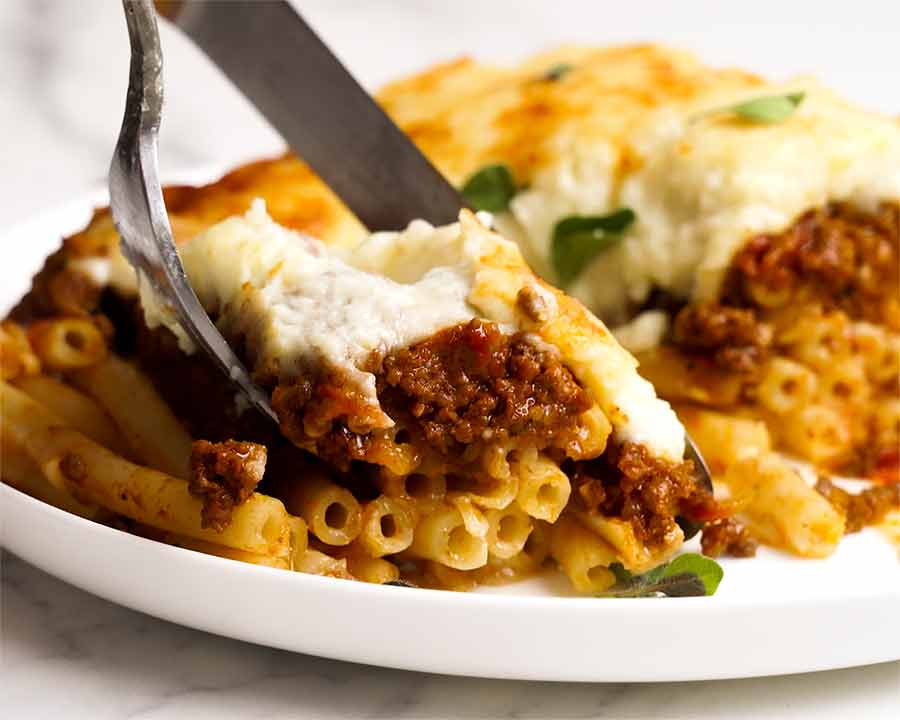
We love how it slices neatly with the layers clearly visible, and the striking tubular Greek bucatini-style pasta.
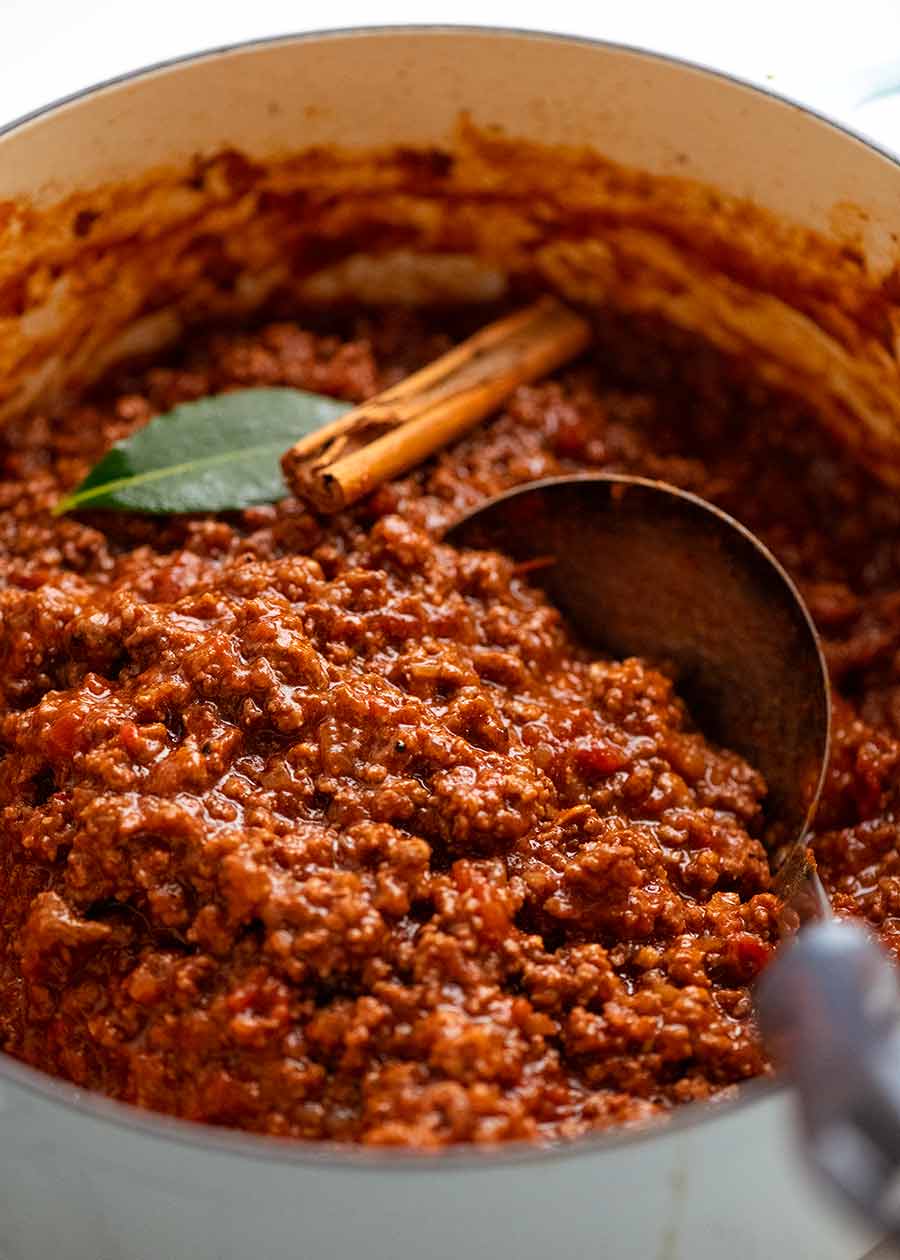
We love how the rich red wine, tomato and meat sauce is spiked with cinnamon and cloves, giving it uniquely Greek personality rather than “just another meat sauce”.
And we (Cheese Monsters in particular) love the extra thick, cheesy Béchamel sauce topping. The Greek’s have not skimped on any element here. It’s all about abundance!
What you need for Pastitsio
There are 3 parts to Pastitsio:
Feta-tossed pasta;
Greek meat sauce – Like Bolognese sauce, but thicker and scented with cinnamon and cloves which you also see in Greek Moussaka; and
Greek Béchamel Sauce – Thickly laid and thicker set than you traditionally see in things like Italian Lasagna.

Feta toss pasta 
Greek meat sauce 
Thick Greek Béchamel
1. Feta-tossed pasta – Thick bucatini
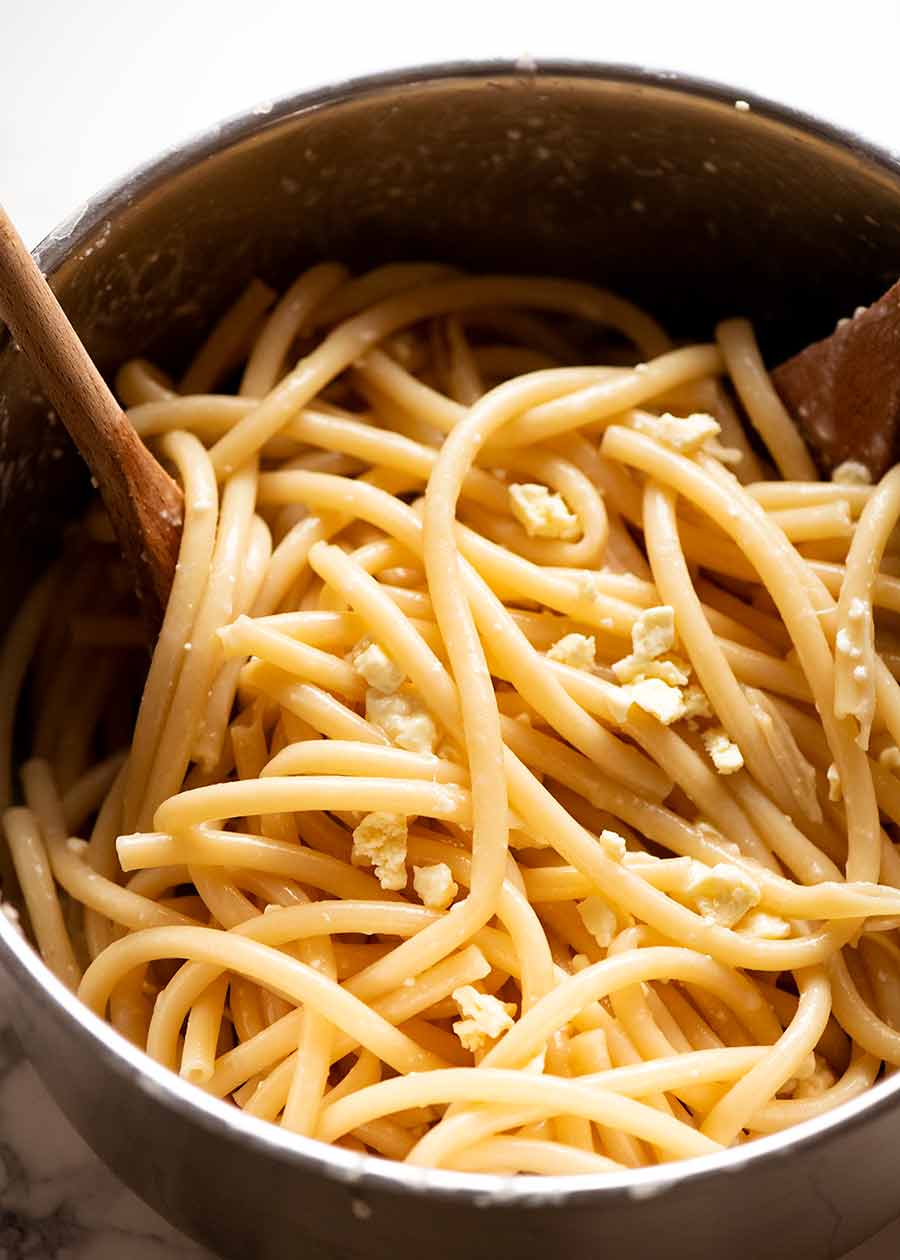
The unique thing about the pasta layer of Pastitsio is the feta cheese tossed through it (yum!) and the addition of egg whites. Feta adds flavour while the egg binds the pasta together so you can cut neat slices, as pictured above.
1.1 Ingredients for the Pastitsio pasta layer
Here’s what you need for the pasta layer:
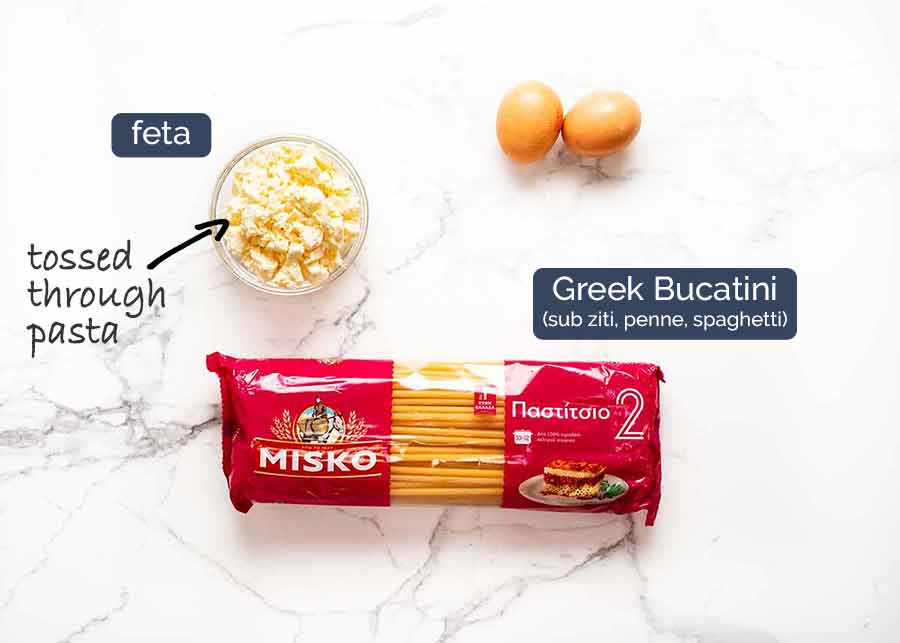
Greek bucatini
The pasta traditionally used in Pastitsio is a thick bucatini-style pasta called “Pastitsio pasta No. 2”, pictured below. It’s a tubular pasta – like a really thick spaghetti with a hole running through it. However it’s thicker than Italian bucatini , such as bucatini used in this Zucchini pasta.
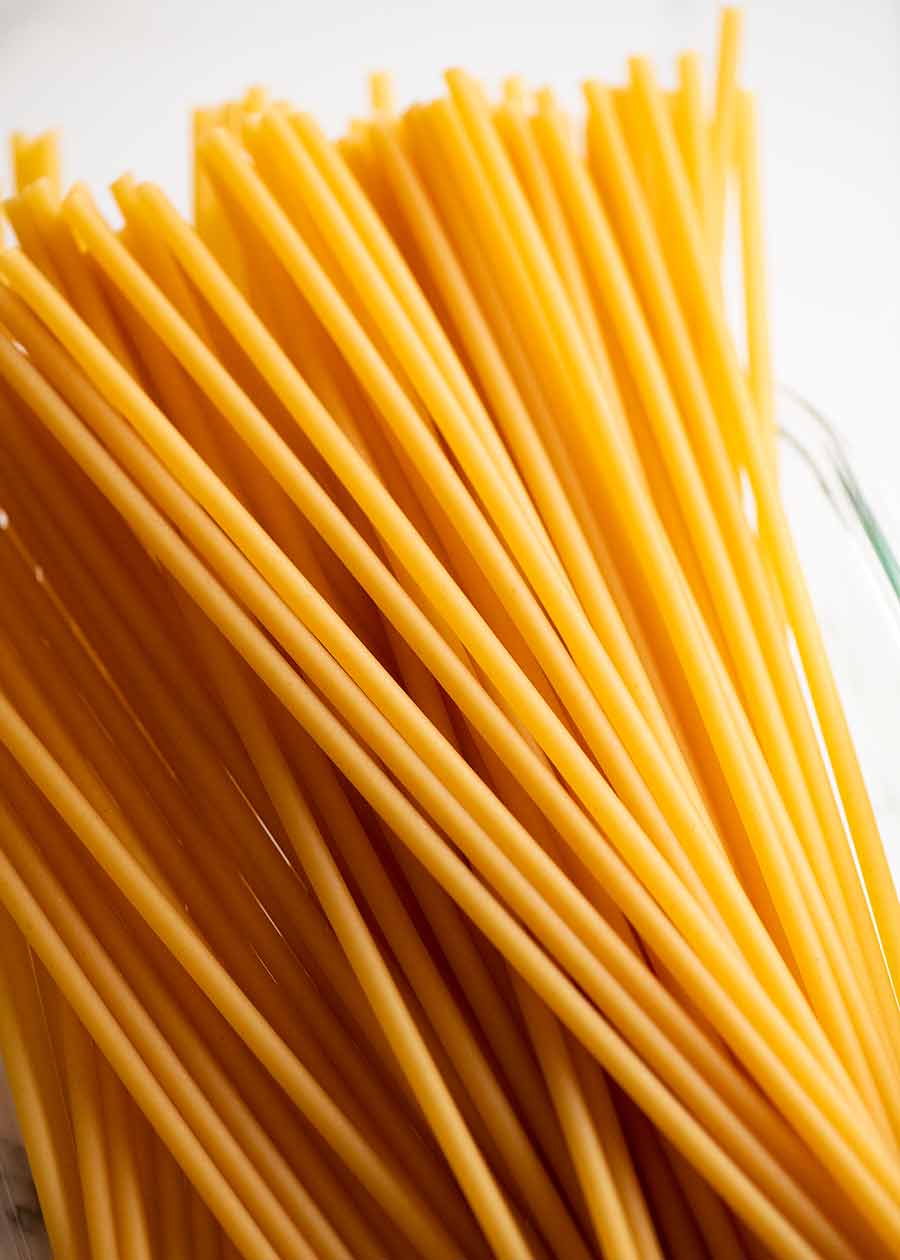
Where to find Greek bucatini-style Pastitsio pasta No. 2
You’ll find Greek Pastitsio Pasta No. 2 at European delis and grocers around Sydney. I found the Misko brand (pictured) at a fruit & veg store in Top Ryde (Sydney) which has a good stock of European goods.
Can’t find Pastitsio pasta?
Honestly, don’t get too hung up about it. Use ziti or penne instead if you want it to look similar when you cut it. Otherwise, ordinary Italian bucatini – sold in the pasta aisle of everyday supermarkets these days – or really, any pasta is just fine. It won’t alter flavour, just how it looks!
2. Pastitsio meat sauce
Making the meat sauce is really no different to making your favourite Spaghetti Bolognese. It’s very straight forward! But there’s two important differences:
Cinnamon and clove – As used in traditional Greek Moussaka, a subtle perfume from these spices is what makes the meat sauce Greek, rather than a generic Bolognese; and
Thicker meat sauce – The sauce is much thicker than Bolognese Sauce. This is intentional so it sits comfortably above the pasta layer, rather than trickling down through it. This is how you get the neat layers!
Here’s what you need for the meat sauce layer:

No boat-rockers amongst the above ingredients. Red onion is often preferred in Greek cooking rather than the typical brown/yellow onions.
And as noted above, the added spices that make this a Pastitsio meat sauce rather than an Italian-style one are cinnamon and cloves.
2.2 How to make Pastitsio meat sauce
As for making it, just pretend you’re making Bolognese! Unlike Bolognese however where a long and slow cooking can be optional, the Pastitsio meat sauce needs to be simmered for a good hour to reduce the sauce so it’s really thick.
This makes the meat sauce sit on the pasta, rather than mixing through the pasta layer, so you get distinct and tidy layers. The added bonus is that the longer simmering time makes the beef super-tender and really intensifies the sauce flavours.
Tip: Cool meat sauce before use
If time permits, let the meat sauce cool before layering over the pasta. It thickens and holds together even more when cooled first, providing even better visual definition between the pasta and meat sauce layers when you slice it, as pictured in the photos in this post.
In fact, if you can make it the day before and leave it overnight in the fridge, the flavour also gets even better!
3. Greek Béchamel Sauce
The Greek Béchamel sauce used in Pastitsio differs from the typical white sauce you see on things like Lasagna:
Thicker layer – About twice the volume used in typical Lasagna. No complaints over here, I’m personally a big fan of lots of cheese white sauce!
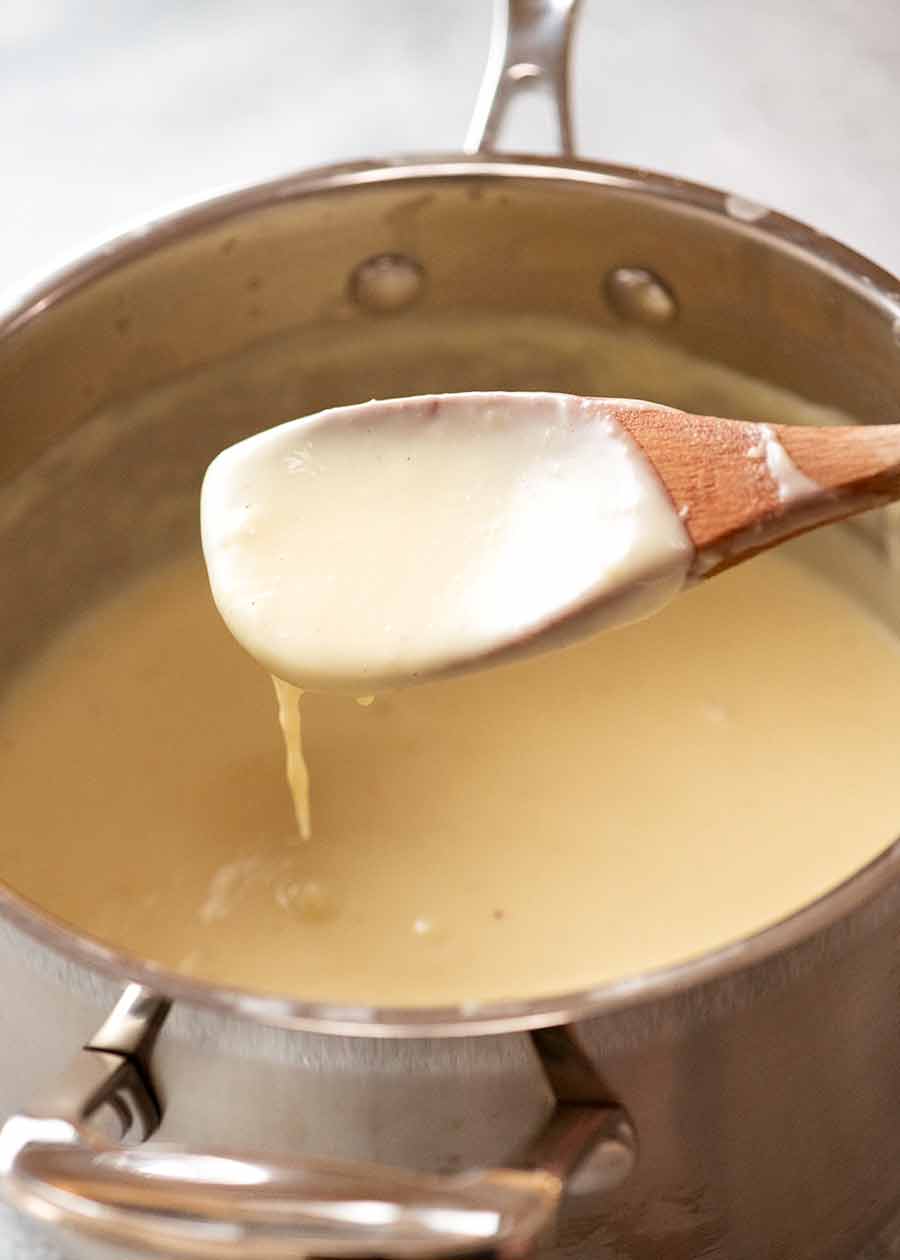
More set – It’s set almost like a custard that you can cut through, as opposed to being creamy like Béchamel typically is. It’s thickened using a combination of a slightly higher flour-to-liquid ratio, as well as the use of egg yolks (which also enriches the sauce beautifully!)
3.1 What goes in Pastitsio Béchamel sauce
Here’s what you need to make the Pastitsio Béchamel sauce:
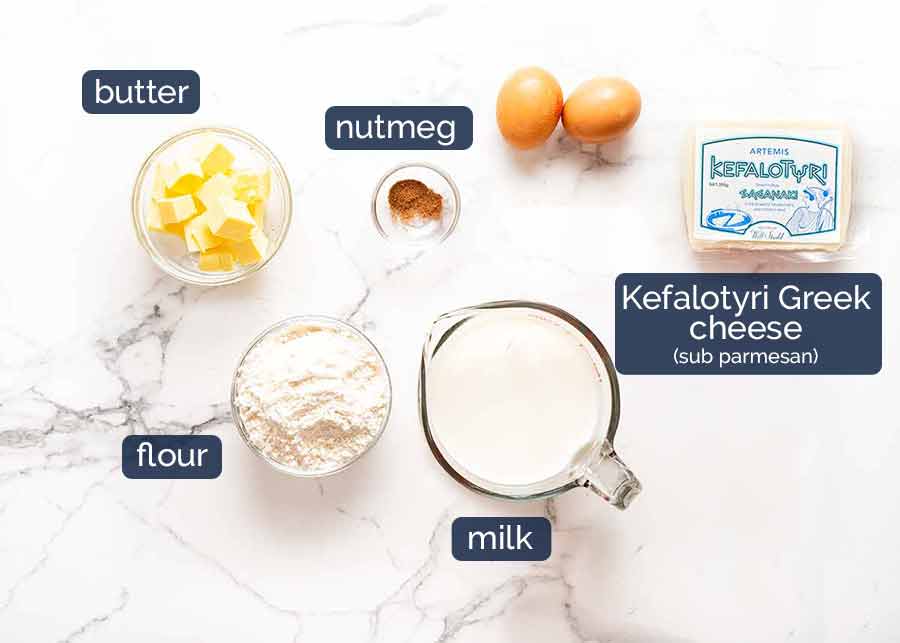
Butter, flour and milk – All the usual suspects you need to make a basic Béchamel / white sauce;
Kefalotyri Cheese – A traditional Greek cheese made from sheep or goat’s milk. It tastes somewhat like parmesan but is not as salty or sharp. More on Kefalotyri below. Sold at Woolworths and Coles in Australia, or European/Greek delis. But don’t go out of your way to hunt it down. Readily-available cheeses like Parmesan or Romano make perfectly acceptable substitutes (*she ducks as 10 million Greeks throw rotten tomatoes at her*);
Nutmeg – A classic inclusion with Béchamel, but not the end of the world if you don’t have it. Freshly ground best, if you have it; and
Egg yolks – This helps the Béchamel Sauce set better so the thick layer holds its shape when you cut slices.
The egg whites are used separately for the pasta, acting as a “glue” to hold the pasta together when you slice it. Full visual effect!
Kefalotyri Greek cheese
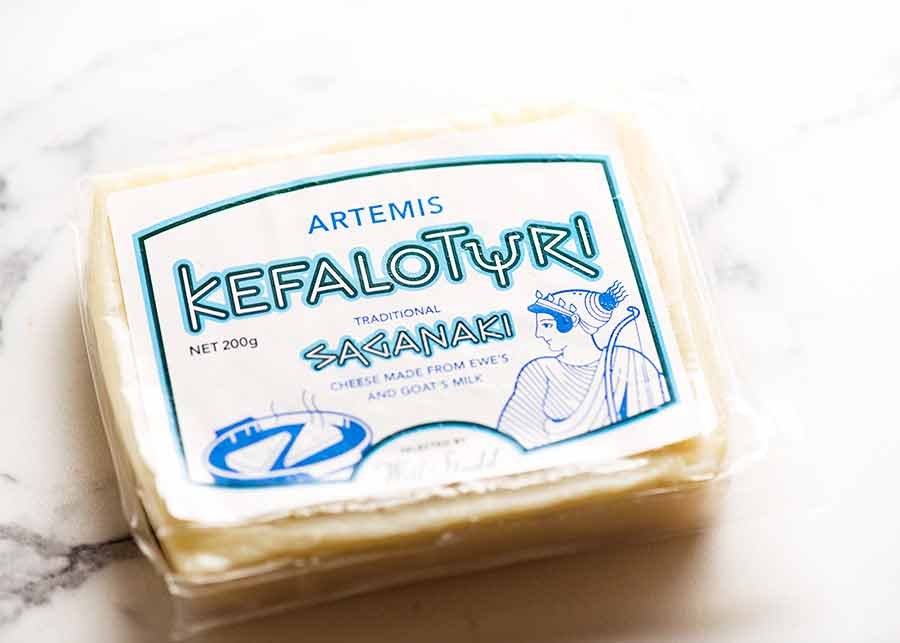
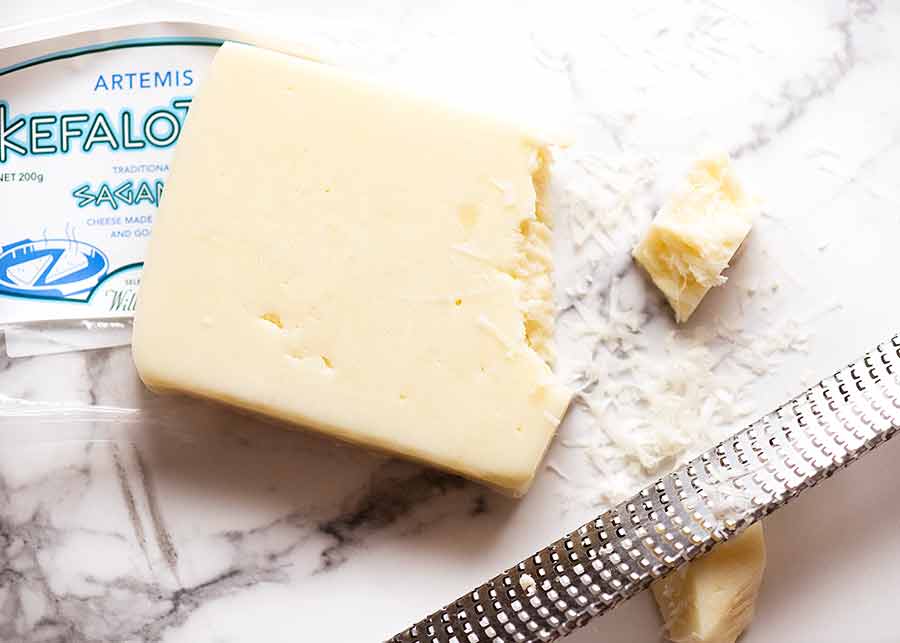
Grates like parmesan
This is a firm, traditional Greek cheese made from sheep or goat’s milk. It’s used to top the Pastitsio to give it a delicious golden crust as well as stirring through the Béchamel Sauce to give it flavour.
Kefalotyri cheese is a hard cheese with a salty, savoury and piquant taste, similar to Parmesan. However it’s not as salty as parmesan.
Believe it or not, these days it’s available at Woolworths and Coles in Australia! 🙌🏻 Pictured below.
Best substitutes (in order): Kefalograviera (a related, hard Greek cheese), pecorino, Parmesan, Romano.
Use leftover Kefalotyri to make Saganaki!
What to do with your leftover Kefalotyri? Make saganaki, a popular melted cheese Greek appetiser! Cut leftover Kefalotyri into 1.5cm / 1/2″ slices, dust with flour then pan fry in olive oil until golden on the outside, melted inside. Squeeze over a bit of lemon, serve with bread for. It’s AMAZING. You can thank me later…!! 😉
3.2 How to make Pastitsio Béchamel sauce
Here’s how to make the Pastitsio white sauce:
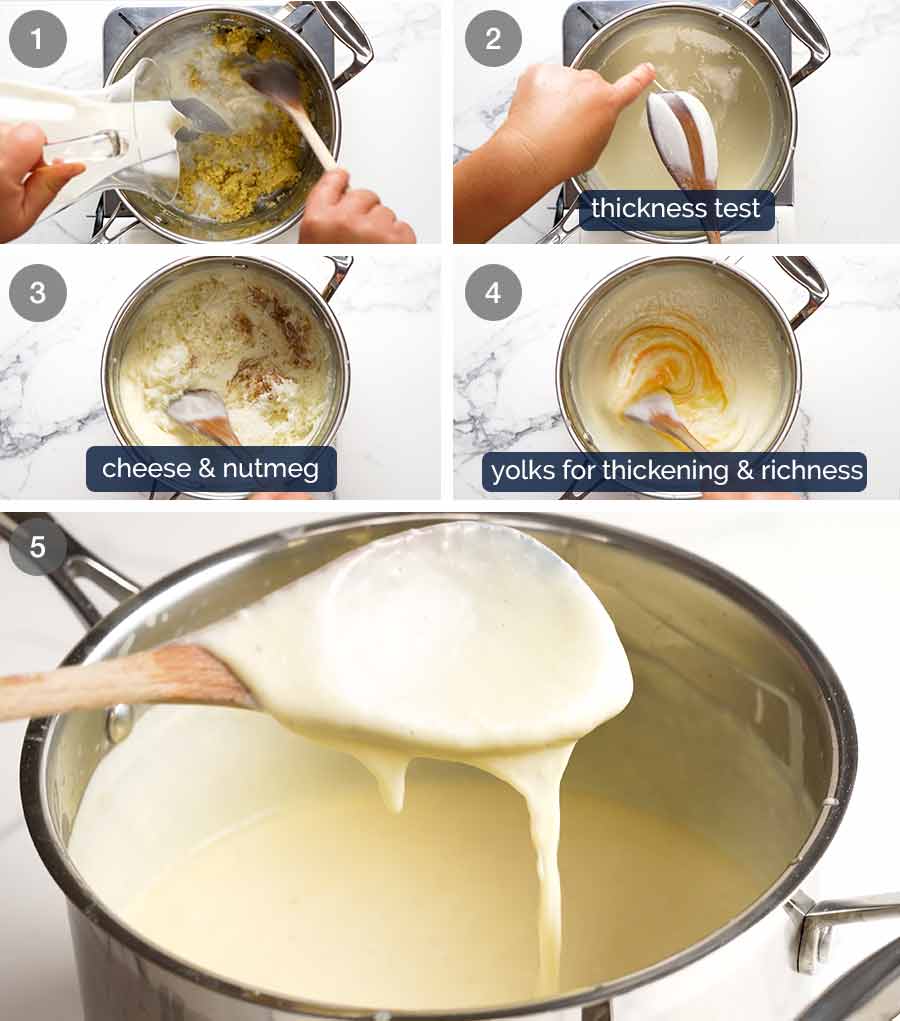
Make a roux – Melt butter, then add the flour and cook it out for a minute. Slowly add the milk in while stirring – this is how you can make a lump-free Béchamel sauce without having to use a whisk! The trick is to make a “paste” first, then add the rest of the milk that the paste easily dissolves into.
Lumpy sauce? Don’t worry! Just give it a good whisk and it will smoothen out.
Cook until thickened – Stir over a medium heat until the sauce thickens, and won’t thicken any further. The thickness test: The sauce should fully coat the back of a spoon and when you draw a path across with your finger it doesn’t disappear;
Flavourings – Stir in cheese and nutmeg. The cheese will also thicken the sauce slightly more;
Egg yolks – Remove sauce from the stove and let it cool for a few minutes. Then whisk the egg yolks in. Make sure you mix straight away once you add the yolks otherwise they may scramble in the sauce!!
Done! While warm, the sauce should be pourable but quite thick, like pictured. Cover with a lid and keep warm until required. If it goes cold, it will get too thick to pour. If that happens just reheat it over a low heat until it becomes pourable again.
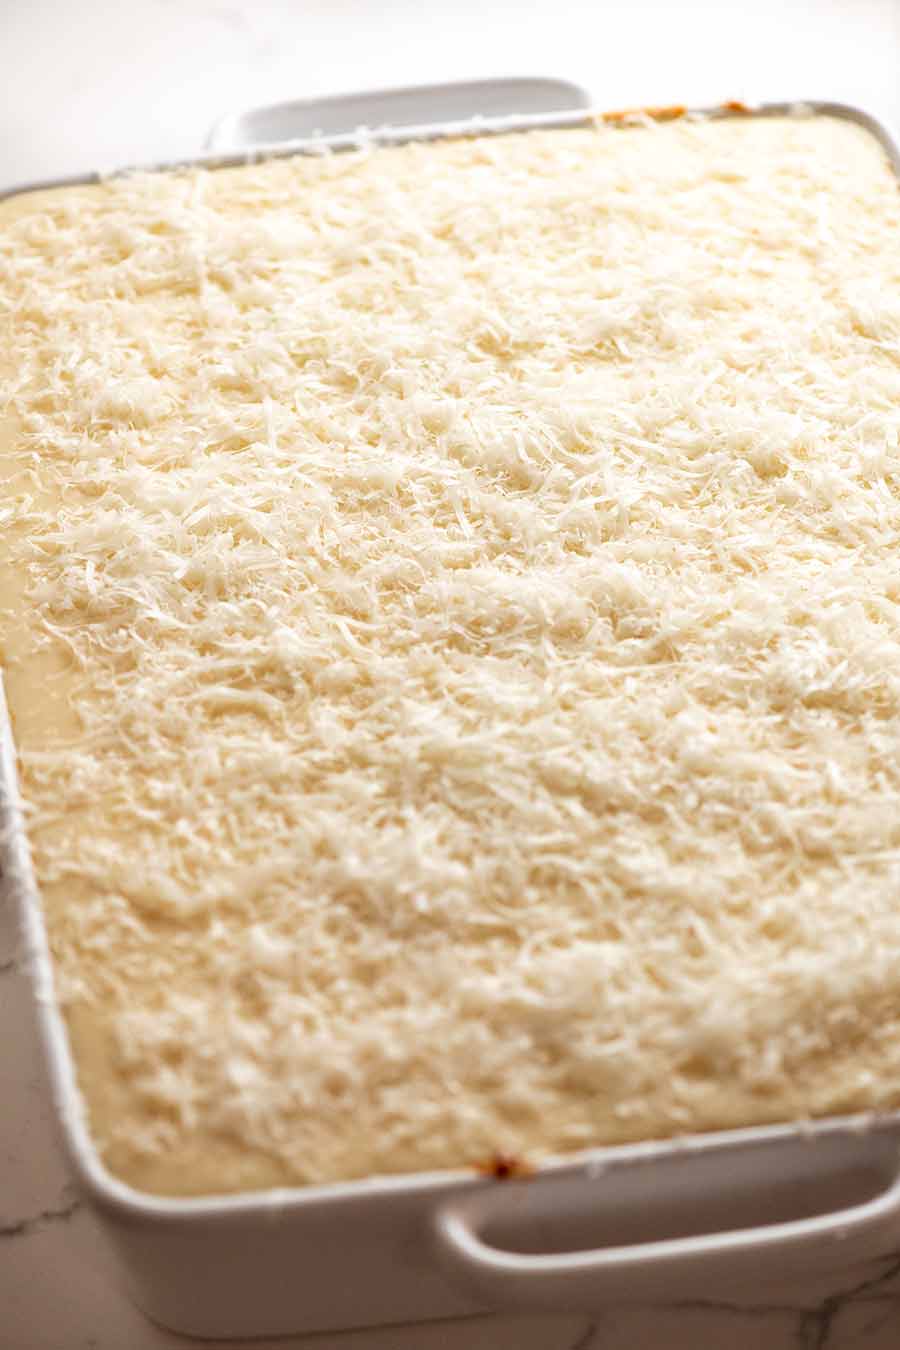
4. Assembly!
You need a BIG casserole dish for Pastitsio! A typical 9 x 13″ pan won’t cut it, it’s not deep enough. My baking dish is 33 x 22 x 7 cm / 9 x 13 x 2.75″.
The next steps, along with some tips I figured out through trial and error:
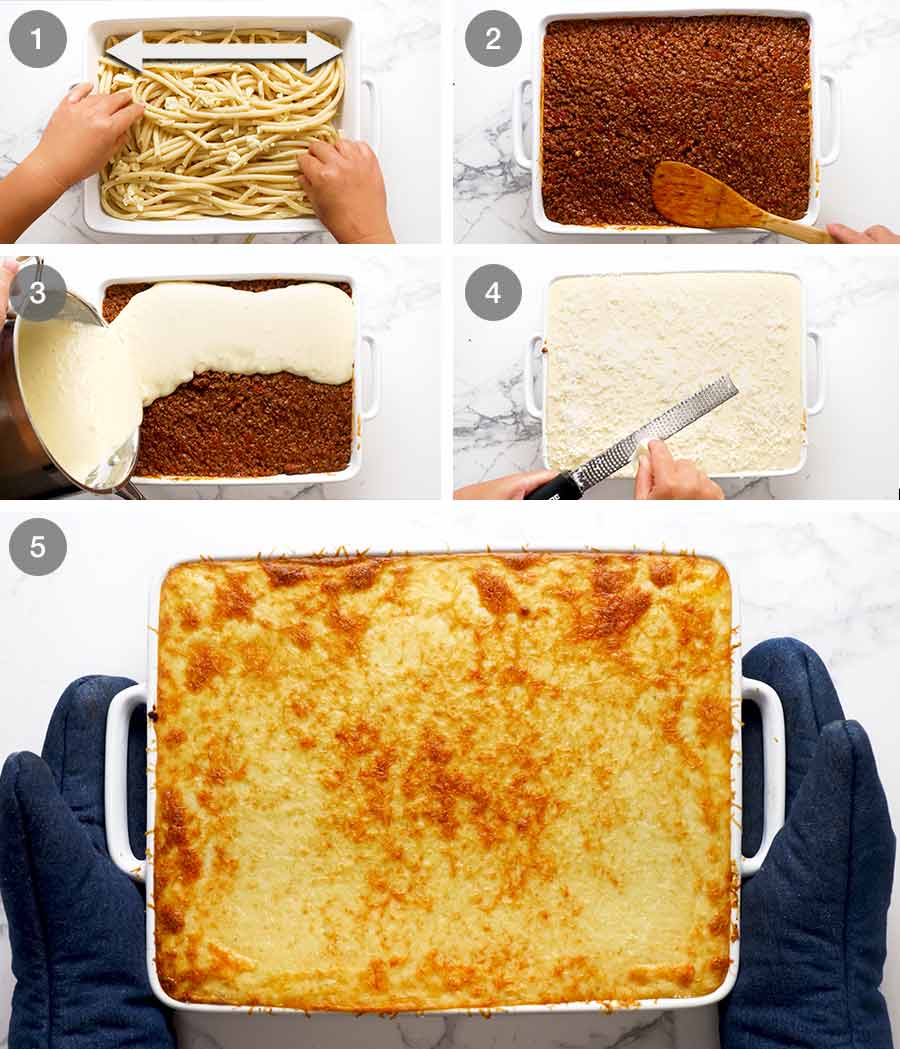
Pasta direction – Lay out the pasta so they are (mostly) in one direction if you want the visual effect of the pasta holes when you cut it, as pictured in the photos in this post;
Cool meat sauce – A cool meat sauce will make the layers more distinct. Because it’s thicker and more emulsified, it sits on top of the pasta rather than seeping down through it. It also provides a firmer bed onto which the Pastitsio white sauce is poured, helping that layer also stay distinct;
White Sauce – Pour over and spread. If your white sauce cooled down and is too thick to pour, just reheat gently on a low stove until it’s pourable;
Grate over Kefalotyri (or parmesan if you can’t find it) – then bake until the top is golden; and
Rest for 15 minutes before cutting to serve. The longer it stands, the better it will hold its shape when cut. If you want really neat slices, make it the day before – reheat in the baking dish then cut!
What to serve with Pastitsio
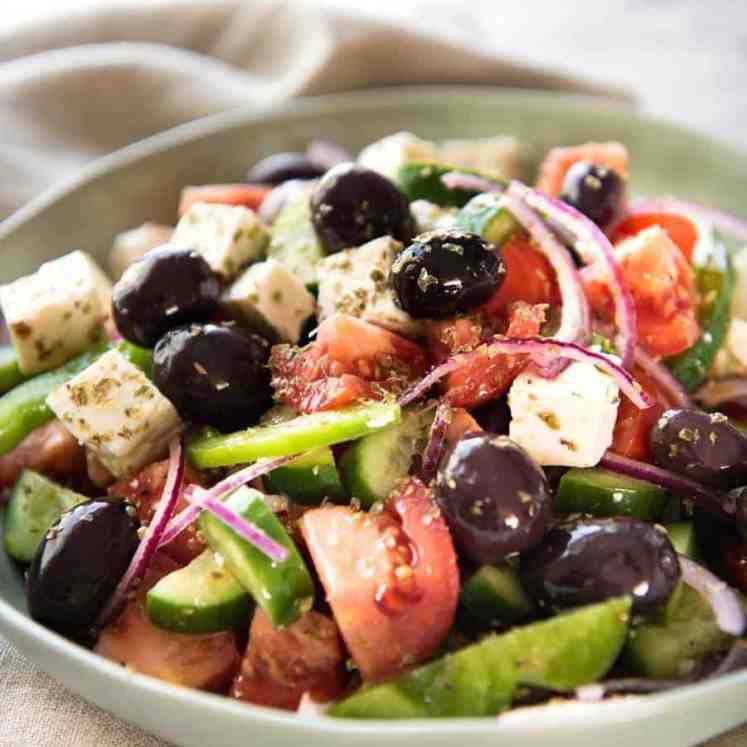
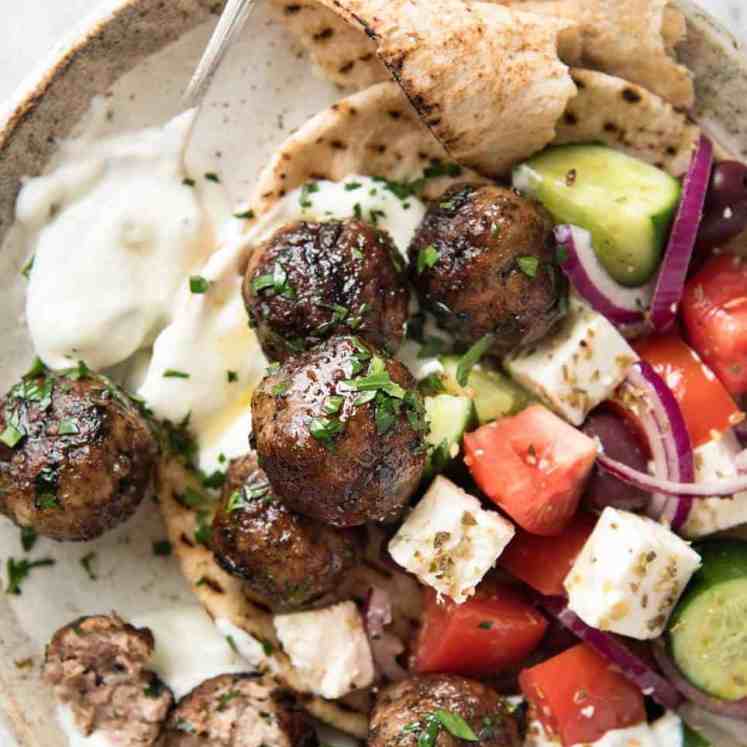
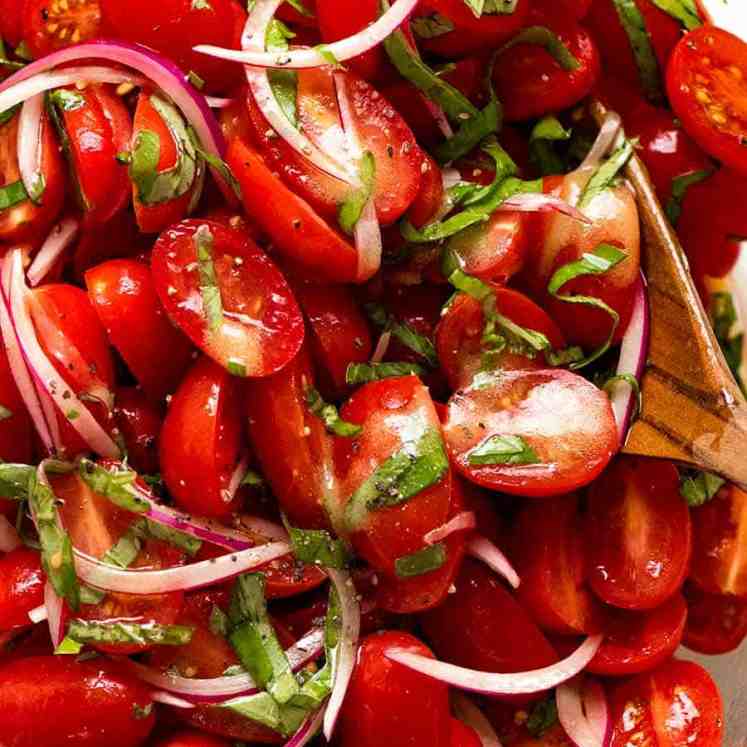
I can’t think of anything more appropriate than a big, fat juicy Greek Salad on the side! This traditional salad is a lovely, refreshing contrast to the richness of Pastitsio.
But here are a few more side salads that I think will also go really well with Pastitsio:

Enjoy! – Nagi x
Watch how to make it

Pastitsio (Greek Pasta Bake)
Ingredients
Meat Sauce:
- 2 tbsp olive oil
- 3 garlic cloves , finely minced
- 2 red onions , finely chopped (sub yellow or brown onions)
- 1 kg / 2 lb beef mince (ground beef)
- 3/4 cup red wine , dry (Note 1)
- 800g / 28 oz canned crushed tomato
- 2 beef bouillon cubes , crumbled (stock cubes)
- 2 tbsp tomato paste
- 1 tsp white sugar
- 1 bay leaf
- 1/2 tsp cinnamon powder
- 1 cinnamon stick (or extra 1/2 tsp cinnamon powder)
- 1/4 tsp ground cloves
- 3/4 tsp salt
- 1 tsp black pepper
Greek Bechamel:
- 100g / 7 tbsp butter , unsalted
- 3/4 cup flour , plain/all purpose
- 1 litre / 4 cups milk , whole/full fat best but low fat ok
- 1/8 tsp nutmeg , preferably freshly grated
- 1/2 tsp salt
- 100g / 3 oz Kefalotyri Greek cheese (sub Parmesan or Romano) , finely shredded (Note 2)
- 2 egg yolks (egg whites are used in the pasta)
Pasta:
- 400g / 14 oz Pastitsio No. 2 pasta / Greek bucatini (sub small ziti, penne or normal bucatini, Note 3)
- 120g / 4 oz feta , crumbled
- 2 egg whites (yolks used in Béchamel)
Topping:
- 75g / 3 oz Kefalotyri Greek cheese (sub parmesan or Romano) , finely grated (Note 2)
Instructions
Meat Sauce:
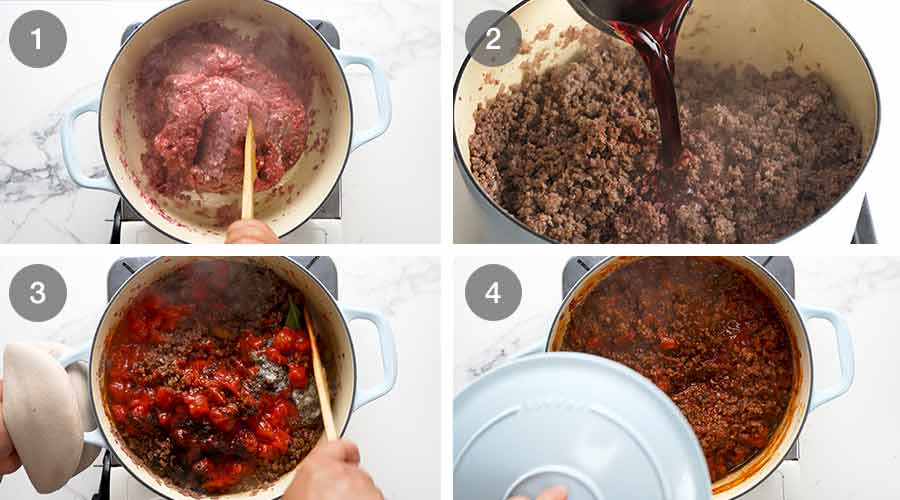
- Heat in a large pot over high heat. Add garlic and onion, cook for 2 – 3 minutes until onion is softened. Add beef and cook, breaking it up as you go, until it changes from red to brown.
- Add wine and and cook until the wine has mostly evaporated – about 3 minutes.
- Add remaining Meat Sauce ingredients. Stir well, bring to simmer, then reduce heat to medium / medium low so it's simmering gently. Cook for 45 min to 1 hour until liquid is mostly gone, stirring every now and then. It should be a thick mixture with little liquid, not saucy like Spaghetti Bolognese (Note 4).
- Remove from stove and cool. Preferably to room temperature, otherwise for at least 30 minutes before assembling (lid off).
Greek Béchamel (Note 5):
- Melt butter in a large saucepan over medium heat. Add flour and stir for 1 minute.
- While stirring, slowly pour half the milk in. It should turn into a wet paste. Then again, while stirring, pour in remaining milk – the paste should easily dissolve so it's lump-free. If not, just whisk vigorously.
- Cook, stirring so the base doesn't catch, for 5 minutes or until thick enough so it coats the back of a wooden spoon thickly and you can draw a path across it with your finger.
- Remove from stove. Stir in nutmeg, cheese and salt.
- Leave to cool for 5 minutes. Then whisk in egg yolks quickly. Place lid on and set aside. If sauce cools and gets too thick to pour, just reheat on a low stove until pourable.
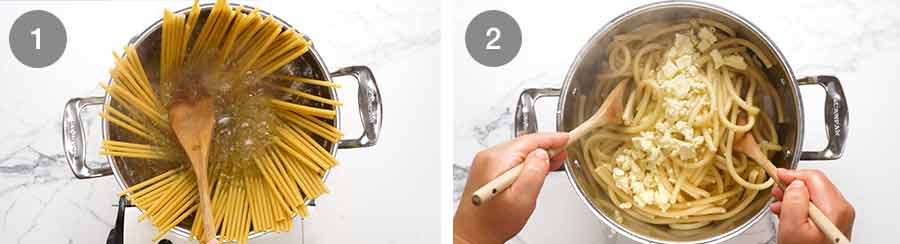
Pasta (Note 6):
- When you're ready to assemble, cook the pasta per packet instructions, minus 1 minute.
- Drain, then return to the pot. Leave to cool for 3 minutes, then stir through egg whites. Gently stir through crumbled feta.
Assemble and bake:
- Preheat oven to 180°C/350°F (all oven types).
- Place pasta in a baking dish (33 x 22 x 7 cm / 9 x 13 x 2.75"), arranging them so they are all going in the same direction as best you can (for visual effect when sliced). Make the surface as level as you can.
- Top with Meat Sauce, then smooth the surface.
- Pour over Béchamel Sauce, then sprinkle over the cheese.
- Bake 30 min or until crust turns golden.
- Cool for at least 10 minutes so you can cut neat slices with tdhe layers neatly visible. Serve!
Notes
Nutrition
10 more delicious Greek recipes
Life of Dozer
A familiar vision – rear view of Dozer’s rump bounding into the water.

The post Pastitsio (Greek beef pasta bake) appeared first on RecipeTin Eats.
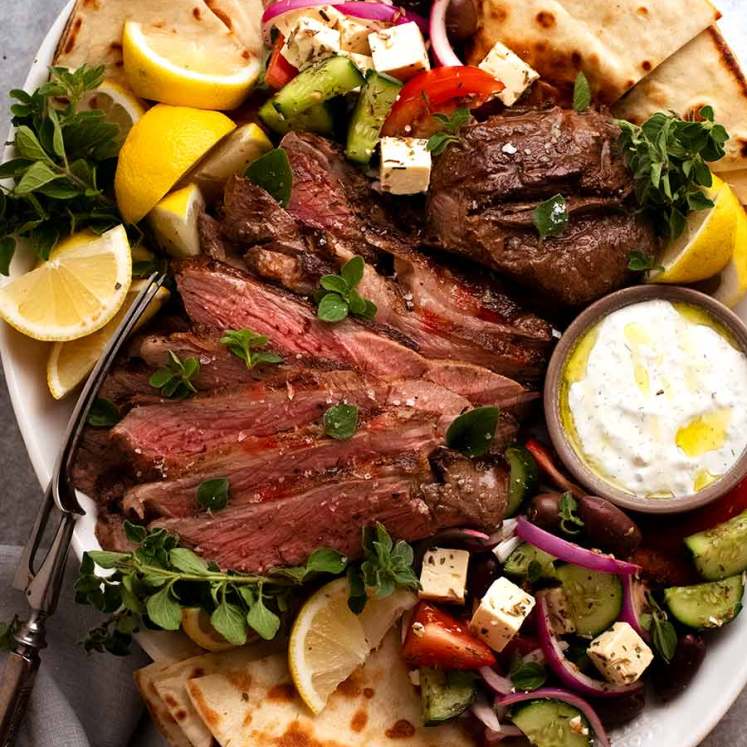
]]> The marinade for the chicken for this Greek Chicken Gyros recipe is SO GOOD that I use it even when I’m not making Gyros. Try it once, and I think you’ll be as obsessed with it as I am! Greek Chicken Gyros recipe It’s been ages since I made this Greek Chicken Gyros. But the minute... Get the Recipe
The post Greek Chicken Gyros recipe appeared first on RecipeTin Eats.
]]>The marinade for the chicken for this Greek Chicken Gyros recipe is SO GOOD that I use it even when I’m not making Gyros. Try it once, and I think you’ll be as obsessed with it as I am!
This is a reader-favourite recipe included by popular demand in my debut cookbook “Dinner”!
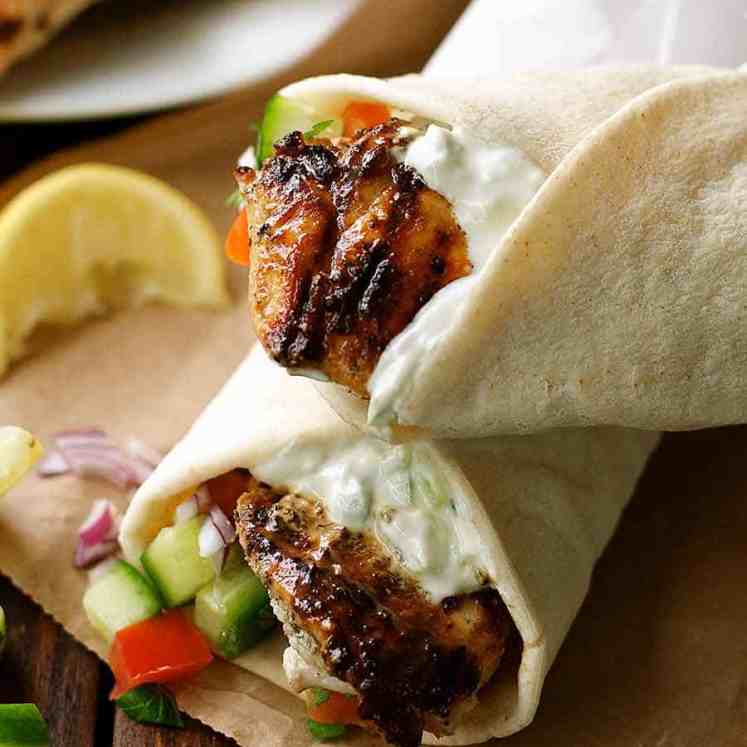
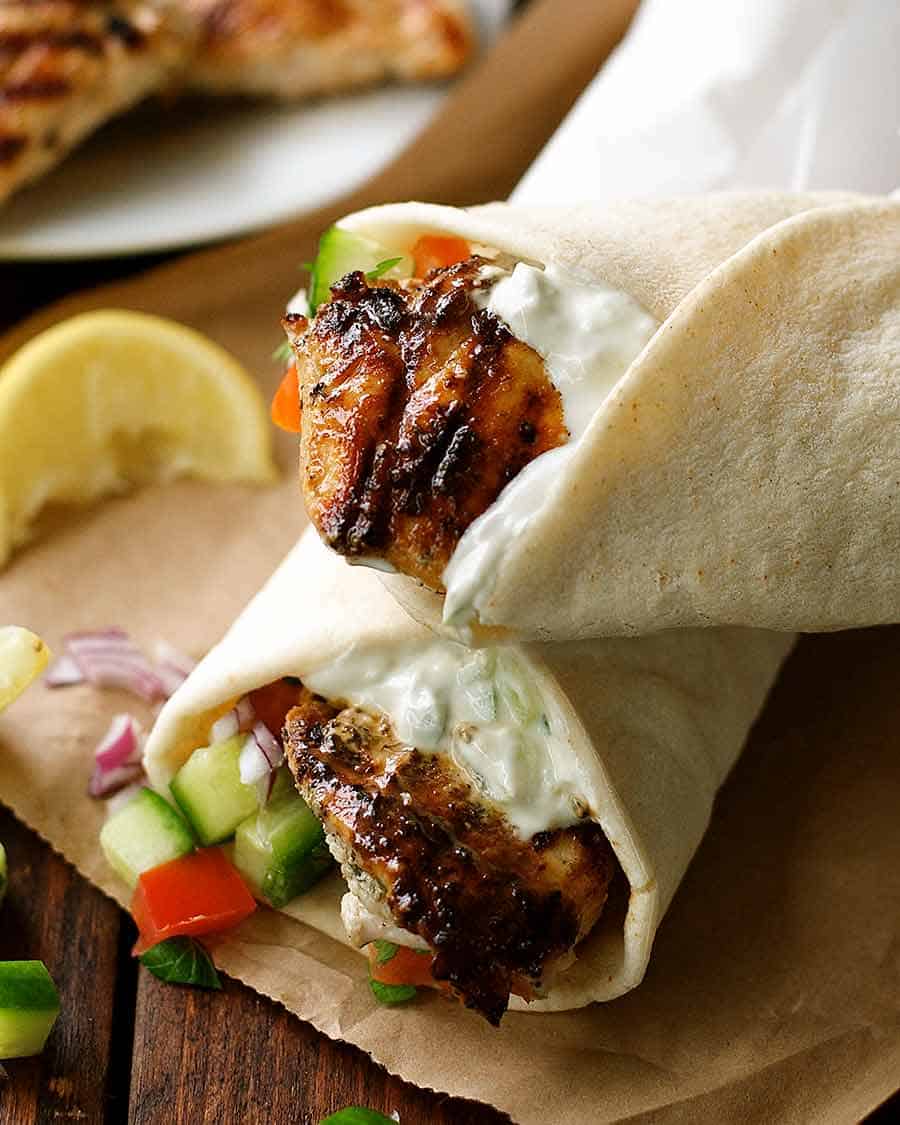
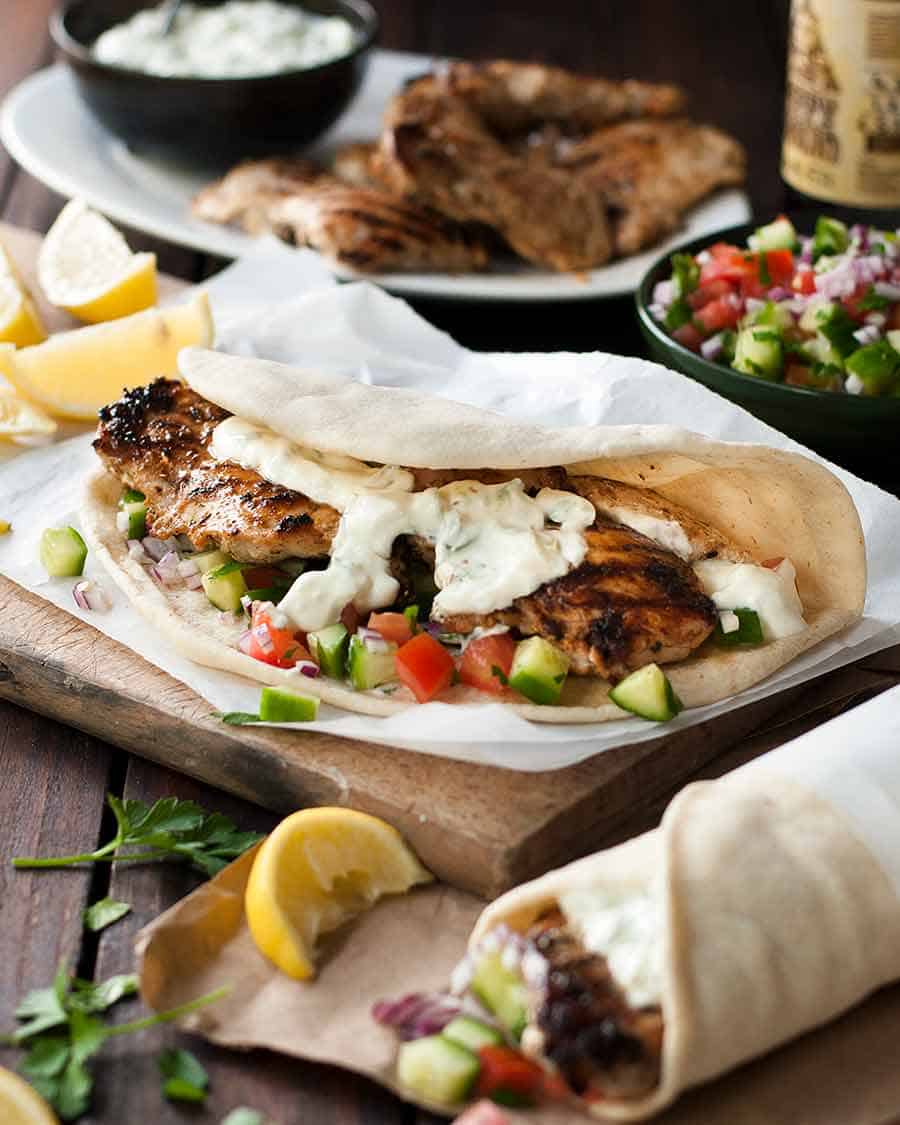
Greek Chicken Gyros recipe
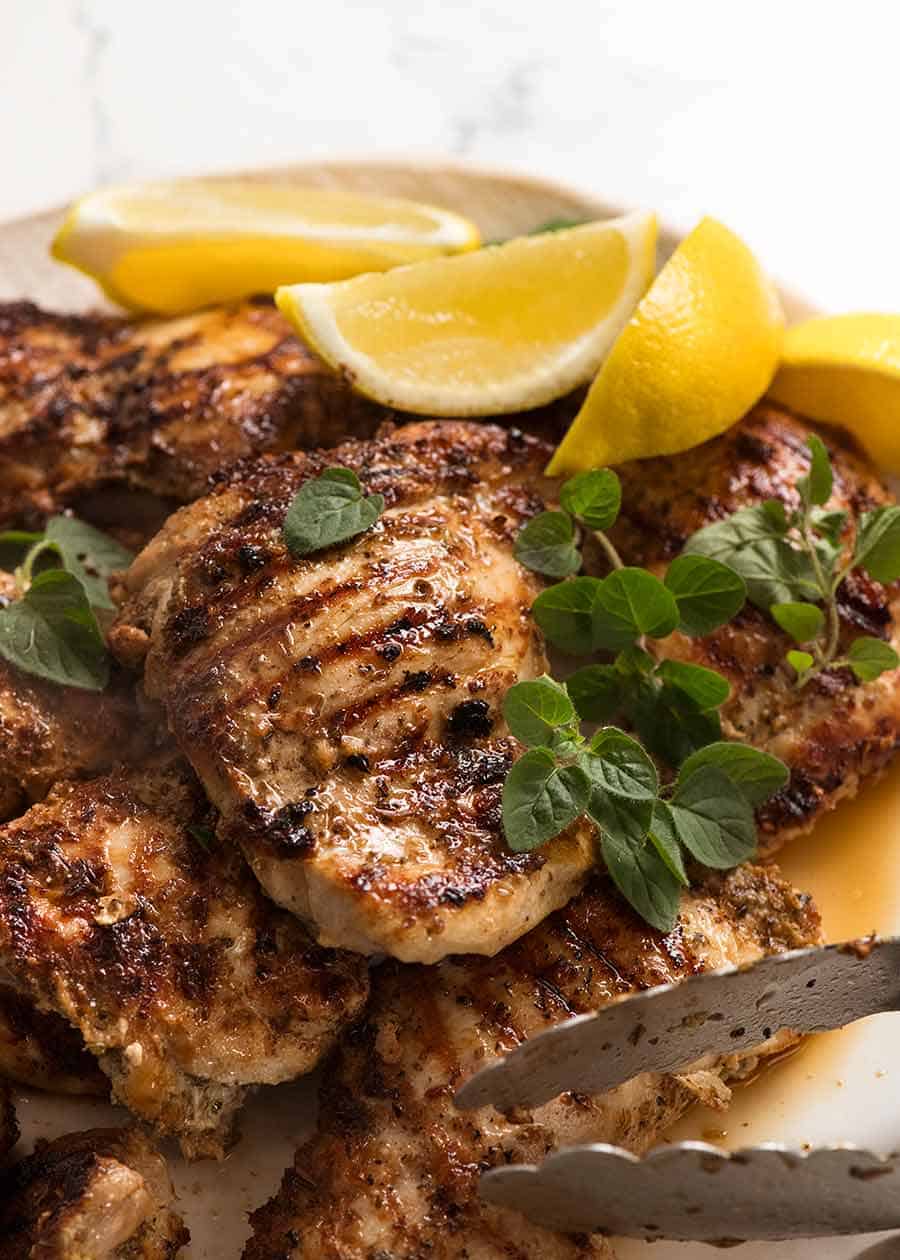
It’s been ages since I made this Greek Chicken Gyros. But the minute the chicken hit the grill, all I could think was “why don’t I make this more often??”
The smell is incredible. You can REALLY smell garlic and oregano. You know how sometimes you add herbs into things and you can’t really taste it? Or you can, but it’s a very subtle flavour. Definitely not the case with this!!
What goes in Gryos
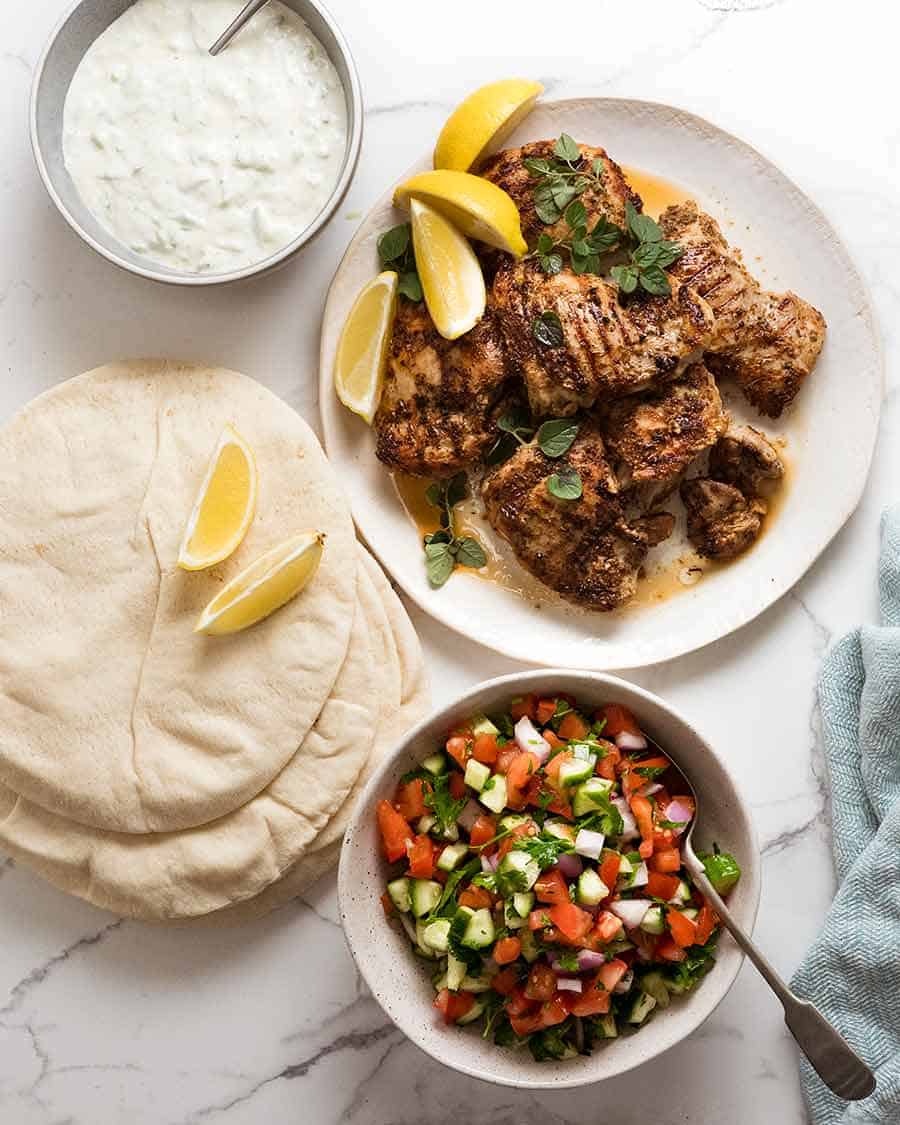
Here are the components that make up a Greek Chicken Gyros wrap:
Marinated Greek Chicken
Tzatziki
Tomato Cucumber Salad
Flatbread to roll up the gyros – or use smaller pita breads and just fold them over
Greek Chicken Gyros Marinade ingredients
Here’s what you need for the marinade. There’s LOTS of garlic and dried oregano. Lots!!
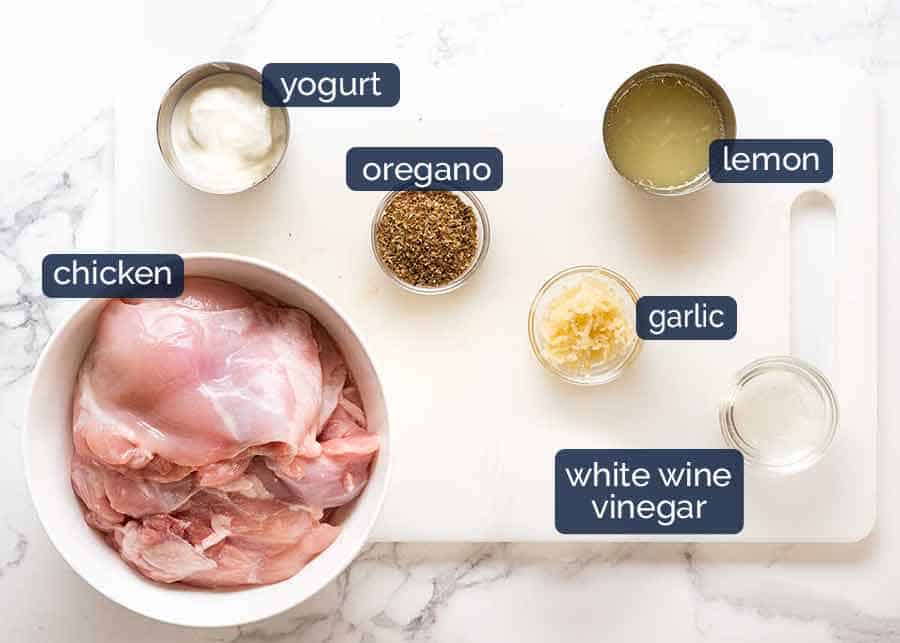
Yogurt is a magical marinade – it’s a terrific flavour carrier and tenderises the chicken!
Yogurt is the secret ingredient in this recipe. The acid in the yoghurt breaks down the fibres so it not only softens the chicken but also helps the marinade really infuse into the flesh.
Plus, the yoghurt makes this marinade “paste like” so it stays slathered on the chicken when you cook it (unlike many marinades that are thin). So you have extra flavour oomph!
In the video, you’ll see that I cook this indoors on a grill pan. But during the warmer months, this is a BBQ favourite!
What goes in Tzatziki for Greek Gyros
And here’s what goes in the tzatziki.
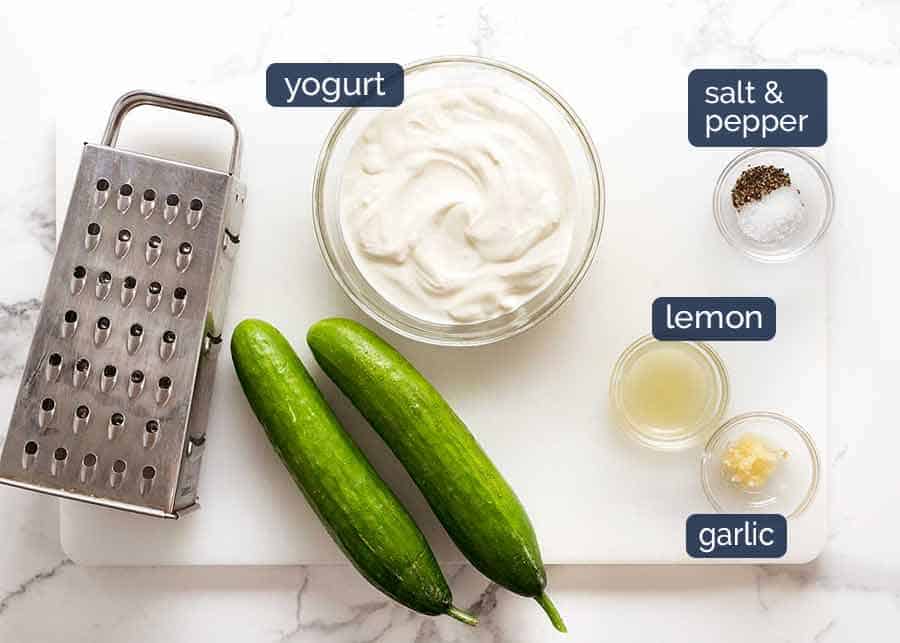
Greek Yogurt please! Or at least Greek style which is what I mostly use because it’s easily found at everyday supermarkets.
How to make Greek Chicken Gyros
And onto the making part!! There are a few components to Gryos – but the making part is a cinch!
GREAT meal for groups – prepare ahead, make loads!
This Greek Chicken Gyros is a really fab recipe for entertaining. Because it is really fast to prepare and the men can BBQ while the girls sip wine and chatter. (Joke joke JOKE!!!)
Then you can just lay everything out on the table. Why should you slave away, rolling up a gyros for everyone? Make ’em do it themselves!
(Few more of my favourite large format foods, DIY style, include: Chicken or Beef / Lamb Doner kebabs, Chicken Shawarma and Lamb Shawarma, Vietnamese Chicken Noodle Bowls).
What to serve on the side
I serve Greek Chicken Gyros as a complete meal in itself because there’s a decent amount of tomato and cucumber used to stuff inside.
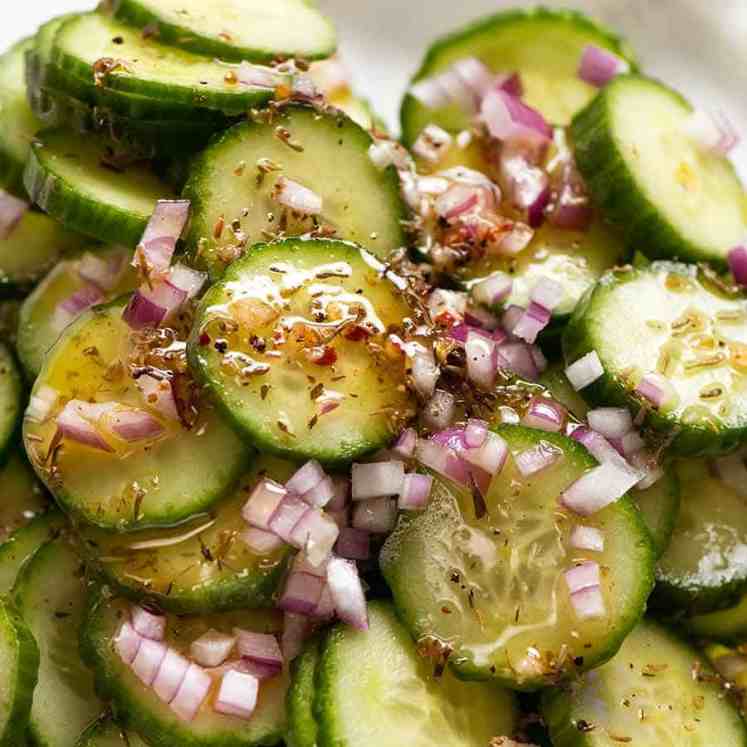
If you wanted to boost the fresh vegetables, a big fat juicy Greek Salad would be terrifically on theme! For something more substantial, especially if you’re making Gyros for a group, try this Greek Lemon Orzo Salad as well.
And though not specifically a Greek-style salad, this Cucumber Salad with Garlic & Herb Dressing OR this Creamy Cucumber Salad with Lemon Yogurt Dressing would go down a treat with this Gyros. I also offer a Greek take on my recipe for Roasted Pumpkin with Yogurt Sauce and Pine Nuts (see Customisations ideas section) that would be a great partner to the Gyros.
If you’re really wanting to impress, make Gyros using your very own homemade flatbread wraps. They’re easy and they’re made without yeast!!
– Nagi x
Watch how to make it
This recipe features in my debut cookbook Dinner. The book is mostly new recipes, but this is a reader favourite included by popular demand!

Greek Chicken Gyros with Tzaziki
Ingredients
- 2 lb / 1 kg chicken thigh fillets , boneless skinless
Marinade
- 3 large garlic cloves , minced (~ 3 tsp)
- 1 tbsp white wine vinegar (or red wine or apple cider vinegar)
- 3 tbsp lemon juice
- 1 tbsp extra virgin olive oil
- 3 tbsp Greek yogurt , preferably full fat
- 1 1/2 tbsp dried oregano
- 1 tsp salt
- Black pepper
Tzatziki
- 2 cucumbers (to make about 1/2 – 3/4 cup grated cucumber after squeezing out juice)
- 1 1/4 cups Greek yoghurt , preferably full fat
- 1 tbsp lemon juice
- 1 tbsp extra virgin olive oil (or more if you want richer)
- 1 garlic clove , minced
- 1/4 tsp salt
- Black pepper
Salad
- 3 tomatoes , desseeded and diced
- 3 cucumbers , diced
- 1/2 red spanish onion , peeled and finely chopped
- 1/4 cup fresh parsley leaves (optional)
- Salt and pepper
To Serve
- 4 to 6 pita breads or flat breads
Instructions
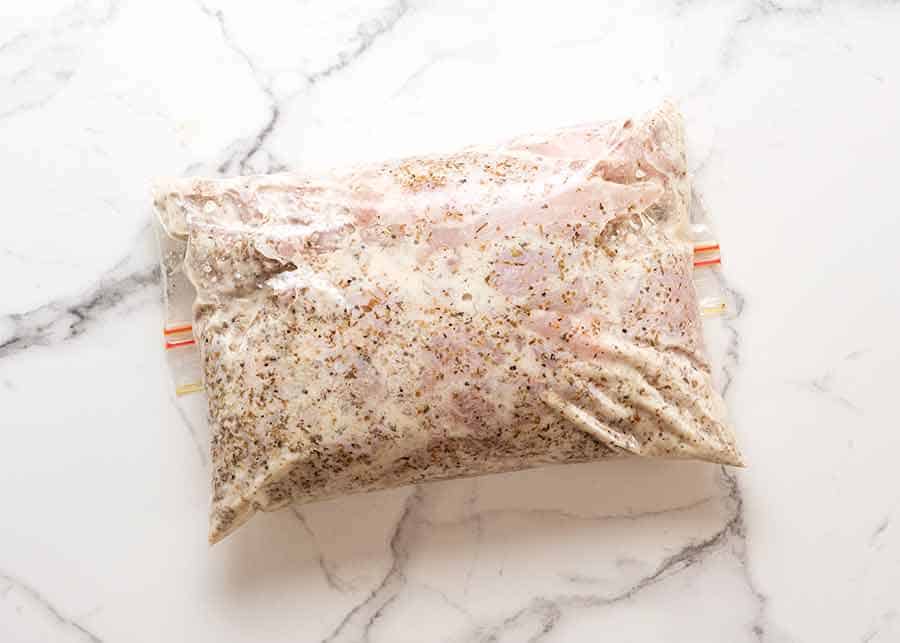
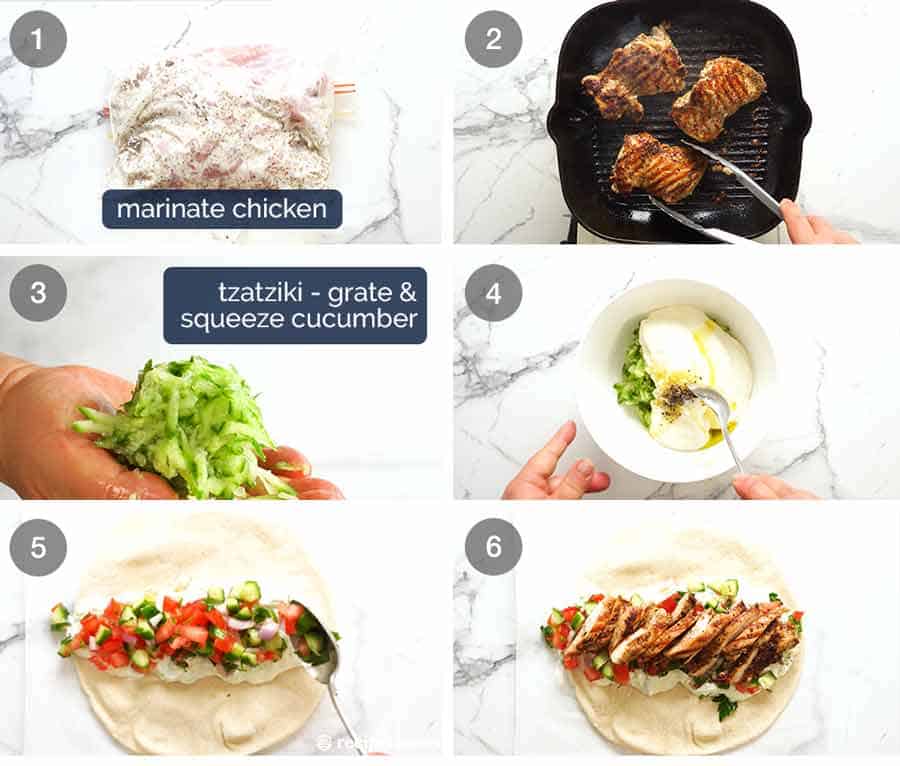
- Place the Marinade ingredients in a ziplock bag and massage to mix. Add the chicken into the ziplock bag and massage to cover all the chicken in the Marinade. Marinate for at least 2 hours, preferably 3 hours, ideally 12 hours and no longer than 24 hours.
Make the Tzatziki
- Cut the cucumber in half lengthwise. Use a teaspoon to scrape the watery seeds out. Coarsely grate the cucumber using a box grater. Then wrap in paper towels or a tea towel and squeeze to remove excess liquid.
- Place cucumber in a bowl. Add remaining ingredients then mix to combine. Set aside for at least 20 minutes for the flavours to meld.
Salad
- Combine ingredients in a bowl.
Cook Chicken
- Brush the outdoor grill with oil, then preheat on medium high. Or heat 1 tbsp of oil in a fry pan over medium high heat.
- Remove chicken from Marinade. Cook the chicken for 2 to 3 minutes on each side, until golden brown and cooked through (cooking time depends on size of chicken).
- Remove the chicken from the grill / fry pan onto a plate. Cover loosely with foil and allow to rest for 5 minutes before serving.
Assemble Gyros
- If your chicken thighs are large, you may need to cut them. Mine were small.
- Get a pita bread or flatbread (preferably warmed) and place it on a piece of parchment (baking) paper (or you could use foil). Place some Salad down the middle of the bread, then top with chicken and Tzatziki.
- Roll the wrap up, enclosing it with the parchment paper. Twist the end with the excess parchment paper to secure it and cut if desired.
- I prefer to lay everything out on a table and let everyone help themselves.
Notes
Nutrition
First published June 2015. Long overdue for fresh new photos and a brand new video!!
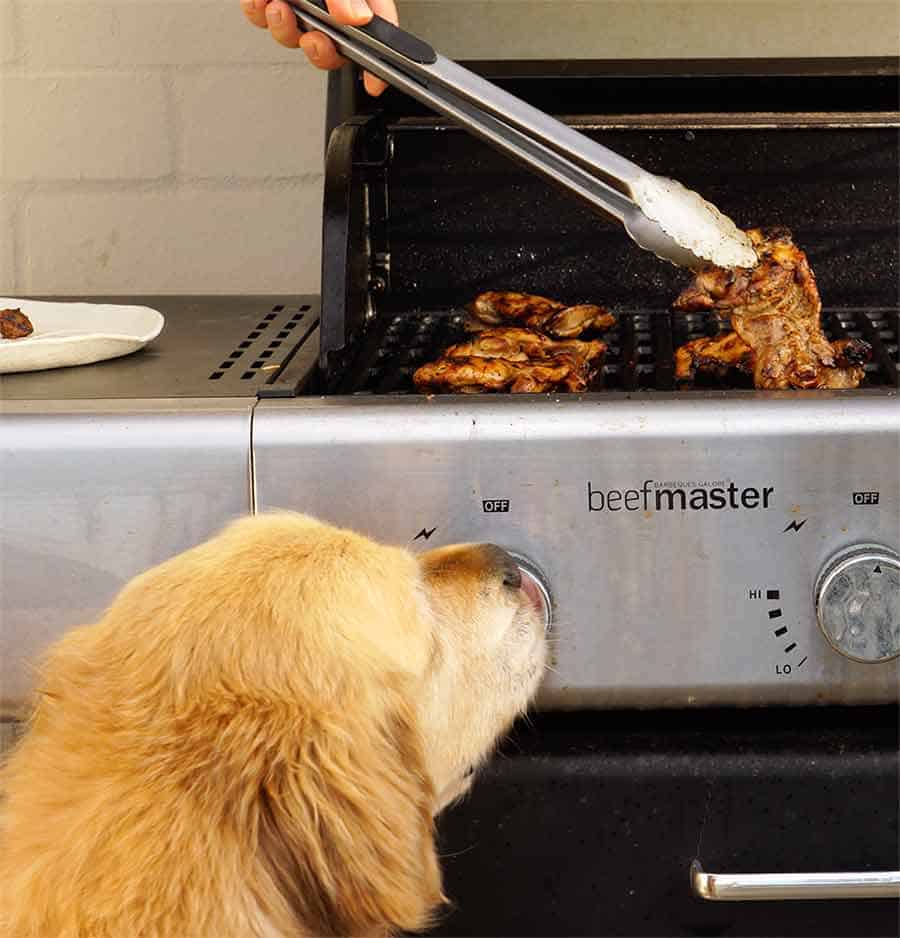
Life of Dozer
WAY too close to the BBQ!
The post Greek Chicken Gyros recipe appeared first on RecipeTin Eats.
]]>