 Vindaloo is a traditional Indian curry that’s not for the faint hearted! Chunks of beef are slow-cooked to tender perfection in a fiery-red sauce packed with big, bold curry flavours. Is it spicy? Heck yes, as it should be! For serious curry lovers, it’s hard to top this. Serve with naan for mopping and yogurt... Get the Recipe
The post Vindaloo appeared first on RecipeTin Eats.
]]>Vindaloo is a traditional Indian curry that’s not for the faint hearted! Chunks of beef are slow-cooked to tender perfection in a fiery-red sauce packed with big, bold curry flavours. Is it spicy? Heck yes, as it should be! For serious curry lovers, it’s hard to top this.
Serve with naan for mopping and yogurt to cool that fire.
Vindaloo Beef Curry
Vindaloo is a traditional tomato-based curry gifted to the world from Goa, a sunny pocket of paradise on the Western coast of India.
The origins of Vindaloo can be traced back to the time when Portugal ruled Goa in the sixteenth century. In fact, the name Vindaloo comes from carne de vinha d’alhos, a Portuguese dish of pork, wine, and garlic. Local chefs added a stack of spices, switched the wine for vinegar, and that’s how Vindaloo as we know it today came about (in a nutshell!)
A staple of Indian restaurant menus around the world, this curry is one for spicy food lovers!! 🌶 Vindaloo is loved for its fiery heat and intense sauce, which packs a generous combination of spices and is sharpened with a good whack of vinegar. It can be made with most proteins, including lamb, goat, pork, prawns, chicken and you could even do a vegetarian number.
While pork is actually traditional, here in Australia beef is the most popular version in Indian restaurants so that’s what I’m sharing today. Chunks of meat are slow-cooked for two hours in the Vindaloo sauce until it’s so tender it easily yields to the touch of a spoon!
What does Vindaloo taste like?
Unlike the easygoing and luscious Butter Chicken and Tikka Masala, Vindaloo is a swinging punch to the head! Plenty of Kashmiri chilli powder – a key spice in Vindaloo – brings flavour, heat and the famously rich red colour to the curry. There’s also warm spices in the form of cumin, coriander, cardamom, a little cinnamon and a few others. Finally, a distinct tang from vinegar is a signature Vindaloo flavour that balances the curry and gives it backbone.
It’s strong, hot and intense! If you’re wondering how spicy it actually is, I’d say it’s an 7 out of 10. Those who are accustomed to spicy food will no doubt scoff this down without breaking a sweat. I may talk a big chilli-heat game but I can’t actually handle very spicy food, and I don’t find this Vindaloo brutally hot.
So for you spice-wimps out there? Don’t worry, see the recipe notes for how to lower the Scoville units in this dish! 😂
Vindaloo curry paste 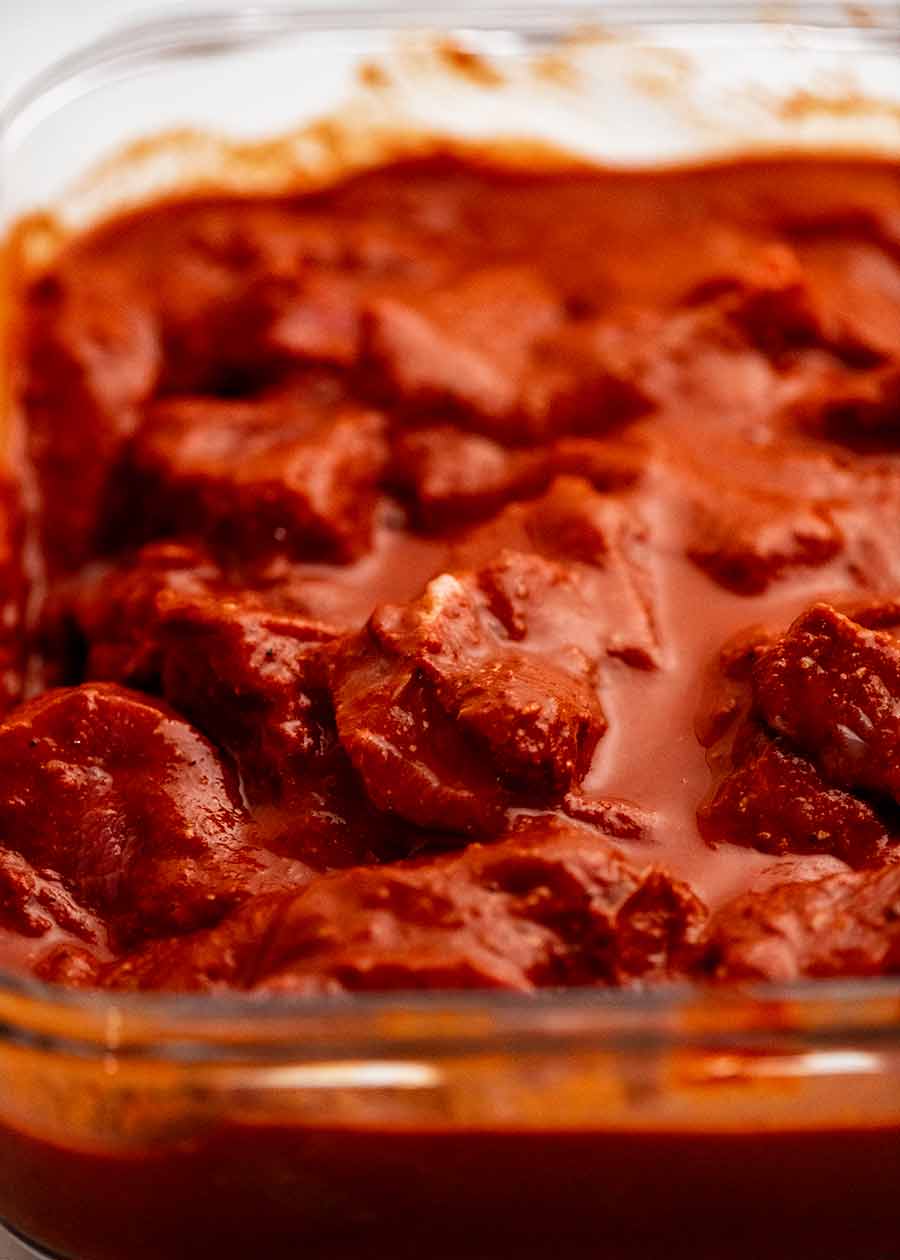
Marinating beef vindaloo
Ingredients in Vindaloo
Let’s go through what you need to make this amazing curry! First, the Vindaloo curry paste which is used to marinate the beef and help form the sauce. (Other proteins are covered in the recipe notes.)
1. The beef and the curry paste marinade
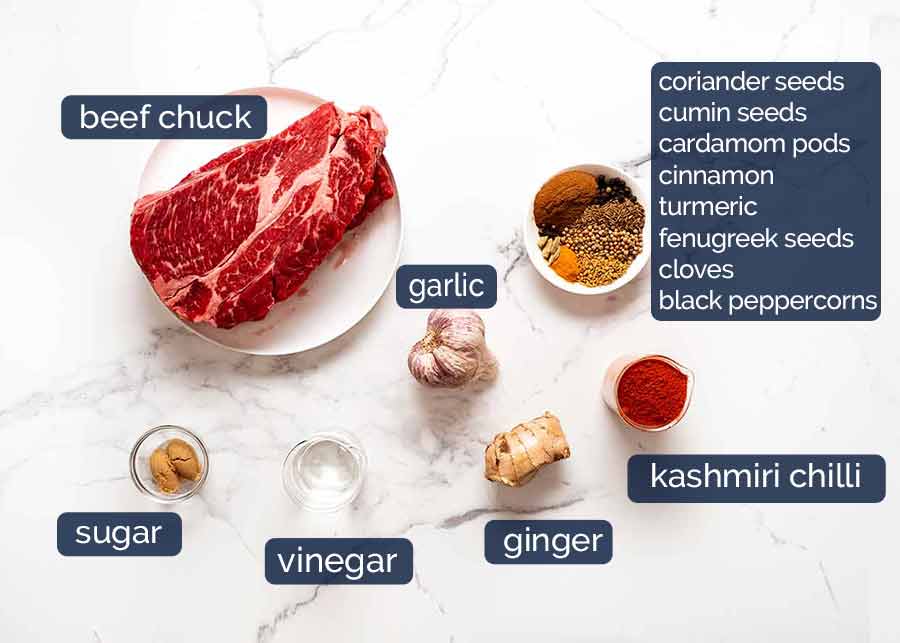
Spices – Most of these spices are fairly accessible these days in the spice section of large grocery stores in Australia. The two exceptions are Kashmiri chilli and fenugreek seeds – see next points;
Kashmiri chilli – This is an Indian chilli that is a little smoky as well as spicy. The Kashmiri chilli gives the curry sauce its signature bright red colour and chilli heat.
Find at: Indian* and some Asian grocery stores (some have Indian sections). Believe it or not, it’s also sold at some Coles grocery stores (Indian section).
Also used in: Goan Fish Curry, Tandoori Chicken.
Best substitute: It’s a key ingredient (we use 6 tablespoons!) so I really urge you to make the effort to find it. But if you can’t and you’re desperate to try this dish (I don’t blame you!), substitute with a mix of sweet paprika + smoked paprika + chilli powder (pure chilli powder, not US Chili Powder which is a blend) / cayenne pepper.
Fenugreek seeds – Another Indian specific cooking spice that actually kind of smells like maple syrup, though doesn’t taste like it when raw.
Find it at some Harris Farms, or Indian* and some Asian grocery stores (some have Indian sections). Use leftover for Palak Paneer!
Can’t find it? Just leave it out.
Beef chuck– An economical cut of beef that is best slow cooked until tender. Try to get it in a block piece so you can cut the pieces yourself. Most butchers and grocery stores cut it too small so the pieces cook too quickly, before the sauce develops enough flavour.
Alternative beef: Boneless ribs will also work as would beef osso bucco (use 1.2kg / 2.4lb including bone, keep them whole, the meat will fall off in pieces once slow cooked). If you can get well marbled brisket, that will also work but I find a brisket a bit stringy cooked in stew-like form.
Other proteins – Slow cooking cuts of lamb (mutton), goat and pork. Chicken will work too but the cook time needs to be shortened. See recipe notes;
Sugar – Just a touch to balance out the vinegar; and
Garlic and ginger – Fresh, just roughly chopped because it’s blitzed up with the spices to make the curry paste.
* I go to the Indian Emporium in Dee Why, Sydney.
2. Other ingredients in the Vindaloo Sauce
Much of the curry flavour of the Vindaloo Sauce comes from the Vindaloo Curry Paste (above) used to marinade the beef. But there’s a few extra ingredients we use to pep up the base of the sauce flavour:
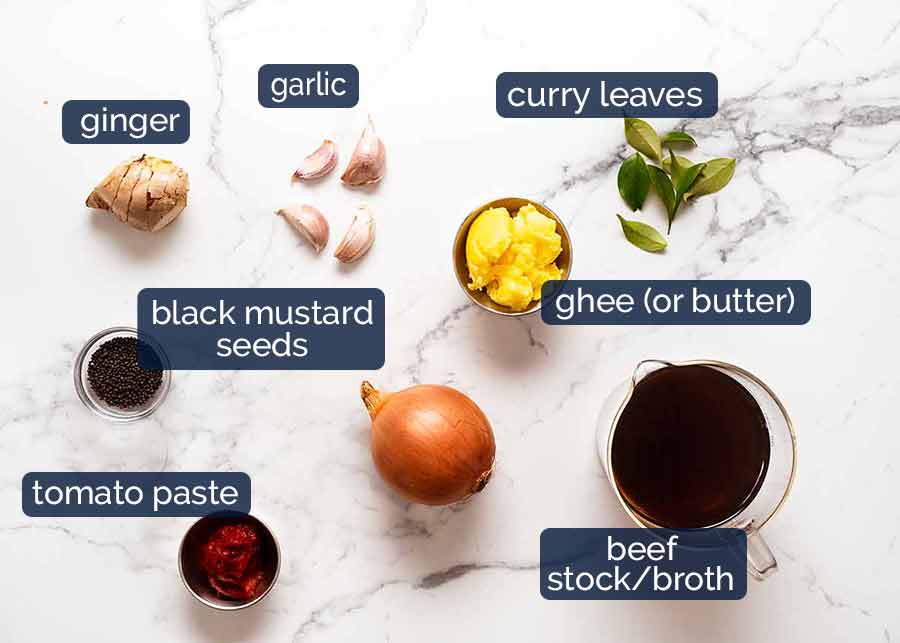
Beef stock – Stock or broth rather than water to add greater depth of flavour into the Vindaloo curry sauce. I did try with just water, but found the sauce a bit lacking.
Ordinarily I’m an advocate of using the best quality beef stock within your budget because producers are yet to successfully mass-produce cheap beef stock to a decent level of quality. However in this case, average store bought beef stock or broth is fine because by the spices are the dominant flavour here! But you get bonus points if you use homemade beef stock. I use homemade when I’m making to impress. 😇
Curry leaves – It smells like curry powder, but in fresh curry leaf form! (Though just so you know, curry powder isn’t derived from curry leaves 🙂) Curry leaves add incredible curry perfume into anything it’s used in in a way that can’t be replicated with powders. Fairly accessible nowadays for Sydney-siders, sold at Harris Farms, most Coles and Woolworths. I have a plant!
Store leftovers in the fridge (several weeks) or freeze for months.
Also used in: Eggplant Curry, Dal, Vegetable Samosa Pie, Cabbage Thoran. Throw in 10 or so when cooking Curried Rice, or into this Indian Chickpea Curry or Vegetable Curry – it will really take it to a new level!
Substitute: dried curry leaves (not quite the same, but it’s the best sub) or Garam Masala powder;
Ghee (or butter) – The fat used in Indian cooking which adds an intense buttery flavour. Ghee is basically the same thing as clarified butter. This is simply normal butter but with milk solids and water removed, leaving behind pure butter fat.
You can either make your own Ghee (it’s cheaper, really easy and keeps for months), buy it, or just use normal butter;
Black mustard seeds – they look like poppyseeds but have a slight wasabi-like bite to them. And they smell Indian, not Japanese! Not spicy, more a fresh zing. It’s about $1.50 in small packs at Indian grocery stores – I go to Indian Emporium in Dee Why on the Northern Beaches, Sydney. Also sold in the Indian food section at some Woolworths (Australia) $1.70, and online – small, light pack so postage should be minimal!
Also used in: Eggplant Curry, Dal, Vegetable Samosa Pie, Cabbage Thoran; and
Ginger and garlic – It’s rare to see an Indian recipe that don’t include these, and Vindaloo is no exception!
How to make Vindaloo Curry
Vindaloo starts with a curry paste made by blitzing or grinding a generous amount of chilli and spices, fresh garlic and ginger. This is then used to marinate beef before before slow cooking in a sauce until the meat is fall-apart-tender.
1. Vindaloo curry paste beef marinade
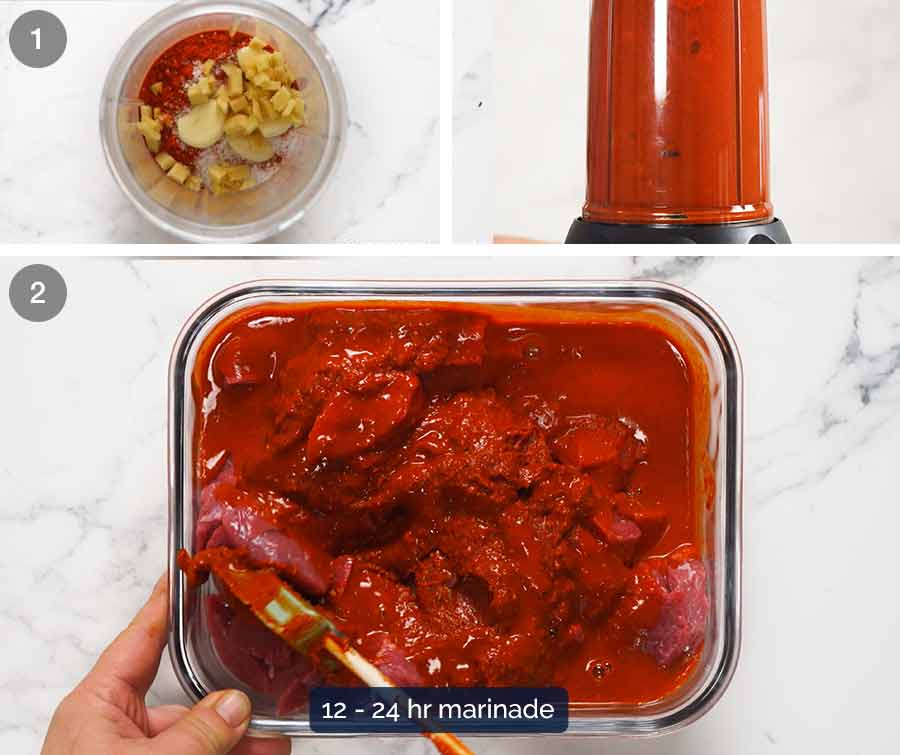
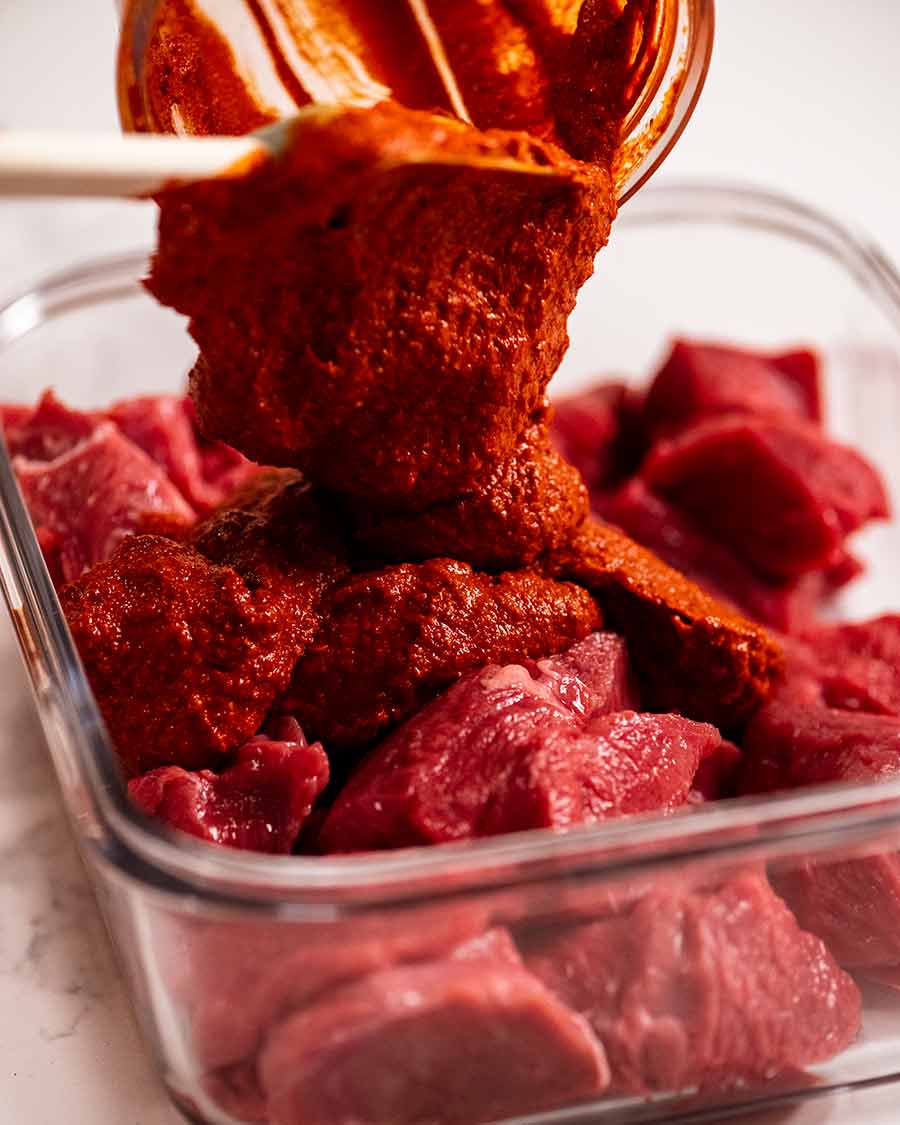
Vindaloo Curry Paste – Place the curry paste ingredients in a small food processor or Nutribullet (pictured) and blitz until it becomes a paste. We use a bit of water which makes it easy to blend until smooth;
Marinate beef – Pour the Vindaloo curry paste over the beef, then marinate for 2 hours minimum. Up to 24 hours is fine, but it doesn’t make the end result any better because the spice flavour is so strong it penetrates into the beef pieces during the slow cooking time.
2. Making the Vindaloo curry sauce base

Make sauce base – The Vindaloo curry sauce starts by sautéing garlic, ginger and onion before adding the black mustard seeds which will sizzle and pop dramatically. Then we cook off the tomato paste (this takes off the raw edge) before mixing in the beef stock;
Transfer to jug – I then transfer the mixture in a jug so the mixture can be pureed with a stick blender. This is necessary because there’s not enough volume to do this in the pot because the head of the stick blender won’t be submerged. Trust me, I tried – and ended up with most of it on my face!!
Puree – The use a stick blender to puree until smooth. You could do this step in a blender or food processor too. The purpose here is to puree the onion, garlic and ginger until smooth which releases flavour and makes the sauce smooth. I didn’t do this for earlier versions of the recipe (and many recipes online do not call for this) but once I added this step, the Vindaloo Sauce flavour noticeably improved;
Back into pot – Then pour the sauce back into the pot, and we’re ready to proceed with slow cooking the beef!
3. Slow cook beef until tender
I like to do the slow cooking step in the oven because it’s entirely hands off. No stirring, no need to worry about the base catching. But if can also be done on a very low heat on the stove.
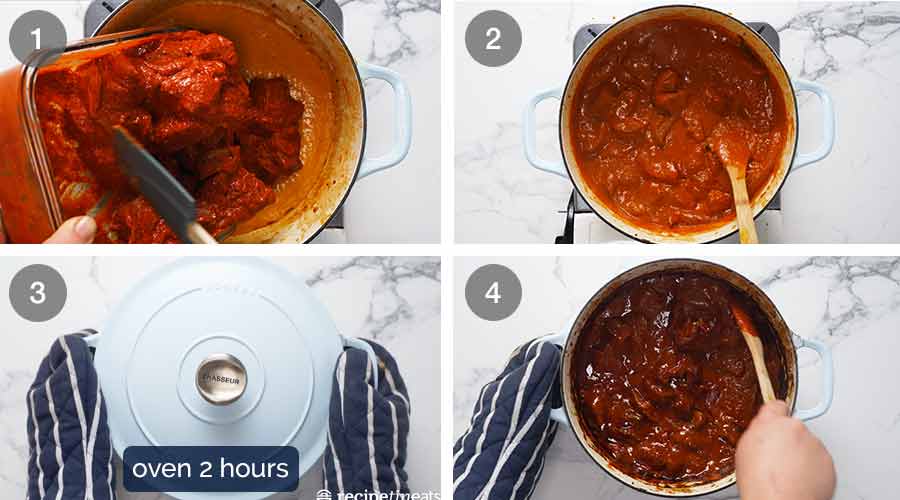
Add beef – Add the beef and every scrap of marinade into the pot with the pureed sauce;
Stir and bring to a simmer;
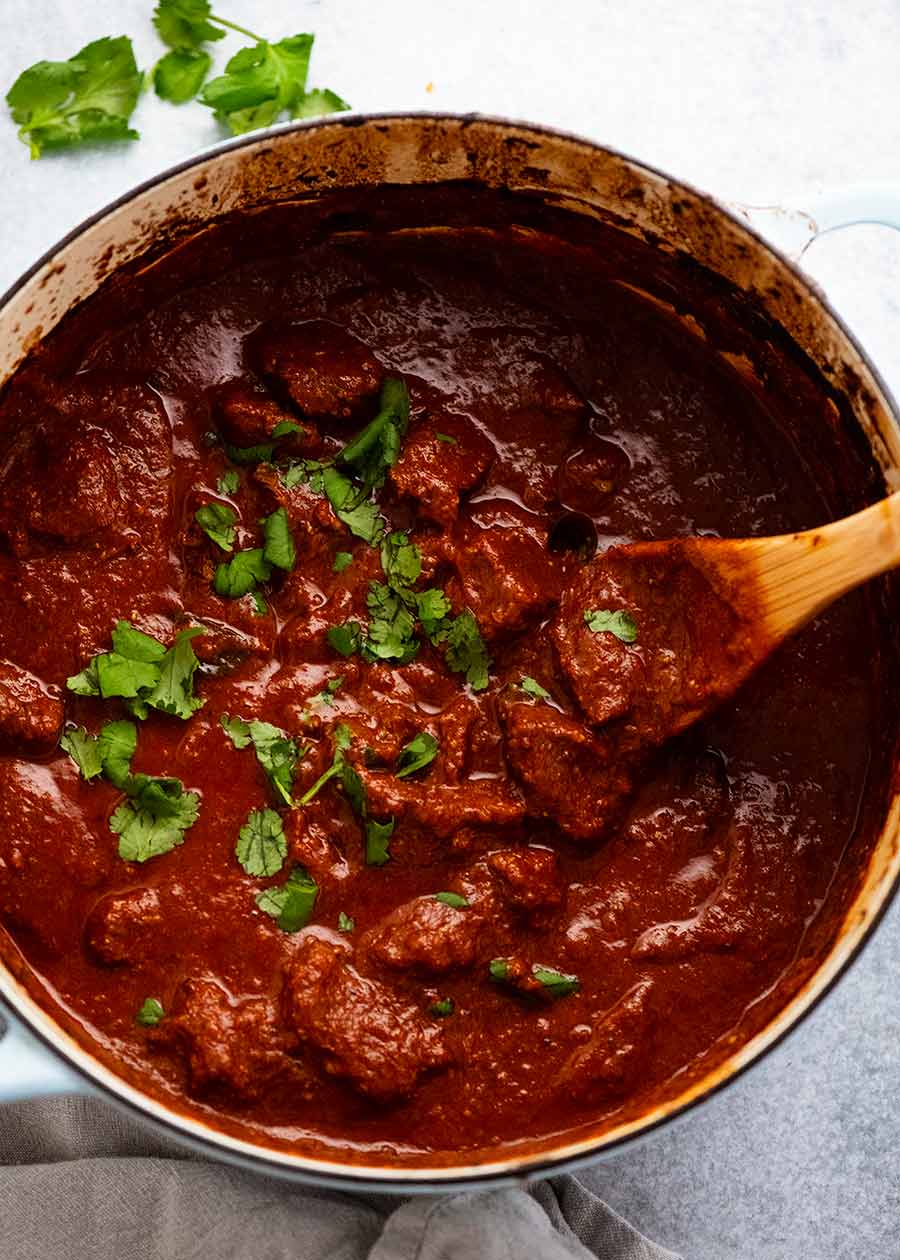
Slow cook – Then transfer to the oven and cook for 2 hours. This is the length of time needed to make 3cm / 1.2″ cubes of chuck beef “fall-apart-tender” and for the sauce to thicken, develop flavour and darken in colour to the signature vibrant red colour.
The oven temperature is 190°C/375°F (170°C standard) which sounds higher than you might expect. But this is the temperature that replicates a low heat on the stove. If you take a peek in the pot midway through cooking, you’ll see that the surface of the liquid is barely bubbling – if at all – which is exactly what you want. I use this same temperature for other slow cooked stew-type things such as Beef Bourguignon, Massaman Lamb Shanks. For other dishes, I will cook for longer at a lower heat where they benefit from the longer cook times.
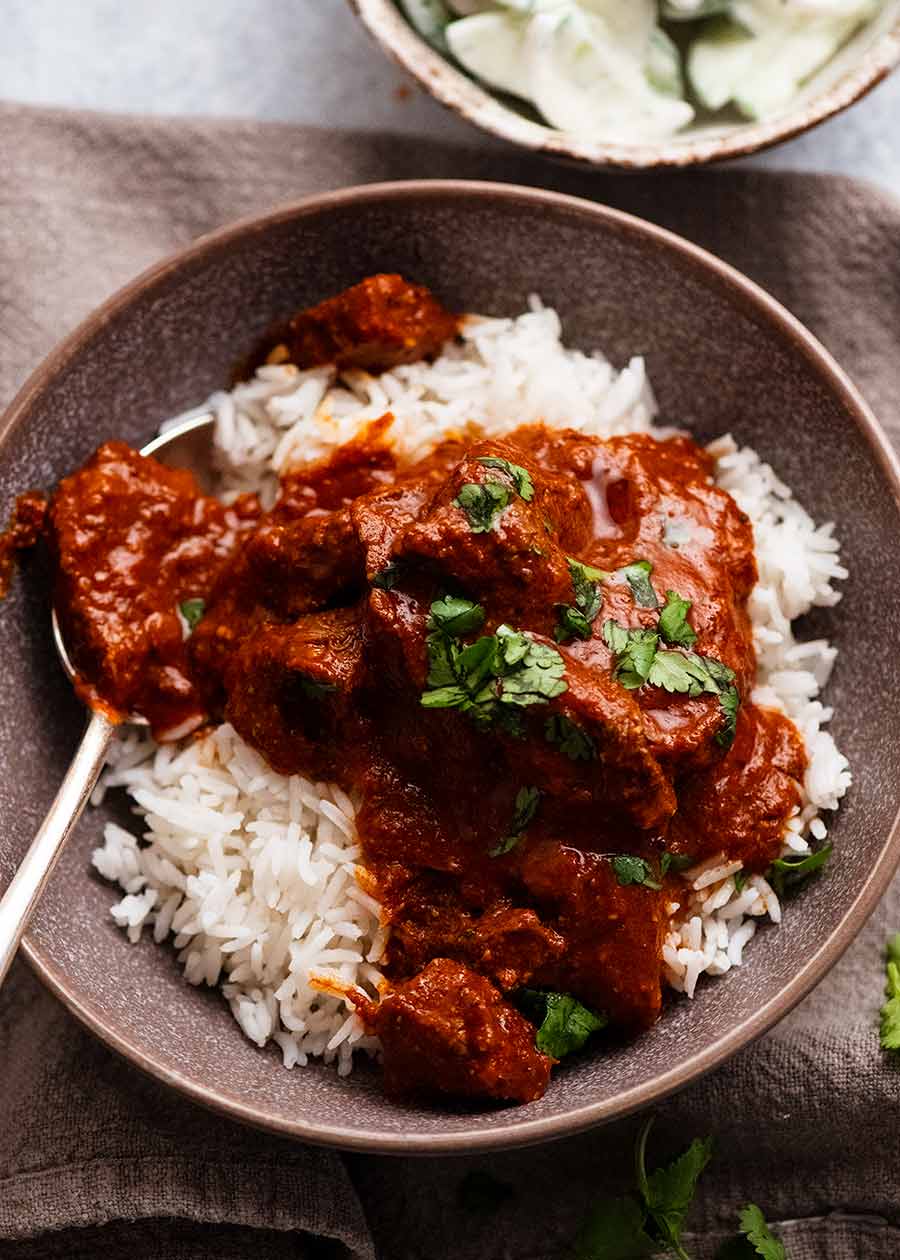
Ready to serve! When you take it out of the oven, the sauce should be a deep red colour (as long as you didn’t skimp on the kashmiri chilli!), thickened so it coats the beef pieces, and the beef should be tender enough to cut into with a fork. If not, just cover and stick it back in the oven!

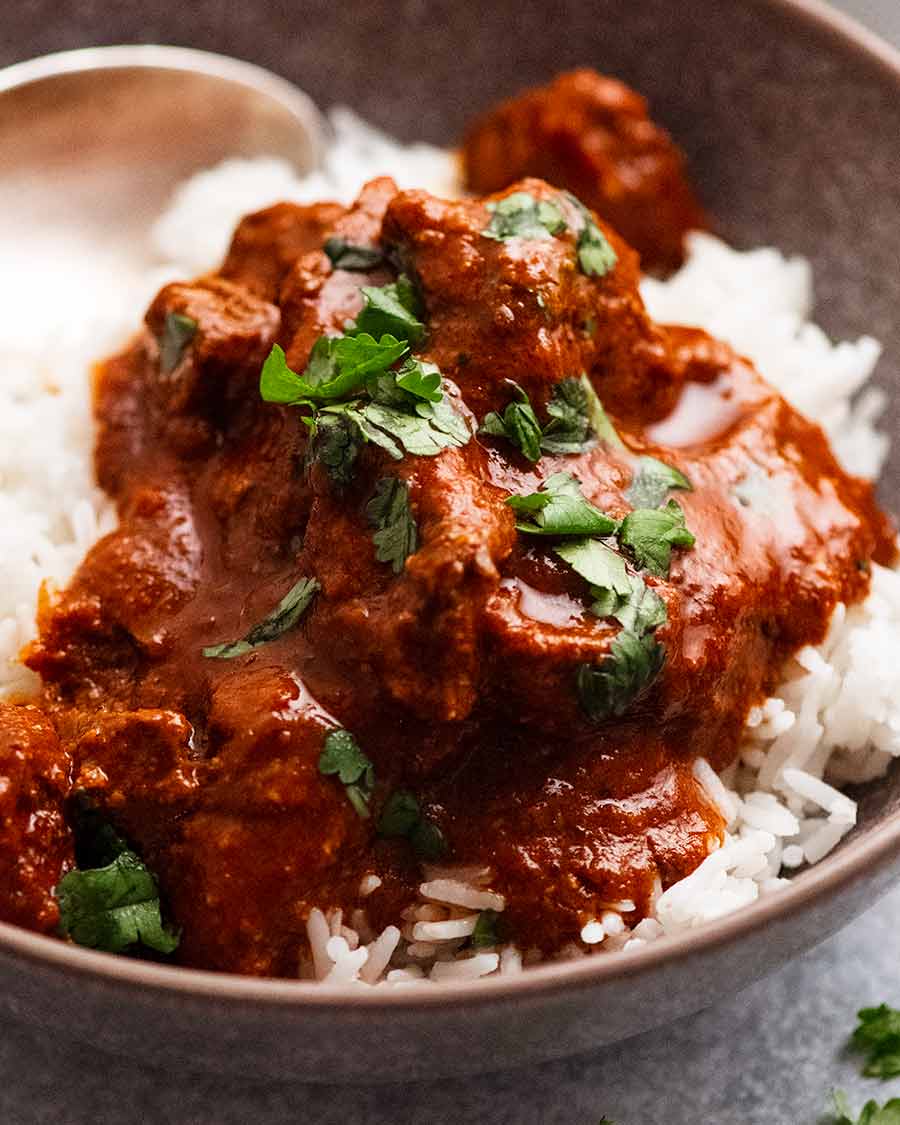
Close up of fresh cooked Vindaloo Beef Curry garnished with coriander 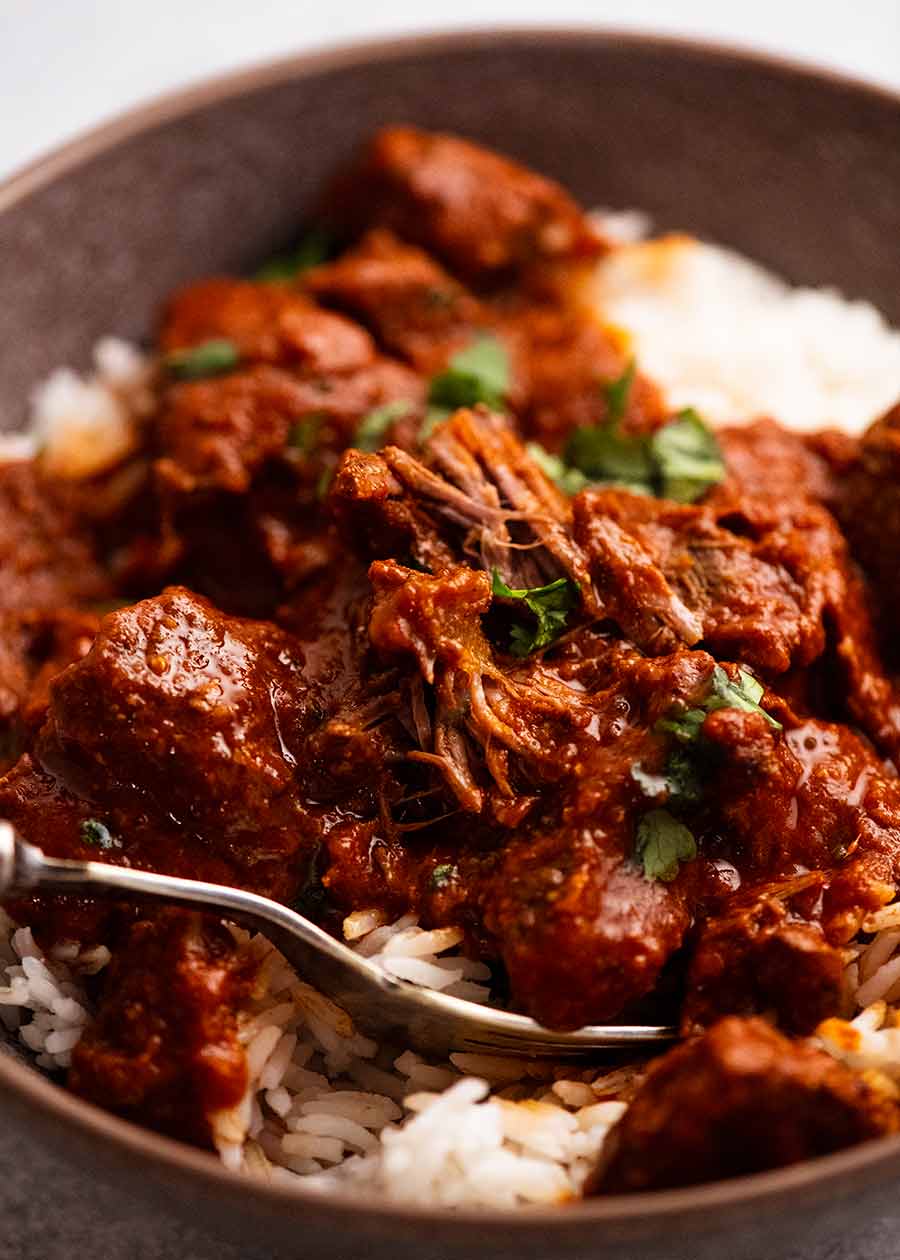
This is what I mean by “fall-apart” beef!
What to serve with Vindaloo curry
Serve over basmati rice which is the traditional rice for Indian food, though any type of plain rice will work fine here (white, jasmine, brown, or low-carb cauliflower rice). Add a dollop of plain yogurt which will cool the spiciness and a sprinkle of coriander/cilantro (for freshness).
Complete your Indian menu!
And if you’re going all out, complete your Indian feast with:
Samosas to start. Golden parcels of crispy pastry filled with spiced potato, this Indian street food is a popular starter in Indian restaurants around the world. This recipe is fun to make and ridiculously good!
Parkoras – Another starter option. Vegetable fritters – the Indian way!
Homemade Naan (it’s naturally no knead!) – The whole RecipeTin team got involved coming up with what we think is the best possible naan that a home cook can make on the stove, just in case you happen not to have a tandoor sitting in the middle of your kitchen! It’s fluffy with the signature chewiness just like you get at restaurants, and you’d never mistake this for another basic flatbread. No yeast? Make this simple No Yeast Flatbread instead!

Samosas 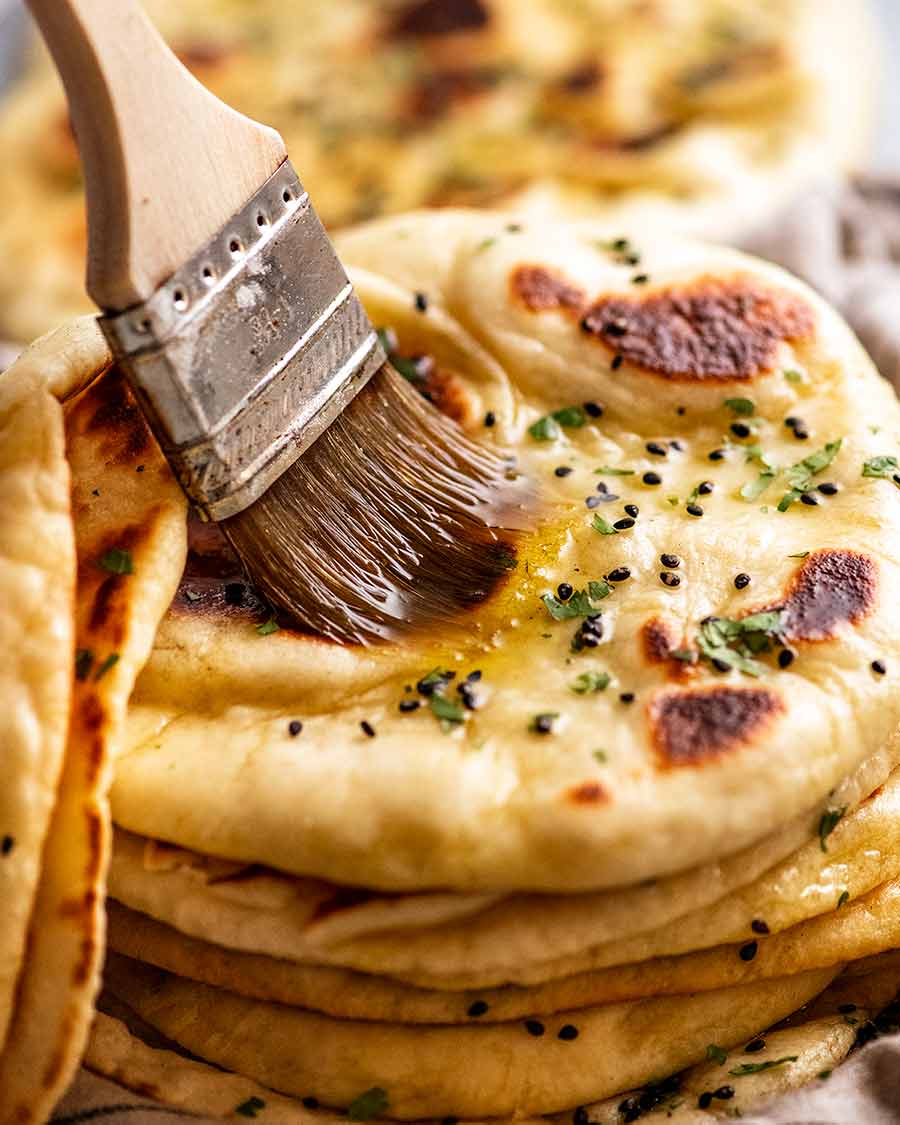
Homemade Naan – incredibly fluffy, bubbly & chewy! 
Dipping pakora into Minted Yogurt Sauce
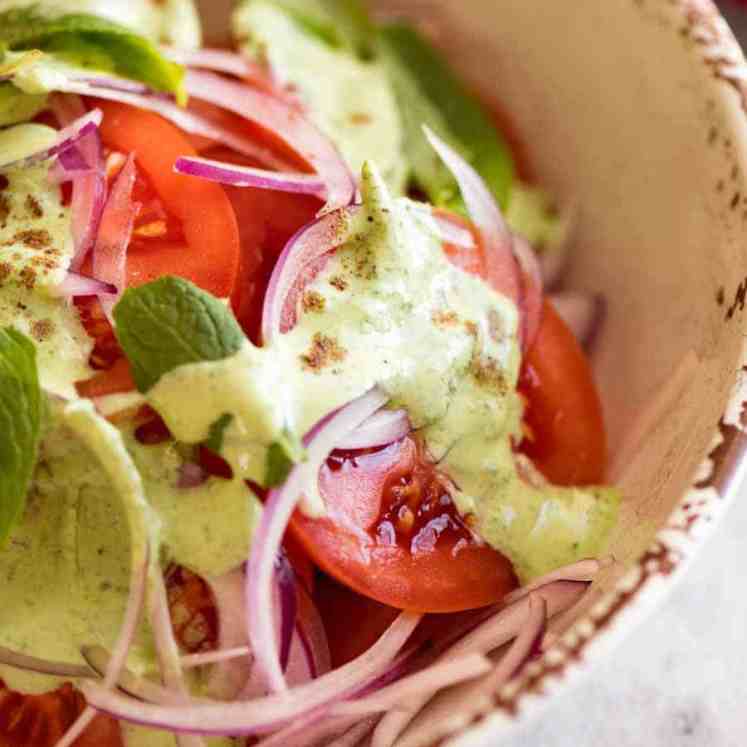
Interestingly, Indian food doesn’t have side salads like we do in Western countries. My theory is because vegetarian food is so prevalent in Indian cooking. However, here are some vegetable sides that I think work well with Indian themed menus:
So, fellow curry lovers, what do you think of my latest addition to my Indian curry collection?? Will you give it a go? Think you can handle the heat?? 🌶🌶🌶 – Nagi x
Watch how to make it
Vindaloo
Ingredients
- 800g / 1.6 lb beef chuck , cut into 3cm / 1.2″ cubes (Note 1)
- 1 1/2 tsp salt
Curry paste:
- 6 tbsp Kashmiri chilli powder – TEST spiciness before using! (Note 2)
- 2 tsp coriander seeds
- 3 tsp cumin seeds
- 4 cloves
- 4 cardamom pods (green)
- 2 tsp cinnamon powder
- 1/2 tsp black peppercorns
- 2 tbsp fresh ginger , roughly chopped
- 10 garlic cloves (yes, 10!)
- 1 tsp brown sugar
- 1 tsp fenugreek seeds (Note 3)
- 1/4 tsp turmeric powder
- 7 tbsp white vinegar
- 2 cups water
Curry sauce:
- 50g / 3 tbsp ghee or unsalted butter (Note 4)
- 1 onion , finely chopped (brown, yellow, white)
- 2 tsp ginger , finely grated
- 4 garlic cloves , finely minced
- 1 1/2 tsp black mustard seeds (Note 5)
- 2 tbsp tomato paste
- 10 curry leaves , fresh (Note 6)
- 2 cups beef stock , low sodium (if using homemade, add 1/2 tsp salt)
Garnish:
- 2 tbsp coriander/cilantro leaves , roughly chopped
Instructions
- Salt beef: Toss beef in salt.
- Check spiciness of kashmiri chilli powder and adjust if desired. See Spiciness Note below.
- Curry Paste: Place Curry Paste ingredients in a Nutribullet or small food processor with 1 cup of the water. Blitz until smooth. Pour over beef. Pour remaining 1 cup water into Nutribullet, shake (to clean out remaining curry paste), then pour/scrape over beef.
- Marinate beef: Mix beef in curry paste, cover, then marinate 2 hours. (Note: marinade is fairly thin – the water cooks down during slow cooking.)
- Preheat oven to 190°C/375°F (170°C fan).
- Curry sauce: Melt ghee over medium high. Cook onion, ginger and garlic until they become translucent – about 3 minutes.
- Mustard seeds: Add black mustard seeds then cook until onion is tinged with gold. Stir in tomato paste, cook 1 minute.
- Puree sauce: Add beef stock, stir. Transfer into a jug then use a stick blender to puree until smooth. Pour back into the pot.
- Add beef: Add beef and curry leaves, stir then bring to boil.
- Slow cook: Cover with a lid, then place in the oven for 2 hours or until beef is fall apart tender and the sauce has darkened in colour and thickened. (See Note 7 if sauce hasn't reduced enough).
- Serve: Garnish with coriander, then serve over basmati rice with a side of naan!
Notes
1. Beef – Beef chuck works well because it’s a tough cut that becomes “fall apart tender” after slow cooking. Boneless ribs will also work as would beef osso bucco (use 1.2kg / 2.4lb inc bone, keep them whole, the meat will fall off in pieces once slow cooked). If you can get well marbled brisket, that will also work but I find a brisket a bit stringy cooked in stew-like form. Other proteins – Lamb shoulder and pork shoulder will work too. For chicken, use about 1 kg / 2lb bone in chicken thighs but remove the skin. Cut in half along bone (equal size pieces). Make recipe as written except cook in oven for 50 minutes. Remove chicken pieces (make sure they are pretty tender), then simmer sauce on stove (very low heat) to reduce and thicken sauce (see video for how it should look, ~ 30 min I think). Return chicken into pot, serve! 2. Kashmiri chilli – TASTE IT before using quantity per recipe. Wet finger, lightly press into Kashmiri and taste. Super spicy? Start with less – you can always add more at the end. The one I get is about 1/4 to 1/3 the spiciness of black pepper. Kashmiri is a spicy, smokey Indian chilli powder that gives this curry the red colour plus spiciness. Sub with 4 tbsp smoked paprika + 1 tsp chilli powder (not US Chili Powder which is a blend) or cayenne pepper. Pretty close flavour but, you won’t get quite the same red colour. Find at Indian store (I go to Indian Emporium in Dee Why, Sydney). Also used in: Goan Fish Curry, Tandoori Chicken 3. Fenugreek seeds – Available at stores that carry a decent range of spices. I found it at Harris Farms (Australia). Also, of course, at Indian grocery stores! Use leftover for Palak Paneer. 4. Ghee is clarified butter, one of the traditional fats used in Indian cooking. It is simply butter without the water and milk solids, so you have pure butter fat, it has a more intense flavour than butter. Either buy it, make it (easy and keeps for months) or just use normal butter! 5. Black mustard seeds – key ingredient for authentic flavour. Look like poppyseeds, wasabi bite, Indian aroma! ~ $1.50 in small packs at Indian grocery stores (my local is Indian Emporium in Dee Why, Sydney). Also sold in the Indian food section at some Woolworths (Australia) $1.70, otherwise try online. Also used in: Eggplant Curry, Dal, Vegetable Samosa Pie, Cabbage Thoran Substitutes (starting with best): Brown mustard seeds, yellow mustard seeds, 1/2 tsp mustard powder*, 1 1/2 tsp Garam Masala (different flavour, but is intended to make up for absence) 6. Fresh curry leaves – key ingredient for authentic flavour! Sub dried curry leaves. Fairly accessible nowadays for Sydney-siders, sold at Harris Farms, most Coles and Woolworths. Store leftovers in fridge (weeks) or freezer (months). Also used in: Eggplant Brinjal Curry, Vegetable Samosa Pie, Cabbage Thoran (seriously good!), Lentil curry Substitute: dried curry leaves, 1.5 tsp Garam Masala powder (add it with rest of spices, different flavour but compensates). 7. Sauce thickness – If the sauce is not darker and thicker at the end of the slow cooking time, then just reduce on the stove on low heat with the lid off. This can happen if you didn’t use a heavy based pot like a dutch oven (heat retention is better = sauce cooks as intended). 8. Slow cooker / pressure cooker / Instant Pot – Won’t work for this, I’m afraid. Really need the oven to caramelise the edges and surface of the sauce which makes it darken and adds flavour, plus some evaporation which helps thicken the sauce. Slow cooker just won’t taste as good. 9. Storage – Leftovers will keep for up to 5 days in the fridge. But I find with curries (unlike Western stews) they are best eaten on the day, or the next day. After this, the intensity of the spice flavours will start to fade. 10. Nutrition per serving, assuming 5 servings. Excludes rice.
Nutrition
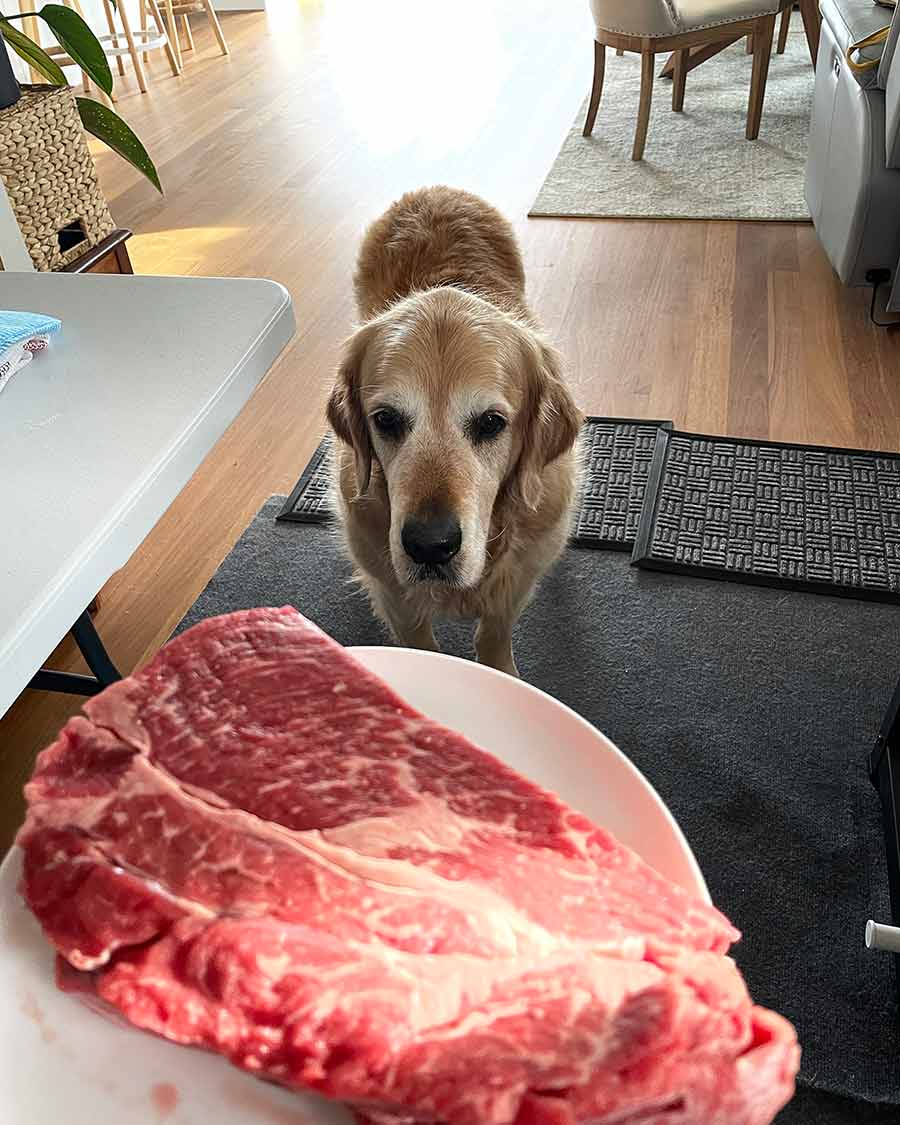
Life of Dozer
Still waiting for the one in a million moment that a slab of beef hits the floor.
The post Vindaloo appeared first on RecipeTin Eats.
]]> To make vegetable fritters irresistible … make Pakora!! These are Indian vegetable patties, spiced and fried until golden and crispy. They can be made with virtually any vegetable, so use this pakora recipe as a springboard to do your own variations. Serve pakora as a starter for an Indian meal, a light meal, or pass... Get the Recipe
The post Pakora (Indian Vegetable Fritters) appeared first on RecipeTin Eats.
]]>To make vegetable fritters irresistible … make Pakora!! These are Indian vegetable patties, spiced and fried until golden and crispy. They can be made with virtually any vegetable, so use this pakora recipe as a springboard to do your own variations.
Serve pakora as a starter for an Indian meal, a light meal, or pass them around as canapés at your next gathering. They’re gluten free and vegan so everybody can enjoy them!
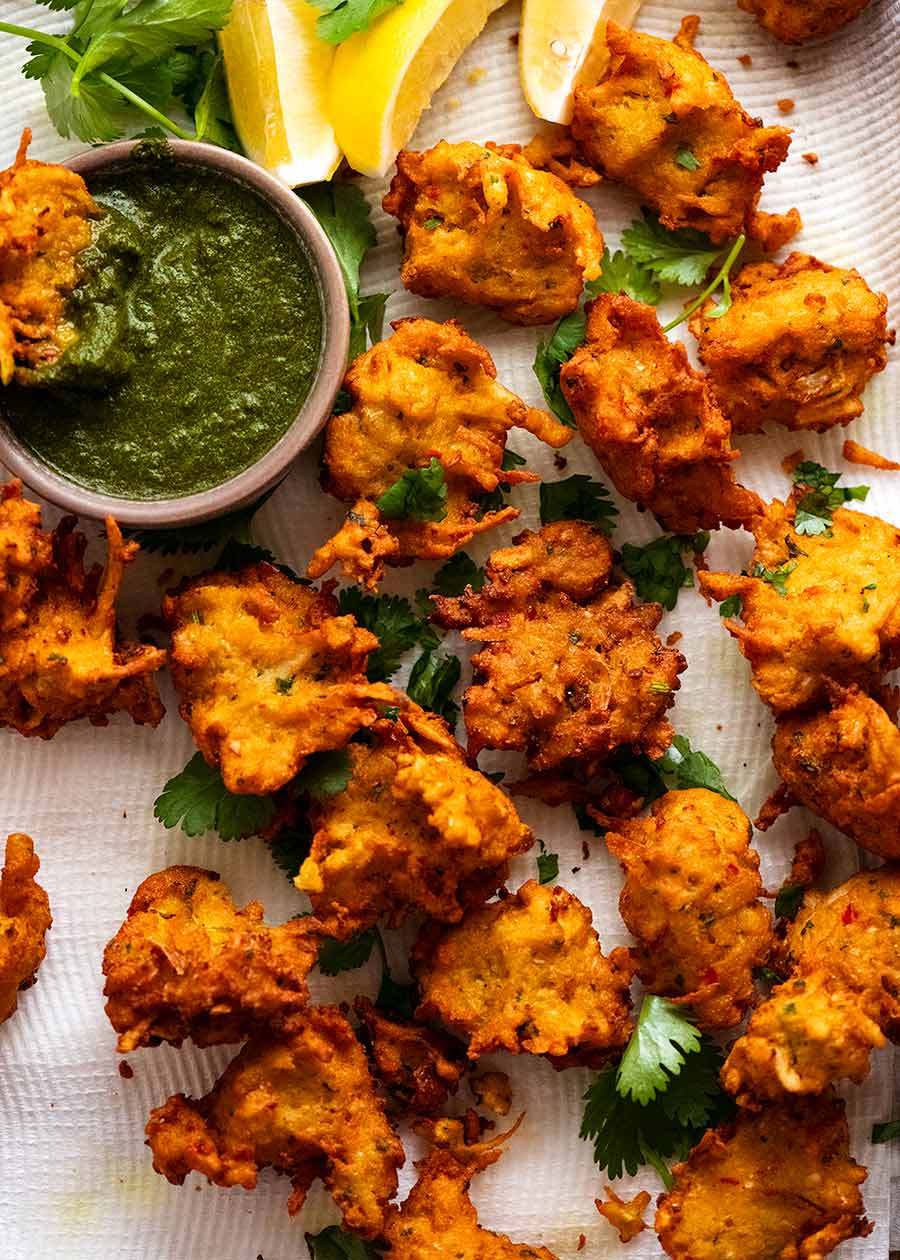
Pakora: Indian Vegetable Fritters
This is street food, the Indian way! Sold as snacks on the streets of India and as popular appetisers in Indian restaurants elsewhere, pakora are crispy, bite-size vegetable fritters. They’re loaded with gorgeous Indian spices before being fried until crunchy.
These little nuggets are dangerously easy to eat, the sort of food you just keep popping into your mouth, one after the other, until you suddenly realise the plate is half empty and you look around to find someone to accuse – Who ate all the pakoras??!!!
Ssshhh!!! I will never tell – if you don’t!

Dipping pakora into Minted Yogurt Sauce 
Inside of Pakora
What goes in Pakora
Pakoras can be made with almost any vegetable that is suitable for cooking in fritter form. I’ve opted to use onion, potato and cauliflower, but there’s an extensive list below of other vegetables that can be used along with how to chop them.
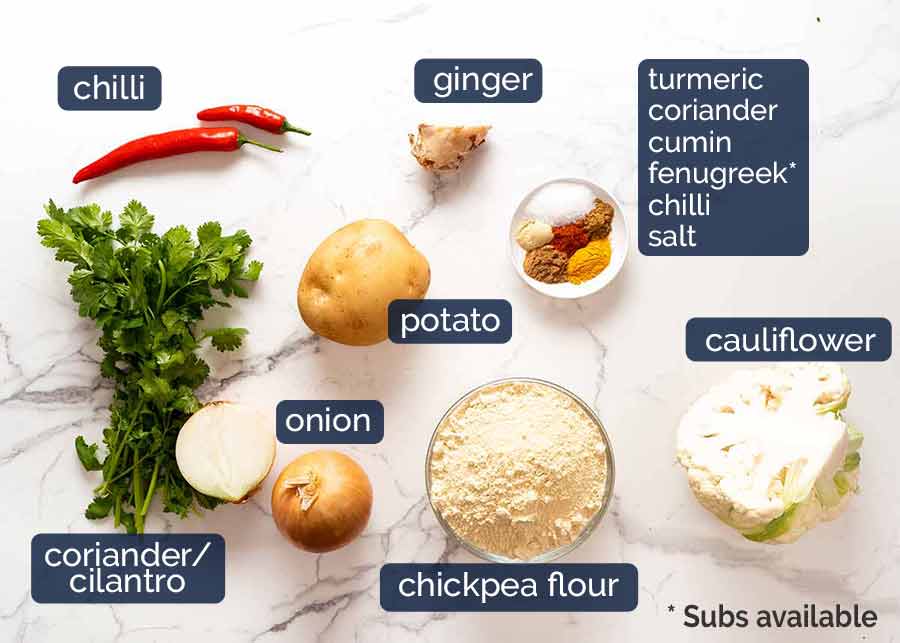
Chickpea flour – Also known as gram flour and besan, it is made from dried chickpeas and is a staple in Indian and Subcontinental cooking. Nowadays it’s sold at large grocery stores in Australia. The flavour is nutty and it’s denser than normal flour with better nutritional qualities (lower carb and higher in protein);
Fenugreek powder – A common Indian / Subcontinental spice, it oddly enough kind of smells like maple syrup. However it tastes nothing like it, and has a pungent and mysterious flavour. It’s available at stores that carry a decent range of spices. I found it at Harris Farms (Australia). Also, of course, at Indian grocery stores!
Best sub: Garam masala or a generic curry powder. (These are not the same at all, but the extra flavour will compensate);
Chilli powder – This is pure ground chillies, not to be confused with US ‘chili powder’ which is a spice mix.
Substitute: cayenne pepper. Feel free to reduce chilli powder if you’re concerned about spiciness. Start conservatively and cook a test pakora. Taste, and if you want more add more chilli into the batter;
Turmeric powder – Adds a beautifully warm, golden colour to the pakora;
Cumin, coriander and fresh ginger – Staple spices / aromatics in Indian cooking;
Fresh chilli – For their fruity flavour and a little warmth. I’m using large cayenne peppers here which are not that spicy, but rather add a warm hum to the pakoras. Generally the rule is the larger the chilli, the less spicy they are. Feel free to omit or reduce to your taste;
Potatoes – Any all-rounder or starchy potatoes work. AU: Sebago, US: russet, UK: King Edward or Maris Piper. Waxy potatoes will work ok too for this recipe;
Onion – These add great sweet, savoury flavour to the fritters so I really do recommend keeping onions in;
Cauliflower – When finely chopped as called for in this recipe, it adds lovely texture to fritters as well as acting like a sponge that absorbs the spices in the pakora batter; and
Coriander/cilantro – For a nice hint of freshness and colour in the pakoras. However, in this recipe it is not a key flavour so it can be omitted or substituted with finely chopped green onions, parsley or chives.
Pakora batter 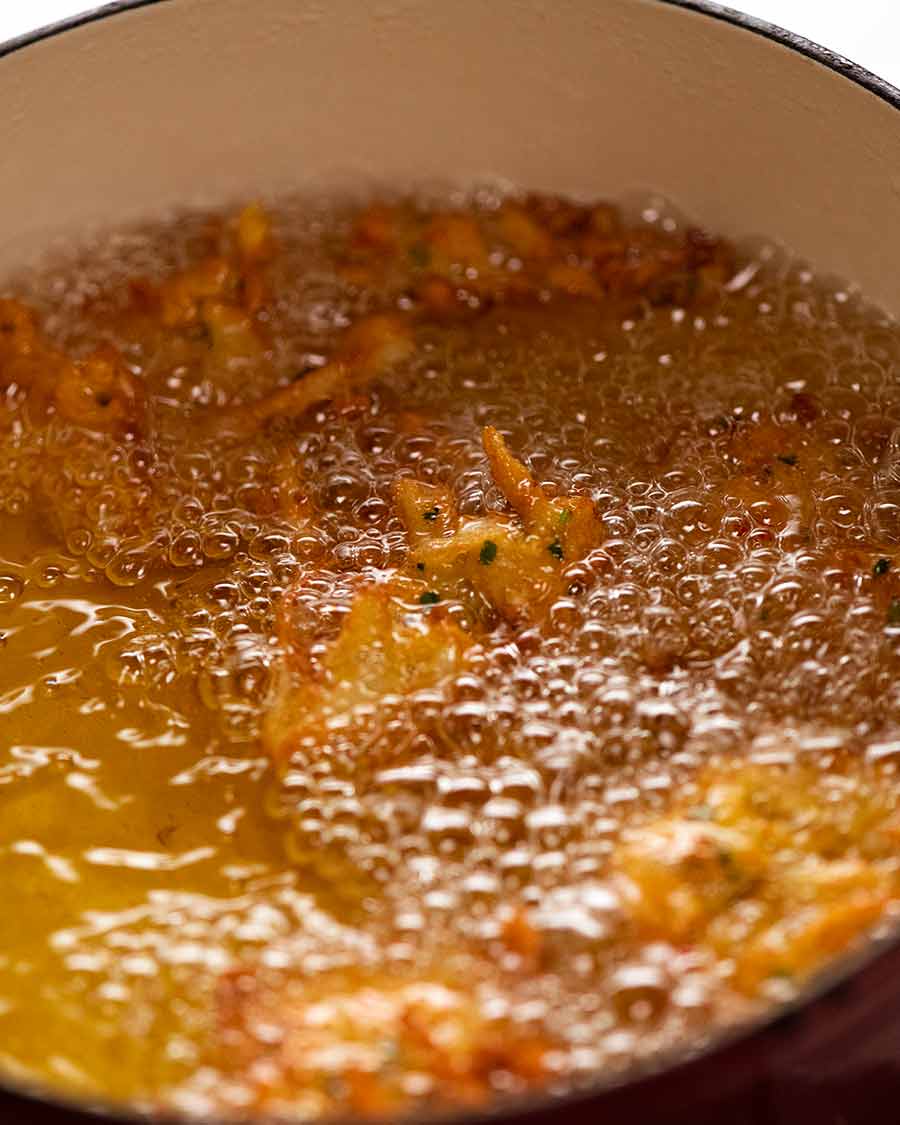
Frying pakoras (no fry option also provided!)
Other vegetables to use for Pakoras
A nice thing about Pakoras are their versatility. While I’ve used cauliflower, potato and onion, you can use other vegetables, as long as they’re finely chopped or grated. Use 6 cups in total:
Carrots – finely julienned or grated
Broccoli, broccolini – chop finely into rice size
Green beans, asparagus – finely spice or julienne
Zucchini – grate and squeeze out excess liquid
Spinach, cabbage and similar – julienne then grab handfuls and squeeze out excess liquid
Capsicum / bell peppers – finely slice into 2.5cm (1″) pieces
Parsnip, celeriac and other root vegetables – grate like potato
Peas and corn kernels – use as-is
Not recommended (or requires extra prep steps): eggplant, pumpkin, celery, fennel, cucumber, tomatoes
How to make Pakoras
Part 1: Preparing the vegetables
Vegetables for pakoras are typically either finely chopped, grated or julienned so they are suitable to form into little patties and cook quickly. I always ensure that there’s at least one vegetable grated or julienned so you get scraggly bits that stick out and become extra crispy!
Here’s how I prepared the fresh vegetables in these pakoras:
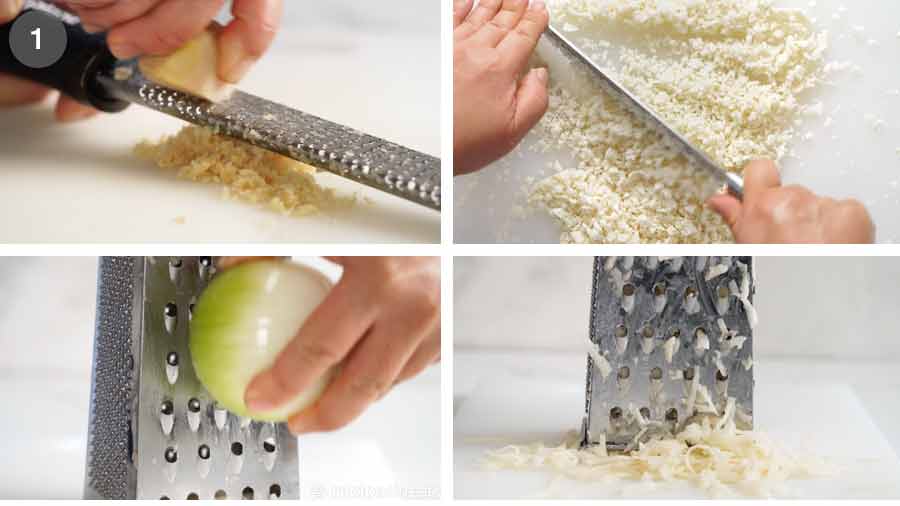
Ginger: Finely minced using a microplane (best for maximum flavour extraction!)
Cauliflower: Finely chopped into rice size pieces, as though preparing to make Cauliflower Rice (which, actually, is a good tip if you want to just buy ready-made – simply use raw cauliflower rice). You can also grate it using a standard box grater. Use a large bowl so the cauliflower bits don’t go everywhere. Otherwise use a food processor!
Potato: Grated using a box grater; and
Onion: Grated using a box grater. Yes, the onion juice squirting out will be torture and will make you cry (unless, like me, you’re protected with contact lenses). But it’s worth it, I promise!
Part 2: Pakora batter and frying
Pakoras are deep fried so you get the signature scraggly sticking out bits that become extra crunchy. However you can cook them like pan-fried fritters (like Zucchini Fritters, Corn Fritters etc) if you prefer not to deep fry. Of course, they won’t be quite the same but they’re still delicious!
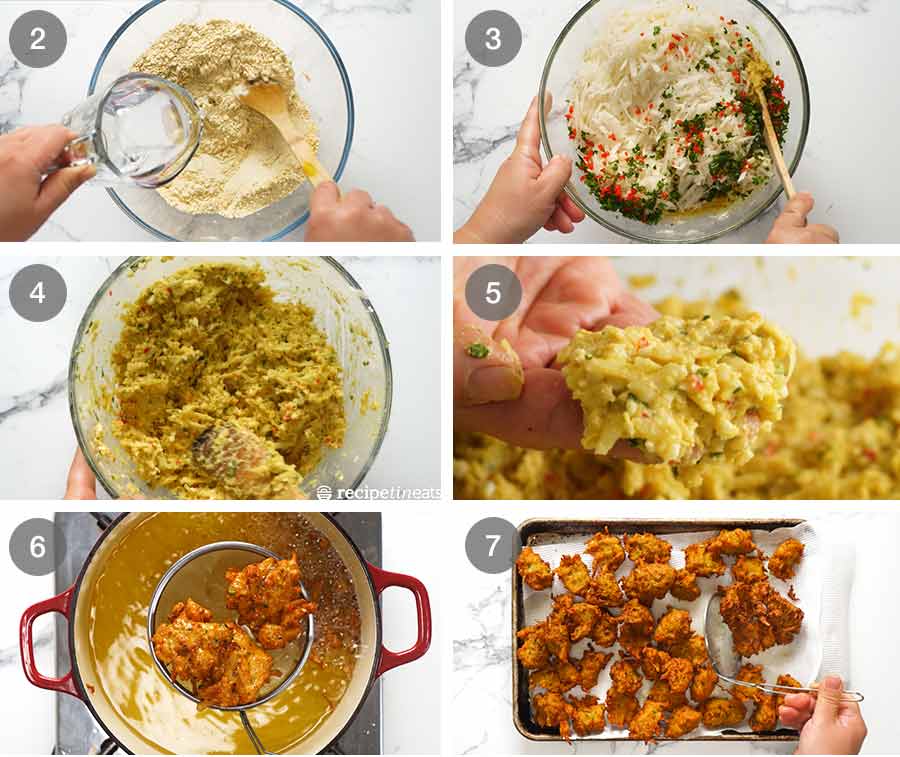
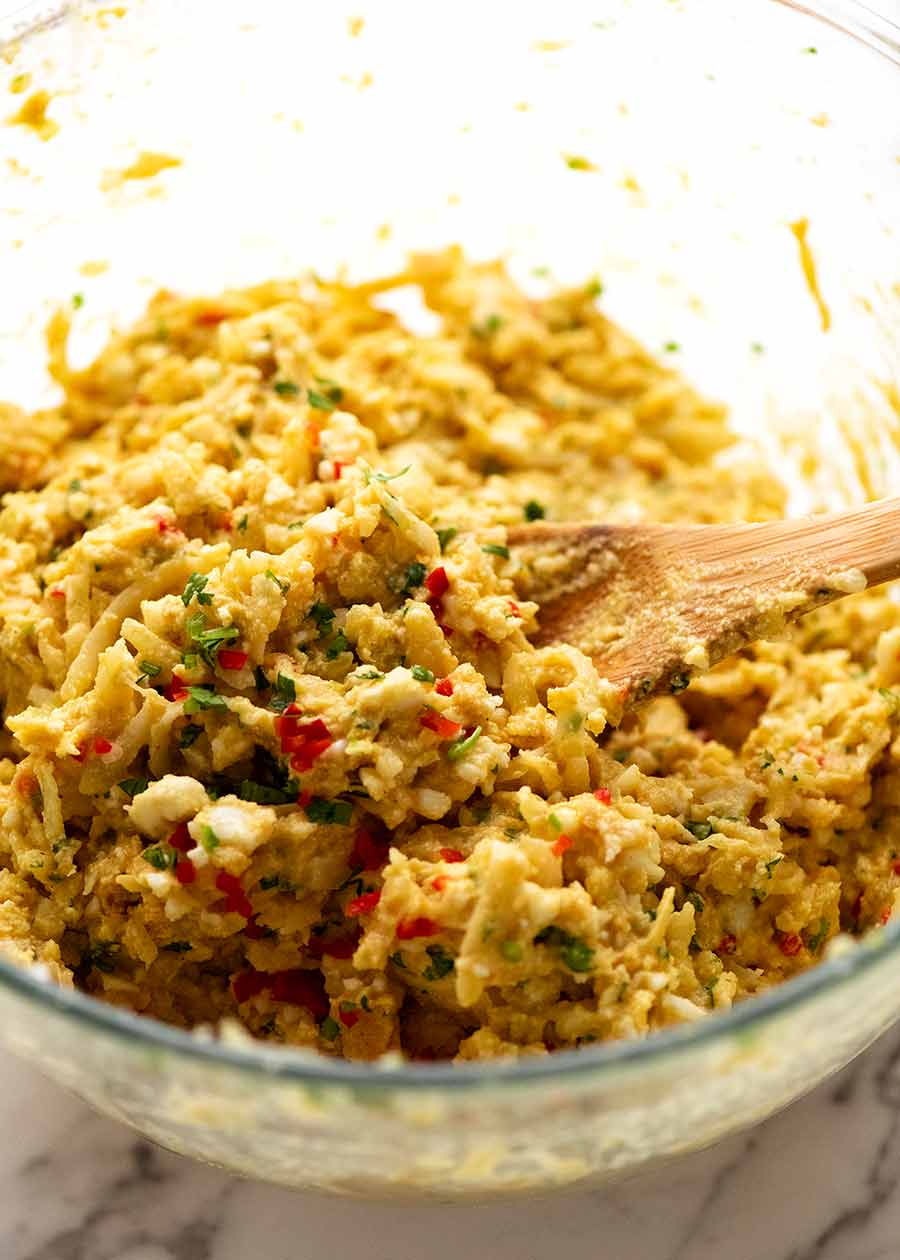
Batter: Make the batter by mixing together the chickpea flour and dried spices with water. At this stage, the batter will seem very thick and paste-like but don’t worry. It actually thins out once the vegetables are added because the salt in the batter draws out water from the vegetables which thins the batter slightly;
Add vegetables: Stir through the fresh vegetables;
Finished batter: The batter should be quite thick, thick enough to drop balls of it into oil. If It seems too thin, add more chickpea flour;
Form rough patties: Drop 1 1/2 to 2 tablespoons of batter roughly formed into a patty shape (~ 1.5cm / 0.6″ thick) into the oil. I use my hands (as is typical in India!) but you can also use 2 dessertspoons. I know it sounds counterintuitive, but I feel it’s safer to use my hands because I have more control and there is less risk of the batter accidentally dropping into the oil from a height, causing splashage.
Remember, don’t crowd the pot! It will lower the oil temperature too much. I generally cook 4 at a time at the beginning to get into the groove of the timing, then up to 6 at a time;
Fry 2 – 3 minutes until golden: Fry the pakoras for 2 to 3 minutes until they are a deep golden and crispy on the outside. They will easily cook through inside in this time;
Drain pakora on paper towels and continue cooking the remainder. Keep cooked pakoras warm in a low oven (80°C / 175°F) on a rack set over a tray.
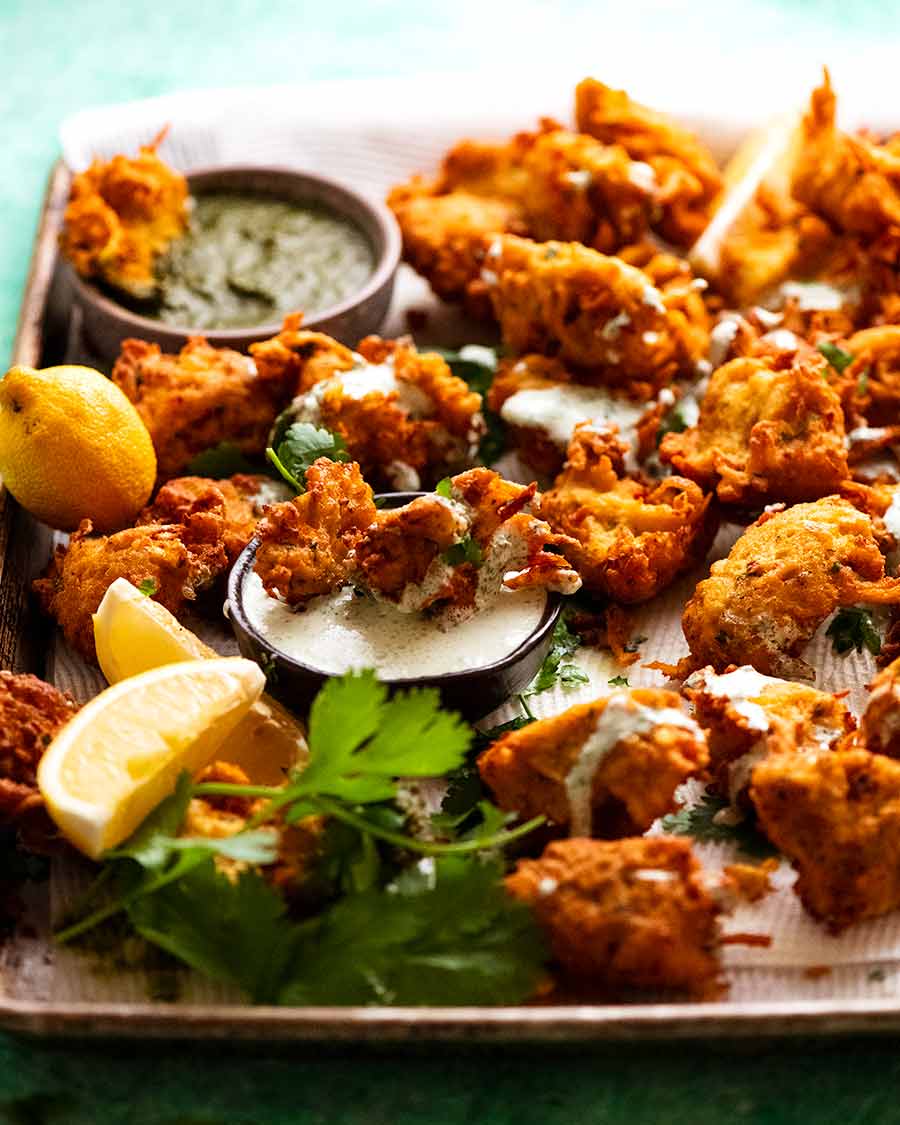
Sauces for Pakora
Pakoras are typically served with a sauce which is fresh and cooling for a delicious contrast to the hot, spiced, fried Pakora.
I’ve got 2 to choose from today:
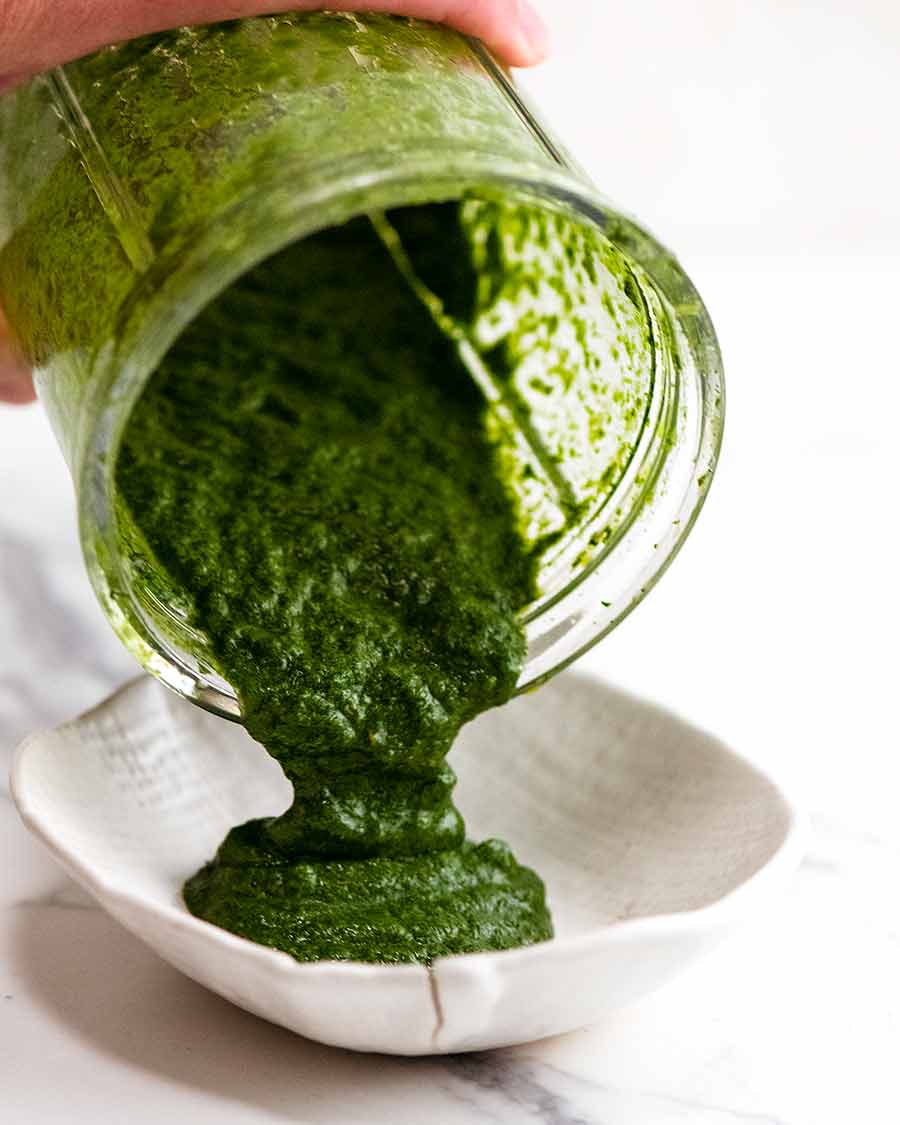
Green Coriander, Mint and Lime Sauce: Fresh and zesty; or
Minted Yogurt Sauce: Cooling and tangy.
You can’t go wrong with either of these, they both work brilliantly with Pakoras! I really just comes down to personal preference.

When and what to serve with Pakoras
Pakoras are a standard starter you’ll find on the menu of every Indian restaurant here in Australia. So make these as the appetiser for a homemade Indian feast. Browse all Indian recipes here!
In India, Pakora are a common street snack sold by street vendors. In this vein, Pakoras would make a great option to pass around as a canapé. They are the perfect finger food size, and something a little different! Cook up a big batch then just pop them in the oven to crisp up just before serving. Fabulous! – Nagi x
PS. This recipe makes a lot – around 40 pakoras. I figure if we’re going to make them, let’s make it worth our while. Plus, they reheat terrifically in the oven and also freeze well. Once you have made a stash, you’ll be glad you did!
Watch how to make it

Pakora (Indian Vegetable Fritters)
Ingredients
- 2 1/4 cups chickpea flour (Note 1)
- 1 tsp turmeric powder
- 1 tsp cumin powder
- 1 tsp coriander powder
- 1 tsp fenugreek powder (Note 2)
- 1/2 tsp chilli powder (pure chilli powder, Note 3)
- 2 tsp salt (cooking/kosher salt)
- 3/4 cups + 2 1/2 tbsp water
- 1 1/2 cups onions , grated using standard box grater (~1 1/2 onions)
- 2 cups potato (~1 large), peeled and grated using standard box grater (Note 4)
- 2 1/2 cups cauliflower (~1/4 large head), finely chopped into rice size pieces (or grate)
- 2 large red chillies (cayenne peppers), finely chopped (adjust spiciness to taste, or leave them out)
- 1 tbsp fresh ginger , finely grated
- 2 tbsp coriander/cilantro leaves , finely chopped
For cooking:
- 3 – 4 cups vegetable or canola oil (4cm / 1.5″ depth in pot)
Coriander Mint Sauce for Pakoras (Option 1):
- 2 cups mint leaves
- 1 cup coriander/cilantro leaves
- 1/4 cup eschalot , sliced
- 3 tbsp lime juice
- 1 tsp caster sugar
- 1/2 tsp cumin seeds
- 1/2 tsp cooking/kosher salt
- 2 ice cubes (loosens + keeps sauce green)
Minted Yogurt Sauce (Option 2):
- 1 cup plain yoghurt
- 1/2 cup mint leaves , packed
- 1/4 tsp salt
Instructions
- Make batter: Place chickpea flour in a bowl with the spices (turmeric, cumin, coriander, fenugreek, chilli). Slow whisk in the water.
- Mix in Vegetables: Add potato, cauliflower, onion, ginger, chilli and coriander. Mix well with a wooden spoon. It should be a thick batter, almost paste-like.
- Preheat oven to 80°C/175°F – to keep cooked pakoras warm. Set a rack over a tray.
- Heat oil: Heat 4cm / 1.5" oil in a large heavy based pot to 180°C/350°F (Note 6).
- Form patties: Drop 2 tbsp of batter roughly formed into a patty shape into the oil. I use my hands (as is typical in India!) but you can also use 2 tablespoons (be careful of splash-age). Don't crowd the pot, it will lower the temperature too much.
- Fry pakoras: Fry 2 – 3 minutes until golden. Drain on paper towels. Keep cooked pakoras hot in the oven on a rack set over a tray.
- Serve: Serve pakoras with Coriander Mint Sauce or Minted Yogurt Sauce!
Coriander Mint Sauce OR Mint Yogurt Sauce:
- Place ingredients in a small food processor or Nutribullet, or use a stick blender. Blitz until smooth.
Notes
1. Chickpea flour – Also known as gram flour, and besan, made from dried chickpeas. Staple in Indian cooking. Nowadays sold at large grocery stores in Australia. Using this instead of flour makes this a naturally gluten free recipe. 2. Fenugreek powder – Staple Indian spice, kind of smells like maple syrup. Available at stores that carry a decent range of spices. I found it at Harris Farms (Australia). Also, of course, at Indian grocery stores! Best sub: Garam Masala or a generic curry powder. (No it’s not the same but the extra flavour will compensate). 3. Chilli Powder – This is pure ground chillies, not to be confused with US Chili Powder which is a spice mix. Sub cayenne pepper. Fee free to reduce chilli powder if you’re concerned about spiciness. You can cook a test one, taste, then add more chilli into the batter. 4. Potatoes – Any all rounder or starchy potatoes work best. Aus: Sebago, US: russet, UK: King Edward/Maris Piper. Waxy potatoes will work ok too. 5. Other Veg: Use 6 cups in total.
- Carrots – finely julienned or grated
- Broccoli, broccolini – chop finely into rice size
- Green beans, asparagus – finely spice or julienne
- Zucchini – grate and squeeze out excess liquid)
- Spinach, cabbage and similar – julienne then grab handfuls and squeeze out excess liquid
- Capsicum/bell peppers (finely slice into 2.5cm/1″ pieces)
- Parsnip, celeriac and other root veg – grate like potato
- Peas and corn – use whole
- Not recommended (or requires extra prep steps) – eggplant, pumpkin, celery, fennel, cucumber, tomatoes
Nutrition
Life of Dozer
Ah Dozer. When you eye off cheesy bread like that, there’s just no doubt that you’re my boy. (Especially when “that cheesy bread” is Croque Monsieur!)

The post Pakora (Indian Vegetable Fritters) appeared first on RecipeTin Eats.
]]>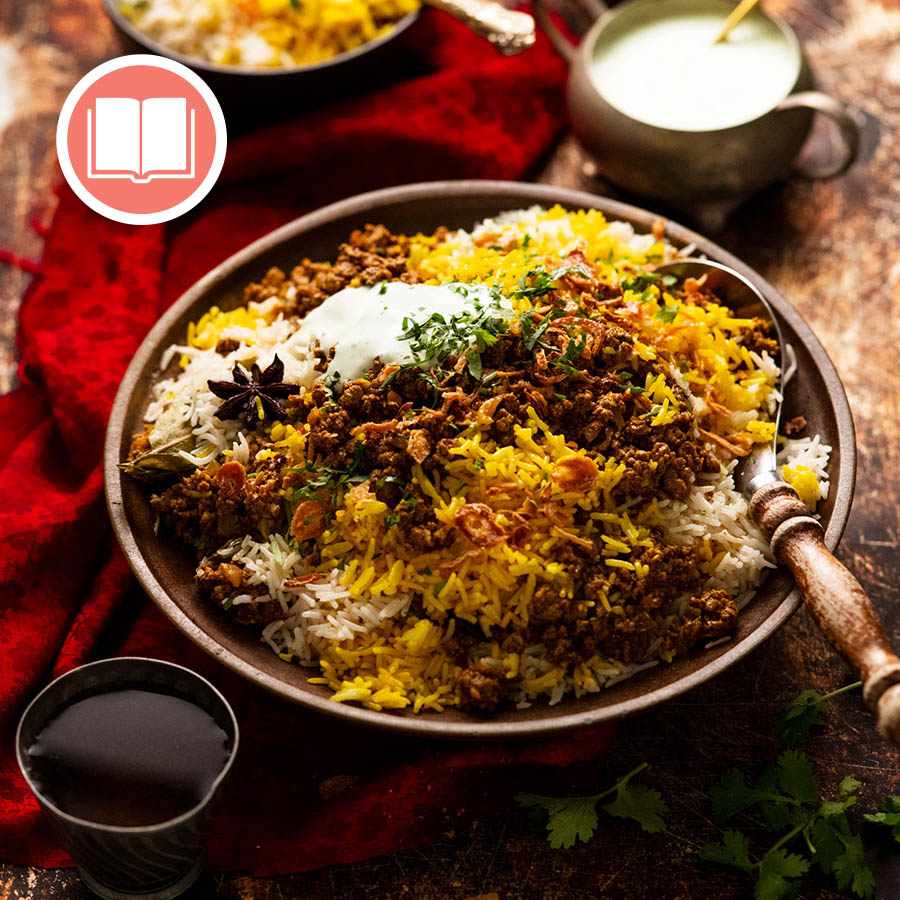 Here’s a beef mince version of classic Indian biryani. It’s everything we love about the dish and just as delicious, but much faster to make! Find the recipe on page 44 of Dinner.
The post Beef Biryani appeared first on RecipeTin Eats.
]]>Here’s a beef mince version of classic Indian biryani. It’s everything we love about the dish and just as delicious, but much faster to make!
Find the recipe on page 44 of Dinner.
This is a cookbook exclusive recipe!
This recipe is exclusive to my debut cookbook Dinner which includes a how-to video for every recipe. Just scan the QR code!
Just to explain….
I know, it’s confusing! You’re so used to getting recipes on my website – there’s over 1,200 of them, after all. And here you are looking at a tasty recipe video and I haven’t provided the recipe. 🙀
I’m not just doing this to torture you, I promise.
This page exists to display the how-to video for this recipe which I exclusively created for my debut cookbook, Dinner. Every recipe in the cookbook has a tutorial video. To watch it, you simply scan the QR code with your phone or tablet and it will take you straight to the recipe video like the one shown above!
Curious about my cookbook?
Read the cookbook overview
Browse all cookbook exclusive recipes here
Read the Cookbook Tales. Spoiler alert: there’s A LOT of dirty dishes!! And quite a lot of Dozer. 😂
Stay tuned for more on this page! Some cookbook exclusive recipes will have extra information added as well as extra tips. I am also looking at enabling comments for selected recipes so I can answer reader questions about cookbook recipes. I’m just a little snowed under during this launch period – book tours, getting 131 recipe videos out, launching the book overseas. Please bear with me! – Nagi x (10 October 2022)
The post Beef Biryani appeared first on RecipeTin Eats.
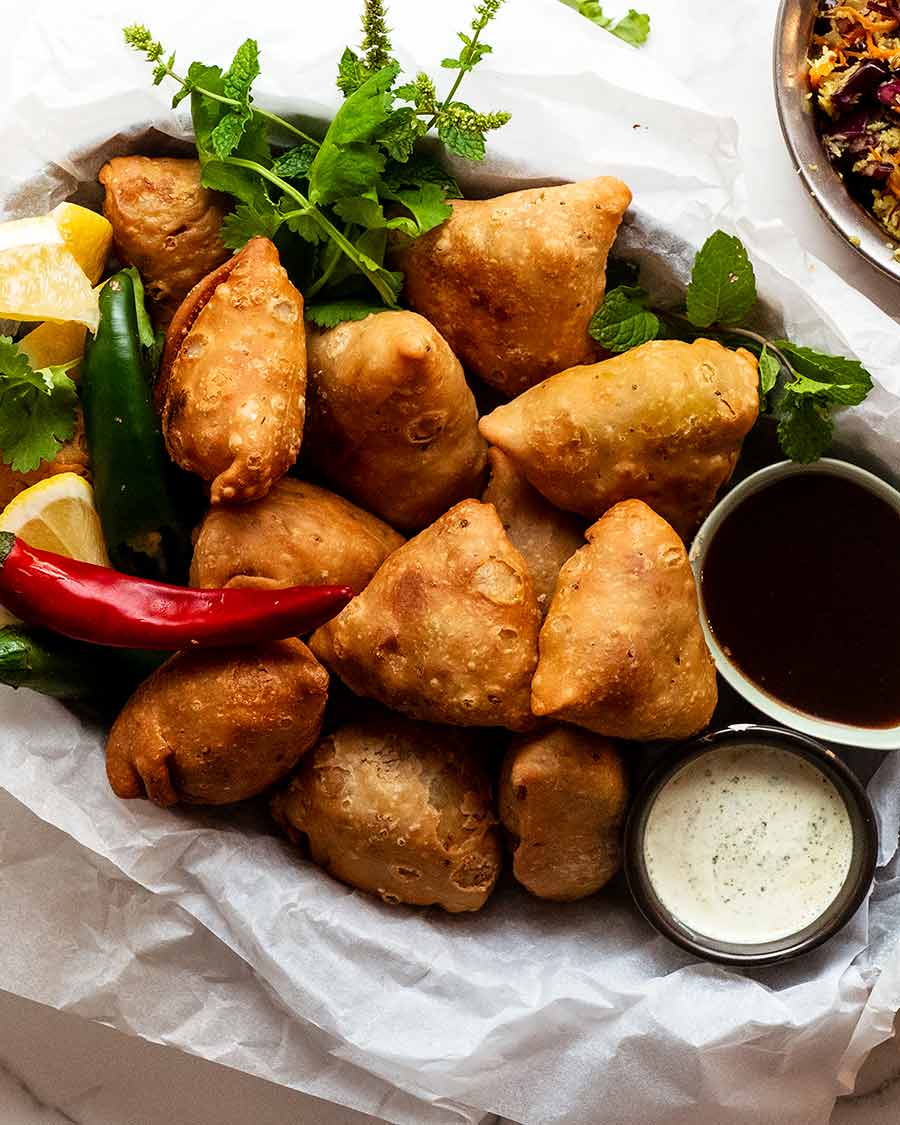
]]> Nobody can resist these perfect pyramids of flaky pastry, stuffed with a delicious spiced potato filling! But not all samosas are created equal. Too dry, not enough filling, bad pastry, weak spicing….. So I set out to make my own, and am proud to now share with you my very own Samosa recipe – my... Get the Recipe
The post Samosa recipe appeared first on RecipeTin Eats.
]]>Nobody can resist these perfect pyramids of flaky pastry, stuffed with a delicious spiced potato filling! But not all samosas are created equal. Too dry, not enough filling, bad pastry, weak spicing….. So I set out to make my own, and am proud to now share with you my very own Samosa recipe – my idea of the perfect Samosa!
🌶 Welcome back to Indian Week! 🌶
It’s Indian Week here at RecipeTin Eats! And week where I’m sharing 4 brand new Indian recipes so you can make your very own feast at home:
Palak Paneer – the famous Indian Spinach Curry, complete with homemade fresh cheese curd (it’s so easy!);
Naan – the fluffiest, bubbliest, chewiest naan you’ll ever make at home, a recipe that eluded me for 5 years!
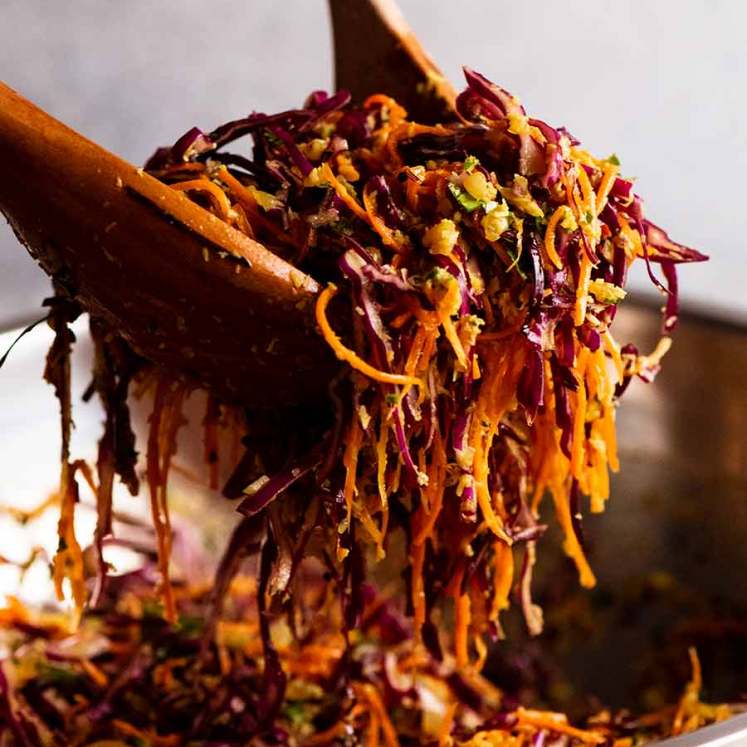
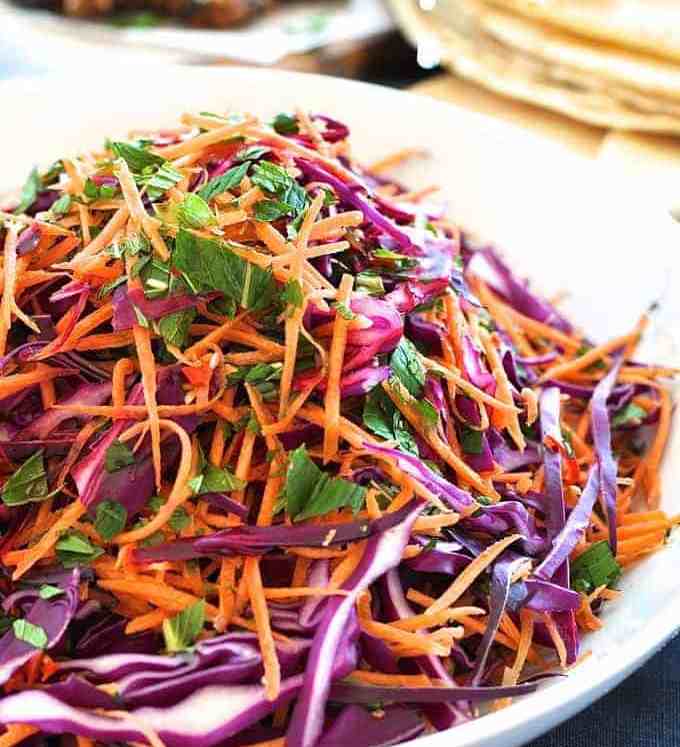
Thoran-style Cabbage Carrot Salad – quite possibly the most incredible cabbage salad you will ever have in your life;
Samosas – this recipe!
Homemade Naan – incredibly fluffy, bubbly & chewy! 
Palak Paneer – spinach curry 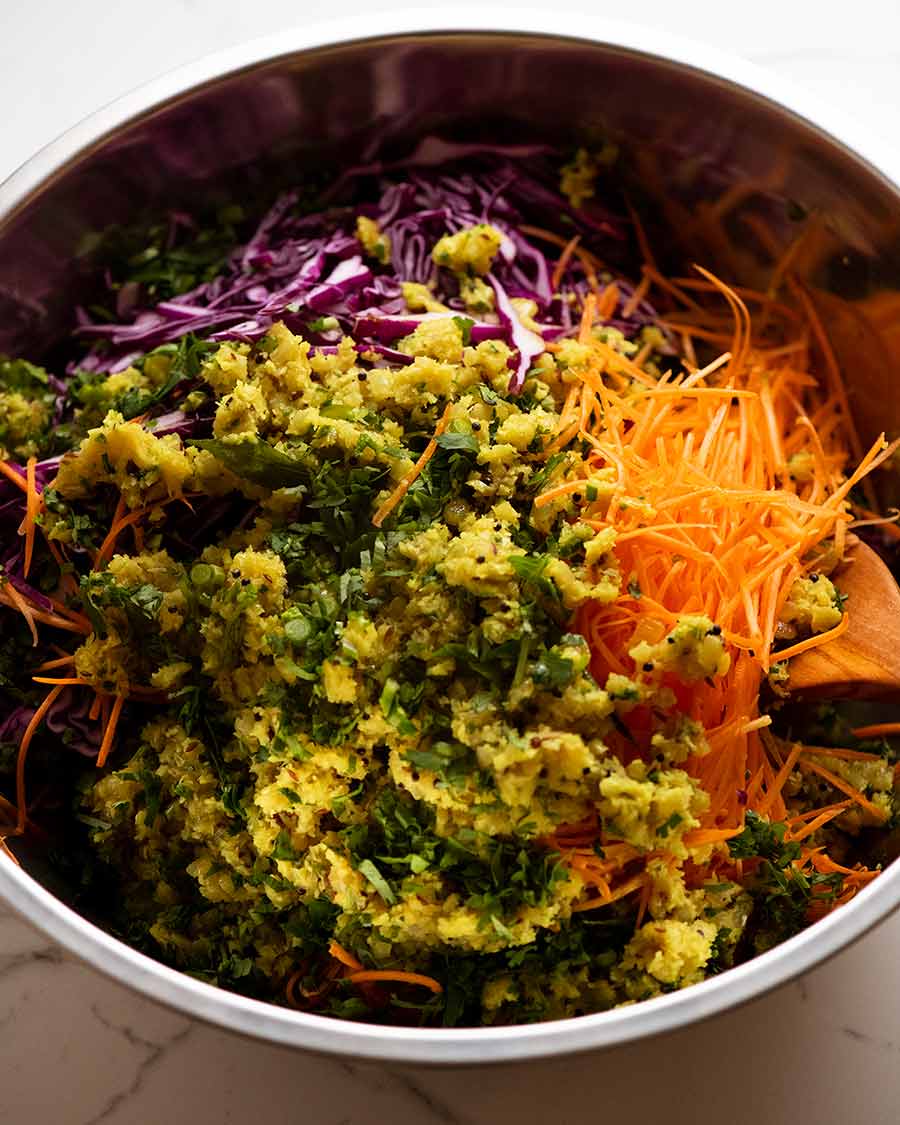
Thoran-style Indian Cabbage Salad
Samosa recipe
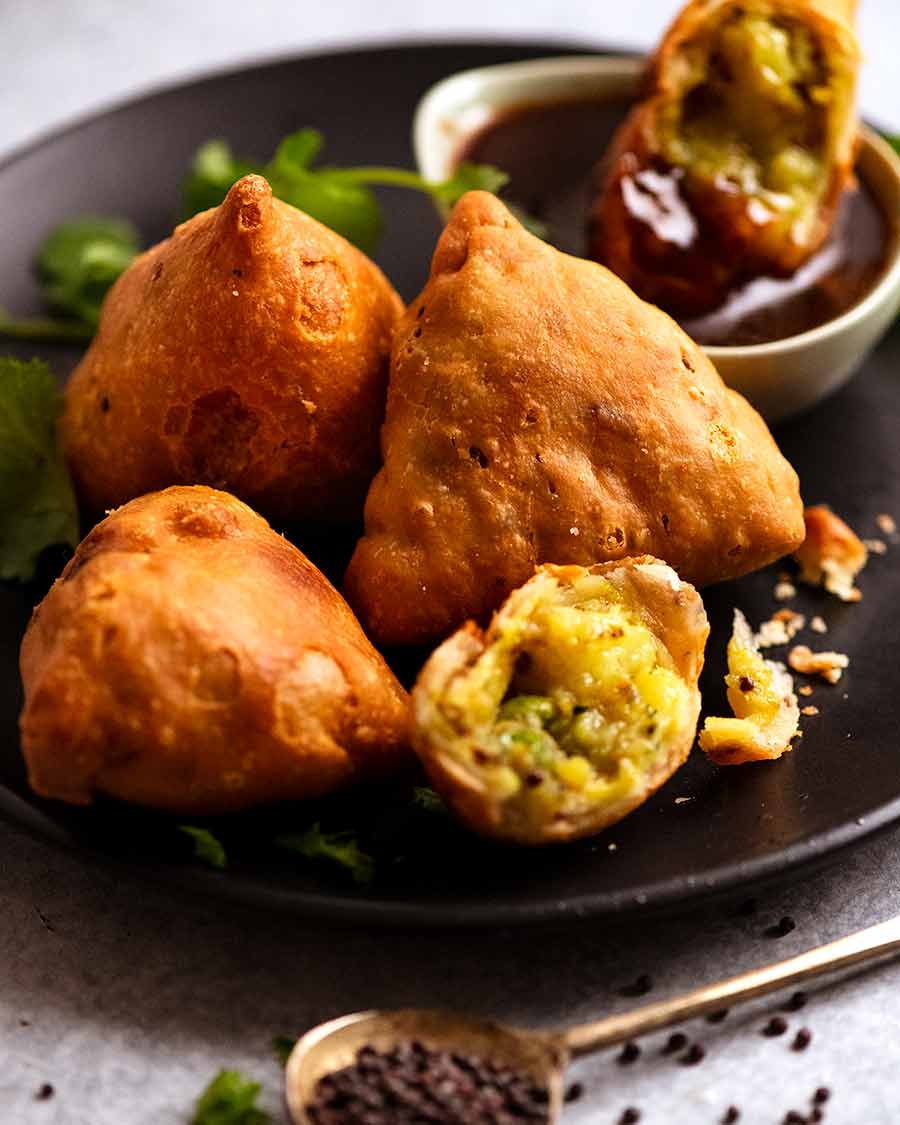
If you think of an “Indian snack”, probably the first image that pops into mind is the humble Samosa.
These little fried parcels of flaky-yet-tender pastry, stuffed to the brim with spiced potatoes and other ingredients, are pretty much my idea of the world’s greatest savoury snack.
Not only are they insanely delicious, but they’re also incredibly versatile. Samosas can be served as appetisers, entrees, or a lunch on the move. They’re good hot or at room temperature. They keep for days and days, and they reheat well. What is not to love?!?
Finding a great Samosa though, is no easy feat – whether they’re bought or recipes. Most are “OK” but never quite get there for me. So I set myself the (not-insignificant!) challenge of creating my own ideal Samosa recipe.
And so, after many rounds of testing, eating, rethinking and (yes!) eating some more, I’m happy to report I’ve finally arrived at this recipe – my idea of the perfect Samosa!


What you need to make Samosas
Here’s what you need to make Samosas. Yes, you will see a few less-common spices in this recipe that call for a trip to the Indian grocery store if you truly want to make real Samosas. If not, I’ve got alternatives to suggest!
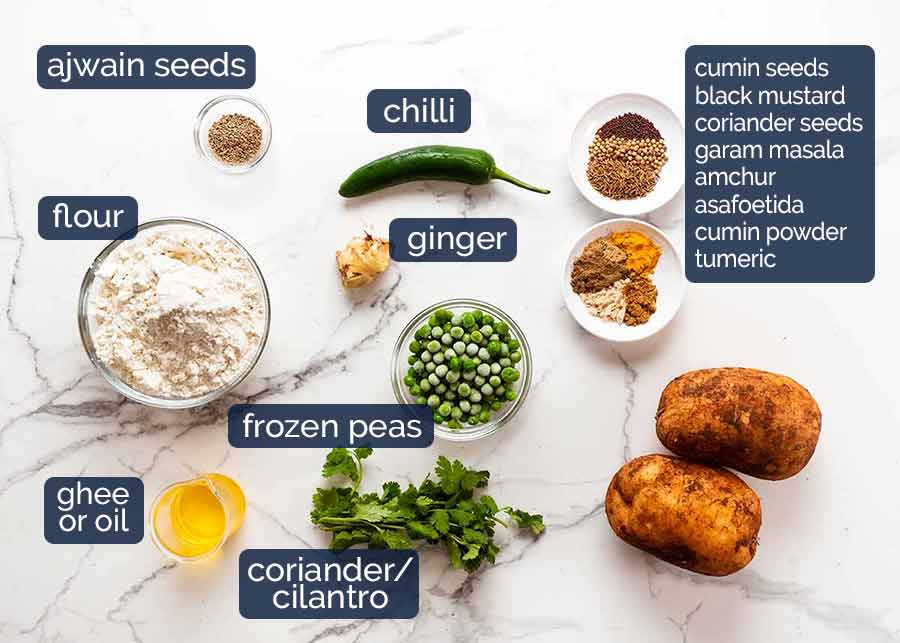
The spices
The spices marked with an asterisk* are speciality spices that likely require a trip to an Indian grocery store. But I’ve made notes for best substitutions!
Ajwain seeds* – An Indian spice with a fragrant and fruity but bitter taste. Substitute thyme leaves;
Amchur* – Also known as mango powder, is made from dried green mangoes. It is sour in taste and is said to help digestion. Substitute 1/2 tsp lemon juice;
Asafoetida* – Also known as hing, this is a traditional ingredient used in Indian cooking that is derived from a species of giant fennel. It has a somewhat bitter garlic / onion flavour, which makes it a great substitute for people who can’t have garlic or onion.! Substitute 1/4 tsp each of garlic and onion powder;
Black mustard seeds – They look like poppyseeds but are fragrant and have a slight horseradish-like bite to them. They’re not spicy, more a fresh zing. ~ $1.50 in small packs at Indian grocery stores. Also sold in the Indian food section at some Woolworths (Australia) $1.70, and online! Also used in Eggplant Curry, Dal and Vegetable Samosa Pie recipes;
Garam Masala – A well-known Indian spice mix which is pretty common these days. It’s found in the spice aisle of regular supermarkets and costs not more than other spices; and
Cumin seeds and powder, coriander seeds and turmeric – Very common spices used in Indian cooking, found everywhere these days at regular grocery stores.
Other ingredients
Flour – Just regular all purpose/plain flour;
Green chilli – Use a cayenne pepper which provides just a mild background hum of spice. These Samosas are not overly spicy!
Ghee or oil – Ghee is a traditional cooking fat used in Indian cooking. It is simply normal butter but with milk solids and water removed, leaving behind pure butter fat. Ghee has a more intense butter flavour than normal butter, with the added bonus that unlike butter, it doesn’t burn even on high heat.
It is rubbed into the flour to make the Samosa pastry flaky.
You can either make your own Ghee (it’s cheaper, really easy and keeps for months), buy it, or just use normal butter;
Potatoes – For the potato filling. Use either starchy or all-rounder potatoes, such as Sebago (Australia brushed “dirt” potatoes), Russet, Yukon Gold or Idahos (US), Maris Piper or King Edwards (UK);
Ginger – Fresh ginger is best here, but you could substitute with ginger powder in an emergency 😇;
Peas – Frozen all the way! No need for fresh here; and
Coriander/cilantro – Stirred into the potato filling at the end, it adds such a great hit of freshness.
How to make Samosas
The four parts to making Samosas are:
The spiced potato filling;
The Samosa dough;
Making the Samosa parcels; and
Frying – Sorry, there is no alternative! Do not try to bake them, you will be sorely disappointed!
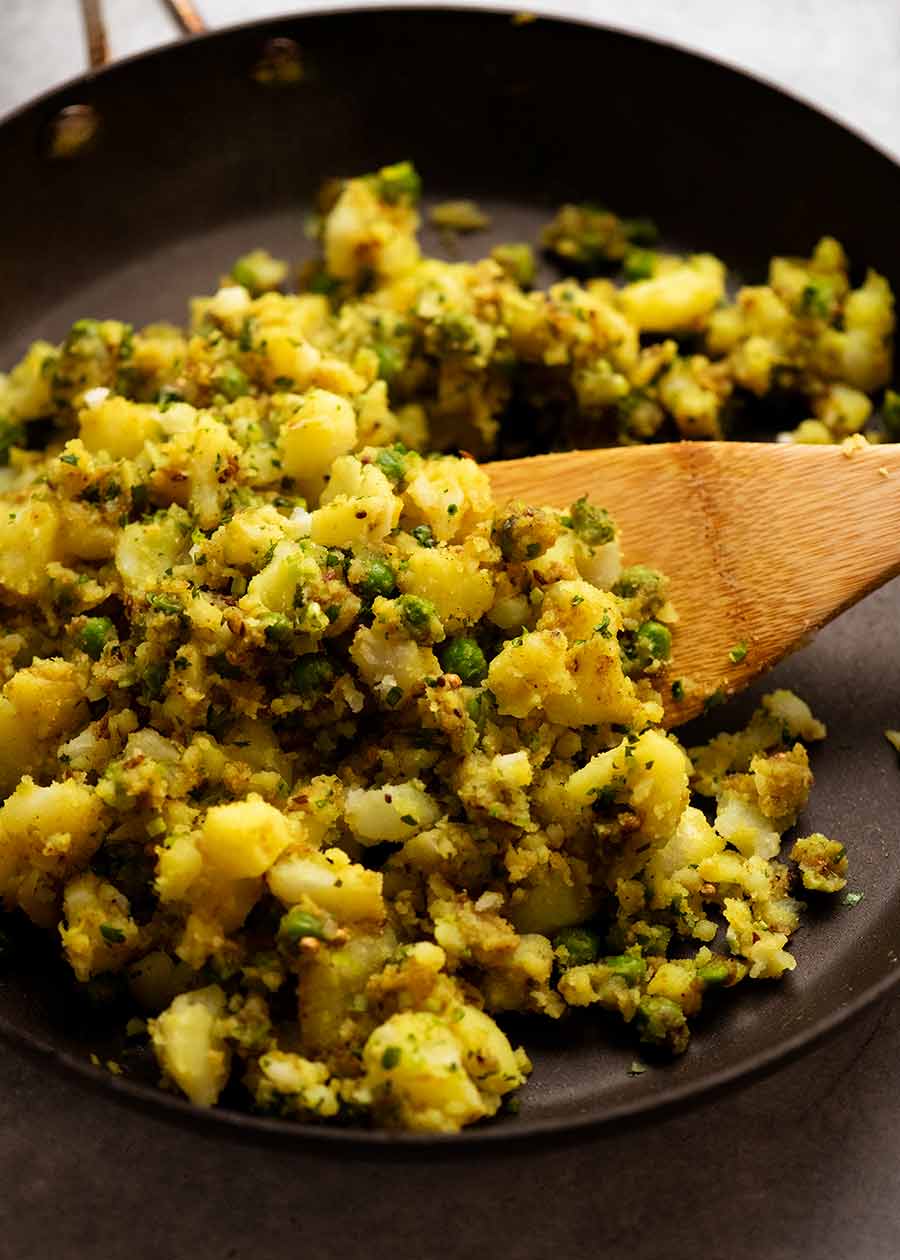
Part 1: Spiced potato filling
The filling for Samosas is typically vegetarian, made with roughly mashed potato that’s cooked up with spices, fresh green chilli and peas. Altthough you’ll see plenty of versions with meat (usually ground), I like to keep things traditional – regular readers know I don’t say that often!😂
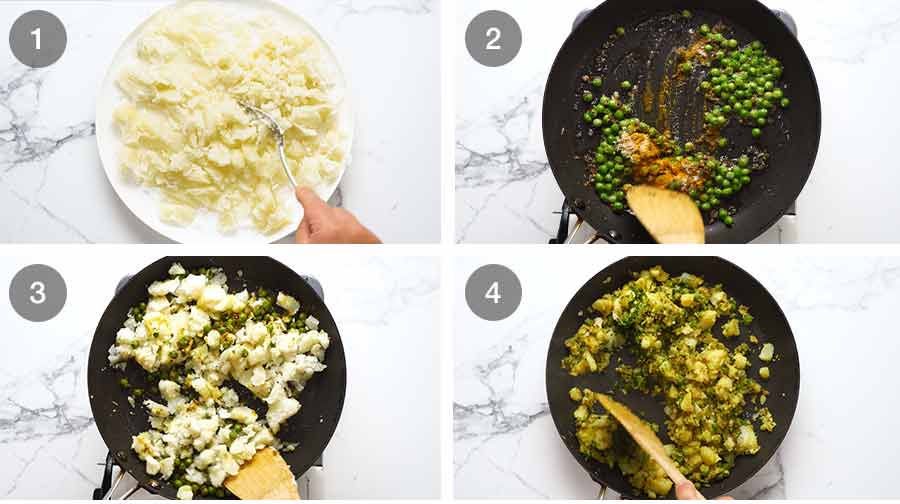
Rough-mashed potato – Boil potatoes until tender, then use a fork to roughly mash. It’s nice to have bits of chunks in the potato for interest, rather than a soft, creamy and uniform mash;
Cook spices and aromatics – A healthy dose of spices are fried up with fresh ginger and chilli which is then tossed through along the peas;
Add potato – Add the mashed potato and gently but thoroughly mix through, so the flavouring fully permeates the potato; and
Fresh coriander, then cool – Lastly, mix through fresh coriander, then let the filling cool completely before using.
Part 2: Samosa dough
A key feature of the Samosa pastry is how flaky it is. This is achieved by rubbing ghee or oil into the flour until it resembles breadcrumbs, just like we do with Western shortcrust pastry!
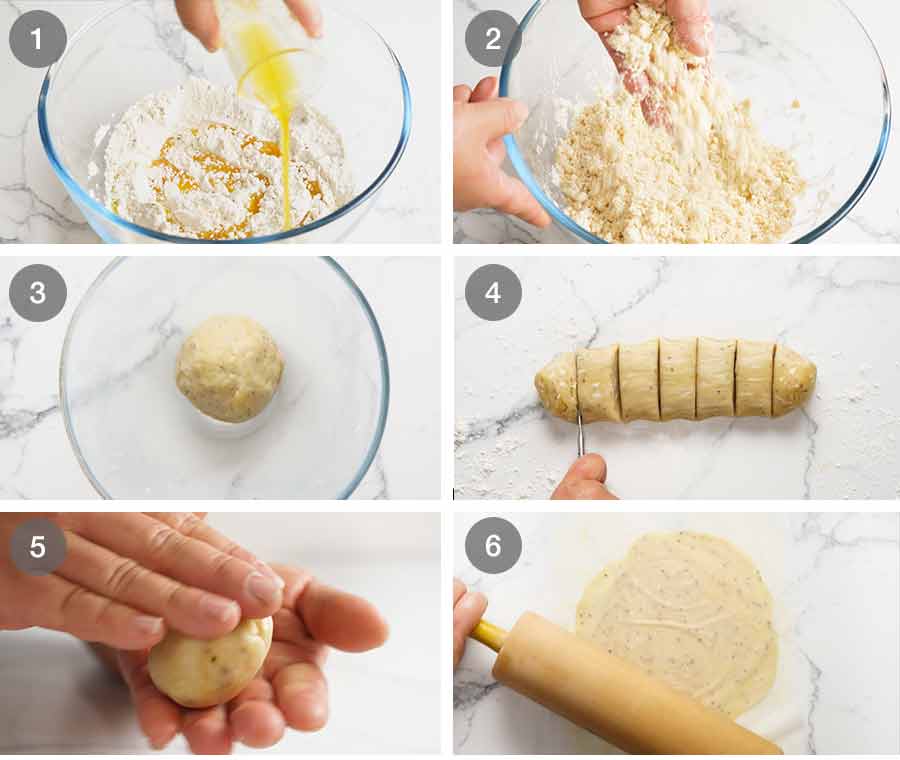
Mix dry ingredients, add ghee – Mix the flour, Ajwain seeds and salt, then pour the ghee or oil in;
Rub fat in – Use your fingers to rub the ghee in until it resembles coarse breadcrumbs. This is the step that gives the Samosa pastry the signature flakiness we know and love so much!
Form dough, rest 30 minutes – We then add water until it is wet enough to form a dough. The dough should be soft and pliable, but not so sticky that it sticks to your hands. Form a ball and let it rest for 30 minutes;
Divide – Form a log, then cut into 6 equal pieces;
Shape dough into balls;
Roll out balls to 2mm thick – Roll the dough balls into discs 2mm thick. They should be about 16cm /6.5” in diameter.
Now, you’re ready to make the little Samosa parcels!
Part 3: Samosa parcels
Don’t get stressed out about this part. It’s honestly not that hard. And if yours are a bit deformed and wonky, so what? It’s still going to taste amazing!!! And you can just say they’re “rustic”. 😉
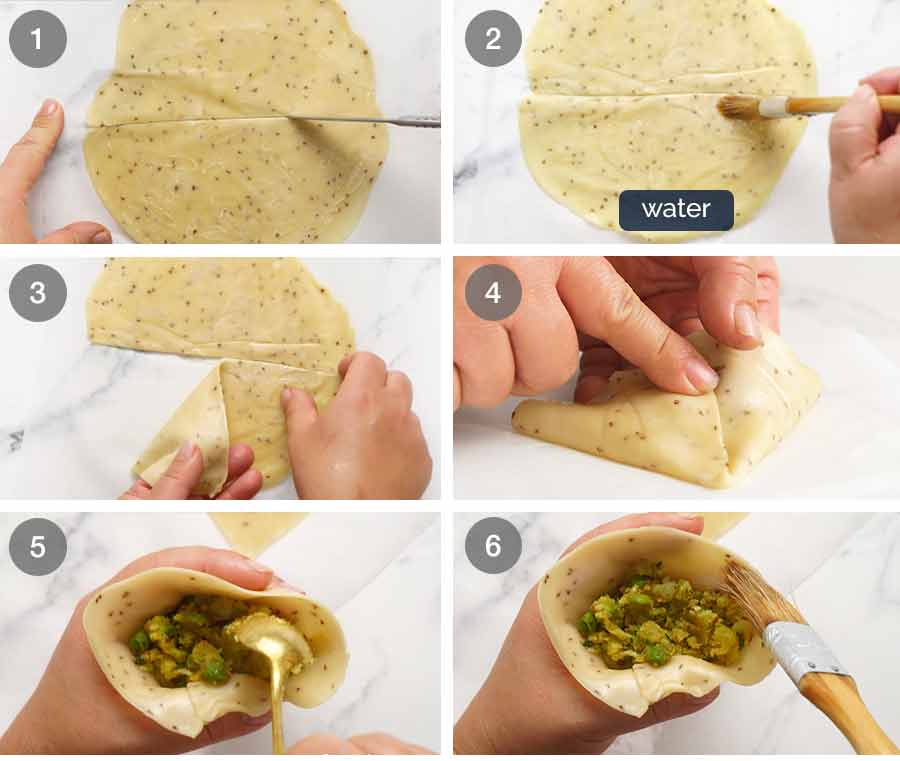
Cut in half – Use a small knife to cut a circle in half. Work with one disc of dough at a time. Keep the others covered under cling wrap so they don’t dry out;
Brush disc with water along half the straight edge you just cut;
Fold one side in;
Form cone – Then fold the other side in, overlapping by about 1cm / 2/5″, to form a cone shape. Press joined edges together to secure;
Fill cone – Form an “O” with your thumb and forefinger, then place the cone inside (like at the holders at the ice cream shop). Fill with the spiced potato filling;
Brush with water along the cone mouth edge;

Seal – Press to seal;
Fold seam side down – Place the seam side down on the work surface so it folds over;
Trim excess pastry off;
Pinch top of cone to make it nice and pointy;
Fold in the other two corners;
Voila! You’re done!
Part 4: Frying – and the trick to less greasy, ultra-crispy Samosas!
The trick to frying Samosas is to start on low heat, otherwise the pastry can burst open and the filling spills out into the hot oil!
Consequently, most recipes will call for the Samosas to be fried at a relatively low temperature of 160°C/320°F for 10 minutes+. But this makes them SUPER-greasy!
Instead, we’re using the good old, reliable Asian double-fry method. It’s fast becoming the world’s worst-kept cooking secret for less greasy, ultra-crispy fried goods, it’s used in takeout favourites from Honey Chicken to Sweet & Sour Pork, to Japanese Karaage. It involves an initial fry on low heat to seal, followed by a second fry on high heat to colour and crisp.
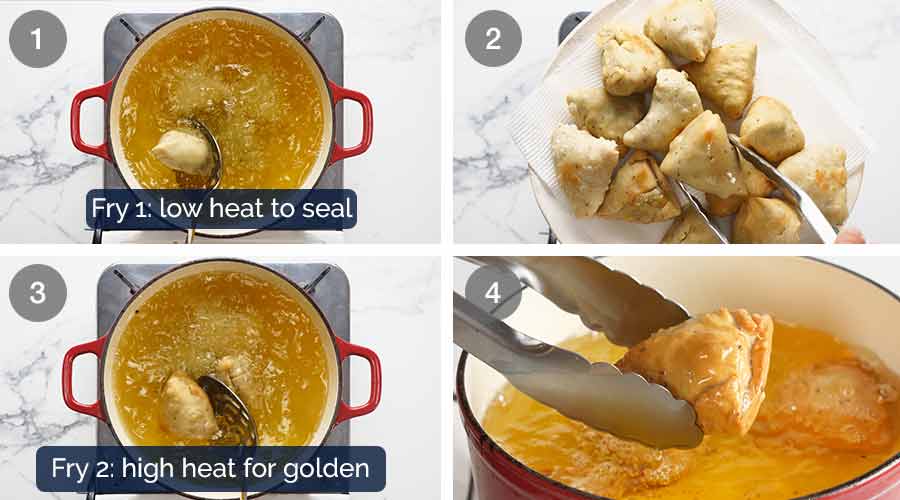
First fry: Seal Pastry – Heat the oil to 160°C/320°F, then fry 3 or 4 samosas for 3 minutes, turning occasionally. The pastry should be cooked but pale;
Drain on paper towels then repeat this first fry with remaining samosas;
Second fry: Colour and crisp – Once you’ve done the first fry with all the Samosas, increase the oil heat to 190°C/375°F. Then fry the Samosas in batches of 3 or 4 for around 1 1/2 to 2 minutes until golden. The Samosas are already cooked through, this step is just to colour and really crisp up that pastry;
Drain on paper towels and serve piping hot for optimum eating experience!

Dipping Sauce for Samosas
The recipe includes a Tamarind Dipping Sauce which is a popular condiment to serve alongside Samosas. The sauce is a bit tart, which nicely cuts through the rich flaky pastry and balances the spice infused filling.
For a simpler option, you could just blitz up yogurt with fresh mint leaves for a quick Raita of sorts (Indian Mint Sauce).
How to serve Samosas
Samosas, like Pakoras, are typically served as a starter or snack, being the terrific hand-held size that they are. Though mind you, I’ve seen plenty of gigantic Samosas in my time. I can’t deal with the thought of the volume of oil required to fry those beasts! 😂
I’m sharing this Samosa recipe as part of an Indian Week, so you can make your very own Indian feast! Just to recap, here’s what we’ve got on the menu:
Palak Paneer – The iconic Indian Spinach Curry with your very own homemade cheese curd (puts store bought to shame!);
Naan – The softest, fluffiest, chewiest naan you will ever make!
Indian Cabbage Salad – This one will surprise you, it’s so incredibly delicious; and
Samosas – to kick start your party!
And with this Samosa recipe, that’s a wrap on Indian Week. I hope you’ve enjoyed the recipes as much as I have creating them … oh yes, and shooting them and filming them and making them over and over to check them … and DEVOURING them!! 😂 – Nagi x
Watch how to make it

Samosa Recipe
Ingredients
Dough:
- 1 1/2 cups flour , plain/all purpose
- 1 tsp ajwain seeds (Note 1)
- 1/2 tsp salt , cooking/kosher
- 4 tbsp ghee (melted and cooled) or oil (any vegetable) (Note 2)
- 6 tbsp water (cold tap water)
Potato Filling:
- 500g/1 potatoes , starchy/all-rounder (Note 3)
- 2 tbsp vegetable/canola oil
- 1 tsp cumin seeds
- 1/4 tsp black mustard seeds
- 1/2 tsp coriander seeds
- 1 tbsp fresh ginger , finely grated
- 1 tbsp green chilli , finely chopped (serrano or cayenne)
- 1/2 cup frozen green peas (thawed)
- 1 tsp garam masala
- 1/4 tsp amchur (Note 4)
- 1/2 tsp asafoetida (Note 5)
- 1/4 tsp cumin powder
- 1/2 tsp turmeric powder
- 1 tsp salt , kosher/cooking
- 2 tbsp coriander/cilantro leaves , finely chopped
Frying:
- Vegetable/Canola oil for frying (at least 1 litre/1 quart)
Serving:
- Tamarind Dipping Sauce – see separate recipe card below
Instructions
Potato Filling:
- Boil potato until soft: Peel then cut potatoes in half. Place in a pot of cold water, bring to boil then cook until very soft, ~10 minutes.
- Mash roughly: Remove the potatoes onto a plate and roughly mash with a fork, leaving some large chunks (we want some textural interest).
- Cook spice seeds: Heat oil in a large skillet over medium heat. Add the cumin seeds, mustard seeds & coriander seeds. Stir the spices for about 30 seconds or until fragrant – don't let them burn!
- Add the ginger, chilli, peas and continue to stir a further minute or so until the chilli is soft.
- Add remaining spices: Add the garam masala, amchur, asafoetida, cumin powder, turmeric and salt. Cook a further 30 seconds.
- Add potato and gently stir to coat in spices for about 1 minute.
- Cool: Remove from the stove, stir in chopped coriander leaves. Spread potato mixture out on a plate and let it cool completely before using.
Samosa Dough:
- Mix dry ingredients: Place the flour, salt and ajwain seeds into a bowl and stir to combine.
- Rub ghee into flour: Add the ghee or oil and mix with your fingertips until the dough resembles breadcrumbs. (This step is key to making flaky samosa pastry.)
- Form a ball: Add the water and mix with the flour until you form a ball of dough. It should be pliable and soft, but not so sticky it sticks to your hands,.
- Rest 30 minutes: Cover the dough in the bowl with glad wrap and leave to rest for 30 minutes.
Making the Samosas – see video:
- Cut into 6: Cut the dough into 6 equal portions, then roll each into a ball. Keep the balls on a plate covered with cling wrap so they don't dry out.
- Place between paper: Place one ball on a sheet of parchment/baking paper. Press down to flatten, then cover with another sheet of paper. Do not flour the work surface – it will dry the pastry out.
- Roll out: Roll the dough into a disc about 2mm / 1/10" thick (~16cm /6.5” diameter).
- Cut in half: Cut through the centre to create two semicircles (2 samosas per disc).
- Make cone: Brush the straight side with water, then fold straight edge to join itself and form a cone. Overlap the edges by about 1 cm / 2/5" then press edges to seal.
- Fill with potato: Make an "O" with your forefinger and thumb, then hold the cone in the "O". Fill with about 2 tbsp of Potato Mixture, lightly pressing in.
- Seal: Brush the open pastry edge with water, then press together so your Samosa is fully sealed. Place sealed edge down on work surface and press down to fold. Trim off excess pastry, fold in corners. Pinch the top corner to make it pointy.
- Repeat with remaining Samosas – you should make 12 in total.
Frying:
- Heat oil to medium: In a deep pan or pot, heat 5cm / 2" oil to 160°C/320°F). (Note 7)
- Fry 1: Carefully drop 3 – 4 samosas in the oil and cook for 3 minutes, moving them around occasionally (if they touch the base of the pot for too long, they get brown spots).
- Drain and repeat: Remove from the oil and drain on paper towels. Repeat with the remaining samosas.
- Increase oil heat: Increase the oil temperature up to 190°C/375°F.
- Fry 2: Carefully place 3 – 4 samosas at the time into the oil, and cook for 1 1/2 to 2 minutes until they are deep golden. Remove from the oil and drain on paper towels. Repeat with remaining Samosas.
- Serve hot with Tamarind Sauce or a Mint Raita (see separate recipe card below this one)
Notes
 7. Baking option – Unfortunately it doesn’t work as well as frying because it takes 30 minutes to get some nice colour on the pastry by which time it dries out a bit. But it does work! Spray formed Samosas generously with oil then bake at 200°C/390°F for 25 to 30 minutes until crispy and golden.
8. Reheating – Reheat leftover samosas in the oven at 180°C/350°F for around 8 minuets, just until the pastry is hot, reasonably crisp again and the inside is warmed. It will never go back to freshly cooked crispy of course – but it’s still pretty good!
9. Nutrition – Assumes each Samosa absorbs 1/2 tbsp vegetable oil from frying. Sauces are not included in calculation.
7. Baking option – Unfortunately it doesn’t work as well as frying because it takes 30 minutes to get some nice colour on the pastry by which time it dries out a bit. But it does work! Spray formed Samosas generously with oil then bake at 200°C/390°F for 25 to 30 minutes until crispy and golden.
8. Reheating – Reheat leftover samosas in the oven at 180°C/350°F for around 8 minuets, just until the pastry is hot, reasonably crisp again and the inside is warmed. It will never go back to freshly cooked crispy of course – but it’s still pretty good!
9. Nutrition – Assumes each Samosa absorbs 1/2 tbsp vegetable oil from frying. Sauces are not included in calculation.Nutrition

Tamarind Dipping Sauce for Samosas
Ingredients
- 1 tbsp vegetable/canola oil
- 1/2 tsp ground ginger
- 1/4 tsp chilli powder *optional
- 1/2 tsp ground cumin
- 1/4 tsp asafoetida (Note 1)
- 1/4 tsp garam masala
- 1 cup water
- 2 – 3 tbsp tamarind paste/concentrate (Note 2)
- 1/2 cup brown sugar
Instructions
- Heat the oil in a small saucepan over medium heat.
- Add the ginger, chilli, cumin, asafoetida and garam masala, stir and cook gently for 1 minute to release the flavours and toast the spices.
- Add the water, tamarind paste and brown sugar and stir until the sugar has completely dissolved.
- Reduce the heat and simmer gently for 15 minutes until the sauce turns thick and syrupy – it should be the consistency of sweet soy/ketchup manis (ie. like very runny honey). Taste and adjust the tamarind to suit.
- Cool the sauce before using. The sauce will thicken as it cools.
- Serve with hot Samosas.
Nutrition
Life of Dozer
Most people look for a pot of gold at the foot of a rainbow. Dozer is just thinking – “snacks?!

The post Samosa recipe appeared first on RecipeTin Eats.
]]>