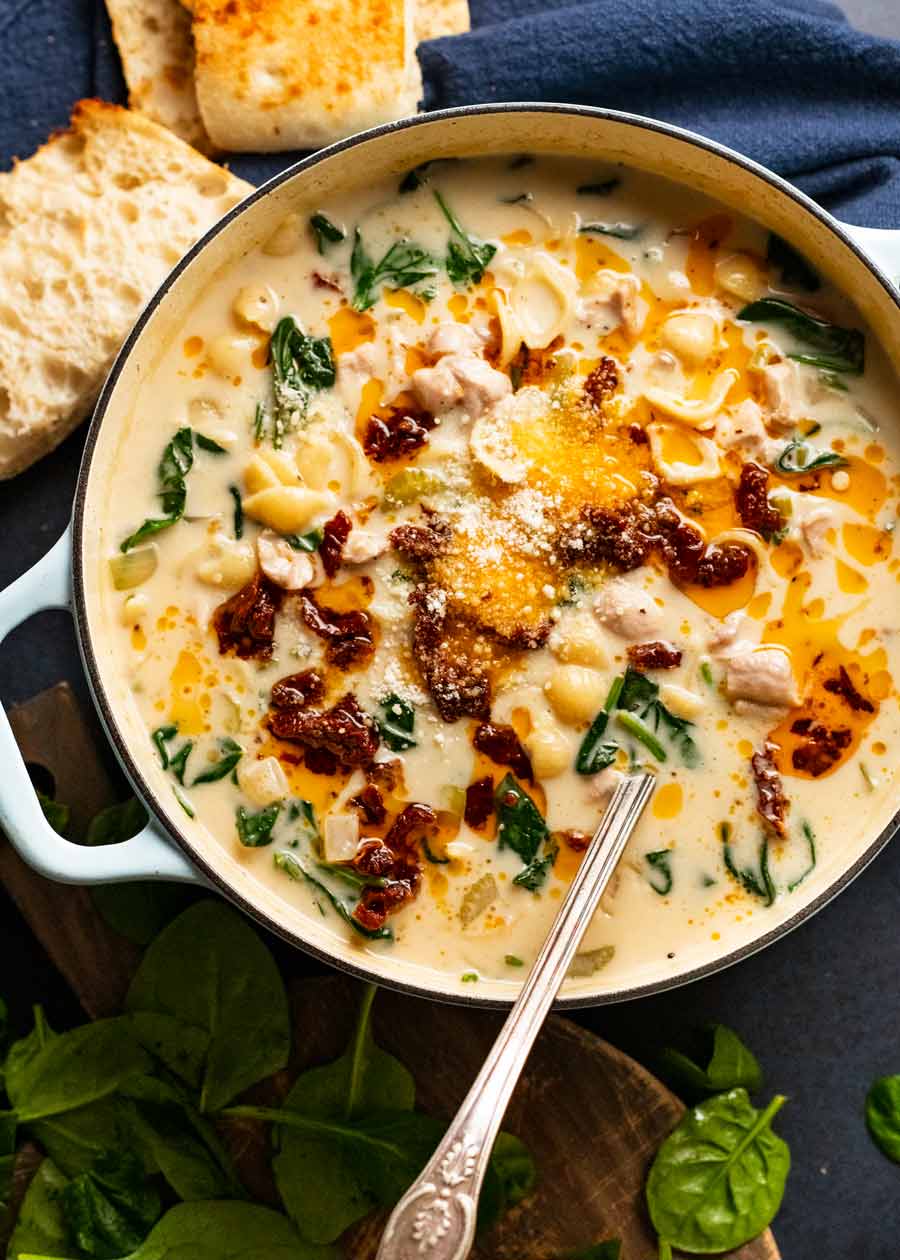
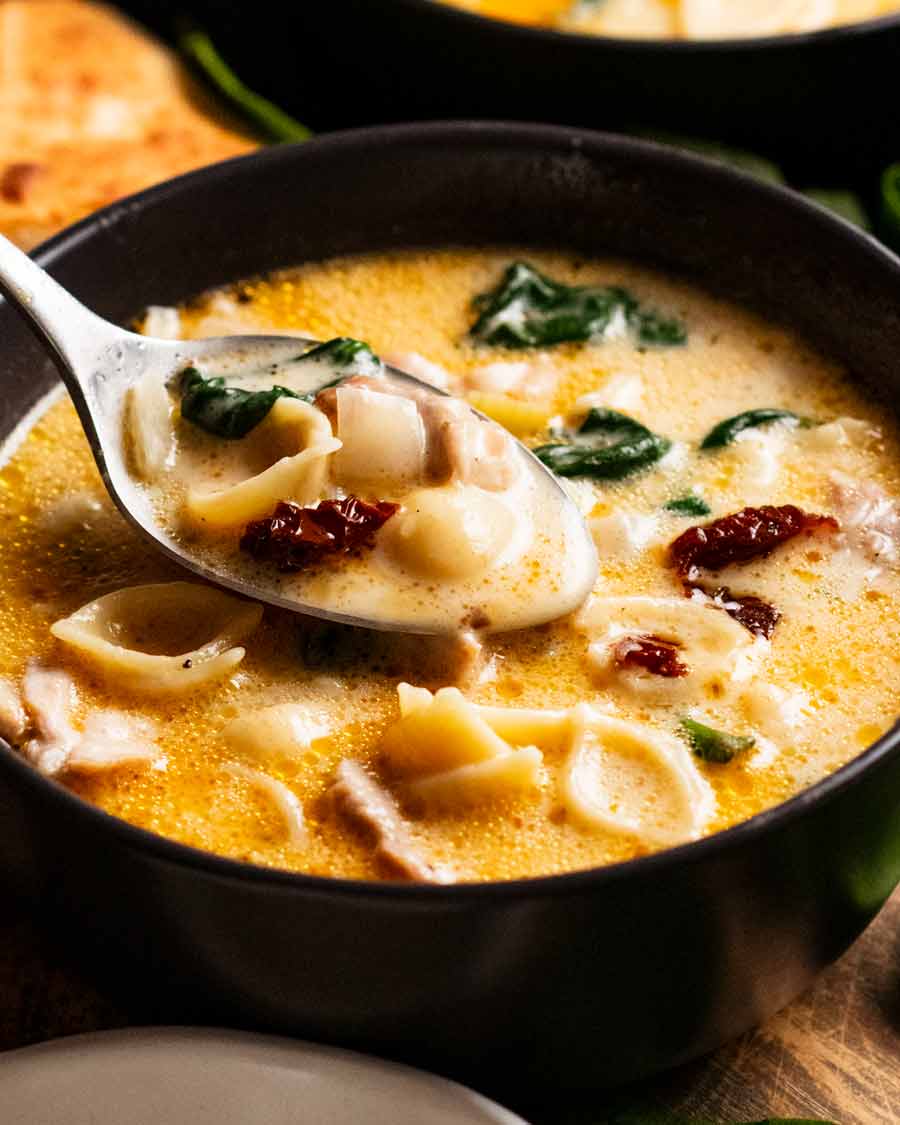
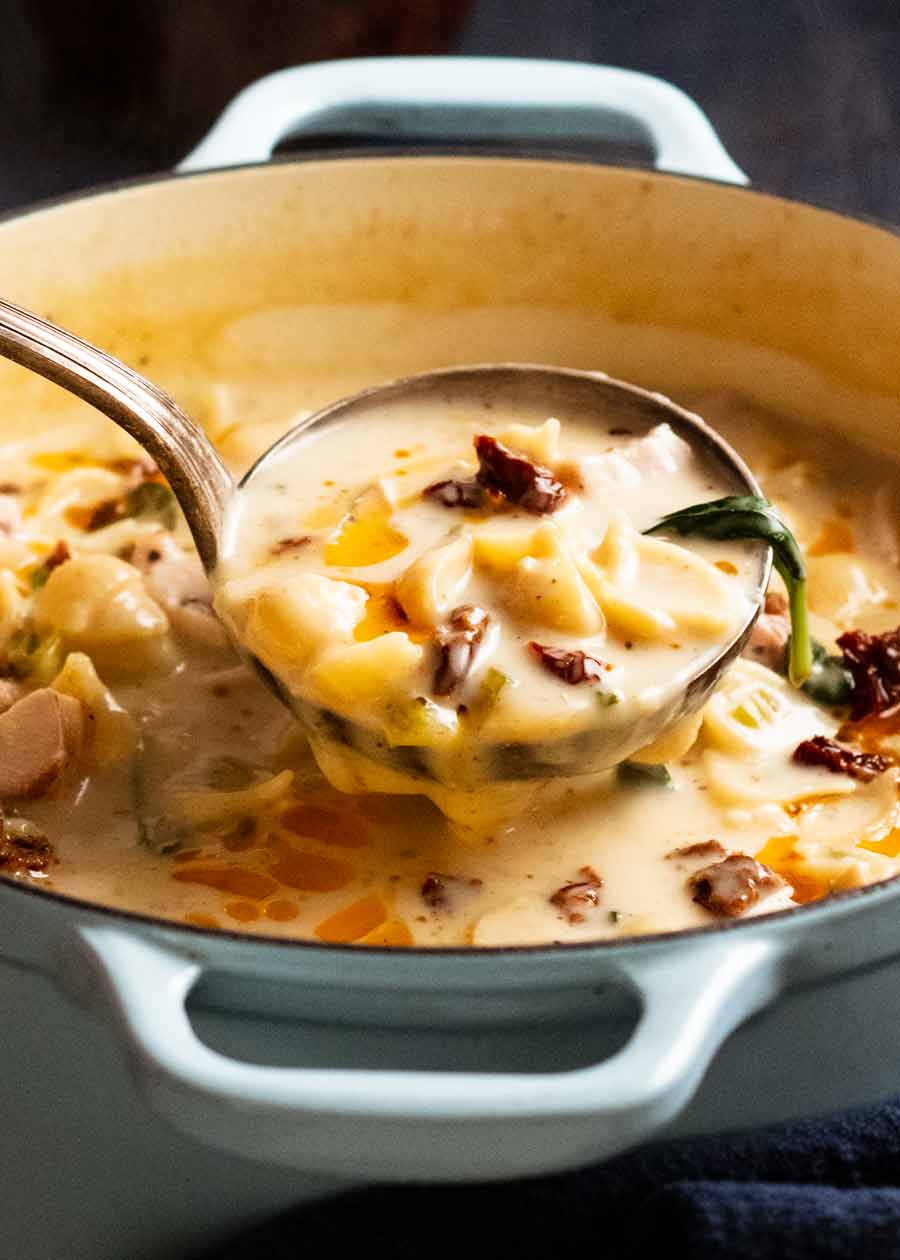
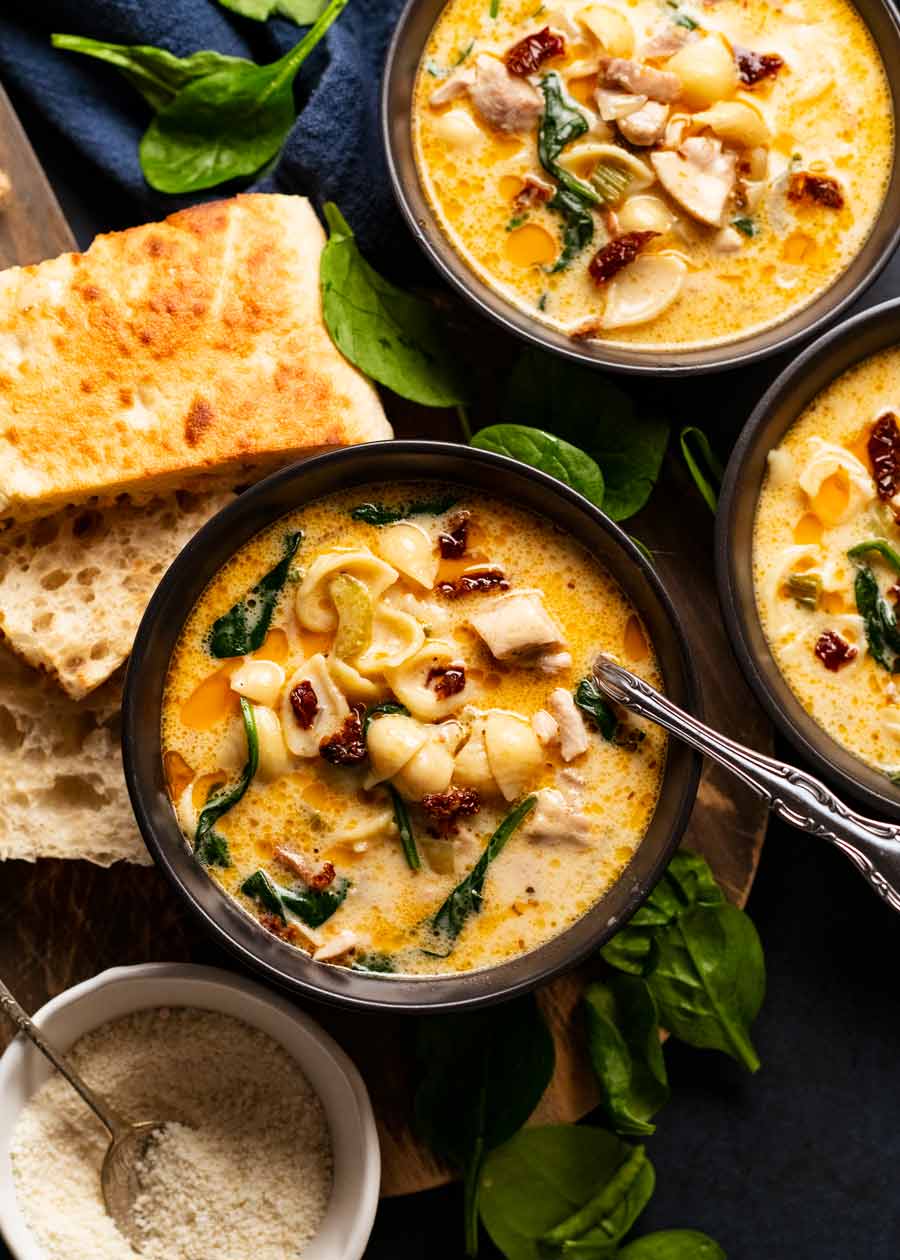
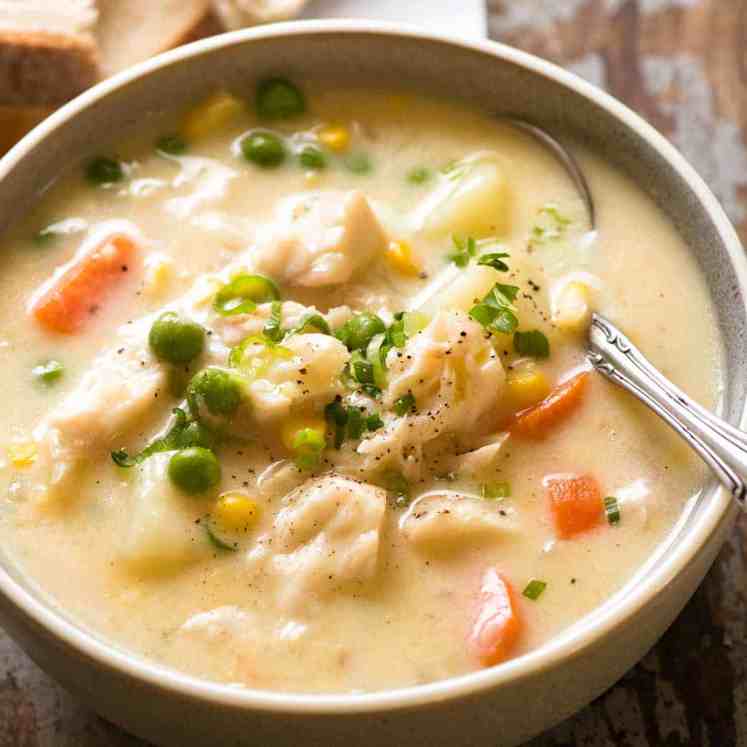
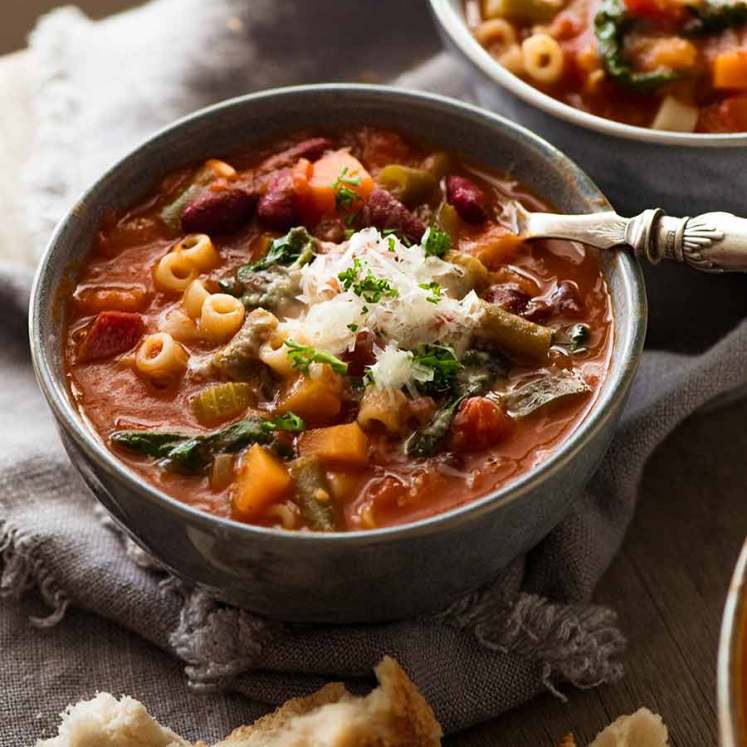
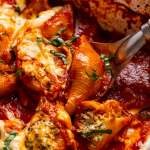
 My current favourite chicken soup! Creamy broth, juicy little bits of chicken, pasta shells and swirls of spinach with a sprinkle of sun dried tomato I use in place of croutons. Think – under the Tuscan Sun. Except – sweater weather food! Creamy Tuscan Chicken Soup Let me just say upfront – I call this... Get the Recipe
The post Creamy Tuscan Chicken Soup appeared first on RecipeTin Eats.
]]>My current favourite chicken soup! Creamy broth, juicy little bits of chicken, pasta shells and swirls of spinach with a sprinkle of sun dried tomato I use in place of croutons. Think – under the Tuscan Sun. Except – sweater weather food!
Creamy Tuscan Chicken Soup
Let me just say upfront – I call this Tuscan but there’s nothing authentically Tuscan about it (as far as I know). To me, it has Tuscan vibes, so I gave it a cute name with the hopes to pique your interest. Just in case my photos and writing doesn’t do the job well enough to convince you that you really need to try this creamy chicken soup!!!
In all honesty, I was gazing longingly at my Tuscan Chicken Pasta Bake from my cookbook, trying to muster up the energy to make it. Because that big bubbling pasta bake does require a semi-modest commitment of time to make. Worth it, but sadly, time is not always on my side.
This Tuscan Soup was born from similar ingredients. A faster, soup version of the pasta bake. I hope you fall in love with this soup as much as I have!
Ingredients in Creamy Tuscan Chicken Soup
Those of you who have made the Tuscan Chicken Pasta Bake will recognise most of these ingredients. All the star players are present – sun dried tomato, spinach, chicken, pasta, cream, cheese!
Things in the soup
Here are the things that are bobbing about in the creamy soup broth:
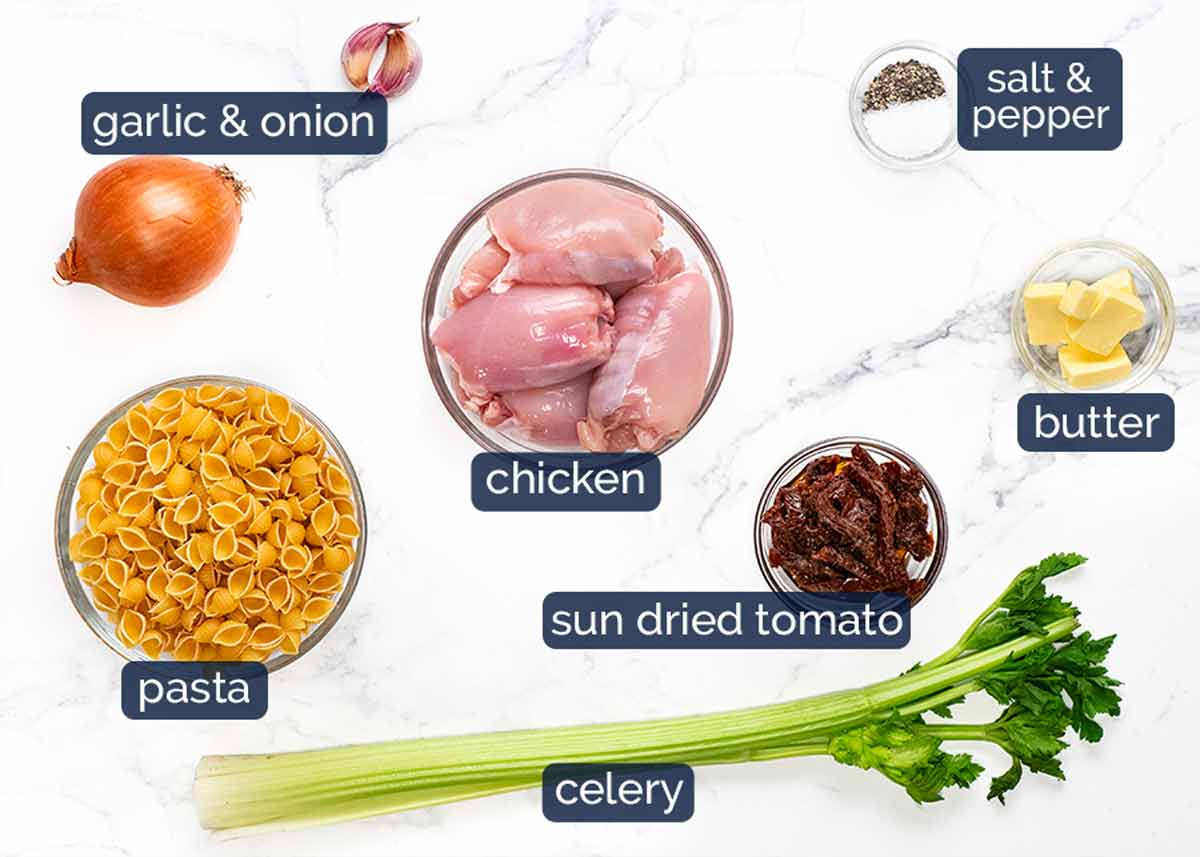
Chicken – I prefer thigh because it’s juicier, has better flavour and is thin enough to cook whole, so no raw meat chopping called for. But breast can be used too. If using chicken breast, slice horizontally into thin steaks to sear. The thick whole breasts are too thick.
Pasta – I use small shells. Any small pasta is fine here. Think – ditalini, small macaroni, risoni/orzo (you’ve got half the packet left from last weeks’ salad, right!?). Anything small enough to be easy to scoop up with a spoon that cooks in around 10 minutes. Broken spaghetti or other long pasta will also work – break into 4cm / 1.5″ pieces.
Sun dried tomato – This is the garnish for this soup! Instead of using croutons, nuts etc.
 Little chewy pops of concentrated savoury tomato flavour with swirls of the red oil from the sun dried tomato jar.
Garlic and onion – Flavour base!
Celery – Vegetable of choice here. I like it because the colour sort of blends into the soup, keeping it lovely and white so the bright red sun dried tomato and swirls of spinach stand out. Plus, celery is a classic flavour base for many savoury things. Substitute with other cook-able vegetables. Think: diced zucchini, corn, carrots.
Butter – The cooking fat of choice, because it’s got more flavour than oil.
Creamy chicken soup broth
A splash of white wine, good handful of parmesan and finishing with cream gives the Tuscan soup broth great flavour!
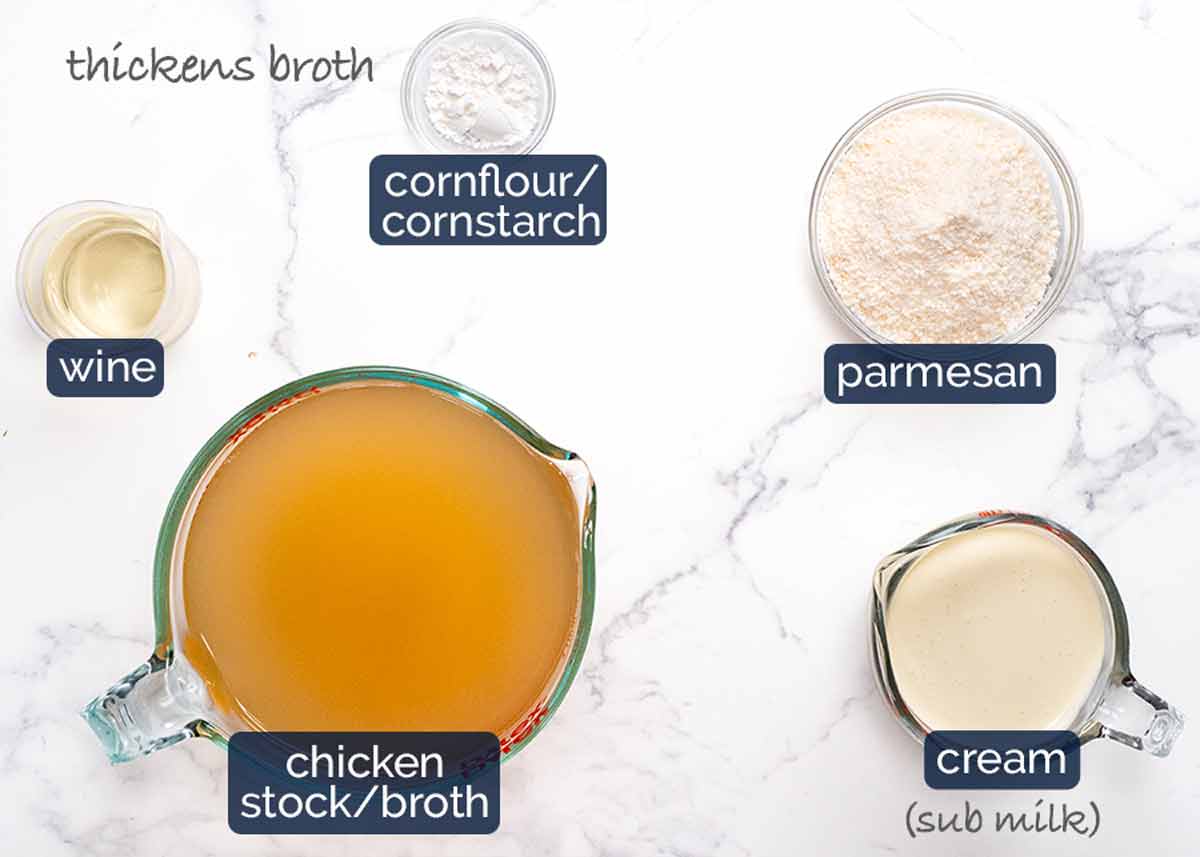
Cornflour/cornstarch – This is what is used to thicken the soup. I opted to use this over flour for calorie control reasons. Using flour, I would’ve needed an extra 30g/2 tbsp of butter to stir the flour into at the beginning to make a roux. With cornflour, you just mix with a bit of water then stir it into the soup right at the end. Also, cornflour makes the soup nice and shiny, which I like in this soup (flour makes broths dull).
Wine – Just 1/2 a cup, adds extra depth of flavour so you there’s enough flavour using half stock, half water, rather than 2 litres / quarts of water. Money saving tip.
It’s like free stock! Doesn’t make the broth taste winey, because we cook out the alcohol, just leaving behind lovely savoury flavour. Can’t consume alcohol? Switch half the water for more chicken stock/broth.
Cream – Gives the soup a lovely creamy mouthfeel finish as well as making the soup white. You can opt to use milk instead, but reduce water by 1/2 cup and use 1 1/2 cups milk (else soup colour not as white). To get a nice finish, I’d add a knob of butter!
Parmesan – Another flavour boost. Normally I recommend shredding your own but I used store-bought pre-shredded for convenience here and it melted fine in the hot soup (unlike in cheesy sauces). The sandy-type, from the fridge (not aisle please! If it ain’t in the fridge, it ain’t real cheese!
)
How to make Creamy Tuscan Chicken Soup
Searing our own chicken makes this soup tastier than just adding pre-cooked chicken into the soup broth. Because colour on the chicken = tastier chicken, and the soup broth gets extra (free!) flavour from the golden bits left in the pot from searing the chicken.
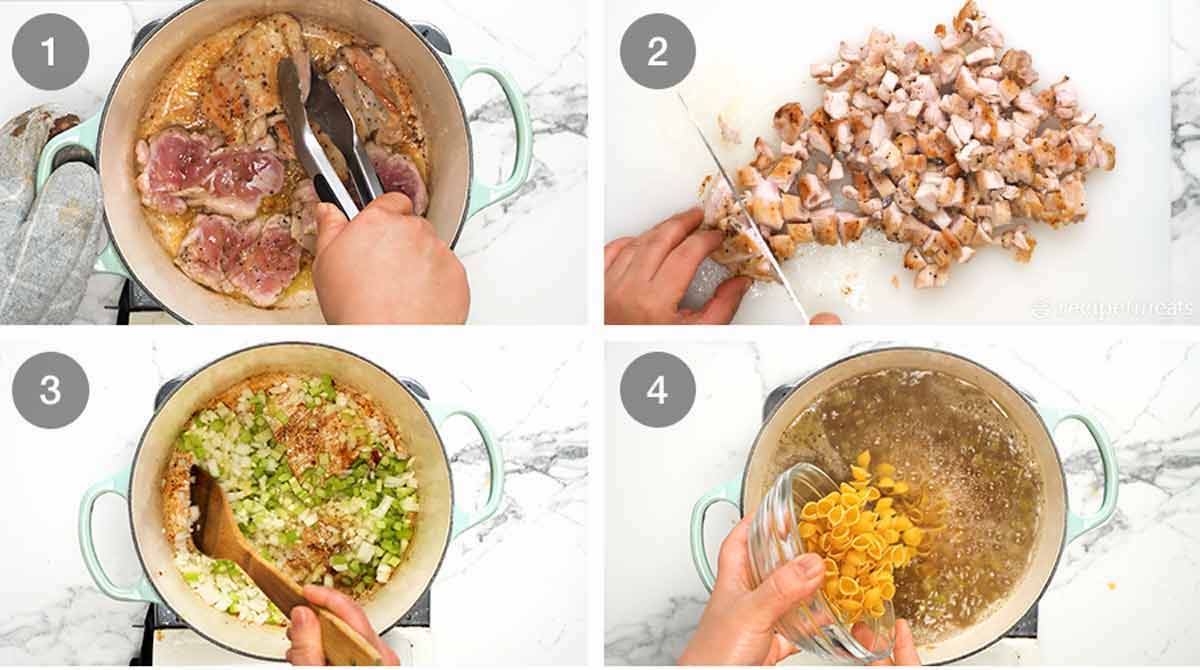
Sear the chicken in the butter, just to get some colour on the surface. It doesn’t matter if it’s not cooked all the way through because after we chop it, it gets added back into the soup. As noted above, cooking our own chicken gets us on the path to a more delicious soup!
Chop the chicken once it’s cool enough to handle. I do this while the pasta is cooking. Don’t worry about raw bits, they will cook through quickly once added back into the hot soup broth.
Sauté the onion, garlic and celery in the same pot using the residual butter.
Broth & pasta – Deglaze the pot by simmering the white wine rapidly until reduced by half. Deglazing just means to dissolve the chicken-searing golden bits on the base of the pot into the liquid for extra flavour in the soup broth.
Pasta – Once the broth is brought back up to the boil, add the pasta and cook it for the time per the packet directions (10 minutes for the small shells I used).
Chopped chicken – Once the pasta is in, I chop the chicken then just add it into the broth about halfway through the pasta cooking time.
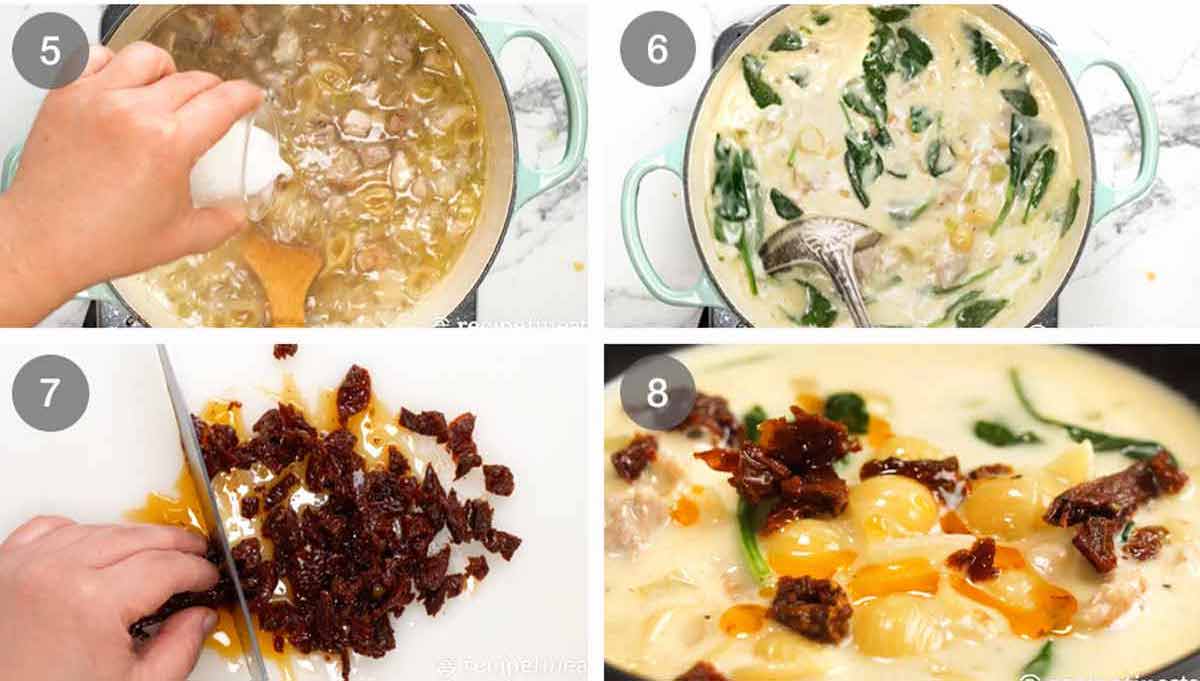
Thicken soup – Mix together the cornflour/cornstarch with a smidge of water then stir it into the soup broth. We only use a bit of cornflour because the soup gets thickening help from the gluten in the pasta and the cream.
Soup finishes – Then stir in the parmesan, follow by the cream and spinach. Once the spinach has wilted, which should only take a minute or so, the cornflour will have thickened the soup. And that’s it – ready to serve!
Sun dried tomatoes – Chop sun dried tomatoes into scattering-size-pieces.
Ladle the soup into bowls. Sprinkle with sun dried tomato and a little drizzle of the oil from the sun dried tomato jars (love how the red looks against the white soup). A sprinkle of extra parmesan wouldn’t hurt either. Then dig in!
Pasta soup storage matters!
Pasta loves to absorb liquid. So if you leave the pasta overnight in the broth, it will bloat and become overly soft.
So to store leftovers, it’s best to separate the broth from the pasta. Just use a slotted spoon to scoop out the pasta bits then store the pasta and broth in separate containers in the fridge. They will keep for 3 to 4 days.
Making ahead intentionally
This is a great soup to prepare ahead to reheat later! Just cook the pasta, drain, thicken the soup , then store the chicken with pasta and soup broth separately. They can be refrigerated for 4 days or frozen for 3 months. Reheat the soup broth first, then add the pasta and chicken to reheat. I’ve popped these directions in the recipe card too.
Hope you enjoy! – Nagi x
Watch how to make it

Creamy Tuscan Chicken Soup
Ingredients
- 500 g/1 lb chicken thighs , skinless boneless (Note 1 for breast)
- 1/2 tsp each salt and pepper
Soup:
- 30g / 2 tbsp unsalted butter
- 1 onion , finely chopped
- 2 garlic cloves , minced
- 2 large celery stems , finely sliced (sub 2 carrots)
- 1/2 cup chardonnay or other dry white wine, optional (Note 2)
- 4 cups chicken stock/broth , low sodium
- 3 cups water
- 1 tsp cooking/kosher salt
- 1/2 tsp black pepper
- 250g/8 oz small pasta shells (or other small pasta, rice, potato etc – see Note 3)
- 1 cup (tightly packed) parmesan, finely grated or store bought pre-grated (sandy type) (Note 4)
- 1 cup thickened/heavy cream (Note 5 for milk sub)
- 2 packed cups baby spinach , chopped kale or similar
- 1/2 cup sun dried tomato strips , chopped into 1cm pieces, plus bit of oil drizzling (Note 6)
Soup thickener (cornflour slurry):
- 2 tsp cornflour/cornstarch mixed with 2 tsp water
Instructions
- Cook outside of chicken – Sprinkle each side with the salt and pepper. Melt butter in a large pot over medium high heat. Once foamy, place the chicken in and cook the first side for 3 minutes or until light golden, then the other side for 2 minutes – it's fine if the inside is still raw, it cooks more later. Remove onto a plate.
- Soup flavour base – Turn the stove down to medium low. Add garlic, onion and celery into the same pot then cook for 3 minutes or until the onion is softened.
- Deglaze – Turn up to high, add wine, stir, then let it simmer until the wine reduces by half.
- Broth & pasta – Add stock/broth, water, salt and pepper. Bring to a boil then add the pasta. Cook for the time per the pasta packet directions (~10 minutes), stirring every now and then so the pasta doesn't stick to the base of the pot.
- Add chicken partway – While the pasta is cooking, chop the chicken into 1.5cm / 1/2" pieces then add into the pot to finish cooking.
- Finish soup – Once the pasta is cooked, turn heat down to low. Stir in parmesan until melted. Stir in the cornflour-water mixture, cream and spinach. Stir for a minute until spinach is wilted and soup thickens slightly.
- Serve – Ladle into bowls. Sprinkle with sun dried tomato strips (and a bit of oil looks nice for finishing). Eat!
- Storing – Separate pasta from soup so it doesn't bloat, refrigerate both. Just scoop out with slotted spoon. (Note 6)
Notes
). It’s like free stock!
For non alcoholic, either use zero-alcohol white wine or substitute half the water for more chicken stock (otherwise the broth will lack a bit of flavour).
3. Pasta subs – Other small pasta like ditalini, small macaroni, rison/orzo can be used in the recipe as written, cook per packet time. Break long strand pasta into spoonable bits.
Gluten free pasta – Make recipe as written but you might want to increase the cornflour/cornstarch slightly to thicken the soup a little because the recipe relies on the starch in gluten pasta to help thicken the soup slightly.
Potato – cube, and reduce soup cook time (1.5 cm / 0.6″ cubes cook in around 7 min). You might want to increase cornflour/cornstarch to thicken soup (same reason as GF pasta).
Rice – White rice, use recipe as written, ~1 cup uncooked rice. Not brown rice (takes too long to cook).
4. Parmesan – Store bought sandy-type parmesan melts fine in this soup. But – fridge. Not from the aisle (that ain’t cheese!)
5. Cream gives the soup a lovely creamy mouthfeel finish as well as making the soup white. If using milk instead, reduce water by 1/2 cup and use 1 1/2 cups full-fat milk (else soup colour not as white). This will shave 140 calories off each serving. Though I’d add a knob of butter!
6. Sun dried tomato is the sprinkle for this soup that keeps things interesting! All my recipes I call “Tuscan this-and-that” has it in it. Nice change from the usual croutons and nuts, and adds a little punch of flavour, plus the red oil looks good!
7. Storing – Pasta left in broth will bloat and soften overnight. For leftovers, just scoop out all the pasta etc using a slotted spoon and store separately from the broth, in the fridge. If making ahead intentionally, for best results: do to the end of step 5, drain soup in colander, return broth into pot. Thicken soup with parmesan and cornflour slurry, add spinach. Cool. Let pasta, chicken etc in colander cool. Store both separately. Can even freeze!
Nutrition per serving. Shave 140 calories off by switching cream for milk, per note 4.Nutrition
More soup love

Life of Dozer
Licking up drips from dirty dishes. He’s such a grot.

The post Creamy Tuscan Chicken Soup appeared first on RecipeTin Eats.
]]> There’s no need to pre-cook shells before you stuff them. Such a pain messing around with hot floppy shells! Just bake in loads of sauce and they’ll cook in the oven. These jumbo shells, called conchiglioni in Italian, are stuffed with spinach and ricotta. Serve with a Mega Italian Salad and garlic bread for the... Get the Recipe
The post Spinach ricotta stuffed shells appeared first on RecipeTin Eats.
]]>There’s no need to pre-cook shells before you stuff them. Such a pain messing around with hot floppy shells! Just bake in loads of sauce and they’ll cook in the oven. These jumbo shells, called conchiglioni in Italian, are stuffed with spinach and ricotta. Serve with a Mega Italian Salad and garlic bread for the perfect dinner.
Stuffed shells
I don’t know if you’ve ever tried, but stuffing hot cooked pasta shells is a nightmare. Slipper suckers that they are, and they break so easily.
There’s no need to suffer through all that! It’s much easier to stuff raw, uncooked pasta shells and cook them in the oven simply by covering them in a LOT of sauce. It 100% works. It’s the way I’ve been cooking cannelloni/manicotti all my life.
The trick is simply to start with a large volume of watery sauce that the pasta shells cook in. Not dissimilar to cooking pasta in a pot of boiling water, actually. And by the end, that watery sauce reduces down into a lovely thick pasta sauce!
This method of cooking also deals with another pet-peeve of mine: dry pasta shells. No worries about that here, we end up with plenty of tomato sauce for serving!
What you need for stuffed pasta shells
While there’s many stuffing options for pasta shells, the most popular is probably spinach and ricotta and that’s what I’ve gone with today. Sorry for being predictable?
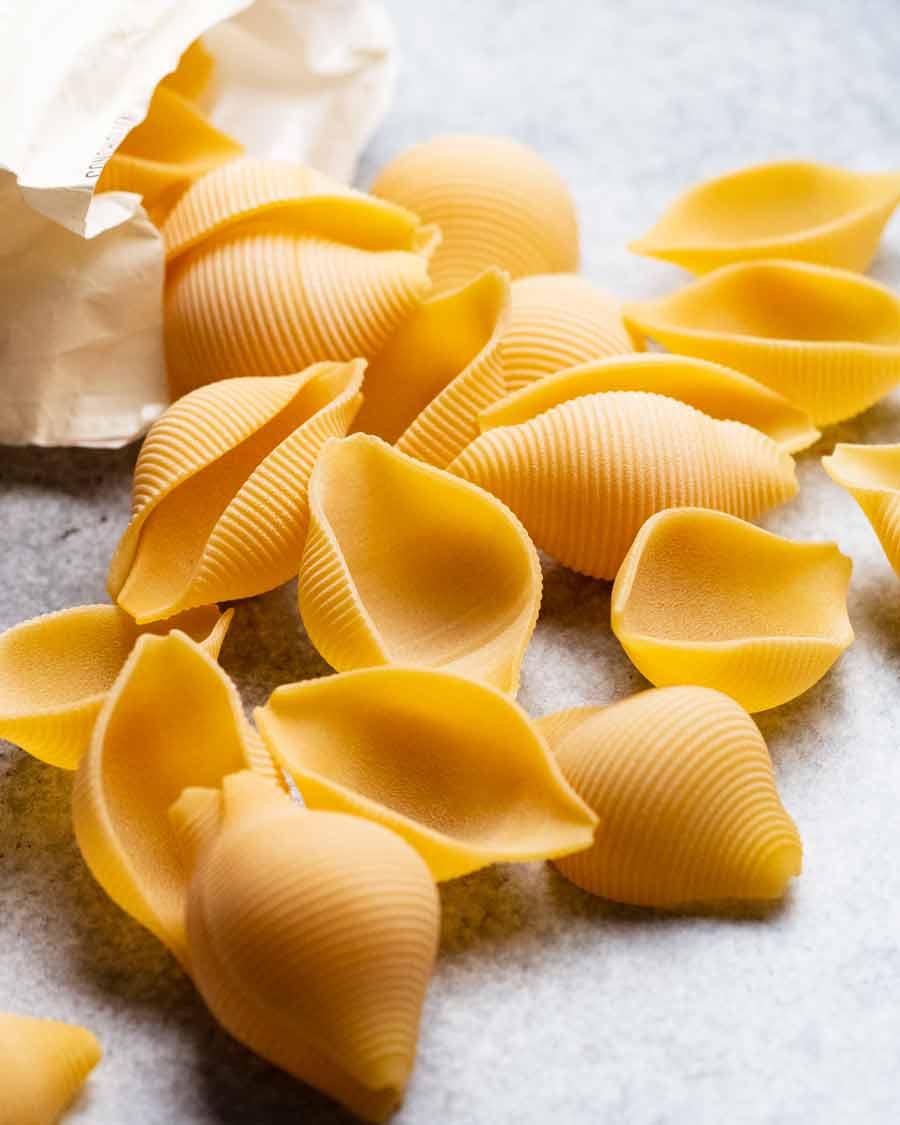
Jumbo shells (conchiglioni)
Jumbo shells (conchiglioni is the proper Italian name) are more readily available these days in Australian grocery stores (Woolies, Coles, Harris Farms) and the primary reason I went on a stuffed shells bender.
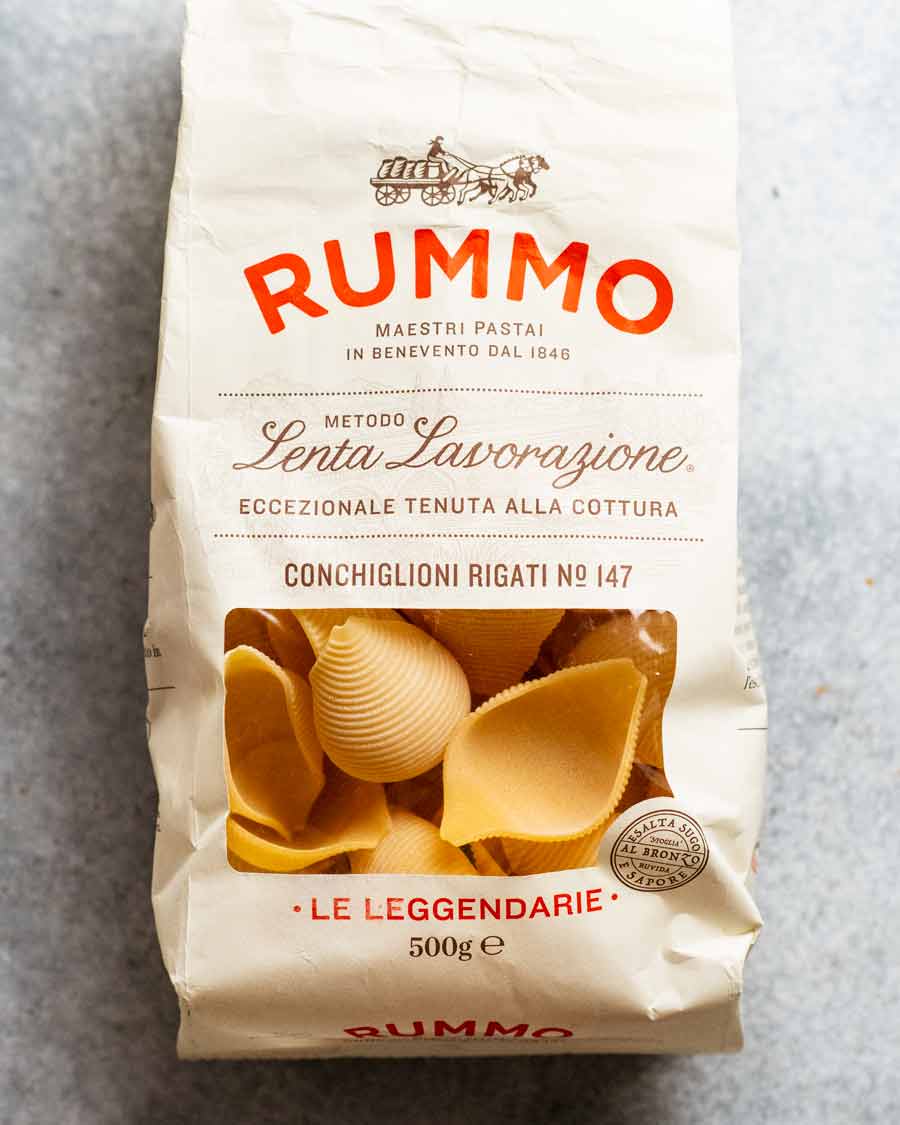
They are a little more expensive than typical pasta shapes – around $5 for a 500g / 1 lb packet. But they go further. You’ll need 250g / 8 oz for this recipe which serves 5 generously, possibly 6. (Let me remind you, I have a rather robust appetite! My serving portions are not skimpy).
The spinach ricotta stuffing
Here’s what you need for the stuffing. Exactly the same combination I use for spinach ricotta cannelloni, spinach ricotta rolls and the fan-favourite spinach ricotta rotolo.
For a meat option, use the beef filling in Beef Cannelloni instead.
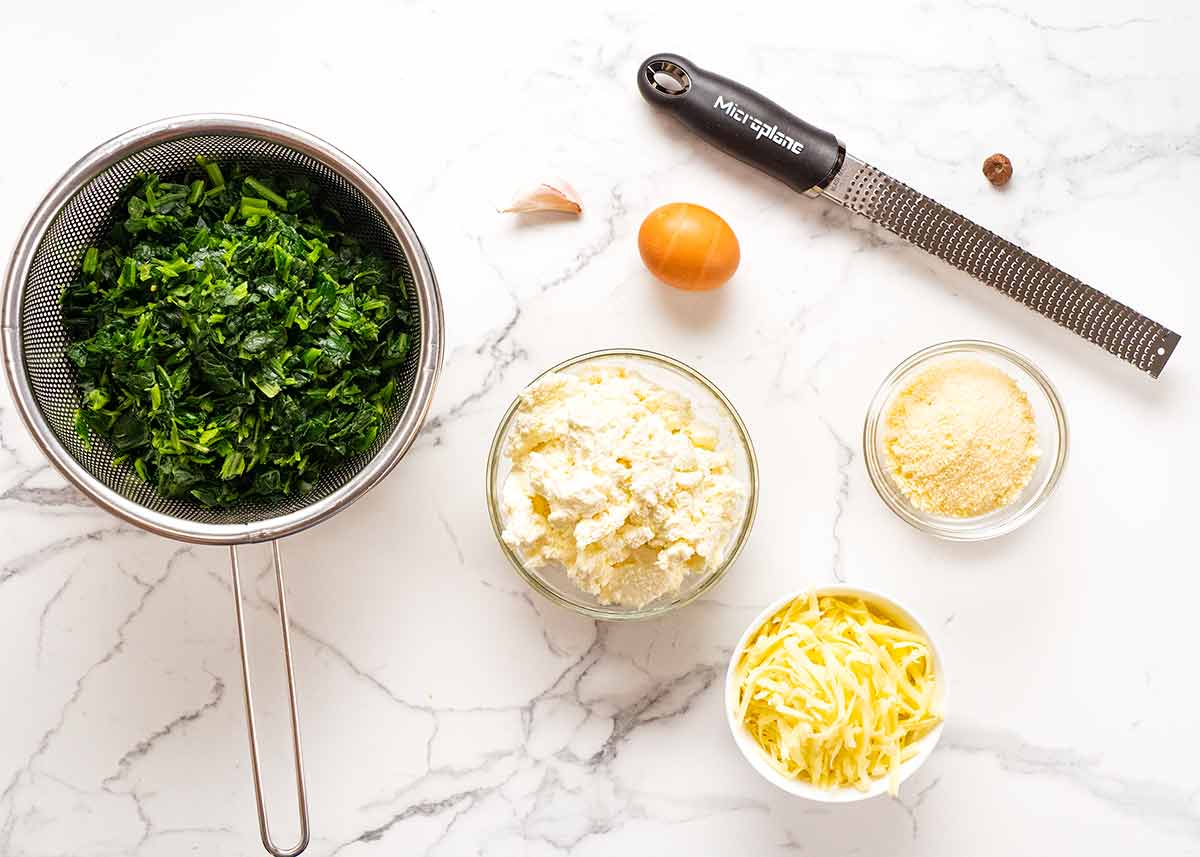
Spinach – use frozen for convenience (thaw, remove excess water before using), or fresh if you’ve got an abundance of it
Ricotta – be sure to use a food quality full fat, creamy one. Tip for Australians: avoid Perfect Italiano tub in the fridge aisle of major supermarkets. It’s quite powdery and unpleasant. My favourite is Paesanella which is sold at Harris Farms and over the deli counter at large supermarkets.
Shredded cheese – A flavoured one is best, like cheddar, tasty, gruyere. Save the mozzarella for the topping (which melts well but doesn’t have that much flavour).
Parmesan – don’t skip this! It adds extra savouriness and seasoning to the filling. Just store bought finely shredded or grated is fine, or grate your own.
Garlic – because it makes everything better
Egg – for binding.
Nutmeg – optional, but it’s a lovely touch. I use it in almost all my spinach ricotta fillings.
Salt and pepper
The sauce
I find this method of cooking stuffed shells from raw works best with a smooth pasta sauce rather than one with lumps of crushed or diced tomatoes. The shells cook more evenly and when it finishes baking, you’re left with a lovely smooth pasta sauce.
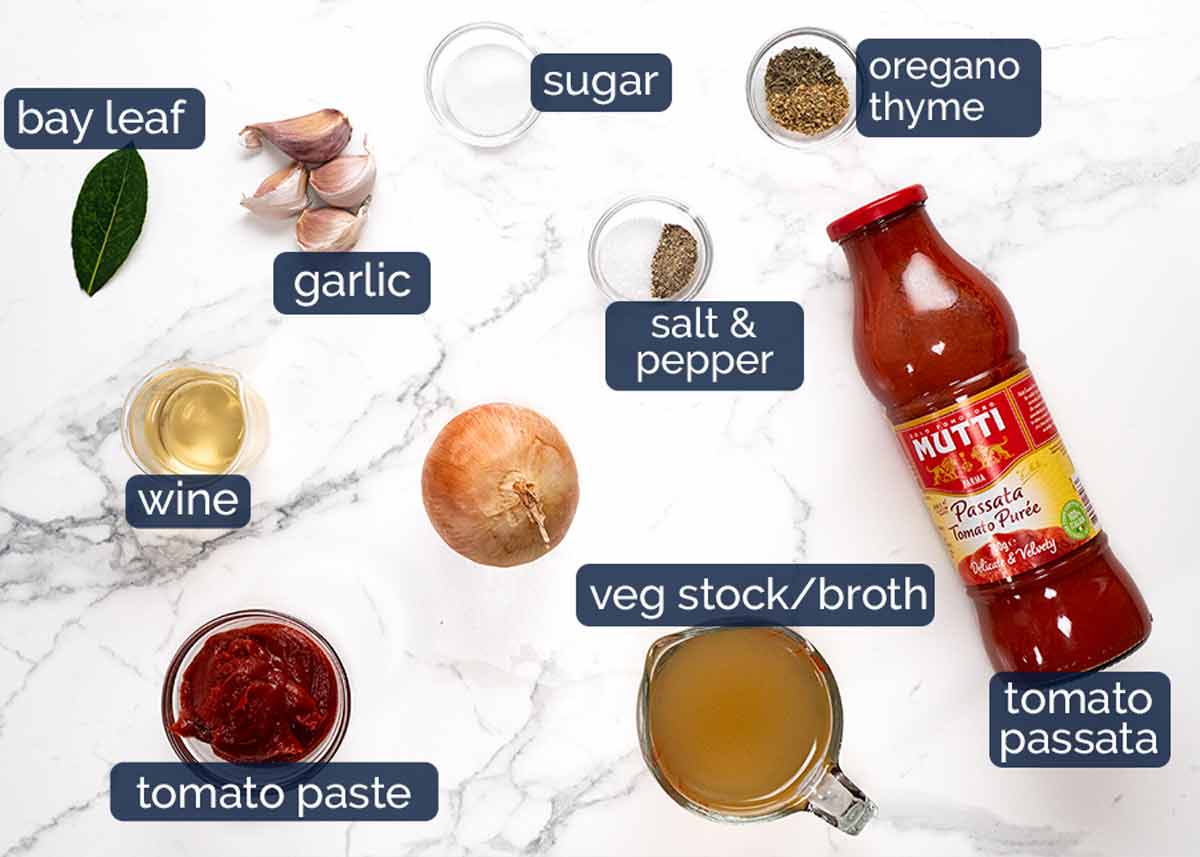
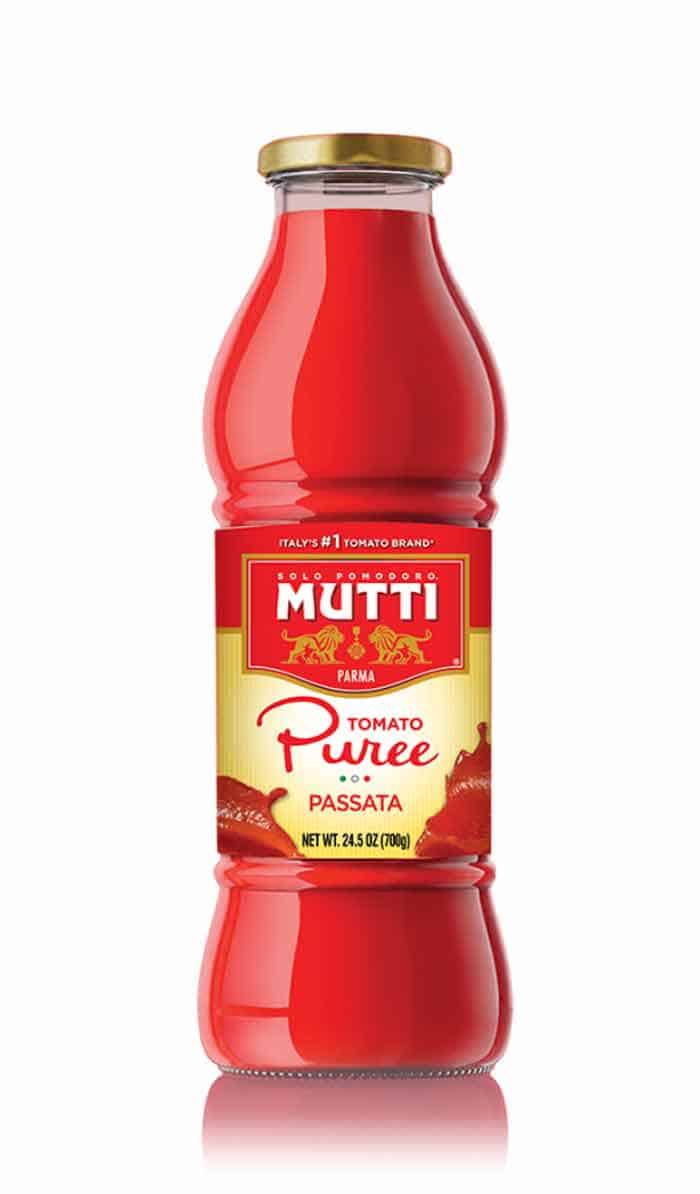
Tomato passata – Pureed, strained plain tomatoes, sometimes labelled “tomato puree” in the US (here’s a photo of Mutti tomato passata sold at Walmart). Readily available in Australian supermarkets nowadays, alongside pasta sauces. Excellent for making smooth sauces rather than simmering for ages to breakdown crushed or diced tomato. More on tomato passata here.
Substitutes – US Hunt’s tomato sauce is a perfect alternative. Otherwise, use crushed canned tomato then puree (like I do for cannelloni/,manicotti).
Eschalots –Also known as French onions, and called “shallots” in the US. They look like baby onions, but have purple-skinned flesh, are finer and sweeter. Not to be confused with what some people in Australia call “shallots” ie the long green onions.
I like using eshalots rather than onions because they are finer so they almost disappear into the sauce so you get a lovely smooth sauce. However, you can substitute with a small onion.
Herbs and spices – Fresh garlic, bay leaf, dried thyme and dried oregano.
Tomato paste – To intensify the tomato flavour and thicken the sauce slightly.
White wine – Adds depth of flavour / complexity into the sauce in a way only wine can! It’s only 1/3 of a cup and we simmer to cook out the alcohol. Substitute with more stock, or just skip it.
Vegetable stock – We need a whole litre / quart (4 cups) because we’re making a LOT of VERY watery sauce here! Just watch the video and you’ll see how it all gets absorbed by the pasta shells, leaving behind a lovely thickened pasta sauce for serving.
Sugar – Just a smidge, to take the sour edge off the tomato paste we’re using (tomato paste is sour!).
How to make stuffed shells
It’s actually extremely straight forward and the recipe has a nice flow to it: make the sauce first, then while it’s simmering, stuff the shells. Then assemble and bake!
How to make sauce for stuffed shells
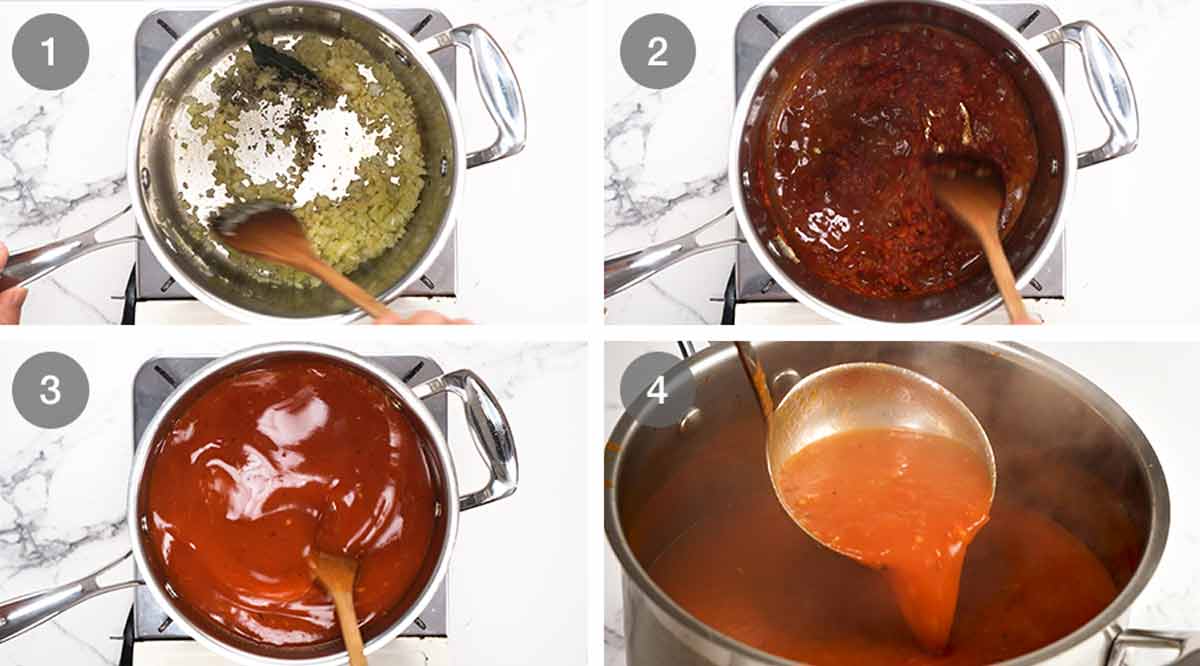
Sauté aromatics – Cook the garlic and eschalots with the herbs in a large saucepan or small pot.
Tomato paste and wine – Cook off the tomato paste for 1 minute (this takes the raw sour edge off and deepens the flavour) then add the wine and simmer rapidly on high heat until it’s mostly evaporated.
Simmer 20 minutes – Add the remaining ingredients then simmer on low for 20 minutes with the lid off.
Watery sauce! The sauce will be VERY watery and there will be loads. Have faith! You need it all – the shells absorb most of that liquid. Keep the sauce hot – we want to use it hot.
Stuffing & bake
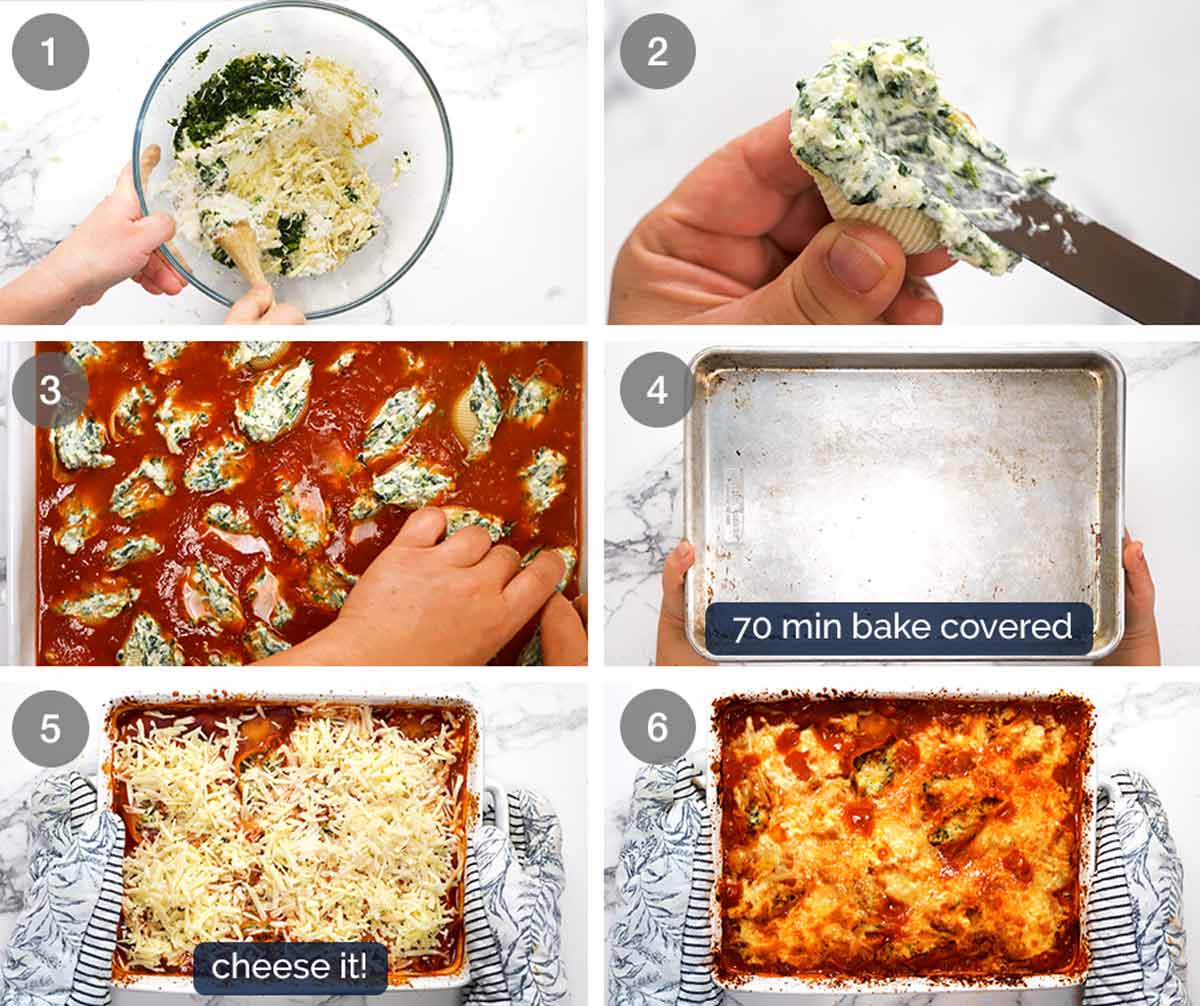
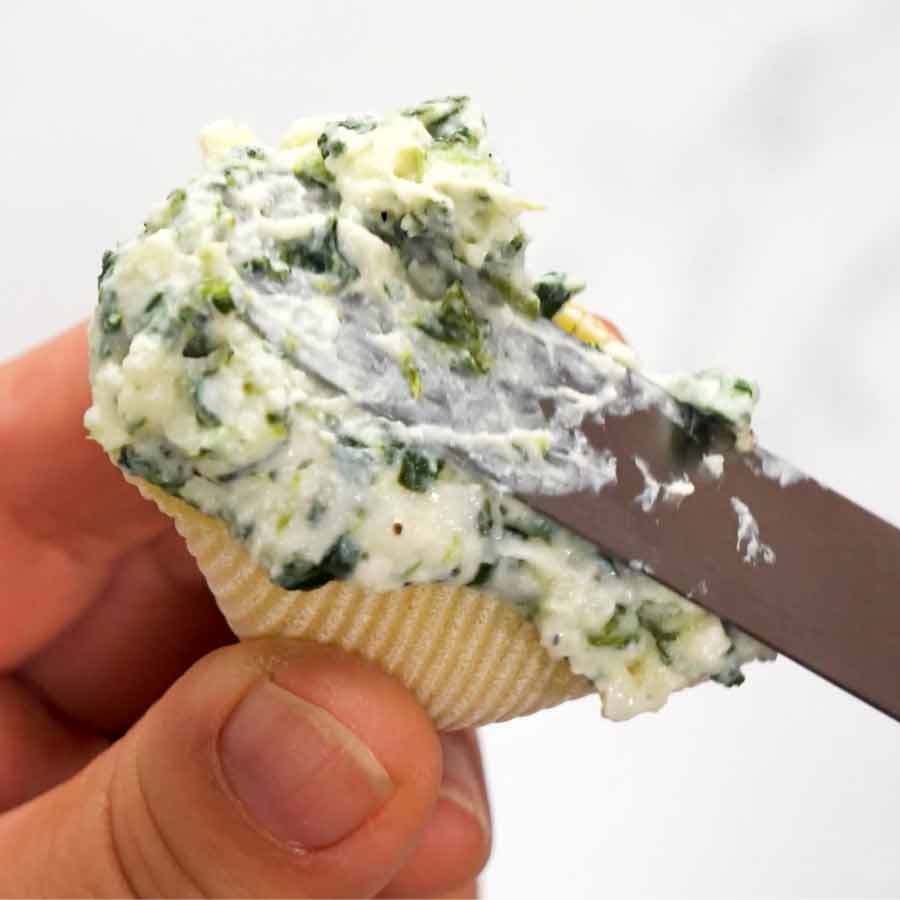
Stuffing – Mix the spinach ricotta stuffing ingredients together.
Stuff the raw uncooked shells. I find it easiest to use a small offset spatula (like a butter knife with a bend in it, super useful kitchen tool). Else a knife, spoon – whatever you find makes it easiest for you.
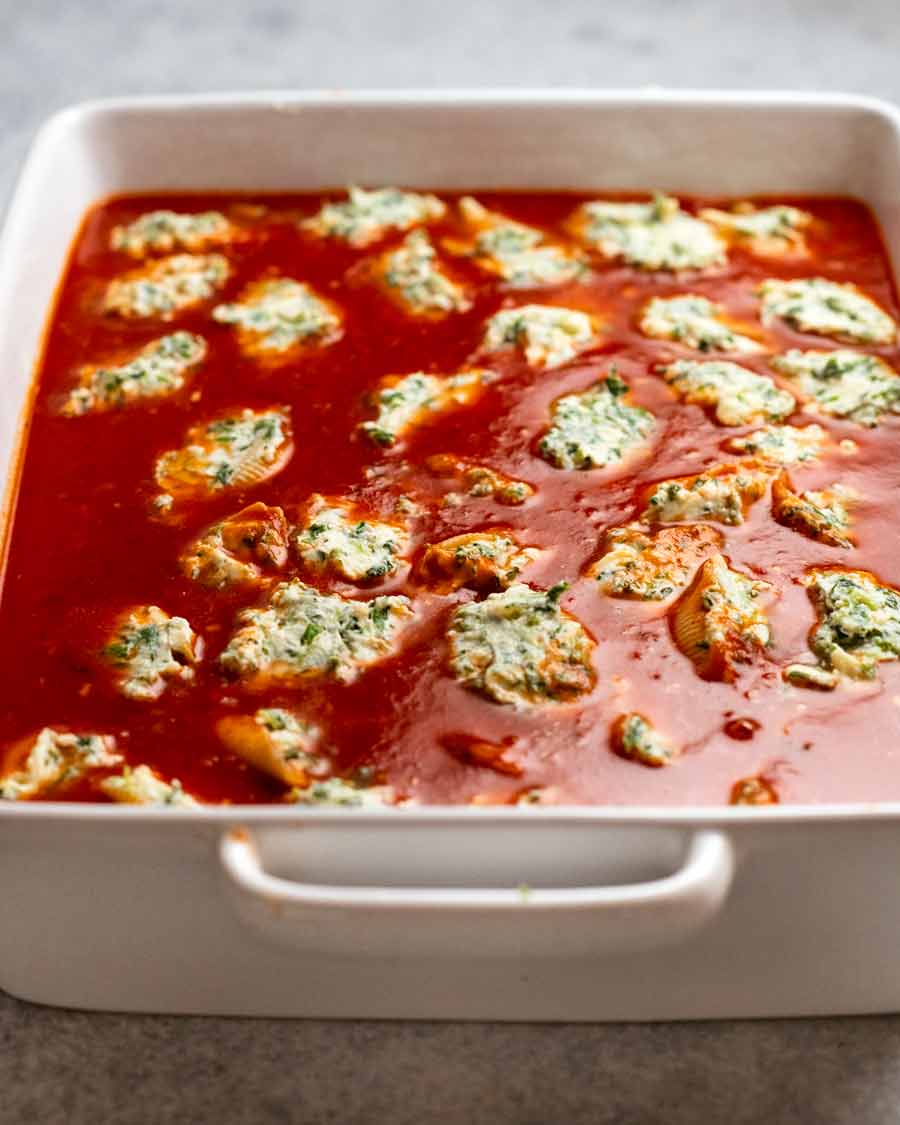
Assemble – Pour the hot sauce into a 23 x 33cm / 9 x 13″ baking dish. Then gently place the pasta shells in. They will be mostly submerged, some might semi-float. But you want most if not all of the pasta submerged under liquid so it cooks evenly (a bit poking above is fine as it will steam-cook).
Bake 70 min covered – Cover the dish with a baking tray (or foil) and bake for 70 minutes. Yes, really, it will take that long!
Why a baking tray? Easy way to cover the baking dish, no waste, no burning yourself, and it lets a little bit of steam escape to help the sauce reduce just the right amount.
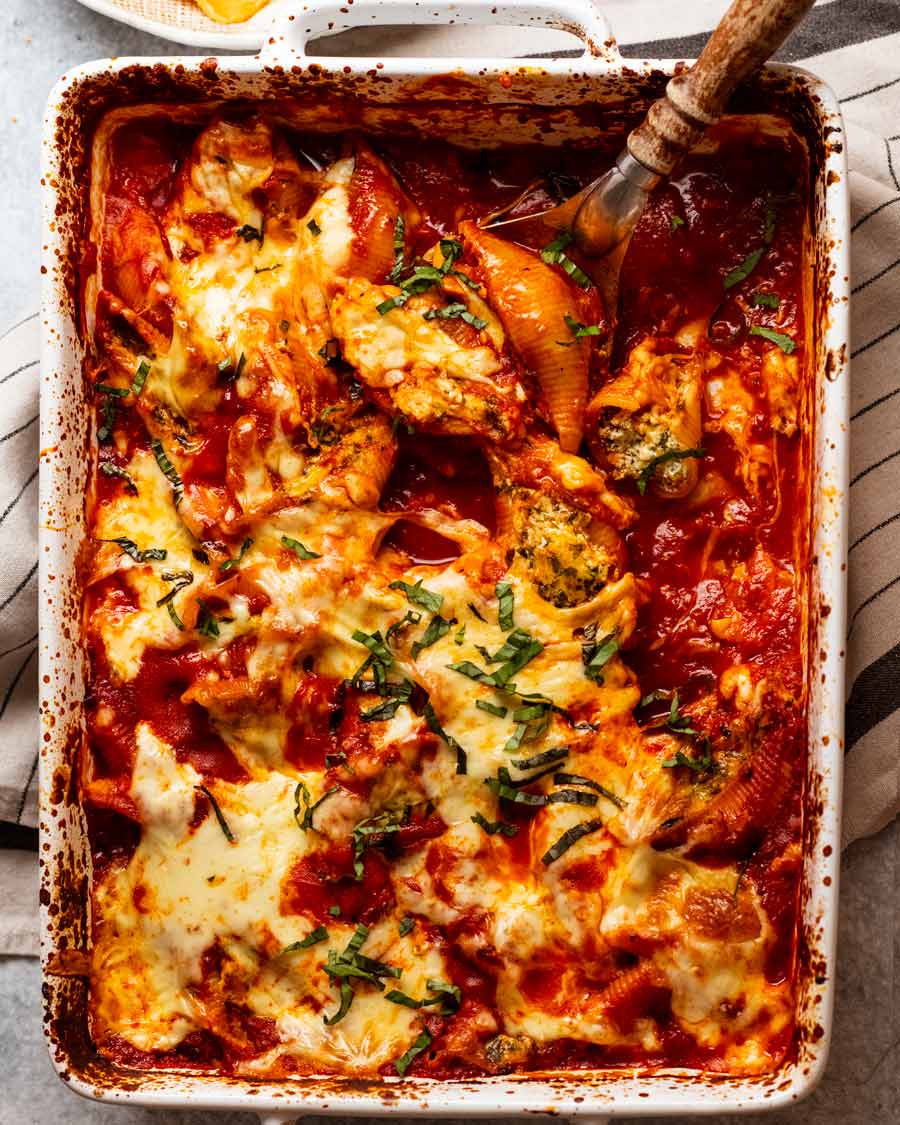
15 min bake, cheesed – Remove the baking dish from the oven. Sprinkle with cheese then bake for a further 15 minutes until bubbly and golden.
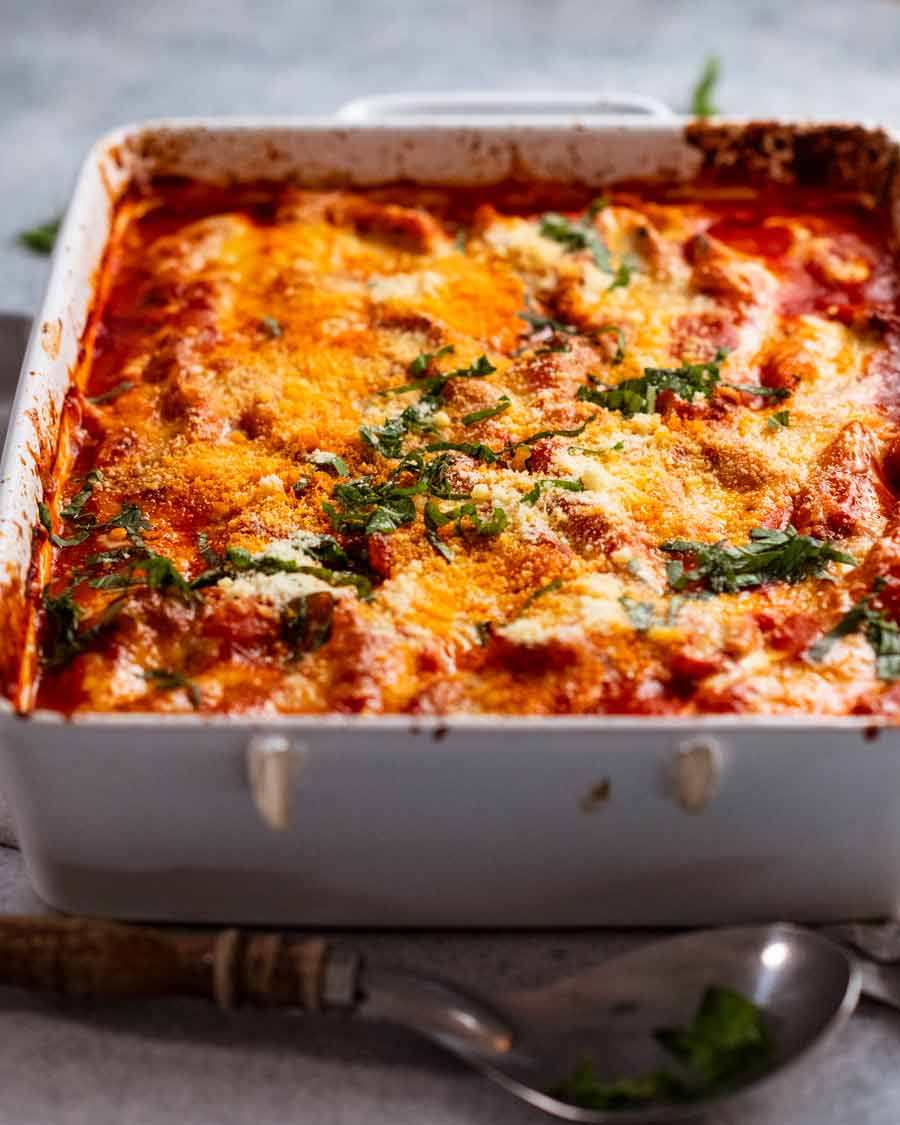
Serve! Scoop and serve. Marvel at how the shells are perfectly al dente and how there’s so much lovely sauce to serve it with!
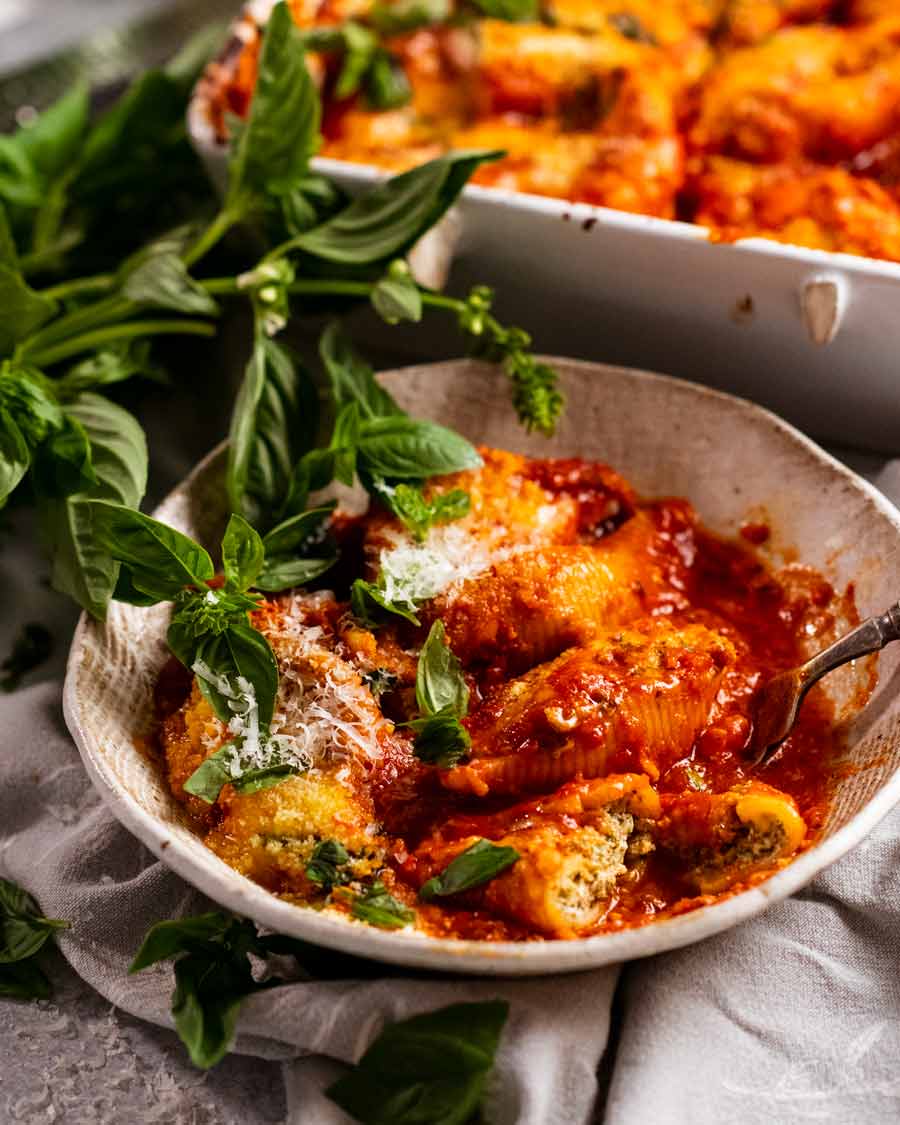
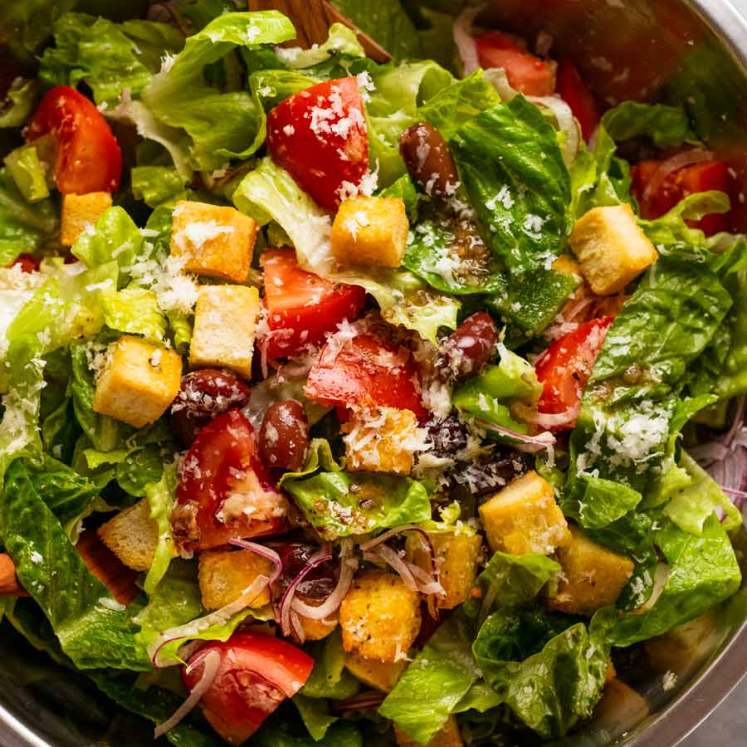
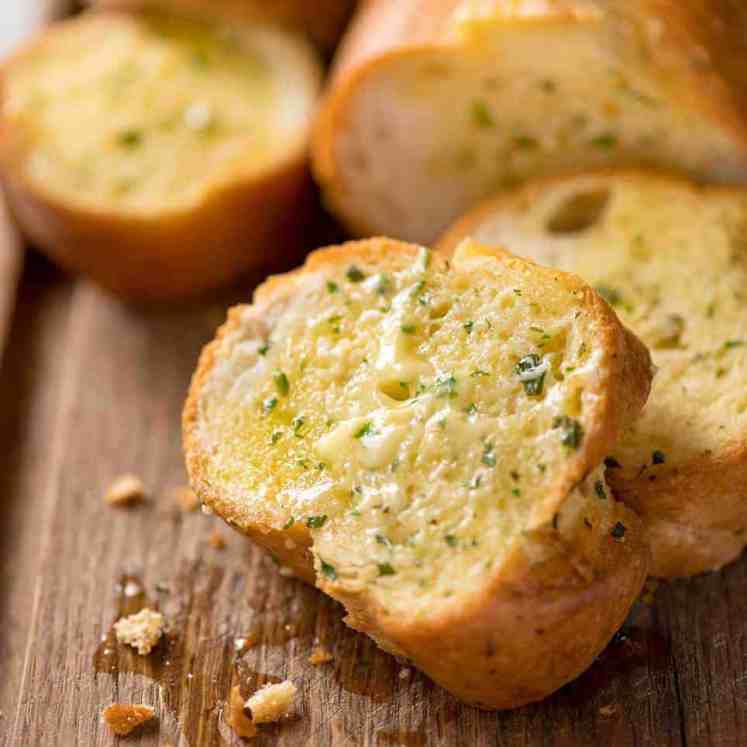
Serve with a quick rocket balsamic salad (that’s arugula, to those of you in the States!) or if you’re out to impress, a Mega Italian Salad (it lives up to its name). Add a side of garlic bread and tiramisu to finish, and that’s pretty much my idea of a perfect dinner. When am I coming over?? – Nagi x

Watch how to make it
Spinach Ricotta Stuffed Shells (Conchiglioni)
Ingredients
Sauce (you need LOTS!):
- 2 tbsp olive oil
- 2 eschallots/shallots or 1 small onion , finely chopped (Note 1)
- 4 garlic cloves , finely minced
- 1 bay leaf , fresh (sub dried)
- 1/2 tsp each dried thyme and oregano
- 1/3 cup tomato paste
- 700g / 25 oz tomato passata (US: tomato sauce) (Note 2)
- 1/3 cup Chardonnay or other dry white wine (sub more stock)
- 4 cups vegetable stock/broth , low sodium
- 3/4 tsp salt
- 1 1/2 tsp white sugar
- 1/3 tsp black pepper
Filling:
- 250g / 8 oz frozen chopped spinach , thawed (Note 3)
- 500g / 1 lb ricotta , full fat please (Note 4)
- 1/2 cup parmesan , finely shredded
- 1 cup shredded cheese (Mozzarella, Colby, Cheddar, Tasty, Gruyere, Swiss, anything!)
- 1 egg
- 1 large garlic clove , minced
- Grated fresh nutmeg (just a sprinkling) or 1/8 tsp nutmeg powder (optional)
- 3/4 tsp cooking / kosher salt
- 1/2 tsp black pepper
Stuffed shells
- 250g / 8 oz jumbo pasta shells (conchiglioni) (Note 3)
- 1 1/2 cups shredded mozzarella
- 1/2 cup parmesan , shredded
- Fresh basil and parmesan , for garnish (optional)
Instructions
Sauce:
- Sauté – Heat oil in a small pot over medium high heat. Add garlic, onion, bay leaf, thyme and oregano. Cook for 3 – 4 minutes until the onion is translucent. Add tomato paste and cook for 1 minute.
- Reduce wine – Add wine, increase heat to high and let it simmer rapidly until mostly evaporated (about 2 minutes).
- Simmer – Add passata, stock, sugar, salt and pepper. Stir then simmer on low *(uncovered) for 20 minutes. Use while hot.
Filling:
- Squeeze spinach – Grab handfuls of spinach and squeeze out excess water.
- Mix filling – Place spinach in a bowl with remaining Filling ingredients. Mix well.
Assemble & Bake:
- Preheat oven to 200°C/400°F (180°C fan).
- Stuff – Stuff UNCOOKED shells with spinach ricotta filling. Stuff them full!
- Assemble – Pour the hot tomato sauce in a 23 x 33 cm / 9 x 13" baking dish. Gently place the stuffed shells in – most will be submerged, some may poke above surface.
- Bake – Cover with a baking tray (or foil) then bake for 70 minutes.
- Cheese it! Check the shells – they should be al dente! (If not, return to oven, covered). Sprinkle with mozzarella then parmesan. Bake 15 minutes until melted.
- Serve, garnished with extra parmesan and basil if desired!
Notes
Nutrition
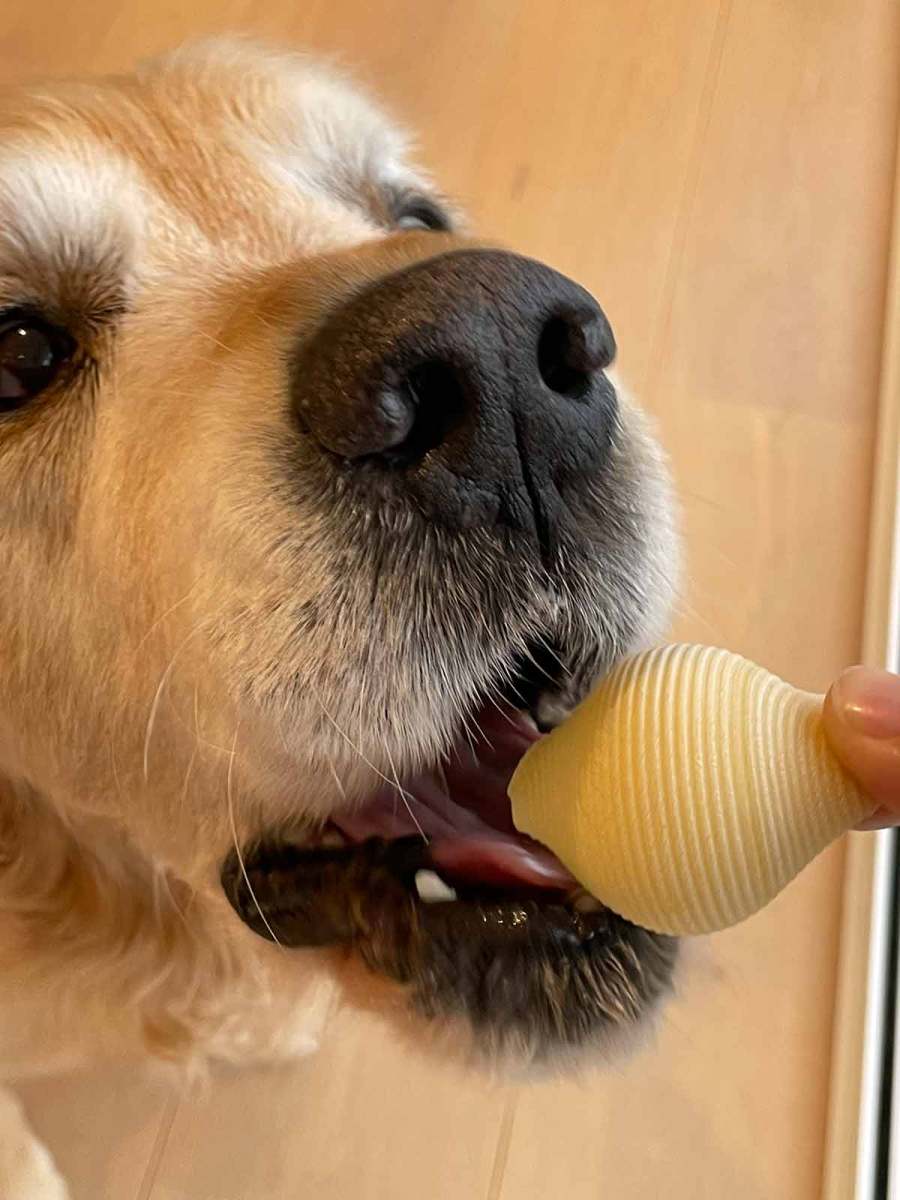
Life of Dozer
Wow. He really will eat anything.
The post Spinach ricotta stuffed shells appeared first on RecipeTin Eats.
]]> Saltimbocca is a traditional Italian dish that’s super-quick and economical too! I adore the textural contrast of the crispy prosciutto, tender meat and the silky white wine butter sauce. Traditionally made with veal, saltimbocca is also excellent made with chicken, pork and beef. HOT TIP: Great dinner party / make-ahead recipe. Keep it prepped in... Get the Recipe
The post Saltimbocca appeared first on RecipeTin Eats.
]]>Saltimbocca is a traditional Italian dish that’s super-quick and economical too! I adore the textural contrast of the crispy prosciutto, tender meat and the silky white wine butter sauce. Traditionally made with veal, saltimbocca is also excellent made with chicken, pork and beef.
HOT TIP: Great dinner party / make-ahead recipe. Keep it prepped in the fridge, then it’s just a 3 1/2-minute cook (including the sauce!).
Saltimbocca
The literal translation of Saltimbocca is “to jump in your mouth” which is probably in reference to the flavour that hits your palate on first bite. But also, perhaps, about the speed at which it can be made. As in: So fast, it jumps in your mouth. You see what I did there??! 😂
A classic Italian dish originating from Rome, Saltimbocca is traditionally made with thin veal cutlets wrapped or topped with prosciutto, and a whole sage leaf often pressed or pinned on top with a toothpick. Pan-frying turns the prosciutto golden and the meat inside is so thin, it literally takes 2 1/2 minutes flat to cook. Then the buttery, silky white wine sauce is made in the same pan – this takes just another minute!
It’s simple, classic, rustic and fabulous. A cursory browse of internet recipes show some rather eyebrow-raising takes on Saltimbocca – rolled versions, skewered versions and versions smothered in cheese that look suspiciously like Parmigiana. Whereas actually true Saltimbocca is far simpler. After all, why mess with perfection?
Veal, beef, pork or chicken Saltimbocca
As mentioned earlier, Saltimbocca is traditionally made with veal. However it works just as well with chicken, pork or beef, which for many people is easier to get and cheaper.
Veal vs beef Saltimbocca – I’ve tried both and here are the differences. Veal is a more delicate, tender version of beef – with a lighter flavour and a more giving texture. Beef, once pounded into thin steaks suitable for saltimbocca, is still more tender than a thick-cut steak but not as soft as veal.
That’s not to say that veal tastes better than beef in my view. They are just different! And different again is using pork or chicken for saltimbocca. Both mighty delicious, I should add!
The chicken saltimbocca pictured below was lunch yesterday. I snapped a quick photo then hoovered it down still warm!

Ingredients in Saltimbocca
Here’s what you need to make traditional Italian Saltimbocca:
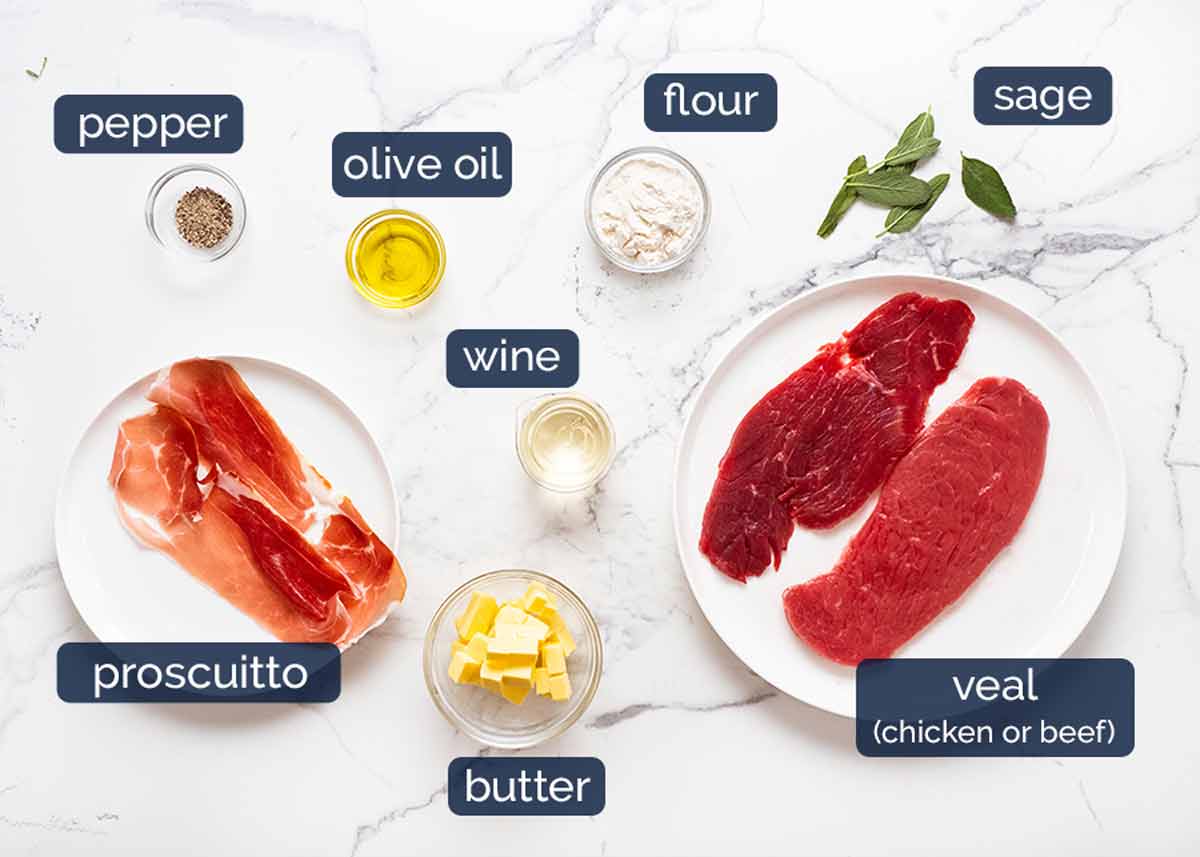
Saltimbocca is unexpectedly economical, calling for just 80g / 2.5 oz protein and 2 small slices of prosciutto per serve.
Veal (or chicken or beef) – Whatever your protein of choice, it needs to be in a thin piece of meat! It’s handy if you can buy them as already thinly sliced steaks (sometimes sold as “sizzle steaks”, “scallopini” or “schnitzel” here in Australia) so they only require a light pounding out. Otherwise, you can slice meat yourself and then flatten the steaks out. Here in Australia, veal steaks in particular are always sold thin, rather than thick-cut like beef steaks.
If you’re preparing your own Saltimbocca meat, just make sure you are using a cut of meat that is suitable for quick-cooking like steaks. Tougher cuts that require slow cooking to make them tender such as chuck, ribs, belly and shoulder (ie cuts you use for stews and casseroles) are not suitable.
Chicken – Use a whole breast, sliced into steaks and pounded out. See step photos below for more guidance (I promise it’s easy, and it doesn’t need to be perfect, just cook-able).
Prosciutto – This is what makes Saltimbocca, well, Saltimbocca rather than a plain ol’ pan-fried piece of meat! Prosciutto is also provides the main seasoning for this dish. We only add the tiniest pinch of salt in the sauce, and none on the veal!
How much prosciutto you need – 4 small pieces or 2 very large slices. Enough to cover one side of the veal when folded over itself as a double layer of prosciutto. The underside is not covered in prosciutto (it can be made wrapped all around but I prefer not).
Fresh sage – The essential herb in Saltimbocca, sage pairs beautifully with the prosciutto and meat. It also brings a pop of colour. I love how it crisps up as it fries!
White wine – A splash of wine is the secret to make a really tasty pan sauce without fussing with lots of ingredients. The wine is reduced to evaporate most of the alcohol, leaving behind just flavour. So it doesn’t taste winey at all.
Wine type – Pinot grigio, being a wine variety popular in Italy, is fitting. However I personally also like chardonnay for the assertive flavours this wine brings to food.
Actually any white wine will work fine here, and even a sparkling wine/champagne. Marsala is a fortified wine that is sometimes also traditionally used in Saltimbocca in Italy, but note it is quite sweet and strongly flavoured – so use less.
Non-alcoholic sub: I think non-alcoholic white wine would be the best alternative here, followed low-sodium chicken stock/broth (be sure to use low-salt else the dish may end up a tad too salty).
COLD butter – Butter is how you transform a watery liquid into a silky, lightly viscous sauce without using any thickening agent like flour or cornflour/cornstarch, properly called “mounting a sauce” in classical cookery. The butter must be cold in order for it to work properly, cut into cubes so it melts evenly and slowly into the sauce. Watch the sauce magic happen in the recipe video below.
Flour – This is used to dust the non-prosciutto side of the veal. Once cooked, it creates a thin crust that gives the sauce something to cling to. Without it, the sauce just slips off the surface of the meat like Teflon. It also helps make the veal or other protein get a little colour on it in the very short cook time.
Pepper only – No salt required! The salt from the prosciutto is all we need on the veal. Although I do like to add a pinch into the sauce, it barely needs it.
Olive oil – For pan-frying the veal.
How to make Saltimbocca
As I re-read this post, it dawned on me that I included a fair amount of step photos for a recipe that I assured you is so fast and easy! It’s really not hard, I promise. I just thought perhaps assembling the Saltimbocca might be new to some readers so I wanted to show it step by step.
If you’re an old hand at Saltimbocca however, you can bypass this whole section. Here’s all you need to know right here:
How to make Saltimbocca: A shorthand recipe for pros!
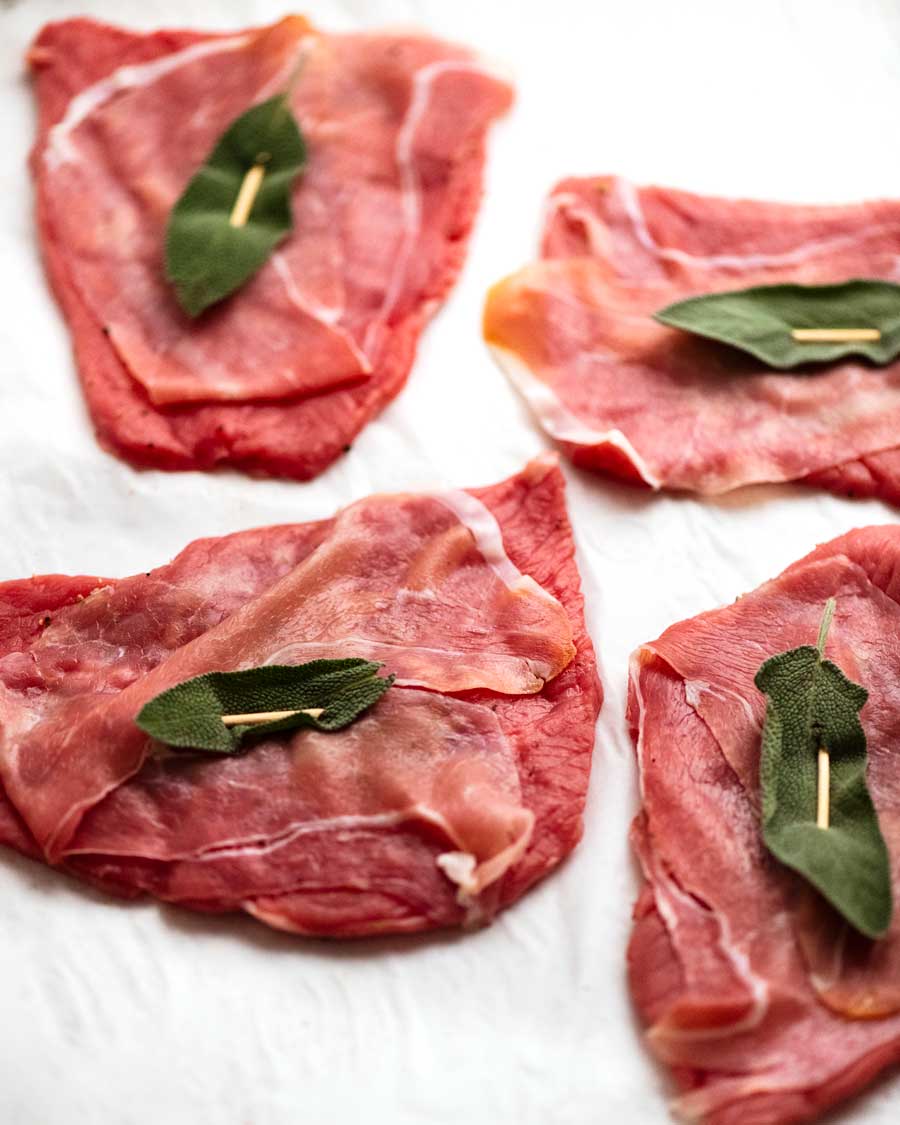
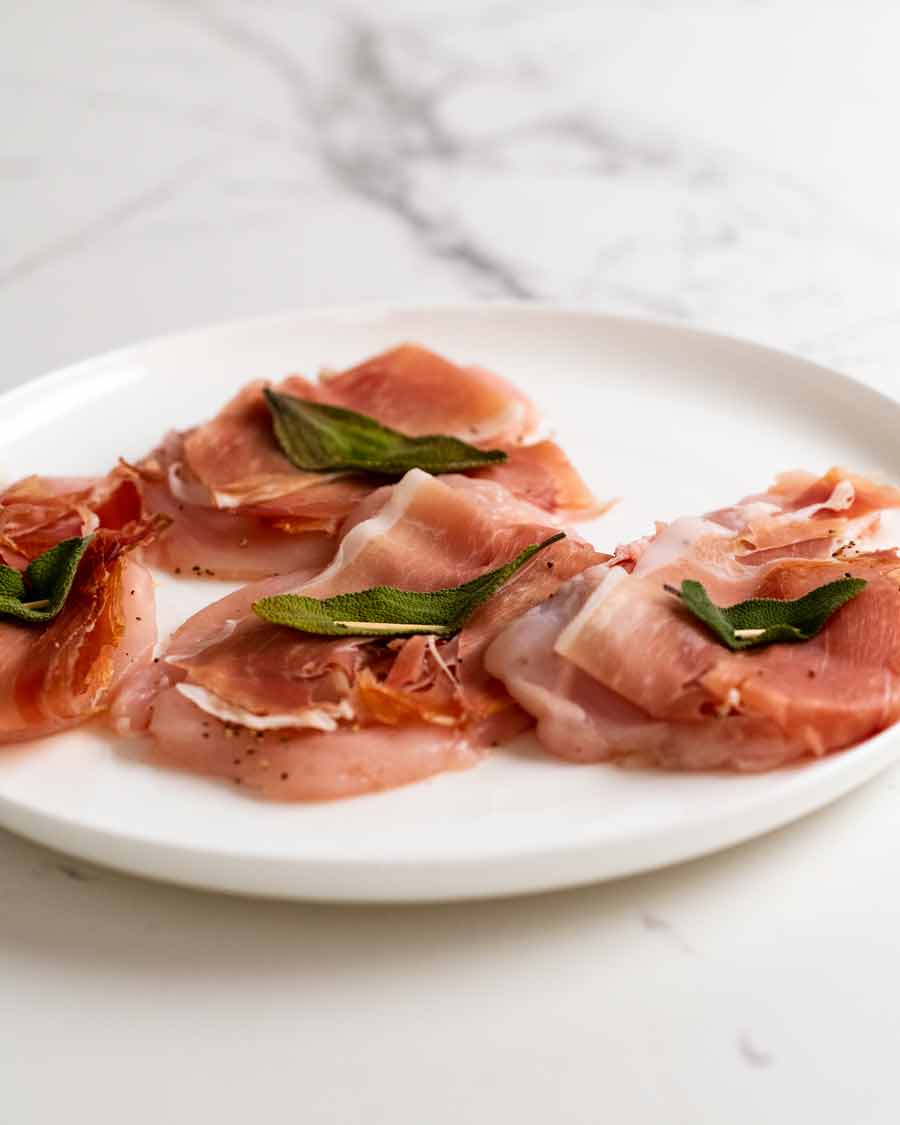
Assemble: Secure folded prosciutto and sage onto 3 mm pounded veal. Dust underside with flour.
Cook: Prosciutto side 90 seconds, flip, 60 seconds on the other.
Deglaze: Remove veal, discard excess oil. Deglaze pan with wine, turn off stove, drop in butter and swirl to melt. Serve!
1. Assemble the saltimbocca
You can make short work of the prep if you purchase ready-to-cook thin slices of veal, which is how they are typically sold here in Australia. Chicken and beef are also often sold in thinly-sliced form here.
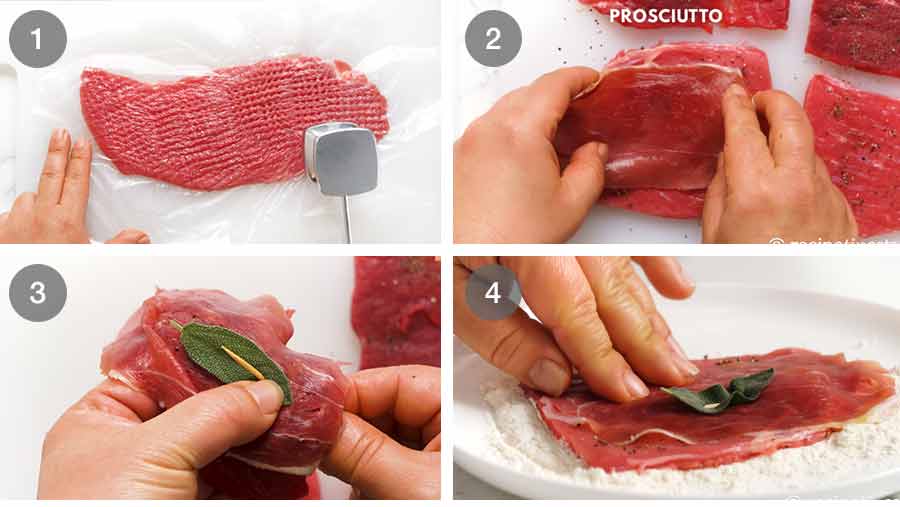
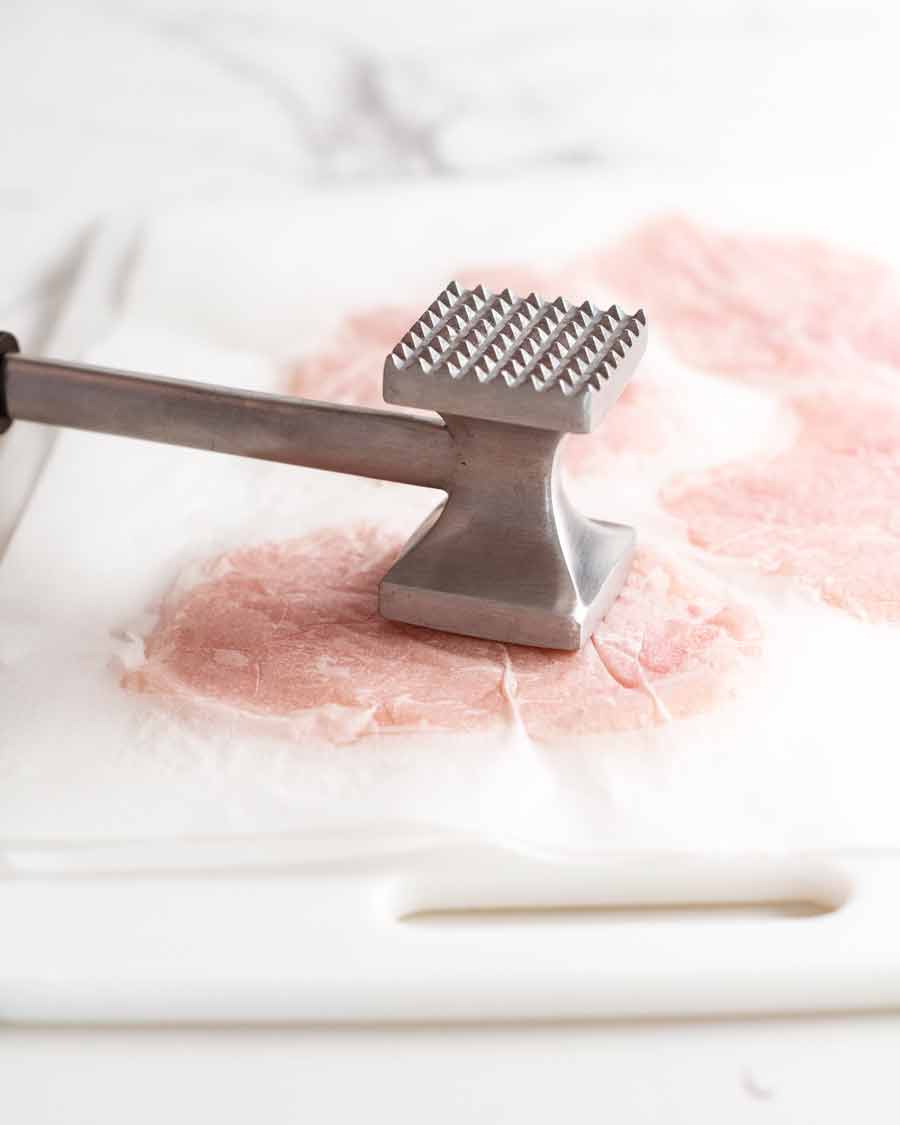
Pound until thin – Pound the veal to a 3mm thickness, then cut each piece to form 4 pieces of veal. It doesn’t matter what size or shape the pieces are, more important is the thickness.
Best way to pound meat: Place the veal between 2 freezer bags, baking paper (parchment paper) or purpose-made plastic sheets called “Go-Between*” (pictured, see below) to protect the meat. Then use a meat mallet or rolling pin to pound the veal gently and evenly so it flattens uniformly.
I use the toothed face of the meat mallet for red meat (veal and beef), and the smooth face for chicken, which is more delicate.
Cutting chicken for saltimbocca – see info box below for detailed steps.
Prosciutto – Sprinkle the veal with pepper (no salt, we get enough from the prosciutto). Fold the prosciutto in half then place on top of the veal. Note it’s does not wrap the meat, it is only covering the top surface.
Secure with toothpick – Place a nice big leaf of sage on top of the prosciutto, then secure both the prosciutto and sage in place with a toothpick. Pierce the meat from the underside, weave through the prosciutto and sage, then back out the underside. This way they sit flatter against the meat and cook more evenly.
Dust underside with flour – Press the side of the veal without prosciutto on it into the flour, shaking off the excess.
* Go-Between is a plastic sheet that comes in rolls, which you tear off to size like cling wrap. It’s used to protect delicate meats when pounding, and also to put between layers of things to stop them from sticking (hence the name!) It’s especially useful for freezing things.
How to cut chicken for Saltimbocca
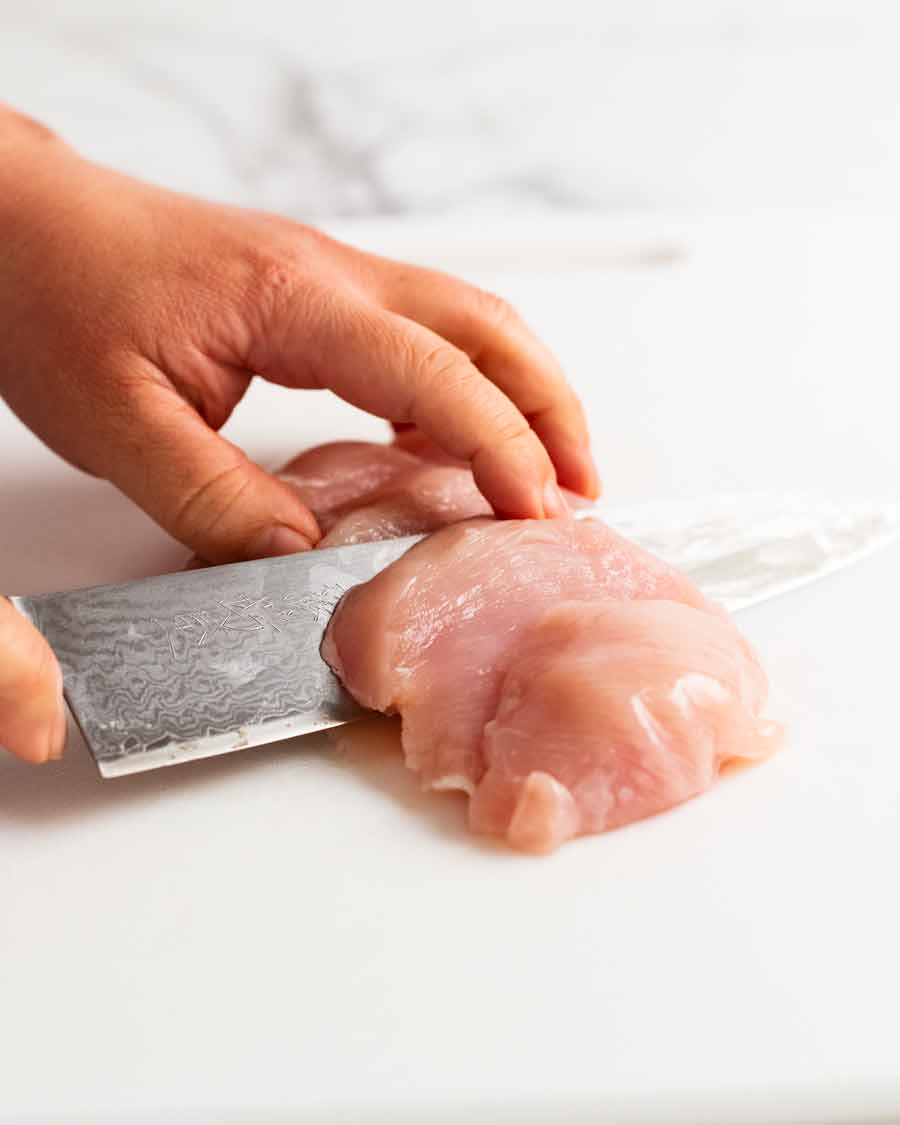
Chicken breast is easiest to handle for Saltimbocca. You will only need one large 220 – 250g / 7 – 8oz breast. Option 1: Slice in half horizontally to form 2 thin steaks, pound to 0.5cm / 1/5″ thickness (using the flat side) then cut each piece in half so you have 4 pieces in total. Option 2: Slice whole breast on a steep angle to make 4 steaks (steps pictured) then pound each one out. Note that I make chicken steaks slightly thicker than veal as chicken flesh is more delicate and is prone to tearing if too thin.

Boneless thighs are another option if you prefer. Use 2 small thighs. Cut open and spread (butterfly) the thicker end to even out the thickness, then pound.
2. Cooking Saltimbocca
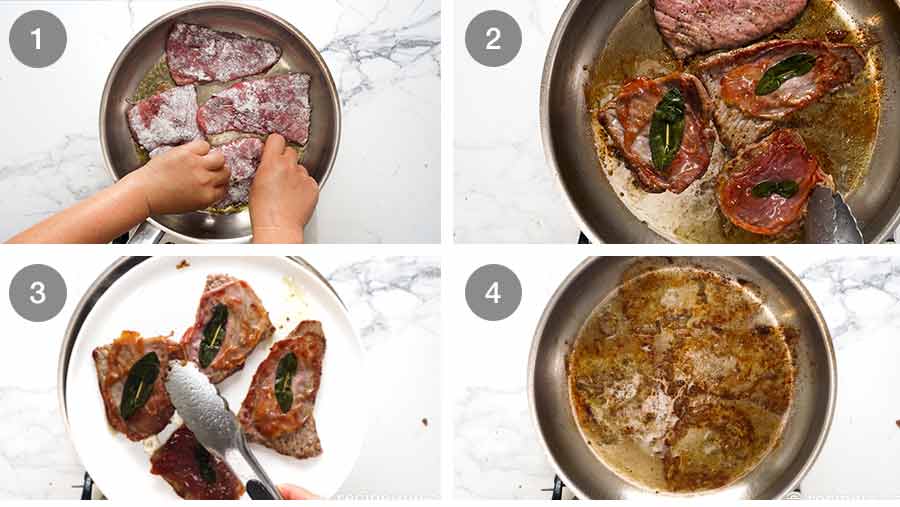
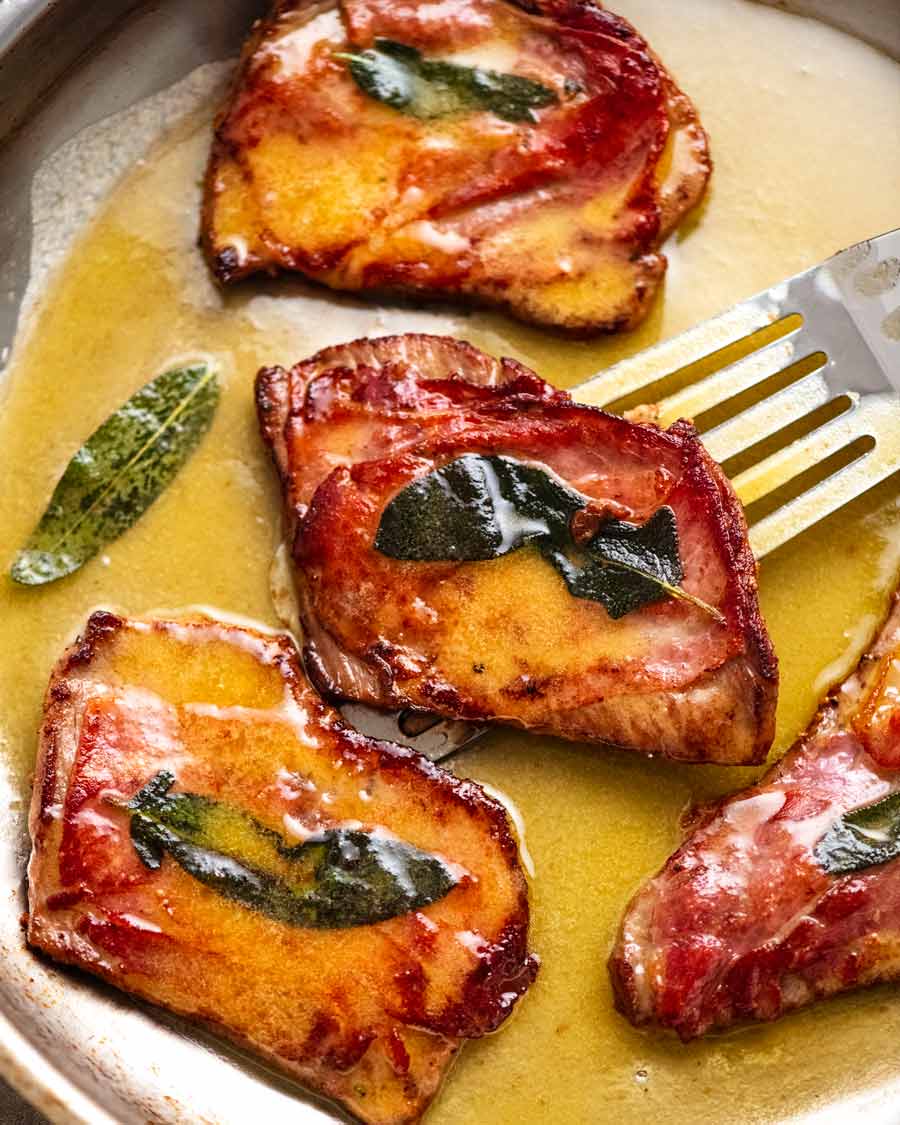
Sear – Cook the prosciutto side of the veal first until golden, around 1 1/2 minutes.
Flip and cook the flour dusted side for 60 more seconds.
Remove the veal straight on to a serving plate (or individual plates) to rest while we make the sauce.
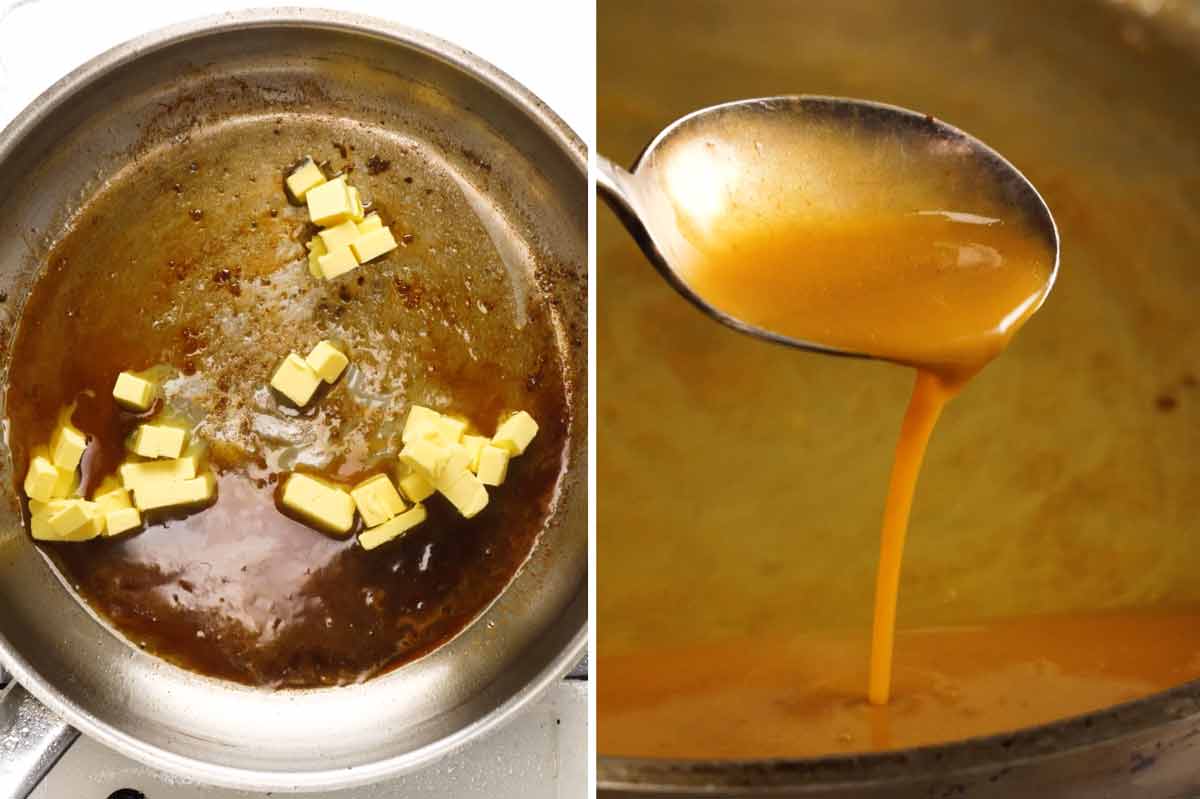
Discard excess oil in the pan. Tip it out, but don’t scrape the pan clean. All that golden stuff you see stuck to the pan is called fond. Fond is packed with umami and concentrated flavour, and is the secret to an incredible tasting pan sauce made with just wine and butter!
3. Saltimbocca sauce
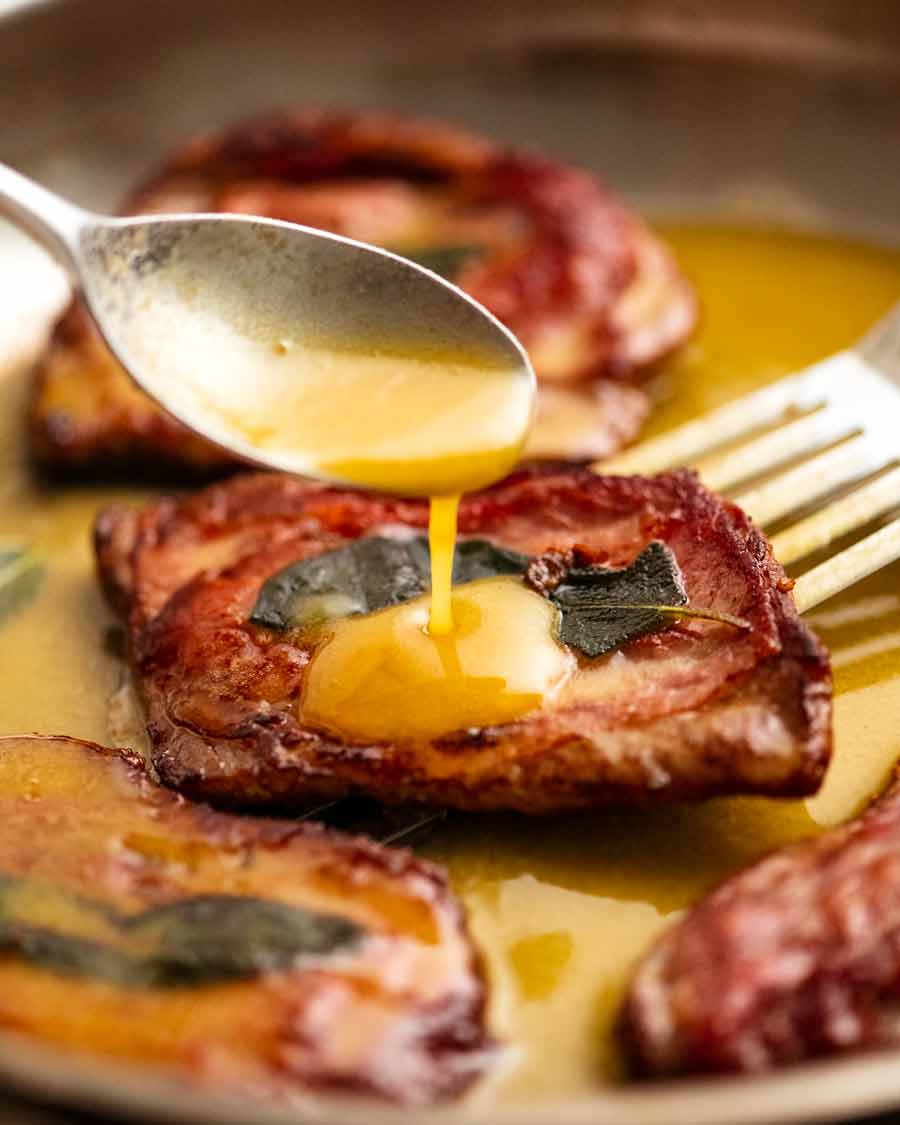
The pan sauce takes 1 minute flat to make: 30 seconds to reduce the wine then 30 seconds to swirl cold butter cubes in until they melt to create a silky sauce.
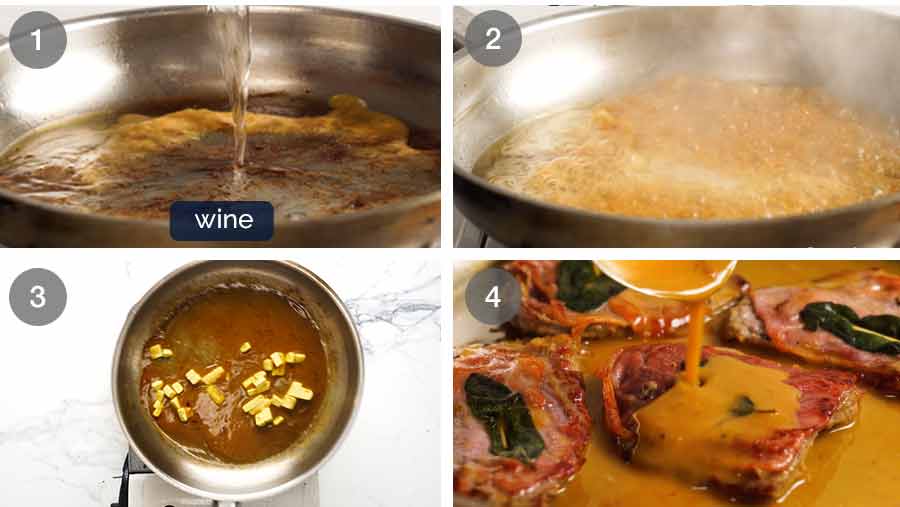
Wine – Return the pan to the stove then add the wine.
Reduce wine by half – The wine will simmer rapidly because we only use a small amount (1/4 cup / 60 ml) in a large, hot pan. Reduce by half, around 20 to 30 seconds.
Add cold butter – Turn the stove off, scatter in the butter cubes and swirl the pan until the butter melts (or just use a wooden spoon). Melting cold butter slowly on a turned off stove is the trick to making an opaque, thickened sauce like the Saltimbocca white wine sauce. High heat means the butter melts faster and becomes more transparent, and you’ll find the sauce won’t thicken as effectively. But, it’s still tasty!
Thickened sauce – And here it is! Look how creamy and glossy that sauce looks. That’s what happens when you slowly melt cold butter into a sauce!
Note on sauce colour: The final colour of your sauce will be affected by the amount of fond in the pan. More fond = browner or more orange-coloured sauce (like in the video). Less fond = more butter-yellow sauce, like in the photos in this post.
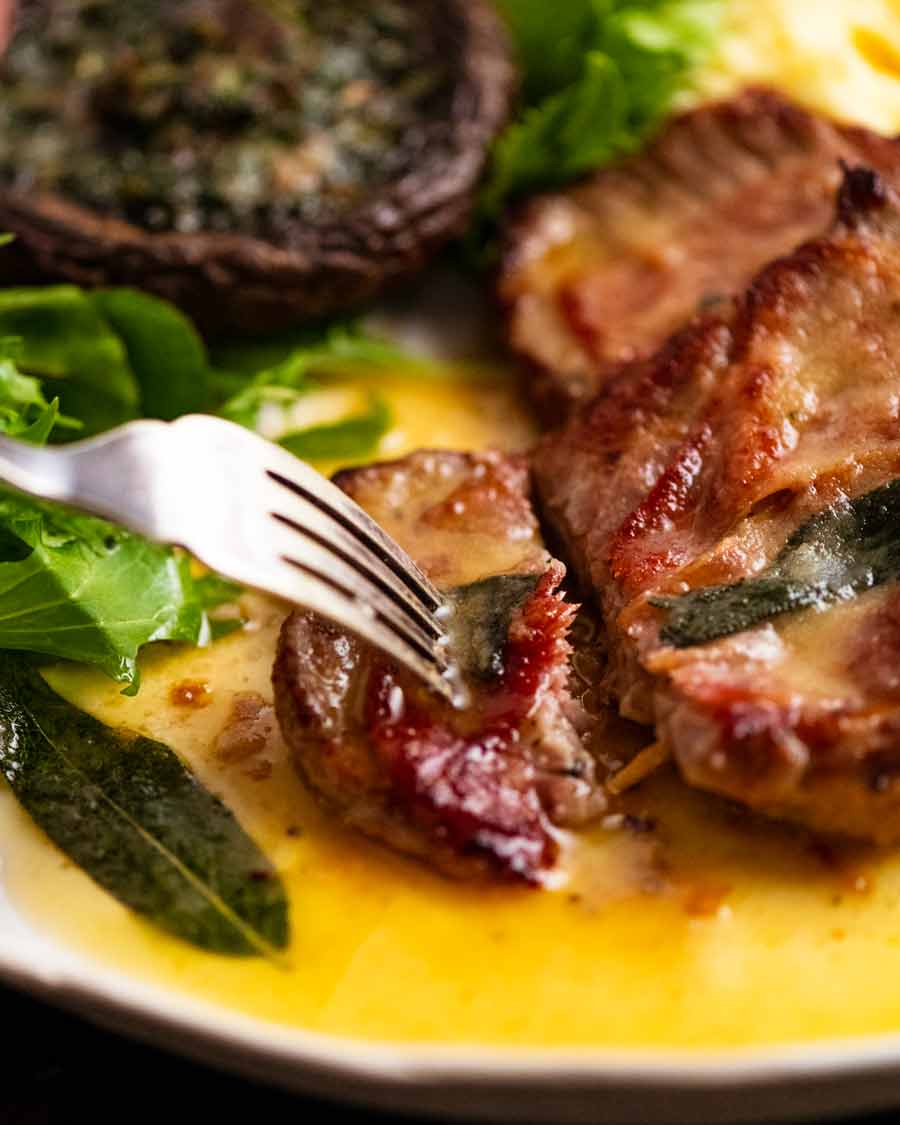
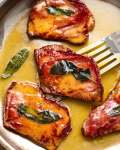
And with that, we’re done! Super fast, see? It HAS to be, or else you’ll overcook the veal. Time to plate up: put the Saltimbocca on serving plates then spoon over that dreamy sauce.
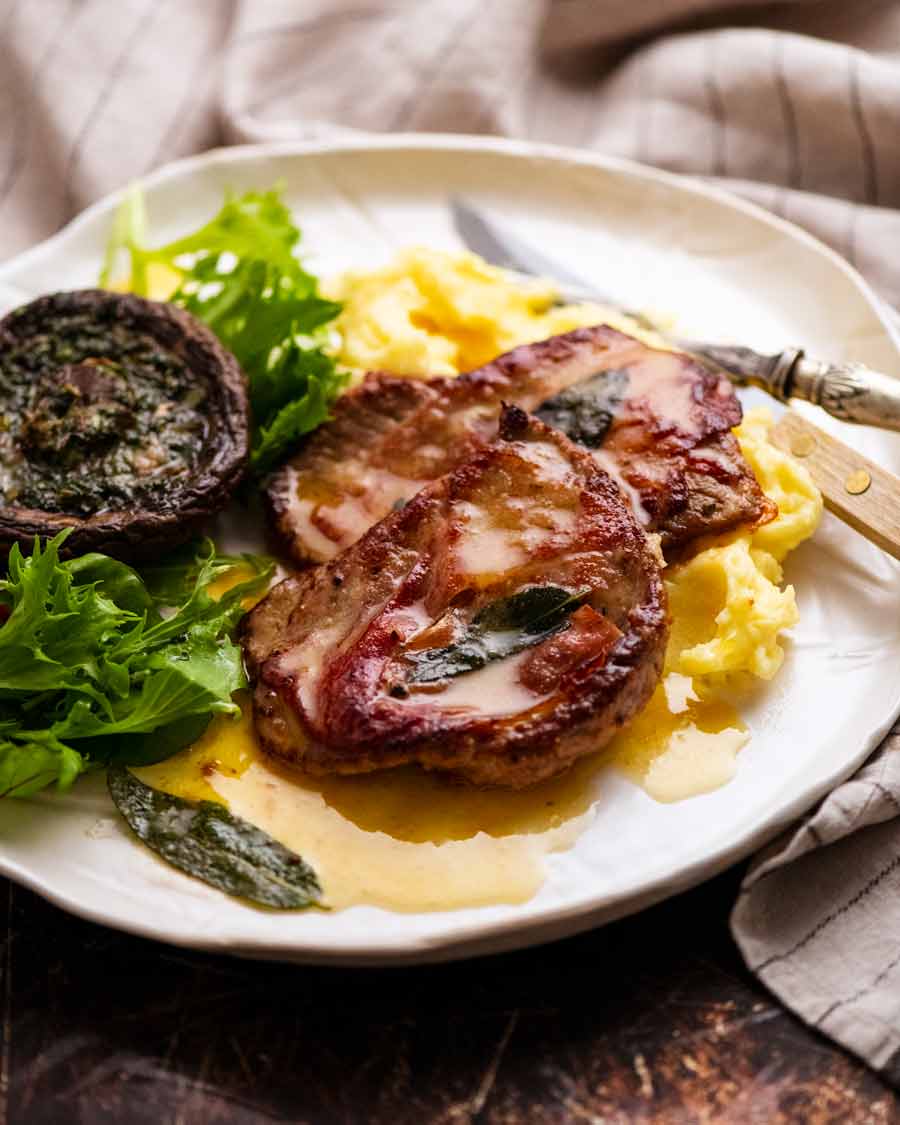
What to serve with Saltimbocca
Starchy vehicle – I always serve Saltimbocca over a starchy base suitable for maximising enjoyment of the sauce. Which means creamy mashed potato on normal days, cauliflower mash on “I’m trying to be good!” days, polenta on “I’m really going for a proper Italian vibe here!” days, and bread for plate-mopping on “I can’t even handle making mash today!” days.
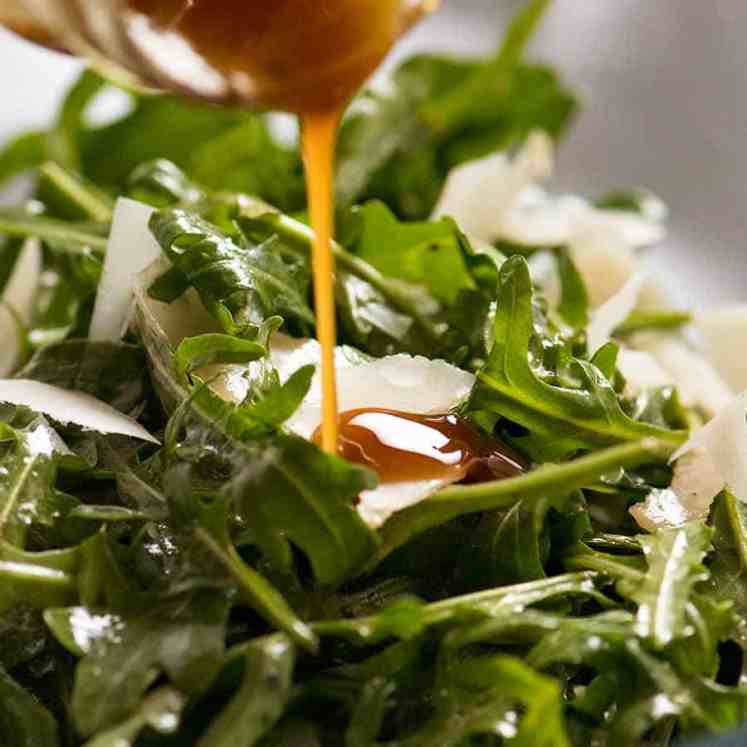
Side salad – Try a side of Sautéed Garlic Green Beans, my favourite Tomato Salad. Or if speed is of the essence, a quick Italian Rocket/Arugula Salad. For something a little special and different, like if you’re serving Saltimbocca for a dinner party, this Bitterleaf Orange Salad or a big Panzanella are options that will turn heads!
More ideas in my vegetable sides section – you can browse by vegetable type which my friends tell me they find quite handy.
I’d love to know what you serve Saltimbocca with if you give this a go, let me know! – Nagi x
Watch how to make it
Saltimbocca
Ingredients
- 2 x 80g / 3 oz thin veal steaks or boneless cutlets (sizzle steaks, schnitzel, scallopini) OR thinly cut beef steaks, pork or a chicken breast (Note 1)
- 1/4 tsp black pepper
- 4 large sage leaves
- 4 prosciutto slices (finely sliced, Note 2)
- 2 tbsp flour (plain/all-purpose)
- 2 tbsp olive oil
Saltimbocca Sauce:
- 50 g / 3 tbsp COLD unsalted butter , cut into 1cm / 1/3″ cubes (Note 3)
- 1/4 cup white wine , pinot grigio or chardonnay (Note 4)
- Small pinch of salt
Instructions
Prepare saltimbocca:
- Pound: Place the veal between sheets of cling wrap or paper. Pound to an even 3mm thickness using a meat mallet (Note 5 for tips!) Cut each piece in half so you have 4 pieces in total, and sprinkle both sides with pepper.
- Prosciutto and sage: Fold a slice of prosciutto in half then place on one piece of veal (trim if needed so it's not hanging off the sides too much). Place a sage leaf on top then secure with a toothpick, piercing from the underside (see step photos or video). Do the same with the other piece of veal.
- Dust: Spread flour on a plate. Press the non-prosciutto side of the veal into the flour, shaking off excess (do not flour the prosciutto side).
Cook:
- First side 1 1/2 minutes: Heat oil in a large fry pan over medium-high heat. Place veal slices in the pan, prosciutto-side down, and cook for 90 seconds until prosciutto is beautifully golden.
- Other side 1 min:Turn veal and cook the other side for 1 minute. Remove to a warm plate.
- Tip out excess oil (do not scrape pan clean however). Return skillet to stove, with heat still on.
Sauce:
- Reduce wine: Pour in wine (careful, it will be steamy!) plus pinch of salt. Bring to a simmer then let it cook for 20 to 30 seconds, stirring to scrape up the brown fond from the base of the pan, until wine is reduced by half.
- Swirl butter: Keep the pan on the stove but turn the stove OFF. Scatter the butter in the pan then swirl (or stir) until it melts. The clear liquid will thicken magically into a luscious butter sauce!
Serve:
- Divide veal between plates. Spoon over sauce. Devour! (Careful of the toothpick!)
Notes
Nutrition
Life of Dozer
Rugs are for humans to enjoy looking at and walk on with bare feet.
Kleenex’s are to wipe eye-snot and unidentifiable goop coming out of one’s nose.
One and the same to him.

The post Saltimbocca appeared first on RecipeTin Eats.
]]>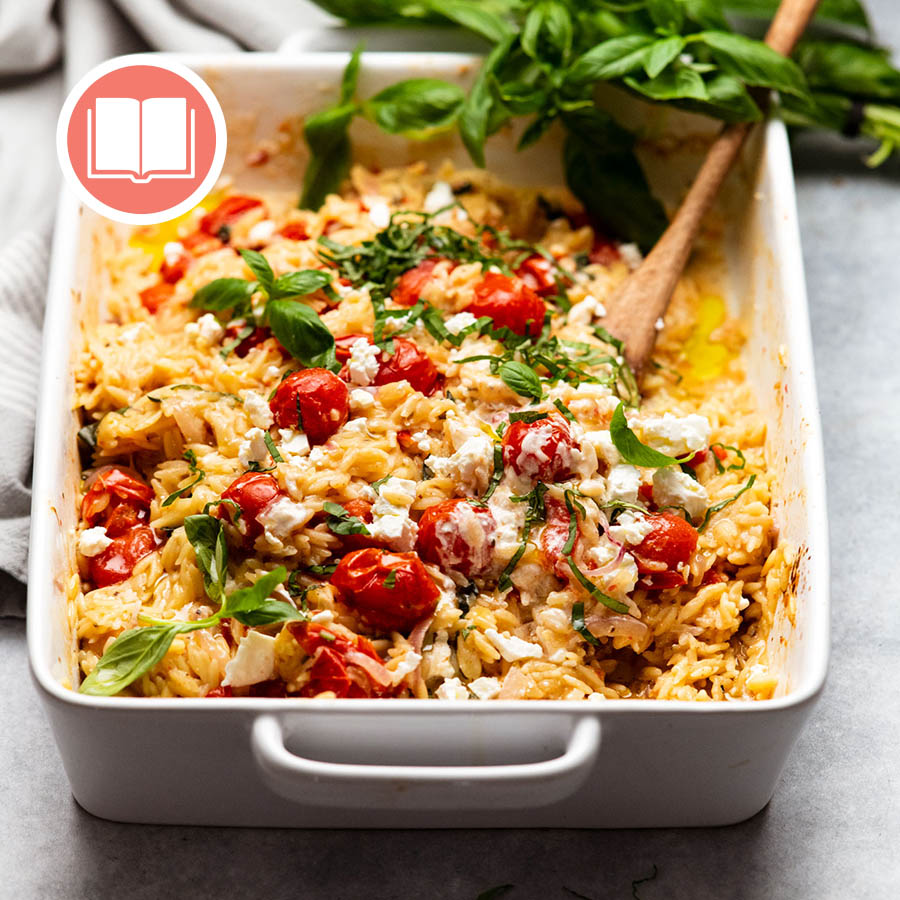 Think risotto, but with pasta, all baked in one dish! Don’t skip the feta – some of it melts to make a creamy sauce and some remains as smeary little salty nuggets.
The post Baked Creamy Feta Risoni appeared first on RecipeTin Eats.
]]>Think risotto, but with pasta, all baked in one dish! Don’t skip the feta – some of it melts to make a creamy sauce and some remains as smeary little salty nuggets.
This is a cookbook exclusive recipe!
This recipe is exclusive to my debut cookbook Dinner which includes a how-to video for every recipe. Just scan the QR code!
Just to explain….
I know, it’s confusing! You’re so used to getting recipes on my website – there’s over 1,200 of them, after all. And here you are looking at a tasty recipe video and I haven’t provided the recipe. 🙀
I’m not just doing this to torture you, I promise.
This page exists to display the how-to video for this recipe which I exclusively created for my debut cookbook, Dinner. Every recipe in the cookbook has a tutorial video. To watch it, you simply scan the QR code with your phone or tablet and it will take you straight to the recipe video like the one shown above!
Curious about my cookbook?
Read the cookbook overview
Browse all cookbook exclusive recipes here
Read the Cookbook Tales. Spoiler alert: there’s A LOT of dirty dishes!! And quite a lot of Dozer. 😂
Stay tuned for more on this page! Some cookbook exclusive recipes will have extra information added as well as extra tips. I am also looking at enabling comments for selected recipes so I can answer reader questions about cookbook recipes. I’m just a little snowed under during this launch period – book tours, getting 131 recipe videos out, launching the book overseas. Please bear with me! – Nagi x (10 October 2022)
The post Baked Creamy Feta Risoni appeared first on RecipeTin Eats.
]]>