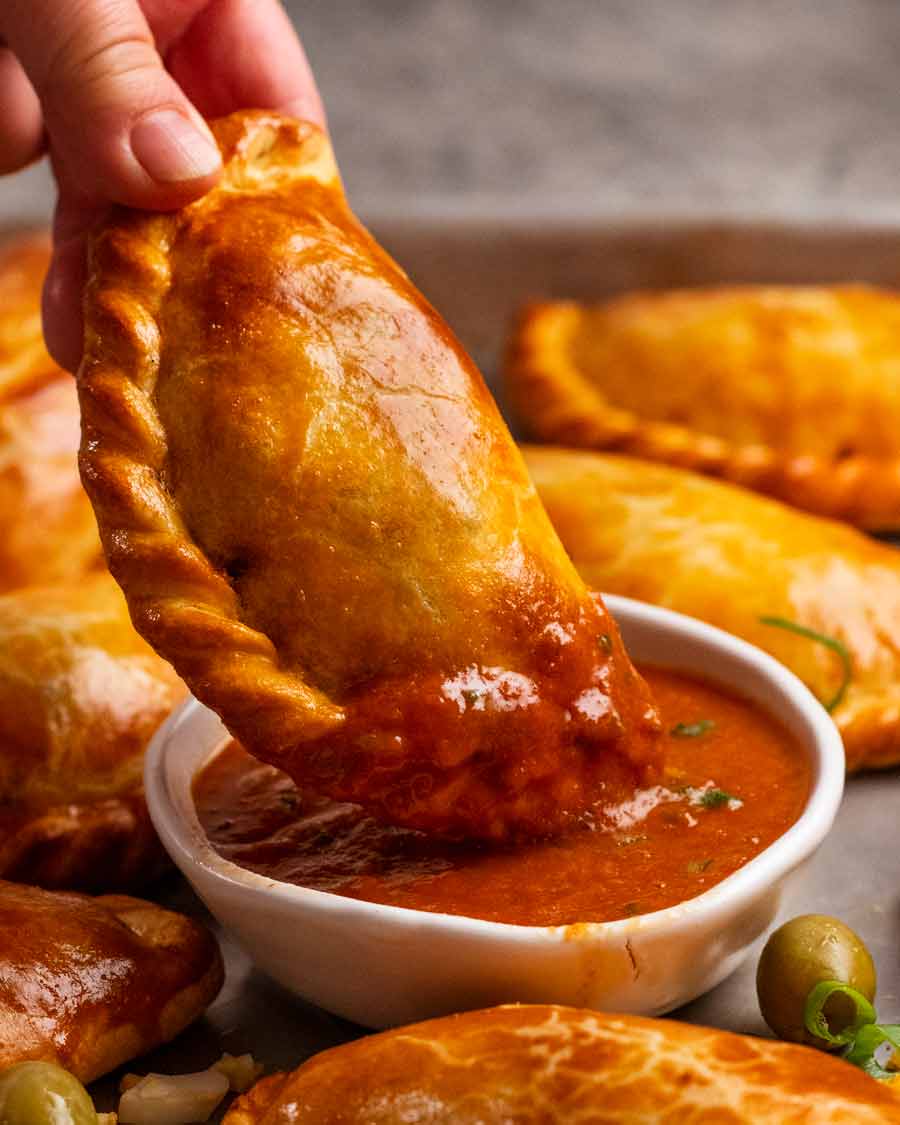
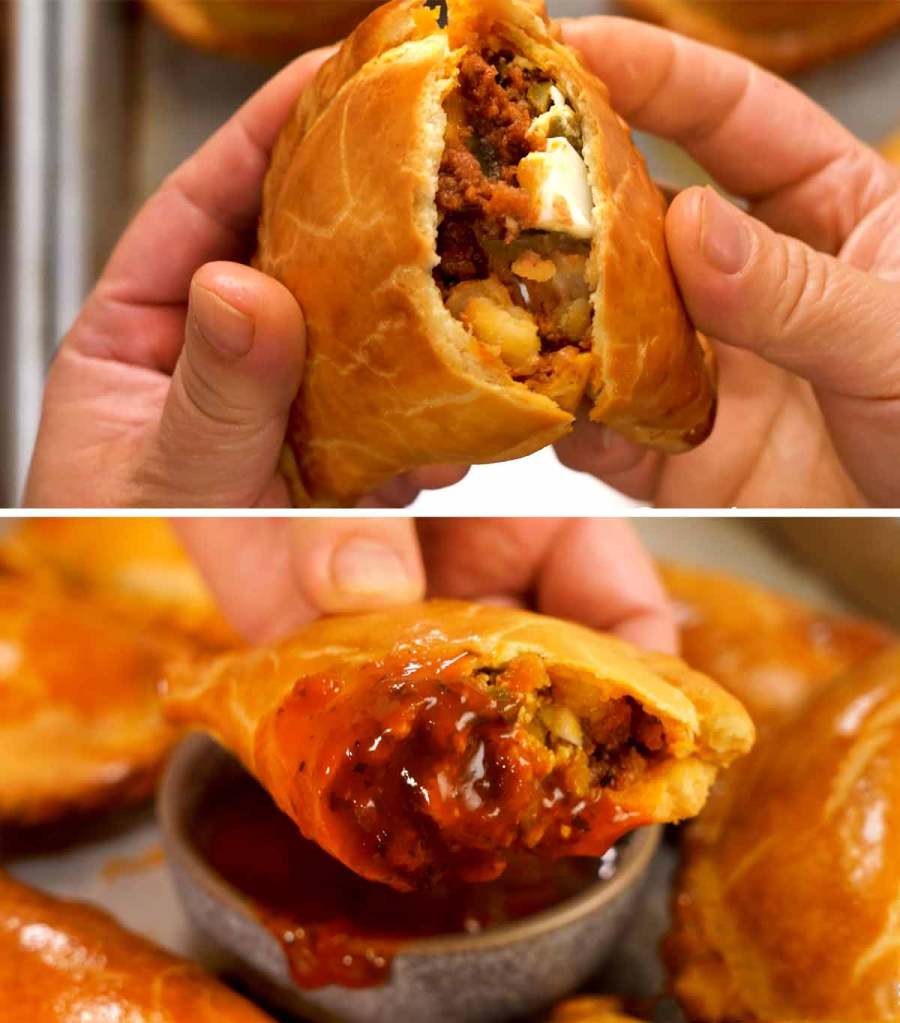
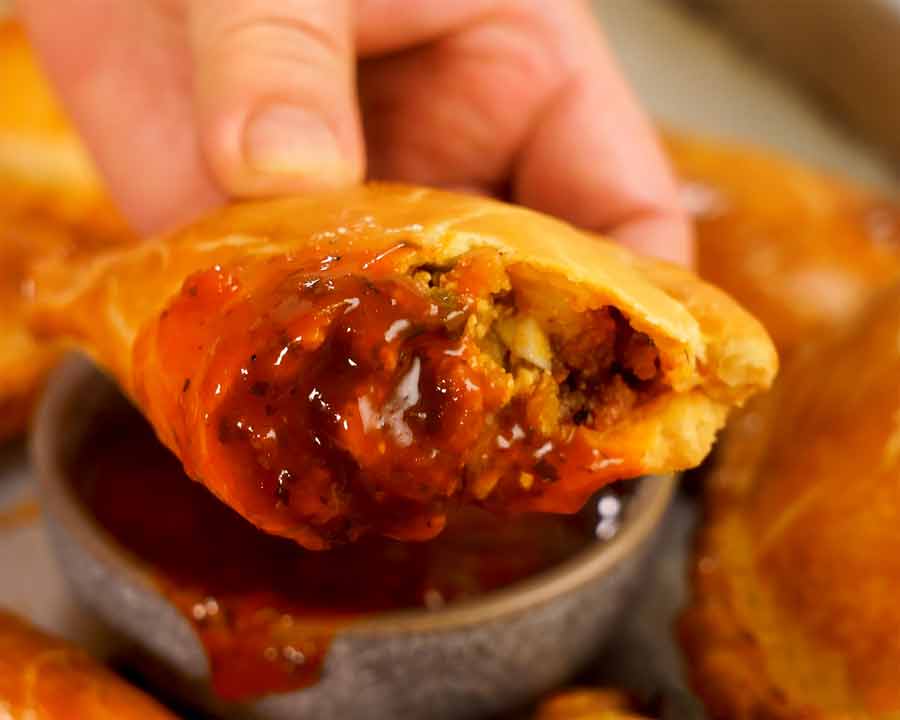
 There’s nothing like a hot, fresh empanada straight out of the oven! And this recipe is everything you dream an empanada to be: golden, buttery, flaky pastry that’s crispy all over. Inside, a juicy beef filling with an extra flavour punch from chorizo, plus the traditional little bits of chopped egg and olives. A worthy... Get the Recipe
The post Beef empanadas appeared first on RecipeTin Eats.
]]>There’s nothing like a hot, fresh empanada straight out of the oven! And this recipe is everything you dream an empanada to be: golden, buttery, flaky pastry that’s crispy all over. Inside, a juicy beef filling with an extra flavour punch from chorizo, plus the traditional little bits of chopped egg and olives.
A worthy addition to the RecipeTin cult-classic collection!
Empanadas recipe
Great empanadas are hard to come by here in Sydney. They should be hot and crunchy on the outside, with juicy flavourful fillings on the inside.
But all too often the pastry is dry and lacking in the signature crispiness, and the filling is dry and bland. Why-oh-why are so many empanada fillings so dry?? To protect the crispy pastry, I guess. But a dry filling is a high price to pay!
So, that ranting introduction is a good foray into what to expect from my empanadas!
Empanadas 101: These delicious handheld pies are pastries stuffed with a variety of savoury fillings including beef, chicken, pork, cheese and vegetables. There’s also sweet versions too! Native to South America, almost every country in Latin America has their own version. Depending where you are, typical fillings vary and empanadas can be baked or deep fried.

Empanada components
The following sections step through how to make empanadas, as follows:
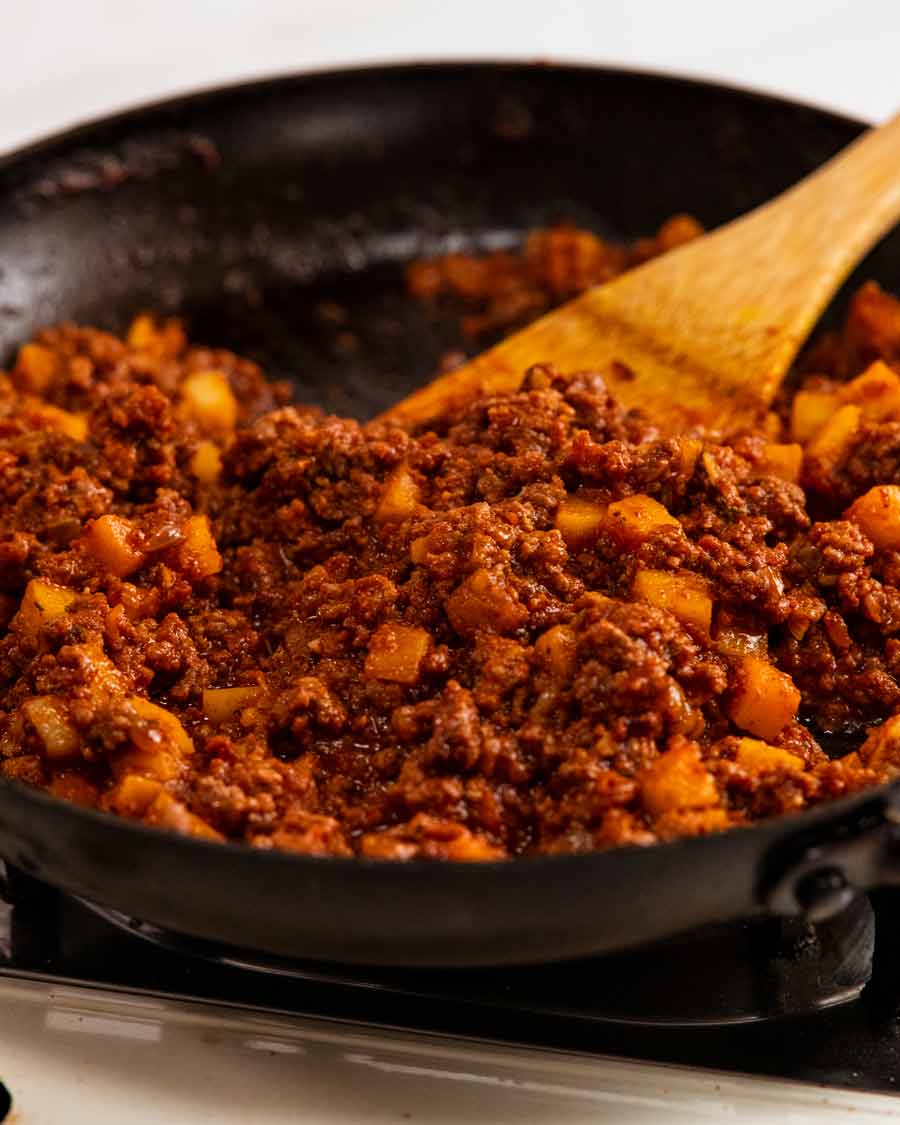
Empanada filling – Nothing tricky here, it’s like making bolognese!
Empanada dough – Made in a food processor for convenience, or hand if you prefer. You’ll love how easy this dough is to work with.
Wrapping the empanadas – Dead easy, because the pleats are 100% optional!
Baking – Just 20 minutes in the oven.
Empanada Filling
Start with the filling first because the empanada dough can be made in the time it takes to fully cool the filling.
Empanada filling ingredients
Empanadas come with all sorts of fillings. Today, I’m sharing a beef one. It gets a punch of flavour from chorizo and spices.
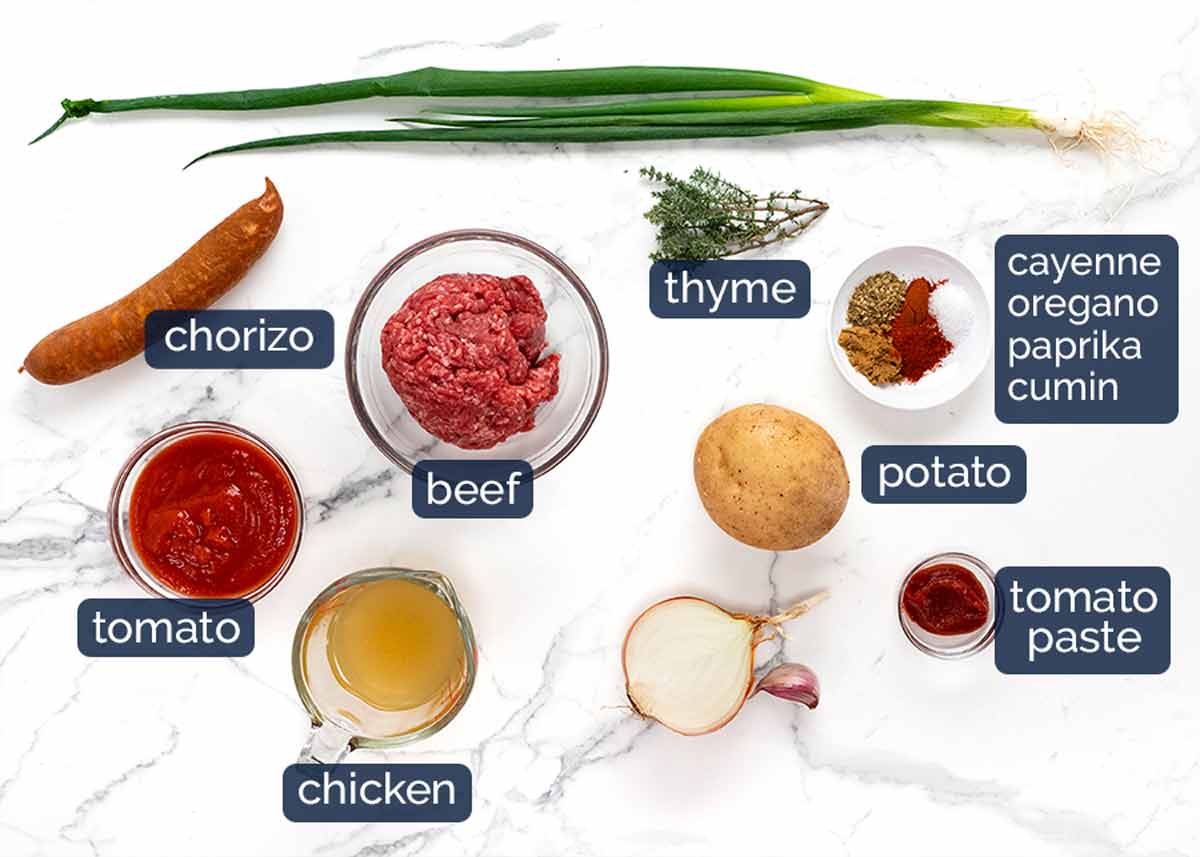
Beef – Just ordinary beef mince / ground beef.
Chorizo – The above mentioned flavour punch! We blitz it up into a paste using a stick blender for maximum effect. LOVE how it blends seamlessly into the beef!
Potato cubes – A traditional inclusion in empanada filling. Starchy potatoes work best because they are fluffier when cooked but any potato really will work just fine.
Herb and spices – Fresh thyme, cayenne, oregano, paprika and cumin. I am a little more heavy handed on the spices than most recipes because I like a punchier flavoured filling. Nobody has ever accused me of bland food! 😂
Tomato paste – For flavour.
Tomato passata (puree) – Pureed, strained plain tomato, widely available these days in Australia in the pasta and canned tomato aisle. See here for more information.
Some will argue that passata is not strictly traditional but I add it because it keeps the filling nice and juicy. Dry filling is a gripe I have with empanadas I’ve tried in my time! Water makes the filling watery which makes the pastry soggy.
Chicken stock/broth – For simmering, to provide a little liquid so the potato cooks.
Garlic and onion – Aromatics for flavour base.
Green onion – For freshness and appealing green bits.
How to make the empanada filling
Really, it’s no different to making bolognese – except it’s less saucy and it has punchier flavours! 😎
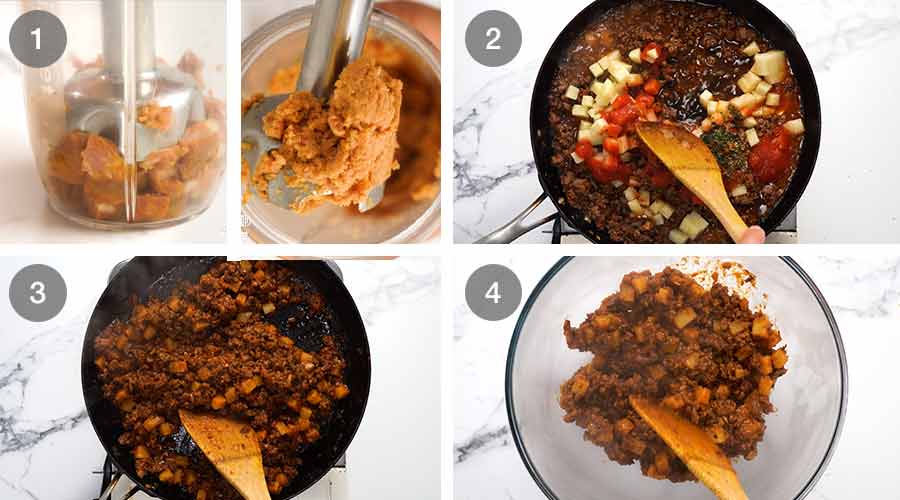
Chorizo blitz – Use a stick blender to blitz the chorizo into a paste. It really does not take long if you chop the chorizo beforehand, just 10 seconds or so. Don’t skip this step! Maximum flavour release and I love how it just seamlessly mixes in with the beef.
Cook like bolognese! Start with onion and garlic, then chorizo to get the tasty red oil out and make it nice and golden. Then cook the beef, breaking it up as you go. Cook off the tomato paste for 1 minute to caramelise it a bit which releases more flavour. Then add everything else, stir, and simmer for 15 minutes.
Goal: juicy but not watery – We want the mixture to be juicy (because nobody likes a dry empanada filling!) but not watery (because nobody likes soggy pastry!). Also by this time the potato should be cooked through.
Cool filling completely before using, at least 2 hours. Hot filling = melts butter in pastry = less flaky. Plus also it will “steam” inside the pastry and make it soggy.
Goal filling texture – Cool/cold but spreadable. If you refrigerate overnight (up to 3 days!) it will become a solid block which is impossible to wrap neatly. Let it come to room temp or microwave in bursts, stirring in between, until it becomes spreadable.
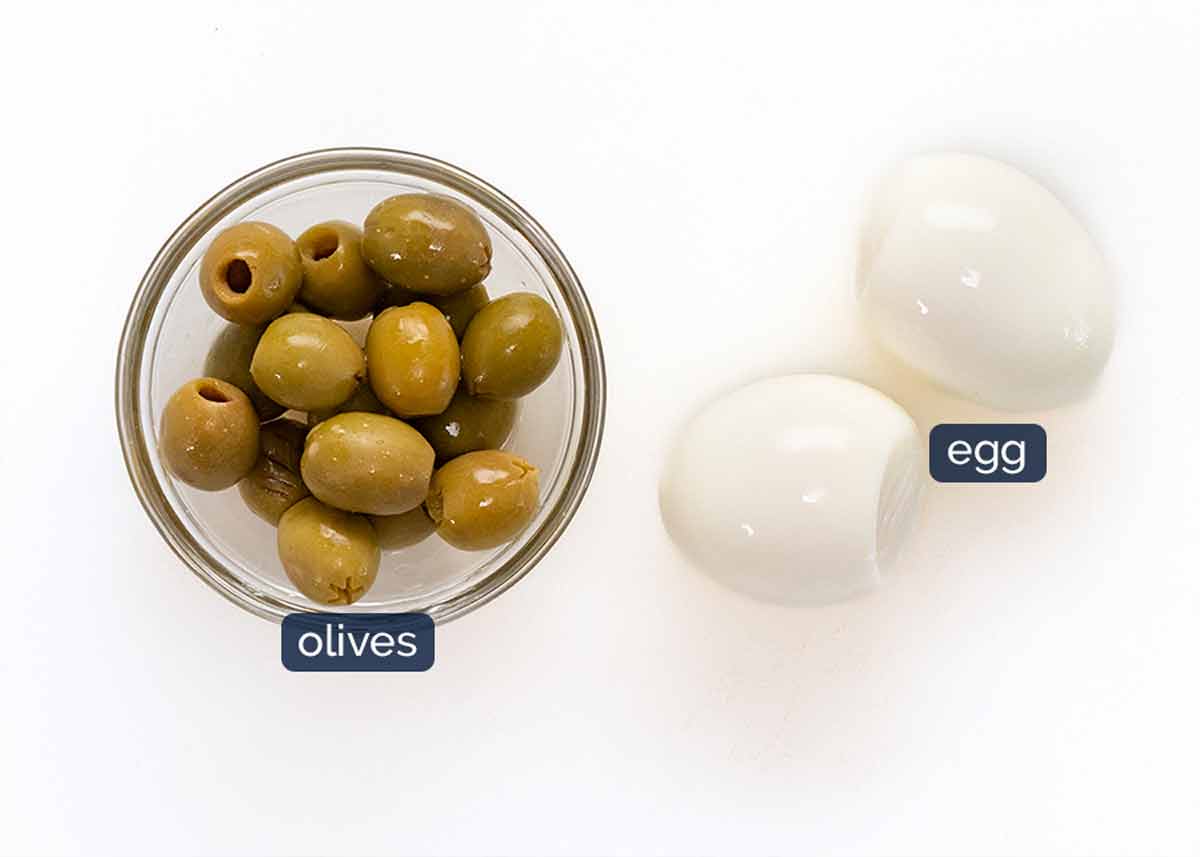
Filling add-ins
This recipe is inspired by Argentinian-style empanadas, so we also include the traditional chopped up olives and hard boiled egg. These additions add interest and make them proper South American-style empanadas, so don’t skip them! They are not mixed into the filling but sprinkled on top just before wrapping.
Empanada dough
Empanada dough is a type of shortcrust pastry. It’s buttery and flaky, similar to the pastry used for pies like pumpkin pie, apple pie etc, but it’s not sweet.
You will love how it’s so easy to work with. It’s easier to work with than store bought puff pastry!
Ingredients in Empanada dough
Here’s what you need to make empanada dough.
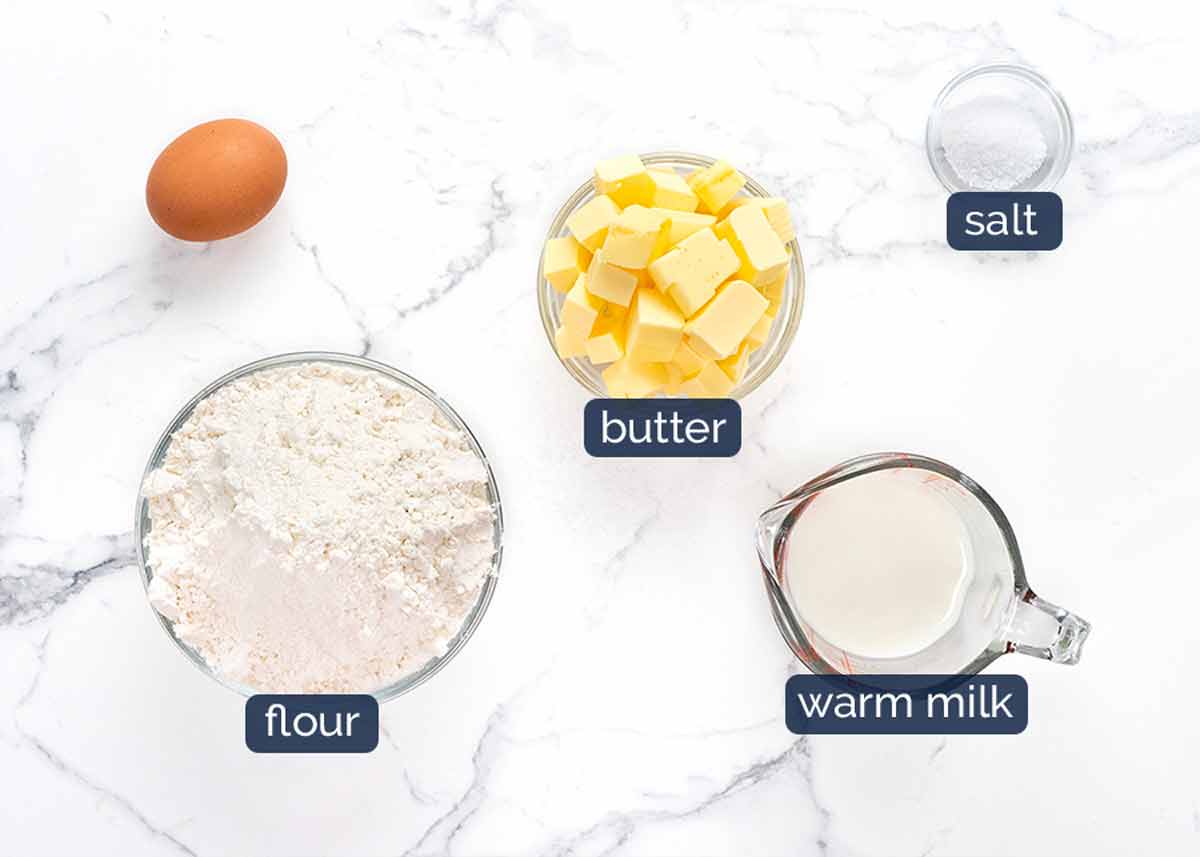
Flour – Just plain / all purpose flour.
Butter – cold, cut into cubes so it’s easy to blitz into fine crumbs in the flour. Tiny little bits of butter throughout the pastry is what makes it beautifully flaky!
Egg – Eggs are not usually included in traditional shortcrust pastry. It makes the dough slightly less crumbly – intentionally, because these are hand held pies. It also has the added bonus that it’s easier to work with as it makes the dough more pliable and less prone to breaking.
Warm milk – Similar to egg, this is not in traditional pastry but makes the pastry slightly less brittle than the pastry on regular pies which is what we want for hand-held empanadas. The milk is warm so it blends into the pastry more easily but because we only use a bit, it’s not enough to melt the butter.
How to make Empanada dough
While it can be made by hand, I opt to use a food processor for ease and speed, as well as to avoid the problem of my hot little hands melting the butter as I work the dough. (As noted above, little butter bits = flaky pastry!).
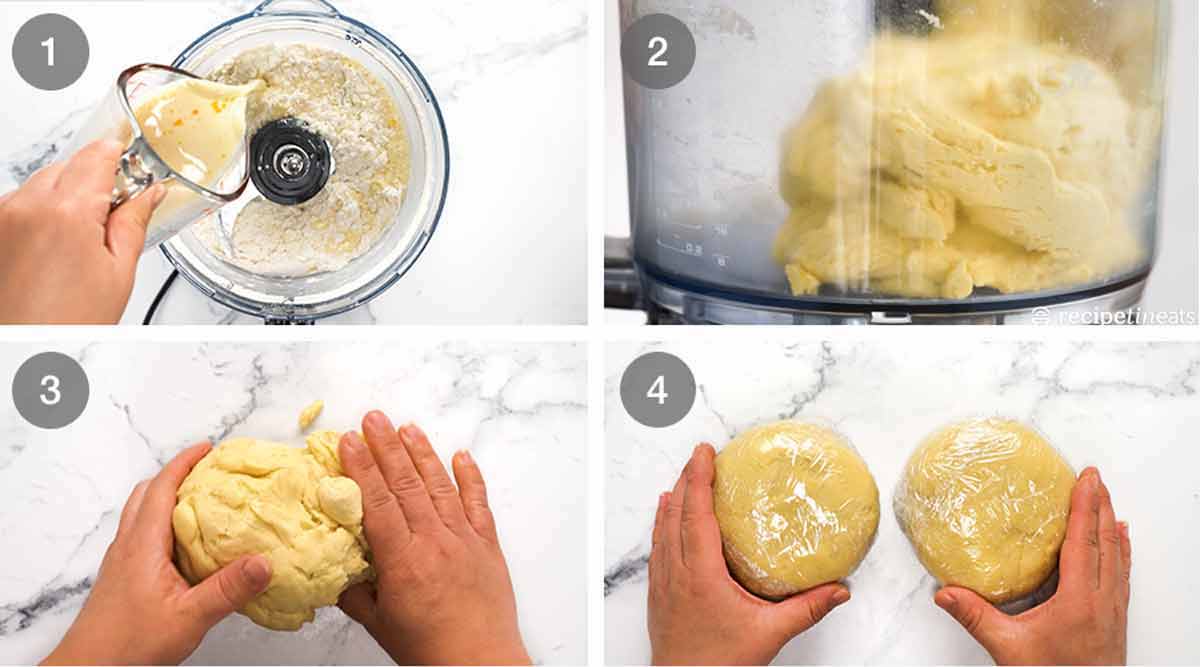
Blitz – Pulse flour, salt and butter until the butter becomes crumbs, usually around 4 to 6 pulses. The largest bits should be no bigger than peas. Whisk the egg and milk together, pour that in then blitz on low speed until the dough comes together – about 10 to 15 seconds.
Blade – Use a dough blade if you’ve got one but as you’ll see in the video, I always forget to switch it from my standard sharp “S” blade and it works just fine!
Dough – This is what the dough looks like in the food processor. Kneaded and ready to go!
Bring together – Turn the dough out onto a work surface then knead it just to bring together into a smooth ball.
Refrigerate 30 minutes – Divide the dough into two pieces then shape into 2cm / 0.8″ thick discs. Wrap in cling wrap and refrigerate for 30 minutes.
It can stay in the fridge for up to 2 days but will become rock hard. Take it out around 30 minutes prior before rolling out.
Hand kneading method
Mix flour and salt in a bowl. Rub cold butter in with fingertips until fine crumbs form. Mix in whisked milk and egg using the handle of a wooden spoon. Turn out onto lightly floured work surface and knead for 5 minutes or until it becomes a smooth ball, as pictured and per video.
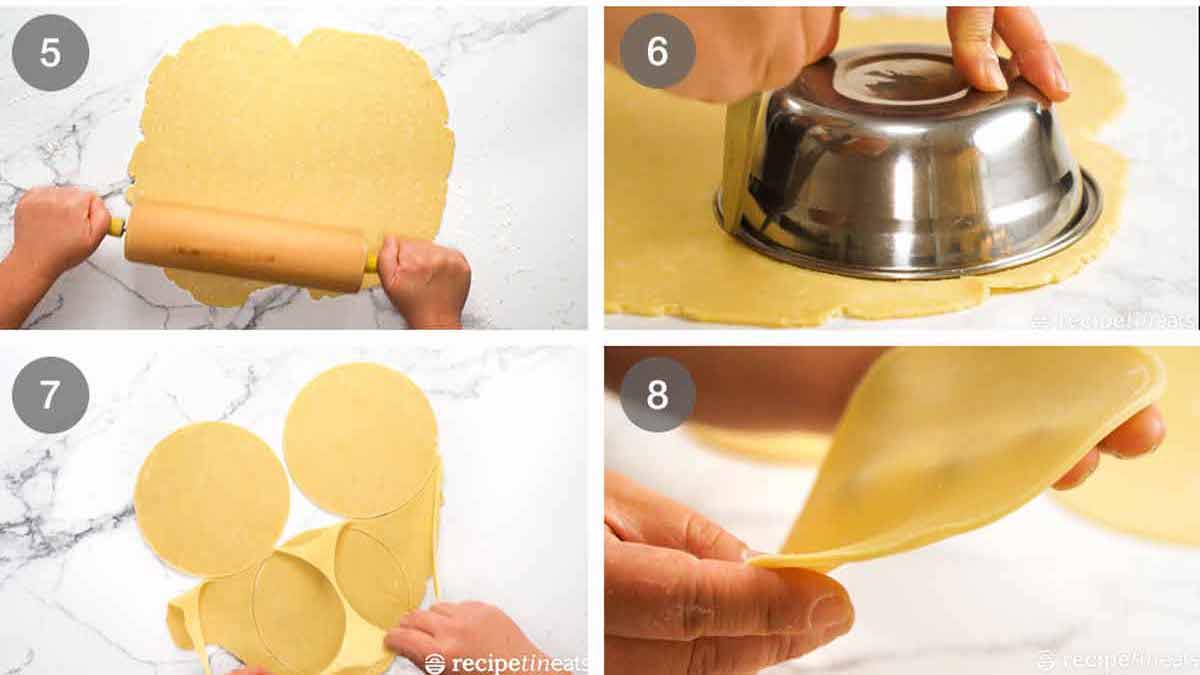
Roll out to 3 mm / 0.1″ thickness. Work with one disc at a time.
Cut 15 cm /6″ rounds (I use a bowl). This is a fairly average traditional empanada size – larger than you think! However, feel free to make them smaller if desired.
Keep cutting – Gather dough scraps into a ball, then repeat to roll out dough and cut rounds. Keep cut rounds covered in the fridge, stacked on paper, as you continue to roll and cut. You should get 10 or 11 rounds.
Dough thickness – 3 mm / 0.1″ thickness is the target thickness. Too thin = filling can break pastry and harder to do pleats. Too thick = a lot of pastry with each bite and harder to do pleats.
You’ll also notice that the dough is easy to work with, not prone to breaking like other doughs.
OK! Pastry done. Let’s wrap some empanadas!
Wrapping empanadas – (can be) easy!
The only part of wrapping empanadas that takes practice is the pleating which is optional! For an easy, faster option, just use a fork (like most store bought frozen empanadas) or keep it flat. It does not affect the eating experience at all!!
The easiest way to learn how to do the empanada pleats is to watch the recipe video – at 3 minute 29 second mark.
1. Filling empanadas
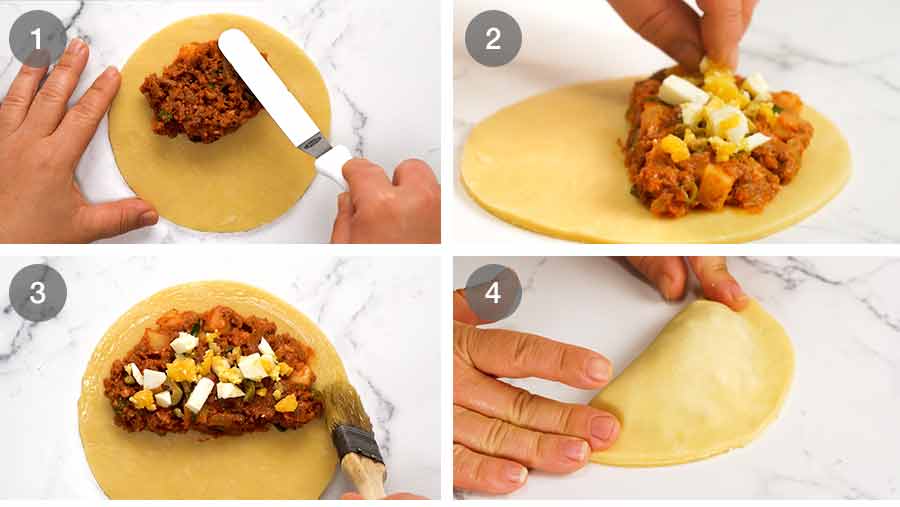
Spread filling in a half moon shape on one side of the round. Make the surface flat. Use 3 tablespoons of filling (55g / 1.94oz to be exact!), leaving a 1.7cm / 2/3″ border (exactness!
 ).
). Sprinkle with a pinch of olives and egg.
Brush with egg whites – Brush the filling side edge with egg whites. We’re reserving the yolks to brush the surface so it bakes up beautifully golden.
Seal – Fold over to enclose filling and press firmly to seal, but don’t squish the pastry and make it thinner – this makes it harder to do neat pleats.
2. Pleating – optional!
As I mentioned above, pleating is optional! You can just decorate using a fork – just press down along the edge – or just leave the seam plain. It will still taste just as good!
For the pleating, the fastest way to learn is to watch the recipe video. Here’s an extract for just the pleating part:
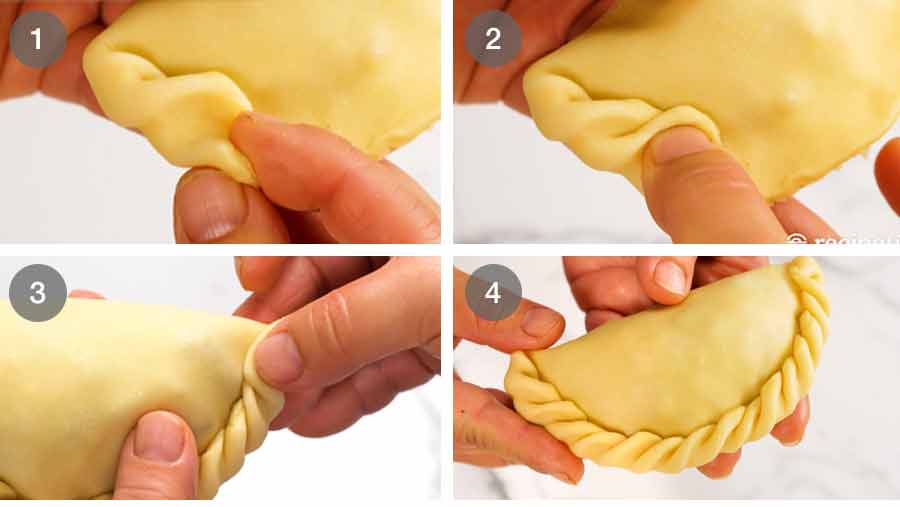
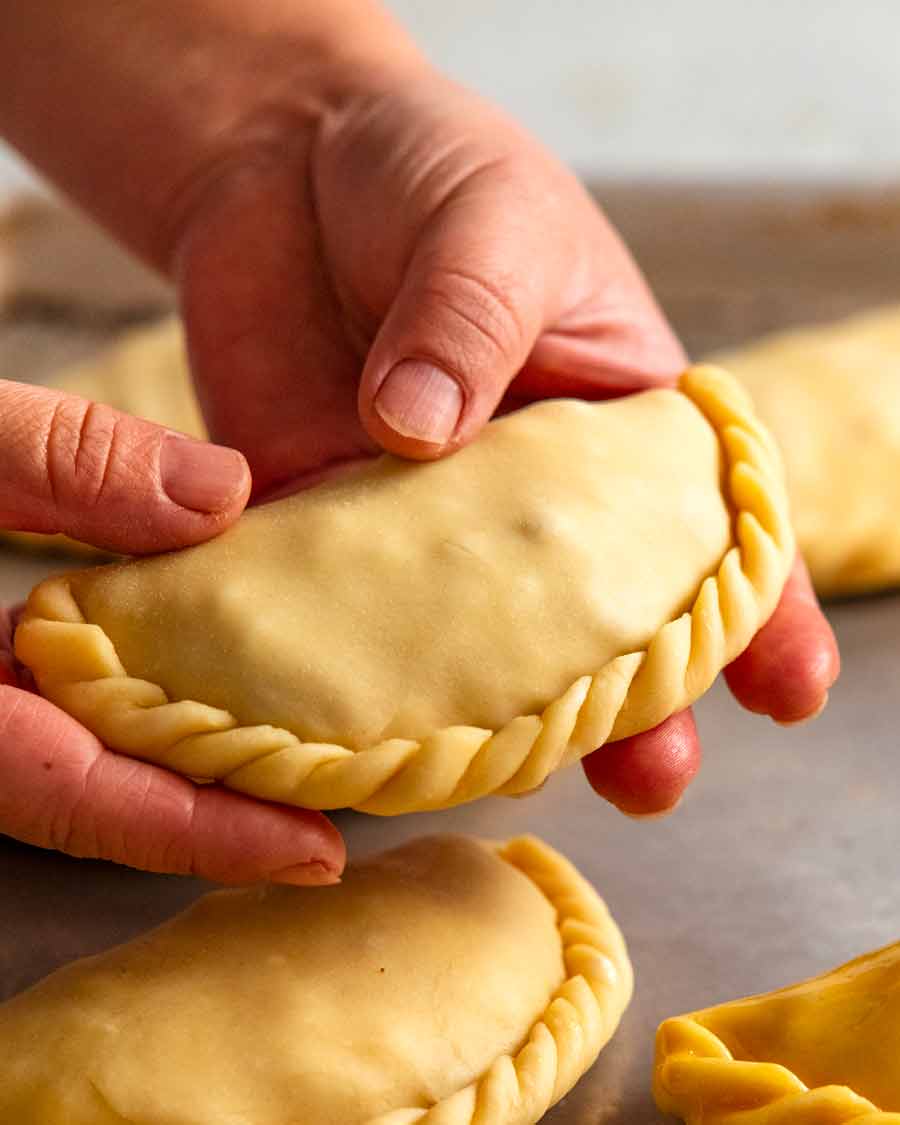
Pleat – Starting from one end, fold the pastry over onto the rim to create a pleat.
Pinch – Without moving your fingers, pinch to make the pleat stay in place and also to make the part of the pastry where the next pleat will be a bit thinner which makes it easier to pleat.
Keep repeating until you finish at the end. Do not be afraid to trim off excess pastry on the corner to tidy it up.
Reshape as needed to push it back into a neat half moon shape. I find mine kind of stretches out in an elongated half moon!
3. Baking
There’s only one thing better than the buttery smell that fills your house when empanadas are in the oven… EATING them!
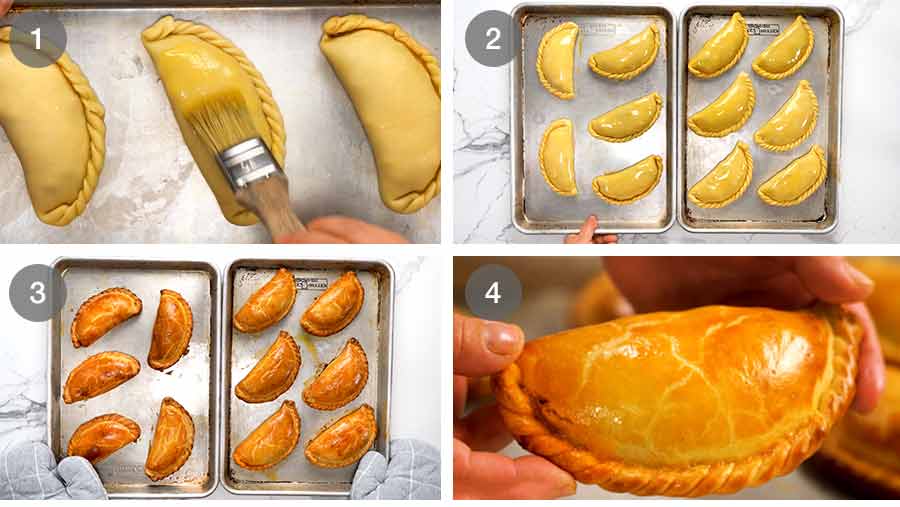
Brush with egg yolk – this makes them bake up beautifully golden.
Bake for 20 minutes in a hot oven – 220°C/425°F (200°C fan).
Golden brown – The empanadas are ready when they are a beautiful golden brown, and the base is crisp.
EAT! Look at your gorgeous empanadas!! EAT WHILE HOT!!

Empanada dipping sauce
Hot, freshly made empanadas are wonderful eaten just plain. But a dipping sauce just elevates the experience! Here are options:
Empanada sauce (recommended) – A purpose-made spiced roasted tomato based sauce for dipping empanadas which is loosely based on a traditional Colombian sauce called hogao. I’ve published this as a separate recipe because it’s worthy.
It is my recommended option – it’s SO GOOD! Use leftovers as a dip for corn chips, veggie sticks, bread.Chimichurri – This bright green fresh parsley-garlic South American sauce is a natural pairing with empanadas!
Pink sauce – Ketchup + sour cream or yogurt or mayo or any combination thereof.
Avocado sauce – Yes. YES! So good.
Ketchup, or spicy ketchup – I won’t judge. It works. (For spicy, just mix with sriracha).

Worth the effort
This is not a quick and easy recipe. And there will be people reading this no doubt who live in areas where excellent empanadas are abundant. Lucky you!
For the rest of us poor sods, this homemade version will satisfy your empanada cravings. When they come out of the oven, hot and crispy, the buttery smell of the pastry mingling with the spiced filling…. and that moment when you bite into them…..
It’s food so good it almost makes you want to weep with joy. Food that is worth the effort!
This empanadas recipe is one of the best new cult-classic recipes to come out of the RecipeTin kitchen in over a year. I really hope you give them a go – and love them as much as I do! – Nagi x
Recipe credit: With many thanks to RecipeTin’s Chef JB for working through so many iterations with me to create the perfect homemade empanadas! This recipe is such a great example of how we work together on more challenging recipes to achieve what we believe to be the best possible outcome for home cooks, and how having a professional chef in my team has raised the bar on the quality and type of recipes I can share on my website. And make things like empanadas accessible to everybody, of varying skills levels!
Watch how to make it

Beef Empanadas
Ingredients
Empanada shortcrust pastry:
- 2 1/2 cups plain/all-purpose flour
- 175g/ 12 tbsp cold unsalted butter , cut into 1 cm / 1/2″ cubes
- 1 tsp cooking/kosher salt
- 1 egg yolk
- 1/2 cup warm milk , full fat (30 sec microwave)
Empanada Filling:
- 1 1/2 tbsp olive oil
- 1/2 onion , finely chopped
- 1 garlic cloves , minced
- 300g/10 oz beef mince (ground beef)
- 120g/4 oz chorizo
- 2 tsp tomato paste
- 1 tsp fresh thyme , finely chopped
- 1/2 tsp EACH dried oregano, cumin, paprika
- 1/4 tsp cayenne pepper
- 1/4 tsp cooking/kosher salt
- 3/4 cup chicken stock/broth , low sodium
- 1/2 cup tomato passata (sub US tomato sauce or crushed tomato)
- 150g/5oz potato , peeled, cut into 8mm/ 1/3" cubes (~1 cup)
- 1/3 cup green onion , finely sliced
Other:
- 2 hard boiled eggs (9 minutes using this method)
- 1/4 cup green olives , roughly chopped
- 2 eggs , separated, yolks whisked (for sealing and brushing pastry)
Dipping sauces:
- Empanada sauce
- Other options – ketchup, ketchup + sriracha, pink sauce, taco sauce, salsa dip
Instructions
Empanada Filling:
- Blitz chorizo – Roughly chop chorizo into 1.5cm / 1/2" pieces. Blitz using a stick blender until it becomes a paste (Note 1)
- Sauté aromatics – Heat oil in a large non stick pan over high heat. Cook onion and garlic for 2 minutes.
- Cook meat – Add chorizo and cook for 2 minutes. Add beef and cook until you no longer see raw beef. Add tomato paste and cook for 1 minute. Then add everything else except green onion, then stir.
- Cook 15 min – Bring to a simmer then lower heat so it's simmering gently. Cook for 15 minutes, stirring every now and then. Goal – juicy but not watery filling, with cooked potato.
- Cool – Stir through green onion. Transfer to bowl and fully cool before using (~ 2 hours).
Empanada shortcrust pastry:
- Blitz dough – Whisk milk and yolk in a small jug. Pulse flour, salt and butter in a food processor until the butter becomes fine crumbs – largest lumps no bigger than peas (~ 4 to 6 times). Add egg-milk mixture, then blitz on low until it comes together into a ball of dough – about 10 seconds. (Note 2 for hand method)
- Chill 30 min – Turn out onto a lightly floured work surface, then bring together into a smooth log ~20cm/8" long. Cut in half, shape into 2cm / 0/8" thick round discs. Wrap in cling wrap then refrigerate 30 minutes (or overnight – Note 3).
- Cut rounds – Place one chilled disc on a lightly floured work surface. Roll out to 3 mm / 0.1" thickness. Cut 15 cm/6" rounds (I use a bowl), or other size as desired (Note 3). Keep covered in the fridge, stacked on paper, as you continue to roll and cut. You should get 10 or 11 rounds.
Make empanadas:
- Preheat oven to 220°C/425°F (200°C fan).
- Filling – Filling should be cold but spreadable (Note 4). Place 3 tablespoons (55g) of filling on the top half of a round of pastry. Spread flat in a half-moon shape, leaving a 1.5cm / 0.6" border. Sprinkle with olive and egg.
- Seal – Brush edge with egg white, fold to enclose, pressing out air and sealing the edge. Optional: Do empanada pleats – see step photos in post or video at 3 min 30 sec. Alternatively, crimp with fork or leave plain.
- Bake 20 min – Place empanadas on 2 baking trays. Brush with egg yolk. Bake 20 minutes or until golden brown all over and crispy on the base.
- Serve hot with dipping sauce of choice – my favourite is the homemade Empanada Sauce!
Notes
I initially made empanadas the size of gyoza and we were called out by Chef JB’s Chilean friend for making them untraditionally small. So we fixed it! But feel free to make smaller ones (same bake time).
4. Filling – If your filling is ice cold and rock hard, it will be hard to wrap. Allow it to come to room temp (or give it a microwave helping hand) so the mixture is loose but still cold (else it will melt butter in the pastry).Life of Dozer
Dozer thanks everyone for the birthday wishes!! He feels very popular – there was a lot of strutting around today. 😂
Meanwhile, there was a lot of grumbling on my part! Snippet of grumbling from Instagram:

The post Beef empanadas appeared first on RecipeTin Eats.
]]> This is an empanada sauce created especially for serving with the homemade empanadas I shared today. Loosely based on a traditional Colombian sauce called hogao, it has a wickedly good smokey flavour from char-roasting tomatoes in the oven. Use leftovers as a dip! I’m a firm believer than empanadas should be so great, you want... Get the Recipe
The post Empanada sauce appeared first on RecipeTin Eats.
]]>This is an empanada sauce created especially for serving with the homemade empanadas I shared today. Loosely based on a traditional Colombian sauce called hogao, it has a wickedly good smokey flavour from char-roasting tomatoes in the oven. Use leftovers as a dip!
I’m a firm believer than empanadas should be so great, you want to grab them straight out of the oven and eat them plain. Make the beef empanadas – and you will! Hot and crispy on the outside, juicy and flavourful on the inside, it’s everything an empanada should be!
But it is nice to have something wet to dip empanadas into because the reality is that there is only so juicy you can make the empanada filling without compromising the crispiness of the base. Empanadas are not like, say, Aussie meat pies which have molten gravy fillings.
While the beef empanada recipe includes various simple sauce options, this empanada sauce was created especially and is by far the best!
Ingredients in empanada sauce
This empanada sauce is based on a traditional Colombian sauce called hogao and is made with tomato that’s roasted until charred for beautiful smoky flavour.
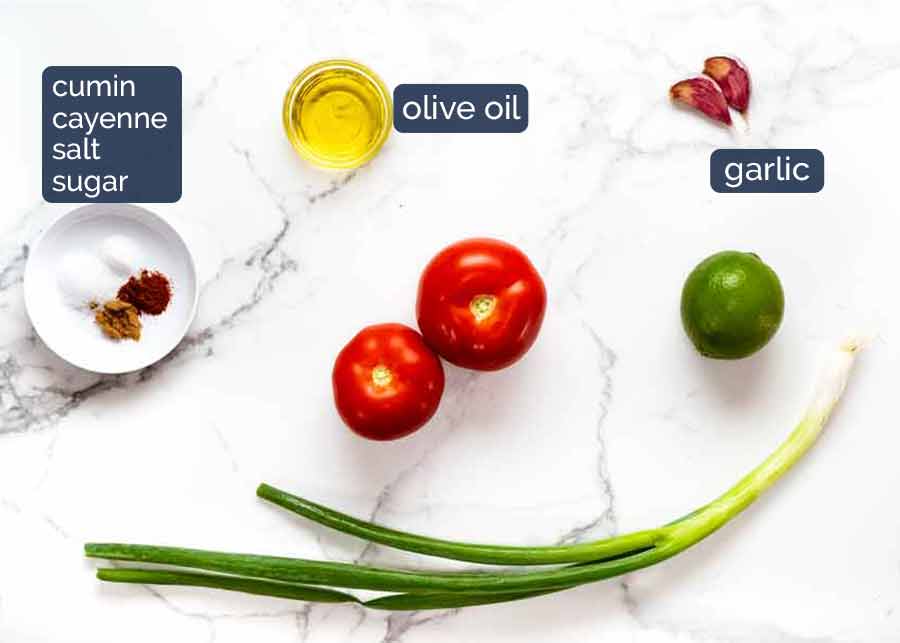
Tomatoes – 2 medium ones, about 125g/4oz each.
Garlic cloves – Peel the skin off but keep them whole.
Spices – cumin for flavour and cayenne pepper for a warm buzz.
Sugar – just a tiny amount, to balance the flavour
Lime juice – for freshness/sour. Substitute with lemon or a vinegar (it’s only a small amount so substitutions are flexible)
Green onion – for a bit of freshness and nice bits of green in the sauce
How to make Empanada sauce
Two simple steps:
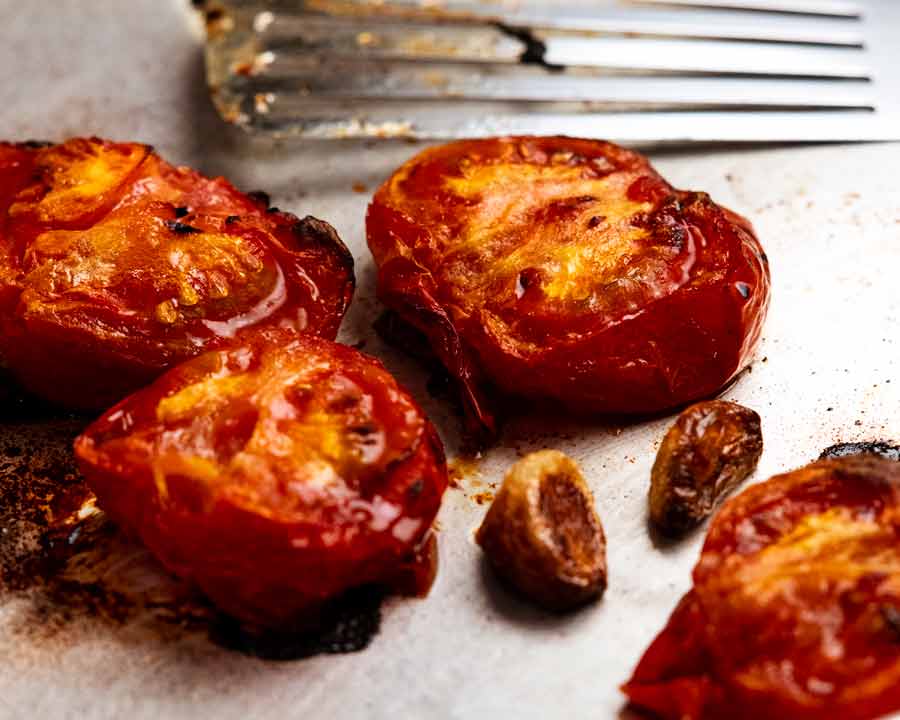
Roast the tomato and garlic until you get nice charred edges which gives the sauce its special smokey flavour; then
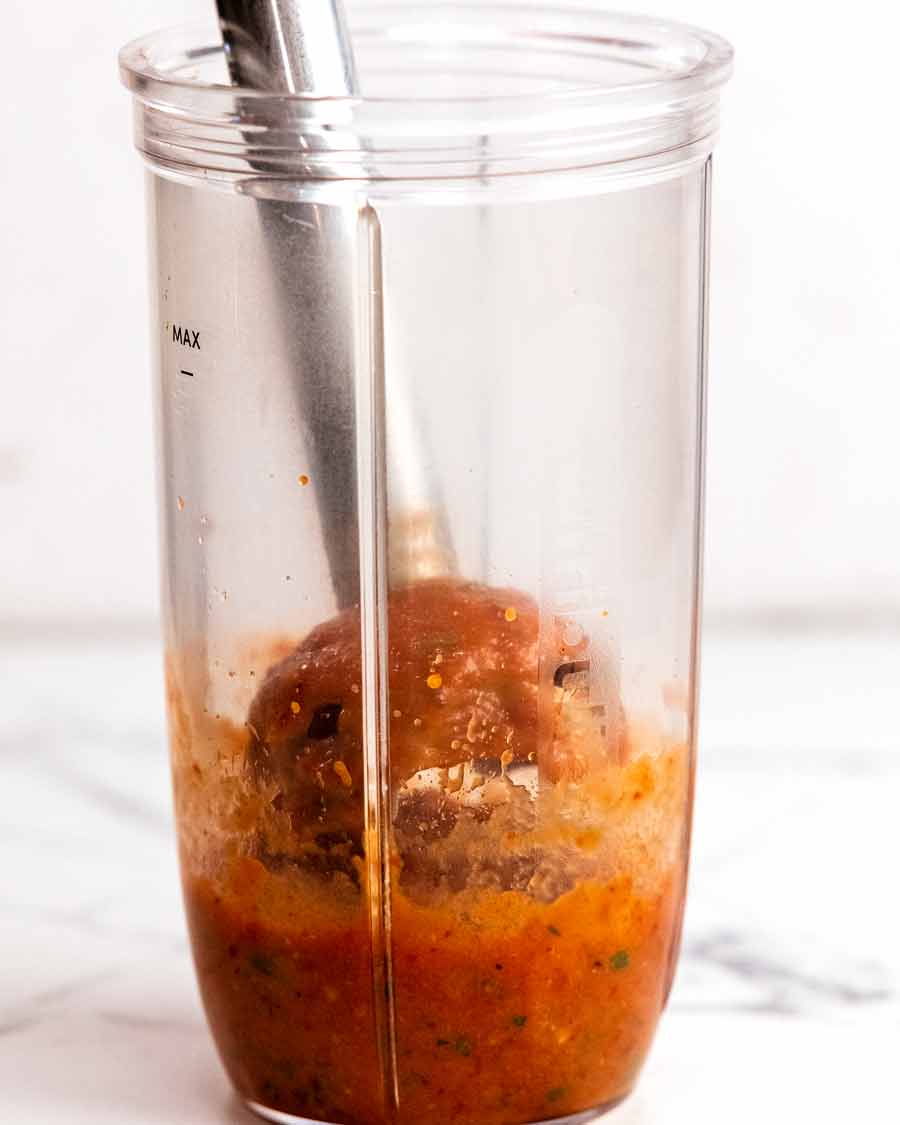
Blitz!
Serve with fresh, homemade empanadas.
Weep with joy.
No recipe video for this one because it’s an extra recipe for the beef empanadas and relatively straight forward. Though I can never resist if there’s demand, so leave your request below if you’d like a recipe video! – Nagi x

Empanada dipping sauce
Ingredients
- 2 medium tomatoes (125g/4oz each), cut in half and core cut out
- 2 garlic cloves , kept whole, peeled
- 1 tbsp extra virgin olive oil
- 1/8 tsp ground cumin
- 1/8 tsp ground cayenne or pure chilli (not US chili powder mix)
- 1/8 tsp white sugar
- 1/4 tsp cooking/kosher salt
- 1 1/2 tsp lime juice (sub lemon or vinegar)
- 2 tbsp sliced green onion
Serving
Instructions
- Preheat the oven to 220°C/425°F (200°C fan).
- Roast tomato 20 min – Toss the tomatoes and garlic with the olive oil in a bowl. Place the tomatoes on the tray, cut side up, then roast for 20 minutes.
- Roast garlic 15 min – Add garlic to the tray and roast for another 15 minutes until the edges of the tomato are browned. Remove from oven and cool on tray.
- Blitz – Transfer to a container that just fits the head of a stick blender. Add all remaining ingredients except the green onion. Blitz until smooth – about 5 seconds. Add the green onion and blitz until it's finely chopped.
- Serve with empanadas – or corn chips, vegetable sticks, bread!
Notes
Nutrition
Life of Dozer
He doesn’t realise this sauce comes with beefy empanadas. You snooze, you lose Dozer!

The post Empanada sauce appeared first on RecipeTin Eats.
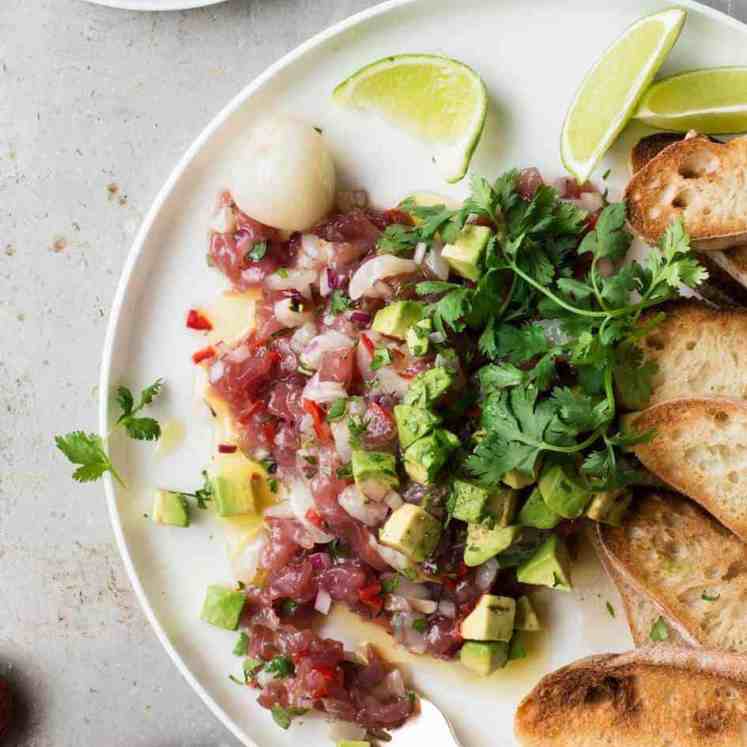
]]>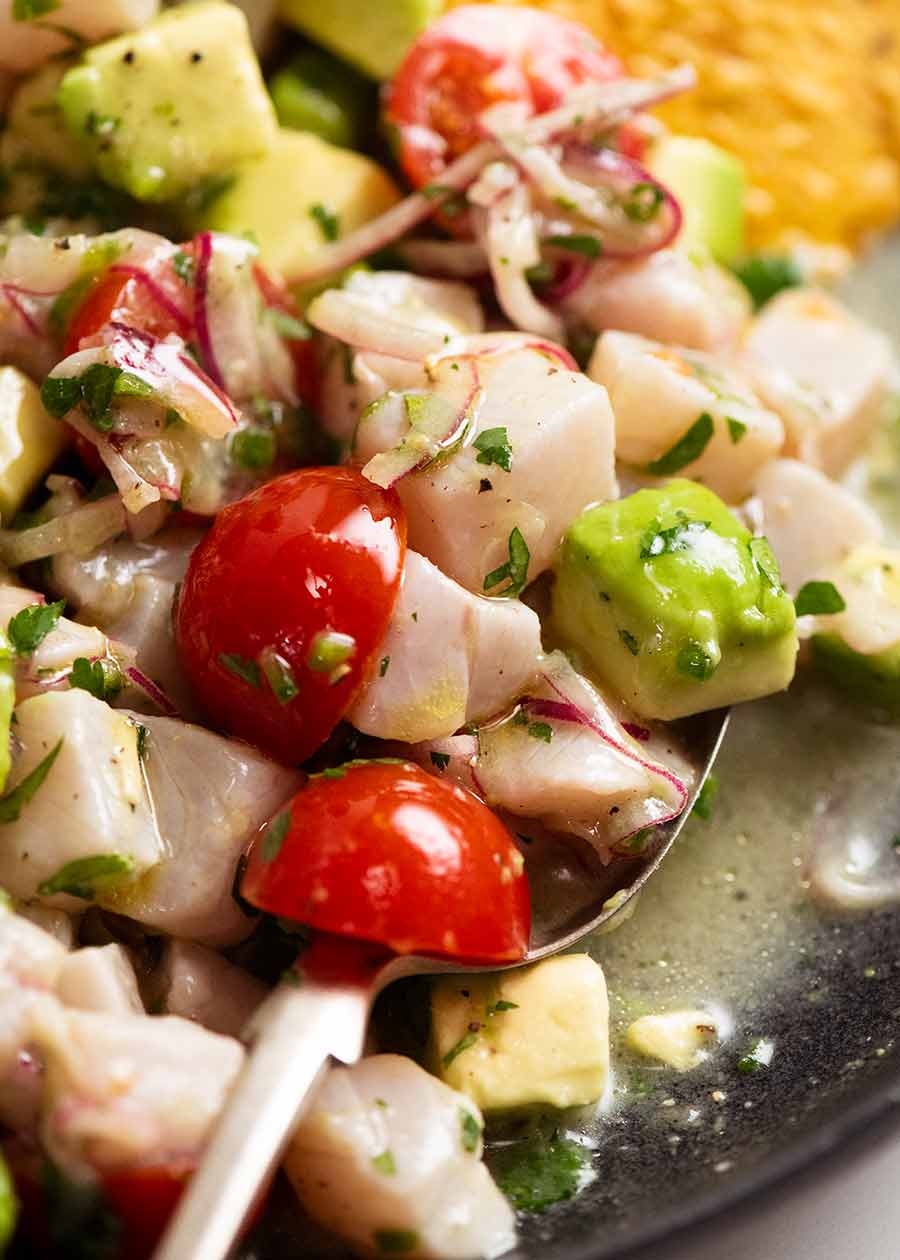 Ceviche is the famous dish from Latin America where fresh fish and other seafood is “cooked” in lime juice and mixed with chilli, coriander/cilantro, onion and other flavourings. Also known as cebiche, seviche or sebiche, this quick and easy recipe makes a wonderful light meal for hot summer days, or an elegant starter. The one... Get the Recipe
The post Ceviche appeared first on RecipeTin Eats.
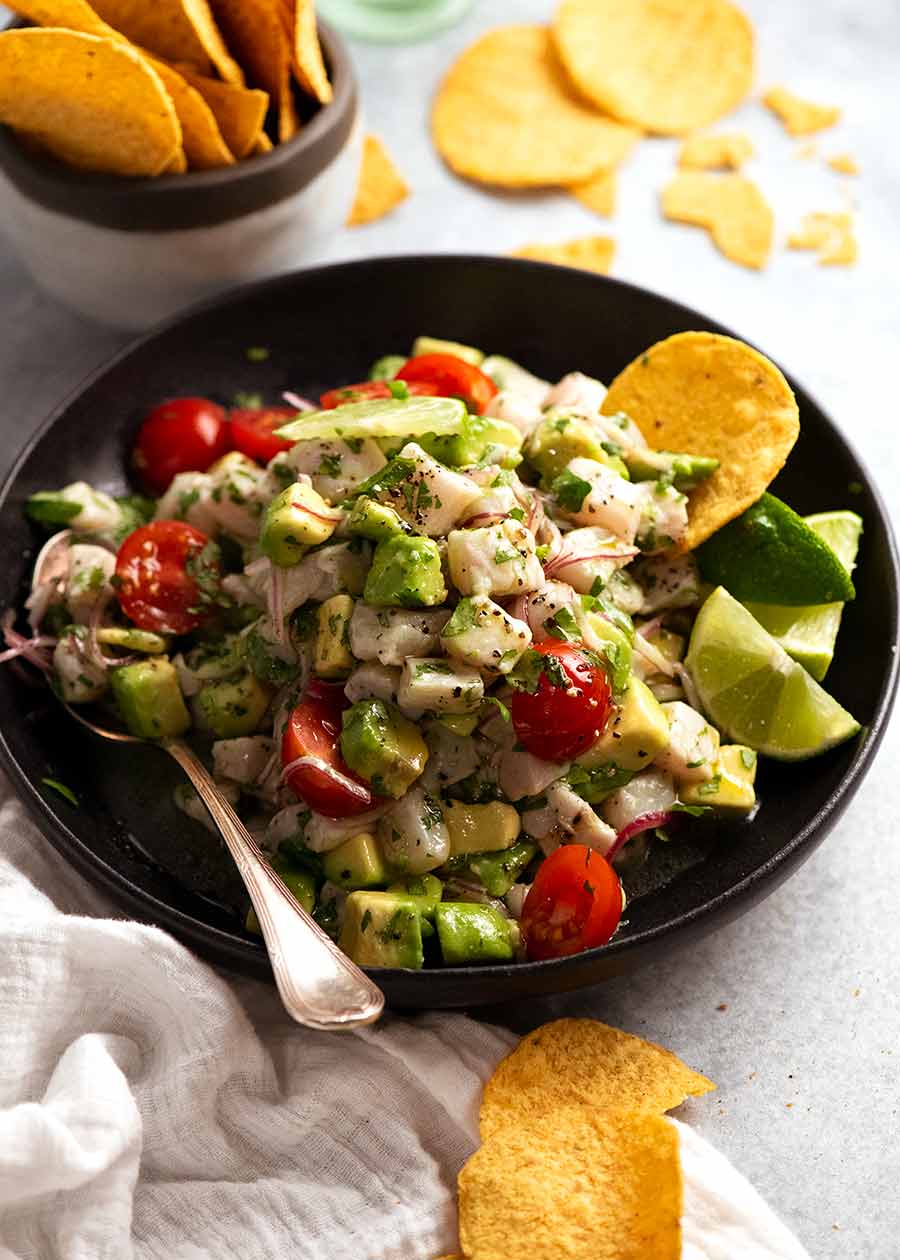
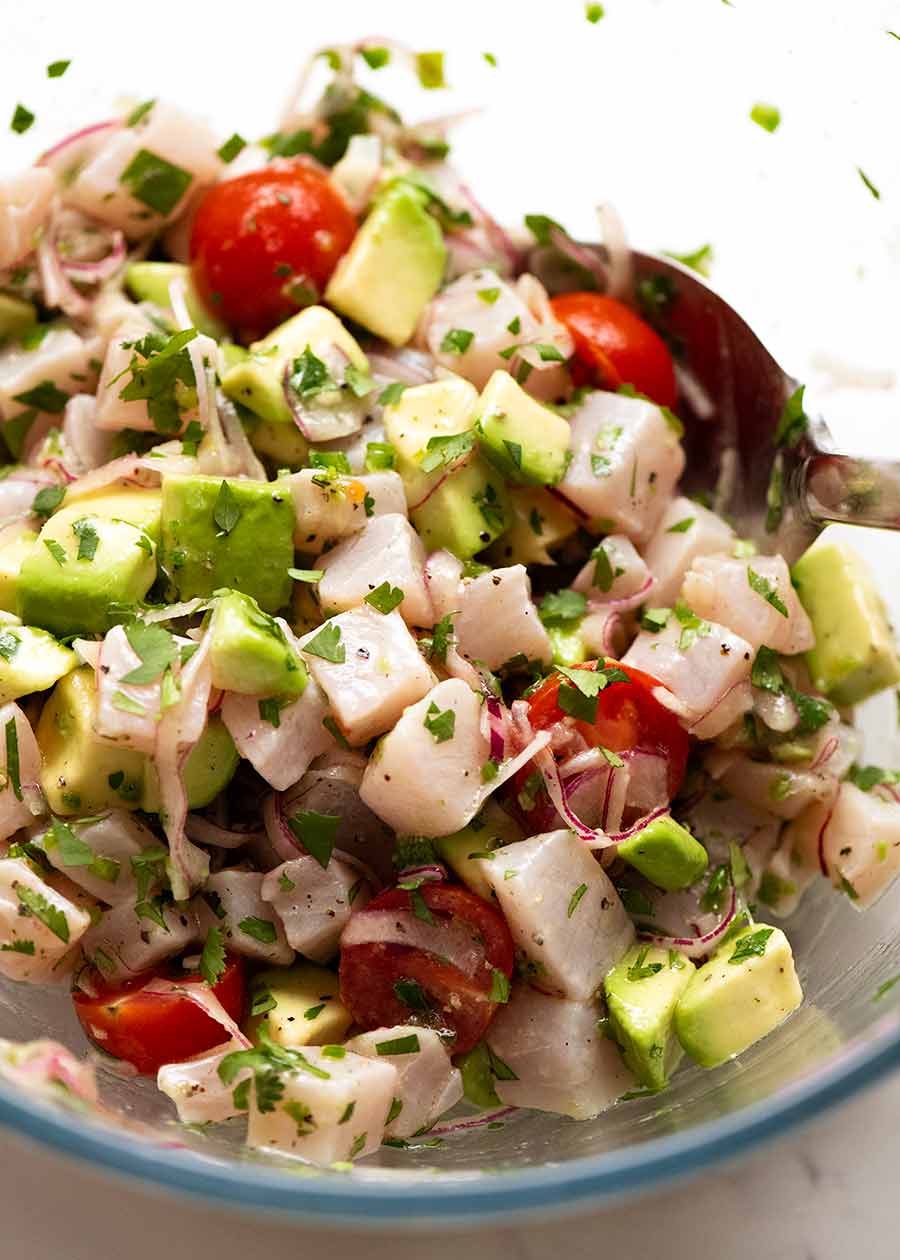
]]>Ceviche is the famous dish from Latin America where fresh fish and other seafood is “cooked” in lime juice and mixed with chilli, coriander/cilantro, onion and other flavourings. Also known as cebiche, seviche or sebiche, this quick and easy recipe makes a wonderful light meal for hot summer days, or an elegant starter.
The one thing that makes this ceviche recipe stand out from the rest is that it’s not too sour. Limes in South America aren’t as sour as ours!
Ceviche
Originating from the west coast of South America, today ceviche can be found in various forms from Mexico down to Peru and beyond. It’s also a dish that has been embraced by fine dining establishments around the world. It plates up elegantly and is an ideal light seafood starter to precede a richer main.
Plus, it’s the sort of dish that people don’t ordinarily think of as simple to make at home, so restaurants readily charge a small fortune for it.
I’m here to bust that myth! As long as you can get your hands on sparkling fresh fish, ceviche is dead easy to make – and super quick too!
Buying sashimi-grade fish suitable for raw consumption is readily available these days, making dishes like ceviche infinitely accessible for ordinary folk like ourselves!
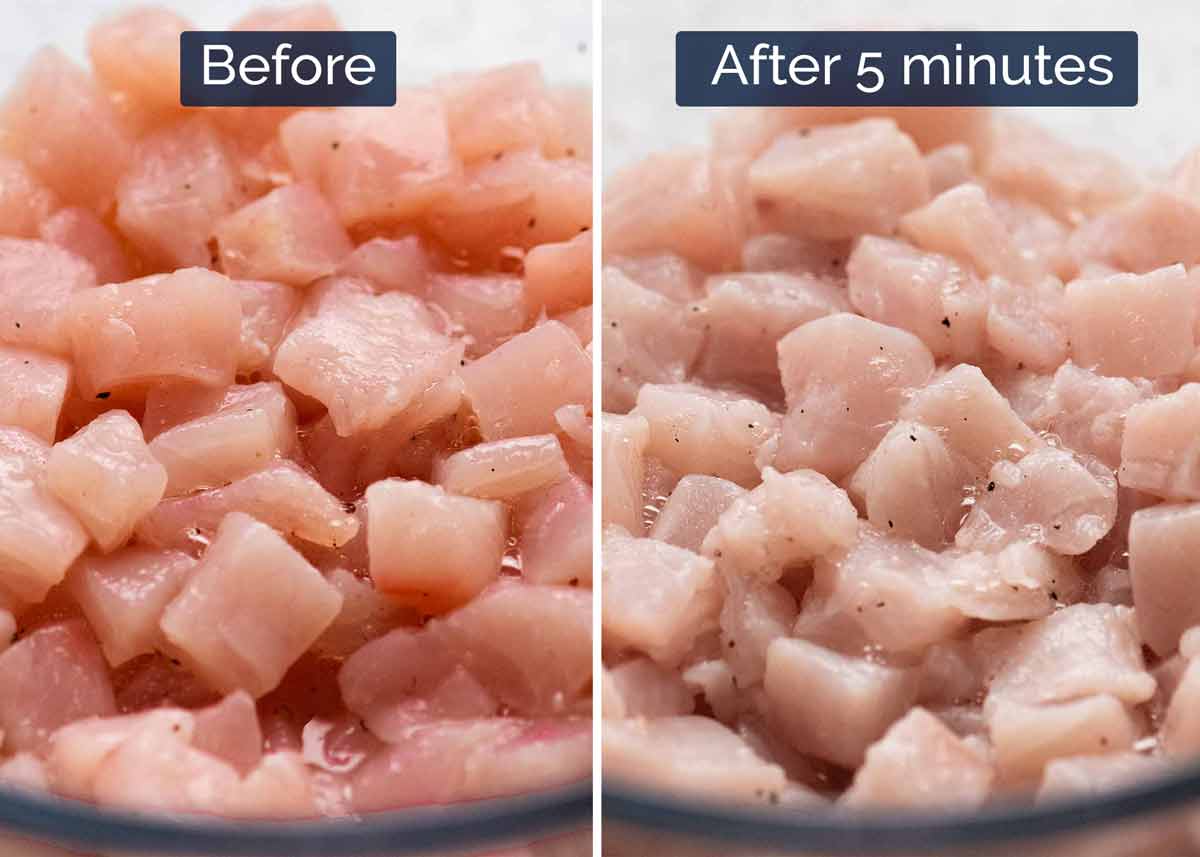
Raw fish + lime juice + 5 minutes = Ceviche!
At its core, Ceviche is as simple as tossing raw fish with lime juice, then leaving it for 5 minutes to let the acid “cook” the fish, making it turn white on the surface, but still raw inside.
Here’s a comparison of the fish immediately after tossing with lime (fish is still translucent), then 5 minutes later, it’s turned white because it’s cooked!
It MUST be sashimi-grade fish
The ONLY fish you should use for ceviche is sashimi-grade fish that is suitable for raw consumption. It is not enough to just buy “fresh fish” from the stores – this usually just means it hasn’t been frozen then thawed. It does not mean it’s fresh enough to eat raw. You need to check with the fish monger that it is “sashimi grade” (usually it will be helpfuly labelled ) and is safe it eat raw.
I know that the thought of eating raw fish from the fishmonger versus at a restaurant might make some people nervous, but food safety standards nowadays here in Australia are such that you shouldn’t have cause for concern. I’ve been eating store bought raw fish all my life since it became available in the late 90’s and I’ve never had a problem.
Of course, if you happen to have a fisherman friend, you can use virtually any freshly caught fish – it’s all sashimi grade! As a child, before sashimi became socially acceptable in Australia, my parents would take us fishing every weekend just so we could catch fresh fish for sushi!
Best fish for ceviche
There is no one way to make ceviche, and there is no single “best fish” for ceviche because it’s driven by the types of seafood available in different regions! There’s plenty of options, so I’m going to list the most common ones for you:
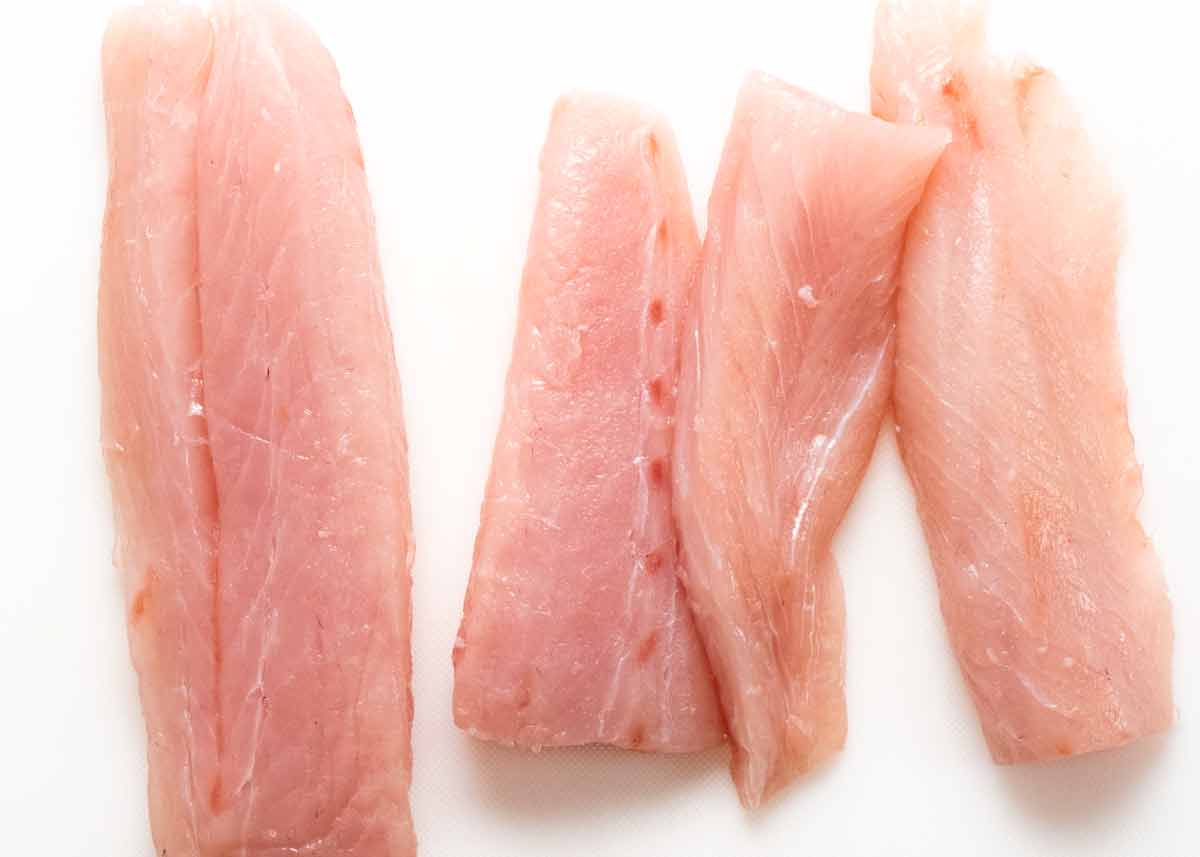
Kingfish (pictured above) – prized for it’s soft white flesh, very popular in Japanese sashimi (shows how good this fish is!). This is one of 3 common sashimi-grade fish sold at Australian fish shops (along with salmon and tuna) and a popular choice of fine dining establishments;
Sea bass – traditionally used for Peruvian Ceviche and easily found in the UK/US;
Tuna – popular in Mexico (along with prawn/shrimp);
Mackerel – also popular in Mexico;
Prawns / shrimp – traditional in Ecuador and popular in Mexico, often with a dash of tomato juice;
Halibut or Patagonian tooth fish – Chile;
Salmon – though not traditional (because white fish is traditional), salmon is excellent made into ceviche. Easy to find in Australia;
Bream – many species, depending where in the world and widely used;
Swordfish – if you are lucky enough to get it(!), this is used in some Latin American countries.
Trevally – Although we haven’t seen it mentioned, raw trevally is beautifully soft-textured and would make a fine ceviche. Available at some good fishmongers here in Australia; and
Cod and mahi mahi – Popular options in America.
Fish that is not suitable for Ceviche
As a general rule, fish that are tender and not chewy when raw will make better ceviche. This is because the fish is cut chunkier compared to the fine slices used in say fish carpaccio or sushi. Thus fish like snapper, grouper, some cods, flounder, which can be sometimes a bit tough eaten raw, are less suitable.
There’s no one way to make ceviche. Each country, city, restaurant and household has their own way. At its core, however, the avocado and jalapeño in this makes this a Mexican Ceviche.
What (else) goes in Ceviche
Here are the other ingredients required for this recipe:
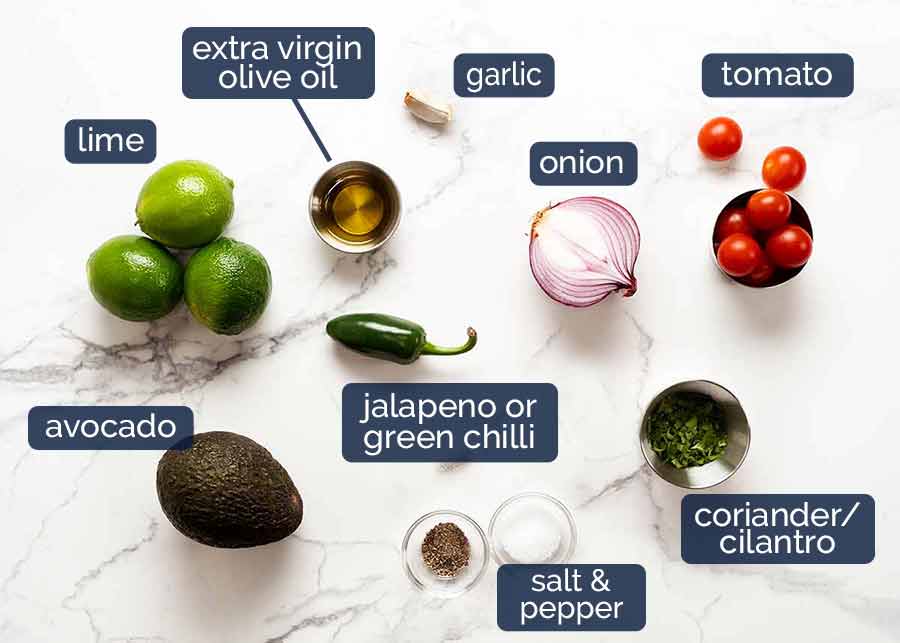
Limes – the essential ingredient that “cooks” the fish;
Extra virgin olive oil – just a touch will take the sharp, sour edge off the otherwise totally sour dish. It’s not strictly traditional to include this, but it’s important to know that limes in Latin America – certainly in Mexico – are often not as sour as those in most Western countries, including Australia and the US. Without oil, I find Ceviche is too sour. Even in Mexico, I found most Ceviches there to be too sour! (*She ducks as Mexicans throw rotten tomatoes at her!*)
Avocado and jalapeño – these add ins are traditional in some versions of Ceviche found in Mexico. Creamy pieces of avocado are a sensational pairing with the delicate pieces of fish!
Coriander/cilantro – essential fresh herb flavouring for ceviche. Coriander haters – sub with chives;
Red onion – very finely sliced so it flops and melds with the fish;
Garlic – crushed using a garlic press so it’s minced finely and “juicy”. We just use 1 small clove – it shouldn’t be overly garlicky; and
Tomato – included in some traditional versions, I really love just adding a bit (not too much) for beautiful pops of colour and fresh juiciness.
How to make Ceviche
The making part is very simple, but I’ve found the key is the order in which ingredients are added – ie what is marinated with the fish, and what is best added later.
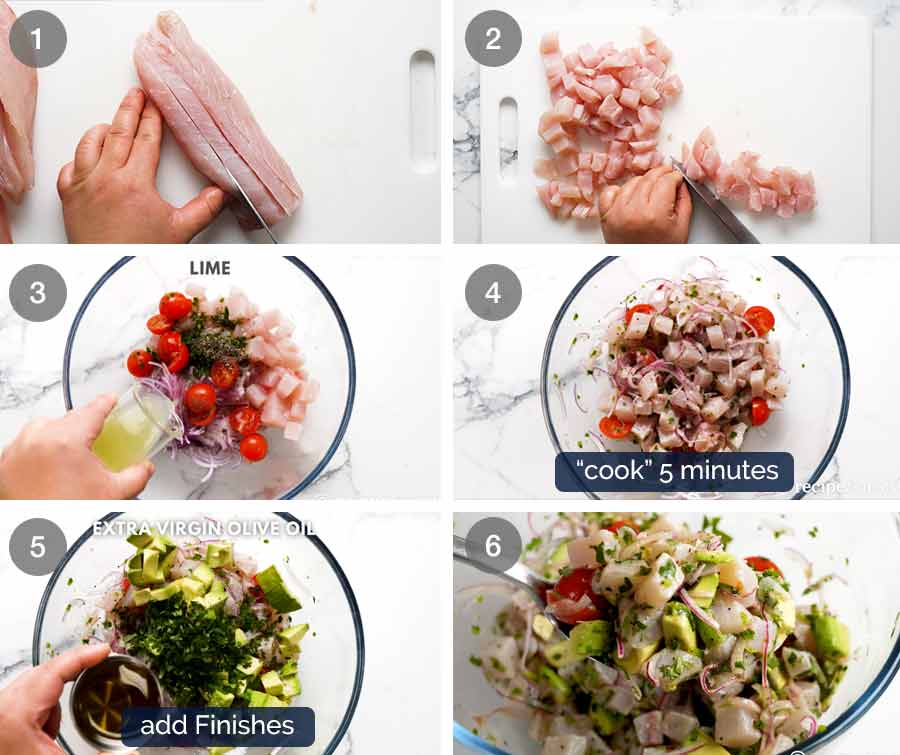
Fish – cut the fish into long strips;
Dice – then cut it into small cubes;
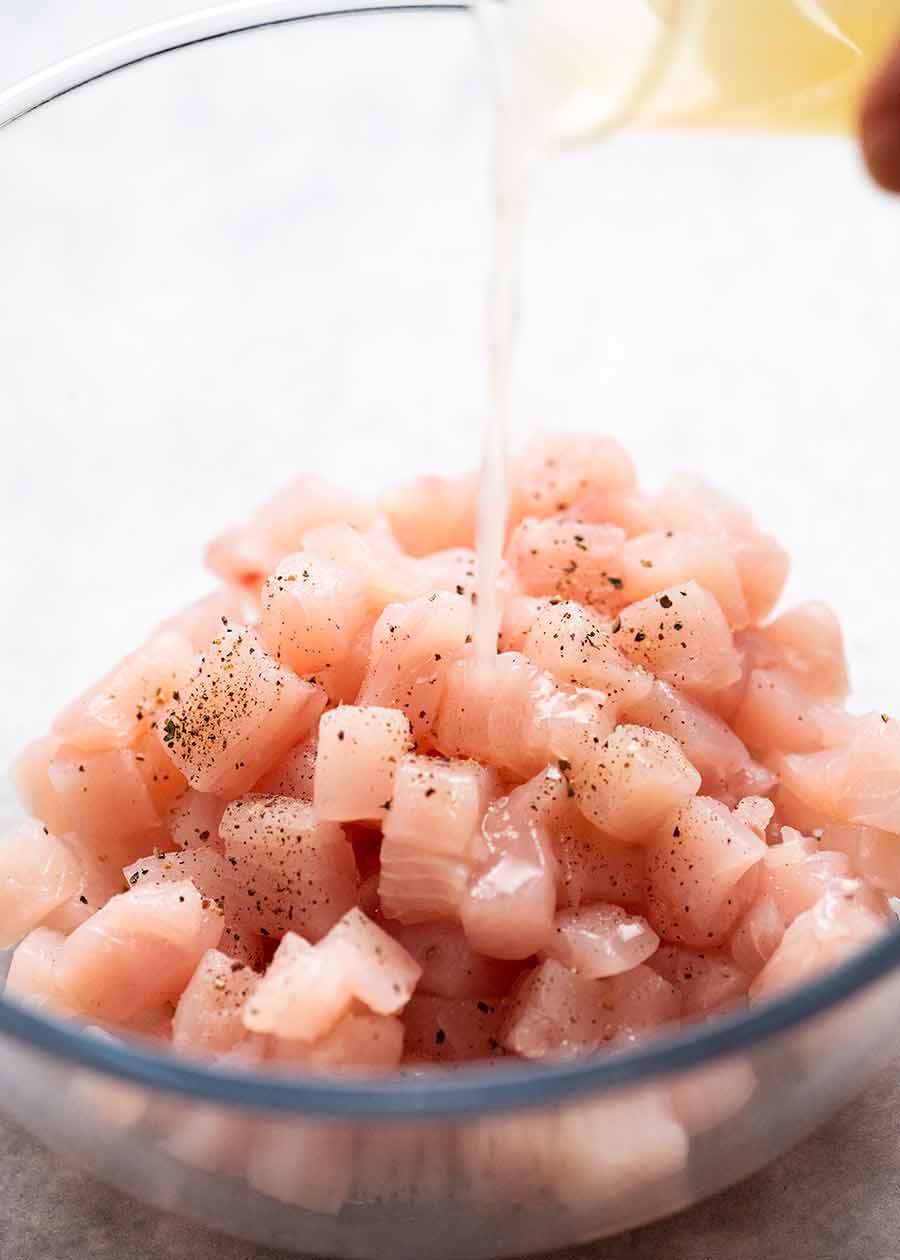
Combine fish with tomato, onion, jalapeño, pepper and lime juice. Do not add salt (this draws water out of the fish), avocado (these get bashed around too much when tossing) or olive oil (this dilutes the acidity of the lime juice and slows down the cooking too much);
“Cook” 5 minutes – gently mix, then set aside for 5 minutes to let the lime “cook” the fish;
Add olive oil, avocado, fresh herbs, salt then gently mix;
Serve immediately.
Despite what other recipes will tell you, there’s no need to be in a manic rush to get the ceviche on the table within 10 seconds otherwise the lime will over cook the fish. Ceviche is certainly best eaten fresh, but it’s still wonderful 20 minutes later. It’s not until around the 30 minute mark that the fish becomes a bit too firm for my taste (literally completely cooked through – but not like stove cooking so it’s not the best texture).
Note: in some countries (such as Peru), Ceviche is traditionally left to “cook” for several hours in the lime but larger pieces of fish are used. I like using small pieces – for better texture and ease of eating.
How to serve Ceviche
Just as there is no one way to make Ceviche, there are plenty of ways to serve it too!
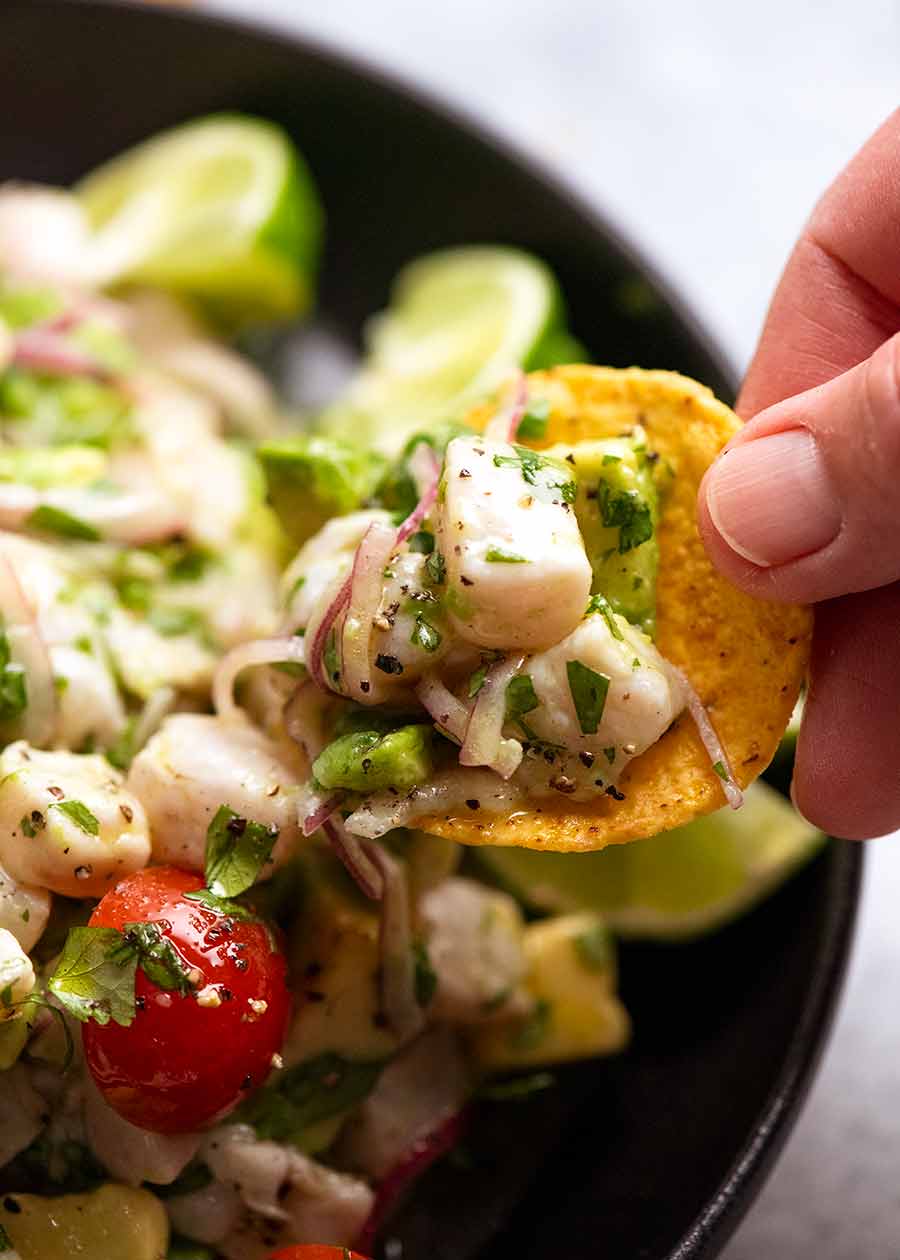
In Mexico and other parts of Central America, it’s often served in small “cups” or dishes , cocktail style, with corn chips or crispy tortillas/tostadas for scooping, as pictured above. I like using this idea to make platters of canapés to pass around at gatherings, as pictured on the below right.
In Peru it’s served as a meal with corn on the cob, slices of cooked sweet potato and sometimes with rice. In other countries it comes with plantain chips or rice.
In fine dining restaurants, it’s served in all sorts of fancy ways. One easy way is to spoon individual portions into a small dish with a side of crostini on the side (toasted small bread), as pictured below.
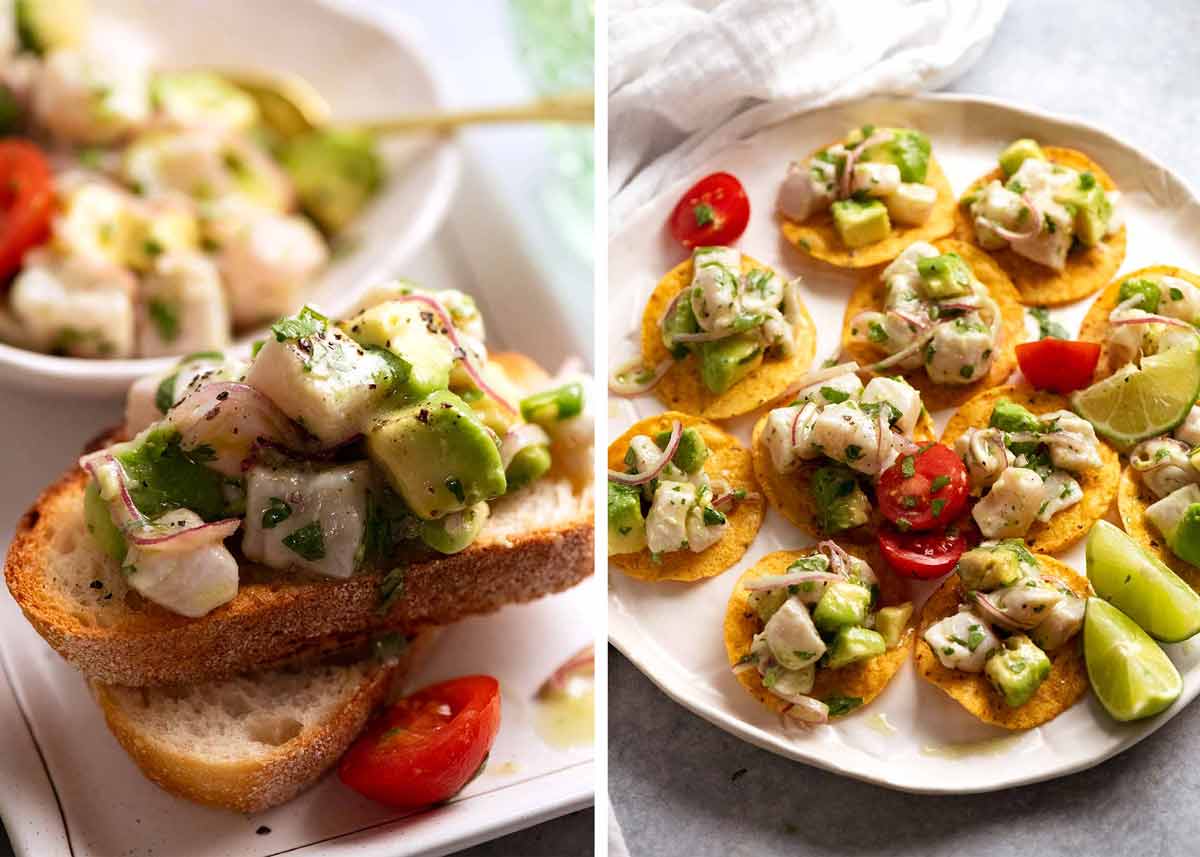
Of course, you can just by-pass all of that and just devour it straight out of the bowl with a spoon, which is exactly what I did.
I really hope you give this a go one day. Especially those of you who have previously been turned off by overly sour ceviche in the past.
Now – go make friends with some local fishermen! 😂 – Nagi x
Watch how to make it

Ceviche
Ingredients
“Cooked” fish:
- 400g / 14 oz kingfish, tuna, sea bass or other sashimi-grade fish suitable for raw eating (Note 1)
- 1/4 red onion , very finely sliced using mandolin (so it "flops")
- 2 tsp fresh jalapeño , finely chopped (or green chilli) – add more or less for spiciness
- 8 cherry tomatoes , halved (large ones quartered)
- 1/4 tsp black pepper
- 1/3 cup lime juice , fresh (or lemon juice)
Add ins:
- 1/2 tsp salt , cooking / kosher (or 1/4 tsp table salt, Note 2)
- 1 avocado , ripe, cut into 1.25cm / 1/2″ cubes
- 1/4 cup coriander/cilantro leaves , roughly chopped (sub chives)
- 2 tbsp extra virgin olive oil (Note 3)
Instructions
- Cut fish: Cut fish into 1.25cm / 1/2" cubes.
- Toss in lime, leave 5 minutes: Place in a bowl with onion, jalapeño, tomato, pepper and lime juice. Gently toss, then set aside for 5 minutes, mixing gently once.
- Add avocado then serve! Sprinkle over salt, then add avocado, coriander and olive oil. Gently stir, then serve immediately with corn chips (see in post for other ideas).
- Ceviche will be good for 20 minutes or so, then fish will start to overcook and firm up. Do not leave overnight (for food safety reasons).
Notes
- Kingfish (pictured in post)- popular choice of fine dining establishments
- Sea bass – traditional in Peruvian
- Tuna and mackeral – popular in Mexico
- Prawns / shrimp – traditional in Ecuador, popular in Mexico
- Halibut or Patagonian tooth fish – Chile
- Salmon – not traditional but excellent for ceviche
- Bream – many species all around the world
- Swordfish – used in some Latin American countries.
- Trevally – not traditional in South America, but beautifully soft-textured and excellent for ceviche
- Cod and mahi mahi – Popular options in America.
4. Leftovers – not recommended to keep leftovers for food hygiene purposes.
5. Nutrition per serving, assuming 5 servings (Ceviche only).Nutrition
More Fresh Fish recipes
More recipes that make the most of sparkling fresh fish!

Life of Dozer
Lazy bugger – stretching out as far as he can to rescue his toy because he can’t be bothered to dive back in. Can you imagine if pool Lifeguards had the same attitude?? I’m gonna stretch out to try to save you, but if I can’t reach you without getting my feet wet then too bad, I’m gonna leave you floating facedown in the pool! 😂

The post Ceviche appeared first on RecipeTin Eats.
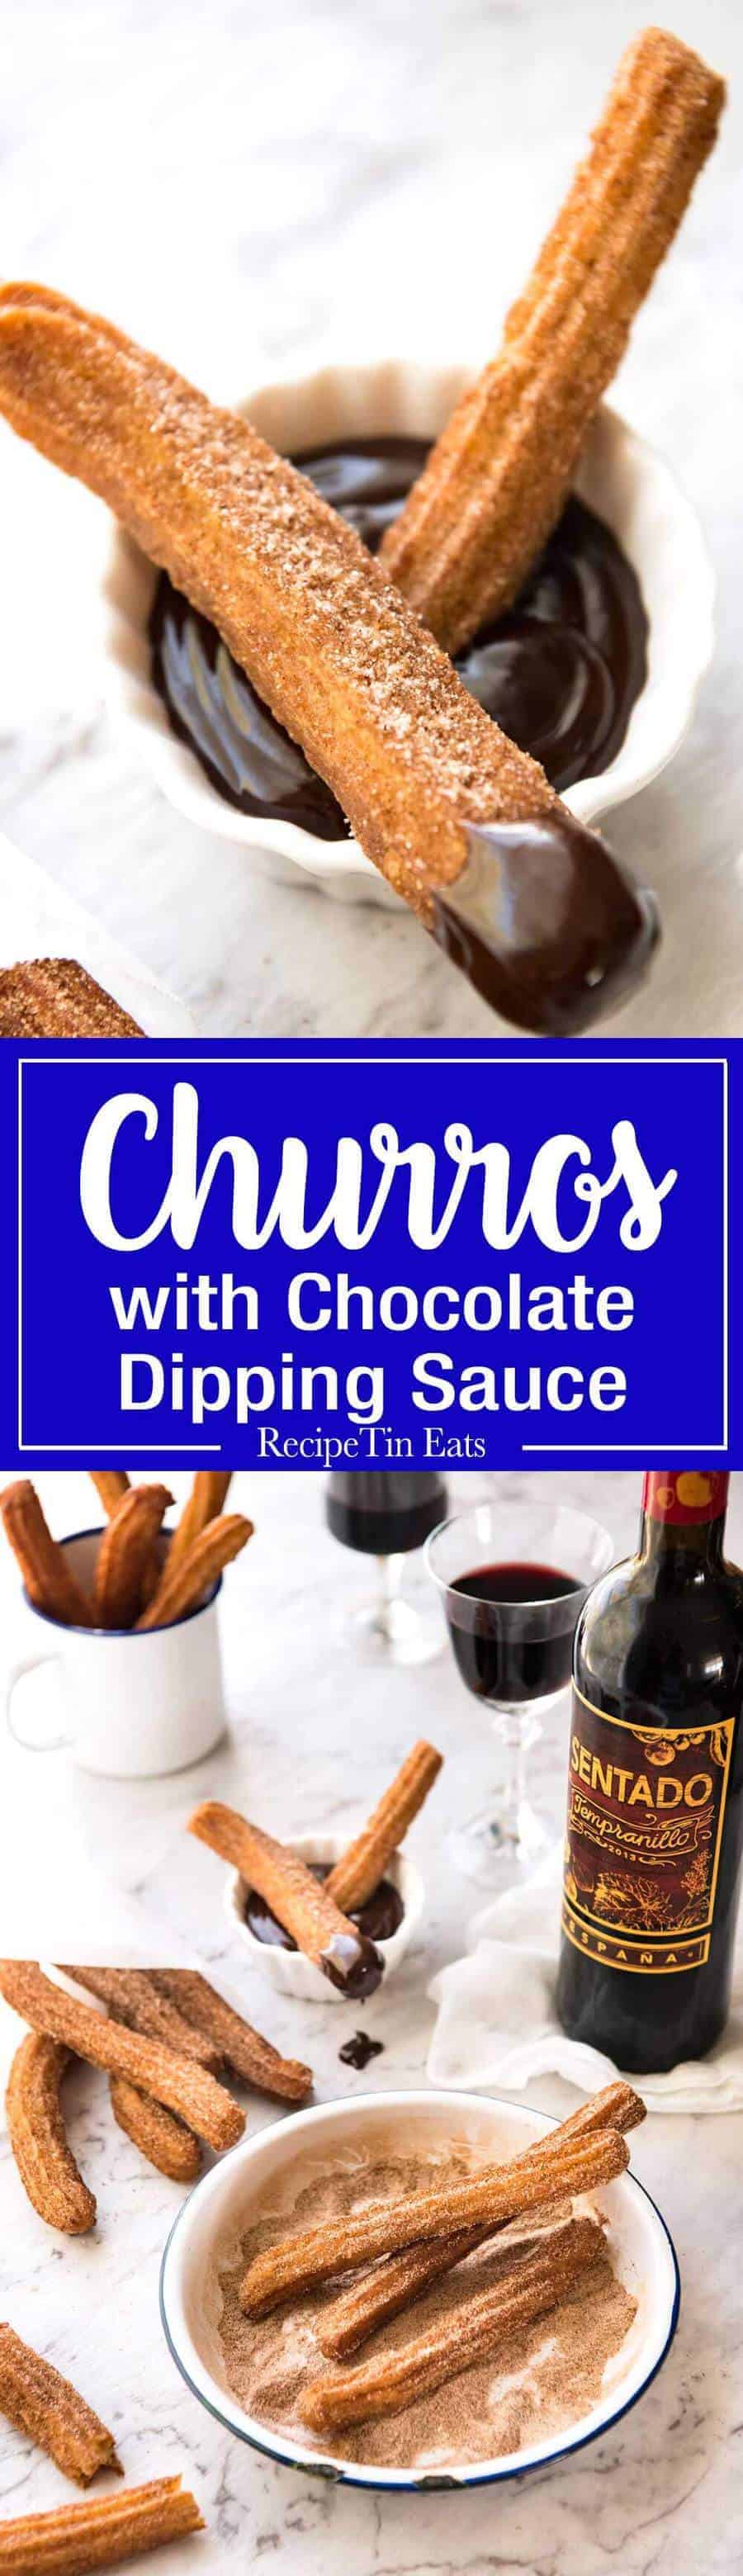
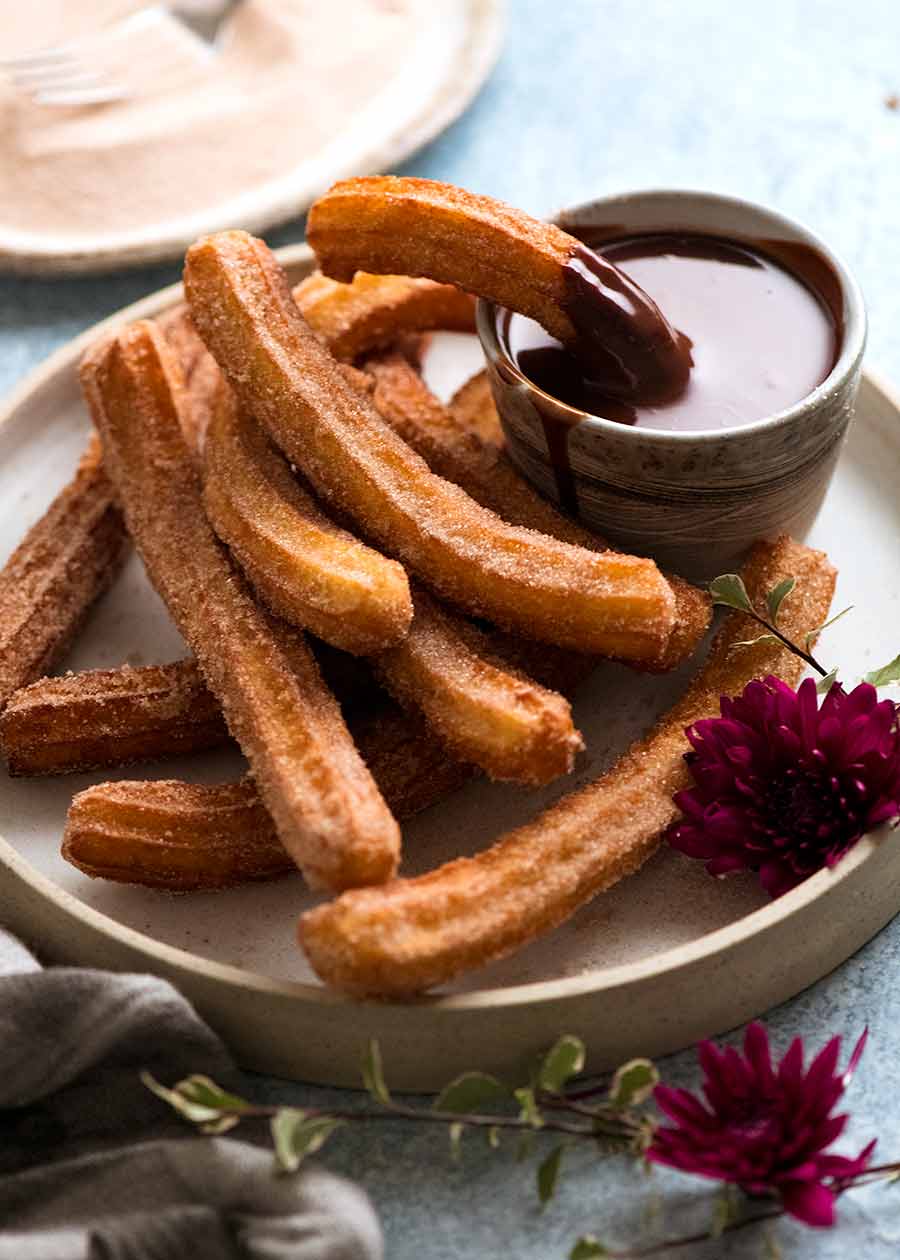
]]>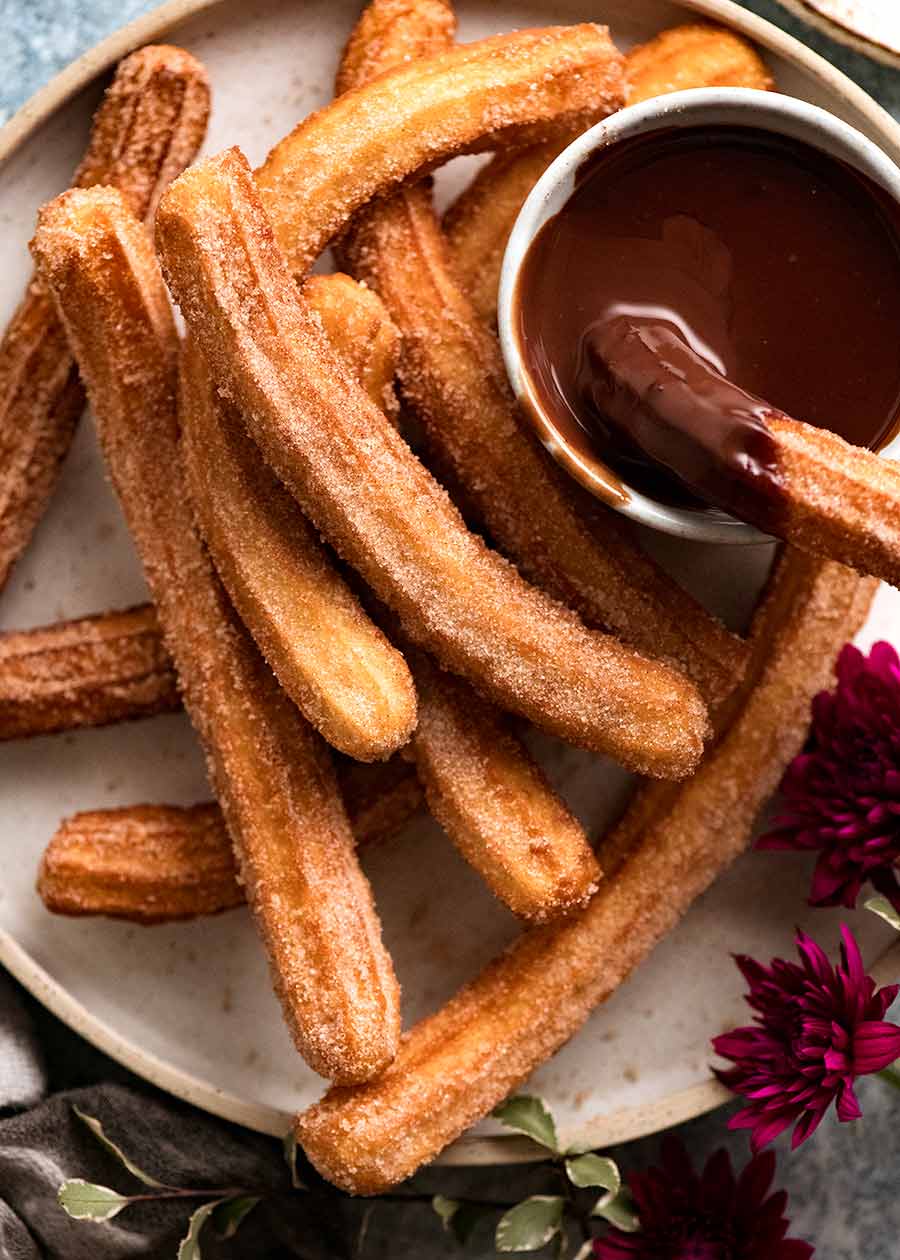 This churros recipe is astonishingly easy, and makes a truly great churros that’s hot and crisp on the outside, fluffy on the inside. The molten chocolate dipping sauce is mandatory, and you’ll have an entire batch on the table in a mere 20 minutes! BONUS: Churros are great for making ahead, making it a great party dessert.... Get the Recipe
The post Churros Recipe appeared first on RecipeTin Eats.
]]>This churros recipe is astonishingly easy, and makes a truly great churros that’s hot and crisp on the outside, fluffy on the inside. The molten chocolate dipping sauce is mandatory, and you’ll have an entire batch on the table in a mere 20 minutes!
BONUS: Churros are great for making ahead, making it a great party dessert.
Churros recipe
Up until several years ago, this churros obsessed food blogger thought Churros was native to Mexico. Thus on her first (but certianly not last) trip to Mexico, she was expecting to be in churro heaven. Churros, churros, churros everywhere.
But no. I barely saw churro at all.
Duh. Churro isn’t native to Mexico. It’s Spanish!🤦🏻♀️
So just as tourists here in Australia wonder why there aren’t kangaroos bounding around on the streets of Sydney and koalas snuggled in trees everywhere, I guess I totally missed the Churro memo.
Having said that though, it is actually very popular in the touristy areas of Mexico!!

We don’t break out the deep fryer very often around here. But with the promise of hot crispy churros waiting on the other side, and also because we only need to shallow fry rather than deep fry like when making things like Fried Chicken, we deem churros to be Fry-Worthy.
Also, it’s FRY-day today.😂 (FRIday) Admit it, you laughed!!
What goes in churros
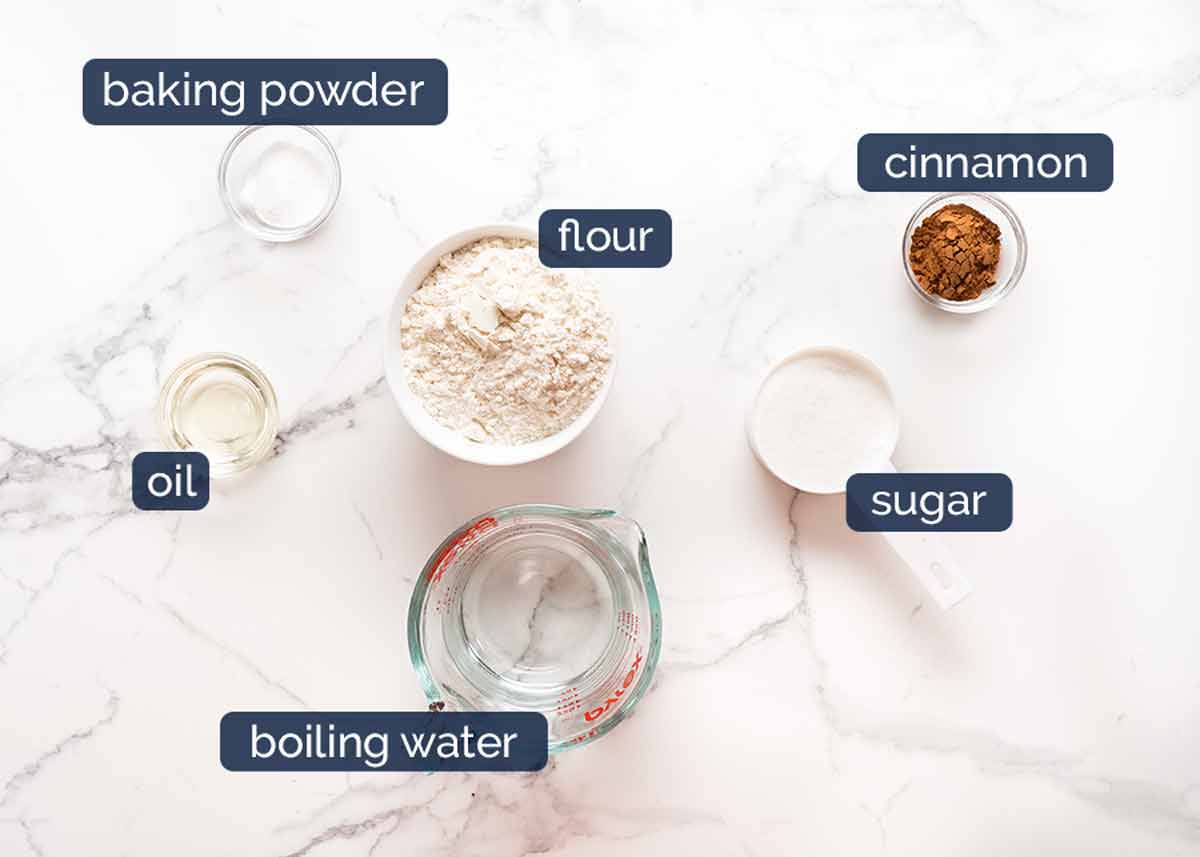
All you need is flour, baking powder, oil and boiling water to make the batter, then cinnamon and sugar for coating.
Boiling water is key here – it makes the batter a unique “gummy” texture so when piped and cooked, it retains the signature ridges. There’s no sugar in the batter – with the cinnamon sugar coating plus mandatory dipping sauce, you absolutely don’t need it.
What does churros taste like?
They taste like cinnamon doughnuts – but BETTER because you’ve got crispy ridges. The inside is fluffy like a doughnut and they are at their prime freshly made, but they reheat exceptionally well too making them a great make ahead for parties!
How to make churros
The batter is a mere dump-and-mix job, and it’s got a unique thick “gummy” texture so the churros holds its form when it’s piped, even before it hits the oil.
The safest and easiest way to cook churros is to use scissors. Because the batter is so thick, you can pipe the batter out and it will hang from the piping bag as you lower it into the oil (as opposed to dropping out, causing the oil to splash), then just snip with scissors.

How long to make them
They come in varying lengths, with longer ones (ie 30cm / 1 foot) being more of a novelty type at carnivals and tourist hot spots. Around 15cm / 6″ is a more practical length – still long enough to look impressive, but short enough to cook in a standard size household pot.
You could also make shorter ones for small bite size options, and if you don’t have a piping bag, just drop balls of dough into the oil and make churros doughnuts!

How to serve churros
I know this might sound like an odd section to include for those of you with extensive churros eating experience – but actually, churros is not so common here in Australia so let me describe how to eat it!
It’s traditionally a street snack, so you buy one long one or a little paper cup with a few shorter ones in it, then eat it while walking around on the street. Managing a dipping sauce while on the move can become a bit tricky, but where there’s a will, there’s a way.
At home, I just pile them up on a platter with a little cup of the dipping sauce, then you just dunk and eat!
Don’t count the churros and compare to what the recipe says it will make. I’ll just tell you now – there’s two missing!
How to REHEAT Churros!
As with anything deep fried, churros are at their prime when they’re freshly made. They stay warm and crisp for around 20 minutes once they come out of the oil, which is ample time to cook a whole batch, coat in cinnamon sugar then serve.
After 30 minutes or so, they soften. And though, like doughnuts, they are still delicious when cold and soft, it’s definitely worth popping them in the oven to reheat and more importantly, crisp up again.
And if you are making these ahead intentionally (as opposed to just reheating leftovers), store the churros WITHOUT the sugar coating – this will make them reheat to near freshly cooked perfection, then just roll in the cinnamon sugar and serve! – Nagi x
PS BONUS: Churros impresses people. “You MADE these??!” *She beams with pride, making a weak attempt to hide her glee*😂
Watch how to make it

Churros Recipe
Ingredients
Cinnamon Sugar Coating
- 1/4 cup caster / superfine sugar
- 2 tsp ground cinnamon
Churros
- 1 cup flour, plain / all purpose (Note 1)
- 1 tsp baking powder
- Pinch of salt
- 1 tbsp vegetable, canola or olive oil (not extra virgin olive oil)
- 1 cup boiling water
- 2 cups+ vegetable or canola oil , for frying
Chocolate Sauce
- 1/2 cup dark chocolate or semi sweet chocolate chips (Note 2)
- 1/2 cup thickened / heavy cream (heavy cream)
Instructions
- Cinnamon sugar coating: Combine sugar and cinnamon in a shallow bowl, set aside.
- Batter: Mix flour, baking powder and salt in a bowl. Add oil and water and mix until just combined - it should be a thick, gummy batter, like a wet sticky dough, not thin and watery.
- Piping bag: Transfer dough into a piping bag with a 8mm / 1/3" star tip nozzle. Set aside while oil heats.
- Heat oil: Heat 5cm / 2" oil over medium high in a small pot, wok or small but deep skillet (Note 3) to 170°C/340°F, or until it takes 20 seconds for a small cube of bread to turn golden.
- Pipe & snip: Pipe 15cm / 6" lengths of dough into the oil, snipping with scissors (snip close to oil surface to avoid splash). Do 3 to 4 per batch, makes 10 to 12 in total.
- Cook: Cook for 2-3 minutes or until golden and crisp, rolling occasionally.
- Drain: Remove onto paper towel lined plate to drain. Then roll in sugar. Serve hot with Chocolate Sauce!
Chocolate Sauce:
- Place in a heatproof bowl and microwave in 30 second bursts, stirring in between, until smooth. Set aside for 5 minutes to cool and thicken slightly.
Notes

Originally published 2016. Long overdue for fresh new photos, brand new process steps and video!
More recipes that are easier than you think
A few more recipes people assume are too hard, but are much easier than you think!


Life of Dozer
He’s not allowed in the shoot room when I deep fry – and he ain’t happy about it!

And from the original publication date in 2016:
Caved. ☺️

The post Churros Recipe appeared first on RecipeTin Eats.
]]>