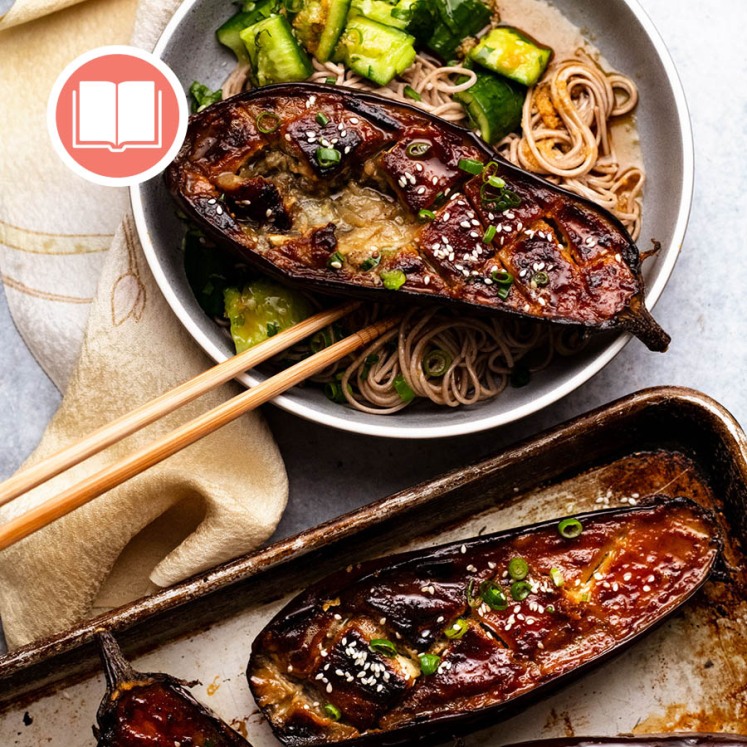
 Try this irresistible, simple recipe for stuffed eggplant: oven-roasted eggplant halves topped with Moroccan spiced lamb or beef. Low-cal, low-carb, low effort and utterly delicious! Moroccan stuffed eggplant You’ll often hear me declaring quite passionately that I think eggplant is one of the most underrated vegetables around. They’re cheap. They’re meaty. And they’re fabulously versatile,... Get the Recipe
The post Easy Moroccan Stuffed Eggplant (beef or lamb) appeared first on RecipeTin Eats.
]]>Try this irresistible, simple recipe for stuffed eggplant: oven-roasted eggplant halves topped with Moroccan spiced lamb or beef. Low-cal, low-carb, low effort and utterly delicious!
Moroccan stuffed eggplant
You’ll often hear me declaring quite passionately that I think eggplant is one of the most underrated vegetables around. They’re cheap. They’re meaty. And they’re fabulously versatile, used in cuisines worldwide like Asian, Italian, Greek and Indian, prepared through various cooking methods including frying, steaming, roasting and simmering.
Today, we’re smearing, roasting and stuffing. Well, topping, not scooping-and-stuffing, in a manner that gives it a semi-stuffed vibe. Think of this as a mid-week take on traditional stuffed eggplant dishes you find in Arabic cuisine that involves hollowing out eggplants, stuffing with rice, meat, herbs and nuts, often baked in a tomato sauce. Sounds magnificent, doesn’t it? And it is. but there’s a lot more pots and pans involved! We’re going simple today. You can make this tonight, after work!!
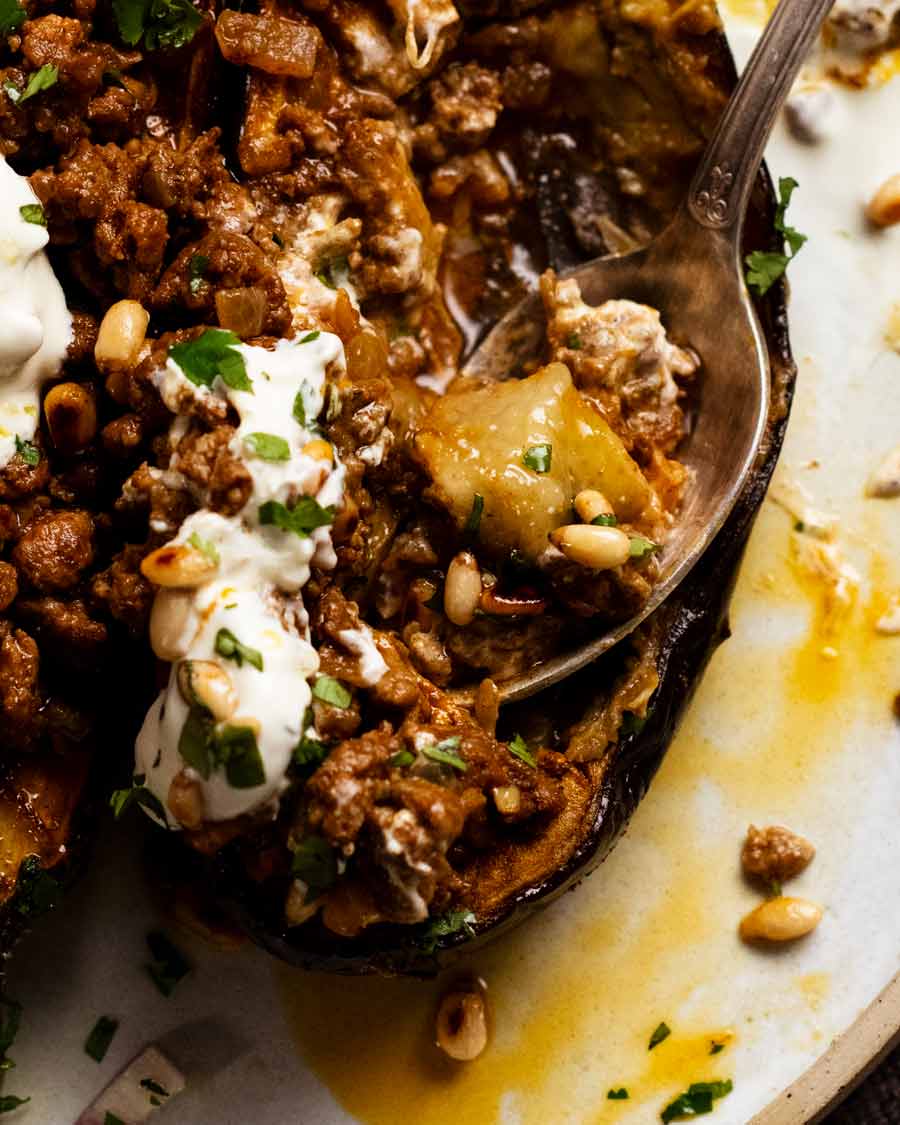
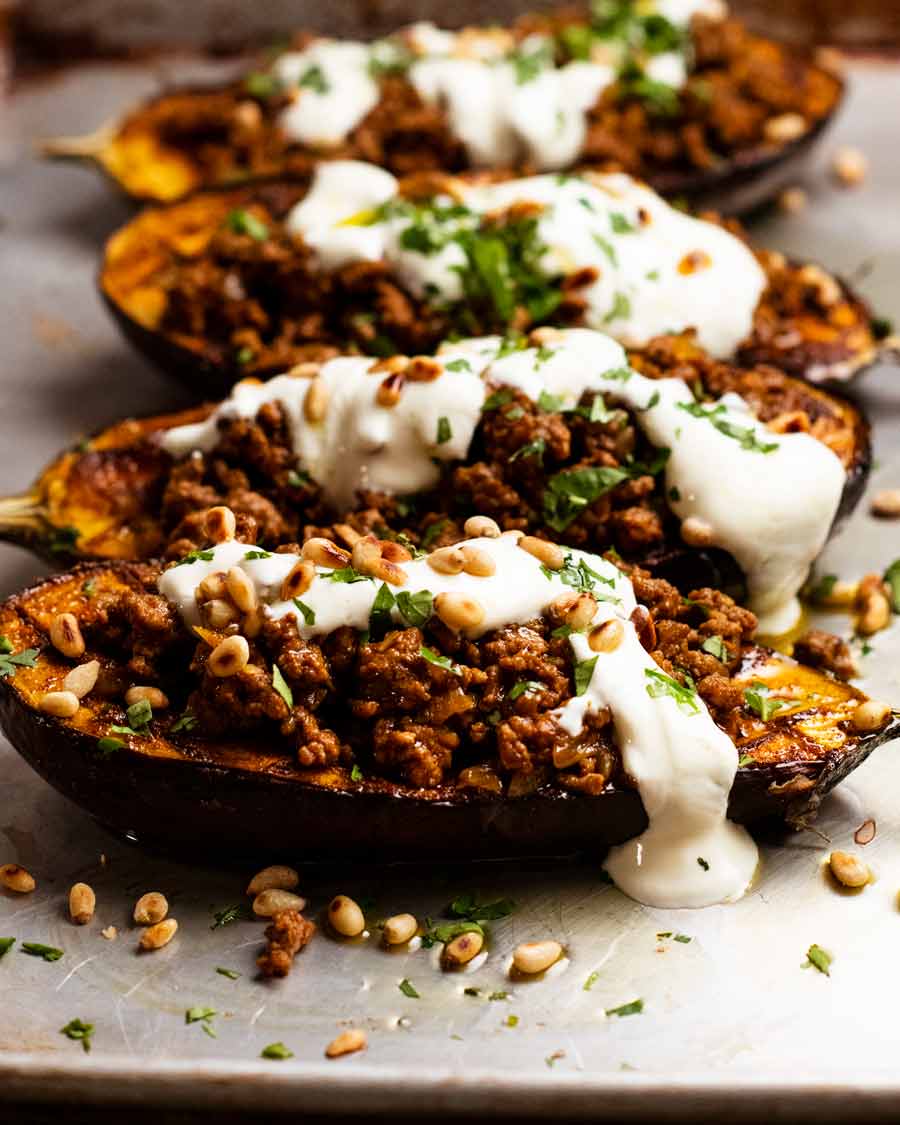
Nice close up of said soft juicy eggplant!
Ingredients in Moroccan stuffed eggplant
The base flavouring for this Moroccan stuffed eggplant is a homemade Chermoula spice mix which does double duty as the spice paste for the eggplant as well as flavouring the meat filling.
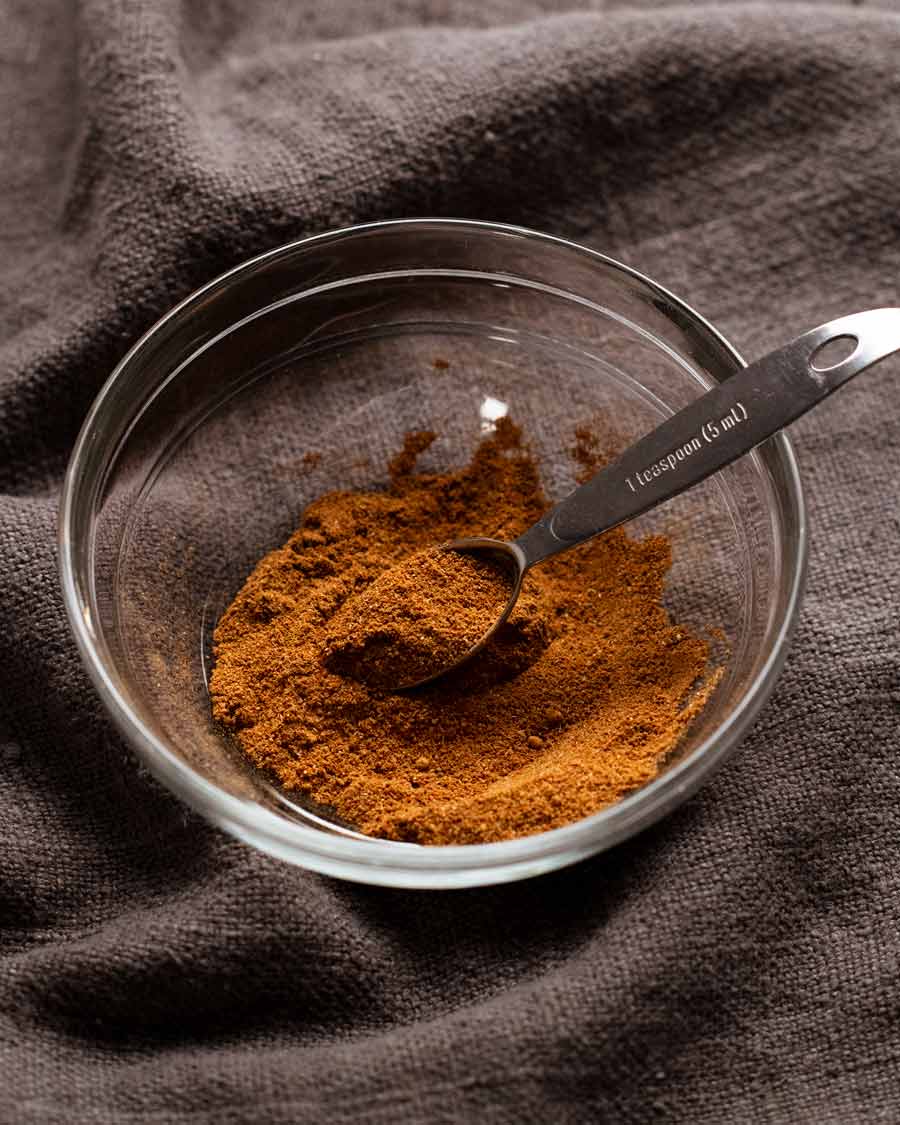
Chermoula spice mix
Chermoula is a North African spice mix that traditionally is a marinade or sauce containing fresh coriander, garlic and spices. Sometimes you can also find it in a dry spice mix form. We’re using the dry blend today for our purposes.
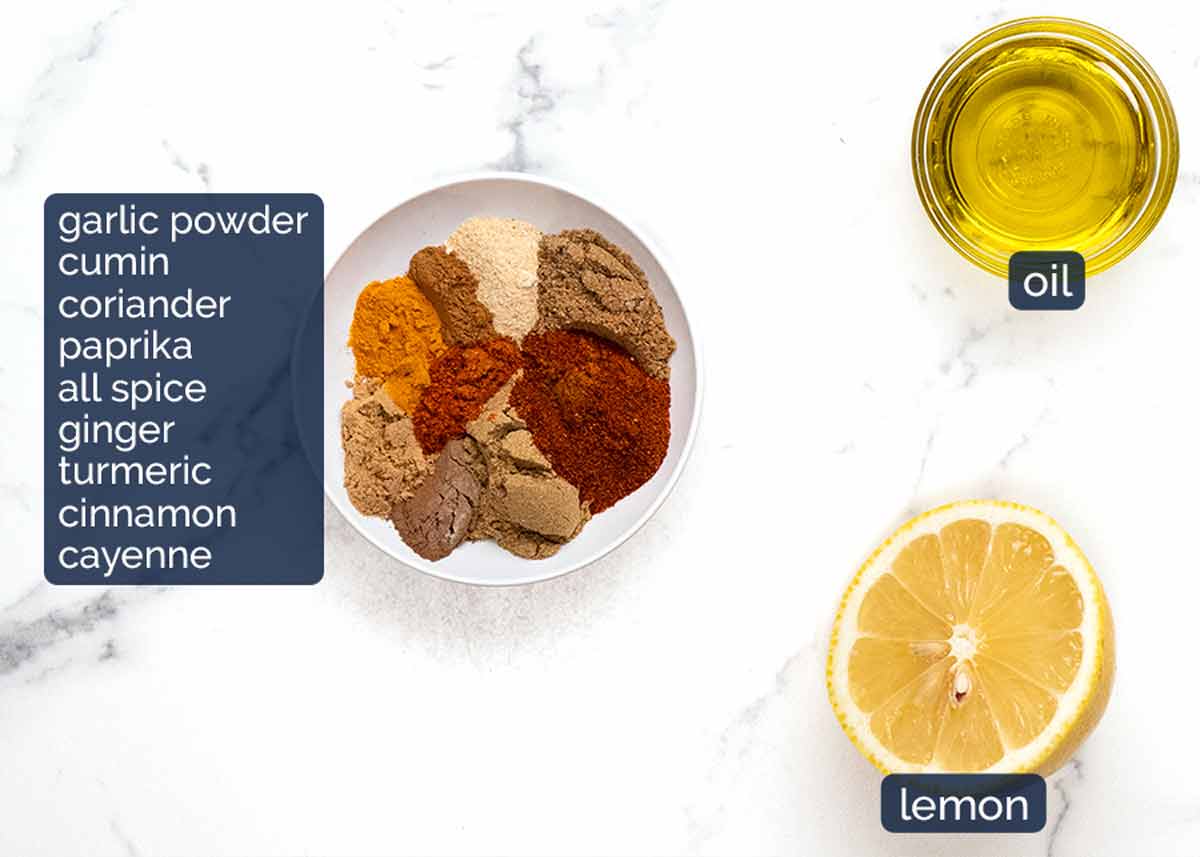
The spices – The majority of the spices are pantry staples, but don’t make a special trip out if you’re missing one or two…or even three! There’s enough in the blend that you can substitute with something else – suggestions are in the recipe notes.
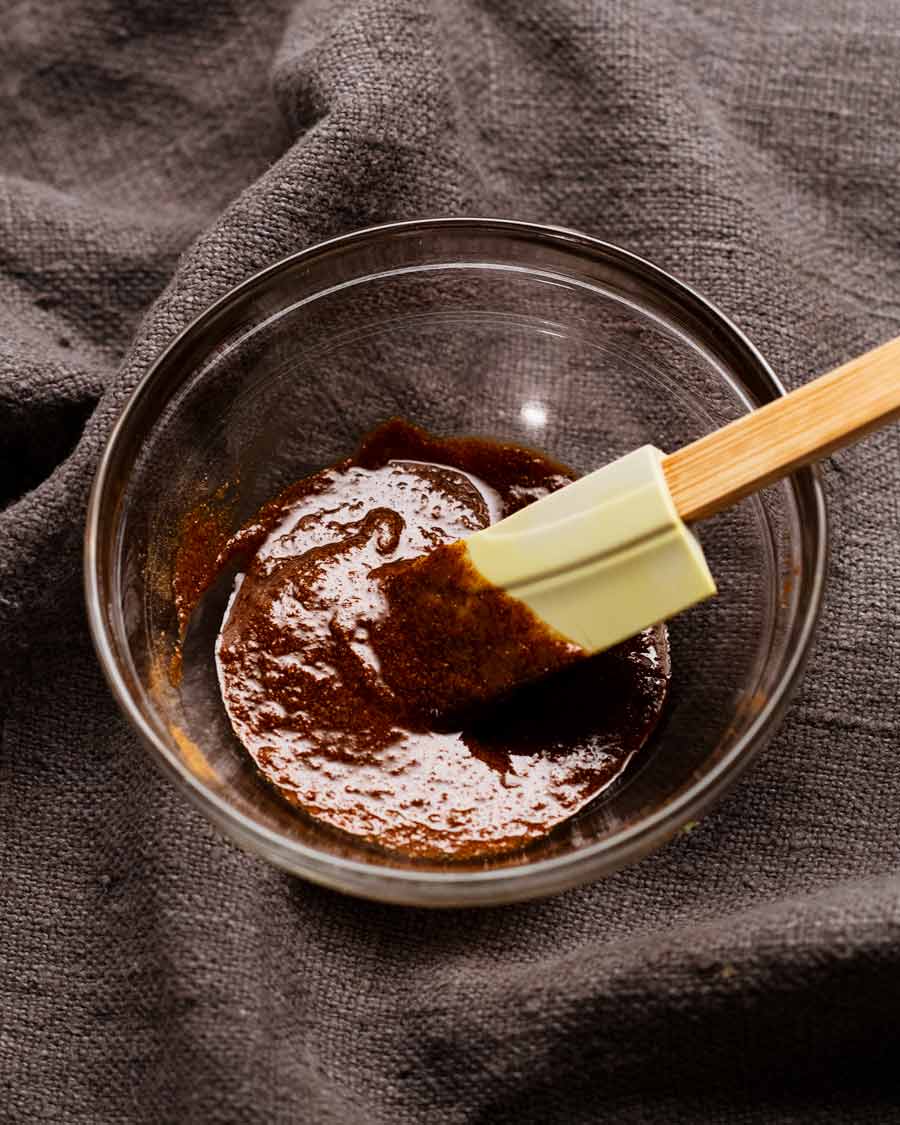
Olive oil and lemon juice – These are used to make the paste. I like to use lemon juice to add a bit of tang as well as cutting down on the oil required to make a smear-able paste.
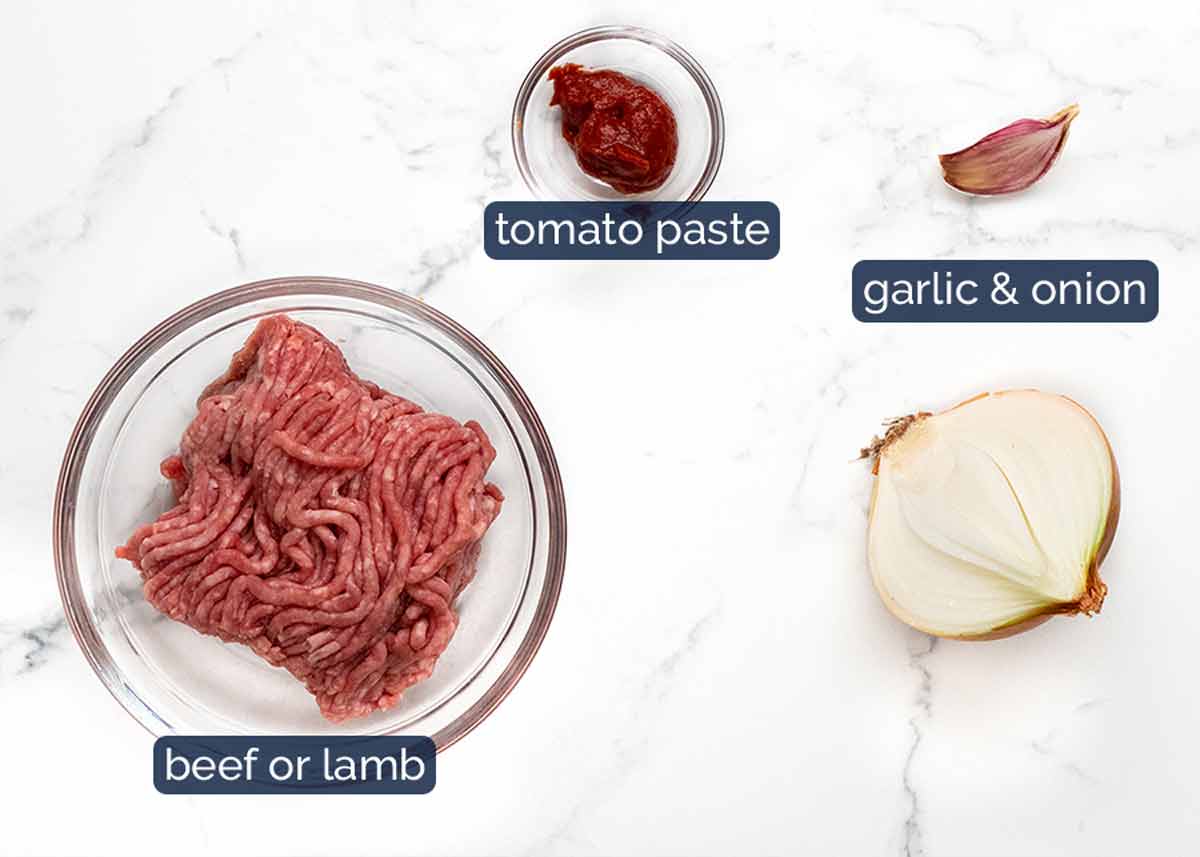
The meat filling (lamb or beef)
Here’s what you need to make the meat filling. You can use lamb or beef, though if I had my pick I’d choose lamb as it’s a classic pairing with flavours from the Arab world.
3 teaspoons of the Chermoula spice blend is used to flavour the filling. In addition to this, we have garlic and onion for aromatics, and a little tomato paste to bind the filling together.
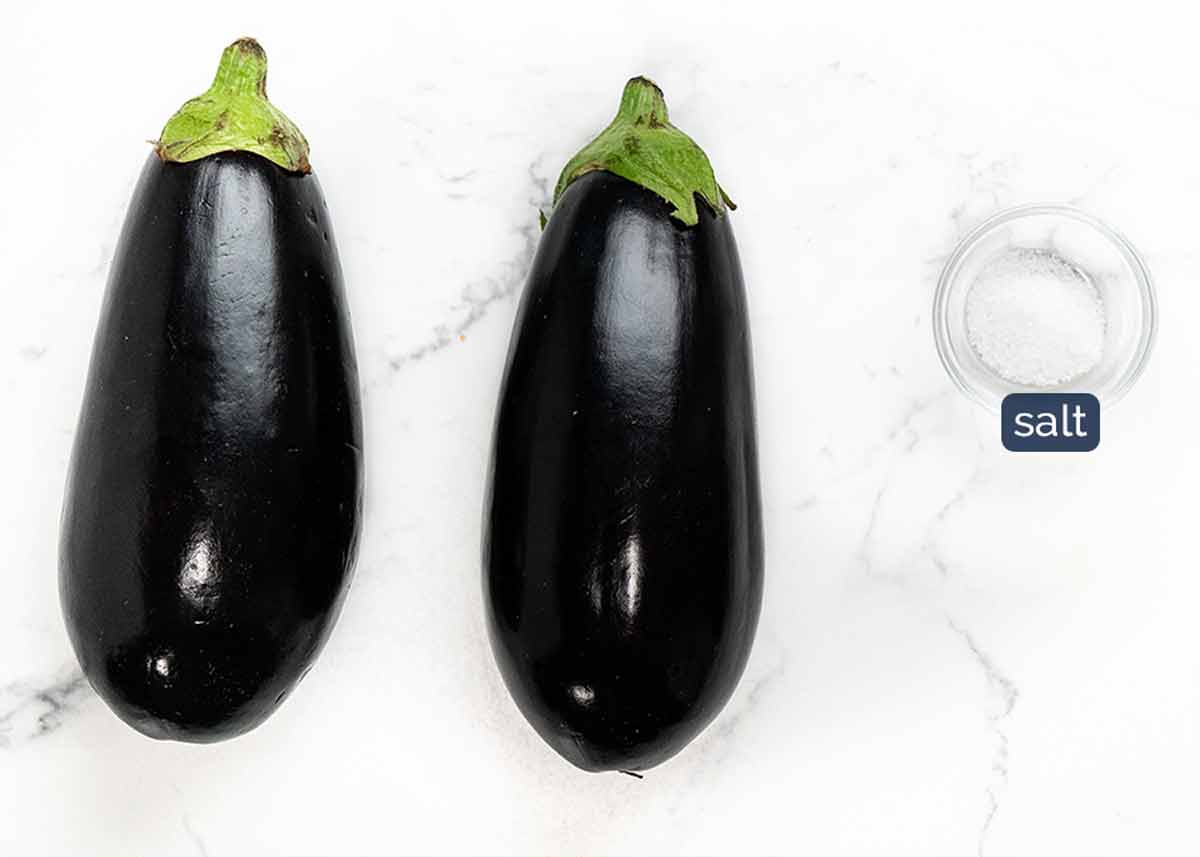
The eggplant
Choose eggplants around 250g/8oz and 17cm/7″ long. Don’t worry about exact size – adjust toppings accordingly. If you end up with larger eggplants, the topping layer might be slightly thinner, but the dish will still be packed with flavor.
Salt helps remove moisture from eggplants. More on this below!
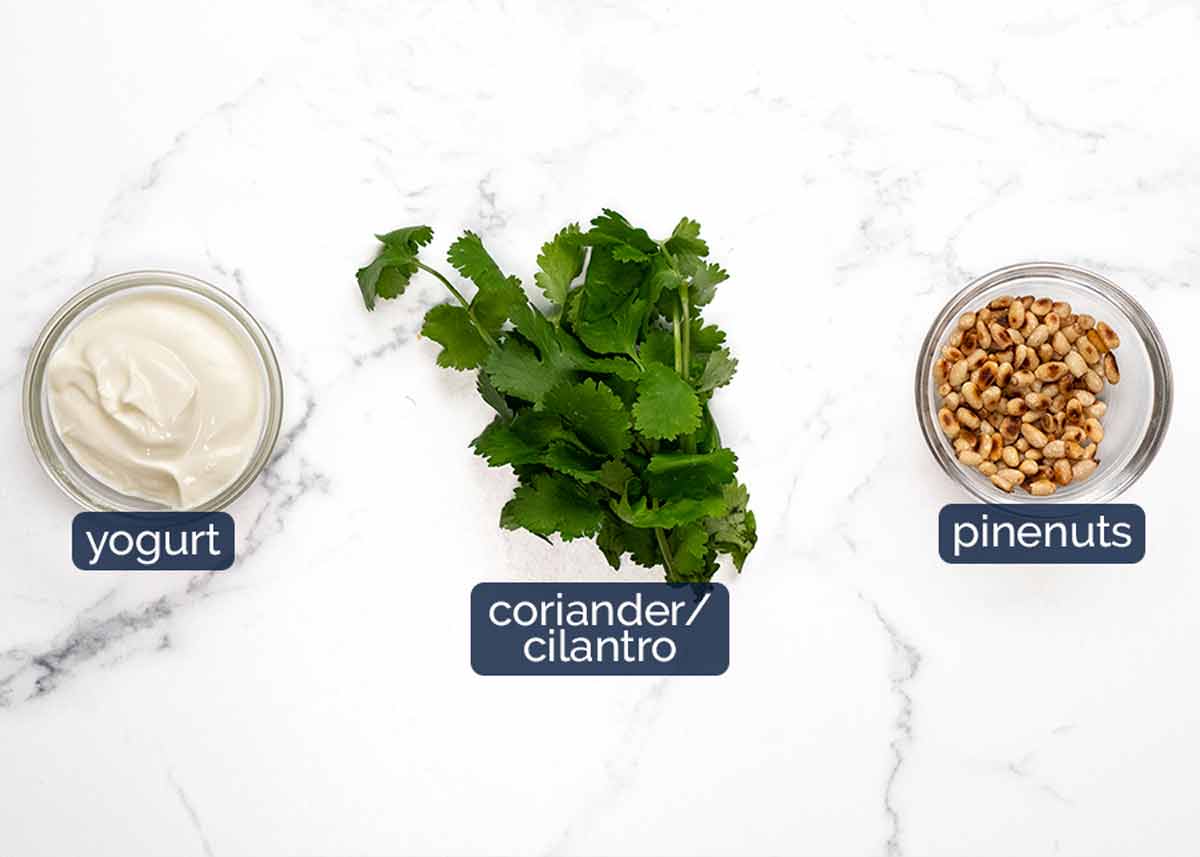
Toppings
And lastly, the toppings! It really finishes this dish so I urge you to use them. The pine nuts are a great finishing touch, though other nuts will make an adequate substitute (almonds, macadamia, walnuts, or seeds).
If you’re anti-coriander/cilantro, switch with parsley!
How to make Moroccan Stuffed Eggplant
As mentioned above, I call it stuffed because describing it as a “topped” eggplant just doesn’t seem to capture the essence of this dish. 😂 But actually, it’s not properly stuffed – which means no scooping necessary, which means it’s easier to make. Win!
Sweating the eggplant (recommended)
Sweating the eggplant to remove excess water is a recommended but not essential step. It seasons the flesh as well as drawing out excess water that otherwise pools in the eggplant which dilutes flavour when you’re eating it.
But you can mostly get around this problem by simply cutting slits in the skin to let the water escape as it roasts. So don’t sweat it if you don’t have time to sweat it! *Sorry, I couldn’t resist!*
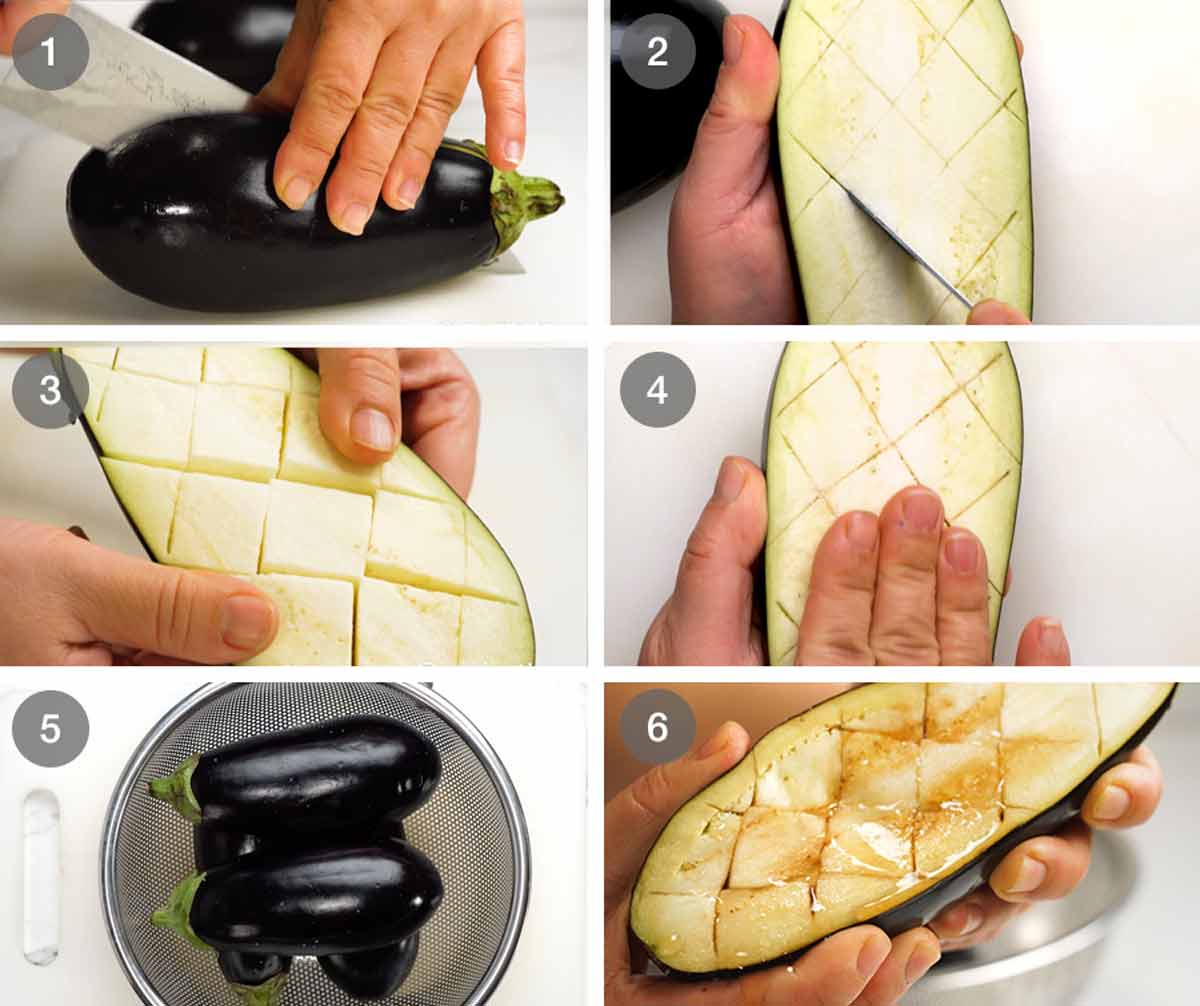
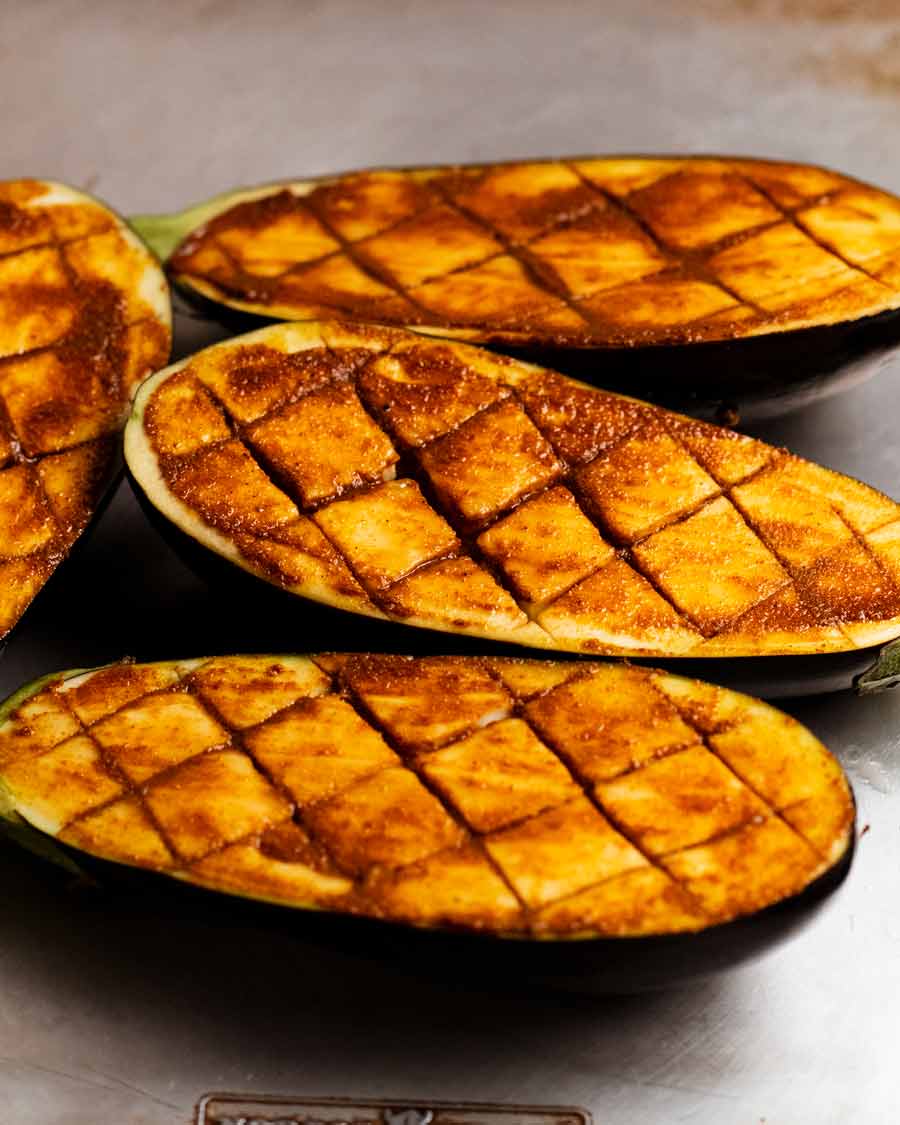
Cut the eggplant in half lengthwise. Keep the cap/stem intact and cut through it, it helps hold the eggplant together once roasted and soft.
Diamonds – Using a small sharp knife, cut 2.5cm/1″ diamonds into the flesh, cutting down as far as you are comfortable without piercing the flesh.
The said diamonds!
Salt – Sprinkle the surface with salt and rub it in. It’s good to get it into the slits but even if you just rub the surface, the salt will make it’s way into the slits.
Sweat for 30 minutes. I put the eggplant upside down in a colander to allow the water to drip out.
Squeeze like sponge to remove the excess water then pat the surface dry.
Making the “stuffed” eggplant
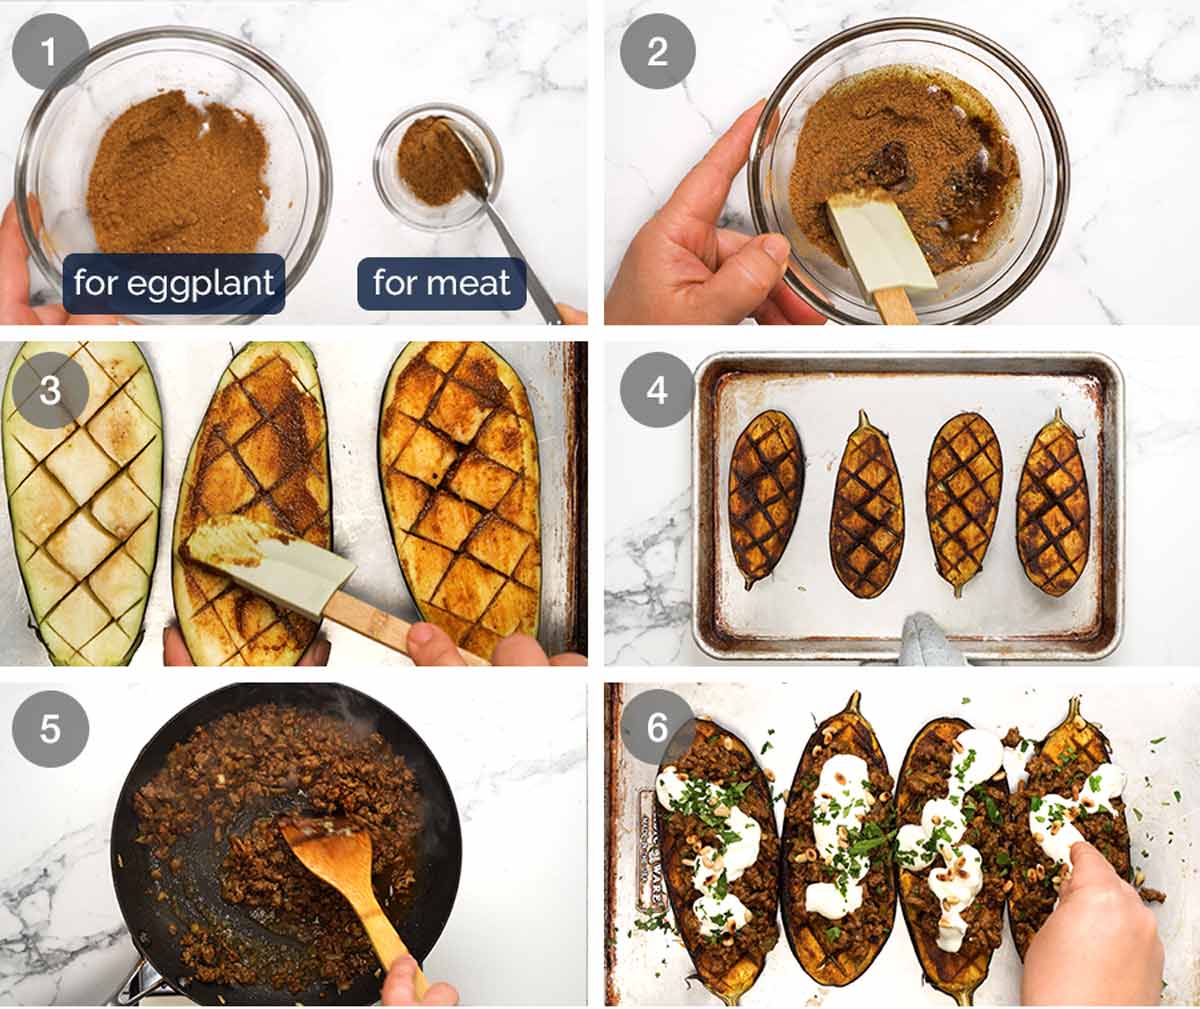
Mix the Chermoula spice blend in a bowl. Measure out 3 teaspoons and set aside for the meat.
Paste – Add olive oil and lemon juice into the remaining chermoula and mix to form a paste.
Smear the paste onto the surface of the eggplant.
Roast for 45 minutes at 180°C/350°F (160°C fan) or until the eggplant is softened. Sometimes it takes longer – don’t forget to check the edges.
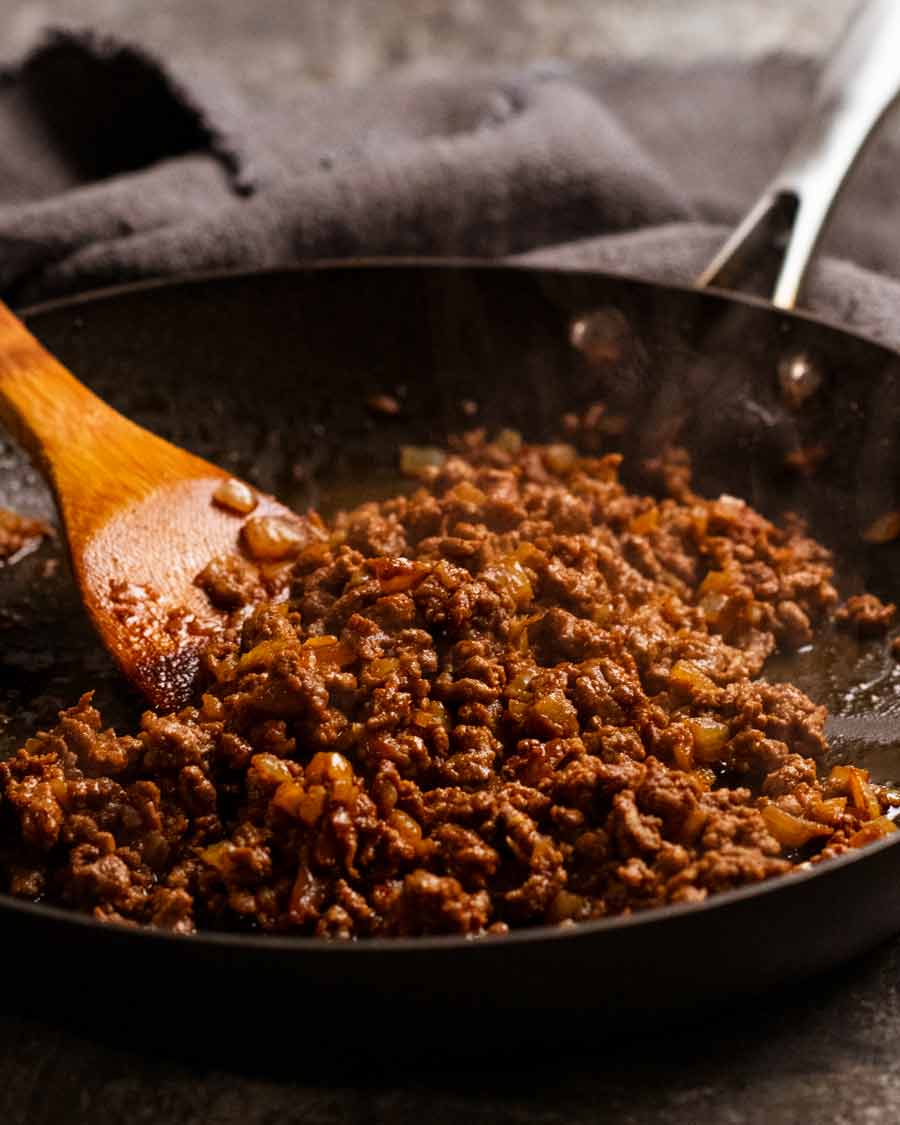
Spiced meat – A quick cook! Sauté the garlic and onion, then cook the lamb with the reserved Chermoula spice blend. Finally, add the tomato paste and water to make the filling “juicy” (rather than dry and crumbly).
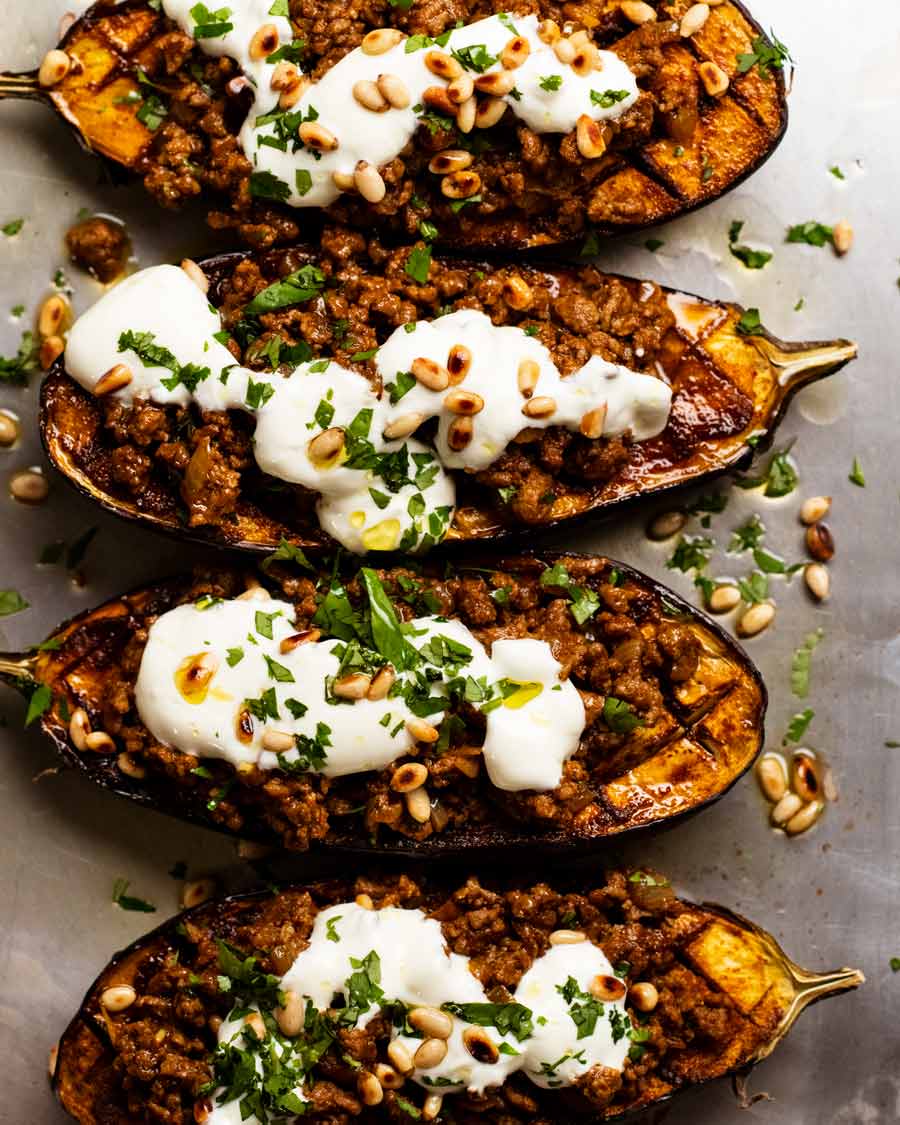
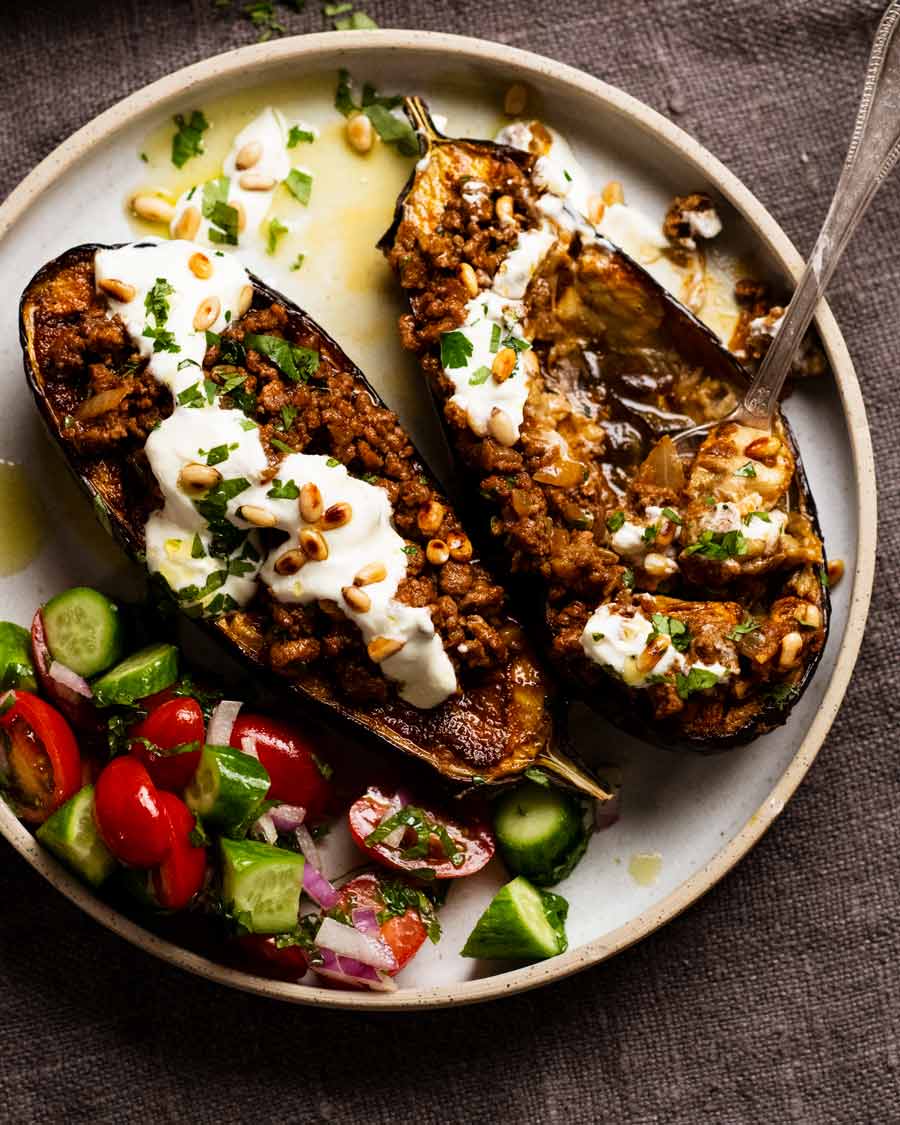
Assemble – Top the roasted eggplant with the lamb filling. Dollop on yogurt, sprinkle with pine nuts and coriander then dig in!
Matters of serving
Servings
This recipe is designed to serve:
2 people as a generous dinner with a small side salad;
4 as a meal with a starch (flatbread, couscous) and a substantial side (like Honey Cinnamon Pumpkin Lentil Salad, roast veg, chickpea salad); or
4 people as a generous starter.
Low carb, low calorie!
For the eggplant alone, it’s a mere 450 calories for a whole eggplant (ie 2 halves) with only 22 grams of carbs. To be honest, a serving of the eggplant alone makes for a satisfying meal – you have protein and vegetables covered! Though I do like to add something fresh on the side, even if it’s just some plain fresh cucumber and tomato.
So, it’s low calorie, low carb, simple to make and a something different to make with beef mince rather than the usual Spag Bol. What do you think?? Feel like giving this a go? I HOPE SO! – Nagi x
Watch how to make it
Easy Moroccan Stuffed Eggplant (beef or lamb)
Ingredients
Eggplant
- 2 x 250g/8oz eggplants (aubergines), ~17cm/7" long (Note 1)
- 3/4 tsp cooking salt / kosher salt
- 1 tbsp extra virgin olive oil
- 1 tbsp lemon juice (or more oil)
Chermoula spice mix (Note 2)
- 1 1/2 tsp EACH coriander, paprika
- 1 tsp cumin
- 3/4 tsp all spice powder
- 1/2 tsp EACH garlic powder, ginger, turmeric powder
- 1/4 tsp cinnamon
- 1/4 tsp cayenne pepper
Spiced beef or Lamb topping
- 1 tbsp olive oil
- 1 garlic clove , finely minced
- 1/2 onion , finely chopped
- 250g / 8oz beef or lamb mince , lean if you can (chicken, turkey, pork also ok)
- 1/2 tsp cooking/kosher salt
- 2 tsp tomato paste (Note 3)
- 1/4 cup water
To Serve
- Yoghurt , plain
- 2 tbsp coriander/cilantro leaves , roughly chopped (sub parsley)
- 2 tbsp pinenuts , toasted (Note 4)
Instructions
- Preheat oven to 180°C/350°F (160°C fan).
- Sweat eggplants (recommended, see Note 5 to skip) – Cut eggplants in half then score with 2.5cm / 1" diamonds. Rub surface with salt, getting some into the slits. Place face down in a colander and set aside for 30 minutes. Gently squeeze like a sponge to remove excess water, pat surface dry.
- Mix Chermoula spice mix ingredients in a bowl. Remove 3 teaspoons for the meat and set aside. Add olive oil and lemon juice into the remaining spice mix and mix into a paste.
- Roast eggplant – Place eggplant on baking tray. Slather spice mix onto the surface. Roast for 45 minutes until softened.
- Spiced topping – Heat oil in a non stick skillet over medium high heat. Cook onion and garlic for 1 minute. Turn heat up to high, add lamb/beef and cook, breaking it up as you go, until you no longer see red. Add reserved spices and salt, then cook for a further 1 minute. Add tomato paste and cook for 1 minute. Stir in water, cook for 1 minute until it's juicy but not watery.
- Assemble – Top eggplant with beef/lamb. Sprinkle over coriander, dollop with yogurt and pine nuts. Finish with an extra drizzle of extra virgin olive oil, if desired!
Notes
- All spice – mixed spice
- Garlic powder – onion powder, or fresh garlic
- Ginger – more garlic
- Turmeric powder – saffron
- Cinnamon – more all spice
 Make ahead – Roast the eggplant and meat filling. Fully cool both, uncovered, then put into containers in the fridge. Re-warm both using method of choice (juice up the meat with a splash of water if needed) then assemble!
Leftovers will keep for 3 days in the fridge. Not convinced cooked eggplant will freeze well but the meat will be fine for 3 months!
Nutrition per serving, using lean beef – 2 eggplant halves (i.e. one whole eggplant) per serving. This is a satisfying meal even by itself!
Make ahead – Roast the eggplant and meat filling. Fully cool both, uncovered, then put into containers in the fridge. Re-warm both using method of choice (juice up the meat with a splash of water if needed) then assemble!
Leftovers will keep for 3 days in the fridge. Not convinced cooked eggplant will freeze well but the meat will be fine for 3 months!
Nutrition per serving, using lean beef – 2 eggplant halves (i.e. one whole eggplant) per serving. This is a satisfying meal even by itself!Nutrition
Originally published in March 2016. Majority spruced up in 2023 with a better, more streamlined recipe with better flavour, sparkling new photos and a brand new recipe video!
Proof of eggplant fondness
Life of Dozer
Can’t even whiteboard recipe ideas without Mr D hovering around.

The post Easy Moroccan Stuffed Eggplant (beef or lamb) appeared first on RecipeTin Eats.
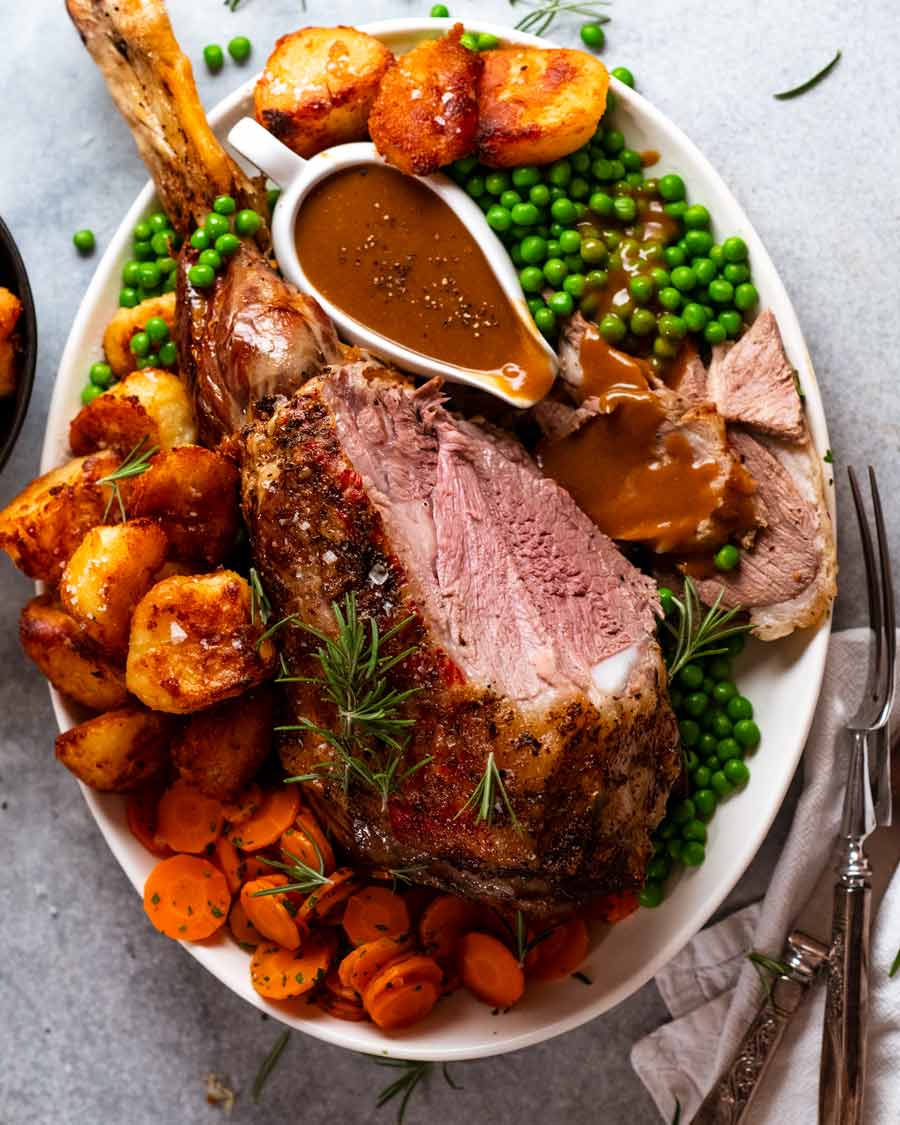
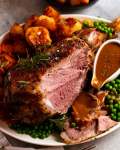
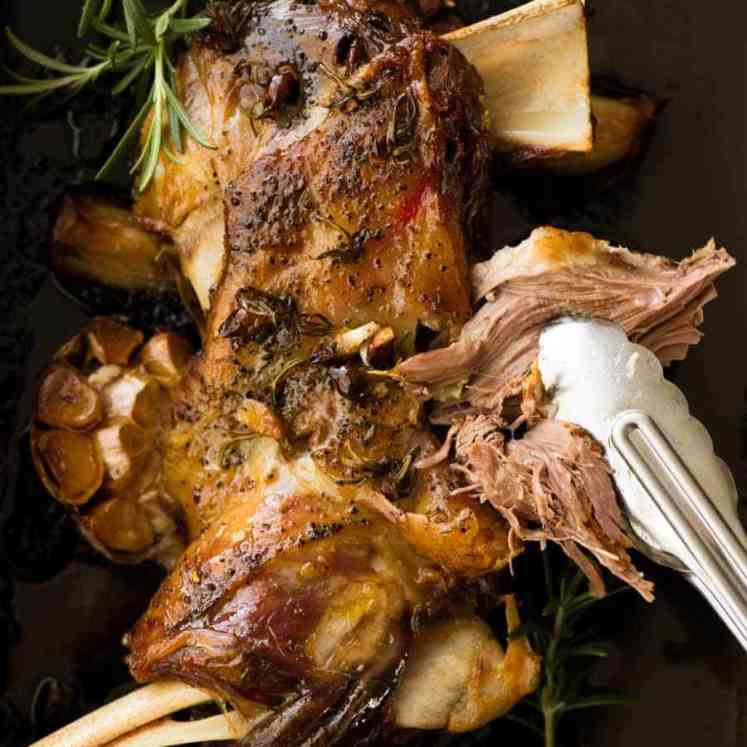
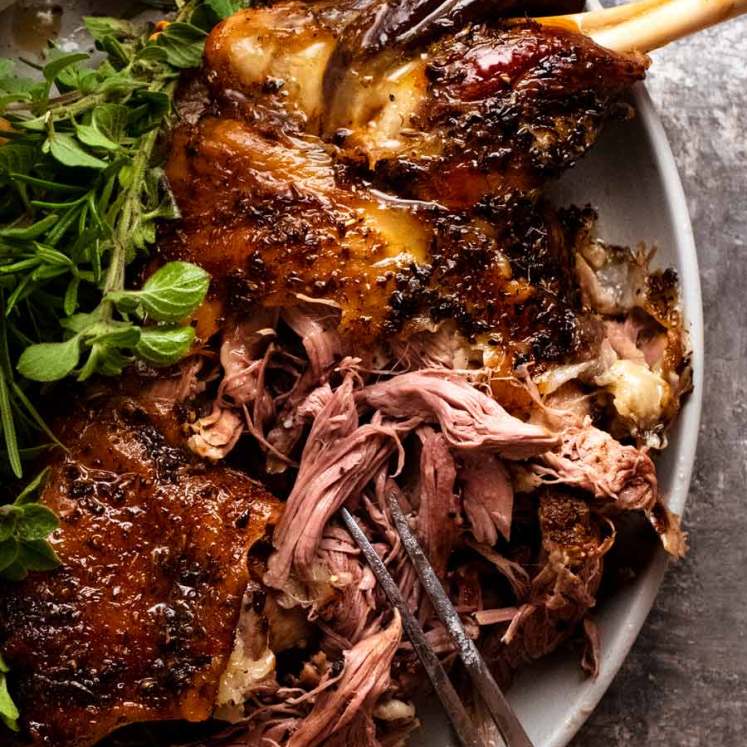
]]>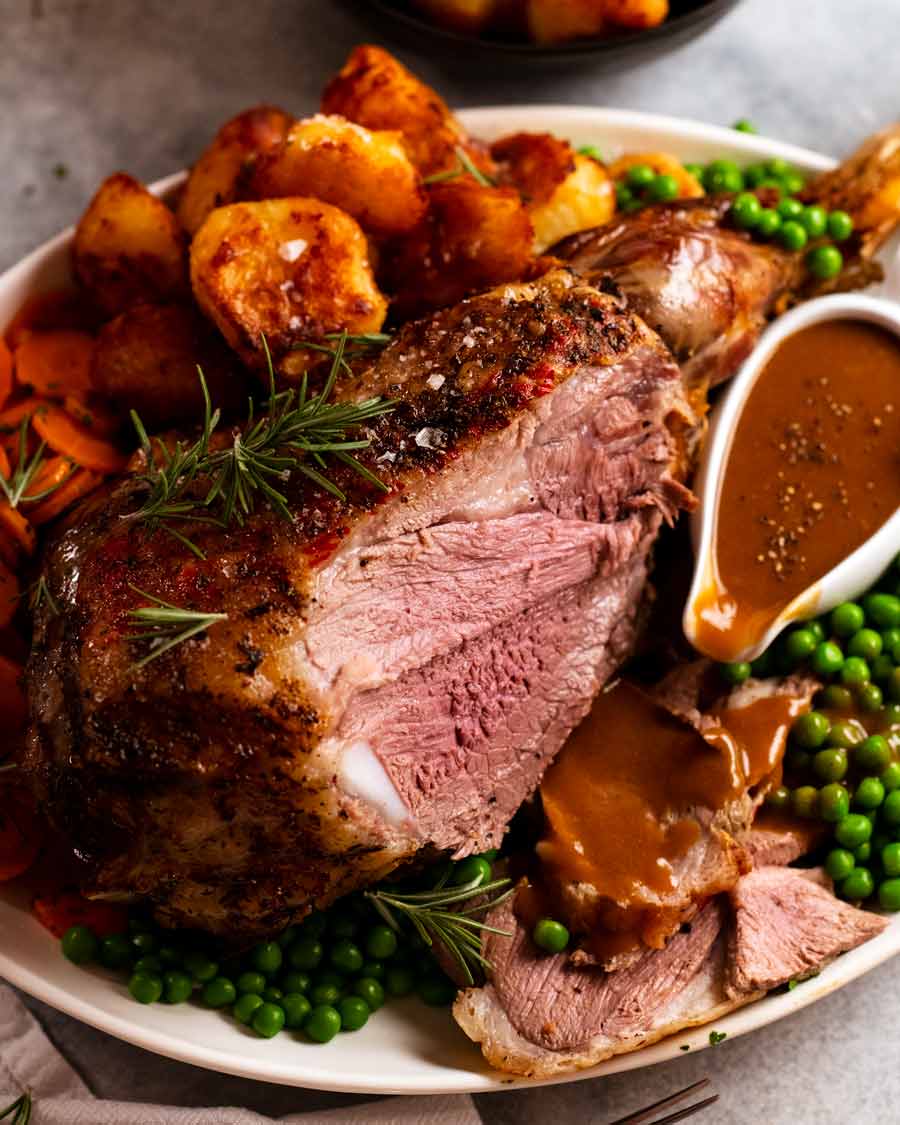 I love a good roast lamb (proof). Here’s my classic recipe for lamb leg, rubbed with garlic and rosemary, served with gravy, peas, carrots and crispy roast potatoes (duck fat or classic). I hope you love it as much as I do! The only thing you need to know for perfect roast lamb leg I... Get the Recipe
The post Roast Lamb Leg with Gravy appeared first on RecipeTin Eats.
]]>I love a good roast lamb (proof). Here’s my classic recipe for lamb leg, rubbed with garlic and rosemary, served with gravy, peas, carrots and crispy roast potatoes (duck fat or classic). I hope you love it as much as I do!
The only thing you need to know for perfect roast lamb leg
I have a lot to say about roasting any kind of meat. Especially Australia’s favourite roast – the great lamb leg. But there’s really only one thing you need to know to make perfect roast lamb leg, every single time:
GET A MEAT THERMOMETER!!
It’s the only way you can take the guesswork out of cooking lamb leg so it’s perfect blushing pink and ridiculously juicy inside. Because – and here’s something Aussies don’t like to talk about – lamb leg is actually very lean so if it’s not pink, it’s dry. Full stop, end of story!
My meat thermometer – For most of my adult life, I was using a $5 thermometer I got on Ebay which never failed me. A few years ago I finally decided it was time to invest in a real one so I got a Thermapen which is pretty well regarded as the best (my thoughts here). Even if you can’t invest in a Thermapen – it’s the 21st century, and even cheap tech isn’t so bad. Invest in a $5 meat thermometer. That’s a lot cheaper than a wasted, overcooked lamb leg!

OK, I do have a few more “how to make the perfect roast lamb leg” tips!
Garlic rosemary rub – classic lamb flavours.
Start on high to get the colour going then lower heat.
Roast on a bed of garlic (or onion).
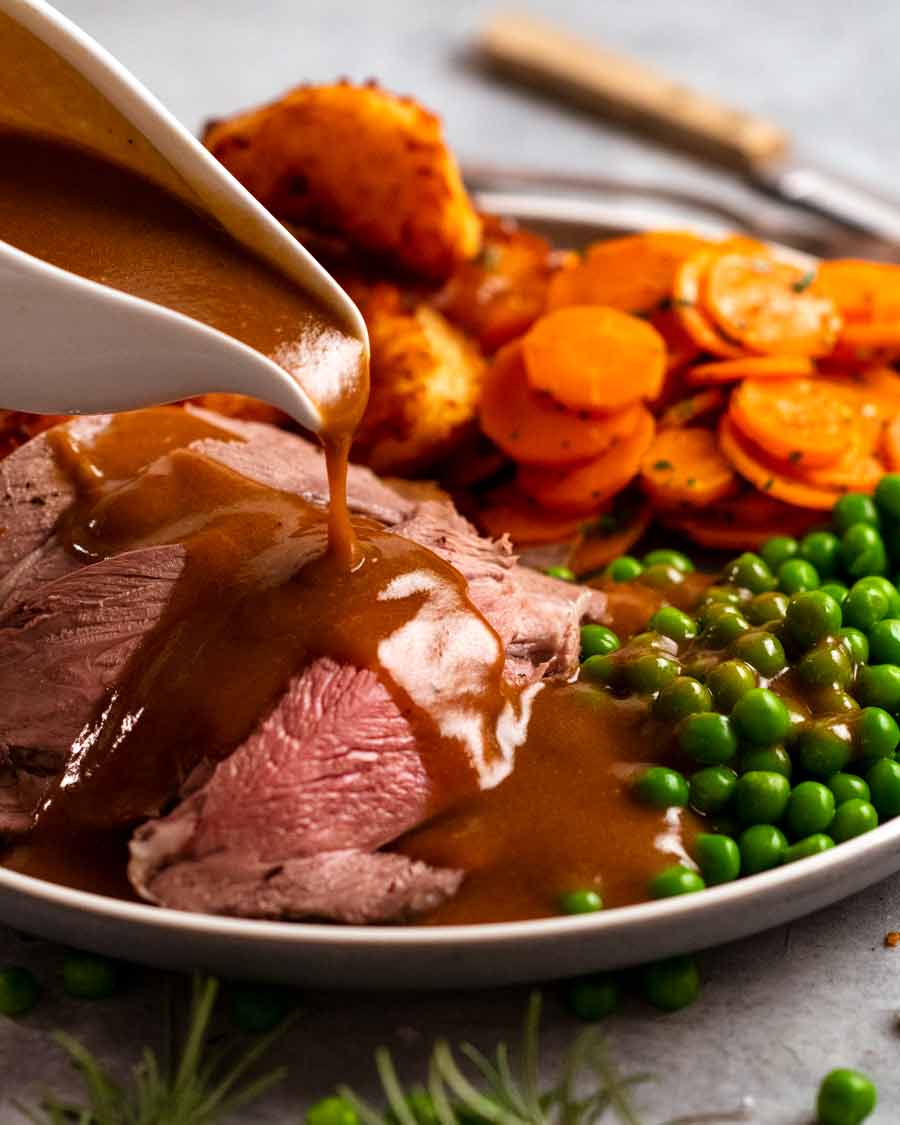
Make the gravy using the pan drippings. Roast lamb gravy is better than every other cut of meat – beef, chicken, pork, none of them compare!

What you need for roast lamb leg
Starting with the hero ingredient – the lamb leg! Get the best you can afford – yes, meat is like wine, the more you pay, the better the quality. Quality of life of the animal also comes into play there.
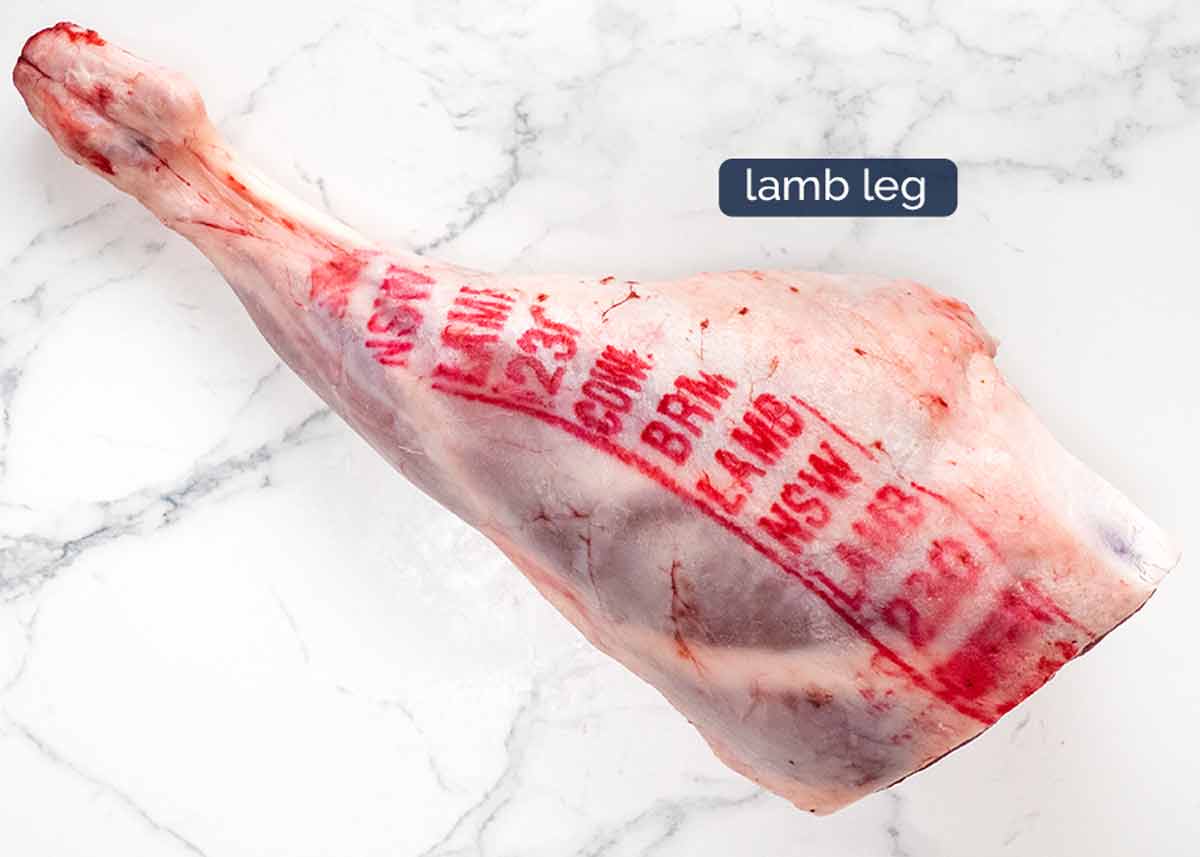
All that red ink you see is perfectly safe to eat and actually, you only see it on better quality lamb. You don’t typically see it on supermarket lamb.
Cut bone – Some (most?) butchers and almost all supermarkets sell lamb leg with the shank (bone) cut. Either fully cut off or partially cut so it folds. This is simply for practical reasons – shelf storage and packing space. For grandness, I like the bone in tact. But it doesn’t matter ,it’s purely a visual decision!
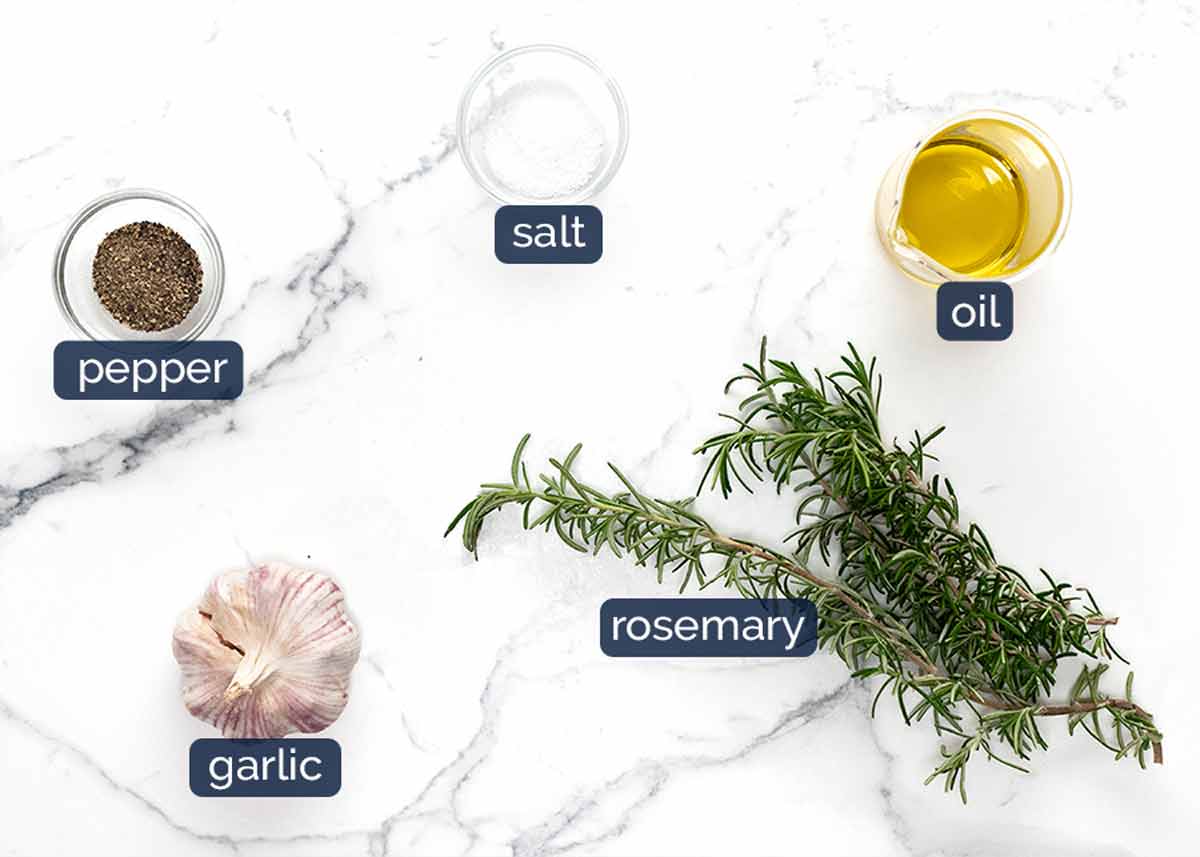
Rub for roast lamb leg
Here’s what you need for the rub: rosemary, garlic, olive oil, salt and pepper. Use fresh rosemary – dried is not the same!
Roast lamb gravy
All you need for gravy is flour for thickening and beef stock/broth for the liquid. You shouldn’t need extra salt for the gravy. I find the salt on the lamb that ends up in the pan drippings plus the salt in the beef stock is enough. But taste and add more if you want!
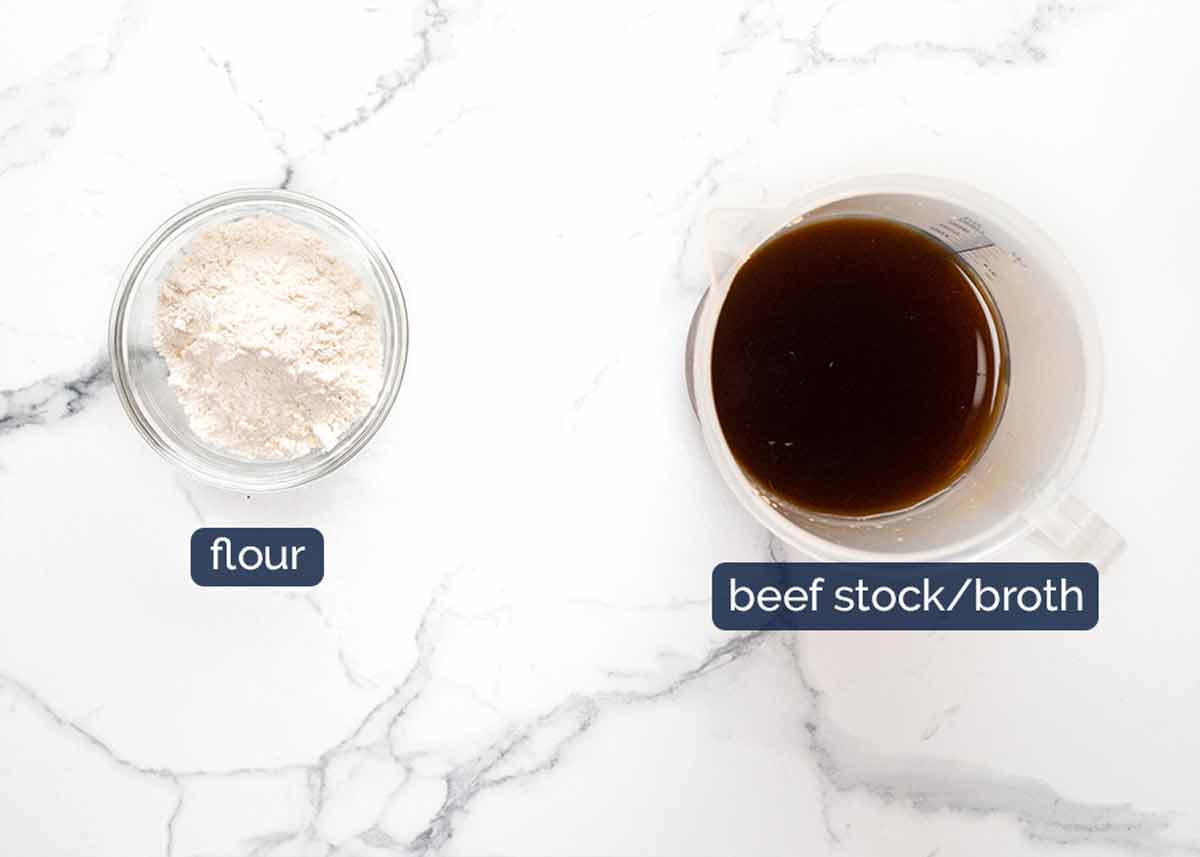
Why beef rather than lamb stock? Well, there’s a reason lamb stock is not typically sold at grocery stores! It’s just very…lamby. Beef has a cleaner flavour. It doesn’t make the gravy taste beefy at all because there is so much lamb flavour from the drippings.
Why not chicken stock? It works fine but the gravy colour is paler. I like my gravy for roast lamb leg to be a really deep brown colour!
How to make roast lamb leg
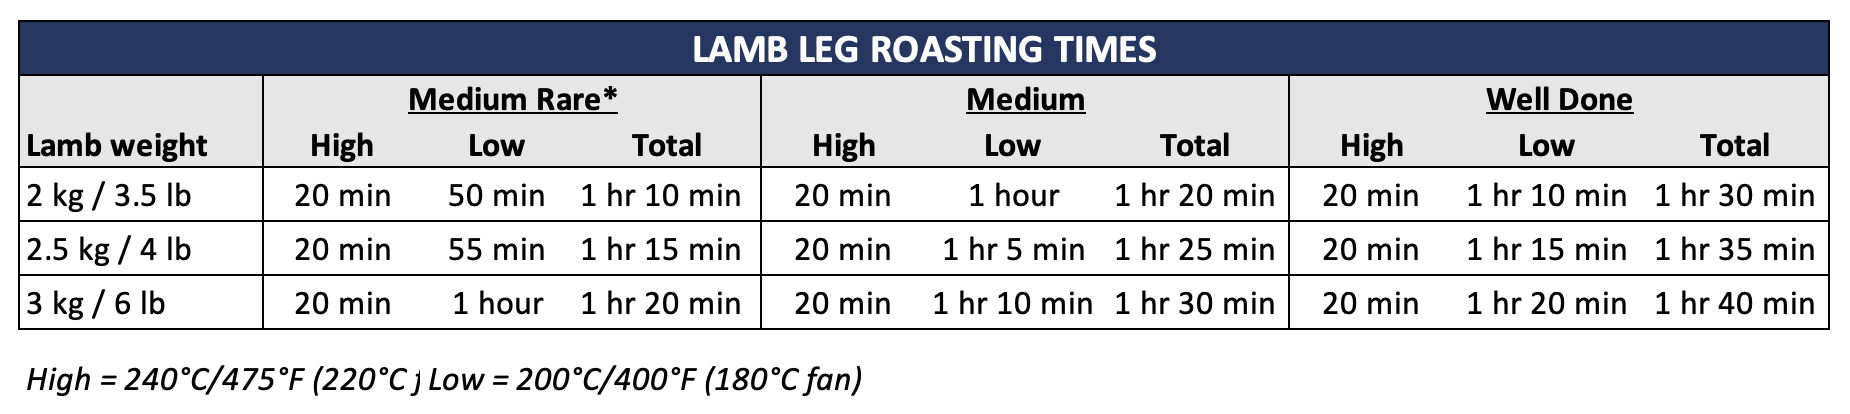
Rub with rosemary and garlic, roast in a hot oven to get the colour going then continue at a lower temperature for 1 hour or until the internal temperature is 53°C/127°F (for blushing pink perfection). Rest for 20 minutes before carving. It will still be very warm even after 1 hour – enough time to make duck fat potatoes!
The lamb leg pictured is a 2.75 kg lamb leg which is about the average size you get from good butchers. Supermarket lamb legs tend to be a little larger from slightly older animals which makes the meat a little less tender and a little stronger “lamby” flavour. Albeit, as you’d expect, cheaper than from butchers.
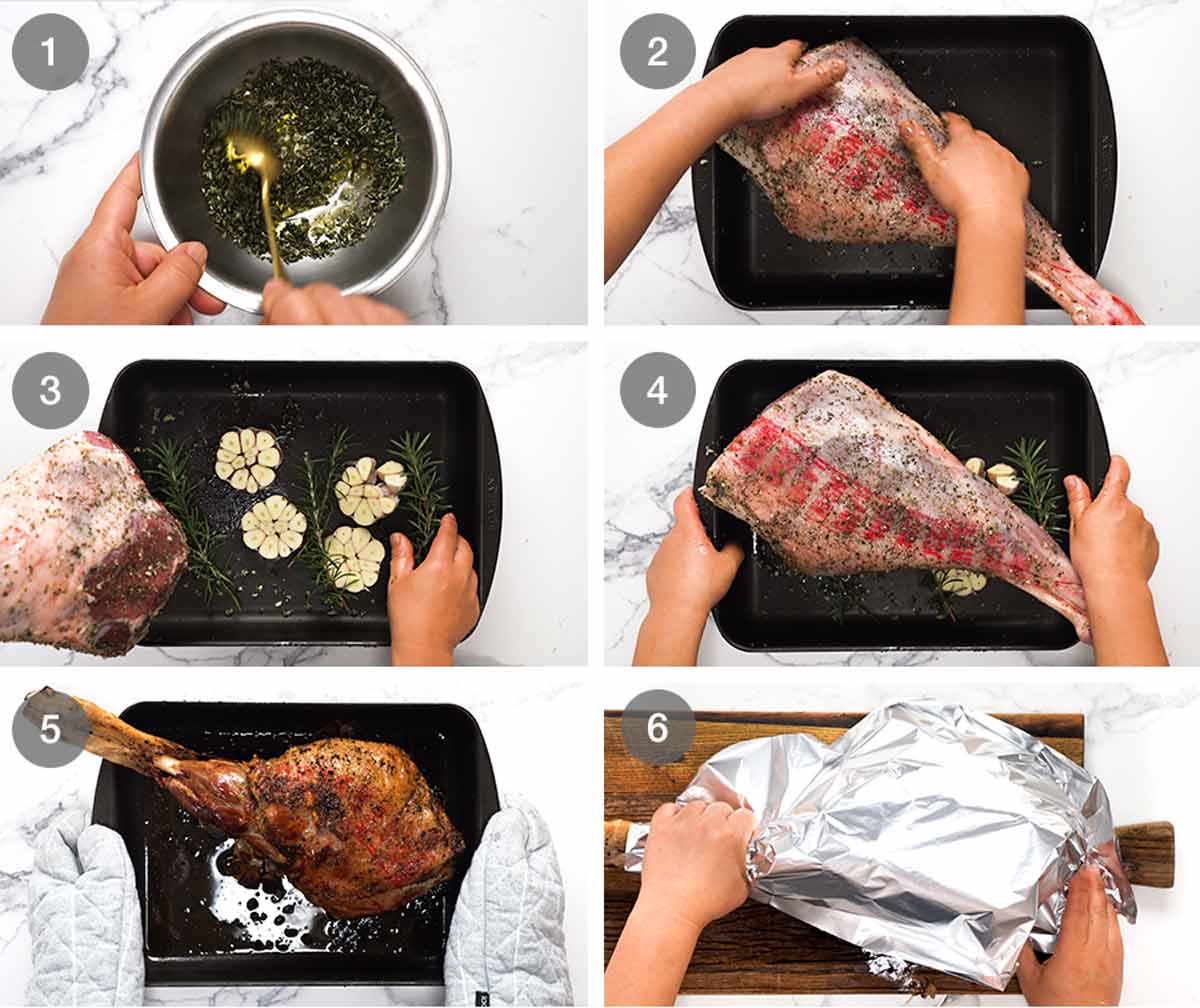
Make rub – Mix oil, garlic and rosemary in a bowl.
Rub then sprinkle – Slather the rub all over the lamb, then sprinkle the salt and pepper all over. It’s better to do it this way for more even dispersion of salt – if you put it in the oil, it doesn’t spread quite as evenly because it pools in the bottom of the bowl.
I do this rubbing step in the roasting pan – why dirty a cutting board??
Garlic bed – Place cut garlic and rosemary under the lamb.
Hot oven 20 minutes – Roast for 20 minutes in a hot 240°C/475°F (220°C fan) oven. This will get the colour going on the lamb. It’s tempting to go longer to get even more colour on it but I find if you go beyond 20 minutes you end up with too much overcooked meat “ring” on the outer edges of the lamb.
1 hour lower oven – Reduce heat to 200°C / 400°F (180°C fan) and roast for a further 1 hour or until the internal temperature of the lamb is 53°C/127°F for blushing pink perfection.
Check the internal temperature at the 45 minute mark. Never rely on a recipe cook time for roast meat, use your thermometer! So many variables can affect the exact roasting time, from oven strength to pan heat distribution, the shape of the lamb leg and how cold the meat is right in the middle.
See below for more information on lamb doneness and different size lambs.
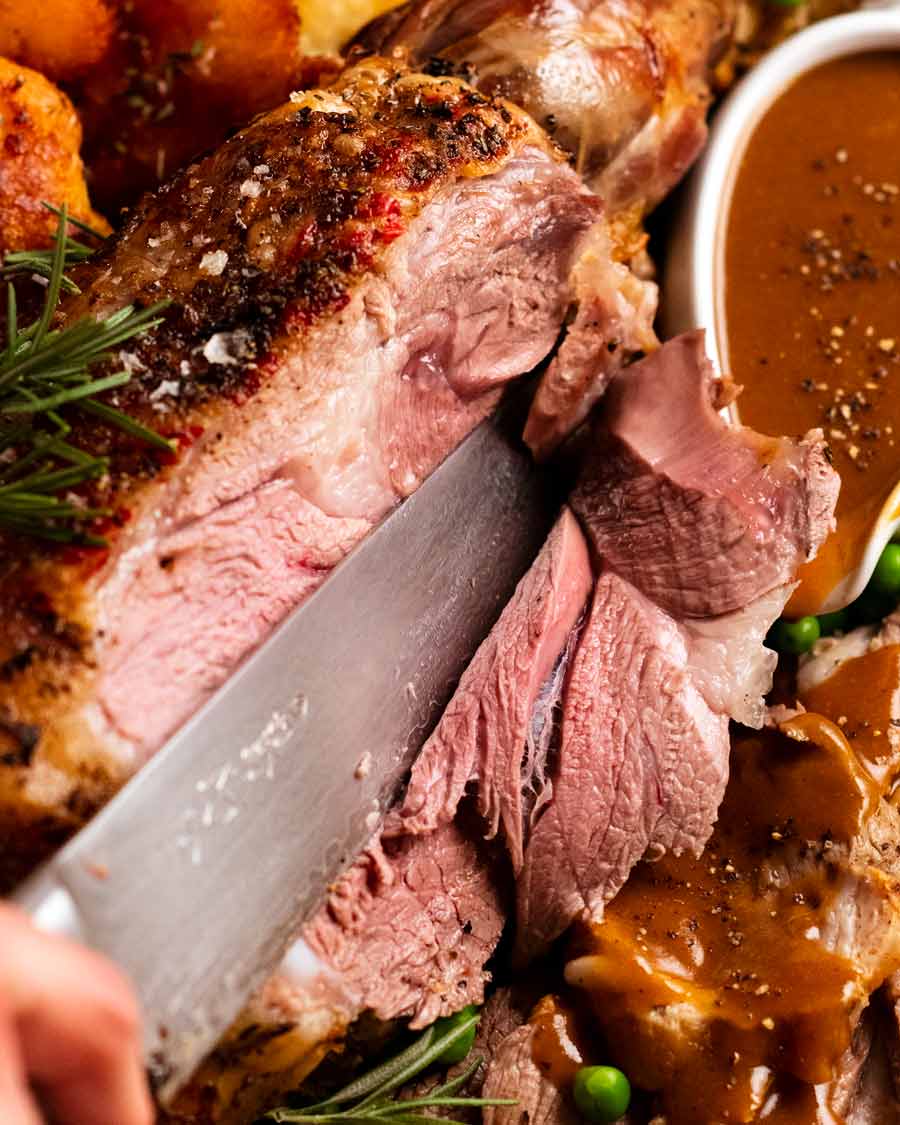
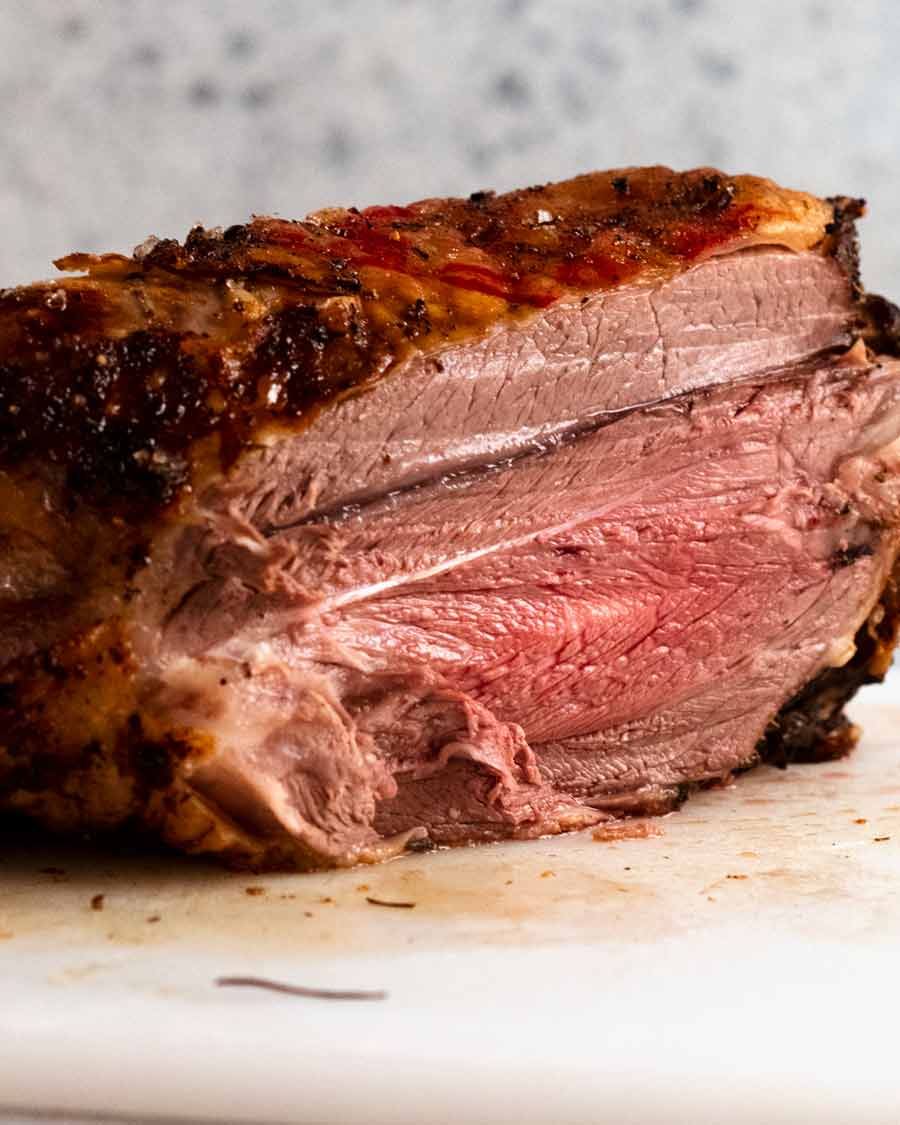
Rest 20 minutes – Rest the lamb for 20 minutes before carving. During this resting stage, the lamb finishes cooking and the internal temperature will rise to 62°C/144°F which is perfect medium rare for lamb.
Also during resting, the lamb juices get re-absorbed by the meat fibres so when you cut into the meat, the juices remain in the meat and eventually end up in your mouth. If you do not rest the meat then the meat juices leak out everywhere when you start carving the lamb.
Internal temperature of roast lamb leg
No credible restaurant would ever serve lamb leg at anything over than medium rare! But I do know some people like their lamb done a little more, so here are the internal temperatures for lamb leg at different levels of doneness.
Take the lamb out when it hits the “temperature out of oven”. After resting for 20 minutes it will rise to your target level of doneness.
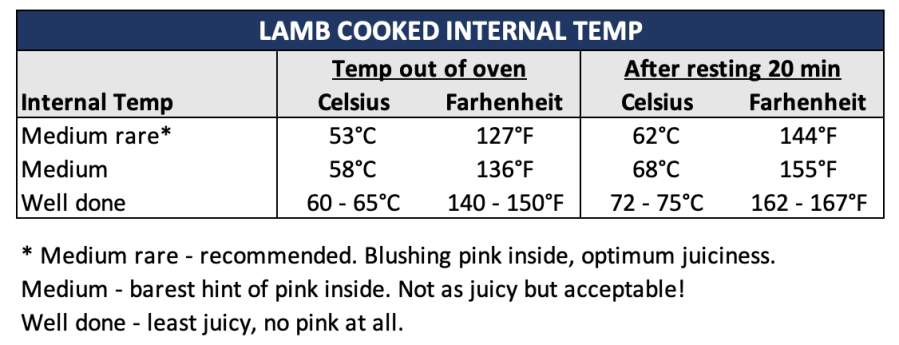
TIP: Take the lamb out early!!!
This is one of the most common mistakes people make when roasting lamb. If you want medium rare lamb and you take the lamb leg out of the oven when it hits 62°C/144°F (which is the medium rare target temperature), it will rise to 73°C/163°F once rested which is well done – no hint of pink at all! This occurs because the lamb continues to cook after you take it out of the oven due to residual heat. It’s called carry-over cooking.
So if you want medium rare, perfectly pink lamb leg, you need to take it out of the oven once the internal temperature reaches 53°C/127°F. At this temperature, the lamb is rare.
But when you rest the lamb for 20 minutes, it will continue to cook and the internal temperature will rise by 9°C/17°F to 62°C/144°F. This temperature is medium rare, the optimum doneness for lamb leg so it’s beautifully juicy. Any more and the lamb meat is drier than ideal, because lamb leg is a lean meat.
How to make gravy for roast lamb leg
Gravy for lamb leg is made using the pan drippings after roasting the lamb. “Drippings” simply refers to the fat and meat juices left in the roasting pan after roasting the meat and it’s our express, free path to a killer gravy.

Heat drippings & cook flour – Once you take the lamb out of the roasting pan, put it straight on the stove to heat the fat. Add flour and stir it for 1 minute to cook it off – it will kind of be like a paste.
Pour in the beef stock, stirring as you go to help dissolve the flour.
Smush the garlic with a potato masher or even a smooth to help release the beautiful caramelised garlic flesh into the gravy.
Strain – Then just simmer for a few minutes until the gravy thickens to your taste then strain into a bowl, pressing the gravy liquid out of the garlic heads. Then pour into a jug to serve!
And that, my friends, is everything you need to know to be the king (or queen) of roast lamb leg from this day forth. The precision by which you roast your lamb to blushing pink perfection will be admired. Your gravy will be whispered about in your circles – the flavour!!! It’s incredible!
Just smile sedately, sit back and bask in the praise. There is no need to reveal your recipe source. 😎
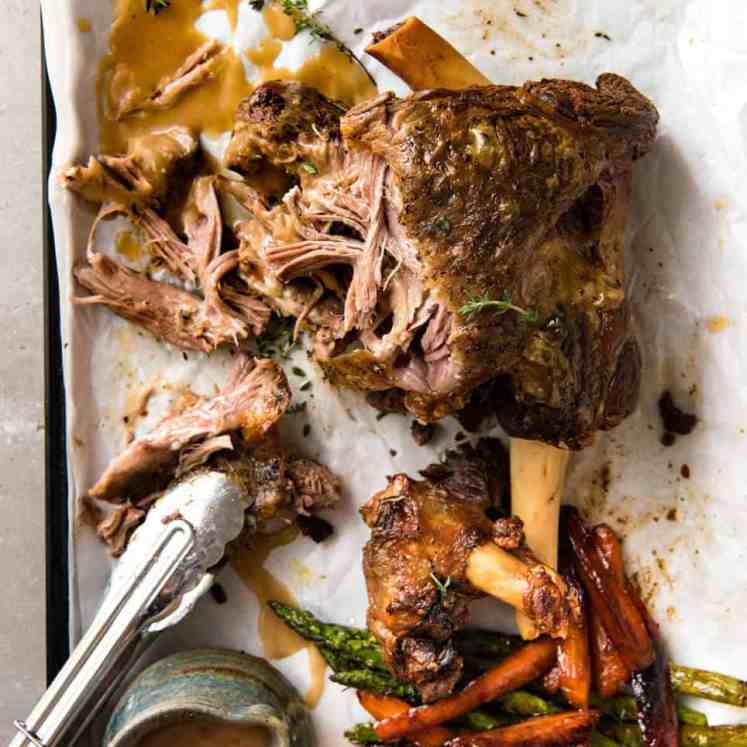
The lamb leg in this post is pictured with duck fat potatoes (the best crispy potatoes in the world!) with peas and steamed carrots tossed with a little butter and parsley. If you don’t have duck fat, make my classic crunchy roast potatoes instead. They are still way crunchier than your usual way of making them.
Go forth and enjoy your new lamb-alicious world! If you’ve got your own lamb leg secrets, sharing in the comments below – readers love hearing what you have to say. – Nagi x
Watch how to make it
Roast Lamb Leg with Gravy
Ingredients
- 2.75 – 3 kg / 5.5 – 6 lb lamb leg , bone-in (Note 1)
- 1 1/2 tsp cooking salt
- 1/2 tsp black pepper
Rub
- 1 1/2 tbsp fresh rosemary leaves , finely chopped
- 3 garlic cloves , finely minced
- 2 tbsp olive oil
Base
- 2 whole heads of garlic , halved horizontally (Note 2)
- Few sprigs rosemary (optional)
Gravy
- 4 tbsp flour , plain/all purpose
- 2 1/2 cups beef broth / stock , low sodium (Note 3)
Instructions
- Take lamb out of fridge at least 1 hour before roasting. (Note 4)
- Preheat oven to 240°C/475°F (220°C fan) with oven shelf in the middle.
- Rub – Mix rosemary, garlic and olive oil.
- Prepare lamb – Place lamb leg in a roasting pan. Coat with the rub using your hands, the sprinkle with the salt and pepper. Place garlic and rosemary sprigs underneath the lamb, garlic cut face up.
- Roast lamb leg for 20 minutes. Turn the oven down to 200°C/400°F (180°C fan) and roast for a further 1 hour or until the internal temperature reaches 53°C/127°F for medium rare (Note 5 other doneness). Check first at 45 minutes – everyone's oven is different!
- Rest – Remove lamb from oven. Transfer lamb to plate, loosely cover with foil and rest for 20 minutes to 1 hour (it will still be warm enough for serving!). The internal temperature will rise to 62°C/144°F (medium rare). Make gravy while lamb is resting – below.
- Serve lamb with gravy, duck fat or classic crunchy roast potatoes, peas and steamed carrots tossed with butter and parsley.
Gravy for roast lamb leg
- Drippings in pan – Discard rosemary sprigs. You should have around 4 – 5 tbsp of fat (drippings). If less, add butter. If much more, discard a bit.
- Add flour – Place roasting pan on stove over medium heat. When the fat starts to bubble, then add flour. Mix flour in and cook for 1 minute.
- Stock – Pour in half the beef stock and mix to dissolve sludge in, then add remaining beef stock and mix.
- Garlic squidging – Use a potato masher (if you're really keen like me) to mush the garlic to squeeze out the flavour (also helps flour caught in garlic to dissolve).
- Taste – Check salt and pepper (I don't add more).
- Thicken – Simmer for a couple of minutes, stirring, until it starts to thicken. Take it off the stove BEFORE the gravy is the thickness you want because it will keep thickening.
- Strain into a bowl, mushing garlic to squeeze all the liquid out. Then pour into gravy jug and serve with lamb!
Notes
 1. Lamb leg – Recipe is based on a whole lamb leg. See roasting time table above for different lamb sizes. Sometimes the bone sticking out is removed, sometimes it is partially cut so it folds inwards. It doesn’t matter either way, but just ensure the bone inside the meat is not removed. (If it is, you have a butterflied lamb leg – use this recipe instead).
Boneless lamb – I love making Greek butterflied lamb leg. If yours is rolled and tied, you could make this recipe but the meat is not quite as juicy because it’s been cut to remove the bone so there’s more escape roots for meat juices! If you can, unroll the lamb to do the rub then roll it back up and tie again (excellent flavour infusion!). Also, cook time likely a bit shorter. I’d do the 20 minute high temp blast, lower oven then check at 40 minute mark.
2. Garlic base – Elevates the lamb slightly so it cooks more evenly and allows the fat to drip over the garlic so the flavour infuses into the drippings that then forms the base of the gravy. Place garlic cut side up so the flavour infuses into the flesh of the lamb.
It is not garlicky at all because when garlic roasts, it becomes sweet and caramelised. It is my big secret for making a killer gravy for roast lamb! You can use 1 onion, quarters (skin on) instead of or in addition to garlic.
3. Gravy for lamb is best made with beef stock/broth because it has a deeper flavour and makes the gravy a beautiful dark brown colour. Store bought is fine, though homemade makes it ultra restaurant-worthy! If you cannot consume beef for religious or health reasons, then chicken broth can be substituted.
4. De-chilling lamb will make it cook more evenly. Cold lamb leg = overcooked on the outside by the time the inside is cooked.
5. Internal temperature of cooked lamb leg:
1. Lamb leg – Recipe is based on a whole lamb leg. See roasting time table above for different lamb sizes. Sometimes the bone sticking out is removed, sometimes it is partially cut so it folds inwards. It doesn’t matter either way, but just ensure the bone inside the meat is not removed. (If it is, you have a butterflied lamb leg – use this recipe instead).
Boneless lamb – I love making Greek butterflied lamb leg. If yours is rolled and tied, you could make this recipe but the meat is not quite as juicy because it’s been cut to remove the bone so there’s more escape roots for meat juices! If you can, unroll the lamb to do the rub then roll it back up and tie again (excellent flavour infusion!). Also, cook time likely a bit shorter. I’d do the 20 minute high temp blast, lower oven then check at 40 minute mark.
2. Garlic base – Elevates the lamb slightly so it cooks more evenly and allows the fat to drip over the garlic so the flavour infuses into the drippings that then forms the base of the gravy. Place garlic cut side up so the flavour infuses into the flesh of the lamb.
It is not garlicky at all because when garlic roasts, it becomes sweet and caramelised. It is my big secret for making a killer gravy for roast lamb! You can use 1 onion, quarters (skin on) instead of or in addition to garlic.
3. Gravy for lamb is best made with beef stock/broth because it has a deeper flavour and makes the gravy a beautiful dark brown colour. Store bought is fine, though homemade makes it ultra restaurant-worthy! If you cannot consume beef for religious or health reasons, then chicken broth can be substituted.
4. De-chilling lamb will make it cook more evenly. Cold lamb leg = overcooked on the outside by the time the inside is cooked.
5. Internal temperature of cooked lamb leg: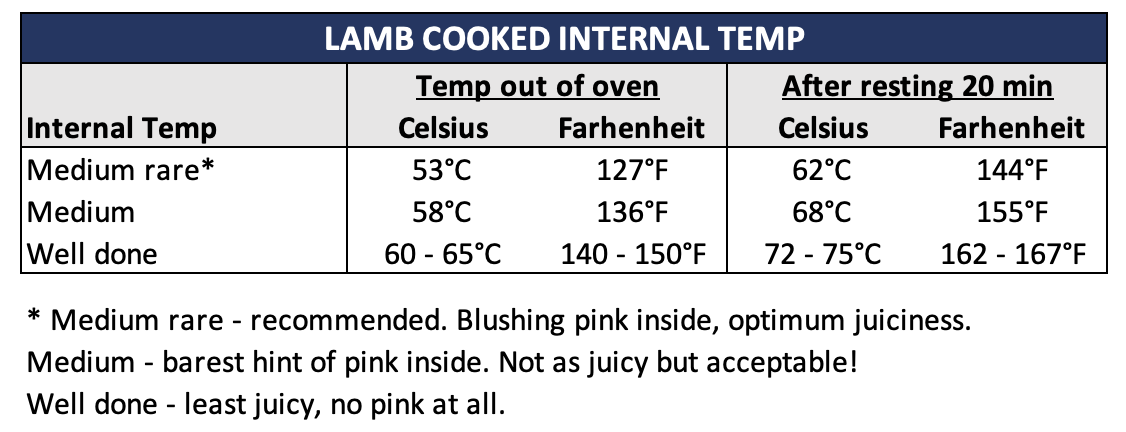 I highly recommend getting a meat thermometer for accuracy – only guaranteed way to get juicy lamb every time!
6. Holding – The lamb leg will stay warm for up to 1 hour, enough time to make duck fat or classic crunchy roast potatoes! The inside of the lamb is still warm even after 3 hours.
7. Servings: A 2.5 kg/5 lb lamb serves 6 very generously and 8 comfortably. After taking into account the bone (500g/1lb) and meat juices lost during roasting, you should end up with around 1.7kg meat after cooking which is around 280g for 6 people (generous!) or 200g for 8 people. If you slice lamb thinly it will go further!
8. Nutrition per serving, assuming 8 servings and that all the gravy is consumed.
I highly recommend getting a meat thermometer for accuracy – only guaranteed way to get juicy lamb every time!
6. Holding – The lamb leg will stay warm for up to 1 hour, enough time to make duck fat or classic crunchy roast potatoes! The inside of the lamb is still warm even after 3 hours.
7. Servings: A 2.5 kg/5 lb lamb serves 6 very generously and 8 comfortably. After taking into account the bone (500g/1lb) and meat juices lost during roasting, you should end up with around 1.7kg meat after cooking which is around 280g for 6 people (generous!) or 200g for 8 people. If you slice lamb thinly it will go further!
8. Nutrition per serving, assuming 8 servings and that all the gravy is consumed.Nutrition
Originally published October 2016. I have been very neglectful not updating one of my favourite recipes with sparkling new photos and a recipe video!
I told you – I LOVE roast lamb! See?
Life of Dozer
Original photo from when I first published this recipe in 2016 still holds true, so no need to update:
DOZER. Don’t breathe your stinky dog breath over my friends while they eat!

The post Roast Lamb Leg with Gravy appeared first on RecipeTin Eats.
]]> Many people have tried this now and no one thinks of it as a gluten free cake. It’s just a delicious cake! Love the coconut + lemon + almond meal combination, and the springy, moist crumb. BONUS: Just about the fastest, easiest cake recipe I know. Lemon coconut almond cake This is a cake that... Get the Recipe
The post Easy lemon coconut almond cake appeared first on RecipeTin Eats.
]]>Many people have tried this now and no one thinks of it as a gluten free cake. It’s just a delicious cake! Love the coconut + lemon + almond meal combination, and the springy, moist crumb. BONUS: Just about the fastest, easiest cake recipe I know.
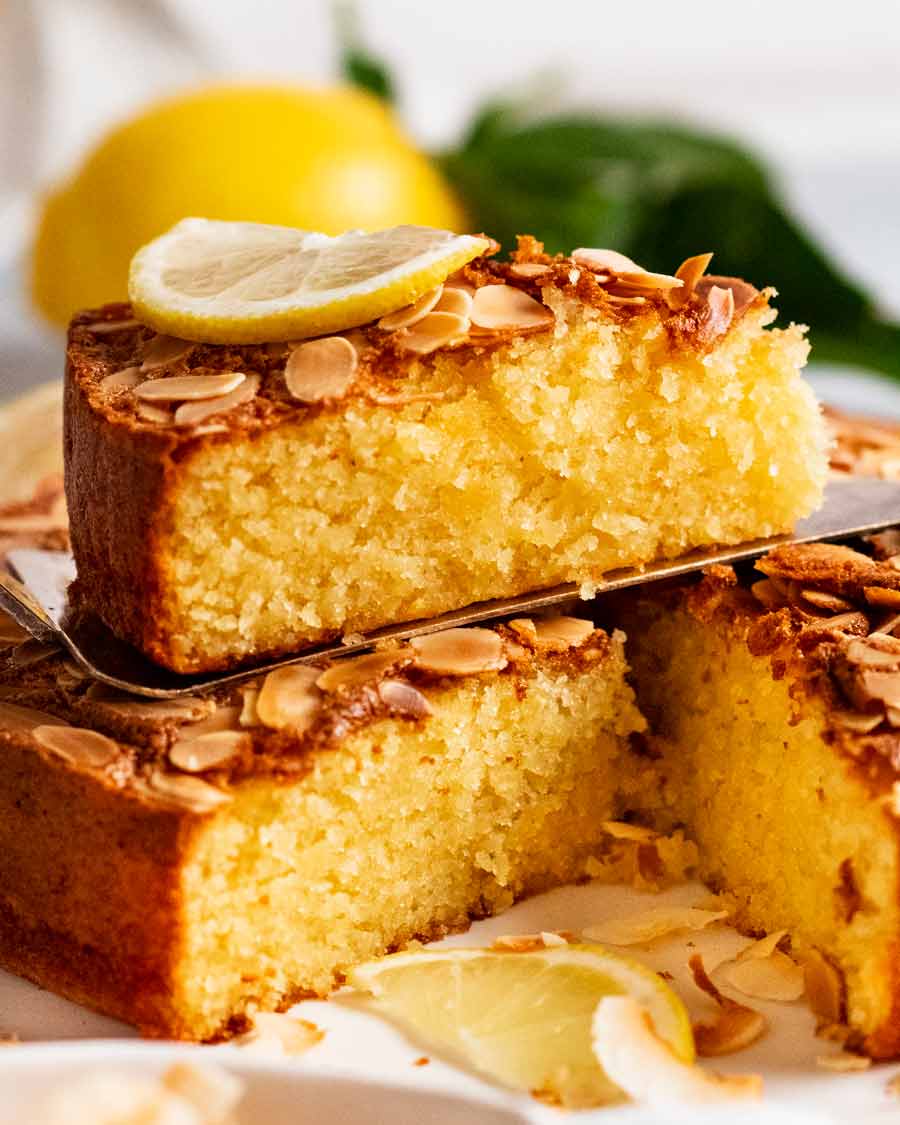
Lemon coconut almond cake
This is a cake that is as delightfully easy to make as it is delicious to eat. Just put everything in a bowl and mix! There’s no need to whip softened butter or pull out your electric beater.
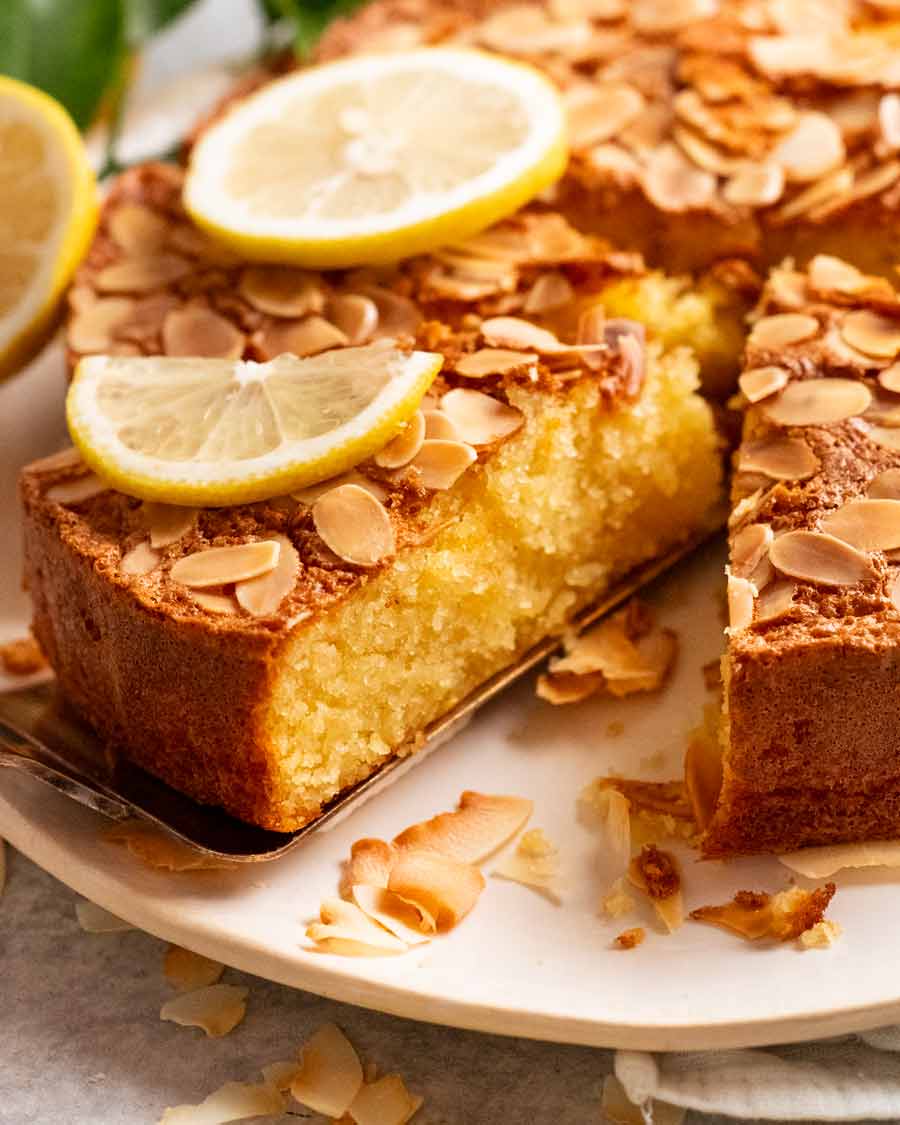
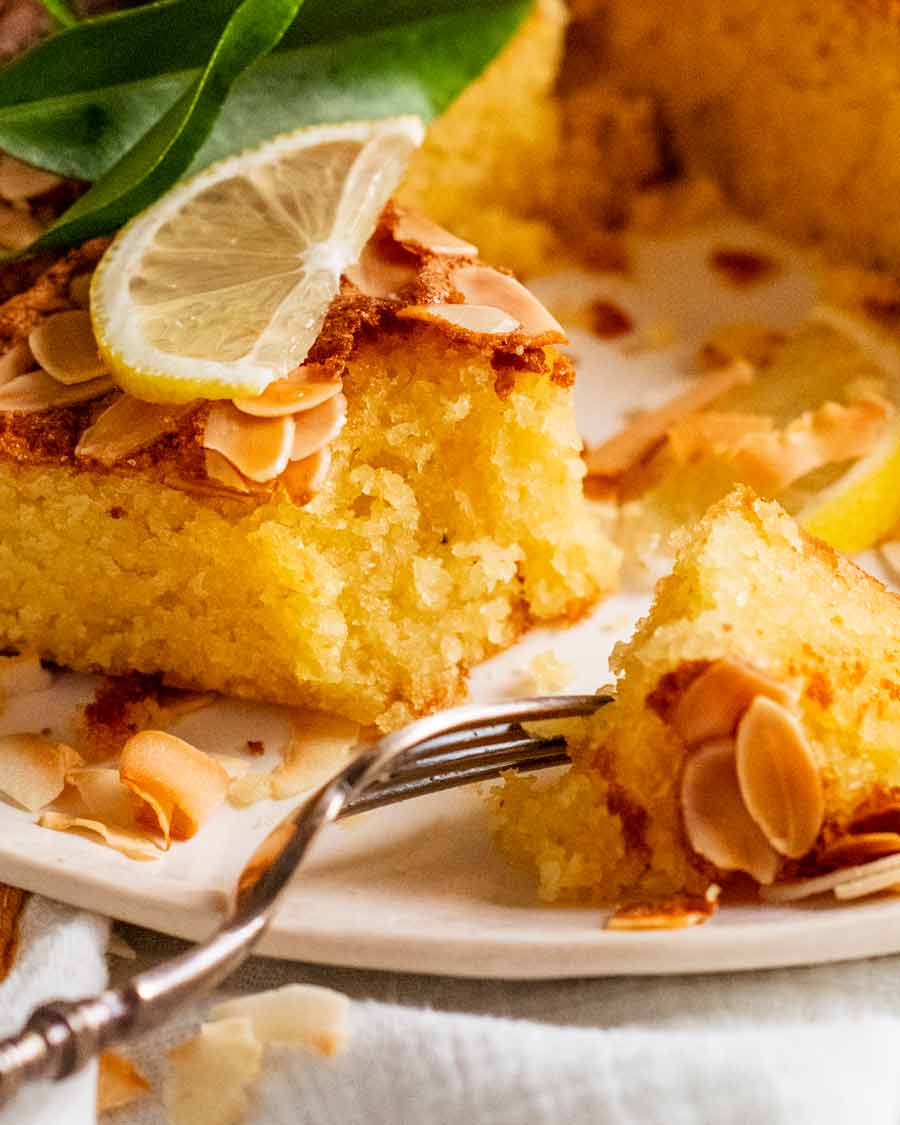
It’s been likened to the fan favourite orange cake in texture – springy yet with an appealing moistness about it. And the flavour! Adore, adore, adore the coconut lemon combination. Idea swiped from my local coffee shop where I’ve been eyeing lemon coconut cake bars for years. This is my copycat.
I don’t actually know if theirs is gluten-free. Mine is, because I’ve never come across a flour-based cake recipe with a crumb as moist as you can make using almond meal.


What you need for this lemon coconut almond cake
Here’s what you need to make this lovely cake:
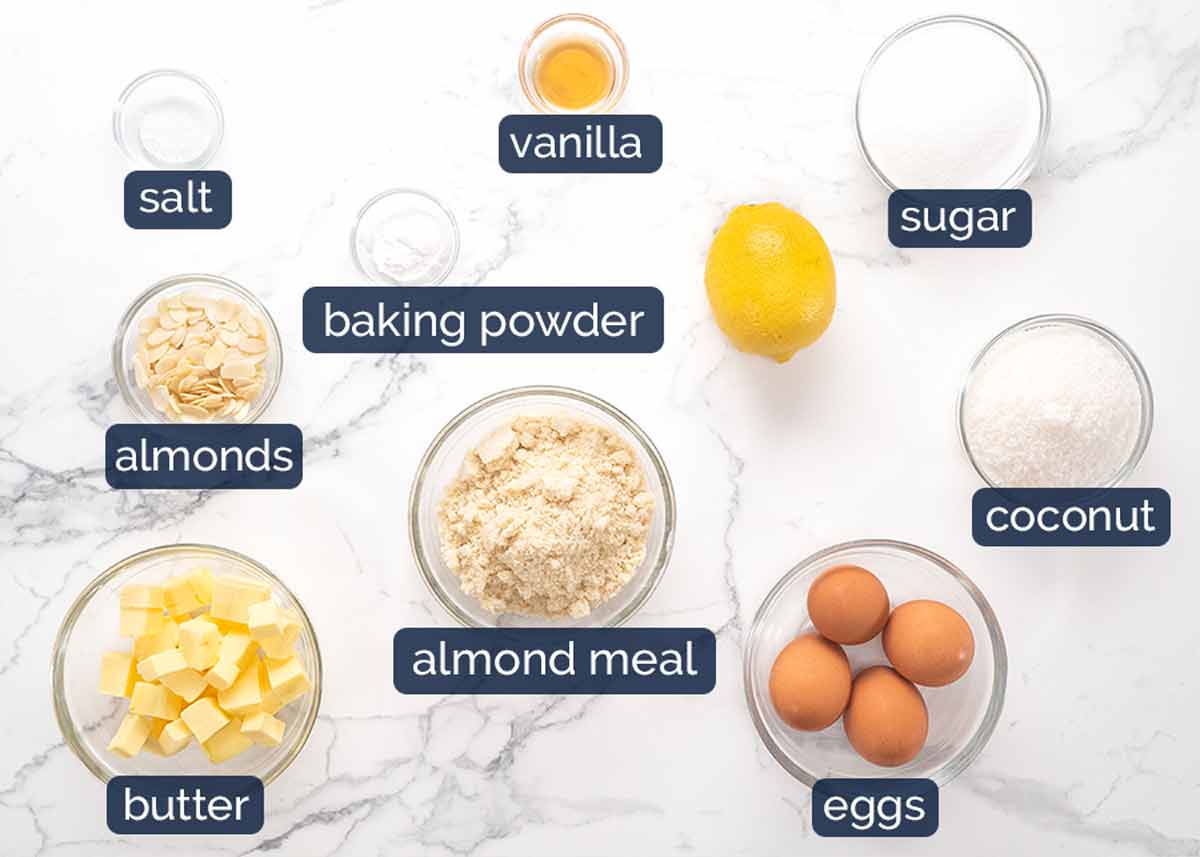
Almond meal (aka ground almonds) – This is raw almonds that are blitzed into a fine powder. Easily found nowadays, sold in the dried fruit & nut section and health food section of grocery stores. Or make your own by blitzing raw, unpeeled, unsalted almonds in a powerful blender (I use a Vitamix) until it becomes a fine powder.
Almond flour can also be used (not as common here in Australia). It’s finer so gives the cake a slightly fluffier texture and less almond flavour. Hazelnut meal can also be substituted though you’ll have lovely hazelnut flavour instead of almond.
Butter – The fat in this recipe, gives it a beautiful buttery flavour.
Baking powder – This is what makes the cake rise.
Eggs – Make sure they are at room temperature so they incorporate more easily into the batter.
Coconut – Desiccated coconut which is finely shredded, unsweetened coconut. Standard shredded coconut (which is like fine strands) will work but you’ll get more coconut texture in the cake. I don’t think coconut flakes (shavings) will work in this cake, it’s not absorbent enough.
Sugar – Use caster / superfine sugar if you can because it is finer so it will dissolve easier. Otherwise, regular / granulated sugar can be used.
Vanilla extract – For flavour. Not to be confused with artificial vanilla essence which is…well, artificial. So not as nice!
Lemon – We are only using the zest in this cake, for beautiful lemon flavour. Because the zest is where all the lemon flavour is – the juice is mostly just sour.
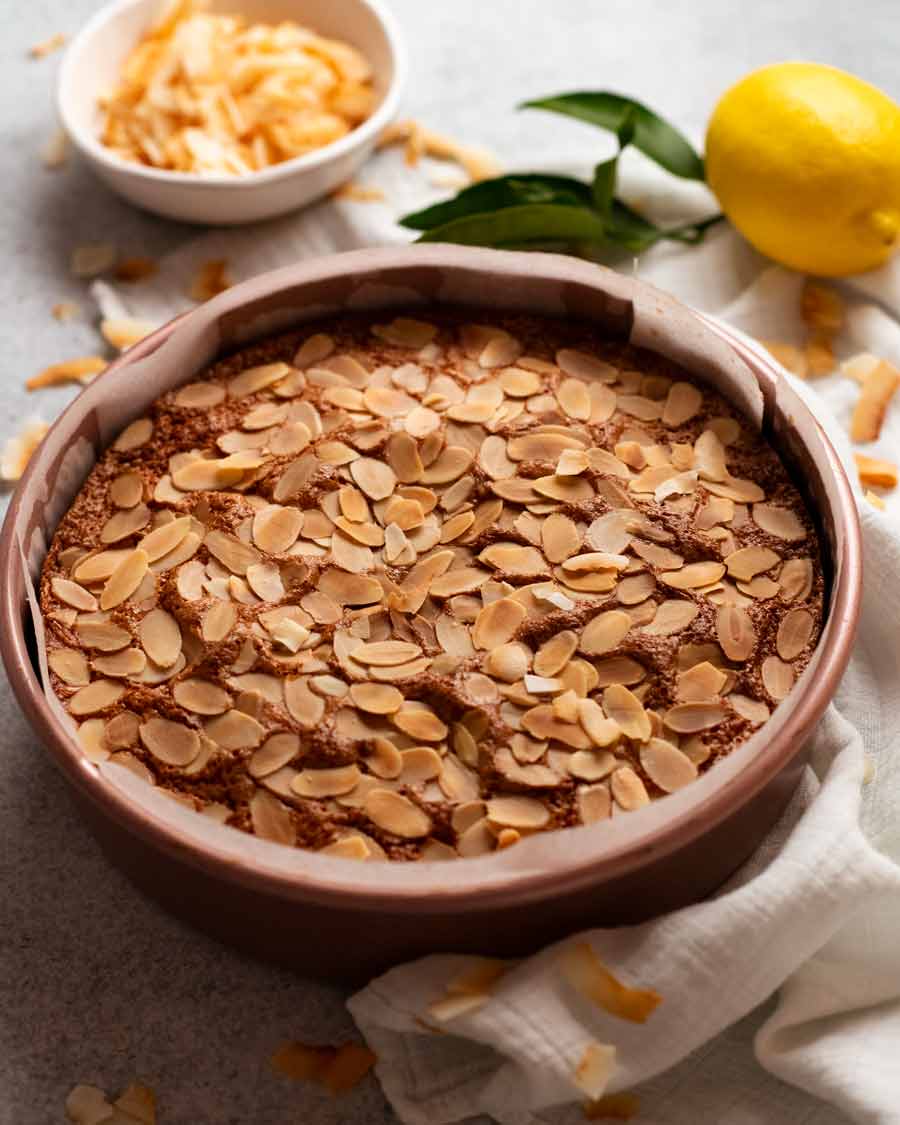
Flaked almonds – for sprinkling on the surface. Adds lovely texture to the cake, looks good and protects the surface from browning too much. But you can skip it you don’t have it!
Salt – Standard inclusion in most of my sweet recipes these days. Just a touch, to bring out the flavours in this cake. Doesn’t make it salty!
How to make lemon coconut cake
Put everything in a bowl and MIX! How good would life be if all baking recipes were this easy??? (Though, my waistline begs to differ).
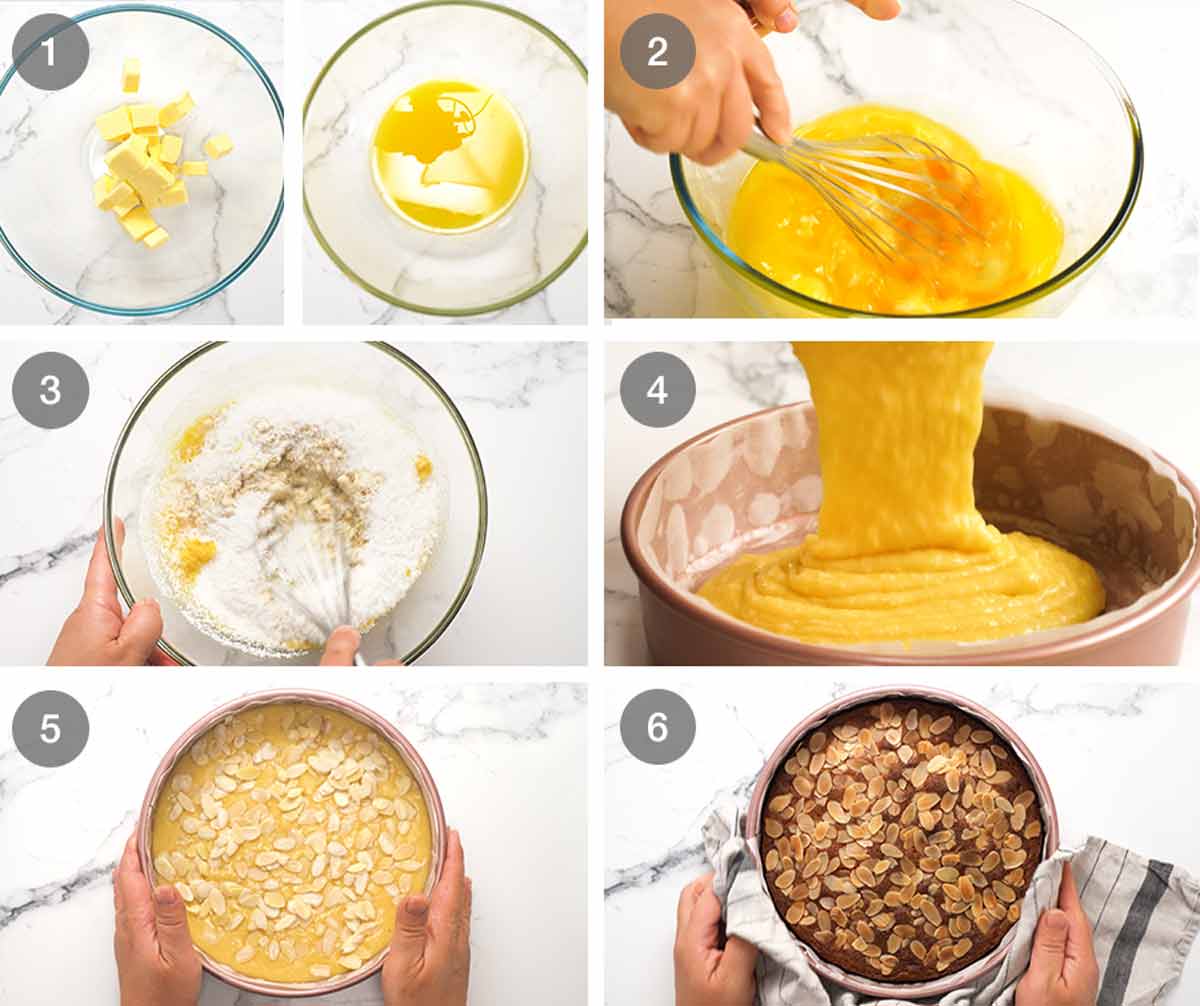
Melt the butter in a bowl using your microwave.
Wet ingredients – Whisk in all the other wet ingredients (eggs, vanilla, sugar – yes, sugar is considered a wet ingredient in baking because it liquifies when mixed with other wet ingredients).
Dry ingredients – Whisk in the almond meal, coconut, baking powder, salt and zest.
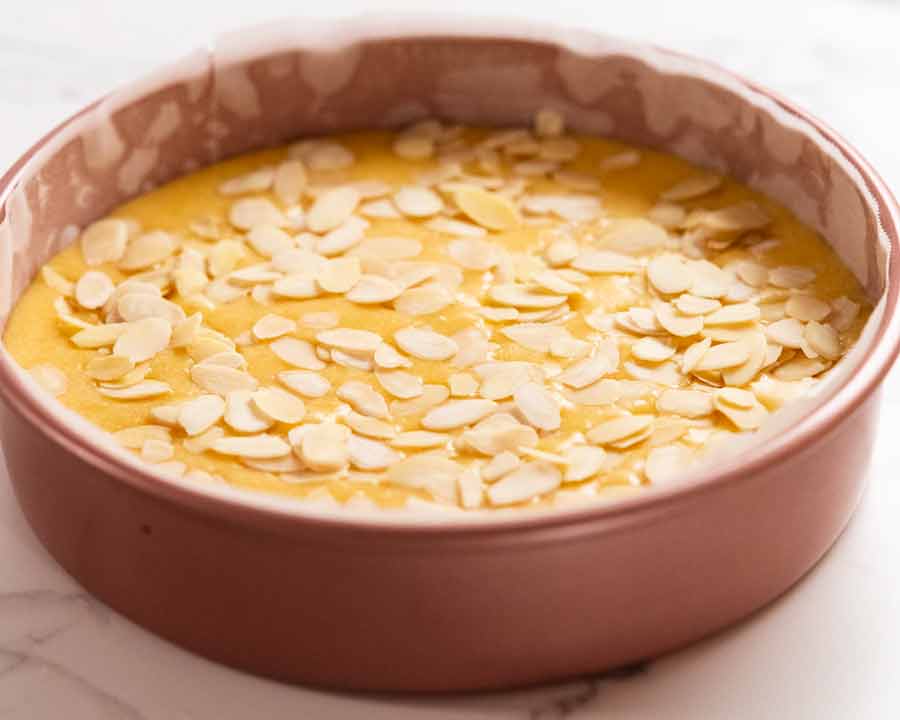
Pour it into a 20cm/8″ lined round cake pan. DO NOT skip lining the pan! Even greasing very generously is not enough to stop it from sticking to the pan, no matter how non-stick you think your pan is. (As you might have guessed, I’m speaking from first hand experience here).
Bake 40 minutes – Sprinkle the surface with almonds then bake for 40 minutes at 180°C/350°F (160°C fan) or until a skewer inserted into the middle comes out clean.
Cool for 1 hour before cutting to serve. I was a bit impatient in early versions and found that because the cake is quite moist, it can appear undercooked if you cut it while still warm. (But it’s not undercooked, it just looks that way if you cut while still hot!).
Serve it plain!
While some cakes I recommend serving with a dollop of cream, ice cream or other such accompaniment, this is a cake that definitely stands on its own two feet. Great flavour (lemon + coconut with a hint of almond) with a very moist crumb which is virtually impossible to replicate with flour-based cakes.
So it’s a great cake for taking places – such as for a work morning tea, book club, school bake sale. Just cut and serve. And those who are gluten-intolerant can enjoy it too. Though honestly, don’t just make this because you need a gluten-free cake. Make it because it’s just a really great cake that happens to be just about one of the easiest, quickest cake recipes I know. – Nagi x
Watch how to make it

Easy Lemon Coconut Almond Cake
Ingredients
- 150g / 10 tbsp unsalted butter
- 4 large eggs (55-60g/2oz each), at room temp
- 1 tsp vanilla extract
- 3/4 cup caster sugar (superfine sugar, Note 2)
- 1 1/2 cups almond meal (ground almond, Note 1)
- 1/4 tsp cooking/kosher salt
- 1 tsp baking powder
- 3/4 cup desiccated coconut (US: finely shredded unsweetened coconut)
- 1 1/2 tsp lemon zest (1 large lemon)
- 1/4 cup flaked almonds , optional (Note 3)
Instructions
- Preheat oven to 180°C/350°F (160°C fan). Grease a 20cm/8” round cake pan (or springform pan) with butter then line with paper.
- Melt butter – Place the butter in a large microwavable bowl and melt in the microwave. Let cool for a couple of minutes.
- Wet ingredients – Add egg, vanilla and sugar and whisk until combined.
- Dry ingredients – Add almond meal, salt, baking powder, coconut and lemon zest. Whisk until combined.
- Bake 40 minutes – Pour into pan. Sprinkle over almonds. Bake 40 minutes. Cool 15 minutes in pan then carefully turn out onto cooling rack.
- Cool at least 1 hour before cutting slices to serve. Moist enough to serve plain – doesn't need cream or anything!
Notes
4. Keeps perfectly for 5 days – best in the fridge if it’s hot.
Nutrition per slice assuming 12 slices.Nutrition
Life of Dozer
Eyeing end of day remnants in a glass cabinet like it’s a big juicy steak.

The post Easy lemon coconut almond cake appeared first on RecipeTin Eats.
]]> Ultra chewy, homemade muesli bars that are cheaper, tastier and much healthier than store-bought. Tastes like a chewy caramel studded with nuts and fruit! Excellent way to clear out random leftover nuts and dried fruit. The case for homemade muesli bars There’s some things that I’ll always (probably) buy from the shops. Like – potato... Get the Recipe
The post Muesli bars (granola bars) appeared first on RecipeTin Eats.
]]>Ultra chewy, homemade muesli bars that are cheaper, tastier and much healthier than store-bought. Tastes like a chewy caramel studded with nuts and fruit! Excellent way to clear out random leftover nuts and dried fruit.
The case for homemade muesli bars
There’s some things that I’ll always (probably) buy from the shops. Like – potato crisps. And cheezels (I love ’em! Don’t judge me.😭)
But there’s some things that I’ll never buy, after discovering how good and easy homemade is. Muesli bars currently tops that list. (That’s granola bars, to those of you in the States!).
I actually bought a box of a popular brand here in Australia called Carmen’s so I could do a side-by-side taste test, homemade vs store bought. The texture is almost exactly the same. But the flavour of homemade is far superior. Put simply, you can taste all the ingredients better. Also, everything in homemade muesli bars is all-natural. No mysterious food additives or preservatives to survive on supermarket shelves!
We’re making chewy ones today
There’s an endless variety of muesli bar flavours available these days. Nut free, fruit free, chocolate chips, chocolate drizzle! With today’s recipe you can customise the flavour to your hearts’ content.
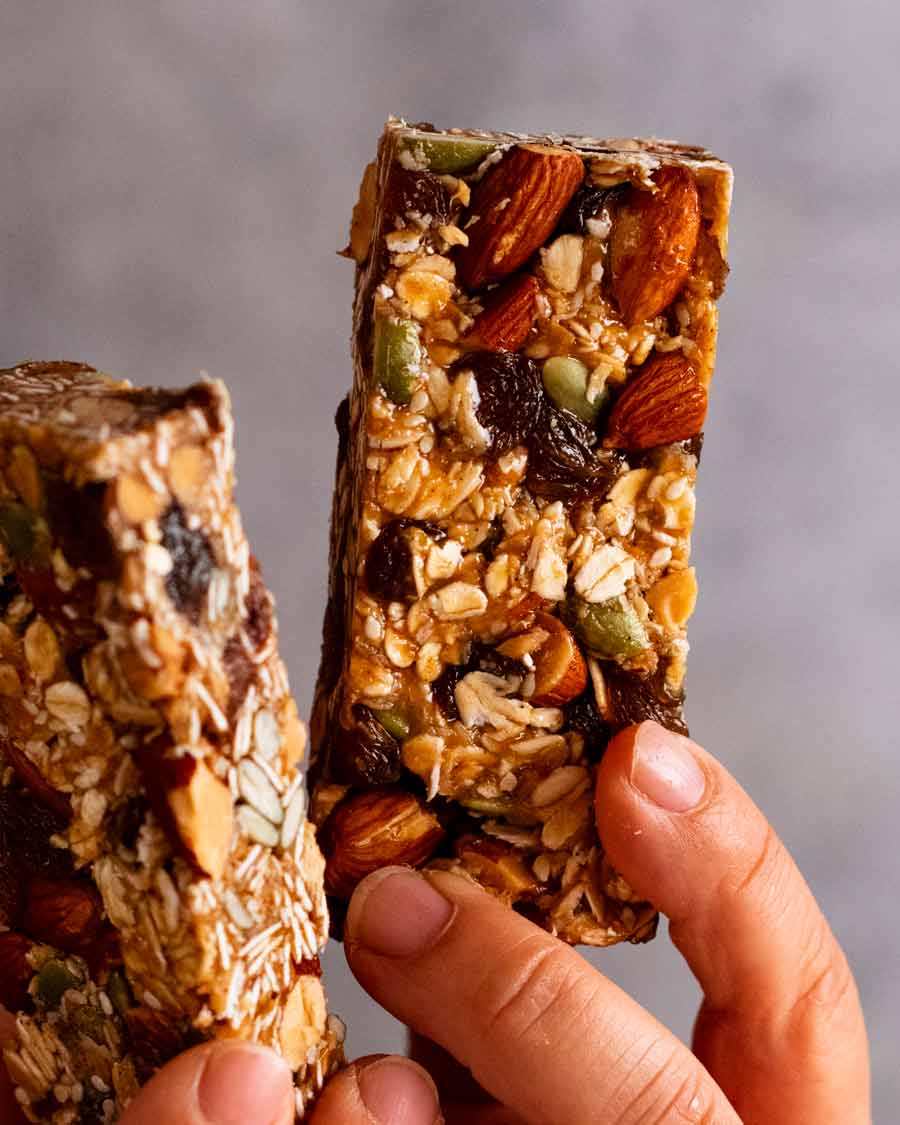
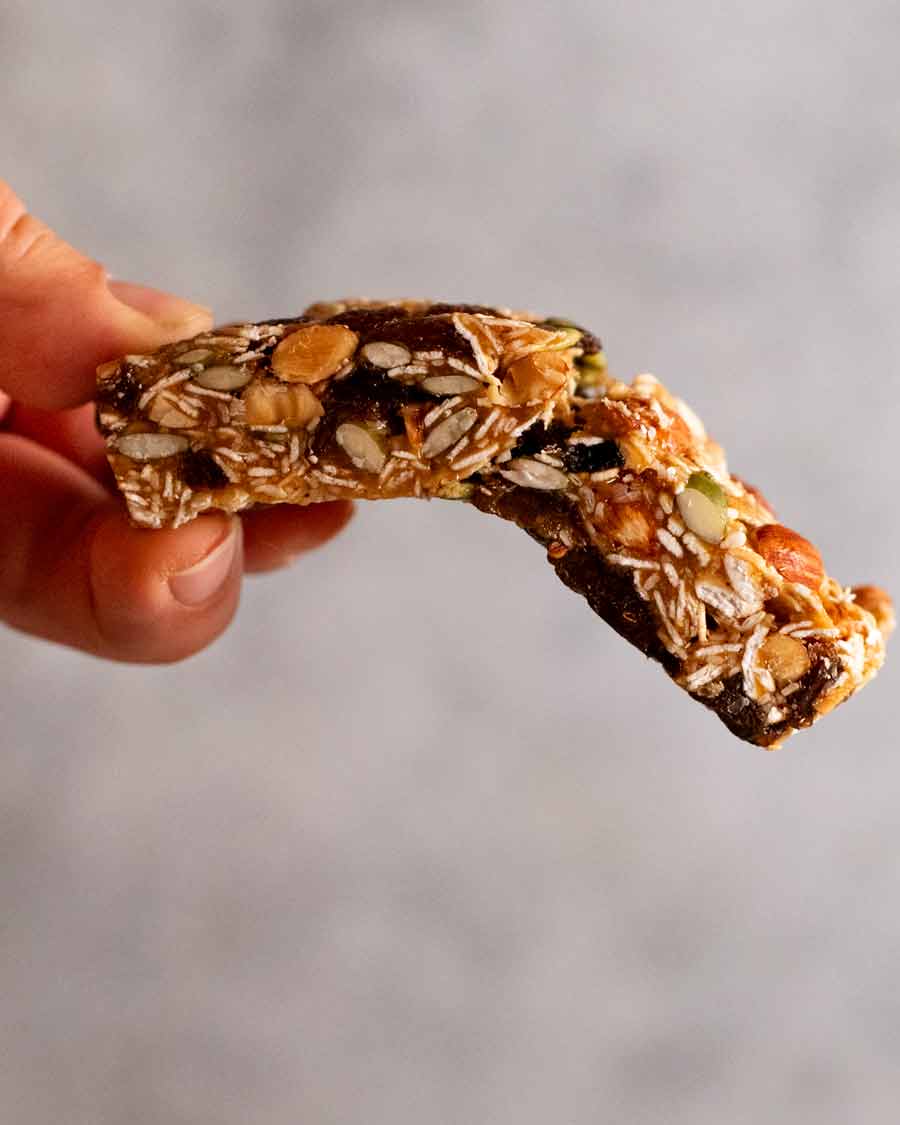
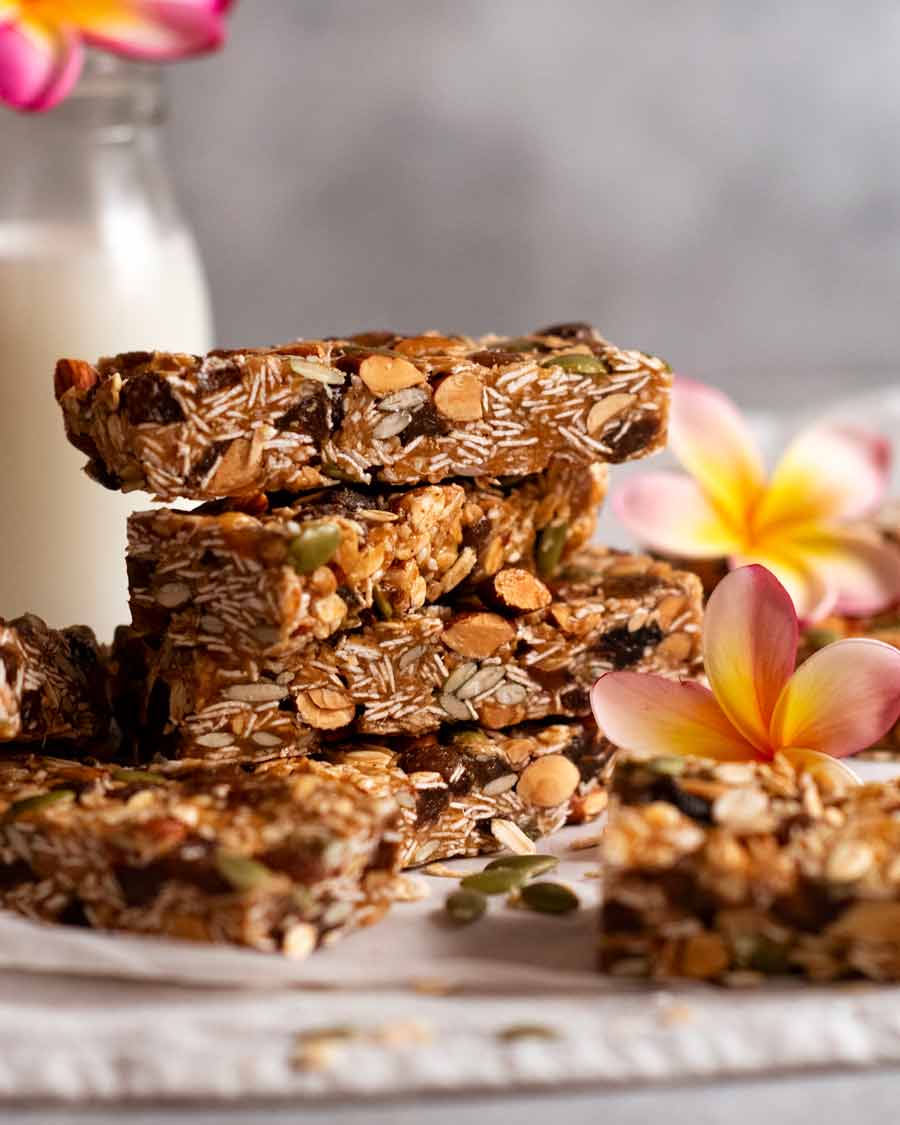
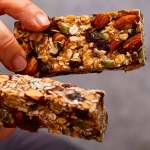
As for texture – broadly speaking, there’s two types: chewy and crunchy. We’re making chewy ones. And when I say chewy, I do not exaggerate. It’s like eating a chewy caramel – except you get to feel smug cause these muesli bars are good for you.
Doubt me? Here’s proof of chew:
What goes in muesli bars
The combination of fruit and nuts I’ve used is a copy-cat of Carmen’s classic fruit & nut muesli bars, a very popular brand here in Australia. You can really use any add-ins you want, as long as you stick to 3 1/2 cups in total as that’s how much the peanut butter-honey “glue” will hold together.
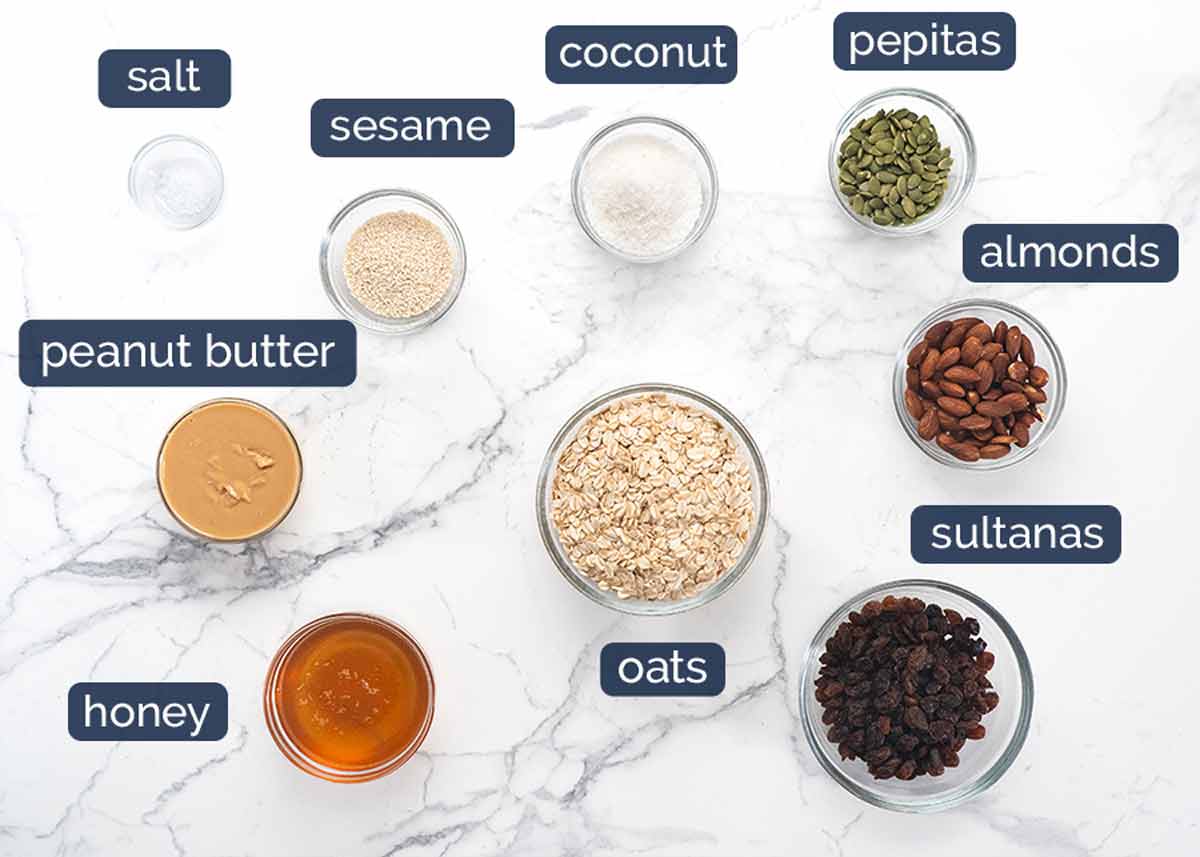
The glue
Natural peanut butter (or almond butter) – Different to commercial peanut butter spread because it’s got no sugar, salt, preservatives etc added. It’s 100% peanuts which means better peanut flavour and it’s runnier (hence why it works better for things like satay sauce).
Mix well if separated – The absence of stabilisers also means that the oil and peanuts will separate if left in the pantry for ages. Be sure to mix well to combine before using. If your peanut butter has solidified into cement, try microwaving briefly to warm (remove the metal lid!) then mix with a butter knife or chopstick. If that still does not work, scrape the oil & peanut cement into a jug and blitz with a stick blender (done that plenty of times!).
Non-peanut substitute: I think almond butter is best, for flavour and texture. I’ve read in other granola bar recipes that other nut butters work too.
Honey – For natural sweetness. Maple syrup should also work.
Add-ins
Rolled oats – not quick oats, just plain traditional oats.
Almonds – whole, roasted, unsalted. I like to give them a very rough chop so it disperses better.
Sultanas – or raisins, cranberries or any other dried fruit of choice (if using big pieces like apricots, suggest chopping).
Pepitas – because it’s in Carmen’s. Like that it adds some colour to all the brown-ness!
Sesame seeds – because it’s in Carmen’s.
Coconut – because it’s in Carmen’s. Use desiccated coconut (ie finely shredded) that is not sweetened. Flakes will also work but because they are larger they won’t disperse as well throughout (maybe chop or crush in hands?).
Cinnamon – a little touch of cinnamon really works in this!
Salt – Just a touch brings out the flavours in this.
How to make ultra-chewy muesli bars
I love that this is a no-bake recipe!
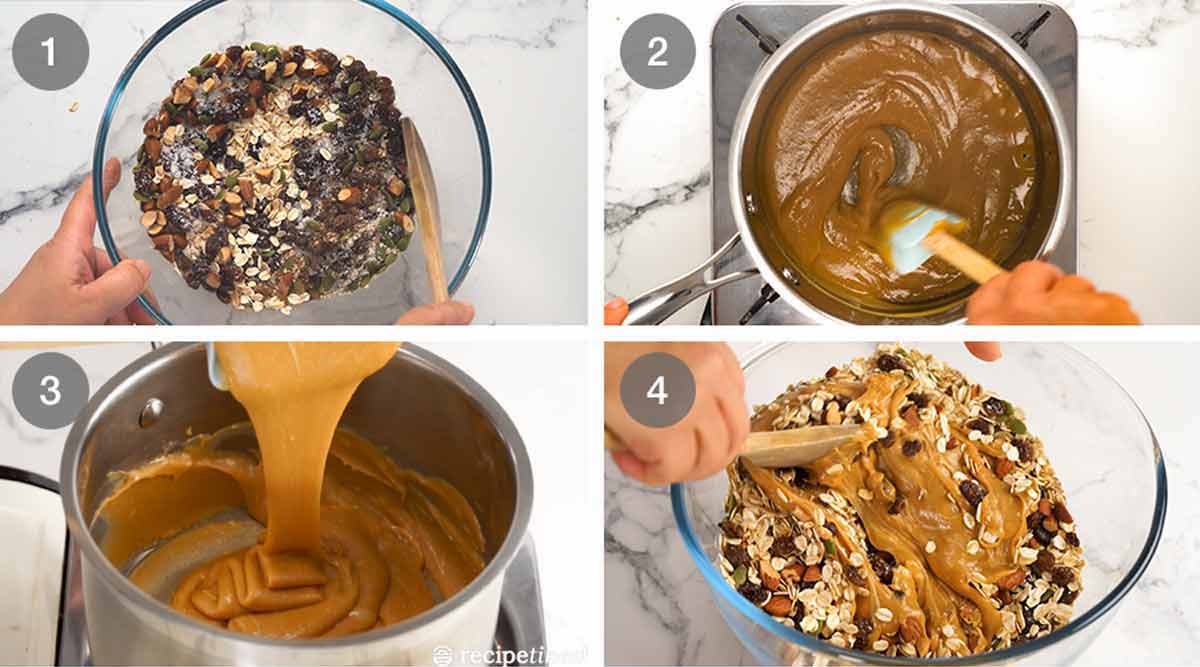
Mix the add-ins in a microwavable bowl using a wooden spoon.
Why microwavable? Because the peanut butter glue is quite thick and if the air is cool or if you take your time with the mixing or if you take a call from your friend mid-mix, the glue may get so thick it’s too hard to mix. If this happens, a 20 second microwave will do the trick!
Mix glue – Put the peanut butter and honey in a saucepan over low heat and mix to combine. Use a rubber spatula and cook, stirring almost constantly, for 5 minutes to thicken. Scrape the base of the saucepan, getting in around the edges. DO NOT WALK AWAY during this step as it can catch easily on the base.
Goal – Thick caramel-like mixture. It should mound like ribbons, as pictured above. Basically, the thicker the mixture, the chewier your muesli bars!
Immediately pour the mixture all across the surface of the oats. Use the wooden spoon to mix to combine until you can no longer see dry oats. At first this will seem impossible, but persevere as it will happen! Using stabbing motions and smearing against the side of the bowl helps.
If it gets too hard to stir, microwave for 20 seconds then it will be a breeze.
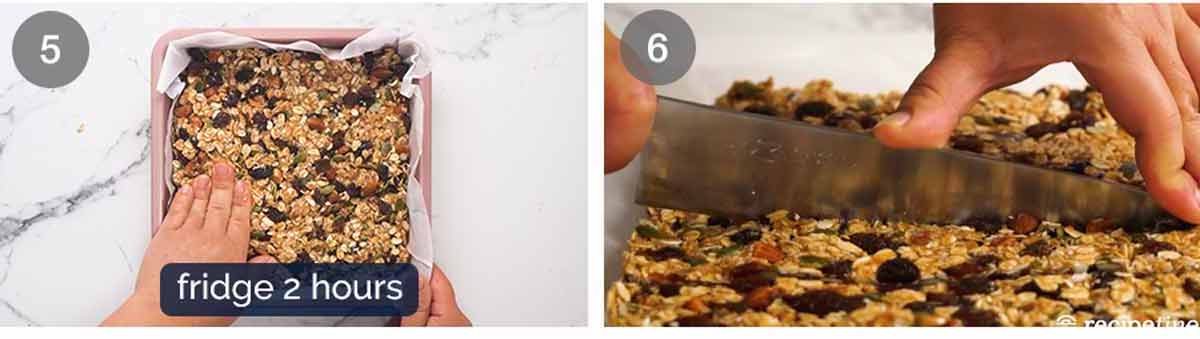
Press – Place a sheet of paper over a 20cm/8″ square pan (no need to grease, why create unnecessary washing up??). Scrape the mixture in then press it into the pan using a combination of the wooden spatula to spread it out, then hands to press it in.
Press firmly but keep some of the surface bumpy rather than aiming for completely flat. If you press really, really firmly ie make the surface almost completely smooth and flat, the bars will be very, very chewy. I personally found it a little too chewy, but maybe that’s what you want!
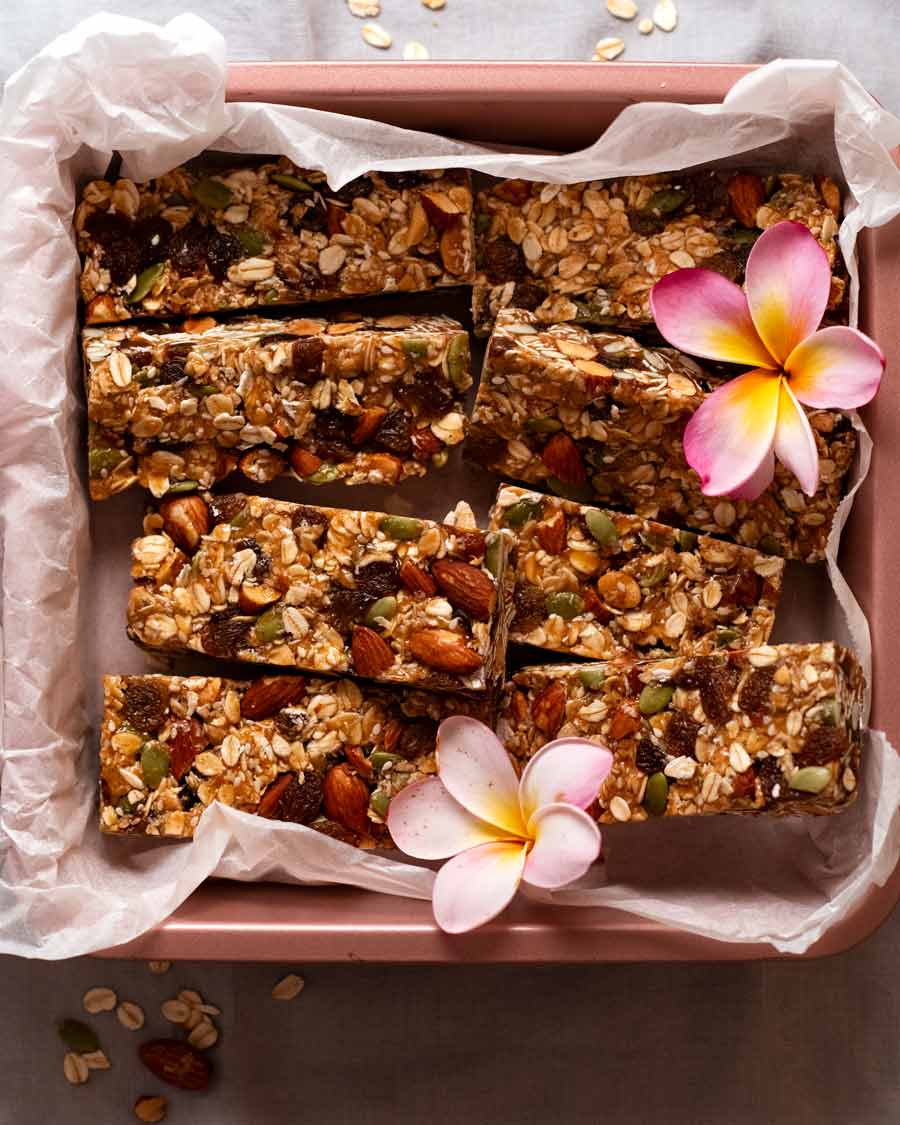
Refrigerate for 2 hours to set then cut into 10 bars. Or 8, if you want bars a little larger than store-bought. Then eat! Well, chew. 😂
Matters of muesli bars
Never thought I’d be writing a section titled as above, but I do have some a few practical matters to share with you on the matter of homemade muesli bars!
Are muesli bars healthy? This homemade one is, being made with all-natural ingredients with no fat or sugar added. However, most store-bought ones are not. Look closely at the ingredients list and you’ll see sugar and unfamiliar food additives listed.
Storage – Airtight container in the fridge keeps them fresh and perky for 2 weeks. Out of the fridge, the oats soften faster over time which alters the texture of the muesli bars. But they don’t go off.
Cold vs room temp – The muesli bars are firmer / chewier when fridge cold then soften to store-bought muesli bar level chewiness at room temperature. I actually really like them cold, for extra chew. As I mentioned earlier, it’s like a guilt-free chewy caramel!
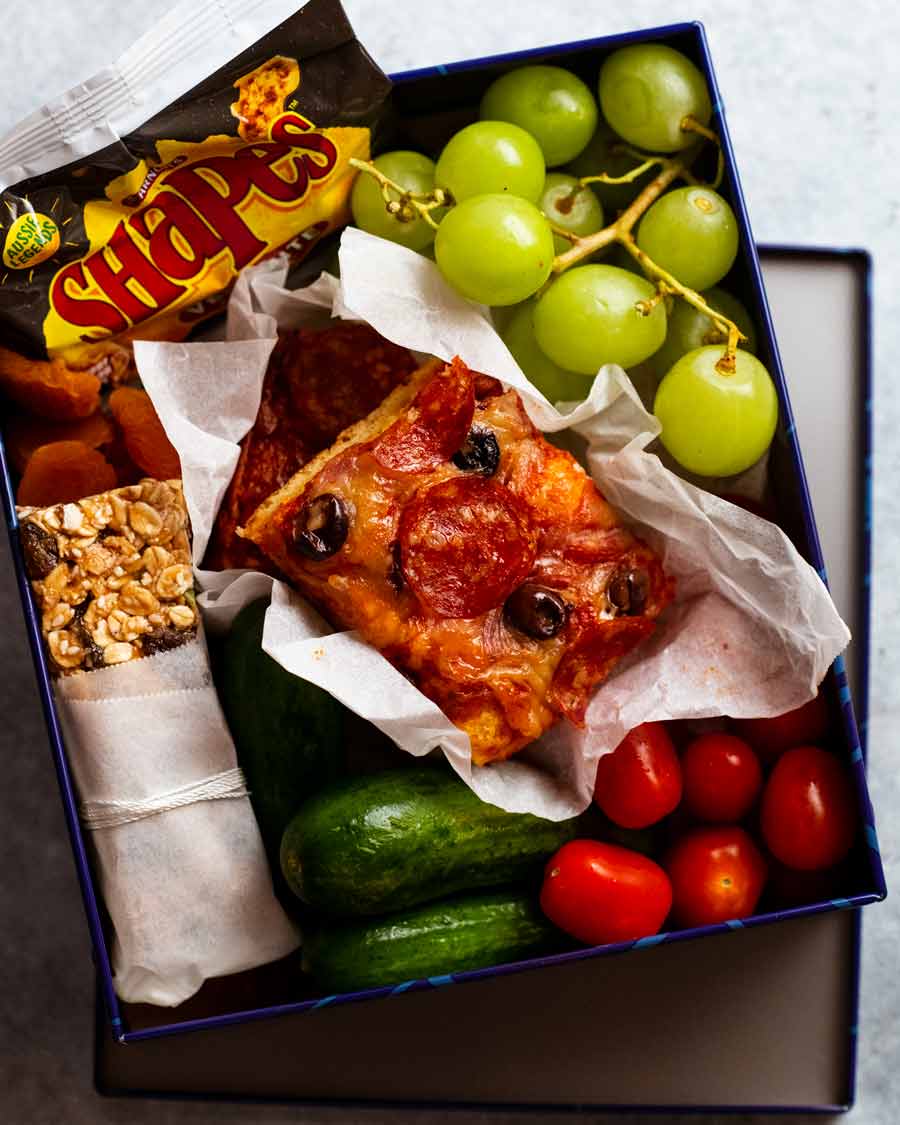
When to eat it – Breakfast on the run or snack! Honestly, you’d never even think of these as “healthy” because they’re sweet and tasty. I cut them into squares, drizzle with chocolate (see last point) and serve as an afternoon tea sweet treat.
Lunchbox shelf life – Easily all day, out of fridge is fine. Fridge storage isn’t about keeping them food-safe, it’s about keeping them fresher for longer.
Mini choc chips – The choc chips on store bought muesli bars are smaller than the ones used in chocolate chip cookies, they are mini ones. I found them at my local Scoop Wholefoods (Mona Vale, Sydney). You know those stores where you help yourself to fruit, nuts, chocolates etc out of tubs?
To add them to your muesli bars, press the mixture into the pan then let it cool slightly else the choc chips will melt. Then scatter the mini choc-chips across the surface and use your hands to press them in. Then refrigerate.
Chocolate drizzle – You will only need a small quantity of chocolate drizzle. I find it hard to melt small quantities of chocolate in a bowl in the microwave (always seizes). I find the easiest way is to pop about 1/4 cup of chocolate chips (normal ones, this time!) in a small ziplock bag. Seal, microwave for 10 seconds at a time (massage to “mix) until melted. Snip corner, drizzle across muesli bars.
So, what do you think? Is this a good weekend to rummage through your pantry to round up all those leftovers nuts and dried fruit from other recipes to make homemade muesli bars?? – Nagi x
Watch how to make it
Muesli bars (granola bars)
Ingredients
- 1/2 cup (120g) pure natural peanut butter, smooth, or other nut butter (mix oil in well, Note 1)
- 1/2 cup (175 g) honey (Note 2)
Add ins (3 1/2 cups your choice, Note 3):
- 1 1/2 cups (175g) rolled oats
- 1 cup sultanas (160g)
- 1/4 cup desiccated coconut , unsweetened (25g)
- 1/2 cup almonds , very roughly chopped (80g)
- 1/4 cup pepitas (40g)
- 2 tbsp white sesame seeds
- 1/8 tsp salt
- 1/2 tsp cinnamon
Instructions
- Mix Add-ins – Using a wooden spoon, mix the add-ins in a large microwaveable bowl (just in case, Note 4).
- Glue – Using a rubber spatula, mix the peanut butter and honey in a saucepan over medium heat until smooth. Once combined, turn the stove down to low. As soon as you start seeing little bubbles around the edges, cook for 5 minutes, stirring constantly scraping the base, until it is like a very thick caramel (see photos and video in post). You should be able to draw a path across the base and it holds before closing in on itself. DO NOT WALK AWAY, it will catch easily. (Note 5)
- Mix – Immediately pour it all over surface of the oats etc then mix with the wooden spoon. It takes a bit of effort but it does come together eventually. Stabbing and smearing against the wall of the bowl helps. If it gets too thick, microwave for 20 seconds on high to loosen the glue then mix (then it's a breeze!).
- Press – Put a square piece of paper over a 20cm/8" square tin (no need to grease). Drop muesli mix in then spread right into the corners, using a combination of your hands and the wooden spoon. Firmer press = chewier muesli bars.
- Set – Refrigerate 2 hours until firm then cut into 10 bars (cut in half, then each half into 5).
Notes
Nutrition
Life of Dozer
You knew I’d do this with the flowers as soon as I was done with the food photos, right??!

The post Muesli bars (granola bars) appeared first on RecipeTin Eats.
]]>