 This is such a wonderful recipe to use economical pork shoulder in an exciting new way! A Vietnamese lemongrass marinade infuses with beautiful flavour while a smidge of baking soda is the secret to tenderising so the pork steaks are tender like premium chops. Vietnamese street-food! Vietnamese lemongrass pork I’ve been wanting to recreate the... Get the Recipe
The post Vietnamese lemongrass pork steaks appeared first on RecipeTin Eats.
]]>This is such a wonderful recipe to use economical pork shoulder in an exciting new way! A Vietnamese lemongrass marinade infuses with beautiful flavour while a smidge of baking soda is the secret to tenderising so the pork steaks are tender like premium chops. Vietnamese street-food!
Vietnamese lemongrass pork
I’ve been wanting to recreate the chargrilled lemongrass marinated pork you find “everywhere” on the streets of Vietnam for years – but it always came out dry. Finally figured out the secret to keeping it juicy, so I had to share the recipe immediately! 😂
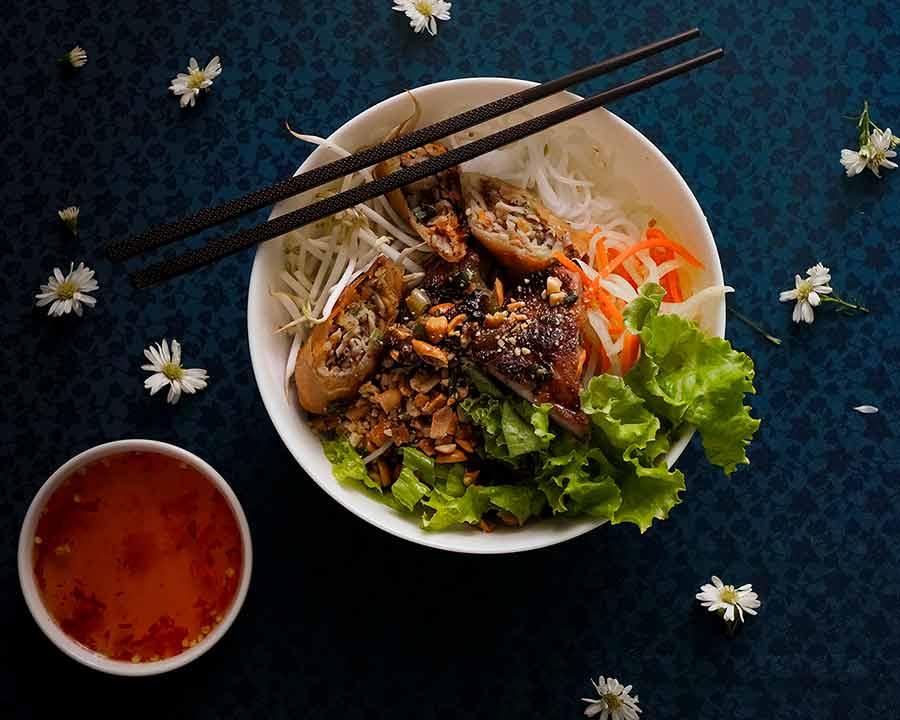
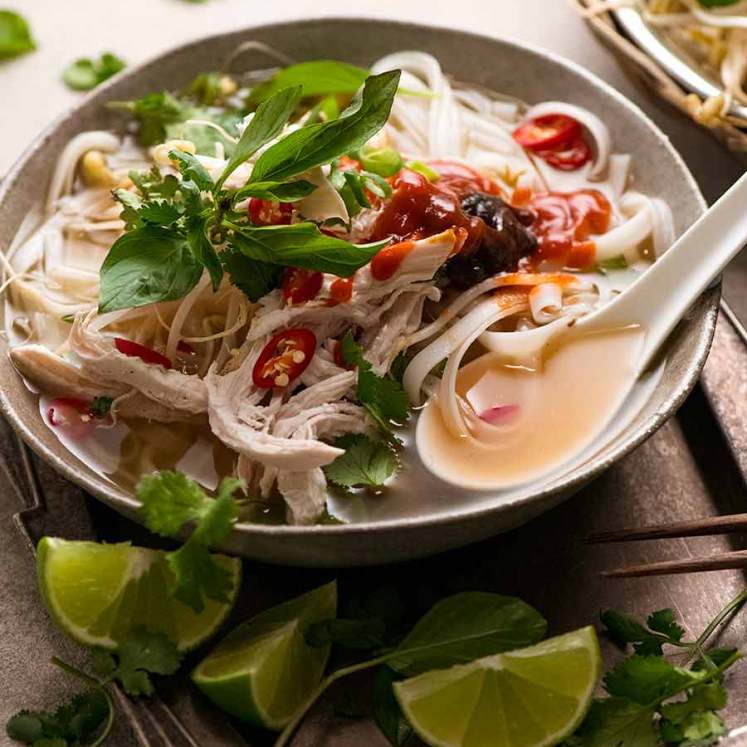
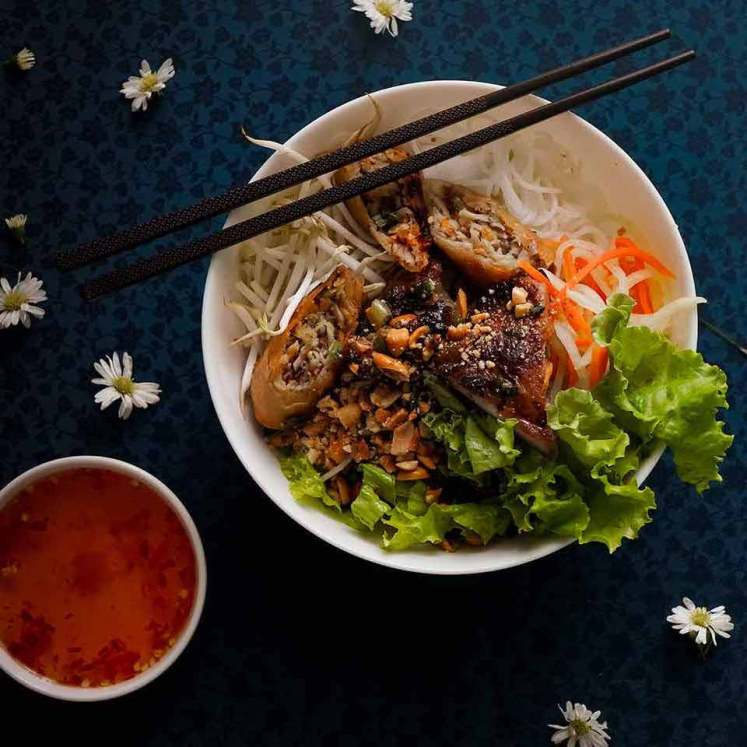
Across Vietnam, variations of this lemongrass pork are served in various forms. On rice, soups, in rice paper rolls, even in Banh Mi. While all are delicious, my favourite are the popular Vietnamese noodle bowl salads, bun thit nuong. Thin rice noodles, topped with this pork, pickled vegetables, lettuce, a smattering of peanuts, lime and served with nuoc cham, that sauce served with “everything” in Vietnam.
I’ve shared the pork noodle bowl as a separate recipe as I wanted to publish the marinated pork separately because I think it’s worthy of your attention!
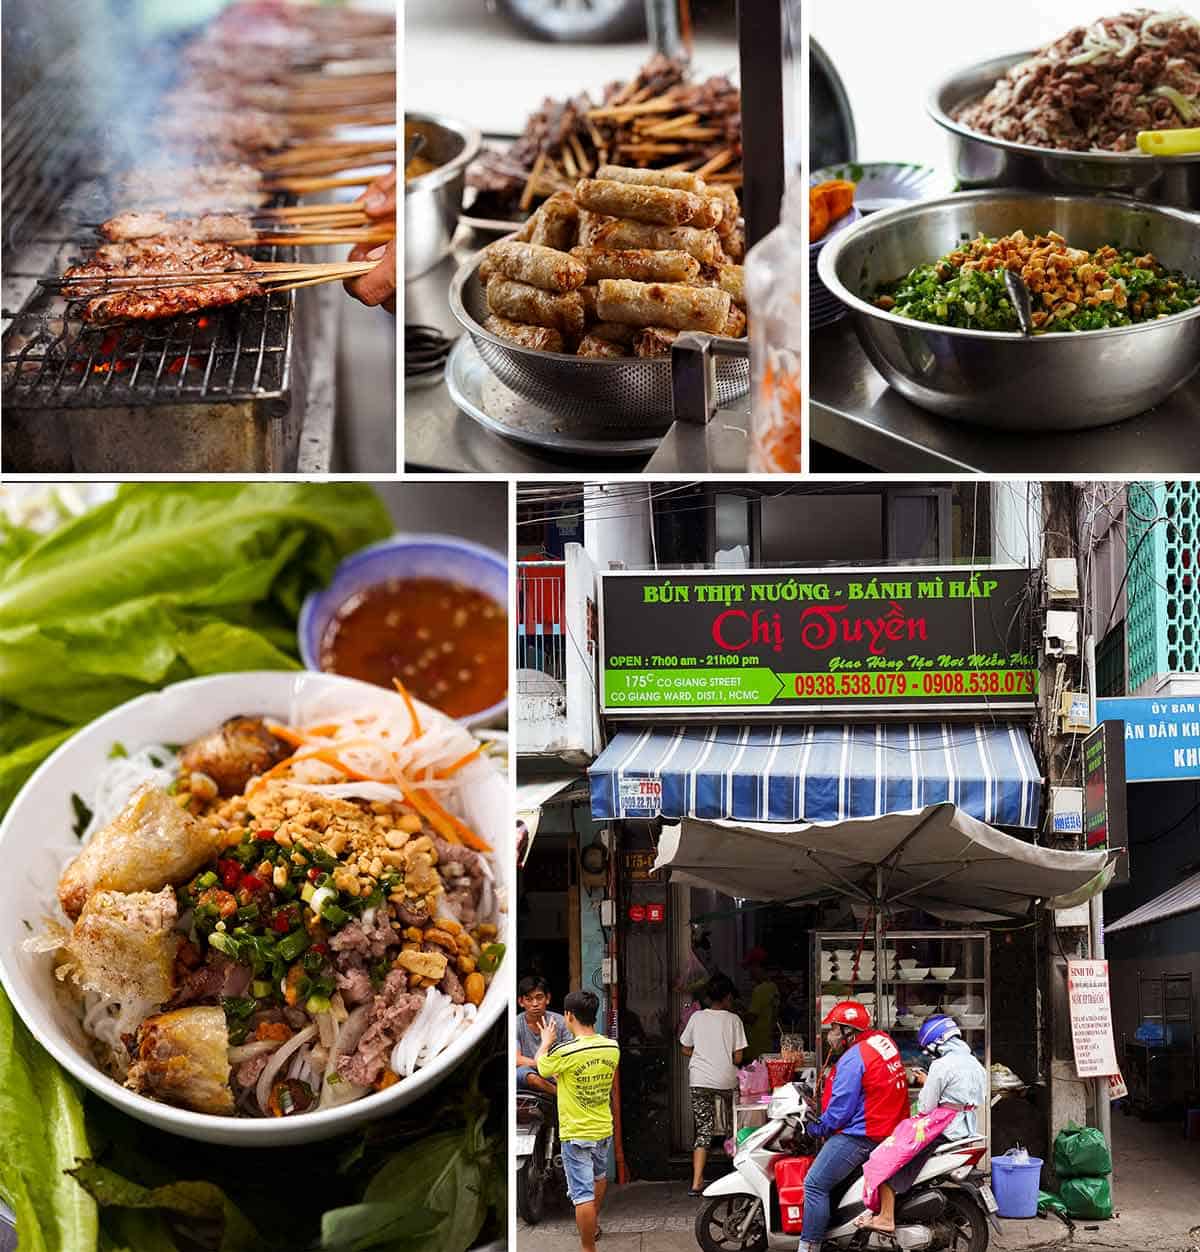
Here’s a photo of the pork rice noodle bowls. I actually took this photo in Vietnam – it’s a dish I bought from a street vendor in Saigon and took back to my hotel to take a photo:
Oh look! And said vendor in Saigon.  They cooked the pork on skewers over charcoal. I’m doing a home version – steaks on a stove. So you can make this any night of the week – rain, hail or shine!
Why you need this Vietnamese pork in your life!
Excellent value – It’s made using economical pork shoulder that is tenderised so it’s juicy like premium pork chops!
Flavour plus value – The meat is sliced and pounded thinly for maximum flavour penetration and so less meat goes further.
Something different but yet so easy, with ingredients you can get from the local shops.
Versatile – Serve at your next BBQ with coconut rice and Asian slaw. Or wait until Friday to make Vietnamese noodle bowls!
Deliciousness factor is extremely high for relatively small effort
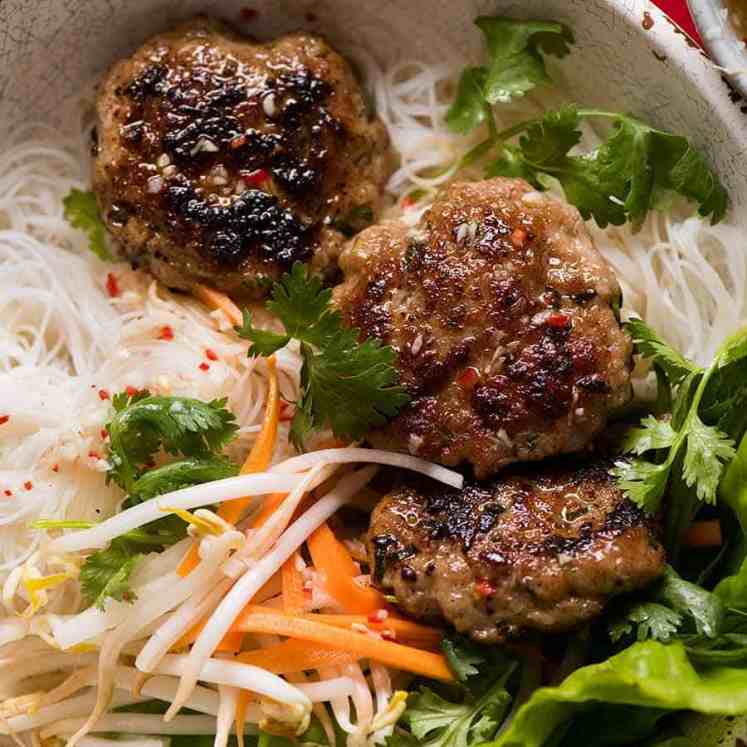
And because I know someone will ask – yes you can make this with chicken, here it is!
What you need
Here’s what you need to make this.

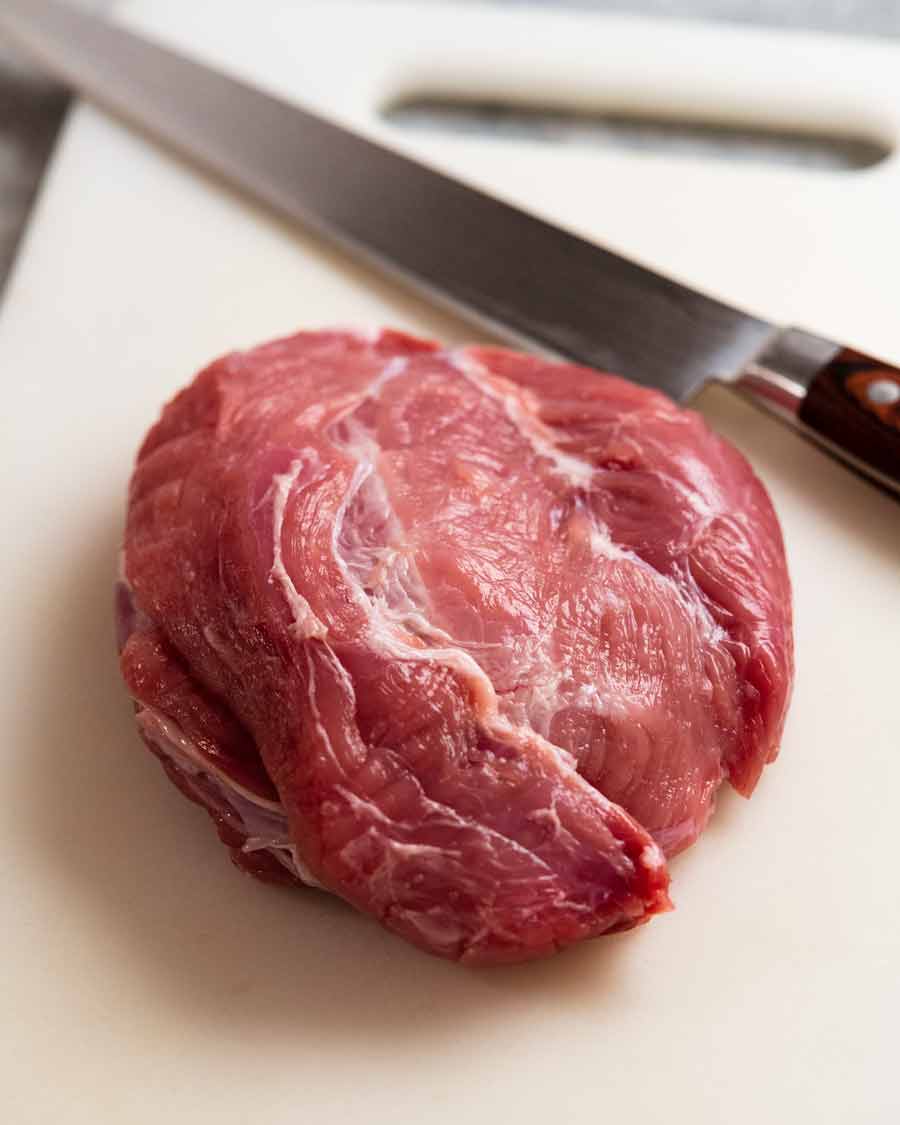
Pork shoulder – Generally, this economical, tough cut of pork is slow cooked until it becomes fall-apart tender. Today, we’re using it in a really different way. Sliced thinly, then marinated with baking soda which tenderises it so when it’s cooked hard-and-fast like steak, it is tender like a pricey pork chop. (Links again for glowing reader reviews who have discovered the wonder of this technique with chicken and beef!).
Baking soda – also known as bi-carb / bi-carbonate. As noted in the point above, this is what tenderises the tough pork shoulder meat.
Lemongrass – For unmistakable, irreplaceable beautiful Vietnamese flavour!
Limes – For tang. A Vietnamese food favourite.
Sugar – For sweet and caramelisation.
Soy sauce and fish sauce – The saltiness. I like to use both to get the right flavour balance. Only fish sauce = too fishy. Only soy sauce = lacks complexity of flavour.
Garlic – Lots!
Oil – To increase the volume of the marinade so there is the right flavour infusion for the volume of meat we’re using. (Initially I just had more of all the other ingredients but the pork was too salty).

How to make Vietnamese lemongrass marinated pork
The key to this recipe is to slice and pound the pork as thinly as you can. This serves a few purposes:
head start tenderising the flesh
opens up the fibres to allow the marinade to penetrate thoroughly
increases surface area and flattens the pork to improve surface area char – for optimum real chargrilled street-food flavour!
allows us to make this with economical pork shoulder rather than pricey pork tenderloin or chops.

Slice the pork shoulder into eight thinnish pieces – gives us a head start on the pounding. I find it easiest to do this by cutting the pork on 45 degree angle but if you have the right shaped piece, you could just cut straight down.
PRO TIP: To get even(ish) pieces without pulling out the scales, cut the pork shoulder in half, then each half in half again, then each in half again. Voila – 8 pieces!
Pound to 5mm / 0.2″ thickness thick using a meat mallet (the jagged side) or rolling pin. Cover with go-between or freezer bags to prevent damaging the meat. (Go-between is a purpose made plastic sheet, sold alongside cling wrap. Also useful for stacking foods in the freezer without sticking together).
Post pounding thin pork!
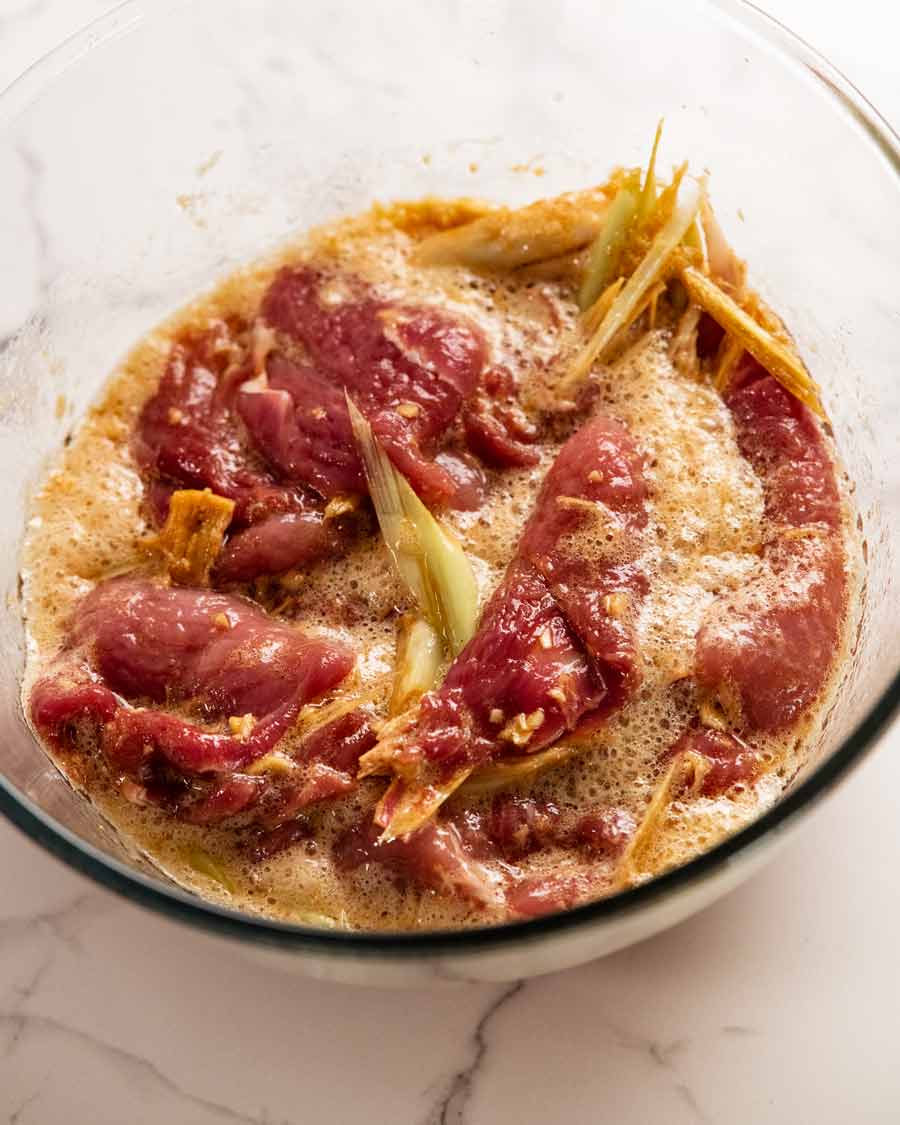
Marinade – Mix the marinade ingredients in a bowl.
Coat pork Add the pork and use tongs to coat well.
Marinate 24 hours – Transfer to a ziplock bag and marinate for 24 hours.
Why mix separately first? To ensure really good, even distribution of the small amount of bi-carb across quite a lot of surface area. I wouldn’t ask you to dirty a bowl unnecessarily
Why a ziplock bag? Because it keeps the meat completely coated in a relatively small amount of marinade. If you prefer a container, use a small one so the meat is as snugly fitted as possible and toss the pork once or twice during the marinading time.
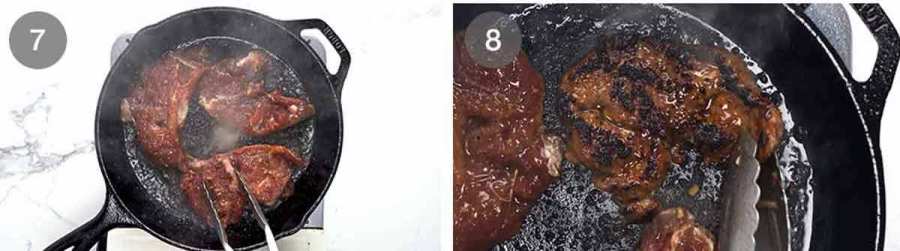
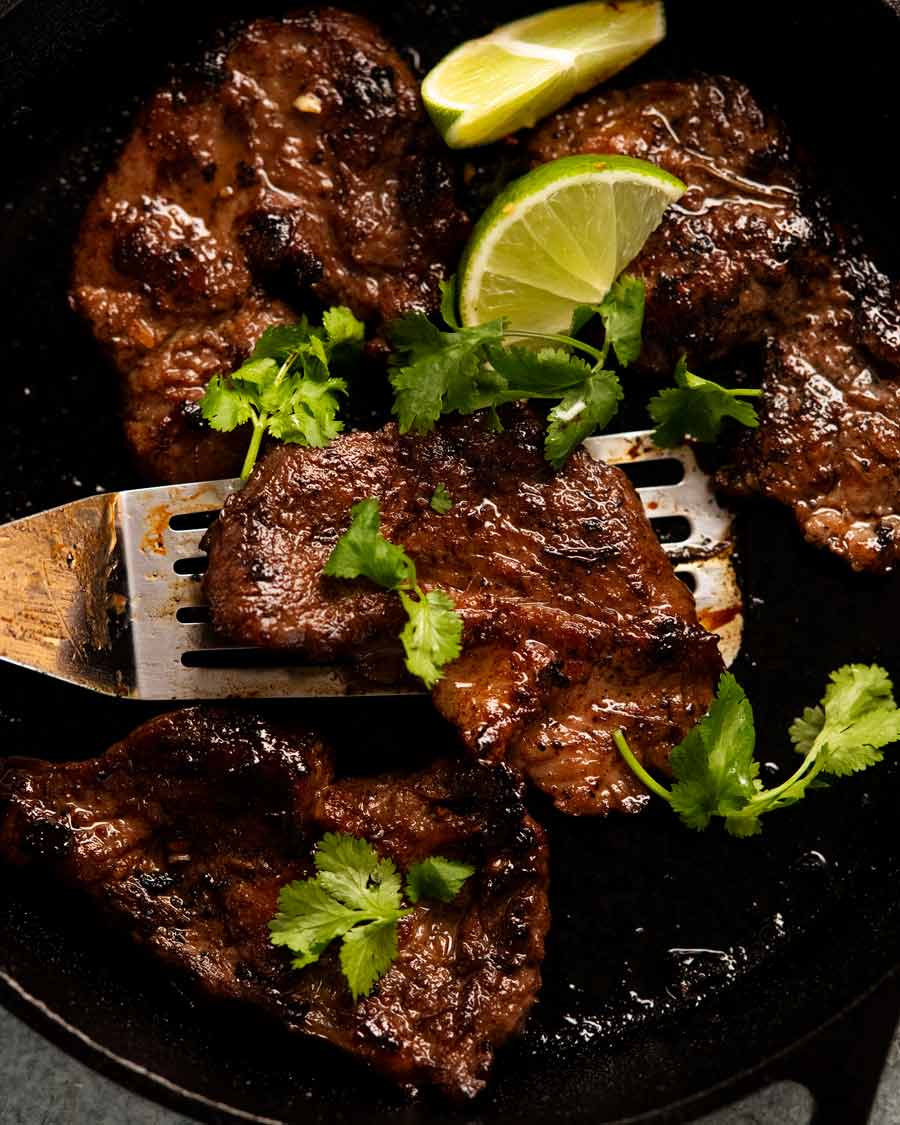
High heat cooking – Cook for 1 1/2 minutes in a hot cast iron skillet OR on your BBQ over high heat. Then cook the other side for 1 minute. Super quick to cook because it’s so thin!
Aim for a nice char – The pork will char quickly because of the sugar in the marinade and that’s what we want, that authentic chargrilled flavour.
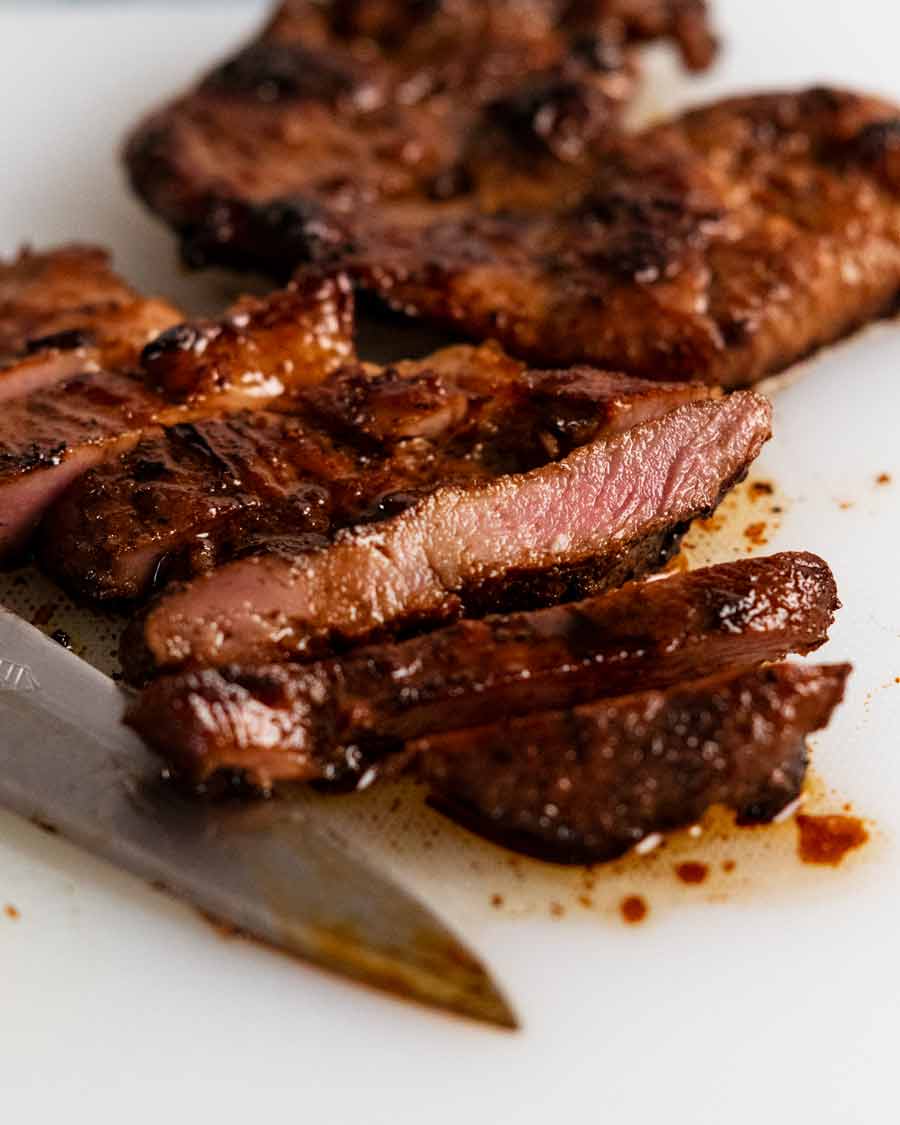
STILL TENDER! Technically, with 2 1/2 minutes of high heat blasting, the thin pork should be overcooked and dry inside, not to mention the tough pork shoulder hasn’t been slow cooked as it should so it should be horridly tough. Nope! The inside is still juicy, and it’s more tender than you ever imagined pork shoulder could be, thanks to the baking soda (read more on this above in the ingredients section).
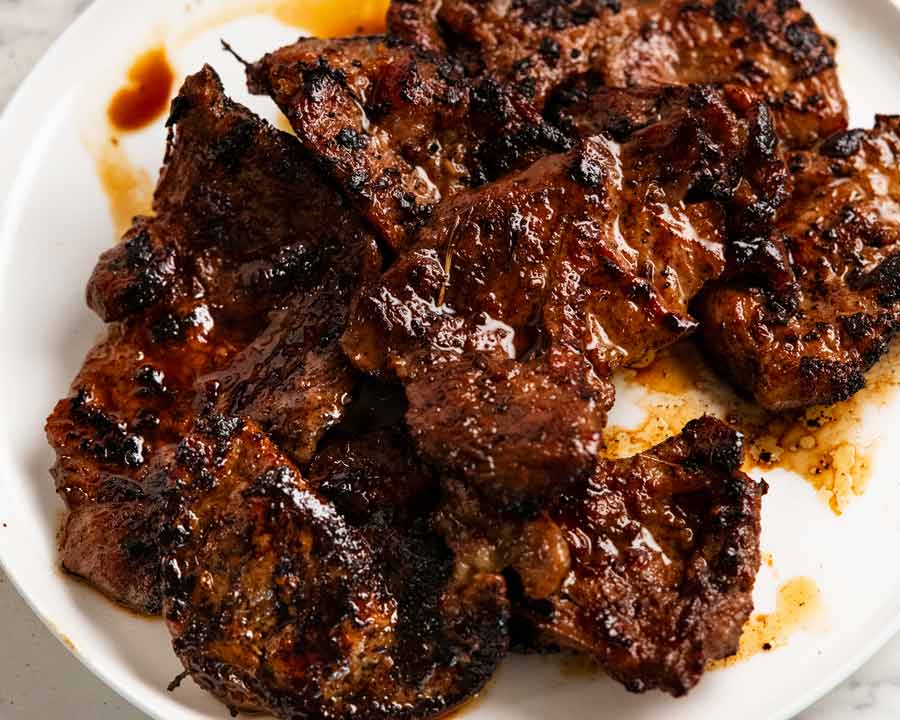
NOTE: Meat tenderised using the baking soda method will be pink inside even when it’s cooked to well done! It’s just what happens. It happens with beef too.
As mentioned above, I’ll share the Vietnamese Pork Noodle Bowls recipe on Friday (UPDATE: here it is!). But think beyond the noodle bowl! Serve it with a side of coconut rice, Vietnamese red fried rice or plain jasmine rice with a side salad. Try one of these:
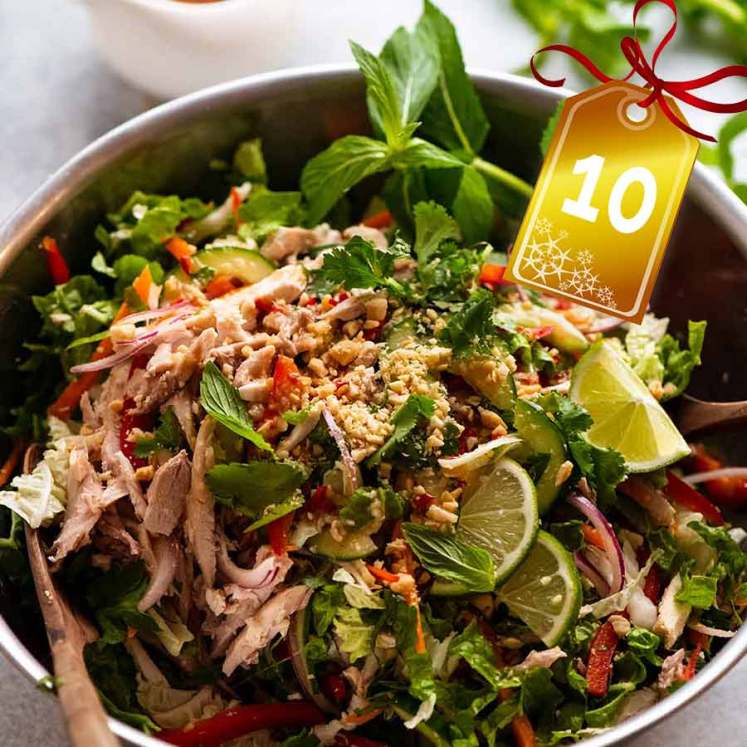
Vietnamese Chicken salad – minus the chicken
Steamed vegetables or any leafy greens drizzled with Asian Sesame Dressing
And just before I sign off, one more look at the pork noodle bowl:
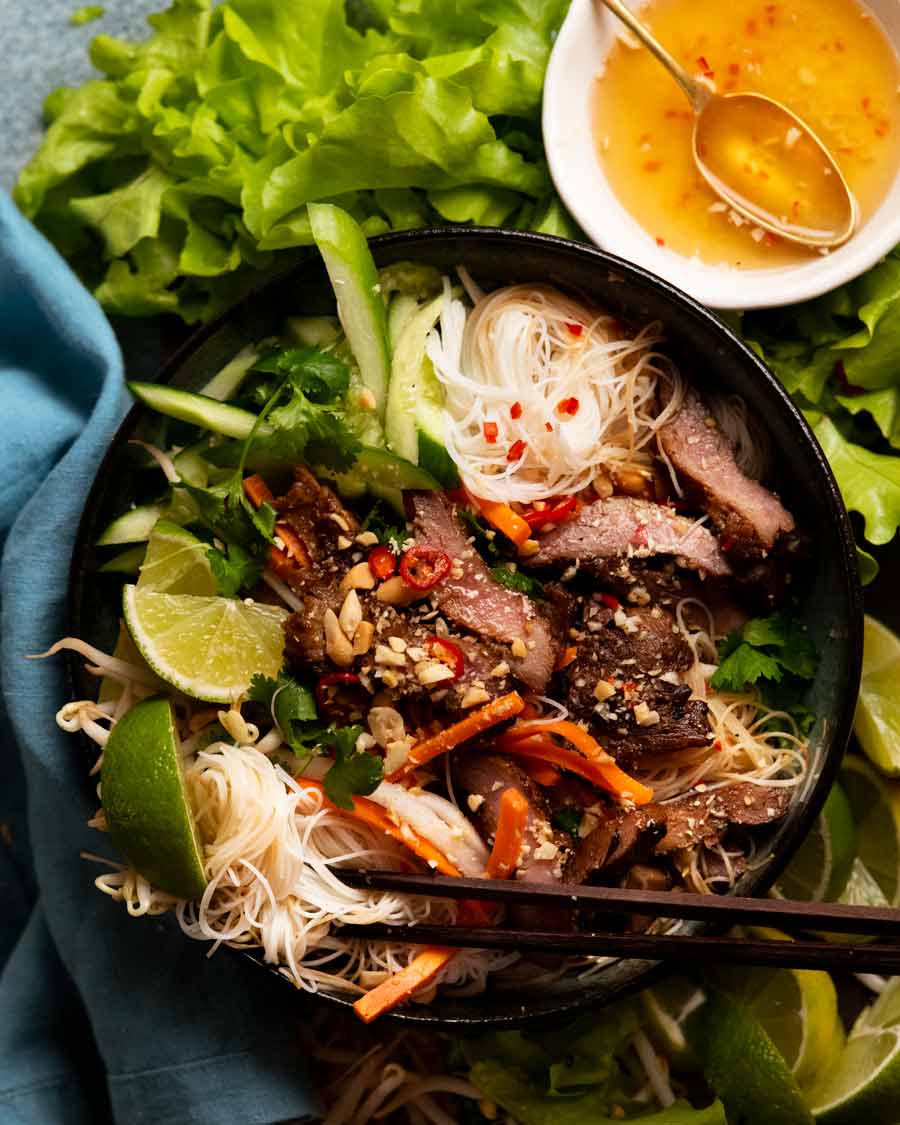
It’s so good! ADORE the contrasting textures of the fresh vegetables and herbs with the flavourful marinated lemongrass pork all doused in nuoc cham, the Vietnamese chilli-garlic sauce served with “everything”.
What do you think?? Have I convinced you to give this Vietnamese pork a go? I hope so!!! If anything, it’s worth experiencing the magic of the marinade and how tender it makes pork shoulder steaks. Try it!! – Nagi x
Watch how to make it

Vietnamese Lemongrass Pork steaks (tenderised!)
Ingredients
- 500g/1 lb pork shoulder , skinless and boneless, or pork scotch (roast or steaks) (Note 1)
- 3 tbsp canola oil
Marinade:
- 2 lemongrass stalks , white part only, bruised, cut into 1 cm / 0.4″ slices on angle (Note 2)
- 4 garlic cloves , finely minced
- 4 tbsp lime juice
- 3 tbsp fish sauce
- 1 tbsp soy sauce (all purpose or light, NOT dark soy, Note 3)
- 4 tbsp brown sugar (tightly packed tablespoons)
- 3 tbsp oil (canola, vegetable, peanut)
- 3/4 tsp baking soda/bi-carb , for tenderising (Note 4)
Instructions
- Cut pork – Cut into 8 equal, thinnish slices of pork. I find it easiest using the knife on a 45° angle, but if you have the right shape piece you can just cut straight down.
- Pound each steak to 5mm / 0.2" thickness using the scary side of a meat mallet (jagged, not flat), using go-between (Note 5) or a freezer bag to avoid damaging the meat. (You can use baking paper for rolling pin or the flat side of the mallet.)
- Marinade – Mix the marinade ingredients in a bowl, it will fizz when the baking soda is added! Add pork then toss well to coat using tongs. Transfer to a ziplock bag and marinate for 24 hours.
- Remove pork from the marinade and brush off the lemongrass pieces. Discard marinade – it's done its job!
- Cook – Heat a cast iron skillet over high heat until you see wisps of smoke. Add 1 1/2 tbsp oil, then cook half the pork for 1 1/2 minutes on one side and 1 minute on the other side until nicely charred. Remove onto a plate. Scrape pan clean of loose black bits then cook the remaining pork.
- Serve! Make Pork Noodle Bowls (bun thit nuong) or serve with rice and a side salad – see note 6 and in post for suggestions!
- NOTE – The thin pork steaks are beyond well done in 2 1/2 minutes but it doesn't matter because the baking soda keeps them tender. It will be blushing pink inside due to the baking soda (same happens with beef). You could cook them for another 5 minutes and they will still be tender inside. Miracle!
Notes
- Vietnamese Chicken salad – minus the chicken
- Asian Slaw
- Chang’s Crispy Noodle Cabbage Salad
- Asian Side Salad
- Steamed vegetables or any leafy greens drizzled with Asian Sesame Dressing
Nutrition
I adore Vietnamese food!
See?


Life of Dozer
When Dozer was in the paper over the Easter break. Specifically, the Good Weekend Magazine!
If you wish to continue to believe I’m an innocent angel, please do not read the article.

The post Vietnamese lemongrass pork steaks appeared first on RecipeTin Eats.
]]> Welcome to the chili dog of my dreams! A thick, molten beef chili sauce, slow cooked for hours, designed to function more like a sauce so it smothers rather than running everywhere. As for the grilled hot dog? Skip the cheap footy franks. Smoked sausages are the way to go. Think – kranksy, bratwurst, half-smokes!... Get the Recipe
The post Chili dogs appeared first on RecipeTin Eats.
]]>Welcome to the chili dog of my dreams! A thick, molten beef chili sauce, slow cooked for hours, designed to function more like a sauce so it smothers rather than running everywhere. As for the grilled hot dog? Skip the cheap footy franks. Smoked sausages are the way to go. Think – kranksy, bratwurst, half-smokes!
A cracking recipe for summer BBQ’s, game-day, and just when you need something seriously moreish.

THE chili sauce for hot dogs….
This is a chili dog that is inspired by the famous Half-Smoke Chili Dogs at Ben’s Chili Bowl in Washington DC. It’s an institution famous for their chili which is served in various formats – in a bowl, burgers, and chili dogs.
The chili sauce used for the hot dogs is different to the chili served in bowls. It’s noticeably thicker and smoother, and doesn’t have beans in it. Essentially, it’s like a thick sauce that stays on the hot dog better than regular chili so you can eat it with your hands.
I’ve always wanted to replicate the Ben’s chili sauce. I’ve had a few attempts over the years – surely I just need to slow cook for longer, longer! Nope, it just didn’t have that same “molten” texture.
The answer came to me when I was making lentil soup: a partial blitz. Releases flavour, thickens the sauce, and makes it smoother too. This changed my chili-dog-game forever. Will it change yours too??

Chili = American vs chilli = Australian/UK: Ordinarily, I write in Australian-English rather than Americanised English, because I live in Australia. However, given that chili dogs is very much a beloved dish of the States, I’ve decided to respect the origins and use “chili” with one “l” throughout this post!
Ingredients in chili dog
Alrighty, first up, what you need to make the chili sauce for hot dogs!
Ingredients in chili sauce
The ingredients are no different to my classic chili con carne except the ratios of the spices are a little different (more!). And there are no beans in this chili sauce so it’s smoother and sits in/on the hot dog better.
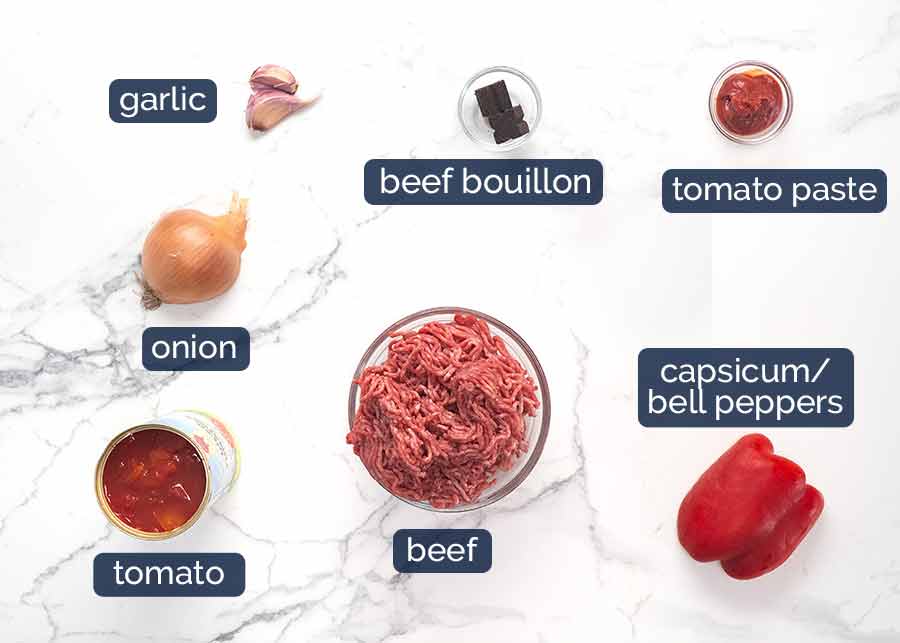
Beef mince / ground beef – While this recipe will work with lean beef, it will not have as much beefy flavour. Because most of the good beefy flavour we love is in the fat!
Beef bouillon cube (stock cube) – Better than salt! Adds more flavour.
Onion & garlic – Essential flavour bases.
Tomato paste and crushed tomato – For thickening and flavour of the sauce. By the time all the spices are added in and it’s been slow cooked, you don’t really taste the tomato at all.
Capsicum/bell pepper – A traditional inclusion in chili.
Homemade chili powder for sauce
There’s no store-bought chili powder mix in my chili sauce. I prefer to make my own from scratch because the flavour of chili powder varies from brand to brand. Making your own ensures consistency of flavour for everyone!
Plus, chili powder spice mix, while common in the US, is not easily found in Australia.
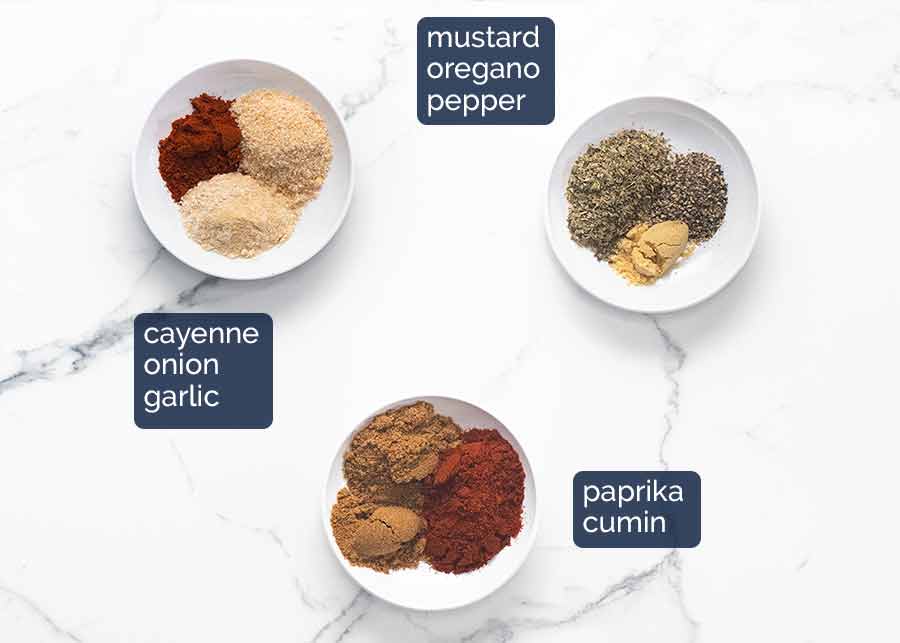
No unusual players here. All pantry essentials (here’s my essential spices list, in case you missed it!), the same spices I use in my chilli con carne. However, I use slightly more spices to give the sauce a stronger flavour because less sauce has to go further when it’s used in a hot dog bun compared to serving a big bowl of chili. Am I making sense?? Not sure I’m explaining that well!
Spiciness – There’s a decent amount of cayenne pepper in this to give the chili sauce a spicy kick, as is traditional. Feel free to dial it back. You can just add it right at the end, bit by bit, tasting as you go.
Chili dog
For the best hot dog of your life, skip the everyday cheap hot dogs and go for a good German or other European smoked sausage (Austrian, Polish). You’re welcome!

Smoked sausages – better than hot dogs! Chili dogs are typically made with economical thin hot dogs. Think – uniform pink colour that are 30 – 40% fillers. Tasty enough, when smothered in a homemade chili sauce. But you can really dial-up your hot dog game by using good European smoked sausages – like kranksy’s, bockwurst, bratwurst, “continental franks”. Just ask Ben’s Chili Bowl. Their famous chili dogs use sausages called “half-smokes” which are a type of smoked sausage.
Why European smoked sausages are better – More meat, less fillers, they’re seasoned with flavour, and fatter so you get more sausage! They are smoked so they are technically cooked but most are usually grilled or pan fried before serving. Makes them even tastier.
Find them easily these days:
Kranksy’s – a deli staple at large supermarkets (Coles, Woolies – see here online, Harris Farms). Get the smoked ones, if you can, but even un-smoked are 20x better than the “footy franks”
Sausages in packets labelled “Continental Franks” or “Weiners”.
German deli – If you are lucky enough to have a German deli in your area, it’s worth a visit because you’ll have an even better selection – and it’s hard to go wrong! Also, other European delis. The Polish and Austrians do wickedly good smoked sausages too.
Where I go – Brot & Wurst in Narrabeen, Sydney, which is near my home. My favourite for chili dogs are Bockwurst (pictured above). But all the smoked sausages of theirs I’ve tried (probably most) are great!

Hot dog buns – Look for soft, pillowy buns for the hot dogs to nestle in.
Yellow mustard – Optional, I guess! For me, a chili dog isn’t a chili dog without a squirt of mustard. I use American mustard – 100% artificial yellow colour, 100% hot dog authentic.
White onion – Optional! This is a direct copycat of the way the chili dogs are served at Ben’s Chili Bowl. A little sprinkle of finely chopped white onion brings a hint of freshness in amongst all that moorish, spicy, saucy goodness. I like to use white onion because it’s not as sharp as brown onion. Red onion will also work from a flavour perspective.
Cheese – A sprinkle of shredded cheese on a chili dog is fairly common practice but melting is not. But, like good ole’ crispy shell beef tacos, melted cheese wins over un-melted cheese any day. So if you have the option to melt, why would you not?? (Bonus: Cheese melting oven time warms up the bun so you don’t have to do it beforehand plus gives all the flavours a chance to meld together into one cohesive chili-dog-of-your-dreams!)
How to make chili dogs
As I mentioned earlier, the one thing that’s a little unique about the chili sauce I make for chili dogs is that it’s thicker, smoother and more “molten” than the usual recipes you see which have larger, chunkier beef bits in a runnier sauce. This is because mine is designed to be like the famous Ben’s Chili Bowl chili sauce which is like a thick sauce that stays in the hot dog rather than slopping out everywhere when I take a (big!) bite!
The trick to achieve this? A little blitz. Releases flavour and thickens the sauce.
1. The chili sauce
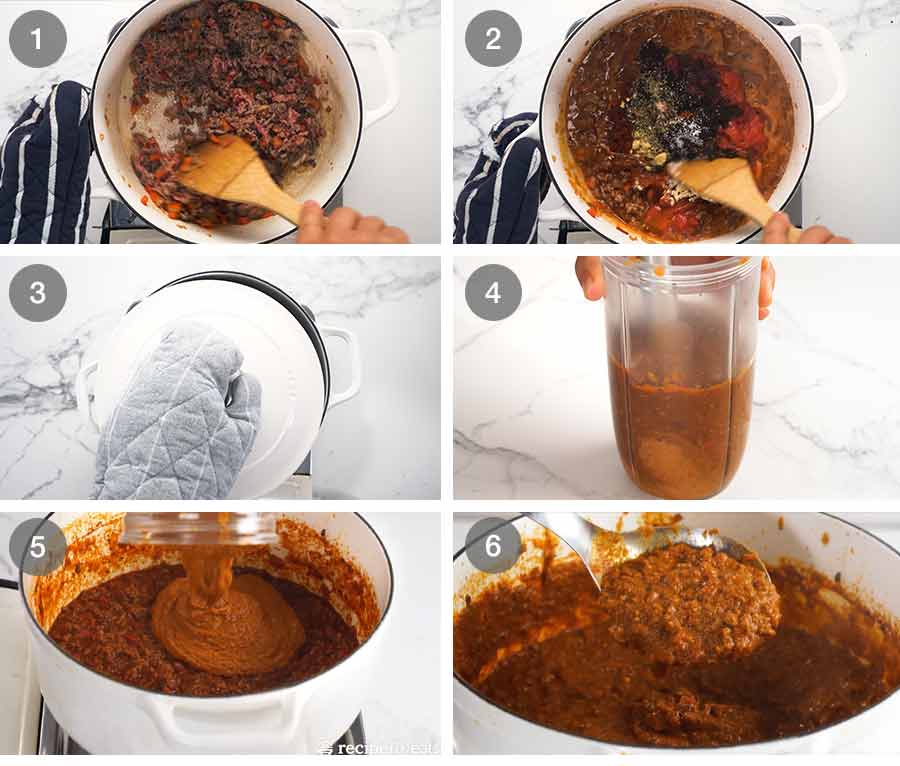
Cook chili sauce – The chili sauce starts off like your everyday chili con carne. Sauté onion, garlic and capsicum. Cook the beef until it’s browned, then stir the tomato paste for a minute to cook out the sour raw flavour.
Add everything else – Add all the spices, canned tomato, beef stock cubes (bouillon cubes), salt and water and give it a good stir then bring it to a simmer.
Slow cook 3 hours – Simmer on a really low heat with the lid partially on. A cracked lid allows the sauce to reduce and thicken. Make sure the heat is really low and give it a stir every now and then to ensure the base doesn’t catch. Remember – we’re making a sauce that is thicker than typical chili con carne.
It can also be cooked in the oven (160°C / 325°F for 3 hours) or slow cooker (low for 6 to 8 hours) – directions included in the recipe.
After 3 hours of slow cooking, the beef should be very tender. Yep, you’ll need to have a spoonful to check!
Blitz to thicken and smooth – Remove 1 1/2 cups of the chili into a container so the head of a stick blender will be submerged under the chili. Then blitz until smooth – it should only take around 15 seconds on high. This will release flavour and also thicken the sauce.
Stir in – Return the pureed chili sauce into the pot and stir well. As you stir, you should find that the slow-cooked beef bits start to fall-apart into really fine pieces of beef to make a smooth-ish, almost molten-like sauce.
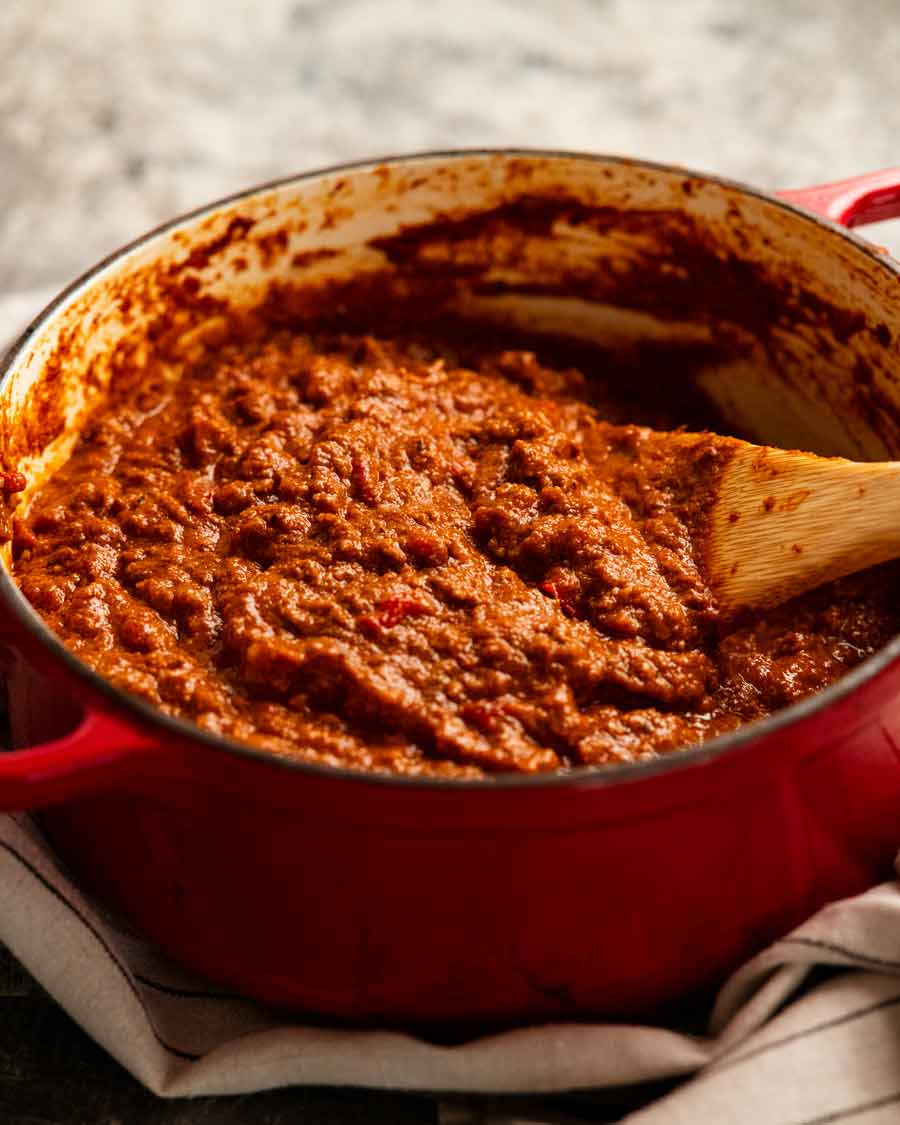
If your beef doesn’t do this, it will just need a bit of help from a potato masher. Just mash the beef straight in the pot until it becomes a fairly fine texture, like pictured.
Thick sauce – This is what your sauce should look like! Dollop-able but it mounds. Now you get to heap it on your hot dog!
2. Assembling chili dogs
Grill, stuff, smother, bake!

Pan fry or grill your hot dogs / smoked sausages until browned and warmed through. Don’t worry if the skin splits! Visually it doesn’t matter because it will be completely hidden by sauce.
Mustard & onion – Add a squiggle of mustard then sprinkle with onion.
Chili sauce – Smother with a good amount of chili sauce. Appreciate how it’s thick and stays on/in the hot dog instead of running everywhere!
Bake for 10 minutes – Top with cheese then bake for 10 minutes just to melt the cheese. Pull out of oven and start getting excited about sinking your teeth into these chili dogs!!!


When to make chili dogs
A backyard grill out, a gathering with friends. Game day, dinner tonight, and, well, just anytime because you can’t get darn-good chili dogs in your area. That would be ME!!
In all seriousness though. A good smoked sausage, pan fried or grilled then tucked into a soft bun is delicious as is.
Smother it with a thick layer of big-flavoured beef chili sauce, and you’re well on your way to food heaven.
Add a blanket of molten, gooey cheese and that, my friends, THAT is what food dreams are made of.
I really hope you try these chili dogs one day. For us Aussies, chili dogs are hard to come by and when we do find them, all too often they are terribly disappointing. I promise this won’t disappoint! – Nagi x
PS As long as you give the cheap footy franks a miss!
Watch how to make it

Chili dogs
Ingredients
Homemade chili powder (Note 1):
- 3 tsp smoked paprika (sub plain paprika)
- 3 tsp cumin powder
- 1 tsp cayenne pepper , adjust to taste
- 1 1/2 tsp garlic powder
- 1 1/2 tsp onion powder
- 1 1/2 tsp oregano
- 1/2 tsp mustard powder
- 1/2 tsp black pepper
Chili sauce:
- 1 tbsp olive oil
- 2 garlic cloves , finely minced
- 1/2 onion , finely chopped
- 1/2 red capsicum / bell pepper , finely chopped
- 500 g/1 lb ground beef / beef mince
- 1 tbsp tomato paste
- 400g / 14 oz canned crushed tomato
- 2 beef cubes (I like Oxo, easy to crumble, Note 2)
- 1 1/2 cups water
- 3/4 tsp cooking/kosher salt , plus more to taste
Chili dogs:
- 6 good smoked sausages (kransky, bratwurst, half-smoke) or hot dogs of choice (Note 3)
- 6 hot dog buns
- 1/2 white onion , finely chopped
- Yellow mustard (I use Heinz American mustard)
- 2 cups Colby or Monterey Jack , shredded (or other cheese of choice)
- Plain crinkle cut potato chips , optional side for serving (traditional!)
Instructions
Chili sauce:
- Sauté aromatics – Heat oil over medium high in a heavy based pot. Cook the onion, garlic and capsicum for 3 minutes.
- Brown beef – Add beef and cook, breaking it up as you go, until you no longer see raw meat. Add tomato paste and stir for 1 minute.
- Sauce – Add the spices, tomato, water, crumbled beef cube and salt. Stir well.
- Slow cook 3 hours – Bring the chili to a simmer then turn down to low, on a small burner. Put the lid partially on (to allow for sauce reduction). Simmer for 3 hours on low (goal: small bubble every now and then), stirring just to ensure the base doesn’t catch. OR put it in a 160°C/325°F oven for 3 hours (lid partially cracked).
- Slow cooker (Note 4) – Reduce water to 3/4 cup. After chili comes to a simmer on the stove, transfer everything to a slow cooker then cook on low for 6 to 8 hours on low.
- Thicken sauce – Remove 1 1/2 cups of the chili into a container so the head of a stick blender will be submerged under the chili. Then blitz until smooth (~ 15 seconds). Add the pureed sauce back in the pot and stir well.
- Sauce goal – As you stir, the remaining beef bits should become quite fine (rather than bolognese type chunks) because the beef is so tender. If the beef bits are not as small as desired, use a potato masher in the pot – it won't take long. The chili sauce should be a thick sauce that mounds up a bit when you scoop it, not runny. (Note 5) Keep sauce warm.
- Optional rest overnight – Allow the sauce to cool then refrigerate overnight. As with most slow-cooked stewy things, the flavour improves! Reheat on the stove before proceeding.
Chili dogs:
- Preheat oven to 180°C/350°F (160°C fan).
- Grill/pan-fry – Preheat a pan with 1/2 tbsp oil (or the BBQ) on medium / medium high. Brown the stages all over until they are heated through (they are already cooked inside, it's just about heating/colour).
- Assemble – Place hot dog buns on a tray. Stuff with a sausage, top with a squiggle of mustard and a sprinkle of onion. Spoon over a generous amount of warm chili sauce, top with cheese.
- Bake for 7 to 10 minutes or until the cheese is melted. Serve immediately. Traditionally with a mound of plain crinkle cut potato chips and an ice cold beer!
Notes
1. Spice notes:
- This blend of spices includes a homemade chili powder which I prefer to do because the flavour of store-bought chili powder mixes (in the US) vary from brand to brand.
- Garlic powder and onion powder can be substituted with more of the other.
- Cayenne pepper provides the spiciness (chili sauce is SUPPOSED to be a bit spicy!). This amount won’t blow your head off but if you’re concerned, hold some (or all) of it back and add right at the end, little by little.
- Mustard powder – sub 1 tsp dijon mustard
Nutrition
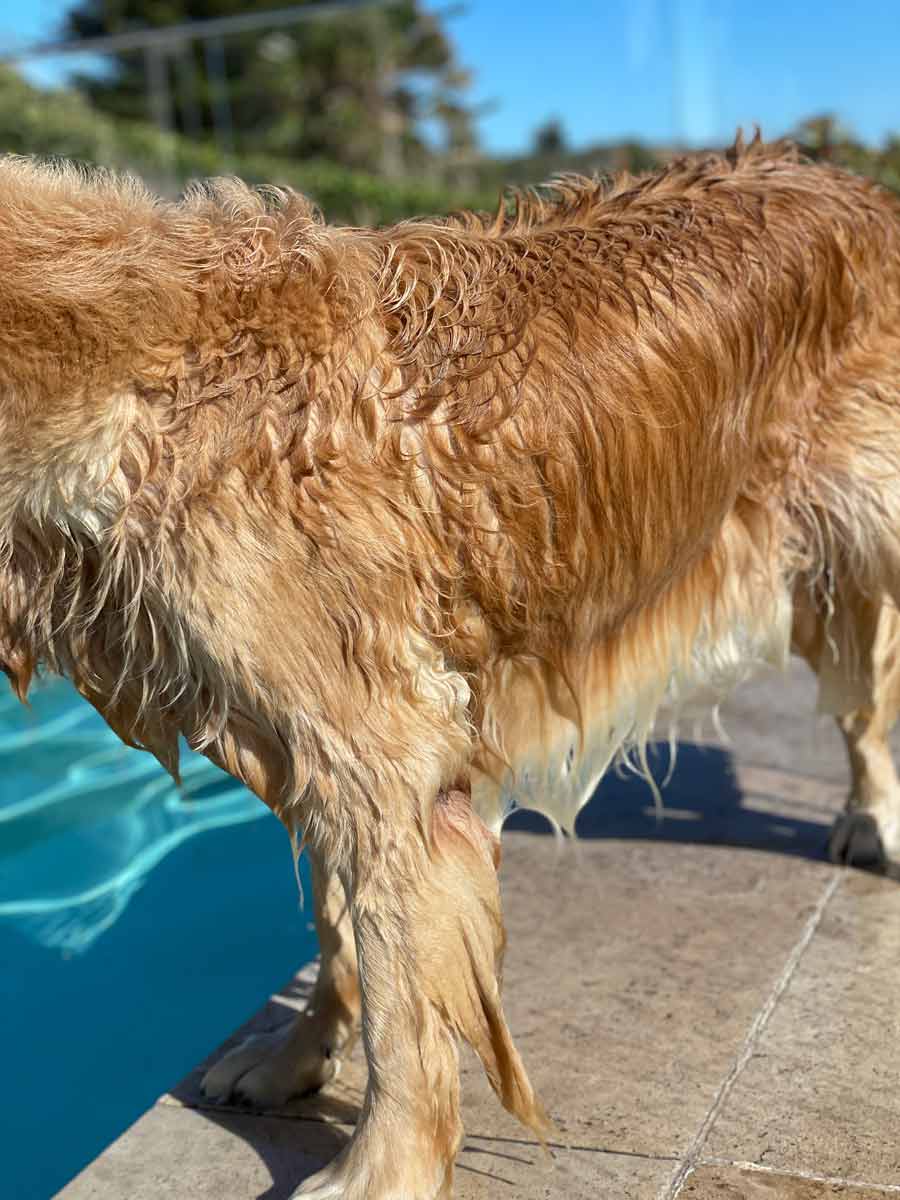
Life of Dozer
I find it quite amusing that he can spend hours in the pool or at the beach and his furry golden head remains fluffy and dry while the rest of him is saturated.
Then I realised I do the same thing. Sometimes a girl just doesn’t want to ruin her hair, y’a know? 😂

The post Chili dogs appeared first on RecipeTin Eats.
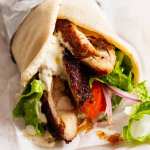
]]> This Chicken Shawarma recipe is going to knock your socks off! Just a handful of every day spices makes an incredible Chicken Shawarma marinade that infuses the chicken with exotic Middle Eastern flavours. The smell when this is cooking is insane! Chicken Shawarma This is one of my signature recipes that will be very familiar to... Get the Recipe
The post Chicken Shawarma (Middle Eastern) appeared first on RecipeTin Eats.
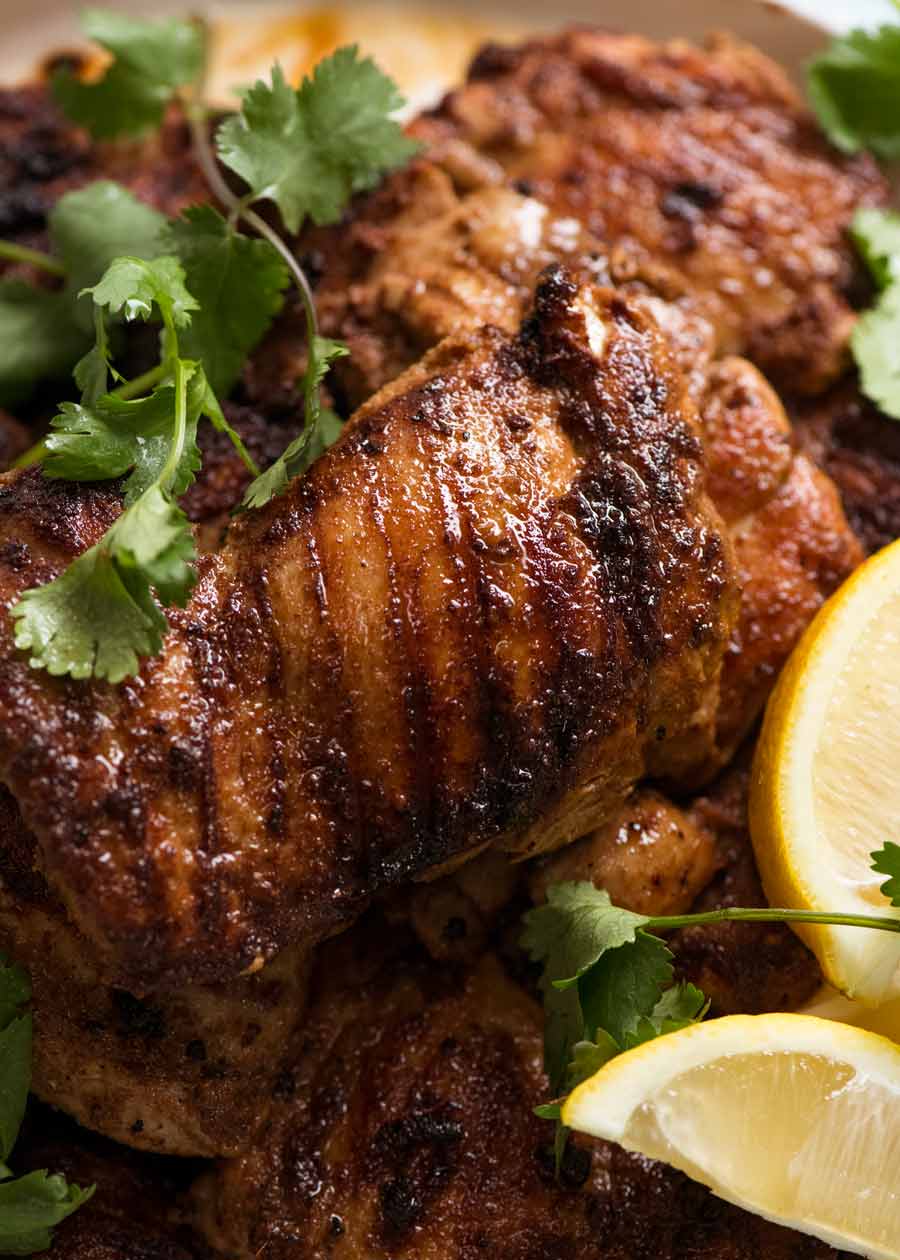
]]>This Chicken Shawarma recipe is going to knock your socks off! Just a handful of every day spices makes an incredible Chicken Shawarma marinade that infuses the chicken with exotic Middle Eastern flavours. The smell when this is cooking is insane!
This is a reader-favourite recipe included by popular demand in my debut cookbook “Dinner”!
Chicken Shawarma
This is one of my signature recipes that will be very familiar to all my friends because I make this so often. It’s off the charts for effort vs output: just a handful of everyday spices, garlic, a splash of lemon and olive oil transforms into the most incredible flavour.
When this chicken is cooking, the smell is incredible. In fact, it’s how I met most of my neighbours when I lived in a townhouse complex, random people I had never met before popping their head over the fence wanting to know what on earth I was making. They were elated when I handed out samples!
What is Chicken Shawarma, actually??
Shawarma is a popular dish originating from the Middle East. It’s a popular street food that is traditionally made in the form of spiced meats that are stacked on a vertical rotisserie with thin slices shaved off as it rotates. But don’t worry! We can cook our horizontally in a good old pan or on the BBQ!
Shawarma was traditionally made with lamb, mutton and chicken though these days you see it with beef too. It’s commonly served in the form of a wrap, though in some countries you see it served on plates with sides such as seasoned rice or fries, and salads. In this recipe, I’m giving you both options!
Ingredients in Chicken Shawarma
Here’s what you need to make Chicken Shawarma. I’m betting you have most if not all of the spices in your pantry already!
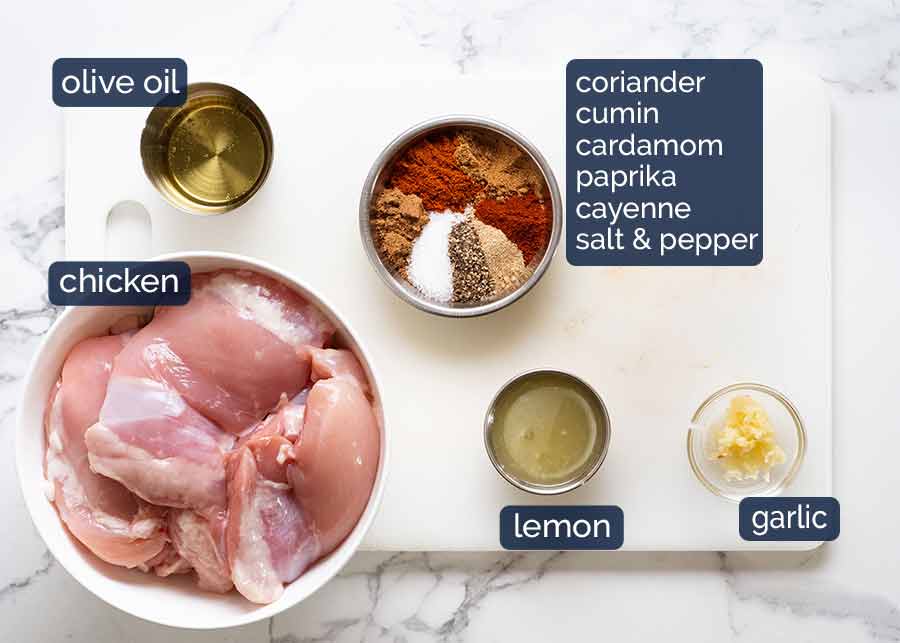
Chicken – I like to make Shawarma with boneless, skinless thighs as its juicier than breast. But chicken breast and tenderloin both work great.
Lemon juice – Fresh!
Olive oil – For a touch of flavour but also to dilute the lemon juice so it doesn’t “cook” the chicken (like we intentionally do with ceviche!).
Spices – Nothing out of the ordinary here! The only one you might not have in stock is cardamom, though these days its easily found at any grocery store. It has a piney, sort of citrusy flavour and it is a key ingredient that distinguishes the Shawarma marinade from other cuisines, such as Mexican, that regularly uses the other spices used in this recipe. In short, don’t skip it!
Spice control – The spiciness in the Shawarma marinade comes from the cayenne pepper. It’s not a key element of the flavour so if you don’t want it spicy, either reduce or eliminate it altogether. I promise you won’t feel robbed. Lots of other flavours going on in this dish!
Sauce options for Shawarma
Shawarma is traditionally served with either a tahini sauce (common in Israel) or a Yogurt Sauce. If you’d like to use a tahini sauce, use the one in this Roasted Broccolini recipe.
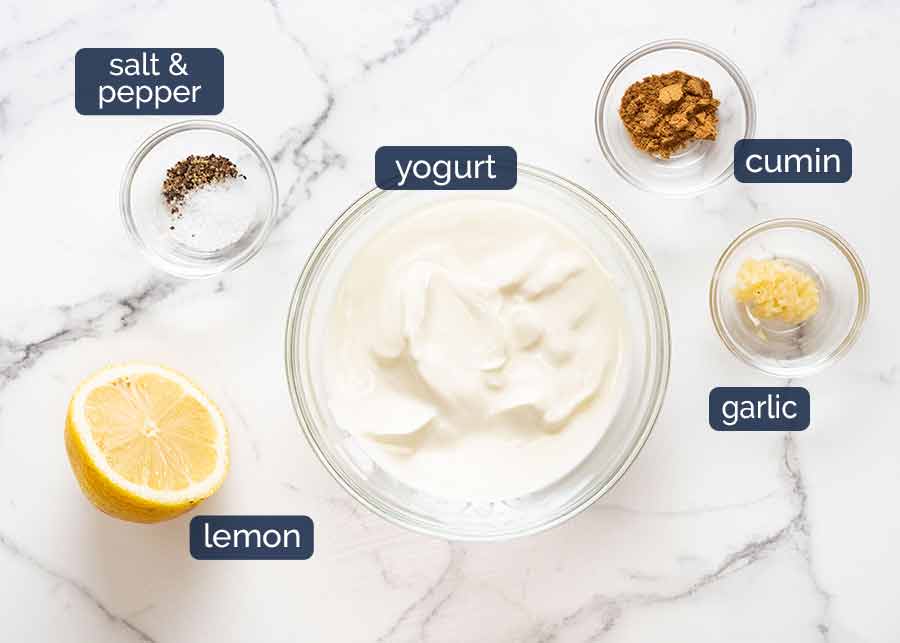
For a Lemon Yogurt Sauce, here’s what you need:
How to make Chicken Shawarma
For the best results, it’s best to marinate the chicken overnight. But to be honest, the volume and flavour of the marinade is intense enough that you can get away with a minimum of 3 hours of marinating. Been there, done that plenty of times, and nobody has complained!
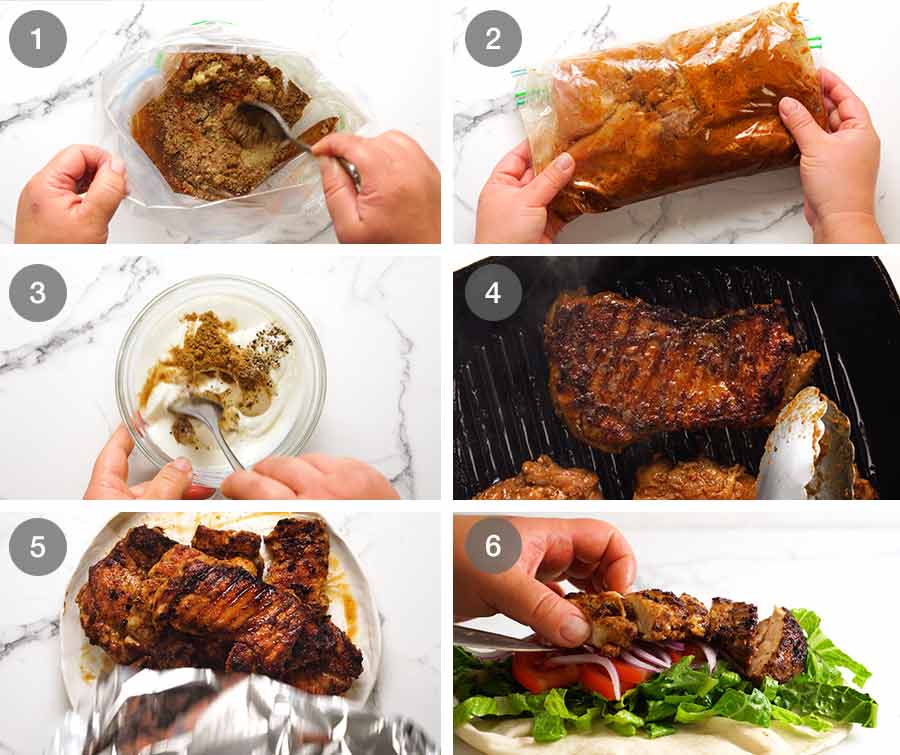
Mix marinade – For convenience, just mix the marinade directly in a ziplock bag. A bag works best because the chicken remains nicely coated in the marinade. If you prefer to use a container, either turn the chicken a few times or increase the marinade by 50%.
Add chicken into the marinade. Seal the bag, removing excess air, then massage to coat from the outside. Leave to marinade for 12 to 24 hours in the fridge. If you’re pressed for time, even 3 hours will do!
Yogurt sauce – Make the yogurt sauce simply by mixing the ingredients then set aside for at least 20 minutes to let the flavours meld. This will keep for 3 days in the fridge.
Cook chicken either on the stove or on the BBQ. It will get a great crust on it from the spices, and you will adore the smell. It’s intoxicating!
Rest chicken for at least 3 minutes before serving to allow the juices to redistribute throughout the flesh, else they will just run out everywhere when you slice the meat.
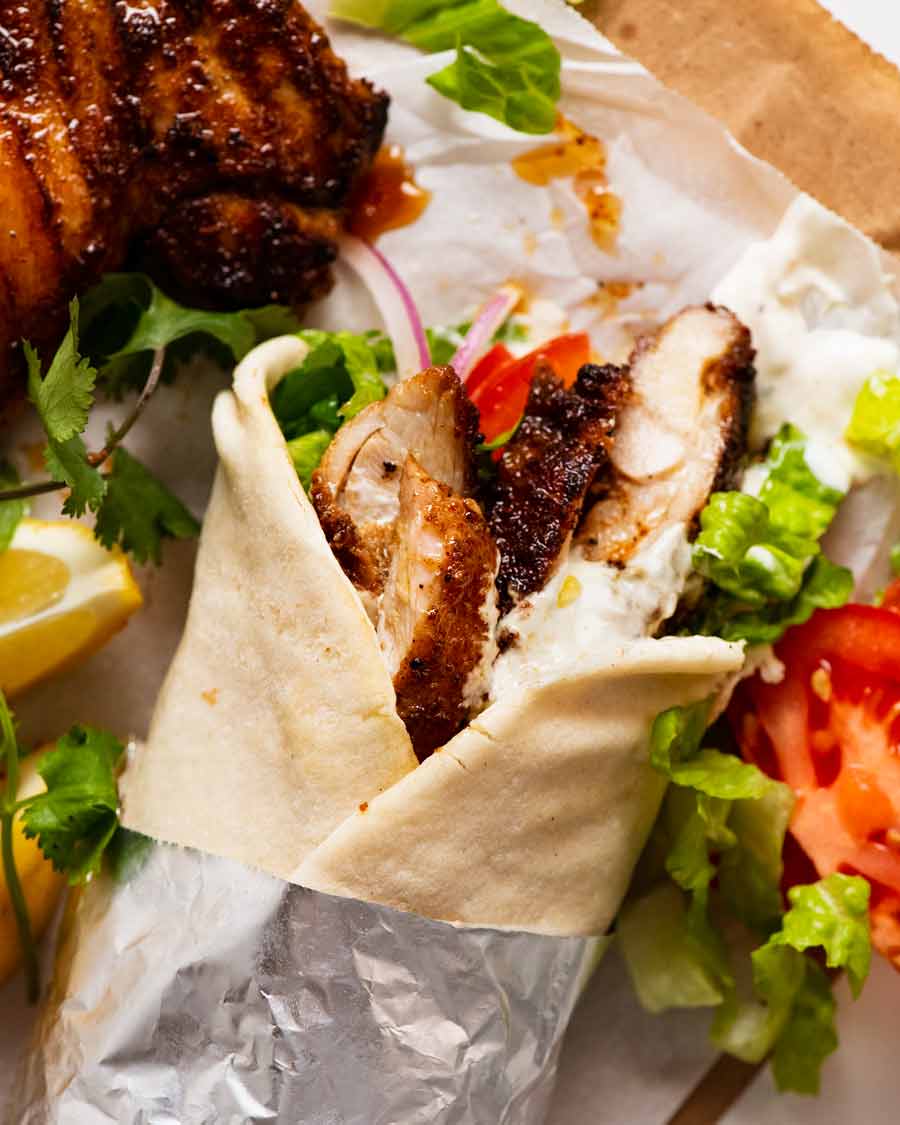
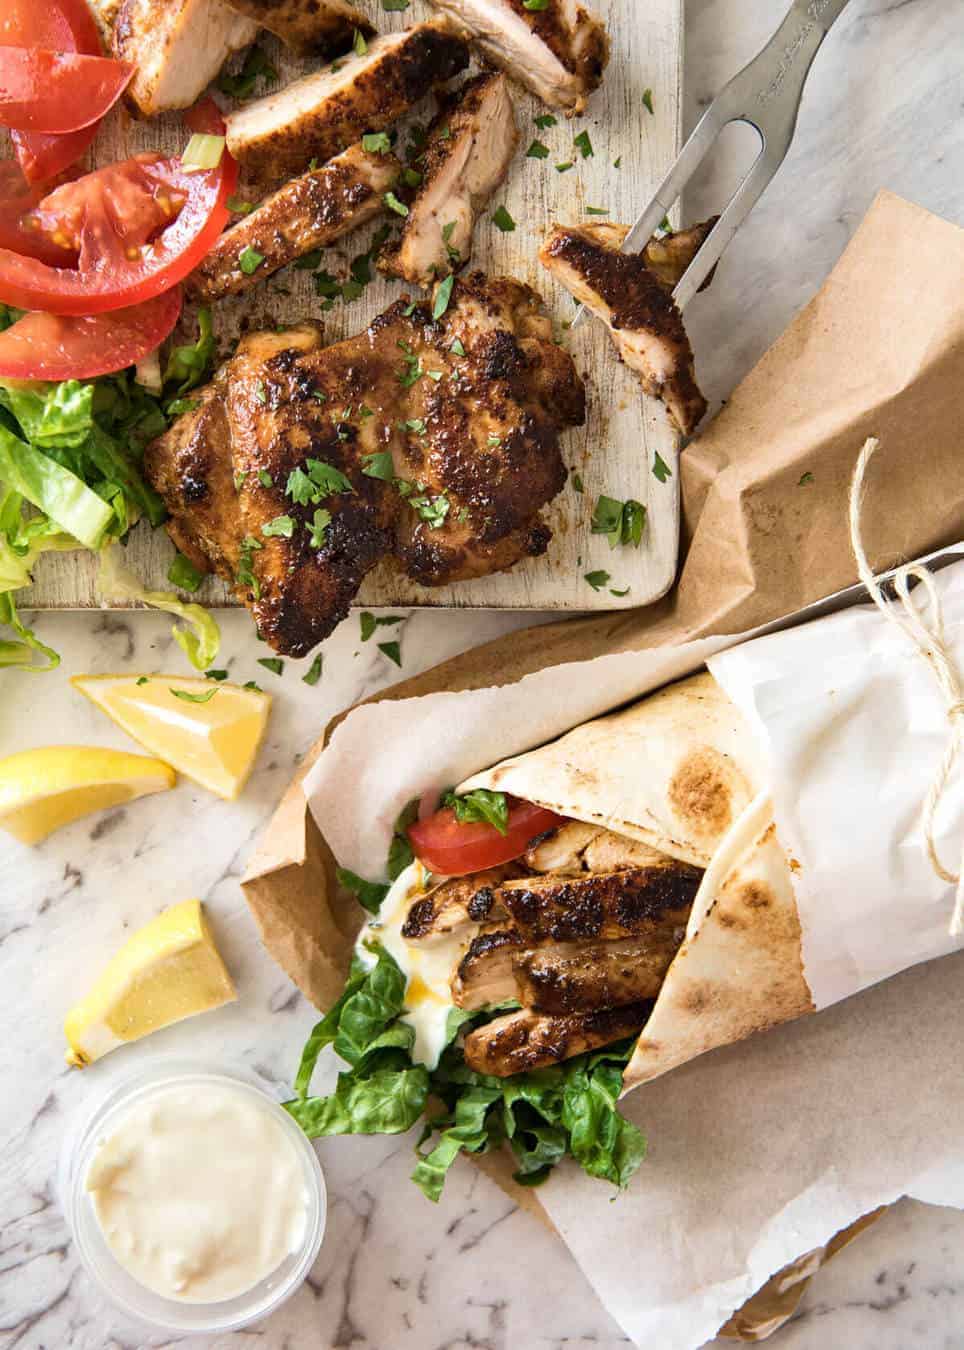
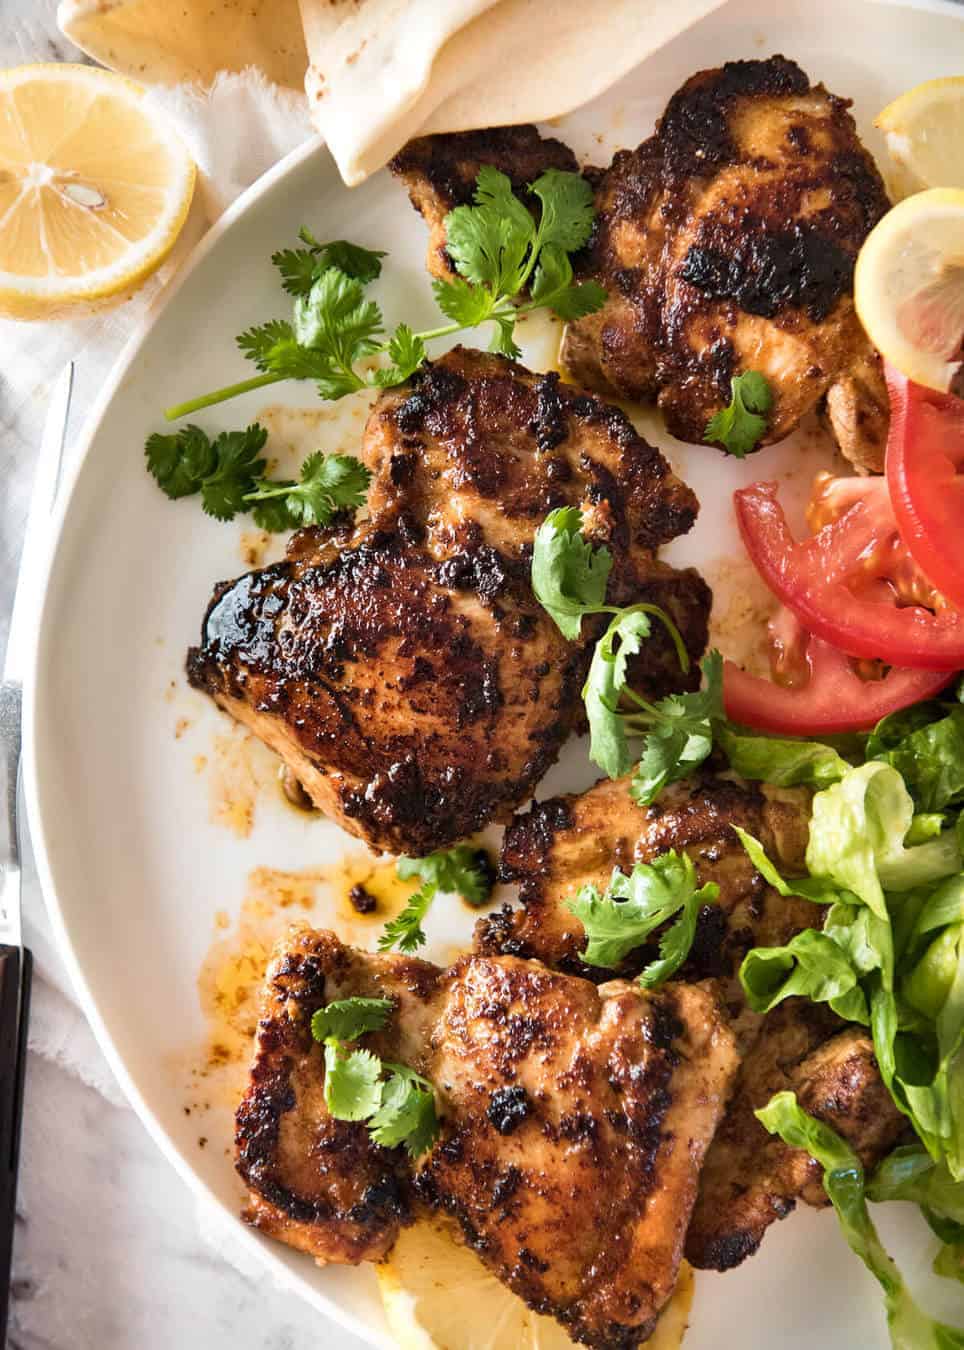
To serve, just pile everything on a platter and let everybody make their own wraps! The chicken, lettuce, tomato slices, onion, yogurt sauce and warmed flatbreads – homemade or store bought. If the chicken is on the larger side, I sometimes slice it. But if they are smaller, I tend to just leave them whole.
How to Serve Chicken Shawarma
There are two main ways to serve Chicken Shawarma.
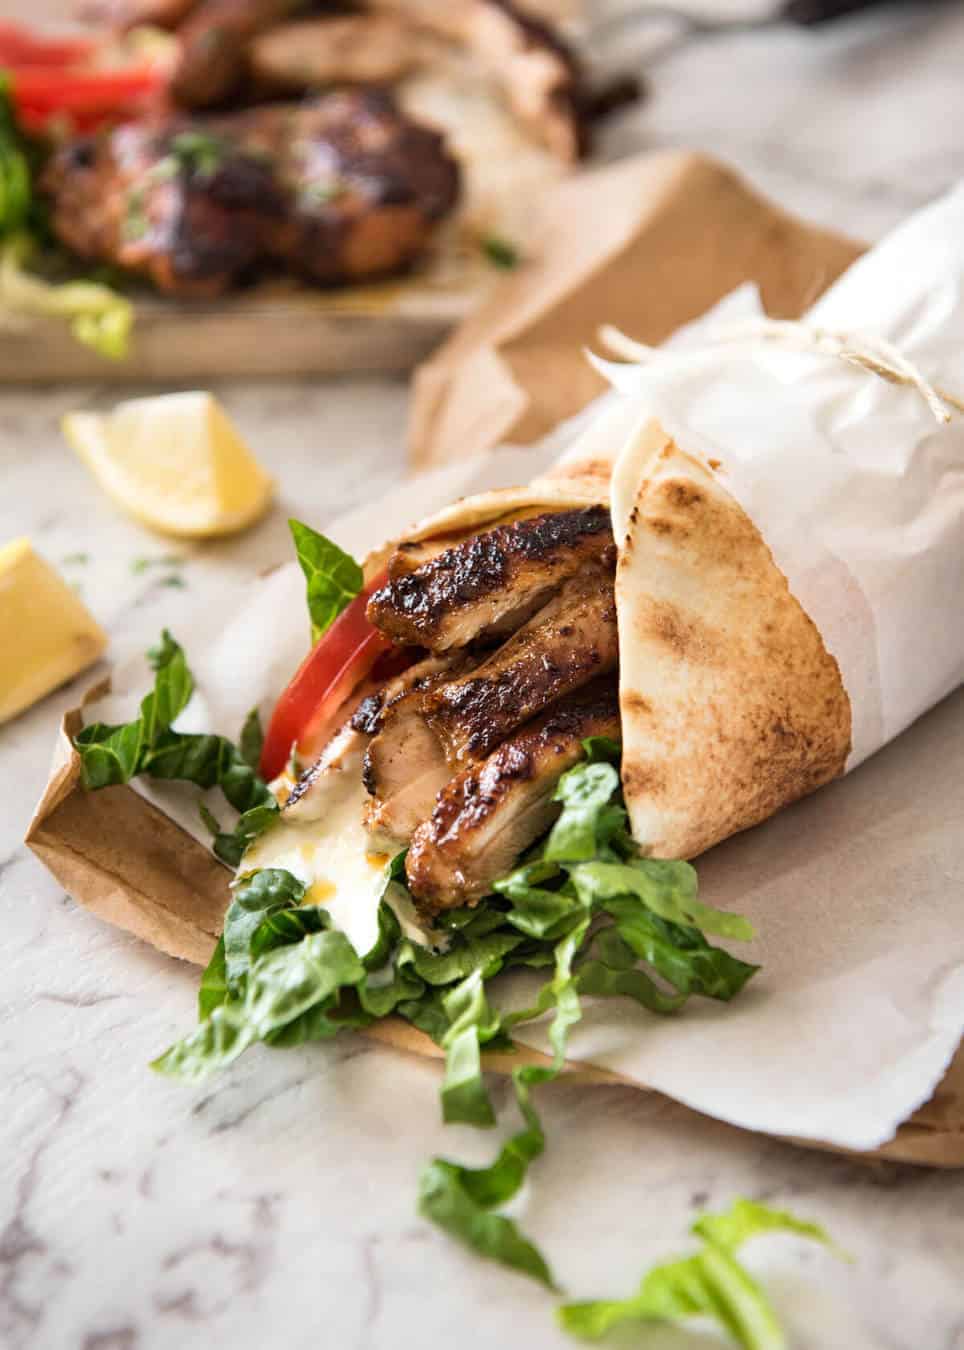
Wraps – As Chicken Shawarma wraps (like Gyros and Doner kebabs), with tomato, lettuce, and a simple yoghurt sauce on the side. Other optional extras include: red onion, cheese (query authenticity? But that’s ok!!), hummus, hot sauce / chilli sauce.
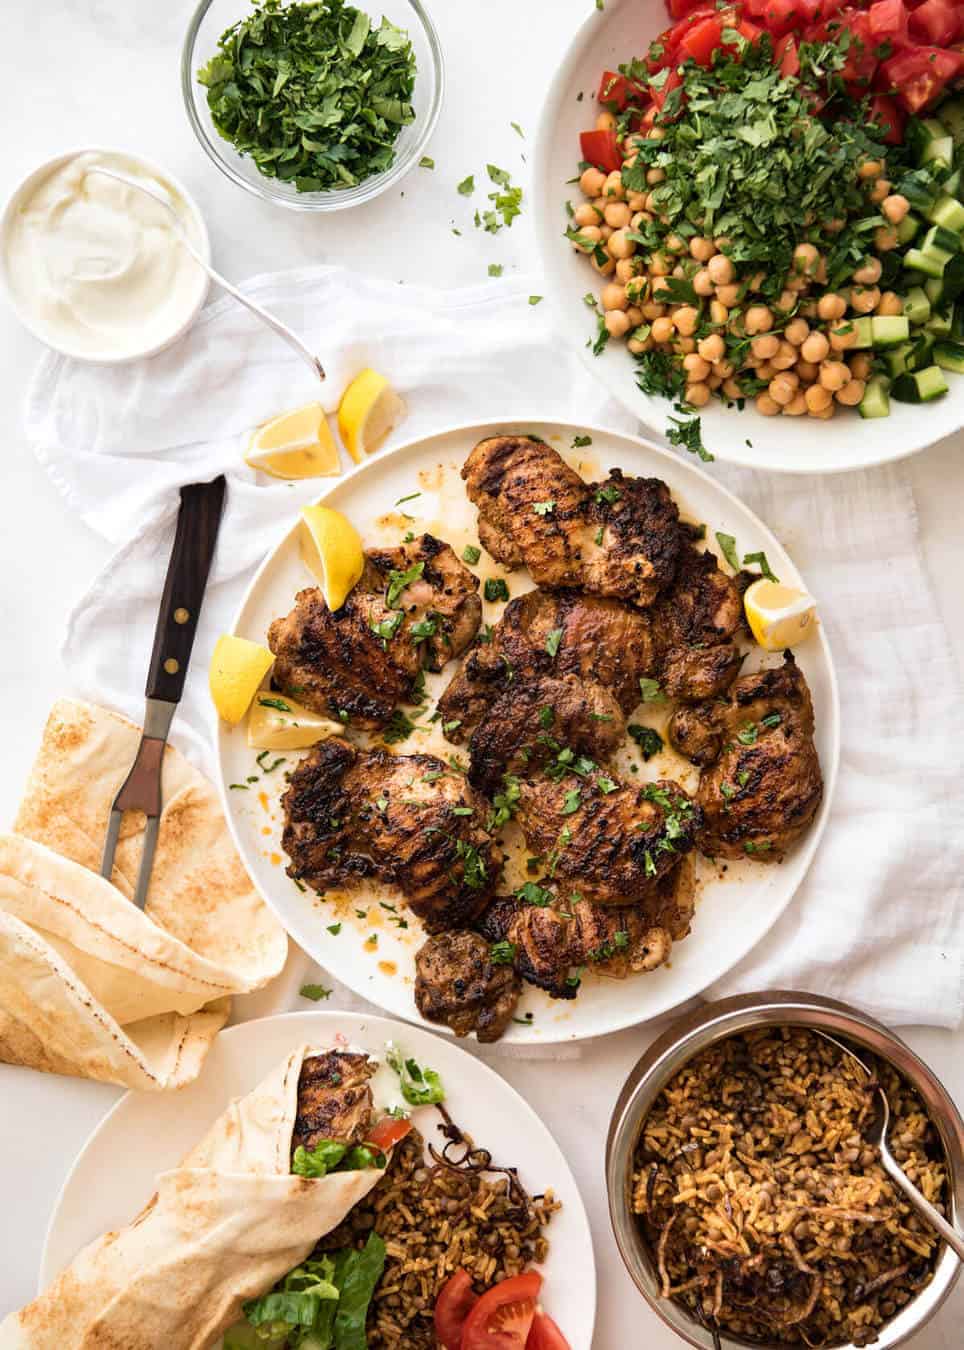
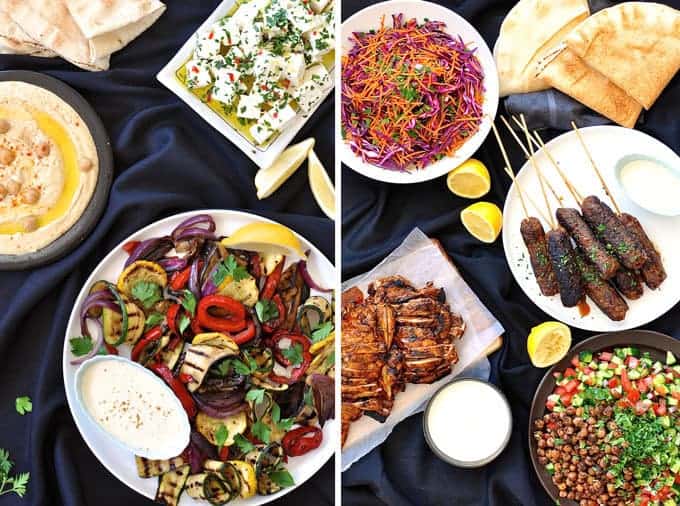
Shawarma plate – With rice and salads on the side. Thought I usually do serve pita bread or another type of flatbread as well, with a big dollop of either Hummus or the Yogurt Sauce in this recipe, just because it’s very on theme. ☺️
Below, the Chicken Shawarma is pictured with Mejadra which is a Middle Eastern lentil rice (seriously so good you can / will want to eat it just by itself!) and a Middle Eastern Chickpea Salad (I skip the spicing of chickpeas otherwise there’s just too much kapow spices going on).
A few other things that would be very much at home alongside Chicken Shawarma:
Juicy Greek Salad – the flavours in Greek salad pair really well with Middle Eastern food
The spread below features the Chickpea Salad referred to above and Mejadra, the lentil spiced rice.
Great food for gatherings
This Chicken Shawarma, along with the Vietnamese Noodles with Lemongrass Chicken, are two of my most frequently made foods when I’m cooking for a crowd because it’s easy to make loads, they are both great “lay it all out and let everyone serve themselves” type foods (I’m a big fan of food like that), and it travels well. I’ve made this multiple times on camping trips (along with the Vietnamese Noodles and Greek Gyros!).
It was also part of a 7 course Arabian Feast menu that I shared way back when I first published this recipe in 2015. I still haven’t gotten around to perking up all the recipes with fresh new photos, but I will one day! I love that menu because so much of it can be prepared ahead, and there’s lots of common ingredients.
Be prepared for the amazing smells when you’re cooking this Chicken Shawarma! – Nagi xx
Watch how to make it
This recipe features in my debut cookbook Dinner. The book is mostly new recipes, but this is a reader favourite included by popular demand!
Chicken Shawarma (Middle Eastern)
Ingredients
- 1 kg / 2 lb chicken thigh fillets , skinless and boneless (Note 3)
Marinade
- 1 large garlic clove , minced (or 2 small cloves)
- 1 tbsp ground coriander
- 1 tbsp ground cumin
- 1 tbsp ground cardamon
- 1 tsp ground cayenne pepper (reduce to 1/2 tsp to make it not spicy)
- 2 tsp smoked paprika
- 2 tsp salt
- Black pepper
- 2 tbsp lemon juice
- 3 tbsp olive oil
Yoghurt Sauce
- 1 cup Greek yoghurt
- 1 clove garlic , crushed
- 1 tsp cumin
- Squeeze of lemon juice
- Salt and pepper
To Serve
- 4 – 5 flatbreads (Lebanese or pita bread orhomemade soft flatbreads)
- Sliced lettuce (cos or iceberg)
- Tomato slices
- Red onion , finely sliced
- Cheese , shredded (optional)
- Hot sauce of choice (optional)
Instructions
- Marinade chicken – Combine the marinade ingredients in a large ziplock bag. Add the chicken, seal, the massage from the outside with your hands to make sure each piece is coated. Marinate 24 hours (minimum 3 hours).
- Yogurt Sauce – Combine the Yogurt Sauce ingredients in a bowl and mix. Cover and put in the fridge until required (it will last for 3 days in the fridge).
- Preheat stove or BBQ – Heat a large non-stick skillet with 1 tablespoon over medium high heat, or lightly brush a BBQ hotplate/grills with oil and heat to medium high. (See notes for baking)
- Cook chicken – Place chicken in the skillet or on the grill and cook the first side for 4 to 5 minutes until nicely charred. Turn and cook the other side for 3 to 4 minutes (the 2nd side takes less time).
- Rest – Remove chicken from the grill and cover loosely with foil. Set aside to rest for 5 minutes.
To Serve
- Slice chicken and pile onto platter alongside flatbreads, Salad and the Yoghurt Sauce (or dairy free Tahini sauce from this recipe).
- To make a wrap, get a piece of flatbread and smear with Yoghurt Sauce. Top with a bit of lettuce and tomato and Chicken Shawarma. Roll up and enjoy!
Notes
* Chickpea Rice Pilaf– slightly less spiced than Mejadra
* Middle Eastern Chickpea Salad (a Yotam Ottolenghi recipe, skip the spicing of chickpeas to keep it fresher) Also see 7 Course Arabian Feast (summary below recipe) and above recipe card in post for lengthier list of side options. 5. BAKING: Cooking on a BBQ or stove is best to get the caramelisation. Baking doesn’t yield quite the same flavour – but still very good! Bake at 425F/220C for 20 – 25 minutes until a browned. 6. Nutrition for chicken only because flatbreads vary so much in size and calories.Assuming 6 servings.
Nutrition
Originally published December 2014, updated with fresh photos and an improved recipe video!
Arabian Feast Menu
Here is a summary of the Arabian Feast Menu that I shared back in 2015. I haven’t updated all the recipes yet – I’ll get to them eventually!
To Nibble: Hummus, Herb Chili Feta, Chargrilled Vegetable Platter
For the Men to Grill: Lamb Koftas, Chicken Shawarma (this recipe)
Because we must have Greens: Shredded Red Cabbage Carrot Salad, Spiced Chickpea Salad
Life of Dozer
Throwback to Life of Dozer in 2015 when I first published this recipe – nothing has changed in the years that has passed!
This shot pretty much encompasses how utterly predictable Dozer is:
✅ Skulking near a big pile of meat
✅ Squeezing himself under a tiny table laden with said food
✅ Eyes sparkling at the possibilities
✅ Licking his lips in anticipation

The post Chicken Shawarma (Middle Eastern) appeared first on RecipeTin Eats.
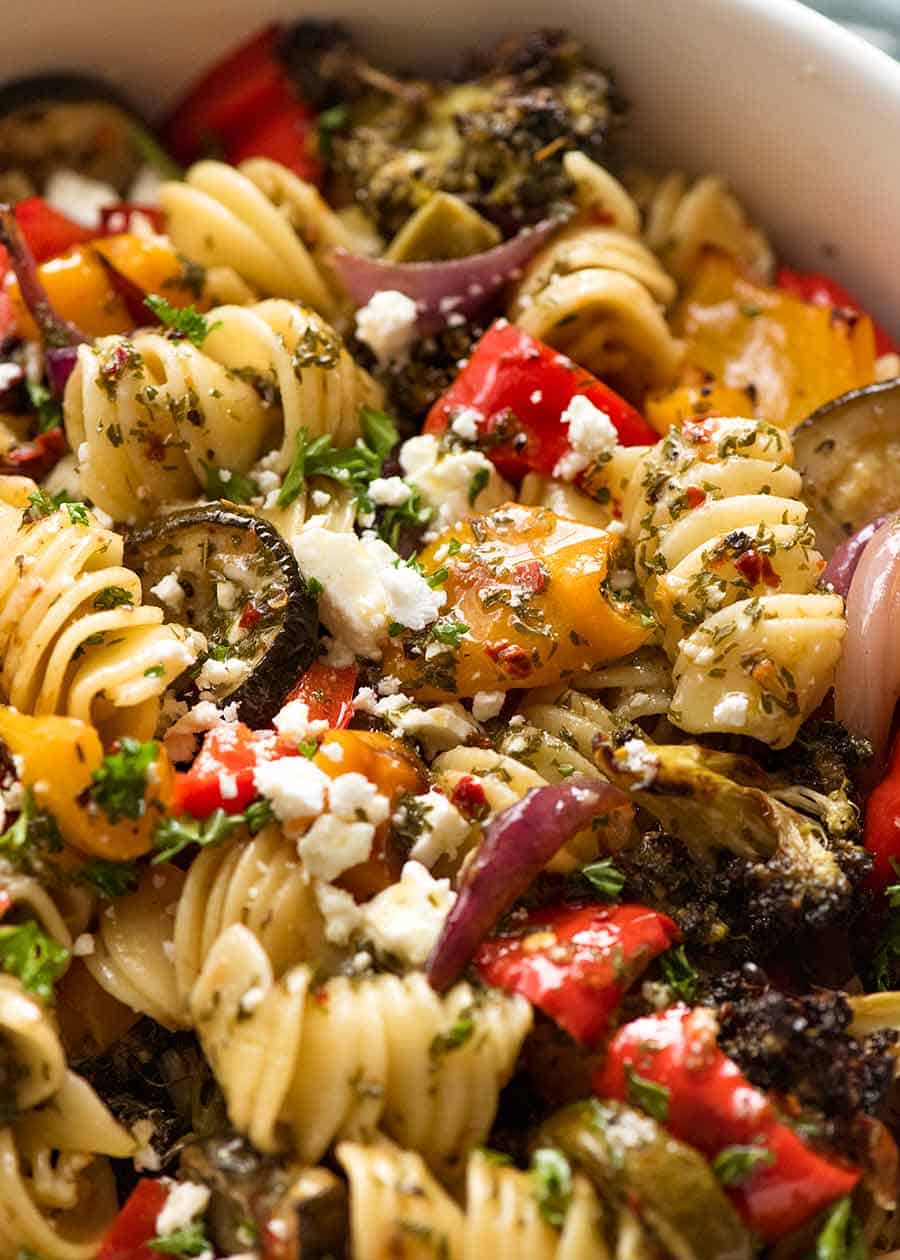
]]> How do you make a Vegetarian Pasta Salad so fabulous that even this self confessed carnivore can’t get enough of it? MARINATE the vegetables! This big, fat pasta salad recipe is a standout – it’s juicy, it’s flavour loaded and it looks as amazing as it tastes! Excellent summer food that lasts for days. Vegetarian... Get the Recipe
The post MARINATED Vegetarian Pasta Salad! appeared first on RecipeTin Eats.
]]>How do you make a Vegetarian Pasta Salad so fabulous that even this self confessed carnivore can’t get enough of it? MARINATE the vegetables! This big, fat pasta salad recipe is a standout – it’s juicy, it’s flavour loaded and it looks as amazing as it tastes! Excellent summer food that lasts for days.
Vegetarian Pasta Salad
Who would’ve thought those random veggies you’ve got left in the bottom of your fridge could be transformed into something as incredible as this Vegetarian Pasta Salad??
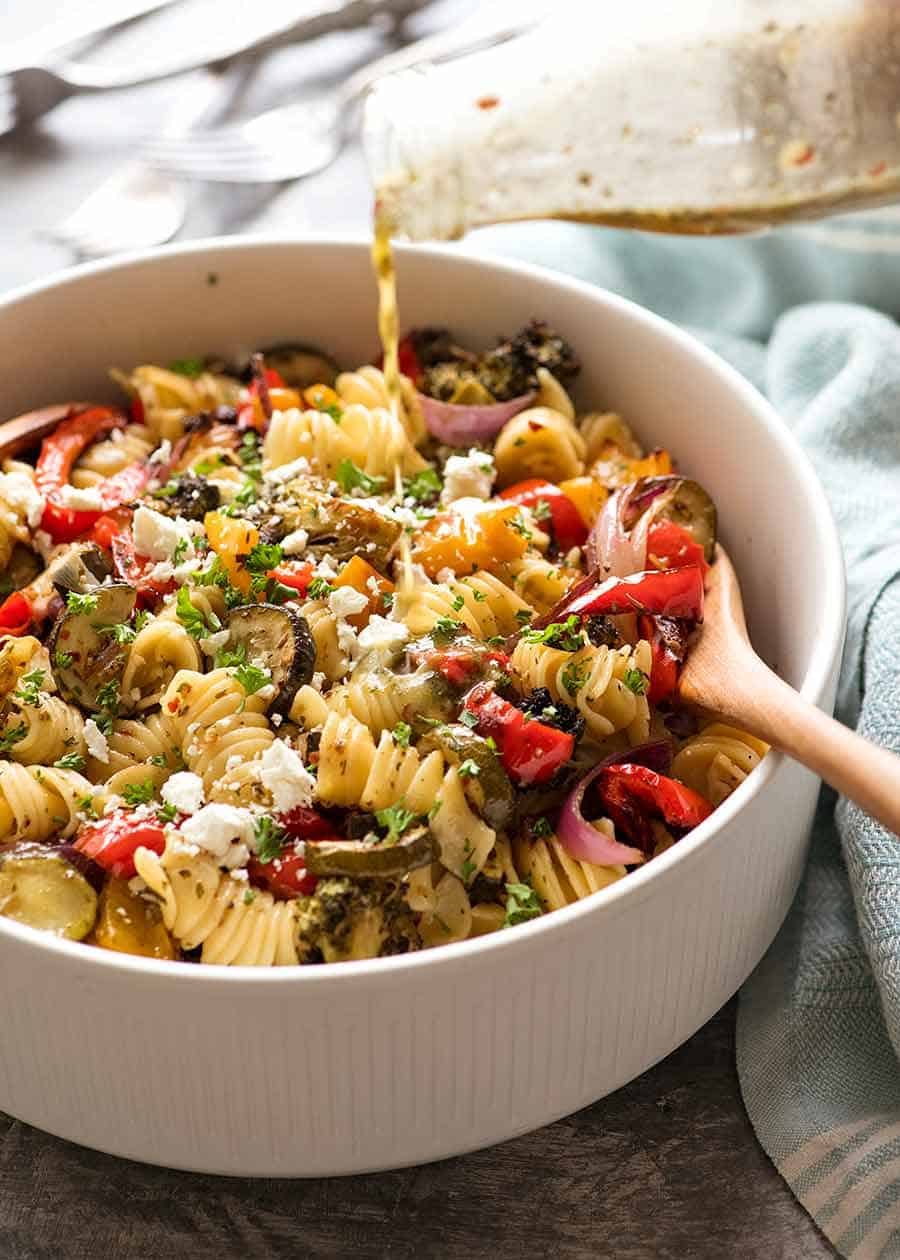
Forget limp, bland veggies sitting sadly amongst tasteless, soggy pasta. THIS cold pasta salad is the polar opposite of that. It’s vibrant, it’s flavour loaded, it’s JUICY, and will make even green-haters scoff down a weeks’ worth of veggies in one sitting!
Marinating the vegetables for just 30 minutes makes all the difference in this pasta salad!
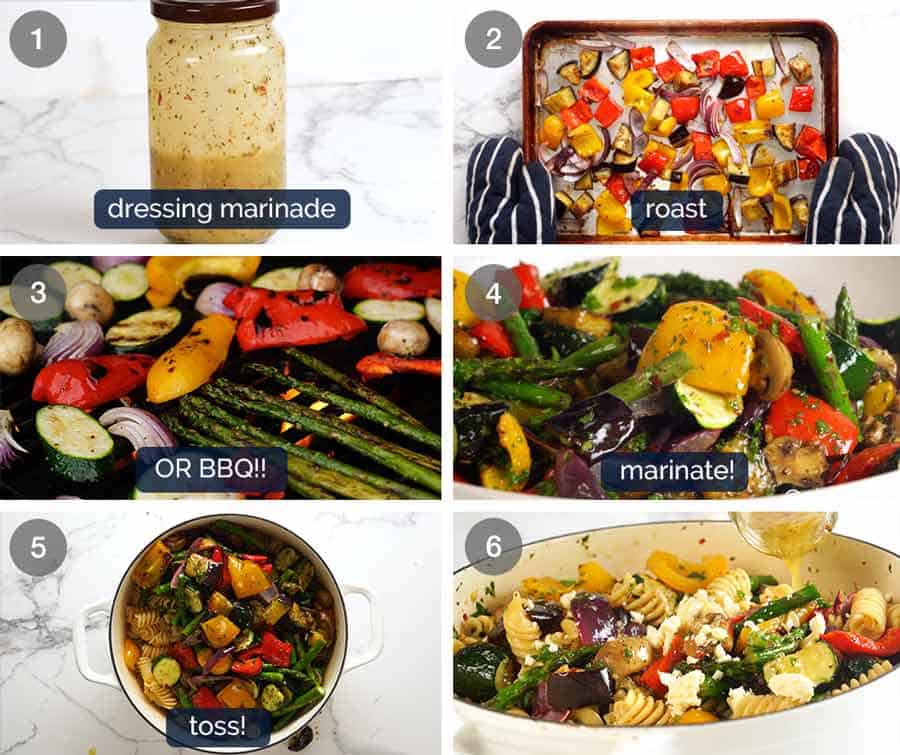
How to make this summer Vegetable Pasta Salad
Cook veggies (BBQ or oven) -> marinade in dressing -> toss through pasta.
Yep. That’s it.
(OK I might’ve skipped a few steps like chop / oil / salt ‘n pepper the veggies, but you get the gist!)
Pro tip – how to keep your pasta salad JUICY (without using tons of oil)
Pasta salads keep well for days upon days, but the pasta tends to suck up all the dressing and vegetable juices. So to keep this nice and juicy if serving this 2, 3 or even 4 days later, the trick is to shake up the dressing with some pasta cooking water to make more dressing without using copious amounts of oil.
This is what happens: pasta cooking water is starchy from the pasta. The starch emulsifies with the oil in the dressing and thickens the pasta cooking water so it’s the consistency of dressing. You have more dressing (with the same amount of flavour in it) so you can reserve some to make the pasta salad nice and juicy when you serve it up the next day….and the next!
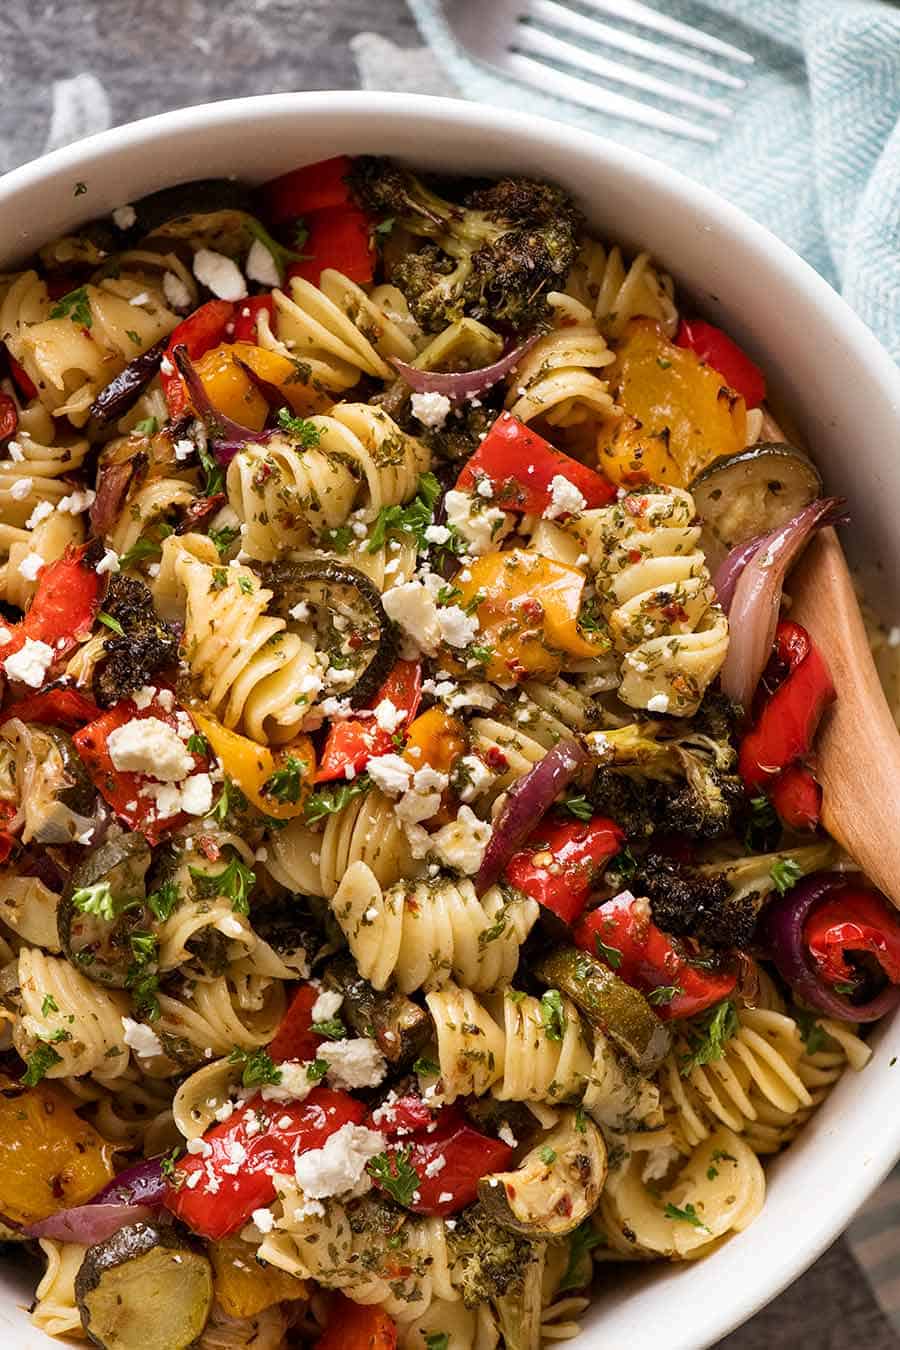
Vegetables for pasta salad
The beauty of this Vegetarian Pasta Salad recipe is this – there are no rules. You can literally put any roastable/grillable veggie in this – and it’s going to be amazing.
Oh wait. That was a grand statement that sounded really good but I realised was a bit untrue. I think potato might be a bit odd. While the notion of carb-on-carb is not something that has passed me by over the years (potato pizza, anyone??), I don’t think it will quite work here.
But that’s the only exception! 😂
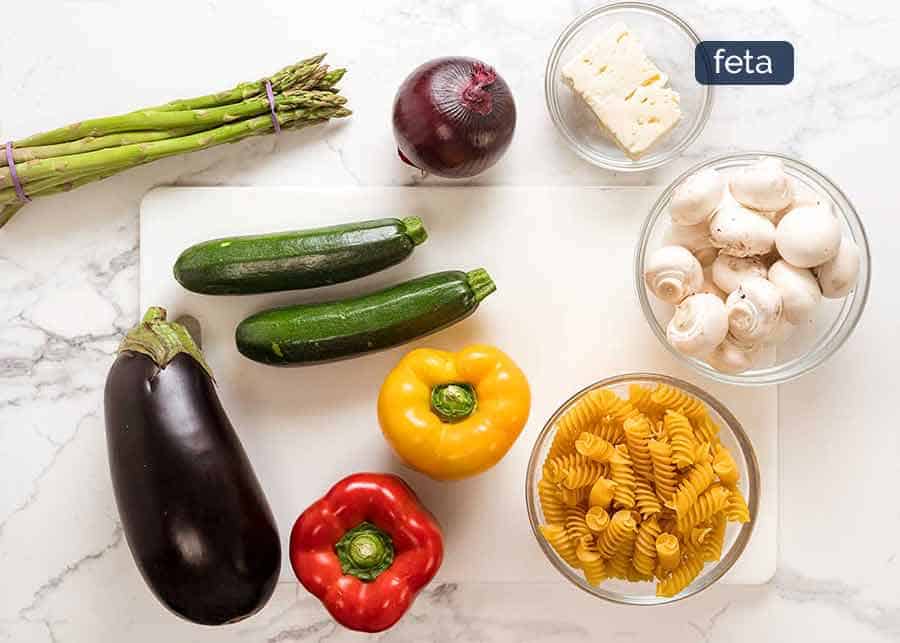
Here’s what I use.
Now, I confess these were not just dregs of my fridge – I specifically wanted to use the same veggies I used in the Marinated BBQ Vegetables so I could use the same clips in the video to show that you can either roast OR BBQ the vegetables. 😇
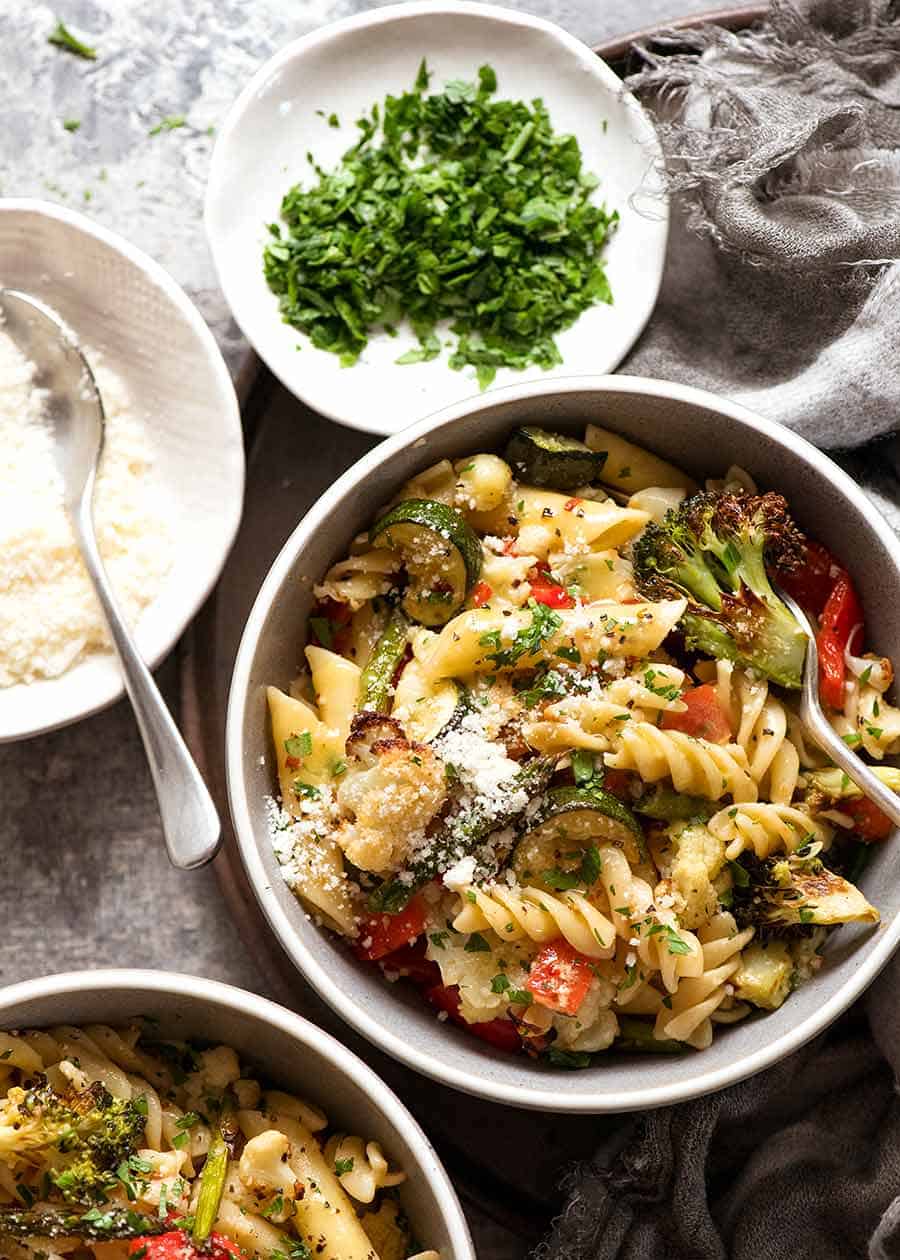
But here’s a photo from another time I made this Vegetarian Pasta Salad using other vegetables (I spy cauliflower and broccoli) and also a mix of leftover pasta I had.
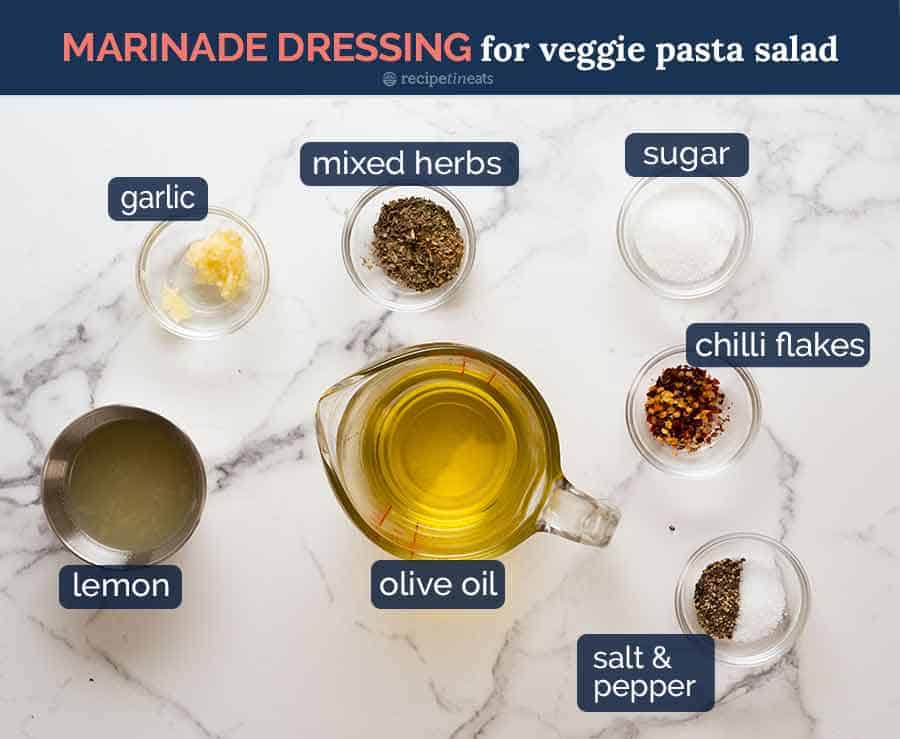
Marinade-Dressing for vegetables (double duty!)
And here’s the marinade / dressing I use for this pasta salad recipe. You get great bang for your buck with this marinade:
When you toss hot vegetables in a dressing, they suck up the flavour which makes the veggies even tastier;
As the veggies marinate, they sweat and creates tasty juices which makes this pasta salad extra juicy and tasty; and
Hold back some of the dressing to add a fresh hit of flavour at the end.
I make this a LOT!
I make this Vegetarian Pasta Salad a LOT. This, along with Baked Frittata, is one of my favourite ways to use up leftover vegetables at the end of the week because they can be made with any roast-able vegetables, and it lasts for days and days so you can make it now when your veggies are at the end of their life, but eat it later.
Some more Leftover Veg favourites include: Vegetarian Lasagna (double up on veg and skip the ricotta layer), Cheesy Vegetable Pasta and this One Pan Roasted Vegetables and Seasoned Rice.
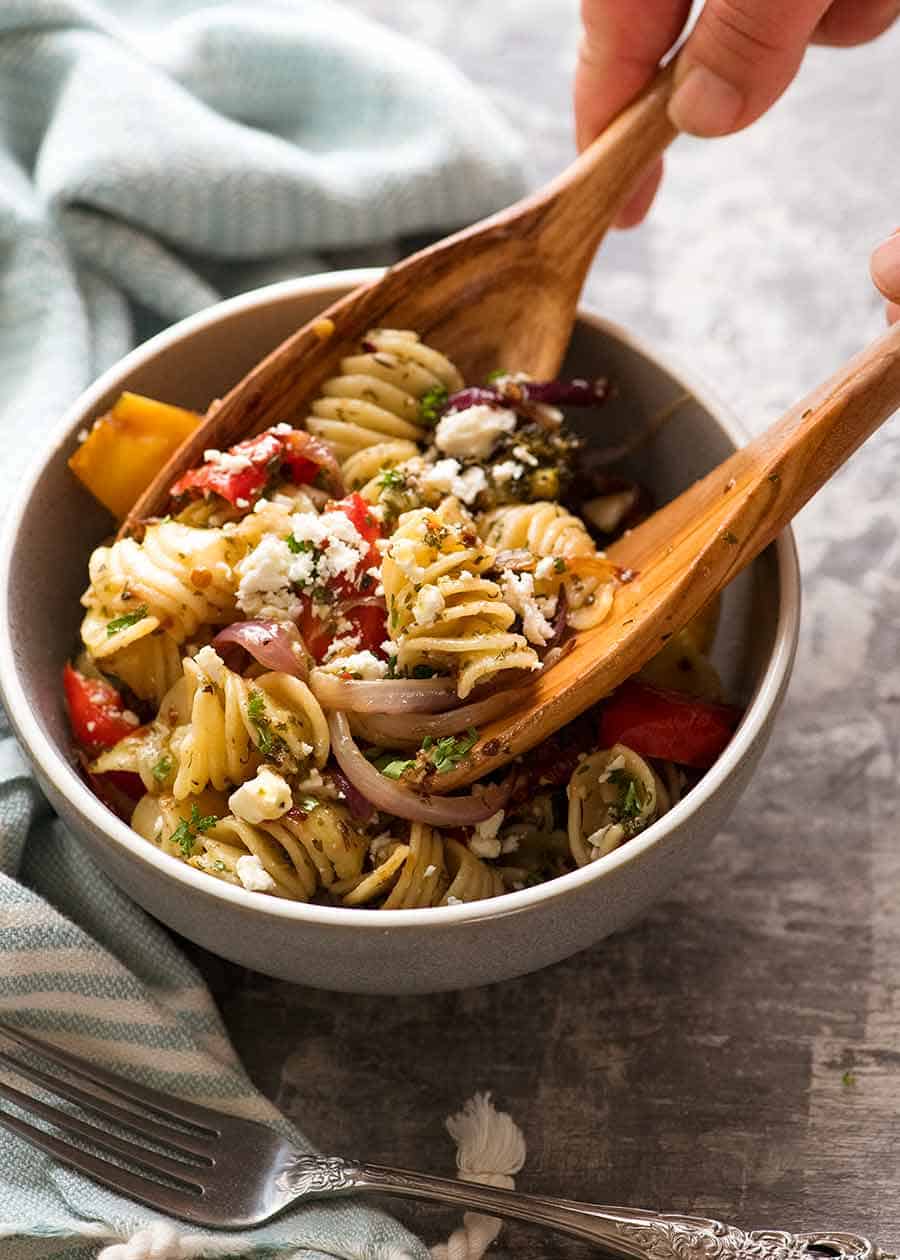
How to serve it
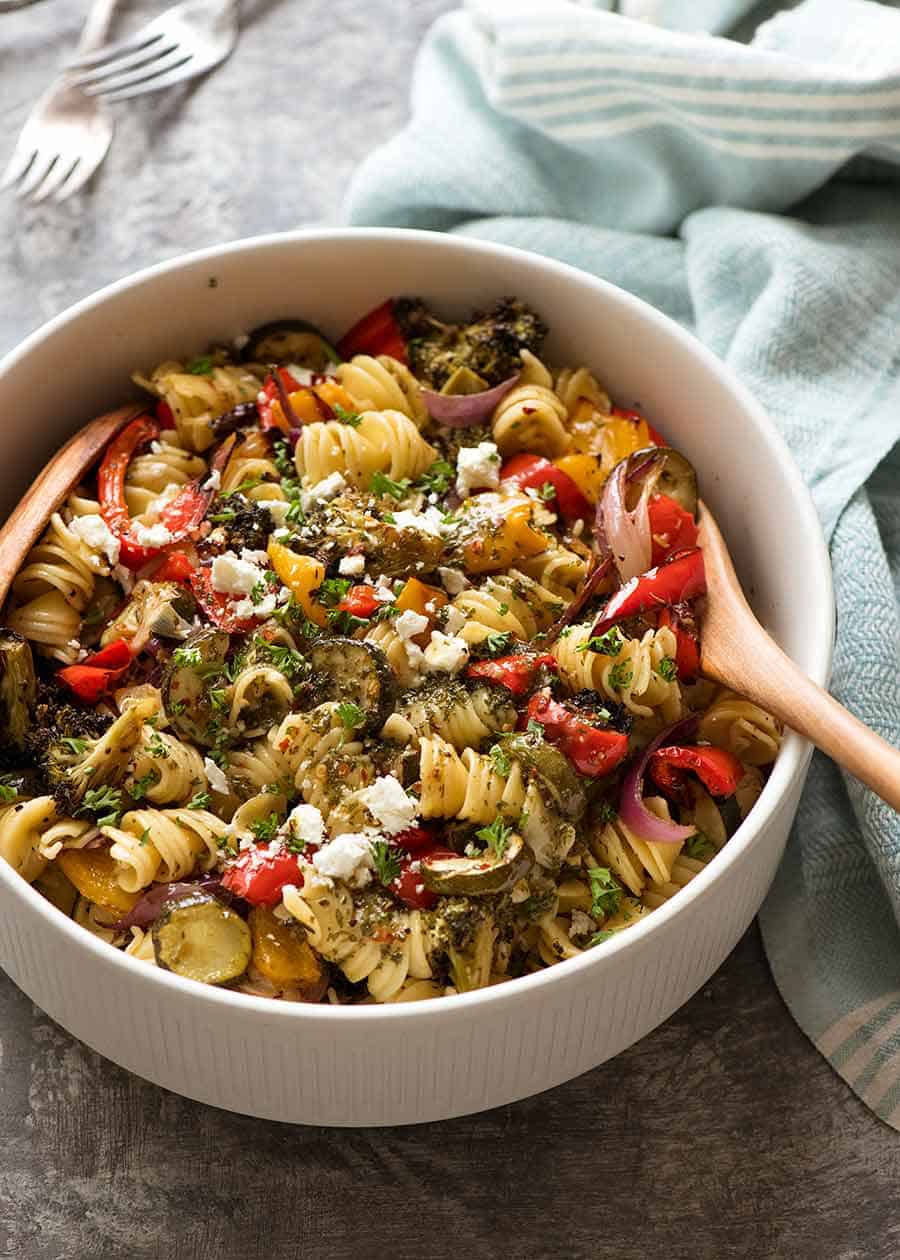
Serve this Vegetarian Pasta Salad as:
a side dish to anything (well, perhaps anything non-Asian!)
a meal in itself
work lunch!
GREAT for potlucks and gatherings – transportable, colourful, and of course super delish
serve it at room temp OR slightly warm
And while it is meat free, you could certainly add a hit of protein by adding some shredded chicken! – Nagi x
Watch how to make it
Marinated Vegetarian Pasta Salad
Ingredients
- 400g / 14oz curly pasta , dried (or other of choice)
- 1/4 cup parsley , roughly chopped (or chives)
- 120g / 4oz feta , crumbled into big chunks
Vegetables (Note 1):
- 2 capsicum/bell peppers (1 red, 1 yellow), cut into 2.5cm / 1" pieces
- 1 red onion , cut into wedges
- 1 eggplant , halved lengthwise, then 1.25cm/ 0.5″ thick semi circles
- 2 zucchini , cut into 1.5cm / 2/3" chunks (see video)
- 200g/ 7oz button mushrooms , halved (large ones quartered)
- 1 bunch asparagus , ends trimmed, cut into 5cm/2" lengths
Roasting:
- 1/4 cup (65ml) extra virgin olive oil
- 1 tsp each salt and pepper
- 3 cloves garlic , minced
Marinade / Dressing:
- 1/3 cup (85ml) lemon juice
- 1/3 cup (85ml) extra virgin olive oil
- 2 tsp white sugar
- 2 garlic cloves , minced
- 1/2 tsp each salt and pepper
- 1/2 tsp each dried basil, parsley, oregano, thyme (Note 2)
- 1/2 – 1 tsp chilli flakes (adjust spice to taste, Note 3)
Instructions
Marinade/Dressing:
- Place ingredients in a jar and shake well. Set aside 10 minutes+.
Roasted Vegetables:
- Preheat oven to 250°C/480°F (230°F fan) – super high heat replicates BBQ charred edges.
- Toss veggies in oil – Place all vegetables other than asparagus in a large bowl. Drizzle with oil, sprinkle with salt, pepper and garlic, toss.
- Spread vegetables on 2 trays (fill one less than the other). Roast 25 minutes, tossing once.
- Add asparagus – Drizzle asparagus with oil and pinch of salt and pepper. Add into oven for last 5 minutes.
- BBQ Option: See Marinated BBQ Vegetables for directions.
Pasta salad:
- Marinate veggies – Transfer vegetables into large bowl, pour over 1/2 the Dressing. Toss, then leave to marinate for 30 minutes to 3 hours.
- Cook pasta + 2 minutes: In large pot of salted water, cook pasta per packet directions but ADD 2 minutes to the cook time (Note 5 for why). Drain and return pasta into pot.
- Add vegetables, including veg juices, into the pasta pot. Add remaining Dressing and parsley, then toss. Set aside for 15 minutes to cool slightly.
- Serve! Sprinkle with feta and serve! Keeps 4 – 5 days, serve at room temp.
Make ahead PRO TIP (Note 4):
- SCOOP OUT a mug of pasta cooking water just before draining. Add 3 tbsp water to reserved Dressing (after marinating veg), shake well. Use this Dressing per above, but reserve 3 tbsp to freshen up pasta salad on Day 2 onwards.
- Freshen up pasta salad: Bring to room temp or briefly microwave (cold pasta = dry) to warm gently. Toss with Reserved Dressing then serve.
Notes
- 25 min roasting – listed veggies, cauliflower, carrots, corn on cob (cut kernels off), parsnip, root veg, pumpkin
- 15 – 20 min – broccoli, broccolini, fennel, beetroot (cubes), leeks
- 5 minutes – asparagus, green beans, peas.
- No cook – olives, artichokes, sun dried tomatoes and other pickled/antipasto veg, tomato, cucumbers, leafy greens.
Nutrition
Originally published July 2019. Writing tidied up January 2022, no change to recipe, I wouldn’t dare!
Life of Dozer
Potato Wedges. He doesn’t have quite the same response with vegetables. 🤷🏻♀️

The post MARINATED Vegetarian Pasta Salad! appeared first on RecipeTin Eats.
]]>