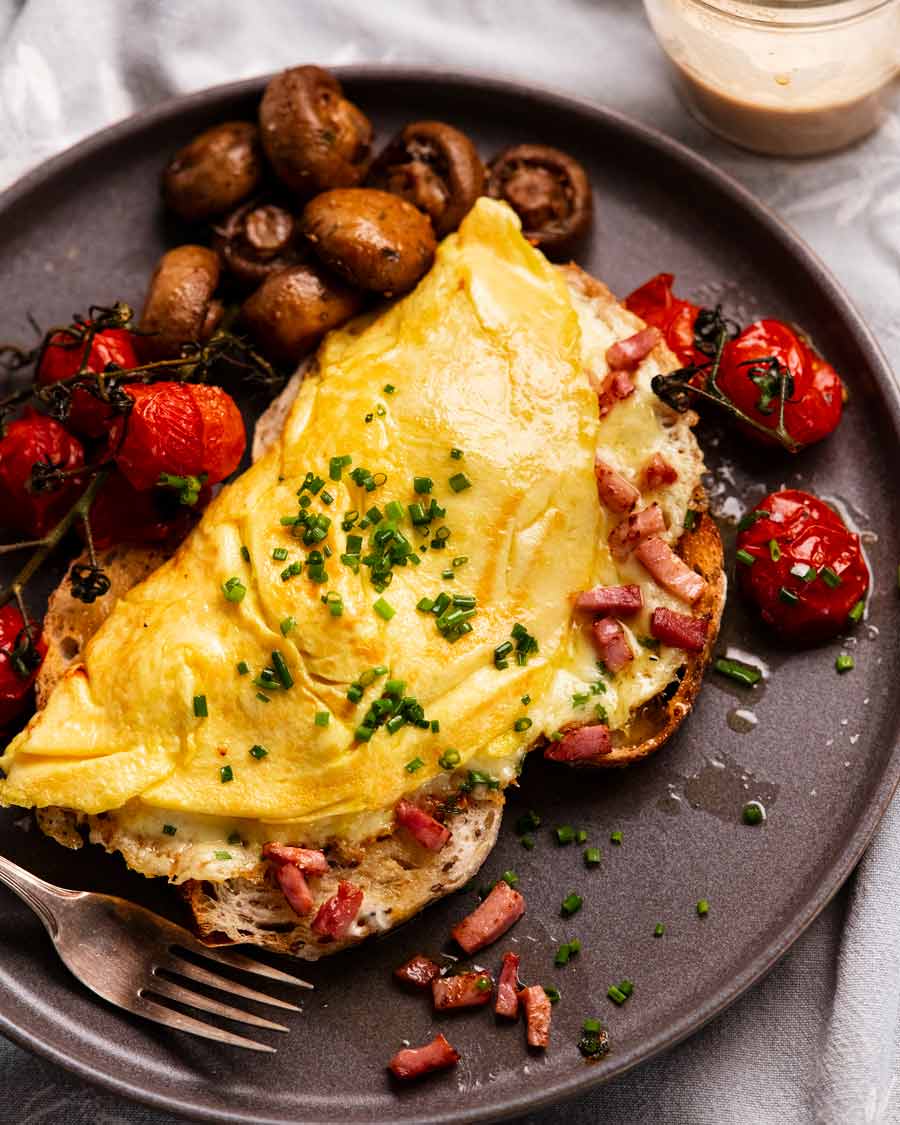
 I’ve updated the way I make omelettes. This “scrambled egg” approach is easier and yields a better result without having to worry about raw egg in the middle. Today’s omelette recipe is filled with ham and cheese. Sauté your ham first! Ham and cheese omelette I used to cook omelettes using the technique whereby you... Get the Recipe
The post Ham and cheese omelette appeared first on RecipeTin Eats.
]]>I’ve updated the way I make omelettes. This “scrambled egg” approach is easier and yields a better result without having to worry about raw egg in the middle. Today’s omelette recipe is filled with ham and cheese. Sauté your ham first!
Ham and cheese omelette
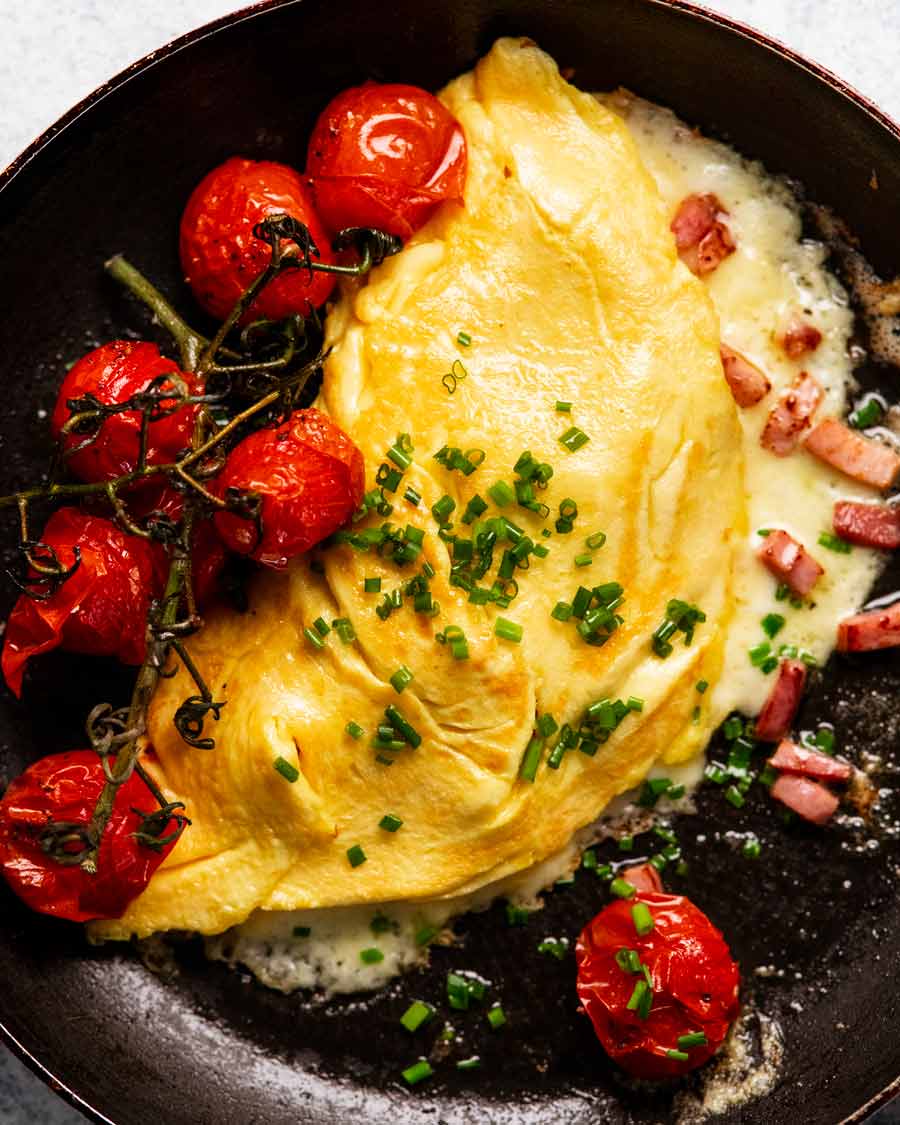
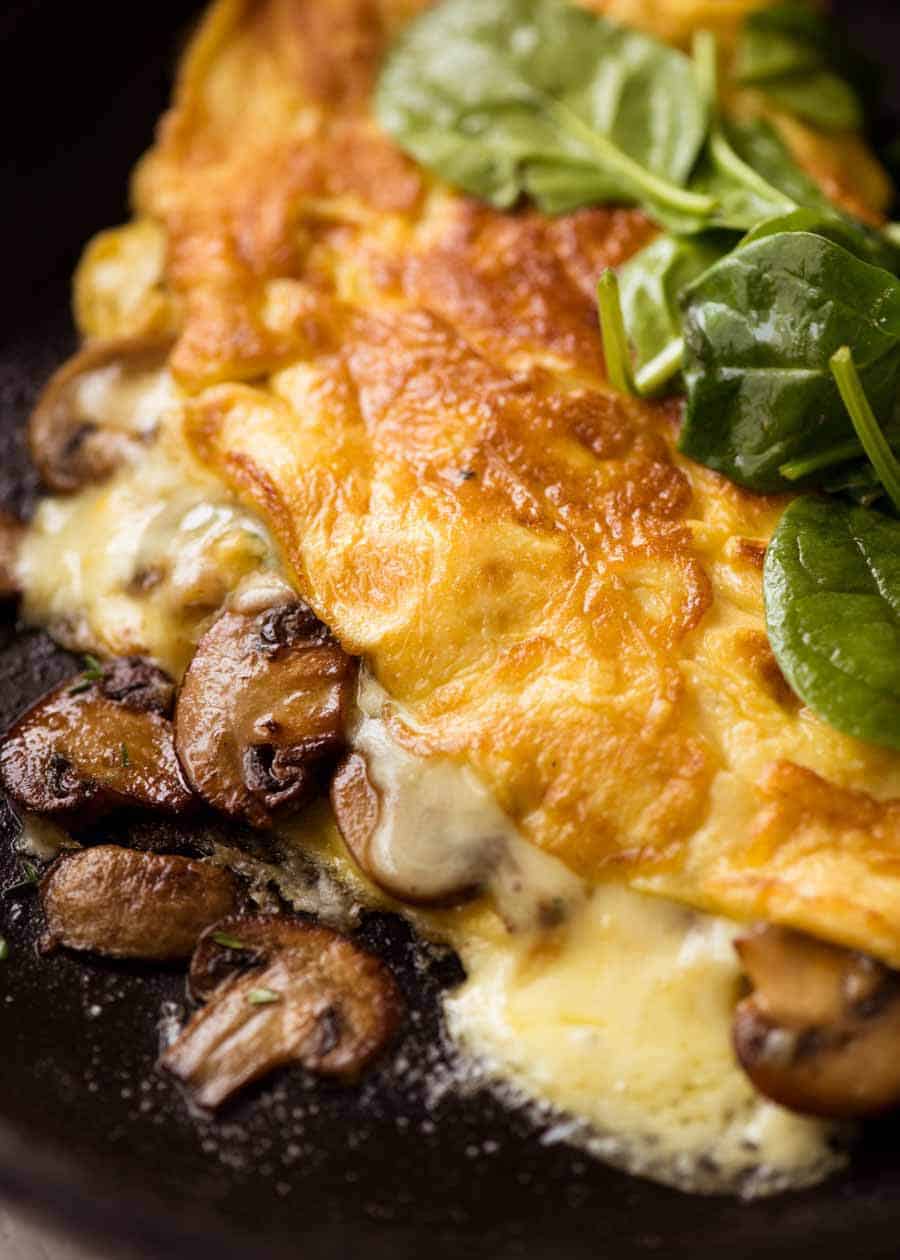
I used to cook omelettes using the technique whereby you lift the edge then tilt the pan to allow the raw egg to run underneath. While that method works fine, it does have a tendency for the risk of raw egg in the middle unless you take the omelette to slightly golden on the surface. While perfectly acceptable to me and in every day diners, this is a no-go zone in the high-end culinary world. The surface of omelettes should not even have a hint of golden colour and the surface should be swirl-free. Like this:
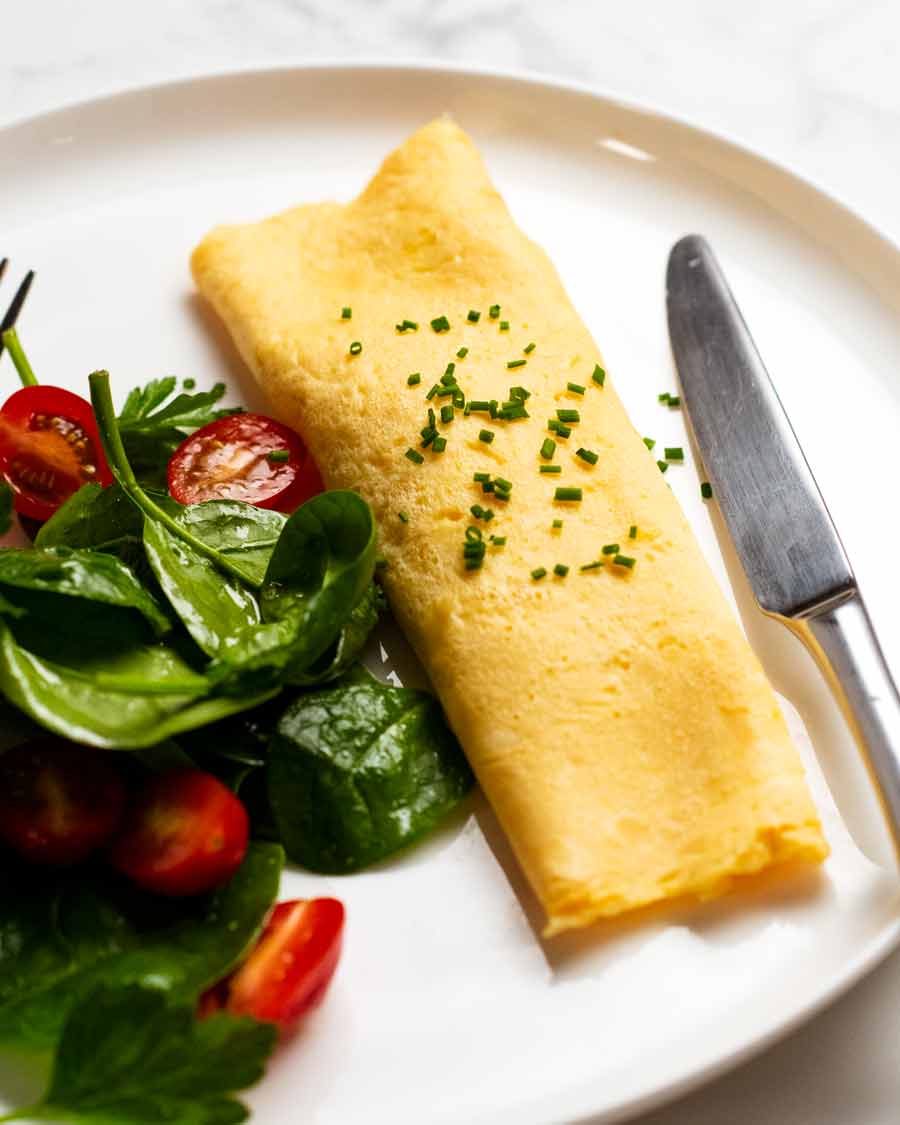
That’s a French omelette, by the way. It’s usually folded in 3, like above, or shaped like an almond rather than half moon. The inside is a little more fluffy than creamy like mine, and there is a little more technique behind it. If you want it, ask me for it! Maybe I should get our French Chef JB to teach you how to make it – would you like that? 
As for today’s omelette, it’s a homestyle one and much more rustic looking. But nevertheless as good as you’ll get at any respectable breakfast bistro around town!
What you need to make an omelette
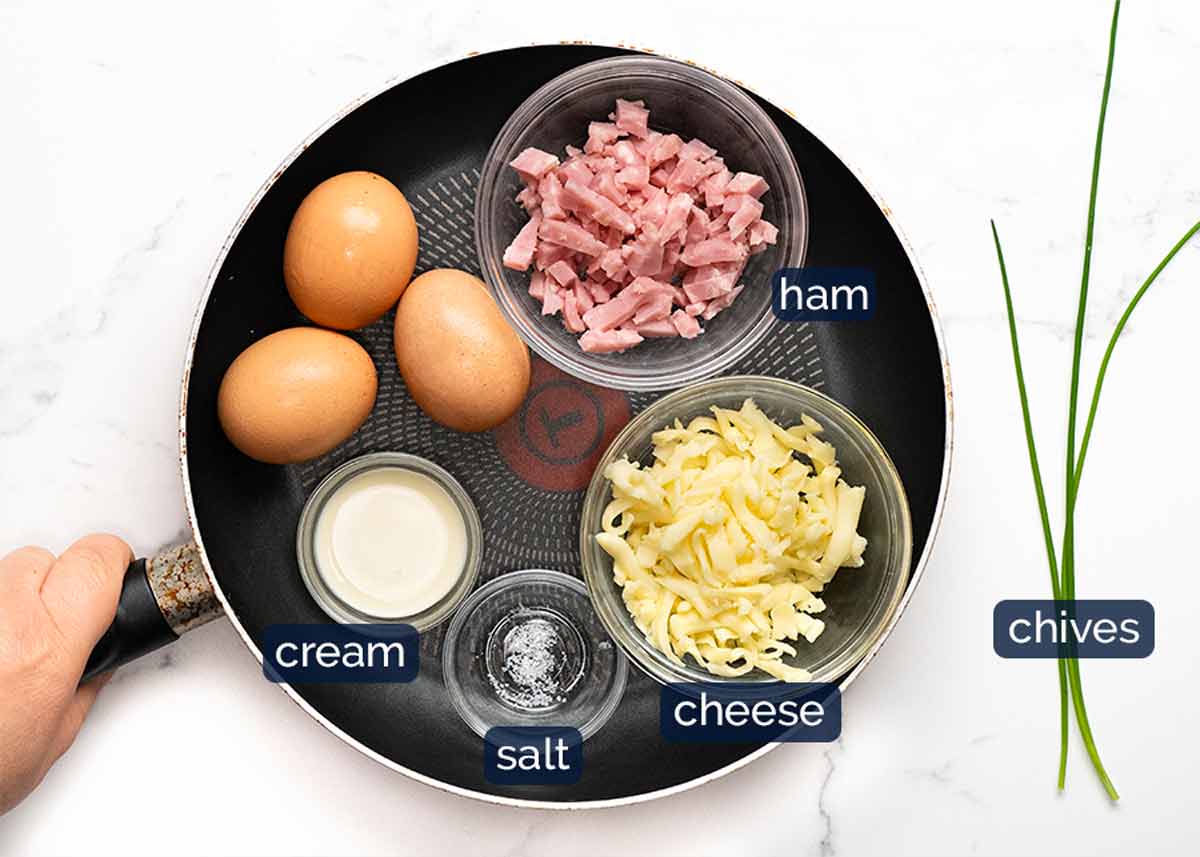
All you need to make the omelette itself is eggs, a pinch of salt and butter or oil for cooking. On the matter of cream or milk – see below!
Do you add cream, milk or water to omelettes? A splash of cream (or milk) is said to make omelettes a little creamier. But in all honesty, the cooking technique makes much more of a difference. No one will ever know if you do or do not include cream. Whereas everybody will know if your omelette is dry and rubbery!!
For me personally, I can’t break the habit so I add cream if I have it, and milk if I don’t.
A note on salt – Eggs, bizarrely, can only take the smallest amount of salt. Even 1/8 teaspoon of salt for 3 eggs makes it too salty – even without ham and cheese. For my egg sandwiches filling, I only use 1/8 teaspoon salt across 6 whole eggs! So for a 3 egg omelette, you only need a pinch of salt.
Butter vs oil – Butter wins every time for flavour! Oil works fine and you can get away with using less. But it doesn’t add to flavour unless you use a really good extra virgin olive oil.
Ham and cheese for omelette
Today’s omelette is stuffed with ham and cheese. For convenience, I used pre-chopped ham (I like that they are a bit meatier than using sliced ham). If you use sliced ham, just chop it into batons or tear into strips.
As for the cheese, I always shred my own because it melts easier than store-bought shredded which is coated with anti-caking agents. Store-bought is also cut thicker which means it takes longer to melt in omelettes.
Use a flavoured melting cheese, like colby (I use this), gruyere, tasty, cheddar, Monterey Jack. Mozzarella melts great but doesn’t have as much flavour so you might want to add a sprinkle of parmesan or pinch of salt on the cheese itself.
Other things to put in omelettes
I’m shameless – I’ll put virtually anything in an omelette. Here are some suggestions – obvious and less obvious!
Garlic mushrooms – see Mushroom Omelette recipe
Prosciutto asparagus (in the egg white omelette) – excellent low calorie filling option
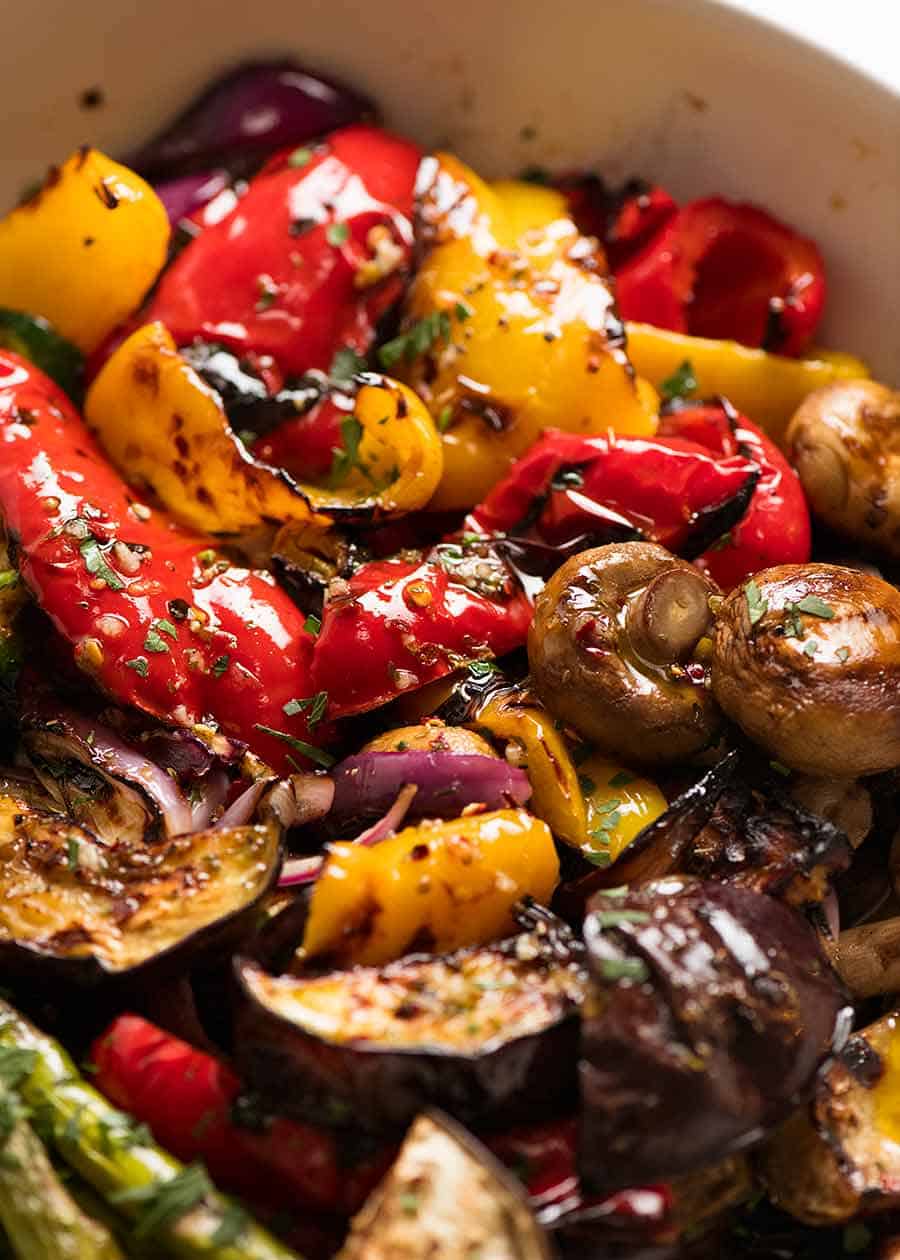
Grilled marinated vegetables or antipasto type things (leftovers from Wednesday’s Antipasto Chickpea Salad!) – chopped
Pizza toppings – pepperoni/salami, capsicum/bell peppers, onion, cheese
Leftover quesadilla fillings
Dinner leftovers – like spaghetti bolognese (I’d add cheese), meatballs (chop them). Good enough for jaffles, good enough for omelettes! Even stir fries will work – Chinese omelettes are a real thing!

It’s gotta be non-stick!
Whatever size pan you use, be sure it has a good non-stick coating. Eggs are the world’s best natural food glue!
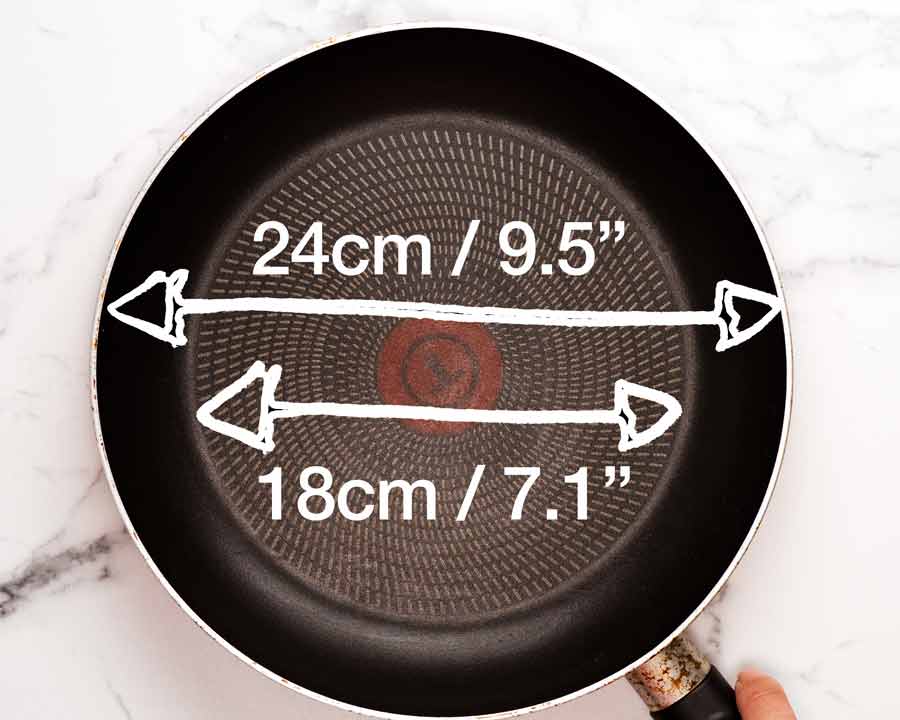
Pan size – The thickness of your omelette will be determined by the size of your omelette pan. I use a 24cm / 9 1/2″ Tefal non-stick pan measured from rim to rim, and this is the size measure the pan is sold as. It has a curved edge, so the flat base of this pan measures 18cm / 7 1/4″ in diameter. This is the size the omelette comes out.
A smaller omelette pan will make a thicker omelette that will take a little longer to cook through. A larger pan will make a thinner omelette. The other thing with a larger omelette is that it can be a little trickier to fold in half, but nothing a little confidence and quick flick of the wrist can manage!
How to make a ham and cheese omelette
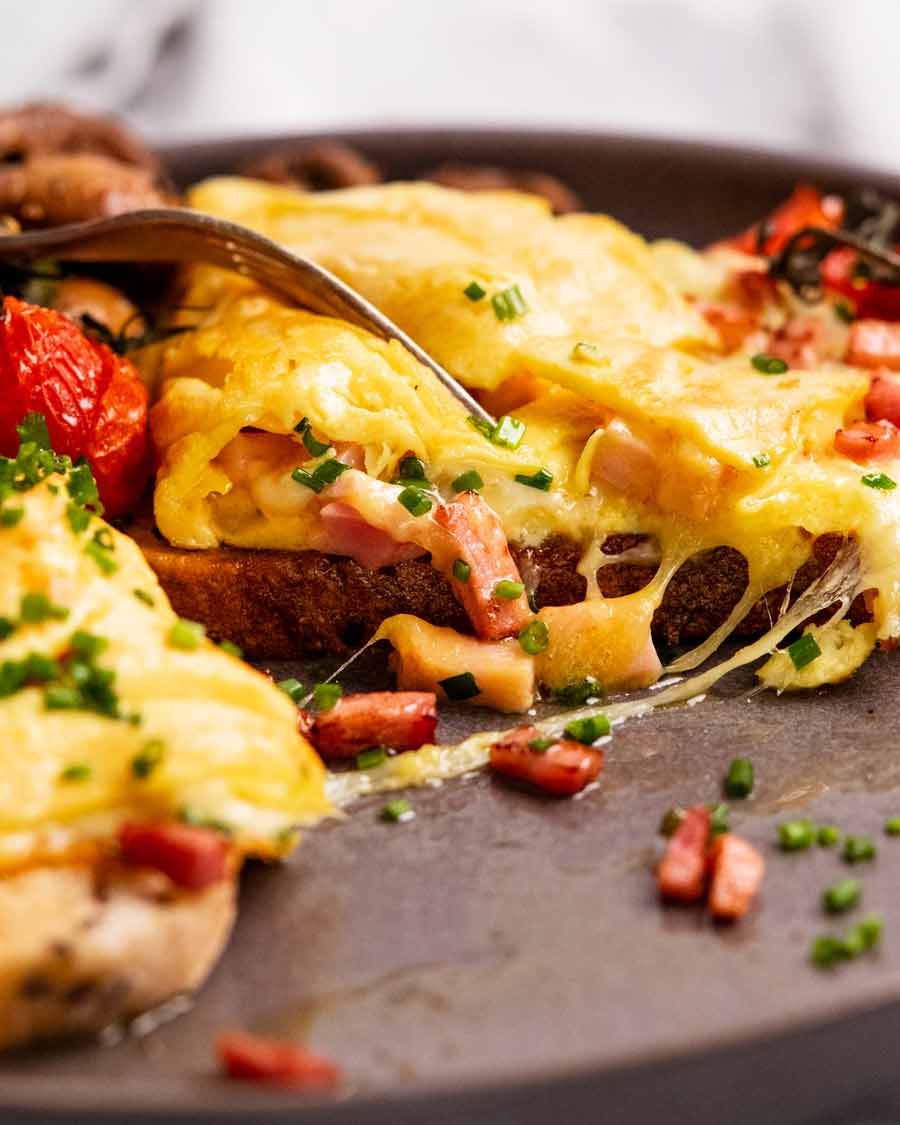
I always sauté the ham first, not only to give it a little flavour but also because the warm ham helps the cheese melt faster so you don’t have to worry about over-cooking the omelette to get oozy cheese. Nobody wants to cut into an omelette only to find the cheese inside is not melted!!
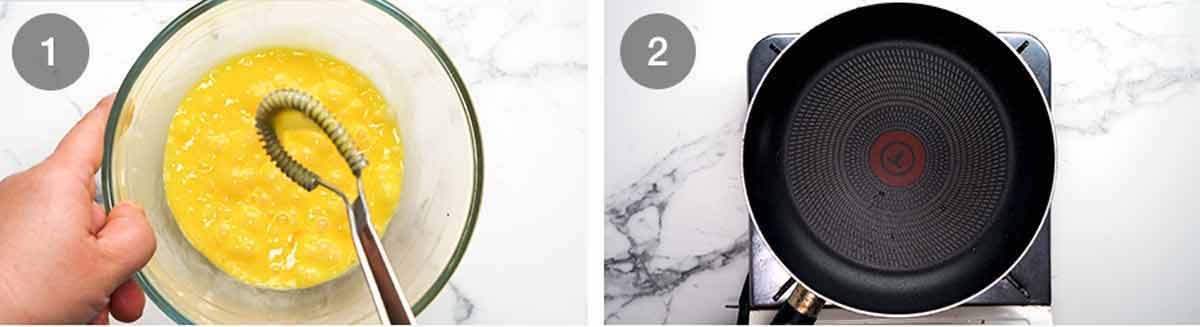
Whisk the eggs with a pinch of salt and cream or milk (if using). Whisk well until fully combined and a bit foamy – takes me about 10 seconds with a mini whisk.
Tools – Use a non stick 24cm/9.5″ wide pan, or thereabouts (18cm/7 1/4″ flat base). You will need at least 1 rubber spatula for cooking, though 2 will make your omelette folding life a whole lot easier!
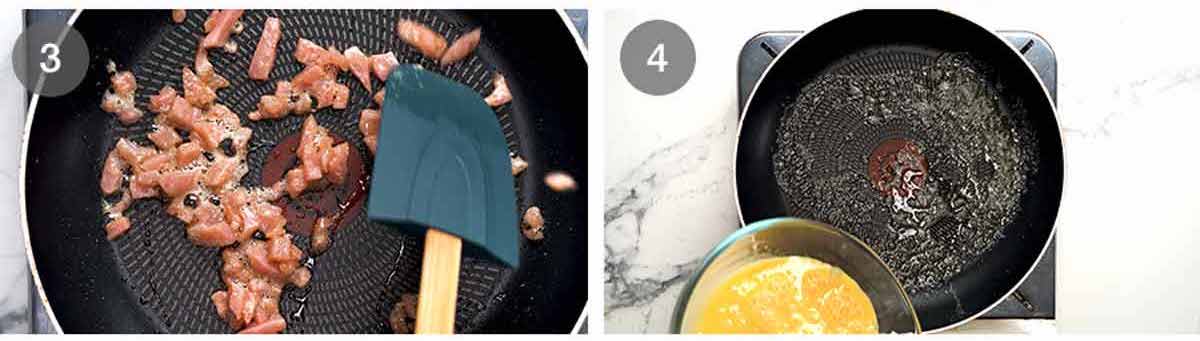
Sauté ham – Melt a tiny dab of butter in the pan over medium heat. Once foaming, swirl/spread then, using a rubber spatula (which we need for the omelette), cook the ham just for a minute or two until it is warmed through. Transfer to a bowl and set aside.
Medium low to medium heat – Return the pan to the stove and melt the remaining butter until foaming. We want the stove on moderate heat – which might be medium low or low for you, depending on the strength of your stove and the size of the stove ring you are using. We don’t want it too high else you’ll have to deal with the surface burning before the inside cooks through. Too low, and the omelette takes so long to cook it kind of turns rubbery. We need to find the happy medium!
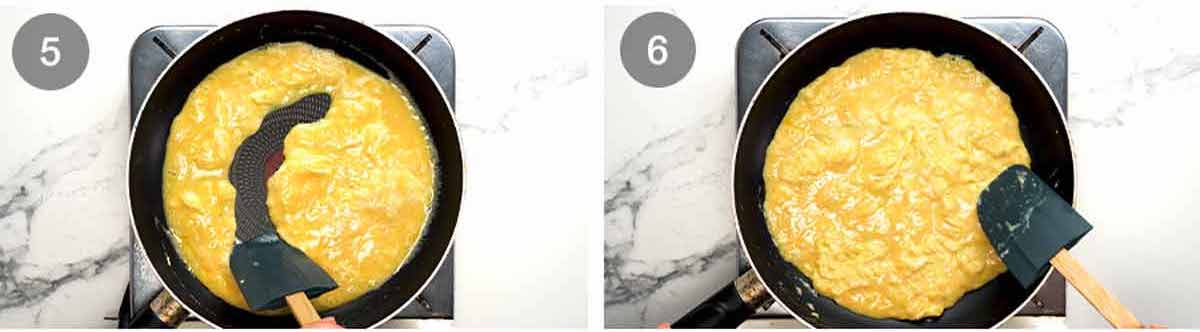
Semi-scrambled your eggs! Give the eggs a quick whisk then pour into the pan. Leave it for 15 seconds or until you see the edges just start to set. Then, using the rubber spatula, start making long, leisurely strokes, scraping the cooked eggs off the base to allow the uncooked egg to run, until the eggs are partially cooked.
GOAL – The eggs should be still raw enough to spread like jam across the base of the skillet, but not raw enough that the eggs run when you tilt the pan.
TIP – If at any point you feel like the eggs are cooking too fast, just remove the skillet off the stove!
Spread the custardy semi-scrambled eggs across the base of the skillet and roughly smooth the surface. Tidy the edges, if you you feel so inclined. (I feel inclined).
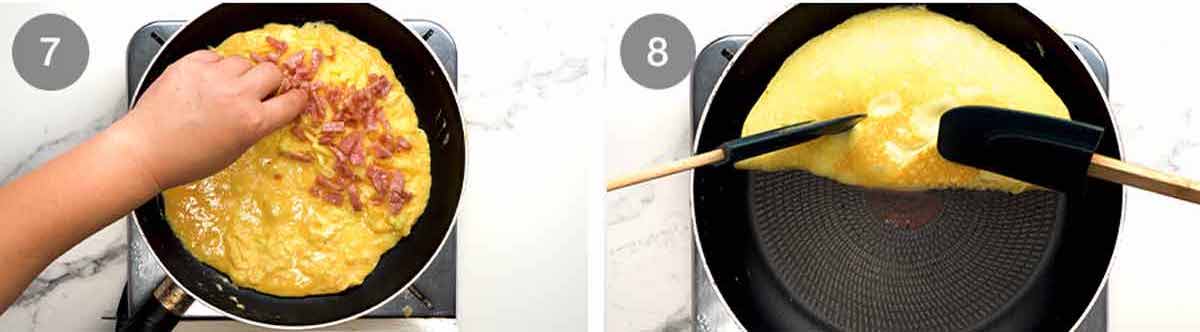
Top – Sprinkle half the omelette with the cheese, then the warmed ham (this helps melt the cheese).
Fold – Ensure the naked side of the omelette is not stuck by running the rubber spatula around the edge (it won’t be, because you are using a good non-stick pan!). Then using 2 rubber spatulas, fold the omelette over.
Optional tidy – At this point, sometimes I may push the edges in to make them nice and tidy. Other times, I see the ooze of cheese and think that’s the prettiest sight in the world, why on earth would anyone push that inside to hide it??!
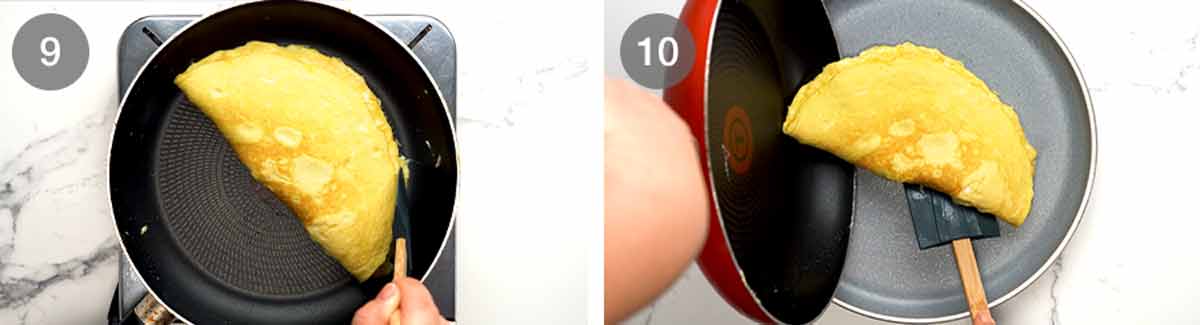
Slide (or flip) out – Checking again to ensure the omelette is not stuck to the pan. Then either slide the omelette out like a normal person or be a bit cheffy and flip it out onto the plate. I show both in the video. Then EAT!
I cannot believe I wrote so much about the humble omelette. Sometimes I even amaze myself at how much I have to say about any type of food!
I’m sorry if I overwhelmed you. And feel free to keep making omelettes as you have been all your life. I get it. If you’re happy with your omelette game, don’t change it! In fact, share your tips!! Bring on the Omelette Debate! – Nagi x
Watch how to make it

Ham and cheese omelette
Ingredients
- 3 large eggs , ~55g/2oz each (fridge cold fine)
- Pinch of salt (that's all you need)
- 1 tbsp cream (or milk), optional (Note 1)
Cooking / add-ins
- 1 tbsp/ 15 g unsalted butter (or 2 tsp extra virgin olive oil)
- 1/3 cup chopped ham (I use store bought, Note 2)
- 1/3 – 1/2 cup shredded colby cheese , use box grater (or cheddar, tasty, gruyere, Monterey Jack – Note 3)
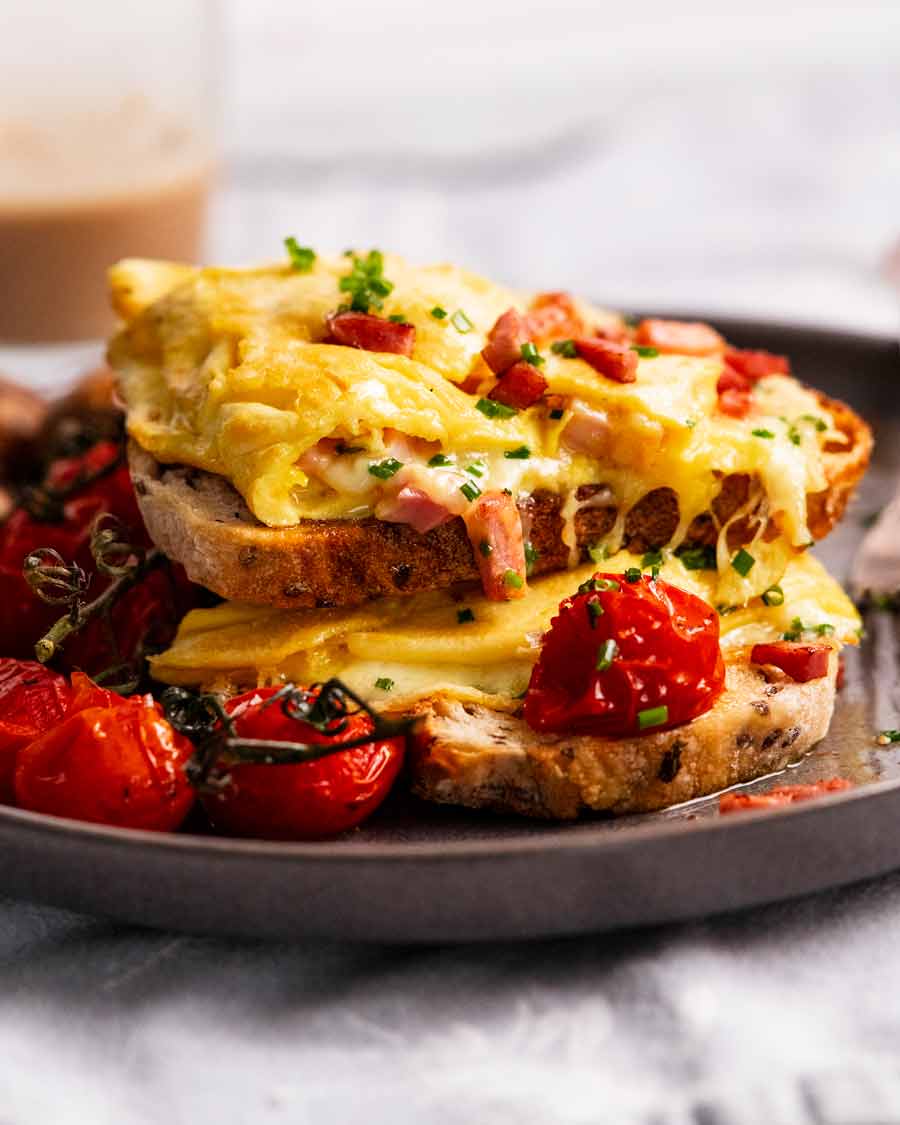
Serving (optional, pictured)
- 1 stem chive , finely chopped
- Garlic butter roasted mushrooms
- Roasted cherry tomatoes (on vine, Note 4)
- Toast
Instructions
- Heat control – If at any stage your omelette is cooking too fast, remove the pan off the stove to let it cool down and lower the heat.
- Whisk the eggs, salt and cream in a bowl for 10 seconds until slightly foamy.
- Warm ham – Melt 1/3 of the butter in a 24cm/9.5" non-stick pan (or thereabouts, Note 5) over medium heat until foamy. Swirl/spread to coat the base, then cook ham using a rubber spatula for 90 seconds until warmed through. Remove into bowl.
- Semi-scramble eggs – Melt and swirl remaining butter in the pan. Give the eggs a quick whisk then pour into the pan. Leave for 15 seconds or until the very edges set, then do long leisurely strokes around and across the pan to scrape up cooked egg and let the raw egg run onto the base. Continue for 30 seconds or so until the egg is partially cooked. GOAL: wet enough to spread like jam, but not so wet that the egg runs when you tilt the pan.
- Spread the egg evenly across the pan (no need to be meticulous). Top half with cheese, then ham. (By this time, the omelette should be almost cooked through but still shiny/custardy on the surface).
- Loosen the naked side then fold over using 2 rubber spatulas. Leave in the pan for another 30 seconds to melt the cheese and finish cooking inside.
- Serve – Slide or flip onto a plate and serve! Sprinkle with chives if desired.
Notes
Nutrition
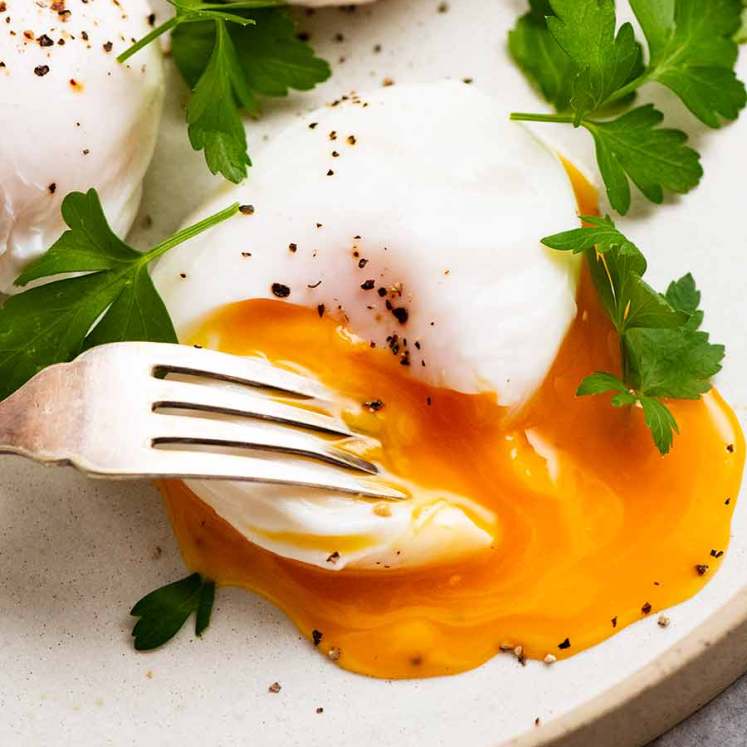
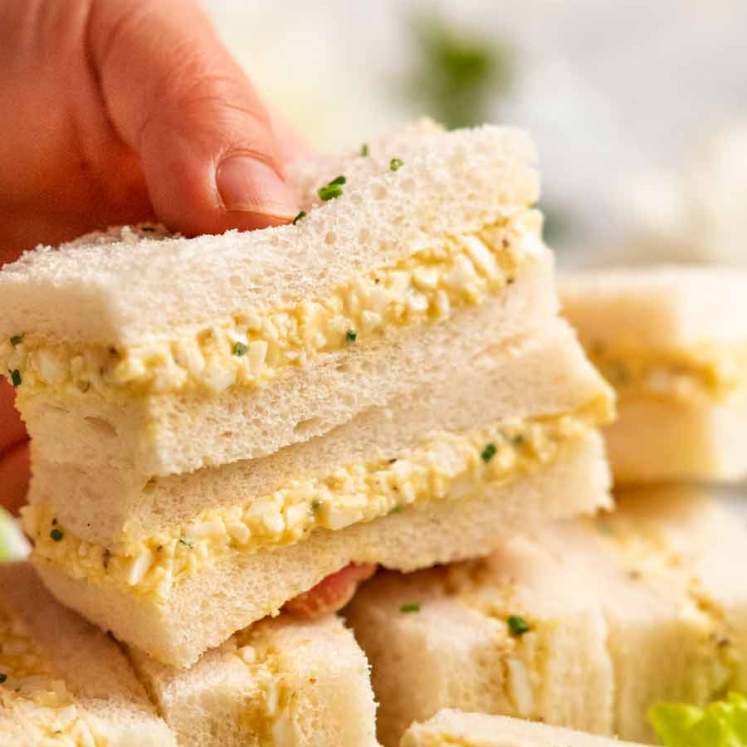
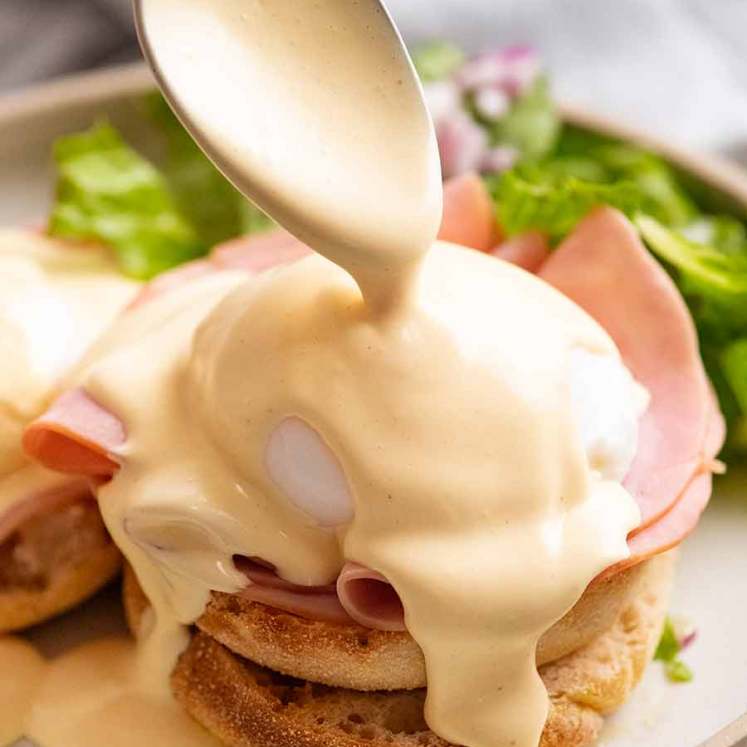
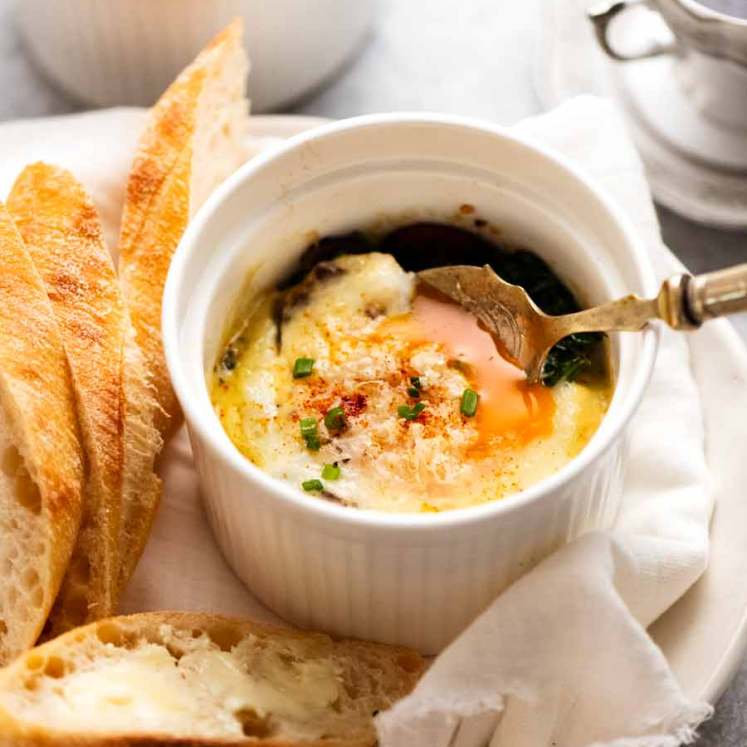
More egg life essentials
Life of Dozer
Dozer’s favourite spot is under the dining table (no prizes for guessing why). So sometimes, if I want a cuddle, that’s where I’ve gotta go!

The post Ham and cheese omelette appeared first on RecipeTin Eats.
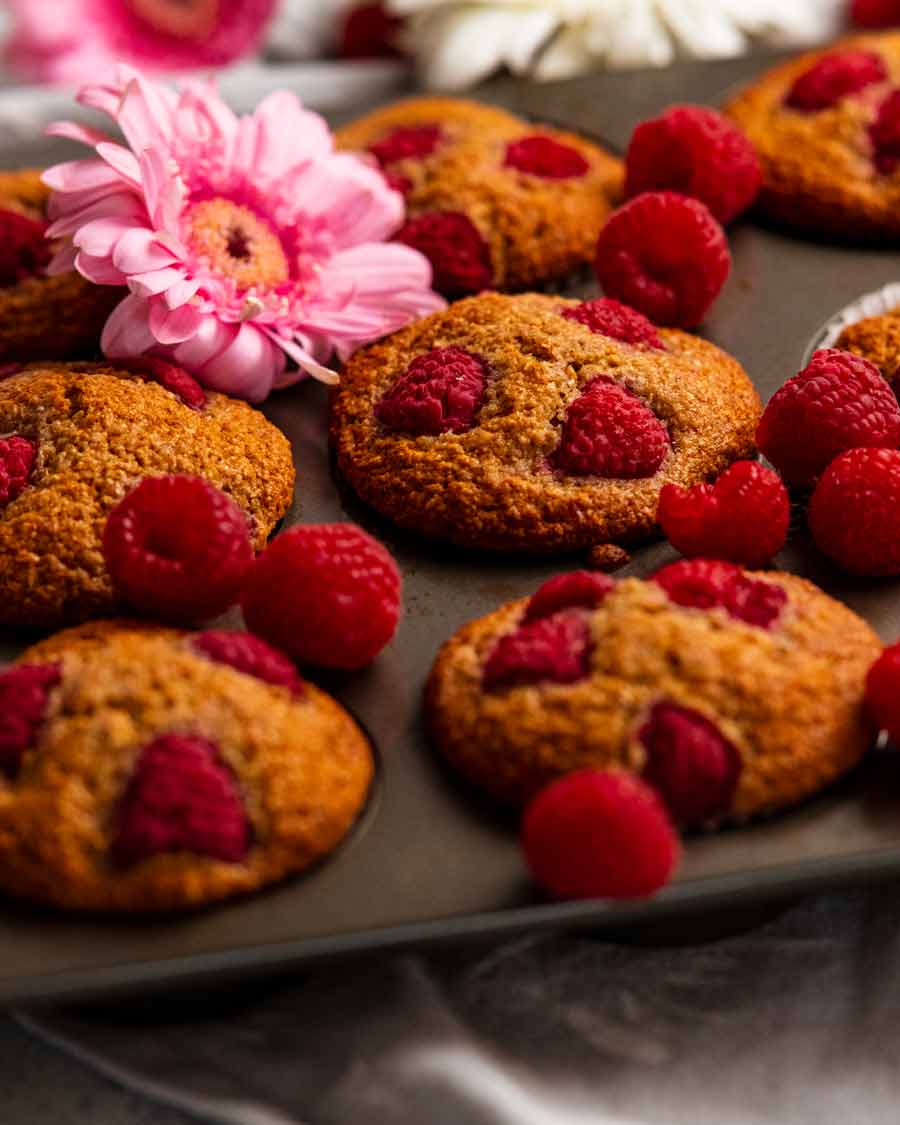
]]> Healthy muffins that are actually delicious! A copy-cat of the raspberry bran muffins from Sydney’s beloved Bowan Island Bakery, these breakfast muffins are a nutritious, convenient breakfast option that’s far better for you than take-away on the way to school or work. Up-and-go Breakfast Muffins Being a savoury gal, I’ve always been partial to savoury... Get the Recipe
The post Up-and-go breakfast muffins! appeared first on RecipeTin Eats.
]]>Healthy muffins that are actually delicious! A copy-cat of the raspberry bran muffins from Sydney’s beloved Bowan Island Bakery, these breakfast muffins are a nutritious, convenient breakfast option that’s far better for you than take-away on the way to school or work.
Up-and-go Breakfast Muffins
Being a savoury gal, I’ve always been partial to savoury muffins for breakfast (proof here, here and here). But a breakfast muffin with a sweet slant has been on my list for a while. I’m talking about the type that doesn’t make you feel like you’re eating cake for breakfast, a muffin that is just sweet enough but still good for you and good to eat.
So here it is!
Why these muffins are better for you
Low fat – just 1 1/4 tsp coconut oil per muffin
Refined-sugar free
Lightly sweetened – Just 2 teaspoons honey per muffin
Extra dietary fibre – keeps your insides….err….moving, shall we say ☺️ as well as keeping you full for longer and stabilising your blood sugars.
Convenient – Grab and go! No need to reheat, eat on the move.
Long shelf life – These last for 4 to 5 days, and are freezable.
Easy to make – One-bowl batter mixed with just a wooden spoon
Add-ins of choice – dried fruit and nuts, oats, fruit, choc chips!
Ingredients in breakfast muffins
Here’s what you need to make these breakfast muffins. Add-ins are flexible – see below for suggestions.
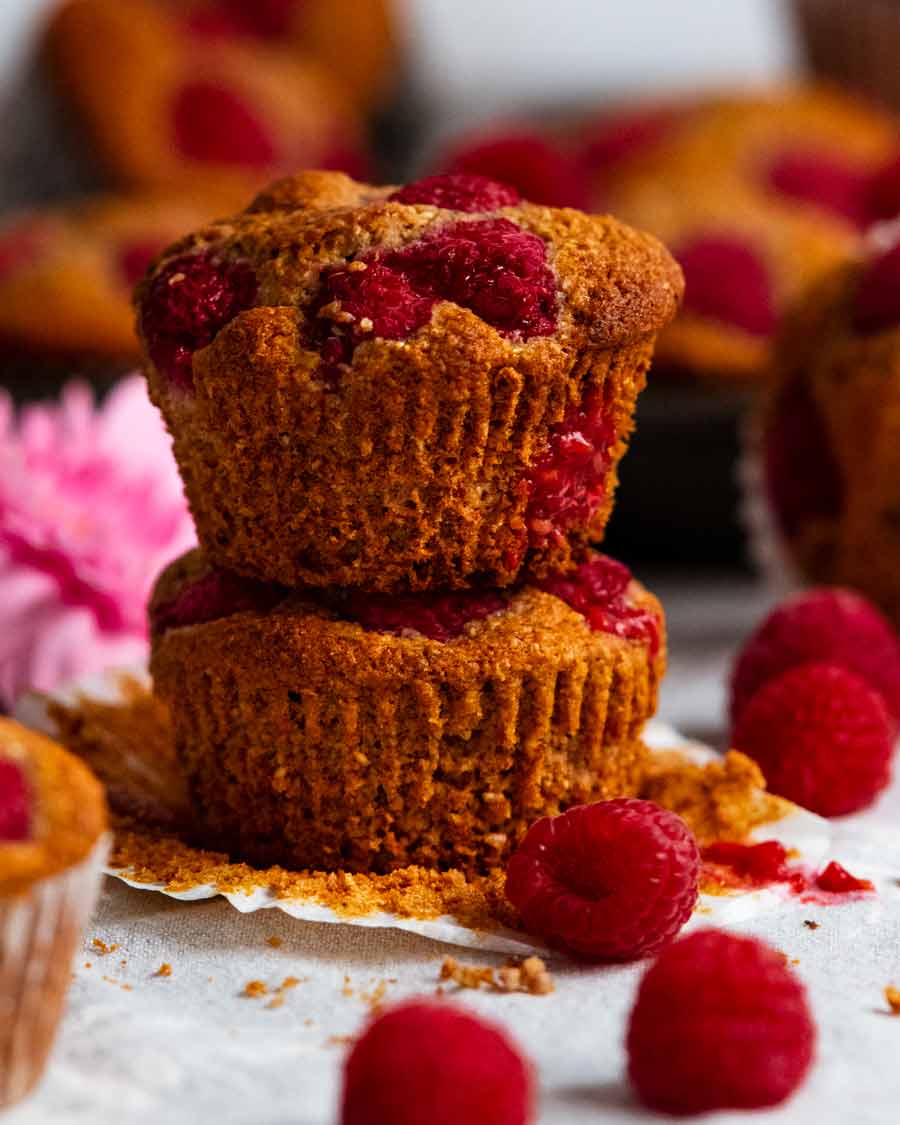
The key ingredient in this for goodness and flavour is wheat germ. Good-for-you extra fibre that gives these muffins a fabulous nutty flavour and lovely warm brown colour!
Dry ingredients
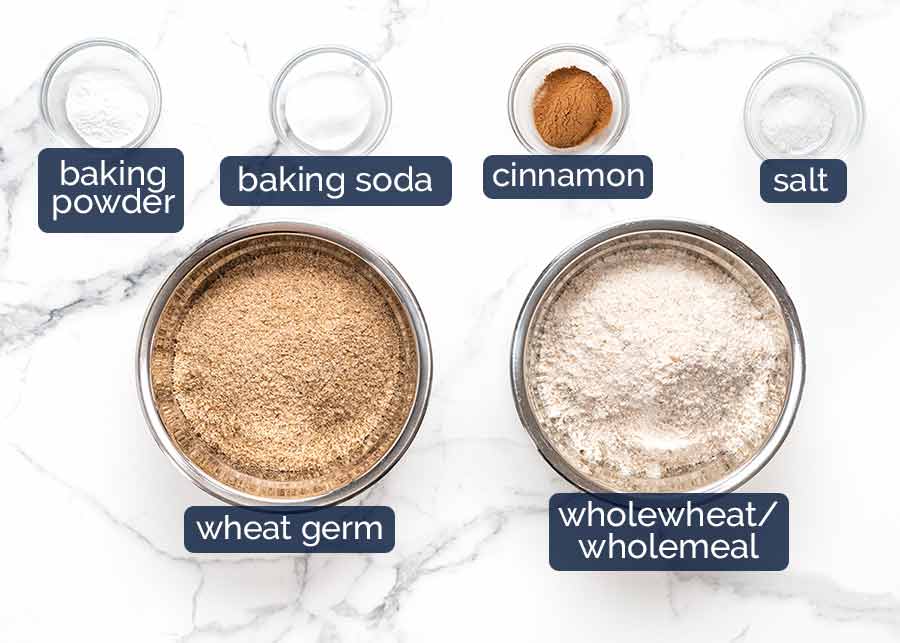
Wheat germ (sub wheat bran) – The good-for-you extra fibre boost! Found in either the cereal aisle, health food section or flour aisle or grocery stores. While both wheat germ and wheat bran work, I think wheat germ is nicer. It has lovely nutty flavour because it’s the seed inside wheat kernels. Whereas wheat germ is the exterior of wheat kernels so it gives the muffins a slightly earthier flavour. Both have similar nutrition characteristics – high in dietary fibre as well as other nutrients. Better for you than plain flour!
Wholewheat / wholemeal flour – In keeping with the better-for-you spirit of these muffins, I’ve opted for wholemeal rather than plain white flour. It has more nutrients because it’s less processed, plus it enhances the nutty flavour of these muffins.
Baking powder AND baking soda (bi-carbonate) – These both make things rise but baking soda is 3x as strong and they each have different rising characteristics. For this recipe, using a combination of both delivers the muffin top shape and crumb texture I want.
The baking soda can be substituted with more baking powder but the crumb is not quite as soft. See recipe card notes for quantity.
Cinnamon – For flavour!
Salt – Brings out the other flavours in the muffins, doesn’t make it salty!
Wet ingredients
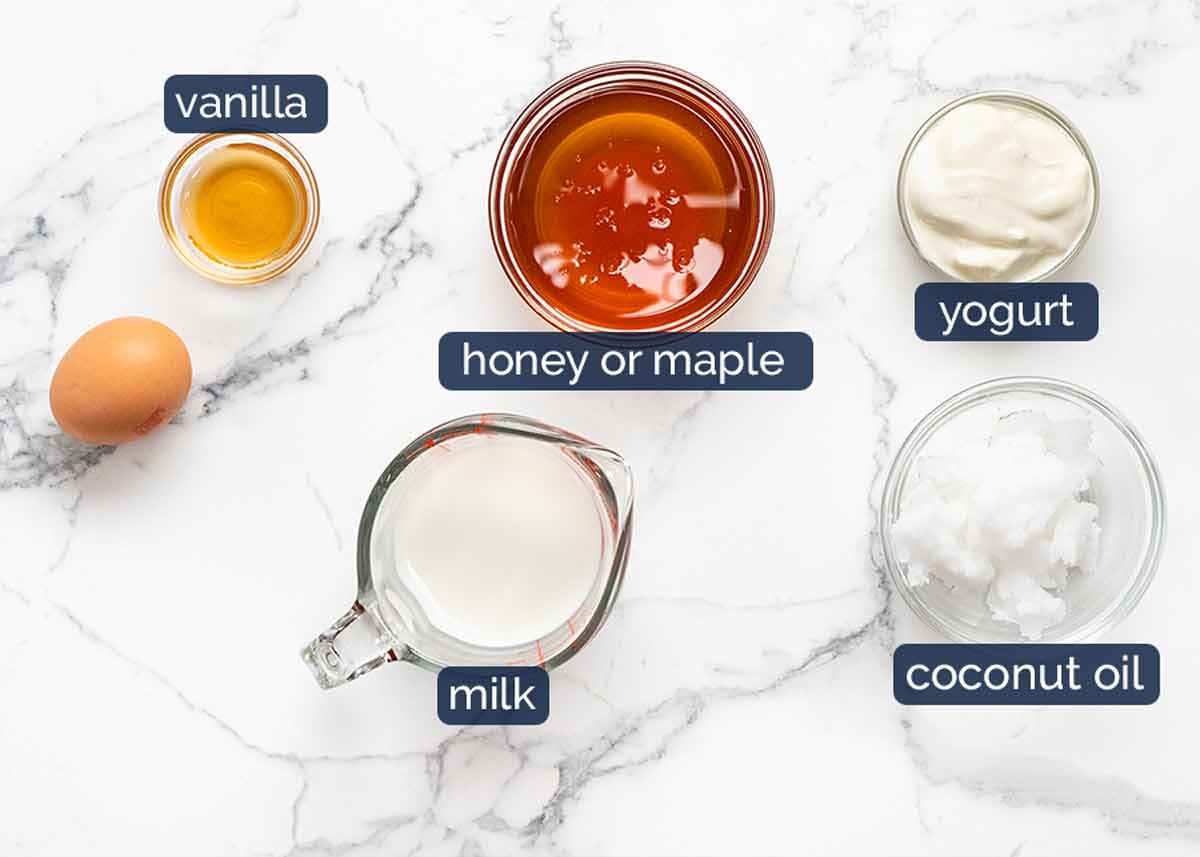
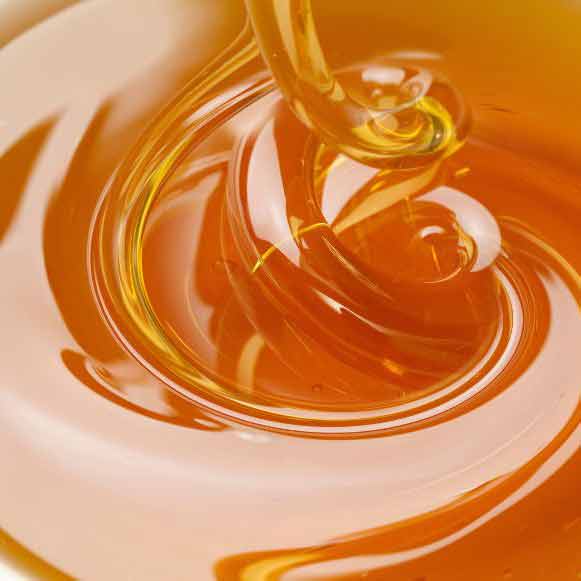
Honey or maple syrup – For sweetening! We only use 1/2 cup across 12 muffins which equates to 2 teaspoons per muffin. See commentary below on why honey is better for you than sugar.
Coconut oil – This is the fat in the muffins. I like to use unrefined / virgin coconut oil which adds a lovely very subtle coconut flavour into the muffins. By no means would anyone call these “coconut muffins”! Use the type that is firm like butter and needs to be melted to mix into batters, rather than the pourable type.
Note: There is also refined coconut oil which is stripped of all coconut oil and aroma. This and other oils will work in this recipe but will not add flavour. If you opt for another oil, I’d suggest doubling the vanilla and adding extra cinnamon.
Yogurt and milk – This is the wet in the batter. Using yogurt serves two purposes. Firstly, it has acid in it which gives the baking soda a rising kick start. Sometimes I use a teaspoon of vinegar in recipes to serve the same purpose, like in my Magic Stay-Moist Apple Muffins.
Secondly, yogurt is not as watery as milk. So it adds wetness to batters without making it as loose which means less flour needed = muffin more moist!
Egg – Just one, to hold the muffins together. Using only 1 egg makes a massive difference to the moistness of the crumb of muffins as the more egg you use, the sturdier but drier the crumb gets.
Vanilla – For flavour.
Why is honey better than sugar?
Because honey is:
sweeter than sugar so you can use less in recipes;
lower GI so your blood sugar levels won’t spike as quickly – which keeps you feeling full for longer; and
more nutritious than sugar which is “empty calories”. That is, sugar literally just contains sugar and nothing else! Honey contains nutrients such as amino acids, enzymes, vitamins and minerals.
Add-ins of choice!
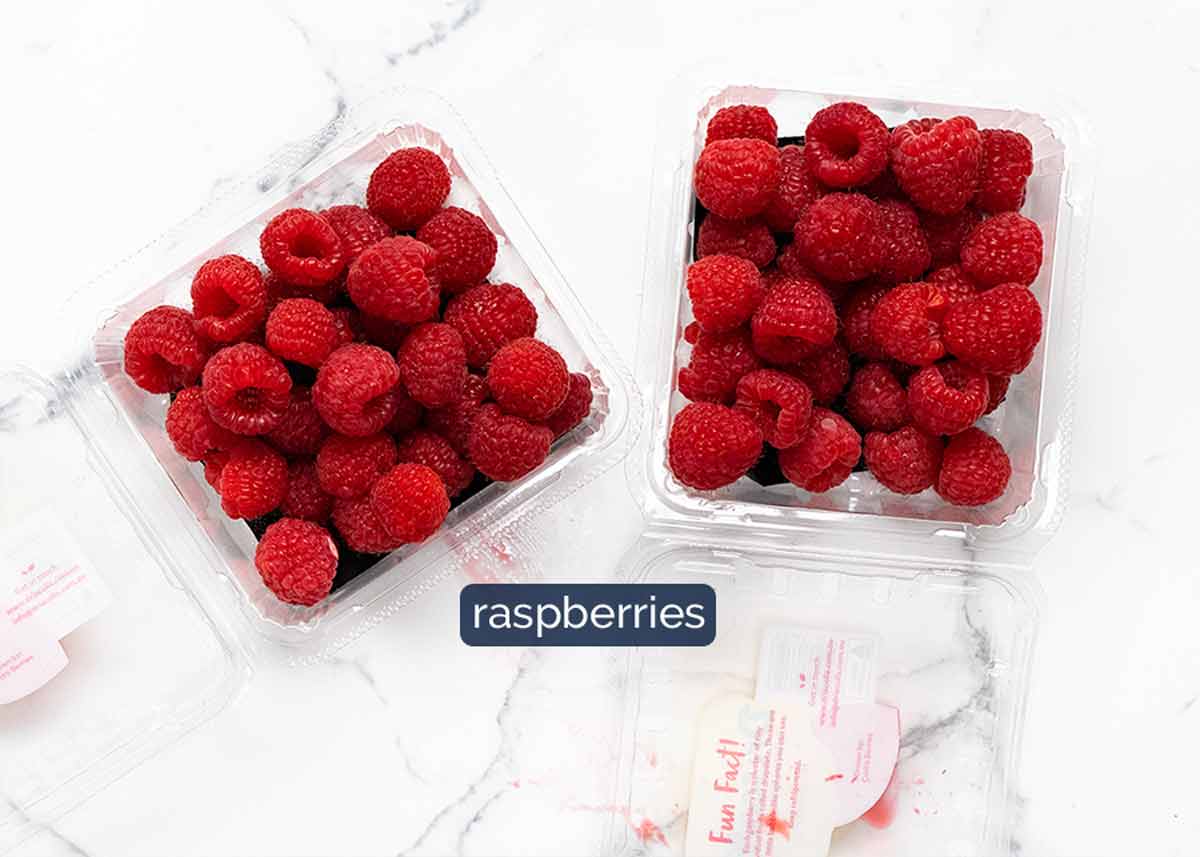
I’ve used raspberries in these because they were on special. However, you really can add any add-ins you want. See suggestions below.
Add-in options:
Raspberries or blueberries, other berries – 250g/8oz, 2 heaped cups
Chopped fruit like apple, pears, cherries, grapes. (Not overly juicy fruit like oranges, peaches etc as they will leech too much liquid into the batter)
Dried fruit – sultanas, apricots, cranberries, apple, mango – anything goes!
Nuts and seeds
Chocolate chips – I mean, the rest of the muffin is healthy. So this tips the scales back to neutral? 😈
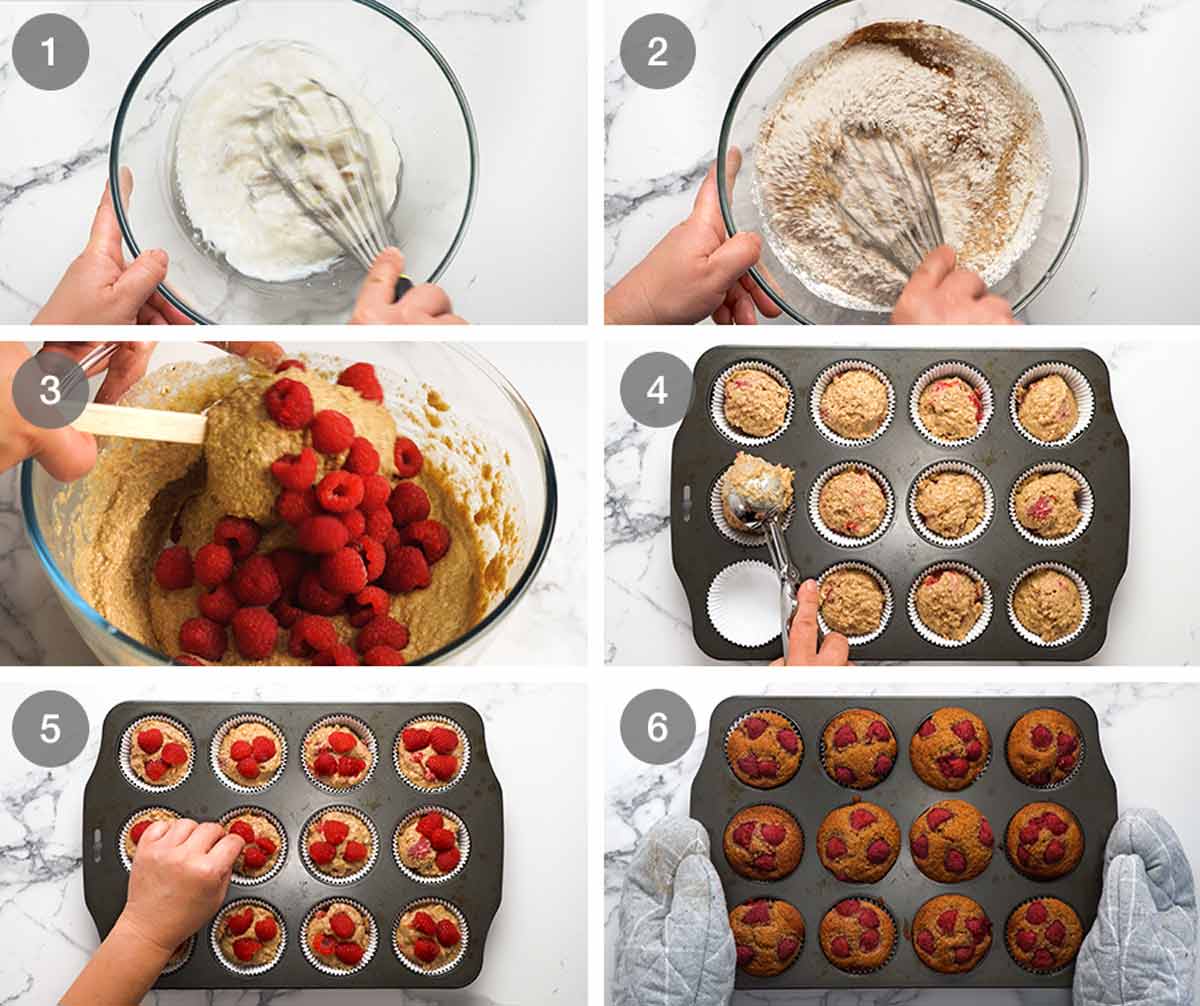
How to make breakfast muffins
It’s as easy as 1-2-3:
Mix wet ingredients
Mix in dry ingredients
Fill muffin holes and bake!
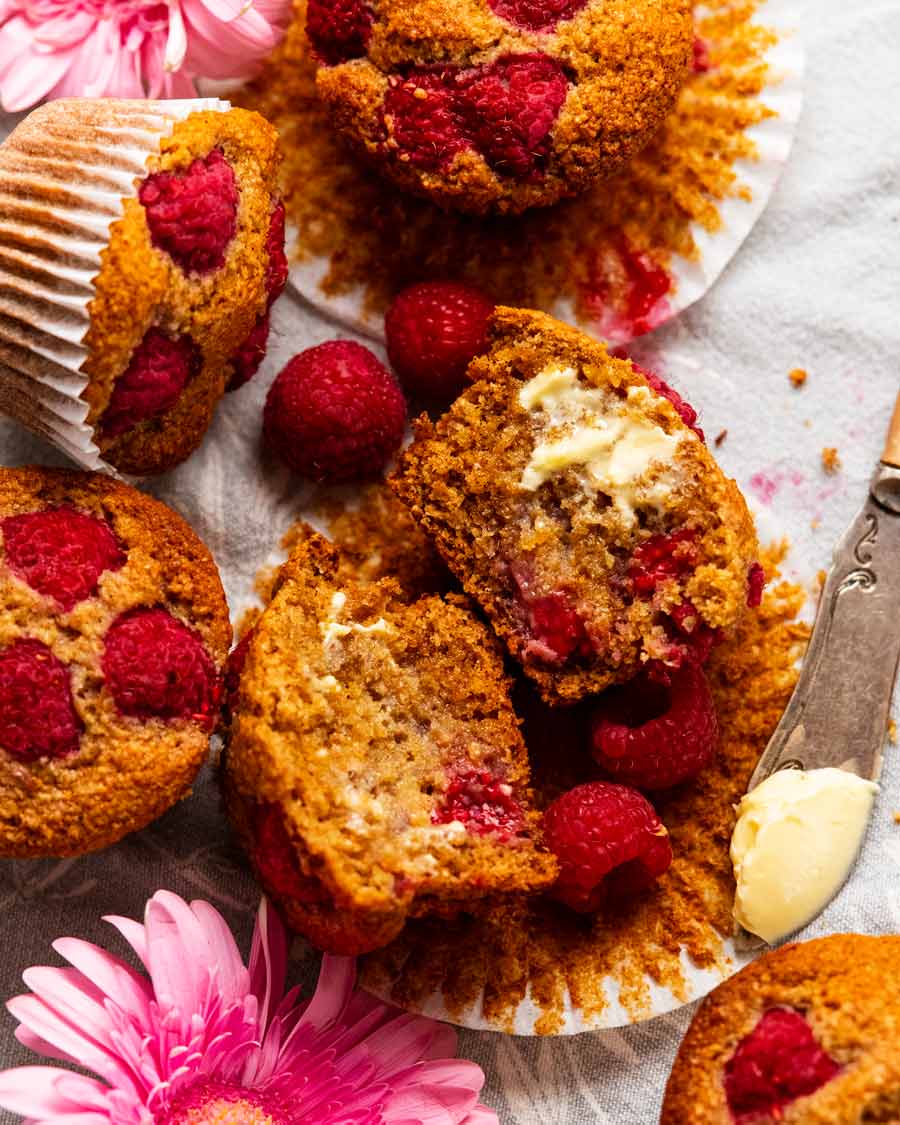
I like to reserve some raspberries to decorate the top, but this entirely optional – for visual purposes only. I know some people prefer more INSIDE the muffins!
Whisk wet – Melt the coconut oil in a microwavable bowl. Then whisk in all the wet ingredients: egg, yogurt, milk, honey and vanilla.
Mix in dry ingredients – Scatter across the surface (incorporates easier) then whisk in. Once you can no longer see flour, stop! Don’t get too enthusiastic with mixing as it will make the muffins tough.
Add-ins – Fold through the raspberries or whatever add-ins you’re using.
Divide between 12 holes. I used liners but it’s not essential, you could just spray with oil.
Top with reserved raspberries, if using.
Bake for 25 minutes at 190°C / 375°F (170°C fan) or until golden brown on the surface. Cool then devour!
Other matters of Up-and-Go Breakfast Muffins
Breakfast on the run – I’ve named these breakfast muffins as such because they are a great grab-and-go breakfast that doesn’t need heating and can be literally eaten on the run. More filling and less sweet than than muesli bars which I personally consider to be more suitable for a snack rather than breakfast.
Storage – These will keep for 4 to 5 days without going stale because they are more moist than typical muffins thanks to the coconut oil and yogurt. If it’s hot where you are, best to keep them in the fridge, otherwise just keep them in the pantry in an airtight container. They will also freeze for 3 months.
And with that, I think I’ve said all I need to on the matter of these breakfast muffins! Just to reiterate, these are less sweet than your usual muffins. To me, they are the perfect sweetness to have as breakfast without feeling like you’re being naughty and eating cake. And they are just sweet enough to have as a morning tea treat. In fact, people who often find Western cakes and cookies too sweet will probably find these the perfect level of sweetness.
Hope you give them a go! Love to know what add-ins you use if you do. – Nagi x
Watch how to make it

Up-and-go breakfast muffins!
Stays fresh for days.Ingredients
Wet:
- 1/3 cup coconut oil , virgin or unrefined (normal oil also works but not as tasty, Note 1)
- 1 large egg , at room temperature (~55g/2oz)
- 2/3 cup milk , at room temperature – full fat best (low fat and non-dairy ok too)
- 1/3 cup yogurt , plain/unsweetened
- 1/2 cup honey (or maple syrup)
- 1/2 tsp vanilla extract
Dry:
- 1 1/4 cups wheat germ (best) OR 1 1/4 cups (80g) wheat bran (Note 2)
- 1 1/2 cups wholemeal flour (sub ordinary flour – Note 3)
- 1/4 tsp salt
- 1 tsp cinnamon powder
- 1 tsp baking powder (Note 4)
- 1 tsp baking soda , sifted if lumpy (or 3 tsp extra baking powder) – Note 4
Add ins – CHOOSE ONE:
- 250g / 8 oz raspberries , 18 set aside and cut in half to decorate top if desired
- 2 cups diced fresh fruit (not watery) – like apples, pears
- 1 1/4 cups dried fruit, nuts, choc chips etc
Instructions
- Preheat oven to 190°C / 375°F (170°C fan). Line a 12 hole standard muffin tin with muffin cases OR spray generously with oil.
- Whisk wet – Place coconut oil in a microwave proof bowl. Microwave for 45 seconds on high or until melted. Add remaining Wet ingredients, whisk until smooth.
- Mix in Dry – Sprinkle the Dry ingredients across the surface in the order listed. Mix just until combined.
- Raspberries – Gently stir in the whole raspberries or other add-ins of choice.
- Fill muffin tin – Divide batter between the 12 holes using an ice cream scoop. Decorate top with halved raspberries.
- Bake 25 minutes. Cool 5 minutes then transfer to a cooling rack.
Notes
Nutrition
Life of Dozer
While I’m in Melbourne for the Good Food & Wine Show, Dozer is with the golden retriever boarder and apparently not showing any signs of separation anxiety. Hmmph!

The post Up-and-go breakfast muffins! appeared first on RecipeTin Eats.
]]> Ricotta pancakes are special because they are extra soft and fluffy inside. These are based on Bill Granger’s ricotta hotcakes recipe from his bistro Bills, a breakfast institution in Sydney. Time to up your pancake game! Ricotta Pancakes Don’t get me wrong – I LOVE traditional pancakes. But sometimes it’s nice to make a wee bit of... Get the Recipe
The post Ricotta Pancakes appeared first on RecipeTin Eats.
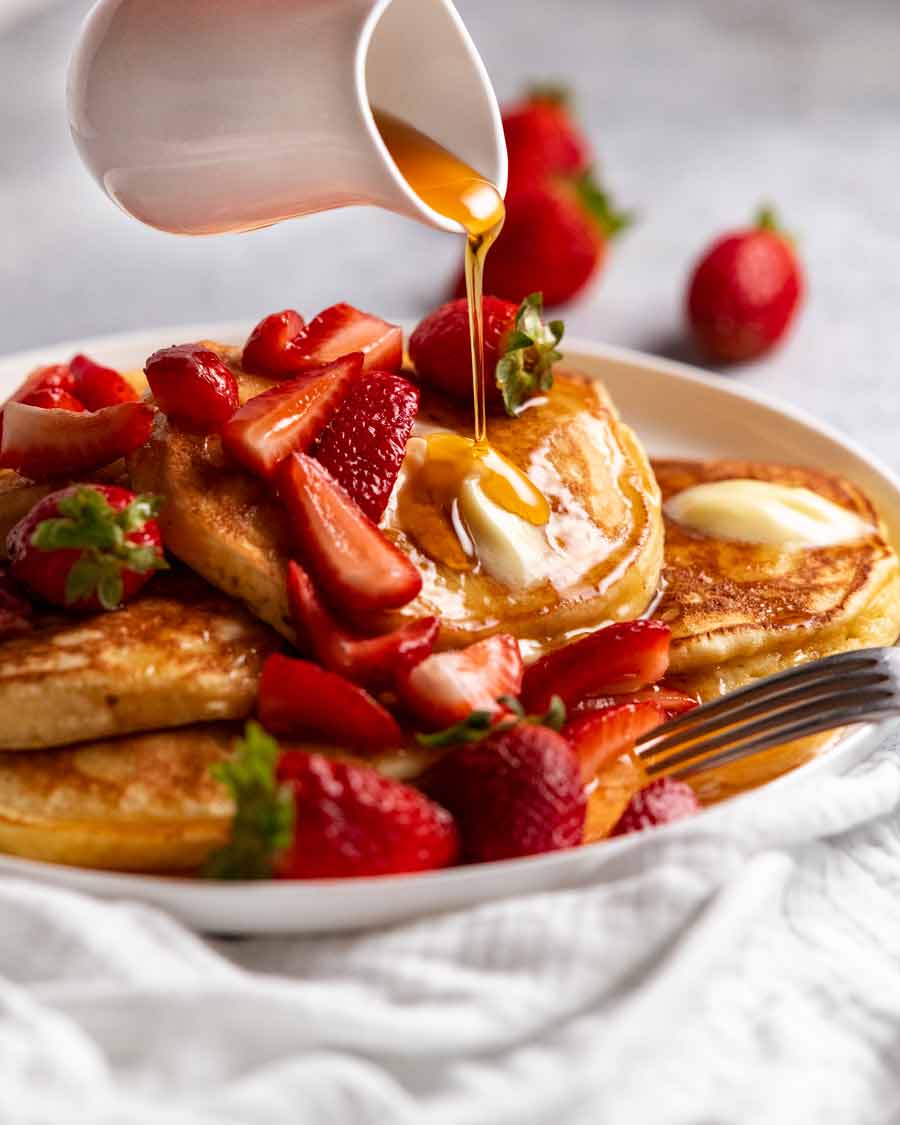
]]>Ricotta pancakes are special because they are extra soft and fluffy inside. These are based on Bill Granger’s ricotta hotcakes recipe from his bistro Bills, a breakfast institution in Sydney. Time to up your pancake game!
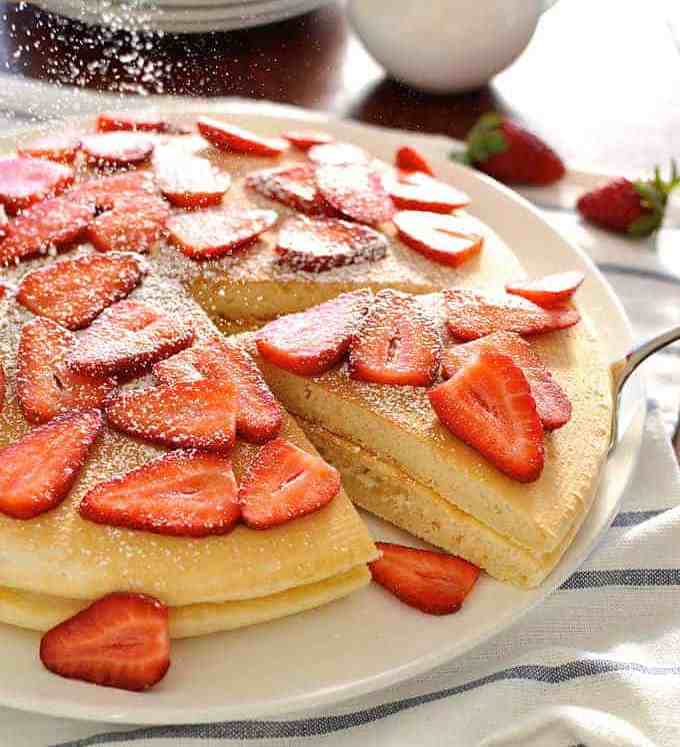
Ricotta Pancakes
Don’t get me wrong – I LOVE traditional pancakes. But sometimes it’s nice to make a wee bit of an effort to make ricotta pancakes which are extra special.
Super moist inside with a flavour that is almost a bit cheesecakey. Even if you don’t know you’re eating a ricotta pancake, you know it’s different to normal pancakes! Which is why they’re a favourite among trendy bistros as a breakfast menu item. Like Bills. Any Sydney-siders fond of Bill Granger’s ricotta hotcakes? No need to battle the traffic into the city on weekends, not to mention the queue for a table or the cost. Just make these at home!
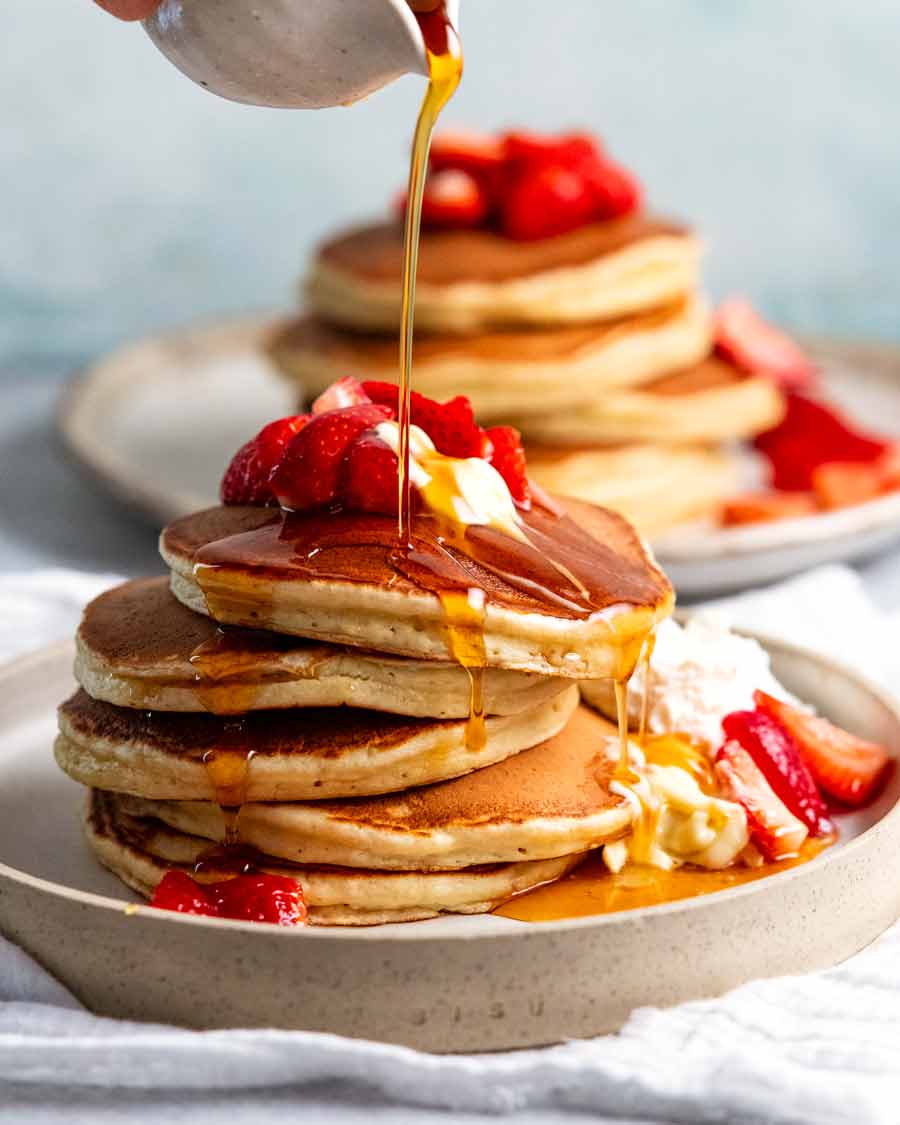
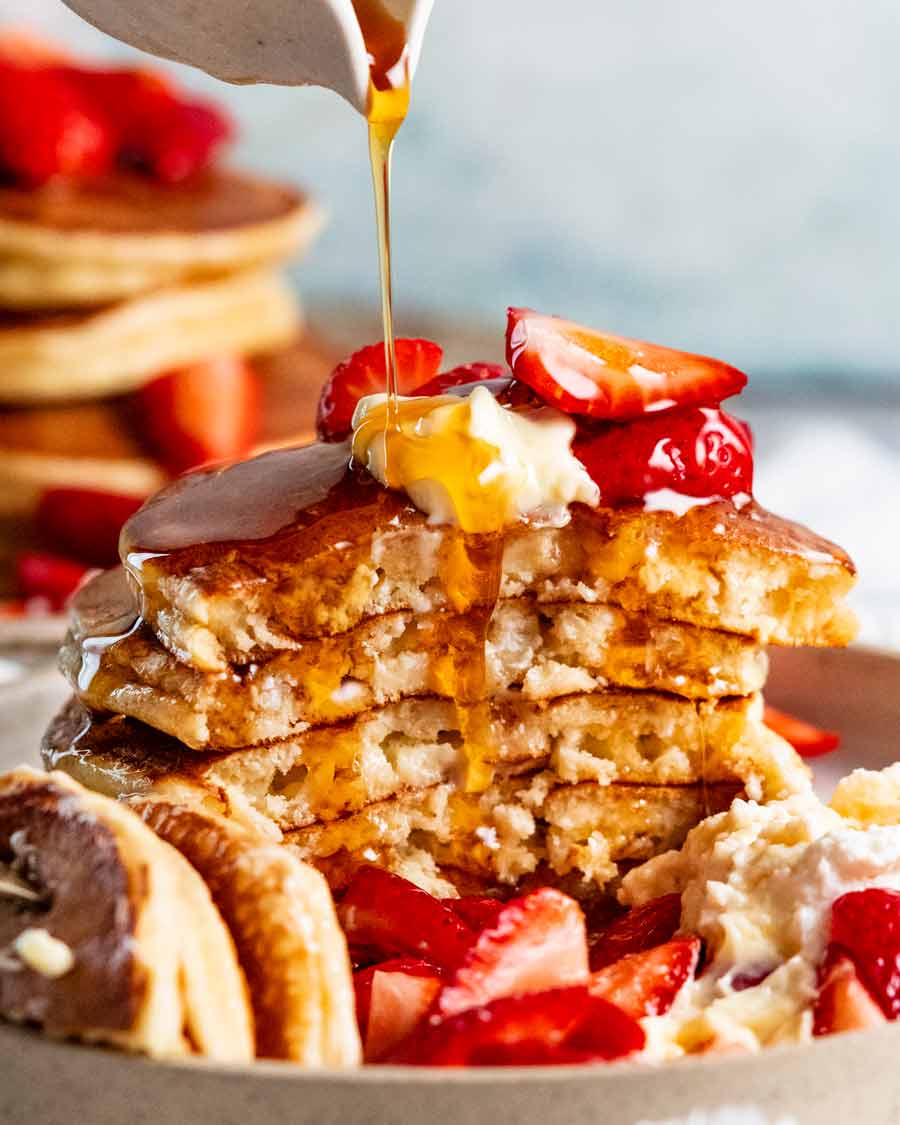
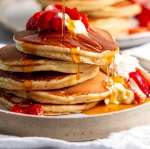
Here’s a nice close up for you. Fluffy. With little bits of ricotta curds studded throughout. Liberally doused with maple syrup. YES!

Ingredients in ricotta pancakes
Other than ricotta, there’s nothing in these that you probably don’t already have in your pantry!
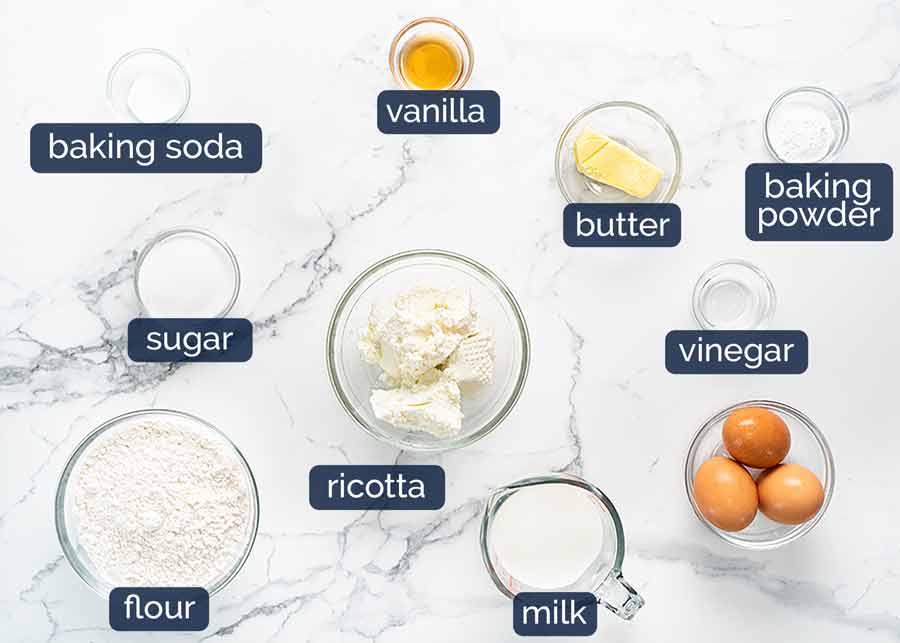
Ricotta – Use full fat, not low fat (it lacks flavour and creaminess, and thus the two things it adds to the pancakes!). Standard ricotta, not whipped or spreadable or any other such variation.
TIP: Get one in a basket sealed in vac packs or over the deli counter. My favourite brand is Paesanella – comes in both forms. Avoid Perfect Italiano in tubs (mainstream Australian grocery store brand.) It’s bizarrely powdery and just not pleasant.
Baking powder AND baking soda/bi-carb – These make the pancakes rise. In my classic pancakes, I only use baking powder as that’s all that’s needed to make them fluffy. Ricotta weighs down the batter so we need the extra rising boost from a touch of baking soda (which is approximately 3x stronger).
Don’t worry if you don’t have bi-carb, just use extra baking powder. The difference is only minor.
Vinegar (or lemon juice) – I know this looks weird, but trust me! Vinegar/acid activates the baking soda to give it a kick start. You see iterations of this in most of my baking recipes, whether it’s a touch of vinegar or yogurt or sour cream (which serve the same purpose).
We only use 1 teaspoon so it doesn’t make the pancakes taste vinegary. Use any clear vinegar or lemon juice.
Flour – Just plain/all-purpose flour. Works better to use flour + baking powder + bi-carb that just self raising flour (which has baking powder pre-mixed) which never rises as well.
Sugar – Just 3 tablespoons. We don’t want these sweet because we will DOUSE them with maple syrup!!
Eggs – 3 large ones which are 55g/2 ounces each. No need to bring them to room temperature, fridge cold is fine.
Milk – Full fat best, though low fat and non-dairy will work too.
Vanilla – For flavour.
Salt – Just a pinch, to bring out the other flavours in the pancakes. Standard baking practice!
How to make ricotta pancakes
The batter part is super easy – whisk the wet ingredients, then whisk in the dry ingredients. We can do that half asleep. But you do need to be awake and alert when you cook them! Aim for 3 minutes on the stove with golden brown surfaces. It might take a bit of stove adjusting to get it right!
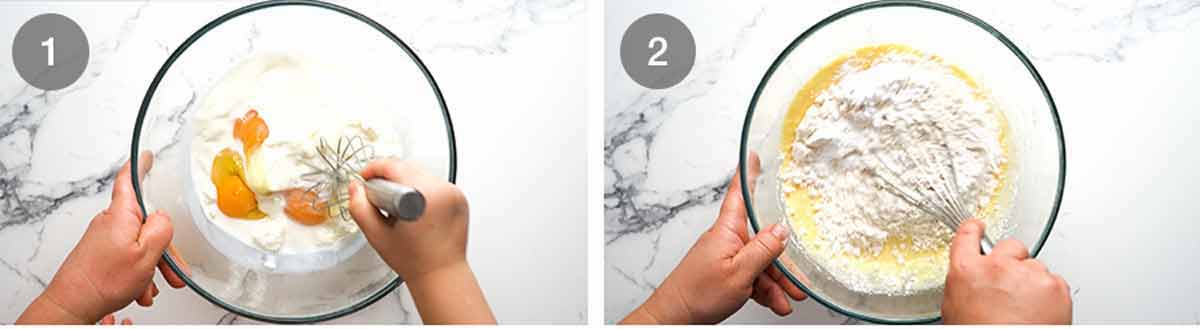
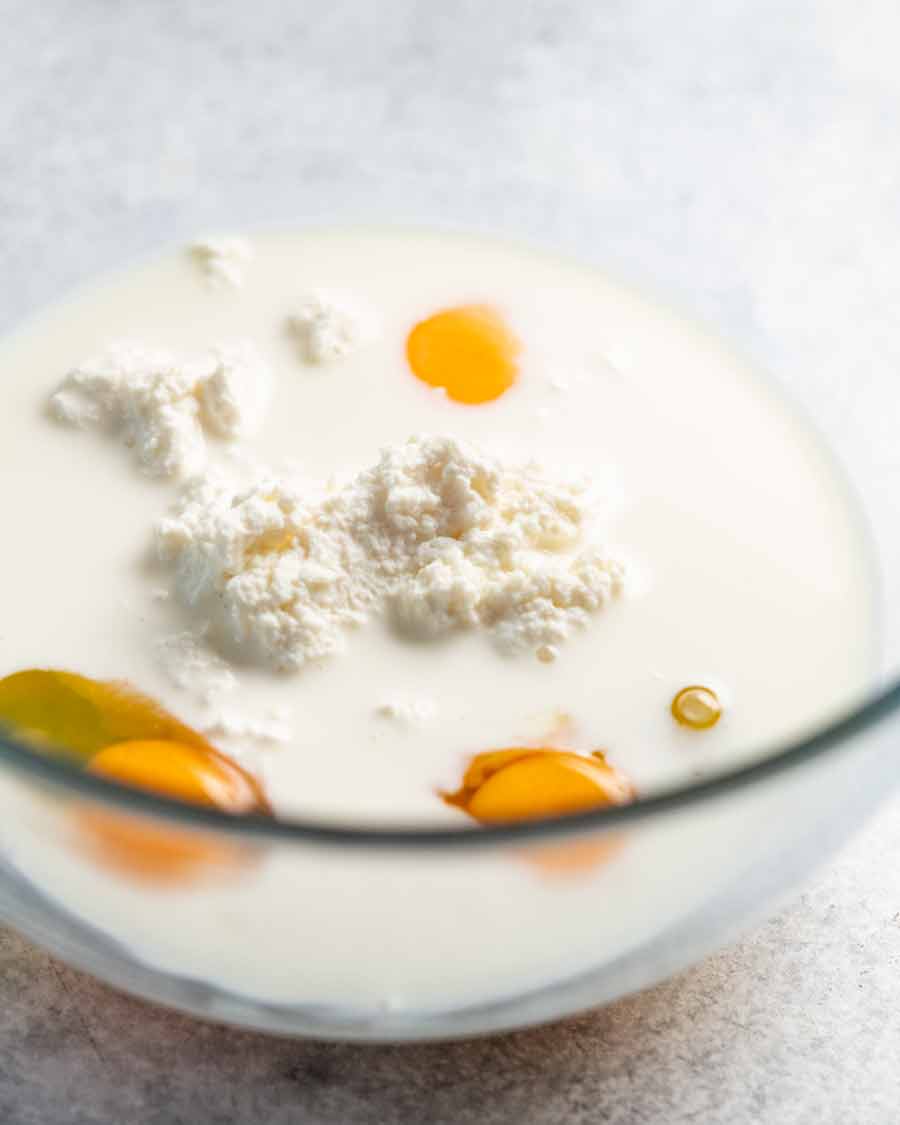
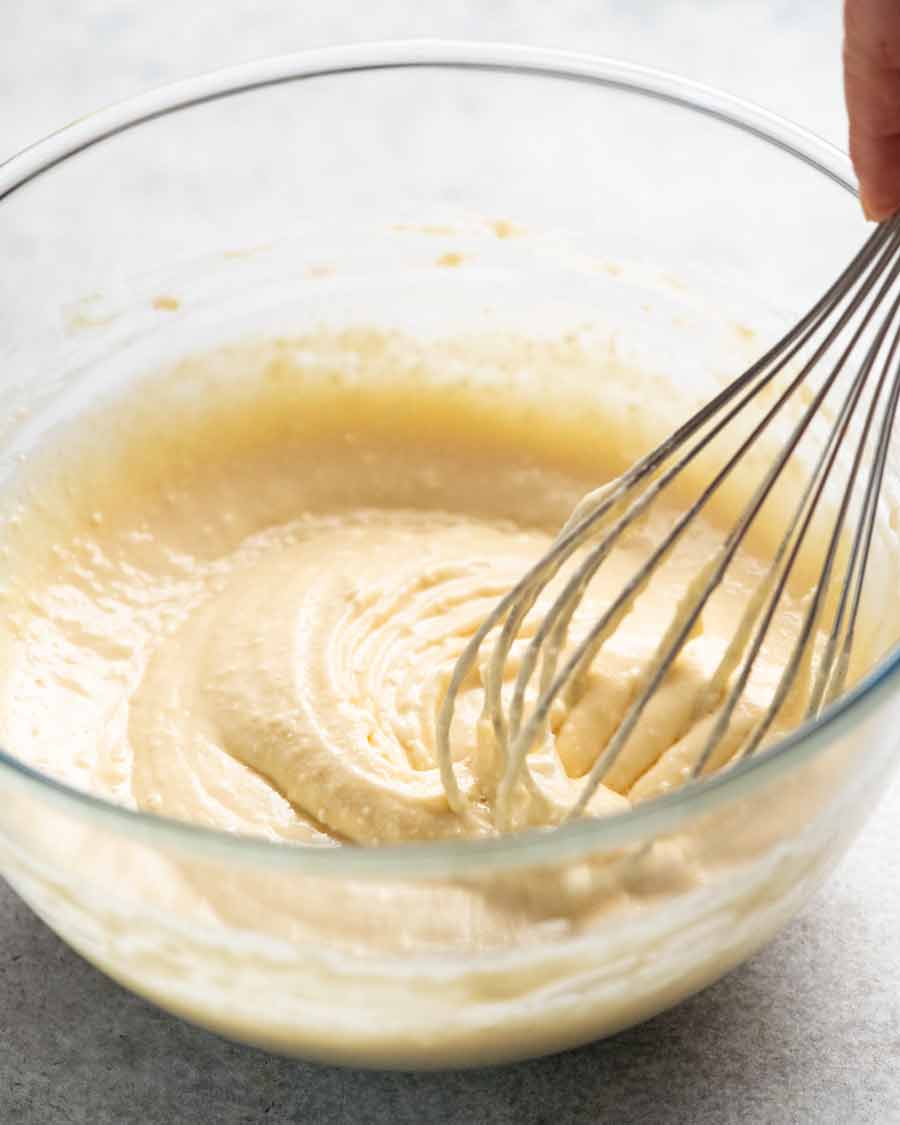
Whisk wet ingredients – Whisk the Wet ingredients in a bowl. Be vigorous to break up the ricotta! You will end up with little ricotta curd bits all throughout but no clumps of ricotta.
Whisk in dry ingredients – Scatter the flour, baking powder, baking soda and salt across the surface. Then whisk just until the flour is incorporated and the batter is lump free.
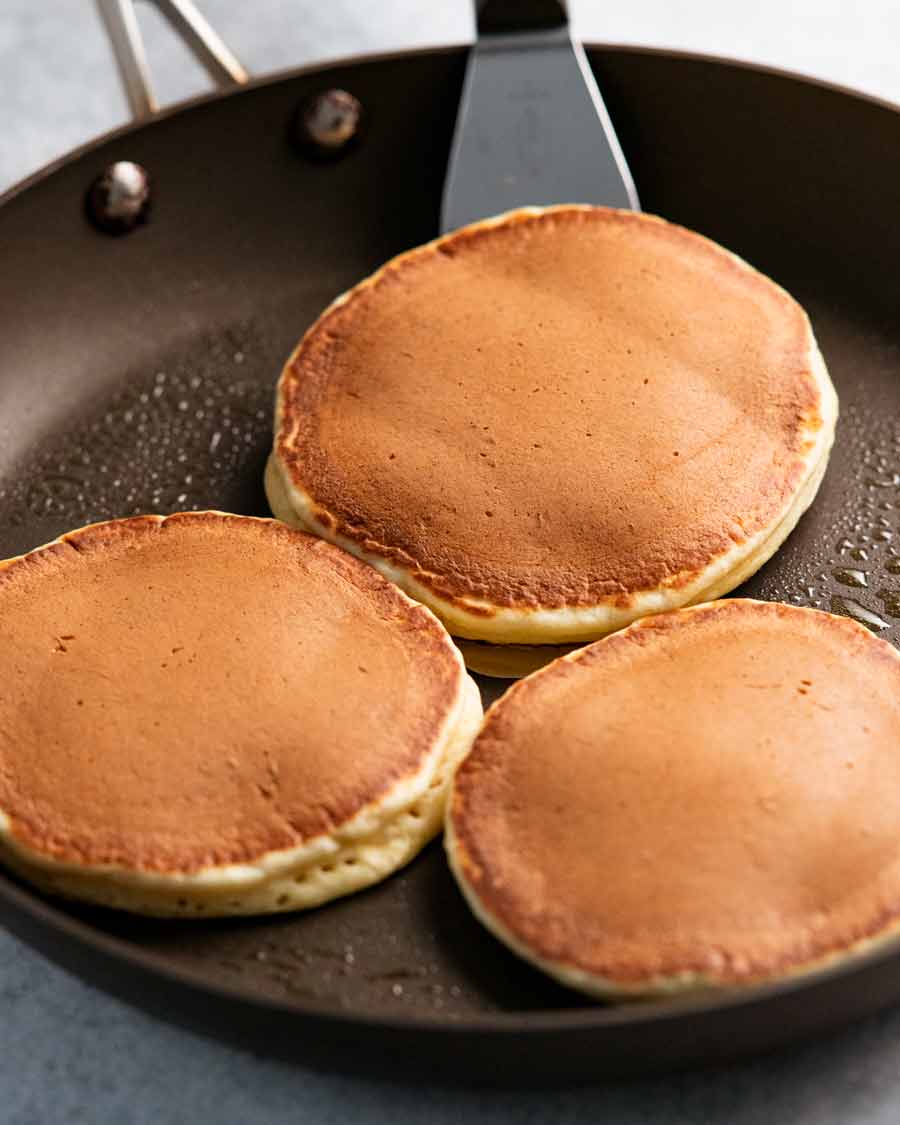
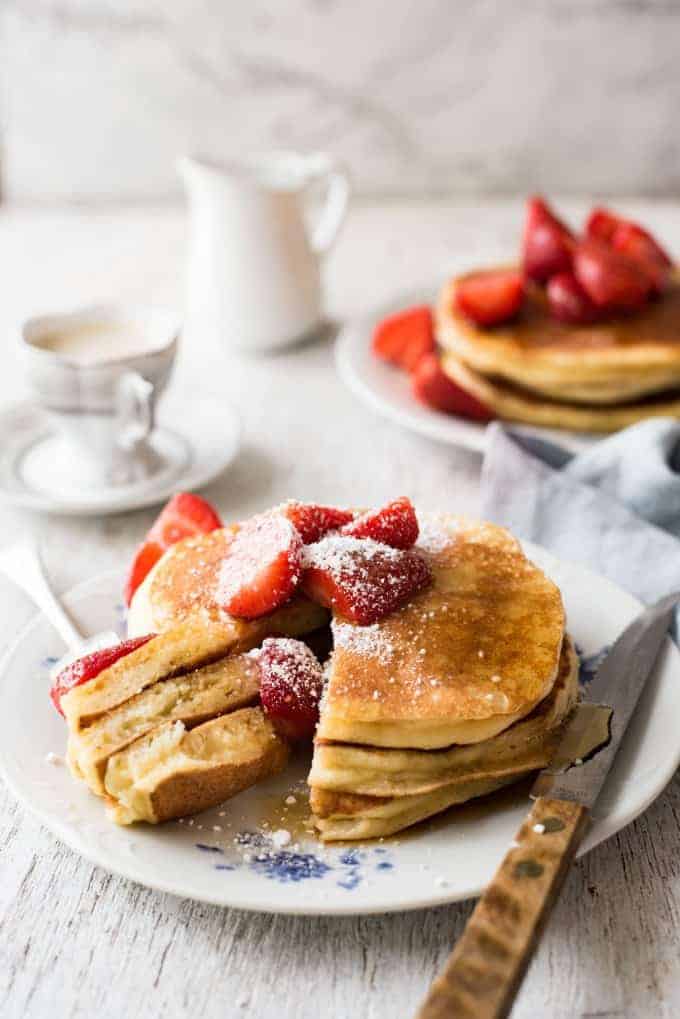
Heat pan (I use 2 pans because I’m impatient) – Using a good non-stick pan, heat it on medium. Then either brush lightly with a bit of melted butter, or melt a little dab of butter then wipe the excess off with a paper towel. Why? Because otherwise the excess butter will burn when cooking the pancake, leaving unsightly dark brown patches and a burnt flavour. It’s a common mistake! We just want to use the bare minimum so the pancake doesn’t get stuck on the pan.
PERFECT GOLDEN BROWN – Also, using minimum butter is how you can make the pancakes a beautiful even golden brown all across the surface, like pictured below, instead of splotchy – like pictured above in the step photo 4. If you use even just a little too much butter in the pan, they come out with golden splotches. It’s not a big deal, just a visual thing! With the added benefit that you’re cooking with less butter which means you can put more butter ON your pancakes… 😈

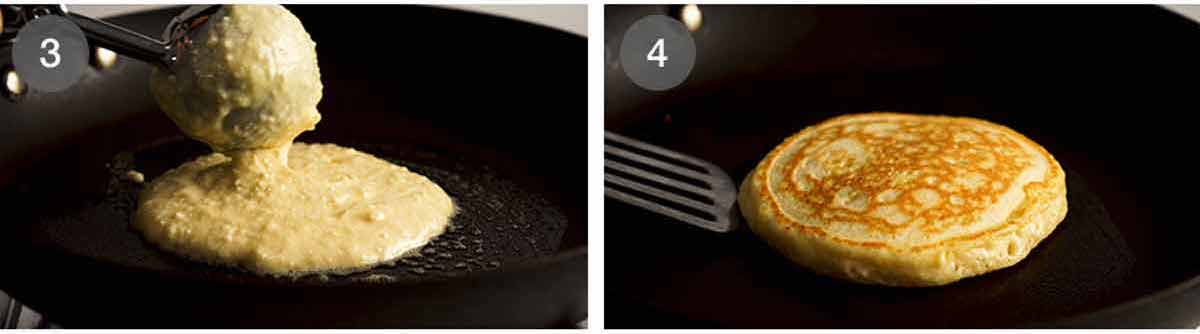
Dollop batter – Pour 1/4 cup batter in the middle of the pan. I use an ice cream scoop, one of my favourite kitchen tools. So handy for pancakes, muffins, cupcakes, fritters, meatballs….
It should pretty much spread into an even-round by itself but may need a bit of coaxing. Don’t spread it too thin, we want ricotta pancakes nice and thick!
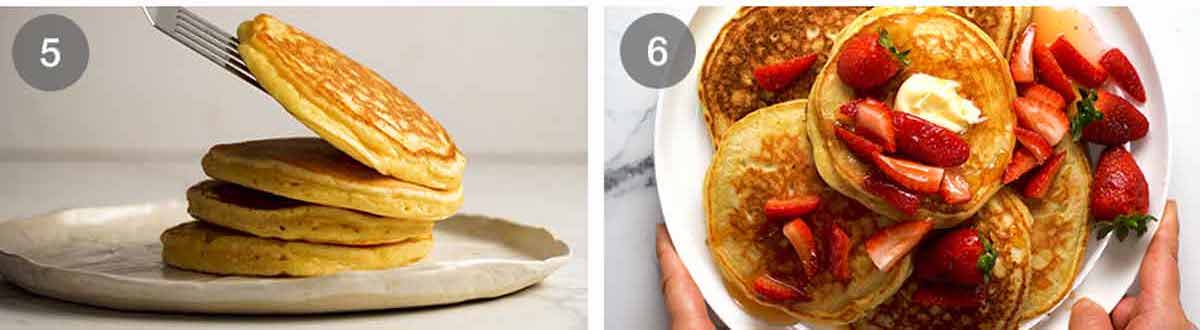
Cook 3 minutes – Cook the first side for 1 1/2 minutes or until golden brown. The sides and surface should be just about set so the pancake holds its shape when you flip.
Flip, then cook the other side for 1 1/2 minutes until golden. Adjust the stove heat as needed to ensure they don’t brown too fast. You really need the pancakes to cook for 3 minutes and be golden brown to ensure they are fully cooked inside.
Remove pancakes and continue cooking. If you want the perfect golden brown surface like pictured in this post, either do not any more butter at all OR just brush the pan very lightly with butter.
Stack the pancakes up so they keep each other warm. I use 2 pans so it takes me around 12 minutes to cook the whole batch. If you’re only using one pan, you might want to keep them warm in a low oven, or just microwave briefly before serving (they reheat 100% perfectly).
Matters of ricotta pancakes
Cooking part done, let’s chat serving!
Toppings – Lovely just served with butter and maple syrup, but I figure if I’m making the effort, I may as well go all the way. By “all the way”, it just involves sprinkling halved strawberries with sugar and leaving them to sweat for a bit to soften the strawberries and extract some of the juice. The fancy word for this is “macerated strawberries”, but really, all it means is that the strawberries are softened slightly.
It’s also a neat trick to improve under-ripe strawberries when they are out of season, like now.
Making ahead – Ricotta Pancakes hold up quite well made ahead too. Because they are so moist, they don’t suffer as much as ordinary pancakes which become stale relatively quickly. Whereas reheated ricotta pancakes are pretty similar to freshly made!
So this weekend, why not stay in for brunch? Flop around in your daggy slippers, stay in your PJ’s, no need to comb your hair. The coffee refills are free and nothing – nothing – beats a good homemade meal!
Happy weekend everyone! – Nagi x
Watch how to make it
Fluffy Ricotta Pancakes
Ingredients
Wet ingredients
- 3/4 cup ricotta cheese , full fat (Note 1)
- 3 large eggs (55g/2oz each)
- 3 tbsp caster sugar (superfine sugar)
- 3/4 cup milk (full fat best but low fat fine)
- 1/2 tsp vanilla extract
- 1 tsp white vinegar (or other clear or clear-ish vinegar, Note 2)
Dry ingredients
- 1 1/3 cups plain/all-purpose flour
- 2 tsp baking powder
- 1/4 tsp baking soda (bi0carb) or 3/4 tsp extra baking powder (Note 3)
- Pinch of salt
Serving/cooking
- 1 tbsp (15g) butter , melted (Note 4)
- 8 oz / 250g strawberries , halved or quartered
- 1 tbsp caster/superfine sugar
- Maple syrup , for dousing
Instructions
- Whisk wet – Place the Wet ingredients in a bowl and whisk vigorously to combine. You should have little ricotta curd bits in it, but you don't want giant ricotta clumps.
- Add dry – Scatter the Dry ingredients across the surface then whisk until combined. The batter is a little thicker than standard pancake batter.
- Lightly butter pan – Heat a non-stick pan over medium heat until hot (I use 2 pans). Brush lightly with melted butter (or melt a bit then wipe off excess with paper towels – Note 4).
- Batter – Pour in 1/4 cup batter – it should just about spread evenly into a round but may need a bit of coaxing. (I use an ice cream scoop – Note 5)
- Cook 3 minutes – Cook the first side for 1 1/2 minutes or until golden brown (turn heat down if browning too fast). Flip then cook the other side for 1 1/2 minutes or until golden. Remove onto a plate.
- Cook remaining – If your non-stick coating is good, you won't need more butter though a very light brush of melted butter every 2nd or 3rd pancake won't hurt. Continue cooking, lowering the heat as you go as the pan gets hotter. You should get 9 to 10 in total. Keep cooked pancakes stacked so they keep each other warm (or use a low 50C/125F oven).
- Serve ricotta pancakes with macerated strawberries (below), softened butter and copious amounts of maple syrup!
Macerated strawberries (optional)
- Toss together strawberries and sugar in a small bowl. Set aside for 20 minutes to allow them to sweat and soften slightly. (Even overnight in fridge is fine.) Serve on pancakes!
Notes
Nutrition per pancake, assuming 10 pancakes, toppings excluded.Nutrition
Originally published in March 2016. Republished May 2023 with improved recipe, brand spanking new photos and a video added!
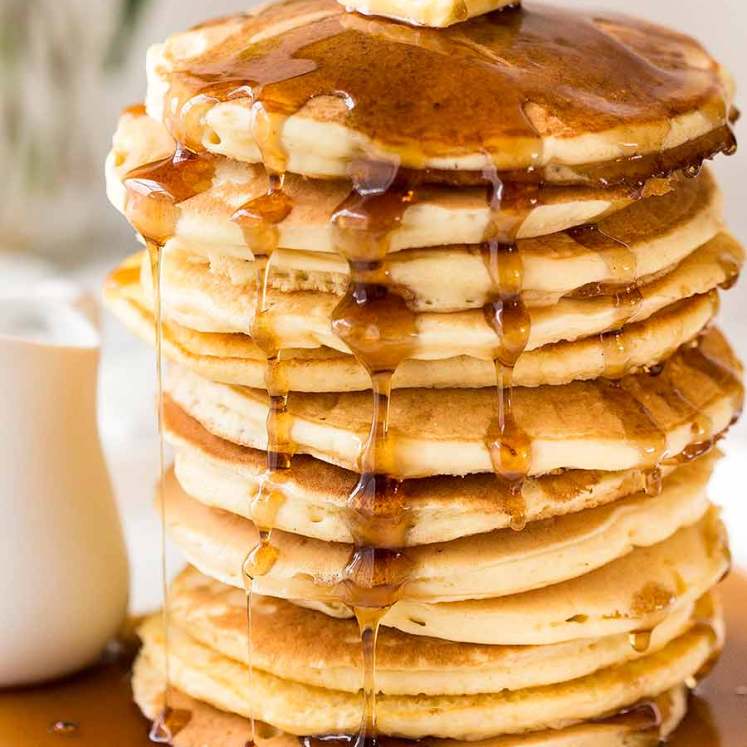
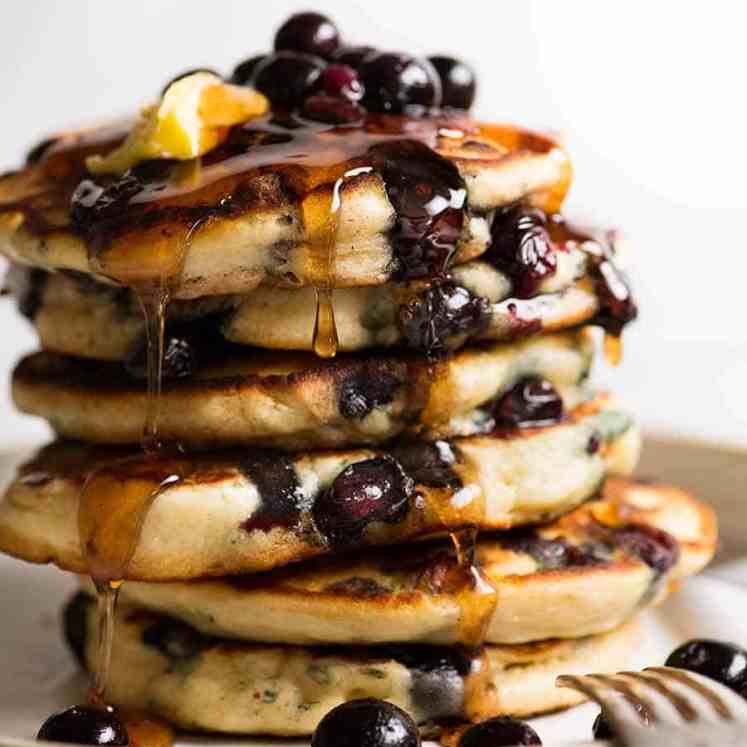
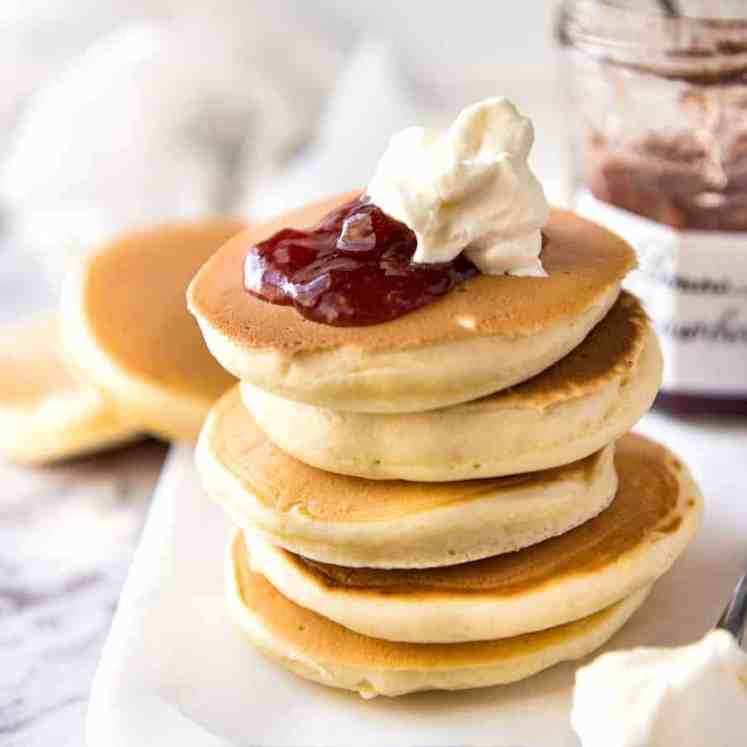
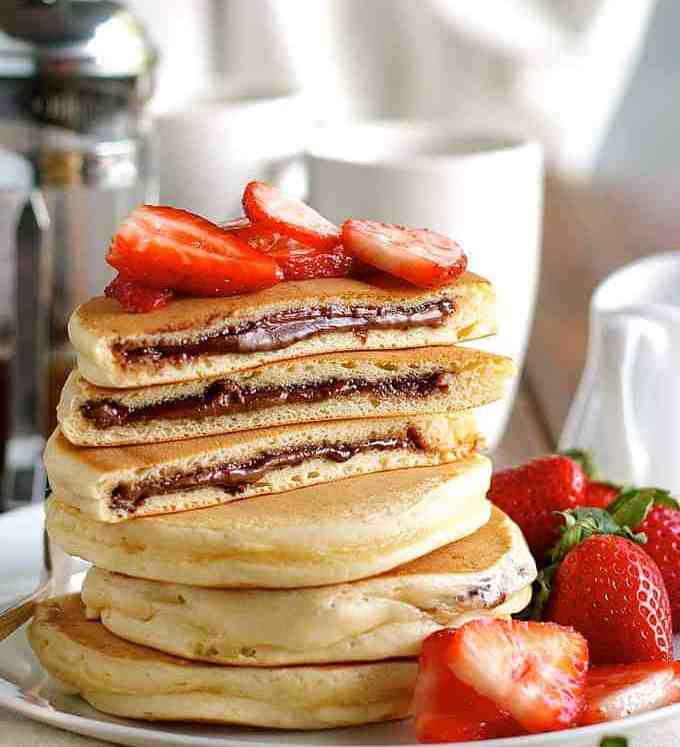
Pancakes, pancakes, pancakes
Life of Dozer
Then and now – when Dozer saw a table full of this……
….here was his reaction back in 2016 on the original publication date…

….and 7 years on, today, on the re-publication date. NOTHING HAS CHANGED!

A stray strawberry and a huge hunk of pancake may have fallen his way….. 
The post Ricotta Pancakes appeared first on RecipeTin Eats.
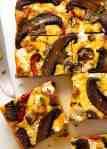
]]> Baked Vegetable Frittata is the easy way to make frittata – just pour everything into a baking dish and pop it in the oven! It tastes like a crustless quiche, and it’s just as great fresh out of the oven as it is 4 days later. Loaded with herb garlic roasted vegetables, take this to... Get the Recipe
The post Baked Vegetable Frittata appeared first on RecipeTin Eats.
]]>Baked Vegetable Frittata is the easy way to make frittata – just pour everything into a baking dish and pop it in the oven! It tastes like a crustless quiche, and it’s just as great fresh out of the oven as it is 4 days later.
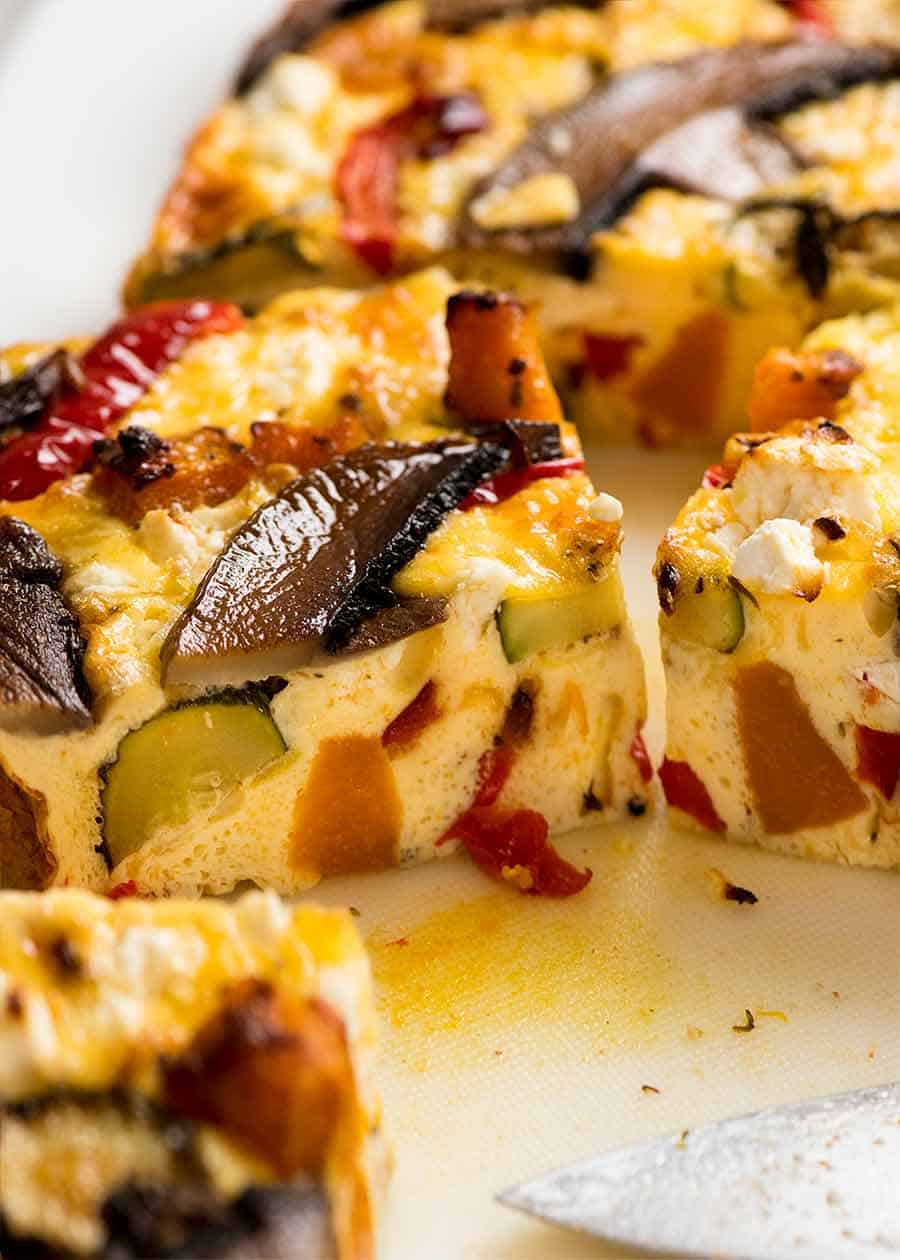
Loaded with herb garlic roasted vegetables, take this to work, make it for breakfast, brunch, or dinner. Use my frittata recipe formula to make this your own – try chicken, ham, spinach and artichoke, salmon and broccoli, or Tuscan antipasto!
Easy Baked Vegetable Frittata
Traditionally, frittata is started on the stove then transferred to the oven to finish cooking. This is the way I cook frittatas if I’m sautéing bacon or similar – so I can cook the frittata in the bacon fat (SO GOOD!).
But when I’m not, I make it entirely in the oven which is how I make this Baked Vegetable Frittata. This is the easier way to make frittata – just plonk everything in a baking dish, pop it in the oven and out comes something that looks very much like a quiche – minus the (calorie-loaded-totally-delicious-buttery) crust!
This is the easy way to make frittata. Just pour the egg mixture into a baking dish and bake!
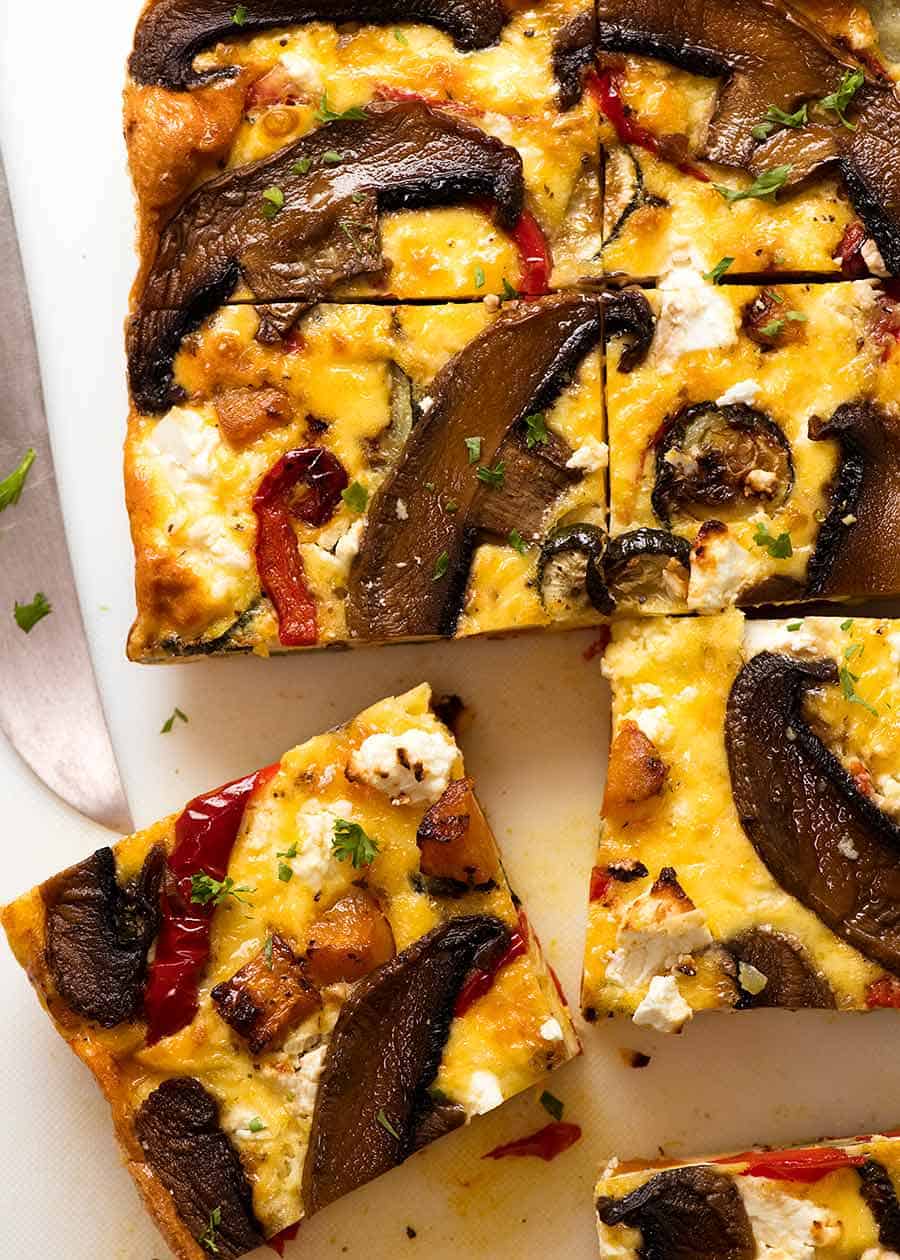
What goes in Vegetable Frittata
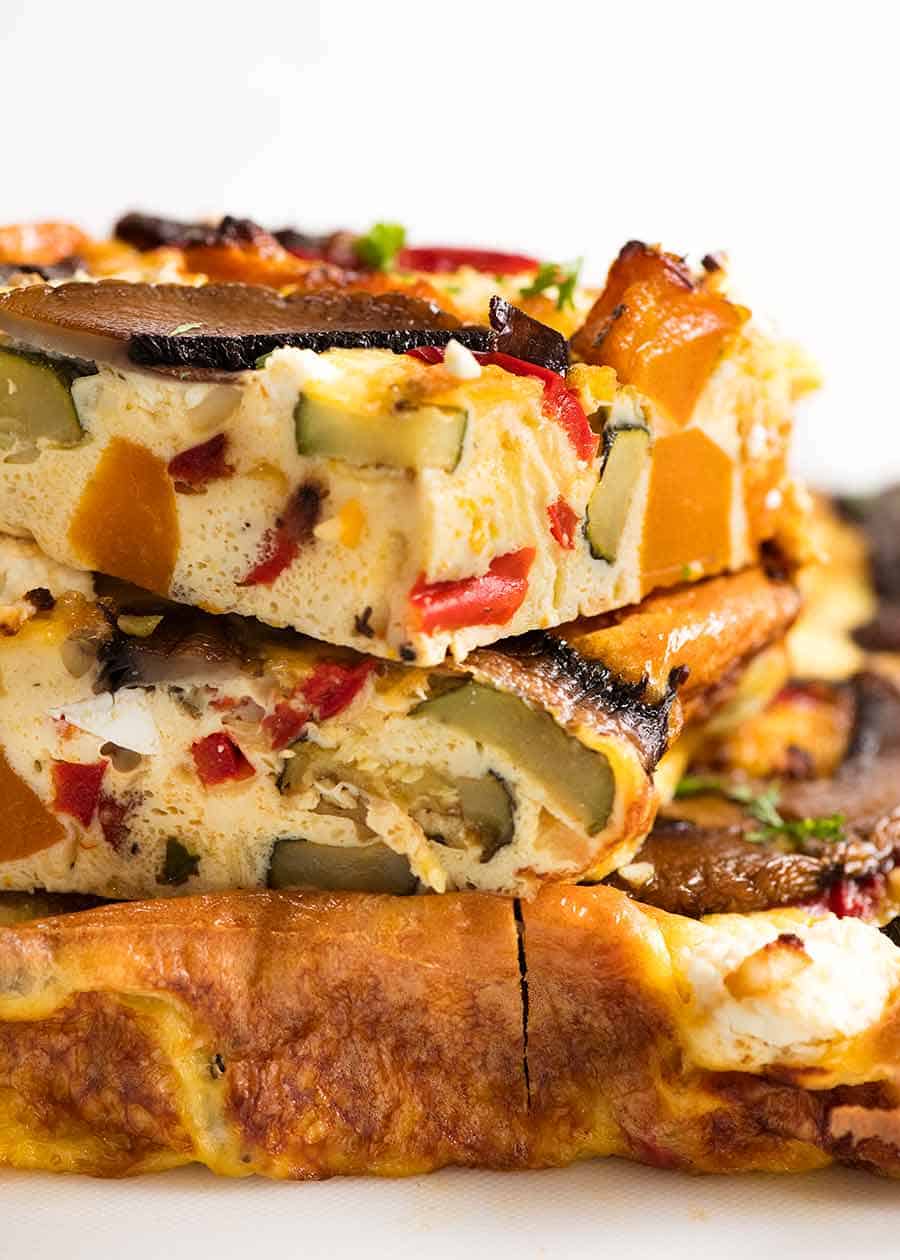
This Baked Frittata recipe I’m sharing today is a Vegetable Frittata. It’s loaded with quite a volume of fresh veggies roasted with garlic and dried herbs – so you can feel good knowing you’re inhaling a good amount of vegetables in the form of this custardy, cheesy frittata slice.
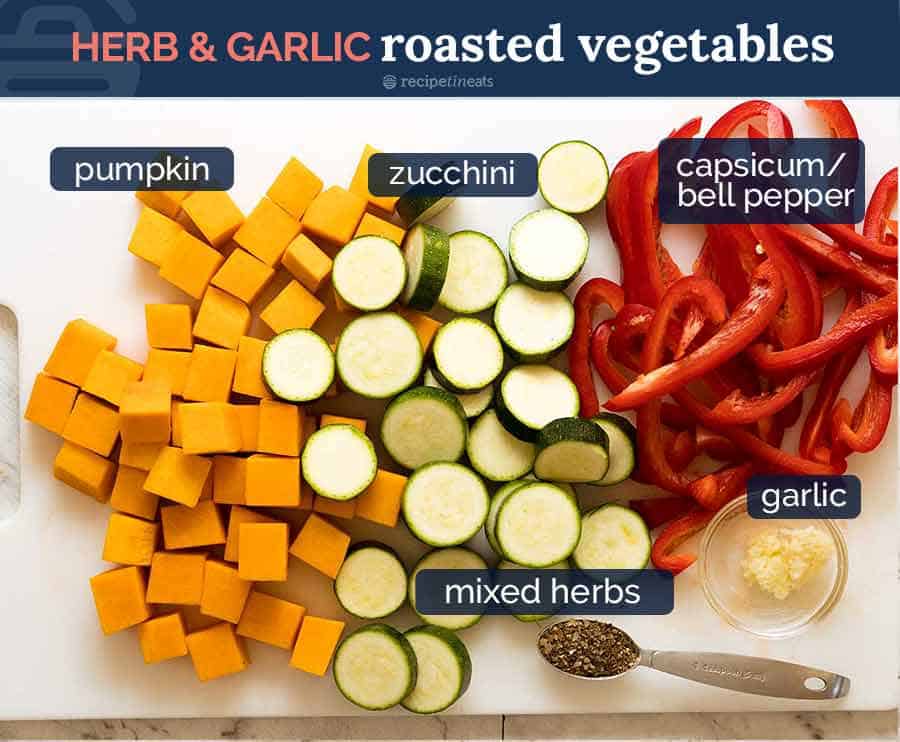
Pumpkin, zucchini and capsicum is a great combo in frittata – for taste and the colours!
Here are the vegetables I’m using – I like this combination of colours and textures. But feel free to switch them out with almost any veggies OR cooked proteins – see below for ideas!
Customise it!
Here are a few ideas for other add ins to make this your own:
Roasting veggies – sweet potato or normal potato, squash, carrots, parsnip, onion, broccoli, cauliflower, green beans, asparagus
Raw veggie stir ins- spinach, brussel sprouts, kale or other vegetables that can be finely shredded and stirred in, canned or diced vegetables (corn, carrots, peas)
Raw veggies- place on top: mushrooms, tomato, asparagus, finely sliced roasting vegetables
Cooked proteins – shredded or diced chicken, turkey or other meats, ham, salami, cooked bacon or similar, sausage, chorizo, flaked cooked fresh or canned salmon or tuna
Antipasto type things – olives, peppers, artichokes, pickles
What you need for the frittata
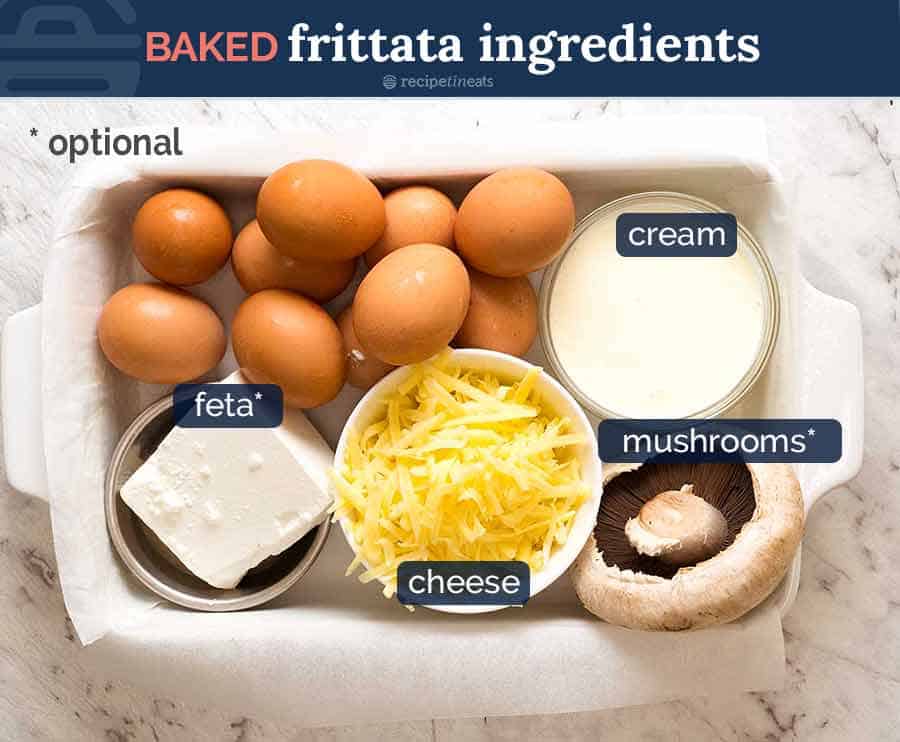
For the actual frittata itself, all you need is eggs, cream or milk, cheese, salt and pepper. Whisk, pour into the pan over all the “stuff” and bake – that’s it.
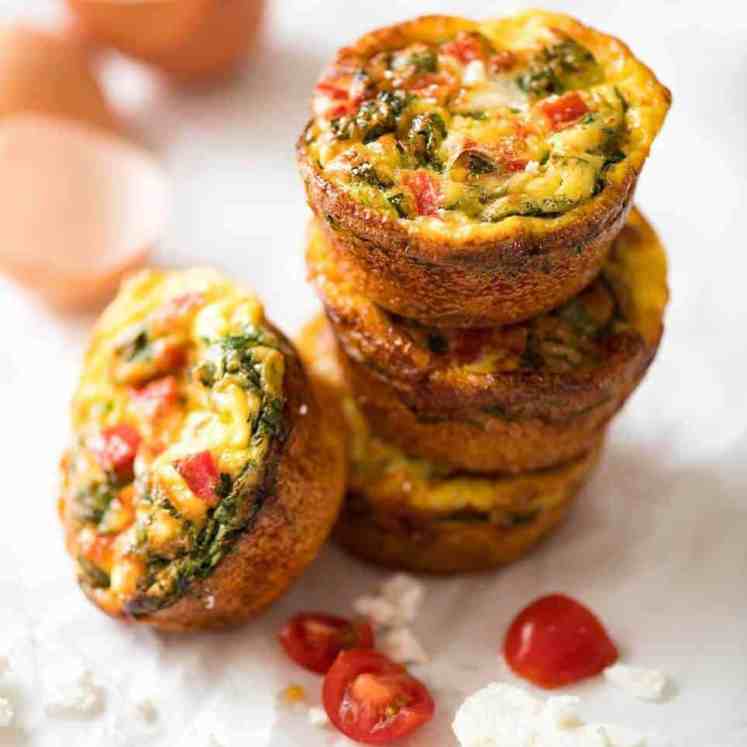
I like to top my frittata with mushroom and feta for extra flavour and also because it looks so great! But these are entirely optional. I used a giant mushroom because they were unusually good value at the time – but any type of sliceable mushrooms will work here.
How to make Baked Vegetable Frittata
I roast the vegetables on a high heat because they’re cut pretty small and I want to get a nice caramelisation on the edges before the inside turns into mush. Because colour = flavour and I always feel that’s especially important for vegetables (nobody likes soggy bland vegetables!).
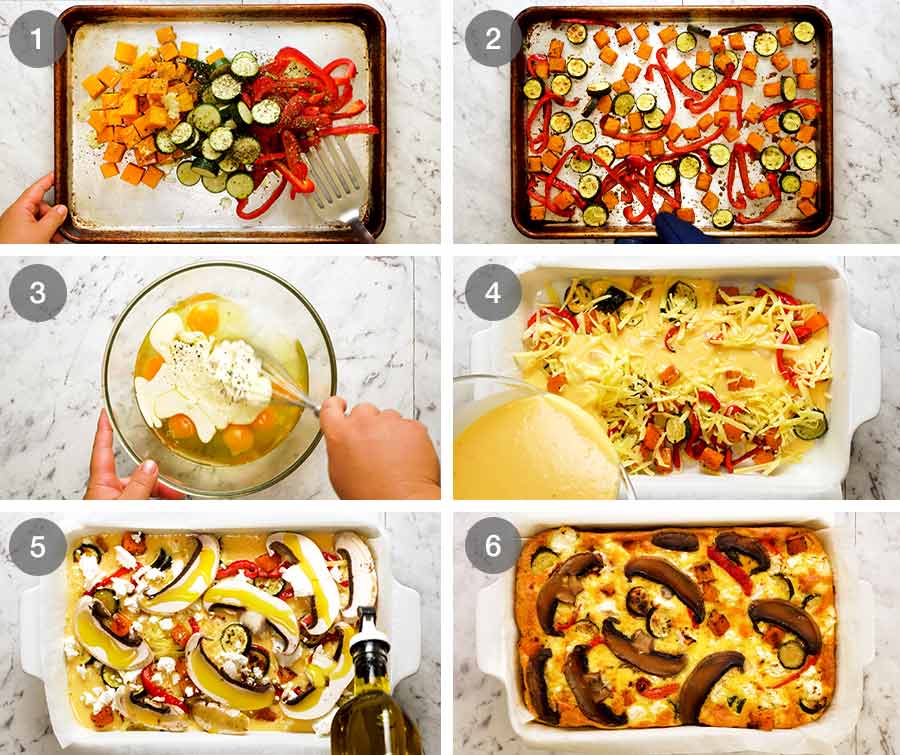
Toss vegetables with salt, pepper, garlic and olive oil.
Roast in a hot 220°C/430°F oven for 25 minutes without flipping. Hot oven / no flipping is the best way to get some nice colour on vegetables that are cut fairly small. In contrast, when roasting larger pieces of vegetables (like in this Roasted Vegetables recipe), it’s best to toss the vegetables partway through.
Whisk the frittata egg mixture.
Assemble – Spray a baking pan with oil then line with a sheet of baking paper (parchment paper) with overhang which will make it easy to lift the frittata out once baked.
Spread most of the vegetables across the base of the baking pan, holding back about 1/3 to put on top for visual purposes. Pour over the egg mixture, scatter over cheese, then top with remaining vegetables. Some of these will poke through the surface once baked.
Feta and mushrooms – Crumble over feta than place the slices of mushroom across the surface. Drizzle a little bit of oil on the mushrooms which makes them roast up golden brown rather than just going wrinkly.
Bake! Now just pop it in the oven and bake for 40 minutes or until the centre of the frittata is cooked. It’s easy to check – just insert a skewer or knife and if it’s cooked, it will come out clean instead of smeared with raw egg.
Lift out using the paper overhang onto a cutting board if serving immediately.
Making ahead – If you want to store the frittata, transfer it to a cooling rack and slide the paper out from underneath so the base of the frittata doesn’t go wet and soggy. Cool completely then store whole and cut slices on an as-need basis, or cut into pieces and then refrigerate or even freeze.
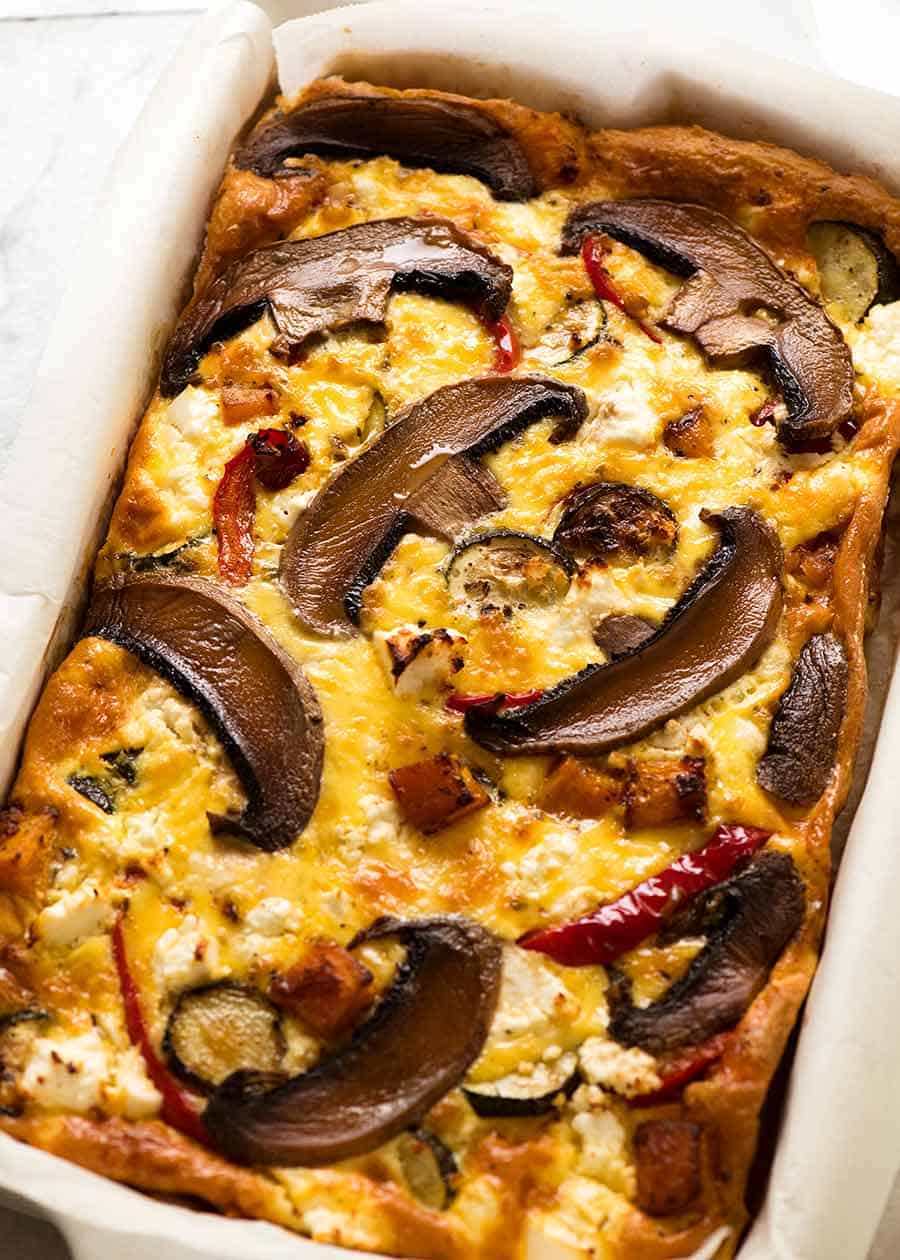
I take it back. Mushrooms are not optional!
I know I said giant mushrooms are optional. In fact, I said mushrooms are entirely optional. But I take that back.
It might be my favourite part about this Vegetable Frittata.
If you come over for brunch, don’t be surprised if you’re served a piece of frittata with a big bare patch on the surface where the mushroom used to be…….
I seriously even considered covering the ENTIRE FRITTATA with mushrooms.
But – golden cheesy surface. Crumbled feta. Browned mushrooms.
We must be fair and make room for them all. 😂
Make this for…
Make this breakfast today, tomorrow and 4 days later.
Make this to put into lunchboxes – it’s terrific at room temperature.
Make this to stash in your freezer.
This is one of those foods that is truly just as great reheated as it is freshly made, and almost as good even when not reheated. Enjoy! – Nagi x
Watch how to make it
Baked Vegetable Frittata
Ingredients
- 10 eggs
- 3/4 cups cream or milk , full fat best (Note 1)
- 1/2 tsp salt and pepper, each
- 1 1/2 cups shredded cheese (cheddar, tasty, or other of choice)
- 100g/3 oz mushroom, sliced (I used 1 large, optional)
- 100g / 3oz feta , crumbled (optional)
Herb Garlic Roasted Vegetables (Note 2 for switches):
- 2 tbsp olive oil
- 2 garlic cloves, minced
- 3/4 tsp salt
- 1/2 tsp pepper
- 1.5 tsp mixed dried herbs (or use any of choice)
- 350g / 12oz pumpkin , butternut or sweet potato, 1.7cm / 0.7″ cubes
- 2 zucchinis , sliced 1.25 / 0.5″ thick rounds
- 1 large red capsicum (bell pepper), sliced
Instructions
Roasted Vegetables:
- Preheat oven to 220°C/430°F (200°C fan).
- Toss vegetables on tray with oil, garlic, herbs, salt and pepper. Spread out.
- Roast 25 minutes, undisturbed (no flipping). Remove and cool for at least 5 minutes before using.
Baked Frittata:
- Lower oven to 180°C/350°F (160°C fan).
- Grease & line pan: Spray a 19 x 30cm / 8 x 10" rectangle or 22 cm / 9" square pan lightly with oil, then line with parchment paper with overhang. (Note 3)
- Egg mixture: Whisk eggs, cream, salt and pepper in a bowl.
- Assemble: Spread 2/3 of the vegetables in the prepared pan. Pour over egg mixture, sprinkle with cheese, then top with remaining vegetables.
- Topping: Top with crumbled feta, then mushrooms. Drizzle mushrooms with a touch of olive oil (makes it brown).
- Bake: Bake 40 minutes until centre is just set.
- Rest & serve: Rest frittata 5 minutes in the pan. Use paper overhang to lift out of pan, then slice into squares and serve.
- Serving later: Cool on rack and remove paper from underneath (otherwise base gets soggy). Cut then refrigerate up to 5 days, or freeze. Reheat in microwave.
Notes
Nutrition
Originally published March 2019. Refreshed with tidied up writing and a better video edits in October 2021!
Baked Vegetable Frittata Extended Family
Frittata with Bacon – the father, made the traditional way (stove then oven)
Quiche Lorraine – the French mother, with the buttery flaky crust
Crustless Ham Quiche – The quicker, low carb way to get a quiche fix!
Salmon Quiche – loaded with smoked salmon
Italian Sausage Quiche – the cheeky Italian uncle
Hash Brown Crust Quiche Lorraine – the flashy cousin with a hash brown crust
Frittata Egg Muffins – the healthy sister
Spanish Tortilla (Omelette) – the Spanish potato-loving aunt
Life of Dozer
I WISH he could actually HELP me make recipe videos rather than just DROOLING on the keyboard!!!!

The post Baked Vegetable Frittata appeared first on RecipeTin Eats.
]]>